

Page 1
1
Page 2

ALA MB100 User Manual
MB100 Specification :
• Frequency : 2.401, 2.450 & 2.480 GHz
• Modulation type: GFSK
• Power: 3.7V Li Battery
• Channel:3
• Output Power: 0dBm
• Data Rate: 2 Mbps
• Operating Tempeature: -10 ~ +50 C
• USB 2.0 Full Speed
• 2 GB NAND FLASH
• OLED 64*128 dots
• FM Tunner: 87.5MHz~108MHz
• Music Format:MP3/WMA/ASF/APE/FLAC
• Bit Rate: MP3/WMA:8K~320K
• Voice Record: WAV
• FM Record: WAV
CS004 Specification :
• Frequency : 2.401, 2.450 & 2.480 GHz
• Modulation type: GFSK
• Op. Voltage: 3V
• Channel:3
• Output Power: 0dBm
• Data Rate: 2 Mbps
• Operating Tempeature: -10 ~ +50 C
• Battery: CR2032
• Battery Life: about 500 hr (working)
• Heart rate sensor sensitivity: above 1mV
GS001 Specification :
• Frequency : 2.401, 2.450 & 2.480 GHz
• Modulation type: GFSK
• Op. Voltage: 3V
• Channel:3
• Output Power: 0dBm
• Data Rate: 2 Mbps
• Operating Tempeature: -10 ~ +50 C
• Battery: CR2032
Warning: Changes or modifications to this unit not expressly approved by the party responsible for
compliance could void the user authority to operate the equipment.
“This device complies with Part 15 of the FCC Rules. Operation is subject to the following two
conditions:
(1) this device may not cause harmful interference, and (2) this device must accept any
interference received, including interference that may cause undesired operation.”
NOTE: This equipment has been tested and found to comply with the limits for a Class B digital
device, pursuant to Part 15 of the FCC Rules. These limits are designed to provide reasonable
protection against harmful interference in a residential installation. This equipment generates,
uses and can radiate radio frequency energy and, if not installed and used in accordance with the
instructions, may cause harmful interference to radio communications.
However, there is no guarantee that interference will not occur in a particular installation. If
this equipment does cause harmful interference to radio or television reception, which can be
determined by turning the equipment off and on, the user is encouraged to try to correct the
interference by one or more of the following measures:
• Reorient or relocate the receiving antenna.
• Increase the separation between the equipment and receiver.
• Connect the equipment into an outlet on a circuit different from that to which the receiver is
needed.
• Consult the dealer or an experienced radio/TV technician for help.
2
English
Page 3
Before Use
We thank you for purchasing the Music Sport y
Recorder. In order to correctl y and effectively use the functi ons of
this device, please read this manual carefully and keep it in a safe
place for future reference.
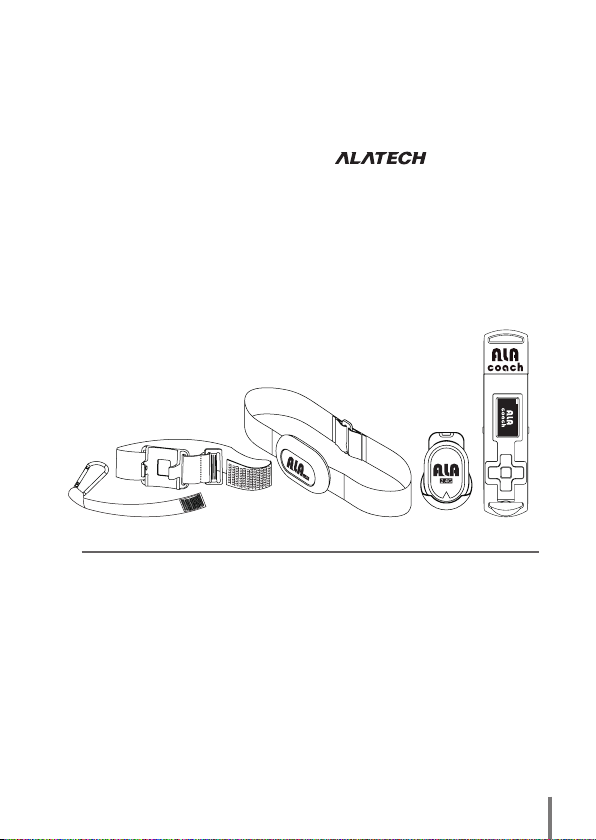
Package Contents
• Music Sporty Recorder (MB100)
• Heart Rate Transmitter (CS004)
• G-Sensor (GS001)
• User Manual
• Accessories
• Warranty Certificate
(optional)
(optional)
Disclaimer
• The MB100 is for
treatment.
• To ensu re correct display values, make the adjustme nts and enter your
personal data when you use this d evice for the first time and also after
ch angin g batter ie s or resett in g. P le ase re fer to the ch apter on use r
configuration.
• The values m eas ured and disp lay ed shou ld be treated as rea sonably
te.
accura
• Alatech i s not r espo nsib le for any claims of loss or dam age from third
parties incurred from the use of this device.
• Alatech reserves the right to change the specifications of the hardw are
and software desc ribed in this manual at any time without prior no tice.
general applications; it is not designed for medical
• Sporty Fixture (optional)
• Aluminum Carabiner (optional)
3
Page 4
ALA MB100 User Manual
Safety message
This manual describes how to properly use your music
sporty recorder.In order to avoid damage to the unit and
to yourself, please read the following safety warning items
carefully:
Protecting yourself
• Please do not disassemble, fix or modify the music sporty recorder by yourself.
• Please do not let the music sporty recorder get damp or wet.If the unit accidently
got wet, please do not turn it on to avoid the risk of getting shocked. Please
Warning
contact the customer service center immediately.
• In order to avoid the risk of damage or electric shock, please do not use this
product during lightning storms.
• For your safety, while exercising or taking a walk, please ensure that the
headphone cable isn’t hung on any other surrounding objects.
Warning
• Please be careful of the USB terminal while in use, if the USB terminal is bulging
out it might cause damage.
• In order to avoid fire or electric shock, please do not place the player in humid,
dusty or polluted environments.
• Using earphones or headphones for long periods of time may cause severe
damage to your hearing. Listening to music over 85 decibels for long periods of
Warning
time may cause adverse effects to your hearing. The louder the volume, the more
severe the damage is caused to your hearing.
• If ringing in your ears occurs, please lower the volume or temporarily stop using
the earphones.
Protecting your music sporty recorder
• Please do not place the recorder in environments over 35 degrees Celsius; for
example steam rooms or inside parked cars.
• Do not jar or place heavy objects on the recorder.
• Prevent any foreign matter or sharp objects from entering the recorder.
• Do not place the recorder near magnetic objects.
• Please backup your important data, our company will not be held responsible for
any data loss.
• Please do not spray water on this product; please do not use chemicals such
as benzene or thinners to clean the recorder as this might cause damage to the
Warning
surface or the unit.
• Please follow the instructions in the manual, or else it might cause damage to the
unit or the recorder.
• When using for the first time, please fully charge the battery for up to 3 hours in
4
order to maintain the battery and recorder’s life span.
English
Page 5

Music Sporty Recorder
Features
Simple, generous, fashionable exterior design, allowing your exercise to be more
stylish.The small unit brings you more convenience, top-end technology along with
your exercise brings you the best music enjoyment; you will love your music sporty
recorder, which allows you to download your favorite music at any time, listen to
your favorite FM radio broadcast, and even bring you step by step benefits for your
exercise training.
Friendly user interface
The MB100 comes with a USB connector, which eliminates the need for extra USB
cables and allows high speed transfer and ease of charging.
Fitness trainer mode
This mode allows you to choose different training exercises according to your
habits, and during the exercise process, it allows you to monitor your heartbeat,
continual time, heart rate intensity, distance, speed, number of laps, number of
paces, calories burned and achieved goal rate.
Thoughtful user settings
Set the most suitable exercise strength and goal according to your personal
information.
Diverse exercise trainings
Depending on your exercise habits, along with different sensors, not only allows
exercise training to be more diverse, it also adds the selection for personal training,
helping you gain physical benefits.
Long playback time; high speed transfer
The fully charged battery allows continual music playback for 12 hours; the player
uses USB2.0 data transfer.
Lightweight and convenient, easy to get started
The MB100 has a very stylish appearance and the interface is flexible and easy to
get started; it is also convenient for you to travel with, allowing music and exercise
to enrich your life.
5
Page 6

ALA MB100 User Manual
Table of contents
0 Thank you for purchasing this product
0-1 Before use ............................................................................................03
0-2 Package contents .................................................................................03
0-3 Warning ............................................................................................... 03
0-4 Safety message ................................................................................... 04
0-5 Music exercise recorder ........................................................................05
0-6 Table of contents ...................................................................................06
1 Getting familiar with the music exercise recorder
1-1 How to wear the wirelessheart rate transmitter chest strap ..................08
1-2 How to wear the integrated three-axis gravity sensor ...........................09
1-3 Basic functions .................................................................................... 10
1-4 Screen description ...............................................................................12
1-5 Exercise Mode ..................................................................................... 13
2 Exercise mode
2-1 Directly start training ..............................................................................16
2-2 Fitness training .................................................................................... 18
2-3 Walking training ................................................................................... 21
2-4 Jogging training ....................................................................................24
2-5 Running training ................................................................................... 27
2-6 Marathon training ................................................................................. 30
2-7 Bike training ......................................................................................... 31
2-8 VO2 max setting .................................................................................. 34
2-8-1 Aerobic fitness index and aerobic ability testing (VO2max) .............. 35
2-8-2 Physical activity table ........................................................................36
2-8-3 Body aerobic ability percentile rating scale ......................................37
2-9 Stride Calibration ..................................................................................38
2-10 Performance ...................................................................................... 39
6
English
Page 7

3 Music mode ...................................................................................... 40
4 Radio mode ...................................................................................... 41
5 Recording mode ............................................................................. 41
6 File Browser ................................................................................... 42
7 Setting
7-1 Setting/Music mode ..............................................................................43
7-2 Setting/FM Radio ................................................................................. 44
7-3 Setting/User settings mode/Unit setting ................................................45
7-4 Setting/User settings mode/Gender setting ..........................................46
7-5 Setting/User settings mode/Age ........................................................... 47
7-6 Setting/User settings mode/High .......................................................... 48
7-6 Setting/User settings mode/Weight ...................................................... 49
7-7 Setting/User settings mode/HR Intensity ...............................................50
7-8 Knowing and customizing training strength suitable for you ................51
7-9 Setting/User settings mode/Wheel Setting ........................................... 54
7-10 Setting/User settings mode/Lap setting .............................................. 56
7-11 Setting/Sound .................................................................................... 57
7-12 Setting/Display ................................................................................... 58
7-13 Setting/Language ............................................................................... 59
7-13 Setting/Date & Time ........................................................................... 60
7-13 Setting/system/Sensor testing .......................................................... 61
7-13 Setting/system/Format ....................................................................... 62
7-13 Setting/system/About MB100 ............................................................ 63
7
Page 8
ALA MB100 User Manual
Getting familiar with the music sporty recorder-MB100
1. This product has six built-in exercise training modes; it can display the user’s exercise
process - directly start training, fitness training, walking training, jogging training, running
training, marathon training and bike training total time, calories burned value, real-time
heartbeat - and use the user’s personal information such as gender, age, weight, high
and highest heart rate as the measuring standard, further helping the monitoring of the
training strength of self-fitness processes. This product brings your exercise step by step
benefits, combining music allowing users to further enjoy the atmosphere of the exercise
process, helping you achieve excellent physical performances.
2. Please reset the various sensors’ sensing status and personal information setting when
using the product for the first time, after exchanging the battery or after resetting and
restarting in order to ensure the accuracy of the values.
How to wear the wireless heart rate transmission chest
strap (CS004)
The wireless heart rate transmission chest strap can detect your real-time heartbeat, and
send the heart rate signal to the display on the MP3 screen.Before using the exercise
heart rate mode, please follow the following instructions to properly wear the wireless
heart rate transmission chest strap.
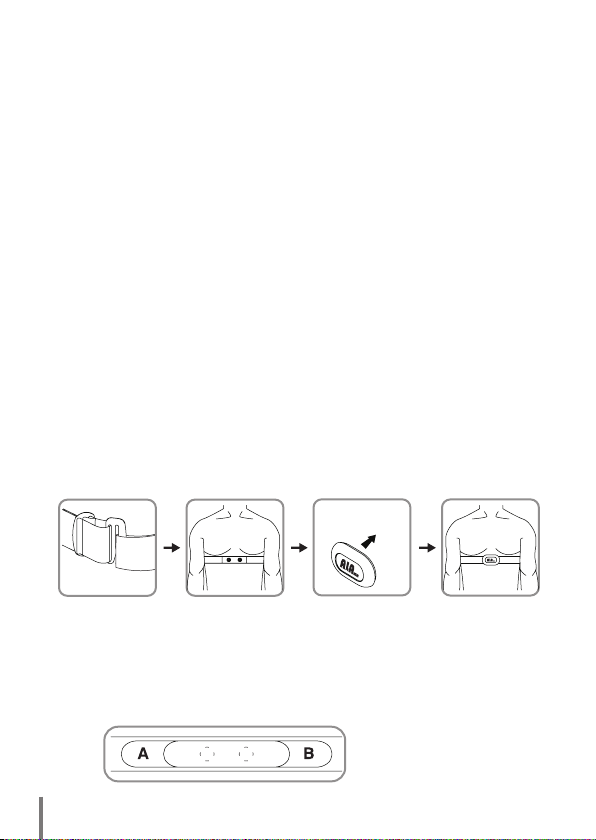
1. Adjust the chest strap length to a sui table personal length, wrap the chest s trap around
the lower chest circumfer ence, and fix the chest strap by insert ing the buckles of the
chest strap into each oth er.
2. Take the CS004 and face the logo forward, and face the rear toward the back.
3. Face the sowed in button part of the chest strap directly behind the CS004, when the
position is confirmed, push the buttons on both sides behind the CS004 down until you
hear them click; then confirm that it is locked in the notch and fixed.
Note: Please confirm again whether the CS004 is properly connected with the chest strap
and whether the buttons are firmly fastened.
Appearance description:
1. ALA logo printed on the front, there is a metal b utton on both the left and right sides on
the back, used to fix ont o the chest strapThere are a total of f our screws on the top and
bottom; unscrew them to m anually exchange the battery (CR2032).
2. Fasten it onto the chest strap, you can add a suitable amount of water on the A and B
sections behind the chest strap, and then wear it.
Back of chest strap diagram:
8
English
Page 9
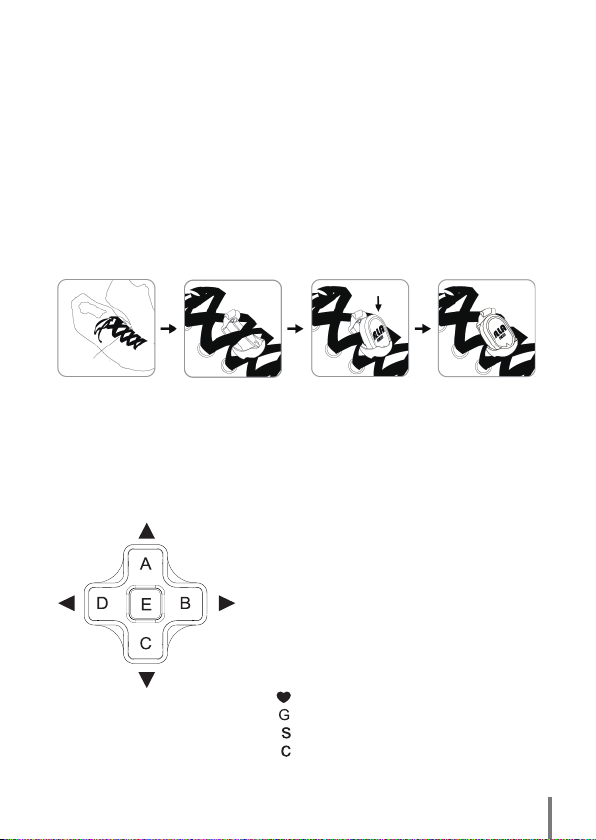
How to properly wear the integrated three-axis gravity
sensor (GS001)
Using the ALATECH G-SENSOR (GS001) can help the exerciser record their
exercise step numbers, total step numbers, total exercise distance and average
speed etc. during the exercise process.
1. Users must wear sneakers with shoelaces in order to install the G-Sensor for use
during the exercising process.
2. Select the position to wear the GS001 and insert the holder from bottom upwards
into the bottom of the shoelace’s X crossing and through the top.
3. Face the front of the G-Sensor upwards, and insert the bottom into the bottom of
the holder.
4. When the bottom is inserted, buckle the top part down until you hear a click to
confirm the completion of the assembling.
Select wearing
position
Appearance description:
1. The ALA logo is printed in front of the G-Sensor, there is a circular back cover
towards the bottom of the back; press the two notches on both the left and right
sides and rotate to the left to open the back cover and manually exchange the
battery component.
2. The holder can be used with the shoelaces of sneakers; it can be firmly fixed to
the G-Sensor’s position. There is no burden since it is lightweight.
Buttons description:
1. The E button is the confirm selection
button.
2. The A-C buttons are the up and down
selection buttons.
3. The B-D buttons are the left and right
selection buttons.
Icon description:
1. The heart-shaped icon is the CS004’s icon.
2. G is the GS001’s icon.
3. S is the speed sensor’s icon.
4. C is the cadence sensor’s icon.
9
Page 10
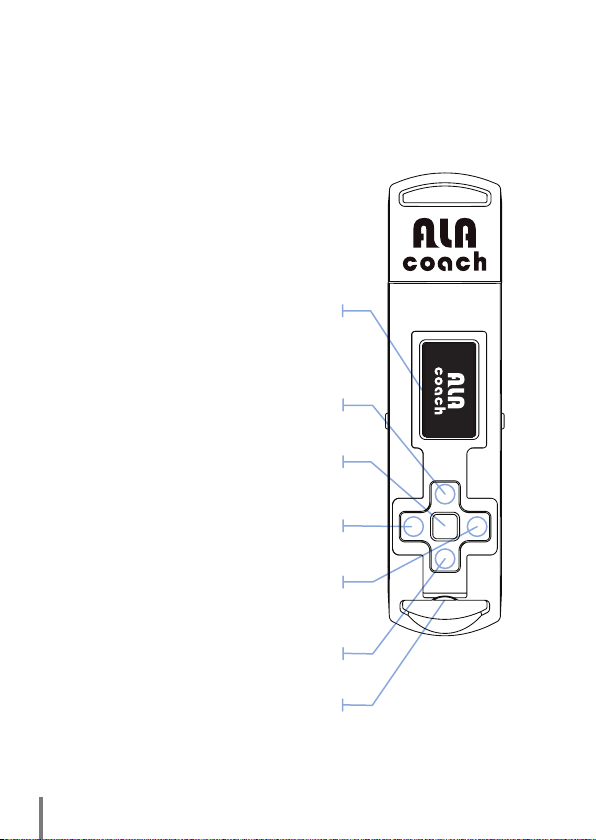
ALA MB100 User Manual
Basic functions
This product has a total of 9 operating buttons; the screen introduction is as
follows.
Screen display
Browse to the left document button [D]
Press to return to the previous option.
10
Press to select the Play/Pause functions,
Press to lower the volume or move to the
Press to increase the volume or return to
English
Play/Pause/Select button [E]
or move to the next menu.
Lower volume button [C]
Increase volume button [A]
Browse to the left document button [B]
Press to move to the next selection.
next option.
the previous option.
Headphone jack
Page 11
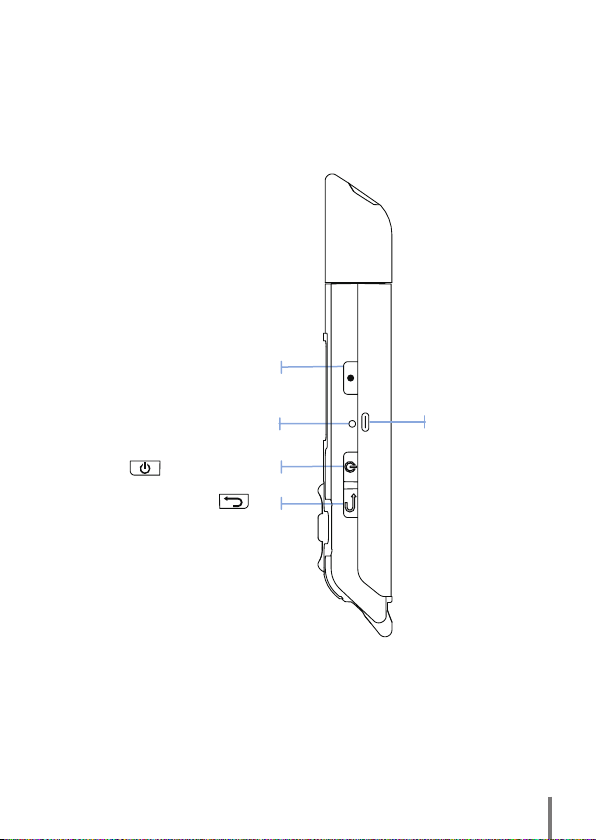
Press to start/stop audio recording.
*During exercise mode, the recording
button works as manual search.
If the recorder is malfunctioning,
please use a thin pointed object to
press and hold down the reset hole
Press to move to the previous screen.
Recording button
Reset hole
to initialize the system.
Power on/off button
Return button
[H]
Fixed-point bracket
Slide until you hear
a click. Confirm
that it is properly
fixed.
11
Page 12
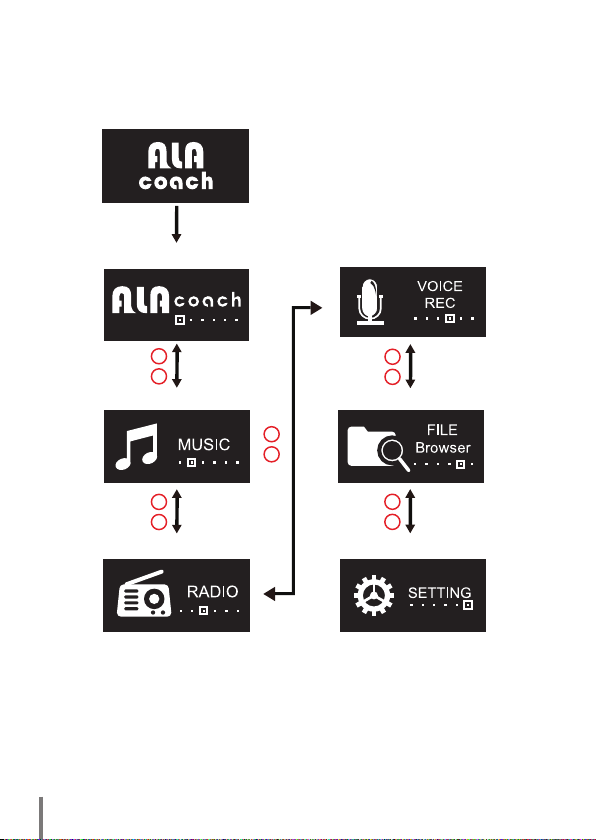
ALA MB100 User Manual
Screen description
MB100 startup screen
When the power on screen is displayed, press
the B-D buttons to move left and right and select
the mode screen you need to use, and then
press the E button to enter that mode.
12
Exercise mode
B
D
Music mode
Voice REC
B
D
File Browser
B
D
B
D
Radio mode
The MB100 has six major built-in options, which are [Exercise Mode], [Music],
[Radio], [Voice REC], [File Browser] and [Setting] respectively; depending on
the user’s different interests and habits, customize dedicated personal usage
functions to achieve effective exercise training goals.
English
B
D
Setting
Page 13
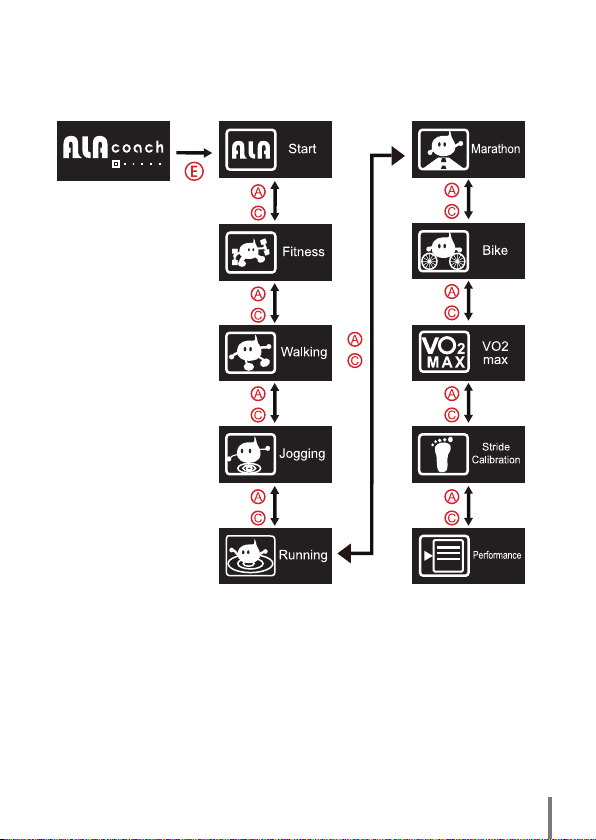
Exercise Mode
Press the E button to
enter
There are 9 built-in exercise modes, including options such as [Start], [Fitness],
[Walking], [Jogging]. [Running], [Marathon], [Bike], [VO2 max] and [Stride
Calibration], depending on personal interest and exercise goal demands, you can
use different trainings to gain step by step benefits for self-physical performance.
• After selecting the exercise mode with the E button from the home page, press
A-C buttons to browse all training options, then press E button again to select the
exercise training you need.
• If you wish to exercise directly and omit the setting steps, after entering exercise
mode, press the E button to select the directly start training page to immediately
enter training status.
• If you want to exit the exercise training, press the H button to return to the
previous page.
13
Page 14
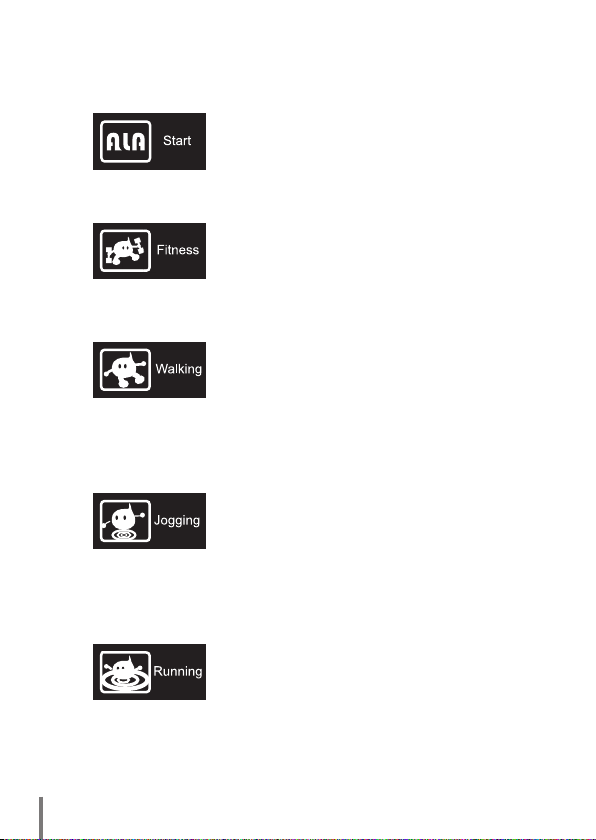
ALA MB100 User Manual
Start training
When the user doesn’t want to set any exercise goals, select
this function to start exercising directly, if the MB100 did not
receive any Sensor DATA for over 2 minutes, it will end the
exercise goal training.
Fitness training
When the user only wore the heart rate chest strap (CS004),
this function can be selected to perform exercise and
calculate the amount of calories burnt; if the MB100 did not
receive any Sensor DATA for over 2 minutes, it will end the
exercise goal training.
Walking training
User must wear the G-Sensor(GS001), to establish this
exercise mode. The heart rate chest strap (CS004) is a
secondary accessory, it works with the walking goal setting
to perform training, and displays calculations such as
distance, step numbers, time and calories burnt etc.; if the
MB100 did not receive any Sensor DATA for over 2 minutes,
it will end the exercise goal training.
Jogging training
User must wear the G-Sensor(GS001), to establish this
exercise mode. The heart rate chest strap (CS004) is a
secondary accessory, it works with the jogging goal setting to
perform training, and displays calculations such as distance,
step numbers, time and calories burnt etc.; if the MB100 did
not receive any Sensor DATA for over 2 minutes, it will end
the exercise goal training.
14
English
Running training
User must wear the G-Sensor(GS001), to establish this
exercise mode. The heart rate chest strap (CS004) is a
secondary accessory, it works with the running goal setting
to perform training, and displays calculations such as
distance, step numbers, time and calories burnt etc.; if the
MB100 did not receive any Sensor DATA for over 2 minutes,
it will end the exercise goal training.
Page 15
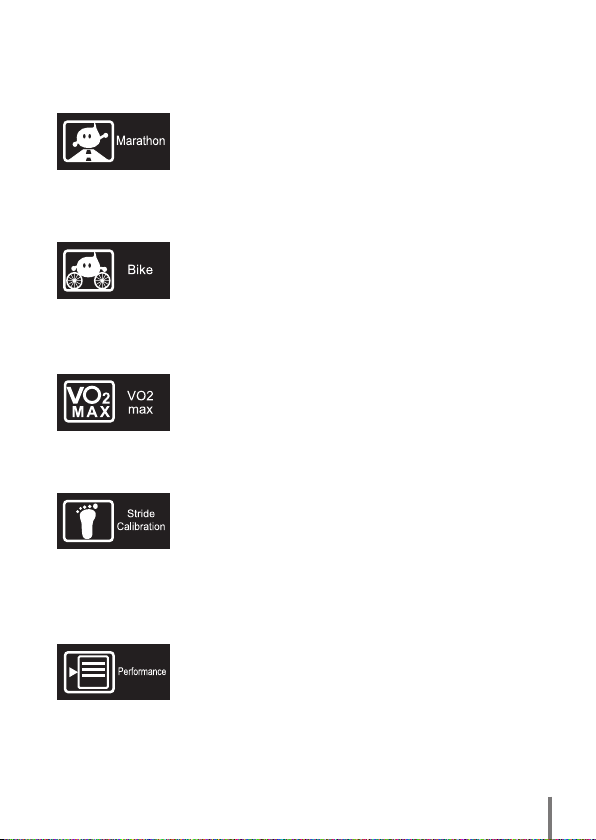
Marathon training
User must wear the G-Sensor(GS001), to establish this exercise
mode.The heart rate chest strap(CS004)is a secondary accessory,
works with the marathon distance goal setting to perform training,
and displays calculations such as the distance, step number, time
and calories burned; if the MB100 did not receive any Sensor DATA
for over 2 minutes, it will end the exercise goal training.
Bike training
User must wear the Speed Sensor (SP001), Cadence Sensor
(CA001), to perform this function. The heart rate chest strap(CS004)
is a secondary accessory, it works with the riding goal to perform
training, and displays the riding distance, RPM, time and calories
burnt etc., if the MB100 did not receive any Sensor DATA for over 2
minutes, it will end the exercise goal training.
VO2 max setting
The user must wear the heart rate chest strap (CS004), select this
function to perform the VO2 setting.
Stride Calibration
The user must wear the GS001; select this function to perform
stride calibration setting.
Performance
Viewing different exercise training files.
15
Page 16
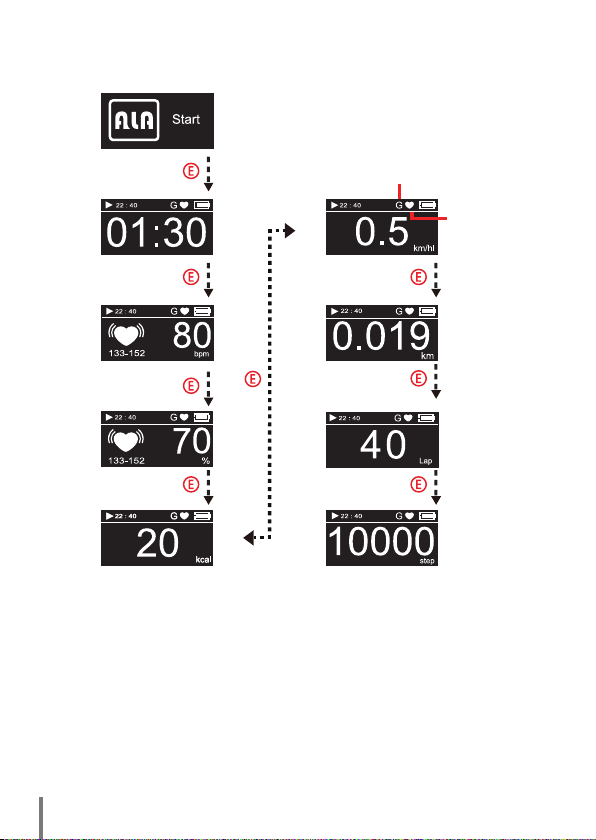
ALA MB100 User Manual
Directly start training
Screen home
page
Note 1: GS001 smart step number sensor.
Note 2: CS004 wireless heart rate transmitter.
Note 1
Note 2
Exercise time
Heart rate
display
Heart rate
strength
Amount of calories burnt
during exercise
• When setting an exercise goal, the displayed value during exercising is a count down.
• If no exercise goal is set, use the START function, the displayed value is a positive
number.
• If you want to use the MP3 or FM functions during exercise, you must first go to the MP3
or FM functions and open it first then select the exercise mode to perform these functions
simultaneously.
• Press the E button to directly enter the exercise screen.
• Short presses of the E button allow you to switch between screens and view real-time
records.
• Press the A-C buttons to adjust the volume, if the MP3 is playing, B-D buttons have the
song selection function; if using broadcast function, B-D buttons allows you to select the
radio stations.
• When the MB100 finds sensor GS001, speed sensor, the distance calculation will mainly
16
be based on the speed sensor.
• Depending on the sensor you are wearing, the screen will display the figure on the icon at
the top-right corner of the screen.
English
Exercise speed
display
Exercise
distance
display
Exercise lap
number display
Exercise step
number display
Page 17
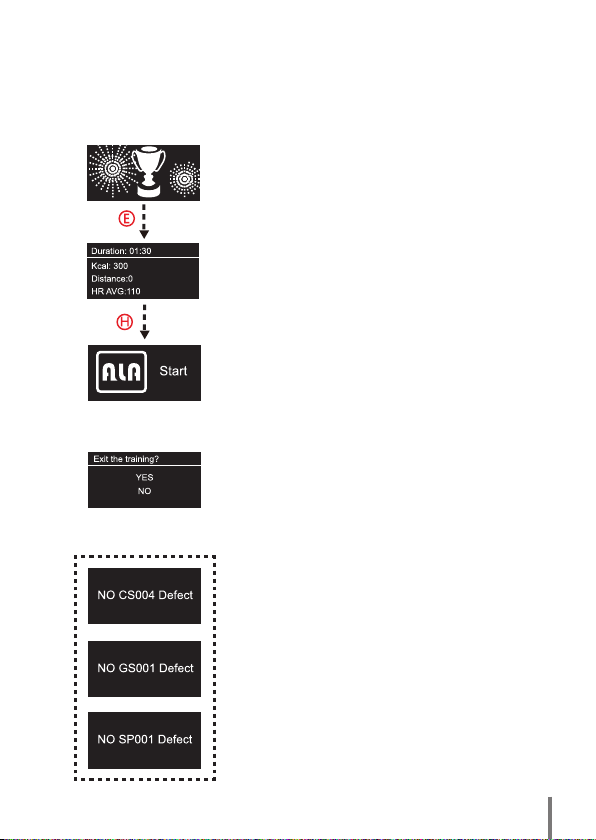
Screen description
Goal achieved
• A warning sound will sound to remind you that the goal
has been achieved.
When the goal is 90% achieved, a reminder will sound.
When the goal is 100% achieved, a reminder will sound
(congratulations for achieving your exercise goal).
When the goal is achieved, it will settle this training, and
display data such as the duration, Kcal, distance & HR
AVG, and then press the H button to return to the main
screen.
Exit the training
Press the H button to immediately end the exercise
training.To avoid users from accidently pressing it, a
confirmation screen will display to avoid the exercise from
being interrupted.
Sensor failed
In training mode, if no main sensors appeared, a reminder
screen will appear to the left one minute later.
17
Page 18
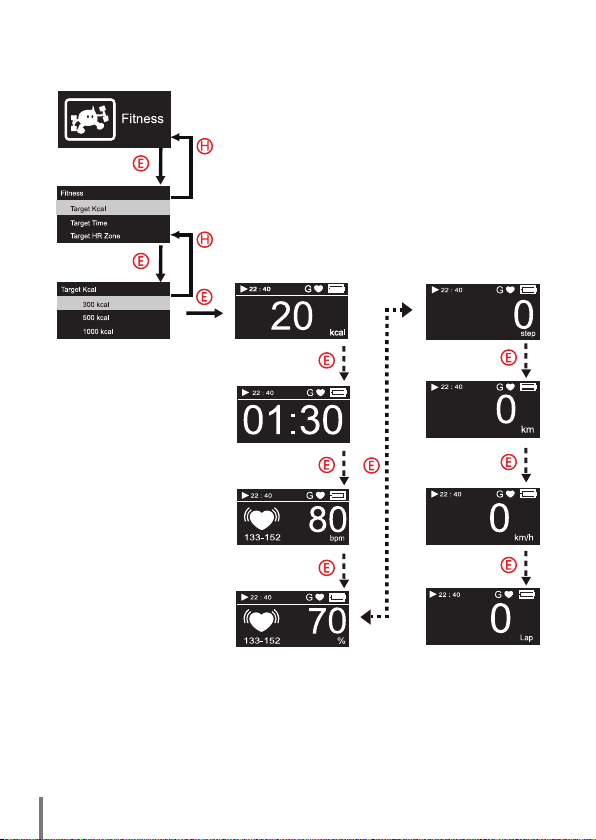
ALA MB100 User Manual
Fitness training
Target calories burned setting
Note: Must wear the CS004
Amount of
calories burnt
Continuous
time
Heart rate
display
Heart rate strength
• This training is a simplified version of the training mode; you only need to wear the
CS004 to start performing training.
• After pressing the E button to select the music function as needed, directly enter the
training screen.
• After entering the training screen, press the A-C buttons up and down selection; there
are a total of three goal settings: [Target Kcal], [Target ime], [Target HR Zone].
18
English
Step number
display
Distance
display
Speed
display
Lap number display
Page 19
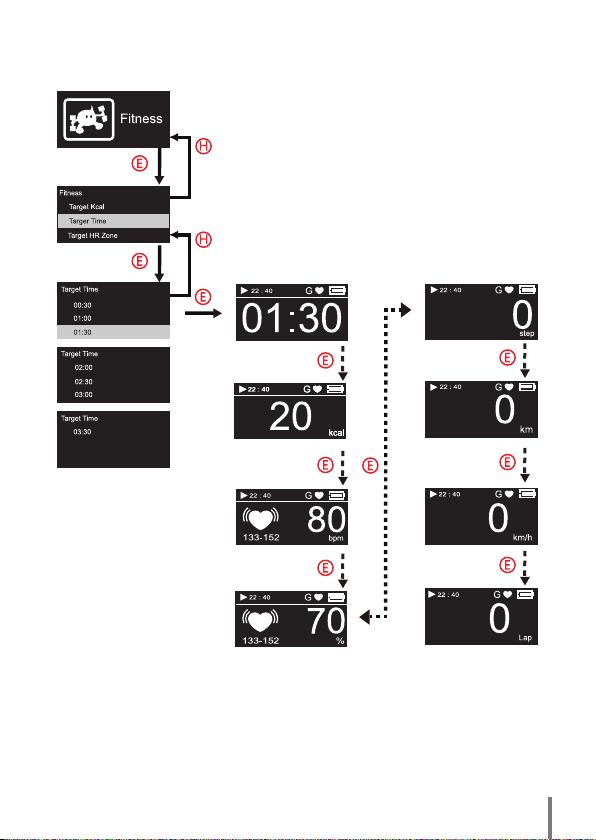
Fitness training
Target Time setting
Note: Must wear the CS004
Continuous
time
Amount of
calories burnt
Heart rate
display
Heart rate strength
Step number
display
Distance
display
Speed display
Lap number display
19
Page 20
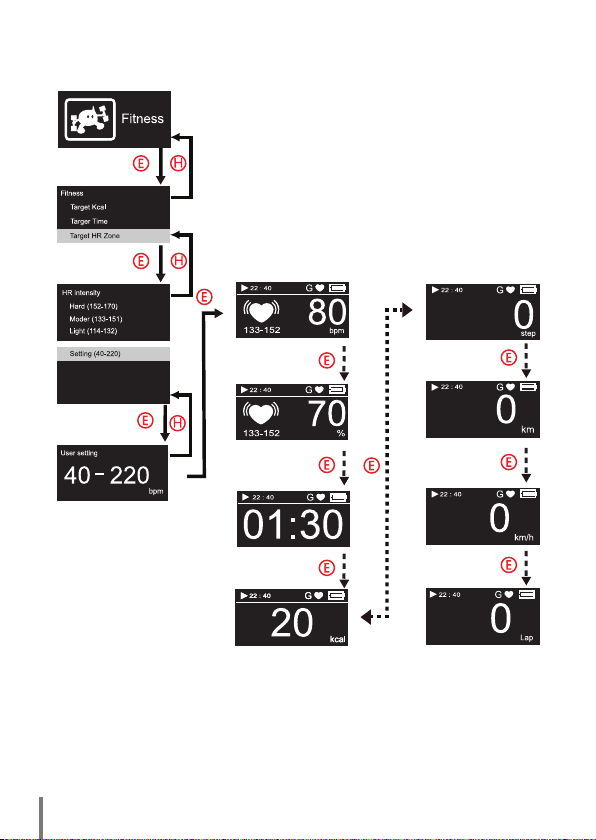
ALA MB100 User Manual
Fitness training
Target HR Zone setting
Note: Must wear the CS004
Heart rate
display
Heart rate
strength
Continuous
time
Amount of calories burnt
• Press the B-D buttons to select left and right range settings.
• Press the A-C buttons to adjust the value, decide the heart rate value (BPM) level,
and press the E button to confirm.
20
English
Step number
display
Distance
display
Speed display
Lap number display
Page 21
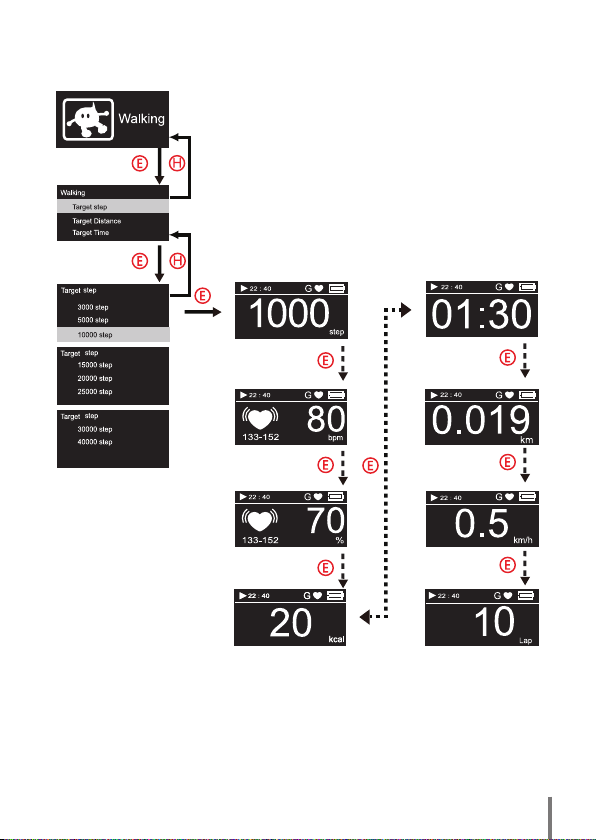
Walking training
Target Step setting
Note: Must wear the GS001.
If you want to find out heart rate related strength you must
also wear the CS004.
Step number
display
Heart rate
display
Heart rate
strength
Amount of calories burnt
• Press the A-C buttons up and down selection, there is a total of three goal
settings: [Target Step], [Target Distance], [Target Time].
• Press the E button to enter the [Target Step], press the A-C buttons up and down
selection, and press the E button to confirm.
• Stride calibration factor is suggested to be 0.5.
Continuous
time
Distance
display
Speed display
Lap number display
21
Page 22
ALA MB100 User Manual
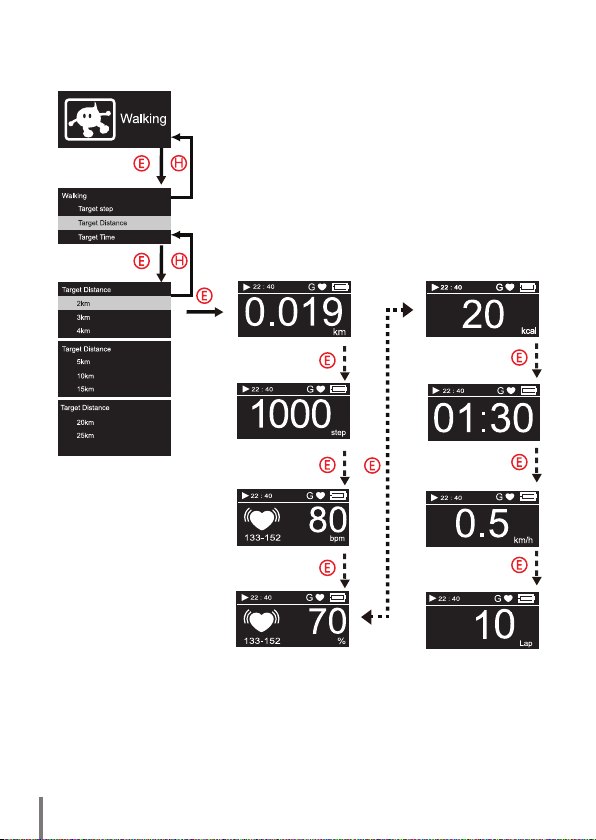
Walking training
Target Distance setting
Note: Must wear the GS001.
If you want to find out heart rate related strength you must
also wear the CS004.
Distance
display
Step number
display
Heart rate
display
Heart rate strength
• Press the E button to enter [Target Distance], press the A-C buttons for up and
down selections and press the E button to confirm.
• Stride calibration factor is suggested to be 0.5.
22
English
Amount of
calories burnt
Continuous
time
Speed display
Lap number display
Page 23
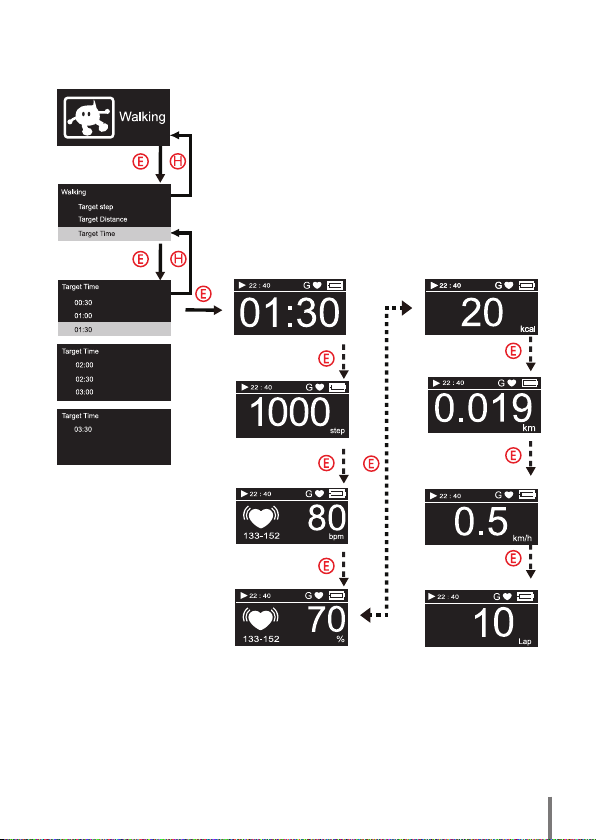
Walking training
Target Time setting
Note: Must wear the GS001.
If you want to find out heart rate related strength you must
also wear the CS004.
Continuous
time
Step number
display
Heart rate
display
Heart rate strength
• After entering the training screen, press the A-C buttons for up and down
selections, select [Target Time] and press the E button.
• Enter [Target Time] and press the A-C buttons for up and down selection and
press the E button to confirm.
• Stride calibration factor is suggested to be 0.5.
Amount of
calories burnt
Distance
display
Speed display
Lap number display
23
Page 24
ALA MB100 User Manual
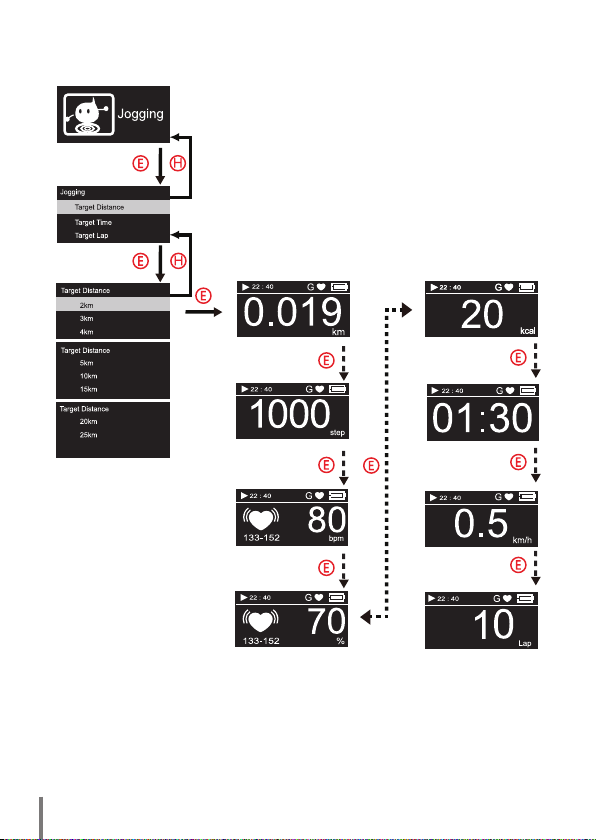
Jogging training
Target Distance setting
Note: Must wear the GS001.
If you want to find out heart rate related strength you must
also wear the CS004.
Distance
display
Step number
display
Heart rate
display
Heart rate strength
• Press the A-C buttons for up and down selections, there are a total of three target
settings: [Target Distance], [Target Time], [Target Lap].
• Press the E button to enter [Target Distance], press the A-C buttons for up and
down selections and press the E button to confirm.
• Stride calibration factor is suggested to be 1.
24
English
Amount of
calories burnt
Continuous
time
Speed display
Lap number display
Page 25
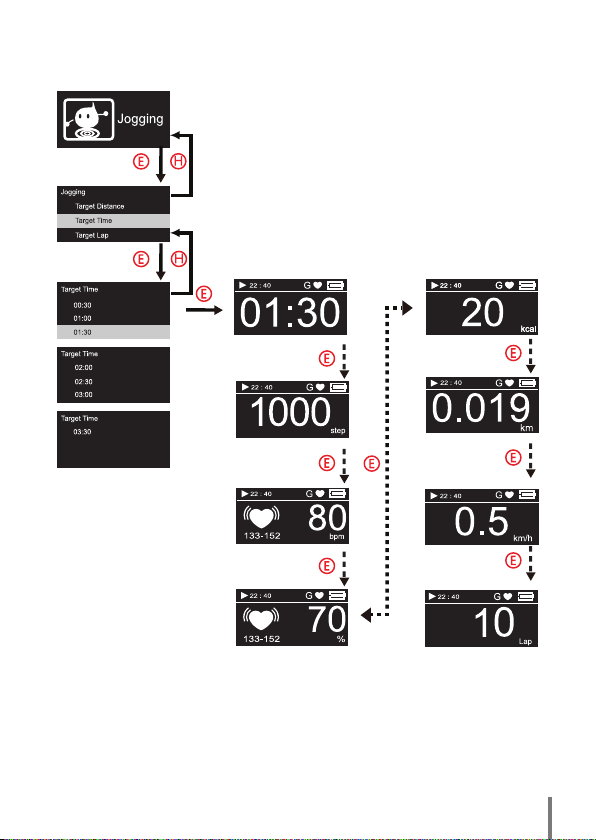
Jogging training
Target Time setting
Note: Must wear the GS001.
If you want to find out heart rate related strength you must
also wear the CS004.
Continuous
time
Step number
display
Heart rate
display
Heart rate strength
• After entering the training screen, press the A-C buttons for up and down
selections, select [Target Time] and press the E button.
• Enter [Target Time] and press the A-C buttons for up and down selection and
press the E button to confirm.
• Stride calibration factor is suggested to be 1.
Amount of
calories burnt
Distance
display
Speed display
Lap number display
25
Page 26
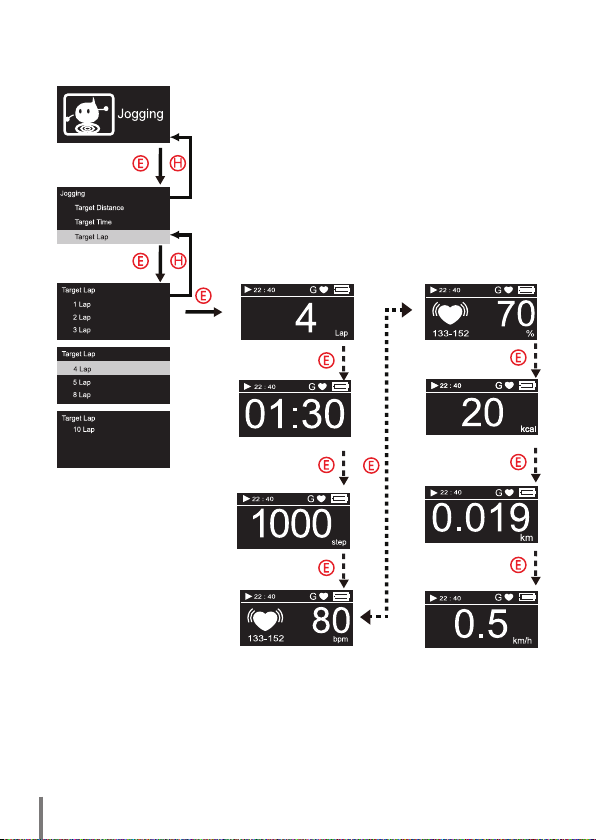
ALA MB100 User Manual
Jogging training
Target Lap setting
Note: Must wear the GS001.
If you want to find out heart rate related strength you must
also wear the CS004.
Lap number
display
Continuous
time
Step number
display
Heart rate display
• Press the E button to enter [Target Lap], press the A-C buttons for up and down
selections and press the E button to confirm.
• Stride calibration factor is suggested to be 1.
26
English
Heart rate
strength
Amount of
calories burnt
Distance
display
Speed display
Page 27
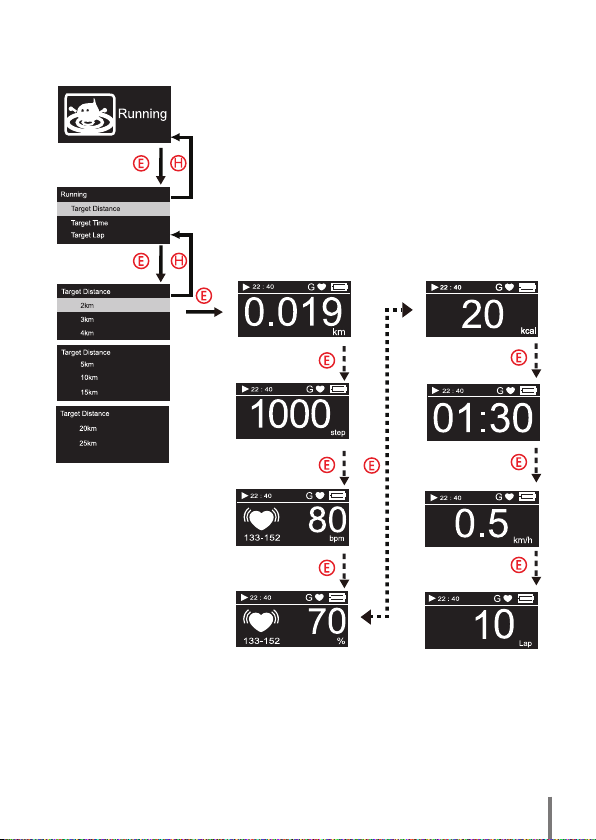
Running training
Target Distance setting
Note: Must wear the GS001.
If you want to find out heart rate related strength you must
also wear the CS004.
Distance
display
Step number
display
Heart rate
display
Heart rate strength
• Press the A-C buttons for up and down selections, there are a total of three target
settings: [Target Distance], [Target Time], [Target Lap].
• Press the E button to enter [Target Distance], press the A-C buttons for up and
down selections and press the E button to confirm.
• Stride calibration factor is suggested to be 1.
Amount of
calories burnt
Continuous
time
Speed display
Lap number display
27
Page 28
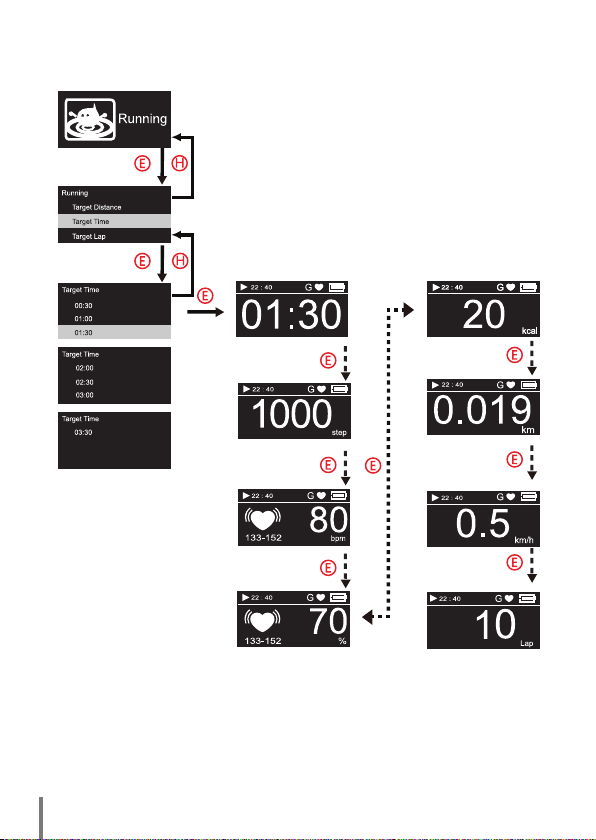
ALA MB100 User Manual
Running training
Target Time setting
Note: Must wear the GS001.
If you want to find out heart rate related strength you
must also wear the CS004.
Continuous
time
Step number
display
Heart rate
display
Heart rate strength
• Enter [Target Time] and press the A-C buttons for up and down selection and
press the E button to confirm.
• Stride calibration factor is suggested to be 1.
28
English
Amount of
calories burnt
Distance
display
Speed display
Lap number display
Page 29
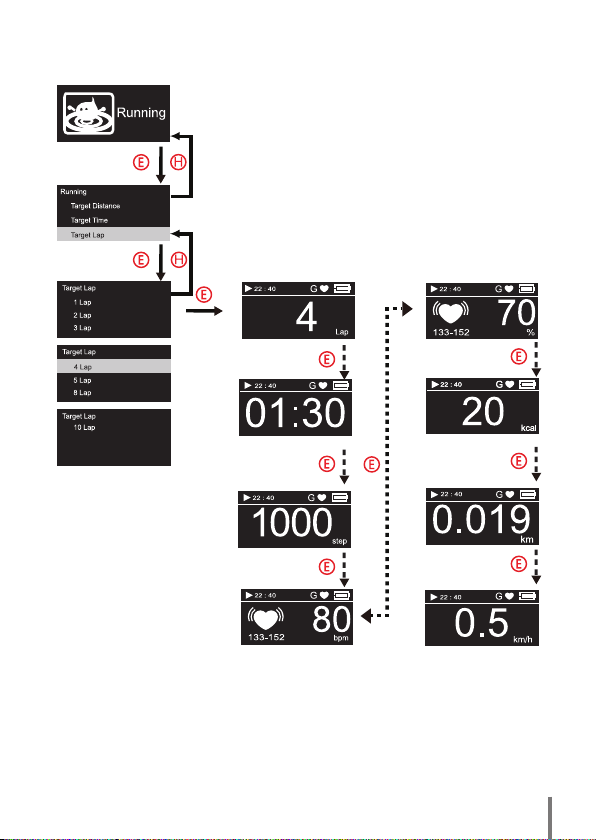
Running training
Target Lap setting
Note: Must wear the GS001.
If you want to find out heart rate related strength you must
also wear the CS004.
Lap number
display
Continuous
time
Step number
display
Heart rate display
• Press the E button to enter [Target Lap], press the A-C buttons for up and down
selections and press the E button to confirm.
• Stride calibration factor is suggested to be 1.
Heart rate
strength
Amount of
calories burnt
Distance
display
Speed display
29
Page 30
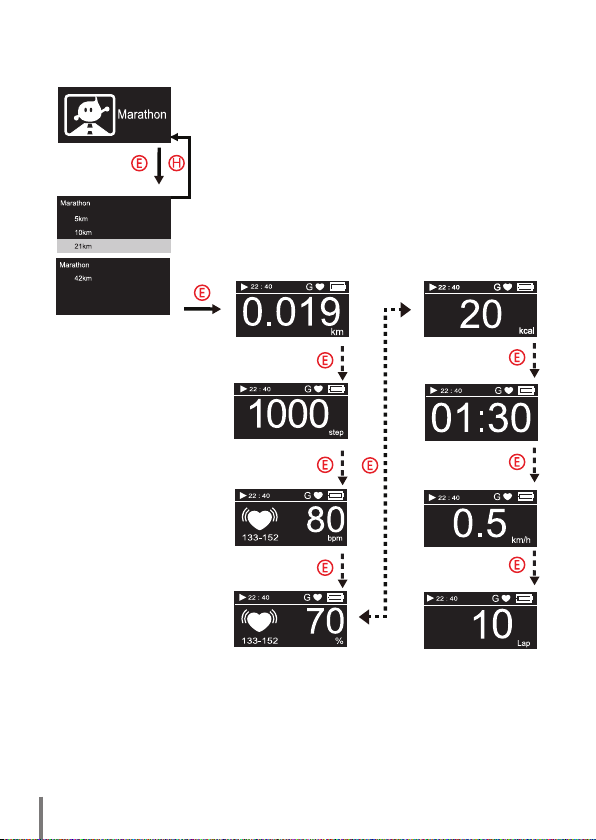
ALA MB100 User Manual
Marathon training
Target Distance setting
Note: Must wear the GS001.
If you want to find out heart rate related strength you must
also wear the CS004.
Distance
display
Step number
display
Heart rate
display
Heart rate strength
• Press the A-C buttons for up and down selections for the marathon target distance
setting.
• Press the E button to enter the training distance, press the A-C buttons for up and
down selections and press the E button to confirm.
30
English
Amount of
calories burnt
Continuous
time
Speed display
Lap number display
Page 31
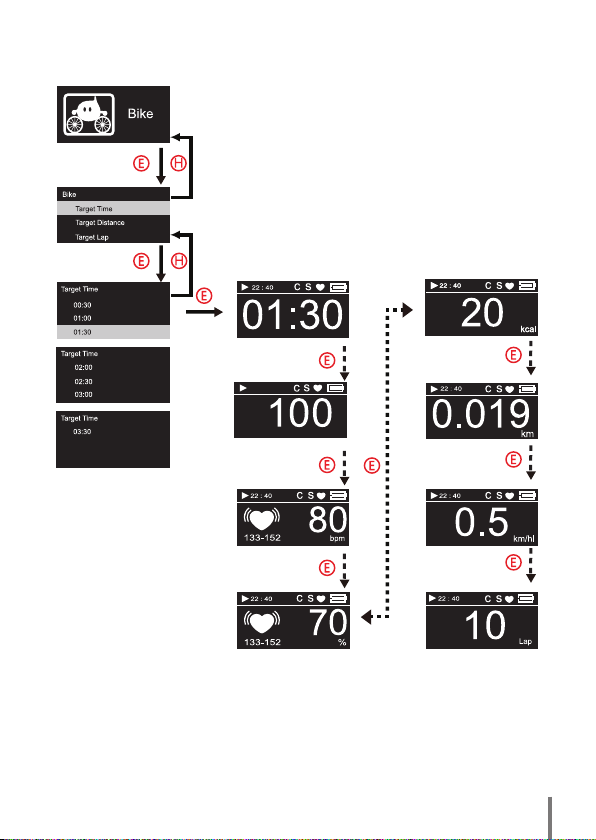
Bike training
Target Time setting
Note: must wear the SPEED & CADENCE SENSORS.
If you want to find out heart rate related strength you must
also wear the CS004.
Continuous
time
22 : 40
Step number
display
Heart rate
display
Heart rate strength
• After entering the training screen, Press the A-C buttons for up and down
selections, there are a total of three target settings: [Target Time], [Target
Distance], [Target Lap].
• Enter [Target Time] and press the A-C buttons for up and down selection and
press the E button to confirm.
rpm
Amount of
calories burnt
Distance
display
Speed display
Lap number display
31
Page 32
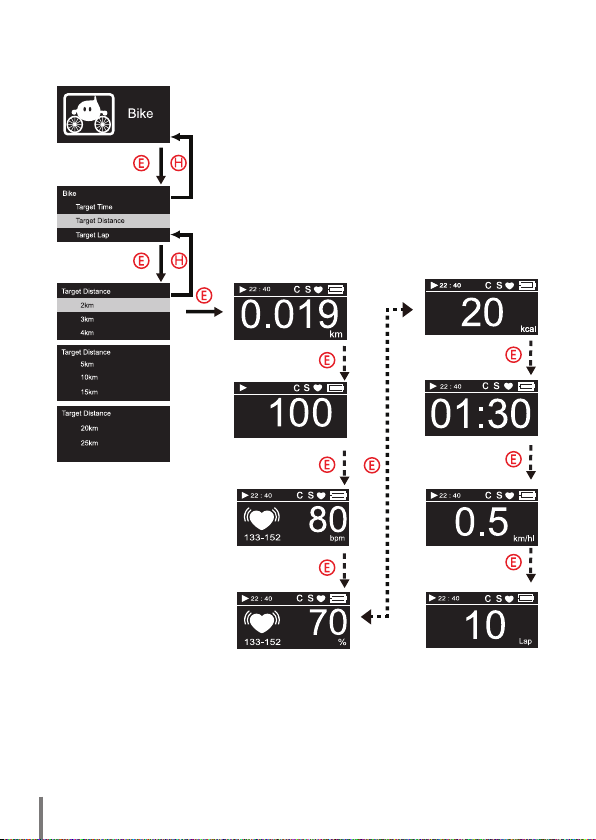
ALA MB100 User Manual
Bike training
Target Distance setting
Note: must wear the SPEED & CADENCE SENSORS.
If you want to find out heart rate related strength you must
also wear the CS004.
Distance
display
22 : 40
Step number
display
Heart rate
display
Heart rate strength
• After entering the training screen, press the A-C buttons for up and down
selections, select [Target Distance] and press the E button.
• Enter [Target Distance] and press the A-C buttons for up and down selection and
press the E button to confirm.
32
English
rpm
Amount of
calories burnt
Continuous
time
Speed display
Lap number display
Page 33
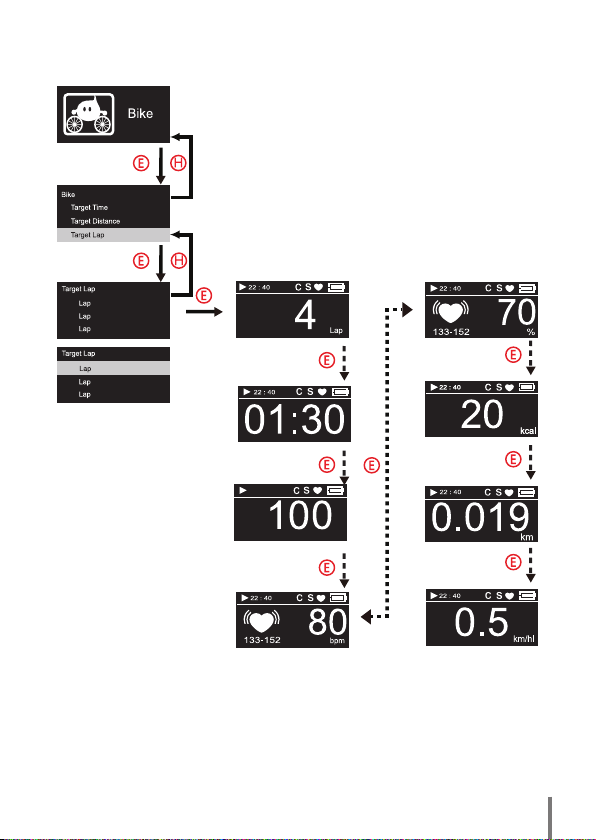
Bike training
10
25
50
75
100
200
Target Lap setting
Note: must wear the SPEED & CADENCE SENSORS.
If you want to find out heart rate related strength you must
also wear the CS004.
Lap number
display
Heart rate
strength
Continuous
time
22 : 40
Step number
display
rpm
Heart rate display
• After entering the training screen, Press the A-C buttons for up and down
selections, select [Target Lap] and press the E button.
• Enter [Target Lap] and press the A-C buttons for up and down selections and
press the E button to confirm.
Amount of
calories burnt
Distance
display
Speed display
33
Page 34
ALA MB100 User Manual
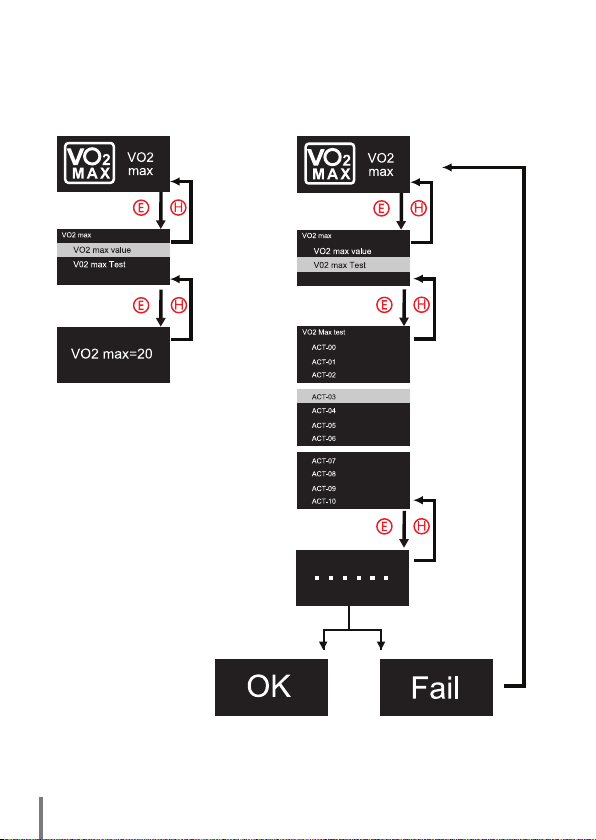
VO2 max setting
VO2 max VO2 mas test
• Press the A-C buttons to select VO2 max setting (maximal oxygen uptake).
• After setting is completed, press the E button to start adjustments.
34
English
Page 35

VO2max Test (Maximal Aerobic Power)
VO2max (Maximal Aerobic Uptake) is also called "Maxima l Aerobic
Pow er" . It is a common descripti on for the assess men t of on e's
phy sical fit ness of cardio-re spiratory endurance (CR Fitness). CR
Fitness refer s to cardio -pulmonary vascular s ystem in the b ody of
oxy gen trans port and the use of physi cal a ctivity a s the ability to
use.
If you had previously i nput your personal data accurately, this wa
wil l estima te your M aximal A erobic Power automat ica lly. To get a
mor e acc urate VO2ma x val ue, y ou can perform the VO2m ax Test
with this watch. Kindly read the following instructions before taking
the test.
1. Please to wear the Transmitter (CS 004) b elow y our chest p roperly
and make sure you input accu rate personal data. Pay attention to
the following gui delines before taking the test:
2. No smok
3. The te st sho ul d be pe rf or me d in a qu ie t environment without
4. In o rder to receive your heart rate signal effect ively, please ensure
5. Lie down and relax for 1~2 minutes before the test.
6. The VO2max Test takes about 2~3 minutes. It is recommended that
7. Take the following steps after you are ready to take the VO2max Test:
8. Select an appropriate ACT grade* for yourself (refer to page 36 for
9. Start the te
10. Press "B" to stop the test anytime.
*The AC T Grade you selected should be the average description of your daily activity
leve l over the past one month.
ing and exce ssing food 2~3 hours before the test. Avoid
alcoholic beverages, medication or strenuous physical efforts a day
before the test.
disturbances such as TV, telephone, radio, people talking etc.
th e tra nsmit te r is fit ted snugly on your che st muscl e and we ll
moistened.
you k eep your body layin g flat , limit body move ment s or talk with
people when you a re taking the test.
the PAR)
st.
tch
-
35
Page 36
ALA MB100 User Manual
Physical Activity Status Scale (PAR)
Grade
Description
Sedentary to Light Exercise
ACT-00
ACT-01
Avoid walk ing or exertion , e.g. , alwa ys use e leva tor,
drive whenever po ssible instead of walking.
Walk for pleasure, routinely use stairs or occas ionally
ex er ci se suffi ci en tl y to ca use hea vy breathi ng or
perspiration.
Recreational Activity (golf, bowling, yard work)
ACT-02
ACT-03
10~60 minutes per week.
Over one hour per week.
Heavy Aerobic Exercise (run or brisk walking or comparable activity
such as basketball, tennis, racquetball, aerobic dance.)
ACT-04
ACT-05
ACT-06
ACT-07
ACT-08
Run a bout 1 mile per week o r walk abou t 1.3 m iles
pe r week or spe nd abo ut 30 min utes per week in
comparable physic al activity.
R
un 1 to 5 miles per week or walk about 1.3 miles to 6
miles per week or spend 30 to 60 minutes per week in
comparable physic al activity.
Run 6 to 10 miles per w eek or wal k ab out 7 to 1 3
miles per week or spend in 1 to 3 ho urs per week in
comparable physic al activity.
Run 11 to 15 mile s per week or walk about 14 to 20
miles per week or spend in 4 to 6 ho urs per week in
comparable physic al activity.
un 16 to 20 miles per week or walk about 21 to 26
R
miles per week or spend in 6 to 8 ho urs per week in
comparable physic al activity.
ACT-09
ACT-10
Source: Natio nal Aeronautics and Space Administratio n.
Ru n 21 to 25 mil es per week or walk about 27 to 33
miles per w eek or spend in 9 to 11 hours per week in
comparable physic al activity
Run over 25 mile s per week or walk over 34 mile s per
wee k or s pen d ove r 12 h ours per week in comparable
physical activity
36
English
Page 37

Percentile Value for Maximal Aerobic Power
Maximal Aerobic Power can improve with training and decrea se with
ag e; world cla ss athle te s typ ic al ly have hi gh VO2ma x. Re se arch
suggests that when the VO2max is below the 20th percentile, it is often
indicative of a sede ntar y life styl e and assoc iate d with increased risk
of death from all causes. C ompare your VO2max value with the table
below to gain a b e
(Unit: ml/kg/ min)
Percentile Value for Maximal Oxygen Uptake in Men
Percentile
20-29 30-39 40-49 50-59 Over 60
90 55.1 52.1 50.6 49.0 44.2
80 52.1 50.6 49.0 44.2 41.0
70 49.0 47.4 45.8 41.0 37.8
60 47.4 44.2 44.2 39.4 36.2
50 44.2 42.6 41.0 37.8 34.6
40 42.6 41.0 39.4 36.2 33.0
30 41.0 39.4 36.2 34.6 31.4
20 37.8 36.2 34.6 31.4 28.3
10 34.6 33.0 31.4 29.9 26.7
Percentile Value for Maximal Oxygen Uptake in Women
Percentile
20-29 30-39 40-49 50-59 Over 60
90 49.0 45.8 42.6 37.8 34.6
80 44.2 41.0 39.4 34.6 33.0
70 41.0 39.4 36.2 33.0 31.4
60 39.4 36.2 34.6 31.4 28.3
50 37.8 34.6 33.0 29.9 26.7
40 36.2 3
30 33.0 31.4 29.9 26.7 23.5
20 31.4 29.9 28.3 25.1 21.9
10 28.3 26.7 25.1 21.9 20.3
Data was obtained from initial exa minations of apparently healthy men and women enrolled
in the "Aerob ics Center Longitud inal Study(ACLS)"(19 70 to 2002).
tter understandin g of your cardiovascular health.
Age
Age
3.0 31.4 28.3 25.1
37
Page 38
ALA MB100 User Manual
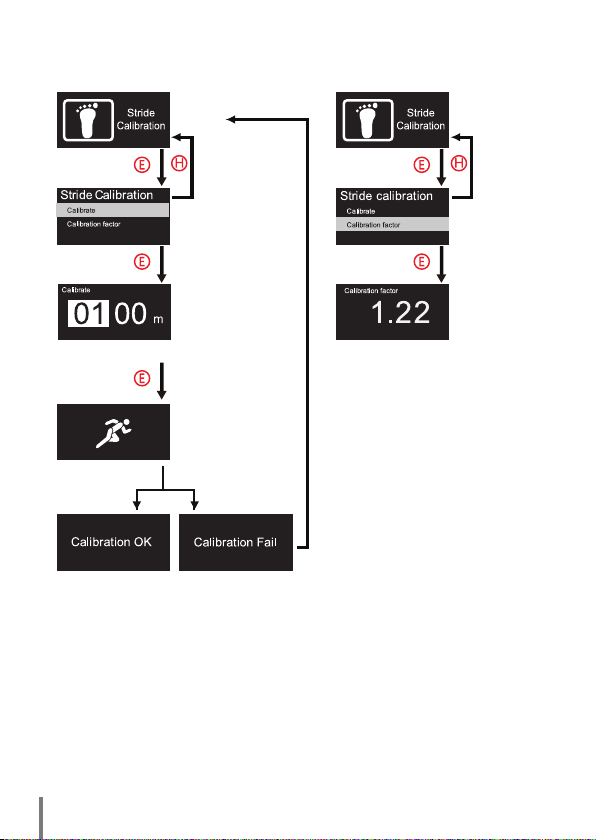
Stride Calibration
Distance limit: 400-2000m
Step Calibration
Press the E button to
end the display screen.
• Must wear the GS001 and confirm that there are no errors for the signal.
• Press the A-C buttons to adjust the distance.
• After setting is completed, press the E button to start adjustments.
• It is suggested that when adjusting, please exercise for at least 800m or above to
ensure the accuracy.
• Walking training : stride calibration factor is suggested to be 0.5.
38
• Jogging and Running training : stride calibration factor is suggested to be 1.
English
Index limit: 0.3-3
Page 39
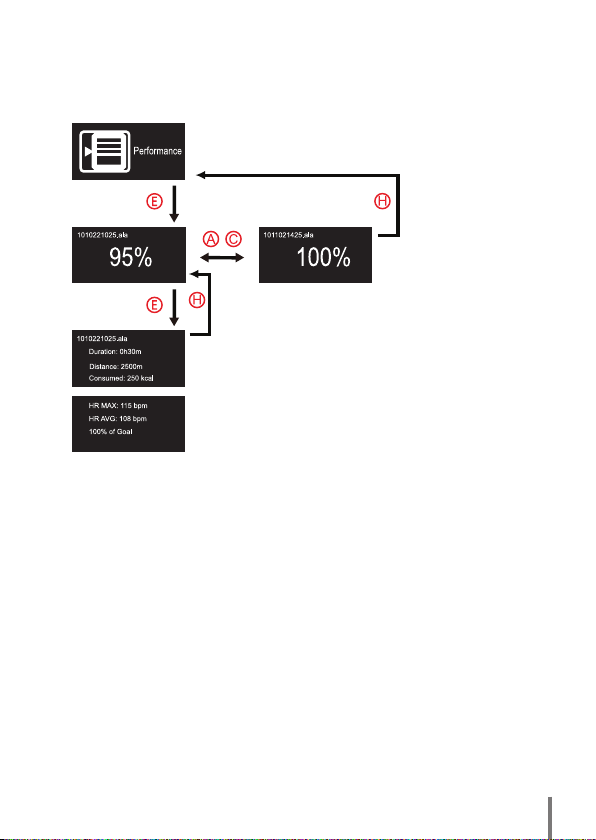
Performance
• Press the E button to view detailed exercise contents.
• Press the A-C buttons to view different exercise training files.
• Press the H button to return to the previous page.
39
Page 40
ALA MB100 User Manual
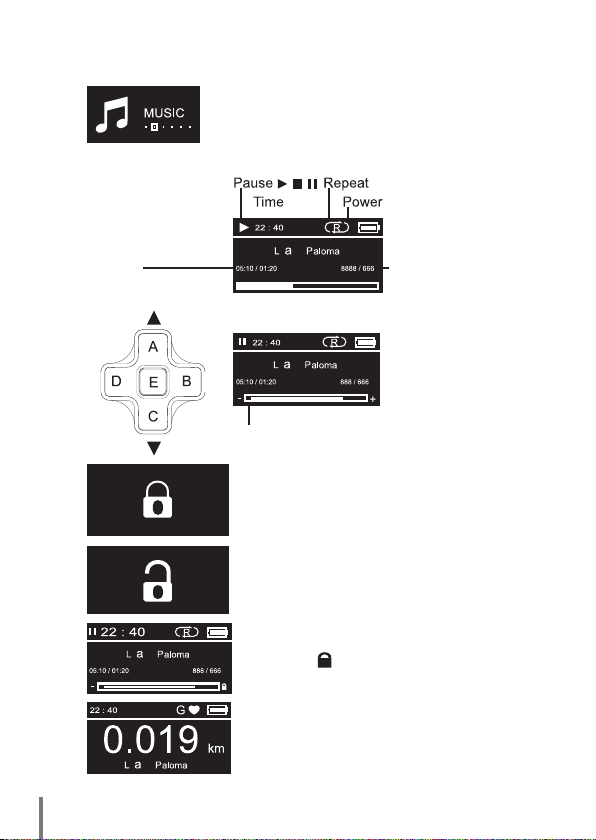
Music mode
Music playback
screen
05:10 / 01:20
Total track time/current
playback time
40
English
8888 / 666 (Currently set
to 4 digits)Total number
of tracks/currently playing
track
Volume
Press the A-C buttons will make the volume bar
appear, which allows you to adjust the volume.
• Short press the power key to lock the buttons; to
unlock the buttons, short press the power key again.
• If the volume limit is turned on, when the volume is
adjusted to a certain level, the volume limit symbol
will appear.
setting option)
• When the sensor is searching, the top-right corner of
the screen will display a sensor icon arrangement.
• The sensor will flash for approximately 5 seconds
when detecting.
(Please refer to user setting/sound
Page 41
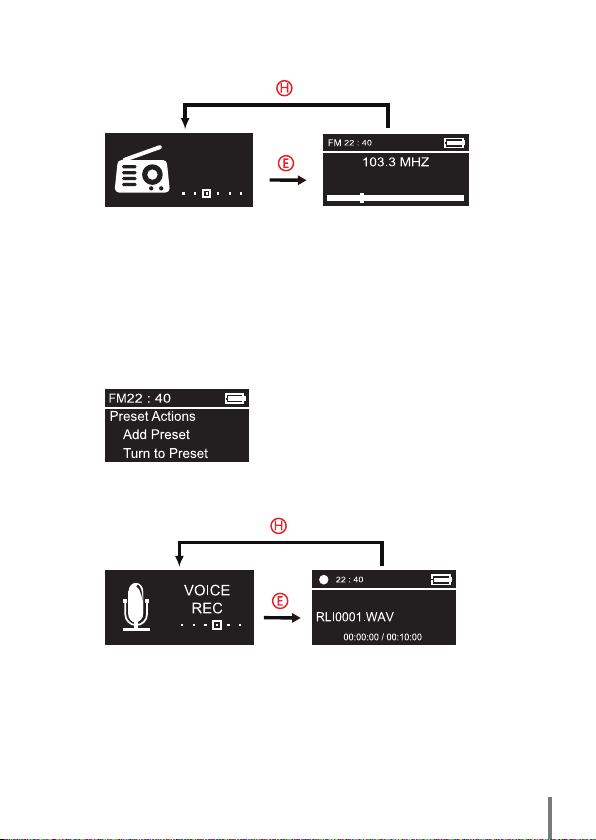
Radio mode
RADIO
Function operation
1. Press and hold down the B-D buttons to automatically search for channels.
2. Short press the B-D buttons to fine tune channels.
3. Press the E button to select saved broadcast radio channels (can save a
maximum of 10 channels).
4. Press the F button to record the broadcast contents:
When [Voice REC] is turned on, press the E button to pause the recording, but
not to leave the [Voice REC]; press the E button again to continue recording.If
you need to exit, press the H button to return to the previous page, and exit [Voice
REC].If executing [Voice REC] under [Radio], please note that you cannot switch
channels randomly.
• Press and hold the E button to display the [Preset
• Press the A-C buttons to select the preset option,
• Press the H button to return to the previous
P3
Actions] option.
and then press the E button to enter.
page.
Recording mode
Function operation
1. Under normal mode, press the F button to enter [Voice REC] mode.
2. When exiting [Voice REC] mode, the system will automatically save the file.
3. Press the F button to start the recording function, and then press the F button
again to stop the recording function.
4. If you need to pause the recording, press the E button to do so; if you need to
resume recording, press the E button again to continue recording.
5. While in FM mode, recording will record the broadcasting program; in any other
mode, the recording will record external sounds.
41
Page 42
ALA MB100 User Manual
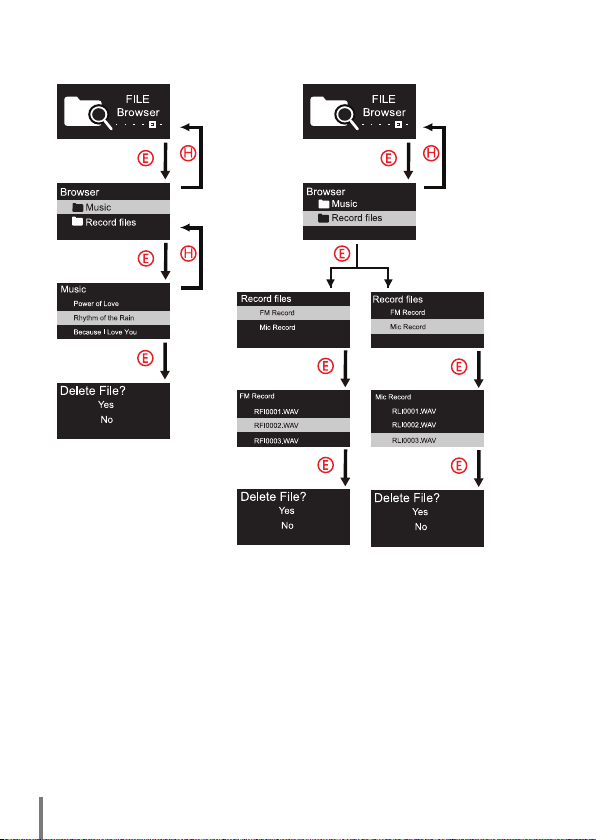
File Browser
Music file
FM Record Mic Record
If you need to delete files, press and hold down the E button and wait for the
confirm file deletion screen to appear.After selecting, the screen will automatically
return to the previous page, continue to browse the music files.
Function operation
• After pressing the E button to enter [File Browser], press the A-C buttons for up
and down selections, there are a total of two items:
[Music], [Record files].
• After pressing the E button and entering [Music], short press the E button for direct
playback; if you need to delete tracks, press and hold down the E button and a
confirm file deletion screen will appear.
• After pressing the E button and entering [Record files], then [FM Record] and [Mic
Record] will appear; after pressing the E button and entering, search for the file
you want to playback, then press the E button again for playback; if you need to
42
delete files, press and hold down the E button and a confirm file deletion screen
will appear.
English
Record files
Page 43
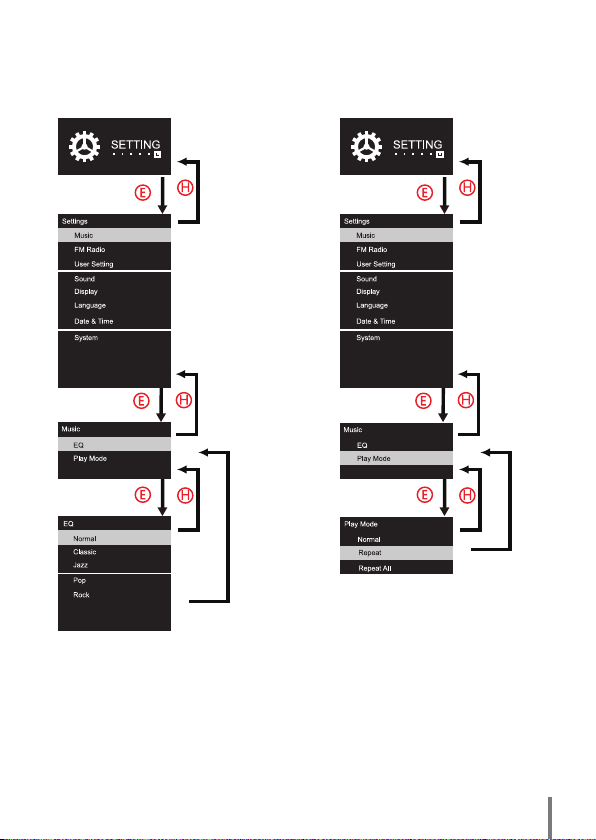
Setting/Music mode
Automatically return after
selection is made.
Automatically return
after selection is made.
• After pressing the E button to enter settings, press the A-C buttons for up and
down selections and select Music [Music], press the E button to enter.
• After pressing the E button to enter Music [Music], press the A-C buttons to select
EQ [EQ] or Play Mode [Play Mode]
• EQ [EQ]: Normal, classic, jazz, pop style and rock style.
• Play Mode [Play Mode]: Normal playback, repeat single track or repeat all tracks.
43
Page 44
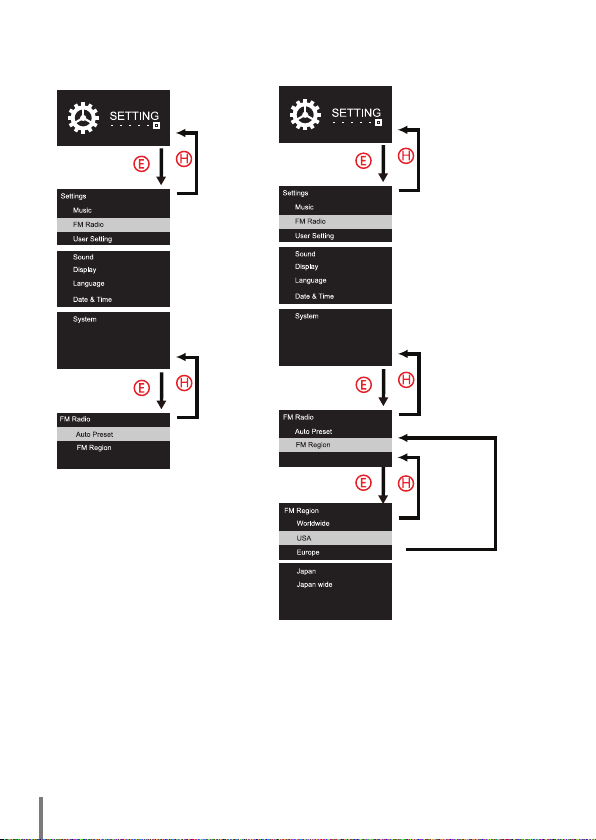
ALA MB100 User Manual
Settings/FM Radio
Automatically return
after selection is made.
Automatically return
• After pressing the E button to enter settings, press the A-C buttons up and down
selection to select FM Radio [FM Radio], and press the E button to enter.
• After pressing the E button to enter FM Radio [FM Radio], press the A-C buttons
to set Auto Preset [Auto Preset] and FM Region [FM Region].
• Press the E button to enter Auto Preset [Auto Preset], an option asking you
whether the turn on automatic default will appear, press the E button and set it
according to personal needs.
• FM Region [FM Region] includes world channels, America, Europe and Japan for
44
selection, press the E button to enter the selectable broadcast region, and then
press the E button again to confirm and complete the setting.
English
after selection is made.
Page 45
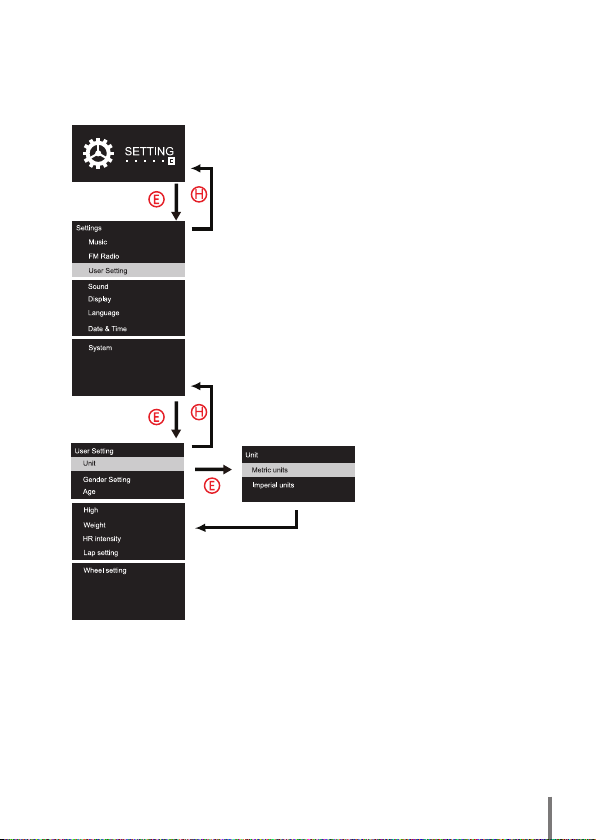
Setting/User Setting/Unit Setting
Automatically return
after selection is made.
Unit setting
Unit setting
After using the A-C buttons up and down to select and pressing the E button to
confirm, it will automatically return to the settings option page. There are two
options for users to select from: metric and imperial.
45
Page 46
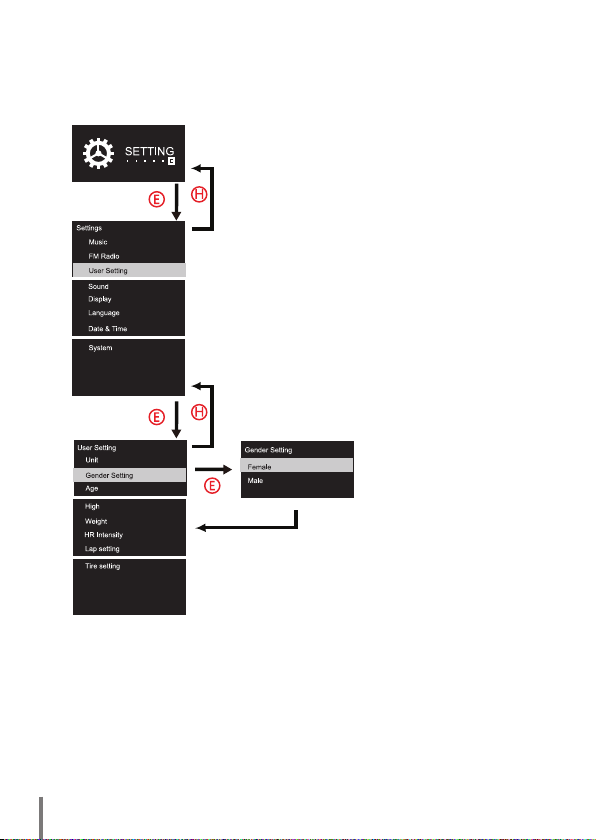
ALA MB100 User Manual
Setting/User Setting/Gender Setting
Automatically return
after selection is made.
User gender setting
46
English
Gender setting
Press the A-C buttons up and down selection, then press the E button to confirm
and it will automatically return to the previous setting screen.
Page 47
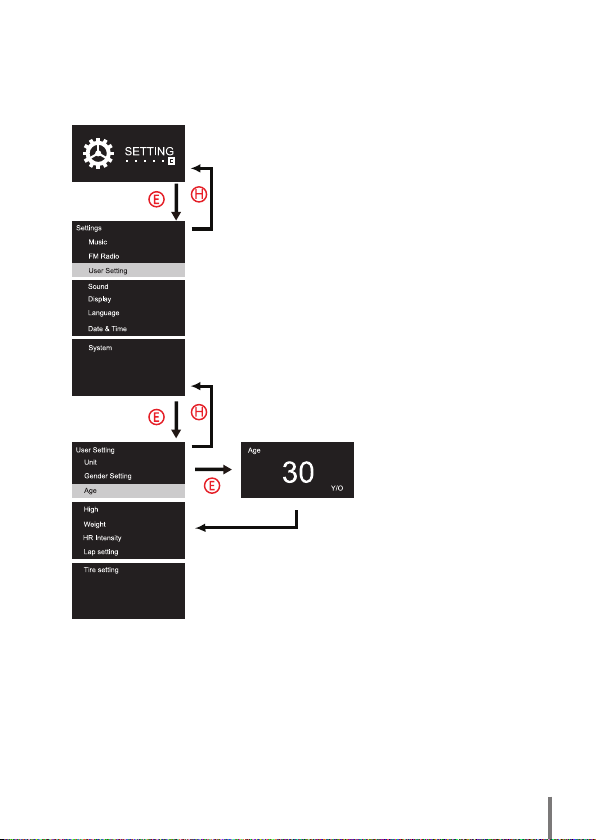
Setting/User Setting/Age
Automatically return
after selection is made.
Age setting
Age setting
Press the A-C buttons up and down selection, then press the E button to confirm
and it will automatically return to the previous setting screen.
47
Page 48
ALA MB100 User Manual
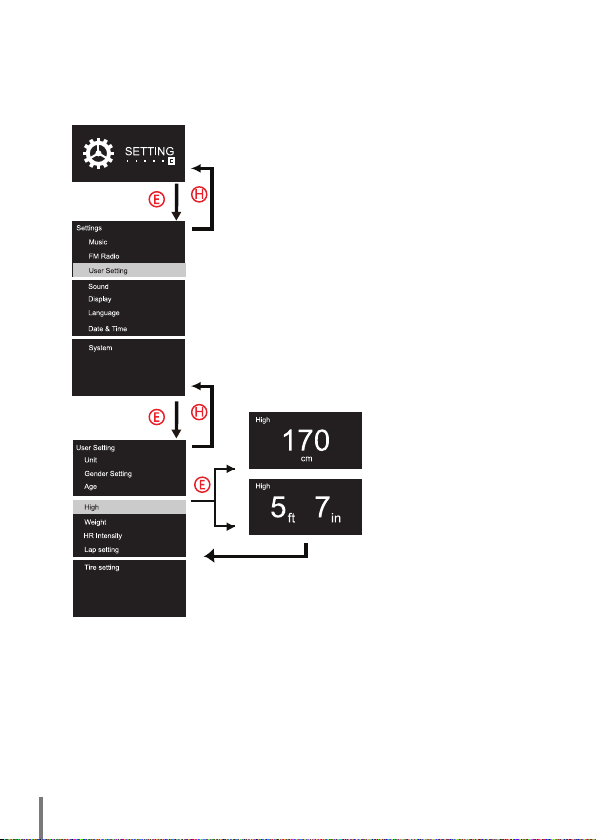
Setting/User Setting/High
Automatically return
after selection is made.
or
Metric unit
Imperial unit
48
High setting
High setting
After using the A-C buttons up and down to select and pressing the E button to
confirm, it will automatically return to the settings option page.
Setting range: 140cm-220cm (4ft7in-8ft3in)
English
Page 49
Setting/User Setting/Weight
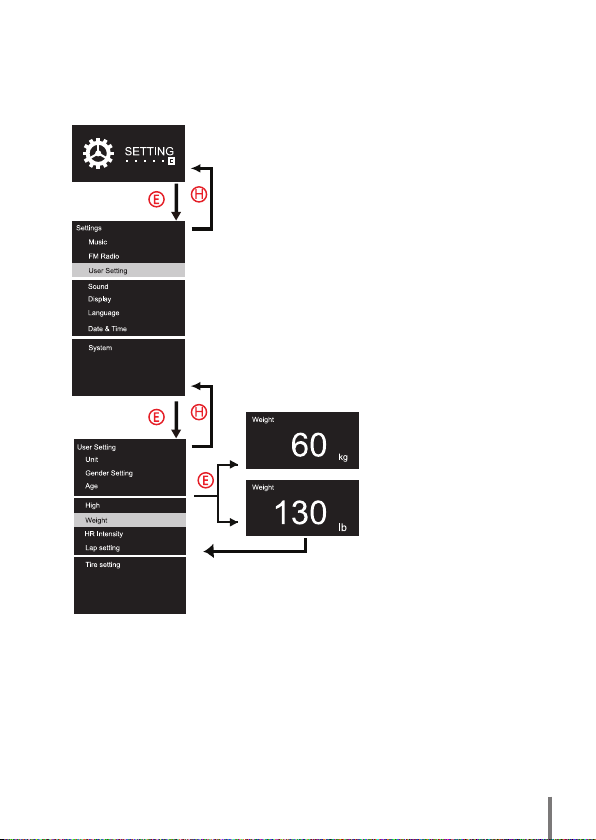
Automatically return
after selection is made.
or
Weight setting
Metric unit
Imperial unit
Weight setting
After using the A-C buttons up and down to select and pressing the E button to
confirm, it will automatically return to the settings option page.
Setting range: 30kg-150kg (66lb-330lb)
49
Page 50
ALA MB100 User Manual
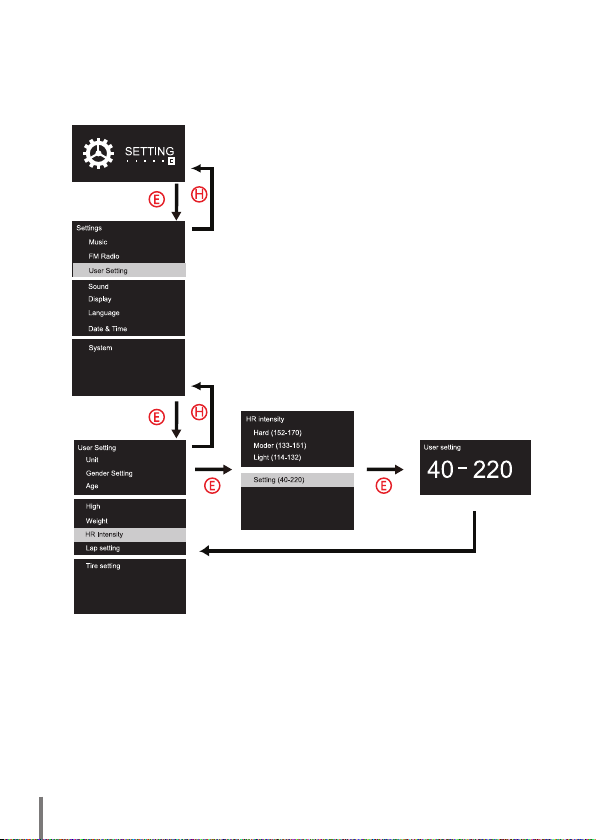
Setting/User Setting/HR Intensity
Automatically return
after selection is made.
50
English
HR Intensity
HR Intensity
After using the A-C buttons up and down to select and pressing the E button to
confirm, it will automatically return to the settings option page.
The set value in the user setting mode is the value displayed for other exercise
goals.If the user needs to enhance the heart rate strength, it will only change
when the value in Fitness / Target HR Zone or options is adjusted.
Page 51
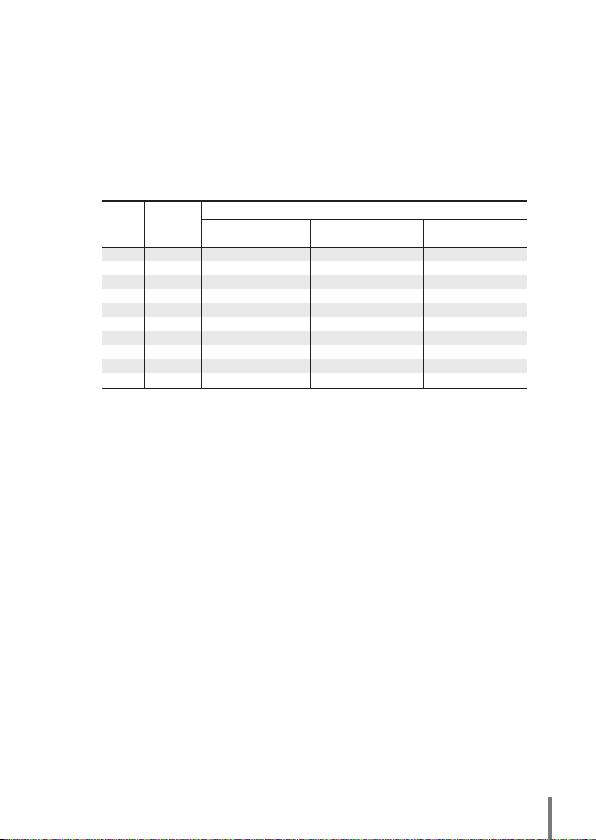
How to Recognize and Set a Suitable Training
Intensity Goal for Yourself
The following tab le is a reference for you to set a suitable train ing
intensity goal fo r yourself at bmp1 (training heart rate). It is
calculated by age in 5-year intervals with the %HRmax formula.
Maximum
Age
Heart Rate
Light Zone
(HRmax)
(60~70 %HRmax)
200
10~20
25
30
35
40
45
50
55
60
65~99
195
190
185
180
175
170
165
160
155
120~140
117~137
114~133
111~130
108~126
105~123
102~119
99~116
96~112
93~109
• Hea rt rat e (abbr evi ate d as "H R") is calcul ate d as the numbe r of
heartbeats/ minut e and expressed as "beats per minute, bpm".
• HRmax = 220 - Age
• Maxim um He ar t Rat e (MH R) , or HRm ax is th e hig he st num
of heartb eat s/ min ute (bp m) d uring maximu m ph ysi cal exe rtion.
It is frequ ently used to cal cu late THR (whic h is a he lpf ul ind ex
wh en set ti ng you r tra in ing intens it y ran ge). The most accura te
wa y of me asu ri ng M HR is via an Ex erc is e St res s Test by an
electrocardiogram (EC G) in a laboratory und er doctors or exper ts
supervision. The "Age Formula" is the most common way to estimate
MHR.
• %HRmax = Ta
× HRmax
rget Heart Rate = percentage of exercise intensity (%)
• Target Heart Rate (THR), or Train ing Hear t Rate, which is a desired
ra ng e of heart rat e rea ch ed du ri ng ae ro bi c exe rc is e for one 's
heart and l ung s to rece ive the m ost benefit fro m a work out . You
can c alculate t he low er and upper limits of THR via t he "%HRma x
Formula".
• User with lower physical strength is advised to exercise wit hin the
Light Zone, and T HR limit to not exceed 60%HRmax.
Training Intensity (unit : bmp)
Moderate Zone
(70~80 %HRmax)
140~160
137~156
133~152
130~148
126~144
123~140
119~136
116~132
112~128
109~124
Intensive Zone
(80~90 %HRmax)
160~180
156~176
152~171
148~167
144~162
140~158
136~153
132~149
128~144
124~140
be r
51
Page 52
ALA MB100 User Manual
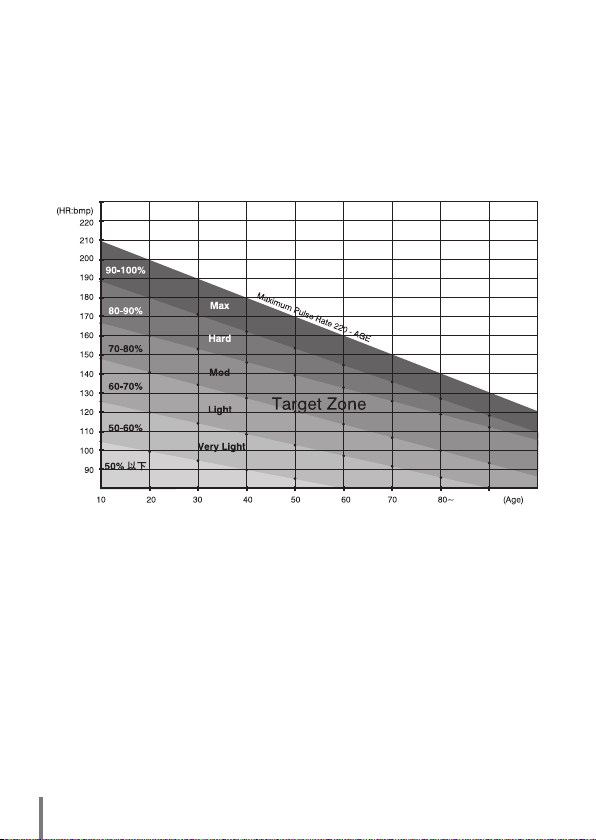
• Know and customize your maximum training output
• The chart below shows the heart rate level using %HR max. HR max
= 220 - Age with every 10 years of age as an age zone. This chart is a
reference for appropriate training output using the heart training mode.
• The unit for heart rate is bpm (beats per minute), or heartbeats per
minute.
• Maximum heart rate = 220 - age. If your age is 20, then 22
200 bpm, and your maximum heart rate is 200 bpm.
• Maximum heart rate (maximum heart rate, MHR, or HRmax)
refers to the maximum heart rate for optimizing exercise or stamina.
It is often used as the prescribed index for training output in order to
find the THR. The most direct and accurate method of measuring the
maximum heart rate is to have this done by a doctor or professional.
ise Stress Test is conducted and monitoring is done by an
An Exerc
electrocardiograph (ECG). Or you can use the simple age formula to
calculate your personal maximum heart rate.
0-20 =
52
English
Page 53
• Target heart rate
= training output (%) × maximum heart rate (HRmax).
• The target heart rate (THR) or training heart rate is used to find the
ideal rate for the optimal performance of aerobics to maximize the
benefit to your heart and lungs. You can find your own upper and
lower range target heart rate using the maximum heart rate formula
(%HRmax).
• In general, for persons with less than optima
l health, it is
recommended that the low-strength target heart rate range be set at
60% or below.
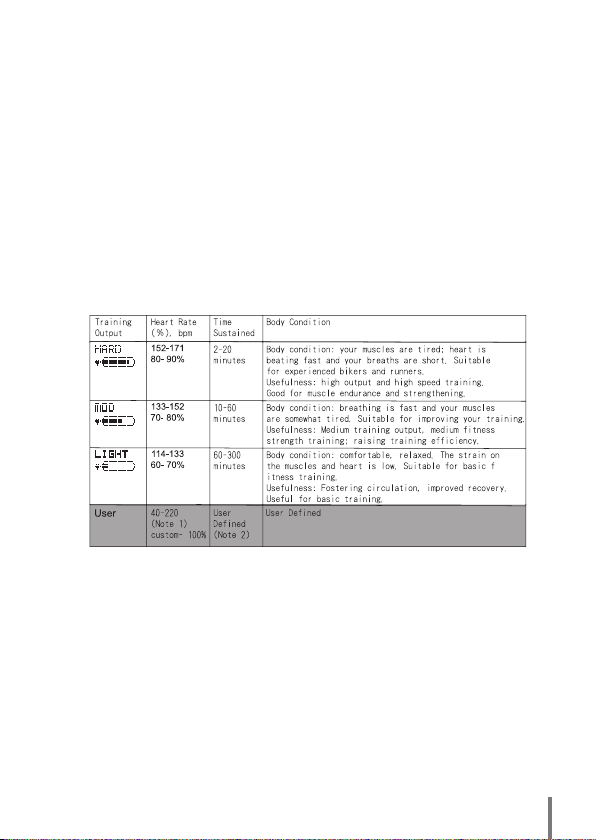
This table has six training programS of exercise intensity heart rate zone:
• Note 1: The 40-220 range is the normal MB100 setting range, but the
range values can be user defined. The graph will show the strength of
the training according to the value configured.
• Note 2: If the user defined training o
utput is above the 90-100% range,
it is recommended that the Time Sustained should be less than 5 to
avoid sports injury.
53
Page 54
ALA MB100 User Manual
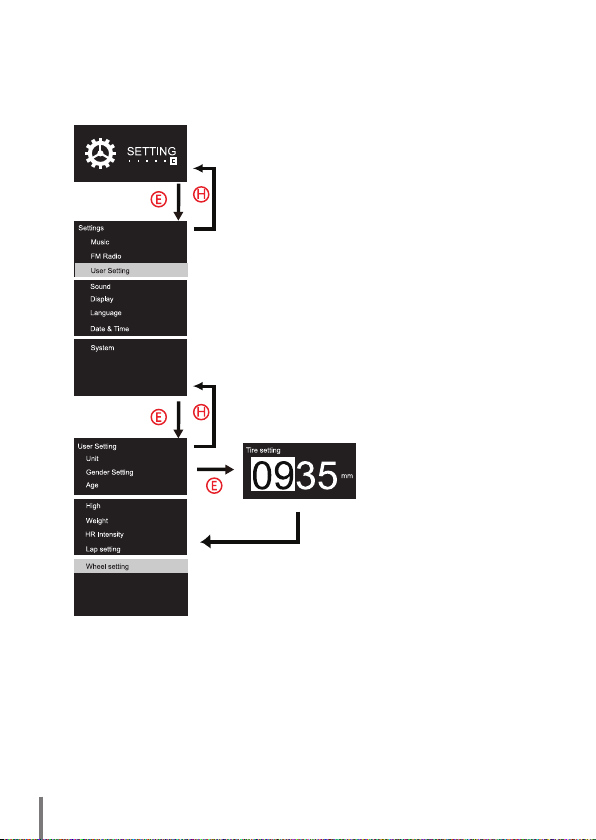
Setting/User Setting/Wheel Setting
Automatically return
after selection is made.
54
English
Wheel Setting
Wheel Setting
After using the A-C buttons up and down to select and pressing the E button to
confirm, it will automatically return to the settings option page.
Mainly [double digit/double digit] figure settings.
Page 55
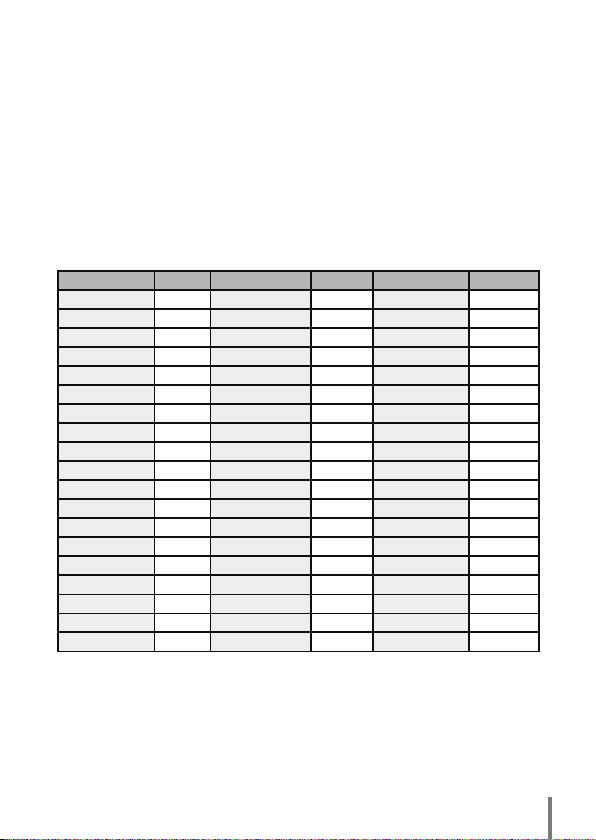
Setting/User Setting/Wheel Setting
• If the sensor coding time runs over 2 minutes, the screen will display coding
fail.
• Enter MB100 to Settings/System/Sensor Pairing/Cadence Sensor
mode and then turn the pedal to see if the signal shows OK or FAIL.
• Enter MB100 to Settings/System/Sensor Pairing/Speed Sensor mode
• Bike Wheel Adjustment Chart
Tire size L (mm) Tire size L (mm) L (mm) Tire size L (mm)
12 x 1.75 935 26 x 1(59) 1913 650 x 20C 1938
14 x 1.50 1020 26 x 1(65) 1952 650 x 23C 1944
14 x 1.75 1055 26 x 1.25 1953 650 x 35A 2090
16 x 1.50 1185 26 x 1-1/8 1970 650 x 38A 2125
16 x 1.75 1195 26 x 1-3/8 2068 650 x 38B 2105
18 x 1.50 1340 26 x 1-1/2 2100 700 x 18C 2070
18 x 1.75 1350 26 x 1.40 2005 700 x 19C 2080
20 x 1.75 1515 26 x 1.50 2010 700 x 20C 2086
20 x 1-3/8 1615 26 x 1.75 2023 700 x 23C 2096
22 x 1-3/8 1770 26 x 1.95 2050 700 x 25C 2105
22 x 1-1/2 1785 26 x 2.00 2055 700 x 28C 2136
24 x 1 1753 26 x 2.10 2068 700 x 30C 2146
24 x 3/4 Tubular 1785 26 x 2.125 2070 700 x 32C 2155
24 x 1-1/8 1795 26 x 2.35 2083 700C Tubular 2130
24 x 1-1/4 1905 26 x 3.00 2170 700 x 35C 2168
24 x 1.75 1890 27 x 1 2145 700 x 38C 2180
24 x 2.00 1925 27 x 1-1/8 2155 700 x 40C 2200
24 x 2.125 1965 27 x 1-1/4 2161 29 x 2.1 2288
26 x 7/8 1920 27 x 1-3/8 2169 29 x 2.3 2326
(The wheel size shown on the chart represents the normal sizes according to the wheel type.
For precise sports data, manual measuring is recommended.)
turn the front wheel to see if the signal shows OK or FAIL.
and then
55
Page 56
ALA MB100 User Manual
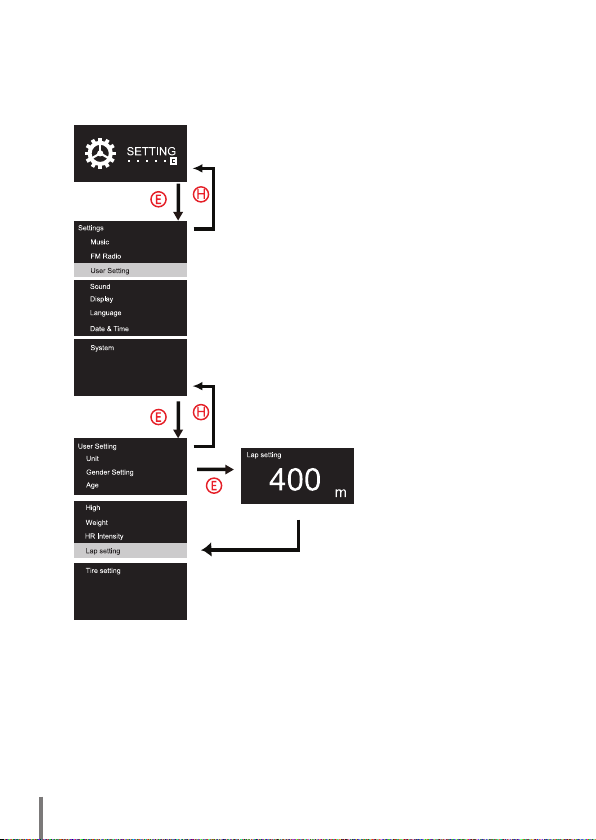
Setting/User Setting/Lap setting
Automatically return
after selection is made.
56
Lap setting
Lap setting
After using the A-C buttons up and down to select and pressing the E button to
confirm, it will automatically return to the settings option page.
Setting range: 200m-1200m (Every adjustment data is 100m)
English
Page 57
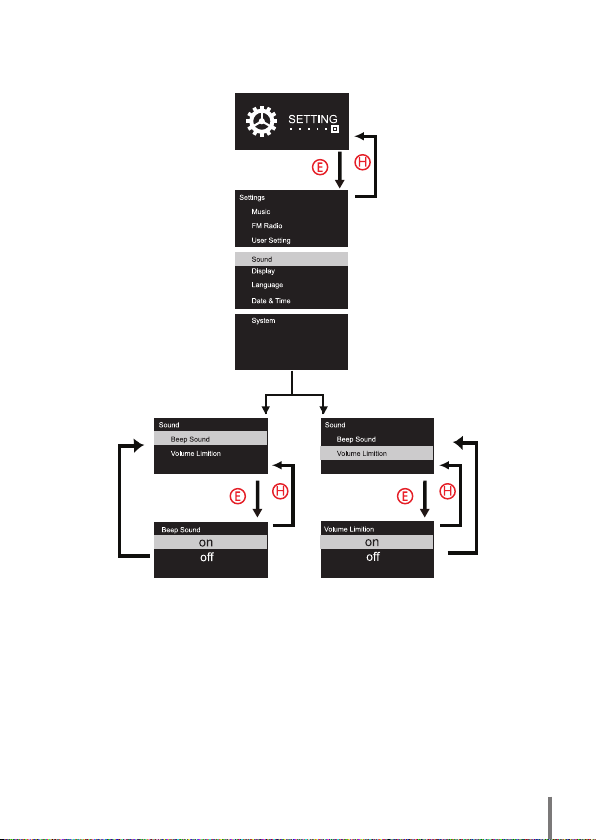
Setting/Sound
Automatically return
after selection is made.
• After entering by pressing the E button, press the A-C buttons to select Sound
[Sound] and press the E button to enter.
• After entering Sound [Sound], press the A-C buttons to select the setting for [Beep
Sound] and [Volume Limition].
57
Page 58
ALA MB100 User Manual
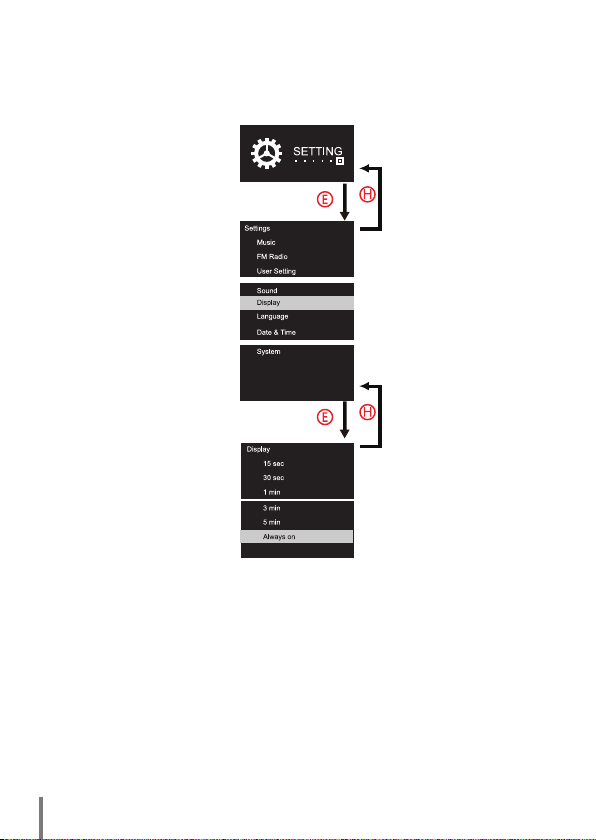
Setting/Display
Automatically return
after selection is made.
• After entering settings, press the A-C buttons to select Display [Display] and press
the E button to enter.
• After entering Display [Display], press the A-C buttons to select [Delay time before
the screen automatically shuts off].
58
English
Page 59
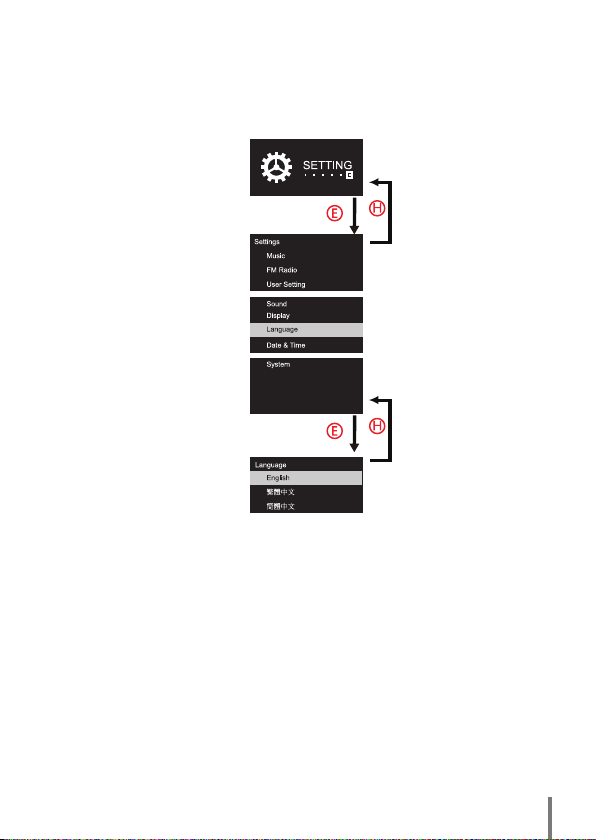
Setting/Language
Automatically return
after selection is made.
• After entering settings, press the A-C buttons to select Language [Language] and
press the E button to enter.
• After confirming the language to use, press the E button to confirm.
59
Page 60
ALA MB100 User Manual
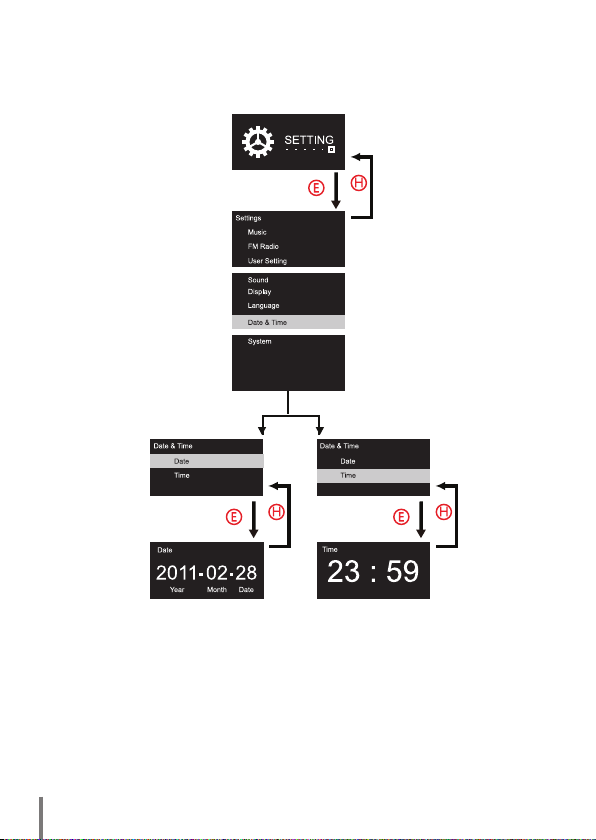
Settings/Date & Time
• After entering settings, select Date & Time [Date & Time] and press the E button
to enter.
• After entering Date & Time [Date & Time], press the A-C buttons to select the time
you wish to adjust.
• Pressing the A-C buttons allow you to select left and right, the B-D buttons allows
60
you to adjust the figure; when adjustment is complete, press the E button to return.
English
Page 61
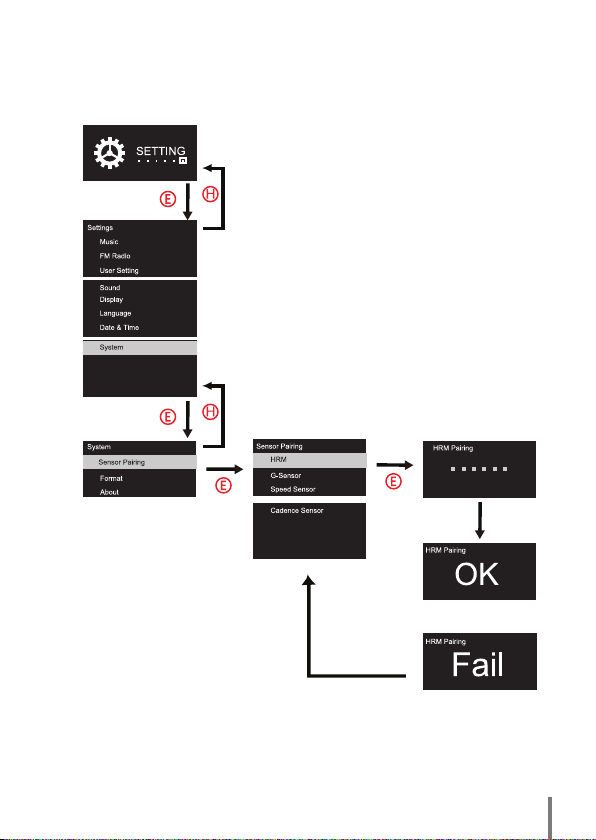
Setting/System/Sensor testing
Sensor sensing
or
• After entering settings, press the A-C buttons up and down selection to select
System [System] and press the E button to enter.
• After entering System [System], there are three options: [Sensor Pairing], [Format],
[About].
• Press the E button to select [Sensor Pairing], this allows you to check the signal
strength of the sensors you are wearing.
61
Page 62
ALA MB100 User Manual
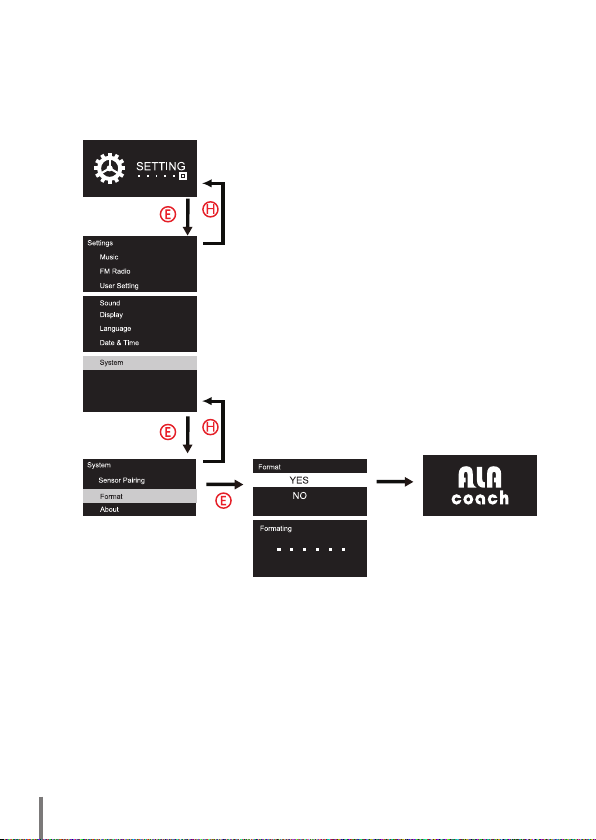
Setting/System/Format
• After entering settings, press the A-C buttons up and down selection to select
System [System] and press the E button to enter.
• After entering System [System], there are three options: [Sensor Pairing], [Format],
[About].
• Press the E button to select [Format], and then select [YES] to confirm the
selection, then the formatting screen will appear; when completed, it will return to
the [ALA COACH] screen.
62
English
Page 63
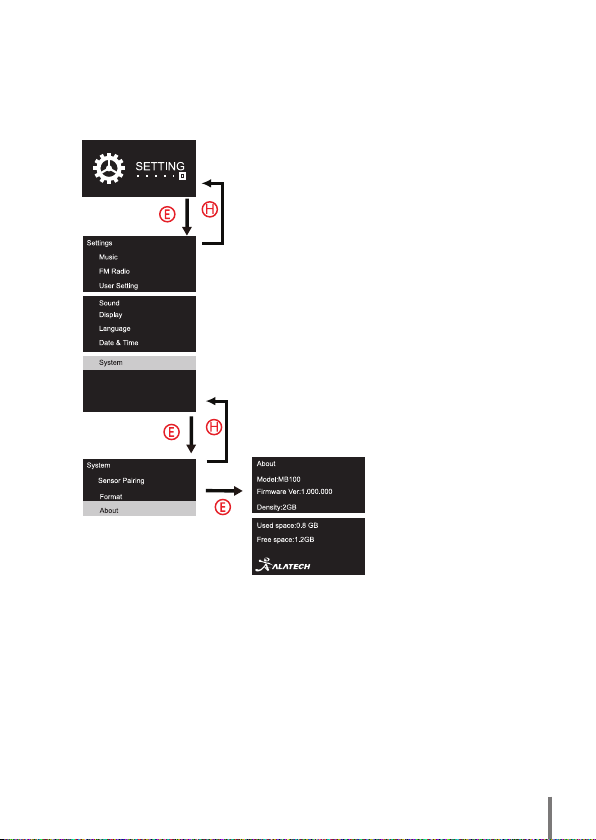
Setting/System/About MB100
63
 Loading...