

Page 1
Bluetooth 4.0
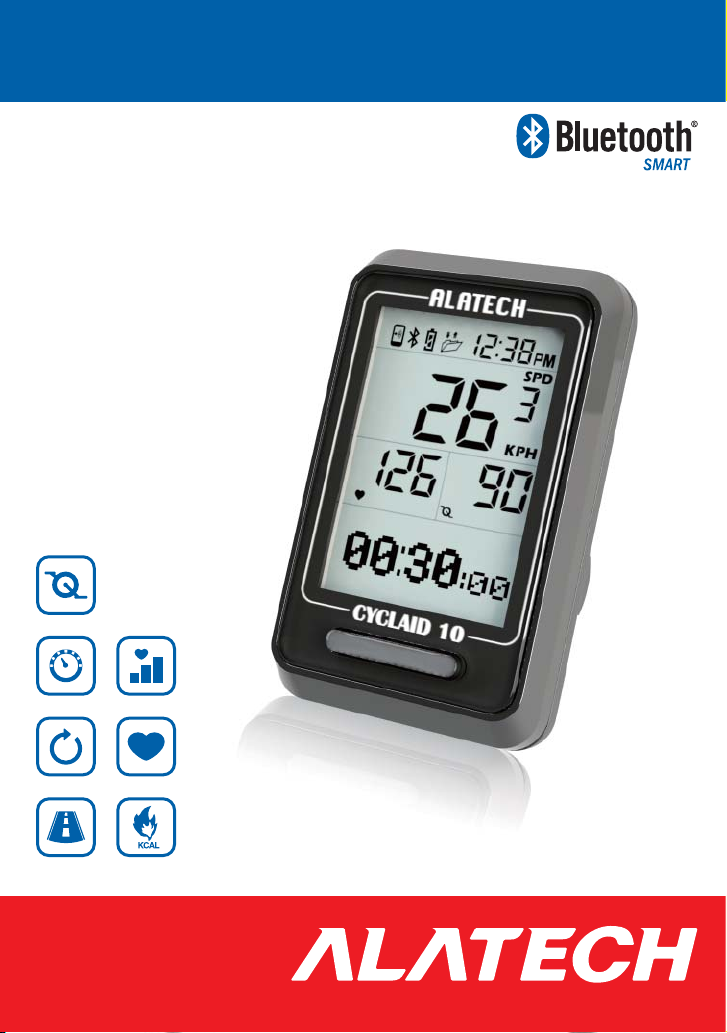
Cycling Computer
Cyclaid 10
User Manual
LAP
www.alatech.com
Page 2
Congratulations on Your Purchase of
T
This Product.
Table of Contents
C
Congratulations on your purchase of the Cyclaid 10
Bluetooth Cycling Computer !
Your Cycling Computer employs low power Bluetooth 4.0
technology for you to exercise together with mobile devices or
sensor accessories.
It helps a lot in your daily exercise training program.
About this manual
Please read this manual carefully before using this product for its correct and
•
effective use.
Icons you may find in this manual:
•
Notes.
Tips and remarks.
Appendix
Please download and view the latest release of this manual at www.alatech.com.
•
Items included with your product
Cyclaid 10 Bluetooth 4.0 Cycling Computer
•
Accessories: Fixer, Fixing Pad and Ties
•
Quick Start Guide
•
Warranty Card
•
Trademark
Bluetooth® is the registered trademark of Bluetooth SIG, Inc.
•
iPhone is the registered trademark of Apple Inc.
•
App store is the service trademark of Apple Inc.
•
For other information and battery replacement, please
refer to appendix.
1 Getting to Know Your Cyclaid 10
1-1 Applications
1-2 Keys
1-3 Screen overview
1-4 Switch the function mode
Function modes
2 Pairing with Sensor
2-1 Pair with your HRM
2-2 Pair with your Speed and Cadence Sensor
3 Basic Setup
3-1 System setup
Tire circumference (L) cross reference table
3-2 User setup
3-3 Hot Key setup
3-4 Sensor setup
4 Install the Cycling Computer
5 Exercise Mode
Training program cross reference table
Instant exercise screen
6 Log Function
6-1 Browse and delete file
6-2 Upload file
7 Exercise Statistics
8 Connect to Smartphone or Mobile Device
8-1 Install App and enable the Bluetooth function
8-2 Pair your Cycling Computer with mobile device
8-3 iPhone exercise sync.
8-4 Synchronize with smartphone
S Specifications
A Appendix
4
4
6
7
8
9
10
10
11
12
12
13
14
15
15
16
17
18
19
20
20
21
22
23
23
24
25
26
28
29
2
Bluetooth Cycling Computer
User Manual
3
Page 3
Blu
eto
ot
Getting to Know Your Cyclaid 10 Getting to Know Your Cyclaid 10
1 1
1-1 Applications 1-1 Applications
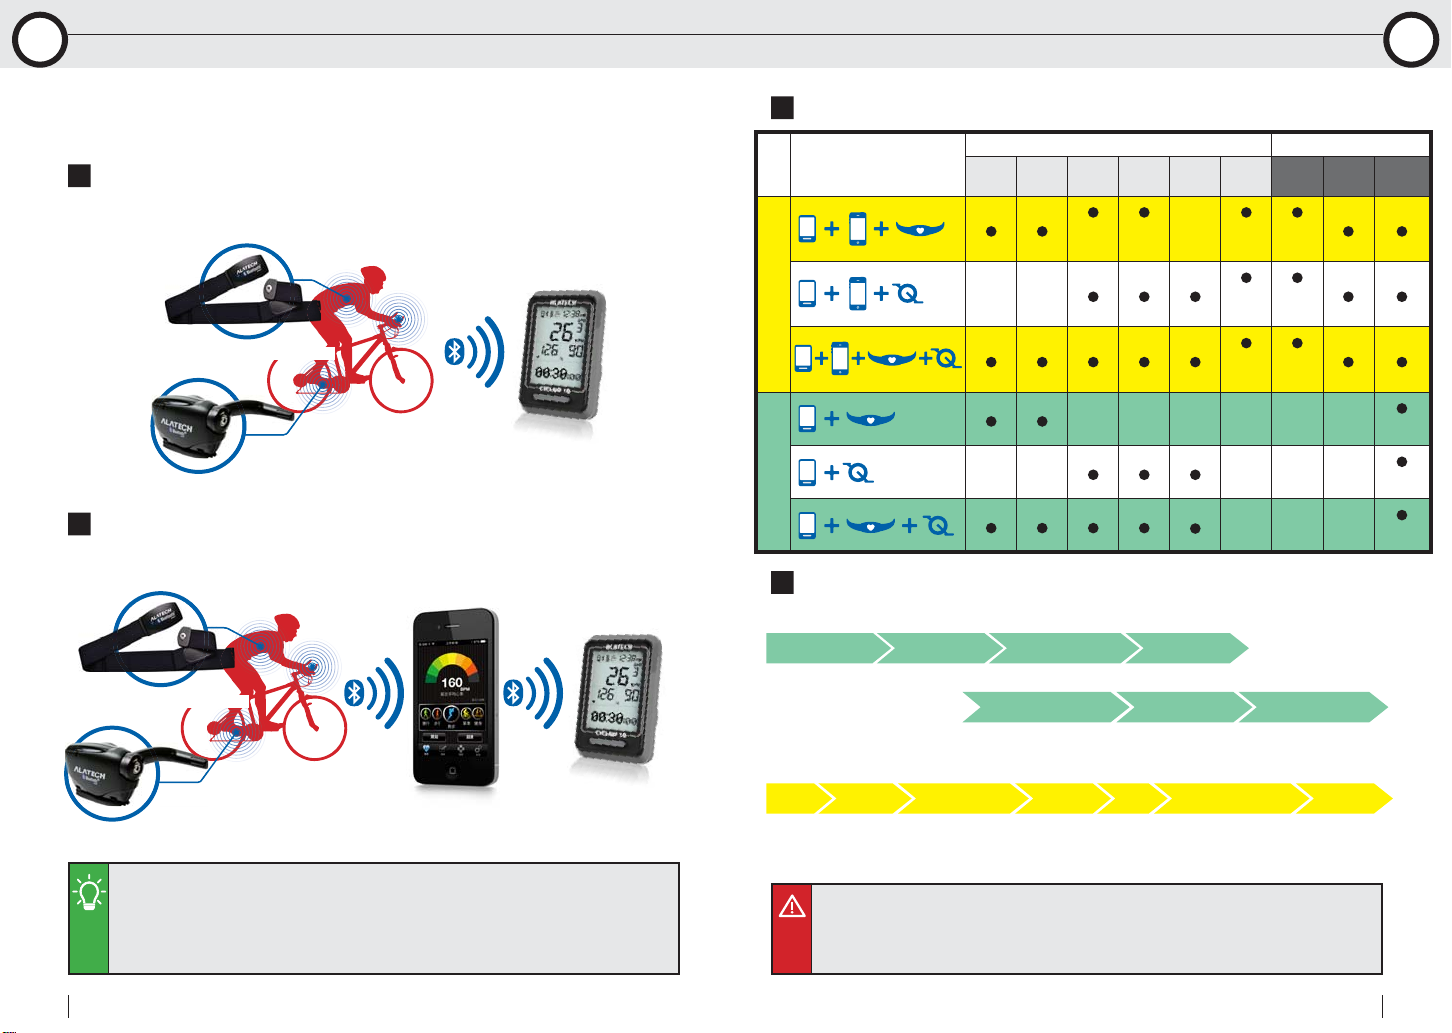
Please refer to the following application and operation index to
know more about using your Cyclaid 10.
Use with sensor alone:
Your Cycling Computer may connect to two sensors with low power Bluetooth 4.0
technology
Note 1
at the same time.
Bluetooth 4.0 Heart Rate Strap
Bluetooth 4.0 Speed
and Cadence Sensor
Cyclaid 10 Cycling
Computer
Bicycling with your smartphone:
Bicycling with your smartphone or mobile devices connected with low power
Bluetooth 4.0 technology
Bluetooth 4.0 Heart Rate Strap
Bluetooth 4.0 Speed
Bluetoot
and Cadence Sensor
•Note 1: Compatible with ALATECH Heart Rate Strap (model CS009/CS010/CS011)
•Note 2: Compatible with mobile device running iOS 5.0 or later and features Bluetooth 4.0
(require installation of App: ALA COACH+).
•For more information on compatible mobile devices and supported accessories, please refer to
page 23 or browse web site at www.alatech.com.
Note 2
.
Cyclaid 10 Cycling
Smart Mobile Devices
ALATECH Speed and Cadence Sensor (model SC001BLE)
Computer
Application cross reference table:
Application
Bicycling together with
your smartphone
Use with sensor alone
Heartbeat
Exercise readings Recording method
Calories Distance Speed Cadence
Mobile
Mobile
phone
phone
GPS
GPS
Slope and
height
Mobile
phone
GPS
Mobile
phone
GPS
Mobile
phone
GPS
Operation index:
Use with sensors
Pair with sensorSetup Hot Key Setup sensor Basic setup
Page 15Page 15 Page 10-11 Page 12-15
Install the
Cycling Computer
Page 16 Page 17-19 Page 20-22
Start bicycling Browse records
Bicycling with your smartphone
Install
Setup
Hot Key
App
•Please pair the optional sensor device with your cycling computer before its first use.
(Page 10-11)
•Please complete the following pairing before using it together with smartphone for the first time:
Pair the Cycling Computer with your smartphone or mobile device. (Page 24)
Pair the optional sensor with your smartphone or mobile device.
Pair with
mobile device
Pair with
sensor
Please refer to
operation manual
included with your
sensors
Sync.
setup
Page 26-27 Page 25Page 16Page 23 Page 15 Page 24
Install the
Cycling Computer
Track Diagram Summary
Mobile
phone
GPS
Mobile
phone
GPS
Mobile
phone
GPS
Cycling
Computer
Cycling
Computer
Cycling
Computer
Sync.
bicycling
4
Bluetooth Cycling Computer
User Manual
5
Page 4
Getting to Know Your Cyclaid 10 Getting to Know Your Cyclaid 10
1 1
1-2 Keys 1-3 Screen Overview
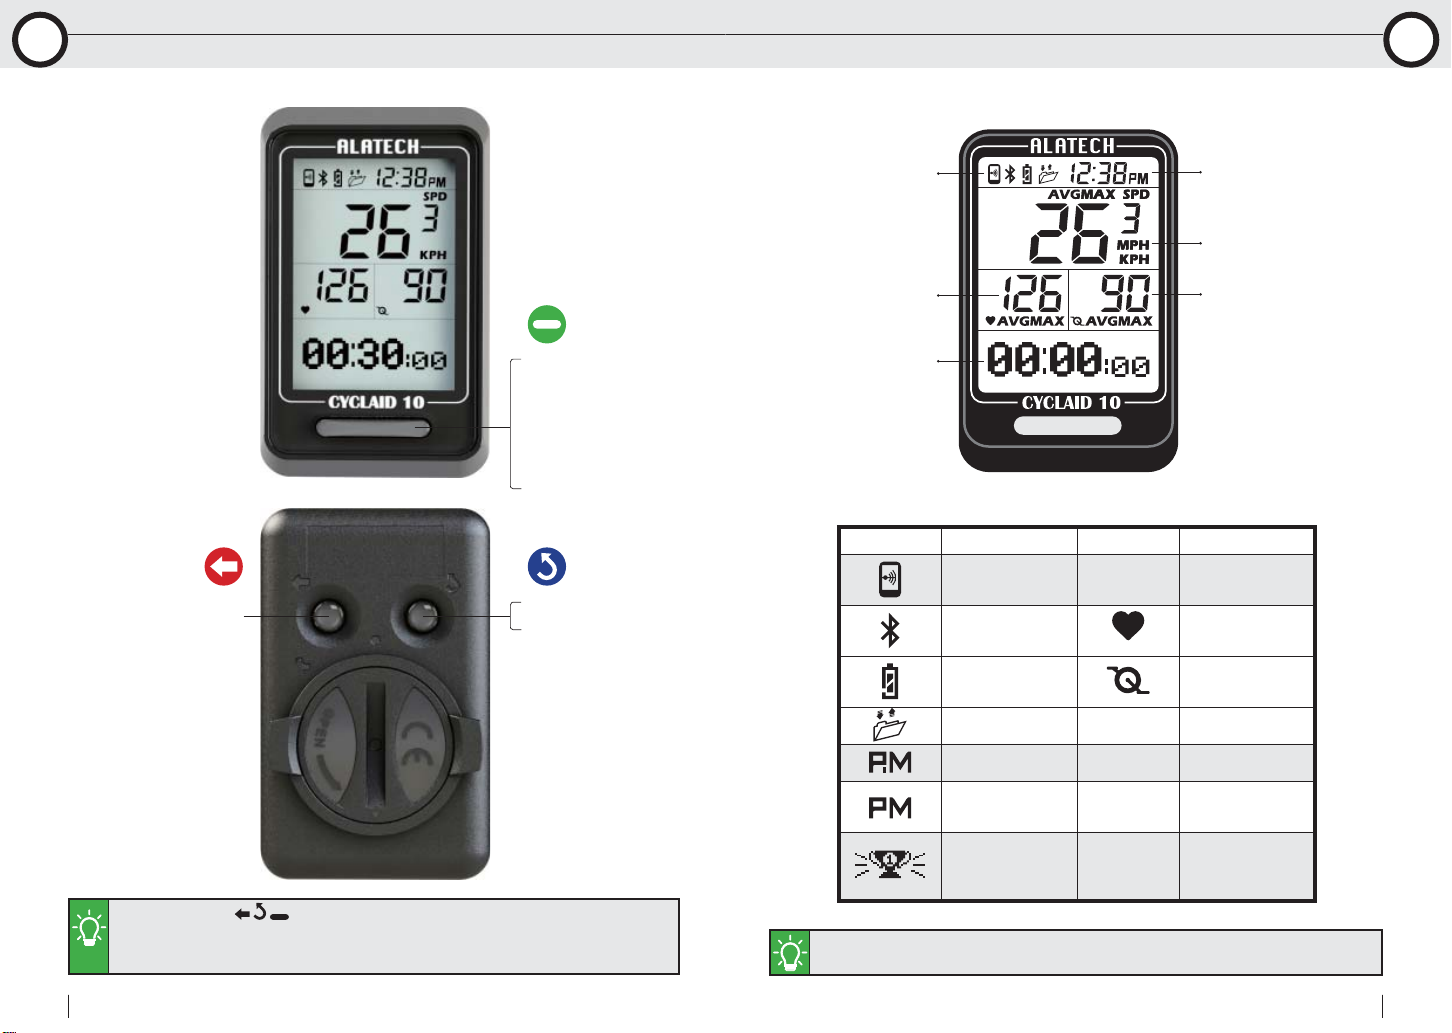
•Right/Down arrow key
•OK
•In the standby mode,
this may be the:
Exercise Hot Key or
iPhone Hot Key
•Start bicycling
•Turn backlight
•Exit/Back
•Stop bicycling
Status bar
Heartbeat display
Information display
Symbol Name Symbol Name
Connection to
Mobile Phone
Connection to
Sensor
Cycling Computer
Battery Power
Upload File
SPD
AVG
Current time
Speed display
Pedaling frequency display
Speed
Heartbeat
Padling
Frequency
Average
6
•Press and hold the / / keys until the screen fully display to reset the Cycling Computer.
•Do the basic setups described in page 12-15 after Cycling Computer reset. If you have setup
Cycling Computer with the ALA COACH+ App, you may re-sync settings to your Cycling
Computeras described in "Phone sync" on page 26-27.
Bluetooth Cycling Computer
AM
PM
Target
Achievement
Trophy
•Screen of the Cycling Computer sleeps when the latter being in standby mode.
•The screen displays symbol of currently active mode or the one you are about to enter into.
MAX
MPH
KPH
Maximum
Speed in Imperial
UOM
Speed in metric
UOM
User Manual
7
Page 5
Getting to Know Your Cyclaid 10 Getting to Know Your Cyclaid 10
1 1
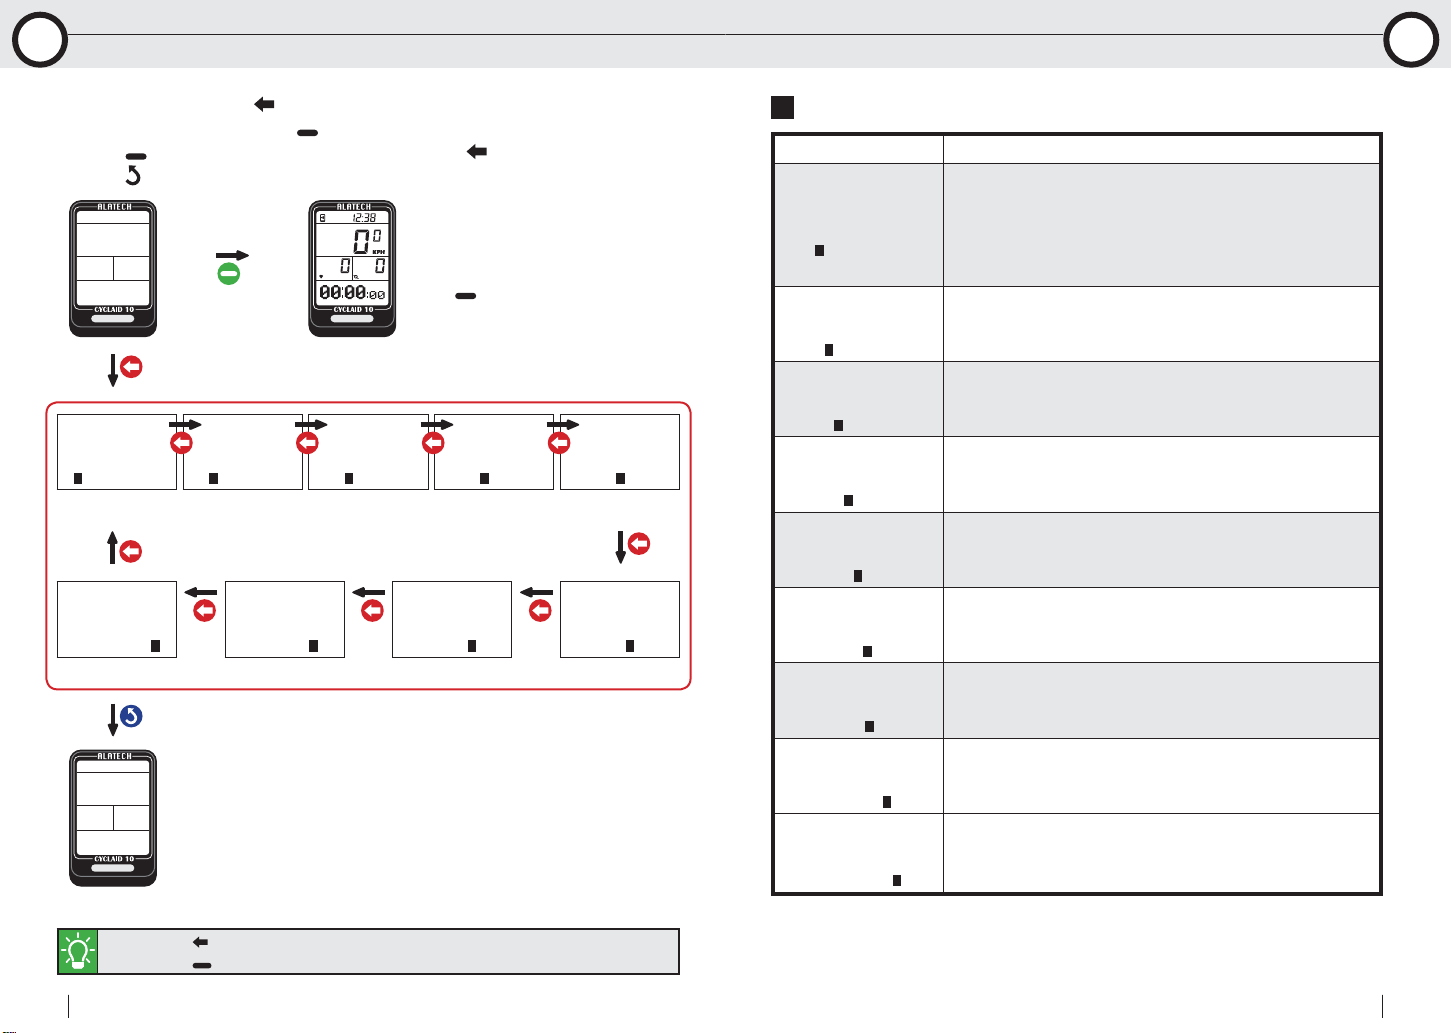
1-4 Switch the Function Mode 1-4 Switch the Function Mode
1.In standby mode, Press to switch the screen from sleep to individual window
2.In the selected window, Press
3.Press
4.Press
TRAINING
PROG.
--------
MEMORY
to switch flashing setup item or page, Press to change settings.
2~3 times in any window to exit to standby mode.
MEMORY
FILE
- -------
SYSTEM
STAT.
--------
Exercise Statistics Bike Settings User Settings Pair with Sensor
------- -
SET
to enter.
Starts timing
HOT KEY
SET
-- ------
Press to enter the bicycling mode
in standby mode
SENSOR
Note 2
.
PHONE
SET
--- -----
Sensor SetupHot Key SetupLog FunctionExercise Mode
USER
SET
------ --
---- ----
Synchronize with
Smartphone
PAIRING
SENSOR
----- ---
Note 1
SYNC
.
Function modes:
Function modes Description
1.Your Cycling Computer comes with low, moderate, and
TRAINING
PROG.
--------
MEMORY
FILE
- -------
high exercise intensity and customizable training programs
including: target heart rate zone and target time, distance,
and calories. (Page 17-18)
2.Execute training program and view instant exercise
information. (Page 17 and 19)
1.You can keep up to 7 records.
2.Browse and delete file. (Page 20)
3.Upload file. (Page 21)
HOT KEY
SET
Switch between hotkeys. (Page 15)
-- ------
SENSOR
SET
Sensor setup. (Page 15)
--- -----
PHONE
SYNC
Sync. with Smartphone. (Page 26-27)
---- ----
PAIRING
SENSOR
----- ---
1.Pair with Your HRM. (Page 10)
2.Pair with Your Speed and Cadence Sensor. (Page 11)
USER
SET
Setup personal data. (Page 14)
------ ---
SYSTEM
SET
------- -
Setup tire circumference (L), enable auto lap counting and
setup single lap distance, enable backlight, setup date and
time. (Page 12-13)
Standby mode
8
•Note 1: Press
•Note 2: Press to switch to bicycling mode and start timing. (Refer to page 15 Hot Key setup.)
Bluetooth Cycling Computer
to switch to individual setup window in standby mode.
MEMORY
STAT.
--------
View total exercise amount including accumulated exercise
time, distance and energy burnt. (Page 22)
User Manual
9
Page 6
Pairing with Sensor
2 2
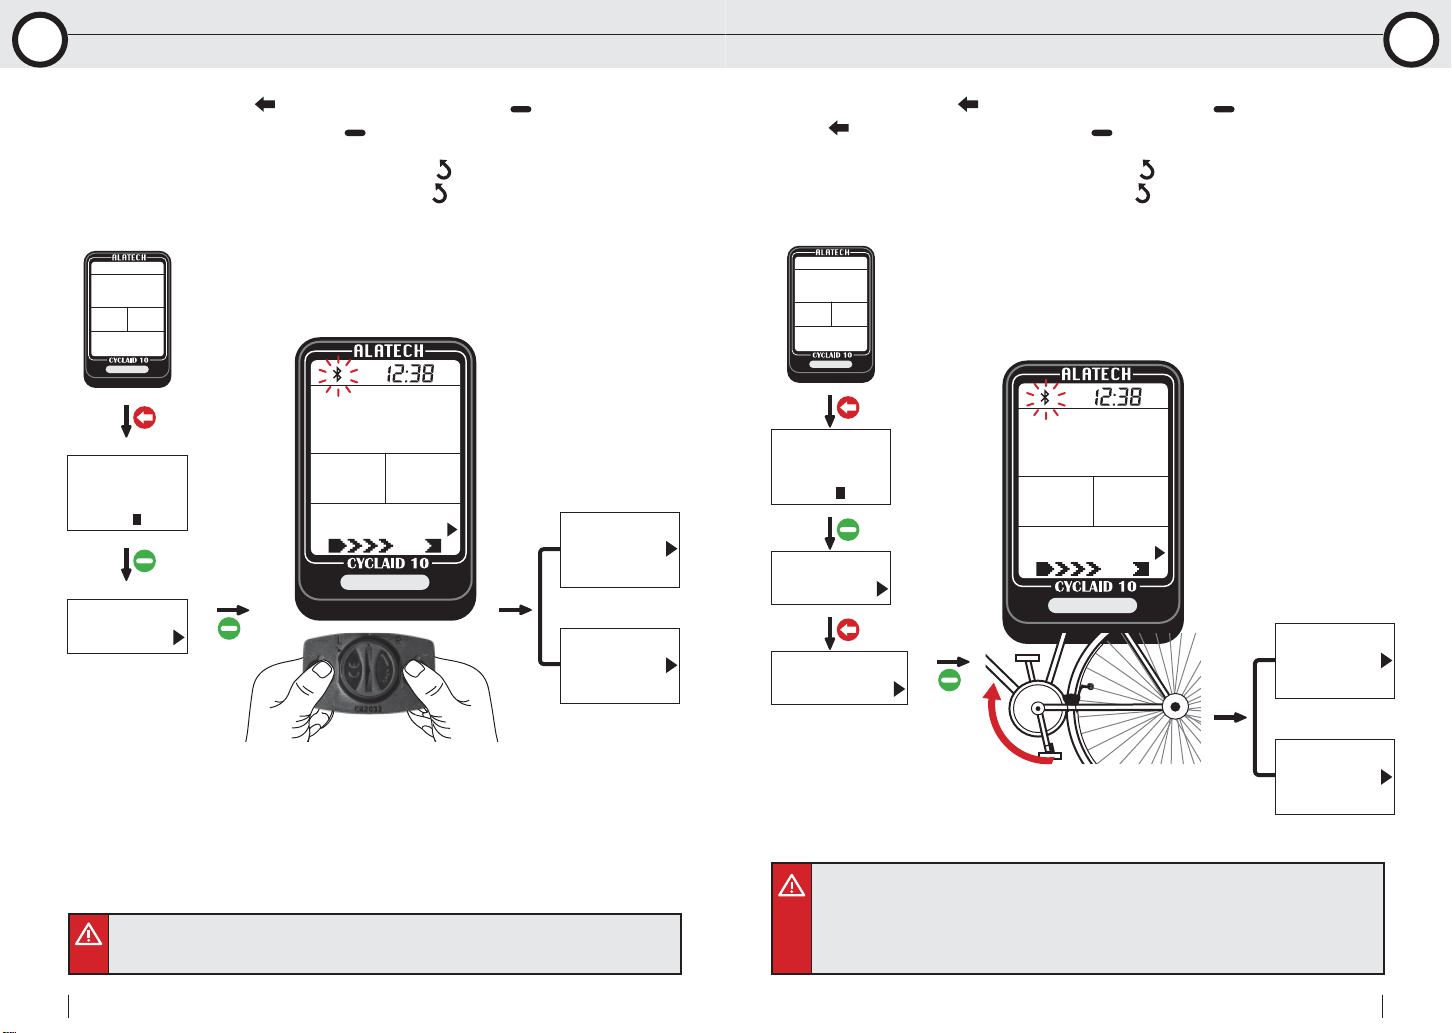
2-1 Pair with Your HRM 2-2 Pair with Your Speed and Cadence Sensor
Pairing with Sensor
1.In standby mode, Press
2.In the PAIRING HRM window, Press
pairing.
3.Paired successfully, message OK prompts, Press
Pairing failed, message NO-DEV prompts, Press
starts from STEP 2 again.
to point to PAIRING SET, Press to enter.
to create Bluetooth connection and start
PAIRING
SENSOR
----- ---
PAIRING
HRM
PAIRING
HRM
Pair your HRM
Please refer to the Heart Rate Strap manual on
wearing it properly, or press and hold the metal
button at the back of the heart rate sensor (HRM) with
both hands until the "OK" message prompts in your
Cycling Computer.
to exit.
to exit to PAIRING HRM and
PAIRING
HRM
OK
PAIRING
HRM
NO-DEV
1.In standby mode, Press to point to PAIRING SET, Press to enter.
2.Press
start pairing.
3.Paired successfully, message OK prompts, Press
Pairing failed, message NO-DEV prompts, Press
starts from STEP 2 again.
to point to PAIRING BIKE, Press to create Bluetooth connection and
to exit.
to exit to PAIRING BIKE and
PAIRING
SENSOR
----- ---
PAIRING
PAIRING
BIKE
HRM
PAIRING
BIKE
Pair your Speed and
Cadence Sensor
Please refer to the Speed and Cadence Sensor manual
to install the sensor and its included magnet to your
bike, turn the crank counterclockwise until the sensor
is connected to the Cycling Computer and the "OK"
message prompts.
PAIRING
BIKE
OK
PAIRING
BIKE
NO-DEV
10
•Make sure HRM is set to ON in the Sensor Setup window. (Page 15)
•Keep your heart rate sensor and Cycling Computer within 10cm from each other. Keep both
away from other Bluetooth devices to prevent incorrect pairing.
Bluetooth Cycling Computer
•Make sure SPD/CAD is set to ON in the Sensor Setup window. (Page 15)
•Activate your Speed and Cadence Sensor before pairing by cranking to start the sensor and
establish connection. Your Speed and Cadence Sensor remains awake for one minute. It goes
back to sleep mode again if no Bluetooth connection is enabled.
•Keep your Speed and Cadence Sensor and Cycling Computer close to each other and away
from other Bluetooth devices for correct pairing.
User Manual
11
Page 7
(
4
0
-
5
5
9
)
2
6
×
1
.
5
0
Basic Setup Basic Setup
3
3-1 System Setup 3-1 System Setup
4
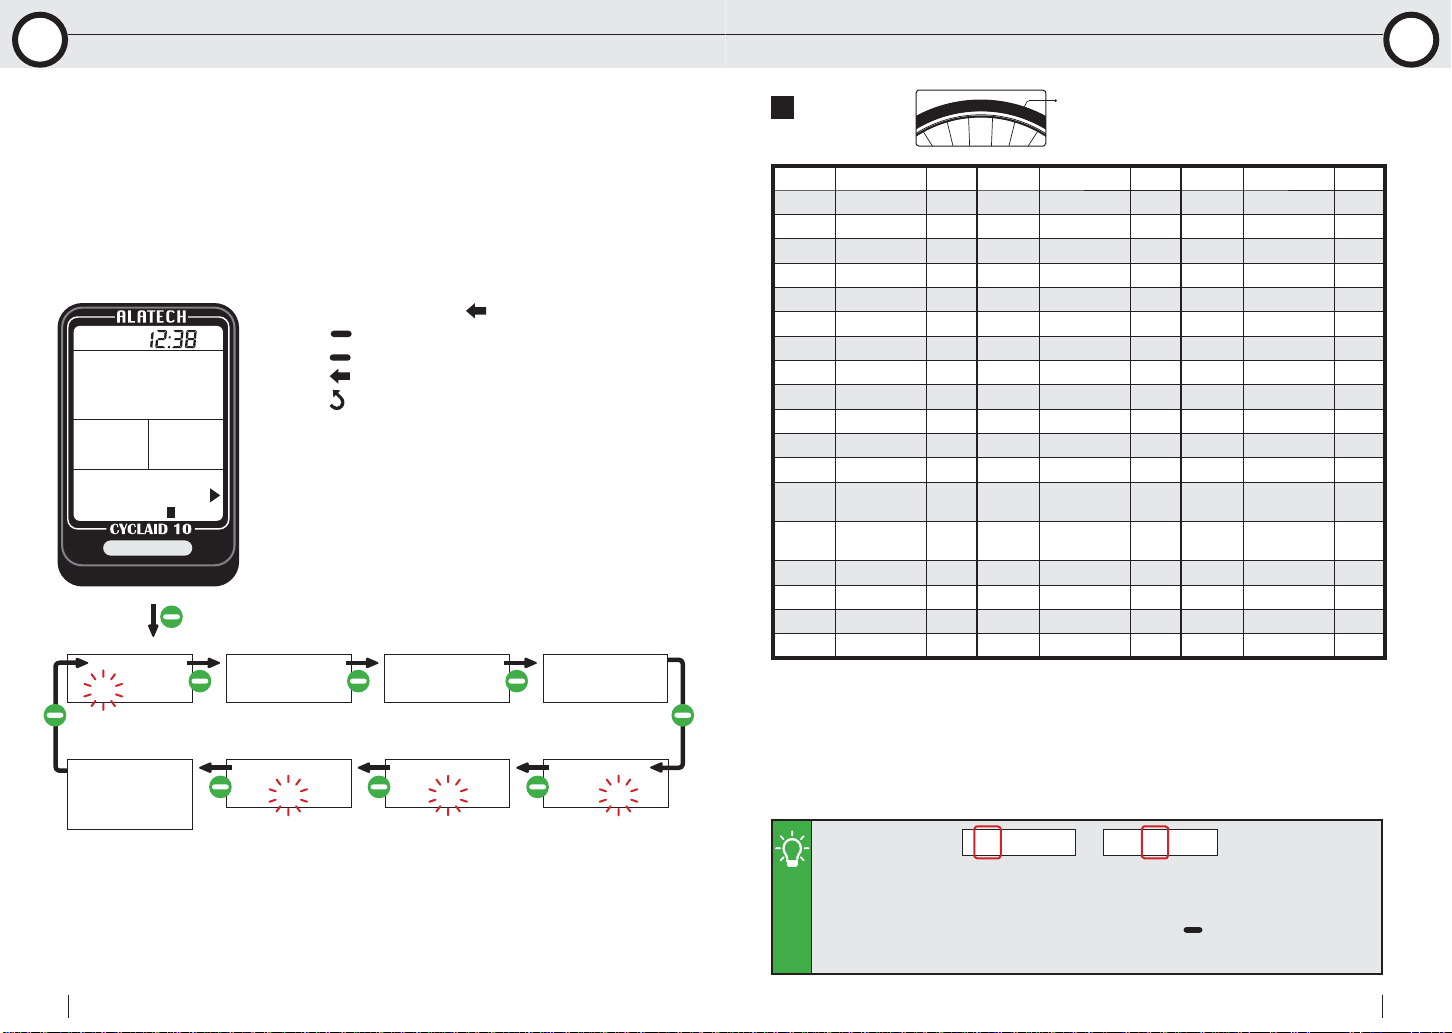
Please setup your basic data before using your product.
You may setup your basic data with the ALA COAH+ App on
your mobile phone or devices and synchronized it to your
Cycling Computer.
See Page 26-27 for its operation.
System setup
3-1
1.In standby mode, Press to point to SYSTEM SET,
Press to enter.
SYSTEM
SET
------- -
WHEEL
1900mm
2.Press
3.Press
4.Press
AUTO LAP
OFF
Auto LapTire Circumference(L) Single Lap Distance Back Light
to point to the next setup item or page.
to change settings.
to exit after setup is completed.
LAP DST
1 KM
LIGHT
OFF
Tire size:
You can find the tire size indicated at both
sides of your wheel. For your reference, use
the tire circumference (L) chart below.
ETRTO Tire size L(mm) ETRTO Tire size L(mm) ETRTO Tire size L(mm)
12×1.75 935 26×7/8 935 32-630 27×1-1/4 2161
14×1.50 1020 23-571 26×1(59) 1020 27×1-3/8 2169
14×1.75 1055 26×1(65) 1055 650×35A 2090
16×1.50 1185 26×1.25 1185 650×38A 2125
47-305 16×1.75 1195 26×1-1/8 1195 18-622 650×38B 2105
18×1.50 1340 37-590 26×1-3/8 1340 700×18C 2070
18×1.75 1350 26×1-1/2 1350 700×19C 2080
47-406 20×1.75 1515 26×1.40 1515 20-622 700×20C 2086
20×1-3/8 1615 40-559 26×1.50 1615 23-622 700×23C 2096
22×1-3/8 1770 47-559 26×1.75 1770 25-622 700×25C 2105
22×1-1/2 1785 50-559 26×1.95 1785 28-622 700×28C 2136
24×1 1753 54-559 26×2.00 1753 700×30C 2170
24×3.4
Tubular
24×1-1/8 1795 57-559 26×2.125 1795
24×1-1/4 1905 26×2.35 1905 700×35C 2168
47-507 24×1.75 1890 57-559 26×3.00 1890 700×38C 2180
24×2.00 1925 27×1 1925 40-522 700×40C 2200
24×2.125 1965 27×1-1/8 1965
1785 26×2.10 1785 32-622 700×32C 2155
700C
Tubular
2130
12
TIME
12:38
24H
Time
12-24 Hours
Bluetooth Cycling Computer
DAY
01
Day Month Last two digits of year of the
MONTH
01
YEAR
2014
Gregorian calendar
• Tire size setup range:
• Single lap distance setup range: 1-5 kilometers.
•You may turn on the backlight for 5 seconds by pressing the key after the backlight option
is selected.
•The back light may be too dim to be noticed under direct sun light.
1900mm
10-25
1-5 miles.
1900mm
00-99
User Manual
13
Page 8
3
Basic Setup
User Setup
3-2
Hot Key Setup,
3-3
Sensor Setup
3-4
Basic Setup
3
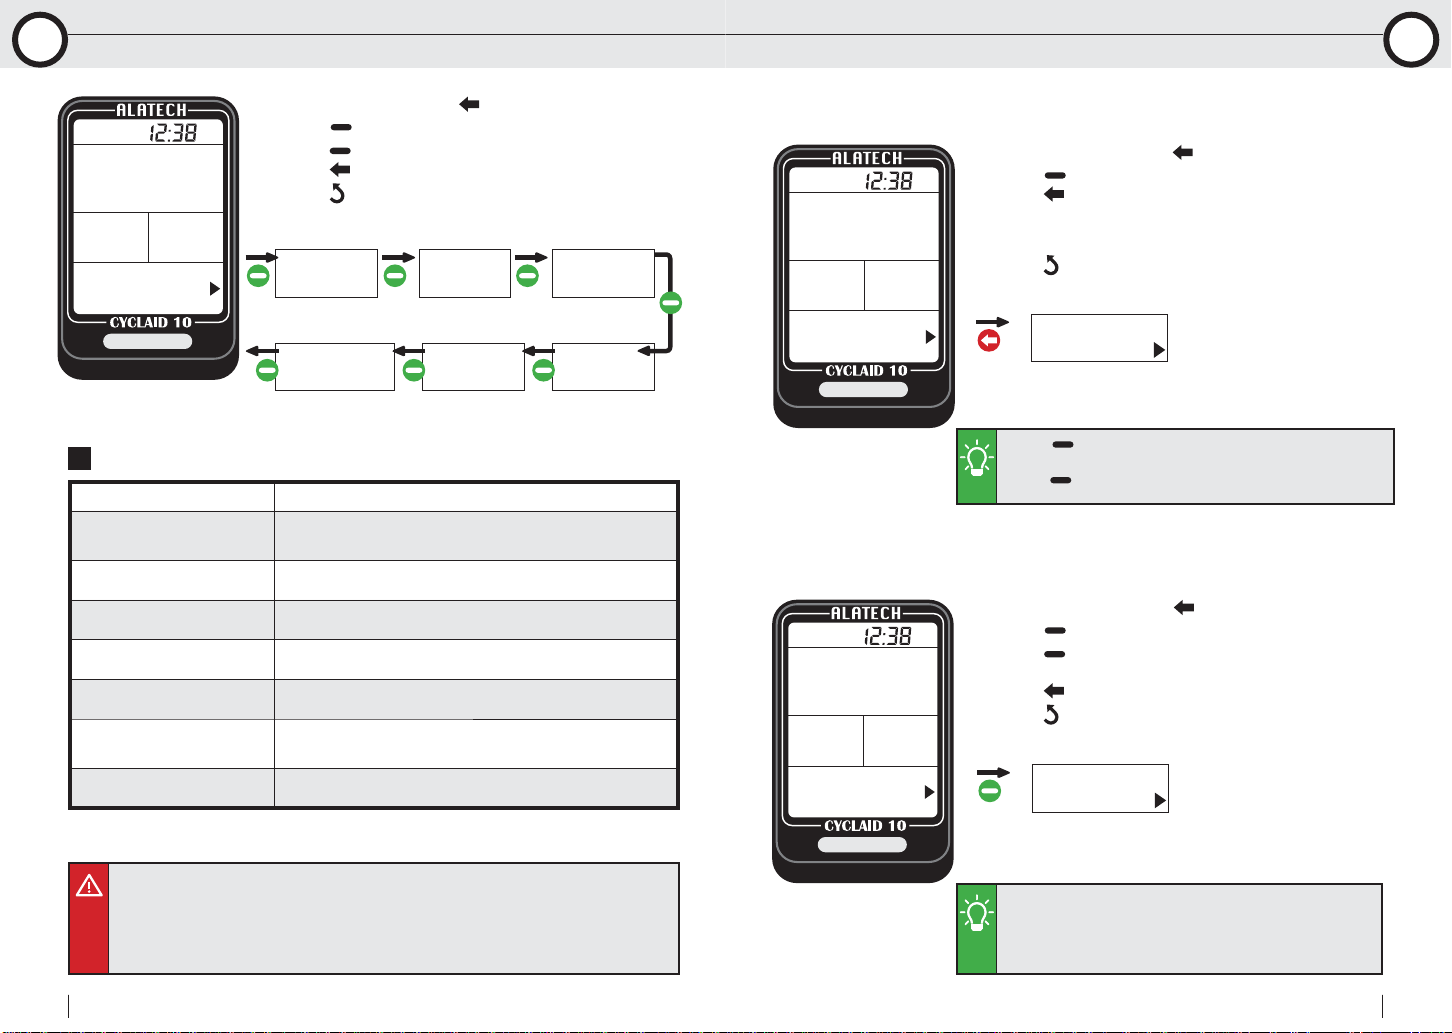
1.In standby mode, Press to point to USER SET,
Press to enter.
UNIT
CM / KG
2.Press
3.Press
4.Press
GENDER
HR ALERT
to change setup page.
to change settings.
to exit after setup is completed.
MALE
HR MAX
OFF
Setup page:
Setup page Description
UNIT
(Unit of measure)
GENDER
AGE
HEIGHT
WEIGHT
HR MAX
(Maximum heart rate)
NOTE 1
HR ALERT
•UOM option: metric CM / KG or Imperial FT / LB
•MALE or FEMALE
•Setup range: 10-99 year-old
•Setup range: 120-230 cm (3' 11" ~ 7' 5")
•Setup range: 30-150 KG (67-330LB)
•Setup range: 130-220 bpm
•ON or OFF
AGE
30
190
HEIGHT
175CM
WEIGHT
70KG
Hot Key Setup
3-3
CONNECT
PHONE
iPhone Hot Key
Sensor Setup
3-4
HRM
ON
1.In standby mode, Press to point to HOT KEY SET,
Press to enter.
2.Press
CONNECT PHONE (iPhone Hot Key) or
CONNECT SENSOR (Exercise Hot Key).
3.Press
to switch between hotkeys:
to exit after setup is completed.
CONNECT
SENSOR
Exercise Hot Key
• Press
directly once the Hot Key is set to CONNECT PHONE. (Page 25)
• Press
once the Hot Key is set to CONNECT SENSOR. (Page17-19)
1.In standby mode, Press to point to SENSOR SET,
Press to enter.
2.Press
screen.
3.Press
4.Press
to enter iPhone Sync. Bicycling in standby mode
to enter Bicycling Training in standby mode directly
to switch between HRM or SPD/CAD setup
to select ON (connect) or OFF (disconnect).
to exit after setup is completed.
SPD/CAD
ON
Connection with Speed and
Cadence Sensor
14
•Please enter your age, gender, height and weight accurately as these may determine the
accuracy in calculating your target training heartbeat and burnt calories range.
•The maximum heart rate is derived from the "Age Formula: 220 - Age" formual automatically.
It is highly recommended to change these settings only with more accurate values arrived with
physicians and professional lab monitoring.
•Note 1:If you are above your target heart rate zone limits, the heart rate value starts flashing.
Bluetooth Cycling Computer
Connection with
Heart Rate Strap
•Your Cycling Computer can connect to two Bluetooth 4.0
sensors (Heart Rate Strap and Speed and Cadence Sensor) at
one time.
•Please only connect sensors required by specific exercises to
save time in search for Bluetooth connections.
User Manual
15
Page 9
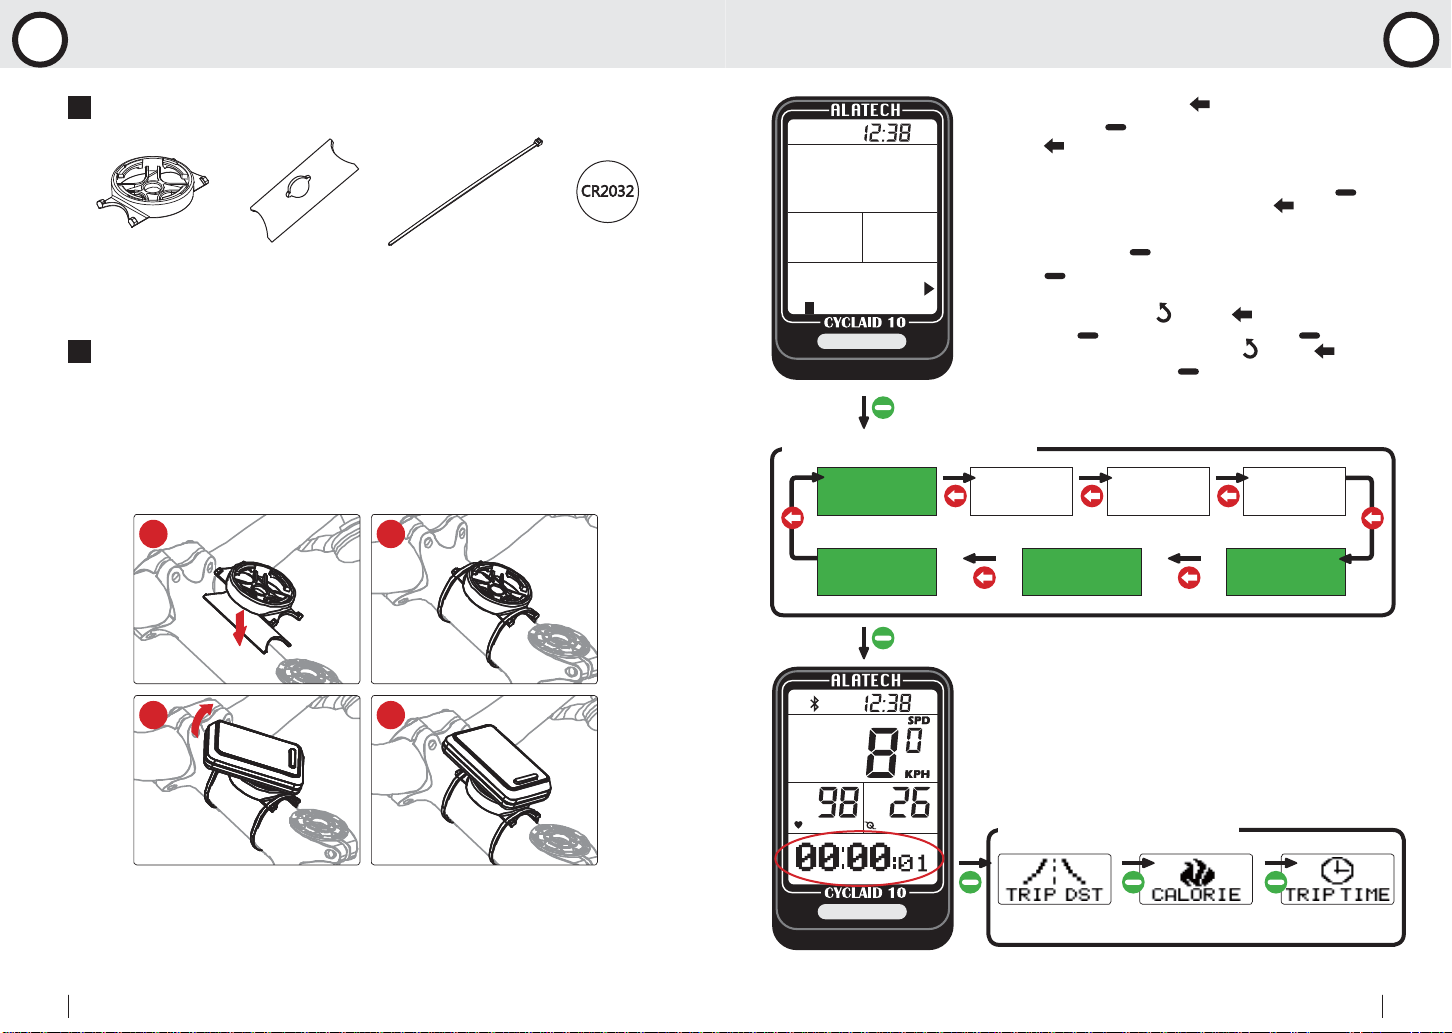
Install the Cycling Computer Exercise Mode
4
5
Accessories included with your product:
Fixer
Fixing pad Ties CR2032 button battery
(pre-installed in your
product)
Installation method:
1.Place the fixing pad under the fixer and attach both to the bike frame.
2.Tie the fixer with straps.
3.Place the Cycling Computer in the fixer 45 degree to the frame as shown in the
diagram.
4.Turn the Cycling Computer clockwise until it clicks into the 12-oclock position.
1
2
1.In standby mode, Press to point to TRAINING
PROG., Press to enter.
2.Press
3.When pointed to training target area for manual
setup (e.g. the green labeled area), Press
point to flashing setup item, Press
settings. (See crossreference in page 18)
4.After setup, Press
TRAINING
PROG.
--------
Switch between training programs
HR-SET
129~144
5.Press
(See crossreference in page 19)
6.Stop bicycling, Press
YES/NO,
results of current bicycling, Press
Save, press YES/NO,
returns to standby mode after bicycling data is saved.
HARD
152~171
TARGET
CALORIE
to switch between training programs.
to change
to start bicycling.
to view instant information during bicycling.
to confirm, Press again to view
TARGET
DIST
to end, Select Exit, press
to exit, Select
to confirm, the system
MOD.
133~152
LIGHT
114~133
TARGET
TIME
to
16
3 4
Bluetooth Cycling Computer
Instant bicycling screen
Change to see other information
Distance Calories Exercise Timing
User Manual
17
Page 10
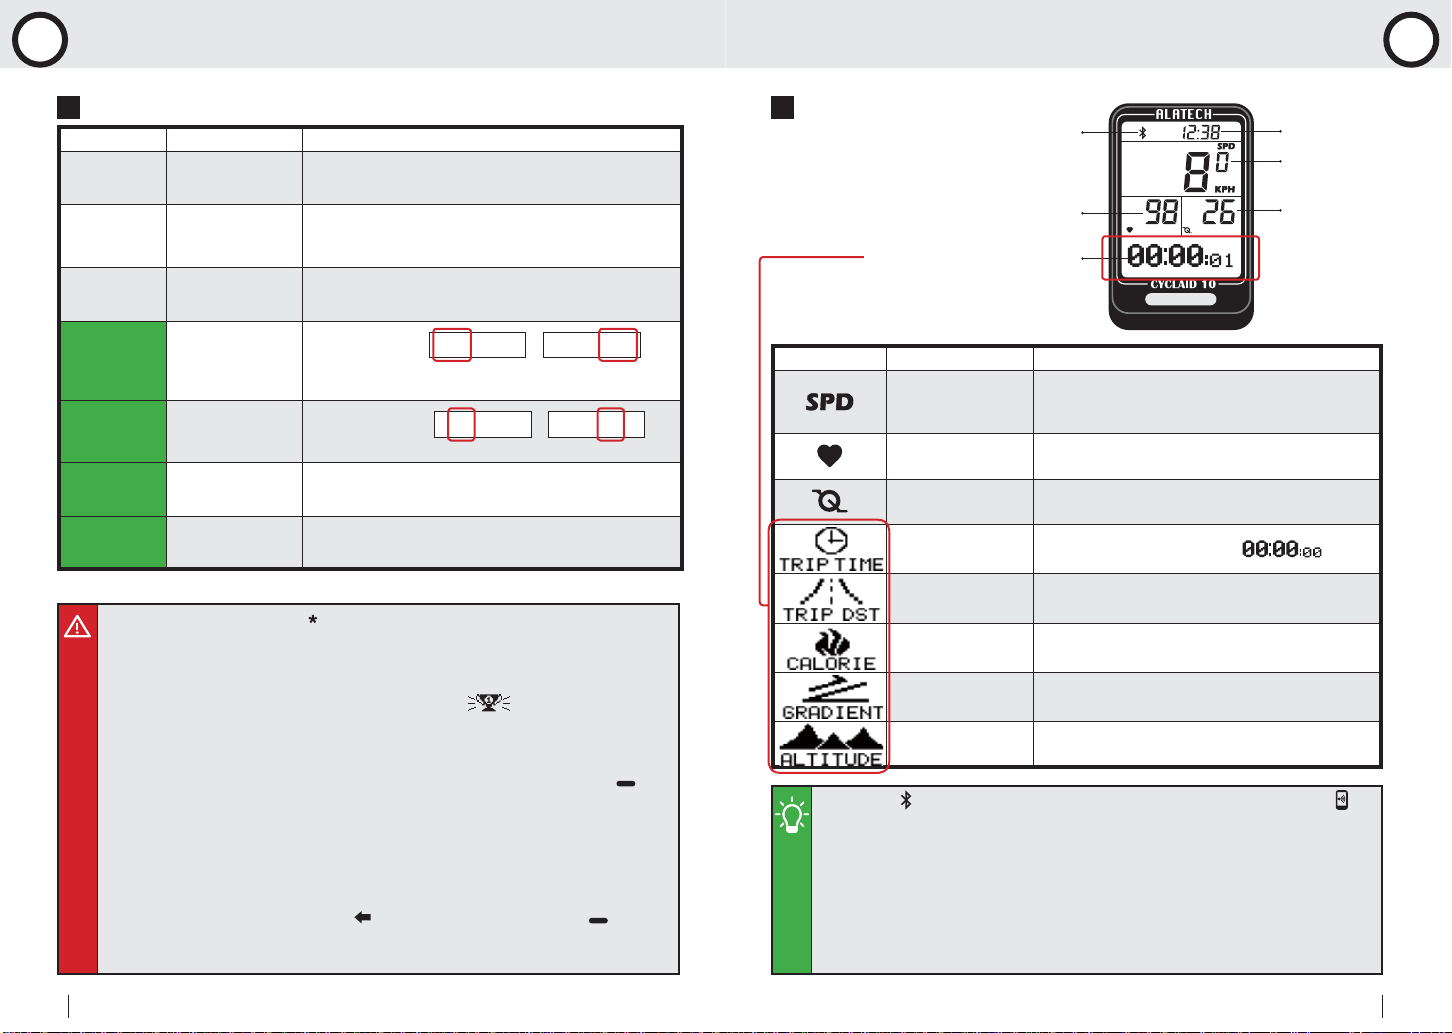
Exercise Mode Exercise Mode
5
5
Training programs:
Training program Name Description
LIGHT*
114~133
MOD.*
133~152
HARD*
152~171
HR-SET
129~144
TARGET
TIME
TARGET
DIST
TARGET
CALORIE
•Training program marked with "
according to your age setup. You may customize the target heart rate range with the HR-SET
program.
•The upper and lower limit of heartbeat varies with your age. Please choose and set a proper
training target on the basis of your physical fitness before every exercise session.
•After a custom training target is achieved, a champion trophy
•Precautions before exercising:
1.Make sure the optional sensor has been paired with your Cycling Computer. (Page 10-11)
2.Press the Cycling Computer Hot Key to CONNECT SENSOR. If you have set HOT KEY to
CONNECT SENSOR, you may skip the training program selection by pressing key
sleep mode to start exercise timing directly. (Page 15)
3.Please only connect sensors required by specific exercises to save time in search for Bluetooth
connections. (Page15)
4.Activate your Speed and Cadence Sensor before using by cranking to start the sensor and
establish connection. Your Speed and Cadence Sensor remains awake for one minute. It goes
back to sleep mode again if no Bluetooth connection is enabled.
5.In case your Cycling Computer lost connection with the sensor during bicycling, the message
"LINK HR or LINK SC" prompts, Press
your choice. If you choose option YES, your Cycling Computer starts searching for the sensor
again, searched successfully, continue timing. If you choose option NO, your Cycling Computer
continues the timing without searching for the sensor.
Light*
Medium*
Strong*
Target
Heart Rate Zone
Target Training
Time
Target
Distance
Target Burning
Calorie
•Intensity: 60~70% of the maximum heart rate.
•Application: health upkeep and weight control.
•Intensity: 70~80% of the maximum heart rate.
•Application: aerobic exercise and advanced fitness
training.
•Intensity: 80~90% of the maximum heart rate.
•Application: sports games and athletic training.
•Setup range:
•Setup range:
129~144 129~144
lower limit
70-144 bpm
upper limit
144-220 bpm
0 : 30 0 : 30
0-99 hours
5-55 minutes
•Setup range in metric unit: 0.5-999.9 kilometer.
•Setup range in Imperial unit: 0.5-619.5 miles.
•Setup range: 50-10,000 Cal (Kcal).
" symbol is calculated by your Cycling Computer system
displays on the screen.
to select option YES or NO, Press to confirm
in the
Instant exercise screen:
Connection to the sensor
Heartbeat
Other information display
Indicator Name Description
Note 3
Speed
Note 1
Note 2
Note 4
•Kilometers (Miles) per hour
•Display in metric unit: KPH (KM per Hour)
•Display in Imperial unit: MPH (Mile per Hour)
•Heartbeat per minute
Pedal
Slope
Height
Note 2
Note 5
Note 5
Note 2
•Display unit: BPM (Heartbeat per Minute)
•Pedaling frequency in minute
Note 3
•Display unit: RPM (Rate per Minute)
•The minimum metric display unit: 0.1 KM
•The minimum Imperial display unit: 0.1 ML
•Display in unit of Kcal (Cal)
•In unit of percentage (%)
•The metric display unit: 1 meter (M)
•The Imperial display unit: 1 foot (FT)
Heartbeat
Frequency
Exercise Timing •Display format: HH:MM:SS
Trip Distance
Calories
•Note 1: The
smartphone.
•Note 2: Value of heartbeat and calories display only when worked together with Heart Rate
Strap. The heartbeat reading flashes once the target area is exceeded.
•Note 3: Value of speed, pedal frequency and trip distance display only when worked together
with Speed and Cadence Sensor.
•Note 4: When viewing current other information, name of the reading displays 1 second before
its value does.
•Note 5: Slope and height readings derived from GPS of your phone display only when a
smartphone or mobile device is connected.
symbol display at top of screen once connected with the sensor and with
Current Time
Speed
Pedal
frequency
Note 3
Note 3
18
Bluetooth Cycling Computer
User Manual
19
Page 11
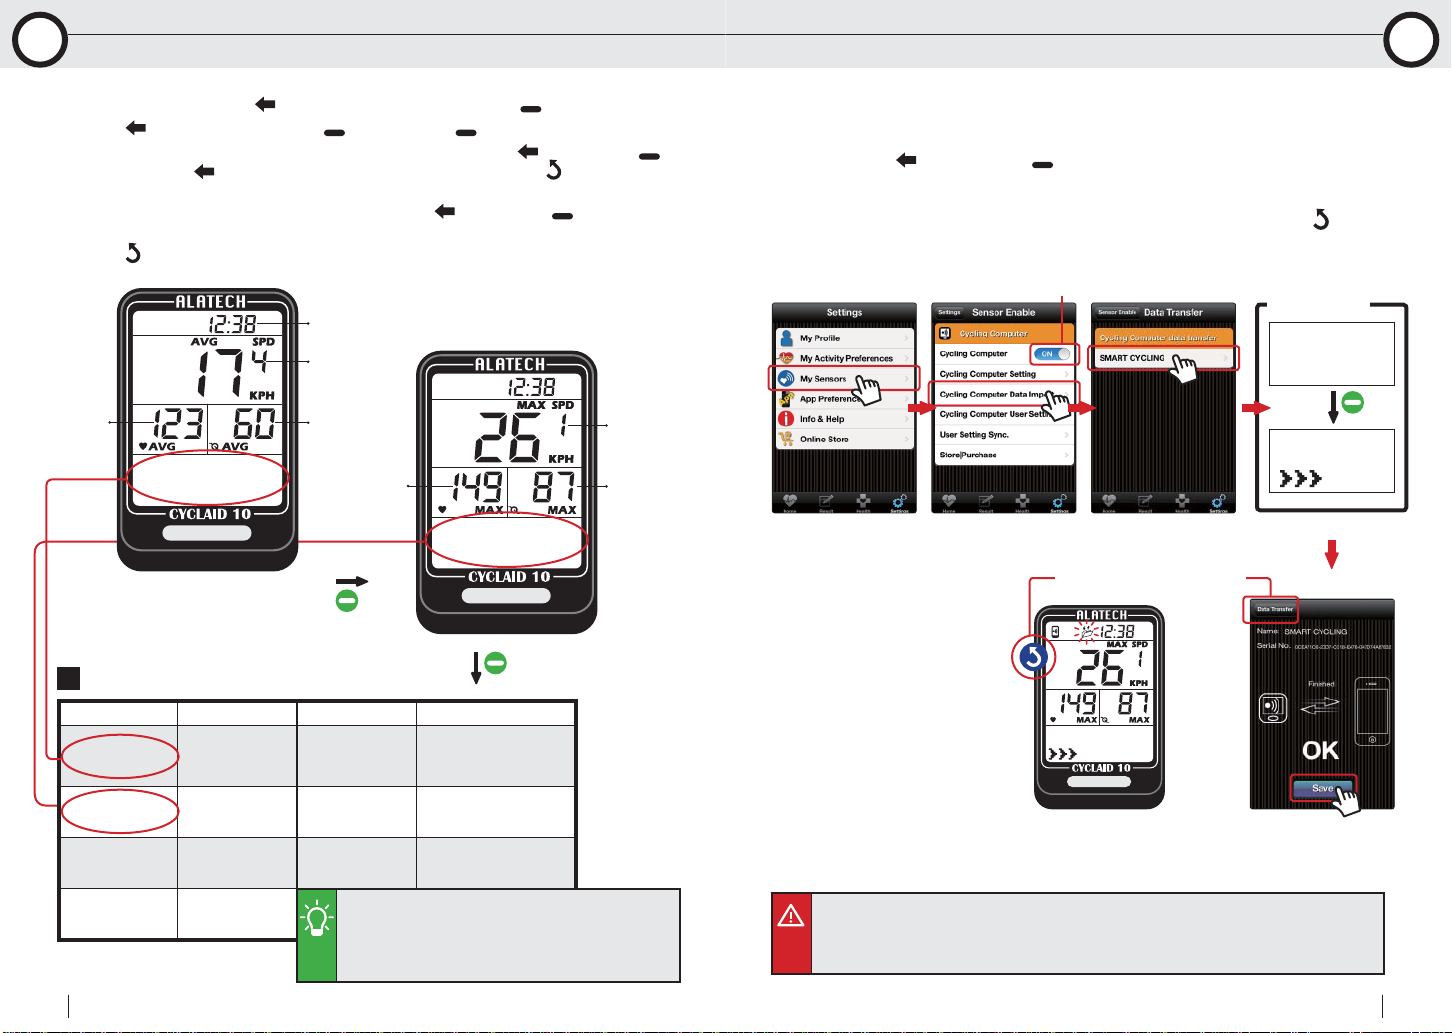
Log Function
6
6-1 Browse and Delete File
Log Function
6-2 Upload File
6
1.In standby mode, Press to point to MEMORY FILE, Press to enter.
2.Press
3.Viewing single lap data
confirm, Press
back to last page.
4.To delete a file: in the
deletion.
5.Press
Average
Heartbeat
to point to file selection, to enter, Press to page through the file.
to exit after the operation is completed.
Note 1
: in the
to view single lap data in sequence,
DELETE FILE window
VIEW LAPS
Current Time
Average Speed
Average
Pedaling
Frequency
window, Select YES, to
, Select YES, to confirm the
Press
TRIP TM
00:30:53
Maximum
Heartbeat
TRIP DST
8.1 KM
Other information reference table:
File infomration Name File infomration Name
TRIP TM
00:30:53
TRIP DST
8.1 KM
CALORIE
174 Cal
LAPS
08
Exercise
Time
Distance
Calories
Number of Laps
VIEW
LAPS
UPLOAD
FILE
DELETE
FILE
• Note 1: You may get to view average speed/heartbeat/
pedaling frefrequency/time per laps.
• Maximum number of laps: 50, lap equivalence:
metric: one kilometer per lap.
Imperial: one mile per lap.
Select to view
single lap data
(See STEP 4)
Upload File
(See page 21)
Delete File
(See STEP 5)
Note 1
after viewing to
Maximum
Speed
Maximum
Pedaling
Frequency
1.Open ALA COACH+ App>Settings>My Sensors>Cycling Computer>Cycling
Computer Data Import>SMART CYCLING.
2.In the Cycling Computer MEMORY FILE>desired file selection>UPLOAD FILE
window, Press
connected, Press App Start button.
3.After the uploading is completed, the App prompts OK, Press App Save button and
then press the button at upper left corner to exit the mobile device, Press
Cycling Computer to exit.
to select YES, to confirm and create Bluetooth connection,
at your
Inspection is ON
Confirm window
UPLOAD
FILE
YES
UPLOAD
FILE
Upload completed, click to exit.
UPLOAD
FILE
•Precautions on file uploading:
1.Make sure the mobile device has paired with your Cycling Computer. (Page 24)
2.Check the mobile device>Settings>Bluetooth
Sensors>Cycling Computer is ON.
®
system and ALA COACH+ App>Settings>My
20
Bluetooth Cycling Computer
User Manual
21
Page 12
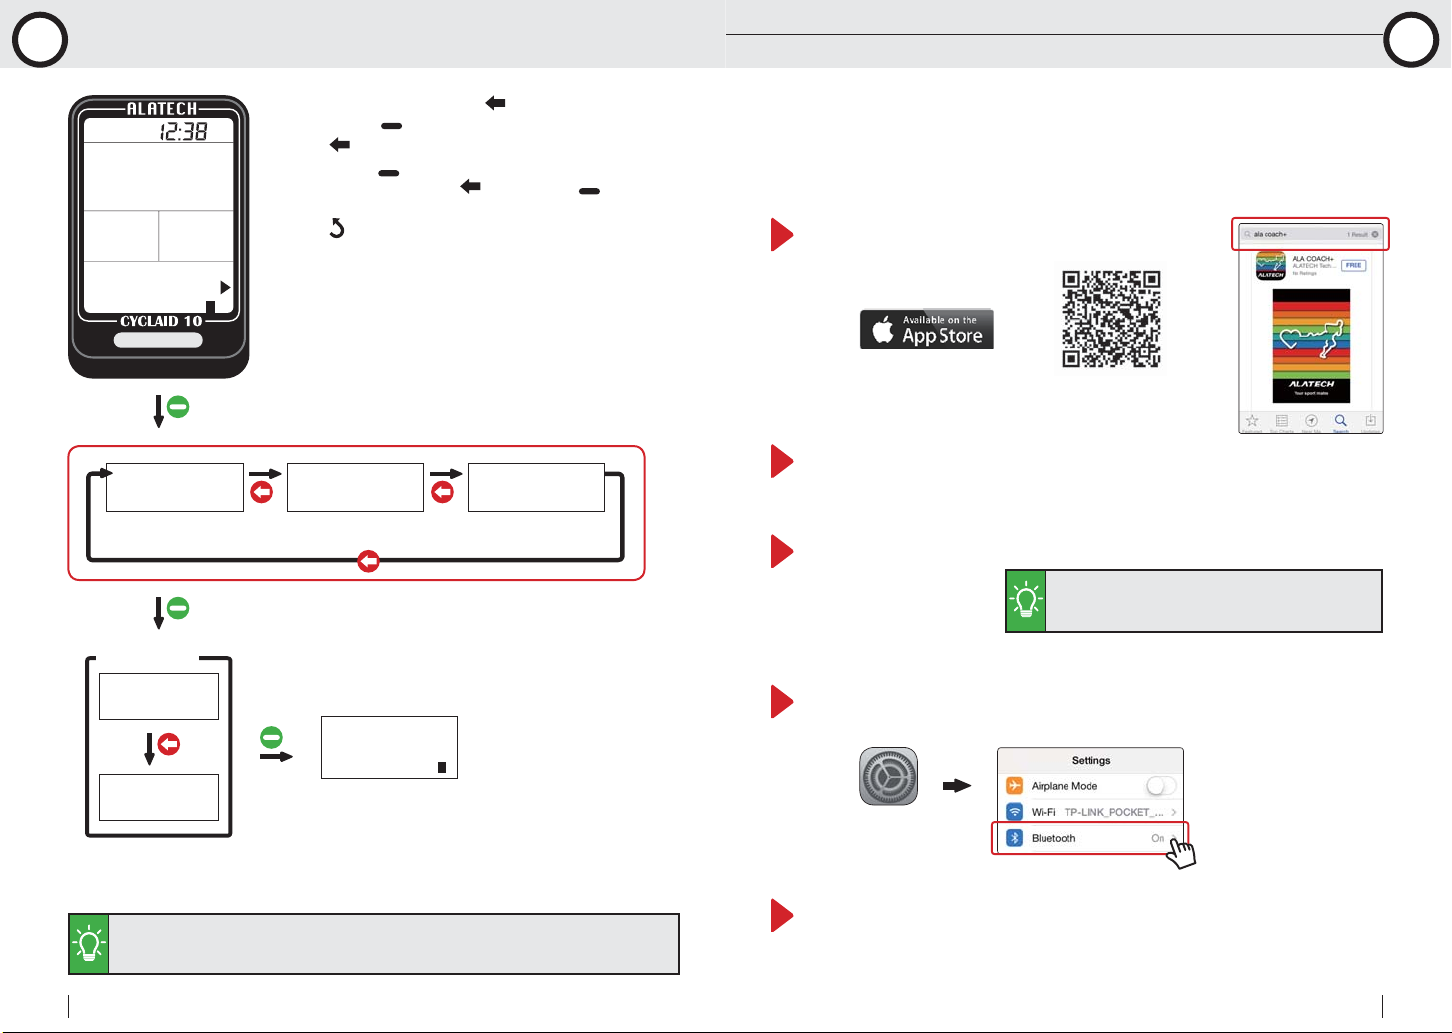
View Exercise Statistics
7
Connect to Smartphone or Mobile Device
8-1 Install App and Enable the Bluetooth Function
8
MEMORY
STAT.
--------
Total TME
3 HR
Accumulated
Exercise Time
Confirm window
RESET
NO
RESET
YES
1.In standby mode, Press to point to MEMORY
STAT., Press to enter.
2.Press
3.Press again
accumulation data
your choice.
4.Press
to page through accumulation data.
to enter the RESET window, To reset
Note 1
, Select YES, to confirm
to exit after the operation is completed.
Total DST
45 KM
Accumulated
Distance
Total CAL
1128
Accumulated Energy
Consumption
MEMORY
STAT.
--------
Please install the ALA COACH+ App on your mobile device
before connecting to it and open your mobile device's Bluetooth®
function for functions including pairing, synchronizing exercises,
and file uploading.
Apple App Store search and install: ALA COACH+
Please scan to download
immediately
Supported OS: Apple iOS 5.0 or later
Compatible mobile devices:
•iPhone 4S or later
•iPod Touch 5 or later
•iPad 3 or later
•iPad mini or later
Please make sure you have turned on your mobile device >Settings>Bluetooth®
system in advance.
Settings
•Please visit us at www.alatech.com to learn more
about the latest information on compatible mobile
devices and supported accessories.
22
•Execute RESET to clear total exercise amount data.
•The RESET function does not erase the exercise file. To delete it, go to MEMORY FILE, and
select individual file for deletion.
Bluetooth Cycling Computer
Please pair your optional sensor with the mobile device. (See user manual
included with the sensor for the pairing procedure.)
User Manual
23
Page 13
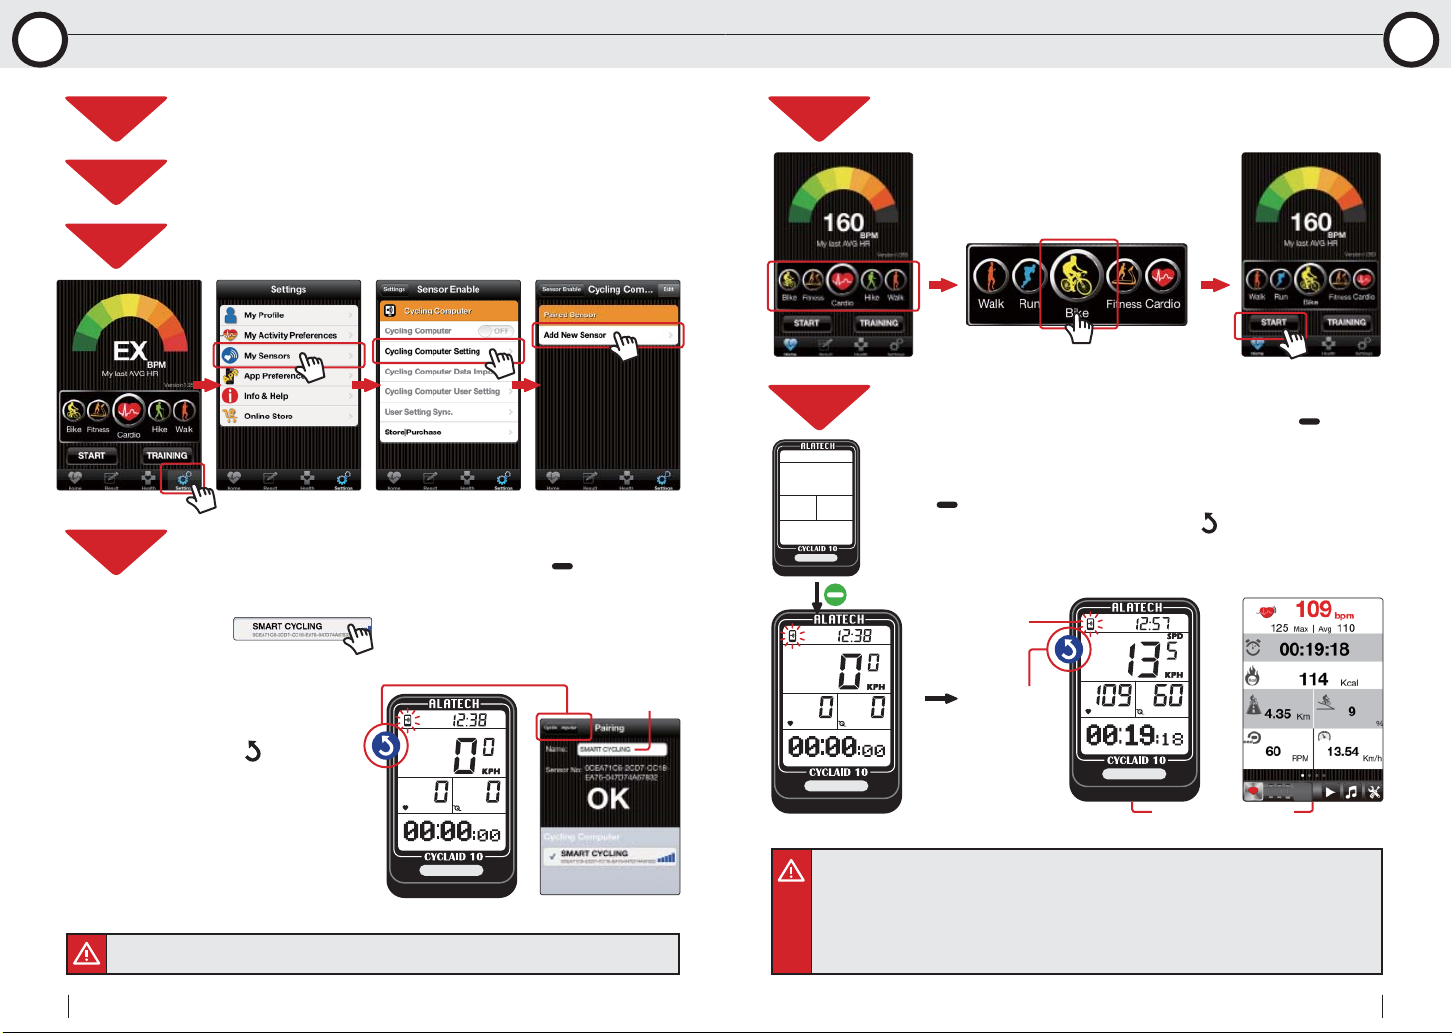
Connect to Smartphone or Mobile Device Connect to Smartphone or Mobile Device
8
8-2 Pair Your Cycling Computer with Mobile Device 8-3 iPhone Exercise Sync.
8
STEP1
STEP2
STEP3
STEP4
Check your mobile device>Settings>Bluetooth
(Page 28)
Set Cycling Computer Hot Key to CONNECT PHONE. (Page14)
Open ALA COACH+ App>Settings>My Sensors>Cycling Computer
>Cycling Computer Setting>Add New Sensor.
Pairing steps:
1.When Cycling Computer is in standby mode, Press
Bluetooth connection.
2.Once your Cycling Computer is discovered by the App,
press to strart pairing.
3.Once pairing is
completed, the App
prompts OK, press
the upper left button to
exit the mobile device
and key
Cycling Computer.
to exit your
Pairing completed, click to exit.
®
system is open.
to create
You may
rename it.
STEP1
STEP2
Open ALA COACH+ App>Homepage, scroll to Bike and press Start
button.
Operation steps:
1.When Cycling Computer is in standby mode, Press
Bluetooth connection.
2.When the App prompts every device is discovered and ready, after
countdown, the App and your Cycling Computer sync. starts timing.
3.Press
4.Stop bicycling, press Cycling Computer's
Cycling Computer exit to standby mode to sleep, the App exit to the
Homepage and save data of current results.
to view instant information during bicycling.
key and OK to exit, the
Connection to
mobile phone.
Press to stop
bicycling.
to create
24
•Keep your mobile device and Cycling Computer within 10cm from each other and keep both
away from other Bluetooth devices to prevent incorrect pairing.
Bluetooth Cycling Computer
Instant exercise screen
•Precautions on connecting smartphone for Exercise Sync.:
1.Make sure your mobile device has been paired with your Cycling Computer. (Page 24)
2.Make sure your mobile device has been paired with your optional sensors (see user manual
included with sensors on pairing).
3.Make sure the Cycling Computer Hot Key is set to CONNECT PHONE. (Page 15)
4.Check the mobile device>Settings>Bluetooth
Sensors>Cycling Computer is ON.
®
and ALA COACH+ App>Settings>My
(Continued on next page.)
User Manual
25
Page 14
Connect to Smartphone or Mobile Device
8
8-4 Synchronize with Smartphone
Connect to Smartphone or Mobile Device
8-4 Synchronize with Smartphone
8
(...Continued from previous page.)
•Precautions on connecting smartphone for Exercise Sync.:
.Basic settings from ALA COACH+ App in your mobile device applies when bicycling with
synchronized smartphone.
.Please keep the mobile device and Cycling Computer within 10 meter direct sight distance
from each other during exercise sync.
3.The exercise result data would be saved in ALA COACH+ App>FILE instead of your Cycling
Computer after the exercise is ended.
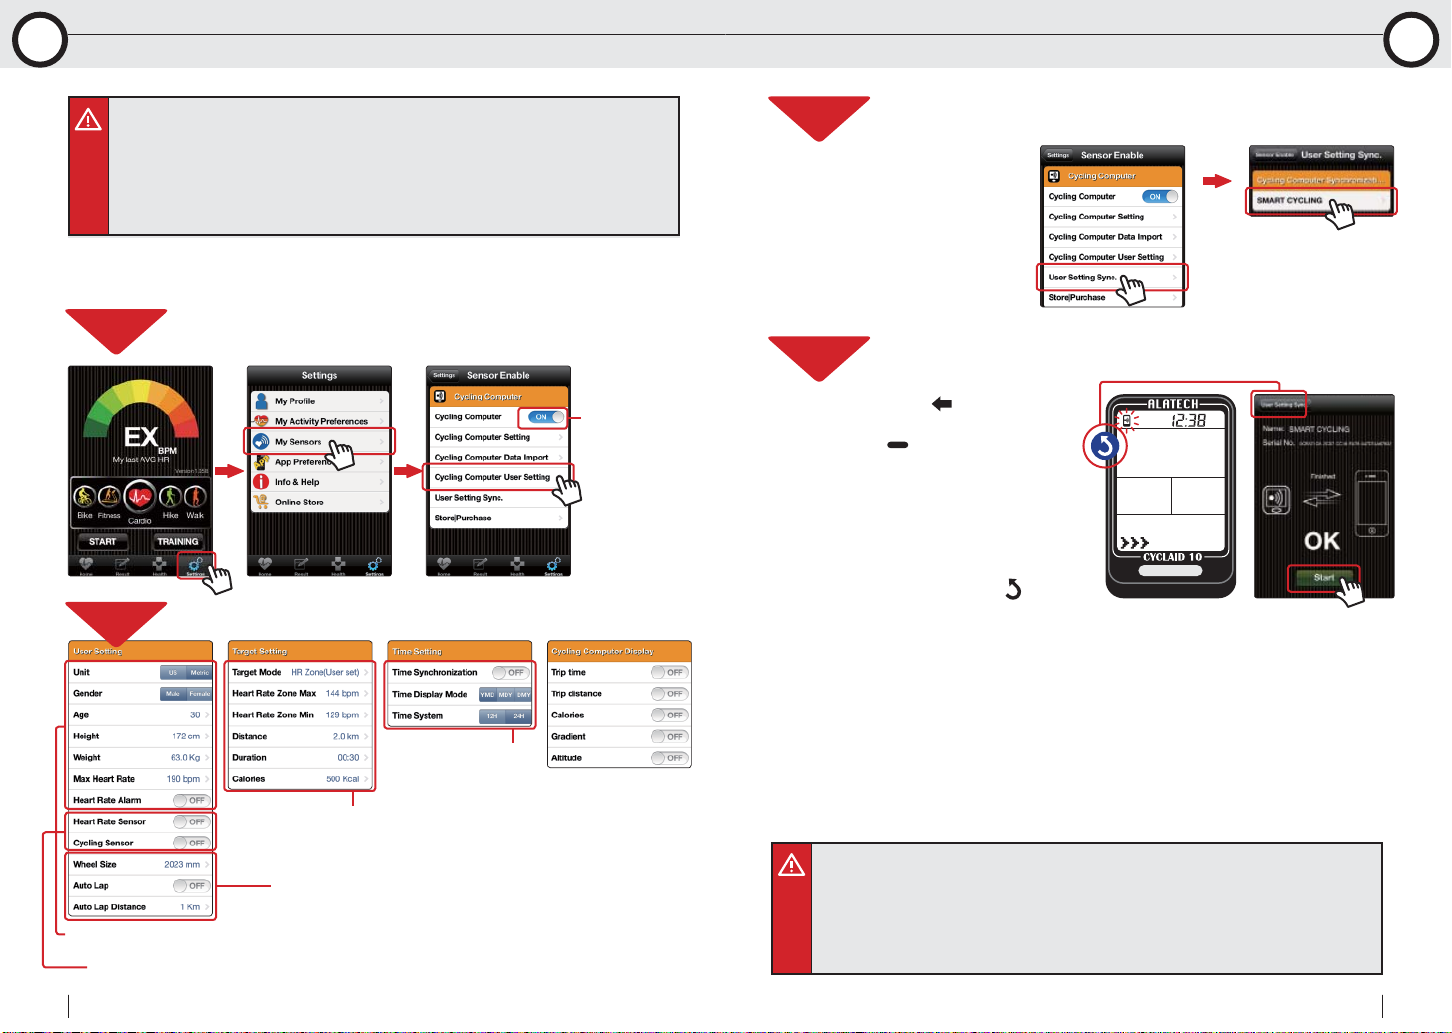
Synchronize with Smartphone
8-4
STEP1
STEP2
Open ALA COACH+ App>Settings>My Sensors>Cycling Computer
>Cycling Computer User Setting.
Setup in sequence.
Inspection is ON
STEP3
STEP4
Open ALA COACH+ App>Settings>My Sensors>Cycling Computer
>User Setting Sync. >SMART CYCLING.
Synchronization steps:
1.When Cycling Computer
is in standby mode,
Press
PHONE SYNC., Press
connection, after
connected, press the App
Start button.
2.Once Sync. is completed,
the App prompts OK,
press the App upper left
button to exit the mobile
device, and Key
your Cycling Computer.
to point to
to create Bluetooth
to exit
Sync. completed, click to exit.
PHONE
SYNC
Synchronize to the user settings
USER SET
Synchronize to the sensor settings
SENSOR SET
26
Bluetooth Cycling Computer
Synchronize to the training
Synchronize to the system settings
SYSTEM SET
targets
TARGET SET
Synchronize to the
system settings
SYSTEM SET
Precautions on connecting smartphone for Synchronizing with Smartphone:
•Check the mobile device>Settings>Bluetooth
Sensors>Cycling Computer is ON.
•Make sure your smartphone or mobile device has been paired with your Cycling Computer
otherwise, please pair the two in advance. (Page 24)
•Keep your mobile device and Cycling Computer within 10cm from each other and keep both
away from other Bluetooth devices during synchronization.
®
system and ALA COACH+ App>Settings>My
User Manual
27
Page 15
Specifications
S
Appendix
A
•Product: Cyclaid 10 Bluetooth Cycling Computer
•Model: CB300
•Operation temperature: 10°C to 60°C (50°F to 140°F )
•Battery type: CR2032
•Battery life: Around one year on average
•Battery low indicator
•Backlight: EL
•Transmission technology: Bluetooth 4.0 (Bluetooth
•Receiving transmission distance: around 10 meters (light of sight)
•Compatible accessories:
ALATECH Bluetooth 4.0 Heart Rate Strap (Optional)
ALATECH Bluetooth 4.0 Speed and Cadence Sensor (Optional)
•Compatible devices:
Mobile devices with iOS 5.0 or later system version (iPhone 4S or later)
•Dimension: L60.5×W37.5×D13.5mm
•Weight: 27.8g
•Material employed: ABS case
(on the basis of exercise seven days per week and one hour per day)
®
Smart)
Precautions for use with Cyclaid 10
•Due to we cannot guarantee compatibility with other manufacturer's sensors, we
sincerely recommen you use ALATECH Bluetooth sensors with your Cyclaid 10 for
bicycle activity tracking. Recommend compatible sensors as below:
ALATECH Heart Rate Strap (model CS009/CS010/CS011)
ALATECH Speed and Cadence Sensor (model SC001BLE)
•To ensure sufficient transmission range from your heart rate strap to your
smartphone, keep your smartphone in front of you. We recommen you do not put it
in a back pocket or backpack during iPhone Exercise Sync.
Take Care of your Cyclaid 10
•DO NOT drop or hit your Cycling Computer.
•DO NOT expose your Cycling Computer to extreme temperature or humidity.
•DO NOT use general purpose non-adhesive screen sheet to protect the poanel from
scratching.
•DO NOT try to disassemble, repaor or modify your Cycling Computer. Fail to do so
may void the warranty.
Fail to Connect to Bluetooth Devices
•In case your Cyclaid 10 failed to connect to a Bluetooth device, please do the
following:
1.Check battery power in your Cycling Computer and the mobile device.
2.Make sure the Cycling Computer HOT KEY is set to CONNECT PHONE. (Page 15)
3.Check whether your Cycling Computer is enabled, ALA COACH+ App>Settings>
My Sensors>Cycling Computer.
4.Keep the mobile device and your Cycling Computer within 10 meters direct sight
distance from each other.
5.If the Bluetooth indicator on the device status bar turn from white to
semi transparent, restart the mobile device, Bluetooth
COACH+ App.
6.Restart the mobile device, Bluetooth
7.If the problem persists, please try pairing the mobile device with other Bluetooth
device to find out the cause is caused by any of your Cycling Computer, the mobile
device, or the Bluetooth
®
system.
®
system and ALA COACH+ App.
®
system and ALA
28
Bluetooth Cycling Computer
•If your Cyclaid 10 failed to connect with sensors through Bluetooth, please do the
following:
1.Check battery power in your Cycling Computer and the sensor.
2.Make sure the Cycling Computer HOT KEY is set to CONNECT SENSOR. (Page15)
User Manual
29
Page 16
Appendix
A
Appendix
A
Health Warnings
•Consult your doctor before starting or changing your exercise program.
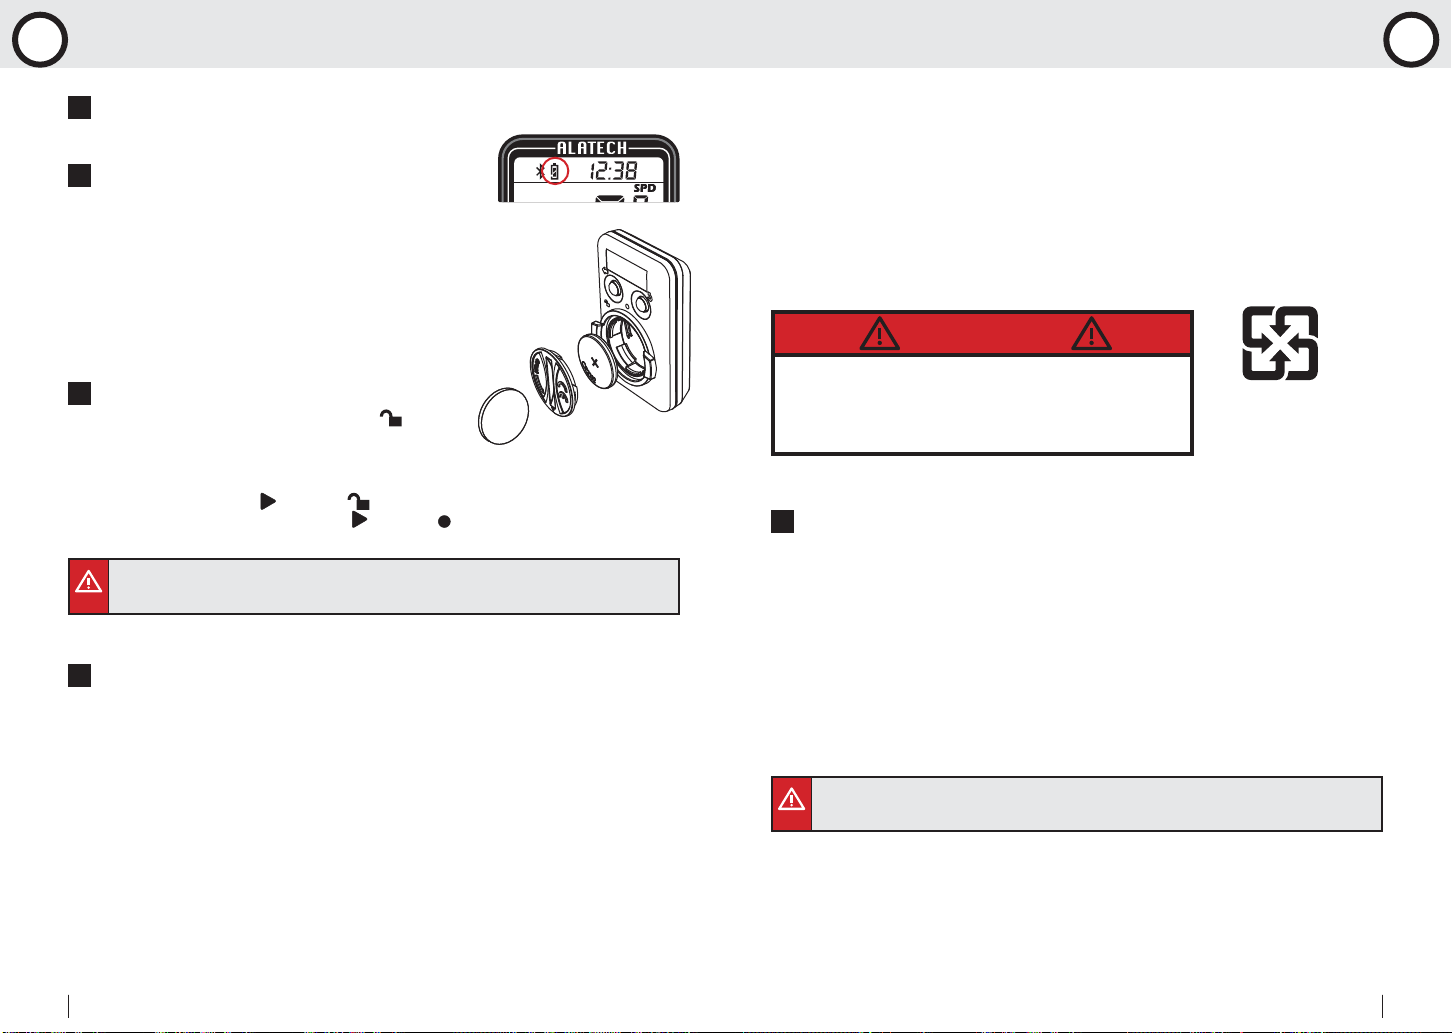
Battery Low Indicator
The battery low indicator prompts once the battery power
is down to a certain level; the following functions may be
affected or limited:
•Bluetooth connection lost and link with sensor or
mobile device failed.
•Backlight failed to turn on.
In case the power low indicator persists displaying, get the battery
replaced immediately.
Replace Battery
1.Use a coin to twist it counter-clockwise to .
2.Remove the cover and insert (replace) the battery
(type: CR2032) into the sensor with positive (+)
side facing up.
3.Place the battery cover (
to twist the cover clockwise to close ( points to ).
•Do the basic setups described in page 12-15 after every battery replacement. If you have done
the Cycling Computer user setup with the ALA COACH+ App, you may re-sync settings to your
Cycling Computer as desicribed in "Phone sync." on page 26-27.
points to ). Use a coin
COIN
Precautions on the Use of Battery
Button battery in your Cycling Computer may suffer shortened life cycle or cause
damage to the core, fire, chemical burns, electrolyte leakage, and/or personal injury.
•DO NOT expose your device to a heat source or high temperatures.
•DO NOT burn or drill your device or its battery.
•Please store your device in environment with a temperature range from
10°C to 60°C (50°F to 140°F) if it is not to be used for long time.
•DO NOT use your device in environment with temperatures exceeding
10°C to 60°C (50°F to 140°F).
•Please check local regulations for disposal of your device / battery or contact
local waste disposal agencies.
Warnings on replaceable batteries:
•DO NOT remove batteries with pointed object.
•Keep batteries out of children's reach.
•DO NOT disassemble, drill, or damage batteries.
•Please replace batteries with correct ones. Fail to do so may lead to fire or
explosion.
•Replaced button battery may contain perchlorate substance and require
special disposal. Warnings on non-replacement battery: DO NOT try to remove
nonreplacement battery.
CAUTION
RISK OF EXPLOSION IF BATTERY IS REPLACED
BY AN INCORRECT TYPE.
DISPOSE OF USED BATTERIES ACCORDING
TO THE INSTRUCTIONS.
FCC Declaration of Conformity
This device complies with Part 15, FCC Code. Operation of this device is subject to
the following two conditions:
1.Devices may not cause interference.
2.Must accept interference from other sources, including interference that may cause
undesired operation. This equipment has been tested and found to comply with the
limits for a Class B digital device, pursuant to Part 15 of the FCC Rules.
These limits are designed to provide reasonable protection against harmful
interference in a residential installation. This equipment generates, uses and can
radiate radio frequency energy and, if not installed and used in accordance with the
instructions, may cause harmful interference to radio communications.
•FCC Caution:
Any changes or modifications not expressly approved by the party responsible for compliance
could void the user's authority to operate this equipment.
Please check local waste disposal
regulations to dispose your
wasted battery.
Cyclaid 10 Bluetooth Cycling Computer
30
User Manual
31
Page 17

© 2014 ALATECH Technology Limited. All rights reserved.
2PF182128100004 (2014.04)
Ver:1
 Loading...