

Page 1

INDICE
Caratteristiche tecniche del Midland BT2 ........................................................................................3
Struttura del manuale d’uso .............................................................................................................4
Ricarica delle batterie ......................................................................................................................4
Descrizione dispositivo e sistema di ssaggio .................................................................................4
Congurazioni tipiche del BT2 ..........................................................................................................6
Considerazioni generali sulla priorità................................................................................................7
Accensione e spegnimento del Midland BT2 ...................................................................................7
Abbinamento ai dispositivi Bluetooth (pairing)..................................................................................7
Regolazione del volume .................................................................................................................. 9
Utilizzo delle funzionalità dei dispositivi Bluetooth ...........................................................................9
Utilizzo dell’ingresso audio a lo ....................................................................................................13
Utilizzo di un ricetrasmettitore .......................................................................................................13
Congurazioni speciali ...................................................................................................................14
Consigli per utilizzi specici ...........................................................................................................15
Segnali acustici e luminosi/ Funzionalità ......................................................................................16
Page 2

Page 3

Midland BT2 Intercom
Grazie per aver acquistato Midland BT2 Intercom il primo vero sistema multimediale wireless pensato per il motociclista.
Midland BT2 è un dispositivo da applicare al proprio casco per comunicare con dispositivi Bluetooth, quali Telefonino, Navigatore
GPS, MP3 player e se abbinato ad un altro Midland BT2 diventa anche un sistema intercom senza li Pilota/Passeggero oppure
Pilota/Pilota da moto a moto no a 200m. In aggiunta Midland BT2 dispone anche di una connessione a lo per collegare iPod/
MP3 player o un ricetrasmettitore PMR446 per la comunicazione Moto a Moto no a 5 Km.
I
Midland BT2 è disponibile in due versioni:
BT2 Intercom confezione singola con un solo dispositivo ›
BT2 Intercom TWIN confezione doppia con due ›
dispositivi.
In base alla versione in vostro possesso nella confezione
troverete:
BT2 Intercom
1 dispositivo di comunicazione BT2 ›
1 Kit audio completo di due speakers stereo, microfono a ›
braccetto rigido e microfono a lo
1 Sistema di aggancio al casco con bi-adesivo ›
1 Sistema di aggancio al casco con morsetto ›
1 cavo audio stereo per collegare un iPod/ o un qualsiasi ›
altro MP3 player
1 Alimentatore da muro mini USB ›
Spugna anti vento, chiave a brugola e velcro per il ›
montaggio
BT2 Intercom TWIN
2 dispositivi di comunicazione BT2 ›
2 Kit audio completi di due speakers stereo, microfono a ›
braccetto rigido e microfono a lo
2 Sistemi di aggancio al casco con bi-adesivo ›
2 Sistemi di aggancio al casco con morsetto ›
2 cavi audio stereo per collegare un iPod o un qualsiasi ›
altro MP3 player
1 Alimentatore da muro mini USB con doppia postazione ›
di ricarica
Spugna anti vento, chiave a brugola e velcro per il ›
montaggio
I dispositivi della confezione TWIN sono già abbinati tra loro
per poter attivare immediatamente la funzione Intercom.
Caratteristiche tecniche del Midland BT2
Generali:
Bluetooth ver. 2.0 stereo (protocollo Headset/Handsfree/ ›
A2DP)
Sistema AGC per il controllo automatico del volume in ›
base al rumore di fondo
Attivazione della comunicazione vocale (VOX) o manuale ›
Telefonata privata oppure condivisa (comunicazione a tre) ›
Comandi manuali per: attivazione telefono, interfono e ›
connessione a lo
Completamente resistente all’acqua ›
Batteria al Lithio con autonomia no a 8 ore di ›
conversazione (1 settimana in standby)
Tempo di ricarica: circa 4 ore ›
Dimensione: Lunghezza: 87mm – Larghezza: 47 mm - ›
Spessore: 16 mm
Connessioni Bluetooth:
Con un dispositivo identico per la modalità Intercom Pilota- ›
Passeggero o Moto a Moto no a 200mt
Con dispositivo Bluetooth: ›
- Telefonino, GPS (Garmin Zumo e TomTom Rider 1 e 2),
MP3 player Stereo (con protocollo A2DP)
- Ricetrasmettitori PMR446 (con Bluetooth integrato o
esterno) per comunicazioni di gruppo moto a moto
Connessioni a lo:
Per sorgente audio stereo (iPod/MP3 player) ›
Per ricetrasmettitori PMR446 (con cavo opzionale) ›
Attenzione: prima di utilizzare il vostro BT2 per la prima
volta, ricordatevi di porlo in carica per almeno 4 ore.
Attenzione: Midland BT2 è stato progettato per essere
resistente all’acqua/pioggia. Vericate sempre che i
gommini di protezione delle prese sia ben chiusi in caso
di pioggia.
3
Page 4

Struttura del manuale d’uso
Il manuale è strutturato in 5 sezioni principali:
Descrizione dispositivo e sistema di ssaggio ›
Abbinamento (Pairing) con i dispositivi Bluetooth ›
Utilizzo dei dispositivi Bluetooth ›
Utilizzo dell’ingresso audio a lo ›
Congurazioni speciali ›
Per una più semplice congurazione del vostro BT2 vi
consigliamo di seguire la stessa sequenza della struttura del
manuale:
Primo passo › : ssare il dispositivo al casco seguendo
le istruzioni nella sezione “Descrizione sistema di
ssaggio al casco”
Secondo passo: › abbinare i dispositivi Bluetooth (come per
esempio telefonino o GPS) al BT2. Seguite la procedura
specicata nel capitolo “Abbinamento a dispositivi
Bluetooth (pairing)”, relativa ai dispositivi Bluetooth in
vostro possesso.
Terzo passo: › conclusa la fase di abbinamento (pairing)
potete passare al capitolo “Utilizzo della funzionalita’
dei dispositivi Bluetooth“ per vericare le speciche
funzionalità legate ai dispositivi in precedenza accoppiati.
Quarto passo: › se avete anche dei dispositivi a lo, potete
consultare il capitolo “Utilizzo dell’ingresso audio a
lo”
Quinto passo: › se dovesse essere necessario utilizzare
delle funzioni avanzate, potete consultare il capitolo
“Congurazioni speciali”
Ricarica delle batterie
Assicuratevi che il dispositivo di comunicazione sia completamente carico prima di iniziare ad utilizzarlo. La prima volta
sono necessarie almeno 5/6 ore. Successivamente il tempo
si riduce mediamente a 4 ore per una ricarica completa. Per
ragioni di comodità, il dispositivo può essere rimosso dal ca-
sco prima di essere ricaricato.
Per caricare il dispositivo di comunicazione, sollevate la protezione in gomma della presa di ricarica e collegate ad essa
lo spinotto del caricatore, quindi innestate la spina CA del
caricatore ad una presa di rete elettrica.
Il LED rosso lampeggerà per tutto il tempo della ricarica. ›
Lasciate l’apparecchio collegato no a che il LED si spe-
gne.
Quando la carica è completa, scollegate il dispositivo dal ›
caricatore.
4
Descrizione dispositivo
e sistema di ssaggio
Descrizione BT2
Il dispositivo BT2 è dotato, sulla parte frontale, di 5 pulsanti
multi funzioni e nella parte inferiore tre connessioni a lo.
Volume +
Telefono
Intercom
Ricarica
Mike & speakers
Descrizione della funzione dei pulsanti:
Telefono › : Permette di attivare/disattivare e controllare le
varie funzionalità del telefonino
Intercom › : Permette l’attivazione/disattivazione della
funzione Intercom e la gestione della comunicazione a tre
AUX › : Permette l’attivazione/disattivazione dell’ingresso
audio a lo
Volume+ › : Permette di aumentare il volume
Volume -: › Permette di diminuire il volume
Descrizione delle connessioni a lo
Presa Ricarica: › Permette la ricarica del dispositivo tramite
alimentatore mini USB standard
Presa Kit Audio: › Permette la connessione del kit audio
(cufe stereo e microfono)
Presa audio ausiliaria (AUX): › Permette la connessioni di
una sorgente audio come un iPod/MP3 player stereo o un
ricetrasmettitore PMR446
Volume -
AUX
Luce blu
e rossa
iPod/MP3
PMR446
Page 5

Descrizione Kit Audio
Il sistema audio si compone di due speaker stereo ultra sottili
e di due microfoni intercambiabili, uno a braccetto e l’altro a
lo. Il mini connettore del microfono vi permette facilmente di
collegare il microfono più adatto al vostro casco.
Altoparlanti stereo. I due altoparlanti stereo sono dotati di
velcro e adesivo per un semplice montaggio all’interno del
casco.
Attenzione, posizionate gli altoparlanti in modo da non
coprire completamente le orecchie, deve essere sempre
possibile sentire i rumori/indicazioni provenienti dalla
strada.
Il microfono può essere ssato al casco in due modi:
Microfono a braccetto. Posizionate il braccetto del
microfono con la parte di Velcro/adesivo tra l’imbottitura e
la calotta rigida del casco, in modo che il microfono sia ben
posizionato di fronte alla bocca, con il simbolo bianco rivolto
verso la bocca stessa. Questo tipo di microfono è adatto per
i caschi Jet e Modulari.
Microfono a lo. Posizionate il microfono, grazie al velcro/
adesivo, all’interno del casco di fronte alla bocca. Questo tipo
di microfono è più indicato per I caschi integrali.
Descrizione sistema di ssaggio al casco
Midland BT2 è fornito con due sistemi differenti di ssaggio
al casco: uno con bi-adesivo e l’altro con sistema di aggancio
a morsetto.
Il sistema di ssaggio permette di “agganciare” in modo sicuro
il dispositivo BT2 al vostro casco e di slarlo in qualsiasi
momento per ricaricarlo o riporlo. Il dispositivo BT2 va ssato
sul lato sinistro del casco.
Fissaggio con bi-adesivo
La piastrina di ssaggio presenta un parte già predisposta
con bi-adesivo. Dopo aver pulito la supercie del casco in
corrispondenza della zona sulla quale si intende ssare il
dispositivo, rimuovete la pellicola del bi-adesivo e posizionate
la piastrina di ssaggio al casco esercitando una leggera
pressione per alcuni secondi.
Fissaggio con morsetto
Mediante la chiave a
brugola, allentate le due
viti del morsetto ed inserite
la piastrina posteriore tra
l’imbottitura del casco e la
calotta esterna rigida.
Dopo aver inserito il morsetto,
stringete le due viti in modo
che risulti stabile e ben ssato.
Inserimento e sgancio del Midland BT2
Il dispositivo BT2 si aggancia al casco, semplicemente
facendolo scorrere verso il basso, in modo che entri
nell’apposita sede del sistema di ssaggio da voi scelto
(biadesivo o a morsetto).
I
Il Kit Audio inne deve essere collegato, tramite il connettore
ad “L” al Midland BT2 Intercom nella presa centrale.
Il connettore è estremamente essibile consentendo
l’adattamento ai diversi caschi disponibili sul mercato.
5
Page 6

Il dispositivo BT2 viene mantenuto in sede, grazie all apposito
clip di aggancio posizionata nella parte superiore (A).
Per sganciare il BT2 è sufciente premere sulla clip di
aggancio e spingere il dispositivo verso l’alto.
Congurazioni tipiche del BT2
A
1. Midland BT2 singolo “solo
pilota”
Connessione Bluetooth con ›
il cellulare, con il GPS e
connessione ad un MP3 player
stereo oppure da un cellulare con
funzione MP3 per ascoltare della
musica
Connessione a lo per l’iPod/MP3 ›
player stereo
Funzione Intercom Moto a Moto “I ›
due piloti possono comunicare tra
di loro no a 200mt di distanza”
Connessione a ricetrasmettitori ›
PMR446 via Bluetooth o a lo per
comunicazioni Moto a Moto no a
5Km di distanza
6
2. Midland BT2 in coppia “pilota e
passeggero”
Funzione Intercom Pilota e ›
Passeggero
Connessioni Bluetooth per il ›
Pilota e per il Passeggero in base
alle esigenze: GPS per il Pilota,
ciascuno al proprio cellulare e
per entrambi connessione ad un
MP3 player stereo via Bluetooth
o a lo.
Il pilota può collegare quindi il ›
GPS, entrambi possono collegare
il loro cellulare ed 1 MP3 Player
Bluetooth, ed allo stesso tempo,
attivare la funzione Intercom
3. Midland BT2 Moto a Moto
“Piloti e Passeggeri tutti
equipaggiati di Midland BT2 e
ricetrasmettitori PMR446”
Funzione Intercom Pilota e ›
Passeggero
Connessioni Bluetooth per il ›
Pilota e per il Passeggero in base
alle esigenze: GPS per il Pilota,
ciascuno al proprio cellulare.
Connessione di gruppo “Moto a ›
Moto” mediante il collegamento
ad un ricetrasmettitore PMR446.
Il collegamento del PMR446, può
essere fatto indifferentemente al
dispositivo del Pilota o a quello
del Passeggero.
Il ricetrasmettitore PMR446 può ›
essere collegato via Bluetooth
oppure via lo
Page 7

Considerazioni generali sulla priorita’
Midland BT2 è un dispositivo Bluetooth che può essere
abbinato ad altri dispositivi Bluetooth con funzionalità
differenti: telefonino, GPS, MP3 player, ecc... In base alla
tipologia del dispositivo, Midland BT2 assegna delle priorità di
funzionamento, per esempio la telefonata è prioritaria rispetto
alla musica, questo vuole dire che al sopraggiungere di una
telefonata, la musica viene interrotta per poter rispondere.
Sono state quindi denite tre priorità di utilizzo per soddisfare
le principali esigenze.
Dispositivi con priorità 1 (Alta)
Il Telefonino o il GPS per loro natura, devono avere la priorità
più alta su qualsiasi altro dispositivo collegato. Quando arriva
una telefonata oppure un’indicazione del Navigatore, questa
deve interrompere qualsiasi altra comunicazione attiva.
I dispositivi con priorità 1 devono essere abbinati al BT2
utilizzando il pulsante “Telefono”.
Dispositivi con priorità 2 (Media)
A questa priorità corrisponde solo un altro BT2 con la
funzionalità di Intercom. Quando la funzione Intercom
viene attivata, tutte le altre comunicazioni verranno chiuse
eccetto per quelle con priorità 1 (Alta). E’ possibile modicare
questa condizione seguendo la procedura descritta nel
capitolo “Comunicazioni a tre sempre attiva”, nella sezione
“Congurazioni speciali”. L’abbinamento tra due Midland BT2
avviene utilizzando i pulsanti “Volume +” e “Volume –“.
Dispositivi con priorità 3 (Bassa)
Un MP3 player, un adattatore Bluetooth o una ricetrasmittente
PMR446, hanno una priorità bassa, quindi verranno interrotti
al sopraggiungere di una telefonata, di un’indicazione GPS
(priorità 1) o alla apertura della comunicazione Intercom
(priorità 2).
I dispositivi con priorità 3 devono essere abbinati al BT2
utilizzando il pulsante “AUX”.
Inne il Midland BT2 accetta anche i dispositivi audio collegati
via lo. Quest’ultima connessione ha la priorità più bassa in
assoluto e viene interrotta ogni volta che una connessione
Bluetooth viene aperta.
Accensione e spegnimento del MIDLAND BT2
Il BT2 può essere acceso tenendo premuto il pulsante
“Intercom”. Per spegnerlo invece, occorre sfruttare la
combinazione dei due pulsanti “Telefono” e “Intercom”. In
questo modo non è possibile spegnere il dispositivo in modo
involontario durante l’uso (cosa che potrebbe succedere,
specialmente se si utilizzano i guanti).
OFFON
Accensione:
Tenete premuto il pulsante “Intercom” per circa 3 secondi, ›
no all’accensione della luce BLU lampeggiante.
Spegnimento:
Tenete premuti i pulsanti “Intercom” e “AUX” insieme ›
per circa 3 secondi, no a che la luce ROSSA emette 3
lampeggi.
Abbinamento a dispositivi Bluetooth
(pairing)
Midland BT2 è un dispositivo Bluetooth che può essere
abbinato ad altri dispositivi Bluetooth.
La procedura prevede che il BT2 entri prima in modalità di
abbinamento (Setup). In questa modalità le uniche operazioni
consentite sono quelle di abbinamento (pairing). Dopo aver
abbinato i dispositivi Bluetooth, per poter utilizzare il BT2 è
necessario uscire dalla modalità “Setup” e passare a quella
di “Utilizzo”.
Modalita’ di abbinamento (setup)
Spegnete il BT2. Tenere premuto il pulsante centrale
(Intercom) no a che la luce non rimane di colore rosso sso.
Ora il BT2 è in modalità di “Abbinamento” (Setup), pronto per
essere abbinato ad altri dispositivi.
I
7
Page 8

Abbinamento ad un altro BT2
I due dispositivi presenti nella stessa confezione (Midland
BT2 Intercom TWIN) sono già accoppiati tra loro e pronti
all’uso, quindi non è necessario attivare questa procedura di
abbinamento.
Se invece, i dispositivi non fanno parte della stessa
confezioneo se avete acquistato un altro BT2 in un secondo
momento (per esempio per il passeggero), dovete prima
procedere alla procedura di abbinamento.
Attivate la modalità “Abbinamento” (set up) su entrambi
i dispositivi (luce rossa accesa ssa), tenere premuto il
pulsante “Volume +” sul primo dispositivo, no a che la luce
lampeggia alternativamente Rossa e Blu. Tenere premuto il
pulsante “Volume –“ sull’altro dispositivo no a che la luce
Rossa e Blu lampeggia alternativamente. Ora i due dispositivi
si cercano per completare l’abbinamento. Se l’abbinamento
è avvenuto in modo corretto, su entrambi si accende, per un
secondo, la luce Blu, per poi tornare in modalità abbinamento
con la luce Rossa ssa.
Abbinamento ad un telefonino
1. Attivate sul vostro telefonino la modalità di ricerca
dispositivi Bluetooth. Questa funzione dipende dalla marca
e modello del vostro telefono (fate riferimento al manuale
del telefonino).
2. Con il BT2 già in modalità “Abbinamento” (luce rossa
ssa), premere il pulsante “Telefono” no a quando la luce
lampeggia Rosso e Blu.
3. Dopo pochi secondi sul telefonino comparirà il nome
“Midland BT2”, selezionatelo e seguite le istruzioni del
vostro telefonino per accettare l’abbinamento. Quando
viene richiesto, immettete il codice di abbinamento: 0000
(quattro zeri). Il telefono confermerà se il processo di
abbinamento è stato completato con successo.
4. Il BT2 tornerà in modalità setup (luce rossa ssa) pronto
per ulteriori abbinamenti.
L’abbinamento di un telefono cellulare esclude la possibilità di
abbinare al BT2 anche un Navigatore GPS, perchè entrambi
sono dispositive con priorità 1 (alta).
Questo limite è facilmente superabile abbinando il
telefonino direttamente al Navigatore GPS, e poi abbinando
quest’ultimo al Midland BT2. In questo caso le funzionalità
del telefonino sono gestite direttamente sul Navigatore GPS.
8
Abbinamento ad un Navigatore GPS
In generale è possibile abbinare qualunque navigatore GPS
che accetti un auricolare Bluetooth.
Midland BT2 è stato testato con successo con la famiglia di
navigatori GPS ZUMO della Garmin e il TOMTOM Rider 1 e 2.
1. Attivate sul vostro GPS la modalità di ricerca dispositivi
auricolari Bluetooth. Questa funzionalità dipende dalla
marca e modello del vostro GPS (fate riferimento al
manuale del GPS).
2. Nello stesso tempo premete il pulsante “Telefono” sul BT2
no a quando la luce lampeggia Rosso e Blu.
3. Dopo pochi secondi sul GPS comparirà il nome “Midland
BT2”, selezionatelo e seguite le istruzioni per accettare
l’abbinamento. Quando viene richiesto, immettete il codice
di abbinamento: 0000 (quattro zeri). Il GPS confermerà
se il processo di abbinamento è stato completato con
successo.
4. Il BT2 torna in modalità setup (luce rossa ssa) pronto per
ulteriori abbinamenti.
L’abbinamento di un Navigatore GPS esclude la possibilità di
abbinare al BT2 anche un telefonino, perchè entrambi sono
dispositivi con priorità 1 (alta).
Questo limite è facilmente superabile abbinando il telefonino
direttamente al Navigatore GPS, e poi abbinando quest’ultimo
al Midland BT2. In questo caso le funzionalità del telefonino
sono gestite direttamente sul Navigatore GPS.
L’abbinamento ad un Navigatore GPS esclude la possibilità
di abbinare al BT2 un telefono cellulare.
Questo limite è facilmente superabile abbinando il telefonino
direttamente al Navigatore GPS, e poi abbinando quest’ultimo
al BT2. In questo caso le funzionalità del telefonino sono
gestite direttamente sul Navigatore GPS.
Abbinamento ad un MP3 player
1. Attivate sul vostro MP3 player la modalità di ricerca dispositivi
Bluetooth. Questa funzione dipende dalla marca e modello
quindi fate riferimento al manuale dell’MP3 player.
2. Nello stesso tempo premete il pulsante “AUX” sul BT2 no
a quando la luce lampeggia Rosso e Blu.
3. Dopo pochi secondi sull’MP3 player comparirà il nome
“Midland BT2”, selezionatelo e seguite le istruzioni per
accettare l’abbinamento. Se viene richiesto, immettete
il codice di abbinamento: 0000 (quattro zeri). L’MP3
player confermerà se il processo di abbinamento è stato
completato con successo.
Page 9

4. Il BT2 torna in modalità setup (luce rossa ssa) pronto per
ulteriori abbinamenti.
Abbinamento ad altri dispositivi Bluetooth
Midland BT2 può essere abbinato ad altri dispositivi Bluetooth,
quali MP3 Player stereo, adattatori Bluetooth (es.: BPA100)
oppure ricetrasmettitori con Bluetooth integrato (es.: Midland
445BT).
1. Attivate la modalità pairing sul dispositivo Bluetooth.
Questa funzione dipende dalla marca e modello, quindi
fate riferimento al manuale dell’apparato Bluetooth.
2. Contemporaneamente premete il pulsante “AUX” sul BT2
no a quando la luce lampeggia Rosso e Blu.
3. Dopo pochi secondi l’abbinamento viene completato e il
BT2 torna in modalità setup (luce rossa ssa) pronto per
ulteriori abbinamenti.
Attenzione: il processo di ricerca di un altro dispositivo
(luce rossa e blu lampeggiante) dura circa 2 minuti
dopo di che se non viene trovato nessun dispositivo,
il BT2 torna in modalità setup (luce rossa ssa). A
questo punto ripetere nuovamente la procedura,
ripartendo dal punto 2. Se volete interrompere
la procedura di abbinamento (luce Rossa e Blu
lampeggiante) e tornare alla fase di set up (luce rossa
ssa) premete 2 volte il pulsante “Intercom”.
Reset di tutti i dispositivi accoppiati
Potrebbe essere necessario eliminare tutti i riferimenti di
abbinamento registrati nel BT2 (reset). Per fare questo dovete
tenere premuto contemporaneamente i pulsanti “Volume +” e
“Volume –“ per 4 secondi, la luce Blu si accenderà ssa per
un secondo.. Da questo momento il BT2 non avrà più nessun
dispositivo Bluetooth in memoria e potrete procedere ad una
nuova sessione di accoppiamento (pairing).
I
Riconnessione ai dispositivi Bluetooth
Dopo aver abbinato con successo i dispositivi, potete
spegnerli e riaccenderli senza dover ripetere la procedura
di abbinamento (pairing). Se per qualsiasi ragione i due
dispositivi dovessero perdere la connessione tra loro (es.:
se un dispositivo viene spento o se supera la massima
distanza consentita) non è necessario rifare la procedura
di abbinamento (pairing), ma in molti casi la riconnessione
avviene in modo automatico, è sufciente riaccendere il
dispositivo o rientrare nella portata e la connessione viene
ripresa. Se questo non dovesse accadere allora è necessario
ritornare nelle impostazioni del dispositivo utilizzato (es.
Telefonino, MP3 player, ecc…), selezionare dall’elenco il
Midland BT2 e attivare la connessione.
Regolazione del volume
Midland BT2 è dotato della tecnologia AGC che regola
automaticamente il volume di ascolto in base al rumore di
fondo. Potete comunque regolare manualmente il volume
agendo sui pulsanti “Volume+” e “Volume -“. Per esempio
potete regolare manualmente il livello massimo di volume
desiderato nelle condizioni più rumorose (come ad alta
velocità), in questo modo il sistema automatico AGC varierà
il volume utilizzando come valore massimo quello stabilito
da voi manualmente. Questa regolazione è utile perchè il
valore massimo del volume dipende dal tipo e dalla qualità
del casco utilizzato.
Utilizzo della funzionalita’ dei
dispositivi Bluetooth
Uscire dalla modalita’ di abbinamento (setup)
Dopo aver concluso il pairing con i vari dispositivi Bluetooth, è
necessario uscire dalla modalità “Setup” per poter utilizzare il BT2.
Tenete premuto per 3 secondi il pulsante Intercom (pulsante
centrale). La luce Rossa si spegne e al suo posto lampeggia
la luce Blu. Ora potete utilizzare il BT2.
Utilizzo della funzionalita’ intercom
Per utilizzare la funzionalità Intercom è necessario che
entrambi i dispositivi siano accesi e che siano stati in
precedenza abbinati fra di loro. Se avete acquistato la
versione “singola” dovete seguire la procedura di abbinamento
spiegata nel capitolo “Abbinamento ad un altro BT2” nelle
pagine precedenti.
9
Page 10

Priorità: La comunicazione Intercom ha sempre una
priorità più alta rispetto alle altre comunicazioni, eccetto
per il Telefono o per il Navigatore GPS. Pertanto quando la
funzione Intercom viene attivata tutte le altre comunicazioni
aperte vengono chiuse. Solo quando arriva una Telefonata
o un’indicazione vocale dal Navigatore la comunicazione
Intercom viene chiusa. Quando la comunicazione telefonica
o l’indicazione del GPS terminano, la funzionalità Intercom
tornerà automaticamente ad attivarsi.
Attenzione: Alcuni telefonini potrebbero richiedere diversi secondi, prima che la linea venga liberata dopo la conclusione della telefonata e quindi prima che l’intercom
possa essere riattivato.
Per attivare la comunicazione Intercom è possibile utilizzare
due modalità:
Attivazione manuale:
Premendo il pulsante “Intercom”, indifferentemente da ›
uno dei due dispositivi, la comunicazione si attiva e
rimarrà attiva no a che non viene premuto nuovamente
il pulsante “Intercom”. Sentirete 1 tono audio a conferma
dell’attivazione dell’Intercom e 2 toni audio a conferma
della disattivazione.
Attivazione vocale (VOX):
La funzionalità VOX per l’attivazione vocale per l’Intercom ›
è attiva di fabbrica. E’ sufciente parlare per aprire
la comunicazione Intercom. Se nessuno parla, dopo
1 minuto l’intercom viene automaticamente chiuso.
Per riaprire la comunicazione sarà sufciente parlare
nuovamente. Quando l’Intercom è attivato tramite VOX è
possibile comunque disattivarlo senza aspettare il tempo
predeterminato, semplicemente premendo il pulsante
“Intercom”.
E’ possibile disattivare la funzione di attivazione vocale ›
(VOX) seguendo la procedura specicata nel capitolo
“Congurazioni speciali”.
Attenzione: la prima volta che attivate la funzione Intercom (vocale o manuale) la comunicazione si aprirà con
un leggero ritardo perchè i due dispositive devono prima
riconoscersi. Dalla seconda attivazione la comunicazione sarà istantanea.
La distanza massima di comunicazione tra due dispositivi
Midland BT2 è di circa 200m in campo aperto. E’ quindi
possibile utilizzare il BT2 come intercom tra due piloti da
“MOTO a MOTO”.
10
Utilizzo della funzionalita’ telefono
Per utilizzare la funzionalità telefono è necessario che
entrambi i dispositivi siano accesi e che siano stati in
precedenza abbinati tra di loro. Seguite la procedura di
abbinamento spiegata nelle pagine precedenti nel capitolo
“Abbinamento ad un telefono cellulare”.
Attenzione: le informazioni riportate in questo capitolo si
riferiscono al collegamento diretto tra Telefonino e BT2.
Se il telefonino è collegato tramite il Navigatore GPS, la
gestione delle funzionalità del telefonino può avvenire
solo tramite il Navigatore stesso.
Priorità: La telefonata è sempre privata e prioritaria, quindi
tutte le altre comunicazioni vengono temporaneamente
interrotte. A telefonata conclusa le comunicazioni in
precedenza interrotte vengono automaticamente riattivate.
Rispondere ad una chiamata
Quando sentite il telefonino squillare, potete rispondere
utilizzando due modalità:
Risposta vocale:
E’ sufciente pronunciare una parola qualunque e quindi
iniziare a parlare.
Risposta manuale:
Premere brevemente il pulsante “Telefono” ed iniziare a
parlare.
Attenzione: la risposta alla telefonata può avvenire solo
dopo il terzo squillo
Riutare una chiamata
Se non intendete rispondere al telefono potete lasciarlo
squillare, oppure tenere premuto per alcuni secondi il pulsante
“Telefono” (sentirete un tono audio di conferma).
Effettuare una chiamata
Ci sono diversi modi per effettuare una chiamata.
Dalla tastiera del telefonino:
Comporre il numero sulla tastiera del telefonino ›
Premere il pulsante “Invio” sul telefonino ›
Chiamare l’ultimo numero:
Tenete premuto per alcuni secondi il pulsante “Telefono”, ›
l’ultimo numero utilizzato verrà richiamato (sentirete un
tono audio di conferma)
Chiamata vocale:
Premete brevemente il pulsante “Telefono”, se il vostro ›
telefonino supporta la chiamata vocale, vi verrà chiesto di
pronunciare il nome del contatto che volete chiamare.
Page 11

Il corretto funzionamento di questa funzionalità può dipendere
dal tipo di casco utilizzato (Jet o Integrale) o dalla velocità
di percorrenza. Fate alcune prove per valutare le condizioni
ottimali di utilizzo.
Attenzione: Se state utilizzando un MP3 Player collegato
via Bluetooth, i comandi di “Chiamata dell’ultimo numero” e di “Chiamata vocale” non posso essere utilizzati,
in quanto gli stessi pulsanti sono attivi per comandare
le funzioni dell’MP3 player. Dovete quindi prima disatti-
vare l’MP3 Player, premendo il pulsante “Intercom” per
3 secondi (sentirete 2 beep di conferma) e poi effettuare
la chiamata.
Chiudere una telefonata
Ci sono diversi modi per chiudere una telefonata:
Aspettare che l’altra parte chiuda la telefonata ›
Premere brevemente il pulsante “Telefono” (sentirete un ›
tono audio di conferma)
Premere il pulsante “Chiuso” sul telefonino ›
Comunicazione a tre con il Telefono
Quando la comunicazione telefonica è in corso, la funzione
Intercom viene momentaneamente chiusa. E’ possibile però
aggiungere il Passeggero alla conversazione attivando
quindi una “comunicazione a tre”. Quando la comunicazione
telefonica è in corso, premere brevemente il pulsante
“Intercom” sul dispositivo che ha ricevuto la telefonata
(sentirete 1 tono audio di conferma). Per ritornare alla
comunicazione telefonica privata, premere nuovamente il
pulsante “Intercom” (sentirete 2 toni audio di conferma).
Utilizzo della funzionalità MP3 player del
telefonino
Molti telefonini possono essere utilizzati come MP3 player
stereo. Midland BT2 supporta completamente i protocolli
A2DP e AVRCP, i quali consentono di ascoltare musica stereo
e di comandare le principali funzioni dell’MP3 player. E’ infatti
possibile utilizzare i pulsanti presenti sul BT2 per gestire le
seguenti funzioni: Play, Stop/Pause, Avanti ed Indietro
Attenzione: l’MP3 player Bluetooth deve supportare il
protocollo AVRCP
I
Comandi disponibili:
Attivazione funzione MP3 Player: tenere premuto il ›
pulsante “Intercom” per 3 secondi
Play/Pausa della musica: tenere premuto per 3 secondi il ›
pulsante “Intercom”
Avanti di una canzone: premere brevemente il pulsante ›
“Telefono”
Indietro di una canzone: premere brevemente il pulsante ›
“AUX”
Disattivazione MP3 Player: premere bevemente il pulsante ›
“Intercom” (2 beep di conferma)
Per aprire la comunicazione Intercom, è sufciente parlare,
oppure per un attivazione manuale, prima disattivare l’MP3
Player, premendo il pulsante “Intercom” e poi premerlo
nuovamente per l’attivazione.
Priorità: L’ascolto della musica ha una priorità più bassa
rispetto a tutti gli altri collegamenti (per esempio: Telefo-
nata o comunicazioni Intercom). Quindi la musica verrà
sempre interrotta nel momento in cui un’altra comunicazione verrà aperta.
Utilizzo delle funzionalita’ abbinate al navigatore GPS
Per utilizzare le funzionalità rese disponibili da un navigatore
GPS è necessario che entrambi i dispositivi siano
accesi e che siano stati in precedenza abbinati tra loro.
Seguite la procedura di abbinamento spiegata nelle pagine
precedenti nel capitolo “Abbinamento ad un Navigatore GPS”.
Priorità: La comunicazione con il Navigatore GPS ha la
priorità più alta, quindi qualsiasi altra comunicazione attiva (come per esempio l’Intercom, la musica o un eventuale ricetrasmettitore) viene momentaneamente chiusa.
11
Page 12

Appena le indicazioni vocali del GPS sono nite, le comunicazioni in precedenza interrotte vengono automaticamente riattivate.
Ascoltare le indicazioni vocali del Navigatore GPS
Ogni volta che il Navigatore invia le indicazioni stradali,
queste saranno immediatamente disponibili. Qualsiasi altra
comunicazione attiva viene momentaneamente chiusa.
Appena le indicazioni vocali del GPS terminano, il BT2
ripristinerà le comunicazioni precedentemente chiuse.
Ascoltare la musica dal Navigatore GPS
I più diffusi GPS sul mercato permettono anche l’ascolto della
musica quando non ci sono indicazioni stradali da comunicare.
In questo caso la comunicazione verso il Navigatore è sempre
aperta ed è prioritaria rispetto alle altre comunicazioni attive.
Potete comunque attivare la funzione Intercom anche mentre
state ascoltando la musica, semplicemente premendo il
pulsante “Intercom” (vedi capitolo “Comunicazione a tre con
il Navigatore GPS”).
Utilizzo del telefonino abbinato al Navigatore GPS
Se avete collegato il Navigatore GPS al Midland BT2 non
potete collegare anche il telefonino ma dovete collegare
quest’ultimo direttamente al Navigatore. In questo modo tutta
la gestione del telefonino sarà a carico del Navigatore GPS,
quindi fate riferimento alla procedura specicata sul manuale
del Navigatore per abbinare un telefonino e per rispondere o
effettuare una telefonata.
Comunicazione a tre con il Navigatore GPS
Quando la comunicazione con il Navigatore è attiva
(indicazioni vocali/musica o telefonata), la funzione Intercom
viene momentaneamente chiusa. E’ possibile però aggiungere
il Passeggero attivando quindi una “comunicazione a tre”
Quando la comunicazione è in corso, premere brevemente
il pulsante “Intercom” sul dispositivo collegato al Navigatore
(sentirete 1 tono audio di conferma) ed il Passeggero ascolterà
ciò che ascolta il Pilota. Per ritornare alla comunicazione
privata, premere nuovamente il pulsante “Intercom” (sentirete
2 toni audio di conferma).
Per utilizzare questi dispositivi è necessario che entrambi gli
apparati siano accesi e che siano stati in precedenza abbinati
fra loro. Seguite la procedura di abbinamento spiegata
nelle pagine precedenti nel capitolo “Abbinamento ad altri
dispositivi Bluetooth”.
I dispositivi abbinati, possono essere attivati o disattivati
senza perdere l’abbinamento, semplicemente utilizzando il
pulsante “AUX”:
Disattivazione: tenete premuto per 3 secondi il pulsante ›
AUX (sentirete 2 toni audio di conferma)
Attivazione: tenete premuto per 3 secondi il pulsante AUX ›
(sentirete 1 tono audio di conferma)
In questo modo il dispositivo viene semplicemente scollegato
temporaneamente dal BT2, ma i due dispositivi rimarranno
comunque abbinati tra loro.
Priorità: La comunicazione ad altri dispositivi Bluetooth ha
una priorità inferiore rispetto alla connessione al Telefonino,
al Navigatore GPS ed alla comunicazione Intercom. Questo
signica che verrà interrotta ogni volta che sopraggiungerà
una telefonata, un’indicazione vocale del navigatore o quando
verrà aperta la comunicazione Intercom.
Attenzione: se utilizzate il Navigatore GPS per ascoltare
la musica, (quindi la comunicazione con il Navigatore è
sempre attiva), gli altri dispositivi Bluetooth, avendo una
priorità inferiore, saranno sempre disattivati.
Utilizzo di un MP3 Player Bluetooth:
Midland BT2 supporta completamente i protocolli A2DP e
AVRCP, i quali consentono di ascoltare musica stereo e di
comandare le principali funzioni dell’MP3 player.
Utilizzo di altri dispositivi Bluetooth
Midland BT2 può essere abbinato ad altri dispositivi Bluetooth
quali MP3 Player, adattatori Bluetooth (es.: BPA100) oppure
ricetrasmettitori con Bluetooth integrato (es.: Midland 445BT).
12
E’ infatti possibile utilizzare i pulsanti presenti sul BT2 per
gestire le seguenti funzioni: Play, Stop/Pause, Avanti e
Indietro.
Page 13

Comandi disponibili:
Attivazione della funzione MP3 Player: tenere premuto per ›
3 secondi il pulsante “Intercom”
Play/Pausa della musica: tenere premuto per 3 secondi il ›
pulsante “Intercom”
Avanti di una canzone: premere brevemente il pulsante ›
“Telefono”
Indietro di una canzone: premere brevemente il pulsante ›
“AUX”
Disattivazione MP3 Player: premere bevemente il pulsante ›
“Intercom” (2 beep di conferma)
Per aprire la comunicazione Intercom, è sufciente parlare,
oppure per un attivazione manuale, prima disattivare l’MP3
Player, premendo il pulsante “Intercom” e poi premerlo
nuovamente per l’attivazione.
Attenzione: Non è possibile garantire la completa com-
patibilità con i vari modelli di MP3 Player Bluetooth sul
mercato, in quanto le modalità di connessione e di controllo sono spesso proprietarie.
Utilizzo di un adattatore Bluetooth:
Midland BT2 può essere collegato ad un adattatore Bluetooth
esterno (come ad esempio il BPA100) per utilizzare dispositivi
audio che non hanno il Bluetooth integrato (come ad esempio
dei ricetrasmettitori o dei GPS di prima generazione). Dopo
aver accoppiato i due dispositivi, seguite le istruzioni fornite
con il dispositivo stesso.
Utilizzo di un ricetrasmettitore con Bluetooth integrato:
Midland BT2 può essere collegato ad un ricetrasmettitore
con Bluetooth integrato come il Midland 445BT per la
comunicazione moto a moto. Dopo aver accoppiato i due
dispositivi come spiegato nel capitolo “Abbinamento di altri
dispositivi Bluetooth”, attivate la connessione Bluetooth
premendo il pulsante apposito sulla radio. Ora è possibile
comunicare via radio utilizzando il pulsante PTT sulla
ricetrasmittente o quello esterno a lo contenuto nella
confezione della radio stessa.
Utilizzo dell’ingresso audio a lo
Midland BT2 ha disponibile anche un ingresso audio a lo
(denominato AUX) per collegare una sorgente audio Stereo
come ad esempio un iPod (o un qualsiasi altro MP3 Player)
oppure un ricetrasmettitore PMR446 per la comunicazione
tra moto a moto.
Priorità: L’ingresso audio a lo ha la priorità più bassa in
assoluto rispetto a tutti gli altri collegamenti via Bluetooth
(Intercom compreso), quindi verrà sempre interrotta nel
momento in cui un’altra comunicazione Bluetooth viene
aperta.
Ascolto della musica
Per ascoltare la musica dall’ingresso a lo è sufciente
collegare la sorgente audio tramite il cavo in dotazione. La
regolazione del volume è gestita in automatico dal sistema
AGC quindi dovete solamente posizionare il volume del
vostro iPod/MP3 Player ad un livello tale che in condizioni
normali (bassa velocità) la musica sia adeguata.
Attenzione: non alzate mai il volume dell’MP3 Player al
massimo.
Consiglio: fate alcune prove, regolando il volume del vostro
iPod/MP3 Player in modo che a bassa velocità il volume in
cufa sia ad un livello ottimale, poi annotatevi il valore in modo
che la prossima volta possiate immediatamente ricongurarlo
con il valore corretto.
Attenzione: I pulsanti di regolazione volume “Volume+” e
“Volume –“ non controllano il volume della sorgente audio
a lo. Solo il sistema automatico AGC gestisce l’audio.
Attivazione/disattivazione dell’ingresso a lo
Grazie al pulsante “AUX” è possibile attivare e disattivare
l’ingresso a lo:
Disattivazione: premere brevemente il pulsante AUX ›
(sentirete 2 toni audio di conferma)
Attivazione: premere brevemente il pulsante AUX (sentirete ›
1 tono audio di conferma)
Utilizzo di un ricetrasmettitore
Per utilizzare un ricetrasmettitore è necessario utilizzare un
cavo specico opzionale che collega direttamente la vostra
radio al Midland BT2. La comunicazione via radio avviene
premendo il pulsante di trasmissione PTT quando si vuole
parlare e rilasciandolo quando si ascolta. Non è possibile
parlare ed ascoltare contemporaneamente. Il cavo di
connessione al ricetrasmettitore è infatti dotato di un pulsante
PTT che può essere ssato al manubrio della moto o tenuto
in mano nel caso la radio sia collegata al Midland BT2 del
Passeggero.
Regolate il volume del ricetrasmettitore ad un livello ottimale, in
condizioni di velocità normale. Ricordate che la regolazione del
13
I
Page 14

volume è controllata dal sistema automatico AGC, quindi verrà
automaticamente aumentato in base al variare del rumore di
fondo.
stereo, verrà comunque interrotto quando si attiva la comunicazione Intercom (solo i dispositivi “mono” possono avere la comunicazione a tre attiva).
Congurazioni speciali
Midland BT2 può essere congurato in modo specico per
rispondere anche al motociclista più esigente.
E’ infatti possibile congurare le seguenti funzionalità
“avanzate”, per gli utilizzatori più esperti:
Comunicazione a tre sempre attiva ›
Attivazione vocale dell’Intercom (VOX) ›
Regolazione della sensibilità del microfono
Disattivazione della funzione VOX
Comunicazione a tre sempre attiva
Normalmente (per defult) sia le comunicazioni Bluetooh con
priorità 3 (bassa) che l’audio proveniente dalla connessione a
lo, si interrompono quando l’Intercom viene aperto. Attivando
invece questa funzione non si chiudono e vengono condivise
con l’altro casco. Questa funzione può essere utile, per
esempio, se si vuole mantenere la comunicazione Intercom
aperta e allo stesso tempo parlare con un ricetrasmettitore
collegato via Bluetooth o via lo. In aggiunta questa funzione
può essere utilizzata per condividere la stessa musica tra
Pilota e Passeggero (vedi il capitolo “Condivisione della
musica tra Pilota e Passeggero” più avanti).
L’attivazione/disattivazione della “comunicazione a tre” può
essere fatta anche su un solo dispositivo, in questo modo solo
quel dispositivo potrà condividere l’audio e non viceversa.
Attivazione/Disattivazione
Con il BT2 spento, tenere premuto il pulsante centrale ›
“Intercom” no a che la luce non rimane di colore rosso
sso. Ora il BT2 è in modalità “Abbinamento” (setup).
Tenere premuto contemporaneamente per tre secondi i ›
pulsanti “Telefono” e “AUX”
Se la funzione era in precedenza disattiva, verrà attivata ›
(luce Blu accesa ssa per 2 secondi).
Al contrario se era attiva, verrà disattivata (luce Blu con 2 ›
lampeggi di 2 secondi).
Attenzione: se il dispositivo Bluetooth è un MP3 player
14
Attivazione vocale dell’intercom (Vox)
L’apertura della comunicazione Intercom, può avvenire oltre
che manualmente, anche tramite attivazione vocale (VOX). Il
corretto funzionamento del VOX dipende dal rumore di fondo, quindi dalla velocità, dalla tipologia di moto e anche dalla
silenziosità del proprio casco. Per ottenere il migliore risultato, è possibile decidere la soglia di attivazione, scegliendo 4
livelli di sensibilità del microfono: alta, media bassa e molto
bassa. La sensibilità alta è più indicata per moto silenziose e
protette come Scooter o moto carenate. La sensibilità bassa
è più indicata per moto scoperte e rumorose (naked).
Di fabbrica il BT2 è precongurato con la sensibilità “media”.
In aggiunta, è possibile anche disabilitare completamente la
funzione VOX e quindi attivare l’Intercom e la risposta alla
telefonata solo in modalità manuale.
Regolazione della sensibilità del microfono
1) Entrate in modalità Abbinamento (Setup): Spegnete il
BT2.
- Tenere premuto il pulsante centrale (Intercom/on) no a
che la luce non rimane di colore rosso sso. Ora il BT2
è in modalità “Abbinamento” (setup).
2) Premete brevemente una volta il pulsante “AUX”, la luce
Blu si accenderà ssa.
3) Ora premete il pulsante “Volume +” o “Volume -“ per aumentare o diminuire la sensibilità. La luce Rossa lampeggerà indicando che il pulsante è stato premuto (quando
raggiungete il limite della regolazione la luce smette di
lampeggiare).
4) Premete nuovamente il pulsante AUX, la luce Blu lampeggerà diverse volte in base alla congurazione della
sensibilità in quel momento attiva: 1 volta= Vox disattivo
/ 2 volte=sensibilità molto bassa / 3 volte=sensibilità bassa / 4 volte= sensibilità media / 5 volte= sensibilità alta
Default=livello medio
5) Ora la luce rossa tornerà ad essere accesa ssa per indicare che le modiche sono state registrate e siete tornati
alla modalità di abbinamento (setup).
6) Se dovete modicare ulteriormente la congurazione della
sensibilità ripetete i passi dal punto 2, altrimenti uscite dalla modalita di “Abbinamento (setup)” tenendo premuto per
Page 15

3 secondi il pulsante Intercom (pulsante centrale). La luce
rossa si spegne e al suo posto lampeggia la luce blu.
Ora potete utilizzare il BT2.
Attenzione: ricordate che disattivando la funzione di Vox
anche la risposta alla telefonata potrà avvenire solo in
modalità manuale (premendo il pulsante “Telefono”).
I
Disattivazione della funzione VOX
(per Intercom e Telefono)
Seguite tutta procedura spiegata per regolare la sensibilità
del microfono (vedi sopra), ma al punto 4 premente il pulsante “Volume -” no a quando la luce rossa non lampeggia
più indicando che avete raggiunto il limite della regolazione.
Premete il pulsante AUX e la luce Blu lampeggerà una volta.
Ora il Vox non è attivo. Uscite dalla modalita di “Abbinamento
(setup)” tenendo premuto per 3 secondi il pulsante Intercom
(pulsante centrale). La luce rossa si spegne e al suo posto
lampeggia la luce blu.
Ora potete utilizzare il BT2.
Se in futuro intendete abilitare nuovamente il VOX, ripetete
tutta la procedura sopra indicata selezionando con il pulsante
“Volume +” il nuovo valore.
Consigli per utilizzi specici
Di seguito alcuni suggerimenti per ottenere il massimo dalle
funzionalità del vostro BT2.
Utilizzo di un ricetrasmettitore PMR446 insieme alla
comunicazione Intercom (Pilota/Passeggero).
Se intendete utilizzare un ricetrasmettitore PMR446 per la
comunicazione di gruppo e allo stesso tempo volete avere
attiva la funzione di Intercom tra Pilota e Passeggero dovete
tenere presente che ogni volta che parlate, grazie alla funzione
VOX, la comunicazione Intercom viene aperta, escludendo di
conseguenza la comunicazione via radio. Quest’ultima infatti
ha una priorita inferiore rispetto alla comunicazione Intercom.
Per ovviare a questo potete procedere in due modi:
Abilitazione della comunicazione a tre sempre attiva
Attivando questa funzione, come spiegato nel capitolo
precedente, ogni volta che parlate l’Intercom viene attivato
ma la comunicazione con il ricetrasmettitore rimane aperta,
dandovi così la possibilità di condividere la comunicazione
via radio anche tra Pilota e Passeggero.
Condivisione della musica tra Pilota e Passeggero
Se intendete condividere la stessa musica tra Pilota e
Passeggero, potete seguire questa semplice procedura:
Collegate la sorgente musicale › a lo ad uno dei due
dispositivi.
Abilitate la “comunicazione a tre” sul dispositivo su cui ›
è collegata la sorgente musicale (seguite la procedura
spiegata nel capitolo precedente).
Attivate l’intercom, ora entrambi ascolterete la stessa ›
musica.
Attenzione: Solo chi ha la musica direttamente collegata
via lo potrà ascoltarla in modalità stereo.
Attenzione: La condivisione della musica non è possibile
se la sorgente è un Player Bluetooth Stereo (A2DP).
Disattivazione del VOX
Disattivate la funzionalità VOX come spiegato nel capitolo
precedente, in modo che quando parlate via radio l’Intercom
non venga automaticamente attivato. Per attivare l’Intercom
sarà necessario premere il pulsante Intercom manualmente
(questo disabiliterà la comunicazione via radio che verrà
automaticamente ripresa quando l’Intercom verrà chiuso,
sempre manualmente).
15
Page 16

SEGNALI ACUSTICI E LUMINOSI
Indicazioni luminose Stato
Generali
Nessuna indicazione (luce spenta) Dispositivo spento/ Dispositivo completamente carico
Luce blu lampeggiante ogni 3 secondi Dispositivo acceso (standby)
Luce rossa lampeggiante ogni 3 secondi Standby – batteria scarica
Tre lampeggi della luce rossa Dispositivo in spegnimento
Luce rossa e blu lampeggiante insieme
ogni 3 secondi
Luce rossa e blu lampeggiante insieme e
un lampeggio rosso
Luce rossa lampeggiante ogni 2 secondi Dispositivo in ricarica (connesso ad una fonte di alimentazione)
SETUP
Luce rossa ssa Modalità “Setup”
Luce rossa e blu lampeggiante Modalità “Pairing” (ricerca dispositivi)
Luce blu ssa per 2 secondi Abbinato con successo/ Reset dei dispositive abbinati/ Comunicazione a tre abili-
Luce blu con lampeggio lungo Comunicazione a tre disabilitata
Segnalazioni audio Stato
Tono ascendente (basso-alto) Dispositivo in accensione
Tono discendente (alto-basso) Dispositivo in spegimento
Intercom Abilitato/Disabilitato 1 tono = abilitato / 2 toni = disabilitato
1 tono Funzione abilitata
2 toni Funzione disabilitata
Dispositivo attivo (Intercom, telefono o connessione Bluetooth)
Dispositivo attivo e batteria scarica
tata
FUNZIONALITA’
Se vuoi questa funzione… …devi fare così
Generali
Accendere il dispositivo Tenere premuto il pulsante “Intercom” per 3 secondi (la luce blu lampeggia)
Spegnere il dispositivo Tenere premuti i pulsanti “Intercom” e “AUX” per 3 secondi (la luce rossa lampeggia
Aumentare il volume Premere o tenere premuto il pulsante “Volume +”
Diminuire il volume Premere o tenere premuto il pulsante “Volume –“
16
tre volte)
Page 17

Telefono cellulare
Rispondere ad una chiamata Premere il pulsante “Telefono” / pronunciare una parola
Riutare una chiamata Mantenere premere il pulsante “Telefono” / rimanere in silenzio
Chiudere una chiamata Premere il pulsante “Telefono”
Chiamata vocale (in stand by) Premere il pulsante “Telefono” e pronunciare il nome della persona
Richiamata l’ultimo numero (in stand by) Tenere premuto il pulsante “Telefono” per 3 secondi (2 beep di conferma)
Conversazione a tre (pilota-passeggero-
telefono)
Rilasciare la conversazione a tre Premere nuovamente il pulsante “Intercom”
Navigatore GPS
Tutti i controlli sono sul GPS
INTERCOM
Attivare l’Intercom Iniziare a parlare/premere il pulsante “Intercom”
Disattivare l’Intercom Smettere di parlare (dopo 1 minuto la comunicazione si chiude)/ premere il pulsante
MP3 player Bluetooth
Attivare l’MP3 player/Play e Pausa Mantenere premuto il pulsante “Intercom” per 3 secondi
Avanti di una canzone Premere il pulsante “Telefono”
Indietro di una canzone Premere il pulsante “AUX”
Disattivare l’MP3 player Premere il pulsante “Intercom”
Con la chiamata attiva, premere il pulsante “Intercom”
“Intercom”
I
Altri dispositivi Bluetooth (adattatori, ricetrasmettitori)
Connessione e disconnessione Tenere premuto il pulsante “AUX” per 3 secondi
Connessione a lo
Attivazione/ Disattivazione Premere brevemente il pulsante “AUX”
SETUP E ABBINAMENTO (PAIRING)
Entrare in modalità SETUP Tenere premuto il pulsante “Intercom” per 7 sec. con il dispositivo spento
Abbinare un telefono o un Navigatore
GPS
Abbinare un dispositivo Bluetooth In modalità Setup, tenere premuto il pulsante “AUX” no a che la luce Blu e Rossa
In modalità Setup, tenere premuto il pulsante “Telefono” no a che la luce Blu e Rossa lampeggia alternativamente
lampeggia alternativamente
17
Page 18

Abbinare un altro dispositivo BT2 In modalità Setup, tenere premuto il pulsante “Volume +” su uno dei due dispositive e
Reset di tutti i dispositivi abbinati In modalità Setup, tenere premuto insieme i pulsanti “Volume +” e “Volume –“. La
Setup di congurazioni Speciali
Comunicazione a tre 3” sempre attiva In modalità Setup, premere il pulsante “Telefono” per 3 secondi.
Cambiare la sensibilità del Vox
o disattivarlo
Uscire alla modalità Setup In modalità Setup, tenere premuto il pulsante “Intercom” no a che la luce rossa si
“Volume –“ sull’altro dispositivo (le luci Rosse e Blu lampeggiano alternativamente).
Appena l’abbinamento avviene, entrambe le luci rimangono blu sse per un secon-
do.
luce blu rimane accesa ssa per due secondi.
Luce blu accesa ssa per 3 secondi=attiva
Luce blu lampeggiante lungo= disattiva
In modalità Setup, premere il pulsante “AUX” (Luce blu ssa)
Adesso premere “Volume +” o “Volume -“ per aumentare o diminuire la sensibilità. Premere nuovamente “AUX” per confermare e tornare alla modalità Setup (luce
Rossa ssa)
Luce blu lampeggiante:
Un lampeggio = VOX disattivo
Due lampeggi = sensibilità molto bassa
Tre lampeggi = sensibilità bassa
Quattro lampeggi = sensibilità media
Cinque lampeggi = sensibilità alta
spegne e la blu inizia a lampeggiare.
Certicazioni e Conformità di Sicurezza
CE/Informazioni generali
Questo prodotto è conforme alla direttiva 99/05/CE e può essere liberamente utilizzato nei paesi dell’UE.
Agli utenti non è permesso effettuare variazioni o modiche di qualsiasi tipo all’apparecchio. Queste ultime, se non
espressamente approvate dal produttore, annullano la possibilità di utilizzo dell’apparecchio ed invalidano la garanzia.
Per ulteriori informazioni, fate riferimento al nostro sito web
www.cte.it
18
Page 19

INDEX
Technical specications of Midland BT2 ...........................................................................................3
Structure of the operator’s manual ................................................................................................... 4
Charging batteries ............................................................................................................................ 4
Description of the unit and installation brackets ............................................................................... 4
Typical congurations of BT2 ........................................................................................................... 6
General considerations on priority .................................................................................................... 6
Switching your Midland BT2 on and off ............................................................................................7
Pairing with Bluetooth devices..........................................................................................................7
Adjusting the volume ........................................................................................................................ 9
Using the features of the Bluetooth devices .....................................................................................9
Using the wired audio input ............................................................................................................ 13
Using a Two Way Radio transceiver ...............................................................................................13
Special congurations ....................................................................................................................13
Recommendations for specic uses ............................................................................................... 14
Light and sound signals/Unit functions ...........................................................................................16
UK
1
Page 20

2
Page 21

Midland BT2 Intercom
Thank you for purchasing the Midland BT2 Intercom, the rst truly wireless multimedia system for bikers.
The Midland BT2 is designed to be tted directly on to your helmet and to be used for communications with Bluetooth devices like
mobile phones, GPS Sat-Navs and MP3 players. If desired, it can also be paired with another Midland BT2 unit and used as wireless
Rider/Pillion Intercom system or Rider to Rider in bike-to-bike mode, within a maximum range of 200 meters. The Midland BT2 is
also supplied with a wired connection that can be used to connect an iPod/MP3 player or PMR446 transceiver,which will then enable
bike-to-bike communications up to a maximum range of 5 km.
UK
Midland BT2 is available in two versions:
Single BT2 Intercom kit with one unit only ›
BT2 Intercom TWIN with two units ›
Depending on the model purchased, the package contains
the following parts:
BT2 Intercom
1 BT2 communication unit ›
1 audio kit with two stereo speakers, microphone with ›
boom and wire microphone
1 plate with bi-adhesive strip to x the unit onto the helmet ›
1 clamp to x the unit onto the helmet ›
1 stereo audio cable to connect an iPod/ or other models ›
of MP3 players
1 miniUSB wall-mounting power supply ›
Wind Suppressing Foam Microphone Cover, Allen key and ›
Velcro strip for assembly
BT2 Intercom TWIN
2 BT2 communication units ›
2 audio kits with two stereo speakers, microphone with ›
boom and wire microphone
2 plates with bi-adhesive strip to x the unit onto the hel- ›
met
2 clamps to x the unit onto the helmet ›
2 stereo audio cables to connect an iPod/ or other models ›
of MP3 players
1 miniUSB wall-mounting power supply with double plug ›
Wind Suppressing Foam Microphone Cover, Allen key and ›
Velcro strip for assembly
The units included in the TWIN kit are already paired and
can therefore be immediately used in the Intercom mode.
Technical specications of Midland BT2
General:
Bluetooth ver. 2.0 stereo (Headset/Handsfree/A2DP pro- ›
tocol)
AGC system automatically controls the volume in relation ›
to background noise
Voice (VOX) or manual communications option ›
Private or shared (3-way communications) call mode ›
Manual controls to enable: telephone, intercom and wire ›
connection
Fully waterproof ›
Lithium battery with 8 hours talk time (1 week in standby ›
mode)
Recharge time: app. 4 hours ›
Dimensions. Length: 87 mm – Width: 47 mm - Thickness: ›
16 mm
Bluetooth connections:
Identical device for Rider to Pillion or Bike-to-Bike Intercom ›
mode, up to a maximum range of 200 meters
Bluetooth devices ›
- Mobile phone, GPS (Garmin Zumo and TomTom Rider 1
and 2), MP3 player Stereo (with A2DP protocol)
- PMR446 transceivers (with built-in or external Bluetooth
connection) for group bike-to-bike communications
Wire connections:
For stereo audio input (iPod/MP3 player) ›
For PMR446 transceivers (with optional cable) ›
Attention: before using BT2 for the rst time, remember
to recharge it for at least 4 hours.
Attention: Midland BT2 is designed to withstand rain and
water. However, if it is raining, always verify that the rubber caps protecting the sockets are fully tted.
3
Page 22

Structure of the operator’s manual
This manual is divided into 5 main sections:
Description of the unit and installation brackets ›
Pairing with Bluetooth devices ›
Using the features of Bluetooth devices ›
Using the wire audio input ›
Special congurations ›
Description of the unit and
installation brackets
Description of the BT2 unit
The BT2 has 5 multifunction buttons on the front and 3 wired
connections in the lower section.
To easily congure your BT2 unit, please follow the sequence
of steps described below:
Step 1: › x the unit onto your helmet following the instruc-
tions provided in the “Fixing the unit onto the helmet”
section.
Step 2: › pair the Bluetooth devices (for example a mobile
phone or GPS) with the BT2 unit. Follow the procedure de-
scribed in the chapter: “Pairing with Bluetooth devices”,
choosing the Bluetooth devices you are using.
Step 3: › after completing the pairing operation, go to the
“Using the features of the Bluetooth devices” section,
choosing Bluetooth devices you are using.
Step 4: › if you have a wired audio input, read chapter “Us-
ing the wire audio input”.
Step 5: › for information on how to use the advanced features, read the “Special congurations” chapter.
Charging batteries
Make sure that the unit is fully charged before use. Allow at
least 5-6 hours for a full charge before using the unit for the
rst time. Normally, after the rst time, it takes 4 hours for a
full charge.
Charge the unit by inserting the wall-charger into the charging
socket (lift the rubber cover to insert the plug).
The red LED on the unit will start ashing when charging ›
begins.
Allow the headset to charge until the red LED turns off. ›
When the charge is complete, release the headset from ›
the charger.
4
Volume +
Phone
Intercom
Charger
Audio Kit
Description of the button features:
Telephone: can be used to enable/disable and manage ›
mobile phone features
Intercom: can be used to enable/disable the Intercom fea- ›
ture and manage 3-way communications
AUX: can be used to enable/disable the wired audio input ›
Volume+: enables you to increase the volume ›
Volume -: enables you to decrease the volume ›
Description of the wired connections
Charger jack: enables to recharge the unit using a stand- ›
ard miniUSB power supply
Audio kit jack: enable to connect an audio kit (stereo head- ›
set and microphone)
Auxiliary audio jack (AUX): can be used to connect an audio
source, like a stereo iPod/MP3 player or PMR446 transceiver
Volume -
AUX
Red and
Blue Light
IPOD/MP3
PMR446
Page 23

Description of the audio kit
The audio system includes two ultra-at stereo speakers and
two interchangeable microphones, which are both supplied
with a bracket and wire connection.
Fixing the stereo speakers. The two stereo speakers have
a Velcro/adhesive strip that aids their xing to your helmet.
Beware to not completely cover your ear with the speak-
ers, you must always be able to listen to the trafc sound
and indication.
The microphone can be xed onto the helmet in two ways:
Boom Microphone. Place the section with the Velcro/adhesive strip between the padding and the rigid cover of the
helmet, so that the microphone is correctly positioned in front
of your mouth and that the white symbol is facing your mouth.
This type of microphone is suited for Open Faced and Flip
Front helmets.
Wire microphone. Using the Velcro/adhesive strip, place the
microphone inside the helmet in front of your mouth. This type
of microphone is more suited for Full Faced helmets.
The mini connector on the microphone allows you choose the
microphone that best suits the helmet you are using.
Plate with bi-adhesive strip
The xing plate has a bi-adhesive strip on one of its sides. To
x the plate in place, clean the application area on the helmet surface, remove the bi-adhesive lm and place the xing
plate on the helmet by keeping it contact with the surface for
a few seconds.
Clamp
Using the Allen Key, loosen
the two screws on the clamp
and place the rear plate be-
tween the helmet padding
and the external rigid protection. Then, tighten the two
screws in order to rmly x
the clamp in place.
Fitting and removing your Midland BT2
The BT2 can be easily tted onto the helmet by sliding it
downwards so that it ts into the slot of the selected xing
device (plate with bi-adhesive strip or clamp).
UK
The audio kit must then be connected to the central jack of
the Midland BT2 Intercom unit using the “L” shaped connector. This connector is very exible and can be easily adapted
to most commercial helmets.
Description of the installation brackets
The Midland BT2 can be xed onto the helmet in two different
ways: By either using the plate with bi-adhesive strip, or the clamp.
These methods allow you to safely “x” the BT2 unit onto your helmet and to remove it at any time in order to recharge or store it.
BT2 is maintained in position thanks to the xing clip located
on the upper section (A).
A
To detach the BT2, simply press the xing clip and push the
unit upwards.
5
Page 24

Typical congurations of BT2
1. Single Midland BT2, “Rider
only”
Bluetooth connection for mobile ›
phone, GPS and MP3 player or a
mobile phone with MP3 feature (to
listen to music)
Wired connection for stereo music ›
player (iPod/MP3 player)
Bike to bike communication sys- ›
tem that allows two riders to communicate up to maximum distanc-
es of 200 meters
2. Midland BT2 paired, “Rider &
Pillion”
Rider to Pillion intercom feature ›
Rider can connect the GPS sys- ›
tem and both Rider and Pillion
can connect/attach their own MP3
Players/Mobile phones etc to their
own headsets and still be able to
communicate with each other via
the Intercom.
Wired connection for stereo music ›
player (iPod/MP3 player)
3.
Midland BT2 Bike-to-bike; “Riders & pillions equipped with Midland BT2 and PMR446 transceiv-
ers”
Rider to Pillion intercom system ›
Bluetooth connections for Rider ›
and Pillion depending on needs:
each connection is t for mo-
bile phone, Rider’s GPS system
and MP3 stereo player or mobile
phone with MP3 feature (to listen
to music)
Wired connection for stereo music ›
player (iPod/MP3 player)
Group communication (“bike to ›
bike”): it is possible to connect a
PMR446 transceiver to all motor-
bikes in order to communicate as a
group. The PMR446 transceiver can
be connected in Bluetooth or wired
mode to both the rider’s or pillion’s
unit. There is no limit to the number
of people who can communicate
whilst using PMR446 to communi-
cate whilst in a group.
General considerations on priority
The Midland BT2 is a Bluetooth unit that can be paired with
other Bluetooth devices with different features: mobile phone,
GPS, MP3 player, etc...
Depending on the type of device, Midland BT2 assigns operating priorities; for example calls have a higher priority compared to music. This means that if a call arrives whilst you are
listening to music, your music will automatically be interrupted so that you can answer the call. There are three priorities
available to meet the most common requirements.
6
Devices with (high) priority 1
Because of their use, mobile phones and GPS Sat-Navs always have a higher priority compared to other connected devices. Therefore, an incoming call or instruction from a GPS
always interrupts all other active communications. Devices
with priority 1 must be paired with the BT2 unit using the
“Phone” button.
Devices with (Medium) priority 2
This priority can be assigned only to another BT2 with Intercom feature. Enabling the Intercom feature disables all other
Page 25

communications except those with (High) priority 1. This is
true if you haven’t changed the default setting, following the
procedure described in the nal chapter “Special Conguration”. The two Midland BT2 units can be paired by means of
“Volume +” and “Volume –“ buttons.
Devices with (Low) priority 3
MP3 players, Bluetooth adapters or PMR446 transceivers
have the lower priority, which means that all communications
with these devices will be disabled if a call or GPS communication (priority 1) arrives or if the Intercom feature is enabled
(priority 2).
Devices with priority 3 must be paired with the BT2 unit using
the “AUX” button.
Midland BT2 can also be paired with audio devices by means
of a wired connection. This connection has the lowest priority and is disabled every time a Bluetooth connection is ena-
bled.
Pairing with Bluetooth devices
Your Midland BT2 is a Bluetooth unit that can be paired with
other Bluetooth devices.
Before performing this procedure, it is necessary to set BT2
into “Pairing mode” (Setup).
The only operations permitted in this mode are the pairing
ones. To use the BT2 unit after pairing it with the desired devices, it is necessary to quit the “Setup” mode and switch to
the “Operating” mode.
Setup mode
Switch off the BT2 device. Press and hold down the central
button (Intercom/on) for about 7 sec. until the red indicator
switches on permanently. BT2 is now in “Setup” mode and
can therefore be paired with other devices.
UK
Switching your MIDLAND BT2 on and off
BT2 can be switched on by means of the central button la-
beled “Intercom”.
To switch off the unit you must use a combination of two
buttons (intercom+AUX), thus lessening the chances that you
might turn off the unit accidentally (especially whilst wearing
heavy gloves).
OFFON
Switching the unit on:
Press and hold Intercom button down for approximately 3 ›
seconds until the BLUE indicator lights.
Switching the unit off:
Press and hold both “Intercom” and “AUX” buttons to- ›
gether for approximately 3 seconds until the RED indicator
ashes 3 times.
Pairing the unit with another BT2 unit
The two units supplied in the Midland BT2 Intercom TWIN
kit, are already paired and ready for use, which means
that it is not necessary to perform this procedure.
If the devices are not part of the same kit, or one of the BT2
units has been purchased separately, you need to pair them
in order to be able to use the Intercom function.
Place both BT2 units in Setup mode (red indicator permanently on)
Press the “Volume +” button on the rst unit until the RED and
BLUE lights begin to ash rapidly and alternately.
Then press the “Volume –“button on the second unit until the
RED and BLUE lights begin to ash rapidly and alternately.
Now both BT2 units are trying to pair to each other.
When successfully paired, each device will light the BLUE
light for 1 sec and go back to setting mode (red light always
on) waiting for additional pairing or setting procedures.
Pairing the unit with your mobile phone
1.
Enable the Bluetooth device search feature on your mobile
phone. As this procedure varies according to the brand and
model of the mobile phone, refer to the manual supplied to
your particular phone for further information.
7
Page 26

2. Set the BT2 unit in “Setup” mode, then press the “Phone” button on the unit until the red and blue indicators start ashing.
3. After a few seconds the mobile phone will display “Midland
BT2”. Select it and follow the instructions provided in your
mobile phone manual to accept the pairing. When prompted,
enter the pairing code, which is 0000 (four zeroes). Your mobile phone should then display a conrmation message if the
pairing operation has been successfully completed.
4. The BT2 unit returns to the Setup mode (red indicator permanently on) to indicate that it is ready to be paired with other
devices
If you pair the BT2 unit with a mobile phone, you will not be able
to pair it with a GPS Sat-Nav, because both these devices are
assigned (high) priority 1.
This problem can be easily solved by pairing your mobile phone
directly with your GPS Sat-Nav and then pairing the GPS with
your Midland BT2 using the above procedure. In this case, the
mobile phone features will be managed by the GPS Sat-Nav.
Pairing the unit with a GPS Sat-Nav
It is generally possible to pair the BT2 unit with all GPS Sat-
Navs that support Bluetooth earpieces.
Midland BT2 has been successfully tested for use with GPS
ZUMO Sat-Navs manufactured by Garmin and TOMTOM
Rider 1 and 2 Sat-Navs.
1.
On your GPS Sat-Nav, enable the Bluetooth earphone search
feature. As this procedure varies according to the brand and
model of GPS, we recommend you refer to the manual supplied with your GPS Sat-Nav for further information.
2. Ensure that the BT2 is in Setup mode (Red light on) &
Press the “Phone” button on the BT2 unit until the red and
blue indicators start to ash.
3. After a few seconds the GPS Sat-Nav will display “Midland
BT2”. Select it and follow the instructions provided in the
GPS Sat-Nav manual to accept the pairing. When prompted, enter the pairing code, which is 0000 (four zeroes).
The GPS should then display a conrmation message if
the pairing operation has been successfully completed.
4. The BT2 unit returns to the Setup mode (red indicator permanently on) to indicate that it is ready to be paired with
other devices.
If you pair the BT2 unit with a GPS Sat-Nav, you will not be
able to pair it with a mobile phone, because both these devices are assigned (high) priority 1.
This problem can be easily solved by pairing the mobile
8
phone directly with the GPS Sat-Nav and by then pairing your
GPS with the Midland BT2. In this case, the mobile phone
features will be managed by the GPS Sat-Nav.
Pairing the unit with a Bluetooth Enabled
MP3 player
NB: Not all MP3 players are “Bluetooth Enabled” Please
check your MP3 players specication before attempting
to connect to the BT2 via Bluetooth.
1. On you MP3 player enable the Bluetooth device search
feature. As the procedure varies according to the brand
and model, refer to the manual supplied with your MP3
player for further information.
2. Ensure that the BT2 is still in Setup mode (Red light on) &
Press the “AUX” button on the BT2 unit until the red and
blue indicators start to ash.
3. After a few seconds the MP3 player should display “Mid-
land BT2”. Select it and follow the instructions provided in
the MP3 Player manual to accept the pairing. If requested,
enter the pairing code, which is 0000 (four zeroes). The
MP3 player should then display a conrmation message if
the pairing operation has been successfully completed.
4. The BT2 unit returns to the Setup mode (red indicator permanently on) to indicate that it is ready to be paired with
other devices.
Pairing the unit with other Bluetooth devices
The Midland BT2 can also be paired with other Bluetooth devices such as non-Bluetooth enabled products connected to
Bluetooth adapters (for example any personal audio product unit
connected to a BPA100) or Two Way Radio transceivers with
built-in Bluetooth connections (for example the Midland 445BT).
1. Enable the pairing mode on the Bluetooth device. As the
procedure varies according to the brand and mode, refer
to the manual supplied with the Bluetooth device for further
information.
2. Ensure that the BT2 is in Setup mode (Red light on) &
press “AUX” button on the BT2 unit until the red and blue
indicators start to ash.
The pairing will be completed in a few seconds and the BT2
3.
unit then returns to the Setup mode (red indicator permanently
on) to indicate that it is ready to be paired with other devices.
Page 27

Attention: the device search procedure (red and
blue lights ashing) continues for approximately 2
minutes. If no device is found within this interval of
time, the BT2 returns to the Setup mode (red light
permanently on). To start again the search, repeat
the pairing procedure from step 2. To cancel the
pairing procedure (red and blue indicators ashing)
and return to the Setup mode at any time, press
“Intercom” button twice.
Resetting all paired devices
Sometimes you may nd it necessary to delete all the pairing
references stored in the BT2 unit (reset operation).
To perform this operation, simultaneously press and hold
down the “Volume +” and “Volume –“ buttons for 4 seconds.
The Blue Light will be lit on for 1 sec.
This procedure deletes all the paired Bluetooth devices
stored in the memory and it is therefore possible to start a
new “clean” pairing session.
Exiting from the Setup mode
After you have paired the desired Bluetooth devices, you
must quit the “Setup” mode in order to be able to use your
BT2.
Press and hold the Intercom button (centre button) for 3 sec-
onds. The red indicator switches off and the blue one starts to
ash. You can now use your BT2.
Reconnecting the unit to bluetooth devices
After successfully pairing your devices, you can switch them
off and on without having the repeat the pairing procedure.
If a connection failure occurs between the two devices (for
example because one device is switched off or you are not
within the maximum range), it is not necessary to repeat the
pairing procedure.
Simply switch the device on again or move within the maximum range. If the connection cannot be re-established automatically, select the device from the “devices menu” of your
Bluetooth device (for example mobile phone, MP3 player,
etc…) and re-enable the connection.
Adjusting the volume
Y
our Midland BT2 uses AGC technology, which automatically
adjusts the listening volume in relation to background noise.
However, it is also possible to manually adjust the volume by
means of the “Volume+” and “Volume -“buttons.
For example, you can manually adjust the maximum volume in
very noisy environments (for example when travelling at high
speeds), to allow the AGC automatic system to change the volume and use the manually set volume as maximum setting. This
operation is useful because each type and standard of helmet is
inuenced in different ways by wind and background noise.
Using the features of the bluetooth
devices
Using the intercom feature
To use the Intercom feature, be sure both units are turned
on and correctly paired together.
If you have purchased a “single” version, follow the pairing
procedure described in section “Pairing the unit with an-
other BT2 unit” above.
Priority: Intercom communications always have a higher
priority, compared to other communications, with the only exceptions being Telephone and GPS Sat-Nav. Therefore, the
Intercom feature automatically disables all other communica-
tions.
The Intercom feature is disabled only when an incoming call
or voice communication is received from the GPS Sat-Nav,
and is automatically re-enabled as soon as these communi-
cations end.
Attention: some mobile phone release the line after a few
seconds, which means that the Intercom feature may not
be immediately available.
The Intercom feature can be enabled in two ways:
Manual activation:
Press “Intercom” button, on one of the two units. Commu- ›
nication is enabled and remains active until you press the
“Intercom” button again. You will hear 1 audio tone when
the Intercom feature is enabled and 2 audio tones when it
is disabled.
UK
9
Page 28

- Voice activation (VOX):
This is the default enabling mode. To start an Inter- ›
com communication, simply start talking. The communication will remain active for all the time you
are talking. If there is no conversation, the Intercom feature is automatically disabled after 1 minute.
To re-enable it, simply start talking again. When the Intercom is “VOX” activated, you can decide to disable it before
the predened time, simply by pressing the Intercom but-
ton once.
To disable the voice enabling mode, follow the instructions ›
provided in the “Special congurations” section.
Attention: when you use the Intercom feature, the rst
time you activate it (voice or manual) the communication
will be established with a short delay because of the fact
that the devices must rst recognize each other. After
that the communication will be immediately established.
Two Midland BT2 units can communicate up to a maximum
range of approximately 200 meters outdoors. It is therefore
possible to use BT2 as Intercom system for “BIKE-TO-BIKE”
communications between two riders. The maximum range
depends on the environment the units are being used in.
Using the telephone feature
To use the Telephone feature, be sure both units are turned
on and correctly paired together, following the pairing procedure described in section “Pairing the unit with a mobile
phone”.
Attention: information provided in this section refers to
the establishment of a direct communication between
the mobile phone and the BT2 unit. If the mobile phone is
connected via the GPS Sat-Nav, the mobile phone features can only be managed via the GPS itself.
Priority: Calls are always private and have a high priority,
which means that all other communications are temporarily
disabled when a call arrives and automatically re-enabled
once the call ends.
after the third Ring. (Be aware that some phones may not
support voice answering)
Manually:
Tap the “Phone” button and start speaking.
Attention: Remember that you can answer the call only
after the third Ring.
Rejecting a call
If you don’t wish to answer, you can let the mobile phone ring
or press the “Telephone” button for a few seconds (you will
hear one audio conrmation tone).
Making a call
There are several ways to make a call.
From the mobile keypad:
Dial the number on the mobile keypad:
Press “Send” on the mobile phone. ›
This way of calling should never be carried out whilst in ›
charge of a moving vehicle.
To redial the last number:
Press and hold “Telephone” button for 3 seconds in order ›
to redial the last number (you will hear one audio conrmation tone).
To make a voice call:
Briey press “Telephone” button. If your mobile phone sup- ›
ports voice calls, you will be asked to spell the name of the
contact you wish to call.
The correct operation of this feature depends on the type of
helmet used (Open or closed faced) and on the speed you
are travelling at. We suggest you perform a few tests to determine the best settings for you as an individual.
Attention: if you are listening the music using an MP3
Player connected via Bluetooth (A2DP protocol), you will
not be able to use the “Dial last number” and “Voice call”
commands, because these buttons are used to control
the MP3 player. Therefore, if you want to make a call, you
must rst disable the music by pressing the “Intercom”
button for 1 second (you will hear two audio conrmation
tone) before making the call.
Answering a call
When you hear the phone ring, you can answer in two different ways:
Vocally:
Simply say one word to answer the call and start talking. Remembering that you can only do this if you answer the call
10
Ending a call
There are several ways to end a call:
Wait for the called person to end the call. ›
Press the Telephone” button for 3 seconds (you will hear ›
an audio conrmation tone).
Press “End” button on the mobile phone. (This way of end- ›
Page 29

ing a call should never be carried out whilst in charge of a
moving vehicle)
3-way telephone communications
The Intercom feature is temporarily disabled when a phone
call is in progress. However, it is possible to add other parties to the conversation by simply enabling the 3-way com-
munication feature. After the initial call has been established,
briey press the “Intercom” button on the BT2 device that has
received the call (you will hear an audio conrmation tone). To
re-establish a private conversation, press the “Intercom” button again (you will hear two audio conrmation tones).
Using the MP3 player feature of the mobile
phone
Many mobile phones are now designed to be used as stereo
MP3 players. Your Midland BT2 fully supports the A2DP and
AVRCP protocols that enable you to listen to stereo music
and remotely control your mobile phone’s MP3 player.
You can even use the buttons on the BT2 unit to control the
following play options:
Play, Pause, Forward and Backward.
Attention: The remote control is enabled only if the MP3
player device supports the AVRCP protocol.
To open the Intercom communication just talk or , for a manual activation, disable rst the MP3 player , pressing the “Intercom” button and than press it again to open the Intercom.
The music listening mode has the lowest priority compared to other connections (such as phone calls or Intercom conversations). Therefore, the music will always
be disabled when another type of communication is ena-
bled.
Using the features of your GPS sat-nav
To use the features of your GPS Sat-Nav, be sure both units
are turned on and correctly paired together, following the pairing procedure described in the “Pairing the unit with a GPS
Sat-Nav” section.
Priority: communications with the GPS Sat-Nav have the
highest priority, which means that the enabling of these communications causes the temporary disabling of
all other communications (Intercom, music or two way
radiotransceiver). Once the GPS communications have
ended, all other communications are automatically re-
enabled.
Listening to voice instructions from your GPS Sat-Nav
Trafc directions from your GPS Sat-Nav will always be immediately transmitted by temporarily disabling all other ac-
tive communications. Once these voice directions have been
transmitted, your BT2 will automatically re-enable all existing
communications.
UK
Available controls:
To enable your connected MP3 Player, press and hold ›
down the “Intercom” button for 3 seconds.
To play/pause music, press and hold down the “Intercom” ›
button for 3 seconds.
To skip forward to the next song, briey press the “Tele- ›
phone” button.
To skip backwards to the previous song, briey press the ›
“AUX” button.
To disable the MP3 player, press the “Intercom” button (2 ›
beeps will conrm it)
Listening to music from your GPS Sat-Nav
The most popular GPS devices usually enable you to listen
to music when no directions are being given. In this case, the
communication with the GPS is always active and has the
highest priority compared to all other active devices.
However, it is possible to enable the Intercom feature at
any time, while listening to music, simply by pressing the “Intercom” button to open a 3 way communication. For further
information, see the “3-way communications with the GPS
Sat-Nav” section below.
Using a mobile phone with a GPS Sat-Nav
If you have connected a GPS Sat-Nav to your Midland BT2,
11
Page 30

you will not be able to connect the mobile phone directly to
the unit; you must instead, connect the phone to the GPS
Sat-Nav. By doing so, all the mobile phone features will be
managed directly by your GPS Sat-Nav. For information on
how to pair a mobile phone and answer/make calls, see the
manual supplied with your particular Sat-Nav.
3-way communications with your GPS Sat-Nav
The Intercom feature is temporarily disabled when communication with your GPS Sat-Nav is active (street indication or
music).However it is possible to allow the passenger to listen,
by enabling a “3-way communication”.
When the communication with the GPS is active, briey press
the “Intercom” button on the BT2 device connected to the GPS
Sat-Nav (you will hear an audio conrmation tone). The pillion
will now be able to listen to the same information/music that the
rider hears. To return to the private mode, press the “Intercom”
button once more.(you will hear two audio conrmation tones).
Using other bluetooth devices
Midland BT2 can also be paired with other Bluetooth devices
like MP3 players, Bluetooth adapters (for example BPA100)
or Two Way Radio transceivers with built-in Bluetooth (for example Midland 445BT).
This can be a great advantage as it is possible to then increase your “Bike to Bike range” up to 5kms!
To use these devices, be sure your BT2 and other device are
both turned on and correctly paired together, following the
pairing procedure described in the “Pairing the unit with other
Bluetooth devices” section.
Paired devices can be enabled or disabled without canceling
the pairing by simply pressing the “AUX” button.
Disabling: press “AUX” button for 3 seconds (you will hear ›
two audio conrmation tones)
Enabling: press “AUX” button for 3 seconds (you will hear ›
one audio conrmation tone)
In this case the device is simply temporarily disconnected from
the BT2 unit, although the devices continue to be paired.
Priority: communications with other Bluetooth devices have
a lower priority compared to those established with a mobile
phone, GPS Sat-Nav and Intercom system. This means that
communications will always be disabled when a call arrives,
when the GPS Sat-Nav transmits instructions, or when the
Intercom feature is enabled.
Attention: if you use your GPS Sat-Nav to listen to music
12
(the communication with the GPS Sat-Nav is always active), all communications with other Bluetooth devices will
be disabled, as they have a lower priority.
Using a Bluetooth MP3 player
The Midland BT2 fully supports the A2DP protocol that enables you to listen to stereo music and manage the main features of your MP3 player. It’s even possible to use the buttons
on the BT2 unit to manage the following play features: Play,
Pause, Forward and Backward.
Available controls:
To enable your connected MP3 Player, press and hold ›
down the “Intercom” button for 3 seconds.
To play/pause music, press and hold down the “Intercom” ›
button for 3 seconds.
To skip forward to the next song, briey press the “Tele- ›
phone” button.
To skip backwards to the previous song, briey press the ›
“AUX” button.
To disable the MP3 player, press the “Intercom” button (2 ›
beeps will conrm it)
To open the Intercom communication just talk or , for a manual activation, disable rst the MP3 player , pressing the “Intercom” button and than press it again to open the Intercom.
It is not possible to garantee the full compatibility with
all the MP3 Bluetooth player in the market, because they
often use different or proprietary procedures.
Using a Bluetooth adapter:
Your Midland BT2 can be connected to an external Bluetooth
adapter (such as a BPA100) to use with audio devices without
built-in Bluetooth connection (like Two Way radio transceivers
or older GPS variants).
Page 31

Using a Bluetooth Enabled Two Way Radio
The Midland BT2 can be connected to Bluetooth Enabled
Two Way Radio (such as Midland 445BT) and used for biketo-bike communications. Pair your BT2 with the Radio, as described in the “Pairing the unit with other Bluetooth devices”
chapter, then enable the Bluetooth connection by pressing the
button on the radio. This will then allow you to transmit over
much greater distances, with more people at once, whilst still
enjoying the exibility and freedom of movement afforded you
by the wireless Bluetooth Connection.
Using the wired audio input
Your Midland BT2 is also tted with a wired audio input
(labeled AUX), that can be used to connect a stereo audio
source, like an iPod (or any other MP3 Player) or a PMR446
transceiver for bike-to-bike communications.
Priority: the wired audio input has the lowest priority when
compared to the other Bluetooth connections (including the
Intercom) and will therefore always be disabled when another
Bluetooth communication is opened.
Listening to music
To listen to music from the wired input, connect the audio
source using the cable supplied with the BT2 unit. The volume level is automatically adjusted by the AGC system,
which means that you only need to adjust the volume of your
iPod/MP3 player to a level that will allow you to listen to music
in normal speed.
Attention: never set the volume of the MP3 Player to the
maximum possible.
Hint: We recommend that you perform a few tests adjusting the
volume of your iPod/MP3 player so at the normal speed the
Headset volume is suited to your needs.
The AGC system will automatically increase the volume on
higher speed. Make a note to remember this setting for future
trips.
Attention: the volume adjustment, (“Volume+” and “Volume –“) buttons, cannot be used to adjust the volume of
the wired audio source(eg MP3 player), only the volume
of the BT2 that the device is connected to.
Enabling/disabling the wire input
The wire input can be enabled and disabled by means of the
“AUX” button.
Disabling: briey press the “AUX” button (you will hear two ›
audio conrmation tones).
Enabling: briey press the “AUX” button (you will hear one ›
audio conrmation tone).
UK
Using a Two Way Radio transceiver
To be able to use the transceiver, it is necessary to purchase
a specic cable (sold separately) in order to connect the radio
to your Midland BT2:
NB, Some manufacturers radios use a different pin con- ›
guration, so we recommend that you ask your dealer as
to which cable is best suited to your needs
To communicate via the attached radio, press the transmission Press Top Talk (PTT) button to speak and release it to
listen. It is not possible to talk and listen simultaneously. The
cable connected to the transceiver has a PTT button that can
be placed on the handlebar of your bike or held in your hand
(If you are the pillion rider)
Adjust the volume of the transceiver to your needs, remembering that the volume adjustment is controlled by the automatic AGC system and that it will therefore be automatically
increased in relation to background noise.
Special congurations
Your Midland BT2 can be congured with customized settings
to suit the needs of even the most demanding bikers.
In particular, expert users may congure the following “ad-
vanced” features:
Permanently enable 3-way communications ›
Voice enable Intercom (VOX) ›
Adjust the microphone sensitivity
Disable the VOX feature
Permanently enabling 3-way communications
Bluetooth communications with a (low) priority and audio communications transmitted by the wired connection are usually
disabled when the Intercom feature is enabled. By enabling
this feature, you can maintain active communications whilst
simply transferring the low priority feature to the other user
(eg pillion).
This feature can be useful, for example, if you wish to main-
13
Page 32

tain Intercom communications and simultaneously talk using
a transceiver radio connected via Bluetooth or wired connection.
In addition it also allows you to share the music between Rider
and Pillion. Considering that the music quality is “mono” for
the second person who will share the music (see the chapter
“Share the music between driver and passenger” below).
Enabling/disabling 3 way communications
Enter the Setup mode:
Switch your BT2 off. Press and hold down the central but- ›
ton (Intercom/on) until the red light switches on permanently.Your BT2 is now set in Setup mode.
Simultaneously press and hold down the “Telephone” and ›
“AUX” buttons for at least three seconds.
If the feature was enabled, it will be disabled (steady blue ›
light for 2 seconds).
If it was disabled, it will be enabled (blue light long ashes). ›
Quit the Setup mode by pressing the “Intercom” button for ›
a minimum of 3 seconds. The red light switches off and the
blue light starts ashing. You can now use the BT2.
Attention: if the Bluetooth device is a stereo MP3 player,
communications will always be disabled when the Intercom feature is enabled. (Only “mono” devices support a
permanently active 3-way communication).
Enabling the intercom by voice (vox)
The Intercom feature can be enabled both manually and vocally (VOX). The VOX activation is inuenced by the background noise and therefore by the speed, type of bike and
soundproof features of your helmet.
For optimum results, it is possible to choose one of the following four microphone sensitivity levels: high, medium, low and
very low. The high settings suited for noiseless and protected
bikes like scooters and fully faired/screened bikes. The low
setting is more suited for naked/noisy bikes. The default setting of BT2 is “medium”.
It is also possible to disable the VOX feature in order to
activate the Intercom and phone call answering features in
manual mode only.
Adjusting the sensitivity of the microphone (VOX)
1) Enter the Setup mode: Switch your BT2 off.
Press and hold down the central button (Intercom) until the
red indicator switches on permanently. Your BT2 is now in
“Set up mode”.
14
2) Briey press the “AUX” button once, the red indicator will
turn to steady Blue
3) Now, press “Volume +” or “Volume -“to increase or reduce sensitivity. Every time you press the Volume buttons
the RED light will ash for conrmation. When you reach
the end of the upper and lower limit, the RED light will not
ash.
4) Press again the AUX button and the Blue light will ash
several times, in order to let you know the selected sensitivity: once = VOX disabled / Twice = very low sensitivity
/ 3 times= low sensitivity / 4 times= medium sensitivity / 5
times = high sensitivity / Default = medium sensitivity
5) The light indicator is now back to steady RED (“Set up
mode”) and the changes are conrmed
6) If needed, you can adjust again the sensitivity repeating
the steps from point 2.
7) Now quit the Setup mode by pressing and holding down
the “Intercom” button for at least 3 seconds. The red light
switches off and the blue light starts ashing. You can now
use the BT2.
Disabling the VOX feature (Intercom and telephone)
In addition to the 4 microphone sensitivity levels, there is a
fth state that allows you to turn off the VOX feature. Follow the same procedure used to adjust the sensitivity of the
microphone (see above) and on step 3 press the “Volume -”
to reduce the sensitivity till the RED light stop ashing. Press
now the “AUX” button and the Blue light will ash one time,
this means that the VOX feature is disabled. Follow now the
procedure above from the point 5.
To enable it again, perform the complete procedure above,
choosing one of the other four sensitivity levels available
(from 2 to 5).
Recommendations for specic uses
The section that follows, provides a few useful suggestions on
how to achieve maximum performance from your BT2 unit.
Using a PMR446 transceiver with the Intercom feature
(Rider to Pillion)
If you wish to use a PMR446 transceiver for group communications and simultaneously maintain the Intercom feature
enabled between the pilot and passenger, you must remember that the Intercom feature is enabled every time you speak
by means of the BT2’s VOX feature.
Page 33

Consequently, radio communications will be disabled whilst
you are talking with your pillion, because they have a lower
priority compared to Intercom communications.
This can be prevented in two ways, which are:
Disabling the VOX feature
Disable the VOX feature, as explained in the previous section, to make sure that the intercom will not automatically be
activated when you speak on the PMR446. To enable the Intercom feature when using this conguration, you will have
to press Intercom button manually. (This operation disables
radio communications that will be automatically re-enabled
when the Intercom feature is disabled).
Attention! If you disable the VOX feature, you will only
be able to answer incoming phone calls by pressing the
“Phone” button.
Permanently enabling 3-way communications
If you enable this feature (as explained in the previous section), every time you talk the Intercom is enabled, but the twoway radio transceiver communications are not disabled. This
means that you can share two-way radio communications
between Rider and Pillion.
Share the music between Rider and Pillion
If you wish to share the same music between the Rider and
the Pillion you must follow these simple steps:
Connect the music player to the Rider or Pillion unit, via ›
wired connection trough the AUX plug
Enable the “3 way communications feature” (see the chap- ›
ter above) on the unit which has the music player con-
nected
Activate the Intercom, now the music is shared. ›
Attention: Onlu those who are connected to music by
wire can listen to it in stereo mode.
Attention: It is not possible to share music if the source
is Bluetooth Stereo Player (A2DP)
UK
15
Page 34

LIGHT AND SOUND SIGNALS
LED indication Status
GENERAL
None Unit is switched off or full charged when connected to the power supply
Single Blue ash every 3 seconds Unit being turned on
Triple red ash Unit being turned off
Single Blue ash every 3 seconds
Single Red ash every 3 seconds
RED and BLUE (together) every 3 se-
conds
RED and BLUE (together) and one ash
of RED light every 3 seconds
Single red ash every 2 seconds Unit in charge when connected to the power supply
SETUP
Steady Red Setup mode
Rapid Red-Blue alternating ash Pairing mode (searching for devices)
Steady Blue for two second Successful pairing/ Reset paired devices/Three way enabled
Blue light two time long ash Three way disabled
Audio signals
Ascending tone (low-high) Unit being turned on
Descending tone (high-low) Unit being turned off
Enable/Disable the Intercom 1 tone = enabled / 2 tones = disabled
1 tone Specic feature turned on
2 tones Specic feature turned off
Standby
Standby - low battery
Active (Intercom, phone call or Bluetooth connection in progress)
Active but low battery
Status
UNIT FUNCTIONS
If you want to... …do this
GENERAL
Turn on the unit Press the Intercom button for 3 seconds at least (start Blue ash)
Turn off the unit Press the Intercom and AUX button together for 3 seconds (triple Red ash)
Increase the volume Short or continues press on the Volume Up control
Decrease the volume Short or continues press on the Volume Down control
16
Page 35

MOBILE PHONE
Answer a call Short press of the Phone button / say a word
Reject a call Long press the Phone Button / remain silent until the rings stop
Terminate a call Short press the Phone Button
Voice Dial (in stand by mode) Short press the Phone button and state the name of the person to call.
Redial Last number (in stand by mode) Long press of the Phone button
Conversation among passenger, driver
and the phone
Release the ‘extended’ conversation
above
GPS Navigator
The control is done only by the GPS
INTERCOM
Start using the Intercom Start talking/short press the Intercom button
Stop using the Intercom Stop talking (after 60 sec. you will return to stand by mode)/Short press the Intercom
BLUETOOTH MP3 player
Activate the MP3 player/Play and Pause press and hold down the “Intercom” button for 3 seconds.
Forword (next song) While the music play, short press of the Phone button
Backword (previous song) While the music play, short press of the AUX button
Deactivate the MP3 Player Press the “Intercom” button
OTHER BLUETOOTH DEVICES (dongle, 2way radio)
Connect / Disconnect Long press of the AUX button
During a phone call, short pressure of the Intercom button on the unit which received
the call
Short pressure of the Intercom button
button
UK
WIRED CONNECTION
Activate /Deactivate Short press of the AUX button
SETUP/PAIRING
Enter SETUP mode Press the Intercom button for 7 seconds while the unit is off
Pairing a Phone or a GPS Navigator While in Setup mode, press the phone button until the LED light ash Red and Blue
alternately
Pairing a Bluetooth device While in Setup mode, press the AUX button until the LED light ash Red and Blue
alternately
17
Page 36

Pairing another BT2 unit While in Setup mode, press the Volume + on one unit (the light will ash Red and
Reset all paired devices While in Setup mode, long press he Volume + and he Volume -. On a successful
SPECIAL SETUP CONFIGURATION
3 way conversation always on While in Setup mode, press the Phone and AUX buttons for 3 sec.
Change VOX sensitivity or disable it While in Setup mode, press short the AUX buttons (blue light on).
Exit SETUP mode While in Setup mode, long press the Intercom button. The Red light will turn off and
Blue alternately), press the Volume - on the other unit (the light will ash Red and
Blue alternately). On a successful pairing, both light turn to Blue for one second.
reset, the Blue light will turn on for two second.
Steady Blue for two seconds= activated
Double long ash = deactivated
Now, press “Volume +” or “Volume -“to increase or reduce sensitivity. Press again
the AUX button to conrm the new setting and go back to the SETUP mode (Red
light always on).
Blue light ashing:
Once = VOX disable
Twice = very low sensitivity
3 times = low sensitivity
4 times = medium sensitivity.
5 times = high sensitivity
the Blue light starts ashing.
European CE Notice Certication and Safety Approvals Information
This product is CE marked according to the RTTE Directive (99/5/EC) and is free use in all the EU countries.
Users are not permitted to make any changes or modications to the device.
Modications which are not expressly approved by the producer invalidate the warranty card.
For further information, please go to our website
www.cte.it
18
Page 37

INHALT
Technische Eigenschaften des Midland BT2 ....................................................................................3
Aufbau der Bedienungsanleitung .....................................................................................................4
Laden des eingebauten Akkus ......................................................................................................... 4
Beschreibung der Einheit und Montagehalterung ............................................................................4
Typische Einstellung des BT2 .......................................................................................................... 5
Allgemeine Überlegungen bei der Priorität ....................................................................................... 6
Ihr Midland BT2 ein- und ausschalten ..............................................................................................6
Mit Bluetooth Geräten paaren ..........................................................................................................6
Die Lautstärke einstellen .................................................................................................................. 9
Die Merkmale der Bluetooth Geräte nutzen ..................................................................................... 9
Den Kabel-Audioeingang benutzen ................................................................................................ 12
Ein Funksprechgerät benutzen.......................................................................................................13
Spezielle Kongurationen ............................................................................................................... 13
Empfehlungen für spezielle Verwendungen ...................................................................................14
Licht und Sound Signale / Funktionen der Einheit..........................................................................16
D
1
Page 38

Midland BT2 Intercom
Vielen Dank für den Kauf des Midland BT2 Intercom, dem ersten wahren schnurlos Multimediasystem für Biker. Das Midland
BT2 wurde für den Einsatz direkt am Helm entwickelt und zur Benutzung mit Bluetooth Geräten, wie Mobiltelefone, GPS
Navigationsgeräte und MP3 Player. Auf Wunsch kann es auch mit einem anderen Midland BT2 Gerät verbunden werden und
als schnurlose Sprechanlage zwischen Fahrer/Sozius oder zwischen Fahrer/Fahrer im Motorrad-zu-Motorrad Modus in einem
Radius von 200 Metern verwendet werden. Das Midland BT2 ist auch mit einer Kabelverbindung ausgestattet, um einen iPod/
MP3 Player oder ein PMR446 Funkgerät anzuschließen, welches eine maximale Reichweite von 5 km im Motorrad-zu-Motorrad
Modus erreicht.
Midland BT2 ist in zwei Versionen erhältlich:
BT2 Einzelset mit nur einer Einheit ›
BT2 Intercom TWIN mit zwei Einheiten ›
Je nach gekauftem Modell enthält die Packung folgenden
Inhalt:
BT2 Intercom
1 BT2 Kommunikationseinheit ›
1 Audioset mit zwei Stereo Lautsprechern, Stabmikrofon ›
und Kabelmikrofon
1 Befestigungsplatte mit zweiseitigem Klebeband zur ›
Befestigung der Einheit am Helm
1 Klammer zur Befestigung der Einheit am Helm ›
1 Stereo Audiokabel zum Anschluss eines iPods oder MP3 ›
Players
1 Steckerladegerät mit Mini USB-Stecker ›
Mikrofon Schaumstoffabdeckung zur Unterdrückung von ›
Windgeräuschen, Inbusschlüssel und Klettverschluß für
die Montage
BT2 Intercom TWIN
2 BT2 Kommunikationseinheit ›
2 Audiosets mit zwei Stereo Lautsprechern, Stabmikrofon ›
und Kabelmikrofon
2 Befestigungsplatten mit zweiseitigem Klebeband zur ›
Befestigung der Einheit am Helm
2 Klammern zum Befestigen der Einheit am Helm ›
2 Stereo Audiokabel zum Anschluss eines iPods oder MP3 ›
Players
1 Steckerladegerät mit 2 Mini-USB Steckern ›
Mikrofon Schaumstoffabdeckung zur Unterdrückung von ›
Windgeräuschen, Inbusschlüssel und Klettverschluß für
die Montage
Die Einheiten im TWIN Set sind bereits gepaart und
können sofort für den Sprechverkehr benutzt werden.
2
Technische Eigenschaften des Midland BT2
Allgemein:
Bluetooth Vers. 2.0 Stereo (Headset/Freihand/A2D Protokoll) ›
Das AGC System kontrolliert automatisch die Lautstärke in ›
Bezug auf die Umgebungsgeräusche
Sprachgesteuerte (VOX) oder manuelle ›
Kommunikationsmöglichkeit
Privater oder offener (3-Wege Kommunikation) ›
Anrufmodus
Manuelle Steuerung zum Aktivieren von: Telefon, ›
Sprechanlage und Schnurlosverbindung
Vollständig Wasserdicht ›
Lithium-Polymerakku mit 8 Stunden Sprechzeit (1 Woche ›
Bereitschaftszeit)
Ladezeit ca. 4 Stunden ›
Abmessung. Länge: 87 mm – Breite: 47 mm - Höhe: 16 mm ›
Bluetooth Verbindungen:
Identische Geräte für Fahrer zu Sozius oder Fahrer zu ›
Fahrer Sprechverbindung mit einer maximalen Reichweite
bis zu 200 Meter
Bluetooth Geräte ›
- Mobiltelefon, GPS (Garmin Zumo und TomTom Rider 1
und 2), MP3 Player Stereo (mit A2DP Protokoll)
- PMR446 Funkgerät ( mit eingebauter oder externer
Bluetooth Verbindung) für Gruppen Motorrad-zu-Motor-
rad Kommunikation
Kabelverbindungen:
Für Stereo Audioeingang (iPod/MP3 Player) ›
Für PMR446 Funkgeräte (mit optionalem Kabel) ›
Achtung: bevor Sie das BT2 das erste Mal in Betrieb
nehmen müssen Sie es mindestens 4 Stunden laden.
Achtung: Das Midland BT2 ist entworfen um Regen und
Wasser zu widerstehen. Stellen Sie aber dennoch sicher,
dass bei Regen die Gummischutzkappen die Anschlüsse
vollständig abdecken.
Page 39

Aufbau der Bedienungsanleitung
Diese Bedienungsanleitung ist in 5 Hauptabschnitte
unterteilt:
Beschreibung der Einheit und Montagehalterung ›
Mit anderen Bluetooth Geräten paaren ›
Die Merkmale von Bluetooth Geräten nutzen ›
Den Kabel Audioeingang benutzen ›
Spezielle Kongurationen ›
Folgen Sie den unten beschriebenen Schritten für eine
einfache Konguration des BT2 Gerätes:
Schritt 1: › befestigen Sie die Einheit an Ihrem Helm gemäß
den Instruktionen im Abschnitt "EINHEIT AM HELM
BEFESTIGEN".
Schritt 2: › paaren Sie die Bluetooth Geräte (z.B. ein
Mobiltelefon oder GPS) mit der BT2 Einheit. Folgen
Sie den Anweisungen im Abschnitt "MIT BLUETOOTH
GERÄTEN PAAREN", wählen Sie das Bluetooth Gerät,
das Sie benutzen.
Schritt 3: › gehen Sie nach dem Paarungsablauf zum
Abschnitt "FUNKTIONEN DES BLUETOOTH GERÄTES
NUTZEN", wählen Sie Ihr Bluetooth Gerät.
Schritt 4: › wenn Sie einen Kabel Audioeingang haben, lesen
Sie Abschnitt "KABEL AUDIOEINGANG BENUTZEN".
Schritt 5: › Informationen über die Nutzung der erweiterten
Funktionen nden Sie im Abschnitt "SPEZIELLE
KONFIGURATION".
Beschreibung der Einheit und
Montagehalterung
Beschreibung der BT2 Einheit
Das BT2 hat 5 Multifunktionstasten auf der Vorderseite und 3
Kabelanschlüsse auf der Unterseite.
Lautstärke +
Telefon
Sprechanlage
Ladegerät
Audioset
Lautstärke -
AUX
Rotes und
blaues
Licht
iPod/MP3
PMR446
D
Laden des eingebauten Akkus
Bitte laden Sie unbedingt vor dem ersten Benutzen bei das
Gerät die eingebauten Lithium-Polymer-Akkus auf, sie sind
im Lieferzustand nur teilgeladen! Beim ersten Laden sollten
Sie mindestens 5-6 Stunde nachladen, später wird das volle
Auaden einer leeren Batterie 4 Stunden dauern.
Zum Laden das Steckernetzteil in eine Steckdose stecken
und eines der beiden Ladekabel in die Ladebuchse der
Elektronikeinheit stecken.
Die LED leuchtet rot, sobald der Ladervorgang startet. ›
Sobald der Akku vollgeladen ist, schaltet die LED automa- ›
tisch wieder ab.
Danach kann das Headset vom Ladekabel getrennt wer- ›
den.
Beschreibung der Tastenfunktion:
Telefon: wird zum Aktivieren/Deaktivieren und Verwalten ›
von Mobiltelefonfunktionen benutzt.
Gegensprechen: wird zum Aktivieren/Deaktivieren der ›
Gegensprechfunktion und zur Verwaltung der 3-Wege
Kommunikation benutzt
AUX: wird zum Aktivieren/Deaktivieren des Kabel ›
Audioeinganges benutzt
Lautstärke +: erhöht die Lautstärke ›
Lautstärke -: verringert die Lautstärke ›
Beschreibung der Kabelverbindung
Ladebuchse: hier kann die Einheit mit einer Standard Mini- ›
USB Stromversorgung aufgeladen werden
Audioset Buchse: hier können Sie ein Audioset anschließen ›
(Stereo Headset und Mikrofon)
Zusatzbuchse für Audiogeräte (AUX): hier können Sie eine ›
Audioquelle, wie z.B. ein Stereo iPod/MP3 Player oder
PMR446 Funkgerät anschließen.
3
Page 40

Beschreibung des Audiosets
Das Audiosystem beinhaltet zwei ultraache Stereo
Lautsprecher und zwei austauschbare Mikrofone, die jeweils
mit Halterung und Kabelverbindung geliefert werden.
Stereo Lautsprecher befestigen: die zwei Stereo Lautsprecher
besitzen einen Klett-/Klebestreifen zur Befestigung an Ihren
Helm. Achten Sie darauf, dass Sie nicht Ihr komplettes Ohr
mit dem Lautsprecher abdecken; Sie müssen immer fähig
sein Verkehrsgeräusche und Signale zu hören.
Das Mikrofon kann auf zwei Arten am Helm befestigt werden:
Stabmikrofon. Platzieren Sie das Klett-/Klebeband zwischen
dem Polster und der harten Schale des Helmes, so, dass
das Mikrofon korrekt vor Ihrem Mund positioniert ist und
das weiße Symbol zu Ihrem Mund zeigt. Diese Modell ist für
offene und klappbare Helme geeignet.
Kabelmikrofon. Platzieren Sie das Mikrofon mit dem Klett-/
Klebestreifen auf der Innenseite Ihres Helmes vor Ihrem
Mund. Diese Modell ist eher für Helme mit Vollgesichtsschutz
geeignet.
Der Ministecker am Mikrofon erlaubt Ihnen ein Mikrofon zu
wählen, das am besten zu Ihrem Helm passt.
Beschreibung der Montagehalterung:
Das Midland BT2 kann auf zwei Arten am Helm befestigt
werden: entweder mit der Platte mit zweiseitigem Klebeband
oder mit der Klammer.
Mit dieser Methode können Sie die BT2 Einheit jederzeit
sicher an Ihrem Helm befestigen und wieder entfernen, um
das Gerät zu laden oder verstauen.
Platte mit zweiseitigem Klebeband
Die Montageplatte hat auf einer Seite ein zweiseitiges
Klebeband. Reinigen Sie die Kontaktäche am Helm bevor
Sie die Platte montieren, entfernen Sie die Schutzfolie des
zweiseitigen Klebebandes, platzieren die Montageplatte
am Helm und drücken sie für ein paar Sekunden auf die
Oberäche.
Klammer
Lösen Sie die zwei Schrauben
der Klammer mit einem
Inbusschlüssel und platzieren
die Rückplatte zwischen dem
Helmpolster und der äußeren
harten Schale.
Danach die beiden
Schrauben anziehen, um die
Klammer fest an ihrem Platz
zu xieren.
Befestigen und entfernen Ihres Midland BT2
Das BT2 kann leicht am Helm befestigt werden, indem es
so nach unten geschoben wird, dass es in die Führung der
Montagevorrichtung passt (Platte mit zweiseitigem Klebeband
oder Klammer)
Das Audioset muss dann mit einem L-Stecker an den
Hauptanschluss des Midland BT2 Intercom angeschlossen
werden. Dieser Stecker ist sehr exibel und passt an fast alle
Helme.
4
Page 41
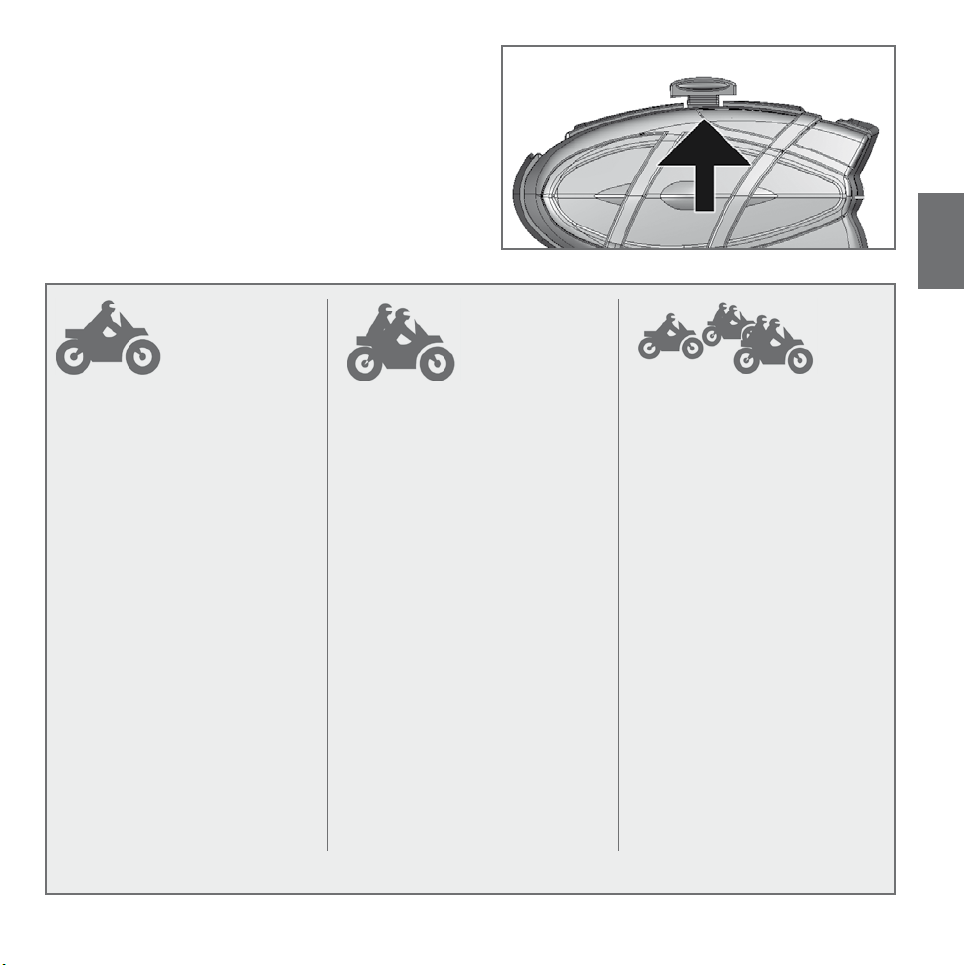
Das BT2 wird mit Hilfe der Befestigungsklammer im oberen
Teil in Position gehalten (A).
Um das BT2 zu entfernen drücken Sie die Befestigungsklammer
und schieben die Einheit nach oben.
A
Typische Einstellung des BT2
1. Einzel Midland BT2, "Nur Fahrer"
Bluetooth Verbindung für ›
Mobiltelefone, GPS und MP3
Player oder Mobiltelefon mit MP3
Funktion (um Musik zu hören)
Kabelverbindung für Stereo ›
Musikplayer (iPod/MP3 Player)
Das Motorrad-zu-Motorrad System ›
ermöglicht die Kommunikation
zweier Fahrer bis zu einer
maximalen Entfernung von 200
Metern
2. Gepaartes Midland BT2, "Fahrer
& Sozius"
Gegensprechfunktion Fahrer-zu- ›
Sozius
Der Fahrer kann ein GPS Gerät ›
anschließen und beide, Fahrer
und Sozius, können ihren
eigenen MP3 Player, Mobiltelefon
etc an ihr eigenes Headset
anschließen und haben trotzdem
die Möglichkeit untereinander
über die Gegensprechanlage zu
kommunizieren.
Kabelverbindung für Stereo ›
Musikplayer (iPod/MP3 Player)
D
3. Midland BT2 Motorrad-zuMotorrad; "Fahrer & Sozius
ausgestattet mit Midland BT2 und
PMR446 Funkgerät"
Gegen › sprechanlage Fahrer-zu-
Sozius
Bluetooth Verbindung für Fahrer ›
und Sozius sind abhängig von den
Bedürfnissen: jede Verbindung ist
geeignet für Mobiltelefone, GPS
Geräte und MP3 Stereo Player
oder Mobiltelefon mit MP3 Funktion
(um Musik zu hören)
Kabelverbindung für Stereo ›
Musikplayer (iPod/MP3 Player)
Gruppenkommunikation ›
("Motorrad-zu-Motorrad"): um in der
Gruppe zu kommunizieren kann
an jedes Motorrad ein PMR446
Funkkgerät angeschlossen werden.
Das PMR446 Funkgerät kann
sowohl per Funk oder Kabel an
die Einheit des Fahrers oder des
Sozius angeschlossen werden. Bei
der Kommunikation in einer Gruppe
mit PMR446 Funkgeräten ist die
Anzahl der Leute nicht begrenzt.
5
Page 42

Allgemeine Überlegungen bei der Priorität
Das Midland BT2 ist ein Bluetooth Gerät, das mit anderen
Bluetooth Geräten mit unterschiedlichen Funktionen gepaart
werden kann: Mobiltelefone, GPS, MP3 Player, etc
Je nach Gerätetyp weist das Midland BT2 Betriebsprioritäten
zu: z.B. haben Anrufe eine höhere Priorität als Musik. Das
bedeutet, wenn Sie einen Anruf erhalten, während Sie Musik
hören, wird die Musik automatisch unterbrochen, damit
Sie den Anruf beantworten können. Drei Prioritäten sind
verfügbar, um die gängisten Anforderungen abzudecken.
Gerät mit (hoher) Priorität 1
Aufgrund ihrer Benutzung haben Mobiltelefone und GPS
Navigationsgeräte eine höhere Priorität im Vergleich zu
anderen angeschlossenen Geräte. Deshalb unterbricht ein
eingehender Anruf oder eine GPS Anweisung immer alle
anderen aktiven Kommunikationen. Geräte mit Priorität 1
müssen mit der BT2 Einheit mit Hilfe der Telefontaste gepaart
werden.
Ihr Midland BT2 ein- und ausschalten
BT2 kann mit der mittlere Taste, gekennzeichnet mit
"Gegensprechen", eingeschaltet werden.
Die Einheit kann nur mit einer Kombination aus zwei Tasten
ausgeschaltet werden und verringert so die Gefahr eines
versehentlichen Ausschaltens (besonders wenn Sie dicke
Handschuhe tragen).
OFFON
Gerät mit (mittlerer) Priorität 2
Diese Priorität kann nur an ein anderes BT2 mit
Gegensprechfunktion übertragen werden. Aktivieren der
Gegensprechfunktion deaktiviert alle anderen Verbindungen
außer die mit (Hoher) Priorität 1. Dies trifft zu, wenn Sie
die Standardeinstellung nicht geändert haben, gemäß der
Prozedur die im letzten Kapitel "Spezielle Konguration"
beschrieben ist. Die zwei Midland BT2 Einheiten können
durch die "Lautstärke+" und "Lautstärke-" Tasten gepaart
werden.
Geräte mit (niedriger) Priorität 3
MP3 Player, Bluetooth Adapter oder PMR446 Funkgeräte
haben niedrige Priorität, das bedeuted, dass jede Verbindung
mit diesen Geräten deaktiviert wird, wenn ein Anruf oder
eine GPS Durchsage (Priorität 1) eingeht oder wenn die
Gegensprechfunktion (Priorität 2) aktiviert ist.
Geräte mit Priorität 3 müssen mit der BT2 Einheit mit Hilfe der
"AUX" Taste gepaart werden.
Midland BT2 kann auch mit Audio Geräten durch eine
Kabelverbindung gepaart werden. Diese Verbindung hat die
geringste Priorität und wird jedesmal deaktiviert wenn eine
Bluetooth Verbindung aktiviert wird.
6
Die Einheit anschalten:
Halten Sie die Gegensprechtaste für ca. 3 Sekunden ›
gedrückt, bis die BLAUE LED leuchtet.
Die Einheit ausschalten:
Halten Sie beide Tasten "Sprechanlage" und "AUX" ›
gleichzeitig gedrückt für ca. 3 Sekunden bis das ROTE
LED 3 mal blinkt.
Mit Bluetooth Geräten paaren
Ihr Midland BT2 ist ein Bluetooth Gerät, das mit anderen
Bluetooth Geräten gepaart werden kann Bevor Sie das tun
können, müssen Sie das BT2 in den "Paarungsmodus"
setzen (Einstellung).
In diesem Modus kann nur gepaart werden. Um das BT2
nach der Paarung mit dem gewünschten Gerät benutzen zu
können, müssen Sie den "Setup" Modus verlassen und zum
"Betriebs" Modus wechseln.
Paarungs-Modus (Einstellung)
Schalten Sie das BT2 aus. Halten Sie die mittlere Taste
(Gegensprechen/an) für ca. 7 Sekunden gedrückt, bis die rote
LED ständig leuchtet. BT2 ist nun im Paarungsmodus (Einstellung)
und kann jetzt mit anderen Geräten gepaart werden.
Page 43

Die Einheit mit einem anderen BT2 paaren
Die beiden mitgelieferten Einheiten im Midland BT2 Intercom
TWIN Set sind bereits gepaart und bereit zur Benutzung;
in diesem Fall muss dieses Verfahren nicht angewendet
werden.
Wenn die Geräte nicht aus demselben Set stammen oder
eines der BT2 Einheiten später gekauft wurde, müssen
Sie die Geräte erst paaren bevor die Gegensprechfunktion
benutzt werden kann.
Versetzen Sie die BT2 Einheit in den Paarungsmodus (rote
LED leuchtet ständig)
Drücken Sie die Lautstärke+ Taste am ersten Gerät bis das
ROTE und BLAUE Licht wechselweise schnell blinkt.
Drücken Sie dann die Lautstärke- Taste am zweiten Gerät
bis das ROTE und BLAUE Licht wechselweise schnell blinkt.
Jetzt versuchen sich beide BT2 Geräte zu paaren.
Nach erfogreichem Paaren leuchtet das BLAUE Licht für eine
Sekunde an beiden Geräten und geht dann zurück in den
Einstellungsmodus (rotes Licht leuchtet ständig) und wartet
auf weitere Paarungen oder Einstellverfahren.
Ihre Einheit mit einem Mobiltelefon paaren
1. Aktivieren Sie die Bluetooth Gerätesuche an Ihrem
Mobiltelefon. Diese Prozedur ist je nach Hersteller
und Modell unterschiedlich; beziehen Sie sich auf die
Bedienungsanleitung, die Ihrem Mobiltelefon beiliegt.
2. Versetzen Sie das BT2 Gerät in den "Paarungs" Modus
(durch Halten der mittleren Taste für ca. 7 Sekunden) und
drücken Sie dann die "Telefon" Taste am Gerät bis die rote
und blaue LED zu blinken beginnt.
3. Nach ein paar Sekunden zeigt das Display des Mobiltelefons
"Midland BT2" an. Wählen Sie es aus und folgen den
Anweisungen der Bedienungsanleitung des Mobiltelefons
zum akzeptieren der Paarung. Nach Aufforderung geben
Sie den Paarungscode, 0000 (vier mal Null) ein. Ihr
Mobiltelefon sollte jetzt eine Bestätigung anzeigen, dass
die Paarung erfolgreich abgeschlossen wurde.
4. Das BT2 Gerät wechselt zurück zum Einstellungsmodus
(rote LED leuchtet ständig) und zeigt an, dass es bereit ist
mit einem anderen Gerät gepaart zu werden.
Wenn sie das BT2 Gerät mit einem Mobiltelefon paaren
können Sie es nicht mit einem GPS Navigationsgerät paaren,
da beide Geräte (hohe) Priorität 1 haben.
Das können Sie umgehen, indem Sie Ihr Mobiltelefon direkt
mit dem GPS Gerät paaren und dann das GPS Gerät mit
Ihrem Midland BT2 paaren wie oben beschrieben. In diesem
Fall werden die Funktionen des Mobiltelefons vom GPS
Gerät übernommen.
Das Gerät mit einem GPS Navigationsgerät
paaren
Allgemein ist es möglich das BT2 Gerät mit jedem GPS
Navigationsgerät zu paaren, das Bluetooth Headsets
unterstützt.
Das Midland BT2 wurde erfolgreich mit dem GPS ZUMO
Navigationsgerät von Garmin sowie dem TOMTOM Rider 1
und 2 getestet.
1. Aktivieren Sie bei Ihrem GPS Gerät die Bluetooth Kopfhörer
Suchfunktion. Diese Prozedur ist je nach Hersteller
und Modell unterschiedlich; beziehen Sie sich auf die
Bedienungsanleitung, die Ihrem GPS Gerät beiliegt.
2. Vergewissern Sie sich, dass das BT2 Gerät im
Paarungsmodus ist (rotes Licht leuchtet) und drücken Sie
die "Telefon" Taste am BT2 Gerät bis das rote und blaue
Licht zu blinken anfängt.
3. Nach ein paar Sekunden zeigt das Display des GPS
Gerätes "Midland BT2" an. Wählen Sie es aus und folgen
den Anweisungen der Bedienungsanleitung des GPS
Gerätes zum akzeptieren der Paarung. Nach Aufforderung
geben Sie den Paarungscode, 0000 (vier mal Null) ein. Ihr
GPS Gerät sollte jetzt eine Bestätigung anzeigen, dass die
Paarung erfolgreich abgeschlossen wurde.
4. Das BT2 Gerät wechselt zurück zum Einstellungsmodus
(rotes LED leuchtet ständig) und zeigt an, dass es bereit
ist, mit einem anderen Gerät gepaart zu werden.
Wenn sie das BT2 Gerät mit einem GPS Gerät paaren,
können Sie es nicht mit einem Mobiltelefon paaren, da beide
Geräte (hohe) Priorität 1 haben.
Das können Sie umgehen, indem Sie Ihr Mobiltelefon direkt
mit dem GPS Gerät paaren und dann das GPS Gerät mit
Ihrem Midland BT2 paaren. In diesem Fall werden die
Funktionen des Mobiltelefons vom GPS Gerät übernommen.
Das Gerät mit einem Bluetoothfähigen MP3
Player paaren
Nicht alle MP3 Player sind "Bluetooth fähig". Überprüfen
Sie die Eigenschaften Ihres MP3 Players bevor Sie ihn
über Bluetooth mit dem BT2 Gerät verbinden.
1. Aktivieren Sie die Bluetooth Gerätesuche an Ihrem
MP3 Player. Diese Prozedur ist je nach Hersteller und
Modell unterschiedlich; beziehen Sie sich für weitere
D
7
Page 44

Informationen auf die Bedienungsanleitung, die Ihrem
MP3 Player beiliegt.
2. Vergewissern Sie sich, dass das BT2 Gerät noch immer im
Paarungsmodus ist (rotes Licht leuchtet) und drücken Sie
die "AUX" Taste am BT2 Gerät bis das rote und blaue Licht
zu blinken anfängt.
3. Nach ein paar Sekunden zeigt das Display des MP3
Players "Midland BT2" an. Wählen Sie es aus und folgen
den Anweisungen der Bedienungsanleitung des MP3
Players zum akzeptieren der Paarung. Falls erforderlich,
geben Sie den Paarungscode, 0000 (vier mal Null) ein. Ihr
MP3 Player sollte jetzt eine Bestätigung anzeigen, dass
die Paarung erfolgreich abgeschlossen wurde.
4. Das BT2 Gerät wechselt zurück zum Einstellungsmodus
(rotes LED leuchtet ständig) und zeigt an, das es bereit ist
mit einem anderen Gerät gepaart zu werden.
Das Gerät mit anderen Bluetooth Geräten
Paaren
Das Midland BT2 kann auch mit Bluetooth Geräten gepaart
werden, die nicht Bluetooth fähig sind, aber mit einem Bluetooth
Adapter verbunden sind (z.B. Audio Geräte, die mit BPA100
verbunden sind) oder Funksprechgeräte mit eingebauter
Bluetooth Verbindung (z.B. das Midland 445BT).
1. Paarung am Bluetooth Gerät aktivieren. Diese Prozedur ist
je nach Hersteller und Modell unterschiedlich; beziehen Sie
sich für weitere Informationen auf die Bedienungsanleitung,
die dem Bluetooth Gerät beiliegt.
2. Vergewissern Sie sich, dass das BT2 Gerät im
Paarungsmodus ist (rotes Licht leuchtet) und drücken Sie
die "AUX" Taste am BT2 Gerät bis das rote und blaue Licht
zu blinken anfängt.
3. Die Paarung ist in wenigen Sekunden abgeschlossen und
das BT2 Gerät wechselt zurück zum Einstellungsmodus
(rotes LED leuchtet ständig) und zeigt an, dass es bereit
ist, mit einem anderen Gerät gepaart zu werden.
Achtung: die Geräte Suchprozedur (blinkendes rotes
und blaues Licht) bleibt ca. 2 Minuten aktiv. Wenn
innerhalb dieses Zeitraumes kein Gerät gefunden wird,
kehrt das BT2 zurück in den Einstellungsmodus (rotes
Licht leuchtet ständig). Um den Suchvorgang erneut
zu star-ten, wiederholen Sie die Paarungsprozedur
ab Schritt 2. Um die Paarungsprozedur zu stoppen
(rotes und blaues Licht blinken) und in den
Einstellungsmodus zurück zu schalten drücken Sie
die "Gegensprechtaste" zweimal.
8
Alle gepaarten Geräte zurücksetzen
Manchmal ist es notwendig, alle gespeicherten
Paarungsreferenzen im BT2 Gerät zu löschen (Reset
Verfahren).
Um diese Prozedur auszuführen, müssen Sie gleichzeitig
die Tasten "Lautstärke+" und "Lautstärke-" für 4 Sekunden
gedrückt halten. Die blaue LED leuchtet für 1 Sekunde.
Dieses Vorgehen löscht alle gespeicherten gepaarte Geräte
und ermöglicht einen neuen "sauberen" Paarungsablauf.
Paarungs-Modus beenden (Einstellung)
Nachdem Sie die gewünschten Geräte gepaart haben,
müssen Sie den "Einstellungssmodus" beenden, um Ihr BT2
Gerät nutzen zu können.
Halten Sie die Gegensprechtaste (mittlere Taste) für 3
Sekunden gedrückt. Das rote LED erlischt und das blaue fängt
an zu blinken. Jetzt können Sie Ihr BT2 Gerät benutzen.
Das Gerät erneut mit einem Bluetooth Gerät
verbinden
Nach einer erfolgreichen Paarung können Sie Ihr Gerät
an- und ausschalten, ohne die ganze Paarungsprozedur zu
wiederholen. Wenn ein Verbindungsfehler zwischen diesen
beiden Geräten auftritt (z.B. wenn ein Gerät ausgeschaltet
ist oder außerhalb der Reichweite liegt), muss die
Paarungsprozedur nicht wiederholt werden.
Schalten Sie das Gerät einfach an oder bringen es in
Reichweite. Wenn die Verbindung nicht automatisch
wiederhergestellt werden kann, wählen Sie das Gerät aus dem
"Gerätemenü" Ihres Bluetooth Gerätes (z.B. Mobiltelefon,
MP3 Player, etc) und stellen Sie die Verbindung wieder her.
Page 45

Die Lautstärke einstellen
Ihr Midland BT2 benutzt AGC Technologie, welche
automatisch die Hörerlautstärke den Hintergrundgeräuschen
anpasst. Sie können aber auch die Lautstärke manuell mit
den Tasten "Lautstärke+" und "Lautstärke-" anpassen.
Sie können zum Beispiel manuell die maximale Lautstärke
in sehr lauter Umgebung einstellen (z.B. beim Fahren mit
hoher Geschwindigkeit) um dem automatischen AGC System
die Anpassung zu ermöglichen, indem es den manuell
eingestellten Wert als Maximalwert benutzt. Dieses Vorgehen
ist sinnvoll, da jeder Helm unterschiedlich durch Wind und
Hintergrund-geräusche beeinusst wird.
Die Merkmale der Bluetooth Geräte
nutzen
Gegensprechfunktionen nutzen
Um die Gegensprechfunktionen zu nutzen müssen beide
Geräte eingeschaltet und richtig gepaart sein.
Wenn Sie eine Einzelausführung gekauft haben folgen Sie
der Beschreibung der Paarungsprozedur im obigen Abschnitt
"Die Einheit mit einem anderen BT2 paaren".
Priorität: Gegensprechverkehr hat immer eine höhere
Priorität, gegenüber anderen Kommunikationsarten, die
einzigen Ausnahmen sind Telefon und GPS Navigationsgeräte.
Deshalb deaktiviert die Gegensprechfunktion automatisch
alle anderen Kommunikationen.
Die Gegensprechfunktion ist nur deaktiviert, wenn ein
eingehender Anruf oder Sprachkommunikation vom GPS
Gerät empfangen wird und ist automatisch wieder aktiviert,
sobald diese Kommunikation endet.
Achtung: Manche Mobiltelefone unterbrechen die Verbindung nach ein paar Sekunden, was bedeutet, dass die
Gegensprechfunktion nicht sofort verfügbar sein kann.
Die Gegensprechfunktion kann auf zwei Arten aktiviert
werden:
Manuelle Aktivierung:
Drücken Sie die "Gegensprechen" Taste, an einer der zwei ›
Einheiten. Kommunikation ist aktiv und bleibt aktiv, bis Sie
nochmals auf die "Gegensprechen" Taste drücken. Sie
hören 1 Töne, wenn die Gegensprechfunktion aktiviert ist
und 2 Töne, wenn es deaktiviert ist.
Sprachsteuerung (VOX):
Dies ist der Standard Aktivierungsmodus. Um den ›
Gegensprechverkehr zu starten, beginnen Sie einfach
zu reden. Die Verbindung bleibt aktiv solange Sie
reden. Wenn keine Konversation stattndet, wird die
Gegensprechfunktion nach einer Minute automatisch
deaktiviert. Um diese neu zu starten, beginnen Sie
nochmals zu reden. Wenn die Gegensprechanlage "VOX"
aktiviert ist, können Sie es vor der vordenierte Zeit
deaktivieren, indem Sie einmal auf die Gegensprechen
Taste drücken.
Um die Sprachsteuerung zu deaktivieren, folgen Sie den ›
Anweisungen im Abschnitt "Spezielle Konguration".
Achtung: wenn Sie die Gegensprechfunktion das erste
Mal benutzen, nachdem Sie sie aktiviert haben (sprachgesteuert oder manuell) startet die Kommunikation mit
einer kurzen Verzögerung, weil die Geräte sich erst erkennen müssen. Danach startet die Kommunikation so-
fort.
Zwei Midland BT2 Einheiten können bis zu einem maximalen
Bereich von ca. 200 Meter im Freien kommunizieren.
Deshalb es ist möglich das BT2 als Gegensprechanlage
für "Motorrad-zu-Motorrad" Kommunikation zwischen zwei
Fahrern zu benutzen. Der maximale Bereich ist abhängig
von den Umgebungsbedingungen, unter denen die Geräte
benutzt werden.
Die Telefonfunktion nutzen
Um die Telefonfunktion zu nutzen, müssen beide Einheiten
angeschaltet und richtig gepaart sein, gemäß der
Paarungsprozedur in Abschnitt "Gerät mit einem Mobiltelefon
paaren".
Achtung: Informationen, die in diesem Abschnitt vorliegen, beziehen sich auf die direkte Kommunikation
zwischen dem Mobiltelefon und dem BT2 Gerät. Falls
das Mobiltelefon mit einem GPS Navigationsgerät ver-
bunden ist, können die Funktionen nur durch das GPS
Gerät verwaltet werden.
Priorität: Anrufe sind immer privat und haben eine hohe
Priorität, was bedeutet, dass alle andere Kommunikationen
vorübergehend deaktiviert sind wenn einen Anruf ankommt
und automatisch wieder aktiviert wird, sobald der Anruf
beendet ist.
Einen Anruf beantworten
Wenn Sie das Telefon klingeln hören, können Sie auf zwei
D
9
Page 46

Arten antworten:
Sprachgesteuert:
Einfach ein Wort sagen um den Anruf anzunehmen, und
Sie können das Gespräch starten. Denken Sie daran, dass
dies nur möglich ist, wenn Sie den Anruf nach dem dritten
Klingelton annehmen (Beachten Sie, dass einige Telefone
eventuell keine Sprachsteuerung unterstützen).
Manuell:
Drücken Sie die Telefontaste und fangen Sie an zu reden.
Achtung: Denken Sie daran, dass Sie den Anruf erst nach
dem dritten Klingelton beantworten können.
Einen Anruf ablehnen
Falls Sie den Anruf nicht annehmen wollen, können Sie
das Mobiltelefon klingeln lassen oder drücken Sie die
"Telefontaste" für ein paar Sekunden (Sie werden einen
Bestätigungston hören)
Einen Anruf machen
Es gibt verschiedene Wege einen Anruf zu machen.
Über die Tastatur des Mobiltelefons:
Die Nummer auf der Tastatur des Mobiltelefons wählen:
Drücken Sie "Senden" auf dem Mobiltelefon. ›
Dieser Art des Telefonierens sollte nie der Fahrer ausführen ›
während er das Motorrad fährt.
Die letzte Nummer wiederwählen:
Halten Sie die Telefontaste für ein paar Sekunden gedrückt ›
um die letzte Nummer wieder zu wählen (Sie hören einen
Bestätigungston)
Einen Sprachgesteuerten Anruf machen:
Kurz auf die Telefontaste drücken. Falls Ihr Mobiltelefon ›
sprachgesteuerte Anrufe unterstützt, werden Sie aufge-
fordert den Namen der Kontaktperson zu buchstabieren.
Die korrekte Ausführung dieser Funktion ist vom Typ des
Helmes abhängig (offener Helm oder Integralhelm) und der
Geschwindigkeit mit der Sie fahren. Wir empfehlen, dass Sie
ein paar Tests durchführen um die beste Einstellungen für
sich persönlich festzustellen.
Achtung: Falls Sie Musik mit einem MP3 Player anhören,
der an Bluetooth angeschlossen ist (A2DP Protokoll),
können Sie die Funktion "letzte Rufnummer" und "sprachgesteuerter Anruf" nicht benutzen, da diese Tasten
für die Steuerung des MP3 Players benutzt werden. Bevor Sie einen Anruf machen wollen, müssen Sie zuerst
die Musik durch drücken der "Gegensprechtaste" für 1
Sekunde deaktivieren (Sie werden 2 Bestätigungston
hören).
10
Einen Anruf beenden
Es gibt verschiedene Wege einen Anruf zu beenden:
Warten Sie bis die angerufene Person den Anruf beendet. ›
Kurz auf die "Telefontaste" drücken (Sie hören einen ›
Bestätigungston)
Drücken Sie "beenden" auf dem Mobiltelefon. Diese Art ›
ein Telefonat zu beenden sollte nie der Fahrer ausführen,
während er das Motorrad fährt.
3-Wege Telefonkommunikation
Der Gegensprechfunktion ist vorübergehend deaktiviert
wenn ein Anruf gerade läuft. Allerdings es ist möglich , den
anderen Partner durch einfaches aktivieren der 3-Wege
Kommunikation zu einer Konferenzschaltung hinzuzufügen.
Nachdem der Erstanruf hergestellt worden ist, betätigen Sie
kurz die "Gegensprechen" Taste auf dem BT2 Gerät, das den
Anruf angenommen hat (Sie hören einen Bestätigungston).
Um eine private Konversation herzustellen drücken Sie
die "Gegensprech" Taste nochmals (Sie hören zwei
Bestätigungstöne).
Die MP3 Player Funktion des Mobiltelefons
benutzen
Viele Mobiltelefone können heute als Stereo MP3 Player
genutzt werden. Ihre Midland BT2 unterstützt die A2DP und
AVRCP Protokolle, die es Ihnen ermöglichen, Stereomusik zu
hören und Ihren MP3 Player am Mobiltelefon fernzu-steuern.
Sie können auch die Tasten an der BT2 Einheit nutzen, um
folgenden Abspielfunktionen zu steuern:
Abspielen, Pause, Vorspulen und Zurückspulen.
Achtung: Die Fernbedienung ist nur aktiviert, wenn der
MP3 Player das AVRCP Protokoll unterstützt.
Verfügbare Steuerungen:
Um Ihren angeschlossene MP3 Player zu aktivieren, halten ›
Page 47

Sie die "Gegensprechtaste" 3 Sekunden lang gedrückt.
Um Musik abzuspielen bzw. anzuhalten, halten Sie die ›
"Gegensprechtaste" für 3 Sekunden gedrückt.
Um zum nächsten Lied zu springen, drücken Sie kurz auf ›
die "Telefontaste".
Um zum vorhergehenden Lied zu springen, drücken Sie ›
kurz auf die "AUX" Taste.
Zum Abschalten des MP3 Players drücken Sie die Inter- ›
com Taste (als Bestätigung hören Sie zwei kurze Töne)
Zum sprachgesteuertem Start der Intercom-Sprechverbindung brauchen Sie nur zu sprechen, soll die Intercomverbindung manuell gestartet werden, schalten Sie zuerst den MP
3 Player aus, indem Sie 1 x die Intercom-Taste drücken, und
dann diese Taste noch einmal drücken. Dadurch wird die manuelle Intercomverbindung eingeschaltet.
Der Musikmodus hat die niedrigste Priorität gegenüber
anderen Anschlüssen (wie z.B. Anrufe oder Gegensprechverkehr). Deshalb wird die Musik immer deaktiviert,
wenn ein anderer Kommunikationstyp aktiviert ist.
Die Funktionen Ihres GPS Navigationsgerätes nutzen
Um die Funktionen Ihres GPS Navigationsgerät zu nutzen,
müssen beide Einheiten angeschaltet und richtig gepaart
sein, gemäß der Paarungsprozedur im Abschnitt "Die Einheit
mit einem GPS Navigationsgerät paaren".
Priorität: Kommunikation mit dem GPS Navigationsgerät
hat die höchste Priorität, was bedeutet, dass die Aktivierung dieser Kommunikation vorübergehende alle anderen Kommunikationen deaktiviert (Gegensprechverkehr,
Musik, oder 2-Wege Funkgerät). Sobald die GPS Kommunikationen beendet ist, werden alle anderen Kommunikationen automatisch wieder aktiviert.
Sprachanweisungen von Ihrem GPS Navigationsgerät
anhören.
Verkehrsanweisungen Ihres GPS Navigationsgerätes
werden immer sofort übertragen durch vorübergehende
Deaktivierung allen anderen aktiven Verbindungen. Sobald
diese Sprachanweisungen übertragen worden sind, aktiviert
Ihr BT2 automatisch alle bestehende Verbindungen wieder.
Musik über Ihr GPS Navigationsgerät anhören.
Die meisten modernen GPS Geräte ermöglichen Ihnen
normalerweise Musik anzuhören wenn keine Richtungsangabe
gemacht werden. In diesem Fall ist die Kommunikation mit
dem GPS immer aktiv und hat die höchste Priorität gegenüber
allen anderen aktiven Geräten.
Es ist möglich die Gegensprechfunktion zu aktivieren, während
man Musik hört, durch Drücken der Gegensprechtaste kann
eine 3-Wege Kommunikation geöffnet werden. Weitere
Information erhalten Sie im Abschnitt "3-Wege Kommunikation
mit einem GPS Navigationsgerät".
Ein Mobiltelefone mit einem GPS Navigationsgerät
benutzen.
Falls Sie ein GPS Navigationsgerät an Ihrem Midland BT2
angeschlossen haben, können Sie das Mobiltelefon nicht
direkt an das Gerät anschließen; Sie müssen stattdessen das
Telefon an das GPS Navigationsgerät anschließen. Hierbei
werden alle Funktionen des Mobiltelefons direkt durch Ihr
GPS Navigationsgerät verwaltet. Information, wie man ein
Mobiltelefon paart und Anrufe beantwort/tätigt, nden Sie im
mitgelieferten Handbuch Ihres Navigationsgerätes.
3-Wege Kommunikation mit Ihrem GPS Navigationsgerät
Die Gegensprechfunktion wird vorübergehend deaktiviert,
wenn Kommunikation mit Ihren GPS Navigationsgerät aktiv
ist (Navi-Ansagen oder Musik). Es ist möglich Ihre Mitfahrer
durch Aktivierung einer "3-Wege Kommunikation". mithören
zu lassen
Wenn die Kommunikation mit dem GPS aktiv ist, drücken
Sie kurz auf die "Gegensprechen" Taste an Ihrem BT2 Gerät,
welches an das GPS Navigationsgerät angeschlossen ist
(Sie hören einen Bestätigungston). Der Sozius kann jetzt
die Information/Musik anhören, die der auch Fahrer hört.
Um zum Privatmodus zurückzukehren, drücken Sie die
"Gegensprechanlagen" Taste noch einmal (Sie hören zwei
Audio Bestätigungstöne).
Andere Bluetooth Geräte benutzen
Das Midland BT2 kann auch mit anderen Bluetooth Geräten,
wie MP3 Player, Bluetooth Adapter (z.B BPA100) oder einem
Sprechfunkgerät mit eingebautem Bluetooth (z.B Midland
445BT). gepaart werden.
Dies kann von Vorteil sein, da es möglich ist, Ihre “Motorrad
- zu- Motorrad Reichweite” um bis zu 5 km zu erweitern!
Um die Geräte zu nutzen, müssen Ihr BT2 und das andere
Gerät angeschaltet und richtig gepaart sein, gemäß der
Paarungsprozedur in Abschnitt "Das Gerät mit einem anderen
Bluetooth Gerät paaren".
Gepaarte Geräte können aktiviert oder deaktiviert werden
11
D
Page 48

ohne die Paarung aufzuheben durch einfaches Drücken der
"AUX" Taste.
Deaktivieren: drücken Sie die "AUX" Taste für 3 Sekunden ›
(Sie werden zwei Bestätigungstöne hören)
Aktivieren: drücken Sie die "AUX" Taste für 3 Sekunden ›
(Sie werden ein Bestätigungston hören)
In diesem Fall ist das Gerät vorübergehend vom BT2 Gerät
getrennt, obwohl die Geräte weiterhin gepaart bleiben.
Priorität: Kommunikation mit anderen Bluetooth Geräten
haben eine niedrigere Priorität als solche, die mit einem
Mobiltelefon, GPS Navigationsgerät und Gegensprechanlage
verbunden sind. Das bedeutet, dass eine Kommunikation
immer unterbrochen wird, wenn ein Anruf eingeht, wenn ein
GPS Navigationsgerät Instruktionen übermittelt oder wenn
die Gegensprechfunktion aktiviert ist.
Achtung: wenn Sie Ihr GPS Navigationsgerät zum Musik
hören benutzen (die Kommunikation mit dem GPS Navigationsgerät ist immer aktiv), wird jede Kommunikation
zu anderen Bluetooth Geräten deaktiviert, da sie niedrigere Priorität haben.
Einen Bluetooth MP3 Player nutzen
Das Midland BT2 unterstützt vollständig das A2DP
Protokoll, welches Ihnen erlaubt, Stereo-Musik zu hören
und die Hauptfunktionen Ihres MP3 Players verwaltet. Es
ist auch möglich, mit den Tasten des BT2 Gerätes folgende
Funktionen zu verwalten: Abspielen, Pause, Vorspulen und
Zurückspulen.
kurz auf die "AUX" Taste.
Zum Abschalten des MP3 Players drücken Sie die Inter- ›
com Taste (als Bestätigung hören Sie zwei kurze Töne)
Zum sprachgesteuertem Start der Intercom-Sprechverbindung brauchen Sie nur zu sprechen, soll die Intercomverbindung manuell gestartet werden, schalten Sie zuerst den MP
3 Player aus, indem Sie 1 x die Intercom-Taste drücken, und
dann diese Taste noch einmal drücken. Dadurch wird die manuelle Intercomverbindung eingeschaltet.
Es ist nicht möglich, für alle Fabrikate von Bluetooth
MP3 Playern eine volle Funktionsgarantie zu geben, da
einige Fabrikate abweichende herstellerspezische Programmierungen aufweisen.
Einen Bluetooth Adapter benutzen
Ihr Midland BT2 kann an einen externen Bluetooth Adapter
angeschlossen werden (z.B. ein BPA 100) um Audiogeräte
zu benutzen ohne eingebaute Bluetooth Funktion (wie ein
Funksprechgerät oder ältere GPS Geräte).
Ein Bluetoothfähiges Funksprechgerät benutzen
Der Midland BT2 kann an ein Bluetoothfähiges Funksprechgerät angeschlossen werden (wie Midland 445BT)
und zur "Motorrad zu Motorrad" Kommunikation genutzt
werden. Paaren Sie Ihr BT2 mit dem Funkgerät, wie im
Abschnitt "Das Gerät mit anderen Bluetooth Geräten Paaren
" beschrieben und aktivieren Sie die Bluetooth Verbindung
durch Drücken der Taste am Funkgerät. Damit können Sie
über viel größere Distanzen zu mehreren Leuten gleichzeitig
sprechen, während Sie die Flexibilität und Bewegungsfreiheit
der drahtlosen Bluetooth Verbindung genießen.
Verfügbare Steuerungen:
Um Ihren angeschlossene MP3 Player zu aktivieren, halten ›
Sie die "Gegensprechtaste" 3 Sekunden lang gedrückt.
Um Musik abzuspielen/anzuhalten, halten Sie die ›
"Gegensprechtaste" für 3 Sekunden gedrückt.
Um zum nächsten Lied zu springen, drücken Sie kurz auf ›
die "Telefontaste".
Um zum vorhergehenden Lied zu springen, drücken Sie ›
12
Den Kabel-Audioeingang benutzen
Ihr Midland BT2 ist auch mit einem Kabel-Audioeingang
ausgestattet (markiert AUX), der zur Verbindung mit einem
Stereo-Audioeingang benutzt werden kann, wie z.B. iPod
(oder irgendein anderer MP3 Player) oder ein PMR446
Funkgerät für Motorrad zu Motorrad Kommunikation.
Priorität: Der Kabel-Audioeingang hat eine niedrigere
Priorität gegenüber anderen Bluetooth Verbindungen (die
Gegensprechanlagen eingeschlossen) und wird deshalb
immer deaktiviert werde, sobald eine andere Bluetooth
Kommunikation geöffnet ist.
Page 49

Musik anhören
Um Musik über den Kabeleingang anzuhören, verbinden Sie
den Audio Ausgang mit dem mitgelieferten BT2 Kabel. Der
Lautstärkepegel wird automatisch über das AGC System
eingestellt, was bedeutet, dass Sie die Lautstärke am iPod/
MP3 nur so einstellen müssen, dass Sie Musik in lauter
Umgebung hören können.
Achtung: Stellen Sie nie die Lautstärke von Ihrem IPod / Player auf Maximum- fangen Sie immer mit kleiner Lautstärke
an.
Hinweis: Wir empfehlen Ihnen, ein paar Tests durchzufüh-
ren, um die Lautstärke Ihres iPod/MP3 Players so einzustellen, dass sie Ihren Wünschen entspricht. Wenn Sie die
Grundlautstärke bei langsamer Fahrt oder im Stand auf ei-
nen sinnvollen Wert einstellen, werden Sie feststellen, dass
die Lautstärke bei höheren Geschwindigkeiten vom AGC
System automatisch nachgeregelt wird. Merken Sie sich die
Einstellungen am IPod bzw. beim MP3 Player für zukünftige
Fahrten.
Achtung: die Lautstärkeeinstellung, ("Lautstärke+ und
Lautstärke-") Tasten können nicht für die Einstellung des Kabel Audio-Ausgangs (z.B. MP3 Player) verwendet werden;
nur die Lautstärke des Gerätes, das am BT2 angeschlossen
ist.
Aktivieren/Deaktivieren des Kabeleingangs
Der Kabeleingang kann durch die Taste "AUX" aktiviert und
deaktiviert werden.
Deaktivieren: drücken Sie kurz die "AUX" Taste (Sie ›
werden zwei Bestätigungstöne hören)
Aktivieren: drücken Sie kurz die "AUX" Taste (Sie werden ›
einen Bestätigungston hören)
Ein Funksprechgerät benutzen
Um das Funkgerät nutzen zu können, benötigen Sie ein
spezielles Kabel (wird separat verkauft), um das Gerät an Ihr
Midland B2 anzuschließen.,
Beachten Sie, dass manche Funkgeräte eine andere Pin ›
Konguration benutzen; fragen Sie Ihren Lieferanten,
welches Kabel am geeignetsten für Ihr Gerät ist.
Drücken Sie die Sprechtaste (PTT) um über das Funkgerät
zu reden und lassen Sie die Taste los um zu hören. Es ist
nicht möglich, gleichzeitig zu reden und zu hören. Das am
Funkgerät angeschlossene Kabel hat eine PTT Taste, die am
Lenker des Motorrades befestigt oder in der Hand gehalten
werden kann (falls Sie der Sozius sind)
Stellen Sie die Lautstärke des Funkgerätes nach
Ihren Bedürfnisse ein und denken Sie daran, dass
die Lautstärkeeinstellung automatisch über das AGC
System angepasst wird und automatisch in Bezug auf die
Hintergrundgeräusche erhöht wird.
Spezielle Kongurationen
Ihr Midland BT2 kann mit benutzerspezischen Einstellungen
konguriert werden, um die Bedürfnisse anspruchsvoller
Motorradfahrer anzupassen.
Besonders erfahrene Benutzer können die folgende
"Fortgeschrittene" Funktionen kongurieren:
3-Wege Kommunikation dauernd aktivieren ›
Sprachgesteuertes Gegensprechen (VOX) ›
Mikrofonempndlichkeit einstellen
VOX Funktionen deaktivieren
3-Wege Kommunikation dauernd aktivieren
Bluetooth Kommunikation mit einer (niedrigen) Priorität und
kabelgebundene Audiokommunikation sind normalerweise
deaktiviert wenn die Gegensprechfunktion aktiviert ist.
Durch aktivieren dieser Funktionen können Sie die aktive
Kommunikation beibehalten, während Sie Funktionen
mit niedriger Priorität an andere Benutzer (z.B. Sozius)
übertragen
Diese Funktion kann nützlich sein, wenn Sie z.B eine Gegensprechverbindung beibehalten wollen und gleichzeitig
über ein Funkgerät reden möchten, das über Bluetooth oder
Kabel verbunden ist.
Zusätzlich ermöglicht es Ihnen Musik zwischen Fahrer und
Sozius zu teilen. Beachten Sie, dass die Musikqualität für die
zweite Person, mit der Sie die Musik teilen "Mono" ist (siehe
Abschnitt "Musik zwischen Fahrer und Sozius teilen").
3-Wege Kommunikation aktivieren/deaktivieren
Paarungsmodus eingeben (Einstellung): ›
Halten Sie die mittlere Taste gedrückt (Gegesprechen/ ›
an) bis das rote Licht dauernd leuchtet, um Ihr BT2
auszuschalten. Ihr BT2 ist jetzt im "Paarungsmodus"
(Einstellung).
Halten Sie die Tasten "Telefon" und "AUX" gleichzeitig für ›
13
D
Page 50

mindestens 3 Sekunde gedrückt.
Falls die Funktion aktiviert war, wird sie jetzt deaktiviert ›
(ständiges blaues Licht für 2 Sekunden)
Falls sie deaktiviert war, wird sie jetzt aktiviert (blaues Licht ›
blinkt lange)
Den Paarungsmodus (Einstellung) können Sie abbrechen, ›
indem Sie die "Gegensprechen" Taste für mindestens 3
Sekunden drücken. Das rotes Licht schaltet ab und das
blaue Licht beginnt zu blinken. Sie können das BT2 jetzt
benutzen.
Achtung: Falls das Bluetooth Gerät ein Stereo MP3 Player
ist, wird die Kommunikation immer deaktiviert sein, sobald die Gegensprechfunktion aktiviert ist. (Nur "Mono"
Geräte unterstützen eine dauernde aktive 3-Wege Kommunikation).
Die Gegensprechanlage durch Sprache
(VOX) aktivieren
Die Gegensprechfunktion kann manuell oder durch
Sprache (VOX) aktiviert werden. Diese Funktion wird durch
Hintergrundgeräusche beeinusst und deshalb auch durch
Geschwindigkeit, Motorradtyp und schalldichte Funktion
Ihres Helmes.
Für optimale Resultate, kann die Aktivierungs-/
Übertragungsschwelle durch Auswählen eines der drei
Mikrofonempndlichkeitspegel gewählt werden: hoch, mittel
und niedrig. Die hohe Einstellung ist geeignet für geräuschlose
und lärmgeschützte Motorräder wie Roller und Vollgeschirmte
Motorräder. Die niedrige Einstellung ist eher für lautere
Motorräder. Die Werkseinstellung von BT2 ist mittel.
Sie können die VOX Funktion auch deaktivieren, um
die Gegensprech- und Telefon-Antwortfunktion nur im
manuellem Modus zu aktivieren.
Einstellung der Empndlichkeit des Mikrofons (VOX)
Paarungsmodus eingeben (Einstellung):
Geben Sie den Paarungsmodus ein (Einstellung): Halten ›
Sie die mittlere Taste gedrückt (Gegensprechen/an) bis
das rote Licht dauernd leuchtet, um Ihr BT2 auszuschalten.
Ihr BT2 ist jetzt im "Paarungsmodus" (Einstellung).
Drücken Sie kurz auf die "AUX" Taste. ›
Die rote Anzeige ändert sich zu ständigem blau und blinkt ›
mehrmals, um die gewählte Empndlichkeit anzuzeigen:
einmal = Vox deaktiviert / zweimal = sehr niedrige
Empndlichkeit / 3 mal = niedrige Empndlichkeit / 4 mal
= mittlere Empndlichkeit / 5 mal= hohe Empndlichkeit
Default = mittel Empndlichkeit
14
Drücken Sie jetzt "Lautstärke +" oder "Lautstärke- " um ›
die Empndlichkeit zu erhöhen oder reduzieren. Die
blaue Anzeige blinkt, um die neu gewählte Empndlichkeit
anzuzeigen.
Drücken Sie die AUX Taste, um die neue Einstellung zu ›
bestätigen und gehen zurück zum Einstellungsmodus
(rotes Licht leuchtet ständig).
Den Paarungsmodus (Einstellung) können Sie abbrechen, ›
indem Sie die "Gegensprechen" Taste für mindestens
3 Sekunden drücken. Das rotes Licht geht aus and das
blaue Licht beginnt zu blinken. Sie können das BT2 jetzt
benutzen.
Der VOX Funktion deaktivieren
(Gegensprechanlage und Telefon)
Zusätzlich zu den 3 Mikrofonempndlichkeitspegeln, gibt
es einen vierten Zustand, der es Ihnen ermöglicht die VOX
Funktion auszuschalten. Wiederholen Sie die Prozedur für
die Empndlichkeitseinstellung des Mikrofons (siehe oben)
und benutzen die "Lautstärke-" Taste, um die Empndlichkeit
zu reduzieren, bis das blaue Licht ständig zu blinken beginnt.
Dies bedeutet, dass die VOX Funktion deaktiviert ist. Um Sie
wieder zu aktivieren, wiederholen Sie die Prozedur und wählen
einen der ersten drei Empndlichkeitspegel (von 1 zu 3).
Empfehlungen für spezielle Verwendungen
Der folgende Abschnitt bietet ein paar nützliche Tips, wie Sie
die maximale Leistung Ihres BT2 Gerätes erreichen können.
Benutzung eines PMR446 Funkgerätes mit der
Gegensprechfunktion (Fahrer zu Sozius)
Falls Sie ein PMR446 Funkgerät für die Gruppenkommunikation
benutzen möchten und gleichzeitig die Gegensprechfunktion
zwischen Fahrer und Sozius beibehalten möchten, müssen
Sie daran denken, dass die Gegensprechfunktion durch
die BT2's VOX Funktion jedesmal aktiviert ist, wenn Sie
sprechen.
Folglich, Funkgerätkommunikation wird deaktiviert während
Sie mit Ihren Sozius sprechen, da sie gegenüber der
Gegensprechfunktion eine niedrigerer Priorität hat.
Dieses kann durch zwei Wege vermieden werden:
Die VOX Funktion deaktivieren
Deaktivieren Sie der VOX Funktionen wie im vorherigen
Abschnitt beschrieben, damit die Gegensprechanlagen
nicht automatisch aktiviert wird während Sie über das
PMR446 sprechen. Um bei dieser Konguration die
Gegensprechfunktion zu aktivieren, müssen Sie die
Gegensprechtaste manuell drücken. (Dieser Betrieb
Page 51

deaktiviert die Funkgerätekommunikation, die automatisch
wieder aktiviert wird, wenn die Gegensprechfunktion
deaktiviert ist).
Achtung: Falls Sie die VOX Funktion deaktivieren, können Sie nur eingehende Anrufe durch Drücken der "Te-
le-fon" Taste beantworten.
3-Wege Kommunikation dauernd aktivieren
Falls Sie diese Funktion aktivieren (wie im oberen Abschnitt
beschrieben) wird die Gegensprechanlage jedesmal aktiviert
wenn Sie reden; die 2-Wege Funkgerätekommunikation
wird nicht deaktiviert. Dadurch können Sie 2-Wege
Funkgerätekommunikation zwischen Fahrer und Sozius
teilen.
Die Musik zwischen Fahrer und Sozius teilen.
Wenn Sie die gleiche Musik zwischen Fahrer und Sozius
teilen möchten, müssen Sie folgende einfache Schritte
befolgen:
Verbinden Sie den Musik Player mit der Fahrer- oder ›
Soziuseinheit (Sie können über Kabel anschluss über
AUX Stecker verbinden)
Die "3 Wege Kommunikationsfunktion" an der Einheit ›
aktivieren, an der der Musik Player angeschlossen ist (s.
Kapitel oben)
Aktivieren Sie die Gegensprechanlage, jetzt kann die ›
Musik gemeinsam genutzt werden.
Hinweis: Stereo-Soundqualität ist nur mit einem Player über
den Kabelanschluss möglich. Wird der Ton von einem Bluetooth Player (z.B. Handy mit A2DP) übertragen, dann kann
nur derjenige die Musik hören, an dessen Bluetooth Gerät
der Player angeschlossen ist.
D
15
Page 52

LICHT UND SOUND SIGNALE
LED Anzeige Status
ALLGEMEINES
Keine Gerät ist ausgeschaltet oder komplett geladen, wenn es an der Stromversorgung ange-
Einzelnes blaues Blinken alle 3 Sekunden Gerät wird angeschaltet
Dreifaches rotes Blinken Gerät wird ausgeschaltet
Einzelnes blaues Blinken alle 3 Sekunde
Einzelnes rotes Blinken alle 3 Sekunde
ROT und BLAU (zusammen) alle 3 Sekun-deAktiv (Sprechanlage, Anruf oder Bluetooth Verbindung im Gange)
schlossen ist
Stand-by
Stand-by - schwache Batterie
ROT und BLAU (zusammen) und einzelnes
Blinken des ROTEN Lichts alle 3 Sekunden
Einzelnes rotes Blinken alle 2 Sekunde Gerät wird geladen, wenn an der Stromversorgung angeschlossen
EINSTELLUNG
Immer Rot Einstellungsmodus
Schnelles wechselweises Rot-Blau Blinken Paarungsmodus (nach Gerät suchen)
Ständig blau für 2 Sekunden Erfolgreiche Paarung/ Gepaarte Geräte zurücksetzen/ Dreifache Verbindung aktiviert
Blaues Licht blinkt zweimal lang Dreifache Verbindung deaktiviert
Audiosignale Status
Ansteigender Ton (niedrig-hoch) Gerät wird angeschaltet
Absteigende Ton (hoch-niedrig) Gerät wird ausgeschaltet
Aktivieren/Deaktivieren der Sprechanlage 1 Ton = aktiviert / 2 Töne = deaktiviert
1 Ton Spezische Funktion angeschaltet
2 Töne Spezische Funktion ausgeschaltet
Aktiv aber schwache Batterie
FUNKTIONEN DER EINHEIT
Wenn Sie wollen... ...tun Sie folgendes
ALLGEMEINES
Gerät einschalten Drücken Sie die Sprechtaste für mindestens 3 Sekunden (starten von blauem Blinken)
Gerät ausschalten Drücken Sie die Sprechtaste und Telefontaste gleichzeitig für 3 Sekunden (dreifaches
Lautstärke erhöhen Kurzes oder langes Drücken von Lautstärke+
Lautstärke reduzieren Kurzes oder langes Drücken von Lautstärke-
rotes Blinken)
16
Page 53

MOBILTELEFON
Einen Anruf beantworten Kurzes Drücken des Telefonknopfes / sprechen Sie
Einen Anruf ablehnen Langes Drücken der Telefontaste / bleibt stumm bis der Klingelton stoppt
Einen Anruf beenden Kurzes Drücken der Telefontaste
Sprachanwahl (im Stand-by Modus) Kurzes Drücken der Telefontaste und den Namen der Person, die angerufen werden
Zuletzt gewählte Nummer wieder wählen
(im Stand-by Modus)
Konversation zwischen Passagier, Fahrer
und Telefon
Die 'erweiterte' Konversation oben been-
den
GPS Navigator
Die Steuerung wird nur über GPS durchgeführt
GEGENSPRECHANLAGE
Gegensprechanlage benutzen Anfangen zu reden/kurzes drücken der Gegensprechtaste
Gegensprechanlage beenden Aufhören zu reden, (nach 60 sek. werden Sie in den Stand-by Modus zurückgesetzt)/
BLUETOOTH MP3 Player
MP3 Player aktivieren/Abspielen und An-
halten
Vorwärts (nächstes Lied) Während die Musik spielt, kurzes Drücken der Telefontaste
Zurück (Vorheriges Lied) Während die Musik spielt, kurzes Drücken der AUX Taste
MP3 Player deaktivieren Drücken Sie die Gegensprechtaste
soll, sprechen.
Langes Drücken der Telefontaste
Kurzes Drücken der Gegensprechtaste während eines Anrufes an dem Gerät, an dem
der Anruf angenommen wurde.
Kurzes Drücken der Gegensprechtaste
kurzes Drücken der Gegensprechtaste
"Gegensprechtaste" drücken und für 3 Sekunden lang gedrückt halten.
D
ANDERE BLUETOOTH GERÄTE (Dongle, 2-Wege Funkgerät)
Verbinden / Abbrechen Langes Drücken der AUX Taste
KABELVERBINDUNG
Aktivieren/Deaktivieren Kurzes Drücken der AUX Taste
EINSTELLUNG/PAARUNG
Einstellungsmodus starten Gegensprechtaste 7 Sekunde lang drücken, während das Gerät ausgeschaltet ist
Ein Telefon oder ein GPS Navigationsgerät
paaren
Bluetooth Geräte paaren Drücken Sie die AUX Taste im Einstellungsmodus, bis das rote und blaue LED Licht
Drücken Sie die Telefontaste im Einstellungsmodus, bis das rote und blaue LED Licht
abwechselnd blinkt
abwechselnd blinkt
17
Page 54

Ein anderes BT2 Gerät paaren Drücken Sie Lautstärke+ im Einstellungsmodus an einem Gerät (das LED Licht blinkt
Starten Sie alle gepaarten Gerät neu Im Einstellungsmodus, drücken Sie lange auf die Lautstärke+ und die Lautstärke-. Nach
SPEZIELLE EINSTELLUNGSKONFIGURATION
3-Wege Konversation ist immer an Im Einstellungsmodus drücken Sie die Telefontaste und AUX Taste für 3 Sek.
VOX Empndlichkeit ändern oder deakti-
vieren.
Einstellungsmodus verlassen Im Einstellungsmodus, drücken Sie lange auf die Gegensprechtaste. Das rote Licht geht
abwechselnd rot und blau), drücken Sie dann Laustärke- auf dem anderen Gerät (das
LED Licht blinkt abwechselnd rot und blau). Nach erfolgreicher Paarung leuchten beide
LED für eine Sekunde blau.
einem erfolgreichen Neustart leuchtet das blaue Licht für zwei Sekunden.
Ständiges blaues Licht für zwei Sekunden = aktiviert
Doppeltes langes Blinken = deaktiviert
Im Einstellungsmodus drücken Sie die kurz auf die AUX Taste (Blaues licht immer an).
Jetzt drücken Sie auf “Lautstärke+ oder Lautstärke-” um die Empndlichkeit zu reduzieren. Drücken nochmals auf die AUX Taste, um die neue Einstellung zu bestätigen und
gehen Sie zurück zum Einstellungsmodus (rotes Licht ist immer an).
Blaues Licht blinkt:
einmal = Vox deaktiviert / zweimal = sehr niedrige Empndlichkeit / 3 mal = niedrige
Empndlichkeit / 4 mal = mittlere Empndlichkeit / 5 mal= hohe Empndlichkeit
Default = mittel Empndlichkeit
aus and das blaue Licht beginnt zu blinken.
Europäische CE Erklärung und Sicherheitshinweise
Dieses Produkt trägt das CE Zeichen nach der R&TTE Direktive (99/5/EC). Es ist gültig für alle EU Staaten.
Es ist nicht zulässig, nicht mit uns abgesprochene Veränderungen an den Geräten vorzunehmen. Sie gefährden mit Änderungen
nicht nur die Gewährleistung, sondern auch das Einhalten der gesetzlichen Grenzwerte.
Näheres an technischen Informationen nden Kunden aus dem deutschsprachigen Raum auch unter http://hobbyradio.de, in der
Rubrik “Biker Sets”, wo Sie die jeweils neueste Ausgabe der Geräteunterlagen zum Download nden
Informationen für Kunden in Deutschland gibt es unter
www.alan-electronics.de
18
Page 55

INDICE
Características técnicas del Midland BT2 ........................................................................................3
Guía del manual de usuario .............................................................................................................4
Carga de las baterías ....................................................................................................................... 4
Descripción del dispositivo y sistema de jación .............................................................................. 4
Conguraciones Típicas del BT2 ......................................................................................................6
Consideraciones generales sobre la prioridad ................................................................................. 6
Encendido y apagado del Midland BT2 ............................................................................................ 7
Sincronización del dispositivo Bluetooth ..........................................................................................7
Ajuste del volumen ........................................................................................................................... 9
Uso de las características de los dispositivos Bluetooth ..................................................................9
Utilización con entradas de audio con cable .................................................................................. 13
Uso de un transceptor pmr446 .......................................................................................................13
Conguraciones especiales............................................................................................................13
Señales acústicas y luminosas / Funcionalidad ............................................................................. 16
E
1
Page 56

2
Page 57

Midland BT2 Intercom
Gracias por haber adquirido el Midland BT2, el primer y único sistema multimedia inalámbrico pensado para el motorista.Midland
BT2 es un dispositivo para instalar en su propio casco y permitir la comunicación con dispositivos Bluetooth, como un teléfono móvil,
navegador GPS, reproductores MP3, etc. Si lo desea, puede sincronizarlo con otro Midland BT2, y realizar la comunicación Piloto-
Copiloto o Moto a Moto con un alcance de hasta 200 m. Además, el Midland BT2 también dispone de conexión mediante cable,
para poder conectar reproductores MP3, iPod o un transceptor pmr446 para realizar comunicaciones Moto a Moto en grupos con
una cobertura de hasta 5 Km.
Midland BT2 esta disponible en dos versiones:
BT2 Individual con un dispositivo. ›
BT2 TWIN con dos dispositivos. ›
En función de la versión adquirida, en dotación incluye:
BT2 Intercom
1 Dispositivo de comunicación BT2 ›
1 Kit de audio completo que incluye dos altavoces estéreo, ›
micrófono de brazo ajustable y micrófono de hilo
1 Sistema de sujeción al casco bi-adhesivo ›
1 Sistema de sujeción al casco por pinza de presión ›
1 Cable de audio estéreo para conectar su iPod o cualquier ›
reproductor MP3
1 Cargador de pared con conector miniUSB ›
Esponja anti viento, llave allen y velcro de montaje ›
BT2 Intercom TWIN
2 Dispositivos de comunicación BT2 ›
2 Kits de audio completos, incluyendo cada uno dos ›
altavoces estéreo, micrófono de brazo ajustable y micrófono
de hilo
2 Sistemas de sujeción al casco bi-adhesivo ›
2 Sistemas de sujeción al casco por pinza de presión ›
2 Cables de audio estéreo para conectar su iPod o cualquier ›
reproductor MP3
1 Cargador de pared con conector miniUSB y doble carga ›
Esponjas anti viento, llave allen y velcro de montaje ›
Características técnicas del Midland BT2
General
Bluetooth versión 2.0 estéreo (protocolo Headset/Handsfree/ ›
A2DP)
Sistema AGC para el control automático de volumen en ›
función del ruido ambiente
Activación automática de la comunicación mediante función ›
VOX o manual
Comunicación privada de teléfono o comunicación a tres ›
Activación manual: activación del teléfono, interfono o ›
conexiones a cable
Totalmente resistente al agua ›
Batería de iones de Litio con una autonomía de hasta 8 ›
horas en conversación y una semana en espera
Tiempo de carga: 4 horas ›
Dimensiones: Largo 87mm – Alto 47 mm - Ancho 16 mm ›
Conexión Bluetooth:
Con un dispositivo idéntico para la modalidad Intercom ›
entre Piloto-Copiloto o Moto a Moto con un alcance de
hasta 200 m.
Con dispositivo Bluetooth: ›
- Teléfono, GPS (Garmin Zumo o TomTom Rider 1 y 2),
reproductor MP3 estéreo (con protocolo A2DP)
- Transmisor pmr446 (con Bluetooth integrado o externo)
para comunicaciones en grupo entre motos
Conexiones a cable:
Para conectar un reproductor estéreo (iPod/MP3) ›
Para conectar un transmisor pmr446 (con cable opcional) ›
Atención: Antes de usar por primera vez su BT2 recuerde
cargarlo al menos durante cuatro horas.
Atención: Midland BT2 es totalmente resistente al agua
siempre que los protectores de goma estén colocados
correctamente.
E
3
Page 58

GUÍA DEL MANUAL DE USUARIO
El manual está estructurado en 5 secciones principales:
Descripción del dispositivo y sistema de jación ›
Sincronización de dispositivos Bluetooth ›
Utilización del dispositivo. ›
Utilización de las conexiones vía cable ›
Conguraciones especiales ›
Para simplicar la conguración de su BT2 le aconsejamos
seguir el orden y estructura de este manual:
Primer paso: › Fije el dispositivo al casco siguiendo las
instrucciones de la sección “DESCRIPCIÓN DEL SISTEMA
DE FIJACIÓN”
Segundo paso: › Emparejar el BT2 con el dispositivo
Bluetooth (por ejemplo su móvil o el GPS). Siguiendo las
instrucciones especícas del capítulo “SINCRONIZACIÓN
DE DISPOSITIVOS BLUETOOTH”, eligiendo el dispositivo
Bluetooth de que disponga.
Tercer paso: › Concluida la fase de emparejamiento puede
pasar al capítulo “UTILIZACIÓN DEL DISPOSITIVO”
Cuarto paso: › Si desea conectar algún dispositivo vía cable,
consulte el capítulo “UTILIZACIÓN DE LAS CONEXIONES
VÍA CABLE”
Quinto paso: › Si precisa la utilización de funciones
avanzadas, consulte el capítulo “CONFIGURACIONES
ESPECIALES”
DESCRIPCIÓN DEL DISPOSITIVO Y
SISTEMA DE FIJACIÓN
DESCRIPCIÓN del BT2
El BT2 está compuesto por una parte frontal con 5 pulsadores
multi-función y, en su parte inferior, tres conexiones para
cable.
Volumen +
Teléfono
Intercom
Cargador
Kit audio
Volumen -
AUX
Luz azul
y roja
iPod/MP3
PMR446
Carga de las baterías
Asegúrese que la unidad estè totalmente cargada antes del
uso. Antes de su primera utilización cárguelo al menos 5-6
horas. El tiempo de carga habitual será de 4 horas.
Cargue la unidad insertando el cargador de pared en el jack de
carga (levante la cubierta de goma para insertar el enchufe).
El LED rojo parpadea cuando se empieza a cargar. ›
Mantenga la unidad en carga hasta que el mencionado ›
LED se apague.
Cuando la carga este completa, desconecte la unidad del ›
cargador.
4
Descripción de los pulsadores multi-función:
Teléfono: › Permite activar, desactivar y controlar varias fun-
ciones del teléfono.
Intercom: › Permite activar y desactivar la función Intercom y
gestionar la comunicación a tres.
AUXILIAR: › Permite la activación y desactivación de las co-
nexiones a cable
Volumen+: › para aumentar el volumen
Volumen-: › para disminuir el volukmen
Descripción de las conexiones con cable
Cargador: › para la carga del dispositivo mediante el carga-
dor con toma miniUSB
Kit de Audio: › para la conexión de los auriculares estéreo
y micrófono
Toma de audio auxiliar (AUX): › permite la conexión de un
reproductor de audio iPod/MP3 o transceptor pmr446.
Page 59

Descripción del kit de audio
El kit de audio está compuesto por dos altavoces estéreo
ultraplanos y dos tipos de micrófono intercambiables: de brazo
ajustable y de hilo. El mini conector del micrófono permite una
rápida y sencilla conexión para la utilización de uno u otro.
Altavoces estéreo. Los dos altavoces estéreo incluyen velcro
adhesivo para una rápida y fácil jación en el interior del casco.
Atención, no je denitivamente los adhesivos a su casco hasta
que haya hecho una prueba de sonoridad sobre su moto y se
asegure de su correcta colocación, esto le permitirá jarlos en
el lugar preciso para disponer de una perfecta sonorización.
El micrófono se puede jar al casco de dos maneras:
Micrófono de brazo ajustable. Posicione la parte del velcro
adhesivo en la parte interior rígida del casco, de modo que el
micrófono le quede justo frente a la comisura de los labios (el
símbolo blanco debe quedar frente a la boca). Este tipo de
micrófono es idóneo para cascos modulares o tipo jet.
transparente que protege el adhesivo, coloque el soporte de
jación en el lugar adecuado y ejerza una ligera presión sobre
el soporte durante unos segundos.
Fijación con pinza de presión
Coloque la pinza de sujeción
entre la parte acolchada del
casco y la bra, coloque la otra
parte del soporte en la parte
exterior del casco, mediante
la llave allen suministrada y
je rmemente las dos partes.
Compruebe que el dispositivo
es estable y ha quedado
perfectamente jado.
Colocación y extracción del Midland BT2
El BT2 se coloca fácilmente, basta deslizar el dispositivo sobre
el soporte de jación, independientemente del sistema de
jación utilizado, sea mediante adhesivo o pinza de presión.
E
Micrófono de hilo: Posicione el micrófono mediante el velcro
adhesivo en el interior del casco frente a la boca. Este tipo de
micrófono es el indicado para cascos integrales
El Kit de audio debe conectarse al jack central del BT2 mediante
el conector en forma de “L”. Este conector es muy exible y se
adapta a la práctica totalidad de cascos del mercado.
Descripción del sistema de jación al casco
Midland BT2 puede jarse al casco mediante dos sistemas
diferentes: adhesivo y sistema de pinza de presión.
Los dos sistemas son altamente seguros y permiten retirar el
dispositivo en cualquier momento para cargarlo o guardarlo.
Fijación con adhesivo
La peana/soporte de jación presenta una de sus partes con
adhesivo. Tras haber limpiado la supercie del casco donde
vamos a colocar el soporte de jación del BT2, retire el plástico
El dispositivo BT2 mantiene perfectamente su posición, gracias
al clip de seguridad que se encuentra en la parte superior de la
peana/soporte (A).
Para retirar el BT2 de su soporte, basta presionar ligeramente
el clip de seguridad y deslizar el dispositivo hacia arriba.
A
5
Page 60

Conguraciones Típicas del BT2
1. Midland BT2 “solo piloto”
Conexión Bluetooth con el teléfono, ›
GPS, reproductor MP3 o a un teléfono con MP3 para escuchar música.
Conexión vía cable para iPod o re- ›
productor MP3.
Función Intercom Moto a Moto hasta ›
una distancia de 200 m.
Conexión a un transceptor pmr446 ›
mediante cable o Bluetooth para comunicación entre varias motos hasta
una distancia de 5 Km
2. Midland BT2 TWIN “piloto y
pasajero”
Función Intercom entre Piloto y Pa- ›
sajero.
Conexión Bluetooth para Piloto y ›
Pasajero en función de las exigencias de cada uno: GPS para el Piloto
y cada uno puede conectar su pro-
pio teléfono o su reproductor estéreo de música vía Bluetooth o cable.
Por lo tanto, el piloto puede enlazar
el GPS, ambos pueden enlazar su
teléfono y un reproductor MP3 y, al
mismo tiempo, activar la función de
Intercom
Consideraciones generales sobre la prioridad
Midland BT2 es un dispositivo Bluetooth que puede ser
sincronizado con otro dispositivo Bluetooth con diferente
funcionalidad: teléfono, GPS, MP3, etc... En base a la
tipología del dispositivo, el Midland BT2 asigna la prioridad
de funcionamiento (por ejemplo, el teléfono tiene prioridad
sobre la música). Esto quiere decir que, en caso de recibir
una llamada telefónica, la música dejará de sonar para poder
atender la llamada. Podemos denir tres prioridades en función
de nuestras exigencias:
6
3. Midland BT2 Bike-to-bike;
“Pilots and passengers equipped
with Midland BT2 and PMR446
transceivers”
Rider to Pillion intercom system ›
Bluetooth connections for Rider and ›
Pillion depending on needs: each
connection is t for mobile phone,
driver’s GPS system and MP3 stereo player or mobile phone with MP3
feature (to listen to music)
Wired connection for stereo music ›
player (iPod/MP3 player )
Group communication (“bike to ›
bike”): it is possible to connect a
PMR446 transceiver to all motorbikes in order to be able to communicate as a group. The PMR446
transceiver can be connected in
Bluetooth or wired mode to both the
rider’s or pillion’s unit.
Dispositivo con prioridad 1 (Alta)
El teléfono y el GPS por defecto siempre tienen Alta prioridad
sobre cualquier otro dispositivo conectado. Cuando recibimos
una llamada o una indicación del navegador, este interrumpirá
cualquier otra comunicación activa. El dispositivo con prioridad
1 debe ser emparejado con el BT2 utilizando el botón
“Teléfono”.
Dispositivo con prioridad 2 (Media)
Esta prioridad corresponde sólo a otro BT2 en la modalidad
Page 61

de Intercom. Cuando la función Intercom está activada,
cortará cualquier otra comunicación excepto las asignadas
con prioridad 1. Se puede modicar esta función de prioridad
siguiendo las instrucciones del capitulo “Conguraciones
especiales”. Los dos Midland BT2 se pueden emparejar
mediante los pulsadores “Volumen+” y “Volume –“
Dispositivo con prioridad 3 (Baja)
Un reproductor MP3, un adaptador Bluetooth o un transceptor
pmr446 tienen una prioridad Baja, lo cual signica que, una
llamada telefónica o indicación del navegador (Prioridad 1) o la
apertura de la función Intercom (Prioridad 2), se antepondrán
a los dispositivos con prioridad 3.
El dispositivo con prioridad 3 se debe activar mediante el
pulsador “AUX” del BT2.
El Midland BT2 también permite conexión vía cable. Este tipo
de conexión tiene una prioridad muy baja, y se cortará cada
vez que se active cualquiera de las conexiones Bluetooth.
SINCRONIZACIÓN DEL
DISPOSITIVO BLUETOOTH
El Midland BT2 es un dispositivo Bluetooth que puede ser
sincronizado con otros dispositivos Bluetooth.
Antes de iniciar este procedimiento el BT2 debe estar en modo
sincronización/emparejamiento (Setup)
Esta modalidad únicamente permite la función de sincronización.
Para poder utilizar posteriormente el BT2 deberá salir de la
modalidad “Setup” y pasar al modo “Utilización”.
Modalidad de sincronización (setup)
Apague el BT2. Mantenga pulsado el botón central (Intercom)
durante aproximadamente 7 segundos hasta que la luz roja se
quede encendida. Ahora el modo “Sincronización” (Setup) está
activado y puede vincularse a otro dispositivo.
If the devices are
E
Encendido y apagado del MIDLAND BT2
El BT2 se enciende manteniendo pulsada durante 3 segundos
la tecla “Intercom”.
Para apagar el dispositivo es necesario pulsar simultáneamente
las teclas “Intercom” e “AUX”, de este modo evitamos que
accidentalmente apaguemos el dispositivo, especialmente
cuando usamos guantes.
OFFON
Encendido:
Mantenga pulsada durante 3 segundos la tecla “Intercom” ›
hasta que la luz azul se quede encendida.
Apagado:
Mantenga pulsadas durante tres segundos aproximada- ›
mente las teclas “Intercom” e “AUX”, hasta que la luz roja
parpadee tres veces.
Sincronizar el BT2 a otro BT2
Cuando usted adquiera la versión TWIN del Midland BT2,
no deberá efectuar la función de sincronización ya que se
suministran por defecto con esta función activada.
Si dispone de dos BT2 que no forman parte del mismo
embalaje o que han sido adquiridos por separado, primero
deberá sincronizarlos para que sean operativos entre sí.
Con el BT2 en la modalidad de “Sincronización” (luz roja
encendida), deberá pulsar y mantener pulsada la tecla
“Volumen+” del primer dispositivo, hasta que la luz roja y
azul parpadeen alternativamente; pulse y mantenga pulsada
la tecla “Volumen-“ del otro dispositivo hasta que la luz roja
y azul parpadeen alternativamente. En este momento, los
dos dispositivos están en fase de sincronización. Si hemos
realizado el proceso de forma correcta, pasados unos
segundos, la luz azul se mantendrá encendida durante un
segundo y, acto seguido, volverá a mostrar la luz roja esperando
la sincronización con otro dispositivo o para realizar otra
Sincronización a un teléfono
1. Active en su teléfono la función de búsqueda de dispositivos
Bluetooth. Esta función dependerá de la marca y modelo de
su teléfono (diríjase al manual del teléfono).
7
Page 62

2. Con el BT2 en modalidad de “Sincronización”, mantenga
pulsada la tecla “Teléfono” de su BT2 hasta que la luz roja y
azul parpadeen alternativamente.
3. Pasados unos segundos, en la pantalla de su teléfono aparecerá “Midland BT2”, selecciónelo y siga las instrucciones
de su teléfono para aceptar la sincronización. Cuando le
pida el código de sincronización, pulse 0000 (cuatro ceros).
El teléfono le conrmará que el proceso de sincronización
ha nalizado con éxito.
4. El BT2 retornará a la modalidad Setup (luz roja encendida)
para indicar que esta disponible para otras sincronizacio-
nes.
Si usted vincula su teléfono al BT2, esto excluirá la posibilidad
de sincronizarlo a un GPS ya que ambos dispositivos tienen
prioridad 1 (Alta).
Este problema se puede solucionar fácilmente sincronizando
primero su teléfono con el Navegador GPS y después
emparejando éste con el Midland BT2. En este caso,
la funcionalidad del teléfono se gestionará mediante el
Navegador GPS.
Sincronización con un Navegador GPS
En general, el BT2 se puede utilizar con cualquier Navegador
GPS que acepte auriculares Bluetooh. El Midland BT2 ha sido
testado con éxito con la familia de Navegadores Garmin Zumo
y con las versiones 1 y 2 del TomTom Rider.
1. Active en su GPS la modalidad de búsqueda de dispositivo
auricular Bluetooth. Esta búsqueda dependerá de la marca
y modelo de su GPS (diríjase al manual de instrucciones
del GPS).
2. Asegúrese al mismo tiempo de que su BT2 está en la modalidad “Sincronización” (luz roja encendida) y pulse la tecla
“Teléfono” del BT2 hasta que las luces roja y azul parpade-
en alternativamente.
3. Tras unos segundos, en el display de su Navegador aparecerá “Midland BT2”, selecciónelo y siga las instrucciones de
sincronización. Cuando le solicite el código de sincronización, pulse 0000 (cuatro ceros). El GPS conrmará que la
sincronización ha nalizado o se ha completado con éxito.
4. El BT2 retornará a la modalidad Setup (luz roja encendida),
lo cual indica que esta listo para realizar otra sincroniza-
ción.
Si usted sincroniza su GPS al BT2, excluirá la posibilidad de
8
sincronizarlo a un teléfono ya que ambos dispositivos tienen
prioridad 1 (Alta).
Este problema se puede solucionar fácilmente sincronizando
primero su teléfono con el Navegador GPS y después
emparejando éste con el Midland BT2. En este caso,
la funcionalidad del teléfono se gestionará mediante el
Navegador GPS.
Sincronización con un reproductor MP3
1. Active en su reproductor MP3 la modalidad de búsqueda de
dispositivos Bluetooth. Esta función depende del modelo y
marca de su reproductor (diríjase al manual de instrucciones de su MP3)
2. Asegúrese al mismo tiempo de que su BT2 está en modo
“Sincronización” (luz roja encendida) y pulse la tecla “AUX”
del BT2 hasta que las luces roja y azul parpadeen alterna-
tivamente.
3. Tras unos segundos en el display de su MP3 aparecerá el
nombre “Midland BT2”, selecciónelo y siga las instrucciones
de sincronización. Cuando le solicite el código de emparejamiento pulse 0000 (cuatro ceros). El MP3 conrmará que la
sincronización ha nalizado o se ha completado con éxito.
4. El BT2 retornará a la modalidad setup (luz roja encendida),
lo cual indica que está listo para realizar otra sincroniza-
ción.
Sincronización de la unidad con otros dispositivos Bluetooth
El Midland BT2 se puede sincronizar con otros dispositivos
que no sean Bluetooth mediante adaptadores (cualquier
producto de audio conectado a un BPA100) o walkie-talkies
con el Bluetooth incorporado (Midland 445BT).
1. Active en su dispositivo la modalidad de búsqueda de dispositivos Bluetooth. Esta función depende del modelo y marca
del dispositivo que utilice (diríjase al manual de instrucciones de su dispositivo).
2. Asegúrese al mismo tiempo de que el BT2 está en modo
“Sincronización” (luz roja encendida) y pulse la tecla “AUX”
del BT2 hasta que las luces roja y azul parpadeen alterna-
tivamente.
3. La sincronización se completará en unos pocos segundos y
el BT2 volverá a modo Setup (luz roja encendida) indicando
que está preparado para sincronizarse con otros dispositi-
vos.
Page 63

Atención: el proceso de búsqueda del dispositivo
Bluetooth (luces roja y azul parpadeando) puede durar
unos 2 minutos. Si no encuentra ningún dispositivo
durante ese tiempo, el BT2 vuelve al modo Setup (luz
roja encendida). Para volver a comenzar la búsqueda,
repita el proceso de sincronización desde el paso
2. Para cancelar el proceso de sincronización (luz
roja y azul parpadeando) y volver al modo Setup en
cualquier momento, pulse la tecla “Intercom” dos
veces.
Reset de todos los dispositivos sincronizados
En ocasiones puede ser necesario eliminar todos los elementos
sincronizados en el BT2 (operación reset). Para realizar esta
operación, mantenga pulsadas simultáneamente las teclas
“Volumen+” y “Volume –” durante 4 segundos.
Este procedimiento borra todos los dispositivos Bluetooth
almacenados en memoria para poder comenzar una nueva
sesión de sincronización.
Salir del modo sincronización (setup)
Después de haber sincronizado los dispositivos Bluetooth
deseados, debe de salir del modo “Setup” para poder utilizar
el BT2.
Mantenga pulsada la tecla Intercom (tecla central) durante
3 segundos. La luz roja se apagará y la azul comenzará a
parpadear. Ahora ya puede utilizar normalmente su BT2
RECONEXIÓN DE LA UNIDAD A LOS DISPOSITIVOS BLUETOOTH
Después de haber sincronizado varios dispositivos, puede
activarlos y desactivarlos sin tener que repetir el proceso de
sincronización. Si ocurre algún fallo de conexión entre los dos
dispositivos (por ejemplo si uno de los dispositivos se apaga
o está fuera del alcance), no será necesario repetir el proceso
de sincronización.
Simplemente, deberá encender el dispositivo o acercarse
hasta entrar en cobertura. Si la conexión no se restablece
automáticamente, seleccione en su dispositivo Bluetooth (p.e.
teléfono móvil, MP3, etc…) el BT2 y restablezca la conexión.
AJUSTE DEL VOLUMEN
El Midland BT2 utiliza tecnología AGC, la cual ajusta el
volumen automáticamente dependiendo del ruido ambiente.
Además, también se puede ajustar manualmente mediante las
teclas “Volumen+” y “Volumen-“.
Por ejemplo, puede ajustar el volumen al máximo deseado
en ambientes ruidosos (p.e. viajando a alta velocidad), para
permitir al sistema AGC cambiar el volumen y usar el ajuste
manual como volumen máximo. Esta operación es muy útil
porque cada tipo de casco se comporta de modo diferente
frente al viento y el ruido ambiente.
USO DE LAS CARACTERÍSTICAS DE
LOS DISPOSITIVOS BLUETOOTH
Uso del intercomunicador
Para utilizar el intercomunicador, asegúrese de que las dos
unidades estén encendidas y sincronizadas.
Si ha adquirido la versión Individual, siga el proceso de
sincronización descrito en la sección anterior.
Prioridad: el Intercomunicador tiene siempre una prioridad
más alta, comparada con otras comunicaciones, con la única
excepción del teléfono móvil y el navegador. Por lo tanto, la
función Intercomunicador desactiva automáticamente las
demás comunicaciones.
La función Intercomunicador se desactiva sólo cuando entra
una llamada de teléfono o el navegador da alguna instrucción
y vuelve a activarse en cuanto naliza dicha llamada o
instrucción.
Atención: algunos teléfonos móviles cortan las llamadas
después de unos segundos, lo que quiere decir que la
función Intercomunicador puede no estar disponible inmediatamente.
La función Intercomunicador se puede activar de dos
maneras:
Activación Manual:
Pulse la tecla “Intercom”, en una de las dos unidades. La ›
comunicación se activa y permanece activa hasta que vuel-
va a pulsar la tecla “Intercom” de nuevo. Escuchará 1 tono
de audio cuando la función se activa y 2 tonos cuando se
desactiva.
E
9
Page 64

Activación por la voz (VOX)
Este es el ajuste por defecto. Para comenzar una conver- ›
sación con el intercomunicador, simplemente comience a
hablar. La comunicación se mantiene activa durante todo el
tiempo que esté hablando. Si no hay conversación, la función se desactiva después de 1 segundo.
Para reactivarla, simplemente vuelva a hablar. En este ›
modo, usted puede decidir desactivarlo antes del tiempo
predenido, simplemente pulsando la tecla Intercom una
vez.
Para desactivar este modo, siga las instrucciones indicadas ›
en la sección “Conguraciones especiales”.
Atención: cuando utilice la función Intercomunicador, la
primera vez que lo active (vox o manual) la comunicación
comenzará con un pequeño retardo debido a que los
dispositivos deben reconocerse por primera vez. Después
de esto, la comunicación comenzará automáticamente.
Dos unidades BT2 pueden comunicarse hasta una distancia
máxima de 200 metros. Por lo tanto, se pueden utilizar para
una comunicación moto a moto. El alcance máximo depende
del entorno donde se usen las unidades BT2
Uso de la función teléfono
Para utilizar la función teléfono, asegúrese de que las dos
unidades estén encendidas y sincronizadas correctamente,
siguiendo el proceso descrito en la sección “Sincronización
con un teléfono móvil”.
Atención: la información suministrada en esta sección,
se reere al establecimiento de una comunicación directa entre el BT2 y un teléfono móvil. Si el teléfono móvil
está conectado vía navegador, solamente se podrá gestionar a través del propio navegador.
Prioridad: las llamadas son siempre privadas y tienen alta
prioridad, lo que signica que las otras comunicaciones se
desconectan temporalmente cuando entra una llamada y se
restablecen cuando la llamada naliza.
cer “ring”. Tenga en cuenta que algunos teléfonos pueden
no soportar la respuesta por voz
Manualmente: ›
Pulse la tecla “Teléfono” y comience a hablar.
Atención: Recuerde que solo puede responder una lla-
mada después del tercer “ring”.
Rechazar una llamada
Si no desea responder, puede dejar sonar el teléfono o pulsar
la tecla “Teléfono” durante unos segundos (escuchará un tono
de conrmación).
Realizar una llamada
Hay varios modos para realizar una llamada.
Desde el teclado del teléfono:
Marque el número en el teclado del teléfono.
Pulse la tecla “Enviar/Llamar” en el teléfono móvil. ›
Esta forma de realizar una llamada, nunca se debe hacer ›
con la moto en marcha.
Remarcar el último número:
Pulse y mantenga pulsada la tecla “Teléfono” durante unos ›
segundos para marcar el último número (escuchará un tono
de conrmación).
Realizar una llamada por comando de voz:
Pulse brevemente la tecla “Teléfono”. Si su teléfono móvil ›
soporta el perl de llamadas de voz, tendrá que decir el
nombre de a quien desea llamar.
La correcta operación de esta función depende del tipo de
casco que utilice (abierto o cerrado) y de la velocidad a la
que circula. Le sugerimos realizar unos cuantos test para
determinar los mejores ajustes.
Atención: si está escuchando un reproductor MP3 vía
Bluetooth (protocolo A2DP), no podrá usar los comandos
“Remarcar el último número” y “Realizar una llamada por
comando de voz”, porque las teclas se utilizan para el
control del MP3.
Por lo tanto, si quiere realizar una llamada, tendrá que
desactivar la música pulsando la tecla “Intercom” durante
1 segundo (escuchará dos tonos de conrmación) antes
de hacer la llamada.
Responder una llamada
Cuando escuche el tono de llamada, puede contestar de dos
formas diferentes:
Vocalmente: ›
Simplemente diga una palabra para responder y comience ›
a hablar. Recuerde que sólo puede hacerlo después del ter-
10
Finalizar una llamada
Hay varias maneras de nalizar una llamada:
Espere a que la otra persona corte la comunicación. ›
Pulse brevemente la tecla “Teléfono” (escuchará un tono de ›
conrmación).
Pulse la tecla “End” del teléfono móvil. (Esta forma de - ›
Page 65

nalizar una llamada, nunca se debe hacer con la moto en
marcha)
Llamada telefónica a tres
La función Intercomunicador se desactiva temporalmente
mientras hay una llamada en curso. Sin embargo, se pueden
añadir otros usuarios a la conversación activando la función
comunicación a tres.
Una vez se establece la comunicación, pulse brevemente
la tecla “Intercom” en el BT2 que ha recibido la llamada
(escuchará un tono de conrmación). Para volver a una
conversación privada, pulse de nuevo la tecla “Intercom”
(escuchará dos tonos de conrmación).
Uso del MP3 de su teléfono móvil
Muchos teléfonos móviles han sido diseñados para usarse
como reproductores MP3. Su Midland BT2 soporta los
protocolos A2DP y AVRCP que le permiten escuchar la música
en estéreo y controlar remotamente la función MP3 de su
teléfono móvil.
Puede incluso utilizar las teclas del BT2 para controlar las
siguientes funciones:
Play, Pausa, Forward (adelante) y Backward (atrás).
Atención: El control remoto solamente es posible si el
reproductor MP3 soporta el protocolo AVRCP.
Para desactivar el reproductor MP3, pulse la tecla “Inter- ›
com” (oirá 2 beeps de conrmación)
Para activar el Intercom basta con hablar o, para una activación manual, desactive primero el MP3, pulse la tecla “Intercom” y púlselo otra vez para activar el Intercom
Prioridad: el modo de escuchar música tiene la prioridad
más baja comparado con otras conexiones (como las
llamadas telefónicas o el intercomunicador). Por lo
tanto, la música se desactivará siempre cuando se active
cualquier otro tipo de comunicación.
Uso de las funciones de un navegador
Para usar las funciones de un navegador, asegúrese de que las
dos unidades estén encendidas y sincronizadas correctamente,
siguiendo el proceso de sincronización descrito en la sección
“Sincronización de la unidad con un navegador”.
Prioridad: la comunicación con un navegador tiene la más
alta prioridad, lo que quiere decir que cuando se activa
esta comunicación, se desactivan temporalmente el resto
de comunicaciones (Intercomunicador, música o walkietalkie). Una vez que la comunicación con el navegador
naliza, el resto de comunicaciones se restablecen
automáticamente.
Escuchar los comandos de voz de su navegador
Las instrucciones de tráco del navegador se transmiten
inmediatamente cortando temporalmente el resto de
comunicaciones. Una vez transmitidas esas instrucciones,
el BT2 restablece automáticamente las comunicaciones
existentes.
E
Controles disponibles:
Para activar el MP3 conectado, mantenga pulsada la tecla ›
“Intercom” durante 3 segundos.
Para activar/detener la música, mantenga pulsada la tecla ›
“Intercom” durante 3 segundos.
Para saltar a la siguiente canción, pulse brevemente la tecla ›
“Teléfono”.
Para saltar a la canción anterior, pulse brevemente la tecla ›
“AUX”.
Escuchar la música desde su navegador
Los navegadores mas modernos permiten escuchar música
mientras no transmiten ninguna información. En este caso, la
comunicación con el navegador es continua y tiene la más alta
prioridad en comparación con los otros dispositivos activos.
Sin embargo, se puede activar el Intercomunicador al mismo
tiempo, mientras se escucha la música, solamente pulsando
la tecla “Intercom” para abrir la comunicación a tres. Para más
información, vea la sección mas abajo “Comunicaciones a tres
con el navegador”.
Usar un teléfono móvil con un navegador
Si ha sincronizado un navegador con su Midland BT2, no podrá
conectar el teléfono móvil directamente al BT2; en su lugar,
11
Page 66

deberá conectar el teléfono con el navegador. Haciéndolo
así, todas las funciones del teléfono se controlan desde el
navegador. Para más información sobre como sincronizar el
teléfono con el navegador, diríjase al manual de usuario del
navegador.
Comunicaciones a tres con el navegador
La función Intercomunicador se desactiva temporalmente
cuando se activa la comunicación con el navegador
(indicaciones de tráco o música). Sin embargo, puede
permitir
Escuchar al pasajero, activando la “comunicación a
tres”.
Cuando la comunicación con el navegador se activa, pulse
brevemente la tecla “Intercom” en el BT2 conectado al
navegador (escuchará un tono de conrmación). El pasajero
podrá ahora escuchar la misma información/música que oye
el piloto. Para volver al modo privado, pulse de nuevo la tecla
“Intercom”. Escuchará dos tonos de conrmación.
El Midland BT2 soporta el protocolo A2DP que le permite
escuchar la música en estéreo y controlar las funciones
principales de su MP3 como son: Play, Pausa, Forward
(adelante) y Backward (Atrás).
Atención: el MP3 debe soportar el protocolo AVRCP.
Controles disponibles:
Para activar el MP3 sincronizado, pulse la tecla “Intercom” ›
durante 3 segundos.
Para activar/detener la música, pulse y mantenga pulsada ›
la tecla “Intercom” durante 3 segundos.
Para saltar a la siguiente canción, pulse brevemente la tecla ›
“Teléfono”.
Para saltar a la canción anterior, pulse brevemente la tecla ›
“AUX”
Para desactivar el reproductor MP3, pulse la tecla “Inter- ›
com” (oirá 2 beeps de conrmación)
Para activar el Intercom basta con hablar o, para una activación
manual, desactive primero el MP3, pulse la tecla “Intercom” y
púlseloaotra vez para activar el Intercom
Uso con otros dispositivos Bluetooth
Prioridad: la comunicación con otros dispositivos Bluetooth
tiene una prioridad baja comparada con la del teléfono
móvil, navegador o Intercomunicador. Esto quiere decir que
la comunicación se desactivará siempre cuando entra una
llamada, cuando el navegador da una instrucción o cuando el
Intercomunicador está activo.
Atención: si utiliza el navegador para escuchar música
(la comunicación siempre está activa), las comunicacio-
nes con otros dispositivos Bluetooth están desactivadas, ya que tienen una prioridad más baja.
Utilización de un reproductor MP3 Bluetooth
12
Uso de un adaptador Bluetooth
Su Midland BT2 se puede conectar a un adaptador Bluetooth
(como es el BPA100) para utilizarlo con dispositivos de audio
sin conexión Bluetooth, como walkie-talkies o navegadores
antiguos.
Uso de un walkie-talkie con Bluetooth incorporado
El Midland BT2 se puede conectar a un walkie-talkie con
Bluetooth incorporado (como el Midland 445BT) y utilizarlo
para comunicaciones de moto a moto. Sincronice el BT2
con el talkie, como se describe en el capítulo “Sincronización
con otros dispositivos Bluetooth”, después active la conexión
Bluetooth pulsando la tecla adecuada en el talkie. Esto le
permitirá transmitir a más larga distancia y con más gente a la
vez, mientras sigue disfrutando de la libertad de movimientos
que le ofrece la comunicación sin hilos.
Page 67

UTILIZACIÓN CON ENTRADAS
DE AUDIO CON CABLE
El Midland BT2 está equipado también con una entrada de
audio por cable (denominada AUX), que se puede usar
para conectar una fuente de audio, como una iPod (u otro
reproductor MP3) o un transceptor pmr446 para comunicarnos
de moto a moto.
Prioridad: la entrada de audio por cable, tiene la prioridad más
baja en comparación con el resto de conexiones Bluetooth
(incluido el Intercomunicador) y por lo tanto se desactiva
siempre cuando una comunicación Bluetooth se activa.
Escuchar la música
Para escuchar la música desde la entrada de cable, conecte
la fuente de audio mediante el cable suministrado con el BT2.
El nivel de volumen se ajusta automáticamente mediante el
sistema AGC, por lo que únicamente tiene que ajustar el nivel
de volumen de su reproductor iPod/MP3 a un nivel que le
permita escuchar la música a velocidad normal.
Nunca ajuste al máximo el volumen de su iPod/MP3
Consejo: le recomendamos realizar algunas pruebas de ajuste
del volumen de su iPod/MP3 para que, a velocidad normal, el
volumen en el casco sea el deseado. El sistema AGC variará
automáticamente el volumen en función de la velocidad.
Acuérdese de este ajuste para futuros viajes.
Atención: las teclas de ajuste de volumen, (“Volumen +”
y “Volume –“), no se pueden utilizar para ajustar el vo-
lumen de la entrada de audio por cable. Solamente se
ajusta la de los dispositivos Bluetooth conectados.
Activación/Desactivación de la entrada de cable
La entrada de cable se puede activar y desactivar mediante
la tecla “AUX”.
Desactivación › : pulse brevemente la tecla “AUX” (escu-
chará dos tonos de conrmación).
Activación › : pulse brevemente la tecla “AUX” (escuchará un
tono de conrmación).
USO DE UN TRANSCEPTOR PMR446
Para poder usar en walkie-talkie, es necesario comprar un
cable especíco (se vende por separado) para poder conectar
la radio al Midland BT2:
Algunos fabricantes utilizan una conguración diferente de ›
los conectores, por lo que le recomendamos que pregunte
a su distribuidor por el cable que mejor se adapta a sus
necesidades
Para comunicarse con la radio conectada, pulse la tecla de
transmisión (PTT) para hablar y suéltela para escuchar. No es
posible hablar y escuchar al mismo tiempo. El cable conectado
a la radio tiene un PTT remoto que se puede colocar en el
manillar de la moto o en su mano (recomendado para el
pasajero)
Ajuste el volumen de la radio al nivel deseado, recordando que
se ajustará automáticamente por el sistema AGC y que el nivel
aumentará automáticamente en función del ruido generado.
CONFIGURACIONES ESPECIALES
El Midland BT2 se puede congurar con ajustes personalizados
para cubrir las máximas exigencias del usuario.
En particular, los usuarios expertos pueden congurar las
siguientes “funciones avanzadas”:
La comunicación a tres activada permanentemente ›
Intercomunicador activado por la voz (VOX) ›
Ajustar la sensibilidad del micrófono
Desactivar la función VOX
Activación permanente de la comunicación a
tres
Las comunicaciones Bluetooth con prioridad baja y las
comunicaciones mediante la entrada de cable se desactivan
cuando el Intercomunicador se activa. Para activar esta función,
puede mantener activas las comunicaciones transriendo la
función de baja prioridad al otro usuario (p.e. al pasajero).
Esta función puede ser útil, por ejemplo, si desea mantener
comunicaciones con el Intercomunicador y al mismo tiempo
hablar utilizando un walkie talkie conectado vía Bluetooth o
por cable.
Además, también le permite compartir la música entre el piloto
13
E
Page 68

y el pasajero, teniendo en cuenta que la calidad de la música
es “mono” para la segunda persona que comparte la música
(vea el capítulo “Compartir la música entre piloto y pasajero”
más abajo).
La activación/desactivación de la “comunicación a tres” puede
efectuarse desde un solo dispositivo. En este caso, deberá ser
ese mismo dispositivo el que nalice la comunicación a tres.
Activación/Desactivación de comunicación a tres
1) Apague el BT2. Mantenga pulsada la tecla central (Intercom/on) hasta que la luz roja se encienda permanentemente. Ahora el BT2 está en modo “Sincronización” (Setup).
2) Mantenga pulsadas simultáneamente las teclas “Teléfono” y
“AUX” durante al menos 3 segundos.
3) Si la función estaba activada, se desactiva (luz azul durante
2 segundos).
4) Si estaba desactivada, se activa (largos ashes de luz
azul).
5) Salga del modo “Sincronización” (Setup) pulsando la tecla
“Intercom” durante al menos 3 segundos. La luz roja se apaga y la luz azul comienza a parpadear. Ahora puede utilizar
el BT2.
Atención: si el dispositivo Bluetooth es un MP3 estéreo,
la comunicación se desactivará siempre cuando el Inter-
comunicador esté activo. (La comunicación a tres sola-
mente soporta dispositivos “mono”).
Activación del intercomunicador por voz (Vox)
La función Intercomunicador se puede activar tanto manualmente como vocalmente (VOX). La activación VOX está
inuenciada por el ruido de fondo y, por lo tanto, por la velocidad, el tipo de moto y el aislamiento que le conera su
casco.
Para un óptimo resultado, se puede seleccionar uno de los 4
siguientes niveles de sensibilidad del micrófono: alto, medio,
bajo y muy bajo. El ajuste alto es adecuado para motos poco
ruidosas como scooters y motos con carenado. El ajuste bajo
es más adecuado para motos ruidosas y sin carenado. El
ajuste por defecto del BT2 es “medio”.
También se puede desactivar la función VOX para activar el
Intercomunicador y las llamadas de teléfono solamente en
modo manual.
14
Ajuste de la sensibilidad del micrófono (VOX)
1) Entre en modo Sincronización (Setup): Apague el BT2.
Mantenga pulsada la tecla central (Intercom/on) hasta que
la luz ROJA se encienda permanentemente. Ahora el BT2
está en modo “Sincronización”(Setup).
2) Pulse brevemente la tecla “AUX” una vez hasta que la luz
cambie a AZUL ja.
3) Pulse “Volumen+” o “Volumen-” para aumentar o reducir la
sensibilidad. Cada vez que pulse los botones de Volumen,
la luz ROJA parpadeará para conrmar. Cuando alcance
el límite superior o inferior, la luz ROJA no parpadeará al
pulsar “Volumen+” o “Volumen-”.
4) Pulse de nuevo la tecla AUX para conrmar el ajuste y la
luz AZUL parpadeará según su elección: una vez = VOX
desactivado / Dos = sensibilidad muy baja / Tres = sensibilidad baja / Cuatro = sensibilidad media / Cinco = sensibilidad alta / Default = sensibilidad media
5) La luz cambiará a ROJA ja (modo Setup) y los cambios
quedan conrmados.
6) Si es necesario, puede volver a ajustar repitiendo desde el
punto 2.
7) Ahora salga del modo Setup pulsando y manteniendo pulsada la tecla “Intercom” durante al menos 3 segundos. La
luz ROJA se apaga y la luz AZUL comienza a parpadear.
El BT2 está ahora listo para funcionar.
Desactivación de la función VOX (Intercomunicador y
teléfono)
Además de los 4 niveles de sensibilidad del micrófono, hay
un quinto estado que le permite desactivar la función VOX.
Siga el mismo proceso detallado en el capítulo anterior y, en
el paso 3, pulse “Volumen-” para reducir la sensibilidad hasta
que la luz ROJA deje de parpadear. Pulse ahora “AUX” y la
luz AZUL parpadeará una sola vez, lo cual signica que el
VOX se ha desactivado. Siga ahora el procedimiento des de
el punto 5.
Para volverlo a activar, realice la misma operación, selec-
cionando uno de los cuatro niveles de ajuste disponibles (de
2 a 5).
Recomendaciones para usos especícos
El siguiente capítulo proporciona unas cuantas sugerencias
para conseguir el máximo de su BT2.
Page 69

Uso de un transceptor pmr446 en modo Intercomunicador
Si desea utilizar una radio pmr446 para comunicaciones en
grupo y mantener simultáneamente la función Intercomunicador
activa entre piloto y pasajero, debe recordar que la función
Intercomunicador se activa cada vez que habla, mediante la
función VOX del BT2.
Por lo tanto, la comunicación mediante el walkie talkie se
desactiva mientras hable con su pasajero, porque tiene un
nivel bajo de prioridad comparado con el Intercomunicador.
Esto se puede prevenir de dos formas, que son:
Desactivación de la función VOX
Desactive la función VOX, como se ha explicado, para
asegurarse que el Intercomunicador no se activará
automáticamente cuando hable en la radio pmr446. Para
activar la función Intercom usando esta conguración, tendrá
que pulsar la tecla Intercom. (Esta operación desactiva la
comunicación por radio, la cual se activará automáticamente
cuando se desactive la función Intercom).
¡Atención! Si desactiva la función VOX, solamente podrá
responder llamadas entrantes pulsando la tecla “Teléfono”.
Activación permanente de la comunicación a tres
Si activa esta función (como se ha explicado antes), cada
vez que hable se activa el intercomunicador, pero las
comunicaciones mediante una radio no se desactivan. Esto
quiere decir que puede compartir la señal de la radio entre
piloto y pasajero.
Compartir la música entre Piloto y Pasajero
Si quiere compartir la misma música entre piloto y pasajero
siga estos simples pasos:
1) Conecte el reproductor de música a la unidad de uno de el-
los mediante la entrada de cable a través de la toma AUX.
2) Active la función “comunicación a tres” (vea los capítulos
anteriores) en la unidad a la que se ha conectado el repro-
ductor de música.
3) Active el Intercom y la música se comparte.
Atención: Sólo aquellos que estén conectados a la músi-
ca vía cable podrán escucharla en estéreo
Atención: No se puede compartir música si la fuente es
un reproductor estéreo Bluetooth (A2DP)
E
15
Page 70

SEÑALES ACÚSTICAS Y LUMINOSAS
Indicaciones luminosas Estado
Generales
Ninguna indicación (luz apagada) BT2 apagado / BT2 completamente descargado
Luz azul parpadeando cada 3 segundos BT2 encendido (en espera)
Luz roja parpadeando cada 3 segundos En espera – batería descargada
Luz roja parpadea 3 veces BT2 apagándose
Luz roja y azul parpadeando a la vez
cada 3 segundos
Luz roja y azul parpadeando a la vez y un
parpadeo rojo
Luz roja parpadeando cada 2 segundos BT2 en carga
SETUP
Luz roja ja Modo “Setup” activo
Luces roja y azul parpadeando Modo “Sincronización” (búsqueda de dispositivos Bluetooth)
Luz azul ja durante 2 segundos Enlazado con éxito / Reset de dispositivos enlazados / Comunicación a 3 habilitada
Luz azul con parpadeo largo Comunicación a tres desactivada
Señalización audio Estado
Tono ascendente (bajo-alto) BT2 encendiéndose
Tono descendente (alto-bajo) BT2 apagándose
1 tono Intercom activado
2 tonos Intercom desactivado
BT2 activo (Intercom, teléfono o conexión Bluetooth)
BT2 activo y batería descargada
FUNCIONALIDAD
Si desea esta función… …debe hacer esto
Generales
Encender el BT2 Mantenga pulsado el botón “Intercom” durante 3 segundos (luz azul parpadea)
Apagar el BT2 Mantenga pulsados los botones “Intercom” e “AUX” durante 3 segundos (la luz roja
Subir Volumen Pulsar o mantener pulsado el botón “Volumen+”
Bajar Volumen Pulsar o mantener pulsado el botón “Volumen-”
16
parpadea 3 veces
Page 71

Teléfono móvil
Responder a una llamada Pulsar el botón “Teléfono” / pronunciar una palabra
Rechazar una llamada Mantener pulsado el botón “Teléfono” / permanecer en silencio
Finalizar una llamada Pulsar el botón “Teléfono”
Marcación por voz (en espera) Pulsar el botón “Teléfono” y pronunciar el nombre asociado a la agenda
Rellamada del último número
(en espera)
Conversación a 3 (piloto-pasajero-telé-
fono)
Finalizar la conversación a 3 Pulsar nuevamente el botón “Intercom” (no naliza la llamada)
Mantener pulsado el botón “Teléfono”
Con la llamada activa, pulsar el botón “Intercom”
Navegador GPS
Todos los controles están en el GPS
Intercom
Activar el Intercom Comenzar a hablar / pulsar el botón “Intercom”
Desactivar el Intercom Dejar de hablar (después de 60 segundos, la comunicación se corta) / pulsar el
Reproductor MP3 Bluetooth
Activar el MP3/Reproducir y Pausa Mantener pulsado el botón “Intercom” durante 3 segundos
Avanzar una canción Pulsar el botón “Teléfono”
Retroceder una canción Pulsar el botón “AUX”
Desactivar el MP3 Pulsar el botón “Intercom”
Otros dispositivos Bluetooth (adaptadores, transceptores)
Conexión y desconexión Mantener pulsado el botón “AUX”
Conexión vía cable
Activación/desactivación Pulsar el botón “AUX”
SETUP y SINCRONIZACIÓN
Entrar en modo SETUP Con el BT2 apagado, mantener pulsado el botón “Intercom” durante 7 segundos
Enlazar con un teléfono o Navegador
GPS
Enlazar un dispositivo Bluetooth En modo SETUP, mantener pulsado el botón “AUX” hasta que la luz azul y roja
botón “Intercom”
En modo SETUP, mantener pulsado el botón “Teléfono” hasta que la luz azul y roja
parpadee alternativamente
parpadee alternativamente
E
17
Page 72

Enlazar con otro BT2 En modo SETUP, mantener pulsado el botón “Volumen+” de unos de los BT2 y
Reset de todos los dispositivos enlazados
SETUP de conguraciones especiales
Conversación a 3 siempre activa En modo SETUP, pulsar el botón “Teléfono” durante 3 segundos.
Cambiar la sensibilidad del Vox o desac-
tivarlo
“Volumen-” en el otro (las luces azul y roja parpadean alternativamente). Cuando
enlacen, ambas luces permanecerán en azul durante un segundo
En modo SETUP, mantener pulsados los botones “Volumen+” y Volumen-”. La luz
azul permanecerá encendida durante 2 segundos
Luz azul encendida ja durante 3 segundos = activa
Luz azul parpadeo largo = desactivada
En modo SETUP, pulsar el botón “AUX” (Luz azul ja)
Pulse “Volumen+” o “Volumen-” para aumentar o reducir la sensibilidad.
Pulse de nuevo la tecla AUX para conrmar el ajuste y la luz AZUL parpadeará
según su elección:
1 vez = VOX desactivado
2 veces = sensibilidad muy baja
3 veces = sensibilidad baja
4 veces = sensibilidad media
5 veces = sensibilidad alta
Salir del modo SETUP Mantener pulsado el botón “Intercom” hasta que la luz roja se apague y la luz azul
comience a parpadear
Certicaciones Europeas CE
Este producto cumple la normativa CE de acuerdo con la Directiva RTTE (99/5/EC). y es de uso libre en todos los países del
UE. No se permite a los usuarios hacer ningún cambio o modicaciones a la unidad.
Las modicaciones que no están aprobadas por el productor invalidan la tarjeta de garantía.
CTE International SRL, declara, bajo su responsabilidad, que este aparato cumple con lo dispuesto en la Directiva 99/05/
CE, del Parlamento Europeo y del Consejo de 9 de marzo de 1999, transpuesta a la legislación española mediante el Real
Decreto 1890/2000, de 20 de noviembre
© ALAN COMMUNICATIONS, SA.
Queda prohibida la reproducción total o parcial sin el permiso por escrito del titular.
Para más información, por favor visite nuestra web:
www.midland.es
18
Page 73

SOMMAIRE
Caractéristiques techniques du Midland BT2 ...................................................................................3
Structure du mode d’emploi..............................................................................................................4
Chargement des batteries ................................................................................................................ 4
Description du dispositif et du système de xation ........................................................................... 4
Congurations typiques du BT2 .......................................................................................................6
Allumage et coupure du MIDLAND BT2 ........................................................................................... 7
Couplage avec des dispositifs Bluetooth (pairing)............................................................................7
Réglage du volume...........................................................................................................................9
Utilisation des fonctions des dispositifs Bluetooth ..........................................................................12
Utilisation de l’entrée audio par l...................................................................................................13
Utilisation d’un émetteur-récepteur.................................................................................................14
Congurations spéciales ................................................................................................................14
Conseils pour des utilisations spéciques ......................................................................................15
Signaux sonores et lumineux / Fonctions ....................................................................................... 16
F
1
Page 74

2
Page 75

Midland BT2 Intercom
Merci d’avoir acheté le Midland BT2 Intercom, le premier réel système multimédia sans l conçu pour le motocycliste.
Midland BT2 est un dispositif à appliquer sur le casque pour communiquer avec des dispositifs Bluetooth comme un téléphone
portable, un navigateur GPS, un lecteur MP3 et s’il est associé à un autre Midland BT2 il devient également un système intercom
sans l Pilote/Passager ou bien Pilote/Pilote d’une moto à l’autre jusqu’à 200 m. De plus Midland BT2 dispose également d’une
connexion par l pour brancher un iPod/lecteur MP3 ou un émetteur-récepteur PMR446 pour la communication de moto à moto
jusqu’à 5 km.
Midland BT2 est disponible dans deux versions:
BT2 Intercom emballage unique avec un seul dispositif ›
BT2 Intercom TWIN emballage double avec deux ›
dispositifs.
En fonction de la version que vous possédez, dans l’emballage
vous trouvererez:
BT2 Intercom
1 dispositif de communication BT2 ›
1 kit audio comprenant deux haut-parleurs stéréo, ›
microphone monté sur tige rigide et microphone à l
1 système d’accrochage au casque avec adhésif double ›
face
1 système d’accrochage au casque avec pince ›
1 câble audio stéréo pour brancher un iPod ou tout autre ›
lecteur MP3
1 alimentation murale mini USB ›
Protection contre le vent en mousse pour le microphone, ›
clé mâle six pans et velcro pour le montage
BT2 Intercom TWIN
2 dispositifs de communication BT2 ›
2 kits audio comprenant deux haut-parleurs stéréo, ›
microphone monté sur tige rigide et microphone à l
2 systèmes d’accrochage au casque avec adhésif double face ›
2 systèmes d’accrochage au casque avec pince ›
2 câbles audio stéréo pour brancher un iPod ou tout autre ›
lecteur MP3
1 alimentation murale mini USB avec double poste de ›
charge
Protection contre le vent en mousse pour le microphone, ›
clé mâle six pans et velcro pour le montage
Les dispositifs de l’emballage TWIN sont déjà couplés
entre eux pour pouvoir activer immédiatement la fonction
Intercom.
Caractéristiques techniques du Midland BT2
Générales:
Bluetooth ver. 2.0 stéréo (protocole Headset/Handsfree/ ›
A2DP)
Système AGC pour le contrôle automatique du volume en ›
fonction du bruit de fond
Activation de la communication vocale (VOX) ou manuelle ›
Appel téléphonique privé ou bien partagé (communication ›
à trois)
Commandes manuelles pour: activation téléphone, ›
interphone et connexion par l
Entièrement résistant à l’eau ›
Batterie au Lithium avec une autonomie de 8 heures de ›
conversation (1 semaine en standby)
Temps de charge 4 heures environ ›
Dimension: Longueur: 87 mm – Largeur: 47 mm - ›
Epaisseur: 16 mm
Connexions Bluetooth:
Avec un dispositif identique pour le mode Intercom Pilote- ›
Passager ou de Moto à Moto jusqu’à 200 m
Avec dispositif Bluetooth: ›
- Téléphone portable, GPS (Garmin Zumo et TomTom Rider 1 et 2), lecteur MP3 stéréo (avec protocole A2DP)
- Emetteurs-récepteurs PMR446 (avec Bluetooth intégré ou
externe) pour les communications de groupe de moto à
moto
Connexions par l:
Pour source audio stéréo (iPod/lecteur MP3) ›
Pour émetteurs-récepteurs PMR446 (avec câble en option) ›
Attention: avant d’utiliser votre BT2 pour la première fois,
n’oubliez pas de le charger pendant au moins 4 heures.
Attention: le Midland BT2 a été conçu pour résister à
l’eau/la pluie. Vériez toujours que les petits bouchons
en caoutchouc de protection des prises sont bien à leur
place en cas de pluie.
F
3
Page 76

Structure du mode d’emploi
Le manuel se divise en 5 sections principales:
Description du dispositif et système de xation ›
Couplage (Pairing) avec les dispositifs Bluetooth ›
Utilisation des dispositifs Bluetooth ›
Utilisation de l’entrée audio par l ›
Congurations spéciales ›
Pour une conguration plus simple de votre BT2 nous nous
conseillons de suivre la même séquence que la structure du
manuel:
Première étape: › xer le dispositif au casque en suivant
les instructions de la section «Description du systeme de
xation au casque»
Deuxième étape: › coupler les dispositifs Bluetooth (comme
par exemple téléphone portable ou GPS) au BT2. Suivre
la procédure spécique dans le chapitre «Couplage aux
dispositifs bluetooth (couplage)», relative aux dispositifs
Bluetooth que vous possédez.
Troisième étape: › une fois terminée la phase de couplage
(pairing) vous pouvez passer au chapitre «Utilisation
des fonctions des dispositifs bluetooth» pour vérier
les fonctions spéciques liées aux dispositifs couplés
auparavant.
Quatrième étape: › si vous avez également des dispositifs
à l, vous pouvez consulter le chapitre «Utilisation de
l’entree audio a l»
Cinquième étape: › s’il s’avère nécessaire d’utiliser des
fonctions avancées, vous pouvez consulter le chapitre
«Congurations speciales»
Chargement des batteries
S’assurer que l’unité est complètement rechargées avant
de l’utiliser pour la première fois. Recharger pendant au moins
5-6 heures avant la toute première utilisation. Habituellement
4 hours sufsent pour une recharge complète.
Recharger l’unité en branchant le chargeur secteur dans la
prise de recharge (soulever le couvercle en plastique pour
brancher la che).
Le voyant rouge sur l’unité clignotera quand le chargement ›
commencera.
Laisser l’appareil se recharger jusqu’à ce que le voyant ›
rouge s’éteigne.
Quand le chargement est terminé, enlever l’appareil du ›
chargeur.
4
Description du dispositif
et du système de xation
Description BT2
Le dispositif BT2 est équipé, sur la partie frontale, de 5
boutons multi-fonctions et dans la partie inférieure de trois
connexions à l.
Volume +
Téléphone
Intercom
Charge
Micro et hauts-parleurs
Description de la fonction des boutons:
Téléphone: Permet d’activer/de désactiver et de contrôler ›
les différentes fonctions du téléphone portable
Intercom: Permet l’activation/la désactivation de la fonction ›
Intercom et la gestion de la communication à trois
AUX: Permet l’activation/la désactivation de l’entrée audio à ›
l
Volume+: Permet d’augmenter le volume ›
Volume -: Permet de diminuer le volume ›
Description des connexions à l
Prise charge: Permet de charger le dispositif au moyen de ›
l’alimentation mini USB standard
Prise kit audio: Permet la connexion du kit audio (casques ›
stéréo et microphone)
Prise audio auxiliaire (AUX): Permet la connexion d’une ›
source audio comme un iPod/lecteur MP3 stéréo ou un
émetteur-récepteur PMR446
Volume -
AUX
Lumière
bleue et
rouge
iPod/MP3
PMR446
Page 77

Description kit audio
Le système audio se compose de deux haut-parleurs stéréo
ultra ns et de deux microphones interchangeables, l’un monté
sur tige et l’autre à l. Le mini connecteur du microphone
vous permet de brancher facilement le microphone le plus
adapté à votre casque.
Attention, positionnez-les de manière à ne pas couvrir
entièrement les oreilles, vous devez toujours pouvoir entendre les bruits/indications en provenance de la route.
Le microphone peut être xé au casque de deux manières:
Microphone monté sur tige. Positionnez la partie avec
le velcro/l’adhésif entre le rembourrage et la partie rigide
du casque, de manière à ce que le microphone soit bien
positionné face à la bouche, avec le symbole blanc tourné
vers la bouche. Ce type de microphone est adapté aux
casques Jet et Modulaires.
Microphone à l. Positionnez le microphone, grâce au velcro
et à l’adhésif, à l’intérieur du casque en face de la bouche.
Ce type de microphone est plus indiqué pour les casques
intégraux.
Haut-parleurs stéréo. Les deux haut-parleurs stéréo sont
équipés de velcro et d’adhésif pour un montage simple à
l’intérieur du casque.
Description du système de xation au casque
Le Midland BT2 est livré avec deux différents systèmes de
xation au casque: un avec adhésif double face et l’autre
avec un système d’accrochage à pince.
Le système de xation permet d’ «accrocher» de façon sûre
le dispositif BT2 à votre casque et de le sortir à tout moment
pour le charger ou le ranger.
Fixation avec adhésif double face
La plaque de xation présente une partie déjà prévue avec
un adhésif double face. Après avoir nettoyé la surface du
casque au niveau de la zone sur laquelle on a l’intention de
xer le dispositif, enlevez la pellicule de l’adhésif double face
et positionnez la plaque de xation sur le casque en exerçant
une légère pression pendant quelques secondes.
Fixation avec pince
Avec la clé mâle six pans,
desserrez les deux vis
de la pince et placez la
plaque postérieure entre le
rembourrage du casque et la
calotte externe rigide.
Après avoir introduit la pince,
serrez les deux vis de manière
à ce qu’elle soit stable et bien
xée.
Introduction et décrochage du Midland BT2
Le dispositif BT2 s’accroche au casque en le faisant
simplement coulisser vers le bas de manière à ce qu’il entre
dans le logement prévu du système de xation que vous avez
choisi (adhésif double face ou à pince).
F
Pour nir le kit audio doit être branché, au moyen du connecteur
en L au Midland BT2 Intercom dans la prise centrale. Le
connecteur est extrêmement exible et il permet l’adaptation
aux différents casques disponibles sur le marché.
5
Page 78

Le dispositif BT2 est maintenu dans son logement grâce au
clip d’accrochage spécial placé dans la partie supérieure (A).
Pour décrocher le BT2 il suft d’appuyer sur le clip
d’accrochage et de pousser le dispositif vers le haut.
Congurations typiques du BT2
A
1. Midland BT2 unique «pilote
seul»
Connexion Bluetooth avec le ›
téléphone portable, avec le GPS et
connexion à un lecteur MP3 stéréo
ou bien à un téléphone portable
avec fonction MP3 pour écouter de
la musique.
Connexion par l pour l’iPod/le ›
lecteur MP3 stéréo
Fonction Intercom de moto à ›
moto «Les deux pilotes peuvent
communiquer entre eux jusqu’à 200
m de distance»
Connexion à des émetteurs- ›
récepteurs PMR446 via Bluetooth
ou par l pour les communications
de moto à moto jusqu’à 5 km de
distance
6
2. Midland BT2 en couple «pilote et
passager»
Fonction Intercom Pilote et ›
Passager
Connexions Bluetooth pour le pilote ›
et pour le passager en fonction
des exigences: GPS pour le pilote,
chacun à son propre téléphone
portable et pour tous les deux
connexion à un lecteur MP3 stéréo
via Bluetooth ou par l.
3. Midland BT2 de moto à moto
«Pilotes et passagers, tous équipés
du Midland BT2 et émetteursrécepteurs PMR446»
Fonction Intercom Pilote et ›
Passager
Connexions Bluetooth pour le pilote ›
et pour le passager en fonction
des exigences: GPS pour le pilote,
chacun à son propre téléphone
portable.
Connexion de groupe «De moto à ›
moto» au moyen du branchement à
un émetteur-récepteur PMR446. Le
branchement du PMR446 peut être
fait indifféremment au dispositif du
pilote ou à celui du passager.
L’émetteur-récepteur PMR446 peut ›
être relié via Bluetooth ou bien par
l.
Page 79

Considérations générales en matière de
priorité
Le Midland BT2 est un dispositif Bluetooth pouvant être
couplé à d’autres dispositifs Bluetooth avec des fonctions
différentes: téléphone portable, GPS, lecteur MP3, etc. En
fonction du type de dispositif, le Midland BT2 attribue des
priorités de fonctionnement, par exemple l’appel téléphonique
est prioritaire par rapport à la musique, cela veut dire que
si un appel arrive, la musique est interrompue pour pouvoir
répondre. Trois priorités d’utilisation ont donc été dénies
pour satisfaire les principales exigences.
Dispositif avec priorité 1 (Elevée)
Le téléphone portable ou le GPS de par leur nature doivent
avoir la priorité la plus élevée sur tout autre dispositif relié.
Quand un appel ou une indication du navigateur arrive,
tout autre communication active doit être interrompue. Les
dispositifs avec priorité 1 doivent être couplés au BT2 à l’aide
du bouton «Téléphone».
Dispositif avec priorité 2 (Moyenne)
A cette priorité correspond uniquement un autre BT2 avec
la fonction d’Intercom. Quand la fonction Intercom est
activée, toutes les autres communications seront fermées à
l’exception de celles avec priorité 1 (Elevée). Il est possible de
modier cette condition en suivant la procédure décrite dans
le chapitre «Congurations spéciales». Le couplage entre
deux Midland BT2 a lieu en utilisant les boutons «Volume +»
et «Volume –».
Allumage et coupure du MIDLAND BT2
Le BT2 peut être allumé en tenant le bouton «Intercom»
appuyé. Par contre pour l’éteindre il faut appuyer
simultanément sur les deux boutons «Téléphone» et
«Intercom». Ainsi il est impossible d’éteindre le dispositif par
inadvertance durant l’utilisation (une chose qui pourrait se
produire, en particulier si on utilise des gants).
Allumage:
Maintenir le bouton «Intercom» appuyé pendant environ ›
3 secondes jusqu’à ce que la lumière BLEUE clignotante
s’allume.
Coupure:
Maintenir les boutons «Intercom» et «AUX» appuyés ›
simultanément pendant environ 3 secondes jusqu’à ce que
la lumière ROUGE clignote à trois reprises.
OFFON
Couplage avec des dispositifs
Bluetooth (pairing)
F
Dispositif avec priorité 3 (Basse)
Un lecteur MP3, un adaptateur Bluetooth ou un émetteurrécepteur PMR446 ont une priorité basse, par conséquent ils
seront interrompus à l’arrivée d’un appel ou d’une indication
GPS (priorité 1) ou lors de l’ouverture de la communication
Intercom (priorité 2).
Les dispositifs avec priorité 3 doivent être couplés au BT2 à
l’aide du bouton «AUX».
Pour nir le Midland BT2 accepte également les dispositifs
audio reliés par l. Cette dernière connexion a la priorité la
plus basse en absolu et elle est interrompue chaque fois
qu’une connexion Bluetooth est ouverte.
Le Midland BT2 est un dispositif Bluetooth pouvant être
couplé à d’autres dispositifs Bluetooth.
La procédure prévoit que le BT2 entre d’abord en mode
de couplage (Setup). Dans ce mode les seules opérations
autorisées sont celles de couplage. Après avoir couplé les
éventuels dispositifs Bluetooth pour pouvoir utiliser le BT2 il
est nécessaire de quitter le mode «Setup» et de passer à
celui d’ «Utilisation».
Mode de couplage (setup)
Eteindre le BT2. Maintenir le bouton central (Intercom)
appuyé jusqu’à ce que la lumière devienne de couleur rouge
xe. Le BT2 est alors en mode «Couplage» (Setup), prêt à
être couplé à d’autres dispositifs.
7
Page 80

Couplage à un autre BT2
Les deux dispositifs présents dans le même paquet (Midland
BT2 Intercom TWIN) sont déjà couplés entre eux et prêts à
l’utilisation, par conséquent il n’est pas nécessaire d’activer
cette procédure de couplage.
Par contre si les dispositifs ne font pas partie du même paquet
ou si vous avez acheté un autre BT2 à un autre moment (par
exemple pour le passager), vous devez d’abord effectuer la
procédure de couplage.
Avec le BT2 en mode «Couplage» (lumière rouge allumée
xe), maintenir appuyé le bouton «Volume +» sur le premier
dispositif jusqu’à ce que la lumière se mette à clignoter
alternativement rouge et bleue. Maintenir le bouton «Volume
–» appuyé sur l’autre dispositif jusqu’à ce que la lumière
rouge et bleue se mette à clignoter en alternance. Les deux
dispositifs sont alors en phase de couplage. Si le couplage
a été fait de la manière correcte, sur tous les deux s’allume,
pendant une seconde, la lumière bleue puis elle retourne en
mode couplage avec la lumière rouge xe.
Couplage à un téléphone portable
1. Activez sur votre téléphone le mode de recherche des
dispositifs Bluetooth. Cette fonction dépend de la marque
et du modèle de votre téléphone (reportez-vous au mode
d’emploi du téléphone).
2. Avec le BT2 déjà en mode «Couplage», appuyer sur le
bouton «Téléphone» sur BT2 jusqu’à ce que la lumière se
mette à clignoter en rouge et bleu.
3. Au bout de quelques secondes sur le téléphone s’afchera
le nom “Midland BT2”, sélectionnez-le et suivez les
instructions de votre téléphone portable pour accepter le
couplage. Lorsqu’il vous est demandé, saisissez le code
de couplage: 0000 (quatre zéros). Le téléphone conrmera
si le processus de couplage a été réussi.
4. Le BT2 reviendra en mode setup (lumière rouge xe) et
sera prêt pour d’autres couplages.
Le couplage d’un téléphone portable exclut la possibilité de
coupler au BT2 également un navigateur GPS car tous les
deux sont des dispositifs avec priorité 1 (élevée).
Cette limite peut être facilement surmontée en couplant le
téléphone directement au navigateur GPS, puis en couplant
ce dernier au Midland BT2. Dans ce cas les fonctions du
téléphone sont gérées directement sur le navigateur GPS.
Couplage à un navigateur GPS
En général il est possible de coupler n’importe quel navigateur
GPS qui accepte un écouteur Bluetooth.
Le Midland BT2 a été testé avec succès avec la famille de
navigateurs GPS ZUMO de Garmin et le TOMTOM Rider 1
et 2.
1. Activez sur votre GPS le mode de recherche des dispositifs
écouteurs Bluetooth. Cette fonction dépend de la marque
et du modèle de votre GPS (reportez-vous au mode
d’emploi du GPS).
2. En même temps appuyez sur le bouton «Téléphone» sur
le BT2 jusqu’à ce que la lumière rouge et bleue se mette à
clignoter.
3. Au bout de quelques secondes sur le GPS s’afchera
le nom “Midland BT2”, sélectionnez-le et suivez les
instructions pour accepter le couplage. Lorsqu’il vous est
demandé, saisissez le code de couplage: 0000 (quatre
zéros). Le GPS conrmera si le processus de couplage a
été réussi.
4. Le BT2 revient en mode setup (lumière rouge xe) prêt
pour d’autres couplages.
Le couplage d’un navigateur GPS exclut la possibilité de
coupler au BT2 également un téléphone portable car tous les
deux sont des dispositifs avec priorité 1 (élevée).
Cette limite peut être facilement surmontée en couplant le
téléphone directement au navigateur GPS, puis en couplant
ce dernier au Midland BT2. Dans ce cas les fonctions du
téléphone sont gérées directement sur le navigateur GPS.
Le couplage à un navigateur GPS exclut la possibilité de
coupler au BT2 un téléphone portable.
Cette limite peut être facilement surmontée en couplant le
téléphone directement au navigateur GPS, puis en couplant
ce dernier au BT2. Dans ce cas les fonctions du téléphone
sont gérées directement sur le navigateur GPS.
Couplage à un lecteur MP3
1. Activez sur votre lecteur MP3 le mode de recherche des
dispositifs Bluetooth. Cette fonction dépend de la marque
et du modèle, par conséquent reportez-vous au mode
d’emploi du lecteur MP3.
2. En même temps appuyez sur le bouton «AUX» sur le
BT2 jusqu’à ce que la lumière rouge et bleue se mette à
clignoter.
3. Au bout de quelques secondes sur le lecteur MP3
s’afchera le nom “Midland BT2”, sélectionnez-le et suivez
les instructions pour accepter le couplage. S’il vous est
8
Page 81

demandé, saisissez le code de couplage: 0000 (quatre
zéros). Le lecteur MP3 conrmera si le processus de
couplage a été réussi.
4. Le BT2 revient en mode setup (lumière rouge xe) prêt
pour d’autres couplages.
Couplage à d’autres dispositifs Bluetooth
Le Midland BT2 peut être couplé à d’autres dispositifs
Bluetooth, tels qu’un lecteur MP3 stéréo, des adaptateurs
Bluetooth (ex.: BPA100) ou bien des émetteurs-récepteurs
avec Bluetooth intégré (ex.: Midland 445BT).
1. Activez le mode couplage sur le dispositif Bluetooth.
Cette fonction dépend de la marque et du modèle, par
conséquent reportez-vous au mode d’emploi de l’appareil
Bluetooth.
2. Simultanément appuyez sur le bouton «AUX» sur le
BT2 jusqu’à ce que la lumière rouge et bleue se mette à
clignoter.
3. Au bout de quelques secondes le couplage est terminé et
le BT2 revient en mode setup (lumière rouge xe) prêt pour
d’autres couplages.
Attention: le processus de recherche d’un autre
dispositif (lumière rouge et bleue clignotante) dure
environ 2 minutes, après quoi si aucun dispositif
n’est trouvé, le BT2 revient en mode setup (lumière
rouge xe). Répéter alors la procédure, en repartant
du point 2. Si vous voulez interrompre la procédure
de couplage (lumière rouge et bleue clignotante)
et revenir à la phase de set up (lumière rouge xe),
appuyez 2 fois sur le bouton «Intercom».
Réinitialisation de tous les dispositifs
couplés
Il pourrait s’avérer nécessaire d’éliminer toutes les références
de couplage enregistrées dans le BT2 (réinitialisation). Pour
cela vous devez maintenir appuyé simultanément les boutons
«Volume +» et «Volume –» pendant 4 secondes, la lumière
bleue s’allumera xe pendant une seconde. A partir de ce
moment-là, le BT2 n’aura plus aucun dispositif Bluetooth en
mémoire et vous pourrez effectuer une nouvelle session de
couplage (pairing).
Quitter le mode couplage (setup)
Après avoir terminé le couplage avec les différents dispositifs
Bluetooth, il est nécessaire de quitter le mode «Setup» pour
pouvoir utiliser le BT2.
Maintenir le bouton Intercom (bouton central) appuyé pendant
3 secondes. La lumière rouge s’éteint et à sa place la lumière
bleue clignote. Vous pouvez maintenant utiliser le BT2.
Reconnexion aux dispositifs Bluetooth
Après avoir couplé avec succès les dispositifs, vous pouvez
les éteindre et les rallumer sans devoir répéter la procédure de
couplage (pairing). Si pour une raison ou une autre les deux
dispositifs perdent la connexion entre eux (ex.: si on éteint un
dispositif ou si on dépasse la distance maximale autorisée),
il n’est pas nécessaire de refaire la procédure de couplage
(pairing), mais dans de nombreux cas la reconnexion a lieu
de manière automatique, il suft de rallumer le dispositif ou
de rentrer dans la portée et la connexion reprend. Si cela ne
se produit pas, il est nécessaire de revenir dans les réglages
du dispositif utilisé (ex. téléphone portable, lecteur MP3,
etc.), sélectionner dans la liste le Midland BT2 et activer la
connexion.
Réglage du volume
Le Midland BT2 est équipé de la technologie AGC qui règle
automatiquement le volume d’écoute en fonction du bruit de
fond. Vous pouvez cependant régler manuellement le volume
au moyen des boutons «Volume +» et «Volume -». Par
exemple vous pouvez régler manuellement le niveau maximal
de volume désiré dans les conditions les plus bruyantes
(comme à grande vitesse), de cette manière le système
automatique AGC variera le volume en utilisant comme
valeur maximale la valeur dénie par vous manuellement. Ce
réglage est utile car la valeur maximale du volume dépend du
type et de la qualité du casque utilisé.
Utilisation des fonctions des
dispositifs Bluetooth
Utilisation de la fonction intercom
Pour utiliser la fonction Intercom il est nécessaire que les
deux dispositifs soient allumés et qu’ils aient été auparavant
F
9
Page 82

couplés entre eux. Si vous avez acheté la version «unique»,
vous devez suivre la procédure de couplage expliquée dans
le chapitre «Couplage à un autre BT2» dans les pages
précédentes.
Priorité: la communication Intercom a toujours une priorité
plus élevée par rapport aux autres communications, à
l’exception du téléphone ou du navigateur GPS. Par
conséquent quand la fonction Intercom est activée, toutes les
autres communications ouvertes sont fermées. Seulement
quand un appel ou une indication vocale du navigateur
arrive, la communication Intercom est fermée. Quand la
communication téléphonique ou l’indication du GPS se
terminent, la fonction Intercom se réactive automatiquement.
Attention: certains téléphones peuvent avoir besoin de
quelques secondes avant que la ligne ne soit libérée
après la n de l’appel et donc avant que l’Intercom puisse être réactivé.
Pour activer la communication Intercom il est possible
d’utiliser deux modes:
Activation manuelle:
En appuyant sur le bouton «Intercom», indifféremment à ›
partir d’un des deux dispositifs, la communication s’active
et reste active jusqu’à ce qu’on appuie à nouveau sur
le bouton «Intercom». Vous entendrez 1 ton audio pour
conrmer l’activation de l’Intercom et 2 tons audio pour
conrmer la désactivation.
Activation vocale (VOX):
La fonction VOX pour l’activation vocale pour l’Intercom ›
est active par défaut. Il suft de parler pour ouvrir la
communication Intercom qui restera ouverte jusqu’à ce
que quelqu’un se mette à parler. Si personne ne parle,
au bout d’une minute l’Intercom est automatiquement
fermé. Pour rouvrir la communication il sufra de parler
à nouveau. Quand l’Intercom est activé par VOX il est
toutefois possible de le désactiver sans attendre le laps de
temps prédéni tout simplement en appuyant sur le bouton
«Intercom».
Il est possible de désactiver la fonction d’activation vocale ›
en suivant la procédure spécique dans le chapitre
«Congurations spéciales».
Attention: la première fois que vous activerez la fonction
Intercom (vocale ou manuelle), la communication s’ouvrira avec un léger retard parce que les deux dispositifs
doivent d’abord se reconnaître. A partir de la deuxième
10
activation la communication sera instantanée.
La distance maximale de communication entre les deux
dispositifs Midland BT2 est d’environ 200 m en rase
campagne. Il est donc possible d’utiliser le BT2 comme
intercom entre deux pilotes de «MOTO à MOTO».
Utilisation de la fonction téléphone
Pour utiliser la fonction téléphone il est nécessaire que les
deux dispositifs soient allumés et qu’ils aient été auparavant
couplés entre eux. Suivez la procédure de couplage expliquée
dans les pages précédentes dans le chapitre «Couplage à un
téléphone portable».
Attention: les informations reportées dans ce chapitre se
réfèrent au branchement direct entre téléphone portable
et BT2. Si le téléphone est branché par l’intermédiaire du
navigateur GPS, la gestion des fonctions du téléphone
peut avoir lieu uniquement par l’intermédiaire du navigateur.
Priorité: l’appel est toujours privé et prioritaire, par conséquent
toutes les autres communications sont temporairement
interrompues, une fois l’appel terminé les communications
interrompues précédemment sont automatiquement
réactivées.
Répondre à un appel
Quand vous entendez le téléphone sonner, vous pouvez
répondre de deux manières:
Réponse vocale:
Il suft de prononcer un mot au hasard puis de commencer
à parler.
Réponse manuelle:
Appuyer brièvement sur le bouton «Téléphone» et commencer
à parler.
Attention: la réponse à l’appel peut avoir lieu seulement
après la troisième sonnerie
Refuser un appel
Si vous n’avez pas l’intention de répondre au téléphone, vous
pouvez le laisser sonner ou bien appuyer pendant quelques
secondes sur le bouton «Téléphone» (vous entendrez un ton
audio de conrmation).
Passer un appel
Il existe différentes manières de passer un appel.
Avec le clavier du téléphone:
Composer le numéro sur le clavier du téléphone ›
Page 83

Appuyer sur le bouton «Envoi» du téléphone ›
Appeler le dernier numéro:
Maintenir appuyé pendant quelques secondes le bouton ›
«Téléphone», le dernier numéro utilisé sera rappelé (vous
entendrez un ton audio de conrmation)
Appel vocal:
Appuyez brièvement sur le bouton «Téléphone», si votre ›
téléphone prend en charge l’appel vocal, il vous sera alors
demandé de prononcer le nom du contact que vous voulez
appeler.
Le fonctionnement correct de cette fonction peut dépendre
du type de casque utilisé (Jet ou Intégral) ou de la vitesse
de déplacement. Faites quelques essais pour évaluer les
conditions optimales d’utilisation.
Attention: si vous êtes en train d’utiliser un lecteur MP3
relié via Bluetooth, les commandes d’ «Appel du dernier
numéro» et d’ «Appel vocal» ne peuvent pas être utilisées
du fait que ces mêmes boutons sont actifs pour commander les fonctions du lecteur MP3. Vous devez donc
d’abord couper la musique en appuyant sur le bouton
«Intercom» pendant 3 secondes (2 bips sonores conrmera la désactivation) puis vous pourrez passer l’appel.
Mettre n à un appel
Il existe différentes manières de mettre n à un appel:
Attendre que l’autre personne mette n à l’appel ›
Appuyer brièvement sur le bouton «Téléphone» (vous ›
entendrez un ton audio de conrmation)
Appuyer sur le bouton «Fermé» du téléphone ›
en charge les protocoles A2DP et AVRCP qui permettent
d’écouter de la musique en stéréo et de commander les
principales fonctions du lecteur MP3. En effet il est possible
d’utiliser les boutons présents sur le BT2 pour gérer les
fonctions suivantes: Lecture, Arrêt/Pause, Avant et Arrière
Attention: le lecteur MP3 Bluetooth doit prendre en charge le protocole AVRCP
Commandes disponibles:
Activation fonction lecteur MP3: appuyer sur le bouton ›
«Intercom» pendant quelques secondes
Lecture/Pause de la musique: appuyer deux fois sur le ›
bouton «Intercom»
Avancer d’une chanson: appuyer brièvement sur le bouton ›
«Téléphone»
Revenir en arrière d’une chanson: appuyer brièvement sur ›
le bouton «AUX»
Pour désactiver le lecteur MP3, appuyez sur le bouton ›
“Intercom” (Vous entendez deux Beep de conrmation).
F
Communication à trois avec le téléphone
Quand la communication téléphonique est en cours, la
fonction Intercom est temporairement fermée. Il est cependant
possible d’ajouter le passager à la conversation en activant
donc une «communication à trois». Quand la communication
téléphonique est en cours, appuyer brièvement sur le bouton
«Intercom» sur le dispositif ayant reçu l’appel (vous entendrez
1 ton audio de conrmation). Pour revenir à la communication
téléphonique privée, appuyer à nouveau sur le bouton
«Intercom» (vous entendrez 2 tons audio de conrmation).
Utilisation de la fonction lecteur MP3 du
téléphone portable
De nombreux téléphones portables peuvent être utilisés
comme lecteur MP3 stéréo. Le Midland BT2 prend entièrement
Pour ouvrir une communication Intercom parler tous
simplement, pour une activation manuel il faut d’abord
désactiver le lecteur MP3 en appuyant sur le bouton Intercom.
Appuyez a nouveau pour activer l’Intercom.
Priorité: l’écoute de la musique a une priorité plus basse
par rapport à toutes les autres connexions (par exemple:
appel téléphonique ou communications Intercom). La
musique sera donc toujours interrompue au moment où
une autre communication sera ouverte.
Utilisation des fonctions couplées au
navigateur GPS
Pour utiliser les fonctions offertes par un navigateur GPS, il
est nécessaire que les deux dispositifs soient allumés et qu’ils
11
Page 84

aient été auparavant couplés entre eux. Suivez la procédure
de couplage expliquée dans les pages précédentes dans le
chapitre «Couplage à un navigateur GPS».
Priorité: la communication avec le navigateur GPS a
la priorité la plus élevée, par conséquent toute autre
communication active (comme par exemple l’Intercom,
la musique ou un éventuel émetteur-récepteur) est
temporairement fermée. Dès que les indications vocales
du GPS cessent, les communications interrompues
précédemment sont automatiquement réactivées.
Ecouter les indications vocales du navigateur GPS
Chaque fois que le navigateur envoie les indications routières,
celles-ci seront immédiatement disponibles, toute autre
communication active sera momentanément interrompue.
Dès que les indications vocales du GPS cessent, le BT2
rétablit les communications précédemment interrompues.
Ecouter la musique du navigateur GPS
Les GPS les plus répandus sur le marché permettent
également d’écouter de la musique quand il n’y a pas
d’indications routières à communiquer. Dans ce cas la
communication vers le navigateur est toujours ouverte et elle
est prioritaire par rapport aux autres communications actives.
Vous pouvez cependant activer la fonction Intercom même
quand vous êtes en train d’écouter de la musique (voir le
chapitre «Communication à trois avec le navigateur GPS»
dans les pages suivantes).
Utilisation du téléphone couplé au navigateur GPS
Si vous avez relié le navigateur GPS au Midland BT2, vous
ne pouvez pas relier aussi le téléphone portable mais vous
devez relier ce dernier directement au navigateur. De cette
manière toute la gestion du téléphone sera prise en charge
par le navigateur GPS, par conséquent reportez-vous à la
procédure spécique sur le manuel du navigateur pour
coupler un téléphone et pour répondre ou passer un appel.
Communication à trois avec le navigateur GPS
Quand la communication avec le navigateur est active
(indications vocales/musique ou appel téléphonique),
la fonction Intercom est momentanément fermée. Il est
cependant possible d’ajouter le passager à la conversation
en activant donc une «communication à trois». Quand la
communication est en cours, appuyer brièvement sur le
bouton «Intercom» sur le dispositif relié au navigateur (vous
entendrez 1 ton audio de conrmation) et le passager écoutera
12
ce que le pilote écoute. Pour revenir à la communication
privée, appuyer à nouveau sur le bouton «Intercom» (vous
entendrez 2 tons audio de conrmation).
Utilisation d’autres dispositifs Bluetooth
Le Midland BT2 peut être couplé à d’autres dispositifs
Bluetooth, tels qu’un lecteur MP3, des adaptateurs Bluetooth
(ex.: BPA100) ou bien des émetteurs-récepteurs avec
Bluetooth intégré (ex.: Midland 445BT). Pour utiliser ces
dispositifs il est nécessaire que les deux appareils soient
allumés et qu’ils aient été auparavant couplés entre eux.
Suivez la procédure de couplage expliquée dans les pages
précédentes dans le chapitre «Couplage à d’autres dispositifs
Bluetooth».
Les dispositifs couplés peuvent être activés ou désactivés
sans perdre le couplage, tout simplement en utilisant le
bouton «AUX»:
Désactivation: maintenir appuyé pendant 3 secondes ›
le bouton AUX (vous entendrez 2 tons audio de
conrmation)
Activation: maintenir appuyé pendant 3 secondes le bouton ›
AUX (vous entendrez 1 ton audio de conrmation)
De cette façon le dispositif est simplement débranché
temporairement du BT2 mais les deux dispositifs restent
quand même couplés entre eux.
Priorité: la communication à d’autres dispositifs Bluetooth a
une priorité inférieure par rapport à la connexion au téléphone
portable, au navigateur GPS et à la communication Intercom.
Ceci veut dire qu’elle sera interrompue chaque fois qu’arrivera
un appel, une indication vocale du navigateur ou quand la
communication Intercom sera ouverte.
Attention: si vous utilisez le navigateur GPS pour écouter
de la musique (la communication avec le navigateur est
toujours active), les autres dispositifs Bluetooth ayant
une priorité inférieure seront toujours désactivés.
Utilisation d’un lecteur MP3 Bluetooth:
Le Midland BT2 prend entièrement en charge le protocole
A2DP qui permet d’écouter de la musique en stéréo et de
commander les principales fonctions du lecteur MP3. En effet
il est possible d’utiliser les boutons présents sur le BT2 pour
gérer les fonctions suivantes: Lecture, Arrêt/Pause, Avant et
Arrière
Page 85

Commandes disponibles:
Activation de la fonction lecteur MP3: appuyer deux fois ›
sur le bouton «Intercom»
Lecture/Pause de la musique: appuyer deux fois sur le ›
bouton «Intercom»
Avancer d’une chanson: appuyer brièvement sur le bouton ›
«Téléphone»
Revenir en arrière d’une chanson: appuyer brièvement sur ›
le bouton «AUX»
Pour désactiver le lecteur MP3, appuyez sur le bouton “In- ›
tercom” (Vous entendez deux Beep de conrmation).
Pour ouvrir une communication Intercom parler tous
simplement, pour une activation manuel il faut d’abord
désactiver le lecteur MP3 en appuyant sur le bouton Intercom.
Appuyez a nouveau pour activer l’Intercom.
Il n’est pas possible de garantir la compatibilité complète avec
tous les modèles de lecteur MP3 Bluetooth du marché, car ils
utilisent souvent différentes procédures propriétaires.
Utilisation d’un adaptateur Bluetooth:
Le Midland BT2 peut être relié à un adaptateur Bluetooth
externe (comme par exemple le BPA100) pour utiliser des
dispositifs audio qui n’ont pas le Bluetooth intégré (comme par
exemple les émetteurs-récepteurs ou des GPS de première
génération). Après avoir couplé les deux dispositifs, suivez
les instructions fournies avec le dispositif lui-même.
Utilisation d’un émetteur-récepteur avec Bluetooth
intégré:
Le Midland BT2 peut être relié à un émetteur-récepteur
avec Bluetooth intégré comme le Midland 445BT pour la
communication de moto à moto. Après avoir couplé les deux
dispositifs comme expliqué dans le chapitre «Couplage des
autres dispositifs Bluetooth», activez la connexion Bluetooth
en appuyant sur le bouton prévu à cet effet sur la radio. Il est
maintenant possible de communiquer via radio en utilisant le
bouton PTT sur la radio ou celui externe à l contenu dans
l’emballage de la radio elle-même.
Utilisation de l’entrée audio par l
Le Midland BT2 dispose également d’une entrée audio par l
(appelée AUX) pour relier une source audio stéréo comme par
exemple un iPod (ou tout autre lecteur MP3) ou bien un émetteurrécepteur PMR446 pour la communication de moto à moto.
Priorité: l’entrée audio à l a la priorité la plus basse en absolu
par rapport à toutes les autres connexions via Bluetooth
(y compris l’Intercom), par conséquent elle sera toujours
interrompue lorsqu’une autre communication Bluetooth sera
ouverte.
Ecoute de la musique
Pour écouter de la musique par l’entrée à l il suft de relier
la source audio au moyen du câble fourni dans l’emballage. Le
réglage du volume est géré automatiquement par le système
AGC par conséquent vous devez simplement positionner le
volume de votre iPod/lecteur MP3 à un niveau tel que vous
puissiez écouter la musique à une vitesse normale.
Attention: ne pas regler le volume du iPod/lecteur MP3
au niveau max
Conseil: faites quelques essais, en réglant le volume de votre
iPod/lecteur MP3 de manière à ce qu’à la vitesse maximale
le volume dans le casque soit adapté à vos exigences.
Le system CAG augmente automatiquement le volume en
cas vitesse élevée. Noté se paramétrage pour des voyage
ultérieur.
Attention: les boutons de réglage du volume «Volume +»
et «Volume –» ne contrôlent pas le volume de la source
audio par l.
Activation/désactivation de l’entrée par l
Grâce au bouton «AUX» il est possible d’activer et de
désactiver l’entrée par l:
Désactivation: appuyer brièvement sur le bouton AUX ›
(vous entendrez 2 tons audio de conrmation)
Activation: appuyer brièvement sur le bouton AUX (vous ›
entendrez 1 ton audio de conrmation)
13
F
Page 86

Utilisation d’un émetteur-récepteur
Pour utiliser un émetteur-récepteur il est nécessaire d’utiliser
un câble spécique en option qui relie directement votre radio
au Midland BT2:
Câble “BT2 Transceiver cable 1 pin” pour émetteurs- ›
récepteurs avec prise accessoires à 2 broches
Câble “BT2 Transceiver cable 2 pin” pour émetteurs- ›
récepteurs avec prise accessoires à 1 broche
La communication via radio a lieu en appuyant sur le bouton
de transmission PTT quand on souhaite parler et en le
relâchant quand on écoute. Il n’est pas possible de parler
et d’écouter en même temps. En effet le câble de connexion
à l’émetteur-récepteur est équipé d’un bouton PTT qui peut
être xé au guidon de la moto ou tenu dans la main si la radio
est reliée au Midland BT2 du passager.
Réglez le volume de l’émetteur-transmetteur an de l’adapter
à vos exigences. N’oubliez-pas que le réglage du volume est
contrôlé par le système automatique AGC, par conséquent il
sera automatiquement augmenté en fonction de la variation
du bruit de fond.
Congurations spéciales
Le Midland BT2 peut être conguré de manière spécique
pour satisfaire même le motocycliste le plus exigeant.
En effet il est possible de congurer les fonctions «avancées»
suivantes pour les utilisateurs plus expérimentés:
Communication à trois toujours active ›
Activation vocale de l’Intercom (VOX) ›
Réglage de la sensibilité du microphone
Désactivation de la fonction VOX
Communication à trois toujours active
Normalement (par défaut) tant les communications Bluetooth
avec priorité 3 (basse) que l’audio provenant de la connexion
par l, sont interrompus au moment de l’ouverture de l’Intercom.
En activant cette fonction, elles restent toujours actives et elles
sont passées à l’autre partie. Cette fonction peut être utile, par
exemple, si l’on souhaite maintenir la communication Intercom
ouverte et en même temps parler avec un émetteur-récepteur
relié via Bluetooth ou par l. De plus cette fonction peut être
utilisée pour partager la même musique entre le pilote et le
passager (voir le chapitre «Partage de la musique entre le
pilote et le passager» plus loin).
14
L’activation/la désactivation de la «communication à trois»
peut être faite même sur un seul dispositif, de cette manière
seul ce dispositif pourra partager l’audio et pas vice-versa.
Activation/Désactivation
Eteindre le BT2. Maintenir le bouton central (Intercom/on- ›
off) appuyé jusqu’à ce que la lumière devienne de couleur
rouge xe. Le BT2 se trouve alors en mode «Couplage»
(setup).
Maintenir appuyé simultanément pendant trois secondes ›
les boutons «Téléphone» et «AUX».
Si la fonction était auparavant désactivée, elle sera activée ›
(lumière bleue allumée xe pendant 2 secondes).
Au contraire si elle était active, elle sera désactivée ›
(lumière bleue avec 2 clignotements de 2 secondes).
Attention: si le dispositif Bluetooth est un lecteur MP3
stéréo, il sera cependant interrompu quand la commu-
nication Intercom sera activée (seuls les dispositifs
«mono» peuvent avoir la communication à trois active).
Activation vocale de l’Intercom (VOX)
L’ouverture de la communication Intercom peut avoir lieu
manuellement ou bien au moyen de l’activation vocale (VOX).
Le fonctionnement correct de cette fonction dépend du bruit de
fond, et donc de la vitesse, du type de moto et également de
l’isolation du propre casque. Pour obtenir le meilleur résultat
il est possible de décider le seuil d’activation en choisissant
l’un des quatre niveaux de sensibilité du microphone: élevée,
moyenne, basse, très basse. La sensibilité élevée est plus
indiquée pour les motos silencieuses et protégées comme
les scooters ou les motos carénées «vitré». La sensibilité
basse est plus indiquée pour les motos découvertes et
bruyantes. En usine le BT2 est conguré avec la sensibilité
«moyenne».
De plus, il est possible également de désactiver entièrement
la fonction VOX et donc d’activer l’Intercom et la réponse à
l’appel téléphonique uniquement en mode manuel.
Réglage de la sensibilité du microphone
Entrées en mode couplage (setup):
1) Éteindre le BT2. Maintenir le bouton central (Intercom/
on) appuyé jusqu’à ce que la lumière devienne de couleur
rouge xe. Le BT2 se trouve alors en mode «Couplage»
(setup).
Page 87

2) Appuyer brièvement une fois sur le bouton «AUX», la lumière rouge passe au bleu xe.
3) Maintenant appuyez sur le bouton «Volume +» ou«Volume
-» pour augmenter ou diminuer la sensibilité. A chaque
changement la LED clignote rouge pour conrmer. Quand
vous atteignez la limite supérieur ou inférieur la LED ne
clignote plus rouge.
4) Appuyer brièvement une nouvelle fois sur le bouton
«AUX», La lumière bleue clignotera à plusieurs reprises
en fonction de la conguration de la sensibilité active à ce
moment-là: 1 fois = VOX désactivé / 2 fois = Très basses
sensibilité / 3 fois= basses sensibilité / 4 fois= moyenne
sensibilité / 5 fois = haute sensibilité /Default = moyenne
sensibilité
5) La lumière revient au rouge xe (Setup) et les change-
ments sont validés.
6) Si besoins, vous pouvez modier la sensibilité en recommençant la procédure à partir de l’étape 2.
7) Quittez le mode Couplage (setup) en maintenant appuyé
pendant 3 secondes le bouton Intercom (bouton central).
La lumière rouge s’éteint et à sa place la lumière bleue
clignote. Vous pouvez maintenant utiliser le BT2.
Désactivation de la fonction VOX (pour Intercom et
téléphone).
En plus des 4 sensibilités de microphone, il y a un cinquième
état qui vous permet de désactiver la fonction VOX. Suivez la
même procédure que pour régler la sensibilité du microphone
(voir paragraphe précédent) et à l’étape 3 appuyez sur la
touche “Volume -” pour réduire la sensibilité jusqu’à ce que
la LED cesse de clignoter rouge. Appuyez alors sur la touche
“AUX” la LED clignote une fois Bleu, ce qui signie que la
fonction VOX est désactivé. Suivez maintenant la procédure
à partir de l’étape 5.
Pour la réactiver, suivez la procédure du chapitre précédent
en sélectionnant une des quatre autres sensibilités (de
l’étape 2 à 5).
Conseils pour des utilisations
spéciques
Ci-dessous quelques suggestions pour obtenir le maximum
de votre BT2.
Utilisation d’un émetteur-récepteur PMR446
coinjointement avec la communication Intercom (Pilote/
Passager).
Si vous souhaitez utiliser un émetteur-récepteur PMR446
pour la communication de groupe et en même temps vous
voulez activer la fonction d’Intercom entre pilote et passager,
vous devez tenir compte que chaque fois que vous parlez,
grâce à la fonction VOX, la communication Intercom s’ouvre,
et exclue dont la communication via radio. En effet cette
dernière possède une priorité inférieure par rapport à la
communication Intercom.
Pour résoudre cela, vous pouvez opérer de deux manières:
Désactivation du VOX
Désactivez la fonction VOX comme cela est expliqué dans
le chapitre précédent, an que quand vous parlez via radio
l’Intercom ne soit pas activé automatiquement. Pour activer
l’Intercom il sera nécessaire d’appuyer sur le bouton Intercom
manuellement (ceci désactivera la communication via radio
qui reprendra automatiquement quand l’Intercom sera fermé,
toujours manuellement).
Attention: n’oubliez pas qu’en désactivant la fonction de Vox,
la réponse à l’appel téléphonique pourra également avoir
lieu en mode manuel uniquement (en appuyant sur le bouton
«Téléphone»).
Habilitation de la communication à trois toujours active
En activant cette fonction, comme cela est expliqué dans le
chapitre précédent, chaque fois que vous parlez l’Intercom
est activé mais la communication avec l’émetteur-récepteur
reste ouverte, ce qui vous donne la possibilité de partager la
communication via radio avec le pilote et le passager.
Partage de la musique entre le pilote et le passager
Si vous souhaitez partager la même musique entre le pilote
et le passager, vous pouvez suivre cette simple procédure:
Reliez la source musicale par l à l’un des deux ›
dispositifs.
Habilitez la «communication à trois» sur le dispositif sur ›
lequel la source musicale est reliée (suivez la procédure
expliquée dans le chapitre précédent).
Activez l’intercom, maintenant vous écouterez tous les ›
deux la même musique.
Attention: la musique partagée peut être ecouté stéréo
seulement si vous êtes connecté par l.
Ce n’est pas possible partager la musique si la source
est Bluetooth Stereo Player (A2DP)
F
15
Page 88

SIGNAUX SONORES ET LUMINEUX
Indications lumineuses Etat
Généralités
Aucune indication (lumière éteinte) Dispositif éteint/Dispositif entièrement chargé
Lumière bleue clignotante toutes les 3
secondes
Lumière rouge clignotante toutes les 3
secondes
Trois clignotements de la lumière rouge Dispositif en train de s'éteindre
Lumière rouge et bleu clignotantes en-
semble toutes les 3 secondes
Lumière rouge et bleue clignotantes ensemble et un clignotement rouge
Lumière rouge clignotante toutes les 2
secondes
SETUP
Lumière rouge xe Mode "Setup"
Lumière rouge et bleue clignotante Mode "Pairing" (recherche dispositifs)
Lumière bleue xe pendant 2 secondes Couplé avec succès/Réinitialisation des dispositifs couplés/Communication à trois
Lumière bleue avec clignotement long Communication à trois désactivée
Signalisations audio
Ton montant (bas-haut) Dispositif en cours d'allumage
Ton descendant (haut-bas) Dispositif en train de s'éteindre
Intercom activé/désactivé 1 ton = activé / 2 tons = désactivé
1 ton Fonction activée
2 tons Fonction désactivée
Dispositif allumé (standby)
Standby – batterie déchargée
Dispositif actif (Intercom, téléphone ou connexion Bluetooth)
Dispositif actif et batterie déchargée
Dispositif en charge (connecté à une source d'alimentation)
habilitée
Etat
FONCTIONS
Si vous voulez cette fonction... ...vous devez faire cela
Généralités
Allumer le dispositif Maintenir appuyé le bouton "Intercom" pendant 3 secondes (la lumière bleue cli-
Eteindre le dispositif Maintenir appuyés les boutons "Intercom" et AUX pendant 3 secondes (la lumière
16
gnote)
rouge clignote trois fois)
Page 89

Augmenter le volume Appuyer ou maintenir appuyé le bouton "Volume +"
Diminuer le volume Appuyer ou maintenir appuyé le bouton "Volume –"
Téléphone portable
Répondre à un appel Appuyer sur le bouton "Téléphone" / prononcer un mot
Refuser un appel Maintenir appuyé le bouton "Téléphone" / rester silencieux
Raccrocher Appuyer sur le bouton "Téléphone"
Appel vocal (en standby) Appuyer sur le bouton "Téléphone" et prononcer le nom de la personne
Rappeler le dernier numéro (en standby) Maintenir appuyé le bouton "Téléphone"
Conversation à trois
(pilote-passager-téléphone)
Relâcher la conversation à trois Appuyer à nouveau sur le bouton "Intercom"
Navigateur GPS
Tous les contrôles sont sur le GPS
Avec l'appel actif, appuyer sur le bouton "Intercom"
INTERCOM
Activer l'Intercom Commencer à parler/appuyer sur le bouton "Intercom"
Désactiver l'Intercom Cesser de parler (au bout de 60 s, la communication se coupe)/appuyer sur le bou-
Lecteur MP3 Bluetooth
Activer le lecteur MP3/Lecture et Pause Maintenir appuyé le bouton "Intercom" pendant 3 secondes
Avancer d'une chanson Appuyer sur le bouton "Téléphone"
Revenir en arrière d'une chanson Appuyer sur le bouton "AUX"
Désactiver le lecteur MP3 Appuyer sur le bouton «Intercom»
Autres dispositifs Bluetooth (adaptateurs, émetteurs-récepteurs)
Connexion et déconnexion Maintenir appuyé le bouton "AUX" pendant 3 secondes
Connexion par l
Activation/Désactivation Appuyer sur le bouton "AUX"
SETUP ET COUPLAGE (PAIRING)
Entrer dans le mode SETUP Maintenir appuyé le bouton "Intercom" pendant 7 s avec le dispositif éteint
Coupler un téléphone ou un navigateur
GPS
ton "Intercom"
En mode Setup, maintenir appuyé le bouton "Téléphone" jusqu'à ce que la lumière
bleue et rouge clignote alternativement
F
17
Page 90

Coupler un dispositif Bluetooth En mode Setup, maintenir appuyé le bouton "AUX" jusqu'à ce que la lumière bleue
Coupler un autre dispositif BT2 En mode Setup, maintenir appuyé le bouton "Volume +" sur l'un des deux dispositifs
Réinitialisation de tous les dispositifs
couplés
Setup de congurations spéciales
Communication à trois toujours active En mode Setup, appuyer sur le bouton "Téléphone" pendant 3 secondes.
Changer la sensibilité du Vox
ou le désactiver
Quitter le mode Setup En mode Setup, maintenir appuyé le bouton "Intercom" jusqu'à ce que la lumière
et rouge clignote alternativement
et "Volume -" sur l'autre dispositif (les lumières rouge et bleue clignotent en alternance). Dès que le couplage a lieu, les deux lumières restent bleues xes pendant
une seconde.
En mode Setup, maintenir appuyé ensemble les boutons "Volume +" et "Volume -".
La lumière bleue reste allumée xe pendant deux secondes.
Lumière bleue allumée xe pendant 3 secondes=active
Lumière bleue clignotante longue= désactivée
En mode Setup, appuyer sur le bouton “AUX” ((lumière bleue xe).
Maintenant appuyer sur «Volume +» ou «Volume -» pour augmenter ou diminuer la
sensibilité. Appuyer à nouveau sur «AUX» pour conrmer et revenir au mode Setup
(lumière rouge xe)
Lumière bleue clignotante :
1 clignotement= VOX désactivé
2 clignotements = sensibilité très basse
3 clignotements = sensibilité basse moyenne
4 clignotements = sensibilité moyenne
5 clignotements = sensibilité élevée
rouge s'éteigne et que la bleue se mette à clignoter.
Certication de notice européenne CE et informations d’agrément aux ns de sécurité
Ce produit porte le marquage CE conformément à la directive RTTE (99/5/CE) et peut être librement utilisé dans tous les pays
de l’UE.
Il est interdit aux utilisateurs d’effectuer des changements ou des modications sur le dispositif. Les modications qui ne sont pas
expressément approuvées par le producteur rendent nulle la garantie.
Pour de plus amples informations, veuillez visiter notre site Internet
www.cte.it
18
Page 91

ÍNDICE
Especicações técnicas do BT2 da Midland .................................................................................... 2
Estrutura do manual do utilizador ..................................................................................................... 3
Carregar as baterias ......................................................................................................................... 3
Descrição da unidade e dos suportes de instalação ........................................................................4
Congurações típicas do BT2 ..........................................................................................................5
Considerações gerais sobre prioridade ............................................................................................ 6
Ligar e desligar o seu BT2 da Midland .............................................................................................6
Emparelhamento com dispositivos Bluetooth...................................................................................6
Ajustar o volume ............................................................................................................................... 9
Utilizar as funcionalidades dos dispositivos Bluetooth ................................................................... 12
Utilizar a entrada de áudio com os ............................................................................................... 13
Utilizar um rádio emissor-receptor bidireccional.............................................................................13
Congurações especiais ................................................................................................................14
Recomendações para utilizações especícas................................................................................15
Sinais luminosos e sonoros / Funções da unidade ....................................................................... 16
P
1
Page 92

Intercomunicador BT2 da Midland
Obrigado por adquirir o Intercomunicador BT2 da Midland, o primeiro sistema multimédia verdadeiramente sem os para motociclistas.
O BT2 da Midland foi concebido para ser instalado directamente no seu capacete e para ser utilizado para comunicações com
dispositivos Bluetooth como, por exemplo, telemóveis, GPS de navegação por satélite e leitores de MP3. Se pretendido, este também
pode ser emparelhado com outra unidade BT2 da Midland e utilizado como sistema intercomunicador condutor/passageiro ou condutor
a condutor no modo de mota para mota, num alcance máximo de 200 metros. O BT2 da Midland também está equipado com uma
ligação com os que pode ser utilizada para ligar um iPod/leitor de MP3 ou emissor-receptor PMR446, o qual irá então possibilitar as
comunicações de mota para mota num alcance máximo de até 5 km.
O BT2 da Midland encontra-se disponível em duas versões:
Kit de intercomunicador BT2 único com apenas uma ›
unidade
Intercomunicador BT2 TWIN com duas unidades ›
Dependendo do modelo adquirido, a embalagem contém os
seguintes artigos:
Intercomunicador BT2
1 unidade de comunicação BT2 ›
1 kit de áudio com dois altifalantes estéreo, microfone com ›
haste e microfone com o
1 placa com tira bi-adesiva para xar a unidade no ›
capacete
1 prendedor para xar a unidade no capacete ›
1 cabo de áudio estéreo para ligar um iPod ou outros ›
modelos de leitores de MP3
1 fonte de alimentação para montagem na parede mini USB ›
Cobertura para microfone em espuma supressora de ›
vento, chave sextavada e tira de velcro para montagem
Intercomunicador BT2 TWIN
2 unidades de comunicação BT2 ›
2 kits de áudio com dois altifalantes estéreo, microfone ›
com haste e microfone com o
2 placas com tira bi-adesiva para xar a unidade no ›
capacete
2 prendedores para xar a unidade no capacete ›
2 cabos de áudio estéreo para ligar um iPod ou outros ›
modelos de leitores de MP3
1 fonte de alimentação para montagem na parede mini ›
USB com cha dupla ›
Cobertura para microfone em espuma supressora de ›
vento, chave sextavada e tira de velcro para montagem
As unidades incluídas no kit TWIN já estão emparelhadas
e podem portanto ser utilizadas imediatamente no modo
de intercomunicador.
2
Especicações técnicas do BT2 da Midland
Geral:
Bluetooth versão 2.0 estéreo (Auscultador/Mãos livres/ ›
Protocolo A2DP)
O sistema AGC controla automaticamente o volume em ›
relação ao ruído de fundo Opção de comunicação por voz
(VOX) ou manual
Modo de chamada privada ou partilhada (comunicações ›
de três vias)
Controlos manuais para permitir: ligação de telefone, ›
intercomunicador e ligação com o
Completamente à prova de água ›
Bateria de lítio com 8 horas de tempo de conversação (1 ›
semana em modo de espera)
Tempo de recarregamento: cerca de 4 horas ›
Dimensões. Comprimento: 87 mm – Largura: 47 mm - ›
Espessura: 16 mm
Ligações Bluetooth:
Dispositivo idêntico para modo de intercomunicação ›
condutor a passageiro ou mota a mota, até um alcance
máximo de 200 metros
Dispositivos Bluetooth ›
- Telemóvel, GPS (Zumo da Garmin e TomTom Rider 1 e
2), leitor de MP3 estéreo (com protocolo A2DP)
- Emissores-receptores PMR446 (com ligação Bluetooth
integrada ou externa) para comunicações em grupo de
mota a mota
Ligações com o:
Para entrada de áudio estéreo (iPod/leitor de MP3) ›
Para emissores-receptores PMR446 (com cabo opcional) ›
Atenção: antes de utilizar o BT2 pela primeira vez,
lembre-se de o recarregar durante pelo menos 4 horas.
Atenção: O BT2 da Midland foi concebido para suportar
chuva e água. Contudo, se estiver a chover, verique
sempre se as coberturas de borracha que protegem as
tomadas estão introduzidas completamente.
Page 93

Estrutura do manual do utilizador
Este manual está dividido em 5 secções principais:
Descrição da unidade e dos suportes de instalação ›
Emparelhamento com dispositivos Bluetooth ›
Utilizar as funcionalidades dos dispositivos Bluetooth ›
Utilizar a entrada de áudio com o ›
Congurações especiais ›
Descrição da unidade e dos
suportes de instalação
Descrição da unidade BT2
O BT2 tem 5 botões multifunção na parte dianteira e 3
ligações com os na secção inferior.
Para congurar facilmente a sua unidade BT2, siga a
sequência de passos descrita a seguir:
Passo 1: › xe a unidade no seu capacete seguindo as
instruções fornecidas na secção “Fixar a unidade no
capacete”.
Passo 2: › emparelhar os dispositivos Bluetooth (por exemplo
um telemóvel ou um GPS) com a unidade BT2. Siga o
procedimento descrito neste capítulo: “Emparelhamento
com dispositivos Bluetooth” escolhendo os dispositivos
Bluetooth que está a utilizar.
Passo 3: › depois de completar a operação de
emparelhamento, avance para a secção “Utilizar
as funcionalidades dos dispositivos Bluetooth”,
escolhendo os dispositivos Bluetooth que está a utilizar.
Passo 4: › se tiver uma entrada de áudio com o, leia o
capítulo “Utilizar a entrada de áudio com o”.
Passo 5: › para mais informações sobre como utilizar as
funcionalidades avançadas, leia o capítulo “Congurações
especiais”.
Carregando as baterias
Assegure-se de que as baterias estão completamente
carregadas antes de usar. Deixe estar em carga durante
5 a 6 horas aquando do primeiro uso. As cargas normais,
posteriores, serão de cerca de 4 horas.
Carregue as baterias inserindo o conector do carregador ›
na tomada da unidade (levantando a protecção de borracha),
O LED vermelho pisca durante a carga. Deixe carregar até ›
que o LED se apague.
Depois da carga completa, desligue a unidade do carrega- ›
dor e esta da tomada de 220V.
Volume +
Telefone
Intercom
Carregador
Kit de áudio
Descrição das funcionalidades dos botões:
Telefone: pode ser utilizado para activar/desactivar e gerir ›
as funcionalidades do telemóvel
Intercom: pode ser utilizado para activar/desactivar ›
a funcionalidade de intercomunicador e gerir as
comunicações de três vias
AUX: pode ser utilizado para activar/desactivar a entrada ›
de áudio com o
Volume+: permite-lhe aumentar o volume ›
Volume -: permite-lhe diminuir o volume ›
Descrição das ligações com os
Tomada de carregador: permite-lhe recarregar a unidade ›
utilizando uma fonte de alimentação miniUSB padrão
Tomada de kit de áudio: permite-lhe ligar um kit de áudio ›
(auscultador e microfone estéreo)
Tomada de áudio auxiliar (AUX): pode ser utilizada para ›
ligar uma fonte de áudio como, por exemplo, um iPod/leitor
de MP3 ou emissor-receptor PMR446
Volume -
vermelha
iPod/MP3
PMR446
AUX
Luz
e azul
P
3
Page 94

Descrição do kit de áudio
O sistema de áudio inclui dois altifalantes estéreo ultraplanos
e dois microfones intercomutáveis, os quais são ambos
fornecidos com um suporte e uma ligação com o.
Fixar os altifalantes estéreo. Os dois altifalantes estéreo
têm uma tira adesiva/de velcro que ajuda na sua xação ao
capacete. Tenha cuidado para não tapar completamente os
ouvidos com os altifalantes, dado que tem sempre de poder
escutar o som e indicações do trânsito.
O microfone pode ser xado no capacete de duas maneiras:
Microfone com haste. Coloque a secção com a tira adesiva/
de velcro entre o almofadado e o canto rígido do capacete,
de modo a que o microfone esteja posicionado correctamente
em frente da boca e a que o símbolo branco esteja virado para
a boca. Este tipo de microfone é adequado para capacetes
abertos e de viseira de levantar.
Microfone com o. Utilizando a tira adesiva/de velcro,
coloque o microfone no interior do capacete em frente da
boca. Este tipo de microfone é mais adequado a capacetes
integrais.
O mini conector no microfone permite-lhe escolher o
microfone que melhor se adequa ao capacete que está a
utilizar.
O kit de áudio deve então ser ligado à tomada central do
intercomunicador BT2 da Midland utilizando o conector
em forma de “L”. Este conector é muito exível e pode
ser facilmente adaptado à grande maioria dos capacetes
comercialmente disponíveis.
Descrição dos suportes de instalação
O BT2 da Midland pode ser xado no capacete de duas
maneiras: Quer através da utilização da placa com a tira bi-
adesiva, ou com o prendedor.
Estes métodos permitem-lhe “xar” com segurança a unidade
BT2 no seu capacete e removê-la em qualquer altura para a
poder recarregar ou guardar.
Placa com tira bi-adesiva
A placa de xação tem uma tira bi-adesiva num dos seus
lados. Para xar a placa na sua posição, limpe a área de
aplicação na superfície do capacete, retire a película biadesiva e coloque a placa de xação no capacete mantendo-a
em contacto com a superfície durante alguns segundos.
Prendedor
Utilizando a chave sextavada,
desaperte os dois parafusos
no prendedor e coloque
a placa traseira entre o
almofadado do capacete e a
protecção rígida externa.
A seguir, aperte os dois
parafusos com vista a xar
rmemente o prendedor na
sua posição.
Instalar e remover o seu BT2 da Midland
O BT2 pode ser instalado facilmente no capacete
deslizando-o para baixo de modo a que encaixe na ranhura
do dispositivo de xação seleccionado (placa com tira biadesiva ou prendedor).
4
Page 95

O BT2 é mantido na sua posição graças ao prendedor de
xação localizado na secção superior (A).
Para desprender o BT2, basta pressionar o prendedor de
xação e empurrar a unidade para cima.
Congurações típicas do BT2
A
1. BT2 único da Midland, “Apenas
condutor”
Ligação Bluetooth para telemóvel, ›
GPS e leitor de MP3 ou um
telemóvel com função de MP3 (para
escutar música).
Ligação com os para leitor de ›
música estéreo (iPod/leitor de
MP3).
Sistema de comunicação mota a ›
mota que permite a comunicação
entre dois condutores numa
distância máxima de até 200
metros.
2. BT2 emparelhado da Midland,
“Condutor e passageiro”
Funcionalidade para ›
intercomunicação de condutor e
passageiro.
O condutor pode ligar o sistema ›
GPS e tanto o condutor como o
passageiro podem ligar os seus
respectivos leitores de MP3/
telemóveis etc. aos seus próprios
auscultadores e ainda ser capazes
de comunicar entre si através do
intercomunicador.
Ligação com os para leitor de ›
música estéreo (iPod/leitor de
MP3).
3. BT2 mota a mota da Midland;
“Condutores e passageiros
equipados com BT2 e emissores-
receptores PMR446 da Midland”
Sistema de intercomunicação de ›
condutor a passageiro.
Ligações Bluetooth para condutor ›
e passageiro dependendo das
necessidades: cada ligação é
adequada para telemóvel, sistema
GPS do condutor e leitor de MP3 ou
telemóvel com funcionalidade MP3
(para ouvir música).
Ligação com os para leitor de ›
música estéreo (iPod/leitor de
MP3).
Comunicação de grupo (“mota a ›
mota”): é possível ligar um emissorreceptor PMR446 a todas as motas
com vista a comunicar como um
grupo. O emissor-receptor PMR446
pode ser ligado em modo Bluetooth
ou com os tanto à unidade do
condutor como do passageiro. Não
existe nenhum limite ao número de
pessoas que podem comunicar ao
utilizar o PMR446 para comunicar
enquanto num grupo.
P
5
Page 96

Considerações gerais sobre prioridade
O BT2 da Midland é uma unidade Bluetooth que pode
ser emparelhada com outros dispositivos Bluetooth com
funcionalidades diferentes: telemóvel, GPS, leitor de MP3,
etc...
Dependendo do tipo de dispositivo, o BT2 da Midland atribui
prioridades de operação; por exemplo, chamadas têm uma
prioridade mais alta quando em comparação com música.
Isto signica que se receber uma chamada enquanto
estiver a ouvir música, a sua música será automaticamente
interrompida de modo a poder atender a chamada. Existem
três prioridades disponíveis para ir de encontro aos requisitos
mais comuns.
Dispositivos com prioridade (alta) 1
Devido à sua utilização, telemóveis e GPS de navegação por
satélite têm sempre uma prioridade superior em comparação
com outros dispositivos ligados. Portanto, uma chamada
recebida ou uma instrução de um GPS interrompem sempre
todas as outras comunicações activas. Os dispositivos com
prioridade 1 têm de ser emparelhados com a unidade BT2
utilizando o botão “Telefone”.
Dispositivos com prioridade (média) 2
Esta prioridade pode ser atribuída apenas a outro BT2 com
funcionalidade de intercomunicador. Activar a funcionalidade
de intercomunicador desactiva todas as outras comunicações
com excepção das com prioridade (alta) 1. Esta acção ocorre
se não tiver alterado a denição predenida, seguindo o
procedimento descrito no capítulo nal “Congurações
especiais”. As duas unidades BT2 da Midland podem ser
emparelhadas através dos botões “Volume +” e “Volume –”.
Dispositivos com prioridade (baixa) 3
Leitores de MP3, adaptadores Bluetooth ou emissoresreceptores PMR446 têm a prioridade mais baixa, o que
signica que todas as comunicações com estes dispositivos
serão desactivados se uma chamada ou comunicação
GPS (prioridade 1) for recebida ou se a funcionalidade de
intercomunicador estiver activada (prioridade 2).
Os dispositivos com prioridade 3 têm de ser emparelhados
com a unidade BT2 utilizando o botão “AUX”.
O BT2 da Midland também pode ser emparelhado com
dispositivos áudio através de uma ligação com os. Esta
ligação tem a prioridade mais baixa e é desactivada cada
vez que uma ligação Bluetooth é activada.
6
Ligar e desligar o seu BT2 DA MIDLAND
O BT2 pode ser ligado através do botão central com a
indicação “Intercom”. Para desligar a unidade tem de
utilizar uma combinação de dois botões, assim reduzindo
as possibilidades de que possa desligar a unidade
acidentalmente (especialmente enquanto utiliza luvas
pesadas).
OFFON
Ligar a unidade:
Pressione e mantenha pressionado o botão “Intercom” ›
durante cerca de 3 segundos até que o indicador AZUL
se acenda.
Desligar a unidade:
Pressione e mantenha pressionados os botões “Intercom” ›
e “AUX” em conjunto durante cerca de 3 segundos até que
o indicador VERMELHO pisque 3 vezes.
Emparelhamento com dispositivos
Bluetooth
O BT2 da Midland é uma unidade Bluetooth que pode ser
emparelhada com outros dispositivos Bluetooth. Antes de
realizar este procedimento, é necessário colocar o BT2
no “Modo de emparelhamento” (Conguração). As únicas
operações permitidas neste modo são as de emparelhamento.
Para utilizar a unidade BT2 depois de a emparelhar com
os dispositivos pretendidos, é necessário sair do modo de
“Conguração” e mudar para o modo de “Operação”.
Modo de emparelhamento (conguração)
Desligue o dispositivo BT2. Pressione e mantenha
pressionado o botão central “Intercom/on” (Intercomunicador/
ligado) durante cerca de 7 segundos até o indicador vermelho
se ligar de forma permanente. O BT2 está agora no modo
Page 97

de “Emparelhamento” (Conguração) e pode portanto ser
emparelhado com outros dispositivos.
Emparelhamento da unidade com outra
unidade BT2
As duas unidades fornecidas no kit TWIN de intercomunicador
BT2 da Midland já estão emparelhadas e prontas a utilizar, o
que signica que não é necessário realizar este procedimento.
Se os dispositivos não zerem parte do mesmo kit, ou se
uma das unidades BT2 tiver sido adquirida separadamente,
tem de as emparelhar para poder utilizar a função de
intercomunicação.Coloque a unidade BT2 no modo de
emparelhamento (indicador vermelho aceso constantemente)
Pressione o botão “Volume +” na primeira unidade até que as
luzes VERMELHA e AZUL comecem a piscar rapidamente e
de forma alternada. A seguir, pressione o botão “Volume -”
na segunda unidade até que as luzes VERMELHA e AZUL
comecem a piscar rapidamente e de forma alternada.
Agora as duas unidades BT2 estão a tentar realizar o
emparelhamento.
Quando emparelhado com êxito, cada dispositivo irá acender
a luz AZUL durante 1 segundo e regressar ao modo de
denição (luz vermelha constantemente acesa) aguardando
por emparelhamento ou procedimentos de denição
adicionais.
Emparelhamento da unidade com o seu
telemóvel
1. Active a funcionalidade de busca de dispositivos Bluetooth
no seu telemóvel. Uma vez que este procedimento varia
consoante a marca e modelo do telemóvel, consulte o
manual fornecido com o seu telefone especíco para mais
informações.
2. Coloque a unidade BT2 no modo de “Emparelhamento”
(mantendo pressionado o botão central durante mais de 7
segundos) e, em seguida, pressione o botão “Telefone” na
unidade até os indicadores vermelho e azul começarem a
piscar.
3. Após alguns segundos o telemóvel irá apresentar a
indicação “Midland BT2”. Seleccione-a e siga as instruções
fornecidas no manual do seu telemóvel para aceitar o
emparelhamento. Quando solicitado, introduza o código
de emparelhamento, o qual é 0000 (quatro zeros). O
seu telemóvel deve então apresentar uma mensagem de
conrmação se a operação de emparelhamento tiver sido
concluída com êxito.
4. A unidade BT2 regressa ao modo de Conguração
(indicador vermelho aceso constantemente) para
indicar que está pronto a ser emparelhado com outros
dispositivos.
Se emparelhar a unidade BT2 com um telemóvel, não a
poderá emparelhar com um GPS de navegação por satélite,
uma vez que estes dispositivos ambos têm uma prioridade
(alta) 1.
Este problema pode ser facilmente resolvido através do
emparelhamento do seu telemóvel directamente com o GPS de
navegação por satélite, e depois, através do emparelhamento
do GPS com o seu BT2 da Midland utilizando o procedimento
anterior. Neste caso, as funcionalidades do telemóvel serão
geridas pelo GPS de navegação por satélite.
Emparelhar a unidade com um GPS de
navegação por satélite
É geralmente possível emparelhar a unidade BT2 com
todos os GPS de navegação por satélite que suportem
auriculares Bluetooth. O BT2 da Midland foi testado com
êxito para utilização com GPS de navegação por satélite
ZUMO fabricados pela Garmin e TOMTOM Rider 1 e 2 de
navegação por satélite.
1. No seu GPS de navegação por satélite, active a
funcionalidade de busca por auriculares Bluetooth. Uma
vez que este procedimento varia consoante a marca e
modelo do GPS, recomendamos que consulte o manual
fornecido com o seu GPS de navegação por satélite para
mais informações.
2. Certique-se de que o BT2 se encontra no modo de
Emparelhamento (luz vermelha acesa) e pressione o
botão “Telefone” na unidade BT2 até que os indicadores
vermelho e azul comecem a piscar.
3. Após alguns segundos o GPS de navegação por satélite
irá apresentar a indicação “Midland BT2”. Seleccione-a e
siga as instruções fornecidas no manual do seu GPS de
navegação por satélite para aceitar o emparelhamento.
Quando solicitado, introduza o código de emparelhamento,
o qual é 0000 (quatro zeros). O GPS deve então
apresentar uma mensagem de conrmação se a operação
de emparelhamento tiver sido concluída com êxito.
4. A unidade BT2 regressa ao modo de Conguração
(indicador vermelho aceso constantemente) para indicar
que está pronta a ser emparelhada com outros dispositivos.
P
7
Page 98

Se emparelhar a unidade BT2 com um GPS de navegação
por satélite, não a poderá emparelhar com um telemóvel,
uma vez que estes dispositivos ambos têm uma prioridade
(alta) 1.
Este problema pode ser facilmente resolvido através do
emparelhamento do seu telemóvel directamente com o
seu GPS de navegação por satélite e depois através do
emparelhamento do GPS com o seu BT2 da Midland. Neste
caso, as funcionalidades do telemóvel serão geridas pelo
GPS de navegação por satélite.
Emparelhar a unidade com um leitor de MP3
com capacidade Bluetooth
NB: Nem todos os leitores de MP3 têm capacidade para
Bluetooth. Verique as especicações dos seus leitores
de MP3 antes de tentar realizar a ligação ao BT2 através
de Bluetooth.
1. No seu leitor de MP3 active a funcionalidade de busca
do dispositivo Bluetooth. Uma vez que o procedimento
varia em conformidade com a marca e modelo, consulte
o manual fornecido com o seu leitor de MP3 para mais
informações.
2. Assegure-se de que o BT2 se encontra no modo de
Emparelhamento (luz vermelha acesa) e pressione o botão
“AUX” na unidade BT2 até que os indicadores vermelho e
azul comecem a piscar.
3. Após alguns segundos o leitor de MP3 irá apresentar
a indicação “Midland BT2”. Seleccione-a e siga as
instruções fornecidas no manual do seu leitor de MP3
para aceitar o emparelhamento. Se solicitado, introduza o
código de emparelhamento, o qual é 0000 (quatro zeros).
O leitor de MP3 deve então apresentar uma mensagem de
conrmação se a operação de emparelhamento tiver sido
concluída com êxito.
4. A unidade BT2 regressa ao modo de Conguração
(indicador vermelho aceso constantemente) para
indicar que está pronta a ser emparelhada com outros
dispositivos.
Emparelhar a unidade com outros dispositivos Bluetooth
O BT2 da Midland também pode ser emparelhado com outros
dispositivos Bluetooth como, por exemplo, produtos sem
capacidade Bluetooth ligados a adaptadores Bluetooth (por
exemplo qualquer unidade de produto áudio pessoal ligada
8
a um BPA100) ou emissores-receptores rádio bidireccionais
com ligações Bluetooth integradas (por exemplo o 445BT da
Midland).
1. Active o modo de emparelhamento no dispositivo Bluetooth.
Uma vez que o procedimento varia em conformidade com
a marca e modelo, consulte o manual fornecido com o
dispositivo Bluetooth para mais informações.
2. Certique-se de que o BT2 se encontra no modo de
emparelhamento (luz vermelha acesa) e pressione o botão
“AUX” na unidade BT2 até que os indicadores vermelho e
azul comecem a piscar.
3. O emparelhamento será concluído no espaço de alguns
segundos e a unidade BT2 regressa ao modo de
Conguração (indicador vermelho aceso constantemente)
para indicar que está pronta a ser emparelhada com outros
dispositivos.
Atenção: o procedimento de busca de dispositivos
(luzes vermelha e azul intermitentes) continua
durante cerca de 2 minutos. Caso não seja
encontrado nenhum dispositivo neste intervalo de
tempo, o BT2 regressa ao modo de Conguração
(luz vermelha acesa constantemente). Para iniciar
a busca novamente, repita o procedimento de
emparelhamento a partir do passo 2. Para cancelar
o procedimento de emparelhamento (indicadores
vermelho e azul intermitentes) e regressar ao modo
de Conguração em qualquer altura, pressione o
botão “Intercom” duas vezes.
Reposição de todos os dispositivos
emparelhados
Por vezes pode ser necessário apagar todas as referências
de emparelhamento guardadas na unidade BT2 (operação
de reposição). Para realizar esta operação, pressione e
mantenha pressionados simultaneamente os botões “Volume
+” e “Volume –” durante 4 segundos.
A luz azul estará acesa durante 1 segundo.Este procedimento
apaga todos os dispositivos Bluetooth emparelhados
guardados na memória e é portanto possível iniciar uma
sessão de emparelhamento “limpa” nova.
Sair do modo de emparelhamento (conguração)
Depois de ter emparelhado os dispositivos Bluetooth
pretendidos, deve sair do modo de “Conguração” com vista
a poder utilizar o seu BT2.
Page 99

Pressione e mantenha pressionado o botão “Intercom” (botão
central) durante 3 segundos. O indicador vermelho desligase e o azul começa a piscar. Pode agora utilizar o seu BT2.
Voltar a ligar a unidade a dispositivos
Bluetooth
Depois de ter realizado o emparelhamento com êxito dos
seus dispositivos, pode ligá-los e desligá-los sem ter de
repetir o procedimento de emparelhamento. Se ocorrer uma
falha de ligação entre os dois dispositivos (por exemplo
porque um dispositivo está desligado ou porque está fora do
alcance máximo), não é necessário repetir o procedimento
de emparelhamento.Basta voltar a ligar o dispositivo ou
movimentá-lo novamente para o intervalo de alcance máximo.
Se a ligação não puder ser restabelecida automaticamente,
seleccione o dispositivo no “menu de dispositivos” do seu
dispositivo Bluetooth (por exemplo telemóvel, leitor de MP3,
etc…) e volte a activar a ligação.
Ajustar o volume
O seu BT2 da Midland utiliza tecnologia AGC, a qual
automaticamente ajusta o volume de audição em relação ao
ruído de fundo. Contudo, também é possível ajustar o volume
manualmente através da utilização dos botões “Volume+” e
“Volume -”.
Por exemplo, pode ajustar manualmente o volume
máximo em ambientes muito barulhentos (por exemplo ao
viajar a velocidades elevadas), para permitir ao sistema
automático AGC alterar o volume e utilizar o volume denido
manualmente como a denição máxima. Esta operação é útil
uma vez que cada tipo e padrão de capacete é inuenciado
de forma diferente pelo vento e pelo ruído de fundo.
Utilizar as funcionalidades dos
dispositivos Bluetooth
Utilizar a funcionalidade de
intercomunicador
Para utilizar a funcionalidade de intercomunicador, certiquese de que ambas as unidades estão ligadas e emparelhadas
correctamente.
Se tiver adquirido uma versão “única”, siga o procedimento
de emparelhamento descrito na secção “Emparelhamento da
unidade com outra unidade BT2” anterior.
Prioridade: As comunicações de intercomunicador
têm sempre uma prioridade superior, comparadas com
outras comunicações, com as únicas excepções a serem
as de telefone e de GPS de navegação por satélite.
Portanto, a funcionalidade de intercomunicador desactiva
automaticamente todas as outras comunicações.
A funcionalidade de intercomunicador é desactivada apenas
quando é recebida uma chamada ou uma comunicação
de voz a partir do GPS de navegação por satélite, e é
automaticamente reactivada assim que estas comunicações
terminam.
Atenção: alguns telemóveis libertam a linha após alguns segundos, o que signica que a funcionalidade
de intercomunicador poderá não estar imediatamente
disponível.
A funcionalidade de intercomunicador pode ser activada de
duas formas:
Activação manual:
Pressione o botão “Intercom”, numa das duas unidades. ›
A comunicação é activada e permanece activa até que
pressione novamente o botão “Intercom”. Irá escutar 1 tom
de áudio quando a funcionalidade de intercomunicador for
activada e 2 tons de áudio quando a funcionalidade for
desactivada.
- Activação por voz (VOX):
Trata-se do modo de activação predenido. Para iniciar uma ›
comunicação de intercomunicador, basta começar a falar.
A comunicação irá permanecer activa durante o tempo em
que estiver a falar. Se não existir nenhuma conversação,
a funcionalidade de intercomunicador é desactivada ao
m de 1 minuto. Para a voltar a activar, basta começar a
falar novamente. Quando o intercomunicador é activado
por “VOX”, pode decidir desactivá-lo antes do tempo
predenido, para tal basta pressionar o botão “Intercom”
uma vez.
Para desactivar o modo de activação por voz, siga ›
as instruções fornecidas na secção “Congurações
especiais”.
Atenção: quando utiliza a funcionalidade de intercomunicador, a primeira vez que a activa (voz ou manual) a
comunicação será estabelecida após um curto intervalo
devido ao facto dos dispositivos primeiro terem de se re-
P
9
Page 100

conhecer um ao outro. Após essa acção, a comunicação
será estabelecida de forma imediata.
Duas unidades BT2 da Midland podem comunicar até um
alcance máximo de cerca de 200 metros no exterior. É portanto
possível utilizar o BT2 como sistema de intercomunicação
para comunicações “MOTA A MOTA” entre dois condutores.
O alcance máximo depende do ambiente em que as unidades
estiverem a ser utilizadas.
Utilizar a funcionalidade de telefone
Para utilizar a funcionalidade de telefone, certique-se
de ambas as unidades estão ligadas e emparelhadas
correctamente, seguindo o procedimento de emparelhamento
descrito na secção “Emparelhamento da unidade com um
telemóvel”.
Atenção: informação fornecida nesta secção refere-se
ao estabelecimento de uma comunicação directa entre o
telemóvel e a unidade BT2. Se o telemóvel estiver ligado
através do GPS de navegação por satélite, as funcionalidades do telemóvel apenas podem ser geridas através
do próprio GPS.
Prioridade: As chamadas são sempre privadas e têm
uma prioridade alta, o que signica que todas as outras
comunicações são temporariamente desactivadas quando
é recebida uma chamada e automaticamente reactivadas
assim que essa chamada termina.
Atender uma chamada
Quando escutar o telefone tocar, pode atender de duas
maneiras:
Vocalmente:
Basta dizer uma palavra para atender a chamada e começar
a falar. Lembre-se de que apenas pode fazer isto se atender
a chamada após o terceiro toque. (Tenha atenção que alguns
telefones podem não suportar atendimento por voz)
Manualmente:
Toque no botão “Telefone” e comece a falar.
Atenção: lembre-se de que pode atender a chamada apenas após o terceiro toque.
Rejeitar uma chamada
Se não desejar atender, pode deixar o telemóvel tocar ou
pressionar o botão “Telefone” durante alguns segundos (irá
escutar um tom de conmação áudio).
Realizar uma chamada
Existem vários modos de realizar uma chamada.
10
A partir do teclado de um telemóvel:
Marque o número no teclado do telemóvel:
Pressione “Enviar” no telemóvel. ›
Este modo de telefonar nunca deve ser realizado enquanto ›
estiver a conduzir um veículo em movimento.
Para remarcar o último número:
Pressione e mantenha pressionado o botão “Telefone” ›
durante alguns segundos com vista a remarcar o último
número (irá escutar um tom de conrmação áudio).
Para realizar uma chamada de voz:
Pressione brevemente o botão “Telefone”. Se o seu ›
telemóvel suportar chamadas de voz, pode-lhe ser
pedido que soletre o nome do contacto a quem pretende
telefonar.
A operação correcta desta funcionalidade depende do tipo
de capacete utilizado (aberto ou integral) e a velocidade a
que está a viajar. Sugerimos que realize alguns testes para
determinar as melhores denições para si a nível individual.
Atenção: se estiver a escutar música utilizando um leitor
de MP3 ligado através de Bluetooth (protocolo A2DP),
não poderá utilizar os comandos “Marcar o último número” e “Chamada de voz”, uma vez que estes botões são
utilizados para controlar o leitor de MP3. Portanto, se
pretende realizar uma chamada, primeiro tem de desactivar a música pressionando o botão “Intercom” durante 1
segundo (irá escutar 2 tom de conrmação áudio) antes
de realizar a chamada.
Terminar uma chamada
Existem vários modos de terminar uma chamada.
Espere que a pessoa contactada termine a chamada. ›
Pressione brevemente o botão “Telefone” (irá escutar um ›
tom de conrmação áudio).
Pressione “Terminar” no telemóvel. (Este modo de terminar ›
uma chamada nunca deve ser realizado enquanto a
conduzir um veículo em movimento.)
Comunicações telefónicas de três vias
A funcionalidade de intercomunicador é desactivada
temporariamente quando está em curso uma chamada
telefónica. Contudo, é possível adicionar outras pessoas à
conversação através da simples activação da funcionalidade
de comunicação de três vias. Após a chamada inicial ter
sido estabelecida, pressione brevemente o botão “Intercom”
no dispositivo BT2 que recebeu a chamada (irá escutar
um tom de conrmação áudio). Para voltar a estabelecer
uma conversação privada, pressione o botão “Intercom”
novamente (irá escutar dois tons de conrmação áudio).
 Loading...