

Page 1
Contents
FOR PLASTIC PINS
Remote ControlButtons ..............................................................................................................................2
LCDTV .......................................................................................................................................................2
Preparation................................................................................................................................................. 3
Safety Precautions .....................................................................................................................................3
Before Switching On Your TV.................................................................................................................... 5
Switching The TV ON/OFF .........................................................................................................................5
Navigating the Menu System ......................................................................................................................6
MenuSystem.............................................................................................................................................. 6
Other Features ......................................................................................................................................... 10
Teletext ..................................................................................................................................................... 11
ConnectPeripheral Equipment.................................................................................................................. 12
Tips .......................................................................................................................................................... 13
Appendix A: Aerial Connection ................................................................................................................. 14
AppendixB: Connect Peripheral Equipment.............................................................................................. 14
User Help Guide ....................................................................................................................................... 15
PeripheralEquipment Connections ........................................................................................................... 16
ImportantInstruction ................................................................................................................................. 17
Specifications ........................................................................................................................................... 18
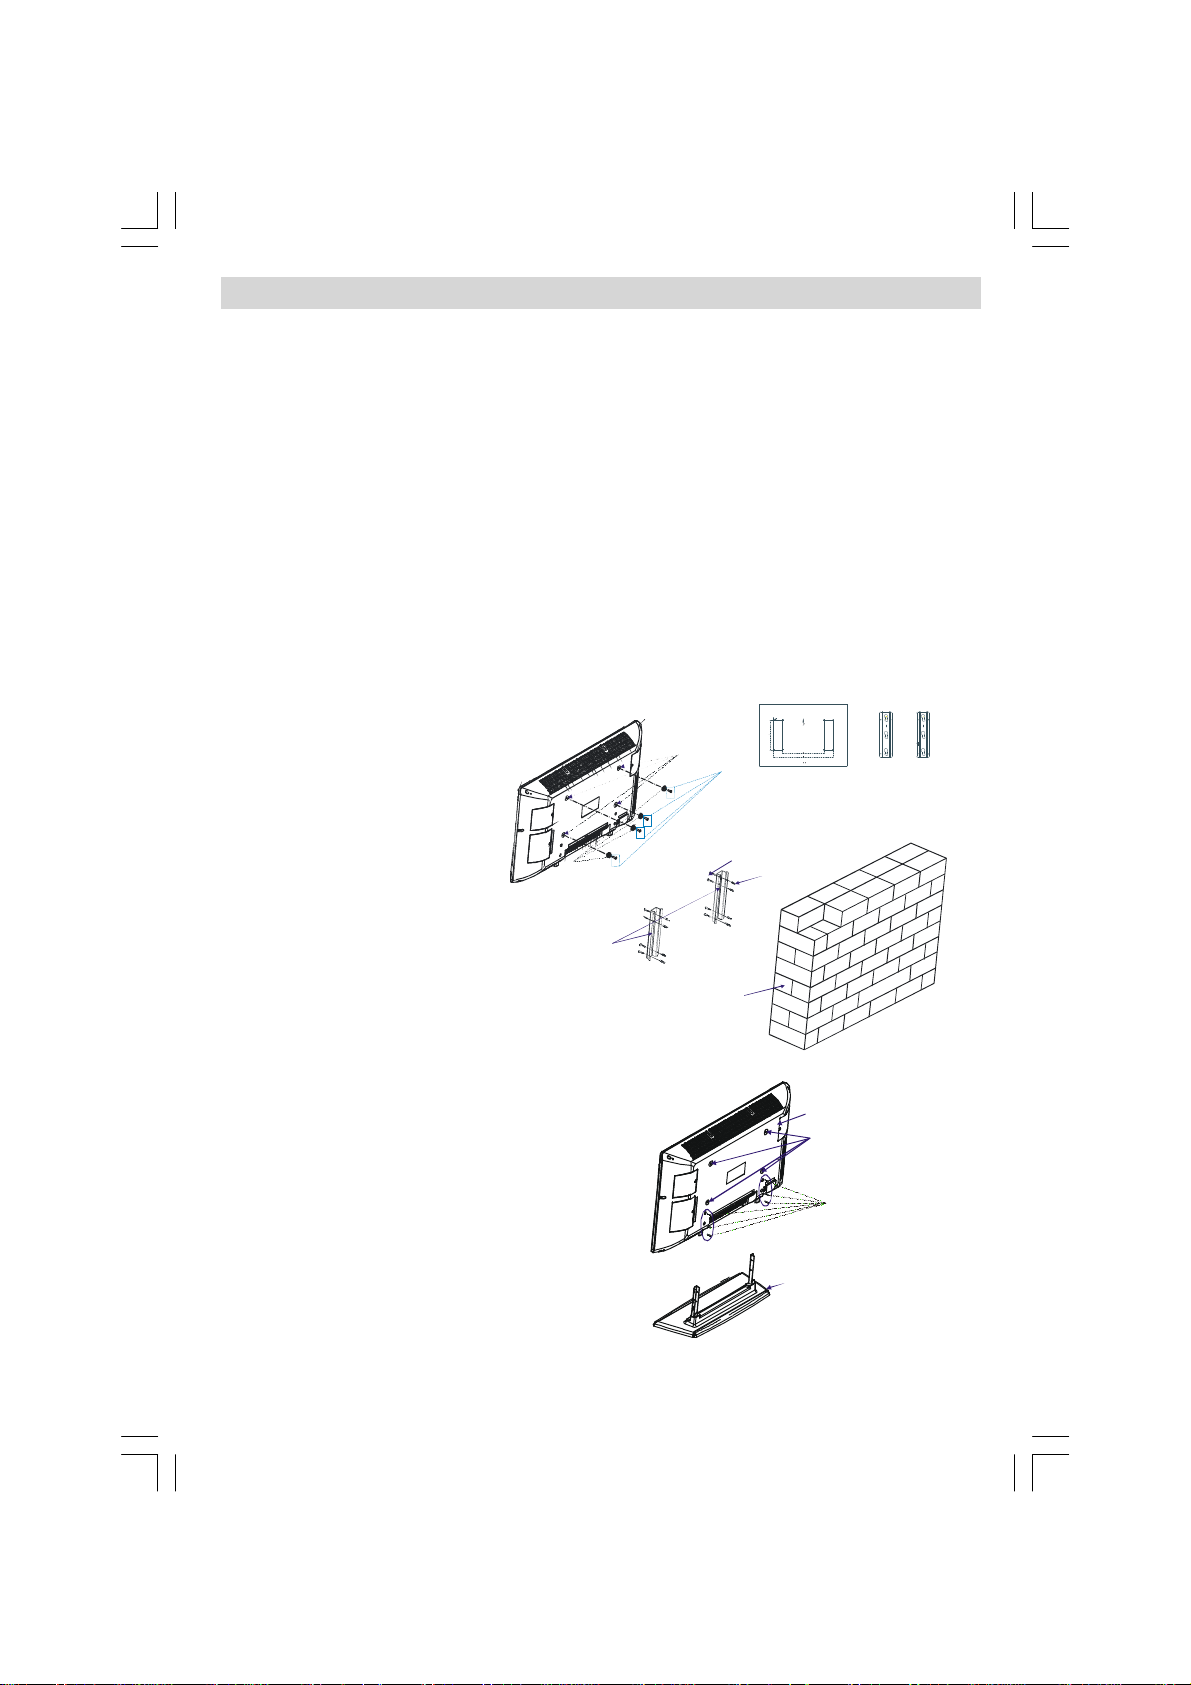
Installation Of The TFT TV To The Wall
TFT PANEL
PLASTIC P INS
1- To install the TFT TV on the wall, first of all, foot
assembly should be removed. (Figure 1). Unscrew
the 6 screws (M4 x 16) that attach the foot assembly
to the TFT panel and remove thefoot assembly from
theTFTpanel.
2- Place the 4 plastic pins to the circular screw holes
attherearofthe TFTand screwthem totheTFT panel
with 4 (4 x 10) screws.
3- Decide the place on the wall where the TFT panel
would be placed. Fix thestencil wall mount (shown
in Figure 2) on the wall.
The stencil wall mount is used for placing the wall
hangers on the wall, properly.
4- Level and mark with a pencil the 4 mountingpoints
on each wall hanger.
Drill pilotholes for the plastic anchors andthenfixthe
wall hangers with 8 screws (4 x 30).
5- Raise the TFT paneland hang it totheholes on the
wall hanger from the 4 hanging screws at the rear of
theTFTpanel.
WALL HANGER
SCREW HOL ES FOR PLASTICP INS
4 SCREWS
(4 x 10)
WALL
(4 x 30)
6 SCREWS
(4 X 16)
WALLHANGERS
- 1 -
ENG-32720W-1055UK-32 INCH 17MB22-(WO SVHS-WO PIP-WO PC)-5010XXXX.P65 10.05.2007, 14:211
Page 2
- P/CH +
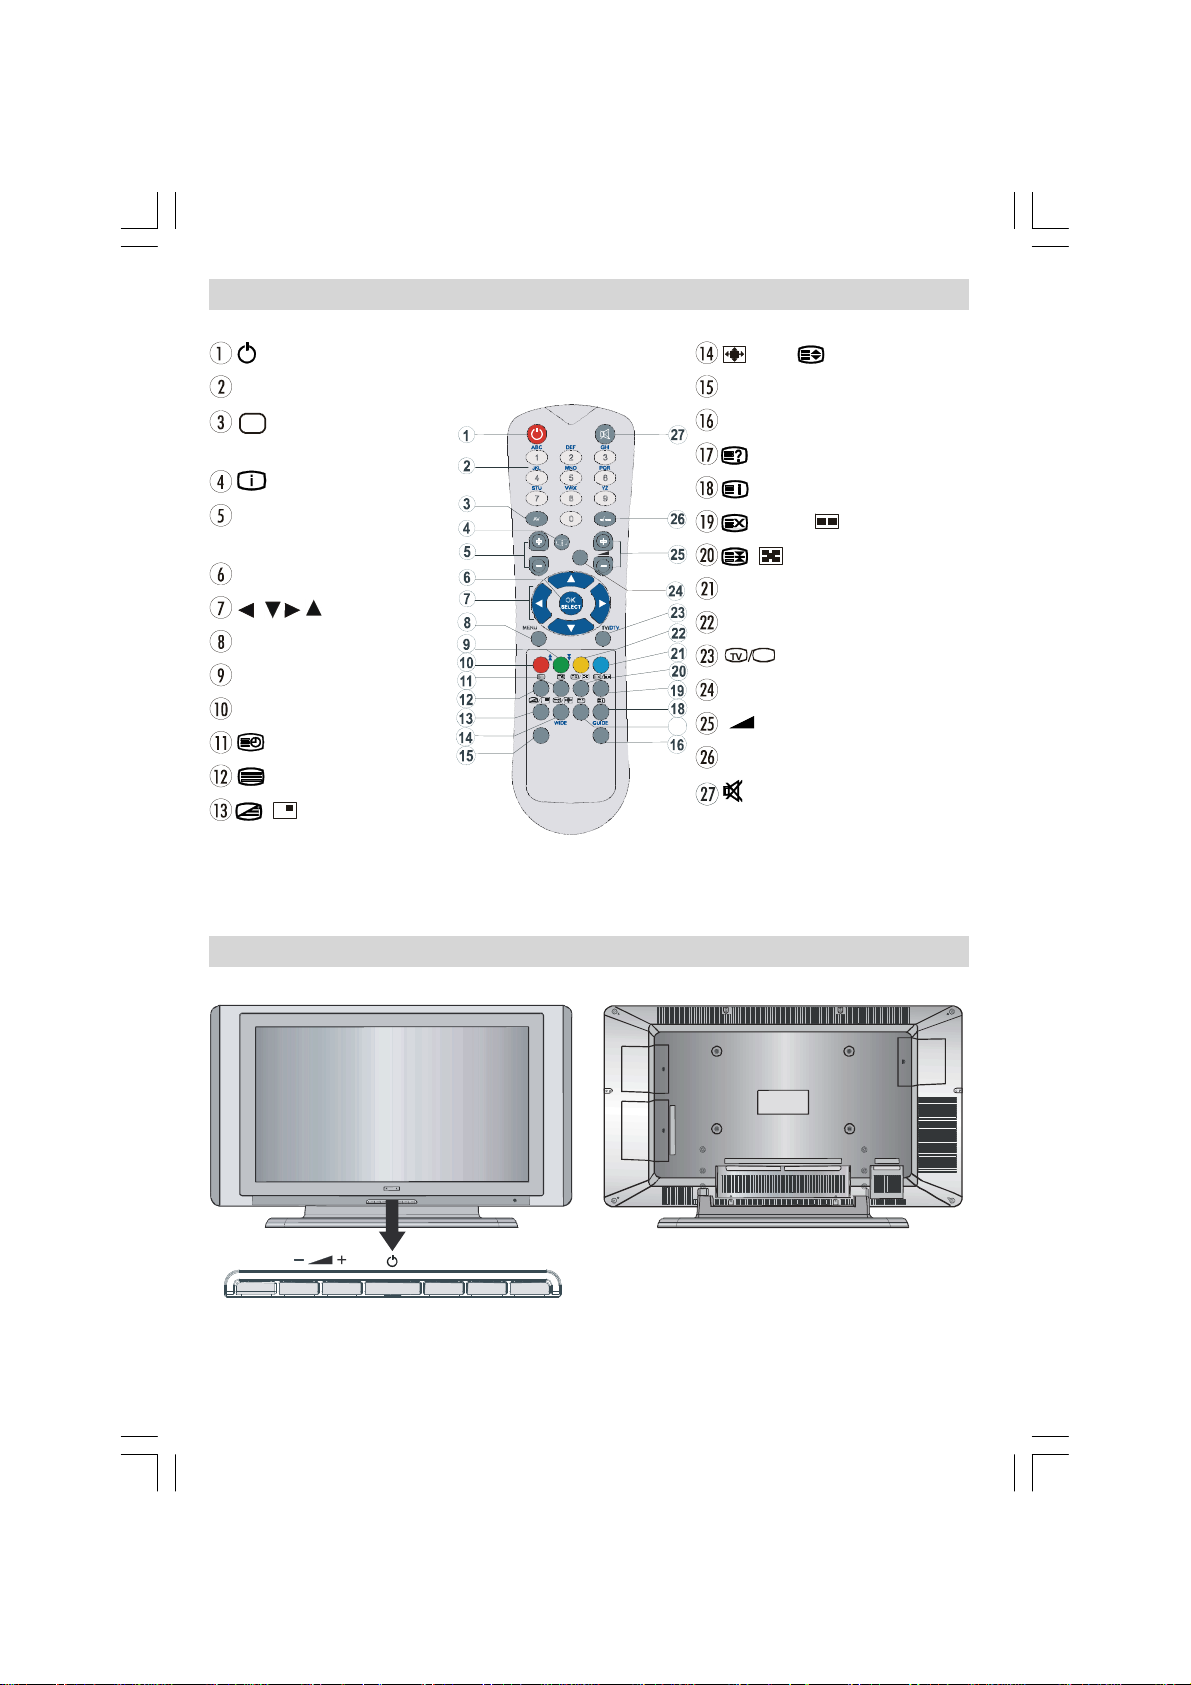
Remote Control Buttons
YZ
TV
DTV
= Stand By
0 - 9 = DirectProgramme
AV
/SOURCE= ExternalSource
(TV,EXT1,EXT2,FAV,HDMI,YPBPR)
/ INFO =Info
P/Ch+ =ProgrammeUp/
P/Ch- = Programme Down
OK/SELECT = Okay(Store)
, , , = Cursor buttons
Menu=Menu
Green button = Picture
Red button = Sound
= Time /Subcode page
= Teletext
/ = Mix/NoFunction
ABC DEF GHI
1 2
JKL MNO PQR
4 5
STU VWX
7 8
AV
SOURCE
INFO
I-II
P/CH
MENU
WIDE
P<P/SWAP PP
/WIDE/ =Imagesize/Expand
P<P/SWAP=PreviousProgramme
PP=ColourTemperature
=Reveal
/ Guide =IndexPage
-/--
EXIT
=Update, =NoFunction
/ =Hold /NoFunction
Blue button
Yellow button
= TV/ Quit menu
I-II =Mono-stereo/ DualI-II
- + = Volume + / Volume-
-/-- / EXIT = No function
= Mute
MENU
ENG-32720W-1055UK-32 INCH 17MB22-(WO SVHS-WO PIP-WO PC)-5010XXXX.P65 10.05.2007, 14:212
LCD TV
TV/AV
- 2 -
Page 3
Preparation
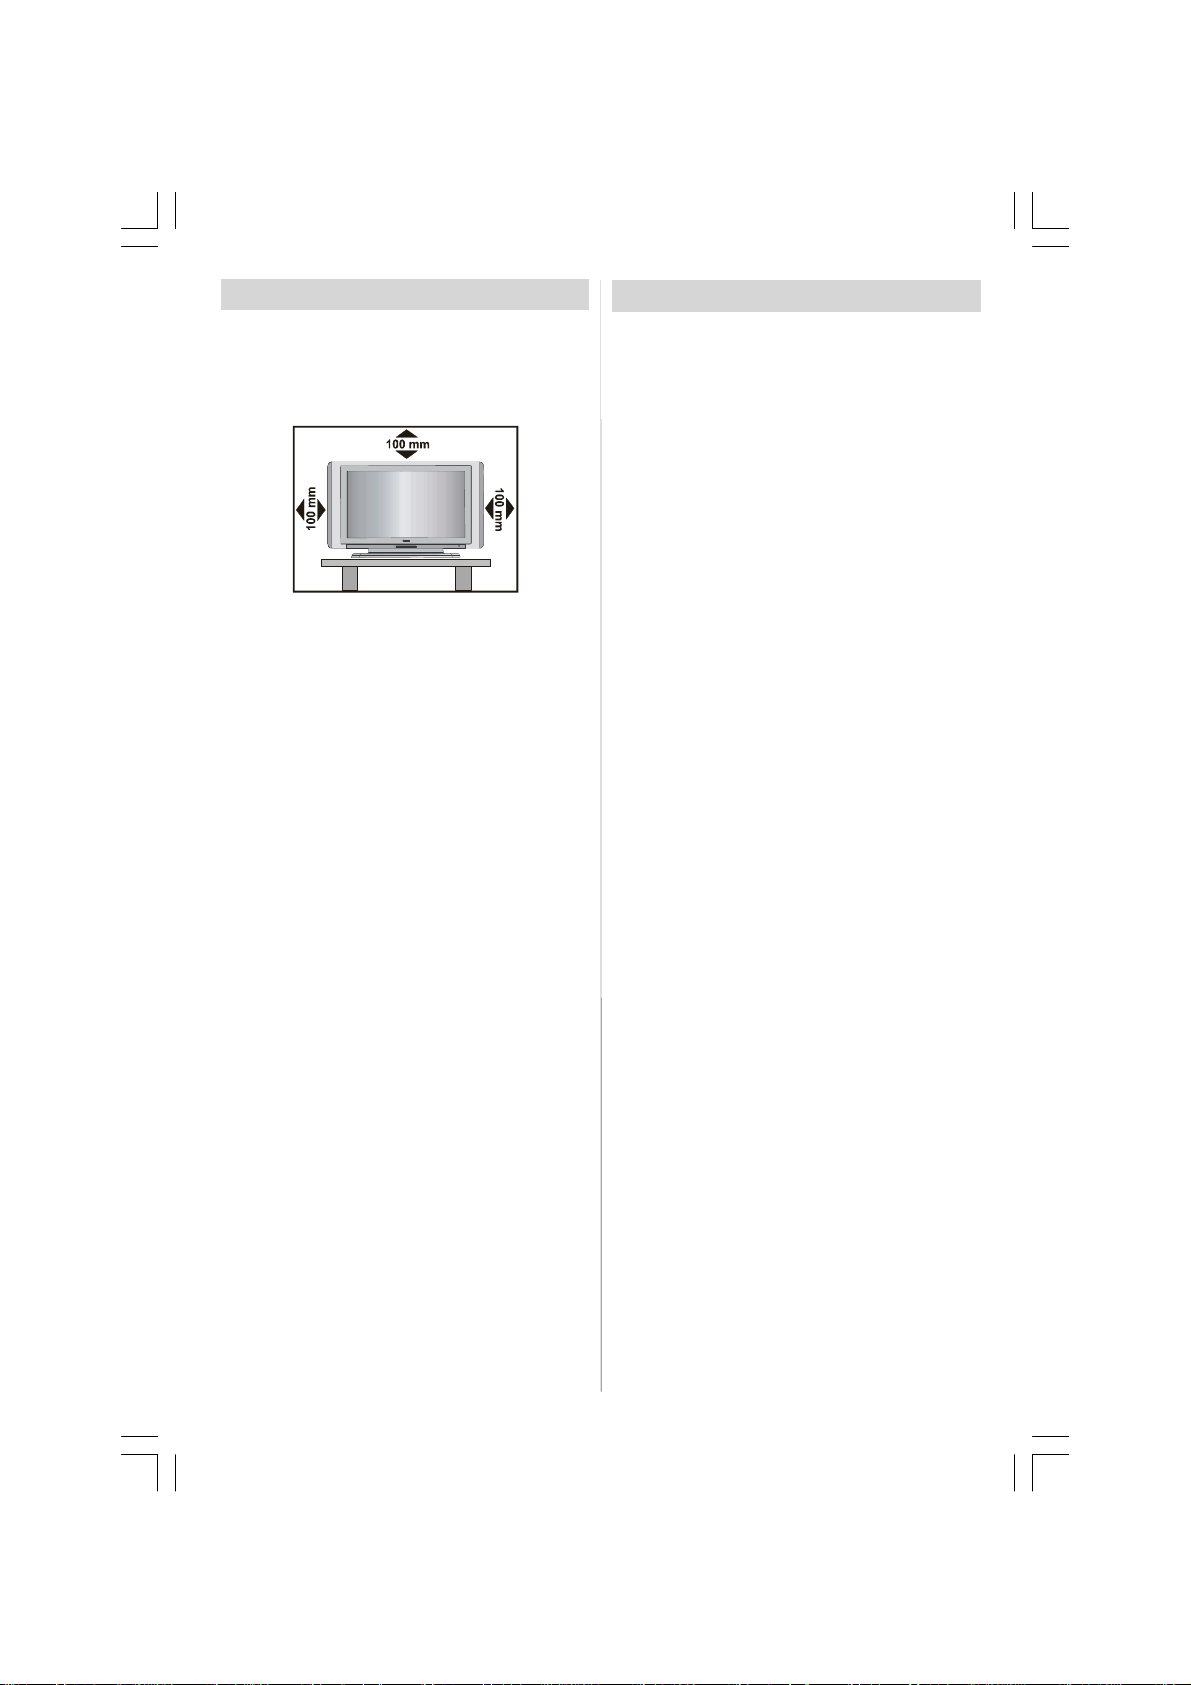
Forventilation,leavea space of atleast 10 cm freeall
around the set. To prevent any fault and unsafe situ-
ations, please do not place anyobjects on top of the
set.
Use this apparatusin moderate climates.
Features
• Remotecontrolled colour LCDTV.
• 100 programmes from VHF, UHF bands or cable
channels can be preset.
• It can tune cable channels.
• Controlling the TV is very easy by its menu driven
system.
• It has2 Scart sockets for external devices (suchas
video, video games, audio set, etc.)
• Stereo sound system (German+Nicam).
• Full functionTeletext (500 pages).
Fastext, TOP text.
• Headphone connection.
•A.P.S. (AutomaticProgrammingSystem).
•Allprogrammes can be named.
• Forward or backward automatic tuning.
•Sleep timer.
• ChildLock.
• Automatic sound mute when no transmission.
•NTSCPlayback.
•IthasanHDMIconnectorfor DigitalVideoandAudio.
This connection is also designed to accept High
Definition signals.
•AVL(Automatic Volume Limiting)
• Whennovalid signalis detected,after 5minutesthe
TV switches itself automatically to stand-by mode.
• PLL (Frequency Search)
•Audio Line Out
Safety Precautions
Please read the following recommended safety precautions carefully for your safety
1. Power Source
The set shouldbe operated onlyfrom a 230-240V 50
Hz supply.
2. Power Cord
Do not place the set, a piece of furniture,etc. on the
power cord(mains lead) or pinch the cord.Handle the
power cord by the plug.Do not pull out the plug by
tugging the cord and never touch the power cord
when yourhands are wet as this could cause a short
circuitorelectric shock.Never makeaknot in thecord
or tie it with other cord.The power cord should be
placed in such a way that they are not likely to be
stepped on.
A damaged powercord can cause fire or give you an
electric shock. When it is damaged and need to be
changed, it should be done by qualified personel.
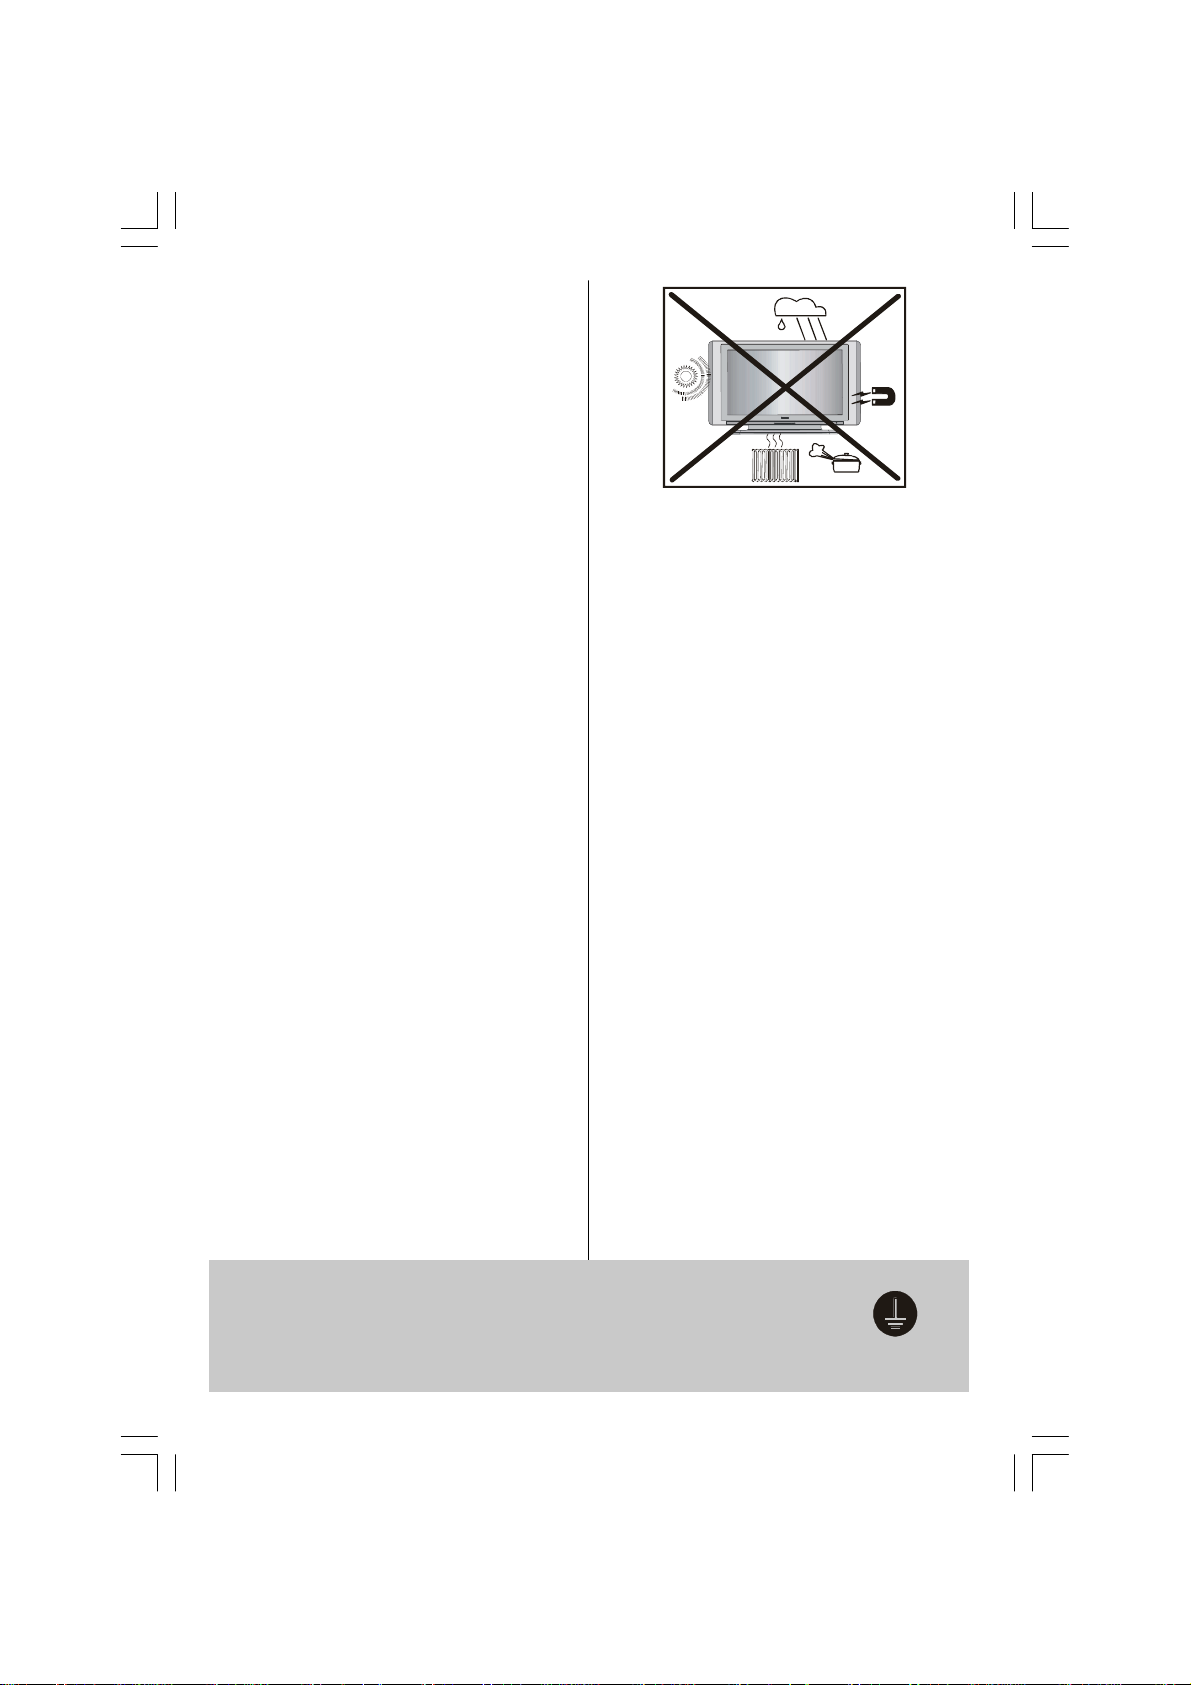
3. Moisture and Water
Donotuse thisequipmentina humid anddamp place
(avoidthebathroom, thesinkinthe kitchen, andnear
the washing machine).Donotexpose this equipment
to rain orwater,asthismay be dangerous and do not
place objects filled with liquids,such as flower vases
on top of the set. Avoid from dripping or splashing.
If anysolid object or liquid falls intothe cabinet, unplug
the set and have it checked by qualified personnel before operating it any further
4. Cleaning
Before cleaning, unplug the set from the wall outlet.
Do not use liquid or aerosol cleaners. Use soft and
dry cloth.
5. Ventilation
The slots and openings on the back cover are intended for ventilation and to ensure reliable opera-
tion.Topreventoverheating,these openings mustnot
be blocked or covered in anyway.
6. Heat and Flames
The set should not be placed near to naked flames
and sources of intense heat,such as an electric
heater. Ensure thatno nakedflamesources, such as
lighted candles, are placed on top of the set
7. Lightning
In the event of a Thunderstorm or when going on
holiday.Disconnect the mains supply and aerial (if
external).
ENG-32720W-1055UK-32 INCH 17MB22-(WO SVHS-WO PIP-WO PC)-5010XXXX.P65 10.05.2007, 14:213
- 3 -
Page 4
8. Replacement Part
Whenreplacement partsare required, be sure the service technician has used replacement parts which are
specified by the manufacturer or havethe same specifications as theoriginal one. Unauthorised substitutions
may result in fire, electrical shock, or other hazards.
9. Servicing
Please refer all servicing to qualified personnel. Do
notremovethe cover yourself as this may resultin an
electric shock.
WARNING: When the device is not in use for a long
time, disconnect from power.
Instructions for waste disposal:
• Packaging and packaging aids are recyclable and
should principally be recycled. Packaging materi-
als, such as foil bag, must be kept away from children.
• Batteries.These should not be placed in the domestic waste.Do NOT break open or throw on a
fire. For disposal contact your local waste authority
• Cold cathode fluoresant lamp in LCD PANEL contains a small amount of mercury, please follow lo-
cal ordinates or regulations for disposal.
• The mains plug is used to disconnect the TV from
the mains and therefore it shall remain readily op-
erable.
Warning: To prevent injury, this device must be securely attached to the floor/wall in accordance with
the installationinstrutions.
“The LCD panel is veryhigh technology product with
about a million thin film transistors, giving you fine
picture details. Occasionally, a few non-active pixels
may appear on the screen as a fixed point of blue,
greenorred. Please notethatthis does notaffect the
performance of your product.”
“DONOTLEAVEYOURTVINSTANDBYOROPERATINGWHENYOULEAVEYOURHOUSE”
This is a "Class One" apparatus. Always ensure the earth terminal is
connected.
If replacing the mains plug or lead ensure the Earth wire is connected.
If you are not sure please consult your local engineer.
- 4 -
ENG-32720W-1055UK-32 INCH 17MB22-(WO SVHS-WO PIP-WO PC)-5010XXXX.P65 10.05.2007, 14:214
Page 5
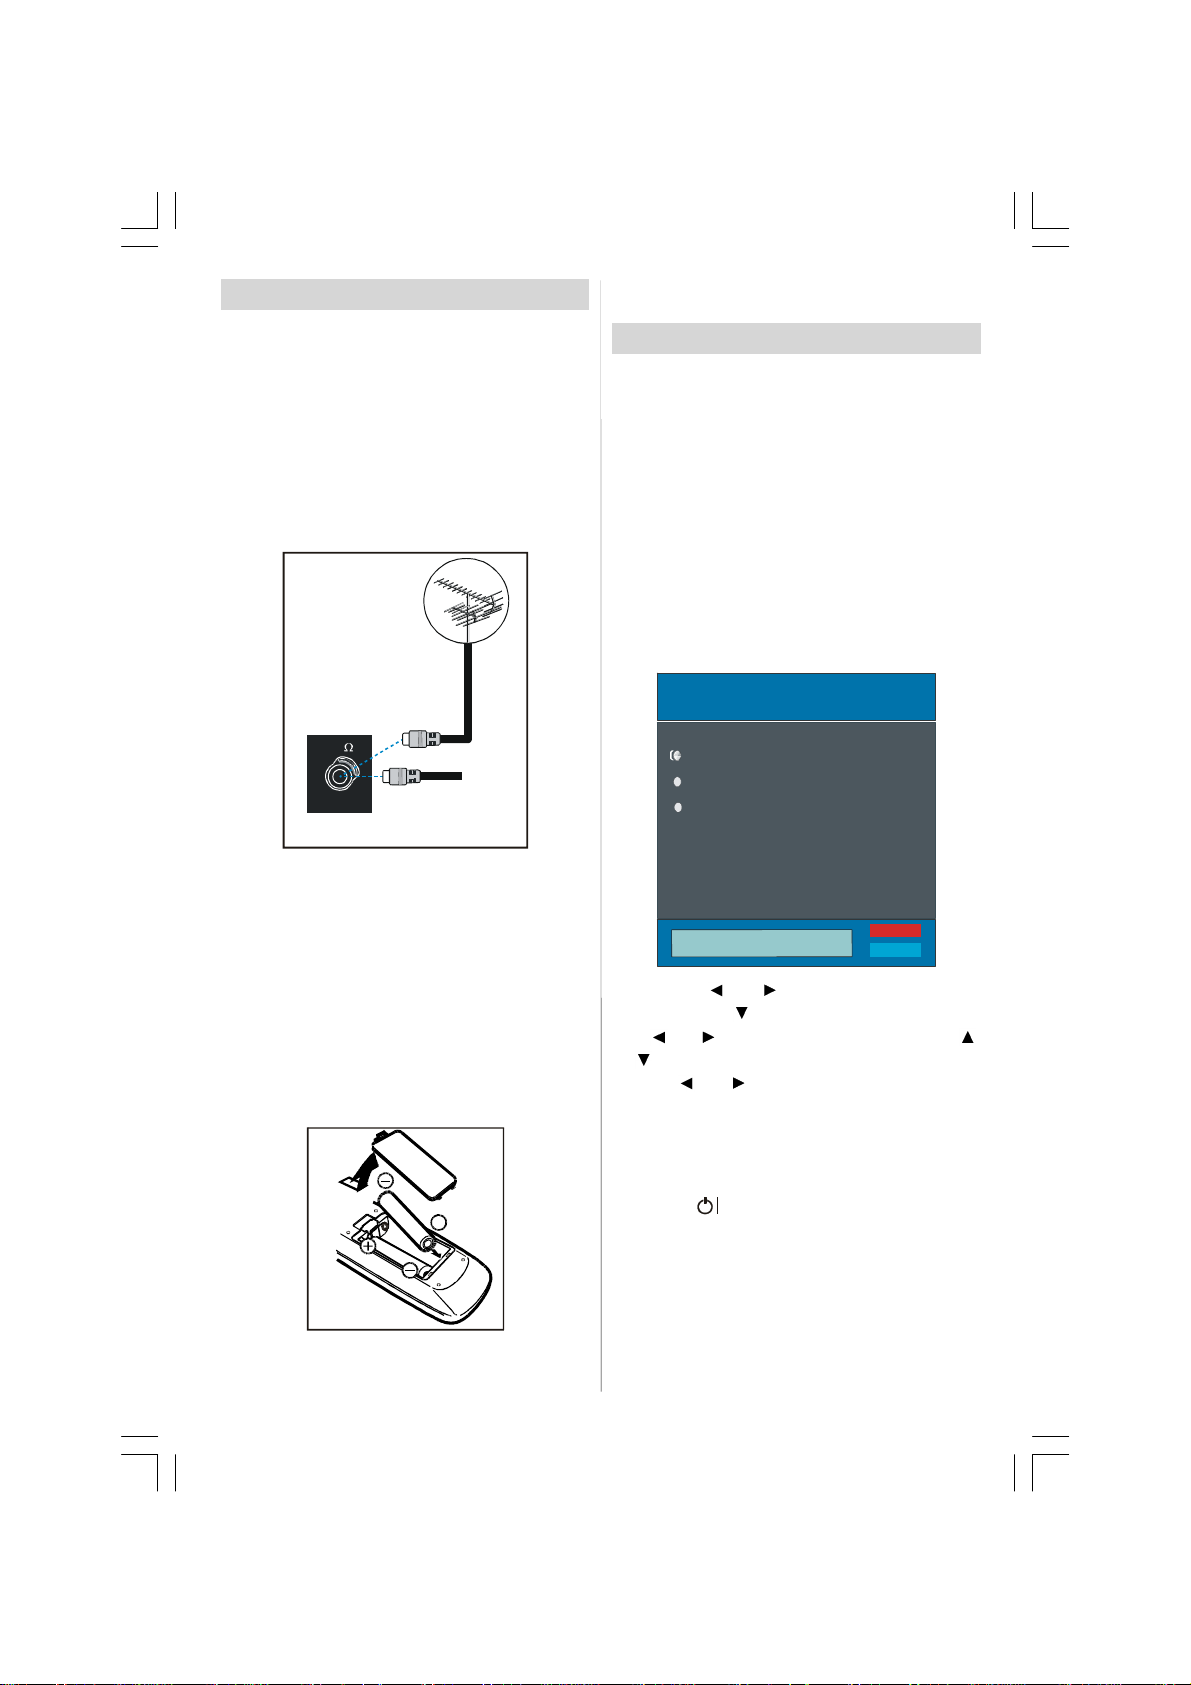
Before Switching On Your TV
Power Connection
IMPORTANT: The TV set is designed to operate on
220-240V AC, 50 Hz.
•After unpacking,allow the TV set to reachthe ambi-
ent roomtemperature beforeyou connect thesetto
themains.
Connections To The Aerial Input Socket
•Connecttheaerial orcable Tvplug totheAerial input
socket located at the rear of the Tv.AVCR or other
box may also be connected.
VHF/UHF
REAR OF THE TV
Inserting Batteries In The Remote
Control Handset
WARNING: Remotecontrolisbatteryincluded.Aplas-
tic protector is used to disconnect the batteries in
ordertopreventthebattery lifefromreducing. Please
remove the plastic protector before the first use.
• Remove the battery coverlocated ontheback of the
handset by gently pulling backwards from the indicated part.
• Insert two AAA/R03 or equivalent type batteries
inside.Place the batteriesin the right directionsand
replace the battery cover.
CABLE TV
wise it can be damaged due to any leakage of battery.
Switching The TV ON/OFF
To switch the TV on:
Your TV will switch on in two steps:
1. Connect the power supplycordto the Tv. Press the
Power ON/Off button located at the REAR of the TV.
The Tv will now be in STANDBY mode.
2. To switch the Tv from Standby mode either :
Press a digit button on the remote control so that a
programme number is selected,orPress the "-P/CH"
or "P/CH+" button on the TV or press the “-P” or
“P+” button on the remotecontrol, so thatlast mode
switched off is selected.
By either methodthe TV will switch on. When the TV
is operated for the first time, the following screen
appears:
Auto Program
Country
Language
TXT Language
AUTO. PROGRAMMING SYSTEM
By pressing “ ” or “ ” button, adjust the Country
item and press “
” or “ ” button to set “Language”. Use “ ”
Use “
” buttons to select “TXT Language” and set it
or “
by using
continue:
For more information on this process, see “Install
Menu” section.
To switch the TV off:
• Pressthe“ (stand-by)” buttononthe remote control or On/Off switch on theTV, so theTVwill switch
to stand-by mode.
To power down the Tv completely, press the Power
On/Off button located at the REAR of the Tv. Or dis-
connect the mains plug from the supply.
” to highlight “Language” item.
” or “ ” buttons. Press “OK” button to
Note: Remove the battery from remote control handset when it is not to be used for a long period. Other-
ENG-32720W-1055UK-32 INCH 17MB22-(WO SVHS-WO PIP-WO PC)-5010XXXX.P65 10.05.2007, 14:215
- 5 -
Page 6
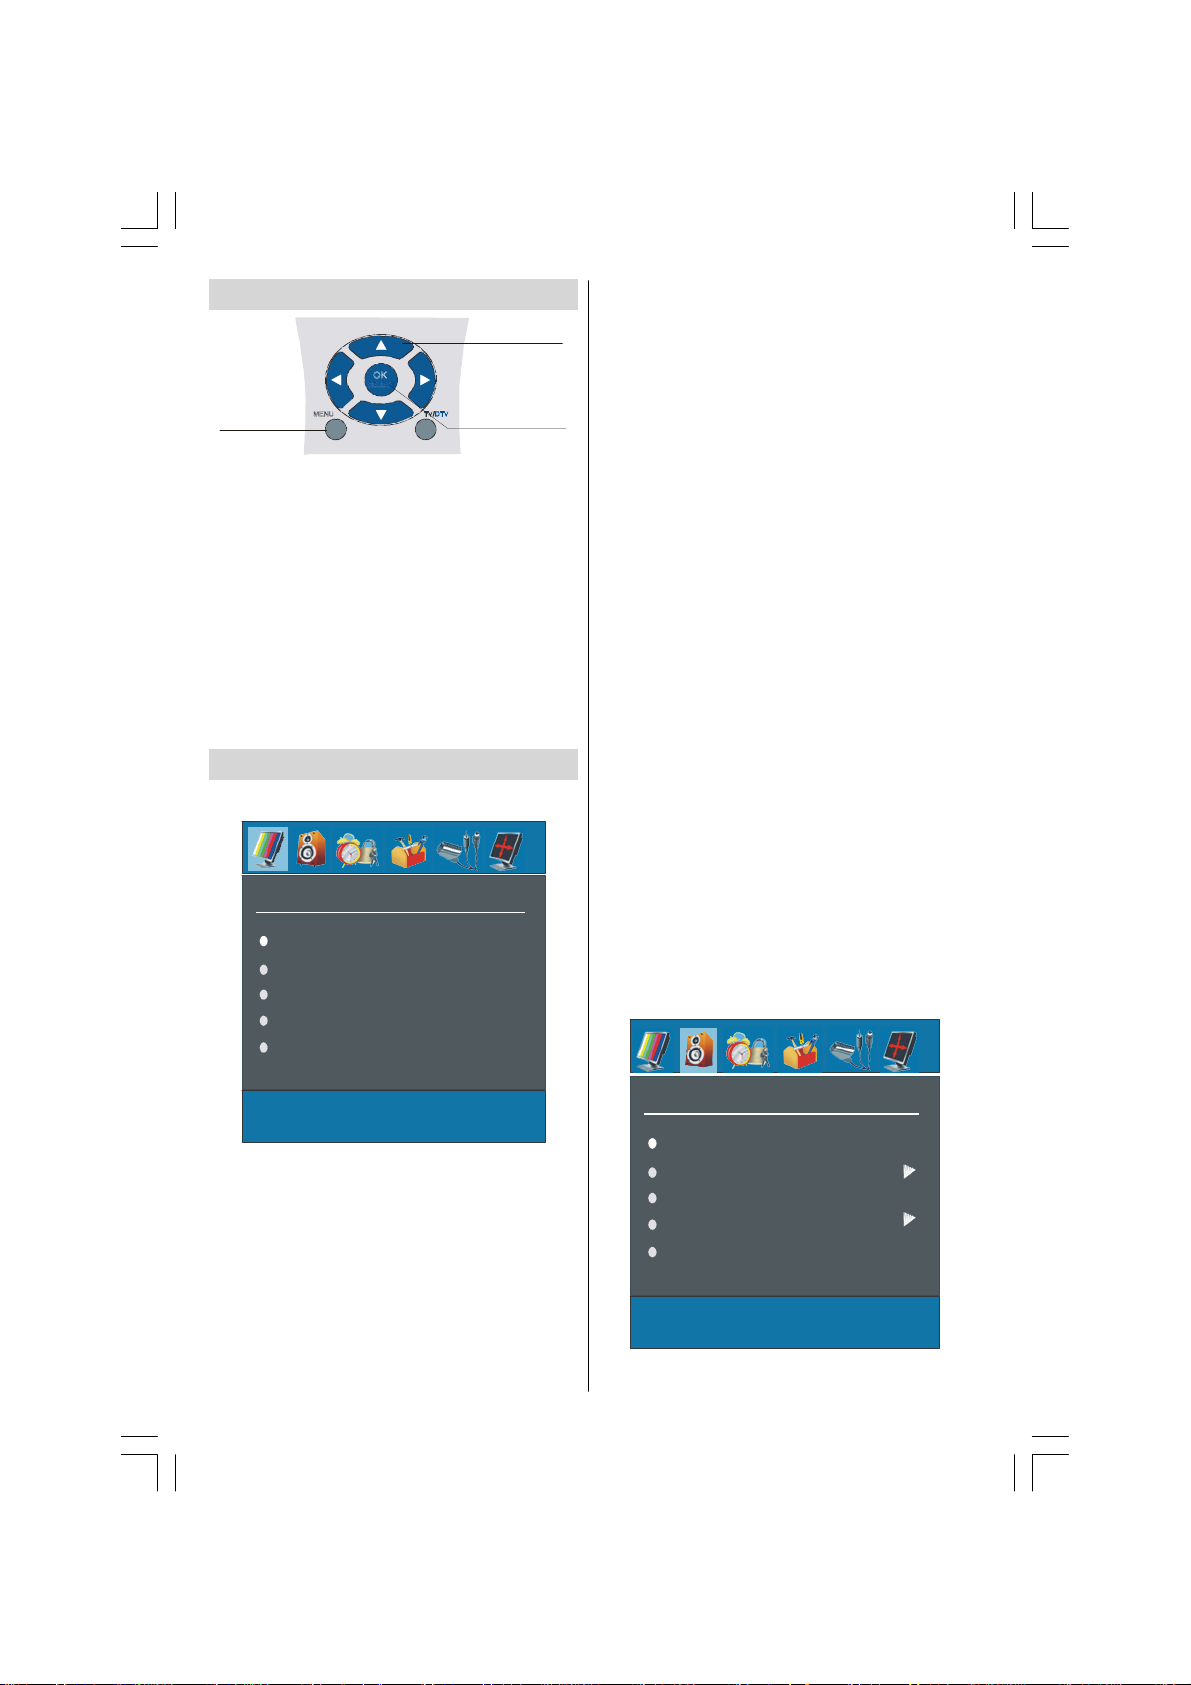
Navigating the Menu System
Contrast
Brightness
/
For Navigation
OK
For Displaying
Menu Options
MENU TV/DTV
1- PressM to displaythe menu.
2- Press “
“
3- Use “
4- Press “
” or “
” button to select an icon. Press
” for more options.
” or “
” button to highlight.
” or “
” buttons to change the settings.
PressOK to set as default.
5- To exit the menu or returnfrom sub-menu screen,
press M.
These explanations are available for the navigation
of the whole Menu System. To select options that are
explained in the following parts, refer to “Navigating
The Menu System”.
Menu System
Picture Menu
Mode
Sharpness
Colour
Hint: Hue is displayed in picture menu when the TV
receives an NTSC signal.
Colour Temp
• By pressing
• Press
Cool, Normal and Warm.
/
button select Colour Temp.
/
to choose from one of these options:
Noise Reduction
By pressing
Press
Low, Medium, High or Off.
/
button select Noise Reduction.
to choose from one of these options:
Film Mode
Films are recorded at a different number offrames
per second to normal television programmes.
By pressing
Press
/
button,selectFilm Mode.
/
button to set this feature On or Off. Turn
this feature on when you are watchingfilms to see
the fast motion scenes clearly.
Picture Zoom
By pressing
/
Use
16:9, 4:3, Panaromic, 14:9 Zoom, Cinema, Subtitle, or Zoom.
/
button select Picture Zoom.
buttons, to change picture zoom to Auto,
Reset
By pressing
“OK ” button to reset the picture modes to factory
default settings.
/
button, selectReset. Press
Store
• By pressing
• Press
“Stored” will be displayed on the screen.
/
button select Store.
or “OK” button to store the adjustments.
Sound Menu
or
In picture menu if YPbPr or HDMI modes are selected, resolution information is displayed at the bottom of the menu osd.
Mode
By pressing
buttontochoosefrom one of these options: Cinema,
Dynamic and Natural.
/
button,selectMode. Press
Contrast/Brightness/Sharpness/Colour/Hue
By pressing/
/
Press
ENG-32720W-1055UK-32 INCH 17MB22-(WO SVHS-WO PIP-WO PC)-5010XXXX.P65 10.05.2007, 14:216
button,select the desired Option.
button to set the level.
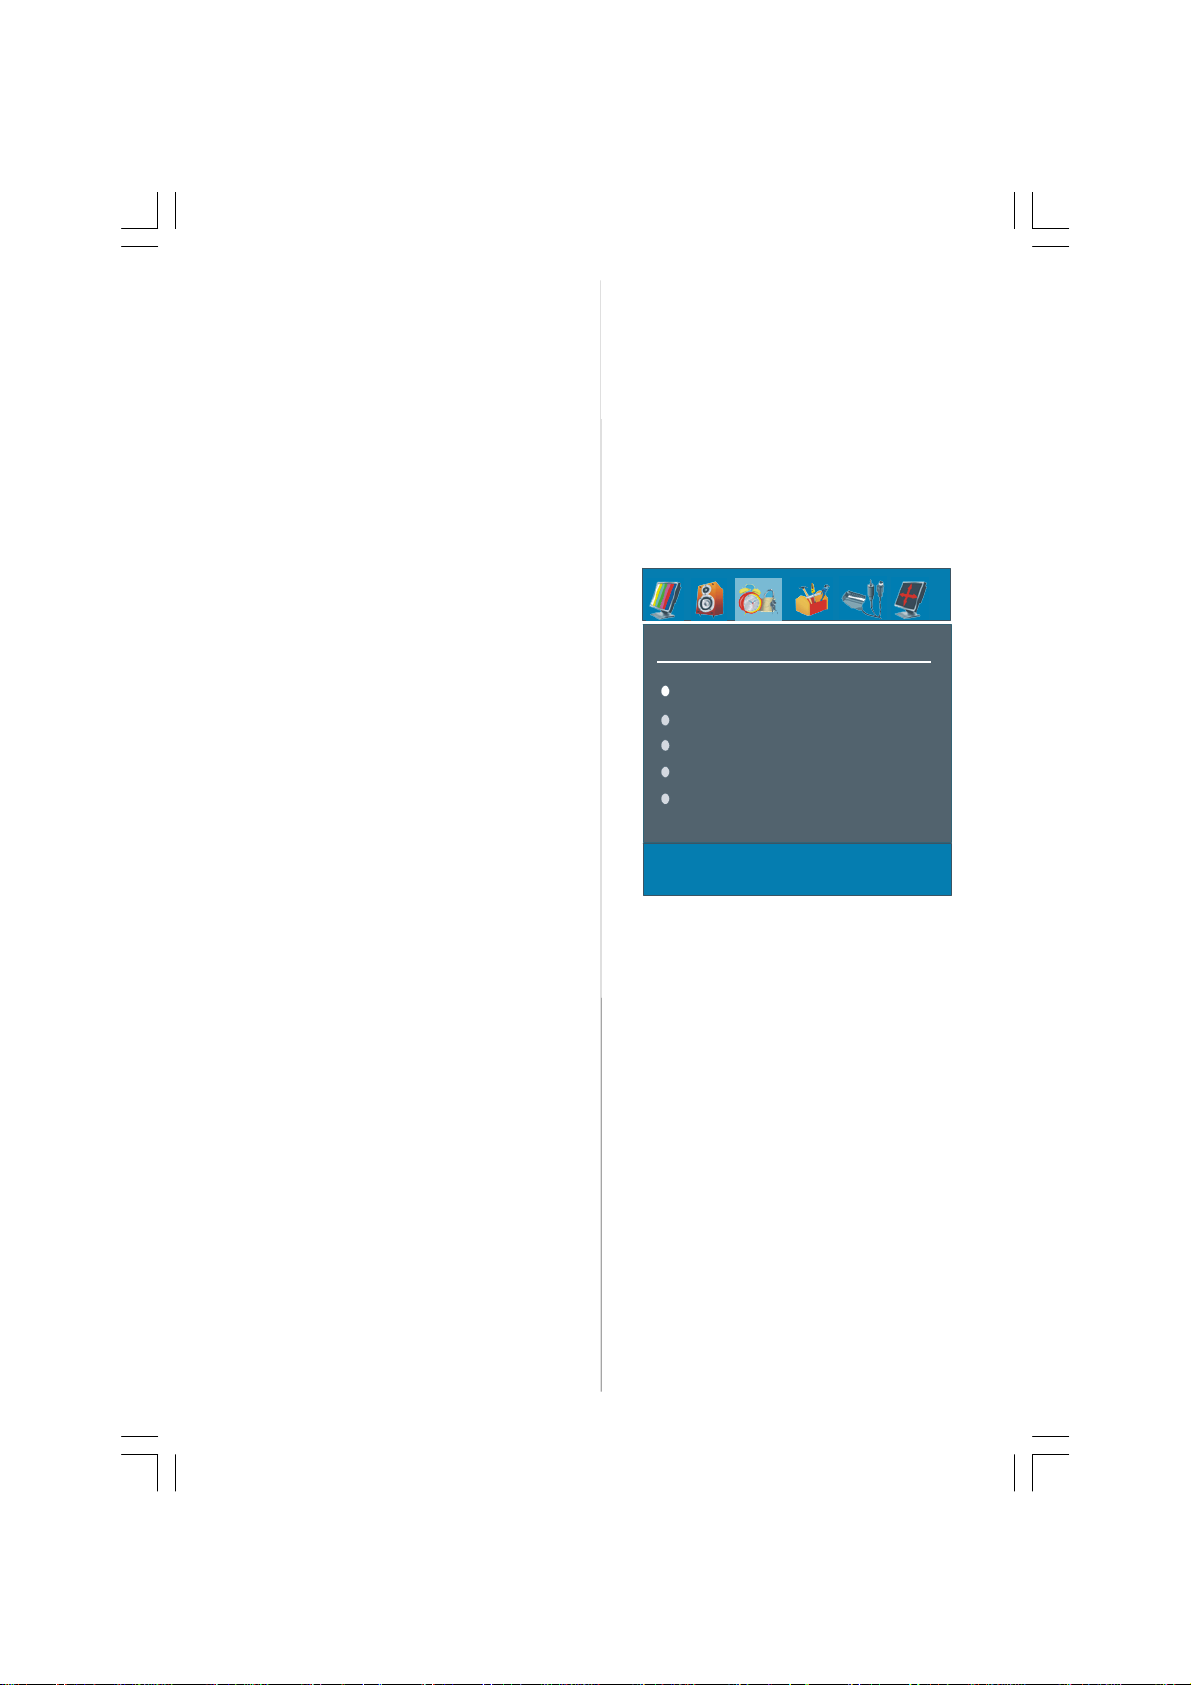
SOUND
Volume
Equalizer
Balance
Headphone
/
- 6 -
Page 7
Volume
By pressing
button to change the level of the Volume.
/
select Volume . Press
/
Equalizer
By pressing
button to change the Equalizer setting. In equalizer
menu,themode canbechangedto Pop, Rock, Jazz,
Flat, Classic or User. Select the desired frequency
by
/
quency gain by pressing
Note: Equalizer menu settings can be altered only
when the Equalizer Mode is in User.
/
select Equalizer.Press
button and increase or decrease the fre-
/
button.
/
Balance
Bypressing
to change the level of the balance.Balancelevel can
be adjusted between -32 and 32.
/
select Balance.Press
/
button
Headphone
By pressing
button to enter hedphonemenu.
/
button,selectHeadphone. Press
volume
By pressing
buttonto increasehpvolume level.Press
decrease hp volume level. Headphone volume level
can be adjusted between 0 and 63.
/
button,select Volume. Press
buttonto
sound mode
Bypressing
/
button to change sound mode.
Sound mode is used to identify sound mode of the
headphone and can be set to mono, stereo, dualI or
dual II accordingtothetransmission.
/
button,select SoundMode. Press
balance
By pressing
button to increase balance to the right. Press
button to decrease balance to the left. Balance level
can be adjusted between -32 and +31.
Press the “M” button to return to the previous menu.
/
button,selectBalance. Press
Sound Mode
By pressing
button,youcan select Mono, Stereo, Dual I or Dual II
mode,onlyif theselectedchannelsupports thatmode.
/
select Sound Mode. Press/
AVL
By pressing
set the AVL as on or off.
/
select AVLVL.Press
/
button to
Effect
By pressing
to set Effect as on or off.
/
select Effect.Press
/
button
Dynamis Bass
Dynamic Bass is used to increase bass effect of the
TV set.
By pressing
pressing
orOff.It isnotrecommendedto selectHighif listening
at high volume levels.
/
button, select Dynamic Bass. By
/
button set Dynamic bass to Low, High
Store
• By pressing
• Press
“Stored” will be displayed on the screen.
/button select Store.
or “OK” button to store the adjustments.
Features Menu
Sleep Timer
Child Lock
Language
Ext-2 Out
Blue background
Sleep Tim er
/
By pressing
button to set theSleepTimer..
The timer can be programmed between Off and 120
minutes in steps of 10 minutes.
Child Lock
By pressing
/
Press
on is selected, the TV can only be controlled by the
remotecontrol handset.In thiscasethecontrol panel
buttons will not work. Hence, if oneof these buttons
is pressed, “Child Lock On” will be displayed on the
screen when the Menu screen is not visible.
button tosettheChildLock onor off.When
Language
By pressing/
/
button to select the language.
EXT2 Out
By pressing
button, to set Ext-2 Out to TV, EXT1, FAV or Audio
YPbPr.
select “Sleep Timer”.Press
/
select Child Lock .
button, select Language.Use
/
select EXT2 Output.Use
/
/
- 7 -
ENG-32720W-1055UK-32 INCH 17MB22-(WO SVHS-WO PIP-WO PC)-5010XXXX.P65 10.05.2007, 14:217
Page 8
Note: When TV Source is set to HDMI, HDMIAudio
INSTALL
P02 C 04
P03 C 05
P04 BBC 1
P06 BBC 2
setting willbeavailableamongEXT-2Outoptions.
BlueBackground
You can set the TV to automatically change to a blue
screen if the signal is weak or absent, or when there
is no input from an external device.
The Blue Background feature can be turned on or off
by pressing “
” / “ ” button.
Menu Background
By pressing
Transparency level is adjustedbypressing “
button.
/
button,select MenuBackground.
” / “ ”
Menu Timeout
By pressing
Press
sec, 30 sec or 60 sec.
/
button, select Menu Timeout.
” / “ ” buttontochangemenutimeout to 15
Teletext Language
By pressing
Press “
to West, East, Turk/Gre,Cyrillic, or Arabic.
/
button,selectTeletext Language.
” / “ ” button to change Teletext Language
Default Zoom
Defaultzoom isafeaturethatprovidesthezoom mode
of the TV set to be switched to the selected default
zoommode(Panoramic,4:3 ,14:9zoom,16:9)in case
no WSS or 4:3 signal by end-user.
By pressing
can set Default Zoom to Panoramic, 4:3, 14:9
Zoom or 16:9 by pressing
/
button, selectDefault Zoom. Youou
/
button.
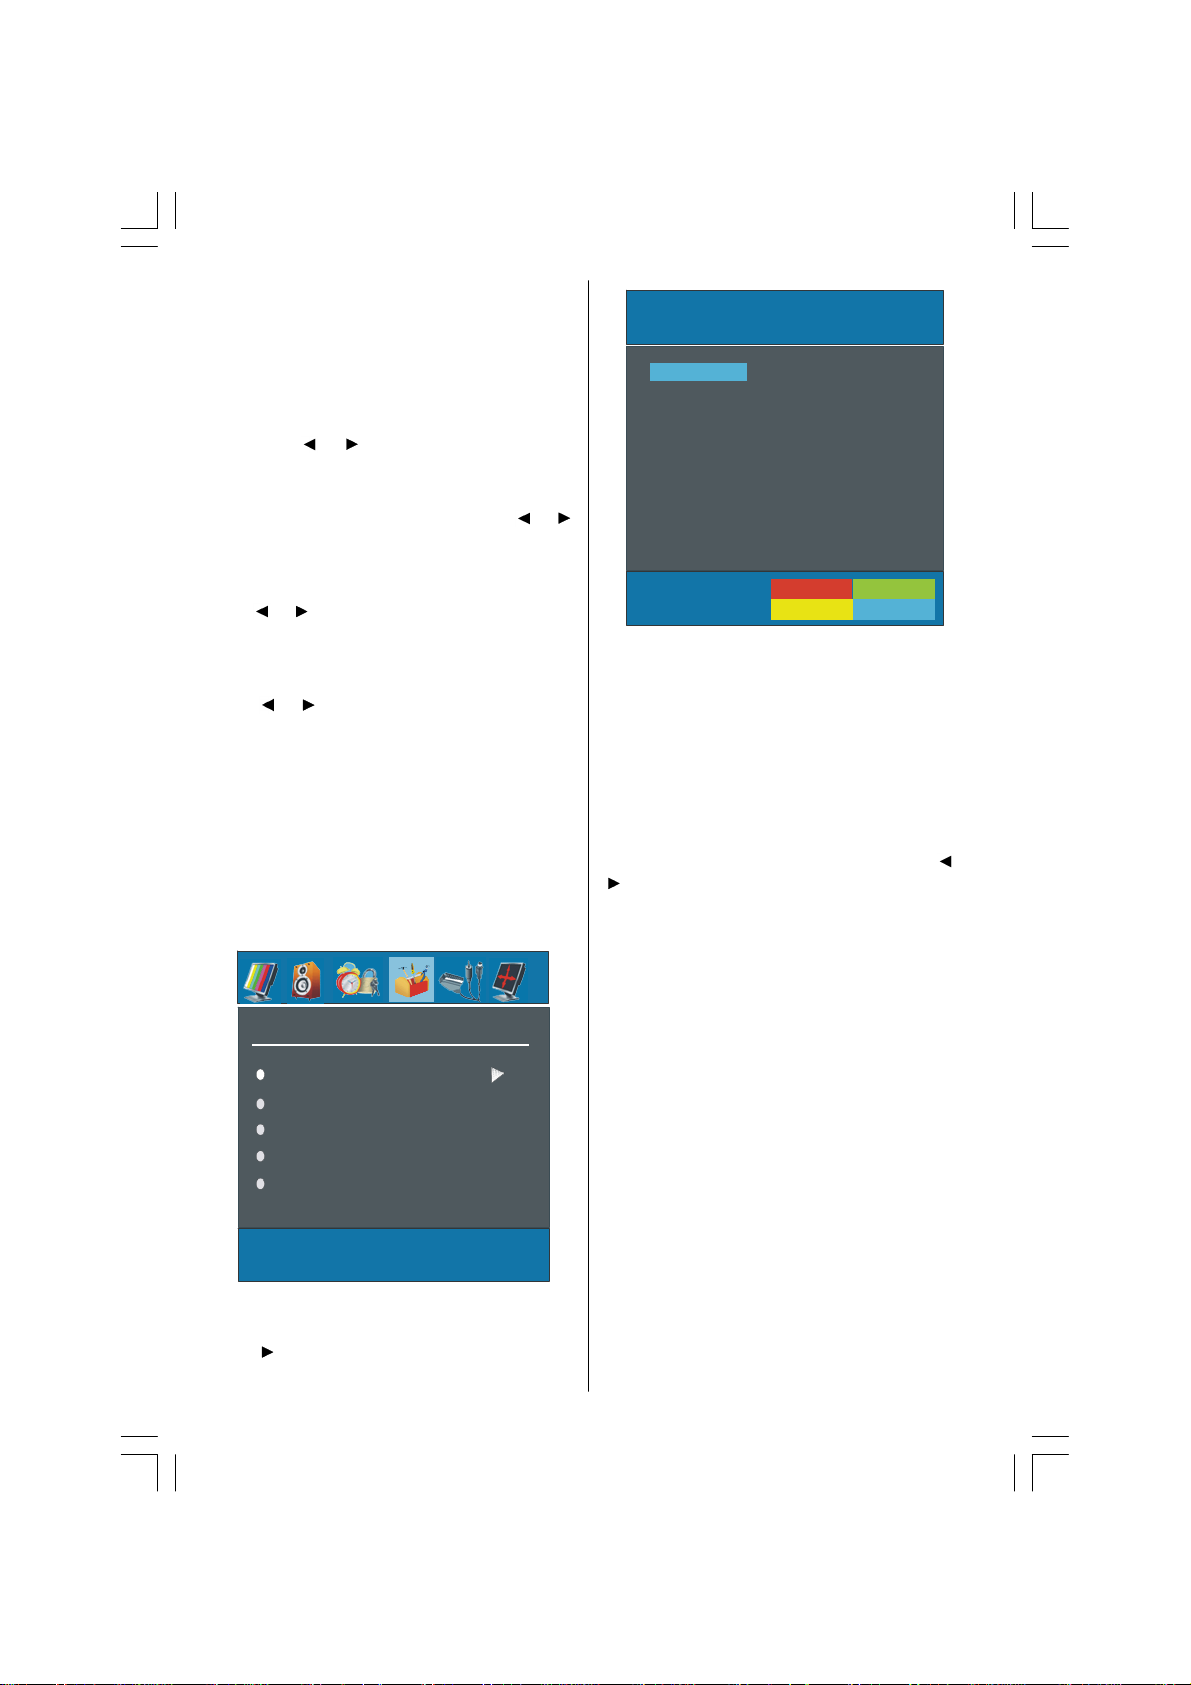
Install Menu
Program Table
Program
Band
Channel
Colour System
Program Table
P01 BBC 1
P05 CH 4
P07 C 04
P08 C 07
P09 C 12
P10 C 15
By movingthecursor in fourdirections you can reach
20 programmesinthesamepage. Youcanscroll the
pages up or downbypressing the navigation buttons
to seeallthe programmesinTV mode (excepttheAV
mode).By cursoraction,programmeselectionis done
automatically.
Name:
To change the nameof a decidedprogramme, select
the programme and press theREDbutton.
Thefirst letterof theselectedname willbe highlighted.
/
Press
” button to select the other letters. By pressing
“
the RED button,youcanstore the name.
button to change that letter and “ ” /
Insert:
Select the programme which you want to insert by
navigationbuttons.Press theGREENbutton. Bynavi-
gation buttons move the selected programme to the
decidedprogramme spaceandpresstheGREENbut-
ton again.
Delete:
To delete a programme, press the YELLOW button.
Pressing the YELLOW button again erases the se-
lected programme from the programme list, and the
programmes below shift one up.
APS (Auto Programming System)
When you press the BLUE button for APS,Auto Programming System Menuwillappear on the Screen.
P11 S 18
P12 S 29
P13 S 31
P14 S 33
P15 S 34
P16 S 35
P17 S 36
P18 S 37
P19 S 40
P20 C 21
Name
Delete
Insert
Program Table
By pressing
Press “
ENG-32720W-1055UK-32 INCH 17MB22-(WO SVHS-WO PIP-WO PC)-5010XXXX.P65 10.05.2007, 14:218
/
button, select Program Table.
” to displayProgram Table.
- 8 -
Page 9
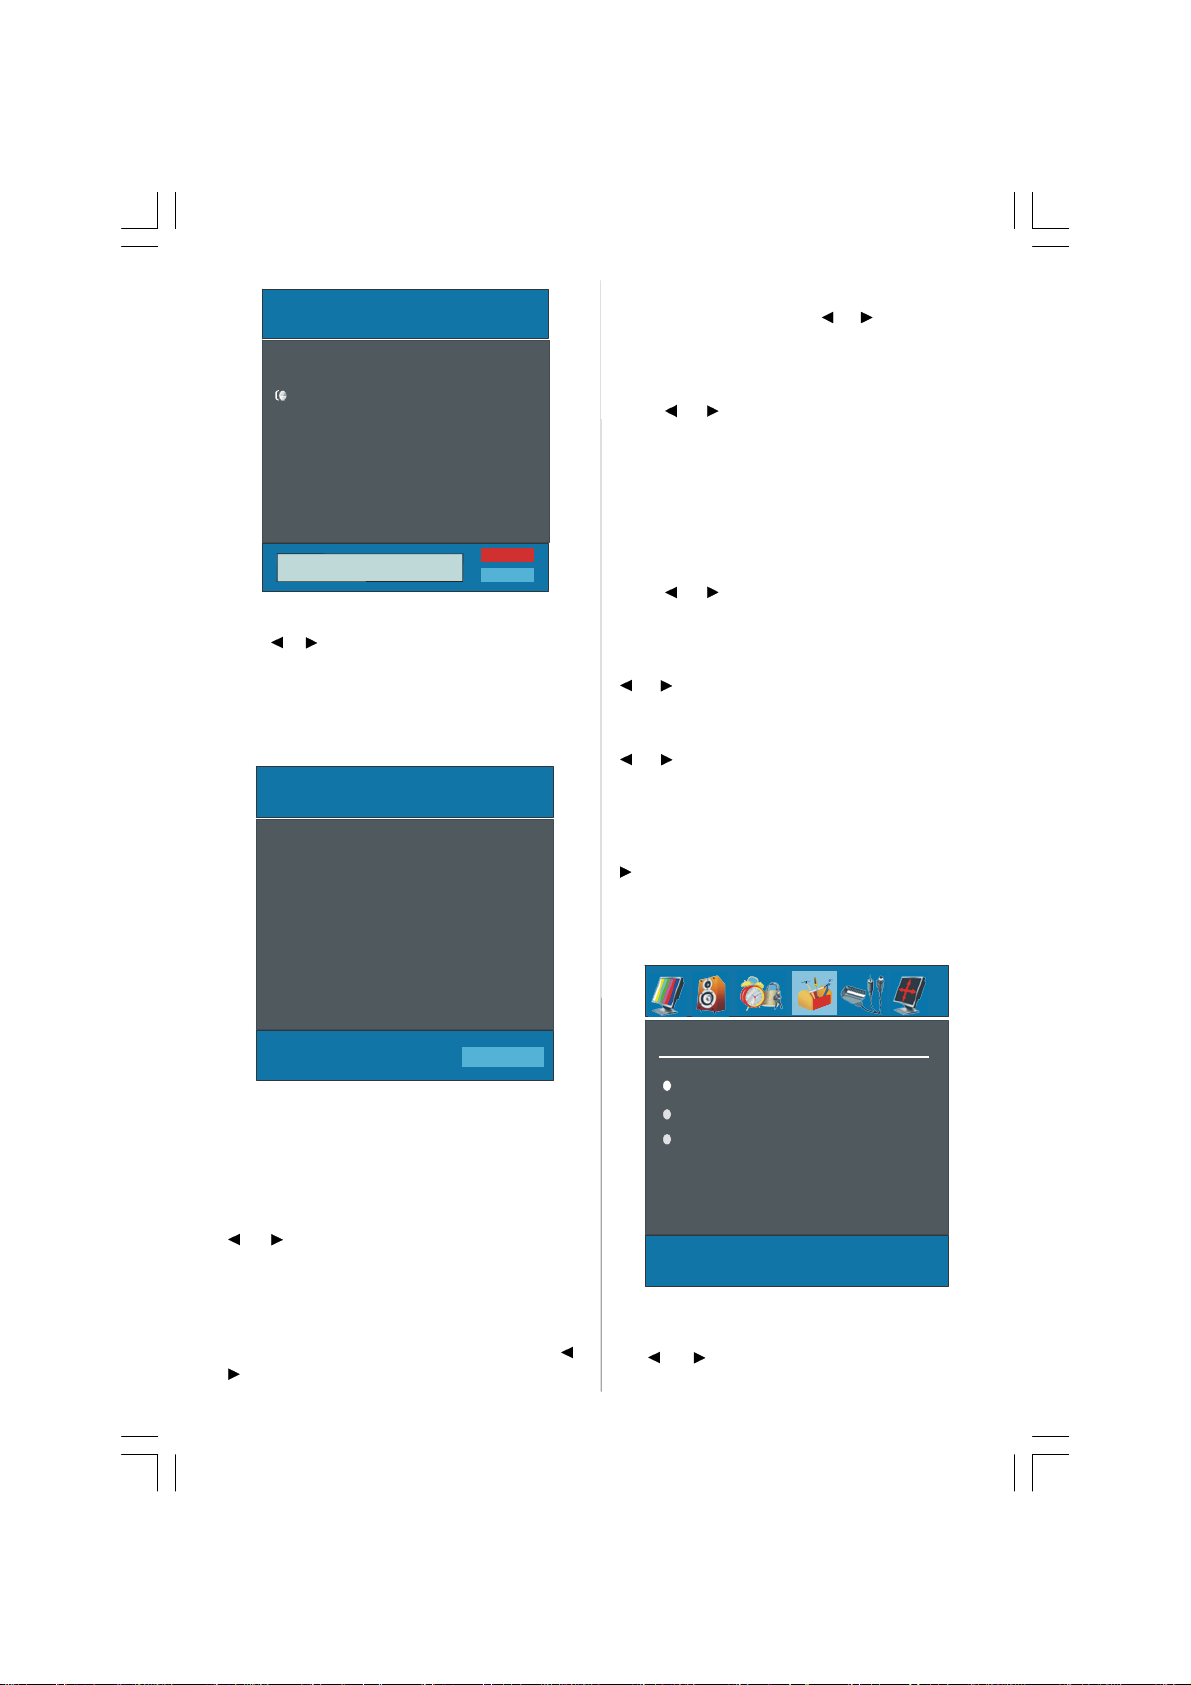
Country
All Prestored Programs
Cancel
WARNING!
will be deleted
A.P.S. (Auto Programming System) Country
Press / button to select your country. If you
want to exit from A.P.S. function, press the “BLUE”
button.
When you press OK or RED button for startingAPS,
all stored programs will be erased and the following
screen will be displayed:
APS is running...
UK
63.75 MHz
6%
Channel
Channel can be changed by “ ” / “ ” button or Digit
Buttons.
Colour System
By pressing
Press “
toPAL,SECAM,PAL60orAUTO.
IfSound SystemissettoI, SECAMis notavailablefor
theColour System.
Note: In EXT mode, you can choose NTSC 3.58 and
NTSC 4.43 as well.
/
button, select Colour System.
” / “ ” button to change the colour system
SoundSystem
By pressing
Press “
toBG, I, L,L’,DK.
/
button, select Sound System.
” / “ ” button to change the sound system
Fine Tune
By pressing
” / “ ” button to adjust the tuning.
“
/
button, select Fine Tune. Press
Search
By pressing
” / “ ” button to start program searching.You can
“
alsoenterthedesiredfrequencyviadigitbuttonswhen
searchitemishighlighted.
/
button, select Search. Press
Store
By pressing
”or“OK” buttontostorethe adjustments.“Stored...”
“
will be displayed on the screen.
/
button, select Store. Press
Install menu in AV modes
The following screen appears in the install menu:
P 03 - C 04
63.75 MHz
Whenever you press the “BLUE” button, A.P.S. func-
tion stopsand Program Tableappears on the screen.
If you wait until the end of A.P.S., Program Table is
displayed with the programmes found and located.
Program
By pressing
” / “ button to select the program number. Youou
“
can also enter a number via digit buttons on the re-
motecontrol.Thereare100programstoragebetween
0 and 99.
/
button, select Program. Press
Band
Band can be selected either “C” or “S” by press“ ” /
button.
“
ENG-32720W-1055UK-32 INCH 17MB22-(WO SVHS-WO PIP-WO PC)-5010XXXX.P65 10.05.2007, 14:219
Colour System
By pressing
” / “ ” button, you can change the colour
ing “
- 9 -
Colour System
VCR
Store
/
select Colour System. By press-
Page 10
system to PAL, SECAM, PAL 60, NTSC 4,43, NTSC
3,58 or AUTO.
VC R
By pressing/
” button, you can set the VCR to ON or OFF..
“
select VCR. By pressing “ ” /
Store
By pressing/
”or“OK” buttontostorethe adjustments.“Stored...”
“
will be displayed on the screen.
button, select Store. Press
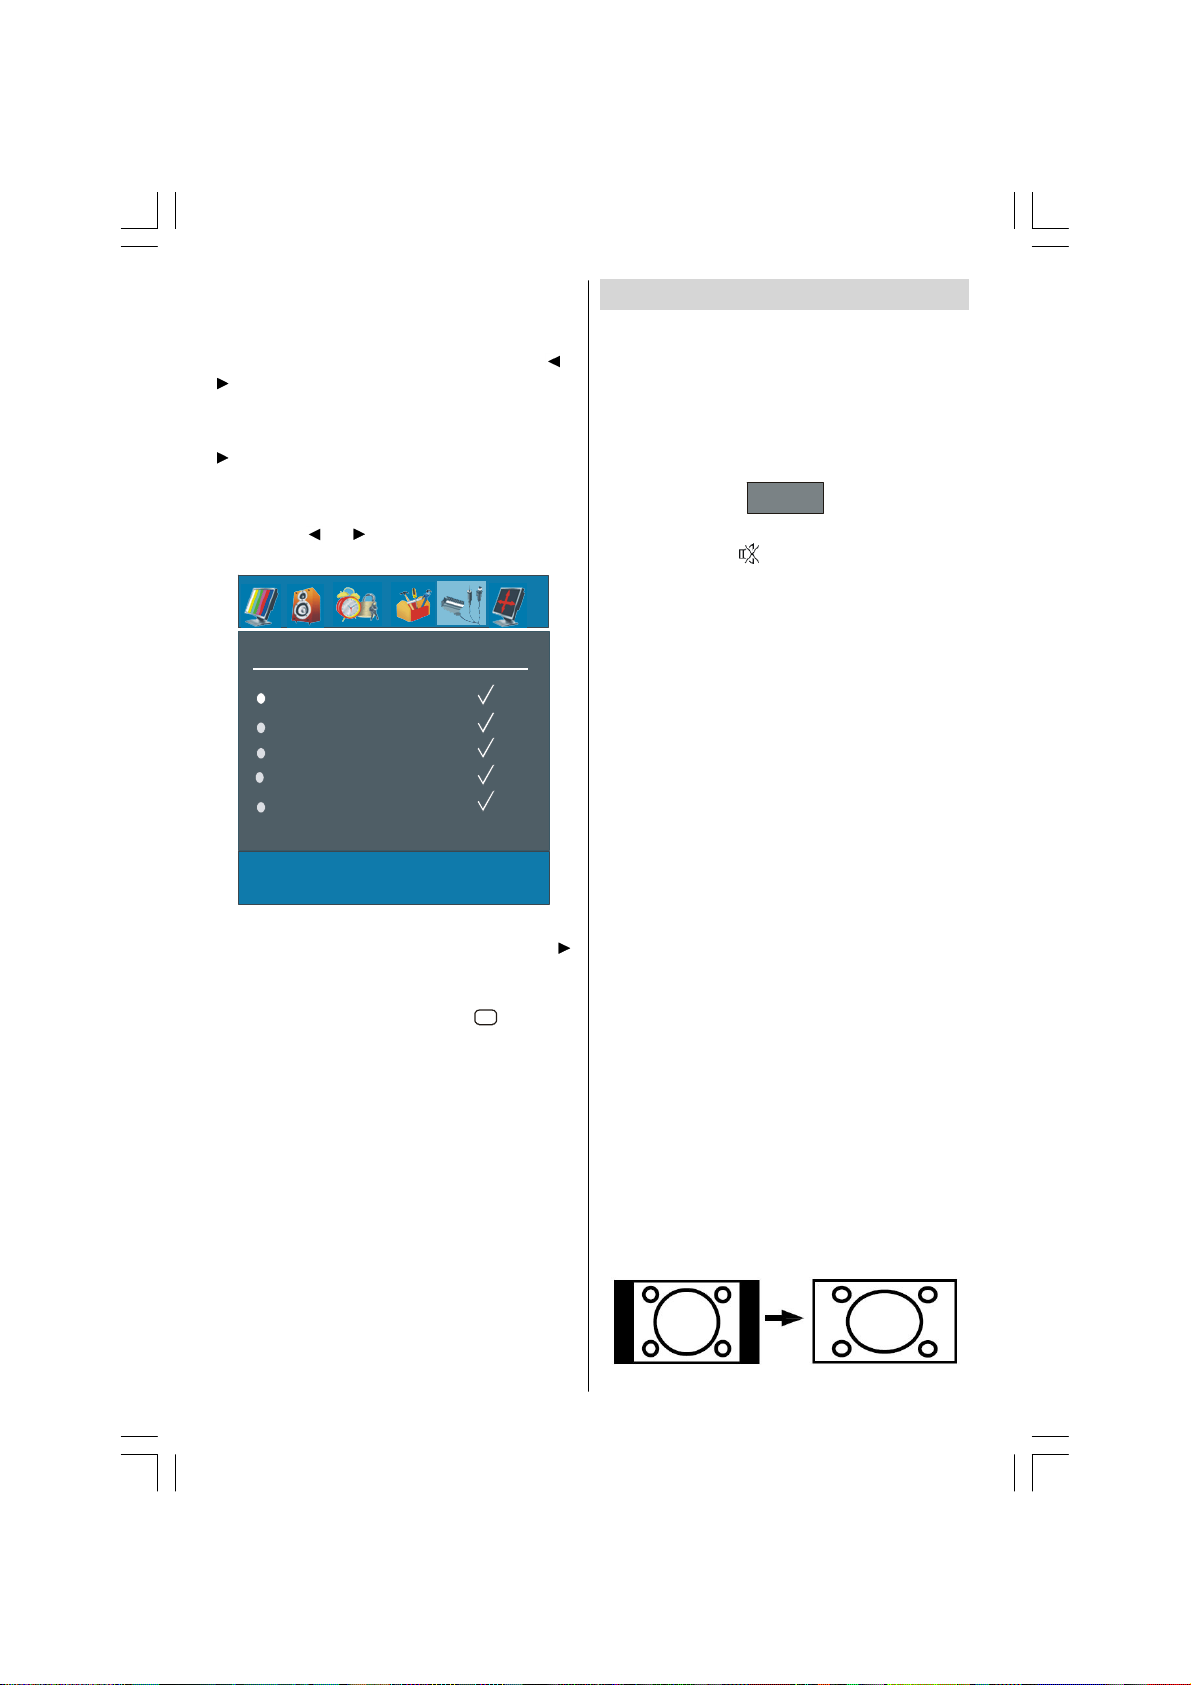
Source menu
By pressing “ ” / “ ” button, select the fifth icon.
Source menu appears on the screen.
SOURCE
TV
EXT-1
EXT-2
FAV
HDMI
In source menu, highlight a source by pressing
button and switch to that mode by pressing “ ”
TV,EXT-1,EXT-2,FAV,HDMIandYPBPR.
Note: You can mark desired source options by press-
ing OK button. Theref or e, when
pressed, only the marked source options will be avail-
able.
AV
but ton is
Other Features
TV Status
Pr ogr amme Nu m ber, Pro g ram me Name,
Sound Indicator and Zoom Mode are displayed
on the screen when a new programme is entered.
Mute Indicator
It is placed in the upper side of the screen when
enabled.
Mute
To cancel mute, there are two alternatives; the first
one is pressing the
increasing the volume level.
AV Modes
By pressing the AV button you can switch yourTV to
AV modes (except being in teletext). Pressing this
button consecutively will switch the TV in one of the
optional AV modes: TV, EXT1, EXT2, FAV, HDMI or
YPBPR.
Personal Preference
BypressingPP button, youmaychangePictureMode
settings.
Zoom Modes
Zoom mode can be changed by pressing the WIDE
button. You can change the screen size according to
the pictureaspect ratio.Selecttheoptimum one from
the following ZOOM modes.
Note:
/
• In YPBPR and HDMI modes, while in 720p-1080i
resolutions, only FULL mode is available.
Auto:
When a WSS (Wide Screen Signalling) signal,
which shows the aspect ratio of the picture, is in-
cluded in the broadcast signal or the signal from an
external device, the TV automatically changes the
ZOOM mode according to the WSS signal.
• When the AUTO mode does not function correctly
due to poor WSS signal qualityorwhen youwant to
changethe ZOOM mode, changeto anotherZOOM
modemanually.
Zoom:
This uniformly stretches the left and right sides of a
normal picture (4:3 aspect ratio) to fill the wide TV
screen.
button and the second one is
ENG-32720W-1055UK-32 INCH 17MB22-(WO SVHS-WO PIP-WO PC)-5010XXXX.P65 10.05.2007, 14:2210
- 10-
Page 11
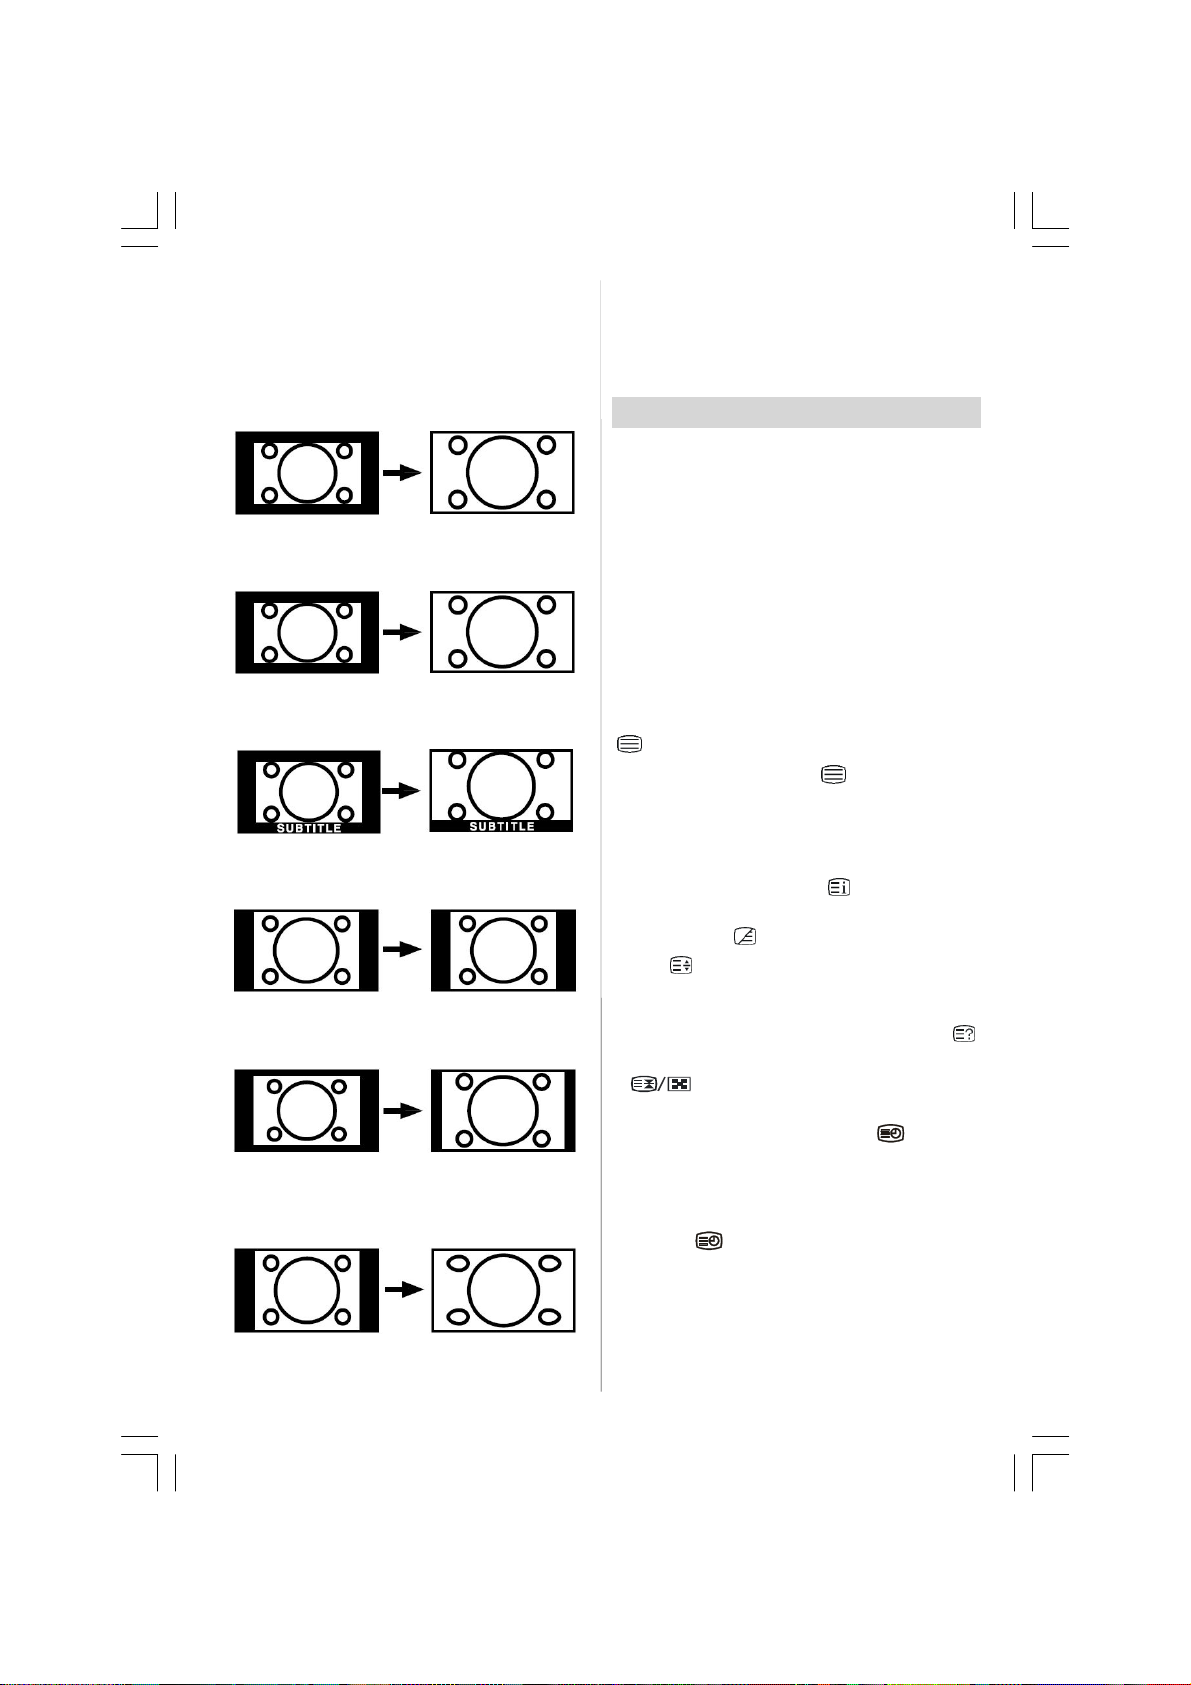
• For 16:9 aspect ratio pictures that have been
squeezed into a normal picture (4:3 aspect ratio),
usetheFullmodetorestorethe picture toits original
shape.
Cinema:
This zooms up the wide picture (16:9 aspect ratio) to
the full screen.
16:9Zoom:
This zooms up the wide picture (16:9 aspect ratio) to
the full screen.
Subtitle:
This zooms up the wide picture (16:9 aspect ratio)
with subtitles to the full screen.
4:3
Use to viewanormal picture (4:3aspect ratio) as this
is its original shape.
14:9Zoom:
This zooms up the wide picture (14:9 aspect ratio) to
the upper and lower limits of the screen.
Panoramic:
This stretches the left and right sides of a normal
picture (4:3 aspect ratio) to fill the screen, without
making the picture appear unnatural.
Freeze Picture
You can freeze the picture on the screen by pressing
the “OK” button.
Note: This feature will be unavailable to be used
while watching YPbPr and HDMI sources.
Teletext
You candisplayTeletextinformationonyour TV. Each
channel whichbroadcasts teletext, transmits a page
with information on how to use its teletext system
(usually page 100). Depending on the TV channel,
teletextistransmittedindifferentsystems.Thecolours
used in the options line correspond with the colour
buttons of your remote control.
• Ensure that the TV is receiving a good signal, or
some text errors may occur.
• When four coloured items appear at the bottom of
the text page,Fasttext is available.Fasttext allows
you to access pages quickly and easily.Press the
corresponding coloured button to access the page.
Special Teletext Functions
“ ” To Display a page of text.
The view text services press “
viewing pressagain.Programmescannot bechanged
until text is cancelled.
• To select a page, press the number buttons or programbuttons(P+,P-).
• To select index page, press “
•To select superimposed over the programme on the
screen, press “
•Press “
again to enlarge the bottom half of the page.Press
again to revert normal size.
• To discover solutions on quizandgames press “
•Attimesit is convenient to hold a pageoftext.Press
“
screen until the button pressed again.
• To select subcode pages press “
pages are subsections of long Teletext pages that
can only be displayed on the screen one section at
atime.
• Time information will be displayed on screen after
pressing “
have teletext transmission, no information will be
displayed.
”oncetoenlargetop halfof thepage,press
” to hold a page. The page willbeheldon
”.
” button.If the programme does not
”. To return normal
” button.
”.Subcode
”
The top and bottom of the picture are slightly cut off.
ENG-32720W-1055UK-32 INCH 17MB22-(WO SVHS-WO PIP-WO PC)-5010XXXX.P65 10.05.2007, 14:2211
- 11-
Page 12

• When ” ” buttonis pressedwhile inteletextmode,
DTV
the screen will be splitted into two windows, one
displaying the teletext and the other displaying the
current channel. Press the “
TV
“
• To exit text press “
Note: If the signal becomes insufficient, the teletext
mode will be quitted.
” button to exit from teletext.
”.
” button or
Fastext
YourTV supports the500pageTeletextsystem.When
the page number of any of the 500 pages in memory
is entered, the system will not search for the requested page; instead it will display the page auto-
matically. If the requested pageis not in memory, the
system will search for the requested page number
andsave the500pages includingthe requested page
into memory after findingit.
• Press the
forward one page at a time.
• Press the
backward one page at a time.
button to move the Teletext screen
button to move the Teletext screen
ForFastext
The subject-heading for the information may have a
particular colour.
• Press an appropriate RED, GREEN, YELLOW or
BLUE button in order to reach the relevant page
quickly.
TOP text
TOPtextmodeofoperationwillbeactivatedautomatically according to the transmission.
• If TOP text transmission is present, colour coded
buttons will appear in status row.
• If TOP text transmission is not present, status row
will not appear.
Thesubject-heading forinformationmaybe locatedin
colored box.
In Top mode the“-P/CH” or “P/CH+” commands will
request the next or previous page respectively. If
TOP text transmissionis not available, in case of operation of these commands, wraparound occurs. For
example page 100 appears to be one greater than
page 199.
Connect Peripheral Equipment
High Definition
Your LCD Television is capable of displaying High
Definition pictures from devices such as a High Defi-
nitionSatelliteReceiveror DVDPlayer. Thesedevices
must be connected via the HDMI socket or Compo-
nent Socket. These sockets can accept either 720p
or 1080i signals.
Note: Whenitis desiredtowatch HDMIsource witha
DVI to HDMI cable; in order to enable audio, Audio
Input (which is located at the left side of the antenna
input)isto be usedto getDVI device’s audio signals.
Via The Scart
The TV has 2 Scart sockets. If you want to connect
peripherals (e.g. video, decoder, etc.) which have
Scart sockets to the TV, you can use SCART socket
of the TV.
Note: If an external device is connected via the Scart
sockets, the TV will automatically switch to AV mode.
If both sockets areemployed at the sime time, SCART
1 becomes the preferential.
Via Aerial Input
If the device you want to connect does not have a
Scart socket, youshould connect it to theAerial input
of the TV.
If the VCR is connected via Aerial input, it is
suggested to use Programme 0.
Decoder
If you are subscribed to cable TV offers, the
organisation will supplyyou a corresponding decoder
unit to allow the programmes to be unscrambled.
For further information consult your dealer.
Connect a decoder with an aerial socket to
the TV
• Connect the aerial cable.
Connect a decoder without an aerial socket
to the TV
• Connect the decoder to the EXTERNAL socket of
TV with a RCA cable. Through the SCART/RCA
socket of the decoder, you may attain a better display resolution.
TV And Video Recorder
• Connect the aerial cables.
Betterpicture quality can be obtained if you also connect a Scart cable to SCART sockets.
Playback NTSC
• ConnectNTSC VCR playertoa Scartsocket of the
TV.
- 12-
ENG-32720W-1055UK-32 INCH 17MB22-(WO SVHS-WO PIP-WO PC)-5010XXXX.P65 10.05.2007, 14:2212
Page 13

Then, press the “AV” button to select EXT1 or EXT2.
Copy Facility
Source selection for VCR recording.
• Select Feature menu.
• Select SCART 2 Out by pressing
• For copying thepicture that comes from the tuner,
selectSCART1.
/
button.
Camera And Camcorder
To Connect ToAV Input
Connectyour cameraorcamcorder toAV inputofthe
TV.
• Connect your equipment to the TV via VIDEO (yellow), AUDIO R (red) and AUDIO L (white) inputs.
You must connect the jacks into the input with the
same colour.
Connect The Decoder To The Video
Recorder
Some video recorders have a special Scart socket
for decoder.
• Connect a Scart cable to the Scart socket of your
decoder and to the special Scart socket of your
video recorder. Refer to the booklet of your video
recorder.
Connecting Headphones (optional)
Use the stereo headphone socket of the TV, to connect headphones.
Note: If you want to connect more equipment to your
TV, consult your dealer.)
Audio Lineout
To connect the external speakers to your TV,use the
HeadphoneLine Out oftheTV.Additionally,turn “Line
out” setting on in the “Sound Menu”.
Note: While watching YPbPr sources, Lineout selec-
tion could only be the current source.
Tips
Care Of The Screen
Clean the screen with a slightly damp, soft cloth. Do
not use abrasive solvents as they may damage the
TV screen coating layer.
Poor Picture
Haveyou selectedthecorrect TV system? IsyourTV
set or house aerial located too close to non-earthed
audioequipment or neon lights, etc.?
Mountains or high buildings can cause double pictures or ghost images. Sometimes you can improve
the picture quality by changing the direction of the
aerial.
Is the picture or Teletext unrecognisable? Check if
you have entered the correct frequency.
The picture quality may degrade when two peripherals areconnectedtotheTV at the same time.Insuch
a case, disconnect one of the peripherals.
No Picture
Is the aerial connected properly? Are the plugs connected tightly to the aerial socket? Is the aerial cable
damaged? Are suitable plugs used to connect the
aerial? If you are in doubt, consult your dealer.
No Picture means that your TV is not receiving a
transmission. Have you selected the correct button
on the remote control?Try once more.
Sound
You can not hear any sound. Did you perhaps interrupt the sound, pressing the
Soundiscomingfrom only one ofthespeakers.Is the
balance set to one extreme? See Sound menu.
Remote Control
Your TV no longer responds to the remote control.
Perhaps the batteries are exhausted. If so you can
still use the local buttons at the bottom of the TV.
button?
ENG-32720W-1055UK-32 INCH 17MB22-(WO SVHS-WO PIP-WO PC)-5010XXXX.P65 10.05.2007, 14:2213
- 13-
Page 14
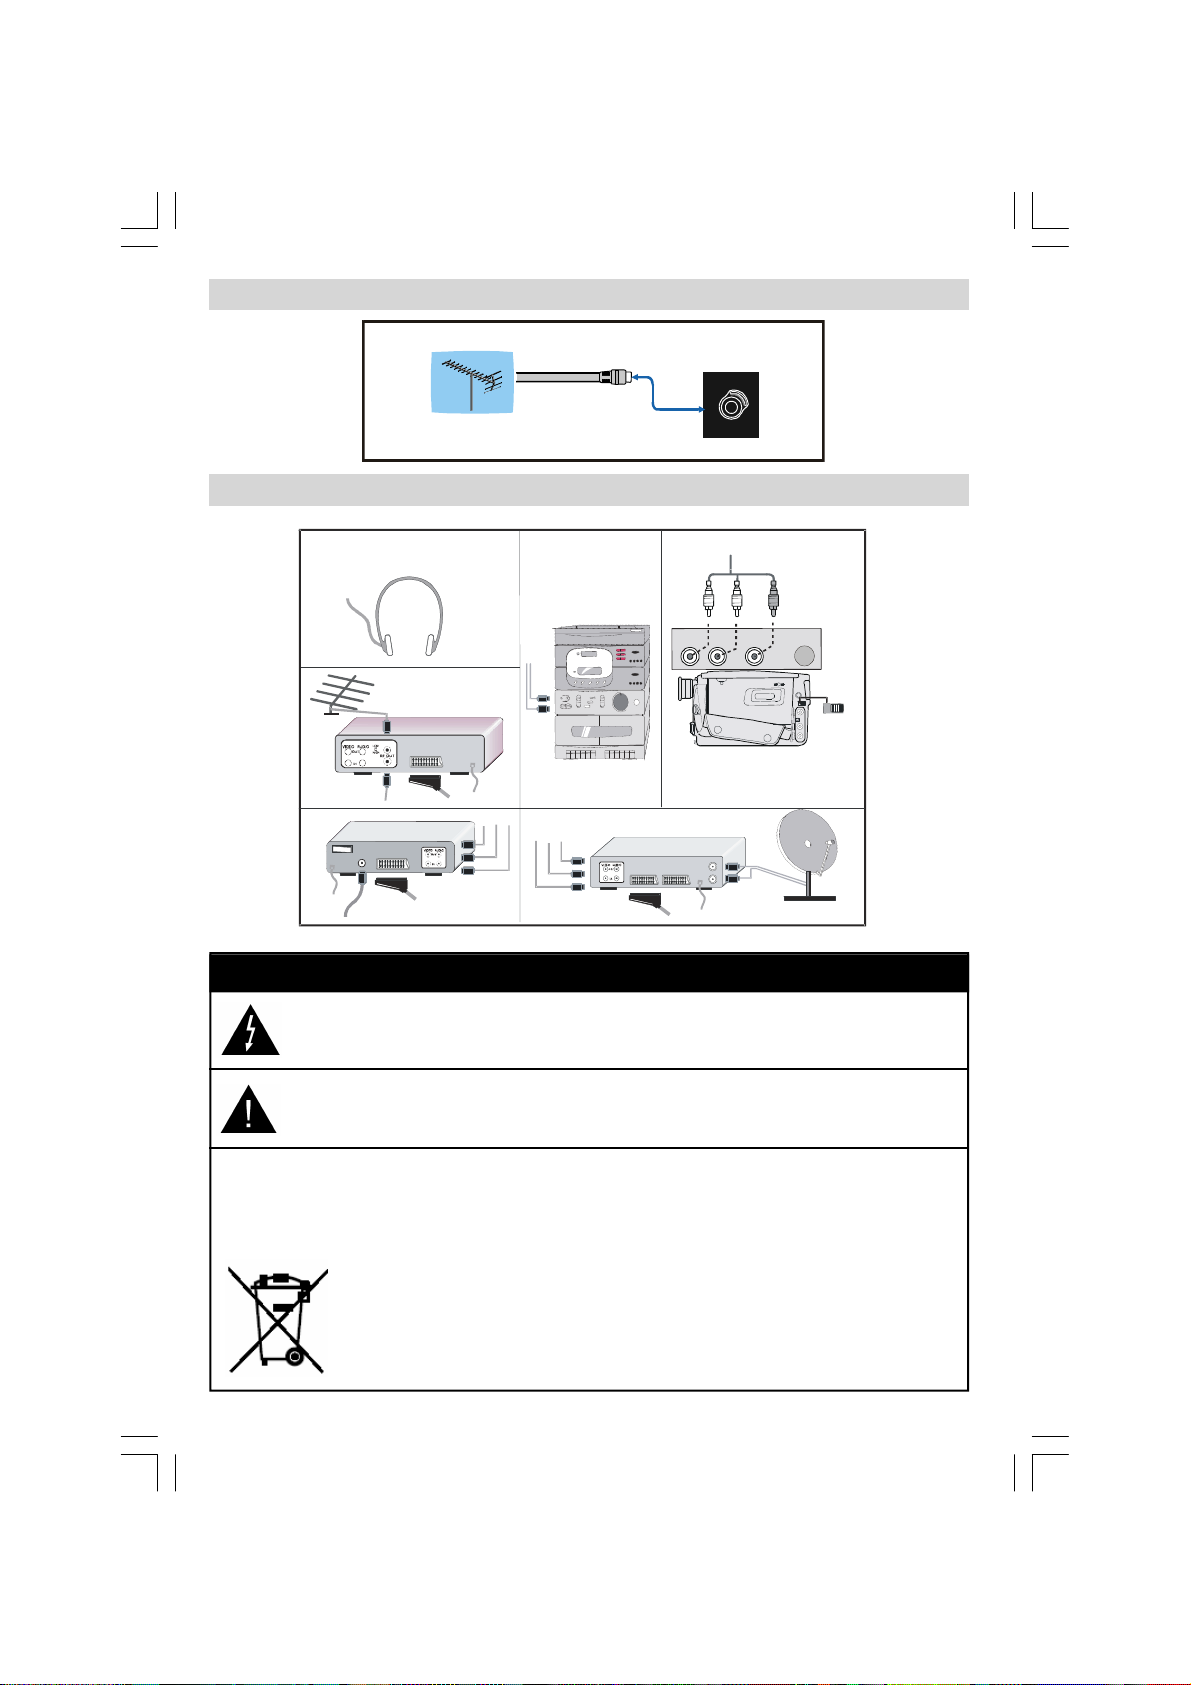
Appendix A: Aerial Connection
AUDIO IN
OUT
SATELLITE RECEIVER
Outdoor Aerial Connection
Round 75 ohmcoaxial cable
Appendix B: Connect Peripheral Equipment
AUDIO
75
Rear of TV
(R)(L)
VIDEO IN
VIDEO
ANT.IN
CAMCORDER
IN
STB
ANTENNA
CAUTION
Thelightningflashwitharrowhead symbol,within anequilateraltriangle,is intendedto alert theuserto
the presence of un-insulated “dangerous voltage” within the products enclosure that may be of
sufficient magnitudeto constitute a risk of electricshock to the persons.
The exclamation point within an equilateral triangle is intend to alert the user to the presence of
important operating and maintenance (servicing) instructions in the literature accompanying the
appliance.
Correct disposal of this Product (Waste Electrical& ElectronicEquipment (WEEE)
The crossed out “Wheelie bin” is intended to show that this appliance must not be placed with ordinary
household waste at the end of its useful life. To prevent possibleharm to theenvironment or human health
from uncontrolled waste disposal, please keep separate from other household waste and recycle it
responsibly to promote the sustainable reuse of material resources.
Household users should contact either the retailer where you purchased the product, or
their local government office for details of where and how you can take this item for
environmentally safe re-cycling.
Business users should contact their supplier and check the terms and conditions of the
purchase contract. This product must not be mixed with other commercial wastes for
disposal
ENG-32720W-1055UK-32 INCH 17MB22-(WO SVHS-WO PIP-WO PC)-5010XXXX.P65 10.05.2007, 14:2214
Page 15
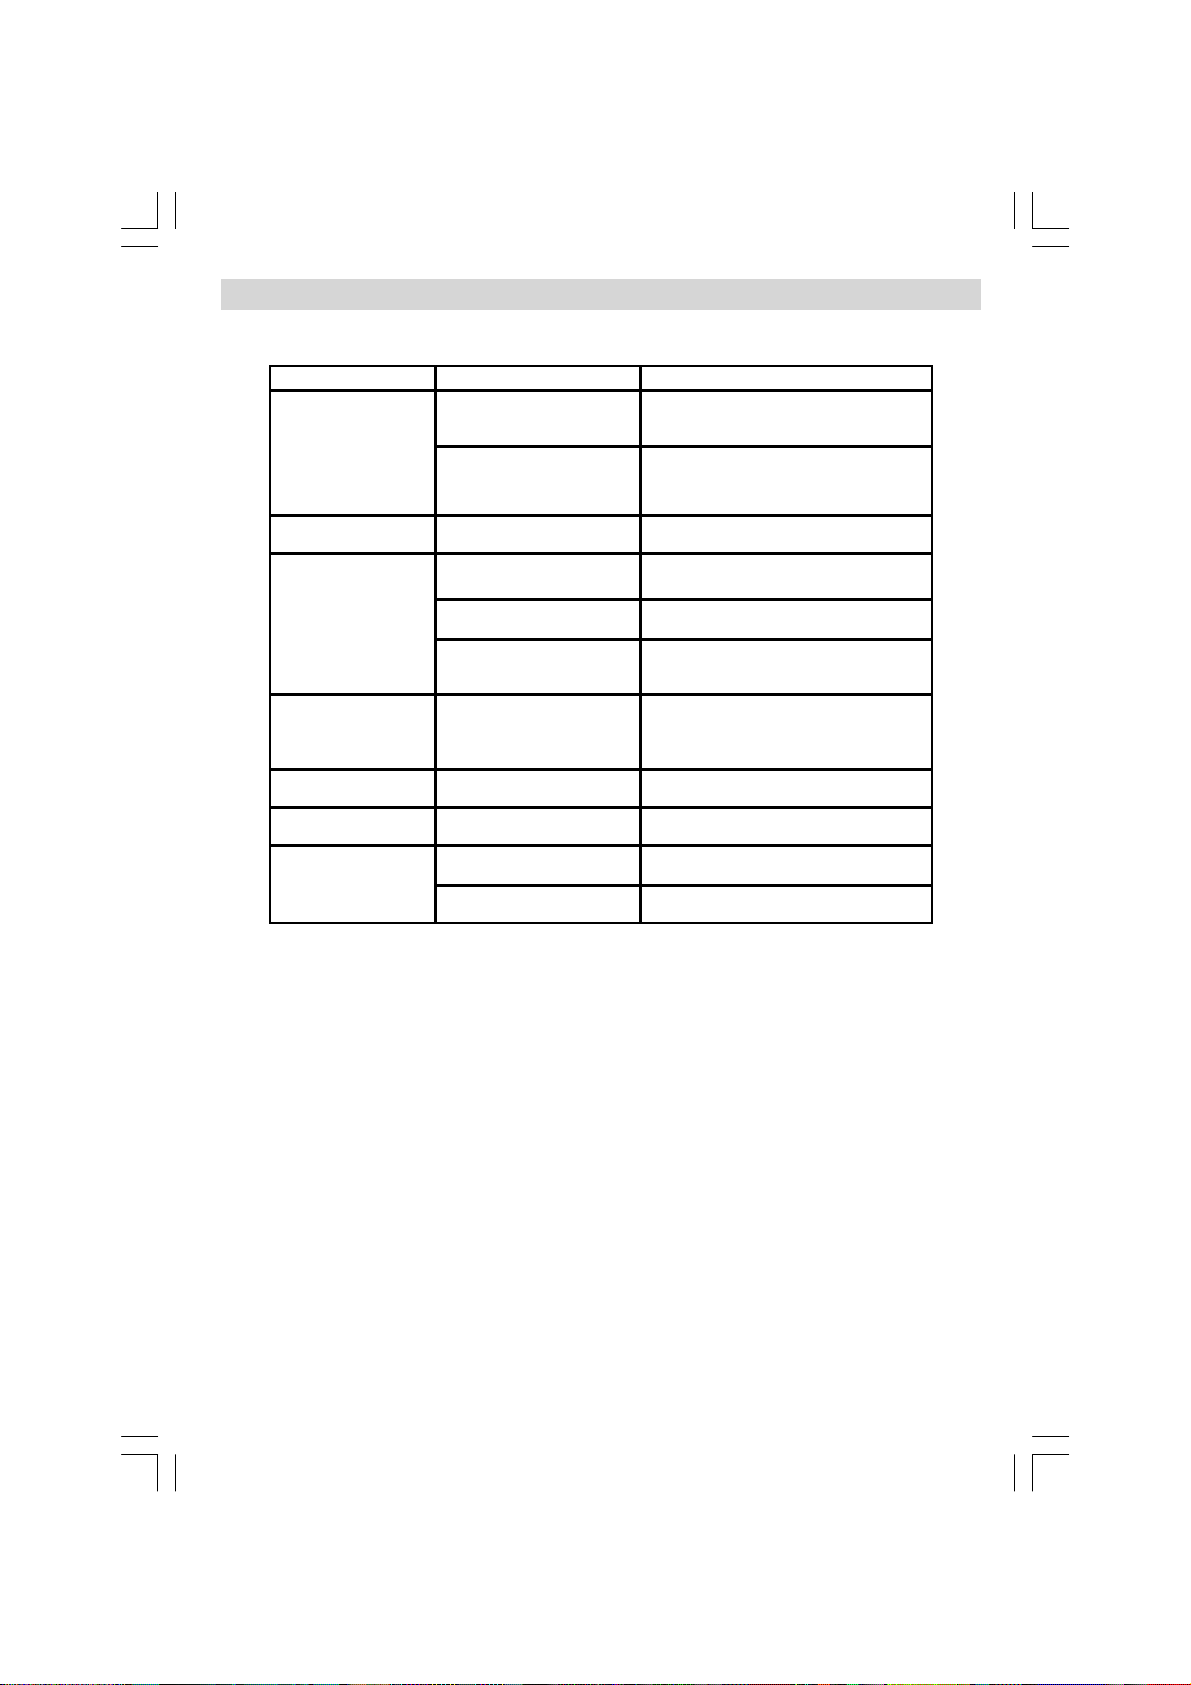
User Help Guide
Should you haveproblems with this Tv please consult the guide below before calling the Technical Help Line.
SYMPTOM POSSIBLE CAUSE REMEDY
Supply not connected to Tv.
DEAD No Power
TV not switched on.
Ensure the Tv is connected to the mains and
is turned on.
Press the button at the Rear of the Tv
adjacent to the mains input plug.
No Picture. Buttons lit
Blue
Screen lit but no picture
(No Signal) on screen.
Picture noisy or ghosting Poor aerial signal.
Teletex breaking up or
freezing
HDMI screen will not
hold picture size.
No Remote Control
functions
Tv in Standby.
Aerial not connected.
Tv not tuned in. See page 6 or 9 for tuning.
Incorrect input selected or
external source not turned on.
As above As above
HDMI Signal source
determines the picture size
Poor battery condition Replace batteries every 6 months.
Object blocking I/R signal to Tv Remove objects in I/R signal path.
Press the Standby button on the Tv or the
Remote Control
Connect a suitable aerial or cable
connection.
Press “Source” button to select required
signal source, and ensure external source is
turned on
Ensure the aerial and cable is in good
condition. If using an indoor aerial try an
external aerial. Note a Tv is only as good as
the signal it receives
Select picture size from HDMI source.
If you are still having difficulty please call the Technical help line. Ring 01422 263313(Normal rates apply).
Openinghours Mon-Fri8am-8pm. Sat 9 am - 4pm. Sun 11am - 4pm "Bank holidays as Sun".
Care of the screen. Do nothit or bangthescreen.Ithasover amillionpixels whichmay be damagedby missuse. Occasionally one or two pixels may turn on or off fully. This is normal and is not a warranty issue.
To clean the screen, do NOT use solvents or petrol based fluids. Use a soft dry cloth. For stubborn sticky
stains use a damp soft cloth with a dilute detergent.
ENG-32720W-1055UK-32 INCH 17MB22-(WO SVHS-WO PIP-WO PC)-5010XXXX.P65 10.05.2007, 14:2215
Page 16
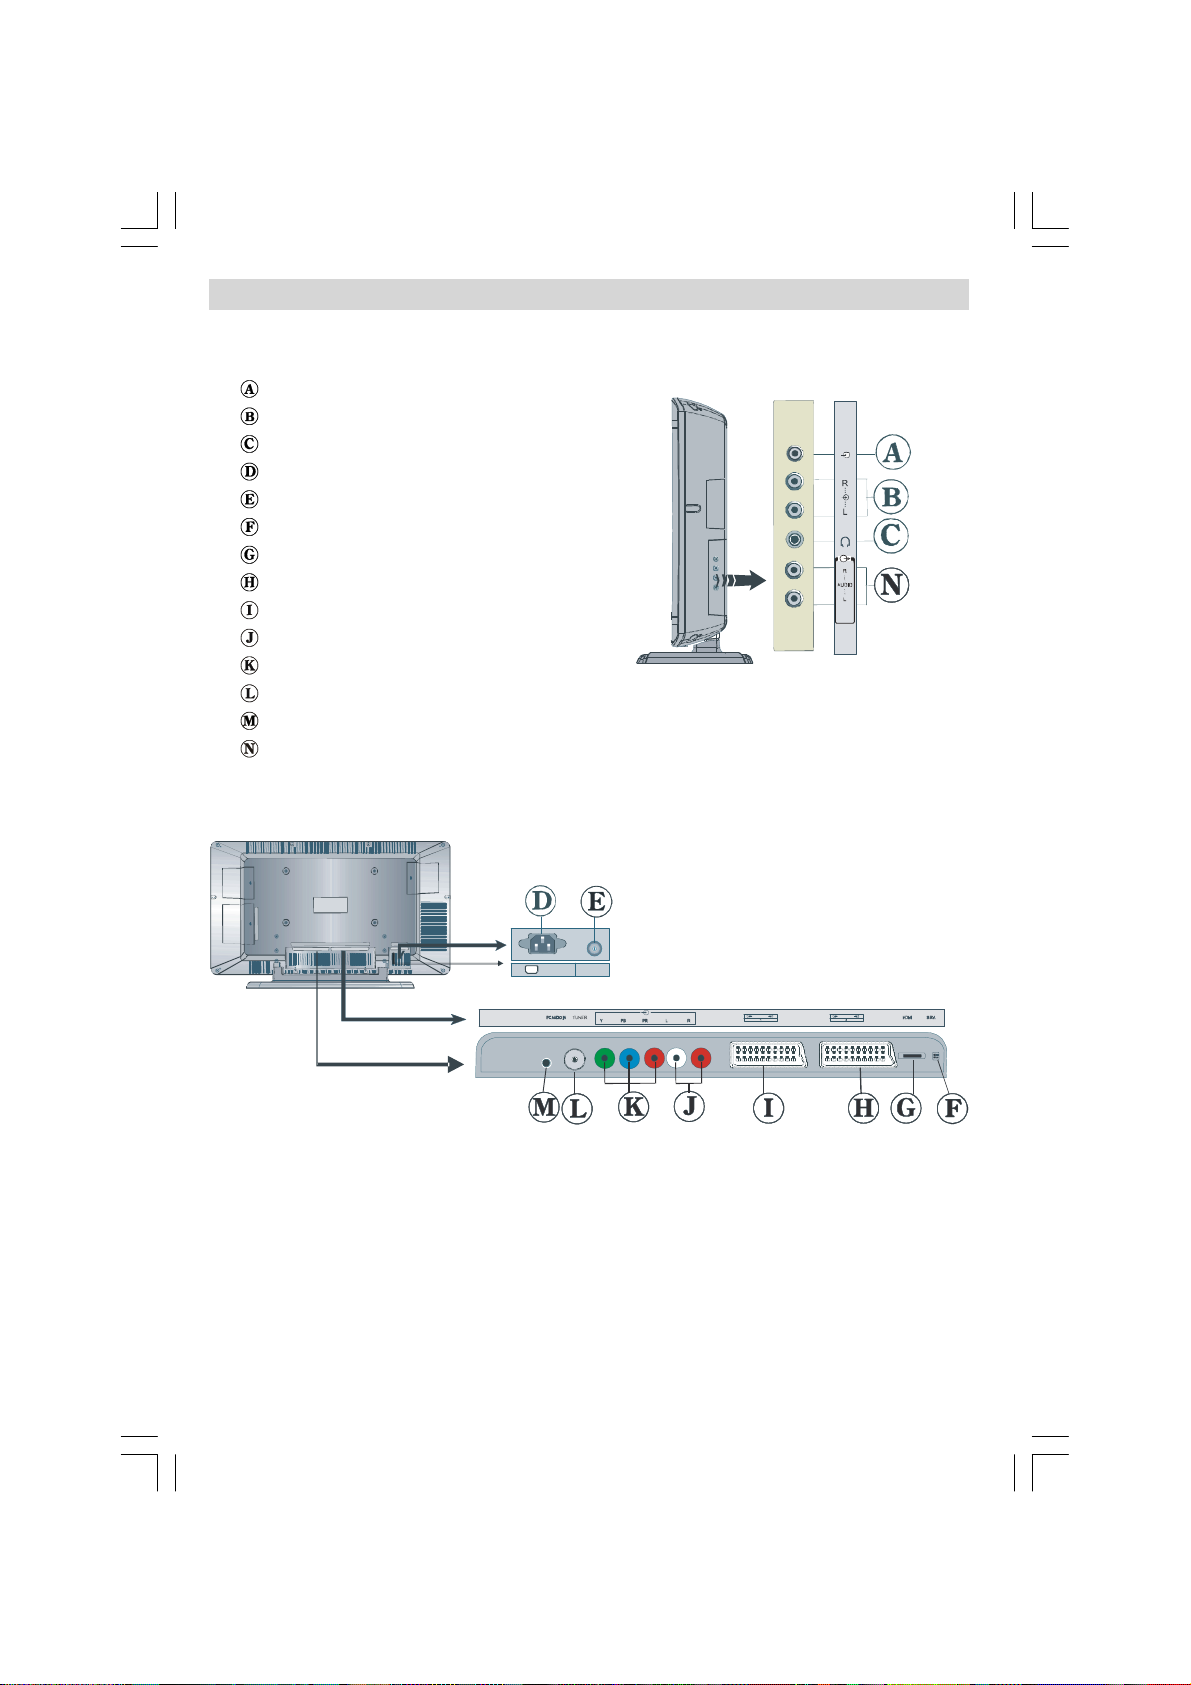
Peripheral Equipment Connections
Video Input
Audio Inputss
Headphone
PowerCord Input
Power On/Off Switch
For Service Use Only
HDMIInput
SCART2
SCART1
Component AudioInputss
Component Video Inputs(YPbPr)
RF
PCAudioInput
Audio Line Outss
ENG-32720W-1055UK-32 INCH 17MB22-(WO SVHS-WO PIP-WO PC)-5010XXXX.P65 10.05.2007, 14:2216
220V-240V
AC~50Hz
POWER
- 16-
Page 17
Important Instruction
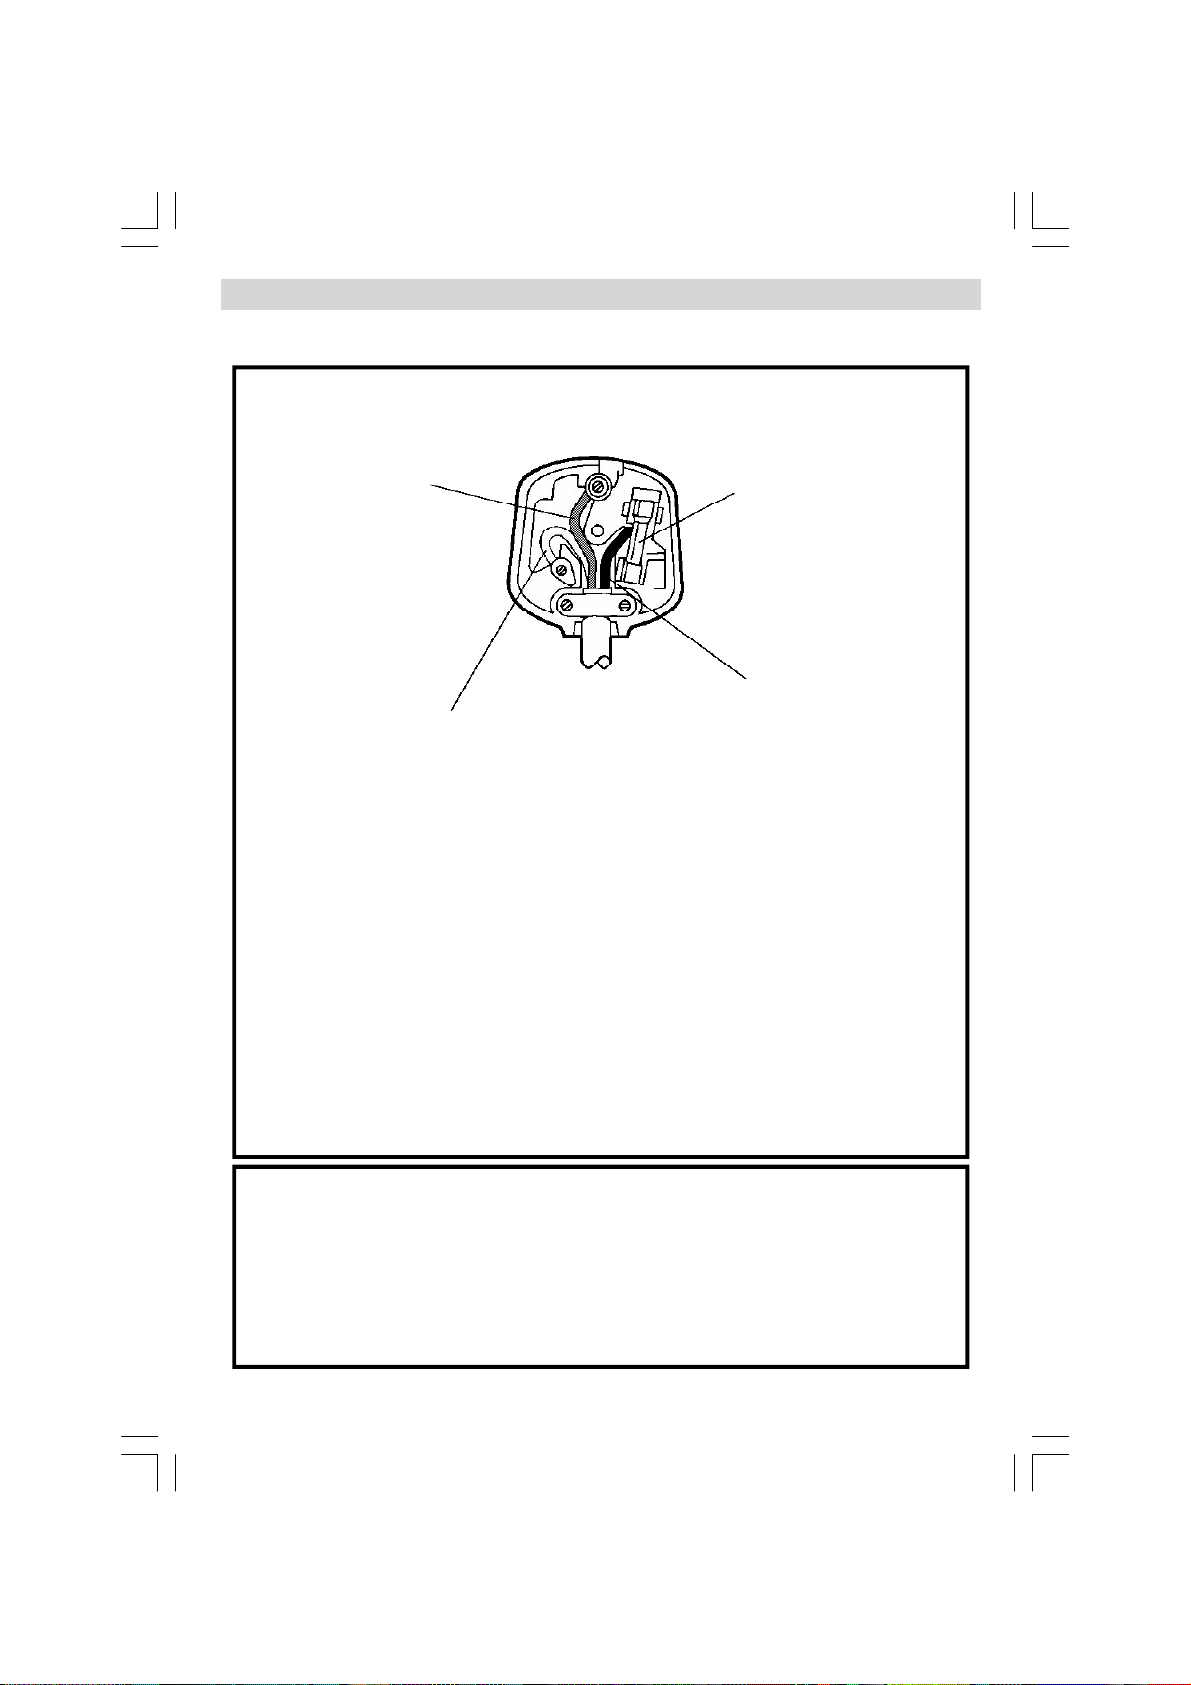
For your own safety read following instruction carefully before attempting to connect this unit to the mains
supply.
MAINS (AC) OPERATION
The wires in the mains lead are coloured in accordance with the following code :
GREEN
&
YELLOW
(Earth)
(if there is
earth cable)
BLUE
(Neutral)
IMPORTANT
For your safety, if the mains plug needs replacing, proceed as fallows:
Connect the Green/Yellow wire to the Centre Pin (EARTH).
Connect the Blue wire to the (N) terminal (this may be coloured blue).
Connect the Brown wire to the (L) terminal adjacent to the fuse (this may be coloured brown).
This appliance must have a 5A fuse fitted.
FUSE
BROWN
(Live)
CAUTION
TOPREVENTELECTRICSHOCKDISCONNECTFROMTHEMAINSBEFOREREMOVINGCOVER.NO
USERSERVICEABLEPARTSINSIDE.REFERSERVICINGTOQUALIFIEDSERVICEPERSONNEL.
SAFETY PRECAUTION
THISEQUIPMENTMUSTBEDISCONNECTEDFROMTHEMAINSWHENNOTINUSE.DONOTALLOW
THISUNITTOBEEXPOSEDTORAINORMOISTURE.
- 17-
ENG-32720W-1055UK-32 INCH 17MB22-(WO SVHS-WO PIP-WO PC)-5010XXXX.P65 10.05.2007, 14:2217
Page 18
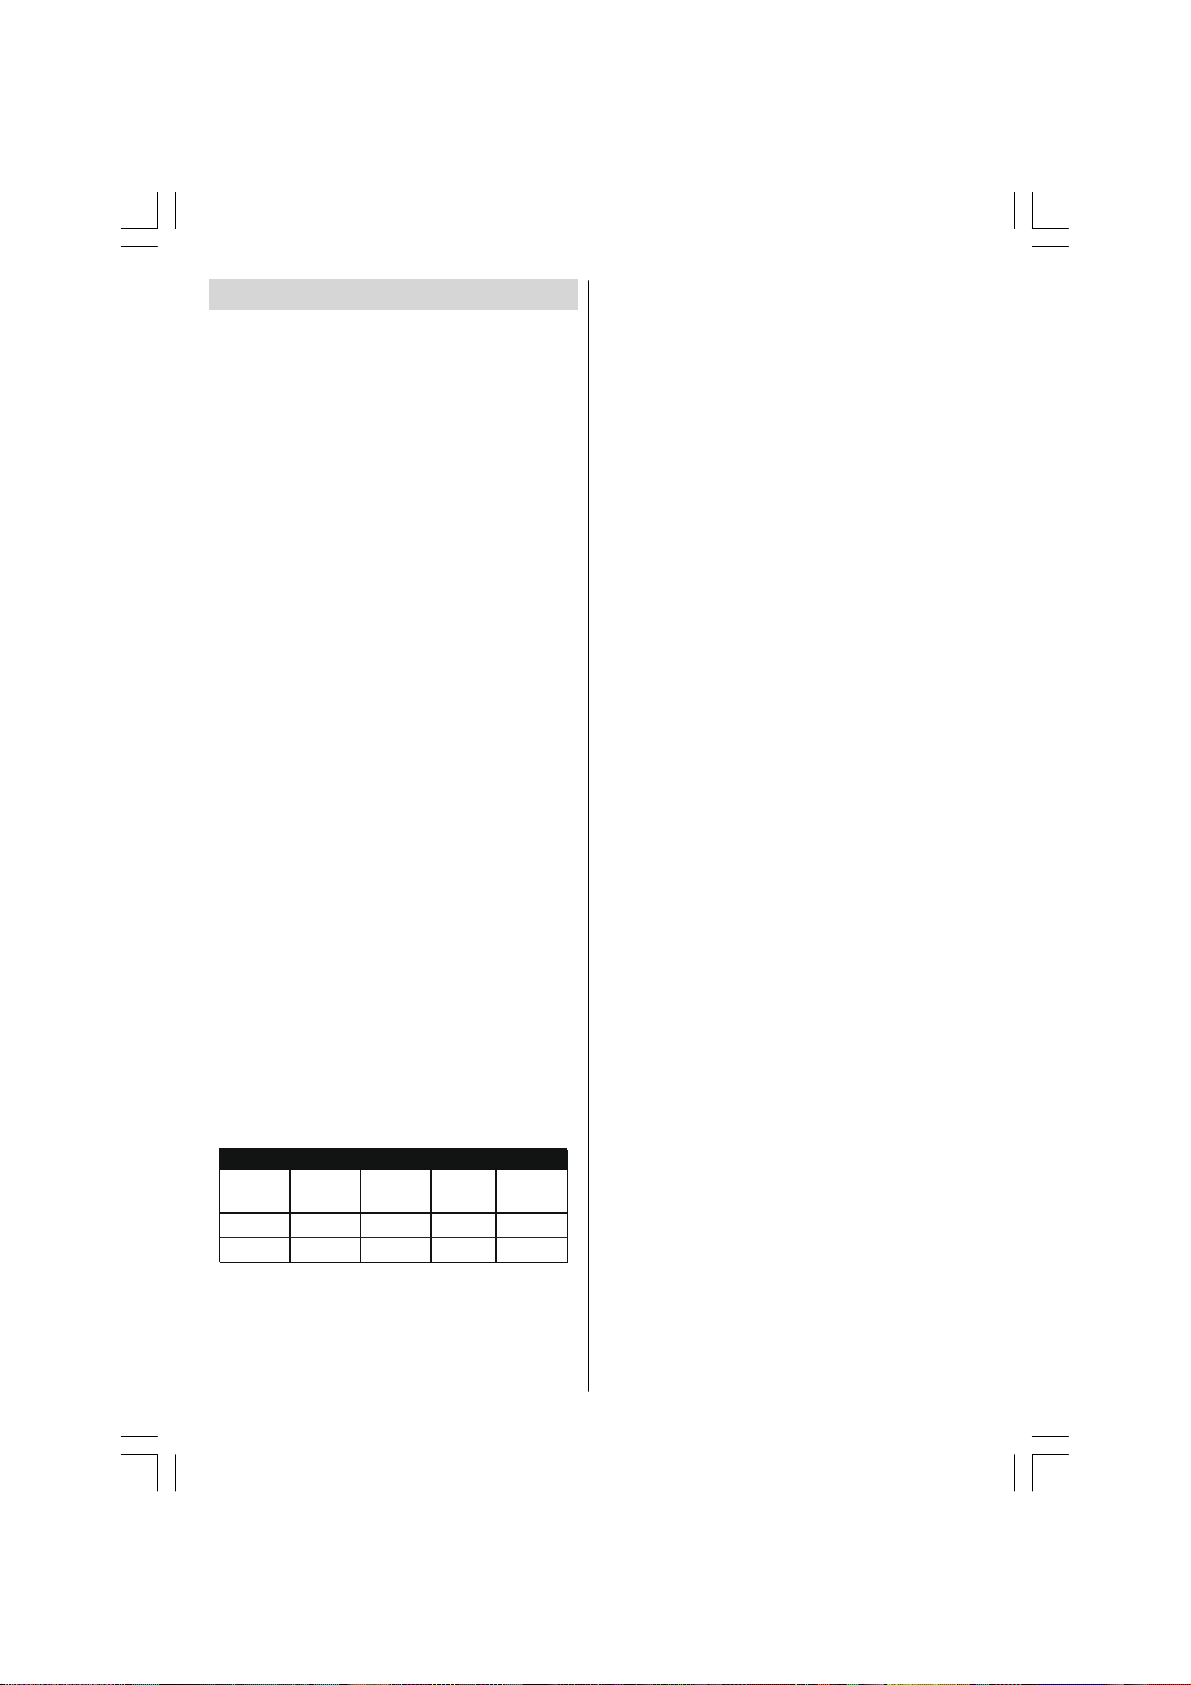
Specifications
DIMENSIONS (mm)
TV BROADCASTING
PAL/SECAMB/GD/KK' I/I'L/L'
RECEIVING CHANNELS
VHF(BANDI/III)
UHF(BANDU)
HYPERBAND
CABLE TV (S1-S20/ S21-S41)
NUMBEROF PRESET CHANNELS
100
CHANNELINDICATOR
On Screen Display
RF AERIAL INPUT
75 Ohm (unbalanced)
OPERATINGVOLTAGE
220-240V AC 50 Hz
AUDIO
German+NicamStereo
AUDIO OUTPUT POWER (W
2 x 8
) (%10 THD)
RMS.
POWER CONSUMPTION (W)
180 W
3 W (Stand-by)
PANEL
16:9 display, 32” Screen Size
DIMENSIONS (mm)
D L H
227
105
ENG-32720W-1055UK-32 INCH 17MB22-(WO SVHS-WO PIP-WO PC)-5010XXXX.P65 10.05.2007, 14:2218
922
922
562
515
Weight (kg)
15,0
13,4
With foot
- 18-
 Loading...