

Page 1

OPERATING INSTRUCTIONS
AV26720-HD2
26" LCD TV COLOUR TELEVISION
Page 2

Contents
Preparation ............................................. 2
Features ...............................................2
Safety Precautions .................................2
LCDTV ..................................................... 4
Remote Control Buttons ......................... 6
Before Switching On Your TV................. 7
Power Connection................................7
Connections To The Aerial Input Socket7
How To Connect Other Devices ...........7
Inserting Batteries In The
Remote Control Handset .....................7
Switching The TV ON/OFF....................... 7
To switch the TV on:..............................7
To switch the TV off:..............................7
Initial Settings .........................................8
InitialAPS (Automatic
Programming System) .........................8
Operating The TV.................................... 8
Operating with the buttons on the TV set8
Operating With Remote Control ...........8
Menu System .......................................... 9
Picture menu ........................................9
Sound menu .......................................10
Feature menu ..................................... 11
Install menu .......................................12
Program menu ...................................13
Source menu......................................14
Other Features...................................... 14
TVStatus.............................................14
Mute Indicator .....................................14
Freeze Picture.....................................14
Zoom Modes ......................................14
Teletext .................................................. 1 5
To Operate Teletext.............................15
To Select A Page OfTeletext ...............16
To Select Index Page..........................16
ToSelectTeletextWith A
TV Programme...................................16
To Select Double Height Text .............16
To Reveal “Concealed” Information ...16
To Stop Automatic Page Change........16
To SelectASubcode Page .................16
To Exit Teletext ....................................16
To Display The Time ..........................16
Fastext................................................16
Connect Peripheral Equipment ............1 7
High Definition....................................17
Via The Scart ......................................17
ViaAerial Input ....................................17
Decoder..............................................17
TVAnd Video Recorder.......................17
Playback NTSC ..................................17
Copy Facility .......................................18
Search ForAnd StoreThe
Test Signal Of The Video Recorder....18
Camera And Camcorder ....................18
To Connect to S-Video Input...............18
Connect The Decoder To The
Video Recorder ..................................18
Connecting Headphones...................18
Aerial Connection .................................19
Care of the Screen. ............................20
CAUTION ................................................ 2 1
Specifications .......................................22
Important Instruction ............................23
ENG-26720W-1549UK-26 INCH 17MB15 OEM-(WO VGA-WO PIP)(HD READY)(S)(OZEL)-50100182.p6516.01.2007, 18:051
-1-
Page 3
Preparation
InstallDisplayon solid horizontalsurfacesuch
as a table or desk.
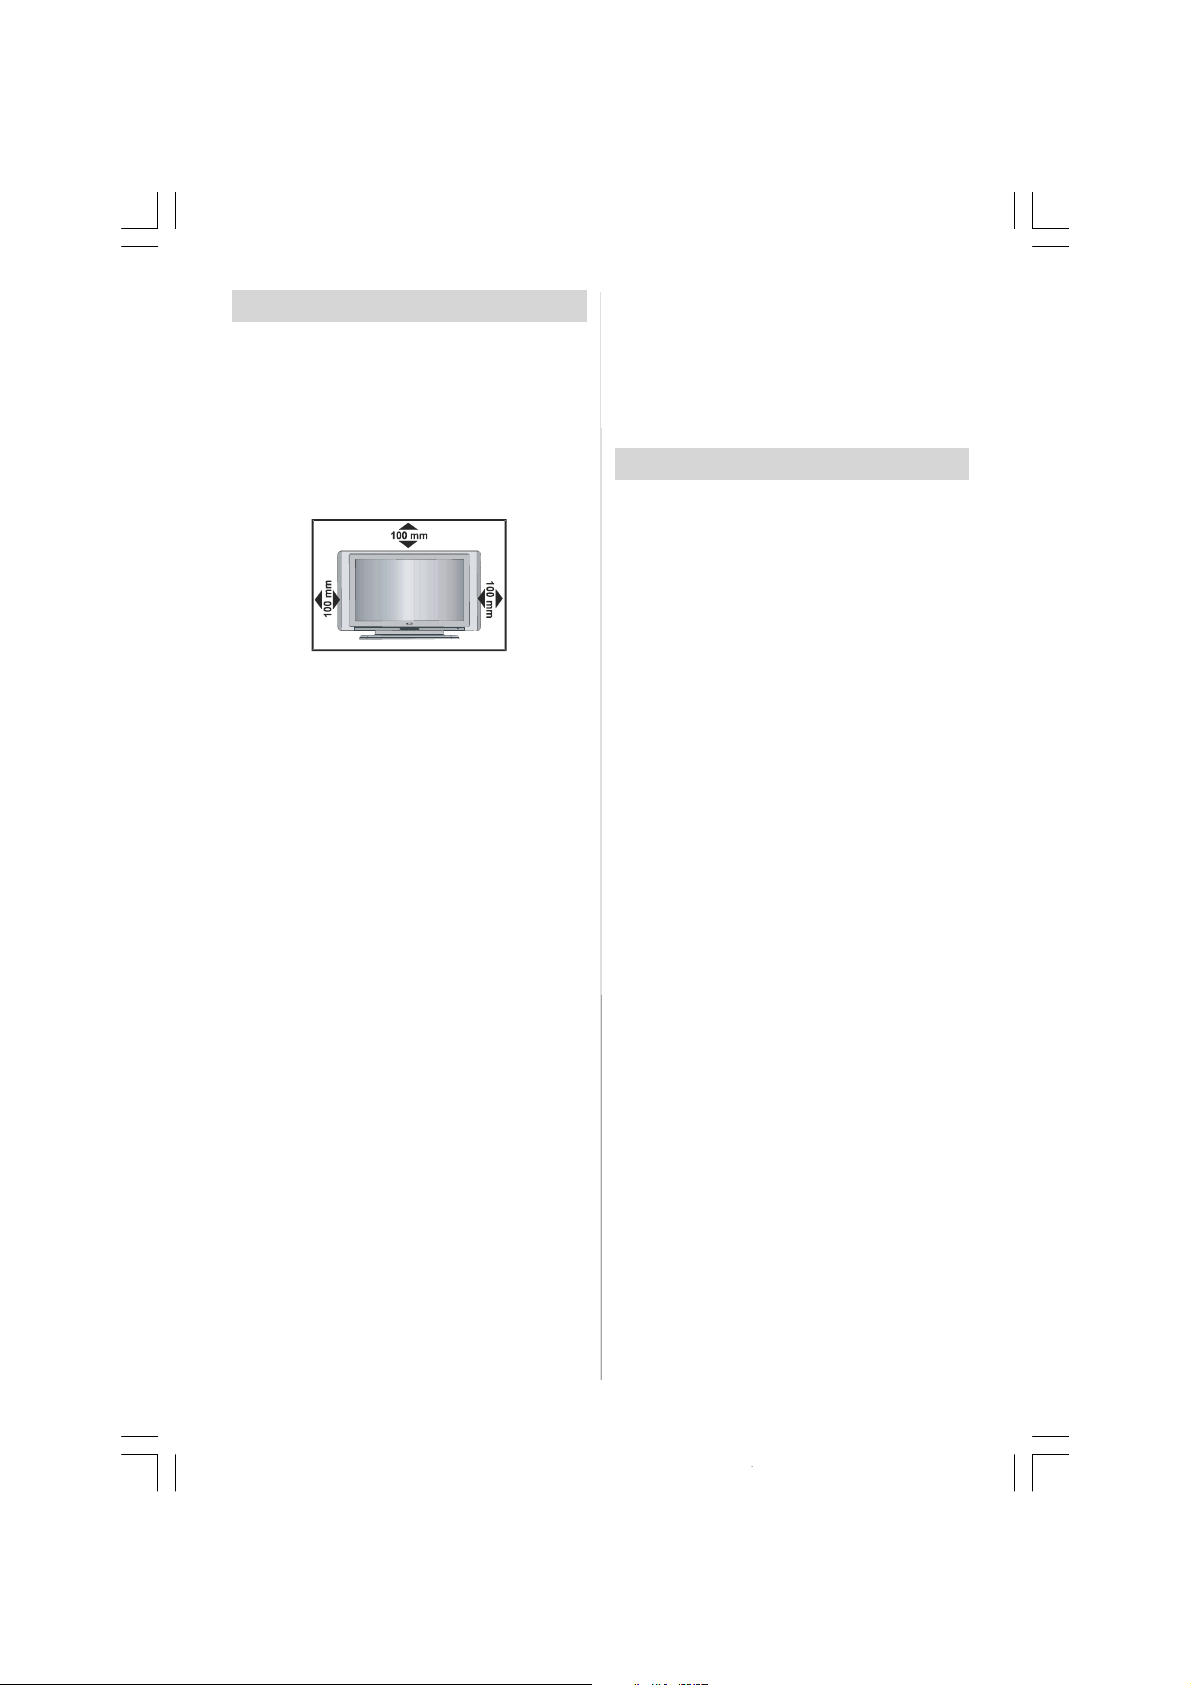
Forventilation,leaveaspaceofatleast10cm
free all around the set. To prevent any fault
and unsafe situations, please do not place
any objects on top of theset.
This apparatus can be used in tropical and/or
moderate climates.
utes the TV switches itself automatically to
stand-by mode.
• StereoPCAudioInput
• PLL (FrequencySearch)
• 3D Comb Filter
SafetyPrecautions
Please read the following recommended
safetyprecautions carefullyfor your safety
1. Power Source
Thereceivermust only be operated on a220240V AC 50 Hz supply.
2. Power Cord
Features
• Remote controlled colour television.
• 100 programmes from VHF, UHF bands or
cable channels can be preset.
• It can tune cable channels.
• Controlling the TV is very easy by its menu
driven system.
•Ithas2Scartsocketsforexternaldevices(such
asvideo,video games, audio set, etc.)
• Stereo sound system (German+Nicam).
• Full function Teletext.
Fastext (1000Pages),TOPtext.
• Headphone connection.
• Direct channel access.
•A.P.S. (Automatic Programming System).
• All programmes can be named.
• Forward or backward automatic tuning.
• Sleep timer.
• Child Lock.
•Automatic sound mute when no transmission.
• NTSC Playback.
•AV in and S VIDEOareavailable.
• It has an HDMI connector for Digital Video
andAudio.This connection is also designed
to accept High Definition signals.
•AVL (AutomaticVolume Limiting)
•When no valid signalisdetected,after 5 min-
Do not place the set, a piece of furniture,etc.
on the power cord(mains lead) or pinch the
cord.Handle the power cord by the plug.Do
not pull out the plug by tugging the cord and
never touch the power cord when your hands
are wet as this could cause a short circuit or
electric shock.Never make a knot in the cord
or tie it with other cord.Thepowercordshould
beplacedinsuchawaythattheyarenotlikely
to be stepped on.
A damaged powercord can cause fire or give
you an electric shock. When it is damaged
and need to be changed, it shouldbe done by
qualified personel.
3. Moisture and Water
Do not use this equipment in a humid and
damp place (avoid the bathroom, the sink in
the kitchen, and near the washing machine).
Do not exposethis equipmentto rain or water,
as this may be dangerous and do not place
objectsfilledwithliquids,suchas flower vases
ontopof theset.Avoidfromdrippingorsplashing.
If any solid object or liquidfalls into the cabinet,
unplugthe set and have it checked by qualified
personnel before operating it any further
4. Cleaning
Before cleaning, disconnect the mains supply.Donot use chemical cleaningagents. Use
a dry duster. For sticky stains, use a damp
cloth with a mild detergent.
-2-
ENG-26720W-1549UK-26 INCH 17MB15 OEM-(WO VGA-WO PIP)(HD READY)(S)(OZEL)-50100182.p6516.01.2007, 18:052
Page 4
Surely connect
the groundwire.
5. Ventilation
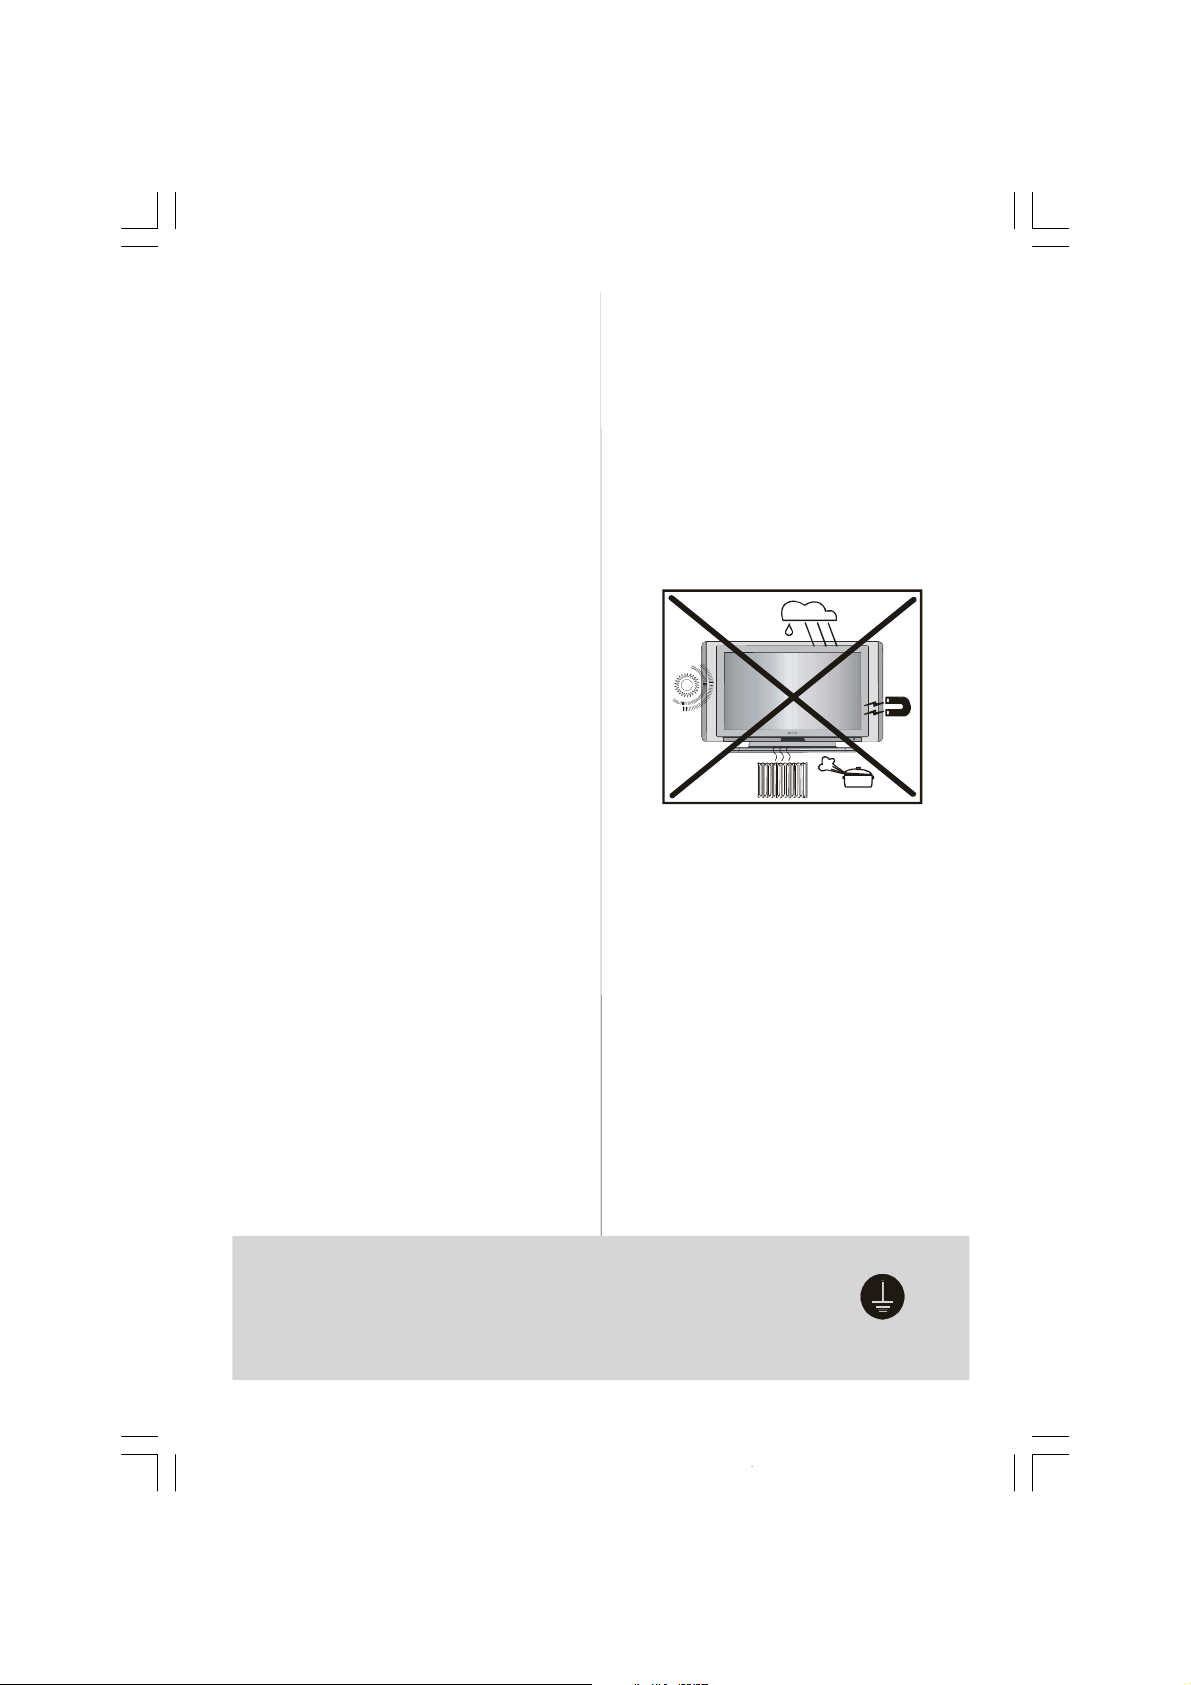
Theslots and openingson the back cover are
intended for ventilation and to ensure reliable
operation.Topreventoverheating,theseopenings must not be blocked or covered in anyway.
6.Heat and Flames
In the case of a Thunderstorm, or when leaving the Tv for long periods, disconnect the
Aerial lead (if outdoor) and the mains supply
to prevent power surges damaging the Tv.
7. Lightning
In the event of a Thunderstorm or when going on holiday. Disconnect the mains supply
and aerial (if external).
8. Replacement Part
When replacementparts are required, be sure
the service technician has used replacement
partswhicharespecifiedbythemanufactureror
havethesamespecificationsastheoriginalone.
Unauthorised substitutions may result in fire,
electrical shock, or other hazards.
9 . Servicing
Please refer all servicing to qualified personnel. Do not remove the cover yourself as this
may result in an electric shock.
WARNING: When the device is not in use for
a long time, disconnect from power.
Instructions for waste disposal:
• Packaging and packaging aids are recyclable and should principally be recycled.
Packaging materials, such as foil bag, must
be kept away from children.
• Remote control batteries should be disposed
of in a safe manner. Do not break open or
throw on a fire. Contact your local environment office for advice.
• Cold cathode fluoresant lamp in LCD PANEL
contains a small amount of mercury, please follow local ordinates or regulations for disposal.
• The mains plug is used to disconnect the TV
from the mains and therefore it shall remain
readily operable.
Warning: To prevent injury, this device must
be securely attached to the floor/wall in accordance with the installation instrutions.
"The LCD panel isveryhigh technologyproduct with abouta million thin film transistors,
giving you fine picture details.Occasionally,
a few non-active pixels may appear on the
screen as afixed point of blue, greenor red.
Please note that this does not affect the performance of your product."
“DO NOT LEAVE THE TV IN STANDBY OR
OPERATINGWHEN LEAVING THE HOUSE”
Be sure to ground the connection properly.
Connect the ground terminal of TV with the ground terminal provided at
the poweroutlet using the enclosedpowercord. If theprovidedplug does
not fit your outlet, consult an electrician for replacement of the obsolete
outlet.
-3-
ENG-26720W-1549UK-26 INCH 17MB15 OEM-(WO VGA-WO PIP)(HD READY)(S)(OZEL)-50100182.p6516.01.2007, 18:053
Page 5
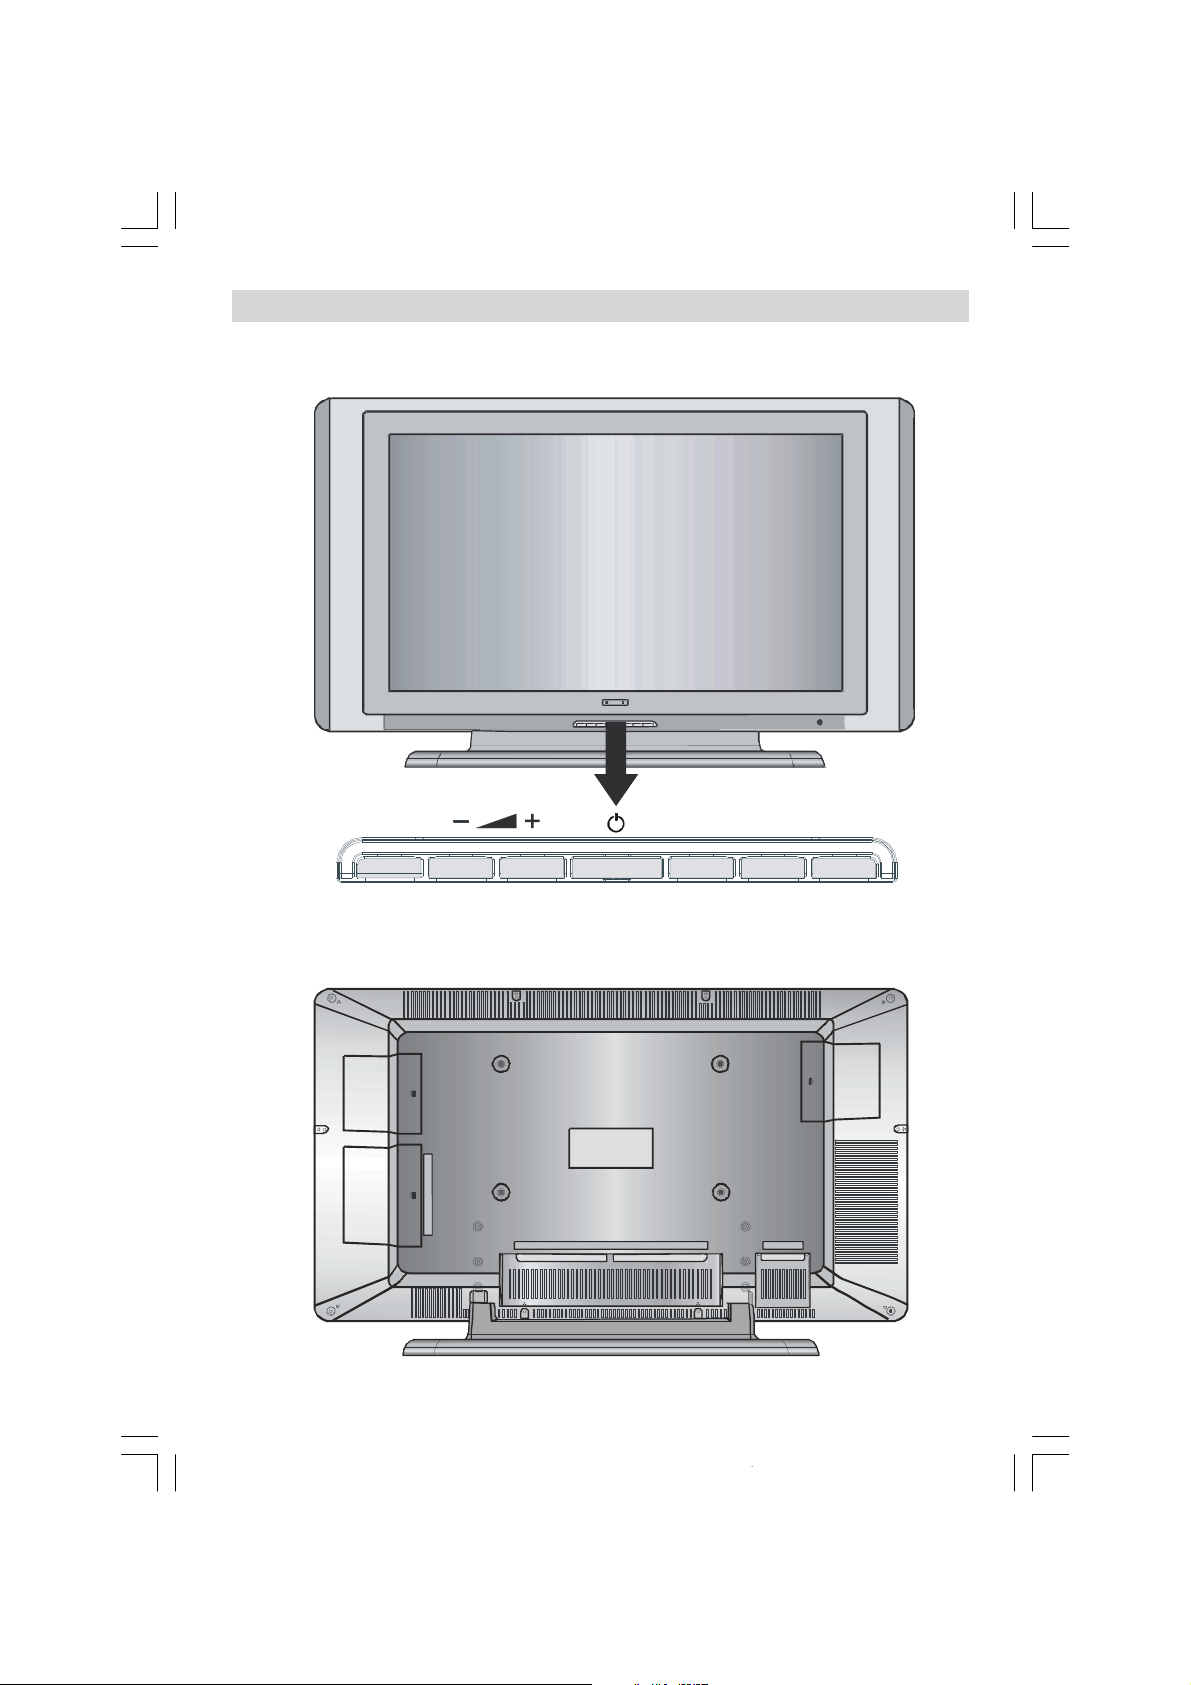
FRONTVIEW
- P/CH +
LCD TV
REARVIEW
MENU
TV/AV
-4-
ENG-26720W-1549UK-26 INCH 17MB15 OEM-(WO VGA-WO PIP)(HD READY)(S)(OZEL)-50100182.p6516.01.2007, 18:054
Page 6
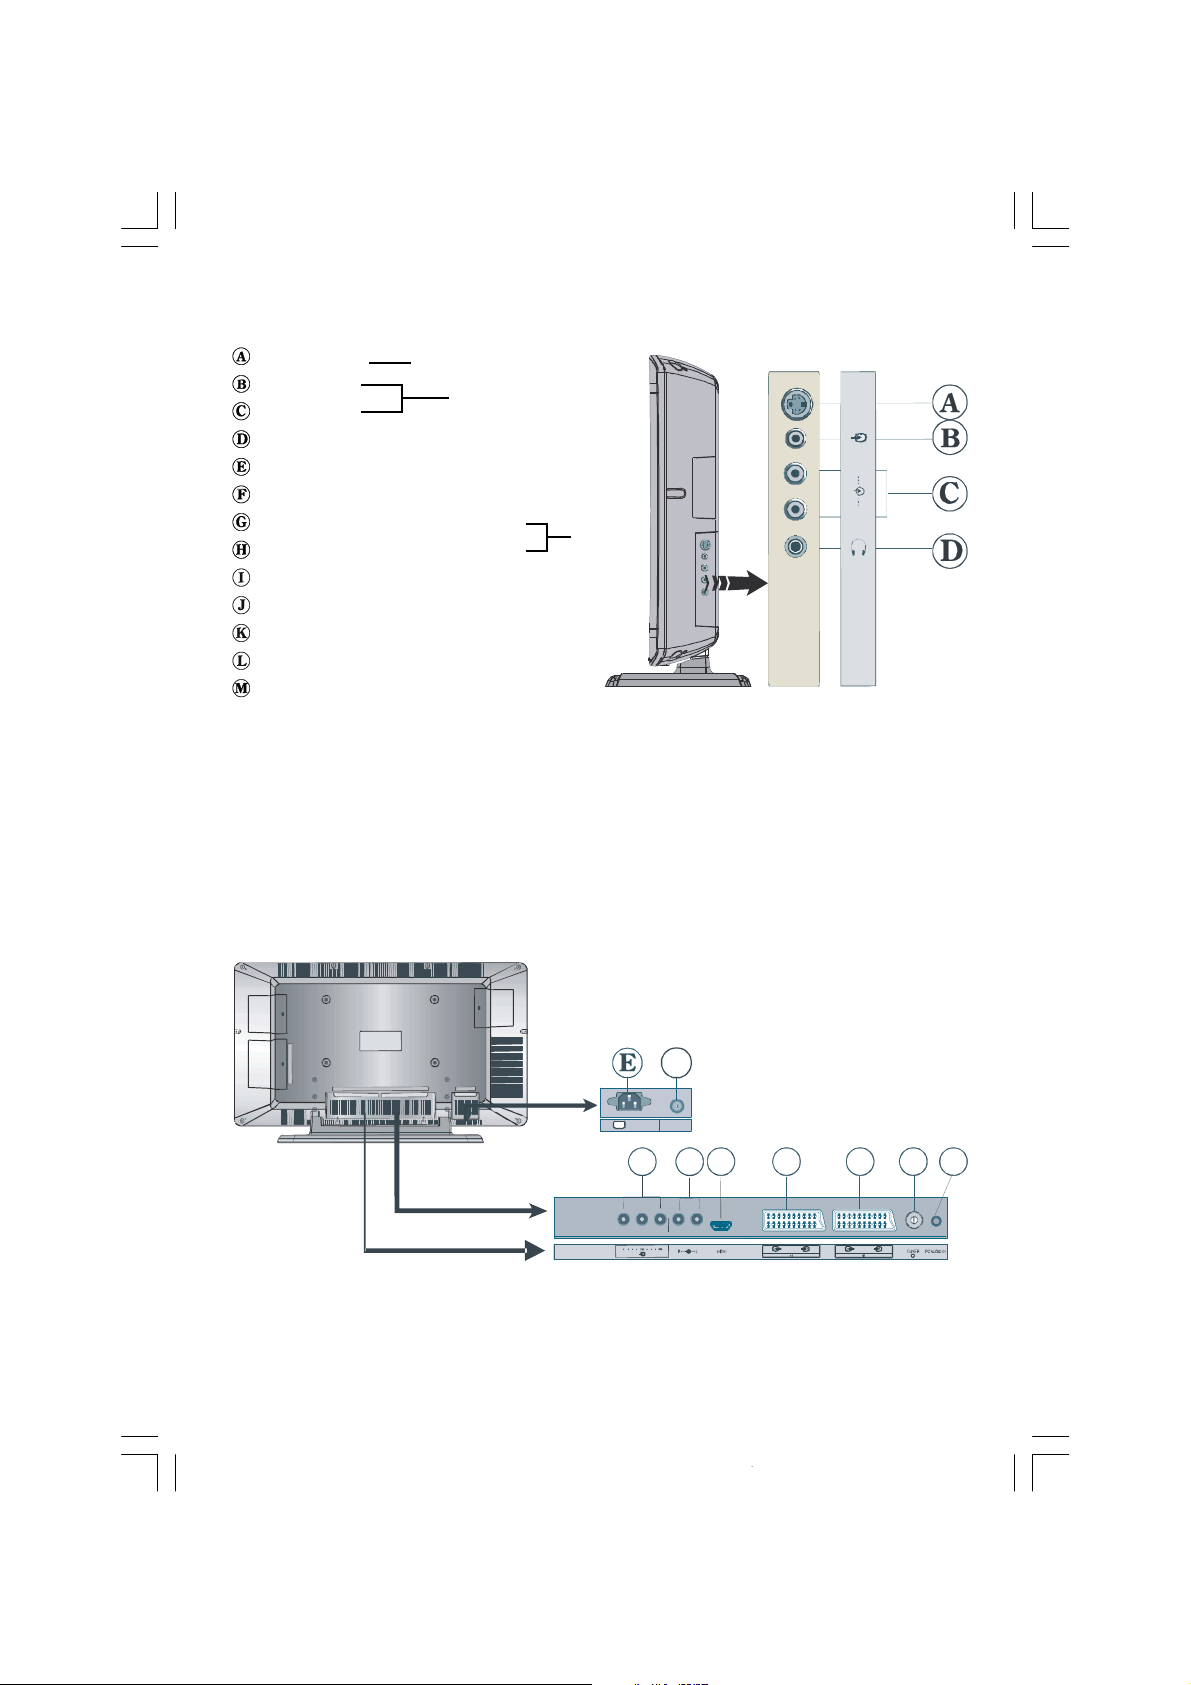
S-Video Input EXT-4S
R
S-VHS
I
J
VideoInput
Audio Inputss
EXT-4
Headphone
Power cord input
PowerOn/Off switch
Component Video (YPbPr) Inputs
Component Audio Inputss
HDMIInput(EXT-5)
Scart1(EXT-1)
Scart2(EXT-2)
Aerial
PCAudioInput
EXT-3
AC~50Hz POWER
-5-
ENG-26720W-1549UK-26 INCH 17MB15 OEM-(WO VGA-WO PIP)(HD READY)(S)(OZEL)-50100182.p6516.01.2007, 18:055
Page 7
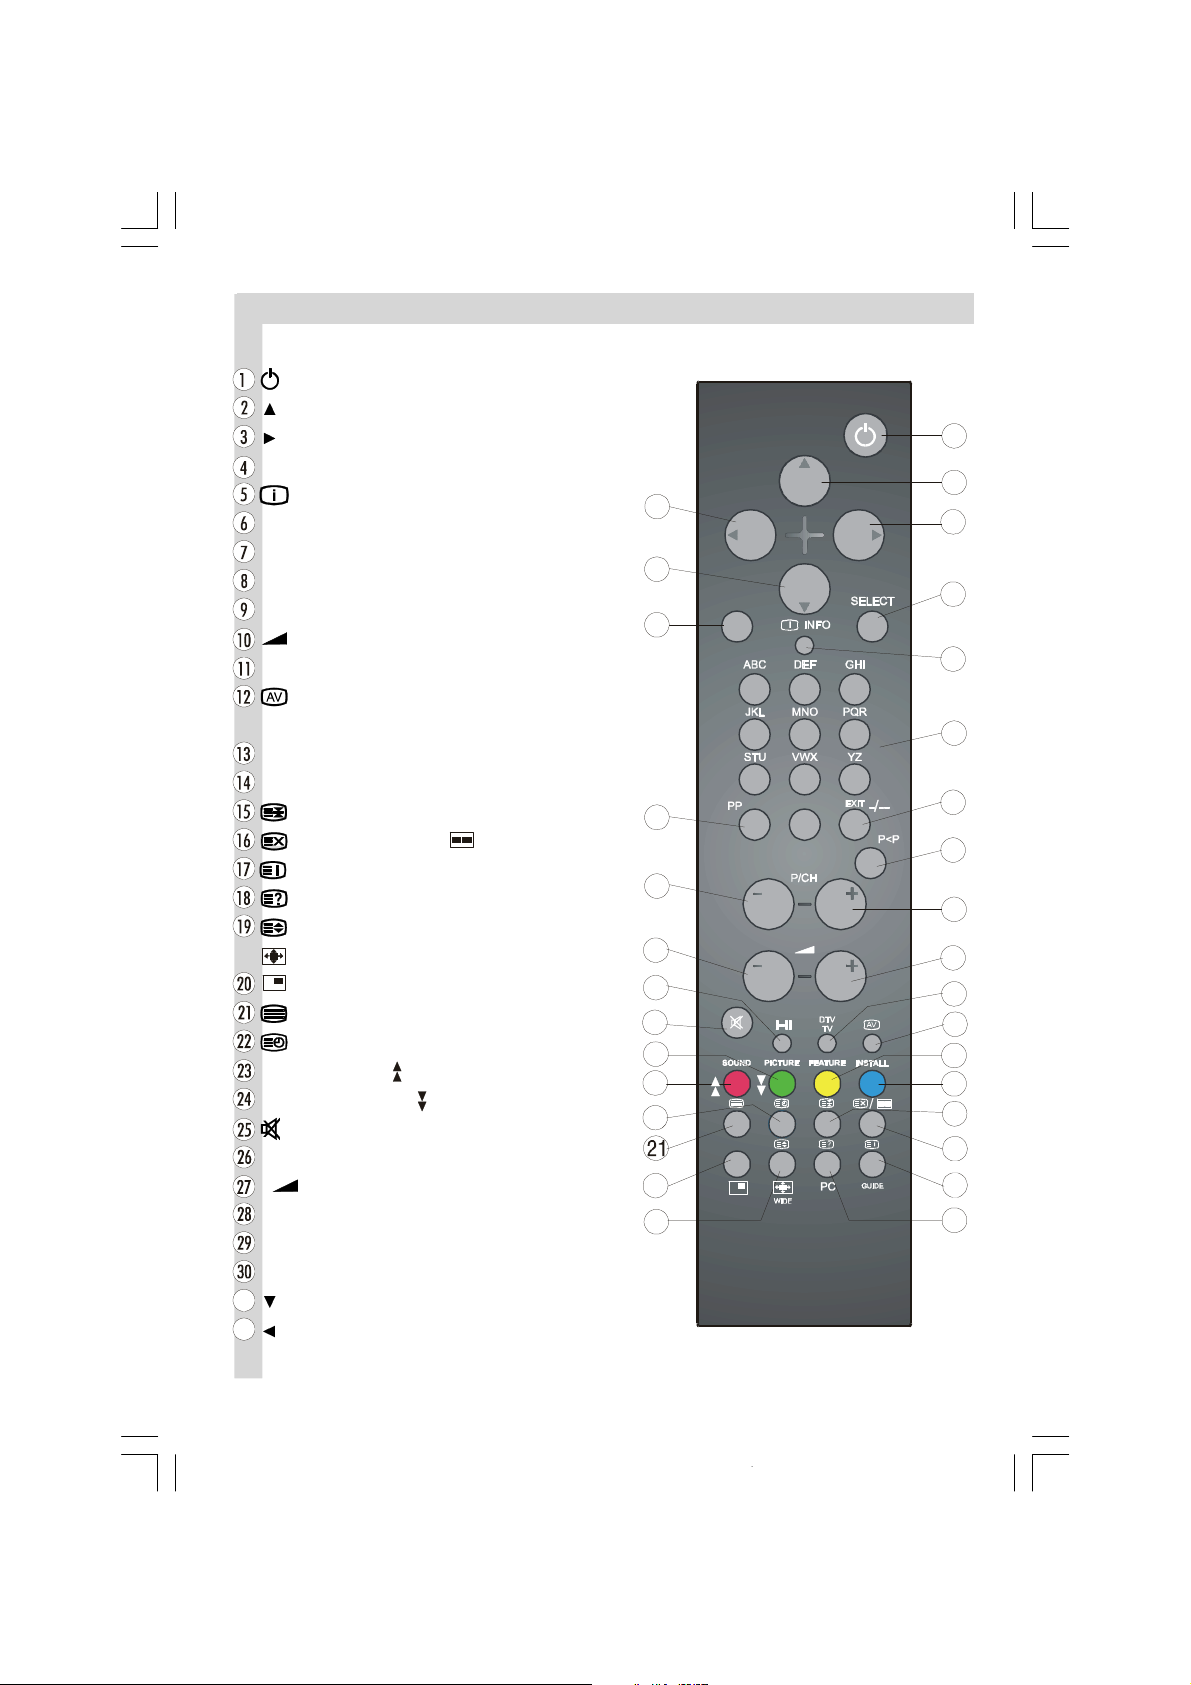
RemoteControlButtons
12
15
= StandBy
= Cursor Up
= Cursor Right
OK / SELECT =Confirm/FreezeImage
INFO= Info
0 - 9 = Direct Programme
-/-- / EXIT= not used
P<P = Previous Programme
P/CH + = Programme Up
+ = Volume Up
DTV / TV =No function/TV
= Source Select
(EXT-1,EXT-2,EXT-3,EXT-4,EXT-4SandEXT-5)
Yellow (FEATURE)= CallFunctionMenu
Blue (INSTALL)= Call Programming Menu
= StopVideotext
=Update Videotext, = No Function
/ GUIDE= IndexpageVideotext
= Show, PC =No Function
= EnlargeVideotext,
WIDE =Picture formatchange
= No Function / Mix
= Teletext
=Clock
Red (SOUND)/ = Call Sound Menu
Green (PICTURE)/ = CallPictureMenu
=Soundoff (Switch to Mute)
I-II =Mono/Stereo - DualA-B
- = Volume Down
- P/CH = Programme Down
PP = Picture Mode Selection
M = Main menu
= Cursor down
=Cursor Left
1
2
4
M
21 3
54 6
87 9
0
-6-
ENG-26720W-1549UK-26 INCH 17MB15 OEM-(WO VGA-WO PIP)(HD READY)(S)(OZEL)-50100182.p6516.01.2007, 18:056
Page 8
BeforeSwitching OnYour TV
Power Connection
IMPORTANT: The TV set is designedto oper-
ate on220-240V AC, 50 Hz.
•Afterunpacking, allowtheTVset to reach the
ambient room temperature before you connect the set to the mains.
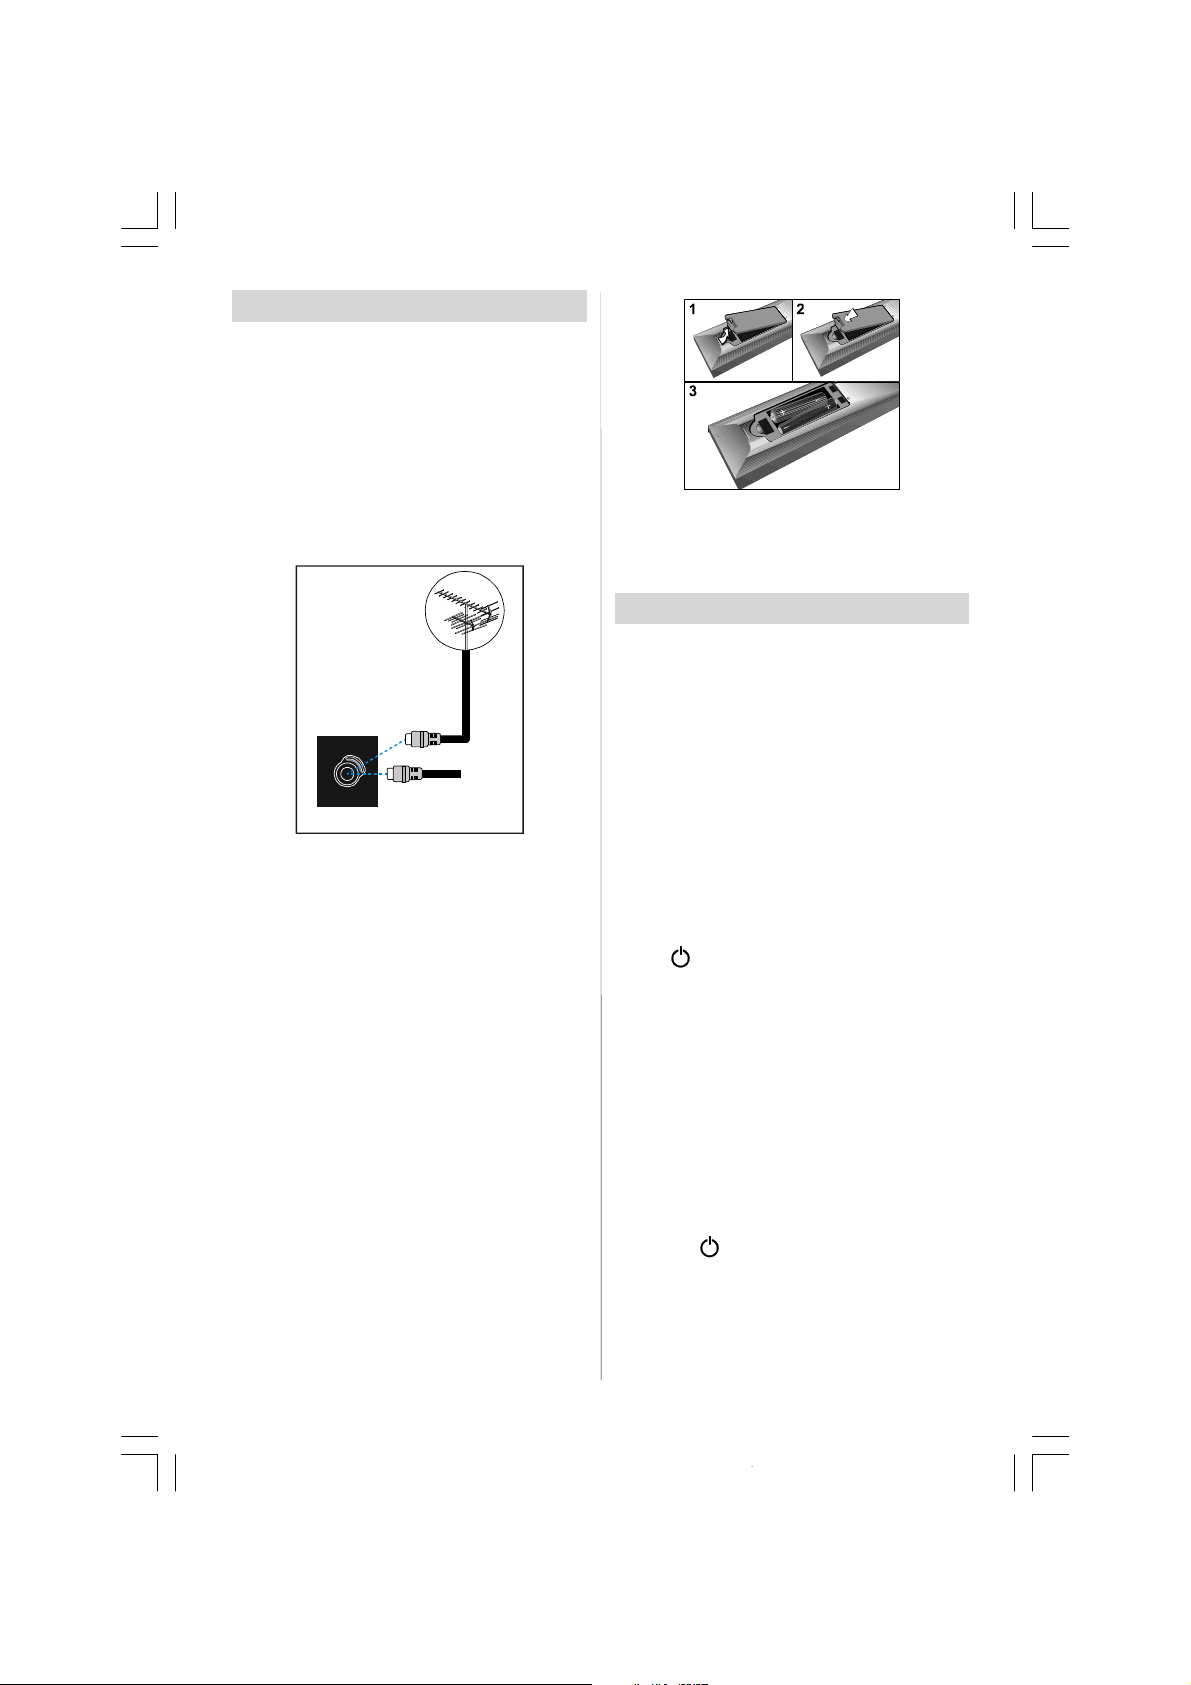
Connections To The Aerial Input
Socket
CABLE TV
VHF/UHF
REAR OF THE TV
•Connecttheaerialtothe aerialsocketon the
Tv, you may alsoconnectaVCRorotherbox
at the same time.
How To Connect Other Devices
IMPORTANT: SwitchofftheTVbeforeconnect-
ing any externaldevice.
Sockets for external connections are at the
rear side of the TV. For connection of other
devices via Scart refer to the manuals of the
related devices.
Inserting Batteries In The Remote
Control Handset
•Removethebatterycoverlocatedontheback
of the handset by gently pulling downwards
from the indicated part.
•InserttwoAAA/R03 orequivalenttypebatter-
ies inside. Place the batteries in the right
directions.
• Replacethe batterycover.
NOTE:Remove the batteries from remote control handset when it is not to be used for a long
period.Otherwise it can be damaged due to
any leakage of batteries.
Switching TheTV ON/OFF
To switch the TV on:
Your TV will switch on in two steps:
1- Connect the power supply cord to the sys-
tem. Press On/Off switch at the rear of the
TV. Then the TV switches itself to stand-by
modeandtheLEDbecomesBLUElocated
on the front of theTV.
2- To switch on the TV from stand-by mode
either:
Press a digit button on the remote control so
that a programme number is selected,
or,
Press “
right side of the TV or press “-P/CH” or “P/
CH+” buttonontheremotecontrol,sothatlast
switched off programme is selected.
By either ways the TV will switch on and the
LED will turn off.
To switch the TV off:
• Press the “stand-by” button on the remote
control, so the TV will switch to stand-by
mode and the LED will become BLUE,
or,
Pressthe “
oftheTV, so the TV willswitchoffandtheLED
will become BLUE.
To power down the TV completely, press On/
Off switch,or
unplugthe power cord from the mains socket.
”, "-P/CH" or "P/CH+" button on the
” button located on the right side
ENG-26720W-1549UK-26 INCH 17MB15 OEM-(WO VGA-WO PIP)(HD READY)(S)(OZEL)-50100182.p6516.01.2007, 18:057
-7-
Page 9
InitialSettings
Cancel
Initial APS(Automatic Programming
System)
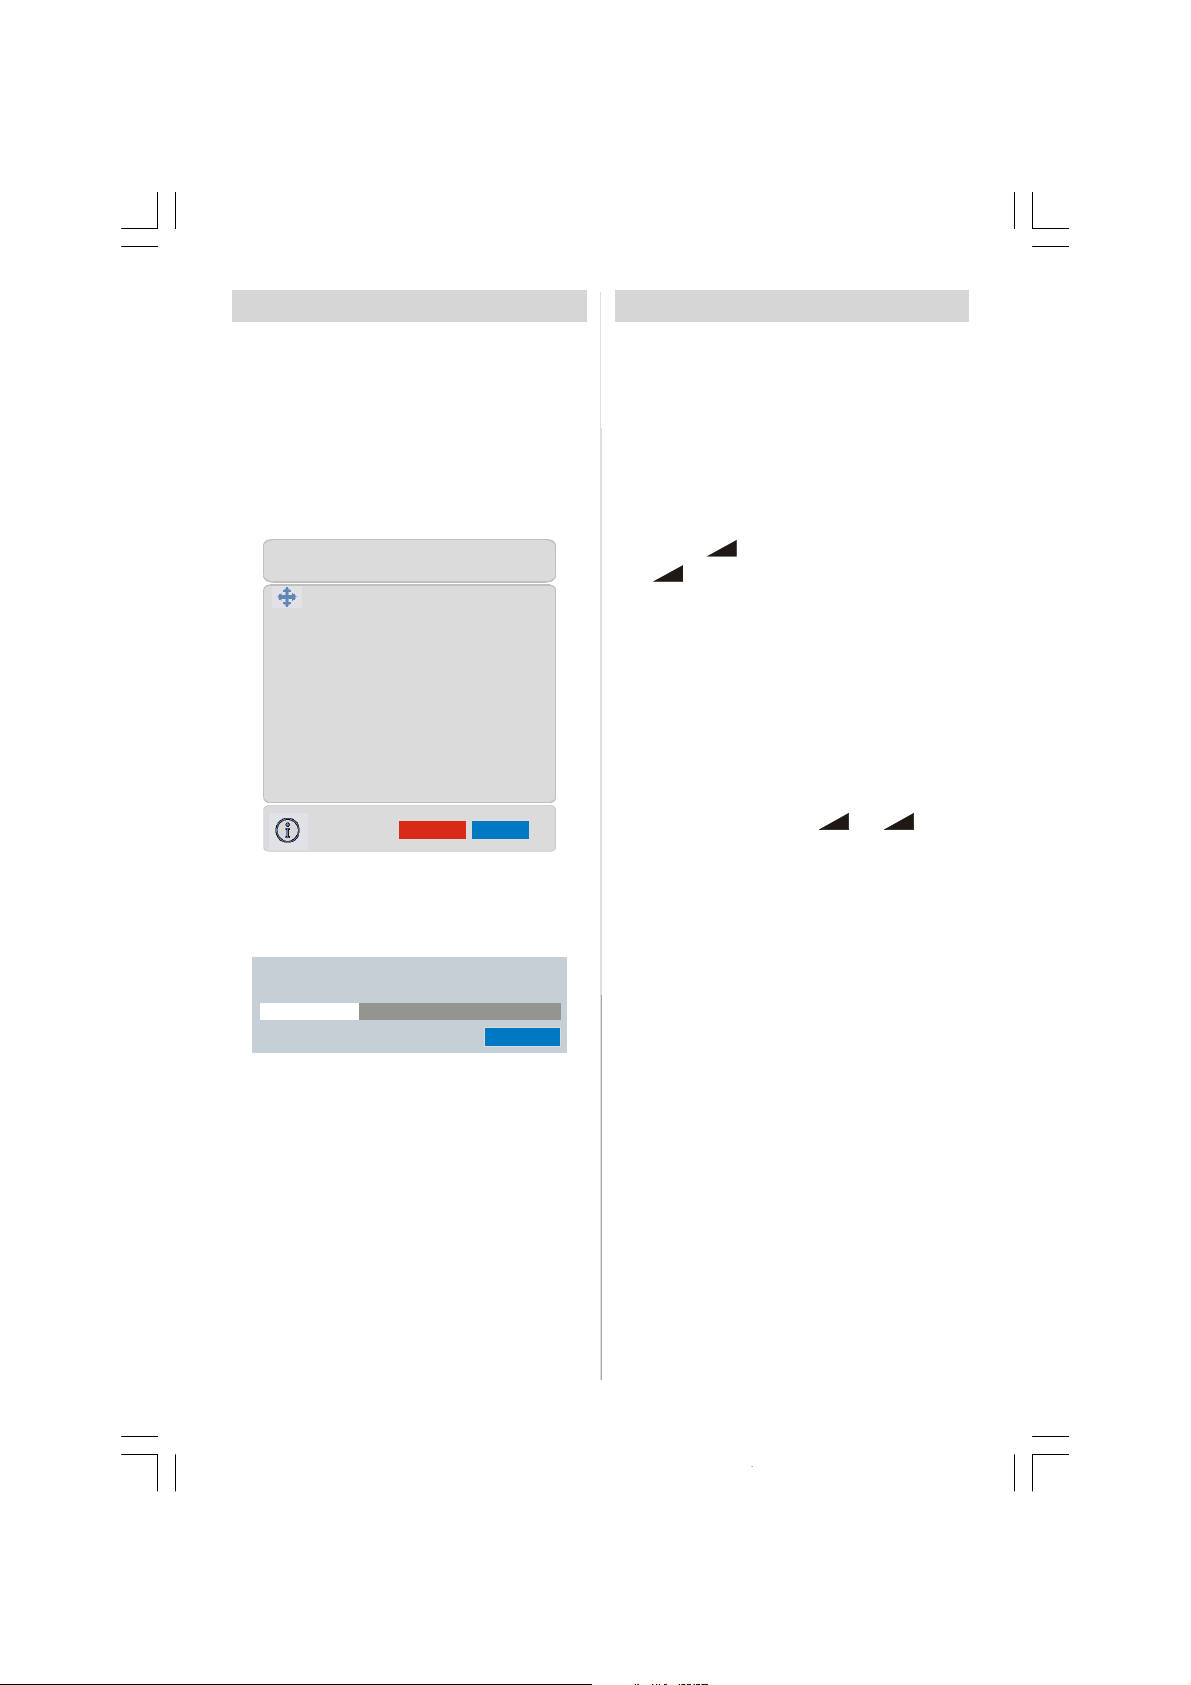
The following menu will be displayed on the
screen when you turn your TV on for the first
time. APS, searches and sorts all channels
and stores them automaticallyon your TV, according to the transmission of programme
systems in your area.
AUTO PROGRAM
Language
Country
PLEASE CHECK ANTENNA CABLE
AUTO. PROGRAMMING SYSTEM
Firstof all choose Language andCountry by
using
the sort process in APS. To start APS, press
theREDor“OK”button.
AfterAPSis finalized,the programmetablewill
appearon the screen.Inthe programmetable
you will see the programme numbers and
names assigned to the programmes.
If you do not accept the locations and / or the
programme names of programmes, you can
change them from the Program Menu. (See
page 13)
/and
UK - I 155,25 Mhz
01 - C-01
/
buttons.This will affect
APS is running...
Operating The TV
You canoperate your TV using both the remote
control handset and thebuttons on the set.
Operating with the buttons on the
TV set
Volume setting and programme selection can
be made by using the buttons on the control
panelat the front of the TV.
Volume Setting
Pressthe"the"
ume level scale (slider) will be displayed at the
bottomof the screen.
Programme Selecting
Press the "+P/CH" button to select the next
programme or the "P/CH-" button to select
the previous programme.
Entering The Menu
Pressthe “MENU”buttonon the controlpanel
at the front of the TV to enterthe menu.
"+P/CH" / "PCH-" and "tonson the TV are used as navigation buttons
in the menu.
AV Mode
Pressthe"TV / AV" buttononthecontrolpanelat
thefrontoftheTVtoswitchyourTVtoEXTmodes.
Operating With Remote Control
The remote control handset of your TV is designed to control all the functions of your TV.
Thefunctionswillbe describedin accordance
withthe menu system of your TV.
Functions of the menu system are described
in Menu System section.
Volume Setting
Press the “V +” button to increase volume.
Press the “- V” button to decrease volume.A
volumelevel scale (slider)will be displayedat
the bottom of the screen.
Programme Selecting
" buttontodecreasevolumeor
+" button toincrease volume,so a vol-
" / " +" but-
(Previous or next programme)
• Press the “- P” buttontoselectthe previous
programme.
-8-
ENG-26720W-1549UK-26 INCH 17MB15 OEM-(WO VGA-WO PIP)(HD READY)(S)(OZEL)-50100182.p6516.01.2007, 18:058
Page 10
• Press the “P +” button to select the next
programme.
Programme Selecting (direct access):
Pressdigitbuttonsontheremotecontrolhandset to select programmes between 0 and 9.
The TV will switchto the selected programme
aftera short delay.
• For a two digitprogramme number enter the
seconddigitafterpressingthe firstdigit within
2 seconds.
MenuSystem
Your TV has been designed with a menu system to provide easy manipulation of a multifunction system.
Pressthe“M” buttonto enter themenu.Press
/
buttonto select a menu title and then
button to select a menu item and
“OK”button to enter the menu item.
You canaccess the menusdirectlybypressing
thecoloured buttonson theremote control:
Red Button Sound Menu
Green Button PictureMenu
Yellow Button Feature Menu
Blue Button Install Menu
• Press the “M” or
TV
button to return to
the previous menu.
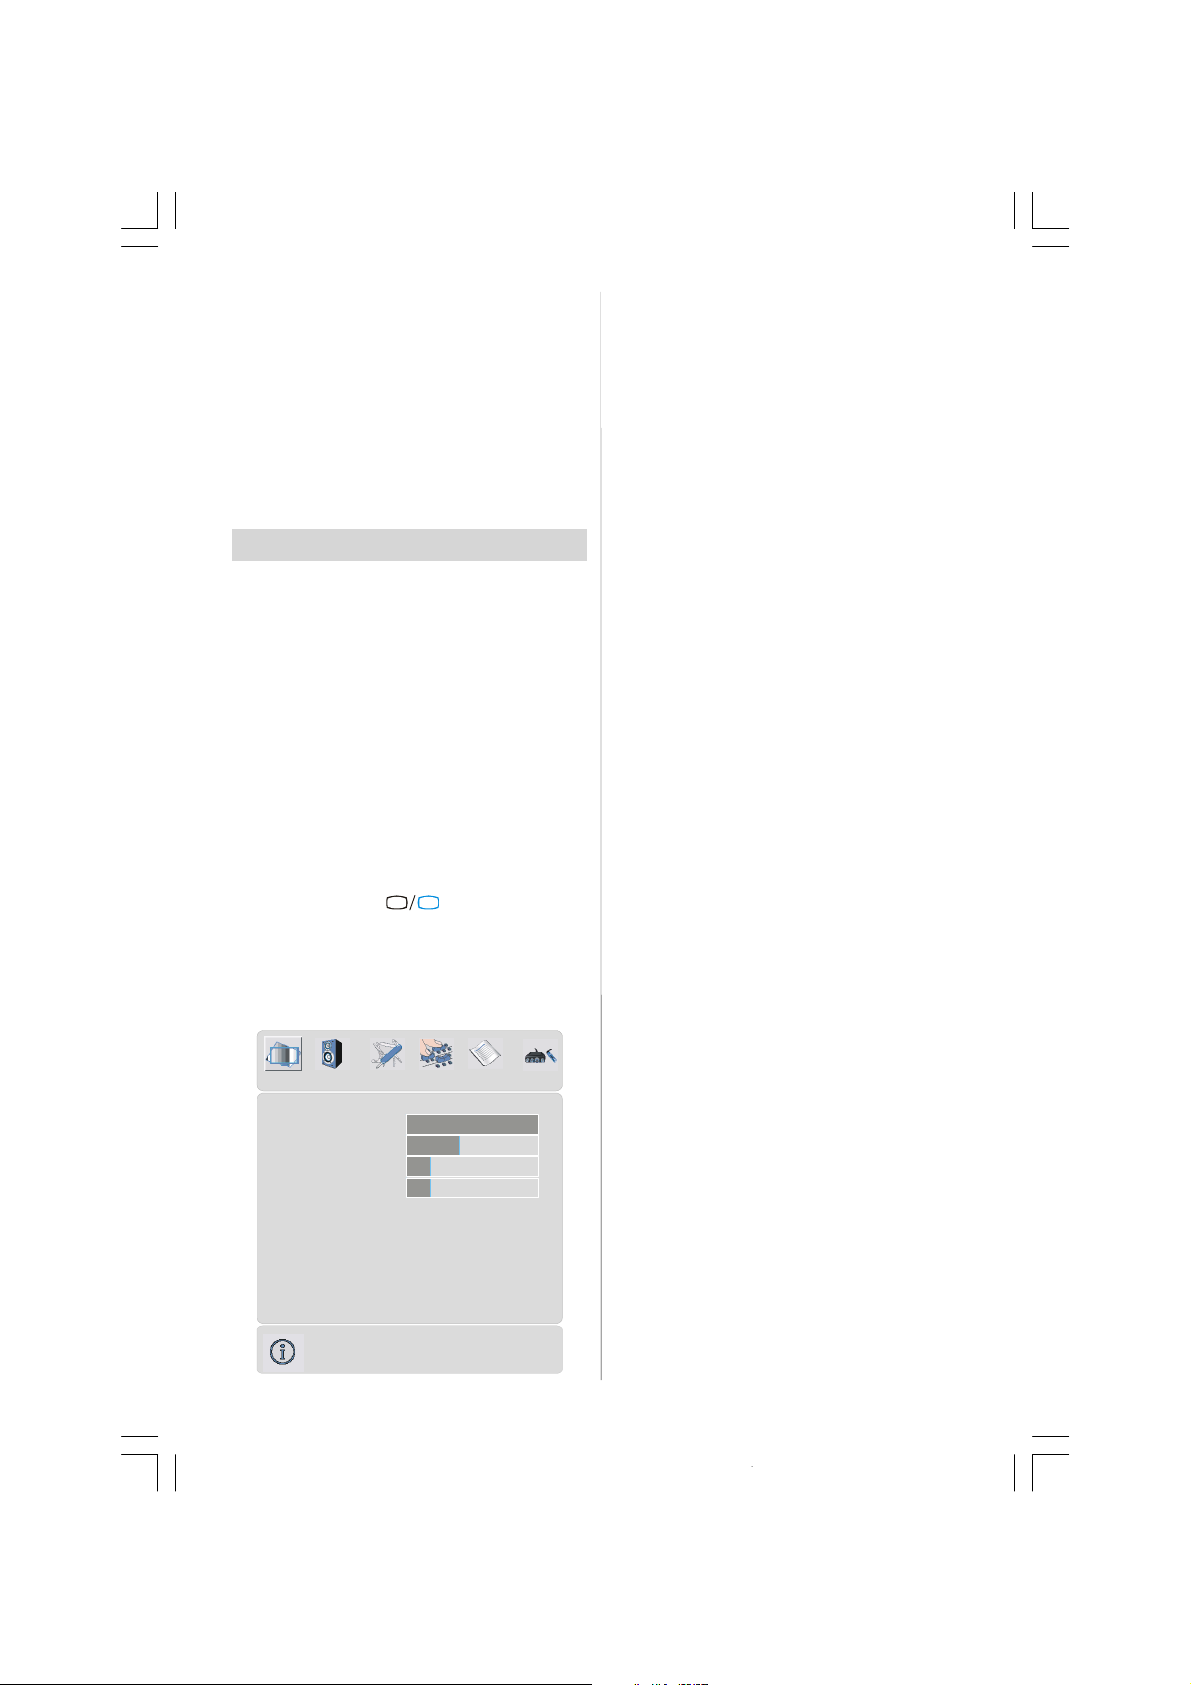
Picture menu
By pressing
Picture menu appears on the screen.
/button, select the first icon.
/
or
Mode
/
Bypressing
/
button to choose one of these options:
button,selectMode. Press
Natural, Cinemaand Dynamic.
Contrast
/
By pressing
Press
button to increase contrast. Press
button, select Contrast.
buttonto decreasecontrast.Contrastlevelcan
be adjusted between 0 and 63.
Brightness
/
By pressing
Press
button to increase brightness. Press
button, select Brightness.
buttontodecreasebrightness.Brightnesslevel
can be adjusted between 0 and 63.
/
Sharpness
/
By pressing
Press
button to increase sharpness. Press
button,select Sharpness.
button to decrease sharpness. Sharpness
level can be adjusted between 0 and 31.
Colour
/
Bypressing
button,selectColour.Press
button to increase colour. Press
decrease colour. Colourlevelcan be adjusted
between 0 and 99.
Hue
This item is displayed in picture menu when
the TV receives an NTSC signal. By pressing
/
button, select Hue. Press
increasehue level.Press
buttonto decrease
hue level. Hue level can be adjustedbetween
-31 and 31.
button to
button to
Contrast
Reset
PAL 50Hz
ENG-26720W-1549UK-26 INCH 17MB15 OEM-(WO VGA-WO PIP)(HD READY)(S)(OZEL)-50100182.p6516.01.2007, 18:059
Off
Off
Off
62
24
10
32
Colour Temp
Bypressing/
Press
/
button,selectColourTemp.
button to choose one of these op-
tions:Cool,Normal and Warm.
Noise Reduction
Thisitem is usedtoreduce theimage noiseand
improve thepicture qualityatweak signals.
By pressing
duction. Press
/
button, select Noise Re-
/
button to set Noise re-
duction level toOff, Low, Medium orHigh.
-9-
Page 11
Film Mode
SOUND
10kHz
0
0
0
0
/
Films are recorded at a different number of
frames per second to normal television
programmes.
By pressing
Press
/
button,selectFilm Mode.
/buttonto set this feature On or Off.
Turn this feature on when you are watching
films to see the fast motion scenes clearly.
3D Comb
3D Comb is used to improve colour transitions and colour quality of pictures.
By pressing
Press
/
button, select 3D Comb.
/buttonto set this feature On or Off.
Reset
/
Bypressing
/
or “OK”buttontoreset the picture modes
button,select Reset. Press
to factory default settings.
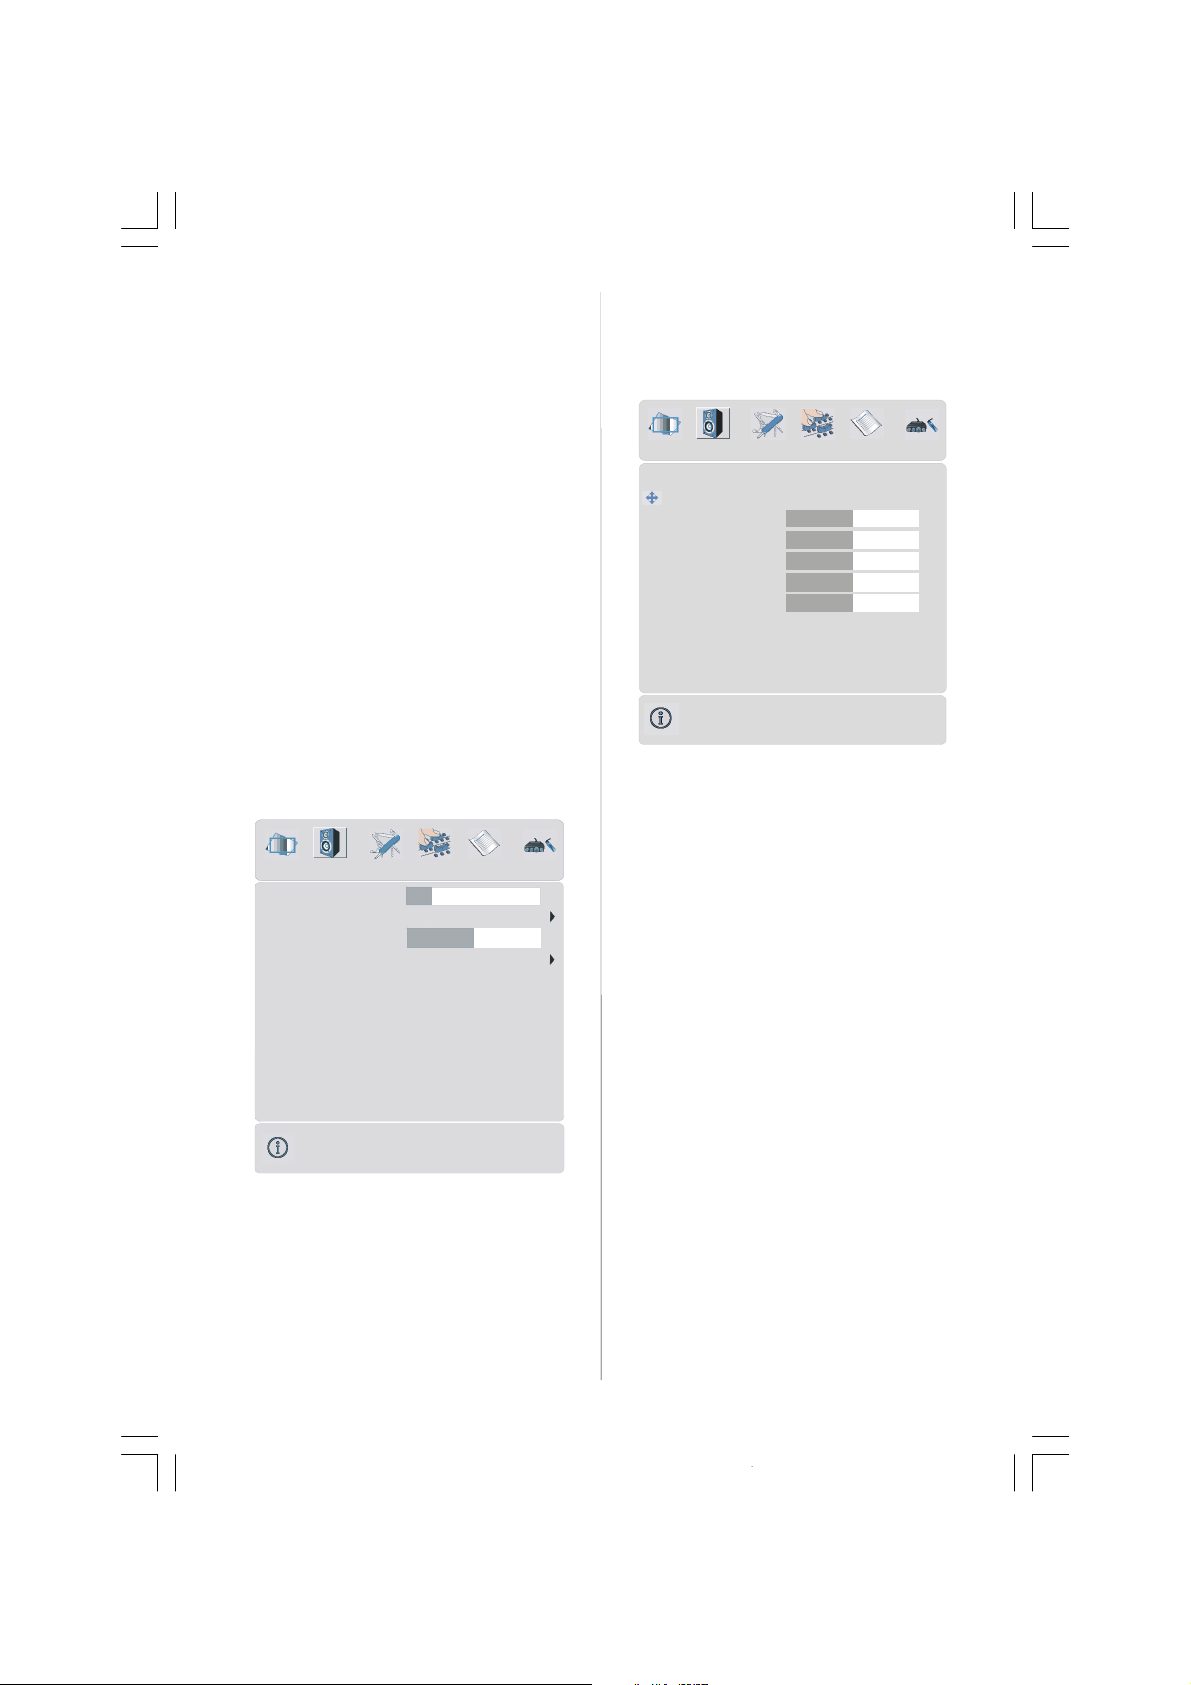
Sound menu
By pressing
icon. Sound menu appears on the screen.
Balance
AVL
Effect
/
button, select the second
10
0
Equalizer
/
By pressing
Press
/
or “OK” button to enter equalizer
button, select Equalizer..
menu.
0
500Hz
1.5kHz
5kHz
In equalizer menu the sound mode can be
changed to User, Pop, Rock, Jazz, Flat and
Classic by pressing
button. Equalizer
menu settings can be changed only when
Sound Mode is User. Select the desired frequency by
crease the frequency gain by pressing
/
button and increase or de-
/
button.
Pressthe“M” buttonto return to the previous
menu.
Balance
By pressing
Press
Press
buttonto increasebalancetotheright.
button to increase balance to the left.
/
button, select Balance.
Balance level can be adjusted between -31
and 31.
Headphone
Volume
/
By pressing
Press
buttonto increasevolumelevel.Press
button, select Volume.
buttontodecreasevolumelevel.Volumelevel
can be adjusted between 0 and 63.
ENG-26720W-1549UK-26 INCH 17MB15 OEM-(WO VGA-WO PIP)(HD READY)(S)(OZEL)-50100182.p6516.01.2007, 18:0510
Bypressing
Press
menu.
-10-
/
button,select Headphone.
/
or “OK” button to enter hedphone
Page 12
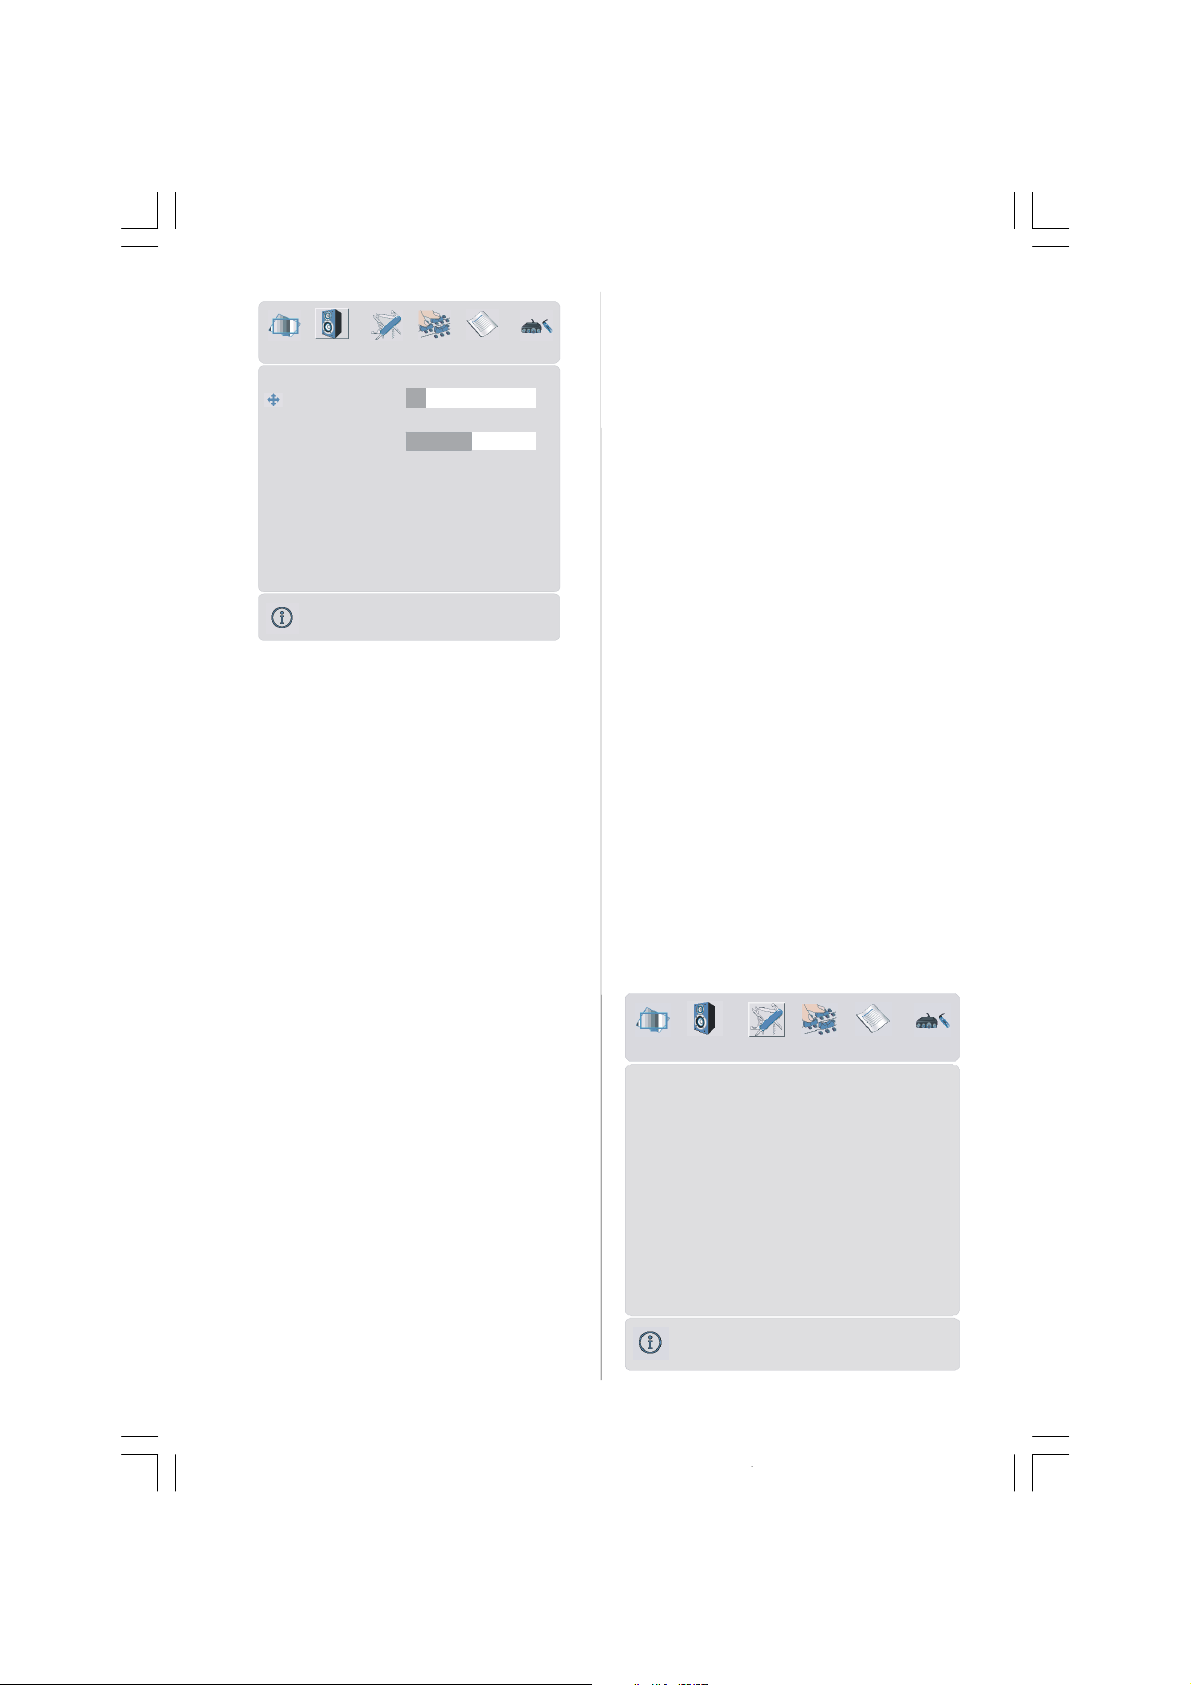
Volume
Child Lock
Default Zoom
FEATURE
Sound Mode
Balance
10
0
volume
By pressing
Press
Press
/
button, select Volume.
button to increase hp volume level.
button to decrease hp volume level.
Headphone volume level can be adjusted between 0 and 63.
sound mode
Bypressing
Press
/
button,selectSound Mode.
/
button to changesoundmode.
Sound mode is used to identify sound mode of
the headphone andcanbeset tomono, stereo,
dual a ordual baccordingtothetransmission.
balance
By pressing
Press
Press
buttonto increasebalanceto the right.
buttontodecreasebalancetotheleft.
/
button, select Balance.
Balance level can be adjusted between -31
and 31.
Pressthe“M” buttonto return to the previous
menu.
Sound Mode
Bypressing
Press
/
button, select Sound Mode.
/
buttonto change the mode.
You can selectMono, Stereo, Dual A or Dual
B mode,onlyif the selectedchannelsupports
that mode.
In case of bilingual broadcast (Dual Sound),
you can select original or dubbed language
using mode option.
AVL
Automatic VolumeLimiting (AVL) function adjusts the sound to obtain fixed output level
between programs, having different sound
levels.
Pressing
/
button will turn this feature on
oroff.
Effect
You can use this feature to switch the sound
effect on or off. If the current sound system is
Mono and the sound effect is switched on,
then the sound will be heard as if it is Stereo.
If the current sound system is Stereo, switchingthiseffectonwillgivea morespatialeffect.
Pressing
/
button will turn this feature on
oroff.
Dynamic Bass
Dynamic Bass is used to increase bass effectoftheTVset.
By pressing
Bass. By pressing
/
button, select Dynamic
/
button set Dynamic
bassto Low,HighorOff.Itisnotrecommended
to select High if listening at high volume levels.
Feature menu
By pressing
Feature menu appears on the screen.
Sleep Timer
Language
Ext-2 Out
/button, select the third icon.
Off
Off
English
EXT - 1
Panoramic
Translucent
30 sec
West
-11-
ENG-26720W-1549UK-26 INCH 17MB15 OEM-(WO VGA-WO PIP)(HD READY)(S)(OZEL)-50100182.p6516.01.2007, 18:0511
Page 13
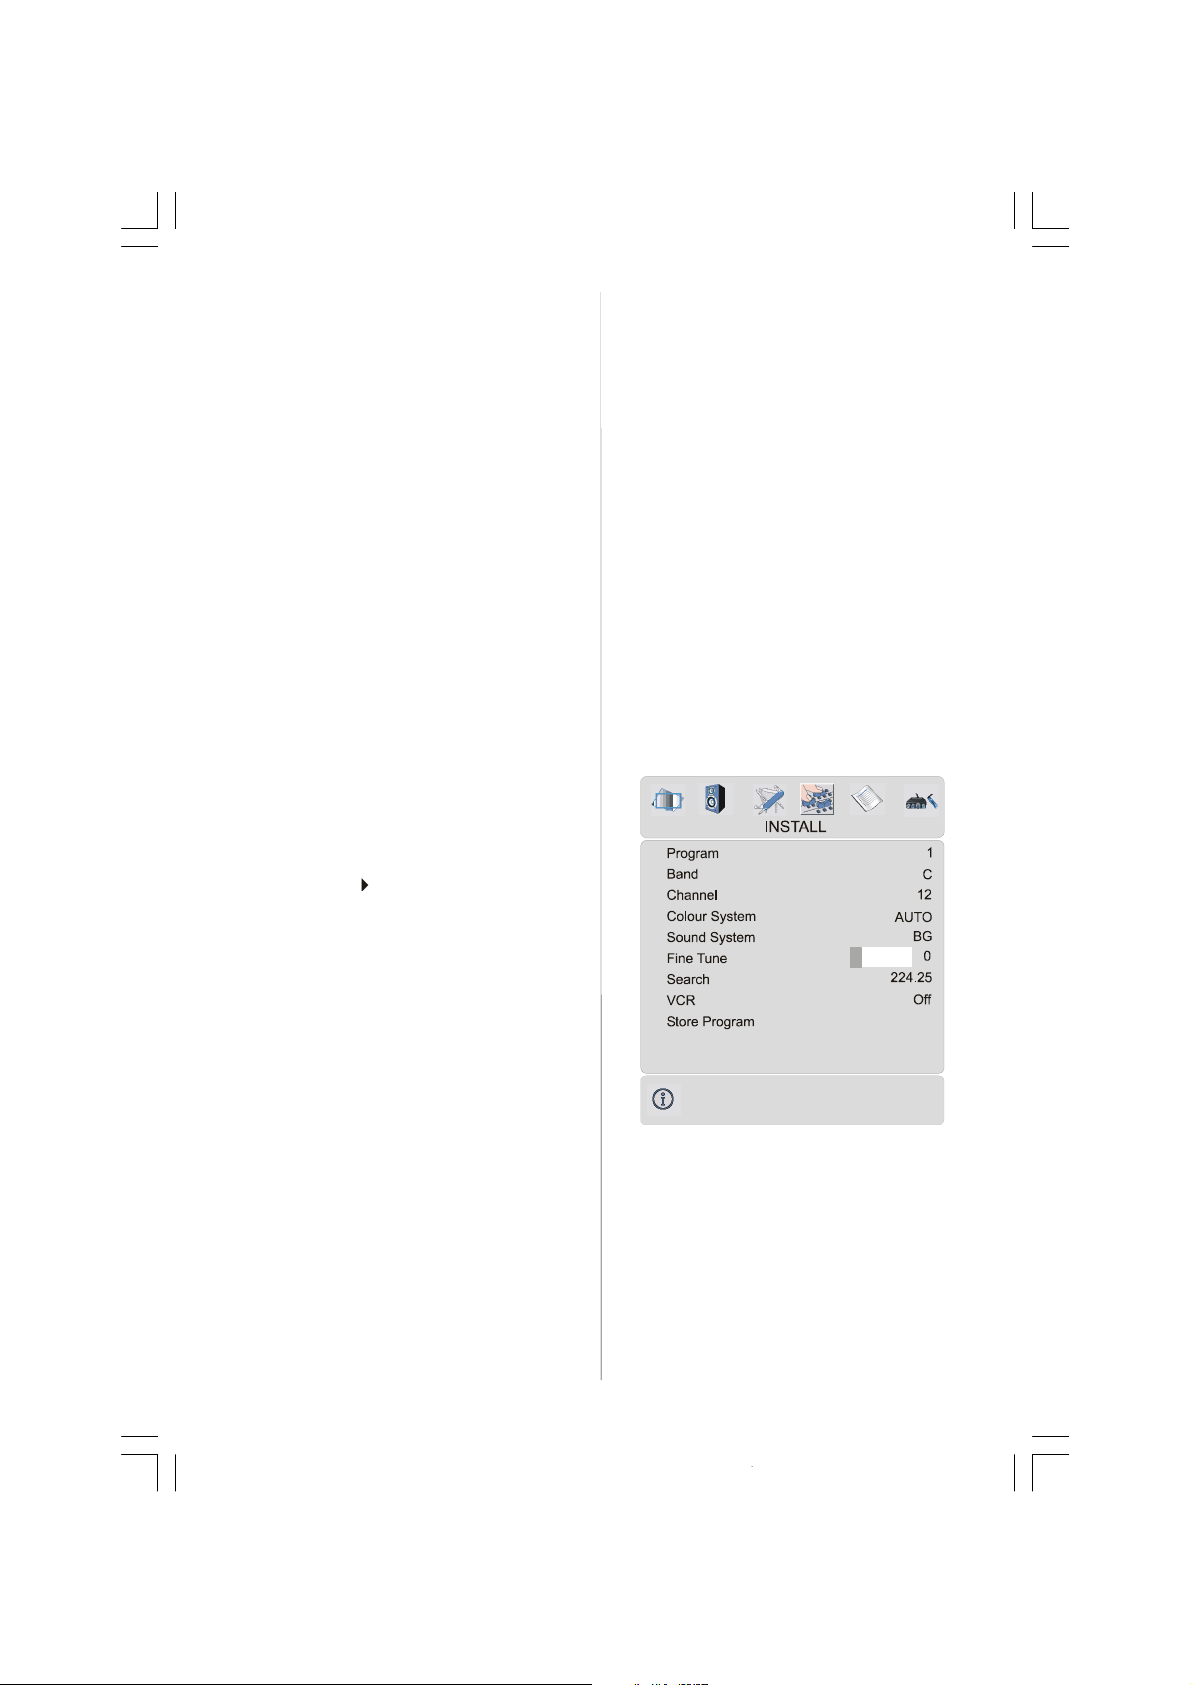
Sleep Timer
/
Bypressing
button,select Sleep Timer..
The timer can be programmed between Off
and 2 hours in steps of 10 minutes by pressing
/
button. If sleep timer is activated, at
the end of the selectedtime, the TVautomatically goes into stand-by mode.
Child Lock
You can use this feature to prevent children
from turning the TV on or changing
programmes or adjustments etc. without remote control.
Thechild lockfeaturecanbesetby
/
button
toeitherOn orOff. WhenOffisselected,there
will be no difference in the operation of your
TV. When On is selected, the TV can only be
controlled by the remote control handset. In
thiscasethe control panel buttons,exceptthe
Poweron/offbutton, at the rear sideof the TV
willnotwork.Ifoneofthesebuttons ispressed,
“Child Lock On” will be displayed on the
screen.
Language
Menu Background
Bypressing
/
button,selectMenu Back-
ground. You can change menu background
to Translucent or Opaque by pressing
/
button.
Menu Timeout
/
By pressing
Timeout. Press
button, select Menu
/
button to change menu
timeout to 15 sec, 30 sec or60 sec.
Teletext Language
/
Bypressing
guage. Press
button,selectTeletext Lan-
/
button to change Teletext
LanguagetoWest, East, Cyrillic, Turk/Gre or
Arabic. This will normally be set to West for
Western Europe.
Install menu
Bypressing
Install menu appears on the screen.
/
button,selectthe fourthicon.
By pressing
By pressing
/
button, select Language.
/
button, you can select the
language.
Ext-2 Out
/
By pressing
button, select Ext-2 Out.
You can set Ext-2 Out to TV, EXT-1, EXT-3,
EXT-4 or EXT-5by pressing
/button.
Note:Only audio output is available for EXT-3
andEXT-5.Theotheroptions have both audio
and video outputs.
Default Zoom
By pressing
/button, select Default
Zoom. You can set Default Zoom to Panoramic, 4:3 or 14:9 Zoom by pressing
/
button.
IfthereisnoWSS or aspectratio(picturesize)
information and zoom mode is selected as
Auto bypressing the“WIDE” button, then the
zoom mode will automatically change to Default Zoom setting. See also Zoom Modes on
page 14.
Program
By pressing
Press
/buttonto select the program num-
/
button, select Program.
ber. You can also enter a number via digitbuttonsontheremotecontrol.There are 100 program storage between 0 and 99.
Band
Band can be selected either "C" or "S" using
the
/
buttons. "C" is used for "Off Air"
signals. "S" is used for cable connections.
-12-
ENG-26720W-1549UK-26 INCH 17MB15 OEM-(WO VGA-WO PIP)(HD READY)(S)(OZEL)-50100182.p6516.01.2007, 18:0512
Page 14
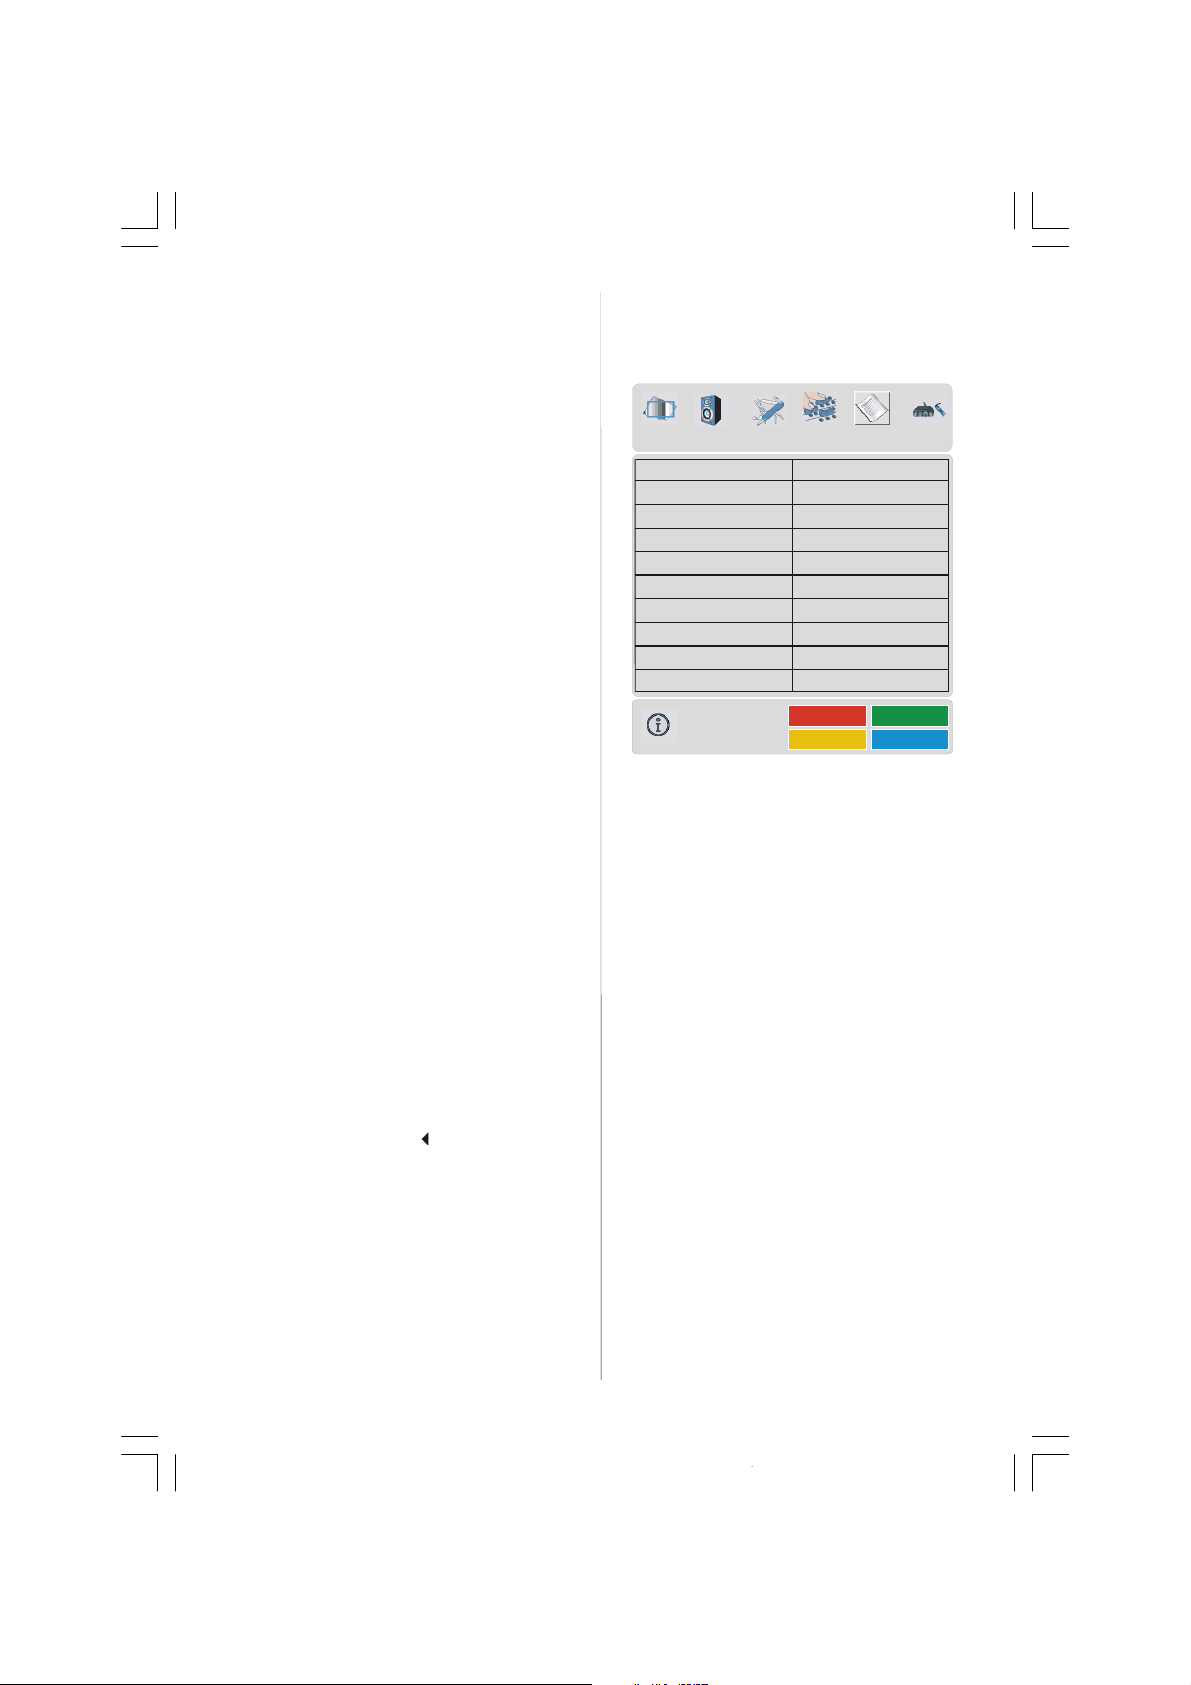
Channel
/
Channel can be changed by
button or
Digit Buttons.
Colour System
/
Bypressing
tem. Press
button,selectColour Sys-
/
button to change the colour
system toPAL, SECAM, PAL60 orAUTO.
If Sound System is set to I, SECAM is not
available for the Colour System.
Note: In EXT mode, you can choose NTSC
3.58 and NTSC 4.43 as well.
Sound System
By pressing the
System. Pressthe
/
buttons,selectSound
/
buttons to select the
Sound system. BG "Western Europe", DK
"Eastern Europe", I "UK only" L and LP
"France".
FineTune
By pressing
Press
/
button, select Fine Tune.
/
button to adjust the tuning.
Search
/
By pressing
Press
/
button to start program searching.
button, select Search.
Thesearchingwillstopwhena signalisfound.
You can also enter a frequency value directly
by pressing the digit buttons.
VCR (Video Cassette Recorder)
• This item can be seen in all modes except
EXT-3 and EXT-5.
•IfyouwanttowatchaVCR sourcefromoneof
these modes, then it will be better to set
VCR mode “on”. For this, while the cursor is
on this item press the
/
buttons to set it
“On”.
•IfyouwanttowatchaDVD ,thenyoumustset
this item “Off”.
Store Program
By pressing
gram. Press
/button, select Store Pro-
/
or “OK” button to store the
adjustments. “Program Stored” will be displayed on the screen.
Program menu
By pressing
Program menu appears on the screen.
By moving the cursor in four directions you
can reach 20 programmes in the same page.
You can scroll the pages up ordownby pressing the navigation buttons to see all the
programmes in TV mode (except the AV
mode).
Bycursoraction,programmeselectionis done
automatically.
Name:
To changethenameof a decidedprogramme,
select the programme and press the RED
button.
The first letter of the selected name starts to
blink.Press
and
/
pressing the RED button, you can store the
name.
Insert:
Select the programme which you want to insert by navigation buttons. Press the GREEN
button. By navigation buttons move the se-
lected programme to the decided programme
space and press the GREEN button again.
/
button, select thefifth icon.
11 C - 43
12 C - 64
13 C - 68
16 - - - - 17 - - - - 18 - - - - 19 - - - - 20 - - - - -
APS
/
buttontochangethat letter
buttonto select the other letters. By
-13-
ENG-26720W-1549UK-26 INCH 17MB15 OEM-(WO VGA-WO PIP)(HD READY)(S)(OZEL)-50100182.p6516.01.2007, 18:0513
Page 15
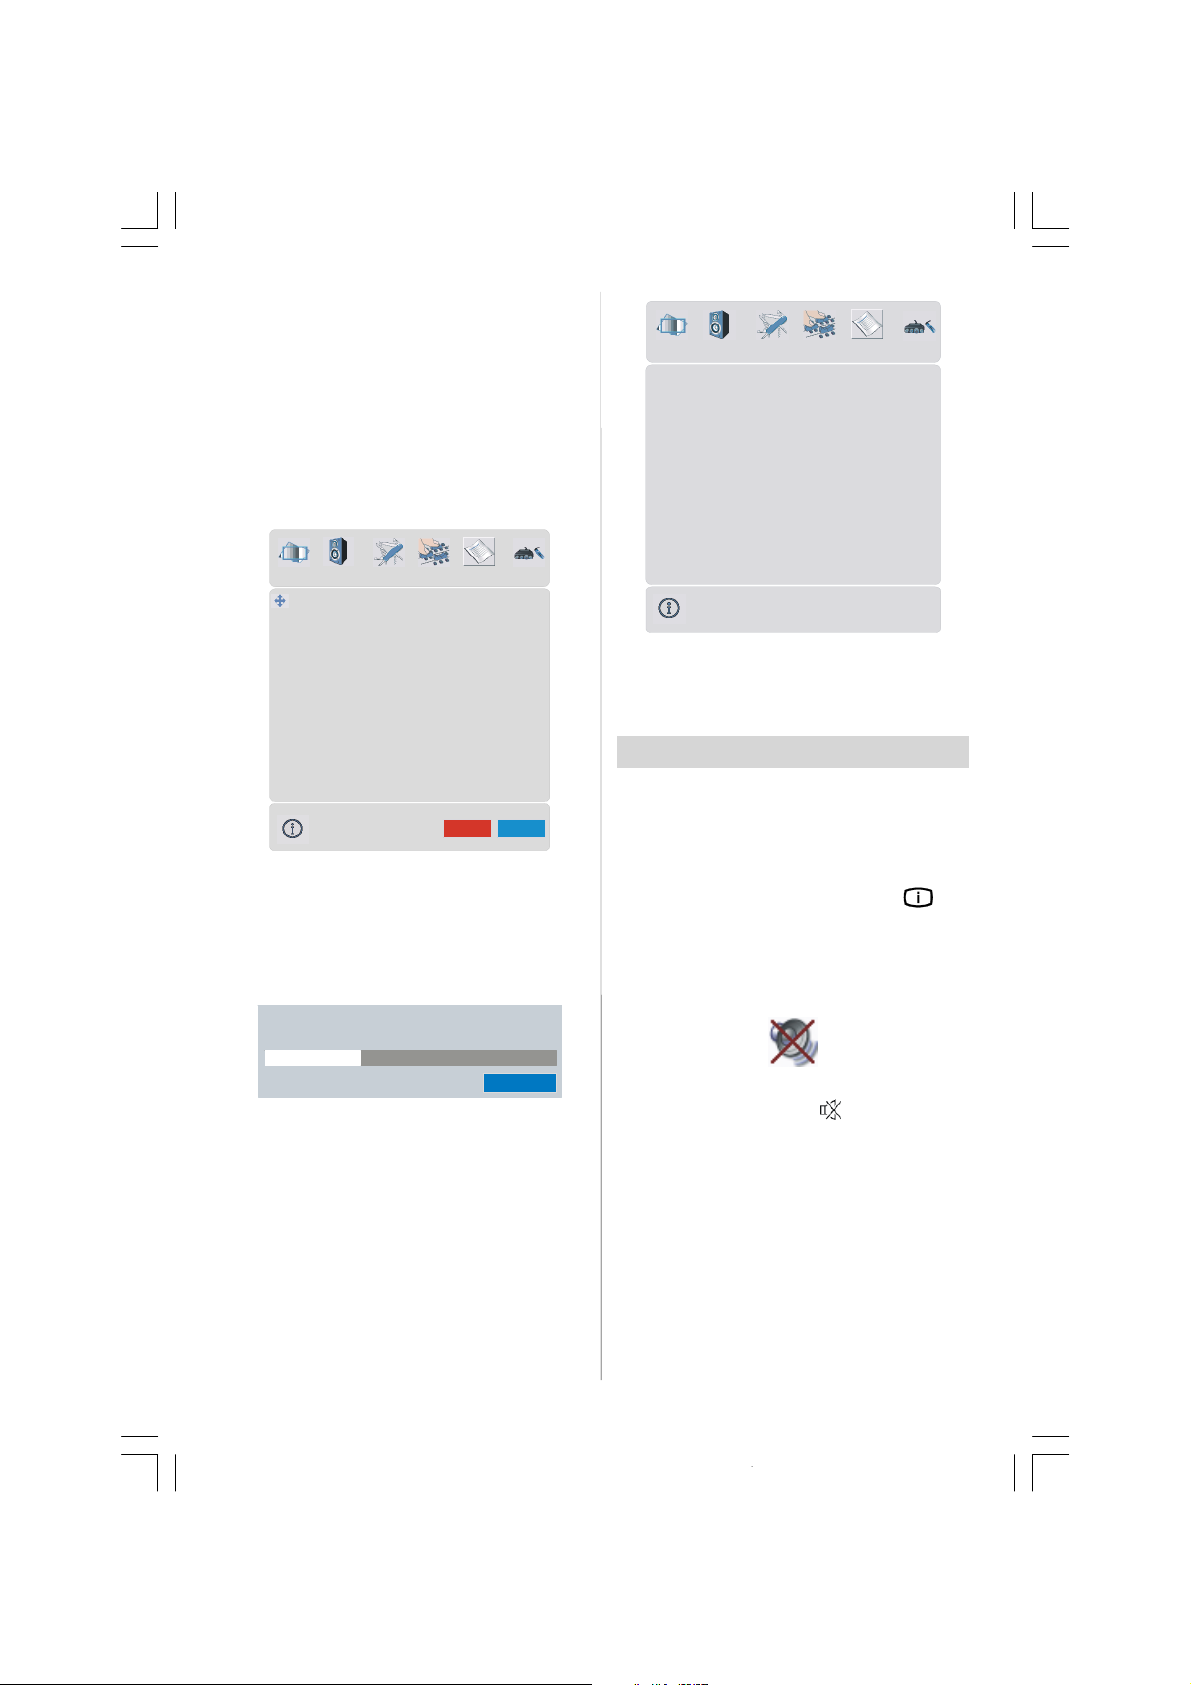
Delete:
WARNING!
UK
Cancel
Cancel
To delete a programme, press the YELLOW
button. Pressing the YELLOW button again
erases the selected programme from the
programme list, and the programmes below
shift one up.
APS (Automatic Programming System)
When you press theBLUEbuttonforAPS, the
following warning screen will be displayed.
All prestoredprograms
will be deleted
PresstheBLUEbuttontocancelAPSifyoudo
not want to delete your existing programme
list.
To continue APS, first select the country by
pressing
/
buttonand then press the RED
or“OK”button.
UK - I 155,25 Mhz
APS is running...
EXT - 2
EXT - 3
EXT - 4
EXT - 4S
EXT - 5
In source menu, highlight a source by pressing
/
button and switch to that mode by
pressing
/
or “OK”button.
Other Features
TV Status
Programme Number, Programme Name,
Sound Indicator and Zoom Mode are dis-
played on the upper right side of the screen
when a new programme is entered,
ton is pressed.
Mute Indicator
It is placed in the upper left side of the screen
when enabled.
but-
01 - C-01
AfterAPSis finalized,the programmetablewill
appear on the screen.
Source menu
By pressing/
Source menu appears on the screen.
ENG-26720W-1549UK-26 INCH 17MB15 OEM-(WO VGA-WO PIP)(HD READY)(S)(OZEL)-50100182.p6516.01.2007, 18:0514
button,select the sixthicon.
To cancelmute,there are twoalternatives;the
first one is pressing the
button and the
second one is increasing/decreasing the volume level.
Freeze Picture
You can freeze the picture on the screen by
pressing the OK button.
Zoom Modes
Zoom mode can be changed by pressing the
WIDE button. Youcanchange the screen size
according to the picture aspect ratio. Select
-14-
Page 16
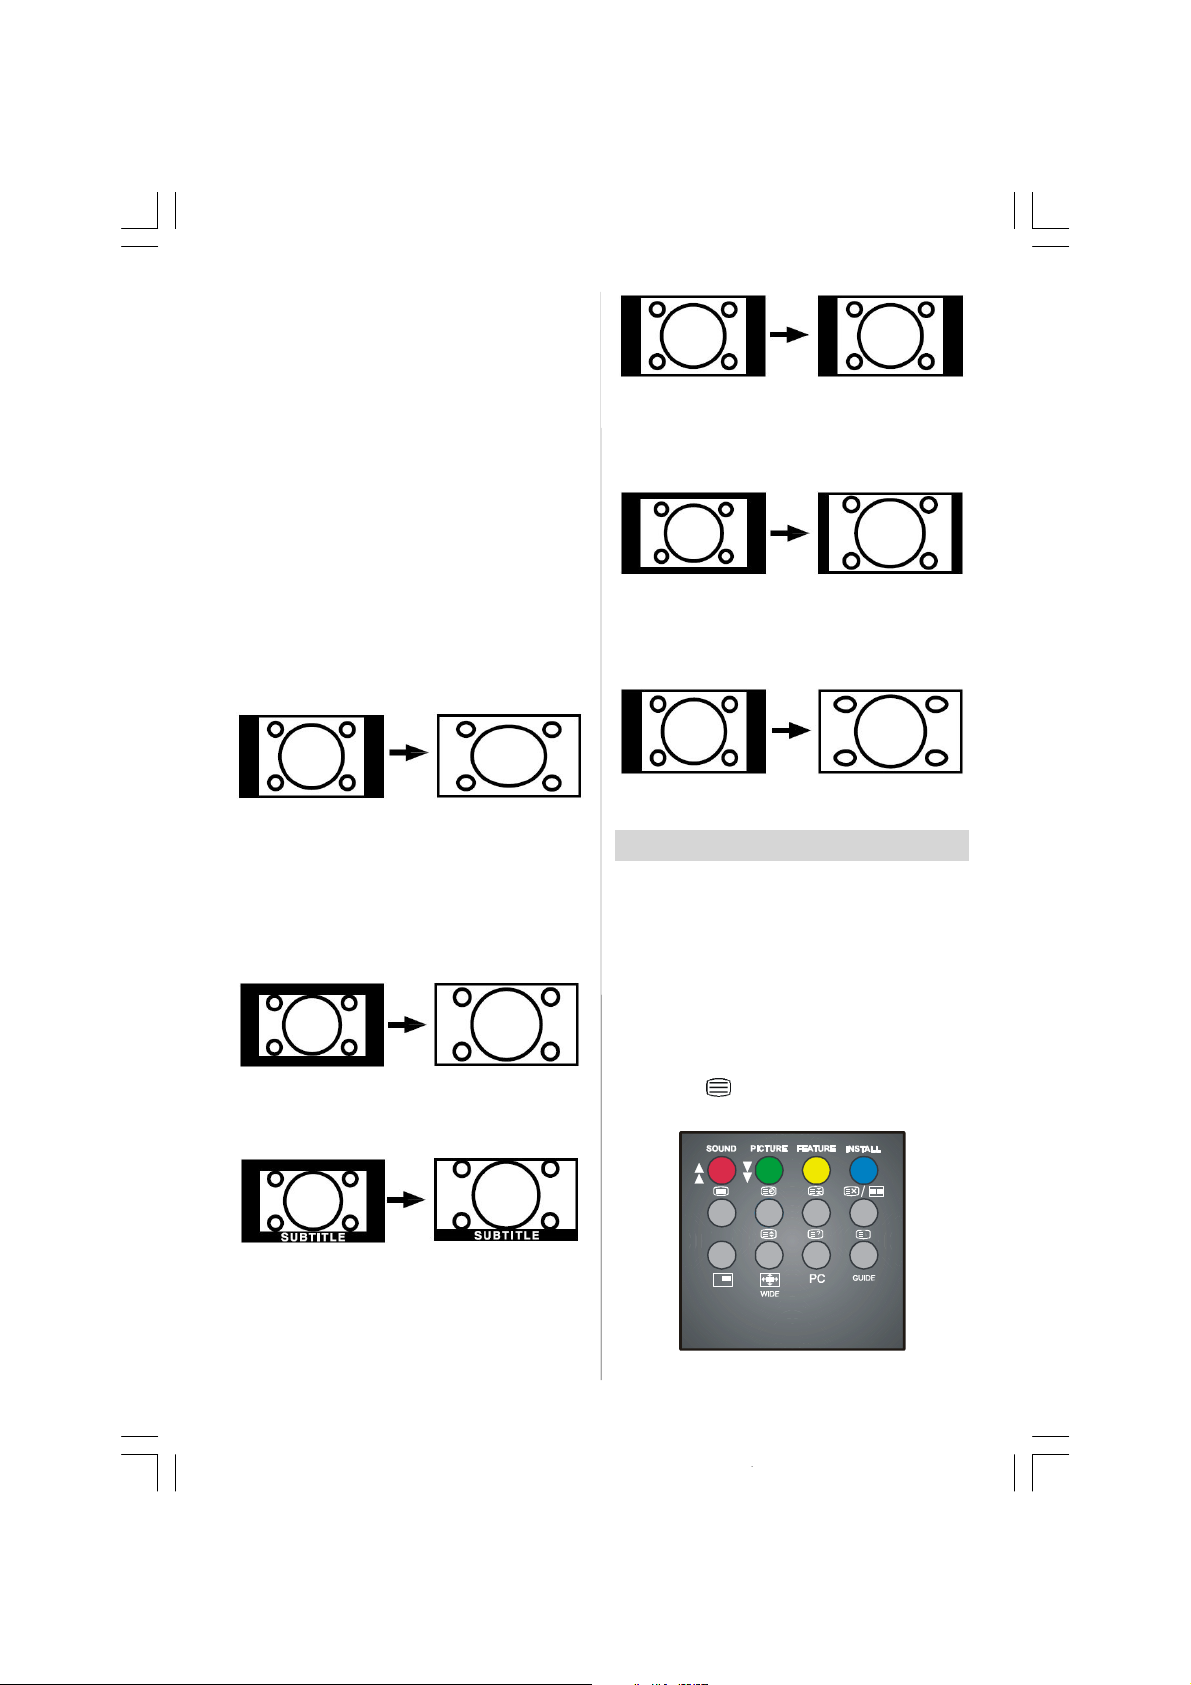
the optimum one from the following ZOOM
modes.
Auto:
When a WSS (Wide Screen Signalling) sig-
nal, which shows the aspect ratio of the picture, is includedin the broadcastsignal or the
signal from an external device, the TV auto-
matically changes the ZOOM mode according to the WSS signal.
•WhentheAUTO modedoesnotfunctioncor-
rectlyduetopoor WSS signalqualityorwhen
youwanttochangetheZOOM mode,change
to another ZOOM mode manually.
Full:
Thisuniformlystretches theleftandrightsides
of a normal picture (4:3 aspect ratio) to fill the
wide TV screen.
•For 16:9 aspectratiopicturesthathavebeen
squeezed into a normal picture (4:3 aspect
ratio), use the Full mode to restore the pic-
ture to its original shape.
Cinema:
This zooms up the wide picture (16:9 aspect
ratio) to the full screen.
14:9 Zoom:
This zooms up the wide picture (14:9 aspect
ratio) to the upper and lower limits of the
screen.
Panoramic:
Thisstretchesthe left and right sides of a normal picture (4:3 aspectratio) to fill the screen,
without making the picture appear unnatural.
The top and bottom of the picture are slightly
cutoff.
Teletext
Teletextis an informationsystem that displays
text on your TV screen. Using the Teletext in-
formation system you can view a page of information on a subject that is available in the
list of contents (index).
16:9 Subtitle:
This zooms up the wide picture (16:9 aspect
ratio) with subtitles to the full screen.
“Default Zoom” Modes:
4:3
Useto view a normal picture (4:3 aspect ratio)
as this is its original shape.
ENG-26720W-1549UK-26 INCH 17MB15 OEM-(WO VGA-WO PIP)(HD READY)(S)(OZEL)-50100182.p6516.01.2007, 18:0515
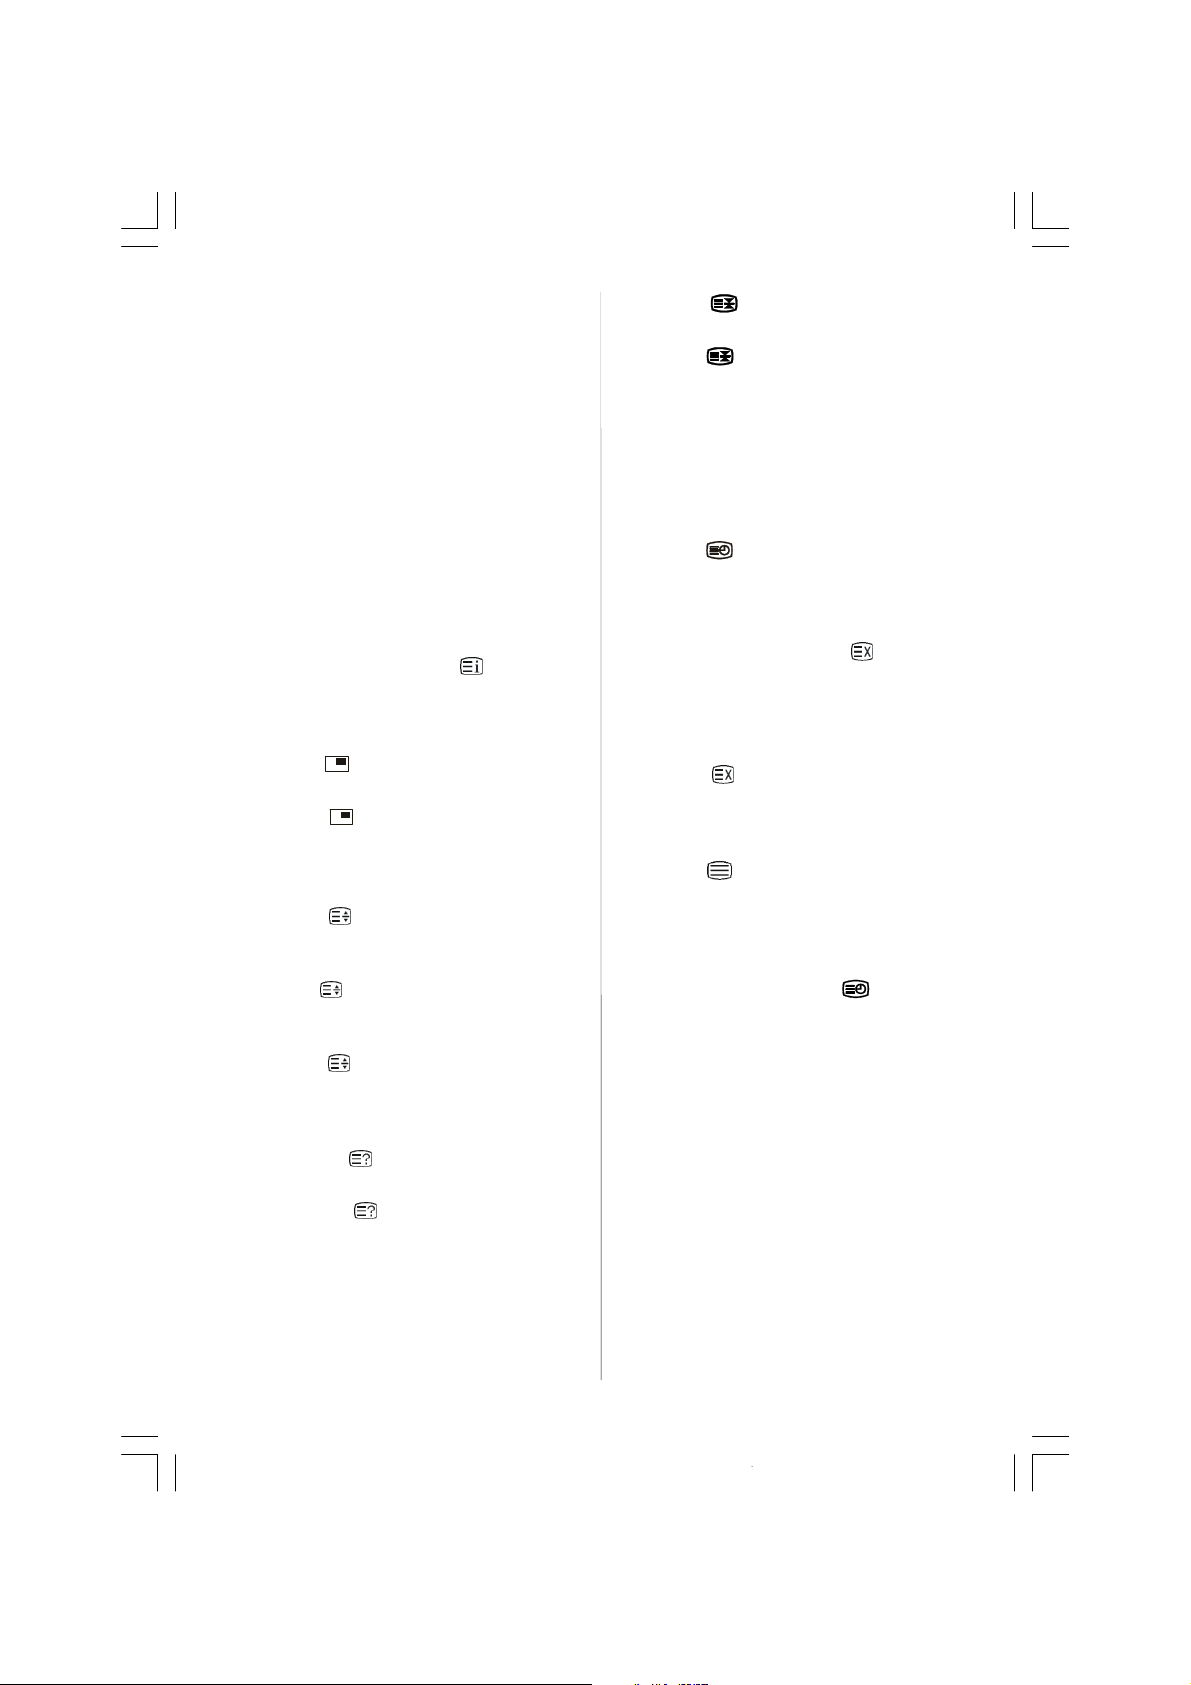
To Operate Teletext
• Select a TV station where Teletext is being
transmitted.
• Press the button. Usually the list of contents (index)is displayed on the screen.
-15-
Page 17
To Select A Page Of Teletext
• Press the appropriate digit buttons for the
required Teletext page number.
The selected page number is displayedin the
topleftcorner of the screen.TheTeletextpage
counter searches until the selected page
number is located, the desired page is then
displayed on the screen.
• Press the
Teletext screen forward one page at a time.
• Press the
text screen backward one page at a time.
or “P +” button to move the
or “- P”button to move the Tele-
To Select Index Page
•To select the page number of the index(generally page 100), press the
button.
To Select Teletext With A TV
Programme
• Press the button. The text is now superimposed over the programme on the screen.
• Press the
Teletext page.
button again to return to the
To Select Double Height Text
• Press the button for the top half of the
information page to be displayed in double
heighttext.
•Pressthe
of the information page to be displayed in
double height text.
• Press the button once more for the full
page of normal height text.
buttonagainfor the bottomhalf
To Reveal “Concealed” Information
• Pressing the button once will reveal answers on a quiz or games page.
• Pressing the
the revealed answers.
button again will conceal
To Stop Automatic Page Change
Theteletext page you have selectedmaycontain more information than what is on the
screen; the rest of the information will be displayedafter a period of time.
• Press the
page change.
• Press the
page to be displayed.
button to stop the automatic
button again to allow the next
To Select A Subcode Page
Subcode pages are subsections of long Teletext pages that can only be displayed on the
screen one section at a time.
• Select the required Teletext page.
• Press the
• Select the required subcode page number
by pressing four digit buttons (e.g. 0001).
•Iftheselectedsubcode pageisnotdisplayed
in a short time, press the
programmewill be displayed on the screen.
• Teletext page number will be displayed on
the upper left corner of the screen when the
selected page is found.
• Press the
Teletext page.
button.
button. TV
button to display the selected
To Exit Teletext
• Press the button. The screen will switch
toTVmode.
To Display The Time
• While watching a TV programme with Teletext transmission press the
currenttimeinformation, capturedfromTeletext will be displayed on the screen.
• If the programme being watched does not
have Teletext transmission, no information
will be displayed.
button. The
Fastext
Your TV supports the 1000 page Teletext system. When thepage number of anyofthe 1000
pagesin memoryisentered, thesystemwill not
search for the requested page; instead it will
displaythepage automatically. If the requested
page is not in memory, the system will search
for the requested page number and save the
1000 pages including the requested page into
memory after finding it.
• Press the
-16-
button to move the Teletext
ENG-26720W-1549UK-26 INCH 17MB15 OEM-(WO VGA-WO PIP)(HD READY)(S)(OZEL)-50100182.p6516.01.2007, 18:0516
Page 18

screen forward one page at a time.
• Press the
screen backward one page at a time.
For Fastext
The subject-heading for the information may
have a particularcolour.
•PressanappropriateRED,GREEN,YELLOW
or BLUE buttoninorderto reach therelevant
page quickly.
For TOP text
TOP text mode of operation will be activated
automatically according to the transmission.
• If TOP text transmission is present, colour
coded buttons will appear in status row.
• If TOP text transmission is not present, status row will not appear.
The subject-heading for information may be
located in coloured box.
In Top mode the
questthenext or previouspagerespectively. If
TOPtexttransmissionis not available,incase
of operation of these commands, wraparound
occurs. For example page 100 appears to be
one greater than page 199.
button to move the Teletext
or
commands will re-
ConnectPeripheral
Equipment
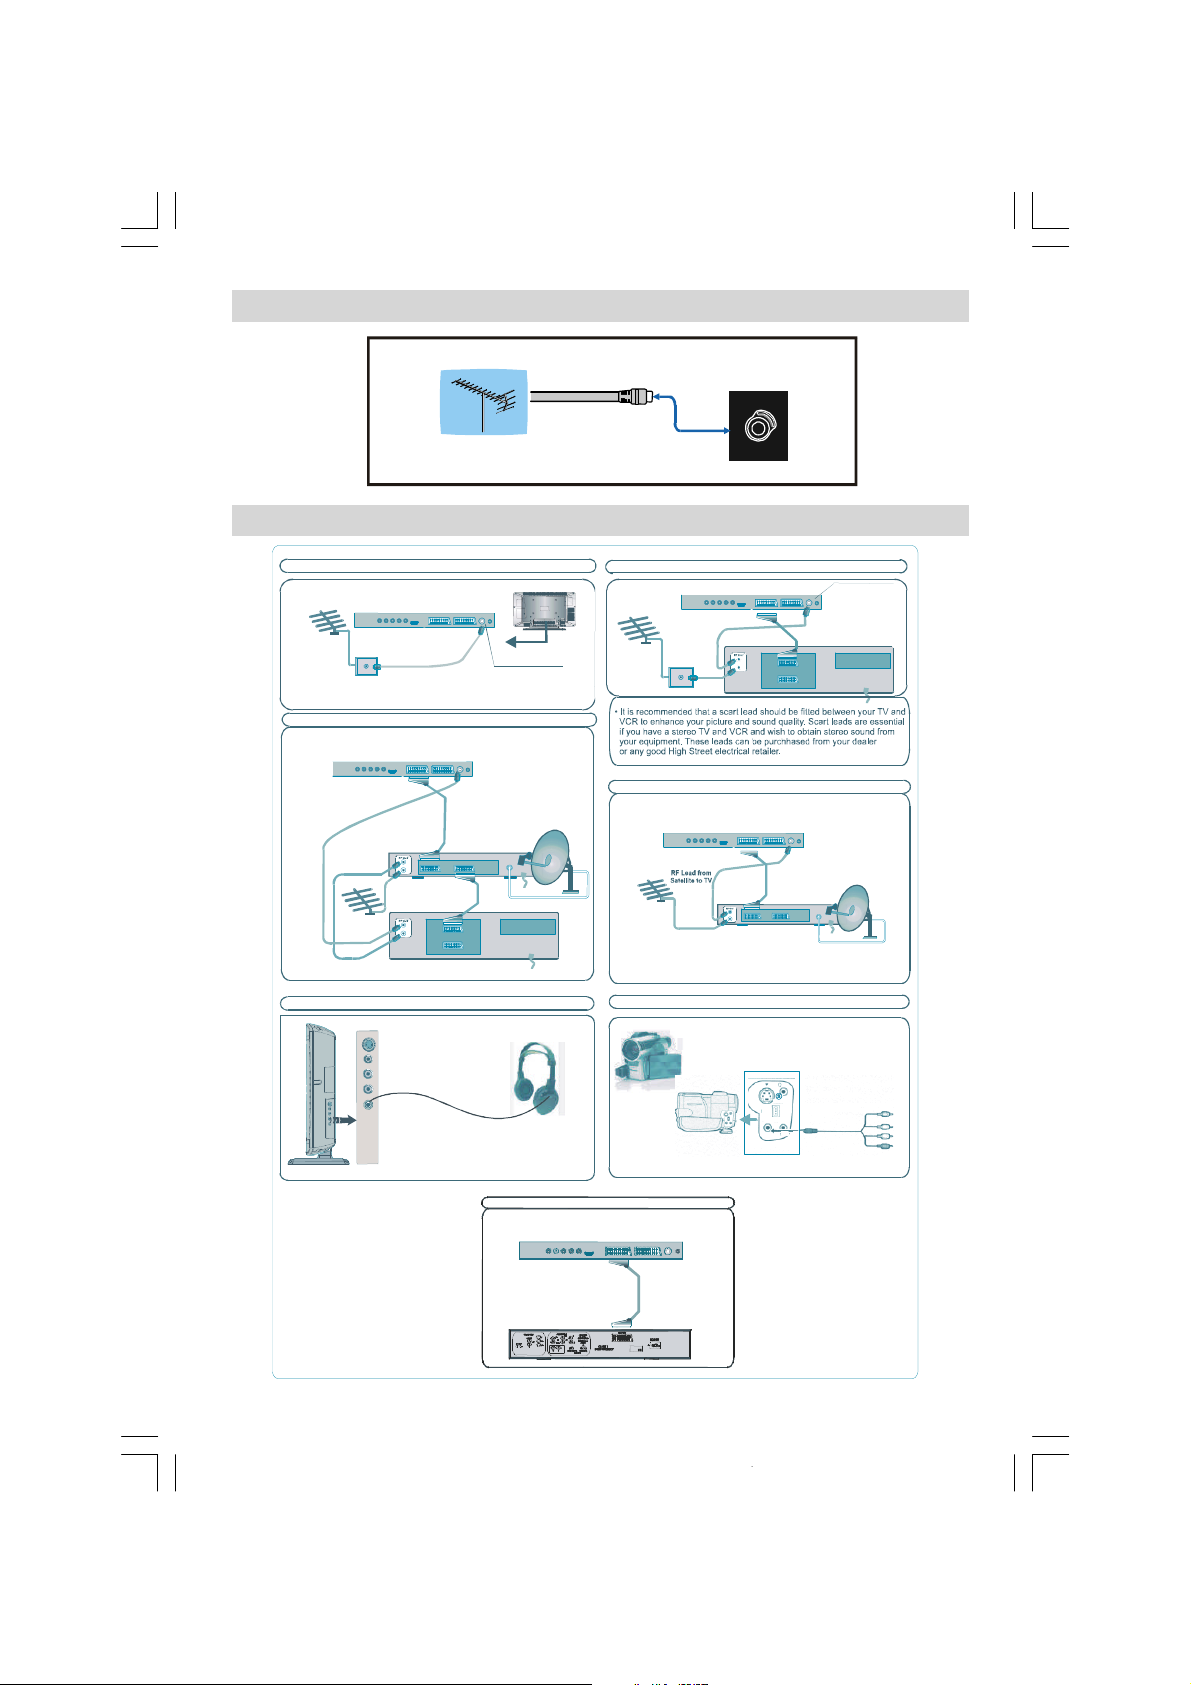
Thereisawiderangeofaudioandvideoequipment that can be connected to your TV.
The following connection diagrams show you
wherethe different (Optional)equipmentshould
beconnected attherear sideoftheTV.
High Definition
Your LCD Television is capable of displaying
High Definition pictures from devices such as
a High Definition Satellite Receiver or DVD
Player. These devices must be connected via
theHDMIsocket(EXT-5)orComponentSocket
(EXT-3).Thesesocketscanaccepteither720p
or 1080i signals.
Note:ForproperconnectionofadevicetoHDMI
inputofyourTVviausingaDVI-to-HDMIcable,
use PC Audio In input for sound connection.
Via The Scart
LCD TV has 2 Scart sockets. If you want to
connectperipherals (e.g. video,decoder, etc.)
whichhaveScartsocketstotheTV,useSCART
1 or SCART 2.
Ifanexternaldeviceisconnectedviathe Scart
sockets, the TV will be switched to AV mode
automatically.
• Do not connect Digital Set Top Box devices
via Scart 1. Use Scart 2.
Via Aerial Input
If you want to connect to your TV, peripherals
like video recorders or decoders, but the deviceyou wantto connectdoesnothavea Scart
socket, you should connect it to theAerial in-
putoftheTV.
If the VCR is connected via Aerialinput it is
suggested to use Programme 0.
Decoder
Cable TV offers you a wide choice of
programmes. Most of them are free, others
are to be paid for by the viewer. This means
that you will need to subscribe to the broadcasting organisation whose programmes you
wish to receive. This organisation will supply
you a corresponding decoder unit to allow the
programmes to be unscrambled.
For further information ask your dealer. See
also the booklet supplied with your decoder.
Connect a decoder with an aerial socket
to the TV
• Connect the aerial cable.
Connect a decoder without an aerial
socket to the TV
• Connect the decoder to the TV with a Scart
cabletoSCART 1.
TV And Video Recorder
• Connect the aerial cables.
Betterpicturequalitycanbeobtainedifyoualso
connecta Scartcableto SCART sockets.
Playback NTSC
To use this option you can;
• Connect an NTSC VCR player to a Scart
socket at the rear side of the TV.
-17-
ENG-26720W-1549UK-26 INCH 17MB15 OEM-(WO VGA-WO PIP)(HD READY)(S)(OZEL)-50100182.p6516.01.2007, 18:0517
Page 19

•ConnectanNTSCVCR playerto RCA Jacks
at the side of the TV.
AV
Then,press
propriate source.
/SOURCE button to select ap-
CopyFacility
Source selection for VCR recording.
• SelectFeature menu.
• Select Ext-2 Out bypressing
• Select a source to copy the picture from that
source.
/
button.
Search For And Store The Test
Signal Of The Video Recorder
•Unplugtheaerial cable fromtheaerialsocket
of your video recorder.
•SwitchonyourTVandputthevideorecorder
on the test signal. (See the booklet for your
video recorder.)
•Enter the Install menu and select search.
• Search for the test signal of your video recorder in the same way as you searched for
and stored the TV signals. Storethe test sig-
nal under programme number 0.
• Replace the aerial cable in the aerial socket
of your video recorderonce you have stored
the test signal.
Connect The Decoder To The
Video Recorder
Some video recorders have a special Scart
socket for decoder.
• Connect a Scartcableto the Scartsocket of
yourdecoder and to the specialScartsocket
ofyourvideorecorder.Refertothebookletof
yourvideorecorder.
•To connect your video recorderto the TV, refer to the TV and Video Recordersection.
Ifyouwant to connectmoreequipmenttoyour
TV, consultyourdealer.
Connecting Headphones
Use the stereo headphone socket at the right
side of the TV, to connect headphones.
Camera And Camcorder
To Connect To AV Input
ConnectyourcameraorcamcordertoAV(EXT-
4) input at the rightside of the TV.
•Connectyourequipmentto the TVviaVIDEO
(yellow), AUDIOR (red)andAUDIOL (white)
inputs. You must connect the jacks to the
input using the same colour.
To Connect to S-Video Input
Connect your camera or camcorder S-Video
outputto the input at theright of the Tv.
Connect the equipment to the Tv via the
S-Video input and audio inputviatheinputAV-
2. Use a S-Videolead and RCA (phono)lead.
ENG-26720W-1549UK-26 INCH 17MB15 OEM-(WO VGA-WO PIP)(HD READY)(S)(OZEL)-50100182.p6516.01.2007, 18:0518
-18-
Page 20
Aerial Connection
Aerial
Outdoor Aerial Connection
Round 75 ohm coaxial cable
75
Rear of TV
ConnectPeripheral Equipment
either connect th e aerial straigh t to your TV...
LCD TV
Wall
socket
Aerial (RF)
Lead
...or through a VCR an d satellite decode r.
LCD TV
RF Lead from
VCR to TV
VCR to Satellite
RF Lead
Aerial
from
ANT.IN
RF Lead to
Aerial
ANT.IN
TV VCR
AV-1
AV-2
• Scart Lead to
on TV.EXT-1
headphone connec tion
Headphone
Aerial (RF) Socket
Satellite LNB lead
...or connect the aer ial through a VCR...
LCD TV
(RF) connector
Aerial (RF)
Lead
lead VCR to TV
Wall
socket
Aerial (RF)
Socket VCR
ANT.IN
LCD TV
RF Lead to Aerial
camcorder c onnection
Optimal Scart Lead
TV to VCR
AV-1
AV-2
EXT-1 on TV.
Aerial (RF) Socket
Satellite LNB lead
OUT
...or through a DVD Player...
LCD TV
EXT-1 on TV.
-19-
ENG-26720W-1549UK-26 INCH 17MB15 OEM-(WO VGA-WO PIP)(HD READY)(S)(OZEL)-50100182.p6516.01.2007, 18:0519
Page 21
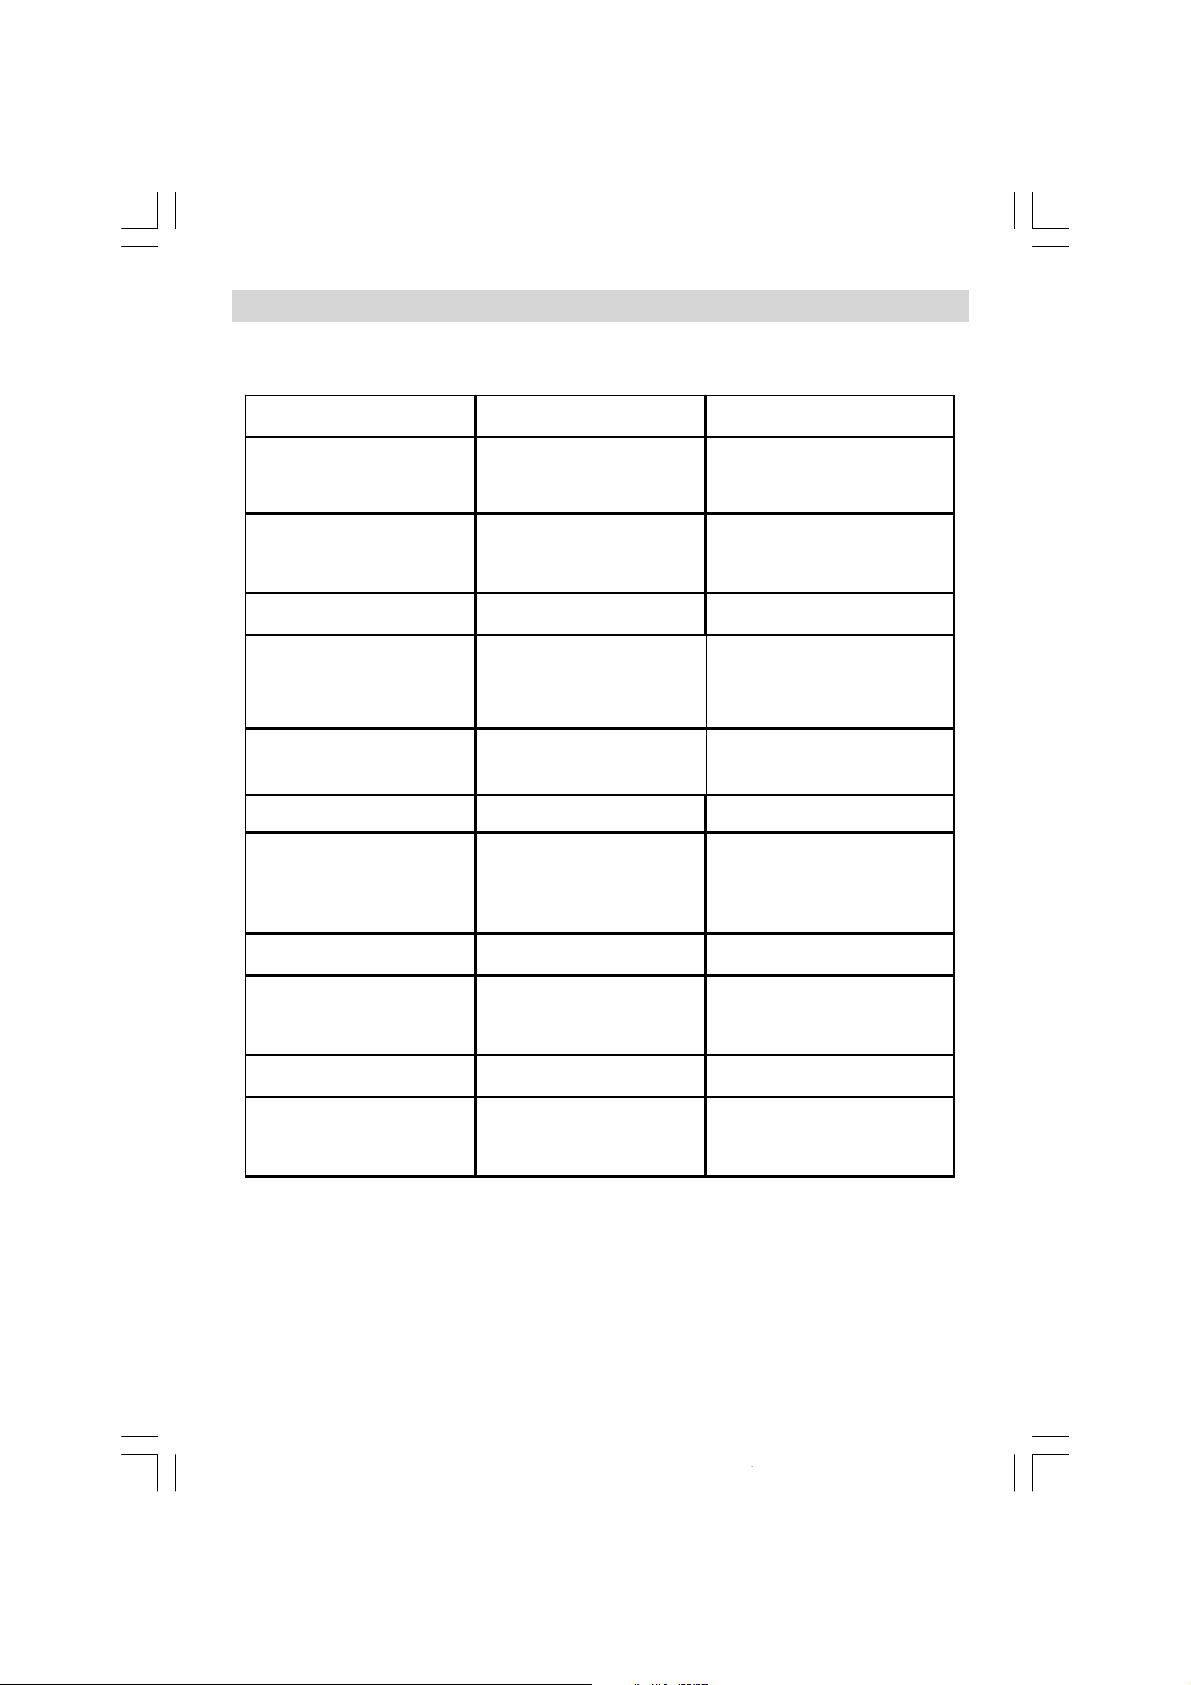
Trouble Shooting Guide
Should the Tv malfunction, please see below before calling the Customer Help line.
Symptom Possible cause Reme dy
Set Dead. No led lit. No power to the Tv
No Picture. Led RED Tvin standbymode.
No Picture. Led Green. Incorrect input selected. Select TVor IDTV.
Noisy or Ghosting picture
(Analog) signal.
Picture freezing or breaking up
(Digital) signal
No Text or corrupt text Poor signal See above
No sound.
Sound onlyfrom one speaker. Balance incorrectlyset.
No AVsignal.
Poor signal.
Poor signal
Sound source maybe
incorrectlyset. Mute mode may
be selected.
Connectrors loose.
Wrong input selected
Switch on the wall socket.
Use either the “on set” controls or
the “decimal digit” buttons on the
R/C to bring the Tvout of standby.
Check all aerial connections.
Ifusing an indoor aerial it maynot
be suitable.
Digital Tvrequires a better signal
than analog. You may need an
aerial upgrade.
Check sound settings, volume
Enter sound menu and adjust
sound balance.
Check all connections, try
replacement leads. Check correct
input is selected.
Remote control
No operation or intermitten
toperation.
Poor I/R signal from handset.
Replace batteries. Move objects in
path to tv. Reduce high incident
light in room.
If you are still having difficulty please call the Technical help line. Ring 01422 203676
(Normal rates apply).
OpeninghoursMon-Fri8 am – 8pm. Sat 9 am – 4pm. Sun 11am– 4pm “Bank holidays as Sun”
Care of the Screen.
Do NOT use any solvents or abrasive cleaners on the screen. You may damage the invisible
coating. If the screen is dirty you may use a soft cloth and mild detergent.
-20-
ENG-26720W-1549UK-26 INCH 17MB15 OEM-(WO VGA-WO PIP)(HD READY)(S)(OZEL)-50100182.p6516.01.2007, 18:0520
Page 22
CAUTION
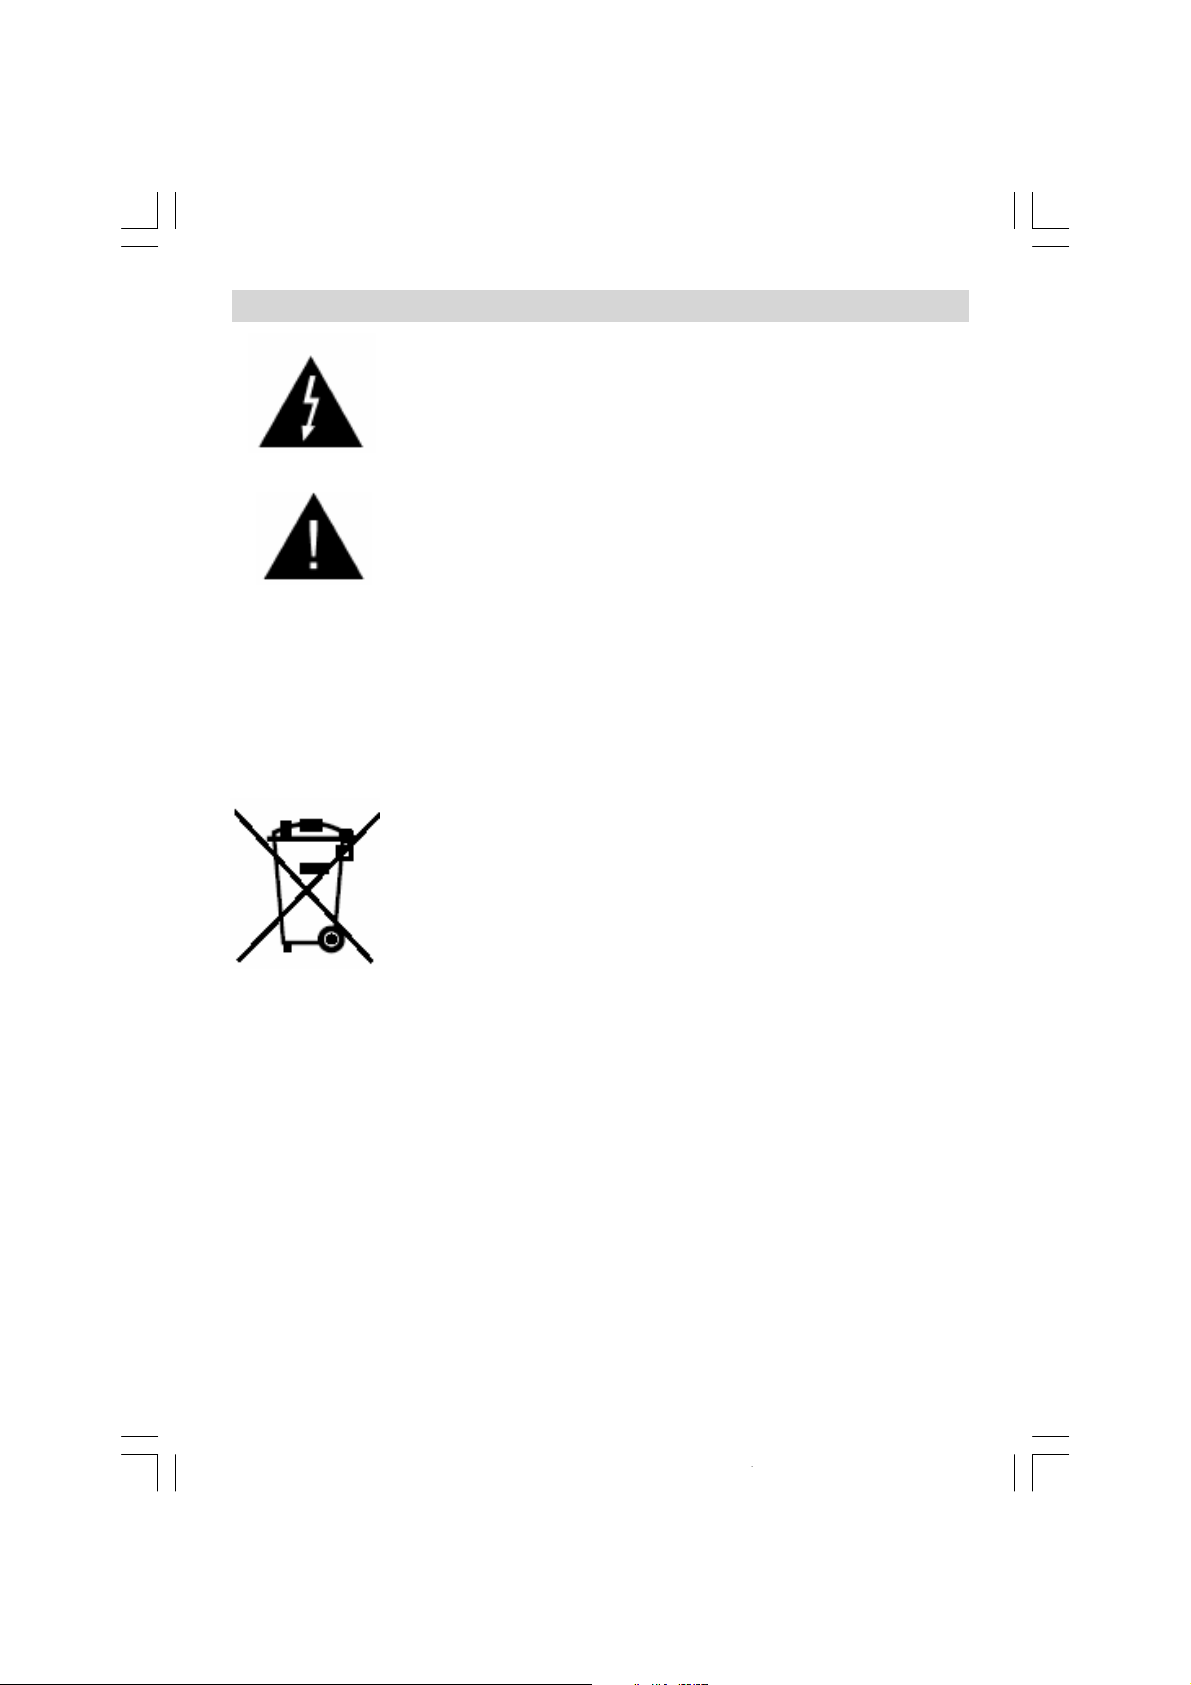
The lightning flash with arrowhead symbol, within an equilateral triangle,
is intended to alert the user to the presence of un-insulated “dangerous
voltage” within the productsenclosurethatmay be of sufficientmagnitude
to constitute a risk of electric shock to the persons.
The exclamation point within an equilateral triangle is intend to alert the
user to the presence of important operating and maintenance (servicing)
instructions in the literature accompanying the appliance.
Correct disposal of this Product
(Waste Electrical &Electronic Equipment (WEEE)
The crossed out “Wheelie bin” is intended to show that this appliance must not be placed with
ordinaryhousehold waste at the end of its useful life. Toprevent possible harm to the environ-
ment or human health from uncontrolled waste disposal, please keep
separate from other household waste and recycle it responsibly to promote the sustainable reuse of material resources.
Household users should contact either the retailer where you purchased
the product, or their local governmentoffice for details of where and how
you can take this item for environmentally safe re-cycling.
Business users should contact their supplier and check the terms and
conditions of the purchase contract. This product must not be mixed with
other commercial wastes for disposal
ENG-26720W-1549UK-26 INCH 17MB15 OEM-(WO VGA-WO PIP)(HD READY)(S)(OZEL)-50100182.p6516.01.2007, 18:0521
-21-
Page 23
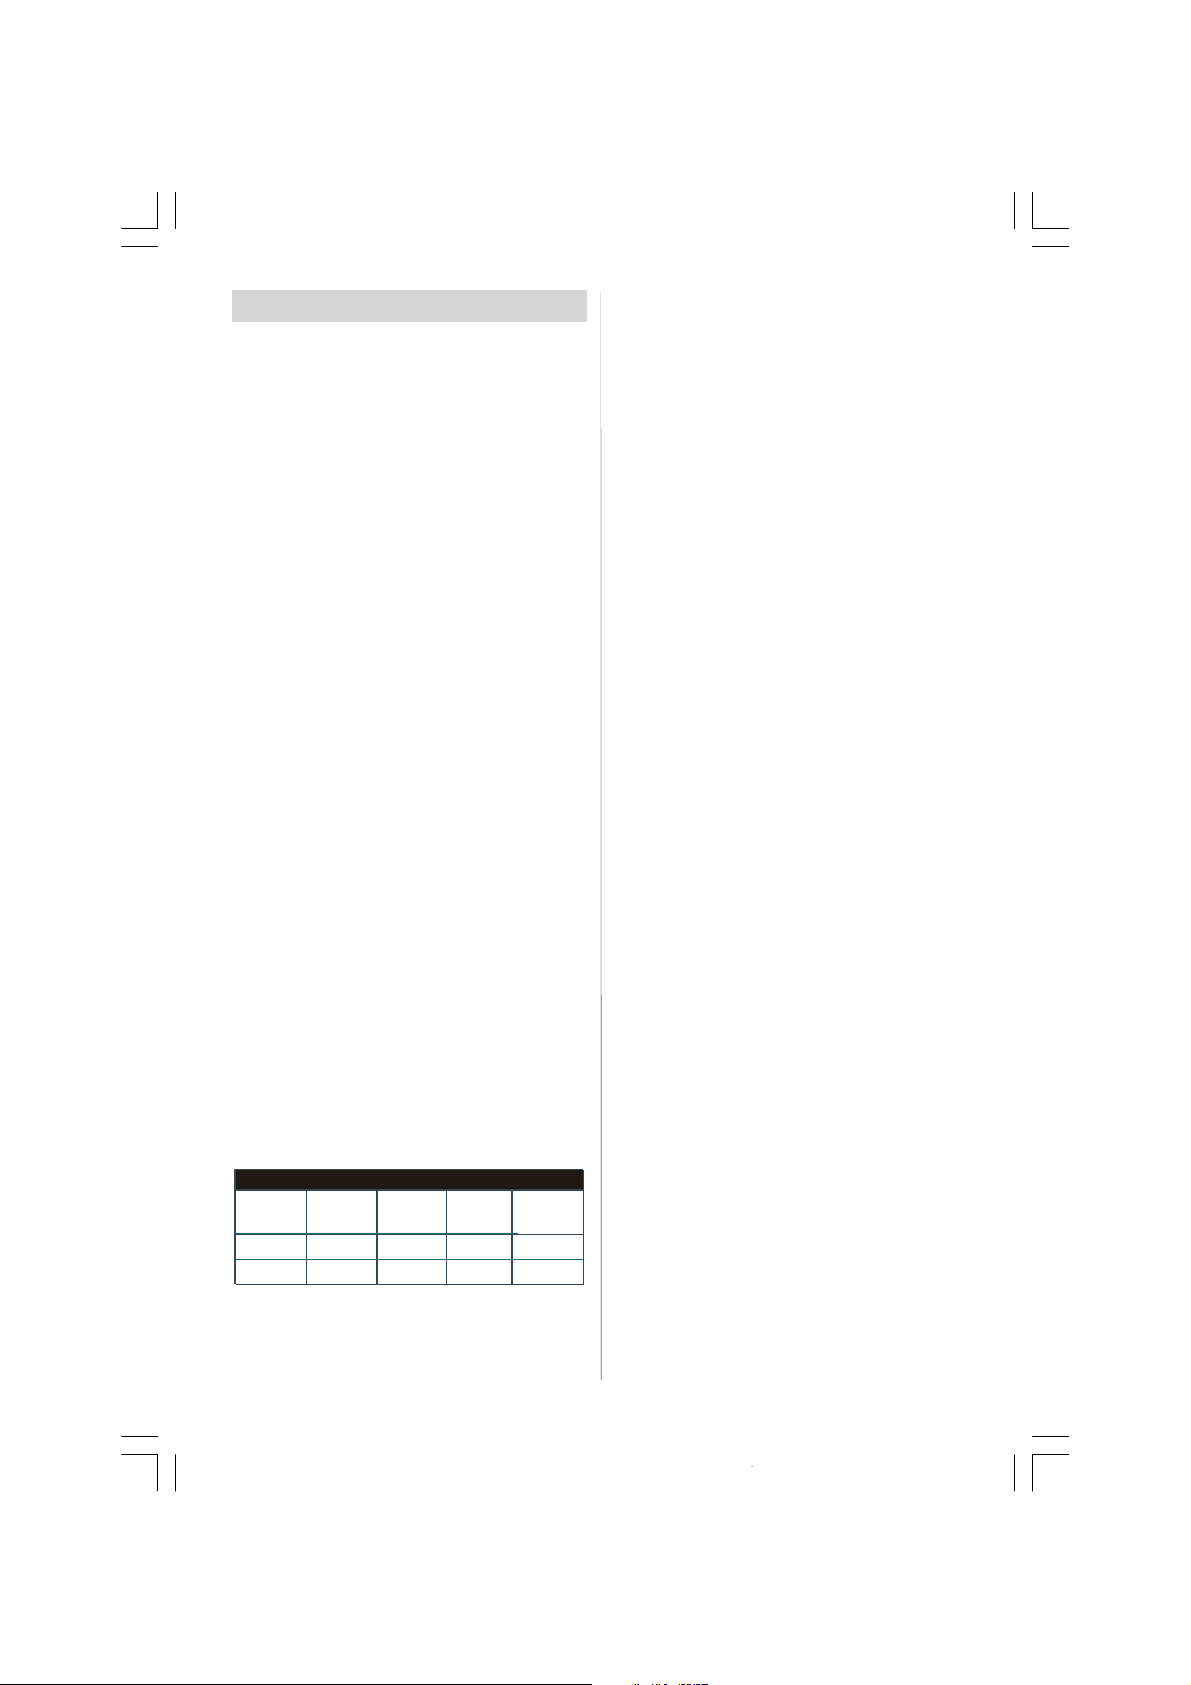
Specifications
Without foot
TVBROADCASTING
PAL/SECAMB/GD/KK'I/I'L/L'
RECEIVINGCHANNELS
VHF(BANDI/III)
UHF(BANDU)
HYPERBAND
CABLETV(S1-S20/ S21-S41)
NUMBER OFPRESETCHANNELS 100
CHANNELINDICATOR
On Screen Display
RFAERIAL INPUT
75 Ohm (unbalanced)
OPERATINGVOLTAGE
220-240VAC, 50 Hz.
AUDIO
German+Nicam Stereo
AUDIOOUTPUT POWER (W
RMS.
2 x 8
POWERCONSUMPTION (W)
160 W
2,7W (Stand-by)
PANEL
16:9 display, 26” ScreenSize
DIMENSIONS (mm)
480
450
Weight (kg)
11,8
10,4
D L H
211
100
810
810
Due to on going developments.
Specifications may be changed without
notice
ENG-26720W-1549UK-26 INCH 17MB15 OEM-(WO VGA-WO PIP)(HD READY)(S)(OZEL)-50100182.p6516.01.2007, 18:0522
) (%10 THD)
With foot
-22-
Page 24
ImportantInstruction
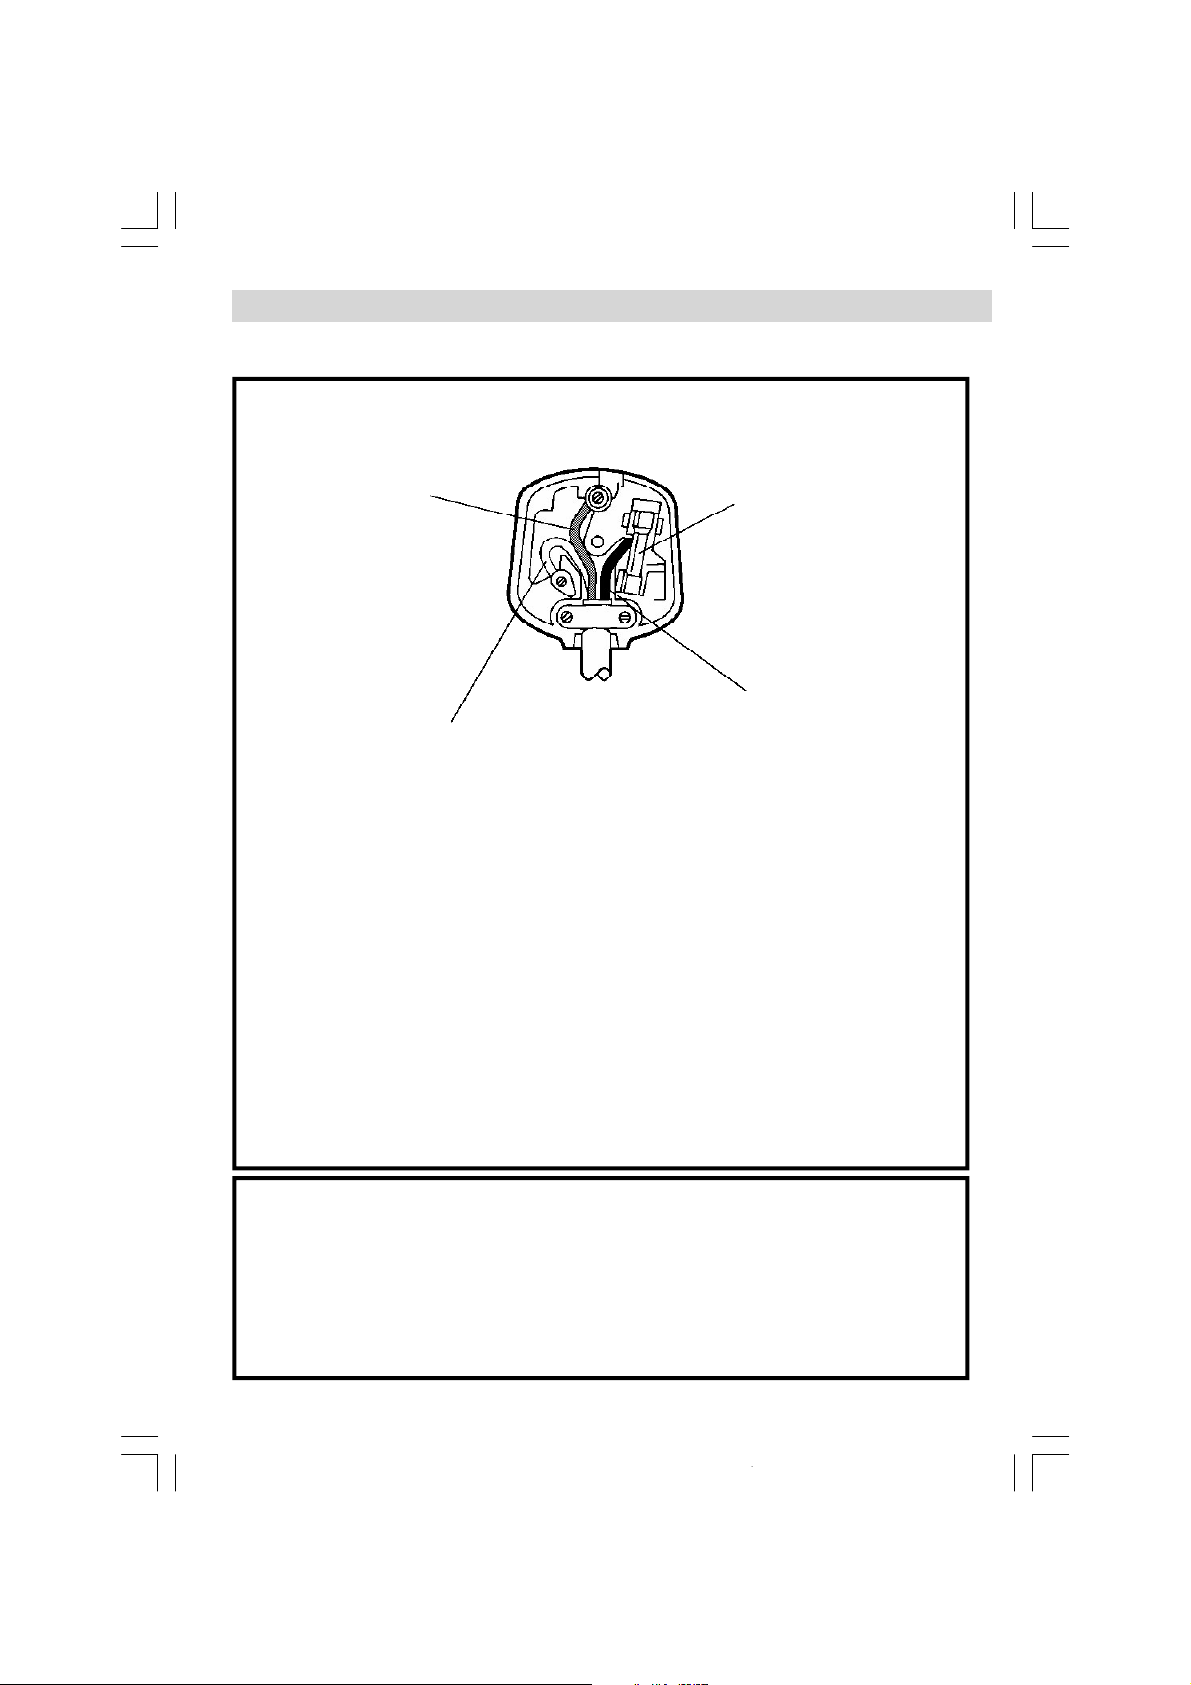
For your own safety read following instructioncarefullybeforeattempting to connect this unitto the
mains supply.
MAINS (AC) OPERATION
The wires in the mains lead are coloured in accordance with the following code :
GREEN
&
YELLOW
(Earth)
(if there is
earth cable)
BLUE
(Neutral)
IMPORTANT
As the coloursof the wires in the mains lead of this appliance may not correspondwiththe
coloured markings identifying the terminals in your plug, proceed as follows:
The wire which is coloured green and yellow must be connected to the terminal which is
marked with the letter E, or by the earth symbol, or coloured green or green and yellow.
The wire which is coloured blue or black must be connected to the terminal which is
marked with the letter N or coloured Black.
The wire which is coloured brown or red must be connected to the terminal which is
marked with the letter L or coloured Red.
For continued protection against risk of fire, replace only with same type and rating of fuse
(ASTAapproved5A250VAC fuse).
FUSE
BROWN
(Live)
CAUTION
TOPREVENTELECTRICSHOCKDISCONNECTFROMTHEMAINSBEFOREREMOVING
COVER. NO USERSERVICEABLEPARTSINSIDE. REFER SERVICING TO QUALIFIED
SERVICE PERSONNEL.
SAFETY PRECAUTION
THISEQUIPMENTMUSTBE DISCONNECTEDFROMTHE MAINSWHEN NOT IN USE.
DONOTALLOW THISUNITTOBEEXPOSEDTORAINORMOISTURE.
-23-
ENG-26720W-1549UK-26 INCH 17MB15 OEM-(WO VGA-WO PIP)(HD READY)(S)(OZEL)-50100182.p6516.01.2007, 18:0523
 Loading...