

Page 1

Please read this manual carefully
before using this TV set and keep it
for future reference.
COMBINED 21" CTV AND DVD PLAYER
AODV211T-S
OWNER'S MANUAL
CTV
+
If you experience any diffculty in setting up or operating
this product please contact the Helpline on 01422 203676.
Page 2

CONTENTS
Before Operation
Warning and cautions...........................................................................2
Installation..............................................................................................3
Aerial connection..................................................................................3
Preparation of the remote control.........................................................3
Function buttons and external sockets...............................................4
Front panel of the TV set.....................................................................4
Rear panel of the TV set.......................................................................4
Using the remote control......................................................................5
Basic operation
Switching on/off the TV set ..................................................................6
Watching TV ..........................................................................................7
Watching TV program..........................................................................7
Program swap and auto scan functions...............................................8
Searching channels...............................................................................9
Full automatic mode...........................................................................9
Semi-automatic search......................................................................10
Manual fine tune.................................................................................11
Program skip .....................................................................................12
Convenient picture and sound control functions.............................13
Multiple picture modes .....................................................................13
Black stretch and noise reduce..........................................................14
Mute and the language on the screen...............................................15
Time functions.....................................................................................16
Clock setting and timer on/off functions..........................................16
Sleep timer and program preset ......................................................17
Setup function ....................................................................................18
Screen saver and childlock functions.................................................18
AVL and calendar functions ..............................................................19
Position exchange function...............................................................20
Teletext..................................................................................................21
DVD Operation
Basic Playback.....................................................................................23
Advanced Playback..............................................................................24
Special Function Playback..................................................................25
DVD System Setup...............................................................................27
Playable Discs......................................................................................31
Disc Protection and DVD Characteristics..........................................32
Others
Connection to the external audio and video equipment..................33
Troubleshooting guide........................................................................34
Specifications......................................................................................35
Page 3
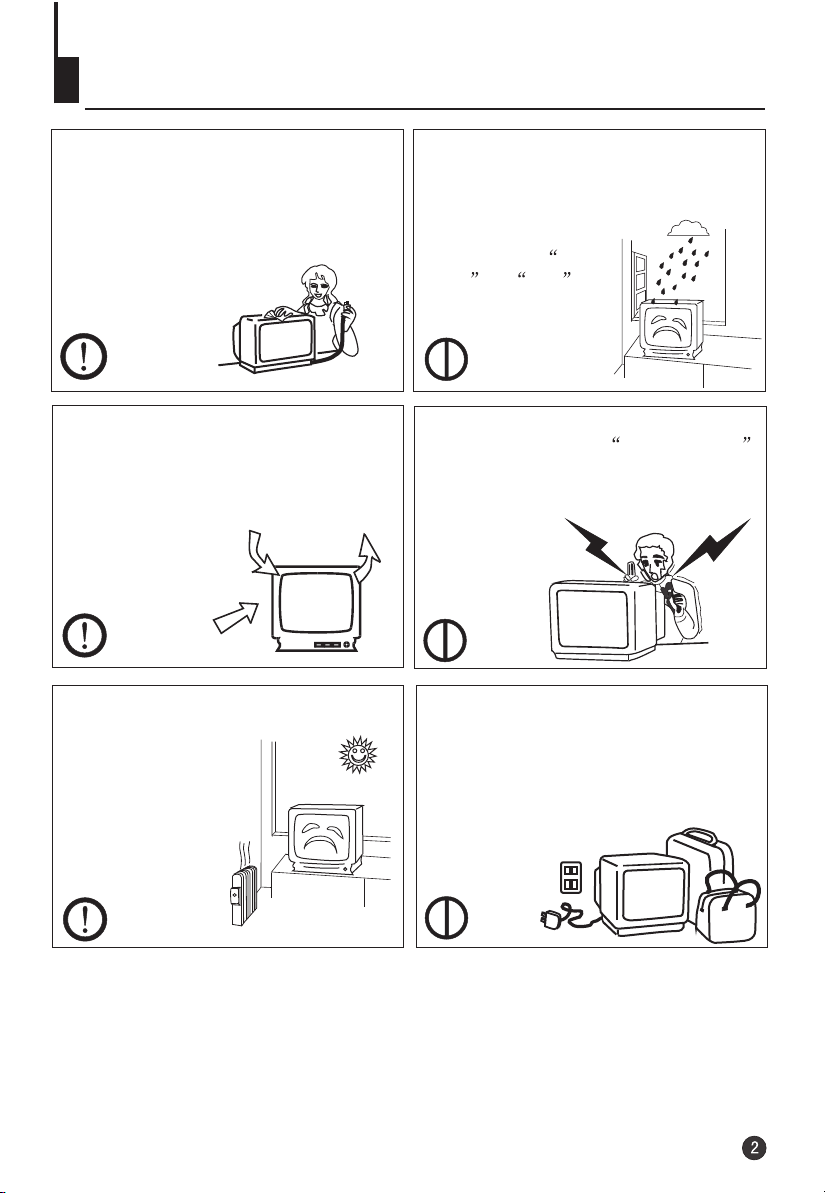
Warning and cautions
1. When you clean the TV set, please
pull out the power plug from AC outlet.
Don't clean the cabinet and the
screen with benzene, petrol and other
chemicals.
2. In order to prolong the of the
product,
Do NOT cover any ventilation slots.
ensure that it is well ventilated.
life
3. Don't place the
TV set in direct
sunlight or near a
heat source.
4. Do not allow the Tv to become wet
or be used in a humid atmosphere. The
set must only be used in dry locations.
Allowing water or fluid
to enter the cabinet
could result in Electric
shock or Fire .
5. Do NOT remove the cabinet back,
this could result in an Electric shock .
If the TV should become faulty, it must
only be serviced by a qualified
technician.
6. If the TV is not going to be used for a
long time, or there is an Electrical storm
in the area, unplug the External antenna
and Mains supply.
Cleaning the tube
If the picture tube cleaningrequires , disconnect the power and use a dry
soft cotton cloth. Do not use any cleaner or abrasive cloths.
22
Page 4
Installation
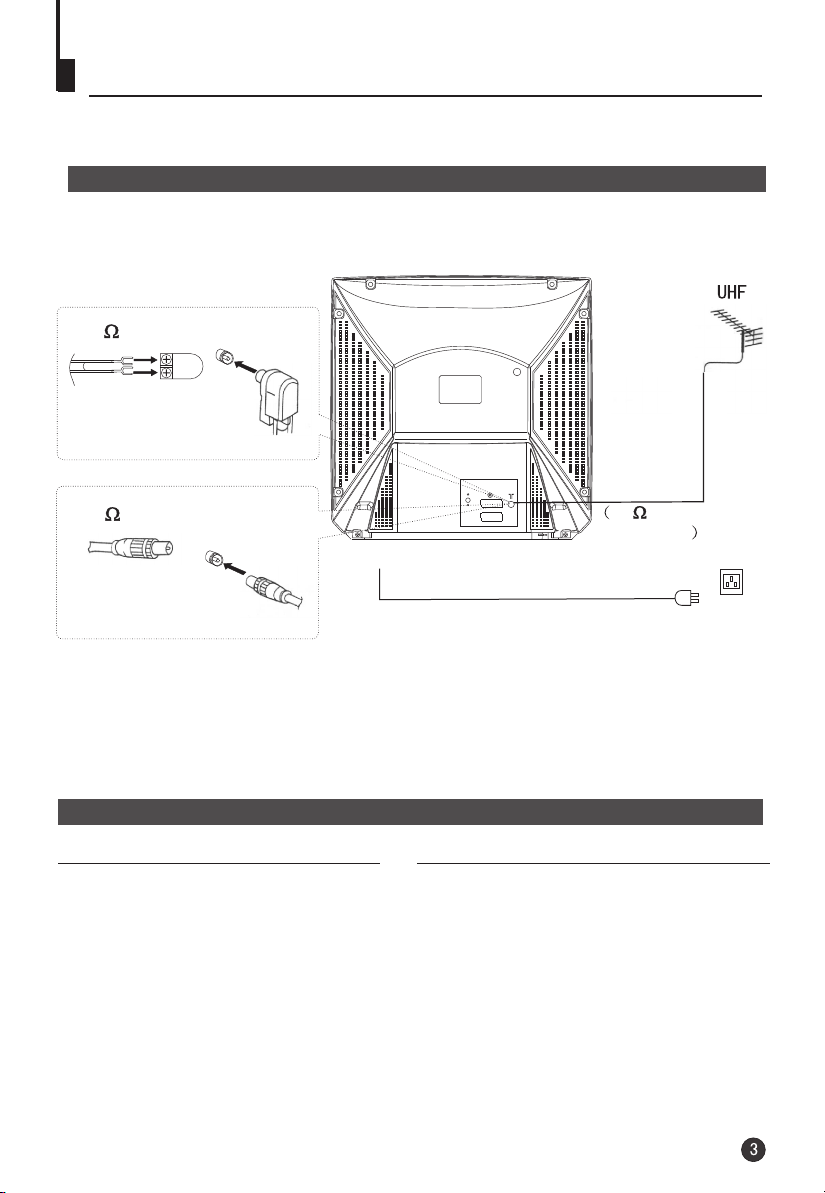
Aerial Connection
If the picture is not clear or is snowy, it is recommended that an External Aerial is
used, this is usually mounted outside.
300 twin-lead cable
Antenna adapter
(Not supplied)
COAXIAL
75 coaxial cable
Plug
(Not supplied)
Aerial input
75 standard
coaxial type
AC power socket
Note:
* It is recommended that a 75 ohm coaxial antenna is used to avoid
interference.
*To avoid interference from electrical signals, do not bind the antenna
cable together with any mains lead.
Preparation for the remote control
Battery installation
!
Remove the battery cover.
!
Insert two size AAA batteries matching
the +/-polarities of the battery to the +/marks inside the battery compartment.
Tips for remote operation
When the remote control is not to be
!
used for a long period, or the batteries
are worn out, remove them to stop
leakage and corrosion.
Do NOT throw used batteries in the fire.
!
Dispose of batteries in a responsible
manner.
Do not drop or dismantle the remote
!
control.
Page 5
Function Buttons and External Sockets
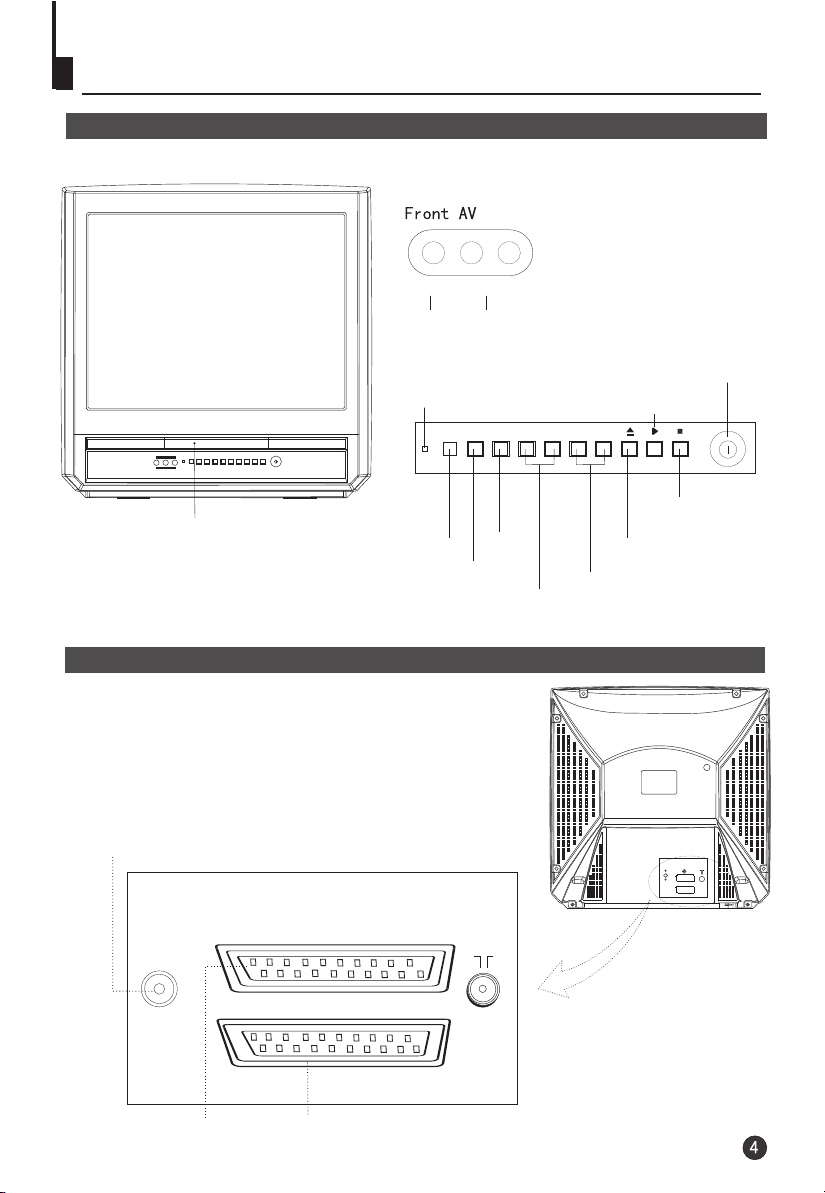
Front panel of the TV set
VIDEO L-AUDIO-R
R/LAudio
Video
Power Switch
Power Indicator
TV/DVD MENU V- V+ P- P+
Play the DVD
The DVD Player
Signal Receiver
TV/DVD Switching
Rear panel of the TV set
Digital audio coaxial output terminal
DVD EXT
COAXIAL
TV EXT
Menu
Stop the DVD
Open/close the DVD
Channel Position up/down
Volume up/ down
COAXIAL
DVD SCART Terminal
TV SCART Terminal
Page 6
Using the Remote Control
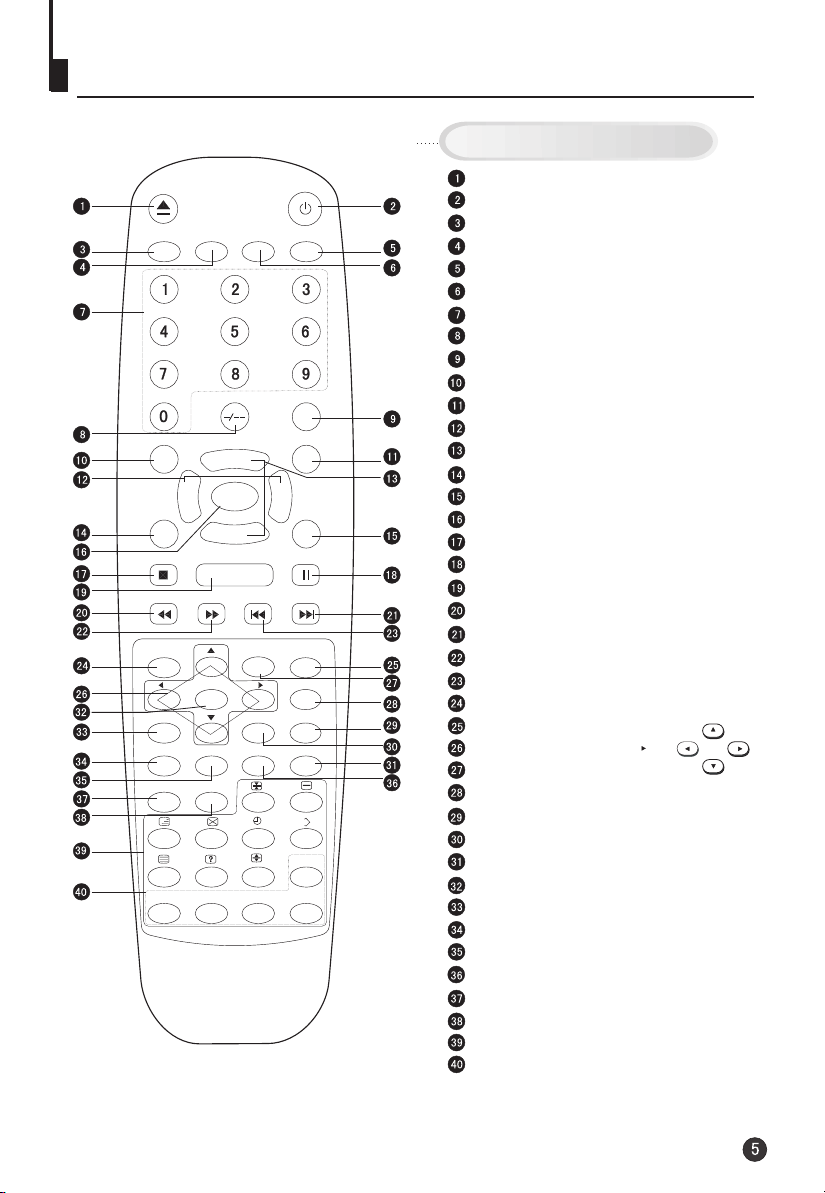
Buttons on the remote control
OPEN/CLOSE
SCAN SWAP
P.STD
P+P+
MENU
V-V- V+V+
EXIT
P-P-
STOPSTOP
REVREV
D.MENUD.MENU
ANGLEANGLE
AUDIOAUDIO
D.CALL
PICTURE SOUND FUNCTIONTIME
SETUPSETUP PAUSE/STEPPAUSE/STEP
FWDFWD
REPEATREPEAT
PLAY/ENTERPLAY/ENTER
TITLE/PBCTITLE/PBC
PROGRAMPROGRAM
CAPTIONCAPTION
CALL
PREVPREV
POWER
MUTE
TV/AV
TV/DVD
10+
NEXTNEXT
A-BA-B
SLOWSLOW
SEARCHSEARCH
ZOOM
TUNE
DVD Open/close
Stand By
Scan
Former Program
Mute
Call Screen Display
Program Number
Digital Selector
TV/AV Exchange
Picture Mode
TV/DVD
Volume Selection
Channel Selection
Exit Screen Display
10+
MENU
DVD STOP
DVD PAUSE/STEP
DVD SETUP
DVD FAST REVERSE
DVD NEXT
DVD FAST FORWARD
DVD PREVIOUS
DVD MENU
DVD A-B REPEAT
DVD Cursor Move button
DVD REPEAT
DVD SLOW
UP
LEFT
DOWN
DVD SEARCH
DVD TITLE
ZOOM
DVD PLAY/ENTER
DVD ANGLE
DVD AUDIO
DVD PROGRAM
DVD SUBTITLE
DVD CALL
(Not available)
TELETEXT BUTTONS
MENU CALL ( ALSO FOR TELETEXT
BUTTONS)
RIGHT
Page 7
Switching on/ off the TV set
This section explains the use of the power button and remote handset
to turn your unit on and off.
Switching on/ off the TV set
Switching on/ off the TV set
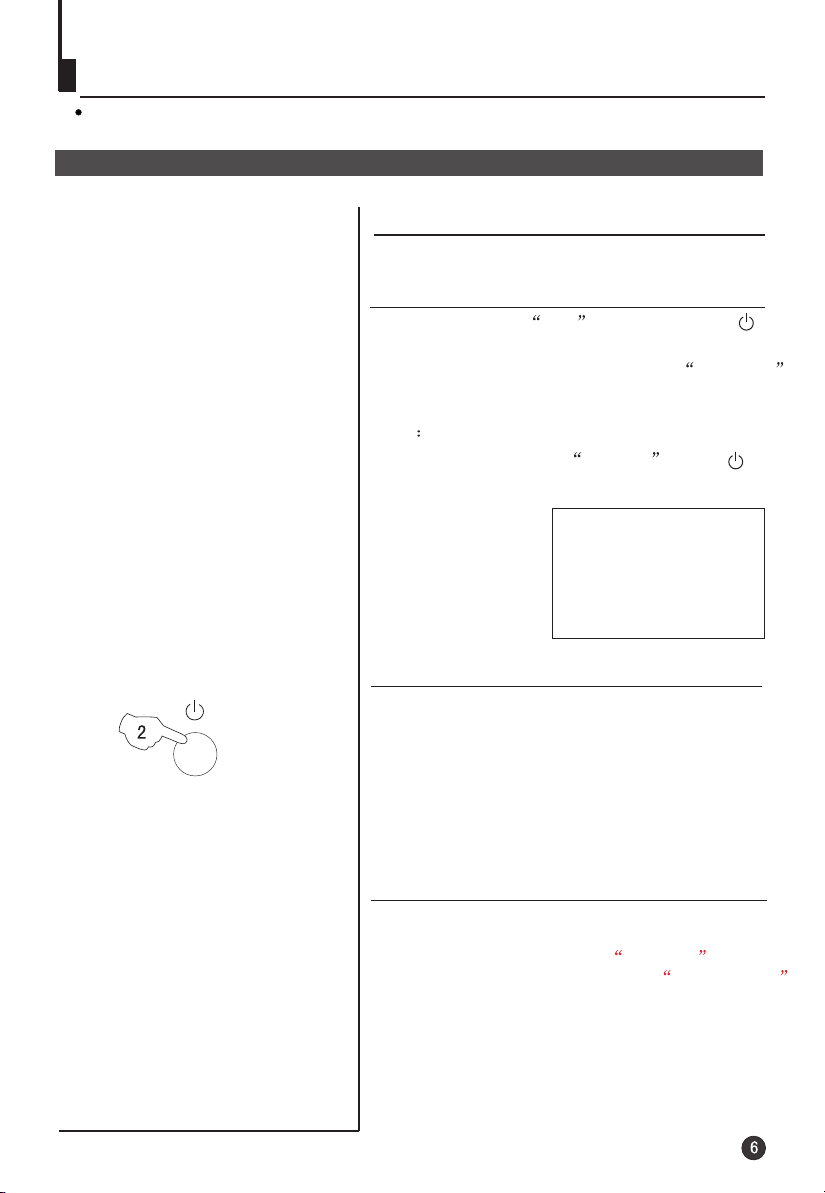
1 Press the Power switch on. The power indicator
will light.
2 If the indicator is Red press the button
on the remote control. Alternatively you can turn
the TV on with P+ or P- buttons, if the Child lock
is not set .
Note
1 To turn the set off to Standby press
button on the remote control.
4
AUTO
I
2 To turn off the TV fully, press the Power button
and release.
Auto switch-off function
Should the signal input from the aerial be
interrupted for more than 5 minutes, the TV
will automatically switch to Standby .
If the Tv is in A/V mode or the Background
is set to off (see page 18), the set will not switch
to standby.
Page 8
Watching TV
Watching TV program
How to select a TV programme.
Select the desired program
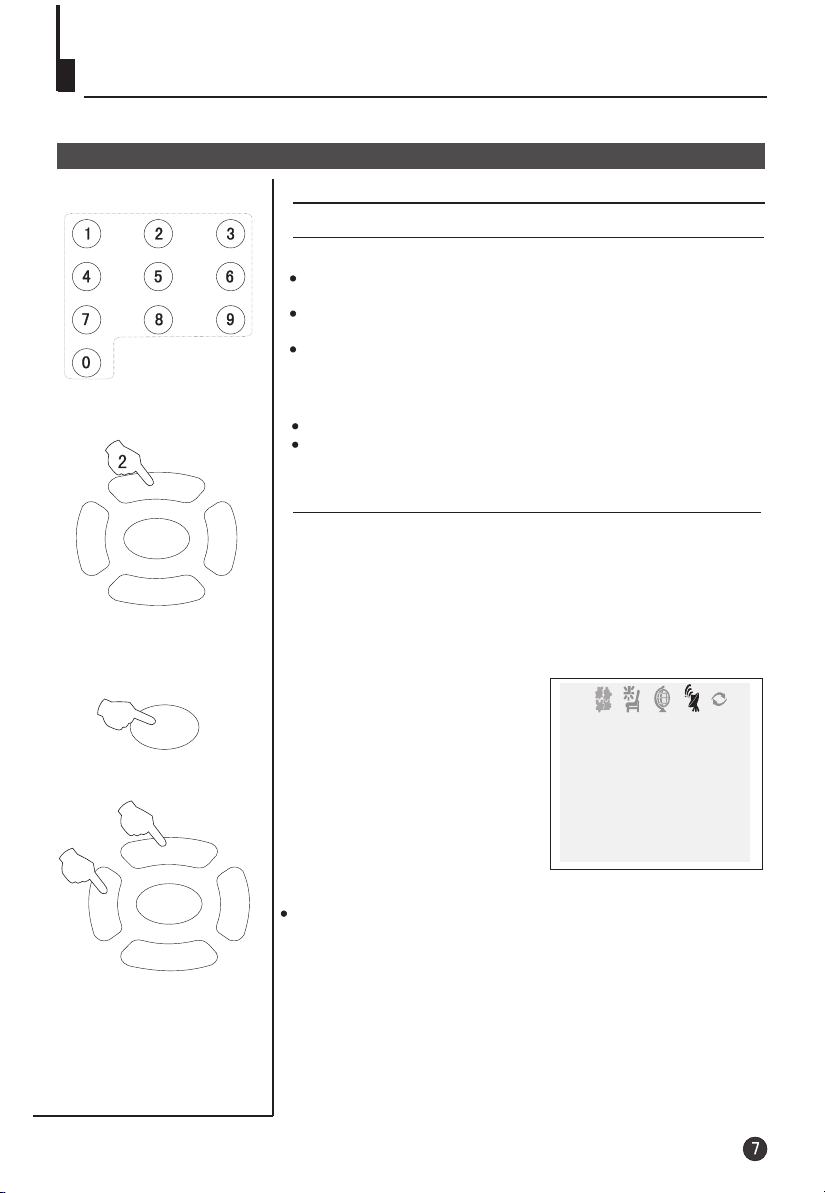
1 Using "Program number" buttons
Directly enter the channel number with the numeric keypad
on the remote control.
To select channel numbers from 10 ~ 99 press [-/--] button
and enter the two digit channel number
To select channel numbers from 100 ~ 218 press [-/--] button
twice and enter the 3 digit channel number
2 Using the P+/- buttons
Press the P+ button to increase channel number.
Press the P- button to decrease channel number.
P+P+
MENU
V-V- V+V+
P-P-
TUNE
P+P+
MENU
V-V- V+V+
P-P-
Adjust the Volume level
Press the V-/+ buttons on the remote or the front of the TV
set to adjust the volume level. The range is 0~100. When the
volume buttons are pressed the volume level is displayed
automatically on the TV screen.
TUNE
COLOUR AUTO
BAND VHFL
SKIP OFF
PROGRAM 0
SEARCH
FINE TUNE
AUTO SEARCH
If picture colo r is abnormalu
If the picture colour is incorrect. This may be due to the TV
being set to the incorrect standard. Use P+ or P- to select
Colour then the V+ /V- buttons to change between Auto,
NTSC and NTSC443
. Press the EXIT button to save the
setting.
PAL,
Page 9
Watching TV continued
Swap function enables quick swap to the last watched program.
Auto scan function enables automatic successive scanning of all the programs in
memory with (each channel will last about 2 seconds)."OFF" skip status
Program swap and auto scan functions
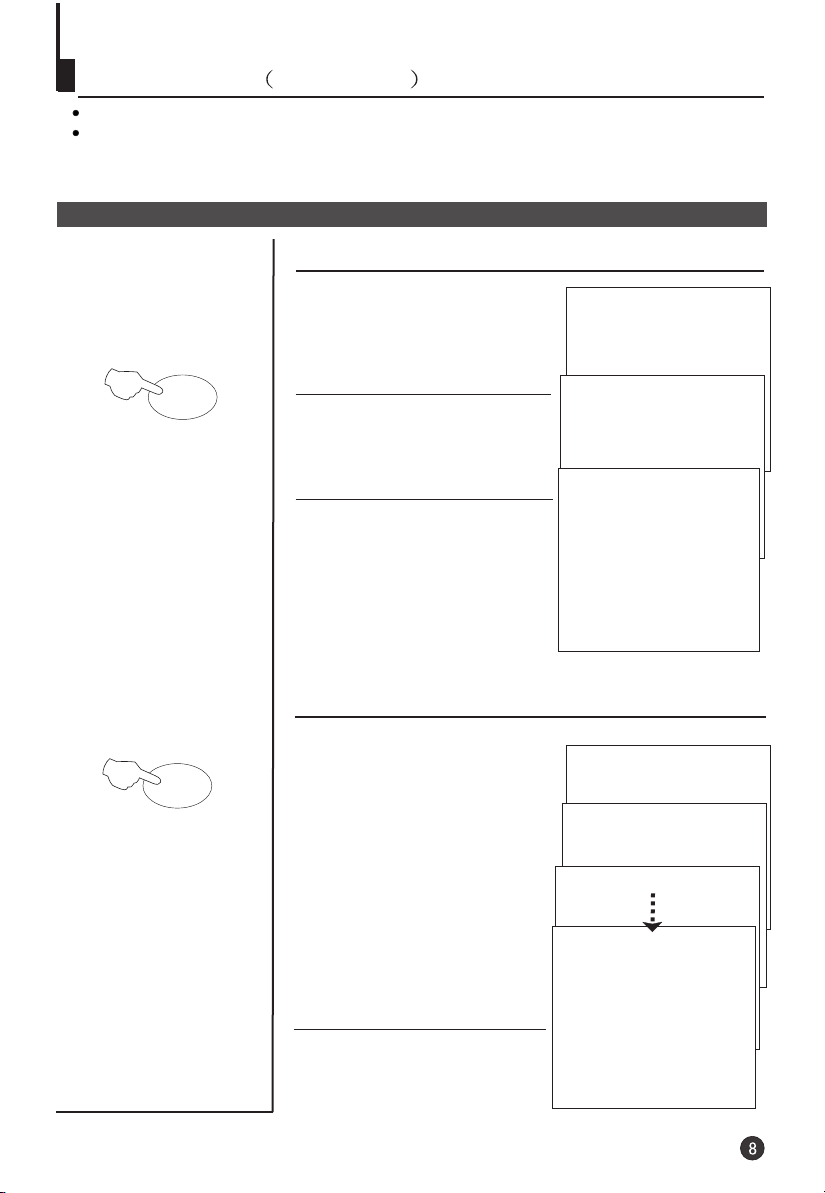
Program swap
Suppose the channel number
SWAP
1
you used just now is 8 and the
channel number you are using
is 18 (as shown in the figure).
2 If you want to return to the
last watched program channel
8, you can simply press the
SWAP button.
3 If you want to return to
channel 18, press the button
again. Through this function,
you can easily change
between the channel you are
using and the channel you
used last time.
18
AUTO
I
8
AUTO
I
18
AUTO
I
SCAN
Auto program scan
1 Press the SCAN button to
scan through all the memorized
TV channels. The scan will
pause for about 2 seconds on
each channel.
2 If you want to stop the function
during auto scanning, simply
press the SCAN button again.
3
AUTO
BG
SCAN
1
AUTO
BG
SCAN
1
AUTO
BG
SCAN
2
AUTO
BG
SCAN
Page 10
Searching channels
This TV set has three methods to set the channels, which are respectively full
automatic, semi automatic and manual fine tune.
-
In this section, how to use the remote control to set the channel is explained. You
can also use the buttons on the Tv .to set the channel
Full automatic mode
TUNE
P+P+
MENU
V-V- V+V+
P-P-
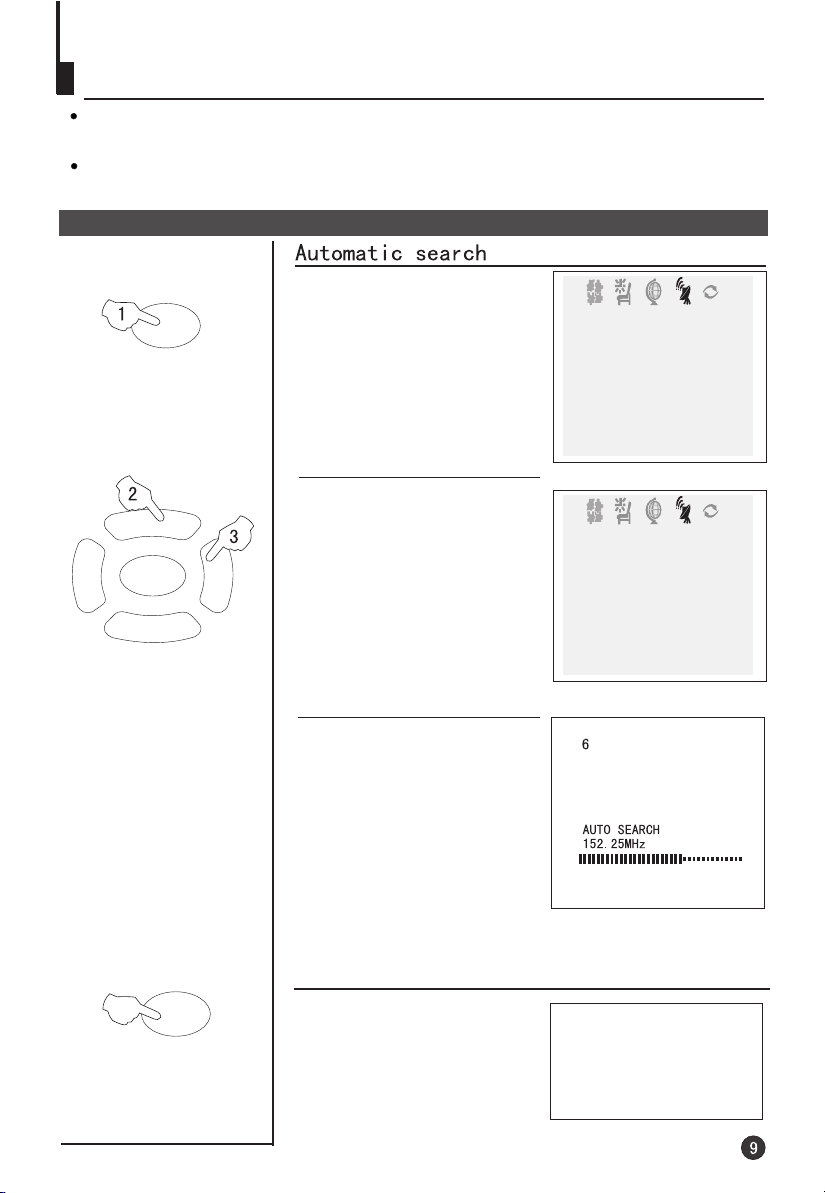
1 Press the TUNE button, the
TUNE menu shown on the right
display on the screen.
Press the P+/-
2 buttons to
select "AUTO SEARCH".
3 Press V+ to start the Auto
search. All channels will be
stored in the order they are
received. After the search has
finished, the first channel
received will be displayed.
TUNE
COLOUR AUTO
BAND VHFL
SKIP OFF
PROGRAM 0
SEARCH
FINE TUNE
AUTO SEARCH
TUNE
COLOUR AUTO
BAND VHFL
SKIP OFF
PROGRAM 0
SEARCH
FINE TUNE
AUTO SEARCH
CALL
Display function
Press the CALL button, then
the channel number and the
systems will be displayed on
the screen.
3
AUTO
I
Page 11
Searching channel
Continued
Semi-automatic search
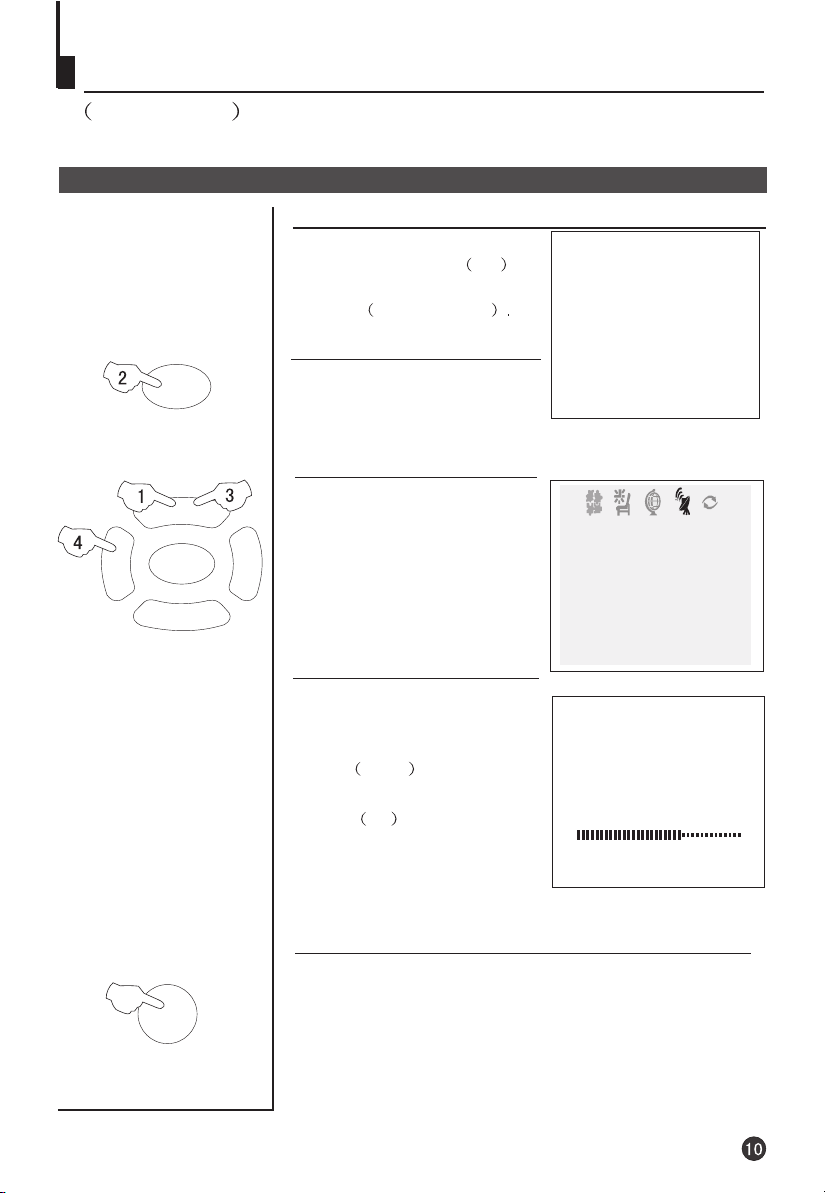
Semi-automatic search
1 Press the P+/- buttons or
PROGRAM NUMBER 0-9
buttons to choose desired
channels I.E. channel 1
TUNE
2
Press the TUNE button, the
TUNE menu will be shown on
the right of the screen.
3 buttons to
P+P+
MENU
V-V- V+V+
P-P-
Press the P+/-
select " SEARCH".
s
1
AUTO
I
TUNE
COLOUR AUTO
BAND VHFL
SKIP OFF
PROGRAM 0
SEARCH
FINE TUNE
AUTO SEARCH
EXIT
Press the V- to search down
4
the scale and V+ to search up
6
the scale.
The V- down button is used
for lower side program search.
The V+ up button is used for
SEARCH
152.25MHz
higher side program search.
Repeat this step, till find the
desired channel.
To turn off the on-screen menu
In general, after you press the MENU button, the menu
, FUNCTION, TUNE, EXCHANGE,
display (PICTURE, TIME
ETC.) will automatically disappear within 15 seconds. If you
want to eliminate these contents immediately, please press
the EXIT button.
item
Page 12
Searching channels
Continued
Manual fine tune
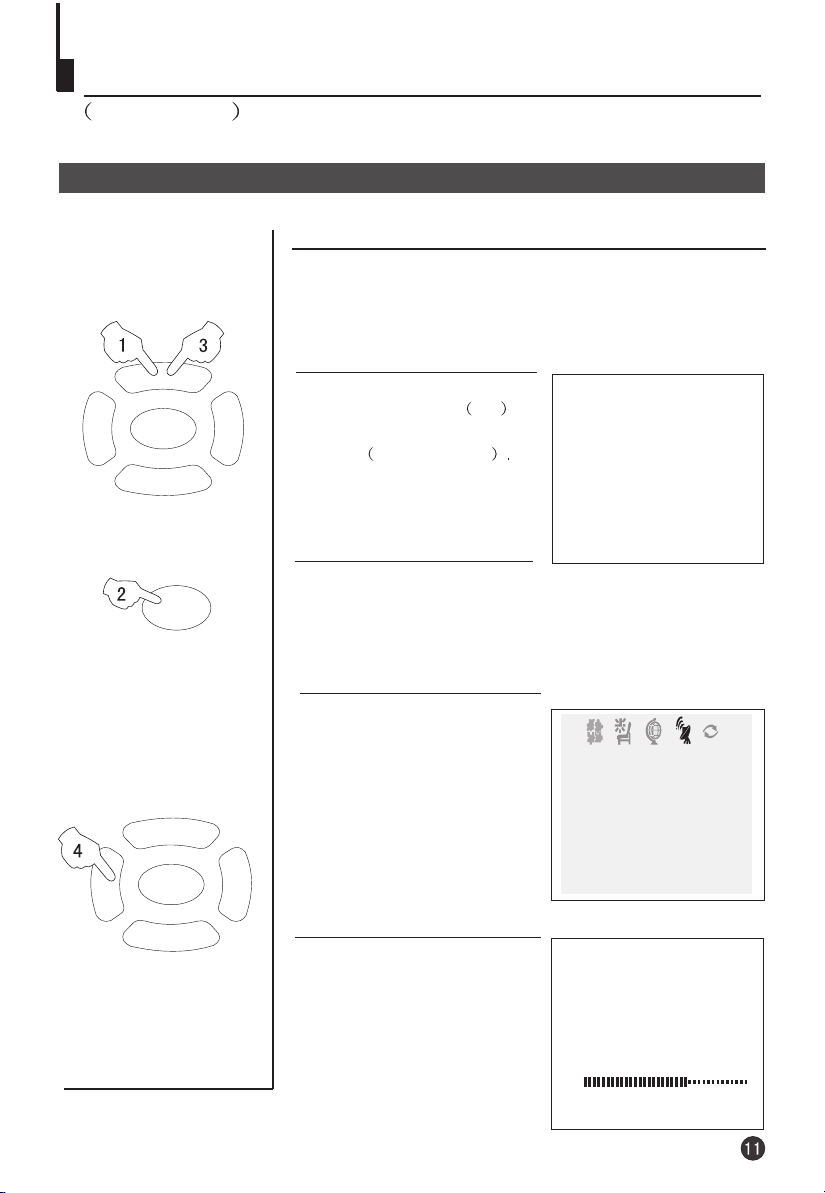
Manual fine tune
If the picture and/or sound are poor, try using the FINE
TUNE feature. Do not use this feature unless
reception is poor.
P+P+
MENU
V-V- V+V+
P-P-
TUNE
P+P+
MENU
V-V- V+V+
P-P-
1 Press the P+/- buttons or
PROGRAM NUMBER 0-9
button to choose desired
channels I.E. channel 1
2 Press the TUNE button, the
TUNE menu shown on the right
display on the screen.
3 buttons to
Press the P+/-
select " FINE TUNE".
4 Press the V-/+ buttons all
through to carry out fine tune,
till the best picture and sound
are obtained.
1
AUTO
I
TUNE
COLOUR AUTO
BAND VHFL
SKIP OFF
PROGRAM 0
SEARCH
FINE TUNE
AUTO SEARCH
5
FINE TUNE
152.25MHz
Page 13
Searching channels
Continued
Program skip
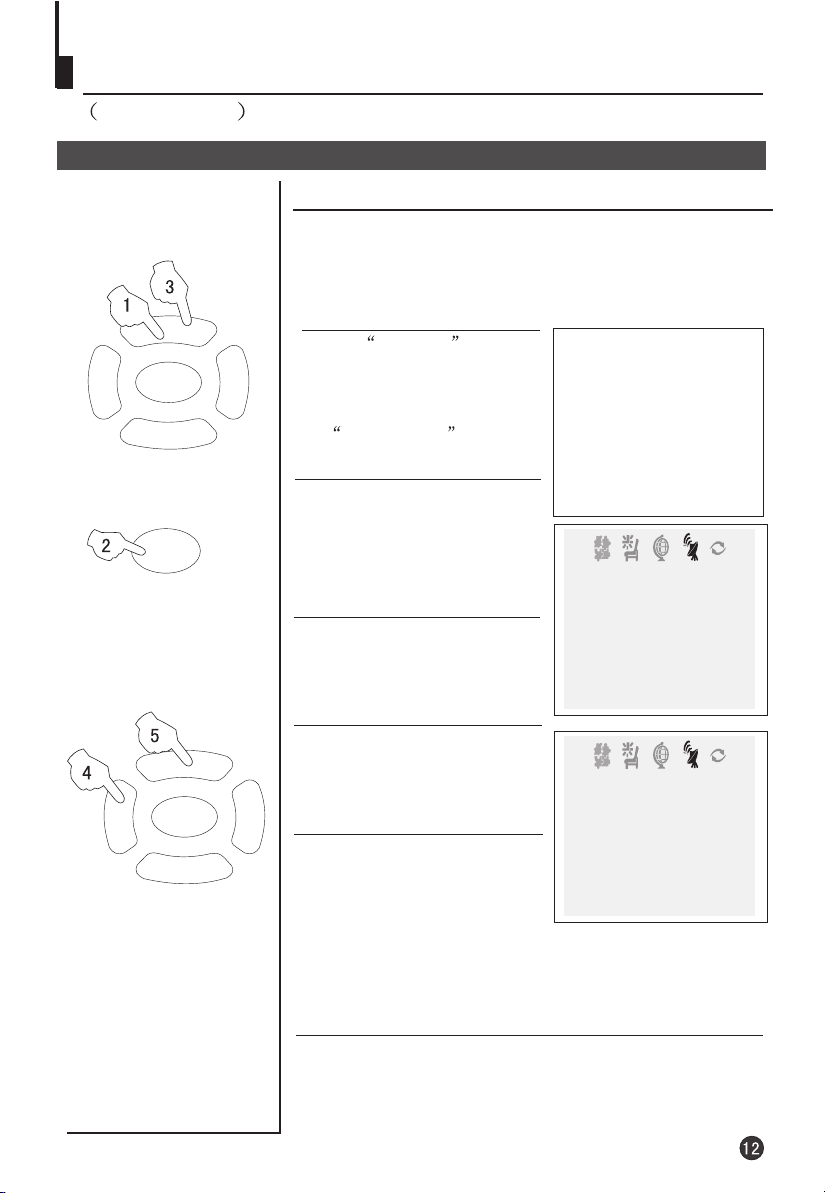
Programme skip
Channels can be set so that they are skipped during
program selection.
P+P+
MENU
V-V- V+V+
P-P-
TUNE
P+P+
MENU
V-V- V+V+
P-P-
1 During Auto tune some
channels may have been received
which are of poor quality, noisy or
ghosting. These can be removed
with Program Skip .
2 Press the TUNE button , the
TUNE menu shown on the right
display on the screen.
3 buttons to
Press the P+/-
select "SKIP".
4 Press the V-/+ buttons to
turn the SKIP function "ON".
5 Press the TUNE button to close
the menu. When you use the P /
+buttons to select channel, this
channel will be skipped. However,
you can still use the PROGRAM
NUMBER buttons to select the
skipped channel numbers.
1
AUTO
I
TUNE
COLOUR AUTO
BAND VHFL
SKIP OFF
PROGRAM 0
SEARCH
FINE TUNE
AUTO SEARCH
TUNE
COLOUR AUTO
BAND VHFL
SKIP ON
PROGRAM 0
SEARCH
FINE TUNE
AUTO SEARCH
If you want to recover the skipped channel
1 Use the PROGRAM NUMBER buttons to select the channel
number to be recovered.
2 Repeat those steps just now.
3 Press the V-/+ buttons to turn the SKIP function "OFF".
Page 14
Convenient picture and sound control functions
Multiple picture modes
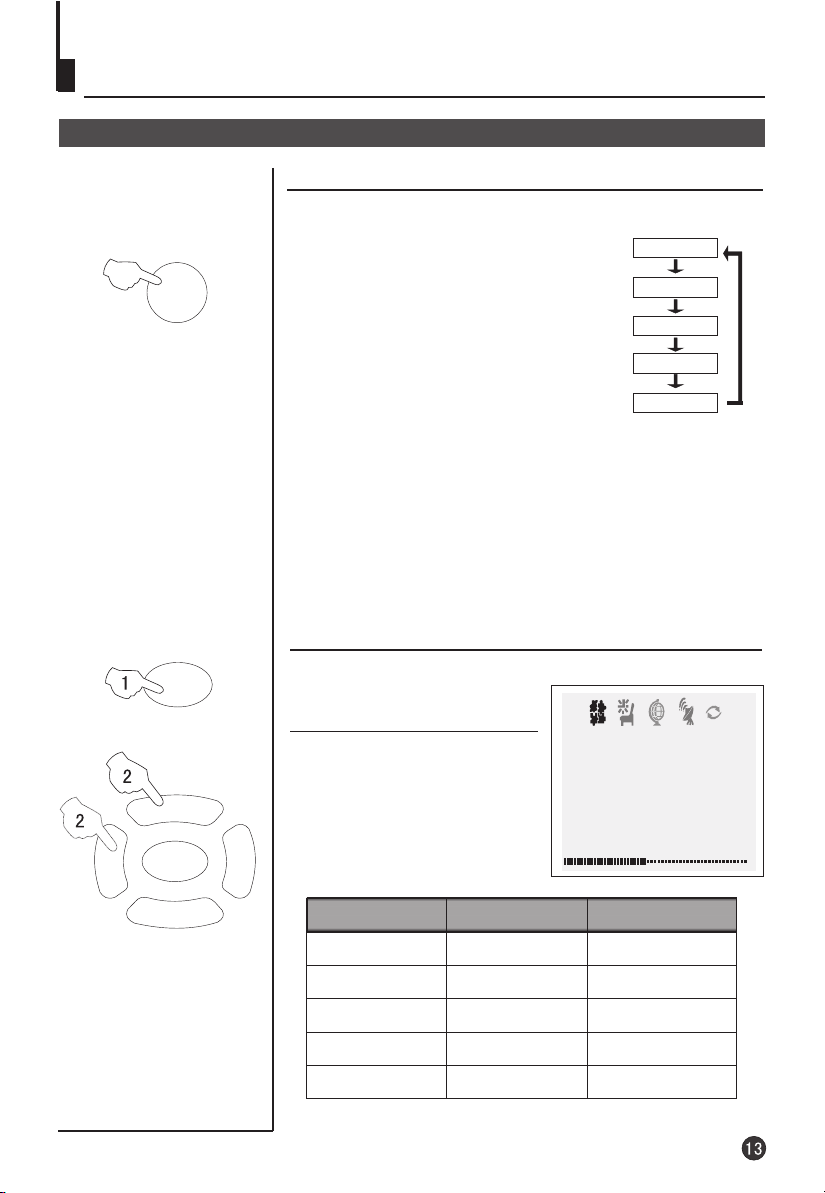
How to select picture modes
You can quickly select the desired picture mode from
P.STD
four preset modes and one customized mode.
Press the P.STD button to select the
STANDARD
desired picture quality. Five kinds
of picture modes (i.e.,
"RICH", "USER","LISTEN",
"STANDARD",
LISTEN
"SOFT" ) can be selected in turn.
The 5 modes are
Listen-This is a new feature that blacks out the TV
screen when listening to music only channels;
Soft-Designed for night time low light viewing;
Standard -Designed for rooms that have good all round
lighting;
Rich-Designed for rooms with high ambient lighting such
as daytime sport;
User-A spare setting that can be adjusted to personal
tastes.
RICH
USER
SOFT
PICTURE
P+P+
MENU
V-V- V+V+
P-P-
How to customize your own picture status
1 Press the PICTURE button, the menu shown on
the right display on the screen.
2 Press the P+/- buttons to
select the item to adjusted,
then press the V-/+ buttons
to obtain the desired effect.
ITEM
CONTRAST
BRIGHTNESS
COLOUR
SHARPNESS
*Hue
Note:
The "Hue" item only appears when the colour system is NTSC.
Press V -
Weak
Dark
Shallow
Soft
lean to purple
PICTURE
PICTURE
CONTRAST 48
BRIGHTNESS 32
COLOUR 48
SHARPNESS 40
*HUE 60
BLACK STRETCH OFF
Press V +
Strong
Bright
Deep
Sharp
lean to green
Page 15
Convenient picture and sound control functions
Continued
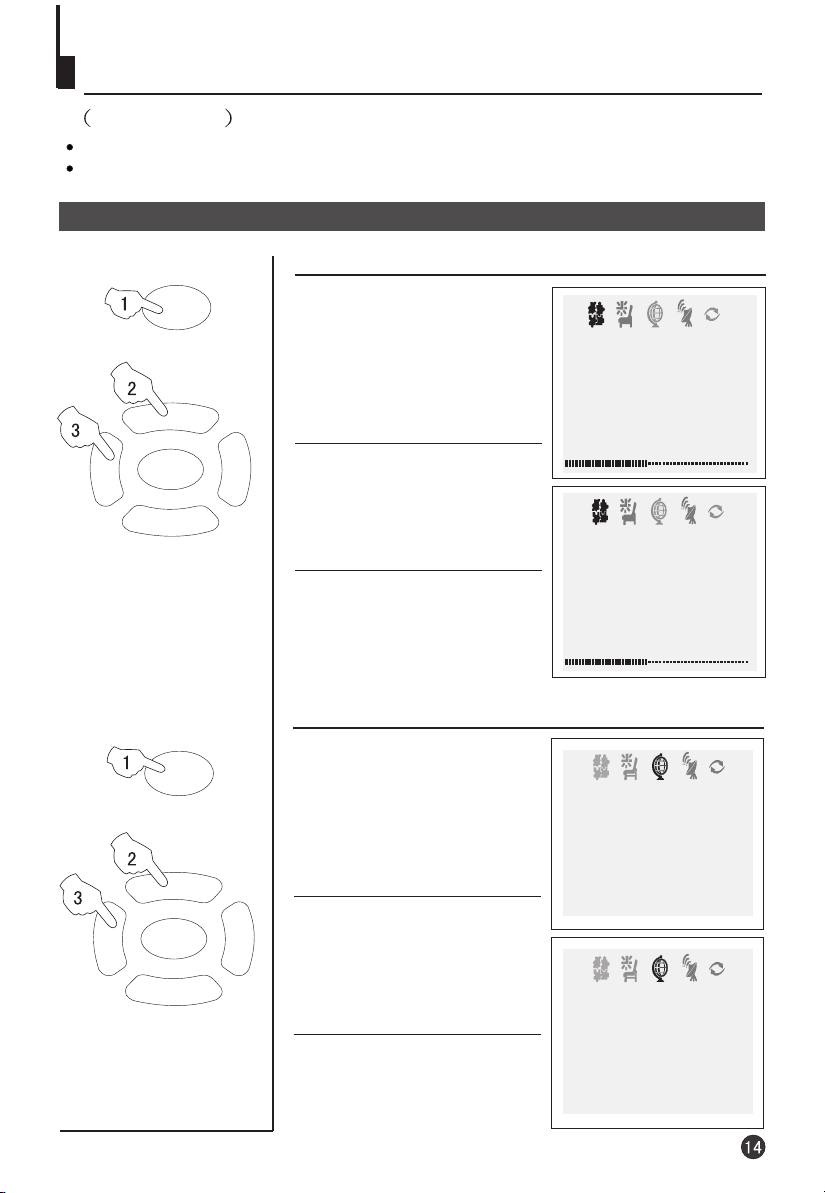
Black Stretch Automatically increases the contrast range
Noise Reduce Picture Noise & Grain Reduction Circuit. (Use only on poor reception)
Black stretch and noise reduce
PICTURE
P+P+
MENU
V-V- V+V+
P-P-
FUNCTION
P+P+
MENU
V-V- V+V+
How to select BLACK STRETCH
1 Press the button, the
PICTURE
right display on the screen.
Press the P+/-
2 buttons to
select "BLACK STRETCH".
3 Press the V-/+ buttons to
turn the BLACK STRETCH
function "ON" or "OFF".
PICTURE
menu shown on the
PICTURE
CONTRAST 48
BRIGHTNESS 32
COLOUR 48
SHARPNESS 40
*HUE 60
BLACK STRETCH OFF
PICTURE
CONTRAST 48
BRIGHTNESS 32
COLOUR 48
SHARPNESS 40
*HUE 60
BLACK STRETCH ON
How to select NOISE REDUCE
1 Press the FUNCTION button,
FUNCTION
the menu shown on
the right display on the screen.
2 buttons to
Press the P+/-
select "NOISE REDUCE".
FUNCTION
LANGUAGE
BACKGROUND ON
NOISE REDUCE ON
CHILD LOCK OFF
AVL ON
CALENDAR
P-P-
3 Press the V-/+ buttons to
turn the NOISE REDUCE
FUNCTION
LANGUAGE
BACKGROUND ON
NOISE REDUCE ON
CHILD LOCK OFF
AVL ON
CALENDAR
function "ON" or "OFF".
Page 16
Convenient picture and sound control functions
Continued
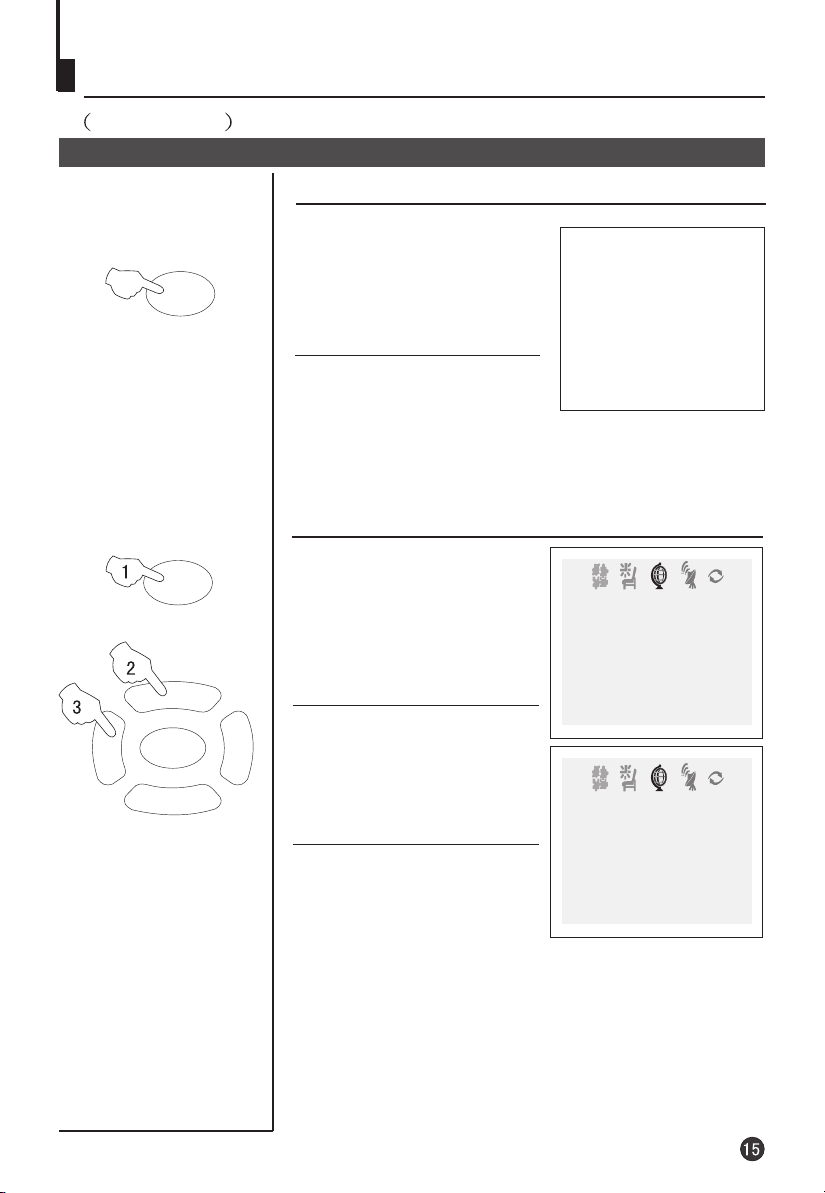
Mute and the language on the screen
Sound mute
MUTE
FUNCTION
P+P+
MENU
V-V- V+V+
P-P-
1 Press the MUTE button on the
remote control to turn off the
MUTE
sound. MUTE will appear on the
top left of the display.
2 Press MUTE again to turn the
sound back on.
How to select the language on the screen
1 Press the FUNCTION button,
the menu shown on
FUNCTION
the right display on the screen.
2 buttons to
Press the P+/-
select " LANGUAGE ".
3 Press VOL+button to select
on-screen display language.
FUNCTION
LANGUAGE
BACKGROUND ON
NOISE REDUCE ON
CHILD LOCK OFF
AVL ON
CALENDAR
FUNCTION
LANGUAGE
BACKGROUND ON
NOISE REDUCE ON
CHILD LOCK OFF
AVL ON
CALENDAR
Page 17
Time functions
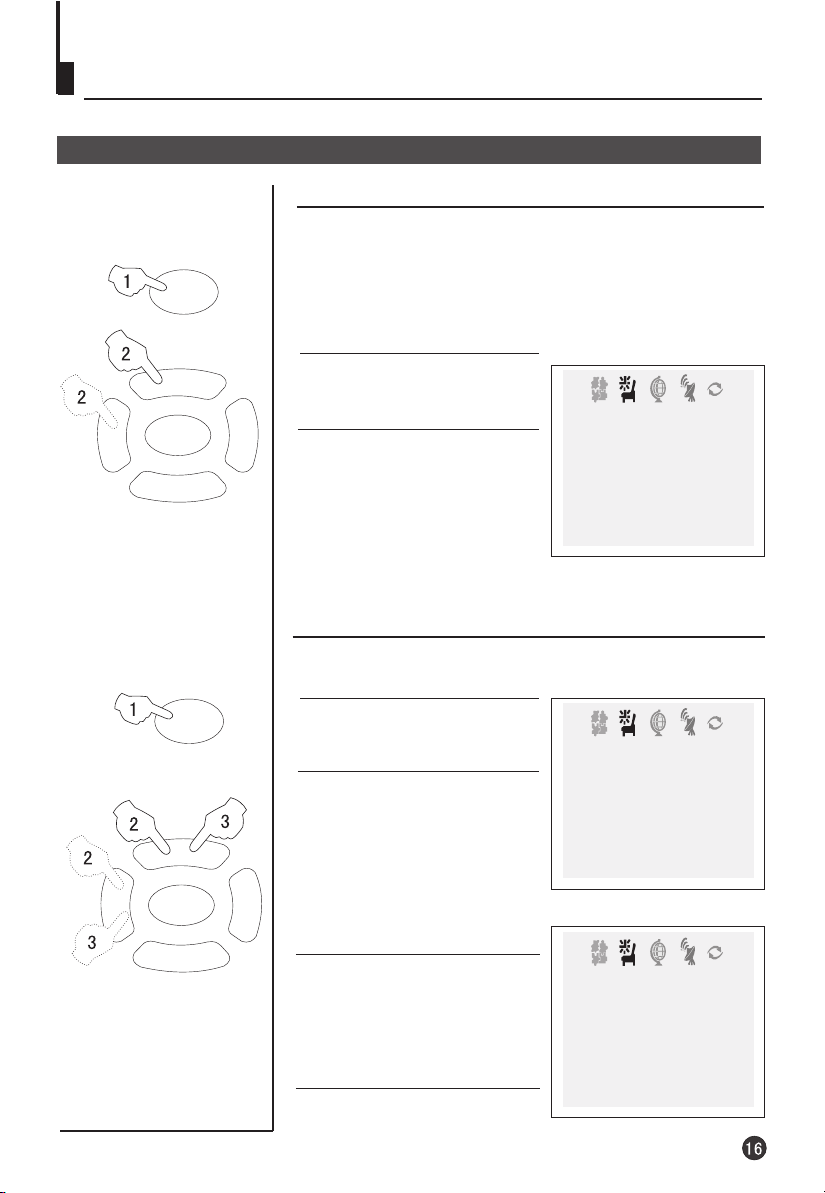
Clock setting and timer on/off functions
TIME
Clock setting
The clock will only work if the TV set if left turned on
or in standby. When the set is disconnect from the
power supply or is turned off by the main power on
the front panel, the clock loses power and will need to
be reset when the power is reconnected.
P+P+
MENU
V-V- V+V+
P-P-
TIME
P+P+
MENU
V-V- V+V+
P-P-
1 Press the TIME button, and
the TIME menu display on the
screen.
2Press the P .+/- buttons select
"CLOCK", then press the V-/+
buttons to adjust the time in
hour position; press again the
P+/- buttons to select the time
TIME
CLOCK 17:18
ON TIME 18:00
ON PROG 1
OFF TIME --:-SLEEP TIMER 0
REMIND TIME --:-REMIND PROG 1
in minute position, then press
the V-/ +buttons to adjust the
value of minutes
On/off timer
Using on/off timer function, the TV set can automatically
turn on to a preset program or shut down in a preset time.
1 Press the TIME button to call
up the TIME menu on the
screen.
2 Press the P+/- buttons to
select "ON TIME", then press
the V-/+ buttons to set the value
in hour position; press again the
P+/- buttons to select the minute
position and set the value of the
minute.(take 18:00 as an
example)
3 Press the P+/- buttons to
select "ON PROG", then press
the V-/+ or program direct
number buttons to select your
desired channel (take 8 as an
example).
4 Repeat step 1-2 to set OFF
TIME.(take 23:00 as an example)
TIME
CLOCK 17:18
ON TIME 18:00
ON PROG 1
OFF TIME --:--
SLEEP TIMER 0
REMIND TIME --:--
REMIND PROG 1
TIME
CLOCK 17:18
ON TIME 18:00
ON PROG 8
OFF TIME 23:00
SLEEP TIMER 0
REMIND TIME --:--
REMIND PROG 1
Page 18
Time functions
Continued
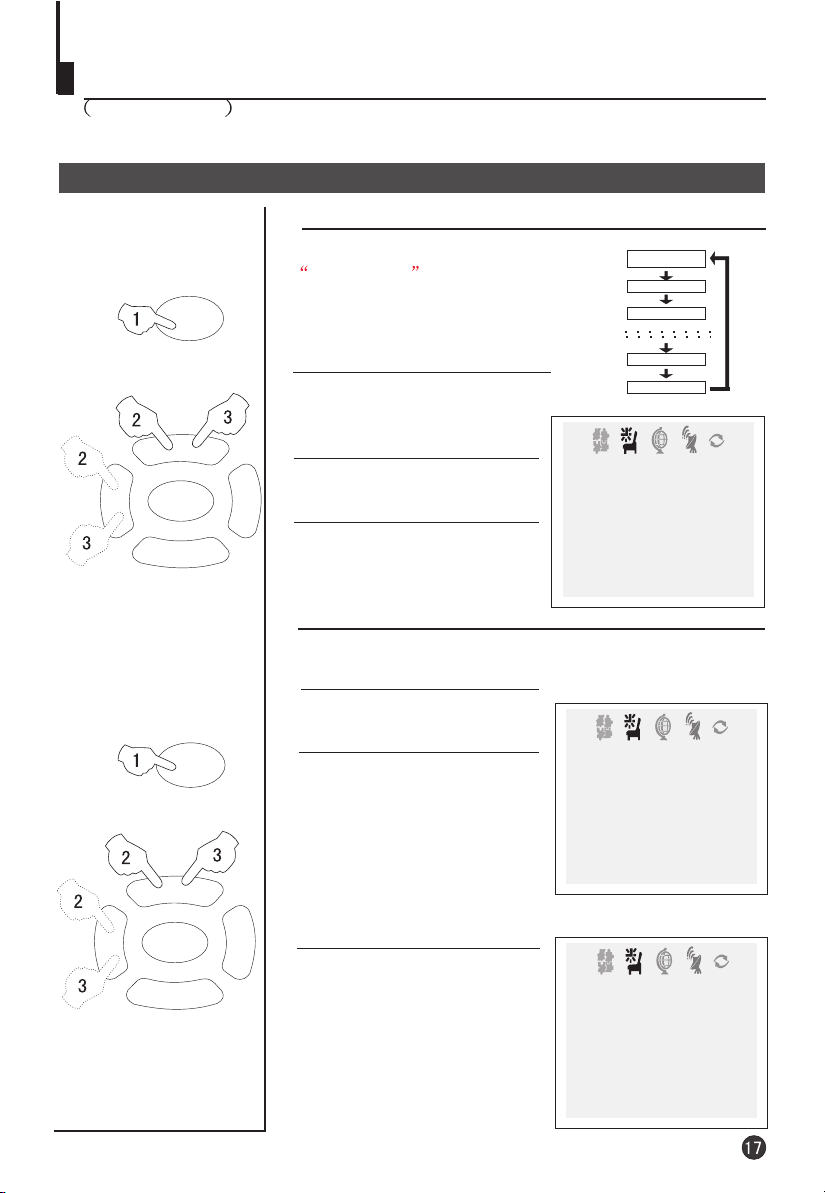
Sleep timer and program preset
Sleep timer
TIME
P+P+
MENU
V-V- V+V+
P-P-
TIME
P+P+
MENU
V-V- V+V+
P-P-
The TV has 18 option settings for
Sleep timer , each setting has
a time value of 10 minutes.
1 Press the TIME button, and
0
10
20
170
180
the TIME menu display on the
screen.
2 Press the P+/- buttons to
select "SLEEP TIMER".
3 press the V -/+ buttons to set
the value of the SLEEP TIMER.
TIME
CLOCK 17:18
ON TIME 18:00
ON PROG 8
OFF TIME 23:00
SLEEP TIMER 120
REMIND TIME --:--
REMIND PROG 1
REMIND PROG function
Program remind timer, that displays an on-screen reminder
prompt, when a program on a different channel is due to start.
1 Press the TIME button to call
up the TIME menu on the
screen.
2 Press the P+/- buttons to
select "REMIND TIME", then
press the V-/+ buttons to set
the value in hour position;
press again the P+/- buttons to
select the minute position, and
then set the value of the
minute.(take 19:00 as an
example)
3.Press the P+/- buttons to
select "REMIND PROG", then
press the V -/+ buttons or the
program direct number buttons
to set the desired channel
(take 18 as an example).
NOTE: For
operate
turned off.
REMIND PROG to
CHILD LOCK must be
TIME
CLOCK 17:18
ON TIME 18:00
ON PROG 8
OFF TIME 23:00
SLEEP TIMER 120
REMIND TIME 19:00
REMIND PROG 1
TIME
CLOCK 17:18
ON TIME 18:00
ON PROG 8
OFF TIME 23:00
SLEEP TIMER 120
REMIND TIME 19:00
REMIND PROG 18
Page 19
Set up function
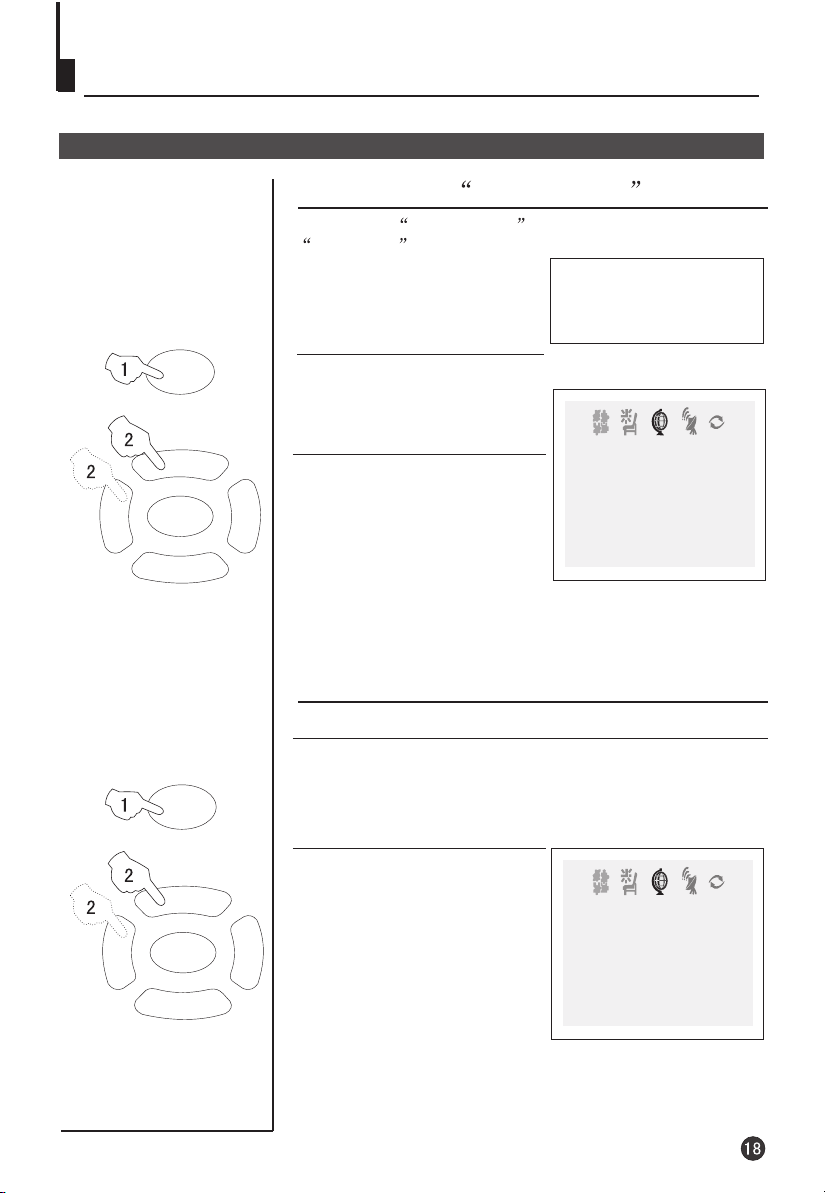
Screen saver and childlock functions
How to select Screen saver function
FUNCTION
P+P+
MENU
V-V- V+V+
P-P-
When the function ON a bouncing
No Signal logo will be displayed on a blue
background.
1
Press the Function button, the
Function menu will be displayed
on the right of the screen.
2 Press the P+/- buttons
select "BACKGROUND" and press
the V-/+ buttons to turn the
BACKGROUND function "ON"
Background is
to
NO SIGNAL
FUNCTION
LANGUAGE
BACKGROUND ON
NOISE REDUCE ON
CHILD LOCK OFF
AVL ON
CALENDAR
.
FUNCTION
P+P+
MENU
V-V- V+V+
P-P-
Child lock function
Enables the TV front control buttons to be locked.
1
Press the Function button, the
Function menu will be displayed
on the right of the screen.
2 Press the P+/-
select "CHILD LOCK" and press
the V-/+ buttons to turn
CHILD LOCK function "ON"
NOTE:
All the control panel buttons on the front of the TV are disabled
when CHILD LOCK is turned on. The power switch will still turn
the TV set off.
buttons to
FUNCTION
LANGUAGE
.
BACKGROUND ON
NOISE REDUCE ON
CHILD LOCK ON
AVL ON
CALENDAR
Page 20
Set up function
Continued
AVL and calendar functions
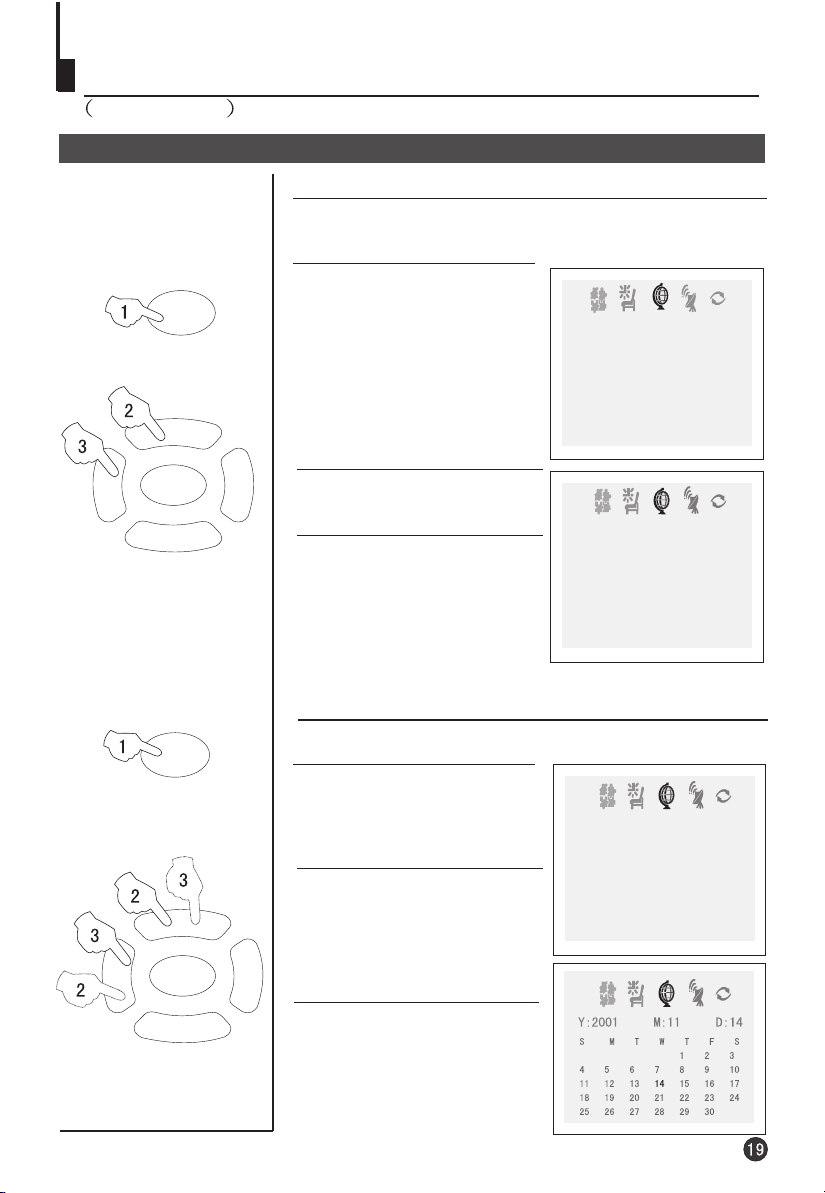
AVL function
Automatic Volume Limit Control reduces the effect of
large volume changes. For instance, when
advertisements come on.
FUNCTION
P+P+
MENU
V-V- V+V+
P-P-
1
Press the Function button, the
Function menu will be displayed
on the right of the screen.
2 Press the P+/-
"AVL"
.
3 Press
AVL function "ON" or "OFF"
buttons to select
V-/+ buttons to turn the
.
FUNCTION
LANGUAGE
BACKGROUND ON
NOISE REDUCE ON
CHILD LOCK OFF
AVL ON
CALENDAR
FUNCTION
LANGUAGE
BACKGROUND ON
NOISE REDUCE ON
CHILD LOCK OFF
AVL ON
CALENDAR
FUNCTION
P+P+
MENU
V-V- V+V+
P-P-
Calendar function
Enables the TV sets internal calendar to be set.
1
Press the Function button, the
Function menu will be displayed
on the right of the screen.
2 Press the P+/-
buttons to select
"CALENDAR" , then press the
V-/+ buttons to the CALENDAR
display on the screen.
3 Press the P+/- buttons to turn
the YEAR/MONTH/DAY, press
V-/+ buttons to set or adjust
the YEAR/MONTH/DAY.
FUNCTION
LANGUAGE
BACKGROUND ON
NOISE REDUCE ON
CHILD LOCK OFF
AVL ON
CALENDAR
Page 21
Position exchange function
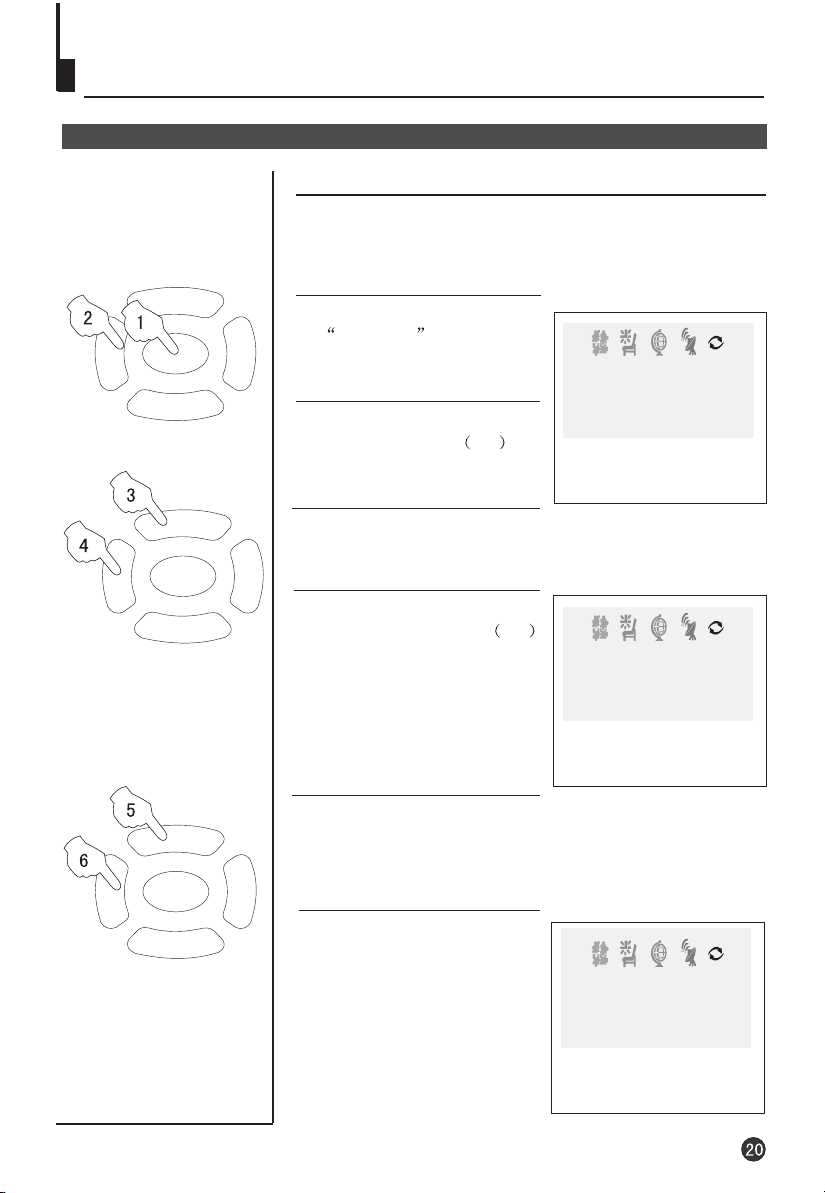
Exchange
Exchange
This feature enables TV programs that may be on a wrong TV
channel number to be swapped/exchanged. This feature is
very useful when Automatic Search Tuning has been used, to
reallocate the found programs to the correct channel numbers.
P+P+
MENU
V-V- V+V+
P-P-
P+P+
MENU
V-V- V+V+
P-P-
P+P+
1
Press the Menu button until
the Exchange menu is
displayed on the screen.
2 Press the V / buttons or the
-+
PROGRAM NUMBER 0-9
buttons to set PROGRAM 1 TO 6.
3 buttons to
Press the P+/-
select " PROGRAM 2".
4 Press the V / buttons or
-+
the PROGRAM NUMBER 0-9
buttons to set PROGRAM 2 TO 9.
5 buttons to
Press the P+/-
select "EXCHANGE".
EXCHANGE
PROGRAM 1 6
PROGRAM 2 2
EXCHANGE
EXCHANGE
PROGRAM 1 6
PROGRAM 2 9
EXCHANGE
MENU
V-V- V+V+
P-P-
6 Press the V-/+ buttons to set
"EXCHANGE".
EXCHANGE
PROGRAM 1 6
PROGRAM 2 9
EXCHANGE
Page 22
Teletext
Teletext is an information system, broadcast by certain channels, which can be read like
a newspaper . It also provides subtitles for people with hearing difficulties or those who
are unfamiliar with the language in which a particular program is being broadcast (cable
networks, satellite channels, etc.).
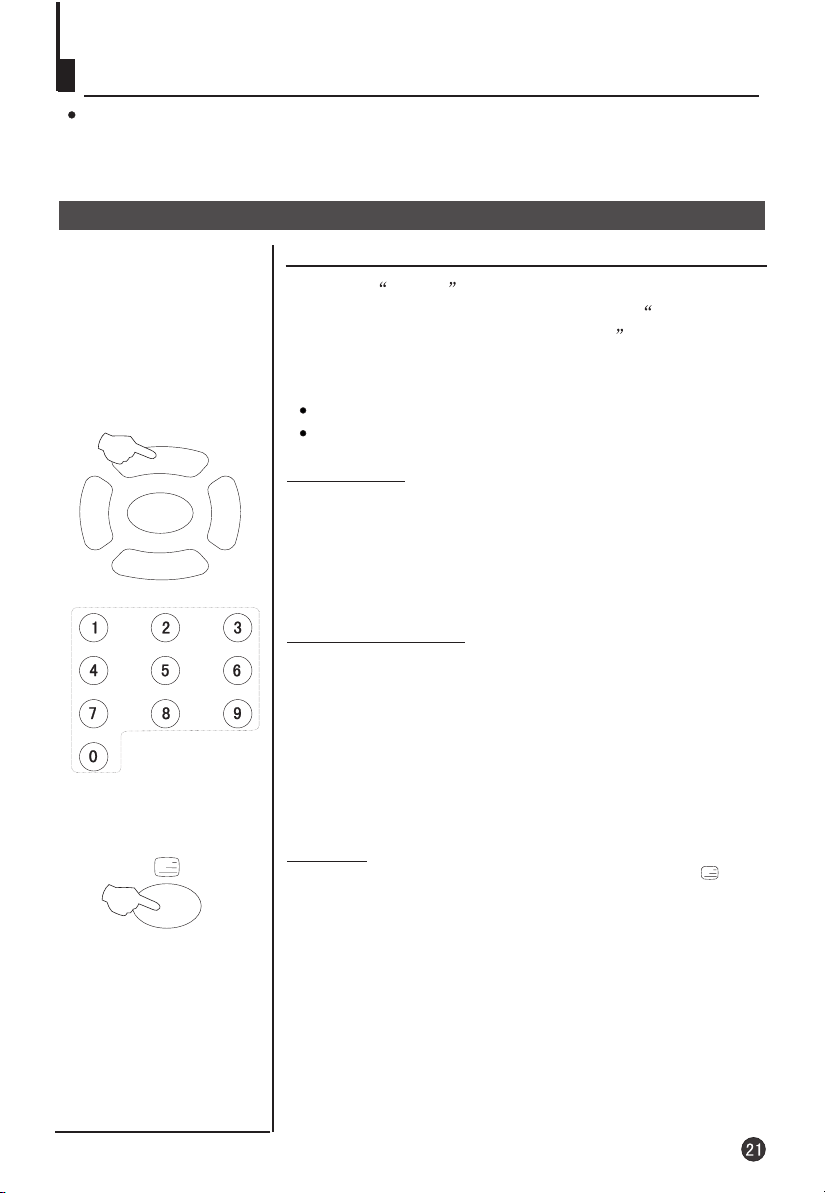
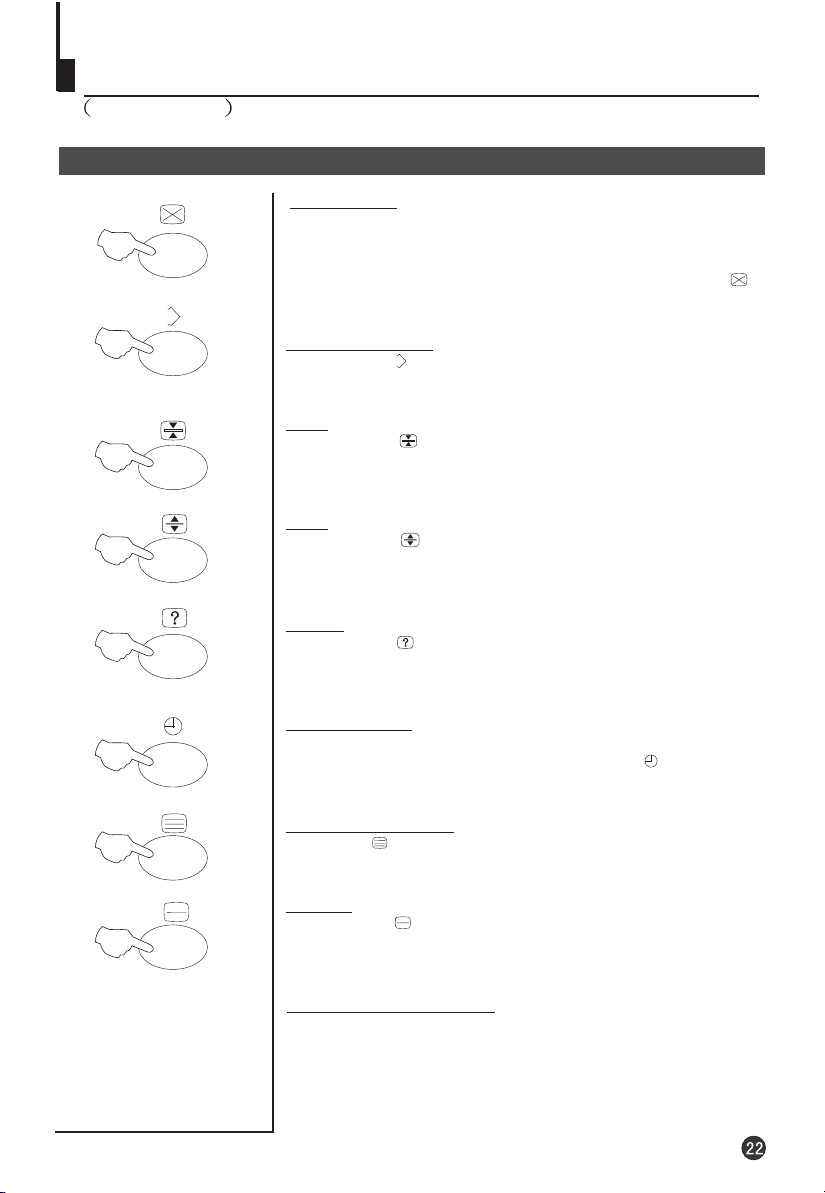
Teletext
Teletext functions
To select Teletext press the Teletext button on the handset.
To switch off Teletext, press the button again. Note all menu
functions are not available in Teletext mode . Only a few direct
button control functions are available in TELETEXT mode, they
are:
Volume adjustment, but without OSD display.
Mute function, but without OSD display.
P+P+
MENU
V-V- V+V+
P-P-
Page up/down
Use the P+/- buttons to browse next or previous page.
Page number entering
To select a Teletext page, enter the page number using the
numeric key pad on the remote control, or use the P+ or Pbuttons, or the coloured Fast text buttons.
Mix mode
To view the Tv picture while in Text mode press the button,
this will superimpose the Teletext data on top of the Tv picture.
Press this button again to return to Full text.
Page 23
Teletext
Continued
Teletext
Cancel mode
This feature allows the TV picture to be displayed while next
page to be searched is entered and found. Only the top
teletext line is displayed until the page is found. Press the
button to hide the teletext information. Either press the
button or the Text button to exit the cancel display mode.
Language change
Pressing the button will change the Teletext characters
between Eastern and Western.
Hold
Pressing the button will stop the teletext page automatically updating. This feature is very useful where there are
several teletext pages or data on the same page number.
Size
Pressing the button changes between full screen top
half bottom half full screen. This feature is very useful as it
magnifies the image making the characters easier to read.
Reveal
Pressing the button will reveal hidden text. This feature
is used to reveal information such as answers to Teletext
on-line interactive puzzles.
Subcode / Time
By entering its 4-digit number to enter a secondary page;
in normal TV mode only, pressing the button will display the
teletext time in the top right hand corner for a few seconds.
Switch teletext on/off
Press the button on the remote control to turn teletext
On/Off.
Subtitle
Pressing the button will get the teletext decoder to
automatically search for the subtitle page.
Fast text coloured buttons
Fast text automatically displays the four most commonly
used pages that the broadcaster thinks that you may want
to choose next. Press the same coloured button on the
remote control as the coloured link at the bottom of the
teletext page to go directly to that page.
While
Page 24
Basic Playback
Basic Playback
Preparations
Press the TV/DVD button on the remote control
or the TV to enter the DVD status.
Basic playback
1. Press OPEN/CLOSE to open the disc tray,
place a disc on the disc tray.
There are two different disc sizes. Place the
disc in the correct guide on the disc tray. If the
disc is out of the guide, it may damage the disc
and cause the DVD player to malfunction.
Do not place a disc which is unplayable in this
DVD player.
2. Press OPEN/CLOSE to close the disc tray, the
playback will automatically start.
Some discs do not start automatically. Press
PLAY/ENTER to start playback.
3. Some discs may start playback with a menu. Use
the cursor buttons on the remote control to select
menu options and press PLAY/ENTER to start. You
may also press the digit buttons to select a menu
option directly. Many DVDs will not allow this during
start-up.
Pause playback
1. Press PAUSE/STEP to pause playback (still mode).
The sound will be muted during still mode.
2. Press PLAY/ENTER to resume normal playback.
Stop playback
Press STOP button to stop the disc playing.
1.
With some discs the player will memorize the stop
position, such as DVD's and audio CD's.
2. Press PLAY/ENTER to playback to resume play back from the location where playback is stopped
or from the beginning of the disc.
3. Press STOP twice to stop completely.
Previous and Next
During Playing, pressing the PREV key will
restart the current chapter and skip chapters
backwards with each subsequent press until the
start of the disc is reached.
Each press of NEXT key during playing will
skip the current chapter and play the next one.
Fast forward and Fast reverse
1. Press FWD to fast forward through the disc.
Each time the FWD button is pressed, the
fast forward motion speed changes.
2. Press PLAY/ENTER to resume normal playback.
3. Press REV to fast reverse through the disc.
Each time the REV button is pressed, the
fast reverse motion speed changes.
4. Press PLAY/ENTER to resume normal playback.
Single step playback
To single step press the Pause
button, then press Pause/Step in
continuous steps to view the next frame.
1. When paused,press PAUSE/STEP continuous
to single step forward to the next frame in the
video.
2. Press PLAY/ENTER to resume normal playback.
Page 25
Advanced Playback
Advanced Playback
IMPORTANT NOTE:
ALL DESCRIBED FUNCTIONS ARE FOR DVD DISCS. IF YOU PLAY OTHER FORMATS,
THE OPERATION AND DISPLAY ON SCREEN MAY VARY.
CAPTION
Press " CAPTION ", the screen will display "SUBTITLE 01/XX XXXXX", "01" indicates the ordinal
number of this language; "XX" indicates total number
of language; "XXXXXX" indicates the language of
country. (the number of language depends on disc).
This function can select up to 32 languages displayed on screen.
REPEAT
Press " REPEAT " and Chapter repeat will be
displayed on screen, the second press will display
Title repeat, the third press will display All repeat,
the fourth press will cancel this function.
A-B
Press A-B to select the Start point. Press
again to select the End point. A third
press will cancel the function.
PROGRAM
When playing discs,press "PROGRAM" to
enter program mode. Press the digit buttons to
select the program number that you want. When
finished move the cursor to select "START" . This
will start the program playback.
SEARCH
Press "SEARCH" once to display the search
menu. Press again to cancel. Use the UP/DOWN
cursor buttons to select the item you require.
Press PLAY/ENTER to confirm.
SLOW
Press SLOW to play a disc in slow forward. Each
time the SLOW button is pressed, the slow
motion speed changes.
Press PLAY/ENTER to resume normal playback;
ANGLE
When enjoying sports, concert or theatre, press this
key to watch same actions in different angles. (Valid
for discs possessing this function. Using a disc
recorded in multi-angle you can view the scene from
different angles,for example,front, side, whole view
and exterior scene).
D.MENU
Press this key to display root menu,select item
according to your preference. (This function will work
with a DVD having a multi-layer menu.)
D.CALL
Pressing this key will cycle through "title elapsed",
"title remain", "chapter elapsed", "chapter remain"
and "display off ".
Note: This function is invalid for CD and MP3.
TITLE/PBC
With some DVD discs pressing this key will display
the title menu. You can then use the digit buttons
to select the item you prefer.
AUDIO
Press this key can change the mode of audio.
such as: Audio 1/2: AC 3 2 CH English
Audio 2/2: AC 3 5.1 CH English
Press this button to cycle between Mono Left, Mono
Right, Mix-Mono and Stereo.
Note Do not press this button continuously.
Each press must have a 3 second delay.
Page 26

Special Function Playback
JPEG DISC PLAYBACK
When a disc containing standard JPEG picture files is inserted into the player, a
navigation menu will be displayed automatically. Use the UP and DOWN cursor
buttons to select a file then press PLAY/ENTER. The slide show will commence.
Press PREVIOUS or NEXT to move between pictures. Press pause to stop on the
current picture. Press PLAY/ENTER to resume normal playing.
JPEG disc contains with JPG-format picture information which can be decoded by microcomputer software and output through video output interface for enjoying on TV screen.
Such function can be used in many domains. For example, in education, teachers can
change those pictures for class into JPG-format file by digital camera or scanner, which is
commonly used in computer, and record them into CD-R disc through disc recorder. It
will be convenient for and direct to the students when teachers play the disc by TV set
or other equipment in class. That reduces teachers' repetition work and good for
reservation (information in disc can be reserved for more than 100 years); in family, users
can record pictures which formed by digital camera or scanner into CD-R disc. Suppose
one picture occupies about 100K bytes, then one disc may record about 6000 pictures;
in commerce, manufacturers can show the products pictures one by one to consumers.
NOTE: The actual content will be different as per disc.
SCREEN SAVER FUNCTION
This unit employs a screen saver mode to help protect the tube during static video
pictures. This can be turned off on the GENERAL SETUP PAGE (see Pg. 27)
Page 27

Special Function Playback(Continued)
Kodak Picture CD FUNCTION INTRODUCTION
A Kodak Picture CD has the size and shape of a regular CD. You can order a
Kodak Picture CD simply by checking the box on the photofinishing envelope
when you drop off a roll of film (35 mm or Advanced Photo System (APS) color
print film) at the time of processing in Kodak Express store displaying "Kodak
Picture CD" sign. When your order is returned, you receive your prints,
negatives, and your full roll of pictures safely stored on your Kodak Picture CD.
Each Kodak Picture CD brings you the tools to enhance, share and manage
your pictures on your computer.
Playback modes (Normal)
When playing an Kodak picture CD disc, a navigation menu will be displayed
automatically. In the menu, use UP and DOWN cursor buttons to choose the
folder, then press PLAY/ ENTER to enter the folder. Use the UP and DOWN
cursor buttons to select the file and press PLAY/ENTER
key.
Page 28
DVD System Setup
DVD System Setup
General Setup Process
SETUP
PLAY/ENTERPLAY/ENTER
SETUP
PLAY/ENTERPLAY/ENTER
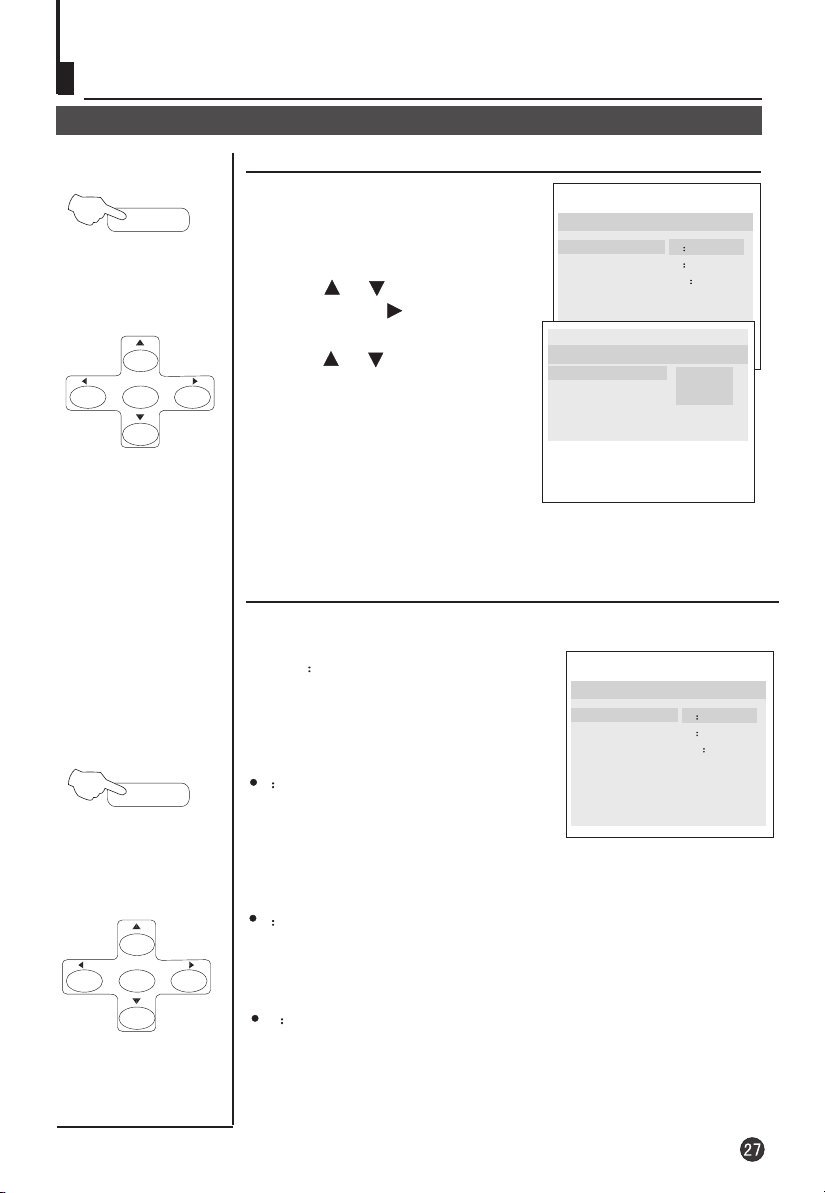
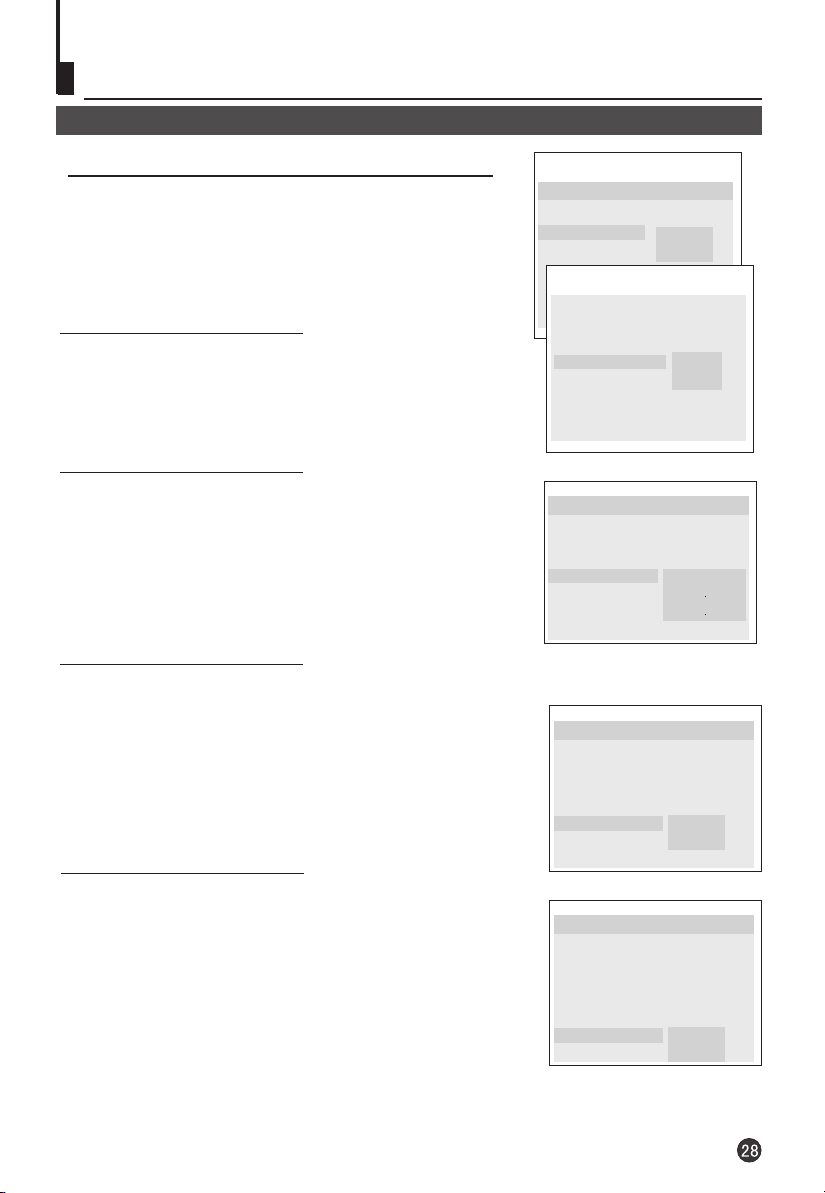
1.Press the SETUP button, the
General Setup Page,Preference
Page will be displayed in turn.
2.Press CH+/- b to select the
or
item,then press to enter the
submenu.
3.Press CH+/- bu to setup,then
or
press PLAY/ENTER to confirm.
4.Press SETUP button to exit
..General Setup Page..
TV Display LB
Angle Mark On
OSD Lang ENG
Spdif Output
Caption On
Screen Saver Off
..Preference Page..
TV Type Auto
Parental
Password
Default
.
4 3:Ps
.
4 3:Lb
16 9
PAL
AUTO
NTSC
the menu.
General Setup Page
ASPECT RATIO DESCRIPTION
When using the DVD with the internal TV,
select 4 3/LB.
The following information applies only
when the DVD output is connected to an
external TV.
4 3/PS (PS = Pan and Scan)
You may select if you have a normal aspect
ratio (4:3) TV, although the NORMAL/LB
(letter box) is a more common choice. In PS
mode, widescreen material will fill the screen, but at the expense of chopping
off extreme left and right edges of the original film picture. For this feature to
work, the disc must be specially coded. Such discs are uncommon.
4 3/LB (LB = Letter Box)
You may select this if you have a normal aspect ratio (4:3) TV. Widescreen
material will be shown in pure unaltered form, allowing the entire picture area
of the original film to be viewed without any side cropping. Black bars will
appear above and below the picture.
16 9
You may select this if you have a widescreen (16:9) TV. Back bars may still
appear above and below the picture even if using a widescreen TV. This is
because some film directors prefer to use ultra widescreen aspect ratios e.g.
2.35:1. This will normally be indicated on the DVD packaging.
..General Setup Page..
TV Display LB
Angle Mark On
OSD Lang ENG
Spdif Output
Caption On
Screen Saver Off
4 3:Ps
4 3:Lb
16 9
.
.
Page 29
DVD System Setup(Continued)
DVD System Setup
General Setup Page
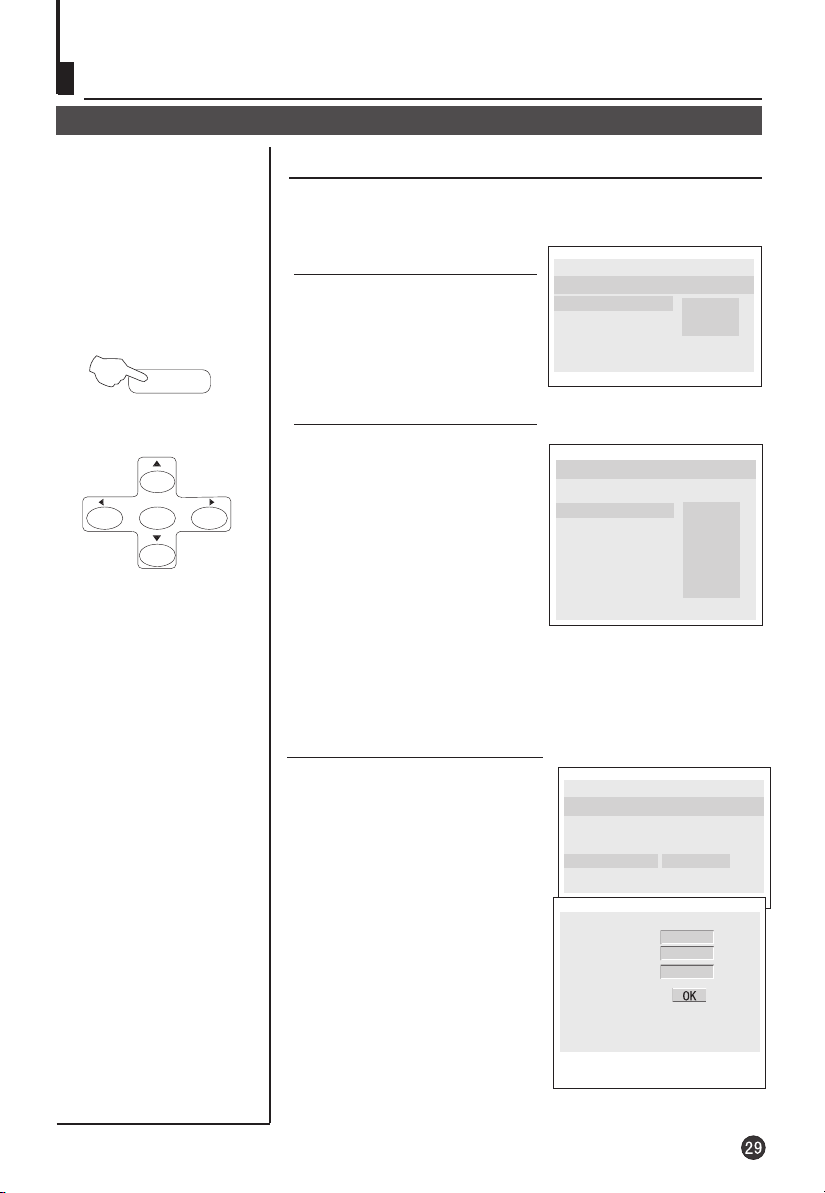
ANGLE MARK: Users can select a particular
camera angle when playing a DVD which offers
multiple angles.
This item allows you to set Angle Mark ON or OFF.
On Screen Display (OSD) Language: Users
can select on-screen display language.
SPDlF OUTPUT MODE: Sets the audio outputs.
This DVD player includes three kinds of audio output:
1. SPDlF OFF: An analog surround sound format is output through the
back-paneI connections for 2-CH audio out or 5.1 CH audio out.
2. SPDlF/RAW or SPDIF/PCM: This
surround sound format is output to a Dolby Digital/DTS decoder
through the coaxial connector on the back panel of the product.
.
..General Setup Page..
TV Display LB
Angle Mark On
OSD Lang ENG
Spdif Output
Captions On
Screen Saver Off
..General Setup Page..
TV Display LB
Angle Mark On
OSD Lang ENG
Spdif Output
Caption On
Screen Saver Off
..General Setup Page..
TV Display LB
Angle Mark On
OSD Lang ENG
Spdif Output
Caption On
Screen Saver Off
On
Off
English
FRENCH
Spdif Off
Spdif: Raw
Spdif: Pcm
CAPTIONS: This you to display or hide the caption. function allows
SCREEN SAVER: If the screen saver is on,then there
will be an animated picture of DVD on the screen
whenever the DVD player is idle for more than 3
minutes .
..General Setup Page..
TV Display LB
Angle Mark On
OSD Lang ENG
Spdif Output
Captions On
Screen Saver Off
..General Setup Page..
TV Display LB
Angle Mark On
OSD Lang ENG
Spdif Output
Caption On
Screen Saver Off
On
Off
On
Off
Page 30
DVD System Setup(Continued)
DVD System Setup
Preference Page
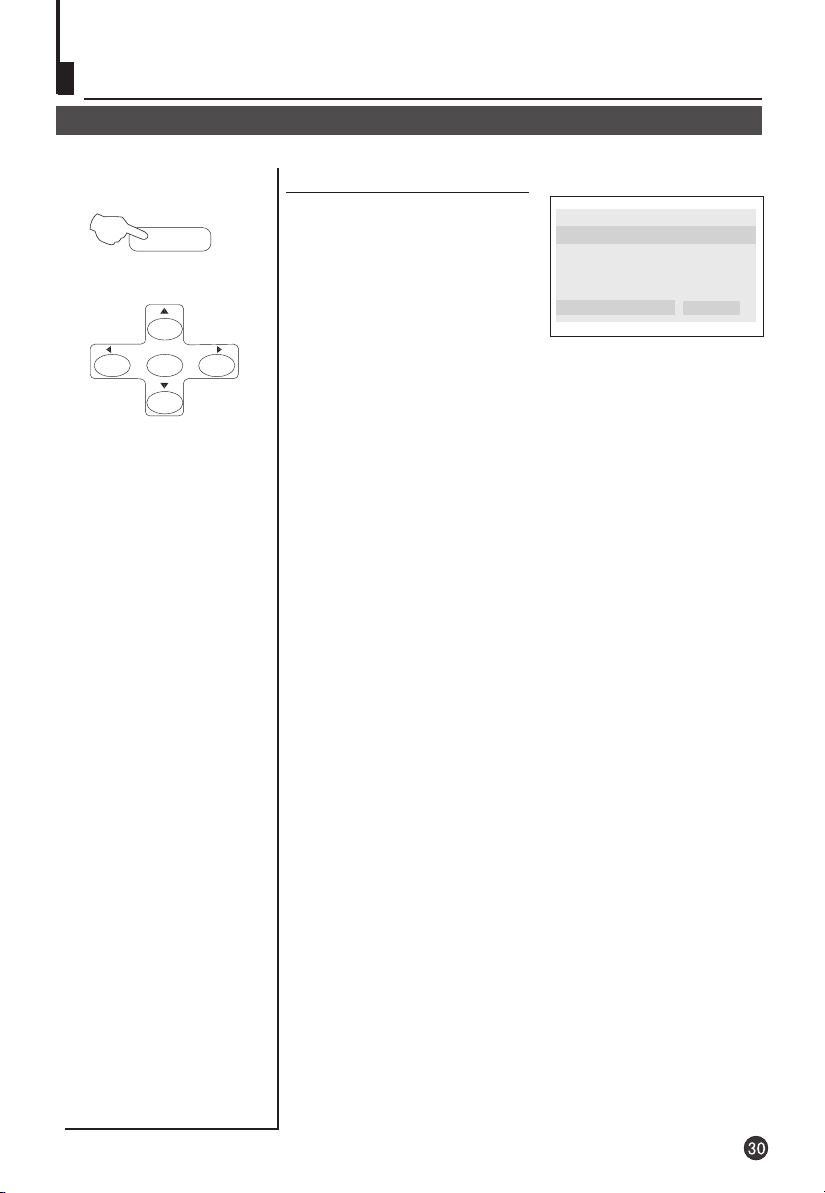
The Preference Page is only available when there is no disc
in the player. These settings are applied consistently to all
discs which are inserted and played.
SETUP
PLAY/ENTERPLAY/ENTER
TV TYPE: This player
supports different TV output,
including MULTI(Auto),
NTSC, and PAL systems.
..Preference Page..
TV Type Auto
Parental
Password
Default
PAL
AUTO
NTSC
Usually please set to MULTI.
PARENTAL: The parental
control function works in
conjunction with the
different censorship classes
assigned to DVDs. These
classes help to control the
types of DVDs that the family
watches, There are up to 8
..Preference Page..
TV Type Auto
Parental
Password
Default
1 Kid Saf
2 G
3 Pg
4 Pg 13
5 Pgr
6 R
7 Nc17
8 Adult
censorship classes for DVDs.
Note:
1 To change this setting you must enter your password.
(Initial password is 1234)
2 When set to OFF, all discs may be viewed.
PASSWORD CHANGE:
You can change your password
by entering 4 digits. Your must
confirm the 4 digits before the
new password can be accepted.
..Preference Page..
TV Type Auto
Parental
Password Change
Default
NOTE:If you forget your password
or a password is accidentally set
enter 1369 as the password. This
will enable you to regain control.
Old Password
New Password
Confirm PWD
Page 31
DVD System Setup(Continued)
DVD System Setup
SETUP
PLAY/ENTERPLAY/ENTER
DEFAULT: Resets all settings
(except password and parental
lock status) for this DVD player
back to the manufacturers
original settings. Press ENTER
to perform the reset.
..Preference Page..
TV Type Auto
Parental
Password
Default
Reset
Note:
Some functions may not be available depending on the type of disc.
Page 32
Playable Discs
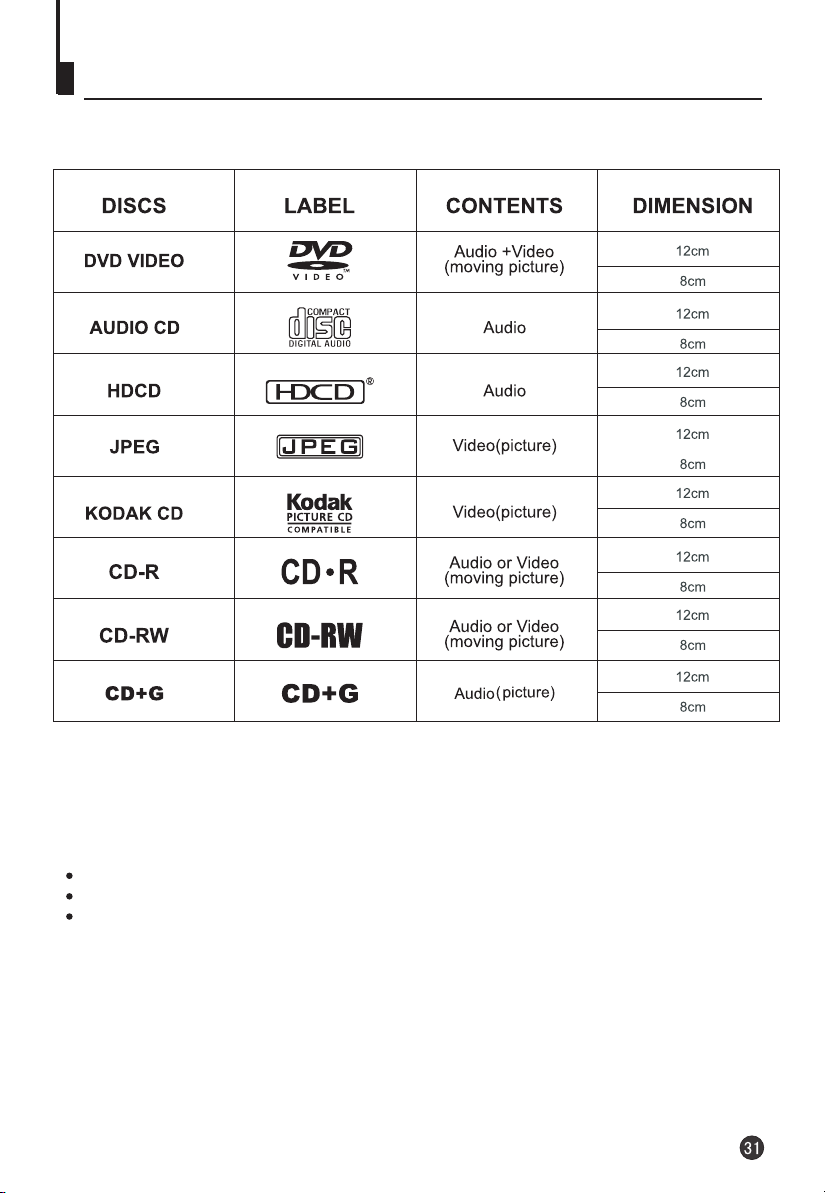
The following discs can be played:
You cannot play discs other than those listed above.
You cannot play discs of non-standardized discs, even if they may be labelled as above.
The performance of CD-R or CD-RW disc is depend on the way of disc-burning. In a few cases,
their performance may be not very well or even no performance.
Page 33
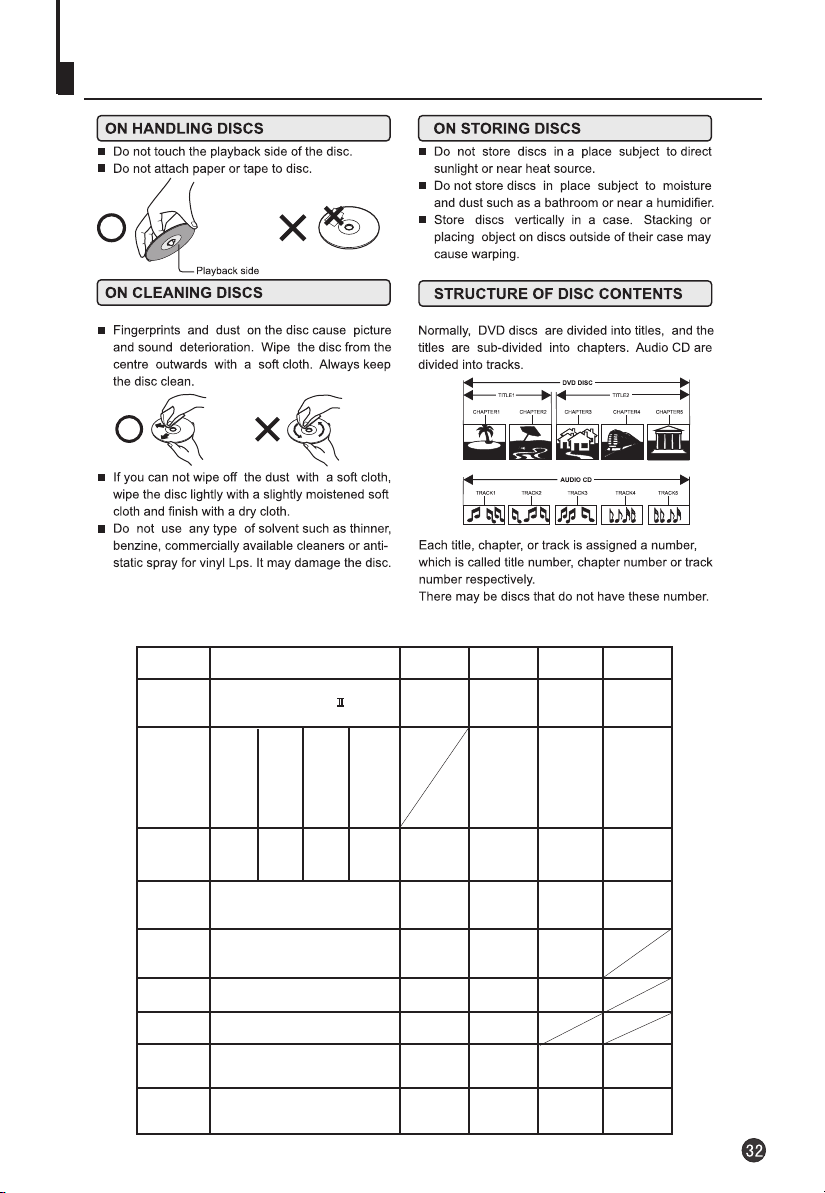
Disc Protection and DVD Characteristics
Compare DVD disc with other discs:
Encode
method
Capacity
Playing Time
Disc diameter
Horizontal
resolution
Picture
proportion
Subtitle
Language
Sound quality
DVD LD
Digital/MPEG
Double
Singleside
singlelayer
4.7G
133
minutes
Single-
-side
side
single
double-
-layer
layer
8.5G
9.4G
242
266
minutes
minutes
12cm/8cm 12cm/8cm
More than 500 line
Multiple kinds
32 kinds
8 kinds
48KHz, 96KHz/
6, 20, 24bit
Doubleside
doublelayer
17G
484
minutes
Analog
Single-side
60 minutes
double-side
120 minutes
30cm/20cm
No more than
430 line
One kind
16 kinds
at most
4 kinds
at most
44.1KHz/
16bit
SVCD
Digital
650MB 650MB 650MB
45 minutes
12cm 12cm
No more than
350 line
One kind
4 kinds
4 kinds
at most
44.1KHz/
16bit
VCD CD
Digital/
Digital
I
MPEG
74 minutes 74 minutes
No more than
250 line
One kind
2 kinds 2 kinds
16bit
44.1KHz/
16bit
44.1KHz/
Page 34
Connecting the TV set to the other video and audio equipment
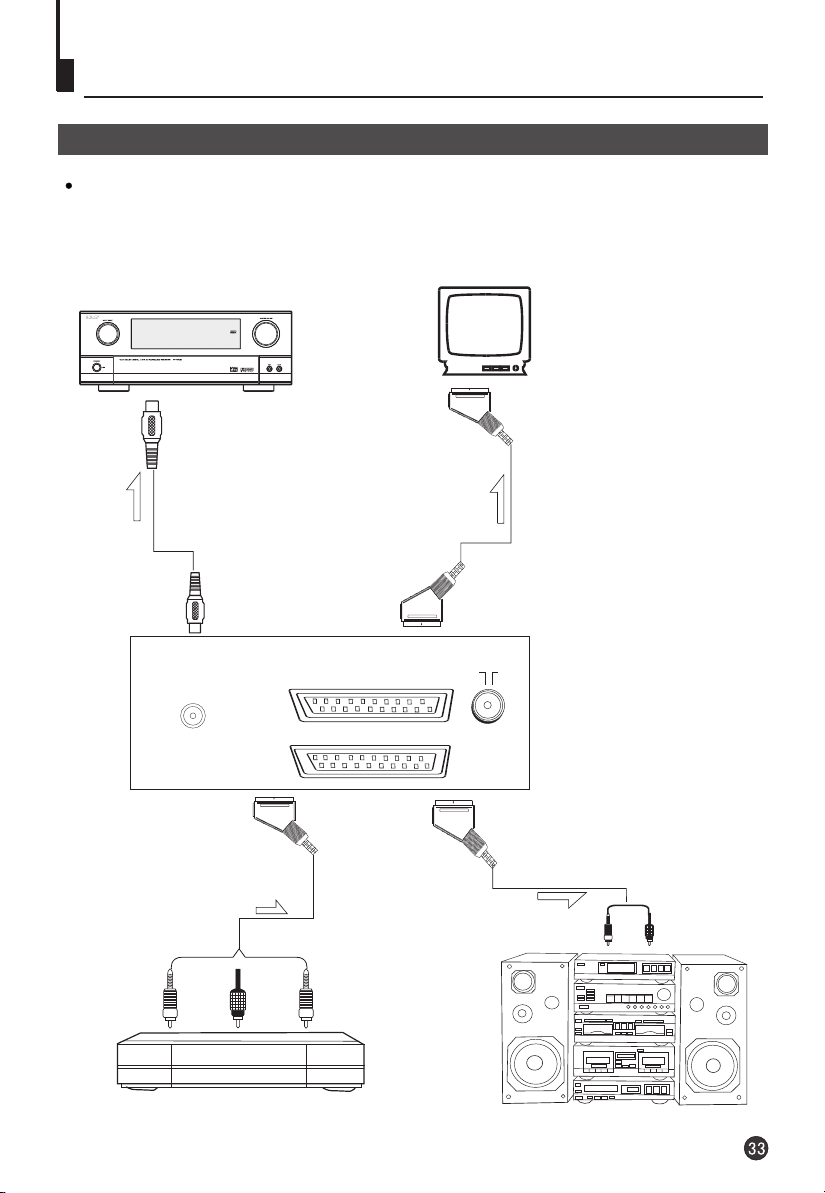
Connecting to the other video and audio equipment
You can attach optional equipment such as another TV or other audio
amplification equipment to the scart/digital coaxial sockets at the rear
of the set to enjoy higher quality sound and picture.
Amplifier
To another
To COAXIAL
type digital
audio input
Coaxial cable
To DVD EXT
TV SCART
terminal
COAXIAL
To TV EXT To TV EXT
To video/audio input
DVD, VCD and other reproducing equipment
DVD EXT
TV EXT
To outside input
Stereo
Page 35
Troubleshooting guide
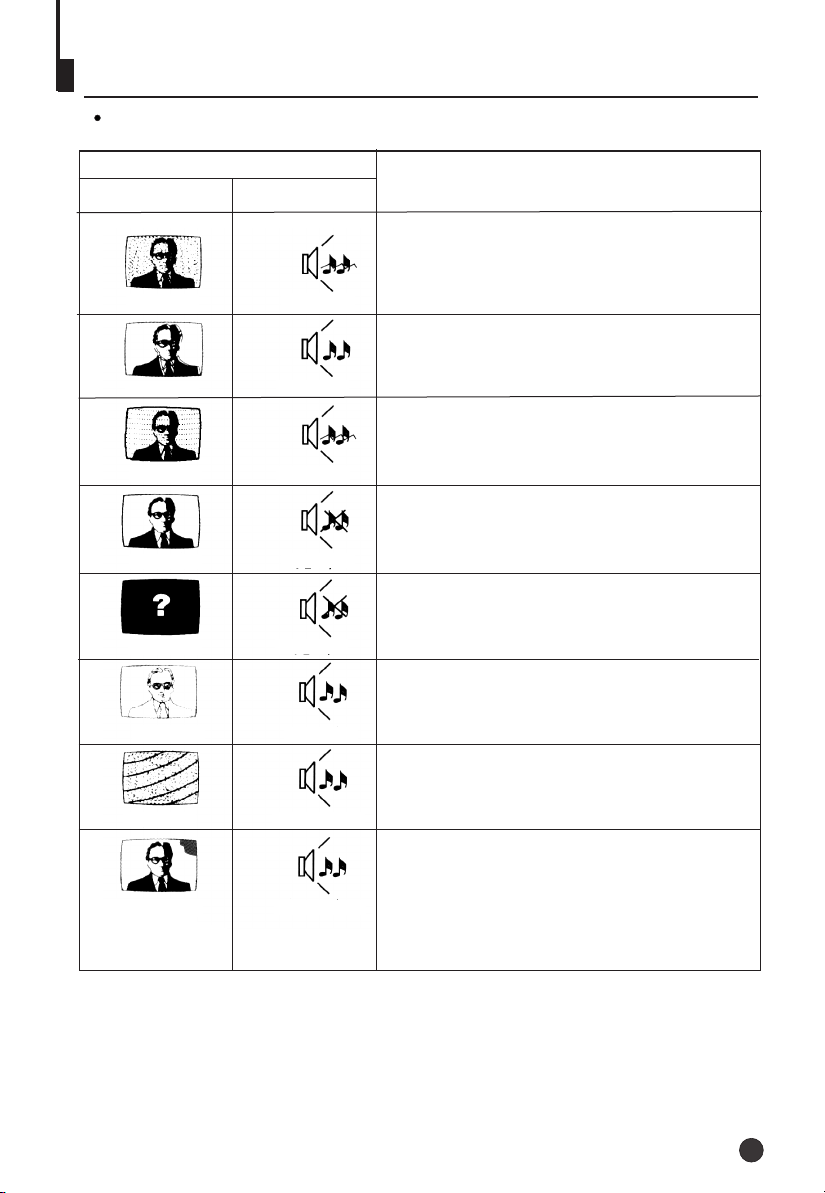
To assist in location possible faults use help guide below.
BREAKDOWN PHENOMENON
PICTURE
Picture with snow
Double or Triple Image
Disturb
No Picture No sound
No colour Normal volume
SOUND
Noise
Normal
Noise
No soundNormal
CHECKING
The aerial direction and connection
This is called ghosting which can be minimized with
an outside aerial, and good quality cable and
terminations. Altering the aerial direction can also
minimize this effect.
Electrical interference which can be caused by cars,
motorbikes etc, Fluorescent lamps and dirty
insulators on overhead power cables.
Volume Sound mute
Ensure that the power supply is connected to
the TV set and turned on. Also ensure that the
TV set is not in "Listen Mode" or that the
brightness and contrast are not turned down.
Adjust colour control
Adjust channel again
Scramble
Colour Spot
Note:
1.If the fault can not be repaired using the above guide consult with your local authorized service
center.
2.The TV set must only be repaired by a qualified registered service person. Never attempt to
remove the back cover as the TV set has dangerous voltages in side that may cause a fatally or fire.
3. The cabinet may produce the occasional "snapping sound" This is normal and caused by the
materials in the cabinet expanding with room temperature changes.
Normal or Weak Volume
Normal volume
Colour Purity fault which can be caused by moving the
TV set, placing magnets near the TV screen or turning
on/off house hold appliances such as vacuum cleaners
near the TV set. Turn the TV off with the mains power
switch for 15 minutes. When the power is turn on again
the TV set will automatically degauss the picture. In
server cases leave the TV set turned off over night.
34
Page 36
Specifications
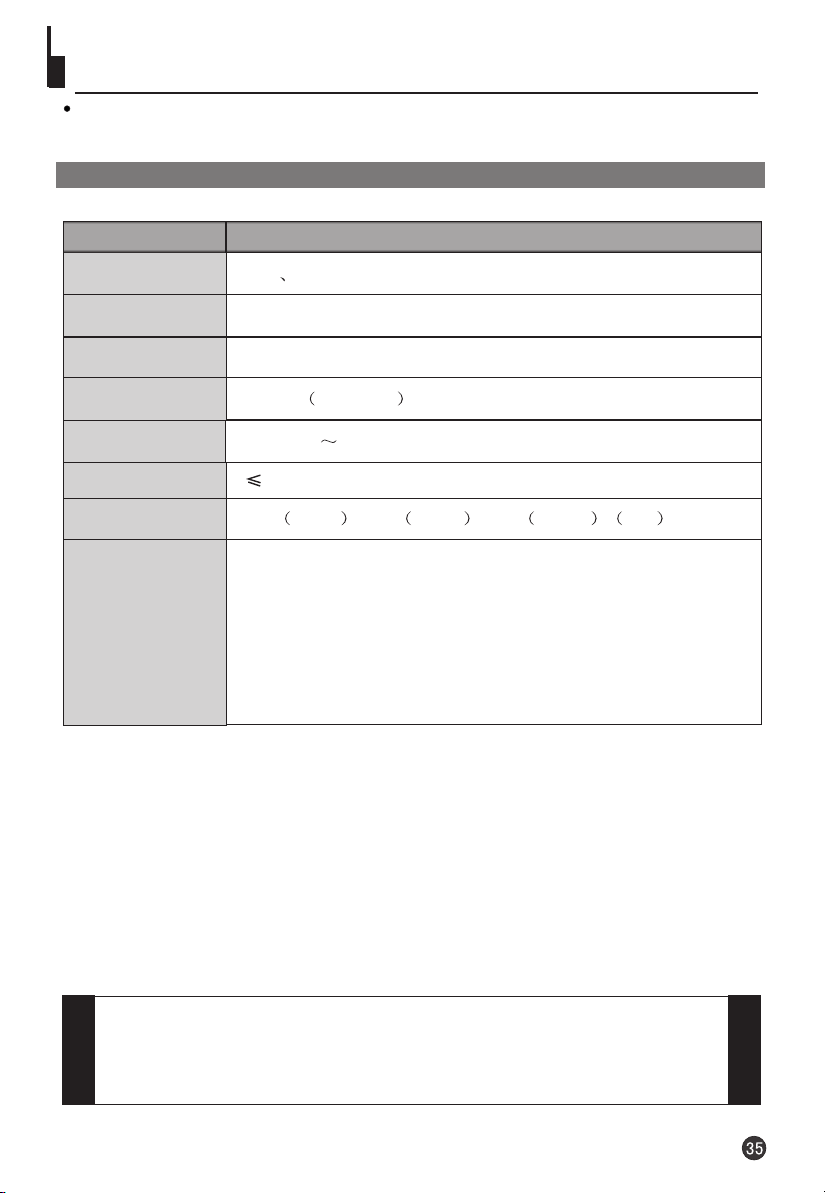
The specifications offered you here are only for reference and, with the improvement
of the products ,there may be some different between the description and the practicality.
Specifications
Model
Colour system
Sound system
Picture tube
Sound output power
Power requirements
Power consumption
Dimension
Accessories
AODV211T-S
PAL NTSC
I
21"colour picture tube (51cm viewable)
2X2W 10% THD
AC 240V 50Hz
80W
504 Width x482 Depth x512 Height mm
Remote control X1
Owner's manual X1
Battery(AAA) X2
Warranty Card X1
Video Island Card X1
NOTE
Design and specifications are subject to change without notice.
Dimensions quoted in this manual are approximate.
Page 37

 Loading...