


USER’S
LCD TV / MONITOR
Please read this manual carefully before installing and operating the TV.
Keep this manual handy for further reference.
IMPORTANT
AHH20LCD
20”LCD SCREEN

1
CONTENTS
INSTALLATION
CAUTION
1. Introduction ………………….….………………….….………………….….………………….…1
2. Warnings and Cautions ………….….………………….….………………….….…………… 2
3. Main Unit Description ………….….………………….….………………….….…………… 4
4. Definition and Function Description of Keys on Remote Control ……….….…………… 5
5. Operation and Function Description of Keys on TV ……………………………………… 11
6. Operation and Function Description of Menu ….….………………….….………………….12
7. Television Installation …………………………………….….………………….….……….. 15
8. Trouble Shooting…………………………………….….………………….….………………… 16
9. Specifications ………………….….………………….….………………….….………………….16
1 Introduction
Thank you very much for your purchase of our product of LCD TV/Monitor. It serves as a normal color TV
and PC monitor. To enjoy your set to the full from the very beginning, read this manual carefully and
keep it handy for ready reference.
Locate the receiver in the room where direct light does not strike the screen.
Total darkness or a reflection on the picture screen can cause eyestrain.
Soft and indirect lighting is recommended for comfortable viewing.
Allow enough space between the receiver and the wall to permit ventilation.
Avoid excessively warm locations to prevent possible damage to the cabinet or premature
component failure.
This TV receiver can be connected to AC 100~240 Volts. 50/60 Hz. Never connect to DC supply or
any other power supply.
Do not install the receiver in a location near heat sources such as radiator, air ducts, direct sunlight,
or in a place somewhere like close compartment and close area.
Do not cover the ventilation openings when using the set.
Never tamper with any components inside your set, or any other adjustment controls not mentioned in
this manual.
The LCD panel is a very high technology product with over 900000 thin film transistors, give you fine
details.
Occasionally, a few non-active pixels may appear on the screen as a fixed point of blue, green or red.
Please note that this does not affect the performance of your product.
2
!
Minimum
10cm
20cm
10cm
5cm
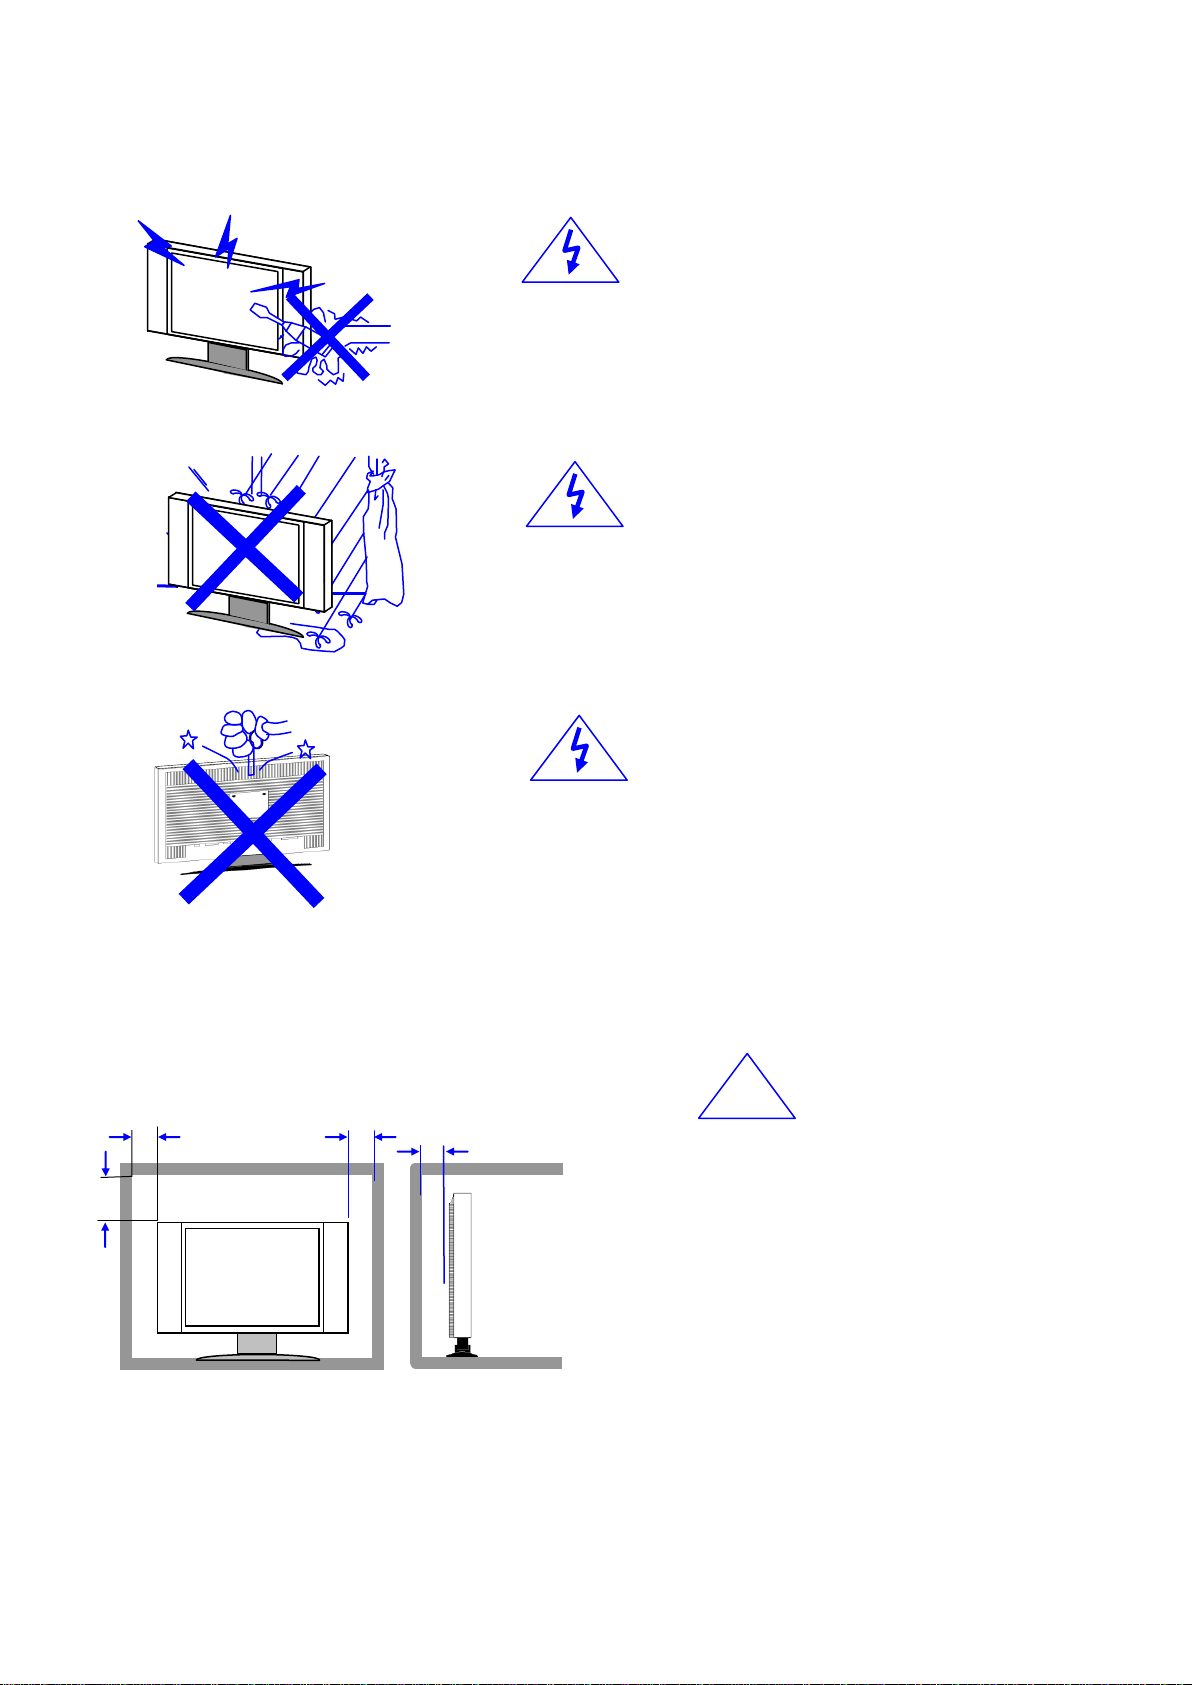
2 Warnings and Cautions
Warning
High voltages are used in the operation of this product.
Do not remote the cabinet back from your set. Refer
servicing to qualified service personnel.
Warning
To prevent fire or electrical shock hazard, Do not expose
the main unit to rain or moisture.
Warning
Do not drop or push objects into the television cabinet slots or
openings. Never spill any kind of liquid on the television
receiver.
Caution
If the television is to be built into a
compartment or similarly enclosed, the
minimum distances must be maintained.
Heat build-up can reduce the service life
of your television, and can also be
dangerous.
3
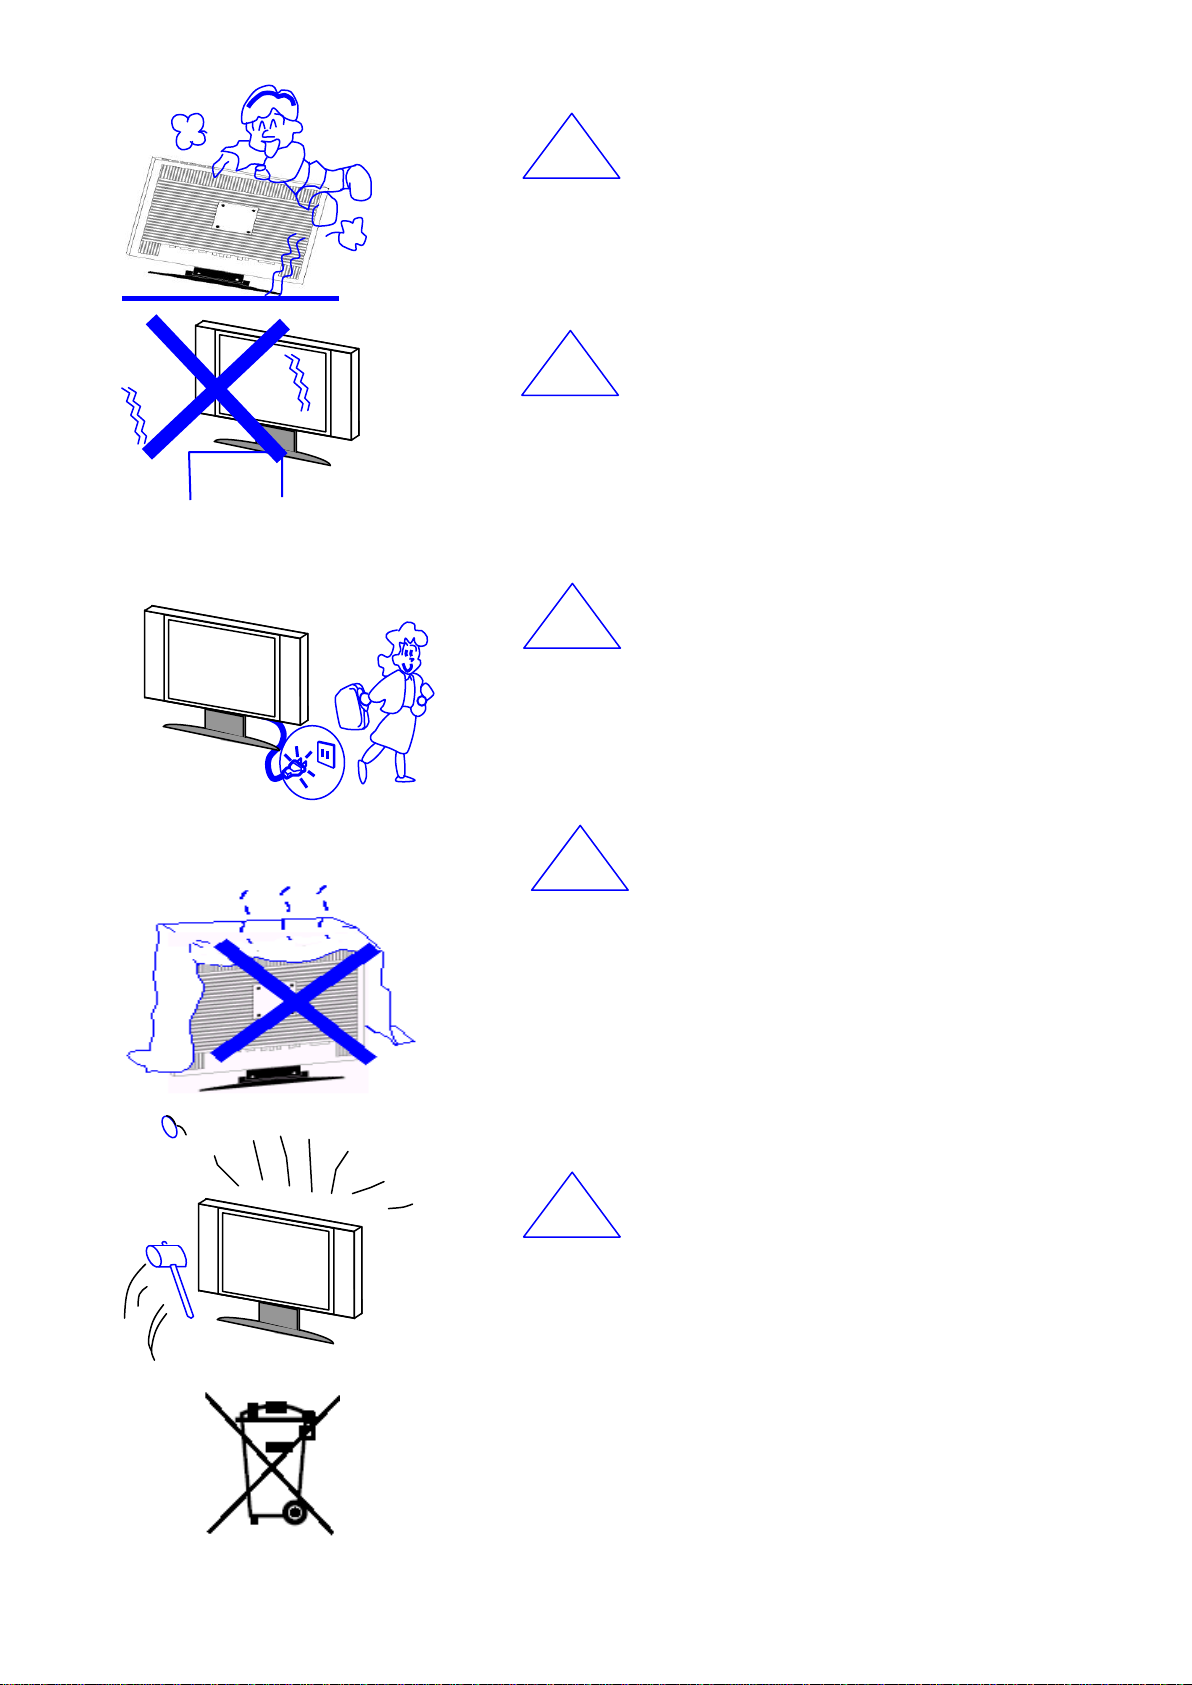
! ! !
!
!
The crossed out “Wheelie bin” is intended to show that this appliance
must not be placed with ordinary household waste.
When this appliance has reached the end of its useful life. It must be
disposed of in accordance with local by-laws. Consult your local waste
disposal authority. (WEEE Directive)
Caution
Never stand on, lean on, push suddenly the Tv or its stand.
Young children should be kept away from the Tv.
Caution
Do not place the Tv on an unstable trolley, stand, shelf or
table. Serious injury to an individual, and damage to the
television, may result if it should fall.
Caution
If there is a local thunderstorm unplug the Tv from the mains
supply and external aerial if fitted. If you are going on
holiday or the product is not used for an extended period it is
advisable to disconnect also.
Caution
Avoid exposing the main unit to direct sunlight and other
source of the heat. Do not stand the Tv directly on other
products which give off heat. E.g. video cassette players,
Audio amplifiers. Do not block the ventilation holes in the
back cover. Ventilation is essential to prevent failure of
electrical components. Do not squash power supply cord
under the main unit.
Caution
The LCD panel used in this product is made of glass.
Therefore, it can break when the product is dropped or
applied with impact. Be careful not to be injured by broken
glass pieces in case the LCD panel breaks.
4
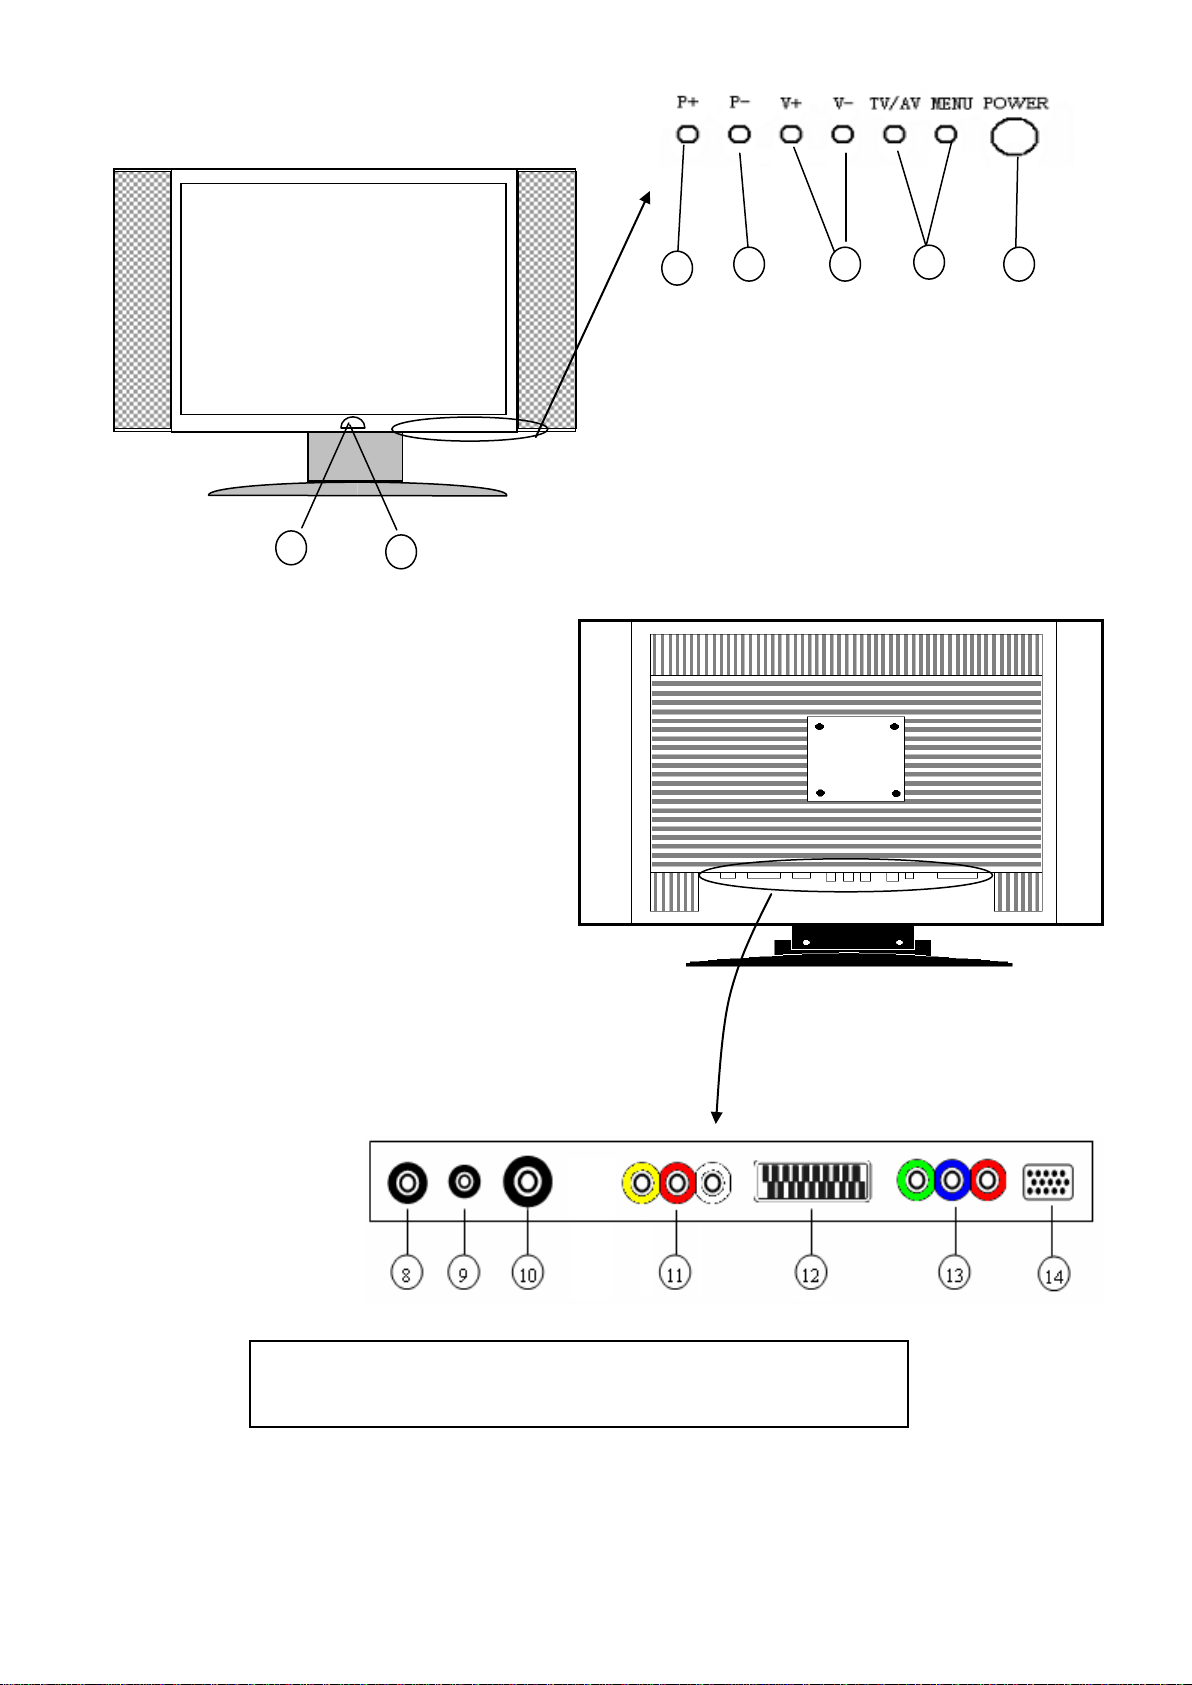
3 Main Unit Descriptions
2
3
6 7 4 1 5
Buttons 1,4,5,6,7 are the local control keys, There are certain
buttons which have the same control function on the remote control
1. Main switcher
2. Remote sensor
3. Power indicator
4. Volume down / up keys
5. Program down / up keys
6. Menu key
7. AV / TV key
8. DC power cord socket
9. Headphone output socket
10. Antenna input socket (75 Ω)
11. Video and video audio input socket
12. SCART input socket
13. YPbPr input socket
14. VGA(PC) input socket
NOTE :
5

4 Definition and Function Description of Keys on Remote
Mute (Ref.P7.)
TV/AV Select (Ref; P6.)
Sleep (Ref; P10.)
Power (Ref; P6.)
Lock (Ref.P7.)
Call (Ref.P7.)
0~9 (Ref.P6.)
QV (Ref.P6)
Picture Mode Setup
(Ref.P9.)
MENU
(Ref.P11.)
Text (Ref.P10.)
Program Up/Down
(Ref; P11.)
Sound Volume Up/Down
(Ref; P11.)
Hold (Ref.P11.)
Mix(Ref; P10.)
Reveal(Ref; P11.)
Cancel(Ref; P10.)
Subcode(Ref.P10.)
-/-- (Ref.P6)
Time(Ref; P9.)
Sound Mode Setup
(Ref; P9.)
RES. (Ref; P8.)
PICTURE (Ref.P10)
CYAN(Ref; P10.)
(Ref.P10.)
Control
The location and function of keys in the R/C are as the following picture :
6

PC
YPBPR
EURO
AV
TV
1
Press [TV/AV], signal
source changes as
following: TV → AV
→ EURO → YPBPR
→ PC → TV.
Directly press the number keys to
switch to the relevant program. The
number of station selections is :
0 - 99.
Double Digit entry.
· To select a programme number with
double digits press the [-/--] button and
then the two digits in order eg (6) (4) =
64
4-1 [POWER]:
Turns the Tv On and Off to Standby mode.
4-2 [TV/AV]:
4-3 [0]~[9]:
4-4 [-/--]
· When entering a “Double Digit” number you must do this in 3 seconds otherwise the Tv will
revert back to “Single Digit” entry.
4-5 [QV]:
7

Selects the previously viewed programme and then back again eg : 2 → 4
→ 2
Pressing “Mute” turns the sound
off, pressing again restores the
sound. When mute is on a display
(as → ) will be shown
Displays the current mode.
·The number is the program number.
·The --:-- is the current time.
Menu Lock Function.
· When entering this menu, the cursor will
stay on the password, input the password
first, then press [P+]/[P-] to enter other
items and press [V+]/[V-] to adjust its
value. The original password is 0000.
· LOCK: is only operational when in TV
mode, not AV or PC mode.
When PARENTAL LOCK is ON, it locks
the present program, if [P+]/[P-] or number
keys [0]~[9] are pressed the following OSD
will be shown.
4-6 [MUTE]:
4-7 CALL:
4-8 [LOCK]:
8

HOTEL MODE: When it is set “ON”
the volume level is limited to a preset
value.
· VOLUME LIMIT: To set the preset
value use the P- key to select
“Volume limit” and the V+ / V- key
to set the level.
· CHANGE PIN: Press P- to select
Change Pin. Enter the new pin
number with the Numeric buttons. To
confirm the number enter it again.
Make a note of the new number
Double entry function key. Sets the picture
mode. Press [→ |P|← ], the picture will change
as follows: User → Mild → Standard →
Dynamic → User. Press [→ |P|← ] once, the
current picture setup will be shown.
This function is only in Tv mode.
4-9 [RES.]:
Press this button to display the current screen resolution.
This can be done in Tv and PC modes, but is for
information only, you cannot change settings
4-10 Picture mode Setup [→ |P|← ]:
9

Enables SUBCODE in the text mode
In teletext mode this control superimposes the Tv picture onto the text.
Press again to switch the picture off.
Double entry function key; Sets the Sound
Mode. Press [→ |S|← ], the sound will change as
follows: User → Speech → Theatre →
Music → User. Press [→ |S|← ] once, the
current sound setup will be shown.
Entry function key; when the current program contains the text information , it will
display the time of the text in the top-right corner of the screen (Tv mode only).
In Teletext mode it is the Fast text Yellow button.
Double entry function key; . To set the Sleep
Timer, press the button once. (0) will be shown,
additional presses will step the timer in 15
minute steps up to 240 minutes. See picture at
right. When it has counted down to zero the Tv
will switch to Standby. In Teletext mode it is
the Fast text Green button.
Switch TV into text mode. Press to enter the Text mode, press again to
exit.
4-11 Sound mode setup [→ |S|← ]:
4-12 [TIME] :
4-13 [SLEEP]:
4-14 [TEXT]:
4-15 [SUBCODE] :
4-16 [MIX]:
10

When a page is selected in teletext, it may take some time before it
becomes available, pressing the [CANCEL] key will return to TV
mode. When the required page is found ,the page number will appear at
the top of the TV picture, press the [CANCEL] key again to return to
teletext for you to browse this page.
Reveals “Hidden” answers on quiz and puzzle pages.
Adjusts the Volume level. Also adjusts
values in the Menu modes
Selects the “Next” and “Previous” programmes in sequential mode.
In menu mode they move the selection Up and Down
Enter/circle switch/quit each menu page.
Pressing “Hold” freezes the text page. Pressing again restores the
refresh mode.
4-17 [CANCEL]:
4-18 [REVEAL]:
4-19 [HOLD] :
4-20 [V+]/[V-]:
4-21 [P+]/[P-]:
4-22 [MENU] :
11

4-23 [PICTURE] :
Selects the Picture Setting mode: Pressing sequentially you may select.
BRIGHT → CONTRAST → COLOR → SHARPNESS
In Teletext mode it is the Fast text Red button.
4-24 [CYAN] :
In Teletext mode it is the Fast text Blue button..
4-25 [] :
In teletext mode one press magnifies the top half of the screen, press again to
magnify the lower half of the screen. Press again to restore normal text.
5. Operation and Function Description of Keys on TV
Key functions on the TV are the same as that on the remote control with the same name
6. Operation and Function Description of Menu
A. Menu Operation Under TV/AV/SVHS/SCART Input Source
1. PICTURE
Brightness: Adjustment of the picture’s brightness.
Contrast: Adjustment of the picture’s contrast.
Color: Adjustment of the picture’s saturation.
Sharpness: Adjustment of the picture’s sharpness.
Tint: Adjustment of the picture’s tone. Only in NTSC mode
·Press [MENU] in turn in normal viewing state, the menu will
change as follows: PICTURE → SOUND → TIMER
→ SETTINGS → SEARCH → EXCHANGE →
Back to Normal.
·Press [P+]/[P-], to move the cursor to relevant item.
·Press [V+]/[V-], adjust value.
·Value range of each item is 0~100.
2. SOUND
VOLUME:Sound Volume Control
12

AVL:Auto Volume Limit (Sets sound level during adverts)
STEREO WIDE: When it is ON, will bring 52% spatial stereo
Effect
TREBLE: Adjusts Treble .
BASS: Adjusts Bass.
BALANCE: Adjusts stereo balance of left and right channels.
13

3. TIMER
Use the P- /P+ buttons to select the item .
·CLOCK:Setup current time. Press [V-] to adjust hours,
which changes as follows: 00 → 01 → 02 → … → 23 → 00
Press [V+] to adjust minutes, which changes as follows: 00 → 01
→ 02 → … → 59 → 00
· OFF TIME:Setup auto off time. While showing “ - -:- -” , the
auto off function will not work; press [V-] to setup hours of auto
off time, which changes as follows: - - → 00 → 01 → 02 →
… → 23 → - -
Press [V+] to setup minutes of auto off time, which changes as
follows: - - → 00 → 01 → 02 → … → 59 → - -
·ON TIME:Setup auto on time. While showing “ - -:- -” , the
auto on function will not work; press [V-] to setup hours of auto
on time, which changes as follows: - - → 00 → 01 → 02 →
… → 23 → - -
Press [V+] to setup minutes of auto on time, which changes as
follows: - - → 00 → 01 → 02 → … → 59 → - -
· ON PROGRAM:Setup auto on program. When the TV turns on
it will come on at the selected program number from 0~99.
· RTC:Real time clock in text of the current program No.
4. SETTINGS
Use the P- /P+ buttons to select the item .
·LANGUAGE:Language setup. Press [V+]/[V-],
language will switch as follows:
English → French → Russian → Turkish → Farsi → Arabic
→ Italian → Spanish → Portuguese → German → Dutch →
Swedish → Norway → Hungarlan → Polish
·COLOR SYSTEM:Color system setup. Press [V+]/[V-],
system changes as follows: AUTO → PAL → NTSC → NTSC4
→ SECAM → AUTO
·SOUND SYSTEM:Sound system setup. Press [V+]/[V-], system
changes as follows: “I” → “DK” → “BG” → “I” (note “I” is used in UK)
·BLUE BACK:Switches the Blue Background On and Off
·EURO AV:Signal source setup. Press [V+]/[V-],
system changes as follows: SVHS → RGB → VIDEO → SVHS (REMOVE SVHS FROM MENU AND
I/B)
·TELETEXT:Text Language setup. Press [V+]/[V-], system changes
as follows: PAN EURO → RUSSIAN → UKRAINIAN →
BYELORUSSIAN → FARSI → ARABIC → PAN EURO
14

5. SEARCH
Use the P- /P+ buttons to select the item .
PROGRAM NO.:Press [V+]/[V-] to directly switch present
program No., or press [-/--] and [0]~[9] to enter relevant program No.
·COLOR SYSTEM:Color system setup. Press [V+]/[V-],
system changes as follows:
AUTO → PAL → NTSC → NTSC4→ SECAM → AUTO
·SOUND SYSTEM:Sound system setup. Press [V+]/[V-],
system changes as follows: “I” → “DK” → “BG” → “I”
· SKIP: When selected “On” this programme is Skipped when using the P+ / P- buttons. The programme is
still available using the “numeric” buttons. To turn “Skip” off, srelect and use the V- button.
· AUTO SEARCH:Press [V+] to start auto search. The Tv will search all bands and store the received
programmes in order . To stop searching press the V- or Menu buttons.
· SEARCH:Press [V+] to start manual search backward. And press [V-] to search forward. The first program
will be the present program (given a program number); press [MENU] in the searching process to stop
searching. If there is no programme found, then it will stop at blue back.
· FINE TUNE:Press [V-]/[V+] for fine tuning.
6. EXCHANGE
· EXCHANGE:Press [V-]/[V+] to enter EXCHANGE:
PROGRAM is the present No., and press [V+]/[V-] to switch,
or press [-/--] and [0]~[9] to find the relevant program.
Next PROGRAM is the exchange no., which could be
achieved through [V+]/[V-] or [-/--] and [0]~[9] to
find the relevant program. Press [V+]/[V-] in EXCHANGE
to confirm exchange, or quit by pressing [MENU].
B. Menu Operation in VGA/YPBPR State.
1. When system signal source is switched to VGA, there will be a PC mark in the top-left corner of the
screen .
2. In VGA mode, if there is no signal, or the signal exceeds the
supported range, there will be a mark of no
signal displayed.
3.In VGA mode, The main menu is as in the picture.
15

75 Co-axis cable
Antenna in jack
75 Co-axis cable
VHF antenna
Mixer
UHF antenna
Input terminal of antenna
Co-axis antenna plug
1st Item: To adjust screen contrast.
2nd Item: To adjust screen brightness.
3rd Item: To adjust the sampling clock of the system for input signal.
4th Item: To adjust the sampling phase of the system for input signal.
5th Item: To adjust the horizontal position of the picture.
6th Item: To adjust the vertical position of the picture.
7th Item: To adjust local VGA color temperature value, which could be ”C9300” or“ C6500”.
8th Item: It is used to carry out Auto Configure, When connected to a PC for the first time it is advisable to use
this setting.
9th Item: To carry out Auto Configure. Besides, it could resume customer data which is stored in the system.
4. . In the VGA mode you may adjust the V+/V- directly, it displays the
volume adjustment.
5.
P.S.:
1. The operation of remote keys and local keys in VGA menu is the same with the former relevant TV
operation.
2. We do not advise use of the 3rd,4th,5th,and 6th item to set screen state. It is better to use 9th item.
3. If only to carry out Auto Configure, it is better not to use this menu.
7 Television Installation
Connect antenna or video facility
1. Use a 75Ω coaxial cable plug to connect antenna to input terminal at the rear of the cabinet.
2. Connect external video apparatus to the audio, video in jacks or Scart socket at the rear of the cabinet.
16

Problems
Check
No picture or sound.
Check if the power supply is plugged in.
Check if the power switch is in “on’” position.
Picture is OK, no sound.
Check if the volume control is set to the minimum or mute position.
Remote control doesn’t work.
Check if the power switch is in “on” position.
Check if the batteries are worn out or not connected.
Make sure that there is no strong light striking the sensor window
of remote control unit.
Check there are no obstacles between the sensor window and
remote control unit.
No TV signal.
Check if the TV/AV button is set to TV status.
Disposal of used batteries. Do not break open or throw
in a fire exhausted batteries. Dispose of in a safe manner
Battery installation and replacement for remote control unit
The remote control uses two 1.5V AA batteries. For battery installation and replacement are as following:
1. Turn the remote control unit upside down. Press
down the grip of battery compartment and slide
the cover in the direction of the arrow.
2. Install two new batteries, make sure that
battery polarity matches with the “+”, “–”
marks inside the battery. Or it could
damage the unit.
3. Close the battery compartment covers
8 Trouble Shooting
Before calling the Customer Help Line please carry out these simple tests
17

Check if the antenna is well connected.
Check if you installed the TV correctly.
No external video signal.
Check if you installed the TV correctly.
Check if the TV/AV button is set to AV position.
Picture lacks colour or picture
too dark.
Check colour, brightness and contrast controls are correctly
adjusted.
All channels lose colour
intermittently.
Check if the antenna is broken.
Check if the antenna is disconnected.
Check if the antenna is damaged.
Poor reception, loss of colour
with certain channels.
Check if channels are correctly tuned (see “Fine tuning”).
Diagonal stripes appear on
picture.
The receiver may be affected by interference (e.g. from nearby
radio broadcasting transmitter or from another TV receiver).
Picture has “snow”.
Check if the antenna is broken.
Check if the antenna is disconnected.
Check if the antenna is damaged.
If using an internal aerial, consider installing an outdoor aerial
Ghost images appear.
The aerial may be damaged or moved in high winds.
If using an indoor aerial, consider installing an outdoor aerial.
If you are still having difficulty please call the Technical help line. Ring 01422 203676 (Normal rates apply).
Opening hours Mon-Fri 8 am – 8pm. Sat 9 am – 4pm. Sun 11am – 4pm “Bank holidays as Sun”
9 Specifications
Television RF system PAL “I” “ B/G” “DK”
Video Color System PAL, NTSC 3.58/4.43,
Channel and frequencies VHF Low channel (VL)=46.25 to 168.25 MHz
VHF high channel (VH)=175.25 to 463.25 MHz
UHF channel (UHF)=471.25 to 863.25 MHz
Television Channel: 99-Position Program Memory
Power input AC Adaptor AC 100-240V, 50/60 Hz
Power input TV unit 12V DC 5A max
Power consumption Maximum 60W
Screen size Visible Size: 51 cm measured diagonally
Audio output 1.5 W +1.5W (Rated output)
Note:
All specifications are subject to change without notice.
18
 Loading...