

aktivmed GlucoCheck XL Service Manual

GlucoCheck
BLOOD GLUCOSE MONITORING SYSTEM
OWNER'S
MANUAL

GlucoCheck
BLOOD GLUCOSE MONITORING SYSTEM
OWNER'S
MANUAL
Version 1.0 January, 2010
311-4277100-001

Dear GlucoCheck XL System Owner:
Thank you for purchasing the GlucoCheck XL Blood Glucose Moni-
toring System. This manual provides important information to help
you to use the system properly. Before using this product, please
read the following contents thoroughly and carefully.
Regular monitoring of your blood glucose levels can help you and
your doctor gain better control of your diabetes. Due to its compact
size and easy operation, you can use the GlucoCheck XL Blood
Glucose Monitoring System to easily monitor your blood glucose
levels by yourself anywhere, any time.
If you have other questions regarding this product, please contact
the place of purchase or call the local customer service.

IMPORTANT SAFETY PRECAUTIONS
READ BEFORE USE
1. Use the device only for the intended use described in this manual.
2. Do not use accessories which are not supplied by the manufacturer.
3. Do NOT use the device if it is not working properly or if it is damaged.
4. Do not use the equipment in places where aerosol sprays are being
used, or where oxygen is being administered.
5. Do NOT under any circumstances use on newborns or infants.
6. This device does NOT serve as a cure for any symptoms or
diseases. The data measured is for reference only. Always consult
your doctor to have the results interpreted.
7. Before using this device to test blood glucose, read all instructions
thoroughly and practice the test. Carry out all quality control checks
as directed.
8. Keep the device and testing supplies away from young children.
Small items such as the battery cover, batteries, test strips, lancets,
and vial caps are choking hazards.
9. Use of this instrument in a dry environment, especially if synthetic
materials are present (synthetic clothing, carpets etc.) may cause
damaging static discharges that may cause erroneous results.
10.Do not use this instrument in close proximity to sources of strong
electromagnetic radiation, as these may interfere with the accurate
operation.
KEEP THESE INSTRUCTIONS IN A SAFE PLACE

TABLE OF CONTENTS
IMPORTANT SAFETY PRECAUTIONS 5
BEFORE YOU BEGIN 8
Important Information 8
Intended Use 9
Test Principle 9
Contents of System 10
Meter Overview 11
Display Screen 12
Test Strip 13
Setting the Meter 14
THE FOUR MEASURING MODES 17
BEFORE TESTING 18
Control Solution Testing 18
Performing a Control Solution Test 19
TESTING WITH BLOOD SAMPLE 21
Overview of the Lancing Device 21
Setting up the Lancing Device 21
Preparing the Puncture Site 23
Alternative Site Testing 25
Performing a Blood Glucose Test 27
METER MEMORY 30
Reviewing Test Results 30
Reviewing Blood Glucose Day Average Results 31
Downloading Results onto a Computer 33

MAINTENANCE 34
Battery 34
Caring for Your Meter 36
Caring for Your Test Strips 36
Important Control Solution Information 37
SYSTEM TROUBLESHOOTING 38
Result Readings 38
Error Message 39
Troubleshooting 40
DETAILED INFORMATION 41
Reference Values 42
Comparing Meter and Laboratory Results 43
SYMBOL INFORMATION 44
SPECIFICATIONS 45

BEFORE YOU BEGIN
Important Information
► Severe dehydration and excessive water loss may cause readings
which are lower than actual values. If you believe you are suffering
from severe dehydration, consult a healthcare professional
immediately.
► If your blood glucose results are lower or higher than usual, and
you do not have any symptoms of illness, rst repeat the test. If
you have symptoms or continue to get results which are higher or
lower than usual, follow the treatment advice of your healthcare
professional.
► Use only capillary whole blood sample to test your blood glucose.
Using other substances will cause incorrect results.
► If you are experiencing symptoms that are inconsistent with your
blood glucose test results and you have followed all instructions
described in this owner’s manual, contact your healthcare
professional.
► We do not recommend using this product on severely hypotensive
individuals or patients in shock. Readings which are lower than actual
values may occur for individuals experiencing a hyperglycaemichyperosmolar state, with or without ketosis. Please consult the
healthcare professional before use.
8

Intended Use
The system is intended for use outside the body (in vitro diagnostic
use) by people with diabetes at home and by health care professionals
in clinical settings as an aid to monitor the effectiveness of diabetes
control. It is intended to be used for the quantitative measurement of
glucose (sugar) in fresh whole blood samples (from the nger, palm,
forearm, upper arm, calf and thigh).
It should not be used for the diagnosis of diabetes, or testing on
newborns.
Test Principle
Your system measures the amount of sugar (glucose) in whole blood.
The glucose testing is based on the measurement of electrical current
generated by the reaction of glucose with the reagent of the strip.
The meter measures the current, calculates the blood glucose level,
and displays the result. The strength of the current produced by the
reaction depends on the amount of glucose in the blood sample
9
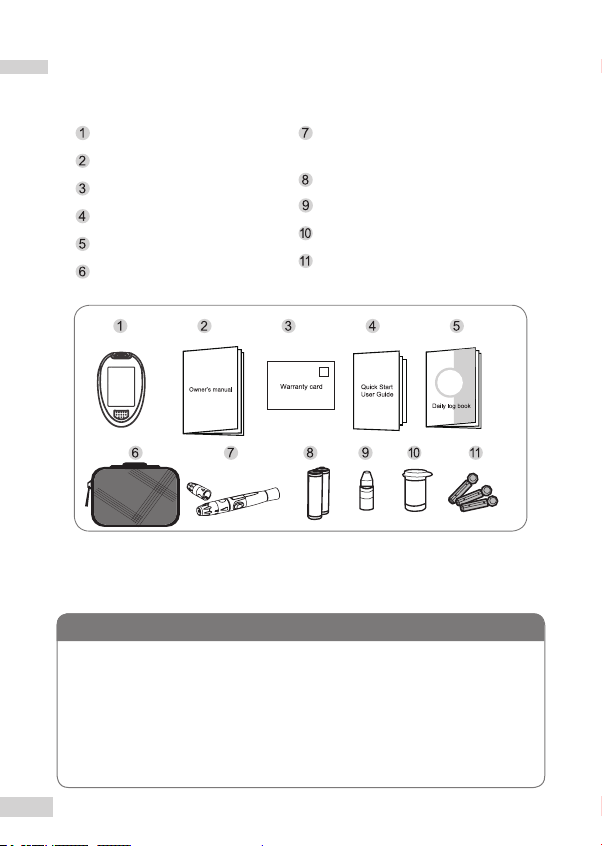
Contents of System
Your new GlucoCheck XL system kit includes:
Meter
Owner’s Manual
Warranty Card
Quick Start User Guide
Daily Log Book
Protective Wallet
Test strips, control solutions, or sterile lancets may not be included in
the kit (please check the contents on your product box). They can be
purchased separately.
If any items are missing from your kit or opened prior to use,
please contact local customer services or place of purchase for
assistance.
Lancing Device with One
Clear Cap
2 x 1.5V AAA Alkaline Batteries
Control Solution
Test Strips
Lancets
NOTE
10
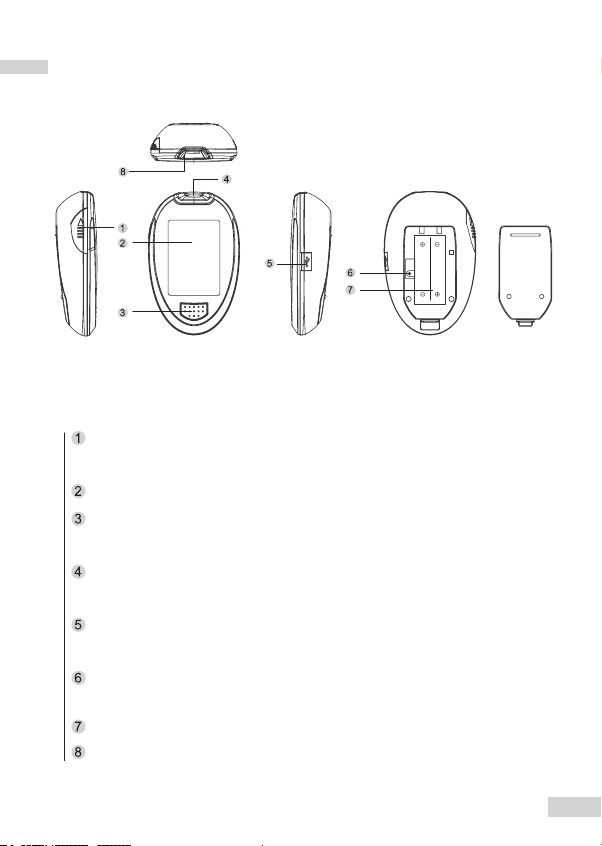
Meter Overview
Top
SET
Front
Right SideLeft Side Back
TEST STRIP EJECTOR
Eject the used strip by pushing up this button.
DISPLAY SCREEN
M BUTTON
Enter the meter memory and silence a reminder alarm.
TEST SLOT
Insert test strip here to turn the meter on for testing.
DATA PORT
Download test results with a cable connection.
SET BUTTON
Enter and conrm the meter settings.
Battery COMPARTMENT
STRIP INDICATION LIGHT
11
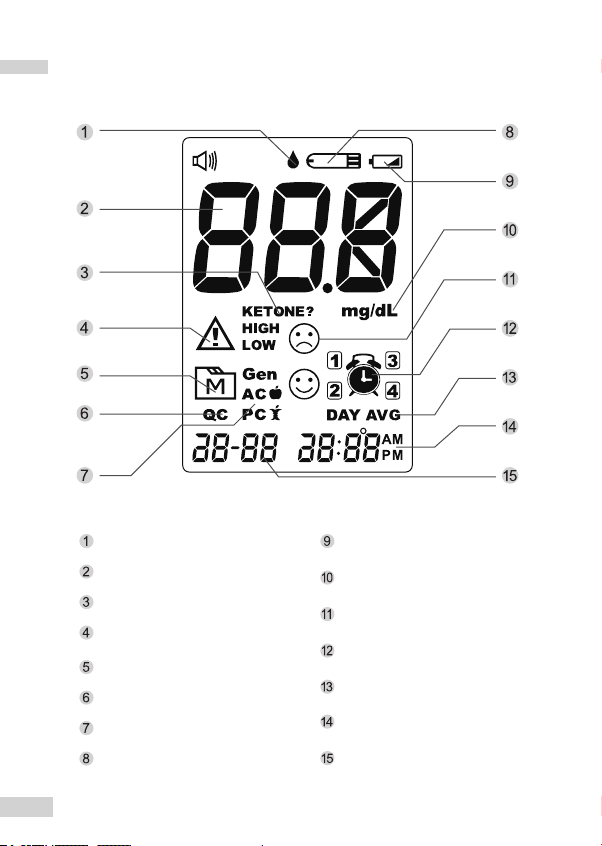
Display Screen
Blood Drop Symbol
Test Result
Ketone Warning
Error Message
Memory Mode Symbol
Control Solution Mode
Measuring Mode
Test Strip Symbol
12
Low Battery Symbol
Measurement Unit
Face/Low/High symbol
Reminder Alarm
Day Average
Time
Date

Test Strip
Absorbent Hole
Apply a drop of blood here. The blood will be automatically absorbed.
Conrmation Window
This is where you conrm if enough blood has been
applied to the absorbent hole of the test strip.
Test Strip Handle
Hold this part to insert the test strip into the slot.
Contact Bars
Insert this end of the test strip into the meter.
Push it in rmly until it will go no further.
Attention!
Test results might be wrong if the contact
bar is not fully inserted into the test slot.
The front side of the test strip should face
up when inserting the test strip.
Front Back
NOTE
The GlucoCheck XL meter should only be used with GlucoCheck
XL Test Strips. Using other test strips with this meter can produce
inaccurate results.
13
Setting the Meter
Before using your meter for the rst time or if you change the meter
battery, you should check and update these settings. Make sure you
complete the steps below and have your desired settings saved.
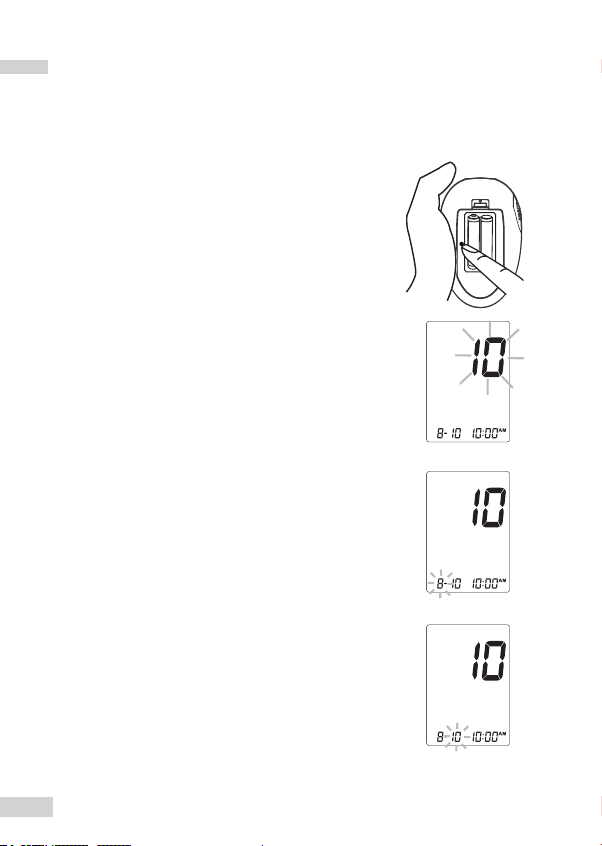
To Enter the Setting Mode
Start with the meter off (no test strip inserted).
Press SET to turn on the meter.
1. Setting the date
With the year ashing, press and release M
button to choose the correct year. Press SET.
With the month ashing, press and release M
button to choose the correct month. Press SET.
With the date ashing, press and release M
button to choose the correct date. Press SET.
14

2. Setting the time format
Press M button to select the desired time format --- 12h or 24h.
Press SET.
3. Setting the time
With the hour ashing, press and release M
button to choose the correct hour. Press SET.
With the minute ashing, press and release M
button to choose the correct minute. Press SET.
4. Deleting the Memory.
With “dEL” and a flashing “
” symbol on the display, press M
button and select “No” to keep the results in memory then press
SET to skip.
To delete all the results, press M button and select “Yes” then
press SET to confirm. “OK” and “
” are displayed on the meter,
which indicates that all data stored is deleted.
15
 Loading...