

Page 1
5012H001 Ed.01
AKO-5012
Guía rápida / Quick guide / Guide rapide /
Schnellstartanleitung / Guia rápido
E
GB
F
D
P
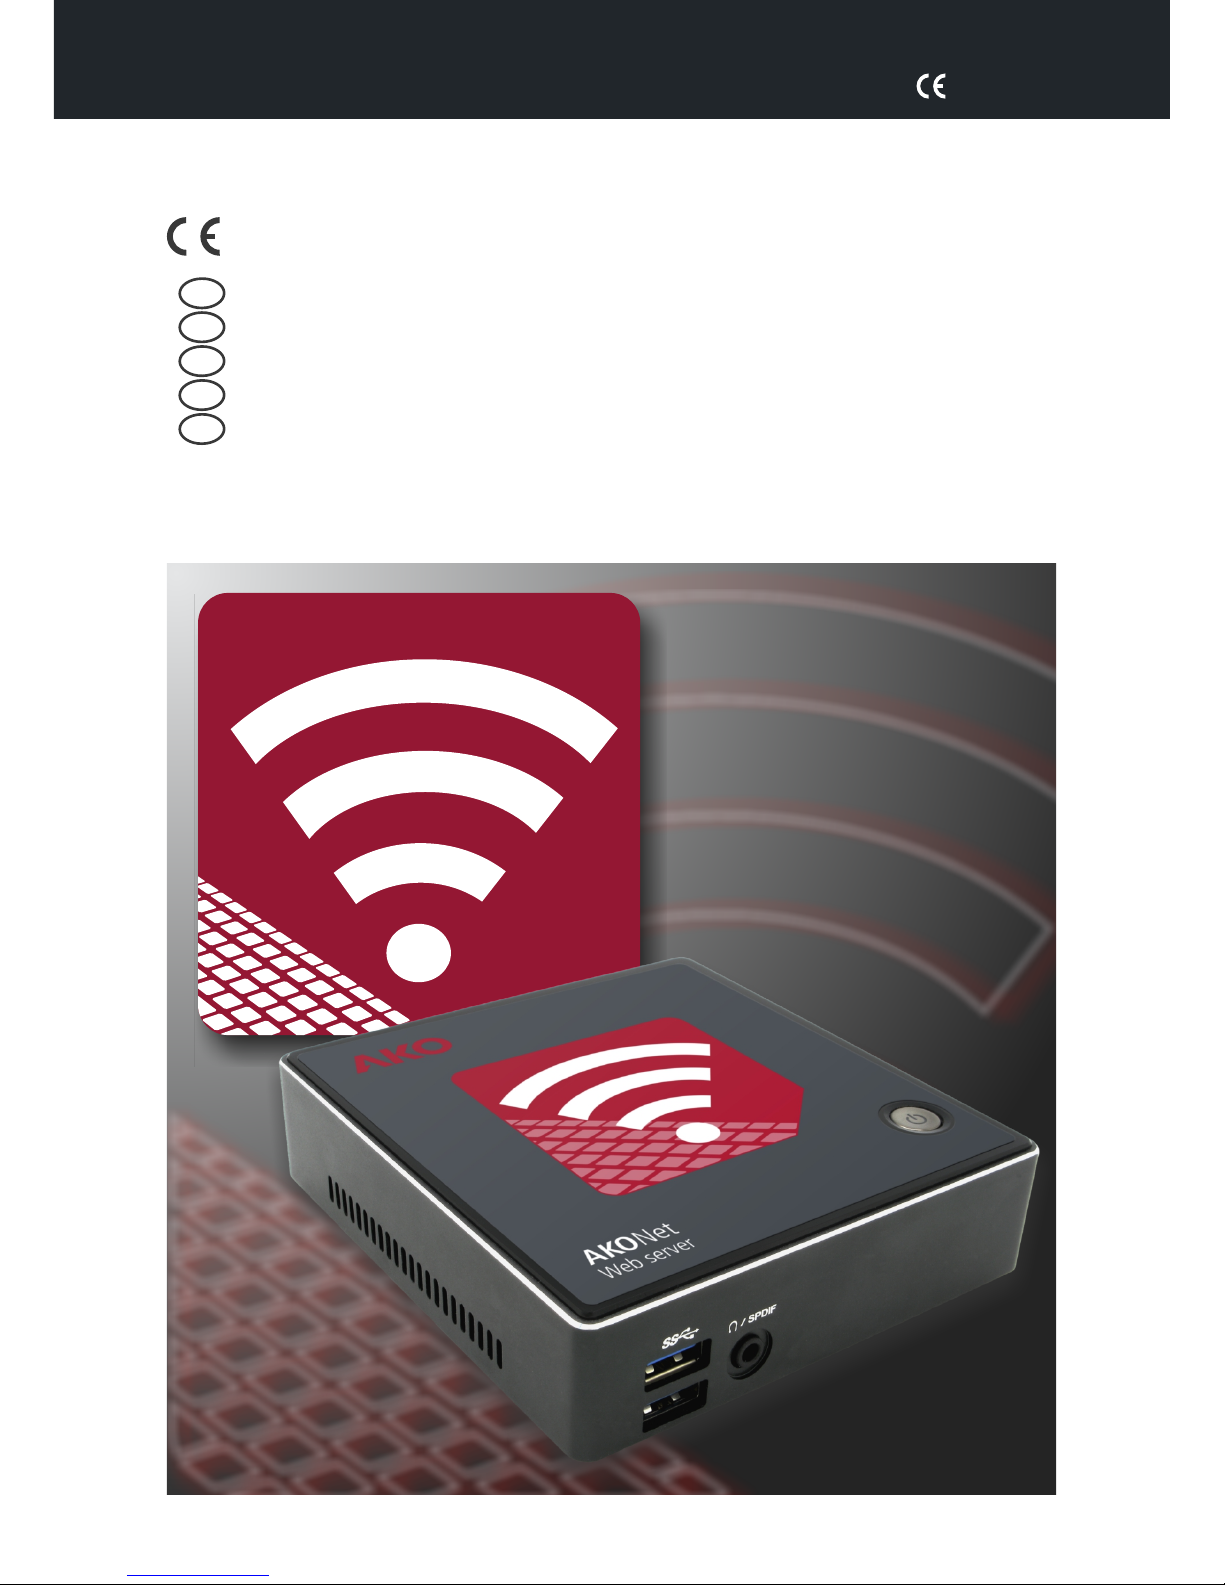
Servidor web para monitorización y supervisión de instalaciones frigoríficas
Monitoring and supervision Web Server for refrigerated facilities.
Serveur web pour la monitorisation et la supervision des installations frigorifiques
Web-Server zur Überwachung und Fernverwaltung von Kühlanlagen
Servidor Web para monitorização e supervisão de instalações frigoríficas
Page 2
AKO-80039
ON
E
5012H001 Ed.01
AK
O-5012
Guía rápida / Quick guide / Guide rapide /
Schnellstartanleitung / Guia rápido
E
GB
F
D
P
Servidor web para monitorización y supervisión de instalaciones frigoríficas
Monitoring and supervision Web Server for refrigerated facilities.
Serveur web pour la
monitorisation
et
la
supervision des
installations
frigorifiques
Web-Server zur Überwachung und Fernverwaltung von Kühlanlagen
Servidor Web para monitorização e supervisão de instalações frigoríficas
AKO-80039
Instrucciones
/
Instructions
/
Anweisungen
/
Instruções
8003H910 Ed.04
E
GB
F
D
P
2
5012H001 Ed.01
Page 3
5012H001 Ed.01
AKO-80039
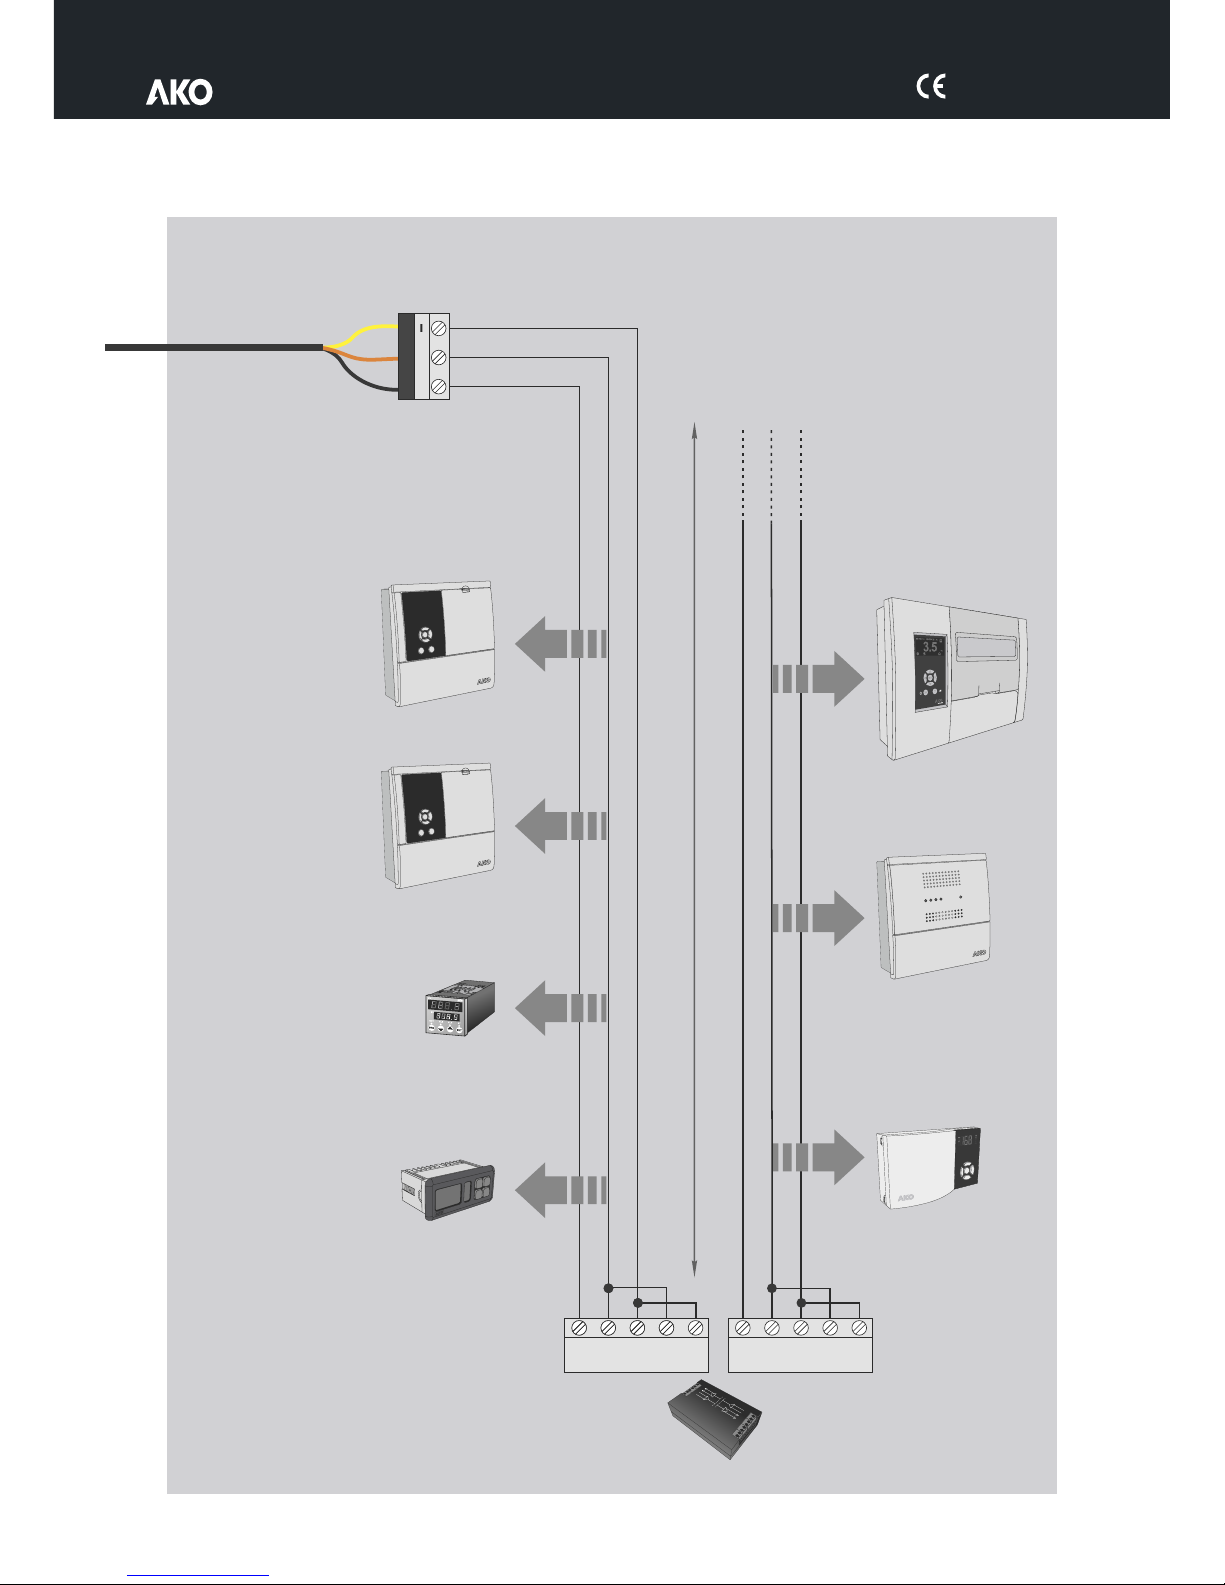
Conexionado / Wiring / Connexion / Verdrahtung / Ligação
ESC
?
SET
CAMCtrl
Tr+
Tr+
GND
GND
Tr-
Tr-
AKOControl*
+
RS-485
GND
AKO-80039
Amarillo / Yellow / Jaune / Gelb / Amarelo
Negro / Black / Noir / Schwarz / Preto
Tr-:
Tr+: Naranja / Orange / Laranja
GND:
A-
A-
B+
B+
A-
A-
B+
B+
GND
GND
AKO-80024**
ESC
?
SET
CAMRegis
AKOControl*
AKOControl*
100 m
CAMAlarm
PROPlus
Controlador AKO con comunicación
*
AKO controller with communication
Contrôleurs AKO avec communication
AKO-Steuergeräte mit Kommunikationsanschluss
Controlador AKO com comunicação
** Utilizar en caso de conectar más de 25 equipos
Use when connecting more than 25 units
Utilisez si vous connectez plus de 25 équipements
Wenn mehr als 25 Geräte angeschlossen sind,
den AKO-80024-Verstärker verwenden
Utilizar em caso de conectar mais de 25 equipamentos.
3
Page 4
5012H001 Ed.01
Configuración inicial
Opcion A, configuración SIN teclado, ratón y monitor
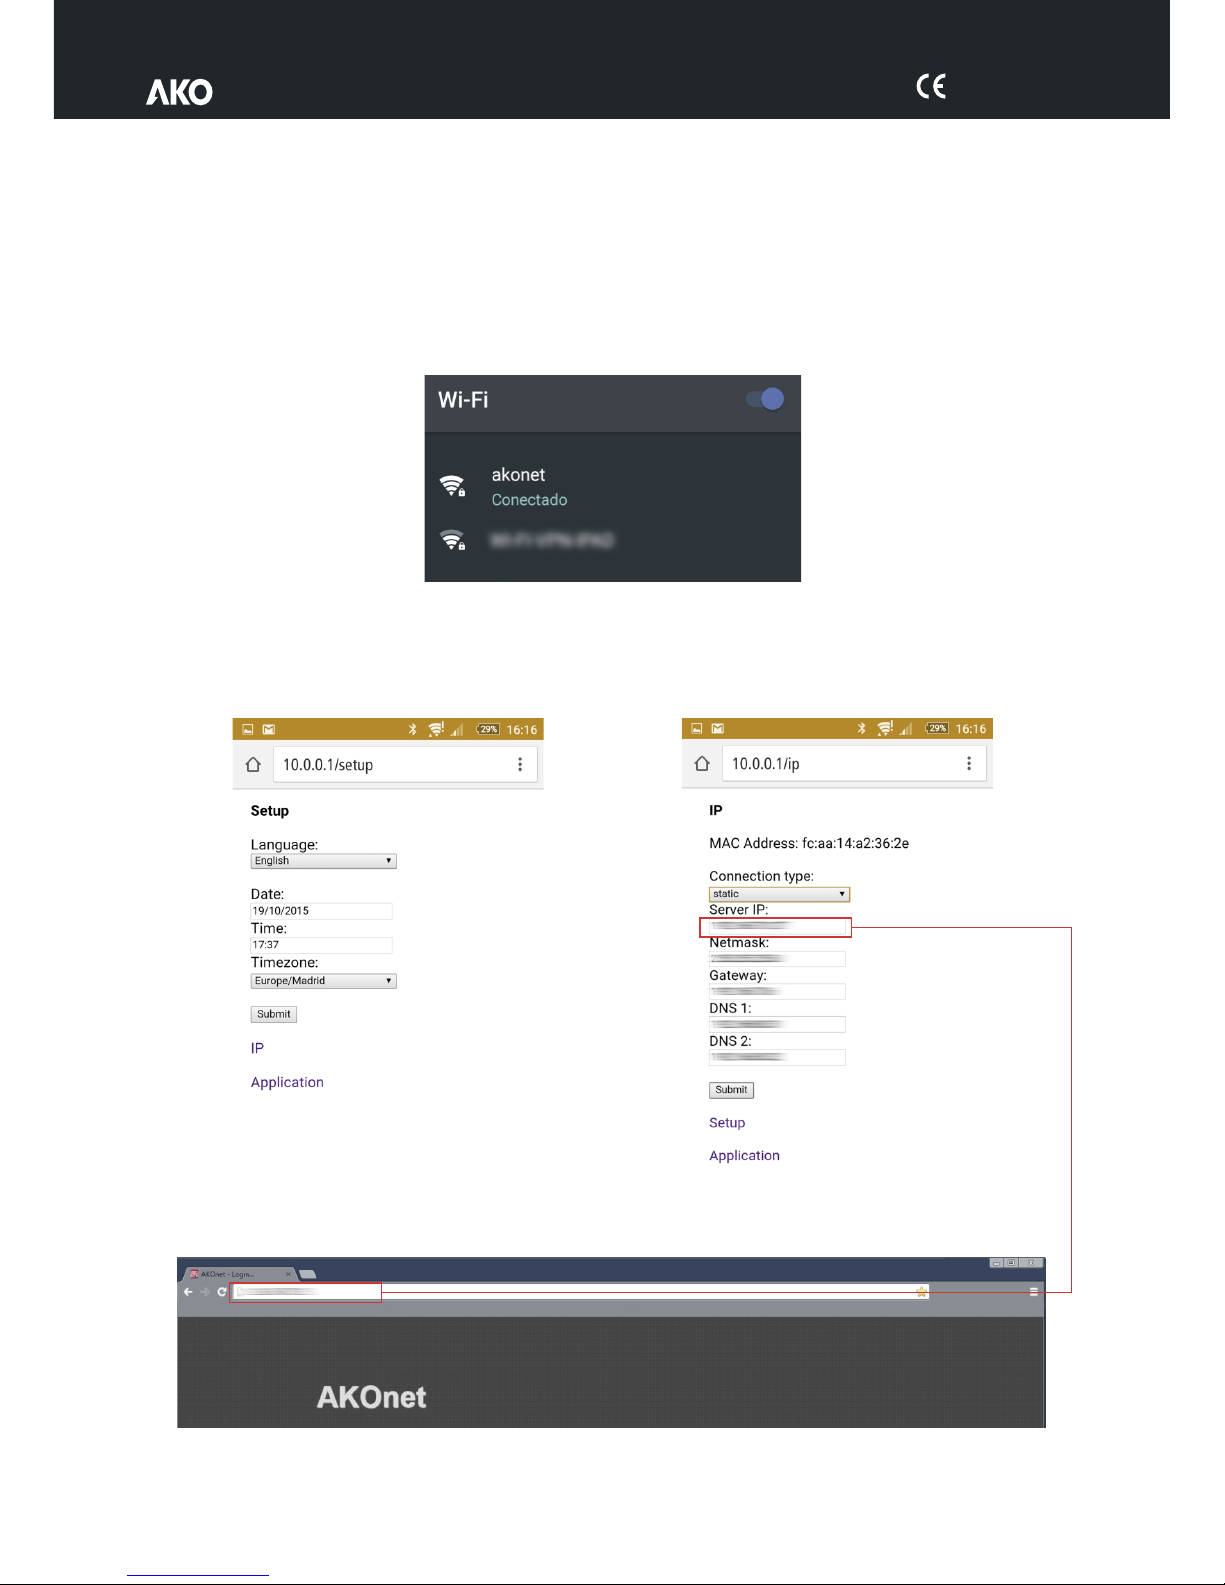
-Utilizando un móvil o tablet, realizar una búsqueda de redes WIFI cerca del AKO-5012.
-Entre las redes encontradas conectarse a“akonet”, la contraseña de acceso es akonet123.
-Abrir el navegador e introducir en la barra de direcciones la siguiente dirección: 10.0.0.1/setup
-Configurar el idioma, fecha, hora y zona horaria y pulsar “submit”.
-Pulsar sobre “IP” y configurar los datos necesarios y pulsar “submit”. Se recomienda configurar el equipo con
una IP fija (static), solicite a su administrador de red la configuración adecuada según su infraestructura.
-Abrir un navegador web en un ordenador que se encuentre en la misma red Ethernet que el servidor web e
introducir en la barra de direcciones la IP configurada en el paso anterior.
-Para continuar la configuración, vaya a la página 6.
4
Page 5
5012H001 Ed.01
Opcion B, configuración con teclado, ratón o monitor
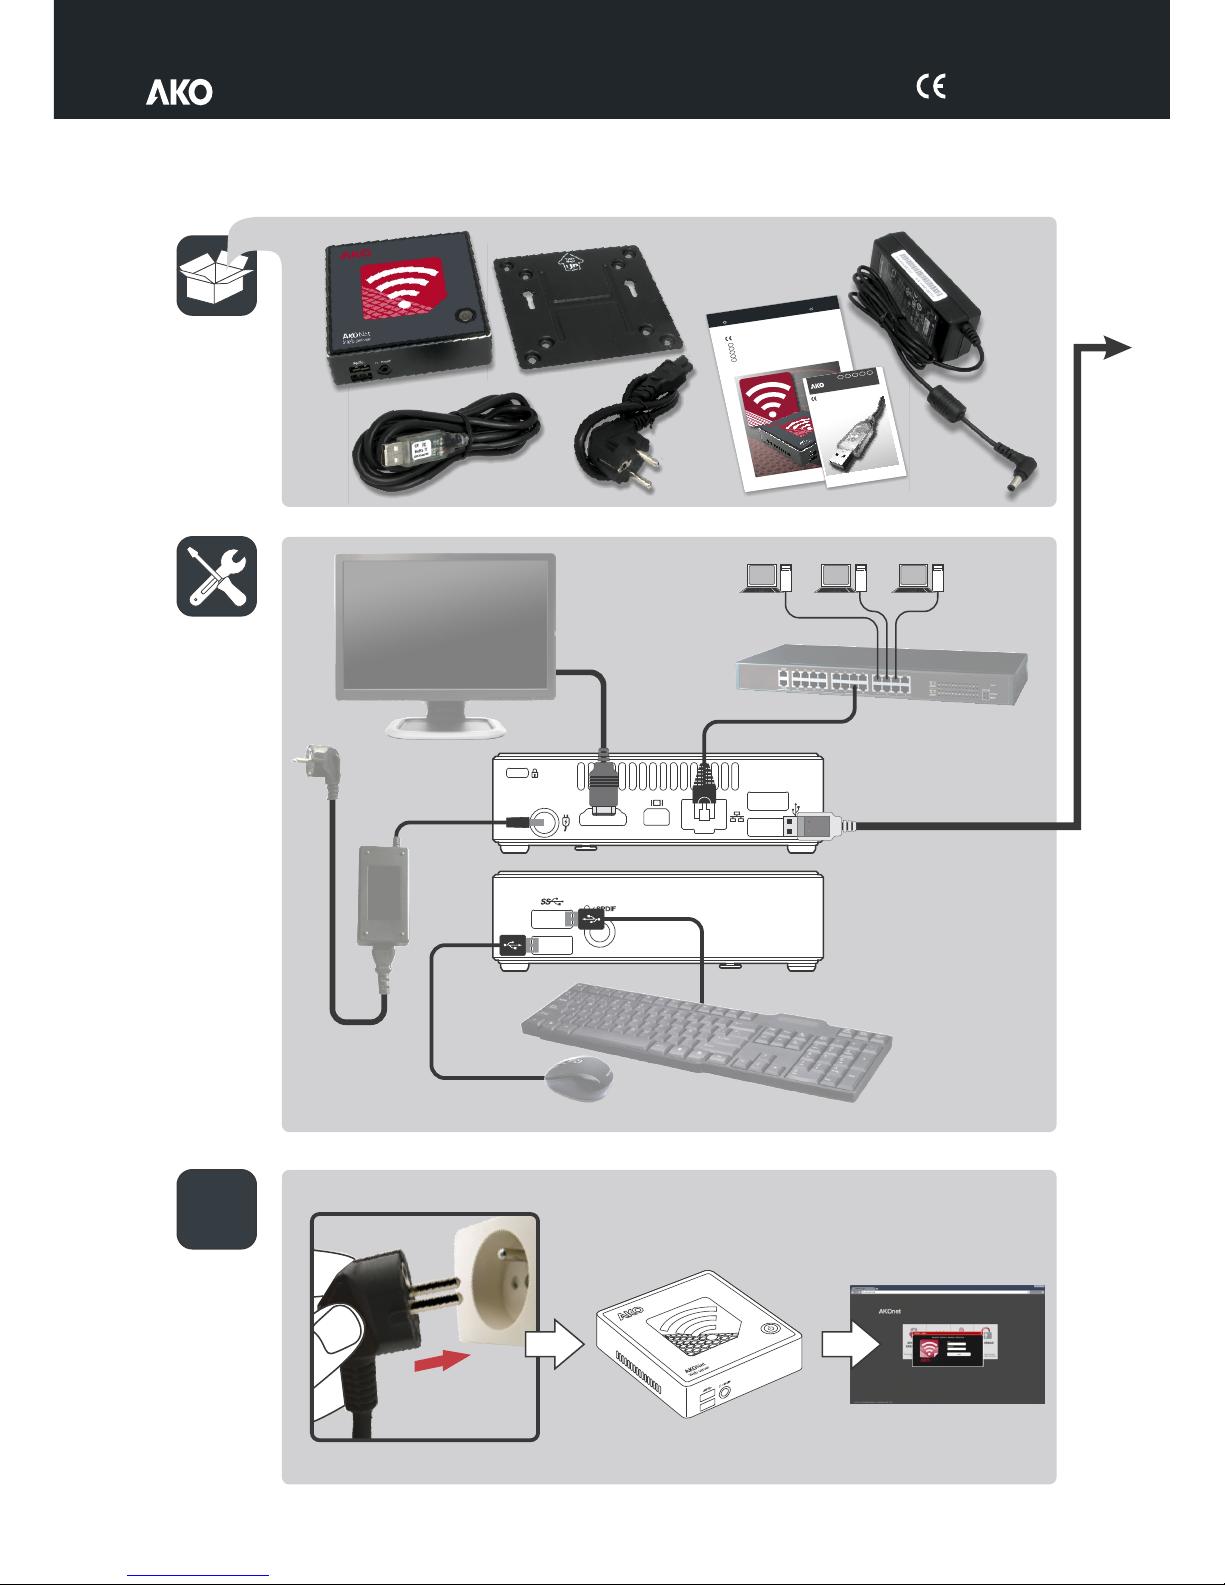
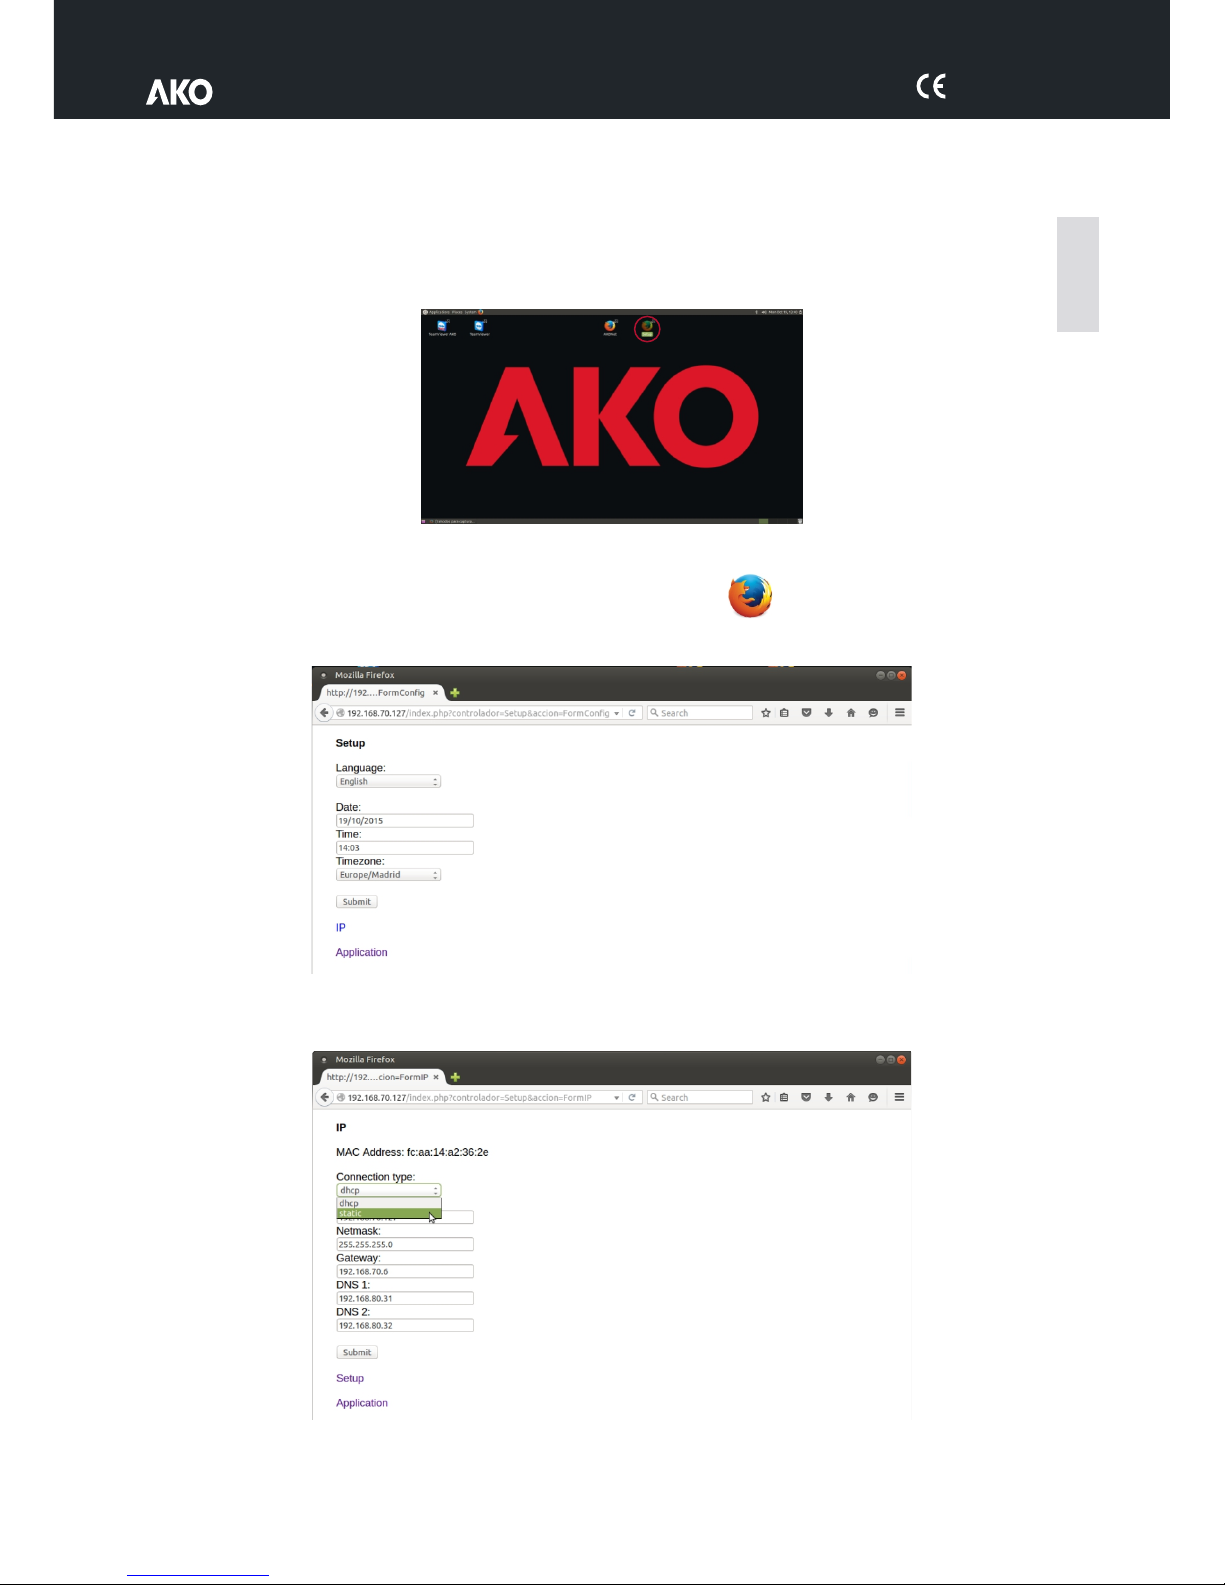
-Conectar un teclado, un ratón y un monitor al servidor web AKO-5012 (ver pág. 2) y ponerlo en marcha. Se
muestra la pantalla inicial.
-Si el equipo esta en modo reposo o con el salvapantallas activado, pulse cualquier tecla e introduzca la contraseña de
sistema, que por defecto es “akonetws”.
-Hacer doble clic sobre el icono “Setup” para acceder a la configuración.
-Configurar el idioma, fecha, hora y zona horaria y pulsar “submit”.
-Pulsar sobre “IP” y configurar los datos necesarios y pulsar “submit”. Se recomienda configurar el equipo con
una IP fija (static), solicite a su administrador de red la configuración adecuada según su infraestructura.
-Pulsar sobre “Application” y continuar la configuración en la página siguiente.
Setup
Español
5
Page 6
5012H001 Ed.01
Buscar dispositivos instalados
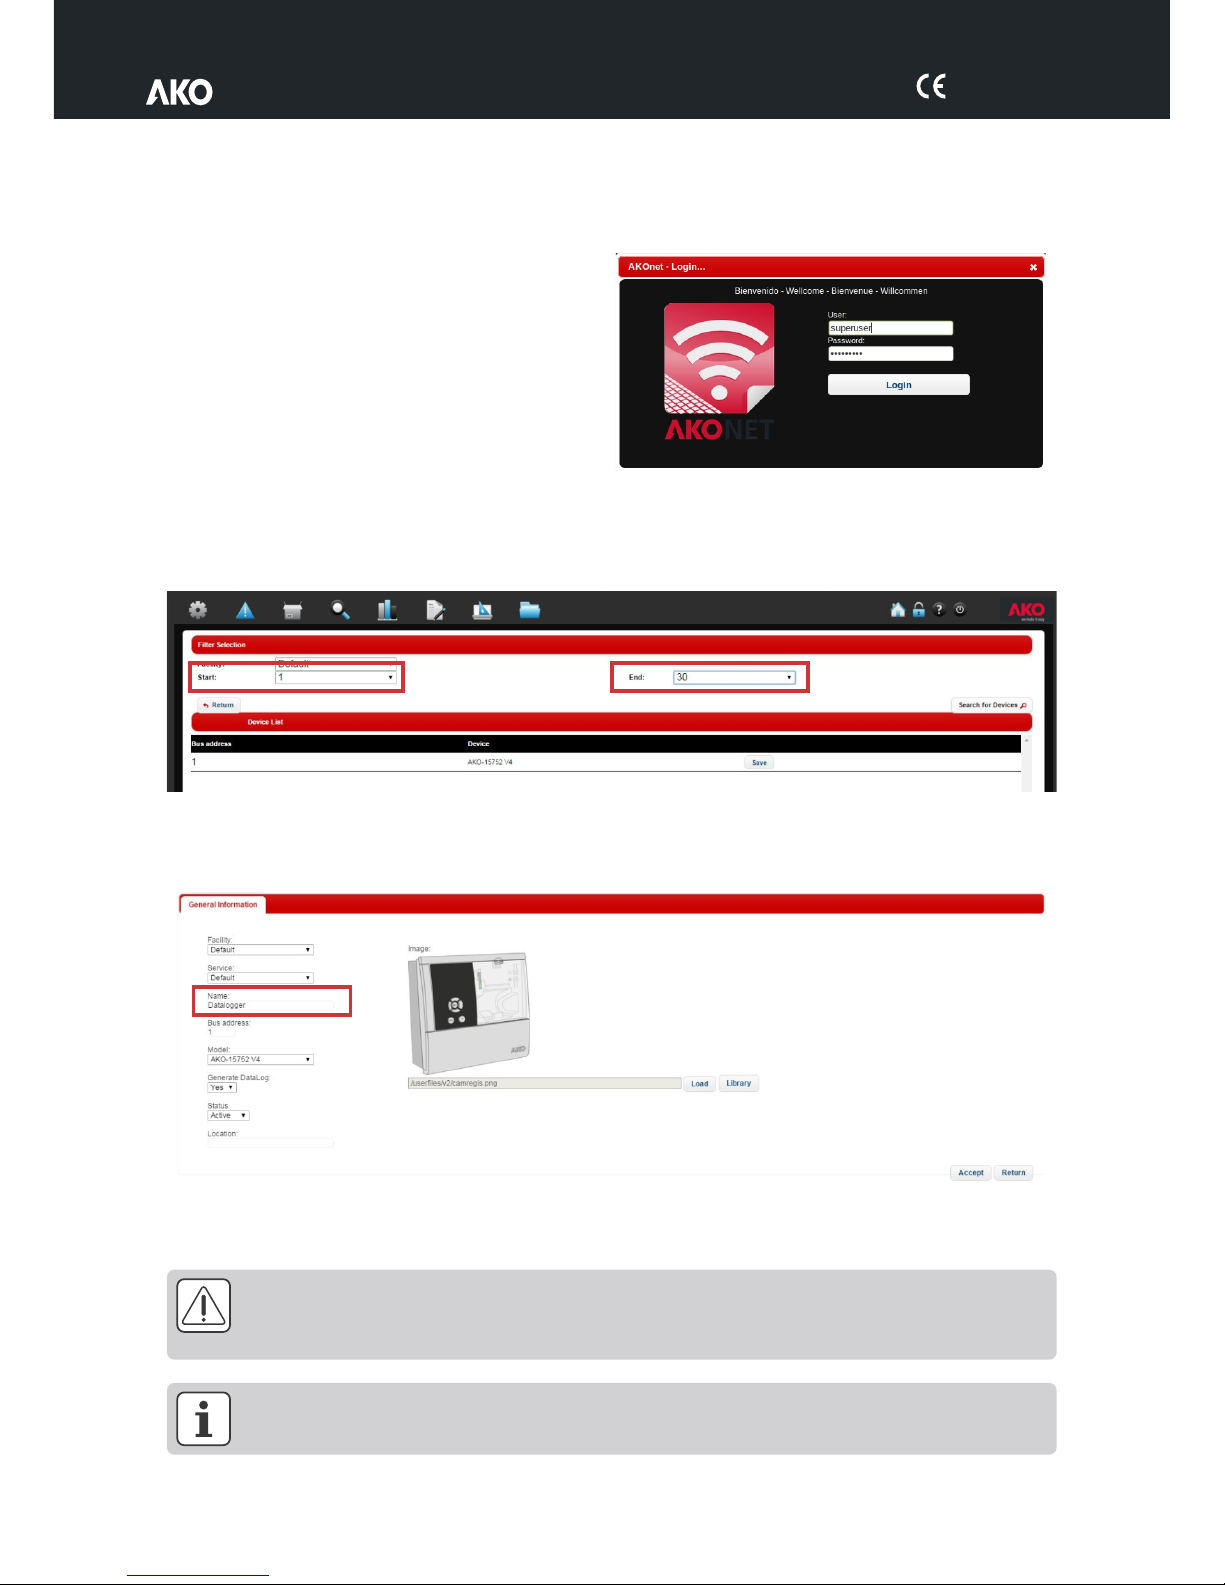
Se solicitan los datos de acceso, por defecto son:
User: superuser
Password: superuser
Si la aplicación no dispone de dispositivos registrados, aparece la ventada de búsqueda de dispositivos, pulsar el
botón “Búsqueda de dispositivos” para iniciar la búsqueda.
Los parámetros “Inicio” y “Fin” definen el rango de direcciones MODBUS en el que se buscan dispositivos. Para
reducir el tiempo de búsqueda, es recomendable ajustar estos parámetros según la configuración de su instalación.
Transcurridos unos instantes, la aplicación muestra una lista con los dispositivos encontrados.
Para guardar cada dispositivo, pulsar el botón “Guardar”, se abre una nueva ventana donde se definen los datos
de cada dispositivo:
Para facilitar su posterior localización, ser recomienda asignar un nombre diferente a cada dispositivo, introducir el
nombre elegido en el campo “Nombre” y pulsar “Aceptar”.
Si transcurridos 5 minutos, la aplicación no encuentra ningún dispositivo, revise la configuración del
conversor AKO-80039 (ver página siguiente) y el rango de direcciones definido.
Si utiliza un conversor AKO-80080 consulte la página siguiente.
La aplicación está lista para funcionar, consulte el manual de usuario de AKONet haciendo clic en el
icono ? de la parte superior derecha de la aplicación.
6
Page 7
5012H001 Ed.01
AKO-80039
El conversor AKO-80039 incluido viene pre-instalado de fabrica para funcionar sin necesidad de configuraciones
adicionales. No obstante, si el equipo no detecta ningún dispositivo, revise los indicadores del conversor:
Ÿ Se iluminan los indicadores rojo y verde de forma intermitente: Funcionamiento normal
Ÿ Solo se ilumina el indicador rojo de forma intermitente: Revise la instalación entre los
dispositivos y el conversor y la configuración de los mismos.
Ÿ No se ilumina ningún indicador: Revise la configuración en el servidor web AKO-5012.
Configuración
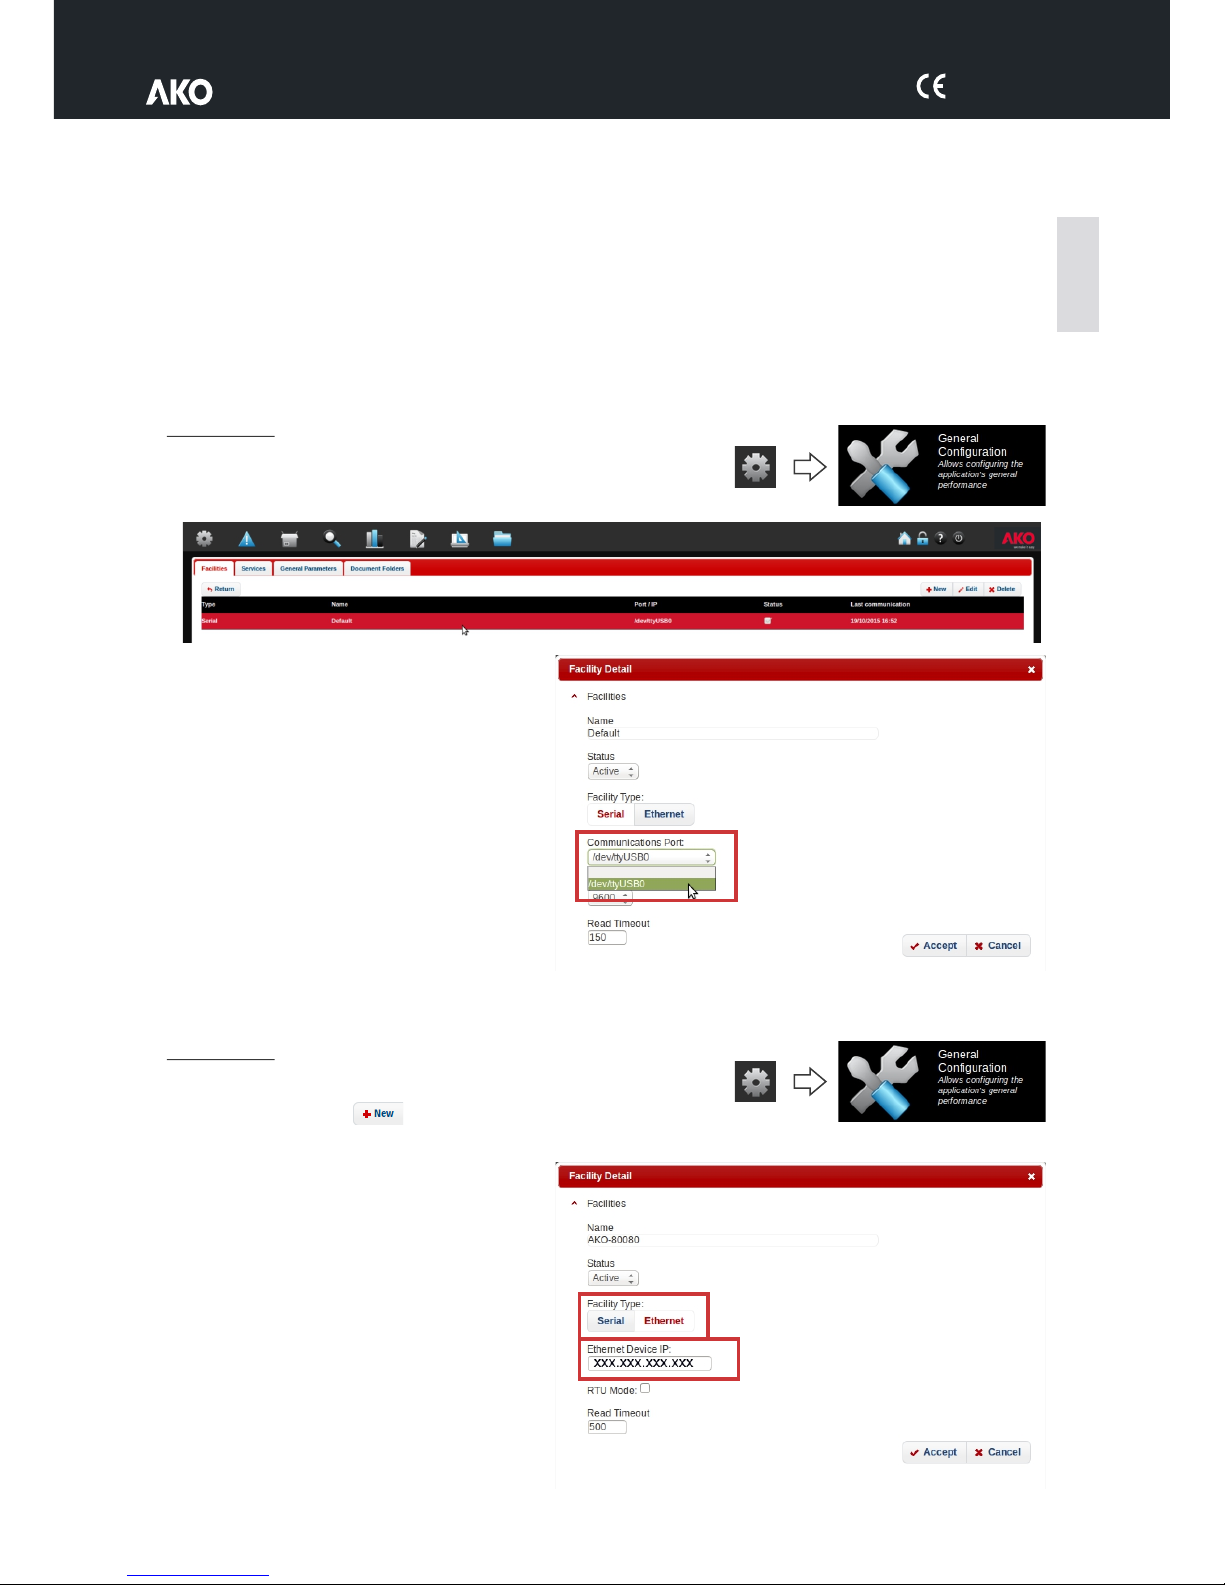
-Acceder al menu de administración / Configuración general
-Seleccionar el dispositivo y pulsar en “Editar”.
-Comprobar si hay otros puertos disponibles. En
caso afirmativo seleccionar otro puerto, pulsar
en “Aceptar” y repetir la búsqueda de
dispositivos comprobando que ambos
indicadores se iluminan de forma intermitente.
AKO-80080
El conversor (no incluido) AKO-80080 requiere una configuración especifica en el servidor web AKO-5012.
Configuración
-Acceder al menu de administración / Configuración general
-Pulsar en “Nuevo”.
-Asignar un nombre a la instalación.
-Cambiar el tipo de instalación a “Ethernet” e
introducir la dirección IP asignada al
conversor (consultar el manual del
conversor). El “modo RTU” debe estar
deshabilitado y el “Tiempo máximo de
lectura” en 500.
-Pulsar en “Aceptar”.
Español
7
Page 8
5012H001 Ed.01
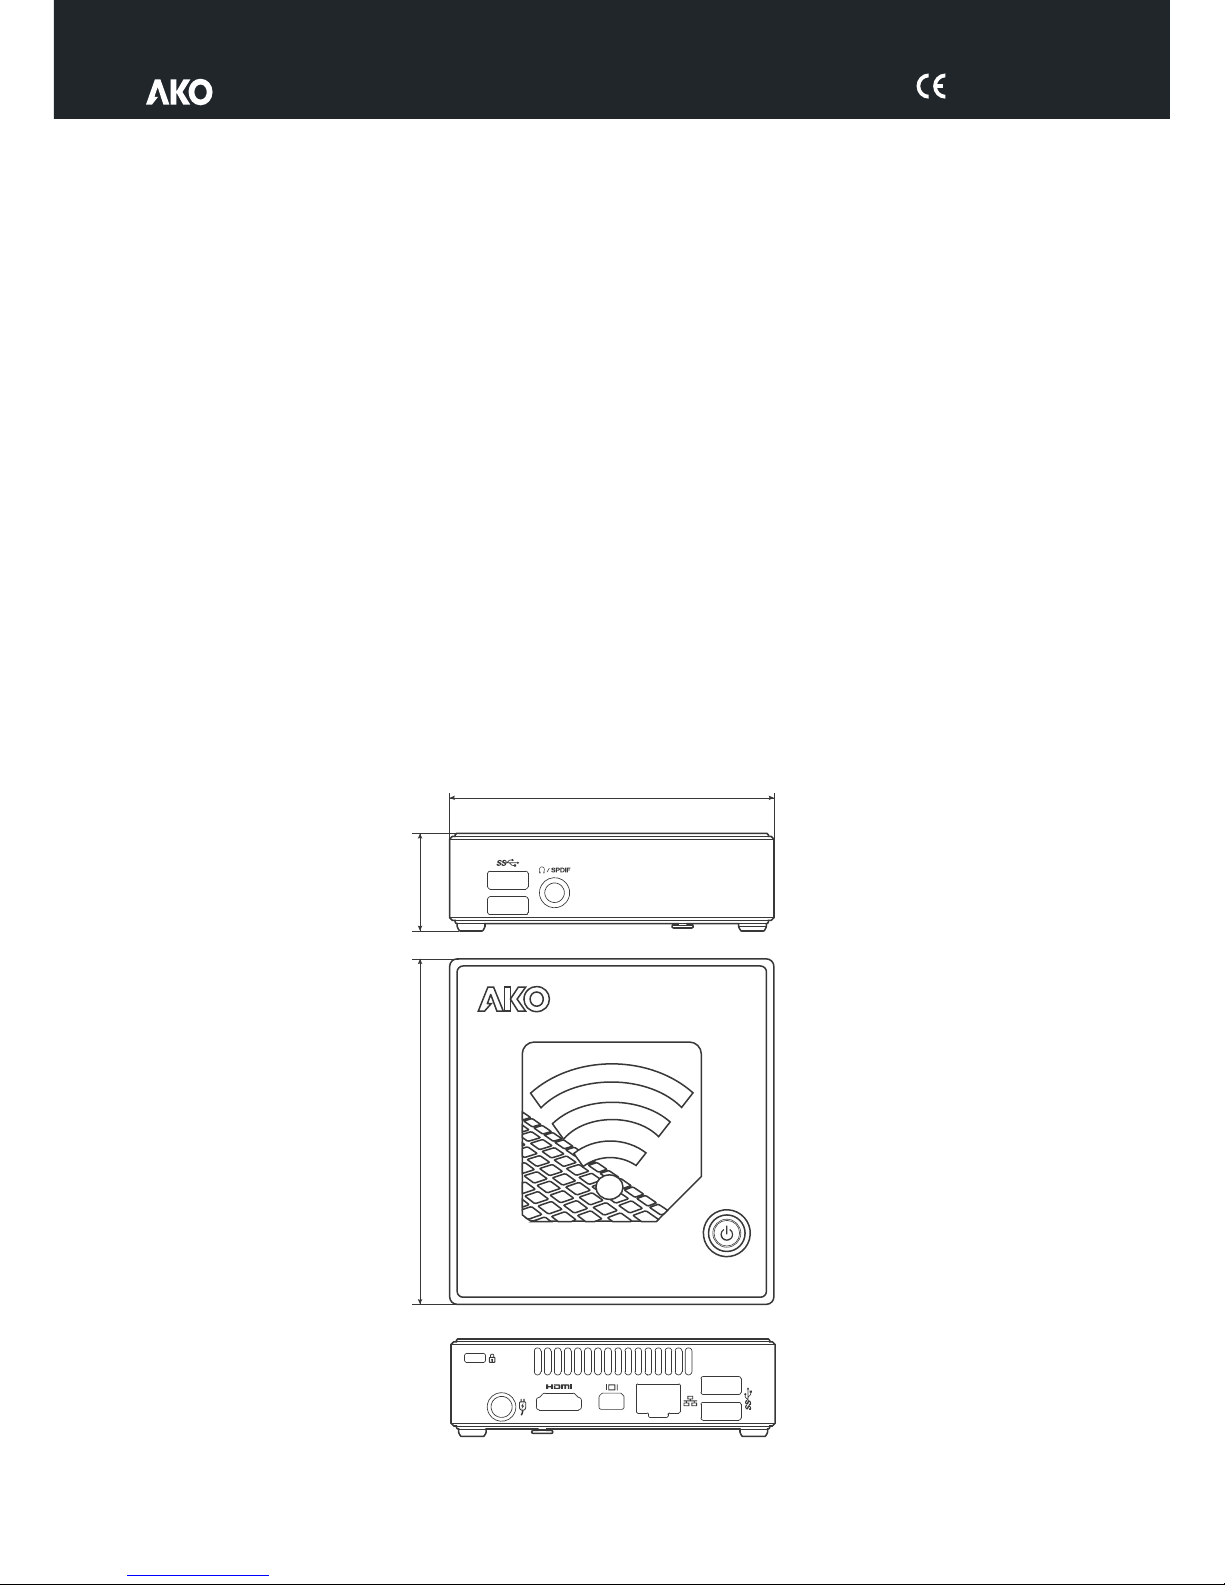
Especificaciones
CPU................................................................................................................5th generation Intel® Core™ i3
Memoria ........................................................................................................................................4GB DDR3L
LAN ................................................................................................................................Gigabit LAN (Realtek)
Graficos..............................................................................................................................Intel® HD Graphics
Resolución máxima HDMI ................................................................................................4096 x 2304 @ 24Hz
Resolución máxima DP ....................................................................................................3840 x 2160 @ 60Hz
Entradas y salidas ............................................................................................................................1 x HDMI
........................................................................................................................4 x USB 3.0
...........................................................................................................1 x Mini Display Port
.............................................................................................................................1 x RJ45
........................................................................................................1 x auriculares / SPDIF
.......................................................................................1 x VDC conector de alimentación
Almacenamiento........................................................................................................................HD SSD 60 Gb
Tarjeta WIFI.................................................................................................IEEE802.11ac, Dual Band & BT 4.0
NFC ..............................................................................................................................................................Si
Alimentación ........................................................................Entrada: AC 100~240V - Salida:
Soporte VESA incluido.......................................................................................................75 x 75 y 100 x 100
Temperatura de trabajo..............................................................................................................-0°C ~ +35°C
OS .................................................................................................................................Linux Ubuntu Desktop
DC19V @ 3.42A
114.4
33.9
107.6
8
AKONet
Web server
Page 9
5012H001 Ed.01
Initial configuration
Option A: Configuration WITHOUT keyboard, mouse and monitor
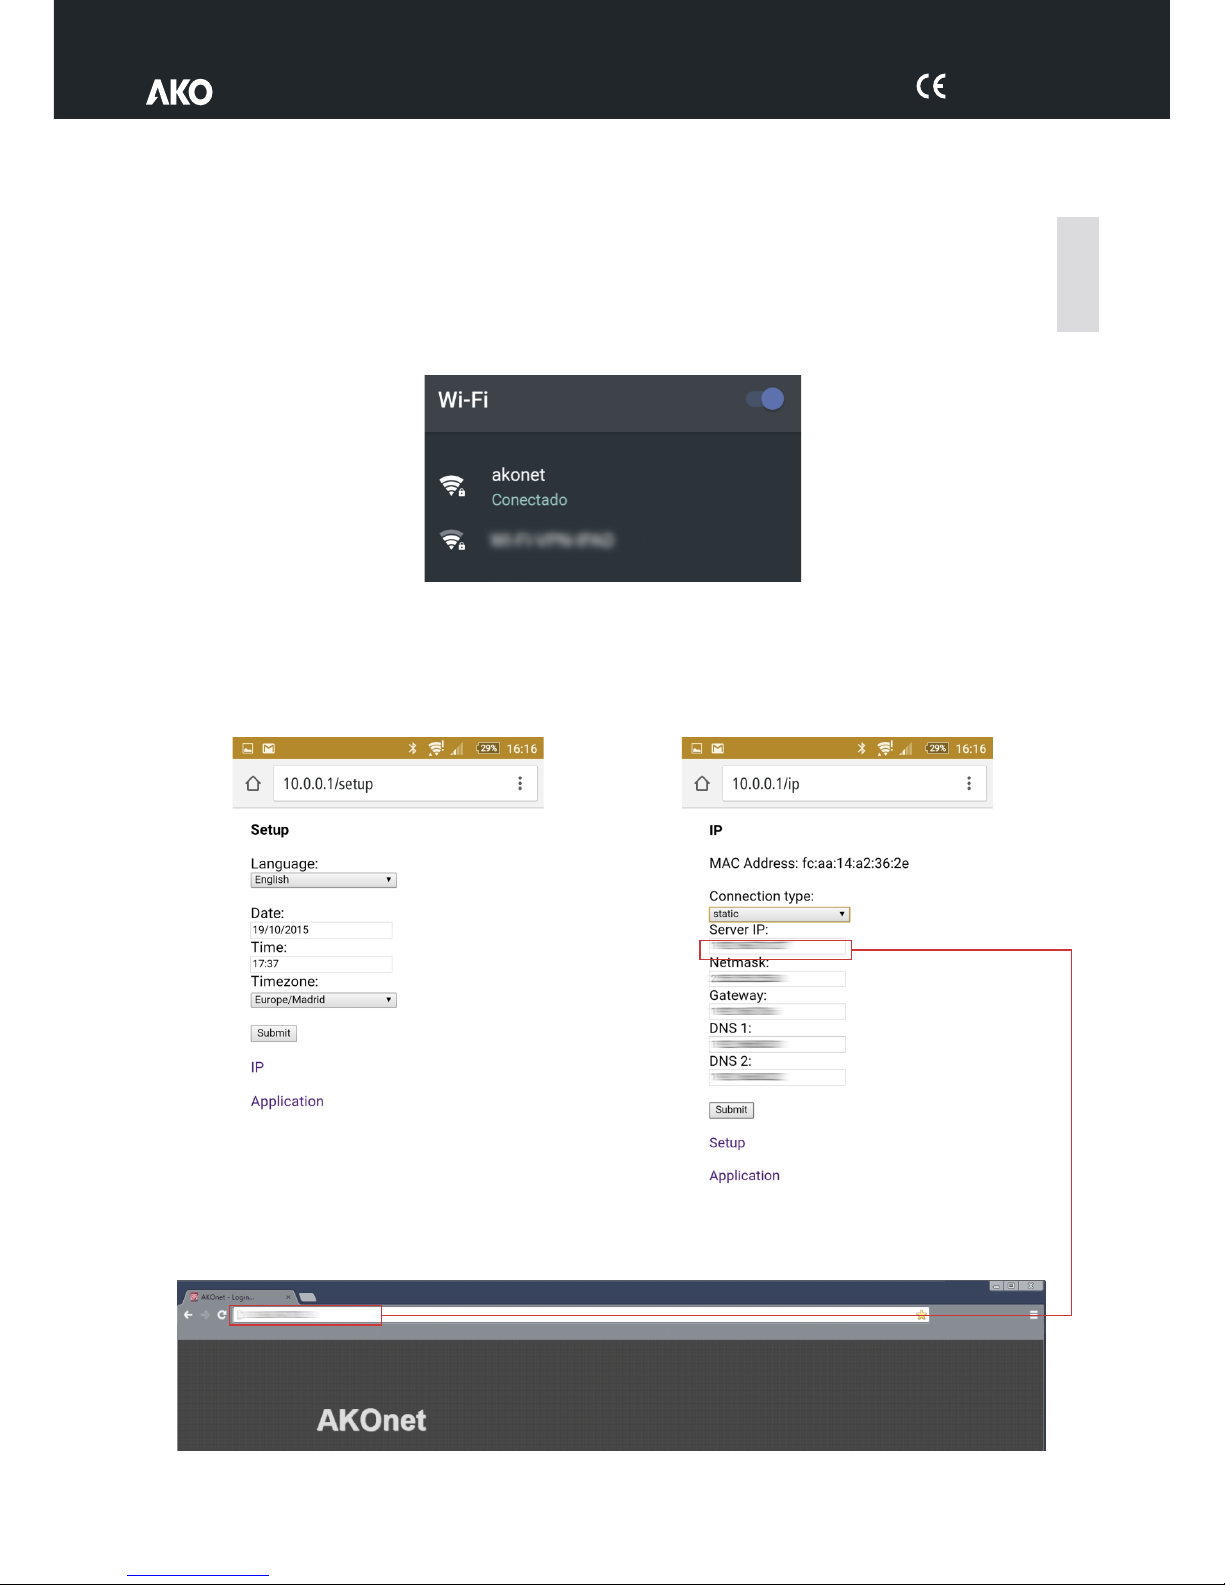
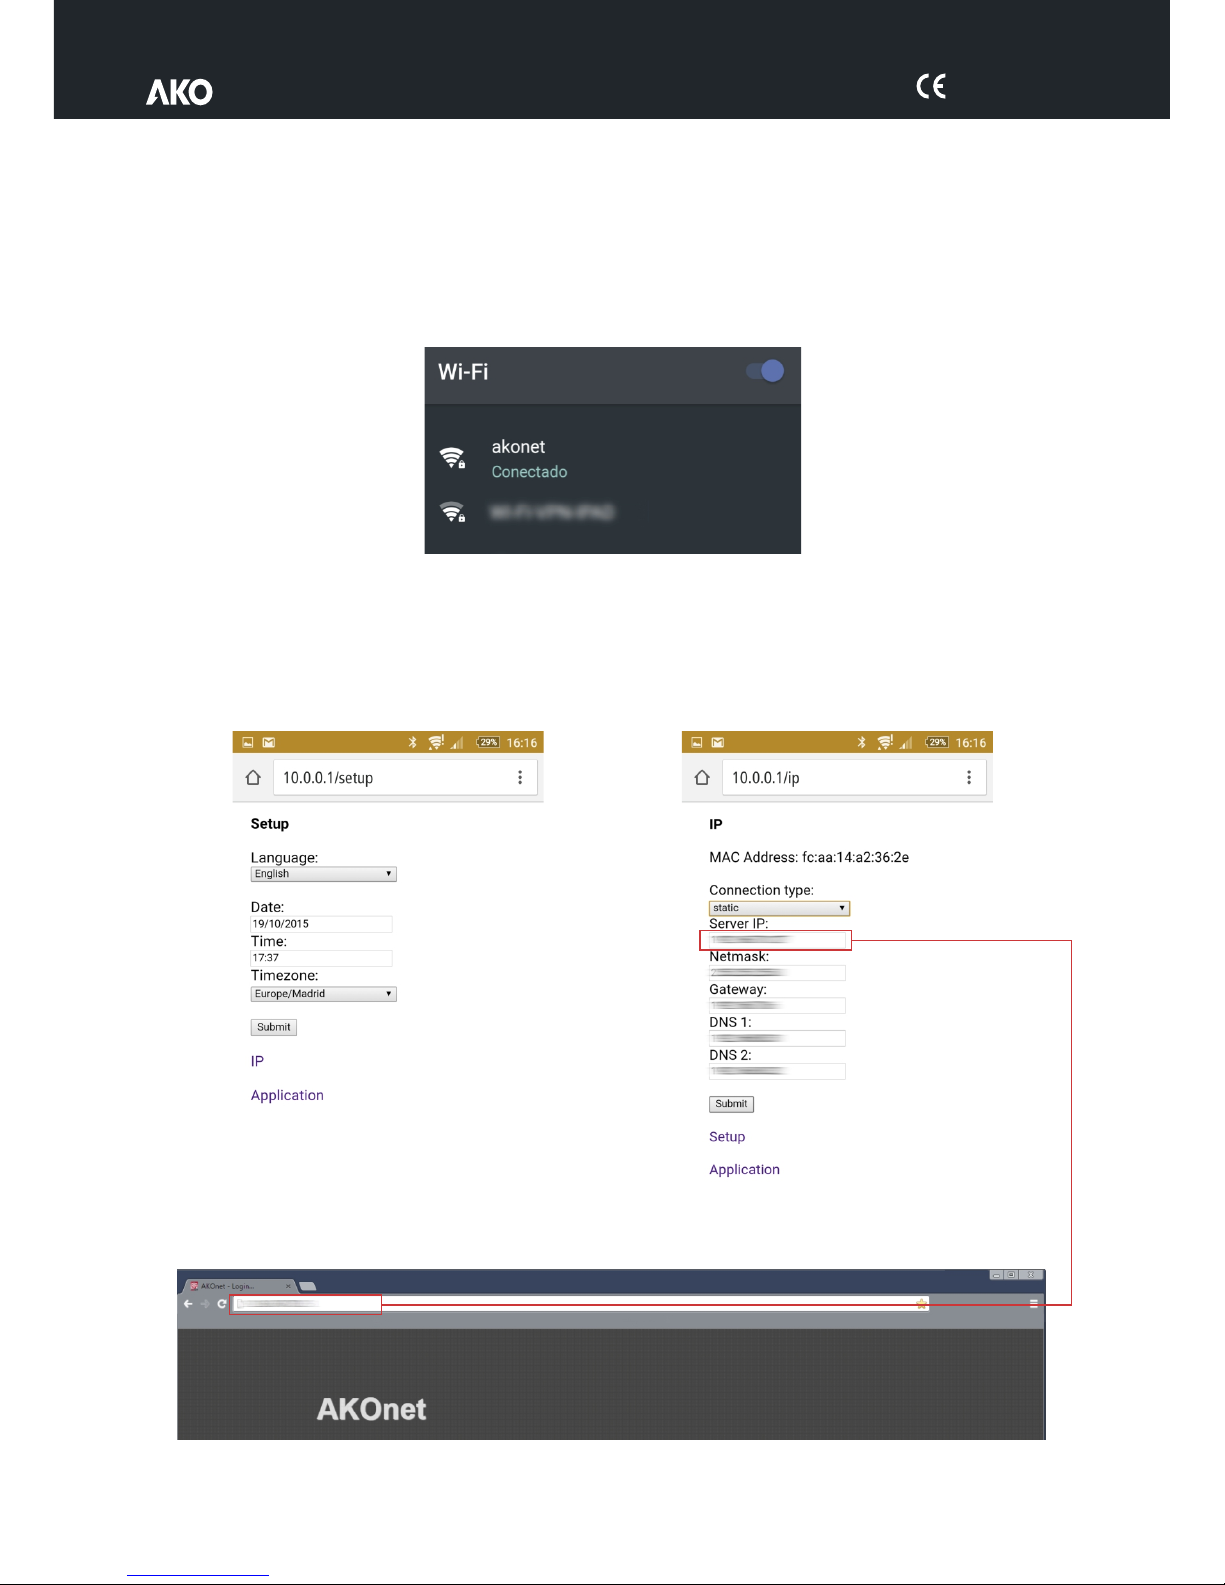
-Using a mobile device or tablet, search for WIFI networks near the AKO-5012.
-Among the networks found, connect to “akonet”. The password is akonet123.
-Open the browser and enter the following address in the address bar: 10.0.0.1/setup
-Configure the language, date, time and time zone and press “submit”.
-Press “IP”, configure the necessary data and press “submit”. It is recommended that you configure the
device with a fixed (static) IP. Ask your network administrator for the appropriate configuration according to its
infrastructure.
-Open a web browser on a computer located in the same Ethernet network as the web server and enter in the
address bar the IP configured in the previous step.
-To continue with configuration, go to page 11.
English
9
Page 10
5012H001 Ed.01
Option B: Configuration with keyboard, mouse or monitor
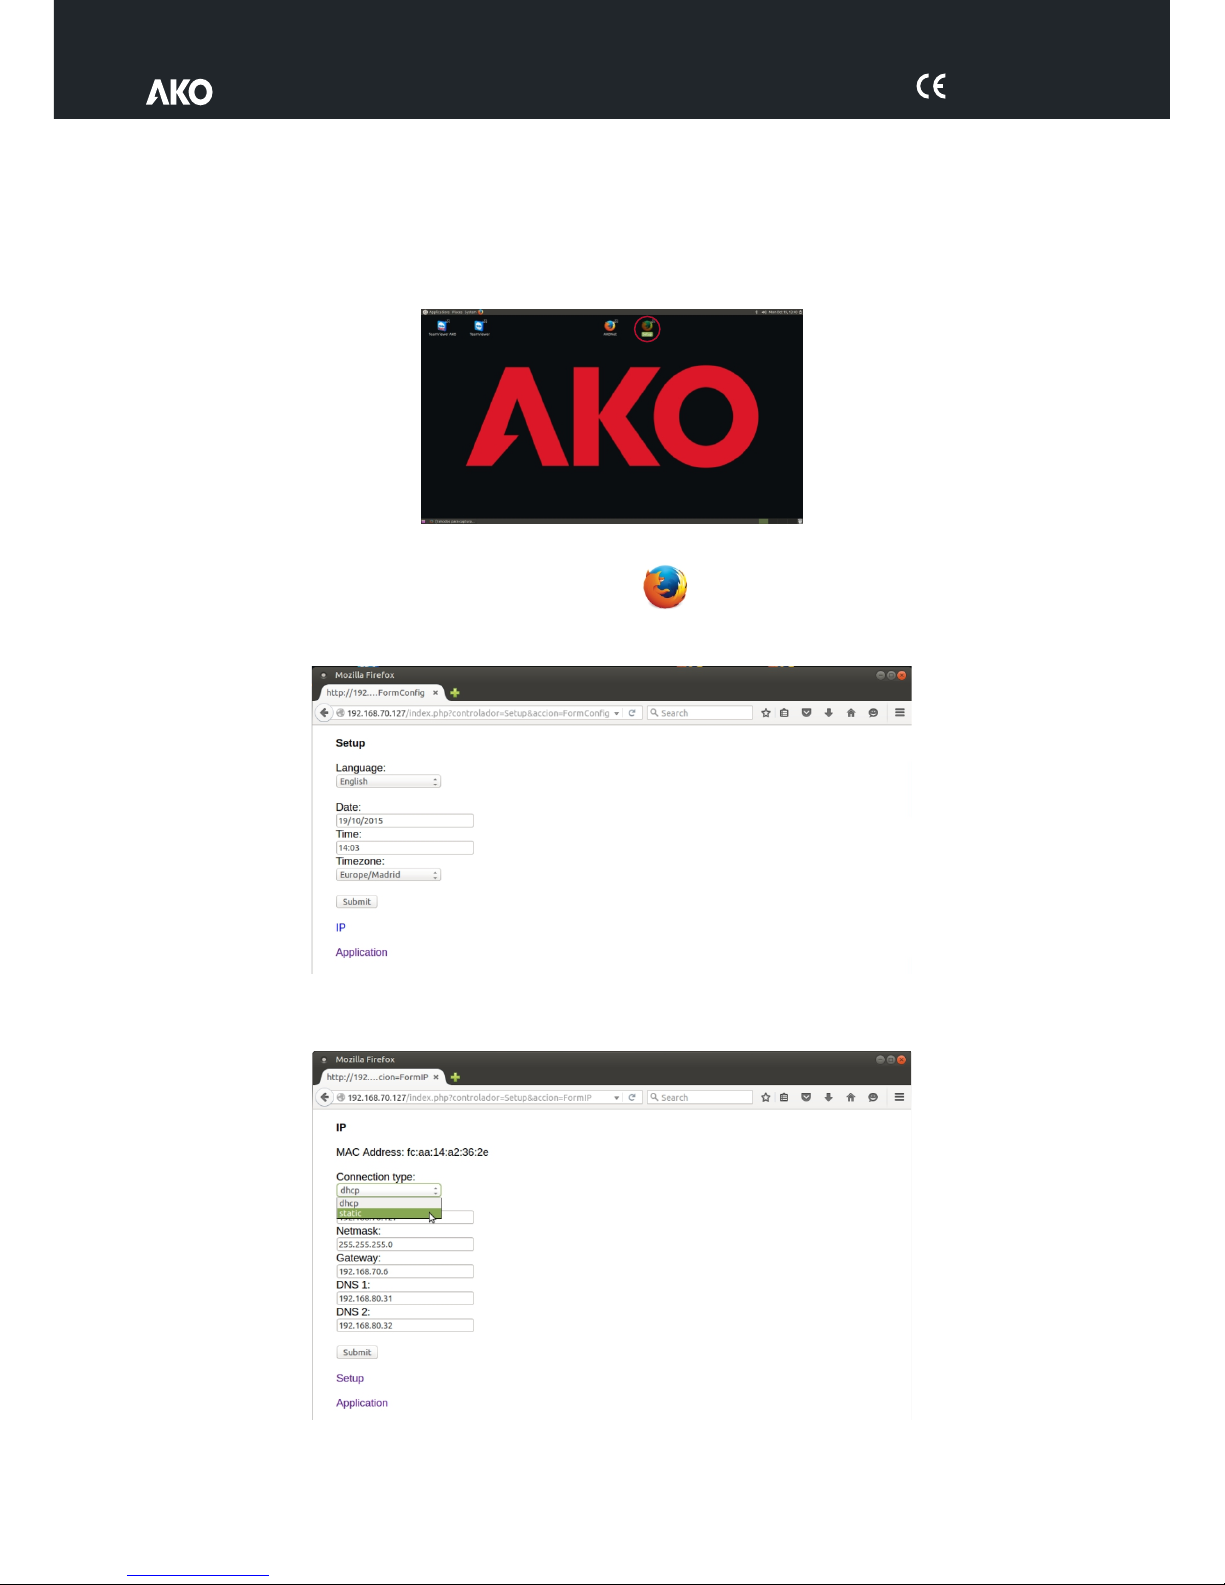
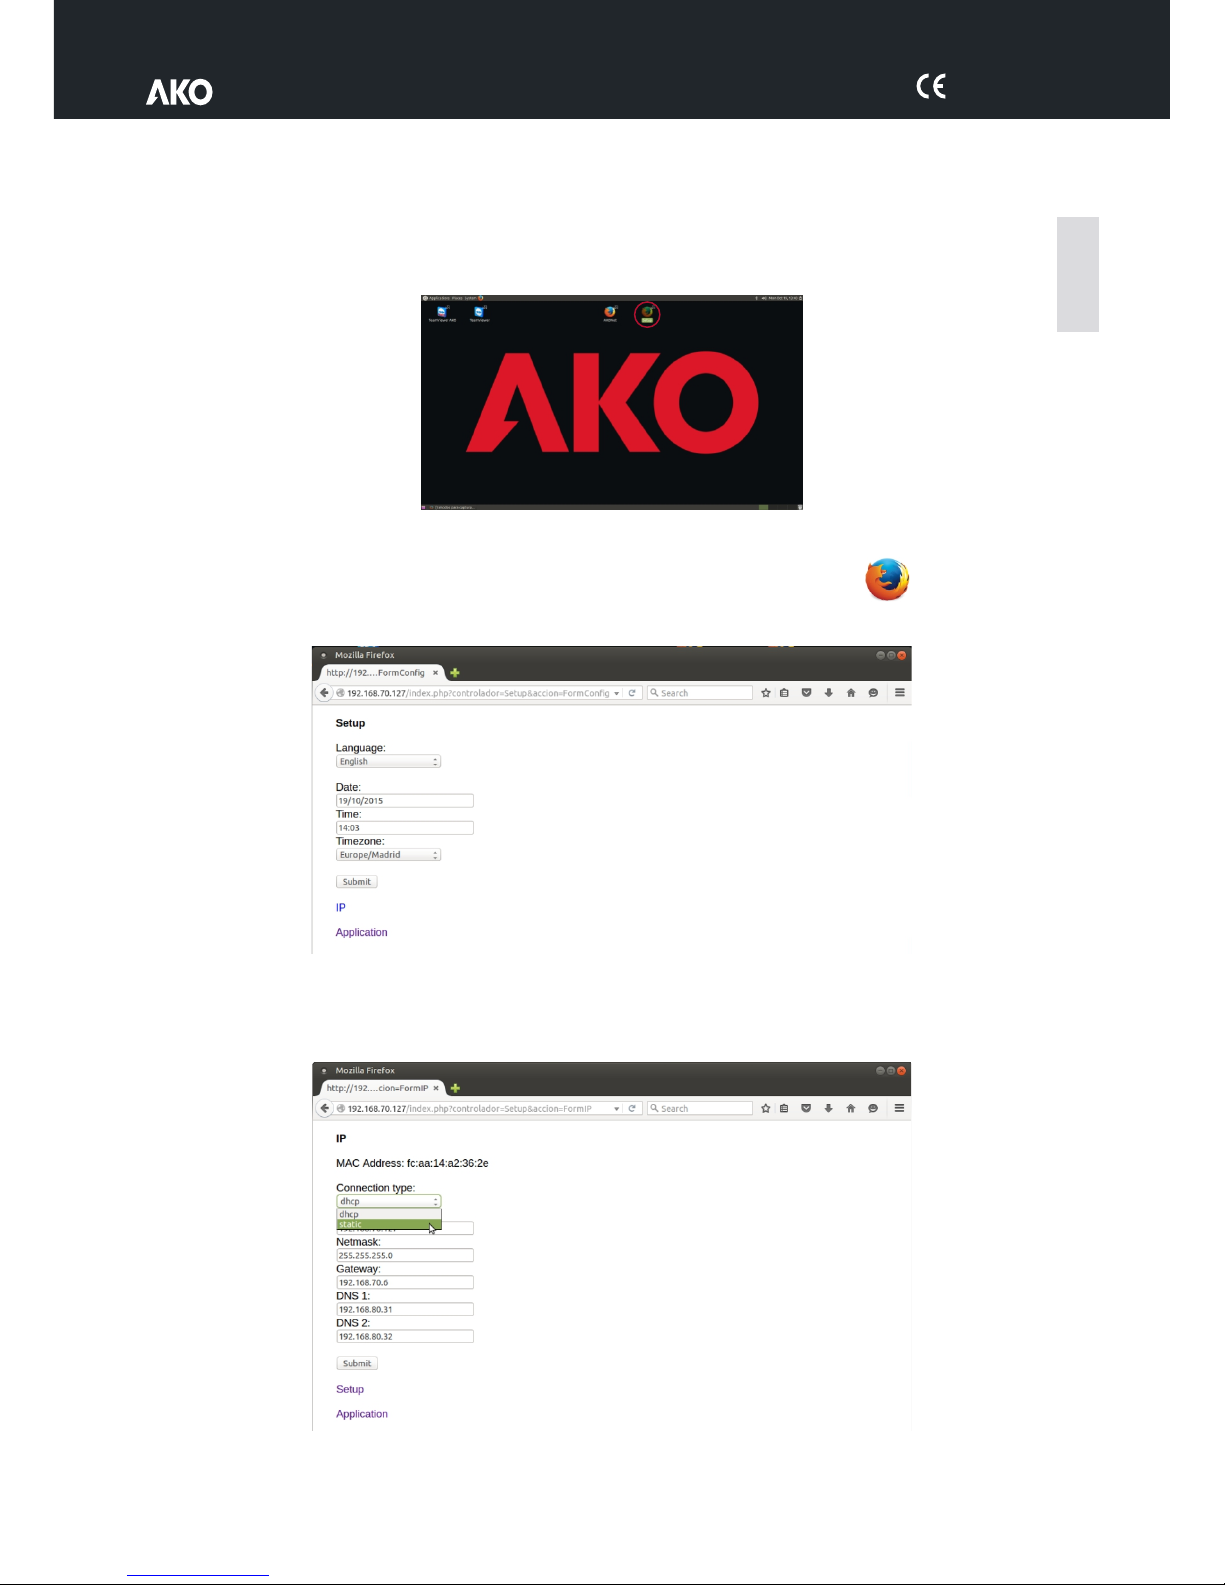
-Connect a keyboard, mouse and monitor to the AKO-5012 web server (see page 2) and turn it on. The home
page is displayed.
-If the device is in standby mode or with the screensaver activated, press any key and enter the system password,
which is “akonetws” by default.
-Double-click the "Setup" icon to access the configuration.
-Configure the language, date, time and time zone and press “submit”.
-Press “IP”, configure the necessary data and press “submit”. It is recommended that you configure the
device with a fixed (static) IP. Ask your network administrator for the appropriate configuration according to its
infrastructure.
Press “Application” and continue with configuration on the next page.
Setup
10
Page 11
5012H001 Ed.01
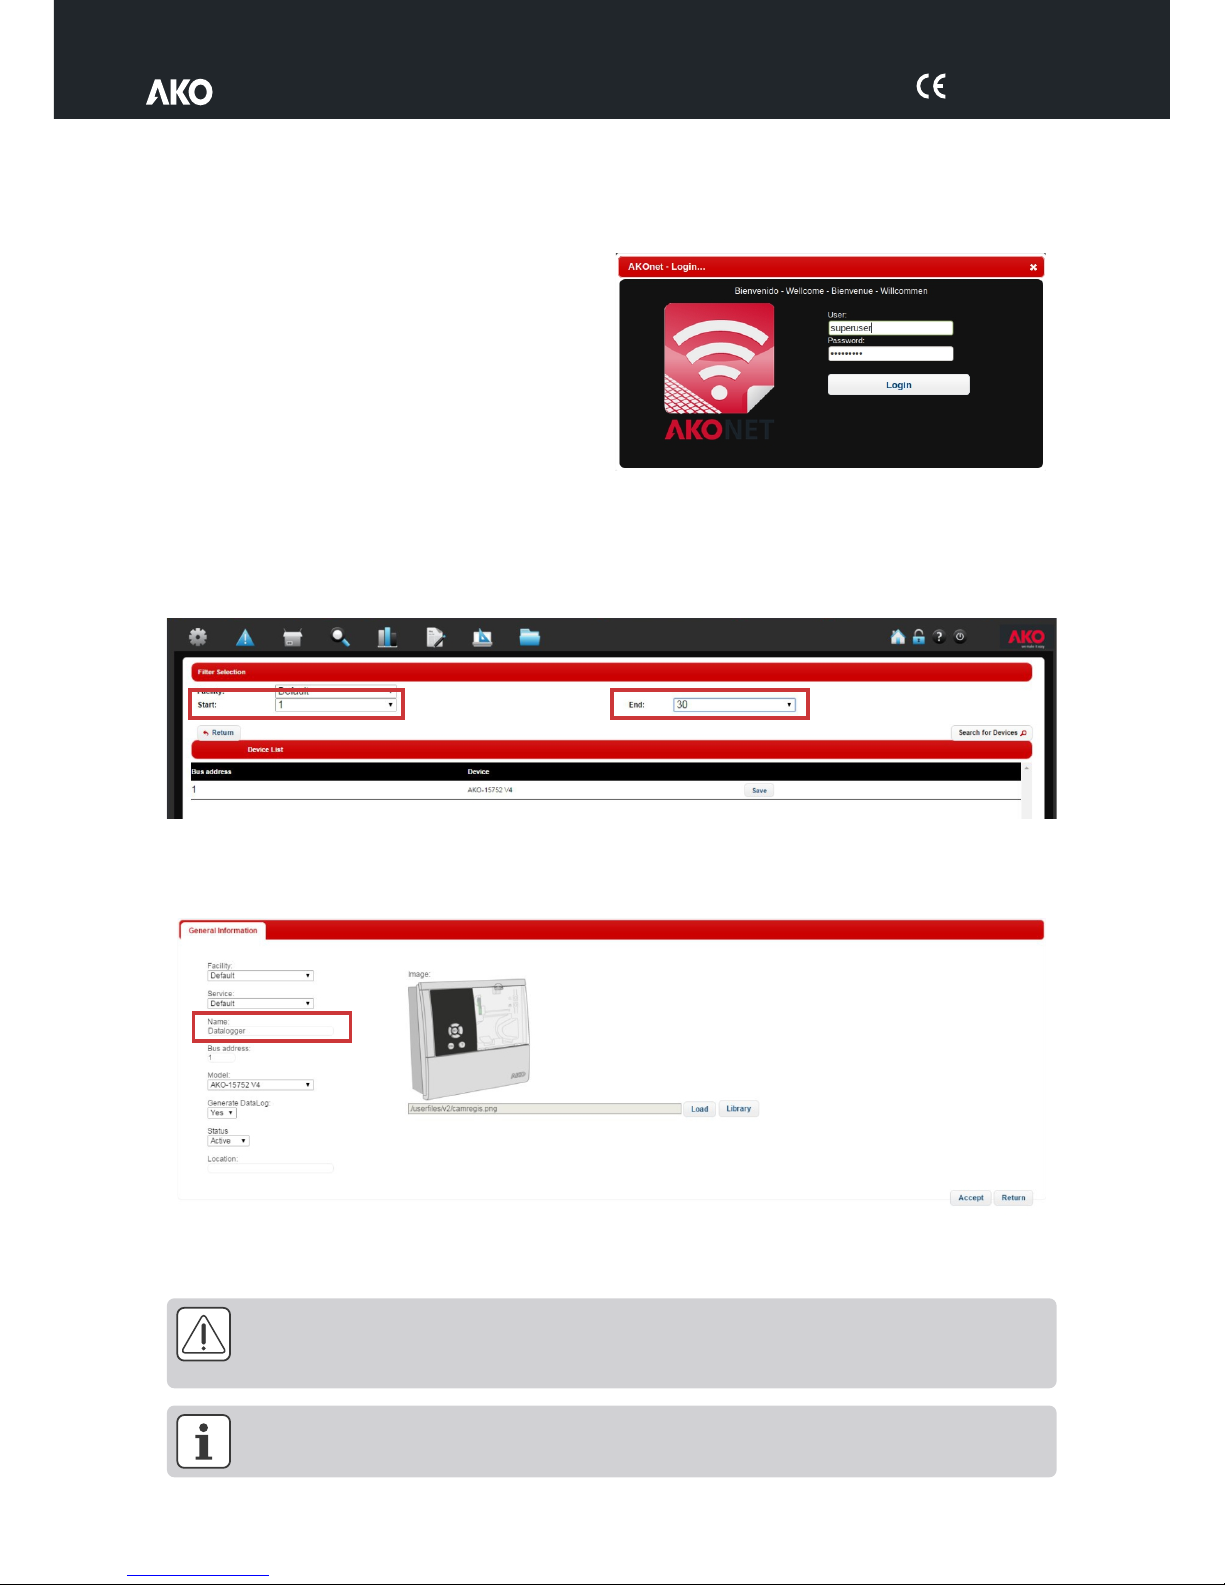
Search for installed devices
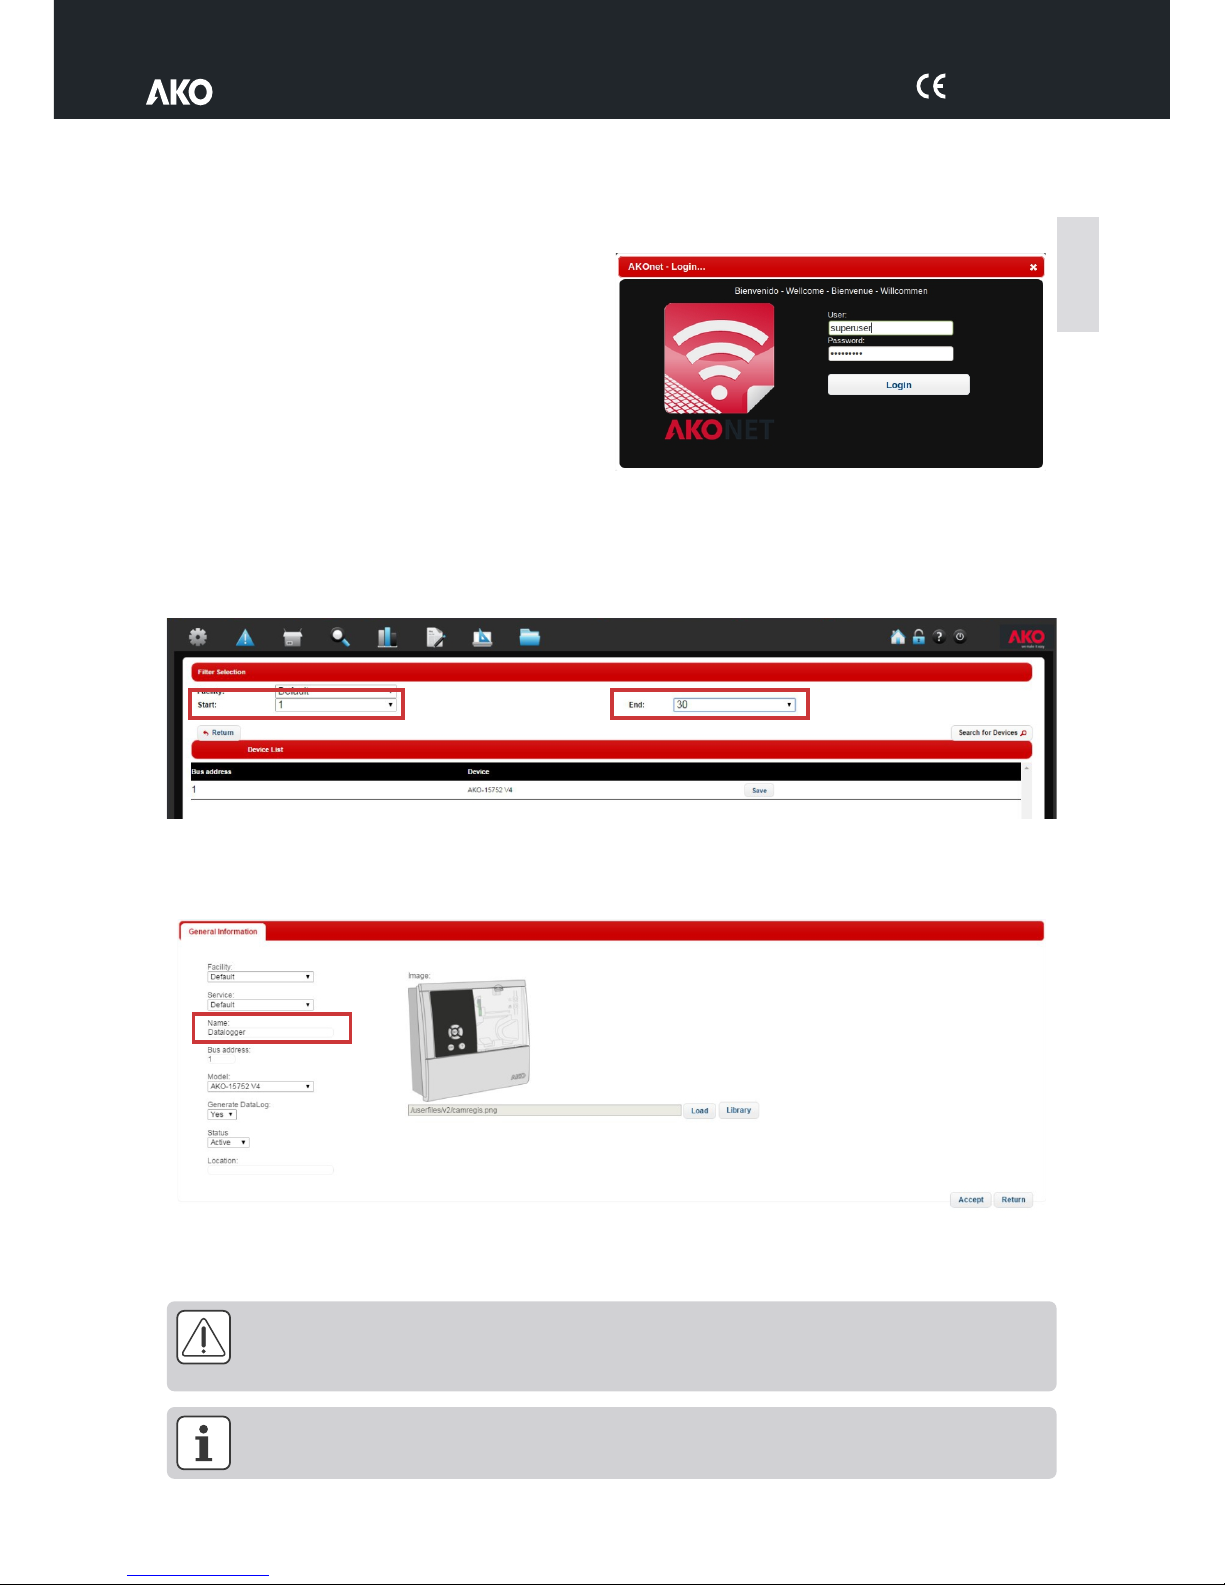
The access data are requested. By default, these are:
User: superuser
Password: superuser
If the application does not have registered devices, the device search window appears. Press the "Search for
devices" button to start the search.
The “Start” and “End” parameters define the MODBUS range of addresses where devices are searched for. To
reduce the search time, it is advisable to adjust these parameters according to the configuration of your
installation.
After a few moments, the application displays a list of devices found.
To save each device, press the “Save” button. This opens a new window where the data for each device are
defined:
To facilitate subsequent location, it is advisable to assign a different name to each device, enter the name chosen
in the “Name” field and press “OK”.
If after 5 minutes the application cannot find any device, check the configuration of the AKO-80039
converter (see the following page) and the range of addresses defined.
If you use an AKO-80080 converter, see the following page.
The application is ready to operate. View the AKONet user manual by pressing the ? icon at the top right
hand side of the application.
English
11
Page 12
5012H001 Ed.01
AKO-80039
The AKO-80039 converter included comes pre-installed out of the box to operate without needing additional
configuration. However, if the software does not detect any device, check the converter indicators:
Ÿ The red and green indicators are flashing: Standard operation
Ÿ Only the red indicator is flashing: Check the installation between the devices and the converter and
their configuration.
Ÿ No indicator is flashing: Check the configuration on the AKO-5012 web server.
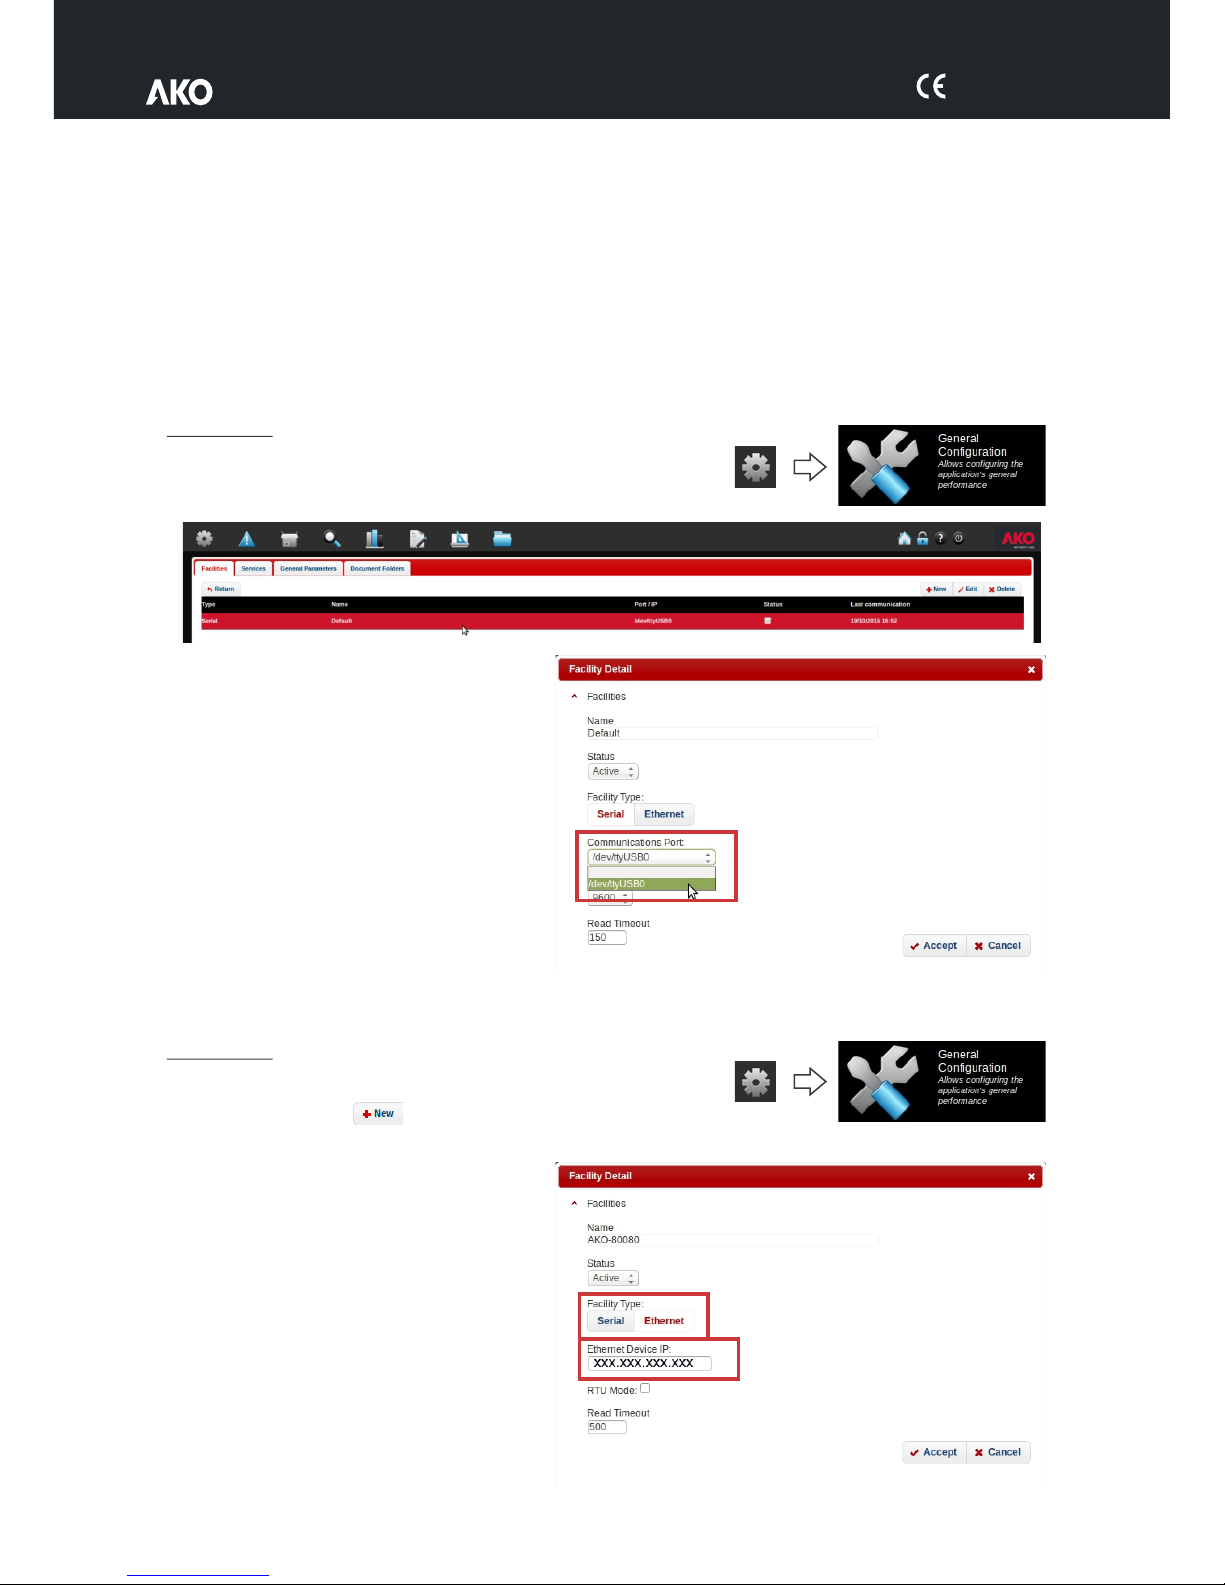
Configuration
-Access the administration / general configuration menu
-Select the device and press “Edit”.
-Check whether there are other ports available.
If so, select another port, press “Accept” and
repeat the search for devices checking that
both indicators are flashing.
AKO-80080
The AKO-80080 converter (not included) requires a specific configuration on the AKO-5012 web server.
Configuration
-Access the administration / general configuration menu
-Press “New”.
-Name the installation.
-Change the installation type to “Ethernet”
and enter the IP address assigned to the
converter (see the converter manual). The
“RTU mode” must be disabled and the
“Read Timeout” must be 500.
-Press “Accept”
12
Page 13
5012H001 Ed.01
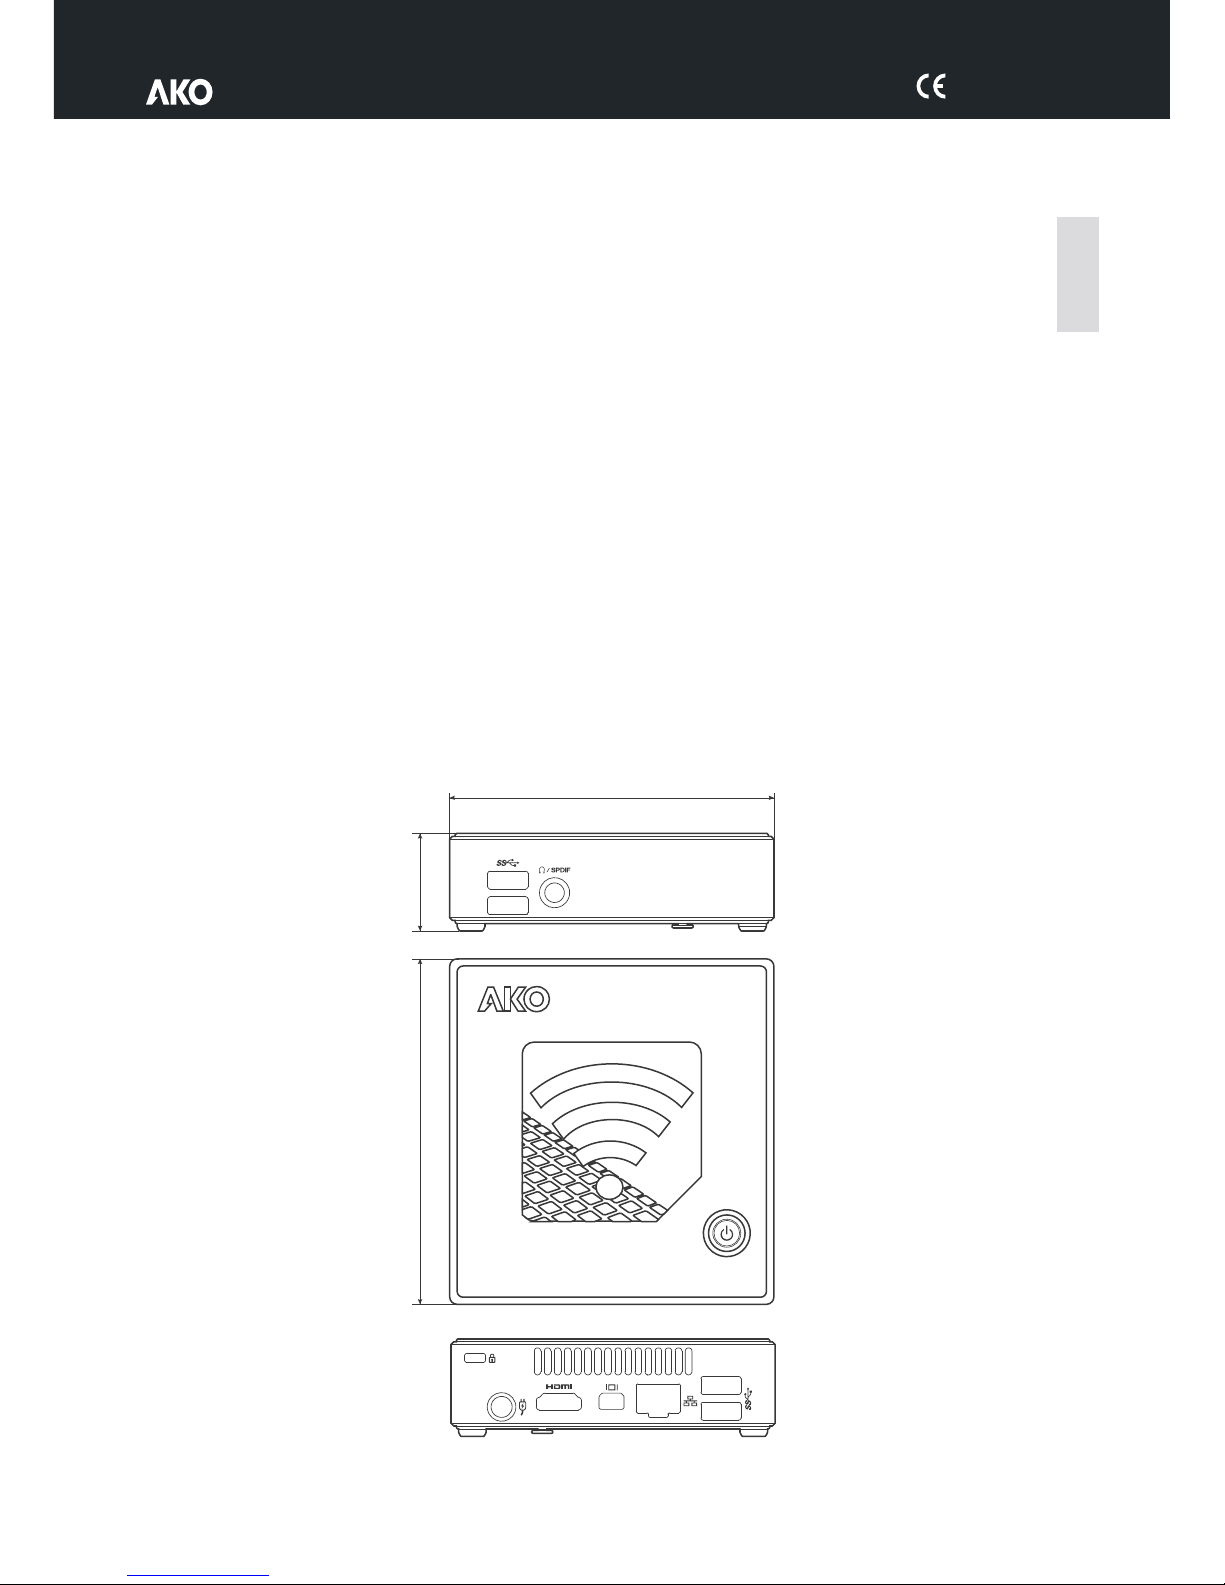
Specifications
CPU................................................................................................................5th generation Intel® Core™ i3
Memory .........................................................................................................................................4GB DDR3L
LAN ................................................................................................................................Gigabit LAN (Realtek)
Graphics.............................................................................................................................Intel® HD Graphics
Maximum HDMI resolution ..............................................................................................4096 x 2304 @ 24Hz
Maximum DP resolution...................................................................................................3840 x 2160 @ 60Hz
Inputs and outputs ............................................................................................................................1 x HDMI
........................................................................................................................4 x USB 3.0
...........................................................................................................1 x Mini Display Port
.............................................................................................................................1 x RJ45
....................................................................................................1 x headphones / SPDIF
.................................................................................................1 x VDC power connector
Storage......................................................................................................................................HD SSD 60 Gb
WIFI card ....................................................................................................IEEE802.11ac, Dual Band & BT 4.0
NFC............................................................................................................................................................Yes
Power supply...........................................................................Input: AC 100~240V - Output:
VESA support included ......................................................................................................75 x 75 y 100 x 100
Working temperature.................................................................................................................-0°C ~ +35°C
OS .................................................................................................................................Linux Ubuntu Desktop
DC19V @ 3.42A
English
13
114.4
33.9
107.6
AKONet
Web server
Page 14
5012H001 Ed.01
Configuration initiale
Option A, configuration SANS clavier, souris et moniteur
-Lors de l'utilisation d'un téléphone portable ou d'une tablette, effectuer une recherche de réseaux WIFI près de
l'AKO-5012.
-Parmi les réseaux trouvés, se connecter à « akonet ». Le mot de passe d'accès est akonet123.
-Ouvrir le navigateur et introduire dans la barre d'adresses l'adresse suivante : 10.0.0.1/setup
-Configurer la langue, la date, l'heure et le fuseau horaire, puis appuyer sur“submit”.
-Appuyer sur « IP » et configurer les données nécessaires, puis appuyer sur « submit ». Il est recommandé de
configurer l'équipement avec une IP fixe (static). Demandez à votre administrateur de réseau la configuration
appropriée pour votre infrastructure.
Ouvrir un navigateur Web sur un ordinateur qui se trouve sur le même réseau Ethernet que le serveur Web et
introduire dans la barre d'adresse l'IP configurée à l'étape précédente.
- Pour continuer la configuration, allez à la page 16.
14
Page 15
5012H001 Ed.01
Option B, configuration avec clavier, souris ou moniteur
-Raccorder un clavier, une souris et un moniteur au serveur web AKO-5012 (voir page 2) et le mettre en marche.
L'écran initial apparaît.
-Si l'équipement est en mode repos ou avec l'économiseur d'écran activé, appuyez sur n'importe quelle touche et
introduisez le mot de passe de système, qui est par défaut « akonetws ».
-Double-cliquez sur l'icône « Setup » pour accéder à la configuration.
-Configurer la langue, la date, l'heure et le fuseau horaire, puis appuyer sur “submit”.
-Appuyer sur « IP » et configurer les données nécessaires, puis appuyer sur « submit ». Il est recommandé de
configurer l'équipement avec une IP fixe (static). Demandez à votre administrateur de réseau la configuration
appropriée pour votre infrastructure.
-Appuyer sur « Application » et continuer la configuration sur la page suivante.
Setup
Français
15
Page 16
5012H001 Ed.01
Chercher des dispositifs installés
Les données d'accès sont demandées et elles sont par
défaut :
User: superuser
Password: superuser
Si l'application ne dispose d'aucun dispositif enregistré, apparaît la fenêtre de recherche de dispositifs. Appuyer sur
le bouton « Chercher Dispositifs » pour démarrer la recherche.
Les paramètres « Début » et « Fin » définissent l'intervalle d'adresses MODBUS sur lequel sont recherchés les
dispositifs. Pour réduire le temps de recherche, il est recommandé de régler ces paramètres en fonction de la
configuration de votre installation.
Après quelques instants, l'application affiche une liste des dispositifs trouvés.
Pour sauvegarder chaque dispositif, appuyer sur le bouton « Sauvegarder ». S'ouvre une nouvelle fenêtre où
sont définies les données de chaque dispositif :
Pour aider à leur localisation postérieure, il est recommandé d'assigner un nom différent à chaque dispositif,
d'introduire le nom choisi dans le champ « Nom » et d'appuyer sur « Accepter ».
Si après 5 minutes, l'application ne trouve aucun dispositif, revoyez la configuration du convertisseur
AKO-80039 (voir page suivante) et l'intervalle d'adresses défini.
Si vous utilisez un convertisseur AKO-80080, consultez la page suivante.
L'application est prête à fonctionner. Consultez le manuel d'utilisateur d'AKONet en cliquant sur l'icône ?
dans la partie supérieure droite de l'application.
16
Page 17
5012H001 Ed.01
AKO-80039
Le convertisseur AKO-80039 inclus est pré-installé en usine pour fonctionner sans que des configurations
supplémentaires soient nécessaires. Cependant, si l'équipement ne détecte aucun dispositif, revoyez les
indicateurs du convertisseur :
Ÿ Les indicateurs rouge et vert s'éclairent de forme intermittente : Fonctionnement normal
Ÿ Seul l'indicateur rouge s'éclaire de forme intermittente : Revoyez l'installation entre les
dispositifs et le convertisseur et la configuration de ces derniers.
Ÿ Aucun indicateur ne s'éclaire : Revoyez la configuration sur le serveur Web AKO-5012.
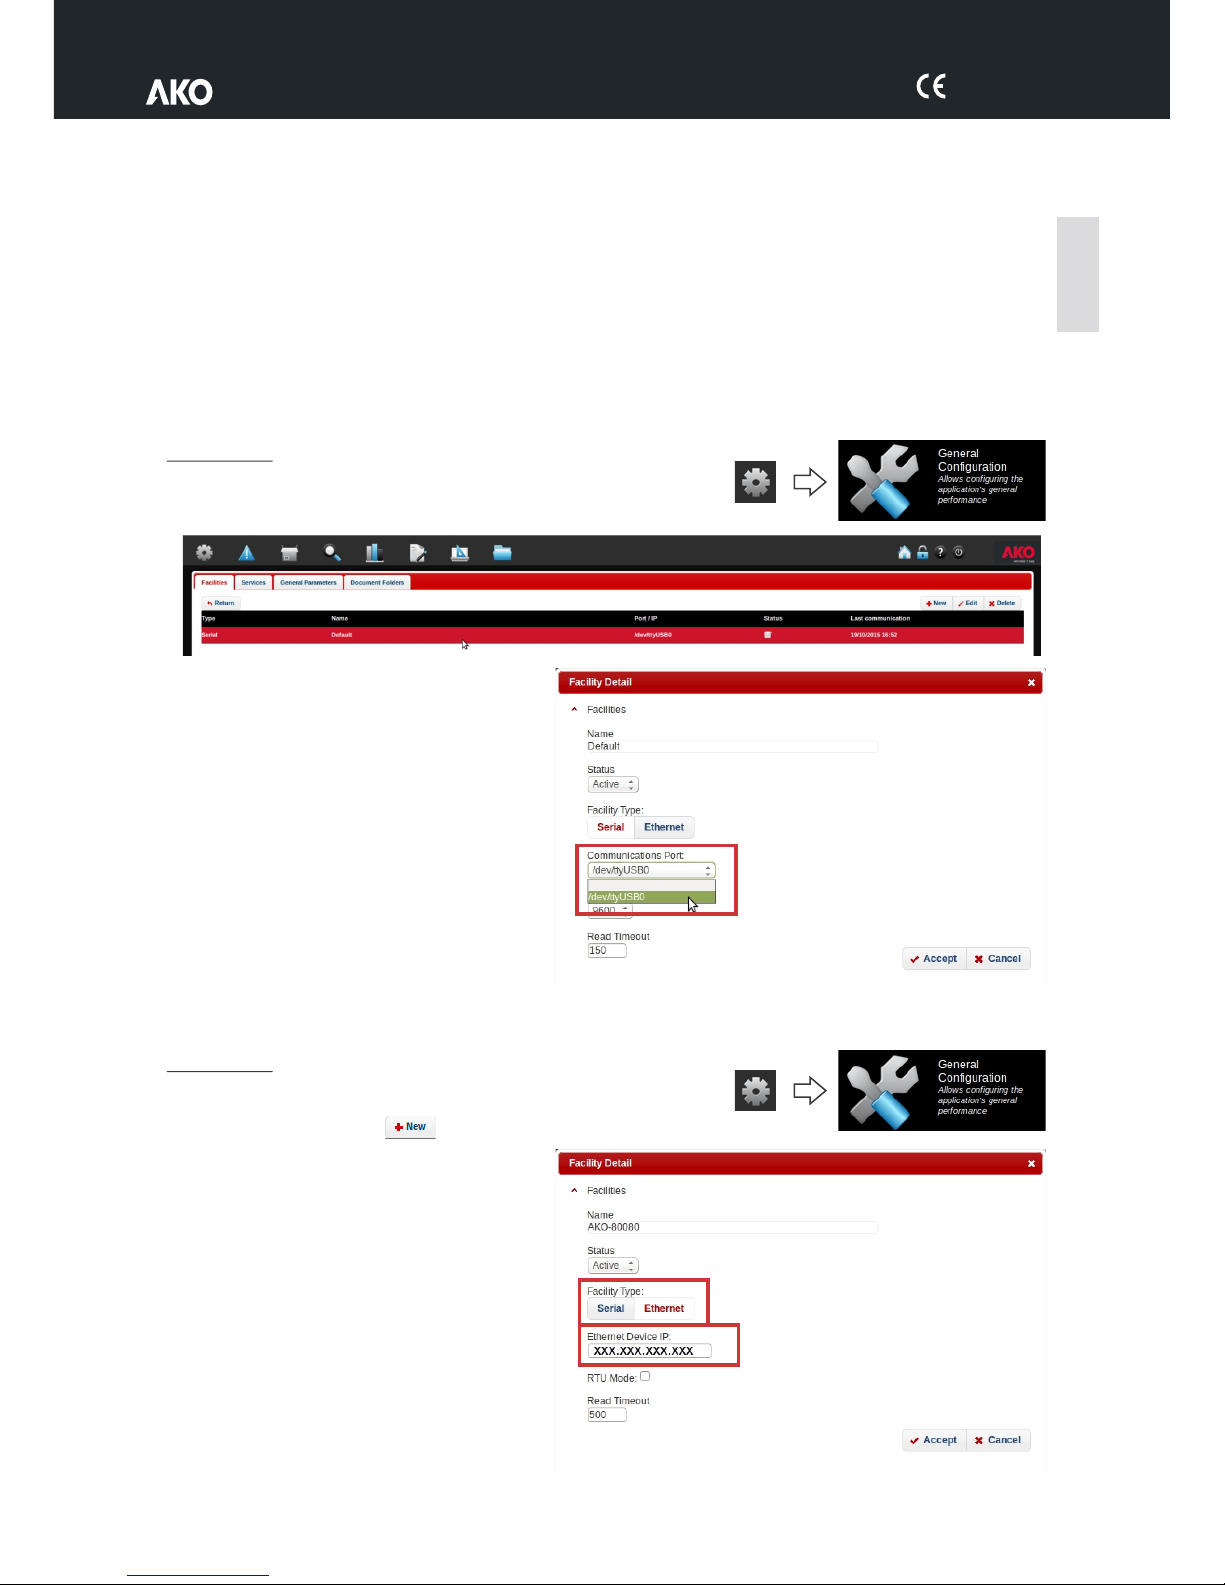
Configuration
-Accéder au menu d'administration/configuration générale
-Choisir le dispositif et appuyer sus « Éditer ».
-Vérifier s'il y a d'autres ports disponibles. Si
c'est le cas, sélectionner un autre port, appuyer
sur « Accepter » et répéter la recherche de
dispositifs en vérifiant que les deux indicateurs
s'éclairent de forme intermittente.
AKO-80080
Le convertisseur (non inclus) AKO-80080 requiert une configuration spécifique sur le serveur Web AKO-5012.
Configuration
-Accéder au menu d'administration/configuration générale
-Cliquer sur « Nouveau ».
-Assigner un nom à l'installation.
-Modifier le type d'installation en le passant à «
Ethernet » et introduire l'adresse IP assignée
au convertisseur (consulter le manuel du
convertisseur). Le « mode RTU » doit être
désactivé et le « Timeout de lecture » être
mis à 500.
-Cliquer sur « Accepter ».
Français
17
Page 18
5012H001 Ed.01
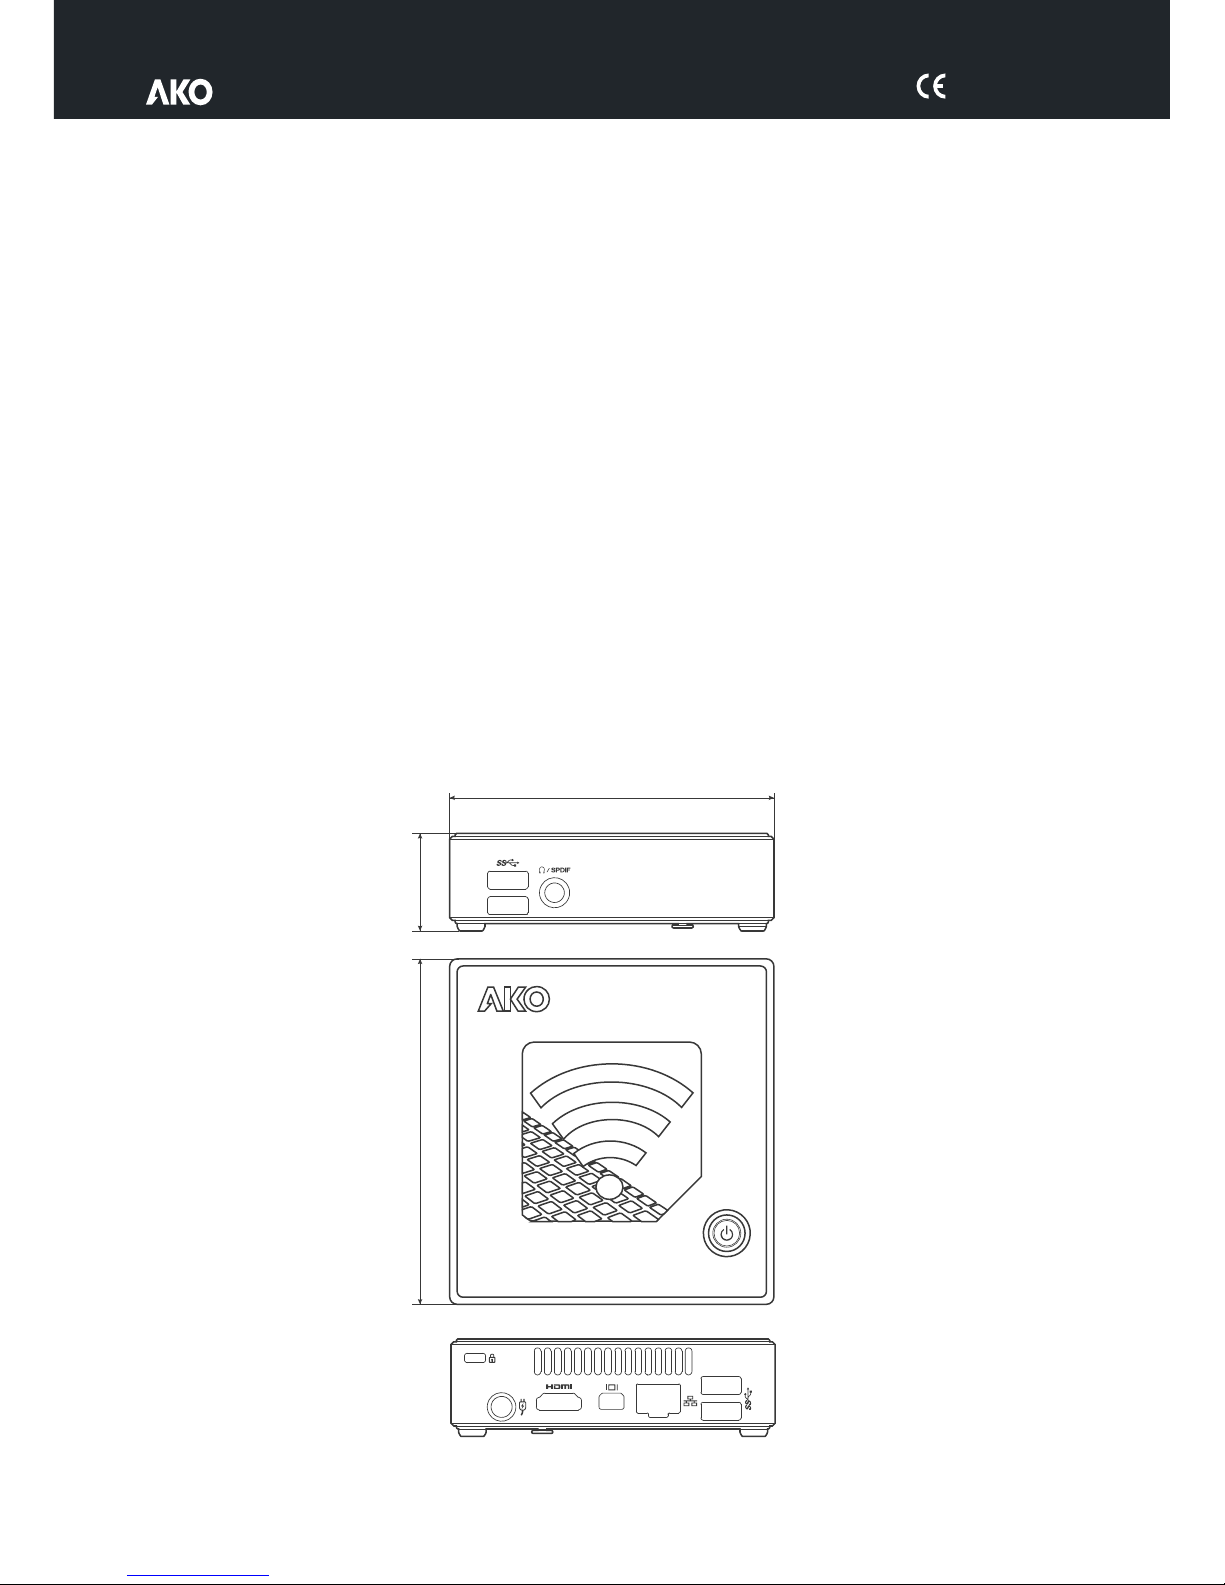
Spécifications
CPU................................................................................................................5th generation Intel® Core™ i3
Mémoire ........................................................................................................................................4GB DDR3L
LAN ................................................................................................................................Gigabit LAN (Realtek)
Graphiques.........................................................................................................................Intel® HD Graphics
Résolution maximale HDMI..............................................................................................4096 x 2304 @ 24Hz
Résolution maximale DP ..................................................................................................3840 x 2160 @ 60Hz
Entrées et sorties ............................................................................................................................1 x HDMI
........................................................................................................................4 x USB 3.0
...........................................................................................................1 x Mini Display Port
.............................................................................................................................1 x RJ45
..........................................................................................................1 x écouteurs / SPDIF
.....................................................................................1 x VDC connecteur d'alimentation
Stockage....................................................................................................................................HD SSD 60 Gb
Carte WI-FI..................................................................................................IEEE802.11ac, Dual Band & BT 4.0
NFC ..............................................................................................................................................................Si
Alimentation .......................................................................Entrée : AC 100~240V - Sortie :
Support VESA inclus..........................................................................................................75 x 75 y 100 x 100
Température de fonctionnement.................................................................................................-0°C ~ +35°C
OS .................................................................................................................................Linux Ubuntu Desktop
DC19V @ 3.42A
18
114.4
33.9
107.6
AKONet
Web server
Page 19
5012H001 Ed.01
Anfangskonfiguration
Option A, Konfiguration OHNE Tastatur, Maus und Bildschirm
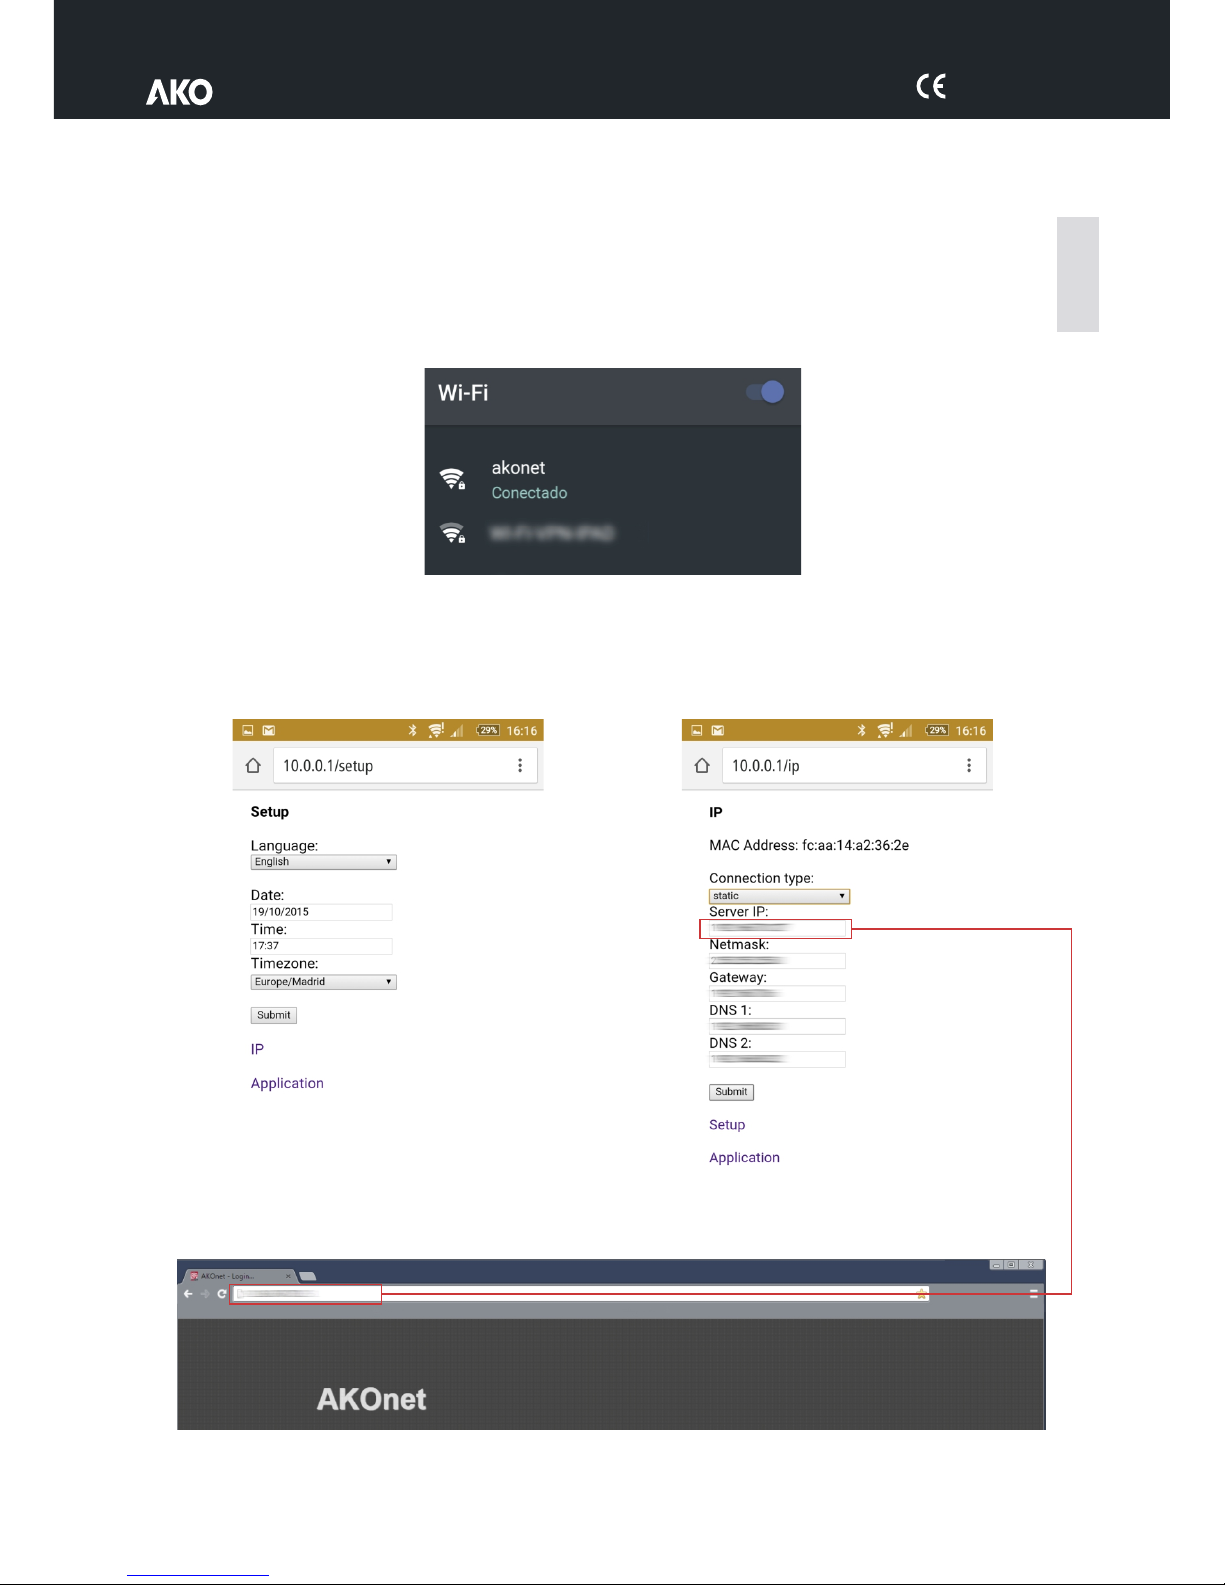
-Mit einem Handy oder Tablet eine Suche nach WIFI-Verbindungen in der Nähe von AKO-5012 durchführen.
-Unter den gefundenen Netzwerken mit „akonet“ verbinden. Das Passwort für den Zugang ist akonet123.
-Den Webbrowser öffnen und in der Adressleiste folgende Adresse eingeben: 10.0.0.1/setup
-Sprache, Datum, Uhrzeit und Zeitzone konfigurieren und auf „submit“ drücken.
-Auf „IP“ drücken, die notwendigen Daten konfigurieren und dann auf „submit“ drücken. Wir empfehlen, das
Gerät mit einer festen IP (static) zu konfigurieren. Fordern Sie bei Ihrem Netzwerkadministrator die geeignete
Konfiguration entsprechend Ihrer Infrastruktur an.
-Öffnen Sie einen Webbrowser in einem PC, der sich im gleichen Ethernet-Netz befindet wie der Web-Server und
geben Sie in der Adressleiste die im vorherigen Schritt konfigurierte IP ein.
-Um mit der Konfiguration fortzufahren, gehen Sie auf Seite 21.
Deutsch
19
Page 20
5012H001 Ed.01
Option B, Konfiguration mit Tastatur, Maus oder Bildschirm
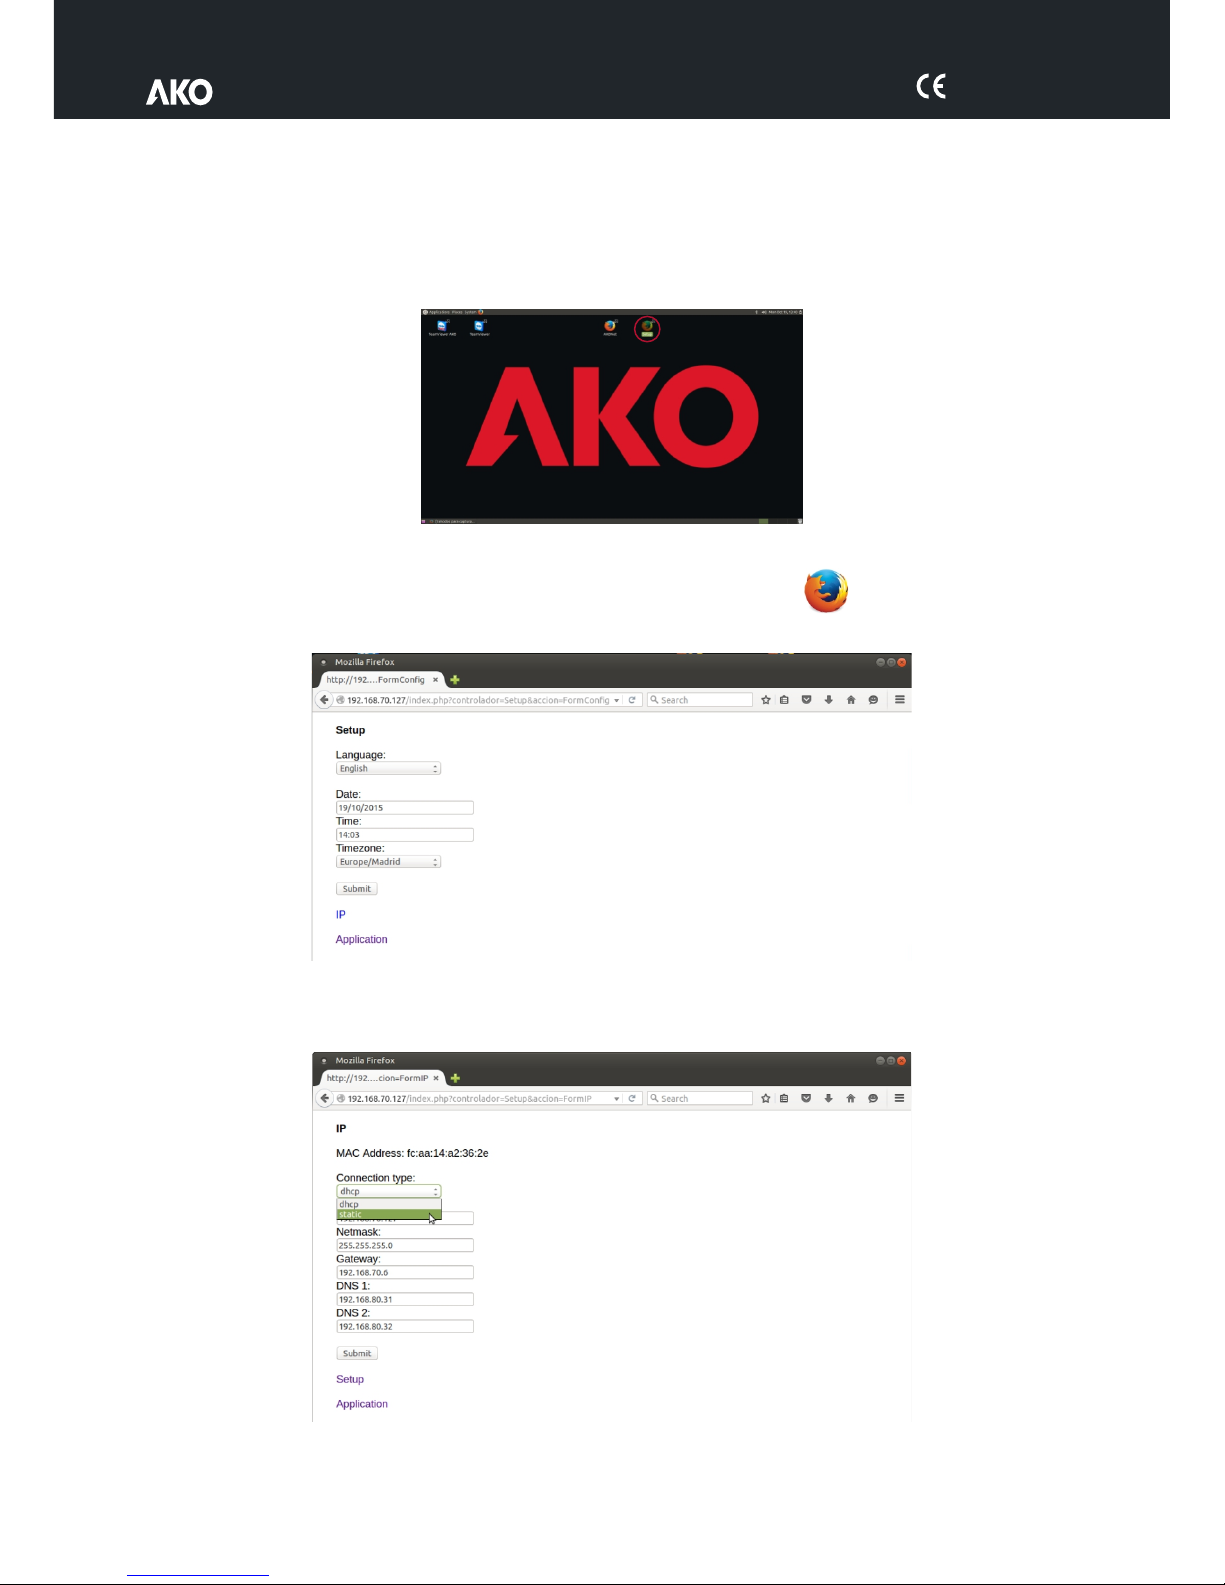
-Schließen Sie die Tastatur, Maus und den Bildschirm an den Web-Server AKO-5012 an (siehe Seite 2) und nehmen
Sie ihn in Betrieb. Es erscheint der Startbildschirm.
-Wenn das Gerät im Standby-Modus ist oder der Bildschirmschoner aktiviert ist, drücken Sie auf eine beliebige Taste
und geben Sie das Systempasswort ein, das standardmäßig „akonetws“ ist.
-Doppelklicken Sie auf das Symbol „Setup“, um die Konfiguration aufzurufen.
-Sprache, Datum, Uhrzeit und Zeitzone konfigurieren und auf „submit“ drücken.
- Auf „IP“ drücken, die notwendigen Daten konfigurieren und dann auf „submit“ drücken. Wir empfehlen, das
Gerät mit einer festen IP (static) zu konfigurieren. Fordern Sie bei Ihrem Netzwerkadministrator die geeignete
Konfiguration entsprechend Ihrer Infrastruktur an.
-Drücken Sie auf „Application“ und fahren Sie mit der Konfiguration auf der nächsten Seite fort.
Setup
20
Page 21
5012H001 Ed.01
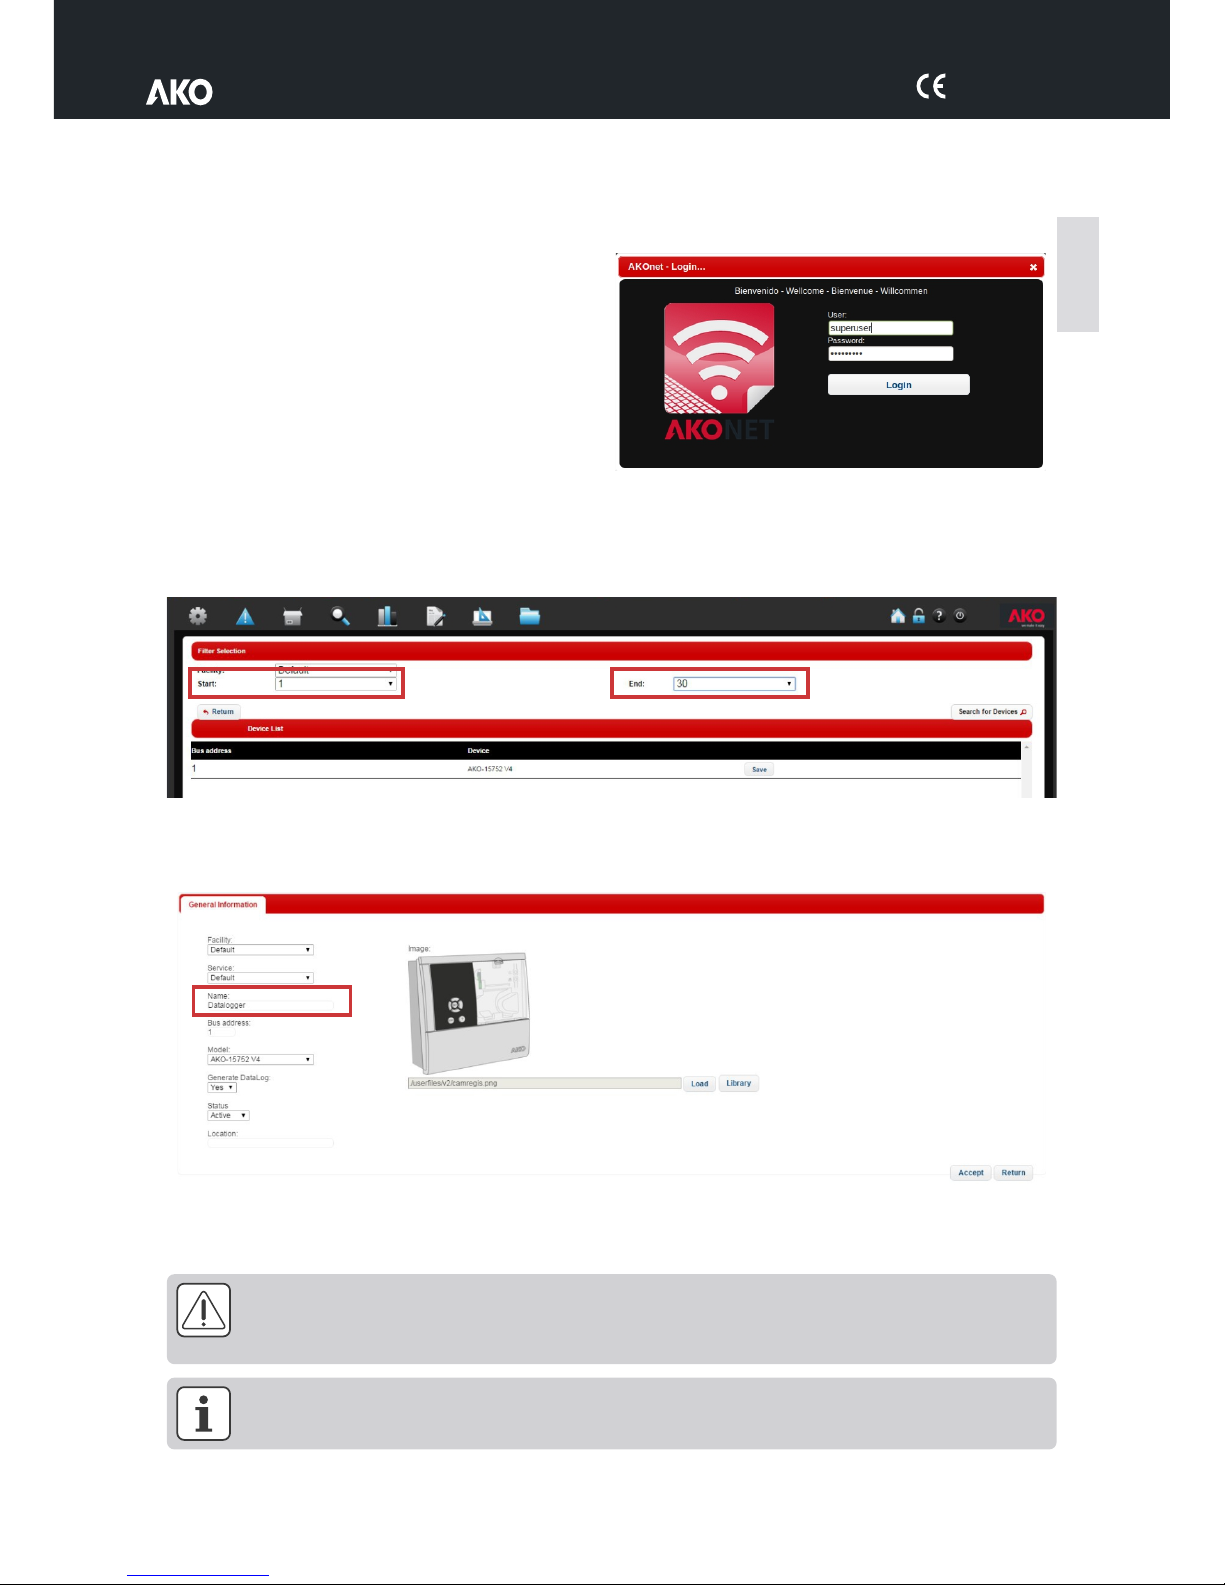
Installierte Geräte suchen
Die Zugangsdaten werden erfragt, die standardmäßig die
folgenden sind:
User: superuser
Password: superuser
Wenn die Anwendung nicht über registrierte Geräte verfügt, öffnet sich das Gerätesuchfenster. Drücken Sie auf die
Schaltfläche „Geräte suchen“, um die Suche zu starten.
Die Parameter „Anfang“ und „Ende“ definieren den Adressbereich MODBUS, in dem nach den Geräten gesucht
wird. Um die Suchzeit zu verkürzen, empfehlen wir diese Parameter nach der Konfiguration Ihrer Anlage einzustellen.
Nach kurzer Zeit, zeigt die Anwendung eine Liste mit den gefundenen Geräten.
Zum Speichern von jedem Gerät, drücken Sie auf die Schaltfläche „Speichern“. Es öffnet sich ein neues Fenster, in
dem die Daten jedes Gerätes definiert werden:
Um deren spätere Lokalisierung zu vereinfachen, empfehlen wir jedem Gerät einen anderen Namen zuzuweisen.
Geben Sie den ausgesuchten Namen in das Feld „Name“ ein und drücken Sie dann auf „Annehmen“.
Wenn die Anwendung nach 5 Minuten kein Gerät findet, überprüfen Sie die Konfiguration des Konverters
AKO-80039 (siehe folgende Seite) und den definierten Adressbereich.
Wenn Sie einen Konverter AKO-80080 verwenden, gehen Sie auf die nächste Seite.
Die Anwendung ist betriebsbereit. Klicken Sie auf das Symbol ? an der rechten oberen Seite der
Anwendung, um das Benutzerhandbuch von AKONet aufzurufen.
Deutsch
21
Page 22
5012H001 Ed.01
AKO-80039
Der inklusive Konverter AKO-80039 wird werksseitig vorinstalliert und benötigt keine zusätzlichen
Konfigurationen. Sollte das Gerät jedoch keine Vorrichtung finden, überprüfen Sie die Anzeiger des Konverters:
Ÿ Wenn sowohl der rote wie der grüne Anzeiger blinken: Funcionamiento normal
Ÿ Nur der rote Anzeiger blinkt: Überprüfen Sie die Installation zwischen den Geräten und dem
Konverter und deren Konfiguration.
Ÿ Es leuchtet kein Anzeiger: Überprüfen Sie die Konfiguration im Web-Server AKO-5012.
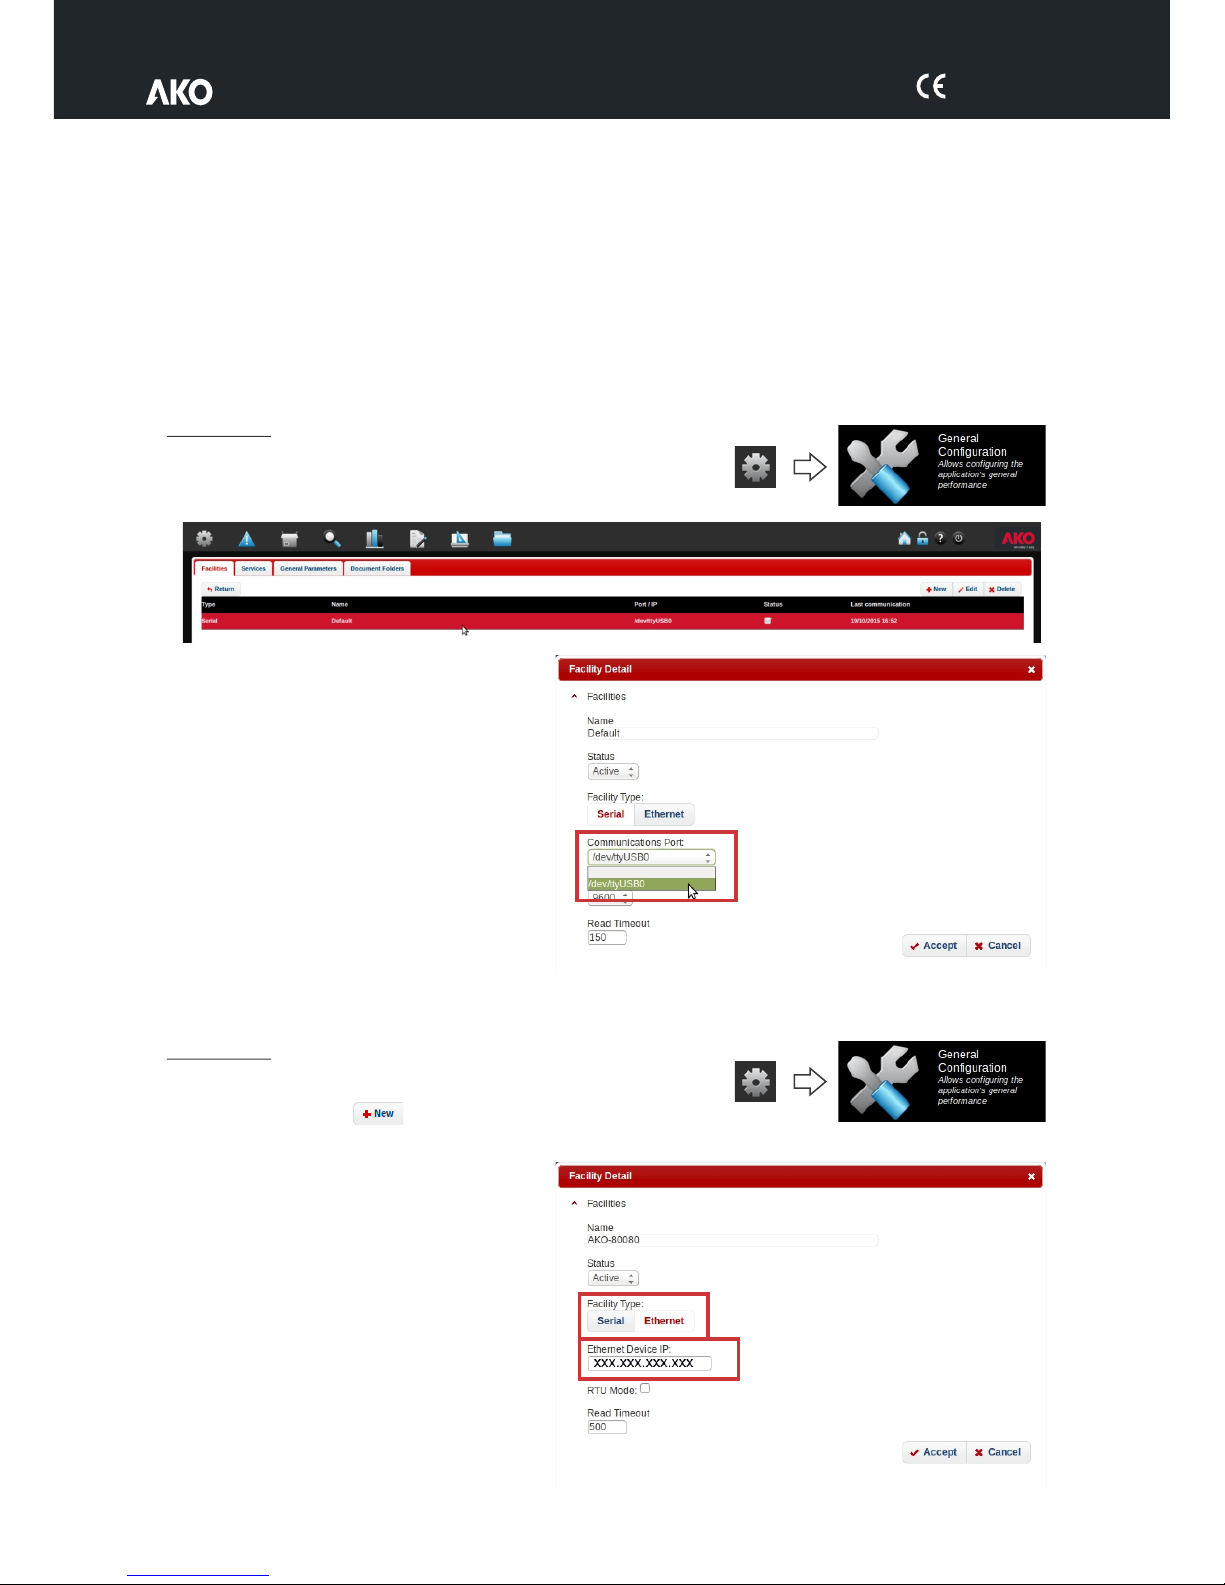
Konfiguration
-Auf das Menü Verwaltung/Allgemeine Konfiguration zugreifen
-Das Gerät auswählen und auf „Bearbeiten“ drücken.
-Überprüfen, ob andere Ports verfügbar sind.
Falls ja, anderen Port auswählen, auf
„Annehmen“ drücken und die Gerätesuche
wiederholen. Beide Anzeiger müssen blinken.
AKO-80080
Der Konverter (nicht eingeschlossen) AKO-80080 benötigt eine spezielle Konfiguration im Web-Server AKO-5012.
Konfiguration
-Auf das Menü Verwaltung/Allgemeine Konfiguration zugreifen
-Auf „Neu“ drücken.
-Der Installation einen Namen zuweisen.
-Die Installations-Art auf „Ethernet“ ändern
und die dem Konverter zugewiesene IP-
Adresse eingeben (siehe Handbuch zum
Konverter). Der „RTU Modus“ muss
deaktiviert und die „lesen Timeout“ auf 500
eingestellt sein.
-Auf “Annehmen” drücken.
22
Page 23
5012H001 Ed.01
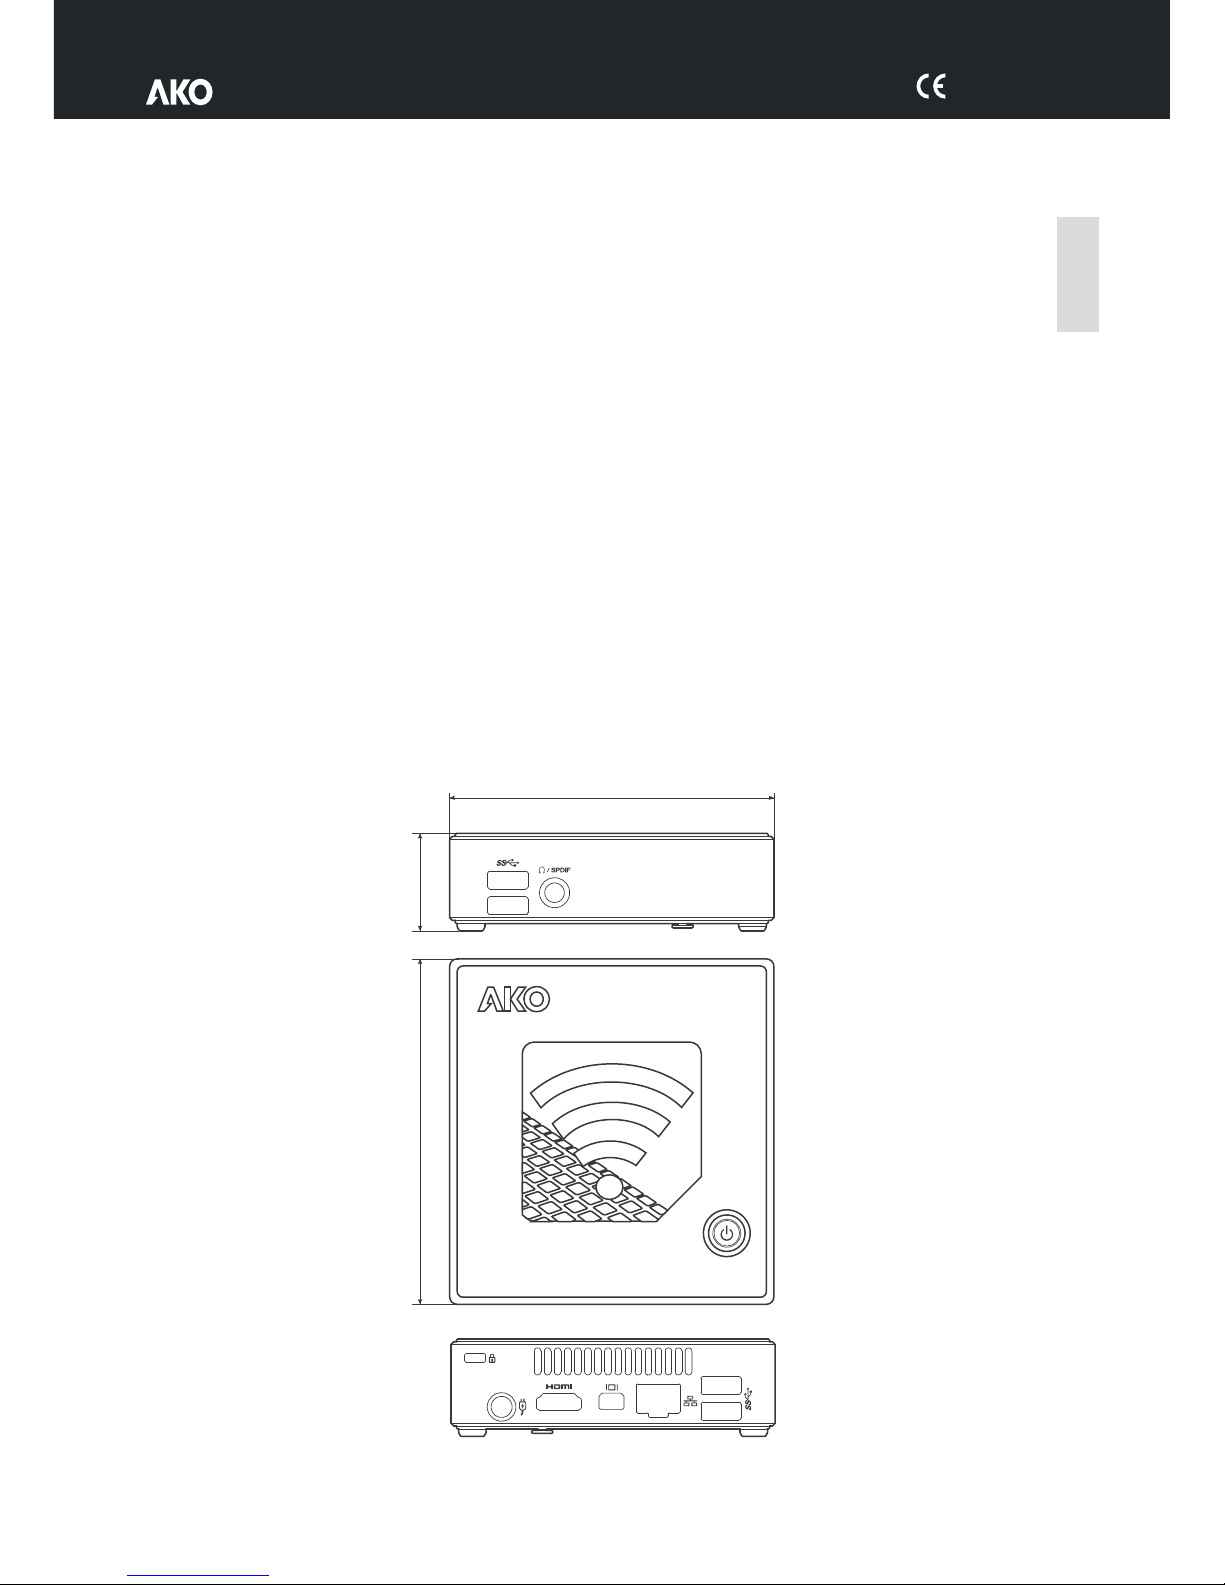
Technische Daten
CPU................................................................................................................5th generation Intel® Core™ i3
Speicher .........................................................................................................................................4GB DDR3L
LAN ................................................................................................................................Gigabit LAN (Realtek)
Grafiken .............................................................................................................................Intel® HD Graphics
Maximale Auflösung HDMI ..............................................................................................4096 x 2304 @ 24Hz
Maximale Auflösung DP...................................................................................................3840 x 2160 @ 60Hz
Ein- und Ausgänge ............................................................................................................................1 x HDMI
........................................................................................................................4 x USB 3.0
...........................................................................................................1 x Mini Display Port
.............................................................................................................................1 x RJ45
............................................................................................................1 x Kopfhörer/SPDIF
...........................................................................................................1 x VDC Netzstecker
Speicherung...............................................................................................................................HD SSD 60 Gb
WIFI-Karte ..................................................................................................IEEE802.11ac, Dual Band & BT 4.0
NFC ..............................................................................................................................................................Si
Stromversorgung..............................................................Eingang: AC 100~240V - Ausgang:
Arbeitstemperatur.............................................................................................................75 x 75 y 100 x 100
Arbeitstemperatur......................................................................................................................-0°C ~ +35°C
OS .................................................................................................................................Linux Ubuntu Desktop
DC19V @ 3.42A
Deutsch
23
114.4
33.9
107.6
AKONet
Web server
Page 24
5012H001 Ed.01
Configuração inicial
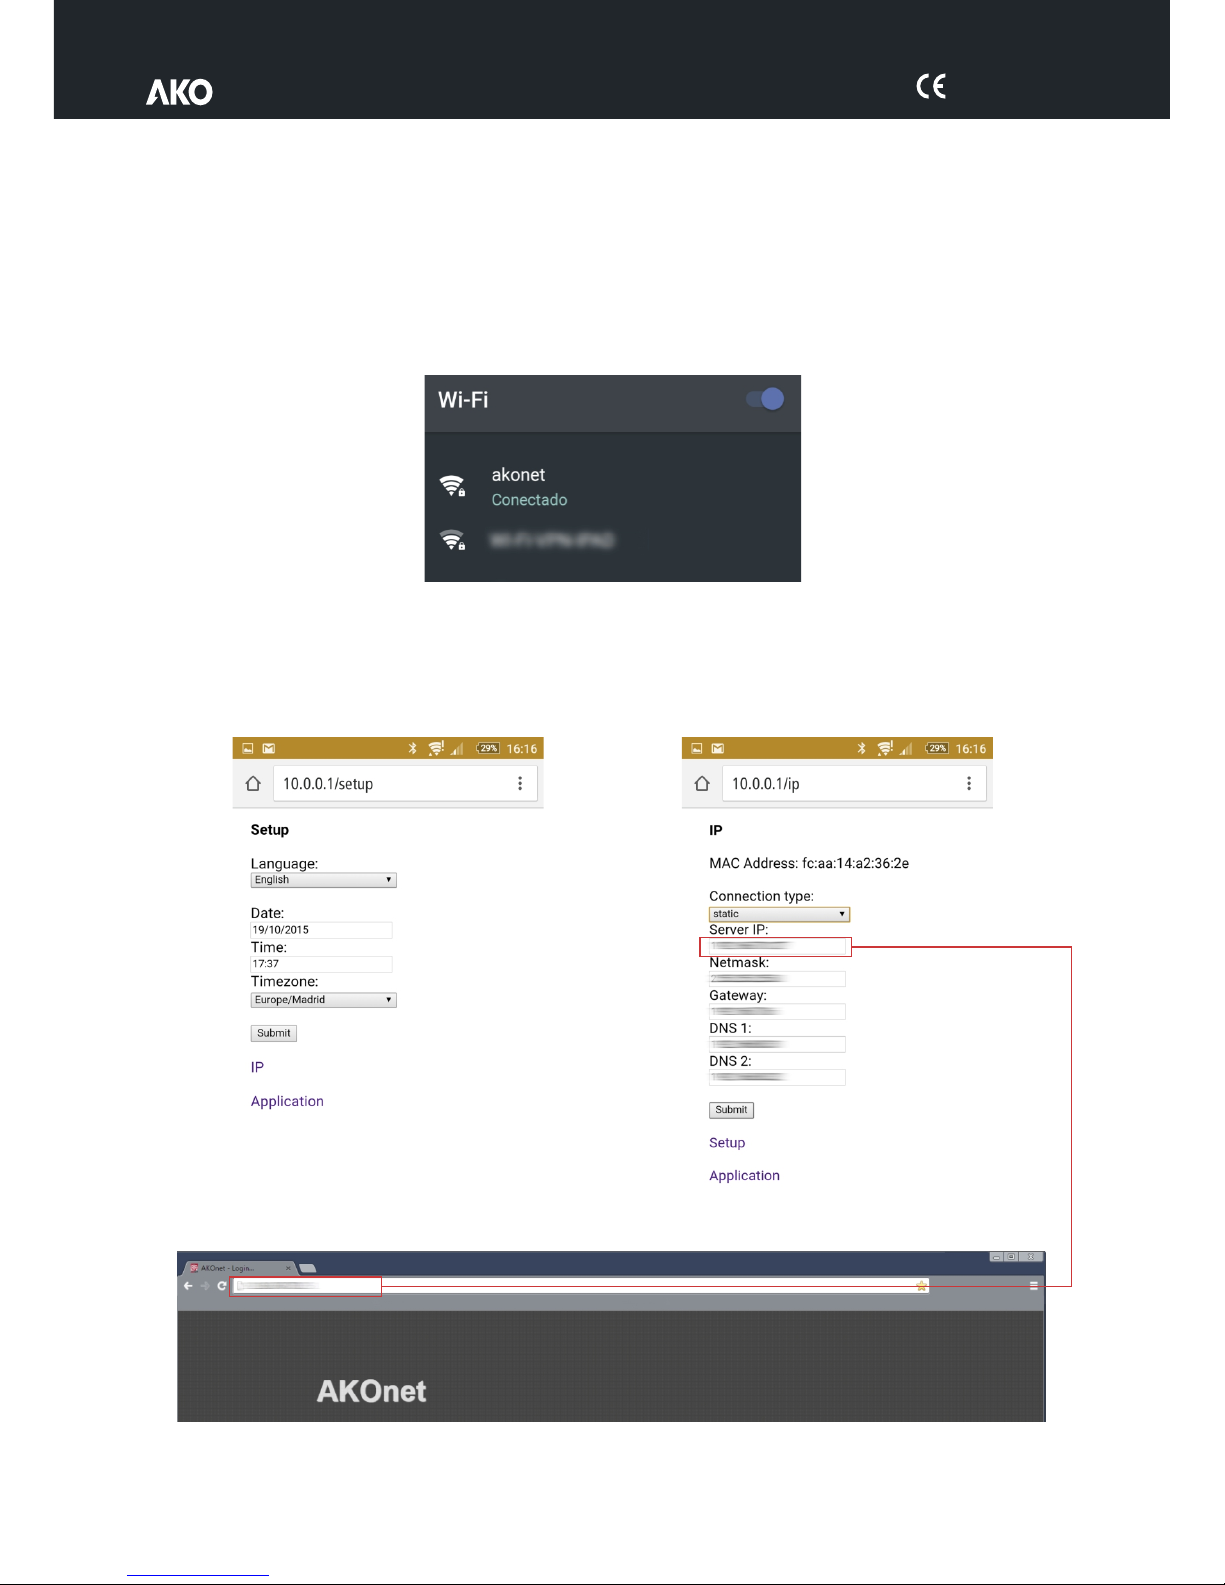
Opção A, configuração SEM teclado, rato e monitor
-Utilizando um telemóvel ou tablet, realizar uma procura de redes WIFI próximo do AKO-5012.
-Entre as redes encontradas, ligar-se a «akonet»; a palavra-passe de acesso é akonet123.
-Abrir o navegador e introduzir na barra de endereços o seguinte endereço: 10.0.0.1/setup
-Configurar o idioma, a data, a hora e o fuso horário e premir “submit”.
-Clicar em «IP», configurar os dados necessários e premir «submit». Recomenda-se a configuração do
equipamento com um IP fixo (static); solicite ao seu administrador de rede a configuração adequada de acordo
com a sua infraestrutura.
-Abrir um navegador Web num computador que se encontre na mesma rede Ethernet que o servidor Web e introduzir
na barra de endereços o IP configurado no passo anterior.
-Para continuar a configuração, vá para a página 26.
24
Page 25
5012H001 Ed.01
Opção B, configuração com teclado, rato ou monitor
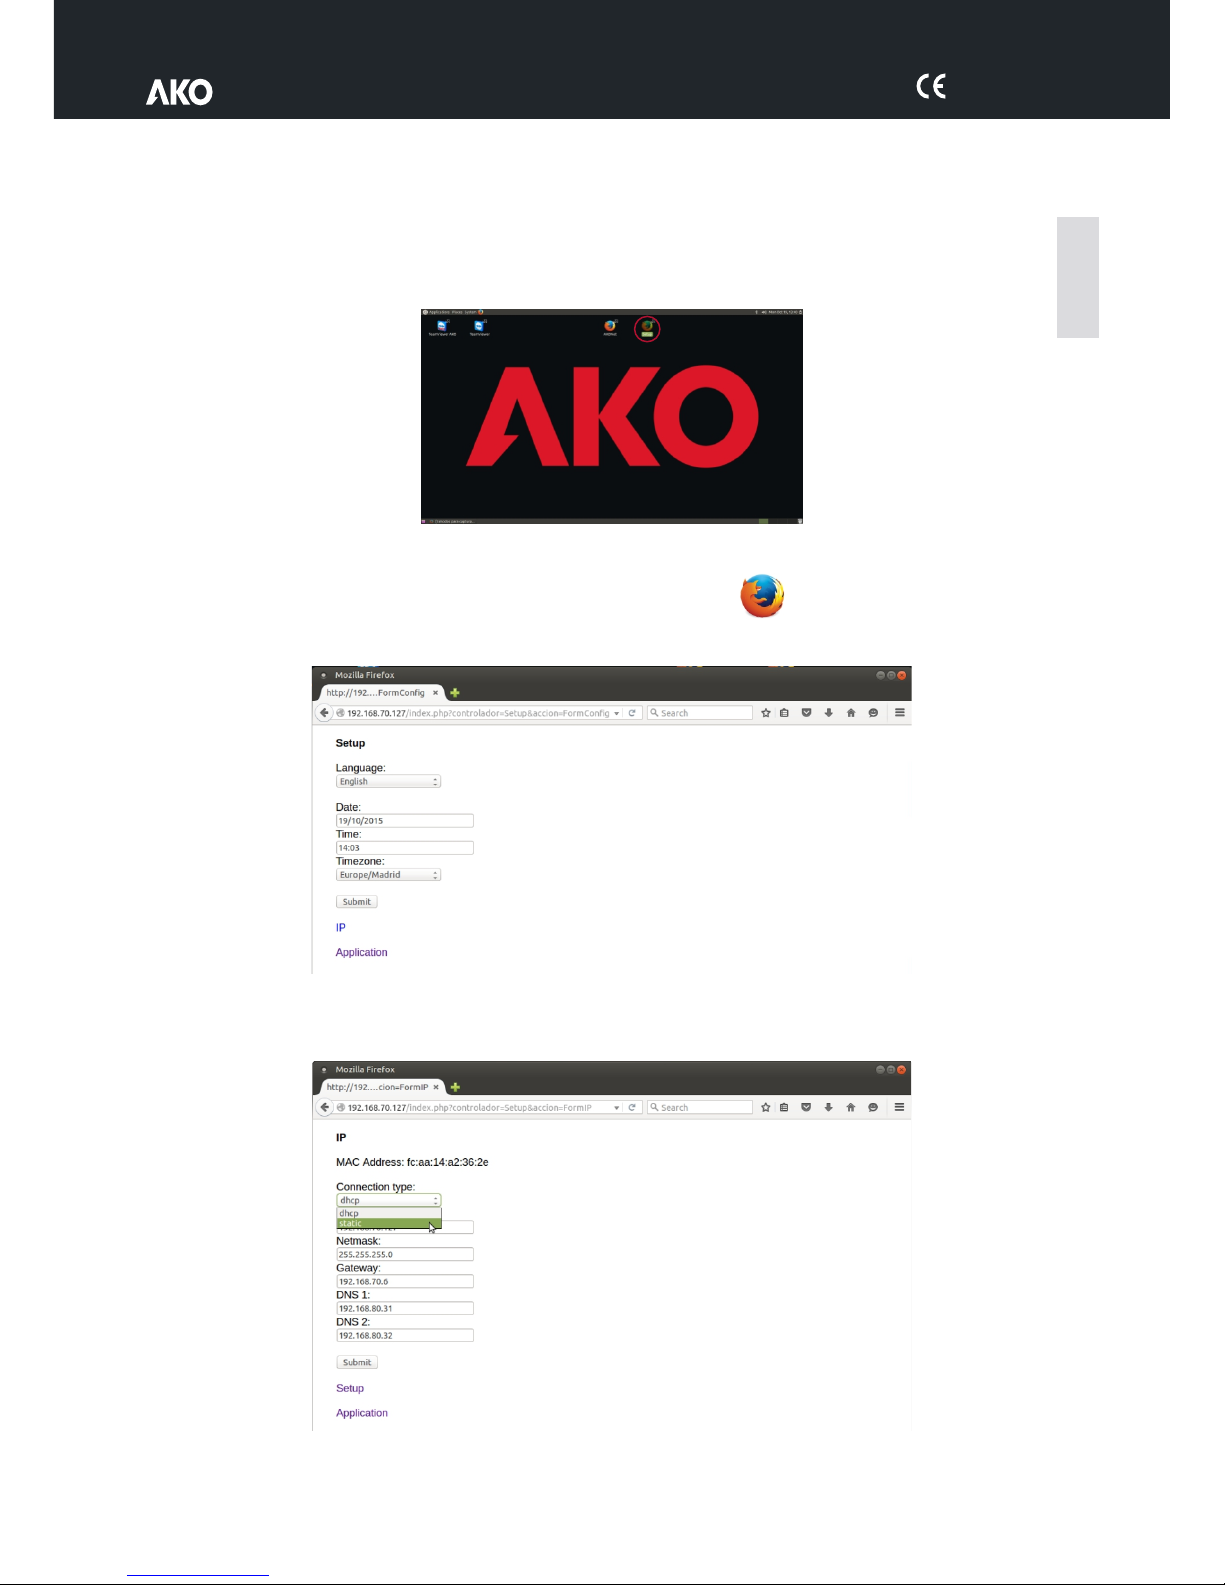
-Ligar um teclado, um rato e um monitor ao servidor Web AKO-5012 (ver pág. 2) e colocar em funcionamento. É
exibido o ecrã inicial.
-Se o equipamento estiver em modo de repouso ou tiver o protetor de ecrã ativado, prima qualquer tecla e introduza a
palavra-passe de sistema, que por defeito é “akonetws”.
-Clique duas vezes no ícone «Setup» para aceder à configuração.
-Configurar o idioma, a data, a hora e o fuso horário e premir “submit”.
-Clicar em «IP», configurar os dados necessários e premir «submit». Recomenda-se a configuração do
equipamento com um IP fixo (static); solicite ao seu administrador de rede a configuração adequada de acordo
com a sua infraestrutura.
-Clicar em «Application» e continuar a configuração na página seguinte.
Setup
Português
25
Page 26
5012H001 Ed.01
Procurar dispositivos instalados
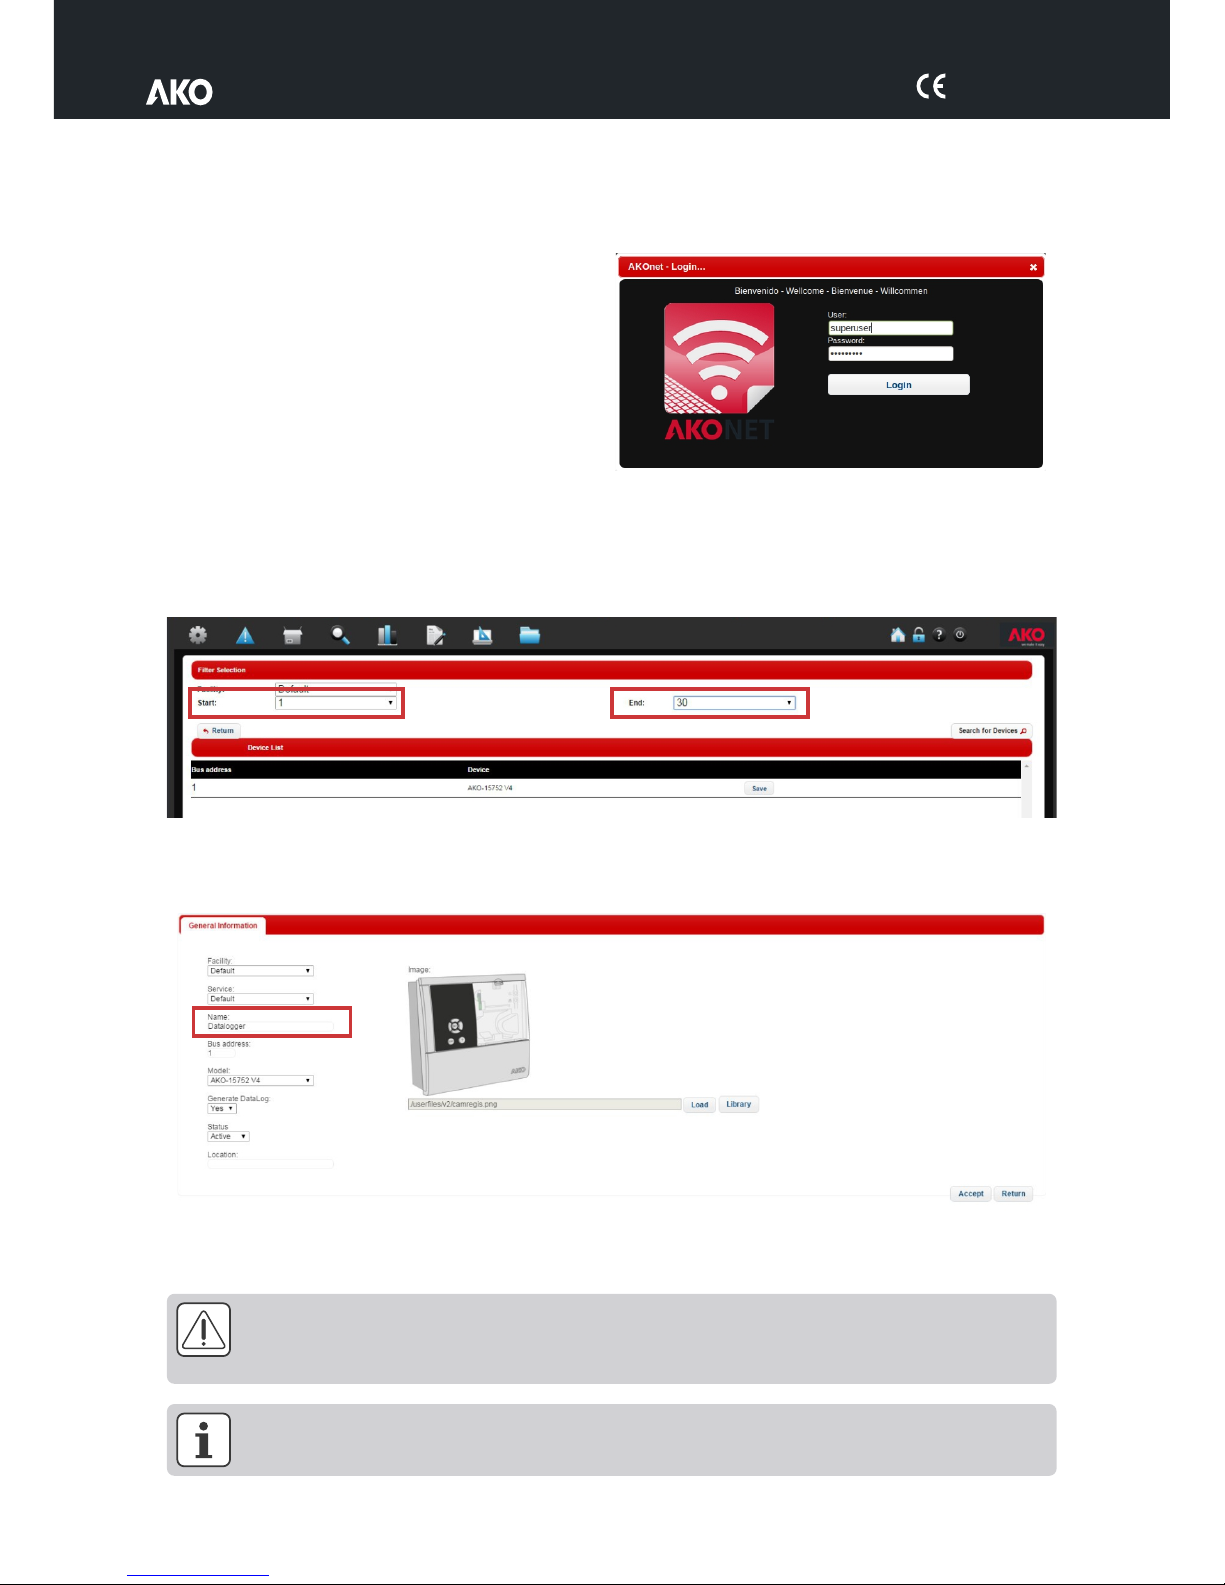
São solicitados os dados de acesso, que por defeito são:
User: superuser
Password: superuser
Caso a aplicação não disponha de dispositivos registados, aparece a janela de procura de dispositivos; premir o
botão «Procurar dispositivos» para iniciar a procura.
Os parâmetros «Início» e «Fim» definem o intervalo de endereços MODBUS no qual são procurados dispositivos.
Para reduzir o tempo de procura, recomenda-se proceder ao ajuste destes parâmetros de acordo com a
configuração da sua instalação.
Após alguns instantes, a aplicação apresenta uma lista com os dispositivos encontrados.
Para guardar cada dispositivo, premir o botão «Guardar», abre-se uma nova janela onde são definidos os dados
de cada dispositivo:
Para facilitar a sua localização posterior, recomenda-se a atribuição de um nome diferente a cada dispositivo,
introduzir o nome escolhido no campo «Nome» e premir «Aceitar».
Se após 5 minutos a aplicação não encontrar nenhum dispositivo, verifique a configuração do conversor
AKO-80039 (ver página seguinte) e o intervalo de endereços definido.
Se utilizar um conversor AKO-80080, consulte a página seguinte.
A aplicação está pronta a funcionar; consulte o manual de utilizador do AKONet clicando no ícone «?» na
parte superior direita da aplicação.
26
Page 27
5012H001 Ed.01
AKO-80039
O conversor AKO-80039 incluído vem pré-instalado de fábrica para funcionar sem necessidade de configurações
adicionais. Contudo, se o equipamento não detetar nenhum dispositivo, verifique os indicadores do conversor:
Ÿ Os indicadores vermelho e verde estão ligados de forma intermitente: Funcionamento normal.
Ÿ Apenas o indicador vermelho está ligado de forma intermitente: Verifique a instalação entre os
dispositivos e o conversor e a configuração dos mesmos.
Ÿ Não está ligado nenhum indicador: Verifique a configuração no servidor Web AKO-5012
Configuração
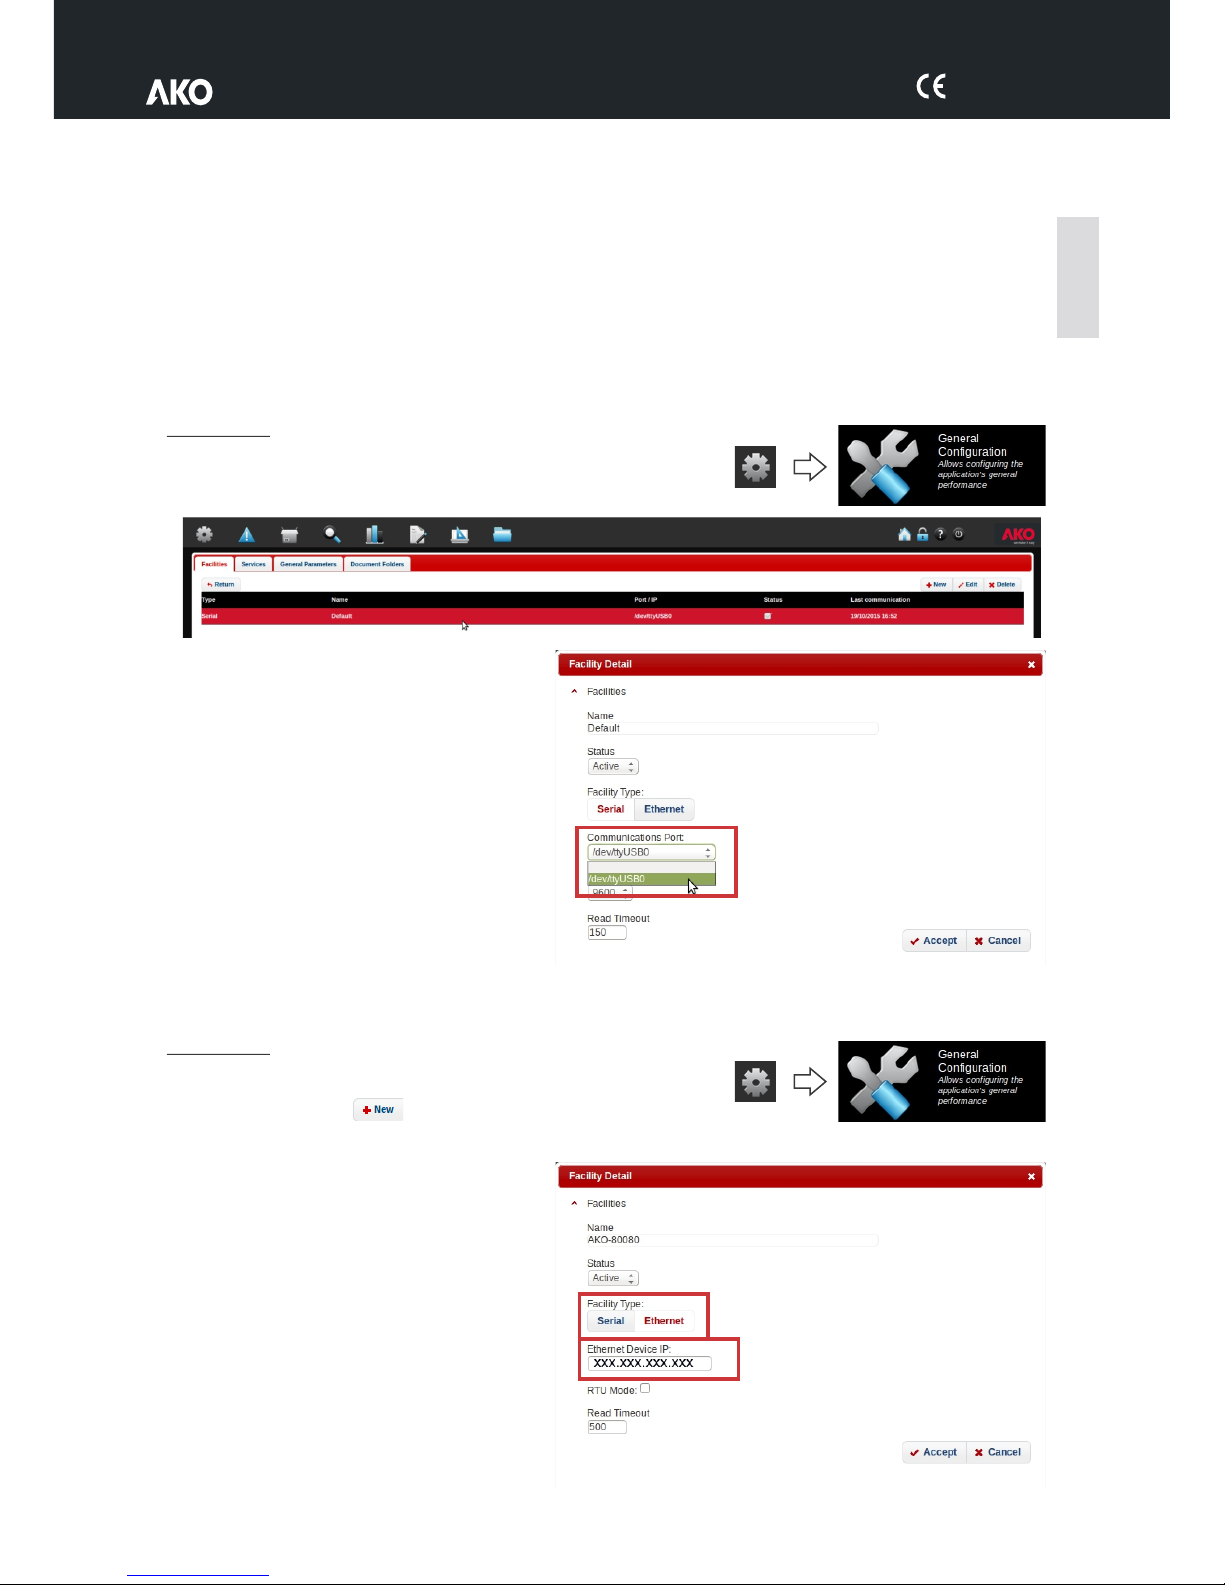
-Aceder ao menu de administração/configuração geral.
-Selecionar o dispositivo e premir “Editar”.
-Comprovar se há outras portas disponíveis. Em
caso afirmativo, selecionar outra porta, premir
«Aceitar» e repetir a procura de dispositivos,
comprovando se ambos os indicadores estão
ligados de forma intermitente.
AKO-80080
O conversor (não incluído) AKO-80080 requer uma configuração específica no servidor Web AKO-5012.
Configuração
-Aceder ao menu de administração/configuração geral
-Clicar em «Novo».
-Atribuir um nome à instalação.
-Alterar o tipo de instalação para «Ethernet» e
introduzir o endereço IP atribuído ao
conversor (consultar o manual do conversor).
O «Modo RTU» deve estar desativado e o
«Leia tempo limite» em 500.
-Clicar em “Aceitar”.
Português
27
Page 28
5012H001 Ed.01
Especificações
CPU................................................................................................................5th generation Intel® Core™ i3
Memória ........................................................................................................................................4GB DDR3L
LAN ................................................................................................................................Gigabit LAN (Realtek)
Gráficos..............................................................................................................................Intel® HD Graphics
Resolução máxima HDMI.................................................................................................4096 x 2304 @ 24Hz
Resolução máxima DP .....................................................................................................3840 x 2160 @ 60Hz
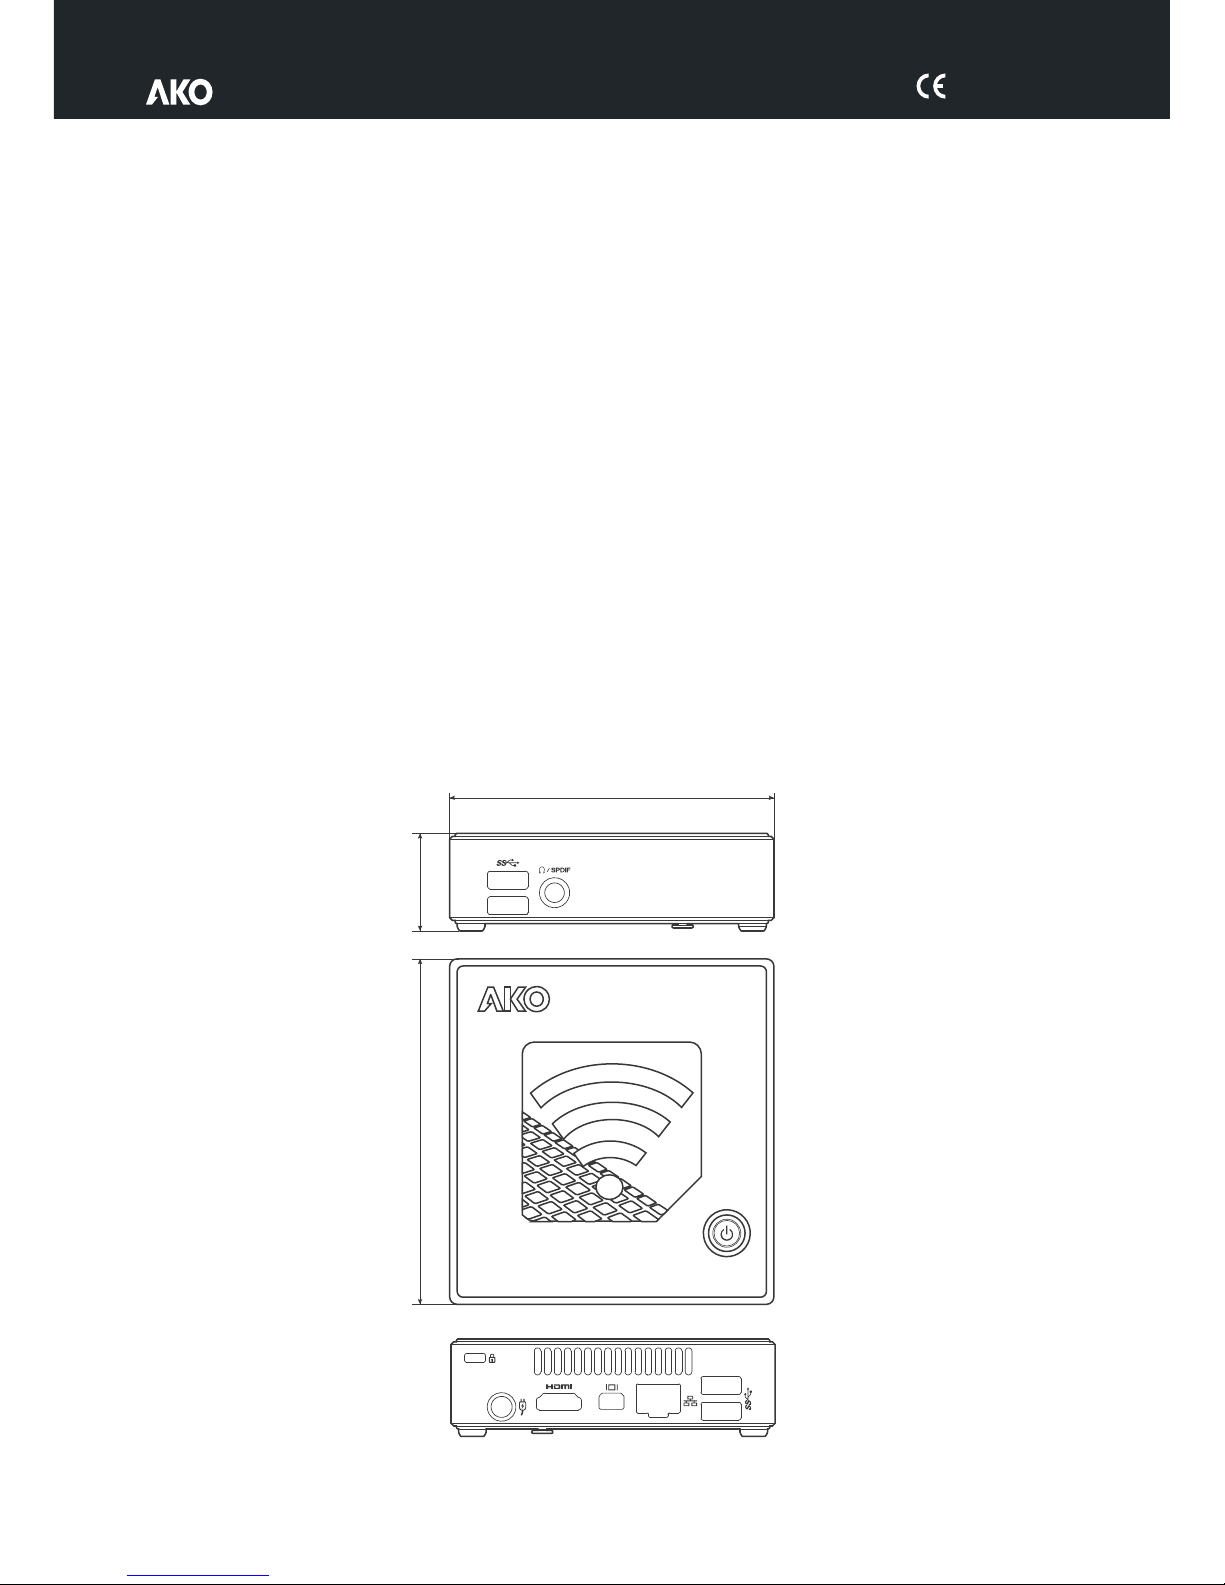
Entradas e saídas ............................................................................................................................1 x HDMI
........................................................................................................................4 x USB 3.0
...........................................................................................................1 x Mini Display Port
.............................................................................................................................1 x RJ45
..........................................................................................................1 x auriculares/SPDIF
.........................................................................................1 x VDC conetor de alimentação
Armazenamento ........................................................................................................................HD SSD 60 Gb
Cartão WIFI.................................................................................................IEEE802.11ac, Dual Band & BT 4.0
NFC ..............................................................................................................................................................Si
Alimentação ..........................................................................Entrada: AC 100~240V - Saída:
Suporte VESA incluído.......................................................................................................75 x 75 y 100 x 100
Temperatura de trabalho............................................................................................................-0°C ~ +35°C
OS .................................................................................................................................Linux Ubuntu Desktop
DC19V @ 3.42A
28
114.4
33.9
107.6
AKONet
Web server
Page 29

5012H001 Ed.01
29
Page 30

5012H001 Ed.01
30
Page 31

5012H001 Ed.01
31
Page 32

355012001 REV.00 2015
Nos reservamos el derecho de suministrar materiales que pudieran diferir levemente de los descritos en nuestras Hojas Técnicas. Información actualizada en nuestra web.
We reserve the right to supply materials that might vary slightly to those described in our Technical Sheets. Updated information is available on our website.
Nous nous réservons le droit de fournir des produits qui peuvent légèrement différer de ceux décrits dans nos Fiches techniques. Informations actualisées sur notre site Web .
Geringfügige Änderungen der Materialien gegenüber den Beschreibungen in den technischen Datenblättern vorbehalten.Aktualisierte Informationen finden Sie auf unserer Website.
Reservamo-nos o direito de fornecer materiais que podem divergir ligeiramente dos materiais descritos nas nossas Fichas Técnicas. Informações actualizadas no nosso website.
AKO ELECTROMECÁNICA , S.A.L.
Avda. Roquetes, 30-38
08812 Sant Pere de Ribes.
Barcelona Spain.
Tel.: +34 902 333 145
Fax: +34 938 934 054
www.ako.com
•
•
 Loading...