

Page 1
WireMac DUO
OPERATION MANUAL
INTRODUCTION
CONGRATULATIONS ON THE PURCHASE OF YOUR NEW WIREMAC DUO, A PROFESSIONAL AND
HEAVY-DUTY WIRE PUNCH AND BINDING MACHINE. YOUR DUAL TWIN BINDER WAS DESIGNED WITH
A FULL RANGE OF FUNCTION AND PREMIUM QUALITY COMPONENTS TO GUARANTEE YOU AN
EFFORTLESS AND PROFESSIONAL BIND, AS WELL AS MANY YEARS OF TROUBLE-FREE SERVICE.
IMPORTANT
WE RECOMMEND THAT YOU TAKE A FEW MINUTES TO FAMILIARIZE YOURSELF WITH THE
FUNCTIONS OF YOUR NEW WIREMAC DUO. YOU WILL FIND THAT WITH JUST A LITTLE PRACTICE,
ANY PERSON CAN ACHIEVE PROFESSIONAL RESULTS.
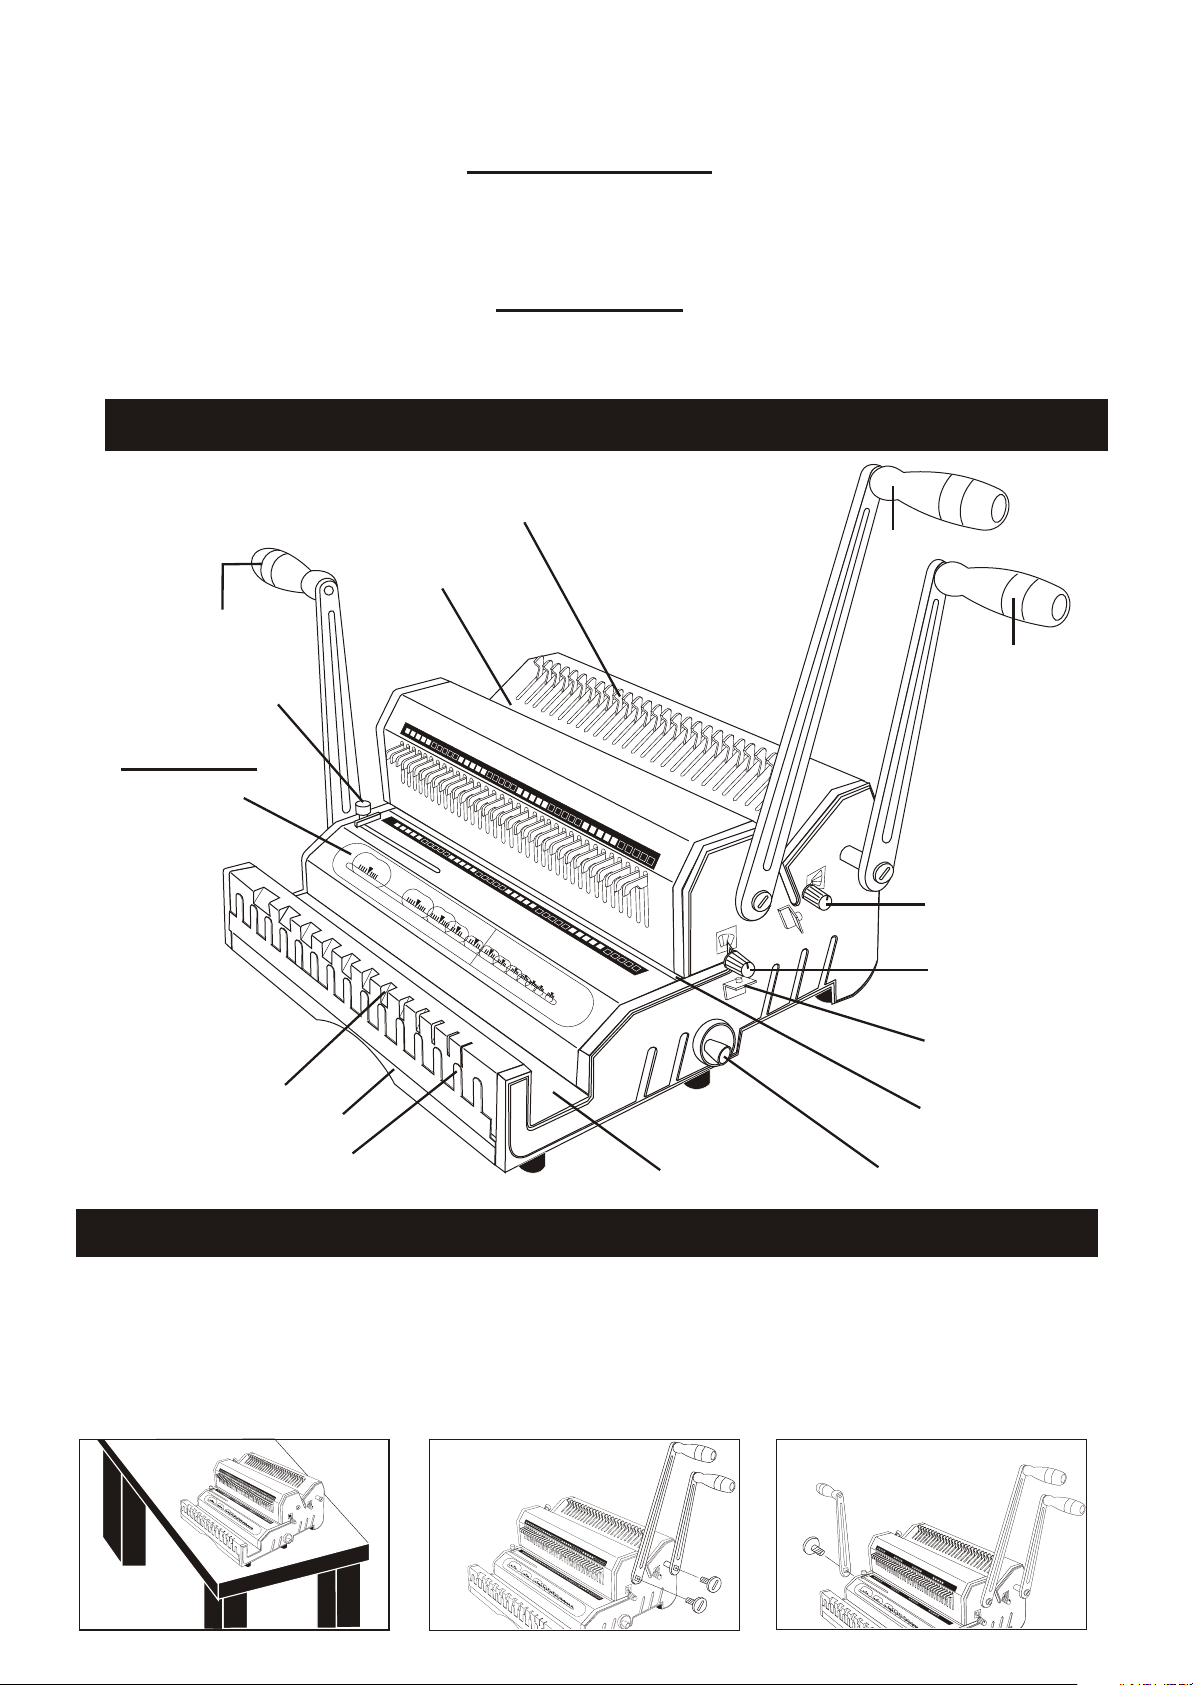
FEATURES
Die Disengagement Pins 3:1
Closer Handle
Side Margin
Control For 3:1
SELECTOR:
Punch Size
Wire Size
Wire Closure
Depth Margin
Paper Scale
Waste Drawer
Wire Snatch
1-1/4"
Punch Throat
Punch Handle For 3:1
& Ruler For 2:1
Punch Handle
For 2:1
1-1/4"
1"
7/
8"
3/
4"
1"
5/8"
9
/16
"
1/2"
7/16"
2
:1
7/8"
3/8"
3:
3/4"
1
5/
8"
9
/
1
6
"
1/2"
7/16"
3/8"
5/16"
1/4"
5/16"
1/4"
3/16"
3/16"
Depth Margin
Control For 2:1
Depth Margin
Control For 3:1
Continuous Punch
Guide
Punch Throat
& Ruler For 3:1
Wire Closer
Wire Closer Control
ASSEMBLY
1. Place your new WireMac DUO on top of a sturdy working table.
2. Remove The Screw from Punching Axle clockwise as indicated, connect 2 Punch Handles,
the longer one for 3:1 and the shorter one for 2:1 in a vertical position onto the Punch Axle.
Tighten-back the Screws counter clockwise.
3. Repeat the same for Closing Handle ( The shorter one ).
3.
1
-1
/
4
1
"
-1
/4
"
1
1
"
"
7
/
8
"
7
/
8
"
3/
4
"
3
/
4
"
5
5
/
/
8
8
"
"
9
/
1
6
"
9/
1
6
1/
"
2"
7/
16
1/
"
2"
3/8"
5/
16
7/
"
16"
1/
4"
3/
16
3/
"
8"
5/16
"
1/
4"
3/
16
"
1.
2.
1
-1
/
4
1
"
-1
/
4
"
1
1
"
"
7
/
8
"
7
/
8
"
3
/
4
"
3
/
4"
5
5
/
/
8
8
"
"
9
/
1
6
"
9
/1
6
1/
"
2"
7/16
1/
"
2"
3/
8"
5/
16
7/
"
16
1/
"
4"
3/16
3/
"
8"
5/
16
"
1/
4"
3/
16
"
1
-1/4
1
"
-1/
4
"
1
1
"
"
7
/
8
"
7
/8
"
3
/
4
"
3
/
4"
5/
5/
8
8
"
"
9/
1
6"
9
/
1
6"
1/
2"
7/
16
1/
"
2"
3/
8"
5/
16"
7/
16
1/4"
"
3/
16"
3/
8"
5/
16
"
1/4"
3/
16"
Page 2
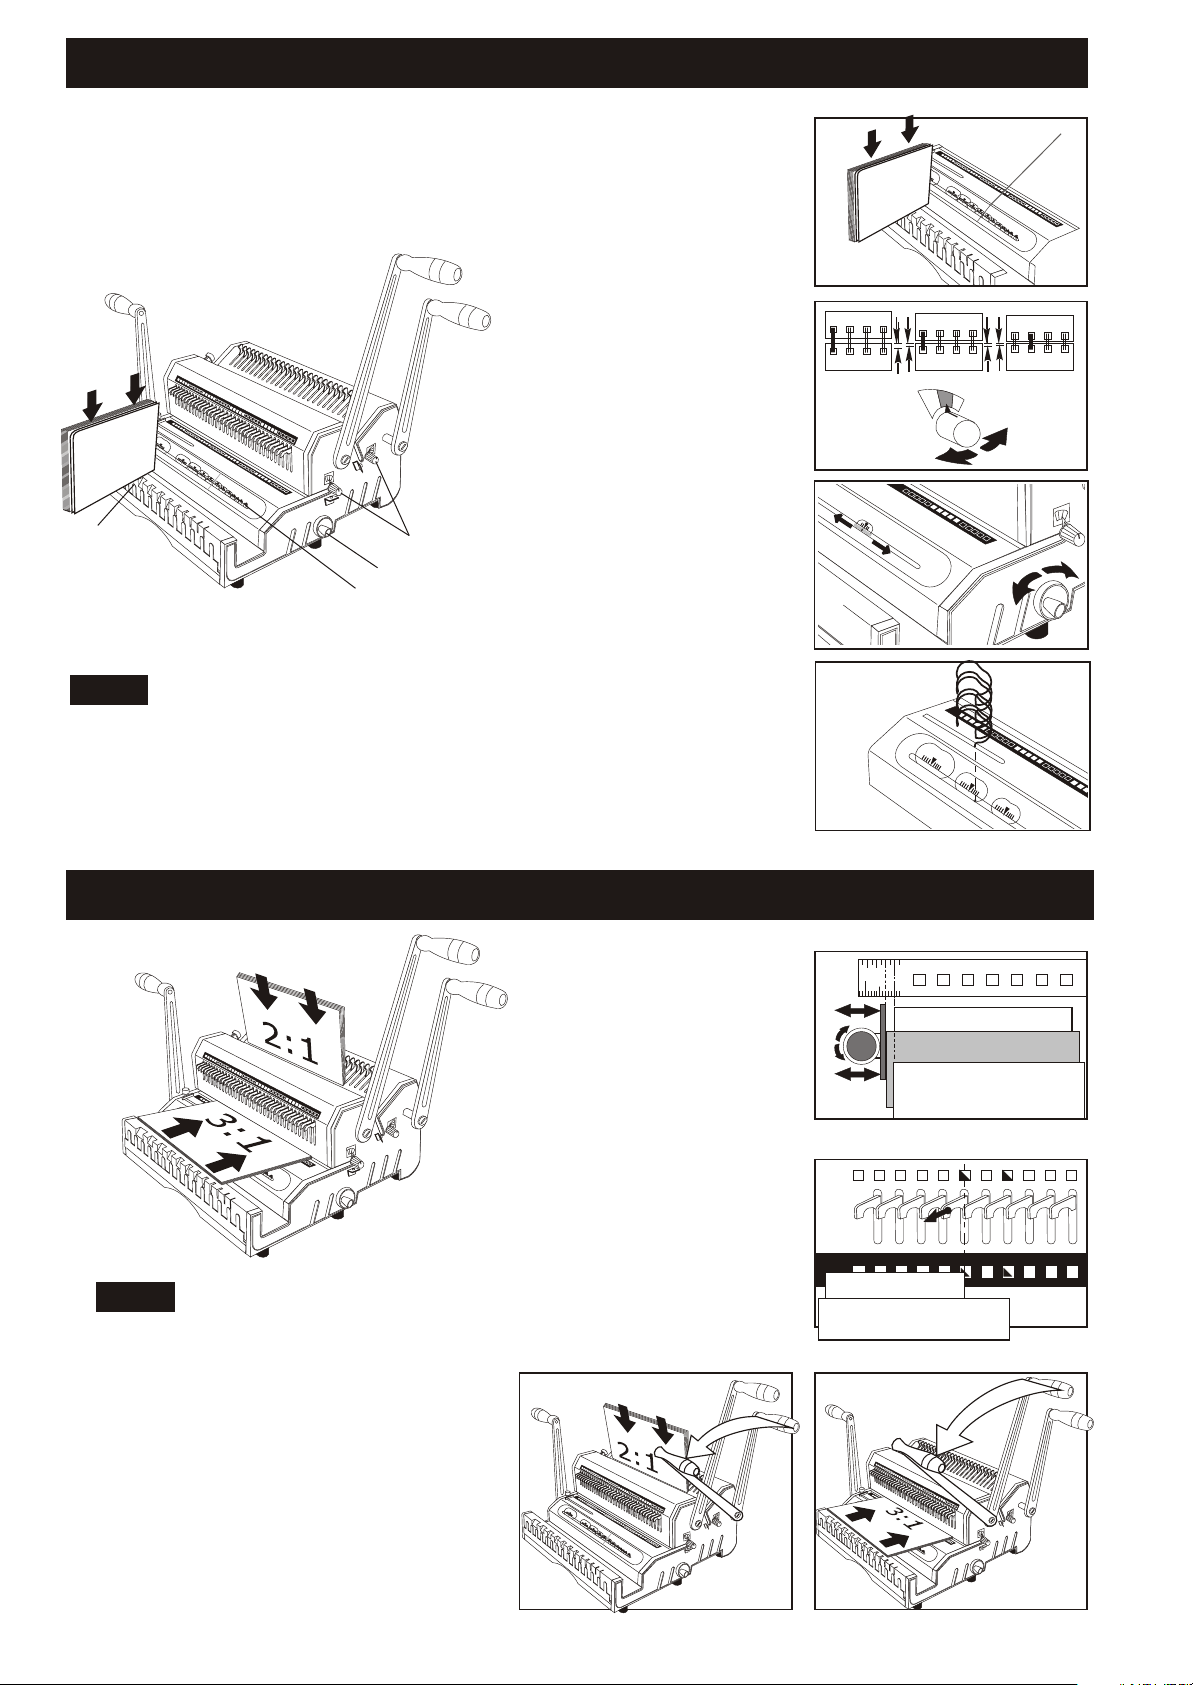
Insert a full unbound
document into Paper Scale.
1-1/4"
1-
1/
4"
1
"
1
"
7
/
8
"
3
/4
2
:
7
/
1
8
"
"
5
/8
"
3
3
/
4
:1
"
5
/
8
"
9
/
16
"
9
/
1
6
1/
"
2"
7/16
1/
"
2"
3/
8"
5/
16
7/
"
16"
1/4"
3/16
3/8"
"
5/
16"
1/4"
3/16
"
1.
3.
4.
2.
SET-UP
1. Read the Selector
to determine the correct:
--Punch pitch 3:1 or 2:1
--Depth Margin
--Wire Size
--Wire Closure
2. Set Depth Control to
the color determined
depth margin. Color
indicated on Depth
Control should match
color on Selector.
3. Set Wire Closer Control
to the determined
wire closure size.
1.
2.
3.
2
:1
3
:
1-
1/4"
1-
1/
4"
1
"
1
"
7/
8
"
3
/4
9
/
1
6
"
2
:
7
/
1
8
"
"
5
/
8
"
3
3
/
4
:
"
1
5/
8
"
9
/1
6
"
9
/
16
1/
"
2"
7/
16"
1/
2"
3/
8"
5/
16"
7/16
1/
"
3/
8"
5/
16
"
1/
4"
3/16
"
1
4"
3/
16
"
TIPS
There may be different size of 3:1 or
2:1 on some wire diameter than the
standard, please make sure your onhand wire before punching 3:1 or 2:1.
1
-1
/
4
1-
"
1/4"
1"
1
"
7
/
8
"
7
/
8
"
3
/
4
"
3
/
4
"
5
5
/8
/
8
"
"
9
/
1
6
"
9
/
1
6
1/
"
2"
7/16"
1/2"
3/
8"
5/
16"
7/16"
1/
4"
3/
16"
3/8"
5/
16
"
1/4"
3/
16
"
4. Read the determined
wire size and set aside.
PUNCHING
1. Move Side Margin
Control to proper
sheet & cover size.
Note There are different
side margins for 11" sheets
& their 11-1/4" Covers.
2. Pull out disengagement
pins for partially covered
holes.
1.
2.
4.
1-1/4"
1"
7/
8"
11"
A
4
11"
11-1/4" COVER
A4
32 34
5
TIPS
Maximum single punching:
20 sheets of 20 Lbs
or 70-80g/m paper.
Comfortable single punching:
12-15 sheets of 20 Lbs
or 70-80 g/m paper.
Punch inner sheets and
cover separately as side margin
may vary.
Re-Align ( Center) margins
for oversize covers.
3. Insert sheets and
pull handle forward
to punch.
2:1 holes 3:1 holes
3.
1
1
-1
/4
1
"
-1/
4
"
1"
1
"
7
/
2
8
"
7/
:
1
8
"
3
/
4
3
"
3
/
4"
:
1
5
5
/
/
8
8
"
"
9
/
1
6
"
9/
1
6
1/
"
2"
7/
16
1/2"
"
3/
8"
5/
16
7/
"
16"
1/
4"
3/16
3/
"
8"
5/
16
"
1/
4"
3/
16
"
-1
/
4
"
1
"
7
/
8
"
11" Sheet
A4 Sheet
1
-1
/
4"
1
"
7
/
8
"
3
/
4
"
3
/
4
"
5
5
/
/
8"
8
"
9
/
1
6
"
9/
1
6
1/
"
2"
7/
16
1/
"
2"
3/
8"
5/
16
7/16
"
1/
"
4"
3/
16
3/8"
"
5/
16
"
1/
4"
3/
16
"
32 34
Page 3
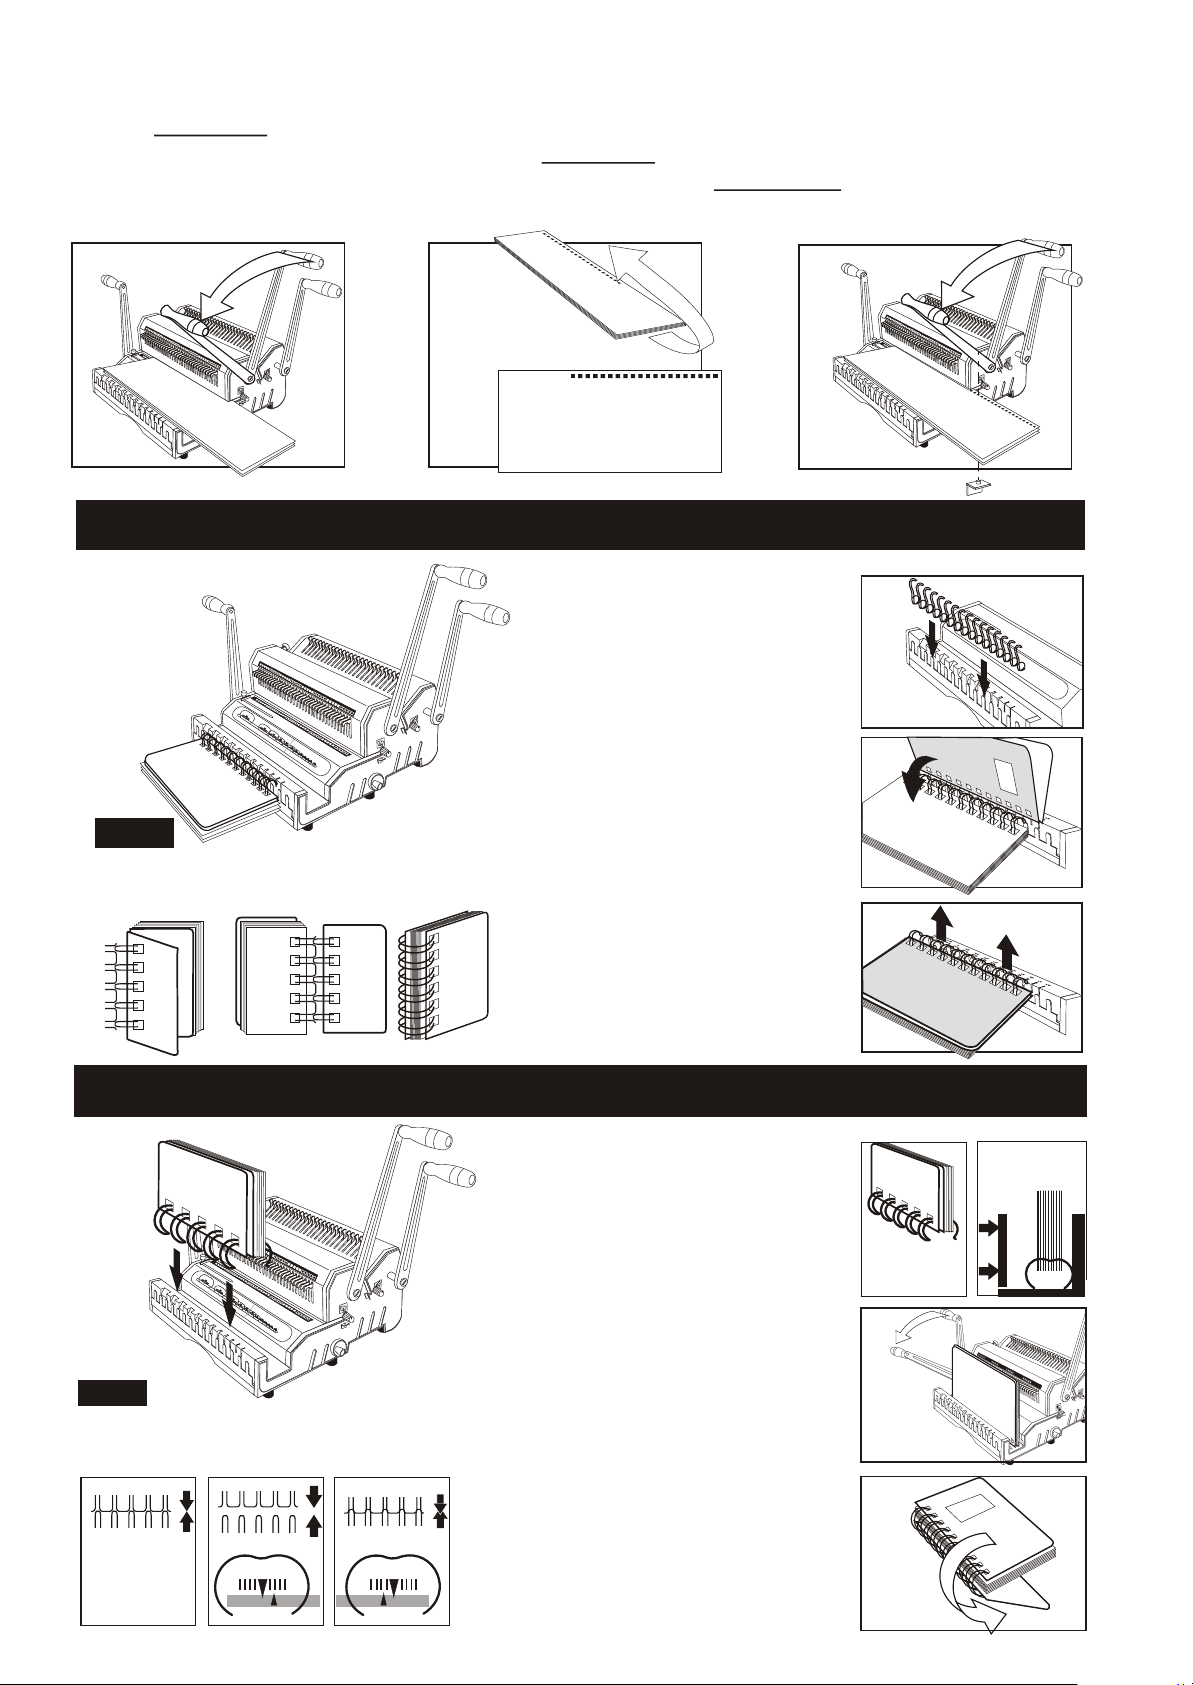
FOR PUNCHING DOCUMENT LARGER THAN 14" (356MM)
1. Align Sheets as indicated on Punch Throat Ruler. Insert sheets and pull handle forward to punch the left part
first. See Picture 1
2. Remove sheets and flip them over as illustrated. See Picture 2.
3. Insert sheet from right-hand-side. Pull the handle forward and punch. See picture 3. IMPORTANT: Document
must be inserted in such a way as to place one of the already perforated holes onto the Continuous Punch Guide.
1.
1
-1
/
4
1
"
-1
/
4
"
1
1
"
"
7/
8
"
7
/
8
"
3
/
4
"
3
/
4
"
5
5
/
/
8
8
"
"
9
/
1
6
"
9
/
1
6
1/
"
2"
7/16
1/
"
2"
3/8"
5/
16
7/
"
16"
1/
4"
3/
16
3/
"
8"
1
5/
16
"
1/
4"
4"
3/
16
"
L
onger
2.
INSERTING
1-1/4
1-1/4
"
"
1
"
1
"
7
/
2
8
"
:1
7
/8
"
3
/
4
TIPS
The seam of closed wire should be inside the book.
Follow step No.2 instruction for best results.
3:
"
3
/4
"
1
5
5
/
/
8
8
"
"
9
/
1
6
"
9
/
1
6
1/
"
2"
7/16
1/
"
2"
3/
8"
5/1
7/16"
6"
1/4
"
3/1
3/
6"
8"
5/
16
"
1/
4"
3/
16"
14"
L
on
g
er
14" Longer
1. Insert pre-selected wire
into Wire Snatch
2. Insert document from
last pages to first
pages then insert front
cover.
The back cover should
be inserted last with
inside facing up.
3.
1
-1
/
4"
1
-1
/
4
"
1
1
"
"
7
/
8
"
7
/
8
"
3
/
4
"
3
/
4
"
5
5
/
/
8
8
"
"
9
/
1
6
"
9
/
1
6
1/
"
2"
7/
16
1/
"
2"
3/
8"
5/
16
7/
"
16
1/
"
4"
3/
16
3/8"
"
14"
5/
16
"
1/
4"
3/
16
"
L
on
g
e
r
1.
1
-1
/
4
"
1/
2"
nt
2.
Fro
Co
T
ver
P
I
R
S
O
O
J
9
E
0
C
0
2
Ba
Co
ck
ver
Front Cover
Front Cover
Back Cover
1
-1
/
4
"
1"
7/
8
"
3
/
4"
Last Page
P
AG
E 4
1
-1
/
4
"
1"
2
:
7
1
/
8
"
3
3
/4
:
"
1
5
5/
/
8
8
"
"
9
/
1
6
"
9/
1
6
1/2"
"
7/
16
1/2"
"
3/
8"
5/
16
7/
"
16
1/4"
"
3/
16
3/
"
8"
5/
16
"
1/4"
3/
16
"
Back Cover
TIPS
The seam of closed wire should be just touching.
Slightly adjust the Closer Control a little left or right
for the under-closed or over- closed seam.
3. Take out inserted
document from
Wire Snatch to close
the wire.
CLOSING
1. Put inserted document
into wire closer.
The wire element must
stand horizontally at
the bottom of closer.
2. Pull closer handle
Forward to close.
3.
1.
2.
B
ack
PAGE 4
Cover
1
-1
/
4"
1
"
7
/
8
"
3
/
4
"
5/
8
"
9/
1
6
"
1/
2"
7/
16
"
3/
8"
5/
16
"
1/
4"
3/
16
"
OK
3. Take out document
and turn back cover
over. The binding is
ready.
3.
Page 4
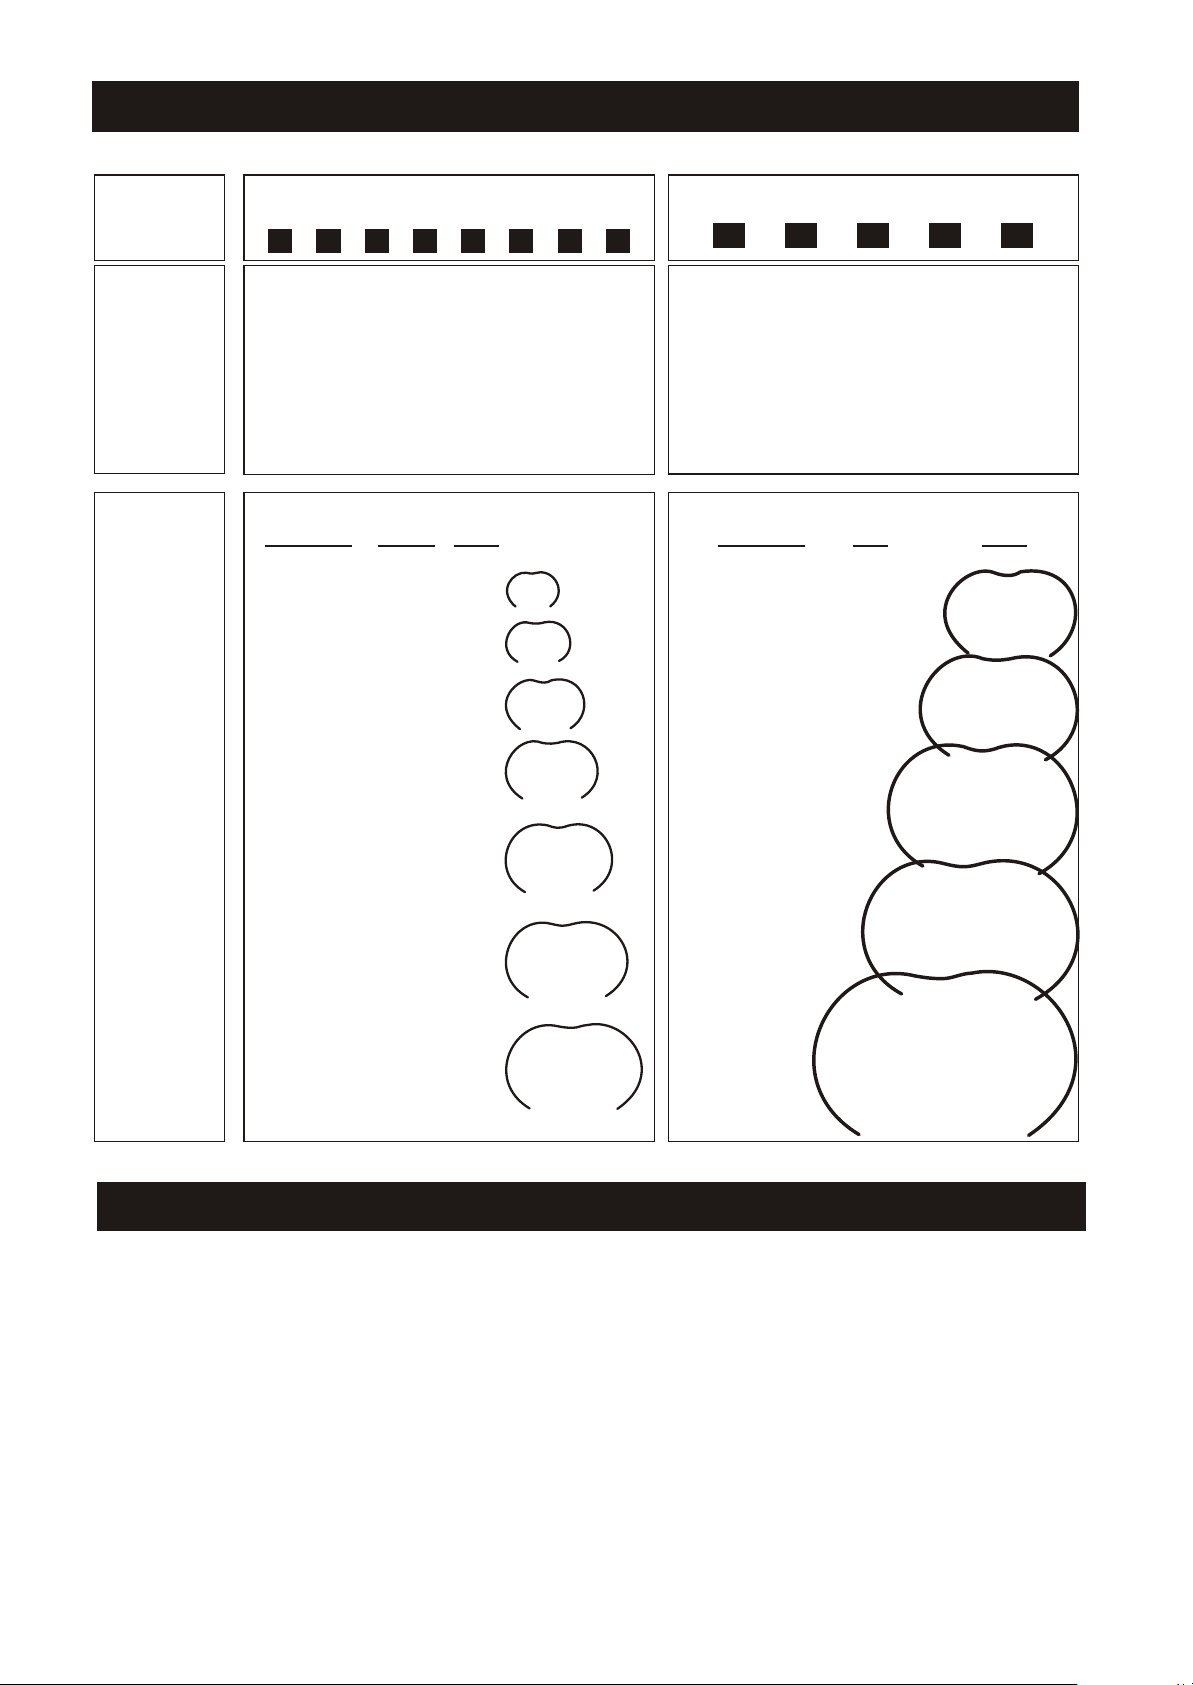
TECHNICAL INFORMATION
Size
Punching
Length
Binding
Capacity
Size 3 : 1 ( 3 HOLES PER INCH )
14" 14" = 40 Holes = 27 Holes
LEGAL LEGAL = 38 Holes = 26 Holes
A4 A4 = 34 Holes = 23 Holes
11" 11" = 32 Holes = 21 Holes
8.5" 8.5" = 24 Holes = 16 Holes
A5 A5 = 24 Holes = 16 Holes
Sheets
70-80 g/m
20
30
50
60
Diameters
2 2
Inch
3/16"
1/4"
5/16"
3/8"
mm mm
4.5
6
8
9
Size 2 : 1 (2 HOLES PER INCH )
5/8"
3/4"
7/8"
Diameters
Inch
16 mm
19 mm
22 mm
Sheets
70-80 g/m
140
160
190
80
100
120
7/16"
1/2"
9/16"
10
12
15
220
280
1"
1-1/4"
25 mm
32 mm
WARRANTY POLICY
YOUR WIREMAC DUO HAS A WARRANTY OF ONE YEAR FROM DATE OF PURCHASE. IN THE EVENT
OF A MANUFACTURER'S DEFECT, YOUR DISTRIBUTOR (AT OPTION) WILL REPAIR OR REPLACE IT.
IMPORTANT: THIS WARRANTY DOES NOT COVER DAMAGES DUE TO IMPROPER USE OR MISS
TREATMENT OF THE UNIT, INCLUDING ANY EXTRAORDINARY EVENT LEADING TO THE DAMAGE OF
THE MACHINE, WHETHER IT IS REVERSIBLE OR NOT.
IF THE WIREMAC DUO IS NOT WORKING PROPERLY, FIRST FOLLOW THE CORRECTIVE ACTIONS
ABOVE. IF THE PROBLEM PERSISTS, PLEASE CONTACT YOUR DEALER FOR FURTHER
INSTRUCTIONS. PLEASE HAVE YOUR MACHINE'S SERIAL NUMBER AND THE PURCHASE DATE READY.
IF THE MACHINE MUST BE RETURNED TO YOUR DISTRIBUTOR, IT IS YOUR RESPONSIBILITY TO
PROPERLY PACK AND SHIP IT. AS ANY DAMAGES INCURRED DURING ITS TRANSPORTATION IS NOT
COVERED BY OUR WARRANTY POLICY.
 Loading...