

Akiles iCoil User Manual
Coil
CONGRATULATIONS ON THE PURCHASE OF YOUR NEW
PUNCH AND BINDING MACHINE FOR COIL BINDING. YOUR WAS DESIGNED WITH
A FULL RANGE OF FUNCTIONS AND PREMIUM QUALITY COMPONENTS TO GUARANTEE AN
EFFORTLESS AND PROFESSIONAL BIND AS WELL AS MANY YEARS OF TROUBLE-FREE SERVICE.
WE RECOMMEND THAT YOU TAKE A FEW MINUTES TO FAMILIARIZE YOURSELF WITH THE FUNCTIONS OF
YOUR NEW . YOU WILL FIND THAT WITH JUST A LITTLE PRACTICE, ANY PERSON CAN
ACHIEVE PROFESSIONAL RESULTS.
, A MODERN, PRACTICAL AND RELIABLE
Punch Handle
Punch Throat & Ruler
Coil size Selector
Coil Crimper
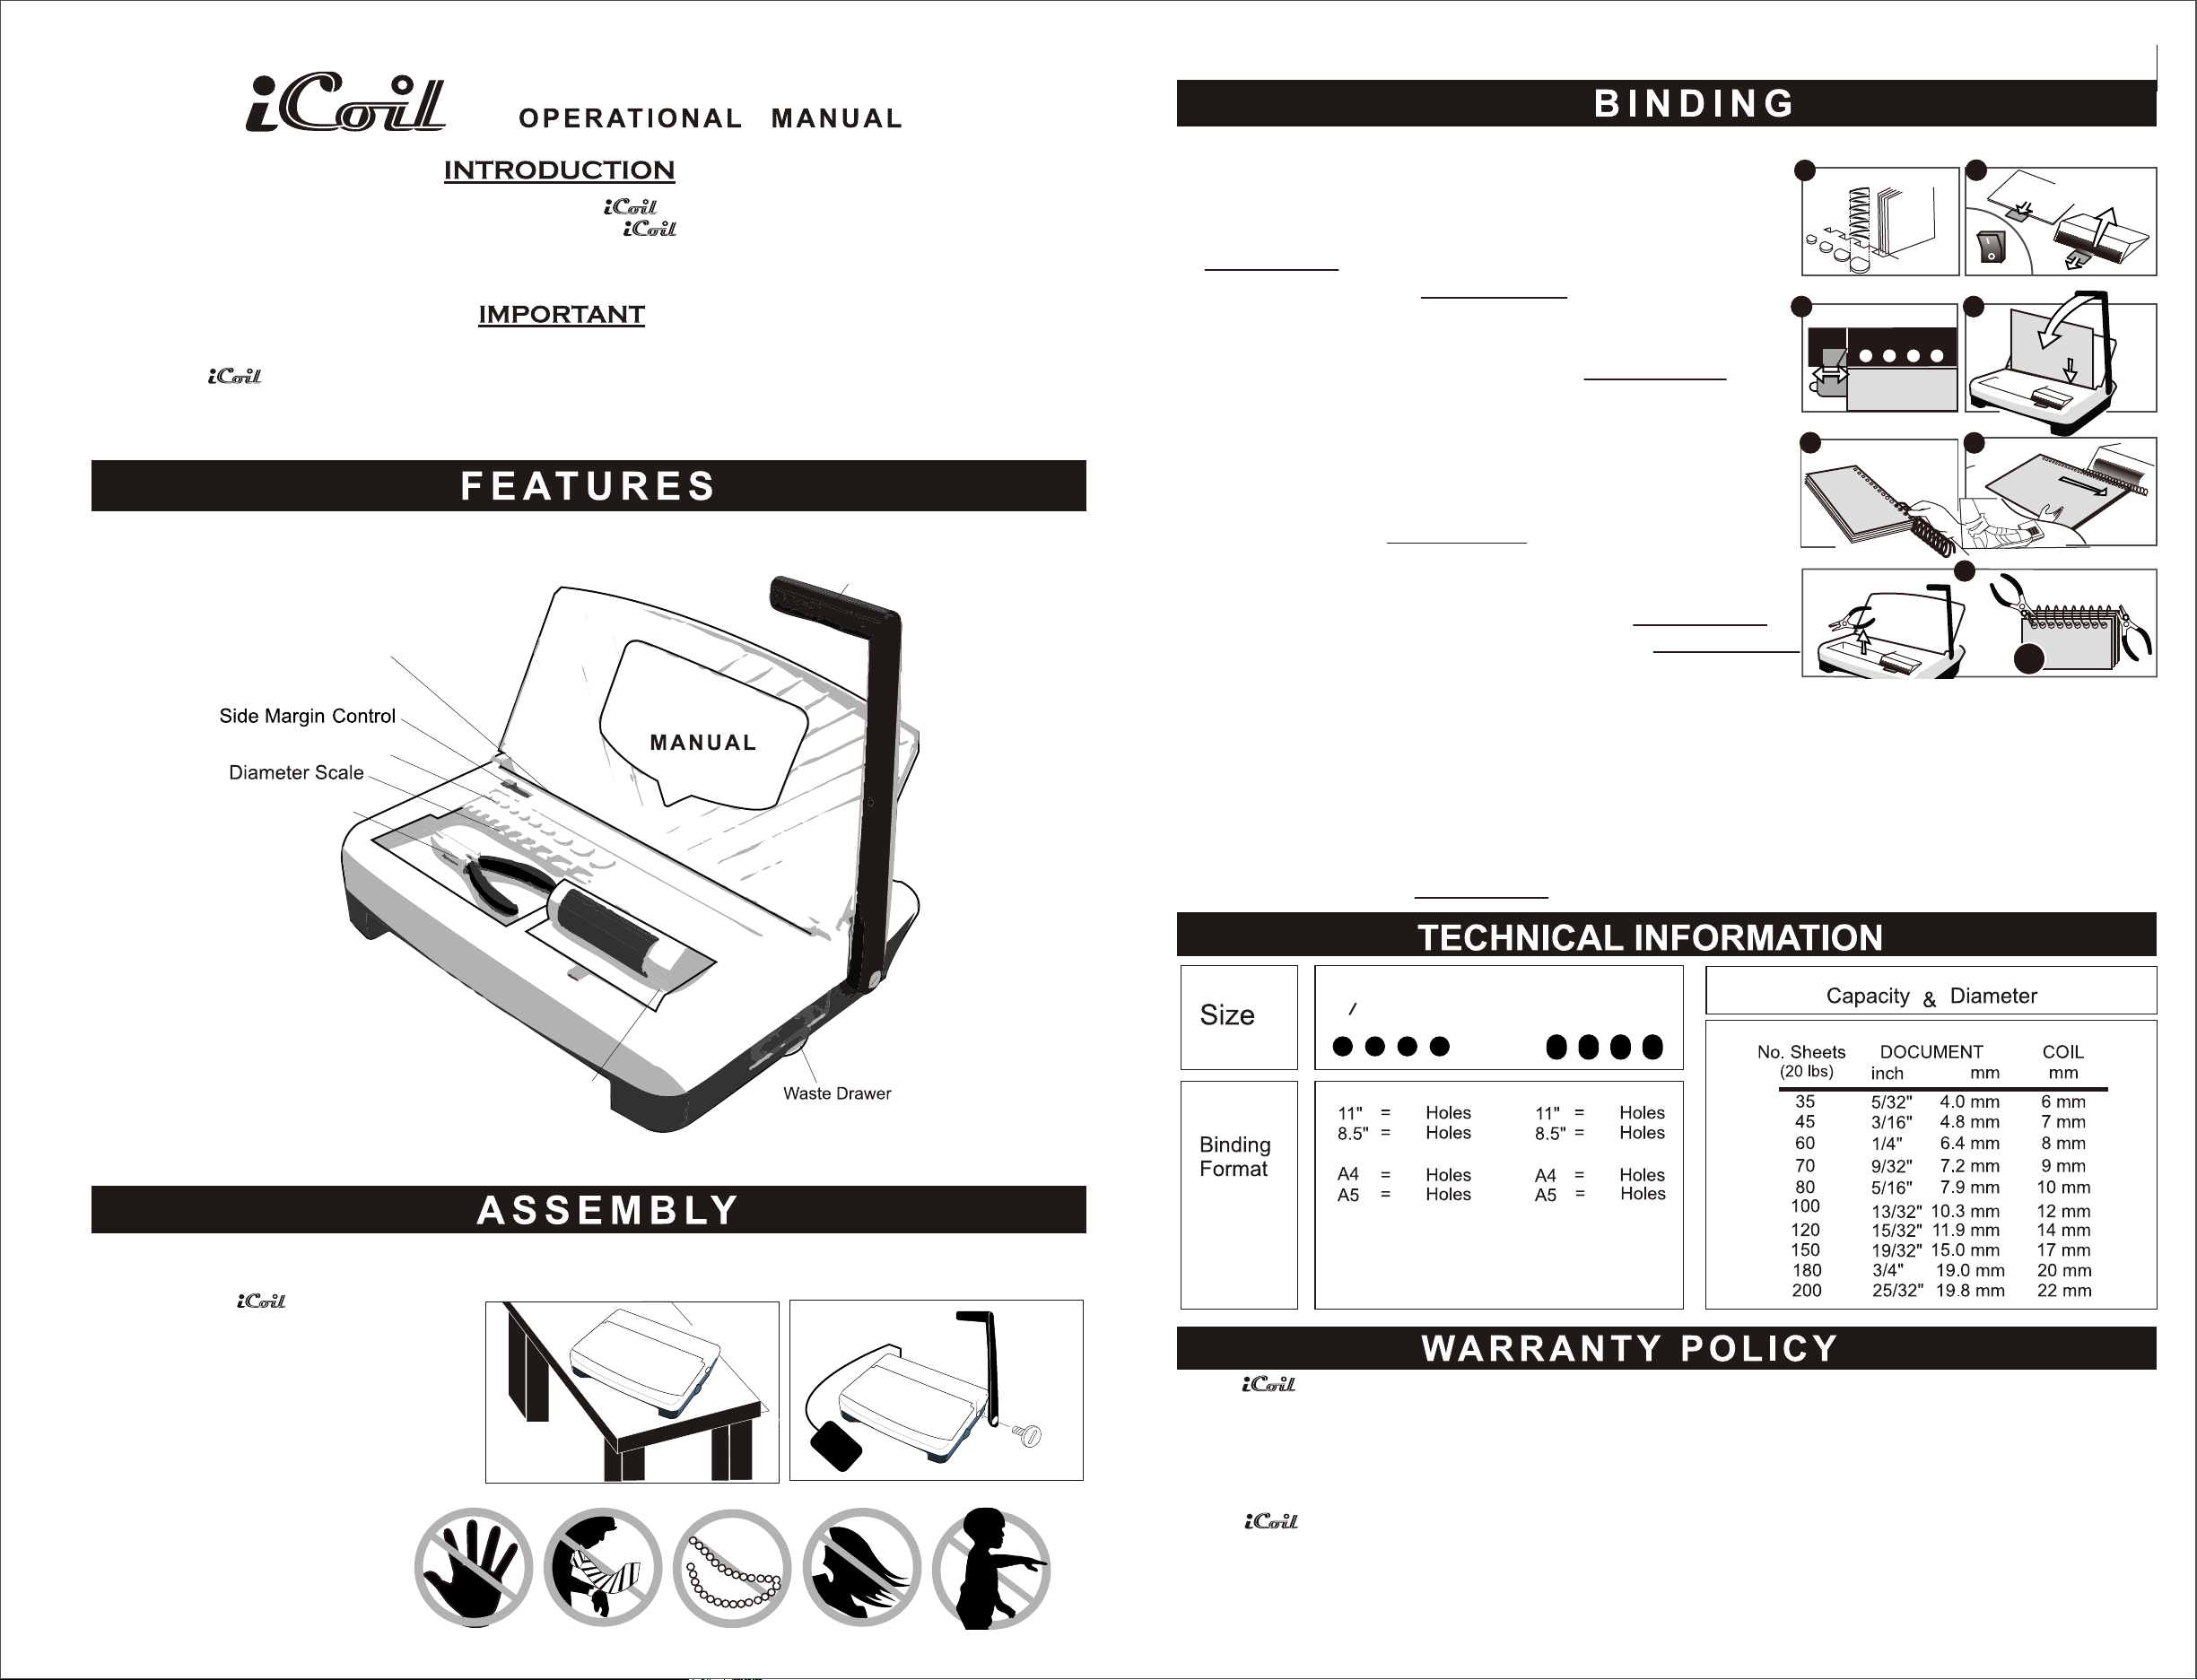
SET-UP INTRUCTIONS (STEPS 1-3)
1) Based on document thickness you must first determine
1.
Diameter Scale and Selector
2.
OPEN the Roller
the optimal coil diameter size needed. To do this, insert
your full unbound document into the Diameter Scale.
See picture 1
2) Open Electric Roller. See picture 2.
3) Based on document length, you must now adjust the
side margin for an evenly centered punch. To do so,
3.
Side Margin Control
11”
4.
PAPER
press and slide Side Margin Control. See Picture 3.
Hint: We recommend for you to test punch some waste
Letter Size Paper
paper and readjust the Side Margin Control as needed.
5.
6.
PUNCHING & INSERTING (STEPS 4-7)
4) Insert sheets into the punch throat and pull handle
forward to punch. See picture 4
Important: Make sure sheets are fully inserted and
slid against the side margin.
CRIMPER
7.
5) Insert pre-selected coil into first 3-4 holes. See picture 5
6) Use Electric roller to complete coil insertion. See picture 6.
Hints:
ok
a) Make sure all holes are evenly aligned.
b) Use both hands to firmly hold left and right side of document as close as possible to
punched holes.
c) Press foot pedal first, then gently bring document parallel to roller until coil touches the roller.
Do not apply excess pressure as this may distort the coil pitch and coil insertion may become
more difficult.
7) Crimp both ends to securely lock your bound book. Hint: Crimper’s Red eye should be facing
toward the operator. See picture 7
1.Place your new on top of a sturdy
work table.
2.Remove the screw from punch axle
counter clockwise as indicated,connect the
punch handle in a vertical position onto the
punch axle. Tighten-back the screw clockwise
& install foot pedal by plugging the cord into
the back of the machine.
Electric Roller
1. 2.
Coil 4:1
O4mm
Round hole
43
34
46 46
33
Y O UR HAS A W A RRA N TY O F ONE YEAR F ROM D AT E O F PUR CHA SE. IN T H E E V E NT O F A
MA N U F A CT U R E R 'S DE F E CT, Y O UR DIS TR IB UT O R (AT O P TIO N ) WIL L R E PA I R O R RE PL A C E IT.
IM P O R TA NT: TH I S W A RR A N T Y D O ES NO T C O VE R D A MA GE S DU E T O IM P RO P E R US E O R MIS S
TR E ATM E N T O F T H E U N IT, IN C L U D I N G A N Y E X T R A O R D IN A R Y EV E N T L E A D I N G TO T H E D A MA GE O F
TH E M A C HIN E , W H E TH E R IT I S RE V E R S IB L E O R N O T.
Coil 4:1+
4X5(6.29 mm)
Oval hole
44
34
33
CAUTION
IF TH E IS NO T W O R K IN G P R O PE R LY, F I R S T F O LL
P RO B L E M P E R S IS TS , P L E A S E CO N TA CT Y OU R DE A L E R FO R F U R T HE R IN S TR UC T IO N S . P L E A S E
HAV E Y O U R M A C H IN E 'S S E R IA L N U M B E R A N D T H E P UR C H A S E D ATE R E AD Y. I F TH E M A C HIN E M U S T
B E R E T U RN E D T O Y O U R D I S T R IB U T O R , IT I S Y O UR R E S P O N S IB IL I T Y T O P R O PE RLY PA C K A N D S HI P
IT, A S A N Y DA M A GE S INC U R R E D D U RIN G I T S T R A N S P O RTATIO N A R E NO T C O VE R E D B Y O U R
W A RR A NT Y P O LI C Y.
O W T HE C O RR E CT I V E A C T IO N S A B OV E . IF T H E
 Loading...