

Akiles DuoMac User Manual
DuoMac
O PERAT I O N A L MA N U A L
INTRODUCTION
CONGRATULATIONS ON THE PURCHASE OF YOUR NEW DuoMac, A PROFESSIONAL AND HEAVY-DUTY
PUNCH AND BINDING MACHINE FOR COILS, WIRES OR COMBS. YOUR DuoMac WAS DESIGNED WITH
A FULL RANGE OF FUNCTION AND PREMIUM QUALITY COMPONENTS TO GUARANTEE YOU AN
EFFORTLESS AND PROFESSIONAL BIND, AS WELL AS MANY YEARS OF TROUBLE-FREE SERVICE. WE
RECOMMEND THAT YOU TAKE A FEW MINUTES TO FAMILIARIZE YOURSELF WITH THE FUNCTIONS OF
YOUR NEW DuoMac. YOU WILL FIND THAT WITH JUST A LITTLE PRACTICE, ANY PERSON CAN
ACHIEVE PROFESSIONAL RESULTS.
THE DuoMac HAS THE FOLLOWING COMBINATIONS AVAILABLE :
DuoMac 541 ( Coil 51 + Coil 41 )
DuoMac 531 ( Coil 51 + Wire 31 )
DuoMac 521 ( Coil 51 + Wire 21 )
DuoMac 431 ( Coil 41 + Wire 31 )
DuoMac 421 ( Coil 41 + Wire 21 )
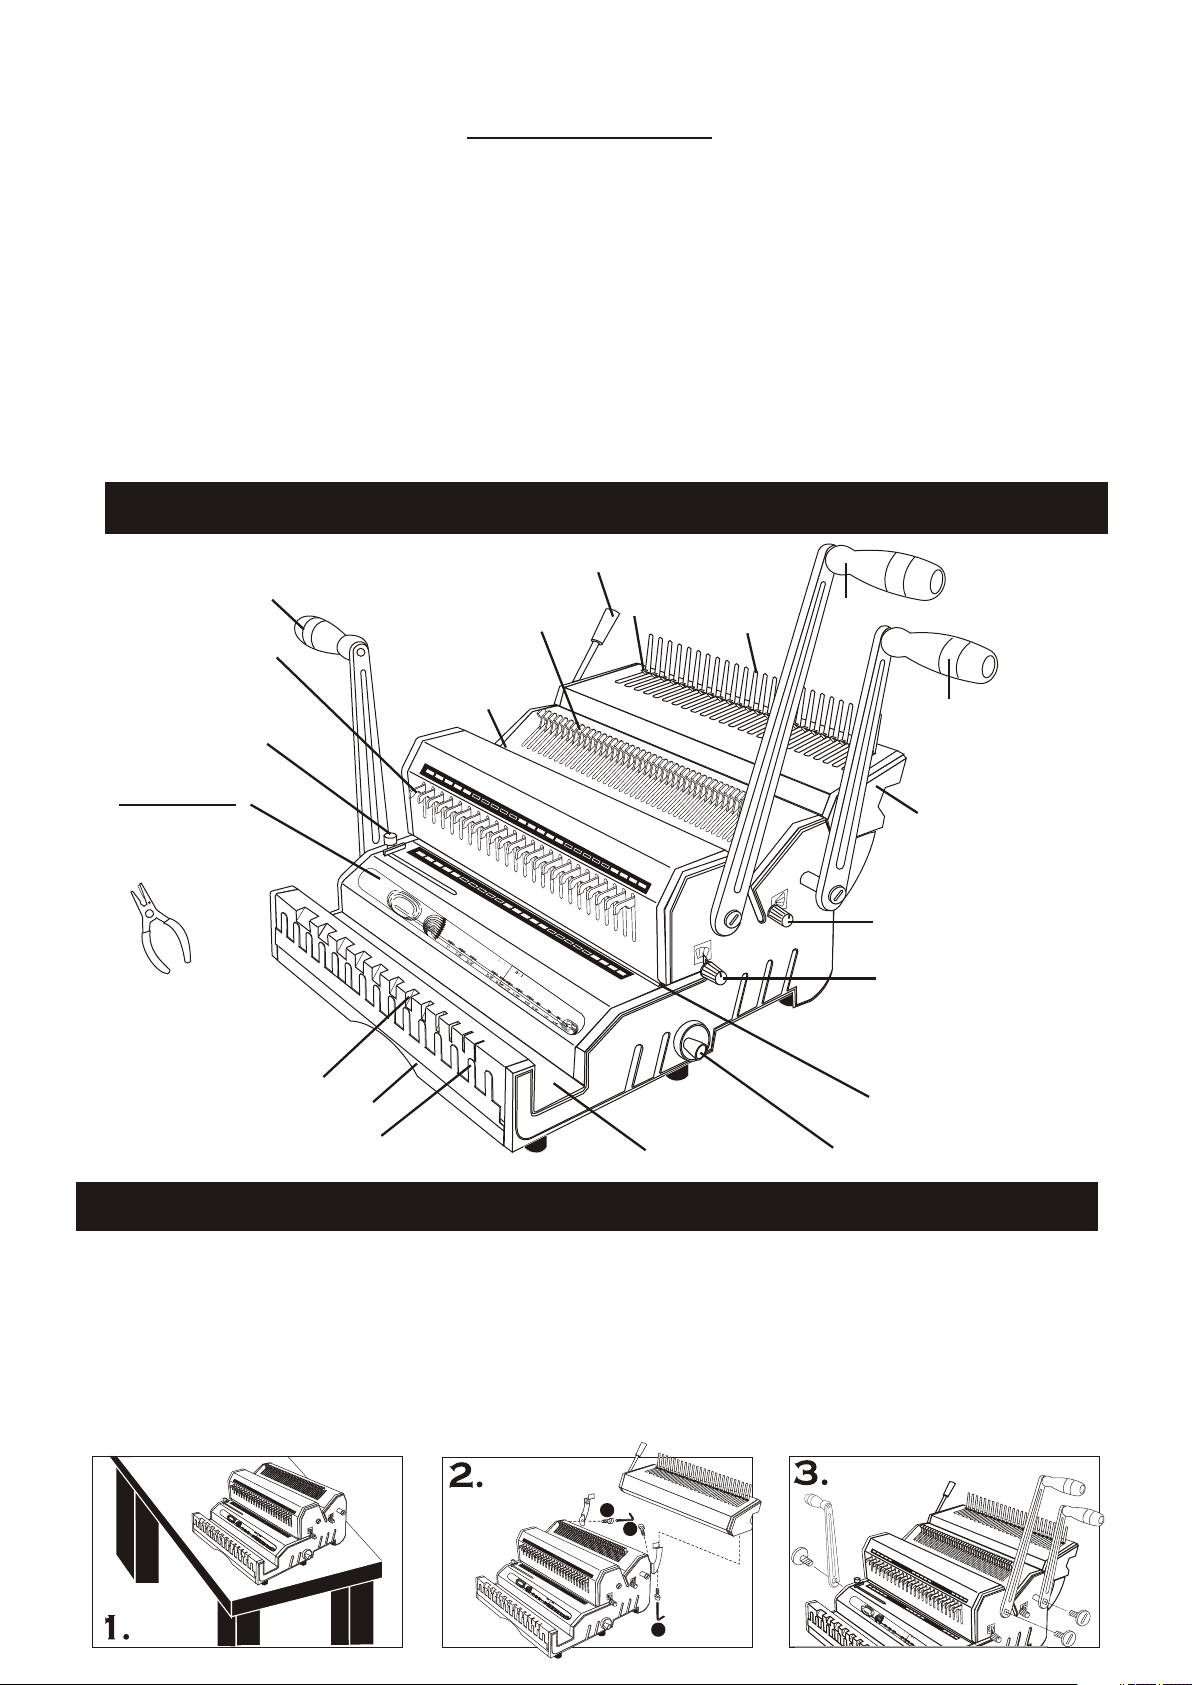
Wire Closer Handle
Die Disengagement
Pins for Wires,
Coils or Combs
Side Margin
Control for Wires,
Coils or Combs
Die Disengagement
Pins for Wires,
Coils or Combs
Punch Throat
& Ruler for Wires,
Coils or Combs
MASTER
SELECTOR:
Wire/Comb Size
Wire Closure
Depth Margin
5
0
4
5
3
8
3
2
2"
3
/1
4
"
1
1
/
1-
2
"
1
/4
"
2
8
1 8
2
5
1
2
"
7
/8"
3
/
4
"
2
2
7/
0
1
3 "
6
/
4
1
5/
4
8
1
9/1
"
2
1
1
6
0
/
"
2
8
38
"
/
6
5
"
/
1
1
6
/
4
"
"
5 "/
8
9
/1
6
"
1
/2
"
7/16"
Coil Crimper
( For models with Coil 41
or Coil 51 option )
1-1/
4
"
1
F E AT U R E S
Comb Binding Handle
Comb Opening
Hooks
-1"
/
"
8
"
3 8"/
/516"
1/
4"
3/16"
1
/
2
71
"
/
9
6
/
"
1
6
"
/"
83
5
16/
1
/"
4
"
3
1
6/
"
DuoMac 321 ( Wire 31 + Wire 21 )
DuoMac C51 ( Comb + Coil 51 )
DuoMac C41 ( Comb + C oil 41 )
DuoMac C31 ( Comb + Wire 31 )
DuoMac C21 (Comb + Wire 21 )
Comb Binding
Fingers
Punch Handle for Comb
Punch Handle
for Wires, Coils
or Combs
Comb Binding Unit
( For models with Comb option )
Depth Margin
Control for Wires
Coils or Combs.
Depth Margin
Control for Wires,
Coils or Combs
Diameter Scale
Waste Drawer
Wire Holder
* Pictures for illustration only
Wire Closer
Punch Throat
& Ruler for Wires,
Coils or Combs.
Wire Closer Control
A S S E M B LY
1. Place your new DuoMac on top of a sturdy working table.
2. ( For models with Comb binding unit ) Install Comb Binding unit to machine as illustrated.
3. Remove the screw from punching axle clockwise as indicated, connect the 2 Punch Handles, ( the
longer one in front and the shorter one in rear ) in a vertical position onto the Punch Axle. Tighten-back
the screws counter clockwise.
4. ( For models with Wire 31 or with Wire 21 option) Repeat the same for Wire Closer Handle ( on the
left ).
50
50
4
5
54
3
838
11
11
323
2
-
-
/
/
4
4
2
2
"
"
"
"
1
1
-
-
3
3
/
/
4
4
"
"
1
1
-
-
1
1
/
/
1
1
2
2
-
-
"
"
1
1
/
/
4
4
"
"
2
2
8
8
1
1
1
1
252
-
-
1
1
5
"
"
/
/
8
8
"
"
1
1
2
2
2
2
"
"
2
2
7
7
0
0
/
/
8
8
"
"
1
1
3
3
6
6
/
/
4
4
1
1
"
"
5
5
4
4
/
/
8
8
1
1
9
9
"
"
2
2
/
/
1
1
7
7
1
1
1
1
6
6
0
0
/
/
"
"
/
/
2
2
8
8
3
3
"
"
8
8
/
/
8
8
6
6
5
5
"
"
"
"
/
/
1
1
1
1
6
6
/
/
4
4
"
"
"
"
3
3
/
/
4
4
"
"
5
5
/
/
8
8
"
"
9
/
/
1
1
6
69
"
"
1
1
/
/
2
2
"
"
71"
71"
6/
6/
3
3
/
/
8
8
"
"
1
1
/
/
2
2
7
7
"
"
1
1
9
9
6/
6/
/
/
"
"
1
1
6
6
/
/
"
"
3
3
/
/
1
1
8
8
5
5
65
65
"
"
/
/
1
1
1
1
6
6
"
"
/
/
4
4
"
"
"
"
3
3
61/
"61/
"
1
1
/
/
4
4
"
"
3
3
/
/
1
1
6
6
"
"
0505
4
4
5
5
3
3
8
8
1
1
3
3
2
2
-
-
1
1
/
/
4
4
2
2
"
"
"
"
1
1
-
-
3
3
/
/
4
4
"
"
1
1
-
-
12
12
/
/
1
1
-
-
"
"
1
1
/
/
4
4
"
"
2
2
8
8
1
1
1
1
2
2
-
-
1
1
5
5
"
"
/
/
8
8
"
"
1
1
2
2
2
2
"
"
2
7
7
020
/
/
8
8
"
"
1
1
6
6
/
/
4
4
1
1
"3
"3
5
5
4
4
/
/
8
8
1
1
96
96
"
"
2
2
/
1/
1
78"
78"
1
1
1
1
0
0
/
/
"
"
/
/
2
2
8
8
3
3
"
"
/
/
8
8
6
6
5
5
"
"
/
/
1
1
1
1
6
6
/
/
4
4
"
"
"
"
3
3
/
/
4
4
"
"
5"
5"
/8
/8
9
9
/
/
1
1
6
6
"
"
1
1
/
/
2
2
"
"
7"
7"
/
/
1
1
6
6
3
3
/
/
8
8
"
"
5
5
/1
/1
6
6
"
"
1
1
/"
/"
4
4
1
2
5
0
4
5
3
8
1-1/
3
2
4"
2
"
1
3
/"
4
1
1/
1
2
-
"
1
/4
1
1
/
/
2
2
7
7
"
"
/
/
1
1
9
9
6
6
/
/
"
"
1
1
6
6
"
"
3
3
/
/
8
8
5
5
"
"
/6
/6
1
1
1
1
/
/
4
4
"
"
"
"
3
3
/
/
1
1
6
6
"
"
3
3
/
/
1"
1"
6
6
3
"
2
8
1
1"
2
1
5
"
/
8
1
2
2
"
2
7/
0
8"
1
3
6
/
4
1
"
5
4
/
8
1
9
"
2
/
1
7
1
1
6
0
/
"
/8
2
8
3
"
/
8
6
56
"
"
/"
1
1
/
4
"
3/4"
58
/
"
/
1
69 "
1
/
2
"
7/
1
6
"
3/
8"
1/
7
"2
/
1
9
6
/
"
1
6
/
"
3
/
1
8
5"
65
"
/
1
1
6
"
/
4
"
3
/
1
6
"
1
/
4
"
3
/1
6"
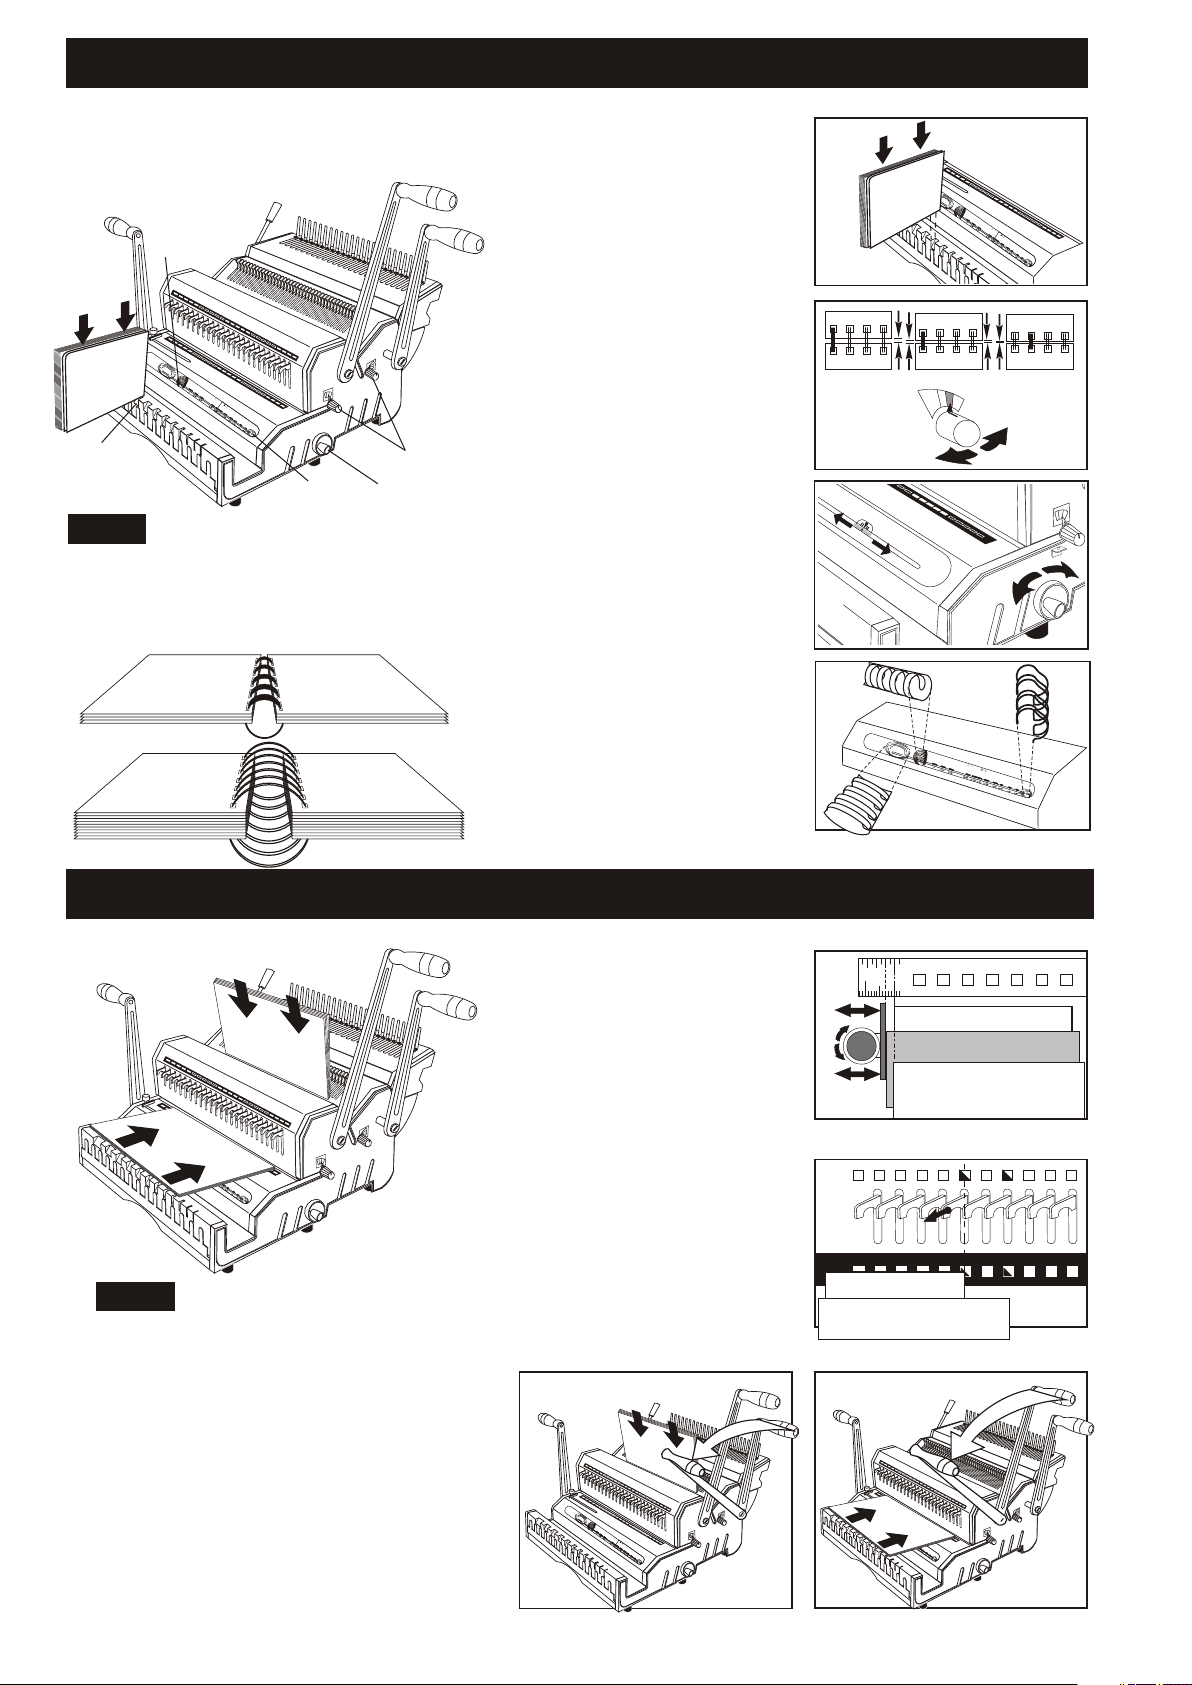
S E T - U P
Insert a full unbound
document into Diameter Scale.
4.
5
0
45
3
8
1-
23
1/
1.
4
"
2
"
1
3
/
4
"
1
1
/
1
2
-
"
1
/
4
"
2
1"1"
8
1
2
-8
1"
5
/
1
2
2
"
20
7
/
8
"
1
3
6
/
4
1
"
5"
4
/
8
1
91
2
/
7/"
1
1
6
0
/
"
2
8
3
"
8
/
8
6
5
"
/
1
1
6
/
4
"
"
3 "/
4
5
/8"
9/
1
6
"
/
2"1
7/
1
6"
3
/
8
"
1
/
2
7
"
/
1
9
6
/
"
5
1
6
/1
"
3
/
8
6"
"
/"5
1
1
6
/
4
"
3
/
1
6
"
1/
4
"
3
/1
6
"
2.
4.
3.
T I P
For easy turning of pages, make sure you
have the right depth margin for punch. The
greater the number of pages, the deeper the
punch margin required.
1. Based on Diameter Scale
reading, on the Master
Selector you will see :
-- Depth Margin of punch
( Color coded )
-- Wire Closure
-- Wire, Coil or Comb Size
2. Set Depth Margin Control
to the color determined
from Step 1. Color indicated
on Depth Margin Control
should match color on Master
Selector.
3. ( For Models with Wire 31
or with Wire 21)
Set Wire Closer Control
to the wire closure size
determined from Step 1.
4. ( If needed ) Use Master
Selector to select /
identify the size of your
wires or combs.
1.
2.
3.
4.
5
0
4
5
3
8
1
3
2
-
1
/4
/9
1
6
"
5
0
4
5
83
3
2
Oval
Comb
2
"
"
1
3
/
4
"
-2
1
/1
-1
"
1
/
4
"
2
2
1
3
/
4
/
2
"
7/
8"
"
"
4/
"3
5/"
8
9
/
1
Round
Comb
2
8
1
1
/
8
2
"
5
1
"
22
7
/
8
2
"
0
3
/
1
4
6
"
5
/
1
8
4
"
9
1
/
1
2
6
"
1
21
0
"/
3
/
8
8
"
5
6
/
1
6
14
"
/
"
8
1
2
1
5
/
8
"
1
2
2
"
2
7
0
/
8
"
1
3/
6
4
1
"
5
4
/
8
1
9
"
2
/
1
1
1
6
0
/
"
2"
8
3
/
8
6
5/
"
1
1
6
/
4
"
"
6
"
1/
"2
7
/1
6
"
38
/
"
1
/
2
7
"
/1
9
/1
"6
5
6
/
"
3"
/
1
8
5
6
/
1
1
6
"
/
4
"
"
3
/1
6
"
1
/4
"
3/
1
6"
Wires
1
7
/
/
2
1"
6
"
5
/
3"
1
6
/
8
"
9
/
1
6
"
1
/
4
"
3
/
1
6
"
1
"
"1
1
1
1
1
/
4
"
P U N C H I NG
5
0
4
5
3
8
1-
3
2
1/4
"
TIPS
Maximum single punching:
20 sheets of 20 Lbs
( 70-80g/m ) paper.
Comfortable single punching:
12-15 sheets of 20 Lbs
( 70-80 g/m ) paper. ( Recommended )
2
"
1
-
3
/
4
"
1
-
1
/
1/
2
-4
"
1
"
2
8
1
2
-
1
"1
5
/
8
"
1
22
"
2
7
0
/
8
"
1
6
/
43
1
"
5
4
/
8
1
9
"
2
/
1
7
1
1
6
0
/
"
/
2
8
3
"
8
/
8
6
5
"
"
/1"
1
6
/
4
"
34"
/
5
/8
"
9
/
1
6
"
1/2"
7
/1
6
"
3
/8
"
1
/
2
7
"
/
1
9
6
/
5
/
"
1
6
"
3
/
16"
8
5
"
/
1
1
6
/"
4
"
3
/
1"
6
1/
4"
3/1
6"
3. Insert sheets to the appropriate
2
2
1. Align Side Margin Control
to proper sheet & cover
size.
Note: There are different side
margins for 11" sheets & their
11-1/4" covers.
2. Whenever necessary, pull
out Disengagement Pins to
avoid partially punched
holes.
slot ( depending on the type of
binding you wish to make ) and
pull its corresponding handle to
punch.
3.
1.
2.
11"
A
4
11"
11-1/4" COVER
A4
11" Sheet
A4 Sheet
5
32 34
32 34
Punch inner sheets and
covers separately as side margin
may vary.
Re-Align ( Center) margins
for oversize covers.
5
0
4
5
3
5
0
4
5
3
8
1
3
2
-/
14
2
"
"
1
3
/
4
"
1
1
/
1
2
-
"
1
/
4
"
2
8
1
2
1
5
"1
/
8
"
1
2
2
"
2
7
0
/
8
"
1
3
6
/
4
1
"
5
4
/
8
1
9/
"
2
1
7
1
1
6
0
/
"
2
8
3
"
8
/
8
6
5
"
"/
/
1
1
6
/
4
"
"
/3 4"
5"
/8
9
/
16
"
1
/
2
"
71
/6"
3
"/8
1
/
2
7
"
/
1
6
/
"
1
69
/65
"
3
/
1
8
5
"
/
1
1
6
"
/
4
"
"
3
/
1
6
"
1/
4"
/6
1"3
8
1
32
-1
/4"
2"
1
-
3
/
4
"
1
-
1
/
1
2
-
"
1
/
4
"
2
8
1
1
2
-
1
5
"
/
8
"
1
2
2
"
2
7
0
/
8
"
1
3
6
/
4
"
5
41
/
8
1
9
"
2
/
16
7
1
1
0
/
"
/
2"
8
3
8
/
8
6
5
"
"
/
1
1
6
/
4
"
"
3/
4
"
/
8
"5
9
/
1
6
"
/"12
71
/6
"
3"
/
8
1
/
2
7
"
/
1
9
6
/
"
5 "
1
6
/6
"
3
/
1
8
"
/
1
1
65
/
4
"
"
3
/
1
6
"
1/4"
/1
63
"
 Loading...