

Page 1
Bitte vor Inbetriebnahme des Gerätes lesen!
Please read the manual before using the equipment!
Veuillez lire cette notice avant d’utiliser le système!
Prima di utilizzare l’apparecchio, leggere il manuale!
Antes de utilizar el equipo, lea por favor el manual!
Por favor leia este manual antes de usar o equipamen
to!
C 420
Bedienungshinweise. . . . . . . S. 2
User Instructions . . . . . . . . . p. 12
Mode d’emploi . . . . . . . . . . . p. 22
Istruzioni d’uso. . . . . . . . . . . p. 32
Modo de empleo . . . . . . . . . p. 42
Instruções de uso . . . . . . . . p. 52
Page 2
2
Das C 420 ist ein Miniatur-Kondensatormikrofon,
das mit einem Nackenbügel am Kopf getragen
wird. Das Mikrofon hat eine nierenförmige Richtcharakteristik und nimmt daher Schall von vorne
(vom Mund) bevorzugt auf.
Das Mikrofongehäuse mit dem Kondensatorwandler ist über eine elastische Lagerung mit dem
Mikrofonarm verbunden, um Kabelgeräusche und
Körperschall zu unterdrücken. Der Mikrofonarm
positioniert das Mikrofon seitlich vor dem Mund.
Dadurch werden Popgeräusche weitgehend vermieden und das Mikrofon vor Verunreinigung geschützt. Der mitgelieferte Windschutz unterdrückt
zusätzlich Wind- und Popgeräusche.
Das C 420 ist in drei Ausführungen erhältlich:
Mit 3-poligem XLR-Stecker mit eingebautem Adapter für Universal-Phantomspeisung von 9 bis
52 V.
Mit verriegelbarem Mini-XLR-Stecker zum Anschluss an Battteriespeisegerät B 29 (neue Ausführung), Phantomspeise-adapter MPA II (neue
Ausführung) oder AKG-Taschensender.
Mit verriegelbarem 3,5 mm-Klinkenstecker zum
Anschluss an das Battteriespeisegerät B 29 (alte
Ausführung), Phantomspeiseadapter MPA II (alte
Ausführung) oder Taschensender PT 300.
1 Beschreibung
1.1 Allgemeines
1.2 Varianten
C 420:
C 420 L:
C 420/B-lock:
Page 3

3
1 Beschreibung
1.3. Mitgeliefertes Zubehör
1.4 Empfohlenes
Zubehör für
C 420
1.5 Empfohlenes
Zubehör für
C 420 L,
C 420 B/lock
2.1 C 420
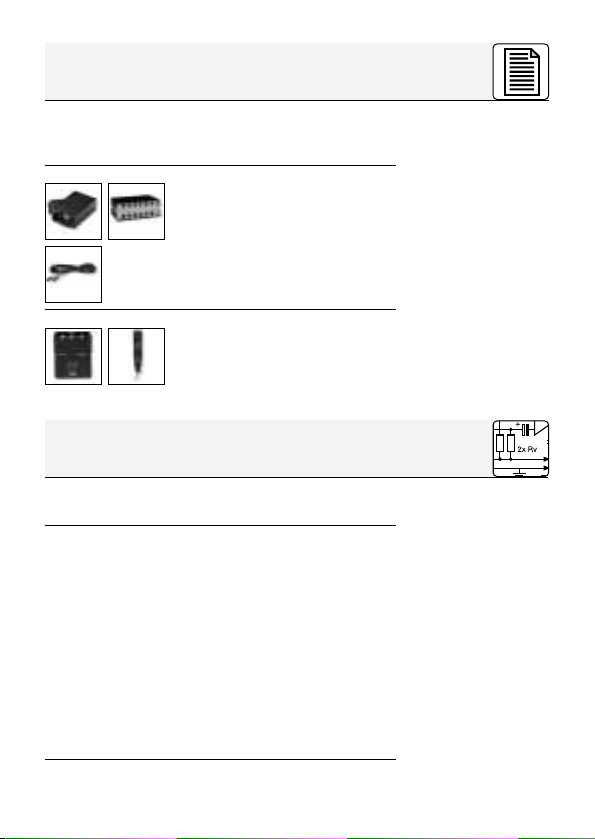
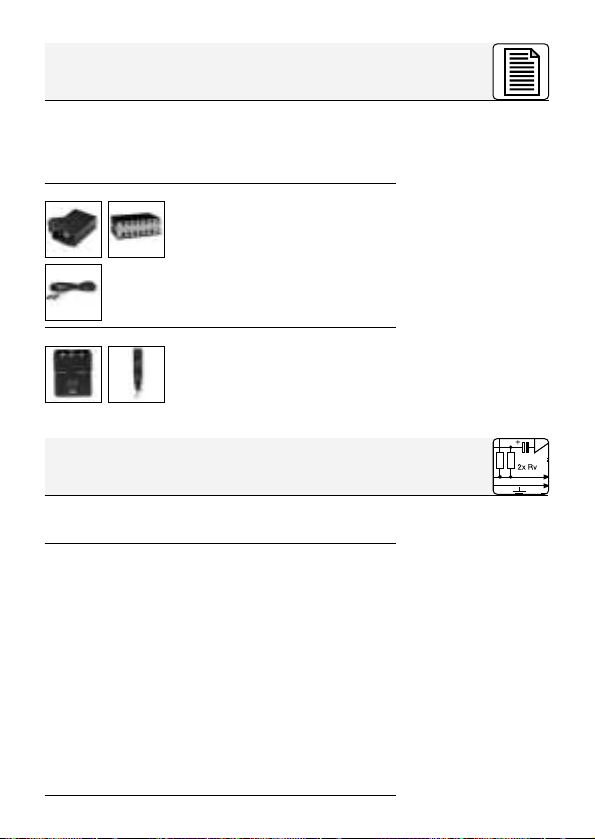
Alle Ausführungen des C 420 werden mit folgendem Zubehör geliefert:
Schaumstoff-Windschutz W 44
Batteriespeisegerät B 18
Netzgerät N 62 E, N 66 E
Anschlusskabel MK 9/10, 10 m
Batteriespeisegerät B 29
Phantomspeiseadapter
MPA II
Das C 420 ist ein Kondensatormikrofon und
benötigt daher eine Stromversorgung.
1. Schliessen Sie den Phantomspeiseadapter am
Mikrofon-kabel an einen symmetrischen XLRMikrofoneingang mit Phantomspeisung an.
2. Schalten Sie die Phantomspeisung ein. (Lesen
Sie dazu in der Betriebsanleitung des jeweiligen Gerätes nach.)
3. Wenn Ihr Mischpult keine Phantomspeisung
besitzt, schalten Sie zwischen Mikrofon und
Mischpulteingang ein AKG-Phantomspeisegerät (N 62 E, N 66 E, B 18 E).
Das Phantomspeisegerät können Sie auch an
einen asymmetrischen Eingang anschließen.
2 Anschluss
Page 4
4
2 Anschluss
2.2 C 420 L
2.3 C 420 B/lock
2.4 Batteriespeisegerät
B29
2.5 Phantom-
speiseadapter
MPA II
2.6 Externe
Phantomspeise-
geräte
Wichtig!
1. Stecken Sie den Mini-XLR-Stecker am Mikrofonkabel bis zum Anschlag in eine der beiden
Mini-XLR-Buchsen am B 29, die Mini-XLRKupplung am Anschlusskabel des MPA II bzw.
die Eingangsbuchse des Taschensenders an.
Der Stecker verriegelt sich automatisch.
2. Verbinden Sie das B 29 bzw. den MPA II mit
dem gewünschten Eingang.
Diese Ausführung entspricht dem C 420 L, besitzt
jedoch einen schraubbaren 3,5-mm-Monoklinkenstecker, den Sie direkt an die alte Ausführung
des B 29, MPA II bzw. AKG-Taschensenders
PT 300 anschließen können. (Lesen Sie dazu in
der Betriebsanleitung des jeweiligen Gerätes
nach.)
Das optionale Batteriespeisegerät B 29 ermöglicht Ihnen, zwei Mikrofone an einen gemeinsamen symmetrischen oder asymmetrischen Eingang anzuschliessen, sodass Sie weniger Mischpulteingänge benötigen.
Mit dem optionalen Phantomspeiseadapter MPA
II können Sie das C 420 an jede Phantomspeisequelle sowie an XLR-Eingänge mit 9 bis 52 V
Phantomspeisung anschließen.
Als Phantomspeisegeräte für C 420 L und C 420 B/
lock mit MPA II empfehlen wir das optionale Netzgerät N 62 E oder N 66 E sowie das (ebenfalls optionale) Batteriespeisegerät B 18 von AKG.
Wenn Sie andere als die von AKG empfohlenen Speisegeräte verwenden, kann das Mikrofon beschädigt werden und erlischt die
Garantie.
Page 5
5
2 Anschluss
2.7 Anschlusskabel
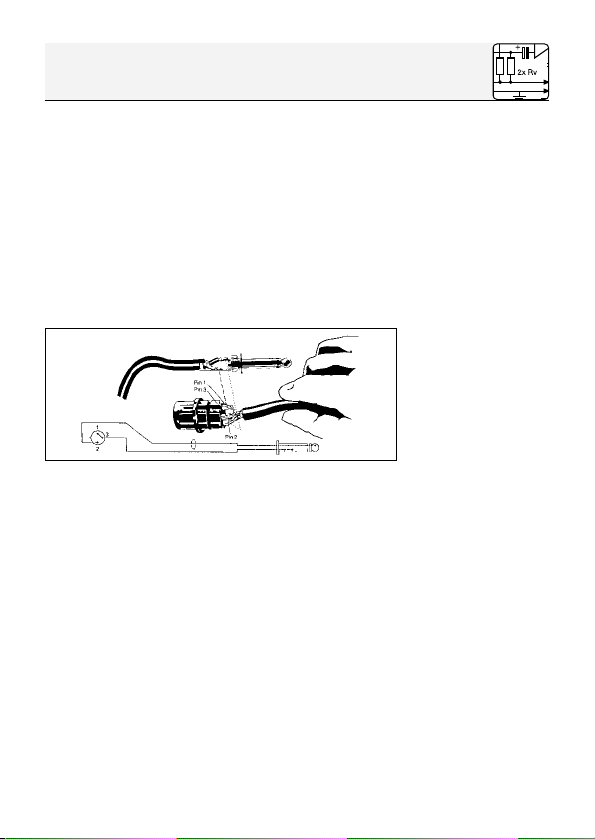
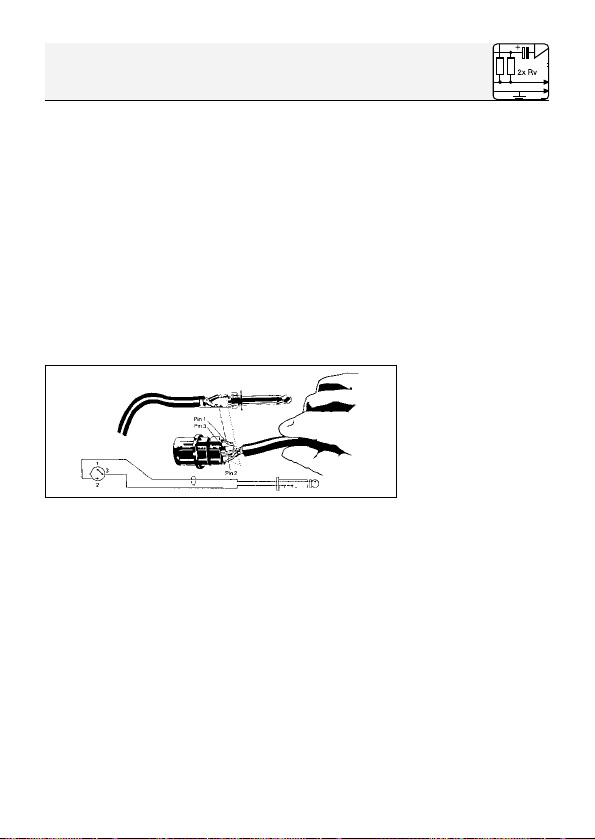
Zum Anschluss an symmetrische (XLR-) Eingänge verwenden Sie ein normales XLR-Kabel.
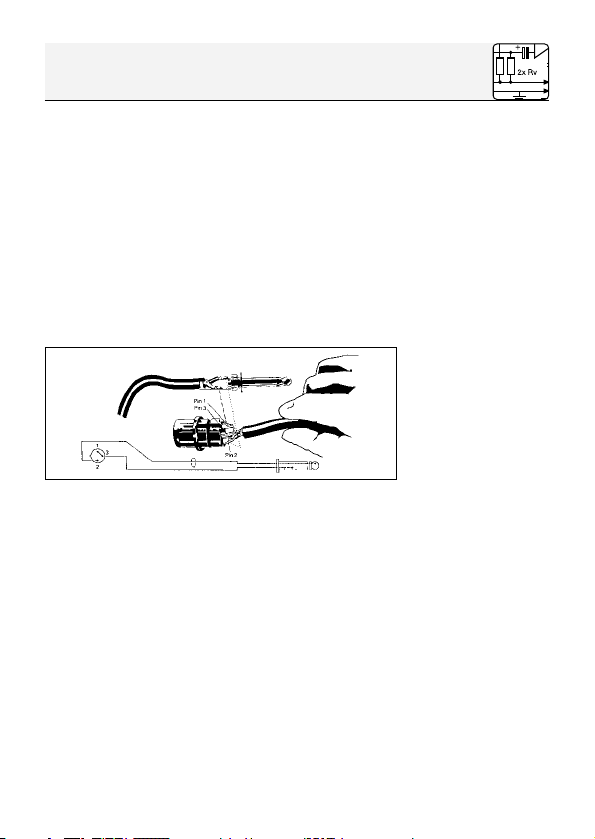
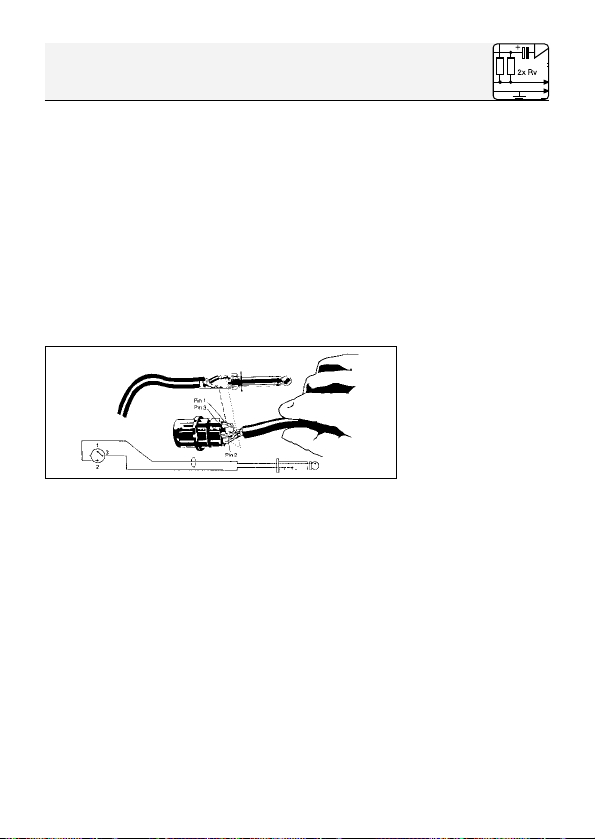
Für asymmetrische Eingänge (Mono-Klinkenbuchse) verwenden Sie ein Kabel mit XLR-Stecker
(weiblich) und Mono-Klinkenstecker (s. Abb. 1):
1. Verbinden Sie im XLR-Stecker mittels einer
Drahtbrücke Stift 1 mit Stift 3 und mit der Abschirmung.
2. Verbinden Sie die innere Ader des Kabels mit
Stift 2 des XLR-Steckers und der Spitze des
Klinkensteckers.
Abb. 1: Anschlusskabel für asymmetrische Mikrofoneingänge.
Page 6

6
3 Anwendungshinweise
3.1 Mikrofon
aufsetzen
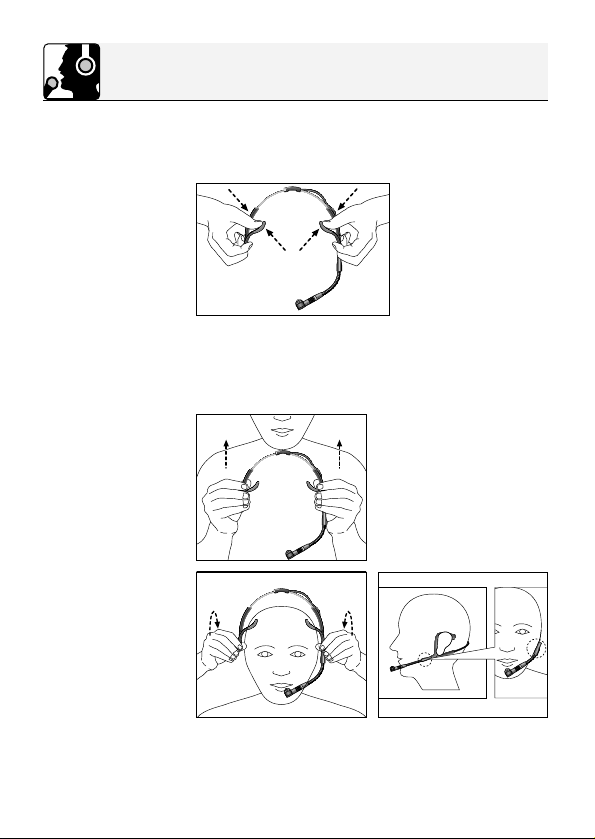
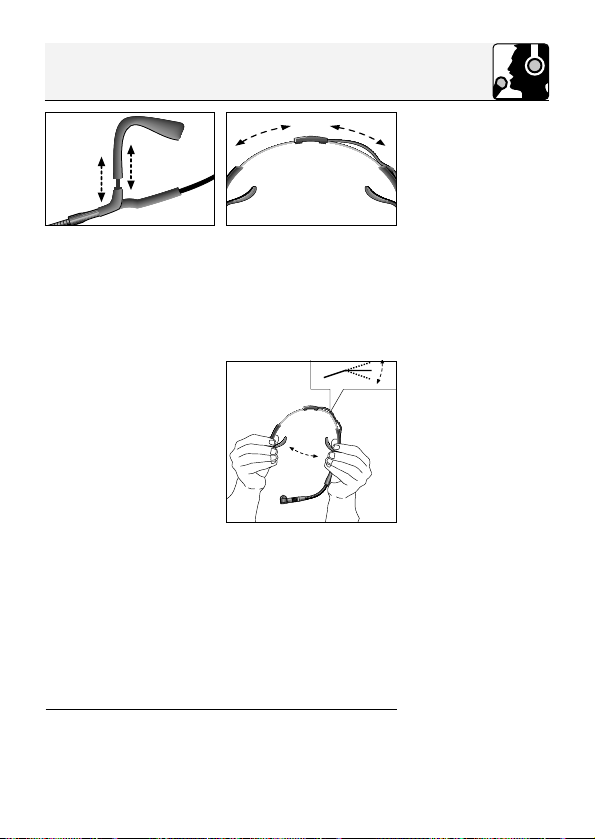
1. Stellen Sie die Ohrbügel so ein, dass der Nackenbügel sicher am Kopf sitzt.
Abb. 2: Ohrbügel einstellen
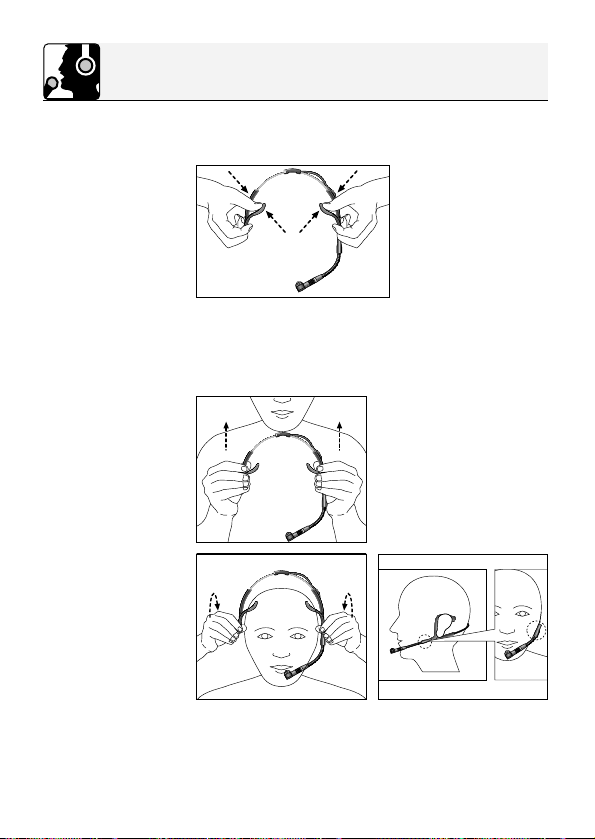
2. Setzen Sie den Nackenbügel wie in Abb. 3
bis 5 gezeigt auf.
Abb. 3: Nackenbügel
Abb. 4 Abb. 5
Page 7

Abb. 8:
5. Biegen Sie den Schwanenhals so, dass das
Mikrofon seitlich vor dem Mundwinkel sitzt.
6. Führen Sie das Mikrofonkabel durch die drei
Schlitze im Halteclip und klemmen Sie den
Halteclip am Hemdkragen an.
Dadurch wird das Mikrofon vom Zug des Kabels entlastet und sitzt angenehm leicht am
Kopf.
7
3 Anwendungshinweise
Ohrbügel nachjustieren:
Mikrofon
positionieren:
Zugentlastung:
Abb. 6 Abb. 7
3. Falls der Nackenbügel nicht optimal sitzt, können Sie die Ohrbügel wie in Abb. 6 gezeigt einstellen. Verschieben Sie den Kabelhalter so,
dass das Kabel lose bleibt (s. Abb. 7).
4. Falls das Mikrofon
noch immer zu locker sitzt, können
Sie den Nackenbügel leicht nach innen
biegen (s. Abb. 8).
Page 8
8
3 Anwendungshinweise
3.2 Windschutz Falls (z.B. im Freien) starke Windgeräusche oder
Popgeräusche auftreten, befestigen Sie den mitgelieferten Schaumstoff-Windschutz am Mikrofon.
1. Stecken Sie den Windschutz auf die Mikrofon-
kapsel auf.
2. Ziehen Sie den Windschutz auch über das
äußere Ende der Mikrofonkapsel.
4.1 Mikrofon
Arbeitsweise: Kondensatormikrofon mit Permanentladung
Richtcharakteristik: Niere
Übertragungsbereich: 20-20.000 Hz
Empfindlichkeit: 5 mV/Pa (-46 dBV bez. auf 1 V/Pa)
Elektrische Impedanz bei 1000 Hz: 200 Ω
Empfohlene Lastimpedanz: >2000 Ω
Grenzschalldruckpegel
für 1% / 3% Klirrfaktor: 126 / 130 dB SPL
Äquivalentschalldruckpegel: 33 dB (nach DIN 45412)
Speisespannung:
C 420: 9-52 V Universalphantomspeisung
C 420 L: 9 V Batteriespeisung über B 29 oder
Taschensender, oder 9 - 52 V
Universalphantomspeisung über
Adapter MPA II
C 420 B/lock: 9 V Batteriespeisung über B 29 oder
9 - 52 V Universalphantomspeisung über
Adapter MPA II
Stromaufnahme: ca. 2 mA
Steckerart: XLR 3-polig
Oberfläche: mattschwarz
Abmessungen: 130 mm ø
4 Technische Daten
Page 9
9
4 Technische Daten
4.4
Polardiagramm
4.2 Konformitätshinweis
Kabellänge: 3 m
Nettogewicht: 30 g ohne Stecker
5 Reinigung
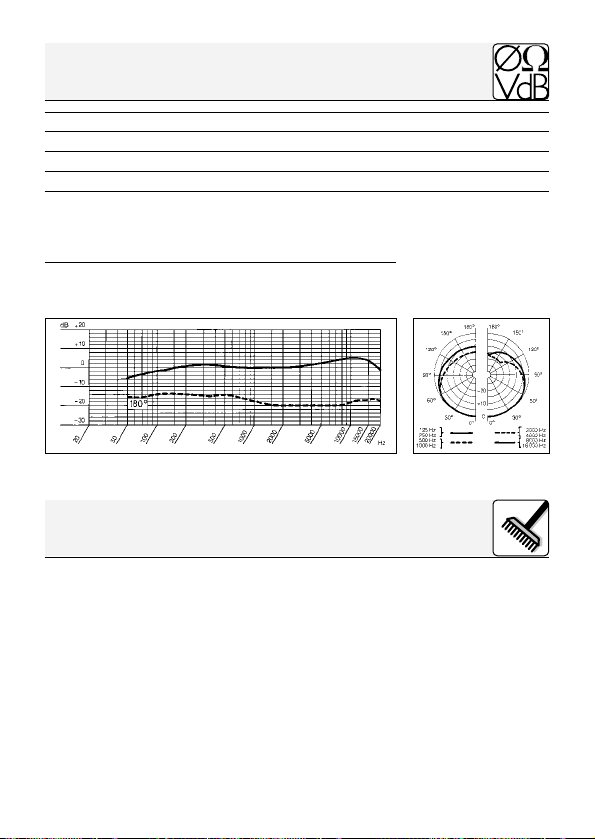
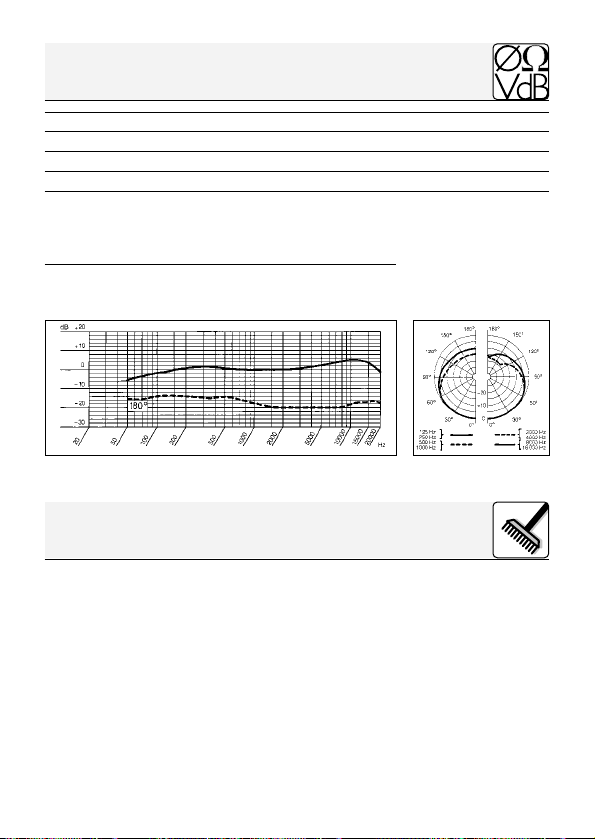
4.3 Frequenzkurve
Alle Metalloberflächen können Sie problemlos mit
(Industrie-) Spiritus oder Alkohol reinigen.
Den Schaumstoff-Windschutz reinigen Sie am
besten mit einer milden Waschmittellösung. Der
Windschutz ist sofort nach dem Trocknen wieder
einsatzbereit.
Dieses Produkt entspricht der Norm EN 50 082-1,
vorausgesetzt, dass nachgeschaltete Geräte CEkonform sind.
Page 10

10
6 Fehlerbehebung
Fehler
1. Mikrofon funktioniert nicht:
2. Headset sitzt nicht
fest am Kopf;
Mikrofonarm
wackelt:
3. Starke Pop-, oder
Wind- und Atemgeräusche hörbar:
4. Mikrofon klingt
mit der Zeit immer
dumpfer:
Mögliche Ursache
Keine Speisespannung
Nackenbügel nicht
richtig eingestellt.
Mikrofon zu nahe an
Mund oder Nase.
Verschmutzter Innenoder Aussenwindschutz W 44 dämpft
hohe Frequenzen.
Behebung
C 420: Phantomspei-
sung überprüfen.
C 420 B/lock: Batte-
rien im B 29 bzw.
PT 300 überprüfen.
C 420 L: Batterien im
Taschensender
überprüfen.
Nackenbügel genau
nach Kapitel 3.1 einstellen. Besonders
Abb. 9 beachten!
Mikrofon-Einsprechöffnungen zum Mundwinkel ausrichten und
so weit von Mund und
Nase entfernt, dass
Atemgeräusche nicht
mehr auftreten.
1. Windschutz W 44
mit Seifenlauge reinigen.
2. Innenwindschutz
von AKG-Service
reinigen lassen.
ACHTUNG: Mikrofon-
gehäuse nicht öffnen, da ansonsten
die Garantie erlischt.
Page 11
11
6 Fehlerbehebung
Fehler
5. Mikrofon klingt
”dünn”, Rückkopplung bereits
bei geringen Pegeln:
Mögliche Ursache
Mikrofon zu weit vom
Mundwinkel entfernt.
Behebung
Mikrofon näher am
Mundwinkel positionieren.
Page 12
12
1 Description
1.1 General
1.2 Versions
C 420:
C420 L:
C 420/B-lock:
The C 420 is a head-worn miniature condenser
microphone with a convenient behind-the-neck
headband. The microphone has a cardioid polar
pattern and therefore “prefers” sounds arriving
from in front of it (from the user’s mouth).
The microphone case containing the condenser
transducer is shock mounted on the microphone
arm in order to suppress cable and mechanical
noise. The microphone arm will place the microphone in front of the corner of your mouth to minimize pop noise and protect the microphone from
contamination. The supplied windscreen makes
the microphone even less susceptible to wind and
pop noise.
The C 420 is available in three versions:
With 3-pin XLR connector with integrated adapter
for 9 to 52 V universal phantom power.
With locking mini XLR connector for use with the
new version B 29 battery power supply, new version MPA II phantom power adapter, or AKG
bodypack transmitters.
With locking mini jack plug for use with the old
version B 29 battery power supply or old version
MPA II phantom power adapter.
Page 13
13
1 Description
1.3 Standard
Accessories
1.4 Optional
Accessories for
C 420
1.5 Optional
Accessories for
C 420 L,
C 420 B/lock
2.1 C 420
All C 420 versions are supplied with:
W 44 foam windscreen
B 18 battery supply
N 62 E, N 66 E AC power
supplies
MK 9/10 10-m (33-ft.)
connecting cable
B 29 battery supply
MPA II phantom power adapter
The C 420 is a condenser microphone and therefore needs a power supply.
1. Connect the phantom power adapter on the
microphone cable to a balanced XLR microphone input with phantom power.
2. Switch the phantom power on. (Refer to the
instruction manual of the unit to which you
connected your C 420.)
3. If your mixer provides no phantom power,
connect an AKG phantom power supply
(N 62 E, N 66 E, B 18) between the microphone
and the mixer.
You may connect AKG phantom power supplies to balanced or unbalanced inputs.
2 Interfacing
Page 14
14
2 Interfacing
2.2 C 420 L
2.3 C 420 B/lock
2.4 B 29 Battery
Supply
2.5 MPA II
Phantom Power
Adapter
2.6 External
Phantom Power
Supplies
Important!
1. Plug the mini XLR connector on the microphone cable all the way into one of the two mini
XLR sockets on the B 29, the mini XLR socket
on the connecting cable of the MPA II, or the
input socket on the bodypack transmitter.
The connector will lock automatically.
2. Connect the B 29 or MPA II to the desired
input.
This version is identical to the C 420 L except that
it uses a screw-in mini jack plug that you can
connect directly to the old versions of the B 29,
MPA II, or AKG bodypack transmitters. (Refer to
the instruction manual of the unit you are using.)
The optional B 29 battery supply allows you to
connect two microphones to a common balanced
or unbalanced input in order to save on mixer
inputs.
The optional MPA II phantom power adapter lets
you connect the C 420 to any phantom power
source or XLR input with 9 to 52 V phantom power.
For phantom powering the C 420 L and C 420
B/lock with MPA II we recommend the optional
N 62 E or N 66 E AC power supply or the B 18 battery supply (also optional) from AKG.
Using any power supply other than those
recommended by AKG may damage your
microphone and will void the warranty.
Page 15
15
2 Interfacing
2.7 Connecting
Cables
To connect to a balanced (XLR) input, use a
standard XLR cable.
To connect to an unbalanced input (mono jack),
use a cable with a female XLR connector and
TS jack plug (see fig. 1 below):
1. On the XLR connector, use a wire bridge to
connect pin 1 to pin 3 and the cable shield.
2. Connect the inside wire of the cable to pin 2 on
the XLR connector and the tip contact of the
jack plug.
Fig. 1: Connecting cable for unbalanced microphone inputs.
Page 16
16
3 Operating Notes
3.1 Putting the
Microphone on
1. Adjust the temple pieces so that the behindthe-neck headband will rest securely against
your head.
Fig. 2: Adjusting the temple pieces.
2. Put the behind-the-neck headband on as
shown in figs. 3 through 5.
Fig. 3: Behind-theneck headband.
Fig. 4 Fig. 5
Page 17

Fig. 8:
5. Bend the gooseneck so that the microphone
will sit to one side in front of the corner of your
mouth.
6. Reeve the microphone cable through the three
slots in the cable clip and clamp the cable clip
on your shirt collar. This takes the pull of the
cable off the microphone and the microphone
will fit your head securely and lightly.
17
3 Operating Notes
Readjusting the
Temple Pieces:
Aligning the
Microphone:
Strain Relief:
Fig. 6 Fig. 7
3. If the behind-the-neck headband does not fit
snugly, readjust the temple pieces as shown in
fig. 6. Slide the cable holder so as to slacken
the cable a little (refer to fig. 7).
4. Should the microphone still fit loosely, bend the
behind-the-neck
headband slightly
inward referring to
fig. 8.
Page 18
18
3 Operating Notes
3.2 Windscreen If (for instance, in outdoor use) excessive wind or
pop noise becomes audible, attach the supplied
windscreen to the microphone.
1. Slide the windscreen onto the microphone
capsule.
2. Pull the windscreen over the outer edge of the
microphone capsule.
4 Specifications
4.1 Microphone
Type: Pre-polarized condenser microphone
Polar pattern: Cardioid
Frequency range: 20 Hz to 20,000 Hz
Sensitivity: 5 mV/Pa (-46 dBV re 1 V/Pa)
Electrical Impedance at 1000 Hz: 200 Ω
Recommended load impedance: >2000 Ω
Max. SPL for 1% / 3% THD: 126 dB / 130 dB
Equivalent noise level: 33 dB (to DIN 45412)
Supply voltage:
C 420: 9 to 52 V universal phantom power
C 420 L: 9 V battery supply through B 29 or body-
pack transmitter, or 9 to 52 V universal
phantom power through MPA II adapter
C 420 B/lock: 9 V battery supply through B 29 or 9 to
52 V universal phantom power through
MPA II adapter
Current consumption: Approx. 2 mA
Connector: 3-pin male XLR
Finish: Matte black
Size: 130 mm (5.2 in.) in dia.
Cable length: 3 m (10 ft.)
Net weight: 30 g (1.1 oz.) exc. of connector
Page 19

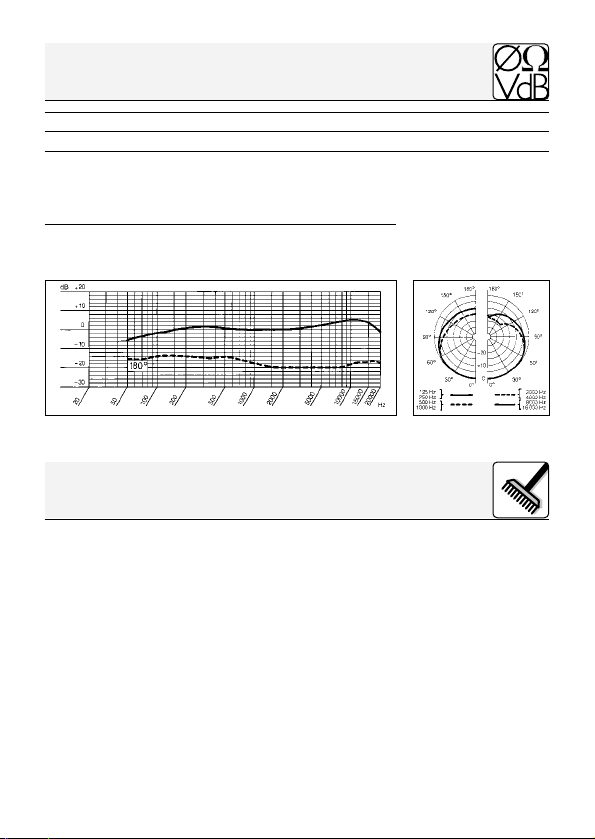
4.4 Polar
Diagram
5 Cleaning
4.3 Frequency Response
Clean metal surfaces with (industrial grade)
methylated spirits or alcohol.
Clean the foam windscreen in mild soap suds. You
can use the windscreen again as soon as it has
dried.
19
4 Specifications
4.2 Declaration
of Conformity
When connected to equipment with a CE sign, this
product conforms to EN 50 082-1.
Page 20
20
6 Troubleshooting
Problem
1. Microphone does
not work:
2. Headset does not
fit securely;
microphone arm
wobbles:
3. Loud pop, wind,
and/or breath
noise:
4. Microphone
sound becomes
duller by and by:
Possible Cause
No supply voltage.
Headband is not adjusted correctly.
Microphone sits too
close to mouth or
nose.
Internal or W 44
external windscreen
when soiled
attenuates high frequencies.
Remedy
C 420: Check phan-
tom power source.
C 420 B/lock: Check
batteries in the
B 29 or PT 300.
C 420 L: Check bat-
teries in the bodypack transmitter.
Adjust headband
exactly as described in
section 3.1, referring
particularly to fig. 9.
Align microphone
sound entry with
corner of mouth and
move microphone just
far enough away from
mouth and nose to
stop breath noise.
1. Clean W 44 windscreen with soap
suds.
2. Refer cleaning of
internal windscreen
to nearest AKG
Service Center.
ATTENTION: Do not
open microphone
case yourself. This
would void the warranty.
Page 21

21
6 Troubleshooting
Problem
5. Microphone
sounds “thin”,
feedback sets in
at low levels:
Possible Cause
Microphone sits too
far away from mouth
or nose.
Remedy
Move microphone
closer to corner of
mouth.
Page 22

22
1 Description
1.1 Généralités
1.2 Versions
C 420 :
C 420 L :
C 420/B-lock :
Le C 420 est un microphone électrostatique
miniature fixé à un arceau se portant sur la nuque.
Il s’agit d’un micro cardioïde, captant principalement les sons sur l’avant (sons sortant de la
bouche).
Le boîtier du micro avec le transducteur électrostatique est monté sur le bras par une suspension élastique évitant la transmission des bruits de
câble et des vibrations. Le bras positionne le
micro devant la bouche, décalé vers la commissure des lèvres pour éviter au maximum les pops
et le protéger des postillons. La bonnette antivent
fournie avec le micro atténue également les bruits
de souffle et les pops.
Le C 420 existe en trois versions :
Avec connecteur type XLR à trois points, avec
adaptateur incorporé pour alimentation fantôme
universelle de 9 à 52 V.
Avec connecteur type XLR miniature, verrouillable, pour raccordement à une alimentation à
piles B 29 (nouveau modèle), à un adaptateur pour
alimentation fantôme MPA II (nouveau modèle) ou
à un émetteur de poche AKG.
Avec jack de 3,5 mm pour raccordement à une alimentation à piles B 29 (ancien modèle), à un
adaptateur pour alimentation fantôme MPA II
(ancien modèle) ou à l’émetteur de poche
AKG PT 300.
Page 23

23
1 Description
1.3 Accessoires
fournis d’origine
1.4 Accessoires
recommandés
pour C 420
1.5 Accessoires
recommandés
pour C 420 L,
C 420 B/lock
2.1 C 420
Toutes les versions du C 420 sont fournies avec :
Bonnette antivent en mousse W 44
Alimentation à piles B 18
Bloc secteur N 62 E, N 66 E
Câble de raccordement
MK 9/10, 10 m
Alimentation à piles B 29
Adaptateur pour alimentation
fantôme MPA II
Le C 420 est un microphone à électret ; il a donc
besoin d’une alimentation.
1. Connectez l’adaptateur pour alimentation
fantôme du câble micro sur une entrée de
micro symétrique type XLR avec alimentation
fantôme.
2. Mettez l’alimentation fantôme sous tension
(Veuillez vous reporter à la notice de l’alimentation utilisée).
3. Si vous n’avez pas d’alimentation fantôme sur
votre table de mixage, insérez une alimentation
fantôme AKG (N 62 E, N 66 E, B 18 E) entre le
micro et l’entrée de la table de mixage.
Vous pouvez aussi connecter l’alimentation
fantôme sur une entrée asymétrique.
2 Raccordement à une alimentation
Page 24
24
2 Raccordement à une alimentation
2.2 C 420 L
2.3 C 420 B/lock
2.4 Alimentation
à piles B 29
2.5 Adaptateur
pour alimenta-
tion fantôme
MPA II
2.6 Alimenta-
tions fantôme
externes
N.B.:
1. Enfoncez le connecteur XLR miniature du
câble micro jusqu’en butée dans une des deux
embases miniature type XLR de l’alimentation
B 29, dans l’accouplement XLR miniature du
câble de raccordement du MPA II ou dans
l’embase d’entrée de l’émetteur de poche.
Le connecteur se verrouille automatiquement.
2. Raccordez selon le cas le B 29 ou le MPA II sur
l’entrée voulue.
Cette version est identique au C 420 L à cette différence qu’elle possède un jack mono de 3,5 mm
vissable que vous pouvez connecter directement
sur un B 29 ou un MPA II anciens modèles, ou sur
un émetteur de poche AKG PT 300. (Veuillez vous
reporter à la notice de l’alimentation utilisée).
L’alimentation à pile B 29 fournie en option permet
de connecter deux micros sur une entrée symétrique ou asymétrique commune, ce qui vous
économise des entrée sur la table de mixage.
L’adaptateur pour alimentation fantôme MPA II
permet de connecter le C 420 sur n’importe quelle
source d’alimentation fantôme de même que sur
des entrées XLR avec alimentation fantôme de 9 à
52 V.
Pour l’alimentation fantôme du C 420 L et du
C 420 B/lock via MPA II, nous recommandons
d’utiliser le bloc secteur optionnel N 62 E ou
N 66 E de même que l’alimentation à piles B 18
d’AKG (également en option).
L’utilisation d’alimentations autres que
celles recommandées par AKG peut provoquer des dégâts sur le micro et entraîne la
perte de la garantie.
Page 25
25
2 Raccordement à une alimentation
2.7 Câble de
raccordement
Pour les connexions à une entrée symétrique
vous pouvez utiliser un câble XLR se trouvant
dans le commerce.
Pour les entrées asymétriques (prise jack mono)
il vous faut un câble avec une fiche XLR femelle et
une fiche à jack mono (voir fig. 1 ci-dessous):
1. Pontez les contacts 1 et 3 de la fiche XLR et
reliez-les au blindage du câble.
2. Reliez le conducteur interne du câble au
contact 2 de la fiche XLR et à la pointe de la
fiche à jack.
Fig. 1 : Câble de raccordement pour entrées
asymétriques
Page 26

26
3 Conseils pour l’utilisation du micro
3.1 Pour mettre
l’arceau
1. Réglez les branches reposant sur les oreilles
pour que l’arceau soit bien d’aplomb.
Fig. 2: Réglage des branches
2. Mettez l’arceau comme indiqué aux Fig. 3 à 5.
Fig. 3: Arceau
Fig. 4 Fig. 5
Page 27

27
3 Conseils pour l’utilisation du micro
Réglage de
l’arceau:
Positionnement
du micro:
Maintien sans
traction sur le
câble :
Fig. 8:
5. Incurvez le col-de-cygne pour que le micro soit
placé devant la commissure des lèvres.
6. Faites passer le câble dans les trois fentes du
clip de maintien et fixez le clip au col de votre
chemise.
De cette façon, il ne s’exerce pas de traction
sur le câble et on ne le sent pas sur la nuque.
Fig. 6 Fig. 7
3. Si l’arceau n’est pas tout à fait d’aplomb,
réglez les branches comme indiqué à la Fig. 6.
Faites glisser la fixation du câble pour que ce
dernier ne soit pas tendu (Cf. Fig. 7).
4. Si l’arceau est trop
lâche vous pouvez
l’incurver légèrment
(Cf. Fig. 8).
Page 28
28
3 Conseils pour l’utilisation du micro
3.2 Bonnette
antivent
Si vous risquez d’avoir des bruits dus au vent (en
plein air), au souffle ou aux pops, fixez la bonnette
antivent fournie sur le micro.
1. Placez la bonnette sur la capsule du micro.
2. Tirez la bonnette jusqu’à l’extrémité de la
capsule.
4 Caractéristiques techniques
4.1 Microphone
Fonctionnement: microphone électrostatique à charge
permanente
Directivité: cardioïde
Réponse en fréquence: 20 … 20.000 Hz
Sensibilité : 5 mV/Pa (-46 dBV rapp. à 1 V/Pa)
Impédance électrique à 1.000 Hz: 200 Ω
Impédance de charge recommandée:
>2000 Ω
Niveau maximum de pression
sonore pour un facteur de
distorsion de 1% / 3%: 126 / 130 dB SPL
Niveau de bruit équivalent: 33 dB (selon DIN 45412)
Tension d’alimentation:
C 420: 9 … 52 V, alimentation fantôme universelle
C 420 L: 9 V, alimentation à pile B 29 ou émetteur de
poche, ou 9 … 52 V, alimentation fantôme
universelle via l’adaptateur MPA II
C 420 B/lock: 9 V, alimentation à pile B 29, ou 9 … 52 V,
alimentation fantôme universelle via
l’adaptateur MPA II
Consommation: env. 2 mA
Connecteur: type XLR, 3 points
Couleur: noir mat
Dimensions: Ø 130 mm
Longueur du câble de raccordement:
3 m
Poids net (sans connecteur): 30 g
Page 29

29
4 Caractéristiques techniques
4.2 ConformitéCe produit est conforme à la norme EN 50 082-1 à
condition que les appareils en aval soient aux
normes européennes.
4.4 Diagramme
polaire
5 Nettoyage
4.3 Courbe de fréquences
Toutes les surfaces métalliques peuvent être nettoyées à l’alcool à brûler (industriel) ou à l’alcool.
La bonnette antivent se lave à l’eau savonneuse
en utilisant un produit doux. La bonnette peut être
réutilisée dès qu’elle est sèche.
Page 30

30
6 Problèmes et remèdes
Problème
1. Le micro ne fonctionne pas:
2. L’arceau n’est pas
bien d’aplomb sur
la nuque, le bras
du micro bouge:
3. On entend trop les
bruits de souffle,
de vent ou les
pops:
4. Avec le temps le
son est de plus en
plus mat:
Cause possible
Pas de tension d’alimentation.
L’arceau est mal réglé.
Le micro est trop près
de la bouche ou du
nez.
L’écran antivent ou
la bonnette antivent
W 44 sont colmatés et
atténuent les hautes
fréquences.
Remède
C 420: Vérifier l’ali-
mentation fantôme.
C 420 B/lock: Vérifier
les piles du B 29 ou
du PT 300.
C 420 L: Vérifier les pi-
les de l’émetteur de
poche.
Régler l’arceau exactement comme décrit
au chapitre 3.1. Se
conformer en particulier aux indications de
la Fig. 9.
Orienter le côté sensible du micro vers la
commissure des lèvres
et l’éloigner suffisamment de la bouche et
du nez pour supprimer
les bruits de souffle.
1. Nettoyer la bonnette W 44 à l’eau
savonneuse.
2. Faire nettoyer
l’écran antivent par
le S.A.V. d’AKG.
N.B.: N’ouvrez jamais
le boîter du micro.
Ceci entraînerait la
perte de la garantie.
Page 31

31
6 Problèmes et remèdes
Problème
5. Le son est “grèle”,
il y a du larsen
même à un faible
niveau sonore:
Cause possible
Le micro est trop loin
de la commissure des
lèvres .
Remède
Placer le micro plus
près de la commissure
des lèvres.
Page 32

32
1 Descrizione
1.1 Generalità
1.2 Varianti
C 420:
C 420 L:
C 420/B-lock:
Il C 420 è un microfono miniaturizzato a condensatore che viene portato dietro la nuca con un
archetto. Il microfono ha una direttività cardioide e
capta quindi il suono prevalentemente dal davanti
(dalla bocca).
La scatola microfonica con il trasduttore a condensatore è collegato al braccio microfonico per
mezzo di una sospensione elastica per sopprimere i rumori causati dal cavo e dalle vibrazioni
meccaniche. Il braccio microfonico posiziona il
microfono lateralmente davanti alla bocca. In
questo modo vengono evitati in gran parte i rumori
pop e il microfono non viene sporcato. Il filtro antisoffio in dotazione sopprime inoltre i rumori pop e
quelli causati dal vento.
Il C 420 è disponibile in tre varianti:
Con connettore XLR a 3 poli con adattatore incorporato per l’alimentazione phantom universale da
9 a 52 V.
Con connettore mini-XLR arrestabile per il collegamento all’alimentatore a batteria B 29 (nuovo
modello), all’adattatore per l’alimentazione
phantom MPA II (nuovo modello) o ai trasmettitori
da tasca AKG.
Con connettore jack arrestabile da 3,5 mm per il
collegamento all’alimentatore a batteria B 29
(vecchio modello), all’adattatore per l’alimentazione phantom MPA II (vecchio modello) o ai trasmettitori da tasca PT 300.
Page 33

33
1 Descrizione
1.3 Accessori in
dotazione
1.4 Accessori
raccomandati
per il
C 420
1.5 Accessori
raccomandati
per il
C 420 L,
C 420 B/lock
2.1 C 420
Tutte le varianti del C 420 vengono fornite con i
seguenti accessori:
Filtro antisoffio in espanso W 44
Alimentatore a batteria B 18
Alimentatore N 62 E, N 66 E
Cavo di collegamento MK 9/10, 10 m
Alimentatore a batteria B 29
Adattatore per l’alimentazione
phantom MPA II
Il C 420 è un microfono a condensatore e ha
quindi bisogno di alimentazione.
1. Collegate l’adattatore per l’alimentazione
phantom disposto sul cavo microfonico a un
ingresso microfonico XLR simmetrico con alimentazione phantom.
2. Inserite l’alimentazione phantom. (Leggete in
merito le istruzioni per l’uso del rispettivo
apparecchio.)
3. Se il vostro mixer non è dotato di alimentazione
phantom, interponete tra microfono e ingresso
sul mixer un alimentatore phantom AKG
(N 62 E, N 66 E, B 18 E).
L’alimentatore phantom può venir collegato
anche ad un ingresso asimmetrico.
2 Collegamento
Page 34

34
2 Collegamento
2.2 C 420 L
2.3 C 420 B/lock
2.4 Alimentatore
a batteria B 29
2.5 Adattatore
per l’alimentazione phantom
MPA II
2.6 Alimentatori
phantom esterni
Importante!
1. Inserite il connettore XLR miniaturizzato disposto sul cavo microfonico fino all‘arresto in
una delle due prese XLR miniaturizzate disposte sul B 29, l‘accoppiamento XLR miniaturizzato disposto sul cavo di collegamento
dell’MPA II o nella presa d’ingresso del trasmettitore da tasca.
Il connettore si blocca automaticamente.
2. Collegate il B 29 rispettivamente l’MPA II
all‘ingresso desiderato.
Questa versione corrisponde al C 420 L, è però
dotata di un connettore jack mono avvitabile da
3,5 mm che può venir collegato direttamente alla
vecchia versione del B 29, dell‘MPA II o al trasmettitore da tasca PT 300 dell’AKG. (Leggete in merito le
istruzioni per l’uso del rispettivo apparecchio.)
L’opzionale alimentatore a batteria B 29 vi offre la
possibilità di collegare due microfoni a un
ingresso simmetrico o asimmetrico comune, in
modo che avete bisogno di meno ingressi sul
mixer.
Con l’opzionale adattatore per l’alimentazione
phantom MPA II potete collegare il C 420 a qualsiasi
fonte di alimentazione phantom nonché ad ingressi
XLR con alimentazione phantom da 9 a 52 V.
Come alimentatori phantom per il C 420 e il C 420 B/
lock con MPA II raccomandiamo l’alimentatore
opzionale N 62 E o N 66 E nonché l’alimentatore a
batteria (sempre opzionale) B 18 dell’AKG.
Se usate alimentatori diversi da quelli raccomandati dall’AKG, il microfono può subire
danni e la garanzia si estingue.
Page 35

35
2 Collegamento
2.7 Cavo di
collegamento
Per collegamenti a ingressi simmetrici (XLR)
potete usare un cavo XLR normale.
Per ingressi asimmetrici (presa jack) ci vuole un
cavo con una presa XLR e una spina jack mono
(vedi fig. 1):
1. Nella presa XLR, collegate con un ponte a filo i
contatti 1 e 3 e portateli sullo schermo del
cavo.
2. Collegate il conduttore interno del cavo con il
contatto 2 della presa XLR e la punta della
spina jack.
Fig. 1: Cavo di collegamento per ingressi micro-
fonici asimmetrici.
Page 36

36
3 Indicazioni per l’uso
3.1 Come
indossare il
microfono
1. Regolate gli archetti che poggiano sugli orecchi
in modo che l’archetto dietro la nuca sia ben
assicurato.
Fig. 2: Regolazione degli archetti sugli orecchi
2. Indossate l’archetto dietro la nuca come indi-
cato nelle figg. 3-5.
Fig. 3: Archetto nuca
Fig. 4 Fig. 5
Page 37

37
3 Indicazioni per l’uso
Aggiustamento
degli archetti
sugli orecchi:
Posizionare il
microfono:
Scarico della
trazione:
Fig. 6 Fig. 7
3. Se l’archetto dietro la nuca non è regolato in
modo ottimale, potete aggiustare gli archetti
sugli orecchi come indicato nella fig. 6. Spostate il reggicavo in modo che il cavo rimanga allentato (vedi fig. 7).
4. Se il micofono è
sempre troppo allentato, l’archetto
dietro la nuca può
venir piegato leggermente verso l’interno (vedi fig. 8).
Fig. 8:
5. Piegate il collo di cigno in modo che il microfono si trovi lateralmente davanti all’angolo
della bocca.
6. Passate il cavo microfonico attraverso le tre
fessure sul clip di fissaggio e fissate il clip sul
collo della camicia.
In questo modo il microfono viene scaricato
dalla trazione del cavo e si adagia in modo
confortevole sulla testa.
Page 38

38
3 Indicazioni per l’uso
3.2 Filtro
antisoffio
Se (p.e. all’aperto) ci sono forti rumori causati dal
vento o rumori pop, fissate l’antisoffio in espanso
in dotazione sul microfono.
1. Infilate il filtro antisoffio sulla capsula microfonica.
2. Infilate l’antisoffio anche sul lato esterno della
capsula microfonica.
4 Dati tecnici
4.1 Microfono
Modo di funzionamento: microfono a condensatore con carica per-
manente
Direttività: cardioide
Risposta in frequenza: 20 - 20.000 Hz
Sensibilità: 5 mV/Pa (-46 dBV rif. a 1 V/Pa)
Impedenza elettrica a 1000 Hz: 200 Ω
Impedenza di carico raccomandata: >2000 Ω
Livello di pressione acustica limite
per un coefficiente di distorsione
armonica di 1% / 3%: 126 / 130 dB SPL
Livello di pressione acustica
equivalente: 33 dB (secondo DIN 45412)
Tensione di alimentazione:
C 420: alimentazione phantom universale 9 - 52 V
C 420 L: alimentazione a batteria 9 V attraverso dal
B 29 o dal trasmettitore da tasca, oppure ali-
mentazione phantom universale 9 - 52 V
dall‘adattatore MPA II
C 420 B/lock: alimentazione a batteria 9 V dal B 29 oppure
alimentazione phantom universale 9-52 V
dall‘adattatore MPA II
Assorbimento: 2 mA circa
Connettore: XLR a 3 poli
Page 39
39
4 Dati tecnici
Superficie: nero opaco
Dimensioni: 130 mm Ø
Lunghezza del cavo: 3 m
Peso netto: 30 g senza connettore
4.4 Diagramma
polare
4.2 Indicazione
di conformità
5 Pulizia
4.3 Curva delle frequenze
Tutte le superfici metalliche possono venir pulite
senza problemi con spirito (industriale) o alcool.
L‘antisoffio in espanso viene pulito preferibilmente
con una blanda soluzione detersiva; appena
asciugato, l‘antisoffio è subito pronto all'uso.
Questo prodotto corrisponde alla norma
EN 50 082-1, presupposto che gli apparecchi
collegati siano conformi alle norme CE.
Page 40

40
6 Guida alla soluzione di problemi
Problema
1. Il microfono non
funziona:
2. L’headset non è
fissato bene sulla
testa; il braccio
microfonico non è
ben fermo:
3. Si avvertono forti
rumori pop, o forti
rumori causati dal
vento o dal fiato:
Possibile causa
Non c’è alimentazione.
L’archetto sopratesta
non è regolato correttamente.
Il microfono è troppo
vicino alla bocca o al
naso.
Rimedio
C 420: Controllare
l’alimentazione
phantom.
C 420 B/lock: Con-
trollare le batterie nel
B 29 o nel PT 300.
C 420 L: Controllare le
batterie nel trasmettitore da tasca.
Regolare l’archetto
sopratesta esattamente come descritto nel
capitolo 3.1. Osservare
in particolare la fig. 9!
Girate le aperture per
l’entrata del suono del
microfono verso l‘angolo della bocca, a una distanza tale da bocca e
naso che non si possono verificare più rumori
causati dal fiato.
Page 41

41
6 Guida alla soluzione di problemi
Problema
4. Il microfono con
l’andar del tempo
ha un suono sempre più cupo:
5. Il microfono ha un
suono “sottile”,
feedback già a livelli minimi:
Possibile causa
Il filtro antisoffio interno o esterno W 44 è
sporco e sopprime
quindi le frequenze
alte.
Il microfono è troppo
lontano dall’angolo
della bocca.
Rimedio
1. Pulire l’antisoffio
W 44 con una
soluzione di
sapone.
2. Far pulire l’antisoffio interno dal service AKG.
ATTENZIONE: Non
aprire la scatola
microfonica perché
altrimenti la garanzia si estingue.
Posizionare il microfono più vicino all’angolo
della bocca.
Page 42

42
1 Descripción
1.1 Generalidades
1.2 Variantes
C 420:
C 420 L:
C 420/B-lock:
El C 420 es un micrófono miniatura de condensador, que se lleva en la cabeza con un cabezal de
nuca. El micrófono tiene característica direccional
cardiode y el sonido lo capta preferentemente
desde adelante (de la boca).
La caja del micrófono con el transductor de condensador está unida al brazo del micrófono por
medio de una suspensión elástica para reprimir
ruidos de cable y de vibraciones. El brazo del
micrófono posiciona el micrófono al lado y por
delante de la boca. Con ello se evitan en gran
medida los sonidos pop y el micrófono queda protegido contra suciedad. La pantalla antiviento
suministrada reprime además sonidos de viento y
pop.
El C 420 puede adquirirse en tres modelos:
Con conector XLR de 3 polos y con adaptador
incorporado para alimentación fantasma universal
de 9 a 52 V.
Con mini conector XLR enclavable para la conexión al alimentador de batería B 29 (modelo
nuevo), adaptador de alimentación fantasma
MPA II (modelo nuevo) o emisor de bolsillo AKG.
Con clavija jack de 3.5 mm enclavable para la
conexión al alimentador de batería B 29 (modelo
antiguo), adaptador de alimentación fantasma
MPA II (modelo antiguo) o emisor de bolsillo
PT 300.
Page 43
43
1 Descripción
1.3 Accesorios
incluidos
1.4 Accesorios
recomendados
para el C 420
1.5 Accesorios
recomendados
para C 420 L,
C 420 B/lock
2.1 C 420
Todos los modelos del C 420 son suministrados
con los accesorios siguientes:
Pantalla antiviento de goma espuma W 44
Alimentador de batería B 18
Adaptador de red N 62 E, N 66 E
Cable de conexión MK 9/10, 10 m
Alimentador de batería B 29
Adaptador de alimentación
fantasma MPA II
El C 420 es un micrófono de condensador y necesita, por lo tanto, alimentación de corriente.
1. Conecte el adaptador de alimentación fantasma del cable del micrófono a una entrada
de micrófono XLR balanceada con alimentación fantasma.
2. Concecte la alimentación fantasma (consulte
para ello el Modo de empleo del aparato correspondiente).
3. Si su pupitre de mezcla no tiene alimentación
fantasma, conecte un alimentador fantasma
de AKG (N 62 E, N 66E, B 18 E) entre el micrófono y la entrada del pupitre de mezcla.
El alimentador fantasma puede conectarse
también a una entrada no balanceada.
2 Conexión
Page 44
44
2 Conexión
2.2 C 420 L
2.3 C 420 B/lock
2.4 Alimentador
de batería B 29
2.5 Adaptador
de alimentación
fantasma MPA II
2.6 Aparatos de
alimentación
fantasma exter-
nos
¡Importante!
1. Enchufe el mini-conector XLR del cable del
micrófono, hasta que llegue al tope, en una de
las dos mini bornas XLR en el alimentador de
batería B 29, el mini-acoplamiento XLR en el
cable de conexión del MPA II o en la borna de
entrada del emisor de bolsillo.
El conector queda enclavado automáticamente.
2. Conecte el B 29 ó el MPA II, respectivamente, a
la entrada deseada.
Este modelo corresponde al C 420 L, pero dispone de una clavija jack mono atornillable de
3.5 mm que puede conectarse directamente al
antiguo modelo del B 29, MPA II o al emisor de
bolsillo PT 300 de AKG (consulte para ello el Modo
de empleo del aparato correspondiente).
El alimentador de batería B 29 opcional permite
conectar dos micrófonos en una entrada común
balanceada o no balanceada, por lo que son
necesarias menos entradas de pupitre de mezcla.
Con el adaptador de alimentación fantasma
opcional MPA II puede conectarse el C 420 a cualquier fuente de alimentación fantasma y también
a entradas XLR con alimentación fantasma de 9 a
52 V.
Como aparatos de alimentación fantasma para el
C 420 L y el C 420 B/lock con MPA II recomendamos el alimentador de red opcional N 62 E o el
N 66 E, así como también el alimentador de
batería B 18 de AKG (que también es un accesorio
opcional).
Si se utilizan alimentadores diferentes a los
recomendados por AKG puede dañarse el
micrófono, cesando con ello la garantía.
Page 45
45
2 Conexión
2.7 Cable de
conexión
Las conexiones para entradas balanceadas
puede realizar con un cable XLR estándar.
Para entradas no balanceadeas (enchufe jack
mono) debe usar un cable con una hembra de
conector XLR y un conector jack mono (véase
fig. 1):
1. Una mediante un puente de alambre la espiga
1 del conector XLR con la espiga 3 y con la
pantalla del cable.
2. Una el conductor interno del cable con la
espiga 2 del conector XLR y la punta del
conector jack.
Fig. 1: Cable de conexión para entradas no
balanceadas
Page 46

46
3 Indicaciones de funcionamiento
3.1 Colocarse el
micrófono
1. Ajuste los arcos auriculares de tal forma que el
cabezal de nuca esté firmemente ceñido a la
cabeza.
Fig. 2: Ajuste de los arcos auriculares
2. Colóquese el cabezal tal como se indica en las
Figs. 3 a 5.
Fig.3: Cabezal
Fig. 4 Fig.5
Page 47
47
3 Indicaciones de funcionamiento
Reajuste de los
arcos auriculares
Posicionar el
micrófono:
Contratracción:
Fig. 8:
5. Doble el cuello de cisne de tal forma que el
micrófono quede ubicado al lado de la comisura de los labios.
6. Haga pasar el cable del micrófono a través de
las tres ranuras en el clip de suspensión y fije
el clip en el cuello de la camisa. De esta forma
se le quita al micrófono la tracción del cable y
se ciñe en forma agradable y ligera a la cabeza.
Fig 6 Fig. 7
3. Si el cabezal no tiene un ajuste óptimo pueden
regularse los arcos auriculares como se indica
en la Fig. 6. Desplace el portacable de tal
forma que el cable esté siempre suelto (véase
Fig. 7).
4. Si el micrófono sigue
estando muy suelto,
el cabezal puede doblarse ligeramente
hacia adentro (véase
Fig. 8).
Page 48

48
3 Indicaciones de funcionamiento
3.2 Pantalla
antiviento
Si (p.ej. al aire libre) surgen fuertes ruidos de
viento o pop, coloque la pantalla antiviento de
goma espuma en el micrófono.
1. Coloque la pantalla antiviento sobre la cápsula
del micrófono.
2. Recubra también el extremo libre de la cápsula
del micrófono con la pantalla antiviento.
4 Datos técnicos
4.1 Micrófono
Modo de funcionamiento: Micrófono de condensador con carga per-
manente
Característica direccional: Cardioide
Gama de frecuencia: 20 - 20000 Hz
Sensibilidad: 5 mV/Pa (-46 dB referido a 1 V/Pa)
Impedancia eléctrica a 1000 Hz:
200 Ω
Impedancia de carga recomendada: >2000 Ω
Presión sonora límite para factor de
distorsión no lineal de 1% / 3%: 126 / 130 dB SPL
Nivel de ruidoequivalente: 33 dB (según DIN 45412)
Tensión de alimentación:
C 420: Alimentación fantasma universal 9 - 52 V
C 420 L: Alimentación de batería 9 V con el
B 29 o el emisor de bolsillo o alimentación
fantasma universal
9 - 52 V con el adaptador MPA II
C 420 B/lock: Alimentación de batería 9 V con el
B 29 o alimentación fantasma universal
9 - 52 V con el adaptador MPA II
Toma de corriente: aprox. 2 mA
Tipo de conector: XLR de 3 polos
Superficie: Negro opaco
Dimensiones: 130 mm de diámetro
Page 49

49
4 Datos técnicos
Longitud de cable: 3 m
Peso neto: 30 g sin conector
4.4
Diagrama polar
4.2 Indicación
de conformidad
5 Limpieza
4.3 Respuesta de frecuencia
Todas las superficies metálicas pueden limpiarse
sin problema con alcohol o alcohol industrial.
La pantalla antiviento de goma espuma puede
limpiarse fácilmente con un detergente suave y
reutilizarse inmediatamente después de haberse
secado.
Este producto corresponde a la norma EN 50 082-1,
siempre y cuando los aparatos postconectados
correspondan también a las normas CE.
Page 50

50
6 Reparación de desperfectos
Desperfectos
1. El micrófono no
funciona:
2. El casco no se
ciñe firmemente a
la cabeza, el brazo
del micrófono se
mueve:
3. Se escuchan ruidos fuertes pop,
de viento o de respiración:
Posibles causas
No hay tensión de alimentación.
El cabezal no está bien
ajustado.
El micrófono está demasiado cerca de la
boca o la nariz.
Reparación
C 420: Controlar la
alimentación fantasma.
C 420 B/lock: Contro-
lar las pilas en el
B29 o en el PT 300.
C 420 L: Controlar las
pilas en el emisor
de bolsillo.
Ajuste el cabezal tal
como se indica en el
Capítulo 3.1. Fíjese
especialmente en la
Fig. 9.
Oriente la rejilla del micrófono sobre la comisura de los labios y a
una distancia tal de la
boca y la nariz que no
se puedan escuchar
los ruidos de la respiración.
Page 51

51
6 Reparación de desperfectos
Desperfectos
4. El micrófono su-
ena cada vez más
bajo:
5. El micrófono su-
ena "débil", la retroalimentación
es percebible a niveles reducidos:
Posibles causas
La pantalla antiviento
interna o externa W 44
está sucia, lo que
atenúa las altas frecuencias.
El micrófono está demasiado alejado de la
comisura de los labios.
Reparación
1. Lavar la pantalla
antiviento W 44 con
una lejía jabonosa.
2. La pantalla antiviento interior debe
ser limpiada por el
servicio de AKG.
ATENCION: No debe
abrirse nunca la
caja del micrófono,
ya que si no cesa la
garantía.
Posicionar el micrófono más cerca de la
comisura de los labios.
Page 52

52
1 Descrição
1.1 Geral
1.2 Versões
C 420:
C420 L:
C 420/B-lock:
O C 420 é um microfone de condesador miniaturizado que se fixa na cabeça por meio de um arco
de nuca. O microfone tem uma caraterística direccional cardióide e por isso è mais sensível para
sons que chegam de frente (da boca).
A carcaça do microfone com o transdutor de condensador está unida ao braço do microfone por
meio de uma suspensão elástica que elimina os
ruídos provocodos pelo cabo e ruidos de
vibração. O braço posiciona o microfone em
frente da comissura dos lábios. Isto é um método
muito eficaz de evitar ruídos pop e a contaminação do microfone. O windscreen incluído na
embalagem proporciona uma protecção adicional
contra os ruídos de vento e pop.
O C 420 é disponível em três versões:
Com conetor XLR tripolar com adatador integrado
para alimentação fantasma universal de 9 a 52 V.
Com conetor mini-XLR travador para a ligação ao
alimentador a pilhas B 29 (versão nova), ao adatador de alimentação fantasma MPA II (versão
nova) ou emissores de bolso AKG.
Com jaque 3,5 mm travador para a ligação ao alimentador a pilhas B 29 (versão antiga), ao adatador de alimentação fantasma MPA II (versão
antiga) ou um emissor de bolso PT 300.
Page 53

53
1 Descrição
1.3 Acessórios
incluídos
1.4 Acessórios
opcionais para
C 420
1.5 Acessórios
opcionais para
C 420L,
C 420 B/lock
2.1 C 420
Todas as versões do C 420 são fornecidas com o
seguinte acessório:
Windscreen de material esponjoso W 44
Alimentador a pilhas B 18
Alimentador de rede N 62 E, N 66 E
Cabo de conexão de 10 m MK 9/10
Alimentador a pilhas B 29
Adatador para alimentação fan-
tasma MPA II
O C 420 é um microfone de condensador e por
isso precisa de uma alimentação de corrente.
1. Conete o adatador de alimentação fantasma
no cabo a uma entrada de microfone XLR com
alimentação fantasma.
2. Ligue a alimentação fantasma. (Veja as
instruções de uso do equipamento ao qual o
microfone está ligado.)
3. Se sua mesa de mistura não tiver uma alimentação fantasma, conete um alimentador fantasma da AKG (N 62 E, N 66 E, B 18 E) entre o
microfone e a entrada na mesa de mistura.
Pode conetar o alimentador fantasma a uma
entrada ou balanceada ou não balanceada.
2 Conexão
Page 54

54
2 Conexão
2.2 C 420 L
2.3 C 420 B/lock
2.4 Alimentador
a pilhas B 29
2.5 Adatador
fantasma MPA II
2.6 Alimentado-
res fantasma
extermos
Importante!
1. Insera até ao encosto a ficha mini-XLR fixado
ao cabo do microfone em uma das tomadas
mini-XLR no B 29, na tomada mini-XLR do
cabo de conexão do MPA II ou no conetor de
entrada do emissor de bolso.
A ficha bloqueia-se automàticamente.
2. Ligue o B 29 ou o MPA II à entrada desejada.
Esta versão é idéntica com o C 420 L mas tem um
plugue jaque mono de 3,5 mm aparafusável que
pode conetar iretamente na versão antiga do
B 29, do MPA II ou no emissor de bolso PT 300 da
AKG. (Veja as instruções de uso do equipamento
respetivo.)
O alimentador a pilhas B 29 permite-lhe conetar
dois microfones a uma entrada comum balanceada ou não balanceada. Deste modo, precisa
de menos entradas na mesa de mistura.
O adatador fantasma MPA II permite-lhe conetar o
C 420 a qualquer fonte de alimentação fantasma
ou entradas XLR com alimentação fantasma de
9 a 52 V.
Como alimentadores fantasma para o C 420 L e
C 420 B/lock com o MPA II recomendamos os
alimentadores de rede opcionais N 62 E e N 66 E e
o alimentador a pilhas B 18 (também opcional) da
AKG.
Se usar outros alimentadores senão aqueles
recomendados pela AKG, o microfone pode
ser danado e caduca a garantia.
Page 55

55
2 Conexão
2.7 Cabo de
conexão
A ligação a entradas balanceadas (XLR) pode
realizar com um cabo XLR normal.
Para entradas não balanceadas (tomada jaque
mono), porém, é preciso um cabo com um
conector XLR fêmea e um plugue jaque mono
(veja fig. 1):
1. Solde em ponte os pinos 1 e 3 no conetor XLR
e conete à blindagem do cabo.
2. Conete o condutor interno do cabo com o pino
2 do conetor XLR e com a ponta do plugue
jaque.
Fig. 1: Cabo de conexão para entradas não
balanceadas.
Page 56
56
3 Indicações de uso
3.1 Meter o
microfone
1. Ajuste as hastes de tal forma que o arco de
nuca assente seguramente na cabeça.
Fig. 2: Ajustar as hastes.
2. Meta o arco de nuca como indicado nas
figuras 3 a 5.
Fig. 3: Arco de nuca
Fig. 4 Fig. 5
Page 57

57
3 Indicações de uso
Reajustar as
hastes:
Posicionar o
microfone:
Destração:
Fig. 8:
5. Curve o pescoço de cisne de tal maneira que o
microfone fique em frente da comissura dos
lábios.
6. Enfie o cabo do microfone pelas três fendas no
grampo de fixação e aperte o grampo no colarinho. Desta maneira, o microfone ficará descarregado da tração do cabo e assentará na
cabeça de forma mais leve e agradável.
Fig. 6 Fig. 7
3. Se o arco de nuca não assentar òtimamente,
pode reajustar as hastes como ilustrado na
figura 6. Posicione o passa-cabo de tal forma
que o cabo fique desapertado (veja fig. 7).
4. Se o microfone
ainda assentar mal,
pode curvar o arco
de nuca um pouco
para dentro (veja
fig. 8).
Page 58
58
3 Indicações de uso
3.2 Windscreen Se surgirem fortes ruídos de vento ou pop (p.ex.
ao ar livre), fixe o windscreen de material esponjoso incluído na embalagem no microfone.
1. Coloque o windscreen na cabeça do micro-
fone.
2. Tire o windscreen até sobre o canto exterior da
cápsula microfonica.
4 Especificações
4.1 Microfone
Tipo: microfone de condensador com carga per-
manente
Caraterística direccional: cardióide
Resposta de freqüência: 20 - 20.000 Hz
Sensibilidade: 5 mV/Pa (-46 dBV ref. a 1 V/Pa)
Impedância: 200 Ω
Impedância de carga recomendada: >2000 Ω
Pressão sonora limite para
1% / 3% de distorsão: 126 / 130 dB SPL
Nível equivalente de ruído: 33 dB (conforme DIN 45412)
Tensão de alimentação:
C 420: 9 a 52 V (alimentação fantasma universal)
C 420 L: alimentação de pilha de 9 V por B 29 ou
emissor de bolso; ou alimentação fantasma
universal entre 9 e 52 V através do adatador
MPA II
C 420 B/lock: alimentação de pilha de 9 V por B 29 ou
emissor de bolso; ou alimentação fantasma
universal entre 9 e 52 V através do adatador
MPA II
Consumo de corrente: aprox. 2 mA
Tipo de conetor: XLR tripolar
Page 59
59
4 Especificações
Superfície: preto mate
Dimensões: 130 mm de diâmetro
Comprimento do cabo: 3 m
Peso líquido: 30 g sem conetor
4.4 Diagrama
polar
4.2 Indicação de
conformidade
5 Limpeza
4.3 Resposta de freqüência
Pode limpar todas as superfícies de metal facilmente com álcool industrial ou álcool.
Lave o windscreen de material esponjoso com
uma solução não agressiva de detergente. Pode
usá-lo imediatamente depois de ter secado.
Este produto corresponde à norma EN 50 082-1
contanto que os equipamentos conetados correspondam às normas CE.
Page 60
60
6 Como resolver problemas
Falha
1. O microfone não
funciona:
2. O arco não assenta seguramente; o braço do
microfone abana:
3. Fortes ruídos de
pop ou vento/
respiração:
Causa possível
Falta a tensão de alimentação.
O arco de nuca não
está bem ajustado.
O microfone está
demais perto da boca
ou do nariz.
Solução
C 420: Controlar a
alimentação fantasma.
C 420 B/lock: Con-
trolar as pilhas no
B 29.
C 420 L: Controlar as
pilhas no emissor
de bolso.
Ajustar o arco de
nuca exatamente
conforme
capítulo 3.1.
Repare bem a figura 9!
Orientar as aberturas
de entrada do som do
microfone para a
comissura dos lábios
e tão longe da boca
que os ruídos de
respiração desapareçam.
Page 61
61
6 Como resolver problemas
Fehler
4. O som do micro-
fone torna-se
mais surdo com o
tempo:
5. O som do micro-
fone está fraco,
feedback começa
já com níveis
baixos:
Causa possível
O Windscreen interno
ou externo (W 44)
atenua freqüências
altas por causa de
contaminação.
O microfone está
demais longe do canto
da boca.
Solução
1. Limpar o windscreen W 44 com
uma solução de
detergente.
2. Mandar o windscreen interno limpado por uma
agência de serviço
da AKG.
ATENÇÃO: Não abrir a
carcaça do
microfone. Neste
caso caducará a
garantia.
Posicionar o micfone
mais perto do canto
da boca.
Page 62

62
Notizen - Notes - Notes - Note - Notas - Notas
Page 63

63
Notizen - Notes - Notes - Note - Notas - Notas
Page 64

AKG ACOUSTICS, U.S.
1449 Donelson Pike, Nashville, TN 37217, U.S.A.
Tel: (615) 360-0499, Fax: (615) 360-0275
Studer Japan Ltd.
2-43-7, Uehara, Shibuya-ku, Tokyo 151-0064/JAPAN
Tel: (813) 3465-2211, Fax: (813) 3465-2214
Erikson Pro Audio
620 McCaffrey, St-Laurent, Quebec, H4T 1N1, CANADA
Tel: (514) 738-3000, Fax: (514) 737-5069
Internet: www.jam-ind.com/eriksonpro
AKG Acoustics GmbH
Lemböckgasse 21–25, P.O.B. 158, A-1230 Vienna/AUSTRIA
Tel: (43 1) 86 654-0*, Fax: (43 1) 86 654-516
Internet: http://www.akg-acoustics.com
AKG Acoustics, Harman Pro GmbH
Bodenseestraße 228, D-81243 München/GERMANY
Tel: (089) 87 16-0, Fax: (089) 87 16-200
e-mail: akg-acoustics@t-online.de
Arbiter Pro Audio
Wilberforce Road, London NW9 6AX/ENGLAND
Tel: (0181) 202 1199, Fax: (0181) 202 7076
Technische Änderungen vorbehalten. Specifications subject to change without notice. Ces caractéristiques sont susceptibles de modifications.
Mikrofone · Kopfhörer · Drahtlosmikrofone · Drahtloskopfhörer · Kopfsprechgarnituren · Akustische Komponenten
Microphones · Headphones · Wireless Microphones · Wireless Headphones · Headsets · Electroacoustical Components
Microphones · Casques HiFi · Microphones sans fil · Casques sans fil · Micros-casques · Composants acoustiques
Microfoni · Cuffie HiFi · Microfoni senza filo · Cuffie senza filo · Cuffie-microfono · Componenti acustici
Micrófonos · Auriculares · Micrófonos inalámbricos · Auriculares inalámbricos · Auriculares con micrófono · Componentes acústicos
Microfones · Fones de ouvido · Microfones s/fios · Fones de ouvido s/fios · Microfones de Cabeça · Componentes Acústicos
Ci riserviamo il diritto di effettuare modifiche tecniche. Nos reservamos el derecho de introducir modificaciones técnicas. Especificações sujeitas à mudanças sem aviso prévio.
Printed in Austria on recycled paper. 09/99/9100 U 0918
 Loading...