

AKG C 1000 S User Instructions [de, en, fr, it, es, pt]

BEDIENUNGSANLEITUNG . . . . . . . . . .S. 2
Bitte vor Inbetriebnahme des Gerätes lesen!
USER INSTRUCTIONS . . . . . . . . . . . . . . .p. 14
Please read the manual before using the equipment!
MODE D’EMPLOI . . . . . . . . . . . . . . . . . . . . .p. 26
Veuillez lire cette notice avant d’utiliser le système!
ISTRUZIONI PER L’USO . . . . . . . . . . . . .p. 38
Prima di utilizzare l’apparecchio, leggere il manuale!
MODO DE EMPLEO . . . . . . . . . . . . . . . . . . .p. 50
¡Sirvase leer el manual antes de utilizar el equipo!
INSTRUÇÕES DE USO . . . . . . . . . . . . . . .S. 62
Favor leia este manual antes de usar o equipamento!
C1000 S

Inhaltsverzeichnis
Seite
Willkommen!............................................................................................................3
Sicherheit und Umwelt.............................................................................................3
Sicherheit............................................................................................................3
Umwelt ...............................................................................................................3
1 Beschreibung ....................................................................................................3
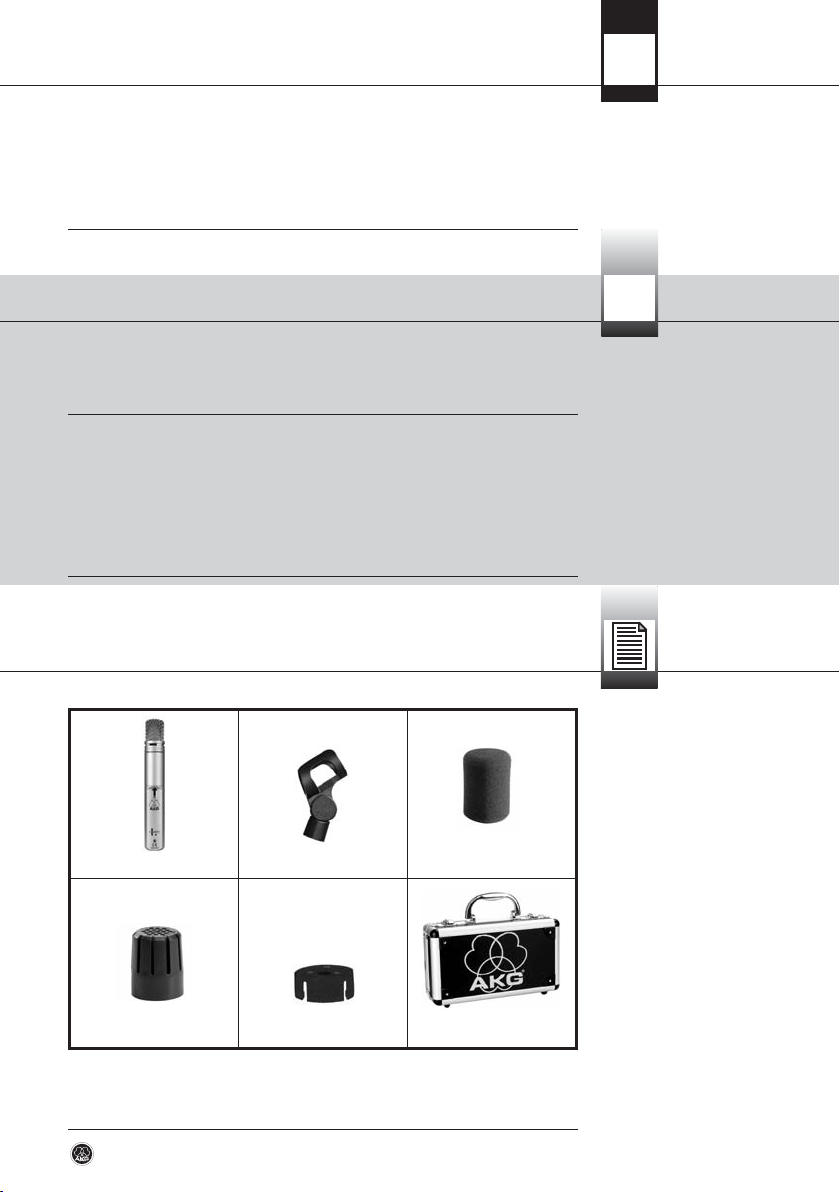
1.1 Lieferumfang ................................................................................................3
1.2 Optionales Zubehör .......................................................................................4
1.3 Mikrofon.......................................................................................................4
2 Stromversorgung und Anschluss.......................................................................5
2.1 Allgemeines..................................................................................................5
2.2 Batteriebetrieb ..............................................................................................5
2.2.1 Batterie einlegen/wechseln und testen ...................................................5
2.2.2 Anschluss an symmetrischen Eingang....................................................6
2.2.3 Mikrofon an unsymmetrischen Eingang anschließen................................6
2.3 Phantomspeisung .........................................................................................7
3 Anwendung .......................................................................................................7
3.1 Montage des PPC 1000 und PB 1000.............................................................7
3.2 Anwendungsgebiete......................................................................................7
3.3 Gesang.........................................................................................................7
3.3.1 Besprechungsabstand und Naheffekt.....................................................8
3.3.2 Schalleinfallswinkel ..............................................................................8
3.3.3 Rückkopplung ......................................................................................8
3.3.4 Sprachverständlichkeit..........................................................................9
3.4 Querflöte ......................................................................................................9
3.5 Saxophon ...................................................................................................10
3.6 Akustische Gitarre .......................................................................................11
4 Reinigung ........................................................................................................11
4.1 Gehäuseoberfläche .....................................................................................11
4.2 Innenwindschutz .........................................................................................11
5 Fehlerbehebung ..............................................................................................12
6 Technische Daten ............................................................................................13
C 1000 S2
Willkommen!
1.1 Lieferumfang
Vielen Dank, dass Sie sich für ein Produkt aus dem Hause AKG entschieden ha-
ben. Bitte lesen Sie die Bedienungsanleitung, insbesondere das Kapitel Sicherheit und Umwelt, aufmerksam durch, bevor Sie das Gerät benützen,
und bewahren Sie die Bedienungsanleitung sorgfältig auf, damit Sie jederzeit
nachschlagen können. Wir wünschen Ihnen viel Spaß und Erfolg!
• Kontrollieren Sie bitte, ob die Verpackung alle oben angeführten Teile enthält.
Falls etwas fehlt, wenden Sie sich bitte an Ihren AKG-Händler.
Sicherheit und Umwelt
Sicherheit
Umwelt
L
• Überprüfen Sie bitte, ob das Gerät, an das Sie das Mikrofon anschließen möchten, den gültigen Sicherheitsbestimmungen entspricht und
mit einer Sicherheitserdung versehen ist.
• Wenn Sie das Gerät verschrotten, trennen Sie Gehäuse, Elektronik und
Kabel und entsorgen Sie alle Komponenten gemäß den dafür geltenden Entsorgungsvorschriften.
• Die Verpackung ist wiederverwertbar. Entsorgen Sie die Verpackung in
einem dafür vorgesehenen Sammelsystem.
C 1000 S
3
1 Beschreibung
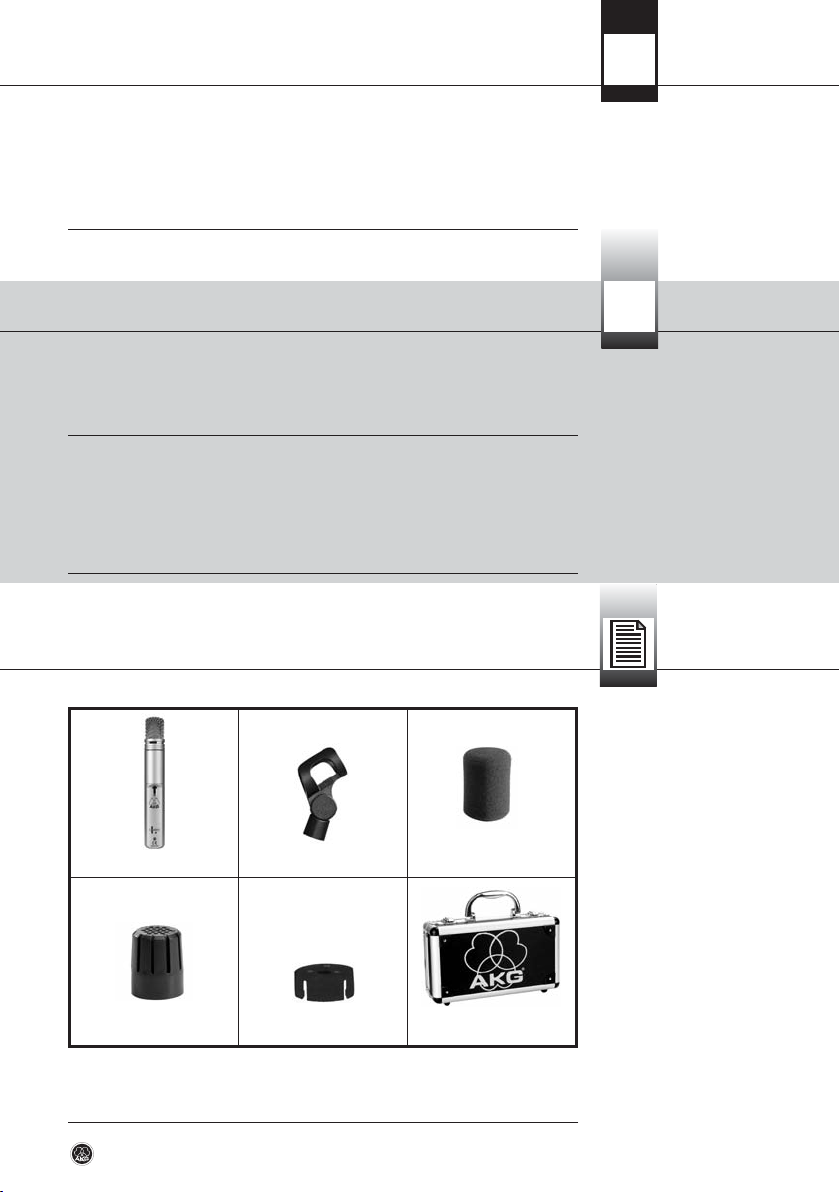
C 1000 S H 63 W 1000
PPC 1000 PB 1000 Mikrofonkoffer

1 Beschreibung
1.2 Optionales Zubehör
1.3 Mikrofon
• Optionales Zubehör finden Sie im aktuellen AKG-Katalog/Folder oder auf
www.akg.com. Ihr Händler berät Sie gerne.
Das Kondensatormikrofon C 1000 S mit nieren/hypernierenförmiger Richtcharakteristik wurde speziell für den professionellen Vokal- und Instrumentaleinsatz auf
der Bühne aber auch im Studio/Broadcastbereich konzipiert. Sie können das Mikrofon entweder mit einer internen 9 V-Batterie oder mit externer Phantomspeisung (9 bis 52 V nach IEC 61938) betreiben und direkt an Mischpulte, Aufnahmegeräte etc. anschließen.
Der hochwertige Backplate-Kondensatorwandler optimiert zusammen mit der
elastischen Kapsellagerung die Unterdrückung von Hand- und Kabelgeräuschen.
Der Mikrofonschaft besteht aus massivem Aluminium mit abschraubbarer Messinghülse mit einem stabilen Nirosta-Stahlgitterkorb. Das Mikrofon besitzt einen
international genormten 3-poligen XLR-Stecker.
Polar Pattern Converter PPC 1000
Der Polar Pattern Converter PPC 1000 wird auf die Kapsel aufgesteckt und wandelt die nierenförmige Richtcharakteristik des Mikrofons in eine hypernierenförmige um. Das Mikrofon wird dadurch für seitlich oder von hinten einfallenden
Schall unempfindlicher, was speziell auf der Bühne dann von Vorteil ist, wenn Sie
Monitorlautsprecher verwenden.
Presence Boost Adapter PB 1000
Der Presence Boost Adapter PB 1000 optimiert die Sprachverständlichkeit durch
eine Anhebung der Empfindlichkeit um etwa 5 dB zwischen 5 kHz und 9 kHz.
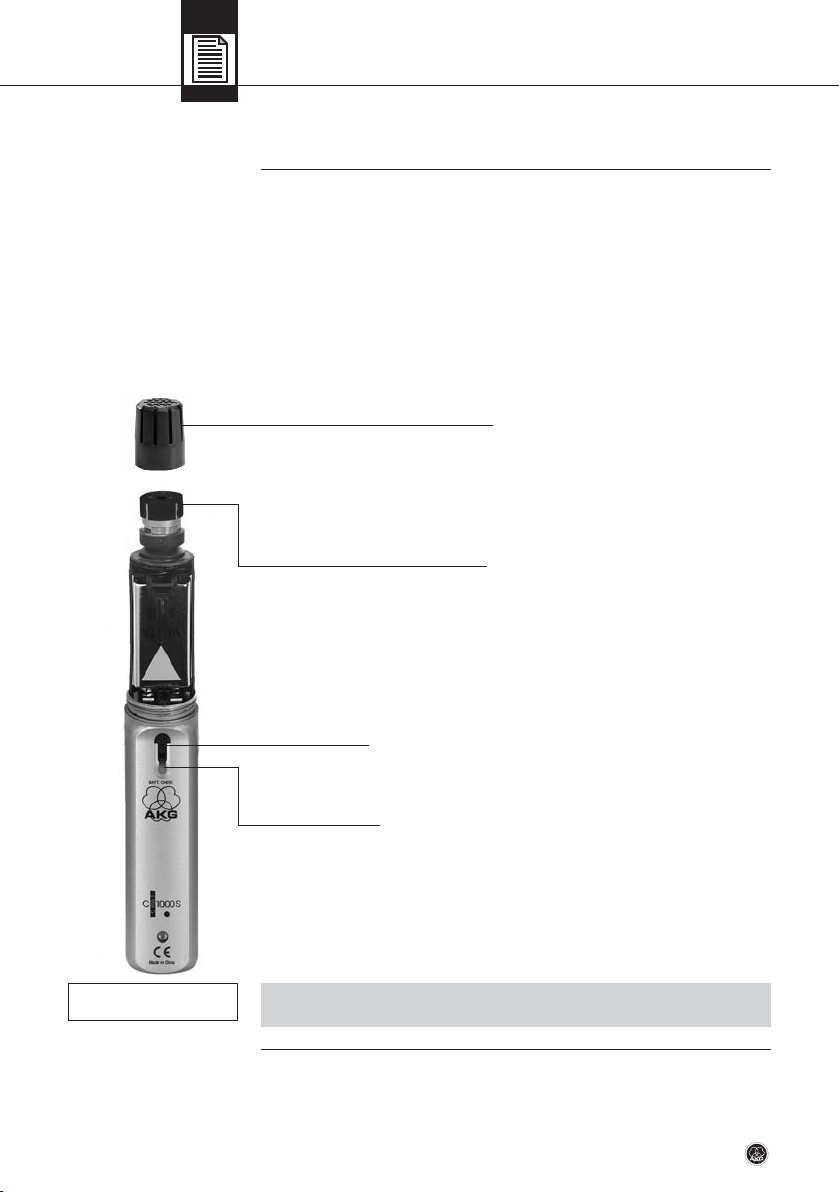
Ein/Ausschalter
Das Mikrofon verfügt über einen Ein/Ausschalter zur Schonung der Batterie. Der
Schalter ist versenkt angeordnet, um unbeabsichtigtes Ausschalten zu verhindern.
Kontroll-LED BATT CHECK
Diese LED zeigt den Ladezustand der Batterie an:
• LED leuchtet beim Einschalten kurz auf und erlischt wieder: Batterien in Ordnung.
• LED leuchtet: Batterien in ca. 60 Minuten erschöpft.
• Wenn Sie das Mikrofon mit Phantomspeisung betreiben, bleibt die KontrollLED immer dunkel.
C 1000 S4
Hinweis
2 Stromversorgung und Anschluss
Das C 1000 S ist ein Kondensatormikrofon und benötigt daher eine Stromversorgung. Die Stromversorgung mittels interner 9 V-Batterie ermöglicht es Ihnen, das
Mikrofon ohne Qualitätsverlust unabhängig von externer Phantomspeisung zu betreiben. Betreiben Sie das Mikrofon jedoch mit externer Phantomspeisung, schaltet es automatisch von Batterie- auf Phantomspeisung um.
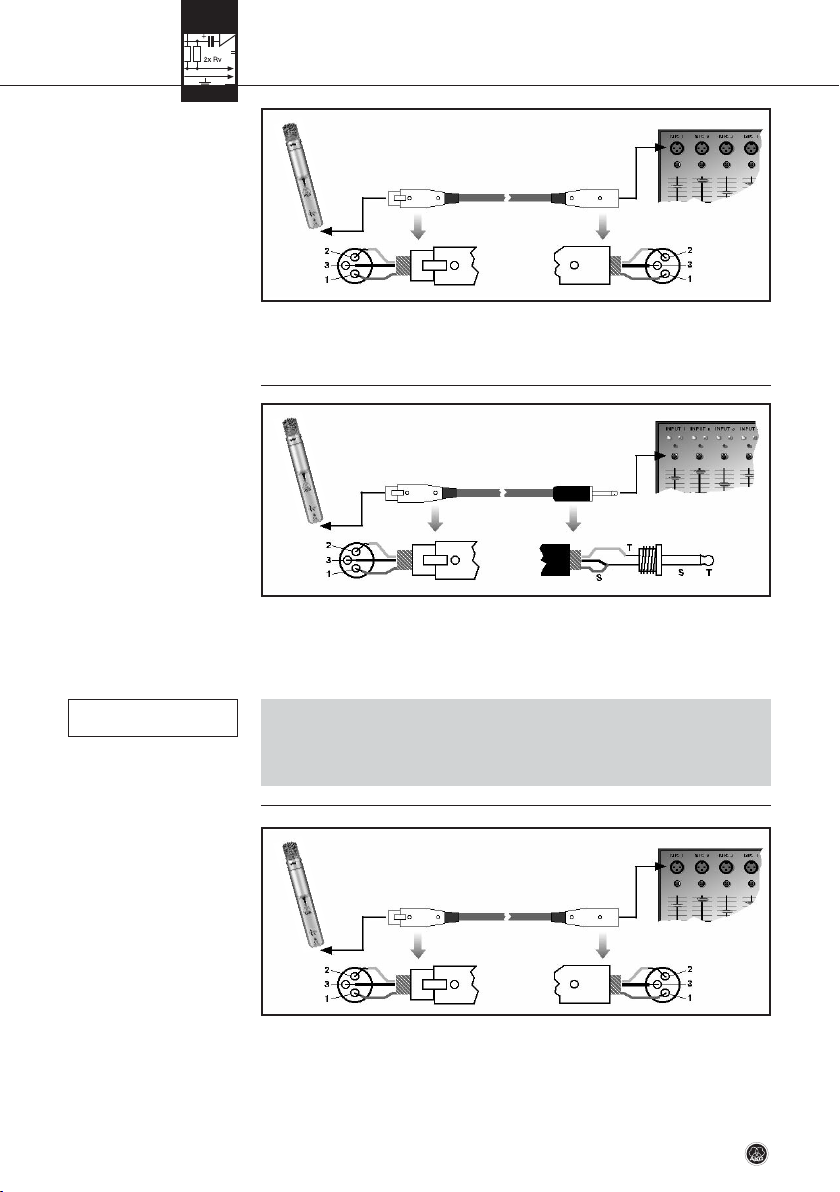
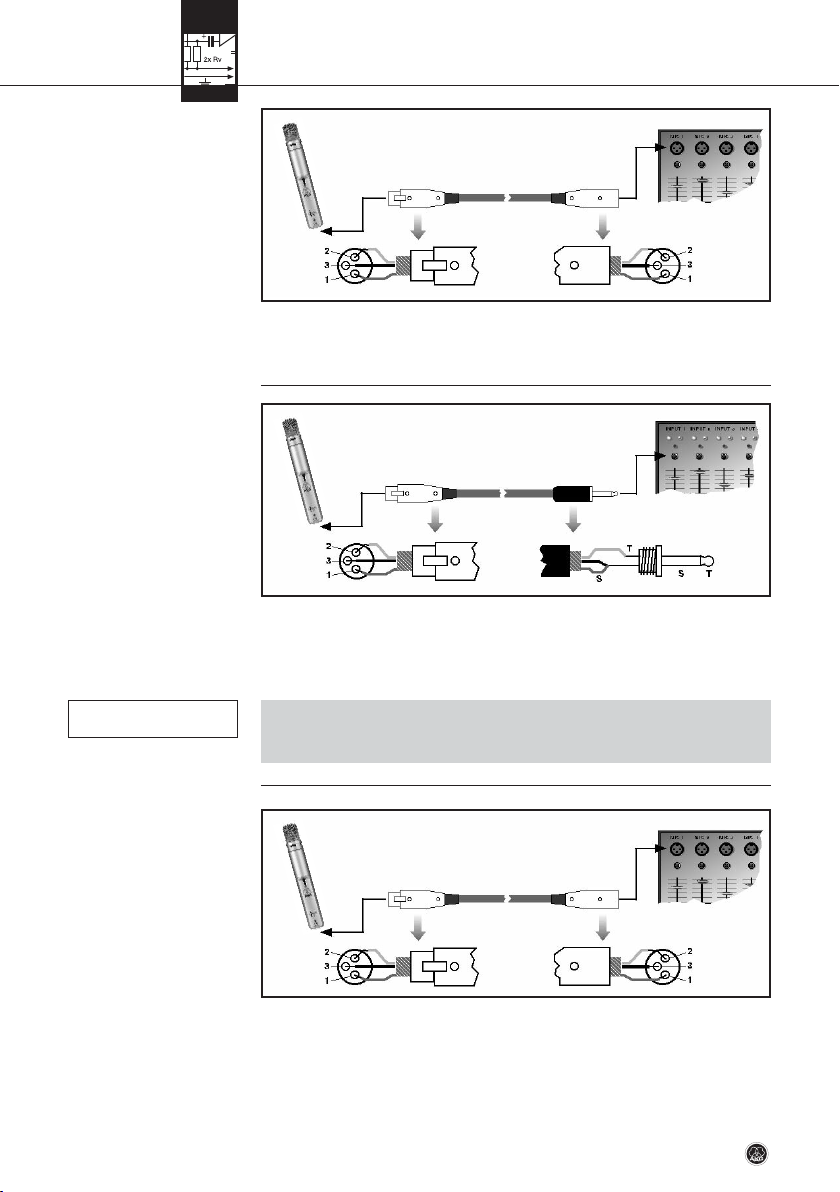
Das Mikrofon besitzt einen symmetrischen Ausgang mit 3-poligem XLR-Stecker:
Stift 1 = Masse
Stift 2 = Tonader (inphase)
Stift 3 = Tonader
Sie können das Mikrofon sowohl an symmetrische Mikrofoneingänge mit oder
ohne Phantomspeisung als auch an unsymmetrisymmetrische Mikrofoneingänge
anschließen.
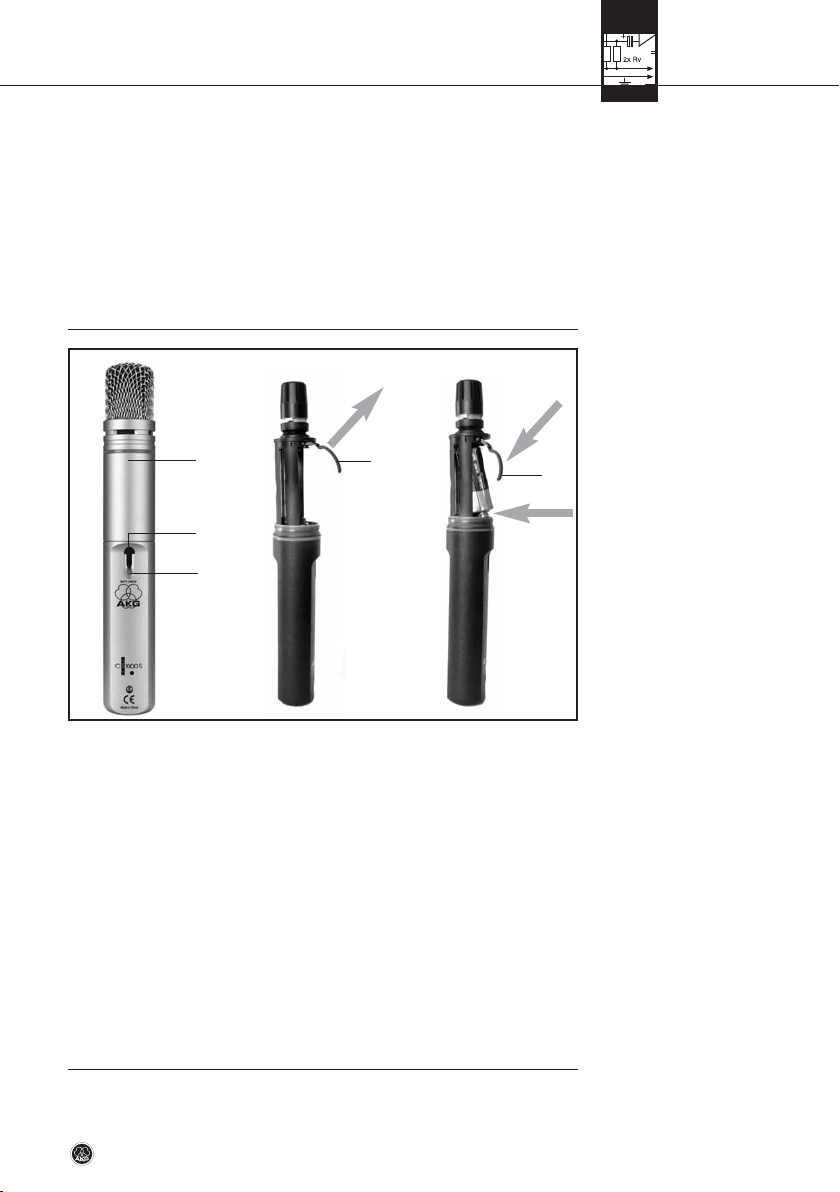
1. Schrauben Sie die Gitterkappe (1) ab.
2. Klappen Sie den Haltebügel (2) auf.
3. Legen Sie die Batterie entsprechend der Markierung "+" und "-" sowie der
Polausnehmungen in das Batteriefach ein.
Es ist nicht möglich, die Batterie mit vertauschten Polen einzusetzen.
4. Klappen Sie den Haltebügel (2) hinunter.
5. Schieben Sie das Batteriefach zurück.
6. Schrauben Sie die Gitterkappe (1) auf das Mikrofon.
7. Schalten Sie das Mikrofon ein, indem Sie den Ein/Aus-Schalter (3) auf "ON"
stellen.
Die Kontroll-LED (4) blitzt kurz auf. Wenn die Batterie in gutem Zustand ist, er-
lischt die Kontroll-LED (4) wieder.
Wenn die Kontroll-LED (4) nicht aufblitzt, ist die Batterie erschöpft. Legen Sie
eine neue Batterie ein.
Wenn die Kontroll-LED (4) zu leuchten beginnt, ist die Batterie in ca. 60 Minu-
ten erschöpft. Tauschen Sie die Batterie möglichst bald gegen eine frische aus.
C 1000 S
5
2.1 Allgemeines
2.2 Batteriebetrieb
2.2.1 Batterie einlegen/
wechseln und testen
Abb. 1: Batterie einlegen
Siehe Abb. 1.
2 Stromversorgung und Anschluss
2.2.2 Anschluss an
symmetrischen Eingang
Abb. 2: Anschluss über
symmetrisches XLR-Kabel
Siehe Abb. 2.
2.2.3 Mikrofon an
unsymmetrischen
Eingang anschließen
Abb. 3: Anschluss über
unsymmetrisches Kabel
Siehe Abb. 3.
2.3 Phantomspeisung
Abb. 4: Anschluss an
symmetrischen Eingang
mit Phantomspeisung
Siehe Abb. 4.
• Verwenden Sie ein handelsübliches XLR-Kabel.
Die Länge dieses Kabels hat keinen Einfluss auf die Signalqualität.
•
Wenn Sie das Mikrofon an einen unsymmetrischen Mikrofoneingang (6,3 mm-Klinkenbuchse) anschließen wollen, verwenden Sie ein Kabel mit XLR-Kupplung und
6,3 mm-Mono-Klinkenstecker. Solche Kabel sind im Musikfachhandel erhältlich.
• Beachten Sie, dass unsymmetrische Kabel Einstreuungen aus Magnetfeldern (von Netz- und Lichtkabeln, Elektromotoren usw.) wie eine Antenne aufnehmen können. Bei Kabeln, die länger als 5 m sind, kann dies zu Brummund ähnlichen Störgeräuschen führen.
1. Schließen Sie das Mikrofon mit einem XLR-Mikrofonkabel an einen symmetrischen XLR-Mikrofoneingang mit Phantomspeisung an.
2. Schalten Sie die Phantomspeisung ein. (Lesen Sie dazu in der Betriebsanleitung des jeweiligen Gerätes nach.)
C 1000 S6
Hinweis

2 Stromversorgung und Anschluss
3.1 Montage des
PPC 1000 und PB 1000
Abb. 5: PPC 1000/
PB 1000 montieren.
Siehe Abb. 5.
3.2 Anwendungsgebiete
3.3 Gesang
• Das Mikrofon schaltet automatisch von Batterie- auf Phantomspeisung um,
wobei die Kontroll-LED deaktiviert wird.
Sie brauchen daher die Batterie nicht aus dem Mikrofon herauszunehmen.
Die Kontroll-LED bleibt dunkel.
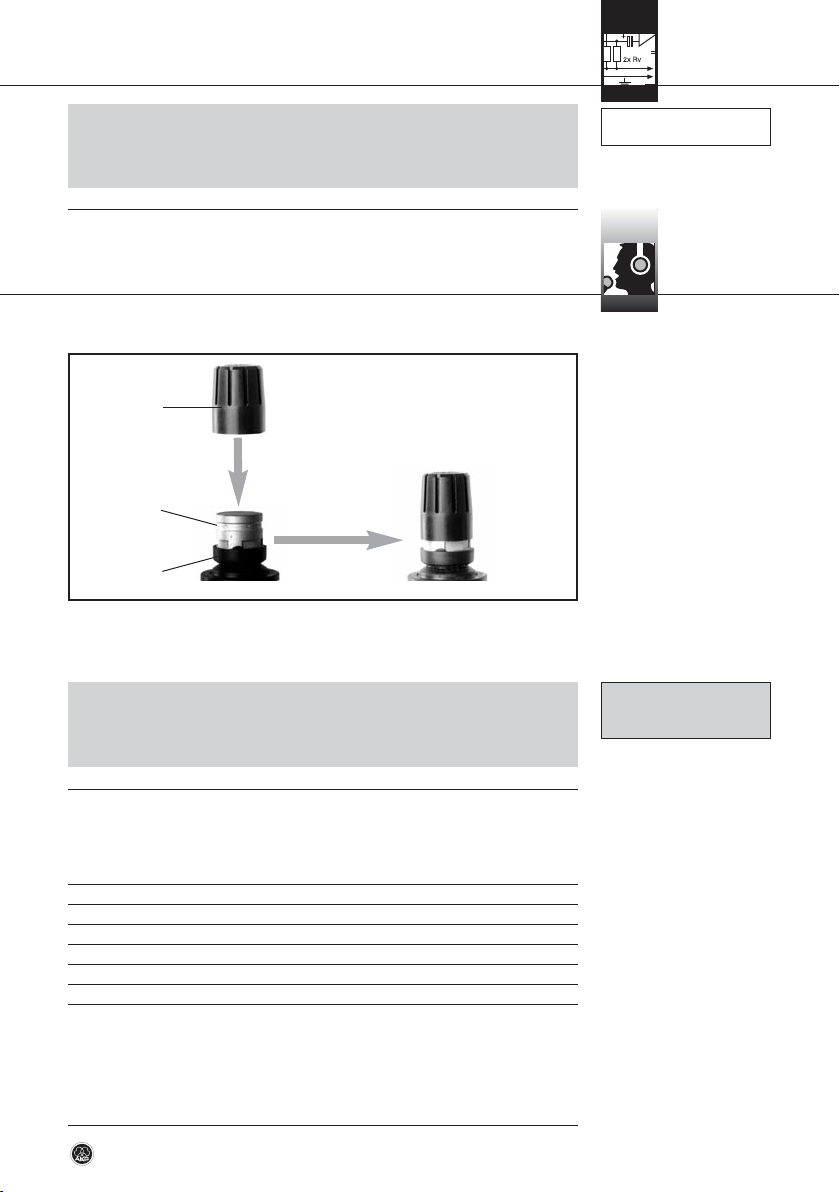
1. Schrauben Sie die Gitterkappe ab.
2. Setzen Sie den PPC 1000 bzw. PB 1000 (1) mit einer leichten Drehbewegung
bis zum Anschlag auf die Mikrofonkapsel (2) auf.
• Sichern Sie beim Montieren und Demontieren des PPC1000/PB 1000
die Mikrofonkapsel (2) in der elastischen Gummilagerung (3) mit der
Hand, um die Kapsel nicht versehentlich aus der Lagerung zu reißen.
Wir empfehlen das C 1000 S für folgende Anwendungen auf der Bühne und im
Studio:
Gesang Instrumental
Solist Blechbläser
Chor Holzbläser
Akustische Gitarre
Hi-Hat
Becken
Snare/Toms
Ein Gesangsmikrofon bietet Ihnen viele Möglichkeiten, den Klang Ihrer Stimme,
wie er durch die Beschallungsanlage wiedergegeben wird, zu gestalten.
• Beachten Sie bitte die folgenden Hinweise, um Ihr Mikrofon optimal einsetzen
zu können.
C 1000 S
7
Hinweis
3 Anwendung
ACHTUNG
L
!
3 Anwendung
3.3.1 Besprechungs-
abstand und Naheffekt
3.3.2 Schall-
einfallswinkel
Abb. 6: Typische
Mikrofonposition
3.3.3 Rückkopplung
Siehe Abb. 7.
Siehe Abb. 7 a.
Siehe Kapitel 3.1
und Abb. 7b.
Grundsätzlich wird Ihre Stimme umso voller und weicher wiedergegeben, je kürzer
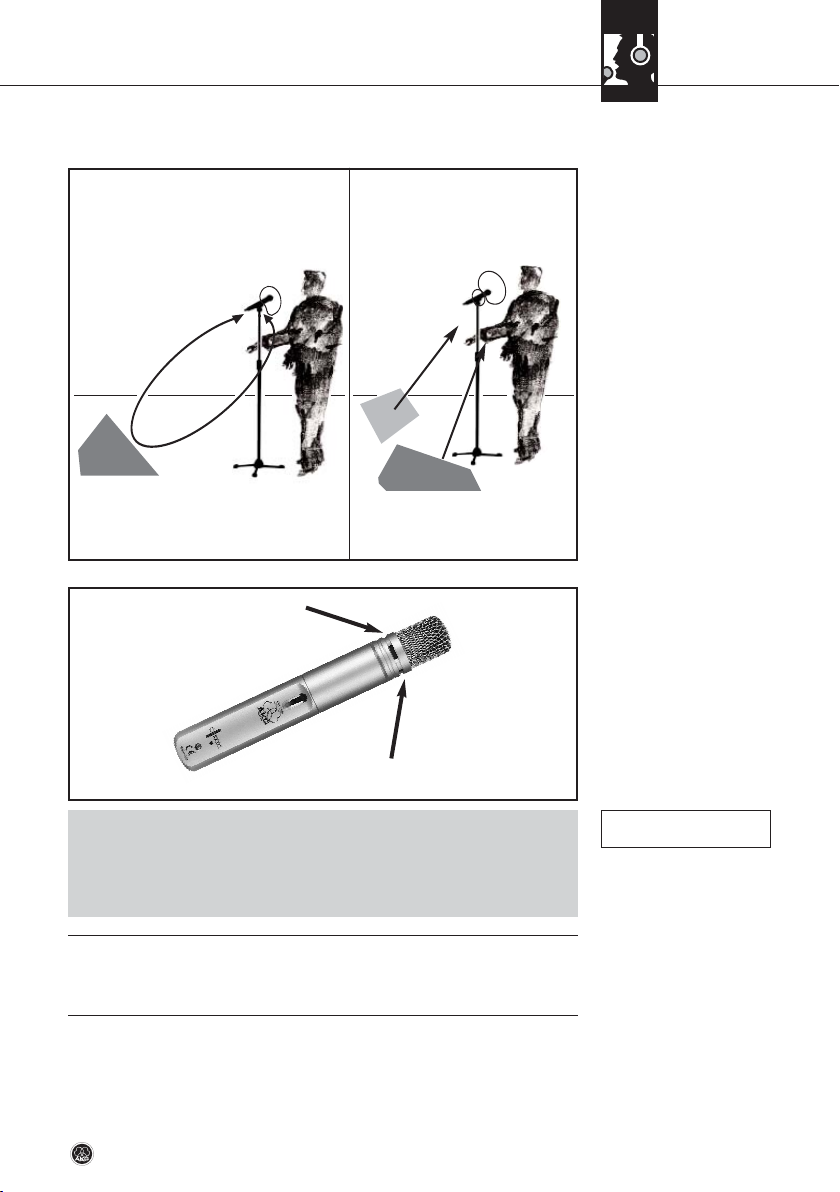
der Abstand zwischen den Lippen und dem Mikrofon ist, während bei größerer Mikrofondistanz ein halligeres, entfernteres Klangbild zustande kommt, da die Akustik des Raumes stärker zur Geltung kommt.
Sie können daher Ihre Stimme aggressiv, neutral oder einschmeichelnd klingen
lassen, indem Sie den Mikrofonabstand verändern.
Der Naheffekt tritt im unmittelbaren Nahbereich der Schallquelle (weniger als
5 cm) auf und bewirkt eine starke Betonung der Tiefen. Er verleiht Ihrer Stimme einen voluminöseren, intimen, bassbetonten Klang.
• Singen Sie seitlich auf das Mikrofon oder über den Mikrofonkopf hinweg. So
erhalten Sie einen ausgewogenen, naturgetreuen Klang.
• Wenn Sie direkt von vorne auf das Mikrofon singen, werden nicht nur Atemgeräusche mitübertragen, sondern auch Verschlusslaute (p, t) und Zischlaute (s,
sch, tsch) unnatürlich hervorgehoben.
Die Rückkopplung kommt dadurch zustande, dass ein Teil des von den Lautsprechern abgegebenen Schalls vom Mikrofon aufgenommen und verstärkt wieder
den Lautsprechern zugeleitet wird. Ab einer bestimmten Lautstärke (der Rückkopplungsgrenze) läuft dieses Signal gewissermaßen im Kreis, die Anlage heult
und pfeift und kann nur durch Zurückdrehen des Lautstärkereglers wieder unter
Kontrolle gebracht werden.
Um dieser Gefahr zu begegnen, hat das Mikrofon eine nierenförmige Richtcharakteristik. Das bedeutet, dass es für Schall, der von vorne einfällt (die Stimme), am
empfindlichsten ist, während es auf seitlich einfallenden Schall oder Schall, der
von hinten auftrifft (z.B. von Monitorlautsprechern), kaum anspricht.
• Minimale Rückkopplungsneigung erreichen Sie, indem Sie die PA-Lautsprecher vor den Mikrofonen (am vorderen Bühnenrand) aufstellen.
• Wenn Sie Monitorlautsprecher verwenden, lassen Sie Ihr Mikrofon nie direkt
auf die Monitore oder die PA-Lautsprecher zeigen.Wir empfehlen, den Polar
Pattern Converter PPC 1000 auf die Kapsel aufzustecken, um die Richtcharakteristik des Mikrofons auf hypernierenförmig umzustellen. Das Mikrofon wird
dadurch für seitlich oder von hinten einfallenden Schall noch unempfindlicher,
die Rückkopplungsgefahr noch geringer.
Rückkopplung kann auch durch Resonanzerscheinungen (als Folge der Raumakustik), besonders im unteren Frequenzbereich, ausgelöst werden, also indirekt
C 1000 S8
3 Anwendung
Abb. 7: Mikrofonaufstellung für
minimale Rückkopplung
Abb. 8: Hintere Schalleintrittsöffnungen freihalten!
3.3.4 Sprachverständlichkeit
3.4 Querflöte
Siehe Abb. 9 (S. 10).
durch den Naheffekt. In diesem Fall brauchen Sie oft nur den Mikrofonabstand zu
vergrößern, um die Rückkopplung zum Abreißen zu bringen.
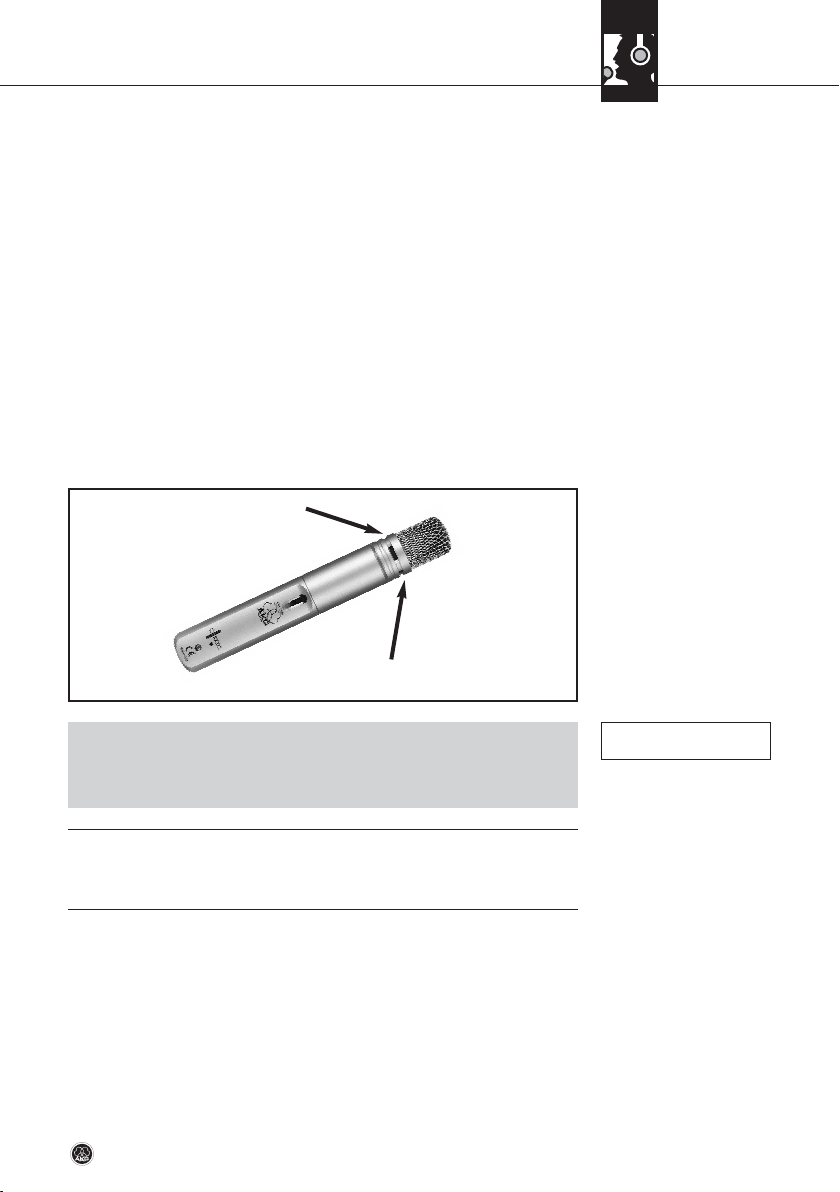
• Um die Rückkopplungsfestigkeit Ihres Mikrofons zu gewährleisten, verschließen Sie niemals die hinteren Schalleintrittsöffnungen (1) mit der Hand.
Dadurch würden Sie die nieren/hypernierenförmige Richtcharakteristik in
eine kugelförmige umwandeln, wodurch Rückkopplungen bereits bei wesentlich geringerer Lautstärke auftreten können.
• Um die Sprachverständlichkeit zu optimieren, können Sie den Presence Boost
Adapter auf die Kapsel aufstecken (siehe Kapitel 3.1).
•
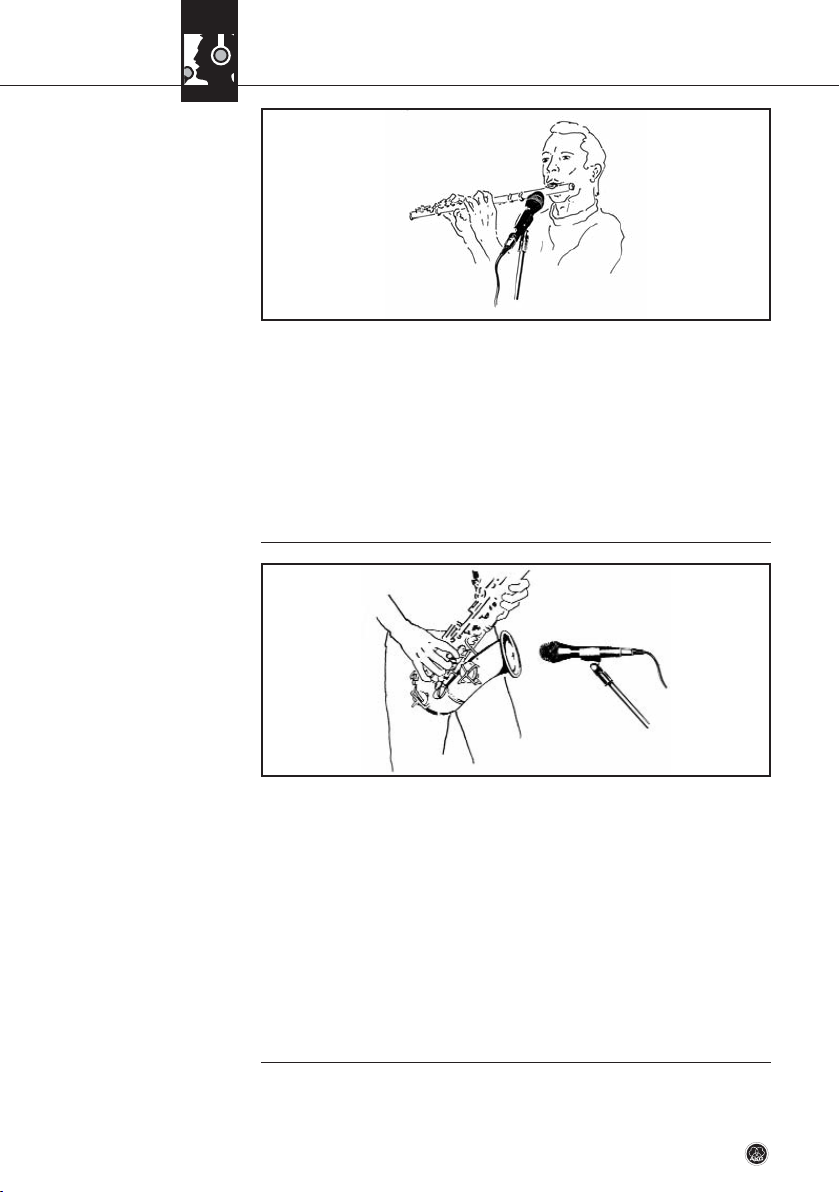
Der Mikrofonabstand hängt primär von der Art des Musikstückes ab. Bei Popmusik
und Jazz können Sie sehr nahe (2–5 cm) an das Mikrofon herangehen, da bei geringem Abstand zum Mikrofon der Anteil der Blas- und Atemgeräusche steigt.
C 1000 S
9
a b
Hinweis
3 Anwendung
Abb. 9: Mikrofon-
aufstellung für Querflöte
3.5 Saxophon
Abb. 10: Mikrofon-
aufstellung für Saxophon
Blasen Sie in diesem Fall etwas unter das Mikrofon, um diese Geräusche nicht
übermäßig zu betonen bzw. das Mikrofon durch Anblasen aus kürzester Entfernung zu überfordern.
• Klassische Musik verlangt nach einer weniger direkten, dafür eher räumlichen
Wiedergabe.
Stellen Sie das Mikrofon etwas oberhalb des Instruments in einem Abstand
von ca. 10 bis 20 cm auf. Richten Sie das Mikrofon nach unten und im rechten
Winkel zum Instrument aus.
• Wenn Sie das Klappengeräusch als charakteristisch für den Saxophonklang
oder das Musikstück empfinden, richten Sie das Mikrofon auf die Mitte des Instruments.
• Erscheinen Ihnen die Klappengeräusche jedoch als störend, richten Sie das
Mikrofon auf den vorderen äußeren Rand des Schallbechers.
• Wenn Sie das Mikrofon in den Schallbecher hinein zeigen lassen, werden Sie
einen hohen Anteil an Luftgeräuschen erhalten.
• Der optimale Mikrofonabstand beträgt 20 bis 30 cm.
• Auf der Bühne müssen Sie eventuell näher zum Mikrofon gehen (bis 5 cm), um
Rückkopplungen und Übersprechen von anderen Instrumenten zu vermeiden.
Achten Sie in diesem Fall besonders darauf, nicht direkt in das Mikrofon zu
blasen.
C 1000 S10
3 Anwendung
3.6 Akustische Gitarre
Abb. 11: Mikrofonaufstellung für akustische Gitarre
4.1 Gehäuseoberfläche
4.2 Innenwindschutz
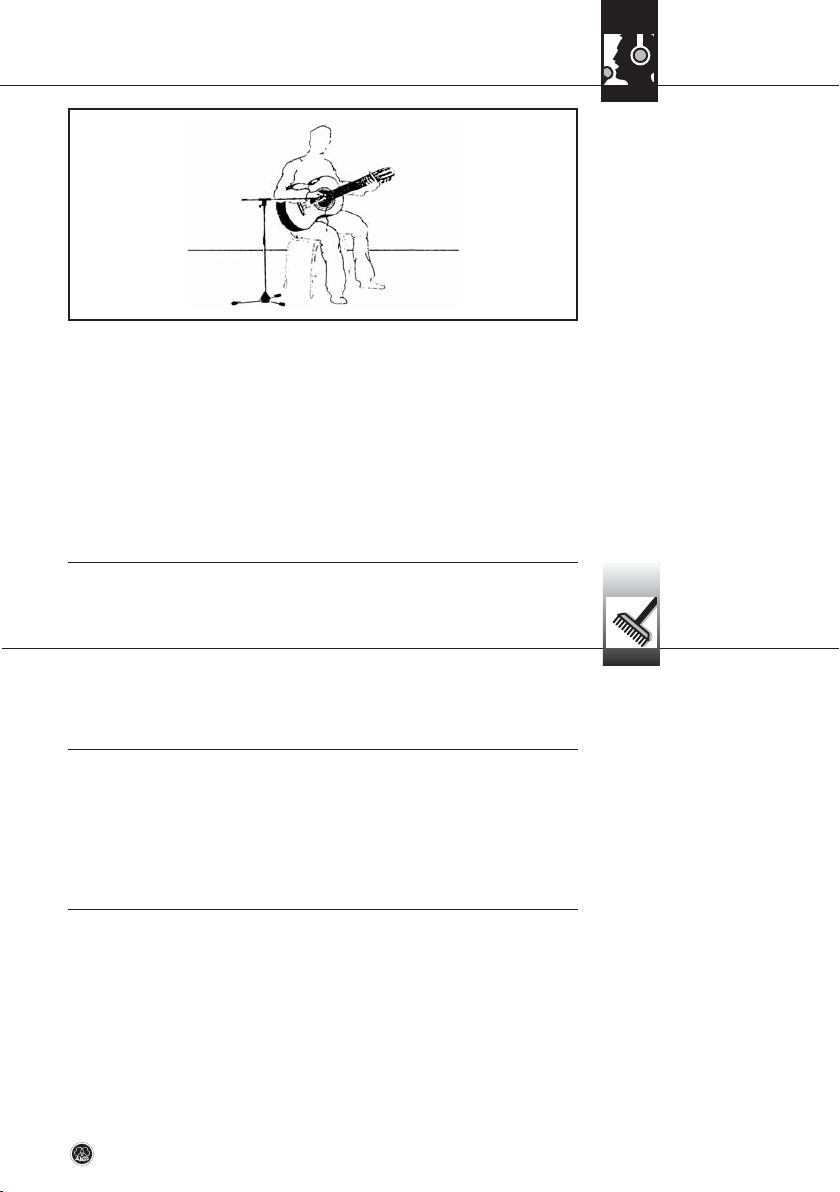
• Wenn es auf der Bühne sehr laut zu- und hergeht, richten Sie das Mikrofon aus
einem Abstand von ca. 20 cm direkt auf das Schallloch. Hier klingt die Gitarre
am lautesten, wenn auch etwas basslastig.
• Einen ausgewogeneren Sound erhalten Sie, indem Sie das Mikrofon auf den
Steg oder einen Punkt in der Nähe des Stegs ausrichten.
• Die in manchen akustischen Gitarren eingebauten Tonabnehmer übertragen
zwar die Bässe und Mitten sehr gut, behandeln die Höhen aber etwas stiefmütterlich. Diesem Nachteil können Sie abhelfen, indem Sie ein zusätzliches Mikrofon einsetzen. Regeln Sie die Tiefen und Mitten des Mikrofonsignals am
Mischpult zurück.
• Reinigen Sie die Gehäuseoberfläche des Mikrofons mit einem mit Wasser befeuchteten Tuch.
1. Schrauben Sie die Gitterkappe des Mikrofons gegen den Uhrzeigersinn ab.
2. Nehmen Sie den Windschutz aus der Gitterkappe heraus und reinigen Sie den
Windschutz mit Seifenwasser.
3. Lassen Sie den Windschutz über Nacht trocknen.
4. Legen Sie den Windschutz in die Gitterkappe ein und schrauben Sie die Gitterkappe im Uhrzeigersinn auf das Mikrofon auf.
C 1000 S
11
4 Reinigung
5 Fehlerbehebung
C 1000 S12
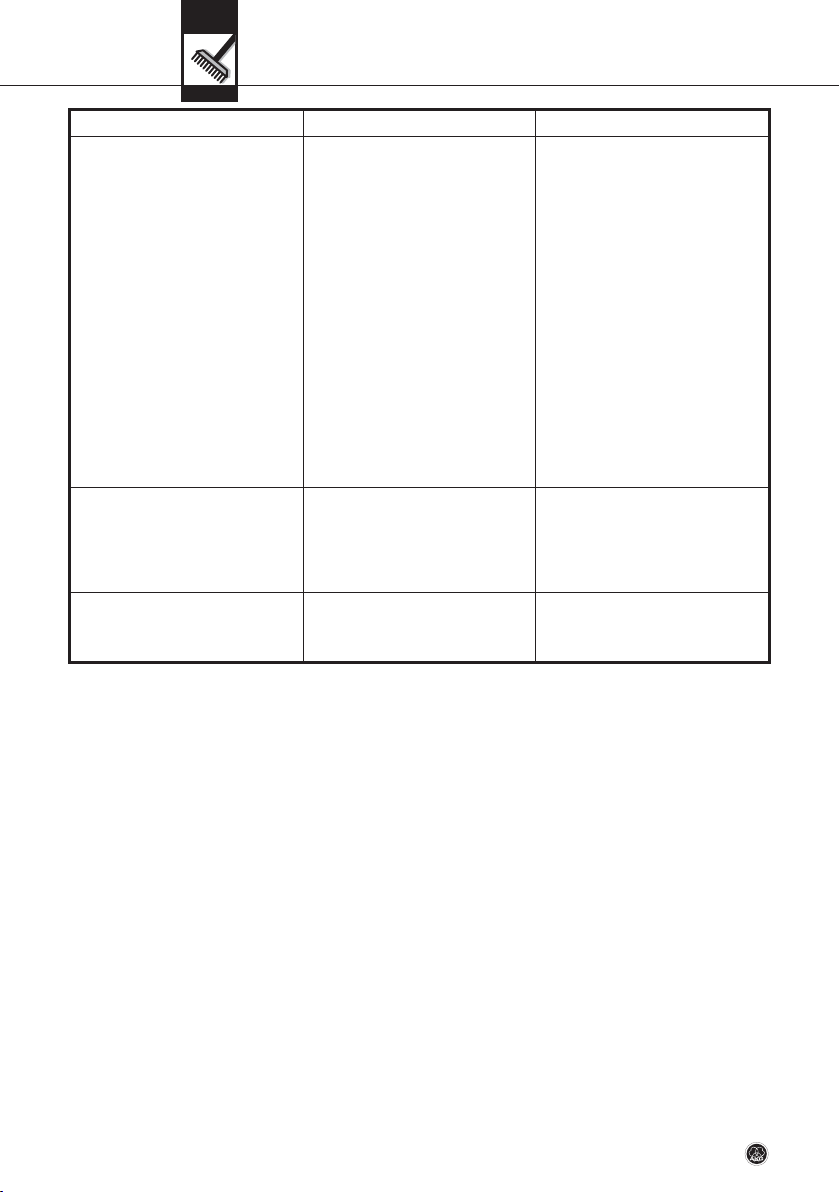
Fehler Mögliche Ursache Abhilfe
Kein Ton: 1. Mischpult und/oder Verstärker
ausgeschaltet.
2. Kanal- oder Summen-Fader
am Mischpult oder Lautstärkeregler des Verstärkers steht auf
Null.
3. Mikrofon nicht an Mischpult
oder Verstärker angeschlossen.
4. Kabelstecker nicht richtig angesteckt.
5. Kabel defekt.
6. Keine Speisespannung.
7. Batterie leer/keine Batterie.
1. Mischpult und/oder Verstärker
einschalten.
2. Kanal-Fader oder Summenpegelregler am Mischpult oder
Lautstärkeregler des Verstärkers auf gewünschten Pegel
einstellen.
3. Mikrofon an Mischpult oder
Verstärker anschließen.
4. Kabelstecker nochmals anstecken.
5. Kabel überprüfen und falls
nötig ersetzen.
6. Phantomspeisung einschalten.
Kabel überprüfen und falls
nötig ersetzen.
7. Batterie überprüfen/einlegen.
Verzerrungen: 1. Gain-Regler am Mischpult zu
weit aufgedreht.
2. Mischpulteingang zu empfindlich.
1. Gain-Regler zurückdrehen.
2. 10-dB-Vorabschwächung zwischen Mikrofonkabel und Eingang stecken.
Mikrofon klingt mit der Zeit immer
dumpfer:
• Verschmutzter Innenwindschutz oder Außenwindschutz
dämpft hohe Frequenzen.
• Innenwindschutz bzw. Außenwindschutz reinigen.

6 Technische Daten
Arbeitsweise: Kondensatormikrofon mit Permanentladung
Richtcharakteristik: Niere/Hyperniere (PPC 1000 montiert)
Übertragungsbereich: 50 - 20.000 Hz
Empfindlichkeit: 6 mV/Pa (-44 dBV)
Grenzschalldruckpegel für 1% Klirfaktor: 137 dB
Äquivalentschalldruckpegel (CCIR 468-3): 32 dB
Äquivalentschalldruckpegel: 21 dB-A
Geräuschspannungsabstand (A-bewertet): 73 dB
Elektrische Impedanz: 200 Ohm
Empfohlene Lastimpedanz: ≥2000 Ohm
Stromversorgung: 9 - 52 V Phantomspeisung nach IEC 61938
oder interne 9 V-Batterie
Stromaufnahme: ca. 2 mA
Stecker: XLR 3-polig
Oberfläche: matt-silber lackiert
Abmessungen: ø 34 x 220 mm
Nettogewicht: 320 g
Bruttogewicht: 650 g
Dieses Produkt entspricht den in der Konformitätserklärung angegebenen Normen. Sie können die Konformitätserklärung auf http://www.akg.com oder per E-Mail an sales@akg.com anfordern.
Frequenzgang (Niere) Polardiagramm (Niere)
Frequenzgang (Hyperniere) Polardiagramm (Hyperniere)
C 1000 S
13

Table of Contents
Page
Welcome!...............................................................................................................15
Safety and Environment .........................................................................................15
Safety ...............................................................................................................15
Environment......................................................................................................15
1 Description......................................................................................................15
1.1 Packing List ................................................................................................15
1.2 Optional Accessories ...................................................................................16
1.3 Microphone ................................................................................................16
2 Interfacing.......................................................................................................17
2.1 General ......................................................................................................17
2.2 Battery Powering.........................................................................................17
2.2.1 Inserting/Replacing and Testing the Battery...........................................17
2.2.2 Connecting the Microphone to a Balanced Input ....................................18
2.2.3 Connecting the Microphone to an Unbalanced Input...............................18
2.3 Phantom Powering ......................................................................................18
3 Using Your Microphone....................................................................................19
3.1 Installing the PPC 1000 or PB 1000 ..............................................................19
3.2 Application Areas ........................................................................................19
3.3 Vocals........................................................................................................19
3.3.1 Working Distance and Proximity Effect..................................................20
3.3.2 Angle of Incidence ..............................................................................20
3.3.3 Feedback...........................................................................................20
3.3.4 Intelligibility........................................................................................21
3.4 Flute ..........................................................................................................22
3.5 Saxophone .................................................................................................22
3.6 Acoustic Guitar............................................................................................23
4 Cleaning ..........................................................................................................23
4.1 Microphone Body ........................................................................................23
4.2 Internal Windscreen.....................................................................................23
5 Troubleshooting...............................................................................................24
6 Specifications..................................................................................................25
C 1000 S14
Welcome!
1.1 Packing List
Thank you for purchasing an AKG product. This Manual contains important in-
structions for setting up and operating your equipment. Please take a few minutes
to read the instructions below, particularly the section on Safety and Envi-
ronment, carefully before operating the equipment. Please keep the Manual
for future reference. Have fun and impress your audience!
1.2 Environment
• Check that the packaging contains all of the components listed above. Should
anything be missing, please contact your AKG dealer.
Safety and Environment
Safety
Environment
L
C 1000 S
15
• Please make sure that the piece of equipment your microphone will
be connected to fulfills the safety regulations in force in your country and is fitted with a ground lead.
• When scrapping the equipment, remove the batteries, separate the
case, circuit boards, and cables, and dispose of all components in
accordance with local waste disposal rules.
• The packaging of the equipment is recyclabe. To dispose of the
packaging, make sure to use a collection/recycling system provided
for that purpose and observe local legislation relating to waste disposal and recycling.
1 Description
C 1000 S H 63 W 1000
PPC 1000 PB 1000 Carrying case
1 Description
1.2 Optional Accessories
1.3 Microphone
C 1000 S16
• For optional accessories, refer to the current AKG catalog or folder, or visit
www.akg.com. Your dealer will be glad to help.
The C 1000 S cardioid/hypercardioid condenser microphone has been specifically
designed for professional live, recording, and broadcast use on vocals and instruments. You can power the microphone either from external phantom power (9 to
52 V to IEC 61938) or use an internal 9 V battery and connect the microphone directly to a mixer, recording device, etc.
The combination of a high quality backplate condenser transducer and capsule
shock mount optimizes handling and cable noise rejection. The microphone body
consists of a massive aluminum shaft and screw-on brass front tube with a rugged
stainless steel mesh cap. The microphone uses an internationally standardized
3-pin male XLR output connector.
PPC 1000 Polar Pattern Converter
Slipping the PPC 1000 Polar Pattern converter on the capsule will change the microphone's pickup pattern from cardioid to hypercardioid. This makes the microphone even less sensitive to sounds arriving from the sides and rear, resulting in
higher gain before feedback when you use monitor speakers on stage.
PB 1000 Presence Boost Adapter
The supplied PB 1000 Presence Boost Adapter boosts the sensitivity of the microphone by approx. 5 dB between 5 kHz and 9 kHz for optimum intelligibility of
speech.
ON/OFF switch
The microphone provides an on/off switch that helps prolong battery life. The
switch is recessed to prevent the microphone being switched off unintentionally.
BATT CHECK LED
This LED indicates the current battery status:
• LED flashes momentarily upon switching ON and extinguishes: battery is OK.
• LED lights constantly: battery will be dead in about 60 minutes.
• As long as you use the microphone with phantom power, the BATT CHECK
LED will not be lit.
Note
2 Interfacing
The C 1000 S is a condenser microphone and therefore needs a power supply. An
internal 9 V battery enables you to use the microphone with no loss in audio quality
even if no phantom power supply is available. When operating off phantom power,
however, the microphone will automatically switch to phantom powering mode.
The microphone provides a balanced output on a 3-pin male XLR connector:
Pin 1: ground
Pin 2: hot
Pin 3: return
You can connect the microphone either to a balanced microphone input with or
without phantom power or an unbalanced microphone input.
1. Unscrew the wire-mesh cap (1).
2. Tilt the securing clip (2) up.
3. Insert the battery to conform with the polarity marks (+/-) and terminal slots in
the battery compartment.
It is impossible to insert the battery with reversed polarity.
4. Depress the securing clip (2).
5. Push the battery compartment back in.
6. Screw the wire-mesh cap (1) back on the microphone.
7. Set the on/off switch (3) to "ON" to switch power to the microphone on.
The BATT CHECK LED (4) will flash momentarily. If the battery is in good condi-
tion, the BATT CHECK LED (4) will extinguish.
If the BATT CHECK LED (4) fails to flash momentarily the battery is dead. Insert
a new battery.
If the BATT CHECK LED (4) illuminates the battery will be dead within about 60
minutes. Replace the battery with a new one as soon as possible.
C 1000 S
17
2.1 General
2.2 Battery Powering
2.2.1 Inserting/
Re placing and Testing
the Battery
Fig. 1: Inserting a battery.
Refer to fig. 1.
2 Interfacing
• Use a commercial XLR cable.
The length of these cables does not affect audio quality.
• To connect the microphone to an unbalanced microphone input (1/4" jack),
use a cable with a female XLR connector and a 1/4" TS jack plug. These cables
are available at music stores.
• Unbalanced cables may pick up interference from stray magnetic fields near
power or lighting cables, electric motors, etc. like an antenna. This may cause
hum or similar noise if you use a cable that is longer than 16 feet (5 m).
1. Use an XLR cable to connect the microphone to a balanced XLR input with
phantom power.
2. Switch the phantom power on. (Refer to the instruction manual of the unit to
which you connected your C 1000 S.)
C 1000 S18
2.2.2 Connecting the
Microphone to a
Balanced Input
Fig. 2: Using a balanced
connecting cable.
Refer to fig. 2.
2.2.3 Connecting the
Microphone to an
Unbalanced Input
Fig. 3: Using an unbal-
anced connecting cable.
Refer to fig. 3.
2.3 Phantom Powering
Fig. 4: Connecting to a
balanced input
with phantom power.
Refer to fig. 4.
Note
2 Interfacing
3.1 Installing the
PPC 1000 or PB 1000
Fig. 5: Installing the
PPC 1000/PB 1000.
Refer to fig. 5.
3.2 Application Areas
3.3 Vocals
• The microphone will automatically switch from battery mode to phantom
power mode and deactivate the BATT CHECK LED.
Therefore, you do not need to remove the battery. The BATT CHECK LED will
remain dark.
1. Unscrew the wire-mesh cap.
2. Slip the attachment (1) on the microphone capsule (2) to the stop, slightly turning the attachment (1) as you push it home.
• When installing or removing the PPC 1000 or PB 1000 attachment,
make sure to grip the capsule (2) and rubber shock mount (3) firmly
with your thumb and forefinger to prevent the capsule being severed
from the shock mount.
We recommend the C 1000 S for the following applications on stage and in the
studio:
Vocals Instruments
Lead Brass
Backing chorus Woodwinds
Acoustic guitar
Hi-hat
Cymbals
Snare drum/toms
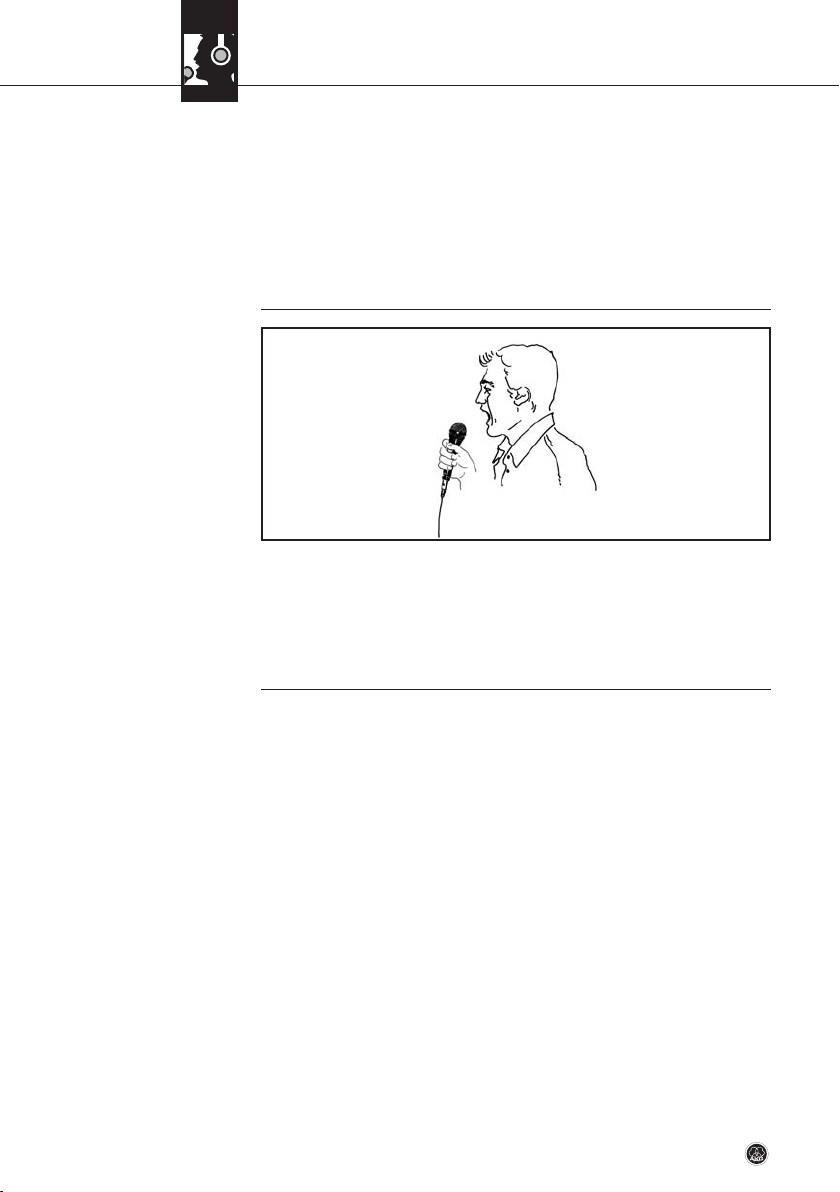
A handheld vocal microphone provides many ways of shaping the sound of your
voice as it is heard over the sound system.
• The following sections contain useful hints on how to use your microphone for
best results.
C 1000 S
19
Note
3 Using your Microphone
NOTICE
L
!

3 Using your Microphone
3.3.1 Working Distance
and Proximity Effect
3.3.2 Angle of Incidence
Fig. 6: Typical
microphone position.
3.3.3 Feedback
Fig. 7: Microphone place-
ment for maximum gain
before feedback.
Basically, your voice will sound the bigger and mellower, the closer you hold the
microphone to your lips. Moving away from the microphone will produce a more
reverberant, more distant sound as the microphone will pick more of the room’s
reverberation.
You can use this effect to make your voice sound aggressive, neutral, insinuating,
etc. simply by changing your working distance.
Proximity effect is a more or less dramatic boost of low frequencies that occurs
when you sing into the microphone from less than 2 inches. It gives more "body" to
your voice and an intimate, bass-heavy sound.
• Sing to one side of the microphone or above and across the microphone’s top.
This provides a well-balanced, natural sound.
• If you sing directly into the microphone, it will not only pick up excessive breath
noise but also overemphasize "sss", "sh", "tch", "p", and "t" sounds.
Feedback is what you get when part of the sound projected by a speaker is picked
up by a microphone, fed to the amplifier, and projected again by the speaker.
Above a specific volume or system gain setting called the "feedback threshold",
the signal starts being regenerated indefinitely, making the sound system howl
and the sound engineer desperately dive for the master fader to reduce the gain
and stop the howling.
C 1000 S20
a b
3 Using your Microphone
Refer to fig. 7 on page 20.
Refer to fig. 7a on page 20.
See section 3.1 (p. 19)
and fig. 7b (p. 20).
Fig. 8: Never cover the rear
sound entries!
3.3.4 Intelligibility
To increase usable gain before feedback, the microphone has a cardioid polar pattern. This means that the microphone is most sensitive to sounds arriving from in
front of it (your voice) while picking up much less of sounds arriving from the sides
or rear (from monitor speakers for instance).
• To get maximum gain before feedback, place the main ("FOH") speakers in
front of the microphones (along the front edge of the stage).
• If you use monitor speakers, be sure never to point any microphone directly at
the monitors, or at the FOH speakers.
We recommend slipping the PPC 1000 Polar Pattern Converter on the capsule
to change the microphone's pickup pattern from cardioid to hypercardioid.
This makes the microphone even less sensitive to sounds arriving from the
sides and further increases gain before feedback.
Feedback may also be triggered by resonances depending on the acoustics of the
room or hall. With resonances at low frequencies, proximity effect may cause feedback. In this case, all you may have to do to stop the feedback is move away from
the microphone a little.
• To ensure high gain before feedback, never cover the rear sound entries (1)
with your hand. This would destroy the cardioid/hypercardioid pickup pattern
and cause the microphone to pick up sound from all around, the result being
sharply reduced gain before feedback.
• In order to optimize the intelligibility of speech, you can slip the PB 1000 Presence Boost Adapter on the capsule (refer to section 3.1).
C 1000 S
21
Note

3 Using your Microphone
• Working distance primarily depends on the kind of music played. For popular
and jazz pieces, relatively short distances may be desirable (1 or 2 in.), as you
will get the more wind and breath noise the closer you get to the microphone.
To avoid getting too much noise, blow a little below the microphone.
• For classical music, which calls for a more spacious sound with more ambience, place the microphone about 4 to 8 inches away from the instrument and
slightly above it. Aim the microphone down toward and roughly at right angles
to the flute.
• If you generally love the noise the keys make while playing or if you feel it is just
what you want for a given song, point the microphone at the middle of the instrument.
• However, if you want no key noise, direct the microphone toward the front outer
rim of the bell.
• If you aim the microphone into the bell, you may get too much wind noise.
• Optimum working distance is 8 to 12 inches.
• On stage, you may have to move as close as 2 inches to the microphone in order to avoid getting feedback or spillover from other instruments. In this situation, make sure not to blow right into the microphone.
C 1000 S22
3.4 Flute
Fig. 9: Microphone
placement for the flute.
3.5 Saxophone
Fig. 10: Microphone place-
ment for the saxophone.

3 Using your Microphone
3.6 Acoustic Guitar
Fig. 11: Microphone
placement for an acoustic
guitar.
4.1 Microphone Body
4.2 Internal Windscreen
• On a very noisy stage, place the microphone about 8 inches from the guitar,
aiming it right at the sound hole for maximum loudness. This technique will,
however, give a somewhat bass-heavy sound.
• For a better balanced sound, align the microphone with the bridge or a point
near the bridge.
• The pickups built into some acoustic guitars work very well for bass and mid
frequencies, but tend to miss out on the highs. To make up for this loss of HF
energy, use an extra microphone and attenuate the bass and mid ranges of the
microphone signal on the mixing desk.
• To clean the surface of the microphone body, use a soft cloth moistened with
water.
1. Unscrew the front grill from the microphone CCW.
2. Remove the windscreen from the from grill and wash the windscreen in soap
suds.
3. Allow the windscreen to dry overnight.
4. Replace the windscreen in the front grill and screw the front grill on the microphone CW.
C 1000 S
23
4 Cleaning
 Loading...