

Page 1
Owner’s Manual
Stainless Steel Range Hood
Under Cabinets Only
Copyright ShopRangeHoods.com© 2016
Office: +1 (626) 321-9834
Email: [email protected]
Distributed by ShopRangeHoods.com
Manufactured by AKDY
FOR RESIDENTIAL USE ONLY IN US & CA
WARRANTY VOID OUTSIDE US & CA
Page 2
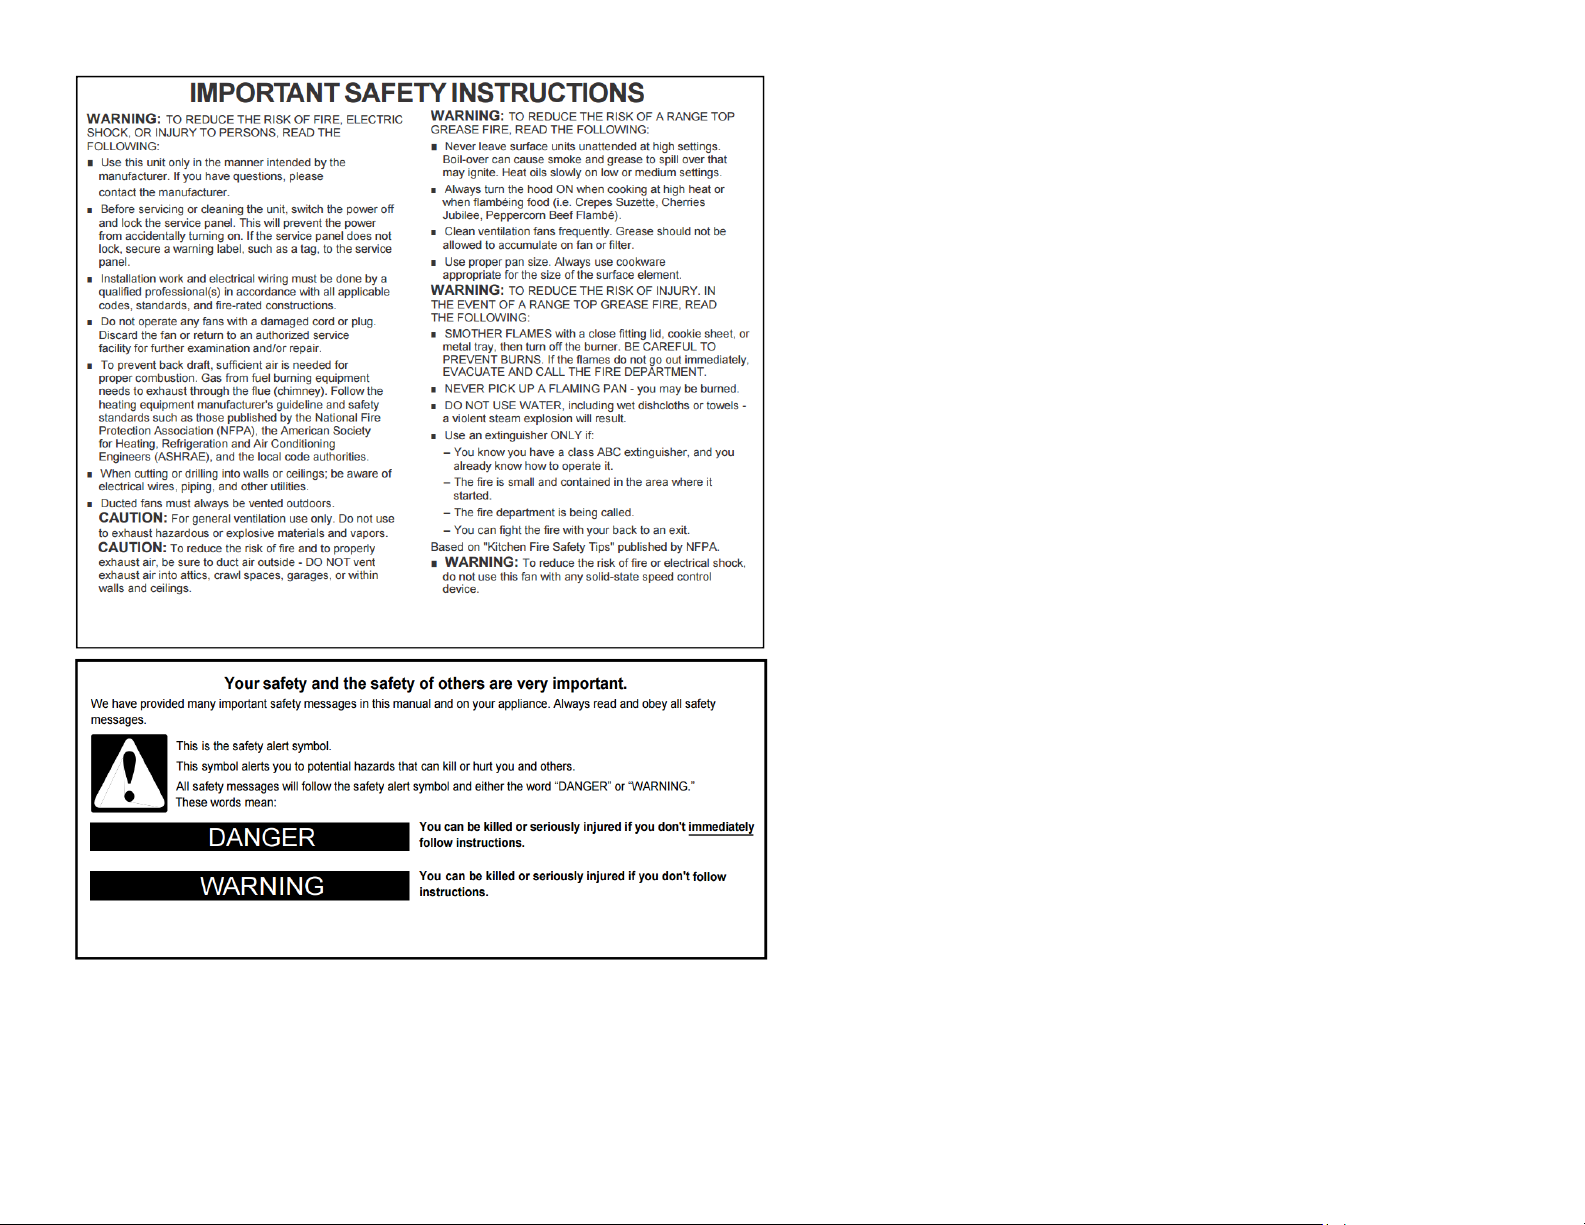
TO REDUCE THE RISK OF FIRE, ELECTRIC SHOCK,
INJURY TO PERSONS, OBSERVE THE FOLLOWING:
1. Use this unit only in the manner intended by the manufacturer. If you have questions, contact
the manufacturer at the address or telephone number listed in the warranty.
2. Before servicing or cleaning unit, switch power off at service panel and lock the service discon-
necting means to prevent power from being switched on accidentally. When the service disconnecting means cannot be locked, securely fasten a prominent warning device, such as a
tag, to the service panel.
3. Installation work and electrical wiring must be done by a qualified person(s) in accordance with
all applicable codes and standards, including fire-rated construction codes and standards.
4. Sufficient air is needed for proper combustion and exhausting of gases through the flue
(chimney) of fuel burning equipment to prevent backdrafting. Follow the heating equipment
manufacturer’s guideline and safety standards such as those published by the National Fire
Protection Association (NFPA), and the American Society for Heating, Refrigeration and Air
Conditioning Engineers (ASHRAE), and the local code authorities.
5. When cutting or drilling into wall or ceiling, do not damage electrical wiring and other hidden
utilities.
6. Ducted fans must always be vented to the outdoors.
7. Acceptable for use over a tub or shower when connected to a GFCI (Ground Fault Circuit
Interrupter) - protected branch circuit (ceiling installation only).
8. This unit must be grounded.
CAUTION
1. For general ventilating use only. Do not use to exhaust hazardous or explosive materials and
vapors.
2. This product can be installed in a wall if mounted 8-ft. or more above the floor.
3. To avoid motor bearing damage and noisy and/or unbalanced impellers, keep drywall spray,
construction dust, etc. off power unit.
4. Please read specification label on product for further information and requirements.
Page 3
TOOLS & PARTS REQUIREMENTS
Electrical drill or ratchet driver
1/2” drill bit for drilling pilot holes
1¼” drill bit for drilling electrical wiring access hole
Screwdrivers: Philips & Straight blade
Pliers
Tape measure or ruler and pencil
Electrical supplies for wiring
Aluminum foil tape and/or HVAC tape
Hammer
Jigsaw or saber saw
Stud finder
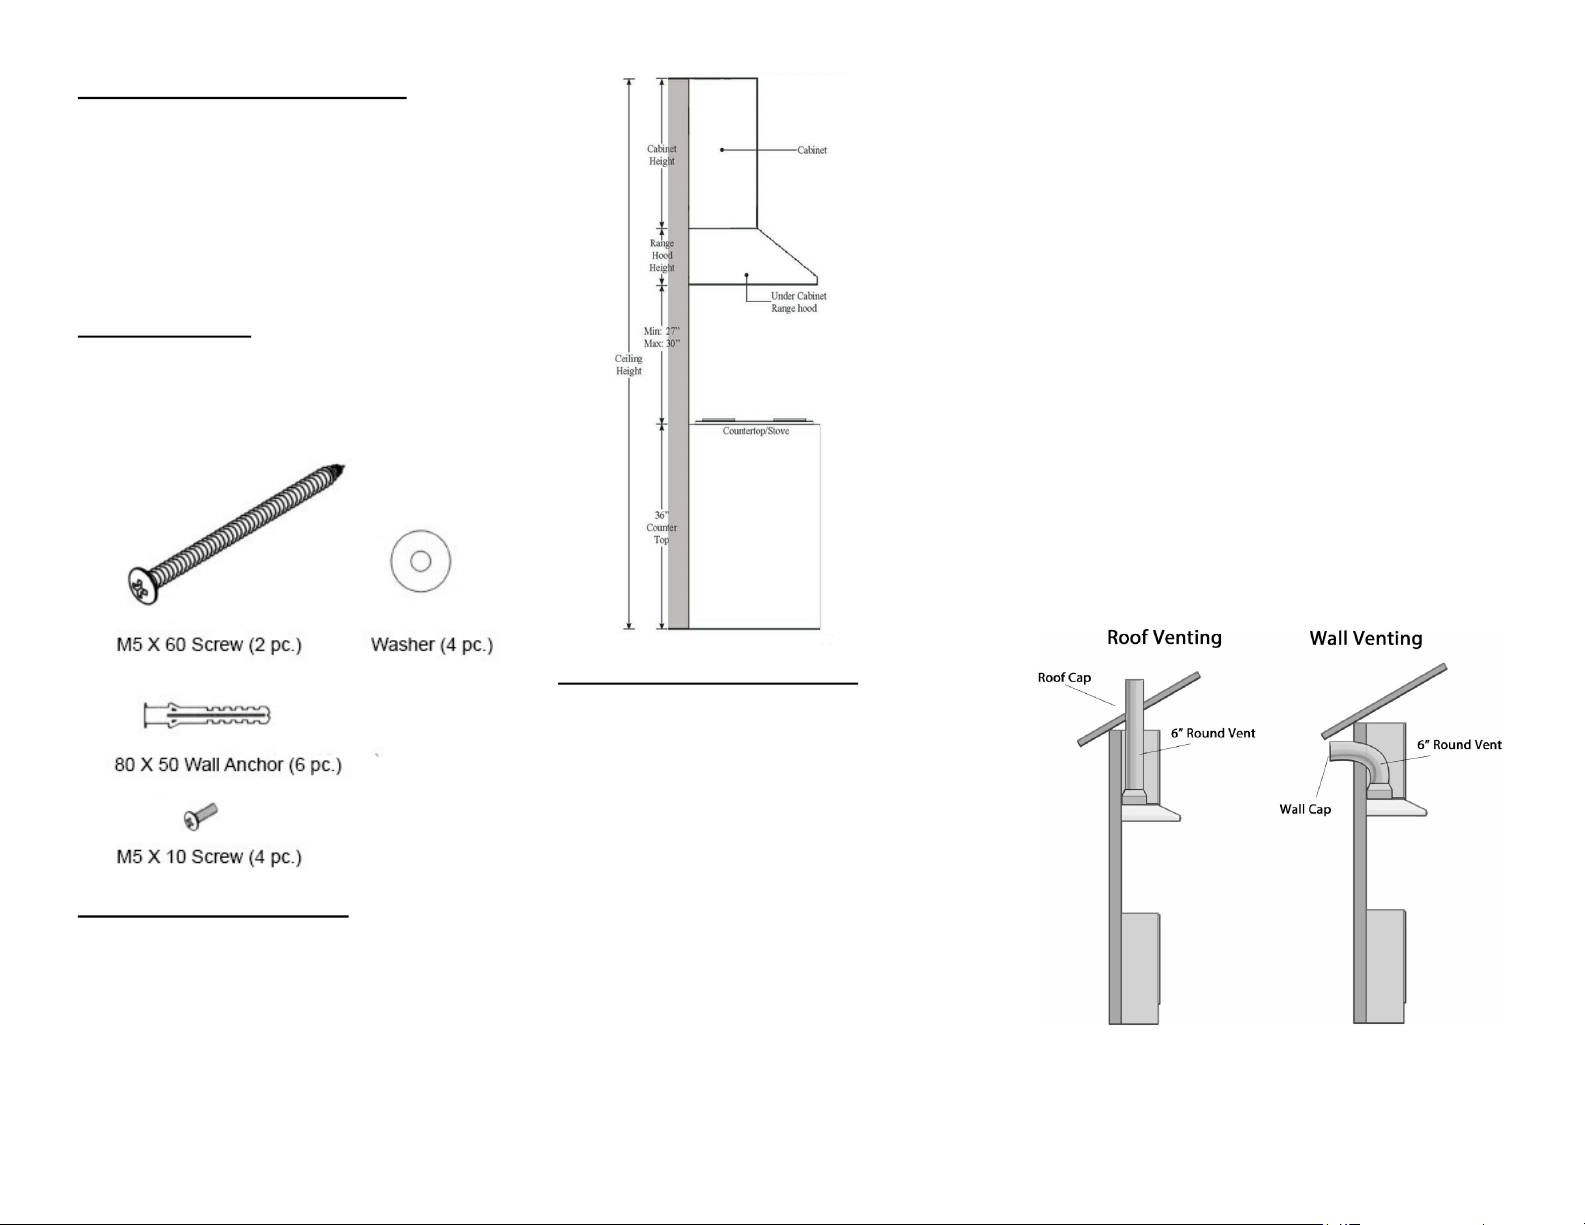
PARTS SUPPLIED
Body & Main Unit: 1 pc.
Installation Manual: 1 set
Chimney Cover: 1 set
Metal Grease Filter: 1-4 pcs.
Hardware: 1 set
LOCATION REQUIREMENTS
Observe all governing codes and ordinances. Have a qualified
technician install the range hood. It is the installer’s responsibility
to comply with installation clearances specified on the model
serial rating plate.
Canopy hood's location should be away from strong draft areas,
such as windows, doors, and strong heating vents.
Recommended heights are shown. Given dimensions provide
minimum clearance.
VENTILATION REQUIREMENTS
Range hoods must be ventilated to the outdoors, except for nonvented (recirculating) installations.
Do not ventilate the range hood into an attic or other en-
closed areas.
Do not use 4" (10.2 cm) laundry-type wall caps.
The length of the range hood and the number of elbows
should be kept to a minimum to provide maximum performance.
For the Most Efficient and Quiet Operation
Use no more than three 90° elbows.
Make sure there is a minimum of 24" (61 cm) of straight duct
between the elbows if more than one elbow is used.
Do not install two elbows together.
Use clamps to seal all joints in the vent system.
The vent system must have a damper. If the roof or wall cap
has a damper, do not use the damper supplied with the
range hood.
Use caulking to seal exterior walls or roof openings around
the cap.
The size of the vents should be uniform.
Makeup Air
Local building codes may require the use of makeup air systems,
when using ventilation systems greater than specified CFM of air
movement. The specified CFM varies from state to state. Consult
your HVAC professional for specific requirements in your area.
Cold Weather Installations
An additional back draft damper should be installed to minimize
backward cold air flow. A thermal break should be installed to
minimize conduction of outside temperatures as part of the vent
system. The damper should be on the cold air side of the thermal
break. The break should be as close as possible to where the
vent system enters the heated portion of the house.
Venting Method
This canopy hood is factory set for through the roof or wall. A
6" (15.2 cm) round vent system is needed for installation. The
hood exhaust opening is 6" (15.2 cm) round. To vent through a
wall, a 90° elbow is needed. If exhaust ducting with a diameter of
less than 5.91” (150 mm) or if flat ducting is used, the noise level
of the range hood will Increase and extraction will be less efficient.
Rear Discharge
A 90° elbow may be installed immediately above the hood.
Page 4
Cleaning & Maintenance
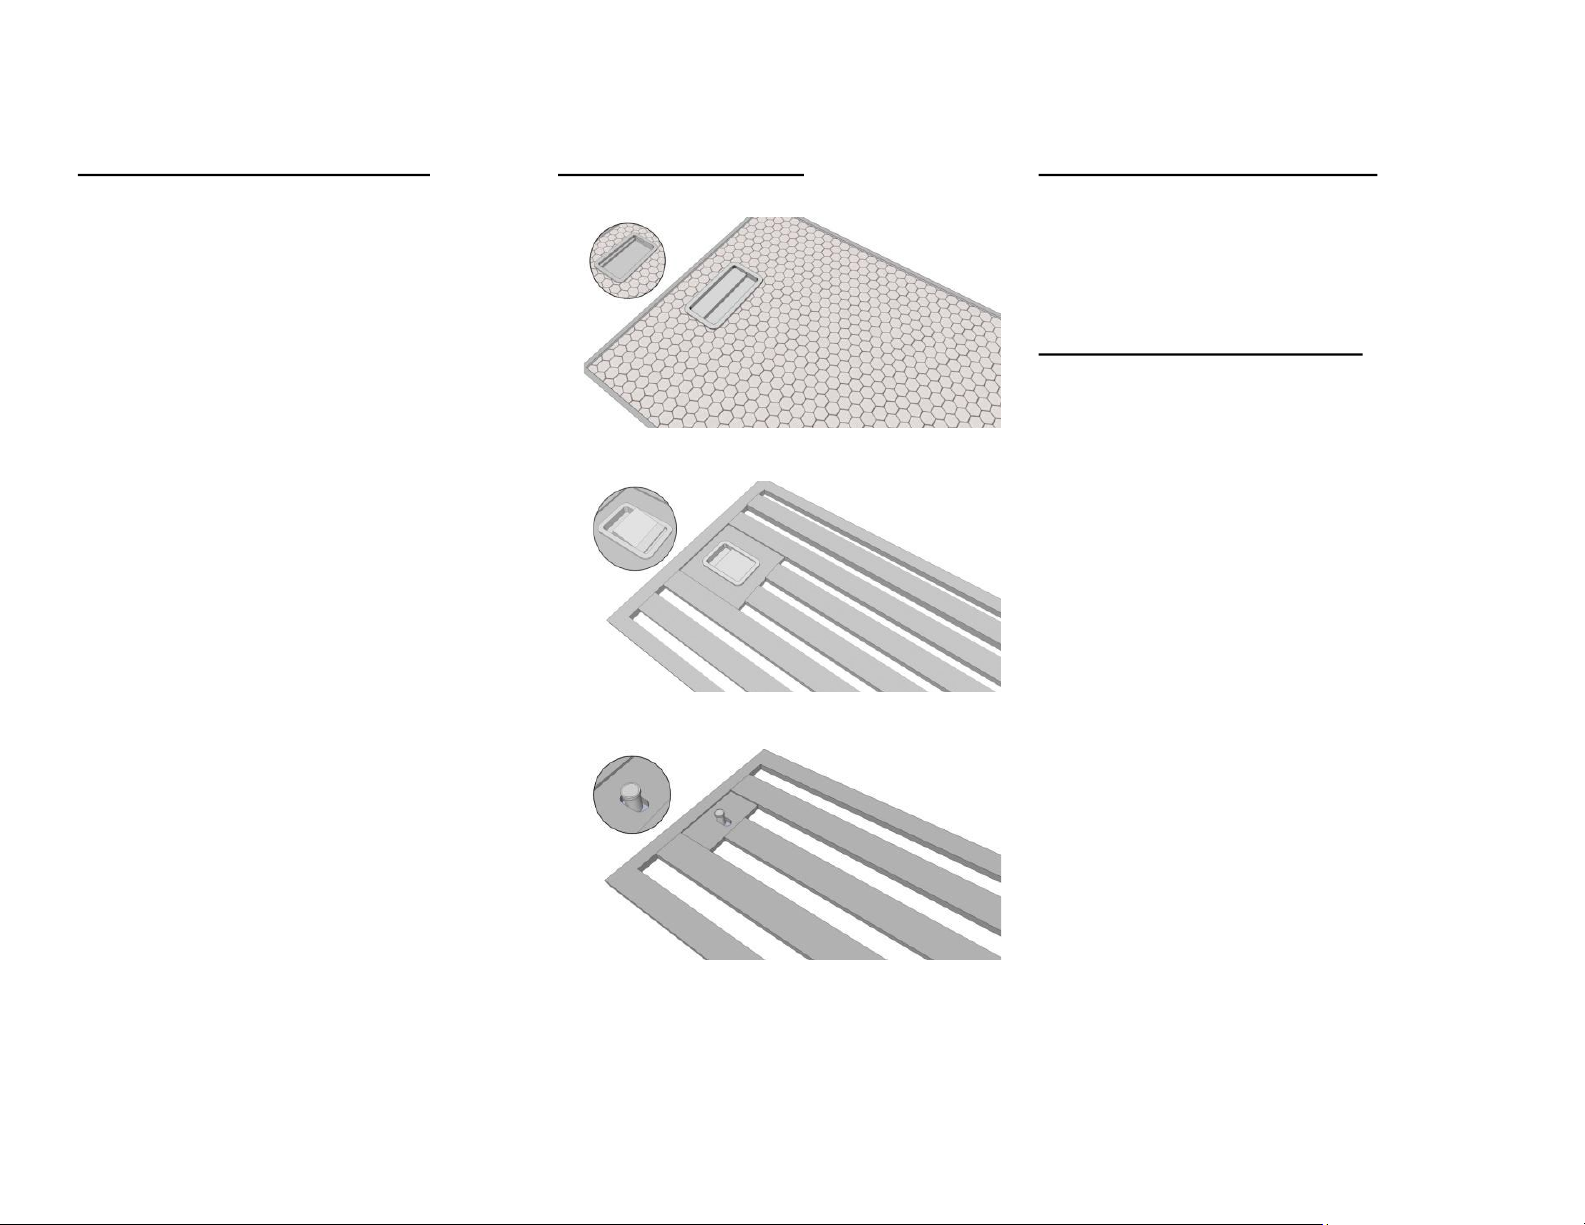
Cleaning Mesh or Baffle Filters
Mesh and baffle filters can be cleaned with regular household
dish washing soap and hot water. Please wear gloves while
cleaning filters to protect against scrapes or cuts. Exercise caution around sharp metal edges and corners.
Ingredients
Very hot or boiling water
Dishwashing soap or degreaser
Baking soda
Non-abrasive scrubbing brush or pad
Dish cloth or paper towels
Instructions
Remove the Filters from the Hood: Us ing th e in cluded
latch (on mesh filters only), remove them from underneath
the range hood.
Fill Your Sink Hot or Boiling Water: Ho t water wil l help
dissolve hard grease and oil built up on the filters.
Add Dishwashing Soap or Degreaser: Pour in a gener-
ous amount of cleaning solution and make sure it is completely dissolved in the water.
Add Baking Soda: Pou r in bakin g soda to the soluti on,
Soak Mesh Filters: Place you r filt ers int o the solu tion
and let it soak for up to 30 minutes.
Scrub the Filters: After so akin g, take a scru bb ing brush
or pad to further remove grease and oil.
Rinse and Let Dry: Thoro ughly rinse w ith cl ean water
and let dry them with a cloth or paper towels.
Reinstall the Filters: Careful ly rein stall t he metal fil ters
once fully dry.
Types of Metal Filters
Mesh
Baffle: Type A
Baffle: Type B
Interior Range Hood Cleaning
The unit must be turned off before being cleaned. Also avoid
spraying cleaner directly onto the light bulb or light bulb socket.
You can clean the interior of the vent hood with a standard household degreaser/cleaner and a sponge or rag; it will probably get
quite dirty, so make sure to use something that you don't mind
throwing away afterward.
Exterior Oven Vent Cleaning
The exterior of a vent hood may also be cleaned with a standard
household degreaser/cleaner or a non-abrasive cleanser. Since
exterior range hood cleaning is a lot easier to do, you may want to
incorporate it into your daily or weekly cleaning routine. If your
vent hoods have never been cleaned, you may want to call in a
professional to do the job the first time, as it is very likely that it
will be pretty messy.
Page 5
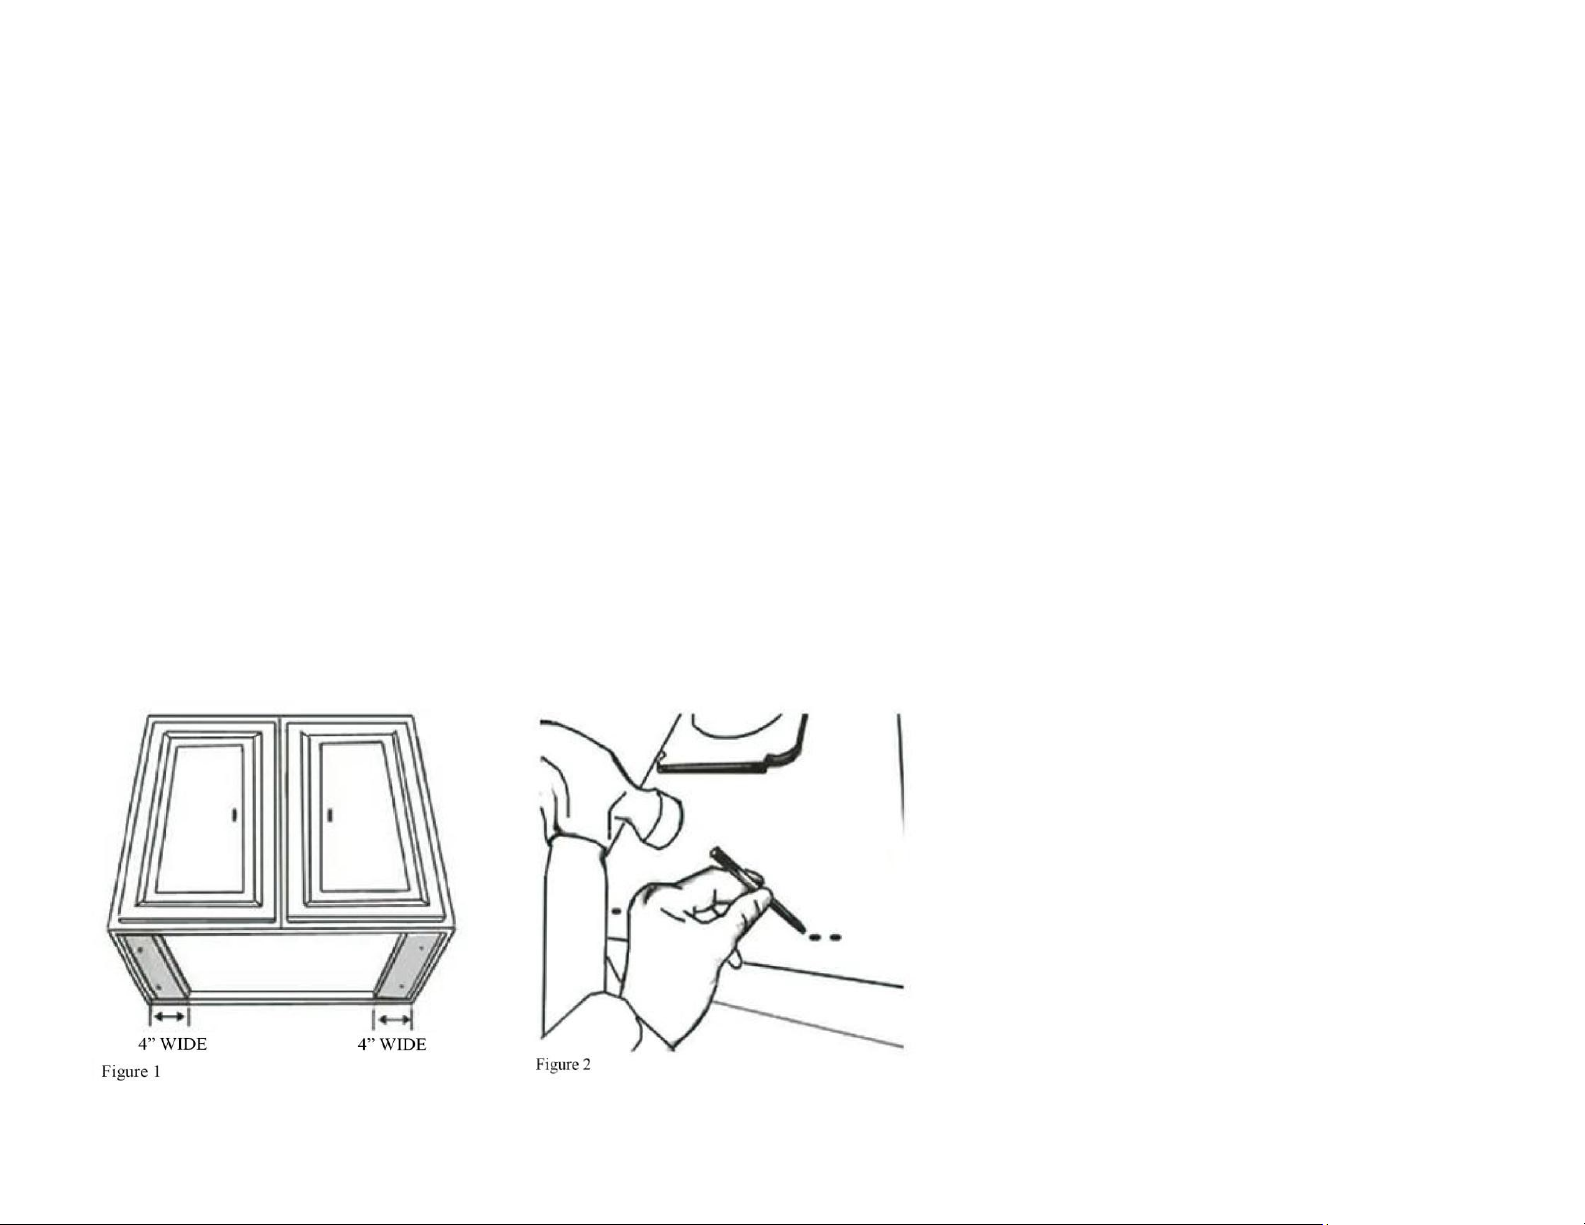
ATTENTION HOMEOWNER: These installation step s are meant to be a general guideline for mount ing and installing your under cabinet range hood. If
you require assistance, please contact your local contractor. Please exercise extreme caution when handling a range hood to prevent risk of injury and electric
shock. Building codes will vary. It is the buyer or contractor’s responsibility to know local county or state regulations before installation of this range hood.
Preparations:
NOTE: To avo id damage t o your hood, prevent debris from entering the vent op ening
Decide the location of the venting pipe from the hood to the outside. Please see “Venting Method” section.
A straight, short vent will allow the hood to perform more efficiently.
Try to avoid as many transitions, elbows, and long run as possible. This may reduce the performance of the hood.
IMPORTANT: Peel w h ite or blue plastic p rotective film off the hood.
Use HVAC foil tape / duct tape to seal joints between the pipe sections.
For installing under cabinets with a recessed bottom, attach 4-inch wide wood filler strips (not provided) on each side. Refer to Figure 1.
Using references in measurements and diagrams provided, create an opening for electrical wires and hood exhaust under the cabinet.
CAUTION: If moving t he cooking ran ge is neces sary to install the hood, fi rst turn off the power. Always turn off the gas befo re moving a gas r ange.
Puncture the knockout holes (for mounting under the cabinet) on the hood as shown in Figure 2.
If necessary, attach two rubber panels with adhesive tape to the rear corners of the range hood. This will; help reduce vibrations and shaking when in opera-
tion.
AKDY Under Mount Range Hood Installation
Page 6
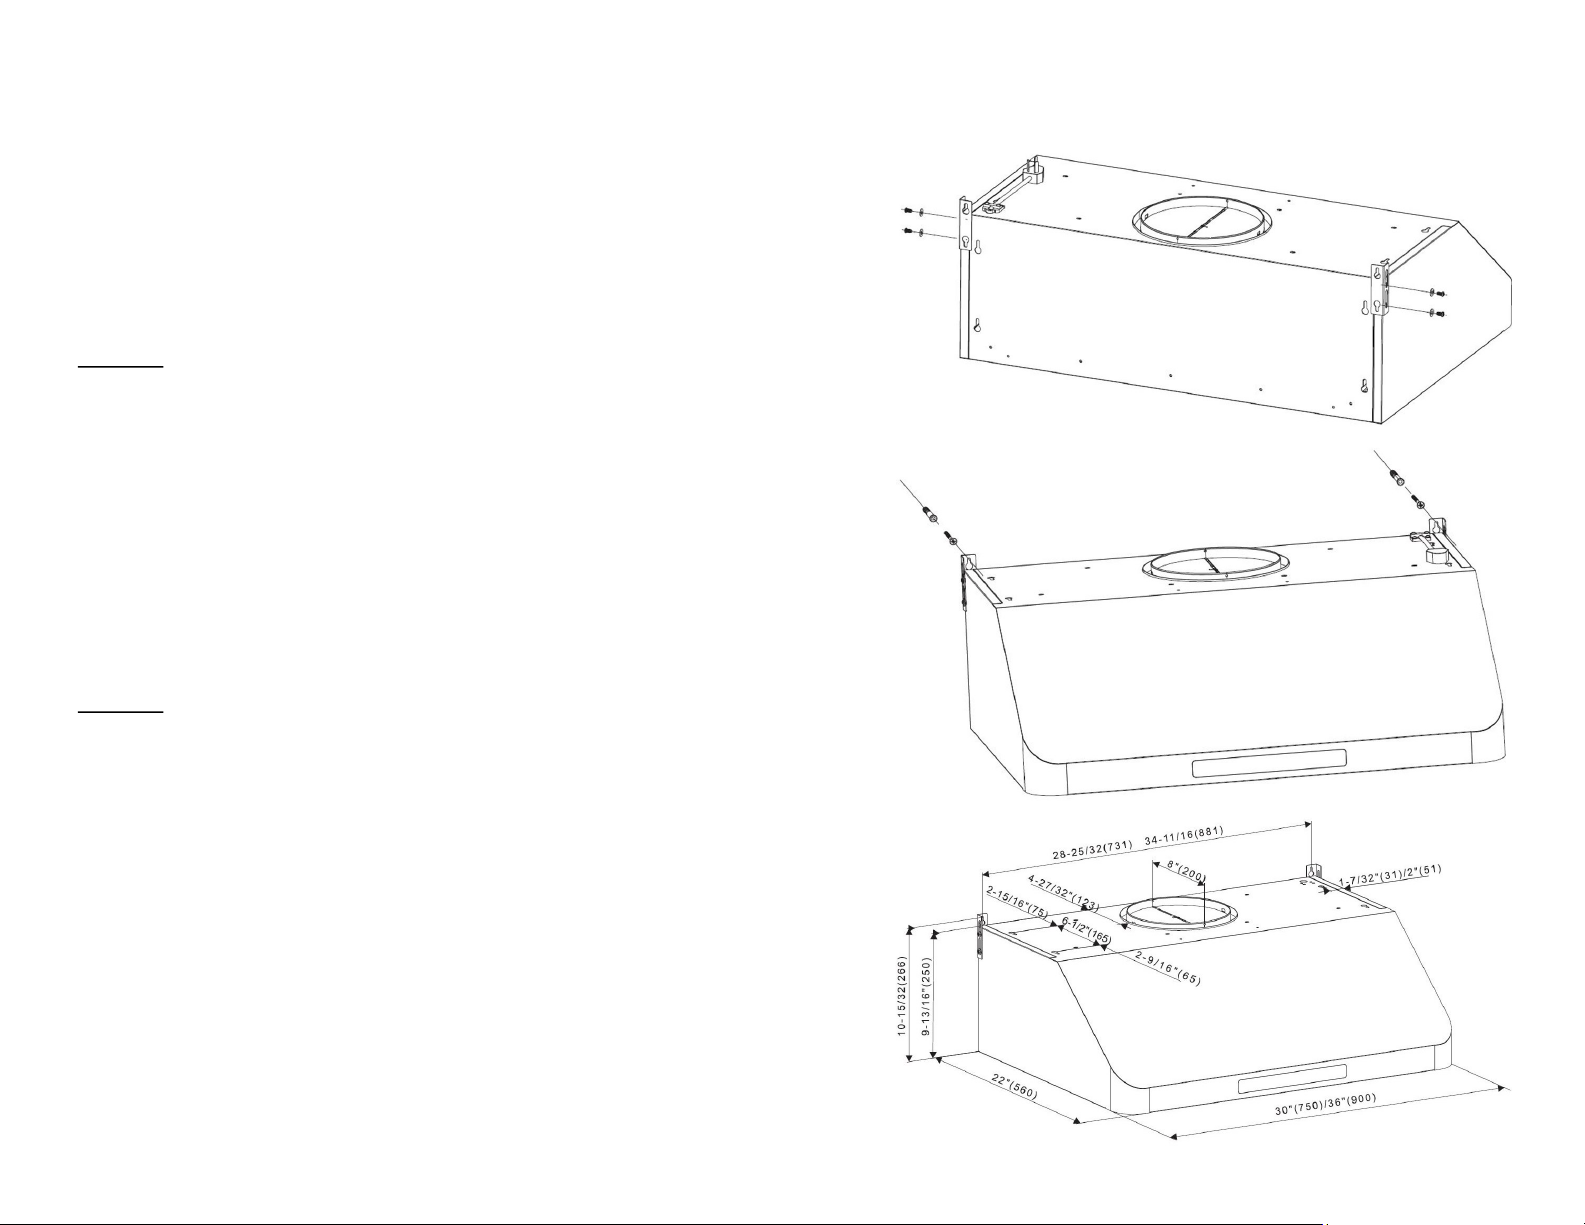
AKDY Under Mount Range Hood Installation
ATTTENTION HOMEOWNER: Tw o people w ill be required to li ft and i nstall the main
unit. We highly recommend professional help and an extra set of hands.
Measure the distance between the stove top and the bottom of the range hood. A distance
of 27” to 30” is recommended.
Step 1: There are two method s (A or B ) to moun t this range hood . For PIDs RH0026,
RH0027, and RH0028, installation method A is not compatible with your model.
Method A
Proceed if you would like to mount this range hood without using the hood mounting bracket.
1A. Using references in the Location Requirements section, center the hood beneath the
cabinet and flush with the front of the cabinet.
2A. Draw the electrical wires through the cabinet access opening if not done so already.
3A. From inside of the hood, place screws into the exact center of each knockout hole and
secure to cabinet bottom. Finish tightening all screws until secure. Be careful when using
electrical screwdrivers, they may cause damage to the range hood. Skip Method B below
and proceed to step 2.
CAUTION: Make certain the range hood is fu lly sec ured b efore releasing!
Method B
Proceed if you would like to mount this range hood using the provided hood mounting
bracket (If included).
1B. Using references in the Location Requirements section, mark the leveling point of the
hood. Position two mounting screws on the wall, leaving 1/8” space away from the wall.
Mounting the hood on wall studs is highly recommended.
2B. Attach the hood mounting bracket to the back of the hood with four screws as shown in
Figure 3.
3B. Puncture the knockout wire access hole at the back of the hood and draw the electrical
wires.
4B. Align hood-mounting brackets to the screws on the wall and hook hood into place as
shown at the right of this page. Tighten screws to secure hood to the wall.
CAUTION: Make certain the range hood is fully secured before releasing!
Page 7
Step 2: For safety pu rposes, pr e-drilled mounting
holes are provided through the back of the hood. For
a more secure installation, use as many mounting
holes as needed to secure the unit from the inside of
hood.
Step 3: Use a 8" diameter (size may vary) venting
pipe (follow building codes in your area) to connect
the exhaust on the hood to the ductwork above. Use
HVAC foil tape / duct tape to make all joints secure
and air tight.
SAFETY WARNING: Risk of electrical sh ock.
This range hood must be properly grounded. Make
sure this is done by qualified electrician in accordance with all applicable national and local electrical
codes. Before connecting wires, switch power off to
prevent power from being switched on accidentally.
Step 4: Con nect the range hood to a design at ed
standard outlet or cut off the plug and connect three
wires (black, white and green) to house wires and
cap with wire connectors. Connect according to col-
ors (i.e. black to black, white to white, and green to
green.) (If applicable).
Step 5: Store excess wires in the w iring box.
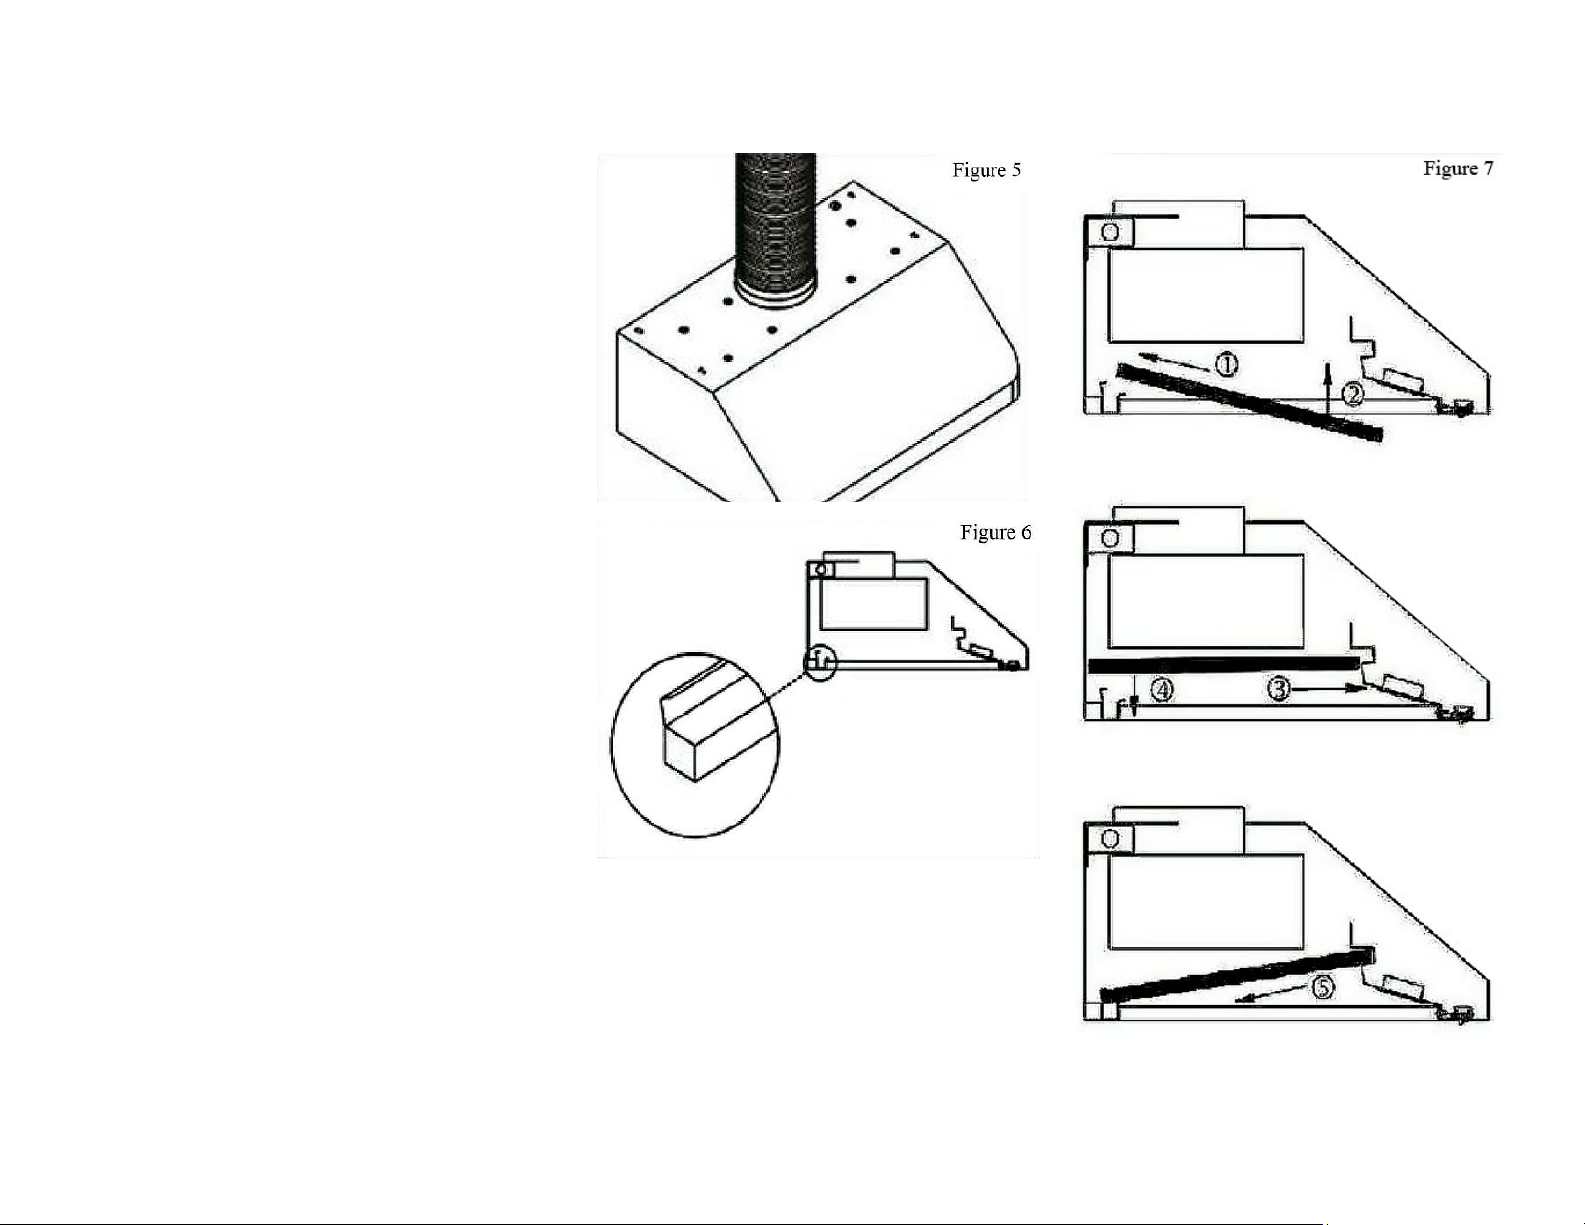
Step 6: Plac e o il tray into rec ess suppo rt near
the rear of the hood. Refer to Figure 6.
Step 7: To in stall b affle fi lters, refer to Fig ure 7
for placement.
1. Angle baffle filter toward the back of hood.
2. Push baffle filter up until almost leveled.
3. Slide iforward into recess behind the front of the
hood.
4. Lower the baffle filter.
5. Slide back until it fits into resting position.
Step 8: Repeat Step 7 to inst all all rem aining baffle filters.
Step 9: Turn power ON wit h Contro l Panel.
Check all lights and fan operations.
Step 10: Make su re to leave this in stallation
guide for the homeowner if you are a contractor.
AKDY Under Mount Range Hood Installation
Page 8
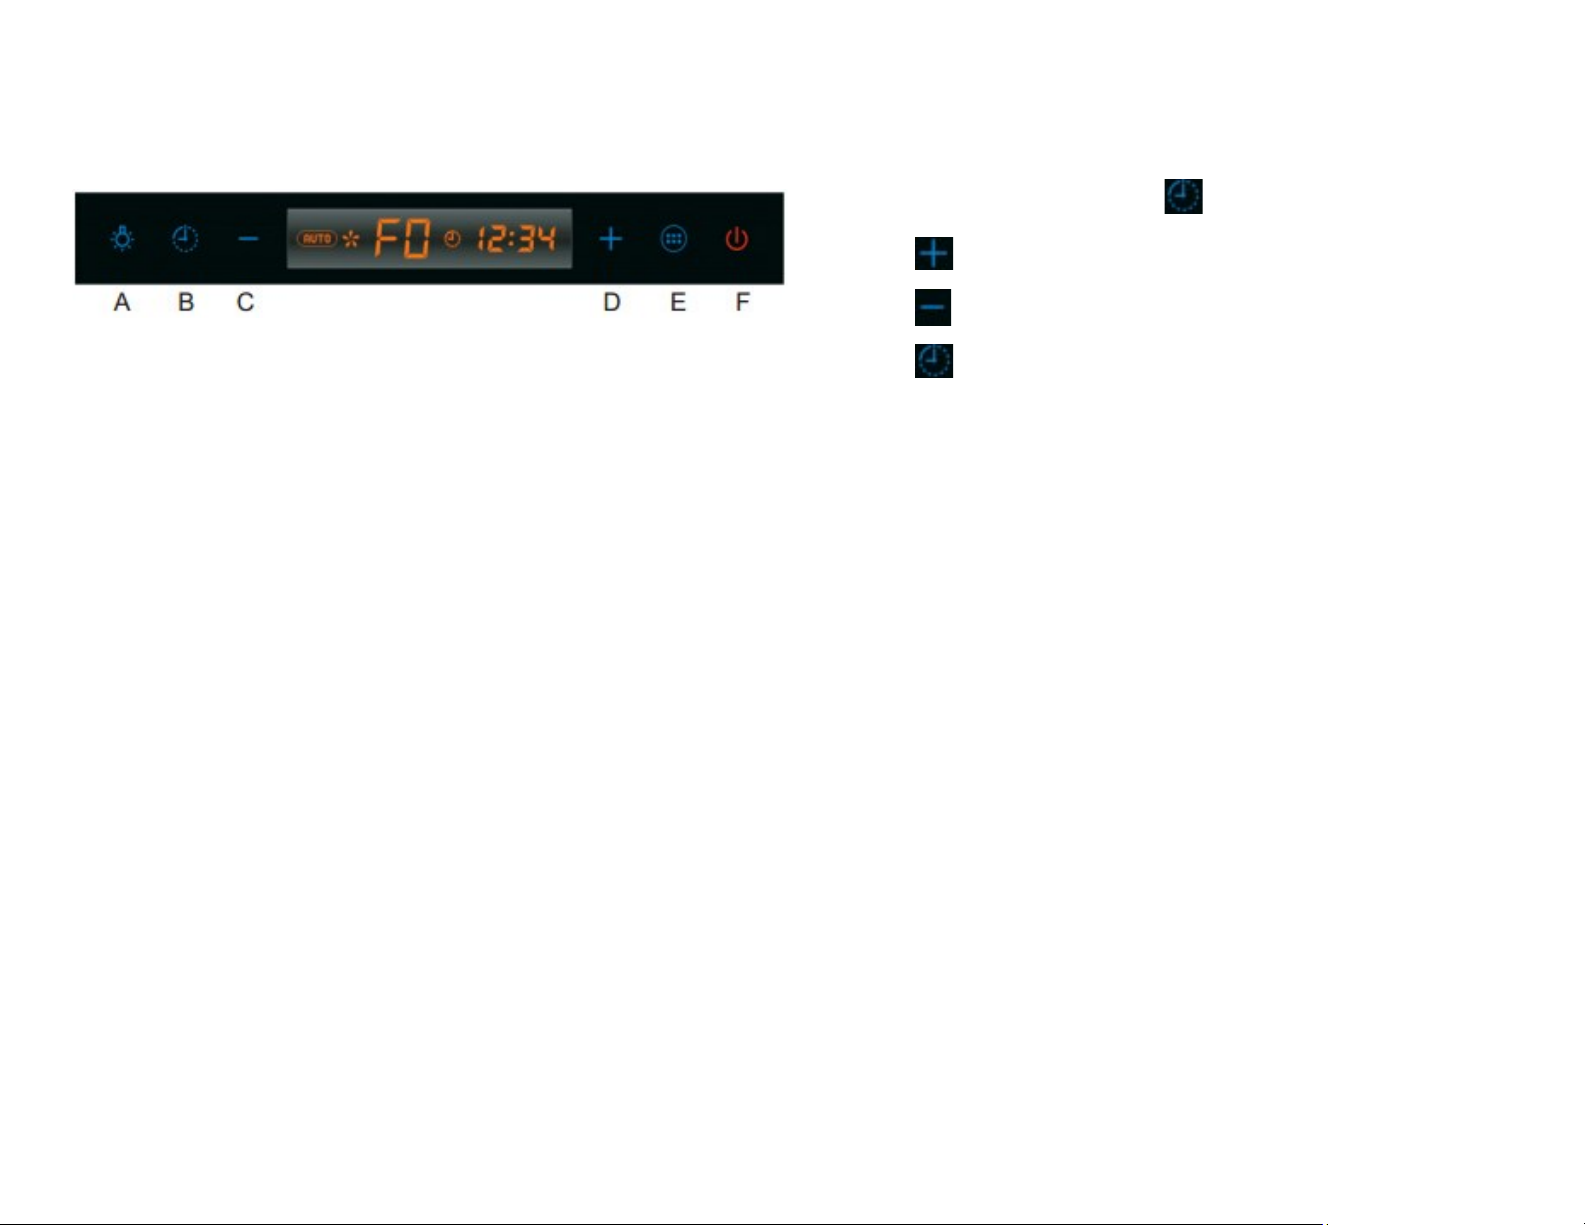
Control Panel & Touch-Sensitive Button Configuration
A: LED or Halogen Lights—tap it once to turn it on, tap a second time to turn it
off.
B: Timer—When the range hood is on standby mode, press the timer button for
3 seconds. The range hood will then enter the time setting state; the display
screen will show numbers. Press the “+” to set hours and Press the “-“ to set the
minutes. After 10 seconds, it will automatically exit the time setting state and the
time you have entered will be saved. When the range hood is on, touch the timer button one time. This will turn on the timer mode and the display will show
03:00. Each time you press the timer button, it will increase by 1 minute and the
maximum timer setting is 60 minutes. Within the last 3 seconds of the timer setting, the range hood will have three beeps.
C: Minus Button—In standby mode, press this button one time and the range
hood will start at F1 speed. If the button is pressed again, the speed will stay
the same.
D: Plus Button—In standby mode, press this button one time, the range hood
will start at F3 speed. If the button is pressed again, the speed will stay the
same.
E: Speed/Gas/Heat Sensor—1. Speed Function – In standby mode, press this
button one time, the range hood will start at F3, press this button again and the
range hood will turn off. 2. Gas/Heater Sensor – In standby mode, hold this button for 3 seconds, the range hood will enter automatic gas/heater sensor mode.
“AUTO” will flash on the display. The gas/heater sensor will now be enabled.
The motor and the lamps will turn on automatically if the gas/temperature in the
kitchen increases rapidly. Hold the button for 3 seconds again and the sensor
will be disabled.
F: Power—When the range hood is off, tapping this button will enter standby
mode. Tapping the button again will turn off the range hood completely. When
the range hood is on, tapping this button once will display 60 seconds. The
lights can then be turned on or off and the speed can be changed in this mode.
Tap the button again and it will turn off the range hood.
Setting the Clock
Step 1: Wit h the un it on, t ap and hold for 5 secs.
Step 2: Tap repeatedly to set the hours.
Step 3: Tap repeatedly to set the mins.
Step 4: Tap to finish.
Using the Control Panel
Page 9

RETURNS & WARRANTY
We thank you for your purchase. If you are not satisfied with your
purchase or have an issue with our product, please kindly let us
know. Our full returns policy is outlined below. Carefully read over
our terms before contacting us. If you have questions, our customer service team can be reached at: +1 (626) 321-9834 or
[email protected].
For 1-3 years from the date of purchase, when this major appliance is operated and maintained according to instructions attached to or furnished with the product, ShopRangeHoods.com
will pay for Factory Specified Parts. This limited warranty is valid
only in the United States or Canada and applies only when the
major appliance is used in the country in which it was purchased.
Outside the United States and Canada, this limited warranty is
null and void Proof of original purchase date is required to obtain
service under this limited warranty.
DISCLAIMER OF IMPLIED WARRANTIES: LIMITATION OF REMEDIES
CUSTOMER'S SOLE AND EXCLUSIVE REMEDY UNDER THIS
LIMITED WARRANTY SHALL BE PRODUCT REPAIR AS PROVIDED HEREIN. IMPLIED WARRANTIES, INCLUDING WARRANTIES OF MERCHANTABILITY OR FITNESS FOR A PARTICULAR PURPOSE, ARE LIMITED TO ONE YEAR OR THE
SHORTEST PERIOD ALLOWED BY LAW. SHOPRANGEHOODS.COM SHALL NOT BE LIABLE FOR INCIDENTAL OR
CONSEQUENTIAL DAMAGES. SOME STATES AND PROVINCES DO NOT ALLOW THE EXCLU-SION OR LIMITATION OF
INCIDENTAL OR CONSEQUENTIAL DAMAGES, OR LIMITA-
TIONS ON THE DURATION OF IMPLIED WARRANTIES OF
MERCHANTABILITY OR FITNESS, SO THESE EXCLUSIONS
OR LIMITATIONS MAY NOT APPLY TO YOU. THIS WARRANTY GIVES YOU SPECIFIC LEGAL RIGHTS, AND YOU MAY
ALSO HAVE OTHER RIGHTS WHICH VARY FROM STATE TO
STATE OR PROVINCE TO PROVINCE.
MANUFACTURER’S WARRANTY
ShopRangeHoods.com provides a 3-year limited parts warranty
for all range hoods, and a 1-year limited parts warranty for all
bathtubs, tub fillers, kitchen sinks, kitchen sinks, shower heads,
shower wands, and shower panels. Under this warranty, you (the
customer), is entitled to replacement parts at no cost to repair and
restore functionality if any part of the product were to fail. No labor
is provided. Certain consumables that are not covered under this
warranty include:
Lights (halogen and LEDs)
Carbon Filters
Mesh or Baffle Filters
Ducting
The above parts are guaranteed to last one year beginning from
the date of purchase. If they fail prematurely or are defective within 1 year of purchase, ShopRangeHoods.com will replace them at
no charge.
If a main unit or complete replacement has to be sent,
ShopRangeHoods.com will require that the customer pay for
shipping. Shipping for parts are free under the warranty period.
RETURNS, DAMAGES, MISSING PARTS
Ground Shipments – Range Hoods, Shower
Heads/Wands, Sinks, Tub Fillers
We accept all returns within 30 days with return shipping to be
paid by the customer if the item was:
deemed unsuitable
the wrong size
purchased but not used
an accidental purchase
buyer’s remorse
Resolution Process for Damages or Missing
Items (Ground Shipments)
1a. Customer provides images of damage (mandatory)
1b. Customer notifies us (ShopRangeHoods.com) for missing
parts or items
2a. We send a replacement unit (discretionary)
2b. We send replacement parts
3. Customer is provided a new tracking number for the replacement or parts shipped via Ground shipping or Parcel
Freight Shipments – Bathtubs, Oversized Range
Hoods
All bathtubs will ship via freight. Due to the large size and weight,
please allow approximately 2 weeks for the item to arrive. If you
have received a freight shipment, please kindly:
inspect for damages (ex: cracks, chips, etc.)
inspect for missing parts or items part of a bundle
Resolution Process for Damages or Missing
Items (Freight Shipments)
1a. Customer provides images of damage (mandatory)
1b. Customer notifies us (ShopRangeHoods.com) for missing
parts or items
2a. We send a replacement unit (discretionary)
2b. We send replacement parts
3. Customer is provided a new tracking number via our 3
rd
party
LTL carrier for the replacement or parts
If the customer contacts us after the 30-day window for a return,
ShopRangeHoods.com will require a 15-40% restocking fee to be
applied to the return depending on the condition of the item and
the number of days passed the standard 30-day window.
If shipping damage is noticeable upon arrival, please immediately
reject the package, take pictures of the damages, and contact
customer support for assistance.
If the item is delivered and arrived damaged, we will either send a
replacement and take back the damaged item, or send parts to
repair the item depending on the severity of the damage. A full
replacement will be issued only under our discretion. Under certain authorized venders who carry our products, shipping damages that require a full replacement will require contacting the seller
and not ShopRangeHoods.com .
All shipping damages must be reported within 30 days of delivery.
Missing or lost items must be reported within 7 days of delivery.
The customer must also notify the local authorities to obtain a
police report if the tracking information shows the item as being
delivered, but not received. A replacement part or unit will be
shipped out only if these rules are met. After the 30-day window
for damaged items or 7 days for lost and missing packages,
ShopRangeHoods.com reserves the right to not ship replacement
parts or complete units. No exceptions will be made and we will
not be held responsible.
WARRANTY EXCLUSIONS
The included warranty is null/void and does not cover the following conditions:
1. Service calls to correct the installation of your major appli-
ance, to instruct you on how to use your major appliance, to
replace or repair house fuses, or to correct house wiring or
plumbing.
2. Service calls to repair or replace appliance light bulbs, air
filters or water filters. Consumable parts are excluded from
warranty coverage.
3. Repairs when your major appliance is used for other than
normal, single-family household use or when it is used in a
manner that is contrary to published user or operator instruc-
tions and/or installation instructions.
4. Damage resulting from accident, alteration, misuse, abuse,
fire, flood, acts of God, improper installation, installation not
in accordance with electrical or plumbing codes, or use of
consumables or cleaning products not approved by us.
5. Cosmetic damage, including scratches, dents, chips or other
damage to the finish of your major appliance, unless such
damage results from defects in materials or workmanship
and is reported to us within 30 days from the date of purchase.
6. Any food loss due to refrigerator or freezer product failures.
7. Costs associated with the removal from your home of your
major appliance for repairs. This major appliance is designed
to be repaired in the home and only in-home service is cov-
ered by this warranty.
8. Repairs to parts or systems resulting from unauthorized
modifications made to the appliance.
9. The removal and reinstallation of your major appliance if it is
installed in an inaccessible location or is not installed in accordance with published installation instructions.
10. Major appliances with original model/serial numbers that
have been removed, altered or cannot be easily determined.
This warranty is void if the factory applied serial number has
been altered or removed from your major appliance. The
cost of repair or replacement under these excluded circumstances shall be borne by the customer.
 Loading...