

AKASA ELITE User Manual
leather finish aluminium enclosure
for 3.5” SATA hard drive with eSATA and USB interface
USER MANUAL
GB FR D ES PT
1
2
English
1
2 3
4
5
Installation instructions
AKASA Company notices
The information contained in this document is subject to change without notice.
All rights reserved. Reproduction, adaptation, or translation of this material is prohibited without
prior written permission of Akasa, except as allowed under copyright laws. Akasa shall not be liable for
technical or editorial errors or omissions contained herein.
Copyright 2008 Akasa Asia Corporation.
INTRODUCTION
Thank you for purchasing an Akasa Elite external hard drive enclosure. This leather-finish enclosure
enables external use of 3.5” SATA hard drive with style on the go or gracefully located on the desk
with provided footstand. It is a Plug & Play device, which gives you a connection choice between
industry standard USB2.0 or ultra fast eSATA. Your SATA enclosure can be used with a new HDD or
existing drives to allow data recovery, storage expansion and data mobility.
PACKAGE CONTENTS
• Akasa Elite 3.5" SATA enclosure
• USB 2.0 data cable ( 1.5m)
• eSATA data cable ( 1.5m)
• Footstand
• DC adapter with power cord
• User's Manual
• HDD mounting kit
Acknowledgements
Microsoft, Windows, Windows 2000 / XP / VISTA, are registered trademarks of Microsoft
Corporation.
Mac and Apple are the registered trademarks of Apple Computer, Inc.
Adobe and Acrobat are trademarks of Adobe Systems Incorporation.
General Notice: Other product names used herein are for identification purposes only and may be
trademarks of their respective owners. Akasa disclaims any and all rights in those marks.
FCC Compliance Statement
This device complies with Part 15 of the FCC Rules. Operation is subject to the following two
conditions:
1. This device may not cause harmful interference
2. This device must accept any interference received, including interference that may cause
undesired operation.
CAUTION
Electrostatic discharge (ESD) can damage PC components. If an ESD-controlled workstation is not
available, wear an antistatic wrist strap or touch the earthed surface before handling the HDD.
Changes or modifications not expressly approved by the party responsible for compliance could void the
user’s authority to operate the equipment.
Warranty
Warranties extend only to defects that occur during normal use and do not extend to damage to
products that results from incompatibility, abuse, misuse, negligence, unauthorized repair, modification,
incorrect installation, incorrect voltage supply, air/water pollution, any accident or natural disasters.
The warranty extends only on Akasa enclosure and does not cover a defective HDD,
motherboard etc. as a result of a defective enclosure or power adapter.
Keep your original sales receipt in a safe place. Nothing herein should be construed as constituting an
additional warranty.
Safety
Packaging complies with
EU directive 94/62/EC
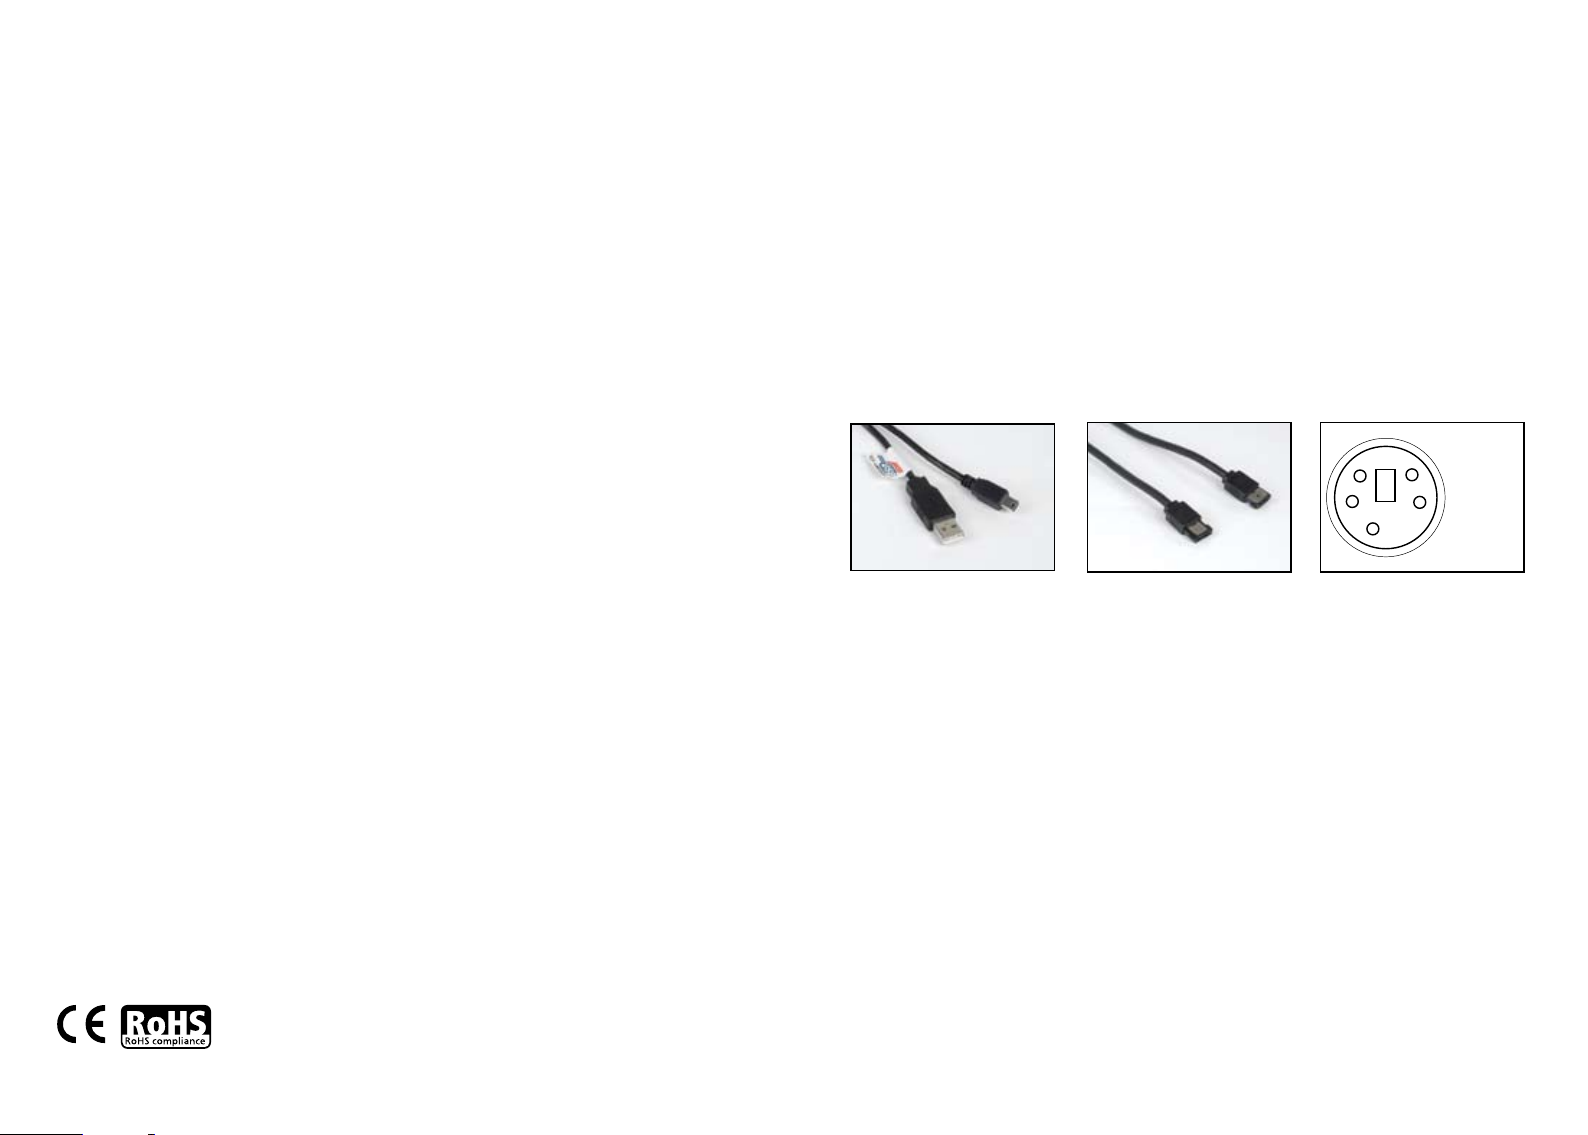
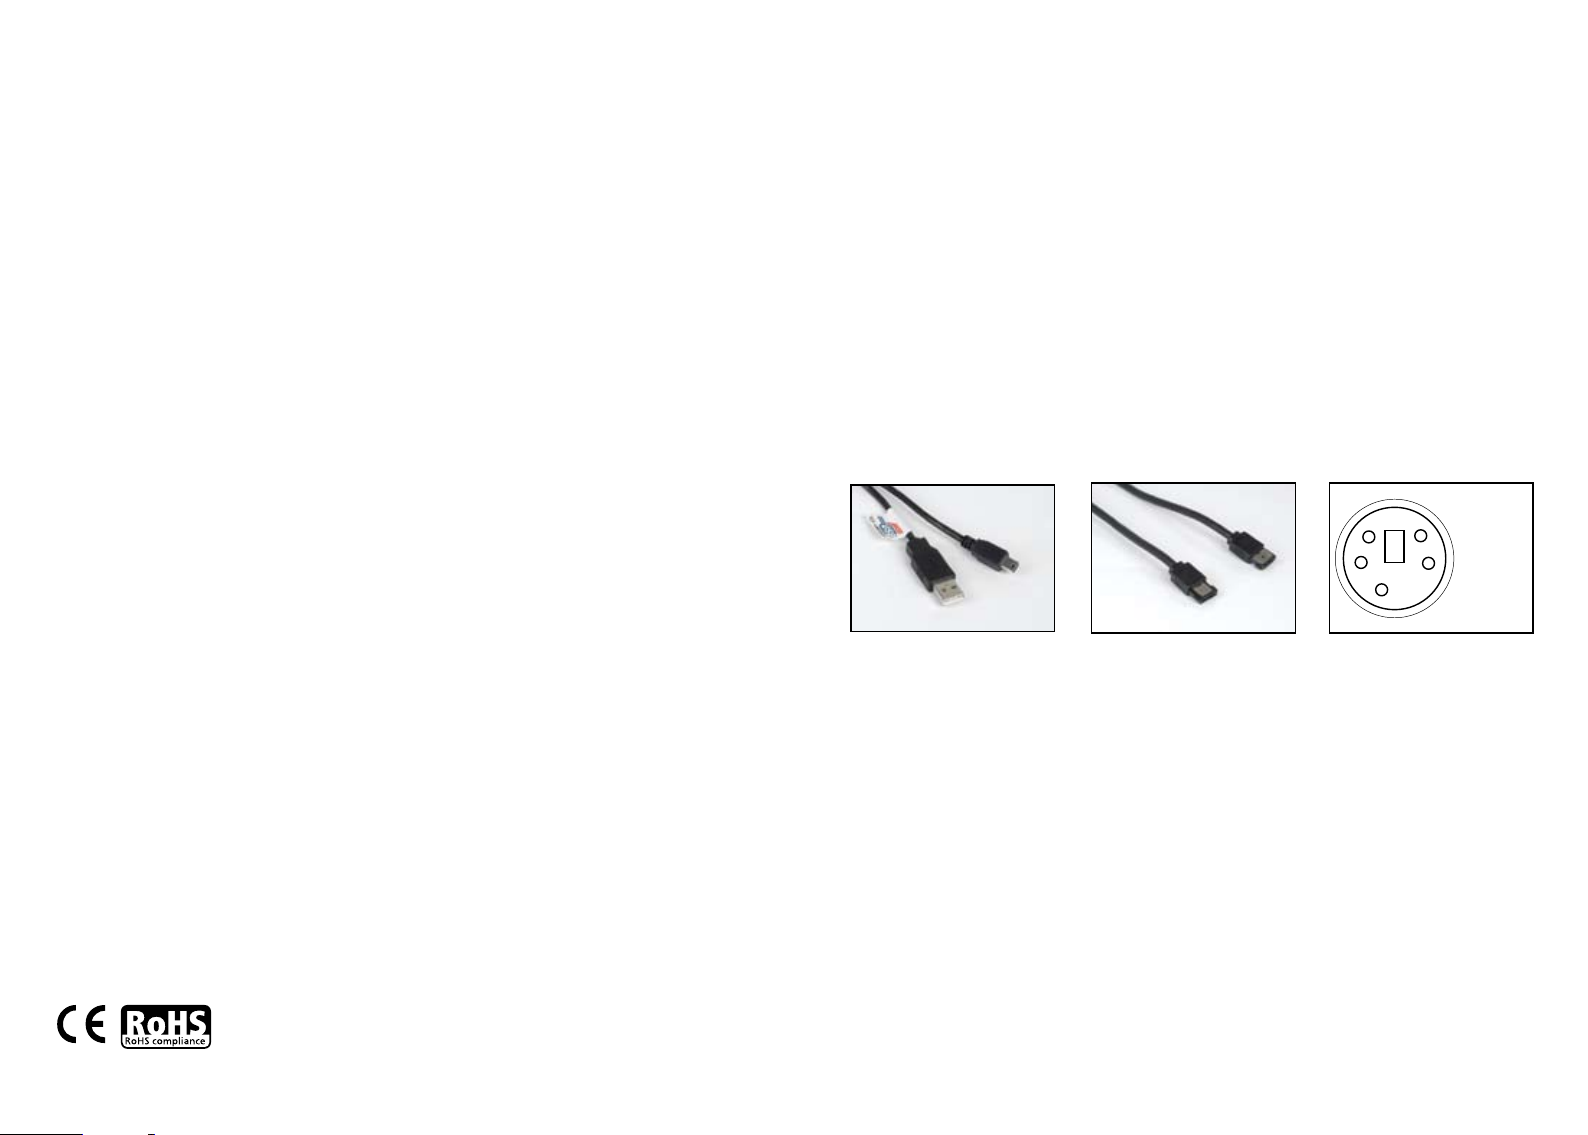
USB2.0 cable eSATA cable
DC power adapter pinout
1.GND
2. GND
3. +5V DC
4. +5V DC
5. +12V DC
FEATURES
• Suitable for 3.5" SATA hard drives
• Stylish black leather finish
• Elegant footstand allows space saving positioning on the desk
• Aluminium body enables fanless design
• USB 2.0 and eSATA interface
• Supports all capacity 3.5" SATA I / II hard disk drives
• Hi-Speed USB 2.0 transfer rates up to 480Mb/s
• eSATA transfer rates up to 3.0Gb/s
• Plug & Play
• Hot-swappable in USB mode
• USB 2.0 USB ( 1.1 compatible)
• Blue LED power on and data transfer indication
• On/Off switch
MANUAL CONTENTS
• Introduction
• Hard Disk Installation
• USB Connection
• eSATA Connection
• Hard Disk Formatting
• FAQ
3
4
HDD Installation
E-SATA
DC5V/12VOFF/ON
SPECIFICATIONS
• Internal interface: Serial ATA I / II
• External interface: eSATA, USB 2.0 (1.1 backward compatible)
• Transfer rates: up to 480Mb/s on USB 2.0 and up to 3.0Gb/s on eSATA
• Power on and data transfer indicator: Blue LED
• Case material: Aluminum body with leather finish
• Weight: 510g (without a HDD)
• Dimensions: 188mm (L) x 129 mm (W) x 33mm (H)
• Power requirements: 110- 230V (AC)
• Power Adapter Output: 2.0A - 5V, 12V (DC)
• Operating Temperatures: 5 to 50 oC
• Storage Temperatures: -40 to 70 oC
• Operating Humidity: 5 to 90%, non-condensing
SYSTEM REQUIREMENT
PC Requirements
• Minimum Intel Processor Pentium II 350MHz, 64MB RAM
• Windows 2000 / XP / Vista
• Active USB or SATA port
MAC Requirements
• Minimum Apple G3 processor, 64MB RAM
• Mac OS 9.1, 9.2, 10.1.5, 10.2, 10.3
• Active USB or eSATA port
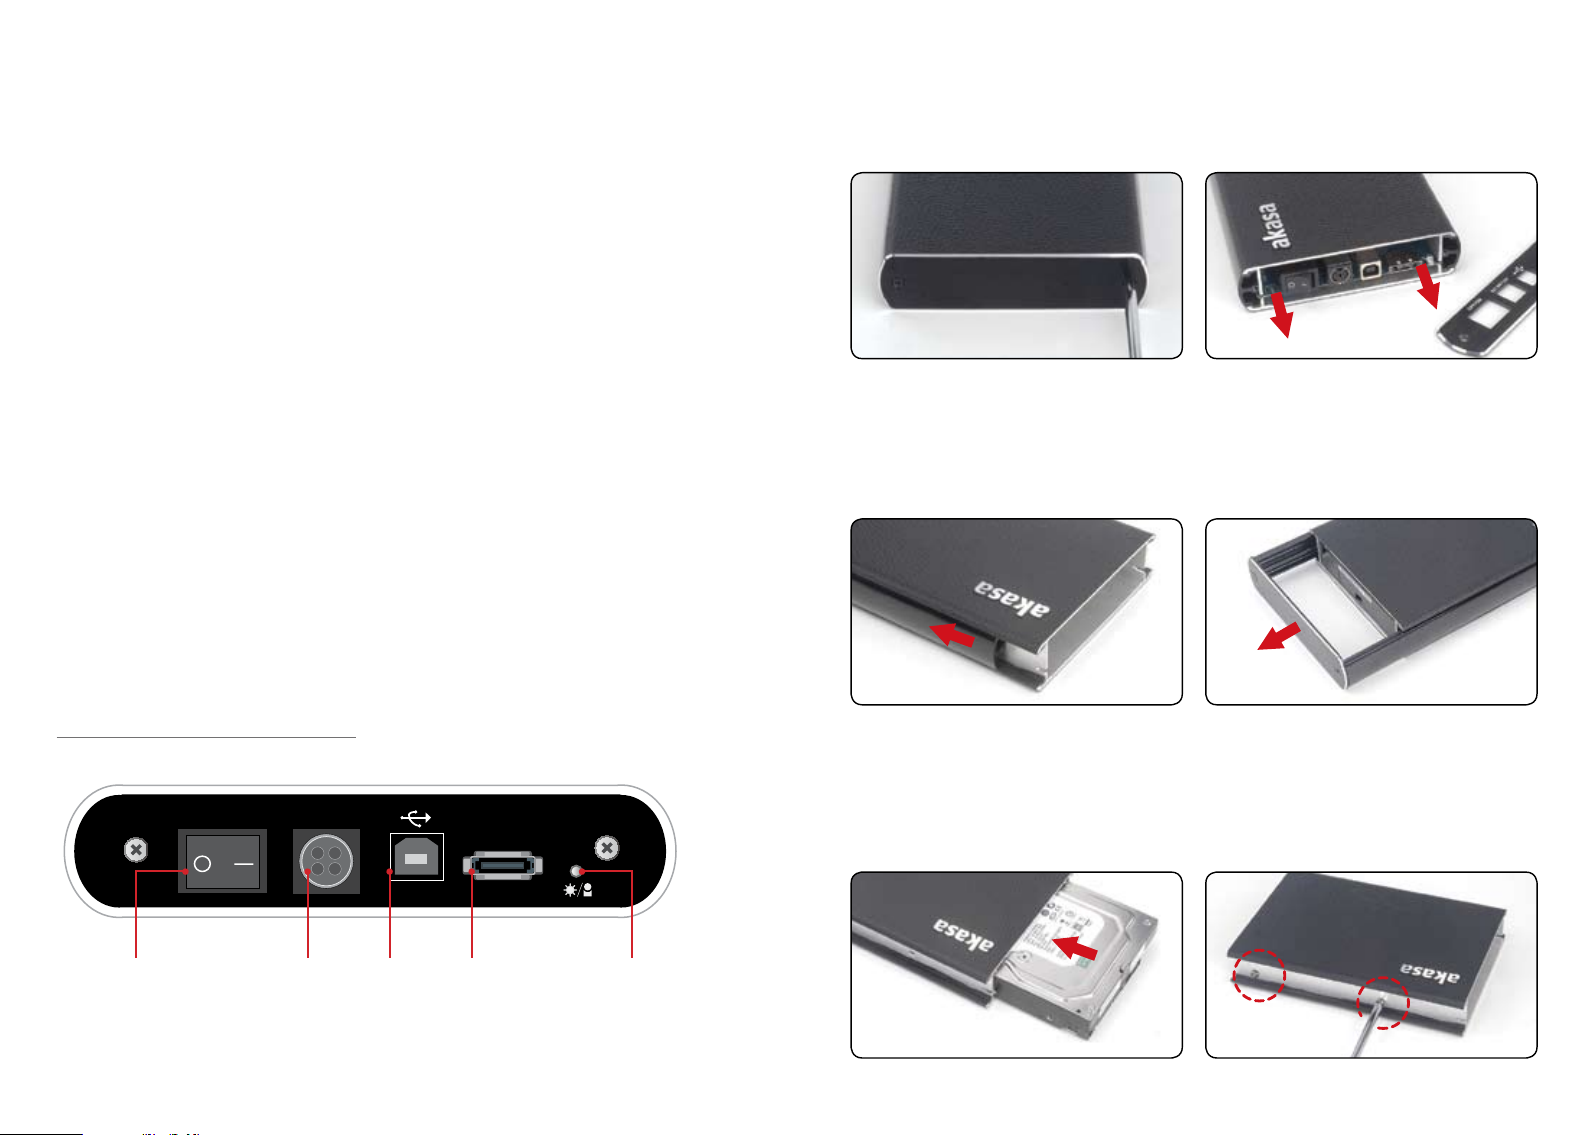
Hard Disk Installation
Open the back of the enclosure by undoing the securing screws and sliding off the interface
1.
board out of the aluminum housing.
Push both side aluminium bars out of the housing in the direction as shown in the picture. Remove the
2.
side panels completely by pulling out the front panel.
BACK PANEL ARRAGEMENT
While keeping the housing on the table gently insert the HDD inside the housing so the mounting holes
3.
line up and secure it with four screws provided (two on each side).
USB port eSATA portDC inputPower switch
LED indicator
5
6
HDD Installation
E-SATA
DC5V/12VOFF/ON
ESATA
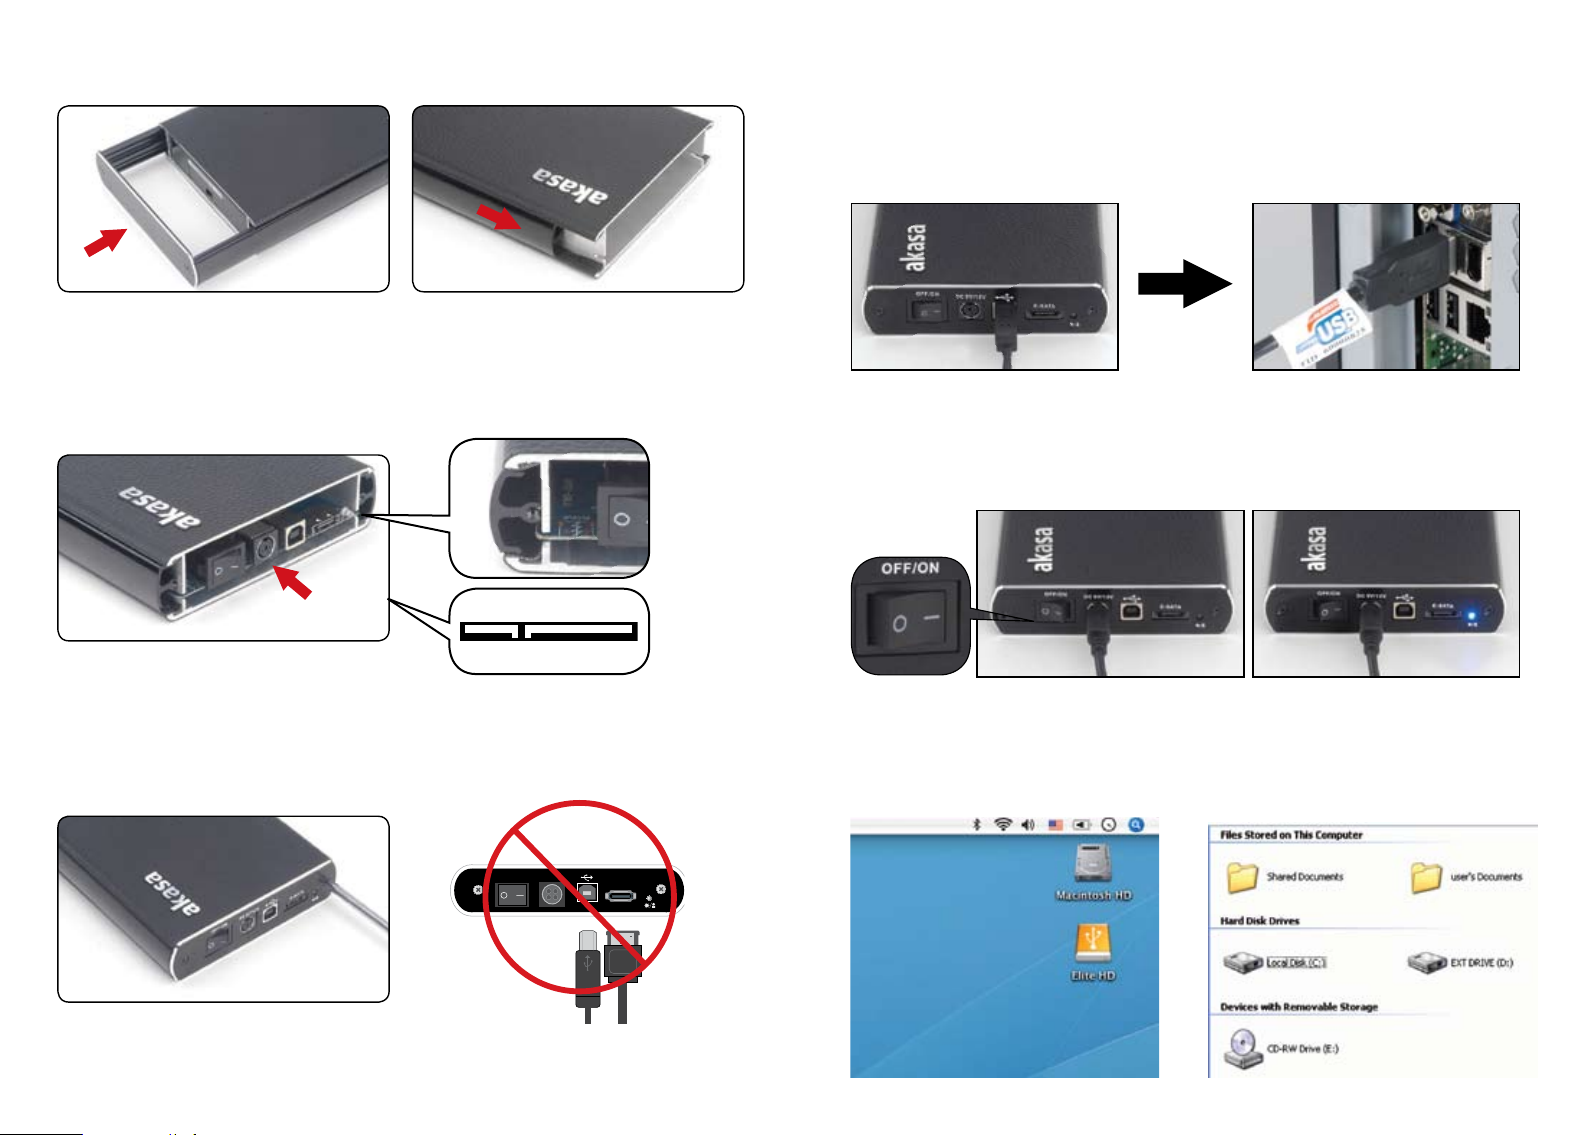
Slide the side panels back into the aluminium housing.
4.
Line-up the connectors and gently insert the interface board onto the 3.5" SATA hard drive until the
5.
connection is secure.
USB Connection
USB CONNECTION
Connecting the Elite enclosure (USB mode)
1. Connect one end of the USB cable into the USB Port of your elite enclosure and the other end into any
available USB port of your PC or MAC.
2. Connect the DC power cord to the back of the enclosure making sure the round connector is aligned
correctly. Plug the power pack into an available AC socket and switch on the enclosure. Blue LED should
light up. Windows or MAC operating system will search for and install the driver automatically.
NOTE:
Please ensure that you are using the supplied power pack only.
Secure the enclosure backplate to the housing using the screws provided. You are now ready to
6.
connect your SATA enclosure to the system. Choose connection you want to use (USB or eSATA) and move
to the corresponding chapter of the manual for further instructions.
NOTE: Do not connect both (USB and eSATA) cables at the same time.
3. (Windows)
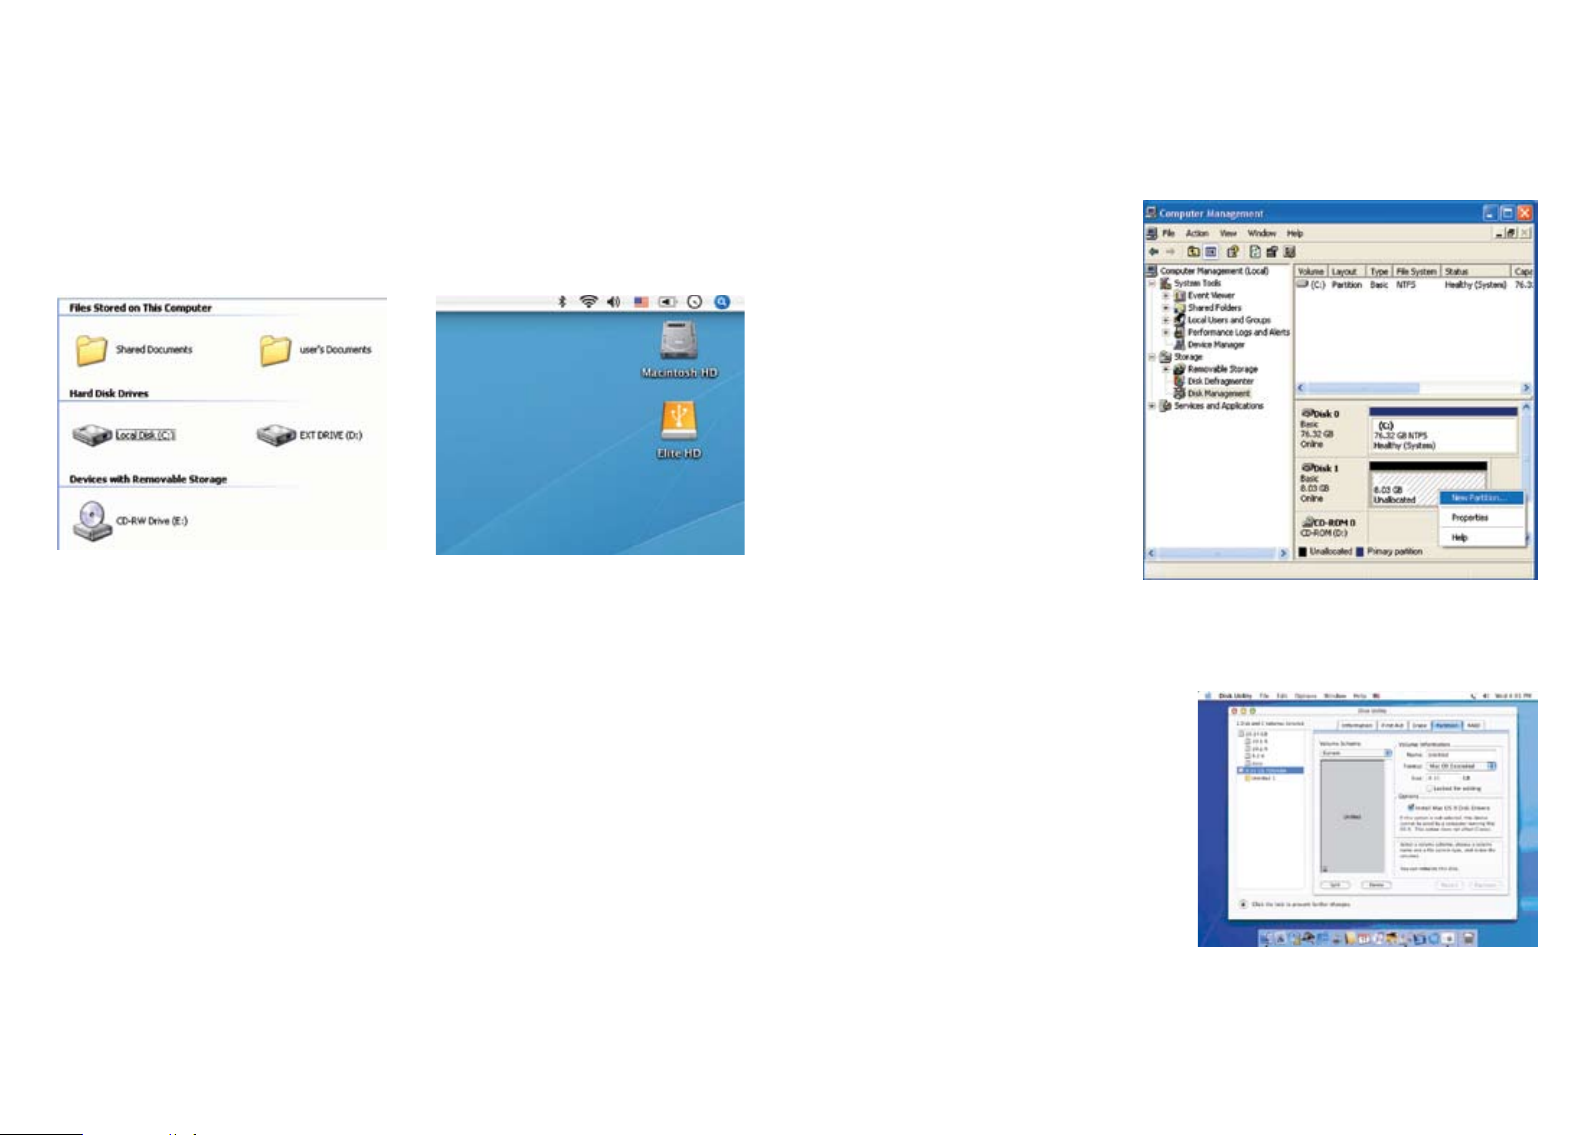
To see your Elite hard drive enclosure open “My Computer” (Windows 2000/XP) or "Computer"
(Windows Vista). Double click on the icon of the external hard drive ready to use.
(MAC)
The icon of the ready to use external drive will appear on the desktop.

7
8
USB Connection
eSATA Connection
4. To access and browse the external drive under Windows or Mac simply double-click on its icon.
NOTE: If the hard drive inside the enclosure is brand new it needs to be formatted before it becomes
accessible (for instructions see hard disk formatting chapter).
Disconnecting the Elite enclosure (USB mode)
WARNING!
Close all windows and quit all running applications that are stored on the Integral External Drive before
switching off the enclosure or unplugging the USB or power cables.
NOT DOING SO MAY RESULT IN LOSS OF DATA!
Windows 2000/XP/VISTA
1. Double-click on the [Unplug arrow icon or Eject
Hardware] icon in the system tray. Dialog
box appears as on the right.
2. Highlight the [USB Mass Storage Device] in the
dialog box, click on [Stop], choose the USB2.0
External Drive that you want to disconnect, then
click on [Stop] again on next screen.
eSATA CONNECTION
NOTE: Motherboard or adapter with SATA interface is required.
Connecting the Elite enclosure (eSATA mode)
1. Make sure the system is switched off.
2. Use supplied eSATA cable to connect the Elite enclosure to the motherboard's eSATA external port.
NOTE: If the port is not present on your motherboard you may need to install an eSATA adapter
(eSATA-45-EX).
3. Connect the DC power cord to the back of the enclosure making sure the round connector is aligned
correctly. Plug the power pack into an available AC socket and switch on the enclosure. Blue LED
should light up.
NOTE: Please ensure that you are using the supplied power pack only.
3. Wait for few seconds, the system prompts
“You may safely remove this device”.
4. You can now safely switch off the enclosure or
unplug the USB cable from the USB port of the
computer.
Mac OS
1. Drag Elite External Drive’s icon into "Trash"
2. MAC OS will dismount the external drive from the
Desktop
3. You can now safely switch off the enclosure or
unplug the USB cable from the USB port
of the MAC.
9
10
eSATA Connection
Hard Disk Formatting
4. Boot-up your system. Windows or MAC operating system will search for and install the driver
automatically.
NOTE: in some cases switching off the system may not be required (depends on
motherboard Hot-Swap support for eSATA port).
(Windows)
To see your Elite hard drive enclosure open “My Computer” (Windows 2000/XP) or
"Computer" (Windows Vista). Double click on the icon of the external hard drive ready to use.
(MAC)
The icon of the ready to use external drive will appear on the desktop.
5. To access and browse the external drive under Windows or Mac simply double-click on its icon.
NOTE: If the hard drive inside the enclosure is brand new it needs to be formatted before it
becomes accessible (for instructions see hard disk formatting chapter).
HARD DISK FORMATTING
WARNING!!
Before you partition or format your hard disk, please be aware that this will destroy all your existing data on the drive,
so make sure you have a backup if required. This step is usually only required the first time you install a factory new
hard drive or if you want to change the existing format of the drive.
Windows 2000/XP/VISTA
Step1
To partition the drive please connect the
enclosure either via USB or eSATA connection
then go to "START", right-click on [My
Computer] and choose [Manage].
A [Computer Management] window will
appear (as on the right).
Step2
Click on [Disk Management] on the left part
of this window and all connected disk drives
will be listed in the right part. Find the Hard
Disk that you added with it's partition status
on the right. You can create a new or delete
an existing partition by right clicking on this
area.
Step3
Right-click on the hard disk partition status
area and choose [New Partition...].The
“New partition wizard” will appear.
Step4
Following the "wizard"instructions to partition
and format your HDD.
Step5
Wait until "wizzard" finished formatting your
eSATA drive. It should now appear in [My
Computer] ready to use.
Disconnecting the Elite enclosure (eSATA mode)
WARNING!
Do not switch off the enclosure or unplug the SATA or power cable when using the Elite enclosure .
DOING THIS MAY RESULT IN LOSS OF DATA!
1. Turn off the system
2. Switch off and unplug the enclosure
Mac OS
NOTE:
Mac OS does not recognize NTFS formatted drives.
Mac OS9.2 and earlier, does not support creating
partitions on an external drive. To do that, you would
need to purchase additional 3rd party software.
Initializing is no problem on all Operating Systems.
Mac OS X, use the Disk Utility to format and create
partitions on your external disk.
• Select “Disk Utilities” in the utilities folder.
• Choose your external drive and format it
according to your requirement.
GENERAL REMARKS
• Only one interface (USB or eSATA) can be connected at the same time.
• For better heat dissipation and performance, do not cover the enclosure or its power adapter and leave
enough room around them.
• Never expose the product to water or humid conditions.

11
12
FAQ
1. Does the enclosure need any drivers in USB mode?
The embedded drivers of Windows 2000/XP/VISTA control the enclosure in USB
mode via mass storage device driver strategy and there are no additional drivers
required.
2. Does the enclosure need any drivers in eSATA mode?
The motherboard’s SATA drivers control the enclosure in eSATA mode and there are
no additional drivers required.
3. When do I need to format the HDD?
The HDD should only be formatted if it is brand new or you want to use an old
HDD with different file format.
4. Is there a HDD limitation?
No, all capacity of SATA I and SATA II hard drives are supported
5. Do I need to restart the system if connecting the enclosure via USB?
No, when using the USB connection the enclosure is Plug and Play.
6. Do I need to restart the system when connecting the enclosure via eSATA?
Most motherboards don’t support Hot Swap on eSATA/SATA connection but
some do. Please refer to your motherboard manual.
7. My system doesn’t have an eSATA port, can I still use the enclosure?
You can use the enclosure in USB mode or equip you PC system with a SATA to eSATA
adapter / SATA to eSATA cable and your Notebook with an eSATA expansion card.
FAQ
8. Can I use any power adapter with the enclosure?
No, only the supplied power pack can be used. Some power adapters may have
similar connectors but the Voltage and pin layout might be different.
Using an unsuitable power pack will result in damage to the HDD and enclosure.
9. Will my HDD overheat if left on for a long period of time?
No, to prevent the hard drives from overheating the body of the enclosure is made of thick
aluminium, which enhances heat dissipation. Avoid keeping the enclosure near a radiator
or in direct sunlight.
10. I've connected the enclosure via eSATA but it does not appears in explorer.
Make sure the motherboard eSATA/SATA port is enabled in BIOS. Restart the system.
If you have any more questions please contact as at: technical@akasa.com.tw
13
14
Français
1
2 3
4
5
Instructions d'installation
INTRODUCTION
Merci d’avoir acheté un boîtier de disque dur externe Elite d’Akasa. Ce boîtier avec finition en cuir
permet l’utilisation externe d’un disque dur SATA 3,5 pouces avec élégance pour les gens toujours en
mouvement ou gracieusement posé sur le bureau à l’aide du pied fourni. C’est un appareil Plug & Play,
qui vous offre comme choix de connexion le standard industriel USB2.0 ou l'ultra rapide eSATA. Votre
boîtier SATA peut être utilisé avec un nouveau disque dur ou des disques existants pour la récupération
des données, l’extension du stockage et la mobilité des données.
Avertissement de la compagnie Akasa
Les informations contenues dans ce document sont sujettes à modifications sans préavis.
Tous droits réservés. Toute reproduction, adaptation, ou traduction de ce document est interdite sans
autorisation écrite de Akasa, excepté ce qui est autorisé par les lois sur les droits d’auteur. Akasa ne peut être
tenu responsable pour des erreurs techniques ou éditoriales ou des omissions dans le présent document. Droits
d’auteur 2008 Akasa Asia Corporation.
Reconnaissances
Microsoft, Windows, Windows 2000 / XP / VISTA, sont des marques commerciales déposées de Microsoft
Corporation. Mac et Apple sont des marques commerciales déposées de Apple Computer, Inc.
Adobe et Acrobat sont des marques déposées de Adobe Systems Incorporation.
Remarque générale: D’autres noms de produits utilisés dans le présent document sont uniquement utilisés par
souci d’identification et peuvent être des marques commerciales de leurs propriétaires respectifs. Akasa n’est le
propriétaire d’aucun des droits associés à ces marques.
Déclaration de conformité de la FCC
Cet appareil est conforme à l’Article 15 des Règles de la FCC. Son fonctionnement est sujet aux deux
conditions suivantes:
1. Cet appareil ne peut pas causer d’interférence dangereuse
2. Cet appareil doit accepter toutes les interférences reçues, y compris les interférences qui peuvent engendrer
un fonctionnement indésirable.
ATTENTION
Une décharge électrostatique (ESD) peut endommager les composants du PC. Si aucune station de travail
protégée contre les décharges électrostatiques n’est disponible, portez un bracelet antistatique ou touchez une
surface reliée à la masse avant de manipuler le disque dur.
Des changements ou des modifications qui ne sont pas expressément approuvés par les parties responsables
de la conformité de l’appareil peuvent entraîner l’annulation de l’autorité de l’utilisateur pour l’utilisation de
cet appareil.
Garantie
Les garanties ne couvrent que les défauts qui surviennent pendant une utilisation normale et ne s’appliquent
pas aux dommages du produits résultants d’incompatibilité, abus, mauvaise utilisation, négligence, réparation
non autorisée, modification, mauvaise installation, erreur d’alimentation, pollution de l’air/l’eau, d’accident ou
de catastrophes naturelles.
La garantie ne couvre que les boîtiers Akasa et ne couvre pas un disque dur défectueux, carte mère
défectueuse, etc. provenant d’un boîtier ou d’une alimentation défectueuse.
Conservez votre preuve d’achat originale dans un endroit sûr. Rien dans le présent document ne peut être
interprété comme constituant une garantie supplémentaire.
Keep your original sales receipt in a safe place. Nothing herein should be construed as constituting an
additional warranty.
Sécurité
L’emballage est compatible avec la
directive 94/62/EC de l’UE
CONTENU DE L'EMBALLAGE
• Boîtier SATA 3,5 pouces Elite d’Akasa
• Câble de données USB 2.0 (1,5m)
• Câble de données eSATA
• Pied
• Adaptateur CC avec cordon d’alimentation
• Manuel de l’utilisateur
• Kit de montage du disque dur
Câble USB2.0 Câble eSATA Transformateur DC male
CARACTÉRISTIQUES
• Approprié pour les disque durs SATA 3.5"
• Elégante finition en cuir noir
• Pied élégant permet d’économiser de l’espace sur votre bureau
• Corps en aluminium pour un design sans ventilateur
• Interface USB2.0 et eSATA
• Prend en charge toutes les capacités de disques durs 3,5 pouces SATA I / II
• Taux de transfert Hi-Speed USB 2.0 jusqu’à 480Mb/s
• Taux de transfert eSATA jusqu’à 3.0Gb/s
• Plug & Play
• Hot-swappable en mode USB
• USB 2.0 (reste compatible avec USB 1.1)
• DEL bleue d’indication de mise sous tension et de transfert des données
• Sélecteur Marche/Arrêt
CONTENU DU MANUEL
• Introduction
• Installation du disque dur
• Connexion USB
• Connexion eSATA
• Formatage du disque dur
• FAQ
1.GND
2. GND
3. +5V DC
4. +5V DC
5. +12V DC
15
16
E-SATA
DC5V/12VOFF/ON
Installation du disque dur
SPECIFICATIONS
• Interface interne: Serial ATA I / II
• Interface externe: eSATA, USB2.0 (reste compatible avec 1.1)
• Taux de transfert: jusqu’à 480Mb/s avec USB 2.0 et jusqu’à 3.0Gb/s avec eSATA
• Indicateur d'alimentation et de transfert des données: DEL bleue
• Matériau du boîtier: Corps en aluminium avec finition en cuir
• Poids: 510g (sans disque dur)
• Dimensions: 188mm (L) x 129 mm (l) x 33mm (h)
• Spécifications de l’alimentation: 110- 230V (CA)
• Sortie de l’adaptateur d’alimentation: 1.5A, 5V, 2V (CC)
• Température de fonctionnement: 5 à 50 oC
• Température de stockage: -40 à 70 oC
• Humidité en fonctionnement: 5 à 90%, sans condensation
SPECIFICATIONS DU SYSTEME
Spécifications du PC
• Processeur Intel Pentium II 350MHz, 64Mo de RAM minimum
• Windows 2000 / XP / VISTA
• Port actif USB ou SATA
Spécifications MAC
• Minimum processeur Apple G3, 64Mo de RAM
• Mac OS 9.1, 9.2, 10.1.5, 10.2, 10.3
• Port actif USB ou eSATA
Installation du disque dur dur
Ouvrez l’arrière du boîtier en dévissant les vis de fixation et en faisant glisser le
1.
panneau du boîtier en aluminium.
Appuyez sur les deux côtés de la barre en aluminium du boîtier dans la direction indiquée sur l’illustration.
2.
Retirez complètement les panneaux latéraux en tirant sur le panneau avant.
AMENAGEMENT DU PANNEAU ARRIERE
Commu tat eur
d’alimentation
Entrée DC
Port USB port eSATA
Indicateur DEL
Tout en gardant le boîtier sur la table, insérez doucement le disque dur à l’intérieur du boîtier afin que les
3.
trous de montage soient alignés et fixez-le avec les quatre vis fournies (deux de chaque côté).
17
18
E-SATA
DC5V/12VOFF/ON
ESATA
Remettez les panneaux latéraux dans le boîtier en aluminium.
4.
Installation du disque dur
Connexion USB
Connexion USB
Connexion du boîtier Elite (mode USB)
1. Connectez une extrémité du câble au port USB de votre boîtier elite et l’autre extrémité à n'importe
quel autre port USB disponible de votre PC ou MAC.
Alignez les connecteurs et insérez doucement le panneau d’interface sur le disque SATA 3,5 pouces jusqu’à
5.
ce que la connexion soit bien fixée.
Fixez le plateau arrière du boîtier en utilisant les vis fournies. Vous êtes maintenant prêt à connecter votre
6.
boîtier SATA au système. Choisissez la connexion que vous voulez utiliser (USB ou eSATA) et allez au
chapitre correspondant du manuel pour plus d’instructions.
REMARQUE: Ne connectez pas les deux câbles (USB et eSATA) en même temps.
2. Connectez le cordon d’alimentation DC à l’arrière du boîtier en vous assurant que le connecteur rond
est correctement aligné. Branchez le pack d’alimentation à la prise AC disponible et mettez le boîtier sous
tension. La DEL bleue s’allumera. Le système d’exploitation Windows ou MAC recherchera et installera
automatiquement le pilote.
REMARQUE:
3. (Windows)
Pour voir votre boîtier de disque dur Elite, ouvrez “Poste de travail” (Windows 2000/XP) ou "Ordinateur"
(Windows Vista). Double cliquez sur l’icône du disque dur externe prêt à l’emploi.
(MAC)
l'icône du disque externe prêt à l’emploi apparaîtra sur le bureau.
Veuillez vous assurer que vous êtes uniquement en train d’utiliser le pack d’alimentation fourni.
 Loading...