

Page 1

TV LCD- 15" avec
Tuner Pal/SECAM & TNT intégré
Manuel d'instructions
DLC-D1503L
Page 2
CONSIGNES DE SECURITE
WARNING
Consignes de sécurité importantes à conserver avec le
produit Merci de lire attentivement
Pour empêcher les risques de feu ou de choc électrique,
n’exposez pas l’appareil à la pluie ou à l’humidité. Afin d’éviter
tout risque de choc électrique, ne jamais ouvrir l’appareil. En cas
de panne, confiez votre matériel exclusivement à une personne
qualifiée. Aucune pièce de cet appareil n’est susceptible d’être
réparée par l’utilisateur.
Toute utilisation de commandes, tout réglage ou toute exécution
de procédures autres que celles spécifiées dans ce manuel
peuvent provoquer une exposition dangereuse de radiation. Ce
produit est classé comme un APPAREIL A LASER DE CLASSE 1.
ATTENTION : Rayonnement laser visible et invisible en cas
d’ouverture, exposition dangereuse au faisceau.
F.C.C.
ATTENTION !
Appareil sous tension dangereuse ! Ne pas ouvrir. Risque de choc électrique ! Aucune
pièce n’est susceptible d’être réparée par l’utilisateur. Laissez à des personnes
qualifiées le soin d’assurer l’entretien de votre appareil.
MANUEL D’UTILISATION
1
Page 3

Bonne disposition de l’appareil
- Placez l’appareil sur une surface plane, rigide et stable. Ne pas placer l’appareil sur un tapis.
- Ne posez pas votre appareil au-dessus d’un autre dispositif qui risquerait d’entraîner une
surchauffe (par exemple, un récepteur ou un amplificateur).
- Ne placez rien en dessous de l’appareil (par exemple, des CD ou des magazines).
Consignes de Sécurité
Espace de ventilation
- Placez l’appareil dans un endroit suffisamment ventilé afin d’éviter une accumulation de chaleur
interne. Laissez au moins un espace de 10cm à l’arrière et au-dessus de l’appareil ainsi qu’un
espace de 5cm sur les côtés afin d’éviter toute surchauffe.
- Ne pas obstruer les ouvertures de ventilation par des objets tels que des journaux, nappes,
rideau, etc…
Préservez l’appareil des températures élevées, de l’humidité, de l’eau et de la poussière.
- Votre appareil ne doit pas être exposé à des égouttements d’eau où a des éclaboussures.
- Ne placez pas d’objets susceptibles d’endommager votre appareil près de ce dernier (par
exemple, objets remplis de liquide ou bougies allumées).
Alimentation électrique
- N’utilisez l’appareil qu’avec l’adaptateur fourni.
- Veuillez débrancher le produit en cas de non utilisation prolongée.
Consignes de Sécurité
- Si le cordon d’alimentation est endommagé, celui-ci doit être remplacé par le fabricant, son
service après-vente ou des personnes qualification similaire afin d’éviter un danger.
- Cet appareil doit être relié à un réseau électrique 230V~ 50Hz.
2
MANUEL D’UTILISATION
Page 4

Précautions à prendre
Avant d’utiliser cet appareil, veillez à lire attentivement toutes les rubriques
applicables du manuel d’instructions, ainsi que les présentes consignes de sécurité.
Après avoir lu ce manuel, conservez-le en lieu sûr afin de pouvoir vous y référer à
l’avenir.
Prenez bien soin de suivre toutes les mises en garde figurant sur l’appareil
proprement dit, ainsi que dans le présent manuel d’instructions.
Sécurité
Alimentation électrique – L’appareil ne doit être raccordé qu’à une source
d’alimentation du type décrit dans le manuel d’instructions ou indiqué sur l’appareil.
Environnement
1. Eau et humidité – Ne faîtes pas fonctionner cet appareil près de l’eau, par
exemple, auprès d’une baignoire, d’un bac de lavage, d’une piscine, etc… Il faut
également éviter de l’installer dans un sous-sol humide.
2. Condensation – De l’humidité risque de se condenser sur l’optique de lecture
dans les conditions suivantes :
Immédiatement après l’allumage d’un appareil de chauffage.
Dans une pièce très humide ou soumise à un dégagement de vapeur.
Lorsque l’appareil est déplacé brusquement d’un environnement froid dans un
environnement chaud.
Si de la condensation se forme à l’intérieur de cet appareil, celui-ci risque de ne pas
fonctionner convenablement. Pour corriger ce problème, patientez environ une heure,
délai au terme duquel l’humidité devrait s’être évaporée.
3. Chaleur – Abstenez-vous de faire fonctionner ou de placer cet appareil auprès
d’une source de chaleur.
Ne le laissez pas pendant longtemps dans une voiture exposée au rayonnement
direct du soleil avec les portes et fenêtres fermées car ceci pourrait déformer le
boîtier.
Consignes de Sécurité
Si vous constatez une odeur anormale ou de la fumée, débranchez immédiatement
l’appareil et faites appel au service après vente
Ne jamais essayer de réparer par vous-même ou d’ouvrir le capot de l’appareil.
MANUEL D’UTILISATION
3
Page 5

SOMMAIRE
PREPARATION .............................................................................................................. 5
SOMMAIRE
Caractéristiques ....................................................................................................................................................... 5
Contenu de la boite ............................................................................................................................................... 6
TV /LCD .................................................................................................................................................................. 7
Face avant ............................................................................................................................................................. 7
Face arrière .............................................................................................................................................................. 8
Télécommande ....................................................................................................................................................... 9
Utilisation................................................................................................................................................................. 12
Raccordements ........................................................................................................... 13
Connexion Câble TV/ Antenne......................................................................................................................... 13
Connexion Lecteur DVD .................................................................................................................................. 14
Connexion Magnétoscope/Caméscope ..................................................................................................... 15
Connexion
Connexion Amplificateur Audio Externe.............................................................................................................. 17
Décodeur/Satellite.............................................................................................................................. 16
Fonctions et utilisation................................................................................................. 18
Opérations de base............................................................................................................................................. 18
Réglages OSD ( Affichage).................................................................................................................................. 19
Réglages Vidéo ................................................................................................................................................... 19
Réglages Audio..................................................................................................................................................... 20
Paramètres ........................................................................................................................................................ 21
Préférences......................................................................................................................................................... 22
Ecran..................................................................................................................................................................... 22
UTILISATION TNT............................................................................................................. 23
GUIDE DE DEPANNAGE.................................................................................................. 31
Spécificités Techniques................................................................................................... 32
MANUEL D’UTILISATION
4
Page 6

PREPARATION
CARACTERISTIQUES
Caractéristiques
Haute luminosité/ Contraste image
Luminosité: 250 cd /m²
Ratio/Contraste: 450:1
Support VGA
640 x 480 / 60Hz-1024 x768/75Hz
Connectique
CVBS
S-Vidéo
Prise péritel
Y, Pb/Cb/Pr
VGA
Audio Stéréo x 2
Tuners analogique et TNT intégrés
PREPARATION
Fonction WSS (Wide Screen Scale)
Cette fonction permet de convertir automatiquement et d’afficher tous les formats image
(ZOOM / WIDE)
Fonction télétexte
Fonction NICAM /FM stéréo
Fonction APS (Réglage automatique des chaînes)
Recherche Manuelle
Fonction “SOMMEIL”
Fonction permettant de régler
Tuner TNT intégré pour réception des chaînes TNT sans décodeur
PREPARATION
5
Page 7
PREPARATION
CONTENU DE LA BOITE
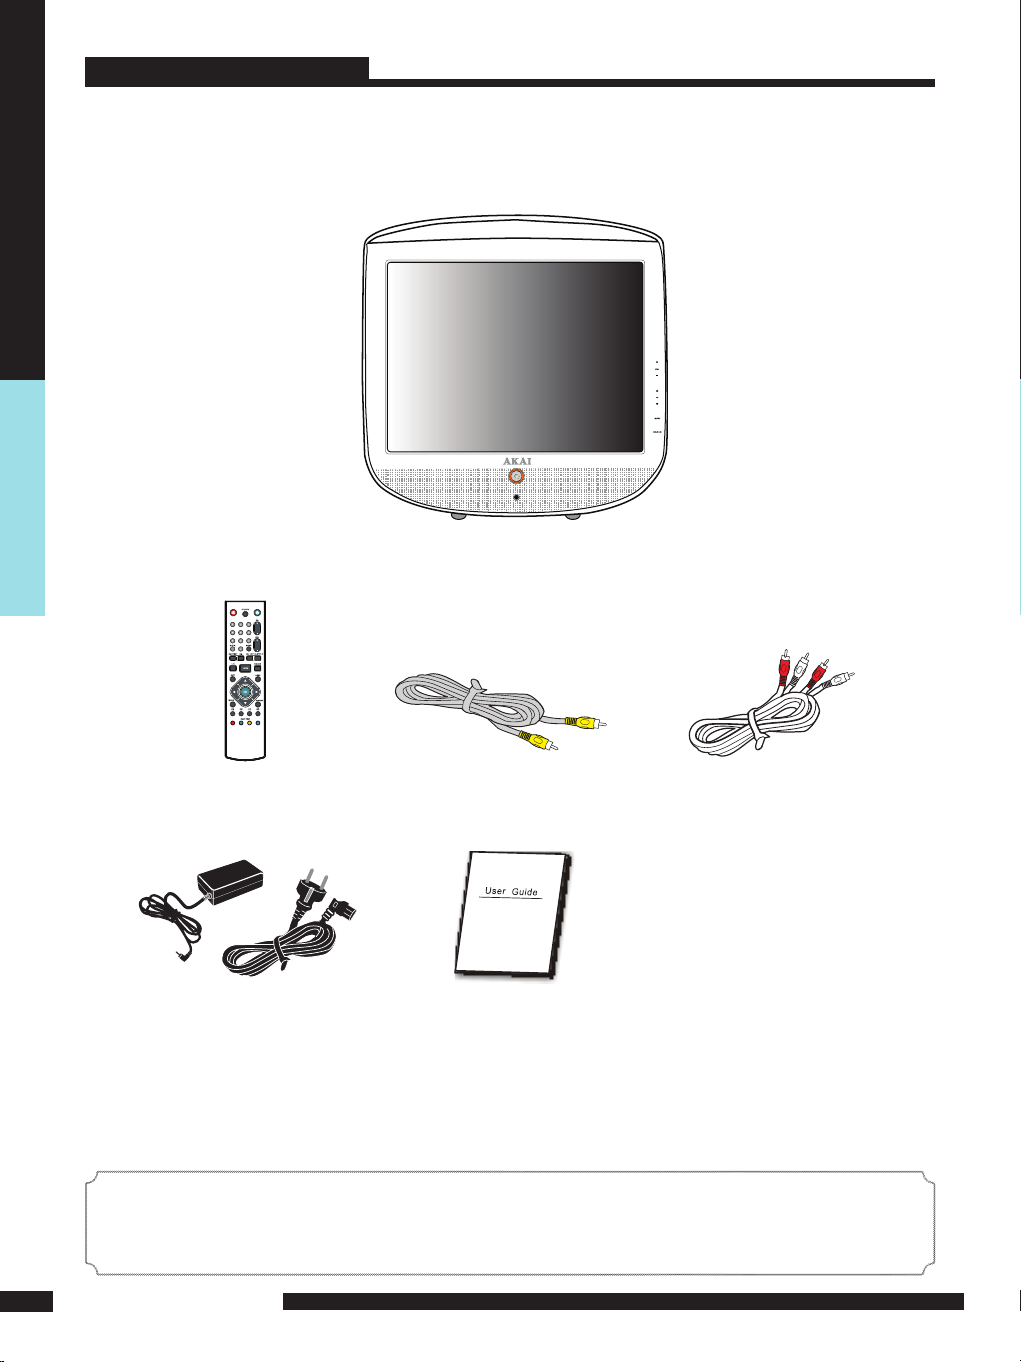
Assurez vous lorsque vous ouvrez la boite quetous les éléments sont
présents
Téléviseur LCD
LCD TV
PREPARATION
6
Télécommande
Câble alimentation +
adaptateur
Câble Vidéo
Manuel d’Instructions
(vous l’avez entre les mains)
Câble Audio
C’est tout ce dont vous avez besoin pour raccorder et faire
fonctionner le téléviseur LCD dans sa configuration de base
La plupart des appareils (magnétoscopes, lecteurs DVD, Etc..) sont fournis avec les câbles
nécessaires à la connexion.
Si vous deviez réaliser un branchement plus complexe, il se peut que vous deviez vous
procurer des câbles supplémentaires non fournis.
Page 8
TELEVISEUR LCD
Panneau Avant
3
PREPARATION
4
5
6
1
7
2
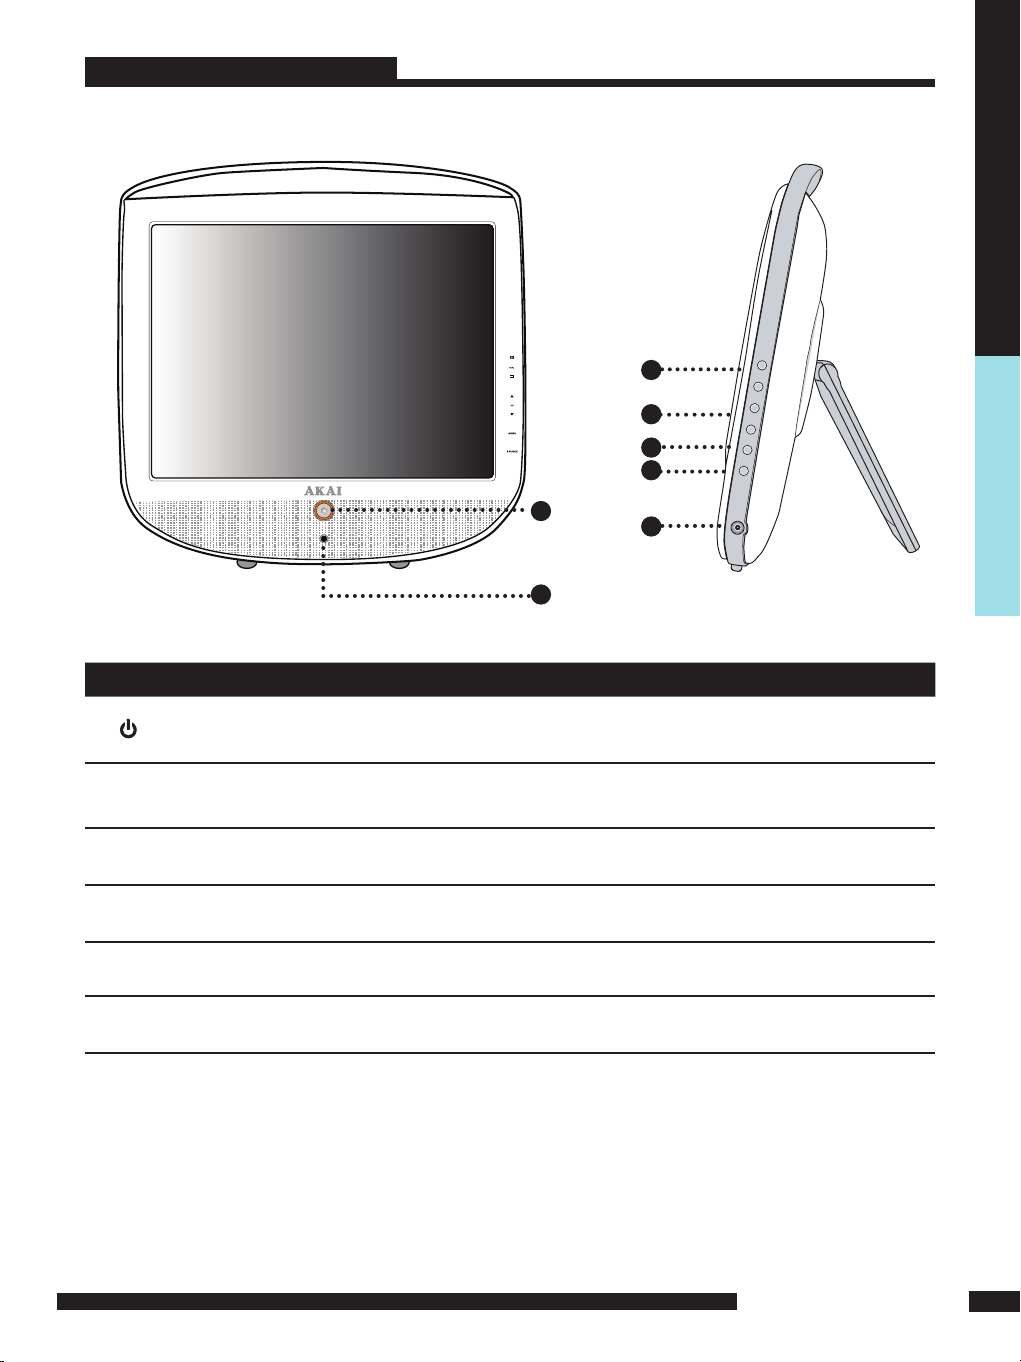
Bouton Description
1 /LED
2 IR Capteur Infrarouge
3 VOLUME
4 CHANNEL
5 MENU
6 SOURCE Permet de sélectionner les sources en cas de branchement externe.
7 Prise Casque Prise Casque Permet de connecter un casque pour une écoute en privé.
Met l’appareil Sous tension et Hors tension
Le témoin lumineux indique le statut, lorsque le téléviseur est connecté; rouge en
mode veille, vert en fonctionnement)
Permet de changer de chaîne. en mode “OSD”
permet de sélectionner le paramètre à régler
Permet de changer de chaîne. en mode “OSD”
permet de sélectionner le paramètre à régler
Appuyer sur le bouton pour activer l’affichage
sur écran, appuyer à nouveau pour désactiver l’affichage
Note:
Le bouton “SOURCE” sur l’appareil dispose des mêmes fonctions que le bouton “OK” de la télécommande, il peut
donc être utilisé comme bouton de validation.
PREPARATION
7
Page 9
TELEVISEUR LCD
Panneau arrière
PREPARATION
1
DC IN
SCART
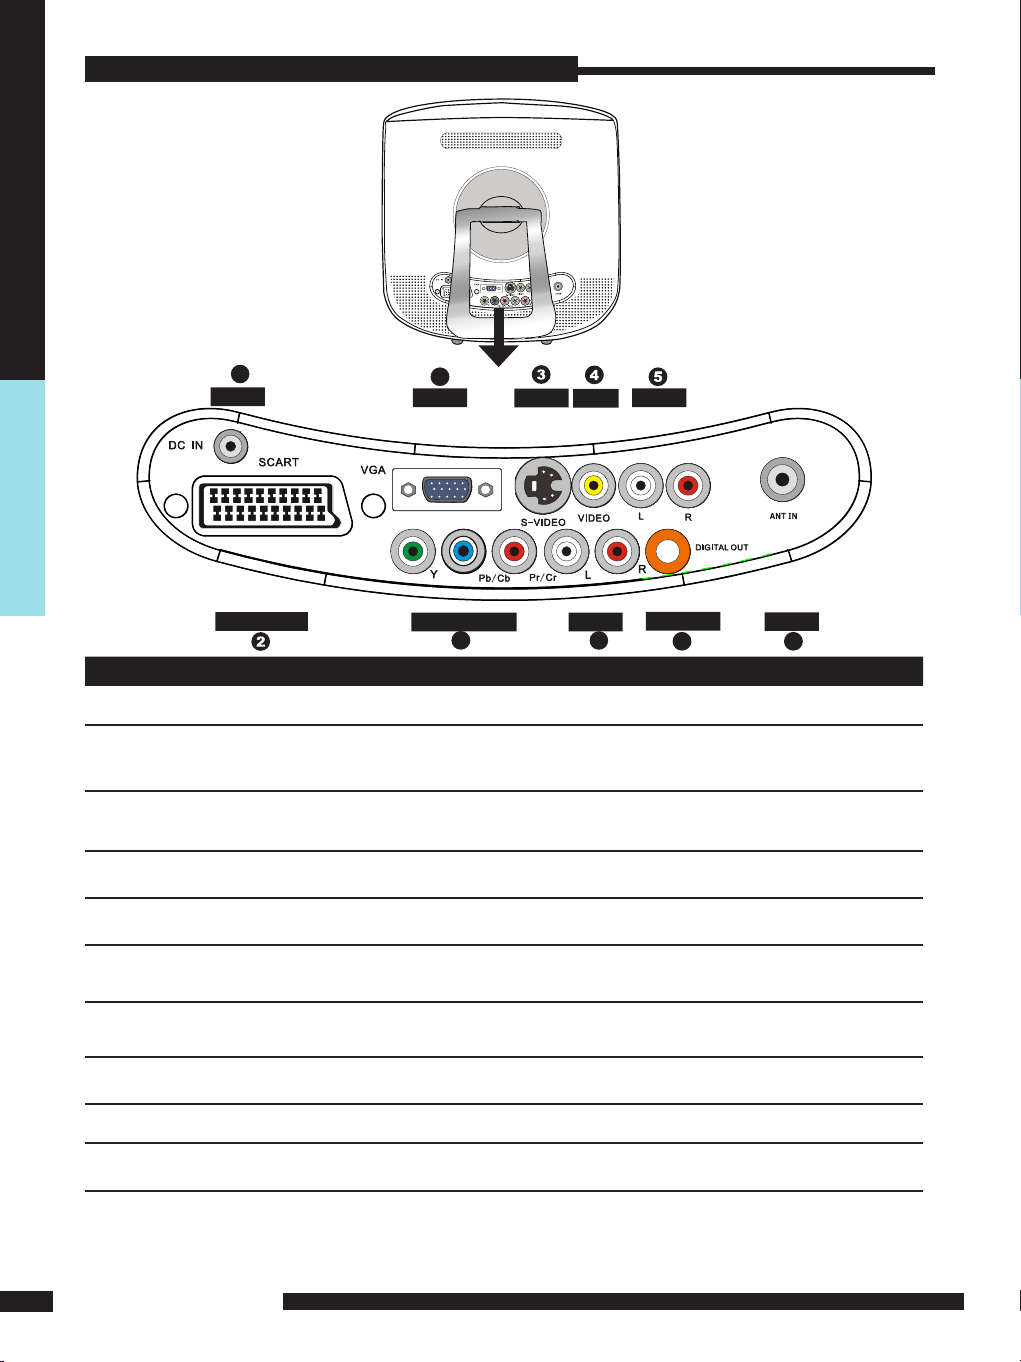
Bouton Description
1 DC IN
AV1
2
SCART
AV2
3
S-VIDEO
4 AV3
VIDEO
5 AUDIO IN( L/R) Connecter la source Audio couplée à Vidéo Composite (4)
Branchement à la prise murale par adaptateur (fourni)
Péritel-Connecter une source externe par l’intermédiaire de la péritel
Péritel Connecter une source externe par S-Vidéo l’intermédiaire de la prise
SVIDEO (Prise Audio par Entrée audio)
Connecter la prise A/V composite à la source vidéo externe
8
VGA
Y, Pb/Cb, Pr/Cr AUDIO IN
6
S-VIDEO
VIDEO
7
AUDIO IN
DIGITAL OUT
9
ANT IN
10
Note:
Note: les entrées S-Vidéo et Vidéo utilisent la même entrée AUDIO, ne pas brancher deux
appareils simultanément sinon, le son des deux appareil sera restitué en même temps
PREPARATION
8
6 AV4
Y, Pb/Cb, Pr/Cr
AUDIO IN( L/R)
7
8 AV5
VGA
9 SORTIE NUMERIQUE
10 ANT IN/
Entrée Antenne
Connecter la prise A/V composite à la source Y,Pb/Cr, Pr/Cr vidéo externe
Connecter la source Audio couplée à l’entrée VGA (8)
Connecter toute autre interface à la prise VGA
Connecter à la Sortie Numérique d’une source numérique
Connecter l’entrée d’une antenne ou d’un câble Pour recevoir la
télévision en haute définition
Page 10

TELECOMMANDE
1
POWER
Met l’appareil sous tension et en mode “VEILLE”.
2
Permet de couper momentanément le son.
Appuyer de nouveau pour remettre le son
3
ATV/DTV
Permet de basculer entre les modes “ATV” (
télévision ANALOGIQUE)et“DTV”(télévision - TNT)
4
0-9
Utiliser le pavé numérique pour accéder aux
chaînes..
5
GUIDE
En mode télévision TNT- appuyer sur la touche
pour afficher le guide des programmes
2
4
5
10
11
12
3
1
6
7
8
PREPARATION
9
13
6
CH. +/-
Pour accéder aux chaînes suivantes /précédentes.
7
VOL. +/-
Augmente/diminue le volume sonore
8
SLEEP
Permet une mise en veille automatique après une
durée programmée
-Appuyer sur la touche “SLEEP” (“Sommeil”) et
ajuster la durée du compte à rebours -15-30-60 mn
(changement à chaque pression sur la touche)
-Appuyer de nouveau sur la touche pour vérifier le
temps restant
-Pour annuler la programmation, appuyer
successivement sur la touche jusqu’à ce que
l’afficheur indique”OFF” (“désactivé”)
9
CH. LIST
Affiche la liste des chaînes et leur nom.
SUBTITLE
Appuyer sur cette touche pour afficher les soustitres si le programme en cours de diffusion en
propose
10
/TEXT
Active/désactive la fonction télétexte
Affiche l’heure diffusée avec le télétexte
14
11
P.S IZ E
Réglage du format image entre
Large/Zoom
12
I-II
Permet de choisir entre les options
AUDIO : MONO/DUAL/STEREO
13
P.MODE
Réglage du mode image- Custom/Vivid/Standard/Mild
14
EXIT
Utiliser cette touche pour quitter
l’affichage écran
PREPARATION
9
Page 11
Remote Control
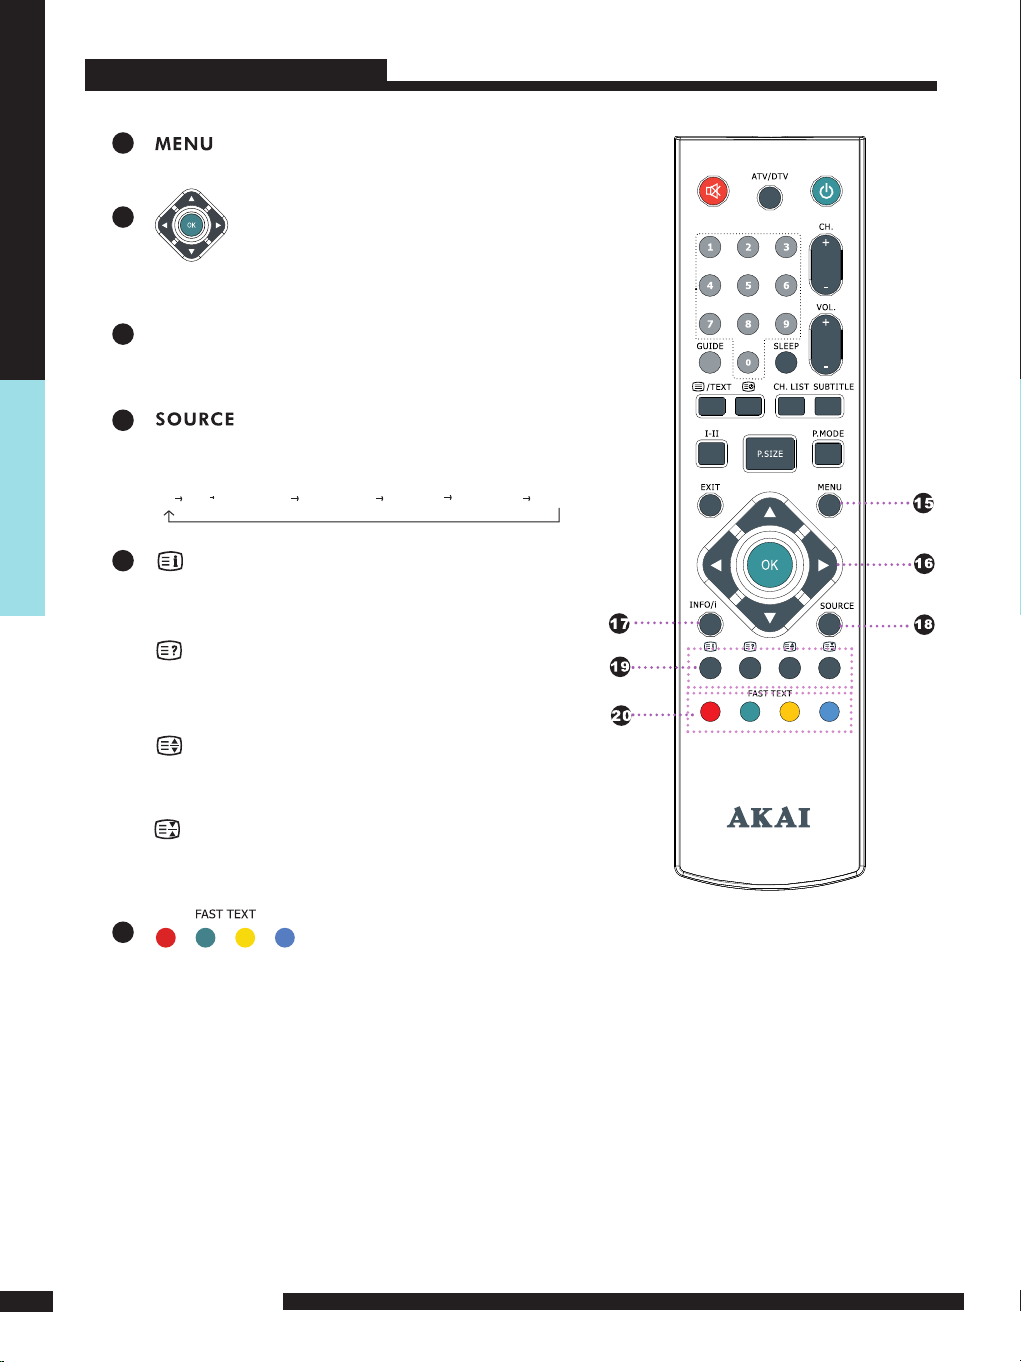
15
Affiche le menu sur l’écran
16
Permettent de naviguer, sélectionner et
paramétrer les option de l’affichage
INFO/i
17
Appuyer pour afficher différentes infos telles que la
chaîne en cours et l’origine de la source
18
Appuyer successivement sur cette touche pour
accéder aux différentes sources dans cet ordre:
TV DTV AV1(SCART) AV2(S-VIDEO) AV3(CVBS) AV4(Y Pb Pr) AV5(VGA)
PREPARATION
19
uniquement en mode Analogique
Affiche le menu principal
Affiche des informations cachées telles que par
exemple les réponses à une jeu télévisé
Fige une partie de la page
Affiche le haut , le bas ou l’ensemble de la page
20
Permet d’accéder aux informations
TELETEXT ou aux pages correspondantes.
Les boutons en couleurs permettent
d’accéder aux modes interactifs lorsque l’on
regarde des chaînes analogiques.
PREPARATION
10
Page 12
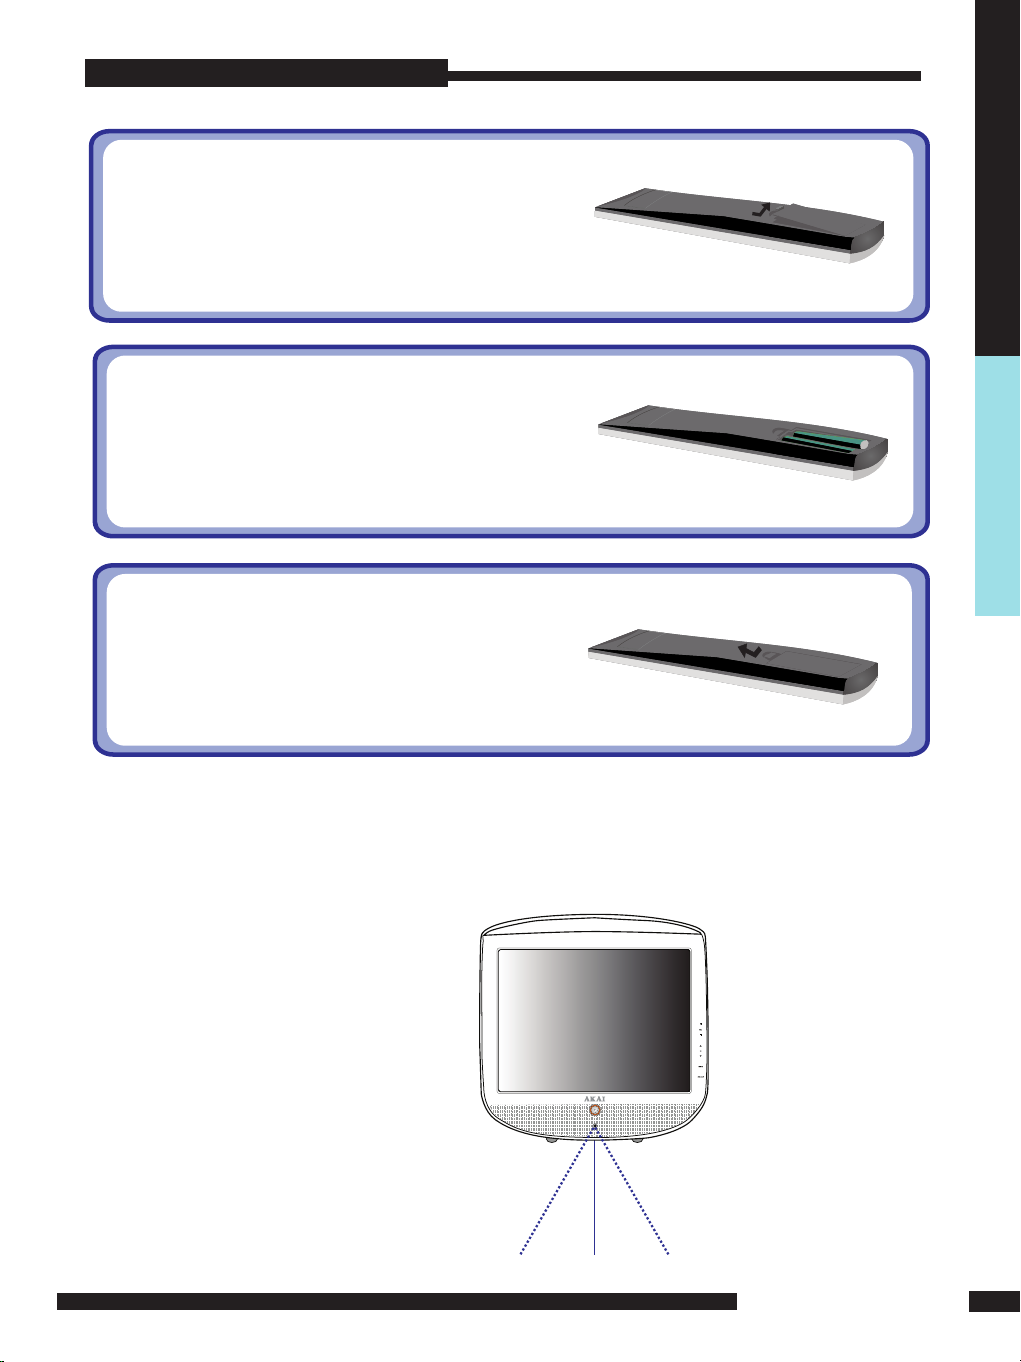
Mise en place des Piles
Installer les piles dans la télécommande
Appuyer sur le taquet de la trappe
pile à l’arrière de la télécom-
1
mande et tirer doucement
Insérer deux piles de type LR 06 ( AAA)-
2
Prendre garde à ce que les polarités
+ et – sont respectées (comme indiqué dans le compartiment piles)
Remettre en place le couvercle de la
3
trappe pile et appuyer légèrement
Note :
ne Jamais utiliser de détergeant caustique ceci pourrait endommager la télécommande
Rayon d’action
Utilisation jusqu’à 5m de distance si la télécommande est poin-
tée directement devant le téléviseur
PREPARATION
PREPARATION
11
Page 13
INSTALLATION
Avant de connecter une source externe, référez vous à son mode d’emploi .
Ne raccorder à la prise murale et ne mettre sous tension qu’une fois tous les branchements
terminés
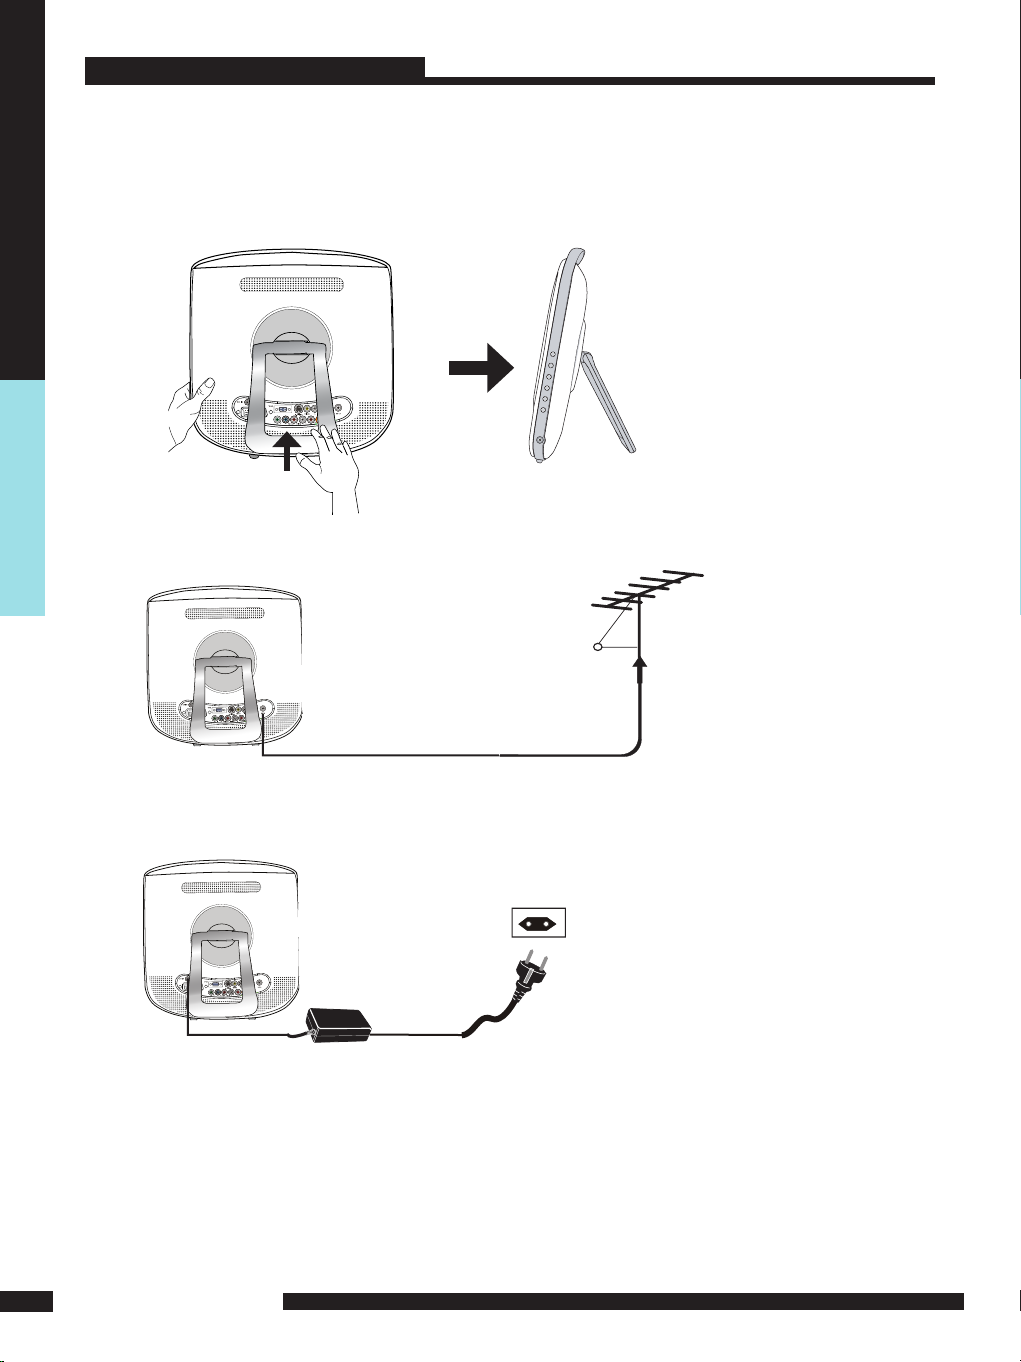
Il est possible de régler l’angle d’inclinaison de l’appareil ( comme indiqué ci-dessous)
1
afin de vous permettre d’être installé le plus confortablement possible .
PREPARATION
Si vous utilisez un câble antenne, il convient de le raccorder à la prise antenne
2
à l’arrière de l’appareil comme indiqué ci-dessous
Brancher l’adaptateur secteur à la prise à l’arrière de l’appareil puis relier à la prise
3
murale
Appuyer sur le bouton “MARCHE /ARRET” de la télécommande
4
PREPARATION
12
5- Appuyer sur le bouton “SOURCE “ de la télécommande et sélectionner le mode
5
TV ou DVD à l’aide de la touche ‘TV/DVD”
Page 14
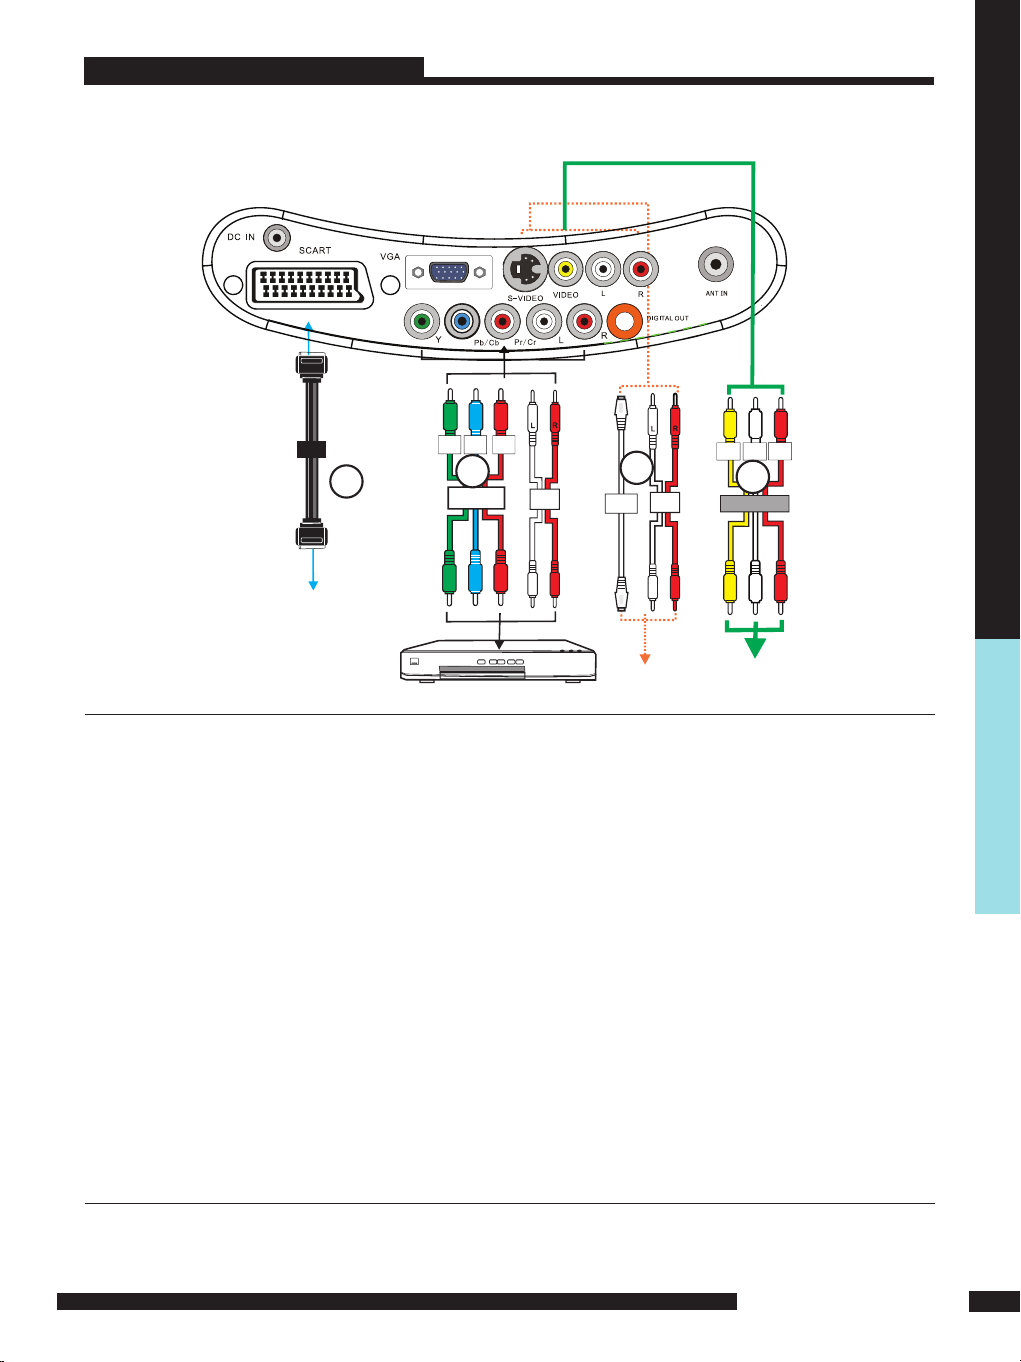
CONNEXION A UN LECTEUR DVD
Afin de bénéficier de la meilleure qualité d’ image possible, si votre lecteur DVD pos-
sède une sortie Vidéo Composantes ( Y Pb/Pr), il est recommandé d’utiliser un câble composantes ( non fourni) au lieu de câbles vidéo ou S-Vidéo standards ( Non fournis)
Vert Bleu
A
Câble
composantes
Rouge
Audi
o
Audio
V
ideo
(L )
B
Câble
Audio
Câble
S-Vidéo
Câble
Audio
( R)
C
Video/Audio Cable
Prise
Péritel
D
Lecteur DVD
1
METHODE A (AV4)
Utiliser un câble composantes (RVB) pour connecter les prises composantes (Y, Pb, Pr)
de l’appareil au lecteur DVD
Utiliser un câble Audio pour relier les sorties Audio du lecteur DVD aux entrées Audio
de l’appareil
METHODE B (AV2)
Utiliser un câble Audio pour relier les sorties Audio du lecteur DVD aux entrées Au-
dio de l’appareil Utiliser un câble S-Vidéo pour relier le lecteur DVD à l’appareil
METHODE C (AV3)
Utiliser un câble A/V Audio /Vidéo pour relier les sorties composites du lecteur
DVD à l’appareil
METHODE D (AV1)
Utiliser un câble Péritel pour connecter la prise Péritel du lecteur DVD à la prise
Péritel de l’appareil
Connecter toutes les sources avant de mettre sous tension
2
Appuyer sur le bouton POWER (marche/arrêt) de l’appareil
3
Afin d’utiliser le lecteur DVD, sélectionner la source qui convient (AV1, AV2, AV3 ou AV4)
4
INSTALLATION
INSTALLATION
13
Page 15
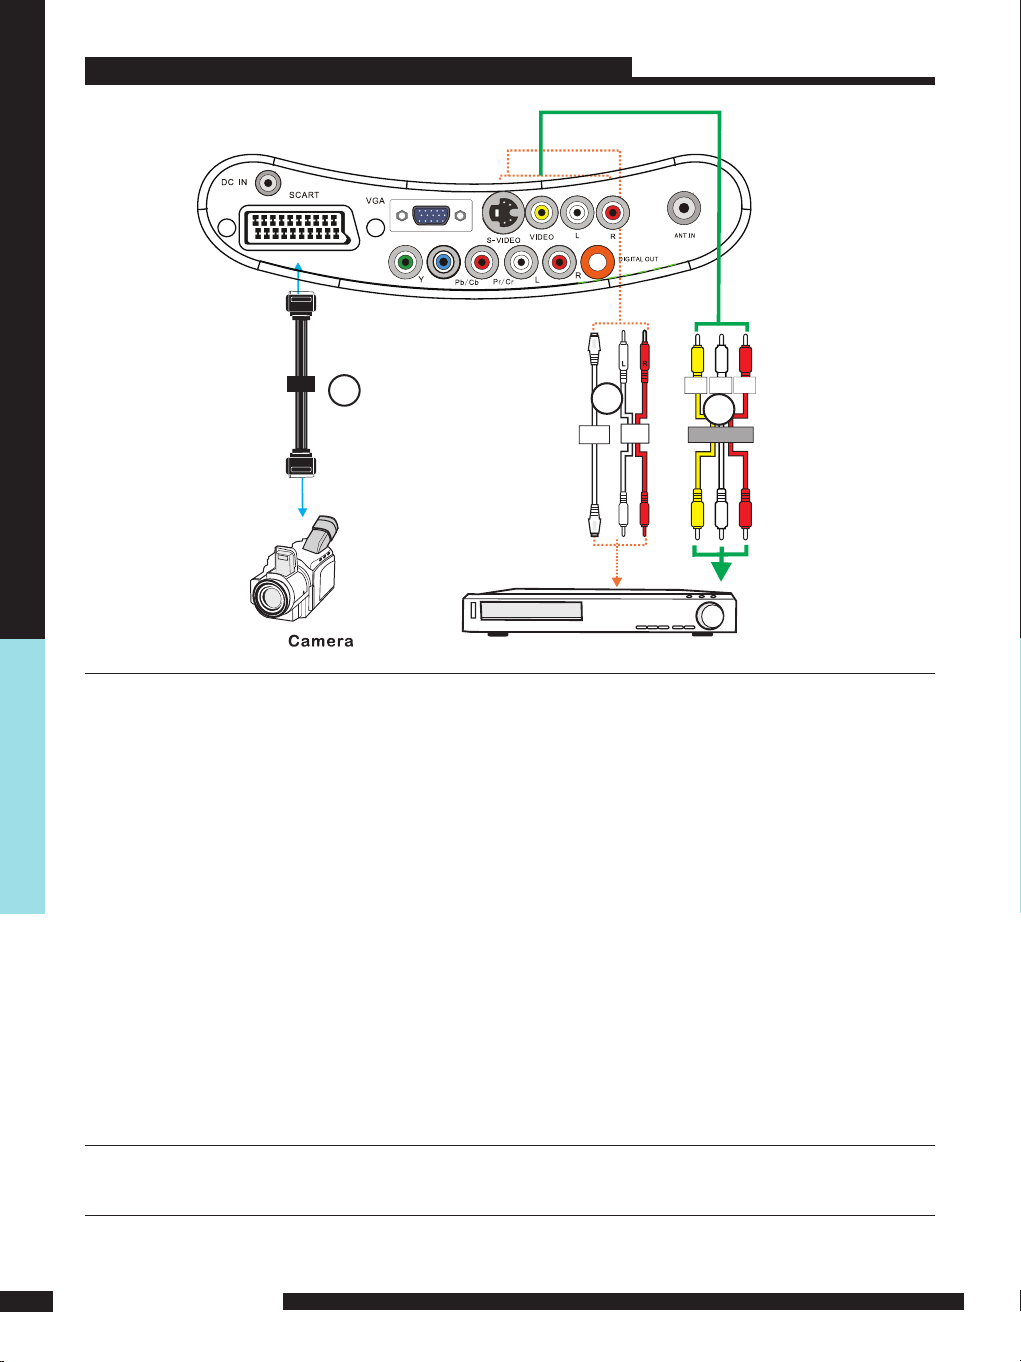
CONNEXION A UN MAGNETOSCOPE OU UN CAMESCOPE
MAGNETOSCOPE
Prise Péritel
Caméscope
C
Câble
S-Vidéo
Audi
o
Audio
V
ideo
(L )
A
Câble
Audio
( R)
B
Câble Audio /Vidéo (A/V)
INSTALLATION
METHODE A (AV2)
1
Utiliser un câble Audio pour relier les sorties Audio de la source externe aux entrées
Audio de l’appareil
UTILISER UN CÂBLE S-VIDÉO POUR RELIER LA SOURCE EXTERNE À L’APPAREIL
METHODE B (AV3)
Utiliser un câble A/V Audio /Vidéo pour relier les sorties composites de la source
externe à l’appareil
METHODE C (AV1)
Utiliser un câble Péritel pour connecter la prise Péritel de la source externe à la prise
Péritel de l’appareil
Connecter toutes les sources avant de mettre sous tension
2
Appuyer sur le bouton POWER (marche/arrêt) de l’appareil
3
Afin d’utiliser un caméscope, sélectionner la source qui convient (AV2, AV3)
4
Afin d’utiliser un magnétoscope, sélectionner la source qui convient (AV1, AV2 ou AV3,)
5
Note:
Certains appareils peuvent ne pas être compatibles avec une connexion à un téléviseurVérifier dans le mode d’emploi correspondant.
14
INSTALLATION
Page 16
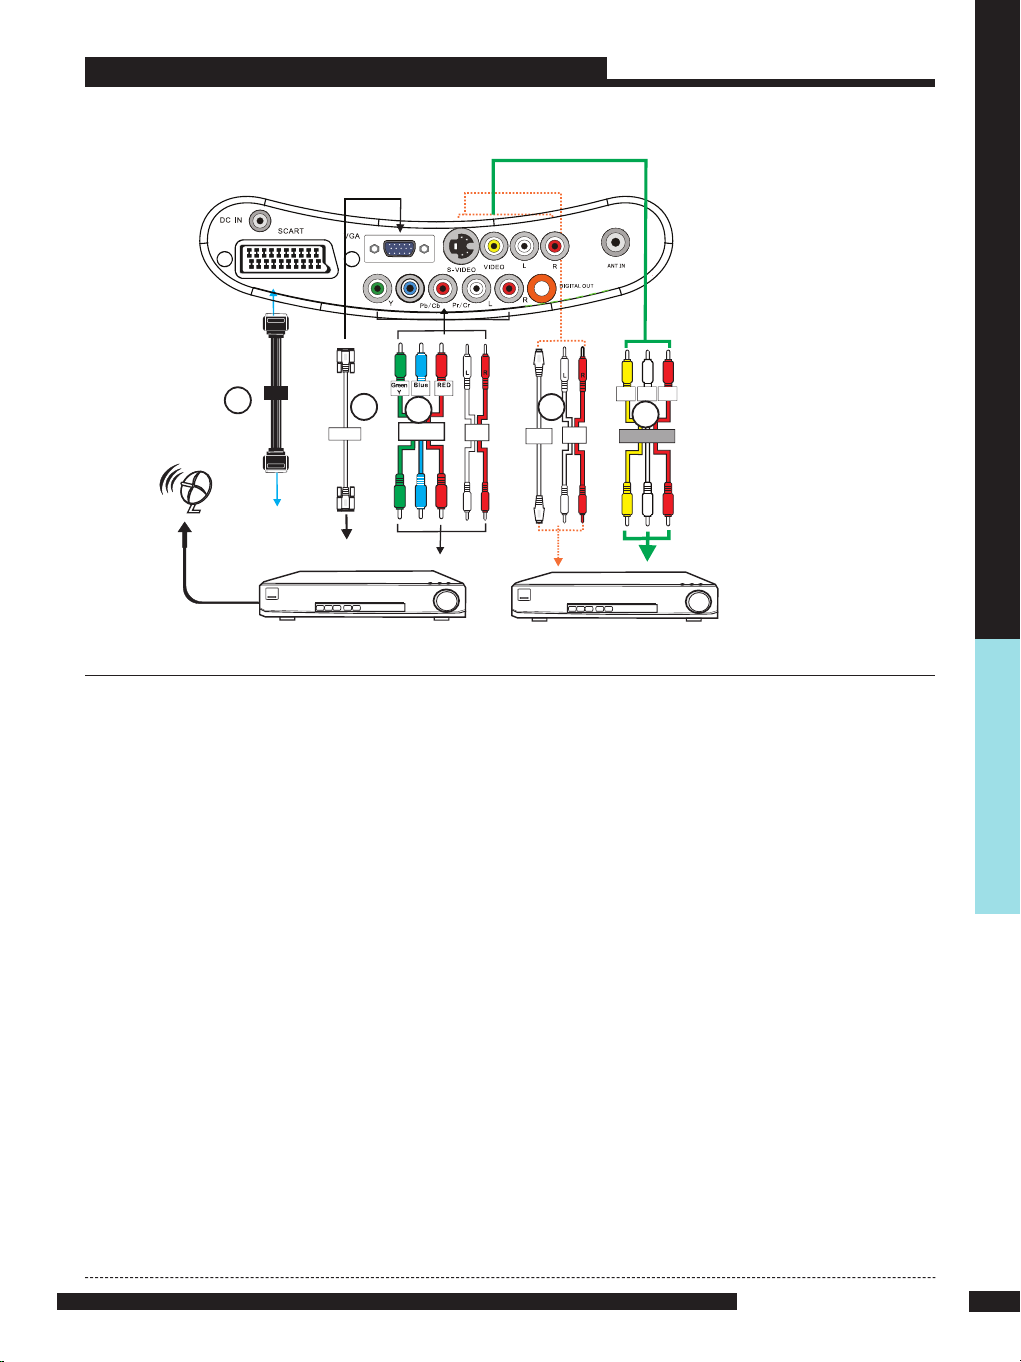
CONNEXION A UN DECODEUR /SATELLITE
Les décodeurs et récepteurs sont généralement livrés avec les câbles de
connexion correspondants , connectez les deux appareils à l’aide du câble Péritel
Antenne satellite
Câble
METHODE A (AV4)
1
Prise
Péritel
E
D
Câble VGA
Récepteur Satellite
Pb
A
Câble Composantes
(VBR)
Pr
B
Câble
Audio
Câble
S-Vidéo
Câble
Audio
Décodeur
Audio
V
ideo
( R)
C
Câble Audio /Vidéo (A/V)
Audi
o
(L )
Utiliser un câble composantes (RVB) pour connecter les prises composantes (Y, Pb, Pr) de
l’appareil au Décodeur/Récepteur
Utiliser un câble Audio pour relier les sorties Audio du Décodeur/Récepteur aux entrées Audio
de l’appareil
METHODE B (AV2)
Utiliser un câble Audio pour relier les sorties Audio du Décodeur/Récepteur aux entrées
Audio de l’appareil
Utiliser un câble S-Vidéo pour relier le Décodeur/Récepteur à l’appareil
METHODE C (AV3)
Utiliser un câble A/V Audio /Vidéo pour relier les sorties composites du Décodeur/Récepteur
à l’appareil
METHODE D (AV5)
Utiliser un câble VGA 15-broches pour connecter les prises RGB du lecteur
Décodeur/Récepteur à la prise RGB de l’appareil
METHODE E (AV1)
Utiliser un câble Péritel pour connecter la prise Péritel du lecteur
Décodeur/Récepteur à la prise Péritel de l’appareil
Connecter toutes les sources avant de mettre sous tension
2
INSTALLATION
Appuyer sur le bouton POWER (marche/arrêt) de l’appareil
3
Afin d’utiliser un caméscope, sélectionner la source qui convient (AV21, AV2, AV3, AV4 ou AV5)
4
INSTALLATION
15
Page 17
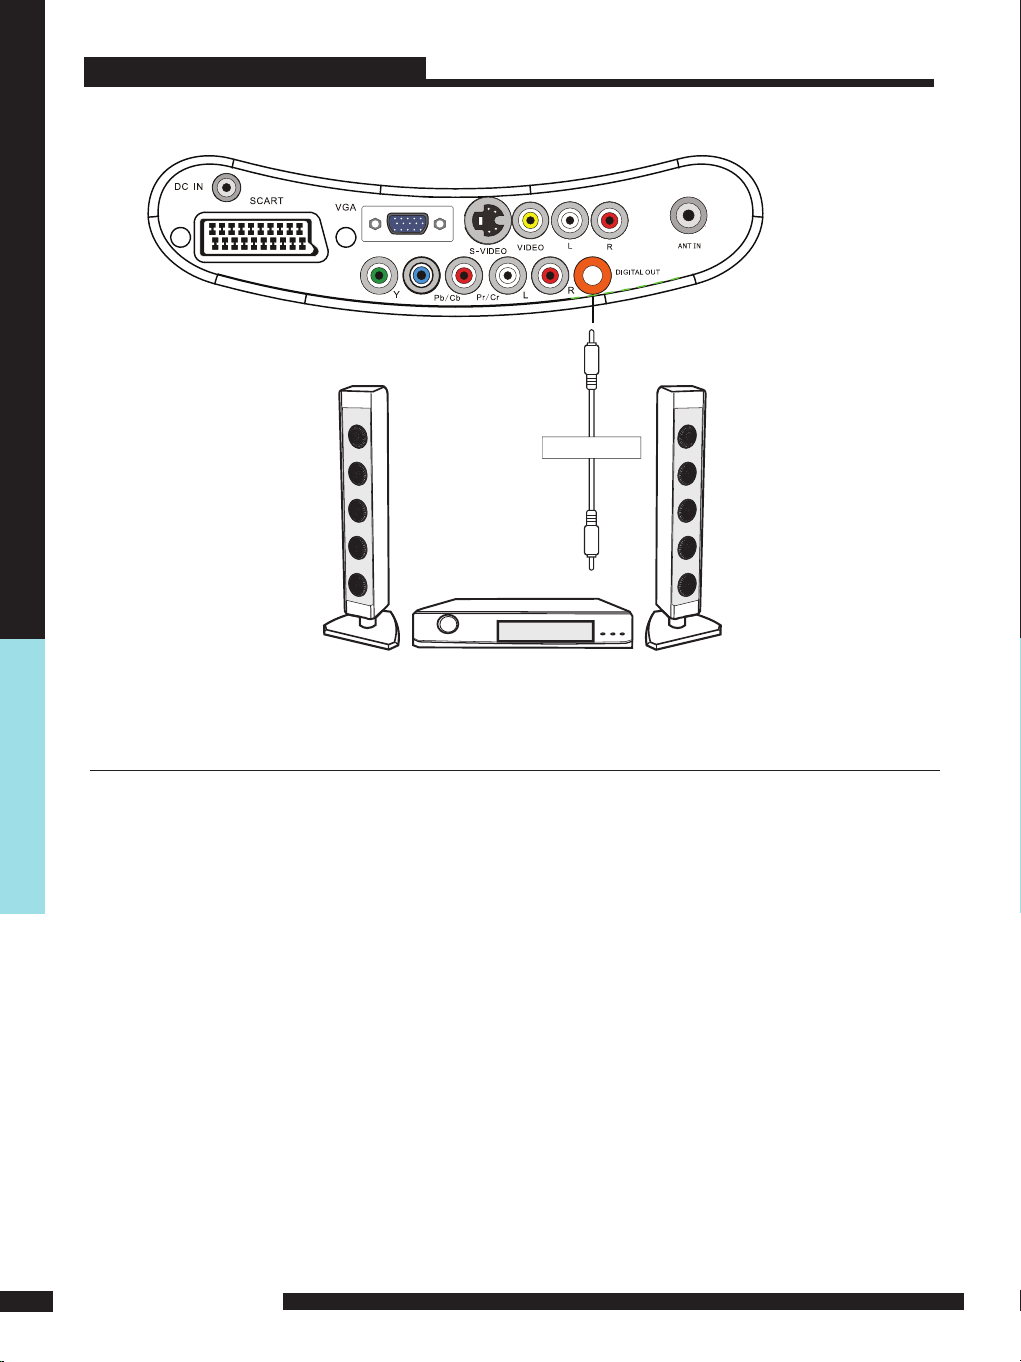
CONNEXION A UN RECEPTEUR AUDIO
Pour bénéficier d’un qualité sonore améliorée, il est possible de connecter l’appareil à
un amplificateur.
Câble Sortie Numérique
INSTALLATION
Amplificateur Dolby numérique
Utiliser un câble audio pour connecter l’entrée AUDIO de la source externe à la Sortie
1
Audio de l’appareil
Connecter toutes les sources avant de mettre sous tension
2
Appuyer sur le bouton POWER (marche/arrêt) de l’appareil
3
16
INSTALLATION
Page 18
FONCTIONS ET UTILISATION
Opérations de base
Recherche des chaînes
1
Après avoir raccordé l’antenne et avoir branché l’appareil sur la prise électrique, mettre
l’appareil sous tension en appuyant sur le bouton d’alimentation à l’avant de l’appareil. Le
témoin lumineux en façade est rouge
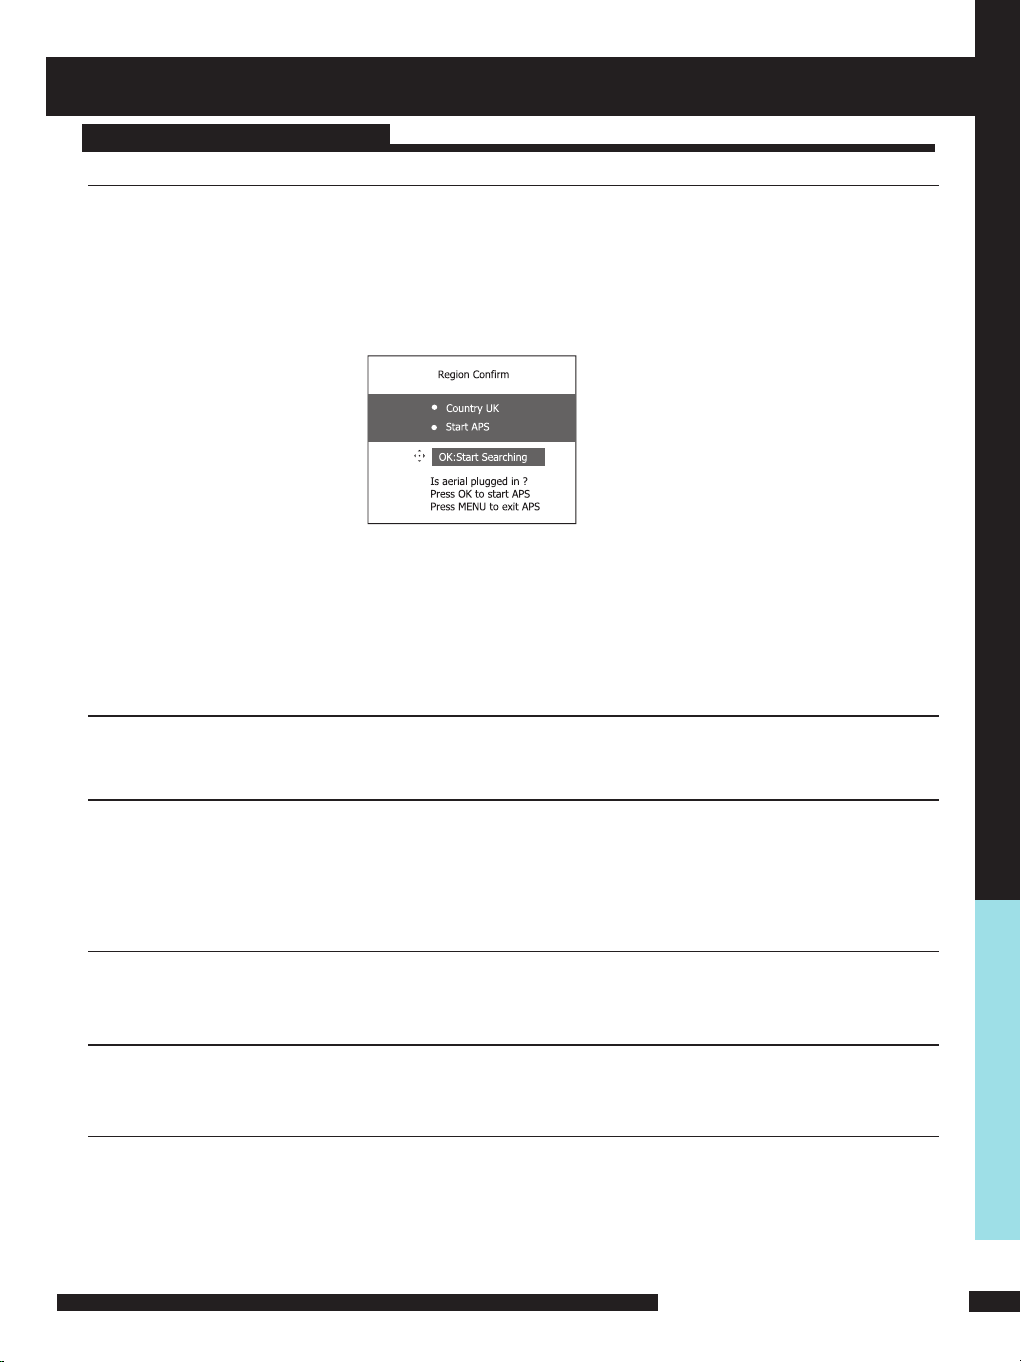
2 Appuyer sur le bouton “POWER” (mise sous tension) de la télécommande ; le témoin
passe au vert et l’écran d’accueil d’installation s’affiche sur l’écran.
1. Assurez vous que le câble antenne est bien branché puis valider et lancer la recherche
automatique des chaînes (APS) en appuyant sur “OK”.
2. Chaque chaîne apparaît brièvement au moment où elle est mise en mémoire. Lorsque la
recherche et la mise en mémoire sont terminées, la première chaîne numérique s’affiche
automatiquement. Appuyer sur les boutons CH +/- afin d’accéder aux autres chaînes
Pour voir la télévision analogique, appuyer sur le bouton “SOURCE” et utiliser les flèches
de navigation, sélectionner “TV” et valider en appuyant sur “OK”.Appuyer sur les boutons
CH +/- afin d’accéder aux autres chaînes
3 Pour mettre l’appareil hors tension, appuyer sur le bouton “POWER”, le témoin lumineux
passe en rouge (Mode “VEILLE”)
Sélectionner une source
Appuyer sur le bouton “SOURCE” pour accéder au choix “ TV/AV”Sélectionner l’option avec les
touches de navigation et valider en appuyant sur “OK”
Sélectionner une chaîne
1 Utiliser les touches CH.+/- de la télécommande ou CH.▲/▼ sur l’appareil pour changer de
chaîne
2 Il est également possible de taper directement le numéro de la chaîne sur le pavé numérique
Ajuster le volume
Utiliser les touches VOL.+/- de la télécommande ou VOL▲/▼ sur l’appareil pour augmenter ou
diminuer le volume
Fonction “SOURDINE” (“MUTE”)
1 Appuyer sur le bouton pour couper le son momentanément
2 Pour remettre le son, appuyer de nouveau sur la touche ou appuyer sur VOL.+/-
Fonction “SOMMEIL” ( “SLEEP”)
Appuyer sur la touche pour régler la durée du compte à rebours avant extinction automatique
de l’appareil. A chaque pression la durée augmente comme suit : OFF (désactivé)/15mn /30mn
/60mn. Après la fin du compte à rebours, l’appareil se met automatiquement en mode veille. Si
le téléviseur ne reçoit plus de signaux, l’appareil s’éteint après 15mn.
FONCTIONS ET UTILISATION
FONCTIONS ET UTILISATION
17
Page 19
REGLAGES DES PARAMETRES OSD (affichage)
1 le menu principal donne accès aux sous-menus suivants
Vidéo
Audio
Réglages
Préférences
Ecran
DTV
Permet de régler les paramètres IMAGE
tels que le format, le contraste, la
luminosité, La netteté, les couleurs et
d’autres paramètres avancés
Permet de régler les paramètres AUDIO
et les effets sonores
Permet d’ajuster les paramètres tels
que les réglages par défaut,la fonction
APS, la recherche des chaînes,
recherche manuelle, et le réglage des
chaînes
Pour paramétrer entre autres tous les
modes de l’affichage, le verrou parental,
le mode “Sommeil”.
Pour régler la taille écran, la
synchronisation automatique
Télévision numérique- Ce menu donne
accès à quatre sous-menus: Modifier
Liste des Chaînes, Configuration,
Contrôle parental et EPG, ainsi vous
pouvez faire tous les réglages à votre
convenance
2 Appuyer sur la touche “MENU” de la télécommande, le menu principal apparaît sur l’écran
3 Utiliser les touches ◄/►pour mettre votre choix en surbrillance et appuyer sur “OK”pour
valider
Utiliser les touches ▲/▼ pour sélectionner des choix du sous-menu puis les touches
◄/►pour ajuster les paramètres et appuyer sur “EXIT “ pour quitter le menu
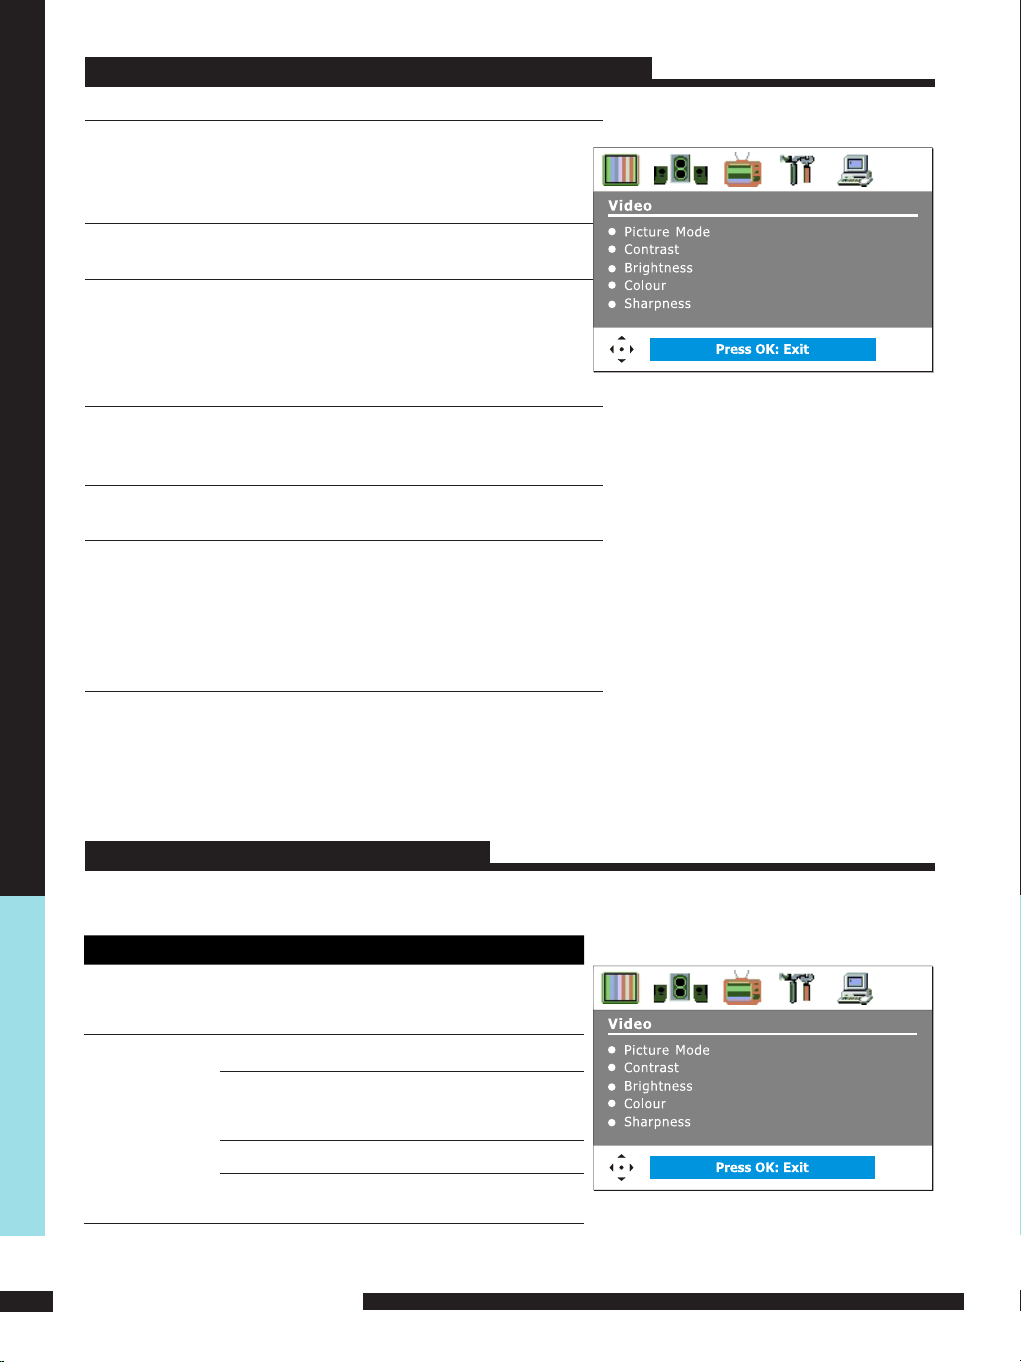
VIDEO
Utiliser le menu de réglage des paramètres Vidéo pour régler et obtenir la qualité d’image qui
correspond à vos souhaits. Le menu Vidéo comprend les options suivantes
OPTION DESCRIPTION
Mode Image
Contrast
FONCTIONS ET UTILISATION
Custom:Personnalisé – Pour régler les
paramètres.Tous peuvent être ajustés en
mode AVANCES
Vivid:Contraste et netteté accentués
Standard:Réglage standards,
recommandés pour une Utilisation
classique
Mild:Contraste et netteté atténués
Uniformisation des différences entre les
zones claires et sombre de l’image
18
FONCTIONS ET UTILISATION
Page 20
Video ( ENTREE VIDEO)
Brightness
Pour augmenter ou diminuer la luminosité
Colour
Tint(NTSC)
Sharpness
OPTION DESCRIPTION
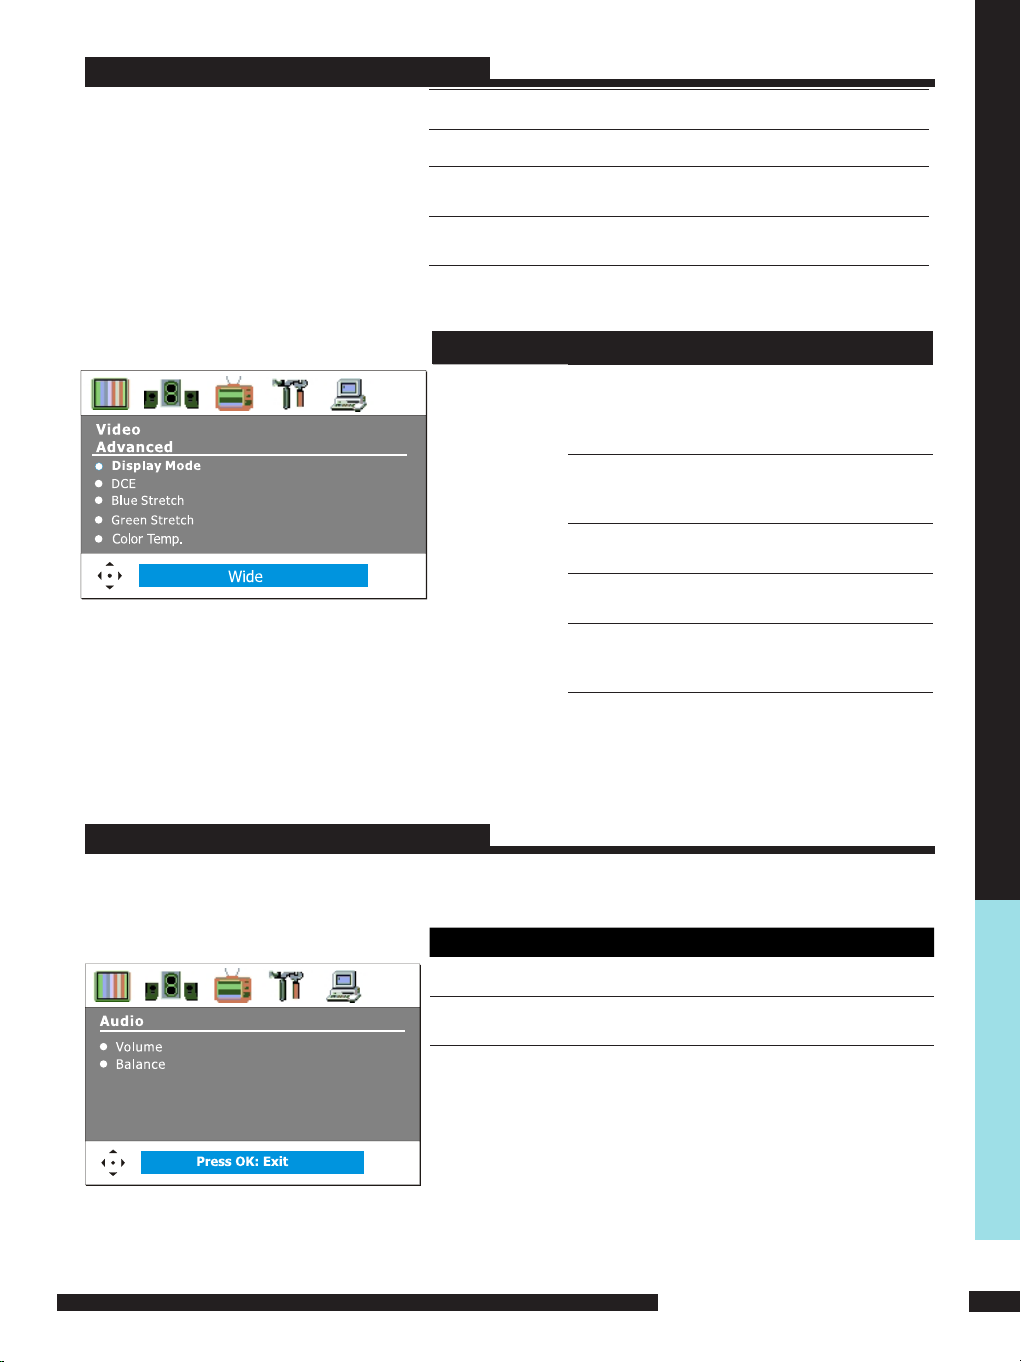
Avancé
Pour ajuster les couleurs de0-100
Pour ajuster la teinte de l’image. (En NTSC
uniquement)
Permet d’adoucir ou d’augmenter la
netteté de l’ image
Format Image Vous permet de
sélectionner entre
les formats image
Original ou Zoom
DCE Permet de choisir 4 réglages :
Section
Bleue
Section
Verte
Color
Temp
Off (Eteint)/ Low (bas)/
Mid (moyen) / High (haut)
NON/ OUI
NON/ OUI
Permet de sélectionner
différents niveaux de
température de l’image
Audio
Utiliser ce Menu pour ajuster les paramètres audio ( Son et Balance)
OPTION DESCRIPTION
Volume
Balance
Pour ajuster un niveau sonore pré-réglé
Permet d’ajuster le réglage pour accentuer le
haut parleur droit ou gauche
FONCTIONS ET UTILISATION
FONCTIONS ET UTILISATION
19
Page 21
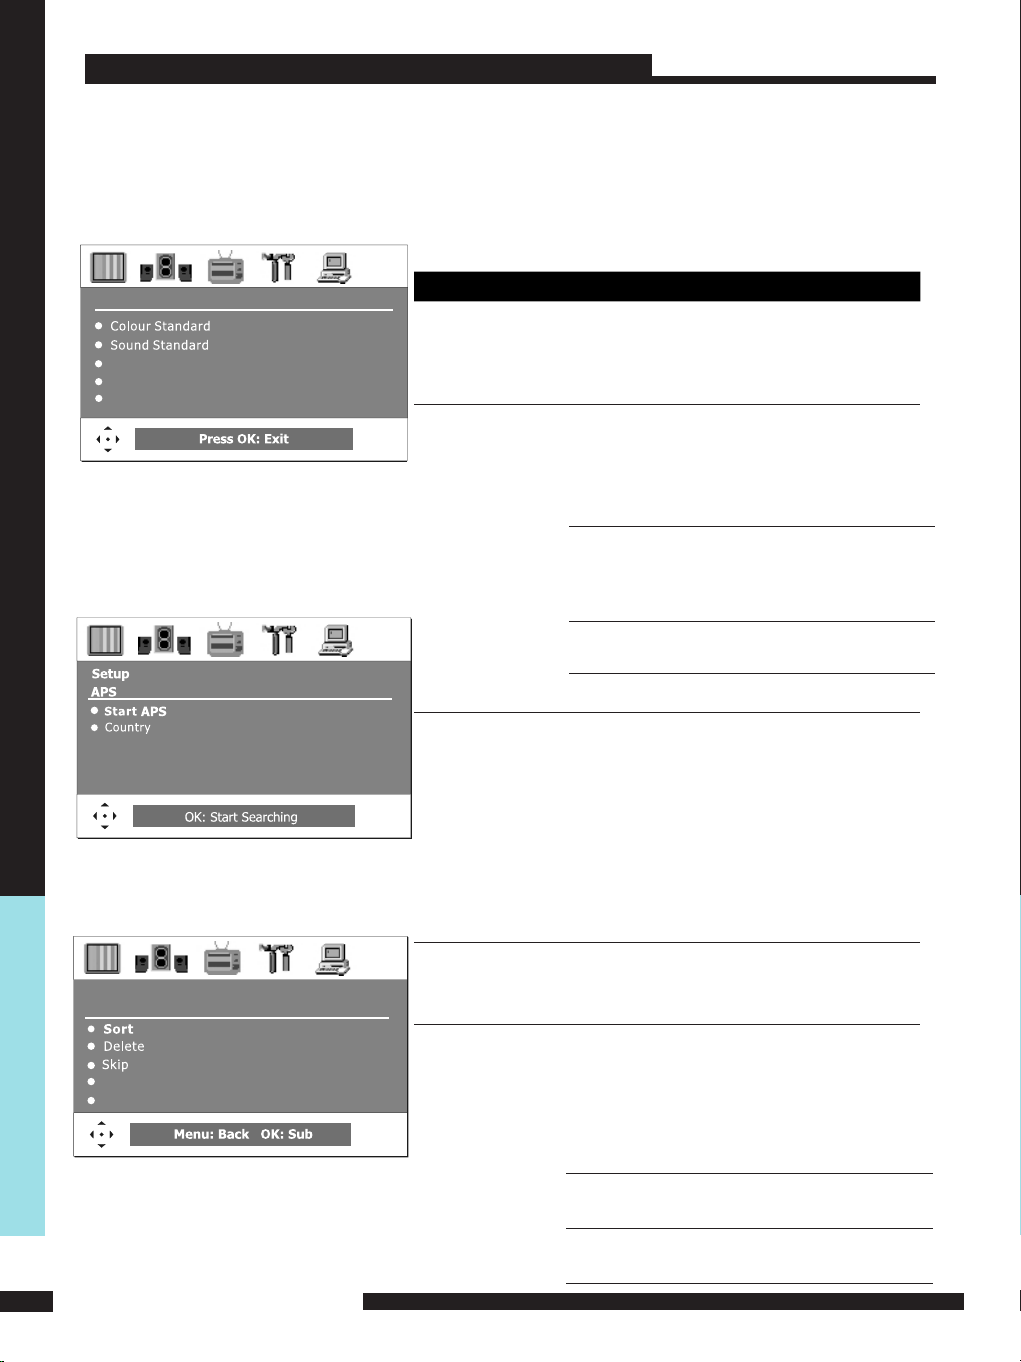
REGLAGES (TV ANALOGIQUE UNIQUEMENT)
Ce menu n’est disponible que lorsque les chaînes regardées
le sont en mode ANALOGIQUE-Ce menu permet d’ajuster
les réglages pour la Couleur, le Son, d’accéder à la fonction
APS, à la recherche manuelle et au réglage des chaînes
Utiliser les flèches directionnelles vers le haut /bas pour
mettre le choix en surbrillance, valider en appuyant sur “OK “
Utiliser les flèches droite/gauche pour ajuster les réglages
Valider en appuyant sur “OK “
Setup
APS
Manual Search
Channel Setup
OPTION
Couleur
Standard
Son
Standard
Permet d’ajuster en fonction du
système du téléviseur : AUTO/
PAL/SECAM
France =SECAM
Permetde choisir entre plusieurs formats
de son :
DK, BG, I, L/L’.
DK
BG
I
L / L’
DESCRIPTION
PAL D/K, SECAM D/K (Europe
Est / Chine )
PAL B/G, SECAM B/G
(Europe/ Europe Est/ Asie/
Nvelle Zélande / Moyen orient
/ Afrique /Australie)
PAL I (R.U. / Irlande / Hong
Kong / Afrique du Sud)
SECAM L/L’ (France)
Setup
Channel Setup
Finetune
Save
FONCTIONS ET UTILISATION
20
FONCTIONS ET UTILISATION
France
APS
Manual
Search
(Canal)
Channel Setup
lancer la fonction APS (Service
Balayage)
Appuyer sur “OK” pour lancer la
recherche et le classement automatique
Pour choisir le pays
Autriche,Belgique, Suisse, Rep.
Tchèque,Allemagne, Danemark, Espagne,
France, Finlande,R.U., Grec, Hongrie, Italie,
Norvège,Pays Bas, Portugal, Pologne,
Suède, Slovénie, Slovaquie, Turquie,
Autres.
Pour une recherche manuelle si
l’image est floue ou le signal très
faible.
Appuyer sur le bouton pour
entre Tri, Supprimer, Ignorer, Réglage,
Enregistrer.
Classer
Permet de trier
► sélectionner
manuellement la liste des
programmes
Effacer
Pour supprimer des
chaînes enregistrées
Ignorer
Pour passer à la chaîne
suivante
Page 22

PREFERENCES
Réglage
fin
Mémoriser
Pour affiner le réglage
d’une chaîne
Pour enregistrer les
modifications et réglages
Utiliser cette page de menu pour ajuster tous les réglages par défaut en fonction de vos
préférences
OPTION DESCRIPTION
OSD
Blue Screen/
Langage OSD : Choix du langage
d’affichage par défaut: Français, Anglais,
Allemand,Espagnol, Italien, néerlandais,
Portugais, Polonais ou Russe
Transparence: Pour ajuster la
transparence de 0 to 15.
Pour activer ou désactiver la fonction
Ecran Bleu
Verrou
parental
Vous permet d’activer ou désactiver le
verrou parental (Code par défaut : 0000.
Mot de passe universel: 3796.)
Modification du mot de passe:Permet de
modifier le code secret pour le verrou
parental
Mode Veille Pour activer cette fonction, chaque
pression modifie la durée comme
suit: Désactivé, 15min, 30min,
60min.
(OSD Timer)
Minuteur DSO
Pour ajuster la durée d’affichage des
informations sur l’écran:5 s,10 s,15 s,20
s, 25 s.
RESET
Restaure les paramètres usine par défaut
affichage
REGLAGES ECRAN (MODE VGA UNIQUEMENT)
OPTION DESCRIPTION
Régler le format horizontal de 0 à100.
Mettre l’image en format Horizontal
Mettre l’image en format Vertical
Améliore la stabilité et la clarté de
l’image.
VGA
Auto Sync.
Réglage
Horizontal
Format
Horizontal
Format
Vertical
Mode Phase
Auto Sync. Synchronisation auto des signaux
FONCTIONS ET UTILISATION
FONCTIONS ET UTILISATION
21
Page 23

UTILISATION EN MODE TUNER TNT
Affichage du MENU
OSD – MODE TNT
MODIFICATIONS LISTE DE CHAINES FAVORITES
Mettre cette option en surbrillance puis valider en appuyant sur “OK” Il convient de choisir
entre deux options: CHAINES ou STATIONS (TV ou Radio) avant de modifier la liste
Utiliser les touches ◄/► pour effectuer le choix puis appuyer sur “ OK” pour lancer la
fonction Utiliser les èches ▲/▼, pour mettre une chaîne en surbrillance dans la liste
utiliser la touche rouge pour verrouiller ou déverrouiller une chaîne et valider par “OK” La
chaîne verrouillée apparaît alors dans la liste avec un petit cadenas rouge devant son nom
Une chaîne ajoutée apparaît avec l’icône de validation à coté de son nom. Une fois la liste
mise à jour, appuyer sur “EXIT “ pour quitter Il vous sera demandé de valider les
modications effectuées.
OPTION DESCRIPTION
Edit Channel
List
Verrouiller certaines chaînes qui ne
sont pas adaptées aux plus jeunes,
supprimer,/ ignorer une chaîne ou
modifier l’ordre de la liste des
chaînes
Configuration
Parental
Control
Ajouter de nouvelles chaînes, régler
l’heure, Le format TV ( 16/9; 4:3 Letter
box, 4:3 Pan/Scan), la puissance de
l’antenne etc…
Vous permet d’activer ou désactiver
le verrou parental et de modifier le
code
EPG Guide Electronique des Programmes
MODE TNT- ATTENTION
LORS DE LA PREMIERE RECHERCHE AUTOMATIQUE DES CHAINES, SI LES EMISSIONS
DIFFUSEES PAR CANAL+ SONT EN CLAIR (à un horaire de diffusion des programmes en non crypté) , LA
CHAINE SERA COMPTABILISEE ET ENREGISTREE COMME CHAINE TV-
FONCTIONS ET UTILISATION
22
SI LES EMISSIONS SONT BROUILLEES ET MEME SI ELLES SONT DECODEES , CANAL + SER A
ENREGISTRE COMME STATION RADIO
AFIN D’EVITER TOUT PROBLEME NOUS RECOMMANDONS DONC D’EFFECTUER LE CALAGE DES
CHAINES A UN MOMENT DE DIFFUSION DE CANAL + EN CLAIR
FONCTIONS ET UTILISATION
Page 24

Utiliser les touches ◄/► pour mettre OUI/YES en surbrillance et valider en appuyant
sur “OK” pour enregistrer les changements.
Afin de visionner une chaîne verrouillée, il convient d’entrer le code de verrou parental.
Si vous avez décidé d’ignorer une chaîne ( “SKIP”), elle ne sera pas affichée dans la ligne
des chaînes, ( en cours de visualisation,appuyer sur “OK” pour afficher la liste des
chaînes favorites) , il vous faudra l”ajouter de nouveau si vous le souhaitez
FONCTIONS ET UTILISATION
FONCTIONS ET UTILISATION
23
Page 25

CONFIGURATION
Mettre le sous-menu Configuration en surbrillance appuyer sur “OK” pour accéder à la
fonction Le menu est affiché
RECHERCHE DES CHAÎNES
Utiliser cette option si vous avez changé de lieu ou si vous souhaitez effectuer une
nouvelle recherche.Appuyer sur “OK” pour afficher le menu d’installation
Pour une recherche automatique, appuyer sur “OK” pour continuer. Utiliser ensuite les
touches de navigation puis valider le choix par “OK”L’option “AJOUTER” ‘add’, ajoute les
nouvelles chaînes trouvées L’option “NOUVEAU” “new” , toutes les chaînes seront
remplacées par celles trouvées
FONCTIONS ET UTILISATION
24
FONCTIONS ET UTILISATION
Page 26

Si vous souhaitez installer manuellement les chaînes , utiliser les touches de navigation
▲/▼ pour mettre l’option de recherche manuelle en surbrillance, valider par “OK” Tout
d’abord il faut choisir le type d’installation, (ensuite le menu ci dessous s’affiche) Utiliser
les touches ◄/► pour naviguer dans la recherche des chaînes Le niveau de puissance et
la qualité du signal sont affichés sous forme de graphique Il faut sélectionner les chaînes
qui ont les niveaux les plus élevés de réception et de qualité puis valider par “OK”
Nouvelles chaînes détectées
Cette fonction indique les chaînes nouvellement installées L’icône devant le nom indique le
type de chaine/station radio
FONCTIONS ET UTILISATION
FONCTIONS ET UTILISATION
25
Page 27

PARAMETRES UTILISATEURS
Mettre la fonction en surbrillance à l’aide des touches ▲/▼-Appuyer sur OK pour
valider
Langage AUDIO
Cette fonction permet de sélectionner le langage Audio par défaut lorsque certains
programmes sont diffusés en version multilingues Mettre la fonction en surbrillance à
l’aide des touches ▲/▼- Naviguer dans le choix des langues proposé à l’aide des boutons
◄/►
Subtitle language
Cette fonction permet de sélectionner le langage des sous titres par défaut lorsque certains programmes le proposent.Mettre la fonction en surbrillance à l’aide des touches ▲/▼-
Naviguer dans le choix des langues proposé à l’aide des boutons ◄/►
Paramètres Système
Utiliser les boutons ▲/▼ pour mettre cette fonction en surbrillance puis appuyer sur OK
pour valider.
Mises à jour
Mettre la fonction en surbrillance à l’aide des touches ▲/▼-Appuyer sur OK pour valider
Si de nouvelles chaînes sont disponibles, la mise à Jour sera effectuée
automatiquement
FONCTIONS ET UTILISATION
26
FONCTIONS ET UTILISATION
Page 28

Informations Système
Mettre cette fonction en surbrillance puis appuyer sur “OK” Toutes les informations
sont affichées Appuyer de nouveau sur “OK” pour quitter
INFORMATIONS SIGNAUX
Mettre cette fonction en surbrillance puis appuyer sur “OK” Naviguer dans les options à
l’aide des touches ◄/► La chaîne et le niveau et la qualité du signal sont affichés Cela
donne une bonne indication sur la possibilité de recevoir la chaîne recherchée .
FONCTIONS ET UTILISATION
FONCTIONS ET UTILISATION
27
Page 29

CONTROLE PARENTAL
Mettre cette option en surbrillance et utiliser les touches ◄/► pour naviguer et modifier
les options comme suit
VERROUILLAGE DE L’APPAREIL
Il vous sera demandé d’entrer le code lorsque l’appareil est mis en marche et le mode TNT
enclenché
MENU PARAMETRES
Si vous choisissez OUI/ YES , Il vous faudra toujours saisir le code avant d’accéder au
menu
Channel lock
Si vous choisissez OUI/ YES , Il vous faudra toujours saisir le code avant d’accéder à la
chaîne verrouillée que vous souhaitez voir
Niveau de verrouillage
Il y a 18 niveaux au total. If si vous modifiez cette option et entrez un chiffre entre 1 et 18
par exemple 15; tous les programmes qui ne sont pas adaptés aux moins de 15 ans
seront verrouillés et il faudra entrer le code.Les chaînes annoncent normalement le niveau
de sécurité pour certains programmes.
FONCTIONS ET UTILISATION
28
FONCTIONS ET UTILISATION
Page 30

Modification du code secret
Appuyer sur le bouton “ROUGE’ pour faire apparaître le menu de changement du code
Saisir le code actuel puis saisir deux fois le nouveau code souhaité (par défaut 0000).
Appuyer sur EXIT pour quitter sans enregistrer ou valider le nouveau code en appuyant
sur “OK”
Appuyer sur “EXIT” pour revenir au menu précèdent sans modifications
EPG GUIDE ELECTRONIQUE DES PROGRAMMES
Appuyer sur la touche “GUIDE” pour accéder à cette fonction, appuyer de nouveau pour
quitter La chaîne en cours est en surbrillance. Utiliser les touches ▲/▼ pour accéder aux
autres chaînes et voir les programmes en cours A l’aide des touches de navigation
accédez et lisez les textes de présentation-Cette fonction est disponible sur 7 jours, pour
voir tous les programmes suivants appuyez sur les touches ◄/►.
Une brève description apparaît sous l’image, pour des informations plus détaillées,
appuyer sur les touches “INFO” ou “OK “ Pour quitter, appuyer de nouveau sur les
touches “INFO” ou “OK “
FONCTIONS ET UTILISATION
FONCTIONS ET UTILISATION
29
Page 31

QUE FAIRE EN CAS DE PROBLEME
Avant de contacter le Service Après Vente, référez vous au informations ci-dessous
PROBLEME
L’appareil ne
s’allume pas
Pas de
Son
Mauvaise image
Image OK, Pas de
son
SOLUTION
□ Assurez vous que le cordon d’alimentation est correctement
raccordé.
□ Vérifiez les piles de la télécommande
□ Vérifiez le câble entre la TV et l’antenne
□ Appuyer sur le bouton POWER de la télécommande
□ Appuyer sur le bouton POWER de la télécommande, puis appuyer sur
la touche SOURCE pour sélectionner une source externe connectée
□ Assurez vous que le bouton MARCHE ARRET à l’avant de ‘appareil
est dans la bonne position
□ Vérifiez le câble entre la TV et l’antenne.
□ Vérifiez avec une autre chaîne
□ Ajuster les paramètres de luminosité et de contraste
□ La fonction MUTE est peut être enclenchée
□ Vérifier le niveau sonore
Interférences
EN CAS DE PROBLEME
EN CAS DE PROBLEME
30
□ Eloignez les appareils susceptibles de créer des interférences
Page 32

SPECIFICATIONS
Modèle
Ecran
Résolution
Système
Luminosité
Contraste Ratio
Connectique
PERITEL
Entrée S-Video
Entrée Video
Entrée Composantes
VGA
DLC-D1503L
15 pouces LCD Panel
1024 pixels(horizontal) x 768 pixels (vertical)
PAL/SECAM L/L” / TNT
250 cd/m
450:1
(Y,Cb Cr/Y,Pb,Pr) x 1
2
1
1
1
1
Entrée Audio
Sortie numérique
Entrée ANT
Alimentation(MAX)
Dimensions( L x H x P)
Poid (Net)
2
1
1
= 12V DC X 4A , <50W,
370(l) x 375(h) x 88(p) mm
3.6 Kg
SPECIFICATIONS
SPECIFICATIONS
31
Page 33

Display Mode
Les paramètres image ont été optimisés comme suit en fonction des modes
d’affichage
VGA TIMING
Dot X Line Horizontal Frequency(kHz) Vertical Frequency(Hz)
640 x 480 31.46 59.94
640 x 480 37.86 72.80
640 x 480 37.50 75.00
800 x 600 37.87 60.31
800 x 600 48.07 72.18
800 x 600 46.87 75.00
1024 x 768 48.36 60.00
1024 x 768 56.47 70.06
1024 x 768 60.02 75.02
SPECIFICATIONS
SPECIFICATIONS
32
Page 34

Page 35

IMPORTANT SAFETY INSTRUCTIONS
WARNING
To reduce the risk of fire or electric shock, do not expose this
equipment to rain or moisture.
CAUTION
RISK OF ELECTRIC SHOCK
DO NOT OPEN
CAUTION: TO AVOID THE RISK OF ELECTRIC SHOCK,
DO NOT REMOVE COVER (OR BACK).
NO USER-SERVICEABLE PARTS INSIDE.
REFER SERVICING TO QUALIFIED SERVICE PERSONNEL.
Safety Instructions
This symbol is intended to alert the user to avoid the risk of
electric shock, do not disassemble this equipment by anyone
except a qualified service personnel.
This symbol is intended to alert the user to the presence
of important operating and maintenance instructions
in the literature accompanying the appliance.
CAUTION
Use of controls or adjustments or performance of procedures other than those
specified herein may result in hazardous radiation exposure.
LCD TV User Guide
1
Page 36

IMPORTANT SAFETY INSTRUCTIONS
To prevent any injuries, the following safety precautions should be observed in the
installation, use, servicing and maintenance of this equipment.
Before operating this equipment, please read this manual completely, and keep it
Safety Instructions
nearby for future reference.
■Do not place the equipment on any uneven or unstable carts, stands, tables, shelves etc. The
equipment may fall, causing serious injury to children or adults and serious damage to the
equipment itself.
■Use only a cart or stand recommended by the manufacturer.
This equipment and recommended cart or stand should be handled with care. Quick stops,
excessive force, and uneven surfaces may cause the equipment and cart/stand to overturn.
■Do not disable the 2-wire grounding type French plug. The grounding pin on the 2-prong
French plug is an important feature. Removing the grounding pin will increase the risk of
damaging the equipment. If you can not fit the French plug into the electrical outlet, contact
an electrician to install a grounding outlet.
■Always operate this equipment from the type of power source indicated on the rear of the
serial/model plate.
■Never overload wall outlets and extensions.
■Use and handle the power cord with care.
■Do not place any heavy objects on the AC power cord.
■Do not pull the AC power cord. Do not handle the AC power cord with a wet hand.
■Do not touch the power cord and antenna cable during lightning.
■Remove the French plug from the wall outlet, if the equipment will not be used for a long
period of time.
■Do not expose the equipment to extreme temperature or to direct sunlight, as the equipment
may heat up and suffer damage.
■Do not install the equipment near any heat sources such as radiators, heat registers, stoves,
or any other apparatus that might produce heat.
■Do not attempt to service the equipment yourself.
■Opening and removing the covers may expose you to dangerous voltage or other hazards and
may void your warranty. Refer service to qualified personnel.
■Do not place or drop any other objects on top.
■Do not insert anything into the ventilation holes of your equipment. Inserting any metal or
flammable objects may result to fire or electric shock.
2
LCD TV User Guide
Page 37

WARNINGS
● Unqualified attempts to repair this TV are not allowed. Refer repairs to this unit
to a qualified technician only.
● Do not disassemble this unit. There are dangerous-voltage parts inside that may
cause electric shock even after power is disconnected.
● Store your unit in a clean, dry environment, Unplug the unit immediately it gets
wet, and consult your servicing technician.
● Always unplug the unit before cleaning it. Wipe dust off the cabinet of the unit
with clean &dry & soft cloth. Apply non-ammonia cleansing lotion onto the cloth,
not directly onto the screen.
● Do not place heavy objects on top of the unit.
● Avoid exposing your unit directly to sunlight or other heat sources.
● Put your unit in a well-ventilated area away from high humidity.
● Do not expose this TV to rain or moisture, dripping or splashing.
Safety Tips
● If smoke, abnormal noise or odour comes out of your unit, unplug from the
mains supply immediately and call your dealer.
● Never try to repair the your unit on your own. Always call your dealer
for repairs.
Safety Instructions
Note
This user’s manual contains for-reference-only graphics and information that are
subject to change without notice.
WEEE:
This appliance is labelled in accordance with European Directive 2002/96/EG
concerning used electrical and electronic appliances(waste electrical and electronic
equipment - WEEE). The guideline determines the framework for the return and
recycling of used appliances as applicable throughout the EU.
LCD TV User Guide
3
Page 38

CONTENT
PREPARATION .............................................................................................................. 5
CONTENT
Features ............................................................................................................................................................... 5
Package Contents ............................................................................................................................................... 6
LCD TV .................................................................................................................................................................. 7
Front View ............................................................................................................................................................. 7
Rear View .............................................................................................................................................................. 8
Remote Control ....................................................................................................................................................... 9
Using your LCD TV............................................................................................................................................... 12
INSTALLATION ........................................................................................................... 13
Connecting a TV Cable or Aerial......................................................................................................................... 13
Connecting a DVD Player .................................................................................................................................. 14
Connecting a VCR& a Video Camera .............................................................................................................. 15
Connecting a TV Box and Satellite Receiver ..................................................................................................... 16
Connecting an Audio Receiver.......................................................................................................................... 17
USING THE FEATURES................................................................................................. 18
Basic Operation................................................................................................................................................. 18
OSD Menu Operation .......................................................................................................................................... 19
Video .................................................................................................................................................................. 19
Audio.................................................................................................................................................................... 20
Setup ................................................................................................................................................................ 21
Preferences........................................................................................................................................................... 22
Screen................................................................................................................................................................... 22
USING THE DTV FEATURES............................................................................................ 23
TROUBLESHOOTING...................................................................................................... 31
SPECIFICATIONS............................................................................................................. 32
LCD TV User Guide
4
Page 39

PREPARATION
Features
Features
High Brightness / Contrast Image
Brightness: 250 cd/m
Contrast Ratio: 450:1
VGA Support:
640x480/60Hz~1024x768/75Hz
Multimedia socket
CVBS in socket
S-VIDEO in socket
SCART socket (RGB, CVBS ,CVBS+RGB,Y/C input)
Y Pb/Cb Pr/Cr in socket
VGA in socket
AUDIO STEREO in x2
Built in ATV (Analogue TV) and DTV Tuners ( Digital TV)
2
PREPARATION
WSS (Screen Scale ) Function
This function can automatically convert and display any aspect ration (ZOOM / WIDE ) TV
broadcast signal.
Teletext Function
NICAM/ FM-Stereo Function
Auto Programme Sorting (APS)
Manual search
Sleep-Timer
User selectable colour temperature settings
Built in ATV (Analogue TV) and DTV Tuners (Digital TV)
The built-in DTV tuner allows the reception of DVB-T broadcasting without
the addition of a set-top box.
PREPARATION
5
Page 40

Package Contents
Once you open the box, make sure all of the following contents are
included.If you’re missing any items, please contact your dealer.
PREPARATION
Remote control
Power Cord
Power Adapter
LCD TV
Video Cable
User Guide
(you are reading it)
Audio Cable
PREPARATION
6
These items are all you need to set up and operate the LCD TV
in its basic configuration.
*Most devices (VCRs, DVD player, etc.) come with the necessary
cable for connection. If you want to set up a complex system, you may need to buy
extra cable, connector, etc.
Page 41

LCD TV
Front View
3
PREPARATION
4
5
6
1
2
7
ITEM DESCRIPTION
1 /LED
Turns the LCD TV on and off.
The LED light indicates when the LCD TV is activated (Orange = standby, Green On).
2 IR Infrared Receiver (IR)
3 VOLUME Adjusts the volume up and down. Change values for items when in the OSD mode.
4 CHANNEL Changes TV channels. Selects menu item when in the OSD mode.
5 MENU Press once to display the OSD (on screen display), press again to turn the OSD off.
6 SOURCE Press to select different input signal sources.
7 HEADPHONE
If you would like to listen to TV audio with a headphone, connect the audio out port to
the headphone.
Note:
Source button on the TV, has the same function of OK button on the remote control,
can be used as confirm button.
PREPARATION
7
Page 42

LCD TV
Rear View
PREPARATION
1
DC IN
SCART
ITEM DESCRIPTION
1 DC IN
AV1
2
SCART
AV2
3
S-VIDEO
4 AV3
VIDEO
5 AUDIO IN( L/R)
6 AV4
Y, Pb/Cb, Pr/Cr
Connects to a wall outlet via the included power adapter.
Connect to external equipment with scart socket. This scart input
allows audio and CVBS/YC/RGB+CVBS.RGB,S-VIDEO from an external
devise to be shown on your TV.
Connects to the S-VIDEO output jacks and audio output jacks on external video
equipment.
Connects to the composite A/V output jacks on external video equipment.
Connects to the audio or video equipment with left and
right audio output sockets of the Video or S-Video.
Connects to the component (Y, Pb/Cb, Pr/Cr) video sockets and audio
output sockets of your DVD player, HDTV, or video equipment.
8
VGA
Y, Pb/Cb, Pr/Cr AUDIO IN
6
S-VIDEO
VIDEO
7
AUDIO IN
DIGITAL OUT
ANT IN
9
10
Note:
S-VIDEO and Video have a common audio input, If both devices are being used at the same time
audio from both will be heard at same time. Only switch on the required device to stop the mixing
of audio.
PREPARATION
8
AUDIO IN( L/R)
7
8 AV5
VGA
9 DIGITAL OUT
10 ANT IN
Connects to the audio or video equipment with left and
right audio output sockets of the VGA or Y Y, Pb/Cb, Pr/Cr .
Connects to a PC or other devices with a VGA interface.
Connects to digital out socket on external digital audio equipment.
Connects RF input from VHF/UHF antenna or cable to receive high/
standard definition television.
Page 43

Remote Control
1
POWER
Turns the LCD TV on and into standby mode .
2
Mutes and restores your LCD TV sound.
3
2
1
3
ATV/DTV
Pressing enter ATV (analogue) or Digital (DTV)
Mode.
0-9
4
Select and switch to a channel by
using 0-9 buttons.
GUIDE
5
In DTV mode,pressing GUIDE key displays
the electronic program guide on the screen.
CH. +/-
6
Changes the channels up and down .
VOL. +/-
7
Increases and decreases volume.
SLEEP
8
Sets the LCD TV sleep time.
- Press the SLEEP button to select the number of
minutes. followed by 15, 30, 60minutes and off.
The timer begins to count down from the number
of minutes selected.
a.To check the remaining sleep time, press the
SLEEP button once.
b.To cancel the sleep time, repeatedly press the
SLEEP button until the display off appears.
c. If you turn the set off after setting the sleep
timer, the setting will be erased.
4
5
10
11
12
14
6
7
8
PREPARATION
9
13
CH. LIST
9
Display all channel list & name.
SUBTITLE
Press the SUBTITLE key to display the subtitle
which is broadcast with the program on the
screen.
10
/TEXT
Turns on and off the Teletext function.
Display the Time which broadcast with the
teletext on the screen.
11
P.S IZ E
Selects from the following modes
settings: Large, Zoom.
12
I-II
Cycles through the TV Sound options:
MONO/DUAL/STEREO.
13
P.MODE
Selects picture mode: Custom, Vivid,
Standard, Mild.
14
EXIT
Exits the OSD menu (on-screen display).
PREPARATION
9
Page 44

Remote Control
15
16
INFO/i
17
Pressing once displays a variety of information such
as the current channel and the input source.
18
Cycles among the different input signal sources:
TV DTV AV1(SCART) AV2(S-VIDEO) AV3(CVBS) AV4(Y Pb Pr) AV5(VGA)
PREPARATION
19
20
Accesses the TELETEXT items or
corresponding pages.
The coloured buttons are used to access
interactive modes when using Digital /
Freeview TV channels.
PREPARATION
10
Page 45

Remote Control
Installing the batteries in your remote control
Pull the tab of the back cover and pull up on
the cover to open the battery compartment
1
of the remote control.
Insert two AAA size batteries.
2
Make sure to match the (+) and (-) ends of
the batteries with the (+) and (-) ends indicated
in the battery compartment.
Align the lower tabs of the back cover to the
3
remote control and squeeze the cover into
place.
Note :
Do not use caustic cleaners( porcelain, stainless steel, toilet, or oven cleaner, etc...).
You may cause damage to your remote control.
Effective range
Your remote control can be activated from up to the LCD TV 5m away,
if points directly in front of the device.
PREPARATION
PREPARATION
11
Page 46

INSTALLATION
Refer to the owner’s manual of the external equipment to be connected.When connecting
external equipment, do not connect any AC power cords to wall outlets until you have completed
all the connections.
In order to ensure a healthy and relaxed body position when using the TV at visual
1
display workstations, you are able to adjust the monitor’s angle of the stand.
The stand angle of the LCD TV may be adjusted as shown:
Insert the supplied mains cable to the mains socket located on the rear of the TV.
2
Connect the other end of this cable to a 3 pin mains socket.
Connect your existing TV aerial to the Aerial input socket on the TV.
The Aerial input socket can be connected with the ATV/DTV Aerial.
INSTALLATION
12
Connect the DC French plug of the AC-DC adapter to the DC IN socket at the back of the
3
TV. Connect the AC-DC adapter to wall outlet.
Press the button on the remote to turn on the remote control.
4
Press the SOURCE button and choose the TV/DTV item to enter
5
the TV/DTV mode.
INSTALLATION
Page 47

Connecting a DVD Player
For best picture quality, if your DVD player has (Y Pb Pr) video output, Please use component
cable instead of a standard video or S-video cable (cables not supplied). Otherwise connect
using a standard Scart cable (not supplied).
Audi
o
Audio
V
ideo
( R)
C
Video/Audio Cable
(L )
D
A
Pr
Pb
B
DVD PLAY ER
1
METHOD A (AV4 )
Use a Component cable to connect the (Y Pb Pr ) sockets on the DVD player to your LCD
TV. Use an audio cable to connect the DVD’s audio sockets to your LCD TV.
METHOD B (AV2)
Use an Audio cable to connect the DVD’s audio output sockets to your LCD TV.
Use a S-Video cable to connect your LCD TV and DVD player.
METHOD C (AV3)
Use an A/V cable to connect the DVD’s composite output sockets to your LCD TV.
METHOD D (AV1)
Use a SCART cable to connect the DVD’s SCART socket to the LCD TV’s SCART socket.
Connect all power sources before turning on the power switch
2
of the LCD TV or other connected equipments.
Press the POWER button to turn on your LCD TV.
3
To watch DVD, press the SOURCE button to select AV1,AV2, AV3,AV4.
4
INSTALLATION
INSTALLATION
13
Page 48

Connecting a VCR & a Video Camera
C
Audi
o
Audio
V
ideo
(L )
A
( R)
B
Video/Audio Cable
INSTALLATION
METHOD A (AV2)
1
Use an Audio cable to connect the VCR’s/ the VIDEO CAMERA’s audio output
sockets to your LCD TV.
Use a S-Video cable to connect your LCD TV and VCR player/ VIDEO CAMERA.
METHOD B (AV3)
Use an A/V cable to connect the VCR’s/ VIDEO CAMERA’
S composite output sockets
to your LCD TV.
METHOD C (AV1)
Use a SCART cable to connect the VCR’s SCART socket to the LCD TV ‘s SCART socket.
Connect all power sources before turning on the power switch of the LCD TV
2
or other connected equipments.
Press the POWER button to turn on your LCD TV.
3
To watch VIDEO CAMERA, press the SOURCE button to select AV2 or AV3.
4
To watch VCR, press the SOURCE button to select AV1, AV2 or AV3 .
5
Note:
Not all cameras have the ability to connect to a TV. Please check your video camera
user guide for compatibility.
14
INSTALLATION
Page 49

Connecting a TV Box and Satellite Receiver
Freeview / Sky boxes will usually have scart cables supplied with them. Connect
the scart cable to the scart socket on the rear of the TV.
Audi
o
Pr
E
GACA BLE
V
D
Pb
A
B
Audio
V
ideo
( R)
C
Video/AudioCable
(L )
Method A(AV4) :
1
Use a Component cable to connect the Y/PbCb/PrCr sockets on the TV Cable Box to
your LCD TV. Use an Audio cable to connect TV cable box’s audio output sockets to LCD TV.
Method B(AV2) :
Use an Audio cable to connect the TV Cable Box’s audio output sockets to your LCD TV.
Use a S-Video cable to connect your LCD TV and TV Cable Box.
Method C(AV3) :
Use an AV cable to connect the TV Cable Box’s composite output sockets to your LCD TV.
Method D(AV5) :
Use a VGA 15 pins cable to connect the TV Cable Box’s RGB output sockets to your LCD TV.
Method E(AV1) :
Use a SCART cable to connect the TV Cable Box’s SCART
socket to the LCD TV’s SCART socket.
Connect all power sources before turning on the power switch of the LCD TV or
2
other connected equipments.
Press the POWER button to turn on your LCD TV.
3
To watch TV cable box, press the SOURCE button to select AV1, AV2, AV3, AV4 ,AV5.
4
INSTALLATION
INSTALLATION
15
Page 50

CONNECTING AN AUDIO RECEIVER
For best Sound quality, you may want to play the LCD TV audio through your Dolby
digital surround system system.
Digital out Cable
INSTALLATION
Dolby digital
amplifier
Use an audio cable to connect the audio receiver’s audio LINE IN sockets to LCD TV ‘s
1
DIGITAL OUT sockets.
Connect all power sources before turning on the power switch of the LCD TV
2
or other connected equipments.
Press the POWER button to turn on your LCD TV.
3
16
INSTALLATION
Page 51

USING THE FEATURES
Basic Operation
Tuning in the TV channels
1
After connecting an aerial to your LCD TV and connecting the mains cable to the TV and
230VAC mains socket, turn the POWER SWITCH of rear TV on, a orange light will show on
the front centre panel of the TV.
2 Press the POWER button, the orange light will change to green and the First Time Installation
screen will show:
1. Make sure an aerial is fitted then press OK button on the remote to start
the Auto Programme Scan (APS).
2. In a short while you will see the TV programmes briefly as each channel is received and
stored in the memory. When APS is completed CH1 digital TV will show, press CH+/ buttons to view the other channels stored. To view analogue TV press Source button and
use the up / down arrow buttons to select TV and then Press the OK button.
Change channels by pressing the CH +/- buttons.
3 To power off press the POWER button, the green light will change to orange.
Selecting a source
Press the SOURCE button to display the function required (TV/AV).
Using the arrow buttons on the remote highlight the function required and press the OK button
to select the function.
Select TV Channel
1 Press the CH.+/- button on the remote control and the CH. ▲/▼ button on the LCD
TV to change the TV channels.
2 You can directly select the TV channel required by pressing 1,2 or 3 etc on the remote button pad.
Adjusting the Volume
Press the VOL . +/– button on the remote control or the VOL . +/- button on the LCD TV to adjust
the volume.
To Mute the Sound
1 Press MUTE and the sound cuts off.
2 To turn mute off, press the MUTE button again, or simply press the VOL +/- button.
Sleep Timer
Press the SLEEP button continuously to select the sleep timer or turn the sleep timer from the
OFF,15,30,60minutes; when the LCD TV has reached the set time, it will automatically turn off.
If the TV has no input signal, it will automatically power down to standby after 15 minutes.
USING THE FEATURES
USING THE FEATURES
17
Page 52

OSD Menu Operation
1 The main menu provides access to the following menus:
Video
Audio
Setup
Adjust picture setting such as picture
mode, contrast, brightness,sharpness
colour and advanced.
Adjust sound option and effects.
Adjust colour standard, sound standard,
APS, Manual search, Channel setup.
Preferences
Adjust preferences such as OSD, blue
screen, childlock, sleep timer, OSD
timer, OSD reset.
Screen
Adjust screen such as horizontal size,
horizontal position, vertical position,
phase, auto sync.
DTV (Digital
TV)
The DTV menu provide four submenus
as follow: edit channel list,configuration
,parental control, EPG,with which you
can set the DTV as you wish.
2 Press the MENU button on the remote control. The main menu will appear on the screen.
3 Use ◄/► to highlight your main menu option, then press OK to enter your selected
option.
Use ▲/▼ to highlight an option of the sub-menu. Use ◄/► to change the value of the
item.Press the EXIT button to exit MENU.
Video
Use this Video setting menu to adjust the picture quality which best corresponds to your
viewing requirements.The Video Menu includes the following options:
OPTION DESCRIPTION
Picture Mode
Contrast
Brightness
USING THE FEATURES
Colour
Custom:Select for user’s settings.
The items of video can be adjusted when
the picture mode is for user’s settings
except advanced item.
Vivid:Select for enhanced picture contrast
and sharpness.
Standard:Select for standard picture
settings.Recommended for home
entertainment.
Mild:Select for mild picture settings.
Adjust the difference between the
brightness and darkness regions of the
picture.
Adjust to increase or decrease the
brightness.
Allows to adjust the colour from 0 to 100.
Tint(NTSC)
Sharpness
18
USING THE FEATURES
Allows you to adjust the color tint of the
picture.(Only for NTSC)
Adjust to sharpen or soften the picture.
Page 53

Video
OPTION DESCRIPTION
Advanced
Display Mode Allows you to select the
display mode to be 4:3,
Zoom.
DCE Allows you to adjust the
Blue
Stretch
Green
Stretch
Color
Temp.
(Dynamic Contrast
Enhancemen) to be off, low,
mid, high.
Allows you to adjust the blue
stretch.
Allows you to adjust the
green
stretch.
Allows you to adjust the color
temp. to be cool, warm ,
standard.
Audio
Use this AUDIO setting menu to adjust the sound and balance and volume to your
listening requirements.
OPTION DESCRIPTION
Volume
Balance
presets the volume to a given setting.
Adjust to emphasize left or right speaker
balance.
USING THE FEATURES
USING THE FEATURES
19
Page 54

Setup (Analogue TV only)
Setup
APS
Manual Search
Channel Setup
Setup menu is only available when viewing Analogue TV.
Use this Setup menu to select Colour Standard, Sound
Standard, APS, Manual Search, Channel Setup.Use the Up/
Down arrow buttons to highlight the required setting.
Press the Press OK button to select the function. Use left /
right arrow buttons to adjust the settings. Press OK to save
the adjustment.
OPTION
Colour
Standard
Allows you to select the colour
standard : AUTO,PAL, SECAM.
DESCRIPTION
France = SECAM
Sound
Standard
Allows you to select the sound standard :
DK, BG, I, L/L’.
DK
BG
I
L / L’
PAL D/K, SECAM D/K (East
Europe / China )
PAL B/G, SECAM B/G (Europe
/ East Europe / Asia / New
Zealand / M.East / Africa /
Australia)
PAL I (U.K. / Ireland / Hong
Kong / South Africa)
SECAM L/L’ (France)
USING THE FEATURES
Setup
Channel Setup
Finetune
Save
France
APS
Manual
Search
Channel Setup
Start APS
Press OK to start Auto Search and auto
sort process. Country
Allows you select the country :Austria,
Belgium, Switzerland, Czech Rep.,
Germany, Denmark, Spain, France, Finland,
UK, Greece, Hungary, Italy, Norway,
Netherlands, Portugal, Poland, Sweden,
Slovenia, Slovakia, Turkey, Others.
Allows you to adjust the manual
search by hand if signal is too weak
or picture is blurry.
Press the
► button to select Sort,
Delete, Skip, Finetune, Save.
Sort
Allows you to manually sort
the stored programme.
Delete
Allows you to delete the
stored programme.
Skip
Allows you to skip the
stored programme.
Finetune
Allows you to finetune the
stored programme.
Save
Allows you to save the setup.
20
USING THE FEATURES
Page 55

Preferences
Use this Preferences setting menu to set up some features: OSD, Blue Screen, Childlock,
Sleep Timer, OSD Timer, OSD Reset.
OPTION DESCRIPTION
OSD
Blue Screen
Childlock
Sleep Timer Allows you to select the sleep timer
OSD Timer
Language : Allows you to select the
OSD to be English, German,
French, Spanish, Italian,
Dutch, Portugese, Polish or
Russian.
Transparency: Allows you to adjust
transparency from 0 to
15.
Allows you to select the blue screen to
be off or on.
Allows you to select the childlock to be
yes or no. (Default password is 0000.
golden password is 3796.)
Change Pin: Allows you to change the
4 -digit password.
to be off, 15min, 30min, 60min.
Allows selection of the display time of
the on-screen menu:5 s,10 s,15 s,
20 s, 25 s.
Screen(Only for VGA)
Auto Sync.
OSD Reset
OPTION DESCRIPTION
Horizontal
Size
Horizontal
Position
Vertical
Position
Phase
Allows you to restore the factory
settings.
Allows you to adjust the Horizontal Size
from 0 to 100.
Allows you to adjust the Horizontal
Position of the picture.
Allows you to adjust the Vertical Position
of the picture.
Allows you to improve focus clarity and
image stability.
Auto Sync. Allows to auto synchronize VGA
signal.
USING THE FEATURES
USING THE FEATURES
21
Page 56

USING THE DTV FEATURES
DTV OSD Menu Operation
Edit Channel List
OPTION DESCRIPTION
Edit Channel
List
Lock some channels that are not
suited for younger members of the
family, skip/add the channel list as
you wish.
Configuration
Parental
Control
Add new channel. Set the local time
offset, audio language, subtitle language,
opacity level, antenna power as you
wish. Upgrade the system. View the
signal information.
Enable or Disable the menu
protection system and allows the
PIN code to be changed.
EPG Electronic Program Guide
USING THE FEATURES
Highlight the edit channel list option, then press OK button to enter the selected option.
You should choose the channel type (TV or Radio) before editing the channel list.
Use ◄/► to choose the channel type, then press OK button to start editing the channel
list. You can select the channel by using ▲/▼, then the selected channel which
highlighted in yellow is displayed in the quarter-screen image windows.
You can lock or unlock the selected channel by pressing the ‘RED’ button, pressing the
‘OK’ button to skip or add the selected channel. A channel selected as a locked appears
in the channel list with a lock icon (red button) against the channel name, a channel
selected as a added appears in the channel list with a add icon (tick) against the channel
name.
22
USING THE FEATURES
Page 57

When you complete the edit, press the EXIT button to quit the favourite channel list
menu. The next menu will ask if you want to save the changes you have made, using
◄/► to highlight the YES option, and press the OK button to save the changes.
Once you lock a channel, you must enter the PIN Code that is set in the parental control
menu at first before the channel is displayed.
If you skip a channel, it can’t be shown in the list menu (Press OK button will popup the
favorite channel list menu when you watch the digital terrestrial television) no longer
unless you add it again. (In the channel list menu,the skipped channel name is not
shown.)
USING THE FEATURES
USING THE FEATURES
23
Page 58

Configuration
Highlight the Configuration option, then press OK button to enter the selected option.
The configuration menu is displayed on the screen now.
Channel Installation
Use these options If you have moved location or want to rescan for new channels. Press
OK button to display the channel installation menu.
If you want TV to auto search the channels, press OK button to continue. Then you
should choose the installation type by using the ◄/► buttons and press the OK button
to start the installation process. If you choose ‘add’, the new channels will be added in
the channel list. If you choose ‘new’, the new channels will replace the previous channels
in the channel list.
USING THE FEATURES
24
USING THE FEATURES
Page 59

If you want to install the channels by yourself, using the▲/▼buttons to highlight the
channel installation (manual) option, and press ok to install manually. First you should
choose the installation type, then you can see the following menu. Using ◄/►to cycle
the channel option, then the bar graphs of signal level and signal quality will indicate
whether any channels are likely to be found. You should choose the channel of which the
signal quality bar is high as well, then press OK button to scan the channels.
New Detected Channels
The New Detected Channels menu shows the channels that you add in the channel list
recently. The type icon of the program is displayed against the channel name.
USING THE FEATURES
USING THE FEATURES
25
Page 60

User Settings
Using the ▲/▼buttons to highlight the user settings item in the configuration menu,
then press OK button to display the user settings menu.
Audio Language
This function select which language soundtrack you will hear when switching to a
channel broadcasting with multiple soundtracks. Highlight the audio language line in the
user settings menu and use ◄/►buttons to cycle through the language options.
Subtitle language
This function selects the desired subtitle language whenever subtitle information is
broadcast. Highlight the subtitle language line in the user settings menu and use
◄/►buttons to cycle through the language option.
System parameters
Using the ▲/▼buttons to highlight the system parameters item in the configuration
menu, then press OK button to display the system parameters menu.
System Upgrade
Highlight the System Upgrade item in the system parameter menu, pressing OK button
USING THE FEATURES
to display the System Upgrade menu. press OK button to upgrade system. If there is a
new software, the unit will upgrade itself.
26
USING THE FEATURES
Page 61

System Information
Highlight the system information item in the system parameter menu, pressing OK
button to display the system information menu. You can view the system information in
this menu, however, you can modify nothing in this menu, Pressing OK button to quit.
Signal information
Highlight the Signal information item in the configuration menu, pressing OK button to
display the Signal information menu. Cycle through the channel option by using the
◄/►buttons on the remote control. The signal level and signal quality of the channel that
offers the upgrade software can be observed on the two bar graphs. The bar graphs of
signal quality and signal level give a good indication of whether the selected channel is
likely to be found. If the signal quality bar is high as well then it is a digital frequency and
digital channels will probably be found.
USING THE FEATURES
USING THE FEATURES
27
Page 62

Parental Control
Highlight the parental control line in the parental control menu and use◄/►buttons to
cycle through the enable and disable option. Toggle this option to enable, then the
following items can be altered.
Receiver lock
You should enter the PIN CODE before you can see the DTV program while you power on
the TV and select the DTV source.
Configuration menu
If you toggle this option to YES, you will enter the PIN CODE before enter the
configuration menu.
Channel lock
If you toggle this option to YES, the channels you locked in the edit channel list menu
can’t be displayed before you enter the PIN CODE.
Maturity level
There are 18 levels total. If you toggle this option to a number (1-18), for example, you
toggle it to 15, that’s to say, if the channels broadcast material is not suitable for the
family members who are under 15 years old , you must enter the PIN CODE before you
USING THE FEATURES
can view them. (The maturity level information should be broadcast with these channels.)
28
USING THE FEATURES
Page 63

PIN Code change
Pressing the ‘RED’ button will popup the PIN code change menu, enter the previous
code by using the 0-9 buttons on the remote control, then enter the new code twice to
confirm and this menu will disappear (The PIN is factory set to 0000). Pressing EXIT to
quit without saving the new code.
Pressing OK button to quit the parental control menu with saving these alteration. Pressing
EXIT button to quit the parental control menu without saving these alteration.
EPG
EPG (Electronic Programme Guide) menu is reached by pressing GUIDE button, quit by
pressing GUIDE button again. Current program is highlighted. Use Channel Up/Down
▲/▼ buttons to change channels and view the other programmes on the selected
channel. Press the Arrow up / Arrow down navigation buttons to scroll through and show
programme content. There is a 7day EPG, you can see the other days channel list by
using Left / right navigation arrow ◄/►buttons.
The short description of the highlighted channel is shown under the image window, and
you can see the extended description by pressing the INFO or OK button and by
pressing this button again you can close this window.
USING THE FEATURES
USING THE FEATURES
29
Page 64

TROUBLESHOOTING
Before contacting AKAI Helpline, check the following chart for a possible cause
of the trouble you are experiencing and for a solution.
PROBLEM
TV will not turn on
No picture, no
sound
Poor picture, sound
OK
Picture OK, Poor
sound
SOLUTION
□ Make sure the power cord is French plugged in.
□ The batteries in the remote control may be exhausted. Replace the
batteries.
□ Check the interface cable between TV and antenna/cable TV.
□ Press the POWER button on the remote.
□ Press the TV button on the remote, then press the SOURCE
button repeatedly to select the connected video sources.
□ Make sure that the main power switch on the back panel is
switched on.
□ Check the interface cable between TV and antenna/cable TV.
□ Try another channel, the station may have broadcast
difficulties.
□ Adjust the Brightness/Contrast options in the VIDEO Menu.
□ Sound may be muted. Press the MUTE button on the remote.
□ Press the TV button on the remote, then press the VOL.+
button to increase the volume.
Audio noise
TROUBLESHOOTING
TROUBLESHOOTING
30
□ Move any infrared equipment away from the TV.
Page 65

SPECIFICATIONS
Model
Panel System
Display Resolution
Television System
Brightness
Contrast Ratio
Inputs/Output
SCART
S-Video In
Video In
Component In
VGA
DLC-D1503L
15 Inch LCD Panel
1024 pixels(horizontal) x 768 pixels (vertical)
SECAM L/L”
250 cd/m
450:1
(Y,Cb Cr/Y,Pb,Pr) x 1
2
1
1
1
1
Audio In
Digital Out
ANT In
Power Source(MAX)
Dimension( W x D x H)
Weight(Net)
2
1
1
= 12V DC X 4A , <50W,
370(w) x 375(h) x 88(d) mm
3.6 Kg
SPECIFICATION
SPECIFICATION
31
Page 66

Display Mode
For the display modes listed below, the screen image has been optimized during
manufacture.
VGA TIMING
Dot X Line Horizontal Frequency(kHz) Vertical Frequency(Hz)
640 x 480 31.46 59.94
640 x 480 37.86 72.80
640 x 480 37.50 75.00
800 x 600 37.87 60.31
800 x 600 48.07 72.18
800 x 600 46.87 75.00
1024 x 768 48.36 60.00
1024 x 768 56.47 70.06
1024 x 768 60.02 75.02
SPECIFICATION
SPECIFICATION
32
Page 67

www.akai-france.com
 Loading...