

Page 1
Page 2
CAUTION
RISK OF ELECTRIC SHOCK
DO NOT OPEN
Page 3
Page 4
Page 5
Page 6
Page 7
Page 8
Page 9
Page 10
Page 11
Page 12
Page 13
Page 14
Page 15
Page 16
Page 17
Page 18
Page 19
Page 20
Page 21
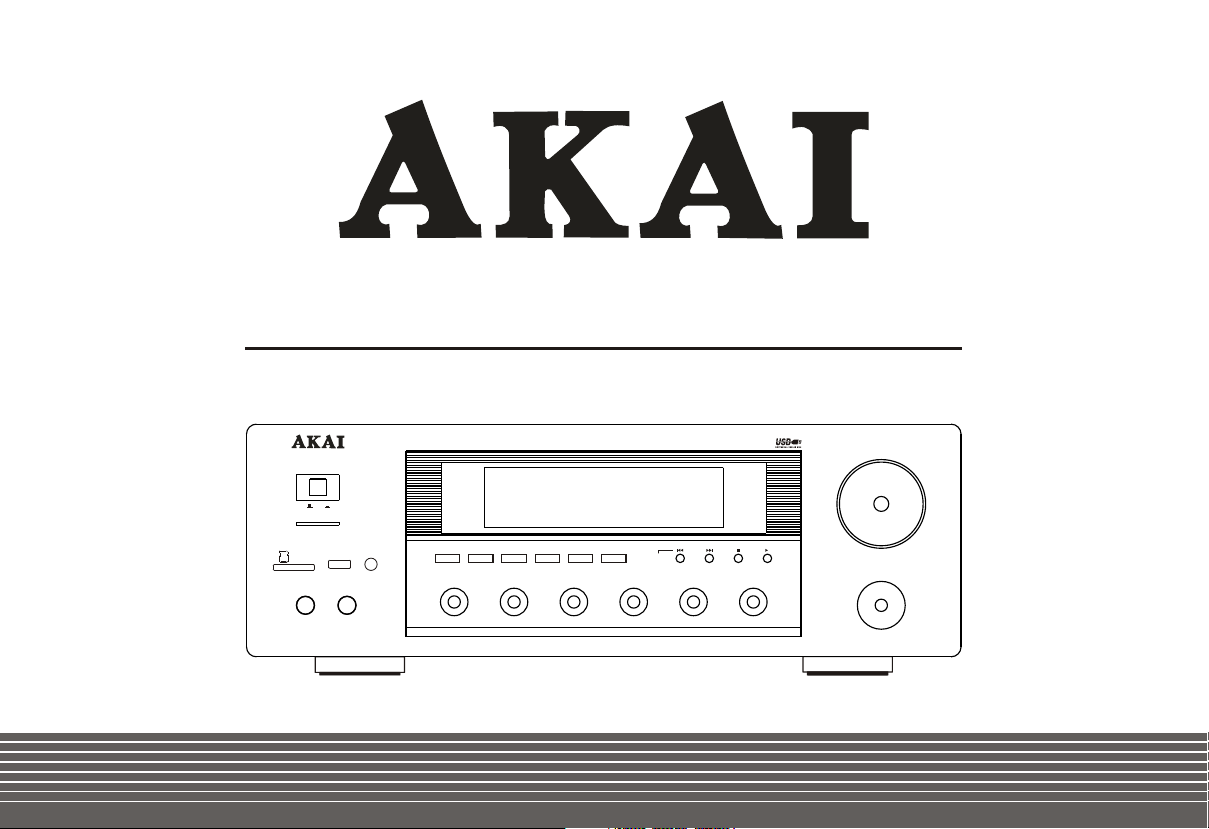
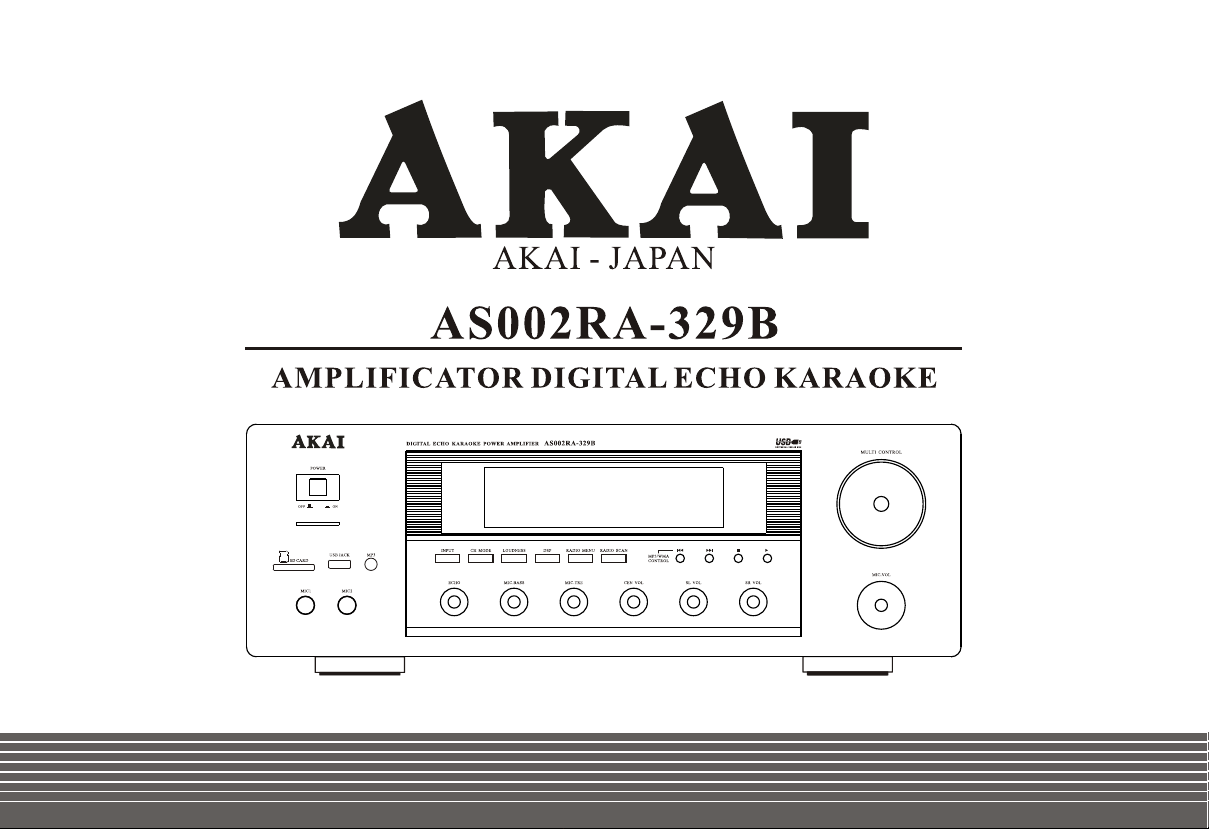
AKAI - JAPAN
AS002RA-329B
DIGITAL ECHO KARAOKE POWER AMPLIFIER
POWER
OFF ON
SD CARD
MIC1 MIC2
USB JACK MP3
DIGITAL ECHO KARAOKE POWER AMPLIFIER AS002RA-329B
LOUDNESS
CH MODE DSP
INPUT
ECHO MIC.BASS MIC.TRE CEN VOL SL VOL SR VOL
RADIO SCANRADIO MENU
MP3/WMA
CONTROL
MULTI CONTROL
MIC.VOL
Page 22
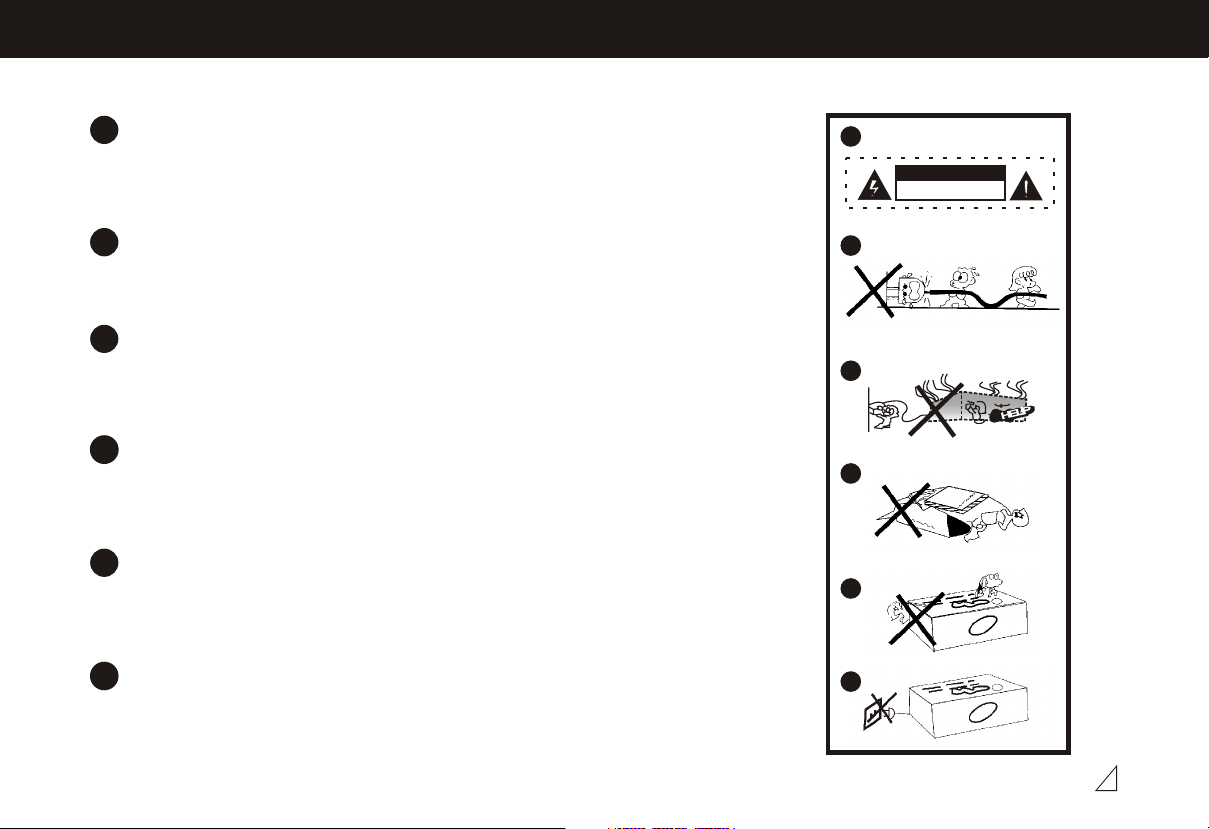
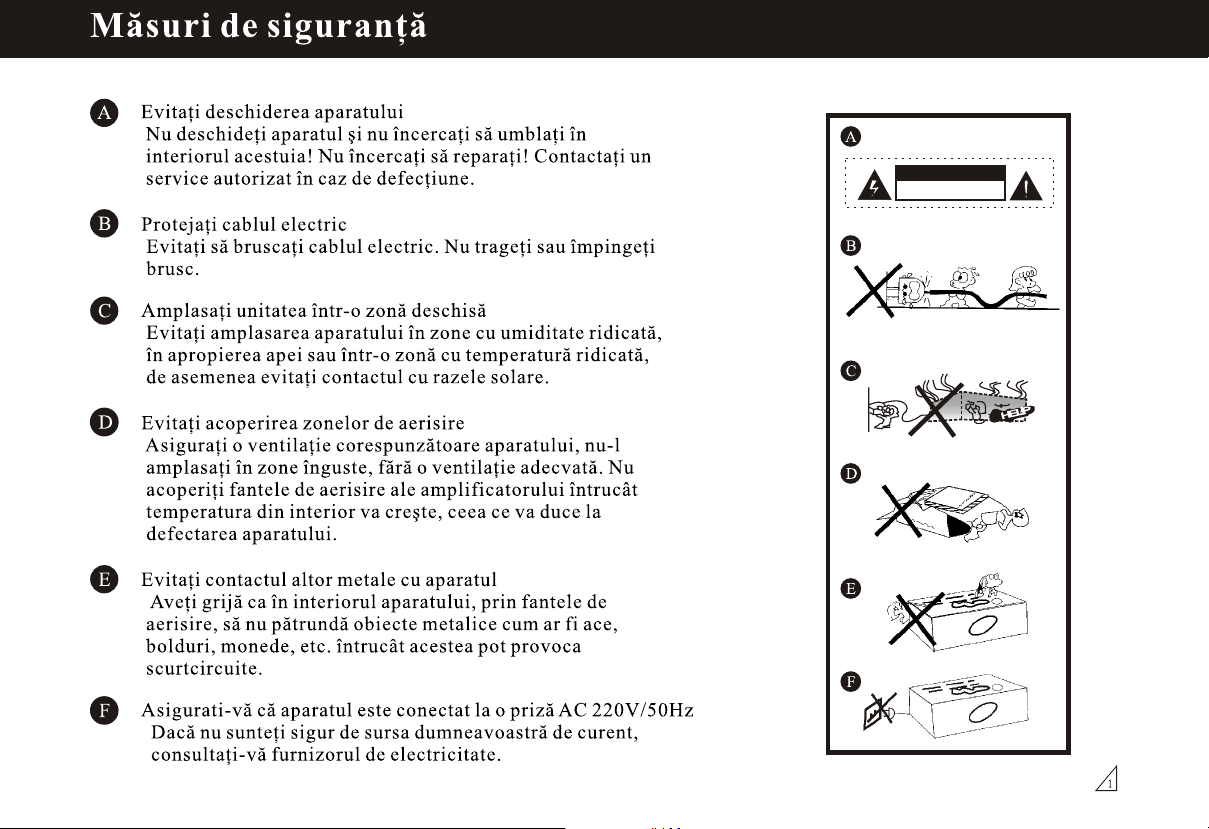
SAFETY PRECAUTIONS
Avoid opening the cover or back
A
Do not open the cover, re-fix or touch the
inner parts. No user-serviceable parts inside,
refer servicing to qualified service personnel.
Protect voltage line
B
Avoid high pressure and stamp on, do not
pull, push excessively.
Please put on this unit in the windy place
C
Avoid direct sunshine and nearing heater.
Do not operate in a sealed box and be sure
to have enough room for heat exchange.
Avoid covering vents
D
Block up the vents will make the temperature
in the unit become higher and will damage
the unit.
Avoid metals dropping in the unit
E
Avoid metals dropping in, like needle,
hairpin, coin, otherwise the unit will
get short and out of work.
A
B
C
D
E
CAUTION
RISK OF ELECTRIC SHOCK
DO NOT OPEN
Be sure to set the line voltage AC220V/50Hz
F
If you are not sure of the type of power supply,
consult your appliance dealer or local power company.
F
1
Page 23

IMPORTANT SAFEGUARDS
1. Read Instructions- All the safety and operating instructions should be read before the appliance is operated.
2. Retain Instructions- The safety and operating lnstructions should be retained for future reference.
3. Follow Instructions- All operating instructions should be followed.
4. Heed Warnings- All warnings on the appliance and in the perating instructions should be adhered to.
5. Power Source- The appliance should be connected to a power supply only of the type specified in the
operating instructions or as marked on the appliance.
6. Power Cord Protection- Power-supply cords should be routed so that they are not likely to be walked on or
pinched by items placed upon or against them, pay particular attention to cords at plugs, convenience
receptacles, and the point where they exit from the appliance.
7. Water and Moisture- The appliance should not be used near water (for example, near a bathtub, washbowl ,
kitchen sink, laundry tub, in a wet basement, or near a swimming pool, etc.)
8. Ventilation- The appliance should be situated so that its location or position does not interfere with its
proper ventilation, Do not use the appliance on a bed, sofa, rug or similar surface that may block the
ventilation openings.
2
Page 24

IMPORTANT SAFEGUARDS
9. Heat - Keep the appliance away from heat sources such as radiators, heat registers, stoves, or other appliances
(including amplifiers) tha t produce heat.
10. Non-use Periods - The power cord of the appliance should be unplugged from t he o utle t when left unus ed
for a long period of time.
11. Damage Requiring Service - The appliance should be serviced by qualified service personnel when:
a. The power-supply cord or plug has been damaged; or
b. Objects have fallen or liquid has been spilled into the appliance; or
c. The appliance has been exposed to rain; or
d. The appliance does not appear to operate normally or exhibits a marked change in performance; or
e. The appliance has been dropped, or the enclosure damaged.
12. Servicing - The user should not attempt to service the appliance beyond that specified in operating
instructions. All other servicing should be referred to qualified service personnel.
13. Clean only with dry cloth.
14. Unplug this apparatus during lightning storms or when unused for long periods of time.
3
Page 25
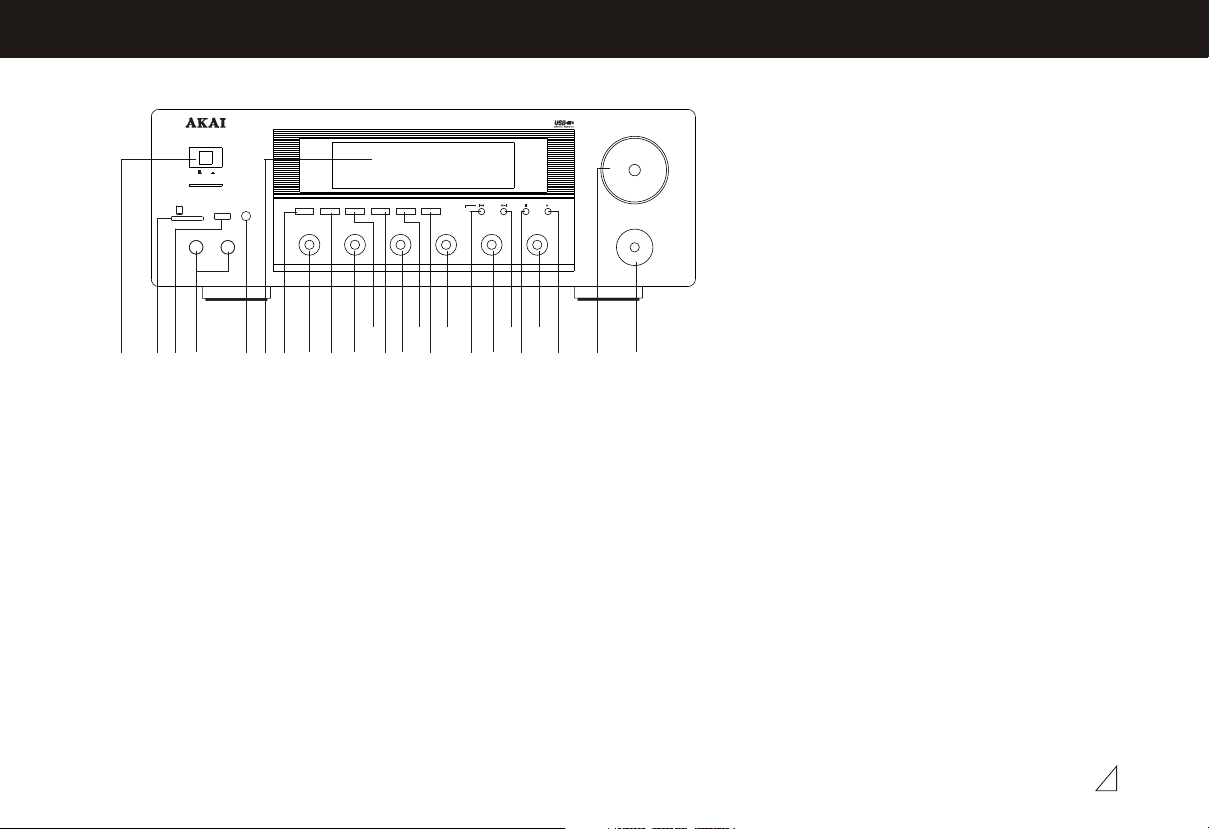
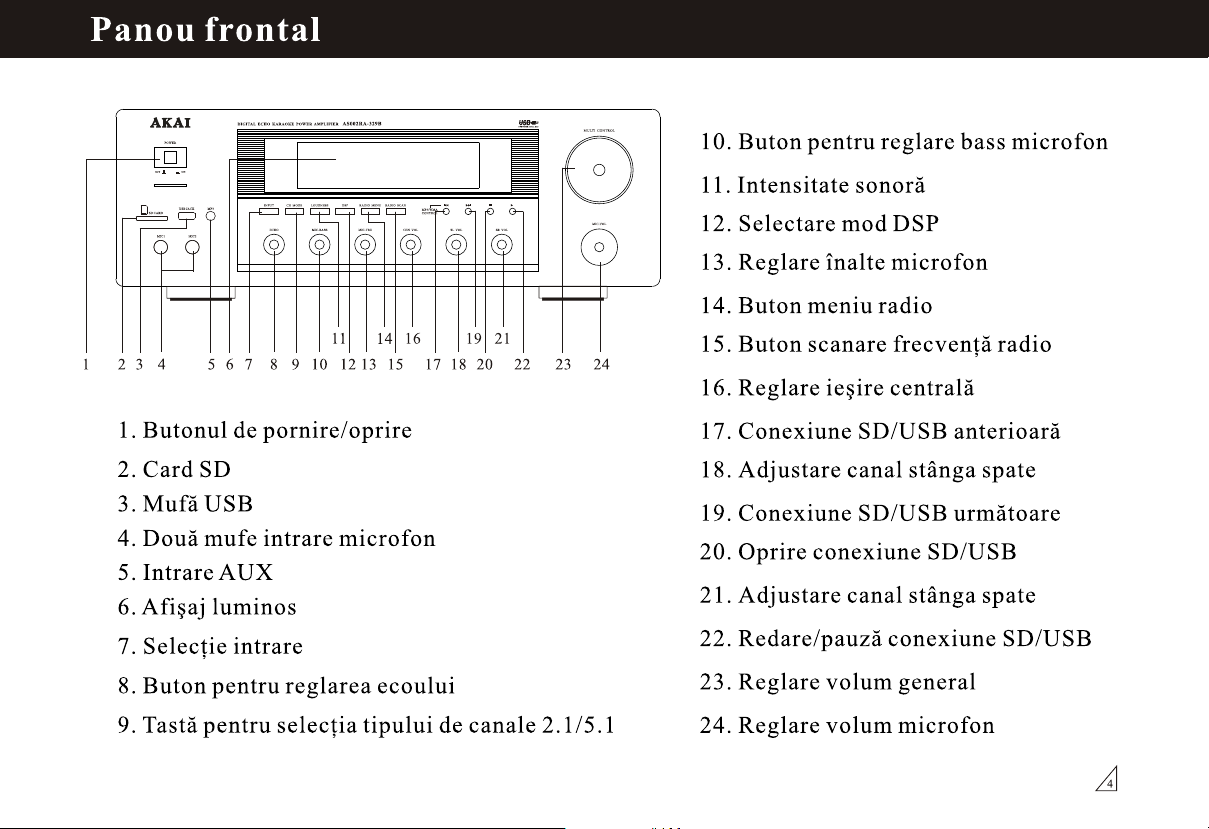
FRONT PANEL
POWER
OFF ON
SD CARD
MIC1 MIC2
1 4 6 7 8 9 101112 1314151617 1819202122 23 24
2 3 5
DIGITAL ECHO KARAOKE POWER AMPLIFIER AS002RA-329B
USB JACK MP3
LOUDNESS
CH MODE DSP
INPUT
ECHO MIC.BASS MIC.TRE CEN VOL SL VOL SR VOL
RADIO SCANRADIO MENU
MP3/WMA
CONTROL
MULTI CONTROL
MIC.VOL
1. Power switch
2. SD Card jack
3. USB jack
4. Microphone-2jack
5. AUX Input jack
6. Vacuum fluorescent display
7. Input selection
8. Echo adjust key
9. 2.1/5.1 Channel selection
10. MIC Bass adjust key
11. Loudness button
12. DSP Mode selector key
13. MIC Treble adjust key
14. Radio menu button
15. Tuner frequency scanning key
16. Centre output adjust key
17. SD/USB Connection previous key
18. Surround left output adjust key
19. SD/USB Connection next key
20. SD/USB Connection stop key
21. Surround right output adjust key
22. SD/USB Connection play/pause key
23.Master volume adjust key
24.MIC Volume adjust key
4
Page 26
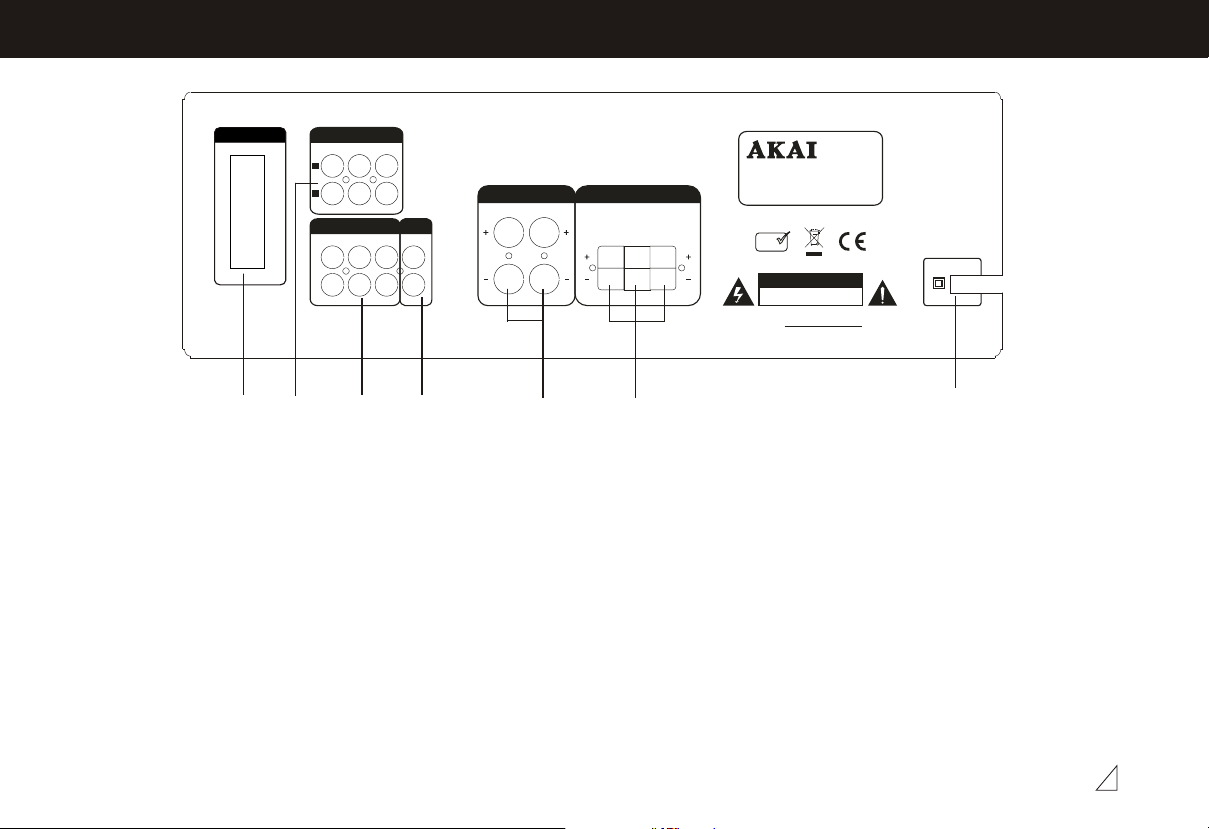
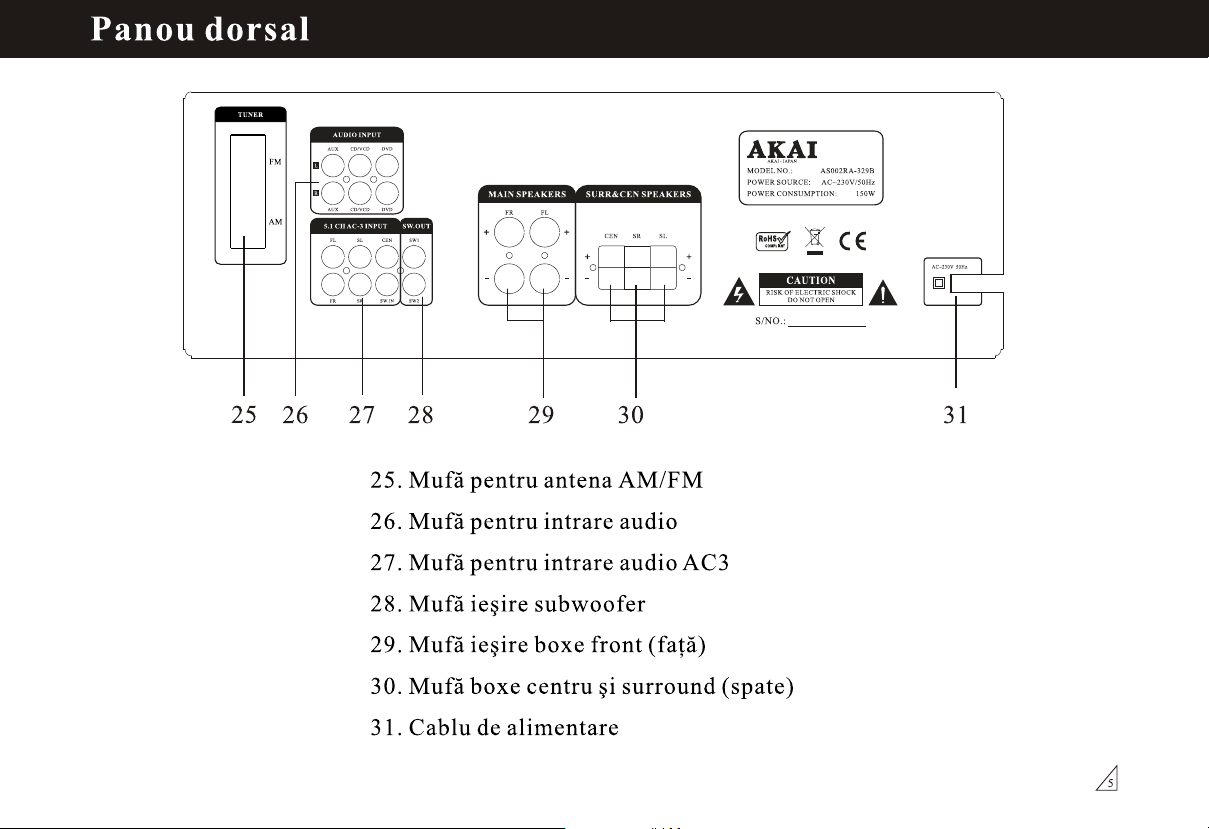
REAR PANEL
TUNER
FM
AM
25
AUDIO INPUT
DVD
AUX
CD/VCD
L
R
AUX
CD/VCD
DVD
5.1 CH AC-3 INPUT SW.OUT
SL
SW1
CEN
FL
SR
SW.IN SW2
FR
26 27 28 29 31
MAIN SPEAKERS SURR&CEN SPEAKERS
FR FL
SR SL
CEN
30
AKAI - JAPAN
MODEL NO.: AS002RA-329B
POWER SOURCE: AC~230V/50Hz
POWER CONSUMPTION: 150W
RoHS
C
OMPLIA
NT
CAUTION
RISK OF ELECTRIC SHOCK
DO NOT OPEN
S/N:
25. AM/FM Antenna connector
26. Audio input jack
27. AC-3 Audio input jack
28. Sub-woofer output
29. Front speaker terminals
30. Center/Surround speaker terminals
AC~230V 50Hz
31. Power cord
5
Page 27
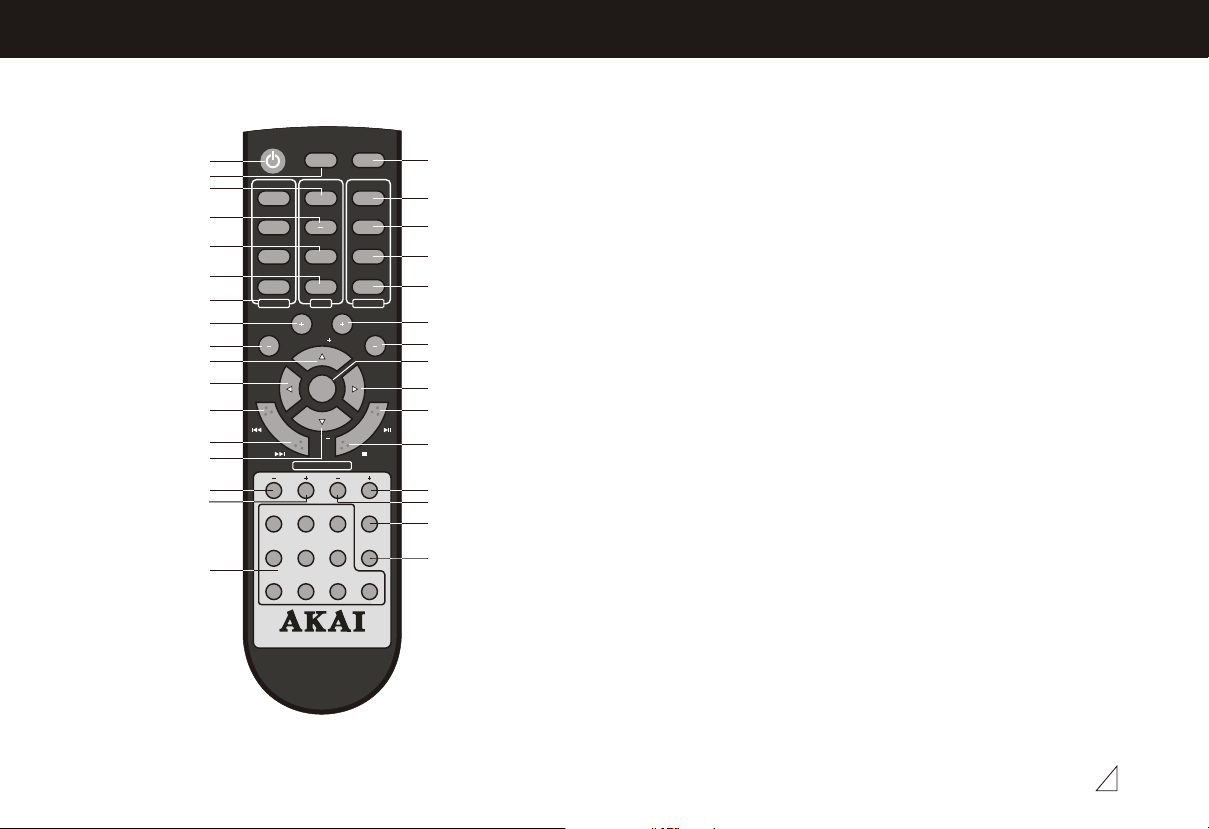
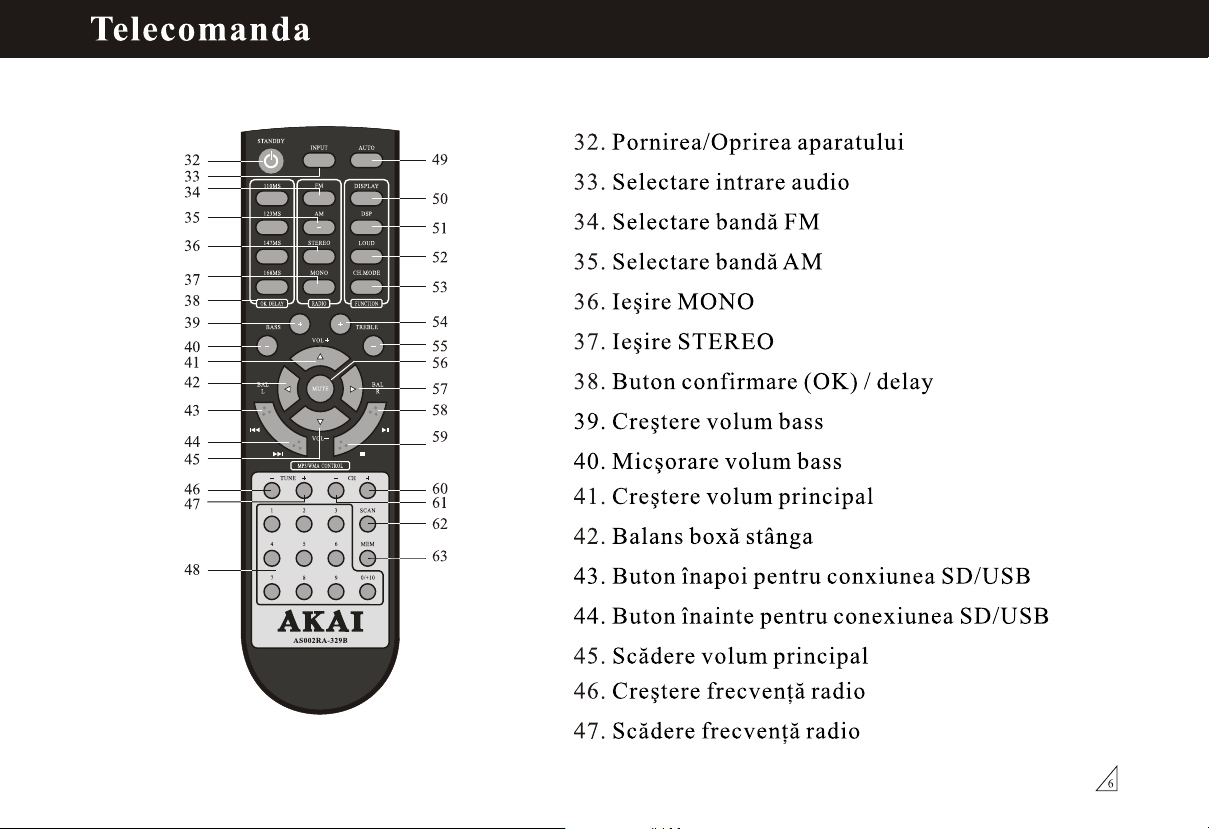
REMOTE CONTROL
STANDBY
INPUT
RADIO
VOL
MUTE
AUTO
FM
DISPLAY
AM
DSP
LOUD
CH.MODE
FUNCTION
BAL
32
33
34
35
36
37
38
39
40
41
42
110MS
123MS
147MS STEREO
168MS MONO
OK DELAY
BASS TREBLE
BAL
L
43
1
TUNE
VOL
MP3/WMA CONTROL
2 3
CH
SCAN
44
45
46
47
49
50
51
52
53
54
55
56
R
57
58
59
60
61
62
4 5 6
48
7 8 9
MEM
0/+10
63
32. Power standby
33. Audio-Input select key
34. FM Select key
35. AM Select key
36. STEREO Select key
37. MONO Select key
38. OK Delay selector key
39. Main channel bass up
40. Main channel bass down
41. Main volume up
42. Left speaker balance
43. SD/USB Connection previous key
44. SD/USB Connection next key
AS002RA-329B
45. Main volume down
46. Tuner frequency down
47. Tuner frequency up
6
Page 28

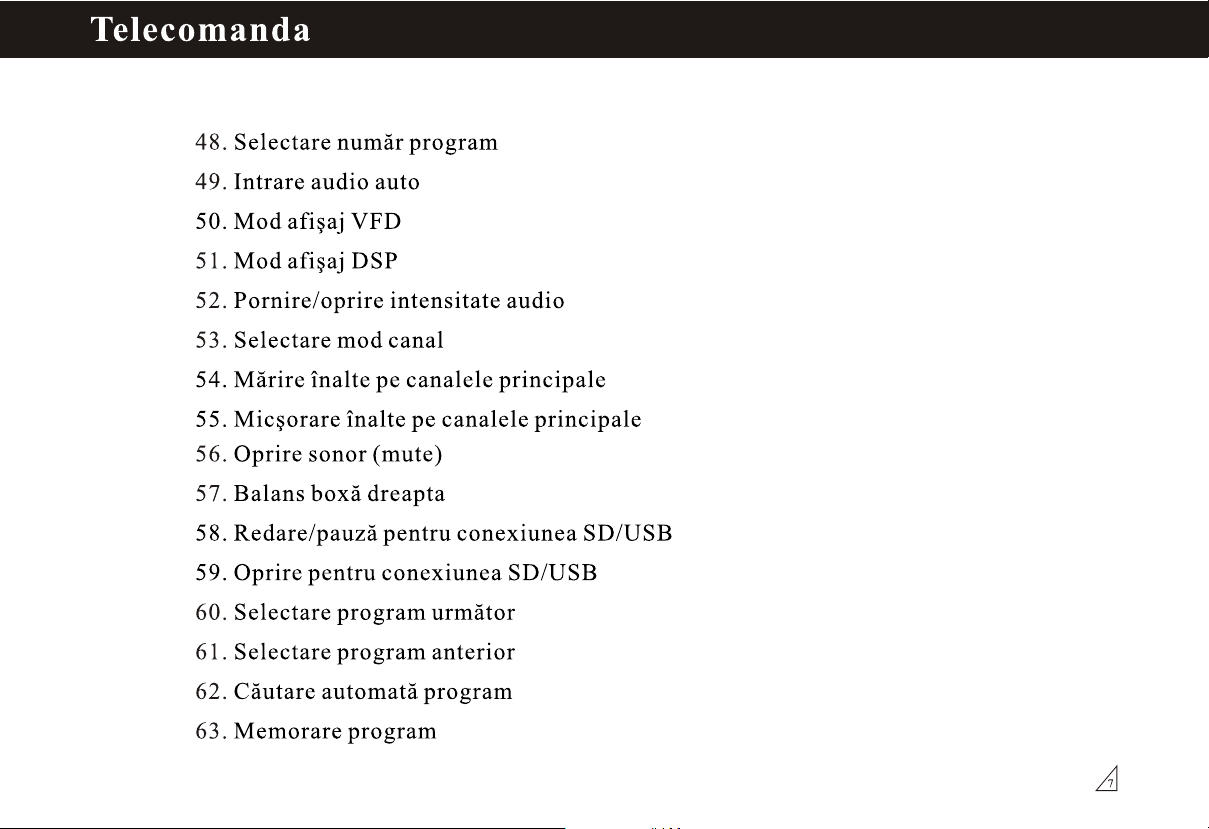
REMOTE CONTROL
48. Program number select key
49. Audio-Input auto key
50. VFD Display mode key
51. DSP Mode selector key
52. Loudness on/off key
53. Channel mode selection key
54. Main channel treble up
55. Main channel treble down
56. Output suspension
57. Right speaker balance
58. SD/USB Connection play/pause key
59. SD/USB Connection stop key
60. Program select up
61. Program select down
62. Program auto search
63. Program memory key
7
Page 29
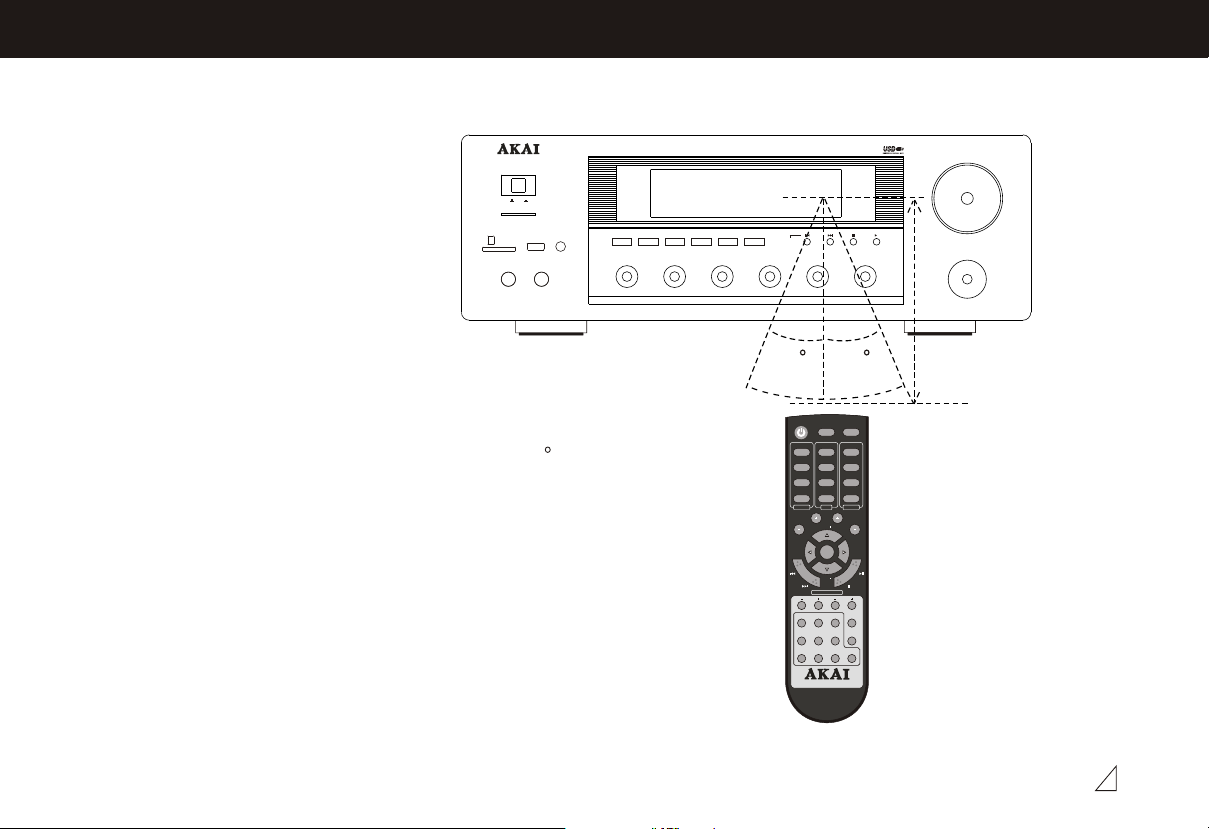
CONTROL OPERATIONS
POWER
OFF ON
USB JACK MP3
SD CARD
MIC1 MIC2
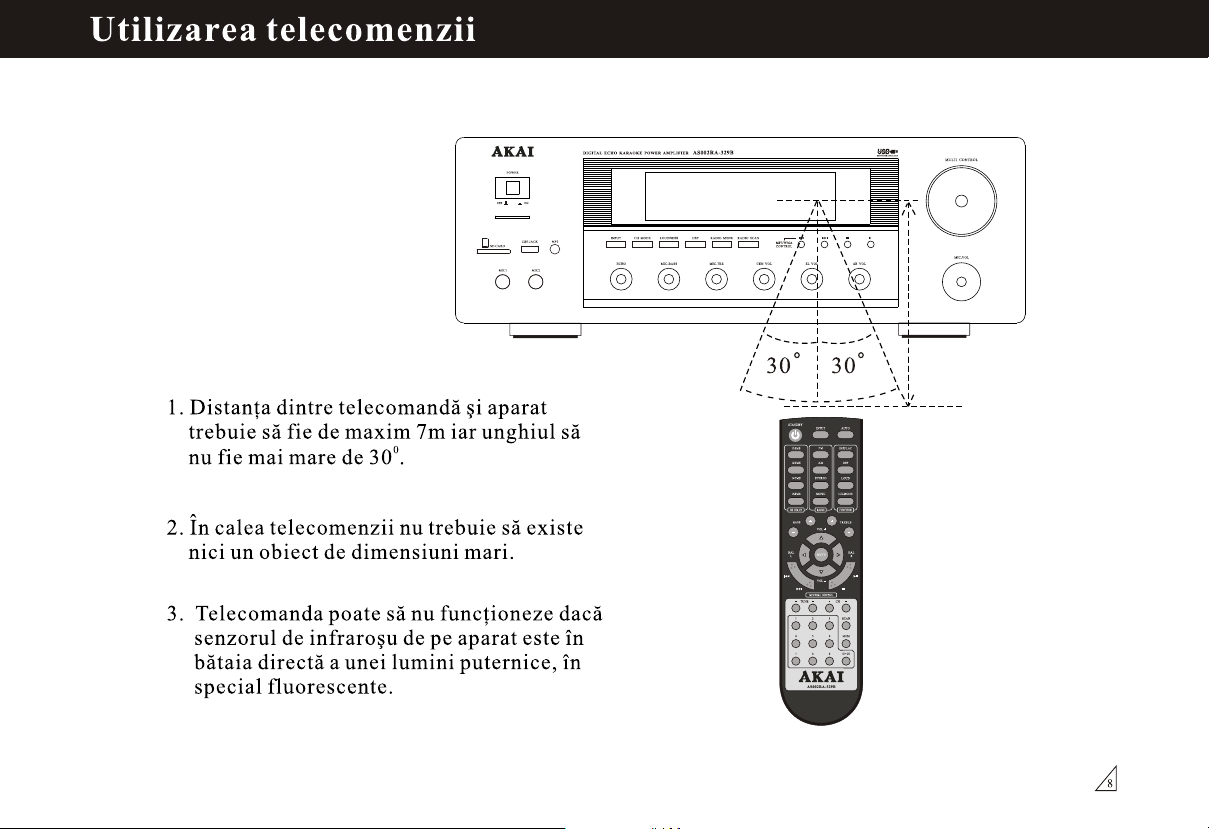
1.Remote distance should be within 7
meters, and the angles between the
central line should not wider than 30 .
2.No large obstacles between remote
control and the sensor.
3.It may be out of control when the sensor
directly shines by strong light, specially
fluorescent lamp. Please remove the unit
beyond the light.
DIGITAL ECHO KARAOKE POWER AMPLIFIER AS002RA-329B
LOUDNESS
CH MODE DSP
INPUT
ECHO MIC.BASS MIC.TRE CEN VOL SL VOL SR VOL
RADIO SCANRADIO MENU
MP3/WMA
CONTROL
30 30
STANDBY
INPUT
FM
110MS
123MS
AM
147MS STEREO
168MS MONO
RADIO
OK DELAY
BASS TREBLE
VOL
BAL
MUTE
L
VOL
MP3/WMA CONTROL
TUNE
1
2 3
4 5 6
7 8 9
AS002RA-329B
MULTI CONTROL
MIC.VOL
AUTO
DISPLAY
DSP
LOUD
CH.MODE
FUNCTION
BAL
R
CH
SCAN
MEM
0/+10
8
Page 30
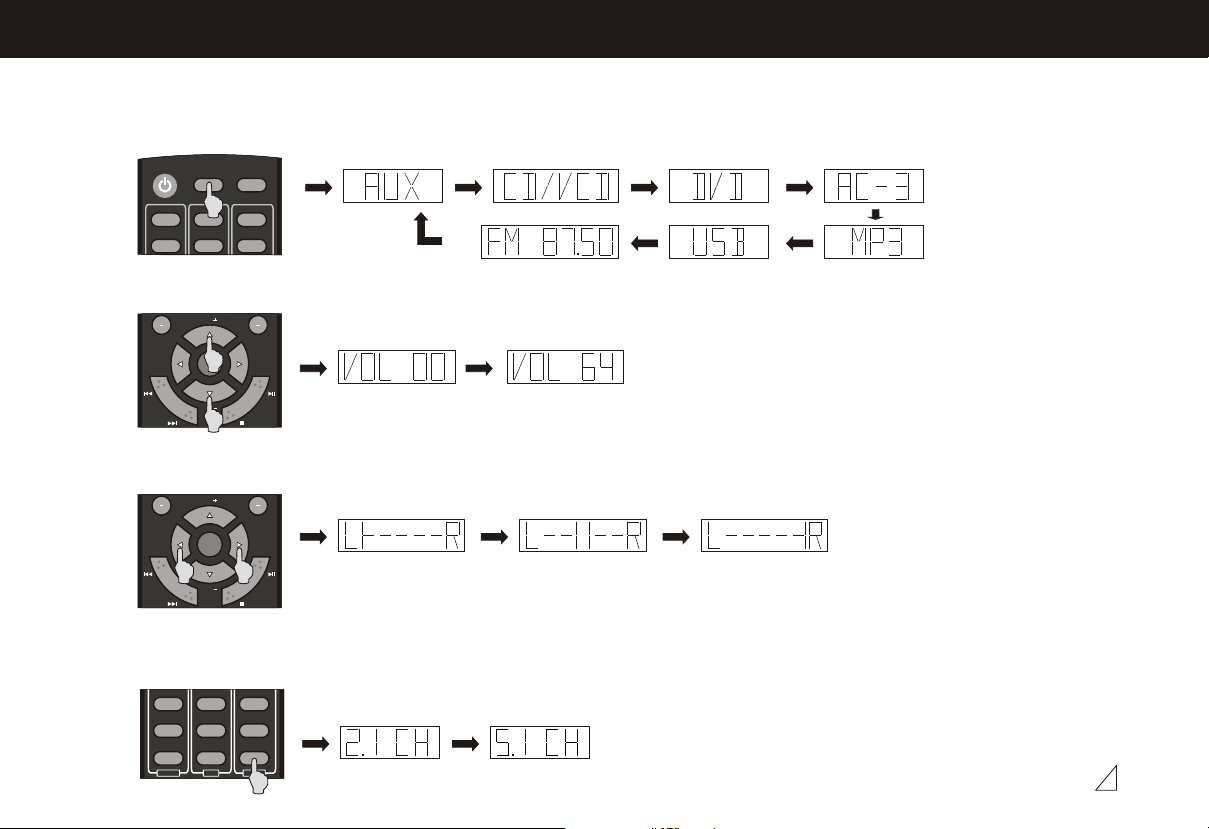
REMOTE CONTROL- OPERATING INSTRUCTION
Normal function
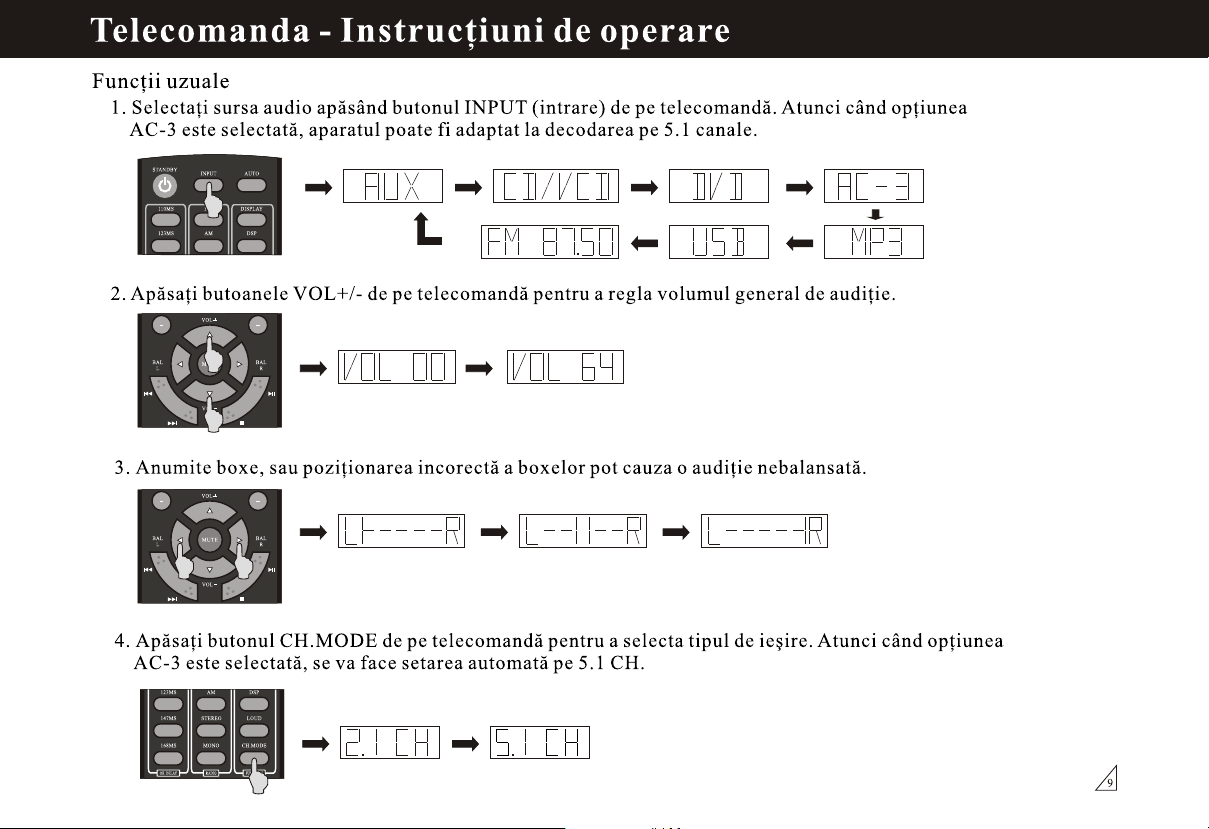
1. Select audio source by press INPUT key on the control. When selecting the AC-3 input the machine can be
lined to the decoders 5.1 channel output.
STANDBY
AUTOINPUT
110MS
123MS
DISPLAY
FM
AM DSP
2. Press VOL+/- keys on the remote control to adjust the setting of main volume control to you listening level.
VOL
BAL
L
MUTE
VOL
BAL
R
3. Some audio sources or speakers, or incorrect speaker placing can cause unbalanced hearing.
VOL
BAL
L
MUTE
VOL
BAL
R
4. Press CH.MODE key on the remote control to select channel mode. When select AC-3 input, it will be
set on 5.1 CH.
123MS
147MS
168MS MONOAMCH.MODE
OK DELAY
STEREO
RADIO
DSP
LOUD
FUNCTION
9
Page 31
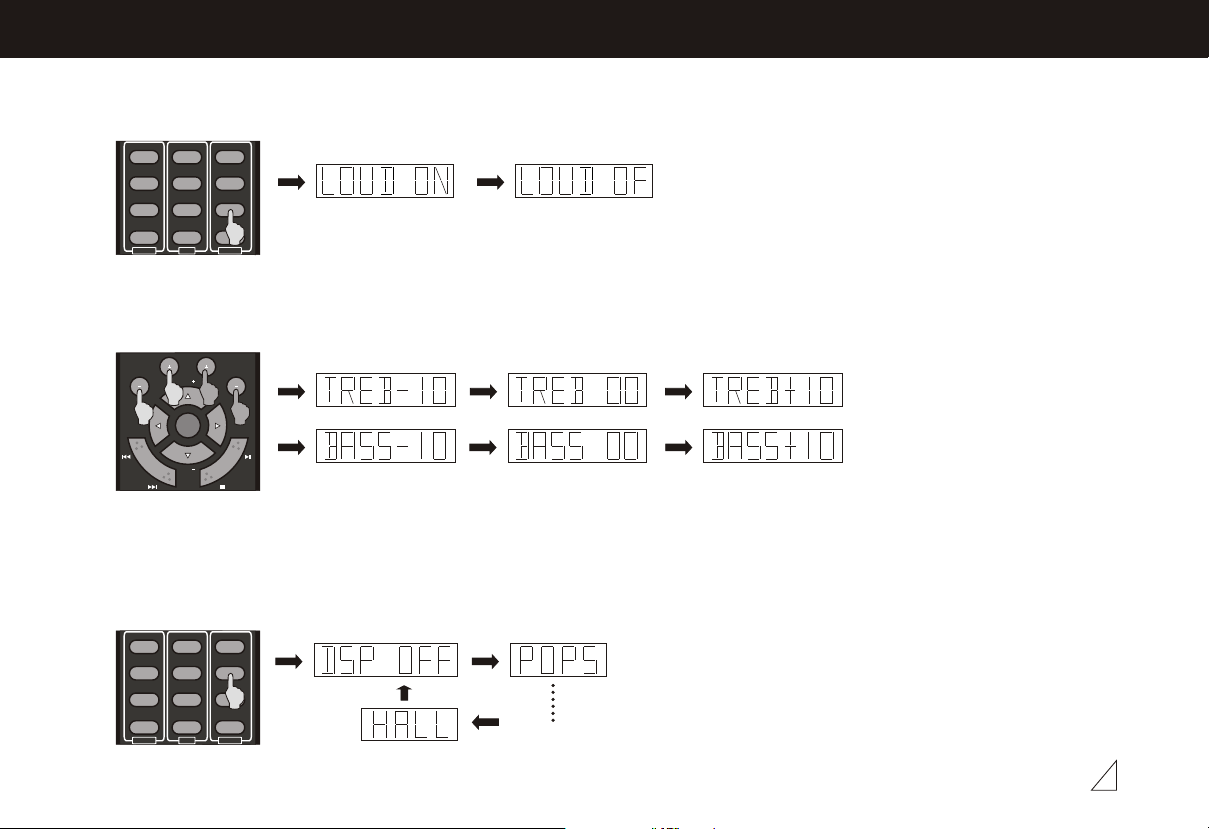
REMOTE CONTROL- OPERATING INSTRUCTION
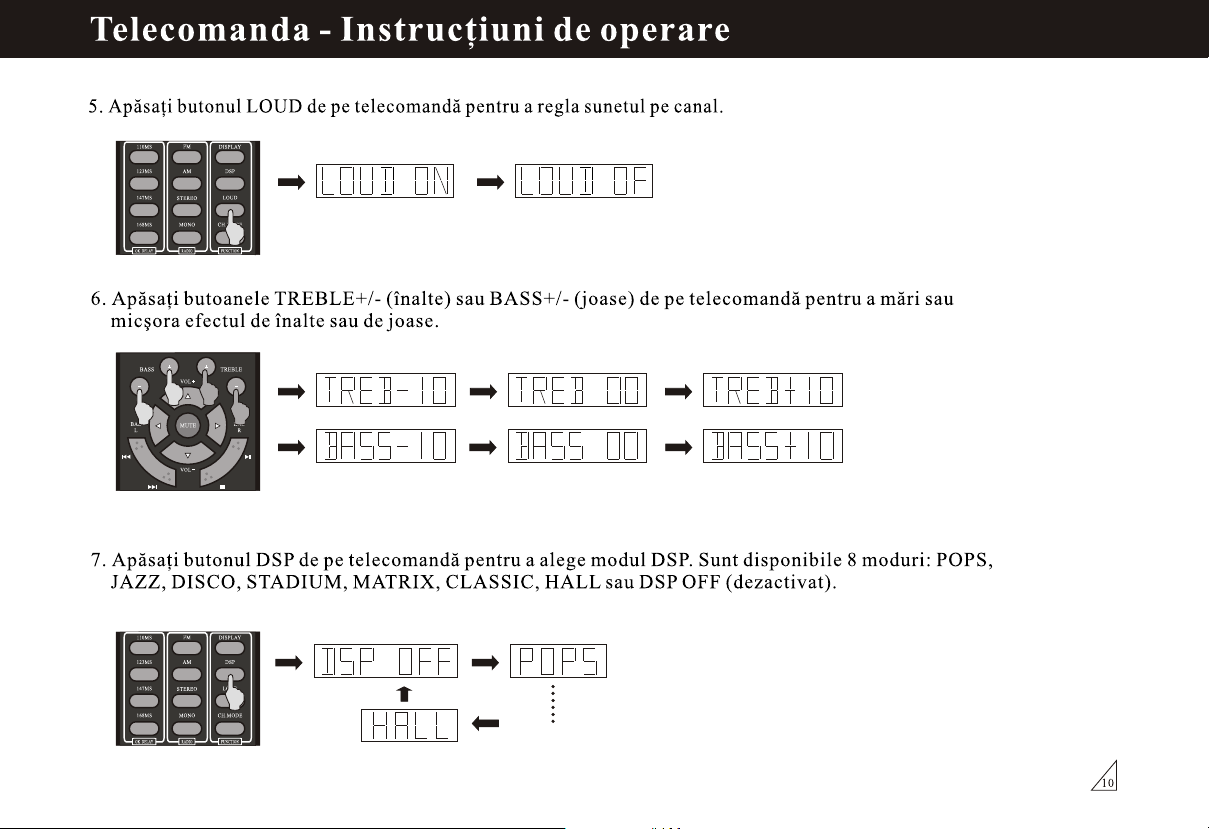
5. Press LOUD key on the remote control to adjust the channel sound.
FM
110MS
123MS
147MS
168MS
OK DELAY
6. Press TREBLE+/- or BASS+/- keys on the remote control to increase or decrease music treble or bass effect.
BASS TREBLE
STEREO
MONO
RADIO
VOL
DISPLAY
AM
DSP
LOUD
CH.MODE
FUNCTION
BAL
L
MUTE
VOL
BAL
R
7. Press DSP key on the remote control to select DSP mode. Eight modes could be selected: POPS, JAZZ, DISCO,
STADIUM, MATRIX, CLASSIC, HALL, or DSP OFF.
FM
110MS
123MS
147MS
168MS
OK DELAY
STEREO
MONO
RADIO
DISPLAY
AM
DSP
LOUD
CH.MODE
FUNCTION
10
Page 32
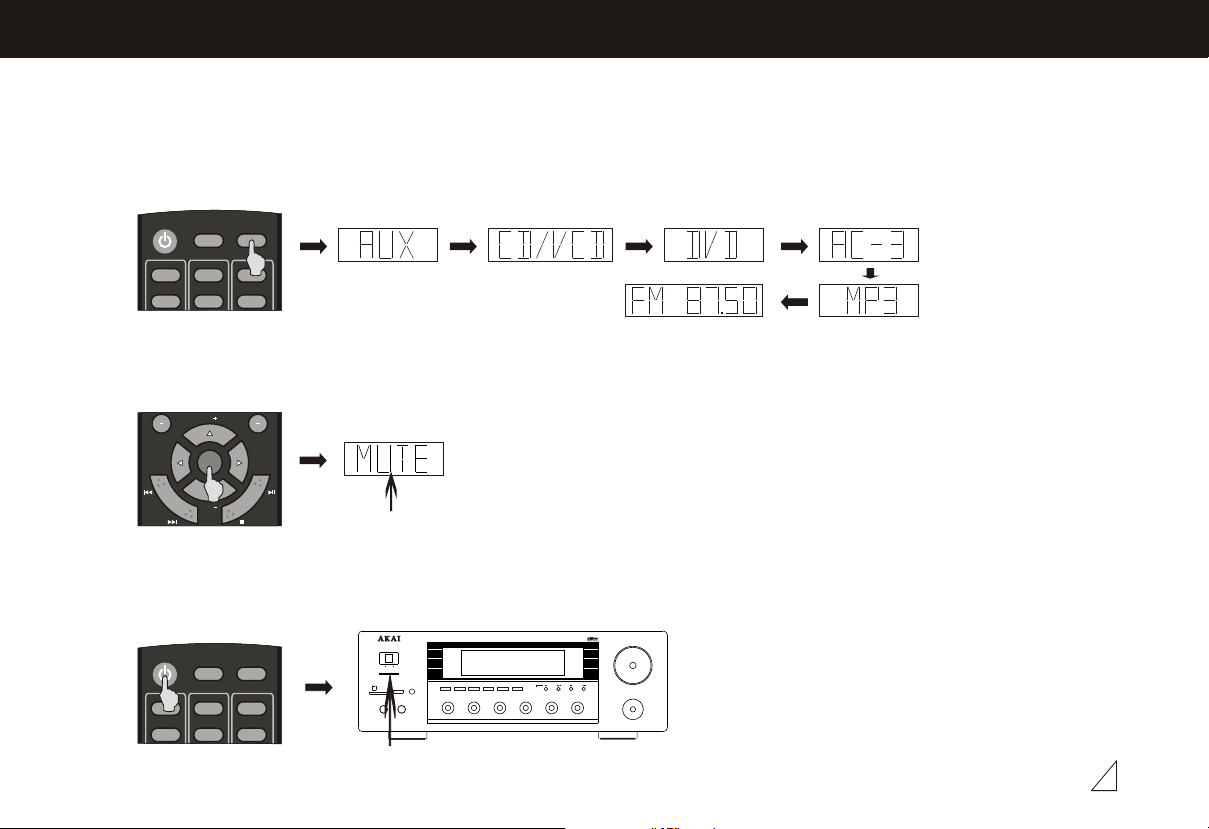
REMOTE CONTROL- OPERATING INSTRUCTION
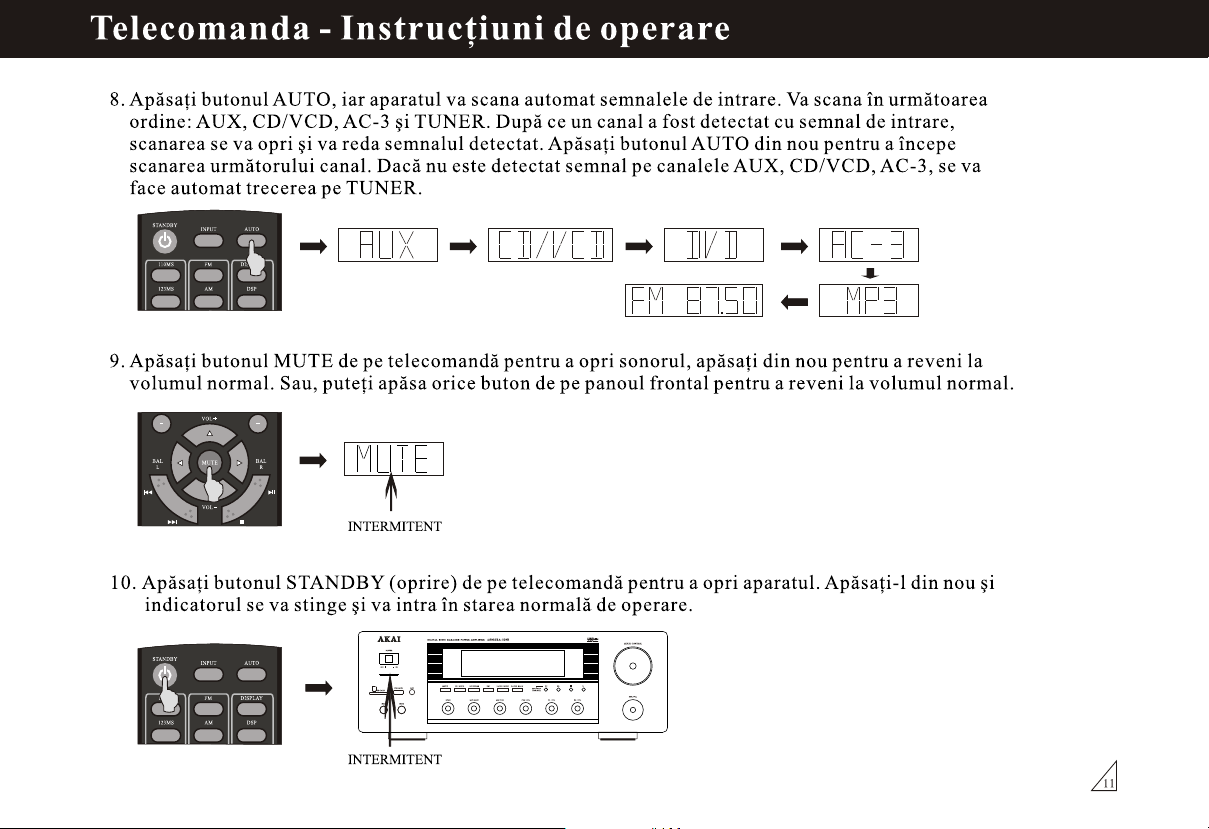
8. Press AUTO key, unit will automatically scan input signals. It will scan in the order of AUX, CD/VCD, AC-3 and
TUNER. After detected one channel had signal input, it will stop scanning and output the signals. Press AUTO
key again to start scanning from next channel. If no signal is detected in AUX, CD/VCD, AC-3 channels, it will
switch to TUNER.
STANDBY
110MS
123MS
DISPLAY
FM
AM DSP
AUTOINPUT
9. Press MUTE key on the remote control to mute, press it again to unmute. Or press any keys on the front panel to
unmute.
VOL
BAL
L
MUTE
VOL
BAL
R
TWINKLE
10. Press STANDBY key on the remote control to make it standby. Press it again the indicator will light down and
enter normal status.
STANDBY
110MS
123MS
DISPLAY
FM
AM DSP
DIGITAL ECHO KARAOKE POWER AMPLIFIER AS002RA-329B
SD CARD
OFF ON
MIC1 MIC2
POWER
INPUT
USB JACK MP3
ECHO MIC.BASS MIC.TRE CEN VOL SL VOL SR VOL
LOUDNESS
CH MODE DSP
RADIO SCANRADIO MENU
MP3/WMA
CONTROL
AUTOINPUT
TWINKLE
MULTI CONTROL
MIC.VOL
11
Page 33
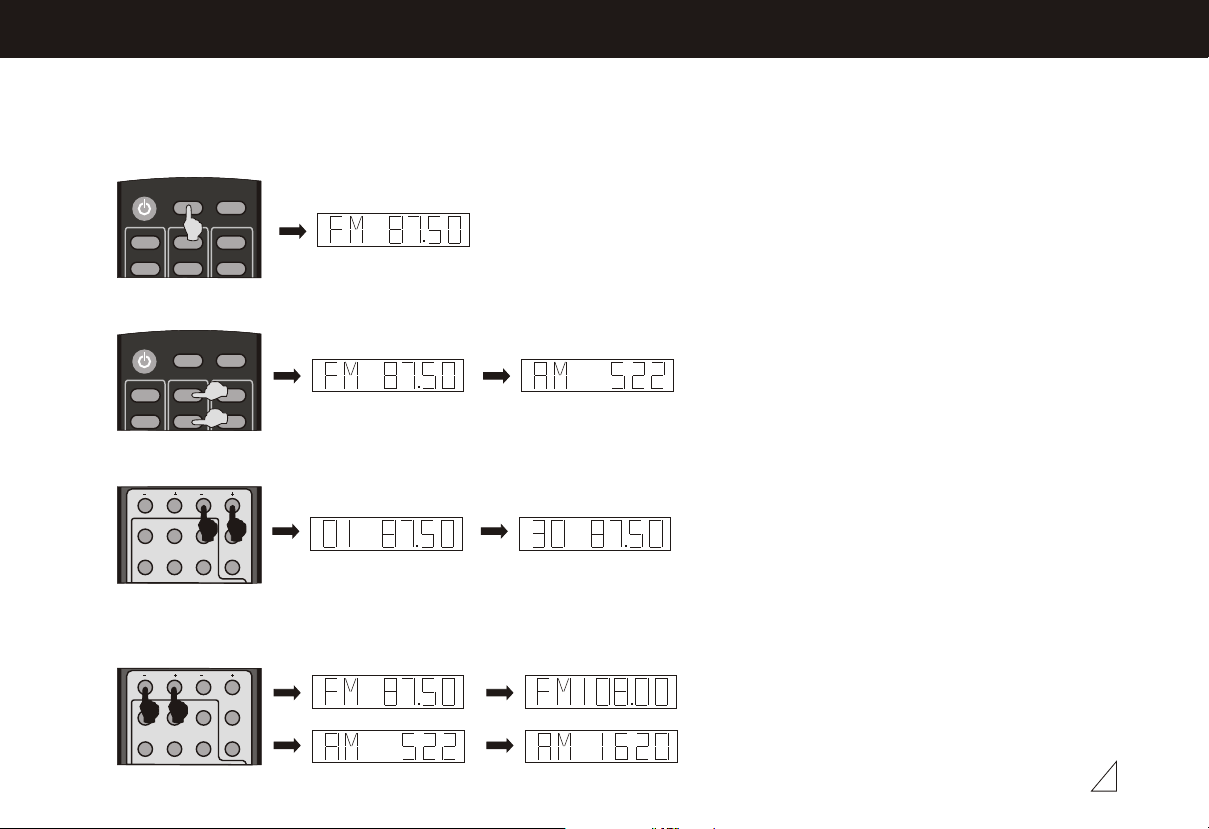
AM/FM TUNER- OPERATING INSTRUCTION
Tuner application
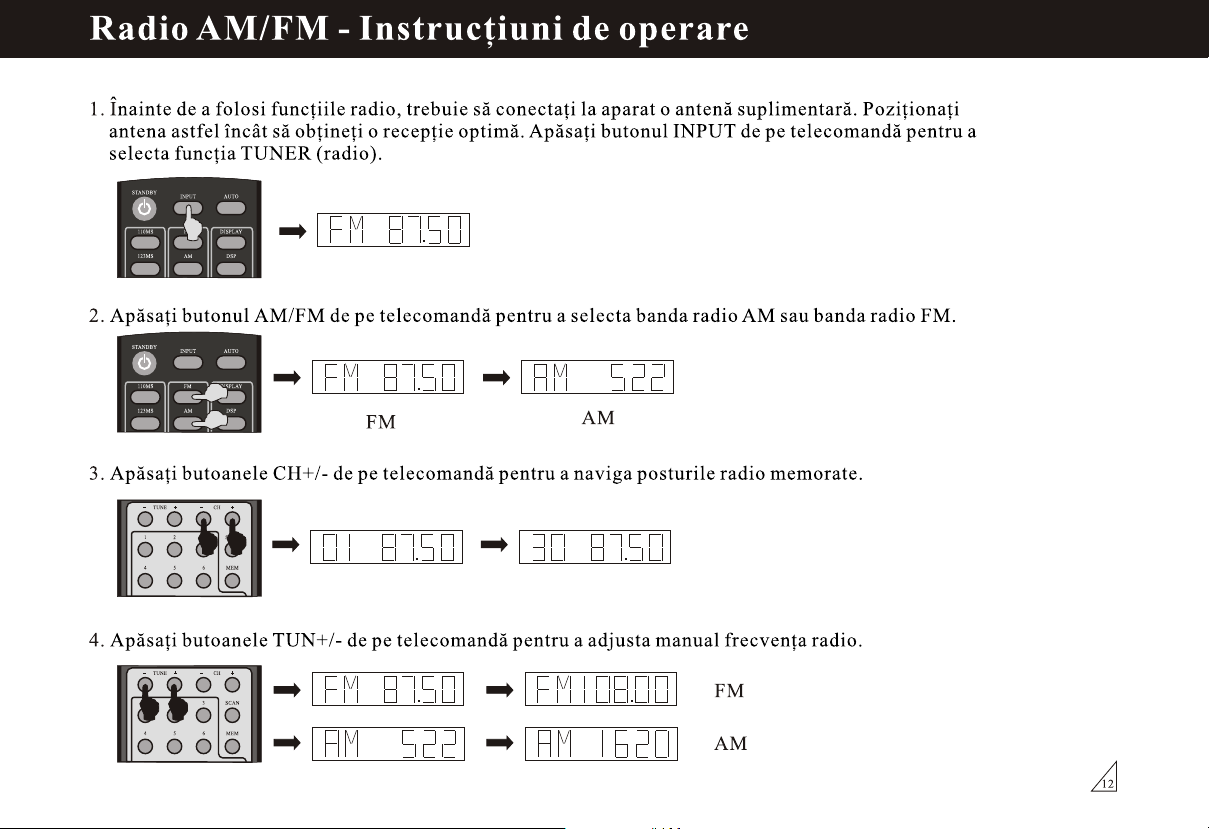
1. Before using radio function, you must connect the supplied antenna. Adjust the antenna to obtain
optimum reception. Press INPUT key on the remote control, to select TUNER function.
STANDBY
110MS
123MS
DISPLAY
FM
AM DSP
AUTOINPUT
2. Press AM/FM keys on the remote control, to select AM band or FM band.
STANDBY
110MS
123MS
DISPLAY
FM
AM DSP
AUTOINPUT
FM
AM
3. Press CH +/- keys on the remote control to find out the radio bands you've memorized before.
TUNE
1
4
CH
362
SCAN
5
MEM
4. Press TUN +/- keys on the remote control to adjust the radio frequency by hand.
TUNE
1
4
CH
362
SCAN
5
MEM
FM
AM
12
Page 34
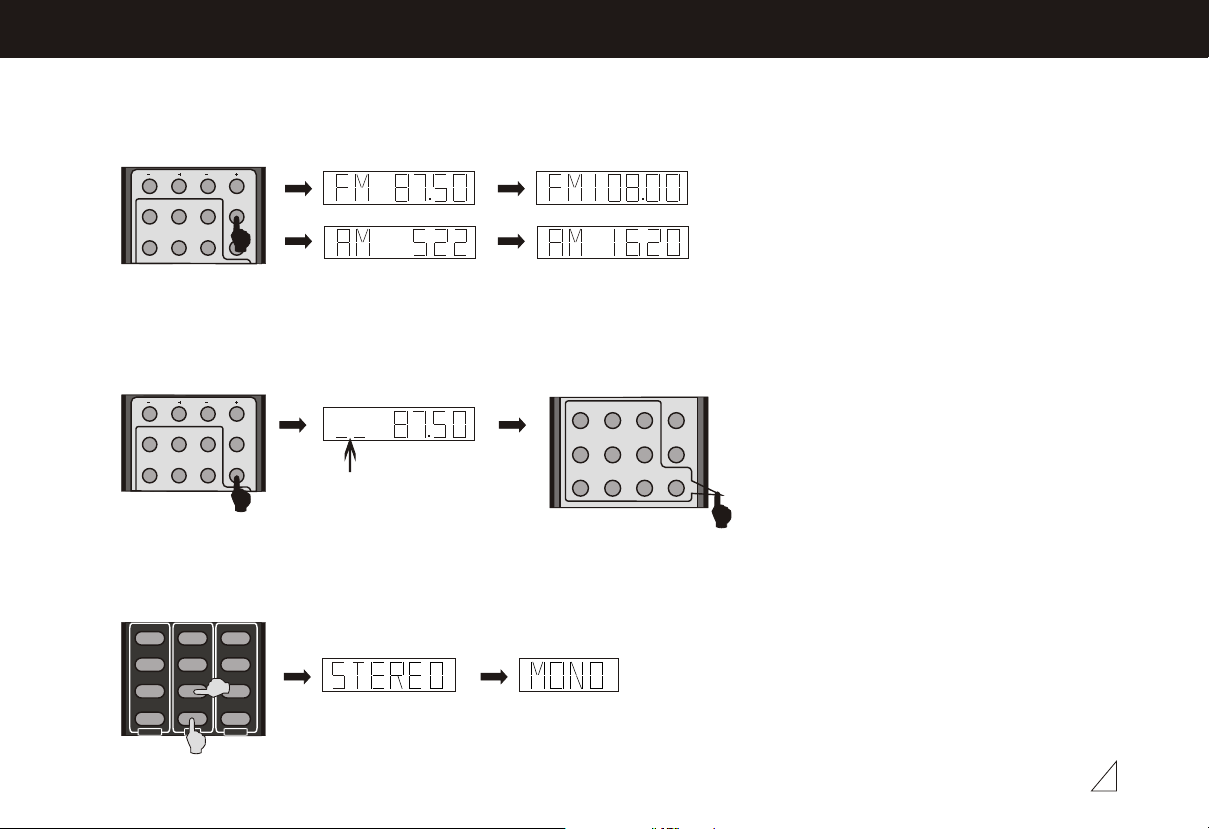
AM/FM TUNER- OPERATING INSTRUCTION
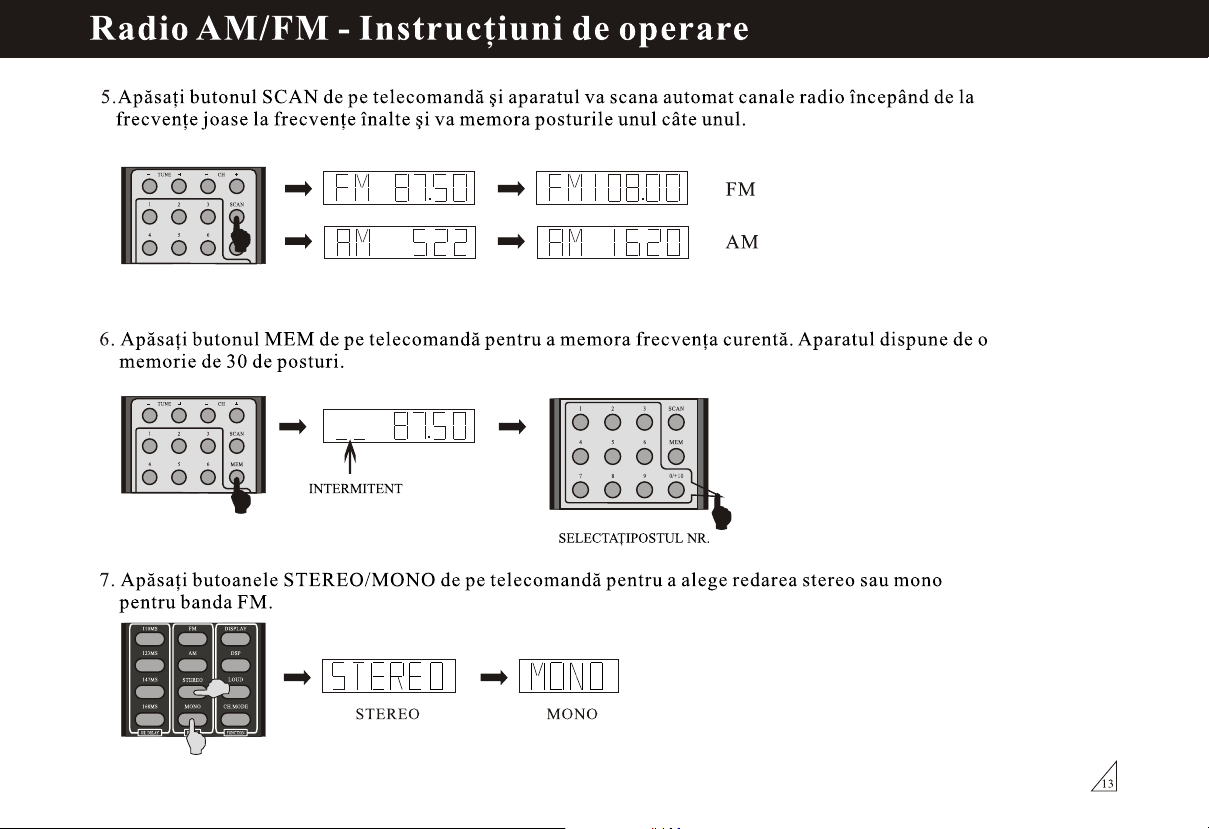
5.Press SCAN key on the remote control, the machine can scour radio channel from low-frequency
to high-frequency by itself, and memorize the channels one by one.
TUNE
1
4
CH
362
SCAN
5
MEM
FM
AM
6. Press MEM key on the remote control to memorize the current radio frequency in the band,
the machine can memorize at most 30 radio bands.
TUNE
1
4
CH
362
SCAN
5
MEM
1
2 3
4 5 6
7 8 9
SCAN
MEM
0/+10
TWINKLE
SELECT STATION NO.
7. Press STEREO/MONO keys on the remote control, to choose stereo or mono effect at FM band.
FM
110MS
123MS
147MS
168MS
OK DELAY
STEREO
MONO
RADIO
DISPLAY
AM
DSP
LOUD
CH.MODE
FUNCTION
STEREO MONO
13
Page 35
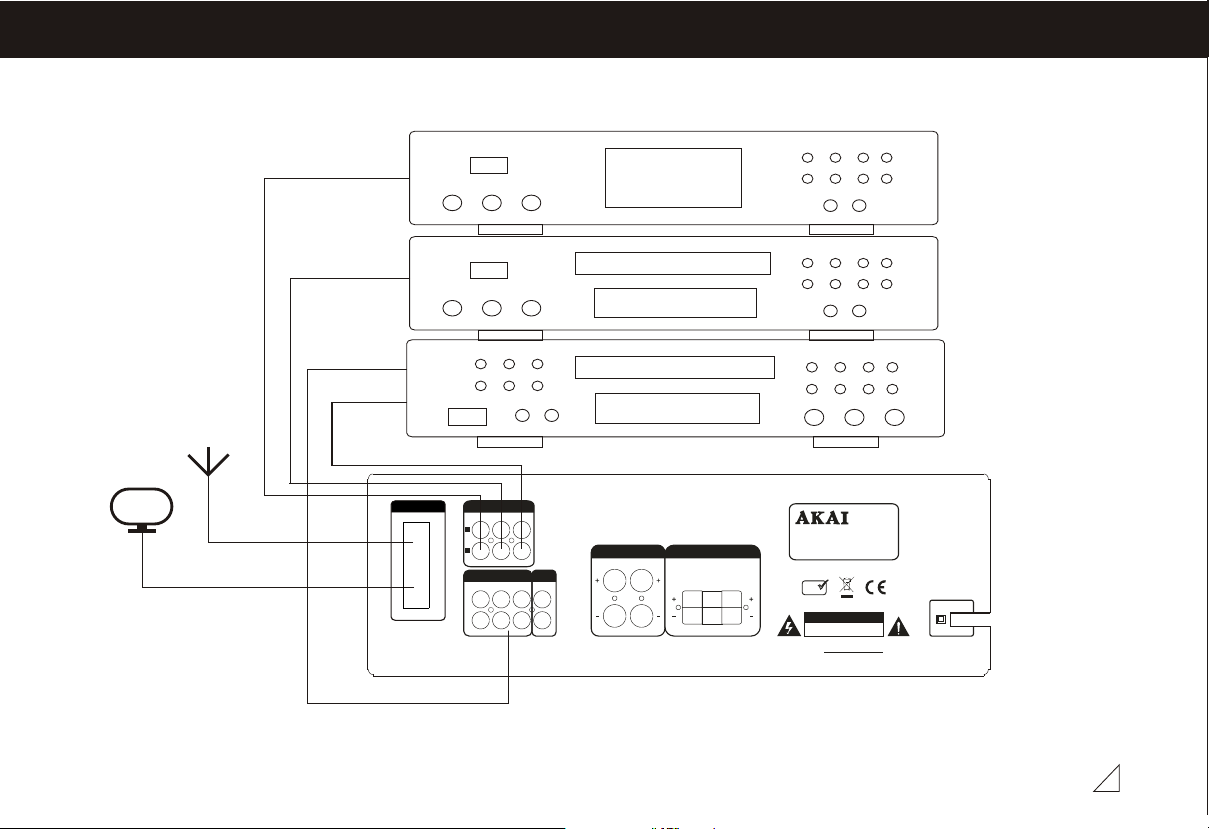
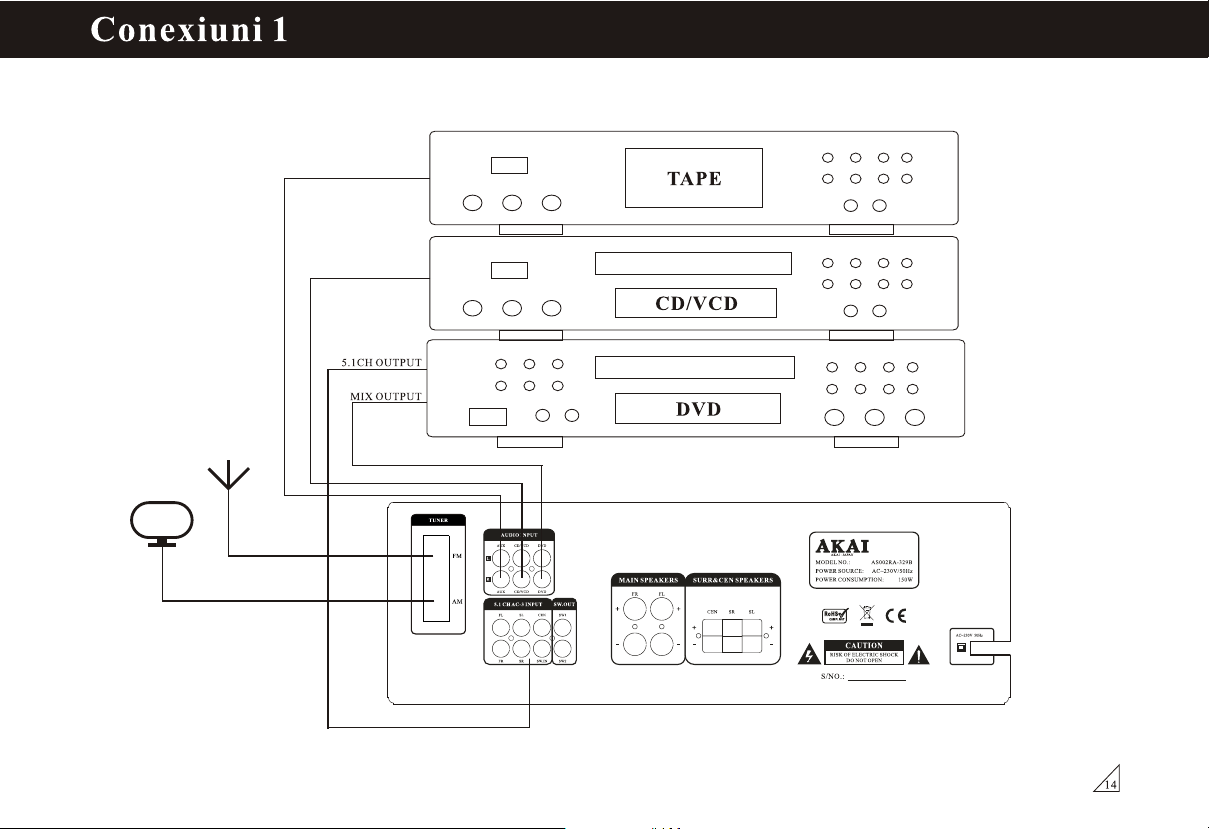
SYSTEM CONNECTION 1
5.1CH OUTPUT
MIX OUTPUT
TAP E
CD/VCD
DVD
TUNER
FM
AM
AUDIO INPUT
DVD
AUX
CD/VCD
L
R
AUX
CD/VCD
DVD
5.1 CH AC-3 INPUT SW.OUT
SL
CEN
FL
SR
SW.IN SW2
FR
MAIN SPEAKERS SURR&CEN SPEAKERS
FR FL
SW1
AKAI - JAPAN
MODEL NO.: AS002RA-329B
POWER SOURCE: AC~230V/50Hz
POWER CONSUMPTION: 150W
SR SL
CEN
RoHS
C
OMPLIA
NT
CAUTION
RISK OF ELECTRIC SHOCK
DO NOT OPEN
AC~230V 50Hz
S/N:
14
Page 36
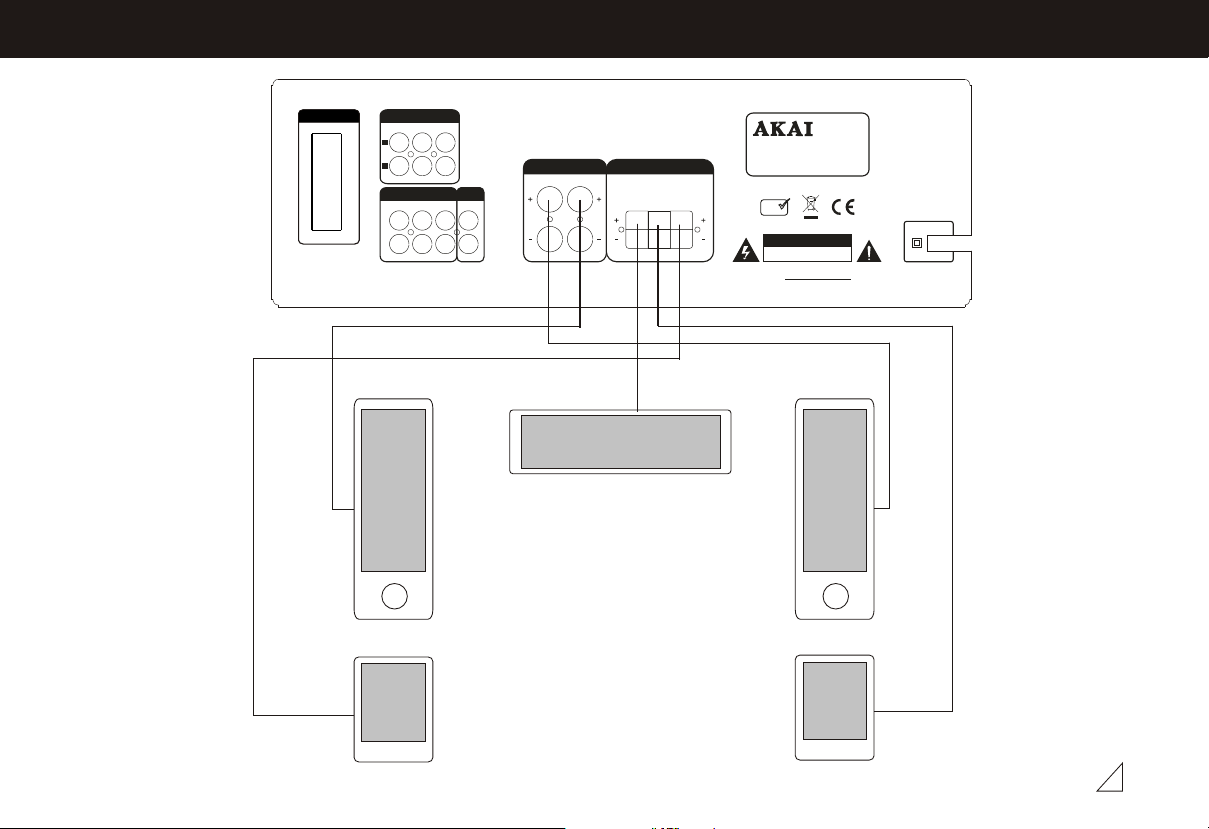
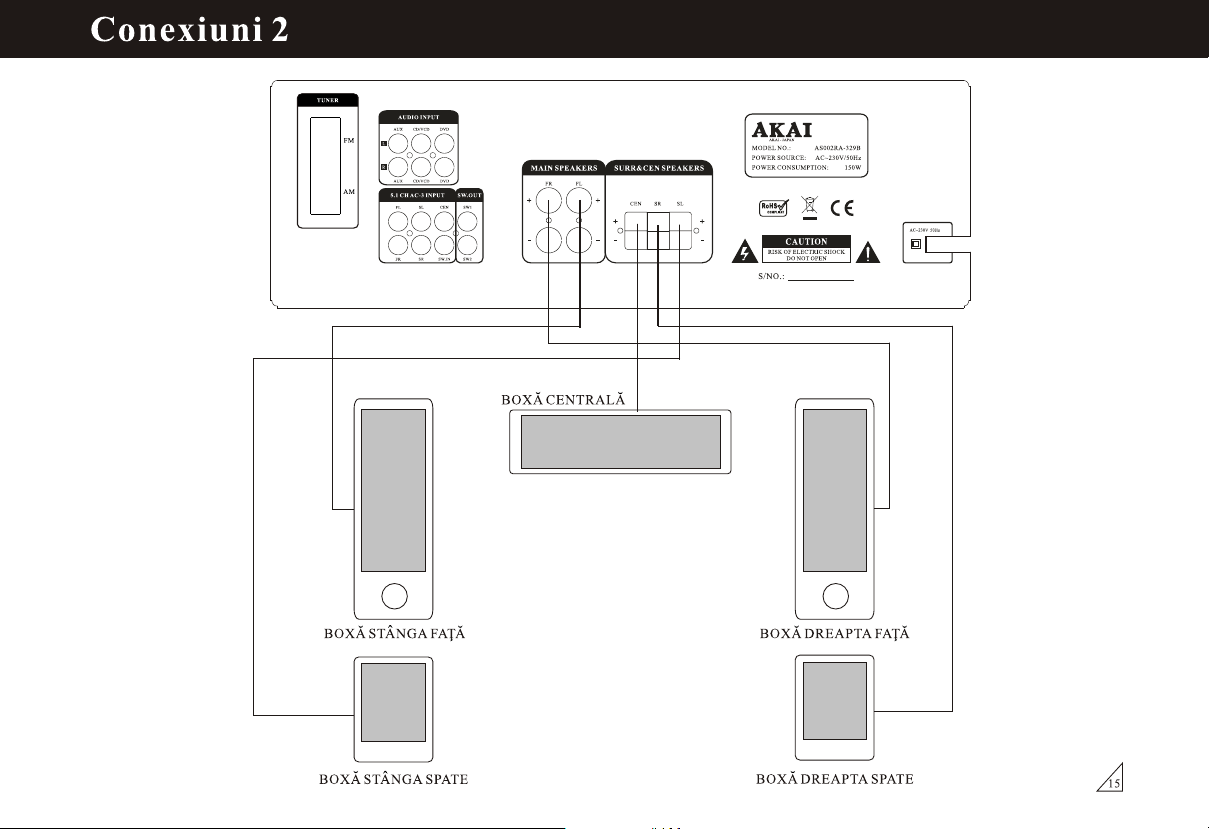
SYSTEM CONNECTION 2
TUNER
FM
AM
AUDIO INPUT
DVD
AUX
CD/VCD
L
R
AUX
CD/VCD
DVD
5.1 CH AC-3 INPUT SW.OUT
SL
CEN
FL
SR
SW.IN SW2
FR
AKAI - JAPAN
MODEL NO.: AS002RA-329B
POWER SOURCE: AC~230V/50Hz
MAIN SPEAKERS SURR&CEN SPEAKERS
FR FL
SR SL
SW1
CEN
POWER CONSUMPTION: 150W
RoHS
C
OMPLIA
NT
CAUTION
RISK OF ELECTRIC SHOCK
DO NOT OPEN
AC~230V 50Hz
S/N:
CENT SPEAKER
FRONT LEFT SPEAKER FRONT RIGHT SPEAKER
SR SPEAKERSL SPEAKER
15
Page 37
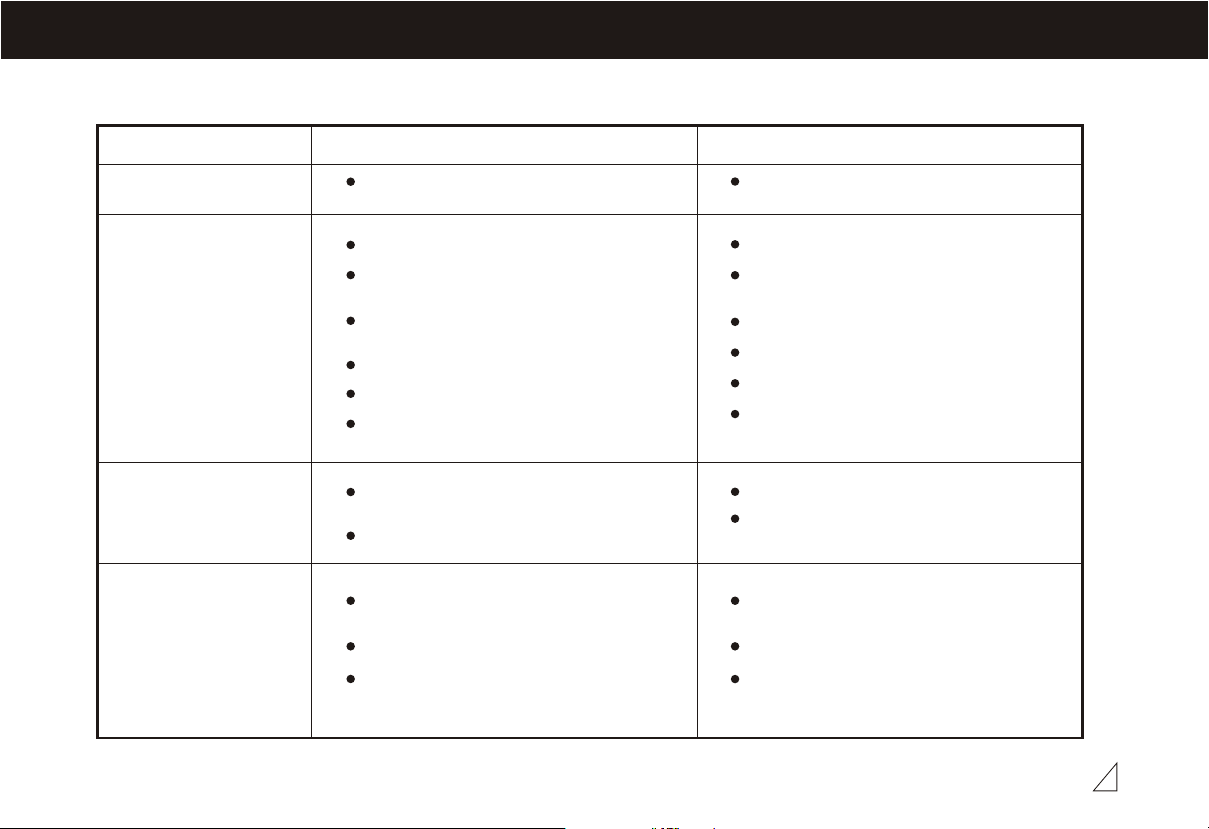
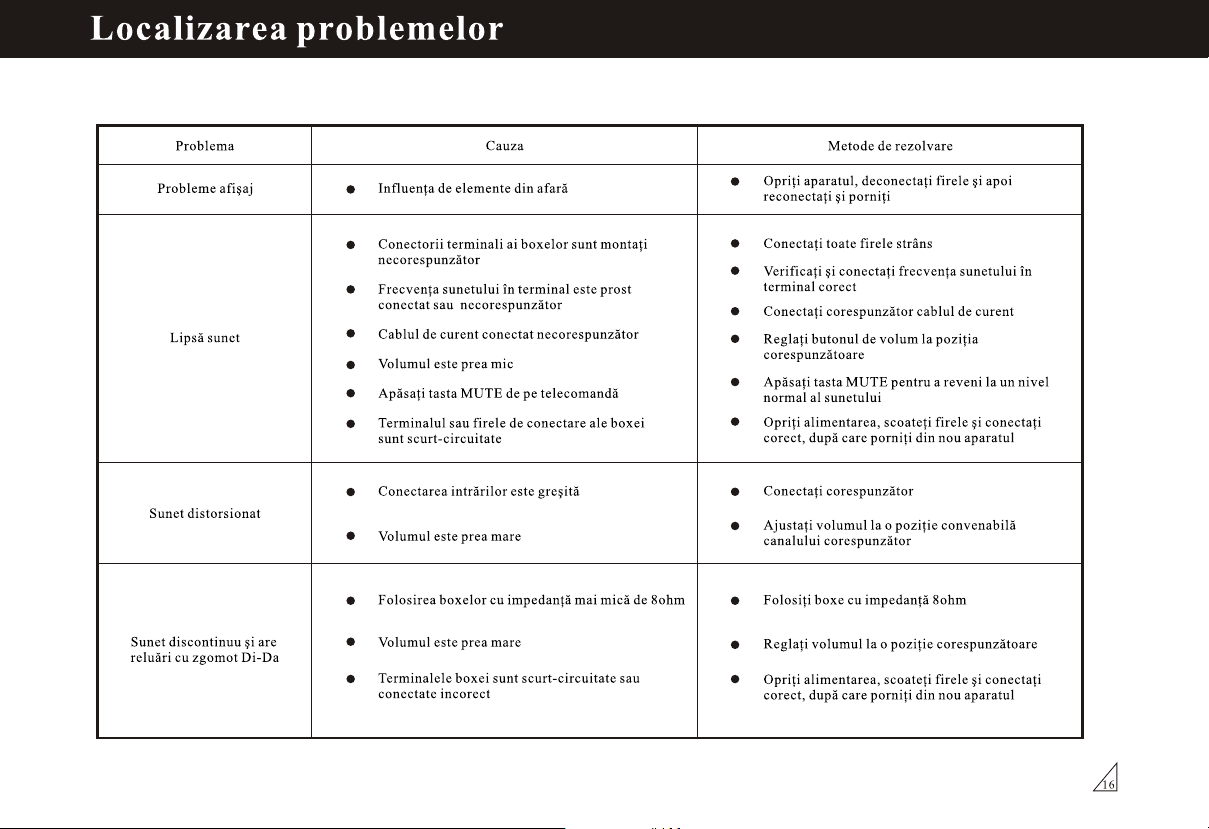
TROUBLE SHOOTING
Problem
Screen displays
disorder or malfunction
No sound
Sound distortion
The sound doesn't
continue and the relays
has 'Di-Da' noise.
Cause
Influenced by the outside element,
computer has problem.
The speaker terminal connects improper.
The sound frequency in terminal wrong
connects or improper.
The power plug connects with the socket
improper.
The volume is too low.
Press the MUTE key on the panel.
The speaker terminal is short-circuited.
The amplifier input terminal wrong
connects.
The volume is too loud.
Using the speaker with the impedance less
then 8 ohm.
The volume is too loud.
The speaker terminal is short-circuited or
connected improperly.
Modified methods
Turn off the set, pull out the wire,
reinsert it then start the set again.
Connect tightly.
Check and connect the sound frequency
in terminal properly.
Connect the power correctly.
Turn the volume to the suitable position.
Press down MUTE key.
Cut off the power and connect the speaker
well, then start the power again.
Connect properly.
Properly adjust the volume of the
corresponding channel.
Using the speaker with the impedance 8
ohm.
Adjust the volume to the suitable position.
Cut off the power and connect the speaker
correctly, then turn on the power.
16
Page 38
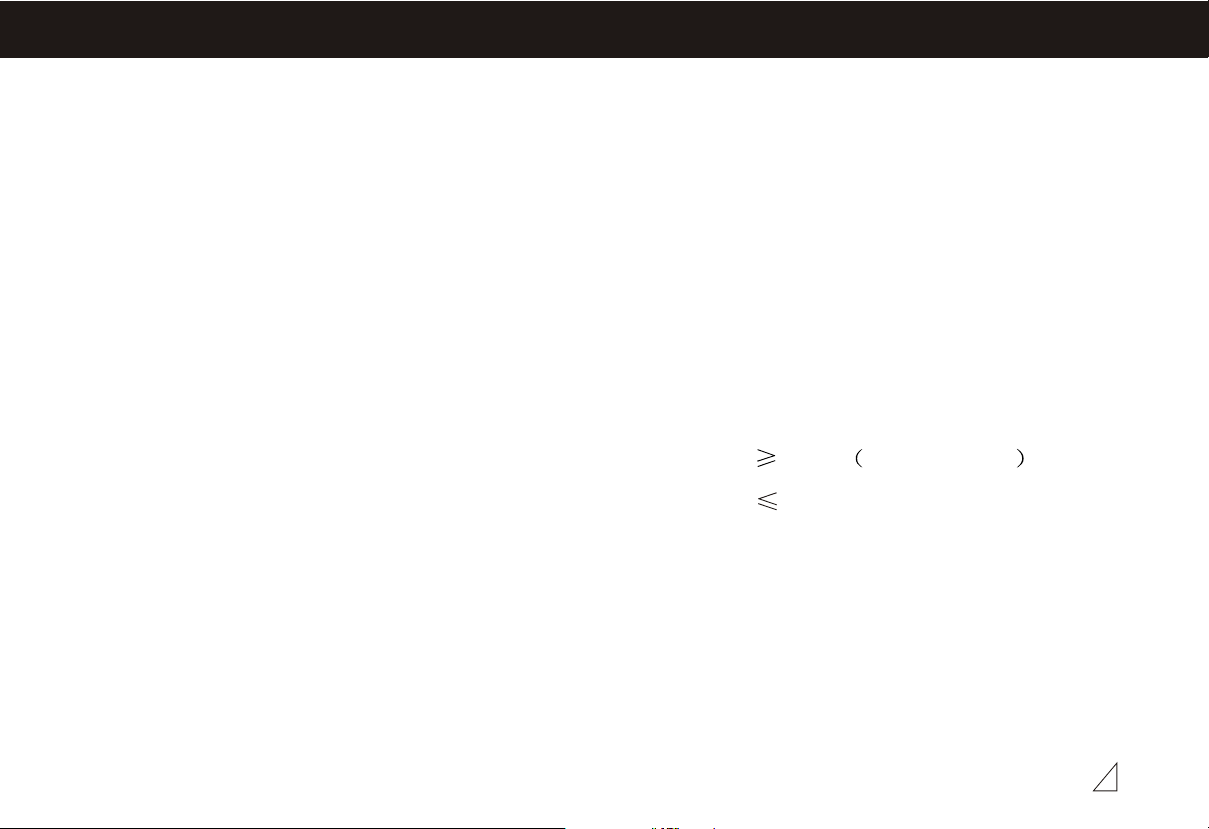
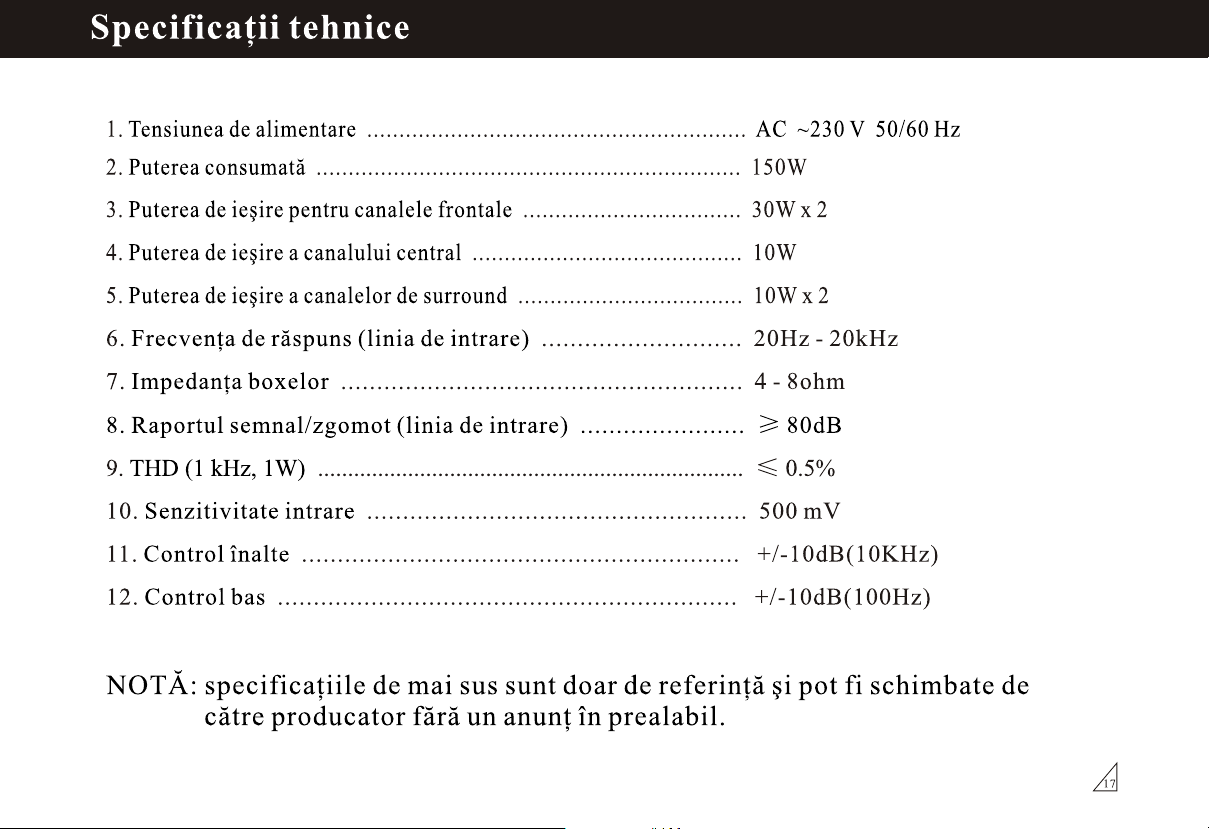
TECHNICAL SPECIFICATIONS
1. Power source ........................................................................... AC~230V/50Hz
2. Power consumption ................................................................. 150W
3. Rating output power ................................................................. 30W x 2
4. Center channel rating output power ........................................... 10W
5. Surround channel rating output power ....................................... 10W x 2
6. Frequency response (line input) ...................................... 20Hz - 20kHz
7. Speaker impedance ...................................................................... 4 - 8ohm
8. Signal to noise ratio (line input) ................................................. 80dB No A-weighted
9. THD(1kHz, 1W) ......................................................................... 0.5%
10. Input sensitivity .......................................................... 500 mV
11. Tremble control .......................................................... +/-10dB(10KHz)
12. Bass control ............................................................... +/-10dB(100Hz)
Note:the above specifications only for your reference.
17
Page 39
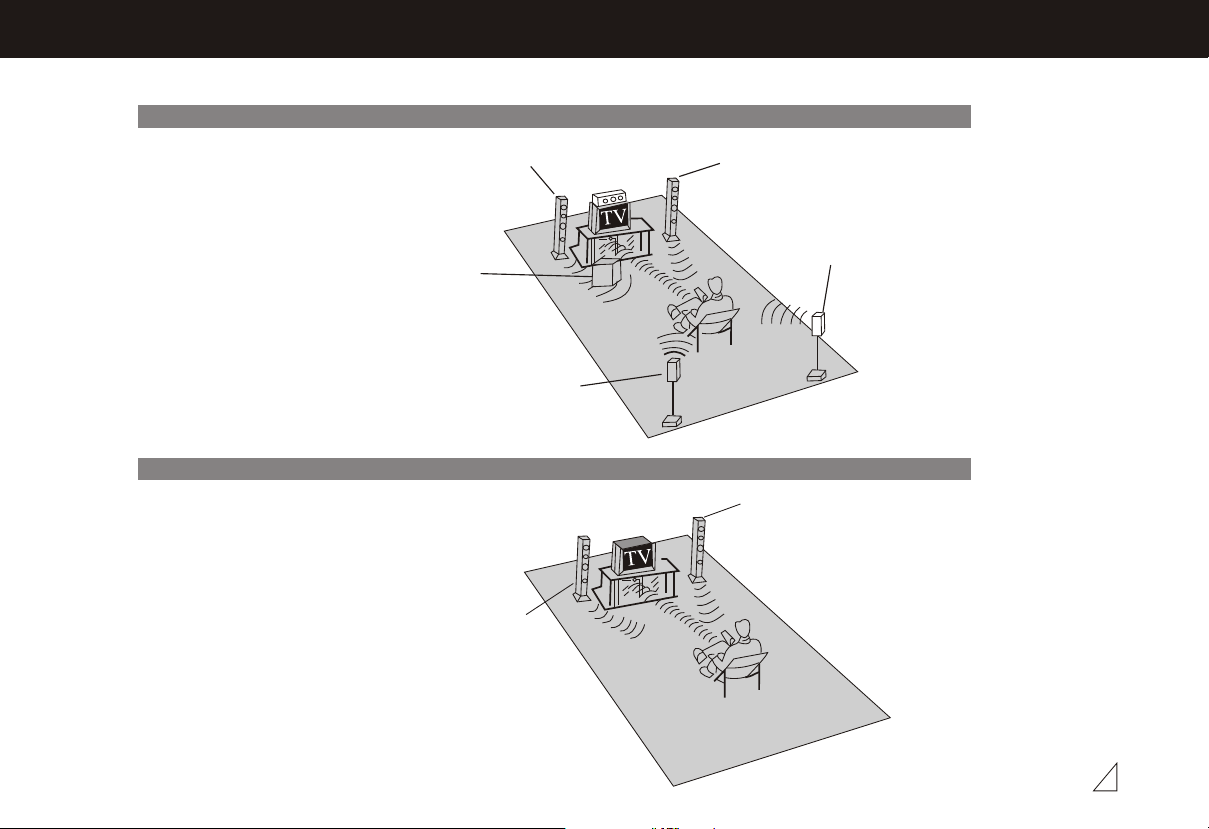
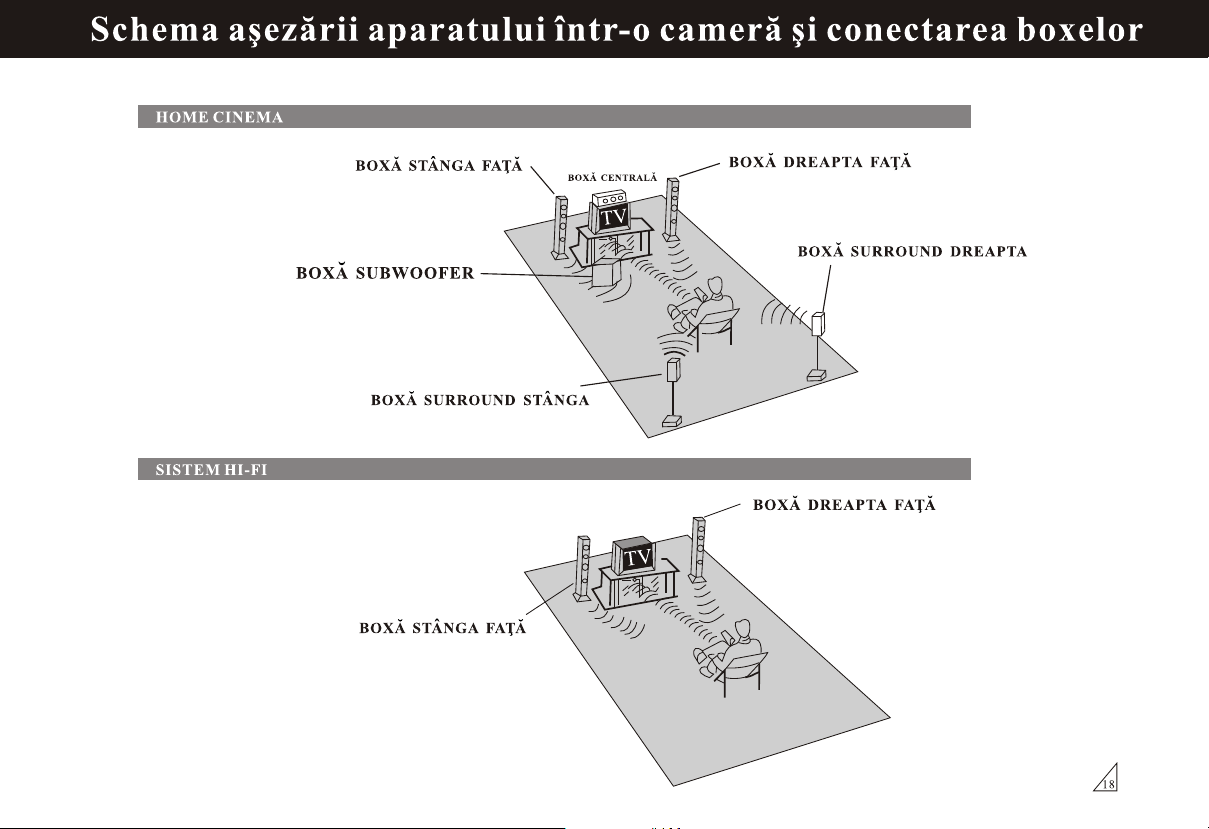
SPEAKER ARRANGEMENT
HOME CINEMA
HI-FI SYSTEM
FRONT LEFT SPEAKER
ACTIVE SUBWOOFER
SURROUND LEFT SPEAKER
FRONT LEFT SPEAKER
CENTER SPEAKER
FRONT RIGHT SPEAKER
SURROUND RIGHT SPEAKER
FRONT RIGHT SPEAKER
18
Page 40

AKAI - JAPAN
 Loading...