

Page 1
T ABLE OF CONTENTS
IMPORT ANT SAFETY INSTRUCTIONS
IMPROTANT SAFETY INSTRUCTIONS ..................................................................................................................................................... 2-3
PREP ARATION FOR USE ....................................................................................................................................................................................... 4
LOCATION OF CONTROLS AND INDICATORS ............................................................................................................................... 5-6
OPERATING INSTRUCTIONS ......................................................................................................................................................................... 7-9
CARE OF MAINTENACE ...................................................................................................................................................................................... 10
TROUBLESHOO TING GUIDE ............................................................................................................................................................................ 11
LABEL MENTION ........................................................................................................................................................................................................ 12
TECHNICAL SPECIFICATIONS ...................................................................................................................................................................... 13
ATTENTION: To reduce the risk of electric shock, do not r emove the cover. There
are no user serviceable parts inside the unit. Refer all servicing to qualified personnel.
The lightening flash with arrowhead symbol within the triangle is a warning sign alerting the user of
"dangerous voltage" inside the unit.
The exclamation point within the triangle is a warning sign alerting the user of important instructions
accompanying the product.
CAUTION: Invisible laser radiation when open and interlocks defeated. Avoid exposure to beam.
1. READ INSTRUCTIONS - All the safety and operating instructions should be read before the product is operated.
2. RETAIN INSTRUCTIONS - The safety and operating instructions should be retained for future reference.
3. HEED WARNINGS - All warnings on the product and in the operating instructions should be adhered to.
4. FOLLOW INSTRUCTIONS - All operating and use instructions should be followed.
5. CLEANING - Unplug this product from the wall outlet before cleaning. Do not use liquid cleaners or aerosol cleaners. Use a damp
cloth for cleaning.
6. ATTACHMENTS - Do not use attachments not recommended by the product manufacturer as they may cause hazards.
7. WATER AND MOISTURE - Do not use this product near water - for example, near a bath tub, wash bowl, kitchen sink, or
laundry tub; in a wet basement; or near a swimming pool; and the like.
8. ACCESSORIES - Do not place this product on an unstable cart, stand, tripod, bracket, or table.
The product may fall, causing serious injury to a child or adult, and serious damage to the product.
Use only with a cart, stand, tripod, bracket, or table recommended by the manufacturer, or sold with
the product. Any mounting of the product should follow the manufacturer’s instructions, and should
use a mounting accessory recommended by the manufacturer. A Product and Cart Combination Should
Be Moved with Care - Quick stops, excessive force and uneven surfaces may cause the product and cart
combination to overturn.
9. VENTILATION - Slots and openings in the cabinet are provided for ventilation and to ensure r eliable operation of the product
and to protect it from overheating, and these openings must not be blocked or covered. The openings should never be blocked
by placing the product on a bed, sofa, rug or other similar surface. This product should not be placed in a built-in installation, such
as a bookcase or rack, unless proper ventilation is provided or the manufacturer’s instructions have been adhered to.
10. POWER SOURCES - This product should be operated only from the type of power source indicated on the marking label. If
you are not sure of the type of power supply to your home, consult your product dealer or local power company. For products
intended to operate from battery power, or other sources, refer to the operating instructions.
11. GROUNDING OR POLARIZATION - This product may be equipped with a polarized alternating-current line plug (a plug
having one blade wider than the other). This plug will fit into the po wer outlet only one way. This is a safety feature: If you are
unable to insert the plug fully into the outlet, try reversing the plug. If the plug should still fail to fit, contact your electrician to
replace your obsolete outlet. Do not defeat the safety purpose of the polarized plug.
12. POWER-CORD PROTECTION - Power -supply cor ds should be r outed so that they ar e not likely to be walk ed on or pinched
by items placed upon or against them, paying particular attention to cords at plugs, convenience receptacles, and the point
where exit from the product.
13. NONUSE PERIODS - The power cord of the product should be unplugged from the outlet when left unused for long periods
of time.
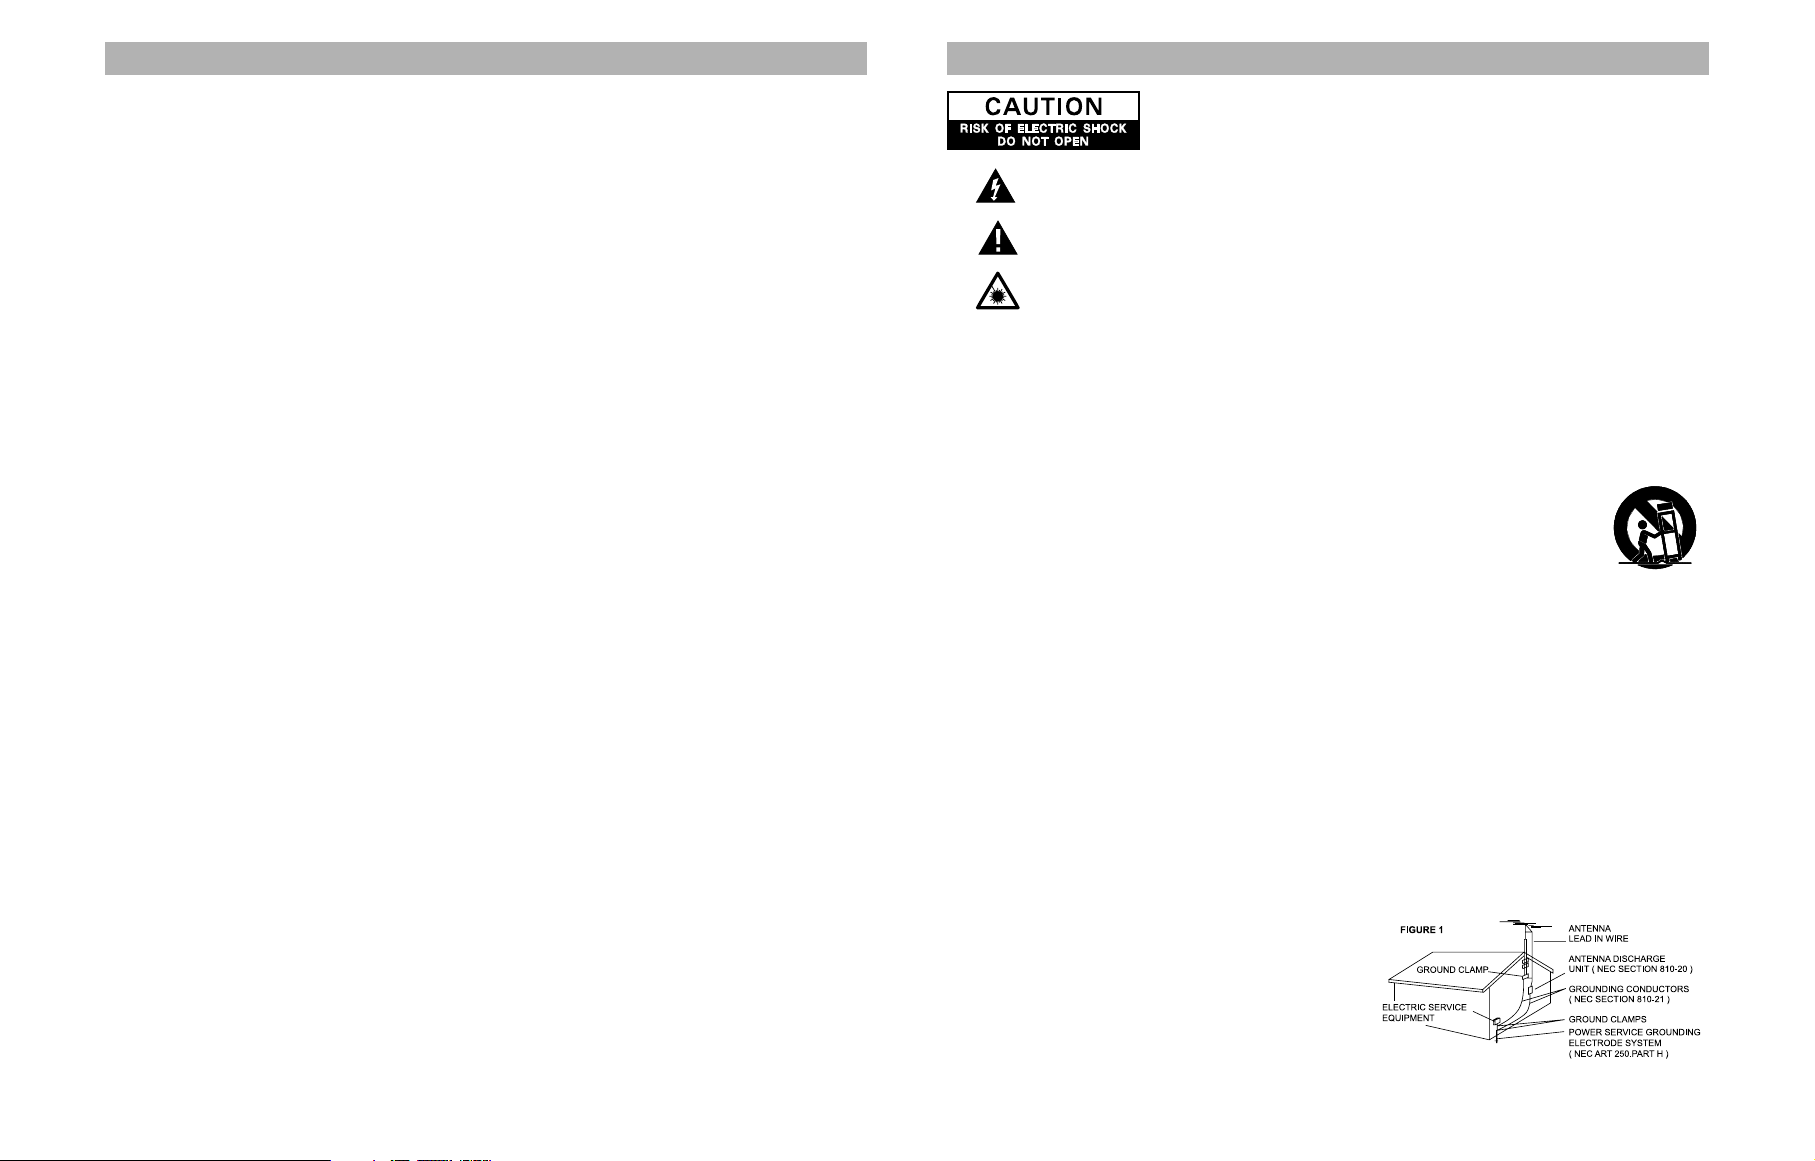
14. OUTDOOR ANTENNA GROUNDING
- If an outside antenna or cable system is connected to the product,
be sure the antenna or cable system is grounded so as to provide
some protection against voltage surges and built-up static charges.
Article 810 of the National Electrical Code, ANSI/NFPA 70, pr o vides
information with regard to proper grounding of the mast and
supporting structure, grounding of the lead-in wire to an antenna
-discharge unit, size of grounding conductors, location of anten
discharge unit, connection to grounding electrodes, and requirements
for the grounding electrode.
See Figure 1.
- GB - 1 - - GB - 2 -
Page 2

15. LIGHTENING - For added protection for this product during a lightening storm, or when it is left unattended and unused for
long periods of time, unplug it from the wall outlet and disconnect the antenna or cable system. This will present damage to the
product due to lightening and power-line surges.
16. POWER LINES - An outside antenna system should not be located in the vicinity of ov erhead power lines or other electric light
or power circuits, or where it can fall into such power lines or other electric light or power circuits, or where it can fall into such
power lines or circuits. When installing an outside antenna system, extreme care should be taken to keep from touching such
power lines or circuits as contact with them might be fatal.
17. OVERLOADING - Do not overload wall outlets, extension cords, or integral convenience receptacles as this can result in a risk
of fire or electric shock.
18. OBJECT AND LIQUID ENTRY - Never push objects of any kind into this product through openings as they may touch
dangerous voltage points or short-out parts that could result in a fire or electric shock. Never spill liquid of any kind on the
product.
19. SERVICING - Do not attempt to service this product yourself as opening or removing covers may expose you to dangerous
voltage or other hazards. Refer all servicing to qualified service personnel.
20. DAMAGES REQUIRING SERVICE - Unplug this product from the wall outlet and refer servicing to qualified service personnel
under the following conditions.
a) When the power-supply cord or plug is damaged.
b) If liquid has been spilled, or objects have fallen into the product.
c) If the product has been exposed to rain or water.
d) If the product does not operate normally by following the operating instructions. Adjust only those controls that ar e cov er ed
by the operating instructions as an improver adjustment of other controls may result in damage and will often require
extensive work by a qualified technician to restore the product to its normal operation.
f) When the product exhibits a distinct change in performance - this indicates a need for service.
21. REPLACEMENT PARTS - When replacement parts are required, be sure the service technician has used replacement parts
specified by the manufacturer or have the same characteristics as the original part, Unauthorized substitutions may result in fire,
electric shock or other hazards.
22. SAFETY CHECK - Upon completion of any service or repair to this product, ask the service technician to perform safety checks
to determine that the product is in proper operating condition.
23. HEAT - The product should be situated away from heat sources such as radiators, heat registers, stoves or other products
(including amplifiers) that produce heat.
PREP ARA TION FOR USE
Unpacking and Setup
* Carefully remove the unit from the display carton and remove all packing material from the unit itself.
* Remove any descriptive labels that may be found on either the front or top cabinet of the unit. Do not remove any labels located on
either the back or button cabinet of the unit.
* Open the CD compartment door. There is a white car d in the CD compartment which is Intended to pr event the CD pickup from
moving during shipment of the product. Remove this card from the CD compartment before use.
Power Sources
This audio system is designed to operate on 230V AC 50Hz house curr ent . Attempting to operate this unit from any other power source
may cause damage to unit, which is not covered by your warranty.
AC Operation
Unwind the AC cord and extend it to its full length, Insert the AC plug into any convenient 230V AC 50Hz household outlet .
* Hold the plug to disconnect it from the mains outlet. Do not pull the power cord.
* When the plug of the unit is connected to the mains outlet, the unit will be still connected to AC even of the power is turned off.
* Disconnect the plug as soon as liquid or objects enter the unit. The unit cannot be used until being checked by experts.
- GB - 3 -
- GB - 4 -
Page 3
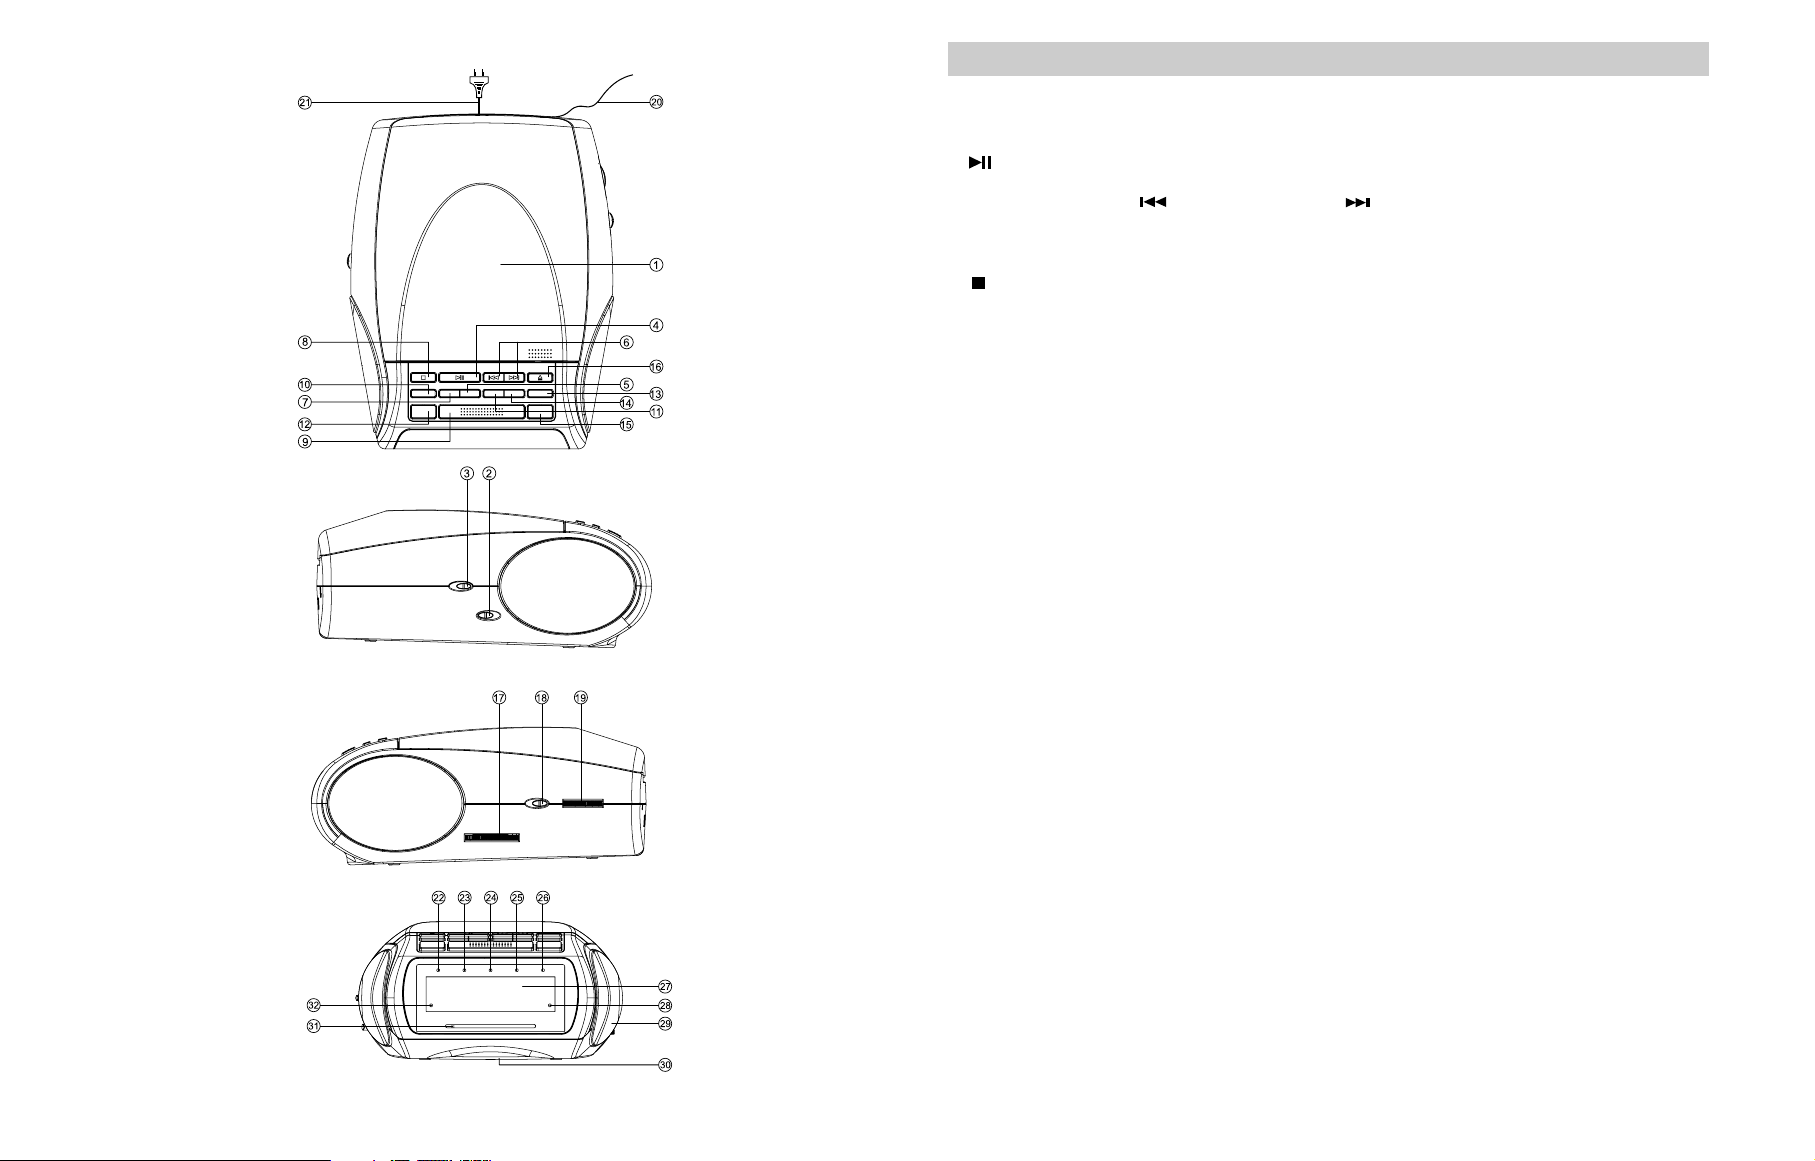
LOCA TION OF CONTROLS AND INDICA TORS
1.CD compartment
2.Alarm Selector : AL 1 - AL 1+2 - AL 2
3.Alarm Mode : Off - Buzzer - Auto
4. PLAY/PAUSE : To start playing the CD or to stop momentarily the disc player
5. RANDOM : To enable / disable random play mode.
6. Skip / Fast Search ( backw ard / f orward ) - HOUR / MINUTE:
- CD track skip and fast search within the track
- All clock functions minute and hour setting
7.REPEAT : To play the disc continuously
8. STOP : To stop pla ying the disc
9.SNOOZE : Interval alarm repetition
10.PTS (PROGRAM) : to set programmable CD tracks
11.ALARM 1 : set
12.SLEEP
13. TIME : set
14.ALARM 2 : set
15. POWER
16.CD door open
17.Tuning knob : To select your radio station
18.Function selector : CD - AM - FM
19.Volume control
20.FM wire antenna
21.AC power cord
22.Power LED Indicator
23.CD Program LED indicator
24.CD Random function LED indicator
25.CD repeat function LED indicator
26.FM Stereo LED indicator
27.Digital Display
28.ALARM 2 LED Indicator
29.Speakers
30.Battery compartment
31.Dial scale and pointer
32.ALARM 1 LED Indicator
- GB - 6 -- GB - 5 -
Page 4

OPERA TING INSTRUCTIONS
POWER SUPPLY
This CD clock radio operates on AC 230V~50Hz. It is also equipped with a clock battery backup system, powered by an optional 9V battery type 6F22 (not provided).
1. Insert the AC power cord (21) into a convenient standard AC wall outlet.
2. Connect the 9V battery inside the compartment at the bottom of the unit (30).
NOTE : An alkaline type battery is recommended. For optimum performance, this battery should
be replaced every 6 months.
BATTERY BACK-UP SYSTEM
Ensures that the unit will continue to operate as normal during AC power disruption (in order to
preserve the battery life the display will not light). Al l clo ck settings will be kept in the memory,
howev er , the cloc k time may require adjustment f or e xact accuracy. If this battery is not installed,
the display will blink to indicate that you have to redo the time and alarm settings.
SETTING THE TIME
1. Press and hold TIME (13) and MINUTE or HOUR (6) to adjust to your desired time.
2. Release TIME (13) to store your setting in memory.
0:00
LISTENING TO THE RADIO
1. Switch to FM or AM position with the function selector (18).
2. For a better reception in FM, extend the antenna (20). In AM, rotate the unit.
3. Press POWER (15).
4. Adjust the volume (19) to the desired level.
5. Select your desired radio station (17) and (31) - (If the FM station is being received in stereo,
the FM STEREO LED indicator (26) will alight).
6. To stop listening to the radio press Power (15).
LISTENING TO THE CD PLAYER
1. Open the CD door (16), load your disc (label up) into CD compartment (1).
2. Switch to the CD position (18).
3. Press POWER (15), the Display (27) will show total track numbers. It will return to the clock
time after few seconds.
4. Press (4) to start listening from the first track. The Display (27) will show , then it will
return to the clock time.
NOTE : Use also this knob to suspend momentarily the playing track.
Press once again to continue playing.
5. Rotate the volume (19) to adjust the desired level.
6. Press (8) to stop listerning the disc.
OTHER CD PLAYER FUNCTIONS
SKIP / FAST SEARCH (6): Press to skip forward to the next track or repeatedly
to skiptracks. Press return to the beginning of the track, or press repeatedly to skip backwards
several tracks. Press and hold or to search quickly within a track.
REPEAT (7):Press once to repeat your selected track. REPEAT indicator (25) blinks.
Press twice to play the disc continuously. REPEAT indicator (25) alight.
Press again to switch off this function, REPEAT indicator (25) goes off.
PROGRAM(10): To set your own musical program.
1.Insert the disc (16, 1). The total number of tracks is displayed (27).
2.Press (10), the display show “ ”. PROGRAM indicator (23) blinks
3 .Select with or (6) your desired track, then press (10) to store your program
in memory. Redo this operation as many times as necessary. 20 tracks can be
memorised.
6. To cancel this function, open the CD compartment
RANDOM : 1. Press RANDOM (5) to select RANDOM play mode and it will play randomly all
the tracks of the CD. RANDOM indicator (24) alight.
SETTING THE ALARM AND WAKE UP MODE
This unit allows you to set two different wake up times which you can choose to use
independently or simultaneously AL 1 or AL 2, or AL 1 and 2.
SETTING THE ALARM
1st Alarm (AL 1) - Press and hold the ALARM 1 (11), and press or (6) to adjust your
desired alarm time, then release ALARM 1 (11) to store your setting in memory.
2nd Alarm (AL 2) - Press and hold the ALARM 2 (14) and redo the same operation as above.
Select your wake-up mode (3) in AUTO (for RADIO or CD), BUZZER (for alarm sound) or OFF
to switch off the alarm.
Select you wake-up time with alarm selector (2).
1. Follow procedures 1 to 6, in "LISTENING TO THE RADIO", to select your desired radio
station.
2. Switch to the AUTO position (3), the alarm indicator (28 and/or 32) will alight.
1. Follow procedures 1 to 6, in "LISTENING TO THE CD PLAYER".
2. Switch to the AUTO (3) position, the alarm LED indicator (28 and/or 32) will alight.
3. Press POWER (15) and POWER indicator (22) goes off
NOTE
WAKE UP TO THE PROGRAMMABLE CD TRACKS
1. Switch to the CD position (18) and press POWER (15). POWER indicator (22) alight.
2. Follow procedures 1 to 5 in "LISTENING TO THE CD PLAYER - PROGRAM ".
3. Switch to the AUTO (3) position, the alarm LED indicator (28 and/ or 32) will alight.
4. Press POWER (15) and POWER and PROGRAM indicators (15, 23) goes off.
NOTE : The music will stop after the programmed tracks, e.g. if one track is programmed, the
alarm will stop at the end of this track. The programmed memor y will be erased once the CD
door be opened.
4.Press (4) to start playing..
5 .Press STOP (8) to stop the disc.
2. Press again to switch off this function until the RANDOM indicator (24) goes off..
WAKE UP TO THE BUZZER SOUND
WAKE UP TO THE CD
: If the CD play time is longer than 60 minutes, the music will stop after playing.
- GB - 7 -
- GB - 8 -
Page 5

STOPPING THE ALARM
The alarm is programmed to run for 60 min.
1. SNOOZE (9) : Press to stop the alarm temporarily, the alarm will stop and ring again
automatically, after 6 min.
2.POWER (15) : The alarm will stop, and will sound again 24 hours later.
3. OFF (3) : To turn off the alarm per manently the alarm LED indicators (28, 32)will go off.
SLEEP T O MUSIC
1. Select CD/FM/AM (18) for the sleep mode, then
2. Press SLEEP (12), the display shows "--", press again to select the desired sleep time.
(three Sleep time 90-60-30 minutes). It will start countdown after few seconds.
3. If in CD mode, it needs to press PLAY/PAUSE (4) for CD playing
4. Press POWER (15) to stop
NOTE : If the CD play time is shorter than your selected sleep time, the music will stop at the
end of the disc.
CARE AND MAINTENANCE
Caring for Compact Discs
* Treat the disc carefully. Handle the disc only by its edges. Never allow your fingers
to come in contact with the shiny, unprinted side of the disc.
* Do not attach adhesive tape, stickers, etc. T o the disc label.
* Clean the disc periodically with a soft , lint-free, dry cloth. Never use detergents or
abrasive cleaners to clean the disc. If necessary, use a CD cleaning kit.
* If a disc skips or gets stuck on a section of the disc, it is probably dirty or damaged
(scratched). When cleaning the disc, wipe in straight lines from the center of the disc
to the outer edge of the disc. Never wipe in circular motions.
* This unit is designed to play only compact discs bearing the identification logo as shown here.
Other discs may not conform to the CD standard and may not play properly.
* Compact Disc should be stored in their cases after each use to avoid damage.
* Do not expose compact disc to direct sunlight, high humidity, high temperatures, or dust, etc. Prolonged
exposure or extreme temperatures can warp the disc.
* Do not stick or write anything on either side of the disc. Sharp writing instruments, or the ink may
damage the surface.
Dripping warning:
Ventilation warning
Unit maintenance
CONDENSATION
Moisture will appear on the pickup lens in the following cases:
* The unit is suddenly moved from a cold place to a warm place.
* The unit is put in a room with a heater, or in cold air from an air - conditioner.
* Use the unit in a humid place. In these cases, the unit cannot work. Unload the disc and leave the unit on for about one hour evaporates
the water.
“The product shall not be exposed to dripping or splashing and that no objects filled with liquids, such as vases,
shall be placed on the product.”
“The normal ventilation of the product shall not be impeded for intended use.”
“Never put the unit in direct sunlight or near heat sources.”
“Put the unit horizontally, never put any heavy object on the unit.”
MORE INFORMA TION
- Do not use your set immediately after transport from a cold place to a warm place, there may be condensation
problems.
- Make sure that you keep your set away from water and high temperatures.
- Clean the player with a soft cloth, or a damp chamois leather. Nev er use solvents.
NOTES ON COMPACT DISCS
- If there is a scratch, dirt or fingerprints on the disc, it may cause tracking error. Before playing, clean the disc with a
cleaning cloth. Wipe the disc from the center out. Don't store discs in places with high temperatures or high humidity they can become warped. After playing, store the disc in its case.
- GB - 9 - - GB - 10 -
Page 6

TROUBLESHOOTING GUIDE
LABEL MENTION
Should this unit exhibit a problem, check the following before seeking service.
(1) LASER CAUTTION LABEL (2) LASER BEAM LABEL
(3) SERIAL NO.LABEL (4) RATING PLATE
S/N: 040400001
onwards
(5) CLASS 1 LABEL (6) ORIGINAL LABEL
- GB - 11 -
(7) THERMAL FUSE LABEL (8) CD PRO TECTION CARD
- GB - 12 -
Page 7

TECHNICAL SPECIFICATIONS
POWER SUPPLY : AC 230V ~ 50 Hz
Battery back-up - 9V type 6F22 / 006P / PP3 (not included)
OUTPUT POWER: 2X250mW R.M.S
UNIT DIMENSION: 181(W) x 87(H) x 230(D) mm
RADIO SECTION
FREQUENCY RANGE: FM/FREQUENCY MODULATION: 88-108 MHz
AM/AMPLITUDE MODULATION: 540-1600 kHz
COMPACT DISC SECTION
OPTICAL PICKUP: 3-BEAM LASER
FREQUENCY RESPONSE: 100 Hz to 16 kHz
LASER : = 760 nm P max = 0.4 mW
CAUTION ! This set uses a laser beam. To prevent any accident due to this type of beam, the
set should only be opened by properly trained personnel.
The unit conforms to the international safety specifications and to guide lines of the european
community, and also complies with current standards concerning electrical safety and electromagnetic compatibility EMC.
Importer AKAI Benelux - Elmarc B.V.
Information:
www.akai.nl
- GB - 13 -
CRD 617 IB AKAI 001 / EU / GB / 26-02-2004
 Loading...