

AKA Tornado AC Valve User Manual
TORNADO
(Pat.5791328)
AC Replacement Valve
AKALMP, Inc.
Web Page: http://www.akalmp.com
E-mail: akapp@akalmp.com
PO Box 441186
Indianapolis, IN 46244-1186
Phone: (317)-631-7200
Fax: (317)-631-0325
WE RECOMMEND THAT YOU CONSULT A QUALIFIED AIRSMITH FOR INSTALLATION.
INSTALLATION INSTRUCTIONS V2.5, SEPT 2003. SUPERSEDES ALL PREVIOUS INSTRUCTIONS.
1. Remove all air sources connected to the marker. Remove all paint.
2. Disassemble the marker until you can take out the valve.
3. Using a valve removal tool remove the old valve. Check to see if your marker is older than a mid-1996 Autococker (32,000 serial number or lower). If the Autococker has an older style air chamber skip to the
AIR CHAMBER MODIFICATION section of these instructions.
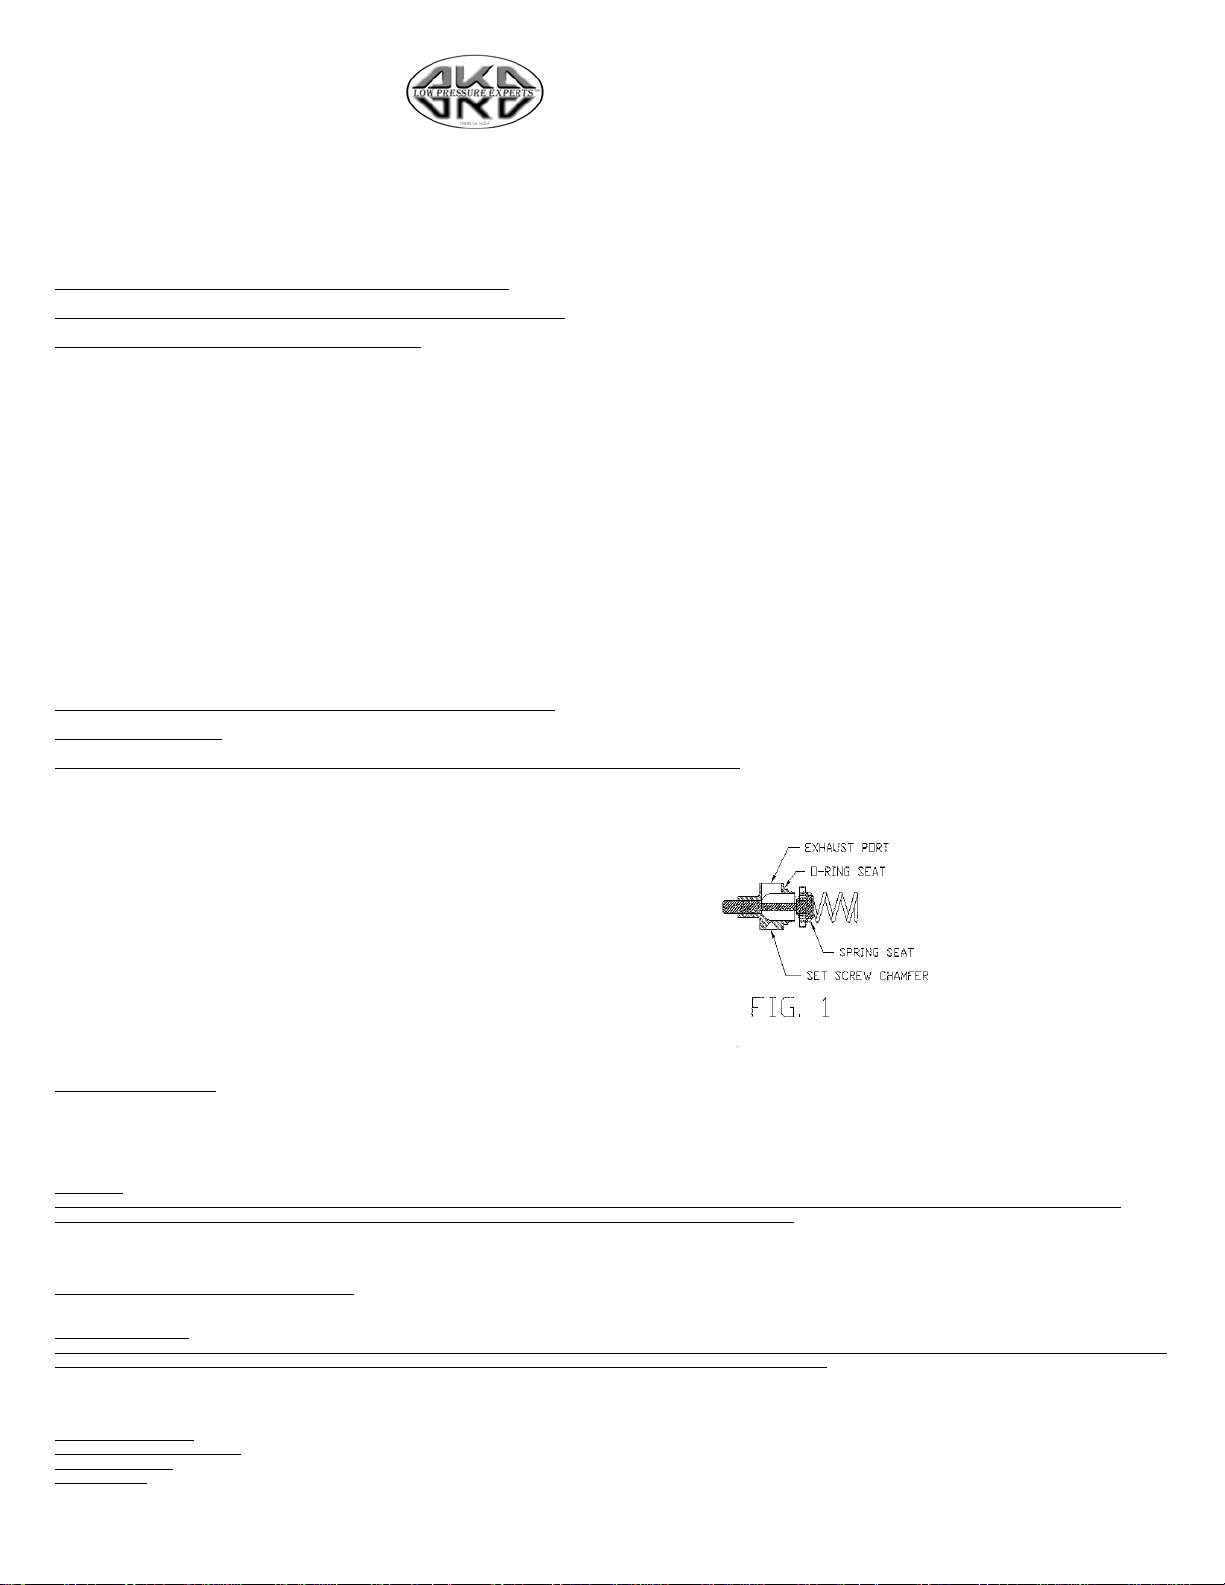
4. Place the new o-ring on the new valve body. It should seat into the small grove on the o-ring seat. SEE FIG 1 for location. Lightly oil the O-ring. Use Extreme-Lube from AKALMP throughout your paintball
marker.
5. Place a yellow Nelson valve spring on the back of the cup seal or equivalent. SEE FIG 1. DO NOT CLIP THE SPRING. (For more spring info, see Best Reported Setup.)
6. Place valve in the marker with a valve removal tool (don't modify the valve) with exhaust port up and the set screw chamfer showing in the set screw hole. SEE FIG 1. Using the new set screw that came with
the valve, place set screw in the marker body and gently tighten down. Now, alternately tighten the jam nut and set screw until both are tight. Do not over-tighten. This alternating tightening action will help
keep the valve body straight inside the bore. Now re-assemble the hammer with a yellow Nelson hammer spring or equivalent. DO NOT CLIP THE SPRING ENDS . This spring setting works well. (See Best
Reported Setup.) You may need to re-time the trigger once the marker is reassembled. The timing for a low pressure marker should be a little more conservative than most high pressure markers.
7. Pull back the hammer and put air to the marker. For most markers the valve should seal right away. There may be a few valves where you have to fire the marker with air leaking out of it a little before the
valve cupseal will seal. If the valve doesn't seal see TROUBLE SHOOTING. After the valve seals it's time to adjust the velocity. This valve design is a hybrid of two valve ideas, one is a spring controlled valve and
the other is a pressure controlled valve. Adjust your Nelson spring adjuster all the way out to the lowest spring tension setting possible and leave it. To adjust the velocity, first check the air pressure settings
based on what type of air system you have. Then follow velocity adjustment instructions.
If you valve does not seal and continues to leak call AKALMP, Inc. for a replacement.
9. YOU NEED TO SHOOT PAINTBALLS, NOT DRY-FIRE THE MARKER TO GET THE CORRECT EFFICIENCY READING. The velocity fluctuations will vary depending on what type of regulator you are using.
AIR PRESSURE SETTINGS ARE BASED ON YOUR AIR SYSTEM SET- UP - FOR LOW PRESSURE.
A. Double regulated air system. (i.e. Using two regulators, the tank regulator and a second regulator on the marker)
*** OLDER NITROGEN SYSTEMS SHOULD BE DOUBLE REGULATED, though it is a good idea to double regulate the new systems, also. ***
Set your main tank regulator output at about 800 to 900 psi. to mimic the output pressure of a CO2 tank. Then set your second regulator at 100 psi and adjust the velocity by adjusting your second regulator
input into the marker as specified in the velocity adjustment section of the instructions.
Please read the instructions completely.
B. Single regulated air system.
*** OLDER NITROGEN SYSTEMS SHOULD BE DOUBLE REGULATED, though it is a good idea to double regulate the new systems, also. ***
Set the regulator at 100 psi output and adjust the regulator output to adjust velocity. (If your regulator has a slow response time, you may want to install an expansion chamber or a gas through grip to store up
a greater volume of regulated gas.)
C. CO2 users
If you are using CO2 and a regulator, follow the double regulated air system since you already have your main tank pressure preset for you. CO2 will work just as well as nitrogen if set up correctly. For
example, you may have a personal setup that starts with a 20oz anti-siphon tank that runs into a bottomline stablizer and then runs into a vertically mounted regulator. With this setup you shouldn't
experience any freezing of the marker or velocity drop off. If you can't, or don't want to invest in nitrogen this method is a good way to go.
D. Unregulated CO2 users - USE A REGULATOR PLEASE!
Setups for regulator information.)
VELOCITY ADJUSTMENT.
With the pressure regulator adjustment screw backed out or set at 100 psi, slowly start raising the pressure into the marker until the velocity raises to the desired FPS. Then, to lower the velocity, turn down the
pressure so there is less pressure pushing the paintball. This method leaves the springs in a more balanced state which produces better results than changing spring tension all the time. It also puts a low
pressure push on the ball which creates less distortion on the paintball & gives better range & accuracy. If you are using just the Tornado valve you may have to do some extra work on the marker (i.e. other
specific low pressure components) to get the pressure as low as 150-230 psi. Most prefer this setting because of the bonus of low pressure and you still
get 2500 shots plus on a 114 cu tank.
BEST REPORTED SETUPS:
in order of performance preference
/ = all in one category
, = next category
(ie. straight from the nitrogen tank regulator or a regulator on the marker with air supplied by a CO2 tank.)
This valve was not designed to be used at pressures over 400 psi. Using pressures above 400 psi will void your valve warranty. (See Best Reported

NITROGEN/AIR - AA, Max Attack Reg. PMS/Maxflow/CO2
The PMS, Max Attack Reg., Maxflow regs. can be run single regulated.
*** OLDER NITROGEN SYSTEMS SHOULD BE DOUBLE REGULATED ***
SECONDARY REGS – AKALMP Sidewinder ™(Pat. 6675791)/Palmer Stabilizer, Bud Orr’s Inline with AKALMP Adjuster Cap/AA Vigilante
BOLTS - AKALMP Lightning(TM) bolt, 10-hole ANS/SLINGSHOT/Bob Long's New Cyclone bolt. Make sure the o-rings on the bolt are a snug fit to bore.
BARREL - Javelin (TM), Lapco or a 14" with a .687 bore or smaller.
MITEY-MAX(PAT # 5,904,133)(TM) AIR RESERVOIR - Needed on mini-cockers but also useable on standard cockers to lower pressure more.
SPRINGS - Yellow Straight Shot Nelson springs or equivalent
INLET PRESSURES INTO THE MARKER - will range from 150 psi to 300 psi depending on marker setup and what type regulator you are using.
Shot count - 1100-1300 from a 68cu 3000psi tank
2200-2500 from a 114cu 3000psi tank
2000-2200 from a 68cu 4500psi tank
2000+ from a 20oz CO2 tank
TROUBLE SHOOTING:
Valve Leaks - are rare, but since the cupseal material is so hard and the pressure is so low, you may need to install the valve and then let the marker sit overnight (6 hours minimum) with an unregulated bottle
of CO2 on it to seal the cupseal. If your marker sits for more then a month without being used, the groove that was formed in the cupseal with use will go away. The cupseal will have to be reseated again by
use. If this procedure doesn't stop the valve from leaking call Leads Metal Products for a replacement valve.
Velocity is not high enough - Turn in spring velocity adjuster one to two turns and then reset pressures. Due to differences in manufacturing of components and springs, you may have to do this - but only as a
last resort. Also check to see if your air chamber is up to the 1997 cocker specs. Check o-rings on the bolt for a good seal to the bore of the marker. Use a tight bore barrel. Check the timing of the marker.
Consult a qualified airsmith if problems persist.
THESE MAY PREVENT ATTAINING MAXIMUM EFFICIENCY AND CAUSE LARGE VELOCITY FLUCTUATIONS:
Bad Paint
Inline filters
Micro airline
Regulators that don't have high enough air flow capacity
Some Venturi bolts
Pro-Connect & others like it
Older FX bodies from Pro-Team Products
Large bore barrels
Some spring sets (see air chamber modification)
The small air chamber on older autocockers
Evolution autocockers need to have a spring spacer put in the air
chamber to allow them to use Nelson springs or use 98 springs.
AIR CHAMBER MODIFICATION: The older autocockers that still have the older style air chamber need to be enlarged to the 97 spec.. Instructions can be supplied to your airsmith from Leads Metal if needed.
98 AUTOCOCKER OR NEWER: The new 98 autococker has a deeper air chamber which makes using the older Nelson springs impossible. AKALMP has new springs that will fit the new air chambers. Please
specify 1997 or 1998 springs when you order Valve Spring Sets. For the 98 and newer guns the stock valve spring can be used but the hammer spring should be replaced with a yellow nelson hammer spring.
When setting the velocity adjust the brass adjuster screw in until the front edge is visible in the middle of the screw hole that holds the beavertail on. This is the best starting point for the adjuster.
FACTORY AUTHORIZED AIRSMITHS : SEE OUR WEB PAGE AT AKALMP.COM
 Loading...