

Page 1
MANUFACTURING
NUMBERS:
9210719
9210721
9210728
VERTICAL CONTACT
P/N 1010930 Rev. C 09/13
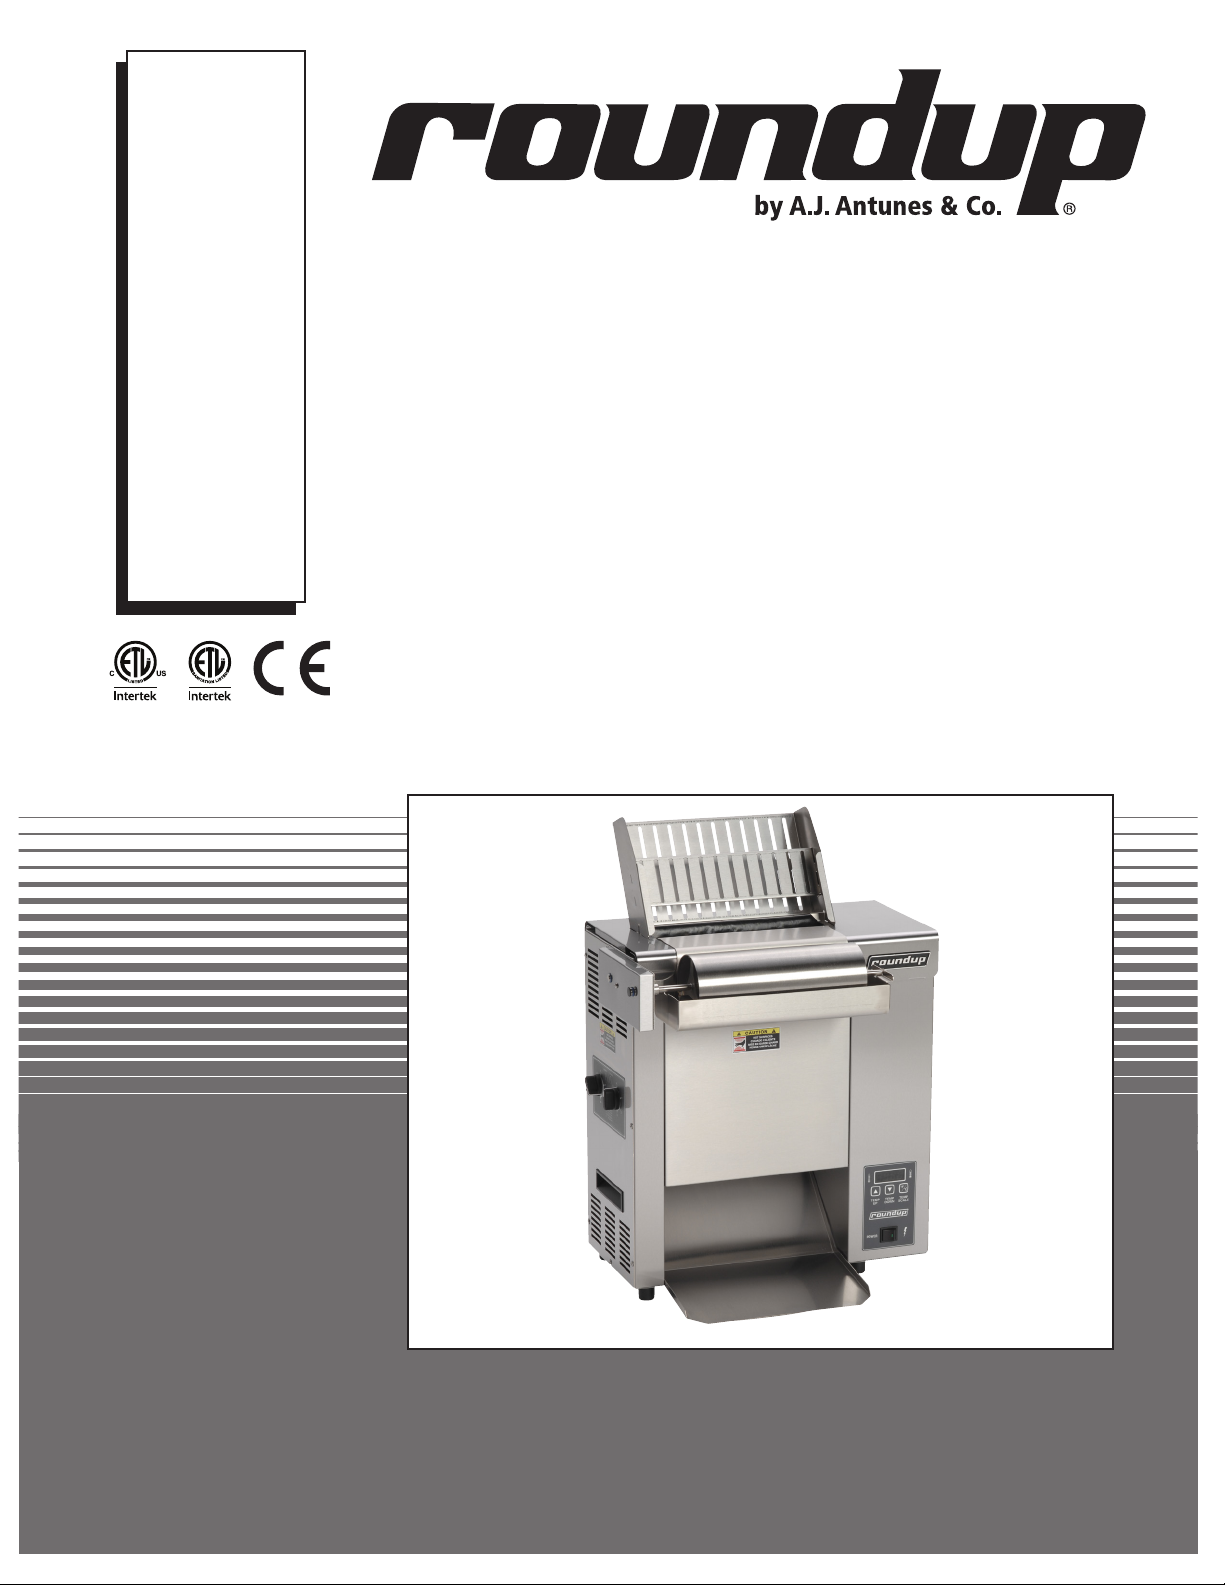
TOASTER
With Mechanical Driven Butter Wheel
Models VCT-1000
Owner’s Manual
Page 2
VERTICAL CONTACT TOASTER
TABLE OF CONTENTS
Owner Information .....................................................2
General ......................................................................2
Warranty Information .................................................2
Service/Technical Assistance ....................................3
Important Safety Information ....................................4
Specifications .............................................................5
Electrical Ratings .......................................................5
Electrical Cord & Plug Configurations .......................5
Dimensions ................................................................5
Model Designation .....................................................5
Installation ...................................................................6
Unpacking ..................................................................6
Equipment Setup .......................................................6
Assembling the Unit ..................................................6
OWNER INFORMATION
General
The Vertical Contact Toaster, is designed for contact
toasting of buns. The toaster design allows the operator to place buns on both sides of the heated Platen
at the same time. Buns are placed into the top of the
toaster and uniform, golden brown, warm buns are then
retrieved from the bottom of the toaster in
approximately 15 seconds (VCT-1000) or 45 seconds
(VCT-50).
This manual provides the safety, installation, and operating procedures for the Vertical Contact Toaster. We
recommend that all information contained in this
manual be read prior to installing and operating the
unit.
Your Vertical Contact Toaster is manufactured from the
finest materials available and assembled to Roundup’s
strict quality standards. This unit has been tested at
the factory to ensure dependable trouble-free
operation.
Operation .....................................................................8
Operating Instructions ...............................................8
Safety Features .........................................................8
Maintenance ................................................................9
Daily ...........................................................................9
Replacing the Black and Silver Release Sheet .........9
Checking the Conveyor Belt Chains .......................10
Replacing the Spring Tensioners .............................11
Troubleshooting .......................................................12
Wiring Diagram .........................................................14
Replacement Parts ...................................................15
Limited Warranty ......................................Back Cover
Warranty Information
Please read the full text of the Limited Warranty in this
manual.
If the unit arrives damaged, contact the carrier immediately and file a damage claim with them. Save all
packing materials when filing a claim. Freight damage
claims are the responsibility of the purchaser and are
NOT covered under warranty.
The warranty does NOT extend to:
• Damages caused in shipment or damage as
result of improper use.
• Installation of electrical service.
• Normal maintenance as outlined in this manual.
• Malfunction resulting from improper maintenance.
• Damage caused by abuse or careless handling.
• Damage from moisture into electrical
components.
• Damage from tampering with, removal of, or
changing any preset control or safety device.
IMPORTANT! Keep these instructions for future reference. If the unit changes
ownership, be sure this manual accompanies the equipment.
2
P/N 1010930 Rev. C 09/13
Page 3
VERTICAL CONTACT TOASTER
OWNER INFORMATION (continued)
Service/Technical Assistance
If you experience any problems with the installation
or operation of your unit, contact your local Roundup
Authorized Service Agency.
Fill in the information below and have it handy when
calling your Authorized Service Agency for assistance.
The serial number is on the specification plate located
on the rear of the unit.
Purchased From:
Date of Purchase:
Model No.:
Serial No.:
Mfg. No.:
Refer to the service agency directory included with your
unit.
Authorized Service Agency
Name:
Phone No.:
Address:
Use only genuine Roundup replacement parts in this
unit. Use of replacement parts other than those supplied by the manufacturer will void the warranty. Your
Authorized Service Agency has been factory trained
and has a complete supply of parts for this toaster.
You may also contact the factory at 1-877-392-7854
if you have trouble locating your nearest Authorized
Service Agency.
IMPORTANT
A.J. Antunes & Co. reserves the right to change specifications and product design
without notice. Such revisions do NOT entitle the buyer to corresponding changes,
improvements, additions, or replacements for previously purchased equipment.
P/N 1010930 Rev. C 09/13
3
Page 4

VERTICAL CONTACT TOASTER
IMPORTANT SAFETY INFORMATION (continued)
In addition to the warnings and cautions in this manual,
use the following guidelines for safe operation of the
unit.
• Read all instructions before using equipment.
• For your safety, the equipment is furnished with
a properly grounded cord connector. Do NOT
attempt to defeat the grounded connector.
• Install or locate the equipment only for its intended use as described in this manual. Do NOT use
corrosive chemicals in this equipment.
• Do NOT operate this equipment if it has a damaged cord or plug, if it is not working properly, or
if it has been damaged or dropped.
• This equipment should be serviced by qualified
personnel only. Contact the nearest Roundup
Authorized Service Agency for adjustment or
repair.
• Do NOT block or cover any openings on the unit.
• Do NOT immerse cord or plug in water.
• Keep cord away from heated surfaces.
• Do NOT allow cord to hang over edge of table or
counter.
The following warnings and cautions appear throughout
this manual and should be carefully observed.
• Turn the power off, unplug the power cord, and
allow unit to cool down before performing any
service or maintenance.
• The procedures in this chapter may include
the use of chemical products. These chemical
products will be highlighted with bold face letters followed by the abbreviated HCS (Hazard
Communication Standard). See Hazard
Communication Standard manual for the appropriated Material Safety Data Sheets (MSDS).
• The toaster should be grounded according to
local electrical codes to prevent the possibility of
electrical shock. It requires a grounded receptacle with separate electrical lines, protected by
fuses or circuit breaker of the proper rating.
• Bread may burn. Therefore toasters must not be
used near or below curtains or other combustible
walls and materials. Failure to maintain safe
operating distances may cause discoloration or
combustion.
• Failure to use Release Sheets may result in
damage to the equipment and loss of warranty
coverage.
• All electrical connections must be in accordance
with local electrical codes and any other applicable codes.
• WARNING ELECTRICAL SHOCK HAZARD.
FAILURE TO FOLLOW THESE INSTRUCTIONS
COULD RESULT IN SERIOUS INJURY OR
DEATH.
- Electrical ground is required on this appliance.
- Do NOT modify the power supply cord plug.
If it does not fit the outlet, have a proper outlet
installed by a qualified electrician.
- Do NOT use an extension cord with this
appliance.
- Check with a qualified electrician if you are
unsure if the appliance is properly grounded.
- If the power cord is damaged, it must be
replaced with a power cord available from
the manufacturer or an Authorized Service
Agency.
4
P/N 1010930 Rev. C 09/13
Page 5

Electrical Ratings
VERTICAL CONTACT TOASTER
SPECIFICATIONS
Model &
Mfg. No.
Volts Watts Amp. Hertz
VCT-1000
9210719
9210721
208–
240
2600–
3455
12.5–
14.4
9210728
Electrical Cord & Plug Configurations
Model &
Mfg. No.
VCT-100 0
9210719
9210721
9210728
Description Configuration
NEMA 6-20P 20
Amp, 250 VAC
Non–Locking
(Assembly Only)
Dimensions
20-5/16"
(515.87 mm)
60
15-1/4”
(387.35 mm)
P/N 1010930 Rev. C 09/13
29-3/16”
(741.36 mm)
9-3/4”
(247.65 mm)
5
Page 6
VERTICAL CONTACT TOASTER
INSTALLATION
Unpacking
1. Remove unit and all packing materials from
shipping carton.
2. Open the large box. It should contain:
• Bun Chute (Figure 1)
• Butter Wheel and Pan (Figure 1)
• Two Release Sheets (Figure 1)
• Owner’s Manual
• Authorized Service Agency Directory
3. Remove all packing materials and protective
coverings from the unit and parts.
NOTE: If any parts are missing or damaged, con-
tact A.J. Antunes & Co. IMMEDIATELY at
630-784-1000.
Equipment Setup
When placing the toaster into service, pay attention to
the following guidelines.
• Make sure power to the unit is off and the toaster
is at room temperature.
• Do NOT block or cover any openings on the unit.
• Do NOT immerse cord or plug in water.
• Keep cord away from heated surfaces.
Assembling the Unit
NOTE: The factory has a pre-installed a Release
Sheet over the Platen (Figure 1). Verify that it is
properly in place before proceeding.
1. Remove the Bun Chute from the box and install
(Figure 1).
2. Remove the Butter Wheel and Pan from box.
3. Install the Pan over the front edge of the Heat
Shield and place the Butter Roller in Pan and
engage into gear case (Figure 1).
NOTE: Make sure the Heat Shield is activating the
Conveyor Interlock Safety Switch (Figure 1). The
conveyors will not rotate unless the Heat Shield
is in place and activating the Conveyor Safety
Interlock Switch.
CAUTION
Failure to use Release Sheets may result in damage
to the unit and loss of warranty coverage.
NOTE: Check the Release Sheet to make sure it
is not caught in the conveyor. Additional Release
Sheets can be purchased through your Authorized
Service Agency under P/N 7000249 (3-Pack) or
7000250 (10-Pack).
• Do NOT allow cord to hang over edge of table or
counter.
• Connect the unit to the power supply. Refer to
the specification plate for the proper voltage.
6
P/N 1010930 Rev. C 09/13
Page 7

Butter
Wheel
VERTICAL CONTACT TOASTER
INSTALLATION (continued)
Bun
Feeder
(optional)
(optional)
Butter
Wheel Pan
Bun Chute
Assembly
connected over
the bottom rear
support rod
Heat Shield
Yellow
Support
Rod
Front
Conveyor
Belt Chain
Spring Tensioner
Assembly
Platen
Release
Sheet
Retainer
Clips
Release
Sheet
Yellow Support
Rod
Rear
Conveyor
Belt Chain
Conveyor
Safety
Interlock
Switch
Rear Conveyor
Cover Assembly
Front Conveyor
Cover Assembly
P/N 1010930 Rev. C 09/13
Bun Chute
Figure 1. VCT-1000 With Mechanical Driven Butter Wheel
7
Page 8

VERTICAL CONTACT TOASTER
1
2
4
5
1 = 1/2"(12.7mm)
2 = 5/8"(15.9mm)
3 = 11/16"(17.5mm)
6 = 7/8"(22.2mm)
THICKNESS
THICKNESS
1
2
3
4
6
6
5
4 = 3/4"(19.1mm)
5 = 13/16"(20.6mm)
3
1
2
3
4
5
1 = 1/2"(12.7mm)
2 = 5/8"(15.9mm)
4 = 3/4"(19.1mm)
5 =13/16"(20.6mm)
6 = 7/8"(22.2mm)
THICKNESS
THICKNESS
1
2
3
4
5
6
6
3 =11/16"(17.5mm)
OPERATION
Operating Instructions
IMPORTANT
Verify that the Release Sheet is installed completely
over the Platen (Figure 1) before proceeding. Failure
to use Release Sheet may cause permanent damage
to the Platen surface that is not covered by warranty.
1. Set the Bun Thickness Compression Knobs
(Figure 3) to the desired settings.
2. Turn the power on.
3. Turn the Temperature Control to 10. Allow the
unit to warm up for 30 minutes before proceeding.
4. Slide buns across the rotating Butter Wheel with
the cut face down and drop buns into toaster
(Figure 2). Cut sides of heel and crown must face
each other.
NOTE: After initial run of 4-6 buns, adjust controls
according to the desired finished product.
5. Toasted product will drop into the Bun Landing
Area (Figure 2).
6. Test at least 4 buns before putting toaster into service. Turn Temperature Control to lower setting
for lighter toasting or to higher setting for darker
toasting.
Bun Thickness
Adjustment Controls
(See Figure 3)
Bun Landing
Area
Figure 2. Toaster Controls
Power
Switch
Hi-Limit Reset
Reset
Button
Protective
Cap
Temperature Control
7. Turn the power off when finished toasting and
follow the daily cleaning procedures.
Safety Features
HI-LIMIT RESET BUTTON
A Hi-Limit Control turns off electrical power to the heater if the Platen overheats. To reset this control, allow
10-15 minutes for the unit to cool down, Remove the
Protective Cap, and press the Reset Button located at
the rear of the unit (Figure 2).
If the unit requires continuous resetting, contact your
Authorized Service Agency.
CONVEYOR INTERLOCK SAFETY SWITCH
A Conveyor Interlock Safety Switch is located on top of
the unit under the Heat Shield (Figure 1). The Conveyor
Belt Chains will not rotate unless the Heat Shield is
seated properly in place and activating the Conveyor
Interlock Safety Switch.
Figure 3. Bun Thickness Compression Knobs
8
P/N 1010930 Rev. C 09/13
Page 9

VERTICAL CONTACT TOASTER
MAINTENANCE
CAUTION
Turn the power off, unplug the power cord, and allow
the unit to cool down 30 minutes before performing
any service or maintenance.
CAUTION
To prevent damage to the unit, do NOT use abrasive
cleaners on the Release Sheet.
CAUTION
Failure to use Release Sheets may result in damage
to the unit and loss of warranty coverage.
Daily
NOTE: Pre-buttering/pre-oiling buns before feeding
them into the toaster leads to butter/oil accumulation on the Release Sheet. This is normal, however
excessive buildup can lead to buns sticking and
burning. It is recommended that the Release Sheet
be replaced or cleaned once for every 6 hours of
operation. Dirty Release Sheets can be soaked in
hot, soapy water for later cleaning. Continue to
rotate Release Sheets, alternating between sides to
maximize usage.
Tools Required:
• Heat-Resistant Gloves
• Clean Towels
• Multipurpose Detergent Solution
• Sanitizer Solution
1. Turn the power off, unplug the power cord, and
clean the Release Sheet and Belt Wraps while
they are warm.
2. Put on heat-resistant gloves and remove the
Butter Wheel, Pan, and Heat Shield (Figure 1).
3. Wash the Butter Wheel, Pan, and Heat Shield in
a sink and wipe them with a damp sanitized towel
and allow them to air dry.
4. Remove the Release Sheet and place it on a
clean, flat dry surface.
5. Wipe the silver side of the Release Sheet with
a clean towel dampened with Multipurpose
Detergent Solution immediately followed by a
second clean towel dampened with sanitizer and
allow it to air dry before continuing.
6. Once the silver side is dry, repeat Step 5 on the
black side of the Release Sheet.
7. Wipe down the outside of the toaster with a
clean, damp, sanitized towel.
8. Install the Release Sheet by draping it over both
sides of the Platen with the crease centered on
the Platen.
NOTE: To prolong the life of the Release Sheet,
rotate it from the black side to the silver side on a
daily or weekly basis.
9. Install the Bun Chute so the hooks are installed
over the lower rear yellow Support Rod.
10. Install the Heat Shield with the Release Sheet
retainer clips securely over the Release Sheet
and Platen.
11. Reinstall the Butter Wheel and Pan, and plug in
the unit.
NOTE: Make sure the Heat Shield is activating the
Conveyor Safety Interlock Switch. The conveyors
will not rotate unless the Heat Shield is in place
and the Conveyor Safety Interlock Switch is
activated.
NOTE: Check the Release Sheet to make sure it is
not caught in the Conveyor. Additional Release
Sheets can be purchased through your Authorized
Service Agency under P/N 7000249 (3-Pack) or
7000250 (10-Pack).
Replacing the Black and Silver Release
Sheet (Every 4–6 weeks)
NOTE: Depending on toaster usage and on how
well it is cleaned daily, the black and silver Release
Sheet should last between 30–45 days.
1. Remove and discard the Release Sheet.
2. Lay a new Release Sheet on a clean, dry surface
and fold it in half lengthwise and gently crease it
at the fold using only your fingers (Figure 4).
3. Install the Release Sheet just as you would after
daily cleaning.
Fold over so
ends meet.
Figure 4. Folding the Release Sheet
Press lightly with
finger to form crease.
P/N 1010930 Rev. C 09/13
9
Page 10

VERTICAL CONTACT TOASTER
MAINTENANCE (continued)
Checking the Conveyor Belt Chains
(Every 3–6 Months)
NOTE: The Bun Thickness Compression Knobs
(Figure 3) must be set to “6 & 6” prior to measuring or removing or reinstalling the Conveyor Belt
Chains.
MEASURING CONVEYOR BELT CHAINS
1. Turn the unit off, unplug the power cord, and
allow the unit to cool.
2. Remove the Butter Wheel, Pan, and Heat
Shield (Figure 1) and set the Bun Thickness
Compression Knobs to 6 & 6.
3. Open both Conveyor Covers.
4. Facing the toaster, locate the approximate centerpoint of the Conveyor Chain.
5. Pull the Conveyor Chain away from the edge of
the toaster (Figure 5).
6. Stand a U.S. Dime on end between the frame
and the chain (Figure 5).
7. If the gap is significantly wider than the coin,
REMOVE links as described below.
8. Disconnect the Conveyor Belt Chain by squeezing any two links together and unhooking both
ends one link (Figure 6). Needle-nose pliers may
be used.
NOTE: There are two small 1/2” links on each side
of the Conveyor Belt Chain. The rest are large 3/4”
links.
9. Remove one 1/2” link from the belt.
10. Reassemble the Conveyor Belt Chain onto the
sprockets as described in Replacing Conveyor
Belt Chains.
11. Measure the gap again to ensure it is not too
tight.
12. Check the opposite side of the toaster using the
same steps.
NOTE: If the Conveyor Belt Chain is too tight to be
reassembled, remove an additional small 1/2” link
and install a large 3/4” link in its place. This will
shorten the Conveyor Belt Chain by 1/4” overall.
Figure 5. Measuring the Conveyor Belt Links
Rotation
Upper Support Rod
Large Link
P/N 0800121
Small Link
P/N 0800204
Figure 6. Conveyor Belt Links
10
P/N 1010930 Rev. C 09/13
Page 11

VERTICAL CONTACT TOASTER
MAINTENANCE (continued)
REPLACING CONVEYOR BELT CHAINS
1. Turn the power off, unplug the power cord, and
allow the unit to cool before proceeding.
2. Remove the Butter Wheel, Pan, and Heat Shield
and set the Compression Control Knobs to 6 & 6.
3. Open both Conveyor Covers.
4. Disconnect the Conveyor Belt Chain by squeezing
any two links together and unhooking both ends
of one link (Figure 6).
5. Place the replacement Conveyor Belt Chain on
the top sprockets with hook ends down.
NOTE: The ends of the hooks must point down
(Figure 6).
6. Wrap the Conveyor Belt Chain around the top
and lower sprockets and connect by hooking both
ends together.
NOTE: Make sure the Conveyor Belt Chain is
installed under the Upper Support Rod and over the
Lower Support Rod.
Replacing the Spring Tensioners
1. Remove the Acorn Nuts (Figure 7).
2. Remove the old Spring Tensioner Assembly.
3. Replace Tensioner Assembly and reassemble
unit.
Acorn Nuts
Tape
Figure 7. Replacing Spring Tensioner Assy.
Weld
Screws
Spring
Tensioner
Assy.
P/N 1010930 Rev. C 09/13
11
Page 12

VERTICAL CONTACT TOASTER
TROUBLESHOOTING
WARNING
To avoid possible personal injury and/or damage to the unit, inspection, test, and repair of electrical equipment
should be performed by qualified service personnel. The unit should be unplugged when servicing, except when
electrical tests are required. Use extreme care during electrical circuit tests. Live circuits will be exposed.
Problem Possible Cause Corrective Action
No heat and conveyor
belts do not move.
No heat but Conveyor
Belt Chains rotate.
Platen is hot but
Conveyor Belt Chains do
not rotate.
Conveyor Belt Chains
hesitate to rotate and/or
skip on sprockets.
Toaster is installed incorrectly. Perform the installation and operating proce-
dures found in the Installation and Operation
sections of this manual.
Inoperable power cord or Power
Switch.
Hi-Limit Control is tripped. Reset the Hi-Limit Control.
Wiring problem. Contact your maintenance person or Authorized
Wiring problem. Contact your maintenance person or Authorized
Inoperative Platen.
Inoperable Thermostat
Heat Shield not installed. Install Heat Shield.
Conveyor Safety Interlock Switch not
activated by the Heat Shield.
Spring Tensioner Assembly is
damaged or missing.
Conveyor Belt Chain links too loose. Adjust Conveyor Belt Chain length as described
Inoperable Drive Motor. Contact your maintenance person or Authorized
Loose Drive Motor Sprocket
Setscrew.
Drive Motor Chain has fallen off
sprocket(s).
Inoperable Safety Interlock Switch.
Conveyor Belt Chains installed
incorrectly.
Conveyor Belt Chains too loose. Adjust Conveyor Belt Chain length as described
Spring Tensioner Assembly is
damaged or missing.
Check receptacle for correct voltage (see the
Specifications section of this manual).
If necessary, contact your maintenance person
or Authorized Service Agency for service.
Service Agency for service.
Service Agency for service.
Re-install the Heat Shield correctly so that the
Heat Shield applies appropriate pressure on the
Conveyor Safety Interlock Switch.
Replace Spring Tensioner if damaged or
missing.
in the Maintenance section of this manual.
Service Agency.
Install Conveyor Belt Chains as described in the
Maintenance section of this manual. Be sure that
the ends of the hooks are facing down.
in the Maintenance section of this manual.
Replace Spring Tensioner Assembly if damaged
or missing.
12
P/N 1010930 Rev. C 09/13
Page 13

Problem Possible Cause Corrective Action
Product is over toasted
or Platen heat is too
high or drop time is too
slow.
Product is under toasted or Platen heat is too
low or drop time is too
fast.
Product is getting
stuck or Conveyor Belt
Chains stop when
product is toasting.
VERTICAL CONTACT TOASTER
TROUBLESHOOTING (continued)
Temperature set too high. Set Temperature Control to a lower setting.
Bun Thickness Compression
Knobs set improperly.
Buns sticking on Release Sheet. Clean or replace Release Sheet as described in the
Conveyor Cover Assembly not
installed properly.
Loose sprocket setscrews. Check drive chain for kinks, broken or bent links,
Conveyor Belt Chain too loose. Adjust Conveyor Belt Chain length as described in the
Spring Tensioner Assembly is
damaged or missing.
Bun Thickness Compression
Knobs set improperly.
Wiring problem. Contact your maintenance person or Authorized
Inoperable Thermostat.
Conveyor Drive Motor inoperable or incorrect conveyor motor
or sprocket installed.
Bun Thickness Compression
Knobs Set improperly.
Release Sheet not cleaned
properly or is missing.
Conveyor Drive motor inoperative or incorrect voltage motor
installed in toaster.
Conveyor Drive Chain loose,
worn, or broken. Loose motor
drive sprocket.
Conveyor Belt Chain too loose. Adjust Conveyor Belt Chain length as described in the
Spring Tensioner Assembly is
damaged or missing.
Measure bun thickness and set Bun Thickness
Compression Knobs accordingly.
Maintenance section of this manual.
Re-install Conveyor Cover Assembly.
or other damage. Check motor sprocket and drive
sprockets; tighten setscrew on flat of shaft if required.
Check for damaged/worn sprocket and replace as
required.
Maintenance section of this manual.
Replace Spring Tensioner Assembly if damaged or
missing.
Measure bun thickness and set Bun Thickness
Compression Knobs correctly.
Service Agency for service.
Measure bun thickness and set Bun Thickness
Compression Knobs accordingly.
Clean or replace Release Sheet as described in the
Maintenance section of this manual.
Contact your maintenance person or Authorized
Service Agency for service.
Check drive chain for kinks, broken or bent links,
or other damage. Check motor sprocket and drive
sprockets, tighten setscrew on flat of shaft if required.
Check for damaged/worn sprockets and replace as
required.
Maintenance section of this manual.
Replace Spring Tensioner Assembly if damaged or
missing.
P/N 1010930 Rev. C 09/13
13
Page 14

VERTICAL CONTACT TOASTER
POWER
BLK
WIRING DIAGRAM
Pictorial Wiring Diagram
VCT-50 & VCT-1000
CORD
NOTE: ALL WIRES TO BE 14 GA. AWM-105°C
UNLESS OTHERWISE SPECIFIED.
* 16 GA. TFE-200°C
GRN
BLK/BRN
WHT/BLU
GRN-YEL
TERMINAL
BLOCK
= 18 GA. AWM-105°C
# 16 GA. AWM-105°C
% 14 GA. TFE-200°C
21
54
GND
WHT
= WHT
HI-LIMIT
THERMOSTAT
INDICATOR
*WHT
%WHT
M
MOTOR 50 Hz
WHT
GRN
POWER
SWITCH
LIGHT
=BLK
BLK
THERMOSTAT
% BLK
% BLK
% BLK
INTERLOCK
SWITCH
PLATEN HEATER
60 Hz
50 Hz
14
P/N 1010930 Rev. C 09/13
Page 15

VERTICAL CONTACT TOASTER
REPLACEMENT PARTS
Parts Identification
Interlock
Switch
Idler Sprocket
Front Drive
Sprocket
Temperature
Control
Thermostat
Power Switch
Drive Chain
Rear Drive
Sprocket
Fan Blade
Hi-Limit Control
Drive Motor Assy.
P/N 1010930 Rev. C 09/13
15
Page 16

VERTICAL CONTACT TOASTER
3
3
8
64
52
38
29
61
76
83
55
93
86
82
10
63
60
98
48
106
105
34
33
66
35
107
110
53
32
123
122
119120
118
117
111
116
115
114
116
112
REPLACEMENT PARTS (continued)
16
P/N 1010930 Rev. C 09/13
Page 17

VERTICAL CONTACT TOASTER
21
70
87
17
19
70
20
90
89
91
72
12
12
62
17
70
72
18
19
17
23
17
70
16
80
75
70
56
74
42
67
67
70
42
67
67
53
23
67
46
22
58
84
43
11
24
32
39
109
108
83
54
REPLACEMENT PARTS (continued)
P/N 1010930 Rev. C 09/13
17
Page 18

VERTICAL CONTACT TOASTER
REPLACEMENT PARTS (continued)
2
79
34
78
88
70
16
31
37
65
1
30, 94
5
67
5
5
5
4
40
4
31, 95
41
9
7
65
6
51
6
7
65
62
1
95
44
67
6
41
9
65
6
7
67
94
85
96
83
85
76
40
30
76
45
18
P/N 1010930 Rev. C 09/13
Page 19

VERTICAL CONTACT TOASTER
REPLACEMENT PARTS (continued)
Item Part No. Description Qty.
1 0011266 Conveyor Belt Chain 2
(Incl. Items Below)
0800204 1/2” Pitch Link, Small 2
0800121 3/4” Pitch Link, Large 38
2 2150117 Idler Shaft 1
3 0011609 Conveyor Cover Assy. 2
4 0010475 Tensioner Assy. (Incl. #40, 76, 85) 4
5 7000644 Rod, Conveyor Cover with Screw 4
6 7000207 Sprocket w/ Setscrew 8
7 7000199 Spacer Kit (Pack of 2) 2
8 0011444 Control Housing Cover Assy. 1
9 2150118 Drive Shaft 3
10 2100212 Handle 2
11 4030355 Thermostat 1
12 7000296 Ball Bearing - Steel (Pack of 2) 1
16 7000167 Bearing & Retainer Kit 6
7000224 Bearing & Retainer Kit (Incl. 6 of #16) 1
17 2150181 Drive Sprocket 2
2150109 Drive Sprocket (Mfg. No. 9210728) 2
18 2150187 Drive Chain 1
19 0011299 Idler Sprocket & Bearing 1
20 0011300 Bracket, Idler Sprocket Assy. 1
(Incl. #19, 87, 89, 90, 91)
21 0503589 Bracket, Motor Mounting 1
22 7000240 Drive Motor Kit 230V, 9 RPM 1
0012112 Gear Motor Assy 230V/3RPM 1
(Mfg. No. 9210728)
23 2150173 Sprocket w/Setscrew, Motor 1
24 4010137 Power Switch, On/Off 1
25 2150109 Drive Sprocket, Rear 1
30 0503496 Tensioner Bracket, Right 2
31 0503497 Tensioner Bracket, Left 2
32 1000899 Label, Housing 1
33 1001047 Label, Dial Compression 1
34 2100253 Knob, Control 2
35 0011552 End Housing Cover Assy. 1
37 0021170 Weldment, End Housing 1
38 7000249 Release Sheet (Pack of 3) 39 0021194 Control Housing 1
40 7000121 Slide Rail Kit (Includes 2 2
Slide Rails for tensioners)
41 0021207 Conveyor Cam 2
42 7000176 Thermocouple Retainer Kit 2
43 4030332 High Limit Control 1
44 0011573 Idler Shaft Assy. (Top, Front) 1
45 0503455 Tension Spring, Inner 4
46 0503590 Slide Plate, Motor Mounting 1
48 0503677 Bun Chute 1
51 7000200 Platen 1
52 2100252 Tape 2
53 7000400 Interlock Switch 1
54 0503608 Cover Plate 2
55 303P127* Hinge Pin, Belt Wrap 2
56 4060355 Terminal Block 1
58 4000170 Fan Blade, Motor 1
60 040K251 Strain Relief Kit (Incl. #63) 1
61 05P2199* Spacer 4
62 0500464 Retainer, Bearing 2
63 040P138* Locknut, 1/2” 1
64 0011528 Heat Shield Assy. 1
65 325P163* Setscrew, 1/4-28 x 5/16” 8
66 100P864* Label, Caution Hot 1
67 310P109* Screw, Hex, #10-32 x 3/8” 2
68 304P105* Nut, #4-40, “KEPS” 4
Item Part No. Description Qty.
69 406P107* Cable Tie 1
70 308P143* Nut, #8-32, “KEPS” 6
71 310P103* Screw, Hex, #10-32 x 1/4” 4
72 310P157* Washer, #10 6
73 308P101* Nut, #8-32 3
74 306P101* Nut, Hex, #6-32 2
75 306P123* Screw, #6-32 x 7/8” 2
76 308P145* Nut, Hex Acorn, #8-32 14
77 100P900* Label, Service 1
78 325P104* Washer, 1/4” 4
79 325P109* Screw, 1/4-20 x 1/2” 4
80 308P124* Screw, 1-Way, #8-32 x 1/2” 1
82 310P136* Screw, #10-32 x 1-1/4” 4
83 308P133* Screw, #8-32 x 1/4” 1
84 308P157* Screw, Tap, #8-32 x 3/8” 20
85 308P181* Screw, Flat Hd., #8-32 x 3/8” 4
86 218P145* Cover, Leg, Bumper 4
87 331P103* Shoulder Bolt, 5/16-18 x 1” 1
88 306P105* Screw, #6-32 x 1/2” 8
89 331P106* Lockwasher, 5/16” 1
90 212P118* Flat Washer, 5/16” 1
91 331P101* Nut, Hex, 5/16-18 1
92 300P102* Nut, Tinnerman 2
93 210K230 Bumper, Recess Leg, 1” (Qty. of 4) 1
94 0503495 Retainer, Tensioner Bracket, RH 1
95 0503507 Retainer, Tensioner Bracket, LH 1
96 2100259 Slide Rail 4
98 0700452 Power Cord 6-20P 250V 1
99 306P104* Screw, #6-32 x 1/4” 6
104 4060374 Ground Lug 1
105 0021320 Butter Wheel Roller 1
106 0503987 Butter Pan 1
107 7000292 Bun Feeder Assembly 1
108 2100133 Knob, Thermostat 1
109 4060323 Indicator Light, Amber 120V 1
4060229 Indicator Light, Amber 250 V 1
110 0011374 Spring Tensioner Assembly 2
111 308P157 Screw, #8-32 x 3/8” 7
112 2150204 Bearing, Shaft, 1/2” 4
114 2150212 Sprocket, 12 Tooth 1
115 2150207 Sprocket, 28 Tooth 1
116 2120149 Spacer, Nylon 2
117 0503891 Housing 1
118 0400295 Plug, Pry Out 1
119 0011553 Shaft Assembly 1
120 2150205 Chain Drive 1
122 7000692 Shaft Coupling Kit (Incl. Items Below) 1
2150201 Shaft, Drive 1
2150202 Coupler 1
123 0021507 Bun Feeder (Mfg. No. 9210719 1
& 9210728 only)
0011549 Bun Feeder (Mfg. No. 9210721 only) 1
124 2140152 Lubricant (not shown) 1
* Sold only as packages of 10.
P/N 1010930 Rev. C 09/13
19
Page 20

LIMITED WARRANTY
Equipment manufactured by Roundup Food Equipment Division of A.J. Antunes & Co. has been constructed of
the finest materials available and manufactured to high quality standards. These units are warranted to be free
from electrical and mechanical defects for a period of one (1) year from date of purchase under normal use and
service, and when installed in accordance with manufacturer’s recommendations. To insure continued operation of the units, follow the maintenance procedures outlined in the Owner’s Manual. During the first 12 months,
electro-mechanical parts, non-overtime labor, and travel expenses up to 2 hours (100 miles/160 km), round trip
from the nearest Authorized Service Center are covered.
1. This warranty does not cover cost of installation, defects caused by improper storage or handling prior to placing of the Equipment. This warranty does not cover overtime charges or work done by unauthorized service
agencies or personnel. This warranty does not cover normal maintenance, calibration, or regular adjustments
as specified in operating and maintenance instructions of this manual, and/or labor involved in moving adjacent
objects to gain access to the equipment. This warranty does not cover consumable/wear items. This warranty
does not cover damage to the Load Cell or Load Cell Assembly due to abuse, misuse, dropping of unit/shock
loads or exceeding maximum weight capacity (4 lbs). This warranty does not cover water contamination problems such as foreign material in water lines or inside solenoid valves. It does not cover water pressure problems
or failures resulting from improper/incorrect voltage supply. This warranty does not cover Travel Time & Mileage
in excess of 2 hours (100 miles/160 km) round trip from the nearest authorized service agency.
2. Roundup reserves the right to make changes in design or add any improvements on any product. The right
is always reserved to modify equipment because of factors beyond our control and government regulations.
Changes to update equipment do not constitute a warranty charge.
3.
If shipment is damaged in transit, the purchaser should make a claim directly upon the carrier. Careful inspection
should be made of the shipment as soon as it arrives and visible damage should be noted upon the carrier’s receipt.
Damage should be reported to the carrier. This damage is not covered under this warranty.
4. Warranty charges do not include freight or foreign, excise, municipal or other sales or use taxes. All such freight
and taxes are the responsibility of the purchaser.
5. THIS WARRANTY IS EXCLUSIVE AND IS IN LIEU OF ALL OTHER WARRANTIES, EXPRESSED OR IMPLIED,
INCLUDING ANY IMPLIED WARRANTY OR MERCHANTABILITY OR FITNESS FOR A PARTICULAR PURPOSE, EACH OF WHICH IS HEREBY EXPRESSLY DISCLAIMED. THE REMEDIES DESCRIBED ABOVE
ARE EXCLUSIVE AND IN NO EVENT SHALL ROUNDUP BE LIABLE FOR SPECIAL CONSEQUENTIAL OR
INCIDENTAL DAMAGES FOR THE BREACH OR DELAY IN PERFORMANCE OF THIS WARRANTY.
 Loading...