

AJA TruZoom User Manual [en, de, es, fr, it]
Installation & Operation Guide
Version 1.1
Published: March 28, 2014

Table of Contents
Table of Contents . . . . . . . . . . . . . . . . . . . . . . . . . . . . . . . . . . . . . . . . . . . . . . 2
Notices. . . . . . . . . . . . . . . . . . . . . . . . . . . . . . . . . . . . . . . . . . . . . . . . . . . . . . . . 5
Trademarks . . . . . . . . . . . . . . . . . . . . . . . . . . . . . . . . . . . . . . . . . . . . . . . . . . . . . . . . . . . . . . . . . . . . . . . . 5
Copyright. . . . . . . . . . . . . . . . . . . . . . . . . . . . . . . . . . . . . . . . . . . . . . . . . . . . . . . . . . . . . . . . . . . . . . . . . . 5
Contacting Support . . . . . . . . . . . . . . . . . . . . . . . . . . . . . . . . . . . . . . . . . . . . . . . . . . . . . . . . . . . . . . . . 5
Chapter 1: Introduction . . . . . . . . . . . . . . . . . . . . . . . . . . . . . . . . . . . . . . . . 6
Overview . . . . . . . . . . . . . . . . . . . . . . . . . . . . . . . . . . . . . . . . . . . . . . . . . . . . . . . . . . . . . . . . . . . . . . . . . . 6
Region of Interest (ROI) Example . . . . . . . . . . . . . . . . . . . . . . . . . . . . . . . . . . . . . . . . . . . . . . . 7
Features . . . . . . . . . . . . . . . . . . . . . . . . . . . . . . . . . . . . . . . . . . . . . . . . . . . . . . . . . . . . . . . . . . . . . . . . . . . 9
Hardware Included . . . . . . . . . . . . . . . . . . . . . . . . . . . . . . . . . . . . . . . . . . . . . . . . . . . . . . . . . . . . 9
Software . . . . . . . . . . . . . . . . . . . . . . . . . . . . . . . . . . . . . . . . . . . . . . . . . . . . . . . . . . . . . . . . . . . . . . 9
In This Manual . . . . . . . . . . . . . . . . . . . . . . . . . . . . . . . . . . . . . . . . . . . . . . . . . . . . . . . . . . . . . . . . . . . . . 9
Chapter 2: Product at a Glance . . . . . . . . . . . . . . . . . . . . . . . . . . . . . . . . 10
Overview . . . . . . . . . . . . . . . . . . . . . . . . . . . . . . . . . . . . . . . . . . . . . . . . . . . . . . . . . . . . . . . . . . . . . . . . . 10
Corvid Ultra Frame . . . . . . . . . . . . . . . . . . . . . . . . . . . . . . . . . . . . . . . . . . . . . . . . . . . . . . . . . . . . . . . . 10
Front Side . . . . . . . . . . . . . . . . . . . . . . . . . . . . . . . . . . . . . . . . . . . . . . . . . . . . . . . . . . . . . . . . . . . . 10
Displays and Indicators . . . . . . . . . . . . . . . . . . . . . . . . . . . . . . . . . . . . . . . . . . . . . . . . . . . 10
Connector Side . . . . . . . . . . . . . . . . . . . . . . . . . . . . . . . . . . . . . . . . . . . . . . . . . . . . . . . . . . . . . . . 11
Corvid Ultra Host Interface Board (HIB). . . . . . . . . . . . . . . . . . . . . . . . . . . . . . . . . . . . . . . . . . . . . 11
PCIe Cable. . . . . . . . . . . . . . . . . . . . . . . . . . . . . . . . . . . . . . . . . . . . . . . . . . . . . . . . . . . . . . . . . . . . 11
Control Panel . . . . . . . . . . . . . . . . . . . . . . . . . . . . . . . . . . . . . . . . . . . . . . . . . . . . . . . . . . . . . . . . . . . . . 12
TruZoom Computer User-Interface . . . . . . . . . . . . . . . . . . . . . . . . . . . . . . . . . . . . . . . . . . . . . . . . 12
Chapter 3: Installation & Configuration . . . . . . . . . . . . . . . . . . . . . . . . 13
Overview . . . . . . . . . . . . . . . . . . . . . . . . . . . . . . . . . . . . . . . . . . . . . . . . . . . . . . . . . . . . . . . . . . . . . . . . . 13
What’s In The Box? . . . . . . . . . . . . . . . . . . . . . . . . . . . . . . . . . . . . . . . . . . . . . . . . . . . . . . . . . . . . . . . . 13
Customer Furnished Equipment . . . . . . . . . . . . . . . . . . . . . . . . . . . . . . . . . . . . . . . . . . . . . . . . . . . 13
Approved Components. . . . . . . . . . . . . . . . . . . . . . . . . . . . . . . . . . . . . . . . . . . . . . . . . . . 13
Workstation PCIe Card Locations. . . . . . . . . . . . . . . . . . . . . . . . . . . . . . . . . . . . . . . . . . 14
RAID Storage Capacity . . . . . . . . . . . . . . . . . . . . . . . . . . . . . . . . . . . . . . . . . . . . . . . . . . . . 14
LSI RAID Configuration . . . . . . . . . . . . . . . . . . . . . . . . . . . . . . . . . . . . . . . . . . . . . . . . . . . 15
Corvid Ultra Processor Frame Installation . . . . . . . . . . . . . . . . . . . . . . . . . . . . . . . . . . . . . . . . . . 20
Optionally Reversing the Rack Ears . . . . . . . . . . . . . . . . . . . . . . . . . . . . . . . . . . . . . . . . . . . . 20
Rack Installation . . . . . . . . . . . . . . . . . . . . . . . . . . . . . . . . . . . . . . . . . . . . . . . . . . . . . . . . . . . . . . 20
Cooling . . . . . . . . . . . . . . . . . . . . . . . . . . . . . . . . . . . . . . . . . . . . . . . . . . . . . . . . . . . . . . . . . . 20
HIB Installation and Cabling . . . . . . . . . . . . . . . . . . . . . . . . . . . . . . . . . . . . . . . . . . . . . . . . . . . 20
Other System Cabling. . . . . . . . . . . . . . . . . . . . . . . . . . . . . . . . . . . . . . . . . . . . . . . . . . . . . . . . . 21
. . . . . . . . . . . . . . . . . . . . . . . . . . . . . . . . . . . . . . . . . . . . . . . . . . . . . . . . . . . . . . . . . . . . . . . . . . 21
Reference Signal . . . . . . . . . . . . . . . . . . . . . . . . . . . . . . . . . . . . . . . . . . . . . . . . . . . . . . . . . 21
Canon RAW Input Cabling . . . . . . . . . . . . . . . . . . . . . . . . . . . . . . . . . . . . . . . . . . . . . . . . 21
Video Outputs . . . . . . . . . . . . . . . . . . . . . . . . . . . . . . . . . . . . . . . . . . . . . . . . . . . . . . . . . . . . . . . . 22
HDMI Output . . . . . . . . . . . . . . . . . . . . . . . . . . . . . . . . . . . . . . . . . . . . . . . . . . . . . . . . . . . . . . . . . 22
Valid Input and Output Formats . . . . . . . . . . . . . . . . . . . . . . . . . . . . . . . . . . . . . . . . . . . . . . . 23
Control Panel Installation. . . . . . . . . . . . . . . . . . . . . . . . . . . . . . . . . . . . . . . . . . . . . . . . . . . . . . . . . . 25
Dimensions. . . . . . . . . . . . . . . . . . . . . . . . . . . . . . . . . . . . . . . . . . . . . . . . . . . . . . . . . . . . . . . . . . . 25
Connections. . . . . . . . . . . . . . . . . . . . . . . . . . . . . . . . . . . . . . . . . . . . . . . . . . . . . . . . . . . . . . . . . . 25
Calibration . . . . . . . . . . . . . . . . . . . . . . . . . . . . . . . . . . . . . . . . . . . . . . . . . . . . . . . . . . . . . . . . . . . 25
Power Up Sequence. . . . . . . . . . . . . . . . . . . . . . . . . . . . . . . . . . . . . . . . . . . . . . . . . . . . . . . . . . . . . . . 26
TruZoom v1.1 www.aja.com
2

TruZoom Software and Corvid Ultra Firmware . . . . . . . . . . . . . . . . . . . . . . . . . . . . . . . . . . . . . 26
Software Installation . . . . . . . . . . . . . . . . . . . . . . . . . . . . . . . . . . . . . . . . . . . . . . . . . . . . . . . . . . 26
To Install TruZoom Software on PC. . . . . . . . . . . . . . . . . . . . . . . . . . . . . . . . . . . . . . . . 26
License Invalid Message . . . . . . . . . . . . . . . . . . . . . . . . . . . . . . . . . . . . . . . . . . . . . . . . . . 27
Firmware Update . . . . . . . . . . . . . . . . . . . . . . . . . . . . . . . . . . . . . . . . . . . . . . . . . . . . . . . . . 28
Configuration. . . . . . . . . . . . . . . . . . . . . . . . . . . . . . . . . . . . . . . . . . . . . . . . . . . . . . . . . . . . . . . . . . . . . 30
Serial Number and Licensing . . . . . . . . . . . . . . . . . . . . . . . . . . . . . . . . . . . . . . . . . . . . . . . . . . 30
Control Settings . . . . . . . . . . . . . . . . . . . . . . . . . . . . . . . . . . . . . . . . . . . . . . . . . . . . . . . . . . . . . . 31
Video Settings . . . . . . . . . . . . . . . . . . . . . . . . . . . . . . . . . . . . . . . . . . . . . . . . . . . . . . . . . . . . . . . . 31
Keyframe Interpolation Method . . . . . . . . . . . . . . . . . . . . . . . . . . . . . . . . . . . . . . . . . . . . . . . 31
Chapter 4: TruZoom Operation . . . . . . . . . . . . . . . . . . . . . . . . . . . . . . . . 32
Overview . . . . . . . . . . . . . . . . . . . . . . . . . . . . . . . . . . . . . . . . . . . . . . . . . . . . . . . . . . . . . . . . . . . . . . . . . 32
Control Panel Operations. . . . . . . . . . . . . . . . . . . . . . . . . . . . . . . . . . . . . . . . . . . . . . . . . . . . . . . . . . 32
TruZoom Operating Modes. . . . . . . . . . . . . . . . . . . . . . . . . . . . . . . . . . . . . . . . . . . . . . . . . . . . . . . . 34
Live Mode . . . . . . . . . . . . . . . . . . . . . . . . . . . . . . . . . . . . . . . . . . . . . . . . . . . . . . . . . . . . . . . . . . . . . . . . 35
Live Mode Screen Description . . . . . . . . . . . . . . . . . . . . . . . . . . . . . . . . . . . . . . . . . . . . . . . . . 35
Preview Display . . . . . . . . . . . . . . . . . . . . . . . . . . . . . . . . . . . . . . . . . . . . . . . . . . . . . . . . . . 35
Zoom Control . . . . . . . . . . . . . . . . . . . . . . . . . . . . . . . . . . . . . . . . . . . . . . . . . . . . . . . . . . . . 36
Virtual Cameras . . . . . . . . . . . . . . . . . . . . . . . . . . . . . . . . . . . . . . . . . . . . . . . . . . . . . . . . . . 36
Preset Transitions . . . . . . . . . . . . . . . . . . . . . . . . . . . . . . . . . . . . . . . . . . . . . . . . . . . . . . . . 37
Live ROI Selection. . . . . . . . . . . . . . . . . . . . . . . . . . . . . . . . . . . . . . . . . . . . . . . . . . . . . . . . . . . . . 38
Control Panel ROI Adjustment . . . . . . . . . . . . . . . . . . . . . . . . . . . . . . . . . . . . . . . . . . . . 38
Mouse/Touch-screen ROI Adjustment . . . . . . . . . . . . . . . . . . . . . . . . . . . . . . . . . . . . . 38
Learning and Recalling Virtual Cameras . . . . . . . . . . . . . . . . . . . . . . . . . . . . . . . . . . . 39
Record Mode . . . . . . . . . . . . . . . . . . . . . . . . . . . . . . . . . . . . . . . . . . . . . . . . . . . . . . . . . . . . . . . . . . . . . 40
About Clips Storage and Folders . . . . . . . . . . . . . . . . . . . . . . . . . . . . . . . . . . . . . . . . . . . . . . 40
Recording a Clip . . . . . . . . . . . . . . . . . . . . . . . . . . . . . . . . . . . . . . . . . . . . . . . . . . . . . . . . . . . . . . 41
Playback Mode. . . . . . . . . . . . . . . . . . . . . . . . . . . . . . . . . . . . . . . . . . . . . . . . . . . . . . . . . . . . . . . . . . . . 42
Playback Mode Screen Description . . . . . . . . . . . . . . . . . . . . . . . . . . . . . . . . . . . . . . . . . . . . 42
Playback Folder. . . . . . . . . . . . . . . . . . . . . . . . . . . . . . . . . . . . . . . . . . . . . . . . . . . . . . . . . . . . . . . 43
Playback Video Format. . . . . . . . . . . . . . . . . . . . . . . . . . . . . . . . . . . . . . . . . . . . . . . . . . . . . . . . 43
Playback Mode ROI Selection. . . . . . . . . . . . . . . . . . . . . . . . . . . . . . . . . . . . . . . . . . . . . . . . . . 43
Playback Mode Clip Controls . . . . . . . . . . . . . . . . . . . . . . . . . . . . . . . . . . . . . . . . . . . . . . . . . . 44
Player Transport Controls . . . . . . . . . . . . . . . . . . . . . . . . . . . . . . . . . . . . . . . . . . . . . . . . . 44
Scrub Bar. . . . . . . . . . . . . . . . . . . . . . . . . . . . . . . . . . . . . . . . . . . . . . . . . . . . . . . . . . . . . . . . . 44
Loading a Clip . . . . . . . . . . . . . . . . . . . . . . . . . . . . . . . . . . . . . . . . . . . . . . . . . . . . . . . . . . . . 44
Playing a Clip. . . . . . . . . . . . . . . . . . . . . . . . . . . . . . . . . . . . . . . . . . . . . . . . . . . . . . . . . . . . . 45
Timeline Controls . . . . . . . . . . . . . . . . . . . . . . . . . . . . . . . . . . . . . . . . . . . . . . . . . . . . . . . . . . . . . 45
Timeline Display. . . . . . . . . . . . . . . . . . . . . . . . . . . . . . . . . . . . . . . . . . . . . . . . . . . . . . . . . . 45
Timeline Magnify Slider . . . . . . . . . . . . . . . . . . . . . . . . . . . . . . . . . . . . . . . . . . . . . . . . . . . 46
Timeline Editing Controls . . . . . . . . . . . . . . . . . . . . . . . . . . . . . . . . . . . . . . . . . . . . . . . . . 46
Timeline Run Controls . . . . . . . . . . . . . . . . . . . . . . . . . . . . . . . . . . . . . . . . . . . . . . . . . . . . 46
Timeline Status . . . . . . . . . . . . . . . . . . . . . . . . . . . . . . . . . . . . . . . . . . . . . . . . . . . . . . . . . . . 47
Timeline Effect Save and Load . . . . . . . . . . . . . . . . . . . . . . . . . . . . . . . . . . . . . . . . . . . . 47
Timeline Effect Operations . . . . . . . . . . . . . . . . . . . . . . . . . . . . . . . . . . . . . . . . . . . . . . . . . . . . . . . . 48
Overview . . . . . . . . . . . . . . . . . . . . . . . . . . . . . . . . . . . . . . . . . . . . . . . . . . . . . . . . . . . . . . . . . . . . . 48
Building a Timeline . . . . . . . . . . . . . . . . . . . . . . . . . . . . . . . . . . . . . . . . . . . . . . . . . . . . . . . . . . . 48
Save and Recall the Timeline (Optional) . . . . . . . . . . . . . . . . . . . . . . . . . . . . . . . . . . . 55
Running A Timeline . . . . . . . . . . . . . . . . . . . . . . . . . . . . . . . . . . . . . . . . . . . . . . . . . . . . . . . . . . . 55
Keyboard Shortcuts . . . . . . . . . . . . . . . . . . . . . . . . . . . . . . . . . . . . . . . . . . . . . . . . . . . . . . . . . . . . . . . 56
TruZoom v1.1 www.aja.com
3

Appendix A: Safety and Compliance . . . . . . . . . . . . . . . . . . . . . . . . . . . 57
Federal Communications Commission (FCC) Compliance Notices . . . . . . . . . . . . . . . . . . . 57
Class B Interference Statement . . . . . . . . . . . . . . . . . . . . . . . . . . . . . . . . . . . . . . . . . . . . . . . . 57
FCC Caution . . . . . . . . . . . . . . . . . . . . . . . . . . . . . . . . . . . . . . . . . . . . . . . . . . . . . . . . . . . . . . . . . . 57
Canadian ICES Statement . . . . . . . . . . . . . . . . . . . . . . . . . . . . . . . . . . . . . . . . . . . . . . . . . . . . . . . . . 57
European Union and European Free Trade Association (EFTA)
Regulatory Compliance . . . . . . . . . . . . . . . . . . . . . . . . . . . . . . . . . . . . . . . . . . . . . . . . . . . . . . . . . . . 58
Declaration of Conformity. . . . . . . . . . . . . . . . . . . . . . . . . . . . . . . . . . . . . . . . . . . . . . . . . . . . . 58
Korean Compliance Statement . . . . . . . . . . . . . . . . . . . . . . . . . . . . . . . . . . . . . . . . . . . . . . . . . . . . 59
Taiwan Compliance Statement . . . . . . . . . . . . . . . . . . . . . . . . . . . . . . . . . . . . . . . . . . . . . . . . . . . . 59
Japanese Compliance Statement . . . . . . . . . . . . . . . . . . . . . . . . . . . . . . . . . . . . . . . . . . . . . . . . . . 59
Translated Warning and Caution Messages . . . . . . . . . . . . . . . . . . . . . . . . . . . . . . . . . . . . . . . . 59
Before Operation Please Read These Instructions. . . . . . . . . . . . . . . . . . . . . . . . . . . . . . . . . . . 60
Warranty and Liability Information . . . . . . . . . . . . . . . . . . . . . . . . . . . . 68
Limited Warranty . . . . . . . . . . . . . . . . . . . . . . . . . . . . . . . . . . . . . . . . . . . . . . . . . . . . . . . . . . . . . . . . . 68
Limitation of Liability. . . . . . . . . . . . . . . . . . . . . . . . . . . . . . . . . . . . . . . . . . . . . . . . . . . . . . . . . . . . . . 69
Index . . . . . . . . . . . . . . . . . . . . . . . . . . . . . . . . . . . . . . . . . . . . . . . . . . . . . . . . 70
TruZoom v1.1 www.aja.com
4

Notices
Trademarks
Copyright
Contacting Support
AJA®, KONA®, Ki Pro®, KUMO® and XENA® are registered trademarks of AJA Video, Inc.,
TruZoom™, TruScale™, Ki Pro Mini™, Io Express™, Io HD
trademarks of AJA Video, Inc. AirPort, Apple, the Apple logo, AppleShare, AppleTalk,
FireWire, iPod, iPod Touch, Mac, and Macintosh are registered trademarks of Apple
Computer, Inc. Final Cut Pro, QuickTime and the QuickTime Logo are trademarks of Apple
Computer, Inc. Avid, Avid Media Composer and Avid DNxHD are trademarks of Avid
Technology, Inc. All other trademarks are the property of their respective holders.
HDMI, the HDMI logo and High-Definition Multimedia Interface are trademarks or
registered trademarks of HDMI Licensing LLC. DVI is a registered trademark of DDWG. All
other trademarks are the property of their respective holders.
Copyright © 2014 AJA Video, Inc. All rights reserved. All information in this manual is
subject to change without notice. No part of the document may be reproduced or
transmitted in any form, or by any means, electronic or mechanical, including
photocopying or recording, without the express written permission of AJA Inc.
When calling for support, have all information at hand prior to calling.
™
, Io™ and “Work. Flow.” are
To contact AJA Video for sales or support, use any of the following methods:
Telephone: +1.530.271.3190
FAX : +1.530.271.3140
Web: http://www.aja.com
Support Email: support@aja.com
Sales Email: sales@aja.com
TruZoom v1.1 www.aja.com
5
DVI /
HDMI
USB
PCIe cable
4K video
SDI video
HDMI
Live Output
Corvid Ultra
processor frame
with TruScale card
4K camera
PC Workstation
with HIB
and RAID
Joystick control panel
Computer
desktop
monitor
ROI DisplayVideo Monitor
Chapter 1: Introduction
Overview
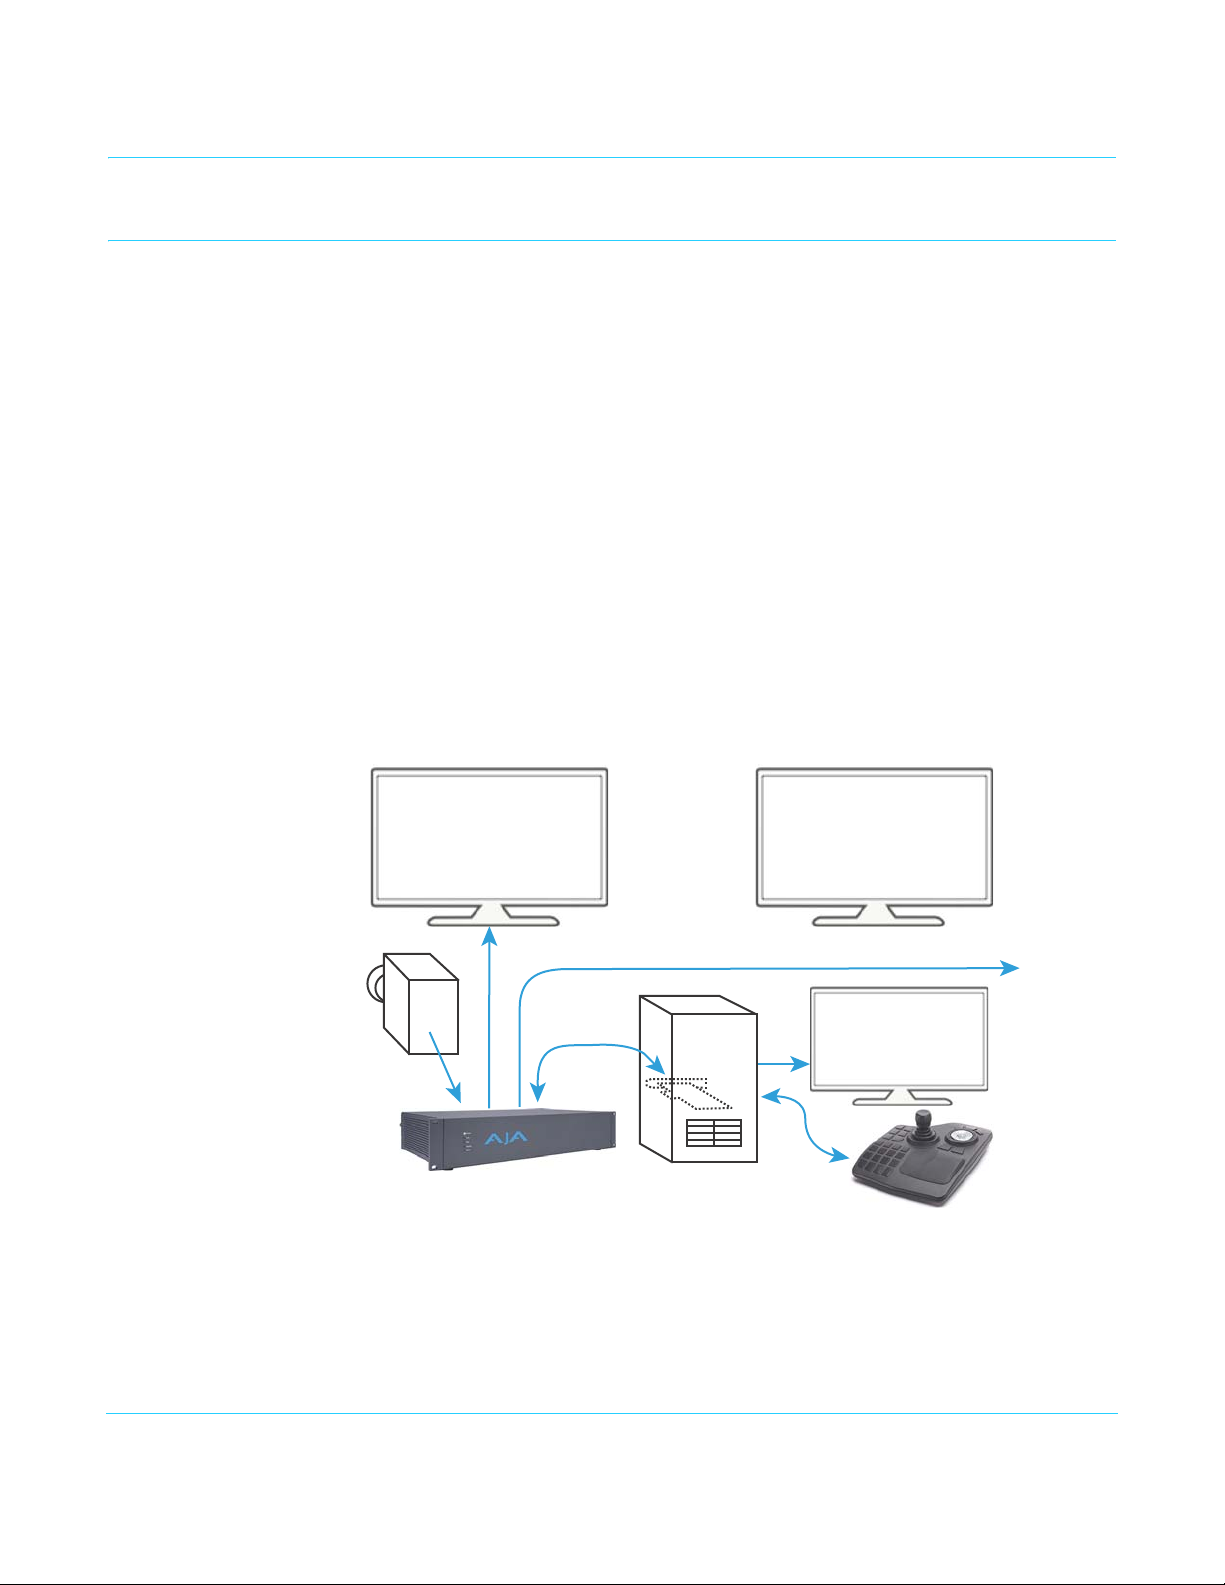
TruZoom provides real-time 4K/UHD recording, playback, and region of interest (ROI)
selection with timeline-based keyframeable control. The power of the TruZoom system
provides unsurpassed flexibility and performance for recording, assembling, and playing
back real-time sports, lecture hall/panel discussions, or courtroom video.
You can eliminate the need for multiple cameras minimizing space and cabling
requirements by using TruZoom with a single, UHD 4K camera coupled with region of
interest selection and playback.
The TruZoom system consists of:
• An AJA Corvid Ultra processing unit
• One or two TruScale scaling engines
• A control panel with joystick
• The TruZoom application software.
The control panel and software operate with a qualified high-performance customerfurnished Windows workstation, including a RAID for high data-rate recording and
playback. (If you use the system for live ROI extraction only, without record or playback, a
RAID is not required.)
Figure 1. TruZoom System
TruZoom v1.1 www.aja.com
6
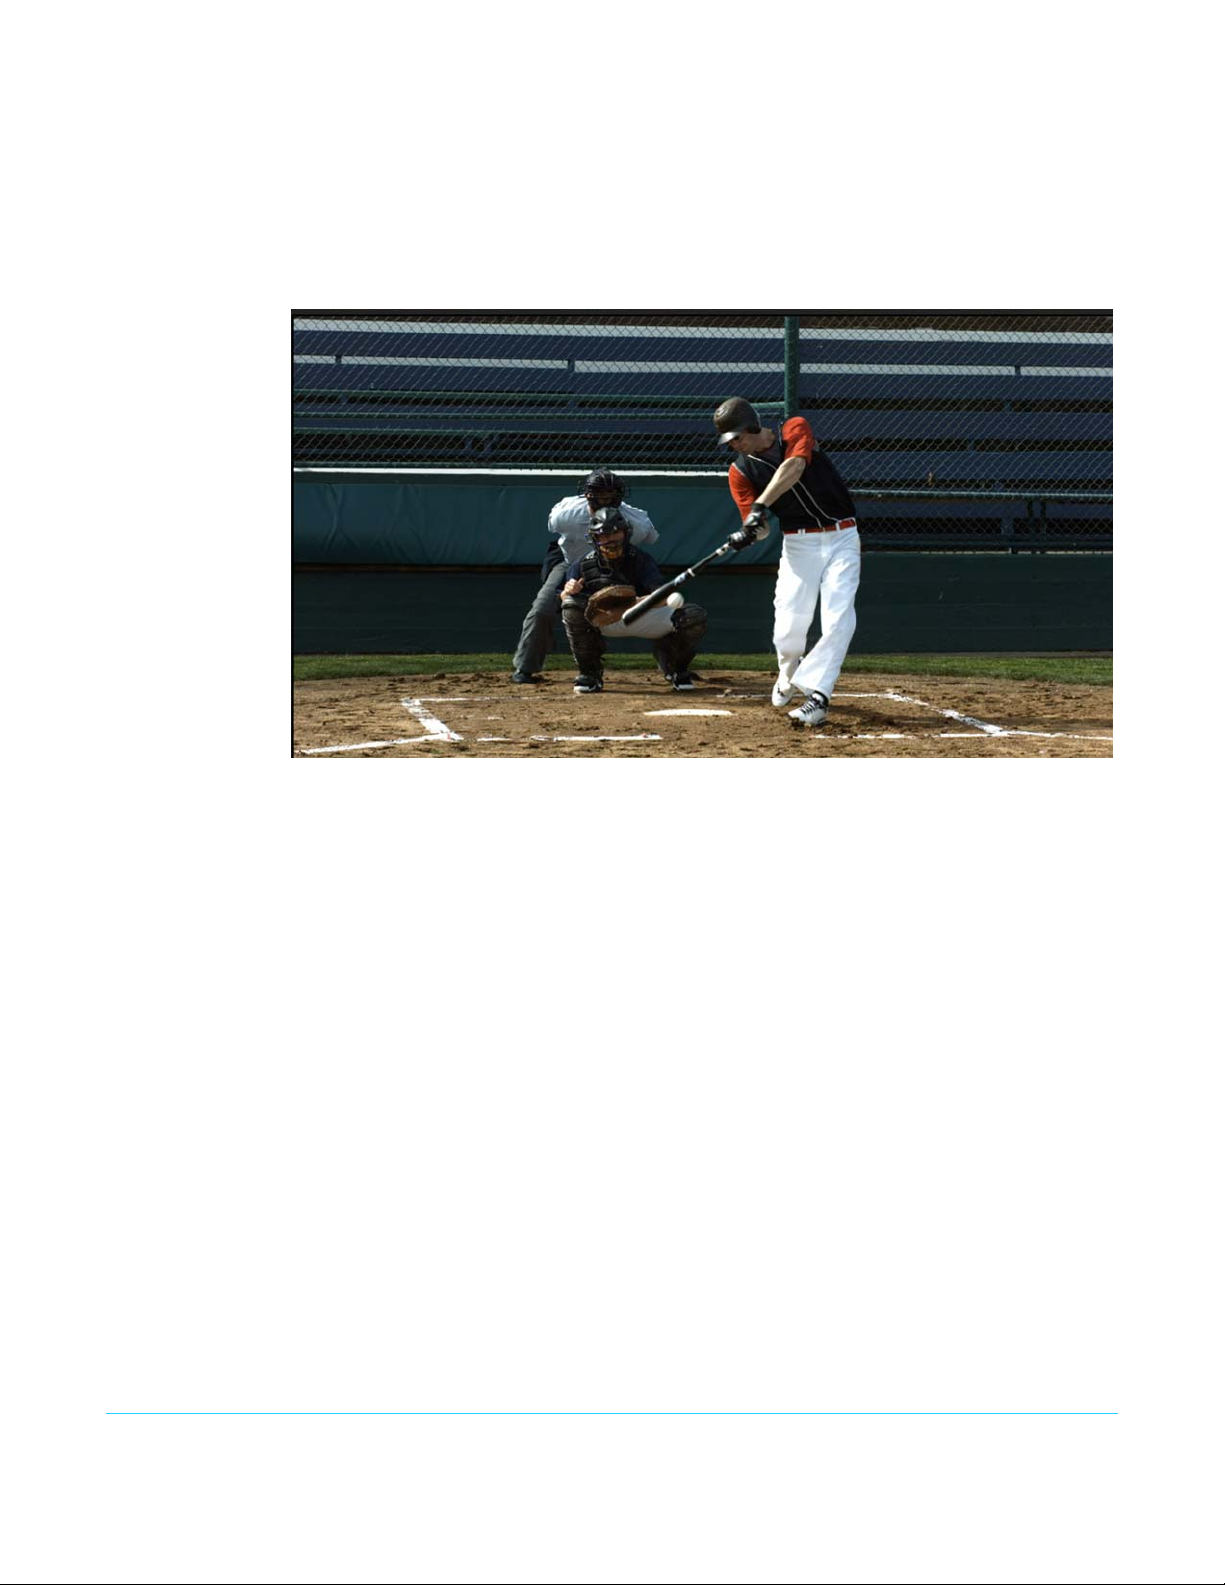
Region of Interest (ROI) Example
The following three figures depict:
• a full-frame 4K video source
• the TruZoom computer screen showing a selected RO
• And the resulting SDI video.
In this example the final ROI SD video image is presented at HD 720p resolution.
Figure 2. Video Source Image
TruZoom v1.1 www.aja.com
7
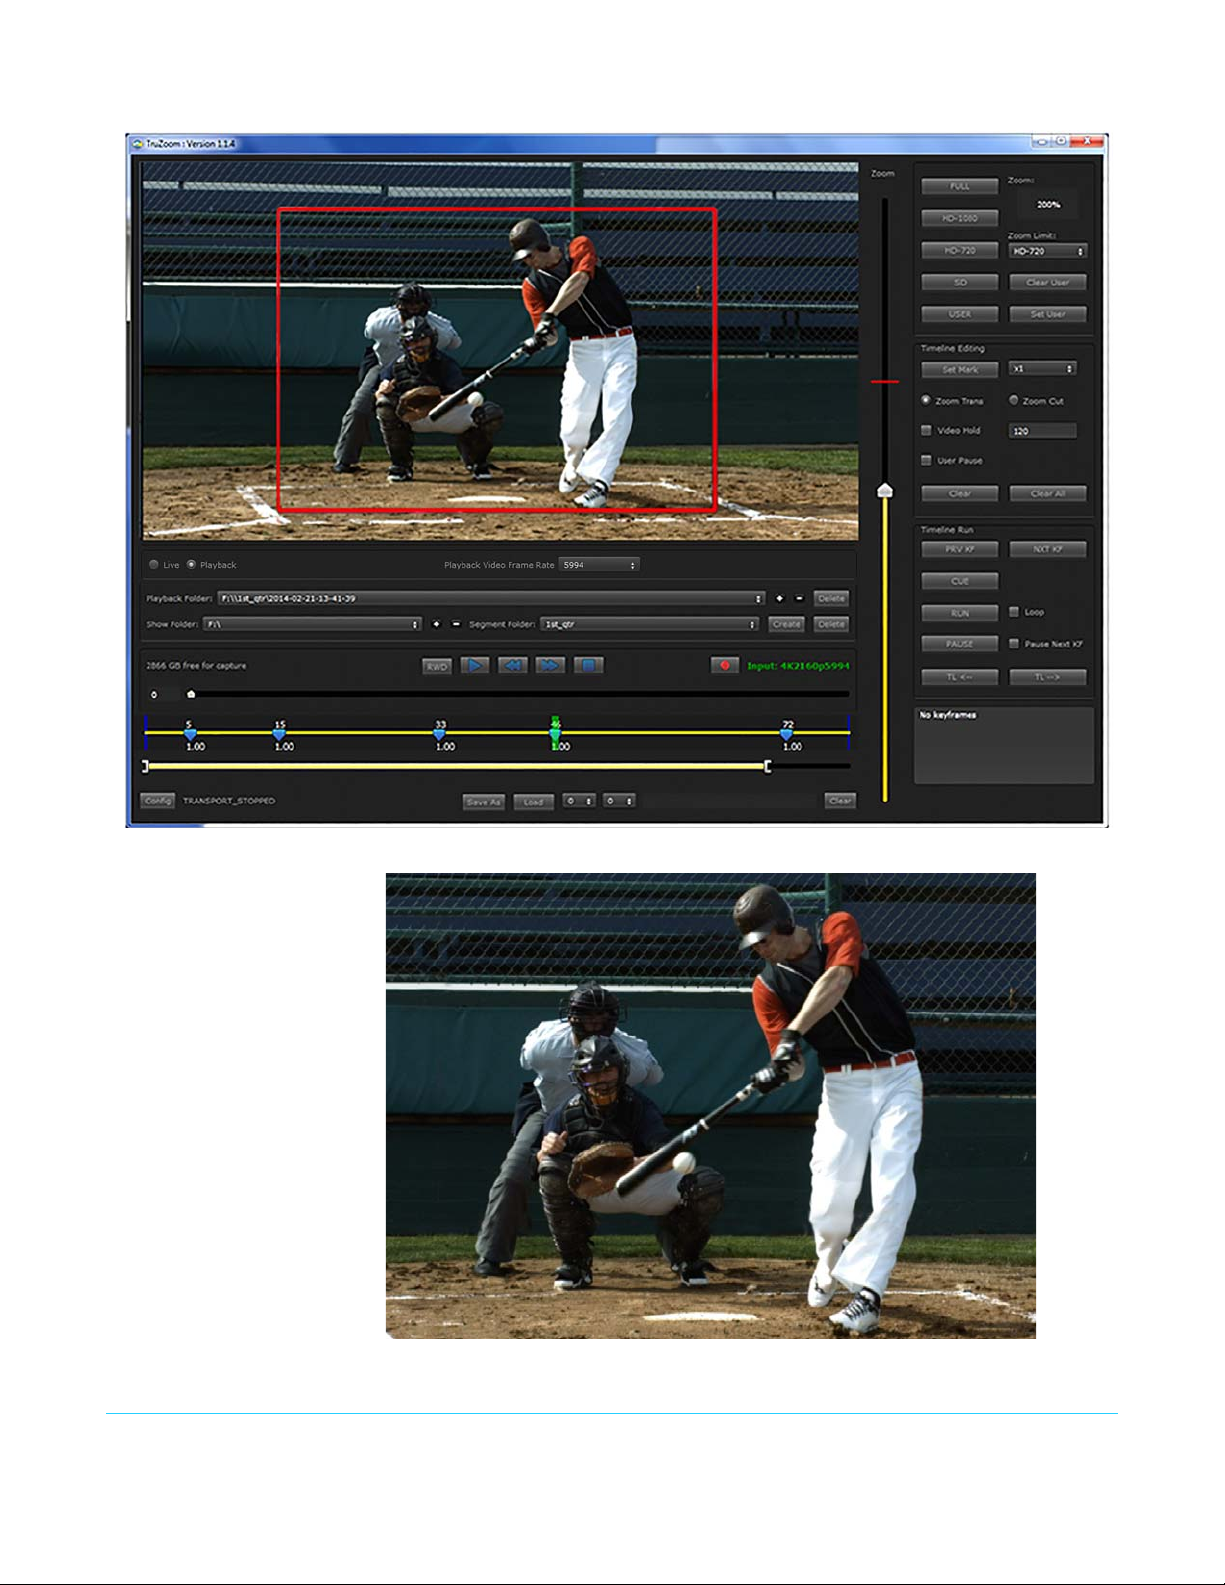
Figure 3. TruZoom Playback Mode UI
Figure 4. Final ROI Output
The actual dynamics of the TruZoom process depicted includes zoom-in and a zoom-out
effects, slow and fast motion playback, and freeze frames, all under keyframeable control.
TruZoom v1.1 www.aja.com
8

Features
• Region of Interest scaling for HD extraction from 4K,UltraHD and HD sources
• High-quality scaling utilizing the AJA Corvid Ultra with TruScale™
• Support for High Frame Rate (HFR) and 4:4:4 workflows
• Work with realtime signals, or recorded uncompressed files
• Instant realtime playback and interaction at the highest quality
• All parameters are keyframeable
• Intuitive interface with on-screen indicators
• Control interfacesInclude:
• Keyboard and Mouse
•Touchscreen
• External joystick and keypad controller
• Optional realtime RAW Debayer firmware for Canon C500
• Compatible with the latest HP workstations running Windows
Hardware Included • Corvid Ultra, with 1 or 2 TruScale options
• USB control panel, with Joystick
Software • TruZoom software plus support tools
In This Manual
Chapter 1 Introduces the product briefly.
Chapter 2 Presents a product overview, showing hardware, connectors, and software controls.
Chapter 3 Explains how to install the product and set up the initial configuration.
Chapter 4 Provides instructions for operating the product.
Appendix A Contains caution, warning, and compliance statements.
Back Matter Contains warranty and Liability information.
Index
TruZoom v1.1 www.aja.com
9
Chapter 2: Product at a Glance
Overview
The TruZoom system consists of:
• AJA Corvid Ultra processing unit
• One or two TruScale scaling engines
• A control panel with joystick and jogwheel
• Host Interface Board (HIB)
•High speed PCIe cable
•TruZoom software.
In a typical system, the control panel and software are installed in a customer-supplied,
RAID equipped Windows workstation with touch-screen and additional video monitors.
Corvid Ultra Frame
Front Side Figure 5. Corvid Ultra Front (default orientation)
Displays and Indicators The Corvid Ultra front has LEDs indicating the following states:
Power - When on (blue), the unit is powered up.
Link - When on (blue), the driver is installed and working and communications has been
established with the host computer.
Ref - When on (blue), the device is locked to reference.
Identify - Reserved for future use.
Alarm - Lights red under any of the following conditions:
• System main FPGA not loaded.
• Frame over temperature.
• Frame power voltage out of range failure
TruZoom v1.1 www.aja.com
10
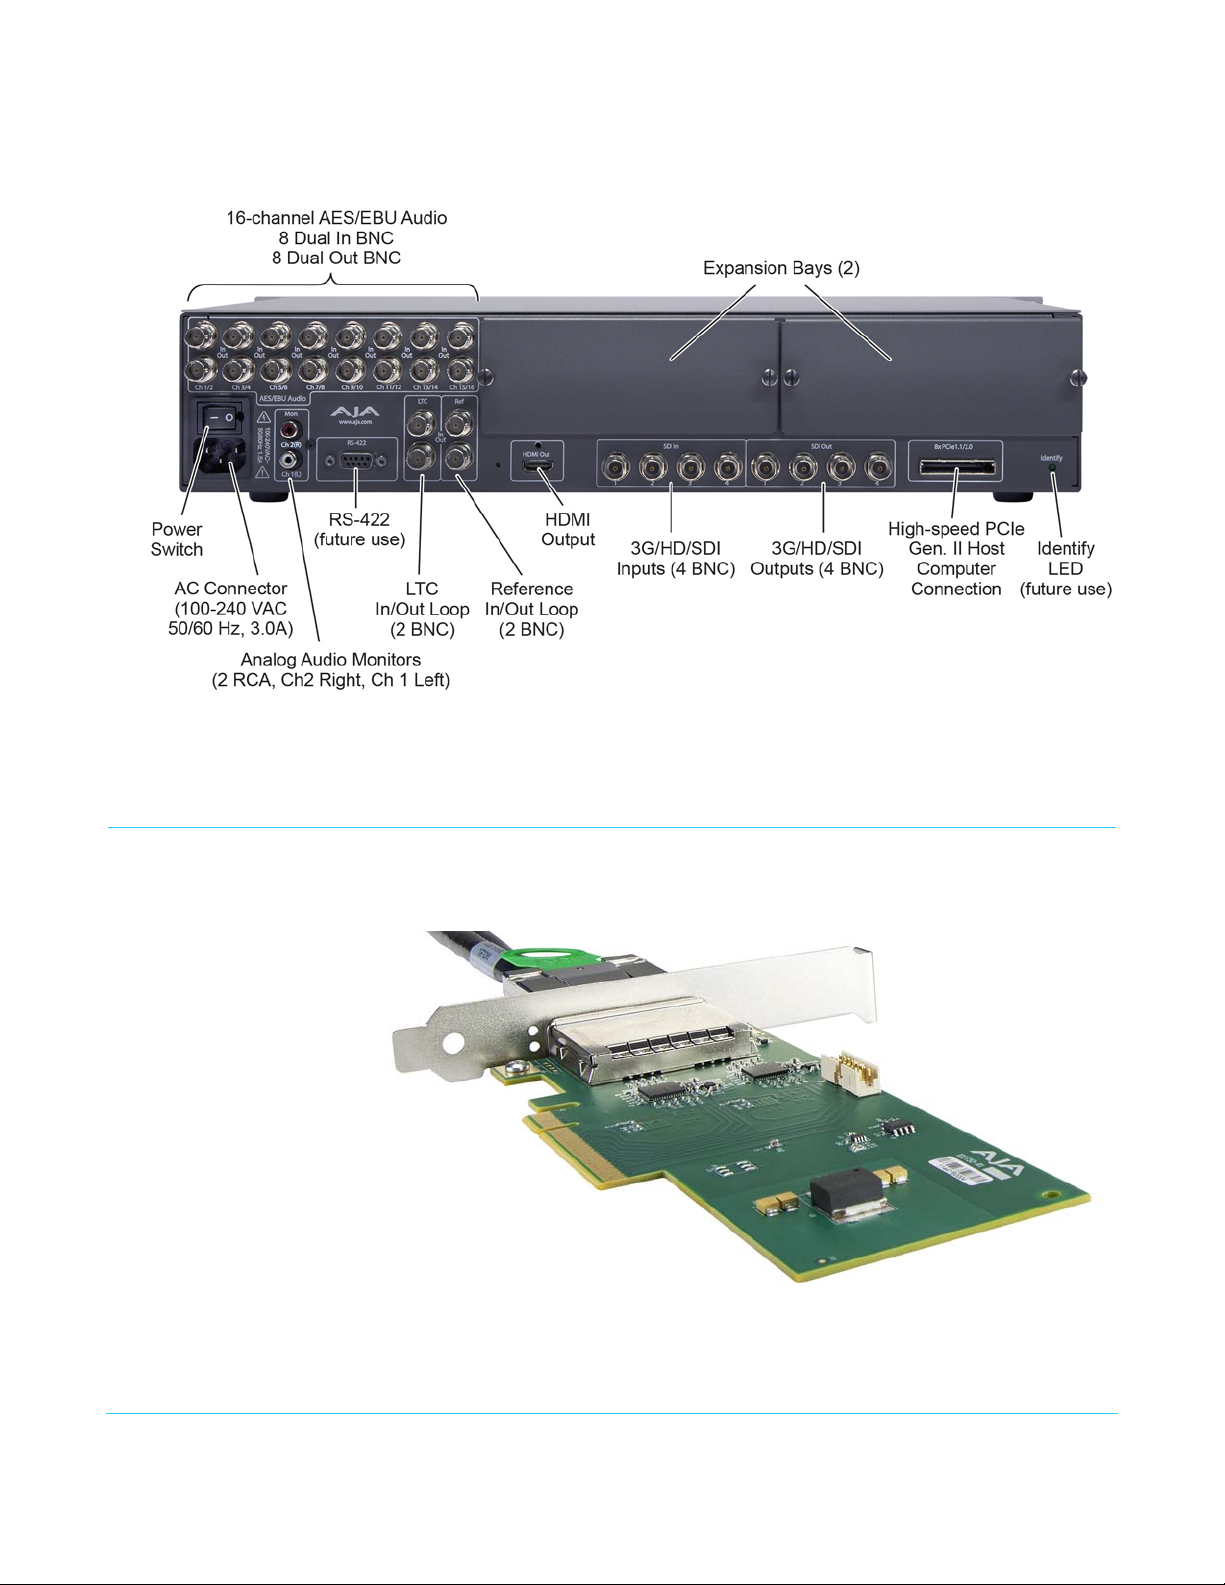
Connector Side The connector side of the Corvid Ultra frame provides audio/video, control, and power
connections.
Figure 6. Corvid Ultra Connector Side
Warning! The expansion bays are used for factory installed options only. Do not
remove the expansion bay covers for any reason.
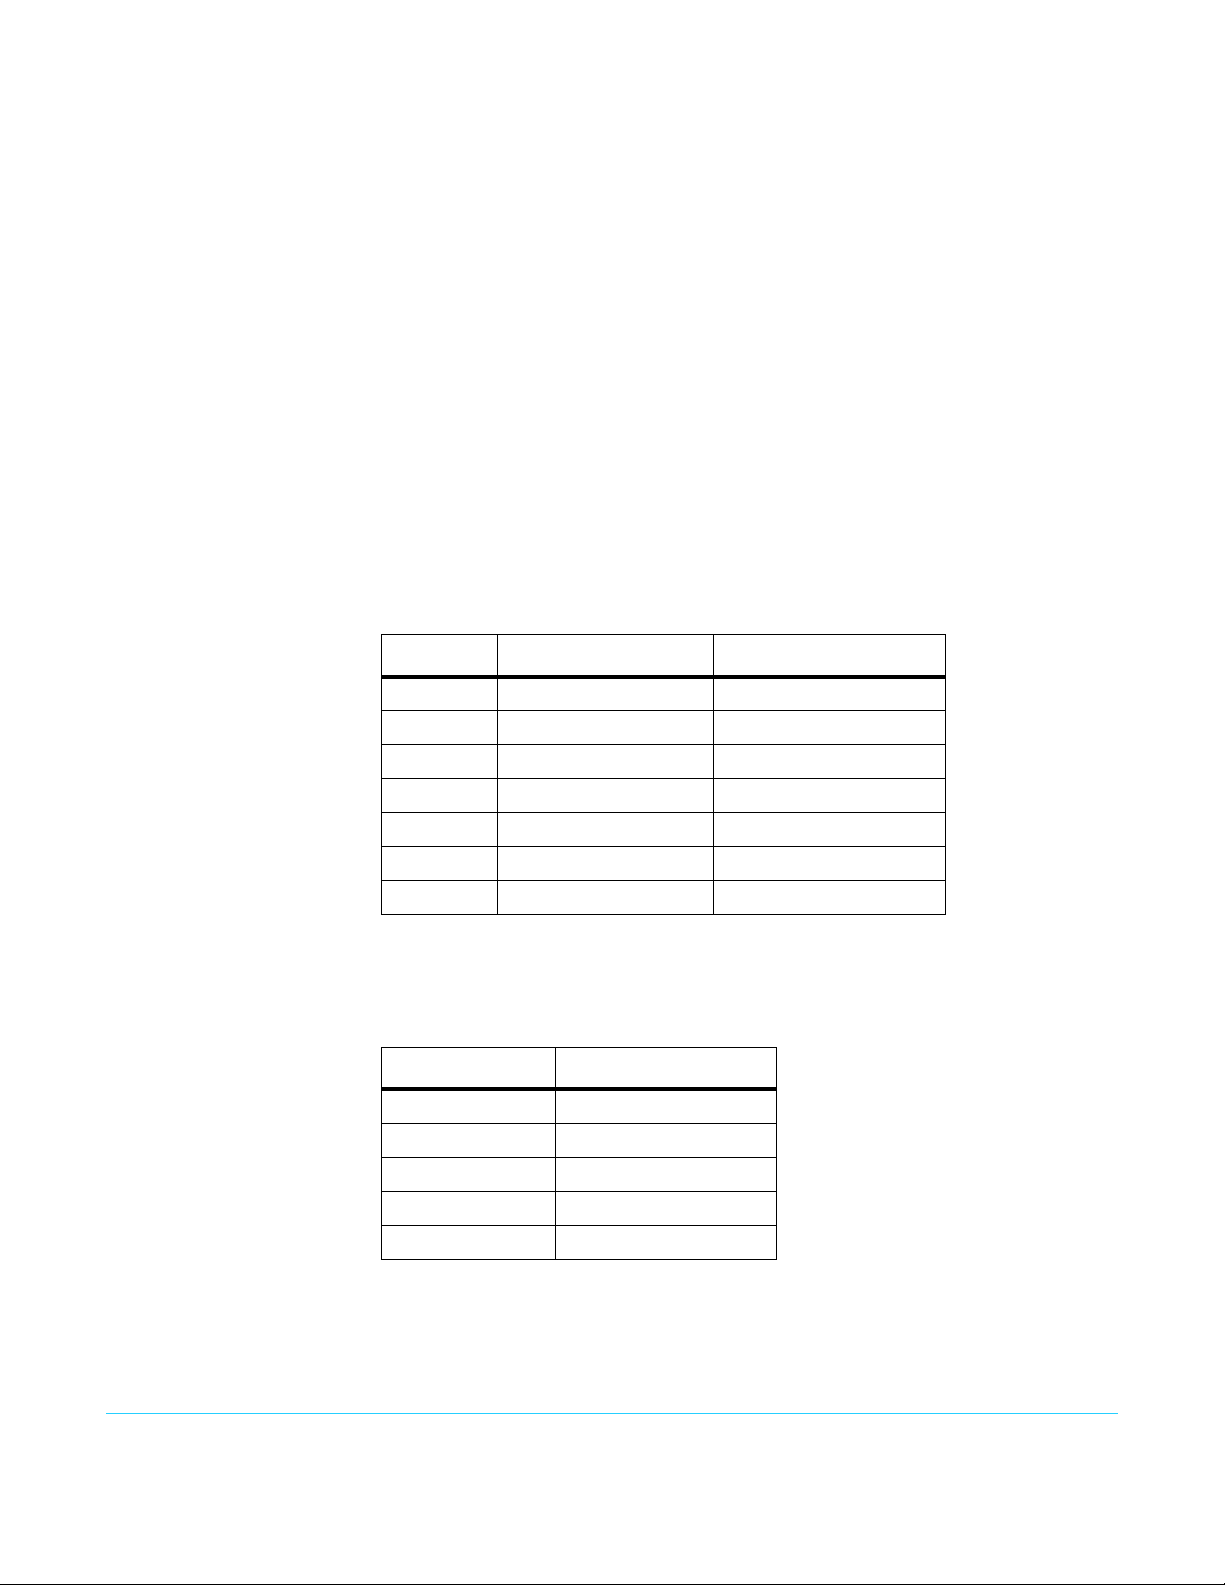
Corvid Ultra Host Interface Board (HIB)
The Corvid Ultra HIB requires a PCIE slot capable of Gen 2 x 8 lanes or better.
Figure 7. Corvid Ultra HIB
PCIe Cable Corvid Ultra uses a high-capacity, high-speed, double cable for maximum data
throughput. The cable provided is 3 meters long.
TruZoom v1.1 www.aja.com
11

Control Panel
The TruZoom control panel features a Joystick, shuttle ring, jog wheel, and several sets of
buttons. It is a USB device, powered via its USB port, and uses a standard game controller
Windows driver.
Figure 8. Control Panel
See“Control Panel Operations” on page 32 for specific information about the control
functions.
TruZoom Computer User-Interface
The TruZoom application runs on a Windows computer connected to the Corvid Ultra
frame providing control via:
• computer touch-screen
•keyboard
•mouse
See"Chapter 4: TruZoom Operation on page 32" for more information.
TruZoom v1.1 www.aja.com
12

Chapter 3: Installation & Configuration
Overview
The following section describes TruZoom system components, and those that must be
provided by the end-user. All components must be installed and configured correctly for
proper operation.
What’s In The Box?
When you unpack your TruZoom shipment you’ll find the following components:
• Corvid Ultra frame containing one or two (optional) TruScale processors
• AC cable for the frame
• Corvid Ultra HIB
•Double PCIe cable
• VM Desktop control panel
NOTE: TruZoom software can be updated at any time. Check the AJA website for the most up-to-
date TruZoom software.
Please save all packaging for return shipping, if necessary.
Customer Furnished Equipment
TruZoom has a very specific set of system requirements to ensure proper operation of the
application. Below is a list of currently supported components and configurations.
Additional configurations are added as they become qualified by AJA. These
specifications are available on the AJA website.
http://www.aja.com/en/software/truzoom#specs
The webpage contains the most up-to-date information on approved TruZoom system
configurations.
Approved Components
Workstation: HP z820 Dual Proc system with Windows 7 installed
RAID controller: LSI 9271-8iCC (configured for RAID 5)
Detailed product information can be found on the LSI website:
http://www.lsi.com/products/raid-controllers/pages/megaraid-sas-9271-
8iCC.aspx
RAID drives: • Eight (8) Intel SSD drives are required.
• Each drive must have a capacity of 240GB or higher.
• All drives in the RAID must be of the same capacity.
• Detailed product information can be found at:
http://www.intel.com/content/www/us/en/solid-state-drives/solid-state-
drives-dc-s3500-series.htm
TruZoom v1.1 www.aja.com
13
SAS/SATA drive cage:: The Athena Power drive cage is the approved drive cage. Each drive cage can house four
(4) SSD drives, so two drive cages are required.
Detailed product information can be found at:
http://athenapower.com/node/99
SAS/SATA cables:: • SFF-8087 (device) to 4xSATA (host) fanout cable
• Two fanout cables are required to connect the LSI RAID controller to the Intel SSD
drives housed in the two Athena Power drive cages.
• These cables can be sourced from several on-line retailers.
Graphics card: High speed GPU equipped graphics card
Computer components: • Touch-screen monitor
• Mouse with scroll wheel
•Keyboard
Workstation PCIe Card
Locations
Two configurations of these PCIe cards that have been tested and approved. Choose one
of the options from the following chart and install the cards into the recommended PCIe
slots on the system’s motherboard.
Table 1. Options for PCIe Card Locations for HP820
Slot Option 1 Option 2
Slot 1 Empty Empty
Slot 2 GPU GPU
Slot 3 Empty/Covered by GPU Empty/Covered by GPU
Slot 4 Corvid Ultra HIB LSI Controller
Slot 5 Empty Empty
Slot 6 LSI Controller Corvid Ultra HIB
Slot 7 Empty Empty
RAID Storage Capacity For 10-bit RGB 4K at a resolution of 4096x2160 and 60fps, total record times in minutes
for the qualified RAID configurations are as follows:
Table 2. RAID Configuration Storage Capacity
SSD Configuration Record Time (minutes)
8 x 240GB 16
8 x 300GB 20
8 x 480GB 32
8 x 600GB 40
8 x 800GB 53
TruZoom v1.1 www.aja.com
14
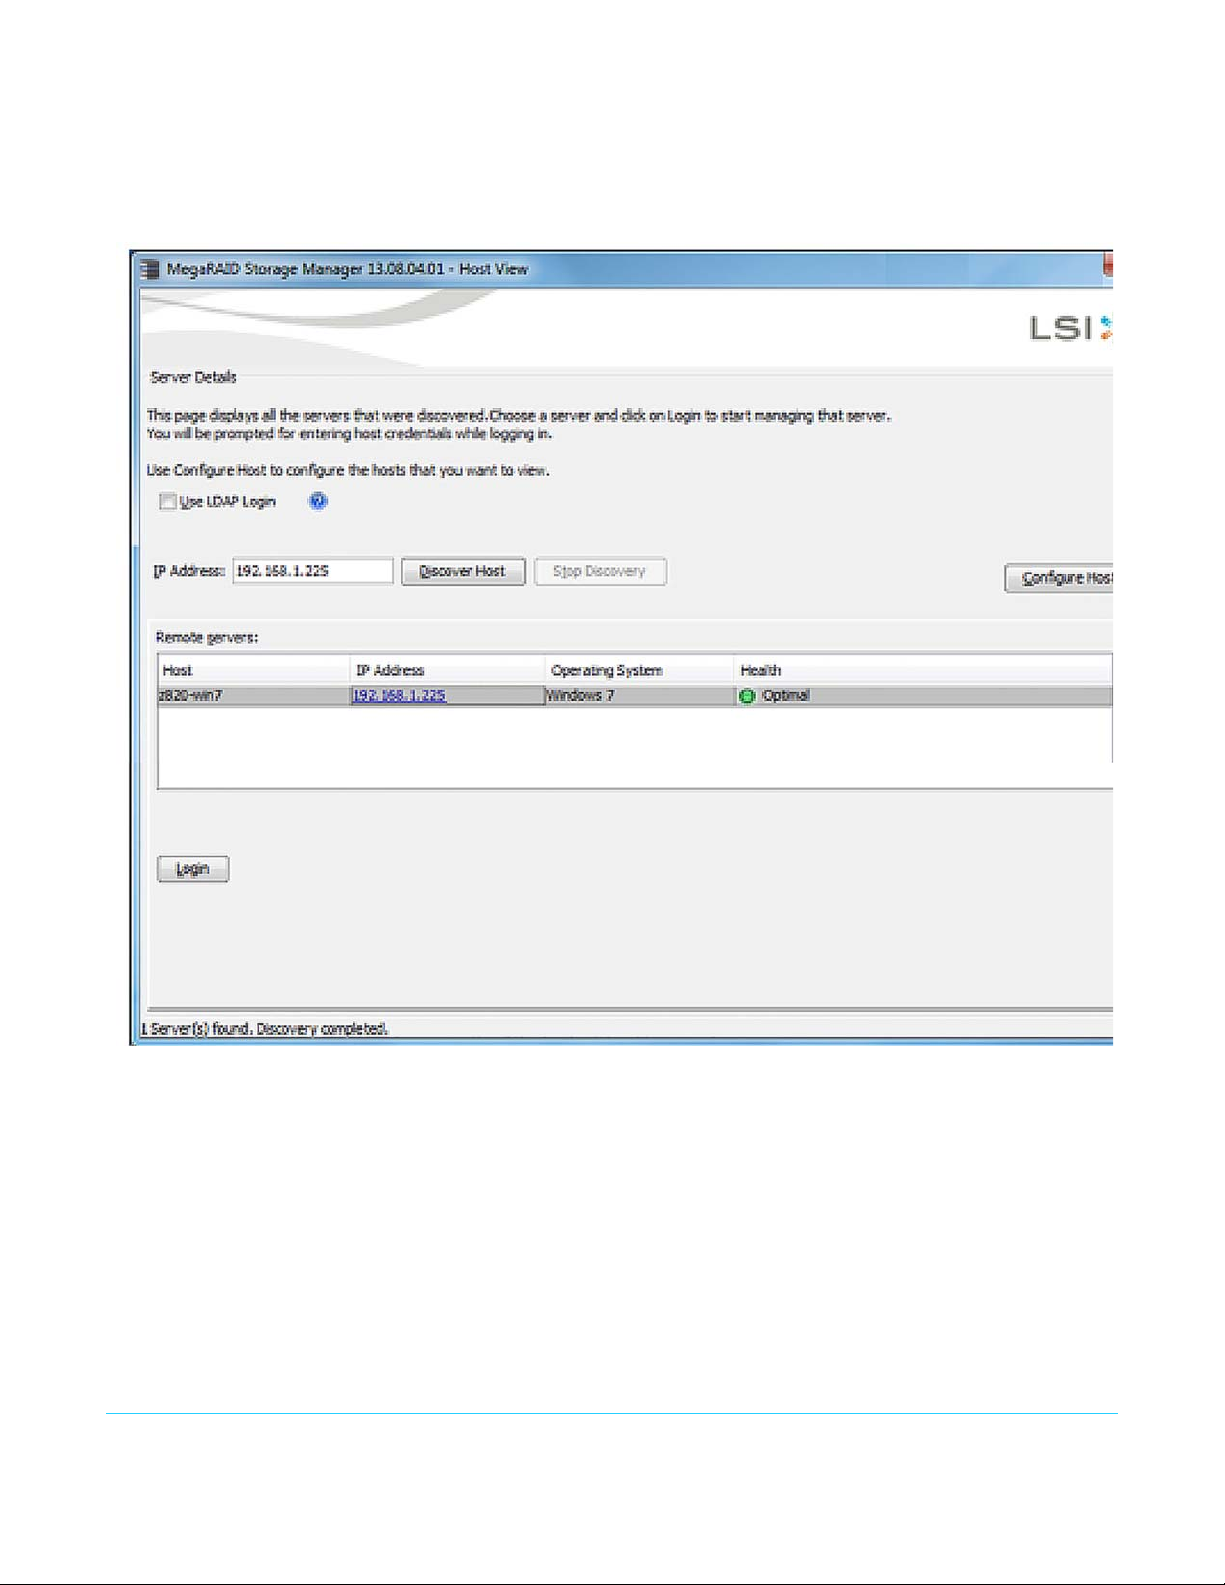
LSI RAID Configuration The following steps will configure the drive array to ensure proper performance to work
with the TruZoom application
.
1. After installing the LSI driver, open the LSI MegaRaid Management application
TruZoom v1.1 www.aja.com
15
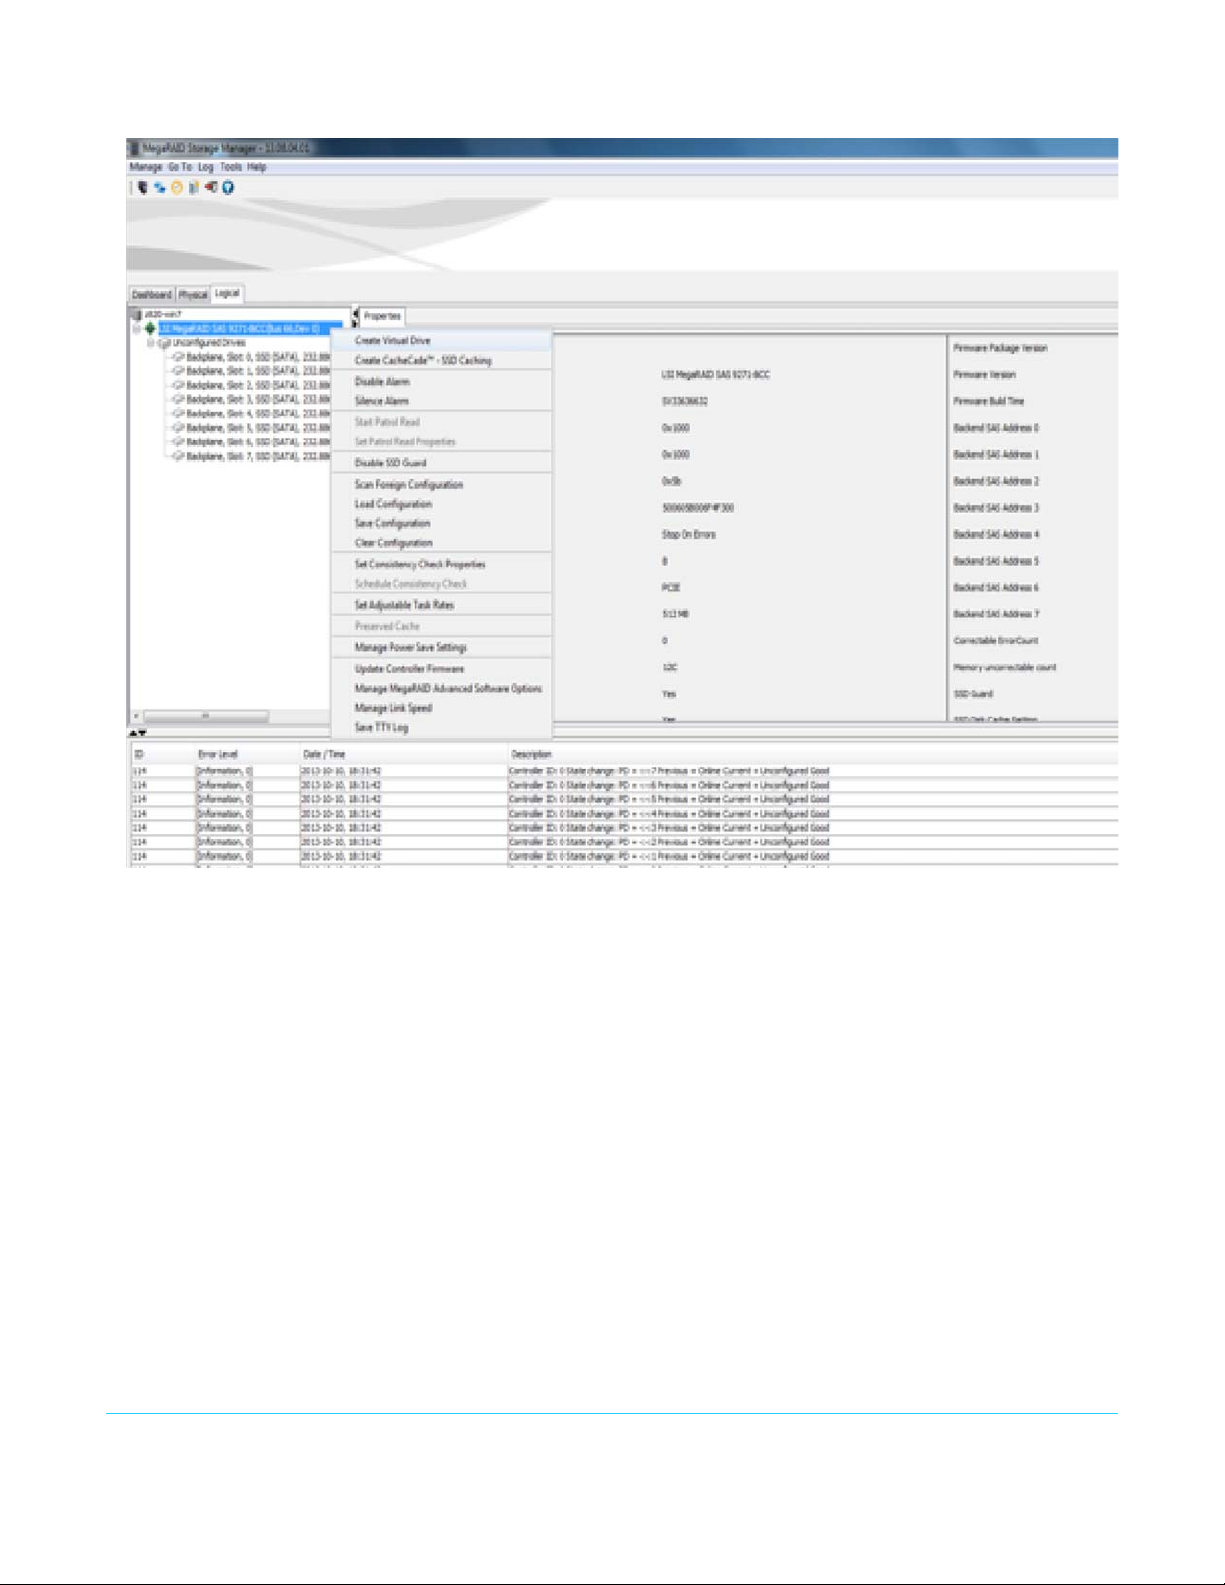
2. Create a new Virtual Drive.
TruZoom v1.1 www.aja.com
16

3. Select Advanced options.
4. Select Raid 0 with Data protection Disabled, Add drives and Create Drive group.
TruZoom v1.1 www.aja.com
17
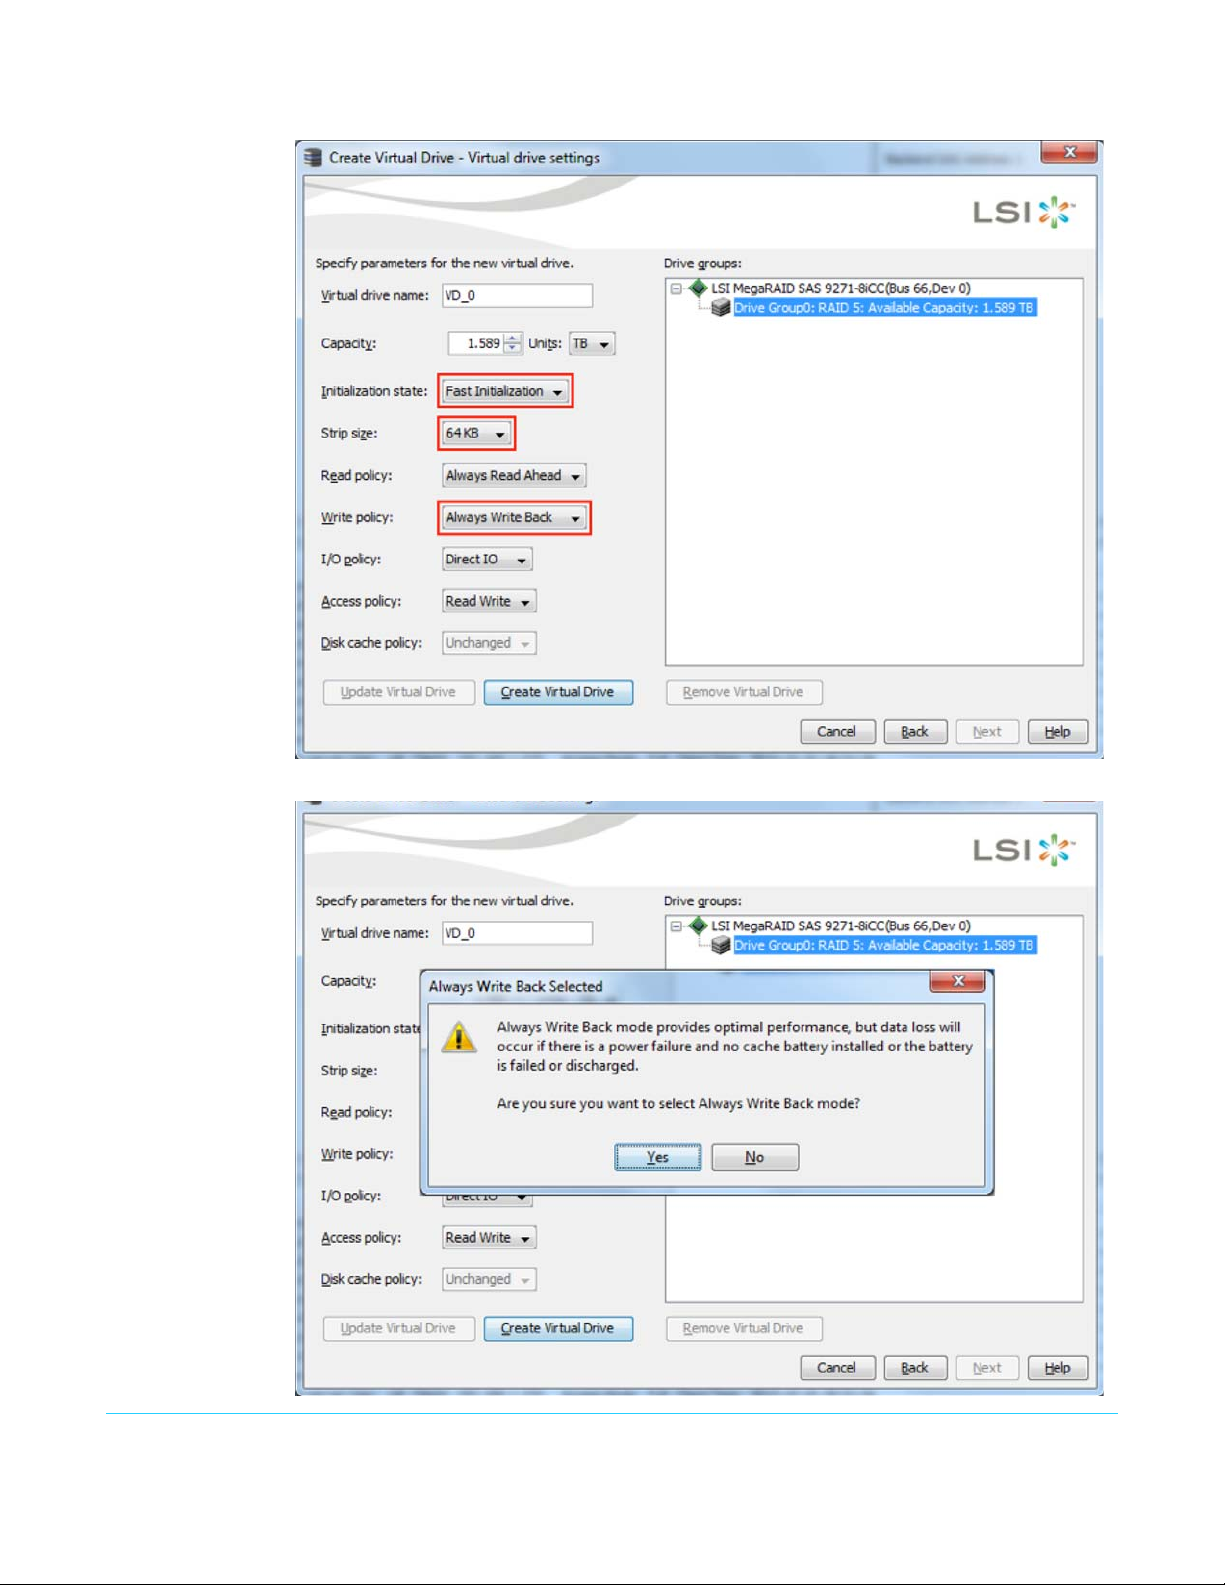
5. Select Fast Initialize, 64K Stripe Size and Always Write Back for Write Policy.
6. Select Yes to the Always Write Back selection for Write Policy.
TruZoom v1.1 www.aja.com
18
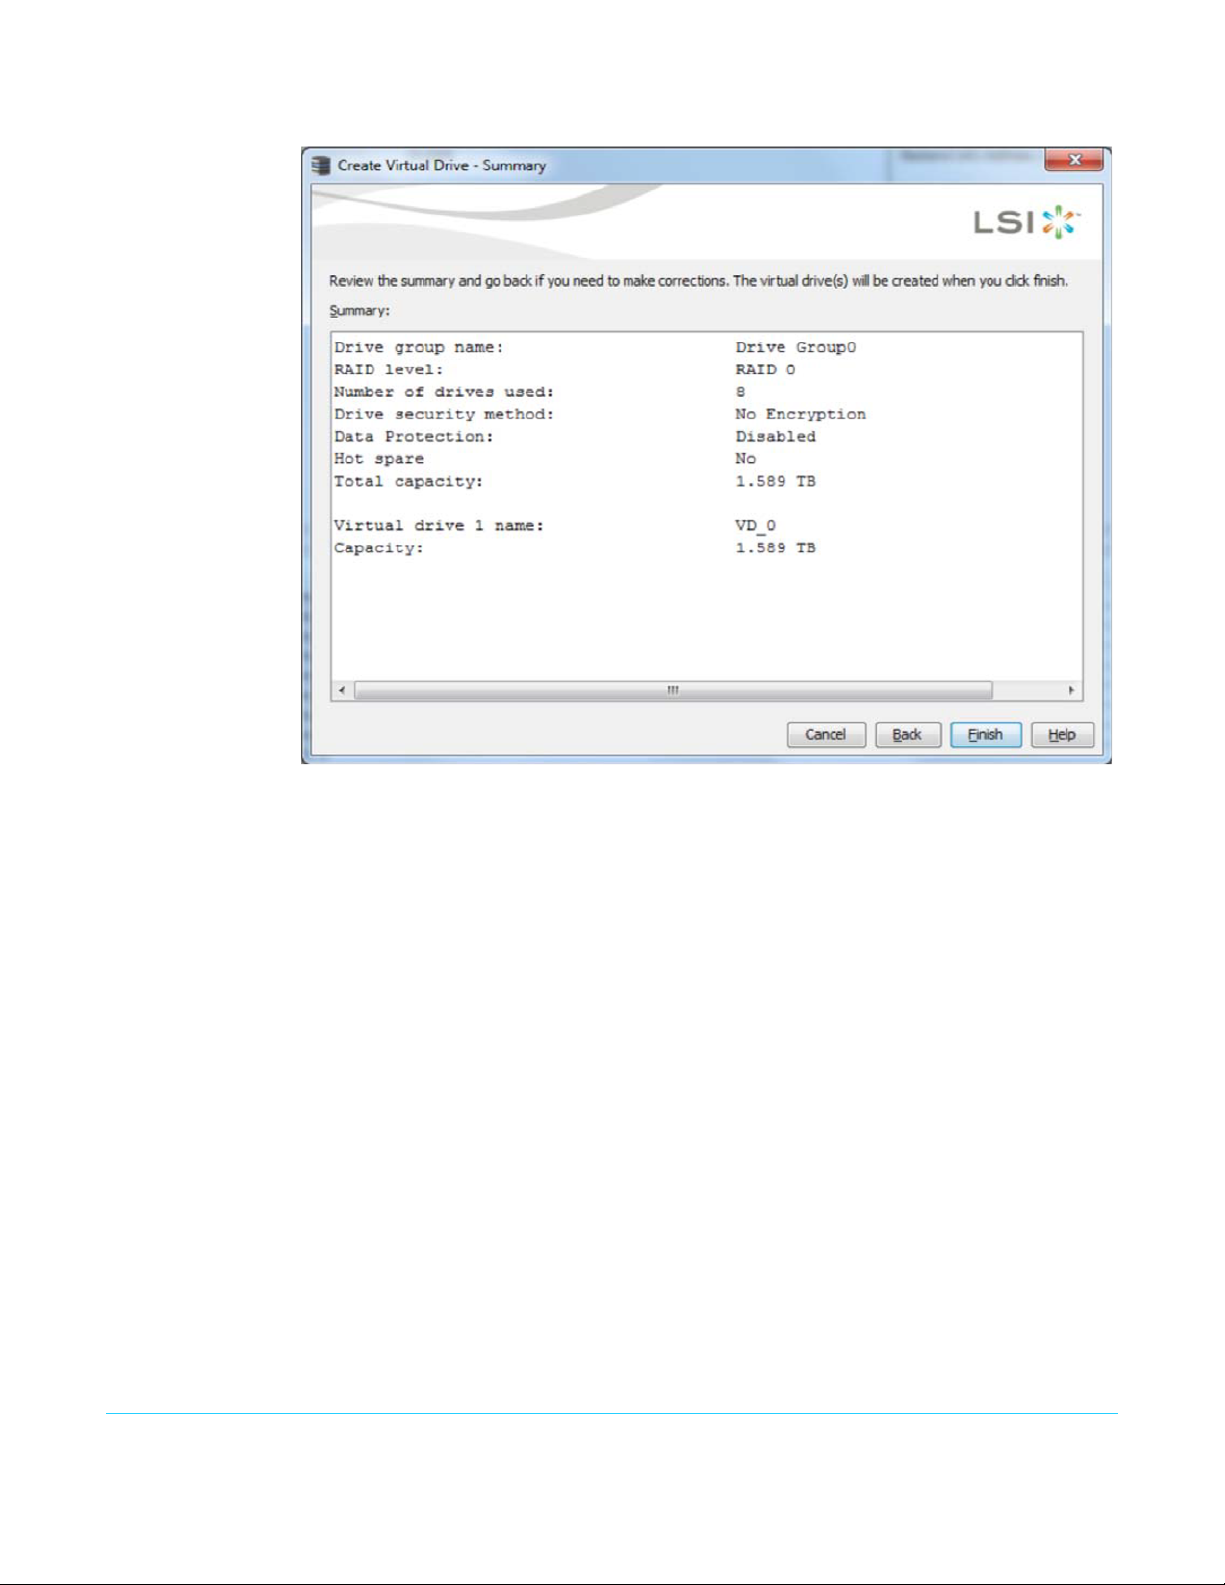
7. Verify setting in the summary.
TruZoom v1.1 www.aja.com
19
Corvid Ultra Processor Frame Installation
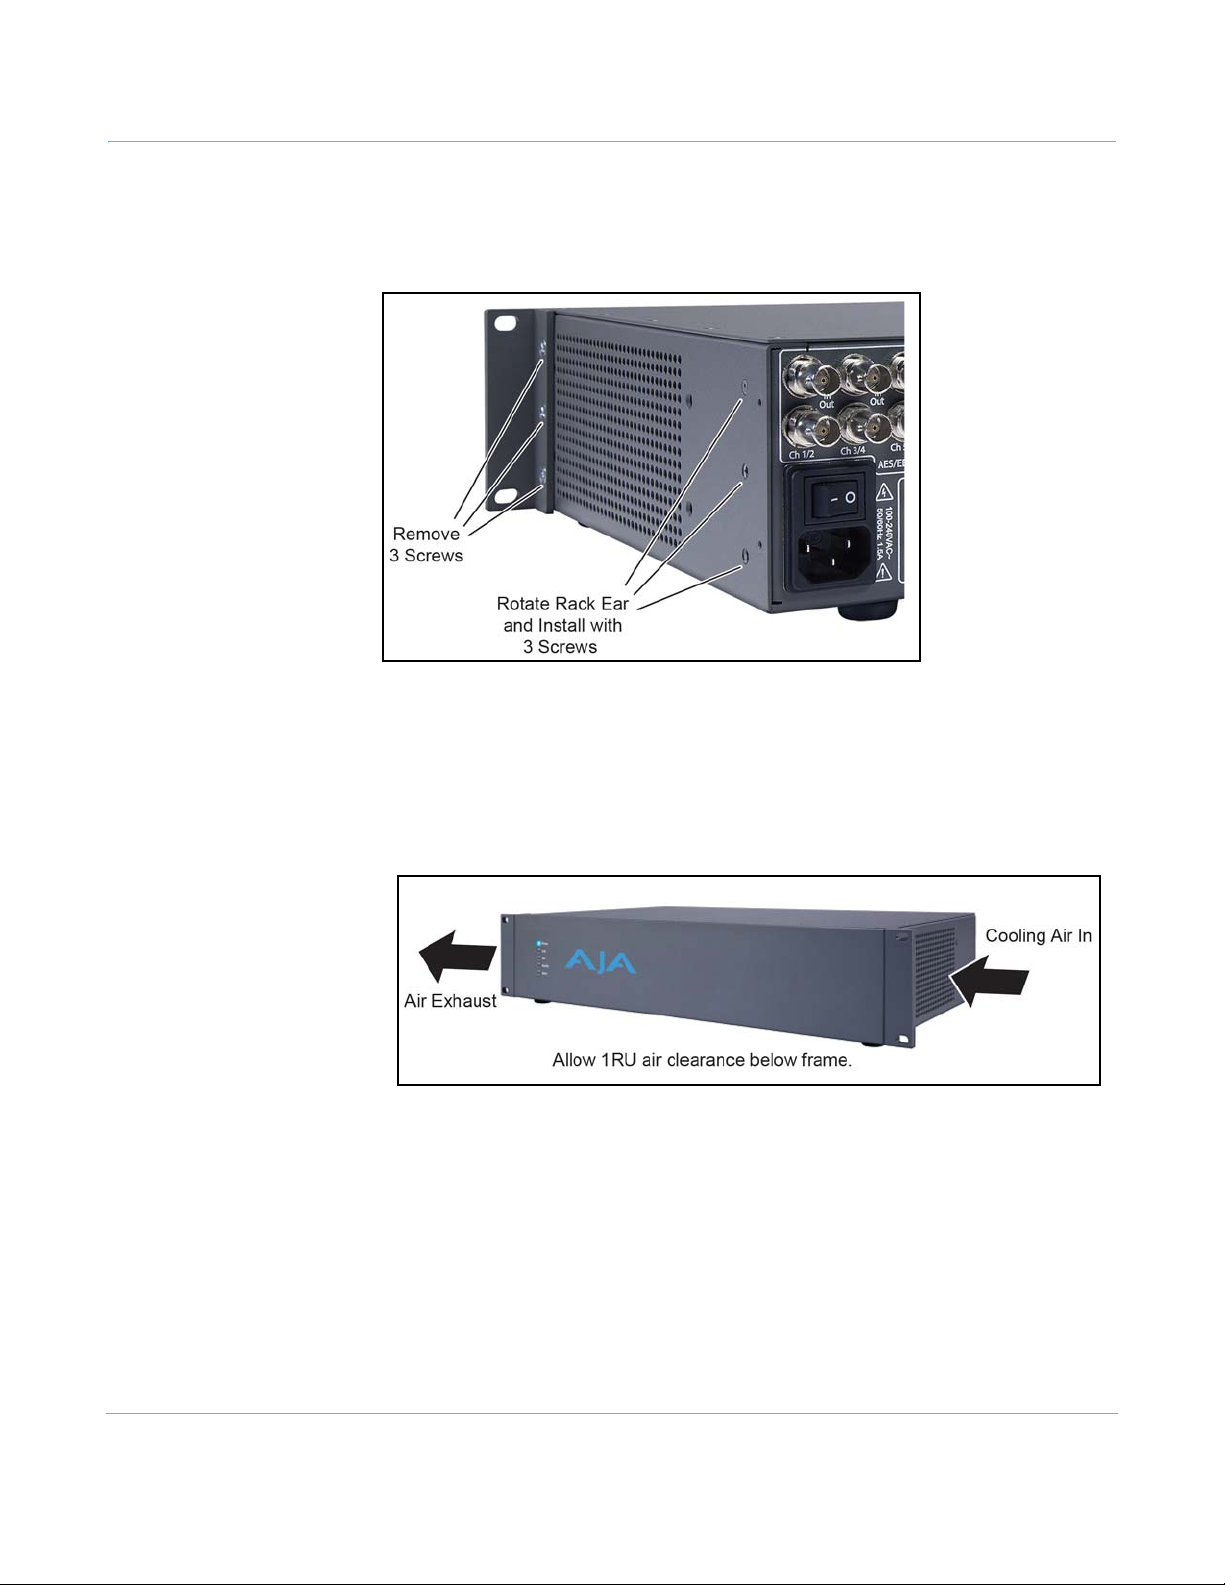
Optionally Reversing the Rack Ears
The unit can be installed so the connectors face the front of the rack, by reversing the
rack ears on each side of the frame (Figure 9).
Figure 9. Reversing the Frame’s Rack Ears
Rack Installation If the frame is installed immediately above other equipment in a rack, the rubber feet on
the bottom of the frame may need to be removed for clearance.
Cooling Internal air flow is directed by fans through the signal processing frame. From the front
HIB Installation and Cabling
(LED indicator side) of the frame, the air flow direction is from right to left (Figure 10).
Figure 10. Cooling Airflow Direction
Do not obstruct the side vents, and allow sufficient space within the equipment rack for
airflow to and from the sides of the frame.
Caution! Use anti-static practices whenever handling circuit board components, to
prevent possible damage from static discharge.
1. With the PC powered off, and using anti-static practices, open the chassis of the host
PC and install the Corvid Ultra HIB into a Gen 2 x 8 lane slot, or better.
2. With both the host PC and the Corvid Ultra frame powered off, connect the PCIe
cable between the two units.
TruZoom v1.1 www.aja.com
20
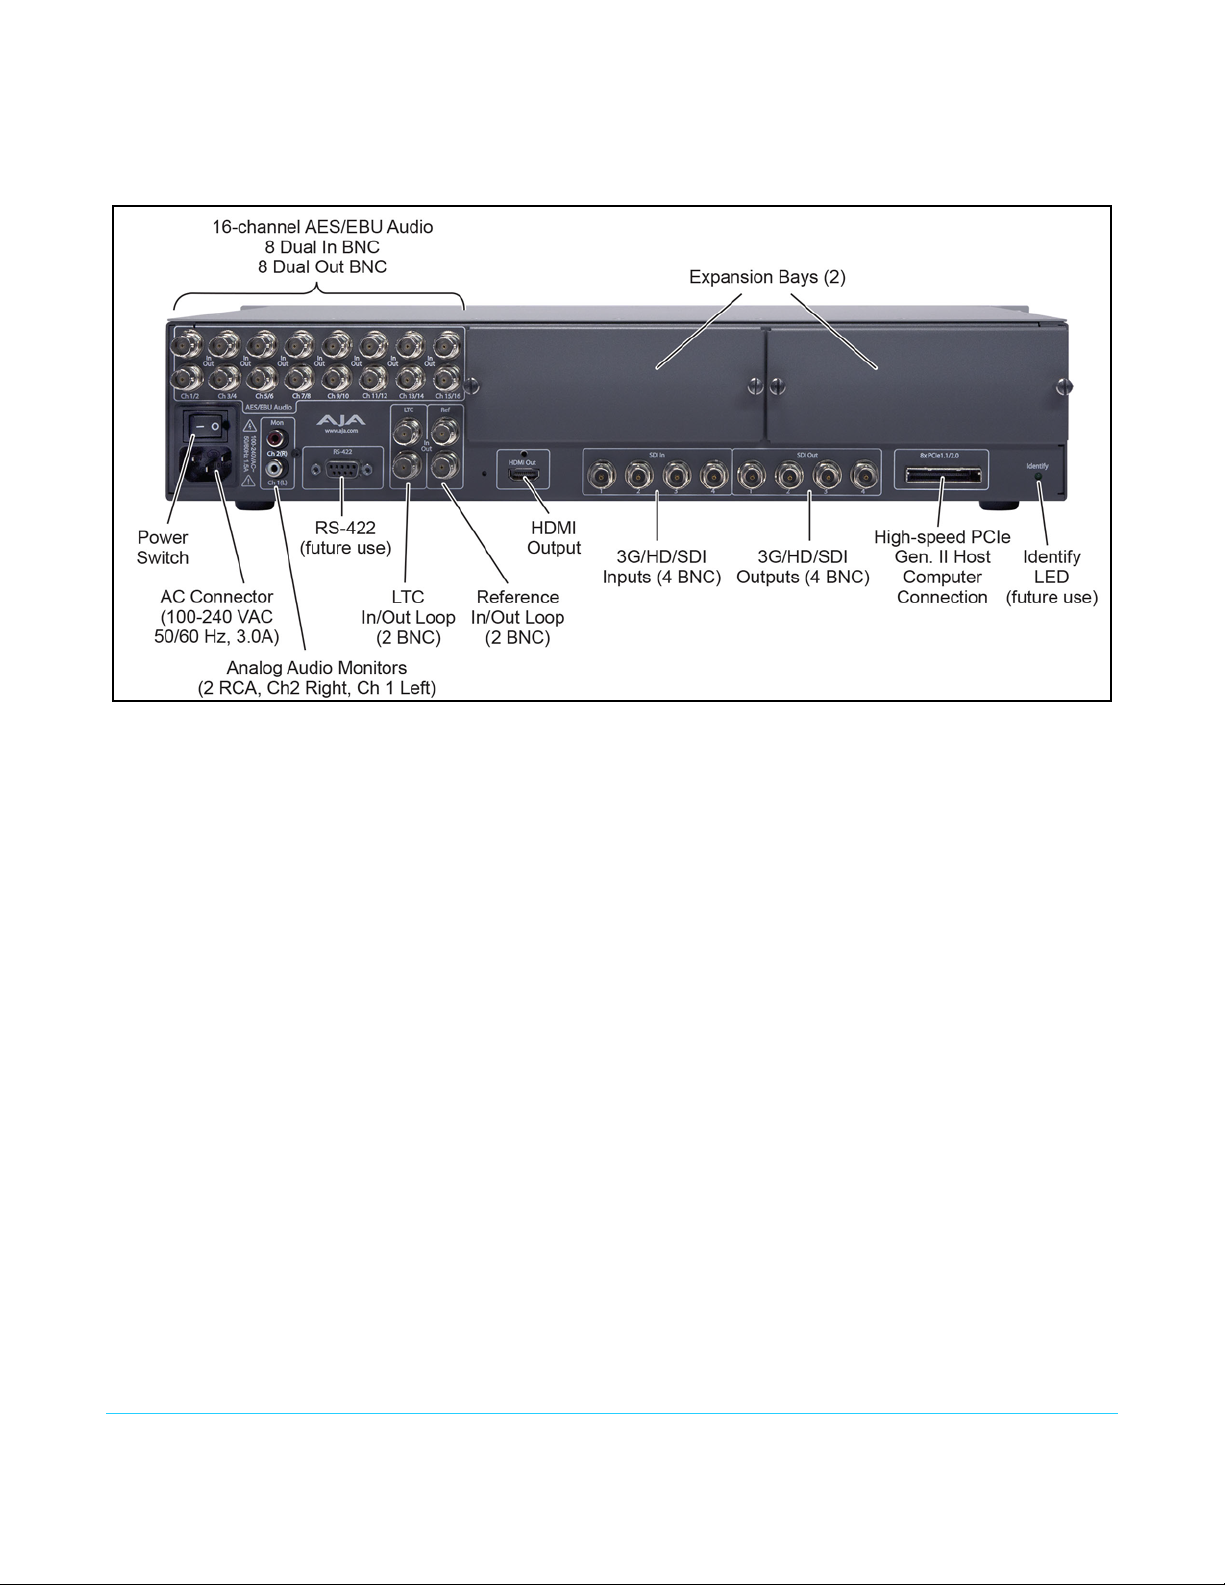
Other System Cabling
With the Corvid frame power still off, connect the reference, video, and audio cabling as
required for your application (Figure 11).
Figure 11. Corvid Ultra System Connections
Warning! The expansion bays are used for factory installed options only. Do not
remove the expansion bay covers for any reason.
Reference Signal Any reference signal should be terminated (75 Ohm) or if looped through should be
terminated at the end of the reference signal chain.
Canon RAW Input
Cabling
IMPORTANT: Camera connections to Corvid Ultra must be made as follows:
TruZoom can take input in RAW format from Canon C500 cameras. When the camera is
configured for 24, 25, or 29.97 fps, a single cable is connected to the Corvid Ultra frame.
When the camera is configured for 50 or 59.94 fps, then two cables are connected.
• Camera output 3G-SDI-1 connects to input SDI 1 on the Corvid Ultra
• Camera output 3G-SDI-2 connects to input SDI2 on the Corvid Ultra
If these cables are crossed, video frames will be recorded and play out in the wrong order.
TruZoom v1.1 www.aja.com
21
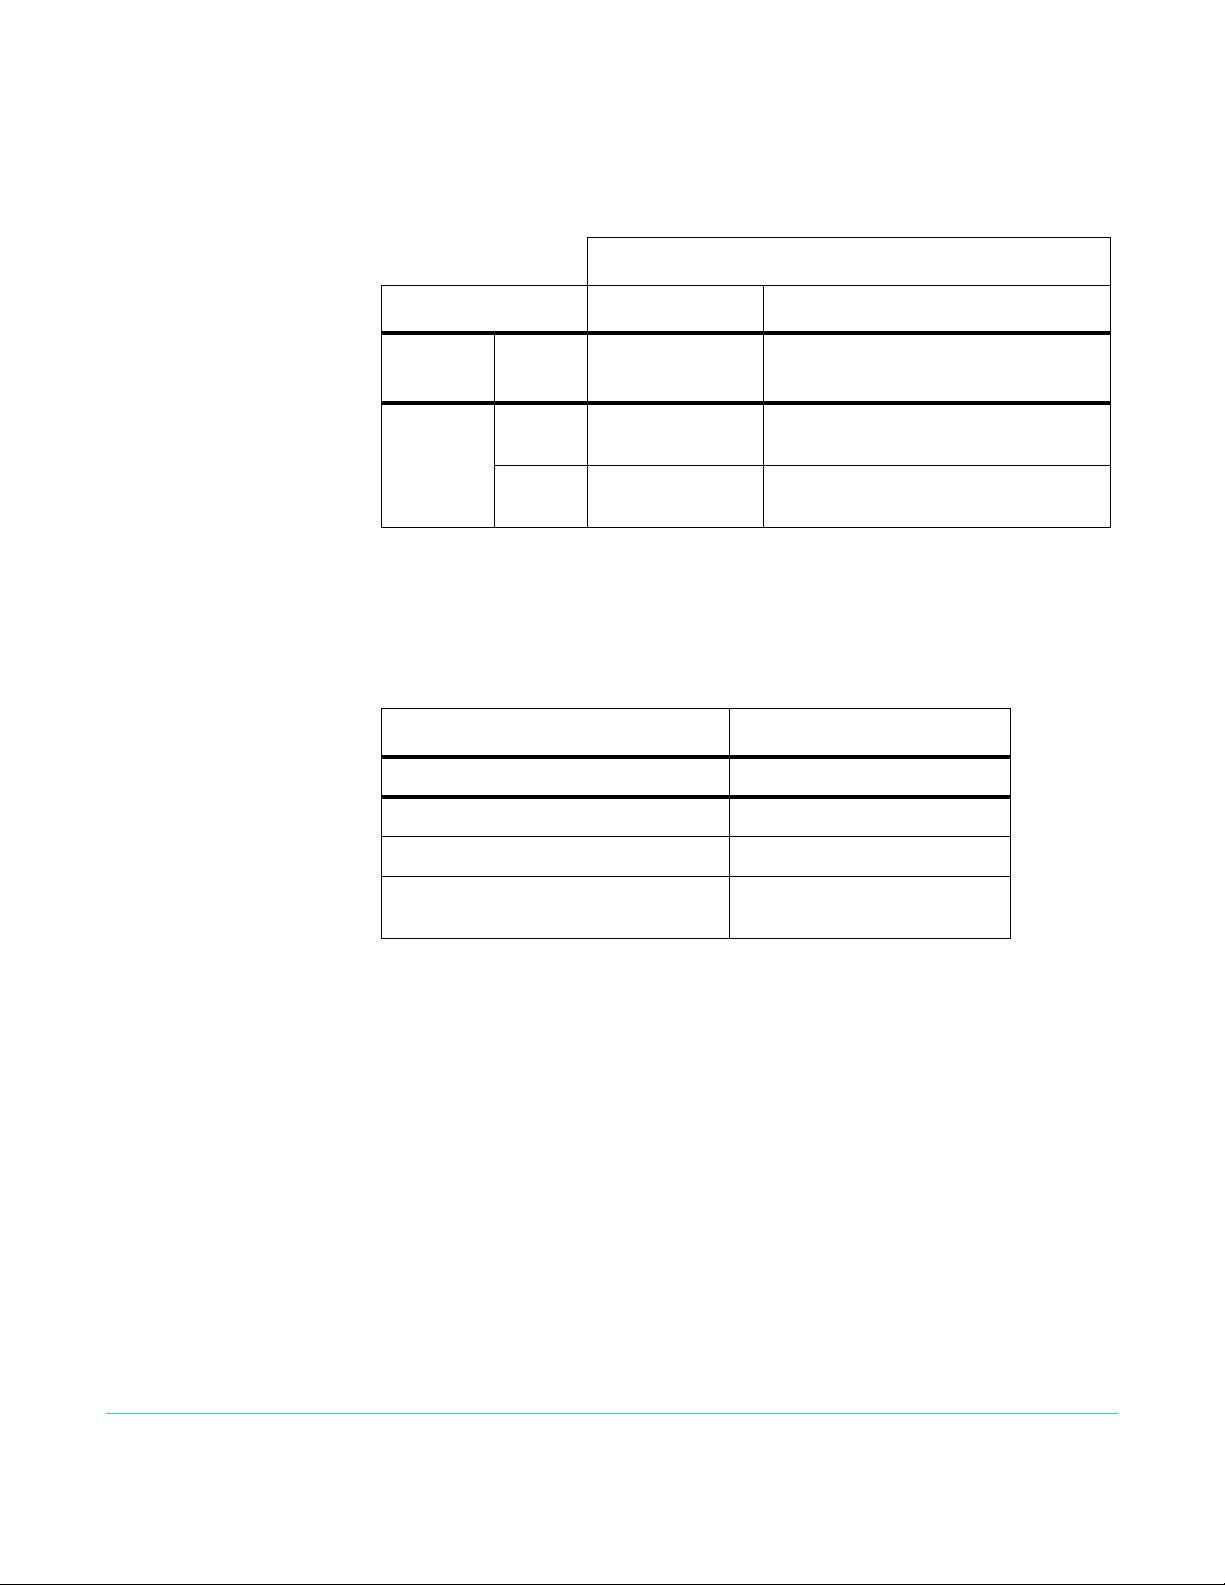
Video Outputs The Corvid Ultra Video signals on the output BNCs vary depending on the configured
output format and number of scalers installed. See “Video Output” on page 31 for more
information.
Table 3. Outputs by Format With One or Two Scalers
SDI Output Mode
Scalers Quad 1080p, 720p, 1080i
One Scaler
Installed
Two
Scalers
Installed
Scaler 1
only
Scaler 1 Scaled image on
Scaler 2 Not used 2 identical copies of full raster
Scaled image on
outputs 1, 2, 3, 4
outputs 1, 2, 3, 4
Four identical copies of scaled image on
outputs 1, 2, 3, 4
2 identical copies of scaled image on
outputs 1 and 2
downscaled image on outputs 3 and 4
HDMI Output An HDMI monitor output is also available on Corvid Ultra scaled as indicated in the
following table.
.
Table 4. HDMI Outputs by Format
SDI Output Mode HDMI Output
1080i Scaled 1080 i
720p Scaled 720p
1080p Scaled 1080p
Quad Unscaled Quad HD up to 30 fps
(alternate frames as 50/60 fps)
TruZoom v1.1 www.aja.com
22
 Loading...