

Page 1

-i Í- . K . ■ í-íi ,4j¡;V -il s; -■ I ’■; r ■■ ,-.ji ■■■ ~r S H' ,': t'i'-: ■ ■ .
COMPA
^ M iPJL'iirj ■ 4 kl
SISTEMA EST
COMPAGOS
..........
CHAINE STEREO AVEC LEC
-MQO
ie^-!
îïï..;_ . •
: ü -'."J fl m>]p>if4»i
■■ ■
OPERATING INSTRUCTIONS
MANUAL DE INSTRUCCIONES
MODE D'EMPLOI
En (English)
E (Español)
8Z-CLB-913-01
990401AYK-H-9
For assistance anci information,
call toll free 1-800-BUY^AIWA.
(Unite(i States and Puerto Rico)
E (Erançais)
(fllOi®
DIGITAL AUDIO
Page 2
ENGLISH
WARNING
TO REDUCE THE RISK OF FIRE OR ELECTRIC
SHOCK, DO NOT EXPOSE THIS APPLIANCE TO
RAIN OR MOISTURE.
CAUTION
RISK OF ELECTRIC SHOCK
DO NOT OPEN
“CAUTION:TO REDUCE THE RISK OF
ELECTRIC SHOCK,
DO NOT REMOVE COVER (OR BACK).
NO USER-SERVICEABLE PARTS INSIDE.
REFER SERVICING TO QUALIFIED
SERVICE PERSONNEL.”
Explanation of Graphical Symbols;
The lightning fiash with arrowhead symboi,
within an equiiaterai triangie, is intended to
alert the user to the presence of uninsulated
“dangerous voltage” within the product’s en
closure that may be of sufficient magnitude to
constitute a risk of electric shock to persons.
The exclamation point within an equilateral
triangle is intended to alert the user to the
presence of important operating and mainte
nance (servicing) instructions in the literature
accompanying the appliance.
PRECAUTIONS
7 Condensation - Moisture may form on the CD pickup lens
when:
- The unit is moved from a cold spot to a warm spot
- The heating system has just been turned on
- The unit is used in a very humid reom
- The unit is cooled by an air conditioner
When this unit has condensation inside, it may not function
normally. Should this occur, leave the unit for a few hours, then
try to operate again.
8 Wall or ceiling mounting - The unit should not be mounted on
a wall or ceiling, unless specified in the Operating Instructions.
Electric Power
1 Power sources - Connect this unit only to power sources
specified in the Operating Instructions, and as marked on the
unit.
2 Polarization - As a safety feature, some units are equipped
with polarized AC power plugs which can only be inserted one
way into a power outlet. If it is difficult or impossible to insert the
AC power plug into an outlet, turn the plug over and try again.
If it still does not easily insert into the outlet, please call a
qualified service technician to sen/ice or replace the outlet. To
avoid defeating the safety feature of the polarized plug, do not
force it into a power outlet.
3 AC power cord
- When disconnecting the AC power cord, pull it out by the AC
power plug. Do not pull the cord itself.
- Never handle the AC power plug with wet hands, as this could
result in fire or shock.
- Power cords should be routed to avoid being severely bent,
pinched, or walked upon. Pay particular attention to the cord
from the unit to the power socket.
- Avoid overloading AC power plugs and extension cords
beyond their capacity, as this could result in fire or shock.
4 Extension cord - To help prevent electric shock, do not use a
polarized AC power plug with an extension cord, receptacle, or
other outlet unless the polarized plug can be completely in
serted to prevent exposure of the blades of the plug.
5 When not in use - Unplug the AC power cord from the AC
outlet if the unit will not be used for several months or more.
When the cord is plugged in, a small amount of current continues
to flow to the unit, even when the power is turned off.
Read the Operating Instructions carefully and completely before
operating the unit. Be sure to keep the Operating Instructions for
future reference. All warnings and cautions in the Operating
Instructions and on the unit should be strictly followed, as well as
the safety suggestions below.
Installation
1 Water and moisture - Do not use this unit near water, such as
near a bathtub, washbowl, swimming pool, or the like.
2 Heat - Do not use this unit near sources of heat, including
heating vents, stoves, or other appliances that generate heat.
It also should not be placed in temperatures less than 5°C
(41 °F) or greater than 35"C (95T).
3 Mounting surface - Place the unit on a flat, even surface.
4 Ventilation - The unit should be situated with adequate space
around it so that proper heat ventilation is assured. Allow 10 cm
(4 in.) clearance from the rear and the top of the unit, and 5 cm
(2 in.) from the each side.
- Do not place the uniton abed, rug, or similar surface that may
block the ventilation openings.
- Do not install the unit in a bookcase, cabinet, or airtight rack
where ventilation may be impeded.
5 Objects and liquid entry -Take care that objects or liquids do
not get inside the unit through the ventilation openings.
6 Carts and stands - When placed or
mounted on a stand or cart, the unit
should be moved with care.
Quick stops, excessive force, and un
even surfaces may cause the unit or
cart to overturn or fall.
Outdoor Antenna
1 Power lines - When connecting an outdoor antenna, make
sure it is located away from power lines.
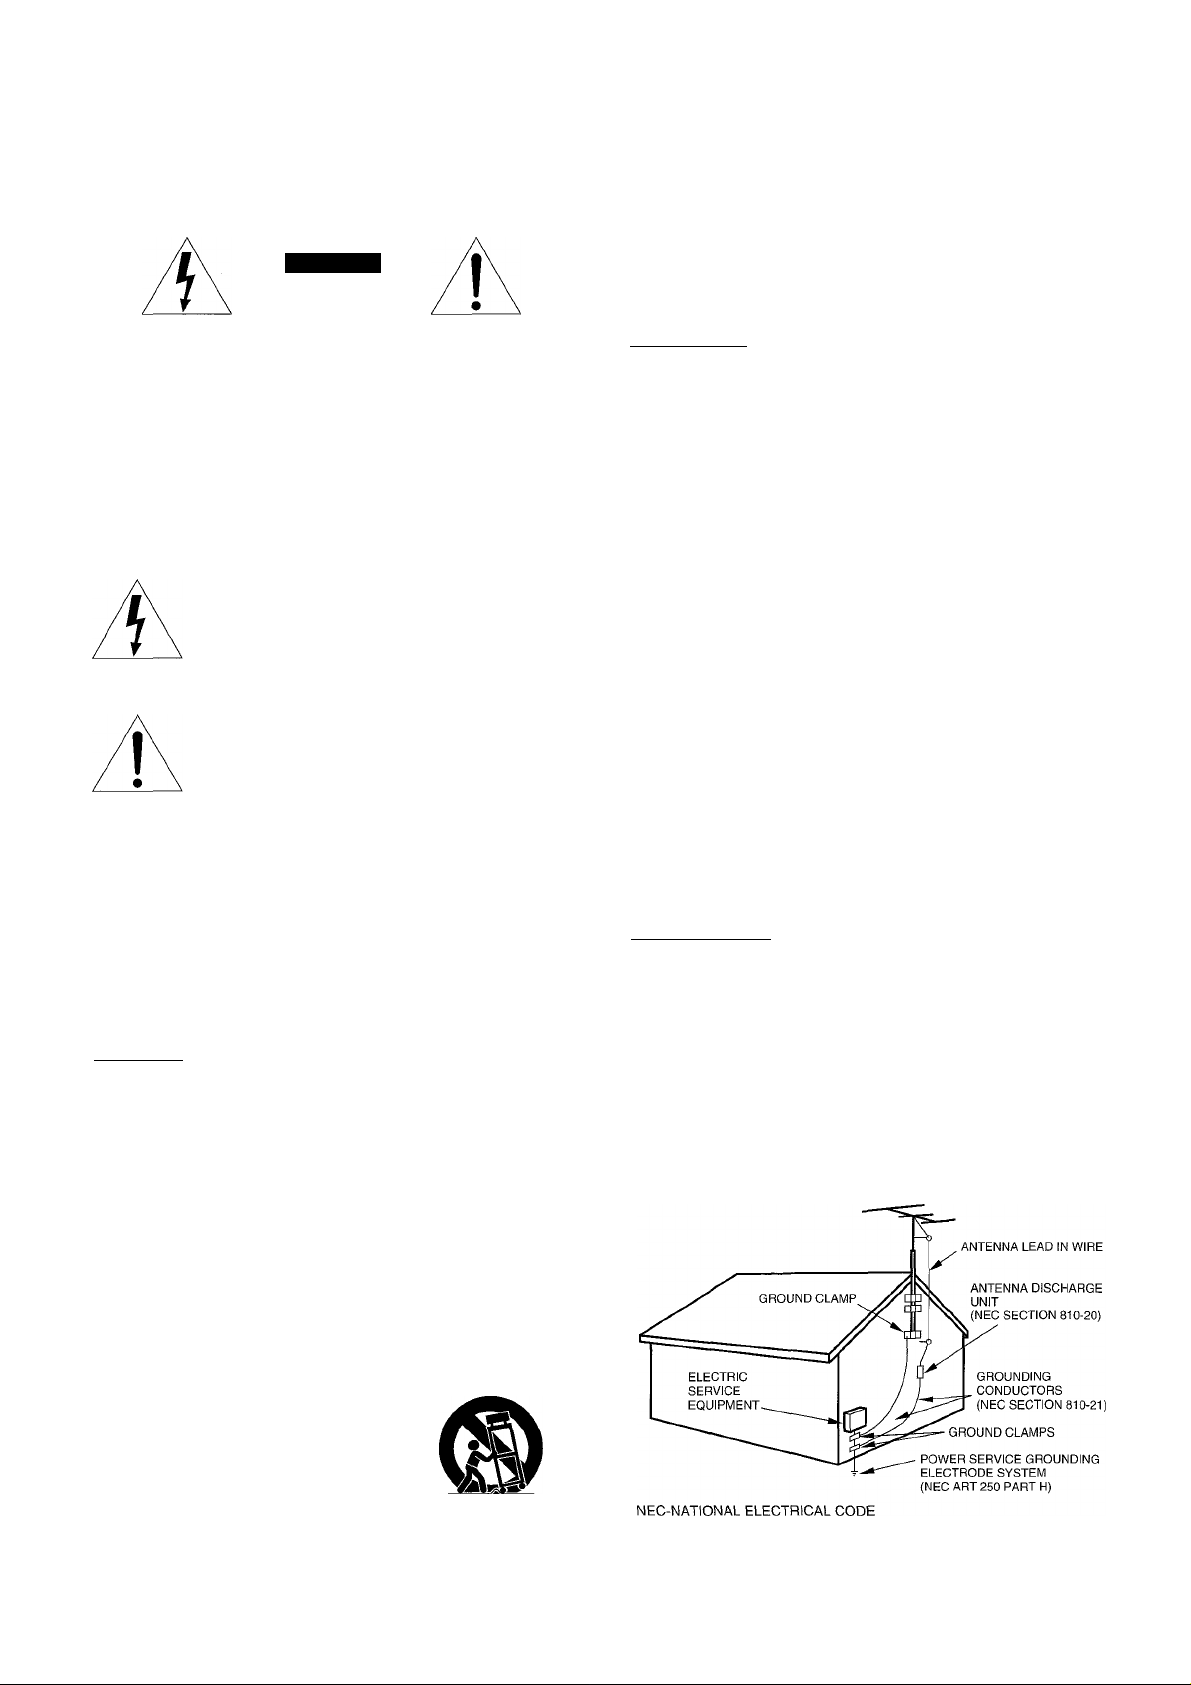
2 Outdoor antenna grounding - Be sure the antenna system is
properly grounded to provide protection against unexpected
voltage surges or static electricity build-up. Article 810 of the
National Electrical Code, ANSI/NFPA 70, provides information
on proper grounding of the mast, supporting structure, and the
lead-in wire to the antenna discharge unit, as well as the size of
the grounding unit, connection to grounding terminals, and
requirements for grounding terminals.
Antenna Grounding According to the National Eiectrical Code
ENGLISH
Page 3
Maintenance
Clean the unit only as recommended in the Operating Instructions.
TABLE OF CONTENTS
Damage Requiring Service
Have the unit serviced by a qualified service technician if:
- The AC power cord or plug has been damaged
- Foreign objects or liquid have gotten inside the unit
- The unit has been exposed to rain or water
- The unit does not seem to operate normally
- The unit exhibits a marked change in performance
- The unit has been dropped, or the cabinet has been damaged
DO NOT ATTEMPT TO SERVICE THE UNIT YOURSELF.
Owner’s record
Foryour convenience, record the model number and serial number
(you will find them on the rear of your set) in the space provided
below. Please refer to them when you contact your Aiwa dealer in
case of difficulty.
Model No. Serial No. (Lot No.)
RX-LM88
FD-LM88
SX-LM200
/4ccuta, Sc&iea- Spätem
Congratulations on your purchase of an Aiwa Stereo System.
To optimize the performance of this system, please take the time
to read through these Operating Instructions and become familiar
with the operating procedures.
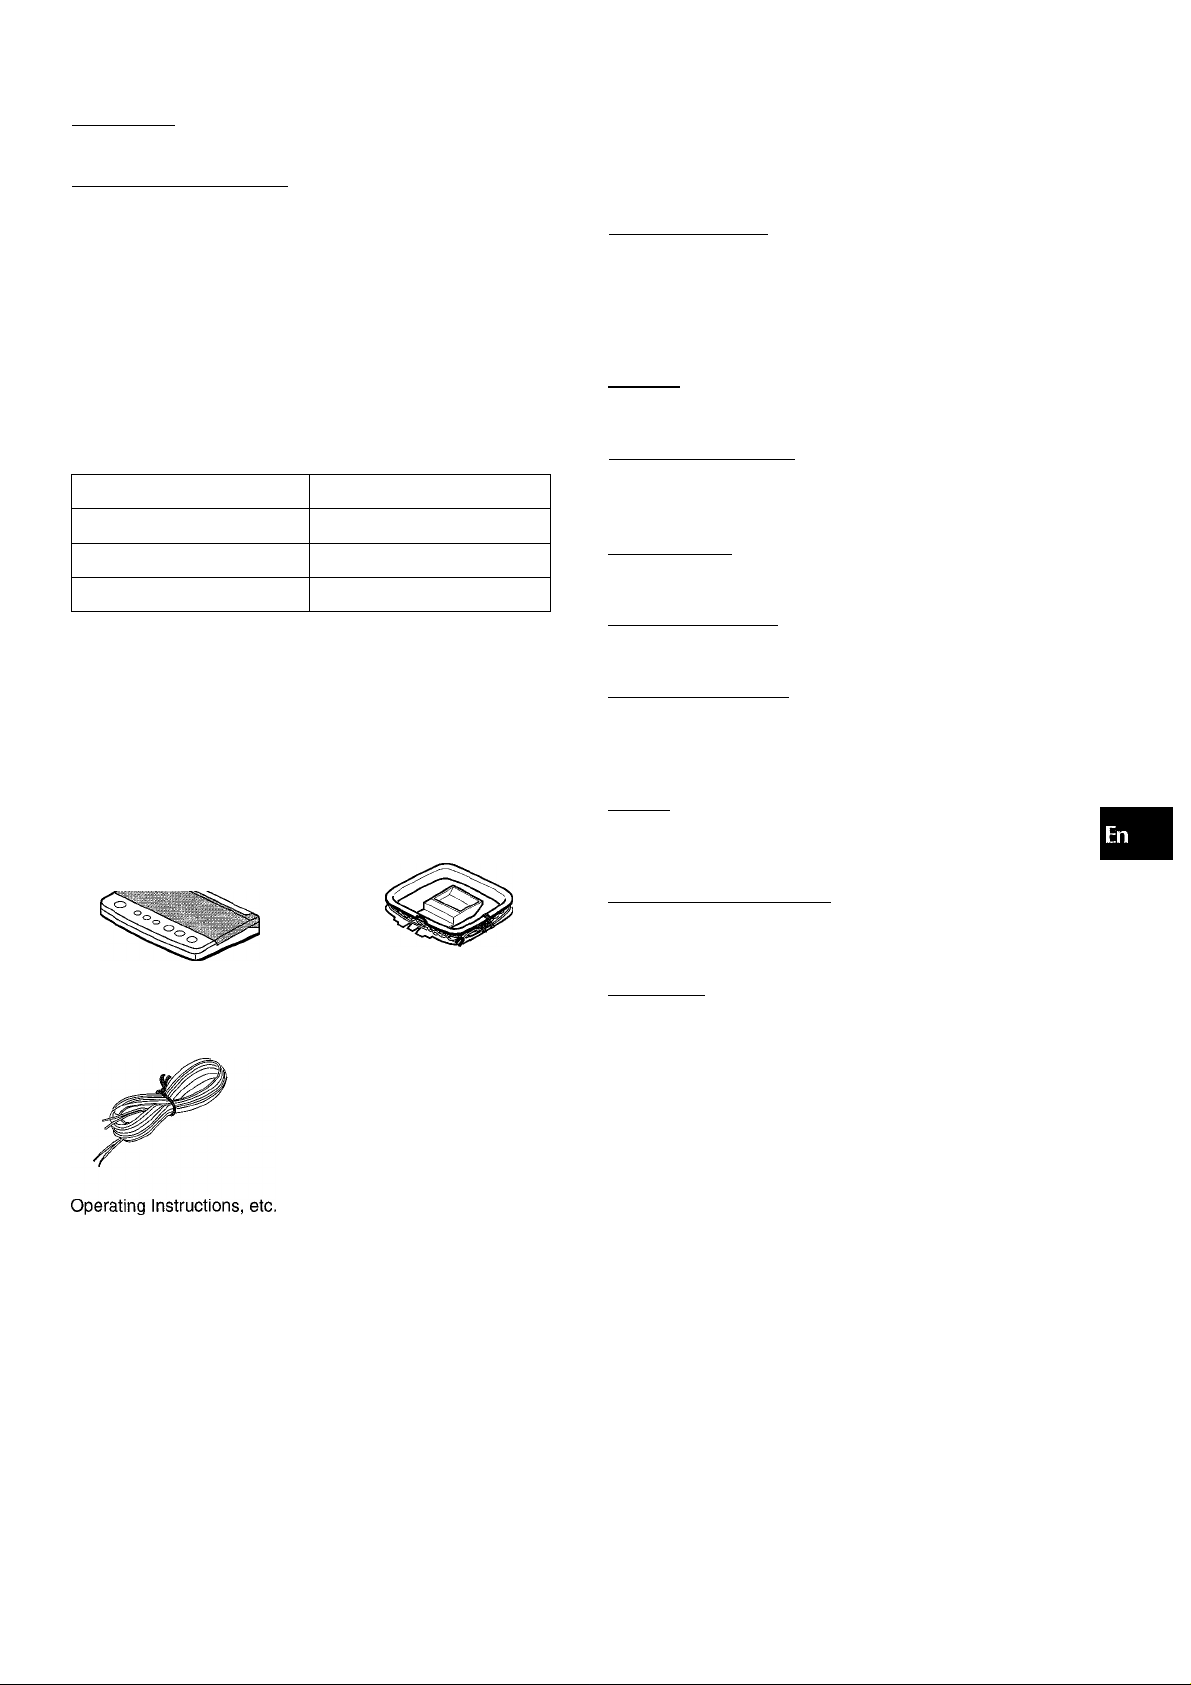
Check your accessories
Remote control
AM antenna
PRECAUTIONS..................................................................2
PREPARATIONS
CONNECTIONS
BEFORE OPERATION
SETTING THE CLOCK
ECONOMIZING POWER
DIMMING THE DISPLAY
SOUND
____________________________________
ADJUSTING THE SOUND
RADIO RECEPTION
MANUAL TUNING..............................................................9
PRESETTING STATIONS.............................................. 10
____________________________
.................................................................
......................................................
......................................................
.................................................
...................................................
.................................................
__________________________
4
6
7
7
7
8
CD PLAYING________________________________
OPERATION
TAPE PLAYBACK
OPERATION.....................................................................13
TAPE RECORDING
BASIC RECORDING........................................................15
Al EDIT RECORDING
PROGRAMMED EDIT RECORDING
TIMER
_____________________________________
TIMER PLAY ANDTIMER RECORDING
SETTING THE SLEEP TIMER
....................................................................
___________________________
__________________________
......................................................
...............................
.........................
........................................
11
16
17
18
19
FM antenna
OTHER CONNECTIONS_______________________
CONNECTING OPTIONAL EQUIPMENT........................20
LISTENING TO EXTERNAL SOURCES
.........................
21
GENERAL__________________________________
CARE AND MAINTENANCE...........................................21
SPECIFICATIONS............................................................22
TROUBLESHOOTING GUIDE.........................................23
PARTS INDEX................................................................ 24
ENGLISH
Page 4
PREPARATIONS
CONNECTIONS
Before connecting the AC cord
The rated voltage of your system shown on the bottom of the
tuner/amplifier unit is 120 V AC. Check that the rated voltage
matches your local voltage.
IMPORTANT
• Connect the speakers, antennas, and all optional equipment
first. Then connect the AC cord.
• There are no differences between the front speakers. Both
speakers can be connected as L (Left) or R (Right).
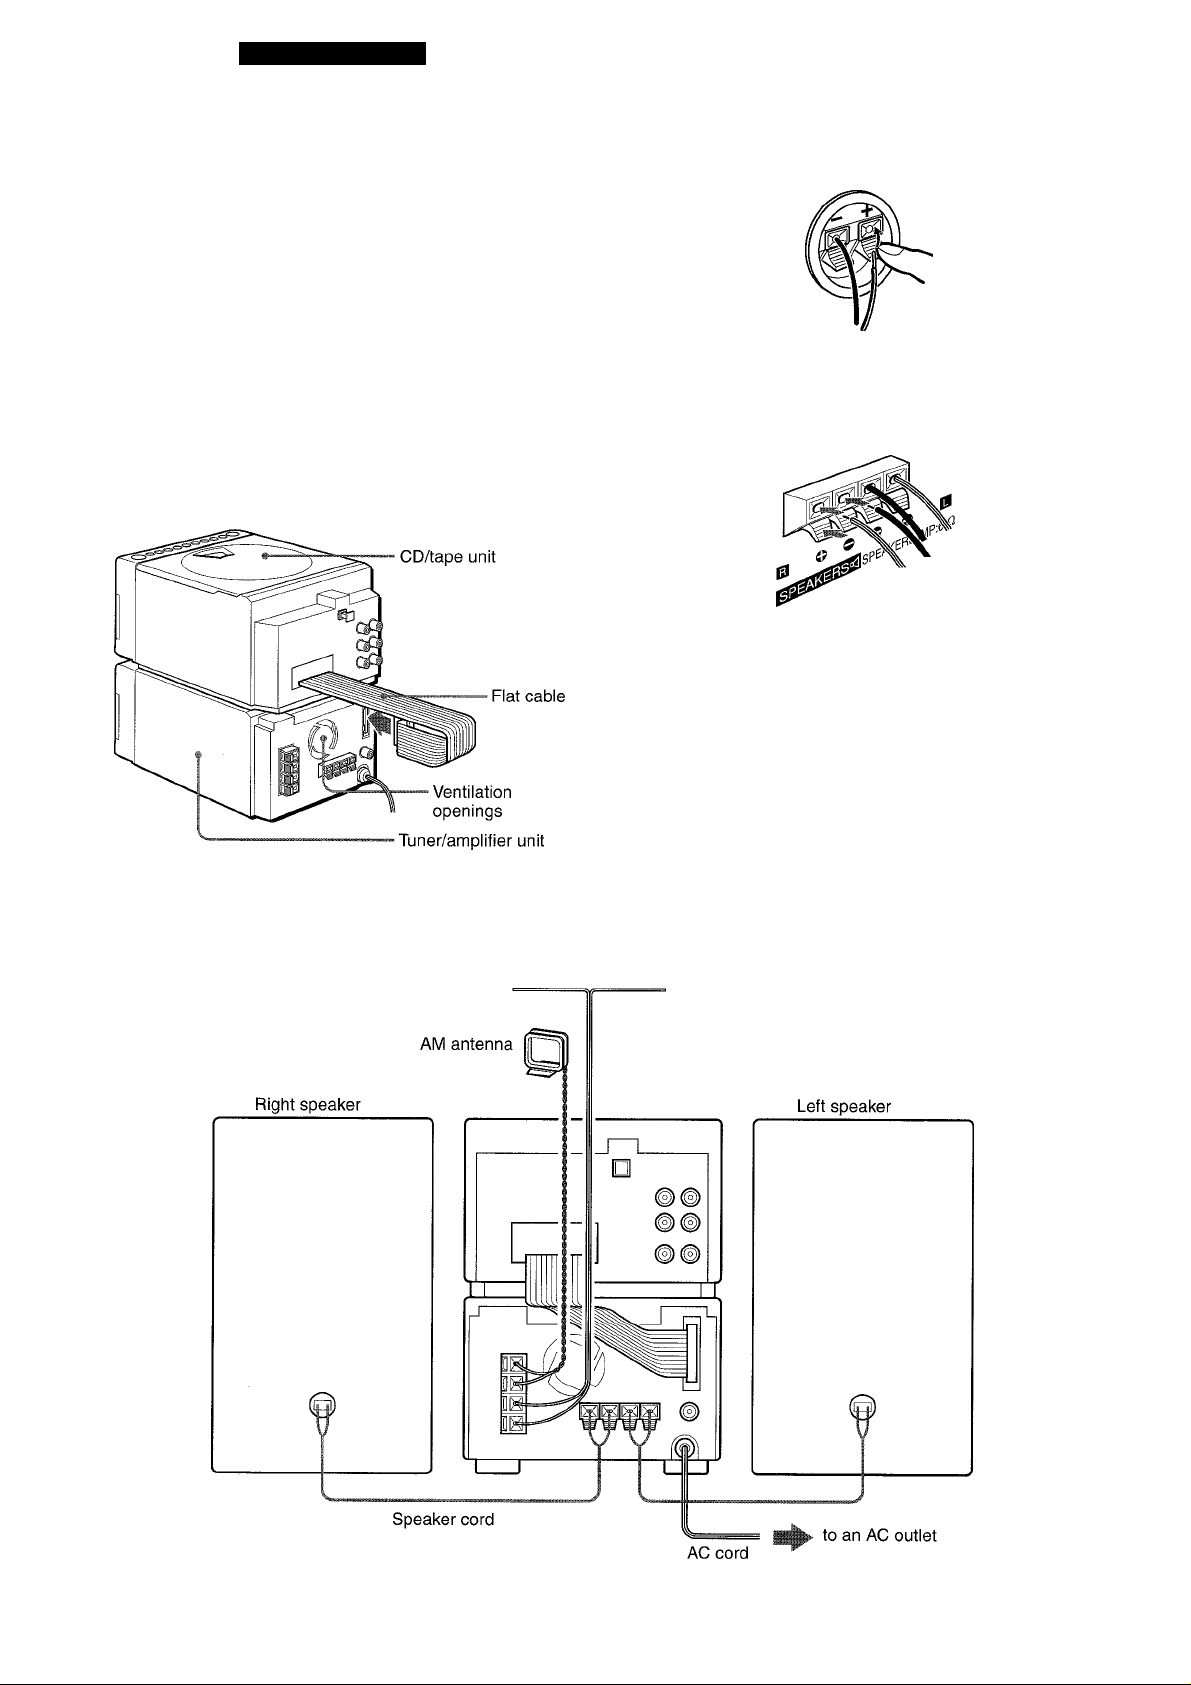
1 Place the CD/tape unit on top of the tuner/
amplifier unit and plug in the connector of the
flat cable as shown below.
Note that the connector can be plugged in in only one direction
with the flat cable facing left.
2 Connect the speaker cords to the speakers.
Connect the cords with the white stripes to © terminals and
the other cords to © terminals.
3 Connect the speaker cords to the tuner/amplifier
unit.
The cords with the white stripes should be connected to the
O terminals and the other cords to the © terminals.
After plugging in the connector, aiiow adequate ciearance
between the fiat cabie and the ventiiation openings.
FM antenna
4 ENGLISH
Page 5
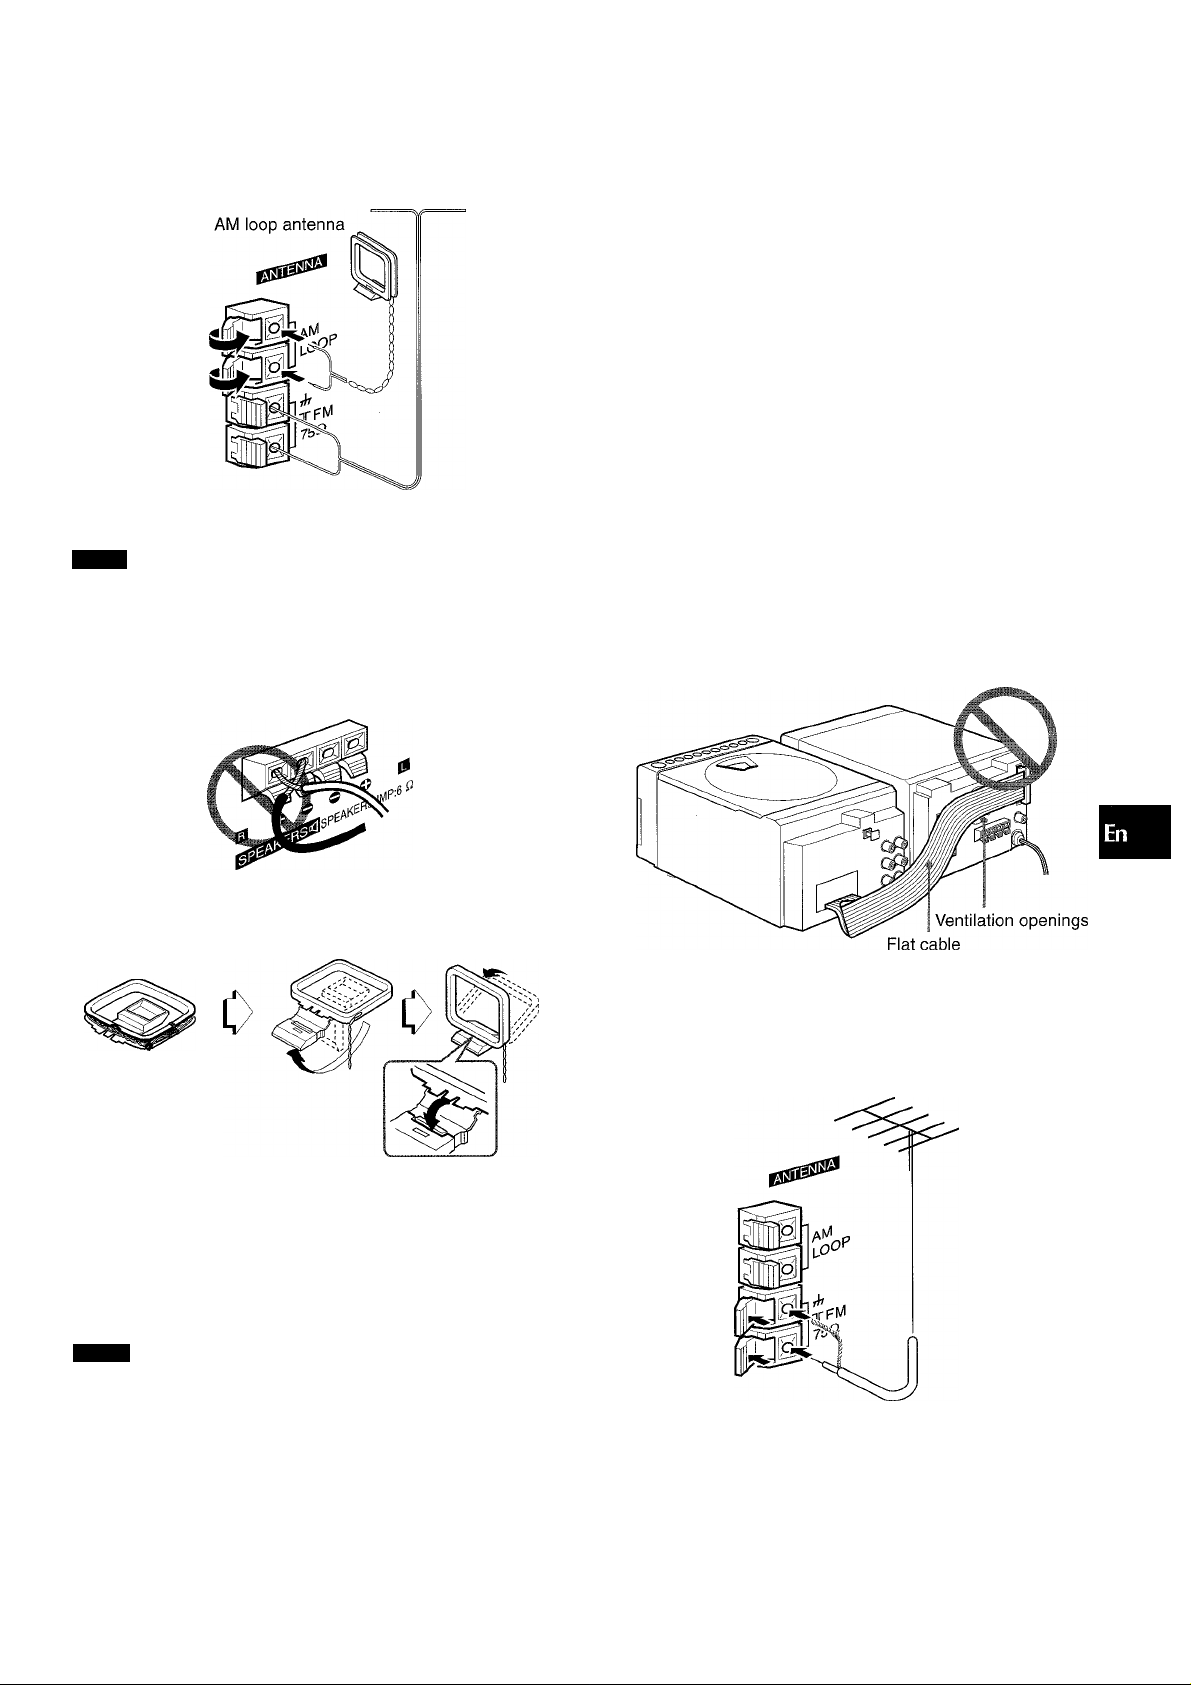
4 Connect the supplied antennas.
Connect the FM antenna to the FM 75 Q. terminals and the
AM antenna to the AM LOOP terminals.
FM antenna
CONCERNING THE DISPLAY WINDOW'S DEMO DISPLAY
When the power cord is plugged into an electrical outlet for the
first time after purchase, a demo display will appear in the display
window. When the power is turned on, the demo display will
end. When the power is turned off, the demo display will appear
again. Until the clock is set, the demo display will appear
whenever the power is turned off. (For setting the clock, see
page 7.)
When the clock is set
The demo display can be seen by pressing the MODE button
while pressing the SHIFT button on the remote control. This
button is used also to dim the display and to set the system in
the power economizing mode. See page 7 for detailed
explanation.
CO
z
g
cc
g
UJ
cc
GL
5 Connect the AC cord to an AC outlet.
NOTE
Do not short-circuit the O and © speaker cord leads; otherwise
the sound may become inaudible or the system may be turned
off. If this happens, disconnect the AC cord from the AC outlet
and re-connect the speaker cords correctly. Connect then the
AC cord and turn the system on again.
To stand the AM antenna on a surface
Fix the claw to the slot.
PLACING THE TWO UNITS SIDE BY SIDE
You may also place the CD/tape and the tuner/amplifier units
side by side according to your preference.
In this case, make sure that the flat cable does not obstruct the
ventilation openings, as shown below.
Always leave adequate clearance between the flat cable and the
ventilation openings.
CONNECTING AN OUTDOOR ANTENNA
For better FM reception, use of an outdoor antenna is
recommended.
Connect the outdoor antenna to the FM 75 Si terminals.
To position the antennas
FM feeder antenna:
Extend this antenna horizontally in a T-shape and fix its ends to
the wall.
AM loop antenna;
Position to find the best direction.
NOTE
' Do not connect any speakers to the system other than the
supplied ones.
' Do not leave objects generating magnetism near the speakers.
■ Do not bring the FM antenna near metal objects or curtain rails.
' Do not bring the AM antenna near other optional equipment,
the stereo system itself, the AC cord or speaker cords, since
noise will be picked up.
' Do not unwind the AM antenna wire.
To connect other optional equipment page 20.
ENGLISH 5
Page 6

BEFORE OPERATION
FUNCTION
POWER
Remote
sensor
PHONES
To turn the system on
Press one of the function buttons (TUNER/BAND, AUX/MD, CD,
TAPE) on the remote control.
Playback of the corresponding source starts (Direct Play
Function).
The POWER button is also available.
To turn the system off
Press the POWER button again.
Using the headphones
Connect headphones with a stereo mini plug (03.5 mm, Va inch)
to the PHONES jack.
No sound is output from the speakers while the headphones are
plugged in.
To use the FUNCTION button on the CD/tape unit
The FUNCTION button on the CD/tape unit substitutes for the
function buttons (TUNER/BAND, AUX/MD, CD, TAPE) on the
remote control. Each time the FUNCTION button is pressed while
power is on, the next function is selected cyclically.
USING THE REMOTE CONTROL
Inserting batteries
Detach the battery cover on the rear of the remote control and
insert two R03 (size AAA) batteries.
When to replace the batteries
The maximum operational distance between the remote control
and the sensor on the CD/tape unit should be approximately 5
meters (16 feet). When this distance decreases, replace the
batteries with new ones.
Opening and closing the top cover
When to use the remote control
Some operations can be performed using the buttons on the
remote control only, while others can be performed using the
buttons on the CD/tape unit as well as on the remote control.
This instructions manual clearly describes the buttons available
for each operation.
• The ► button on the remote control has the same function as
that of the button on the CD/tape unit.
• If the system is not going to be used for an extended period of
time, remove the batteries to prevent possible electrolyte
leakage.
• The remote control may not operate correctly when:
- The line of sight between the remote control and the remote
sensor is exposed to intense light, such as direct sunlight.
- Other remote controls are used nearby (television, etc.)
ENGLISH
The number buttons from 1 to 9 also have the functions indicated
on the plate above them. To use these functions, press the
buttons while pressing the SHIFT button on the remote control.
Page 7
SEHING THE CLOCK
II
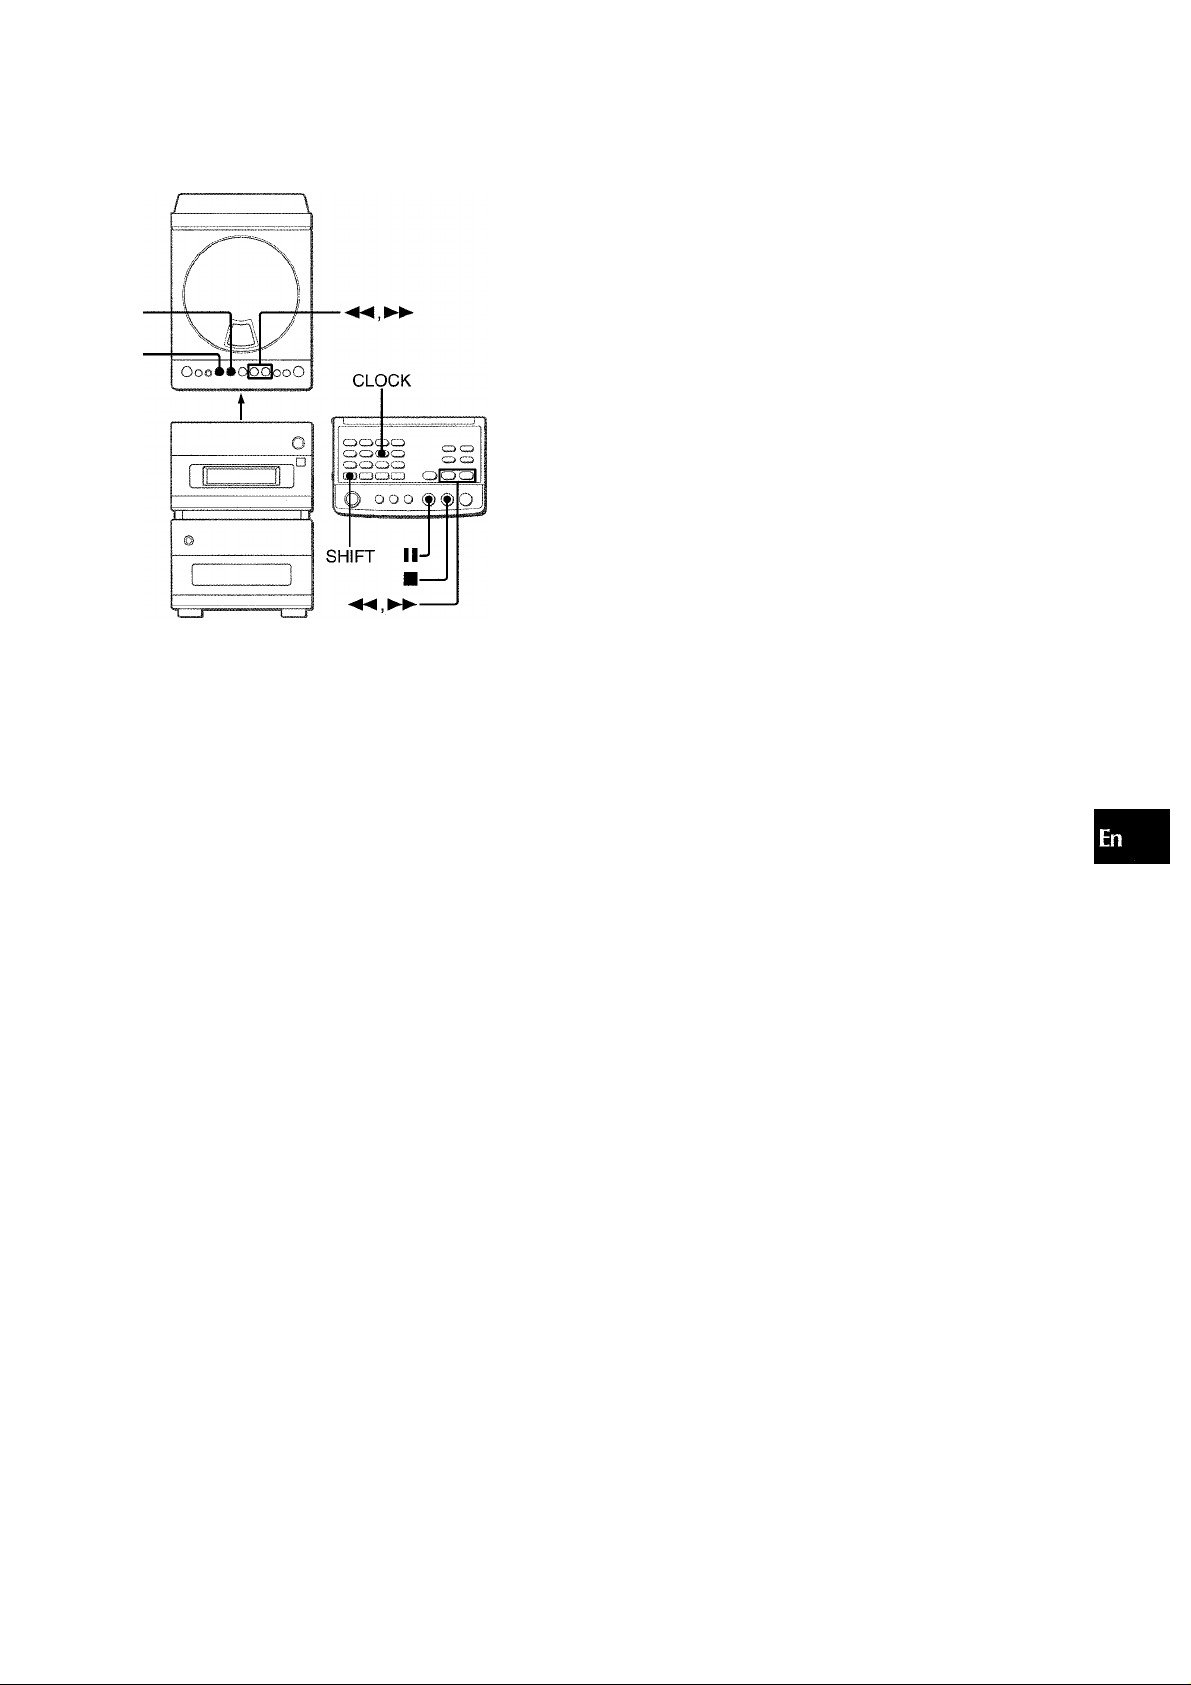
1 Press the II button while the power is turned off,
or press the CLOCK button while pressing the
SHIFT button on the remote control.
The clock flashes on the display.
MiT 12;; 00.
2 While the clock is displayed (for 4 seconds), press
the ◄◄ or ►► button to designate the time.
Pressing the ◄◄ button once will move the time back by 1
minute, and pressing the ►► button once will advance the
time by 1 minute.
Holding these buttons down wiil vary the time in 10-minute
units.
To switch to the 24-hour standard, press the ■ button.
To restore the 12-hour standard, press the ■ button again.
If you do not start setting the time within 4 seconds
The clock starts and becomes darker.
To set the clock, press the II button, or press the CLOCK
button while pressing the SHIFT button on the remote control.
The clock becomes brighter and the ◄◄ and ►► buttons
become available.
3 Press the
The clock starts from 00 seconds.
When the clock is set for the first time after purchase
Everything on the display will clear.
This is because the power economizing mode of the system is
activated, and is not a malfunction.
The power economizing mode can be canceled. See
“ECONOMIZING POWER” for details.
To display the current time
Press the CLOCK button while pressing the SHIFT button on
the remote control. The time is displayed for 4 seconds.
While the clock is displayed, you can reset it by pressing the
II
button.
or ►► button. In this case, press the II button in the end.
MODE
oooca C3C3
C30C=.i>
o|paaa_ _0 0 0
OOO OOO
SHIFT
ECONOMIZING POWER
This system allows you to regulate its power consumption by
displaying nothing on the display while the power is off. This is
called the power economizing mode.
Press the MODE button while pressing the SHiFT
button on the remote control with the power turned off.
Each press of this button changes the display status as follows:
r>© Power economizing mode
@ Demo display (power economizing mode canceled)
'—® Clock display (power economizing mode canceled)
When the power economizing mode is set
“Eco Mode” is displayed for 4 seconds, and everything on the
display will clear.
Only the red indicator to the right of the display window lights to
show that the power is supplied to the system.
Standby power consumption
If the power economizing mode is activated : 2.5 W
If you press the button on the CD/tape unit (or the ► button
on the remote control) with the power turned off, the power
economizing mode, if activated, will be canceled and the demo
display appears.
DIMMING THE DISPLAY
This system allows you to change the brightness of the display
window according to your preference.
Press the MODE button whiie pressing the SHIFT button on the remote control with the power turned on.
Each press of this button changes the display status as follows:
r>® Brighter display
(D Darker display
'—(3) Demo display
If the power is turned off after changing the display brightness,
the display returns to the last status when the power is turned on
the next time.
C/}
z
o
g
QC
lU
cr
CL
ENGLISH 7
Page 8
ADJUSTING THE SOUND
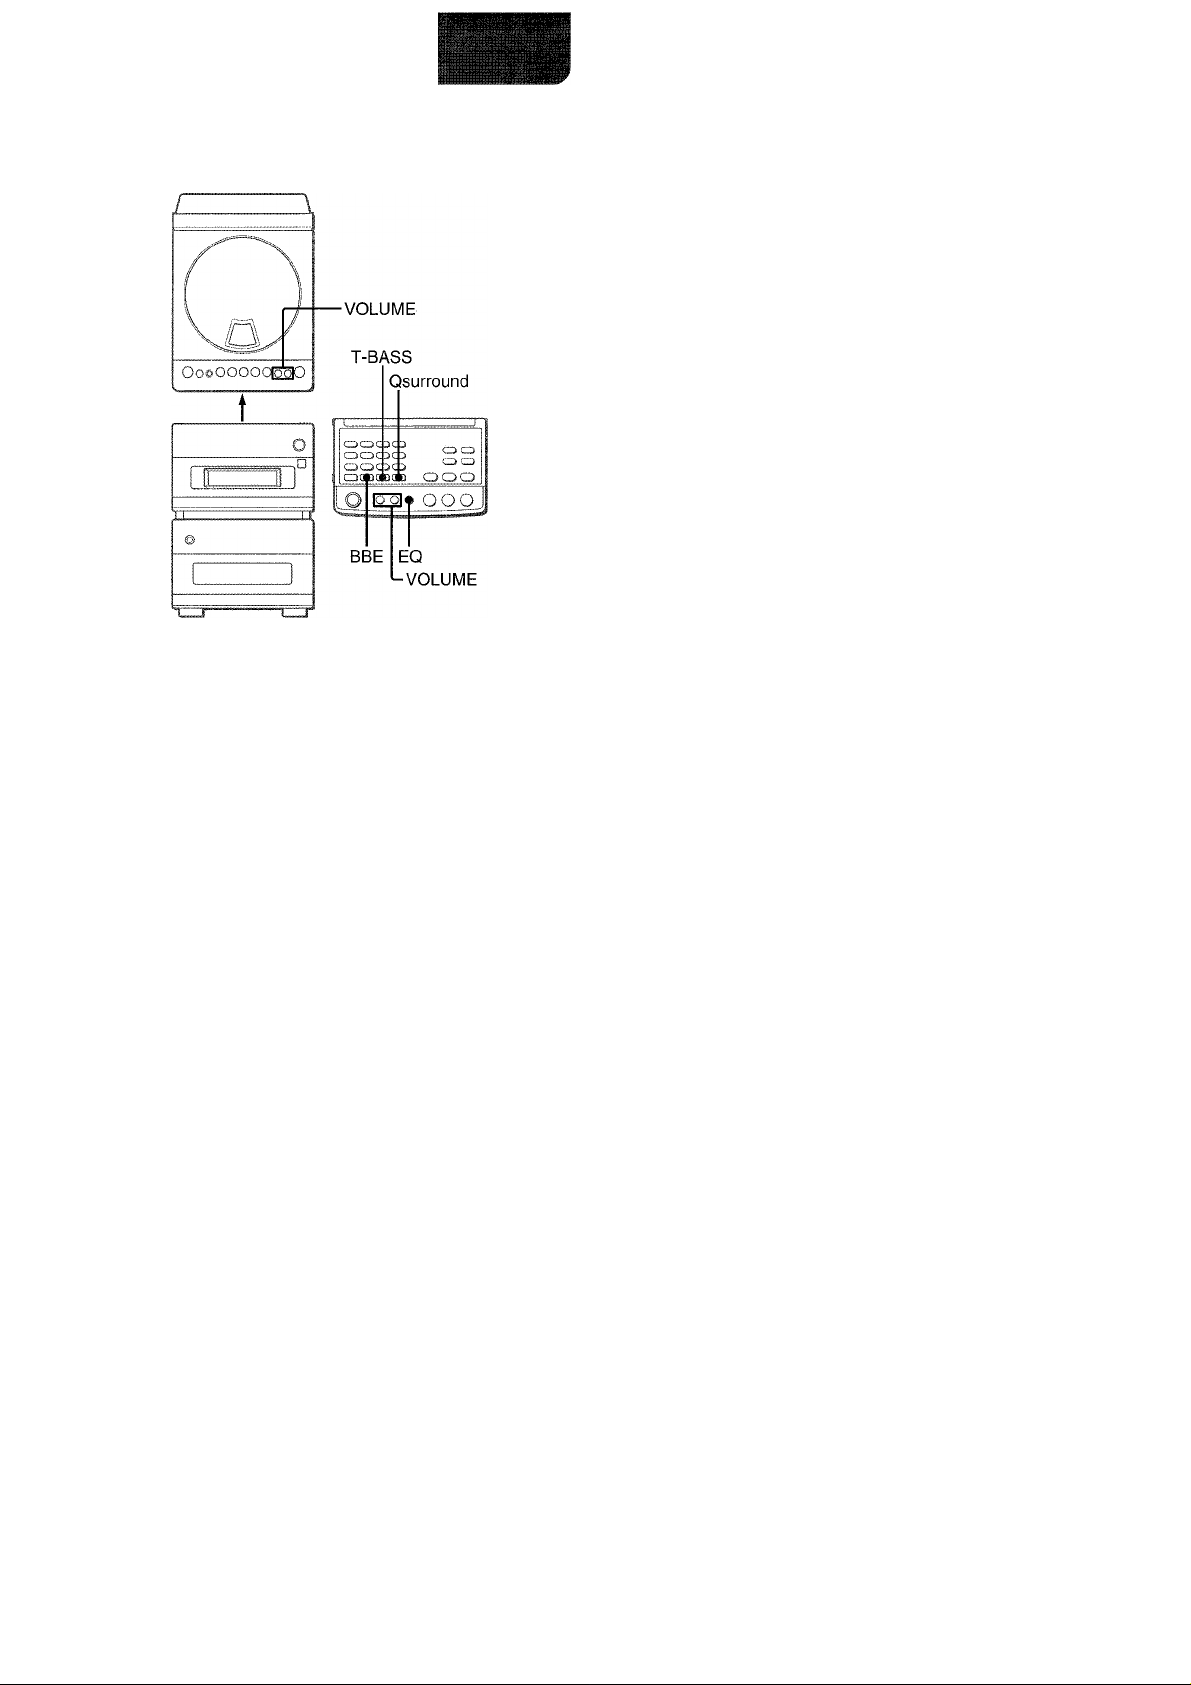
ENHANCING THE BASS SOUND
The T-BASS system enhances the realism of low-frequency
sound.
Press the T-BASS button on the remote control.
Each press on the T-BASS button lets you select one of the three
levels, or the off position.
ADJUSTING THE VOLUME
Press the VOLUME buttons.
The volume level Is shown on the display for 4 seconds. It can be
set from 0 (minimum) to 30, and then MAX (maximum).
The volume is memorized even after the power is turned off.
However, if the power is turned off when the volume is set to
more than 21, it is automatically set to 21 the next time the power
is turned on.
u
(OFF)
iiiilllll
...
III;! lijj:
iiiii iiiii iiiii
Low frequency sound may be distorted when the T-BASS system
is used for a disc or tape in which low frequency sound is originally
emphasized. In this case, cancel the T-BASS system.
.
......
Ill
EQ (EQUALIZER)
This system provides the following three different kinds.
ROCK: Powerful sound emphasizing treble and bass
POP: More presence in the vocals and midrange
JAZZ: Accented lower frequencies for jazz-type music
Press the EQ button on the remote control.
0 c: K
ENHANCING THE TREBLE SOUND
The BBE system enhances the clarity of high-frequency sound.
Press the BBE button on the remote control.
Each press on the BBE button lets you select one of the three
levels, or the off position.
J
.
(OFF)
.
.....
......
INI.
i;: ill
¡lj.ig.lill III
.
........
The graphic curve corresponding to the selected equalization
mode appears on the display.
Q SURROUND SYSTEM
The Q SURROUND system built into this system uses only two
speakers at the left and right to create an atmosphere that sounds
as if you are surrounded by two front speakers and two rear
speakers.
Press the Qsurround button on the remote control.
“QSURROUND ON” runs through the display, and the
“QSURROUND” indicator appears.
To cancel the Q SURROUND effect
Press the Qsurround button on the remote control.
“QSURROUND OFF” runs through the display, and the
“QSURROUND” indicator goes off.
’ The Q SURROUND system does not work in monaural mode.
' When the Q SURROUND system is on, the sound may be
distorted at a higher volume. If this happens, turn the volume
down.
8 ENGLISH
SOUND ADJUSTMENT DURING RECORDING
The output volume and tone of the speakers or headphones may
be freely varied without affecting the level of the recording.
Page 9

RADIO RECEPTION
MANUAL TUNING
DISPLAY
TUNER/BAND
'.1 b'./'...) —
Q o c o O O
SHIFT MONO
1 Press the TUNER/BAND button on the remote
control (or the FUNCTION button on the CD/tape
unit) repeatedly to select the desired band.
FM AM^
If the power is turned off, the previously tuned station will be
played (Direct Play Function).
O
When an FM stereo broadcast contains noise
Press the MONO button on the remote control.
“MONO” appears on the display.
Noise is reduced, although reception is monaural.
MONO
FM 98:: 00MHz
To restore stereo reception, repeat the above again
To change the AM tuning interval
The default setting of the AM tuning interval is 10 kHz/step. If
you use this system in an area where the frequency allocation
system is 9 kHz/step, change the tuning interval.
Press the POWER button while pressing the II button on the
CD/tape unit.
To reset the interval, repeat this procedure.
When the AM tuning interval is changed, all preset stations (see
“PRESETTING STATIONS”) are cleared.The preset stations have
to be set again.
To change the display
Press the DISPLAY button while pressing the SHIFT button on
the remote control. With each press of the button, the display
changes in the following order,
r»® Level indicator
'—@ Frequency of the tuned station
(Example: FM 98.00MHz)
o
lU
u
3
UJ
o
tc
(0
o
Q
<
cr
Press the ◄◄ or ►► button to select a station.
Each time the button is pressed, the frequency changes.
When a station is received, “TUNE” is displayed for 2 seconds.
During FM stereo reception, (Ucn)i)) is displayed.
{II0III
FM 98.00MHz
About the level indicator
The above display automatically changes to the level indicator
after 4 seconds.
The level indicator shows an approximate playback sound level.
To search for a station quickly (Auto Search)
Keep the ◄◄ or ►► button pressed until the tuner starts
searching for a station. After tuning in to a station, the search
stops. .
To stop the Auto Search manually, press the ◄◄ or ►► button.
• The Auto Search may not stop at stations with very weak signals.
ENGLISH 9
Page 10

PRESETTING STATIONS
0-9,+10
TUNER/BAND
I
PRESET NUMBER TUNING
1 Press the TUNER/BAND button on the remote
controi or the FUNCTION button on the CD/tape
unit to seiect a band.
2 Press the button on the CD/tape unit or the
► button on the remote controi.
Each time the button is pressed, the next ascending preset
number is selected.
Tuning by preset number
1 Press the TUNER/BAND button on the remote control to select
a band. (Or use the FUNCTION button on the CD/tape unit.)
2 Press the numbered buttons on the remote control to select a
preset number:
Example:
To seiect preset number 10, press the +10 and 0 buttons.
To select preset number 15, press the +10 and 5 buttons.
II
The system can store a total of 32 preset stations. (Each band
has a maximum of 20 available preset stations.) When a station
is stored, a preset number is assigned to the station. Use the
preset number to tune in to a preset station directly.
1 Press the TUNER/BAND button on the remote
control (or the FUNCTION button on the CD/tape
unit) to select a band. Then, press the or
button to select a station.
2 Press the II button to store the station.
A station is assigned a preset number, beginning from 1 in
consecutive order for each band.
Preset number
I
FN 90:: 00MH
Frequency
3 Repeat steps 1 and 2.
The next station will not be stored if 32 preset stations have
already been stored (“FULL” will be displayed).
To clear a preset station
Select the preset number of the station to be cleared. Then, press
the ■ button, and press the II button within 4 seconds.
The preset numbers of all other stations in the band with higher
numbers are also decreased by one.
If there is a long period of power failure or disconnection of AC
cord, the presetting of the stations is canceled. In this case, preset
again.
1 0 ENGLISH
Page 11
CD PLAYIN
OPERATION
LOADING A DISC
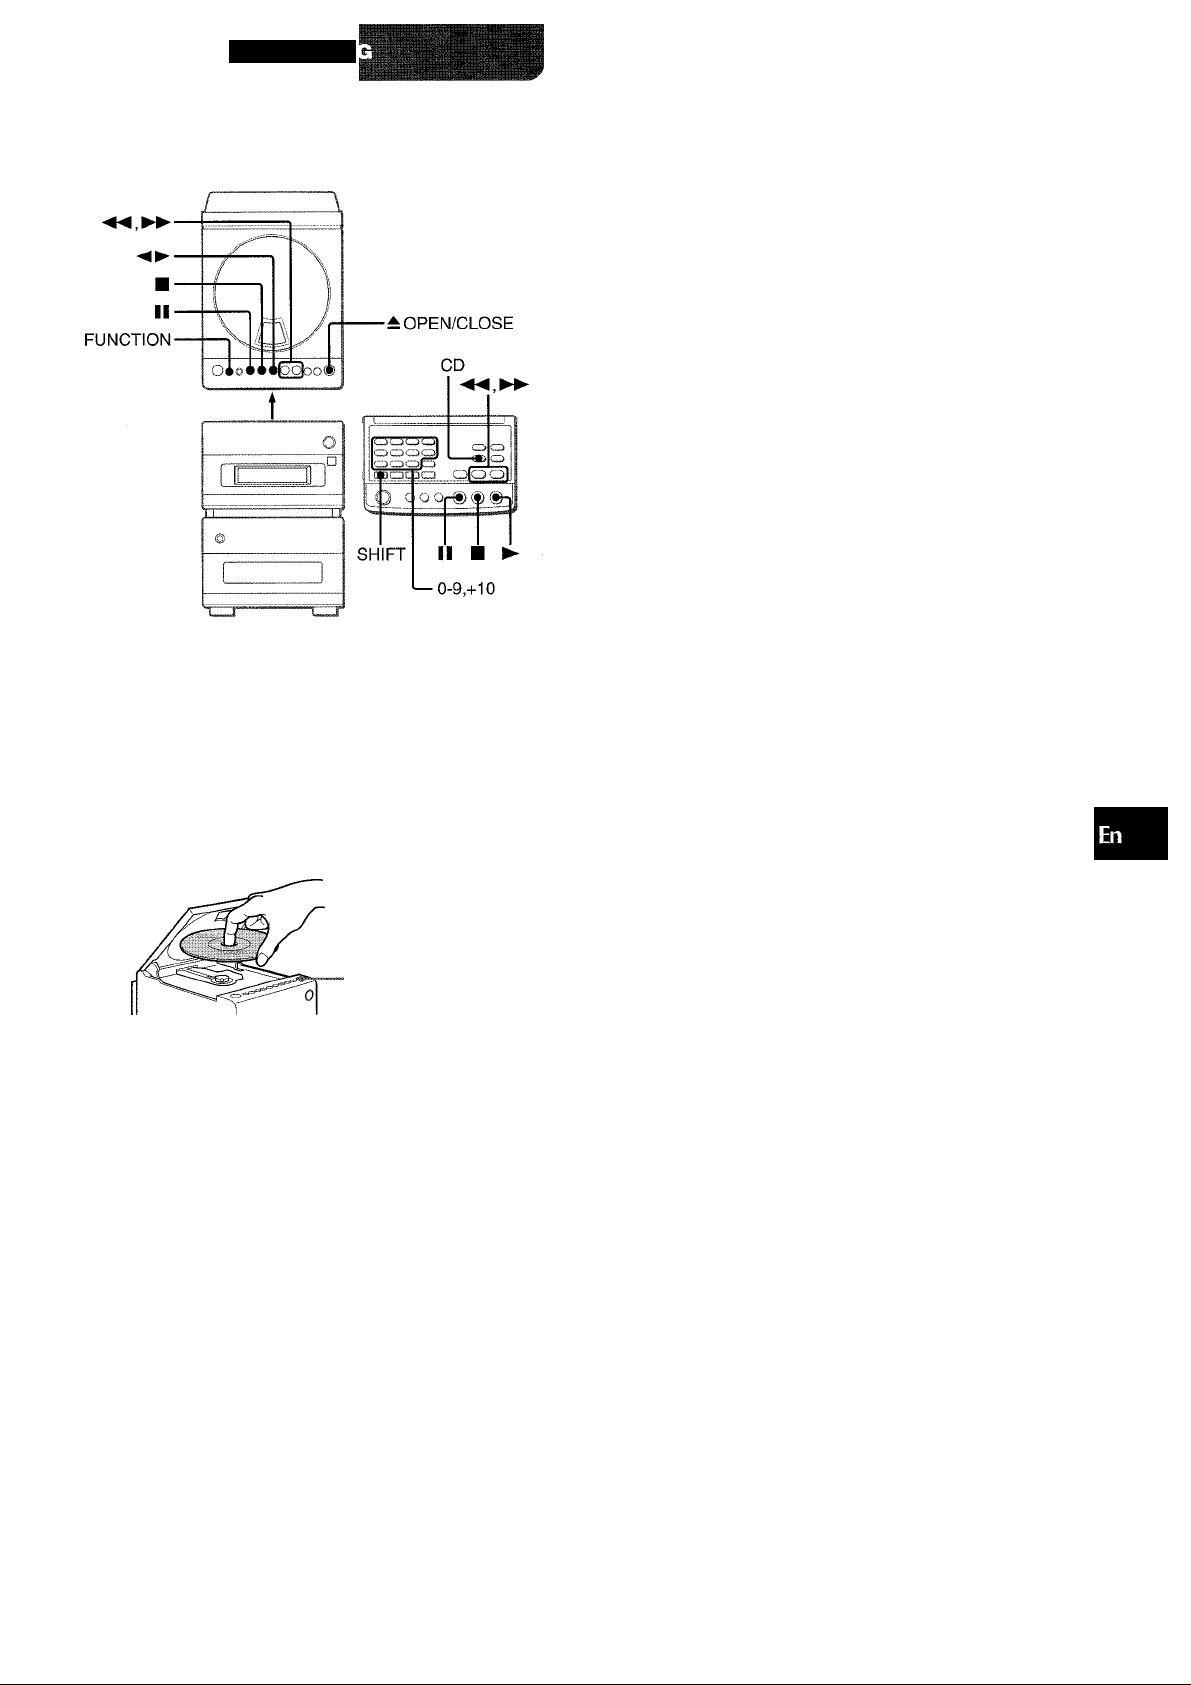
1 Press the CD button on the remote control (or
press the FUNCTION button on the CD/tape unit
repeatedly until “CD” appears on the display),
then press the ± OPEN/CLOSE button to open
the disc compartment cover.
2 Load a disc with the label side up.
About the ievel indicator
The above dispiay automaticaiiy changes to the ievel indicator
after 4 seconds.
The level indicator shows an approximate playback sound level.
:d
To stop play, press the ■ button.
To pause play, press the II button.To resume play, press again.
To search for a particular point during playback, keep the
◄◄ or ►► button pressed and release the button at the desired
point.
To skip to the beginning of a track during playback, press
the ◄◄ or ►► button repeatedly. The system skips forward
through the tracks with the ►► button, and skips back with the
◄◄ button.
To remove the disc, stop play and press the ^ OPEN/CLOSE
button.
Display window in stop mode
Music calender (only the first
Total number of tracks
20 tracks are displayed)
CD iC ivBo:; 31
12 3 4
5'6‘7‘8
9’l0‘ ■
" I
Total playing time
To start play when the power is off (Direct Play
Function)
Press the CD button on the remote control. The power is turned
on and play of the loaded disc begins.
O
I-C5
Q- Z
lu c
o: Q.
Oo
qO
<
cc
OPEN/CLOSE
3 Press the ± OPEN/CLOSE button again to close
the disc compartment cover.
Caution
Be sure not to put your fingers in the disc compartment whiie
the disc compartment cover is ciosing.
PLAYING A DISC
Load a disc.
Press the button on the CD/tape unit or the
button on the remote control.
Play of the loaded CD begins with the first track.
Number of track being played
■¡H«!
-15-34
8
:D :D:r 0;;2E
I
Elapsed playing time
Selecting a track with the remote control
Press the numbered buttons and the +10 button to select a track.
Example:
To select the 25th track, press the +10, +10 and 5 buttons.
To select the 10th track, press the +10 and 0 buttons.
The selected track starts to play and play continues to the end of
that disc.
Do not load more than one compact disc in the disc compartment.
ENGLISH 1 1
Page 12

REPEAT —
RANDOM -I
0-9,+10-
(KKXXXXSI
Iqqcz^d
—PROGRAM
r-DISPLAY
ooo o
PROGRAMMED PLAY
Up to 30 tracks can be programmed from the inserted disc.
Use the remote controi.
1 Press the PROGRAM button while pressing the
SHIFT button in stop mode.
“PRGM” appears on the dispiay.
To change the display in playback mode
Press the DISPLAY button while pressing the SHiFT button on
the remote controi.
Each press on the button changes the dispiay in the foilowing
order:
r>® Level indicator
® Track number being played and elapsed playing time
(Exampie; CD 3Tr 3:43)
@ Remaining time of piayback
(Exampie: CD -26:15)
RANDOM PLAY
Ali the tracks on the disc can be piayed randomiy.
Press the RANDOM button while pressing the SHIFT
button on the remote controi.
“RANDOM” lights up on the dispiay.
To cancei random piay, repeat the above.
• Even if the ◄◄ button is pressed, a previousiy played track
cannot be skipped. The system returns to the beginning of the
current track oniy.
• When you seiect a track with the numbered buttons on the
remote controi during the random piay mode, the selected track
starts to piay and the random play mode is canceled.
Cl)
...........
2 Press the numbered buttons and the +10 button
i•■■i;; i.-11.1
to program a track.
Example:
To select the 12th track, press the +10 and 2 buttons.
To select the 20th track, press the +10, +10 and 0 buttons.
CD 20:v P
Selected track number Program number
CD
Total number of Total playing time of
selected tracks the selected tracks
3 Repeat step 2 to program other tracks.
4 Press the ► button to start play.
....................
03
1 iS;; :i. :■:)
REPEAT PLAY
A single track or all tracks can be played back repeatedly.
While pressing the SHIFT button, press the REPEAT
button repeatedly on the remote control.
“C*-T’ lights up when singie track repeat play is seiected, and
“C».” iights up when all tracks repeat play is seiected.
To cancei repeat play, repeat the above.
To repeat random play
First activate the random play mode by pressing the RANDOM
button while pressing the SHIFT button on the remote control.
Then press the REPEAT button while pressing the SHIFT button
so that “C*-” lights up.
To repeat programmed play
After programming the desired tracks, press the REPEAT button
while pressing the SHIFT button on the remote control so that
lights up.
Then start programmed piay.
To check the program
Each time the button is pressed in stop mode, a track number
and program number wiil be dispiayed.
To clear the program
Press the ■ button in stop mode.
To add tracks to the program
Before playing, repeat step 2. The track will be programmed after
the last track.
To change the programmed tracks
Clear the program and repeat all the steps again.
During programmed play, the RANDOM and numbered buttons
do not function.
1 2 ENGLISH
Page 13

TAPE PLAYBACK
OPERATION
LOADING A TAPE
PLAYING BACK A TAPE
Load a tape.
Press the button on the CD/tape unit or the I
button on the remote control.
Playback side of the tape
I
.........
ГИРЕ 0000'
The tape counter indicates the tape
running length. (It disappears when no
tape is inserted.)
C>; The side facing upward is being played (forward).
<1: The side facing downward is being played (reverse).
About the level indicator
The above display automatically changes to the level indicator
after 4 seconds.
The level indicator shows an approximate playback sound level.
X.
ii
a a.
a Ш
»You can select a reverse mode to play back one or both sides.
• Use Type I (normal) , Type II (high/CrOa) or Type IV (metal)
tapes for playback.
Press the TAPE button on the remote control (or
press the FUNCTION button on the CD/tape unit
repeatedly until “TAPE” appears on the display.)
Then insert a tape with the exposed side facing to
the right and push it gently until it is loaded
automatically inside the unit.
To select a reverse mode
Press the TAPE button on the remote control.
Each time the button is pressed, the reverse mode changes.
^ z:> сиз
ТИРЕ
To stop play, press the ■ button.
To pause play, press the II button. To resume play, press again.
To change the playback side, press the button on the
CD/tape unit or the ► button on the remote control in play or
pause mode.
To fast forward or rewind, press the ◄◄ or ►>- button in stop
mode. Then press the ■ button to stop the tape.
To eject the loaded tape, press the — TAPE EJECT button in
stop mode.
To start play when the power is off (Direct Play
Function)
Press theTAPE button on the remote control. The power is turned
on and play of the loaded tape begins.
To set the tape counter to 0000
Press the ■ button in stop mode.
The counter is also set to 0000 when the tape is ejected.
fZT
ТИРЕ 0000
To play one side only, select Z.
To play from the side facing upward to the opposite side once
only, select T3.
To play both sides repeatedly, select CZ).
ENGLISH 1 3
Page 14
DISPLAY
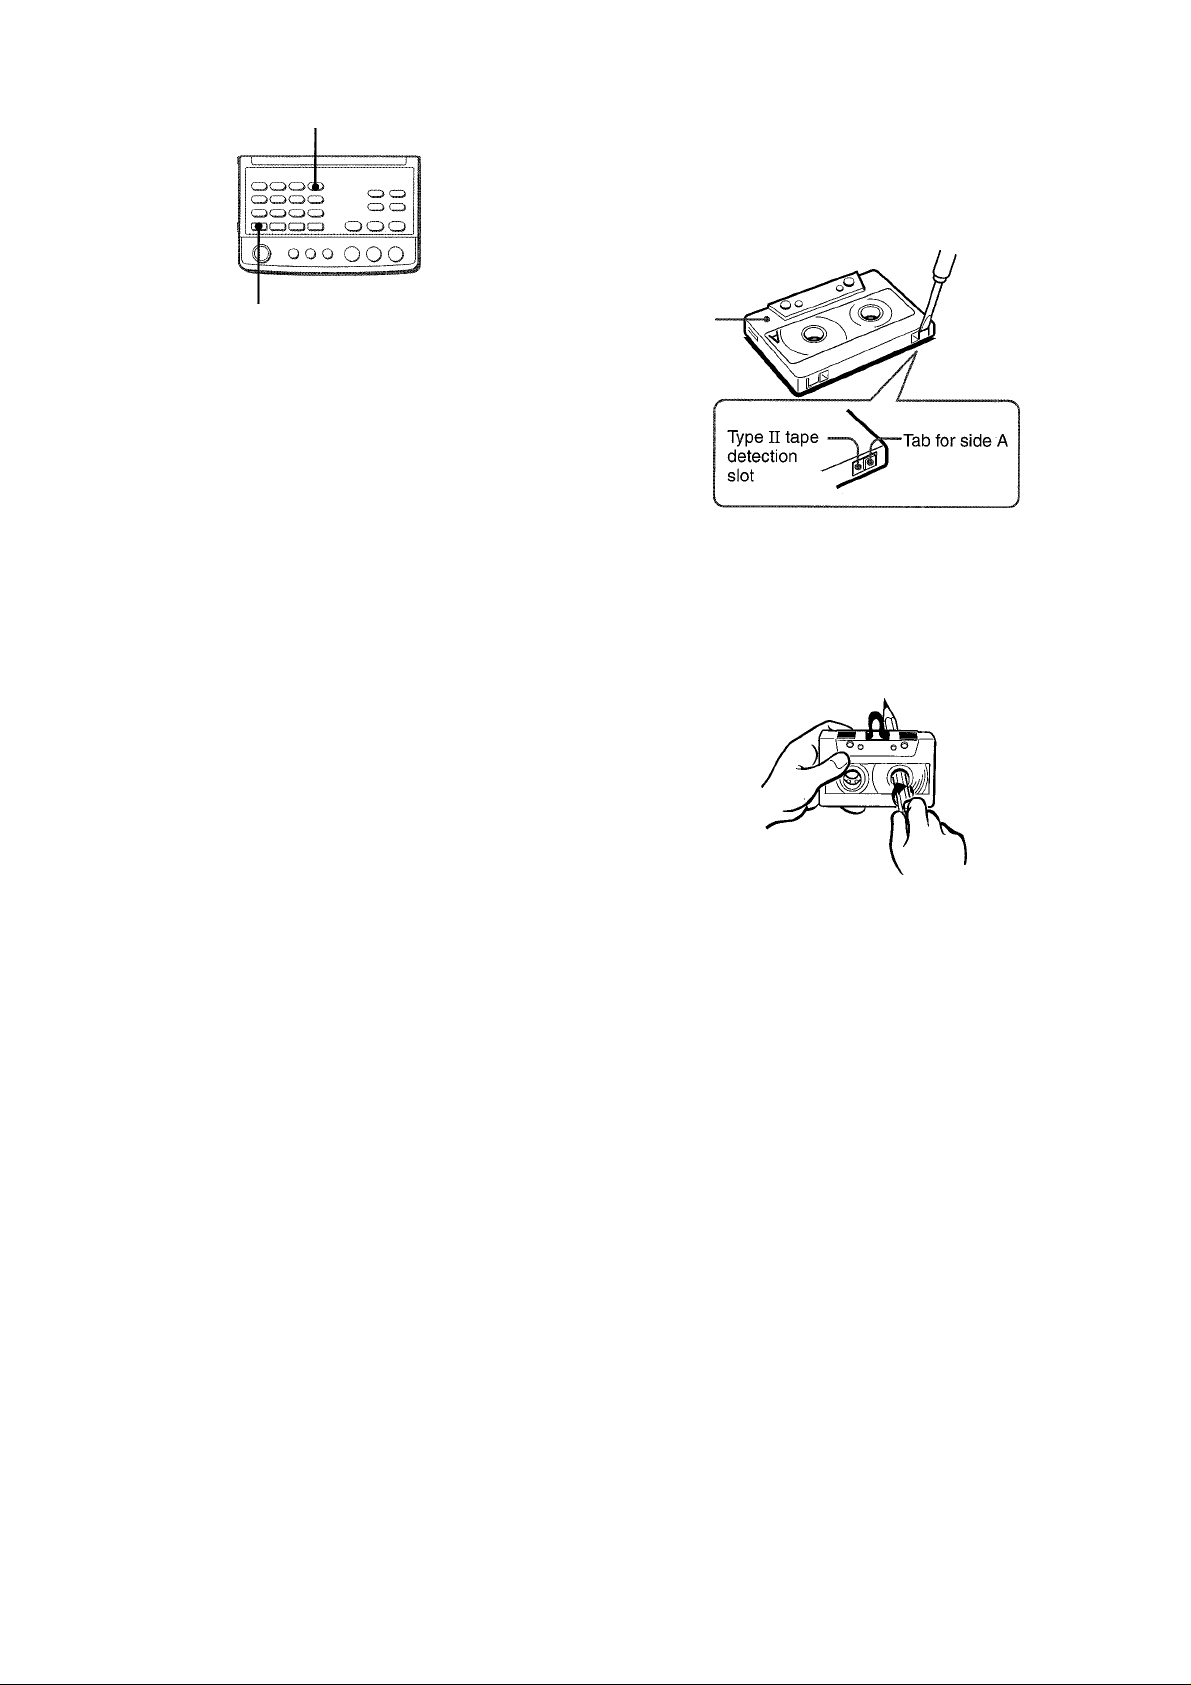
About cassette tapes
• To prevent accidental erasure, break off the plastic tabs on
the cassette tape after recording with a screwdriver or other
pointed tool.
SHIFT
To change the display in playback mode
Press the DISPLAY button while pressing the SHIFT button on
the remote control.
Each press on the button changes the display in the following
order:
[->© Level indicator
'—@ Tape counter
(Example: TAPE 0185)
Side A
To record on the tape again, cover the tab openings with
adhesive tape, etc. (On Type II tapes, take care not to cover
the Type II tape detection slot.)
• 120-minute or longer tapes are extremely thin and easily
deformed or damaged. They are not recommended.
• Take up any slack in the tape with a pencil or similar tool
before use. Slack tape may breaker jam in the mechanism.
1 4 ENGLISH
Page 15
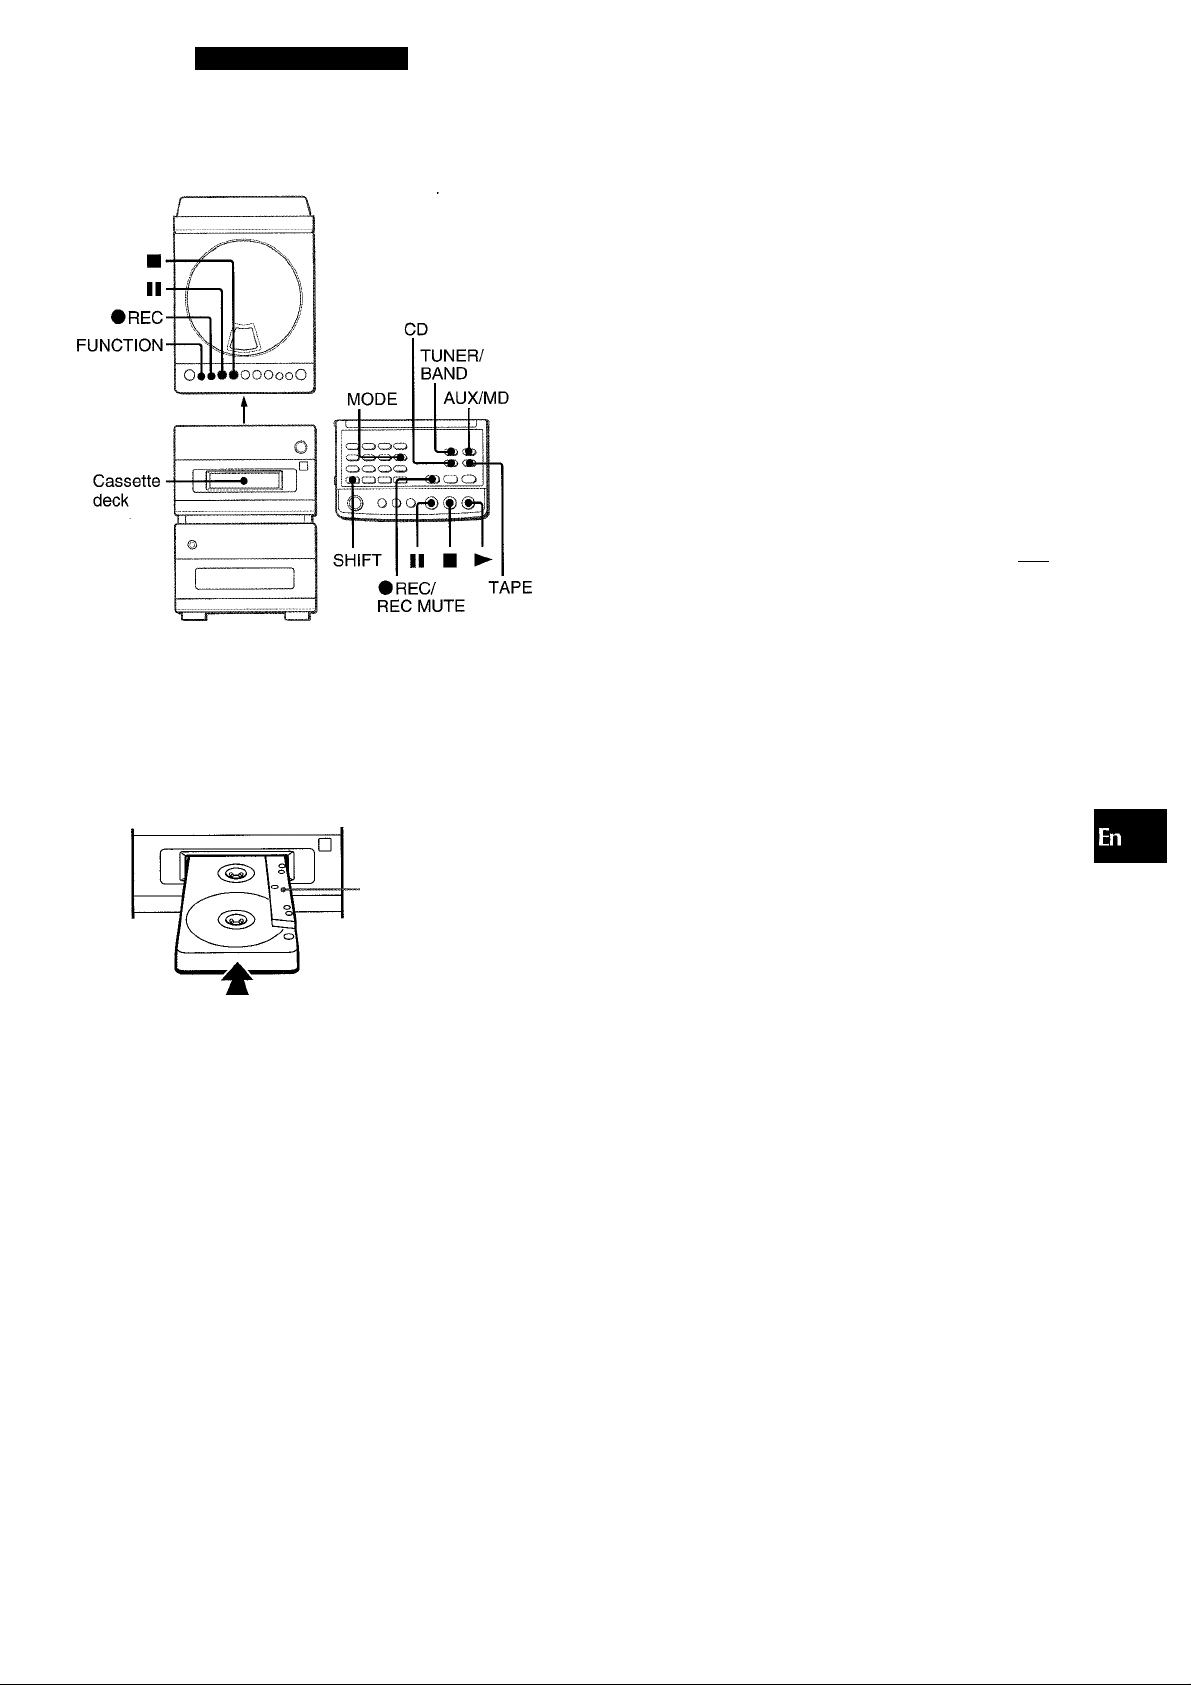
TAPE RECORDING
BASIC RECORDING
Preparation
• Set the tape to the point where recording will start.
• Use Type I (normal) and Type II (high/CrOa) tapes for recording.
To stop recording, press the ■ button. When recording from a
CD, press the ■ button again to stop playback.
To pause recording, press the II button. (Applicable when
recording from a radio broadcast or connected equipment.) To
resume recording, press again.
INSERTING BLANK SPACES
Insertion of 4-second blank spaces may help you to locate the
beginning of the track when the tape is played back on other
equipment. (Applicable when the source Is radio or connected
equipment.)
1 Press the • REC/REC MUTE button on the remote control
during recording or while in recording pause mode.
“TAPE 13^” flashes rapidly for 4 seconds and the tape runs
without recording. After 4 seconds, the deck enters the
recording pause mode.
2 Press the II button to resume recording.
To insert a blank space of less than 4 seconds, press
the • REC/REC MUTE button again while “TAPE lil^»l” Is
flashing rapidly.
To insert blank spaces of more than 4 seconds, after the deck
enters recording pause mode, press the • REC/REC MUTE
button again. Each time the button is pressed, a 4-second blank
space is added.
OS
<Q
m (£
58
II
1 Load the tape to be recorded on into the deck.
Load the tape with the side to be recorded on first facing
upward and the exposed side facing to the right.
Side to be
recorded first
Press the TAPE button on the remote control to
select the reverse mode.
To record on one side only, select Z.
To record on both sides, select or CTD.
When recording is started from the side facing downward,
the tape stops at the end of recording of this side, even if the
reverse mode is set to Z) or CZ).
Press one of the function buttons and prepare
the source to be recorded.
To record from a radio broadcast, press the TUNER/BAND
button on the remote control and tune in to a station.
To record from a CD, press the CD button on the remote
control and load a CD.
To record from equipment connected to the AUX IN jacks
or the MD IN jacks, press the AUX/MD button repeatedly to
display “AUX” or “MD” respectively, and prepare the equipment
for playback.
Press the • REC button on the CD/tape unit to start recording.
To start recording with the remote control, press the • REC/
REC MUTE button and within 2 seconds, press the ► button.
When recording from a CD, playback and recording start
simultaneously.
When recording from connected equipment, start playback.
To erase a recording
1 Load the tape to be erased into the deck.
2 Set the tape to the point where the erasure is to be started.
3 Press the AUX/MD button on the remote control, or press
repeatedly the FUNCTION button on the CD/tape unit so that
“AUX” is displayed.
If an optional equipment is connected to the AUX IN jacks,
turn it off.
4 Press the • REC button on the CD/tape unit to start the
erasure.
ENGLISH 1 5
Page 16

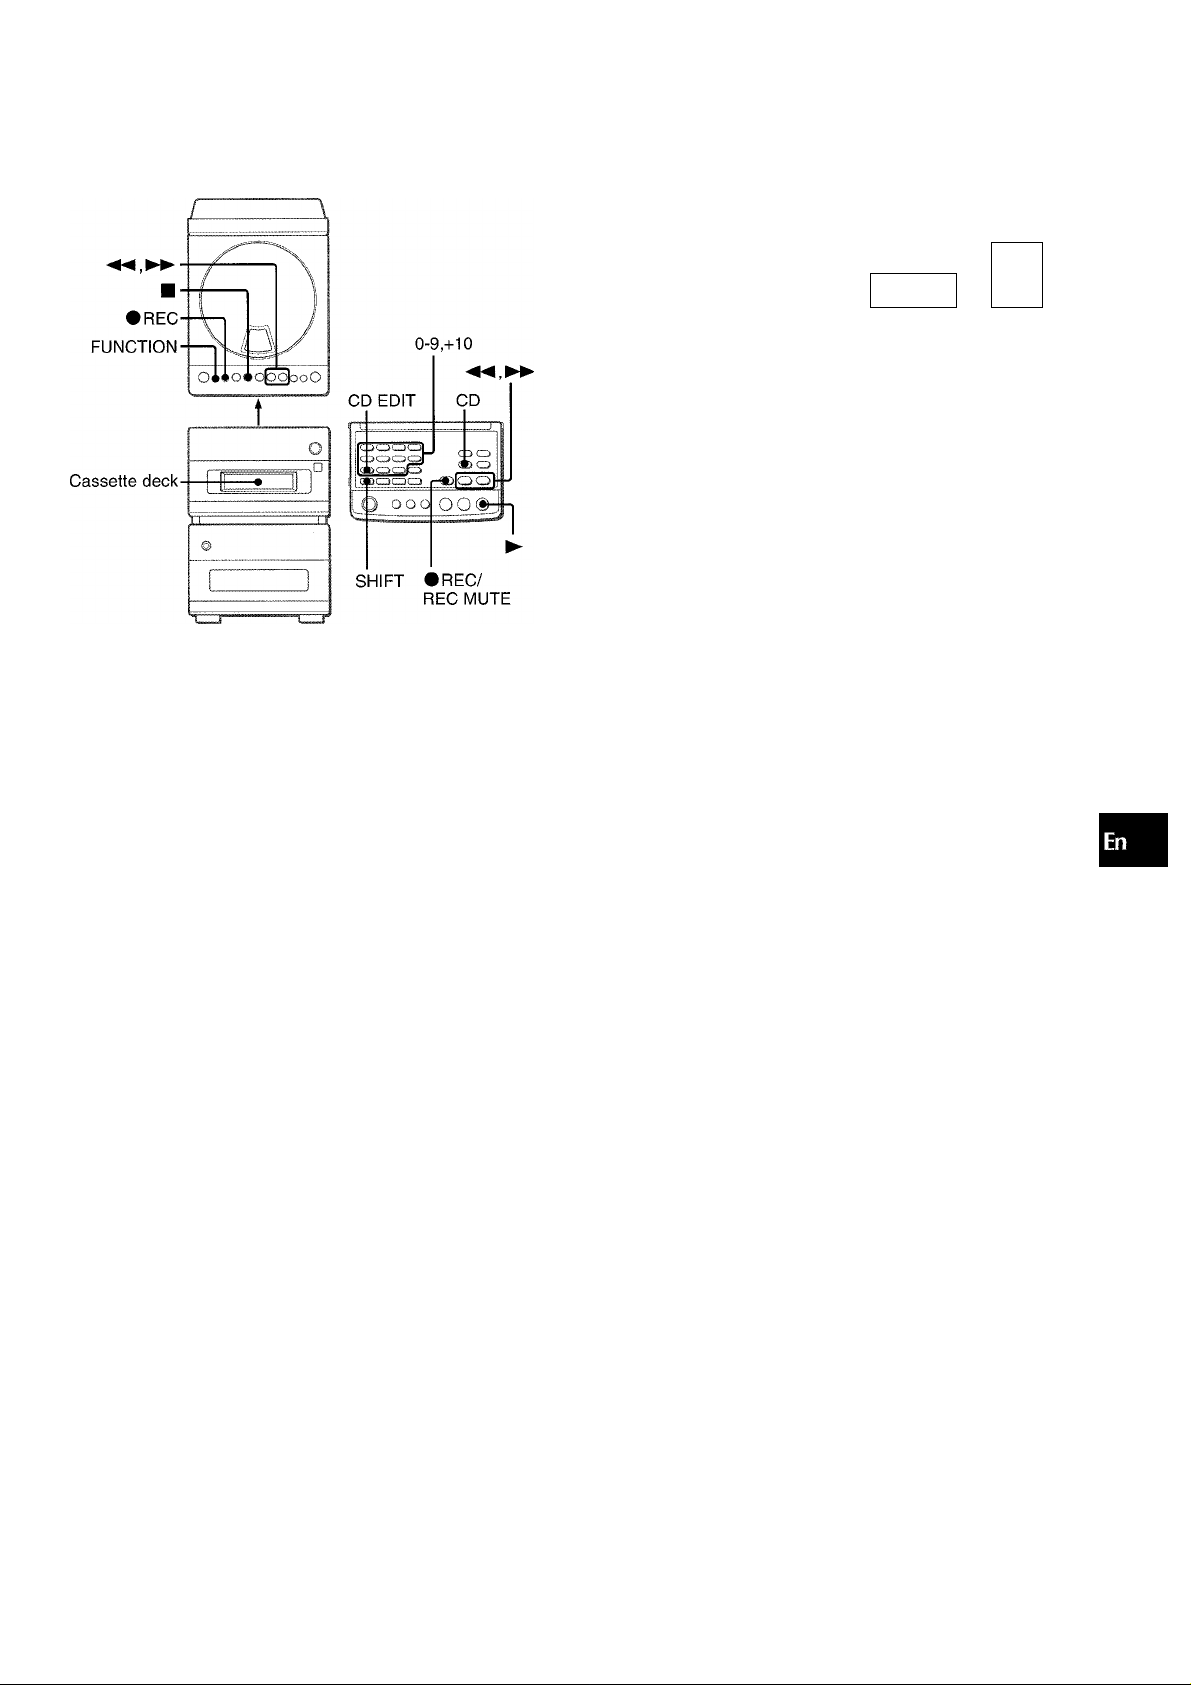
Al EDIT RECORDING
Press the numbered buttons to designate the tape
length.
10 to 99 minutes can be specified.
Example: When using a 60-minute tape, press the 6 and 0
buttons.
In a few seconds, the microcomputer determines the tracks
to be recorded on each side of the tape.
• The ◄◄ and ►► buttons are also available to designate
the tape length.
0-9,+10
CD EDIT CD
C 5CDCD!
0(DC3CDa r-aalool
0 0 0
SHIFT •REC/
The Al edit function enables CD recording without worrying about
tape length and track length. When a CD is inserted, the unit
automatically calculates track lengths. If necessary, the order of
tracks is rearranged so that no track is cut short.
(Al: Artificial Intelligence)
NOTE
Al edit recording will not start from a point halfway into the tape.
The tape must be recorded from the beginning of either side.
1 Load the tape into the cassette deck.
Load the tape with the side to be recorded on first facing
upward.
2 Press the CD button on the remote control, or
C 3 CD
CÉIO
REC MUTE
press repeatedly the FUNCTION button on the CD/
tape unit so that “CD” is dispiayed, and ioad the
disc.
3 Press the CD EDIT button repeatedly while
pressing the SHiFT button on the remote controi
until “EDIT” lights up and “Ai” flashes on the
display.
! !
...
i"i i:
Tape side A o Tape length
...
Number of programmed
tracks
i:;j !! I;;;:
!■": !■■■;
Remaining time of side A
5 Press the # REC button on the CD/tape unit to
start recording.
To start recording with the remote control, press the # REC/
REC MUTE button and within 2 seconds, press the ► button.
The tape is rewound to the beginning of the side facing upward,
the lead segment is played through for 10 seconds, and
recording starts. When recording on the side facing upward
(side A) ends, recording on the opposite side (side B) starts.
To stop recording
Press the ■ button. Recording and CD play stop simultaneously.
To clear the edit program
Press the ■ button twice so that “EDIT” disappears on the display.
To check the order of the programmed track numbers
Before recording, press the CD EDIT button while pressing the
SHIFT button on the remote control to select side A or B, and
press the ►► button repeatedly.
Tape side Program number
I i
cz:>
1 6 ENGLISH
H I
.
ì::ì i"ì
hi > T 1.
Track number
Time on cassette tapes and editing time
The actual cassette recording time is usually a little longer than
the specified recording time printed on the label. This system
can program tracks to use the extra time.
> Recording is inhibited if the erasure prevention tab on either
side of the tape is broken off.
• The Al edit function cannot be used with discs containing 31
tracks or more.
Programmed track
numbers
Page 17
PROGRAMMED EDIT RECORDING
Programmed edit function enables CD recording while checking
the remaining time on each side of the tape as the tracks are
programmed.
6 Repeat step 5 for the rest of the tracks for side A.
A track whose playing time is longer than the remaining time
cannot be programmed.
Selected track
ir
N>
pm
p
....
03
Program number
<H> 3'.10 ii 25
Total number of Remaining time of side A
programmed tracks
Press the CD EDIT button while pressing the
SHIFT button on the remote control to select side
B and program the tracks for side B.
After confirming B on the display, repeat step 5.
Tape side B (opposite side)
o
z
Q
CC
o
o
lU
QC
III
O.
<
The programmed edit recording will not start from a point halfway
in the tape. The tape must be recorded from the beginning of
either side.
1 Load the tape into the cassette deck.
Load the tape with the side to be recorded on first facing
upward.
2 Press the CD button on the remote control, or
press repeatedly the FUNCTION button on the CD/
tape unit so that “CD” is displayed, and load the
disc.
3 Press the CD EDiT button repeatediy while
pressing the SHIFT button on the remote controi
untii “EDIT” lights up and “PRGM” flashes on the
display.
4 Press the numbered buttons to designate the tape
length.
10 to 99 minutes can be specified.
Example: When using a 60-minute tape, press the 6 and 0
buttons.
• The ◄◄ and ►► buttons are also available to designate
the tape length.
Tape side A (front side)
I
■: p>
Maximum recording time for
side A
;; |/i
5 Press the numbered buttons to program a track.
Example: To select the 10th track, press the numbered
buttons +10 and 0.
1 i:;;...................3 0 ' d id
8 Press the # REC button on the CD/tape unit to
start recording.
To start recording with the remote control, press the • REC/
REC MUTE button and within 2 seconds, press the ► button.
The tape is rewound to the beginning of the side facing upward,
the lead segment is played through for 10 seconds, and
recording starts. When recording on the side facing upward
(A) ends, recording on the opposite side (B) starts.
To stop recording
Press the ■ button. Recording and CD play stop simultaneously.
To check the order of the programmed track numbers
Before recording, press the CD EDIT button while pressing the
SHIFT button on the remote control to select side A or B, and
press the ►► button repeatedly.
Track number track numbers
N>.10 P..................01
Program number
To change the program of each side
Press the CD EDIT button while pressing the SHIFT button on
the remote control to select side A or B, and press the ■ button
to clear the program of the selected side. Then program tracks
again.
To clear the edit program
Press the ■ button repeatedly so that “EDIT” disappears on the
display.
Recording is inhibited if the erasure prevention tab on either side
of the tape is broken off.
Programmed
ENGLISH 1 7
Page 18

TIMER PLAY AND TIMER
RECORDING___________
4 Press the
When timer play is selected;
II
button.
-TIMER
c:>ooo
dbocDO
C3000
|apoc3C3 QIQQH —
ooo ®00
®-i
POWER
SHIFT
The system can be turned on at a specified time every day with
the buiit-in timer.
Make sure the clock is set correctiy. (See page 7.)
Use the remote controi.
1 Prepare the source and recording destination.
To listen to a CD, press the CD button on the remote control
and load a CD.
To listen to or record from a radio broadcast, press the
TUNER/BAND button on the remote control and tune in to a
station.
To listen to or record from the connected equipment, press
the AUX/MD button on the remote controi repeatedly until the
corresponding source appears on the display, and set the timer
of the equipment to start playing at the required timer-on time.
2 Press theTIMER button repeatedly while pressing
QO
_
____
_
-II
the SHIFT button on the remote control to display
“TIMER ©PLAY” (for timer play) or “TIMER
0REC” (for timer recording).
EM 1 20:-
When timer recording is selected:
EM R120..
5 Select the duration for the timer-activated period
with the ◄◄ or ►► button.
C;:D
Timer-activated period
The duration for the timer-activated period can be set between
5 and 240 minutes in 5-minute steps.
6 Press the
If 4 seconds elapse without the II button pressed, the timer
set in steps 1 through 5 becomes effective.
7 For timer recording, load the tape to record on.
8 Press the POWER button to turn the system off
II
button.
after adjusting the volume and tone.
© or ©ES remains on the display after the power is turned
off (timer standby mode).
Note, however, that everything on the display will clear if the
power economizing mode (see page 7) is activated. To confirm
the timer standby mode, press the MODE button while
pressing the SHIFT button on the remote control to turn off
the power economizing mode.
/ ii ^
TIMER 0REC
TIMER ©PLAY : for timer play
TIMER ©REC ; for timer recording
3 Within 4 seconds, designate the timer-on time by
pressing the ◄◄ or ►► button.
Pressing the ◄◄ button once will move the time back by 1
minute, and pressing the ►► button once will advance the
time by 1 minute.
Holding these buttons down will vary the time in 10-minute
units.
When the timer-on time is reached, the system turns on and
begins play (or recording) with the selected source.
If the volume level was set to higher than 21 when the power
was turned off, it is automatically set to 21 when the system
turns on by the timer.
1 8 ENGLISH
Page 19

To check the specified time and source
Press the TIMER button while pressing the SHIFT button on the
remote control. The selected source name, the timer-on time
and the duration for the timer-activated period are displayed for
4 seconds.
To change the timer setting
Set the timer again from the beginning.
To cancel timer standby mode temporarily
Press the TIMER button repeatedly while pressing the SHIFT
button on the remote control so that “TIMER OFF” is displayed
on the display.
To restore the timer standby mode, select “TIMER © REC” or
“TIMER © PLAY” instead of “TIMER OFF.”
Using the system whiie the timer is set
You can use the system normally after setting the timer.
Before turning off the power, prepare the source and the recording
source, and adjust the volume and tone.
NOTE
' Timer play and timer recording will not begin unless the power
is turned off.
' Connected equipment cannot be turned on and off by the built-
in timer of this system. Use an external timer.
SEniNG THE SLEEP TIMER
SLEEP
—
oc
^oo
0(3
DOO
oc
300
Cl
131000 d3l
ooo oo
I ^
SHIFT
The system can be turned off automatically at a specified time.
Use the remote control.
1 Press the SLEEP button while pressing the SHIFT
button on the remote control.
2 Within 4 seconds, press the ◄◄ or ►► button
to specify the time until the power is turned off.
Each time the button is pressed, the time changes between 5
and 240 minutes in 5-minute steps.
1
C3 o
o o
o
cc
IIJ
s
p
SLE-lEP i?0
Specified time SLEEP
To check the time remaining untii the power is turned off
Press the SLEEP button once while pressing the SHIFT button
on the remote control. The remaining time is displayed for 4
seconds.
To cancel the sleep timer
Press the SLEEP button twice while pressing the SHIFT button
on the remote control so that “SLEEP OFF” is displayed.
ENGLISH 1 9
Page 20
OTHER CONNECTIONS
CONNECTING OPTIONAL EQUIPMENT
Refer to the operating instructions of the connected equipment
for details.
• The connecting cords are not supplied. Obtain the necessary
connecting cords.
• Consult your local Aiwa dealer for optional equipment.
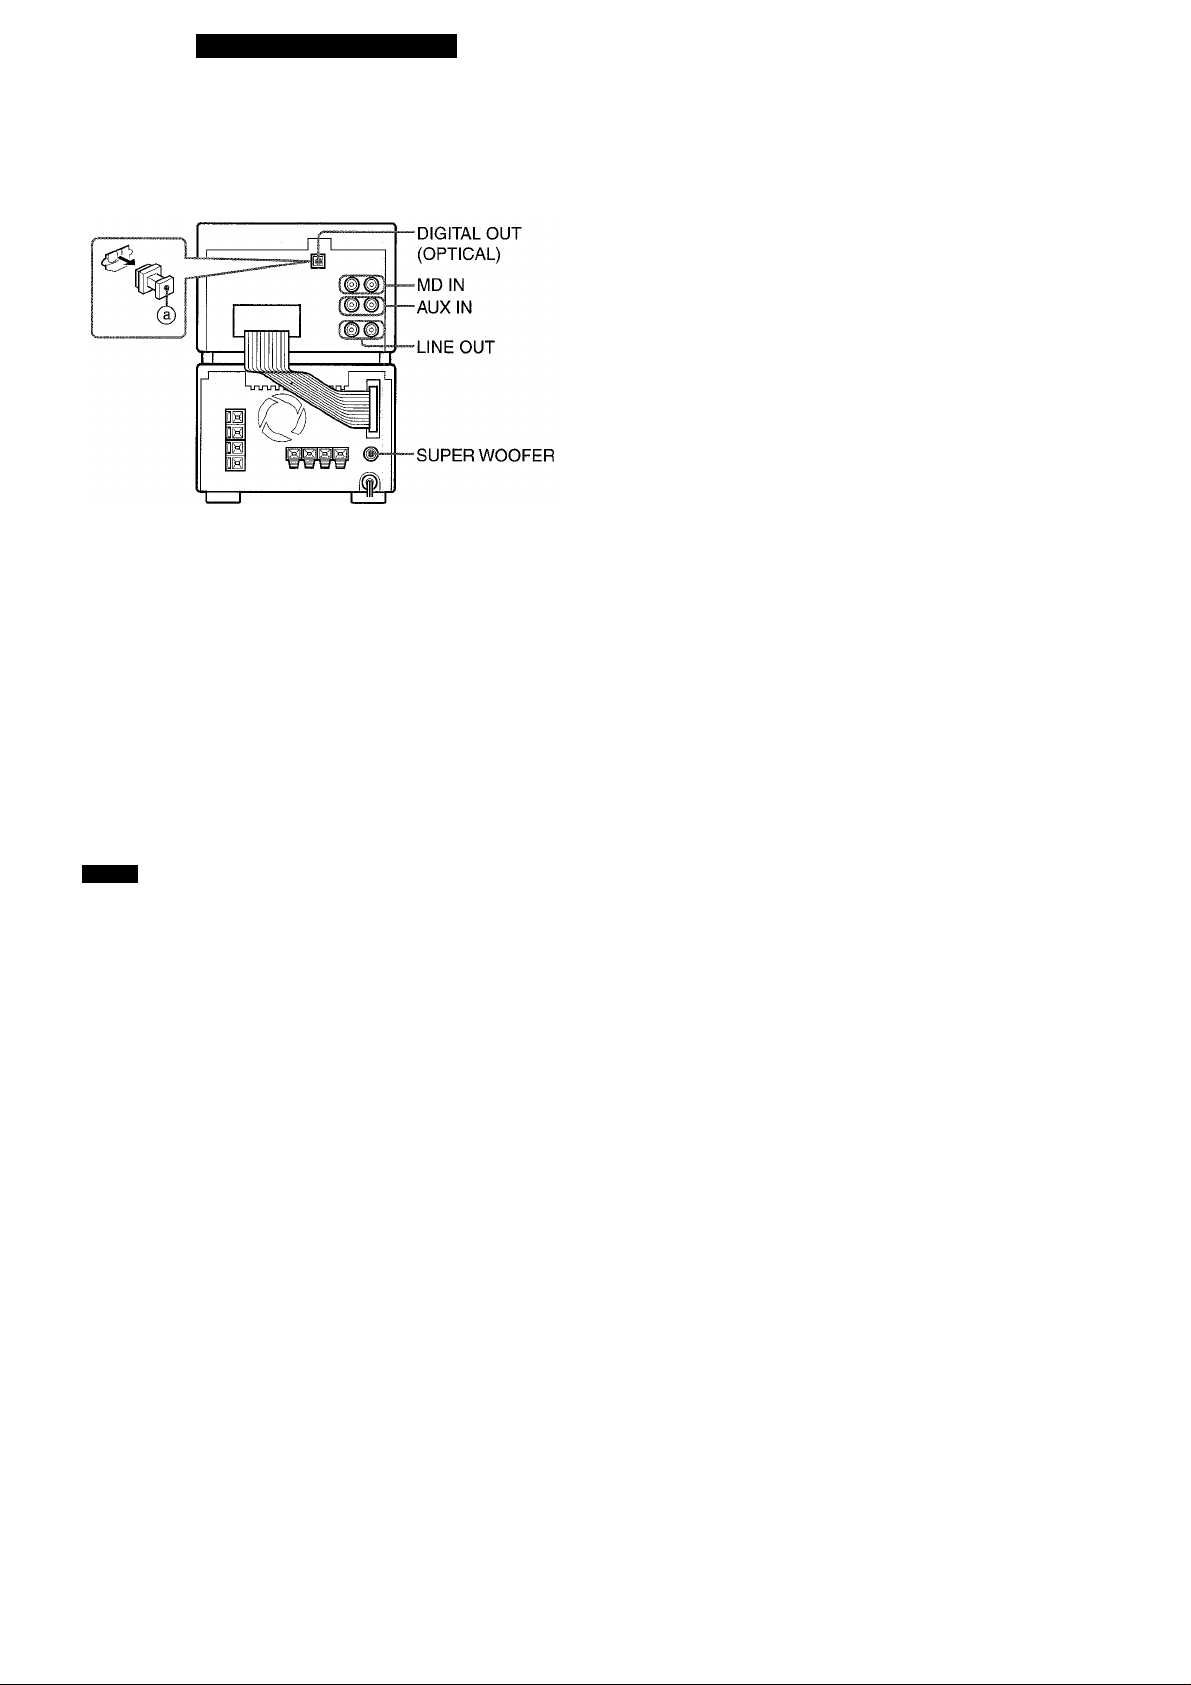
MD IN JACKS
DIGITAL OUT (OPTICAL) JACK
This system can output CD digital sound signals through this
jack. Use an optical cable to connect digital audio equipment
(digital amplifier, DAT deck, MD recorder, etc.).
Remove the dust cap @ from the DIGITAL CUT (CPTICAL) jack.
Then, connect an optical cable plug to the DIGITAL GUT
(CPTICAL) jack.
When recording the CD digital sound of this system using an
external digital equipment such as an MD recorder connected to
the DIGITAL GUT (CPTICAL) jack, proceed as follows to prevent
the beginning of the sound to be recorded from being cut.
1 Set the CD/tape unit to the CD playback pause mode.
2 Start recording on the connected equipment.
3 Start playback of the CD on the CD/tape unit.
When DIGITAL OUT (OPTICAL) jack is not being used
Attach the supplied dust cap.
SUPERWOOFER <1 JACK
Connect an optional powered sub woofer with a built-in-amplifier
to the jack.
This system can input analog sound signals from an MD player
or MD recorder through these jacks.
Use a cable with RCA phono plugs to connect an MD player/
recorder.
Connect the red plug to the R jack, and the white plug to the L
jack.
NOTE
When using an MD recorder to record the sound of this system
(radio or CD), connect the MD recorder to the LINE OUT jacks.
This connection enables recording onto an MD in analog signal.
To record the CD playback sound of this system in digital signal,
connect the MD recorder to the DIGITAL OUT (OPTICAL) jack.
AUX IN JACKS
This system can input analog sound signals through these jacks.
Use a cable with RCA phono plugs to connect audio equipment
(turntables, LD players, VCRs, TV, etc.).
Connect the red plug to the R jack, and the white plug to the L
jack.
When connecting a turntable
Use an Aiwa turntable equipped with a built-in equalizer amplifier.
LINE OUT JACKS
This system can output analog sound signals for all functions
through these jacks.
Use a cable with RCA phono plugs to connect audio equipment.
Connect the red plug to the R jack, and the white plug to the L
jack.
Do not connect equipment to the LINE OUT jacks and AUX IN
jacks simultaneously.
Otherwise, noise is generated and malfunctions may occur.
20 ENGLISH
Page 21
I
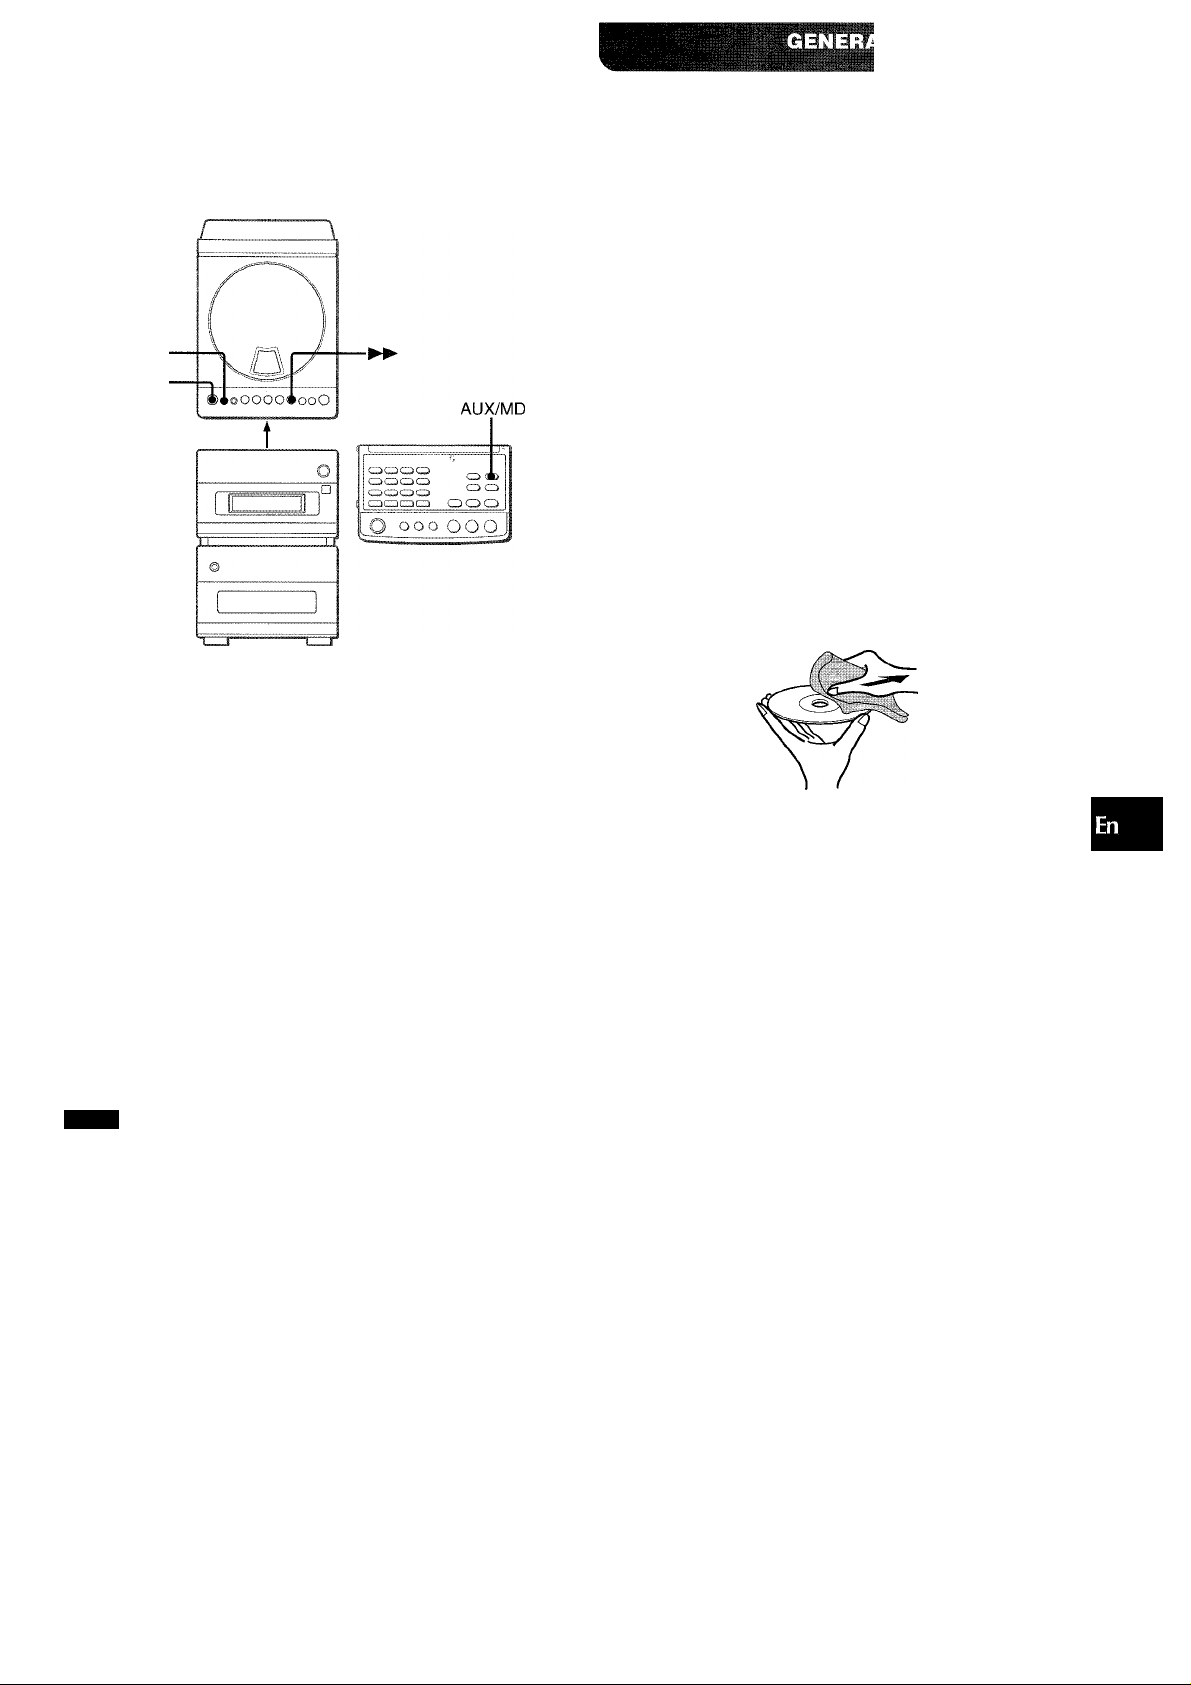
LISTENING TO EXTERNAL
SOURCES
FUNCTION
POWER
1 Press the AUX/MD button on the remote control
repeatedly until corresponding source appears
on the display.
To listen to the equipment connected to the AUX IN jack,
display “AUX.”
To listen to the equipment connected to the MD IN jack, display
“MD.”
2 Play the corresponding equipment connected.
To change the source name display corresponding to the equipment connected to the AUX IN jack
For the equipment connected to the AUX IN jack, “AUX” is
displayed initially. It can be changed to “TV” or “VIDEO” according
to the equipment actually connected to the jacks.
Call up “AUX” on the display window and press the POWER button
while pressing the ►► button. Each press on the button changes
the display in the following order:
CARE AND MAINTENANCE
Occasional care and maintenance of the system and the software
are needed to optimize the performance of your system.
To clean the cabinet
Use a soft and dry cloth.
If the surfaces are extremely dirty, use a soft cloth lightly
moistened with mild detergent solution. Do not use strong
solvents, such as alcohol, benzine or thinner as these could
damage the finish of the system.
To clean the heads and tape paths
After every 10 hours of use, clean the heads and tape paths with
a commercially available head cleaning cassette.
Care of the system
• Do not give the system a strong shock i.e., drop or hit.
• Do not use the system close to a strong magnetic field such as
a television. Doing so may cause malfunctions.
Care of CDs
• When a disc becomes dirty, wipe the disc from the center out
with a cleaning cloth.
• After playing a disc, store the disc in its case. Do not leave the
disc in places that are hot or humid.
Care of tapes
• Store tapes in their cases after use.
• Do not leave tapes near magnets, motors, television sets, or
any source of magnetism. This will downgrade the sound quality
and cause noise.
• Do not expose tapes to direct sunlight, or leave them in a car
parked in direct sunlight.
(0
z
o
F=
U -1
LU <
z tr.
Z LU
OZ
MiU
LU
X
&
AUX
NOTE
The FUNCTION button on the CD/tape unit cannot be used to
select “MD” or “AUX.” Pressing the FUNCTION button only calls
up the external source currently selected.
VIDEO
TV
□
ENGLISH 21
Page 22

SPECIFICATIONS
STEREO RECEIVER RX-LM88
FM tuner section
Tuning range
Usable sensitivity (IMF)
Antenna terminals
AM tuner section
Tuning range
Usable sensitivity
Antenna
Amplifier section
Power output
Total harmonic distortion
Outputs
Generai
Power requirements
Power consumption
Standby power consumption
Dimensions (W x H x D)
Weight
STEREO CASSETTE DECK/COMPACTDISC PLAYER FD-LM88
Compact disc piayer section
Laser
D-A converter
Signal-to-noise ratio
Harmonic distortion
Wow and flutter
87.5 MHz to 108 MHz
13.2 dBf
75 ohms (unbalanced)
530 kHz to 1710 kHz (10 kHz step)
531 kHz to 1602 kHz (9 kHz step)
350 pV/m
Loop antenna
16 watts per channel
RMS at 6 ohms, from 65 Hz to
15 kHz, with no more than 1 %
Total Harmonic Distortion
0.1 % (7 W, 1 kHz, 6 ohms, DIN
AUDIO)
SUPERWOOFER: 1.4 V
SPEAKERS: accept speakers of
6 ohms or more
PHONES (stereo minijack):
accepts headphones of 32 ohms
120 V AC, 60 Hz
50 W
2.5 W (power economizing mode
set to ON)
144 X 100 X 206.5 mm
(5% X 4 X 8V4 in.)
2.7 kg (5 lbs15oz)
Semiconductor laser (X = 780 nm)
1 bit dual
85 dB (1 kHz, 0 dB)
0.05 % (1 kHz, 0 dB)
Unmeasurable
SPEAKER SYSTEM SX-LM200
Cabinet type
Speakers
Impedance
Output sound pressure level
Dimensions (W x H x D)
Weight
• Specifications and external appearance are subject to change
without notice.
uuu SYSTEM
The word “BBE” and the “BBE symbol” are trademarks of BBE
Sound, Inc.
Under license from BBE sound, Inc.
2 way, bass reflex (magnetic
shielded type)
Woofer:
100 mm cone type
Tweeter:
25 mm balanced dome type
6 ohms
87 dB/W/m
120 X 200 X 182 mm
(4% X 77s X 7V4 in.)
1.6 kg (3 lbs 8 oz)
COPYRIGHT
Please check the laws on copyright relating to recordings from
discs, radio or external tape for the country in which the machine
is being used.
NOTE
This equipment has been tested and found to comply with the
limits for a Class B digital device, pursuant to Part 15 of the FCC
Rules.These limits are designed to provide reasonable protection
against harmful interference in a residential installation.
This equipment generates, uses, and can radiate radio frequency
energy and, if not installed and used in accordance with the
instructions, may cause harmful interference to radio
communications. However, there is no guarantee that interference
will not occur in a particular installation. If this equipment does
cause harmful interference to radio or television reception, which
can be determined by turning the equipment off and on, the user
is encouraged to try to correct the interference by one or more of
the following measures:
-Reorient or relocate the receiving antenna.
- Increase the separation between the equipment and receiver.
-Connect the equipment into an outlet on circuit different from
that to which the receiver is connected.
-Consult the dealer or an experienced radioATV technician
for help.
Cassette deck section
Track format
Frequency response
Signal-to-noise ratio
Recording system
Heads
General
Inputs
Outputs
Dimensions (W x H x D)
Weight
22 ENGLISH
4 tracks, 2 channels stereo
Cr02 tape: 50 Hz - 16000 Hz
Normal tape: 50 Hz - 15000 Hz
54 dB (Cr02 tape peak level)
AC bias
Recordmg/playback head x1
Erase head x2
MD IN: 470 mV
AUX IN: 400 mV
DIGITAL OUT
LINE OUT: 400 mV
144x100.6x203 mm
(5% X 4 X 8 in.)
1.5 kg (3 lbs 15 oz)
CAUTION
Modifications or adjustments to this product, which are not
expressly approved by the manufacturer, may void the user's
right or authority to operate this product.
Page 23

TROUBLESHOOTING GUIDE
If the system fails to perform as described in these Operating
Instructions, check the following guide.
GENERAL
There is no sound.
• Is the AC cord connected properly?
• Is there a bad connection? (-> page 4)
• Was an incorrect function button pressed?
Sound is emitted from one speaker only.
• Is the other speaker disconnected?
Sound becomes inaudible suddenly.
-* The protection circuit was activated due to an internal heat
build-up. Turn off the power, make sure there is sufficient
clearance behind the ventilation openings on the rear, and
leave the system until it cools down.
An erroneous display or a malfunction occurs, or an error
message appears.
-+ Reset the system as stated below.
TUNER SECTION
There is constant, wave-like static.
• Is the antenna connected properly? (-» page 5)
• Is the signal weak?
-► Connect an outdoor antenna.
The reception contains noise interferences or the sound is
distorted.
• Is the system picking up external noise or multipath distortion?
-► Change the orientation of the antenna.
-► Move the system away from other electrical appliances.
CASSETTE DECK SECTION
The tape does not run.
• Is the deck in pause mode? (-> page 13)
The sound is off-balance or not adequately high.
• Is the playback head dirty? (-♦ page 21)
Recording is not possible.
• Is the erasure prevention tab on the tape broken off?
(-»page 14)
• Is the recording head dirty? (-► page 21)
Erasure is not possible.
• Is the erasure head dirty? (-» page 21)
• Is a metal tape being used?
High frequency sound is not emitted.
• Is the recording/playback head dirty? (-> page 21)
u
z
lU
a
CD PLAYER SECTION
The CD player does not play.
• Is the disc correctly inserted? (-» page 11)
• Is the disc dirty? (-+ page 21)
• Is the lens affected by condensation?
Wait approximately one hour and try again.
To reset
If an unusual condition occurs in the display window, reset the
system as follows.
1 Press the POWER button to turn off the power.
2 Press the POWER button to turn the power back on while
pressing the ■ button. Everything stored in memory after
purchase is canceled.
If the power cannot be turned off in step 1 because of a
malfunction, reset by disconnecting the AC cord and repeat step
2.
ENGLISH 23
Page 24

PARTS INDEX
Instructions about each part on the system or remote control
are indicated on the pages shown below.
0
o
IT
Name
O ■ CLEAR
0 II SET
© • REG
O FUNCTION
© POWER
0 PHONES
O DIR/PRESET
0 ►►TUNING DOWN/UP 7, 9, 10, 11, 13, 16, 17
© VOLUME +/- 8
©^OPEN/CLOSE 11
TAPE EJECT 13
Page
10, 11, 13, 15, 16, 17
7, 9, 10, 11, 13, 15
15, 16, 17
6
6, 9
6
10, 11, 13, 15
#■
XT
□
o
©
©
©
©
©
Name
© Numbered buttons
1/RAN DOM
2/REPEAT
3/PROGRAM
4/DISPLAY
5/TIMER
6/SLEEP
7/CLOCK
8/MODE
9/CD EDIT
© SHIFT
© POWER
© VOLUME +/© EQ
© MONO
© • REC/REC MUTE
© Function buttons
TUNER/BAND
AUX/MD
CD
TAPE
® ◄◄,►► TUNING DOWN/UP
® BBE
T-BASS
Qsurround
@ ► PRESET
@ ■ CLEAR
© II SET
Page
10, 11, 12, 16, 17
12
12
12
9, 12, 14
18
19
7
7
16, 17
6
6, 18
8
8
9
15, 16, 17
6, 9, 10
6, 21
6, 11, 16, 17
6, 13
7, 9, 10, 11, 13, 16, 17, ■
19
8
8
8
10, 11, 12, 13, 15
10, 11, 12, 13, 15, 16, 17
7, 10, 11, 13, 15, 18
24 ENGLISH
Page 25

Page 26

ESPAÑOLI
ADVERTENCIA
PARA REDUCIR EL RIESGO DE INCENDIOS O
SACUDIDAS ELECTRICAS, NO EXPONGA ESTE
APARATO A LA LLUVIA NI A LA HUMEDAD.
CAUTION
RISK OF ELECTRIC SHOCK
A
“CAUTION:TO REDUCE THE RISK OF
DO NOT REMOVE COVER (OR BACK).
NO USER-SERVICEABLE PARTS INSIDE.
REFER SERVICING TO QUALIFIED
SERVICE PERSONNEL.”
Explicación de los símbolos gráficos
DO NOT OPEN
ELECTRIC SHOCK,
El símbolo de un rayo con una flecha en la
punta, dentro de un triángulo equilátero es una
alerta al usuario de la existencia de un “voltaje
peligroso” sin aislar en el interior del aparato
que puede ser lo suficientemente fuerte como
para provocar sacudidas eléctricas en las
personas.
El signo de exclamación en el triángulo
equilátero es una alerta al usuario de la
existencia de instrucciones de funcionamiento
y de mantenimiento (servicio) importantes en
los manuales que vienen con el aparato.
A
PRECAUCIONES
Lea cuidadosa y completamente el manual de instrucciones antes
de utilizar la unidad. Asegúrese de guardar el manual de
instrucciones para utilizarlo como referencia en el futuro. Todas
las advertencias y precauciones del manual de instrucciones y de
la unidad deberán cumplirse estrictamente, así como también las
sugerencias de seguridad mencionadas más abajo.
Instalación
1 Agua y humedad - No utilice esta unidad cerca del agua
como, por ejemplo, cerca de una banadera, una palangana,
una piscina o algo similar.
2 Calor - No utilice esta unidad cerca de fuentes de calor,
incluyendo salidas de aire caliente, estufas u otros aparatos
que generen calor. No deberá colocarse tampoco en lugares
donde la temperatura sea inferior a 5°C o superior a 35"C.
3 Superficie de montaje - Ponga la unidad sobre una superficie
plana y nivelada.
4 Ventilación - La unidad deberá situarse donde tenga suficiente
espacio libre a su alrededor para que la ventilación apropiada
quede asegurada. Deje un espacio libre de 10 cm para la parte
posterior y superior de la unidad y 5 cm para cada lado.
- No ponga la unidad sobre una cama, una alfombrao superficies
similares que podrán tapar las aberturas de ventilación.
- No instale la unidad en una librería, mueble o estantería
cerrada herméticamente donde la ventilación no seaadecuada
5 Entrada de objetos y líquidos - Tenga cuidado de que
objetos y líquidos no entren en la unidad por las aberturas de
ventilación.
6 Carros de mano y soportes-Cuando
ponga o monte la unidad en un soporte
o carro de mano, ésta deberá moverse
con mucho cuidado. Las paradas
repentinas, la fuerza excesiva y las
superficies irregulares pueden hacer
que la unidad o el carro de mano se dé
vuelta o se caiga.
2 ESPAÑOL
7 Condensación - En la lente del fonocaptor del reproductor de
discos compactos tal vez se forme condensación cuando:
- La unidad se pase de un lugar frío a uno caliente
- El sistema de calefacción se acabe de encender.
- La unidad se utilice en una habitación muy húmeda.
- La unidad se enfríe mediante un acondicionador de aire.
Esta unidad tal vez funcione mal cuando tenga condensación
en su interior. En este caso, deje en reposo la unidad durante
unas pocas horas y repita de nuevo la operación.
8 Montaje en pared o techo - la unidad no se deberá montar en
luna pared ni en el techo, a menos que se especifique lo
contrario en el manual de instrucciones.
Energía eléctrica
1 Fuentes de alimentación - Conecte esta unidad sólo a las
fuentes de alimentación especificadas en el manual de
instrucciones, y como está marcado en la unidad.
2 Polarización - Para su seguridad, algunos aparatos tienen
clavijas de alimentación de CA que sólo pueden enchufarse en
un sentido en el tomacorriente. si fuera muy difícil por no decir
imposible de enchufarlo en el tomacorriente, pruebe a hacerlo
girando la clavija de alimentación. Si todavía tiene problemas,
llame a un técnico en reparaciones cualificado para que le
cambie el tomacorriente. No elimine esta seguridad de la
clavija de alimentación polarizada enchufándolo a la fuerza en
el tomacorriente.
3 Cable eléctrico de CA
- Cuando desconecte el cable eléctrico de CA, sujete la clavija
de alimentación de CA y tire de ella. No tire del propio cable.
- Nunca maneje la clavija de alimentación de CA con las manos
mojadas porque podría producirse un incendio o una sacudida
eléctrica.
- Los cables de alimentación deberán colocarse de forma que
no sean doblados excesivamente, pellizcados o pisados.
Tenga mucho cuidado con el cable que va de la unidad a la
toma de corriente.
- Evite sobrecargar las tomas de CA y los cables de extensión
más allá de su capacidad porque esto podrá causar un
incendio o una sacudida eléctrica.
4 Cable de extensión - Para evitar una sacudida eléctrica, no
utilice un enchufe de CA polarizado con un cable de extensión,
divisor u otro tomacorriente excepto uno en el que pueda
enchufar completamente para evitar la exposición parcial de
las patas del enchufe.
5 Períodos de no utilización - Desenchufe la clavija de
alimentación de CA del tomacorriente de CA si la unidad no va
a ser utilizada durante varios meses o más. Cuando el cable
eléctrico esté conectado, por la unidad continuará circulando
una pequeña cantidad de corriente, aunque la alimentación
esté desconectada.
Antena exterior
1 Líneas eléctricas - Cuando conecte una antena exterior,
asegúrese de instalarla lejos de las líneas eléctricas.
2 Tierra de la antena exterior-Asegúrese de que el sistema de
antena está bien conectado a tierra para protegerlo contra
sobretensión o acumulación de electricidad estática. El artículo
810 del -Código de Electricidad Nacional, ANSI/NFPA 70
contiene información sobre una correcta conexión a tierra del
mástil, estructura de soporte y el cable conductor a la unidad
de descarga de la antena, así como el tamaño de la tierra,
conexión a los terminales de tierra y requisitos sobre los
terminales de tierra.
Puesta a tierra de la antena según el Codigo Eléctrico Nacional
CABLE DE BAJADA
DE LA ANTENA
UNIDAD DE DESCARGA
DE LA ANTENA
(NEC,SECCION 810-20)
CONDUCTORES DE
PUESTA A TIERRA
(NEC,SECCION 810-21)
ABRAZADERAS DE
PUESTA A TIERRA
SISTEMA DE ELECTRODO DE PUESTA
A TIERRA DEL SERVICIO ELECTRICO
NEC{CODÍGO ELECTRICO NACIONAL)
(NEC,ARTICULO 250.PARTE H)
Page 27

Mantenimiento
Limpie la unidad sólo como se recomienda en el manual de
instrucciones.
Daños que necesitan ser reparados
Haga que un técnico en reparaciones cualificado le repare las
unidades si:
- El cable de alimentación de CA o su clavija está estropeado.
- Objetos extraños o líquidos han entrado en la unidad.
- La unidad ha estado expuesta a la lluvia o ai agua.
- La unidad no parece funcionar normalmente.
- La unidad muestra un cambio considerable en sus prestaciones.
- La unidad se ha caído o la caja se ha estropeado.
NO TRATE DE REPARAR LA UNIDAD USTED MISMO.
Registro del propietario
Para su conveniencia, registre el número de modelo y número de
serie (en la parte trasera de su aparato) en el espacio a continuación.
Consúltelos cuando llame a su tienda de Aiwa en caso de tener
problemas.
№ de modelo № de serie (№ de lote)
RX-LM88
FD-LM88
SX-LM200
INDiCE
PRECAUCIONES............................................................. 2
PREPARATIVOS_____________________________
CONEXIONES....................................................................4
ANTES DE LA OPERACIÓN
AJUSTE DEL RELOJ.........................................................7
AHORRO DE ENERGÍA.....................................................7
REDUCCIÓN DEL BRILLO DE LA PANTALLA
SONIDO____________________________________
AJUSTE DEL SONIDO
RECEPCIÓN DE LA RADIO
SINTONIZACIÓN MANUAL...............................................9
PRESINTONIZACIÓN DE EMISORAS............................10
REPRODUCCIÓN DE DISCOS COMPACTOS
OPERACIÓN....................................................................11
REPRODUCCIÓN DE CINTAS__________________
OPERACIÓN....................................................................13
............................................
...............
......................................................
____________________
6
7
8
oí Scátema. S^téneO'/4ócímz
Enhorabuena por haber adquirido un sistema estéreo Aiwa.
Para aprovechar al máximo el funcionamiento de este sistema le
rogamos unos minutos de su tiempo para leer con atención este
Manual de Instrucciones y familiarizarse con los procedimientos
de operación.
Verifique ios accesorios
Mando a distancia
Antena de FM
Antena de cuadro de AM
GRABACIÓN DE LA CINTA
GRABACIÓN BÁSICA.....................................................15
GRABACIÓN CON EDICIÓN DE Al
GRABACIÓN CON EDICIÓN PROGRAMADA
TEMPORIZADOR
REPRODUCCIÓN CONTEMPORIZADOR Y
GRABACIÓN CONTEMPORIZADOR
AJUSTE DEL TEMPORIZADOR DE APAGADO ...........
____________________________
OTRAS CONEXIONES
CONEXIÓN DE UN EQUIPO OPCIONAL
ESCUCHANDO FUENTES EXTERNAS
GENERALIDADES
CUIDADO Y MANTENIMIENTO......................................21
ESPECIFICACIONES
SOLUCIÓN A PEQUEÑOS PROBLEMAS......................23
ÍNDICE DE LOS COMPONENTES
___________________________
.....................................................
____________________
................................
...............
.......................
________________________
.....................
.........................
..................................
16
17
18
19
20
21
22
24
Manual de instrucciones, etc.
ESPAÑOL 3
Page 28

PREPARATIVOS
CONEXIONES
Antes de conectar el cable eléctrico de CA
La tensión nominal de su unidad, mostrada en el panel trasero
es una CA de 120 V. Compruebe que la tensión nominal sea la
misma que la empleada en su localidad.
IMPORTANTE
• Conecte primero los altavoces, las antenas y todos los demás
equipos opcionales. Después conecte el cable eléctrico de CA.
• Los altavoces delanteros son Iguales. Puede conectarlos como
L (Izq.) o R (der.) indistintamente.
1 Carque el reproductor de discos compactos/
platina de casetes encima de la unidad del
sintonizador/amplificador y enchufe en el
conector del cable plano como se indica a
continuación.
Tenga en cuenta que el conector puede conectarse sólo en
un sentido con el cable plano hacia la izquierda.
Después de acoplar el conector, deje una holgura
adecuada entre el cable plano y las aberturas de
ventilación.
2 Conecte los cables de altavoces en los altavoces.
Los cables con rayas blancas se deben conectar a los
terminales © y los otros cables a los terminales ©.
3 Conecte los cables de altavoz a la unidad del
sintonizador/amplificador.
El cable de altavoz con la franja blanca debe conectarse al
terminal O y el cable negro al terminal O.
Antena de FM
4 ESPAÑOL
Page 29

Conecte tas antenas suministradas.
Conecte la antena de FM a los terminales FM 75 Í2 y la antena
de AM a los terminales AM LOOP.
Antena de FM
SOBRE LA INDICACION DE
DEMOSTRACIÓN EN LA PANTALLA
Cuando se enchufa por primera vez el cable eléctrico en el
tomacorriente, aparecerá una indicación de demostración en la
pantalla. Cuando conecte la alimentación, esta demostración
terminará. Al desconectar la alimentación volverá a aparecer la
demostración. Esta demostración aparece cada vez que
desconecte la alimentación, hasta que ajuste la hora del reloj.
(Para el ajuste del reloj, consulte la página 7.)
Cuando ajuste el reloj
Puede volver a ver la demostración con el botón MODE mientras
pulsa el botón SHIFT del mando a distancia. Este botón también
permite reducir el brillo de la pantalla y cambiar el aparato al
modo de ahorro de energía. Para más detalles, consulte la página
7.
(/)
O
>
tr
2
lU
cc
o.
5 Conecte et cabte etéctrico de CA a un
tomacorriente de CA.
NOTA
No cortocircuite los cables conductores O y © del altavoz; el
sonido se volverá inaudible o el aparato puede desconectarse.
En este caso, desenchufe el cable eléctrico de CA del
tomacorriente de CA y vuelva a conectar correctamente los
cables de altavoz. Vuelva a enchufar el cable eléctrico de CA y
conecte el aparato.
Para apoyar la antena de AM en una superficie
Fije la garra en la ranura.
COLOCACIÓN DE DOS APARATOS LADO
A LADO
También puede colocar el reproductor de discos compactos/
platina de casetes y el sintonizador/amplificado lado a lado de
acuerdo con su preferencia.
En este caso, asegúrese de que el cable plano no tape las salidas
de circulación de aire, como en la siguiente figura.
Deje siempre suficiente separación entre el cable plano y las
salidas de circulación de aire.
CONEXIÓN DE UNA ANTENA EXTERIOR
Para una mejor recepción de FM, se recomienda utilizar una
antena exterior.
Conecte la antena exterior a los terminales FM de 75 Q.
Para colocar las antenas Antena de cable de FM:
Alargue la antena horizontalmente con forma de T y fije sus
puntas en la pared.
Antena de cuadro de AM:
Gire hasta encontrar la mejor dirección.
NOTA
' No conecte otros altavoces en el aparato que no sean los
suministrados.
No deje objetos que generen magnetismo cerca de los
altavoces.
' No acerque la antena de FM cerca de objetos de metal o rieles
de cortina.
' No acerque la antena de AM cerca de otros equipos opcionales,
el sistema estéreo en sí, el cable de CA o los cables de altavoz,
debido a que se recibirá el ruido.
' No desenrolle el cable de antenas de AM.
Para conectar otro equipo opcional página 20.
ESPAÑOL 5
Page 30

ANTES DE LA OPERACION
AUX/MD —
TUNER/BANDt
0QC30 „Tí
C300CD O C D C >
I ooo OCX)
CD-
TAPE-
■ POWER
Para conectar el aparato
Pulse uno de los botones de función (TUNER/BAND, AUX/MD,
CD, TAPE) del mando a distancia.
Empieza a reproducir correspondiente fuente (función de
reproducción directa).
También puede utilizar el botón POWER.
Para desconectar el aparato
Vuelva a pulsar el botón POWER.
Para utilizar ios auricuiares
Conecte los auriculares con un mini-enchufe estéreo (03,5 mm)
en la toma PHONES.
No se escuchará ningún sonido por los altavoces cuando se
conectan los auriculares.
Para utilizar el botón FUNCTION en el reproductor de
discos compactos/platina de cintas
El botón FUNCTION en el reproductor de discos compactos/
platina de cintas actúa en lugar de los botones de función
(TUNER/BAND, AUX/MD, CD, TAPE) del mando a distancia.
Cada vez que pulse el botón FUNCTION con el aparato
conectado, se selecciona la siguiente función, cíclicamente.
MANDO A DISTANCIA
Colocación de baterías
Abra la tapa de baterías en la parte trasera del mando a distancia
y coloque dos baterías ROS (tamaño AAA).
Cuando cambiar las baterías
El alcance máximo entre el mando a distancia y el sensor del
reproductor de discos compactos/platina de casetes debe ser
de aproximadamente 5 metros. Cuando disminuye la distancia,
cambie las baterías por otras nuevas.
Apertura y cierre de la tapa superior
Cuándo utilizar el mando a distancia
Algunas operaciones pueden hacerse sólo con los botones del
mando a distancia o sólo con los botones del aparato mientras
que otros pueden hacerse con los botones del reproductor de
discos compactos/platina de casetes y del mando a distancia.
Este manual de Instrucciones especifica claramente los botones
que puede utilizar para cada operación.
NOTA
• El botón ► del mando a distancia tiene la misma función que
el botón en el reproductor de discos compactos/platina
de casetes.
• Si no se va a utilizar el aparato durante mucho tiempo, saque
las baterías para evitar que se produzca una fuga de electrólito.
• El mando a distancia puede no funcionar correctamente
cuando:
- La línea recta entre el mando a distancia y el sensor remoto
en la parte superior derecha del panel delantero está expuesta
a una luz intensa fuerte, por ejemplo los rayos del sol.
- Se utilizan otros mandos a distancia cerca (televisor, etc.)
6 ESPAÑOL
Las teclas numeradas de 1 a 9 tienen también las funciones
indicadas en la placa encima de ellas. Para utilizar estas
funciones, pulse las teclas mientras pulsa el botón SHIFT del
mando a distancia.
Page 31

AJUSTE DEL RELOJ
1 Pulse el botón
desconectado o pulse el botón CLOCK mientras
pulsa el botón SHIFT del mando a distancia.
Parpadea el reloj en la pantalla.
II
con el interruptor principal
MODE
QCDQC 3
oocDao
C3CDOO
Cf} CJC3C3
SHIFT
........
0.00..
OOO ooo
AHORRO DE ENERGÍA
Este sistema permite controiar el consumo de energía haciendo
que no aparezca nada en la pantalla cuando se desconecta el
aparato. Este es el modo de ahorro de energía.
Pulse el botón MODE mientras pulsa el botón SHIFT del mando a distancia con el aparato desconectado.
Cada pulsación de este botón hace que cambie el estado de
indicación de la siguiente forma:
r^© Modo de ahorro de energía
® Indicación de demostración (se canceia el modo de
ahorro de energía)
Indicación del reloj (se cancela el modo de ahorro de
energía)
(O
§
5
Œ
2
LU
(T
0.
i .i:: ' i:::i í::i
I \ " -
2 Mientras aparece el reloj (durante 4 segundos)
pulse el botón ◄◄ o ►► para cambiar la hora.
Pulse el botón ◄◄ una vez para retroceder la hora en 1
minuto y pulse el botón ►► una vez para avanzar la hora en
un minuto.
Mantenga estos botones pulsados para cambiar ia hora en
unidades de 10 minutos.
Pulse el botón ■ para cambiar a la indicación de la hora de
24 horas.
Pulse nuevamente el botón ■ para volver a la indicación de
la hora en 12 horas.
Si no ajusta la hora antes de 4 segundos
Empieza a funcionar el reloj y se vuelve más oscuro.
Para ajustar el reloj, pulse el botón II o pulse el botón CLOCK
mientras pulsa el botón SHIFT del mando a distancia.
El reloj se vuelve más brillante y puede utilizar los botones
◄◄ y
3 Pulse el botón
El reloj empieza desde 00 segundos.
Cuando se ajusta el reloj por primera vez después de la compra
Toda la pantalla está en blanco.
Esto se debe a que está activado el modo de ahorro de energía
y no es un mal funcionamiento.
Se puede cancelar el modo de ahorro de energía. Para más
detalles, consulte el “AHORRO DE ENERGÍA”.
Para mostrar la hora real
Pulse el botón CLOCK mientras pulsa el botón SHIFT del mando
a distancia. La hora aparece durante 4 segundos.
Mientras aparece el reloj, puede cambiar la hora con el botón
o En este caso, pulse el botón II al final.
II.
Cuando está en el modo de ahorro de energía
Aparece “Eco Mode” durante 4 segundos y la pantalla queda en
blanco.
Sólo el indicador rojo a la derecha de la pantalla se enciende
para indicar que hay alimentación eléctrica ai sistema.
Consumo eléctrico en espera
Si está activado ei modo de ahorro de energía: 2,5 W
NOTA
Si pulsa el botón en el reproductor de discos compactos/
platina de casetes (o el botón ► del mando a distancia) con el
aparato desconectado, el modo de ahorro de energía, si está
activado, se canceiará y aparece ia indicación de demostración.
REDUCCION DEL BRILLO DE LA
PANTALLA
Este sistema permite cambiar el brillo de la pantalla de acuerdo
con sus preferencias.
Pulse el botón MODE mientras pulsa el botón SHIFT del mando a distancia, con ei aparato conectado.
Cada puisación de este botón cambia el estado de la pantalla
de la siguiente forma:
l^® Pantalla más brillante
® Pantalla más oscura
'—®) Indicación de demostración
Si se desconecta la alimentación después de cambiar el brillo
de la pantalla, ésta vuelve al último estado al volver a conectar
el aparato.
ESPAÑOL 1
Page 32

L
. 'Î-. , .»-A*', i
••
...
J’ - . ..L
AJUSTE DEL SONIDO
AJUSTE DEL VOLUMEN
Pulse los botones VOLUME.
El nivel de volumen aparece en la pantalla durante 4 segundos.
Puede ajustarse entre 0 (mínimo) y 30 y después a MAX
(máximo).
El volumen queda memorizado incluso al desconectar el aparato.
Sin embargo, si el volumen estaba a más de 21, se ajustará
automáticamente a 21 al conectar otra vez.
REFUERZO DE LOS GRAVES
El sistema T-BASS refuerza el realismo de los sonidos en las
bajas frecuencias.
Pulse varias veces el botón T-BASS del mando a
distancia.
Cada pulsación del botón T-BASS permite seleccionar uno de
los tres niveles o a la posición de desconexión.
t>(ñ
(OFF)
T
....
BhSS i.IIII
NOTA
Los sonidos de bajas frecuencias pueden distorsionarse cuando
se utiliza el sistema T-BASS para un disco que ya tiene los
sonidos de baja frecuencia reforzados de origen. En este caso
cancele el sistema T-BASS.
■ lililí
J
EQ (ECUALIZADOR)
Este sistema tiene las siguientes tres curvas de ecualización
diferentes.
ROCK: Poderosos sonidos que dan énfasis a los agudos y graves
POP: Mayor presencia de voces y gama media
JAZZ: Se acentúan las bajas frecuencias para música de tipo
jazz
Pulse el botón EQ del mando a distancia.
REFUERZO DE LOS AGUDOS
El sistema BBE aumenta la nitidez de los sonidos en las altas
frecuencias.
Pulse varias veces el botón BBE del mando a
distancia.
Cada pulsación del botón BBE permite seleccionar uno de los
tres niveles, o la posición de desconexión.
u
(OFF)
i'i'. •■'lillill
i(HB
...... ^mo.iiiiiiii
n
BBE
RÜCr::
La curva gráfica correspondiente al modo de ecualización
seleccionado aparecerá en la pantalla.
SISTEMA Q SURROUND
El sistema Q SURROUND integrado en este aparato utiliza sólo
los dos altavoces de la izquierda y derecha para crear un
ambiente de sonidos como si estuviera rodeado por dos altavoces
delanteros y dos traseros.
Pulse el botón Qsurround del mando a distancia
Avanza “QSURROUND ON” en la pantalla y se enciende el
Indicador “QSURROUND”.
Para cancelar el efecto Q SURROUND
Pulse el botón Qsurround del mando a distancia
Avanza “QSURROUND OFF” en la pantalla y se apaga el
indicador “QSURROUND”.
' El sistema Q SURROUND no funciona en el modo monoaural.
’ Cuando el sistema Q SURROUND está activado, el sonido
puede escucharse distorsionado a un volumen alto. En este
caso, baje el volumen.
8 ESPAÑOL
AJUSTE DE SONIDO DURANTE LA GRABACIÓN
El volumen de salida y el tono de los altavoces o auriculares
puede cambiar libremente sin afectar el nivel de la grabación.
Page 33

RECEPCION DE LA RADIO
SINTONIZACIÓN MANUAL
II
FUNCTION
POWER
Pulse repetidamente el botón TUNER/BAND del
mando a distancia (o el botón FUNCTION del
reproductor de discos compactos/platina de
casetes) para seleccionar la banda deseada.
FM AM^
Si se desconecta el aparato, la próxima vez se escuchará la
última emisora anterior sintonizada (función de reproducción
directa).
Cuando hay ruidos en la transmisión de FM en estéreo
Pulse el botón MONO del mando a distancia.
Aparece “MONO” en la pantalla.
Se reduce el ruido pero la recepción se escucha en monoaural.
MONO
.............
Fn 9:
Para volver a la recepción en estéreo, repita el paso anterior.
00nHz '■■■'
...J
............
...
....
..
Para cambiar el intervalo de sintonización en AM
El ajuste por omisión del intervalo de sintonización en AM es de
10 khlz. Si utiliza este aparato en lugares donde el sistema de
distribución de frecuencia se hace a intervalos de 9 kHz, cambie
el intervalo de sintonización.
Pulse el botón POWER al mismo tiempo que el botón II del
aparato.
Para reponer el intervalo, repita este procedimiento.
Cuando se cambia el intervalo de sintonización en AM, quedan
borradas todas las emisoras por presintonía (consulte la
“PRESINTONIZACIÓN DE EMISORAS”). Deberá volver a
presintonizar las emisoras.
Para cambiar la pantalla
Pulse el botón DISPLAY mientras pulsa el botón SHIFT del
mando a distancia. Con cada pulsación del botón, la pantalla
cambia en el siguiente orden.
1^® Indicador de nivel
'—® Frecuencia de la emisora sintonizada
(Ejemplo: FM 98.00MHz)
o
a
<
cc
o3
Q UJ
2°
oz
(fl'O
O
O.
UJ
u
UJ
tr
Pulse el botón ◄◄ o ►► para seleccionar una
emisora.
Cada vez que pulse el botón, cambia la frecuencia. Cuando
se sintoniza una emisora, aparece “TUNE” durante 2
segundos. Durante la recepción de FM estéreo, aparece
((Kmi)l.
■■■ !■.■!
Sobre el indicador de nivel
La indicación anterior cambia automáticamente al indicador de
nivel después de 4 segundos.
El indicador de nivel muestra el nivel aproximado de ios sonidos
reproducidos.
...
::::! ü::: ü;;; ,
Para buscar rápidamente una emisora (Búsqueda automática)
Mantenga pulsado el botón ◄◄ o ►► hasta que el sintonizador
empiece a buscar una emisora. La búsqueda se detiene al
sintonizar una emisora.
Para parar manualmente la búsqueda automática, pulse el botón
◄◄ o
• La búsqueda automática puede no parar en estaciones con
señales muy débiles.
ESPAÑOL 9
Page 34

PRESINTONIZACION DE EMISORAS
SINTONIZACION POR NUMERO DE PRESINTONÍA
1 Pulse el botón TUNER/BANDO del mando a
distancia o el botón FUNCTION del reproductor
de discos compactos/platina de casetes para
seleccionar una banda.
2 Pulse el botón en el reproductor de discos
compactos/platina de casetes o el botón ^ del
mando a distancia.
Cada vez que pulse el botón, se selecciona el siguiente
número de presintonía en orden ascendente.
Sintonización por número de presintonía
1 Pulse el botón TUNER/BAND del mando a distancia para
seleccionar una banda. (O utilice el botón FUNCTION del
reproductor de discos compactos/platina de casetes.)
2 Pulse las teclas numeradas del mando a distancia para
seleccionar un número de presintonía.
Ejemplo:
Para seleccionar el número de presintonía 10, pulse las teclas
+10y0.
Para seleccionar el número de presintonía 15, pulse las teclas
+10 y 5.
El sistema puede memorizar un total de 32 emisoras por
presintonía. (Cada banda tiene un máximo de 20 emisoras por
presintonía.) Cuando se memoriza una emisora, se asigna un
número de presintonía a la emisora. Utilice el número de
presintonía para la presintonía directa de emisoras.
1 Pulse el botón TUNER/BAND del mando a
distancia (o el botón FUNCTION del reproductor
de discos compactos/platina de casetes) para
seleccionar una banda. Pulse el botón ◄◄ o ►►
para seleccionar una emisora.
2 Pulse el botón II para memorizar la emisora.
Se asigna un número de presintonía a la emisora, empezando
por el 1 y en orden consecutivo para cada banda.
Número de presintonía
I
FN 98,:'i;F;;;inHz
3 Repita ios pasos 1 y 2.
La siguiente emisora no se memorizará cuando se han
memorizadoya32 emisoras por presintonía (aparece “FULL’).
...
..........
Frecuencia
—I
Para borrar una emisora de presintonía
Seleccione el número de presintonía de la emisora a borrar. Pulse
el botón ■ y pulse el botón II antes de 4 segundos.
Los números de presintonía de todas las demás emisoras en la
banda con números más altos bajarán en una unidad.
NOTA
Si hay un corte eléctrico de larga duración o se desenchufa el
cable eléctrico de CA, se cancelarán las emisoras de presintonía.
En este caso, haga nuevamente la presintonización de emisoras.
1 0 ESPAÑOL
Page 35

REPRODUCCION DE DISCOS COMPACTOS
OPERACIÓN
CARGA DE UN DISCO
Sobre el indicador de nívei
La indicación anterior cambia automáticamente al indicador de
nivel después de 4 segundos.
El indicador de nivel muestra el nivel aproximado de los sonidos
reproducidos.
JD
Para parar la reproducción, pulse el botón ■.
Para hacer una pausa de reproducción, pulse el botón II.
Para seguir reproduciendo, pulse nuevamente.
Para buscar un punto especial durante la reproducción,
mantenga pulsado el botón ◄◄ o ►► y suelte el botón en el
punto deseado.
Para saltar al principio de una pista durante la reproducción,
pulse repetidamente el botón ◄◄ o ►►. El aparato salta hacia
adelante por las pistas con el botón ►► y salta hacia atrás con
el botón ◄◄.
Para sacar el disco, pulse el botón OPEN/CLOSE.
Pantalla en el modo de parada
Número total de pistas
Calendario musical (sólo
aparecen las primeras
20 pistas)
I
1 Pulse el botón CD del mando a distancia (o puise
repetidamente ei botón FUNCTiON del
reproductor de discos compactos/piatina de
casetes hasta que aparezca “CD” en la pantalla)
y pulse el botón ± OPEN/CLOSE para abrir la
tapa del compartimiento dei disco.
2 Cargue un disco con ei lado de la etiqueta hacia
arriba.
± OPEN/CLOSE
3 Pulse nuevamente el botón £ OPEN/CLOSE para
cerrar la tapa del compartimiento dei disco.
Precaución
No ponga sus dedos en el compartimiento del disco cuando
se está cerrando la tapa del compartimiento del disco.
REPRODUCCION DE UN DISCO
Cargue un disco.
I..Ù
..........................
Para empezar a reproducir cuando el aparato está
desconectado (función de reproducción directa)
Pulse el botón CD del mando a distancia. Se conecta el aparato
y empieza a reproducir ei disco cargado.
Selección de una pista con el mando a distancia
Pulse las teclas numeradas y la tecla +10 para seleccionar una
pista.
Ejemplo:
Para seleccionar la pista 25, pulse las teclas +10, +10 y 5.
Para seleccionar la pista 10, pulse las teclas +10 y 0.
La pista seleccionada empieza a reproducir y sigue
reproduciendo hasta el final del disco.
No coloque más de un disco compacto en la bandeja del disco.
10i:b0':;'3 i
....
.................
.........................................................
Tiempo de reproducción total
Pulse el botón en el reproductor de discos
compactos/piatina de casetes o el botón ^ del
mando a distancia.
Empieza a reproducir la primera pista del disco compacto
cargado.
Número de la pista que se reproduce
I
L'Ü 1 Ï" 0 bb-
Tiempo de reproducción
transcurrido
ESPAÑOL 1 1
Page 36

REPEAT
RANDOM -1
-----
qEqBq DoBj
0-9 +-|oH- cDCDCDa
’ Iqqqp
CDQQCZJ OO
O ooo O
■PROGRAM
-DISPLAY
REPRODUCCION PROGRAMADA
Se pueden programar hasta 30 pistas del disco insertado. Utilice
el mando a distancia.
1 Pulse el botón PROGRAM mientras pulsa el botón
SHIFT en el modo de parada.
Aparece “PRQM” en la pantalla.
Para cambiar la indicación en ei modo de reproducción
Pulse el botón DISPLAY mientras pulsa el botón SHIFT del
mando a distancia.
Cada pulsación del botón hace que la pantalla cambie en el
siguiente orden.
|->© Indicador de nivel
(D El número de la pista reproducida y tiempo de
reproducción transcurrido
(Ejemplo: CD 3Tr 3:43)
(D Tiempo restante de la reproducción
(Ejemplo: CD -26:15)
REPRODUCCIÓN ALEATORIA
Se pueden reproducir todas las pistas del disco en orden
aleatorio.
Pulse el botón RANDOM mientras pulsa el botón
SHIFT del mando a distancia.
Se enciende “RANDOM” en la pantalla.
Para cancelar la reproducción aleatoria, repita el procedimiento
anterior.
NOTA
• Incluso cuando pulse el botón no podrá saltar a una pista
reproducida antes. El aparato sólo puede volver al principio de
la pista que se está reproduciendo.
• Cuando seleccione una pista con las teclas numeradas en el
mando a distancia durante ei modo de reproducción aleatoria,
la pista seleccionada empieza a reproducirse y se cancela el
modo de reproducción aleatoria.
REPRODUCCIÓN REPETIDA
:D
..........
!■■■! ;; i-i i- i
2 Pulse las teclas numeradas y la tecla -4-10 para
programar una pista.
Ejemplo:
Para seleccionar la pista 12, pulse las teclas +10 y 2.
Para seleccionar la pista 20, pulse las teclas +10, +10 y 0.
JD 20::-' P-03
Número de pista Número de programa
seleccionada
CD 1. b ;;
Número total de pistas
seleccionadas
3 Repita el paso 2 para programar otras pistas.
4 Puise el botón ► para empezar a reproducir.
Para repetir la reproducción programada
Después de programar las pistas deseadas, pulse repetidamente
el botón REPEAT mientras pulsa el botón SHIFT del mando a
distancia para que se encienda “C*.”.
Empieza la reproducción programada.
Dista
a
o
Tiempo de reproducción
total de las pistas
seleccionadas
Se pueden reproducir repetidamente una sola pista o todas las
pistas.
Pulse repetidamente el botón REPEAT mientras
mantiene pulsado el botón SHIFT del mando a
distancia.
Se enciende “C+-1” al seleccionar la reproducción repetida de
una pista y se enciende “C*.” al seleccionar la reproducción
repetida de todas las pistas.
Para cancelar la reproducción repetida, repita el procedimiento
anterior.
Para repetir la reproducción aleatoria
Active primero la reproducción aleatoria pulsando el botón
RANDOM mientras pulsa el botón SHIFT del mando a distancia.
A continuación, pulse el botón REPEAT mientras pulsa el botón
SHIFT para que se encienda “C>-”.
12 ESPAÑOL
Para verificar el programa
Cada vez que pulsa el botón ►► en el modo de parada,
aparecerá un número de pista y el número de programa.
Para borrar el programa
Pulse ei botón ■ en el modo de parada.
Para agregar pistas en el programa
Antes de reproducir, repita el paso 2. La pista se programará
como última pista del programa.
Para cambiar las pistas programadas
Borre el programa y repita los pasos desde el principio.
NOTA
Durante la reproducción programada, no funcionará ni el botón
RANDOM ni las teclas numeradas.
Page 37

REPRODUCCIÓN DE CINTAS
OPERACIÓN
MODE
SHIFT
COLOCACION DE UNA CINTA
»-elool
II
TAPE
CD C 3
cm C! D
REPRODUCCION DE UNA CINTA
Coloque una cinta.
Pulse el botón en el reproductor de discos o'
compactos/platina de casetes o el botón ^ del o!
mando a distancia. m :
Lado de reproducción o |
de ia cinta S ■
O'i
■ TnRÍ:: 8000
..
......
...
..............................* ..........
El contador de cinta indica la longitud de
la cinta. (Apagado cuando no hay cinta
insertada.)
t>: Se reproduce el lado de afuera (adelante)
<l: Se reproduce el lado de adentro (inversión)
Sobre el indicador de nivei
La indicación anterior cambia automáticamente al indicador de
nivel después de 4 segundos.
El indicador de nivel muestra el nivel aproximado del sonido
reproducido.
r..........
...................
•<
(/}
• Se puede seleccionar un modo de inversión para reproducir
uno o los dos lados de la cinta.
• Utilice cintas de tipo I (normal), tipo II (alto/Cr02) o tipo IV
(metal) para reproducir.
Pulse el botón TAPE del mando a distancia (o pulse
repetidamente el botón FUNCTION en el reproductor
de discos compactos/platina de casetes hasta que
aparezca “TAPE” en la pantalla).
Inserte una cinta con el lado expuesto hacia la
derecha y empuje suavemente hasta que se cargue
automáticamente dentro del aparato.
Para seleccionar el modo de inversión
Pulse el botón TAPE del mando a distancia.
Cada vez que pulsa el botón cambia el modo de inversión.
^ z
□
i i-i í:::. iiiii iiiii :::::
Para parar la reproducción, pulse el botón ■.
Para hacer una pausa en la reproducción, pulse el botón II.
Para seguir reproduciendo, vuelva a pulsar.
Para cambiar el lado a reproducir, pulse el botón en el
reproductor de discos compactos/platina de casetes o el botón
► del mando a distancia en el modo de reproducción o pausa.
Para avanzar rápidamente o rebobinar, pulse el botón ◄◄ o
►► en ei modo de parada. Pulse el botón ■ para parar la cinta.
Para expulsar la cinta cargada, pulse el botón A TAPE EJECT
en el modo de parada.
Para empezar a reproducir con ei aparato
desconectado (Función de reproducción directa)
Pulse el botón TAPE del mando a distancia. Se conecta el aparato
y empieza la reproducción de la cinta cargada.
Para volver el contador de cinta al 0000
Pulse el botón ■ en el modo de parada.
El contador también vuelve al 0000 cuando se expulsa la cinta.
....................
CZ3
<3 TUPE
Para reproducir un lado, seleccione H.
Para reproducir del lado delantero al lado trasero una sola vez,
seleccione ID.
Para reproducir ambos lados repetidamente, seleccione CI).
i::í ki ki i"i
ESPAÑOL 13
Page 38

DISPLAY
Sobre ias cintas de casete
• Para evitar el borrado por accidente, rompa las lengüetas
de plástico en el casete después de grabar, con un
destornillador u otra herramienta puntiaguda.
SHIFT
Para cambiar la indicación en ei modo de reproducción
Pulse el botón DISPLAY mientras pulsa el botón SHIFT del
mando a distancia.
Cada vez que pulsa el botón, la indicación cambia en el siguiente
orden:
[->■© Indicador de nivel
■—(D Contador de cinta
(Ejemplo: TAPE 0185)
Lado A
Para seguir grabando en la cinta, cubra la abertura de la
lengüeta con cinta adhesiva, etc. (En las cintas de tipo II,
tenga cuidado de no cubrir la ranura de detección de cinta
de tipo II.)
' Las cintas de 120 minutos o más son muy finas y se
deforman o dañan fácilmente. No se recomienda su uso.
• Elimine la flojedad de la cinta con un lápiz u herramienta
similar antes del uso. Una cinta floja puede romperse o
atascarse en el mecanismo.
1 4 ESPAÑOL
Page 39

GRABACION DE LA CINTA
GRABACION BASICA
CD
TUNER/
BAND
MODE
SHIFT
• REC/ TAPE
REC MUTE
Preparativo
• Avance la cinta al punto donde desea empezar a grabar.
• Utilice cintas de tipo I (normal) y tipo II (alto/Cr02) para grabar.
AUX/MD
Para parar la grabación, pulse el botón ■. Cuando grabe de
un disco compacto, pulse nuevamente el botón ■ para parar la
reproducción.
Para hacer una pausa de grabación, pulse el botón 11. (Cuando
se graba de la radio o el equipo conectado.) Para seguir
grabando, pulse nuevamente.
COLOCACION DE ESPACIOS EN BLANCO 2
La colocación de espacios en blanco de 4 segundos ayuda a
buscar el principio de una pista cuando se reproduce la cinta en
otro equipo. (Cuando se graba de la radio o el equipo conectado.)
1 Pulse el botón • REC/REC MUTE del mando a distancia
durante la grabación o en el modo de pausa de grabación.
Parpadea rápidamente “TAPE039” durante 4 segundos y
avanza la cinta sin grabar. Después de 4 segundos, la platina
entra en el modo de pausa de grabación.
2 Pulse el botón II para seguir grabando.
Para colocar un espacio en blanco de menos de 4 segundos,
pulse nuevamente el botón • REC/REC MUTE mientras está
parpadeando rápidamente “TAPEE33”.
Para colocar un espacio en blanco de más de 4 segundos,
pulse nuevamente el botón • REC/REC MUTE. Cada vez que
pulse el botón, se agrega un espacio en blanco de 4 segundos.
(O
íí
zz
oü
ui<
o -)
o °
ü‘0
O <
om
oc<
o. cr
LU
oc
1 Cargue la cinta a grabar en la platina.
Cargue la cinta con el lado a grabar primero hacia arriba y el
lado de cinta abierta hacia la derecha.
Lado a grabar
primero
2 Pulse el botón TAPE del mando a distancia para
seleccionar el modo de inversión.
Para grabar un lado, seleccione T.
Para grabar en ambos lados, seleccione T3 o CÜ5.
Cuando empieza la grabación por el lado que está hacia abajo,
la cinta se detiene al final de la grabación de ese lado, aunque
el modo de inversión está en Z? o CZ).
3 Puise uno de ios botones de función y prepare la
fuente a grabar.
Para grabar una emisora de radio, puise el botón TUNER/
BAND y sintonice una emisora.
Para grabar de un disco compacto, pulse el botón CD del
mando a distancia y cargue el disco compacto.
Para grabar del equipo conectado a las tomas AUX IN o
tomas MD IN, pulse repetidamente el botón AUX/MD para
que aparezca “AUX” o “MD” respectivamente, y prepare el
equipo para reproducir.
4 Pulse el botón # REC del reproductor de discos
compactos/piatina de casetes para empezar a
grabar.
Para empezar a grabar con el mando a distancia, pulse el
botón • REC/REC MUTE del mando a distancia y pulse el
botón ► antes de 2 segundos.
Cuando grabe de un disco compacto, la reproducción y
grabación empiezan simultáneamente.
Cuando grabe de un equipo conectado, empiece a reproducir.
Para borrar una grabación
1 Cargue la cinta a borrar en la platina.
2 Mueva la cinta ai punto donde desea empezar a borrar.
3 Pulse el botón AUX/MD del mando a distancia o pulse
repetidamente el botón FUNCTION en el reproductor de
discos compactos/piatina de cintas para que aparezca “AUX”.
Si se ha conectado un equipo opcional en las tomas AUX IN,
desconecte la alimentación del equipo.
4 Pulse el botón • REC del reproductor de discos compactos/
platina de cintas para empezar el borrado.
ESPAÑOL 1 5
Page 40

GRABACION CON EDICION DE Al
La función de edición de Al permite grabar un disco compacto
sin preocuparse por ia longitud de la cinta y la longitud de las
pistas. Cuando se coioca un disco compacto, ei aparato calcula
automáticamente la longitud de ias pistas. Si fuera necesario,
se cambiará ei orden de ias pistas para que ninguna pista quede
cortada por la mitad.
(Al: Inteligencia Artificiai)
NOTA
La grabación con edición de Al no empezará desde un punto en
el medio de la cinta.
La cinta debe grabarse desde el principio de uno de los lados.
1 Cargue la cinta en la platina.
Cargue la cinta con el lado a grabar primero mirando hacia
arriba.
2 Pulse el botón CD del mando a distancia o pulse
repetidamente el botón FUNCTION en el
reproductor de discos compactos/platina de
casetes de tal forma que aparece “CD” y cargue
el disco.
3 Pulse repetidamente el botón CD EDIT mientras
puisa el botón SHIFT del mando a distancia hasta
que se encienda “EDIT” y parpadee “Al” en la
pantalla.
Pulse las teclas numeradas para especificar la
longitud de la cinta.
Se puede especificar entre 10 y 99 minutos.
Ejemplo; Cuando utiiice una cinta de 60 minutos, pulse las
teclas 6 y 0.
En pocos segundos el microordenador determina las pistas
a grabar en cada lado de la cinta.
• Los botones ◄◄ y ►► también pueden especificar ia
longitud de ia cinta.
f:
.....
i;
Lado A de ia cinta ^ longitud de ia cinta
i:::'
< í"!>'
Número de pistas Tiempo restante dei iado A
programadas
..
'i
h:ki
i -i ;; i-: !■■■::
5 Pulse el botón # REC en el reproductor de discos
compactos/platina de casetes y empiece a grabar.
Para empezar a grabar con el mando a distancia, pulse el
botón # REC/REC MUTE y pulse el botón ► antes de 2
segundos.
La cinta se rebobina ai principio dei lado que está arriba, se
reproduce ei segmento de punta guía durante 10 segundos y
empieza a grabar. Cuando termina ia grabación del lado que
mira hacia arriba (iado A), empieza ia grabación en el lado
opuesto (lado B).
Para parar la grabación
Pulse el botón ■. La grabación y la reproducción de disco
compacto se paran simultáneamente.
Para borrar el programa de edición
Pulse dos veces el botón ■ para que se apague “EDIT” en la
pantalla.
Para verificar el orden de los números de pistas programadas
Antes de grabar, pulse el botón CD EDIT mientras pulsa el botón
SHIFT del mando a distancia para seleccionar el lado A o B y
pulse varias veces el botón
Lado de la cinta Número de programa
CZD
1 6 ESPAÑOL
<H> i' P '0.ÍP'■ 1
:
....
];
i-^i i-i
Tiempo en las cintas de casete y tiempo de edición
El tiempo real de grabación en el casete es normalmente un
poco más largo que el tiempo de grabación especificado, indicado
en la etiqueta. Este aparato puede programar las pistas de forma
de utilizar este tiempo adicional.
NOTA
' No puede grabar si la lengüeta para evitar el borrado en uno
de los lados de la cinta está rota.
' La función de edición con Al no puede utilizarse en discos que
tienen 31 pistas o más.
I
Número de pista Números de pistas
programadas
..
r
Page 41

GRABACION CON EDICIÓN PROGRAMADA
6 Repita el paso 5 para el resto de las pistas del
lado A.
No puede programarse una pista cuyo tiempo de reproducción
sea más largo que el tiempo restante.
Pista seleccionada
I
<H> 2 P-:03- ■
......
..........................
-j■-—-i- —
,^1^ Número de programa
Z
ü
3
lil
a
z
>g
GO
<
GC
O
La función de edición programada permite hacer grabaciones
de disco compacto mientras verifica ei tiempo restante en cada
iado de ia cinta a medida que programa las pistas.
NOTA
La grabación de edición programada no empezará desde un
punto en el medio de la cinta. La cinta debe grabarse desde el
principio de uno de los lados.
1 Cargue la cinta en la platina.
Cargue la cinta con ei lado a grabar primero hacia arriba.
2 Pulse el botón CD del mando a distancia o pulse
repetidamente el botón FUNCTION en el
reproductor de discos compactos/platina de
casetes de tal forma que aparezca “CD” y cargue
el disco.
3 Pulse repetidamente el botón CD EDIT mientras
pulsa el botón SHIFT del mando a distancia hasta
que se encienda “EDIT” y parpadee “PRGM” en
la pantalla.
4 Pulse las teclas numeradas para especificar la
longitud de la cinta.
Se puede especificar entre 10 y 99 minutos.
Ejemplo: Cuando utilice una cinta de 60 minutos, presione
las teclas 6 y 0.
• Los botones ◄◄ y ►► también pueden especificar la
longitud de la cinta.
Lado A de ia cinta (iado delantero)
<P>
; í::í ;; i.-i
Máximo tiempo de grabación
para ei iado A
5 Pulse las teclas numeradas para programar una
pista.
Ejemplo: Para seleccionar la 10a. pista, pulse las teclas
numeradas +10 y 0.
<H> 3'
....
10;; 2b bb. "
i n
Número total de pistas Tiempo restante para
programadas el lado A
7 Pulse el botón CD EDIT mientras pulsa el botón
SHIFT del mando a distancia para seleccionar el
lado B y programe las pistas para el lado B.
Después de confirmar B en la pantalla, repita el paso 5.
Lado B de la cinta (lado opuesto)
■: ; " i
—■pRGMj”'
8 Pulse el botón • REC en el reproductor de discos
compactos/platina de casetes y empiece a grabar.
Para empezar a grabar con el mando a distancia, pulse el
botón # REC/REC MUTE y pulse el botón ► antes de 2
segundos.
La cinta se rebobina al principio del lado que está arriba, se
reproduce el segmento de punta guía durante 10 segundos y
empieza a grabar. Cuando termina la grabación del lado que
mira hacia arriba (lado A), empieza la grabación en el lado
opuesto (lado B).
Para parar la grabación
Pulse el botón ■. La grabación y la reproducción de disco
compacto se paran simultáneamente.
Para verificar el orden de los números de pistas
programadas
Antes de grabar, pulse el botón CD EDIT mientras pulsa el botón
SHIFT para seleccionar el lado A o B y pulse repetidamente el
botón
Número de pista programados
0>10 P
Para cambiar el programa de cada lado
Pulse el botón CD EDIT mientras pulsa el botón SHIFT del mando
a distancia para seleccionar el lado A o B y pulse el botón ■
para borrar el programa del lado seleccionado. Vuelva a
programar las pistas.
Para borrar el programa de edición
Pulse repetidamente el botón ■ para que se apague “EDIT” de
la pantalla.
No puede grabar si la lengüeta para evitar el borrado en uno de
los lados de la cinta está rota.
Números de pista
........
01:
Número de programa
ESPAÑOL 1 7
Page 42

TEMPORIZADO
REPRODUCCION CON
TEMPORIZADOR Y GRABACIÓN
CON TEMPORIZADOR
-TIMER
CJCDCZIiCD
(»GDOCD
OQQCD ^^
reKJCDCDCJ QlQQt
ooo ®OO
POWER
SHIFT
El sistema puede conectarse a una hora especificada todos los
días con el temporizador integrado.
Compruebe que ei reloj está a la hora correcta. (Consulte la
página 7.)
Utilice el mando a distancia.
1 Prepare la fuente y el destino donde se graba.
Para escuchar un disco compacto, pulse el botón CD del
mando a distancia y cargue un disco compacto.
Para escuchar o grabar una emisora de ia radio, pulse el
botón TUNER/BAND del mando a distancia y sintonice una
emisora.
Para escuchar o grabar del equipo conectado, pulse
repetidamente el botón AUX/MD del mando a distancia hasta
que aparezca la correspondiente fuente en la pantalla y ajuste
el temporizador del equipo que empieza a reproducir a la
hora de conexión del temporizador.
2 Pulse repetidamente ei botón TiMER mientras
puisa ei botón SHIFT del mando a distancia para
que aparezca “TIMER © PLAY” (para la
reproducción con temporizador) o “TiMER
0REC” (para ia grabación con temporizador).
TTMiER 0REC
Q O
OO
-II
4 Pulse el botón
Cuando se ha seleccionado el temporizador de reproducción:
Cuando se ha seleccionado el temporizador de grabación:
II.
Pivi
i 20-
Fn KTP120
5 Seleccione ia duración dei período de activación
dei temporizador con ei botón o
C [J i¿i'
Período de activación del temporizador
La duración del período de activación del temporizador puede
ajustarse entre 5 y 240 minutos en pasos de 5 minutos.
6 Puise el botón
Si transcurren 4 segundos sin pulsar el botón II, queda
programado el temporizador ajustado en los pasos 1 a 5.
II.
7 Para la grabación con temporizador, cargue la
cinta para grabar.
8 Puise ei botón POWER para desconectar ei
sistema después de ajustar ei voiumen y ei tono.
Permanece encendido 0 o 0l:t=tH en la pantalla después
de desconectar el aparato (modo de espera del temporizador).
Sin embargo, todas las indicaciones desaparecen si se ha
activado ei modo de ahorro de energía (consulte la página
7). Para confirmar el modo de espera de temporizador, pulse
el botón MODE mientras se pulsa el botón SHIFT del mando
a distancia para desactivar el modo de ahorro de energía.
Cuando llegue a la hora de conexión del temporizador, el sistema
se conecta y empieza a reproducir (o grabar) la fuente
seleccionada.
Si el nivel de volumen estaba a más de 21 cuando desconectó
el aparato, bajará automáticamente a 21 cuando se conecta con
el temporizador.
■ r
TIMER ©PLAY : para la reproducción con temporizador
TIMER 0REC : para la grabación con temporizador
Antes de 4 segundos, cambie ei temporizador de
conexión pulsando el botón ◄◄ o
Pulse el botón ◄◄ una vez para retroceder la hora en 1
minuto y pulse el botón ►► una vez para avanzar la hora en
un minuto.
Mantenga estos botones pulsados para cambiar la hora en
unidades de 10 minutos.
1 8 ESPAÑOL
Page 43

Para verificar ia hora y fuente especificadas
Pulse repefidamenfe el botón TIMER mientras se pulsa el botón
SHIFT del mando a distancia. Aparecen el nombre de la fuente
seleccionada, el tiempo de conexión del temporizador y la
duración del período de activación del temporizador durante 4
segundos.
Para cambiar el ajuste del temporizador
Ajuste nuevamente el temporizador desde el principio.
Para cancelar temporalmente el modo de espera del
temporizador
Pulse repetidamente el botón TIMER mientras pulsa el botón
SHIFT del mando a distancia para que aparezca “TIMER OFF”
en la pantalla.
Para volver al modo de espera de temporizador, seleccione
“TIMER © REO” o “TIMER 0 PLAY” en lugar de “TIMER OFF”.
Utilización del aparato cuando está ajustado el temporizador
Puede utilizar normalmente el sistema después de ajustar el
temporizador.
Antes de desconectar el aparato, prepare la fuente y ajuste el
volumen y el tono.
' La reproducción con temporizador y la grabación con
temporizador no empezarán a menos que se haya
desconectado el aparato.
' El equipo conectado no puede conectarse y desconectarse
con el temporizador integrado de este sistema. Utilice un
temporizador externo.
AJUSTE DEL TEMPORIZADOR DE
APAGADO
El sistema puede desconectarse automáticamente a la hora
especificada.
Utilice el mando a distancia.
7 Pulse el botón SLEEP mientras pulsa el botón
SHIFT del mando a distancia.
2 Antes de 4 segundos, pulse el botón
para especificar la hora de apagado.
Cada vez que pulse el botón, la hora cambia entre 5 y 240
minutos en incrementos de 5 minutos.
___________________
SLEEP
...
.. ..
.. ... ... . .. . ... ... ... . ... ... ... . .. . ... ... ... . ... . )
CDC
■ZDQ
CDC
q
5 o o o o o
SHIFT
SLEEP
C30
bcDQ OQ
OlOOl
Oj
cc
o
Q
N
ir
O
Q.
s
UJ
Hora especificada SLEEP
Para verificar el tiempo restante hasta el apagado
Pulse el botón SLEEP una vez mientras pulsa el botón SHIFT
del mando a distancia. El tiempo restante aparece durante 4
segundos.
Para cancelar el temporizador de apagado
Pulse dos veces el botón SLEEP una vez mientras pulsa el botón
SHIFT del mando a distancia hasta que aparezca “SLEEP OFF”.
ESPAÑOL 19
Page 44

OTRAS CONEXIONES
CONEXIÓN DE UN EQUIPO OPCIONAL
Para más detalles, consulte el manual de instrucciones del equipo
conectado.
• Los cables de conexión no vienen con ei aparato. Obtenga los
cables de conexión necesarios.
• Consuite con su concesionario iocal de Aiwa sobre ei equipo
opcional.
TOMAS MD IN
Este sistema puede recibir señaies de sonido anaiógico de un
reproductor de minidisco o grabador de minidiscos por estas
tomas.
Utilice un cabie con enchufes fonográficos ROA para conectar
una piatina de cinta.
Conecte el enchufe rojo en la toma R (der.) y el enchufe blanco
en la toma L (izq.)
TOMAS LINE OUT
Este sistema puede transmitir señaies de sonido analógico para
todas las funciones a través de estas tomas.
Utiiice un cable con tomas fonográficas RCA para conectar el
equipo de audio.
Conecte ei enchufe rojo en ia toma R (der.) y ei enchufe blanco
en la toma L (izq.)
No conecte ei equipo a ias tomas LINE CUT y las tomas AUX IN
al mismo tiempo.
Puede generar ruido y puede provocar un mai funcionamiento.
TOMA DIGITAL OUT (OPTICAL)
Este sistema puede transmitir señaies de sonido digitai CD por
esta toma. Utiiice un cable óptico para conectar ei equipo de
audio digital (amplificador digitai, piatina DAT, grabador de
minidiscos, etc.).
Saque la tapa para polvo d) de la toma DIGITAL CUT (CPTICAL).
Conecte un enchufe de cable óptico en ia toma DIGITAL CUT
(CPTICAL).
Cuando se graba el sonido digitai de disco compacto de este
sistema utiiizando un equipo digitai externo, como un grabador
de minidiscos conectado a la toma DIGITAL CUT (CPTICAL),
realice io siguiente para evitar que se corte ei principio del sonido
a grabar.
1 Ajuste ei tocadiscos de discos compactos/piatina de casetes
en ei modo de pausa de reproducción del disco compacto.
2 Empiece a grabar en el equipo conectado.
3 Empiece a reproducir ei disco compacto en ei tocadiscos de
discos compacto/platina de casetes.
Cuando utilice un grabador de minidiscos para grabar el sonido
de este sistema (radio o disco compacto) conecte el grabador
de minidiscos a ias tomas UNE CUT.
Esta conexión permite grabar en un minidisco con una señai
anaiógica.
Para grabar ei sonido de la reproducción de un disco compacto
de este sistema en una señai digitai, conecte el grabador de
minidiscos en la toma DIGITAL CUT (CPTICAL).
TOMAS AUX IN
Este sistema puede recibir señaies de sonido anaiógico por estas
tomas.
Utiiice un cable con enchufes fonográficos RCA para conectar
ei equipo de audio (giradiscos, reproductores de discos láser,
videograbadoras, TV, etc.).
Conecte ei enchufe rojo en ia toma R (der.) y ei enchufe bianco
en ia toma L (izq.)
Cuando conecte un giradiscos
Utiiice un giradiscos de Aiwa con un ampiificador ecuaiizador
integrado.
Cuando no se usa la toma DIGITAL OUT (OPTICAL)
Acopie ia caperuza antipolvo que se suminsitra.
TOMA SUPER WOOFER ^
Conecte un altavoz realzador de graves con un amplificador
integrado en esta toma.
20 ESPAÑOL
Page 45

GENERALIDADES
ESCUCHANDO FUENTES EXTERNAS
FUNCTION
POWER
Pulse repetidamente el botón AUX/MD hasta que
aparezca la correspondiente fuente en la pantalla.
Para escuchar el equipo conectado a la toma AUX IN, haga
que aparezca “AUX”.
Para escuchar el equipo conectado a la toma MD IN, haga
que aparezca “MD”.
CUIDADO Y MANTENIMIENTO
Es necesario un cuidado y mantenimiento ocasionales del
aparato y del software para un óptimo funcionamiento de su
sistema.
Para limpiar el mueble
Utilice un paño suave y seco.
Si las superficies están muy sucias, utilice un paño suave
ligeramente empapado en una solución detergente neutra. No
utilice disolventes fuertes tales como alcohol, bencina o diluyente
de pintura ya que pueden dañar el acabado del aparato.
Para limpiar los cabezales y trayecto de la cinta
Después de cada 10 horas de uso, limpie los cabezales y el
trayecto de la cinta con un casete de limpieza de cabezales de
venta comercial.
Cuidado de los aparatos
• No golpee con fuerza los aparatos, dejándolos caer o golpeando
contra algo.
• No utilice los aparatos cerca de un campo magnético fuerte,
por ejemplo la televisión. Puede provocar un mal
funcionamiento.
Cuidado de los discos compactos
• Cuando un disco está sucio, limpie el disco desde el centro
hacia afuera con un paño de limpieza.
(/)
Oq
x<
LU D
Zl¡
o<
U CC
ñ
2 Reproduzca
el correspondiente equipo
conectado.
Para cambiar el nombre de la fuente en la pantalla,
correspondiente al equipo conectado en la toma AUX
IN
Para el equipo conectado a la toma AUX IN, aparece “AUX” al
principio. Puede cambiar a “TV” o “VIDEO” de acuerdo al equipo
que está realmente conectado a las tomas.
Llame “AUX” en la pantalla y pulse el botón POWER del mientras
pulsa el botón ►►. Cada vez que pulse el botón cambia la
indicación en el siguiente orden:
AUX
No puede utilizar el botón FUNCTION del reproductor de discos
compactos/platina de cintas para seleccionar “MD” o “AUX”.
Cuando pulse el botón FUNCTION sólo podrá llamar la fuente
externa seleccionada actualmente.
VIDEO
TV
□
• Después de reproducir un disco, guárdelo en su caja. No deje
los discos en lugares calientes o húmedos.
Cuidado de las cintas
• Guarde las cintas en sus cajas después de utilizar.
• No deje las cintas cerca de imanes, motores, aparatos de
televisión o cualquier otra fuente de magnetismo. Se afectará
la calidad del sonido y provocará ruidos.
• No exponga las cintas a los rayos del sol o deje en un coche
estacionado bajo los rayos del sol.
ESPAÑOL 21
Page 46

ESPECIFICACIONES
RECEPTOR ESTEREO RX-LM88
Sección del sintonizador de FM
Gama de sintonización 87,5 MHz a 108 MHz
Sensibiiidad utilizabie (IMF) 13,2 dBf
Terminales de antena 75 ohmios (desequilibrado)
Sección del sintonizador de AM
Gama de sintonización
Sensibiiidad utiiizable
Antena
Sección del amplificador
Salida de potencia
Distorsión armónica total
Salidas
General
Requisitos eléctricos
Consumo eléctrico
Consumo eléctrico en espera
Dimensiones (An. x Al. x Prof.) 144 x 100 x 206, 5 mm
Peso 2,7 kg
PLATINA DE CASETES ESTEREO/REPRODUCTOR DE DISCOS COMPACTOS FD-LM88
Sección del reproductor de discos compactos
Láser
Convertidor D-A
Relación de señal a ruido
Distorsión armónica
Variación de velocidad
Sección de la platina de casetes
Formato de pista
Respuestas de frecuencia
Relación de señal a ruido
Sistemas de grabación
Cabezales
530 kHz a 1710 kHz (intervalos
de 10 kHz)
531 kHz a 1602 kHz (intervalos
de 9 kHz)
350 pV/m
Antena de cuadro
16 vatios por canal
RMS a 6 ohmios de 65 Hz a
15 kHz, con no más de 1% de
distorsión armónica total
0,1% (7 W, 1 kHz, 6 ohmios, DIN
AUDIO)
SUPERWOOFER: 1,4 V
SPEAKERS; acepta altavoces
de 6 ohmios o más
PHONES (minitoma estéreo):
acepta auriculares de 32 ohmios
o más
CA de 120 V, 60 Hz
50 W
2,5 W (modo de ahorro de energía
activado)
Láser semiconductor (^ = 780 nm)
1 bit doble
85 dB (1 kHz, 0 dB)
0,05% (1 kHz, 0 dB)
No medible
4 pistas, 2 canales estéreo
Cinta Cr02: 50 Hz -16000 Hz
Cinta normal: 50 Hz - 15000 Hz
Nivel pico de cinta Cr02 de 54 dB
Polarización CA
Cabezal de grabación/
reproducción
Cabezal de borrado x 2
x 1
SISTEMA DE ALTAVOCES SX-LM200
Tipo de mueble 2 vías, reflejo de graves (tipo
blindado magnético)
Altavoces Graves:
Tipo cono de 100 mm
Agudos:
Tipo domo balanceado de 25 mm
Impedancia 6 ohmios
Nivel de presión de sonido de salida
87 dB/W/m
Dimensiones (An. x Al. x Prof.) 120 x 200 x 182 mm
Peso 1,6 kg
• Las especificaciones y aspecto exterior están sujetos a cambios
sin previo aviso.
liUM SYSTEM
La palabra “BBE” y el “símbolo BBE” son marcas registradas por
BBE Sound, Inc.
Bajo licencia de BBE sound, Inc.
DERECHOS DE AUTOR
Estudie las leyes sobre derechos de autor relacionadas con las
grabaciones de discos, radio o cinta del país en el que se utiliza
el aparato.
NOTA
Este equipo ha sido probado y se ha probado que cumple con
los límites de clase B de aparatos digitales de acuerdo con la
Parte 15 de las reglas de la FCC. Estos límites se diseñaron
para dar una protección razonable contra interferencias
peligrosas en una instalación residencial.
Este equipo genera, utiliza y puede generar energía de
frecuencias de radio y, si no se instala y utiliza de acuerdo con
las instrucciones, puede provocar interferencias peligrosas en
las radiocomunicaciones. Sin embargo no existe ninguna garantía
de que no se produzcan interferencias en la recepción de radio
o televisión, lo que puede determinarse conectando y
desconectando el equipo. Se recomienda al usuario probar a
corregir la interferencia tomando una de las siguientes medidas:
-Cambie la orientación o vuelva a instalar la antena receptora.
-Aumente la separación entre el equipo y el receptor.
-Conecte el equipo en un tomacorriente con un circuito
diferente del receptor.
-Consulte con su tienda o un técnico con experiencia en radio/
TV para solicitar su ayuda.
PRECAUCIÓN
Las modificaciones o ajustes de este producto, no autorizados
a título expreso por el fabricante, pueden cancelar el derecho
del usuario o su autoridad para utilizar este producto.
General
Entradas
Salidas:
Dimensiones (An. x Al. x Prof.)
Peso
22 ESPAÑOL
MD IN: 470 mV
AUX IN: 400 mV
DIGITAL OUT
LINE OUT: 400 mV
144 X 100,6 X 203 mm
1,5 kg
Page 47

SOLUCIÓN A PEQUEÑOS
PROBLEMAS
Si el aparato no funciona tal como se describe en el manual de
instrucciones, verifique la siguiente guía.
GENERAL
No se escucha ningún sonido.
• ¿Se ha conectado correctamente el cable eléctrico de CA?
• ¿Hay mala conexión? (-» página 4)
• ¿Se ha presionado un botón de función incorrecto?
Se escucha el sonido por sólo uno de los altavoces.
• ¿Está desconectado el otro altavoz?
El sonido se vuelve inaudible repentinamente.
-» Se ha activado el circuito de protección debido a la
acumulación de calor en el interior. Desconecte el aparato,
compruebe que hay suficiente separación detrás de las
salidas de circulación de aire atrás y deje que se enfríe el
sistema.
Se produce una indicación incorrecta en la pantalla o hay
un mensaje de error.
-» Resetee el sistema como se indica a continuación.
SECCIÓN DEL SINTONIZADOR
Hay una estática tipo onda constante.
• ¿Está correctamente conectada la antena? (-» página 5)
• La señal está débil?
-> Conecte una antena externa.
La recepción contiene interferencias de ruido o el sonido
está distorsionado.
• ¿El sistema recibe ruidos externos o distorsión de pasos
múltiples?
-> Cambie la orientación de la antena.
-> Aleje el aparato de otros aparatos eléctricos.
SECCIÓN DE LA PLATINA DE CASETES
No se mueve la cinta.
• ¿La platina está en el modo de pausa? (-► página 13)
El sonido está fuera de balance o no es lo suficientemente
alto.
• ¿El cabezal de reproducción está sucia? (-* página 21)
No es posible la grabación.
• ¿La lengüeta para evitar el borrado en la cinta está rota?
(-»página 14)
• ¿El cabezal de grabación está sucio? (-► página 21)
No es posible el borrado
• ¿El cabezal de borrado está sucio? (-► página 21)
• ¿Se está utilizando cinta de metal?
No se emiten los sonidos de alta frecuencia.
• El cabezal de grabación/borrado está sucio? (-► página 21)
(/>
lU
O
<
o
.J
<
ir
ui
z
UJ
o
SECCIÓN DEL REPRODUCTOR DE DISCOS
COMPACTOS
El reproductor de discos compactos no reproduce.
• ¿Se ha insertado correctamente el disco? (-► página 11)
• ¿Está sucio el disco? (-> página 21)
• ¿Se ve afectada la lente por la condensación?
-» Espere aproximadamente una hora y pruebe nuevamente.
Para resetear
Si se produce un estado anormal en la pantalla o la platina de
casetes, resetee el aparato de la siguiente forma.
1 Pulse el botón POWER para desconectar el aparato.
2 Pulse el botón POWER para conectar el aparato al mismo
tiempo que el botón ■. Todo lo que está en la memoria,
desde que compró el aparato, queda cancelado.
Si no puede desconectar el aparato en el paso 1 debido a una
avería, resetee desconectando el cable eléctrico de CA y repita
el paso 2.
ESPAÑOL 23
Page 48

ÍNDICE DE LOS COMPONENTES
Las instrucciones de cada parte dei aparato o mando a distancia
se indican en las páginas a continuación.
o
o
©
CD
□
O
Nombre
0 ■ CLEAR
© II SET
© • REC
O FUNCTION
© POWER
O PHONES
O DIR/PRESET
© ►►TUNING DOWN/UP 7, 9, 10, 11, 13, 16, 17
© VOLUME +/- 8
® ± OPEN/CLOSE 11
TAPE EJECT 13
-m
Página
10, 11, 13, 15, 16, 17
7, 9, 10, 11, 13, 15
15, 16, 17
6
6, 9
6
10, 11, 13, 15
Nombre Página
© Teclas numeradas
1/RANDOM
2/REPEAT 12
3/PROGRAM 12
4/DISPLAY
5/TIMER 18
6/SLEEP 19
7/CLOCK
8/MODE 7
9/CD EDIT 16, 17
© SHIFT 6
© POWER
© VOLUME +/-
© EQ 8
® MONO
© • REC/REC MUTE
© Botones de función
TUNER/BAND
AUX/MD
CD
TAPE
® ◄◄,►► TUNING DOWN/UP 7, 9, 10, 11, 13, 16, 17, •
® BBE
T-BASS
Qsurround 8
© ► PRESET 10, 11, 12, 13, 15
® ■ CLEAR
© II SET
10, 11, 12, 16, 17
12
9, 12, 14
7
6, 18
8
9
15, 16, 17
6, 9, 10
6, 21
6, 11, 16, 17
6. 13
19
8
8
10, 11, 12, 13, 15, 16, 17
7, 10, 11, 13, 15, 18
24 ESPAÑOL
Page 49

Page 50

FRANÇAIS
AVERTISSEMENT
POUR REDUIRE LE RISQUE D’INCENDIE OU DE
DECHARGE ELECTRIQUE, NE PAS EXPOSER CET
APPAREIL A LA PLUIE OU A L’HUMIDITE.
CAUTION
RISK OF ELECTRIC SHOCK
DO NOT OPEN
“CAUTIONTO REDUCE THE RISK OF
ELECTRIC SHOCK,
DO NOT REMOVE COVER (OR BACK).
NO USER-SERVICEABLE PARTS INSIDE.
REFER SERVICING TO QUALIFIED
SERVICE PERSONNEL.”
Explication des symboles graphiques:
Le signe de l’éclair fléché dans un triangle
équilatéral est destiné à avertir l’utilisateur de
la présence d’une “tension dangereuse” non
isolée dans le coffret de l’appareil qui pourrait
être d’une ampleur suffisante pour constituer
un risque de décharge électrique à des
personnes.
Le point d’exclamation dans un triangle
équilatéral est destiné à avertir l’utilisateur de
la présence d’instructions importantes
concernant lefonctionnement et la maintenance
(entretien) dans la documentation
accompagnant l’appareil.
PRECAUTIONS
Lisez attentivement et entièrement ce mode d'emploi avant de
faire fonctionner l’appareil. Conservez-ie pour toute référence
ultérieure. Tous les avertissements et précautions dans le Mode
d’emploi et sur l’appareil doivent être suivis à la lettre, ainsi que les
suggestions pour la sécurité ci-après.
Installation
1 Eau et humidité - N’utilisez pas cet appareil près de l’eau, par
exemple près d’une baignoire, d’un lavabo, d’une piscine ou
similaire.
2 Chaleur - N’utilisez pas cet appareil près d’une source de
chaleur, comme la sortie d’un appareil de chauffage, un poêle,
ou d’autres appareils générateurs de chaleur. Cet appareil ne
doit pas être soumis à des températures inférieures à 5°C ou
supérieures à 35°C.
3 Surface de montage - Placez cet appareil sur une surface
plate et uniforme.
4 Ventilation - Ménagez un espace suffisant autour de l’appareil
pour assurer une bonne ventilation. Laissez 10 cm à l’arrière et
sur le dessus de l’appareil, et 5 cm de chaque côté.
- Ne placez pas l’appareil sur un lit, un tapis, ou une surface
similaire qui pourrait bloquer les orifices de ventilation.
- N’installez pas l’appareil dans une étagère, une armoire ou un
meuble complètement fermé où l’aération serait insuffisante.
5 Pénétration d’objets et de liquide - Evitez la pénétration de
tout objet ou liquide dans l’appareil par les ouvertures de
ventilation.
6 Chariotsetsupports-Quand l’appareil
est placé sur un support ou un chariot,
il doit être déplacé avec soin.
Des arrêts brutaux, une force excessive
et des surfaces inégales peuvent
provoquer le renversement ou la chute
de l’appareil.
2 FRANÇAIS
7 Condensation - De l’humidité peut se former sur la lentille de
lecture du CD quand:
- L’appareil est déplacé d’un endroit froid à un endroit chaud.
- Le chauffage vient juste d’être allumé.
- L’appareil est utilisé dans une pièce humide.
- L’appareil est refroidi par un climatiseur.
Quand il y a condensation dans l’appareil, il ne fonctionne pas
normalement. Dans ce cas, laissez l’appareil tel quel quelques
heures avant d’essayer à nouveau de le faire fonctionner.
8 Montage mural ou au plafond - Cet appareil ne doit pas être
monté au mur ou au plafond, sauf indication contraire dans le
Mode d’emploi.
Alimentation
1 Sources d’alimentation - Raccordez cet appareil à une des
sources électriques spécifiées dans le Mode d’emploi, et comme
indiqué sur l’appareil.
2 Polarisation - Comme caractéristique de sécurité, certains
appareils sont pourvus de fiches secteur polarisées pouvant
s’insérer seulement dans un sens dans une prise d’alimentation.
S’il est difficile ou impossible d’insérer une fiche secteur dans
une prise, tournez-la et essayez à nouveau. Si l’insertion dans
la prise reste difficile, demandez à un technicien de service
qualifié de réparer ou de remplacer la prise. N’essayez pas
d’insérer de force la fiche polarisée dans la prise; sa
caractéristique de sécurité serait ruinée.
3 Cordon d’alimentation secteur
- En déconnectant le cordon d’alimentation secteur, saisissez
la fiche. Ne tirez pas sur le cordon lui-même.
- Ne saisissez jamais la fiche d’alimentation secteur avec des
mains mouillées, cela pourrait provoquer un incendie ou une
décharge électrique.
- Les cordons d’alimentation doivent être acheminés de manière
à éviter qu’ils soient pliés, pincés ou piétinés. Faites très
attention au cordon allant de l’appareil à la prise d’alimentation.
- Evitez de surcharger les prises d’alimentation et les rallonges,
cela pourrait provoquer un incendie ou une décharge
électrique.
4 Rallonge- Pour éviter toute décharge électrique, n’utilisez une
fiche d’alimentation polarisée avec une rallonge, une prise ou
une autre sortie que si la fiche polarisée peut être insérée
complètement en ne laissant aucune lame exposée.
5 Quand l’appareil n’est pas utilisé - Débranchez le cordon
d’alimentation de la prise secteur si l’appareil doit rester inutilisé
pendant plusieurs mois ou plus. Quand le cordon est inséré, un
peu de courant passe dans l’appareil même quand l’alimentation
est coupée.
Antenne extérieure
1 Lignes d’alimentation - A la connexion à une antenne
extérieure, vérifiez qu’elle est éloignée des lignes d’alimentation.
2 Mise à ia masse de l’antenne extérieure - Vérifiez que le
système d’antenne est correctement mis à la masse pour
assurer une protection efficace contre les surtensions imprévues
ou l’accumulation d’électricité statique. L’Article 810 du Code
national de l’électricité (NEC, Etats-Unis), ANSI/NFPA 70,
fournit des informations sur la mise à la masse correcte du mât,
de la structure de soutien et du fil de descente d’antenne à
l’unité de décharge d’antenne, ainsi que sur la taille de l’unité de
mise à la masse, la connexion aux bornes de mise à la masse
et les exigences pour les bornes de mise à la masse.
Mise à la terre d'une antenne selon le code national
d'électrlclté(NEC)
. DE DESCENTE D'ANTENNE
UNITE DE DECHARGE
D'ANTENNE
(NEC SECTION 810-20)
CONDUCTEURS DE
MISE A LA TERRE
(NEC SECTION 810-21)
COLLIERS DE MISE A LA TERRE
ELECTRODE DE MISE A LA TERRE DE
LA LIGNE D'AMENEE DE COURANT
(NEC ARTICLE 250 PARTIE H)
NEC: CODE NATIONAL D'ELECTRICITE
Page 51

Entretien
Nettoyez l’appareil seulement comme indiqué dans ce Mode
d’emploi.
Dommages exigeant une réparation
Faites réparer l’appareil par un réparateur qualifié si;
- Le cordon ou la prise d’alimentation sont endommagés.
- Un matériau étranger ou du liquide a pénétré dans l’appareil.
- L’appareil a été exposé à la pluie ou à l’eau.
- L’appareil ne semble pas fonctionner correctement.
- L’appareil présente un changement de performance important.
- L’appareil est tombé, ou le coffret a été endommagé.
N’ESSAYEZ PAS DE REPARER L’APPAREIL VOUS-MEME.
Enregistrement du propriétaire
Pour la commodité, inscrivez le numéro du modèle et le numéro de
série (marqués à l’arrière de l’appareil) dans l’espace ci-dessous.
Veuillez les indiquer quand vous contactez un revendeur Aiwa en
cas de problème.
№ de modèle
RX-LM88
FD-LM88
№ de série (№ de lot)
TABLE DES MATIÈRES
PRECAUTIONS................................................................ 2
PRÉPARATIFS
RACCORDEMENTS...........................................................4
AVANT L’UTILISATION.....................................................6
RÉGLAGE DE L’HORLOGE..............................................7
ÉCONOMIE D’ÉNERGIE
ASSOMBRISSEMENT DE L’AFFICHEUR
SON_______________________________________
AJUSTEMENT DU SON.....................................................8
RÉCEPTION RADIO
ACCORD MANUEL............................................................9
PRÉRÉGLAGE DES STATIONS
LECTURE DE CD
EXPLOITATION...............................................................11
...................................................
........................
__________________________
...................................
10
____________________________
7
7
SX-LM200
Nous vous félicitons d'avoir acheté une Chaîne Stéréo Aiwa.
Afin d'optimiser le bon fonctionnement de cette chaîne, prenez le
temps de bien lire ce manuel d'exploitation et de vous familiariser
avec les méthodes d'utilisation.
Vérifiez la présence des accessoires.
Télécommande
Antenne FM
Antenne-cadre AM
LECTURE DE CASSETTE
EXPLOITATION
...............................................................
ENREGISTREMENT SUR CASSETTE
ENREGISTREMENT DE BASE
ENREGISTREMENT D’ÉDITION Al
ENREGISTREMENT D’ÉDITION PROGRAMMÉE...........17
MINUTERIE
LECTURE TEMPORISÉE ET ENREGISTREMENT
TEMPORISÉ...............................................................18
RÉGLAGE DE LA MINUTERIE D’EXTINCTION
_________________________________
AUTRES RACCORDEMENTS
RACCORDEMENT D’UN ÉQUIPEMENT EN OPTION ....20
ÉCOUTE DE SOURCES EXTÉRIEURES
GÉNÉRALITÉS
ENTRETIEN ET MAINTENANCE....................................21
SPÉCIFICATIONS............................................................22
GUIDE DE DÉPANNAGE.................................................23
NOMENCLATURE
______________________________
...........................................................
_____________________
___________
.......................................
................................
.............
__________________
.......................
13
^
15
16
19
21
24
FRANÇAIS 3
Page 52

PRÉPARATIFS
RACCORDEMENTS
Avant de raccorder le cordon secteur
La tension nominale de votre appareil indiquée sur le panneau
arrière est secteur 120 V. Vérifiez qu’elle correspond à la tension
locale.
IMPORTANT
• Raccordez d’abord les enceintes, les antennes et les autres
équipements, puis le cordon secteur en dernier.
• Il n’y a pas de différences entre les enceintes avant. Elles
peuvent indifféremment être raccordées à L (gauche) et R
(droite).
1 Placez le lecteur CD/platIne cassette sur le tuner/
amplificateur et branchez le connecteur du câble
plat comme indiqué ci-dessous.
Notez que le connecteur peut être inséré seulement dans un
sens, avec le câble plat dirigé vers la gauche.
2 Raccordez les cordons d’enceinte aux enceintes.
Raccordez les cordons à rayures blanches aux bornes © et
les autres aux bornes ©.
3 Raccordez ies cordons d’enceinte au tuner/
ampiificateur.
Les cordons à rayures blanches doivent être raccordés aux
bornes O et les autres aux bornes O.
Après le branchement du connecteur, ménagez un espace
suffisant entre le câble plat et les ouvertures de
ventilation.
Antenne FM
4 FRANÇAIS
Page 53

4 Raccordez les antennes fournies.
Raccordez fanfenne FM aux prises FM 75 Ü et l’antenne AM
aux prises AM LOOR
Antenne FM
5 Branchez le cordon secteur sur une prise murale.
REMARQUE
Ne court-circuitez pas les conducteurs des cordons d’enceintes
O et ©; sinon, le son pourrait devenir inaudible ou la chaîne
pourrait être mis hors tension. Dans ce cas, déconnectez le
cordon secteur de la prise murale et reconnectez correctement
les cordons d’enceinte. Reconnectez alors le cordon secteur et
remettez la chaîne sous tension.
AFFICHAGE DÉMO DE L’AFFICHEUR
Quand vous branchez le cordon secteur dans une prise électrique
la première fois après l’achat, un affichage démo apparaît sur
l’afficheur. A la mise sous tension, l’affichage démo s’arrête. A la
mise hors tension, il réapparaîtra. L’affichage démo apparaîtra à
chaque mise hors tension jusqu’au réglage de l’horloge. (Voir la
page 7 pour le réglage de l’horloge.)
Quand l’horloge est réglée
L’affichage démo est visible en appuyant sur la touche MODE
tout en appuyant sur la touche SHIFT sur la télécommande.
Cette touche sert aussi à assombrir l’afficheur et à mettre la
chaîne en mode économie d’énergie. Voir la page 7 pour les
explications détaillées.
INSTALLATION DES DEUX APPAREILS COTE A COTE
Vous pouvez aussi, si vous le souhaitez, placer le lecteur CD/
platine cassette et le tuner/amplificateur côte à côte.
Dans ce cas, vérifiez que le câble plat n’obstrue pas les
ouvertures de ventilation, comme indiqué ci-dessous.
Ménagez toujours un espace suffisant entre le câble plat et les
ouvertures de ventilation.
(O
U.
i
tr
g
-tu
cc
Q.
Pour installer l’antenne AM sur une surface
Fixez l’ergot dans la fente.
Pour positionner les antennes Antenne FM;
Etendez-la horizontalement en forme de T et fixez ses extrémités
au mur.
Antenne-cadre AM:
Orientez-la le mieux possible.
REMARQUE
Ne raccordez pas des enceintes autres que celles fournies à la
chaîne.
Ne laissez pas des objets produisant un champ magnétique
près des enceintes.
' N’approchez pas l’antenne FM d’objets métalliques ou de
tringles de rideaux.
' N’approchez pas l’antenne AM d’autres équipements en option,
de la chaîne stéréo elle-même, du cordon secteur ou des
cordons d’enceinte, car elle pourrait ramasser du bruit.
' Ne déroulez pas le fil de l’antenne AM.
RACCORDEMENT D’UNE ANTENNE
EXTERIEURE
Pour améliorer la réception, l’emploi d’une antenne extérieure
est recommandé.
Raccordez l’antenne extérieure aux prises FM 75 Q.
Pour raccorder un équipement en option -♦ page 20.
FRANÇAIS 5
Page 54

AVANT L’UTILISATION
FUNCTION
POWER
Capteur de
télécommande
PHONES
Pour mettre la chaîne sous tension
Appuyez sur une des touches de fonction (TUNER/BAND, AUX/
MD, CD, TAPE) sur la télécommande.
La lecture de la source correspondante démarre (fonction Lecture
directe).
La touche POWER est également utilisable.
Pour mettre la chaîne hors tension
Appuyez à nouveau sur la touche POWER.
Pour utiliser les écouteurs
Raccordez des écouteurs à minifiche stéréo (03,5 mm) à la prise
PHONES.
Aucun son ne sort des enceintes quand des écouteurs sont
branchés.
Pour utiliser la touche FUNCTION sur le lecteur CD/
platine cassette
La touche FUNCTION du lecteur CD/platine cassette remplace
les touches de fonction (TUNER/BAND, AUX/MD, CD, TAPE) sur
la télécommande. A chaque pression de la touche FUNCTION,
la fonction suivante est cycliquement sélectionnée.
EMPLOI DE LA TÉLÉCOMMANDE
Insertion des piles
Retirez le couvercle du logement des piles à l’arrière de la
télécommande et insérez deux piles R03 (format AAA).
Quand remplacer les piles
La distance de commande maximale entre la télécommande et
le capteur du lecteur CD/platine cassette est d’environ 5 m.
Remplacez les piles par des neuves quand cette distance
diminue.
Ouverture et fermeture du couvercle supérieur
Pour utiliser la télécommande
Certaines opérations peuvent seulement être effectuées avec
les touches de la télécommande, d’autres avec les touches sur
le lecteur CD/platine cassette et celles de la télécommande.
Ce mode d’emploi indique clairement les touches utilisables pour
chaque opération.
REMARQUE
• La touche ► sur la télécommande a la même fonction que la
touche sur le lecteur CD/platine cassette.
• Si la chaîne doit rester inutilisée pendant une période prolongée,
retirez les piles pour éviter tout risque de fuite d’électrolyte.
• La télécommande peut ne pas fonctionner correctement quand:
- La ligne de vision entre la télécommande et le capteur de
télécommande est exposée à une lumière intense, en plein
soleil par exemple.
- D’autres télécommandes sont utilisées à proximité (téléviseur,
etc.).
FRANÇAIS
Les touches numériques de 1 à 9 ont aussi les fonctions indiquées
sur la plaque au-dessus d’elles. Pour utiliser ces fonctions,
appuyez sur les touches tout en maintenant pressée la touche
SHIFT sur la télécommande.
Page 55

REGLAGE OE L’HORLOGE
Appuyez sur la touche 11 quand la chaîne est hors tension, ou sur la touche CLOCK en maintenant pressée la touche SHIFT sur la télécommande.
L’horloge clignote sur l’afficheur.
i'.'l
I...Ì ï
: i :
2 Pendant l’affichage de l’horloge (4 secondes),
appuyez sur la touche ◄◄ ou ►► pour régler
l’heure.
Une pression de la touchefera reculer l’heure d’1 minute,
et une pression de la touche ►► la fera avancer d’1 minute.
Maintenir ces touches enfoncées fera varier l’heure par unités
de 10 minutes.
Pour commuter à l’affichage 24 heures, appuyez sur la touche
■ .
Pour revenir à l’indication 12 heures, appuyez une seconde
fois sur la touche I.
Si vous ne commencez pas à régler l’heure dans les
4 secondes
L’horloge démarre et s’assombrit.
Pour régler l’horloge, appuyez sur la touche II, ou appuyez
sur la touche CLOCK en maintenant la touche SHIFT enfoncée
sur la télécommande.
L’horloge devient plus lumineuse et les touches ◄◄ et ►►
deviennent disponibles.
3 Appuyez sur la touche II.
L’horloge démarre à partir de 00 seconde.
Au premier branchement du cordon d’alimentation dans une prise éiectrique après l’achat
Tout l’affichage est effacé.
Cela parce que le mode économie d’énergie de la chaîne est
activé; il ne s’agit pas d’une anomalie.
Le mode économie d’énergie est annulable. Voir “ÉCONOMIE
D’ÉNERGIE” pour les détails.
Pour afficher l’heure présente
Appuyez sur la touche CLOCK tout en pressant la touche SHIFT
sur la télécommande. L’heure s’affiche 4 secondes.
Pendant l’affichage de l’horloge, vous pouvez la remettre à zéro
en appuyant sur la touche ◄◄ ou ►►. Dans ce cas, appuyez
sur la touche II à la fin.
•I ■•"î
^ / i \
MODE
iZ
oooca
oocdÆ gg
ooo 0 0 0._
SHIFT
ECONOMIE D’ENERGIE
Cette chaîne vous permet de réguler sa consommation d’énergie
en n’affichant rien sur l’afficheur quand elle est hors tension.
C’est ce qu’on appelle mode économie d’énergie.
Appuyez sur la touche MODE tout en pressant la
touche SHIFT sur la télécommande quand la chaîne est
hors tension.
Chaque pression de cette touche modifie l’état de l’affichage
comme suit:
r>® Mode économie d’énergie
@ Affichage démo (mode économie d’énergie annulé)
'—(3) Affichage de l’horloge (mode économie d’énergie annulé)
Quand la chaîne est en mode économie d’énergie
“Eco Mode” s’affiche 4 secondes, et l’afficheur s’efface.
Seul le voyant rouge à droite de l’afficheur s’allume pour indiquer
que la chaîne est sous tension.
Consommation d’énergie en mode d’attente
Si le mode économie d’énergie est activé: 2,5 W
REMARQUE
Si vous appuyez sur la touche ◄ ► du lecteur CD/platine cassette
(ou la touche ► sur la télécommande) quand il est hors tension,
le mode économie d’énergie, s’il est activé, sera annulé et
l’affichage démo apparaîtra.
ASSOMBRISSEMENT DE
L’AFFICHEUR
Cette chaîne vous permet de régler la luminosité de l’afficheur à
votre goût.
Appuyez sur la touche MODE en pressant la touche
SHIFT sur la télécommande quand la chaîne est sous
tension.
Chaque pression fait passer l’afficheur entre les états suivants:
r>® Affichage lumineux
® Affichage assombri
'—@ Affichage démo
Si la chaîne est mise hors tension après modification de la
luminosité de l’afficheur, le dernier état est rétabli à la mise sous
tension suivante.
FRANÇAIS 1
'LU
CC
Q.
(A
u.
I
£
Page 56

AJUSTEMENT DU SON
RENFORCEMENT DES GRAVES
Le système T-BASS renforce le réalisme des sons de basses
fréquences.
Appuyez plusieurs fois sur la touche T-BASS sur la
télécommande.
Chaque pression de la touche T-BASS vous permet de
sélectionner un des trois niveaux disponibles ou la position OFF.
-VOLUME
T-BASS
Qsurround
oocp
c:>
oo
oo
CiC
QMD
(KO
EPf ooo
BBE EQ
oo
<30
ooo
VOLUME
AJUSTEMENT DU VOLUME
Appuyez sur les touches VOLUME.
Le volume s’affiche pendant 4 secondes. Il est réglable de 0
(minimum) à 30, puis MAX (maximum).
Le volume reste mémorisé même après la mise hors tension.
Mais si la chaîne est mise hors tension alors que le volume est
réglé à plus de 21, Il sera automatiquement réglé à 21 à la mise
sous tension suivante.
RENFORCEMENT DES AIGUS
1, 1
(OFF)
. 111111111
...■ i ;■ :::;i îiîii
: ___ : |;:|| ;|it; |
REMARQUE
Le son de basses fréquences peut être déformé quand le système
T-BASS est utilisé pour un disque dont le son de basses
fréquences est accentué à l’origine. Dans ce cas, annulez le
système T-BASS.
EQ (ÉGALISEUR)
Cette chaîne fournit les trois courbes d’égalisation suivantes:
ROCK: Son puissant accentuant les graves et les aigus.
POP: Plus de présence des voix et des médians.
JAZZ: Basses fréquences accentuées pour la musique de type
jazz
Appuyez sur la touche EQ sur la télécommande.
f:;ück
Le système BBE renforce la netteté des sons de hautes
fréquences.
Appuyez plusieurs fois sur la touche BBE sur la
télécommande.
Chaque pression de la touche BBE vous permet de sélectionner
un des trois niveaux disponibles ou la position OFF.
n
Ill
(OFF)
•EÜliii iHiii.iiiii
.-±L .nîlî ilT
BBE
i!::;
.
............
La courbe graphique correspondant au mode d’égalisation
sélectionné s’affichera.
SYSTÈME Q SURROUND
Le système Q SURROUND intégré à l’appareil utilise uniquement
deux enceintes, droite et gauche, pour créer une atmosphère
donnant l’impression d’être entouré de deux enceintes avant et
de deux enceintes arrière.
Appuyez sur la touche Qsurround sur la télécommande.
“QSURROUND ON” défile sur l’afficheur, et l’indicateur
“QSURROUND” apparaît.
Pour annuler l’effet Q SURROUND
Appuyez sur la touche Qsurround sur la télécommande.
“QSURROUND OFF” défile sur l’afficheur, et l’indicateur
“QSURROUND” s’éteint.
REMARQUE
• Le système Q SURROUND ne fonctionne pas en mode
monaural.
• Quand le système Q SURROUND est activé, le son peut être
déformé à volume élevé. Dans ce cas, abaissez le volume.
8 FRANÇAIS
AJUSTEMENT DU SON PENDANT
L’ENREGISTREMENT
Vous pouvez modifier à votre guise le volume de sortie et la
tonalité des enceintes ou écouteurs sans affecter le niveau
d’enregistrement.
Page 57

RECEPTION RADIO
ACCORD MANUEL
Appuyez plusieurs fois sur ia touche TUNER/
BAND de ia télécommande (ou sur la touche
FUNCTION sur le lecteur CD/platine cassette)
pour sélectionner ia bande souhaitée.
►FM^ AM
Si la chaîne est mise hors tension, la station préalablement
accordée est lue (fonction Lecture directe).
2 Appuyez sur ia touche
sélectionner une station.
La fréquence change à chaque pression.
A la réception d'une station, “TUNE” s'affiche pendant 2
secondes.
(((®))) s’affiche pendant la réception FM stéréo.
OU
pour
Quand une émission FM stéréo contient du bruit
Appuyez sur la touche MONO de la télécommande.
“MONO” apparaît sur l’afficheur.
Le bruit est réduit, mais la réception est monaurale.
MONO
FM 90,
Répétez la procédure ci-dessus pour revenir en réception stéréo.
Pour modifier l’intervalle d’accord AM
Le réglage par défaut de l’intervalle d’accord est de 10 kHz/pas.
Modifiez l’intervalle de fréquence si vous utilisez cette chaîne
dans une zone où le système d’affectation des fréquences est
de 9 kHz/pas.
Appuyez sur la touche POWER tout en pressant la touche II
sur le lecteur CD/platine cassette.
Répétez cette procédure pour revenir à l’ancien intervalle.
A la modification de l’intervalle d’accord AM, toutes les stations
préréglées (voir “PRÉRÉGLAGE DES STATIONS”) sont effacées.
Elles doivent être réglées à nouveau.
Modification de l’affichage
Appuyez sur la touche DISPLAY en pressant la touche SHIFT
sur la télécommande. A chaque pression, l’affichage change
comme suit:
® Vumètre
@ Fréquence de la station accordée
(Exemple: FM 98.00MHz)
:z
)0
O
Q
<
QC
m
U
-UJ
tr
M
A propos du vumètre
L’affichage ci-dessus commute automatiquement au vumètre au
bout de 4 secondes.
Le vumètre indique un niveau sonore de lecture approximatif.
0 0 M i-|
i::: M
Recherche rapide d’une station (Recherche auto)
Maintenez la touche ◄◄ ou ►► pressée jusqu’à ce que le tuner
commence à chercher une station. Après l’accord d’une station,
la recherche s’arrête.
Pressez la touche ◄◄ ou ►► pour arrêter la Recherche auto
manuellement.
• La Recherche auto peut ne pas s’arrêter à des stations à signal
très faible.
FRANÇAIS 9
Page 58

PREREGLAGE DES STATIONS
ACCORD PAR NUMÉRO DE
PRÉRÉGLAGE
1 Appuyez sur la touche TUNER/BAND de la
télécommande ou la touche FUNCTION sur le
lecteur CD/platine cassette pour sélectionner une
bande.
0-9,+10
TUNER/BAND
cdcdcdqI
ocdqI ^
QOQQ OlQQi
O O Qr^ ^
II
La chaîne peut mémoriser un total de 32 stations préréglées.
(20 stations prérégiées maximum sont disponibles sur chaque
bande.) A la mémorisation d’une station, un numéro de
préréglage est affecté à la station. Utilisez ce numéro pour
accorder directement une station préréglée.
1 Appuyez sur la touche TUNER/BAND de la
télécommande (ou sur la touche FUNCTION sur
le lecteur CD/platIne cassette) pour sélectionner
une bande. Puis, appuyez sur la touche ou
pour sélectionner une station.
2 Appuyez sur la touche II pour mémoriser une
station.
Un numéro de préréglage, à commencer par 1 et dans l’ordre
consécutif, est affecté à chaque bande.
2 Appuyez sur la touche sur le lecteur CD/
platine cassette ou sur ia touche ^ sur ia
téiécommande.
A chaque pression de la touche, le numéro de préréglage
ascendant suivant est sélectionné.
Accord avec le numéro de préréglage
1 Appuyez sur la touche TUNER/BAND sur la télécommande
pour sélectionner une bande. (Ou utilisez la touche
FUNCTION sur le lecteur CD/platine cassette.)
2 Appuyez sur les touches numériques de la télécommande
pour sélectionner un numéro de préréglage.
Exemples:
Pour sélectionner le numéro de préréglage 10, appuyez sur
les touches +10 et 0.
Pour sélectionner le numéro de préréglage 15, appuyez sur
les touches +10 et 5.
Pour effacer une station préréglée
Sélectionnez le numéro de préréglage de ia station à effacer.
Puis, appuyez sur la touche ■, ensuite sur la touche II dans
les 4 secondes.
Les numéros de préréglage de toutes les stations à numéro
supérieur de la bande seront diminués d’une unité.
REMARQU
En cas de panne de courant ou de déconnexion du cordon
secteur de longue durée, le préréglage des stations sera annulé.
Dans ce cas, préréglez à nouveau.
Numéro de préréglage
FM .90.00MH
... . ^
Fréquence
3 Répétez les étapes 1 et 2.
La station suivante ne sera pas mémorisée si 32 stations
préréglées sont déjà mémorisées (“FULL” est affiché).
10 FRANÇAIS
Page 59

LECTURE DE CD
EXPLOITATION
II
FUNCTION
CHARGEMENT D’UN DISQUE
A propos du vumètre
L’affichage ci-dessus passe au vumètre au bout de 4 secondes.
Le vumètre indique un niveau sonore de lecture approximatif.
CD
Pour arrêter la lecture, appuyez sur la touche ■.
Pour faire une pause de lecture, appuyez sur la touche II.
Appuyez une seconde fois pour reprendre la lecture.
Pour rechercher un point particulier pendant la lecture,
maintenez la touche ◄◄ ou pressée et relâchez-la au point
souhaité.
Pour sauter au début d’une piste pendant la lecture, appuyez
plusieurs fois sur la touche ◄◄ ou ►►. La chaîne saute en
avant à la pression de la touche et en arrière à la pression
de la touche
Pour retirer le disque, arrêtez la lecture et appuyez sur la touche
± OPEN/CLOSE.
Afficheur en mode d’arrêt
Calendrier musical (seules les
Nombre total de pistes 20 premières pistes sont lues)
I
|s
|S
Pi
5io
Um
•iu_j
GC
1 Appuyez sur la touche CD de la télécommande
(ou plusieurs fois sur la touche FUNCTION sur le
lecteur CD/platine cassette jusqu’à l’affichage de
“CD”), puis sur la touche ± OPEN/CLOSE pour
ouvrir le couvercle du logement du disque.
2 Chargez un disque, la face portant l’étiquette
dirigée vers le haut.
± OPEN/CLOSE
3 Appuyez à nouveau sur la touche £ OPEN/
CLOSE pour refermer le couvercle du logement
du disque.
Attention
Ne vous coincez pas les doigts dans le logement du disque à
la fermeture du couvercle.
LECTURE D’UN DISQUE
Chargez un disque.
CD ■ 1 0 ;bcM; 3 1 3:3
i
Temps total de lecture
Pour démarrer la lecture quand la chaîne est hors
tension (fonction Lecture directe)
Appuyez sur la touche CD de la télécommande. La chaîne se
met sous tension et la lecture du disque chargé démarre.
Sélection d’une piste avec la télécommande
Appuyez sur les touches numériques et la touche -i-IO pour
sélectionner une piste.
Exemples:
Pour sélectionner la piste 25, appuyez sur les touches -i-l 0, +10
et 5.
Pour sélectionner la piste 10, appuyez sur les touches +10 et 0.
La lecture de la piste sélectionnée démarre, puis la lecture se
poursuit jusqu’à la fin du disque.
REMARQUE
Ne placez pas plus d’un disque compact sur le plateau à disque.
Appuyez sur la touche ^ sur le lecteur CD/platine
cassette ou sur la touche ^ sur la télécommande.
La lecture du CD inséré commence à partir de la piste 1.
Numéro de la piste en cours de lecture
f-î'e
CD 3I.ÎV 0::2b :C.3
Temps de lecture
écoulé
FRANÇAIS 1 1
Page 60

------
bd
PROGRAM
(-DISPLAY
cj o
— ►
REPEAT■
0-9,+10-■
Pour modifier i’affichage en mode de iecture
Appuyez sur la touche DISPLAY en pressant la touche SHIFT
sur la télécommande.
Chaque pression de la touche modifie l’affichage comme suit:
► © Vumètre
@ Numéro de la piste en cours de lecture et temps de lecture
écoulé
(Exemple: CD 3Tr 3:43)
Temps de lecture restant
(Exemple: CD -26:15)
dbd
C3C
cacaaa CJ(-jr*i-+
,O ooo 0(^@-
LECTURE ALÉATOIRE
LECTURE PROGRAMMEE
Jusqu’à 30 pistes peuvent être programmées sur le disque inséré.
Utilisez la télécommande.
1 En mode d’arrêt, appuyez sur la touche
PROGRAM en maintenant la touche SHIFT
pressée.
“PRGM” s’affiche.
CD
...........
2 Appuyez sur les touches numériques et sur la
touche -i-10 pour programmer une piste.
Exemples:
Pour sélectionner la piste 12, appuyez sur les touches +10 et
2.
Pour sélectionner la piste 20, appuyez sur les touches +10,
+10et0.
!.■■! ;; i-'l
Toutes les pistes du disque peuvent être lues dans le désordre.
Appuyez sur la touche RANDOM en pressant la
touche SHIFT sur la télécommande.
“RANDOM” s’allume sur l’affichage.
Répétez cette procédure pour annuler la lecture aléatoire.
'Même si la touche ◄◄ est pressée, une piste lue
antérieurement ne peut pas être sautée. La chaîne revient
seulement au début de la piste présente.
' A la sélection d’une piste avec les touches numériques de la
télécommande en mode lecture aléatoire, la lecture de la piste
sélectionnée démarre, et le mode lecture aléatoire est annulé.
LECTURE REPETEE
Une piste ou toutes les pistes peuvent être lues de manière
répétée.
Maintenez la touche SHIFT pressée, et appuyez
plusieurs fois sur ia touche REPEAT de ia
télécommande.
“Ci-i” s’allume quand la lecture répétée d’une piste est
sélectionnée, et “C*-” quand celle de toutes les pistes l’est.
Pour annuler la lecture répétée, répétez l’opération ci-dessus.
Pour répéter une lecture aléatoire
Appuyez d’abord sur la touche RANDOM tout en maintenant la
touche SHIFT pressée sur la télécommande pour activer la
lecture aléatoire. Puis, appuyez sur la touche REPEAT en
maintenant la touche SHIFT pressée de sorte que “L*-” s’allume.
CD 20n- P'....03
Numéro de la piste Numéro de
sélectionnée programmation
O
CD
Nombre total de pistes Temps total de lecture des
sélectionnées pistes sélectionnées
3 Répétez l’étape 2 pour programmer d’autres
pistes.
4 Appuyez sur la touche
lecture.
Pour répéter une lecture programmée
Après la programmation des pistes souhaitées, appuyez sur la
touche REPEAT en maintenant la touche SHIFT pressée sur la
télécommande de sorte que s’allume.
La lecture programmée démarre alors.
Pour vérifier la programmation
A chaque pression de la touche ►► en mode d’arrêt, un numéro
de piste et le numéro de programmation s’affichent.
Pour effacer un programme
Appuyez sur la touche ■ en mode d’arrêt.
1 iS J. :3'
pour démarrer la
12 FRANÇAIS
Pour ajouter des pistes à un programme
Répétez l’étape 2 avant la lecture. La piste sera programmée
après la dernière piste.
Pour modifier les pistes programmées
Effacez le programme et répétez toutes les étapes.
REMARQUE
Les touches RANDOM et numériques sont inopérantes pendant
la lecture programmée.
Page 61

LECTURE DE CASSETTE
EXPLOITATION
MODE
TAPE
d> C 3
[yOOP МЭ1С301
'k jf '--«’OU
SHIFT
CHARGEMENT D’UNE CASSETTE
• Vous pouvez sélectionner un mode d’inversion pour lire une
face ou les deux.
• Utilisez une cassette de type I (normale), de type II (high/Cr02)
ou de type IV (métal) pour la lecture.
Appuyez sur la touche TAPE de la télécommande
(ou plusieurs fois sur la touche FUNCTION sur le
lecteur CD/platine cassette jusqu’à ce que “TAPE”
s’affiche).
Puis insérez une cassette, ia face exposée dirigée
vers ia droite, et appuyez iégèrement dessus jusqu’à
ce qu’eile se charge automatiquement.
T
II
LECTURE D’UNE CASSETTE
Chargez une cassette.
Appuyez sur la touche sur le lecteur CD/platine
cassette ou sur ia touche ► sur la télécommande.
Face lue de la cassette
I
Тире и 000,
Le compteur de bande indique le temps
de défilement de la bande. (Invisible quant
aucune cassette n’est insérée.)
[>: La face vers le haut est lue (en avant).
<1: La face vers le bas est lue (en arrière).
A propos du vumètre
L’affichage ci-dessus passe au vumètre au bout de 4 secondes.
Le vumètre indique un niveau sonore de lecture approximatif.
ТИРЕ
Pour arrêter la lecture, appuyez sur la touche ■.
Pour faire une pause de lecture, appuyez sur la touche II.
Appuyez une seconde fois pour reprendre la lecture.
Pour changer de face lue, appuyez sur la touche sur le
lecteur CD/platine cassette ou sur la touche ► sur la
télécommande en mode de lecture ou pause.
Pour avancer ou reculer rapidement, appuyez sur ia touche
◄◄ ou ►► en mode d’arrêt. Puis, appuyez sur la touche ■
pour arrêter la bande.
Pour éjecter la cassette chargée, appuyez sur la touche A
TAPE EJECT en mode d’arrêt.
Démarrage de la lecture quand l’alimentation est
coupée (fonction Lecture directe)
Appuyez sur la touche TAPE sur la télécommande. La chaîne se
met automatiquement sous tension et la lecture de la cassette
chargée démarre.
..
ОШ
ü (Д
luS
°ü
“I
Ш 3
P
“'o
Ш
Sélection d’un mode d’inversion
Appuyez sur la touche TAPE de la télécommande.
A chaque pression de la touche, le mode d’inversion change.
^7^
Kzy,
Pour lire seulement une face, sélectionnez Z..
Pour lire la face avant puis la face arrière seulement une fois,
sélectionnez T5.
Pour lire les deux faces de manière répétée, sélectionnez CI).
T i”
i i" PE
i-l ki И !■■■!
Remise à 0000 du compteur de bande
Appuyez sur la touche ■ en mode d’arrêt.
Le compteur est également remis à 0000 à l’éjection de la
cassette.
FRANÇAIS 1 3
Page 62

DISPLAY
SHIFT
Pour modifier l’affichage en mode de lecture
Appuyez sur la touche DISPLAY en maintenant pressée la touche
SHIFT de la télécommande.
Chaque pression de la touche modifie l’affichage comme suit:
r>® Vumètre
'—® Compteur de bande
(Exemple: TAPE 0185)
A propos des cassettes
• Pour éviter tout effacement accidentel, brisez les taquets
en plastique sur la cassette après l’enregistrement avec un
tournevis ou un autre outil pointu.
Pour réenregistrer sur la bande, couvrez les ouvertures
laissées par le taquet avec du ruban adhésif, etc. (Sur les
cassettes de type II, prenez garde de ne pas couvrir la fente
de détection de cassette de type IL)
* Les cassettes de 120 minutes ou plus sont extrêmement
fines et se déforment ou s’endommagent facilement. Elles
ne sont pas recommandées.
• Retendez la bande avec un crayon ou un outil similaire avant
l’utilisation. Une bande détendue peut se casser ou
s’emmêler dans le mécanisme.
1 4 FRANÇAIS
Page 63

ENREGISTREMENT SUR CASSETTE
ENREGISTREMENT DE BASE
Préparatifs
• Réglez la cassette au point ou l’enregistrement doit démarrer.
• Utilisez des cassettes de type I (normal) ou de type II (high/
Cr02) pour l’enregistrement.
Pour arrêter la lecture, appuyez sur la touche ■.
A l’enregistrement à partir d’un CD, appuyez à nouveau sur la
touche ■ pour arrêter la lecture.
Pour faire une pause d’enregistrement, appuyez sur la touche
II. (Applicable lors de l’enregistrement d’une émission de radio
ou à partir d’un équipement raccordé.) Appuyez à nouveau pour
reprendre l’enregistrement.
INSERTION D’ESPACES VIERGES
L’insertion d’espaces vierges de 4 secondes peut vous permettre
de localiser le début d’une piste quand la cassette est lue sur un
autre équipement. (Applicable quand la source est la radio ou
un équipement raccordé.)
1 Appuyez sur la touche 9 REC/REC MUTE sur la
télécommande pendant l’enregistrement ou en mode
pause d’enregistrement.
“TAPE 013” clignote rapidement 4 secondes et la bande
défile sans enregistrement. Au bout de 4 secondes, la platine
passe en mode pause d’enregistrement.
2 Appuyez sur la touche 11 pour reprendre l’enregistrement.
Pour insérer un espace vierge de moins de 4 secondes,
appuyez à nouveau sur la touche 9 REC/REC MUTE pendant
le clignotement rapide de “TAPE
Pour insérer des espaces vierges de plus de 4 secondes,
après le passage de la platine en mode pause d’enregistrement,
appuyez à nouveau sur la touche
pression, un espace vierge de 4 secondes sera ajouté.
9
REC/REC MUTE. A chaque
UJ
iüS
wU
(/) oc
< 3
(3
lU^
Q111
LUS
oc UJ
O«
UJ U
_l UJ
oc
1 Chargez la cassette à enregistrer dans la platine.
Chargez la cassette, la face à enregistrer en premier vers le
haut, et la face exposée vers la droite.
Face à
enregistrer en
premier
2 Appuyez sur la touche TAPE sur la télécommande
pour sélectionner le mode d’inversion.
Pour enregistrer sur une face seulement, sélectionnez Z.
Pour enregistrer sur les deux faces, sélectionnez Z) ou CZ).
Si l’enregistrement est commencé sur la face dirigée vers le
bas, la bande s’arrête à la fin de l’enregistrement sur cette
face, même si le mode d’inversion est réglé à Z) ou CZ),
3 Appuyez sur une des touches de fonction et
préparez la source à enregistrer.
Pour enregistrer une émission de radio, appuyez sur la
touche TUNER/BAND et accordez une station.
Pour enregistrer à partir d’un CD, appuyez sur la touche
CD sur la télécommande, puis chargez un CD.
Pour enregistrer à partir d’une source raccordée aux
prises AUX iN ou MD iN, appuyez plusieurs fois sur la touche
AUX/MD pour afficher respectivement “AUX” ou “MD”.
4 Appuyez sur la touche # REC sur le lecteur CD/
platine cassette pour démarrer l’enregistrement.
Pour démarrer l’enregistrement avec la télécommande,
appuyez sur la touche
secondes sur la touche ►.
A l’enregistrement à partir d’un CD, la lecture et
l’enregistrement démarrent simultanément.
A l’enregistrement à partir d’un équipement raccordé,
démarrez la lecture.
9
REC/REC MODE et dans les 2
Pour effacer un enregistrement
1 Insérez la cassette à effacer dans la platine.
2 Réglez la cassette au point où l’effacement doit commencer.
3 Appuyez sur la touche AUX/MD sur la télécommande, ou
plusieurs fois sur la touche FUNCTION sur le lecteur CD/
platine cassette jusqu’à l’affichage de “AUX”.
Si un équipement en option est raccordé aux prises AUX IN,
mettez-le hors tension.
4 Appuyez sur la touche
cassette pour démarrer l’effacement.
9
REC sur le lecteur CD/platine
FRANÇAIS 1 5
Page 64

ENREGISTREMENT D’EDITION Al
4 Appuyez sur les touches numériques pour
désigner la longueur de la bande.
10 à 99 minutes peuvent être spécifiées.
Exemple: Pour une cassette de 60 minutes, appuyez sur les
touches 6 et 0.
En quelques secondes, le micro-ordinateur détermine les
pistes à enregistrer sur chaque face de la cassette.
• Les touches ◄◄ et ►► sont aussi utilisables pour désigner
la longueur de la cassette.
m; c'
.......................
La fonction d’édition Al permet l’enregistrement d’un CD sans
avoir à s’inquiéter de la longueur de la bande et des pistes. Quand
un CD est inséré, le lecteur CD/platine cassette calcule
automatiquement la longueur des pistes. Si nécessaire, l’ordre
des pistes sera modifié pour éviter toute coupure de piste.
(Al; Intelligence artificielle)
L’enregistrement d’édition Al ne commencera pas d’un point en
cours de bande. La cassette doit être enregistrée du début d’une
face.
1 Insérez la cassette dans la platine.
Chargez la cassette, la face à enregistrer en premier vers le
haut.
2 Appuyez sur la touche CD de la télécommande,
ou plusieurs fois sur ia touche FUNCTiON de ie
iecteur CD/piatine cassette de sorte que “EDiT”
s’affiche et que “Al” clignote sur l’afficheur.
3 Appuyez plusieurs fois sur la touche CD EDIT en
pressant la touche SHIFT sur la télécommande
jusqu’à ce que “EDIT” s’allume et que “Al”
clignote sur l’afficheur.
C.ZÌ
...
H I
i/i ki
Face A de la cassette
< M>
Nombre de pistes
programmées
i:;:"
Longueur de la cassette
..
biS'
Temps restant sur la face A
5 Appuyez sur la touche # REC du lecteur CD/
platine cassette pour démarrer l’enregistrement.
Pour démarrer l’enregistrement avec la télécommande,
appuyez sur la touche • REC/REC MODE et dans les 2
secondes sur la touche ►.
La bande est rebobinée jusqu’au début de la face vers le haut,
l’amorce est lue 10 secondes et l’enregistrement démarre. A
la fin de l’enregistrement sur ia face vers le haut (face A),
l’enregistrement démarre sur l’autre face (face B).
Pour arrêter l’enregistrement
Appuyez sur la touche ■. Lenregistrement et la lecture du CD
s'arrêtent simultanément.
Pour effacer un programme édité
Appuyez deux fois sur la touche I
disparaisse de l’afficheur.
Pour vérifier l’ordre des numéros des pistes programmées
Avant l’enregistrement, appuyez sur la touche CD EDIT en
maintenant pressée la touche SHIFT de la télécommande pour
sélectionner la face A ou B, puis plusieurs fois sur la touche
Face de la cassette Numéro de programme
de sorte que “EDIT”
I
<p> i P
...........
Bi-
16 FRANÇAIS
Numéro de piste Numéros des pistes
programmées
Durée des cassettes et durée d’édition
La durée réelle d’enregistrement de la cassette est ordinairement
un peu plus longue que la durée d’enregistrement imprimée sur
l’étiquette. Cette chaîne peut programmer des pistes pour utiliser
ce temps additionnel.
•L’enregistrement est invalidé si le taquet de prévention
d’enregistrement sur une des faces de la cassette est brisé.
• La fonction édition Al est inutilisable avec des disques contenant
31 pistes ou plus.
Page 65

ENREGISTREMENT D’EDITION PROGRAMMÉE
6 Répétez l’étape 5 pour le reste des pistes de la
face A.
Une piste dont le temps de lecture est supérieur au temps
restant ne pourra pas être programmée.
Piste sélectionnée
LU
1=
lU
c/>
(/}
<
CJ
QC
3
(/>
0-9,+10
CD EDIT
SHIFT •REC/
La fonction édition programmée permet l’enregistrement d’un CD
tout en contrôlant le temps restant sur chaque face de la cassette
pendant la programmation des pistes.
Lenregistrement d’édition programmée ne commencera pas d’un
point en cours de bande. La cassette doit être enregistrée du
début d’une face.
REC MUTE
1 Insérez la cassette dans la platine.
Chargez la cassette, la face à enregistrer en premier vers le
haut.
2 Appuyez sur la touche CD de la télécommande,
ou plusieurs fois sur la touche FUNCTION du
lecteur CD/platine cassette de sorte que “CD”
s’affiche, et chargez le disque.
3 Appuyez piusieurs fois sur ia touche CD EDIT en
mainenant pressée la touche SHIFT sur la
télécommande jusqu’à ce que “EDIT” s’allume et
que “PRGM” clignote sur l’afficheur.
4 Appuyez sur les touches numériques pour
désigner la longueur de la bande.
10 à 99 minutes peuvent être spécifiées.
Exemple: Pour une cassette de 60 minutes, appuyez sur les
touches 6 et 0.
• Les touches ◄◄ et ►► sont aussi utilisables pour désigner
la longueur de la cassette.
Face A de la cassette (avant)
ÙM ;
.................
:3 0 ;; i;jg
Temps d’enregistrement
maximum de la face A
5 Appuyez sur les touches numériques pour
programmer une piste.
Exemple: Pour sélectionner la piste 10, appuyez sur les
touches numériques +10 et 0.
< H.>
> 2 P’
M> 'Î-’-iÜ;:
Nombre total de pistes Temps restant sur la face A
programmées
......
03-
Numéro de
programmation
■ 3
7 Appuyez sur la touche CD EDIT en maintenant
pressée la touche SHIFT sur la télécommande
pour sélectionner la face B et programmer les
pistes pour la face B.
Répétez l’étape 5 après confirmation de B sur l’afficheur.
Face B de la cassette (face opposée)
iï !-i
M
8 Appuyez sur la touche # REC du lecteur CD/
platine cassette pour démarrer l’enregistrement.
Pour démarrer l’enregistrement avec la télécommande,
appuyez sur la touche • REC/REC MUTE et dans les 2
secondes sur la touche ►.
La bande est rebobinée jusqu’au début de la face vers le haut,
l’amorce est lue 10 secondes et l’enregistrement démarre. A
la fin de l’enregistrement sur la face vers le haut (face A),
l’enregistrement sur l’autre face (face B) démarre.
Pour arrêter l’enregistrement
Appuyez sur la touche ■. L’enregistrement et la lecture du CD
s’arrêtent simultanément.
Pour vérifier l’ordre des numéros des pistes programmées
Avant l’enregistrement, appuyez sur la touche CD EDIT en
maintenant pressée la touche SHIFT sur la télécommande pour
sélectionner la face A ou B, puis plusieurs fois sur la touche
Numéro de piste programmées
P>l0 P
Pour modifier le programme de chaque face
Appuyez sur la touche CD EDIT en maintenant pressée la touche
SHIFT sur la télécommande pour sélectionner la face A ou B,
puis sur la touche ■ pour effacer le programme de la face
sélectionnée. Ensuite, reprogrammez les pistes.
Pour effacer un programme édité
Appuyez plusieurs fois sur la touche
disparaisse de l’afficheur.
L’enregistrement est invalidé si le taquet de prévention contre
l’enregistrement est brisé sur une des faces de la cassette.
.........
Numéro de programmation
Numéros des pistes
0Ì
de sorte que “EDIT”
FRANÇAIS 1 7
LU
S
LU
CE
h—
çn
O
LU
CE
Z
LU
Page 66

MINUTERI
LECTURE TEMPORISEE ET ENREGISTREMENT TEMPORISÉ
-TIMER
Æooq
C3 cacaci
(gpc3C3C3
%~poo ^QQ
POWER
SHIFT
Cette chaîne peut être mise sous tension à une heure spécifiée
tous ies jours avec ia minuterie intégrée.
Vérifiez que l’horioge est régiée corréctement. (Voir page 7.)
Utiiisez la télécommande.
1 Préparez la source et la destination
d’enregistrement.
Pour écouter un CD, appuyez sur la touche CD sur la
télécommande et chargez un CD.
Pour écouter ou enregistrer une émission de radio,
appuyez sur la touche TUNER/BAND sur la télécommande
et accordez une station.
Pour lire ou enregistrer à partir d’un équipement raccordé,
appuyez plusieurs fois sur la touche AUX/MD sur la
télécommande jusqu’à ce que la source s’affiche, et réglez la
minuterie de l’équipement pour démarrer la lecture à l’heure
d’activation de la minuterie.
2 Appuyez plusieurs fois sur la touche TIMER en
maintenant pressée la touche SHIFT de la
télécommande de sorte que “TIMER ©PLAY”
(pour la lecture temporisée) ou “TIMER ©REC”
(pour l’enregistrement temporisé) s’affiche.
caca
caca
QlQQH—
-Il
4 Appuyez sur la touche
A la sélection de la lecture temporisée:
A la sélection de l’enregistrement temporisé:
II.
120- : ■
FM ÌP-TPÌ20.^-'-'
5 Sélectionnez la durée pour la période d’activation
de la minuterie avec la touche « ou
C: 0
'r
Période d’activation de la
minuterie
La durée pour la période d’activation de la minuterie peut être
réglée entre 5 et 240 minutes par étapes de 5 minutes.
6 Appuyez sur la touche
Si 4 secondes s’écoulent sans pression de la touche II, le
réglage de la minuterie des étapes 1 à 5 entre en vigueur.
II.
7 Pour l’enregistrement temporisé, chargez la
cassette à enregistrer.
8 Appuyez sur la touche POWER pour mettre la
chaîne hors tension après ajustement du volume
et de la tonalité.
© ou ©BS reste affiché après la mise hors tension (mode
d’attente de minuterie).
Notez cependant que tout sera effacé de l’afficheur si le mode
économie d’énergie (voir la page 7) est activé. Pour confirmer
le mode d’attente de la minuterie, appuyez sur la touche
MODE en maintenant pressée la touche SHIFT sur la
télécommande, pour annuler le mode économie d’énergie.
TI il ER 0REC
TIMER ©PLAY: pour la lecture temporisée
TIMER ©REC: pour l’enregistrement
temporisé
Dans les 4 secondes, appuyez sur la touche
ou »■ pour fixer l’heure d’activation de la
minuterie.
Une pression de la touche ◄◄ fait reculer d’1 minute, et une
pression de la touche ►► avancer d’1 minute.
Maintenez ces touches pressées pour faire varier l’heure par
unités de 10 minutes.
Quand l’heure d’activation de la minuterie arrive, la chaîne se
met sous tension et démarre la lecture (ou l’enregistrement) de
la source sélectionnée.
Si le niveau de volume a été réglé à plus de 21 avant ia mise
hors tension, il est automatiquement réglé à 21 à la mise sous
tension par minuterie.
1 8 FRANÇAIS
Page 67

Pour vérifier i’heure et ia source spécifiées
Appuyez sur la touche TIMER en maintenant pressée la touche
SHIFT de la télécommande. Le nom de la source sélectionnée,
l’heure d’activation de la minuterie et la durée d’activation par
minuterie s’affichent 4 secondes.
Pour modifier ie réglage de la minuterie
Refaites le réglage depuis le début.
Pour annuler temporairement le mode d’attente de minuterie
Appuyez sur la touche TIMER en maintenant pressée la touche
SHIFT de la télécommande pour afficher “TIMER OFF”.
Pour rétablir le mode d’attente de minuterie, sélectionnez “TIMER
©REC” ou “TIMER ©PLAY" au lieu de “TIMER OFF”.
Utilisation de la chaîne quand la minuterie est réglée
Vous pouvez utiliser cette chaîne normalement après le réglage
de la minuterie.
Avant la mise hors tension, préparez la source et la destination
d’enregistrement, et ajustez le volume et la tonalité.
REMARQUE
’ La lecture et l’enregistrement temporisés ne démarreront pas
que si la chaîne est hors tension.
' L’équipement raccordé ne peut pas être mis sous/hors tension
par la minuterie intégrée à cette chaîne. Utilisez une minuterie
extérieure.
REGLAGE DE LA MINUTERIE D’EXTINCTION
Cette chaîne peut être mise hors tension automatiquement à
une heure spécifiée.
Utilisez la télécommande.
1 Appuyez sur la touche SLEEP en maintenant
pressée la touche SHIFT de la télécommande.
Dans les 4 secondes, appuyez sur la touche ou ou pour spécifier i’heure de mise hors tension.
A chaque pression de la touche, l’heure change entre 5 et
240 minutes par étapes de 5 minutes.
___________
SLEEP
oc ÌCDC3
ocbcDco
opioacD
SHIFT
OlOOl
OOO O O
O O
C3 O
O
m
tr
LU
I
D
Z
SLEEP 70
Heure spécifiée SLEEP
Pour vérifier le temps restant avant la mise hors tension
Appuyez sur la touche SLEEP en maintenant pressée la touche
SHIFT de la télécommande. Le temps restant s’affiche 4
secondes.
Pour annuler la minuterie d’extinction
Appuyez deux fois sur la touche SLEEP en maintenant pressée
la touche SHIFT de la télécommande de sorte que “SLEEP OFF”
s’affiche.
FRANÇAIS 1 9
Page 68

RACCORDEMENT D’UN ÉOUIPEMENT EN OPTION
Voir le mode d’emploi de l’équipement raccordé pour les détails.
• Les cordons de raccordement ne sont pas fournis. Procurezvous les cordons nécessaires.
• Consultez votre revendeur Aiwa local au sujet de l’équipement
en option.
PRISES LINE OUT
Cette chaîne peut fournir des signaux sonores analogiques pour
toutes les fonctions par ces prises.
Utilisez un câble à fiches RCA phono pour raccorder un
équipement audio.
Raccordez la fiche rouge à la prise R et la fiche blanche à la
prise L.
Ne raccordez pas simultanément l’équipement aux prises LINE
OUT et AUX IN.
Sinon, du bruit sera produit et un mauvais fonctionnement pourrait
s’ensuivre.
PRISE DIGITAL OUT (OPTICAL)
Cette chaîne peut fournit des signaux sonores numériques CD
via cette prise. Utilisez un câble optique pour raccorder un
équipement audio numérique (ampiificateur numérique, platine
DAT, enregistreur MD, etc.).
Retirez ie bouchon anti-poussière (D de la prise DIGITAL OUT
(OPTICAL). Puis raccordez une fiche de câble optique sur la
prise DIGITAL OUT (OPTICAL).
PRISES MD IN
Cette chaîne peut entrer des signaux sonores analogiques d’un
lecteur ou enregistreur MD via ces prises.
Utilisez un câble avec fiches phono RCA pour raccorder un
lecteur/enregistreur MD.
Raccordez la fiche rouge à la prise R et la fiche blanche à la
prise L.
REMARQUE
Si vous utilisez un enregistreur MD pour enregistrer le son de
cette chaîne (radio ou CD), raccordez l’enregistreur MD à la prise
LINE OUT.
Ce raccordement permet d’enregistrer sur le MD en signal
analogique.
Pour enregistrer le son lu du CD de cette chaîne en signal
numérique, raccordez l’enregistreur MD à la prise DIGITAL OUT
(OPTICAL).
PRISES AUX IN
Cette chaîne peut entrer des signaux sonores numériques par
ces prises.
Utilisez un câble avec fiches phono RCA pour raccorder un
équipement audio (tourne-disque, lecteur LD, magnétoscope,
téléviseur, etc.).
Raccordez la fiche rouge à la prise R et la fiche blanche à la
prise L.
A l’enregistrement du son numérique CD de ce système avec
un équipement numérique extérieur tel qu’enregistreur MD
raccordé à la prise DIGITAL OUT (OPTICAL), procédez comme
suit pour éviter la coupure du début du son à enregistrer.
1 Réglez le lecteur CD/platine cassette au mode pause de
lecture CD.
2 Démarrez l’enregistrement sur l’appareil raccordé.
3 Démarrez la lecture du CD dans le lecteur CD/platine cassette.
Quand la prise DIGITAL OUT (OPTICAL) n’est pas
utilisée
Insérez le bouchon anti-poussière.
PRISE SUPER WOOFER il
Raccordez un sub-woofer alimenté en option avec amplificateur
intégré à la prise.
Raccordement d’un tourne-disque
Utilisez un tourne-disque Aiwa avec amplificateur égalisateur
intégré.
20 FRANÇAIS
Page 69

ECOUTE DE SOURCES EXTÉRIEURES
FUNCTION
POWER
AUX/MD
1 Appuyez plusieurs fois sur la touche AUX/MD de
la télécommande de manière à afficher la source
correspondante.
Pour écouter l’équipement raccordé aux prises AUX IN,
affichez “AUX”.
Pour écouter l’équipement raccordé aux prises MD IN, affichez
“MD”.
ENTRETIEN ET MAINTENANCE
L’entretien et le maintenance occasionnelles de cette chaîne et
des supports sont requis pour optimiser ses performances.
Nettoyage du coffret
Utilisez un chiffon doux et sec.
Si la surface est extrêmement sale, utilisez un chiffon sec
légèrement humidifié de solution détergente douce. N’utilisez pas
de solvant puissant, tel qu’alcool, benzine ou solvant; ils
pourraient abîmer la finition de la chaîne.
Nettoyage des têtes
Toutes les 10 heures de fonctionnement, nettoyez les têtes et le
parcours de la bande avec une cassette de nettoyage de têtes
disponible dans le commerce.
Entretien de la chaîne
• N’exercez pas de choc violent sur la chaîne, à savoir ne le
faites pas tomber et ne le cognez pas.
• N’utilisez pas cette chaîne à proximité d’un champ magnétique
puissant, tel que téléviseur. Cela pourrait causer un mauvais
fonctionnement.
Entretien des CD
• Quand un disque est sale, essuyez-le du centre vers la
périphérie avec un chiffon de nettoyage.
(/}
LU
mW
<1
a:.g
CO O
LU
OC
l
u
<
2 Lisez sur l’équipement correspondant raccordé.
Pour modifier le nom de la source sur l’afficheur
correspondant à l’équipement raccordé aux prises AUX
IN
Pour l’équipement raccordé aux prises AUX IN, “AUX” s’affiche
Initialement. Cette indication peut être modifiée à “TV” ou “VIDEO”
selon l’équipement réellement raccordé à ces prises.
Appelez “AUX” sur l’afficheur et appuyez sur la touche POWER
tout en pressant la touche ►►. Chaque pression de la touche
modifie l’affichage comme suit:
AUX
[!:
La touche FUNCTION sur le lecteur CD/platine cassette est
inutilisable pour sélectionner “MD” ou “AUX”. La pression de la
touche FUNCTION appelle seulement la source extérieure
présentement sélectionnée.
VIDEO
TV
□
• Après la lecture d’un disque, rangez-le dans sa boîte. Ne laissez
pas les disques à un endroit chaud ou humide.
Entretien des cassettes
• Rangez les cassettes dans leur boîte après l’emploi.
• Ne laissez pas les cassettes près d’un aimant, moteur,
téléviseur, ou d’une autre source de magnétisme. Cela
dégraderait la qualité sonore et provoquerait du bruit.
• N’exposez pas les cassettes en plein soleil, et ne les laissez
pas dans une voiture garée en plein soleil.
FRANÇAIS 21
Page 70

SPECIFICATIONS
RÉCEPTEUR STÉRÉO RX-LM88
Section tuner FM
Plage d’accord
Sensibilité utilisable (IHF)
Bornes d’antenne
Section tuner AM
Plage d’accord
Sensibilité utilisable
Antenne
Section ampiificateur
Puissance de sortie
Distorsion harmonique totale
Sorties
Généraiités
Alimentation
Consommation
Consommation en attente
Dimensions (L x H x P)
Poids
PLATINE CASSETTE /LECTEUR DE DiSQUE COMPACT
STÉRÉO FD-LM88
Section lecteur de CD
Laser
Convertisseur n-a
Rapport signal/bruit
Distorsion harmonique
Pleurage et scintillement
Section platine cassette
Format des pistes
Réponse en fréquence
Rapport signal/bruit
Système d’enregistrement
Têtes
87,5 à 108 MHz
13,2 dBf
75 ohms (asymétriques)
530 à 1710 kHz (pas de 10 kHz)
531 à 1602 kHz (pas de 9 kHz)
350 pV/m
Antenne-cadre
16 W par canal
RMS à 6 ohms, de 65 Hz à
15 kHz, avec distorsion
harmonique totale de 1% ou
moins
0,1% (7 W, 1 kHz, 6 ohms, DIN
AUDIO)
SUPERWOOFER: 1,4 V
SPEAKERS: accepte des
enceintes de 6 ohms ou plus
PHONES (miniprise stéréo):
accepte des écouteurs de 32
ohms ou plus
Secteur de 120 V, 60 Hz
50 W
2,5 W (mode économie d’énergie
activé)
144 X 100 X 206,5 mm
2,7 kg
Semi-conducteur (X = 780 nm)
Double 1 bit
85 dB (1 kHz, 0 dB)
0,05% (1 kHz, 0 dB)
Non mesurable
4 pistes, 2 canaux stéréo
Cassette Cr02: 50 - 16.000 Hz
Cassette normale: 50 -15000 Hz
54 dB (niveau de crête cassette
Cr02)
Polarisation secteur
1 tête d’enregistrement/lecture
2 têtes d’effacement
SYSTEME D’ENCEINTES SX-LM200
Type coffret 2 voies, bass reflex (à blindage
antimagnétique)
Enceintes Woofer:
type cône 100 mm
Tweeter:
type dôme équilibré 25 mm
Impédance 6 ohms
Niveau de pression sonore de sortie
87 dBA/V/m
Dimensions (L X H X P) 120x200x 182mm
Poids 1,6 kg
• Les spécifications et l’aspect extérieur sont sujets à
modifications sans préavis.
UUM SYSTEM
Le mot “BBE” et le “BBE Symbol” sont des marques de fabrique
de BBE Sound, Inc.
Sous licence de BBE Sound, Inc.
DROITS D’AUTEUR
Veuillez consulter les lois sur les droits d’auteur concernant
l'enregistrement de disques, de la radio ou d’une cassette
extérieure du pays dans lequel l’appareil est utilisé.
REMARQUE
Cet appareil a été testé et jugé conforme aux limites des appareils
numériques de Classe B, conformément à la Partie 15 des Règles
FCC. Ces limites sont conçues pour fournir une protection
raisonnable contre les interférences néfastes dans une
installation résidentielle.
Cet appareil produit, utilise et peut rayonner une énergie de
fréquence radio et, s'il n'est pas Installé et utilisé conformément
aux instructions, peut provoquer des interférences gênantes pour
les communications radio. Mais rien ne garantit qu'une telle
interférence ne se produira pas dans une installation particulière.
Si cet appareil produit des interférences gênantes pour la
réception radio ou de télévision, ce qui peut se déterminer en
allumant et éteignant l'appareil, il est recommandé à l'utilisateur
d'essayer de corriger cette interférence en appliquant une ou
plusieurs des méthodes ci-dessous.
-Réorientation ou déplacement de l'antenne réceptrice.
-Eloignement de l'appareil du récepteur.
-Raccordement de l'appareil à une prise d'un circuit différent
de celui du récepteur.
-Consultez le revendeur ou un technicien radio/télévision
expérimenté.
PRÉCAUTION
Les modifications ou ajustements de ce produit, non
expressément approuvés par le fabricant, peuvent invalider la
droit ou l'autorité de l'utilisateur à utiliser ce produit.
Généralités
Entrées
Sorties
Dimensions (I x h x p)
Poids
22 FRANÇAIS
MD IN: 470 mV
AUX IN: 400 mV
DIGITAL OUT
LINE OUT: 400 mV
144 X 100,6 X 203 mm
1,5 kg
Page 71

GUIDE DE DEPANNAGE
Vérifiez les points ci-dessous si la chaîne ne fonctionne pas
comme indiqué dans ce manuel.
GÉNÉRALITÉS
Il n’y a pas de son.
• Le cordon secteur est-il branché correctement?
• Y a-t-il une mauvaise connexion? (-► page 4)
• Une touche de fonction incorrecte a-t-elle été pressée?
Le son sort seulement d’une enceinte.
• L’autre enceinte est-elle déconnectée?
Le son devient subitement inaudible.
-► Le circuit de protection s’est activé suite à une accumulation
de chaleur. Mettez la chaîne hors tension, vérifiez qu’il y a
suffisamment d’espace derrière les ouvertures de ventilation
à l’arrière, et laissez la chaîne telle quelle jusqu’à ce qu’elle
soit refroidie.
Affichage erroné ou d’un mauvais fonctionnement.
-* Réinitialisez la chaîne comme indiqué ci-dessous.
SECTION TUNER
Parasites de type onde constants.
• L’antenne est-elle connectée correctement? {-* page 5)
• Le signal est-il faible?
-> Raccordez une antenne extérieure.
Interférences parasites dans la réception ou son déformé.
• La chaîne ramasse-t-elle du bruit extérieur ou une distorsion
diversifiée?
Modifiez l’orientation de l’antenne.
-» Eloignez la chaîne d’autres appareils électriques.
SECTION PLATINE CASSETTE
La bande ne défile pas.
• La platine est-eiie en mode pause? (-* page 13)
Le son est déséquilibré ou pas adéquatement élevé.
• La tête de lecture est-elle sale? (-+ page 21)
L’enregistrement est impossible.
• Le taquet de protection contre l’enregistrement est-il brisé?
(-► page 14)
• La tête d’enregistrement est-elle sale? (-► page 21)
L’effacement est impossible.
• La tête d’effacement est-elle sale? (-> page 21)
• Une cassette à bande métal est-elle utilisée?
Les sons de hautes fréquences ne sont pas émis.
• La tête d’enregistrement/lecture est-elle sale? (-► page 21)
(/)
•UJ
t
<
ce
■ UJ
Z
UJ
U
SECTION LECTEUR CD
Le lecteur CD ne lit pas.
• Le disque est-il inséré correctement? (-► page 11)
• Le disque est-il sale? (-+ page 21)
• La lentille est-elle affectée par la condensation?
-» Attendez environ une heure et essayez à nouveau.
Pour réinitialiser
En cas d’anomalie sur l’afficheur, réinitialisez la chaîne comme
suit.
1 Appuyez sur la touche POWER pour mettre hors tension.
2 Appuyez sur la touche POWER pour remettre sous
tension tout en pressant la touche ■. Toutes les données
mémorisées après l’achat sont annulées.
Si la chaîne ne peut pas être mise hors tension à l’étape 1 à
cause d’un mauvais fonctionnement, réinitialisez en déconnectant
le cordon secteur et répétez l’étape 2.
FRANÇAIS 23
Page 72

NOMENCLATURE
Les instructions concernant chaque élément de la chaîne ou de
la télécommande sont données aux pages indiquées ci-dessous.
O
Q
O
0
LJ
TT
O
Dénomination
O ■ CLEAR
0 II SET
0 • REC
O FUNCTION
© POWER
0 PHONES
O DIR/PRESET
0 ►►TUNING DOWN/UP
© VOLUME +/-
® ± OPEN/CLOSE
® ± TAPE EJECT
Page
10, 11, 13, 15, 16, 17
7, 9, 10, 11, 13, 15
15, 16, 17
6
6, 9
6
10, 11, 13, 15
7, 9, 10, 11, 13, 16, 17
8
11
13
Dénomination Page
© Touches numériques
1/RANDOM
2/REPEAT
3/PROGRAM
4/DISPLAY 9, 12, 14
5/TIMER 18
6/SLEEP 19
7/CLOCK
8/MODE
9/CD EDIT 16, 17
® SHIFT 6
© POWER 6, 18
© VOLUME +/- 8
© EQ
© MONO 9
© • REC/REC MUTE
© Touches de fonction
TUNER/BAND 6, 9, 10
AUX/MD
CD
TAPE 6, 13
® ◄◄,►► TUNING DOWN/UP
® BBE
T-BASS
Qsurround
@ ► PRESET
® ■ CLEAR
© Il SET
10, 11, 12, 16, 17
12
12
12
7
7
8
15, 16, 17
6, 21
6, 11, 16, 17
7, 9, 10, 11, 13, 16, 17, •
19
8
8
8
10, 11, 12, 13, 15
10, 11, 12, 13, 15, 16, 17
7, 10, 11, 13, 15, 18
18,
24 FRANÇAIS
Page 73

Page 74

Page 75

Page 76

For assistance and information,
call toll free 1-800-BUY-AIWA. (United States and Puerto Rico)
Printed in Malaysia
AIWA CO.,LTD.
 Loading...