

Page 1
PRECAUTIONS
ENGLISH
XP-V7260C
COMPACT DISC PLAYER
CAR AUDIO CASSETTE ADAPTOR CAP-6
CAR BATTERY ADAPTOR DC-602
REPRODUCTOR DE DISCOS
ADAPTADOR DE CASETE DE AUDIO PARA COCHE CAP-6
ADAPTADOR PARA BATERIA DE COCHE DC-602
LECTEUR DE DISQUE COMPACT
ADAPTATEUR DE CHAINE AUTOMOBILE CASSETTE CAP-6
ADAPTATEUR DE BATTERIE AUTOMOBILE
DC-602
OPERA TING INSTRUCTIONS
INSTRUCCIONES DE MANEJO
MODE D’EMPLOI
8B-HC4-910-01
001109AYO-O9
Printed in Indonesia
• For proper operation, avoid using or storing in extremely hot environments or
exposing to direct sunlight.
• To disconnect the cord, pull by grasping the plug, do not pull the cord.
CAR AUDIO CASSETTE ADAPTOR
• Never remove the protective film from the head and the white tape of the
CAP-6.
• Clean the heads of the cassette car stereo regularly for optimum sound quality.
• Gather and secure excess cord so that it does not interfere with driving.
CAR BATTERY ADAPTOR
• The adaptor is designed for negative ground 12V/24V cars. It cannot be used
with positive ground cars.
• In some cars, electric current will continue to flow through the car battery adaptor
even though the car ignition switch is turned off. This will cause a discharge of
electricity. When not in use, disconnect the car adaptor.
• Power may shut off if the DC output plug of the car adaptor touches metal parts
of the car. Disconnect it from the cigarette lighter socket when not in use.
• Should any trouble occur (such as the car adaptor emitting smoke), disconnect
it from the cigarette lighter socket immediately and contact an Aiwa service
representative.
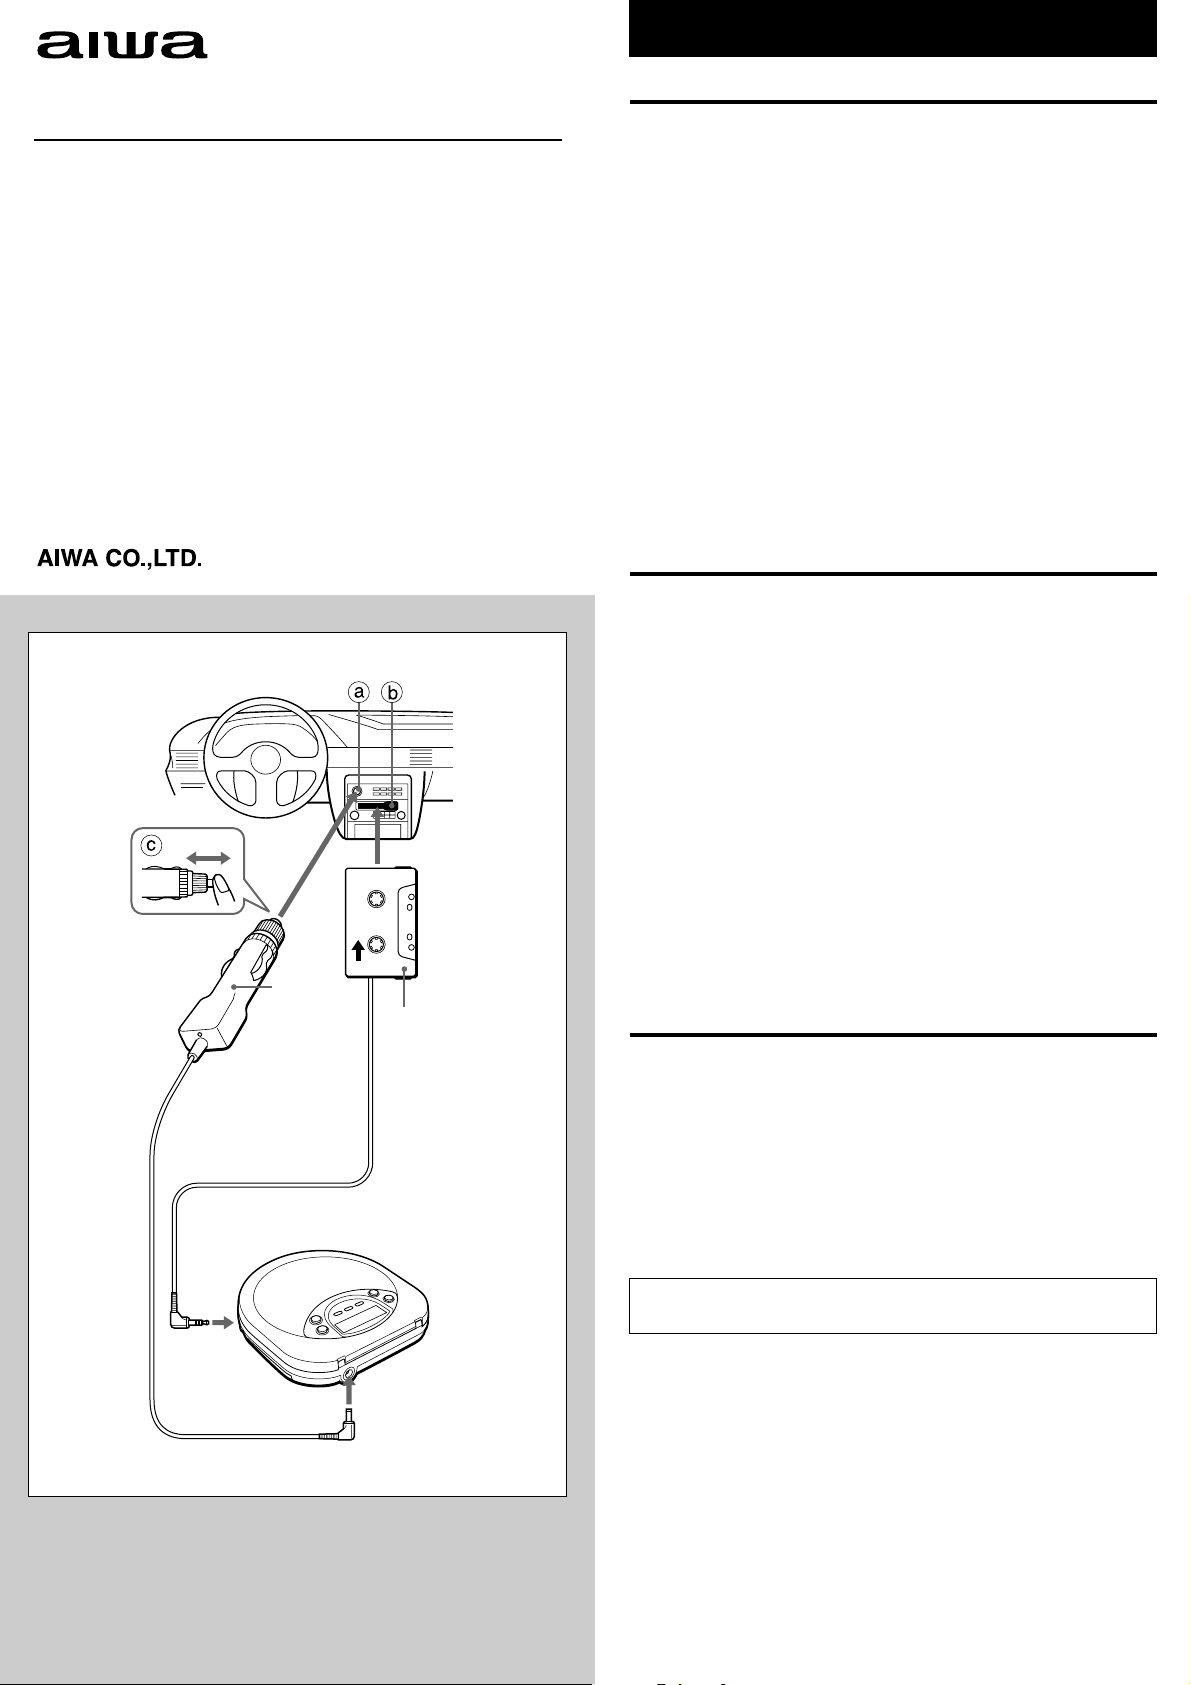
CONNECTIONS
First turn down the volume of the cassette car stereo.
• Connect the DC-602 to the 5~6V DC jack of the compact disc player and to the
cigarette lighter socket a.
• Connect the plug of the CAP-6 to the PHONES/LINE OUT jack of the compact
disc player and insert the CAP-6 into the slot of the cassette car stereo b.
PHONES/
LINE OUT
DC-602
CAP-6
CAP-6 CAR AUDIO CASSETTE ADAPTOR
• The CAP-6 is designed only for side-loading cassette car stereo. Insert the
CAP-6 to the slot of the cassette car stereo in the direction of the arrow on the
CAP-6.
• The CAP-6 may not be compatible with some cassette car stereos.
• If the CAP-6 is ejected from the cassette car stereo, change the playback direction
of the cassette car stereo and insert the CAP-6 again.
DC-602 CAR BATTERY ADAPTOR
• Check first if the metal tip of the DC-602 pops up by spring action when you
press it down and release it. → c
• When you replace the fuse (1 amp.) of the DC-602, remove the cap of the
DC-602 by turning it counterclockwise.
• Use the DC-602 only with an Aiwa compact disc player.
SPECIFICATIONS
CAR AUDIO CASSETTE ADAPTOR
Frequency range 50 – 20,000 Hz (It may differ depending on type of your cassette
Cord length 1.5 m (4 feet 11 inches)
Dimensions 102.4 (W) × 12.1 (H) × 63.8 (D) mm
Weight Approx. 41 g (1.4 oz)
CAR BATTER Y ADAPT OR
Input voltage DC 12 V/24 V
Output voltage DC 6 V 300 mA
Cord length 1.5 m (4 feet 11 inches)
Weight Approx. 53 g (1.9 oz)
Specifications and external appearance are subject to change without notice.
For the compact disc player operation, please refer the attached OPERATING
INSTRUCTIONS of the compact disc player .
car stereo.)
1
/8 × 1/2 × 2 5/8 inches)
(4
DC 5~6V
Page 2
A
B
ENGLISH
This operating instructions shows you how to use the supplied remote control.
PRECAUTIONS
• Avoid installing the remote control where it may be subject to high temperatures
such as from direct sunlight or hot air from the heater, etc.
• Strong ambient light sources such as fluorescent lamp or direct sunlight may
cause unreliable operation.
• Point the remote control at the remote sensor on the main unit.
Before use
Pull out the plastic sheet b from the remote control a as shown. → A
When to replace the batteries
The maximum operational distance between the remote control and the remote
1
sensor on the front of the player should be approximately 4 meters. When this
distance decreases, replace the batteries with the new ones.
INSERTING THE BATTERY → B
1 Insert the tip of a pointed object A into the hole B and pull out the battery
holder.
a Remote control (back)
b Lithium battery (CR2025)
c Battery holder
2
2 Install a lithium battery (CR2025) with the ) side facing up in the battery
holder.
3 Push the battery holder into the unit until it clicks.
C
CAUTION
• Keep the lithium battery out of the reach of children. If swallowed, consult a
doctor immediately.
• To prevent a short circuit, never pinch the battery with pliers, etc.
• If the remote control is not going to be used for an extended period of time,
remove the batteries to prevent possible electrolyte leakage.
3
NAMES AND FUNCTIONS OF PARTS → C
The buttons with no explanations function the same as those of the main unit with
identical indications, refer to the instruction manual of the main unit.
1 0-9,+10
• To select track directly
Example:
To select the 25th track, press +10, +10 and 5.
To select the 10th track, Press +10 and 0.
The selected track starts to play and continues to the end of the disc.
• To select the desired track during program mode
Instead of steps 2 and 3 of the PROGRAM PLAY as mentioned in the
operating instructions of the main unit, press the numbered buttons and +10
button to select and program a track at the same time.
2 RANDOM/REPEAT
It functions the same as that of PLAY MODE on the main unit.
3 REMAIN/ENTER
It functions the same as that of DISPLAY/ENTER on the main unit.
1
2
3
4
5
6
4 r,t
5 e
6 sPOWER OFF
Note
• During off mode, the remote control unit cannot be operated except e which
can turned on the unit only when using with AC adapter.
• sPOWER OFF cannot be used to start charging or force charging.
• During programmed play, the numbered buttons and +10 button cannot be used
to select the track directly.
• When the HOLD switch of the main unit is set to HOLD position, this remote
control unit can still be activated.
 Loading...