

Page 1
d
c
OWNER’S RECORD
For your convenience, record the model number and the serial number (you will
find it on the bottom of your set) in the space provided below. Please refer to
them when you contact your Aiwa dealer in case of difficulty.
Model No.
Serial No.
XP-R207
COMPACT DISC PLAYER
OPERA TING INSTRUCTIONS
A
8A-HC1-941-01
000824AYO-OX
Printed in Hong Kong
NOTE
FOR USE IN THE U.S.A.
This equipment has been tested and found to comply with the limits for a Class
B digital device, pursuant to Part 15 of the FCC Rules. These limits are designed
to provide reasonable protection against harmful interference in a residential
installation.
This equipment generates, uses, and can radiate radio frequency energy and, if
not installed and used in accordance with the instructions, may cause harmful
interference to radio communications. However, there is no guarantee that
interference will not occur in a particular installation. If this equipment does cause
harmful interference to radio or television reception, which can be determined by
turning the equipment off and on, the user is encouraged to try to correct the
interference by one or more of the following measures:
– Reorient or relocate the receiving antenna.
– Increase the separation between the equipment and receiver.
– Connect the equipment into an outlet on circuit different from that to which
the receiver is connected.
– Consult the dealer or an experienced radio/TV technician for help.
CAUTION
Modifications or adjustments to this product, which are not expressly approved
by the manufacturer, may void the user’s right or authority to operate this product.
Highlighted letters in the text of this manual correspond to the illustrations.
PRECAUTIONS
T o maintain good performance
• Do not use the unit in places which are extremely hot, cold, dusty or humid. In
particular, do not use or keep the unit in following places.
• in a high humidity area such as a bathroom
• near a heater
• in an area exposed to direct sunlight (e.g., inside a parked car, where it can
become extremely hot)
• near sources of strong magnetism, such as televisions, speakers, or magnets
• where there is a lot of movement or vibration, such as on a car dashboard or
an unstable shelf
A
B
AA (LR6) × 2
For safety
• Do not attempt to disassemble the unit. Laser rays from the optical pickup are
dangerous to the eyes.
• Make sure that pins or other foreign object do not get inside the player.
• Take care not to drop the unit or subject it to strong shocks.
• To keep dust from the pickup lens, keep the disc compartment lid closed after
use. Never touch the lens.
• If you hear no sound when playing a disc, DO NOT turn the volume up high
because music could suddenly start at high volume. Turn the volume control
to the lowest level before starting playback and slowly turn it up to the desired
level.
Note on listening with the headphones
• Listen at moderate volumes to avoid hearing damage.
• Do not wear the headphones while driving or cycling. It may create a traffic
hazard.
• You should use extreme caution or temporarily discontinue use in potentially
hazardous situations, such as walking, jogging, etc.
• Wear them properly; L is left, R is right.
Note on condensation
If the unit is suddenly moved from a cold place to a warm one, it may result in
condensation on the pickup lens and malfunction or playback difficulties.
Should this occur, leave the unit for a few hours, then try to playback again.
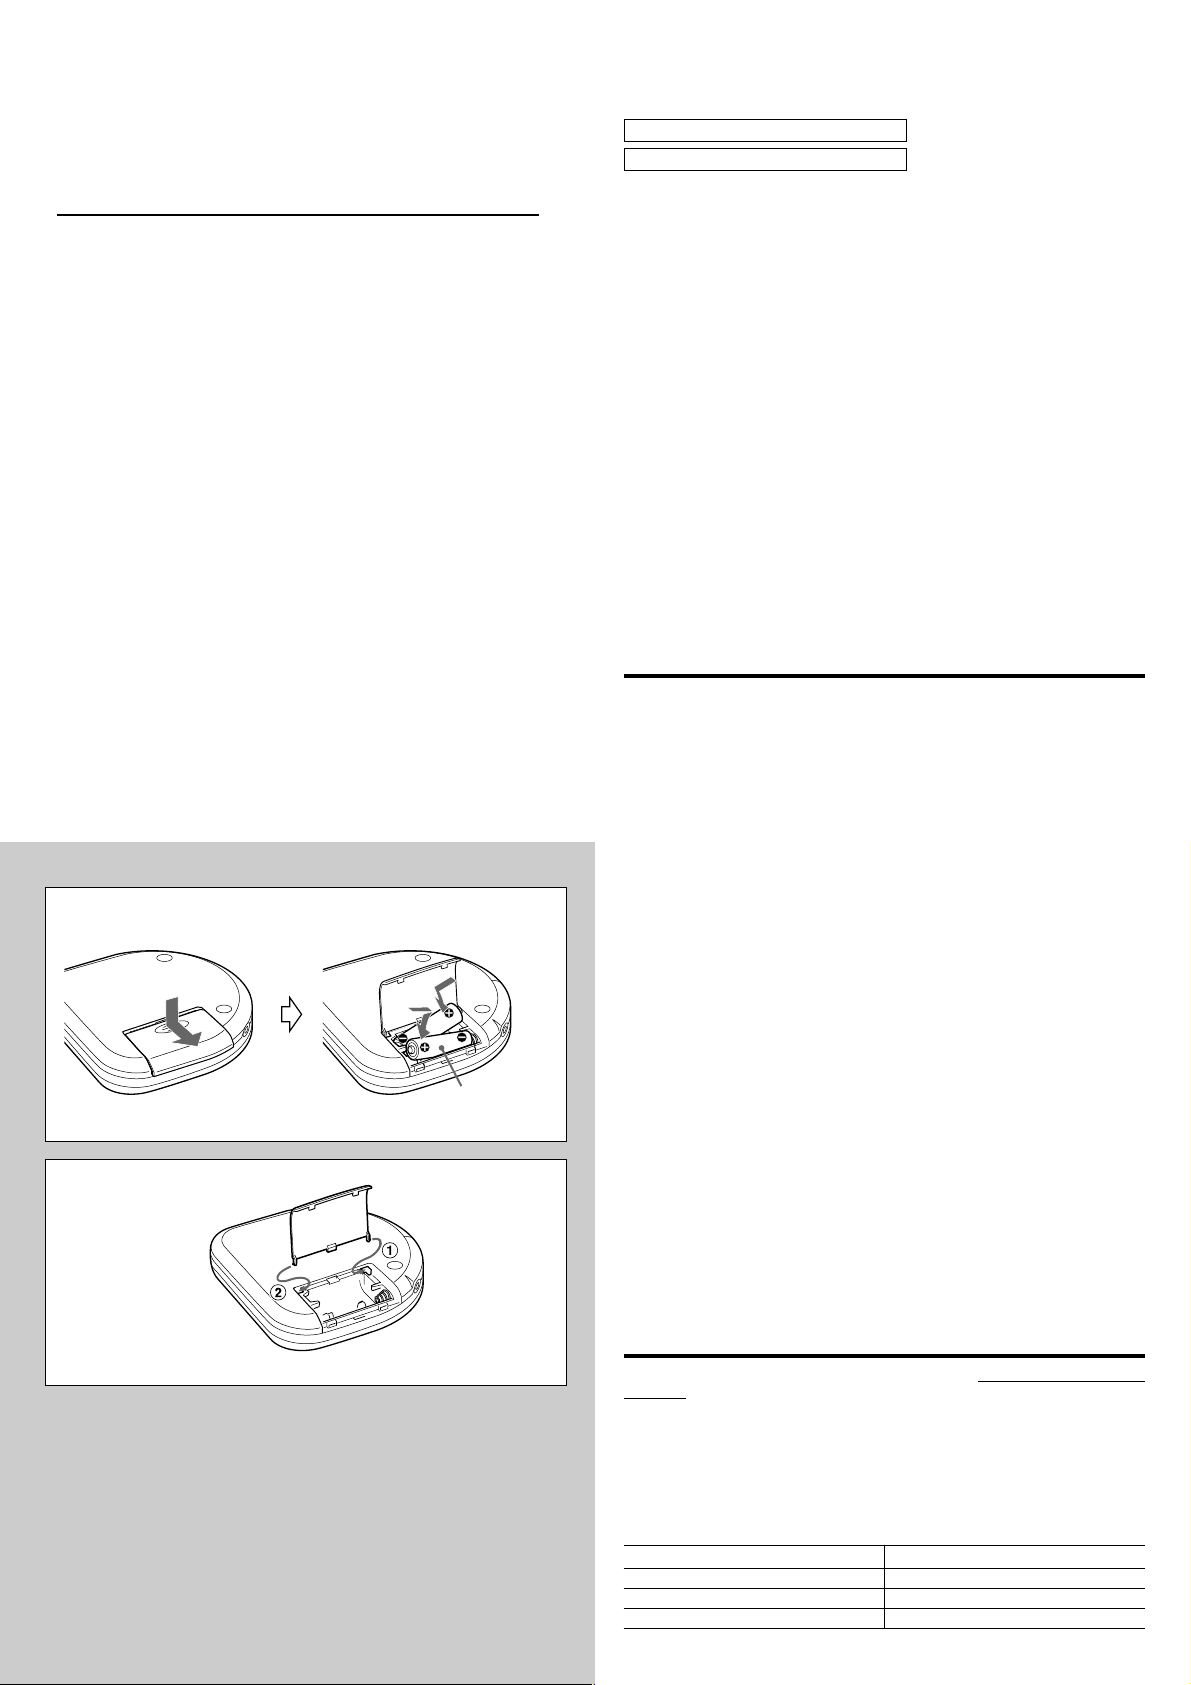
USING ON DRY CELL BATTERIES → A
Open the battery compartment and insert two size AA (LR6) alkaline
batteries with the 0 and 9 marks correctly aligned.
Battery replacement
OPE/BA TT indicator changes from F (green) to M (orange) to E (red) according
to the remaining power of the batteries. Replace the batteries when E (red) lights.
If the unit remains in use after E (red) lights, “Lo-bAtt” appears and operation
stops.
Battery life (using alkaline batteries LR6)
The setting of the E•A•S•S switch Battery life
48 Approx. 20 hours
12 Approx. 19 hours
OFF Approx. 15 hours
Battery life may vary depending on conditions of use.
Page 2

B
hazard.
• You should use extreme caution or temporarily discontinue use in potentially
hazardous situations, such as walking, jogging, etc.
• Wear them properly; L is left, R is right.
Note on condensation
If the unit is suddenly moved from a cold place to a warm one, it may result in
condensation on the pickup lens and malfunction or playback difficulties.
Should this occur, leave the unit for a few hours, then try to playback again.
USING ON DRY CELL BATTERIES → A
Open the battery compartment and insert two size AA (LR6) alkaline
batteries with the 0 and 9 marks correctly aligned.
Battery replacement
OPE/BA TT indicator changes from F (green) to M (orange) to E (red) according
to the remaining power of the batteries. Replace the batteries when E (red) lights.
If the unit remains in use after E (red) lights, “Lo-bAtt” appears and operation
stops.
Battery life (using alkaline batteries LR6)
The setting of the E•A•S•S switch Battery life
48 Approx. 20 hours
12 Approx. 19 hours
OFF Approx. 15 hours
Battery life may vary depending on conditions of use.
If the cover of the battery compartment comes off → B
Note on dry cell batteries
• Make sure that the 0 and 9 marks are correctly aligned.
• Do not mix the different types of batteries, or an old battery with a new one.
• To prevent the risk of electrolyte leakage or explosions, never recharge the
batteries, apply heat to them, or take them apart.
• When not using the batteries, remove them to prevent needless battery wear.
• If liquid leaks from the batteries, wipe thoroughly to remove.
Page 3
C
3
D
12
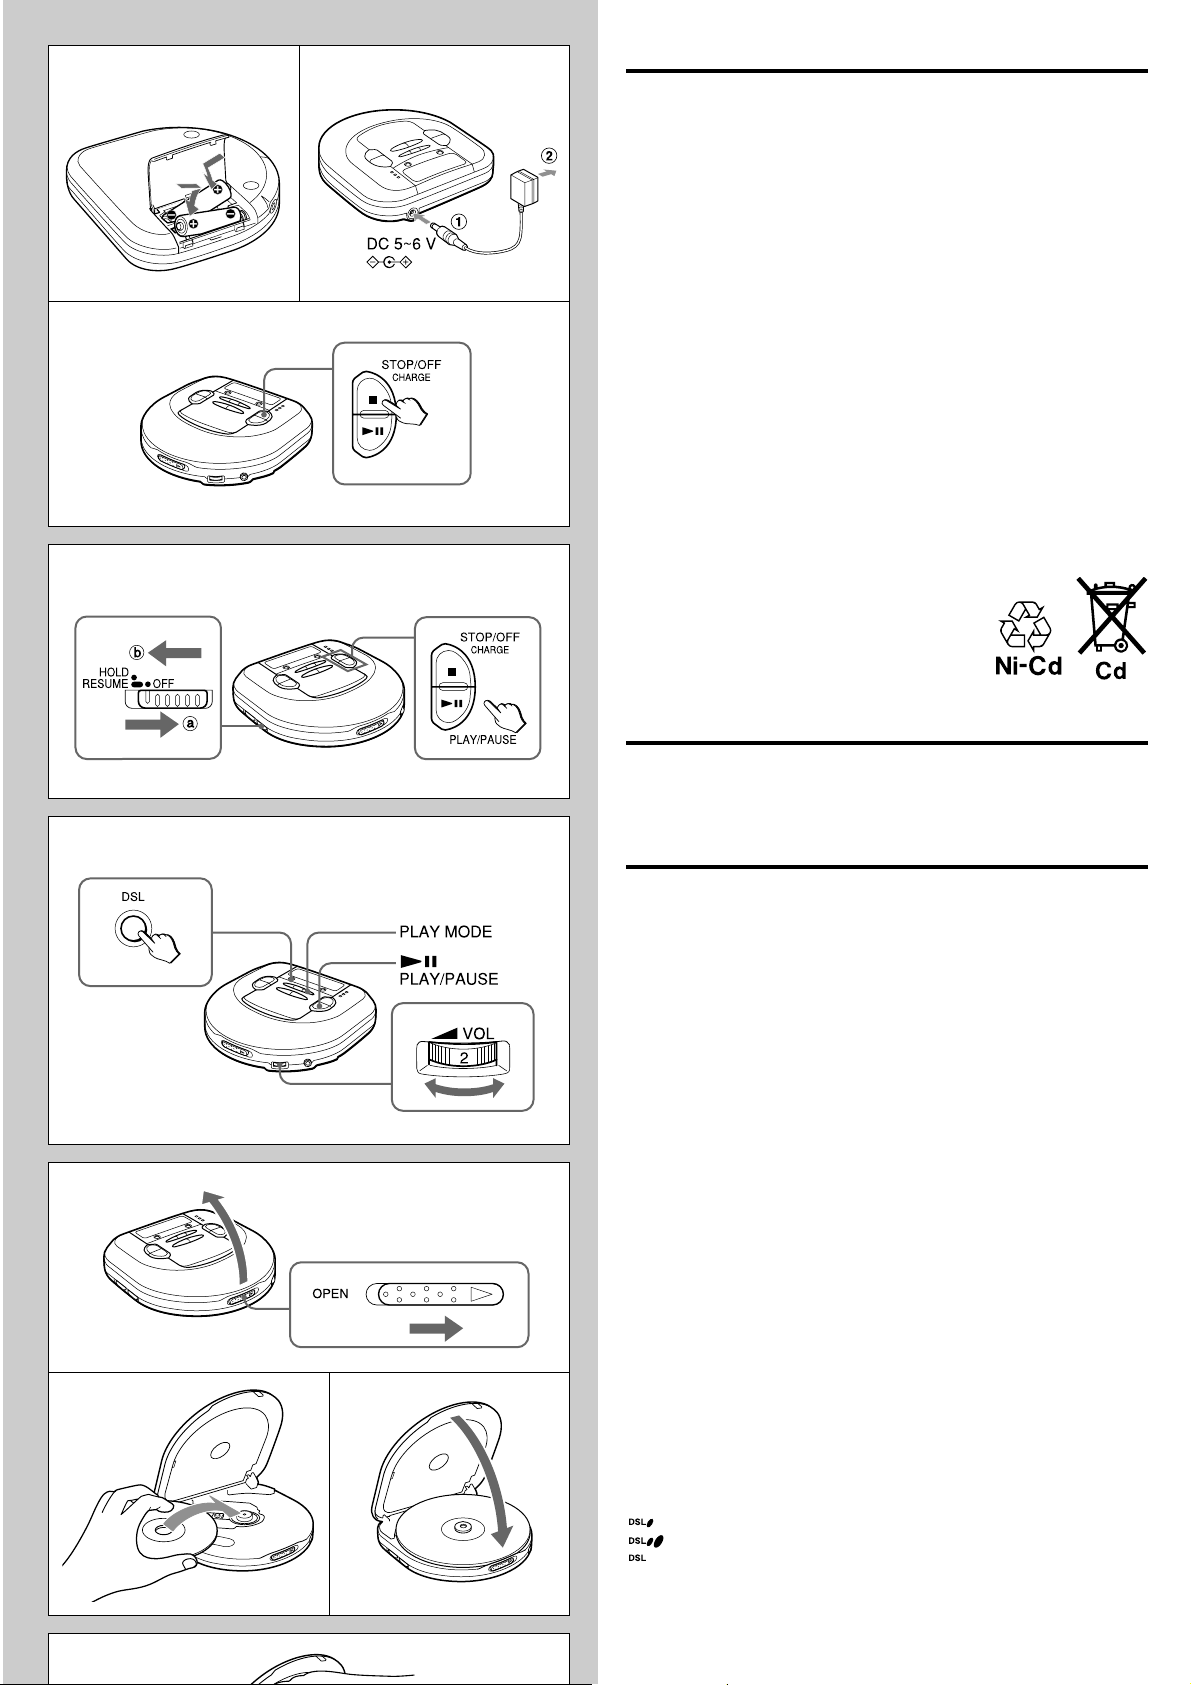
USING ON RECHARGEABLE BATTERIES → C
• Be sure to use size AA Ni-Cd 1.2 V 700 mAh rechargeable batteries, which are
commercially available.
• Be sure to read the instructions of the purchased rechargeable batteries before
use.
• When using on rechargeable batteries for the first time, charge them until the
battery indicator goes out.
• Before charging the batteries, close the disc compartment. Y ou cannot charge
the batteries while it is opened.
1 Insert the rechargeable batteries with the 0 and 9 marks correctly
aligned.
2 Connect the AC adaptor.
1 to DC 5 ~ 6 V jack
2 to a wall outlet
3 Keep sSTOP/OFF/CHARGE pressed for about 1 second to start charging.
“C-On” appears, and OPE/BATT indicator blinks.
When charging is completed, “C-OFF” flashes a few times, and OPE/BATT
indicator goes out.
After charging, disconnect the AC adaptor.
Time to recharge the batteries
Recharge the batteries when E (red) lights. If the unit remains in use after E
(red) lights, “Lo-bAtt” appears and the current operation stops.
To stop charging
Press sSTOP/OFF/CHARGE during charging.
ATTENTION:
The product you have purchased can be powered by
nickel cadmium batteries which is recyclable. At the
end of their useful life, under various state and local
laws, it is illegal to dispose of these batteries into your
municipal waste stream.
Please call 1-800-289-2492 for information on how to
recycle these batteries.
E
F
1
USING ON AC HOUSE CURRENT
Connect the supplied AC adaptor in the same way as when recharging the
batteries.
During operation on AC house current, all of OPE/BATT indicators light.
BEFORE PLAYBACK
HOLD switch → D
Release the HOLD switch before playback. → a
When not using the unit, set the HOLD switch to the HOLD position. → b
Accidentally pressed button will not function.
If buttons are pressed when the HOLD switch is set to the HOLD position, “HOLd”
flashes in the display.
Turning on and off → D
Turning the power on
Press ePLA Y/PAUSE. Power is turned on and playback starts.
Note
“Err” appears on the display when you play a disc placed upside-down or a
defective disc.
Turning the power off
If no new operations are done within 30 seconds from the end of last operation,
the power is turned off automatically. (Auto power off function)
• You can turn off the power by pressing sSTOP/OFF/CHARGE before it is
automatically turned off.
Standby mode → D
When an operation finishes, the unit goes into standby mode until the auto power
off function automatically turns off the power.
To enter standby mode, press ePLAY/PAUSE to start playback, then press
sSTOP/OFF/CHARGE.
23
G
Adjusting the sound → E
Volume
Turn the VOL control to adjust the volume.
DSL
Press DSL repeatedly for more powerful sound and deeper bass.
: Deep bass is emphasized.
: Deep bass is strongly emphasized.
: Normal sound
Signal sound function
You can check the operation by beep sound when you press an operation button.
The signal sound function is not activated when you purchase this unit.
T o use the signal sound function, press ePLA Y/P AUSE while pressing PLA Y
MODE while in stop mode. The beep sound is heard when you press a button.
Page 4
defective disc.
F
1
23
G
Turning the power off
If no new operations are done within 30 seconds from the end of last operation,
the power is turned off automatically. (Auto power off function)
• You can turn off the power by pressing sSTOP/OFF/CHARGE before it is
automatically turned off.
Standby mode → D
When an operation finishes, the unit goes into standby mode until the auto power
off function automatically turns off the power.
To enter standby mode, press ePLAY/PAUSE to start playback, then press
sSTOP/OFF/CHARGE.
Adjusting the sound → E
Volume
Turn the VOL control to adjust the volume.
DSL
Press DSL repeatedly for more powerful sound and deeper bass.
: Deep bass is emphasized.
: Deep bass is strongly emphasized.
: Normal sound
Signal sound function
You can check the operation by beep sound when you press an operation button.
The signal sound function is not activated when you purchase this unit.
T o use the signal sound function, press ePLA Y/P AUSE while pressing PLA Y
MODE while in stop mode. The beep sound is heard when you press a button.
To cancel the beep sound, repeat this procedure.
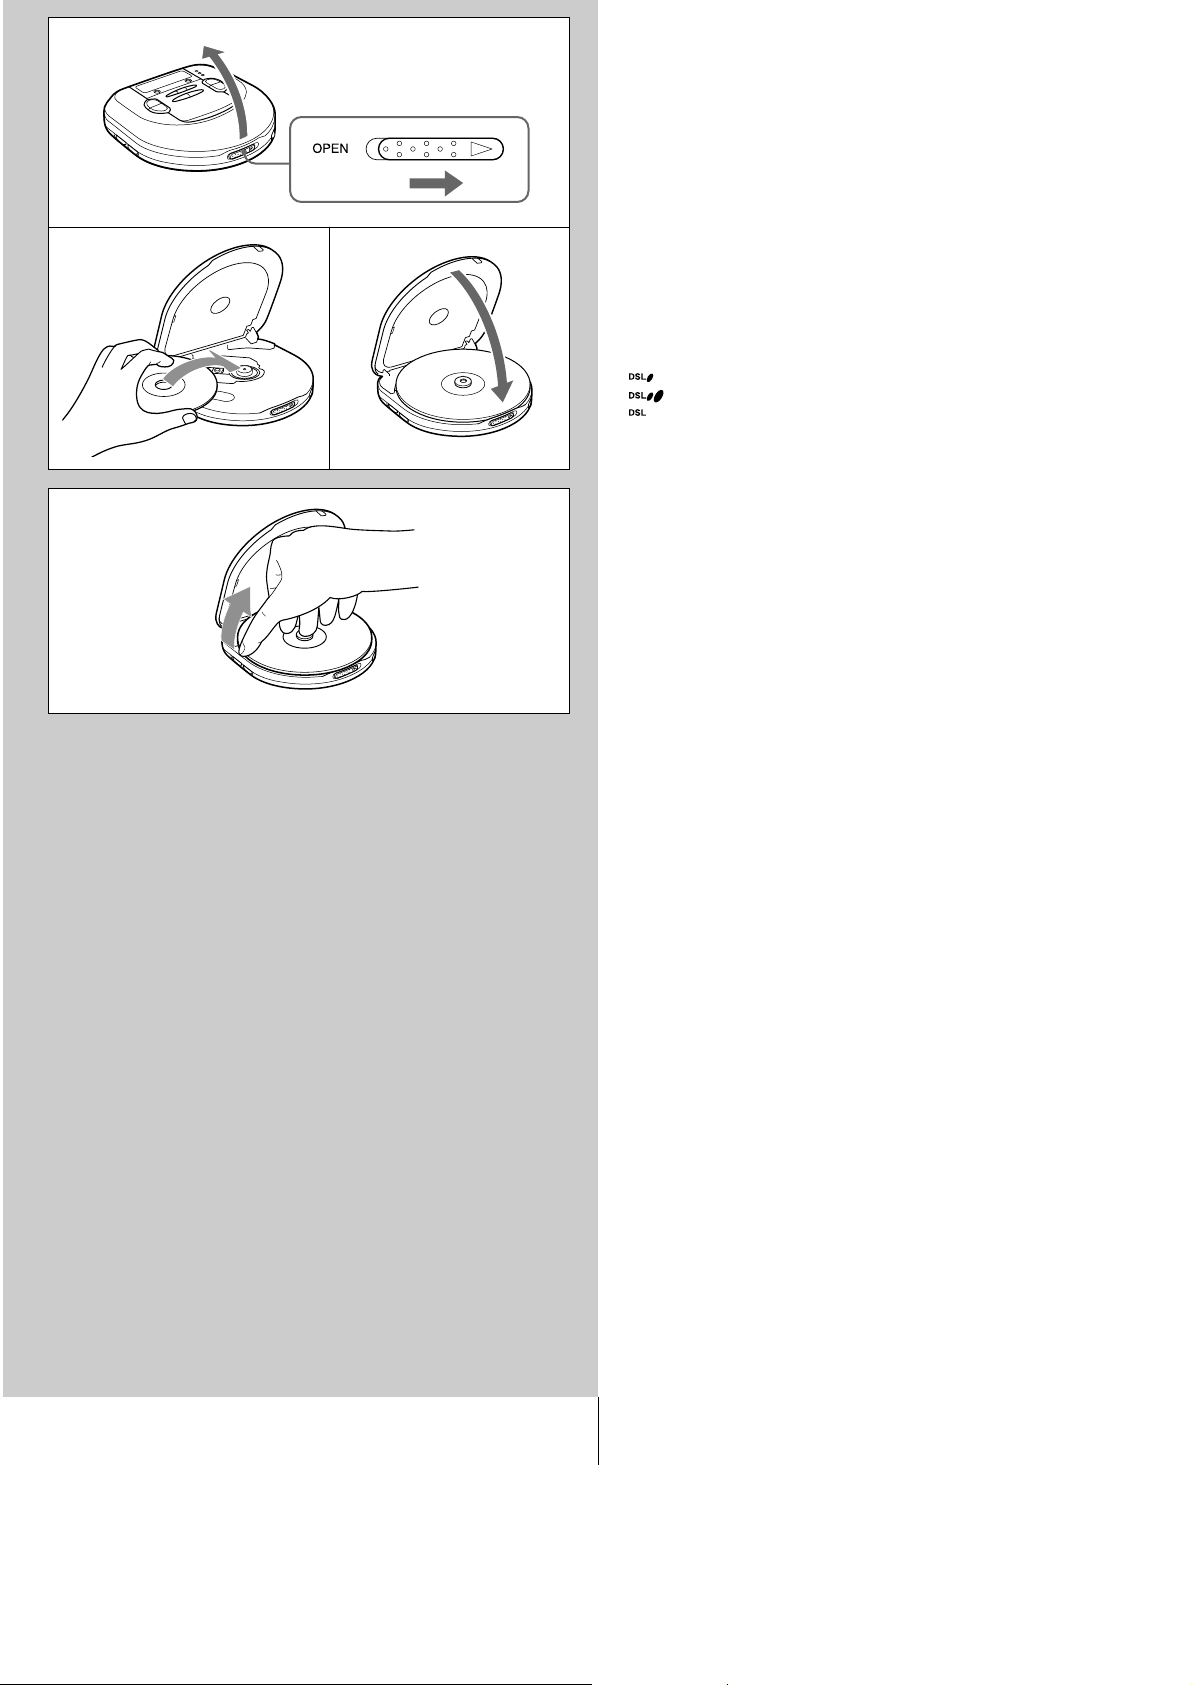
Inserting a disc → F
1 Slide the OPEN switch to open the disc compartment.
2 Place a disc in the center with the label side facing up.
3 Close the disc compartment.
To remove the disc → G
Pick up the disc, holding its edge, while pressing the pivot gently.
Note
• The unit may not play a CD-R/RW disc that is recorded on personal computers
or some kinds of CD-R/RW recorders because of differences in recording
platforms.
• Do not attach any seal or label to either side (the recordable side or the labeled
side) of a CD-R/RW disc. It may cause malfunction.
XP-R207 (AU) E Page 1
Page 5
H
12
3
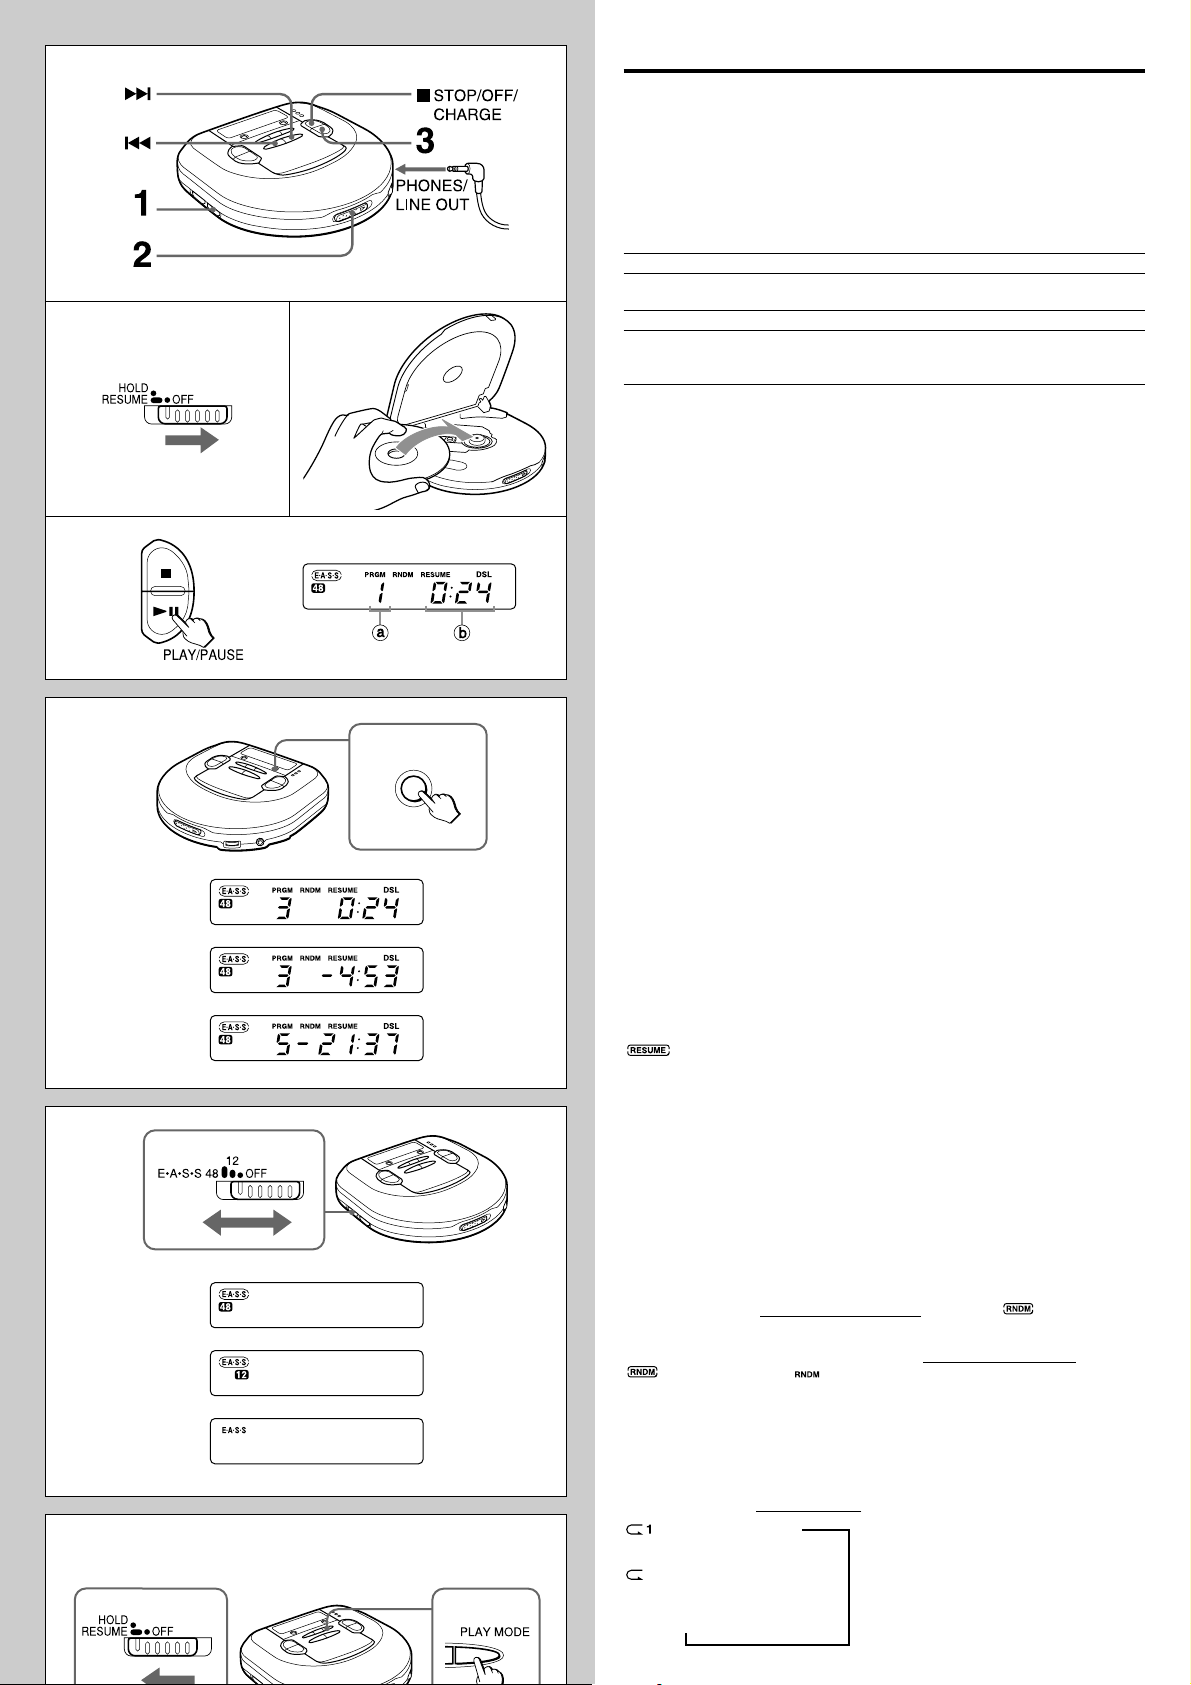
PLAYBACK → H
Connect the supplied headphones to the PHONES/LINE OUT jack.
1 Release HOLD.
2 Place a disc.
3 Press ePLAY/PAUSE.
Playback starts from the first track.
a track number
b elapsed playing time
Basic operation
To stop
To pause
To search for the beginning of a track
To locate a desired passage
Display during playback → I
Press ENTER/DISP during playback to change the display as follows.
1 Track display and elapsed playing time (normal display)
V
2 Track display and remaining playing time of the track in play
V
3 Remaining number of tracks and remaining playing time
The time is not displayed in following cases.
• When trying to program tracks beyond No.32.
• When the total remaining time of the programmed tracks is over 100 minutes.
Press sSTOP/OFF/CHARGE.
Press ePLAY/PAUSE.
To resume, press it again.
Press r or t.
Keep r or t pressed.
Release the button at the start of desired
passage.
I
J
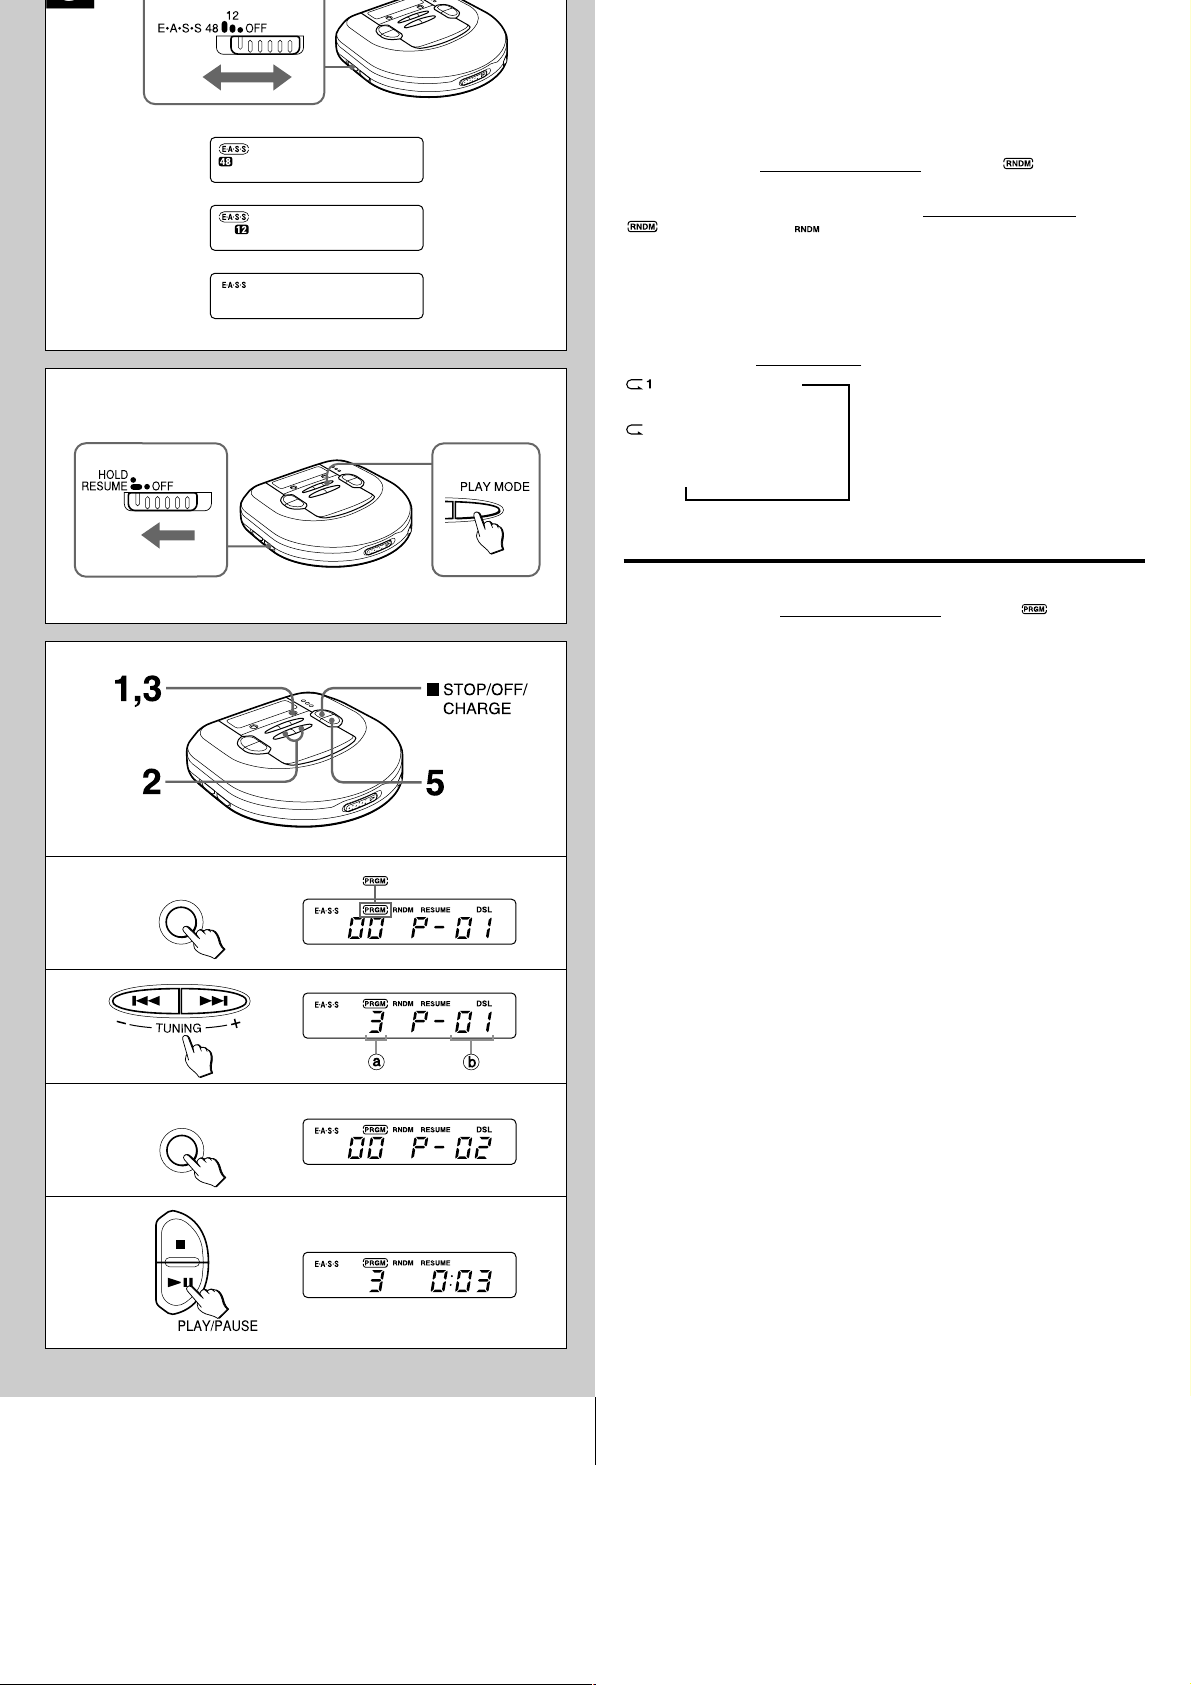
E•A•S•S PLUS (Electronic Anti-Shock System) → J
The E•A•S•S PLUS function reduces skipping or muting of the sound when the
unit is subjected to shocks.
The player keeps about 48 seconds or 12 seconds of playback sound in its
memory.
To keep 48 seconds in the memory, set the E•A•S•S switch to 48.
ENTER/DISP
V
V
To keep 12 seconds in the memory, set the E•A•S•S switch to 12.
To cancel the E•A•S•S PLUS function, set the E•A•S•S switch to OFF.
Note
• Before jogging with this unit, allow sufficient time for the memory buffer to fill up
completely (ideally 40 to 48 seconds).
Continuous shock or vibration may cause the sound to be interrupted even if
the E•A•S•S PLUS function is activated. This is normal and not a malfunction.
Should you experience an interruption in sound, stabilize the unit for a few
seconds, then resume your activity.
• When the E•A•S•S switch is slid during playback, the unit will pause for about
2 seconds.
• When you set the E•A•S•S switch to the 12 or OFF position, the quality of the
sound will be better than the case that you set it to the 48 position.
Resume function → K
Set the HOLD switch to RESUME.
appears, and you can start playback from the point where you stopped
playback by pressing sSTOP/OFF/CHARGE.
When the resume function is on, all-track repeat is selected automatically.
To cancel resume play, set the HOLD switch to OFF.
Note
• Resume play may start at a point about 30 seconds behind or ahead the stopped
point. Resume play may not operate if you stopped at the last 30 seconds of
the final track.
• Resume play will be canceled if you open the disc compartment. If the unit is
turned off, resume play will not be canceled. In this case, be sure to set the
HOLD switch to OFF before changing discs.
K
Random play → K
Press PLAY MODE while in standby mode to display .
V
V
Tracks on the disc are played in random order.
To cancel random play, press PLAY MODE while in standby mode.
display changes to .
Note
• Y ou cannot back to previous track by pressing r during random play.
• You cannot select one-track repeat during random play.
Repeat play → K
Press PLAY MODE during playback to select repeat play as follows.
: one-track repeat
V
: all-track repeat
V
no repeat play (normal play)
B
Page 6
J
Note
• Resume play may start at a point about 30 seconds behind or ahead the stopped
point. Resume play may not operate if you stopped at the last 30 seconds of
the final track.
• Resume play will be canceled if you open the disc compartment. If the unit is
turned off, resume play will not be canceled. In this case, be sure to set the
HOLD switch to OFF before changing discs.
Random play → K
Press PLAY MODE while in standby mode to display .
V
Tracks on the disc are played in random order.
To cancel random play, press PLAY MODE while in standby mode.
display changes to .
K
L
1
ENTER/DISP
V
Note
• Y ou cannot back to previous track by pressing r during random play.
• You cannot select one-track repeat during random play.
Repeat play → K
Press PLAY MODE during playback to select repeat play as follows.
: one-track repeat
V
: all-track repeat
V
no repeat play (normal play)
B
PROGRAM PLAY → L
Up to 24 tracks can be chosen for program play.
1 Press ENTER/DISP while in standby mode to display .
2 Select the desired track by pressing r and t.
a track number
b program number
3 Press ENTER/DISP within 8 seconds.
If it is not pressed within 8 seconds, the track number changes to 00. Repeat
the procedure from step 2 again.
4 Repeat steps 2 and 3 to program more tracks.
5 Press ePLA Y/PAUSE to start program play.
To stop program play
Press sSTOP/OFF/CHARGE.
To add tracks to the program
Repeat steps 2 and 3 before you proceed to step 5. You can add tracks to the
end of the program.
To erase the program
Press sSTOP/OFF/CHARGE while in standby mode.
2
3
5
ENTER/DISP
To check the programmed tracks
Press ENTER/DISP repeatedly before you proceed to step 5.
The number of each programmed track will be displayed in order of playback.
Note
• The program is also erased when the disc compartment is opened or the auto
power off function turns the power off.
• When 24 tracks are programmed, “P-FULL” appears, and no more tracks may
be added.
• Y ou cannot back to the previous track by holding r pressed during program
play.
• Repeat play and random play can be performed during program play.
Page 7
M
1
2
N
FM AM
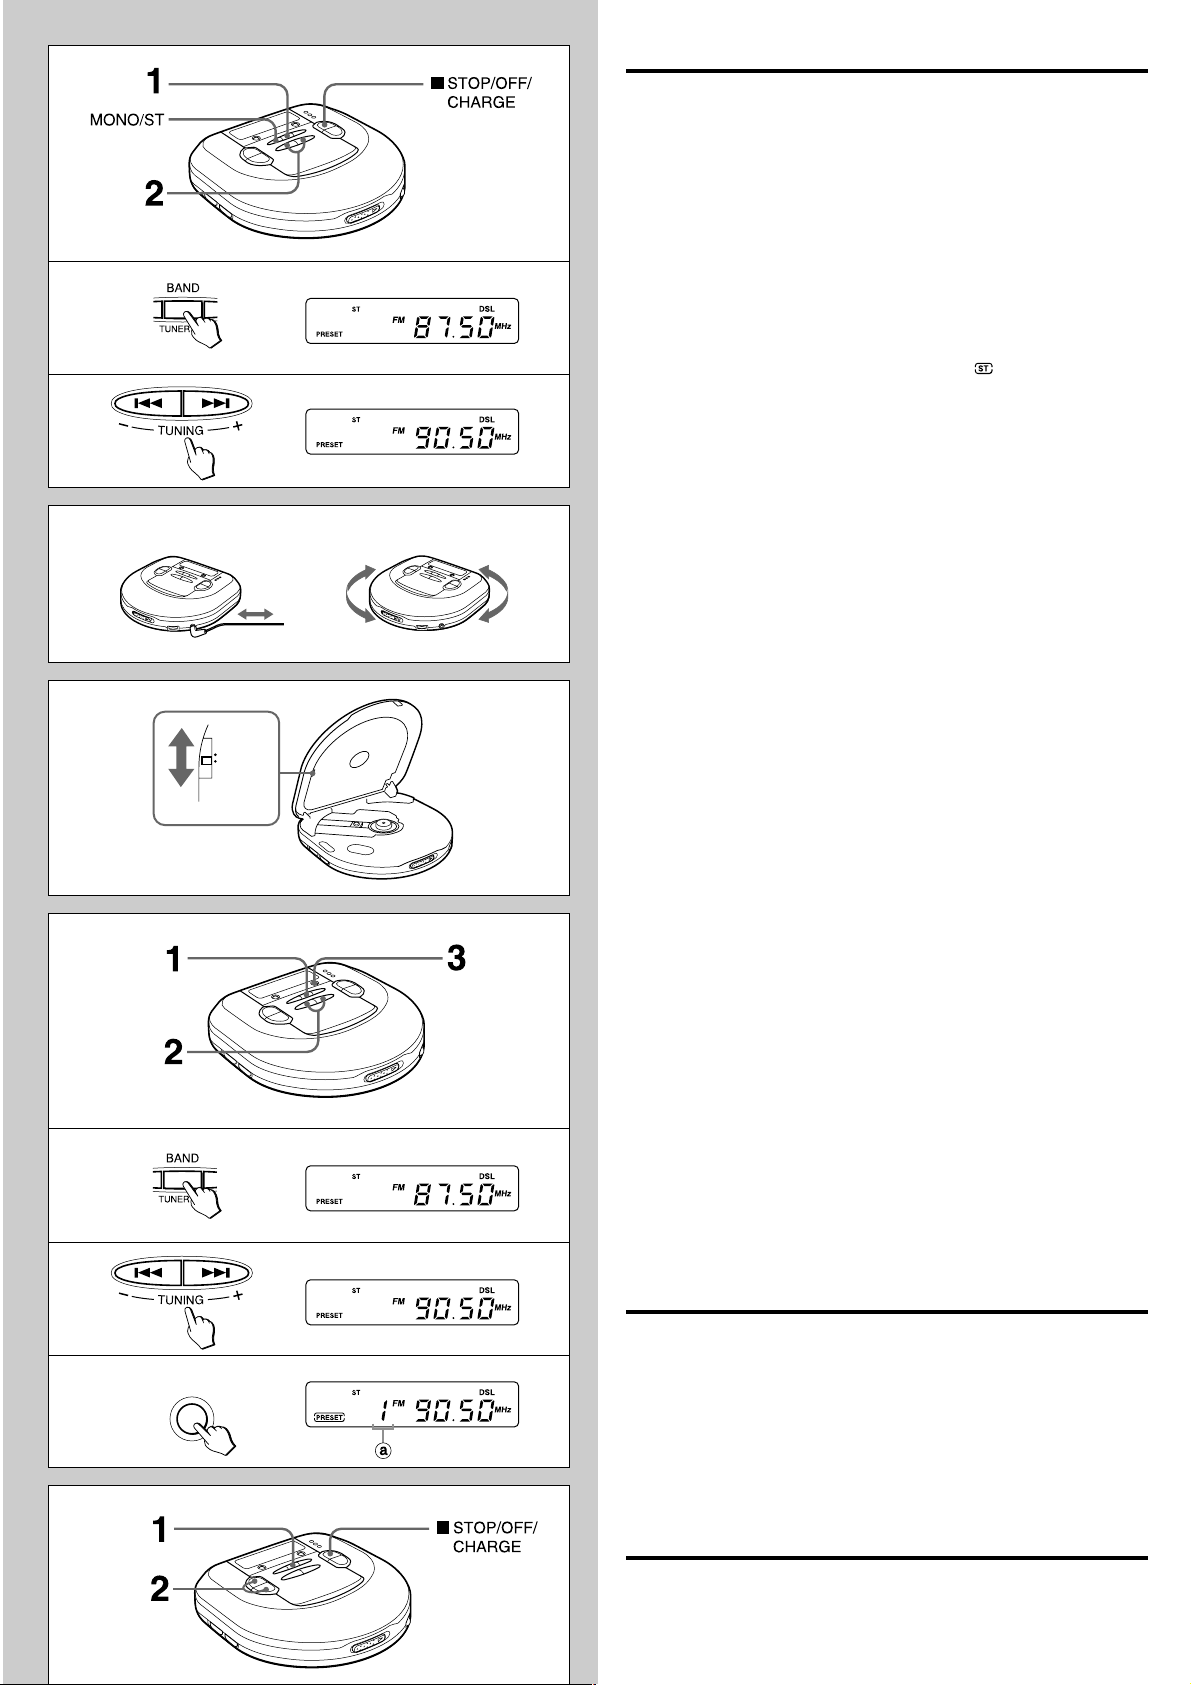
RADIO RECEPTION
Tuning in to a station → M
1 Press TUNER ON/BAND repeatedly to select AM or FM.
2 Press TUNING + (t) or - (r) to tune in to a station.
After listening, press sSTOP/OFF/CHARGE to turn off the radio.
For quick tuning
Keep either TUNING + (t) or - (r) pressed for about 1 second. When a
station is tuned in to, the frequency stops automatically. However, it does not
stop if the broadcast signal is weak.
For better reception → N
FM: The headphone cord functions as the FM antenna. Keep it extended.
AM: Turn the unit to find the position which gives the best reception.
To listen to an FM stereo broadcasting
When a tuned in station is in stereo, ST changes to .
When the FM stereo signal is weak and distorted, press MONO/ST . ST goes out
and the sound will be heard in monaural but distortion will be reduced.
Note
• Do not open the disc compartment during radio reception. The buttons will be
deactivated.
• The power is turned off automatically if no operation is made after 180 minutes
from the last operation during radio reception.
AM steps → O
Radio broadcasts have different frequency ranges and changes in different steps
in different countries.
This unit is factory-set to 10 kHz steps on AM. When using the unit where the AM
step changes to 9 kHz, set the AM STEP switch on the inner side of the disc
compartment to 9 kHz.
• When the AM step is changed, stations that you preset are erased.
O
P
1
AM STEP
9kHz
10kHz
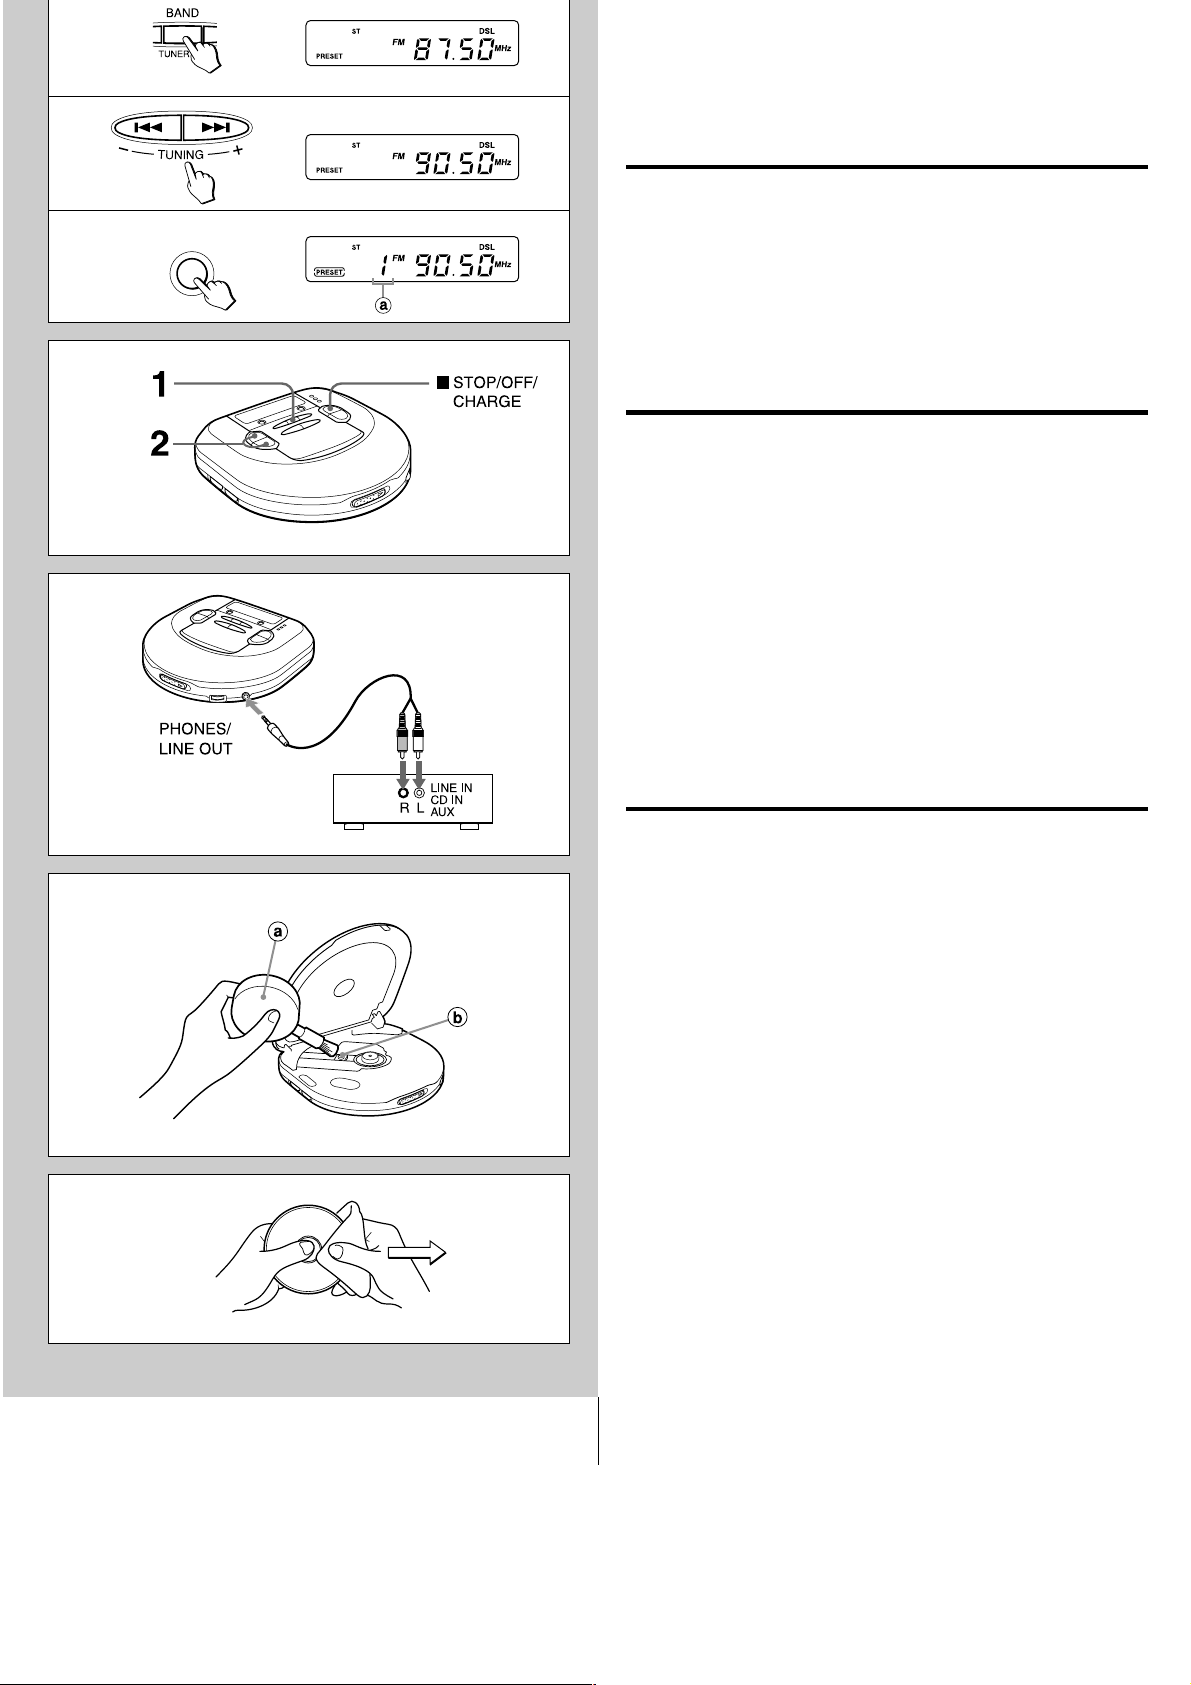
Presetting stations → P
You can preset up to total of 30 stations on AM and FM.
1 Press TUNER ON/BAND repeatedly to select AM or FM.
2 Press TUNING + (t) or - (r) to tune in to a station.
3 Press ENTER/DISP to preset the station.
a Preset number
To preset more stations, repeat steps 2 and 3.
Listening to preset stations → Q
1 Press TUNER ON/BAND repeatedly to select AM or FM.
2 Press PRESET CALL i/k repeatedly to select the preset number.
After listening, press sSTOP/OFF/CHARGE to turn off the radio.
Changing the presetting
1 Press PRESET CALL i/k repeatedly to select the preset number you
wish to change.
2 Keep ENTER/DISP pressed for 1 or more seconds until the preset number
and the frequency flash.
3 While the preset number is flashing, press TUNING + (t) or - (r)
to tune in to a station.
4 Press ENTER/DISP to preset the station on the selected preset number.
If the flashing stops, repeat the procedure from step 2.
Erasing the presettings one by one
Press sSTOP/OFF/CHARGE after step 2 in “Changing the presetting” above.
Each preset station is erased. All the settings move up by one and the preset
numbers are refreshed.
Erasing all of the presetting
Keep ENTER/DISP pressed, then press TUNER ON/BAND when the frequency
and preset number starts flashing.
2
3
Q
ENTER/DISP
CONNECTING TO AN EXTERNAL UNIT → R
Use a commercially available connection cord which has a 3.5 ø stereo miniplug at one end and two phono plugs at the other end.
Connect the stereo mini-plug to the PHONES/LINE OUT jack of the unit and
connect the phono plugs to the analog input terminals of the external unit.
Note
• Turn off the power of both units before connection.
• DO NOT connect to the PHONO inputs of an amplifier (with a built-in
phonoequalizer-amplifier).
• Adjust the volume and DSL on this unit.
MAINTENANCE
To clean the lens → S
If the lens becomes dirty, the player will skip or not play. If this occurs, clean the
lens in the following manner.
T o remove dust or dry particles, first use a camera lens blower/brush a to blow
a few times to loosen particles, then gently brush the lens b clean. Finish by
blowing the lens again.
Page 8
1
2
3
Q
ENTER/DISP
Each preset station is erased. All the settings move up by one and the preset
numbers are refreshed.
Erasing all of the presetting
Keep ENTER/DISP pressed, then press TUNER ON/BAND when the frequency
and preset number starts flashing.
CONNECTING TO AN EXTERNAL UNIT → R
Use a commercially available connection cord which has a 3.5 ø stereo miniplug at one end and two phono plugs at the other end.
Connect the stereo mini-plug to the PHONES/LINE OUT jack of the unit and
connect the phono plugs to the analog input terminals of the external unit.
Note
• Turn off the power of both units before connection.
• DO NOT connect to the PHONO inputs of an amplifier (with a built-in
phonoequalizer-amplifier).
• Adjust the volume and DSL on this unit.
MAINTENANCE
To clean the lens → S
If the lens becomes dirty, the player will skip or not play. If this occurs, clean the
lens in the following manner.
T o remove dust or dry particles, first use a camera lens blower/brush a to blow
a few times to loosen particles, then gently brush the lens b clean. Finish by
blowing the lens again.
T o remove fingerprints, use a cotton swab dipped in lens cleaning solution. Wipe
gently from the center to the edge. Lens cleaning solution is commercially
available.
R
S
T
Note
T ake care not to get too much solution on the swab, which could flow into the unit
and cause damage.
Pressing too strongly with the swab could scratch or break the lens.
To clean the discs → T
Before playing, wipe the disc from the center outward with a cleaning cloth. After
playing, store the disc in its case.
SPECIFICATIONS
Tracking system 3-beam laser
Laser pickup Semiconductor laser
D/A conversion 4-times oversampling digital filter + 1-bit DAC
Frequency response 20 – 20,000 Hz (47 k ohms)
Output PHONES/LINE OUT jack (stereo mini-jack)
Frequency range AM: 530/531 kHz – 1,710/1,602 kHz
(10 kHz/9 kHz steps)
FM: 87.5 – 108 MHz
Maximum output 12 mW + 12 mW (16 ohms at 1 kHz)
500 mV (47 k ohms at 1 kHz)
Power supply DC 3 V using two size AA (LR6) alkaline
batteries
DC 2.4 V using two commercially available
(Ni-Cd 1.2 V 700 mAh) rechargeable batteries
AC house current using the supplied AC adaptor
Maximum outside dimensions
128 (W) × 31.2 (H) × 129.5 (D) mm (excluding
projecting parts and controls)
(5 1/8 × 1 1/4 × 5 1/8 in.)
Weight Approx. 225 g (7.9 oz.) excluding batteries
Accessories AC adaptor AC-D603 (1)
Stereo headphones (1)
AC adaptor AC-D603U Rated input: AC 120 V, 60 Hz
The specifications and external appearance of this unit are subject to change
without notice.
XP-R207 (AU) E Page 2
Page 9

d
XP-R207
COMPACT DISC PLAYER
REPRODUCTOR DE DISCOS COMPACTOS
INSTRUCCIONES DE MANEJO
Las letras subrayadas a lo largo de este manual corresponden a las mismas
letras en las figuras.
PRECAUCIONES
Para mantener buenas prestaciones
• No utilice el aparato en lugares muy calientes, fríos o húmedos. Especialmente,
no utilice o instale el aparato en los siguientes lugares.
• en lugares muy húmedos como en el baño
• cerca de la calefacción
• en un lugar expuesto a los rayos del sol (por ejemplo en un coche estacionado
donde puede calentarse mucho)
• cerca de fuentes magnéticas fuertes, por ejemplo televisores, altavoces o
imanes
• donde hay mucho movimiento o vibración, sobre el cubretablero del coche o
en un estante poco estable
Para su seguridad
• No trate de desarmar el aparato. Los rayos láser del receptor óptico son
peligrosos para los ojos.
• Compruebe que los pasadores u otras materias extrañas no entren en el
reproductor.
• No deje caer el aparato ni exponga a un golpe fuerte.
• Para no ensuciar la lente del receptor con polvo cierre la tapa del compartimiento
del disco después de usar. No toque la lente.
• Si no se escucha el sonido durante la reproducción de un disco. NO levante el
volumen porque la música puede empezar a un volumen alto. Gire el control
de volumen a su nivel más bajo antes de empezar a reproducir y gire lentamente
hasta subir al volumen deseado.
Notas para escuchar con los auriculares
• Escuche a un volumen bajo para no dañar sus oídos.
• No escuche con los auriculares cuando ande en bicicleta. Puede ser un peligro
para el tráfico.
• Se debe tener mucho cuidado o dejar se utilizar temporalmente en casos
potencialmente peligrosos, por ejemplo cuando camina, corre, etc.
• Utilice correctamente, L para el izquierdo y R para el derecho.
A
A
B
8A-HC1-942-01
000824AYO-OX
Printed in Hong Kong
AA (LR6) × 2
Nota sobre la condensación
Si se lleva el aparato repentinamente de un lugar frío a uno caliente puede
condensarse la humedad en la lente del receptor y puede funcionar mal o tener
problemas en la reproducción.
En este caso, deje descansar el aparato unas horas y trate de volver a reproducir.
FUNCIONAMIENTO CON PILAS → A
Abra el portapilas y coloque dos pilas alcalinas tamaño AA (LR6) con las
marcas 0 y 9 correctamente alineadas.
Cambio de las pilas
El indicador OPE/BATT cambia de F (verde) a M (naranja) a E (rojo) según la
carga de las pilas. Cambie las pilas cuando se enciende la luz E (rojo). Si se
sigue utilizando el aparato después de que se encienda la luz E (rojo), aparece
“Lo-bAtt” y deja de funcionar.
Vida de las pilas (con pilas alcalinas LR6)
El ajuste del interruptor E•A•S•S Vida de las pilas
48 Aprox. 20 horas
12 Aprox. 19 horas
OFF Aprox. 15 horas
La vida de las pilas depende de la forma de utilizar el aparato.
Si se sale la tapa del portapilas → B
Notas sobre las pilas
• Compruebe que las marcas 0 y 9 están correctamente alineadas.
• No mezcle diferentes tipos de pilas o una pila nueva con otra vieja.
• Para que no haya fugas de electrólito o explosión no cargue las pilas, caliente
o desarme.
• Cuando no utilice las pilas, sáquelas para evitar que se gasten inútilmente.
• Si se produce una fuga del líquido de las pilas, limpie a fondo para sacarlas.
Page 10

B
La vida de las pilas depende de la forma de utilizar el aparato.
Si se sale la tapa del portapilas → B
Notas sobre las pilas
• Compruebe que las marcas 0 y 9 están correctamente alineadas.
• No mezcle diferentes tipos de pilas o una pila nueva con otra vieja.
• Para que no haya fugas de electrólito o explosión no cargue las pilas, caliente
o desarme.
• Cuando no utilice las pilas, sáquelas para evitar que se gasten inútilmente.
• Si se produce una fuga del líquido de las pilas, limpie a fondo para sacarlas.
Page 11

C
3
D
12
FUNCIONAMIENTO CON BATERIAS
RECARGABLES → C
• Asegúrese de utilizar baterías recargables Ni-Cd de 1,2 V 700 mAh de tamaño
AA en venta en los comercios del ramo.
• Lea las instrucciones sobre las baterías recargables antes de utilizarlas.
• Cuando utilice baterías recargables por primera vez, cárguelas hasta que se
apague el indicador de batería.
• Antes de cargar las baterías, cierre el compartimiento del disco. No pueden
cargarse las baterías cuando está abierto.
1 Coloque las baterías recargables con las marcas 0 y 9 correctamente
alineadas.
2 Conecte el adaptador de CA.
1 a la toma de DC 5 ~ 6 V
2 al tomacorriente de la pared
3 Mantenga presionado sSTOP/OFF/CHARGE durante aproximadamente
1 segundo para empezar a cargar.
Aparece “C-On” y destella el indicador OPE/BATT.
Cuando se ha completado la carga, “C-OFF” destella varias veces y se apaga
el indicador OPE/BATT.
Después de cargar, desconecte el adaptador de CA.
Tiempo para recargar las pilas
Recargue las baterías cuando se encienda la luz E (rojo). Si el aparato se sigue
utilizando después de que se encienda E (rojo), aparece “Lo-bAtt” y la operación
en curso deja de funcionar.
Para dejar de cargar
Presione sSTOP/OFF/CHARGE mientras está cargando.
ADVERTENCIA:
El producto que ha comprado puede funcionar con
baterías de níquel cadmio reciclables. Al final de su
vida útil, varias leyes estatales y locales prohiben
deshacerse de las baterías en la basura municipal.
Llame al 1-800-289-2492 para más detalles sobre el
reciclado de estas baterías.
E
F
1
FUNCIONAMIENTO CON LA CA DEL HOGAR
Conecte el adaptador de CA suministrado de la misma forma que para recargar
las baterías.
Si se hace funcionar con la CA del hogar, se encienden todos los indicadores
OPE/BATT.
ANTES DE REPRODUCIR
Interruptor HOLD → D
Suelte el interruptor HOLD antes de reproducir. → a
Cuando no utilice el aparato, mueva el interruptor HOLD a la posición HOLD.
→ b
Esto impedirá que funcione al presionar accidentalmente uno de los botones.
Si se presionan botones cuando el interruptor HOLD está en la posición HOLD,
destella “HOLd” en la pantalla.
Conexión y desconexión → D
Conexión del aparato
Presione ePLA Y/PAUSE. Se conecta el aparato y empieza a reproducir.
Nota
Aparece “Err” en la pantalla al reproducir un disco al revés o un disco averiado.
Desconexión del aparato
Si no se hace ninguna nueva operación antes de 30 segundos después de
terminar la última operación, se desconecta automáticamente el aparato. (función
de desconexión automática)
• Se puede desconectar el aparato presionando sSTOP/OFF/CHARGE antes
de desconectarse automáticamente.
23
G
Modo de espera → D
Cuando termine una operación, el aparato entra en el modo de espera hasta
que se desconecta automáticamente con la función de desconexión automática.
Para entrar en el modo de espera, presione ePLAY/PAUSE para empezar a
reproducir y después presione sSTOP/OFF/CHARGE.
Ajuste del sonido → E
Volumen
Gire el control VOL para ajustar el volumen.
DSL
Presione repetidamente DSL para un sonido más poderoso y graves más
profundos.
: Se da énfasis a los graves profundos.
: Se da énfasis fuerte a los graves profundos.
: Sonido normal
Función de sonido de señal
Page 12

F
1
23
Nota
Aparece “Err” en la pantalla al reproducir un disco al revés o un disco averiado.
Desconexión del aparato
Si no se hace ninguna nueva operación antes de 30 segundos después de
terminar la última operación, se desconecta automáticamente el aparato. (función
de desconexión automática)
• Se puede desconectar el aparato presionando sSTOP/OFF/CHARGE antes
de desconectarse automáticamente.
Modo de espera → D
Cuando termine una operación, el aparato entra en el modo de espera hasta
que se desconecta automáticamente con la función de desconexión automática.
Para entrar en el modo de espera, presione ePLAY/PAUSE para empezar a
reproducir y después presione sSTOP/OFF/CHARGE.
Ajuste del sonido → E
Volumen
Gire el control VOL para ajustar el volumen.
DSL
Presione repetidamente DSL para un sonido más poderoso y graves más
profundos.
: Se da énfasis a los graves profundos.
: Se da énfasis fuerte a los graves profundos.
: Sonido normal
G
Función de sonido de señal
Se puede comprobar el funcionamiento mediante un timbre que suena al
presionar un botón de función.
La función de sonido de señal no está activada al momento de comprar este
aparato.
Para utilizar la función de sonido de señal, presione ePLAY/P AUSE mientras
presiona PLAY MODE en el modo de parada. Se escucha el sonido de timbre
cuando presione un botón.
Para cancelar el sonido de timbre, repita este procedimiento.
Coloque un disco → F
1 Deslice el interruptor OPEN para abrir el compartimiento del disco.
2 Coloque un disco en el centro con la etiqueta hacia arriba.
3 Cierre el compartimiento del disco.
Para sacar el disco → G
Saque el disco, sujetándolo por su borde, mientras presiona ligeramente sobre
el pivote.
Nota
• Puede ser no posible reproducir discos CD-R/RW grabados en un ordenador
personal o en algunos tipos de grabadores de CD-R/RW en este aparato debido
a que existen diferencias en los formatos de grabación.
• No pegue un sello o etiqueta en sus lados (el lado grabable o el lado de etiqueta)
de un disco CD-R/RW. Puede provocar un mal funcionamiento.
XP-R207 (AU) S Page 1
Page 13

H
12
3
REPRODUCCION → H
Conecte los auriculares suministrados en la toma PHONES/LINE OUT.
1 Suelte HOLD.
2 Coloque un disco.
3 Presione ePLAY/PAUSE.
Empieza la reproducción desde la primera pista.
a número de pista
b tiempo de reproducción transcurrido
Funcionamiento básico
Para parar
Para hacer una pausa
Para buscar el principio de una pista
Para encontrar determinar una parte del
disco deseada
Indicación durante la reproducción → I
Presione ENTER/DISP durante la reproducción para cambiar las indicaciones
de la siguiente forma.
1 Indicación de pista y tiempo de reproducción transcurrido (indicación normal)
V
2 Indicación de la pista y tiempo de reproducción remanente de la pista que se
reproduce
V
3 Número de pistas remanente y tiempo de reproducción remanente
El tiempo no aparece en los siguientes casos.
• Cuando se trata de programar pistas más allá de la No 32.
• Cuando el tiempo remanente total de las pistas programadas es de más de
100 minutos.
Presione sSTOP/OFF/CHARGE.
Presione ePLAY/PAUSE.
Para seguir, vuelva a presionar.
Presione r o t.
Mantenga r o t presionado.
Suelte el botón al llegar a la parte del
disco deseada.
I
J
K
E•A•S•S PLUS (Sistema electrónico antichoque) → J
La función E•A•S•S PLUS reduce los saltos o silencios en el sonido cuando el
aparato recibe un golpe.
El reproductor mantiene unos 48 segundos o 12 segundos de sonido de
ENTER/DISP
V
V
reproducción en su memoria.
Para mantener 48 segundos en la memoria, mueva el interruptor E•A•S•S a 48.
Para mantener 12 segundos en la memoria, mueva el interruptor E•A•S•S a 12.
Para cancelar la función E•A•S•S PLUS, mueva el interruptor E•A•S•S a OFF.
Notas
• Antes de correr o hacer ejercicio con esta unidad, deje suficiente tiempo como
para que se llene completamente la memoria de reserva. (Lo ideal es 40 a 48
segundos).
Un golpe o vibración continuo puede provocar una interrupción del sonido
incluso cuando se ha activado la función E•A•S•S PLUS. Esto es normal y no
es un síntoma de avería. Si hay un corte de sonido, estabilice la unidad durante
unos segundos antes de continuar con su actividad.
• Cuando deslice el interruptor E•A•S•S en el medio de la reproducción se produce
una pausa de unos 2 segundos.
• Cuando mueva el interruptor E•A•S•S a la posición 12 u OFF, la calidad del
sonido será mejor que si se lo mueve a la posición 48.
Continuación del funcionamiento → K
Mueva el interruptor HOLD a RESUME.
Aparece y puede empezar a reproducir desde el punto donde se dejó de
reproducir presionando sSTOP/OFF/CHARGE.
Cuando la función de continuación está activada se selecciona automáticamente
la repetición de todas las pistas.
Para cancelar la continuación de la reproducción, mueva el interruptor HOLD
a OFF.
Notas
• Puede empezar la continuación de la reproducción unos 30 segundos antes o
después del punto de parada. La continuación de la reproducción Puede no
funcionar si se detiene en los 30 segundos finales de la última pista.
• Se cancelará la continuación de la reproducción en caso de abrir el
compartimiento del disco. No se cancelará la continuación de la reproducción
en caso de desconectar la unidad. En este caso, mueva el interruptor HOLD a
V
OFF antes de cambiar de disco.
Reproducción aleatoria → K
Presione PLA Y MODE durante el modo de espera para que aparezca .
V
Las pistas en el disco se reproducen en orden aleatorio.
Para cancelar la reproducción aleatoria, presione PLAY MODE durante el
modo de espera.
La indicación cambia a .
Notas
• No puede volver a una pista anterior presionando r durante la reproducción
aleatoria.
• No puede seleccionar la repetición de una pista durante la reproducción
aleatoria.
Reproducción repetida → K
Presione PLAY MODE durante la reproducción para seleccionar la siguiente
reproducción repetida.
: repetición de una pista
B
Page 14

J
K
la re etición de todas las istas.
Para cancelar la continuación de la reproducción, mueva el interruptor HOLD
a OFF.
Notas
• Puede empezar la continuación de la reproducción unos 30 segundos antes o
después del punto de parada. La continuación de la reproducción Puede no
funcionar si se detiene en los 30 segundos finales de la última pista.
• Se cancelará la continuación de la reproducción en caso de abrir el
compartimiento del disco. No se cancelará la continuación de la reproducción
en caso de desconectar la unidad. En este caso, mueva el interruptor HOLD a
V
OFF antes de cambiar de disco.
Reproducción aleatoria → K
Presione PLA Y MODE durante el modo de espera para que aparezca .
V
Las pistas en el disco se reproducen en orden aleatorio.
Para cancelar la reproducción aleatoria, presione PLAY MODE durante el
modo de espera.
La indicación cambia a .
Notas
• No puede volver a una pista anterior presionando r durante la reproducción
aleatoria.
• No puede seleccionar la repetición de una pista durante la reproducción
aleatoria.
Reproducción repetida → K
Presione PLAY MODE durante la reproducción para seleccionar la siguiente
reproducción repetida.
: repetición de una pista
V
: repetición de todas las pistas
V
sin reproducción repetida (reproducción normal)
B
L
1
2
3
5
ENTER/DISP
ENTER/DISP
REPRODUCCION PROGRAMADA → L
Se pueden seleccionar hasta 24 pistas para la reproducción programada.
1 Presione ENTER/DISP durante el modo de espera para que aparezca
.
2 Seleccione la pista deseada presionando r y t.
a número de pista
b número de programa
3 Presione ENTER/DISP antes de 8 segundos.
Si no se presiona antes de 8 segundos, el número de pista cambia a 00.
Repita nuevamente el procedimiento desde el paso 2.
4 Repita los pasos 2 y 3 para programar pistas adicionales.
5 Presione ePLA Y/PAUSE para empezar la reproducción programada.
Para parar la reproducción programada
Presione s
Para agregar pistas al programa
Repita los pasos 2 y 3 antes de seguir con el paso 5. Se pueden agregar pistas
al final del programa.
Para borrar el programa
Presione s
Para verificar las pistas programadas
Presione repetidamente ENTER/DISP antes de seguir con el paso 5.
El número de cada pista programada aparece en el orden de la reproducción.
Notas
• El programa también se borra cuando se abre el compartimiento o la función
de desconexión automática desconecta el aparato.
• Cuando se programan 24 pistas, aparece “P-FULL” y no puede agregar más
pistas.
• No puede volver a una pista anterior presionando r durante la reproducción
programada.
• La reproducción repetida y la reproducción aleatoria pueden realizarse durante
la reproducción programada.
STOP/OFF/CHARGE.
STOP/OFF/CHARGE durante el modo de espera.
Page 15

M
1
2
N
FM AM
RECEPCION DE LA RADIO
Sintonización de una emisora → M
1 Presione repetidamente TUNER ON/BAND para seleccionar AM o FM.
2 Presione TUNING + (t) o - (r) para sintonizar una emisora.
Después de escuchar, presione sSTOP/OFF/CHARGE para desconectar la
radio.
Para una sintonización rápida
Mantenga presionado TUNING + (t) o - (r) durante aprox. 1 segundo.
Cuando se sintoniza una emisora, la frecuencia se detiene automáticamente.
No se detendrá, sin embargo, si la señal transmitida es muy débil.
Para una mejor recepción → N
FM: El cable del auricular funciona como antena de FM. Manténgala extendida.
AM: Gire el aparato hasta encontrar la posición que dé la mejor recepción.
Para escuchar transmisiones de FM estéreo
Cuando se sintoniza una emisora en estéreo, ST cambia a .
Cuando la señal FM estéreo es débil y se escucha distorsionada, presione MONO/
ST. Se apaga ST y el sonido se escucha en monoaural pero se reduce la
distorsión.
Notas
• No abra el compartimiento del disco durante la recepción de la radio. Se
desactivarán los botones.
• Se desconecta automáticamente el aparato si no se hace ninguna operación
después de 180 minutos de la última operación mientras escucha la radio.
Pasos de AM → O
Las emisoras de radio tienen distintas gamas de frecuencia y cambia a distintos
intervalos en diferentes países.
El aparato ha sido ajustado de fábrica a intervalos de 10 kHz en AM. Cuando
utilice el aparato en lugares donde los intervalos de AM cambian a 9 kHz, mueva
el interruptor AM STEP en el lado interior del compartimiento del disco a 9 kHz.
• Cuando cambie el intervalo para AM, se borran las emisoras en la memoria.
O
P
1
2
AM STEP
9kHz
10kHz
Programación de emisoras → P
Se pueden programar un total de 30 emisoras para AM y FM.
1 Presione repetidamente TUNER ON/BAND para seleccionar AM o FM.
2 Presione TUNING + (t) o - (r) para sintonizar una emisora.
3 Presione ENTER/DISP para programar la emisora.
a Número de programa
Para programar emisoras adicionales, repita los pasos 2 y 3.
Para escuchar emisoras programadas → Q
1 Presione repetidamente TUNER ON/BAND para seleccionar AM o FM.
2 Presione repetidamente PRESET CALL i/k para seleccionar el número
de programa.
Después de escuchar, presione sSTOP/OFF/CHARGE para desconectar la
radio.
Cambio de la programación
1 Presione repetidamente PRESET CALL i/kpara seleccionar el número
de programa que desea cambiar.
2 Mantenga presionado ENTER/DISP durante 1 segundo o más hasta que
el número de programa y la frecuencia destellen.
3 Mientras destella el número de programa, presione TUNING + (t) o
- (r) para sintonizar una emisora.
4 Presionado ENTER/DISP para programar la emisora en el número de
programa seleccionado.
Si deja de destellar, repita el procedimiento desde el paso 2.
Borrado de las programaciones una a una
Presione s STOP/OFF/CHARGE después del paso 2 de “Cambio de la
programación” anterior. Cada emisora programada se borra. Todos los ajustes
se mueven en una unidad y los números de programa se renuevan.
Borrado de toda la programación
Mantenga presionado ENTER/DISP y presione TUNER ON/BAND cuando
empiecen a destellar la frecuencia y número de programa.
3
Q
ENTER/DISP
CONEXION DE UN APARATO A UN EQUIPO
EXTERNO → R
Utilice un cable de conexión en venta en los comercios del ramo, con una minitoma
estéreo de diám. 3,5 ø en una punta y dos tomas fonográficas en la otra punta.
Conecte la minitoma estéreo en la toma PHONES/LINE OUT del aparato y conecte
las tomas fonográficas en los terminales de entrada analógicos del equipo externo.
Notas
• Desconecte ambos aparatos antes de hacer esta conexión.
• NO conecte las entradas PHONO de un amplificador (con un fonoecualizadoramplificador incorporado).
• Ajuste el volumen y el DSL de este aparato.
MANTENIMIENTO
Para limpiar la lente → S
Si la lente está sucia, puede haber saltos en el sonido o no reproducir. En este
caso limpie la lente de la siguiente forma.
Page 16

1
2
3
Q
R
ENTER/DISP
Borrado de las programaciones una a una
Presione s STOP/OFF/CHARGE después del paso 2 de “Cambio de la
programación” anterior. Cada emisora programada se borra. Todos los ajustes
se mueven en una unidad y los números de programa se renuevan.
Borrado de toda la programación
Mantenga presionado ENTER/DISP y presione TUNER ON/BAND cuando
empiecen a destellar la frecuencia y número de programa.
CONEXION DE UN APARATO A UN EQUIPO
EXTERNO → R
Utilice un cable de conexión en venta en los comercios del ramo, con una minitoma
estéreo de diám. 3,5 ø en una punta y dos tomas fonográficas en la otra punta.
Conecte la minitoma estéreo en la toma PHONES/LINE OUT del aparato y conecte
las tomas fonográficas en los terminales de entrada analógicos del equipo externo.
Notas
• Desconecte ambos aparatos antes de hacer esta conexión.
• NO conecte las entradas PHONO de un amplificador (con un fonoecualizadoramplificador incorporado).
• Ajuste el volumen y el DSL de este aparato.
MANTENIMIENTO
Para limpiar la lente → S
Si la lente está sucia, puede haber saltos en el sonido o no reproducir. En este
caso limpie la lente de la siguiente forma.
Para limpiar el polvo o las partículas sucias, utilice primero un cepillo con soplador
para cámaras fotográficas a para soplar varias veces y desalojar las partículas
de polvo pegadas y cepillar suavemente la lente b. Termine soplando
nuevamente sobre la lente.
Para limpiar las huellas dactilares, utilice un algodón empapado en una solución
de limpieza. Limpie suavemente desde el centro a los bordes. Hay líquidos de
limpieza en venta en los comercios.
Nota
Limpie cuidando de no mojar demasiado el algodón ya que el líquido puede
penetrar en el aparato y dañarlo.
No frote con fuerza el algodón porque puede rayar o romper la lente.
S
T
Para limpiar los discos → T
Antes de reproducir, limpie el disco desde el centro hacia afuera con un paño de
limpieza. Después de reproducir, guarde el disco en su caja.
ESPECIFICACIONES
Sistema de seguimiento 3 haz láser
Receptor de láser Láser semiconductor
Conversión D/A Filtro digital con sobremuestreo de 4 veces + 1
Respuesta de frecuencia 20 – 20.000 Hz (47 k ohmios)
Salida Toma PHONES/LINE OUT (minitoma estéreo)
Gama de frecuencias AM: 530/531 kHz – 1.710/1.602 kHz
Salida máxima 12 mW + 12 mW (16 ohmios a 1 kHz)
Alimentación eléctrica CC de 3 V utilizando dos pilas alcalinas tamaño
Dimensiones exteriores máximas
Peso Aprox. 225 g sin pilas
Accesorios Adaptador de CA AC-D603 (1)
Adaptador de CA AC-D603U
Las especificaciones y aspecto de este aparato están sujetos a cambios sin
previo aviso.
bit de conversión digital analógica
(intervalos de 10 kHz/9 kHz)
FM: 87,5 – 108 MHz
500 mV (47 k ohmios a 1 kHz)
AA (LR6)
CC de 2,4 V utilizando dos baterías recargables
(Ni-Cd 1,2 V 700 mAh) vendidas en los
comercios del ramo
CA del hogar utilizando el adaptador de CA
incluido
128 (An.) × 31,2 (Al.) × 129,5 (Prof.) mm
(excluyendo partes salientes controles)
Auriculares estéreo (1)
Entrada nominal: CA de 120 V, 60 Hz
XP-R207 (AU) S Page 2
Page 17

d
XP-R207
COMPACT DISC PLAYER
MODE D’EMPLOI
Les lettres en évidence dans ce mode d’emploi correspondent à celles des
illustrations.
c
PRECAUTIONS
Pour maintenir de bonnes performances
• N’utilisez pas cet appareil à des endroits très chauds, froids, humides ou
poussiéreux. En particulier, ne l’utilisez pas et ne le rangez pas aux
emplacements suivants.
• à un endroit très humide comme une salle de bains
• près d’un appareil de chauffage
• à un endroit exposé en plein soleil (la température peut devenir très élevée
dans une voiture garée)
• près d’une source de champ magnétique puissant, un téléviseur, des
enceintes, ou des aimants par exemple
• à un endroit soumis à des mouvements ou vibrations, le tableau de bord
d’une voiture ou une étagère instable par exemple
Sécurité
• N’essayez pas de démonter cet appareil. Les rayons laser de la tête de lecture
optique sont dangereux pour les yeux.
• Vérifiez qu’aucun trombone ni autre matière extérieure ne sont tombés dans le
coffret.
• Ne laissez pas tomber l’appareil, et ne le soumettez pas à des chocs violents.
• Protégez la lentille contre la poussière en naintenant le couvercle du logement
du disque fermé après l’emploi. Ne touchez jamais la lentille.
• Si vous n’entendez aucun son lors de la lecture d’un disque, N’AUGMENTEZ
PAS le volume, car la musique pourrait démarrer brutalement à volume très
fort. Tournez la commande de volume au niveau le plus faible avant de
commencer la lecture et amenez-la lentement au niveau souhaité.
Remarques sur l’écoute avec des écouteurs
• Ecoutez à volume modéré pour éviter tout dommage de l’ouïe.
• Ne portez pas les écouteurs en conduisant ni à bicyclette. Cela pourrait
provoquer des accidents de la circulation.
• Montrez-vous très prudent ou arrêtez temporairement d’utiliser l’appareil dans
des conditions potentiellement dangereuses comme la marche, le jogging, etc.
• Mettez correctement les écouteurs: L sur l’oreille gauche et R sur l’oreille droite.
A
A
B
8A-HC1-943-01
000824AYO-OX
Printed in Hong Kong
AA (LR6) × 2
Remarque sur la condensation
Si cet appareil est brutalement transporté d’un endroit froid à un endroit chaud,
cela peut se traduire par la formation de condensation sur la lentille de la tête de
lecture, et causer un mauvais fonctionnement ou des problèmes de lecture.
Dans ce cas, laissez l’appareil tel quel pendant quelques heures, puis essayez
à nouveau de lire un disque.
FONCTIONNEMENT SUR PILES SECHES → A
Ouvrez le logement des piles et insérez deux piles alcalines format AA
(LR6) en respectant les polarités 0 et 9.
Remplacement des piles
L’indicateur OPE/BATT passe de F (vert) à M (orange) puis à E (rouge) selon la
capacité restante des piles. Remplacez les piles quand l’indicateur E (rouge)
s’allume. Si vous continuez à utiliser l’appareil alors que E (rouge) est allumé,
“Lo-bAtt” s’affiche et l’appareil s’arrête.
Vie de service (avec des piles alcalines LR6)
Réglage du sélecteur E•A•S•S Vie de service des piles
48 Env. 20 heures
12 Env. 19 heures
OFF Env. 15 heures
La vie de service des piles varie selon les conditions d’utilisation.
Si le couvercle du logement des piles s’ouvre → B
Remarques sur les piles sèches
• Vérifiez que les marques 0 et 9 sont correctement alignées.
• Ne mélangez pas des piles de types différents, ou des piles ancienne et neuve.
• Pour éviter tout risque de fuite d’électrolyte ou d’explosion, ne rechargez pas,
ne chauffez pas et ne démontez jamais les piles.
• Retirez les piles de l’appareil quand il n’est pas utilisé, pour éviter toute usure
inutile.
• En cas de fuite d’électrolyte, éliminez complètement tout le liquide en l’essuyant.
Page 18

B
12 Env. 19 heures
OFF Env. 15 heures
La vie de service des piles varie selon les conditions d’utilisation.
Si le couvercle du logement des piles s’ouvre → B
Remarques sur les piles sèches
• Vérifiez que les marques 0 et 9 sont correctement alignées.
• Ne mélangez pas des piles de types différents, ou des piles ancienne et neuve.
• Pour éviter tout risque de fuite d’électrolyte ou d’explosion, ne rechargez pas,
ne chauffez pas et ne démontez jamais les piles.
• Retirez les piles de l’appareil quand il n’est pas utilisé, pour éviter toute usure
inutile.
• En cas de fuite d’électrolyte, éliminez complètement tout le liquide en l’essuyant.
Page 19

C
3
12
FONCTIONNEMENT SUR PILES RECHARGEABLES
→ C
• Utilisez bien des piles Ni-Cd rechargeables format AA 1,2 V 700 mAh,
disponibles dans le commerce.
• Lisez le mode d’emploi des piles avant de les utiliser.
• A la première utilisation, rechargez les piles jusqu’à ce que l’indicateur s’éteigne.
• Avant de charger les piles, refermez le compartiment du disque. Sinon la
charge sera impossible.
1 Insérez les piles rechargeables en alignant correctement les marques
0 et 9.
2 Connectez l’adaptateur secteur.
1 à la prise DC 5 ~ 6 V
2 à la prise murale
3 Maintenez sST OP/OFF/CHARGE pressé pendant environ 1 seconde pour
démarrer la charge.
“C-On” apparaît, et l’indicateur OPE/BATT clignote.
Quand la charge est achevée, “C-OFF” clignote plusieurs fois et l’indicateur
OPE/BATT s’éteint.
Après la charge, déconnectez l’adaptateur secteur.
Temps requis pour la recharge des piles
Rechargez les piles quand E (rouge) s’allume. Si vous continuez à utiliser
l’appareil alors que E (rouge) est allumé, “Lo-bAtt” apparaîtra et l’opération en
cours s’arrêtera.
Pour arrêter la charge
Appuyez sur sSTOP/OFF/CHARGE pendant la charge.
D
E
AVERTISSEMENT:
Le produit que vous avez acheté peut fonctionner sur
piles au nickel-cadmium recyclables. Certains états et
des lois locales interdisent leur mise au rebut dans les
ordures ménagères municipales à la fin de leur vie de
service.
Faites le 1-800-289-2492 pour obtenir des informations
sur le recyclage de ces piles.
FONCTIONNEMENT SUR LE SECTEUR
Raccordez l’adaptateur secteur comme pour la recharge des piles.
Pendant le fonctionnement sur le secteur, tous les indicateurs OPE/BATT
s’allument.
AVANT LA LECTURE
Commutateur HOLD → D
Libérez le commutateur HOLD avant la lecture. → a
Quand vous utilisez l’appareil, réglez le commutateur HOLD à la position HOLD.
→ b
Les touches pressées par inadvertance resteront inopérantes.
Si des touches sont pressées alors que le commutateur HOLD est à la position
HOLD, “HOLd” clignotera dans l’affichage.
Mise sous et hors tension → D
Mise sous tension
Appuyez sur ePLAY/PAUSE. L’appareil sera mis sous tension et la lecture
démarrera.
F
1
23
G
Remarque
“Err” s’affiche à la lecture d’un disque inséré à l’envers ou défectueux.
Mise hors tension
Si aucune nouvelle opération n’est effectuée pendant 30 secondes après la fin
du fonctionnement, l’appareil sera automatiquement mis hors tension. (fonction
de coupure automatique)
• Vous pouvez mettre l’appareil hors tension en appuyant sur sSTOP/OFF/
CHARGE avant sa mise hors tension automatique.
Mode d’attente → D
Après la fin du fonctionnement, l’appareil passe en mode d’attente jusqu’à la
coupure automatique.
Pour passer en mode d’attente, appuyez sur ePLAY/PAUSE pour démarrer
la lecture, puis sur sSTOP/OFF/CHARGE.
Ajustement du son → E
Volume
Tournez la commande VOL pour ajuster le volume.
DSL
Appuyez plusieurs fois sur DSL pour obtenir un son plus puissant et des graves
plus profonds.
: Les sons très graves sont accentués.
: Les sons très graves sont très accentués.
: Son normal
Fonction tonalité signal
Page 20

F
1
23
Remarque
“Err” s’affiche à la lecture d’un disque inséré à l’envers ou défectueux.
Mise hors tension
Si aucune nouvelle opération n’est effectuée pendant 30 secondes après la fin
du fonctionnement, l’appareil sera automatiquement mis hors tension. (fonction
de coupure automatique)
• Vous pouvez mettre l’appareil hors tension en appuyant sur sSTOP/OFF/
CHARGE avant sa mise hors tension automatique.
Mode d’attente → D
Après la fin du fonctionnement, l’appareil passe en mode d’attente jusqu’à la
coupure automatique.
Pour passer en mode d’attente, appuyez sur ePLAY/PAUSE pour démarrer
la lecture, puis sur sSTOP/OFF/CHARGE.
Ajustement du son → E
Volume
Tournez la commande VOL pour ajuster le volume.
DSL
Appuyez plusieurs fois sur DSL pour obtenir un son plus puissant et des graves
plus profonds.
: Les sons très graves sont accentués.
: Les sons très graves sont très accentués.
: Son normal
G
Fonction tonalité signal
Vous pouvez contrôler le fonctionnement par une tonalité bip quand vous appuyez
sur une touche d’opération.
La fonction tonalité signal n’est pas activée à l’achat de l’appareil.
Pour l’utiliser, appuyez sur ePLAY/PAUSE pendant la pression de PLAY
MODE en mode d’arrêt. La tonalité bip sera audible à la pression d’une touche.
Pour l’annuler, répétez cette procédure.
Insertion d’un disque → F
1 Glissez le commutateur OPEN pour ouvrir le compartiment du disque.
2 Placez un disque au centre, la face portant l’étiquette dirigée vers le
haut.
3 Refermez le compartiment du disque.
Pour retirer le disque → G
Enlevez le disque en le tenant par ses bords, en appuyant doucement sur le
pivot.
Remarques
• L’appareil peut ne pas lire un disque CD-R/RW enregistré sur un ordinateur
personnel ou avec certains enregistreurs CD-R/RW à cause de la différence
de plate-forme d’enregistrement.
• Ne collez pas d’autocollant ou étiquette sur les faces (la face enregistrable ou
la face étiquetée) d’un disque CD-R/RW. Cela pourrait causer un mauvais
fonctionnement.
XP-R207 (AU) F Page 1
Page 21

H
12
3
LECTURE → H
Raccordez les écouteurs fournis à la prise PHONES/LINE OUT.
1 Libérez HOLD.
2 Placez un disque.
3 Appuyez sur ePLAY/PAUSE.
La lecture démarre à partir de la première plage.
a numéro de plage
b temps de lecture écoulé
Fonctionnement de base
Pour arrêter
Pour faire une pause
Pour rechercher le début d’une plage
Pour localiser une plage souhaitée
Affichage pendant la lecture → I
Appuyez sur ENTER/DISP pendant la lecture pour modifier l’affichage comme
suit.
1 Affichage de la plage et temps de lecture écoulé (affichage normal)
V
2 Affichage de la plage et temps de lecture restant de la plage lue
V
3 Nombre de plages restantes et temps de lecture restant
Le temps n’est pas affiché dans les cas suivants.
• Quand vous essayez de programmer au-delà de la plage n° 32.
• Quand le temps de lecture restant total des pistes programmées est supérieur
à 100 minutes.
Appuyez sur sSTOP/OFF/CHARGE.
Appuyez sur ePLAY/PAUSE.
Appuyez sur une seconde fois pour
reprendre la lecture.
Appuyez sur r ou t.
Maintenez r ou t pressé.
Libérez la touche au début du passage
souhaité.
I
J
Système électronique anti-chocs E•A•S•S PLUS → J
La fonction E•A•S•S PLUS réduit le saut ou l’assourdissement du son quand
l’appareil est soumis à un choc.
L’appareil conserve environ 48 ou 12 secondes de son lu en mémoire.
ENTER/DISP
V
V
Pour conserver 48 secondes en mémoire, réglez le sélecteur E•A•S•S à 48.
Pour conserver 12 secondes en mémoire, réglez le sélecteur E•A•S•S à 12.
Pour annuler la fonction E•A•S•S PLUS, mettez le sélecteur E•A•S•S sur OFF .
Remarques
• Avant de faire du jogging avec cet appareil, attendez que la mémoire tampon
se remplisse totalement (au moins de 40 à 48 secondes).
Des impacts ou vibrations continus peuvent provoquer une interruption du son
même si la fonction E•A•S•S PLUS est activée. Il ne s’agit pas d’une anomalie.
En cas d’interruption du son, stabilisez l’appareil pendant quelques secondes,
puis remettez-le en marche.
• Si le commutateur E•A•S•S est glissé pendant la lecture, l’appareil fera une
pause d’environ 2 secondes.
• Quand le sélecteur E•A•S•S est sur 12 ou OFF , la qualité du son est meilleure
que quand il est à la position 48.
Fonction de reprise → K
Réglez le commutateur HOLD à RESUME.
s’affiche et vous pouvez démarrer la lecture du point où vous avez arrêté
la lecture en appuyant sur sSTOP/OFF/CHARGE.
Quand la fonction de reprise est activée, la répétition de toutes les plages est
automatiquement sélectionnée.
Pour annuler la lecture de reprise, réglez le commutateur HOLD sur OFF.
Remarques
• La lecture de reprise démarre à un point environ 30 secondes après ou avant
le point de l’arrêt. La reprise peut ne pas fonctionner si vous avez arrêté la
lecture dans les 30 dernières secondes de la plage finale.
• Le lecture de reprise sera annulée si vous ouvrez le compartiment du disque.
Si l’appareil est mis hors tension, la lecture de reprise ne sera pas annulée.
Dans ce cas, n’oubliez pas de régler le commutateur HOLD à OFF avant de
changer de disque.
K
V
V
Lecture aléatoire → K
Appuyez sur PLAY MODE en mode d’attente pour afficher .
Les plages du disque seront lues en ordre aléatoire.
Pour annuler la lecture aléatoire, appuyez sur PLAY MODE en mode d’attente.
passera à .
Remarques
• Il est impossible de revenir à la plage précédente en appuyant sur r pendant
la lecture aléatoire.
• Il est impossible de sélectionner la répétiton d’une plage pendant la lecture
aléatoire.
Lecture répétée → K
Appuyez sur PLA Y MODE pendant le lecture pour sélectionner la lecture répétée
comme suit.
: répétition d’une plage
V
: répétition de toutes les plages
V
B
Page 22

J
Pour annuler la lecture de reprise, réglez le commutateur HOLD sur OFF.
Remarques
• La lecture de reprise démarre à un point environ 30 secondes après ou avant
le point de l’arrêt. La reprise peut ne pas fonctionner si vous avez arrêté la
lecture dans les 30 dernières secondes de la plage finale.
• Le lecture de reprise sera annulée si vous ouvrez le compartiment du disque.
Si l’appareil est mis hors tension, la lecture de reprise ne sera pas annulée.
Dans ce cas, n’oubliez pas de régler le commutateur HOLD à OFF avant de
changer de disque.
K
L
1
2
3
5
ENTER/DISP
ENTER/DISP
V
V
Lecture aléatoire → K
Appuyez sur PLAY MODE en mode d’attente pour afficher .
Les plages du disque seront lues en ordre aléatoire.
Pour annuler la lecture aléatoire, appuyez sur PLAY MODE en mode d’attente.
passera à .
Remarques
• Il est impossible de revenir à la plage précédente en appuyant sur r pendant
la lecture aléatoire.
• Il est impossible de sélectionner la répétiton d’une plage pendant la lecture
aléatoire.
Lecture répétée → K
Appuyez sur PLA Y MODE pendant le lecture pour sélectionner la lecture répétée
comme suit.
: répétition d’une plage
V
: répétition de toutes les plages
V
pas de lecture répétée (lecture normale)
B
LECTURE PROGRAMMEE → L
24 plages maximum peuvent être sélectionnées pour la lecture programmée.
1 Appuyez sur ENTER/DISP en mode d’attente pour afficher .
2 Sélectionnez la plage souhaitée en appuyant sur r et t.
a numéro de plage
b numéro de programme
3 Appuyez sur ENTER/DISP dans les 8 secondes.
Si vous n’appuyez pas dans les 8 secondes, le numéro de plage passe à 00.
Alors, répétez la procédure depuis l’étape 2.
4 Répétez les étapes 2 et 3 pour programmer d’autres plages.
5 Appuyez sur ePLAY/PAUSE pour démarrer la lecture programmée.
Pour arrêter la lecture programmée
Appuyez sur sSTOP/OFF/CHARGE.
Pour ajouter des plages au programme
Répétez les étapes 2 et 3 avant de passer à l’étape 5. Vous pouvez ajouter des
plages à la fin du programme.
Pour effacer le programme
Appuyez sur sSTOP/OFF/CHARGE en mode d’attente.
Pour contrôler les plages programmées
Appuyez plusieurs fois sur ENTER/DISP avant de passer à l’étape 5.
Le numéro de chaque plage programmée s’affichera dans l’ordre de lecture.
Remarques
• Le programme est aussi effacé à l’ouverture du compartiment du disque ou
quand la fonction de coupure automatique met l’appareil hors tension.
• Quand 24 plages sont programmées, “P-FULL” s’affiche, et aucune plage ne
peut plus être ajoutée.
• Il est impossible de revenir à la plage précédente en maintenant r pressé
pendant la lecture programmée.
• La lecture répétée et la lecture aléatoire sont possibles pendant la lecture
programmée.
Page 23

M
1
2
N
O
P
1
2
FM AM
AM STEP
9kHz
10kHz
RECEPTION RADIO
Accord d’une station → M
1 Appuyez de façon répétée sur TUNER ON/BAND pour sélectionner AM
ou FM.
2 Appuyez sur TUNING + (t) ou - (r) pour accorder une station.
Après l’écoute, appuyez sur sSTOP/OFF/CHARGE pour éteindre la radio.
Accord rapide
Maintenez TUNING + (t) ou - (r) pressé environ 1 seconde. A l’accord
d’une station, la fréquence s’arrête automatiquement sauf si le signal d’émission
est faible.
Pour améliorer la réception → N
FM:Le cordon des écouteurs fait office d’antenne FM. Déployez-le pour écouter
une émission FM.
AM:Tournez l’appareil pour trouver la meilleure position de réception.
Pour écouter une émission FM stéréo
Quand la station accordée est en stéréo, ST passe à .
Quand le signal FM stéréo est faible et déformé, appuyez sur MONO/ST. ST
s’éteint, le son sera audible en monaural, mais la distorsion sera réduite.
Remarques
• N’ouvrez pas le volet du compartiment de disque pendant la réception radio,
sinon les touches seront désactivées.
• L’alimentation est automatiquement coupée si aucune opération n’est effectuée
au cours des 180 minutes qui suivent la dernière opération, lors de la réception
radio.
Intervalles d’accord AM → O
Les plages de fréquences des émissions de radio et les intervalles d’accord
varient d’un pays à l’autre.
Cet appareil est préréglé à l’usine à un intervalle d’accord de 10 kHz pour la
gamme AM. Pour utiliser cet appareil dans un pays où l’intervalle d’accord est de
9 kHz, réglez le commutateur AM STEP à l’intérieur du logement de disque sur
9 kHz.
• Au changement de l’intervalle d’accord AM. les stations préréglées sont effacées.
Préréglage des stations → P
30 stations au total sont préréglables en AM et FM.
1 Appuyez de façon répétée sur TUNER ON/BAND pour sélectionner AM
ou FM.
2 Appuyez sur TUNING + (t) ou - (r) pour accorder une station.
3 Appuyez sur ENTER/DISP pour prérégler la station.
aNuméro de préréglage
Pour prérégler d’autres stations, répétez les étapes 2 et 3.
Ecoute des stations préréglées → Q
1 Appuyez de façon répétée sur TUNER ON/BAND pour sélectionner AM
ou FM.
2 Appuyez de façon répétée sur PRESET CALL i/k pour sélectionner le
numéro de préréglage.
Après l’écoute, appuyez sur sSTOP/OFF/CHARGE pour éteindre la radio.
Changement de préréglage
1 Appuyez de façon répétée sur PRESET CALL i/k pour sélectionner le
numéro de préréglage à changer.
2 Maintenez ENTER/DISP pressé au moins 1 seconde jusqu’à ce que le
numéro de préréglage et la fréquence clignotent.
3 Quand le numéro de préréglage clignote, appuyez sur TUNING + (t)
ou - (r) pour accorder une station.
4 Appuyez sur ENTER/DISP pour prérégler la station sur le numéro
sélectionné.
Si le numéro cesse de clignoter, recommencez à partir de l’étape 2.
Suppression des préréglages un à un
Appuyez sur sSTOP/OFF/CHARGE après l’étape 2 de “Changement de
préréglage” ci-dessus. La station préréglée sera supprimée. Tous les réglages
augmenteront d’une unité et les numéros de préréglage seront rafraîchis.
Effacement de tous les préréglages
Maintenez ENTER/DISP pressé, puis appuyez sur TUNER ON/BAND quand la
fréquence et le numéro de préréglage se mettent à clignoter.
3
Q
ENTER/DISP
RACCORDEMENT A UN APPAREIL EXTERIEUR → R
Utilisez un cordon de raccordement ordinaire disponible dans le commerce à
miniprise stéréo 3,5 ø à une extrémité et deux prises phono à l’autre.
Raccordez la miniprise stéréo à la prise PHONES/LINE OUT de l’appareil et les
prises phono aux bornes d’entrée analogique de l’appareil extérieur.
Remarques
• Mettez les deux appareils hors tension avant le raccordement.
• NE CONNECTEZ PAS aux entrées PHONO d’un amplificateur (à égalisateur
amplificateur phono intégré).
• Ajustez le volume et le DSL sur cet appareil.
MAINTENANCE
Pour nettoyer la lentille → S
Si la lentille est sale, le lecteur sautera ou ne jouera pas. Dans ce cas, nettoyez
la lentille de la manière suivante.
Page 24

1
2
sélectionné.
Si le numéro cesse de clignoter, recommencez à partir de l’étape 2.
Suppression des préréglages un à un
Appuyez sur sSTOP/OFF/CHARGE après l’étape 2 de “Changement de
préréglage” ci-dessus. La station préréglée sera supprimée. Tous les réglages
augmenteront d’une unité et les numéros de préréglage seront rafraîchis.
Effacement de tous les préréglages
Maintenez ENTER/DISP pressé, puis appuyez sur TUNER ON/BAND quand la
fréquence et le numéro de préréglage se mettent à clignoter.
3
Q
R
ENTER/DISP
RACCORDEMENT A UN APPAREIL EXTERIEUR → R
Utilisez un cordon de raccordement ordinaire disponible dans le commerce à
miniprise stéréo 3,5 ø à une extrémité et deux prises phono à l’autre.
Raccordez la miniprise stéréo à la prise PHONES/LINE OUT de l’appareil et les
prises phono aux bornes d’entrée analogique de l’appareil extérieur.
Remarques
• Mettez les deux appareils hors tension avant le raccordement.
• NE CONNECTEZ PAS aux entrées PHONO d’un amplificateur (à égalisateur
amplificateur phono intégré).
• Ajustez le volume et le DSL sur cet appareil.
MAINTENANCE
Pour nettoyer la lentille → S
Si la lentille est sale, le lecteur sautera ou ne jouera pas. Dans ce cas, nettoyez
la lentille de la manière suivante.
Pour éliminer la poussière ou des particules sèches, utilisez d’abord un soufflet/
brosse a pour objectif d’appareil photo et soufflez plusieurs fois pour détacher
les particules, puis brossez doucement la lentille b pour la nettoyer. Finissez
en soufflant encore une fois la lentille.
Pour éliminer les empreintes de doigts, utilisez une ouate de coton humectée de
solution de nettoyage pour lentilles. Essuyez doucement du centre vers les bords.
Des solutions de nettoyage pour lentilles sont disponibles dans le commerce.
Remarque
Evitez de mettre trop de solution sur l’ouate de coton; elle pourrait couler dans
l’appareil et causer des dommages.
Appuyer trop fort avec l’ouate pourrait rayer ou briser la lentille.
Pour nettoyer les disques → T
Avant la lecture, essuyez le disque du centre vers la périphérie avec un chiffon
de nettoyage. Après la lecture, rangez-le dans sa boîte.
S
T
SPECIFICATIONS
Système de recherche Laser 3 faisceau
Tête de lecture laser Laser semi-conducteur
Conversion N-A Filtre numérique à suréchantillonage 4 fois +
convertisseur N-A 1 bit
Réponse de fréquence 20 à 20.000 Hz (47 k ohms)
Sortie Prise PHONES/LINE OUT (miniprise stéréo)
Plage de fréquences AM: 530/531 kHz – 1.710/1.602 kHz (intervalle
de 10 kHz/9 kHz)
FM: 87,5 – 108 MHz
Puissance maximum 12 mW + 12 mW (16 ohms à 1 kHz)
500 mV (47 kohms à 1 kHz)
Alimentation 3 V c.c. avec deux piles alcalines format AA
(LR6)
2,4 V c.c. avec deux piles rechargeables (Ni-Cd
1,2 V 700 mAh) disponibles dans le commerce
Secteur avec l’adaptateur secteur fourni
Dimensions extérieures maximum
(l/h/p) 128 × 31,2 × 129,5 mm (pièces et
commandes en saillie exclues)
Poids Env. 225 g, piles exclues
Accessoires Adaptateur secteur AC-D603 (1)
Ecouteurs stéréo (1)
Adaptateur secteur AC-D603U
Entrée nominale: 120 V CA, 60 Hz
Les spécifications et l’aspect extérieur de cet appareil sont sujets à modification
sans préavis.
XP-R207 (AU) F Page 2
 Loading...