

Page 1
OPERATING INSTRUCTIONS
BEDIENUNGSANLEITUNG
MODE D’EMPLOI
INSTRUCCIONES DE MANEJO
ISTRUZIONI PER L’USO
GEBRUIKSAANWIJZING
XP-MP3
COMPACT DISC PLAYER
REPRODUCT OR DE DISCOS
COMPACTOS
ENGLISH
DEUTSCH
FRANÇAIS
ESPAÑOL
ITALIANO
NEDERLANDS
WARNING: TO REDUCE THE RISK OF FIRE OR ELECTRIC SHOCK, DO NOT
EXPOSE THIS APPLIANCE TO RAIN OR MOISTURE.
Page 2
CAUTION
Use of controls or adjustments or
performance of procedures other than those
specified herein may result in hazardous
radiation exposure.
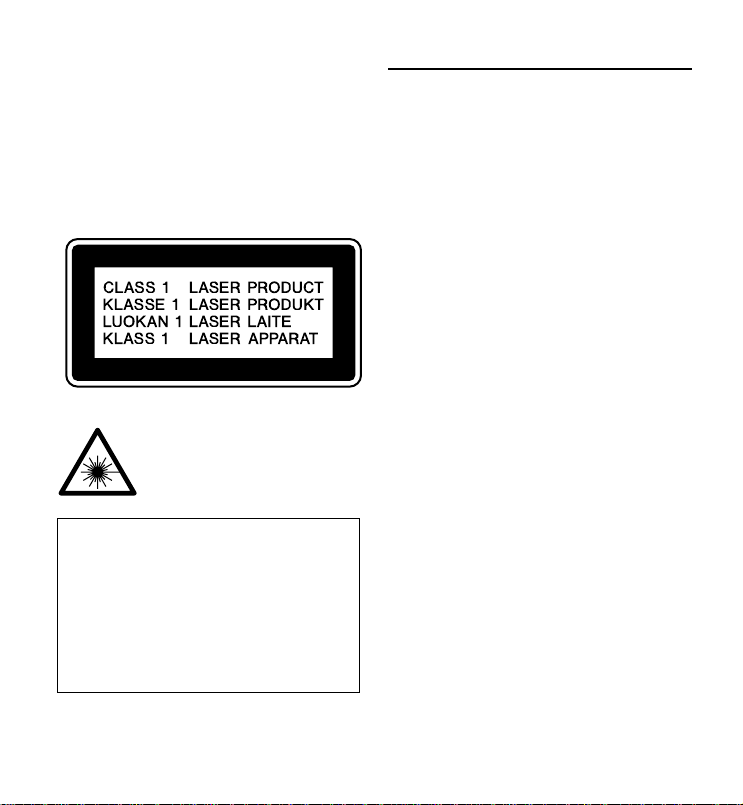
This compact disc player is classified as a
CLASS 1 LASER product. The CLASS 1
LASER PRODUCT label is located on the
exterior.
CAUTION!
Invisible laser radiation when
open and interlocks defeated.
Avoid exposure to beam.
• An MP3 file stores audio data
compressed using MPEG1/2, the audio
layer-3 file-coding scheme.
• In this manual, CDs, CD-R discs and
CD-RW discs are all referred to as
“discs”. We refer to what are called
“folder” and “file” in PC terminology as
“album” and “track”.
TABLE OF CONTENTS
PRECAUTIONS ...........................................3
USING ON DRY CELL BATTERIES............4
USING ON RECHARGEABLE
BATTERIES ............................................. 5
BEFORE PLAYBACK ................................. 6
PLAYBACK OF AUDIO DISC ..................... 9
PROGRAM PLAY......................................12
PLAYBACK OF MP3 DISC .......................14
CONNECTING AN EXTERNAL UNIT ....... 22
MAINTENANCE ......................................... 22
TERMINOLOGY ........................................ 23
SPECIFICATIONS ..................................... 25
2
ENGLISH
Page 3

PRECAUTIONS
To maintain good performance
• Do not use the unit in places which are
extremely hot, cold, dusty or humid. In
particular, do not use or keep the unit in
following places.
• in a high humidity area such as a bathroom
• near a heater
• in an area exposed to direct sunlight
(e.g., inside a parked car, where it can
become extremely hot)
• near sources of strong magnetism, such
as televisions, speakers, or magnets
• where there is a lot of movement or
vibration, such as on a car dashboard or
an unstable shelf
For safety
• Do not attempt to disassemble the unit.
Laser rays from the optical pickup are
dangerous to the eyes.
• Make sure that pins or other foreign object
do not get inside the player.
• Take care not to drop the unit or subject it
to strong shocks.
• To keep dust from the pickup lens, keep
the disc compartment lid closed after use.
Never touch the lens.
• If you hear no sound when playing a disc,
DO NOT turn the volume up high because
music could suddenly start at high volume.
Turn the volume control to the lowest level
before starting playback and slowly turn it
up to the desired level.
Note on listening with the
headphones
• Listen at moderate volumes to avoid hearing
damage.
• Do not wear the headphones while driving
or cycling.It may create a traffic hazard.
• You should use extreme caution or
temporarily discontinue use in potentially
hazardous situations, such as walking,
jogging, etc.
• Wear them properly; L is left, R is right.
• The in-ear type headphones should be
worn with the longer cord behind your
neck.
CAUTION
Listening to headphone stereo at full power
for extended periods of time can result in
hearing damage.
Note on condensation
If the unit is suddenly moved from a cold
place to a warm one, it may result in
condensation on the pickup lens and
malfunction or playback difficulties.
Should this occur, leave the unit for a few
hours, then try to playback again.
ENGLISH
ENGLISH
3
Page 4
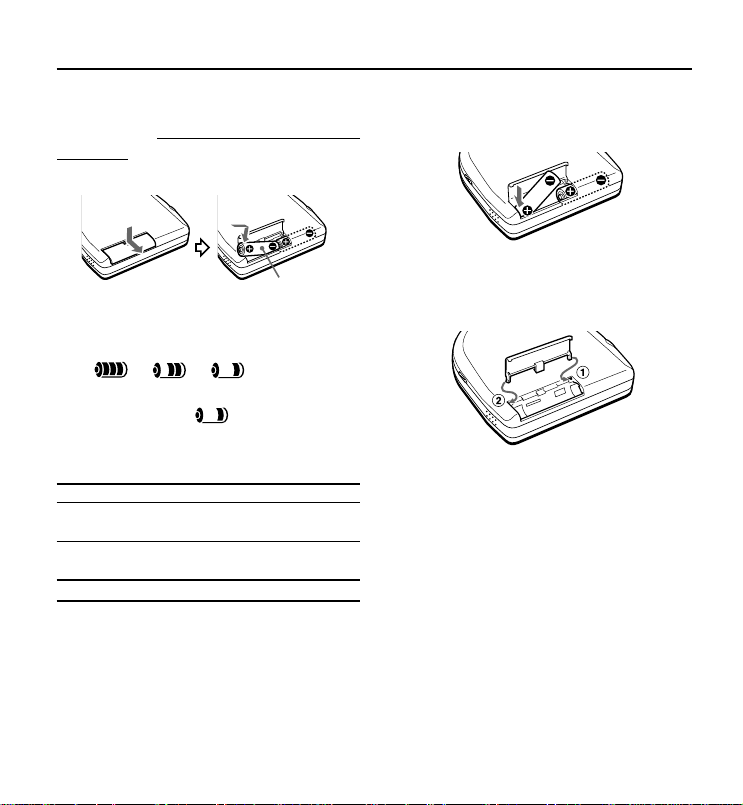
USING ON DRY CELL BATTERIES
Open the battery compartment and
insert two
LR6 (size AA) alkaline
batteries with the 0 and 9 marks
correctly aligned.
LR6 × 2
Battery replacement
The battery indicator in the display changes
from to to according to the
remaining power of the batteries. Replace
the batteries when lights.
Battery life (using alkaline batteries
LR6)
Audio disc playback
E•A•S•S PLUS Approx. 10 hours
function on
E•A•S•S PLUS Approx. 11 hours
function off
MP3 disc playback Approx. 5 hours
Battery life may vary depending on conditions
of use.
To remove the batteries
If the cover of the battery
compartment comes off
Note on dry cell batteries
• Make sure that the 0 and 9 marks are
correctly aligned.
• Do not mix the different types of batteries,
or an old battery with a new one.
• To prevent the risk of electrolyte leakage or
explosions, never recharge the batteries,
apply heat to them, or take them apart.
• When not using the batteries, remove them
to prevent needless battery wear.
• If liquid leaks from the batteries, wipe
thoroughly to remove.
4
ENGLISH
Page 5
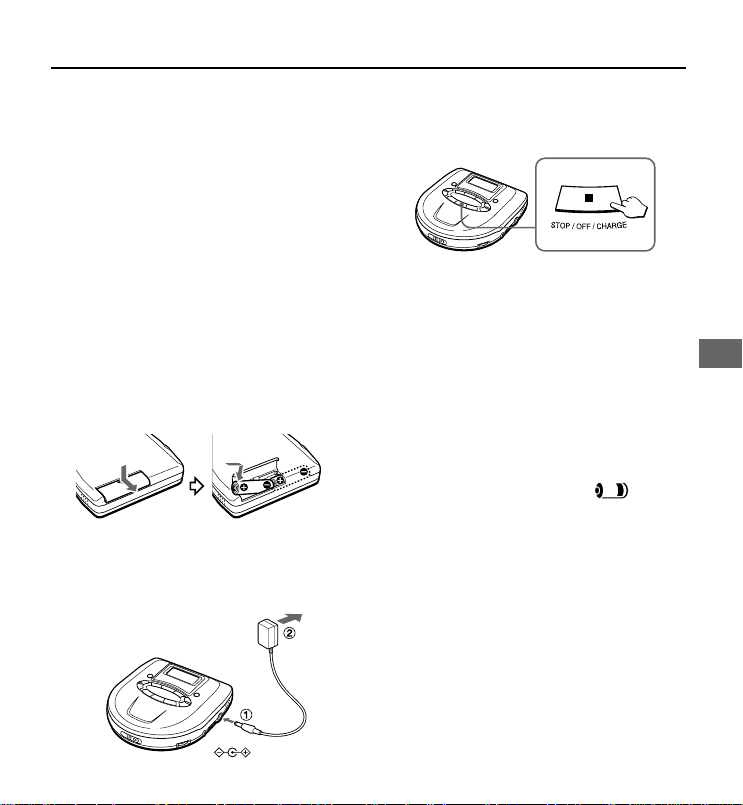
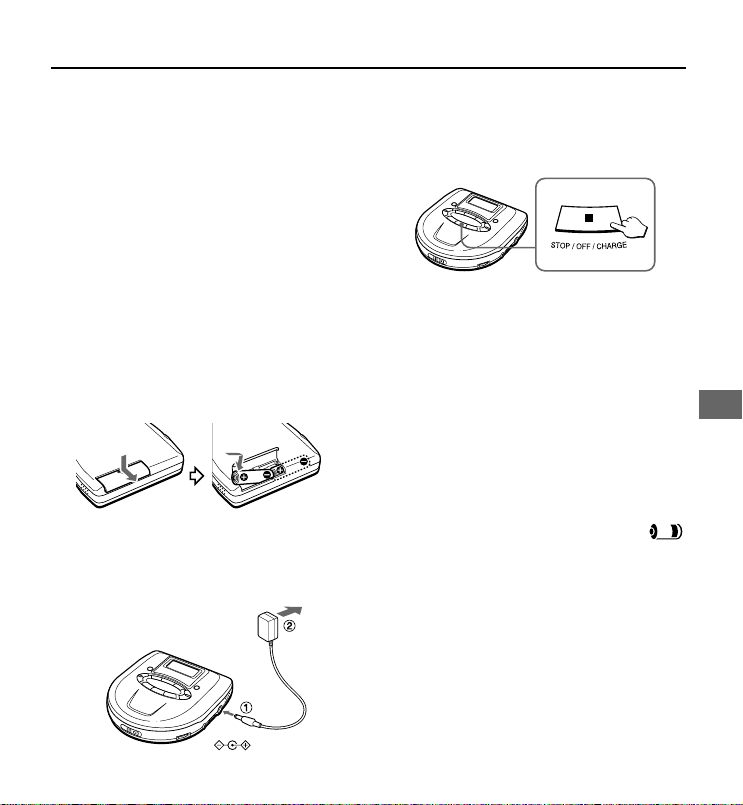
USING ON RECHARGEABLE BATTERIES
• Be sure to use size AA Ni-MH 1.2V
1600mAh rechargeable batteries, which
are commercially available.
• Be sure to read the instructions of the
purchased rechargeable batteries before
use.
• When using on the rechargeable batteries
for the first time, charge them until the
battery indicators go out.
• Before charging the batteries, close the
disc compartment. You cannot charge the
batteries while it is opened.
1 Insert the rechargeable batteries
with the 0 and 9 marks correctly
aligned.
2 Connect the AC adaptor.
1 to DC 5 V jack
2 to wall outlet
3
Keep sSTOP/OFF/CHARGE pressed
for about 2 seconds to start charging.
“Charge ON” appears, and battery
indicator blinks.
When charging is completed, “Charge
OFF” flashes a few times, and the battery
indicator goes out.
Recharging fully used batteries takes
about 3 hours.
After charging, disconnect the AC
adaptor.
Time to recharge the batteries
Recharge the batteries when lights.
To stop charging
Press s STOP/OFF/CHARGE during
charging.
USING ON AC HOUSE CURRENT
Connect the supplied AC adaptor in the
same way as recharging the batteries.
ENGLISH
DC 5V
ENGLISH
5
Page 6
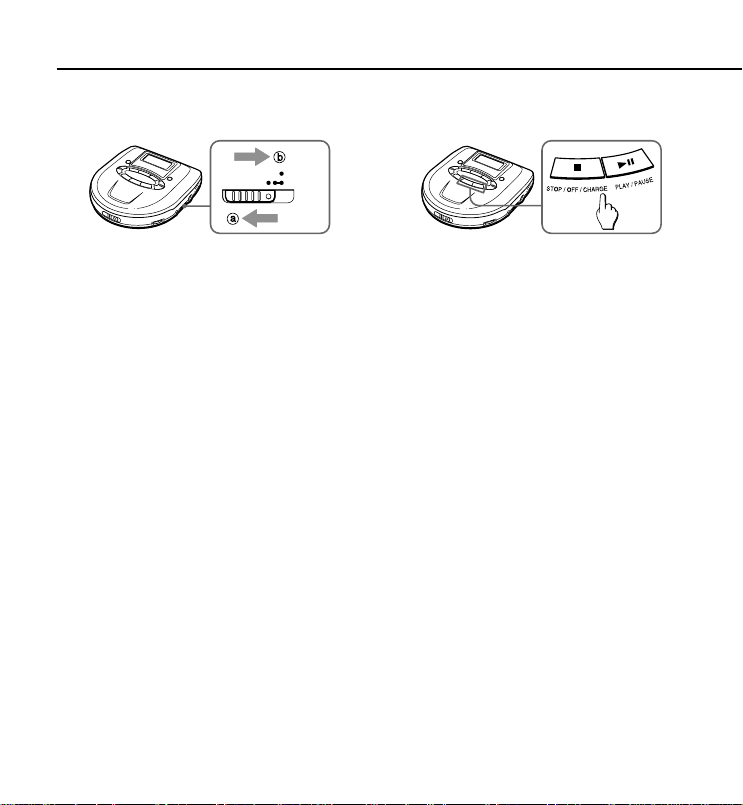
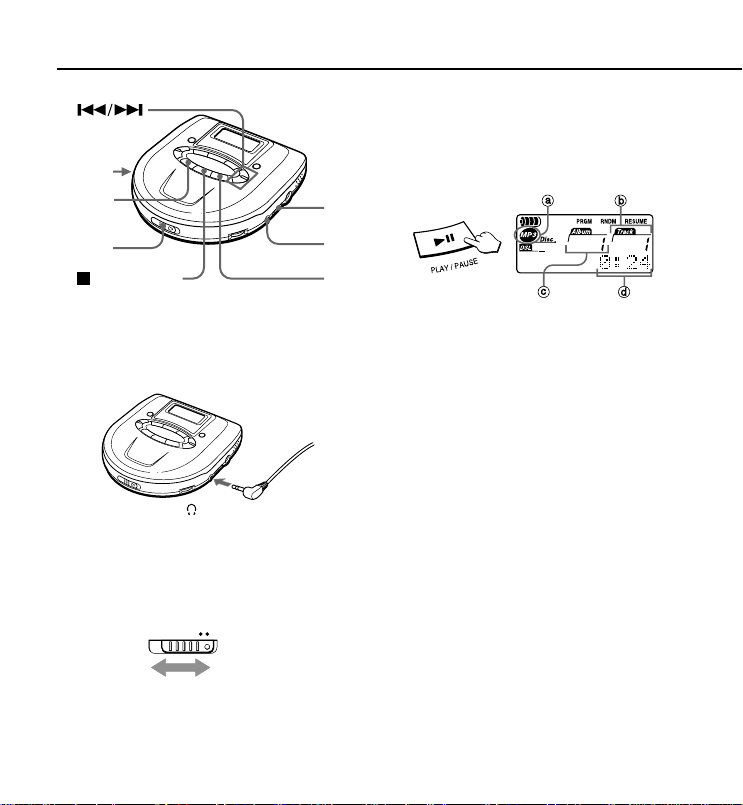
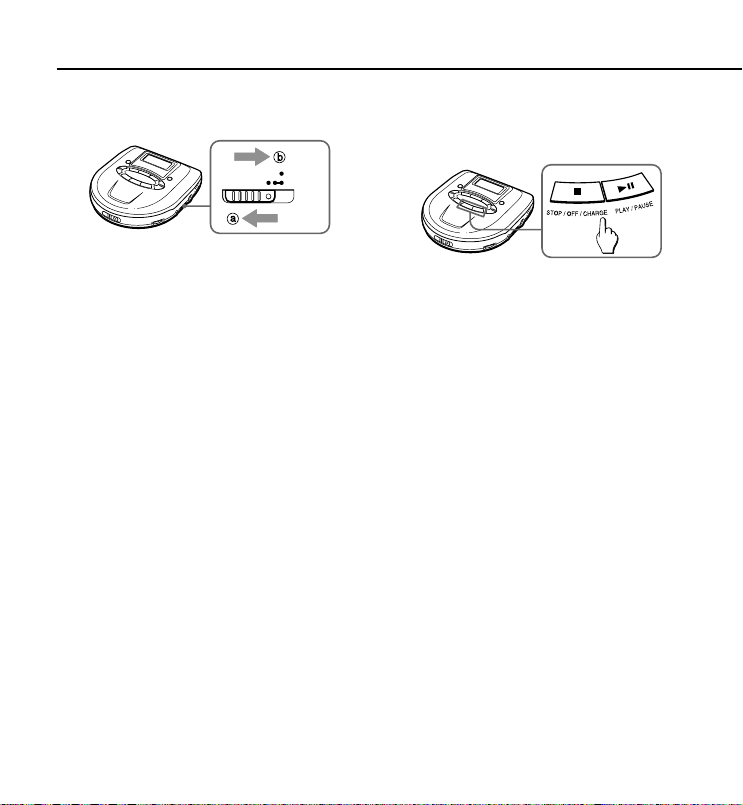
BEFORE PLAYBACK
HOLD switch
HOLD
RESUME
OFF
Release the HOLD switch before playback.
b a
When not using the unit, set the HOLD
switch to the HOLD position. b b
Accidentally pressed button will not function.
If buttons are pressed when the HOLD switch
is set to HOLD position, “HOLD” flashes in
the display.
Turning on and off
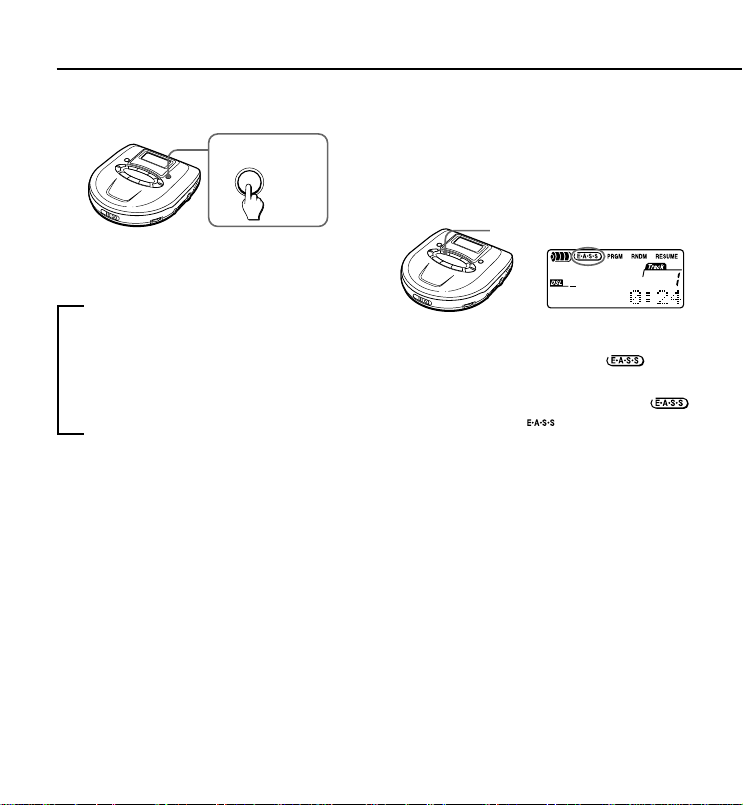
Turning the power on
Press ePLAY/PAUSE. Power is turned
on and playback starts.
Note
“ERROR” appears on the display when you
play a disc placed upside-down or a defective
disc.
6
ENGLISH
Page 7
Turning off the power
If no new operations are done within 30
seconds from the end of last operation, the
power is turned off automatically. (Auto power
off function)
• You can turn off the power by pressing
s STOP/OFF/CHARGE before it is
automatically turned off.
Standby mode
When an operation finishes, the unit goes
into standby mode until the auto power off
function automatically turns off the power.
To enter standby mode, press ePLAY/
PAUSE to start playback, then press
sSTOP/OFF/CHARGE.
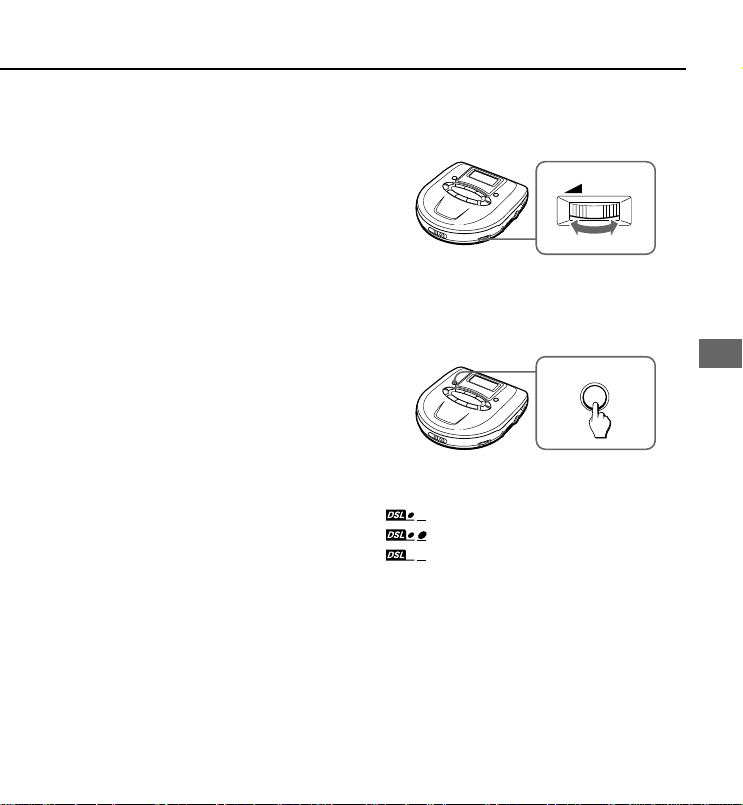
Adjusting the sound
Volume
VOLUME
6
Turn the VOLUME control to adjust the
volume.
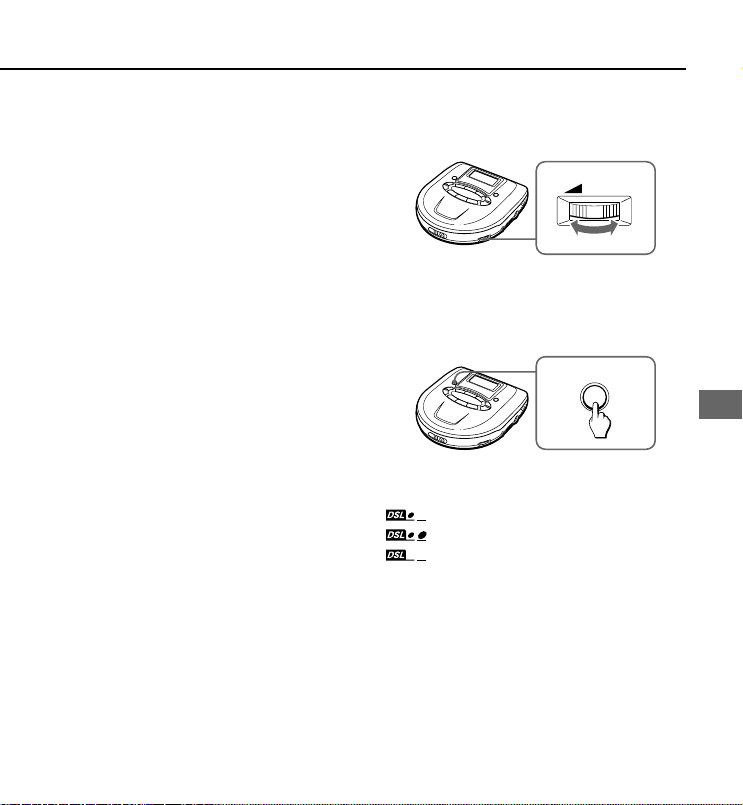
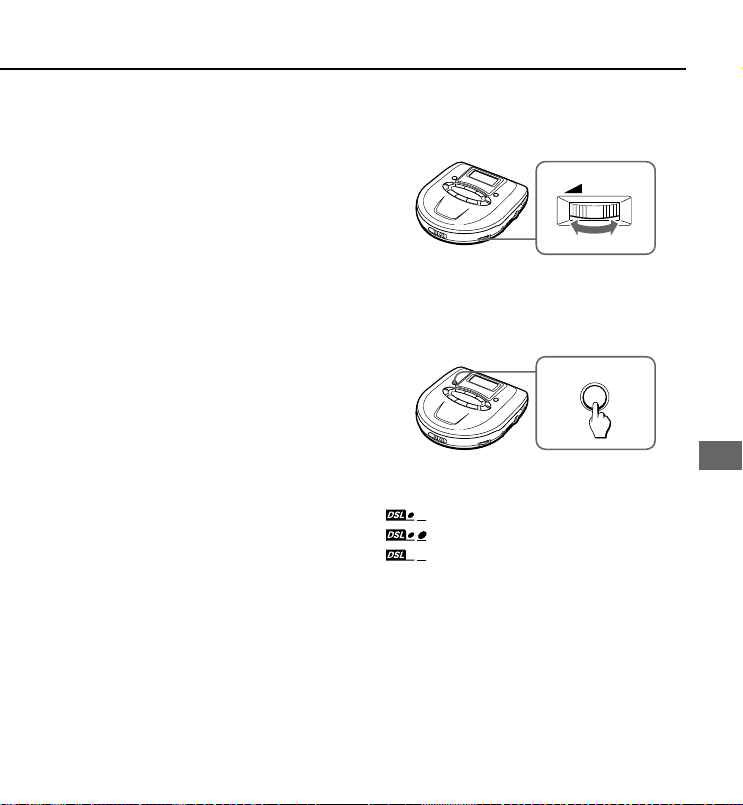
DSL
DSL
Press DSL repeatedly for more powerful
sound and deeper bass.
: Deep bass is emphasized.
: Deep bass is strongly emphasized.
: Normal sound
ENGLISH
ENGLISH
7
Page 8
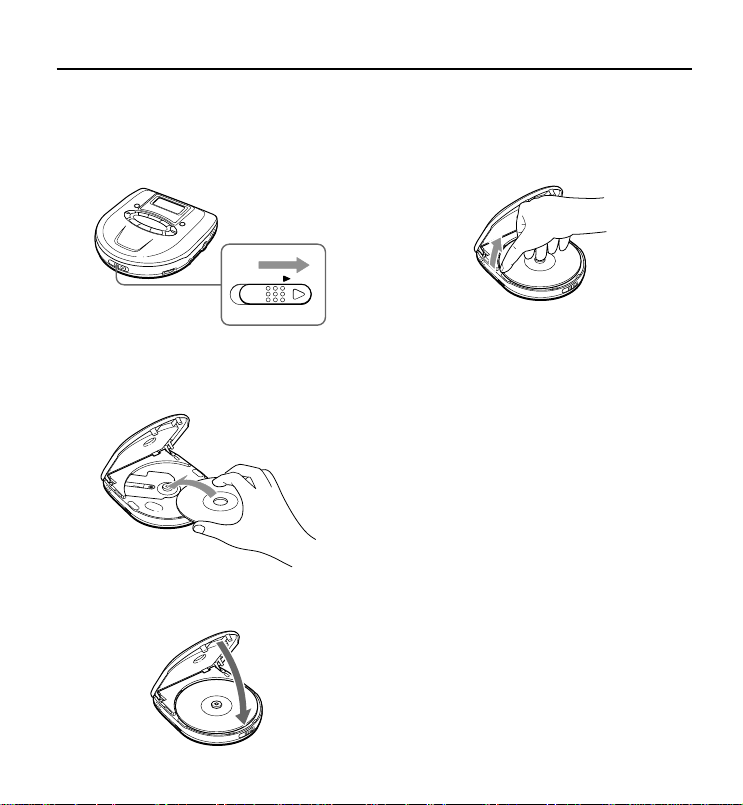
BEFORE PLAYBACK
Inserting a disc
1 Slide the OPEN switch to open the
disc compartment.
OPEN
2 Place a disc in the center with the
label side facing up.
3 Close the disc compartment.
To remove the disc
Pick up the disc, holding its edge, while
pressing the pivot gently.
Note
• The unit may not play a CD-R/RW disc that
is recorded on personal computers or some
kinds of CD-R/RW recorders because of
differences in recording platforms.
• Do not attach any seal or label to either
side (the recordable side or the labeled
side) of a CD-R/RW disc. It may cause
malfunction.
8
ENGLISH
Page 9
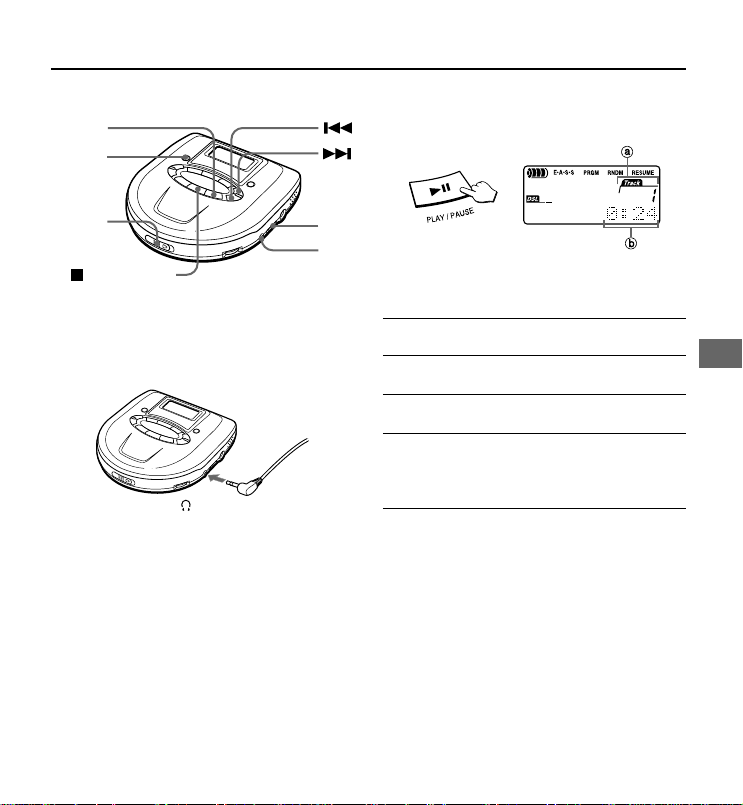
PLAYBACK OF AUDIO DISC
4
5
4 Press ePLAY/PAUSE.
Playback starts from the first track.
3
2
1
STOP/OFF/
CHARGE
1 Connect the supplied headphones
to the \/LINE OUT jack.
/LINE OUT
2 Release HOLD.
3 Place a disc.
a track number
b elapsed playing time
Basic operation
To stop
To pause
To search for the
beginning of a track
To locate a desired
passage
Press sSTOP/OFF/
CHARGE.
Press ePLAY/PAUSE.
To resume, press again.
Press r or t.
Keep r or t
pressed.
Release the button at the
start of desired passage.
ENGLISH
ENGLISH
9
Page 10
PLAYBACK OF AUDIO DISC
Display during playback
PRGM / ENTER /
DISPLAY
Press PRGM/ENTER/DISPLAY during
playback to change the display as follows.
b Track display and remaining playing
time of the track in play
V
Remaining number of tracks and
remaining playing time
V
Track display and elapsed playing time
(normal display)
E•A•S•S PLUS (Electronic AntiShock System)
The E•A•S•S PLUS function reduces skipping
or muting of the sound when the unit is
subjected to shocks.
E•A•S•S
To activate the E•A•S•S plus function, press
E•A•S•S repeatedly to display .
To cancel, press E•A•S•S again.
display changes to .
Note
• Continuous shock or vibration may cause
the sound to be interrupted even if the
E•A•S•S PLUS function is activated. This
is normal and not a malfunction. Should
you experience an interruption in sound,
stabilize the unit for a few seconds, then
resume your activity.
• When the E•A•S•S button is pressed during
playback, the unit will pause for about 2
seconds.
10
ENGLISH
Page 11
Resume function
Set the HOLD switch to RESUME.
HOLD
RESUME
OFF
Random play
1
2
appears, and you can start playback
from the point where you stopped playback
by pressing sSTOP/OFF/CHARGE.
When the resume function is on, all-track
repeat is selected automatically.
To cancel resume function, set the HOLD
switch to OFF.
Note
• Resume play may start at a point about 30
seconds behind or ahead the stopped point.
Resume play may not operate if you
stopped at the last 30 seconds of the final
track.
• Resume play will be canceled if you open
the disc compartment. If the unit is turned
off, resume play will not be canceled. In this
case, be sure to set the HOLD switch to
OFF before changing discs.
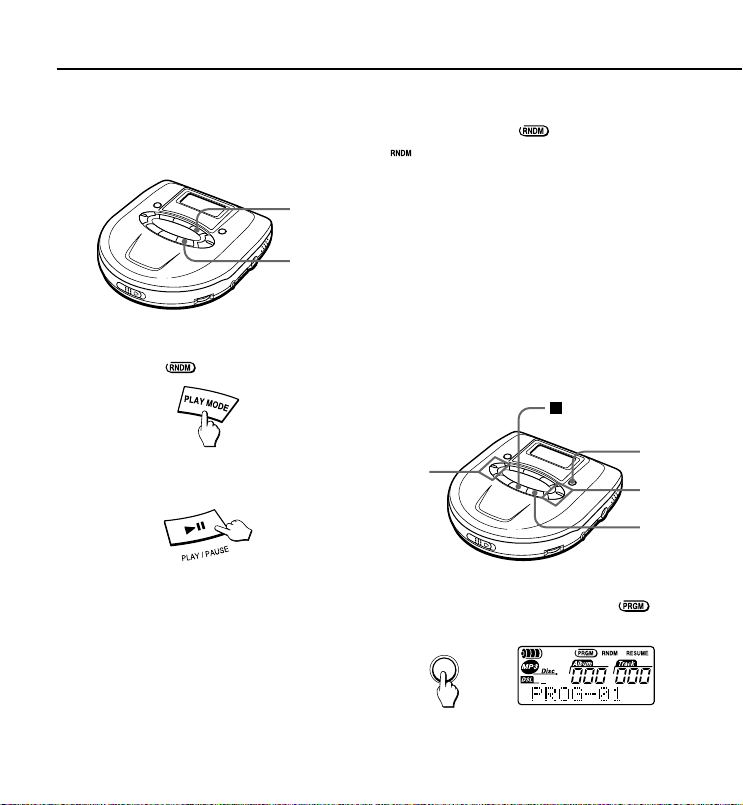
1 Press PLAY MODE in standby mode
to display
.
2 Press ePLAY/PAUSE to start
playback.
Tracks on the disc are played in random
order.
To cancel random play, press PLAY MODE
in standby mode. display changes to
.
Note
• You cannot back to previous track by
pressing r during random play.
• You cannot select one-track repeat during
random play.
ENGLISH
11
ENGLISH
Page 12
PRGM / ENTER /
DISPLAY
PLAYBACK OF AUDIO DISC
PROGRAM PLAY
Repeat play
Press PLAY MODE during playback to select
repeat play as follows.
: one-track repeat B
V
: all-track repeat
V
no repeat play (normal play)
STOP/OFF/
CHARGE
1,3
2
5
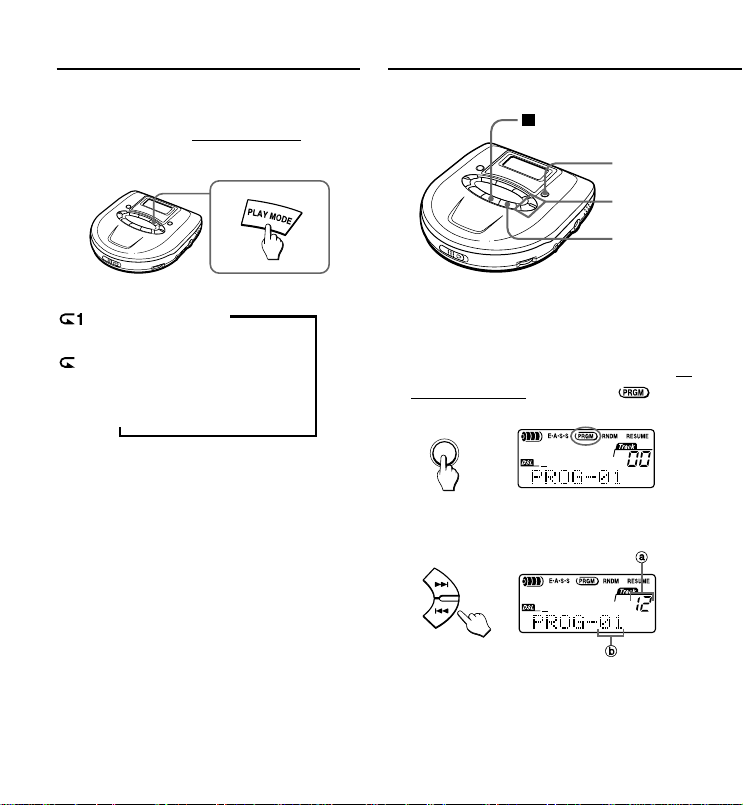
Up to 24 tracks can be chosen for program
play.
1 Press PRGM/ENTER/DISPLAY in
standby mode to display .
2 Select the desired track by pressing
r or t.
SKIP /
SEARCH
a track number
b program number
12
ENGLISH
Page 13
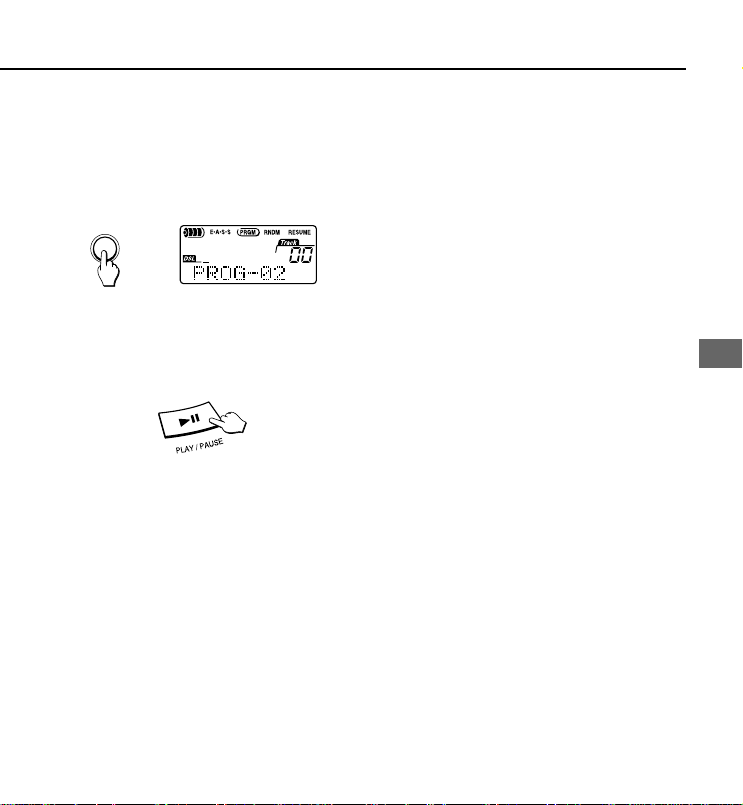
3 Press PRGM/ENTER/DISPLAY
within 4 seconds.
If it is not pressed within 4 seconds, the
track number changes to 00. Repeat the
procedure from step 2 again.
PRGM / ENTER /
DISPLAY
4 Repeat steps 2 and 3 to program
more tracks.
5 Press ePLAY/PAUSE to start
program play.
To stop program play
Press sSTOP/OFF/CHARGE.
To add tracks to the program
Repeat steps 2 and 3 before while in standby
mode. You can add tracks to the end of the
program.
To erase the program
Press s STOP/OFF/CHARGE while in
standby mode.
Note
• The program is also erased when the disc
compartment is opened or the auto power
off function turns power off.
• When the 24 tracks are programmed,
“PROG-FULL” appears, and no more tracks
may be added.
• You cannot back to previous track by
holding r pressed during program play.
• Repeat play and random play can be
performed during program play.
ENGLISH
ENGLISH
13
Page 14

PLAYBACK OF MP3 DISC
• An MP3 file stores audio data
compressed using MPEG1/2, the audio
layer-3 file-coding scheme.
• In this manual, CDs, CD-R discs and
CD-RW discs are all referred to as
“discs”. We refer to what are called
“folder” and “file” in PC terminology as
“album” and “track”.
Notes on playing MP3 files
• An MP3 track must be recorded on a disc
in the format compliant with ISO 9660.
Note, however, that the unit may not play
tracks in the order they were recorded.
• The maximum allowable number of tracks
and albums in a disc are as follows:
– number of tracks : 512 (depending on the
number of albums)
– number of albums : up to 512 (depending
on the number of tracks)
• The maximum allowable depth of nested
albums is 8.
• E•A•S•S PLUS does not function.
• It may take 30 seconds or more before the
unit can start play of MP3 tracks, depending
on the number of recorded tracks and the
complexity of the album tree.
• If a disc contains audio tracks and MP3
tracks, the unit plays only the audio tracks.
• As for a multi-session disc, up to 10 sessions
are recommended.
• The unit may not play MP3 tracks recorded
using a packet writing utility.
• The unit can play MP3 tracks having a file
extension “.mp3”.
• If you play a non-MP3 track that has the
“.mp3” file extension, you may hear some
noise.
• The sound may skip or mute during
playback of files encoded with bit rate
between 256 kbps and 320 kbps.
Notes on display indications during
play
• Up to 64 characters (including its extension)
are displayed for the name of an album or
a track. If ID3TAG version 1.X was applied
to record additional informations for an
MP3 track, up to 30 characters showing
track title and artist’s name are displayed.
Characters other than uppercase letters
(“A” to “Z”), numerals (“0” to “9”) and an
underscore (_) may not be displayed
correctly or is displayed instead of the
character.
• The elapsed playing time may not be
displayed correctly for MP3 tracks.
14
ENGLISH
Page 15

Notes on creating MP3 discs
When converting audio data to MP3
To enjoy high sound quality, we recommend
storing MP3 files with a sampling frequency
of 44.1 kHz and a fixed bit rate of 128 kbps.
To play tracks in the order they were
recorded
1 Use a writing software capable of
recording MP3 tracks (files) in
numerical and alphabetical order.
For details on using the software, refer to
the operating instructions supplied with
the software.
2 Use only one album. (Do not create
a sub-album within an album.)
3 Include a two- or three- digit number
at the beginning of each album or
track name so that the albums and
tracks are played in order.
<example of recommended names>
01XXXXX.mp3
02XXXXX.mp3
03XXXXX.mp3
04XXXXX.mp3
05XXXXX.mp3
<example of names not recommended>
1XXXXX.mp3
5XXXXX.mp3
10XXXXX.mp3
15XXXXX.mp3
20XXXXX.mp3
(Numbers at the beginning have
different digit number. The tracks will
not be played in this order but played in
the order of “1”, “10”, “15”, “20” and “5”.)
ENGLISH
ENGLISH
15
Page 16
PLAYBACK OF MP3 DISC
2
MP3
MODE
3
STOP/OFF/
CHARGE
1 Connect the supplied headphones
to the \/LINE OUT jack.
/LINE OUT
2 Set the START MODE switch to
select the disc reading format.
START MODE
NORMALQUICK
4
1
5
3 Insert an MP3 disc.
4 Release the HOLD switch.
5 Press ePLAY/PAUSE to start
playback.
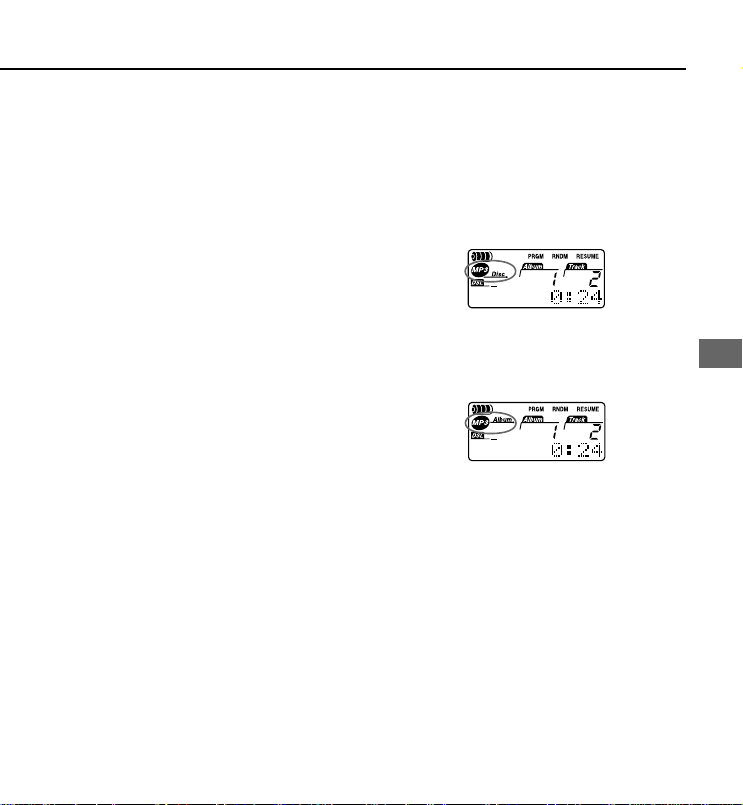
a appears when an MP3 disc is inserted
b track number
c album number
d elapsed playing time
Power is turned on and “READING”
flashes in the display.
After reading the disc, playback starts
from the first track of the Album 1.
Please refer to “Setting the START MODE
switch” on the next page and set the
switch to correct position.
16
ENGLISH
Page 17
Setting the START MODE switch
Set the switch to the correct position
depending on the playback mode and type
of disc.
QUICK
The unit reads only the number of the album
before playback, then disc reading finishes
earlier. However, program play and random
play cannot be operated.
The unit reads the track information during
playback. When the unit detects an album
that has no mp3 file, the number of album is
decreased. This position is recommended
when playing back a disc recorded many
albums.
NORMAL
The unit reads the number of albums and
tracks before playback, then it takes longer
time for disc reading than when the switch is
set to QUICK.
Note
If you slide the START MODE switch during
playback, the disc reading format is not
changed. Stop playback and press
sSTOP/OFF/CHARGE to turn off the power,
and slide the START MODE switch to change
the disc reading format.
To select MP3 playback mode
Press MP3 MODE repeatedly to select the
playback mode.
Disc mode
All tracks recorded in the disc are played
back.
Album mode
All tracks in the current album are played
back.
To stop playback
Press sSTOP/OFF/CHARGE.
Playback stops and disc reading format
(NORMAL or QUICK) is displayed.
To search for a beginning of a track
Press r or t.
ENGLISH
ENGLISH
17
Page 18

PLAYBACK OF MP3 DISC
To locate a desired passage
Keep r or t pressed. Release the
button at the start of desired passage.
• You cannot monitor the sound while the
button is pressed during MP3 file playback.
To pause playback
Press ePLAY/PAUSE. To resume, press
it again.
To change the album
ALBUM
SKIP
Press ALBUM SKIP.
To skip to the first track of next album, press
i.
To skip to the first track of previous album,
press k.
Display during playback
PRGM / ENTER /
DISPLAY
Press PRGM/ENTER/DISPLAY during
playback to change the display as follows.
b Current track name
The file name of the current track is
displayed.
V
ID3 TAG
The ID3 TAG of the current track is
displayed.
If the ID3 TAG is not recorded on the
current track, “No Title” is displayed.
V
Normal display
The elapsed time of the current track is
displayed.
18
ENGLISH
Page 19

Repeat play
Press PLAY MODE during playback to select
the repeat play as follows.
b : one track repeat
The current track is played back
repeatedly.
V
: all track repeat
All tracks on the disc are played back
repeatedly during DISC MODE
playback.
All tracks of the current album are
played back repeatedly during ALBUM
MODE playback.
V
no repeat play (normal play)
Resume function
Set the HOLD switch to RESUME.
HOLD
RESUME
OFF
appears, and you can start playback
from the point where you stopped playback
by pressing sSTOP/OFF/CHARGE.
When the resume function is on, all-track
repeat is selected automatically.
To cancel resume function, set the HOLD
switch to OFF.
Note
• Resume play may start at a point about 30
seconds behind or ahead the stopped point.
Resume play may not operate if you
stopped at the last 30 seconds of the final
track.
• Resume play will be canceled if you open
the disc compartment. If the unit is turned
off, resume play will not be canceled. In this
case, be sure to set the HOLD switch to
OFF before changing discs.
• Resume play will be canceled after the
batteries are removed or the AC adaptor is
disconnected.
ENGLISH
ENGLISH
19
Page 20
PLAYBACK OF MP3 DISC
3
1,4
6
2
STOP/OFF/
CHARGE
PRGM / ENTER /
DISPLAY
Random play
• Before random play, set START MODE to
NORMAL (Please refer to page 17).
1 Press PLAY MODE in standby mode
to display
2 Press ePLAY/PAUSE to start
playback.
All tracks on the disc are played back in
random order during DISC MODE
playback.
All tracks of the current album are played
back in random order during ALBUM
MODE playback.
.
20
ENGLISH
To cancel random play, press PLAY MODE
in standby mode. display changes to
.
Note
1
2
• You cannot back to previous track by
pressing r during random play.
• You cannot select one-track repeat during
random play.
Program play
• Before program play, set START MODE to
NORMAL (Please refer to page 17).
• Up to 24 tracks can be chosen for program
play.
1 Press PRGM/ENTER/DISPLAY in
standby mode to display
.
Page 21

2 Select the desired album by pressing
ALBUM SKIP.
ALBUM
SKIP
3 Select the desired track by pressing
r or t.
SKIP /
SEARCH
4 Press PRGM/ENTER/DISPLAY.
PRGM / ENTER /
DISPLAY
If it is not pressed within 4 seconds, the
track number changes to 00. Repeat the
procedure from step 2 again.
5 Repeat steps 2 ,3, and 4 to program
more tracks.
6 Press ePLAY/PAUSE to start
program play.
To stop program play
Press sSTOP/OFF/CHARGE.
To add tracks to the program
Repeat steps 2, 3 and 4 in standby mode.
You can add tracks to the end of program.
To erase the program
Press sSTOP/OFF/CHARGE in standby
mode.
Note
• The program play is also canceled when
the disc compartment is opened or the
auto power function turns off the power.
• When the 24 tracks are already
programmed, “PROG-FULL” appears, and
no more tracks may be added.
• You cannot back to the previous track by
holding r pressed during playback.
• Repeat play and random play can be
performed during program play.
ENGLISH
ENGLISH
21
Page 22

CONNECTING AN
EXTERNAL UNIT
Use a commercially available connection
cord which has a 3.5 ø stereo mini-plug at
one end and two phono plugs at the other
end.
Connect the stereo mini-plug to the
\/LINE OUT jack of the unit and connect the
phono plugs to the analog input terminals of
the external unit.
RL
LINE IN
CD IN
AUX
Note
• Turn off the power of both units before
connection.
• DO NOT connect to the PHONO inputs of
an amplifier (with a built-in phonoequalizeramplifier).
• Adjust the volume and DSL on this unit.
MAINTENANCE
To clean the lens
If the lens becomes dirty, the player will skip
or not play. If this occurs, clean the lens in the
following manner.
To remove dust or dry particles, first use a
camera lens blower/brush a to blow a few
times to loosen particles, then gently brush
the lens b clean. Finish by blowing the lens
again.
To remove fingerprints, use a cotton swab
dipped in lens cleaning solution. Wipe gently
from the center to the edge. Lens cleaning
solution is commercially available.
Note
Take care not to get too much solution on the
swab, which could flow into the unit and
cause damage.
Pressing too strongly with the swab could
scratch or break the lens.
22
ENGLISH
Page 23
TERMINOLOGY
To clean the discs
Before playing, wipe the disc from the center
outward with a cleaning cloth. After playing,
store the disc in its case.
ISO 9660
ISO stands for the “International Organization
for Standardization”. ISO 9660 determines
the file structure for the CD-ROMs. This unit
can play MP3 files recorded in the format
compliant with ISO 9660.
Nesting of folders (albums)
To organize data files stored in a PC, you
can store related files in a folder. A folder can
contain other folders as well as files. For
example, folder A can contain folder B, and
folder B can contain folder C; this is called
“nesting of folders”. The maximum depth of
nested folders, allowed by ISO 9660, is 8.
Writing utilities
There are 3 utilities used to record data on a
disc.
1 DAO (Disc At Once) utility
All data to be written must be prepared in
advance and written onto a disc from the
beginning to the end in one operation. No
data can be added to a disc on which data
were already written with DAO utility.
2 TAO (Track At Once) utility
Data are written onto a disc track by
track. Data can be added to a disc on
which data were written with TAO utility.
ENGLISH
ENGLISH
23
Page 24
TERMINOLOGY
3 Packet writing utility
Tracks are divided into smaller pieces
while being recorded, depending on the
size of available spaces on the disc. Data
can be added to a disc on which data
were written with packet writing utility.
This unit can play MP3 discs recorded using
DAO and TAO utilities.
Multi-session
A session is a collection of data, covering
from the beginning to the end of recording
made in one operation. With TAO (Track At
Once) utility, data can be recorded with
several operations. A session corresponds
to the data recorded in one operation.
SESSION1 SESSION2 SESSOIN3
ID3TAG
ID3TAG determines the data format for the
text to be added to an MP3 file, mainly used
to indicate a track name or an artist’s name,
etc.
File extension
A 3-character string added to a file name
under Windows or DOS environment is called
“file extension”. A file extension is used mainly
to identify types of files. File extension for
MP3 files is “.mp3”.
24
ENGLISH
Page 25

SPECIFICATIONS
Tracking system 3-beam laser
Laser pickup Semiconductor laser
D/A conversion Multi-bit DAC
Frequency response
Output \/LINE OUT jack (stereo
Maximum output 5 mW + 5 mW
Power supply DC 3 V using two LR6 (size
Maximum outside dimensions
Weight Approx. 285 g excluding
Accessories AC adaptor AC-A56E (1)
20 – 20,000 Hz (47 k ohms)
mini-jack)
(16 ohms at 1 kHz)
500 mV (47 k ohms at 1 kHz)
AA) alkaline batteries
DC 2.4 V using two
commercially available (Ni-MH
1.2 V 1600mAh) rechargeable
batteries
AC house current using the
supplied AC adaptor
131 (W) × 35 (H) × 144 (D)
mm (excluding projecting
parts and controls)
batteries
Stereo headphones (1)
«AC Adaptor AC-A56E»
Rated input AC 230 V, 50 Hz
Supplied headphones HP-M043
Recommended commercially available
headphones
The specifications and external appearance of this
unit are subject to change without notice.
Type: In-ear type
Impedance: 16 ohms
Sensitivity: 107 dB/mW
Type: In-ear type/
Vertical type/Headband type
Impedance: 16 – 32 ohms
Sensitivity: 100 – 109 dB/mW
ENGLISH
ENGLISH
25
Page 26

• Eine MP3-Datei speichert Audiodaten,
die mit MPEG1/2, der „audio layer-3"
Dateicodierung komprimiert wurden.
• In dieser Bedienungsanleitung werden
CDs, CD-R-Discs und CD-RW-Discs
als „Discs” bezeichnet. Wir beziehen
uns auf die Computerfachausdrücke
„Ordner” und „Datei” als „Album” und
„Titel”.
INHALTSVERZEICHNIS
VORSICHTSMASSNAHMEN ...................... 3
BATTERIEBETRIEB MIT
TROCKENZELLEN.................................. 4
BATTERIEBETRIEB MIT AKKUS................5
VOR DER CD-WIEDERGABE .................... 6
WIEDERGABE VON AUDIODISCS ............ 9
PROGRAMMWIEDERGABE .................... 12
WIEDERGABE VON MP3-DISCS ............. 14
ANSCHLUSS AN
AUDIOKOMPONENTEN ....................... 22
PFLEGE UND WARTUNG ........................ 22
TERMINOLOGIE .......................................23
TECHNISCHE DATEN .............................. 25
2
DEUTSCH
Page 27

VORSICHTSMASSNAHMEN
Im Interesse einer einwandfreien
Geräteleistung über lange Zeit
• Betreiben Sie das Gerät keinesfalls an
Orten, die extremen Temperaturen oder
starker Staub- oder Feuchtigkeitsbelastung
ausgesetzt sind. Vermeiden Sie vor allem
auch Gebrauch oder Lagerung des Geräts
an folgenden Orten oder unter folgenden
Bedingungen:
• Feuchträume wie Badezimmer
• Neben Heizkörpern
• Direkte Sonneneinstrahlung (z.B. im
Inneren eines geparkten Pkw, wo es u.U.
zu einem Hitzestau kommen kann)
• Einwirkung starker Magnetfelder, wie sie
z.B. von Fernsehgeräten, Lautsprechern
oder Magneten erzeugt werden.
• Heftige Bewegungen oder
Erschütterungen, wie sie am
Armaturenbrett eines Pkw oder an einem
wackeligen Regal auftreten können.
Im Interesse der Betriebssicherheit
• Versuchen Sie keinesfalls, das Gerät zu
öffnen. Andernfalls drohen Augenschäden
durch die Laserstrahlung des optischen
Abtasters.
• Sorgen Sie dafür, daß keine Fremdkörper
in das Geräteinnere eindringen.
• Vermeiden Sie unbedingt, daß das Gerät
zu Boden fällt oder unter heftigen Stößen
leidet.
• Damit die Abtasterlinse nicht einstaubt,
halten Sie das CD-Fach nach Gebrauch
geschlossen, und berühren Sie auch
keinesfalls die Linse.
•
Wenn Sie beim Abspielen einer Disc keine
Musik hören, stellen Sie NICHT die Lautstärke
höher ein, da die Musik plötzlich mit hoher
Lautstärke einsetzen könnte. Drehen Sie
vielmehr vor Beginn der Wiedergabe den
Lautstärkeregler ganz zurück und
anschließend bis auf den gewünschten Wert.
Hinweise zur Kopfhörerwiedergabe
• Vermeiden Sie im Interesse Ihres Gehörs
eine zu hohe Wiedergabelautstärke.
• Im Interesse der Verkehrssicherheit sollten
Sie beim Radfahren oder am Steuer Ihres
Wagens keinesfalls Kopfhörer tragen.
•
In möglichen Gefahrensituationen wie z.B.
beim Gehen, Joggen etc. immer sehr vorsichtig
sein oder die Kopfhörer zeitweise abnehmen.
• Achten Sie stets auf die richtige Zuordnung:
L steht für links und R für rechts.
• Beim Tragen von Kopfhörern, die ins Ohr
gesteckt werden, sollten Sie das längere
Verbindungskabel um das Genick legen.
VORSICHT
Ständige Wiedergabe mit voller Lautstärke über die
Stereo-Kopfhörer kann zu Gehörschäden führen.
Kondenswasserbildung
Ein plötzlicher Temperaturwechsel von warm
zu kalt kann zur Bildung von Kondenswasser
auf der Abtasterlinse führen und damit auch
zu Funktionsstörungen oder schlechter
Klangwiedergabe.
Sollte dieser Fall eintreten, lassen Sie das
Gerät einige Stunden lang stehen, damit der
Beschlag verschwindet, und versuchen Sie
die Wiedergabe erneut.
DEUTSCH
3
DEUTSCH
Page 28
BATTERIEBETRIEB MIT TROCKENZELLEN
Öffnen Sie das Batteriefach, und legen
Sie zwei
Alkalibatterien (LR6, Format
AA) richtig gepolt ein (0 und 9
beachten).
LR6 × 2
Batterieaustausch
Je nach der restlichen Akkukapazität
wechselt die Batterieanzeige auf dem Display
von auf bzw. . Ersetzen
Sie die Batterien, wenn leuchtet.
Batterielebensdauer
(mit Alkalibatterien LR6)
Wiedergabe von Audiodiscs
Funktion E•A•S•S ca. 10 Stunden
PLUS aktiviert
Funktion E•A•S•S ca. 11 Stunden
PLUS deaktiviert
Wiedergabe von ca. 5 Stunden
MP3-Discs
Die tatsäshliche Batterielebensdauer richtet
sich nach den jeweiligen
Gebrauchsbedingungen.
Herausnehmen der Batterien
Bei Ablösung des Batteriefachdeckels
Hinweise zum Umgang mit Trockenzellen
• Stellen Sie sicher, daß die Markierungen
0 und 9 richtig ausgerichtet sind.
• Keinesfalls verschiedenartige Batterien
oder frische und erschöpfte zusammen
verwenden.
• Zum Schutz vor Auslaufen des Elektrolyts
oder Bersten die Batterien keinesfalls
aufladen, erhitzen oder zerlegen.
• Bei Nichtgebrauch des Geräts die Batterien
entnehmen, um ihre Kapazität zu schonen.
• Bei Austritt von Elektrolyt aus den Batterien
die Flüssigkeit gründlich entfernen.
4
DEUTSCH
Page 29
BATTERIEBETRIEB MIT AKKUS
• Verwenden Sie unbedingt Ni-MH-Akkus
(1,2 V/1600 mAh) im Mignonformat (AA),
die im Fachhandel erhältlich sind.
• Machen Sie sich vor Gebrauch mit dem
Inhalt der Gebrauchsanleitung der
erworbenen Akkus vertraut.
• Bei erstmaligem Gebrauch im Gerät sind
die Akkus aufzuladen, bis die
Batterieanzeigen erlöschen.
• Vor dem Aufladen der Akkus müssen Sie
das CD-Fach schließen, da sich die Akkus
nur in diesem Betriebszustand des Geräts
aufladen lassen.
1 Die Akkus richtig gepolt
entsprechend 0 und 9 einlegen.
2 Schließen Sie den Netzteil wie folgt
an:
1 an die Buchse DC 5 V am Gerät
2 an eine geeignete Netzsteckdose
DC 5V
3
Halten Sie sSTOP/OFF/CHARGE
etwa 2 Sekunden lang gedrückt, um
den Ladevorgang zu starten.
Die Anzeige “Charge ON” erscheint, und
die Batterieanzeige blinkt.
Sobald die Aufladung abgeschlossen ist,
blinkt “Charge OFF” mehrmals und die
Batterieanzeige erlischt.
Das Aufladen vollständig entladener
Akkus dauert etwa 3 Stunden.
Nach dem Laden trennen Sie das Netzteil
ab.
Notwendigkeit zum Aufladen der
Akkus
Laden Sie die Batterien auf, wenn
leuchtet.
Abbruch des Ladevorgangs
Drücken Sie s STOP/OFF/CHARGE
während des Ladevorgangs.
BETRIEB MIT NETZSTROM
Schließen Sie das mitgelieferte Netzteil auf
gleiche Weise wie beim Aufladen der
Batterien an.
DEUTSCH
DEUTSCH
5
Page 30
VOR DER CD-WIEDERGABE
HOLD-Schalter
HOLD
RESUME
OFF
Entriegeln Sie vor der Wiedergabe das Gerät
mit dem HOLD-Schalter. b a
Bei Nichtgebrauch des Geräts muß der
HOLD-Schalter auf HOLD stehen. b b
Dadurch wird eine versehentliche Betätigung
der Bedienelemente verhindert.
Bei Drücken einer Taste in HOLDSchalterstellung HOLD blinkt die Anzeige
„HOLD“ auf dem Display.
Ein- und Ausschalten der
Stromversorgung
Einschalten der Stromversorgung
Drücken Sie die Taste ePLAY/PAUSE.
Daraufhin wird die Stromversorgung
eingeschaltet und die Wiedergabe gestartet.
Hinweis
„ERROR“ erscheint im Display, wenn eine
Disc verkehrt herum eingelegt ist oder eine
defekte Disc eingelegt ist.
6
DEUTSCH
Page 31
Ausschalten
Wenn 30 Sekunden nach dem letzten
Bedienvorgang keine Bedienung
vorgenommen wird, schaltet das Gerät
automatisch aus. (Automatische
Ausschaltfunktion)
• Sie können Das Gerät durch Drücken von
s STOP/OFF/CHARGE ausschalten,
bevor es automatisch ausschaltet.
Betriebsbereitschaft
Nach einem Bedienvorgang schaltet das
Gerät auf Betriebsbereitschaft, bis die
Stromversorgung von der Abschaltautomatik
ausgeschaltet wird.
Zum Schalten auf Betriebsbereitschaft
starten Sie zunächst die Wiedergabe mit
Taste ePLAY/PAUSE und drücken dann
die Taste sSTOP/OFF/CHARGE.
Klangeinstellung
Lautstärke
VOLUME
6
Stellen Sie mit dem Regler VOLUME die
Lautstärke ein.
DSL-Funktion
DSL
DEUTSCH
Drücken Sie DSL wiederholt für einen
kräftigeren Ton und tiefere Bässe.
: Tiefe Bässe werden betont.
: Tiefe Bässe werden stark betont.
: Normaler Klang
DEUTSCH
7
Page 32

VOR DER CD-WIEDERGABE
Einlegen von Disc
1 Schieben Sie den OPEN-Schalter
zum Öffnen des Disc-Fachs.
OPEN
2 Legen Sie eine Disc zentriert mit
dem Etikett nach oben ein.
3 Schließen Sie das Disc-Fach.
Entnehmen von Disc
Fassen Sie die Disc an der Kante und heben
Sie sie durch leichtes Drücken auf den
Mitnehmer heraus.
Hinweis
• Das Gerät kann nicht in der Lage sein, eine
CD-R/RW-Disc abzuspielen, die auf PCs
oder bestimmten CD-R/RW-Recordern
aufgezeichnet wurde, da die Aufzeichnung
auf unterschiedlichen Plattformen geschah.
• Keine Aufkleber oder Etiketten auf einer
Seite (weder der bespielbaren noch der
Beschriftungsseite) einer CD-R/RW-Disc
anbringen. Dadurch können
Betriebsstörungen verursacht werden.
8
DEUTSCH
Page 33

WIEDERGABE VON AUDIODISCS
4Drücken Sie ePLAY/PAUSE.
4
5
Daraufhin startet die Wiedergabe mit dem
ersten Titel.
3
2
1
STOP/OFF/
CHARGE
1 Verbinden Sie den mitgelieferten
Kopfhörer mit der Buchse
\/LINE OUT.
/LINE OUT
2 Entriegeln Sie das Gerät mit HOLD.
3 Legen Sie eine CD ein.
a Titelnummer
b Abspielzeit
Grundlegende Bedienung
Wiedergabestopp
Wiedergabepause
Titelsuche
Lokalisieren einer
bestimmten Passage
Drücken Sie sSTOP/
OFF/CHARGE.
Drücken Sie ePLAY/
PAUSE.
Zur
Wiedergabefortsetzung
ist diese Taste erneut zu
drücken.
Drücken Sie r oder
t.
Halten Sie r oder t
gedrückt, und lassen Sie
die Taste beim Beginn der
gewünschten Passage
los.
DEUTSCH
DEUTSCH
9
Page 34

WIEDERGABE VON AUDIODISCS
Anzeige während der Wiedergabe
PRGM / ENTER /
DISPLAY
Drücken Sie PRGM/ENTER/DISPLAY
während der Wiedergabe, um das Display
wie folgt umzustellen.
b Titelanzeige und restliche Spielzeit des
aktuellen Titels
V
Restliche Anzahl von Titel und restliche
Spielzeit
V
Titelanzeige und verflossene Spielzeit
(normale Anzeige)
10
DEUTSCH
E•A•S•S PLUS (Electronic AntiShock System)
Die Funktion E•A•S•S PLUS reduziert
Tonaussetzer bzw. verhindert die
Stummschaltung, wenn das Gerät bei der
Wiedergabe Stößen ausgesetzt ist.
E•A•S•S
Zum Aufrufen der Funktion E•A•S•S PLUS
drücken Sie den E•A•S•S-Schalter so oft, bis
auf dem Display erscheint.
Zur Annullierung drücken Sie erneut den
E•A•S•S-Schalter, woraufhin die
Displayanzeige von auf
wechselt.
Hinweis
• Fortgesetzte Erschütterungen oder
Vibrationen können Klangaussetzer
bewirken, auch wenn die E•A•S•S-Funktion
aktiviert ist. Dies ist normal und keine
Fehlfunktion. Sollten Klangaussetzer
auftreten, halten Sie das Gerät einige
Sekunden lang ruhig und fahren Sie dann
normal mit dem Betrieb fort.
• Wird während der Wiedergabe der
E•A•S•S-Schalter gedrückt, so wird ca. 2
Sekunden lang auf Wiedergabepause
umgeschaltet.
Page 35

Wiedergabefortsetzung
Stellen Sie Schalter HOLD auf RESUME.
HOLD
RESUME
OFF
Zufallswiedergabe
1
2
erscheint, und Sie können die
Wiedergabe von der Stelle beginnen, wo sie
durch Drücken von sSTOP/OFF/CHARGE
ausgeschaltet wurde.
Wenn die Fortsetzen-Funktion eingeschaltet
ist, wird automatisch Wiederholung aller Titel
gewählt.
Zum Abbrechen der
Fortsetzungswiedergabe stellen Sie den
HOLD-Schalter auf OFF.
Hinweis
• Die Wiedergabefortsetzung setzt u.U. an
einer Stelle 30 Sekunden vor oder hinter
der Stoppstelle ein. Liegt die Stoppstelle
innerhalb der letzten 30 Sekunden des
letzten Titels, so ist u.U. eine
Wiedergabefortsetzung nicht möglich.
• Die Fortsetzungswiedergabe wird
aufgehoben, wenn Sie das Disc-Fach
öffnen. Wenn das Gerät ausgeschaltet ist,
wird die Fortsetzungswiedergabe nicht
aufgehoben. In diesem Fall sicherstellen,
daß der HOLD-Schalter auf OFF gestellt
ist, bevor Discs gewechselt werden.
1Drücken Sie die Taste PLAY MODE
bei Betriebsbereitschaft, woraufhin
die Anzeige
erscheint.
2 Starten Sie die Wiedergabe durch
Drücken von ePLAY/PAUSE.
Titel auf der Disc werden in zufälliger
Reihenfolge abgespielt.
Zur Deaktivierung der Zufallswiedergabe
drücken Sie Taste PLAY MODE bei
Betriebsbereitschaft, wobei die Anzeige
auf wechselt.
Hinweise
• Bei Zufallswiedergabe ist der Rücksprung
auf den vorhergehenden Titel durch
Drücken von r nicht möglich.
• Dies gilt auch für die Wiederholung
einzelner Titel.
DEUTSCH
11
DEUTSCH
Page 36

PRGM / ENTER /
DISPLAY
WIEDERGABE VON AUDIODISCS
PROGRAMMWIEDERGABE
Wiedergabewiederholung
Durch Drücken von Taste PLAY MODE
während der Wiedergabe werden
nacheinander die verschiedenen
Wiederholbetriebsarten wie folgt gewählt:
: Wiederholung einzelner Titel B
V
: Wiederholung aller Titel
V
Keine Wiederholung (Normalwiedergabe)
STOP/OFF/
CHARGE
1,3
2
5
Bis zu 24 Titel lassen sich zu einem
Wiedergabeprogramm zusammenfassen.
1Drücken Sie Taste PRGM/ENTER/
DISPLAY
woraufhin die Anzeige
erscheint.
2Wählen Sie den gewünschten Titel
durch entsprechend häufiges
Drücken von r oder t.
bei Betriebsbereitschaft,
SKIP /
SEARCH
12
a Titelnummer
b Programmnummer
DEUTSCH
Page 37

3Drücken Sie die Taste PRGM/
ENTER/DISPLAY innerhalb von 4
Sekunden.
Wird der Titel nicht innerhalb von 4
Sekunden gewählt, so wechselt die
Titelnummer auf 00. Wiederholen Sie in
diesem Fall Bedienschritt 2.
PRGM / ENTER /
DISPLAY
4 Wiederholen Sie die Schritte 2 und 3
zur Programmierung weiterer Titel.
5 Starten Sie die
Programmwiedergabe durch
Drücken der Taste e PLAY/
PAUSE.
Stoppen der Programmwiedergabe
Drücken Sie die Taste s STOP/OFF/
CHARGE.
Erweiterung des Programms durch
weitere Titel
Wiederholen Sie Schritt 2 und 3 im
Bereitschaftsbetrieb. Sie können Titel am
Ende des Programms hinzufügen.
Löschen des Programms
Drücken Sie die Taste s STOP/OFF/
CHARGE bei Betriebsbereitschaft.
Hinweise
• Das Programm wird auch gelöscht, wenn
das Disc-Fach geöffnet oder das Gerät
durch die automatische Ausschaltfunktion
ausgeschaltet wird.
• Wenn die 24 Titel programmiert sind,
erscheint „PROG-FULL“, und weitere Titel
können nicht hinzugefügt werden.
• Sie können nicht zum vorherigen Titel
zurückgehen, indem Sie r bei der
Programmwiedergabe gedrückt halten.
• Dagegen sind Wiedergabewiederholung
und Zufallswiedergabe möglich.
DEUTSCH
DEUTSCH
13
Page 38

WIEDERGABE VON MP3-DISCS
Hinweise zur Wiedergabe von
MP3-Dateien
• MP3-Dateien müssen im Format gemäß
ISO 9660 auf Discs aufgezeichnet werden.
Dabei ist allerdings zu beachten, daß die
Titel u.U. nicht in der Aufnahmereihenfolge
abgespielt werden.
• Die maximal zulässige Zahl von Titeln und
Alben auf einer Disc ist wie folgt:
–Titelzahl : 512 (je nach der Zahl der
Alben)
–Albenzahl : bis zu 512 (je nach der Zahl
der Titel)
• Die maximal zulässige Tiefe von
verschachtelten Alben beträgt 8.
• E•A•S•S PLUS ist funktionslos.
• Je nach der Zahl der aufgezeichneten Titel
und der Komplexität des Albumbaums
braucht der Player u.U. 30 Sekunden oder
länger, bevor die Wiedergabe von MP3Titeln möglich ist.
• Enthält eine Disc gleichzeitig Audio- und
MP3-Titel, werden lediglich die Audiotitel
abgespielt.
• Bei Multi-Sitzungs-Discs werden bis zu 10
Sitzungen empfohlen.
• MP3-Discs, die mit einem
Paketbeschreibungs-Dienstprogramm
aufgezeichnet worden sind, lassen sich
nicht auf diesem Player abspielen.
• Der Player kann MP3-Discs mit der
Dateierweiterung „.mp3“ wiedergeben.
14
DEUTSCH
• Die Wiedergabe eines nicht im MP3-Format
aufgezeichneten Titels mit „.mp3“-
Erweiterung ist u.U. etwas verrauscht.
• Während der Wiedergabe von mit einer
Bitrate zwischen 256 und 320 kbit/s
codierten Dateien sind u.U. Klangaussetzer
oder Stummschaltung möglich.
Hinweise zu den Displayanzeigen
während der Wiedergabe
• Bei der Anzeige von Album- oder
Titelnamen sind bis zu 64 Zeichnen
(einschließlich Erweiterung) möglich. Falls
bei einem MP3-Titel die Aufzeichnung
zusätzlicher Informationen mit Hilfe von
ID3TAG, Version 1.X erfolgt, können bis
zu 30 Zeichen für Titel und den Namen des
Interpreten angezeigt werden. Andere
Zeichen als Großbuchstaben („A“ bis „Z“),
Ziffern („0“ bis „9“) und Unterstreichung (_)
werden u.U. entweder jeweils durch
ersetzt oder überhaupt nicht angezeigt.
• Bei MP3-Titeln wird u.U. die bisherige
Abspielzeit nicht korrekt angezeigt.
Page 39

Hinweise zur Kreierung von MP3Discs
Bei Konvertierung von Audiodaten in
MP3-Format
Um in den Genuß von hoher Klangqualität
zu kommen, empfiehlt sich die
Abspeicherung von MP3-Dateien mit einer
Abtastfrequenz von 44.1 kHz und einer festen
Bitrate von 128 kbit/s.
Zum Abspielen von Titeln in der
Reihenfolge ihrer Aufnahme
1 Verwenden Sie eine
Beschreibungssoftware, die sich für
die Aufnahme von MP3-Titeln
(Dateien) in numerischer und
alphabetischer Reihenfolge eignet.
Näheres zur Anwendung der Software
finden Sie in der zugehörigen Anleitung.
2 Nutzen Sie nur ein Album. (Kreieren
Sie keinesfalls ein Unteralbum in
einem Album.)
3 Setzen Sie eine zwei- oder
dreistellige Nummer an den Anfang
jedes Album- oder Titelnamens,
damit die Alben und Titel in der
richtigen Reihenfolge abgespielt
werden.
<Beispiel für empfehlenswerte
Namensgebung>
01XXXXX.mp3
02XXXXX.mp3
03XXXXX.mp3
04XXXXX.mp3
05XXXXX.mp3
<Beispiel für nicht empfehlenswerte
Namensgebung>
1XXXXX.mp3
5XXXXX.mp3
10XXXXX.mp3
15XXXXX.mp3
20XXXXX.mp3
(Die vorangestellten Nummern haben
unterschiedliche Stellenzahl. Die Titel
werden nicht in der o.a. Reihenfolge
abgespielt, sondern in der Abfolge „1“,
„10“, „15“, „20“ und „5“.)
DEUTSCH
DEUTSCH
15
Page 40

WIEDERGABE VON MP3-DISCS
2
MP3
MODE
3
STOP/OFF/
CHARGE
1 Verbinden Sie den mitgelieferten
Kopfhörer mit der Buchse \/LINE
OUT.
/LINE OUT
2Wählen Sie mit dem START MODE-
Schalter das Disc/Leseformat.
START MODE
NORMALQUICK
4
1
5
3 Legen Sie eine MP3-Disc ein.
4 Geben Sie die HOLD-Taste frei.
5 Starten Sie die Wiedergabe durch
Drücken von ePLAY/PAUSE.
a Erscheint, wenn eine MP3-Disc
eingelegt ist.
b Titelnummer
c Albumnummer
d Bisherige Abspielzeit
Die Stromversorgung ist eingeschaltet,
und die Anzeige „READING“ blinkt auf
dem Display.
Nach dem Auslesen der Disc setzt die
Wiedergabe mit dem ersten Titel von
Album 1 ein.
Bringen Sie den Schalter anhand den
Angaben unter „Einstellung des START
MODE-Schalters“ auf der nächsten Seite
in die richtige Stellung.
16
DEUTSCH
Page 41

Einstellung des START MODESchalters
Bringen Sie den Schalter je nach
Wiedergabemodus und -typ in die korrekte
Stellung.
QUICK
Vor der Wiedergabe wird nur die Nummer
des Albums gelesen, woraufhin das Auslesen
der Discs rascher erfolgt. Allerdings sind in
diesem Fall Programmwiedergabe und
Zufallswiedergabe funktionslos.
Der Player liest die Titelinformationen
während der Wiedergabe. Erkennt der Player
ein Album ohne MP3-Datei, so wird die Zahl
der Alben vermindert. Diese Schalterstellung
empfiehlt sich bei der Wiedergabe einer
Disc mit zahlreichen Alben.
NORMAL
Der Player liest die Nummern der Alben und
Titel vor der Wiedergabe, woraufhin das
Auslesen der Disc länger dauert als bei
Schalterstellung QUICK.
Hinweis
Wird der START MODE-Schalter während
der Wiedergabe verschoben, so bleibt das
Disc-Leseformat unverändert. Zum Wechsel
des Disc-Leseformats stoppen Sie zunächst
die Wiedergabe und drücken sSTOP/OFF/
CHARGE, um die Stromversorgung
auszuschalten, und verschieben dann den
START MODE-Schalter.
Zur Wahl der MP3Wiedergabebetriebsart
Drücken Sie MP3 MODE so oft, bis die
gewünschte Wiedergabebetriebsart gewählt
ist.
Disc-Betriebsart
Wiedergabe aller auf der Disc
aufgezeichneten Titel.
Album-Betriebsart
Wiedergabe aller auf dem aktuellen Album
aufgezeichneten Titel.
Zum Umschalten auf
Wiedergabestopp
Drücken Sie sSTOP/OFF/CHARGE.
Daraufhin setzt die Wiedergabe aus, und
das Disc-Leseformat (NORMAL oder
QUICK) wird angezeigt.
Zum Auffinden eines Titelanfangs
Drücken Sie r oder t.
DEUTSCH
17
DEUTSCH
Page 42
WIEDERGABE VON MP3-DISCS
Zum Lokalisieren einer gewünschten
Passage
Halten Sie r oder t gedrückt. Lassen
Sie die Taste am Anfang der gewünschten
Passage los.
• Während des Drückens der Taste bei
Wiedergabe von MP3-Dateien ist eine
Mithörkontrolle nicht möglich.
Zum Umschalten auf
Wiedergabepause
Drücken Sie e PLAY/PAUSE. Zur
Fortsetzung der Wiedergabe drücken Sie
die Taste erneut.
Zum Wechsel des Albums
ALBUM
SKIP
Drücken Sie ALBUM SKIP.
Für Sprung zum ersten Titel des nächsten
Albums drücken Sie i.
Für Sprung zum ersten Titel des
vorhergehenden Albums drücken Sie k.
Anzeige während der Wiedergabe
PRGM / ENTER /
DISPLAY
Drücken Sie PRGM/ENTER/DISPLAY
während der Wiedergabe, woraufhin die
Displayanzeige wie folgt wechselt:
b Aktueller Titelname
Anzeige des Namens des aktuellen
Titels.
V
ID3TAG
Anzeige der ID3TAG-Kennung des
aktuellen Titels.
Enthält der aktuelle Titel keine ID3TAGKennung, so erscheint „No Title“ auf
dem Display.
V
Normale Displayanzeige
Anzeige der bisherigen Abspielzeit des
aktuellen Titels.
18
DEUTSCH
Page 43

Wiedergabewiederholung
Wählen Sie während der Wiedergabe mit
PLAY MODE die Wiederholung wie folgt.
b : Wiederholung eines einzigen
Titels
Der aktuelle Titel wird beständig
abgespielt.
V
: Wiederholung aller Titel
Bei DISC MODE-Wiedergabe werden
alle Titel auf der Disc immer wieder
abgespielt.
Bei ALBUM MODE-Wiedergabe
werden alle Titel im aktuellen Album
immer wieder abgespielt.
V
Keine Wiederholung
(Normalwiedergabe)
Wiedergabefortsetzung
Stellen Sie die HOLD-Taste auf RESUME.
HOLD
RESUME
OFF
Daraufhin erscheint auf dem Display,
und durch Drücken von sSTOP/OFF/
CHARGE können Sie die Wiedergabe von
der Stoppstelle an fortsetzen. Bei aktivierter
Wiedergabefortsetzung wird automatisch die
Wiederholung aller Titel gewählt.
Zur Annullierung der Wiedergabefortsetzung,
stellen Sie die HOLD-Taste auf OFF.
Hinweis
• Die Wiedergabefortsetzung setzt u.U. an
einer Stelle 30 Sekunden vor oder hinter
der Stoppstelle ein. Liegt die Stoppstelle
innerhalb der letzten 30 Sekunden des
letzten Titels, so ist u.U. eine
Wiedergabefortsetzung nicht möglich.
• Bei geöffnetem Disc-Fach wird die
Wiedergabefortsetzung annulliert. Wird der
Player ausgeschaltet, so bleibt die
Wiedergabefortsetzung aktiviert. In diesem
Fall müssen Sie vor einem Disc-Wechsel
die HOLD-Taste auf OFF schieben.
• Nach dem Herausnehmen der Akkus oder
Abtrennen des Netzadapters wird die
Wiedergabefortsetzung annulliert.
DEUTSCH
19
DEUTSCH
Page 44

WIEDERGABE VON MP3-DISCS
3
1,4
6
2
STOP/OFF/
CHARGE
PRGM / ENTER /
DISPLAY
Zufallswiedergabe
• Stellen Sie vor der Zufallswiedergabe
START MODE auf NORMAL (siehe Seite
17).
1Drücken Sie PLAY MODE im
Bereitschaftsbetrieb, woraufhin zur
Bestätigung
2 Starten Sie die Wiedergabe durch
Drücken von ePLAY/PAUSE.
Daraufhin werden im DISC MODEBetrieb alle Titel auf der Disc in zufälliger
Reihenfolge abgespielt. Im ALBUM
MODE-Betrieb dagegen erfolgt die
Wiedergabe aller Titel des aktuellen
Albums in zufälliger Abfolge.
20
DEUTSCH
angezeigt wird.
Zur Annullierung der Zufallswiedergabe
drücken Sie PLAY MODE im
Bereitschaftsbetrieb. Daraufhin wechselt die
Anzeige auf .
Hinweis
1
2
• Während der Zufallswiedergabe können
Sie nicht durch Drücken von r zum
vorhergehenden Titel zurückspringen.
•
Während der Zufallswiedergabe läßt sich nicht
die Wiederholung eines einzigen Titels wählen.
Programmwiedergabe
•
Stellen Sie vor der Zufallswiedergabe START
MODE auf NORMAL (siehe Seite 17).
• Bis zu 24 Titel können für die
Programmwiedergabe gewählt werden.
1
Drücken Sie PRGM/ENTER/DISPLAY
im Bereitschaftsbetrieb, woraufhin
zur Bestätigung
angezeigt wird.
Page 45

2Wählen Sie das gewünschte Album
durch Drücken von ALBUM SKIP.
ALBUM
SKIP
3Wählen Sie den gewünschten Titel
mit Taste r oder t.
SKIP /
SEARCH
4Drücken Sie PRGM/ENTER/
DISPLAY.
PRGM / ENTER /
DISPLAY
Wird der Titel nicht innerhalb von 4
Sekunden gewählt, so wechselt die
Titelnummer auf 00. Wiederholen Sie in
diesem Fall Bedienschritt 2.
5 Zur Programmierung weiterer Titel
wiederholen Sie Schritt 2, 3 und 4.
Starten Sie die Programmwiedergabe
6
durch Drücken von ePLAY/PAUSE.
Zum Stoppen der
Programmwiedergabe
Drücken Sie sSTOP/OFF/CHARGE.
Zum Hinzufügen von Titeln zum
Programm
Wiederholen Sie Schritt 2, 3 und 4 im
Bereitschaftsbetrieb. Nun können Sie weitere
Titel an das Programmende anhängen.
Zum Löschen des Programms
Drücken Sie sSTOP/OFF/CHARGE im
Bereitschaftsbetrieb.
Hinweis
• Die Programmwiedergabe wird auch dann
annulliert, wenn das Disc-Fach geöffnet oder die
Stromversorgung durch die Ausschaltautomatik
ausschaltet wird.
• Sind bereits 24 Titel programmiert, so erscheint
die Anzeige „PROG-FULL“, und es lassen sich
keine weiteren Titel hinzufügen.
• Durch Gedrückthalten von r während der
Wiedergabe können Sie nicht zum
vorhergehenden Titel zurückspringen.
• Während der Programmwiedergabe ist
gleichzeitig auch Wiederholung und
Zufallswiedergabe von Titeln möglich.
DEUTSCH
DEUTSCH
21
Page 46

ANSCHLUSS AN
AUDIOKOMPONENTEN
Verwenden Sie zu diesem Zweck ein
handelsübliches Verbindungskabel mit
einem Stereo-Ministecker
(ø 3,5 mm) an einem Ende und zwei CinchSteckern am anderen.
Verbinden Sie den Stereo-Ministecker mit
der Buchse \/LINE OUT am Gerät und die
Cinch-Stecker mit den Analogeingängen an
der Audiokomponente.
RL
LINE IN
CD IN
AUX
Hinweise
• Vor der Herstellung der Verbindung muß
die Stromversorgung des Geräts und der
Audiokomponente ausgeschaltet sein.
• Schließen Sie das Gerät KEINESFALLS
an die PHONO-Eingänge eines Verstärkers
(mit integriertem Entzerrer-Vorverstärker)
an.
• Stellen Sie die Lautstärke und DSLFunktion am Spieler ein.
PFLEGE UND WARTUNG
Reinigung der Abtasterlinse
Bei verschmutzter Linse kommt es bei der
Klangwiedergabe zu Aussetzern oder das
Gerät ist stummgeschaltet.
In solch einem Fall müssen Sie die Linse
gemäß den nachstehenden Verfahren
reinigen.
Zum Entfernen von Staub oder trockenen
Partikeln verwenden Sie einen Staubpinsel
für Kameraobjektive a. Dabei lösen Sie
zunächst durch mehrmaliges Blasen die
Partikel und bürsten dann die Linse b
behutsam sauber. Zum Schluß blasen Sie
noch einmal auf die Linsenoberfläche.
Fingerabdrücke lassen sich mit einem
Wattebausch entfernen, der mit flüssigem
Objektivreiniger angefeuchtet ist. Dabei
müssen Sie vorsichtig von der Mitte zum
Rand der Linse wischen. Objektivreiniger ist
im Fachhandel erhältlich.
22
DEUTSCH
Page 47

TERMINOLOGIE
Hinweis
Der Wattebausch darf nicht zu stark
angefeuchtet werden, da sonst versehentlich
überschüssige Flüssigkeit in das Gerät
eindringen und dort Schäden verursachen
kann.
Außerdem ist bei der Reinigung auch
unbedingt ein übermäßig starkes Drücken
auf die Linse zu vermeiden, damit sie nicht
verkratzt wird oder bricht.
Reinigung von CDs
Vor dem Abspielen wischen Sie die Disc von
der Mitte zum Rand mit einem
Reinigungstuch ab. Nach dem Abspielen
sollte die Disc stets in ihrer Kunststoffhülle
aufbewahrt werden.
ISO 9660
ISO steht für „International Organization for
Standardization„ (Internationale
Normungsorganisation). In ISO 9660 ist die
Dateistruktur für CD-ROM festgelegt. Dieser
Player kann MP3-Dateien wiedergeben, die
im Format gemäß ISO 9660 aufgezeichnet
worden sind.
Verschachtelung von Ordnern
(Alben)
Zur Organisierung von in einem PC
abgespeicherten Datendateien können Sie
zusammengehörige Dateien gemeinsam in
einem Ordner ablegen. Ordner können
andere Ordner sowie auch Dateien enthalten.
So kann z.B. Ordner A den Ordner B und
dieser wiederum Ordner C enthalten; diese
Möglichkeit wird als „Verschachtelung von
Ordnern“ bezeichnet. Die maximale, von
ISO 9660 zugelassene
Verschachtelungstiefe beträgt 8.
Dienstprogramme für Beschreiben
Es gibt 3 Dienstprogramme zur Aufzeichnung
von Daten auf einer Disc.
DEUTSCH
DEUTSCH
23
Page 48

TERMINOLOGIE
1 DAO-Dienstprogramm (Disc At
Once)
Alle Beschreibungsdaten sind im voraus
zu erstellen, und werden dann von Anfang
bis Ende in einem Zug auf die Disc
geschrieben. Auf Discs, die bereits mit
einem DAO-Dienstprogramm
beschrieben worden sind, lassen sich
keine weiteren Daten aufzeichnen.
2 TAO-Dienstprogramm (Track At
Once)
In diesem Fall werden die Daten titelweise
auf der Disc aufgezeichnet. Beim
Beschreiben mit TAO-Dienstprogramm
lassen sich später noch weitere Daten
hinzufügen.
3
Dienstprogramm für Paketbeschreibung
Während der Aufzeichnung werden die
Titel je nach der verfügbaren
Speicherkapazität in entsprechend
kleinere Abschnitte unterteilt. Beim
Beschreiben mit PaketbeschreibungsDienstprogramm lassen sich später noch
weitere Daten hinzufügen.
Der Player kann MP3-Discs wiedergeben,
die mit Hilfe von DAO- und TAODienstprogramm beschrieben worden sind.
24
DEUTSCH
Multi-Sitzungen
Eine Sitzung ist eine Sammlung von Daten, die
die Aufnahme in einem Zug von Anfang bis Ende
abdeckt. Mit dem TAO-Dienstprogramm (Track
At Once) lassen sich Daten in mehreren
Durchgängen aufzeichnen. Eine Sitzung entspricht
den in einem Durchgang aufgezeichneten Daten.
Der Player kann Daten bis zum 5. Durchgang
einschließlich wiedergeben, mit anderen Worten,
er kann bis zu 5 Sitzungen abspielen.
SESSION1 SESSION2 SESSOIN3
ID3TAG-Kennung
Die ID3TAG-Kennung bestimmt das Datenformat
für den Text, der einer MP3-Datei hinzugefügt
werden soll und u.a. vor allem zur Angabe der
Namen von Titeln oder Interpreten dient.
Erweiterung des Dateinamens
Eine dreistellige Zeichengruppe, die unter
Windows oder DOS an den Dateinamen
angehängt wird, wird als „Dateierweiterung“
bezeichnet. Dateierweiterungen dienen vor
allem zur Kennzeichnung von Dateitypen.
Die Erweiterung für MP3-Dateien ist „.mp3“.
Page 49

TECHNISCHE DATEN
Auslesesystem 3-Strahl-Laser
Optischer Abtaster
D/A-Wandlung Multi-Bit-D/A-Wandler
Frequenzgang 20 bis 20.000 Hz (47 kOhm)
Ausgang Buchse \/LINE OUT (Stereo-
Maximalausgang 5 mW + 5 mW (16 Ohm bei 1
Betriebsstrom Gleichstrom 3 V mit zwei LR6
Maximale Außanabmessungen (B/H/T)
Gewicht ca. 285 g ohne Batterien
Zubehör Netzteil AC-A56E (1)
Halbleiterlaser
Minibuchse)
kHz)
500 mV (47 kOhm bei 1 kHz)
(AA, Mignon) Alkalibatterien
Gleichspannung 2,4 V mit
zwei handelsüblichen Akkus
(Ni-MH 1,2 V/1600 mAh)
Netzstrom über mitgeliefertes
Netzteil
131 × 35 × 144 mm (ohne
hervoastehende Teile und
Regler)
Stereo-Kopfhörer (1)
«Netzteil AC-A56E»
Nenneingang Wechselstrom 230 V, 50 Hz
Im Lieferumfang der Kopfhörer HP-M043
Empfohlene handelsübliche Kopfhörer
Änderungen des Designs und der technischen
Daten, die dem Fortschritt dienen, bleiben
vorbehalten.
Typ: Ohrstöpsel-Kopfhörer
Impedanz: 16 Ohm
Empfindlichkeit: 107 dB/mW
Typ: Ohrstöpsel, Vertikal oder
Kopfband
Impedanz: 16 – 32 Ohm
Empfindlichkeit: 100 – 109 dB/
mW
DEUTSCH
DEUTSCH
25
Page 50

• Un fichier MP3 mémorise des données
audio comprimées à l’aide du MPEG 1/
2, le système audio de codage de fichier
à 3 couches.
• Dans ce mode d’emploi, “disques” se
rapporte aux CD, aux disques CD-R et
aux disques CD-RW. Ce qu’on appelle
“dossier” et “fichier” en langage
informatique se rapportent à “album” et
“piste”.
TABLE DES MATIÈRES
PRÉCAUTIONS ...........................................3
UTILISATION SUR PILES SÈCHES ........... 4
UTILISATION SUR PILES
RECHARGEABLES ................................. 5
INFORMATIONS PRÉLIMINAIRES ............6
LECTURE D’UN DISQUE AUDIO ............... 9
LECTURE PROGRAMMÉE ...................... 12
LECTURE D’UN DISQUE MP3 ................. 14
RACCORDEMENT À UN AUTRE
APPAREIL ............................................. 22
ENTRETIEN............................................... 22
TERMINOLOGIE .......................................23
SPÉCIFICATIONS ..................................... 25
2
FRANÇAIS
Page 51

PRÉCAUTIONS
Pour assurer une performance optimale
• N’utilisez pas l’appareil dans des lieux
extrêmement chauds, froids, poussiéreux
ou humides. En particulier, n’utilisez pas et
ne laissez pas l’appareil dans les endroits
suivants:
• extrêmement humides, comme une salle
de bains
•à proximité d’un appareil de chauffage
• exposés à la lumière directe du soleil (par
ex. dans une voiture garée en plein soleil,
car l’habitacle peut devenir extrêmement
chaud)
•à proximité d’une source de magnétisme
puissante, comme un téléviseur, une
enceinte ou un aimant
• exposés à des vibrations ou mouvements
intenses, comme sur le tableau de bord
d’une voiture ou une étagère instable
Sécurité
• N’essayez pas de démonter l’appareil. Les
rayons laser provenant du bloc de lecture
sont dangereux pour la vue.
• Prenez garde de ne pas laisser tomber
d’épingles ou autres objets dans l’appareil.
•
Prenez garde de ne pas laisser tomber l’appareil
et de ne pas le soumettre à des chocs violents.
• Afin d’éviter que de la poussière ne se
dépose sur la lentille de lecture, laissez
toujours le volet du logement de disque
fermé après avoir utilisé le lecteur. Ne
touchez jamais la lentille.
•
Si vous n’entendez pas de son pendant la
lecture d’un disque, N’AUGMENTEZ PAS trop
le volume car la musique pourrait brutalement
démarrer à un volume très fort. Avant la lecture,
réduisez complètement le volume et augmentezle lentement jusqu’au niveau souhaité.
Remarques sur l’écoute aux écouteurs
• Ecoutez à un niveau modéré pour éviter
toute lésion auditive.
• Ne portez pas les écouteurs pendant la
conduite d’un véhicule ou d’une moto (vélo).
Vous pourriez occasionner un accident.
•
Montrez-vous très prudent ou arrêtez
temporairement d’utiliser l’appareil en cas
de situation potentiellement dangereuse, par
exemple pendant la marche, le jogging etc.
•
Portez les écouteurs correctement: l’oreillette
portant la marque “L” sur l’oreille gauche et
l’oreillette portant la marque “R” sur l’oreille droite.
•
Les écouteurs de type interne doivent être portés
avec le cordon le plus long passé sur la nuque.
ATTENTION
A pleine puissance, l’écoute prolongée du
baladeur peut endommager l’oreille de l’utilisateur.
Remarque sur la condensation
Si vous portez l’appareil d’un endroit froid
dans un endroit chaud, de l’humidité peut se
condenser sur la lentille de lecture, causant
un problème de fonctionnement ou de lecture.
Le cas échéant, n’utilisez pas l’appareil pendant
quelques heures, puis remettez-le en marche.
FRANÇAIS
3
FRANÇAIS
Page 52

UTILISATION SUR PILES SÈCHES
Ouvrez le logement des piles et insérez
deux
piles alcalines LR6 (format AA)
avec les pôles 0 et 9 dirigés dans le
bons sens.
LR6 × 2
Remplacement des piles
L’indicateur de piles passe de à
à selon la puissance restante des
piles. Remplacez les piles quand
s’allume.
Autonomie des piles (avec piles
alcalines LR6)
Lecture d’un disque audio
Fonction E•A•S•S Env . 10 heures
PLUS activée
Fonction E•A•S•S Env . 11 heures
PLUS désactivée
Lecture d’un disque MP3 Env. 5 heures
L’autonomie des piles peut varier selon les
conditions d’utilisation.
4
FRANÇAIS
Retrait des piles
Si le couvercle du logement des piles
se détache
Remarques sur les piles sèches
• Vérifiez que les marques 0 et 9 sont
correctement alignées.
• N’insérez pas en même temps différents
types de piles, ou une pile usée et une pile
neuve.
• Afin d’éviter les risques d’explosion ou de
fuite d’électrolyte, ne rechargez jamais les
piles, ne les chauffez pas et ne les démontez
pas.
• Quand vous n’utilisez pas les piles, enlevezles pour éviter qu’elles ne s’usent
inutilement.
• Si les piles fuient, essuyez bien le logement
pour enlever tout le liquide.
Page 53

UTILISATION SUR PILES RECHARGEABLES
• Utilisez bien des piles rechargeables de
format AA Ni-MH 1,2 V 1600 mAh,
disponibles dans le commerce.
• Lisez bien les instructions sur les piles
rechargeables achetées avant l’utilisation.
• Si vous utilisez l’appareil sur des piles
rechargeables neuves, rechargez les piles
jusqu’à ce que le témoin de piles s’éteigne.
• Avant de recharger les piles, fermez le
volet du logement de disque. Vous ne
pouvez pas recharger les piles si le volet
reste ouvert.
1 Insérez les piles rechargeables avec
les marques 0 et 9 correctement
alignées.
2 Raccordez l’adaptateur secteur.
1 à la prise DC 5 V
2 à une prise murale
3
Maintenez sSTOP/OFF/CHARGE
pressé environ 2 secondes pour
démarrer la charge.
“Charge ON” apparaît et l’indicateur des
piles clignote. Une fois la charge terminée,
“Charge OFF” clignote plusieurs fois, et
l’indicateur de piles s’éteint.
La recharge de piles entièrement
épuisées demande environ 3 heures.
Après la charge, déconnectez
l’adaptateur secteur.
Quand recharger les piles
Rechargez les piles quand s’allume.
Pour arrêter la recharge
Appuyez sur s STOP/OFF/CHARGE
pendant la recharge.
UTILISATION SUR LE COURANT
SECTEUR
Raccordez l’adaptateur secteur de la même
façon que pour la recharge des piles.
FRANÇAIS
DC 5V
FRANÇAIS
5
Page 54

INFORMATIONS PRÉLIMINAIRES
Commutateur de blocage des
touches (HOLD)
HOLD
RESUME
OFF
Libérez le commutateur HOLD avant la
lecture. b a
Lorsque vous n’utilisez pas l’appareil, réglez
le commutateur HOLD sur la position HOLD
(blocage des touches). b b
Si vous appuyez par hazard sur une touche,
elle ne fonctionnera pas.
Si vous appuyez sur une touche quand le
commutateur HOLD est à la position HOLD,
“HOLD” clignote sur l’afficheur.
Mise sous et hors tension du lecteur
Mise sous tension
Appuyez sur ePLAY/PAUSE. Le lecteur
se met sous tension et la lecture commence.
Remarque
“ERROR” s’affiche à la lecture d’un disque
inséré à l’envers ou défectueux.
6
FRANÇAIS
Page 55
Mise hors tension
Si vous n’effectuez aucune opération dans
les 30 secondes suivant la fin de la dernière
opération, l’appareil se met automatiquement
hors tension (fonction de coupure
automatique).
• Vous pouvez mettre hors tension en
appuyant sur sSTOP/OFF/CHARGE
avant la coupure automatique.
Mode de veille
Quand une opération est terminée, l’appareil
se met en veille jusqu’à la coupure
automatique.
Pour mettre l’appareil en mode de veille,
appuyez sur e PLAY/PAUSE pour
commencer la lecture, puis sur sSTOP/
OFF/CHARGE.
Réglage du son
Volume
VOLUME
6
Ajustez le volume avec la commande
VOLUME.
DSL
DSL
Appuyez plusieurs fois sur DSL pour obtenir
des graves plus puissants et omniprésents.
: Accentuation normale des graves.
: Accentuation marquée des graves.
: Son normal
FRANÇAIS
FRANÇAIS
7
Page 56

INFORMATIONS PRÉLIMINAIRES
Mise en place d’un disque
1 Faites glisser le commutateur OPEN
pour ouvrir le volet du logement de
disque.
OPEN
2 Placez un disque au centre, la face
portant l’étiquette vers le haut.
3 Refermez le volet du logement de
disque.
Pour retirer le disque
Saisissez le disque par son pourtour, en
appuyant légèrement sur l’axe.
Remarques
• L’appareil peut ne pas lire un disque
CD-R/RW enregistré sur un ordinateur
personnel ou avec certains enregistreurs
CD-R/RW à cause de la différence de
plate-forme d’enregistrement.
• Ne collez pas d’autocollant ou étiquette sur
les faces (la face enregistrable ou la face
étiquetée) d’un disque CD-R/RW. Cela
pourrait causer un mauvais
fonctionnement.
8
FRANÇAIS
Page 57

LECTURE D’UN DISQUE AUDIO
4 Appuyez sur ePLAY/PAUSE.
4
5
La lecture commence à partir de la
première plage.
3
2
1
STOP/OFF/
CHARGE
1 Raccordez les écouteurs fournis à
la prise \/LINE OUT.
/LINE OUT
2 Libérez HOLD.
3 Placez un disque.
a Numéro de plage
b Temps de lecture écoulé
Opérations élémentaires
Pour arrêter
Pour f aire une pause
Pour localiser le
début d’une plage
Pour localiser
un passage
Appuyez sur sSTOP/
OFF/CHARGE.
Appuyez sur ePLAY/
PAUSE.
Pour poursuivre la
lecture, appuyez une
nouvelle fois.
Appuyez sur r ou
t.
Appuyez en continu sur
r ou t.
Relâchez la touche au
début du passage
souhaité.
FRANÇAIS
FRANÇAIS
9
Page 58

LECTURE D’UN DISQUE AUDIO
Affichage pendant la lecture
PRGM / ENTER /
DISPLAY
Appuyez sur PRGM/ENTER/DISPLAY
pendant la lecture pour modifier l’affichage
comme suit.
b Affichage de plage et temps de lecture
restant de la plage lue
V
Nombre de plages restantes et temps
de lecture restant
V
Affichage de plage et temps de lecture
écoulé (affichage normal)
E•A•S•S PLUS (Système Antichoc
Électronique)
La fonction E•A•S•S PLUS réduit les
coupures du son qui peuvent se produire
lorsque l’appareil est soumis à des chocs.
E•A•S•S
Pour activer la fonction E•A•S•S PLUS,
appuyez plusieurs fois sur E•A•S•S pour
afficher .
Pour annuler, appuyez à nouveau sur
E•A•S•S L’affichage passe à .
Remarques
• Des impacts ou vibrations continus peuvent
provoquer une interruption du son même si
la fonction E•A•S•S PLUS est activée. Il ne
s’agit pas d’une anomalie. En cas
d’interruption du son, stabilisez l’appareil
pendant quelques secondes, puis
remettez-le en marche.
• Quand le sélecteur E•A•S•S est pressé
pendant la lecture, l’appareil passe en
pause environ 2 secondes.
10
FRANÇAIS
Page 59

Fonction de reprise
Réglez le commutateur HOLD à
RESUME.
Lecture aléatoire
1
HOLD
RESUME
OFF
apparaît, et vous pouvez commencer
la lecture à partir du point où vous aviez
arrêté la lecture en appuyant sur
sSTOP/OFF/CHARGE.
Quand la fonction de reprise est en service,
la répétition de toutes les plages est
automatiquement sélectionnée.
Pour annuler la fonction de reprise, réglez
le commutateur HOLD à OFF.
Remarques
• Le point de reprise de la lecture peut être
décalé de 30 secondes environ du point
d’arrêt. Si vous avez arrêté la lecture à
moins de 30 secondes de la dernière plage,
la fonction risque d’être inopérante.
• La lecture de reprise sera annulée si vous
ouvrez le volet du logement de disque. Si
l’appareil est mis hors tension, la lecture de
reprise ne sera pas annulée. Dans ce cas,
réglez le commutateur HOLD sur OFF
avant de changer de disque.
2
1 Appuyez sur PLAY MODE en mode
de veille pour afficher
2 Appuyez sur ePLAY/PAUSE
pour démarrer la lecture.
Les plages sur le disque sont lus dans un
ordre aléatoire.
Pour annuler la lecture aléatoire, appuyez
sur PLAY MODE en mode de veille.
L’affichage passe à .
Remarques
• Vous ne pouvez pas revenir à la plage
précédente en appuyant sur r pendant
la lecture aléatoire.
• Il n’est pas possible de sélectionner la
répétition d’une plage pendant la lecture
aléatoire.
.
FRANÇAIS
11
FRANÇAIS
Page 60

PRGM / ENTER /
DISPLAY
LECTURE D’UN DISQUE AUDIO
LECTURE PROGRAMMÉE
Lecture répétée
Appuyez sur PLAY MODE pendant la lecture
pour sélectionner la lecture répétée de la
façon suivante.
: Répétition d’une plage B
V
: Répétition de toutes les plages
V
Lecture sans répétition (lecture normale)
12
FRANÇAIS
STOP/OFF/
CHARGE
1,3
2
5
En tout 24 plages peuvent être sélectionnées
pour la lecture programmée.
1 Appuyez sur PRGM/ENTER/
DISPLAY
afficher
2Sélectionnez la plage souhaitée en
appuyant sur r ou t.
a Numéro de plage
b Numéro de programme
en mode de veille pour
.
SKIP /
SEARCH
Page 61

3 Appuyez sur PRGM/ENTER/
DISPLAY en l’espace de 4 secondes.
Si vous n’appuyez pas sur la touche en
l’espace de 4 secondes, le numéro de
plage reviendra à 00. Refaites les mêmes
opérations à partir de l’étape 2.
PRGM / ENTER /
DISPLAY
4Répétez les étapes 2 et 3 pour
programmer d’autres plages.
5 Appuyez sur ePLAY/PAUSE
pour commencer la lecture
programmée.
Pour arrêter la lecture programmée
Appuyez sur sSTOP/OFF/CHARGE.
Pour ajouter des plages au
programme
Répétez les étapes 2 et 3 ci-dessus en mode
d’attente. Vous pouvez ajouter des plages à
la fin du programme.
Pour effacer le programme
Appuyez sur sSTOP/OFF/CHARGE en
mode de veille.
Remarques
• Le programme est également supprimé à
l’ouverture du volet du logement de disque,
ou à la mise hors tension de l’appareil par
la fonction de coupure automatique.
• Quand 24 plages sont programmées,
“PROG-FULL” apparaît, et aucune autre
plage ne peut être ajoutée.
• Vous ne pouvez pas revenir à la plage
précédente en maintenant r pressé
pendant la lecture programmée.
• La lecture répétée et la lecture aléatoire
sont possibles pendant la lecture
programmée.
FRANÇAIS
FRANÇAIS
13
Page 62

LECTURE D’UN DISQUE MP3
Remarques sur la lecture des
fichiers MP3
• Une plage MP3 doit être enregistrée sur un
disque dans un format conforme à ISO
9660. Notez toutefois que cet appareil peut
ne pas lire les plages dans leur ordre
d’enregistrement,
• Le nombre maximum de plages et d’albums
autorisés sur un disque sont comme suit:
–nombre de plages: 512 (selon le nombre
d’albums)
–nombre d’albums: jusqu’à 512 (selon le
nombre de plages)
• La profondeur maximale des albums
imbriqués est de 8.
• La fonction E•A•S•S PLUS ne fonctionne
pas.
• Il peut falloir 30 secondes ou plus à l’appareil
avant de pouvoir lire les plages MP3, selon
le nombre de plages enregistrées et la
complexité de l’arborescence des albums.
• Si un disque contient des plages audio et
des plages MP3, l’appareil lit seulement
les plages audio.
• Pour un disque multi-session, un maximum
de 10 sessions est recommandé.
• L’appareil ne peut pas lire des plages MP3
enregistrées en utilisant un utilitaire
d’écriture de paquets.
• L’appareil peut lire des plages MP3 à
extension de fichier “.mp3”.
• Si vous lisez un fichier non MP3 à extension
de fichier “.mp3”, du bruit pourra être
audible.
• Le son peut sauter ou s'assourdir pendant
la lecture de fichiers codés à un débit
binaire entre 256 et 320 kbps.
Remarques sur les indications
affichées pendant la lecture
• 64 caractères maximum (extension y
compris) sont affichés pour le nom d’un
album ou d’une plage. Si ID3TAG version
1.X est appliqué pour enregistrer des
informations additionnelles pour une plage
MP3, un maximum de 30 caractères
indiquant le titre de la plage et le nom de
l’artiste sont affichés. Les caractères autres
que les majuscules (“A” à “Z”), les chiffres
(“0” à “9”) et un soulignement (_) peuvent
ne pas être affichés correctement ou
s’affiche au lieu du caractère.
• Le temps de lecture écoulé peut ne pas
être affiché correctement pour les plages
MP3.
14
FRANÇAIS
Page 63

Remarques sur la création de
disques MP3
A la conversion de données audio en
MP3
Pour apprécier une haute qualité sonore,
nous recommandons le stockage des fichiers
MP3 à une fréquence d’échantillonnage de
44,1 kHz et à un débit binaire fixe de 128
kbps.
Pour lire des plages dans leur ordre
d’enregistrement
1 Utilisez un logiciel d’écriture capable
d’enregistrer des plages MP3
(fichiers) en ordre numérique et
alphabétique.
Voir le mode d’emploi fourni avec le
logiciel pour les détails de son
fonctionnement.
2 Utilisez un seul album. (Ne créez
pas d’album secondaire dans un
album.)
3 Incluez un numéro de deux ou trois
chiffres au commencement du nom
de chaque album ou plage de sorte
que les albums et plages soient lus
dans l’ordre.
<exemples de noms recommandés>
01XXXXX.mp3
02XXXXX.mp3
03XXXXX.mp3
04XXXXX.mp3
05XXXXX.mp3
<exemples de noms non recommandés>
1XXXXX.mp3
5XXXXX.mp3
10XXXXX.mp3
15XXXXX.mp3
20XXXXX.mp3
(Les numéros au début ont des chiffres
différents. Les plages ne seront pas
lues dans cet ordre, mais dans l’ordre
“1”, “10”, “15”, “20” et “5”.)
FRANÇAIS
FRANÇAIS
15
Page 64
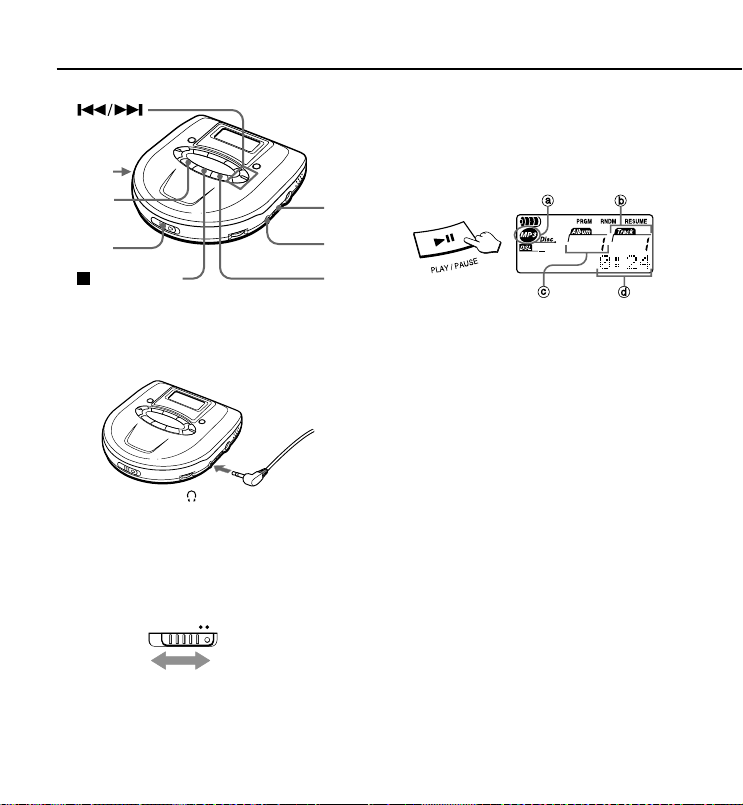
LECTURE D’UN DISQUE MP3
2
MP3
MODE
3
STOP/OFF/
CHARGE
1 Raccordez les écouteurs fournis à
la prise \/LINE OUT.
/LINE OUT
2Réglez le sélecteur START MODE
pour sélectionner le format de
lecture du disque.
START MODE
NORMALQUICK
4
1
5
3 Insérez un disque MP3.
4 Libérez le commutateur HOLD.
5 Appuyez sur e/PLAY/PAUSE
pour démarrer la lecture.
a apparaît quand un disque MP3 est
inséré
b numéro de plage
c numéro d’album
d temps de lecture écoulé
L’appareil est mis sous tension et
“READING” clignote sur l’affichage.
Après la lecture du disque, la lecture
commence à partir de la première piste
de l’Album 1.
Consultez “Réglage du sélecteur START
MODE” à la page suivante et réglez le
sélecteur à la position correcte.
16
FRANÇAIS
Page 65

Réglage du sélecteur START MODE
Réglez le sélecteur à la position correcte
selon le mode lecture et le type de disque.
QUICK
L’appareil lit seulement le numéro de l’album
avant la lecture, puis la lecture du disque se
termine plus rapidement.
Mais la lecture programmée et la lecture
aléatoire ne sont pas utilisables.
L’appareil lit les informations sur les plages
avant la lecture. Quand il détecte un album
sans fichier MP3, le numéro de l’album est
abaissé. Cette position est recommandée à
la lecture d’un disque contenant beaucoup
d’albums.
NORMAL
L’appareil lit le numéro des albums et plages
avant la lecture, puis prend plus de temps
pour la lecture du disque que si le sélecteur
est réglé à QUICK.
Remarque
Si vous faites glisser le sélecteur START
MODE pendant la lecture, le format de lecture
du disque ne change pas. Arrêtez la lecture
et appuyez sur sSTOP/OFF/CHANGE pour
mettre hors tension, et glissez le sélecteur
START MODE pour changer de format de
lecture.
Sélection du mode de lecture MP3
Appuyez plusieurs fois sur MP3 MODE pour
sélectionner le mode de lecture.
Mode disque
Toutes les plages enregistrées sur le disque
sont lues.
Mode album
Toutes les plages de l’album actuel sont
lues.
FRANÇAIS
Arrêt de la lecture
Appuyez sur sSTOP/OFF/CHANGE.
La lecture s’arrête et le format de lecture du
disque (NORMAL ou QUICK) s’affiche.
Recherche du début d’une plage
Appuyez sur r ou t.
FRANÇAIS
17
Page 66

LECTURE D’UN DISQUE MP3
Localisation d’un passage souhaité
Maintenez r ou t pressé. Libérez la
touche au début du passage souhaité.
• Vous ne pouvez pas contrôler le son quand la
touche est pressée pendant la lecture d’un fichier
MP3.
Pause de lecture
Appuyez sur e/PLAY/PAUSE. Appuyez
à nouveau pour reprendre la lecture.
Changement d’album
ALBUM
SKIP
Appuyez sur ALBUM SKIP.
Pour sauter à la première piste de l’album
suivant, appuyez sur i.
Pour sauter à la première piste de l’album
précédent, appuyez sur k.
Affichage pendant la lecture
PRGM / ENTER /
DISPLAY
Appuyez sur PRGM/ENTER/DISPLAY
pendant la lecture pour modifier l’affichage
comme suit.
b Nom de la plage actuelle
Le nom de fichier de la plage actuelle
s’affiche.
V
ID3 TAG
Le ID3 TAG de la plage actuelle est
affiché.
Si le ID3 TAG n’est pas enregistré sur la
plage actuelle, “No Title” s’affiche.
V
Affichage normal
Le temps écoulé de la plage actuelle
s’affiche.
18
FRANÇAIS
Page 67
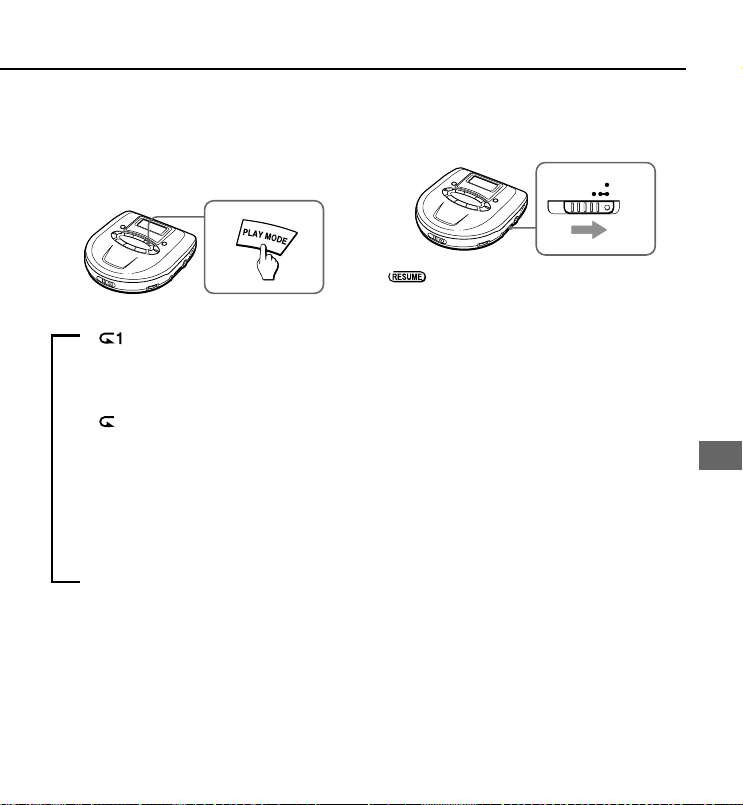
Lecture répétée
Appuyez sur PLAY MODE pendant la lecture
pour sélectionner la lecture répétée comme
suit.
b : répétition d’une plage
La plage actuelle est lue de manière
répétée.
V
: répétition de toutes les plages
Toutes les plages du disque sont lues
de manière répétée en mode DISC
MODE.
Toutes les plages de l’album actuel
sont lues de manière répétée en
lecture ALBUM MODE.
V
pas de lecture répétée (lecture
normale)
Fonction de reprise
Réglez le commutateur HOLD à RESUME.
HOLD
RESUME
OFF
apparaît, et vous pouvez démarrer la
lecture à partir du point où vous l’avez arrêtée
en appuyant sur sSTOP/OFF/CHARGE.
Quand la fonction de reprise est activée, la
lecture de toutes les plages est
automatiquement sélectionnée.
Pour annuler la fonction de reprise, réglez
le commutateur sur OFF.
Remarque
• La lecture de reprise peut démarrer à un
point environ 30 secondes avant ou après
le point d’arrêt.
La lecture de reprise peut ne pas fonctionner
dans les 30 dernières secondes de la
dernière plage.
• La lecture de reprise sera annulée si vous
ouvrez le logement du disque. Si l’appareil
est mis hors tension, la lecture de reprise
ne sera pas annulée. Dans ce cas, réglez
bien le commutateur HOLD à OFF avant
de changer de disque.
• La lecture de reprise sera annulée après le
changement des piles ou la déconnexion
de l’adaptateur secteur.
FRANÇAIS
19
FRANÇAIS
Page 68

LECTURE D’UN DISQUE MP3
3
1,4
6
2
STOP/OFF/
CHARGE
PRGM / ENTER /
DISPLAY
Lecture aléatoire
• Avant la lecture aléatoire, réglez START
MODE à NORMAL (consultez la page 17).
1 Appuyez sur PLAY MODE en mode
d’attente pour afficher
2 Appuyez sur ePLAY/PAUSE
pour démarrer la lecture.
Toutes les plages du disque sont lues
dans un ordre aléatoire en mode DISC
MODE.
Toutes les plages de l’album actuel sont
lue dans un ordre aléatoire en lecture
ALBUM MODE.
20
FRANÇAIS
Pour annuler la lecture aléatoire, appuyez
sur PLAY MODE en mode d’attente.
L’affichage passe à .
Remarque
1
2
• Vous ne pouvez pas revenir à la plage
précédente en appuyant sur r en lecture
aléatoire.
• Vous ne pouvez pas sélectionner la
répétition d’une plage en lecture aléatoire.
Lecture programmée
• Avant la lecture programmée, réglez
.
START MODE à NORMAL (voir la page
17).
• Jusqu’à 24 plages peuvent être
sélectionnées pour la lecture programmée.
1 Appuyez sur PRGM/ENTER/
DISPLAY en mode d’attente pour
afficher
.
Page 69

2Sélectionnez l’album souhaité en
appuyant sur ALBUM SKIP.
ALBUM
SKIP
3Sélectionnez la plage souhaitée en
appuyant sur r ou t.
SKIP /
SEARCH
4 Appuyez sur PRGM/ENTER/
DISPLAY.
PRGM / ENTER /
DISPLAY
Si vous n’appuyez pas sur la touche en
l’espace de 4 secondes, le numéro de
plage reviendra à 00. Refaites les mêmes
opérations à partir de l’étape 2.
5Répétez les étapes 2, 3 et 4 pour
programmer plus de plages.
Appuyez sur ePLAY/PAUSE pour
6
démarrer la lecture programmée.
Arrêt de la lecture programmée
Appuyez sur sSTOP/OFF/CHARGE.
Addition de plages au programme
Répétez les étapes 2, 3 et 4 en mode
d’attente. Vous pouvez ajouter des plages à
la fin du programme.
Effacement d’un programme
Appuyez sur sSTOP/OFF/CHARGE en
mode d’attente.
Remarques
• La lecture programmée est aussi annulée
à l’ouverture du logement des disque ou
quand la fonction de coupure automatique
met l’appareil hors tension.
• Quand 24 plages sont déjà programmées,
“PROG-FULL” apparaît et aucune plage
ne peut être ajoutée.
• Vous ne pouvez pas revenir à la plage
précédente en maintenant r pressé
pendant la lecture.
• La lecture répétée et la lecture aléatoire
sont possibles en lecture programmée.
FRANÇAIS
FRANÇAIS
21
Page 70

RACCORDEMENT À UN
AUTRE APPAREIL
Utilisez un cordon de liaison à minifiche
stéréo 3,5 ø mm à une extrémité et deux
fiches cinch à l’autre en vente dans le
commerce.
Raccordez le minifiche stéréo à la prise
\/LINE OUT de l’appareil et les fiches cinch
aux prises d’entrée analogiques de l’autre
appareil.
RL
LINE IN
CD IN
AUX
Remarques
• Eteignez les deux appareils avant de les
relier.
• NE RACCORDEZ PAS le cordon aux
entrées PHONO d’un amplificateur (en cas
d’amplificateur-égaliseur phono intégré).
• Ajustez le volume et la fonction DSL sur
l’appareil.
22
FRANÇAIS
ENTRETIEN
Pour nettoyer la lentille
Si la lentille est sale, des sauts de lecture
surviendront ou le lecteur ne fonctionnera
pas.
Le cas échéant, nettoyez la lentille de la
façon suivante.
Pour enlever la poussière et les particules
sèches, utilisez d’abord une poire soufflante
pour objectif d’appareil photo a et soufflez
plusieurs fois de suite pour détacher les
particules. Brossez ensuite légèrement la
lentille b pour la nettoyer. Soufflez une
dernière fois sur la lentille pour disperser la
saleté.
Pour enlever les traces de doigts, utilisez de
l’ouate imprégnée d’un liquide de nettoyage.
Essuyez légèrement la lentille du centre
vers le bord. Vous trouverez des liquides de
nettoyage spéciaux dans le commerce.
Remarque
N’imprégnez pas trop l’ouate de liquide, car
il pourrait couler dans l’appareil et
l’endommager.
Ne frottez pas trop fort la lentille avec l’ouate,
car elle pourrait être rayée ou brisée.
Page 71

TERMINOLOGIE
Pour nettoyer les disques
Avant la lecture, essuyez le disque du centre
vers la périphérie avec un chiffon de
nettoyage. Après la lecture, rangez toujours
le disque dans son étui.
ISO 9660
ISO est l’abréviation de “International
Organization for Standardization”. ISO 9660
définit la structure des fichiers des CD-ROM.
Cet appareil peut lire des fichier MP3 enregistrés
dans un format conforme à ISO 9660.
Imbrication des dossiers (albums)
Pour organiser les fichiers de données dans un
P, vous pouvez stoker des fichiers concernés
dans un dossier. Un dossier peut contenir
d’autres dossiers ainsi que des fichiers. Par
exemple, le dossier A peut contenir le dossier
B, et le dossier B peut contenir le dossier C.
C’est ce qu’on appelle “imbrication des
dossiers”. La profondeur maximale des dossiers
imbriqués autorisées par ISO 9660 est 8.
Utilisés d’écriture
3 utilités d’écritures utilisées pour enregistrer
des données sur un disque.
1 Utilité DAO (Disc At Once)
Toutes les données à écrire doivent être
préparées à l’avance et écrites sur un
disque du début à la fin en une opération.
Aucune donnée ne peut être ajoutée à un
disque sur lequel des données sont déjà
écrites avec une utilité DAO.
2 Utilité TAO (Track At Once)
Les données sont écrites sur un disque
plage par plage. Des données peuvent
être ajoutées à un disque sur lequel des
données ont été écrites avec l’utilité TAO.
FRANÇAIS
FRANÇAIS
23
Page 72

TERMINOLOGIE
3 Utilité d’écriture par paquets
Les plages sont divisées en éléments
plus petits pendant l’enregistrement,
selon la taille des espaces disponibles
sur le disque. Des données peuvent être
ajoutées sur un disque sur lequel des
données ont été écrites avec l’utilité
d’écriture par paquets.
Cet appareil peut lire des disque MP3
enregistrés avec les utilités DAO et TAO.
Multi-session
Une session est un ensemble de données,
allant du début à la fin d’un enregistrement
effectué en une opération. Avec l’utilité TAO
(Track At Once), les données peuvent être
enregistrées en plusieurs opérations. Une
session correspond aux données
enregistrées en une opération. Cet appareil
peut lire des données enregistrées en 5
opérations. Autrement dit, il peut lire des
données d’un maximum de 5 sessions.
ID3TAG
ID3TAG définit le format des données pour
le texte à ajouter à un fichier MP3,
principalement utilisé pour indiquer un nom
de fichier ou un nom d’artiste etc.
Extension de fichier
Une chaîne de 3 caractères ajoutée à un
nom de fichier en environnement Windows
ou DOS est appelée “extension de fichier”.
Une extension de fichier est principalement
utilisée pour identifier les types de fichiers.
L’extension de fichier pour les fichiers MP3
est “.mp3”.
SESSION1 SESSION2 SESSOIN3
24
FRANÇAIS
Page 73

SPÉCIFICATIONS
Système de lecture
Dispositif de lecture
Conversion n-a Multi-bit (CNA)
Réponse en fréquence
Sortie Prise \/LINE OUT (minifiche
Puissance maximale
Alimentation 3 V c.c. avec les deux piles
Dimensions extérieures maximales
Poids Environ 285 g sans les piles
Accessoires Adaptateur secteur AC-A56E
Laser à 3 faisceaux
Laser semi-conducteur
20 – 20.000 Hz (47 kohms)
stéréo)
5 mW + 5 mW (16 ohms à 1
kHz)
500 mV (47 kohms à 1 kHz)
alcalines LR6 (format AA)
DC 2,4 V en utilisant deux
piles rechargeables (Ni-MH
1,2 V 1600 mAh) disponibles
dans le commerce.
Secteur domestique avec
l’adaptateur secteur fourni
131 (L) × 35 (H) × 144 (P) mm
(pièces et commandes en
saillie exclues)
(1)
Ecouteurs stéréo (1)
«Adaptateur secteur AC-A56E»
Entrée nominale Secteur 230 V, 50 Hz
Ecouteurs HP-M043 fournis
Ecouteurs recommandés disponibles dans le
commerce
La conception et les spécifications peuvent être
modifiées sans préavis.
Type: interne
Impédance: 16 ohms
Sensibilité: 107 dB/mW
Type: interne/vertical/à
courroie
Impédance: 16 – 32 ohms
Sensibilité: 100 – 109 dB/mW
FRANÇAIS
FRANÇAIS
25
Page 74

• Un archivo MP3 guarda datos de audio
comprimidos empleando la tecnología
MPEG1/2, el sistema de codificación
de archivos de audio de tercer nivel de
compresión.
• En este manual, los discos compactos,
los discos CD-R y los CD-RW son
todos denominados como “discos”.
Además, nos referimos a lo que en
terminología informática se llaman
“carpeta” y “archivo” como “álbum” y
“pista”.
INDICE
PRECAUCIONES ........................................ 3
USO DE PILAS ............................................ 4
USO DE BATERIAS RECARGABLES ........ 5
ANTES DE REPRODUCIR.......................... 6
REPRODUCCION DE DISCO DE
AUDIO ..................................................... 9
REPRODUCCION PROGRAMADA .......... 12
REPRODUCCION DE DISCO MP3........... 14
CONEXION DE UNA UNIDAD
EXTERNA .............................................. 22
MANTENIMIENTO ..................................... 22
GLOSARIO DE TERMINOS ...................... 23
ESPECIFICACIONES ................................ 25
2
ESPAÑOL
Page 75

PRECAUTIONS
Para mantener en buen estado de
funcionamiento
• No utilice el aparato en lugares muy
calientes, fríos, con polvo o humedad.
Especialmente, no deje el aparato:
• en un lugar muy húmedo, por ejemplo en
un baño
• cerca de la calefacción
• en un lugar expuesto a los rayos del sol
(dentro de un coche estacionado donde
puede subir mucho la temperatura)
• cerca de fuentes magnéticas fuertes por
ejemplo televisores, altavoces o imanes
• donde hay mucho movimiento o vibración,
por ejemplo en el cubretablero del coche
o estante inestable
Para su seguridad
•
No trate de desarmar el aparato. Los rayos láser
del receptor óptico pueden dañar sus ojos.
•
Asegúrese de que los alfileres u otros objetos
extraños no entren en el interior del reproductor.
• Tenga cuidado de no dejar caer el aparato
o exponerlo a golpes fuertes.
•
Para evitar que el polvo ensucie la lente
captora, mantenga la tapa del compartimiento
del disco cerrado. No toque nunca la lente.
• Si no se escucha ningún sonido durante la
reproducción de un disco, NO suba el
volumen porque la música puede empezar
repentinamente a un volumen muy alto.
Gire el control de volumen a su nivel más
bajo antes de empezar a reproducir y gire
lentamente hasta el nivel deseado.
Notas para escuchar con los
auriculares
• Escuche a un volumen no muy alto para no
dañar sus oídos.
• No utilice auriculares durante la conducción
o al andar en bicicleta. Puede provocar un
accidente de tráfico.
• Debe tener mucho cuidado o dejar se
utilizar temporalmente en situaciones
potencialmente peligrosas, por ejemplo
mientras camina, corre, etc.
• Utilice correctamente: L es para la izquierda
y R para la derecha.
• Los auriculares de tipo en el oído deben
utilizarse pasando el cable más largo por
detrás del cuello.
PRECAUCION
Si se escucha con los auriculares estéreo a
toda potencia durante mucho tiempo puede
terminar dañando sus oídos.
Nota sobre la condensación
Si se lleva repentinamente el aparato de un
lugar frío a un lugar caliente puede
condensarse la humedad en la lente captora
y provocar un mal funcionamiento o
problemas en la reproducción.
En este caso, deje descansar el aparato
unas horas y trate de volver a reproducir.
ESPAÑOL
ESPAÑOL
3
Page 76

USO DE PILAS
Abra el portapilas y coloque dos pilas
alcalinas LR6 (tamaño AA) con las
marcas 0 y 9 correctamente
alineadas.
LR6 × 2
Cambio de las pilas
El indicador de pilas en la pantalla cambia de
a a de acuerdo con la
carga remanente de las pilas. Cambie las
pilas cuando se encienda la luz .
Longevidad de las pilas (con pilas
alcalinas LR6)
Reproducción de discos de audio
Función E•A•S•S Aprox. 10 horas
PLUS activada
Función E•A•S•S Aprox. 11 horas
PLUS desactivada
Reproducción de Aprox. 5 horas
disco MP3
La longevidad de las pilas depende de las
condiciones de uso.
Retirado de las pilas
Si se sale la tapa del portapilas
Notas sobre las pilas
• Compruebe que las marcas 0 y 9 están
correctamente alineadas.
• No mezcle pilas de distinto tipo o una pila
vieja con otra nueva.
• Para evitar que se produzcan fugas de
electrólito o explosiones, no recargue las
pilas, caliente o desarme.
• Cuando no se utilicen las pilas, sáquelas
para evitar que se desgasten inútilmente.
• Si se produce una fuga del líquido de las
pilas, limpie a fondo para eliminar los restos.
4
ESPAÑOL
Page 77

USO DE BATERIAS RECARGABLES
• Compruebe que se están utilizando
baterías recargables de tamaño AA Ni-MH
1,2 V 1600 mAh de venta en los comercios.
• Lea sin falta las instrucciones de las
baterías recargables compradas antes de
utilizarlas.
• Cuando utilice baterías recargables por
primera vez, cargue hasta que se apague
el indicador de batería.
• Antes de cargar las baterías, cierre el
compartimiento del disco. No puede cargar
las baterías cuando está abierto.
1 Coloque las baterías recargables
con las marcas 0 y 9 correctamente
alineadas.
2 Conecte el adaptador de CA.
1 a la toma DC 5 V
2 al tomacorriente de la pared
3
Mantenga presionado sSTOP/OFF/
CHARGE durante aprox. 2 segundos
para empezar a cargar.
Aparece “Charge ON” y destella el
indicador de batería. Cuando se completa
la carga, destella “Charge OFF” varias
veces y se apaga el indicador de batería.
Una recarga completa de las baterías
agotadas demora unas 3 horas.
Después de la carga, desconecte el
adaptador de CA.
Tiempo para cargar las baterías
Cargue las baterías cuando se encienda
.
Para dejar de cargar
Presione sSTOP/OFF/CHARGE durante
la carga.
USO DE LA CA DEL HOGAR
Conecte el adaptador de CA suministrado
de la misma forma que lo haría para cargar
las baterías.
ESPAÑOL
DC 5V
ESPAÑOL
5
Page 78

ANTES DE REPRODUCIR
Interruptor HOLD
HOLD
RESUME
OFF
Suelte el interruptor HOLD antes de
reproducir. b a
Cuando no utilice el aparato mueva el
interruptor HOLD a la posición HOLD. b b
No funcionará aunque presione
accidentalmente un botón.
Si se presionan botones con el interruptor
HOLD en la posición HOLD, destella “HOLD”
en la pantalla.
Conexión y desconexión
Conexión del aparato
Presione ePLAY/PAUSE. Se conecta el
aparato y empieza la reproducción.
Nota
Aparece “ERROR” en la pantalla al reproducir
un disco al revés o un disco averiado.
6
ESPAÑOL
Page 79

Desconexión del aparato
Si no se hacen nuevas operaciones antes
de 30 segundos desde que terminó la última
operación, se desconecta automáticamente
el aparato. (Función de desconexión
automática)
• Se puede desconectar el aparato antes de
que funcione la desconexión automática
presionando sSTOP/OFF/CHARGE.
Modo de espera
Cuando termina de hacer funcionar, el
aparato se conmuta al modo de espera
hasta que funcione automáticamente la
detección automática.
Para entrar en el modo de espera, presione
e PLAY/PAUSE para empezar la
reproducción y, después, presione
sSTOP/OFF/CHARGE.
Ajuste del sonido
Volumen
VOLUME
6
Gire el control de VOLUME para ajustar el
volumen.
DSL
DSL
Presione DSL repetidamente para sonidos
más poderosos y graves más intensos.
: Se da énfasis a graves intensos.
: Se da énfasis fuerte a los graves
intensos.
: Sonido normal
ESPAÑOL
ESPAÑOL
7
Page 80

ANTES DE REPRODUCIR
Colocación de un disco
1 Deslice el interruptor OPEN para
abrir el compartimiento del disco.
OPEN
2 Coloque un disco en el centro con el
lado de etiqueta hacia arriba.
3 Cierre el compartimiento del disco.
Para sacar el disco
Tome el disco por sus bordes mientras
presiona suavemente sobre el pivote.
Nota
• Puede ser no posible reproducir discos
CD-R/RW grabados en un ordenador
personal o en algunos tipos de grabadores
de CD-R/RW en este aparato debido a que
existen diferencias en los formatos de
grabación.
• No pegue un sello o etiqueta en sus lados
(el lado grabable o el lado de etiqueta de
un disco CD-R/RW. Puede provocar un
mal funcionamiento.
8
ESPAÑOL
Page 81

REPRODUCCION DE DISCO DE AUDIO
4 Presione e PLAY/PAUSE.
4
5
Empieza a reproducir desde la primera
canción.
3
2
1
STOP/OFF/
CHARGE
1 Conecte los auriculares
suministrados en la toma
\/LINE OUT.
/LINE OUT
2 Suelte HOLD.
3 Coloque un disco.
a número de canción
b tiempo de reproducción transcurrido
Funciones básicas
Para parar
Para hacer una
pausa
Para hacer una
búsqueda del
principio
de una canción
Para buscar un
determinado punto
de la canción
Presione sSTOP/OFF/
CHARGE.
Presione ePLAY/
PAUSE.
Para seguir, vuelva a
presionar.
Presione r o t.
Mantenga presionado
r o t.
Suelte el botón al llegar al
punto deseado.
ESPAÑOL
ESPAÑOL
9
Page 82

REPRODUCCION DE DISCO DE AUDIO
Indicaciones durante la reproducción
PRGM / ENTER /
DISPLAY
Presione PRGM/ENTER/DISPLAY durante
la reproducción para cambiar la indicación
de la siguiente forma.
b Indicación de la canción y tiempo de
reproducción remanente de la canción
que se está reproduciendo
V
Número de canciones remanentes y
tiempo de reproducción remanente
V
Indicación de la canción y tiempo de
reproducción transcurrido (indicación
normal)
E•A•S•S PLUS (Sistema electrónico
antichoques)
La función E•A•S•S PLUS reduce los saltos
o silencios del sonido cuando el aparato
recibe un golpe.
E•A•S•S
Para activar la función E•A•S•S PLUS,
presione repetidamente E•A•S•S para que
aparezca .
Para cancelar, presione nuevamente
E•A•S•S. La indicación cambia a .
Notas
• Un golpe o vibración continuo puede
provocar una interrupción del sonido
incluso cuando se ha activado la función
E•A•S•S PLUS. Esto es normal y no es un
síntoma de avería. Si hay un corte de
sonido, estabilice la unidad durante unos
segundos antes de continuar con su
actividad.
• Cuando se presiona el botón E•A•S•S
durante la reproducción, el aparato hace
una pausa de unos 2 segundos.
10
ESPAÑOL
Page 83

Función de continuación
Mueva el interruptor HOLD a RESUME.
HOLD
RESUME
OFF
Reproducción aleatoria
1
2
Aparece y puede empezar a
reproducir desde el punto donde se paró la
reproducción presionando sSTOP/OFF/
CHARGE.
Cuando la función de continuación está
activada, se selecciona automáticamente la
repetición de todas las canciones.
Para cancelar la continuación de la
reproducción, mueva el interruptor HOLD
a OFF.
Notas
• Puede empezar la continuación de la
reproducción en un punto unos 30
segundos antes o después del punto de
parada. La continuación de la reproducción
puede no funcionar si se ha parado en los
últimos 30 segundos de la última canción.
• Se cancelará la reproducción continua si
se abre el compartimiento del disco. No se
cancela la reproducción continua cuando
desconecte el aparato. En este caso,
mueva el interruptor HOLD a OFF antes de
cambiar de disco.
1 Presione PLAY MODE en el modo
de espera para que aparezca
2 Presione ePLAY/PAUSE para
empezar a reproducir.
Las canciones del disco de reproducen
en orden aleatorio.
Para cancelar la reproducción aleatoria,
presione PLAY MODE en el modo de espera,
la indicación cambia a .
Notas
• No puede volver hacia atrás una canción
presionando r durante la reproducción
aleatoria.
• No se puede seleccionar la repetición de
una pista durante la reproducción aleatoria.
ESPAÑOL
11
.
ESPAÑOL
Page 84

PRGM / ENTER /
DISPLAY
REPRODUCCION DE DISCO DE AUDIO
Repetición de la reproducción
Presione PLAY MODE durante la
reproducción para seleccionar las siguientes
modalidades de repetición de la
reproducción.
: repetición de una canción B
V
: repetición de todas las canciones
V
reproducción sin repetición
(reproducción normal)
REPRODUCCION
PROGRAMADA
STOP/OFF/
CHARGE
1,3
2
5
Se pueden seleccionar hasta 24 canciones
para su reproducción programada.
1 Presione PRGM/ENTER/DISPLY en
el modo de espera para que aparezca
.
2 Seleccione la canción deseada
presionando r o t.
12
ESPAÑOL
SKIP /
SEARCH
a número de canción
b número de programa
Page 85

3 Presione PRGM/ENTER/DISPLY
antes de 4 segundos.
Si no se presiona antes de 4 segundos,
el número de canción cambia a 00. Repita
nuevamente el procedimiento desde el
paso 2.
PRGM / ENTER /
DISPLAY
4 Repita los pasos 2 y 3 para
programar canciones adicionales.
5 Presione ePLAY/PAUSE para
empezar la reproducción
programada.
Para parar la reproducción
programada
Presione sSTOP/OFF/CHARGE.
Para agregar canciones al programa
Repita los pasos 2 y 3 antes cuando está en
el modo de espera. Se pueden agregar
canciones al final del programa.
Para borrar el programa
Presione sSTOP/OFF/CHARGE en el
modo de espera.
Notas
• El programa también se borra cuando se
abre el compartimiento del disco o cuando
la función de desconexión automática
desconecta el aparato.
• Cuando se han programado 24 canciones,
aparece “PROG-FULL” y no pueden
agregarse más canciones.
• No se puede volver a una canción anterior
presionando r durante la reproducción
programada.
• Se puede usar la repetición de la
reproducción o la reproducción aleatoria
junto con la reproducción programada.
ESPAÑOL
13
ESPAÑOL
Page 86

REPRODUCCION DE DISCO MP3
Notas para la reproducción de
archivos MP3
• Una canción en MP3 debe grabarse en un
disco con un formato que cumpla con ISO
9660. Sin embargo, tenga en cuenta que el
aparato puede no reproducir canciones en
el orden en el que fueron grabadas.
• El máximo número de canciones y álbumes
que pueden hacerse en un disco son los
siguientes:
–número de canciones: 512 (según el
número de álbumes)
–número de álbumes: hasta 512 (según el
número de canciones)
• La máxima profundidad tolerable de
álbumes dentro de álbumes es de 8.
• No funciona el E•A•S•S PLUS.
• Puede demorar unos 30 segundos o más
antes de que el aparato pueda empezar a
reproducir las canciones MP3, según el
número de canciones grabadas y la
complejidad del árbol de álbumes.
• Si un disco tiene canciones de audio y
canciones MP3, el aparato sólo reproduce
las canciones de audio.
• Para un disco de múltiples sesiones, se
recomiendan hasta 10 sesiones.
• El aparato puede no reproducir las
canciones MP3 grabada con una utilidad
de escritura en paquete.
• El aparato puede reproducir las canciones
MP3 si tienen una extensión de archivo
“.mp3”.
• Si se reproduce una canción que no sea
MP3 pero tenga la extensión de archivo
“.mp3”, puede escuchar ruidos.
• Puede haber saltos en el sonido o silencios
durante la reproducción de archivos
codificados con velocidades de bit de entre
256 kbps y 320 kbps.
Notas sobre las indicaciones
visualizadas durante la reproducción
• Aparecen hasta 64 caracteres (incluyendo
su extensión) para el nombre de un archivo
o canción. Si la versión 1.X de ID3TAG se
aplicó para grabar información adicional
para una canción MP3, aparecen hasta 30
caracteres que muestran el título de la
canción y el nombre del artista. Los otros
caracteres que no sean mayúsculas (“A” a
“Z”), números (“0” a “9”) y subrayado (__)
pueden no aparecer correctamente o
aparece en lugar del carácter.
• El tiempo de reproducción transcurrido
puede no aparecer correctamente para las
canciones MP3.
14
ESPAÑOL
Page 87

Notas sobre la creación de discos
MP3
Cuando se convierten los datos de
audio a MP3
Para disfrutar de sonidos de gran calidad, se
recomienda memorizar los archivos MP3
con una frecuencia de muestreo de 44,1 kHz
y una velocidad de bit fijada de 128 kbps.
Para reproducir canciones en el
orden en el que fueron grabadas.
1 Utilice un software capaz de grabar
canciones (archivos) MP3 en orden
número y alfabético.
Para más detalles sobre el uso del
programa, consulte el manual de
instrucciones de su programa.
2 Utilice sólo un álbum. (No cree un
sub-álbum dentro de un álbum.)
3 Incluya un número de dos o tres
cifras al principio de cada nombre
de álbum o canción para que los
álbumes y canciones se
reproduzcan en orden.
(ejemplo de nombres recomendados)
01XXXXX.mp3
02XXXXX.mp3
03XXXXX.mp3
04XXXXX.mp3
05XXXXX.mp3
(ejemplo de nombres no recomendados)
1XXXXX.mp3
2XXXXX.mp3
10XXXXX.mp3
15XXXXX.mp3
20XXXXX.mp3
(Los números al principio tienen una
cifra diferente. Las canciones no se
reproducirán en este orden sino que se
reproducirán en el orden “1”, “10”, “15”,
“20” y “5”.)
ESPAÑOL
ESPAÑOL
15
Page 88

REPRODUCCION DE DISCO MP3
2
MP3
MODE
3
STOP/OFF/
CHARGE
1 Conecte los auriculares incluidos
en la toma \/LINE OUT.
/LINE OUT
2 Ajuste el interruptor START MODE
para seleccionar el formato de
lectura de disco.
START MODE
NORMALQUICK
4
1
5
3 Inserte un disco MP3.
4 Suelte el interruptor HOLD.
5 Presione ePLAY/PAUSE para
empezar la reproducción.
a aparece cuando se inserta un disco
MP3
b número de canción
c número de álbum
d tiempo de reproducción transcurrido
Se conecta la alimentación y destella
“READING” en la pantalla.
Después de leer el disco, la reproducción
empieza desde la primera canción en el
Album 1.
Refiérase al “Ajuste del interruptor START
MODE” en la siguiente página y ajuste el
interruptor a la posición correcta.
16
ESPAÑOL
Page 89

Ajuste del interruptor START MODE.
Ajuste el interruptor a la posición correcta
según el modo de reproducción y tipo de
disco.
QUICK (rápido)
El aparato sólo lee el número del álbum
antes de reproducir y la lectura del disco
termina antes.
Sin embargo, no puede hacerlo en la
reproducción programada y reproducción
aleatoria.
El aparato lee la información de canción
durante la reproducción. Cuando el aparato
detecta un álbum que no tiene archivo mp3,
el número del álbum disminuye. Se
recomienda utilizar esta posición cuando se
reproduce un disco que contenga muchos
álbumes.
NORMAL
El aparato lee el número de álbumes y
canciones antes de reproducir y demora
más tiempo para leer el disco que cuando el
interruptor está en QUICK.
Nota
Si desliza el interruptor START MODE
durante la reproducción, no cambia el formato
de lectura del disco. Pare la reproducción y
presione s STOP/OFF/CHARGE para
desconectar la alimentación y deslice el
interruptor START MODE para cambiar el
formato de lectura del disco.
Para seleccionar el modo de
reproducción MP3
Presione repetidamente el MP3 MODE para
seleccionar el modo de reproducción.
Modo de disco
Se reproducen todas las canciones del disco.
Modo de álbum
Se reproducen todas las canciones del álbum
seleccionado en ese momento.
Para parar la reproducción
Presione sSTOP/OFF/CHARGE.
La reproducción se para y aparece el formato
de lectura del disco (NORMAL o QUICK).
Para buscar el principio de una
canción
Presione r o t.
ESPAÑOL
17
ESPAÑOL
Page 90

REPRODUCCION DE DISCO MP3
Para buscar un pasaje deseado
Mantenga presionado r o t. Suelte el
botón al principio del pasaje deseado.
• No puede controlar el sonido cuando está
presionado el botón durante la
reproducción de un archivo MP3.
Para hacer una pausa de
reproducción
Presione ePLAY/PAUSE. Presione
nuevamente para continuar.
Para cambiar el álbum
ALBUM
SKIP
Presione ALBUM SKIP.
Para saltar a la primera canción del siguiente
álbum, presione i.
Para saltar a la primera canción del álbum
anterior, presione k.
Aparece durante la reproducción
PRGM / ENTER /
DISPLAY
Presione PRGM/ENTER/DISPLAY durante
la reproducción para cambiar la pantalla de
la siguiente forma.
b Nombre de la canción actual
Aparece el nombre del archivo de la
canción actual.
V
ID3 TAG
Aparece el ID3TAG de la canción actual.
Si no hay ID3 TAG grabado en la canción
actual, aparece “No Title”.
V
Pantalla normal
Aparece el tiempo transcurrido de la
canción actual.
18
ESPAÑOL
Page 91

Reproducción repetida
Presione PLAY MODE durante la
reproducción para seleccionar la
reproducción repetida de la siguiente forma.
b : repetición de una canción
La canción actual se reproduce
repetidamente.
V
: Repetición de todas las
canciones
Todas las canciones del disco se
reproducen repetidamente durante la
reproducción en el DISC MODE.
Todas las canciones del álbum actual
se reproducen repetidamente durante
la reproducción en el ALBUM MODE.
V
reproducción sin repetición
(reproducción normal)
Función de continuación
Mueva el interruptor HOLD a RESUME.
HOLD
RESUME
OFF
Aparece y puede empezar a
reproducir desde el punto donde paró la
reproducción presionando sSTOP/OFF/
CHARGE. Cuando la función de continuación
está activada, se selecciona
automáticamente la repetición de todas las
canciones.
Para cancelar la función de continuación,
mueva el interruptor HOLD a OFF.
Nota
• La continuación de la reproducción puede
empezar en un punto unos 30 segundos
antes o después del punto donde se paró.
• La continuación de la reproducción puede
no funcionar si paró en los últimos 30
segundos de la última canción.
• La continuación de la reproducción se
cancela cuando se sacan las pilas o se
desconecta el adaptador de CA.
ESPAÑOL
ESPAÑOL
19
Page 92

REPRODUCCION DE DISCO MP3
3
1,4
6
2
STOP/OFF/
CHARGE
PRGM / ENTER /
DISPLAY
Reproducción aleatoria
• Antes de la reproducción aleatoria, mueva
el START MODE a NORMAL (Consulte la
página 17).
1 Presione PLAY MODE en el modo
de espera para que aparezca
2 Presione ePLAY/PAUSE para
empezar la reproducción.
Todas las canciones del disco se
reproducen en orden aleatorio durante la
20
reproducción en el DISC MODE. Todas
las canciones del álbum actual se
reproducen en orden aleatorio durante la
reproducción en el ALBUM MODE.
ESPAÑOL
Para cancelar la reproducción aleatoria,
presione PLAY MODE en el modo de espera.
La indicación cambia a .
Nota
• No puede volver a una canción anterior
1
2
presionando rdurante la reproducción
aleatoria.
• No puede seleccionar la repetición de una
canción durante la reproducción aleatoria.
Reproducción programada
• Antes de empezar la reproducción
programada, mueva START MODE a
NORMAL (Consulte la página 17).
.
• Se pueden seleccionar hasta 24 canciones
para la reproducción programada.
1 Presione PRGM/ENTER/DISPLAY en
el modo de espera para que aparezca
.
Page 93

2 Seleccione el álbum deseado
presionando ALBUM SKIP.
ALBUM
SKIP
3 Seleccione la canción deseada
presionando r o t.
SKIP /
SEARCH
4 Presione PRGM/ENTER/DISPLAY.
PRGM / ENTER /
DISPLAY
Si no se presiona antes de 4 segundos,
el número de canción cambia a 00. Repita
nuevamente el procedimiento desde el
paso 2.
5 Repita los pasos 2, 3 y 4 para
programar más canciones.
Presione e PLAY/PAUSE para
6
empezar la reproducción programada.
Para parar la reproducción
programada
Presione sSTOP/OFF/CHARGE.
Para agregar canciones al programa
Repita los pasos 2, 3 y 4 en el modo de
espera. Puede agregar canciones al final del
programa.
Para borrar el programa
Presione sSTOP/OFF/CHARGE en el
modo de espera.
Nota
• La reproducción programada también se
cancela cuando se abre el compartimiento
del disco o cuando la función de
desconexión automática desconecta la
alimentación.
• Cuando se programan 24 canciones,
aparece “PROG-FULL” y no puede seguir
agregando canciones.
• No puede volver a una canción anterior
aunque mantenga presionado r durante
la reproducción.
• Puede hacer la reproducción repetida y la
reproducción al azar durante la
reproducción programada.
ESPAÑOL
ESPAÑOL
21
Page 94

CONEXION DE UNA
UNIDAD EXTERNA
Utilice un cable de conexión en venta en los
comercios, con un minienchufe estéreo de
3,5 ø en una punta y dos enchufes
fonográficos en la otra punta.
Conecte el minienchufe estéreo en la toma
de salida
\/LINE OUT del aparato y conecte los
enchufes fonocaptores en los terminales de
entrada analógicos de la unidad externa.
RL
LINE IN
CD IN
AUX
Notas
• Desconecte ambos aparatos antes de
hacer esta conexión.
• NO conecte las entradas PHONO de un
amplificador (con un amplificador
fonoecualizador incorporado).
• Ajuste el volumen y el DSL de este aparato.
MANTENIMIENTO
Para limpiar la lente
Cuando la lente está sucia el reproductor
saltará o no podrá reproducir. En este caso
limpie la lente de la siguiente forma.
Para eliminar el polvo o partículas secas,
utilice primero un cepillo/soplador de lente
de cámara fotográfica a para soplar las
partículas finas y cepille suavemente la lente
b para limpiar. Termine soplando
nuevamente sobre la lente.
Para eliminar las huellas dactilares, utilice
un palillo cubierto con un algodón empapado
con una solución de limpieza de lentes.
Frote suavemente empezando por el centro
y hasta los bordes. Hay soluciones de
limpieza de lentes en venta en los comercios.
Nota
No moje excesivamente el algodón porque
puede gotear hacia el interior del aparato y
dañarlo.
No presione con fuerza con el algodón porque
puede rayar o romper la lente.
22
ESPAÑOL
Page 95
GLOSARIO DE TERMINOS
Para limpiar los discos
Antes de reproducir, frote el disco desde el
centro hacia afuera con un paño de limpieza.
Después de reproducir, guarde el disco en
su caja.
ISO 9660
ISO son las siglas de “Organización
Internacional de Estandarización” e ISO 9660
determina la estructura de archivos en el
CD-ROM. Este aparato puede reproducir
los archivos MP3 grabados en un formato
que cumpla con ISO 9660.
Telaraña de carpetas (álbumes)
Para organizar los archivos de datos memorizados
en un ordenador, puede memorizar todos los
archivos relacionados en una carpeta. Una
carpeta también puede contener otras carpetas
además de archivos. Por ejemplo, la carpeta A
puede contener la carpeta B y la carpeta B puede
contener la carpeta C: es una “telaraña de
carpetas”. La máxima profundidad de carpetas
en telaraña permitida por la ISO 9660 es de 8.
Utilidades de escritura
Hay 3 utilidades utilizadas para registrar los
datos en un disco.
ESPAÑOL
1 Utilidad DAO (Disco de una vez)
Todos los datos a escribir deben prepararse
por adelantado y escribirlos en un disco desde
el principio al final en una misma operación.
No pueden agregarse datos a un disco en el
que ya se escribieron con la utilidad DAO.y.
2 Utilidad TAO (Canción de una vez)
Los datos se escribieron en un disco
canción por canción. Pueden agregarse
datos a un disco en el que se escribieron
datos con la utilidad TAO.
ESPAÑOL
23
Page 96

TERMINOLOGY
3 Utilidad de escritura en paquete
Las canciones se dividieron en piezas
más pequeñas durante la grabación,
según el tamaño de los espacios
disponibles en el disco. Los datos pueden
agregarse a un disco en el que los datos
se escribieron con la utilidad de escritura
en paquete.
Este aparato puede reproducir discos MP3
utilizando las utilidades DAO y TAO.
Múltiples sesiones
Una sesión es una colección de datos que
abarca desde el principio al final de la
grabación hecha en una misma operación.
Con la utilidad TAO (Canción de una vez),
los datos pueden grabarse en varias
operaciones. Una sesión corresponde a los
datos grabados en una operación. Este
aparato puede reproducir los datos grabados
en la 5ª operación. En otras palabras, el
aparato puede reproducir hasta 5 sesiones.
ID3TAG
El ID3TAG determina el formato de los datos
para el texto a agregar a un archivo MP3,
utilizado principalmente para indicar un
nombre de canción o un nombre de artista,
etc.
Extensión de archivo
Una cadena de 3 caracteres agregada al
nombre del archivo en una configuración de
Windows o DOS se denomina “extensión de
archivo”. Una extensión de archivo se utiliza
principalmente para identificar tipos de
archivos. La extensión de archivo para los
archivos MP3 es “.mp3”.
SESSION1 SESSION2 SESSOIN3
24
ESPAÑOL
Page 97

ESPECIFICACIONES
Sistema de seguimiento
Receptor del láser
Conversión D/A Conversión digital analógica
Respuesta de frecuencia
Salida Toma \/LINE OUT (minitoma
Salida máxima 5 mW + 5 mW
Alimentación eléctrica
Dimensiones exteriores máximas
Peso Aprox. 285 g sin pilas
Accesorios Adaptador de CA AC-A56E
3 rayos láser
Láser semiconductor
de múltiples bit
20 – 20.000 Hz (47 k ohmios)
estéreo)
(de 16 ohmios a 1 kHz)
500 mV (47 k ohmios a 1 kHz)
CC de 3 V utilizando dos pilas
alcalinas de LR6 (tamaño AA)
CC de 2,4 V utilizando dos
baterías recargables de venta
en los comercios (Ni-MH 1,2 V
1600 mAh)
CA del hogar utilizando el
adaptador de CA suministrado
131 (An.) × 35 (Al.) ×
144 (Prof.) mm (sin incluir
partes salientes y controles)
(1)
Auriculares estéreo (1)
«Adaptador de CA AC-A56E»
Entrada de régimen CA de 230 V, 50 Hz
Auriculares suministrados HP-M043
Auriculares recomendados de venta
comercial
Las especificaciones y aspecto exterior de este
aparato están sujetos a cambios sin previo aviso.
Tipo: en el oído
Impedancia: 16 ohmios
Sensibilidad: 107 dB/mW
Tipo: Tipo en el oído/tipo
Vertical/Cascos
Impedancia: 16 – 32 ohmios
Sensibilidad: 100 – 109 dB/
mW
ESPAÑOL
ESPAÑOL
25
Page 98

AVVERTENZA
L’uso di comandi o regolazioni o l’esecuzione
di procedimenti diversi da quelli qui specificati
può causare pericolose esposizioni a
radiazioni.
Questo lettore di compact disc è classificato
come prodotto LASER CLASSE 1.
L’etichetta CLASS 1 LASER PRODUCT si
trova all’esterno.
AVVERTENZA!
Radiazione laser invisibile
quando aperto con gli
interblocchi disattivati.
Evitare l’esposizione al raggio.
• LMP3 è un file audio che permette di
registrare contenuti audio compressi,
sfruttando il formato MPEG1/2,
lalgoritmo di codifica 3 layer.
• In questo manuale, i CD, i CD registrabili
e i CD-RW saranno indicati come dischi.
I concetti di cartella e file relativi alla
terminologia informatica, in questo
manuale saranno indicati con i termini
album e traccia.
INDICE
PRECAUZIONI ............................................ 3
USO CON LE PILE A SECCO ..................... 4
USO CON LE PILE RICARICABILI ............. 5
PRIMA DELLA RIPRODUZIONE ................ 6
RIPRODUZIONE DI DISCHI AUDIO ...........9
RIPRODUZIONE PROGRAMMATA ......... 12
RIPRODUZIONE DI DISCHI MP3 ............. 14
COLLEGAMENTO DI UN APPARECCHIO
ESTERNO.............................................. 22
MANUTENZIONE ...................................... 22
TERMINOLOGIA .......................................23
CARATTERISTICHE TECNICHE .............. 25
2
ITALIANO
Page 99

PRECAUZIONI
Per garantire prestazioni ottimali
• Non usare l’apparecchio in luoghi
eccessivamente caldi, freddi, polverosi o
umidi. In particolare, non usare e non
collocare l’apparecchio nei seguenti luoghi:
• in ambienti molto umidi come la stanza
da bagno
• nei pressi di impianti di riscaldamento
•
in luoghi esposti alla luce solare diretta (ad
esempio all’interno di un’automobile
parcheggiata con i finestrini chiusi, dove la
temperatura può aumentare considerevolmente)
•
nei pressi di fonti di forte magnetismo,
come vicino a televisori, diffusori o magneti
• in luoghi soggetti a forti movimenti o
vibrazioni, come sul cruscotto di
un’automobile o su uno scaffale instabile
Precauzioni di sicurezza
• Non tentare di smontare l’apparecchio. I
raggi laser che fuoriscono dal pick-up ottico
sono pericolosi per la vista.
•
Fare attenzione ad evitare la penetrazione di
spilli o altri oggetti estranei all’interno del lettore.
•
Fare attenzione a non far cadere
l’apparecchio e a non sottoporlo a forti scosse.
•
Per evitare che la polvere si accumuli sulla lente
del pick-up, tenere chiuso il coperchio del comparto
disco dopo l’uso. Non toccare mai la lente.
• Se non si sente alcun suono durante la
riproduzione del disco NON AUMENTARE
il volume, poichè la musica potrebbe
incominciare improvvisamente ad alto
volume. Regolare il comando del volume
sul livello minimo prima di avviare la
riproduzione e alzare lentamente il volume
fino ad ottenere il livello desiderato.
Note sull’ascolto con le cuffie
• Ascoltare il suono a volume moderato per
evitare danni all’udito.
• Non indossare le cuffie mentre si guida o si
va in bicicletta. Questo può costituire un
pericolo per il traffico.
• Usare estrema cautela o interrompere
temporaneamente l’uso dell’apparecchio
in situazioni potenzialmente pericolose per
esempio passeggiando, facendo jogging,
ecc.
• Indossare le cuffie correttamente: L indica
la sinistra, R la destra.
• Le cuffie del tipo ad auricolare devono
essere indossate facendo passare il cavo
più lungo dietro al collo.
ATTENZIONE
A piena potenza, l’ascolto prolungato delle
cuffie può danneggiare l’udito.
Nota sulla condensazione di umidità
Quando si sposta improvvisamente
l’apparecchio da un luogo freddo ad uno
caldo, l’umidità può condensarsi sulla lente
del pick-up e possono verificarsi problemi di
funzionamento o di riproduzione.
In questo caso, non usare l’apparecchio per
alcune ore, quindi riprovare ad avviare la
riproduzione.
ITALIANO
ITALIANO
3
Page 100

USO CON LE PILE A SECCO
Aprire il comparto pile ed inserire due
pile alcaline LR6 (formato AA) con i
poli 0 e 9 correttamente orientati.
LR6 × 2
Sostituzione delle pile
Sul display, l’indicatore delle pile cambia da
a a a seconda della carica
rimanente delle pile. Sostituire le pile quando
si illumina.
Durata delle pile (con pile alcaline
LR6)
Riproduzione di dischi audio
Funzioni E•A•S•S PLUS on Circa 10 ore
Funzioni E•A•S•S PLUS off Circa 11 ore
Riproduzione dischi MP3 Circa 5 ore
La durata delle pile può variare a seconda
delle condizioni di impiego.
Per rimuovere le pile
Se il coperchio del comparto pile si
stacca
Note sulle pile a secco
• Assicurarsi che i segni 0 e 9 siano allineati
correttamente.
• Non usare insieme pile di tipo diverso, o
una pila vecchia e una nuova.
• Per evitare il rischio di perdite di elettrolita
o esplosioni, non ricaricare mai le pile, non
esporle al calore e non smontarle.
• Quando non si intende usare l’apparecchio
con le pile, estrarre le pile per evitare che
si consumino inutilmente.
• In caso di perdite di liquido dalle pile, pulirle
accuratamente in modo da eliminare ogni
traccia di liquido.
4
ITALIANO
 Loading...