

Page 1
DVD PLAYER
PLATINA DVD
XD-SPM823
OPERATING INSTRUCTIONS
MANUAL DE INSTRUCCIONES
8C-AVL-903-01
020401AMK-H-L
Owner’s record
For your convenience, record the model number and serial
number (you will find them on the rear of your set) in the
space provided below. Please refer to them when you
contact your Aiwa dealer in case of difficulty.
Model No. Serial No. (Lot No.)
XD-SPM823
For assistance and information,
call toll free 1-800-BUY-AIWA.
(United States and Puerto Rico)
U
En
(English)
E
(Español)
Page 2
ENGLISH
WARNING
TO REDUCE THE RISK OF FIRE OR
ELECTRIC SHOCK, DO NOT EXPOSE THIS
APPLIANCE TO RAIN OR MOISTURE.
Explanation of Graphical Symbols:
The lightning flash with arrowhead symbol,
within an equilateral triangle, is intended to
alert the user to the presence of uninsulated
"dangerous voltage" within the product’s
enclosure that may be of sufficient magnitude
to constitute a risk of electric shock to persons.
The exclamation point within an equilateral
triangle is intended to alert the user to the
presence of important operating and
maintenance (servicing) instructions in the
literature accompanying the appliance.
WARNING:
TO REDUCE THE RISK OF FIRE OR ELECTRIC SHOCK,
DO NOT EXPOSE THIS PRODUCT TO RAIN OR
MOISTURE.
CAUTION:
TO PREVENT ELECTRIC SHOCK, MA TCH WIDE BLADE
OF PLUG TO WIDE SLOT, FULL Y INSERT.
CAUTION:
This Digital Video Disc Player employs a Laser System.
To ensure proper use of this product, please read this
operating instructions carefully and retain for future
reference, should the unit require maintenance, contact an
authorized service location - see service procedure.
Use of controls, adjustments or the performance of
procedures other than those specified herein may result
hazardous radiation exposure.
To prevent direct exposure to laser beam, do not try to open
the enclosure. Visible laser radiation when open. DO NOT
STARE INT O BEAM.
2
ENGLISH
Page 3

IMPORTANT SAFETY
INSTRUCTIONS
CAUTION:
PLEASE READ AND OBSERVE ALL WARNINGS AND
INSTRUCTIONS IN THESE OPERATING INSTRUCTIONS
AND THOSE MARKED ON THE UNIT. RETAIN THIS
BOOKLET FOR FUTURE REFERENCE.
This set has been designed and manufactured to assure
personal safety. Improper use can result in electric shock
or fire hazard. The safeguards incorporated in this unit will
protect you if you observe the following procedures for
installation, use and servicing.
This unit is fully transistorized and does not contain any
parts that can be repaired by the user.
DO NOT REMOVE THE CABINET COVER, OR YOU MA Y
BE EXPOSED TO DANGEROUS VOLTAGE. REFER
SERVICING TO QUALIFIED SERVICE PERSONNEL
ONLY.
6. Water and moisture
Do not use this product near water - for example, near
a bath tub, wash bowl, kitchen sink, or laundry tub; in a
wet basement; or near a swimming pool and the like.
7. Cleaning
Unplug this product from the wall outlet before cleaning.
Do not use liquid cleaners or aerosol cleaners. Use a
damp cloth for cleaning.
8. Power cord protection
Power supply cords should be routed so that they are
not likely to be walked on or pinched by items placed
upon or against them, paying particular attention to cords
at plugs, convenience receptacles, and the point where
they exit from the product.
9. Overloading
Do not overload wall outlets, extension cords, or integral
convenience receptacles as this can result in a risk of
fire or electric shock.
INTRODUCTION
1. Read operating instructions
After unpacking this product, read the operating
instructions carefully, and follow all the operating and
other instructions.
2. Power sources
This product should be operated only from the type of
power source indicated on the marking label. If you are
not sure of the type of power supply in your home,
consult your product dealer or local power company. For
products intended to operate from battery power, or
other sources, refer to the operating insturctions.
3. Grounding or polarization
This product is equipped with a polarized alternating
current line plug (a plug having one blade wider than
the other). This plug will fit into the power outlet only
one way. This is a safety feature. If you are unable to
insert the plug fully into the outlet, try reversing the plug.
If the plug should still fail to fit, contact your electrician
to replace your obsolete outlet. Do not defeat the safety
purpose of the polarized plug.
4. Ventilation
Slots and openings in the cabinet are provided for
ventilation and to ensure reliable operation of the product
and to protect it from overheating. These openings must
not be blocked or covered. The openings should never
be blocked by placing the product on a bed, sofa, rug or
other similar surface.
This product should not be placed in a built-in installation
such as a bookcase or rack unless proper ventilation is
provided or the manufacturer's instructions have been
adhered to.
5. Heat
The product should be situated away from heat sources
such as radiators, heat registers, stoves, or other
products (including amplifiers) that produce heat.
10.Lightning
For added protection of this product during storms, or
when it is left unattended and unused for long periods
of time, unplug it from the wall outlet.
This will prevent damage to the product due to lightning
and power line surges.
11.Object and liquid entry
Never push objects of any kind into this product through
openings as they may touch dangerous voltage points
or short-out parts that could result in a fire or electric
shock. Never spill liquid of any kind on the product.
12.Attachements
Do not use attachments not recommended by the
product manufacturer as they may cause hazards.
13.Accessories, carts and stands
Do not place this product on an unstable
cart, stand, tripod, bracket, or table. The
product may fall, causing serious injury
to a child or adult, and serious damage
to the product. Use only with a cart, stand,
tripod, bracket, or table recommended by the
manufacturer, or sold with the product. Any mounting of
the product should follow the manufacturer's
instructions, and should use a mounting accessory
recommended by the manufacturer. A product and cart
combination should be moved with care. Quick stops,
excessive force, and uneven surfaces may cause the
product and cart combination to overturn.
14.Disc tray
Keep your fingers well clear of the disc tray as it is
closing. It may cause serious personal injury.
En
ENGLISH
3
Page 4

15.Burden
Do not place a heavy object on or step on the product.
The object may fall, causing serious personal injury and
serious damage to the product.
16.Connecting
When you connect the product to other equipment, turn
off the power and unplug all of the equipment from the
wall outlet. Failure to do so may cause an electric shock
and serious personal injury. Read the operating
instructions of the other equipment carefully and follow
the instructions when making any connections.
23.Servicing
Do not attempt to service this product yourself as
opening or removing covers may expose you to
dangerous voltage or other hazards. Refer all servicing
to qualified service personnel.
24.Replacement parts
When replacement parts are required, be sure the
service technician has used replacement parts specified
by the manufacturer or have the same characteristics
as the original part. Unauthorized substitutions may
result in fire, electric shock, or other hazards.
17.Sound volume
Reduce the volume to the minimum level before you
turn on the product. Otherwise, sudden high volume
sound may cause hearing or speaker damage.
18.Sound distortion
Do not allow the product to output distorted sound for a
long time. It may cause speaker overheating and fire.
19.Headphones
When you use the headphones, keep the volume at a
moderate level. If you use the headphones continuously
with high volume sound, it may cause hearing damage.
20.Laser beam
Do not look into the opening of the disc tray or ventilation
opening of the product to see the source of the laser
beam. It may cause sight damage.
21.Disc
Do not use a cracked, deformed, or repaired disc. These
discs are easily broken and may cause serious personal
injury and product malfunction.
22.Damage requiring service
Unplug this product from the wall outlet and refer
servicing to qualified service personnel under the
following conditions:
a)When the power supply cord or plug is damaged.
b)If liquid has been spilled, or objects have fallen into
the product.
c)If the product has been exposed to rain or water.
d)If the product does not operate normally by following
the operating instructions. Adjust only those controls
that are covered by the operating instructions as an
improper adjustment of other controls may result in
damage and will often require extensive work by a
qualified technician to restore the product to its normal
operation.
e)If the product has been dropped or damaged in any
way.
f) When the product exhibits a distinct change in
performance - this indicates a need for service.
25.Safety check
Upon completion of any service or repairs to this product,
ask the service technician to perform safety checks to
determine that the product is in proper operating
condition.
4
ENGLISH
Page 5

Table of Contents
Introduction
Important safety instructions .................................3
Before Use.................................................................6
Disc symbols used in this manual...................6
Supported disc formats ....................................6
Disc-related terms..............................................7
Handling the unit................................................7
Handling discs....................................................7
Cleaning the unit................................................7
Cleaning discs....................................................8
Storing discs ...................................................... 8
Notes on copyright ............................................8
Remote control.................................................. 8
General information on progressive scan ......9
Parts and Controls ................................................ 10
Front panel....................................................... 10
Remote control................................................ 10
Display window ............................................... 12
Preparations
Connections........................................................... 13
Connecting to a TV.......................................... 13
Connecting to audio equipment.................... 14
A-1 Connecting to a TV ...................................15
A-2 Connecting to a TV equipped with
an S-video input connector ....................... 16
A-3 Connecting to a TV or monitor with
component video input connectors ........ 17
B Connecting to a TV and an amplifier
with a digital input jack..............................18
C Connecting to a TV and a stereo
system ......................................................... 19
D Connecting to a TV and an AV receiver
equipped with a Dolby Digital (AC-3)
decoder .......................................................20
E Connecting to a TV and an AV receiver
equipped with a DTS decoder................... 21
F Connecting to a TV and an AV receiver
equipped with a Dolby Pro Logic
decoder .......................................................22
Basic Operations
Playback ................................................................. 23
Loading discs .................................................. 23
Starting playback ............................................ 24
Still (pause)...................................................... 26
Frame advance ................................................ 26
Resuming playback ........................................ 26
Fast forward and fast reverse........................ 27
Slow playback.................................................. 27
Skipping ........................................................... 27
Basic operation of the OSD (On-Screen
Display) menu ........................................... 28
Description of each OSD menu item ............ 29
More Features
Search ..................................................................... 30
Title/Track search............................................ 30
Chapter search ................................................ 31
Time search ..................................................... 31
Mark search ..................................................... 32
Zooming and Changing the Angle ...................... 33
Zooming the picture ....................................... 33
Changing the angle......................................... 33
Random and Repeat Playback............................. 34
Random playback ........................................... 34
Repeat playback .............................................. 34
Repeating a section between two
specified points (A-B repeat) .................. 35
Programmed Playback.......................................... 36
Creating a 3D Surround Effect............................. 38
Changing the Audio T rack/Channel..................... 39
Displaying and Changing Subtitles .................... 40
Playing an MP3 Disc ............................................. 41
Notes on MP3 discs ........................................ 41
Glossary ........................................................... 41
Basic operations of MP3 playback ............... 42
OSD (On-Screen Display) menu for
the MP3 disc .............................................. 43
Repeat playback .............................................. 43
Programmed playback.................................... 44
As Necessary
Changing Setup Values......................................... 46
Basic operations ............................................. 46
Disc Audio........................................................ 47
Disc Subtitle .................................................... 48
Disc Menu ........................................................ 48
Rating ............................................................... 49
Country Code .................................................. 50
TV Aspect......................................................... 50
Menu Language............................................... 51
Progressive Scan ............................................ 52
Digital Audio Output ....................................... 52
Others ............................................................... 53
Country codes ................................................. 54
Language codes.............................................. 56
Troubleshooting .................................................... 57
Specifications ........................................................ 58
Features
High quality digital audio and images
• Including a progressive scan conversion circuit
• The linear PCM sound of a 96 kHz/24 bit creates audio
quality superior to that of audio CDs.
• Compatible with audio CDs, as well as DVDs
•MP3 playback
Accessory checklist
Remote control (1)
Audio cord (1)
Video cord (1)
Operating Instructions
INTRODUCTION
En
ENGLISH
5
Page 6
Before Use
Please read the following before operating the unit.
Disc symbols used in this manual
Although this unit can play DVDs, audio CDs and MP3 discs,
some of the functions are restricted depending on the type
of disc.
The following symbols are used to make distinctions.
No symbols: The function works for DVDs, audio CDs and
MP3 discs.
:Indicates a function or display for DVDs only.
: Indicates a function or display for audio CDs
only.
: Indicates a function or display for MP3 discs
only.
Playback of MP3 discs is different from that of other
kinds of discs. For information about playing MP3 discs,
see "Playing an MP3 Disc" on page 41.
Supported disc formats
This unit can play discs with the following marks.
DVD
(8-cm and 12-cm discs)
Audio CD
(8-cm and 12-cm discs)
In addition, the unit can play DVD-R and DVD-RW discs
recorded in Video mode, and CD-R and CD-RW discs that
contain audio titles or MP3 files.
NOTES
• The unit can play DVD-R/RW discs recorded in Video
mode only. DVD-R/R W discs recorded in Video Recording
(VR) mode cannot be played on the unit.
•Depending on the conditions of the recording equipment,
some DVD-R/RW discs cannot be played on the unit even
if they have been recorded in Video mode.
• Some DVD-R/RW discs cannot be played on the unit
due to scratches on the surface or warp of the disc, etc.
• Because of their relatively low reflectance, DVD-RW discs
are more likely not to be playable on the unit than DVDR discs.
• Audio CDs which contain copy protection signals cannot
be played on the unit.
•Depending on the conditions of the recording equipment
or the CD-R/RW disc itself, some CD-R/RW discs cannot
be played on the unit.
• The unit cannot play the CD-R/RW discs that contain no
data, or contain different kinds of formatted data other
than MP3. For more information about MP3, see page
41.
• Some 8-cm CD-R discs cannot be played on the unit.
•Do not attach any seal or label to either side (the labeled
side or recorded side) of a disc.
• Do not use irregular shaped CDs (e.g. heart-shaped or
octagonal). It may result in malfunctions.
6
ENGLISH
Notes on color system
This unit is designed for the NTSC color system only.
The materials for DVD discs are recorded in the PAL and
NTSC color systems.
Select the DVD recorded in the NTSC color system.
Notes on DVDs
Some playback operations of DVDs may be intentionally
fixed by software manufacturers. As this unit plays DVDs
according to disc content designed by the software
manufacturer, some playback features of the unit may not
be available, or other functions may be added.
Refer also to the instructions supplied with the DVDs.
Some DVDs made for business purposes may not be played
on the unit.
Page 7
Region code of the DVD player and DVDs
CONTINUE
CONTINÚE
This DVD player is designed and manufactured for playback
of region "1" encoded DVD software. The region code on
the labels of some DVD discs indicates which type of player
can play those discs. This unit can play only DVD discs
labeled "1" or "ALL." If you try to play any other discs, the
message "Check Regional Code" will appear on the TV
screen. Some DVD discs may not have a region code label
even though their playback is prohibited by area limits.
Handling the unit
When shipping the unit
The original shipping carton and packing materials come
in handy. For maximum protection, repack the unit as it
was originally packed at the factory.
When setting the unit
The picture and sound of a nearby TV, VCR, or radio may
be distorted during playback. In this case, position the unit
away from the TV, VCR, or radio, or turn off the unit after
removing the disc.
INTRODUCTION
Disc-related terms
Title
The longest section of a picture or a musical piece on a
DVD, a movie for a picture piece on video software, or an
album for a musical piece on audio software. Each title is
assigned a title number enabling you to locate the title you
want.
Chapter
Sections of a picture or a musical piece that are smaller
than titles.
A title is composed of several chapters. Each chapter is
assigned a chapter number, enabling you to locate the
chapter you want. Depending on the disc, no chapters may
be recorded.
Track
Sections of a musical piece on an audio CD. Each track is
assigned a track number, enabling you to locate the track
you want.
To keep the surface clean
Do not use volatile liquids, such as insecticide spray , near
the unit. Do not leave rubber or plastic products in contact
with the unit for a long period of time. They will leave marks
on the surface.
Handling discs
Do not touch the playback side of the disc.
Hold the disc by the edges so that fingerprints will not get
on the surface.
Do not stick paper or tape on the disc.
Cleaning the unit
To clean the cabinet
Use a soft, dry cloth. If the surfaces are extremely dirty,
use a soft cloth lightly moistened with a mild detergent
solution. Do not use strong solvents, such as alcohol,
benzine, or thinner, as these might damage the surface of
the unit.
To obtain a clear picture
The DVD player is a high-tech, precision device. If the
optical pick-up lens and disc drive parts are dirty or worn
down, the picture quality will be poor.
Regular inspection and maintenance are recommended
after every 1,000 hours of use. (This depends on the
operating environment.)
For details, please contact your Aiwa dealer.
En
ENGLISH
7
Page 8

Before Use (continued)
Cleaning discs
Fingerprints and dust on the disc can cause poor picture
quality and sound distortion. Before playing, clean the disc
with a clean cloth. Wipe the disc from the center out.
Do not use strong solvents such as alcohol, benzine,
thinner, commercially available cleaners, or anti-static spray
intended for analog records.
Storing discs
After playing, store the disc in its case.
Do not expose the disc to direct sunlight or sources of heat,
or leave it in a parked car exposed to direct sunlight, as
there may be a considerable temperature increase inside
the car.
Notes on copyright
It is forbidden by law to copy, broadcast, show, broadcast
via cable, play in public, or rent copyright material without
permission.
This product features the copy protection function
developed by Macrovision. Copy protection signals are
recorded on some discs. When recording and playing the
pictures of these discs on a VCR, the picture noise will
appear.
This product incorporates copyright protection technology
that is protected by method claims of certain U.S. patents
and other intellectual property rights owned by Macrovision
Corporation and other rights owners. Use of this copyright
protection technology must be authorized by Macrovision
Corporation, and is intended for home and other limited
viewing uses only unless otherwise authorized by
Macrovision Corporation. Reverse engineering or
disassembly is prohibited.
Remote control
Installing batteries
Detach the battery cover on the rear of the remote control,
and insert two LR03 (size AAA) batteries with 0 and 9
aligned correctly.
LR03 (AAA)
When to replace the batteries
The maximum operating distance between the remote
control and the sensor of the unit is approximately 7 meters
(23 feet). If the operating range decreases, replace the
batteries with new ones.
NOTES
•When operating with the remote control, point the top of
the remote control toward the DVD player.
• If the unit is not going to be used for an extended period
of time, remove the batteries to prevent possible
electrolyte leakage.
• The remote control may not operate correctly when:
- There is an intense light, such as sunlight, in the line
of sight between the remote control and the DVD player.
- There is fluorescent lighting near the remote sensor in
the display window of the unit.
-Other remote controls are used nearby (those of a TV,
etc.).
8
ENGLISH
Page 9
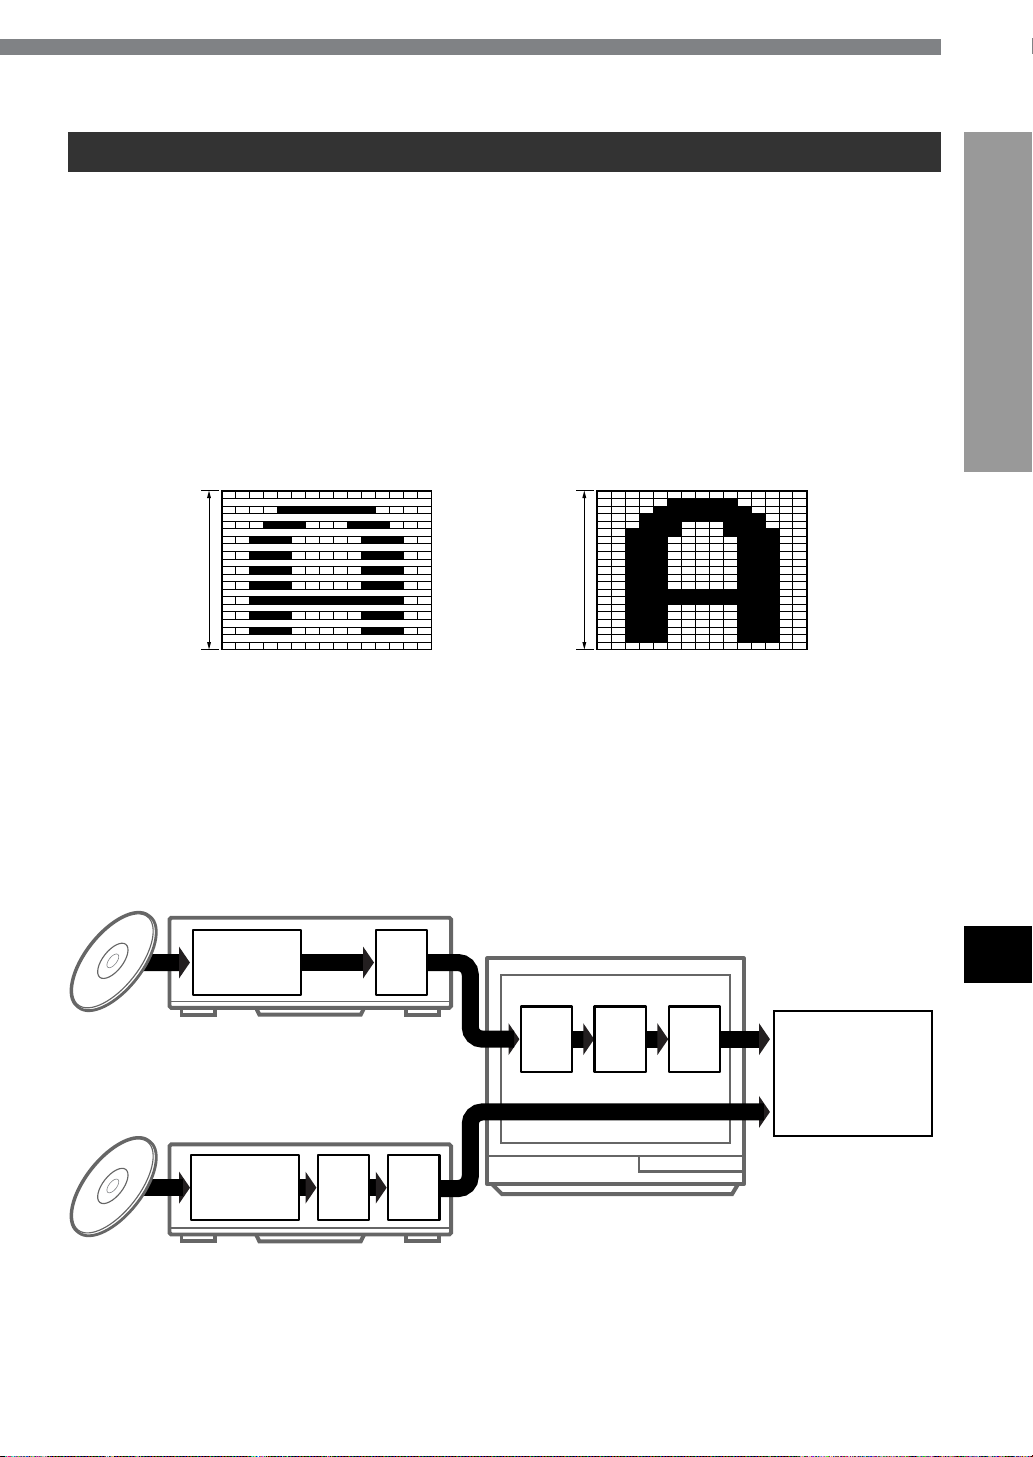
General information on progressive scan
This unit includes a progressive scan conversion circuit. This generates high-resolution progressive scan video, with a lower
flicker rate, allowing you to see the movie at its original quality.
What is a progressive scan?
The conventional television system has 525 scan lines
making up a frame, but these are scanned in alternate
interlaced passes of the 262.5 odd scan lines and the 262.5
even scan lines (in the case of the NTSC color system).
Since its frame rate is 30 frames per second, one of these
passes, termed a field, occurs every 1/60 second. With
larger screens, since the whole screen is only refreshed
every 1/30 second, there can be noticeable flickers.
In distinction to this, a progressive scan is one where all of
the lines are scanned successively in a single pass. By
saving a field in memory, it is possible to convert an
interlaced video signal to a progressive scan, which then
allows the image to be refreshed every 1/60 second,
reducing flickers on a large screen.
INTRODUCTION
Conventional interlaced scan
Progressive scan
(525 lines)
525 lines262.5 lines
Scan of one field (1/60 second) Scan of whole frame (1/60 second)
Advantages of progressive scan conversion in the DVD player
Since the DVD player converts the video signal to a
progressive scan before digital-analog conversion, the total
number of conversions the signal undergoes is reduced,
compared with using a progressive scan conversion in the
television (see following figure). This reduces signal
degradation, and allows higher quality video playback.
Progressive scan conversion in the TV
DVD player
AV
decoder
D/A
∗1
TV
En
Progressive scan conversion in the DVD player
DVD player
AV
decoder
D/AI/P
∗1: Digital-to-analog conversion
∗2: Analog-to-digital conversion
∗3: Interlaced-to-progressive scan conversion
A/D
∗2
I/P
∗3
D/A
Progressive
scan image
ENGLISH
9
Page 10
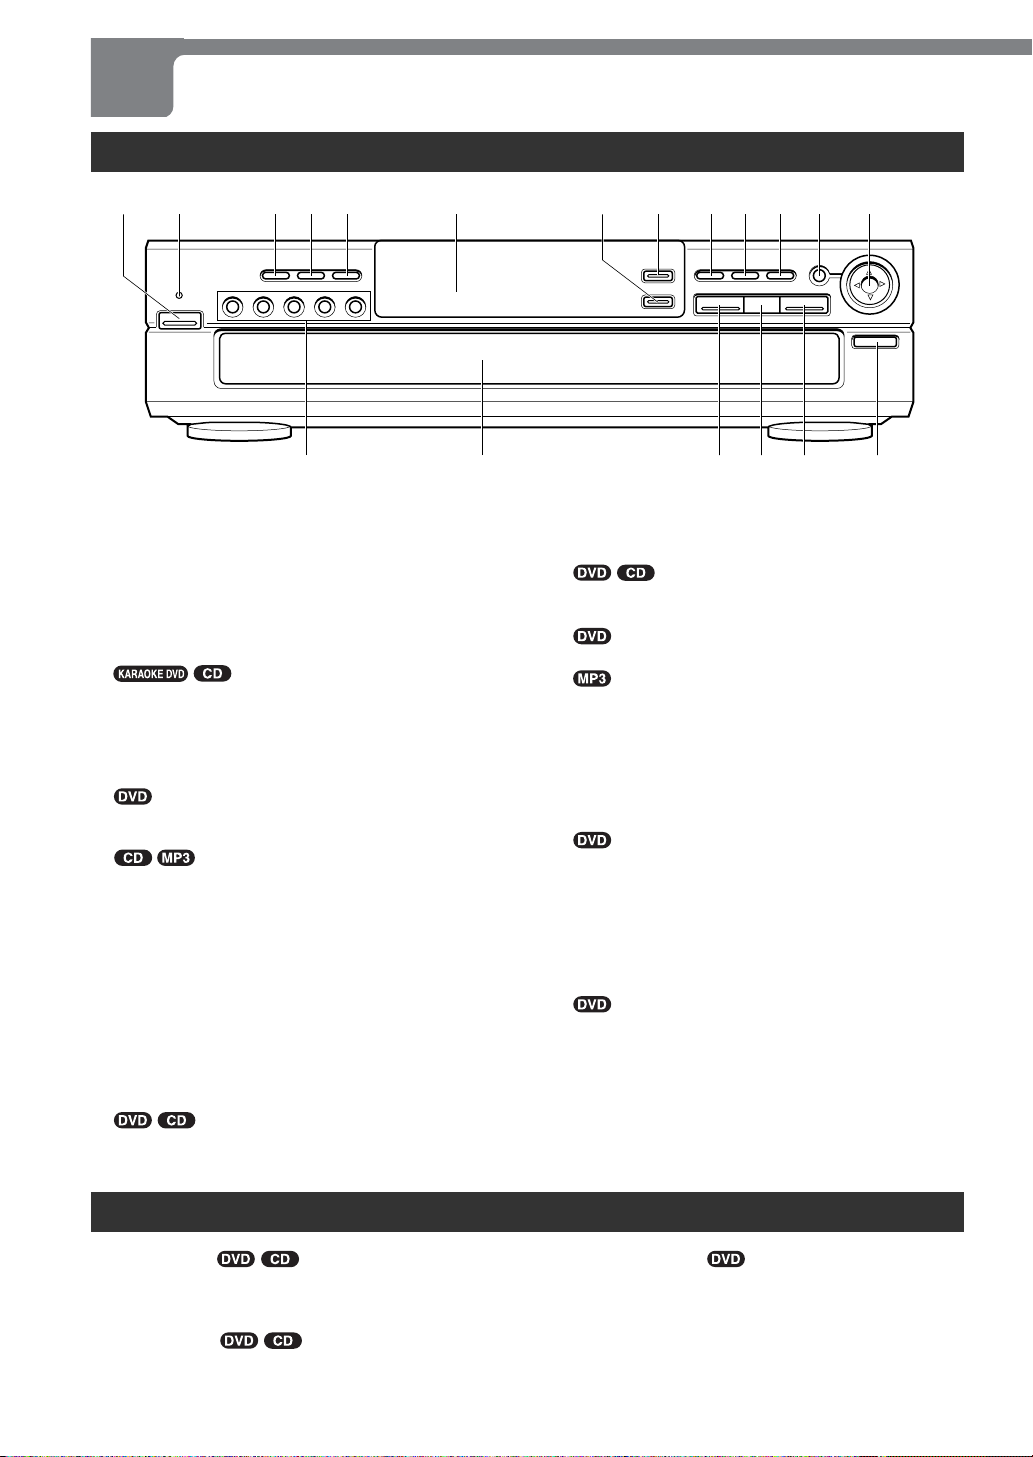
Parts and Controls
Front panel
2134 56 90 ! @ #
( & ^ % $
POWER button
1
Press to turn on and off the unit.
6STANDBY/ON indicator
2
•Lights in red when the unit is in power-off standby
mode.
•Lights in green when the unit is turned on.
RANDOM button
3
Press to play in random order.
REPEAT button
4
Press to repeat playback.
CLEAR button
5
• Press to cancel an input number.
• Press to clear the mark memory.
• Press to turn off the zoom function.
• Press to delete a track from the program list.
Display window
6
Displays information on the unit status.
DISC CHANGE button
7
Press to change a disc while playing back another disc.
DISC SKIP button
8
• Press to skip to the next disc.
•Press to rotate the disc trays while the disc
compartment is open.
r/f button
9
•Press to return to the beginning of the currect chapter/
track or skip back to the previous chapter/track.
• Press and hold to fast reverse a disc.
*
87
g/t button
0
• Press to skip to the next chapter/track.
• Press and hold to fast forward a disc.
MENU button
!
• Press to display menu programs.
• Press to move to the previous page of the track/
program list in the OSD menu.
ENTER button
@
Press to execute or fix the selected item from a disc
menu.
i/k/j/l button
#
• Press to select an item.
• Press to move the zoom area.
z OPEN/CLOSE button
$
Press to open and close the disc compartment.
STOP s button
%
Press to stop playing back a disc.
PAUSE a button
^
• Press to pause playback.
• Press to advance the picture by one frame.
PLAY c button
&
Press to start playback.
Disc compartment
*
Accepts up to five discs.
DISC DIRECT PLAY (1-5) buttons
(
Press to start playback of the desired disc.
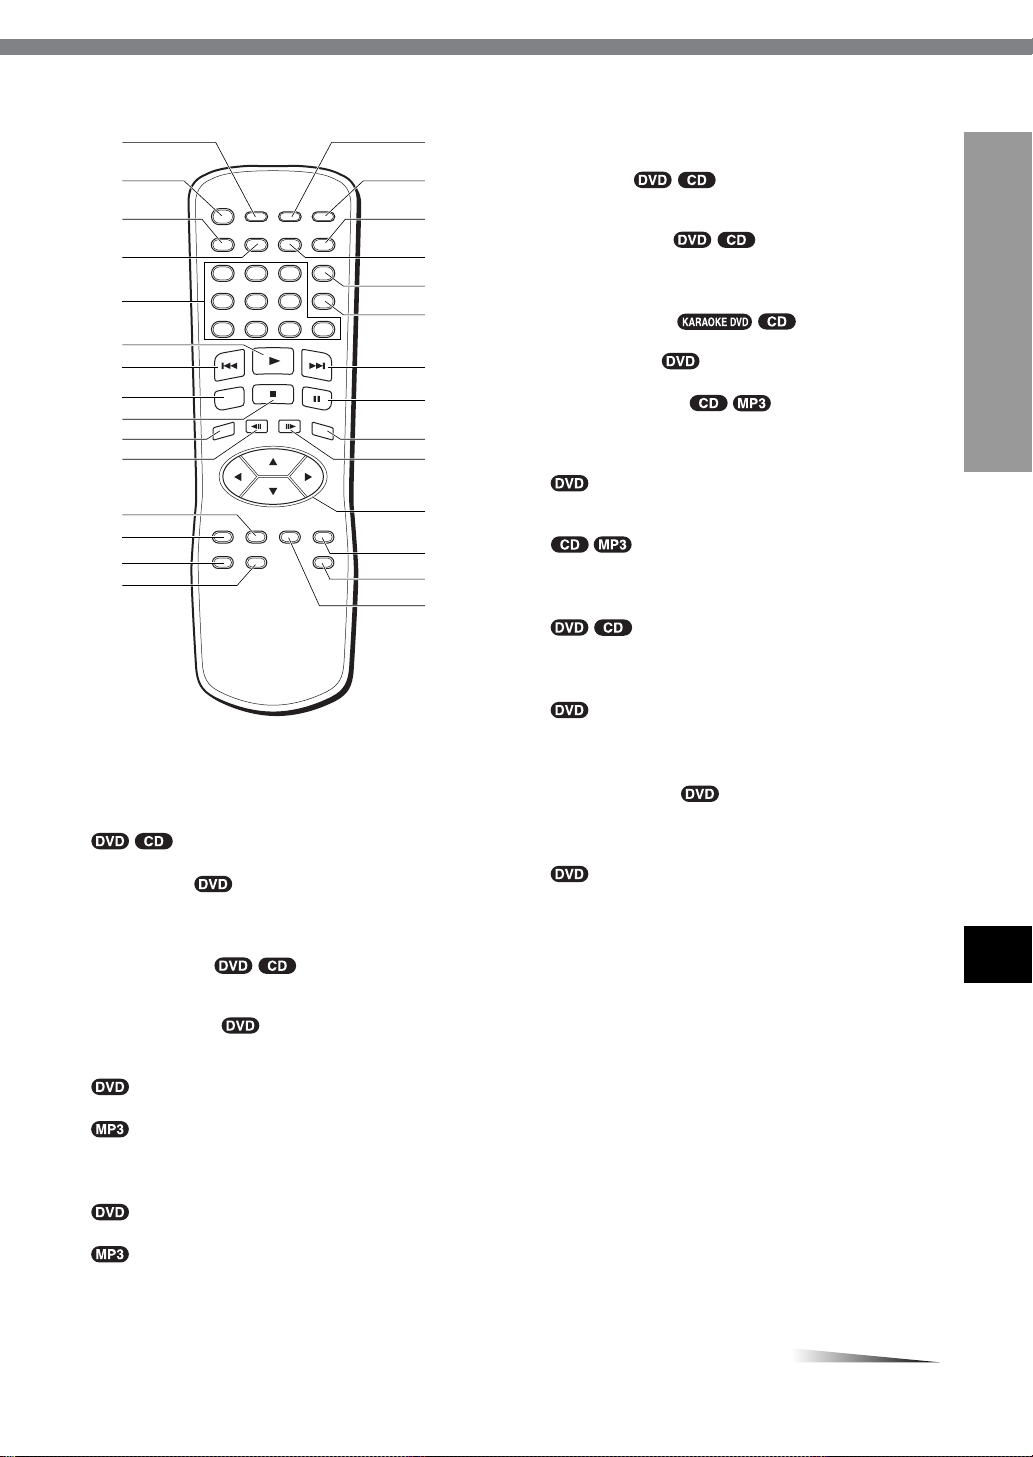
Remote control
MARK button
1
Press to mark a point on a disc during playback.
POWER button
2
Press to turn on and off the unit.
AUDIO button
3
Press to select the audio track/channel during playback.
10
ENGLISH
SUBTITLE button
4
Press to change the subtitle language during playback.
Number buttons
5
c button
6
Press to start playback.
Page 11
1
CONTINUE
2
3
4
5
6
7
8
9
0
!
^
&
*
(
)
-
=
[
]
\
REPEAT button
$
Press to repeat playback.
A-B button
%
Press to specify the starting and ending points of a
section to be repeated.
SEARCH button
^
Press to display the mark search menu.
zOPEN/CLOSE button
&
Press to open and close the disc tray.
RANDOM button
*
Press to play a disc in random order.
ANGLE button
(
Press to change the picture angle during playback.
PROGRAM button
)
Press to enter program edit mode.
CLEAR button
-
• Press to cancel an input number.
INTRODUCTION
@
#
$
%
r button
7
• Press to return to the beginning of the current chapter/
track or skip back to the previous chapter/track.
• Press and hold to fast reverse a disc.
ZOOM button
8
Press to enlarge the picture.
s button
9
Press to stop playback.
DISPLAY button
0
Press to display the OSD (On-Screen Display) menu
during playback.
GSLOW button
!
Press to perform backward slow playback.
TOP MENU button
@
;
'
,
.
• Press to clear the mark memory.
• Press to turn off the zoom function.
• Press to delete a track from the program list.
t button
=
• Press to skip to the next chapter/track.
• Press and hold to fast forward a disc.
a button
[
• Press to pause playback.
• Press to advance the picture by one frame.
SELECT/ENTER button
]
Press to execute or confirm the selected item in a menu.
FSLOW button
\
Press to perform forward slow playback.
i/k/j/l buttons
;
• Press to select an item.
• Press to move the zoom area.
RETURN button
'
Press to exit the setup menu.
DISC SKIP button
,
• Press to skip to the next disc.
• Press to rotate the disc trays while the disc
compartment is open.
SETUP button
.
Press to display the setup menu on the TV screen.
En
#
• Press to display the title menu of a DVD.
• Press to move to the next page of the track/program
list in the OSD menu.
MENU button
• Press to display menu programs.
• Press to move to the previous page of the track/
program list in the OSD menu.
ENGLISH
11
Page 12
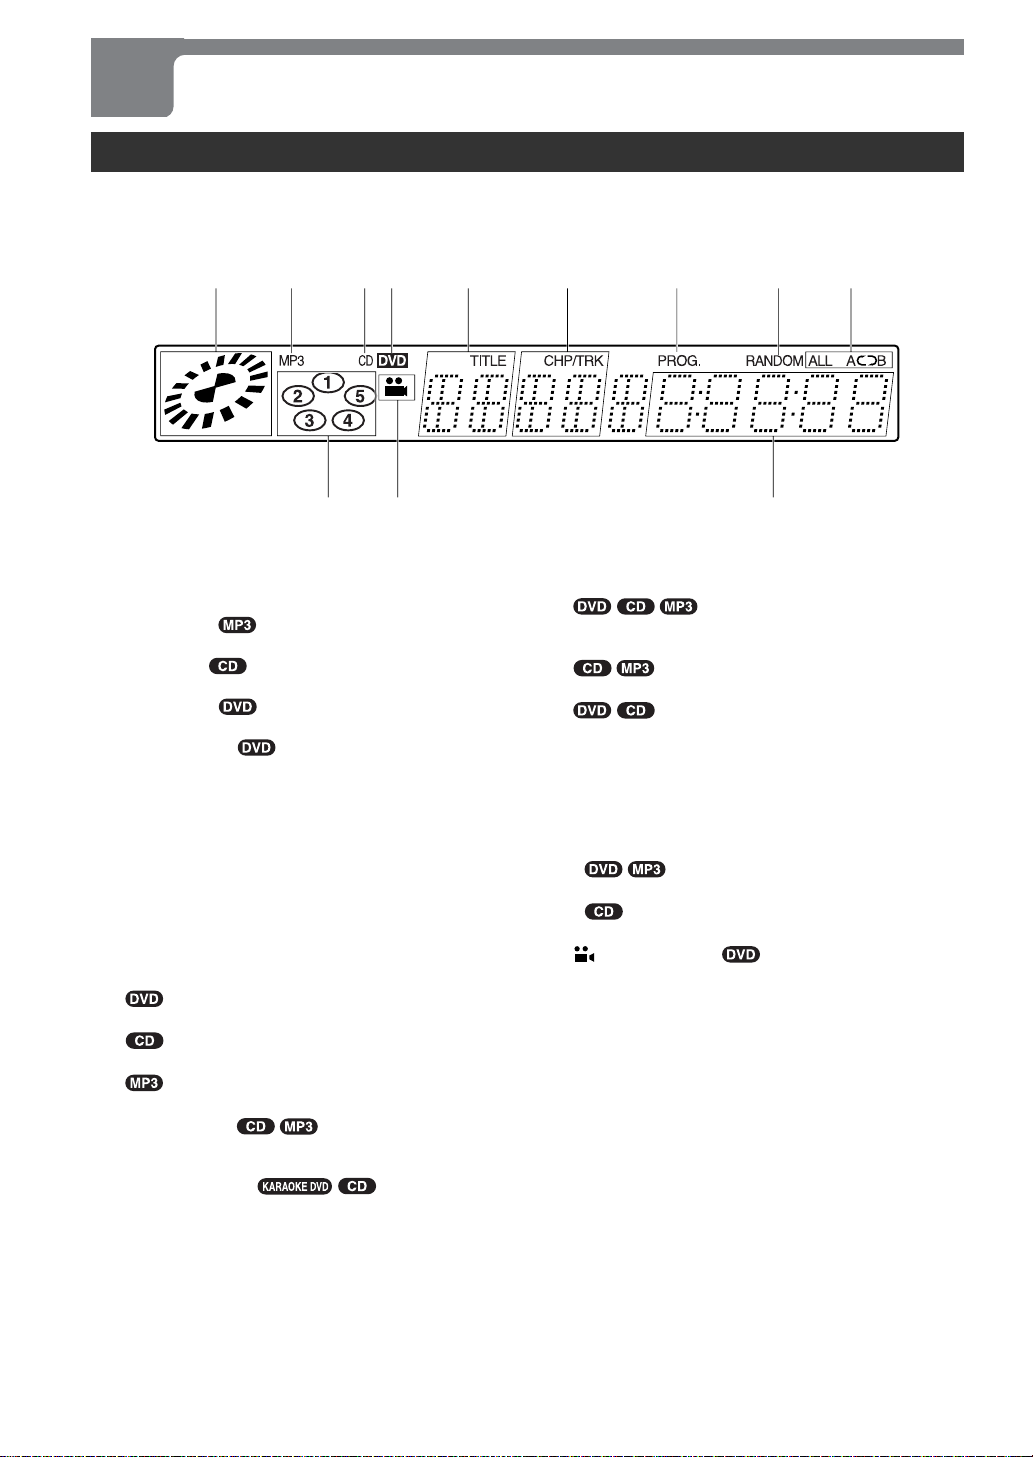
Parts and Controls (continued)
Display window
The unit shows on-screen display menus and messages on the TV screen, and LCD indications in the unit's display window .
They make operations simple and easy , especially when playing DVDs.
The instructions in this manual refer mainly to the on-screen display on the TV screen.
12345 6 7 89
0!@
Operating status indicator
1
Rotates when loading and playing a disc.
MP3 indicator
2
Lights up when an MP3 disc is loaded.
CD indicator
3
Lights up when a CD is loaded.
DVD indicator
4
Lights up when a DVD is loaded.
TITLE indication
5
• Indicates the current title number during playback.
• In stop mode
-When the resume function is on, indicates the current
title number.
-When the resume function is off, "STOP" is displayed
here.
CHP/TRK indication
6
• Indicates the current chapter/track number during
playback.
• In stop mode when the resume function is on, indicates
the current chapter/track number.
• In stop mode when the resume function is off
- "STOP" is displayed here.
- Indicates the total number of tracks.
- Indicates the current track number.
PROG. indicator
7
Lights up during program edit mode and programmed
playback.
RANDOM indicator
8
Lights up during random playback.
ALL A]B repeat indicator
9
0
!
@
• ] appears in title/chapter, one-track or one-disc
repeat play mode.
• ALL ] appears in all-disc repeat play mode.
•A]B appears in A-B repeat play mode.
Time counter
• Indicates the elapsed time of the current chapter/track
during playback.
• In stop mode when the resume function is on, indicates
the elapsed time of the current chapter/track.
• In stop mode when the resume function is off
- No indication.
- Indicates the total play time of the disc.
(angle) indicator
Blinks when a multi-angle scene comes on during
playback.
Disc tray indicators
•When the power is turned on, all the indicators light
up. After the disc trays rotate and the unit detects that
there is no disc, the corresponding indicator goes off.
• The indicator corresponding to the currently selected
disc flashes.
12
ENGLISH
Page 13
Connections
CONTINUE
Before making connections, identify the type of your audio equipment and TV referring to the respective charts. Then,
decide the connection and setup procedures accordingly.
Before making connections
• Connect the AC cords of the unit and any external equipment last, after finishing all other connections.
• Insert the plugs completely into the jacks. Loose connections may produce a humming sound or other noise interference.
• Refer to the instructions of the connected equipment. For speaker connections, refer to the instructions of the connected
AV receiver.
Connecting to a TV
Type of the TV to be connected to the unit
Standard TV equipped with a composite video input jack
TV equipped with an S-video input connector
TV equipped with component video input connectors
A-1 on page 15
A-2 on page 16
A-3 on page 17
Refer to
PREPARATIONS
Notes on connecting to a TV
• If picture noise appears while playing copy-protected
DVDs, connect the unit directly to a TV. Do not connect
through a VCR, TV/VCR or AV selector.
• The unit cannot be connected to a TV which is not
equipped with a video input connector.
• Use a commercially available stereo-monaural audio cord
when connecting to a monaural TV.
• If you are connecting the unit to a TV equipped with an
S-video input connector, it is recommended that a
commercially available S-video cord be used to achieve
the best possible picture clarity.
About component video output jacks
(Y, PR/CR, PB/CB)
The component video output jacks output the different color
signals (PR/CR, PB/CB) and luminance signal (Y) separately
in order to achieve high fidelity in reproducing colors.
The descriptions of the component video input connectors
on TV sets may differ depending on the TV or monitor.
Among descriptions generally used are PR/PB/Y, CR/CB/Y
and R-Y/B-Y/Y.
Progressive scan connection
If you are using a high-definition or "digital ready" TV that
is compatible with progressive scan signals, you can take
advantage of the unit's progressive scan output for high
quality video with less flickers. For more information on the
mechanism and features of progressive scan, see page 9.
To use the unit's progressive scan output, you need
to:
– Use a TV that is compatible with progressive scan signals.
– Set the VIDEO OUTPUT switch on the rear of the unit to
"COMPONENT/PROGRESSIVE SCAN" before
connecting to the TV.
– Connect the COMPONENT VIDEO OUT (Y, PR/CR, PB/
CB) jacks on the unit to the component video input
connectors on the TV using commercially available video
cables.
– Set the "Progressive Scan" in the setup menu to "On"
for output of progressive scan signals.
CAUTION
DO NOT set the "Progressive Scan" in the setup menu
to "On" when connecting to a TV that is not compatible
with progressive scan signals. If you set "Progressive
Scan" to "On" in error, the picture will appear scrambled.
In this case, reset the unit by holding down s for more
than 5 seconds in stop mode. The original video output
will be restored and the picture will become visible again.
En
ENGLISH
13
Page 14
Connections (continued)
Connecting to audio equipment
Audio equipment to be connected
to the unit
None (only a TV is connected)
•Amplifier
• Stereo system
• Dolby Digital decoder
•AV receiver equipped with a Dolby Digital or
Dolby Pro Logic decoder
• DTS decoder
•AV receiver equipped with a DTS decoder
—
Digital input jack
Analog audio input jacks (L/R)
Digital input jack
Analog audio input jacks (L/R) F on page 22
Digital input jack
Notes on digital audio connections
•When using an optical connection, remove the dust cap
from the DIGIT AL OUT OPTICAL jack on the rear of the
unit. Keep the cap handy. When not using the optical
connection, the dust cap should be replaced.
• Use either a commercially available optical cord or a 75ohm coaxial cord when connecting the unit to an AV
amplifier with a digital input jack. The supplied video cord
can also be used instead of a coaxial cord.
CAUTION
DO NOT select "DOLBY DIGIT AL/PCM" or "Stream/PCM"
for the "Digital Audio Output" in the setup menu when
connecting to an AV receiver not equipped with a Dolby
Digital decoder or DTS decoder (with an optical or coaxial
connecting cord).
Merely attempting to play a disc may cause a screeching
noise which could be harmful to your ears and damage
the speakers. In this case, be sure to select "PCM" for the
"Digital Audio Output".
Input jack of the audio
equipment
Refer to
A on pages 15-17
B on page 18
C on page 19
D on page 20
E on page 21
Note on DTS-encoded discs
Set "Digital Audio Output" to "Stream/PCM" in the setup
menu, after connecting the digital output of this unit to an
AV receiver equipped with a DTS decoder.
14
ENGLISH
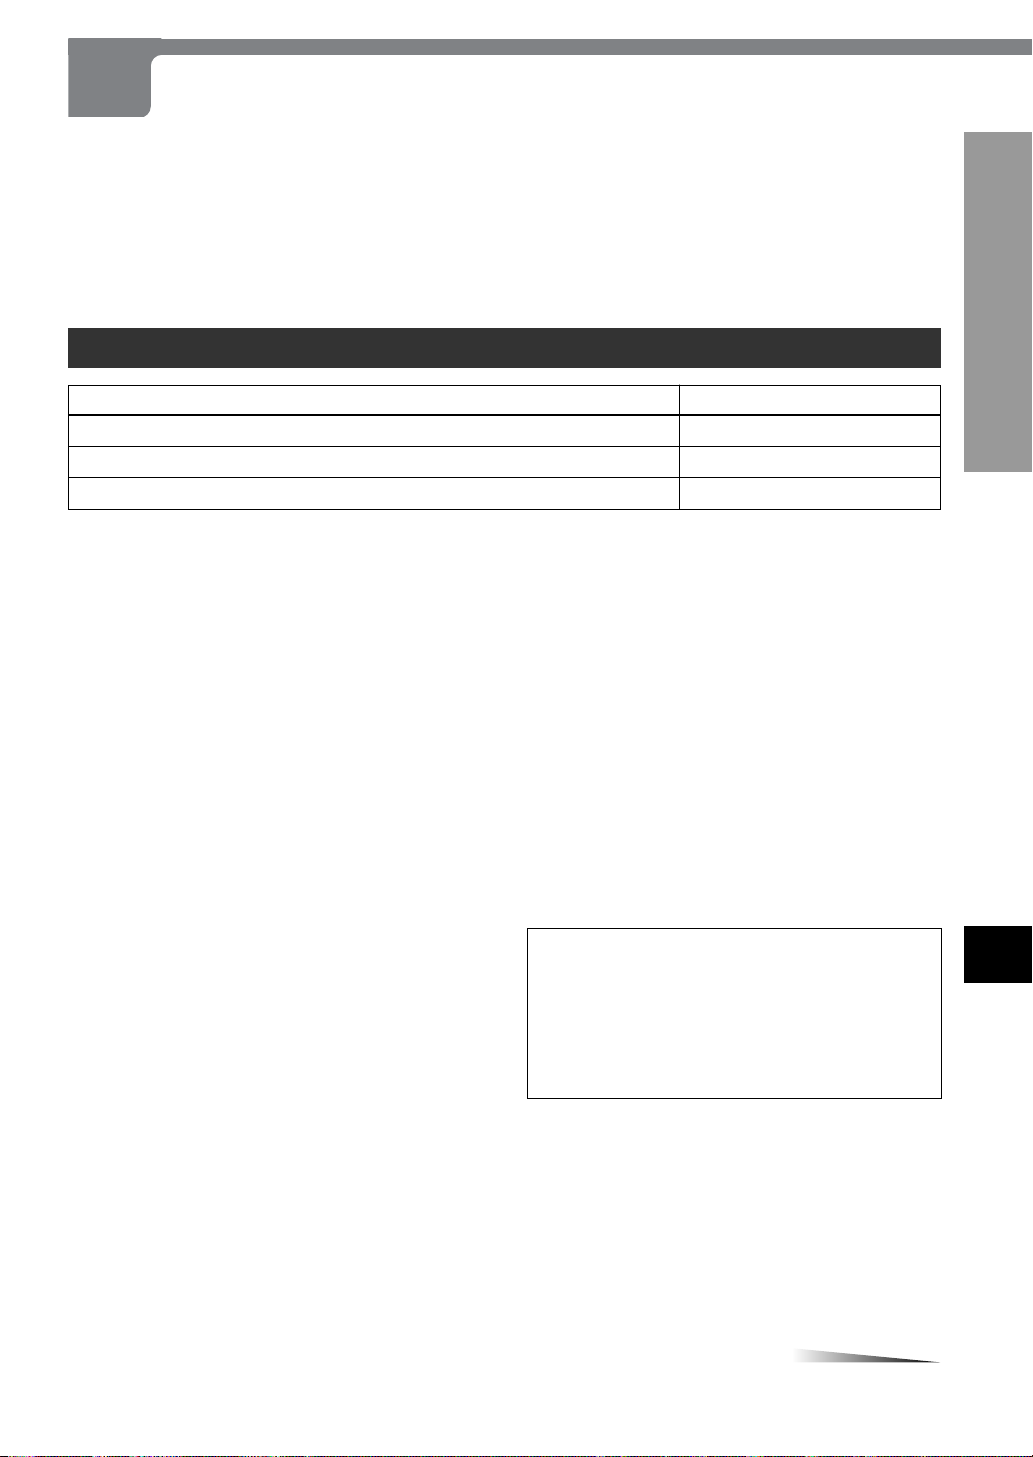
Page 15
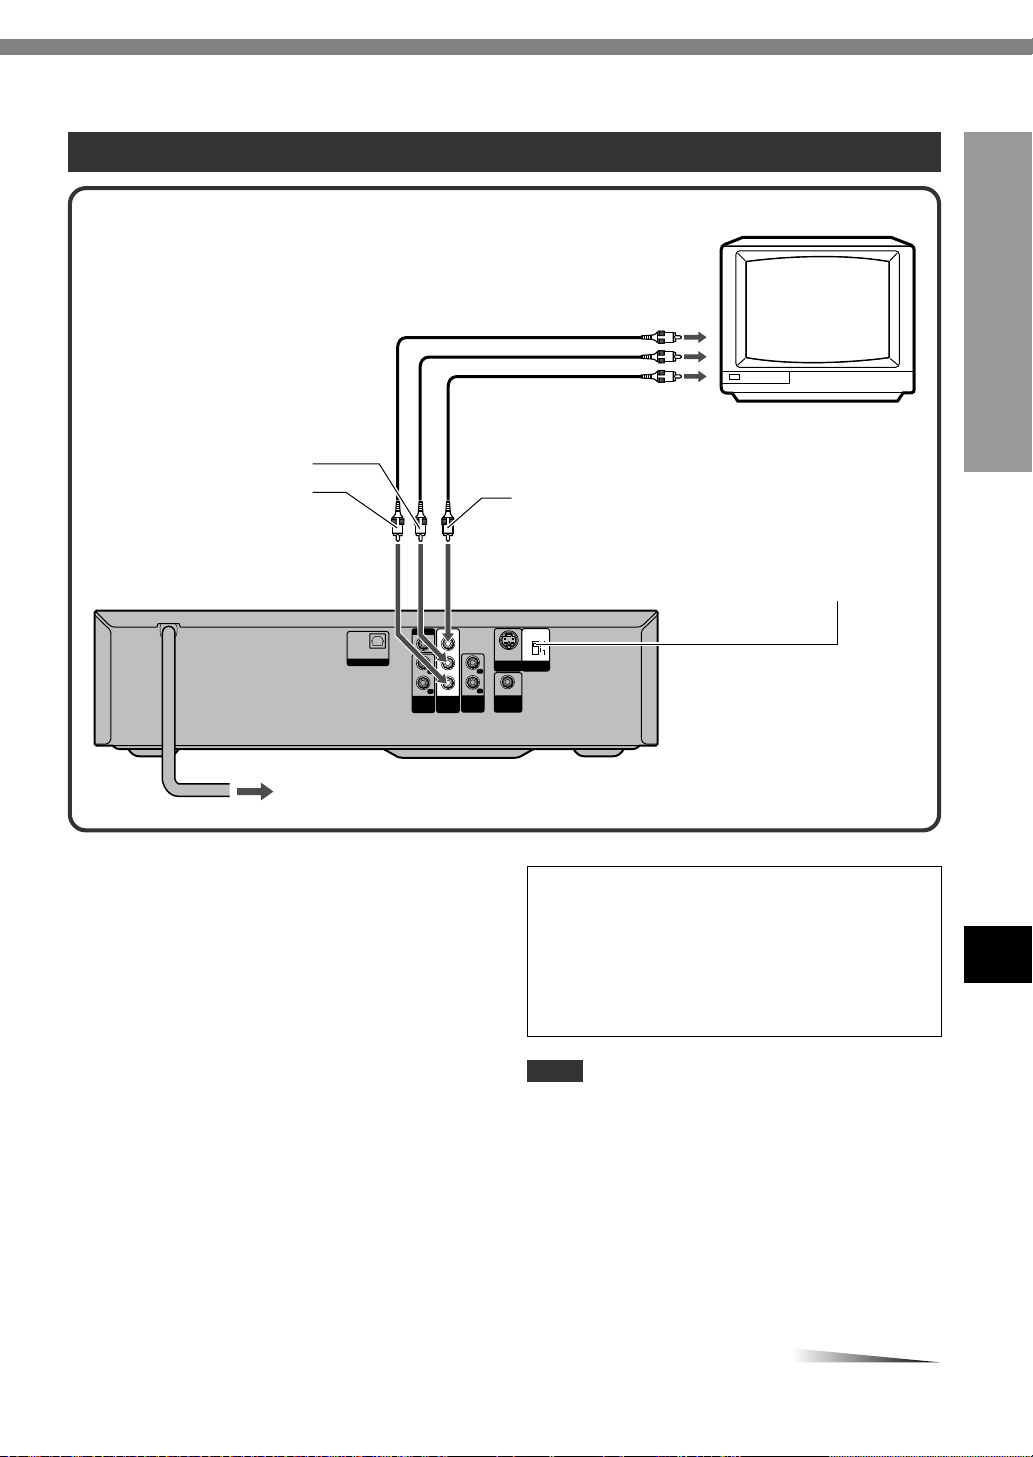
A-1 Connecting to a TV
CONTINUE
Video input jack (yellow)
Rear of the TV
Audio input jacks (Left/white, Right/red)
Audio cord (supllied) Video cord (supplied)
to AUDIO OUT 1*
Rear of the unit
L (white)/R (red) jacks
red white
OPTICAL
DIGITAL OUT
to an AC outlet
VIDEO OUT
AUDIO
OUT1
yellow
yellow
to VIDEO OUT jack (yellow)
COMPONENT/
PROGRESSIVE SCAN
S-VIDEO
S-VIDEO
VIDEO
OUT
OUT
L
R
COAXIAL
DIGITAL
AUDIO
OUT
OUT2
L
R
Y
P
R/CR
PB/C
COMPONENT
VIDEO OUT/
PROGRESSIVE
SCAN
B
* AUDIO OUT 2 L/R jacks are also available.
PREPARATIONS
En
Set the setup menu correctly after
connecting
Set the "TV Aspect" in the setup menu according to the TV
connected to the unit as follows:
(See "Changing Setup Values" on page 46 for details.)
TV Aspect
When the TV has a conventional 4:3 screen:
4:3 Letterbox or 4:3 Panscan
When the TV has a wide 16:9 screen:
16:9 Wide
ENGLISH
15
Page 16
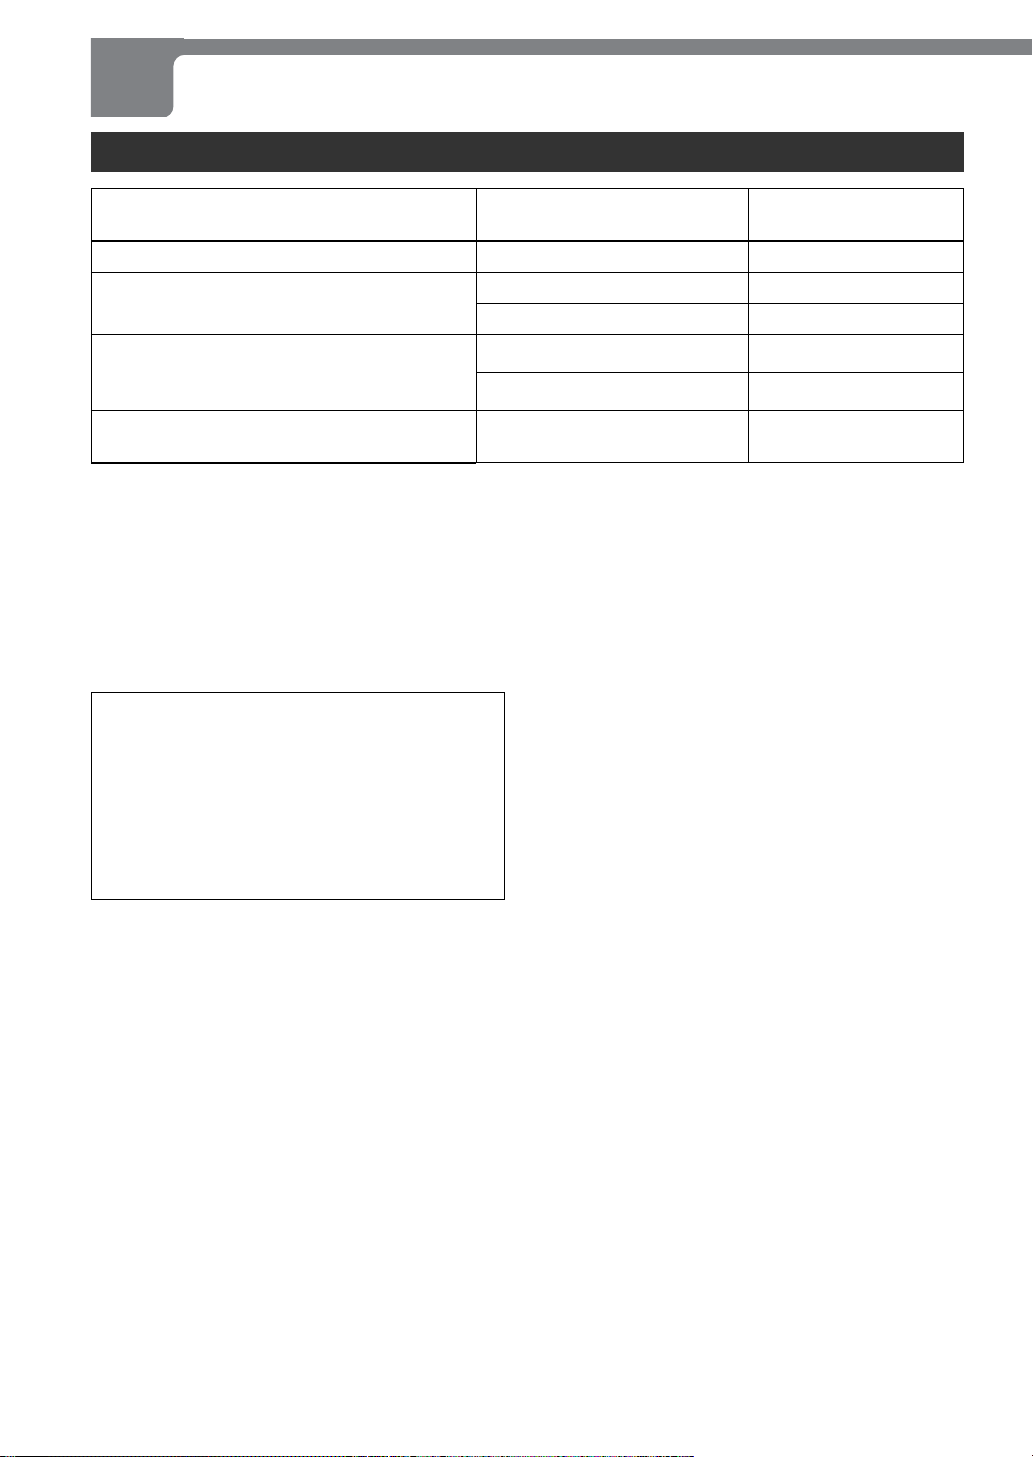
Connections (continued)
A-2 Connecting to a TV equipped with an S-video input connector
Rear of the TV
S-video input connector (S1, S2)
S-video cord (not supplied)
Rear of the unit
to S-VIDEO OUT connector
OPTICAL
DIGITAL OUT
to an AC outlet
Set the VIDEO OUTPUT switch before
connecting
Set the VIDEO OUTPUT switch to "S-VIDEO" before
connecting to a TV with an S-video input connector.
Set the VIDEO OUT switch to S-VIDEO
VIDEO OUT
AUDIO
OUT1
L
R
Y
PR/C
PB/C
COMPONENT
VIDEO OUT/
PROGRESSIVE
SCAN
R
B
AUDIO
OUT2
COMPONENT/
PROGRESSIVE SCAN
S-VIDEO
VIDEO
S-VIDEO
OUT
OUT
L
R
COAXIAL
DIGITAL
OUT
Set the setup menu correctly after
connecting
Set the "TV Aspect" in the setup menu according to the TV
connected to the unit as follows:
(See "Changing Setup Values" on page 46 for details.)
TV Aspect
When the TV has a conventional 4:3 screen:
4:3 Letterbox or 4:3 Panscan
When the TV has a wide 16:9 screen:
16:9 Wide
NOTE
For the best possible picture clarity, it is recommended that
an S (separate) video cord (not supplied) be used when
connecting the unit to a TV equipped with an S-video input
connector.
16
ENGLISH
Page 17
A-3 Connecting to a TV or monitor with component video input connectors
CONTINUE
TV or monitor
to the video input jacks
red
blue
(Y: green, P
B/CB: blue)
P
Video cables (not supplied)
green
R/CR: red,
PREPARATIONS
to COMPONENT VIDEO
OUT/PROGRESSIVE SCAN
VIDEO OUT
AUDIO
OUT1
L
R
Y
PR/C
PB/C
COMPONENT
VIDEO OUT/
PROGRESSIVE
SCAN
R
B
(Y, P
AUDIO
OUT2
Rear of the unit
OPTICAL
DIGITAL OUT
to an AC outlet
Set the VIDEO OUTPUT switch before
connecting
Set the VIDEO OUTPUT switch to "COMPONENT/
PROGRESSIVE SCAN" before connecting to a TV with
component input connectors.
Set the setup menu correctly after
connecting
Set the "TV Aspect" and "Progressive Scan" in the setup
menu according to the TV connected to the unit as follows:
(See "Changing Setup Values" on page 46 for details.)
TV Aspect
When the TV has a conventional 4:3 screen:
4:3 Letterbox or 4:3 Panscan
When the TV has a wide 16:9 screen:
16:9 Wide
Set the VIDEO OUT switch to
R/CR, PB/CB) jacks
COMPONENT/
PROGRESSIVE SCAN
S-VIDEO
S-VIDEO
VIDEO
OUT
OUT
L
R
COAXIAL
DIGITAL
OUT
COMPONENT/PROGRESSIVE SCAN
CAUTION
DO NOT set the "Progressive Scan" in the setup menu
to "On" when connecting to a TV that is not compatible
with progressive scan signals. If you set "Progressive
Scan" to "On" in error, the picture will appear scrambled.
In this case, reset the unit by holding down s for more
than 5 seconds in stop mode. The original video output
will be restored and the picture will become visible again.
NOTE
Composite video signals are not output from the VIDEO
OUT jack on the unit if "Progressive Scan" is set to "On".
En
Progressive Scan
When the TV is compatible with progressive scan signals:
On
When the TV is not compatible with progressive scan
signals:
Off
ENGLISH
17
Page 18
Connections (continued)
B Connecting to a TV and an amplifier with a digital input jack
yellow
to the video input jack (yellow)
Video cord (supplied)
TV
yellow
Rear of the unit
OPTICAL
to DIGITAL OUT
OPTICAL jack
to an AC outlet
Optical cord (not supplied)
to the digital input jack
Front speaker (L) Amplifier with a digital input jack Front speaker (R)
Set the setup menu correctly after
connecting
Set the "TV Aspect" and "Digital Audio Output" in the setup
menu according to the TV and audio equipment connected
to the unit as follows:
(See "Changing Setup Values" on page 46 for details.)
TV Aspect
When the TV has a conventional 4:3 screen:
4:3 Letterbox or 4:3 Panscan
When the TV has a wide 16:9 screen:
16:9 Wide
DIGITAL OUT
to VIDEO OUT jack
(yellow)
VIDEO OUT
AUDIO
OUT1
L
R
Y
PR/C
PB/C
COMPONENT
VIDEO OUT/
PROGRESSIVE
SCAN
R
B
AUDIO
OUT2
COMPONENT/
PROGRESSIVE SCAN
S-VIDEO
S-VIDEO
VIDEO
OUT
OUT
L
R
COAXIAL
DIGITAL
OUT
to DIGITAL OUT
COAXIAL jack
Coaxial cord (not supplied)
CAUTION
DO NOT select "DOLBY DIGIT AL/PCM" or "Stream/PCM"
for the "Digital Audio Output" in the setup menu when
connecting to an AV receiver not equipped with a Dolby
Digital decoder or DTS decoder (with an optical or coaxial
connecting cord).
Merely attempting to play a disc may cause a screeching
noise which could be harmful to your ears and damage
the speakers. In this case, be sure to select "PCM" for the
"Digital Audio Output".
Digital Audio Output
PCM
18
ENGLISH
Page 19

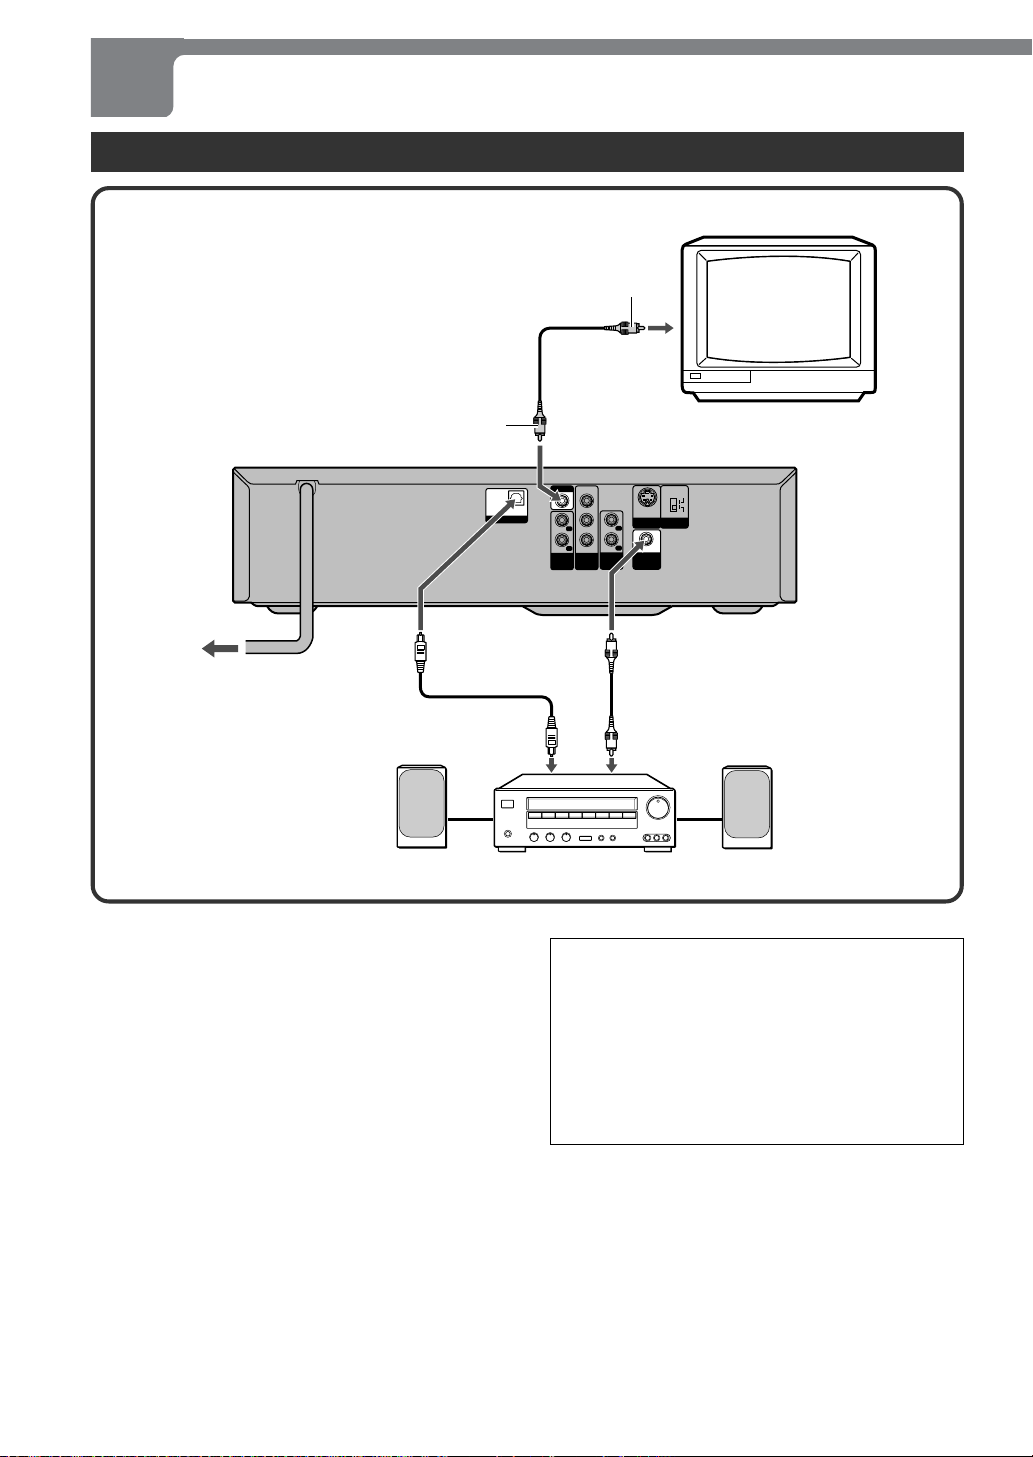
C Connecting to a TV and a stereo system
CONTINUE
to the video input jack (yellow)
Video cord (supplied)
yellow
Rear of the unit
TV
yellow
PREPARATIONS
to VIDEO OUT jack
(yellow)
to an AC outlet
to AUDIO OUT 1*
L (white)/R (red) jacks
Audio cord (supplied)
Stereo system
OPTICAL
DIGITAL OUT
VIDEO OUT
AUDIO
OUT1
L
R
Y
PR/C
PB/C
COMPONENT
VIDEO OUT/
PROGRESSIVE
SCAN
R
B
AUDIO
OUT2
to the audio input jacks
(Left/white, Right/red)
COMPONENT/
PROGRESSIVE SCAN
S-VIDEO
S-VIDEO
VIDEO
OUT
OUT
L
R
COAXIAL
DIGITAL
OUT
red
white
* AUDIO OUT 2 L/R jacks are also available.
En
Set the setup menu correctly after
connecting
Set the "TV Aspect" in the setup menu according to the TV
connected to the unit as follows:
(See "Changing Setup Values" on page 46 for details.)
TV Aspect
When the TV has a conventional 4:3 screen:
4:3 Letterbox or 4:3 Panscan
When the TV has a wide 16:9 screen:
16:9 Wide
ENGLISH
19
Page 20

Connections (continued)
D
Connecting to a TV and an AV receiver equipped with a Dolby Digital (AC-3) decoder
TV
yellow
to the video input jack (yellow)
Video cord (supplied)
yellow
Rear of the unit
OPTICAL
DIGITAL OUT
to VIDEO OUT jack (yellow)
VIDEO OUT
AUDIO
OUT1
L
R
Y
PR/C
PB/C
COMPONENT
VIDEO OUT/
PROGRESSIVE
SCAN
R
B
AUDIO
OUT2
COMPONENT/
PROGRESSIVE SCAN
S-VIDEO
S-VIDEO
VIDEO
OUT
OUT
L
R
COAXIAL
DIGITAL
OUT
to DIGITAL OUT
OPTICAL jack
to an AC outlet
Optical cord (not supplied)
to the digital input jack
Front speaker (L)
Surround speaker (L) Center speaker Subwoofer Surround speaker (R)
Set the setup menu correctly after
connecting
Set the "TV Aspect" and "Digital Audio Output" in the setup
menu according to the TV and audio equipment connected
to the unit as follows:
(See "Changing Setup Values" on page 46 for details.)
TV Aspect
When the TV has a conventional 4:3 screen:
4:3 Letterbox or 4:3 Panscan
When the TV has a wide 16:9 screen:
16:9 Wide
to DIGITAL OUT
COAXIAL jack
Coaxial cord (not supplied)
Receiver equipped with
a Dolby Digital decoder
Front speaker (R)
CAUTION
DO NOT select "DOLBY DIGITAL/PCM" for the "Digital
Audio Output" in the setup menu when connecting to an
AV receiver not equipped with a Dolby Digital decoder (with
an optical or coaxial connecting cord).
Merely attempting to play a disc may cause a screeching
noise which could be harmful to your ears and damage
the speakers. In this case, be sure to select "PCM" for the
"Digital Audio Output".
Digital Audio Output
DOLBY DIGIT AL/PCM
20
ENGLISH
Page 21

E Connecting to a TV and an AV receiver equipped with a DTS decoder
CONTINUE
TV
yellow
to the video input jack (yellow)
Rear of the unit
to an AC outlet
Front speaker (L)
Surround speaker (L)
Video cord (supplied)
yellow
to VIDEO OUT jack (yellow)
OPTICAL
DIGITAL OUT
to DIGITAL OUT
OPTICAL jack
VIDEO OUT
AUDIO
OUT1
L
R
Y
PR/C
PB/C
COMPONENT
VIDEO OUT/
PROGRESSIVE
SCAN
R
B
AUDIO
OUT2
COMPONENT/
PROGRESSIVE SCAN
S-VIDEO
VIDEO
S-VIDEO
OUT
OUT
L
R
COAXIAL
DIGITAL
OUT
to DIGITAL OUT
COAXIAL jack
Coaxial cord (not supplied)
Optical cord (not supplied)
to the digital input jack
Receiver equipped
with a DTS decoder
Center speaker Subwoofer Surround speaker (R)
PREPARATIONS
Front speaker (R)
En
Set the setup menu correctly after
connecting
Set the "TV Aspect" and "Digital Audio Output" in the setup
menu according to the TV and audio equipment connected
to the unit as follows:
(See "Changing Setup Values" on page 46 for details.)
TV Aspect
When the TV has a conventional 4:3 screen:
4:3 Letterbox or 4:3 Panscan
When the TV has a wide 16:9 screen:
16:9 Wide
Digital Audio Output
Stream/PCM
CAUTION
DO NOT select "Stream/PCM" for the "Digital Audio
Output" in the setup menu when connecting to an AV
receiver not equipped with a DTS decoder (with an optical
or coaxial connecting cord).
Merely attempting to play a disc may cause a screeching
noise which could be harmful to your ears and damage
the speakers. In this case, be sure to select "PCM" for the
"Digital Audio Output".
ENGLISH
21
Page 22

Connections (continued)
F Connecting to a TV and an AV receiver equipped with a Dolby Pro Logic decoder
TV
yellow
to the video input jack (yellow)
Video cord (supplied)
Rear of the unit
to an AC outlet
Front speaker (L)
to AUDIO OUT 1*
L (white)/R (red) jacks
Audio cord (supplied)
Receiver equipped
with a Dolby Pro
Logic decoder
Surround speaker (L)
yellow
OPTICAL
DIGITAL OUT
Center speaker
to VIDEO OUT jack (yellow)
VIDEO OUT
AUDIO
OUT1
L
R
Y
PR/C
PB/C
COMPONENT
VIDEO OUT/
PROGRESSIVE
SCAN
R
B
AUDIO
OUT2
COMPONENT/
PROGRESSIVE SCAN
S-VIDEO
S-VIDEO
VIDEO
OUT
OUT
L
R
COAXIAL
DIGITAL
OUT
red
white
to the audio input jacks
(L/white, R/red)
Surround speaker (R)
Front speaker (R)
Set the setup menu correctly after
connecting
Set the "TV Aspect" in the setup menu according to the TV
connected to the unit as follows:
(See "Changing Setup Values" on page 46 for details.)
TV Aspect
When the TV has a conventional 4:3 screen:
4:3 Letterbox or 4:3 Panscan
When the TV has a wide 16:9 screen:
16:9 Wide
22
ENGLISH
* AUDIO OUT 2 L/R jacks are also available.
Page 23

CONTINUE
6STANDBY/
ON indicator
Playback
123 4
Getting ready to play
•Turn on the TV, and set its video source (Video 1, Video
2, Video 3, etc.) to the one connected to the unit.
•Turn on the audio equipment connected to the unit. Set
its input source to the one connected to the unit.
Loading discs
Press POWER.
1
The unit turns on and the 6STANDBY/ON indicator turns
green. The “aiwa” screen appears on the TV screen.
BASIC OPERA TIONS
12
4
About the symbol display
• The symbol will be displayed on the TV screen if
you press a button which cannot be used or enter an
invalid number.
•Some DVDs may have places where they do not allow
pressing certain buttons. The symbol will be
displayed on the TV screen if you press a button that
is not allowed in such a place.
Press z OPEN/CLOSE.
2
The disc compartment opens.
Load a disc in the tray at the center
3
position.
Place a disc in the tray guides (round slotted area) with the
label side facing up. When loading an 8-cm disc, place it in
the inner slotted area correctly.
To load another disc, press DISC SKIP.
4
The disc trays rotate and the next tray comes to the center
position.
Place a disc in the tray.
Repeat this step to load other discs (up to five discs).
Now you are ready to start playback.
NOTES
• Do not shock or vibrate the unit while playing.
• Do not push or shock the disc compartment while rotating
the disc trays.
•Do not put any objects other than discs on the disc trays.
En
ENGLISH
23
Page 24

Playback (continued)
Starting playback
POWER DISC SKIP
PLAY (1-5)
POWER
s
TOP MENU
MENU
DISC CHANGEDISC DIRECT
i/k/j/l
ENTER
c s
zOPEN/CLOSE
c
SELECT/ENTER
i/k/j/l
DISC SKIP
zOPEN/
CLOSE
After loading discs, you can start playback by either one of
the following ways; A or B.
sss Single disc playback
Press DISC DIRECT PLAY (1-5) on the
A
unit.
Press the desired button corresponding to the disc number
you want to play .
The disc compartment closes automatically , and playback
starts with the specified disc. Playback stops after playing
the disc.
sss All discs playback
Press c.
B
Alternatively, press z OPEN/CLOSE to close the disc
compartment, and then press c.
The disc compartment closes automatically , playback starts
with the disc located at the center position, and all the discs
are played back. The unit always enters the All discs
playback mode when c is pressed at any time.
Playback stops after playing all the discs.
• If a disc is placed in upside down, “DISC Error” will be
indicated and the disc compartment opens automatically.
Place the disc correctly.
NOTES
• The All discs playback mode does not work with MP3
discs.
• The All discs playback mode does not work with certain
DVDs, depending on the DVD navigation system.
24
ENGLISH
Page 25

When the menu screen is displayed
CONTINUE
The OSD menu for the CD is displayed on the TV screen.
The menu screen may be displayed first after loading a
DVD which contains a menu.
Use the i/k/j/l buttons to select the title/chapter you
want to view, then press ENTER or c on the unit (or
SELECT/ENTER or c on the remote control) to start
playback.
Press TOP MENU or MENU to return to the menu screen.
To replace discs during playback
While one disc is playing, the other discs can be replaced
without interrupting playback.
1
Press DISC CHANGE to open the disc compartment.
2
Press DISC SKIP to rotate the disc trays.
3
Exchange the discs.
4
Press DISC CHANGE or z OPEN/CLOSE to close the
disc compartment.
To skip to the next disc
While the unit is in stop or playback mode, press DISC
SKIP.
The disc trays rotate, and playback begins from the
beginning of the next disc.
To skip to the desired disc
While the unit is in stop or playback mode, press one of the
DISC DIRECT PLAY (1-5) buttons on the unit.
Playback begins from the beginning of the specified disc.
Playback stops after playing the disc.
To stop playback
Press s.
To turn the power off
Press POWER. The unit enters power-off standby mode
and the 6STANDBY/ON indicator turns red.
BASIC OPERA TIONS
Auto power-off
If the unit is left for 8 minutes in stop mode without any
operation, the unit automatically enters power-off
standby mode.
NOTE
The disc continues to spin while the menu screen is
displayed even if s is pressed. When you are finished using
the unit, turn the power off after pressing s.
En
ENGLISH
25
Page 26

Playback (continued)
Still (pause)
Number
buttons
r
s
GSLOW
FSLOW
c
g/tr/f
as
c
t
a
Press a during playback.
To return to normal playback
Press c.
You can also press a to return to normal playback.
Frame advance
Press a during pause.
Each time you press the button, the picture advances one
frame.
There is no audio during frame advance playback.
To return to normal playback
Press c.
Resuming playback
When the unit enters stop mode with the resume function
turned on, the unit remembers the point where you stopped
the disc so that you can resume playback from that point.
26
Press c in stop mode.
The unit starts playback from the point where you stopped
the disc last time.
When the resume function is turned on, the as mark
appears on the upper right corner of the TV screen or the
OSD menu.
To cancel the resume function
Press s again after you stop playback.
The resume function is also canceled when:
– you change the disc to be played.
– you press z OPEN/CLOSE to open the disc
compartment.
– you press POWER to turn the power off.
ENGLISH
Page 27

Fast forward and fast reverse
CONTINUE
Slow playback
Press and hold r (/f) or (g/) t
for about 2 seconds during playback.
Each time you press and hold the button, the play speed
changes as shown below.
×4×2 ×16 ×100
There is no audio during fast forward or fast reverse
playback of a DVD.
×4 ×8×2
To return to normal playback
Press c.
Press G SLOW or F SLOW during
playback.
Each time you press the button, the play speed changes
as shown below.
×1/8×1/16 ×1/4 ×1/2
BASIC OPERA TIONS
There is no audio during slow playback.
Subtitles are not displayed during backward slow playback.
To return to normal playback
Press c.
Skipping
Press r (/f) or (g/) t during
playback.
To skip to the next chapter/track
Press (g/) t.
The disc position advances one chapter/track each time
you press the button.
To skip back to the previous chapter/track
Press r (/f) once to skip back to the beginning of
the chapter/track currently being played.
Press r (/f) twice in rapid succession to skip back to
the beginning of the previous chapter/track.
To skip to the desired track using the number
buttons
Enter the desired track number using the number buttons.
Example: To play track 3
Playback starts from the beginning of the selected track.
Press 3.
To play track 20
Press 2 and then 0.
ENGLISH
27
En
Page 28

Playback (continued)
3
Basic operation of the OSD (On-Screen Display) menu
You can check the general playback status or start playback
from a desired point on the disc, etc. by displaying and
operating the OSD menu.
Number
buttons
1
2,
Press DISPLAY during playback.
1
Press i/k to select a desired menu
2
item.
A yellow frame in the OSD menu indicates the currently
selected item.
Press j/l to change the setting of
3
the selected menu item.
The number buttons can also be used for entering numbers
(for example, title number).
To turn off the OSD menu
Press DISPLAY.
NOTE
If no button is pressed for 10 seconds, the OSD menu
disappears.
Example OSD (On-Screen Display) menu
1/3
1/12
0:16:57
1 ENG
D
6 CH
OFF
1/3
NORM.
1/16
16:57
STER.
NORM.
28
ENGLISH
Page 29

Description of each OSD menu item
Each menu item shows its current status/setting which can be changed on the OSD menu. For details of the functions or
optional settings, refer to the page in parentheses.
Menu item Current status/setting
Title number/total number of titles
1/3
Chapter number/total number of chapters
1/12
Elapsed play time
0:16:57
1 ENG
D
6 CH
OFF
1/3
NORM.
• Soundtrack language
• Encoding format
•Channel number
Subtitle language
Angle number/total number of angles
Surround on/off
Function
Skip to the desired title (page 30).
Skip to the desired chapter (page 31).
Skip to the desired time point (page 31).
Change the setting (page 39).
Turn on/off subtitle display or change the
subtitle language (page 40).
Change the angle (page 33).
Turn on/off the 3D surround effect (page 38).
BASIC OPERA TIONS
Menu item Current status/setting
Track number
1/16
Elapsed playing time
16:57
Audio channel
STER.
Sound
NORM.
NOTE
Some discs may not provide all of the above OSD menu items.
Function
Skip to the desired track
(Track search on page 30)
Change the setting (page 39)
Change the setting (page 38)
ENGLISH
En
29
Page 30

Number
buttons
DISPLAY
Search
CLEAR
SELECT/ENTER
i/k/j/l
Title/Track search
Press DISPLAY during playback or in
1
stop mode.
If the unit is in stop mode, continue to step 3.
Press i/k to select "T" (title/track).
2
1/3
Press j/l to select a desired title
3
number.
3/3
This unit provides 5 disc search functions.
Title search
When a disc has more than one title, you can select a
desired title to start playback.
Track search
You can specify a desired track number.
Chapter search
When a title on a disc has more than one chapter, you can
select a desired chapter to start playback.
Time search
You can start playback from a desired point on the disc by
specifying the time.
Mark search
You can start playback from a marked point.
You can also use the number buttons to enter a desired
title number.
Example: To play title number 2
Press 2.
Playback starts from the beginning of the specified title/
track.
NOTE
If no button is pressed for 10 seconds, the OSD menu
disappears.
30
ENGLISH
Page 31

Chapter search
CONTINUE
Time search
Press DISPLAY during playback.
1
Press i/k to select "C" (chapter).
2
1/8
Press j /l to select a desired
3
chapter number.
3/8
You can also use the number buttons to enter a desired
chapter number.
Example: To play chapter number 17
Playback starts from the beginning of the specified chapter.
NOTES
• If no button is pressed for 10 seconds, the OSD menu
disappears.
•Chapter search does not function if you specify a chapter
number which does not exist on the disc.
Press 1 and then 7.
Press DISPLAY during playback.
1
Press i/k to select the time icon.
2
-:--:--
Use the number buttons to enter the
3
time of the desired position.
1:17:30
Example: To start playback at 1 hour, 17 minutes, 30
If you enter wrong numbers
Press CLEAR to cancel the numbers. Then enter the correct
numbers.
4
Playback starts from the specified position (time).
seconds (1:17:30)
Press 1, 1, 7, 3 and then 0.
To start playback at 8 minutes 7 seconds
(0:08:07)
Press 8, 0 and then 7.
Press SELECT/ENTER.
MORE FEATURES
NOTES
• If no button is pressed for 10 seconds, the OSD menu
disappears.
•Time search does not function if you specify a time longer
than the length of the disc.
•Time search does not function with some discs even if
the elapsed time is displayed.
ENGLISH
31
En
Page 32

Search (continued)
To start playback from a marked point
MARK
Number
buttons
jl
SEARCH
CLEAR
SELECT/ENTER
Mark search
You can start playback from a desired marked point. Up to
9 points can be marked on the same disc.
To mark a desired point
During playback, press MARK at a position to be
memorized as marked point.
Press SEARCH during playback or in
1
stop mode.
The mark search menu appears on the TV screen.
MARKER SEARCH
1234
Within 10 seconds, press j/l to
2
5––––
select a marked point you want to
recall.
Press SELECT/ENTER.
3
Playback starts from the selected marked point.
In step 2, you can also use the number buttons (1 - 9) to
specify a marked point.
Playback starts immediately without your pressing
SELECT/ENTER.
To clear a marked point
In step 2 above, select the marked point you want to clear,
then press CLEAR.
NOTES
• It may be prohibited to mark a point at multi-angle scenes
or where subtitles are recorded.
•All the marked points are cleared when:
- you turn off the power.
- you remove the disc.
- you select another disc tray.
1/9
Marked point 1 is memorized.
Each time you press MARK, an additional point is marked.
32
ENGLISH
Page 33

Zooming and Changing the Angle
Changing the angle
ANGLE
CLEAR
ZOOM
i/k/j/l
Zooming the picture
Press ZOOM during playback or still
playback (pause).
When playing a DVD with multi-angle scenes
(photographed from several different angles), you can select
the angle you want to view.
When a multi-angle scene comes on during playback, " "
will blink in the display window to let you know that you can
change the angle.
Although the following is the simpler procedure, you can
also change the angle by operating the OSD menu (see
page 28).
Press ANGLE during playback.
1
The unit displays the current angle number/total number of
angles.
1/3
Press ANGLE repeatedly until the
2
desired angle is selected.
2/3
MORE FEATURES
Each time you press the button, the magnification changes
as shown below.
×4×2 ×6 ×9
×16 ×12NORMAL
To move the zoom area
Press i/k/j/l.
To return to the normal display
Press CLEAR.
NOTES
• The zoom function may not work with some discs.
• The zoom function may not work at multi-angle scenes.
The symbol appears if you press ANGLE during
playback of a disc with no multi-angle scenes recorded,
or at a scene where the angle cannot be changed.
Tip
The total number of angles recorded on a DVD usually
appears on its case within the following symbol.
3
ENGLISH
33
En
Page 34

Random and Repeat Playback
Repeat playback
RANDOM
r
REPEAT
t
A-B
Random playback
Press RANDOM during playback or in stop
mode.
The unit starts random playback and the RANDOM indicator
lights up in the display window.
Press REPEAT during playback.
Each time you press the button, repeat play mode changes
as follows:
CHAPT:
Repeats the chapter currently being played.
CHAPT
TITLE:
Repeats the title currently being played.
TITLE
OFF:
Cancels repeat playback. (Normal playback)
To skip to another title or track during
random playback
Press (g/) t.
The unit selects another title or track and resumes random
playback.
Pressing r (/f) once makes the unit return to the
beginning of the title or track currently being played.
To return to normal playback
Press RANDOM.
The RANDOM indicator disappears from the display
window.
34
ENGLISH
OFF
NOTES
•Chapter repeat playback does not function on DVDs with
no chapters recorded.
• Chapter repeat playback is canceled when you change
the chapter by pressing r or t.
Page 35

TRACK:
Repeats the track currently being played.
TRACK
DISC:
Repeats all tracks on the disc.
DISC
Repeating a section between two
specified points (A-B repeat)
You can specify a section and play it repeatedly.
During playback, press A-B at the
1
starting point (A) of the section you
want to repeat.
A *
Press A-B again at the ending point
2
(B) of the section you want to repeat.
MORE FEATURES
ALL:
Repeats all discs loaded in the unit or on the
program list.
ALL
OFF:
Cancels repeat playback. (Normal playback)
OFF
NOTES
•Track repeat playback is canceled when you change the
track by pressing r or t.
•Only track repeat and disc repeat playback work during
random playback.
The unit returns to point A and plays the section between
A and B repeatedly.
A B
To return to normal playback
Press A-B again.
OFF
En
NOTES
• The section to be repeated must be within a title and
cannot span across the boundary of a title.
• On multi-angle scenes, the unit may play a section other
than the one specified for A-B repeat playback.
ENGLISH
35
Page 36

Programmed Playback
Press the number button (1 - 5) to
2
select the disc tray number.
Number
buttons
c
REPEAT
You can select up to 20 tracks out of 5 discs, and play
them in programmed order.
Press PROGRAM in stop mode.
1
The program menu screen appears on the TV screen and
the PROG. indicator appears in the display window.
PROGRAM
CLEAR
SELECT/ENTER
i/k/j/l
Program
1
Press SELECT/ENTER.
3
Press the number buttons to select the
4
Step
Clear All
desired track number.
Program
1
3
Track number
Disc tray number
Step
Clear All
1
1
Program
•To turn off the menu screen, press PROGRAM again.
36
ENGLISH
Step
1
Clear All
Press SELECT/ENTER.
5
Repeat steps 2 through 5.
6
Program
51
3 1 4
19
Step
3
Clear All
Page 37

Press c to start playback.
7
The selected tracks are memorized and playback begins
in the programmed order.
If a disc does not exist in the disc tray you programmed,
the programmed playback of the disc is canceled, and
playback skips to the next program.
To repeat the programmed playback
Press REPEAT repeatedly . Each time you press the button,
repeat mode changes (see page 35).
When you select "ALL", the tracks are played repeatedly in
the programmed order.
To skip tracks
Press r or t repeatedly. Playback skips to the
previous or succeeding tracks within the program setting.
To delete a track from the program setting
Press i/k/j/l in step 2 or 4 on the previous page to
select an unwanted track and press CLEAR.
To clear all the programs settings
Pressi/k/j/l in step 2 or 4 on the previous page to
select "Clear All" and press SELECT/ENTER.
The program’s settings are also cleared when the disc is
removed.
MORE FEATURES
ENGLISH
En
37
Page 38

Creating a 3D Surround Effect
The unit can produce a 3D surround effect, which simulates
multi-channel audio playback with two conventional stereo
speakers, instead of five or more speakers usually required
to listen to multi-channel audio of a home theater system.
NOTES
•Turn off other surround effects of the TV and connected
audio equipment when using the unit's 3D surround
effect.
•Turn off the 3D surround effect when recording the audio
DISPLAY
i/k/j/l
source output from this unit.
Press DISPLAY during playback.
1
Press i/k to select the sound icon.
2
Press j/l to select "3D SUR".
3
NORM.
3D SUR
NOTES
• If no button is pressed for 10 seconds, the OSD menu
disappears.
•The 3D surround effect may not function with some DVDs.
To turn off the 3D surround effect
Select "NORM." in step 3.
38
ENGLISH
Page 39

Changing the Audio Track/Channel
Some discs have more than one audio track, such as
soundtracks with different languages. While playing such a
disc, the audio track can be changed to play the different
AUDIO
soundtracks.
Although the following is the simpler procedure, you can
also change the soundtrack by operating the OSD menu
(see page 28).
•When playing a DVD with soundtracks in multiple
languages, the audio will automatically be played in
the designated language set in the setup menu (page
47). If that language is not on the disc, the original
language for the disc is selected.
• The audio track can only be changed with discs which
contain multiple audio tracks.
• The number of audio tracks available differs from disc
to disc.
Tip
The total number of soundtracks on a DVD usually appears
on its case within the following symbol.
Press AUDIO during playback.
1
The soundtrack language currently selected is displayed.
1 ENG
D
6 CH
Press AUDIO repeatedly until the
2
desired language is selected.
2 FRE
D
6 CH
Press AUDIO repeatedly until the desired
audio channel is selected.
Each time you press the button, the display changes as
follows:
STER.(stereo) LEFT RIGHT
MORE FEATURES
En
3
NOTE
This unit does not apply to the multiple karaoke function.
When playing back karaoke DVDs, this unit cannot turn on
and off the sound of the vocal part.
STER.
ENGLISH
39
Page 40

Displaying and Changing Subtitles
When playing DVDs which contain subtitles, you can turn
on and off the subtitle display on the TV screen or change
the language of the subtitles.
SUBTITLE
• The subtitle is displayed in the designated language
set in the setup menu (page 48). If that language is
not available on the disc, the original language for
the disc is selected.
• Subtitles can only be changed with discs which
contain more than one set of subtitles.
• The number of subtitle languages differs depending
on the disc.
Although the following is the simpler procedure, you can
also change the subtitle language and turn on/off the
subtitle display by operating the OSD menu (see page 28).
Press SUBTITLE during playback.
1
1 ENG
Press SUBTITLE repeatedly until the
2
desired language is selected.
2 FRE
To turn off the subtitle display
Press SUBTITLE repeatedly to select "OFF".
OFF
Tip
The total number of subtitle languages on a DVD usually
appears on its case within the following symbol.
2
40
ENGLISH
NOTES
•When playing a disc supporting closed captions, the
subtitles and the closed captions may overlap each other
on the TV screen. In this case, turn the subtitle display
off.
•With some discs, it may take a few moments to display
new subtitles after you press SUBTITLE.
Page 41

CONTINUE
Playing an MP3 Disc
The unit can play MP3 audio recorded on CD-ROM, CD-R
or CD-RW discs.
Before playing an MP3 disc, read the following notes.
Notes on MP3 discs
An MP3 file stores audio data compressed using MPEG 1,
the audio layer-3 file-coding scheme.
In this manual, we refer to what, in PC terminology, are
called "folders" and "files" as "albums" and "tracks",
respectively.
Notes on playing MP3
• The unit can play MP3 discs containing audio data
compressed using MPEG 1, the audio layer-3 file-coding
scheme and complying with ISO 9660. Note however,
that the unit may not play tracks in the order they were
recorded.
•The maximum allowable number of tracks and/or albums
in a disc is 200, including the root albums (directories).
• The maximum allowable depth of a nested album is 50,
including tracks.
• If a disc contains audio tracks and MP3 tracks, the unit
cannot play it.
• As for multi-session discs, the unit plays only the first
session.
• The unit can play only MP3 tracks which were converted
with a sampling frequency of 44.1 kHz and a fixed bit
rate of 128 kbps.
• The unit may not play MP3 tracks recorded using a packet
writing utility.
• The unit can play only MP3 tracks having a file extension
".mp3".
• It may take 30 seconds or more before the unit can start
playing MP3 tracks, depending on the number of
recorded tracks and the complexity of the album tree.
• If you play a non-MP3 track that has the ".mp3" file
extension, you may hear some noise.
•Digital audio signals cannot be output from the DIGITAL
OUT (OPTICAL/COAXIAL) of this unit, when playing MP3
discs. In this case, connect AUDIO OUT 1 or 2 L/R jacks
to the analog audio input jacks of the audio equipment
(see page 19).
Notes on display indications during playback
• Up to 8 characters are displayed for the name of a track.
•Characters other than uppercase letters ("A" to "Z"),
numerals ("0" to "9") and underscore ("_") may not be
displayed, or may be displayed in different characters.
• The elapsed play time may not be displayed correctly for
MP3 tracks.
• Depending on the condition of the recording equipment
or the CD-R/RW disc itself, a false track which cannot
be played on the unit may be displayed.
Notes on creating MP3 discs
•When converting audio data to MP3
Create MP3 files with a sampling frequency of 44.1 kHz
and a fixed bit rate of 128 kbps.
•When creating MP3 discs
Do not store more than 200 albums and/or tracks in a
disc.
•To play tracks in the order they were recorded
1.Use a writing software capable of recording MP3 tracks
(files) in numerical and alphabetical order. For details
on using the software, refer to the operating
instructions supplied with the software.
2.Use only one album. (Do not create a sub-album within
an album.)
3.Include a two or three-digit number at the beginning
of each album or track name so that the albums and
tracks are played in order.
<Example of recommended name structure>
01XXXXX.mp3
02XXXXX.mp3
03XXXXX.mp3
04XXXXX.mp3
05XXXXX.mp3
<Avoid using the following structure>
1XXXXX.mp3
5XXXXX.mp3
10XXXXX.mp3
15XXXXX.mp3
20XXXXX.mp3
(The beginning numbers determine the order, therefore
the tracks shown above will be played in the wrong
order, i.e., "1", "10", "15", "20", and "5".)
Glossary
File extension:
A 3-character string added to a file name under the
Windows or DOS environment is called a "file extension".
A file extension is used mainly to identify types of files. The
file extension for MP3 files is ".mp3".
ISO 9660:
ISO stands for the "International Organization for
Standardization". ISO 9660 determines the file structure
for the CD-ROMs. This unit can play MP3 files recorded in
the format compliant with ISO 9660.
Nesting of folders (albums):
To organize data files stored in a PC, you can store related
files in a folder. A folder can contain other folders as well
as files. For example, folder A can contain folder B, and
folder B can contain folder C; this is called "nesting of
folders".
Session:
A session is one uninterrupted section of written data on a
disc.
A multi-session disc is a disc which has more than two
sessions.
MORE FEATURES
En
ENGLISH
41
Page 42

Playing an MP3 Disc (continued)
r
s
i
TOP MENU
MENU
Unlike audio CD operations,
play modes are not available when playing an MP3 disc.
• Fast forward, fast reverse, random and A-B repeat
playback
• 3D surround and audio track selection
the following functions and
c
t
a
SELECT/ENTER
k
Press i/k to select a track.
2
Press TOP MENU to move to the next page or MENU to
move to the previous page of the track list.
Press c or SELECT/ENTER to start
3
playback.
MP3 Program
01 TRACK. mp3
02 TRACK. mp3
03 TRACK. mp3
04 TRACK. mp3
05 TRACK. mp3
06 TRACK. mp3
07 TRACK. mp3
08 TRACK. mp3
02:18l 4 OFF
To stop playback
Press s.
To skip to another track during playback
Press (g/) t to skip to the next track.
Press r (/f) to skip back to the beginning of the
current track. Press r (/f) twice in rapid succession
to skip back to the previous track.
Alternatively, press i/k to select a track, then press c
or SELECT/ENTER to start playback.
To pause playback
Press a.
To resume playback, press c or a.
Clear All
Basic operations of MP3 playback
Load an MP3 disc.
1
The OSD menu for the MP3 disc is displayed.
MP3 Program
01 TRACK. mp3
02 TRACK. mp3
03 TRACK. mp3
04 TRACK. mp3
05 TRACK. mp3
06 TRACK. mp3
07 TRACK. mp3
08 TRACK. mp3
00:00 1 OFF
NOTE
It may take over 30 seconds to read the MP3 tracks
depending on the number of recorded tracks and complexity
of the album tree.
42
ENGLISH
Clear All
Page 43

OSD (On-Screen Display) menu for the MP3 disc
CONTINUE
The OSD menu for the MP3 disc is displayed when an MP3 disc is loaded. It enables you to check the general playback
status, select tracks and perform programmed playback.
MP3 Program
01 TRACK. mp3
02 TRACK. mp3
Track list
03 TRACK. mp3
04 TRACK. mp3
05 TRACK. mp3
06 TRACK. mp3
07 TRACK. mp3
08 TRACK. mp3
00:00 1 OFF
Clear All
Program list
MORE FEATURES
Disc status indication
Time indication Track indication
Menu item
Track list
Program list
Disc status indication
Time indication
Track indication
Repeat mode indication
Tracks on the MP3 disc
Programmed tracks
Play c/pause a/stop with resume on as/
stop with resume off s
Elapsed play time of the track
Selected track number
Repeat play mode
Current status/setting
Repeat playback
You can play a track or all the tracks on the MP3 disc
repeatedly.
The procedure is the same as that for the audio CD. Refer
to "Repeat playback" on page 35.
Note, however, that the "TRACK" repeat, "ALL" repeat and
"OFF" only can be selected for an MP3 disc.
Repeat mode indication
Function
Select the desired track.
Edit program and start programmed
playback.
—
—
—
—
En
ENGLISH
43
Page 44

Playing an MP3 Disc (continued)
3
The selected track is entered on the program list.
Press SELECT/ENTER.
PROGRAM
CLEAR
c
SELECT/ENTER
i/k/j/l
TOP MENU
MENU
Programmed playback
You can select up to 60 tracks and play them in the
programmed order.
Press PROGRAM during playback or
1
in stop mode to enter program edit
mode.
The "E" mark appears on the upper right of the program
list and the PROG. indicator appears in the display window.
MP3 Program
01 TRACK.mp3
02 TRACK.mp3
03 TRACK.mp3
04 TRACK.mp3
05 TRACK.mp3
06 TRACK.mp3
07 TRACK.mp3
08 TRACK.mp3
1:05:00 1 OFF
Clear All
E
MP3 Program
02 TRACK.mp3
03 TRACK.mp3
04 TRACK.mp3
05 TRACK.mp3
06 TRACK.mp3
07 TRACK.mp3
08 TRACK.mp3
1:05:00 1 OFF
Repeat steps 2 and 3 to enter
4
05 TRACK.mp301 TRACK.mp3
Clear All
E
additional tracks on the program list.
Press PROGRAM to exit the program
5
edit mode.
The "E" mark disappears from the OSD menu.
Press the l right cursor button.
6
The last entered track on the program list is highlighted.
MP3 Program
01 TRACK.mp3
02 TRACK.mp3
03 TRACK.mp3
04 TRACK.mp3
05 TRACK.mp3
06 TRACK.mp3
07 TRACK.mp3
08 TRACK.mp3
1:05:00 1 OFF
Press i/k to select a track to start
7
05 TRACK.mp3
03 TRACK.mp3
10 TRACK.mp3
07 TRACK.mp3
Clear All
E
playback on the program list.
To move to the next page, press TOP MENU.
To move to the previous page, press MENU.
Press c or SELECT/ENTER.
8
Playback starts from the selected track in the programmed
order.
Press i/k to select a track.
2
To move to the next page, press TOP MENU.
To move to the previous page, press MENU.
44
ENGLISH
Playback stops after the last programmed track on the
program list has been played.
Page 45

To return to normal playback
Press and hold PROGRAM for about 3 seconds.
Alternatively, press the j left cursor button and i/k to
select a track, then press c or SELECT/ENTER.
The PROG. indicator disappears from the display window.
To delete a track from the program list
1
Press PROGRAM to enter program edit mode.
2
Press the l right cursor button to move to the program
list.
3
Press i/k to select the track you want to delete, then
press CLEAR.
The selected track is deleted from the program list.
To clear the entire program
1
Follow steps 1 and 2 of “To delete a track from the
program list” above.
2
Press i/k repeatedly or press the l right cursor button
to select “Clear All”, then press SELECT/ENTER.
The program is also cleared when you open the disc
compartment.
MORE FEATURES
ENGLISH
En
45
Page 46

Changing Setup Values
Press i/k to select the item to be
2
changed, then press the l right
cursor button.
Disc Audio* (page 47)
Sets the audio soundtrack language.
c
SELECT/ENTER
i/k/j/l
RETURN
SETUP
All the basic settings of the unit are properly preset at
the factory.
Check that "TV Aspect", "Progressive Scan" and "Digital
Audio Output" in the setup menu are correctly set according
to the type of equipment connected to the unit. For details
on the setting, refer to the "Connections" section on pages
13 to 22.
Change any other settings according to your personal
preferences.
Basic operations
Press SETUP.
1
The setup menu is displayed.
Disc Audio
Disc Subtitle
Disc Menu
Rating
Country Code
TV Aspect
Menu Language
Progressive Scan
Digital Audio Output
Others
Original
English
French
German
Spanish
Italian
Chinese
Polish
Hungarian
Russian
Other – – – –
Disc Subtitle* (page 48)
Sets the subtitle language.
Disc Menu* (page 48)
Sets the language used in the DVD menu screen.
* If the selected language does not exist on the disc, the
original language for the disc is selected.
Rating** (page 49)
When playing discs with preset restriction level encoding,
the unit cuts scenes of excessive violence, etc. by this
setting.
Country Code** (page 50)
Adjust the set restriction level to the cinema rating system
of the country where the DVD disc was produced.
** The setting is protected by a password.
TV Aspect (page 50)
Sets the aspect ratio of the TV connected to the unit.
Menu Language (page 51)
Sets the language used in the setup menu.
Progressive Scan (page 52)
Turns on and off the progressive scan signal output.
Digital Audio Output (page 52)
Sets the digital audio to be output from the unit according
to the type of audio equipment connected to the unit.
Others (page 53)
Turns on and off the DRC (Dynamic Range Control).
Press i /k to select the desired
3
setting and press SELECT/ENTER.
Some items require additional steps.
For details of the setting options for each item, see the
procedure of each setting on the following pages.
To exit setup menu
Press SETUP, RETURN or c.
46
ENGLISH
Page 47

CONTINUE
Number
buttons
CLEAR
SELECT/ENTER
i/k/j/l
Press i /k to select the desired
2
language.
Original:
The original language set for the disc is selected.
English/French/German/Spanish/Italian/Chinese/
Polish/Hungarian/Russian
Other:
To select another language, use the number buttons to enter
its 4-digit language code referring to the language code
list on page 56.
If you enter a wrong number, press CLEAR and re-enter
the correct number.
AS NECESSARY
Disc Audio
The soundtrack language on a DVD can be changed. If the
selected language is not available on the disc, the original
language for the disc is selected.
Press i/k to select "Disc Audio" in
1
the setup menu and press the l right
cursor button.
Disc Audio
Disc Subtitle
Disc Menu
Rating
Country Code
TV Aspect
Menu Language
Progressive Scan
Digital Audio Output
Others
Original
English
French
German
Spanish
Italian
Chinese
Polish
Hungarian
Russian
Other – – – –
Disc Audio
Disc Subtitle
Disc Menu
Rating
Country Code
TV Aspect
Menu Language
Progressive Scan
Digital Audio Output
Others
Press SELECT/ENTER.
3
Original
English
French
German
Spanish
Italian
Chinese
Polish
Hungarian
Russian
Other – – 1 2
En
ENGLISH
47
Page 48

Changing Setup Values (continued)
Disc Subtitle
The subtitle language on a DVD can be changed. If the
selected language is not available on the disc, the original
language for the disc is selected.
Press i/k to select "Disc Subtitle"
1
in the setup menu and press the l
right cursor button.
Disc Audio
Disc Subtitle
Disc Menu
Rating
Country Code
TV Aspect
Menu Language
Progressive Scan
Digital Audio Output
Others
Press i /k to select the desired
2
Original
English
French
German
Spanish
Italian
Chinese
Polish
Hungarian
Russian
Other – – – –
language.
Original:
The original language set for the disc is selected.
Disc Menu
The language used in the DVD menu can be changed. If
the selected language is not available on the disc, the
original language for the disc is selected.
Press i/k to select "Disc Menu" in
1
the setup menu and press the l right
cursor button.
Disc Audio
Disc Subtitle
Disc Menu
Rating
Country Code
TV Aspect
Menu Language
Progressive Scan
Digital Audio Output
Others
Press i /k to select the desired
2
Original
English
French
German
Spanish
Italian
Chinese
Polish
Hungarian
Russian
Other – – – –
language.
Original:
The original language set for the disc is selected.
English/French/German/Spanish/Italian/Chinese/
Polish/Hungarian/Russian
Other:
To select another language, use the number buttons to enter
its 4-digit language code referring to the language code
list on page 56.
If you enter a wrong number, press CLEAR and re-enter
the correct number.
Press SELECT/ENTER.
3
48
ENGLISH
Page 49

Rating
CONTINUE
Some DVDs contain parental control information that
applies to the complete disc or certain scenes on the disc.
By using the parental control feature of the unit, you can
specify the restriction level to prevent the unit from playing
scenes not suitable for children (for example, scenes of
excessive violence).
The unit is also equipped with a password-locking
mechanism designed to prevent children from changing the
restriction level.
NOTES
• Parental control does not function with DVDs which do
not contain parental control information.
• Parental control does not function if the parental control
information on the DVD does not match the country code
setting (page 50).
Press i/k to select "Rating" in the
1
setup menu and press the l right
cursor button.
Disc Audio
Disc Subtitle
Disc Menu
Rating
Country Code
TV Aspect
Menu Language
Progressive Scan
Digital Audio Output
Others
New
– – – –
Press i /k to select the desired
3
restriction level and press SELECT/
ENTER.
Disc Audio
Disc Subtitle
Disc Menu
Rating
Country Code
TV Aspect
Menu Language
Progressive Scan
Digital Audio Output
Others
You cannot play DVDs rated higher than the level you have
selected unless you cancel the parental control. For
example, selecting level 1 makes it impossible to play any
disc with a rating of 2 to 8.
In the next "Country Code" section, adjust the restriction
level you have set here to the cinema rating system of the
country where the DVD disc was produced.
To cancel the parental control
Select "Unlock" in step 3.
To change the password
1 In step 3 above, press i/k to select "Change" and
press SELECT/ENTER.
2 Enter a new 4-digit password and press SELECT/
ENTER.
3 Enter the password again and press SELECT/
ENTER to confirm it.
8 Blocked
7 Blocked
6
5
4
3
2
1
Unlock
Change
AS NECESSARY
2
When you have not entered a password yet
Enter a 4-digit password and press SELECT/ENTER. Then,
enter the password again and press SELECT/ENTER to
confirm it.
Example: To enter password "1234", press the number
When you have already entered a password
Enter the password and press SELECT/ENTER.
If you entered a wrong number
Press CLEAR and re-enter the correct password, then
press SELECT/ENTER.
Enter a 4-digit password using the
number buttons.
buttons 1, 2, 3 and then 4.
If you forget the password
Carry out the following procedure to clear the current
password.
1 Press SETUP to display the setup menu.
If the setup menu has been displayed, first exit the
setup menu.
2 Use the number buttons to enter the 6-digit number
"210499".
"P CLr" appears in the display window and the current
password is cleared.
ENGLISH
49
En
Page 50

Changing Setup Values (continued)
Country Code
After specifying the restriction level in the previous "Rating"
section, set the country code so that the set restriction level
is adjusted to the cinema rating system of the country where
the DVD disc was produced.
Press i/k to select "Country Code"
1
in the setup menu and press the l
right cursor button.
Disc Audio
Disc Subtitle
Disc Menu
Rating
Country Code
TV Aspect
Menu Language
Progressive Scan
Digital Audio Output
Others
Carry out step 2 of "Rating" on the
2
NEW
– – – –
previous page.
Press i /k to select the first
3
character of the country code and
press the l right cursor button.
Refer to the country code list on pages 54 and 55.
Disc Audio
Disc Subtitle
Disc Menu
Rating
Country Code
TV Aspect
Menu Language
Progressive Scan
Digital Audio Output
Others
Code Set
U S
TV Aspect
Select the appropriate display format, depending on
whether you are using a conventional (4:3) or wide-screen
(16:9) TV .
Press i/k to select "TV Aspect" in
1
the setup menu and press the l right
cursor button.
Disc Audio
Disc Subtitle
Disc Menu
Rating
Country Code
TV Aspect
Menu Language
Progressive Scan
Digital Audio Output
Others
Press i/k to select the desired TV
2
4:3 Letterbox
4:3 Panscan
16:9 Wide
aspect and press SELECT/ENTER.
Disc Audio
Disc Subtitle
Disc Menu
Rating
Country Code
TV Aspect
Menu Language
Progressive Scan
Digital Audio Output
Others
4:3 Letterbox
4:3 Panscan
16:9 Wide
Press i /k to select the second
4
character of the country code and
press SELECT/ENTER.
To change the country code
Follow the above steps again.
50
ENGLISH
Page 51

CONTINUE
4:3 Letterbox:
Select this when a conventional TV is connected. Titles
recorded in wide-screen (16:9) format will be played in
letterbox mode, with black bands at the top and bottom of
the screen.
Menu Language
The language used in this setup menu can be changed.
Press i /k to select "Menu
1
Language" in the setup menu and
press the l right cursor button.
4:3 Letterbox *
4:3 Panscan:
Select this to play titles that include pan-scan encoding on
a conventional 4:3 screen TV: the picture of wide-screen
titles is displayed at full screen height with the left or right
cropped. Other titles will be played in letterbox mode.
Cut off
4:3 Panscan *
16:9 Wide:
Select this when a wide-screen TV is connected. Titles
recorded in wide-screen (16:9) format will be played at full
size. (Setting the wide-screen TV to full-size mode is also
necessary.)
Disc Audio
Disc Subtitle
Disc Menu
Rating
Country Code
TV Aspect
Menu Language
Progressive Scan
Digital Audio Output
Others
Press i /k to select the desired
2
English
Spanish
French
language and press SELECT/ENTER.
Disc Audio
Disc Subtitle
Disc Menu
Rating
Country Code
TV Aspect
Menu Language
Progressive Scan
Digital Audio Output
Others
English/Spanish/French:
The setup menu is displayed in the selected language.
English
Spanish
French
AS NECESSARY
* Each screen above shows an example when playing a
16:9 Wide *
title recorded in the wide-screen format. (This setting
does not affect the video titles recorded in the 4:3 screen
format.)
ENGLISH
En
51
Page 52

Changing Setup Values (continued)
Progressive Scan
When connecting the unit to a progressive-scan compatible
TV , you can take advantage of the unit's progressive scan
output enabling high quality video playback with less
flickers.
CAUTION
DO NOT set the "Progressive Scan" to "On" when
connecting to a TV that is not compatible with progressive
scan signals. If you set "Progressive Scan" to "On" in
error, the picture will appear scrambled. In this case, reset
the unit by holding down s for more than 5 seconds in
stop mode. The original video output will be restored and
the picture will become visible again.
Press i/k to select "Progressive
1
Scan" in the setup menu and press the
l right cursor button.
Disc Audio
Disc Subtitle
Disc Menu
Rating
Country Code
TV Aspect
Menu Language
Progressive Scan
Digital Audio Output
Others
Off
On
Digital Audio Output
Set the audio output of the unit according to the type of
audio equipment connected to the unit.
CAUTION
DO NOT select "DOLBY DIGIT AL/PCM" or "Stream/PCM"
for the "Digital Audio Output" when connecting to an A V
receiver not equipped with a Dolby Digital decoder or DTS
decoder (with an optical or coaxial connecting cord).
Merely attempting to play a disc may cause a screeching
noise which could be harmful to your ears and damage
the speakers. In this case, be sure to select "PCM" for the
"Digital Audio Output".
Press i/k to select "Digital Audio
1
Output" in the setup menu and press
the l right cursor button.
DOLBY
/PCM
Disc Audio
Disc Subtitle
Disc Menu
Rating
Country Code
TV Aspect
Menu Language
Progressive Scan
Digital Audio Output
Others
DIGITAL
Stream/PCM
PCM
Sample Freq.
48KHz
96KHz
Press i/k to select "On" or "Off" and
2
press SELECT/ENTER.
On:
You can change the setting to "On" when using the
COMPONENT VIDEO OUT/PROGRESSIVE SCAN jacks
on the unit for connection to a TV compatible with
progressive scan signals.
Off:
– Do not change the setting (keep the setting "Off") when
using the COMPONENT VIDEO OUT/PROGRESSIVE
SCAN jacks on the unit for connection to a TV which is
not compatible with progressive scan signals.
– Do not change the setting (keep the setting "Off") when
using the VIDEO OUT jack or S-VIDEO OUT jack on the
unit for connection to a TV.
NOTES
• The Progressive Scan menu item is not displayed when
the VIDEO OUTPUT switch is set to "S-VIDEO".
• Composite video signals are not output from the VIDEO
OUT jack on the unit if "Progressive Scan" is set to "On".
Press i/k to select the appropriate
2
setting and press SELECT/ENTER.
DOLBY DIGITAL/PCM:
Select this when connecting to an AV receiver equipped
with a Dolby Digital (AC-3) decoder.
Stream/PCM:
Select this when connecting to an AV receiver equipped
with a DTS decoder or an MPEG decoder, or an A V receiver
equipped with both Dolby Digital and DTS decoders.
PCM:
Select this when connecting to an audio system without a
Dolby Digital (AC-3), DTS or other special decoder.
52
ENGLISH
Page 53

Output
CONTINUE
Playback
disc
96-kHz
linear PCM
DVD
DTS DVD
Dolby
Digital DVD
MPEG DVD
Audio CD
DTS audio
CD
3
Stream/
PCM
PCM
DTS bit
stream
Dolby
Digital bit
stream
MPEG bit
stream
PCM
DTS bit
stream
DOLBY
DIGITAL/
PCM
PCM
Not output
Dolby
Digital bit
stream
PCM
PCM
Not output
PCM
PCM
Not output
PCM
PCM
PCM
Not output
Press i /k to select the sample
frequency and press SELECT/ENTER.
DOLBY
/PCM
Disc Audio
Disc Subtitle
Disc Menu
Rating
Country Code
TV Aspect
Menu Language
Progressive Scan
Digital Audio Output
Others
96KHz:
Select this if your audio equipment can handle 96-kHz
signals.
48KHz:
Select this if your audio equipment cannot handle 96-kHz
signals.
NOTE
If you have connected the unit to an AV receiver equipped
with both Dolby Digital and DTS decoders, it may be
necessary to change the receiver setting manually
depending on the disc to be played. For details, refer to the
operating instructions of the AV receiver.
DIGITAL
Stream/PCM
PCM
Sample Freq.
48KHz
96KHz
Others
You can turn on and of f the DRC (Dynamic Range Control).
When the DRC is turned on, the unit compresses the
dynamic range of the audio output (i.e. the difference
between the loudest and the quietest sounds) so that you
can listen to a movie or music at a low volume without losing
the clarity of sound.
Press i/k to select "Others" in the
1
setup menu and press the l right
cursor button.
Disc Audio
Disc Subtitle
Disc Menu
Rating
Country Code
TV Aspect
Menu Language
Progressive Scan
Digital Audio Output
Others
Others
Press SELECT/ENTER repeatedly to
2
DRC Off
select "On" or "Off".
DRC On:
Select this to play a disc at a low volume.
DRC Off:
Select this to play a disc without DRC.
NOTE
When playing DVDs recorded in Dolby Digital (AC-3) format,
the DRC only works for analog audio signals output from
the AUDIO OUT L/R jacks of the unit.
AS NECESSARY
En
ENGLISH
53
Page 54

Changing Setup Values (continued)
Country codes
Code Country Code Country Code Country
AD Andorra
AE United Arab Emirates
AF Afghanistan
AG Antigua and Barbuda
AI Anguilla
AL Albania
AM Armenia
AN Netherlands Antilles
AO Angola
AQ Antarctica
AR Argentina
AS American Samoa
AT Austria
AU Australia
AW Aruba
AZ Azerbaidjan
BA Bosnia-Herzegovina
BB Barbados
BD Bangladesh
BE Belgium
BF Burkina Faso
BG Bulgaria
BH Bahrain
BI Burundi
BJ Benin
BM Bermuda
BN Brunei Darussalam
BO Bolivia
BR Brazil
BS Bahamas
BT Bhutan
BV Bouvet Island
BW Botswana
BY Belarus
BZ Belize
CA Canada
CC Cocos (Keeling) Islands
CF Central African Republic
CG Congo
CH Switzerland
CI Ivory Coast
CK Cook Islands
CL Chile
CM Cameroon
CN China
CO Colombia
CR Costa Rica
CS Former Czechoslovakia
CU Cuba
CV Cape Verde
CX Christmas Island
CY Cyprus
CZ Czech Republic
DE Germany
DJ Djibouti
DK Denmark
DM Dominica
DZ Algeria
EC Ecuador
EE Estonia
EG Egypt
EH Western Sahara
ER Eritrea
ES Spain
ET Ethiopia
FI Finland
FJ Fiji
FK Falkland Islands
FM Micronesia
FO Feroe Islands
FR France
FX
GA Gabon
GB Great Britain
GD Grenada
GE Georgia
GF French Guyana
GH Ghana
GI Gibraltar
GL Greenland
GM Gambia
GN Guinea
GP Guadeloupe (French)
GQ Equatorial Guinea
GR Greece
GS
GT Guatemala
GU Guam (USA)
France (European Territory)
S. Georgia & S. Sandwich Isles.
GW Guinea Bissau
GY Guyana
HK Hong Kong
HK
HN Honduras
HR Croatia
HT Haiti
HU Hungary
ID Indonesia
IE Ireland
IL Israel
IN India
IO
IQ Iraq
IR Iran
IS Iceland
IT Italy
JM Jamaica
JO Jordan
JP Japan
KE Kenya
KG Kyrgyzstan
KH Cambodia
KI Kiribati
KM Comoros
KN Saint Kitts & Nevis Anguilla
KP North Korea
KR South Korea
KW Kuwait
KY Cayman Islands
KZ Kazakhstan
LA Laos
LB Lebanon
LC Saint Lucia
LI Liechtenstein
LK Sri Lanka
LR Liberia
LS Lesotho
LT Lithuania
LU Luxembourg
LV Latvia
LY Libya
MA Morocco
MC Monaco
Heard and McDonald Islands
British Indian Ocean Territory
54
ENGLISH
Page 55

Code Country Code Country Code Country
CONTINUE
MD Moldavia
MG Madagascar
MH Marshall Islands
MK Macedonia
ML Mali
MM Myanmar
MN Mongolia
MO Macau
MP Northern Mariana Islands
MQ Martinique (French)
MR Mauritania
MS Montserrat
MT Malta
MU Mauritius
MV Maldives
MW Malawi
MX Mexico
MY Malaysia
MZ Mozambique
NA Namibia
NC New Caledonia (French)
NE Niger
NF Norfolk Island
NG Nigeria
NI Nicaragua
NL Netherlands
NO Norway
NP Nepal
NR Nauru
NU Niue
NZ New Zealand
OM Oman
PA Panama
PE Peru
PF Polynesia (French)
PG Papua New Guinea
PH Philippines
PK Pakistan
PL Poland
PM Saint Pierre and Miquelon
PN Pitcairn Island
PR Puerto Rico
PT Portugal
PW Palau
PY Paraguay
QA Qatar
RE Reunion (French)
RO Romania
RU Russian Federation
RW Rwanda
SA Saudi Arabia
SB Solomon Islands
SC Seychelles
SD Sudan
SE Sweden
SG Singapore
SH Saint Helena
SI Slovenia
SJ
SK Slovak Republic
SL Sierra Leone
SM San Marino
SN Senegal
SO Somalia
SR Suriname
ST Saint Tome and Principe
SU Former USSR
SV El Salvador
SY Syria
SZ Swaziland
TC Turks and Caicos Islands
TD Chad
TF
TG Togo
TH Thailand
TJ Tadjikistan
TK Tokelau
TM Turkmenistan
TN Tunisia
TO T onga
TP East Timor
TR Turkey
TT Trinidad and T obago
TV Tuvalu
TW Taiwan
TZ Tanzania
UA Ukraine
UG Uganda
UK United Kingdom
UM
US United States
UY Uruguay
Svalbard and Jan Mayen Islands
French Southern Territories
USA Minor Outlying Islands
UZ Uzbekistan
VA Vatican City State
VC
VE Venezuela
VG Virgin Islands (British)
VI Virgin Islands (USA)
VN Vietnam
VU Vanuatu
WF Wallis and Futuna Islands
WS Samoa
YE Yemen
YT Mayotte
YU Yugoslavia
ZA South Africa
ZM Zambia
ZR Zaire
ZW Zimbabwe
Saint Vincent & Grenadines
AS NECESSARY
En
ENGLISH
55
Page 56

Changing Setup Values (continued)
Language codes
Code Language Code Language Code Language
6565 Afar
6566 Abkhazian
6570 Afrikaans
6577 Amharic
6582 Arabic
6583 Assamese
6588 Aymara
6590 Azerbaijani
6665 Bashkir
6669 Byelorussian
6671 Bulgarian
6672 Bihari
6678 Bengali; Bangla
6679 Tibetan
6682 Breton
6765 Catala
6779 Corsican
6783 Czech
6789 Welsh
6865 Danish
6869 German
6890 Bhutani
6976 Greek
6978 English
6979 Esperanto
6983 Spanish
6984 Estonian
6985 Basque
7065 Persian
7073 Finnish
7074 Fiji
7079 Faroese
7082 French
7089 Frisian
7165 Irish
7168 Scots Gaelic
7176 Galician
7178 Guarani
7185 Gujarati
7265 Hausa
7273 Hindi
7282 Croatian
7285 Hungarian
7289 Armenian
7365 Interlingua
7378 Indonesian
7383 Icelandic
7384 Italian
7387 Hebrew
7465 Japanese
7473 Yiddish
7487 Javanese
7565 Georgian
7575 Kazakh
7576 Greenlandic
7577 Cambodian
7578 Kannada
7579 Korean
7583 Kashmiri
7585 Kurdish
7589 Kirghiz
7665 Latin
7678 Lingala
7679 Laothian
7684 Lithuanian
7686 Latvian, Lettish
7771 Malagasy
7773 Maori
7775 Macedonian
7776 Malayalam
7778 Mongolian
7779 Moldavian
7782 Marathi
7783 Malay
7784 Maltese
7789 Burmese
7865 Nauru
7869 Nepali
7876 Dutch
7879 Norwegian
7982 Oriya
8065 Punjabi
8076 Polish
8083 Pashto, Pushto
8084 Portuguese
8185 Quechua
8277 Rhaeto-Romance
8279 Romanian
8285 Russian
8365 Sanskrit
8368 Sindhi
8372 Serbo-Croatian
8373 Singhalese
8375 Slovak
8376 Slovenian
8377 Samoan
8378 Shona
8379 Somali
8381 Albanian
8382 Serbian
8385 Sundanese
8386 Swedish
8387 Swahili
8465 Tamil
8469 Telugu
8471 Tajik
8472 Thai
8473 Tigrinya
8475 Turkmen
8476 Tagalog
8479 Tonga
8482 Turkish
8484 Tatar
8487 Twi
8575 Ukrainian
8582 Urdu
8590 Uzbek
8673 Vietnamese
8679 Volapük
8779 Wolof
8872 Xhosa
8979 Yoruba
9072 Chinese
9085 Zulu
56
ENGLISH
Page 57

Troubleshooting
If something seems to be wrong with your DVD player, first check the items in the table below.
Symptom
The power does not come on.
The disc does not play.
Playback stops almost
immediately.
No picture
The picture quality is poor.
No sound
The remote control does not
work at all, or does not work
correctly.
Check See page
• Is the power cord plugged firmly into a live outlet?
• Is there condensation inside the unit? Leave the unit idle with the
power on for 1 to 2 hours.
• Are you trying to use a disc not available for the unit, such as a
PHOTO CD?
• Is the disc dirty? Is it loaded properly?
• Does the disc exceed the specified parental control rating level?
• Is the unit connected correctly?
• Are the video connectons firmly attached?
• Is the television video mode set correctly?
• Is the unit in a place subject to vibrations?
• Are the video connections firmly attached?
• Is the disc dirty?
• Is the unit connected directly to the TV? Or is it connected
through a VCR, a selector switch, or a TV/VCR?
- The picture may be bad when used with some television sets or
projectors, due to the DVD copy protection scheme.
- The picture quality may also suffer if the unit is connected through a
selector switch with other video equipment. Try turning of f the power
to the other video equipment.
- The picture quality may be somewhat poor when paused, when doing
frame advance, or during fast forward or fast reverse. This is not a
malfunction.
• Is the unit connected correctly?
• Are the audio connections firmly attached?
• Is the connected audio equipment turned on? Is the volume of
the connected equipment set correctly? (Note that there is no
audio playback during slow playback, frame advance, and fast
forward and fast reverse of a DVD.)
• Are the remote control batteries installed correctly?
• Is the remote control too far from the main unit? Is there
something in the way?
• Are the remote control batteries getting weak?
• Is the unit in strong sunlight or strong fluorescent light?
13
6
8, 23
49
13
13
23
3
13
8
13
14
13
23
8
8
8
8
AS NECESSARY
Each DVD has different capabilities
The DVD's many capabilities differ depending on the disc.
The following situations may be caused by information on
the disc itself.
• The audio or subtitles are not reproduced in the language
specified in the setup menu.
• The audio track or subtitles cannot be changed.
• There are no subtitles.
• No DVD menu. The DVD menu is not displayed in the
language you want.
• The viewing angle cannot be changed.
• The rating restriction does not work.
• The resume or mark search function does not work.
ENGLISH
En
57
Page 58

Specifications
Power supply 120 V AC, 60 Hz
Power consumption 16 W
Power consumption in standby mode
1.4 W
Weight 5.7 kg (12.9 lbs)
External dimensions 430 × 118 × 414 mm
(17 × 4.7 × 16.3 inches)
(w × h × d)
Laser Semiconductor laser, wavelength:
650/780 nm
Signal format NTSC
Supported discs DVD video discs: 12 cm (single-
sided single layer, single-
sided double layer, double-
sided double layer), 8 cm
(single-sided single layer,
single-sided double layer,
double-sided double layer)
Compact discs (CD-DA, MP3):
12 cm and 8 cm
Component video output
Y output: 1.0 Vp-p
(75 ohms, sync negative)
PR/CR, PB/CB outputs: 0.7 Vp-p
(75 ohms)
RCA jacks (CR/CB/Y) × 1
S-video output Y output: 1.0 Vp-p (75 ohms,
sync negative)
C output: 0.3 Vp-p
4-pin mini DIN jack × 1
Composite video output
1.0 Vp-p (75 ohms, sync
negative)
RCA jack × 1
Audio output Digital output: 0.5 Vp-p
(75 ohms), RCA jack × 1
0.5 Vp-p (75 ohms), Fiber
optical connector × 1
Analog output: 2.0 Vrms
(1 kHz, 0 dB, 330 ohms),
RCA jacks (L/R) × 1
Audio output characteristics
Signal-to-noise ratio: More than
95 dB (EIAJ)
Dynamic range: More than 90 dB
(EIAJ)
Harmonic distortion: 0.008%
Frequency response:
CD: 4 Hz to 20 kHz
DVD: 4 Hz to 22 kHz (48-kHz
sampling), 4 Hz to 44 kHz
(96-kHz sampling)
Operating temperatures
5˚C to 35˚C (41˚F to 95˚F)
Accessories Video cord (1)
Audio cord (1)
Remote control (1)
Operating instructions
NOTE
This equipment has been tested and found to comply with
the limits for a Class B digital device, pursuant to Part 15
of the FCC Rules. These limits are designed to provide
reasonable protection against harmful interference in a
residential installation.
This equipment generates, uses, and can radiate radio
frequency energy and, if not installed and used in
accordance with the instructions, may cause harmful
interference to radio communications. However, there is no
guarantee that interference will not occur in a particular
installation. If this equipment does cause harmful
interference to radio or television reception, which can be
determined by turning the equipment off and on, the user
is encouraged to try to correct the interference by one or
more of the following measures:
- Reorient or relocate the receiving antenna.
- Increase the separation between the equipment and
receiver.
-Connect the equipment into an outlet on circuit different
from that to which the receiver is connected.
-Consult the dealer or an experienced radio/TV
technician for help.
CAUTION
Modifications or adjustments to this product, which are not
expressly approved by the manufacturer, may void the
user’s right or authority to operate this product.
•Manufactured under license from Dolby Laboratories.
"Dolby", "Pro Logic" and the double-D symbol are
trademarks of Dolby Laboratories. Confidential
unpublished works. ©1992-1999 Dolby Laboratories. All
rights reserved.
• "DTS" and "DTS Digital Out" are trademarks of Digital
Theater Systems, Inc.
Specifications are subject to change without notice.
58
ENGLISH
Page 59

For Assistance and Information,
Call Toll Free 1-800-BUY-AIWA
(United States and Puerto Rico)
Printed in China
 Loading...