

Page 1

DVD PLAYER
CCC
XD-DV270
OPERATING INSTRUCTIONS
CCC
8A-AV5-902-01
010130AMK-Y-T
HRJ
En (English)
CCC
CCC
HEJ
Page 2
ENGLISH
WARNING
TO REDUCE THE RISK OF FIRE OR
ELECTRIC SHOCK, DO NOT EXPOSE THIS
APPLIANCE TO RAIN OR MOISTURE.
CAUTION
RISK OF ELECTRIC SHOCK
DO NOT OPEN
CAUTION
Use of controls or adjustments or performance of
procedures other than those specified herein may
result in hazardous radiation exposure.
This DVD player is classified as a CLASS 1 LASER
product.
The CLASS 1 LASER PRODUCT label is located on the
exterior.
CAUTION!
Invisible laser radiation when open
and inter locks defeated. Avoid
exposure to beam.
PRECAUTIONS
Read the Operating Instructions carefully and completely
before operating the unit. Be sure to keep the Operating
Instructions for future reference. All warnings and cautions
in the Operating Instructions and on the unit should be
strictly followed, as well as the safety suggestions below.
Installation
1Water and moisture — Do not use this unit near water,
such as near a bathtub, sink, swimming pool, or the
like.
2 Heat — Do not use this unit near sources of heat,
including heating vents, stoves, or other appliances that
generate heat. This unit should not be placed in
temperatures less than 5˚C or greater than 40˚C.
3Mounting place — Place the unit:
- on a flat , even surface
- away from strong magnetic fields
- at least one meter away from any radios or receivers
DO NOT PLACE HEAVY OBJECTS ON THE UNIT,
OTHERWISE DISC TRAY OF THIS UNIT MAY NOT BE
OPENED.
4Ventilation — The unit should be situated with adequate
space around it so that proper heat ventilation is assured.
Allow a clearance of 10 cm from the rear and the top of
the unit, and 5 cm from each side.
- Do not place the unit on a bed, rug, or similar surface
that may block the ventilation openings.
- Do not install the unit in a bookcase, cabinet, or airtight
rack where ventilation may be impeded.
5 Foreign objects and liquid — Be careful that foreign
objects or liquid do not enter the unit through the
ventilation openings.
6Carts and stands — The unit should be moved with
care when placed or mounted on a stand or cart.
Sudden stops, excessive force, or an uneven surface
may cause the unit or cart to fall over.
7 Condensation — Moisture may form on the pickup lens
when:
- This unit is moved from a cold spot to a warm spot
-A heating system has just been turned on
- The unit is used in a very humid room
- The unit is cooled by an air conditioner
When this unit has condensation inside, it may not
function normally. Should this occur, leave the unit
for a few hours, then try to operate again.
Electric power
1 Power sources — Connect this unit only to power
sources specified in the Operating Instructions, and as
marked on the unit.
2AC power cord
-When disconnecting the AC power cord, pull it out by
the AC power plug. Do not pull the cord itself.
- Never handle the AC power plug with wet hands, as
this could result in fire or electrical shock.
- Power cords should be firmly secured to avoid being
severely bent, pinched, or walked upon. Pay particular
attention to the cord from the unit to the power socket.
-Avoid overloading AC power plugs and extension
cords beyond their capacity, as this could result in
fire or electrical shock.
3When not in use — Unplug the AC power cord from
the AC outlet if the unit will not be used for several
months or more. When the cord is plugged in, a small
electrical current continues to flow into the unit, even if
the power is turned off.
4 In case of lightning — Immediately disconnect the AC
power cord from the AC outlet.
Maintenance
Clean the unit only as recommended in the Operating
Instructions.
Damage requiring service
Have this unit serviced by a qualified service technician if:
- The AC power cord or plug has been damaged
-A foreign object or liquid has entered the unit
- The unit has been exposed to rain or water
- The unit does not seem to operate normally
- The unit exhibits a marked change in performance
- The unit has been dropped, or the cabinet has been
damaged
DO NOT OPEN THE CABINET AND ATTEMPT TO
SERVICE THE UNIT YOURSELF.
2
ENGLISH
Page 3

TABLE OF CONTENTS
Introduction
Precautions ............................................................... 2
Before Use ................................................................. 4
Supported disc formats .................................... 4
Disc-related terms .............................................. 4
Types of video CDs ............................................ 4
Notes on MP3 ..................................................... 5
Handling the unit ................................................ 6
Handling discs.................................................... 6
Cleaning the unit ................................................ 6
Cleaning discs .................................................... 6
Storing discs ...................................................... 6
Notes on copyright ............................................ 6
Parts and Controls ................................................... 7
Front panel .......................................................... 7
Remote control ................................................... 8
Display window .................................................. 9
Preparations
Connections ............................................................ 10
A Connecting to a TV set only ....................... 11
B Connecting to a TV set and an amplifier
with a Digital In jack .............................. 12
C Connecting to a TV set and an audio
system ..................................................... 13
D Connecting to an AV receiver equipped
with a Dolby Digital (AC-3) or DTS
decoder ................................................... 14
E Connecting to a TV set and an AV receiver
with the Dolby Pro Logic Surround
system ..................................................... 15
Connecting to a TV set equipped with S-video
jack .......................................................... 16
Remote control ....................................................... 17
About symbols ........................................................ 17
Basic Operations
Playback .................................................................. 18
Play Back Control (PBC) ................................. 19
Digest menu ...................................................... 19
Still (Pause) ....................................................... 20
Frame advance ................................................. 20
Stopping playback ........................................... 20
Fast Forward, Reverse ..................................... 21
Slow playback................................................... 21
Skipping ............................................................ 21
Direct skipping ................................................. 21
More Features
Mark playback ......................................................... 22
Marking .............................................................. 22
Mark playback .................................................. 22
Zooming and changing the angle ......................... 23
Zoom function .................................................. 23
Changing the angle .......................................... 23
Random and repeat playback ............................... 24
Random playback ............................................ 24
Repeating a portion between two specified
points (A-B Repeat) ................................ 24
Programmed playback ........................................... 25
Creating a 3D Surround effect .............................. 26
Changing audio soundtracks................................ 27
Displaying and changing subtitles....................... 28
On Screen Display (OSD) ...................................... 29
Playing Karaoke...................................................... 30
Playing a karaoke disc .................................... 30
Adjusting microphone volume ....................... 30
Karaoke menu options .................................... 31
As Necessary
Changing setup values .......................................... 32
Basic operations .............................................. 32
LANGUAGE ....................................................... 32
SUBTITLE .......................................................... 33
AUDIO (soundtrack language) ........................ 33
TV TYPE ............................................................. 33
TV SYS ............................................................... 34
AUD OUT (Digital Audio Output) .................... 34
PASSWORD....................................................... 35
RATING (Parent lock level).............................. 35
OSD (On Screen Display on/off) ..................... 35
Terminology ............................................................ 36
Troubleshooting ..................................................... 37
Specifications ......................................................... 38
Features
DVD: providing a completely new dimension in video
entertainment.
• With the multi-angle function* you can select a viewing
angle of scenes shot from multiple camera angles and
recorded on the disc.
• With the parental lock function* you can prevent
playback of specified discs unsuitable for certain
audiences.
*All of the above functions are dependent on the DVD
software.
High quality digital audio and images
• Compatible with super video CDs, video CDs and
audio CDs as well as DVDs
• MP3 playback
Accessory checklist
Remote control (1)
Audio cord (1)
Video cord (1)
Operating Instructions
INTRODUCTION
En
ENGLISH
3
Page 4
BEFORE USE
Please read the following before operating the DVD player.
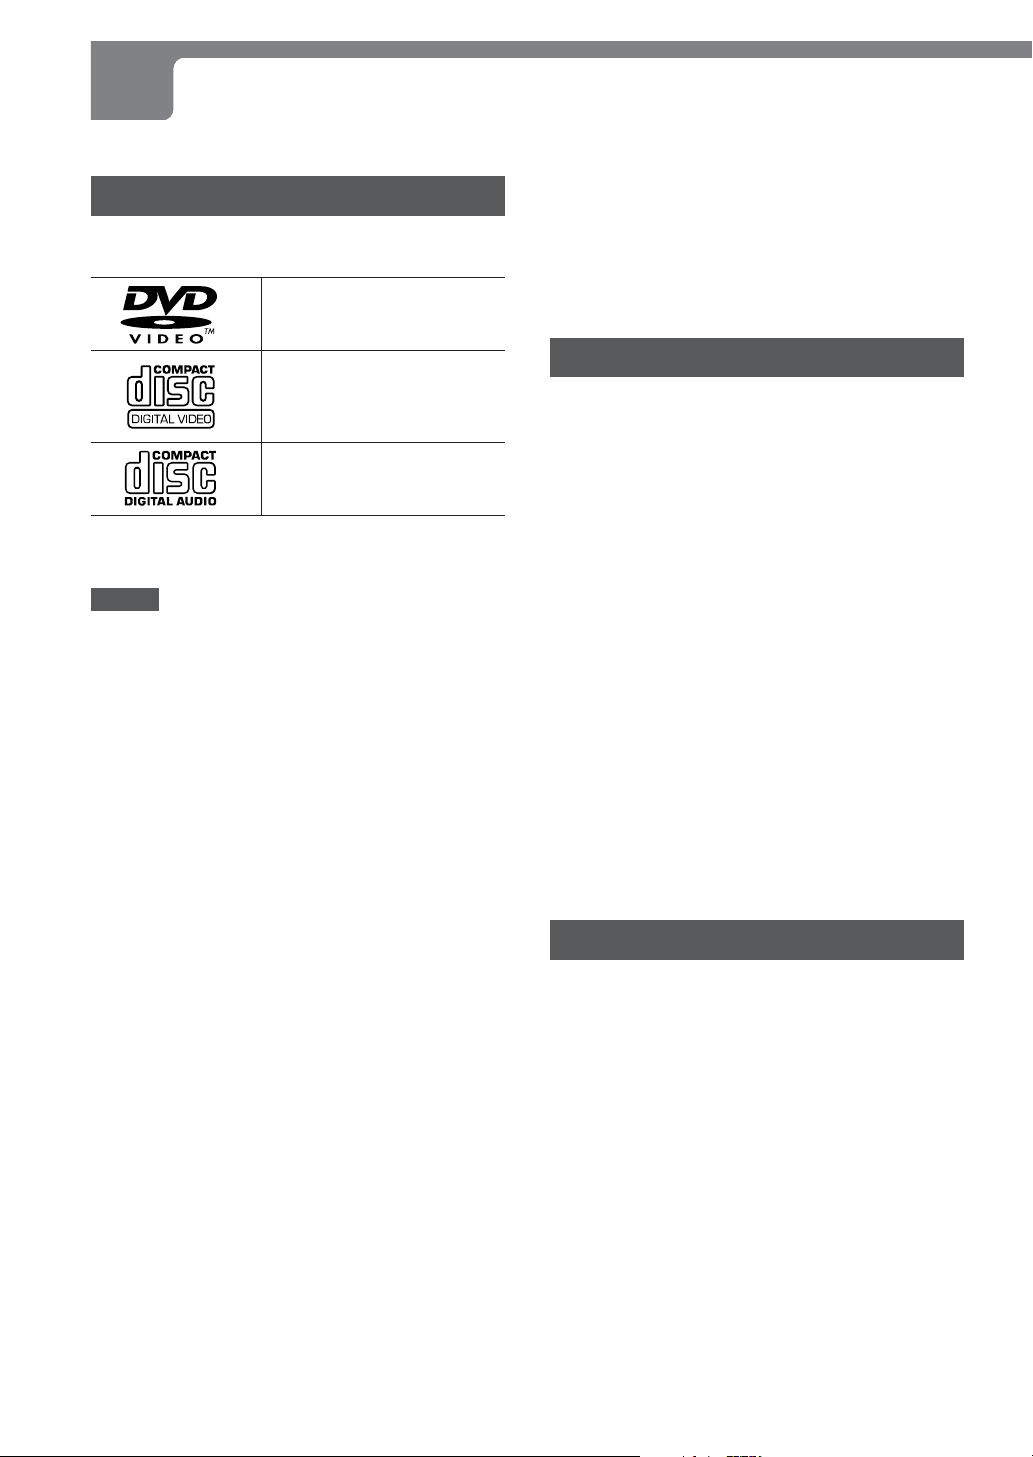
Supported disc formats
This DVD player can play discs with the following marks
only.
DVDs
(8 cm disc/12 cm disc)
Super video CDs (SVCDs)
Video CDs (VCDs)
(8 cm disc/12 cm disc)
Audio CDs
(8 cm disc/12 cm disc)
In addition, this unit can be played back a CD-R or CD-RW
that contains audio titles or MP3 files.
NOTES
• Depending on the conditions of the recording equipment
or the CD-R/RW disc itself, some CD-R/RW discs can
not be played on this unit.
• The unit can not play back the CD-R/RW discs
that contain no data or different kinds of formatted
data other than MP3.
• Do not attach any seal or label to either side (the labeled
side or the recorded side) of a disc.
• Do not use irregular shape CDs (example: heart-shaped,
octagonal ones). It may result in malfunctions.
Notes on color system
This unit is designed for the both PAL and NTSC color
system.
Notes on DVDs, super video CDs and video CDs
Some playback operations of DVDs, super video CDs and
video CDs may be intentionally fixed by software
manufacturers. As this player plays DVDs, super video CDs
and video CDs according to disc contents designed by the
software manufacturer, some playback features of this player
may not be available, or other functions may be added.
Also refer to the instructions supplied with the DVDs, super
video CDs and video CDs.
Some DVDs made for business purposes may not be played
on this player.
Region code of the DVD player and DVDs
This DVD player is designed and manufactured for playback
of region “3” encoded DVD software. Region code labels
appear on the labels of some DVD discs to indicate which
type of player can play those discs. Unless “3” is included in
these labels, or “ALL” appears on the DVD disc labels, those
discs cannot be played on this player. If you try to play these
discs, the message “INVALID REGION” will appear on TV
screen. Some DVD discs may not have a region code label
even though their playback is prohibited by area limits.
Note on DTS-encoded CDs
When playing DTS-encoded CDs, excessive noise will be
exhibited from the analog stereo outputs. To avoid possible
damage to the audio system, the consumer should turn
down the volume before playing back such a disc, adjust
the volume gradually, and keep the volume level low. To
enjoy DTSTM playback, an external 5.1 channel DTS
decoder system must be connected to the digital output of
this unit.
Disc-related terms
Title (DVD only)
The longest section of a picture or a musical piece on a DVD;
a movie for a picture piece on video software, or an album for
a musical piece on audio software. Each title is assigned a
title number enabling you to locate the title you want.
Chapter (DVD only)
Sections of a picture or a musical piece that are smaller
than titles.
A title is composed of several chapters. Each chapter is
assigned a chapter number, enabling you to locate the
chapter you want. Depending on the disc, there may be no
chapter recorded.
Track (Super video CD, video CD and audio CD)
Sections of a picture or a musical piece on a super video
CD, a video CD or an audio CD. Each track is assigned a
track number, enabling you to locate the track you want.
Scene
On a super video CD or a video CD with PBC (playback
control) functions, moving pictures and still pictures are
divided into sections called “Scenes”. Each scene is
displayed in the menu screen and assigned a scene
number, enabling you to locate the scene you want.
A scene is composed of one or several tracks.
Types of video CDs
There are two types of video CD (VCD)s.
Video CDs equipped with PBC (Version 2.0)
PBC (playback control) allows you to interact with the
system via menus, search functions or other typical
computer-like operations. Moreover, still pictures of high
resolution can be played, if they are included in the disc.
Video CDs not equipped with PBC (Version 1.1)
Operated in the same way as audio CDs, these discs allow
playback of video pictures as well as sound, but they are
not equipped with PBC.
TM
4
ENGLISH
Page 5
Notes on MP3
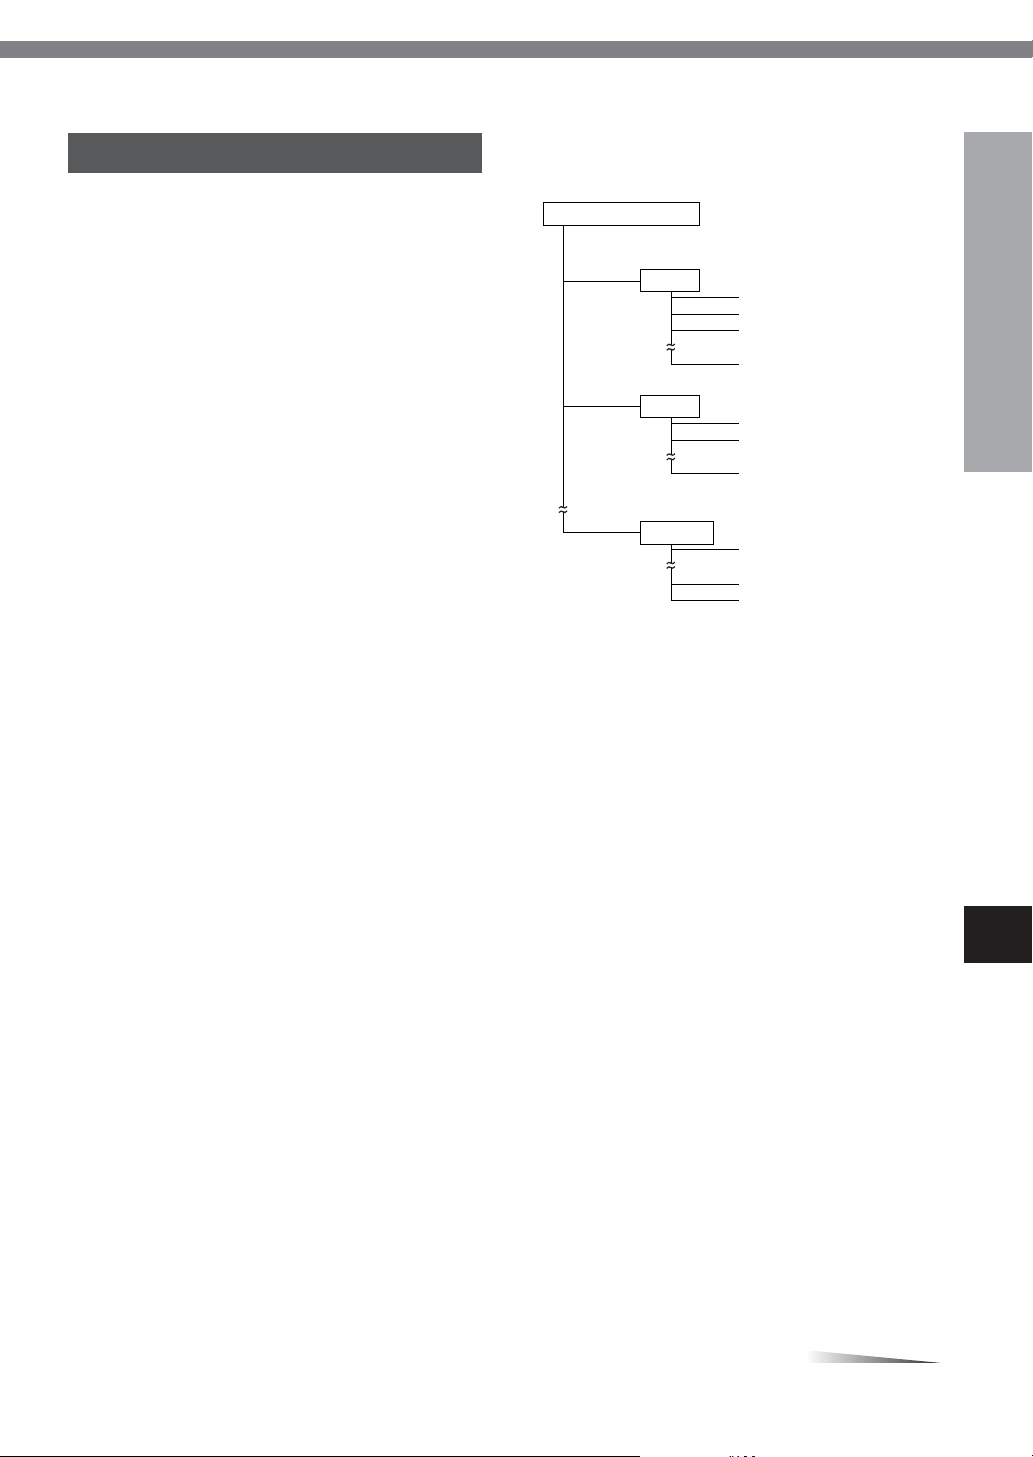
The order of playing back MP3
The unit only plays MP3 tracks in the following order.
An MP3 file stores audio data compressed using MPEG1,
the audio layer-3 file-coding scheme.
In this manual, we refer to what are called “folder” and “file”
in PC terminology as “album” and “track”.
Notes on playing MP3
• An MP3 track must be recorded on a disc in the format
compliant with ISO 9660. Note, however, that the unit
may not play tracks in the order they were recorded.
• The maximum allowable number of tracks and albums
in a disc are as follows:
- number of tracks : 300
- number of albums : 127
• The maximum allowable depth of nested albums is 2,
including the root album (directory).
• If a disc contains audio tracks and MP3 tracks, the unit
cannot play.
• As for a multi-session disc, the unit play only the first
session.
• The unit can play only MP3 tracks which were converted
with a sampling frequency of 44.1 kHz and a fixed bit
rate of 128 kbps.
• The unit may not play MP3 tracks recorded using a packet
writing utility.
• The unit can play only MP3 tracks having a file extension
“.mp3”.
• It may take 30 seconds or more before the unit can start
play of MP3 tracks, depending on the number of recorded
tracks and the complexity of the album tree.
•If you play a non-MP3 track that has the “.mp3” file
extension, you may hear some noise.
• The unit does not output digital signals while playing MP3
tracks.
•Only the following function buttons works while playing
MP3 tracks:
- PLAY c, STOP s, PAUSE a, Forward SKIP t,
Reverse SKIP r, ON SCREEN DISPLAY ON/OFF,
numbered buttons, OPEN/CLOSE.
Notes on display indications during play
• The elapsed playing time may not be displayed correctly
for MP3 tracks.
• Any names of albums and tracks are not displayed.
Root Directory(Album) [Order of Playback]
Album 1
Tr ac k 1 [ 1 ]
Tr ac k 2 [ 2 ]
Tr ac k 3 [ 3 ]
Tr ac k 20 [ 20 ]
Album 2
Tr ac k 1 [ 21 ]
Tr ac k 2 [ 22 ]
Tr ac k 12 [ 32 ]
Album 127
Tr ack 1 [ 291 ]
Tr ack 9 [ 299 ]
Tr ack 10 [ 300 ]
Notes on creating MP3 discs
•When converting audio data to MP3
To enjoy high sound quality, create MP3 files with a
sampling frequency of 44.1 kHz and a fixed bit rate of
128 kbps.
•When creating MP3 discs
Do not store more than 127 albums in a disc. Also, keep
the total number of albums and tracks 300 or less in a
disc.
•To play tracks in the order they were recorded
1. Use a writing software capable of recording MP3 tracks
(files) in numerical and alphabetical order. For details
on using the software, refer to the operating instructions
supplied with the software.
2. Use only one album. (Do not create a sub-album within
an album.)
3. Include a two or three-digit number at the beginning
of each album or track name so that the albums and
tracks are played in order.
<example of recommended names>
01XXXXX.mp3
02XXXXX.mp3
03XXXXX.mp3
04XXXXX.mp3
05XXXXX.mp3
<example of names not recommended>
1XXXXX.mp3
5XXXXX.mp3
10XXXXX.mp3
15XXXXX.mp3
20XXXXX.mp3
(Numbers at the beginning have different digit number. The
tracks will not be played in this order but played in the order
of “1”, “10”, “15”, “20” and “5”.)
INTRODUCTION
En
CONTINUE
ENGLISH
5
Page 6

BEFORE USE (CONTINUED)
Handling the unit
When shipping the this unit
The original shipping carton and packing materials come
in handy. For maximum protection, re-pack the unit as it
was originally packed at the factory.
When setting the this unit
The picture and sound of a nearby TV, VCR or radio may
be distorted during DVD playback. In this case, position
the player away from the TV, radio or VCR, or turn off the
player after removing the disc.
To keep the surface clean
Do not use volatile liquids, such as insecticide spray, near
the player. Do not leave rubber or plastic products in contact
with the player for a long period of time. They will leave
marks on the surface.
Handling discs
Do not touch the playback side of the disc.
Hold the disc by the edges so that fingerprints will not get
on the surface.
Do not stick paper or tape on the disc.
Cleaning the unit
To clean the cabinet
Use a soft, dry cloth. If the surfaces are extremely dirty,
use a soft cloth lightly moistened with a mild detergent
solution. Do not use strong solvents, such as alcohol,
benzine or thinner, as these might damage the surface of
the player.
To obtain a clear picture
This unit is a high-tech, precision device. If the optical pickup lens and disc drive parts are dirty or worn down, the
picture quality will be poor.
Regular inspection and maintenance are recommended
after every 1,000 hours of use. (This depends on the
operating environment.)
For details, please contact your Aiwa dealer.
Cleaning discs
Fingerprints and dust on the disc can cause poor picture
quality and sound distortion. Before playing, clean the disc
with a clean cloth. Wipe the disc from the center out.
Do not use strong solvents such as alcohol, benzine,
thinner, commercially available cleaners or anti-static spray
intended for analog records.
Storing discs
After playing, store the disc in its case.
Do not expose the disc to direct sunlight or sources of heat,
or leave it in a parked car exposed to direct sunlight, as
there may be a considerable temperature increase inside
the car.
Notes on copyright
It is forbidden by law to copy, broadcast, show, broadcast
via cable, play in public, or rent copyright material without
permission.
This product features the copy protection function
developed by Macrovision. Copy protection signals are
recorded on some discs. When recording and playing the
pictures of these discs on a VCR, the picture noise will
appear.
This product incorporates copyright protection technology
that is protected by method claims of certain U.S. patents
and other intellectual property rights owned by Macrovision
Corporation and other rights owners. Use of this copyright
protection technology must be authorized by Macrovision
Corporation, and is intended for home and other limited
viewing uses only unless otherwise authorized by
Macrovision Corporation. Reverse engineering or
disassembly is prohibited.
6
ENGLISH
Page 7
PARTS AND CONTROLS
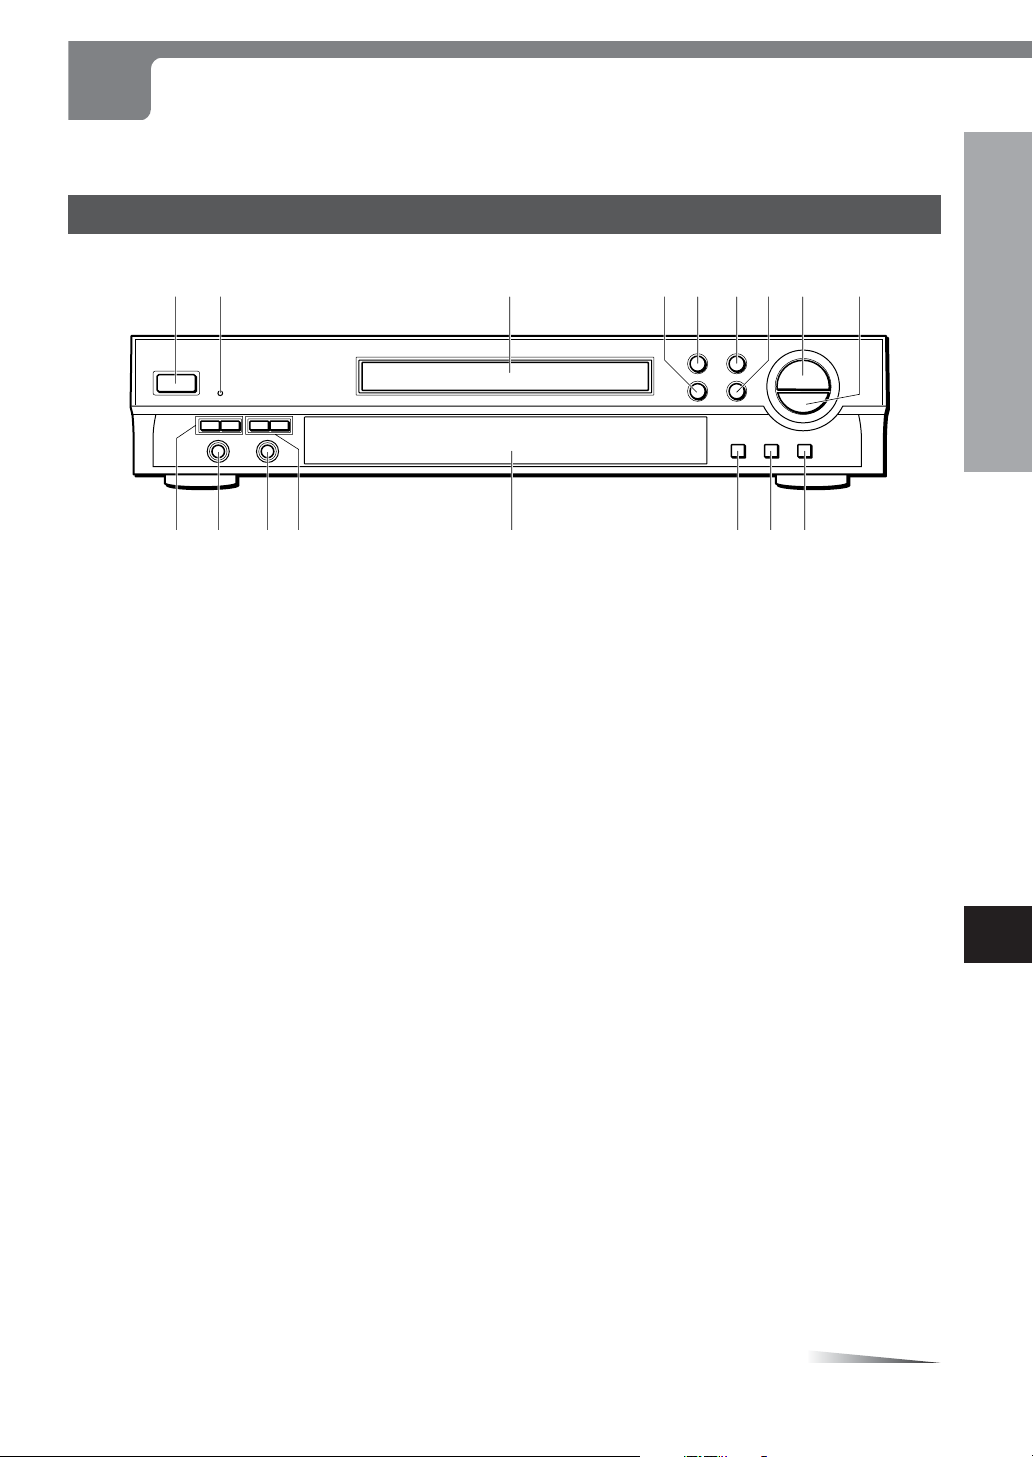
The instructions in this manual refer mainly to the buttons on the remote control. Buttons on the main unit with the same
names as those on the remote control can be used as well.
Front panel
12 3 45678 9
INTRODUCTION
$%^&
POWER button
1
Press to switch on and off the main power of this unit.
6STANDBY/ON indicator
2
• Lights in red when the unit is in standby mode.
• Lights off when the unit is turned on or the main power
is off.
Disc tray
3
Loading and removing discs.
r B SKIP button
4
Press to return the beginning of the current track or skip
back the previous track.
z OPEN/CLOSE button
5
Press to open and close the disc tray.
a PAUSE button
6
Press to pause a playback.
t F SKIP button
7
Press to skip the next track.
c PLAY button
8
Press to begin a playback.
#
s STOP button
9
Press to stop playing back a disc.
& KEY CONTROL button
0
Press repeatedly to adjust the key upward while playing
karaoke.
^ KEY CONTROL button
!
Press to return to the normal key while playing karaoke.
7 KEY CONTROL button
@
Press repeatedly to adjust the key downward while
playing karaoke.
0!@
#Display window
Displays the information of unit’s status.
$MIC 2 i/k (volume) button
Adjusts the sound volume of the microphone connected
to MIC 2 jack.
%MIC 2 jack
Connects a microphone.
^MIC 1 jack
Connects a microphone.
&MIC 1 i/k (volume) button
Adjusts the sound volume of the microphone connected
to MIC 1 jack.
En
CONTINUE
ENGLISH
7
Page 8
PARTS AND CONTROLS (CONTINUED)
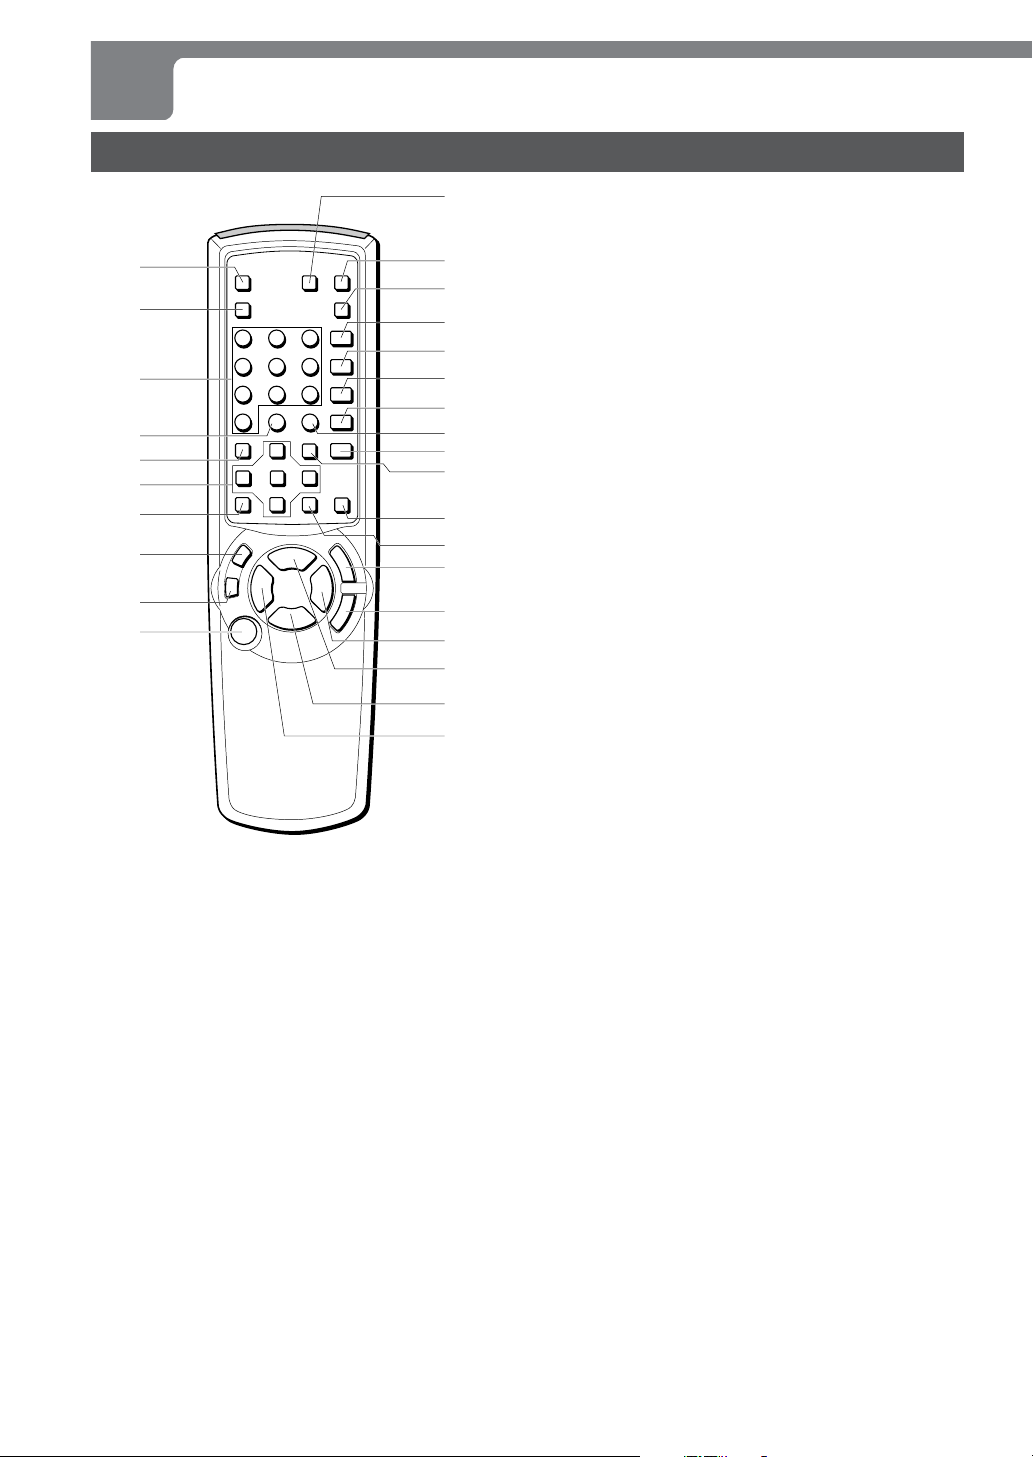
Remote control
!
0
@
#
9
$
%
8
^
&
7
6
5
4
3
2
1
*
(
)
-
=
[
]
\
;
'
,
1POWER button
Press to turn on and off the unit.
2ON SCREEN DISPLAY ON/OFF button
Press repeatedly to display the On Screen Display
information.
3a button
Press to pause a playback.
4v RETURN button
Press to display the video CD menu itself while playing
back a super video CD or video CD (version 2.0).
5i/k/j/l/ENTER buttons
• Press a i/k/j/l cursor button to select an item.
• Press ENTER to execute or fix the selected item on the
disc menus.
6 TOP MENU button
• Press to display the title menu on the DVD.
• Press to display the digest menu screen while playing
back a super video CD or video CD (version 2.0).
CLEAR button
7
• Press to clear the MARK memory.
• Press to cancel the wrong track number when
programming tracks on the disc.
8Numbered buttons
Press to select a track or title directly.
9MARK button
Press to mark any point in a disc (except for MP3 disc)
during playback.
0OPEN/CLOSE button
Press to open and close the disc tray.
!ZOOM button
Press repeatedly to enlarge the picture while playing
back a DVD,super video CD or video CD.
SURROUND button
@
Press to turn on the 3D Surround effect.
A-B Repeat button
#
Press to memorize the point you want to repeat.
$ANGLE button
Press to change the angle while playing back a DVD
where the multiple viewing angles have been recorded.
%AUDIO SELECT button
Press to select the soundtrack language while playing
back a DVD or super video CD.
^SUBTITLE SELECT button
Press to change the subtitle language while playing back
a DVD.
&RANDOM button
Press to execute a random (shuffle) playback on a super
video CD, video CD or audio CD.
*PROGRAM button
Press to execute a programmed playback on a super
video CD, video CD or audio CD.
KARAOKE button
(
Press to display the karaoke menu.
MENU button
)
• Press to display the menu programs on the DVD.
• Press repeatedly to turn on and off Play Back Control
(PBC) on a super video CD or video CD (version 2.0).
SLOW button
-
Press to execute a slow playback when playing back a
DVD, super video CD or video CD.
SETUP button
=
Press to display the setup menu on the TV screen when
stopped.
g button
[
Hold down to play back a disc forward.
]f button
Hold down to play back a disc in reverse.
\t button
Press to skip the next track.
;c button
Press to begin a playback.
's button
Press to stop playing back a disc.
,r button
Press to return the beginning of the current track or skip
back the previous track.
8
ENGLISH
Page 9
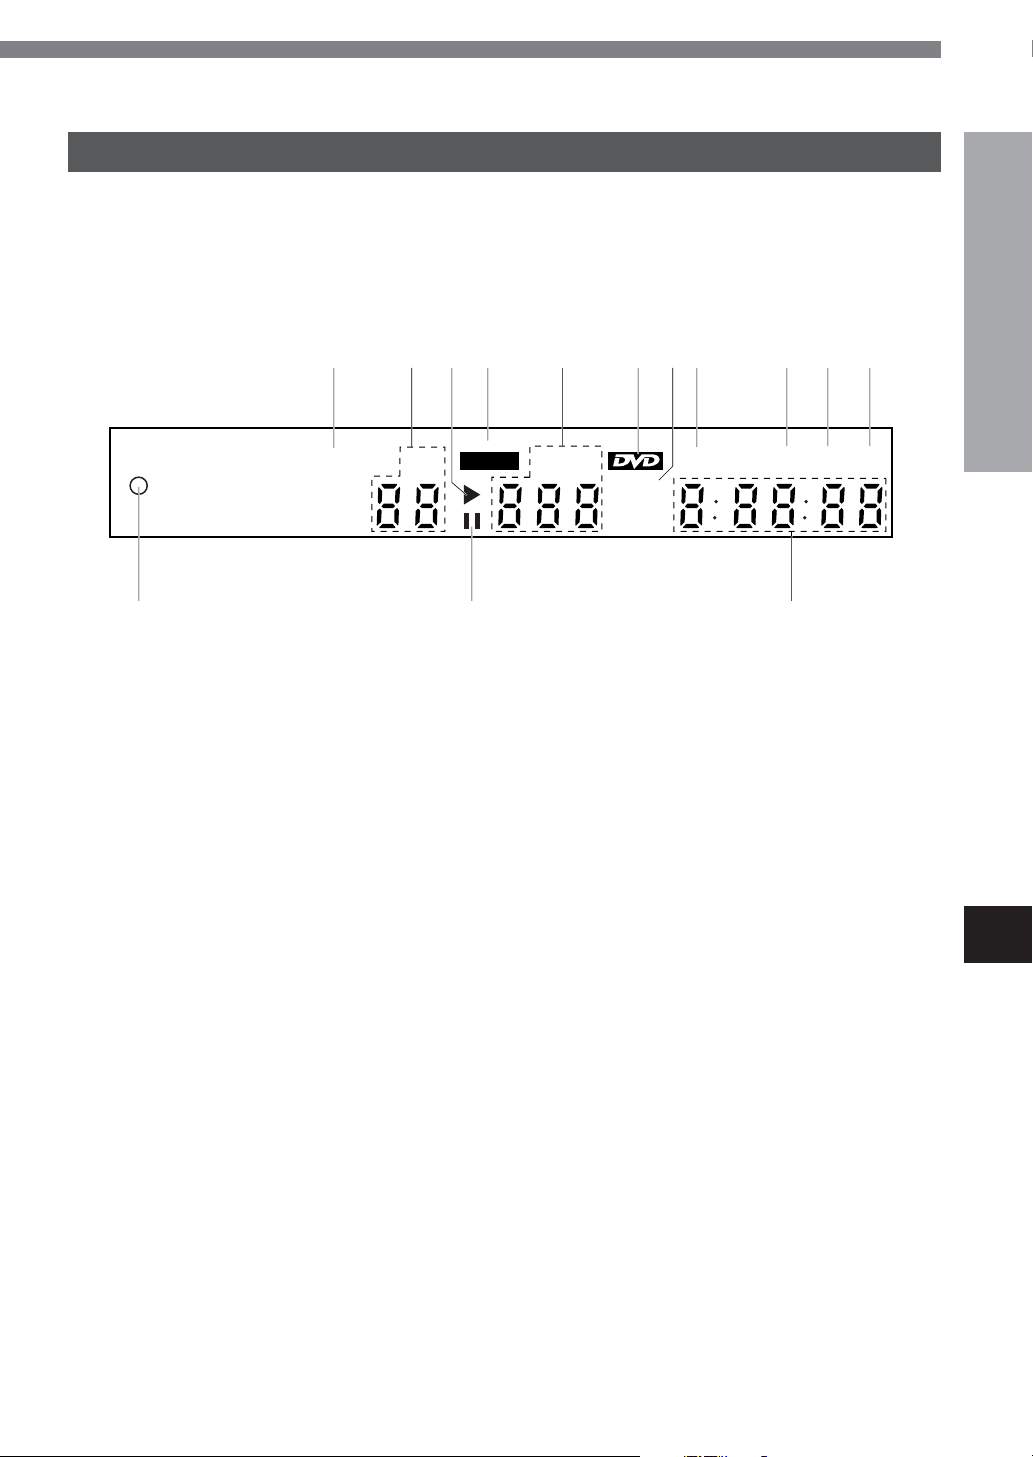
Display window
This unit shows On-Screen Display messages on the screen of the TV set to which this unit is connected, as well as those
on the display window of the unit.
The On-Screen Display messages, which accompany each operation of the unit, make operation simple and easy especially
when playing DVDs or video CDs. They are also displayed when pressing the ON SCREEN DISPLAY ON/OFF button on the
remote control.
The instructions in this manual refer mainly to the On-Screen Display messages.
1 2 3 5 6 7 8 9 0 !4
Audio
TITLE
KARAOKE
$
1Audio CD indicator
Lights when an audio CD is loaded.
2TITLE Number indicator
•Displays the number of the title being played while
playing back a DVD.
Displays the total number of the titles on the DVD when
stopped.
3c PLAY indicator
Lights when playing back.
4KARAOKE indicator
Lights while Karaoke function working.
5CHP/TRK Number indicator
• Displays the number of the chapter being played while
playing a DVD.
Displays the total number of the chapters on the disc
when stopped.
• Displays the number of the track being played while
playing a super video CD, video CD, audio CD or MP3
disc.
Displays the total number of the tracks on the disc when
stopped.
6DVD indicator
Lights when a DVD is loaded.
Video CD indicator
7
Lights when a super video CD or video CD is loaded.
ANGLE indicator
8
Lights when a multi-angle scene comes on, while playing
back a DVD.
9PROG indicator
Lights during programmed playback.
CHP/TRK
ANGLE
PROG
SHUF
REP
Video CD
@#
0SHUF (RANDOM) indicator
Lights during random playback.
!REP indicator
Lights when pressing A-B button on the remote control.
@Time counter
• The elapsed time of current track is displayed while
playing a super video CD, video CD, audio CD or MP3
disc.
The total elapsed time is displayed while playing a DVD.
• The total playing time is displayed when stopped. (The
total playing time is not displayed when an MP3 disc is
loaded.)
#a PAUSE indicator
Lights during still (pause) mode.
$Dolby Digital indicator
Lights when a DVD which is recorded with Dolby Digital
is loaded.
INTRODUCTION
En
ENGLISH
9
Page 10
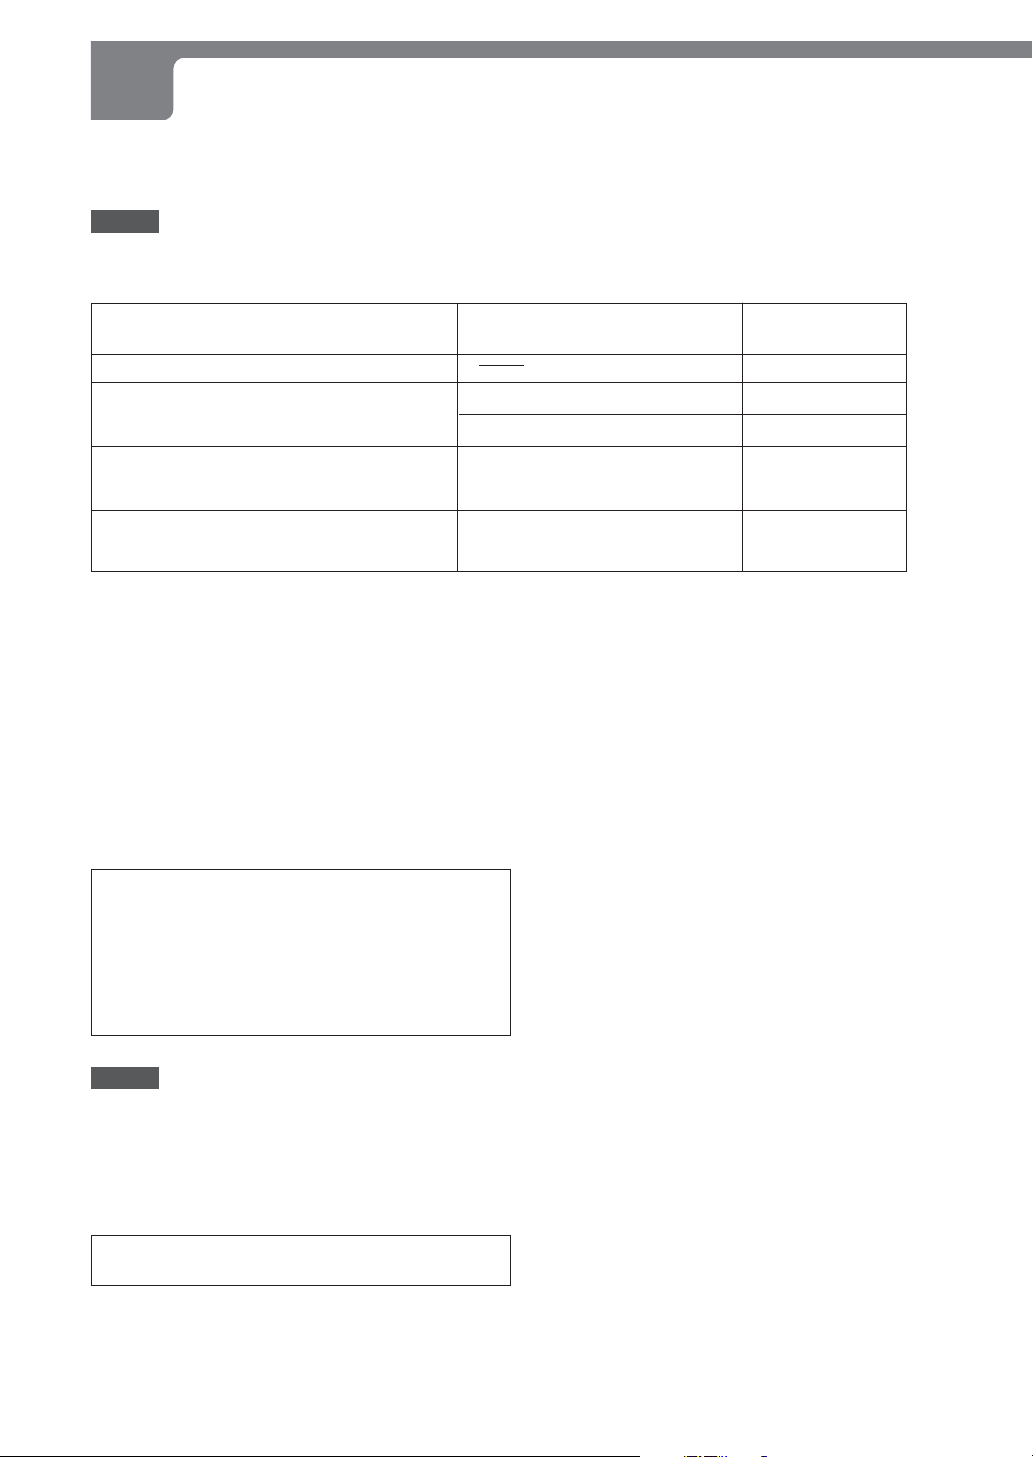
CONNECTIONS
Before connection, identify the type of your audio equipment or of the TV set referring to the following chart. Then decide
the connection and the setup menu according to the types.
NOTES
• The player cannot be connected to a TV set which is not equipped with a video input connector .
•Use a commercially available stereo-monaural audio cord when connecting to a monaural TV set.
Audio system to be connected
None (only the television is connected)
A stereo system or an amplifier
An AV receiver equipped with Dolby Digital
decoder or DTS decoder
An AV receiver equipped with Dolby Pro Logic
Surround
Input jack of equipment to be
connected to the DVD player
Digital input jack
Analog audio input jacks (L/R)
Digital input jack
Analog audio input jacks (L/R)
Before making connections
• Connect the AC cords of the unit and external
equipment at the end, after finishing the other
connections.
•Insert the plugs completely into the jacks. Loose
connections may produce a humming sound or other
noise interference.
• When using an optical connection, remove the dust cap
from the DIGIT AL AUDIO OUT OPTICAL jack on the rear
of this unit. Keep the cap in store. When not using optical
connections, the dust cap should be in place.
• Refer to the instructions for the connected equipment.
CAUTION
Do not select “ BITSTREAM” in the “AUD OUT” when
connecting to an AV receiver not equipped with a Dolby
Digital decoder or DTS decoder (with an optical or
coaxial connecting cord).
Merely attempting to play a DVD may cause a high level
of noise which could be harmful to your ears and
damage the speakers. In such a case, be sure to select
“DIGITAL PCM” in the “AUD OUT”.
Referring
Letter
See A.
See B.
See C.
See D.
See E.
For customers living in Burma, Cambodia,
Philippines, Taiwan or Republic of Korea
In the above countries, TV broadcasting system is NTSC.
To use this unit with the NTSC TV set, TV SYS in the setup
menu of this unit must be changed to NTSC, after connecting.
For more details, refer to "Basic operations" on page 32
and "TV SYS" on page 34.
NOTES
•When the picture noise appears while copy-protected DVDs
are played, connect the unit directly to a TV set. Do not
connect through a VCR, TV/VCR or AV selector .
• For the speakers and their connection, refer to the
instructions for the AV receiver .
CAUTION
Do not place heavy objects on this unit, otherwise disc
tray of this unit may not be opened.
10
ENGLISH
Page 11

A Connecting to a TV set only
Video cord (supplied)
Rear of TV set
to a video input jack (yellow)
to an audio input jacks
(Left/white, Right/red)
Audio cord (supplied)
PREPARATIONS
yellow
to VIDEO OUT
1 or 2 jack
(yellow)
VIDEO
OUT
S-VIDEO
red
white
to AUDIO OUT L (white)/
R (red) jacks
AUDIO OUT
LR
COAXIAL
OPTICAL
DIGITAL
AUDIO OUT
When your TV set is equipped with an S-video input terminal, see page 16.
Set the setup menu correctly after connecting!
According to the audio equipment and TV set to which this
unit is connected, set the “TV TYPE” of the setup menu
correctly referring to the following below .
See “CHANGING SETUP VALUE” on page 32 in detail.
NOTE
When the picture noise appears while copy-protected DVDs
are played, connect the unit directly to a TV set. Do not
connect through a VCR, TV/VCR or AV selector .
TV TYPE
When your TV set is a conventional-screen size TV:
[4:3 LB ]
When your TV set is a wide-screen size TV:
[16:9 ]
Rear of the unit
En
to an AC outlet
CONTINUE
ENGLISH
11
Page 12

CONNECTIONS (CONTINUED)
B Connecting to a TV set and an amplifier with a Digital In jack
Use either the commercially available optical cord or 75 ohm coaxial cord when connecting this unit to an amplifier with a
Digital In jack. The supplied video cord is also available instead of the coaxial cord.
TV set
yellow
Video cord
(supplied)
to VIDEO OUT 1 or 2
jack (yellow)
VIDEO
OUT
AUDIO OUT
S-VIDEO
to DIGITAL
AUDIO OUT
COAXIAL jack
to a video input
jack (yellow)
yellow
LR
COAXIAL
OPTICAL
DIGITAL
AUDIO OUT
to DIGITAL AUDIO
OUT OPTICAL jack
Optical cord (not supplied)
Coaxial cord
(not supplied)
yellow
Rear of the unit
to an AC outlet
to a digital input jack
Front
speaker (L)
Amplifier with a Digital In jack
When your TV set is equipped with an S-video input terminal, see page 16.
Set the setup menu correctly after connecting!
According to the audio equipment and TV set to which
this unit is connected, set the “AUD OUT” and “TV TYPE”
of the setup menu correctly referring to the following below .
See “CHANGING SETUP VALUE” on page 32 in detail.
AUD OUT
TV TYPE
When your TV set is a conventional-screen size TV:
[4:3 LB ]
When your TV set is a wide-screen size TV:
[16:9 ]
[DIGITAL PCM]
NOTE
When the picture noise appears while copy-protected DVDs
are played, connect the unit directly to a TV set. Do not
connect through a VCR, TV/VCR or AV selector .
12
ENGLISH
Front
speaker (R)
Page 13

C Connecting to a TV set and an audio system
TV set
to a video input jack
(yellow)
Video cord
(supplied)
PREPARATIONS
yellow
to AUDIO OUT
L (white)/ R (red) jacks
to VIDEO OUT 1 or 2
jack (yellow)
VIDEO
OUT
AUDIO OUT
S-VIDEO
LR
COAXIAL
OPTICAL
DIGITAL
AUDIO OUT
white
red
Audio cord (supplied)
to an audio input jacks
(Left/ white, Right/ red)
Audio system
When your TV set is equipped with an S-video input terminal, see page 16.
Rear of the unit
to an AC outlet
En
Set the setup menu correctly after connecting!
According to the audio equipment and TV set to which this
unit is connected, set the “TV TYPE” of the setup menu
correctly referring to the following below .
See “CHANGING SETUP VALUE” on page 32 in detail.
TV TYPE
When your TV set is a conventional-screen size TV:
[4:3 LB ]
When your TV set is a wide-screen size TV:
[16:9 ]
NOTE
When the picture noise appears while copy-protected DVDs
are played, connect the unit directly to a TV set. Do not
connect through a VCR, TV/VCR or AV selector .
CONTINUE
ENGLISH
13
Page 14

CONNECTIONS (CONTINUED)
D C
onnecting to an AV receiver equipped with a Dolby Digital (AC-3) or DTS decoder
Use either the commercially available optical cord or 75 ohm coaxial cord when connecting this unit to an AV receiver with
a Digital In jack. The supplied video cord is also available instead of the coaxial cord.
TV set
to a video input jack
(yellow)
Video cord
yellow
to DIGITAL AUDIO
OUT COAXIAL jack
(supplied)
to VIDEO OUT 1 or 2
jack (yellow)
Rear of the unit
VIDEO
AUDIO OUT
S-VIDEO
OUT
yellow
LR
COAXIAL
OPTICAL
DIGITAL
AUDIO OUT
to DIGITAL AUDIO
OUT OPTICAL jack
Optical cord (not supplied)
Rear of the unit
to an AC outlet
Front
speaker (L)
Coaxial cord
(not supplied)
Center speaker Subwoofer Surround speaker (R)Surround speaker (L)
to a digital input jack
Receiver equipped with a Dolby
Digital decoder or DTS decoder
When your TV set is equipped with an S-video input terminal, see page 16.
Set the setup menu correctly after connecting!
According to the audio equipment and TV set to which this
unit is connected, set the “AUD OUT” and “TV TYPE” of
the setup menu correctly referring to the following below .
See “CHANGING SETUP VALUE” on page 32 in detail.
AUD OUT
[BITSTREAM]
TV TYPE
When your TV set is a conventional-screen size TV:
[4:3 LB ]
When your TV set is a wide-screen size TV:
[16:9 ]
NOTE
When the picture noise appears while copy-protected DVDs
are played, connect the unit directly to a TV set. Do not
connect through a VCR, TV/VCR or AV selector .
CAUTION
If the AV receiver is not equipped with a Dolby Digital or
DTS decoder, do not select “BITSTREAM” in the “AUD
OUT” when connecting the AV receiver with an optical or
coaxial connecting cord.
Merely attempting to play a DVD may cause a high level of
noise which could be harmful to your ears and damage the
speakers. In such a case, be sure to select “DIGITAL PCM”
in the “AUD OUT”.
Front
speaker (R)
14
ENGLISH
Page 15

E Connecting to a TV set and an AV
to a video input jack
(yellow)
Video cord
(supplied)
receiver
with the Dolby Pro Logic Surround system
TV set
PREPARATIONS
yellow
to AUDIO OUT L (white)/
R (red) jacks
to VIDEO OUT 1 or 2
jack (yellow)
VIDEO
S-VIDEO
OUT
AUDIO OUT
LR
COAXIAL
OPTICAL
DIGITAL
AUDIO OUT
white
red
Audio cord (supplied)
Receiver
equipped with
Dolby Pro Logic Surround
Front
speaker (L)
Surround speaker (L)
Center speaker
to an audio input jacks
(Left/ white, Right/ red)
Front
speaker (R)
Surround speaker (R)
Rear of the unit
to an AC outlet
En
When your TV set is equipped with an S-video input terminal, see page 16.
Set the setup menu correctly after connecting!
According to the audio equipment and TV set to which this
unit is connected, set the “TV TYPE” of the setup menu
correctly referring to the following below .
See “CHANGING SETUP VALUE” on page 32 in detail.
NOTE
When the picture noise appears while copy-protected DVDs
are played, connect the unit directly to a TV set. Do not
connect through a VCR, TV/VCR or AV selector .
TV TYPE
When your TV set is a conventional-screen size TV:
[4:3 LB ]
When your TV set is a wide-screen size TV:
[16:9 ]
CONTINUE
ENGLISH
15
Page 16

CONNECTIONS (CONTINUED)
Connecting to a TV set equipped with S-video jack
Rear of TV set
S-video input
connector (S1, S2)
S-video cord (not supplied)
to S-VIDEO OUT connector
S-VIDEO
AUDIO OUT
LR
COAXIAL
OPTICAL
DIGITAL
AUDIO OUT
VIDEO
OUT
Set the setup menu correctly after connecting!
Set the “TV TYPE” of the setup menu correctly referring to
the following below .
See “CHANGING SETUP VALUE” on page 32 in detail.
TV TYPE
When your TV set is a conventional-screen size TV:
[4:3 LB ]
When your TV set is a wide-screen size TV:
[16:9 ]
Rear of the unit
to an AC outlet
NOTES
• For the best possible picture clarity , it is recommended
that an S (separate) video cord (not supplied) be used
when connecting the unit to a TV set equipped with an Svideo input terminal.
•When the picture noise appears while copy-protected
DVDs are played, connect the unit directly to a TV set. Do
not connect through a VCR, TV/VCR or AV selector .
16
ENGLISH
Page 17

REMOTE CONTROL
ABOUT SYMBOLS
Installing batteries
Detach the battery cover on the rear of the remote control,
and insert two R6 (size AA) batteries with 0 and 9 aligned
correctly .
When to replace the batteries
The maximum operational distance between the remote
control and the sensor of the units should be approximately
7 meters. If this distance decreases, replace the batteries
with new ones.
NOTES
•When operating with the remote control, point the top of
the remote control toward the player .
• If the unit is not going to be used for an extended period of
time, remove the batteries to prevent possible electrolyte
leakage.
• The remote control may not operate correctly when:
- The line of sight between the remote control and the
unit is exposed to intense light, such as direct sunlight.
- There is fluorescent lighting near the remote sensor in
the display window .
-Other remote controls are used nearby (those of a TV
set, etc.).
Although this unit can play DVDs, super video CDs, V ideo
CDs, Audio CDs or MP3 discs, some of the functions are
restricted by the kinds of discs.
In this operating instructions, the following symbols are used
to make distinction.
: Shows the function or the display for only
DVDs.
: Shows the function or the display for only super
video CDs.
PREPARATIONS
:Shows the function or the display for only video
CDs.
: Shows the function or the display for only
audio CDs.
:Shows the function or the display for only MP3
discs.
No symbols: The function works in common.
About the symbol display
• The symbol will be displayed on TV screen if you
press a button which cannot be used or enter an incorrect
number.
• Some discs may have places where they do not allow
pressing of the STOP, SKIP, or other buttons. The
mark will be displayed on the screen if you press a button
that is not allowed in such a place.
ENGLISH
En
17
Page 18

PLAYBACK
Getting ready to play
•Turn on the television, and set its video source (V ideo 1,
Video 2, V ideo 3, etc.) to the one connected to this unit.
•Turn on the audio device connected to this unit. Set its
input source to the one connected to this unit.
1
2,4
TOP MENU
i/k/j/l/ENTER
vRETURN
POWER
3 2,4
c
MENU
c
Press POWER on this unit.
1
On TV screen, “aiwa DVD VIDEO” screen is displayed.
In the display window , “- on-” is displayed then it will change
to “no disc”.
Press zOPEN/CLOSE.
2
The disc tray opens.
Load a disc.
3
Place a disc in the tray guides (depression), with the label
side facing up. When loading an 8-cm disc, place it in the
inner depression.
Press zOPEN/CLOSE.
4
The disc tray closes, and the DVD player automatically
begins to play the disc.
If the disc does not begin to play , press c.
Audio
TITLE
KARAOKE
CHP/TRK
Video CD
ANGLE
PROG
SHUF
REP
18
ENGLISH
Audio
Audio
Audio
TITLE
TITLE
TITLE
KARAOKE
KARAOKE
KARAOKE
CHP/TRK
CHP/TRK
CHP/TRK
Video CD
Video CD
Video CD
ANGLE
ANGLE
ANGLE
PROG
PROG
PROG
SHUF
SHUF
SHUF
REP
REP
REP
Page 19

When the menu screen is displayed
The menu screen may be displayed first after loading a
DVD, super video CD or video CD (version 2.0) which
contains a menu.
Use ikjl to select the program you would like to
view, then press ENTER to begin playback. Press TOP
MENU or MENU to return to the menu screen.
Use the numbered buttons to select the program you
would like to view.
Press vRETURN to return to the menu screen.
For either DVD, super video CDs or video CDs (version
2.0), menu continuations and the exact operating
procedures for using the menu may vary from disc to
disc. Follow the instructions on the menu screen.
Moving the “aiwa DVD VIDEO” screen after 8 minutes
To prevent TV screen from burning up, the “aiwa DVD
VIDEO” screen moves around on TV screen, either when
8 minutes elapsed without any operations after the unit had
stopped or when 8 minutes elapsed without any operations
after playing an audio CD or MP3 disc.
The “aiwa DVD VIDEO” screen does not move around only
while displaying setup menu on TV screen, even if the unit
stopped.
To turn the power off
Press POWER on the remote control. The unit enters the
power standby mode, and the 6STANDBY/ON indicator
turns red.
If 15 minutes have elapsed without performing any
operations
This unit automatically returns to the power standby
mode, when stopped without performing any
operations for 15 minutes.
The unit does not return to the power standby mode,
only while displaying setup menu on TV screen.
Play Back Control (PBC)
This unit equips Play Back Control (PBC) ON/OFF function.
After turning off PBC, super video CDs or video CDs
(version 2.0) can be played back as well as audio CDs,
without returning to the menu screen.
Press MENU once either while playing
1
or when stopped.
“PBC : [ON]” appears on TV screen.
Within 2 seconds, press MENU again
2
to turn off PBC.
The PBC ON/OFF menu changes to “PBC : [OFF]” , then
it will disappear after 2 seconds. If PBC is turned off while
stopping, the unit automatically starts playback.
To turn on PBC
Repeat the step 1 and 2 above. The unit automatically will
start playback.
When OPEN/CLOSE is pressed, the unit also automatically
turns on PBC.
Digest menu
The pictures divided into 9 are displayed.
Press TOP MENU either while playing
1
or when stopped.
When the unit plays back:
The current track playing is divided into 9 random intervals,
then the pictures which were divided into 9 will be displayed
on TV screen.
BASIC OPERATIONS
En
When the unit stops:
The each beginning of pictures up to the first 9 tracks on
the disc will be displayed on TV screen.
If only one track is recorded on the disc, one picture is
displayed.
Press the numbered buttons or press
2
i/k /j /l to select the desired
picture, then press ENTER or c.
The unit will start playback from the selected point of the
track.
NOTE
PBC function turns off when this function is activated.
CONTINUE
ENGLISH
19
Page 20

PLAYBACK (CONTINUED)
Still (Pause)
Numbered
buttons
i/k/j/l/
ENTER
r
a
s
rt
ca
s
CLEAR
SLOW
c
g
t
f
Press a during playback.
To return to normal playback
Press c or ENTER.
Frame advance
Press a while the disc is paused.
Each time you press the button, the program advances one
frame. There is no audio when doing Frame advance.
To return to normal playback
Press c or ENTER.
Stopping playback
Press s.
When s is pressed during playback, the unit remembers
the point at which playback stopped. (resume function)
Performing fast forward, fast reverse, or skipping
operations while turning on PBC may cause this unit to
return to the menu screen.
To resume playback from the point where it stopped
Press c or ENTER.
To clear the point to be resumed
Press s again.
When zOPEN/CLOSE is pressed to open the disc tray or
when POWER is pressed to turn the power off, the point to
be resumed is also cleared.
NOTES
• The disc continues to spin while the menu screen is
displayed even if s is pressed. When you are finished
using this unit, turn the power off after pressing s.
• Resume function does not work when PBC function is
effective on the super video CD or video CD.
• As far as MP3 discs, the resume playback starts from the
beginning of the track where it stopped.
20
ENGLISH
Page 21

Fast Forward, Reverse
Press g or f during playback.
Each time you press the button, the playback speed
becomes faster as shown below.
× 2 × 4 × 8 × 20
× 2 × 4 × 8
To return to normal playback
Press c or ENTER.
Skipping
Press r or t.
Skip to the next chapter or track: t
The disc position advances one chapter or track each time
the button is pressed.
Return to the previous chapter or track: r
In each disc, pressing r once skips to the beginning of
the chapter (track) currently being played, and pressing
r twice skips to the previous chapter.
NOTE
Depending on some super video CDs or video CDs which
equipped with PBC, the unit may return to the menu screen
when pressing r or t.
In this case, turn off PBC (see page 19).
Direct skipping
BASIC OPERATIONS
NOTE
There is no audio while playing DVD, super video CD or
video CD.
Slow playback
Press SLOW during playback.
1
“SLOWF 1/7” appears on TV screen and the unit goes into
a forward slow playback.
Press g or f to change the slow
2
playback speed.
“SLOWR 1/7” appears on TV screen and a reverse slow
playback starts, when f is pressed.
Each time you press the button, the slow playback speed
changes as shown below.
SLOWF 1/7 SLOWF 1/6 SLOWF 1/5
SLOWF 1/2 SLOWF 1/3 SLOWF 1/4
SLOWR 1/7 SLOWR 1/6 SLOWR 1/5
SLOWR 1/2 SLOWR 1/3 SLOWR 1/4
To use this function for super video CDs or video CDs
(version 2.0), turn off PBC first (see page 19).
Press numbered buttons to select your
1
desired track either while playing
back or when stopped.
Example: To select track 3
When inputting a wrong number, press CLEAR.
2
Playback begins at the beginning of the selected track.
Press 3 on the remote control.
To select track 20
Press 2, 0 on the remote control.
Press ENTER or c.
En
To return to normal playback
Press c, ENTER or SLOW.
ENGLISH
21
Page 22

MARK PLAYBACK
MARKERS: 0:08:40
MARK 1:
MARK 2:
MARK 3:
00840
–––––
–––––
MARKERS: 1:02:30
MARK 1:
MARK 2:
MARK 3:
00840
02257
05321
MARK
CLEAR
i/k/j/l/
ENTER
c
Press ENTER or c to mark your
3
desired scene or track.
The total elapsed time of the marked point is memorized
and displayed.
Repeat the step 2 and 3 above to
4
mark.
To turn off the MARK menu
Press MARK.
Mark playback
Mark playback allows you to mark a scene or track on the
disc, and the playback can be started from the marked point.
Up to 3 points can be marked.
Marking
Press MARK during playback.
1
MARK menu appears on TV screen.
Press i /k to choose one from
2
MARK1 - MARK3.
22
ENGLISH
MARKERS: 0:08:25
MARK 1:
MARK 2:
MARK 3:
–––––
–––––
–––––
Press MARK either while playing or
1
when stopped.
The MARK menu appears on TV screen.
Press i/k to select your desired
2
marked point, and press ENTER or c.
MARK menu turns off and mark playback will start from
the marked point.
To clear the marked point
1
Press MARK during playback.
2
Press i/k to select the mark point, and press CLEAR.
All of the marked points are cleared, either when the disc
is removed or when the unit enters power standby mode.
NOTES
• Mark search may not work on multi-angle scenes or
subtitles recorded portions.
• Depending on some discs, the unit cannot mark.
Page 23

ZOOMING AND CHANGING THE ANGLE
Changing the angle
ZOOM
ANGLE
i/k/j/l/
ENTER
Zoom function
The function allows you to Zoom-in and enlarge the picture.
When playing a DVD which has been recorded in multiangle (photographed from several different angles), you can
select which angle you would like to view the action from.
When a multi-angle scene comes on during playback,
“ANGLE” lights in the display window to let you know that
you can change the angle.
Press ANGLE once during playback.
1
“ [1/4]” appears on TV screen if the disc contains 4
scenes.
Within 2 seconds, press ANGLE
2
repeatedly until the desired angle is
selected.
1st out of 4 available
angles for the scene.
[1/4]
[2/4]
MORE FEATURES
Press ZOOM during playback or Still
playback.
The zoom area changes each time the button is pressed,
as shown below.
ZOOM 1 ZOOM 2
NO ZOOM ZOOM 3
To move the zoom area
Press i/k/j/l.
To return to the normal playback
Press ZOOM until “NO ZOOM” is displayed.
NOTES
• Some DVDs may not respond to Zoom function.
• Zoom function does not work on DVDs recorded with PAL
format.
• Zoom function may not work on multi-angle scenes.
[4/4]
symbol will be displayed if you press ANGLE while
viewing a disc which does not have multiple viewing
angles, or if viewing a part of the disc which does not
allow angle selection.
[3/4]
ENGLISH
En
23
Page 24

RANDOM AND REPEAT PLAYBACK
Repeating a portion between two
specified points (A-B Repeat)
Allows you to select a portion of a track or chapter to be
A-B
repeated. The portion to be repeated may not span a track
boundary, but must be within a single track or chapter.
RANDOM
t
Random playback
Press RANDOM once either while
1
playing or when stopped.
“SHUFFLE: [OFF]” appears on TV screen.
During playback, press A-B at the
1
starting point of the section you want
to repeat.
“REPEAT A-” appears on TV screen and “REP” lights in
the display window.
Press A-B again at the ending point
2
of the section you want to repeat.
“REPEAT A-B SET” appears on TV screen.
The unit returns to the point A and plays the section between
the point A and the point B.
To return to the normal playback
Press A-B again during playback.
“REPEAT A-B CANCELLED” appears on TV screen.
A-B repeat playback is also canceled, when one of the
following function buttons is pressed:
- OPEN/CLOSE, TOP MENU, s, r, t, MARK,
RANDOM, SLOW.
NOTES
• During a multi-angle scene, the unit may play the different
scene that you memorized by pressing A-B.
• The following playback cannot be played on DVDs during
A-B repeat playback.
- Frame advance, Slow playback
Within 2 seconds, press RANDOM
2
again.
“SHUF” lights in the display window and random playback
starts.
The random menu also changes to “SHUFFLE: [On]”, then
it will disappear after 2 seconds.
To skip another track at random
Press t.
To return to normal playback
Press s. Or press RANDOM repeatedly until “SHUFFLE:
[OFF]” appears on TV screen. “SHUF” in the display window
turns off.
NOTE
PBC function turns off when this function is activated.
24
ENGLISH
Page 25

PROGRAMMED PLAYBACK
PROGRAM EDIT:
<OK> <CLEAR ALL>
[1-12]
1[–3]
2[
––
]
3[
––
]
4[
––
]
5[
––
]
6[
––
]
7[
––
]
8[
––
]
9[
––
]
10 [
––
]
11 [
––
]
12 [
––
]
13 [
––
]
14 [
––
]
15 [
––
]
16 [
––
]
PROGRAM EDIT:
<OK> <CLEAR ALL>
[1-12]
1[–3]
2[
12
]
3[
––
]
4[
––
]
5[
––
]
6[
––
]
7[
––
]
8[
––
]
9[
––
]
10 [
––
]
11 [
––
]
12 [
––
]
13 [
––
]
14 [
––
]
15 [
––
]
16 [
––
]
Press the numbered buttons to select
2
the desired track number.
Example : To select track 3, press 3.
To select track 12, press 1 and 2.
2,3,4
1
CLEAR
3,4,5
[1-12]
13 [
––
––
14 [
––
15 [
16 [––]
t
]
]
]
r
Up to 16 tracks can be selected and played back in any
order.
Press PROGRAM either while playing
1
or when stopped.
Program menu screen appears on TV screen.
PROGRAM EDIT:
5[
1[––]
––
]
2[
––
]
3[
4[––]
<OK> <CLEAR ALL>
• To exit the screen, press PROGRAM.
––
––
6[
––
7[
8[––]
]
]
10 [
]
11 [
12 [––]
9[
––
––
––
]
]
]
Press i/k/j/l to move the cursor
3
on the program menu in accordance
with the number of programming
order.
Then press the numbered buttons to
select the desired track number.
To delete a track from the program
Press i/k/j/l to select the unwanted track and press
CLEAR.
To clear all the programs
Press i/k/j /l to select <CLEAR ALL> and press
ENTER.
(The programs are also cleared when the disc is removed.)
Repeat step 3.
4
Press i/k/j/l to select <OK> on
5
the program menu. Then press ENTER
or c.
The program menu disappears. Then “PROGRAM PLAY”
appears on TV screen and playback begins in the
programmed sequence.
MORE FEATURES
En
After playback
Programmed playback is stopped.
To skip tracks
Press r or t repeatedly. Playback skips to the
previous or succeeding tracks within the program.
ENGLISH
25
Page 26

CREATING A 3D SURROUND EFFECT
This unit can produce a 3D Surround effect, which simulates
multi-channel audio playback from two conventional stereo
speakers, instead of the five or more speakers normally
required to listen to multi-channel audio from a home theater
SURROUND
system.
Press SURROUND once either while
1
playing or when stopped.
“SURROUND OFF” appears on TV screen.
Within 2 seconds, press SURROUND.
2
SURROUND ON/OFF menu changes to “SURROUND ON”
and the 3D Surround effect works.
SURROUND ON/OFF menu will turn off after 2 seconds.
To turn off the 3D Surround effect
Press SURROUND repeatedly until “SURROUND OFF” is
displayed.
NOTES
• 3D Surround effect cannot work if BITSTREAM is set in
the AUD OUT of the setup menu.
To work 3D Surround effect, set to DIGITAL PCM (see
page 32).
• Dolby Pro Logic Surround may not work when this function
is turned on.
• 3D Surround effect cannot work while Karaoke function
turns on.
• This 3D Surround effect may not be available on some
DVD discs, such as those recorded with a mono audio
soundtrack.
•Turn off the TV surround sound and other surround effects
when using this 3D Surround effect.
•Do not press SURROUND while recording the music. The
sound signals which come from this unit are intermitted.
26
ENGLISH
Page 27

CHANGING AUDIO SOUNDTRACKS
Some discs have more than one audio track, such as
soundtracks with different languages. While playing such
a disc, the audio track can be changed to hear the different
soundtracks.
Press AUDIO SELECT once during
AUDIO SELECT
1
playback.
For example:
when playing back the DVD, “AUDIO : [1 ENG PCM 2CH]”
appears on TV screen.
when playing back the super video CD, “AUDIO : [1]”
appears on TV screen.
Within 2 seconds, press AUDIO
2
SELECT repeatedly until the desired
soundtrack is selected.
The AUDIO SELECT menu will turn off after 2 seconds.
MORE FEATURES
•When playing a DVD with soundtracks in multiple
languages, the audio will automatically be played in
the language which was selected when this unit was
set up. If there is not a soundtrack in that language
on the disc, the disc will determine which audio track
is played.
•The audio track may only be changed for discs which
contain multiple audio tracks.
• The number of audio tracks available differs from
disc to disc.
En
ENGLISH
27
Page 28

DISPLAYING AND CHANGING SUBTITLES
When playing DVD discs which contain subtitles, the
subtitles can be displayed on the screen and the language
of them can be changed.
Press SUBTITLE SELECT once during
1
SUBTITLE
SELECT
playback.
“SUBTITLE : [OFF]” appears on TV screen.
Within 2 seconds, press SUBTITLE
2
SELECT repeatedly until the desired
language is selected.
The SUBTITLE menu will turn off after 2 seconds.
To turn off the subtitle language
Press SUBTITLE SELECT repeatedly until “SUBTITLE :
[OFF]” is displayed.
When pressing r during playback, it also turns off.
• The first subtitles displayed will be in the subtitle
language selected with the subtitle setting (see page
32). If there are no subtitles in that language on the
disc, the disc will determine which subtitles are
shown.
•Subtitles may only be changed with discs which
contain more than one set of subtitles.
• The number of subtitle languages varies from disc
to disc.
•With some discs, it may take a few moments after
you press SUBTITLE SELECT for the new subtitles
to be displayed.
28
ENGLISH
Page 29

ON SCREEN DISPLAY (OSD)
0:04:350:00:15
General playback status can be displayed on TV screen.
Press ON SCREEN DISPLAY ON/OFF
1
once either while playing or when
stopped.
The total elapsed time of title and the total remaining time
of title are displayed on TV screen.
ON SCREEN
DISPLAY ON/OFF
NOTES
• The remaining time of current track and the total playing
time cannot be displayed while playing MP3 disc.
• The only top of items turns off for 2 seconds, if you press
another function button (e.g. c,r,t,a,s, etc.)
while displaying OSD. To prevent this, set OSD in the setup
menu to off (see page 32).
• Each letter of the OSD may shrink while playing discs
recorded with NTSC format.
On Screen Display (OSD)
2
DVD 0:45:500:22:10
1
4
CHAPTER: 3 TOTAL: 12
6
TITLE: 1
8
AUDIO: [1ENG PCM 2CH]
9
SUBTITLE [ENG 1]
0
1
#
:[1/4]
SVCD 0:04:450:00:15
TRACK: 3 TOTAL: 12
TOTAL: 1
3
5
7
!
@
$
∗
∗
The elapsed time of current track and the remaining time
of current track are displayed on TV screen.
remaining time of
title or track
elapsed time of
title or track
Press ON SCREEN DISPLAY ON/OFF
2
again .
The detailed playback status is displayed as shown below.
To turn off OSD
Press ON SCREEN DISPLAY ON/OFF until the OSD turns off.
1:Displays kinds of the disc;
- DVD: DVD is loaded
- SVCD: Super video CD is loaded
-
VCD2.0
- VCD1.1: Video CD equipped with PBC version 1.1 is loaded
- CDDA: Audio CD is loaded
- MP3: MP3 disc is loaded
2:Displays the total elapsed time of title.
When stopped, total playing time of title is displayed.
3:Displays the total remaining time of title.
When stopped,“0:00:00” is displayed.
4:Displays the current chapter playing.
5:Displays the total number of chapters on the disc.
6:Displays the current title playing.
7:Displays the total number of title on the disc.
8:Displays the audio soundtrack selected.
9:Displays the subtitle language selected.
0:Displays the selected number of multi angle scene.
"NONE" is displayed if the disc is not recorded in multi-angle.
!:Displays the elapsed time of current track.
When stopped,“0:00:00” is displayed.
@:Displays the remaining time of current track.
When stopped, the total playing time on the disc is
displayed. Not displayed while playing MP3 disc.
#:Displays the current track playing.
When stopped, “TRACK : 0” is displayed.
$:Displays the total number of tracks on the disc.
∗When stopped, the selected audio soundtrack and subtitle
language are not displayed correctly.
:Video CD equipped with PBC version 2.0 is loaded
MORE FEATURES
En
ENGLISH
29
Page 30

PLAYING KARAOKE
KARAOKE:
<EXIT>
[OFF]
KEY: [ ]
ECHO: [------------------] 00
VOCAL: [V1+V2]
MELODY: [ON]
MIC1VOL: [ ----------] 08
MIC1VOL: [------------------] 08
<BACK>
1
Playing a karaoke disc
Connect microphone to MIC 1 or MIC 2
or to both jacks.
i/k/j/l/
ENTER
MIC 1
VOLUME
MIC 2
VOLUME
MIC 2
MIC 1
Microphone
KARAOKE
c
^&7
Load the karaoke disc.
2
Press KARAOKE either while playing
3
or when stopped.
Karaoke menu appears on TV screen.
When playing a super video CD, video CD or audio CD,
“[STEREO]” is displayed in stead of “[V1+V2]”.
Press i/k to select KARAOKE, then
4
press ENTER or c.
“KARAOKE” lights in the display window and Karaoke
function now works.
To turn off the karaoke menu
Press KARAOKE. Or press i/k to select <EXIT> on the
karaoke menu, then press ENTER or c.
Turn off the karaoke menu after setting the karaoke
menu options on the next page.
Before enjoying Karaoke
•Your singing voice through a microphone is only output
from AUDIO OUT of this unit. To enjoy Karaoke,
connect the unit to an audio system or AV receiver
with the supplied audio cord (See page 13).
• Use microphones with standard plugs(ø 6.3mm).
• The karaoke function does not work if BITSTREAM is
set in AUD OUT of the setup menu.
To work the karaoke function, set to DIGITAL PCM
(see page 32).
Recommended microphones
The use of unidirectional type microphone is recommended
to prevent howling. Contact your Aiwa dealer for details.
30
ENGLISH
Adjusting microphone volume
Press KARAOKE to display the
1
Karaoke menu.
Press i/k to select <NEXT>, then
2
press ENTER or c.
Next page of the Karaoke menu appears.
Page 31

Press i/k to select MIC 1 VOL or
3
MIC 2 VOL in correspond with
connecting the microphone.
To adjust the key control on the unit
Press 7 or &.
Each time you press &, the key becomes higher.
Each time you press 7, the key becomes lower.
To return to the normal key, press ^ to return.
Press j/l to adjust the microphone
4
volume.
The default setting of the microphone volume is 08.
Each time you press l, the microphone volume increases up
to 16.
Each time you press j, the microphone volume decreases to 00.
To return to the first page of Karaoke menu
Press i/k to select <BACK>, then press ENTER or c.
To adjust the microphone volume on the unit
1
Press –/+ of MIC 1 volume or –/+ of MIC 2 volume.
MIC volume menu appears on TV screen.
2
Within 2 seconds, press + or –.
Each time you press +, the microphone volume
increases up to 16.
Each time you press –, the microphone volume
decreases to 00.
NOTE
If a microphone is held too near the speakers, a howling
sound may be produced. In this case, hold the microphone
away from the speakers, or decrease the MIC 1 and MIC 2
VOLUME. If sound through the microphone is extremely
loud, it may be distorted. In this case, decrease the MIC 1
and MIC 2 VOLUME.
Karaoke menu options
KARAOKE:
KEY: [ ]
ECHO: [------------------] 00
VOCAL: [V1+V2]
MELODY: [ON]
<EXIT> <NEXT>
Key control
The key of playback sound can be higher or lower,
incrementing by half tone.
1
Press i/k to select KEY.
2
Press j/l to adjust the key control.
Each time you press l, the key becomes higher.
Each time you press j, the key becomes lower.
To return to the normal
Press j/l to move the cursor to *.
[ON]
Echo level
The default echo level is 00, and it can be changed up to 32.
1
Press i/k to select ECHO.
2
Press j/l to adjust the echo level.
Vocal select
Audio tracks on Karaoke DVDs or audio signals can be
selected.
1
Press i/k to select VOCAL.
2
Press ENTER or c.
Each time you press, VOCAL menu changes as
follows.
V1+V2 OFF V1 V2
V1+V2: Audio tracks of the vocal 1 and 2 are selected.
V1: Only audio track of vocal 1 is selected.
V2: Only audio track of vocal 2 is selected.
OFF: Any audio track is not selected.
STEREO LEFT RIGHT
R PARTNER L PARTNER
STEREO: Both left and right channel signals are
LEFT: Only left channel signal is output to both
RIGHT: Only right channel signal is output to both
L PARTNER: Left channel signal is output to both left
R PARTNER:Right channel signal is output to both left
Guide Melody (DVD only)
If you wish to sing only to the back grand band or orchestra
unaccompanied by a vocal guide melody, set to off.
1
Press i/k to select MELODY.
2
Press ENTER or c to turn off the Guide Melody.
NOTES
• The karaoke feature functions only with karaoke
compatible discs.
• The voice select and Guide Melody menus may not be
available on some karaoke discs.
• For more details, refer to the information supplied with
the disc.
output to each left and right speakers.
left and right speakers.
left and right speakers.
and right speakers, only while singing
with connecting the microphone.
and right speakers, only while singing
with connecting the microphone.
MORE FEATURES
En
ENGLISH
31
Page 32

CHANGING SETUP VALUES
AUD OUT:
<BACK>
[DIGITAL PCM]
PASSWORD:[----]
RATING: [VIEW ALL]
OSD: [ON]
i/k/j/l/
ENTER
SETUP
This unit comes from the factory with all the basic
items set properly.
• Check the “AUD OUT” and “TV TYPE” settings to make
sure they are correct for the type of equipment
connected to this unit. For more information, refer to
the “Connections” section, which begins on page 10.
•To use this unit with the NTSC TV set, change the
default setting of "TV SYS" to NTSC.
• Change any other settings according to your individual
setup and preferences.
To move the next page of setup menu
Press i/k to select <NEXT>, then press ENTER or c.
The next page of setup menu appears.
To return the first page of setup menu
Press i/k to select <BACK>, then press ENTER or c.
Press i/k to select the desired item,
2
then press j/l.
Each time you press j/l, the menu option changes.
Press ENTER or c to fix the selected
3
menu option.
The selected menu options are preserved even if the unit
is turned off.
To exit the setup menu
Press SETUP. Or press i/k to select <EXIT> on the setup
menu, then press ENTER or c.
LANGUAGE
The displaying language of this setup menu, playback status
and OSD can be changed to either English or Chinese.
The default setting is [ ].
Basic operations
Press SETUP when stopped.
1
The setup menu is displayed.
32
ENGLISH
LANGUAGE
SUBTITLE: [CHINESE]
AUDIO: [CHINESE]
TV TYPE: [4:3 LB ]
TV SYS: [PAL60]
<EXIT> <NEXT>
:
[ENGLISH]
Press i/k to select LANGUAGE, then
1
press j/l.
Each time you press j/l, the menu option changes.
[ ]: displays in Chinese.
[ENGLISH]: displays in English.
Press ENTER or c to fix the selected
2
menu option.
Page 33

SUBTITLE
The subtitle language on a DVD can be changed.
If the language selected is not available on the disc, the
original designated by each disc will be selected.
The default setting is [CHINESE].
Press i/k to select SUBTITLE, then
1
press j/l.
Each time you press j/l, the menu option changes.
[CHINESE]:
[OFF]: Any subtitle languages is not displayed.
[AUTO]:
[ENGLISH]: The subtitle language is displayed in English.
2
The subtitle language is displayed in Chinese.
The same language selected at “AUDIO” is
displayed.
Press ENTER or c to fix the selected
menu option.
AUDIO (soundtrack language)
The audio soundtrack language on a DVD can be changed.
If the language selected is not available on the disc, the
original designated by each disc will be selected.
The default setting is [CHINESE].
4:3 LB
4:3 Letter Box : Select when a conventional TV set is
connected. Media recorded in wide (16:9)
format will be played in “Letter Box” style,
with black bands at the top and bottom of
the screen.
AS NECESSARY
4:3 Letter Box
4:3 PS
4:3 Pan & Scan :Media recorded in wide (16:9) format will
be played at the full screen height, with
the left and right portions cut off, for media
which contains pan-scan encoding. Other
media will be played in “Letter Box” style.
Cut off
Press i/k to select AUDIO, then
1
press j/l.
Each time you press j/l, the menu option changes.
[CHINESE]: The soundtrack language selected is
[ENGLISH]: The soundtrack language selected is
2
displayed in Chinese.
displayed in English.
Press ENTER or c to fix the selected
menu option.
TV TYPE
You can select the appropriate screen type according to
your TV set; 4:3 Letter Box(LB), 4:3 Pan & Scan(PS) or
16:9 wide screen.
The default setting is [4:3 LB ].
Press i/k to select TV TYPE, then
1
press j/l.
Each time you press j/l, the menu option changes.
4:3 Pan & Scan
16:9
16:9 Wide :Select when a wide-screen TV set is
*Each screen shows an example when the video
material for a wide-screen is played.
(This setting does not affect the video material for
conventional size.)
Press ENTER or c to fix the selected
2
connected.
Played in “FULL” size. (Setting the widescreen TV to “FULL” mode is also
necessary.)
16:9 Wide
menu option.
En
CONTINUE
ENGLISH
33
Page 34

CHANGING SETUP VALUES (CONTINUED)
TV SYS
You don’t need to change this option usually.
Change this option, when using this unit in other places
where Color Television Broadcasting system is different
from PAL format.
The default setting is [PAL60].
Press i/k to select TV SYS, then
1
press j/l.
Each time you press j/l, the menu option changes.
[PAL60]: Select this when playing a disc recorded with
[PAL60R]: Select this when your TV set does not work
[AUTO]: Video signals of discs recorded with PAL format
[NTSC]: Select this if you use a NTSC TV set. But
[PAL]:Select this if you use a PAL TV set. Discs
NTSC. Discs recorded with NTSC format can
be played at PAL60 resolution and the frame
rate.
properly. Discs recorded with NTSC format can
be played at PAL60 resolution and the frame
rate, but with the field reverse.
are output with PAL.
Video signals of discs recorded with NTSC
format are output with NTSC.
selecting this, discs recorded with PAL format
cannot be played.
recorded with NTSC format can be played at
PAL resolution and the frame rate.
AUD OUT (Digital Audio Output)
Each DVD has a variety of audio output options.
Set the unit's digital audio output according to the type of
audio system you use.
The default setting is [DIGITAL PCM].
CAUTION
If the AV receiver is not equipped with a Dolby
Digital decoder or DTS decoder, do not select
“BITSTREAM” in the “AUD OUT” when connecting
the AV receiver with an optical or coaxial
connecting cord.
Merely attempting to play a DVD may cause a high
level of noise which could be harmful to your ears and
damage the speakers. In such a case, be sure to select
“DIGITAL PCM”.
Press i/k to select AUD OUT, then
1
press j/l.
Each time you press j/l, the menu option changes.
[DIGITAL PCM]: Select this when connecting to an AV
[BITSTREAM]: Select this when connecting to an AV
receiver not equipped with Dolby Digital
or DTS decoder.
receiver equipped with Dolby Digital or
DTS decoder.
Press ENTER or c to fix the selected
2
menu option.
To return to normal, when the TV screen is distorted by
selecting wrong option.
1
Press SETUP to turn off the setup menu.
2
Press OPEN/CLOSE to open the disc tray.
3
Press AUDIO SELECT repeatedly until the TV
screen returns to normal.
NOTE
3D Surround effect and Karaoke function does not work
when selecting [BITSTREAM].
Press ENTER or c to fix the selected
2
menu option.
34
ENGLISH
Page 35

PASSWORD
RATING (Parent lock level)
A 4-digit password can be set to prevent playback of discs
with higher ratings which you set the parent lock level at
the next “RATING”.
Press i/k to select PASSWORD.
1
Input a 4-digit password using the
2
numbered buttons.
Example : To set the 4-digit password as1234, press 1, 2,
When inputting a wrong number, press CLEAR.
Do not forget your password. The password cannot be
changed until you enter the correct 4-digit password.
3
3 and 4.
Press ENTER or c to lock your
password.
The PASSWORD changes as follows.
PASSWORD: [
To unlock the 4-digit password
Input your 4-digit password, then press ENTER or c.
The PASSWORD changes as follows.
PASSWORD: [- - - - ]
To change your password
Unlock your 4-digit password, then repeat step 2 and 3
above.
When you forget your 4-digit password
If you forget your password, follow the procedures below.
NOTE
All of the setup menu options which you set are cleared
and changed to the default settings after executing the
procedures below.
1
Press OPEN/CLOSE to open the disc tray.
2
Press ZOOM.
3
Press i.
4
Press j.
5
Press k.
6
Press l.
Software code of this unit appears on TV screen and the
disc tray automatically closes.
****
]
Some DVDs contain a restriction level which enables
parents to cut scenes or prevent playback of discs by
children. This function is linked to PASSWORD.
The default setting is [VIEW ALL].
Unlock your 4-digit password first if it is set.
Press i/k to select RATING, then
1
press j/l.
Each time you press j/l, the menu option changes.
[VIEW ALL]: Allows any DVD to play back.
[NO ADULT]: Allows titles with a parent lock level of 5 or
[KID’S ONLY]: Allows only titles with a parent lock level of
The parent lock level is equivalent to the following USA
movie ratings.
Example
Level 7: NC-17 Level 6: R Level 4: PG 13
Level 3: PG Level 1: G
2
less to be played back.
1 and 2 to be played back.
Press ENTER or c to fix the selected
menu option.
After setting, make sure that the unit actually prevents
playback of discs with higher ratings which you set.
When DVDs with a parent lock level are higher than
what you set
This unit will prompt you to set the parent lock level to the
DVD. In addition, PASSWORD menu appears if a 4-digit
password was set.
To continue playback, enter your 4-digit password. All of
scenes or titles will be played.
OSD (On Screen Display on/off)
Pop-up OSD messages (e.g. PLAY,STOP,PAUSE,etc.) on
TV screen can be set to turn on and off.
The default setting is [ON].
Press i/k to select OSD, then press
1
j/l.
Each time you press j/l, the menu option changes.
[ON]: Pop-up OSD messages are displayed.
[OFF]: Pop-up OSD messages are not displayed.
AS NECESSARY
En
Press ENTER or c to fix the selected
2
menu option.
ENGLISH
35
Page 36

TERMINOLOGY
• ISO 9660
ISO stands for the “International Organization for
Standardization”. ISO 9660 determines the file
structure for the CD-ROMs. This unit can play MP3 files
recorded in the format compliant with ISO 9660.
• Nesting of folders (albums)
To organize data files stored in a PC, you can store
related files in a folder. A folder can contain other
folders as well as files. For example, folder A can
contain folder B, and folder B can contain folder C; this
is called “nesting of folders”. The maximum depth of
nested folders, allowed by this unit, is 2.
• Writing utilities
There are 3 utilities used to record data on a disc.
1. DAO (Disc At Once) utility
All data to be written must be prepared in advance
and written onto a disc from the beginning to the end
in one operation. No data can be added to a disc on
which data were already written with DAO utility.
2. TAO (Track At Once) utility
Data are written onto a disc track by track. Data can
be added to a disc on which data were written with
TAO utility.
3. Packet writing utility
Tracks are divided into smaller pieces while being
recorded, depending on the size of available spaces
on the disc. Data can be added to a disc on which
data were written with packet writing utility.
This unit can play MP3 discs recorded using DAO
and TAO utilities.
• File extension
A 3-character string added to a file name under
Windows or DOS environment is called “file extension”.
A file extension is used mainly to identify types of files.
File extension for MP3 files is “.mp3”.
• Multi-session
A session is a collection of data, covering from the
beginning to the end of recording made in one
operation. With TAO (Track At Once) utility, data can be
recorded with several operations. A session
corresponds to the data recorded in one operation.
This unit only play data recorded in the first operation.
In other words, the unit can only play the first session.
SESSION1 SESSION2 SESSION 3
36
ENGLISH
Page 37

TROUBLESHOOTING
If something seems to be wrong with this unit, first check the items in the table below.
Symptom Check See page
The power does not come on.
•Make sure the power cord is plugged firmly into a live
outlet.
10
A disc does not play.
Playback stops almost
immediately.
No picture.
The picture is bad.
No sound.
The remote control does not
work, or does not work correctly.
• Is there condensation inside this unit? (Leave the
player idle with the power on for 1 to 2 hours.)
• Are you trying to use a disc that can’t be played,
such as a PHOTO CD?
• Is the disc dirty? Is it loaded properly?
• Does the disc exceed the specified rating level?
• Is this unit connected correctly?
• Are the video connections firmly attached?
• Is the television video mode set correctly?
• Is this unit in a place with lots of vibration?
• Are the video connections firmly attached?
• Is the disc dirty?
• Is this unit connected directly to the television set? Or
is it connected through a video deck, a selector
switch, or a television with a built-in video deck?
The picture may be bad when used with some
television sets or projectors, due to the DVD copy
protection scheme.
The picture quality may also suffer if this unit is
connected through a selector switch with other video
equipment. Try turning off the power to the other
video equipment.
The picture quality may be somewhat poor when
paused, when doing Frame Advance, or during fast
forward or fast reverse. This is normal.
• Is this unit connected correctly?
• Are the audio connections firmly attached?
• Is the connected audio equipment turned on? Is the
volume set correctly? (Note that there will be no
audio playback during slow playback, Frame
Advance, fast forward, or fast reverse.)
• Are the remote control batteries installed correctly?
• Is the remote control too far from the main unit? Is
there something in the way?
• Are the remote control batteries getting weak?
• Is this unit in sunlight or strong fluorescent light?
2
4
6, 18
35
10
10
18
2
10
6
10
10
10
18
17
17
17
17
AS NECESSARY
En
DVD has many capabilities
Some of these capabilities may differ based on the disc being
played. The following situations may be caused by
information on the disc itself.
• The audio or subtitles are not reproduced in the
specified default language.
• The audio track or subtitles cannot be changed.
• There are no subtitles.
• No DVD menu. The DVD menu does not display in
the language you want.
• The view angle cannot be changed.
• Everything on the disc is played back regardless of
the rating level you have set.
Caution:
Abnormal functioning of this unit may be caused by
static electricity, or external interference.
To restore normal function, power off and on this unit
again.
ENGLISH
37
Page 38

SPECIFICATIONS
Power supply 100-240 V AC, 50/60 Hz
Power consumption 20 W (Standby: 10 W)
Weight 3.2 kg
External dimensions 430 × 85 × 300 mm (w × h × d)
Laser Semiconductor Laser,
wavelength 655/780 nm
Signal format PAL/NTSC
Supported discs DVD video discs
12 cm (single-sided single-layer,
single-sided double-layer, doublesided double-layer)
8 cm (single-sided single-layer,
single-sided double-layer, doublesided double-layer)
Compact discs (CD-DA, video CD)
12 cm and 8 cm discs
S video output Y output: 1 Vp-p (75 ohms, sync
negative)
C output: 0.286 Vp-p
1 Mini DIN 4 Pin
Video output Video composite output
1 Vp-p (75 ohms, sync negative)
2 RCA jacks
Audio output Digital output
0.5 Vp-p (75 ohms)
1 Fiber optical connector
1 RCA jack
Analog output
1.8 ± 0.2 Vrms (1 kHz, 0 dB,
10 k ohms)
1 RCA jacks (L/R)
Audio output characteristics
Signal to noise ratio
More than 93 dB (EIAJ)
Dynamic range
More than 90 dB (EIAJ)
Harmonic distortion
0.015 %
Frequency range:
SVCD/VCD/CD: 4 Hz to 20 kHz
(44.1 kHz sampling)
DVD: 4 Hz to 22 kHz
(48 kHz/96 kHz sampling)
Wow and flutter: unmeasurable
Operating conditions 5 ˚C to 40 ˚C
Accessories Video cable (1)
Audio cable (1)
Remote control (1)
• Manufactured under license from Dolby
Laboratories. “Dolby”, “Pro Logic” and the doubleD symbol are trademarks of Dolby Laboratories.
Confidential unpublished works. ©1992-1997
Dolby Laboratories. All rights reserved.
•Manufactured under license from Digital Theater
Systems, Inc. US Pat. No. 5,451,942 and other
worldwide patents issued and pending. “DTS” and
“DTS Digital Out” are trademarks of Digital
Theater Systems, Inc. ©1996 Digital Theater
systems, Inc. All rights reserved.
Specifications are subject to change without notice.
38
ENGLISH
Page 39

En
AS NECESSARY
ENGLISH
39
 Loading...