

Page 1

TV-AR205
RHCAM
SERVICE MANUAL
COLOR TELEVISION
This Service Manual does not include MECHANICAL EXPLODED VIEW and
MECHANICAL MAIN PARTS LIST.
These items will be issued in the next Supplement.
SPECIFICATION
Sistemas de recepção de cores: PAL-M/PAL-N/NTSC com seleção automática ou manual
Recepção de canais (181 canais) VHF = canais de 2 a 13
UHF = canais de 14 a 69
CATV = canais de 1a 125
Cinescópio (tubo de imagens):
Alimentação elétrica (FREE VOLTAGE)110 a 240V AC - 50/60Hz
Consumo de energia 85 W
Potência acústica: 2,5 W por canal
Peso
Dimensões (LxAxP): 610 x 440 x 483 mm
20 polegadas
Diagonal visual: 48 cm (19 polegadas)
18,5 kg
• Design and specifications are subject to change without notice.
S/M Code No. 09-009-349-1N1
DATA
Page 2
NOTICES BEFORE REPAIRING
To make the best use of this equipment, make sure to
obey the following items when repairing (or mending).
1. Do not damage or melt the tunicate of the leading
wire on the AC1 side, including the power supply
cord.
2. Do not soil or stain the letters on the spec.
inscription plates, notice labels, fuse labels, etc.
3. When repairing the part extracted from the
conducted side of the board pattern, fix it firmly
with applying bond to the pattern and the part.
4. Restore the following items after repairing.
1) Conditions of soldering of the wires (especially,
the distance on the AC1 side).
2) Conditions of wiring, bundling of wires, etc.
3) Types of the wries.
4) Attachment conditions of all types of the insulation.
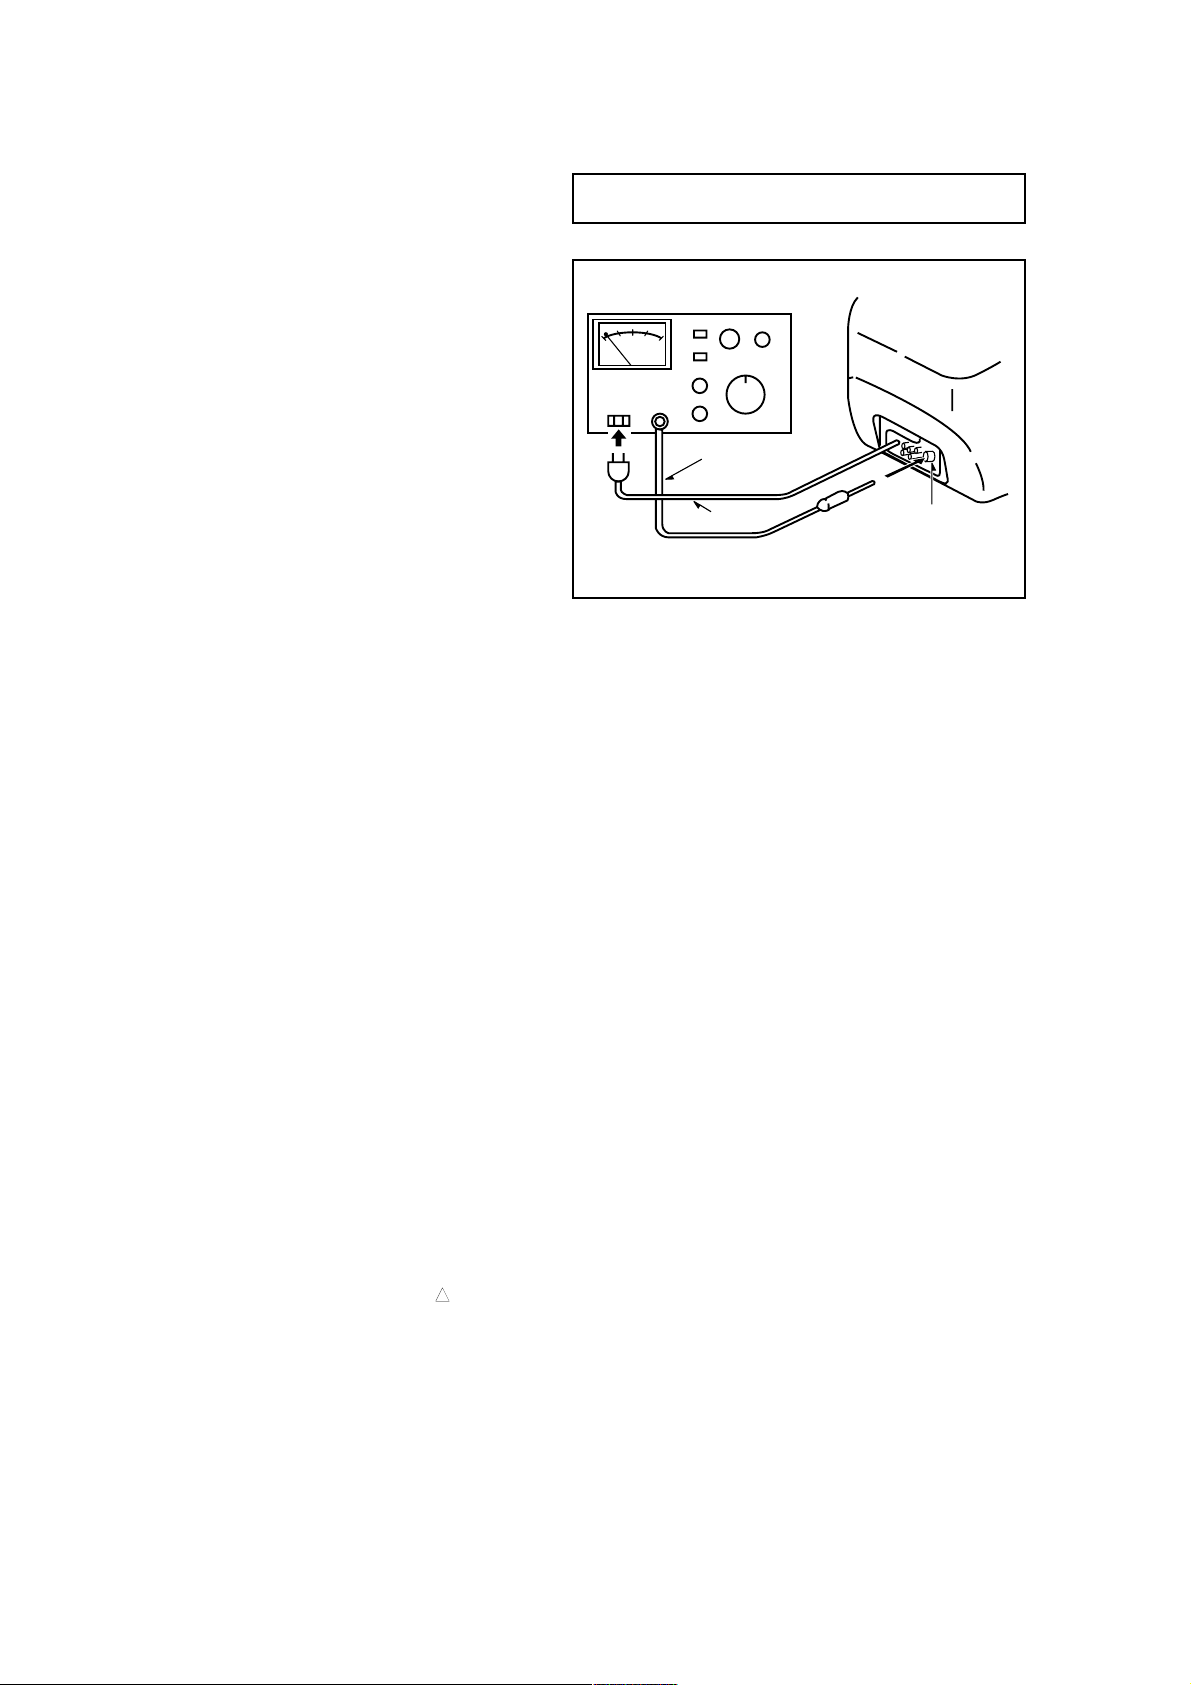
5. After repairing, always measure the insulation
resistance and perform the voltage-withstand test
(See Fig-1).
1) The insulation resistance must be 7.0 to 9.5 M
when applying
2) In the voltage withstand test, apply 3.0 KV for 1
minute and check that the GO lamp lights.
500V per second.
Insulation resistance: 7.0 to 9.5 M (500 V/s)
Voltage-withstand: 3.0 KV for 1 minute
Safety checker (Model 7110, etc.)
Earth cable
AC cable
Fig-1
Connect the earth cable
to the outside metal part
terminal.
* Breaking current set to 10 mA.
* Connect the safety checker as shown in Fig-1,
then measure the resistance and perform the test.
* Do not touch the equipment during testing.
* For details of the safety checker, refer to the supplied
Operation manual.
When servicing and checking on the TV, note the followings.
1. Keep the notices
As for the places which need special attentions, they
are indicated with the labels or seals on the cabinet,
chassis and parts. Make sure to keep the indications
and notices in the operation manual.
2. Avoid an electric shock.
There is a high voltage part inside. Avoid an electric
shock while the electric current is flowing.
3. Use the designated parts.
The parts in this equipment have the specific
characters of incombustibility and withstand voltage
for safety.
Therefore, the part which is replaced should be used
the part which has the same character. Especially as
to the important parts for safety which is indicated in
the circuit diagram or the table of parts as a mark,
the designated parts must be used.
4. Put parts and wires in the original position after
assembling or wiring.
There are parts which use the insulation material
such as a tube or tape for safety, or which are
assembled so that these parts do not contact with
the printed board. The inside wiring is designed not
!
to get closer to the pyrogenic parts and high voltage
parts. Therefore, put these parts in the original
positions.
5. Take care of the cathode-ray tube.
By setting an explosion-proof cathode-ray tube is set
in this equipment, safety is secured against
implosion.
However, when removing it or serving from
backward, it is dangerous to give a shock. Take
enough care to deal with it.
6. Avoid an X-ray.
Safety is secured against an X-ray by considering
about the cathode-ray tube and the high voltage
peripheral circuit, etc. Therefore, when repairing the
high voltage peripheral circuit, use the designated
parts and do not change the circuit. Repairing
except indicates causes rising of high voltage, and
the cathode-ray tube emits an X-ray.
7. Perform a safety check after servicing.
Confirm that the screws, parts and wiring which were
removed in order to service are put in the original
positions, or whether there are the portions which are
deteriorated around the places serviced.
2
Page 3

ELECTRICAL MAIN PARTS LIST
REF. NO PART NO. KANRI DESCRIPTION
CAP.CERAMICO
C410 C1-363-471-600 C.C.D.Y5P/Y5E 470PF>=500V K
C417 C1-364-331-795 C.C.D.SL 330PF/2KV K
C420 C1-363-102-601 C.C.D.Y5P 1KPF>=500V K
C421 C1-363-102-601 C.C.D.Y5P 1KPF>=500V K
C422 C1-363-102-601 C.C.D.Y5P 1KPF>=500V K
C427 C1-363-222-302 C.C.D.Y5P 2,2KPF>=50V K
C636 C1-364-104-103 C.C.D.Y5V/Y5U 100KPF>=25V Z
C643 C1-364-104-103 C.C.D.Y5V/Y5U 100KPF>=25V Z
C717 C1-364-223-202 C.C.D.Y5U 22KPF>=50V Z
C718 C1-363-102-300 C.C.D.Y5P 1KPF>=50V K
C724 C1-363-102-300 C.C.D.Y5P 1KPF>=50V K
C734 C1-361-151-303 C.C.D.N220 150PF>=50V K
C735 C1-361-151-303 C.C.D.N220 150PF>=50V K
!C800 C1-245-102-346 CCD GKO 1KPF/250VAC
C802 C1-363-472-803 C.C.D.Y5U 4,7KPF/2KV M (7,5mm)
C803 C1-363-472-803 C.C.D.Y5U 4,7KPF/2KV M (7,5mm)
C804 C1-363-472-803 C.C.D.Y5U 4,7KPF/2KV M (7,5mm)
C815 C1-363-221-600 C.C.D.Y5P 220PF>=500V K
C816 C1-363-471-600 C.C.D.Y5P/Y5E 470PF>=500V K
C819 C1-244-472-641 C.C.D.Y5P 4,7KPF/1KV K (6LR)
C820 C1-364-331-795 C.C.D.SL 330PF/2KV K
C822 C1-363-102-300 C.C.D.Y5P 1KPF>=50V K
C822 C1-363-102-300 C.C.D.Y5P 1KPF>=50V K
!C823 C1-369-222-803 C.C.D.GKO 2K2PF/620 M
C833 C1-363-102-601 C.C.D.Y5P 1KPF>=500V K
C842 C1-364-331-795 C.C.D.SL 330PF/2KV K
C843 C1-364-221-795 C.C.D.SL 220PF/1KV K
C844 C1-364-102-795 C.C.D.R 1KPF/1KV K
C901 C1-363-471-600 C.C.D.Y5P/Y5E 470PF>=500V K
C904 C1-363-102-803 C.C.D.Y5P 1KPF/2KV K 6LS
C905 C1-363-102-601 C.C.D.Y5P 1KPF>=500V K
CAP.POLY
C301 C1-331-104-004 C.POLYPRO 100KPF/160V 5%
C303 C1-330-224-222 C.POLYMET 220KPF/100V K
C409 C1-330-122-101 C.POLYMET 1,2KPF/100V J
C411 C1-330-103-516 C.POLYMET 10KPF/400V K
C414 C1-330-122-101 C.POLYMET 1,2KPF/100V J
C416 C1-265-394-553 CAP.POLYPRO 390KPF/250V J
C418 C1-265-772-952 CAP.POLYPRO 7K7PF/1600V J
C423 C1-330-104-421 C.POLYMET 100KPF/250V J
C424 C1-330-473-521 C.POLYMET 47KPF/400V K
C801 C1-265-104-073 C.POLY.100KPF/250VAC M(SUP.X1)
C809 C1-330-273-103 C.POLYMET 27KPF/63V J
C827 C1-330-474-904 C.POLYMET 470KPF/63V K
C902 C1-330-104-421 C.POLYMET 100KPF/250V J
CAP.SMD
C102 C1-490-410-410 CAP. SMD X7R 100KPF/25V K 805
C102 C1-494-210-410 CAP.SMD Y5P 100KPF/25V K 0805
C105 C1-490-510-300 CAP.SMD X7R 10KPF/50V K 0805
C106 C1-490-510-300 CAP.SMD X7R 10KPF/50V K 0805
C108 C1-490-410-100 CAP.SMD NPO 100PF/50V K 0805
C109 C1-490-410-100 CAP.SMD NPO 100PF/50V K 0805
C203 C1-490-410-410 CAP. SMD X7R 100KPF/25V K 805
C203 C1-494-210-410 CAP.SMD Y5P 100KPF/25V K 0805
C205 C1-490-522-300 CAP.SMD X7R 22KPF/50V K 0805
C206 C1-490-410-410 CAP. SMD X7R 100KPF/25V K 805
C206 C1-494-210-410 CAP.SMD Y5P 100KPF/25V K 0805
C208 C1-490-547-303 CAP.SMD X7R 47KPF/25V K 0805
C209 C1-490-547-303 CAP.SMD X7R 47KPF/25V K 0805
C210 C1-490-410-410 CAP. SMD X7R 100KPF/25V K 805
C210 C1-494-210-410 CAP.SMD Y5P 100KPF/25V K 0805
C211 C1-490-510-300 CAP.SMD X7R 10KPF/50V K 0805
C216 C1-490-447-000 CAP.SMD NPO 47PF/50V K 0805
C217 C1-490-447-000 CAP.SMD NPO 47PF/50V K 0805
NO.
C304 C1-490-510-300 CAP.SMD X7R 10KPF/50V K 0805
C401 C1-490-433-004 CAP.SMD NPO 33PF/50V J 0805
C402 C1-490-433-004 CAP.SMD NPO 33PF/50V J 0805
C403 C1-490-547-200 CAP.SMD X7R 4,7KPF/50V K 0805
C403 C1-494-247-200 CAP.SMD Y5P 4,7KPF/50V K 0805
C405 C1-490-522-200 CAP.SMD X7R 2,2KPF/50V K 0805
C405 C1-494-222-200 CAP.SMD Y5P 2,2KPF/50V K 0805
C406 C1-490-510-200 CAP.SMD X7R 1KPF/50V K 0805
C406 C1-494-210-200 CAP.SMD Y5P 1KPF/50V K 0805
C407 C1-490-447-104 CAP.SMD X7R 470PF/50V J 0805
C413 C1-490-522-300 CAP.SMD X7R 22KPF/50V K 0805
C501 C1-490-410-410 CAP. SMD X7R 100KPF/25V K 805
C501 C1-494-210-410 CAP.SMD Y5P 100KPF/25V K 0805
C502 C1-490-533-200 CAP.SMD X7R 3,3KPF/50V K 0805
C502 C1-494-233-200 CAP.SMD Y5P 3,3KPF/50V K 0805
C503 C1-490-510-300 CAP.SMD X7R 10KPF/50V K 0805
C504 C1-490-510-300 CAP.SMD X7R 10KPF/50V K 0805
C505 C1-490-510-300 CAP.SMD X7R 10KPF/50V K 0805
C601 C1-490-410-100 CAP.SMD NPO 100PF/50V K 0805
C602 C1-490-510-200 CAP.SMD X7R 1KPF/50V K 0805
C602 C1-494-210-200 CAP.SMD Y5P 1KPF/50V K 0805
C604 C1-490-433-004 CAP.SMD NPO 33PF/50V J 0805
C605 C1-490-547-303 CAP.SMD X7R 47KPF/25V K 0805
C607 C1-490-410-410 CAP. SMD X7R 100KPF/25V K 805
C607 C1-494-210-410 CAP.SMD Y5P 100KPF/25V K 0805
C610 C1-490-510-300 CAP.SMD X7R 10KPF/50V K 0805
C613 C1-490-647-405 CAP.SMD Y5V 470KPF/25V Z 0805
C614 C1-490-522-420 CAP.SMD X7R 220KPF/16V K 0805
C614 C1-494-222-420 CAP.SMD Y5P 220KPF/16V K 0805
C621 C1-490-510-200 CAP.SMD X7R 1KPF/50V K 0805
C621 C1-494-210-200 CAP.SMD Y5P 1KPF/50V K 0805
C622 C1-490-410-410 CAP. SMD X7R 100KPF/25V K 805
C622 C1-494-210-410 CAP.SMD Y5P 100KPF/25V K 0805
C624 C1-490-515-300 CAP.SMD X7R 15KPF/50V K 0805
C624 C1-494-215-300 CAP.SMD Y5P 15KPF/50V K 0805
C625 C1-490-510-200 CAP.SMD X7R 1KPF/50V K 0805
C625 C1-494-210-200 CAP.SMD Y5P 1KPF/50V K 0805
C629 C1-490-510-300 CAP.SMD X7R 10KPF/50V K 0805
C631 C1-490-510-200 CAP.SMD X7R 1KPF/50V K 0805
C631 C1-494-210-200 CAP.SMD Y5P 1KPF/50V K 0805
C633 C1-490-410-410 CAP. SMD X7R 100KPF/25V K 805
C633 C1-494-210-410 CAP.SMD Y5P 100KPF/25V K 0805
C637 C1-490-510-300 CAP.SMD X7R 10KPF/50V K 0805
C638 C1-490-510-200 CAP.SMD X7R 1KPF/50V K 0805
C638 C1-494-210-200 CAP.SMD Y5P 1KPF/50V K 0805
C640 C1-490-410-410 CAP. SMD X7R 100KPF/25V K 805
C640 C1-494-210-410 CAP.SMD Y5P 100KPF/25V K 0805
C644 C1-490-510-300 CAP.SMD X7R 10KPF/50V K 0805
C645 C1-490-510-300 CAP.SMD X7R 10KPF/50V K 0805
C652 C1-490-410-100 CAP.SMD NPO 100PF/50V K 0805
C702 C1-490-415-104 CAP.SMD NPO 150PF/50V J 0805
C704 C1-490-415-104 CAP.SMD NPO 150PF/50V J 0805
C705 C1-490-415-104 CAP.SMD NPO 150PF/50V J 0805
C706 C1-490-415-104 CAP.SMD NPO 150PF/50V J 0805
C707 C1-490-415-104 CAP.SMD NPO 150PF/50V J 0805
C709 C1-490-433-000 CAP.SMD NPO 33PF/50V K 0805
C710 C1-490-433-000 CAP.SMD NPO 33PF/50V K 0805
C711 C1-490-433-000 CAP.SMD NPO 33PF/50V K 0805
C712 C1-490-433-000 CAP.SMD NPO 33PF/50V K 0805
C719 C1-490-433-000 CAP.SMD NPO 33PF/50V K 0805
C721 C1-490-433-000 CAP.SMD NPO 33PF/50V K 0805
C722 C1-490-433-000 CAP.SMD NPO 33PF/50V K 0805
C725 C1-490-447-100 CAP.SMD NPO 470PF/50V K 0805
C727 C1-490-415-104 CAP.SMD NPO 150PF/50V J 0805
C728 C1-490-415-104 CAP.SMD NPO 150PF/50V J 0805
C729 C1-490-410-410 CAP. SMD X7R 100KPF/25V K 805
C729 C1-494-210-410 CAP.SMD Y5P 100KPF/25V K 0805
C730 C1-490-447-100 CAP.SMD NPO 470PF/50V K 0805
C731 C1-490-410-410 CAP. SMD X7R 100KPF/25V K 805
C731 C1-494-210-410 CAP.SMD Y5P 100KPF/25V K 0805
REF. NO PART NO. KANRI DESCRIPTION
NO.
3
Page 4

REF. NO PART NO. KANRI DESCRIPTION
C732 C1-490-510-300 CAP.SMD X7R 10KPF/50V K 0805
C808 C1-490-533-200 CAP.SMD X7R 3,3KPF/50V K 0805
C808 C1-494-233-200 CAP.SMD Y5P 3,3KPF/50V K 0805
C810 C1-490-547-303 CAP.SMD X7R 47KPF/25V K 0805
C811 C1-490-522-200 CAP.SMD X7R 2,2KPF/50V K 0805
C811 C1-494-222-200 CAP.SMD Y5P 2,2KPF/50V K 0805
C813 C1-490-410-410 CAP. SMD X7R 100KPF/25V K 805
C813 C1-494-210-410 CAP.SMD Y5P 100KPF/25V K 0805
C818 C1-490-522-300 CAP.SMD X7R 22KPF/50V K 0805
C824 C1-490-510-200 CAP.SMD X7R 1KPF/50V K 0805
C824 C1-494-210-200 CAP.SMD Y5P 1KPF/50V K 0805
C826 C1-490-410-100 CAP.SMD NPO 100PF/50V K 0805
C837 C1-490-510-300 CAP.SMD X7R 10KPF/50V K 0805
C841 C1-490-510-300 CAP.SMD X7R 10KPF/50V K 0805
C847 C1-490-547-420 CAP.SMD X7R 470KPF/16V K 0805
CAP.ELCO
C101 C1-380-220-221 ELCO G1 22UF >= 16V M
C103 C1-380-478-622 ELCO 0,47UF/100V M
C104 C1-380-100-524 ELCO 10UF/50V M
C107 C1-380-101-228 ELCO G1 100UF >= 16V M
C201 C1-380-100-221 ELCO G1 10UF >= 16V M
C204 C1-380-229-622 ELCO 2,2UF/100V M 5x11mm
C207 C1-380-100-221 ELCO G1 10UF >= 16V M
C212 C1-380-229-622 ELCO 2,2UF/100V M 5x11mm
C302 C1-380-101-630 ELCO 100UF/35V M 6,3X11
C404 C1-380-109-622 ELCO 1UF/100V M
C412 C1-380-101-228 ELCO G1 100UF >= 16V M
C415 C1-380-479-732 ELCO 4,7UF/160V M
C419 C1-380-109-622 ELCO 1UF/100V M
C425 C1-380-471-229 ELCO 470UF/16V M
C426 C1-380-471-229 ELCO 470UF/16V M
C603 C1-380-100-221 ELCO G1 10UF >= 16V M
C606 C1-380-100-221 ELCO G1 10UF >= 16V M
C608 C1-380-479-522 ELCO G1 4,7UF/50V M
C609 C1-380-470-224 ELCO G1 47UF >= 16V M
C611 C1-380-479-522 ELCO G1 4,7UF/50V M
C612 C1-380-100-221 ELCO G1 10UF >= 16V M
C615 C1-380-479-522 ELCO G1 4,7UF/50V M
C616 C1-380-100-525 ELCO 10UF/16V M LL
C617 C1-380-109-521 ELCO G1 1UF >= 50V M
C618 C1-380-109-521 ELCO G1 1UF >= 50V M
C619 C1-380-100-221 ELCO G1 10UF >= 16V M
C620 C1-380-100-221 ELCO G1 10UF >= 16V M
C623 C1-380-100-221 ELCO G1 10UF >= 16V M
C626 C1-380-479-522 ELCO G1 4,7UF/50V M
C627 C1-380-479-522 ELCO G1 4,7UF/50V M
C628 C1-380-100-221 ELCO G1 10UF >= 16V M
C630 C1-380-470-224 ELCO G1 47UF >= 16V M
C632 C1-380-478-622 ELCO 0,47UF/100V M
C634 C1-380-109-622 ELCO 1UF/100V M
C635 C1-380-221-231 ELCO 220UF/16V M 6,3X11mm
C639 C1-380-478-622 ELCO 0,47UF/100V M
C641 C1-380-109-622 ELCO 1UF/100V M
C642 C1-380-221-231 ELCO 220UF/16V M 6,3X11mm
C646 C1-291-222-422 ELCO 2200UF/25V M
C647 C1-380-109-521 ELCO G1 1UF >= 50V M
C648 C1-380-109-521 ELCO G1 1UF >= 50V M
C649 C1-380-109-521 ELCO G1 1UF >= 50V M
C650 C1-380-109-521 ELCO G1 1UF >= 50V M
C651 C1-380-229-622 ELCO 2,2UF/100V M 5x11mm
C653 C1-380-229-622 ELCO 2,2UF/100V M 5x11mm
C655 C1-380-100-221 ELCO G1 10UF >= 16V M
C701 C1-380-109-622 ELCO 1UF/100V M
C703 C1-380-470-922 ELCO 47UF/10V M
C708 C1-380-109-622 ELCO 1UF/100V M
C716 C1-380-221-231 ELCO 220UF/16V M 6,3X11mm
C720 C1-380-101-228 ELCO G1 100UF >= 16V M
C723 C1-380-100-221 ELCO G1 10UF >= 16V M
NO.
C733 C1-380-478-521 ELCO G1 0,47UF/50V M
C805 C1-292-221-055 ELCO 220UF / 385V (30X30)
C806 C1-380-479-522 ELCO G1 4,7UF/50V M
C807 C1-380-479-522 ELCO G1 4,7UF/50V M
C812 C1-380-470-224 ELCO G1 47UF >= 16V M
C825 C1-297-101-934 ELCO 100UF/160V HR
C829 C1-297-330-922 ELCO 33UF/160V HR
C831 C1-297-102-334 ELCO 1000UF/25V HR
C834 C1-380-101-328 ELCO 100UF/25V M
C835 C1-380-470-224 ELCO G1 47UF >= 16V M
C836 C1-380-101-228 ELCO G1 100UF >= 16V M
C838 C1-380-221-231 ELCO 220UF/16V M 6,3X11mm
C839 C1-380-101-228 ELCO G1 100UF >= 16V M
C840 C1-291-102-318 ELCO 1000UF/16V M 10X16
C840 C1-291-102-317 ELCO 1000UF/16V M 10X20
C846 C1-380-470-222 ELCO 47UF/16V M
C903 C1-291-220-017 ELCO 22UF/250V M 12,5X25
FILTRO
CF201 C1-421-506-600 FILTRO CERAMICO TPS4.5MB
CF601 C1-421-500-400 FILTRO CERAMICO SFE- 4.5MB
CF601 C1-421-507-600 FILTRO CERAMICO SFSH4.5MDB
SF101 C1-421-507-200 FILTRO CERAMICO M1971M
CRISTAL
X501 C1-425-009-200 CRISTAL NTSC 3.579545 SE / S
X502 C1-425-009-100 CRISTAL PAL-M 3.575611 SSP / S
X503 C1-425-009-300 CRISTAL PAL-N 3.582056 SSP / S
X701 C1-425-011-400 CRISTAL 32,768KHZ
RS601 C1-421-506-100 RESSONADOR CERAMICO CSB-503F58
FERRITE
FB801 C1-427-010-820 FERR.BEAD BL02RN2R6T4 DP.RAD
FB802 C1-427-010-820 FERR.BEAD BL02RN2R6T4 DP.RAD
FB803 C1-427-010-820 FERR.BEAD BL02RN2R6T4 DP.RAD
FB803 C1-427-011-000 FERRITE 5,1X1,5X4
FB804 C1-427-011-000 FERRITE 5,1X1,5X4
FB701 C1-427-011-600 FERRITE BEAD 3,5x6,5-0,8H
CONECTOR
C1-647-661-800 CABO 18AWG 70MM PR AMARRACAO F
CN401 C1-631-028-304 BASE CONECTORA 04VIAS
CN401 C1-647-661-600 CABO JUMPER 20AWG 50MM EST.AZ
CN501 C1-647-660-200 CABO FLAT 2.54 24AWG 5V 390MM
CN601 C1-633-210-660 BASE CONECTORA 4VIAS 180 MIS
CN801 C1-633-212-700 BASE CONECTORA 2VIAS
CN802 C1-633-211-202 BASE CONECTORA 2VIAS
EP601 C1-633-213-000 JACK PHONE
EP601 C1-633-213-000 JACK PHONE
EP601 C1-633-212-500 JACK PHONE STEREO
EP601 C1-633-212-500 JACK PHONE STEREO
JK601 C1-633-212-400 CJT.TOMADA 3RCA HT C/CHAVE
JK601 C1-633-213-100 CJT.TOMADA 3RCA HT C/CHAVE
JK602 C1-633-212-600 CJT.TOMADA 3RCA HT C/CHAVE
W1 C1-647-659-700 CABO MONT.1VC/TER.18AWG MR460
W2 C1-647-658-900 CAB.MONT.1VC/TR.18AWG 380MM MR
DIODO
D201 C1-414-621-902 DIODO 1N-4148 75V SINAL
D301 C1-410-430-015 DIODO 1N-4004 RETIFICADOR
D301 C1-415-172-201 DIODO UF-4004
D401 C1-415-161-909 DIODO BYD-33G
D401 C1-415-167-701 DIODO RAP.PASS.A VIDRO RGP10G
D401 C1-129-314-199 DIODO SK-4F1/06 RETIFICADOR
D402 C1-415-161-909 DIODO BYD-33G
REF. NO PART NO. KANRI DESCRIPTION
NO.
4
Page 5

REF. NO PART NO. KANRI DESCRIPTION
D402 C1-415-167-701 DIODO RAP.PASS.A VIDRO RGP10G
D402 C1-129-314-199 DIODO SK-4F1/06 RETIFICADOR
D403 C1-415-161-909 DIODO BYD-33G
D403 C1-415-167-701 DIODO RAP.PASS.A VIDRO RGP10G
D403 C1-129-314-199 DIODO SK-4F1/06 RETIFICADOR
D404 C1-415-161-909 DIODO BYD-33G
D404 C1-415-167-701 DIODO RAP.PASS.A VIDRO RGP10G
D404 C1-129-314-199 DIODO SK-4F1/06 RETIFICADOR
D405 C1-414-621-902 DIODO 1N-4148 75V SINAL
D406 C1-414-621-902 DIODO 1N-4148 75V SINAL
D701 C1-414-621-902 DIODO 1N-4148 75V SINAL
D801 C1-414-621-902 DIODO 1N-4148 75V SINAL
D802 C1-414-621-902 DIODO 1N-4148 75V SINAL
D803 C1-414-621-902 DIODO 1N-4148 75V SINAL
D804 C1-414-621-902 DIODO 1N-4148 75V SINAL
D805 C1-414-621-903 DIODO BAV-21
D805 C1-414-621-905 DIODO DE CHAVEAMENTO 1SS244T77
D806 C1-415-161-910 DIODO BYD-33J
D806 C1-415-167-701 DIODO RAP.PASS.A VIDRO RGP10G
D806 C1-129-314-199 DIODO SK-4F1/06 RETIFICADOR
D808 C1-415-163-601 DIODO BYM-26D D808
D808 C1-129-313-899 DIODO SK-3GH06 RETIFICADOR
D809 C1-411-431-007 DIODO 1N-5062
D809 C1-415-168-001 DIODO PASSIVADO A VIDRO GP15K
D809 C1-129-314-099 DIODO SK-1/08 RETIFICADOR
D810 C1-411-431-007 DIODO 1N-5062
D810 C1-415-168-001 DIODO PASSIVADO A VIDRO GP15K
D810 C1-129-314-099 DIODO SK-1/08 RETIFICADOR
D811 C1-411-431-007 DIODO 1N-5062
D811 C1-415-168-001 DIODO PASSIVADO A VIDRO GP15K
D811 C1-129-314-099 DIODO SK-1/08 RETIFICADOR
D812 C1-411-431-007 DIODO 1N-5062
D812 C1-415-168-001 DIODO PASSIVADO A VIDRO GP15K
D812 C1-129-314-099 DIODO SK-1/08 RETIFICADOR
D813 C1-415-161-910 DIODO BYD-33J
D813 C1-415-167-701 DIODO RAP.PASS.A VIDRO RGP10G
D813 C1-129-314-199 DIODO SK-4F1/06 RETIFICADOR
D814 C1-414-621-902 DIODO 1N-4148 75V SINAL
D815 C1-414-621-902 DIODO 1N-4148 75V SINAL
D816 C1-414-621-902 DIODO 1N-4148 75V SINAL
D819 C1-129-309-899 DIODO MR-856
D819 C1-129-313-899 DIODO SK-3GH06 RETIFICADOR
D901 C1-414-621-903 DIODO BAV-21
D901 C1-414-621-905 DIODO DE CHAVEAMENTO 1SS244T77
D902 C1-414-621-903 DIODO BAV-21
D902 C1-414-621-905 DIODO DE CHAVEAMENTO 1SS244T77
D903 C1-414-621-903 DIODO BAV-21
D903 C1-414-621-905 DIODO DE CHAVEAMENTO 1SS244T77
NTC801 C1-125-707-400 RES.COEF.NEG.NTC LIM.CORR.PICO
PTC801 C1-125-707-100 PTC B59209-T80-B10
DIODO ZENER
DZ806 C1-415-166-801 DIODO BZX79B9V1
DZ801 C1-415-171-901 DIODO BZX79C18V
DZ802 C1-415-171-901 DIODO BZX79C18V
DZ804 C1-415-171-901 DIODO BZX79C18V
DZ808 C1-415-169-001 DIODO BZX79C3V6
DZ701 C1-415-169-301 DIODO BZX79C4V7
DZ703 C1-415-169-301 DIODO BZX79C4V7
DZ803 C1-415-169-301 DIODO BZX79C4V7
!DZ805 C1-415-169-301 DIODO BZX79C4V7
DZ702 C1-415-169-401 DIODO BZX79C5V1
DZ704 C1-415-169-501 DIODO BZX79C5V6
DZ705 C1-415-169-501 DIODO BZX79C5V6
DZ809 C1-415-169-501 DIODO BZX79C5V6
DZ201 C1-415-169-801 DIODO BZX79C8V2
DZ202 C1-415-169-801 DIODO BZX79C8V2
DZ401 C1-415-169-801 DIODO BZX79C8V2
DZ601 C1-415-169-801 DIODO BZX79C8V2
NO.
DZ602 C1-415-169-801 DIODO BZX79C8V2
DZ604 C1-415-169-801 DIODO BZX79C8V2
DZ605 C1-415-169-801 DIODO BZX79C8V2
DZ807 C1-415-169-801 DIODO BZX79C8V2
DZ901 C1-415-169-801 DIODO BZX79C8V2
DZ806 C1-415-165-701 DIODO MTZ-JT77-9,1C
DIODO SMD
DZ702 C1-550-100-011 DIODO SMD BZV55-F5V1
DZ702 C1-550-100-018 DIODO SMD UDZTE-17 5,1VB
FUSIVEL
!F801 C1-461-058-002 FUS.ACAO RET.20AG 4A/250V
!F802 C1-461-052-002 FUS.ACAO RET.20AG 1A/250V
ALTO FALANTE
FL601 C1-510-454-007 ALTO FALANTE 2X5"
FL602 C1-510-454-007 ALTO FALANTE 2X5"
FUSISTOR
!FR301 C1-183-515-917 FUSISTOR 1/2W 1,5R J
!FR401 C1-185-510-914 FUSISTOR 1W 1R 5% N
!FR402 C1-183-510-917 FUSISTOR 1/2W 1R J
!FR403 C1-183-510-917 FUSISTOR 1/2W 1R J
!FR404 C1-183-522-017 FUSISTOR 1/2W 22R J
!FR602 C1-183-533-917 FUSISTOR 1/2W 3,3R J
!FR603 C1-183-533-917 FUSISTOR 1/2W 3,3R J
!FR801 C1-183-510-917 FUSISTOR 1/2W 1R J
!FR802 C1-183-539-017 FUSISTOR 1/2W 39R J
!FR803 C1-183-510-217 FUSISTOR 1/2W 1K J
FR804 C1-183-539-017 FUSISTOR 1/2W 39R J
IC
IC101 C1-149-302-499 I.C. UPC-574/KA-33V
IC301 C1-149-389-299 I.C.TDA-9309 AMP.VT.C/ACOPL.DC
IC501 C1-149-390-999 I.C. TDA8841/N2
IC601 C1-149-379-299 I.C. TDA-1013B
IC602 C1-149-379-299 I.C. TDA-1013B
IC701 C1-710-100-085 I.C. MC68HC908TV24
IC703 C1-149-394-899 I.C. M51943B
IC801 C1-149-392-099 I.C. UC-3842BN
IC802 C1-146-300-103 I.C. TL-431-BCLP
IC803 C1-139-999-427 PHOTO COUPLER PC817X1 A (DIP)
IC803 C1-139-999-159 PHOTO COUPLER PS-2501-1-H
IC804 C1-146-100-353 I.C. 7805 (METAL)
IC901 C1-149-388-799 I.C. TDA-6107Q-N1
IC SMD
IC603 C1-710-100-023 I.C. SMD HEF4052B M1/BU4052BCF
IC604 C1-710-100-063 I.C. SMD TDA-9850T
IC701 C1-710-100-095 I.C. XC68HC08TV24CP-AIWA
IC702 C1-710-100-062 I.C. SMD MN24C08MN6
INDUTOR/BOBINA
C1-311-604-300 BOBINA DESMAGNETIZADORA
L101 C1-479-920-034 INDUTOR 0,82UH K
L102 C1-479-903-734 INDUTOR FIXO 22UH K AXIAL
L201 C1-479-908-634 INDUTOR FIXO 15UH K AXIAL
L402 C1-319-951-400 INDUTOR 22UH
L701 C1-479-906-734 INDUTOR FIXO 2,2UH K AXIAL
L702 C1-479-906-734 INDUTOR FIXO 2,2UH K AXIAL
L703 C1-479-909-334 INDUTOR FIXO 33UH K AXIAL
L801 C1-479-907-634 INDUTOR FIXO 5,6UH K AXIAL
REF. NO PART NO. KANRI DESCRIPTION
NO.
5
Page 6

REF. NO PART NO. KANRI DESCRIPTION
L803 C1-319-953-000 INDUTOR 33UH
LF801 C1-312-400-900 FILTRO DE LINHA ELF18N012A
DIODO LED
LD701 C1-459-524-100 DIODO LED BICOLOR SLP-581D-51
TRANSISTOR
Q401 C1-139-608-600 TRANSISTOR MPS-A42
!Q402 C1-139-999-405 TRANSISTOR 2SC5297
!Q402 C1-139-999-301 TRANSISTOR BU-2508DX
!Q801 C1-139-999-351 TRANSISTOR 2SK-2545
!Q801 C1-139-999-404 TRANSISTOR MOS FET FL7KM-12A
Q802 C1-139-999-188 TRANSISTOR 2SD2061E/F
Q804 C1-320-030-402 TRANSISTOR BC-327/16
TRANSISTOR SMD
Q201 C1-700-100-003 TRANSISTOR SMD BC-847B
Q202 C1-700-100-003 TRANSISTOR SMD BC-847B
Q501 C1-700-100-003 TRANSISTOR SMD BC-847B
Q502 C1-700-100-003 TRANSISTOR SMD BC-847B
Q601 C1-700-100-004 TRANSISTOR SMD BC-857B
Q701 C1-700-100-003 TRANSISTOR SMD BC-847B
Q702 C1-700-100-003 TRANSISTOR SMD BC-847B
Q703 C1-700-100-003 TRANSISTOR SMD BC-847B
Q704 C1-700-100-003 TRANSISTOR SMD BC-847B
Q705 C1-700-100-004 TRANSISTOR SMD BC-857B
Q706 C1-700-100-003 TRANSISTOR SMD BC-847B
Q707 C1-700-100-004 TRANSISTOR SMD BC-857B
Q708 C1-700-100-003 TRANSISTOR SMD BC-847B
Q709 C1-700-100-004 TRANSISTOR SMD BC-857B
Q803 C1-700-100-003 TRANSISTOR SMD BC-847B
RESISTOR
R102 C1-183-568-192 RES.METAL FILME 1/2W 680R 5% N
R106 C1-183-527-292 RES.METAL FILME 1/2W 2,7K 5% N
R107 C1-183-527-292 RES.METAL FILME 1/2W 2,7K 5% N
R110 C1-183-527-292 RES.METAL FILME 1/2W 2,7K 5% N
R111 C1-183-527-292 RES.METAL FILME 1/2W 2,7K 5% N
R112 C1-183-527-292 RES.METAL FILME 1/2W 2,7K 5% N
R113 C1-183-527-292 RES.METAL FILME 1/2W 2,7K 5% N
R202 C1-183-547-992 RES.METAL FILME 1/2W 4,7R 5% N
R207 C1-185-547-145 RES.METAL FILME 1W 470R 5%
R208 C1-183-518-392 RES.METAL FILME 1/2W 18K 5% N
R209 C1-183-518-392 RES.METAL FILME 1/2W 18K 5% N
R210 C1-183-522-292 RES.METAL FILME 1/2W 2,2K 5% N
R215 C1-183-547-192 RES.METAL FILME 1/2W 470R 5% N
R301 C1-189-139-331 RES.PRECISAO 0,4W 39K 1% N
R302 C1-183-510-192 RES.METAL FILME 1/2W 100R 5% N
R303 C1-183-510-192 RES.METAL FILME 1/2W 100R 5% N
R304 C1-183-515-292 RES.METAL FILME 1/2W 1,5K 5% N
R305 C1-183-515-292 RES.METAL FILME 1/2W 1,5K 5% N
R307 C1-183-533-192 RES.METAL.FILME 1/2W 330R 5% N
R308 C1-185-527-912 RES.M.FILME 1W 2,7R 5% N
R309 C1-185-527-912 RES.M.FILME 1W 2,7R 5% N
R408 C1-183-539-192 RES.METAL FILME 1/2W 390R 5% N
R410 C1-183-556-292 RES.METAL FILME 1/2W 5,6K 5% N
R411 C1-187-547-212 RES.METAL FILME 3W 4,7K 5% N
R412 C1-183-522-992 RES.METAL FILME 1/2W 2,2R 5% N
R413 C1-183-556-392 RES.METAL FILME 1/2W 56K 5% N
R414 C1-183-515-392 RES.METAL FILME 1/2W 15K 5% N
R415 C1-185-515-345 RES.METAL FILME 1W 15K 5%
R416 C1-183-547-092 RES.METAL FILME 1/2W 47R 5% N
R504 C1-183-522-392 RES.METAL FILME 1/2W 22K 5% N
R506 C1-183-522-392 RES.METAL FILME 1/2W 22K 5% N
R507 C1-183-510-292 RES.METAL FILME 1/2W 1K 5% N
R508 C1-183-522-192 RES.METAL FILME 1/2W 220R 5% N
NO.
R509 C1-183-522-192 RES.METAL FILME 1/2W 220R 5% N
R510 C1-183-522-192 RES.METAL FILME 1/2W 220R 5% N
R608 C1-183-522-292 RES.METAL FILME 1/2W 2,2K 5% N
R616 C1-183-522-492 RES.METAL FILME 1/2W 220K 5% N
R616 C1-183-522-492 RES.METAL FILME 1/2W 220K 5% N
R617 C1-185-515-145 RES.METAL FILME 1W 150R 5%
R619 C1-185-515-145 RES.METAL FILME 1W 150R 5%
R620 C1-183-522-492 RES.METAL FILME 1/2W 220K 5% N
R620 C1-183-522-492 RES.METAL FILME 1/2W 220K 5% N
R628 C1-183-522-292 RES.METAL FILME 1/2W 2,2K 5% N
R702 C1-183-510-192 RES.METAL FILME 1/2W 100R 5% N
R704 C1-183-533-392 RES.METAL FILME 1/2W 33K 5% N
R705 C1-183-547-192 RES.METAL FILME 1/2W 470R 5% N
R706 C1-183-547-092 RES.METAL FILME 1/2W 47R 5% N
R711 C1-183-510-192 RES.METAL FILME 1/2W 100R 5% N
R712 C1-183-510-192 RES.METAL FILME 1/2W 100R 5% N
R713 C1-183-510-192 RES.METAL FILME 1/2W 100R 5% N
R714 C1-183-510-192 RES.METAL FILME 1/2W 100R 5% N
R715 C1-183-510-192 RES.METAL FILME 1/2W 100R 5% N
R716 C1-183-510-192 RES.METAL FILME 1/2W 100R 5% N
R717 C1-183-510-192 RES.METAL FILME 1/2W 100R 5% N
R720 C1-183-527-292 RES.METAL FILME 1/2W 2,7K 5% N
R721 C1-183-527-292 RES.METAL FILME 1/2W 2,7K 5% N
R722 C1-183-527-292 RES.METAL FILME 1/2W 2,7K 5% N
R728 C1-183-510-192 RES.METAL FILME 1/2W 100R 5% N
R729 C1-183-510-192 RES.METAL FILME 1/2W 100R 5% N
R736 C1-183-510-292 RES.METAL FILME 1/2W 1K 5% N
R737 C1-183-510-292 RES.METAL FILME 1/2W 1K 5% N
R739 C1-183-522-192 RES.METAL FILME 1/2W 220R 5% N
R740 C1-183-533-392 RES.METAL FILME 1/2W 33K 5% N
R743 C1-183-547-292 RES.METAL FILME 1/2W 4,7K 5% N
R745 C1-183-510-292 RES.METAL FILME 1/2W 1K 5% N
R749 C1-183-547-192 RES.METAL FILME 1/2W 470R 5% N
R759 C1-183-547-192 RES.METAL FILME 1/2W 470R 5% N
R760 C1-183-556-192 RES.METAL FILME 1/2W 560R 5% N
R761 C1-183-547-292 RES.METAL FILME 1/2W 4,7K 5% N
R762 C1-183-556-192 RES.METAL FILME 1/2W 560R 5% N
R763 C1-183-547-292 RES.METAL FILME 1/2W 4,7K 5% N
R764 C1-183-556-192 RES.METAL FILME 1/2W 560R 5% N
R765 C1-183-547-292 RES.METAL FILME 1/2W 4,7K 5% N
R766 C1-183-522-592 RES.METAL FILME 1/2W 2,2M 5% N
R801 C1-184-527-312 RES.METAL FILME 2W 27K 5% N
R804 C1-183-518-292 RES.METAL FILME 1/2W 1,8K 5% N
R810 C1-184-527-812 RES.METAL FILME 2W 0,27R 5% N
R812 C1-184-547-312 RES.METAL FILME 2W 47K 5% N
R813 C1-183-568-392 RES.METAL FILME 1/2W 68K 5% N
R814 C1-183-515-192 RES.METAL FILME 1/2W 150R 5% N
!R815 C1-183-568-548 RES.METAL GLAZED 6,8M
!R816 C1-189-112-431 RES.PRECISAO 0,6W 120K 0,5%
!R817 C1-189-123-790 RES.PRECISAO 0,6W 2,37K 0,5%
R820 C1-185-547-145 RES.METAL FILME 1W 470R 5%
R821 C1-187-533-040 RES.METAL FILME 3W 33R 5% N
R823 C1-185-510-245 RES.METAL FILME 1W 1K 5%
R824 C1-183-533-992 RES.METAL FILME 1/2W 3,3R 5% N
R825 C1-183-510-092 RES.METAL FILME 1/2W 10R 5% N
R826 C1-183-510-392 RES.METAL.FILME 1/2W 10K 5% N
R827 C1-174-051-025 RES.FIO 5W 1K 5% V-SQM
R828 C1-183-518-292 RES.METAL FILME 1/2W 1,8K 5% N
R829 C1-183-518-292 RES.METAL FILME 1/2W 1,8K 5% N
R830 C1-183-518-292 RES.METAL FILME 1/2W 1,8K 5% N
R831 C1-183-510-392 RES.METAL.FILME 1/2W 10K 5% N
R901 C1-183-510-192 RES.METAL FILME 1/2W 100R 5% N
R902 C1-183-510-192 RES.METAL FILME 1/2W 100R 5% N
R903 C1-183-510-192 RES.METAL FILME 1/2W 100R 5% N
R904 C1-183-615-219 RES.COMPOS.1/2W 1,5K 5% N
R905 C1-183-615-219 RES.COMPOS.1/2W 1,5K 5% N
R906 C1-183-615-219 RES.COMPOS.1/2W 1,5K 5% N
R907 C1-183-510-292 RES.METAL FILME 1/2W 1K 5% N
REF. NO PART NO. KANRI DESCRIPTION
NO.
6
Page 7

REF. NO PART NO. KANRI DESCRIPTION
RES.SMD
R101 C1-502-539-202 RES.SMD 3,9K 0805
R103 C1-502-510-102 RES.SMD 100R 5% 0805
R104 C1-502-510-102 RES.SMD 100R 5% 0805
R105 C1-502-556-102 RES.SMD 560R 5% N 0805
R201 C1-502-510-202 RES.SMD 1K 5% 0805
R203 C1-502-518-102 RES.SMD 180R 5% 0805
R204 C1-502-518-102 RES.SMD 180R 5% 0805
R205 C1-502-510-002 RES.SMD 10R 5% 0805
R206 C1-502-512-202 RES.SMD 1,2K 5% 0805
R211 C1-502-510-102 RES.SMD 100R 5% 0805
R212 C1-502-575-002 RES.SMD 75R 5% 0805
R213 C1-502-510-102 RES.SMD 100R 5% 0805
R216 C1-502-533-102 RES.SMD 330R 5% 0805
R218 C1-502-547-102 RES.SMD 470R 5% 0805
R219 C1-502-575-002 RES.SMD 75R 5% 0805
R228 C1-502-522-502 RES.SMD 2,2M 5% 0805
R401 C1-502-510-102 RES.SMD 100R 5% 0805
R402 C1-502-510-102 RES.SMD 100R 5% 0805
R403 C1-502-518-302 RES.SMD 18K 5% 0805
R404 C1-502-527-302 RES.SMD 27K 5% 0805
R405 C1-502-515-202 RES.SMD 1,5K 5% 0805
R406 C1-502-547-202 RES.SMD 4,7K 5% 0805
R407 C1-502-547-202 RES.SMD 4,7K 5% 0805
R409 C1-502-533-102 RES.SMD 330R 5% 0805
R418 C1-502-527-302 RES.SMD 27K 5% 0805
R502 C1-502-510-402 RES.SMD 100K 5% 0805
R503 C1-502-547-302 RES.SMD 47K 5% 0805
R505 C1-502-547-302 RES.SMD 47K 5% 0805
R601 C1-502-510-102 RES.SMD 100R 5% 0805
R602 C1-502-512-202 RES.SMD 1,2K 5% 0805
R603 C1-502-182-202 RES.SMD 8,2K 1% 0805
R604 C1-502-116-102 RES.SMD 160R 1% 0805
R605 C1-502-510-102 RES.SMD 100R 5% 0805
R606 C1-502-510-102 RES.SMD 100R 5% 0805
R607 C1-502-522-202 RES.SMD 2,2K 5% 0805
R609 C1-502-522-202 RES.SMD 2,2K 5% 0805
R610 C1-502-510-402 RES.SMD 100K 5% 0805
R611 C1-502-510-402 RES.SMD 100K 5% 0805
R612 C1-502-510-402 RES.SMD 100K 5% 0805
R613 C1-502-510-402 RES.SMD 100K 5% 0805
R614 C1-502-510-202 RES.SMD 1K 5% 0805
R618 C1-502-510-202 RES.SMD 1K 5% 0805
R621 C1-502-510-302 RES.SMD 10K 5% 0805
R622 C1-502-522-202 RES.SMD 2,2K 5% 0805
R623 C1-502-510-402 RES.SMD 100K 5% 0805
R624 C1-502-522-202 RES.SMD 2,2K 5% 0805
R625 C1-502-510-402 RES.SMD 100K 5% 0805
R626 C1-502-522-202 RES.SMD 2,2K 5% 0805
R627 C1-502-510-402 RES.SMD 100K 5% 0805
R629 C1-502-510-402 RES.SMD 100K 5% 0805
R630 C1-502-510-302 RES.SMD 10K 5% 0805
R631 C1-502-547-202 RES.SMD 4,7K 5% 0805
R633 C1-502-510-302 RES.SMD 10K 5% 0805
R634 C1-502-510-302 RES.SMD 10K 5% 0805
R635 C1-502-510-202 RES.SMD 1K 5% 0805
R637 C1-502-510-202 RES.SMD 1K 5% 0805
R638 C1-502-510-202 RES.SMD 1K 5% 0805
R646 C1-502-533-402 RES.SMD 330K 5% 0805
R701 C1-502-510-302 RES.SMD 10K 5% 0805
R707 C1-502-547-202 RES.SMD 4,7K 5% 0805
R708 C1-502-547-202 RES.SMD 4,7K 5% 0805
R709 C1-502-547-202 RES.SMD 4,7K 5% 0805
R710 C1-502-547-202 RES.SMD 4,7K 5% 0805
R718 C1-502-522-202 RES.SMD 2,2K 5% 0805
R719 C1-502-522-202 RES.SMD 2,2K 5% 0805
R726 C1-502-547-202 RES.SMD 4,7K 5% 0805
R727 C1-502-547-202 RES.SMD 4,7K 5% 0805
R730 C1-502-547-502 RES.SMD 4,7M 5% 0805
NO.
REF. NO PART NO. KANRI DESCRIPTION
R731 C1-502-547-202 RES.SMD 4,7K 5% 0805
R732 C1-502-547-202 RES.SMD 4,7K 5% 0805
R734 C1-502-547-202 RES.SMD 4,7K 5% 0805
R735 C1-502-547-202 RES.SMD 4,7K 5% 0805
R741 C1-502-522-202 RES.SMD 2,2K 5% 0805
R744 C1-502-547-202 RES.SMD 4,7K 5% 0805
R747 C1-502-510-302 RES.SMD 10K 5% 0805
R748 C1-502-510-302 RES.SMD 10K 5% 0805
R750 C1-502-547-202 RES.SMD 4,7K 5% 0805
R751 C1-502-510-202 RES.SMD 1K 5% 0805
R753 C1-502-533-402 RES.SMD 330K 5% 0805
R754 C1-502-510-302 RES.SMD 10K 5% 0805
R755 C1-502-522-302 RES.SMD 22K 5% 0805
R756 C1-502-510-202 RES.SMD 1K 5% 0805
R757 C1-502-547-202 RES.SMD 4,7K 5% 0805
R802 C1-502-515-202 RES.SMD 1,5K 5% 0805
R803 C1-502-522-202 RES.SMD 2,2K 5% 0805
R805 C1-502-533-302 RES.SMD 33K 5% 0805
R806 C1-502-510-502 RES.SMD 1M 5% 0805
R807 C1-502-518-202 RES.SMD 1,8K 5% 0805
R808 C1-502-522-102 RES.SMD 220R 5% 0805
R809 C1-502-518-102 RES.SMD 180R 5% 0805
R818 C1-502-547-302 RES.SMD 47K 5% 0805
R819 C1-502-510-202 RES.SMD 1K 5% 0805
MODULO
RM701 C1-271-205-400 RECEPTOR IR SBX1981-72P
CHAVE
SW702 C1-449-009-400 CHAVE DE TOQUE 7,0MM 260g
SW702 C1-449-009-200 CHAVE DE TOQUE 7,0MM 260g
SW703 C1-449-009-400 CHAVE DE TOQUE 7,0MM 260g
SW703 C1-449-009-200 CHAVE DE TOQUE 7,0MM 260g
SW704 C1-449-009-400 CHAVE DE TOQUE 7,0MM 260g
SW704 C1-449-009-200 CHAVE DE TOQUE 7,0MM 260g
SW705 C1-449-009-400 CHAVE DE TOQUE 7,0MM 260g
SW705 C1-449-009-200 CHAVE DE TOQUE 7,0MM 260g
SW706 C1-449-009-400 CHAVE DE TOQUE 7,0MM 260g
SW706 C1-449-009-200 CHAVE DE TOQUE 7,0MM 260g
SW707 C1-449-009-400 CHAVE DE TOQUE 7,0MM 260g
SW707 C1-449-009-200 CHAVE DE TOQUE 7,0MM 260g
SW801 C1-440-090-053 CHAVE POWER
TRAFO
T401 C1-353-101-200 TRAFO DRIVE HT
!T402 C1-355-215-900 TRAFO FLY BACK 20"KFT3AA294X
!T801 C1-356-005-600 TRAFO CHAVEAMENTO
SINTONIZAD0R
TU101 C1-271-503-800 SINTONIZADOR 181CH UV-1336S/AF
TU101 C1-271-503-500 SINTONIZADOR IIC 5V ENV56D33G3
PEPCI CINESCOPIO
!V901 C1-408-010-100 CJT.CINESCOPIO A48KRD89X22
C1-027-221-912 CJT.PCI AUTOMATICO CINESCOPIO
C1-027-221-902 CJT.PCI MANUAL/MONT CINESCOPIO
C1-027-221-922 CJT.PCI SMD CINESCOPIO
C1-107-221-802 PEPCI CINESCOPIO 9PECAS
C1-682-021-400 MOLA DO ATERRAMENTO DO CRT
CONECTOR
C1-638-101-012 SOQUETE P/CINESCOPIO 1SHM12S
NO.
REF. NO PART NO. KANRI DESCRIPTION
PEPCIPRINCIPAL
C1-107-221-801 PCI PRINCIPAL
C1-027-221-911 CJT.PCI AUTOMATICO PRINCIPAL
C1-027-221-901 CJT.PCI MAN/MONT PRINCIPAL
C1-027-221-921 CJT.PCI SMD PRINCIPAL
C1-644-505-100 CABO DE FORCA 2X18X2 C/CONECT
C1-027-218-580 CONTROLE REMOTO MONTADO
C1-637-615-640 GARRA P/FUSIVEL
C1-027-218-580 CONTROLE REMOTO MONTADO
C1-738-002-500 MALHA DE ATERRAMENTO
C1-777-221-908 SUPORTE DO LED
NO.
87
Page 8
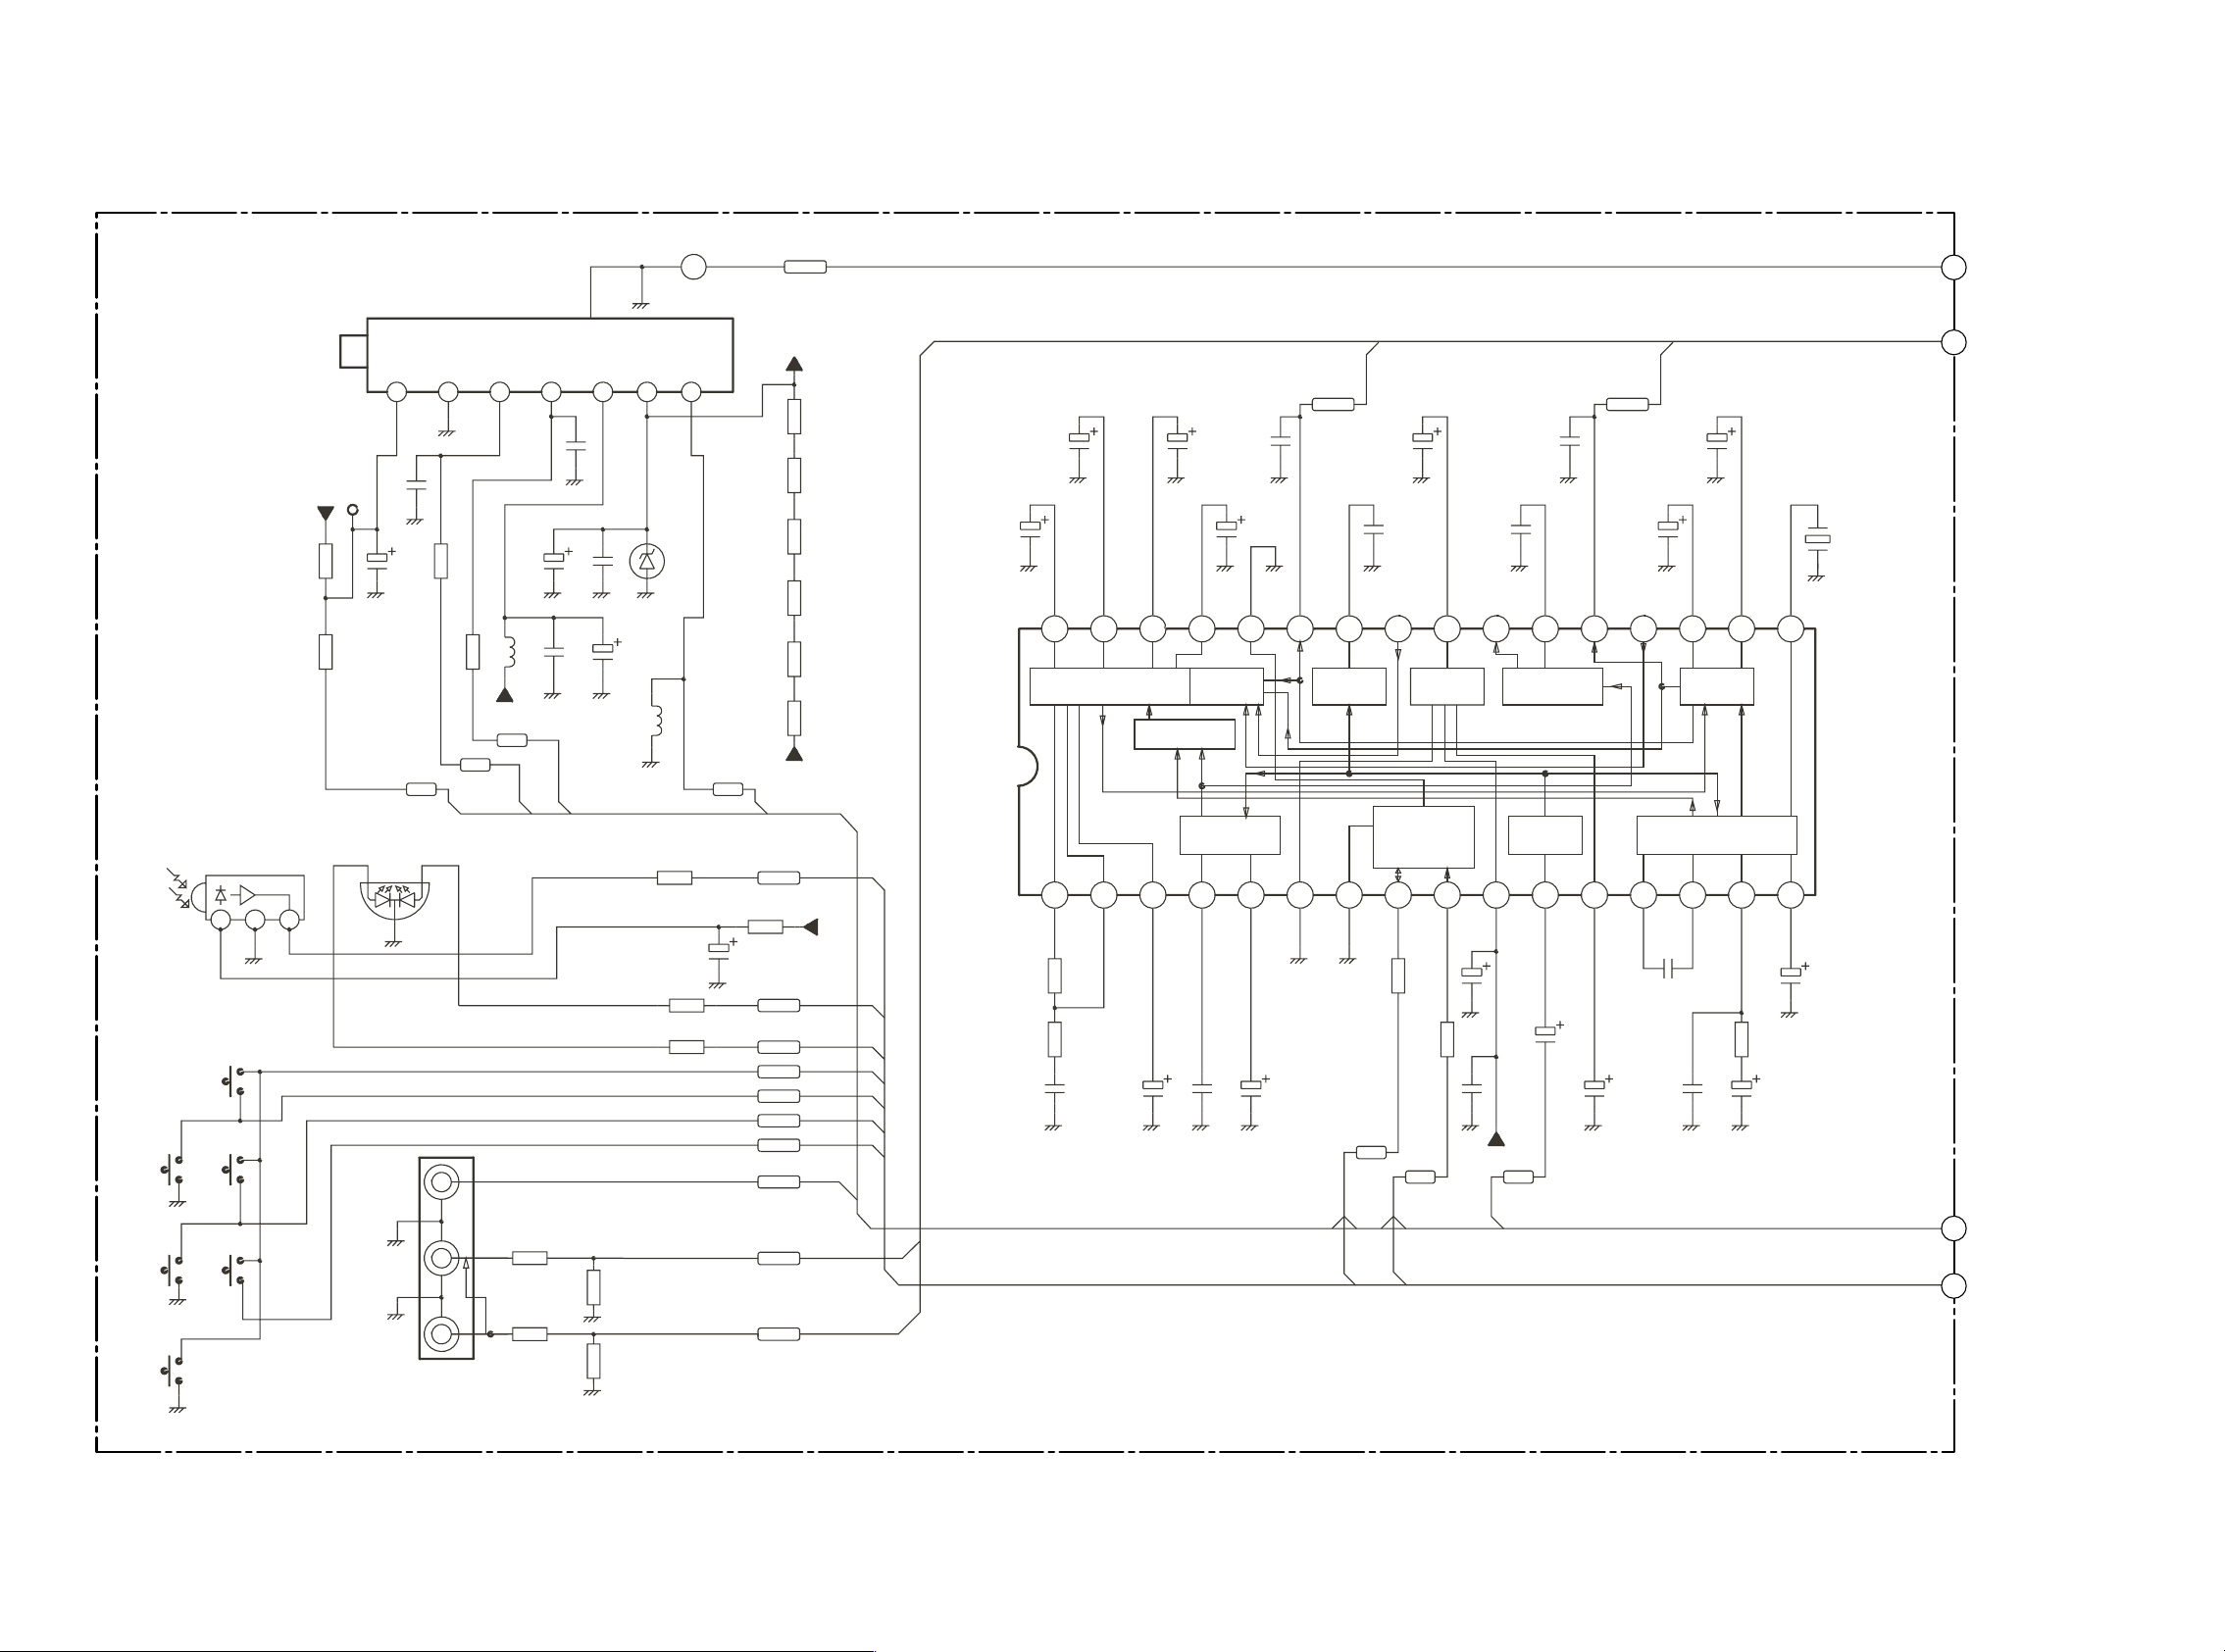
SCHEMATIC DIAGRAM-1 (MAIN C.B-1/6)
MAIN C. B -1/6 (TUNER/DECODER/FRONT SECTION)
W1
SPARK
To
1
MAIN C.B
-5/6
SW702
VOL+
2
SW706
MENU
SW704
CANAL+
RM701
38KHz
1
R101
3k9
3
5V6
22uF/1 6V
R102
680R(N)
JK201
VIDEO2
AGC
SCL
RS
17911345
C108
C101
100pF/ 50V
R103
100R
R104
100R
C109
100pF/ 50V
5V
SDA
SCL
AGC
LD701
1
3
GR
2
SDA
5V
C104 C105
10uF/5 0V 10kpF/ 50V
L102
22uH
C106
10kpF/ 50V
100uF/ 16V
L101
0.8 2uH
C107
33V
IC1 01
uPC574
JE15
560R(N)
470R(N)
470R(N)
R749
R705
FI
TU101
FI
R706
47R(N)
C703
47uF/1 0V
R113
2k7(N)
R112
2k7(N)
R111
2k7(N)
R110
2k7(N)
R107
2k7(N)
R106
2k7(N)
REMOT
TIM_ON
ST_BY
KEY01
KEY02
KEY03
KEY04
VD2
+33V
129.5V
To
2
MAIN C.B
-2/6
OUT-R
4u7F/ 50V
OUT -ROUT-L
C627
4u7F/1 6V
C626
4u7F/50V
L-R/SAP
STEREO DECODER
13 14 15 16
121110987654321
C613
470kpF /25 V
C612
10uF/1 6V
C614
220kpF /16 V
DEMATRIX
+ MODE
SELECT
RS601
CSB503F58
L+R
R607
2k2
C615
4u7F/5 0V
1718192021222324
C616
10uF/2 5V( LL)
C621
1kpF/5 0V
C619
10uF/1 6V
C620
10uF/1 6V
10uF/1 6V
100kpF /25 V
C623
C622
C624
15kpF/50V
C625
1kpF/50V
C617
1uF/50 V
C618
1uF/50V
32 31 30 29 28 27 26 25
MAD
C608
4u7F/5 0V
OUT-L
NOISE
DETECTOR
GND
GND
SDA 9V
GND
LOGIC, I2 C
TRANSCEIVER
R605
100R
R606
100R
SCL AUD
IC604
TDA9850
5V6
R603
8k2/1%
R604
160R/1 %
47kpF/ 50V(5%)
C605
DBX
L-R/SAP
C606
10uF/1 6V
STEREO/SA P
SWITCH
DEMODULATOR
C607
100kpF /25 V
STEREO
ADJUST
SAP
MAD
SUPPLY
SCLSDA
SAP
sem DBX
VCC
C609
C610
DE-EMPHASIS
INPUT
LEVEL
ADJUST
47uF/ 16V
10kpF/ 50V
C611
SW703
VOL-
SW707
TV/ AV
SW705
CANAL-
JK602
AUDI O-R
JK603
AUDI O-L
FRONT
R628
2k2
R626
2k2
R629
100k
R627
100k
AUD2R
AUD2L
To
4
MAIN C.B
-4/6
To
3
MAIN C.B
-3/6
109
Page 9
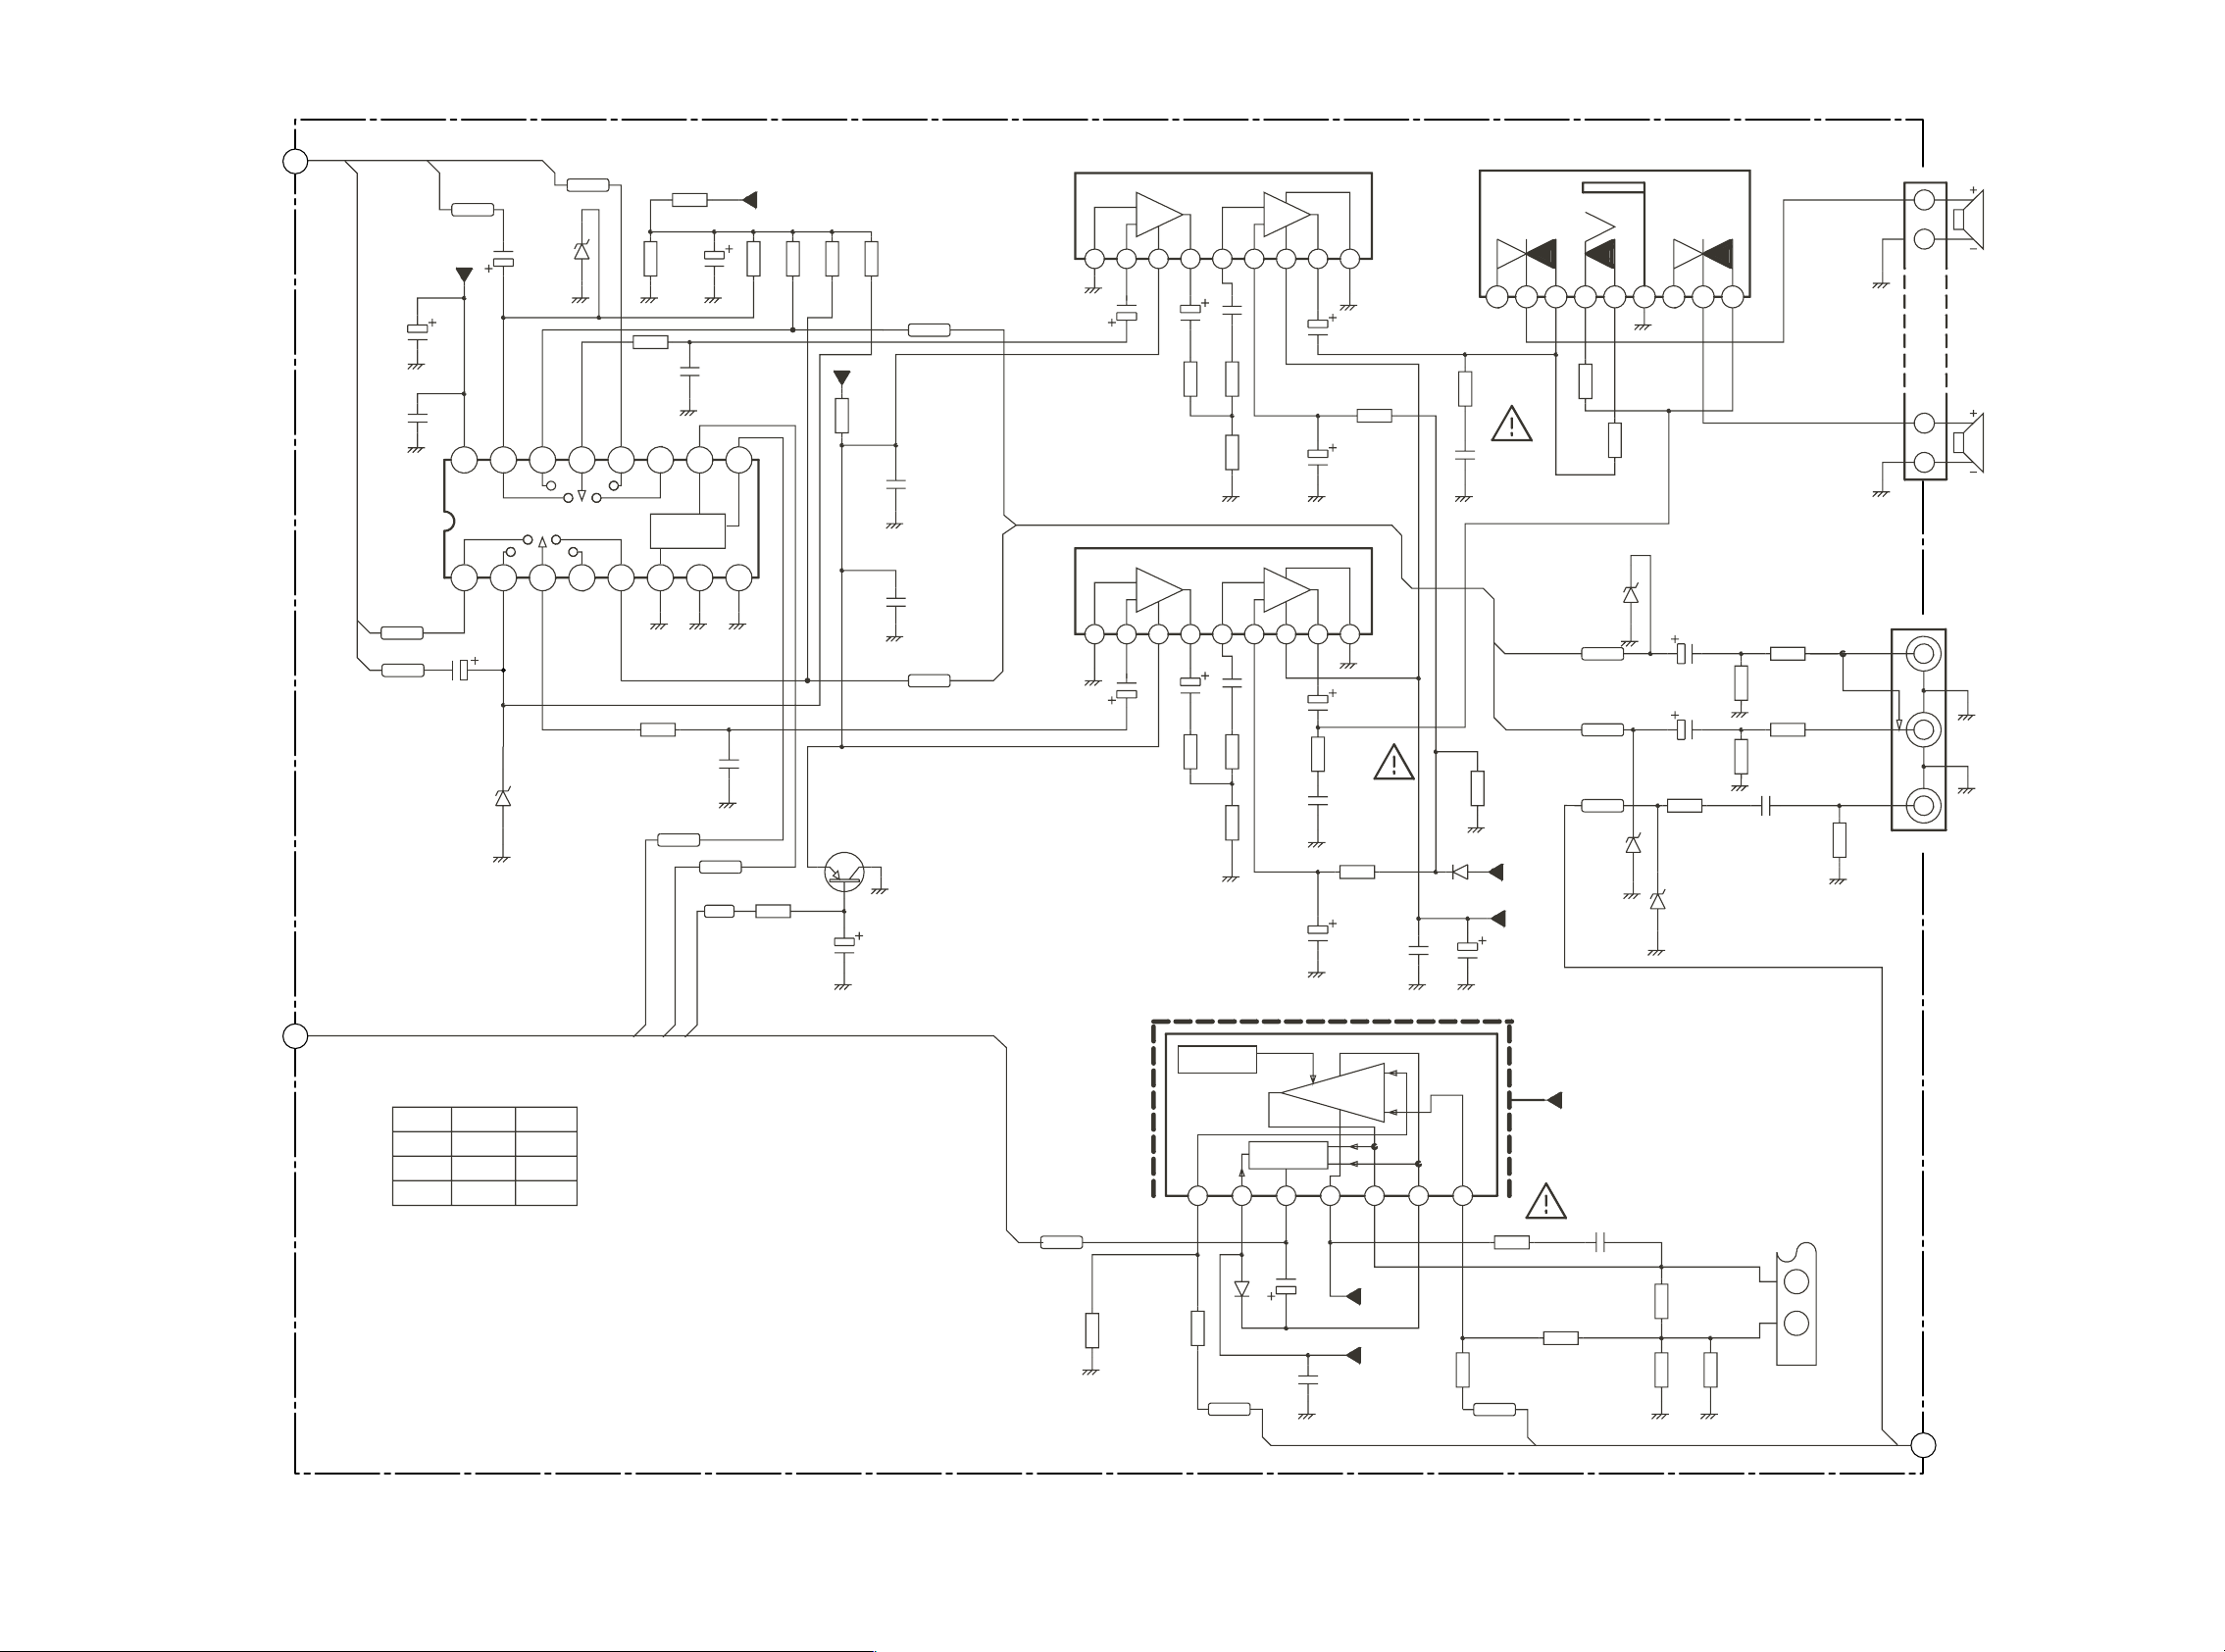
SCHEMATIC DIAGRAM-2 (MAIN C.B-2/6)
To
MAIN C.B
-1/6
To
MAIN C.B
-3/6
MAIN C. B -2/6 (AUDIO/V.DRIVE SECTION)
2
OUT-R
8V2(N)
DZ601
X
C628
10uF/1 6V
C629
10kpF/ 50V
AUD2R
C650
1uF/50 V
5V6
16 15 14 13 12 10 9
VDD
X2
IC603
HEF4052
Y0
Y
Y2
Y1
Y3
1
OUT-L
AUD2L
C649
1uF/50 V
DZ602
8V2(N)
5
IC603
STATUSCTRL2CTRL1
LLTV
LHAV1
LHAV2
X0X1
R614
1k
X3
R618
R608
2k2(N)
R609
2k2
C630
47uF/1 6V
11
CONTROL
UNIT
1k
1kpF/5 0V
CTRL1
C631
1kpF/5 0V
C638
CTRL2
CN601
FL601
1
2
8R
RIGHT
LEFT
FL602
4
3
8R
5V6
R610 R611
100k 100k
R631
4k7
R612 R613
100k 100k
9V
C637
10kpF/ 50V
AUD1R
IC601
TDA1013B
0.4 7uF/100V
98765432987654321
C633
R630
10K
2. 2uF/ 16V
C651
100kpF/ 25V
R637
1K
R621
10K
C632
TDA1013B
GNDGND
C635
220uF/ 16V
R616
220k(N )
C634
1uF/10 0V
IC6 02
OUT-RIGHT
FR602
C636
100kpF/25V(N)
EP601
4 825131097
3R3
R617
150R/1 W
R619
150R/1 W
VSSVEE
8765432
100kpF/25V(N)
AMPLIFIER
C302
100uF/ 35V
10kpF/ 50V
GNDGND
C642
220uF/ 16V
FR603
3R3
C643
R620
220k(N )
C645
C641
1uF/10 0V
10kpF/ 50V 2200uF/25 V
+
POWER
-
GND
OUT PUT
-12 V
+12V
C304
OUT PUT
D601
1N4004(N)
STAGE SUPPLY
7654321
R646
C646
INVERTING
INPUT
FR301
1R5(N)
R303
100R(N)
-V. DR
330K
12V
16V
IC301
TDA9309
C644
10kpF/ 50V
AUD1L
Q601
BC857
R635
VOL
1k
C655
10uF/1 6V
98765432987654321
R302
100R(N)
2. 2uF/ 16V
R633
10K
PROTECTION
NON-INVERTING
C653
R634
10K
THERMAL
INPUT
SUPPLY
1N4004(N)
+V. DR
VOLTAGE
VSYN
R304
1k5(N)
C639
0.4 7uF/10 0V
C640
100kpF/ 25V
R638
1K
FLYBACK
GENERATOR
D301
DZ605
8V2(N)
AUD1L
AUD1R
VD1
DZ604
8V2(N)
-12 V
C303
220kpF /10 0V( N)
R305
1k5(N)
C647
1uF/50 V
R623
100k
C648
1uF/50 V
R625
100k
R211
100R
DZ201
2R7/1W 2R7/1W
8V2(N)
R307
330R(N)
47kpF/ 25V
R309R308
R622
R624
2k2(N)
C208
1/2 CN402
VERTICAL
2k2
R212
75R
YOKE
3VD
4
JK601
AUDI O-L
AUDI O-R
VI DEO1
REAR
AM
To
6
MAIN C.B
-4/6
1211
Page 10
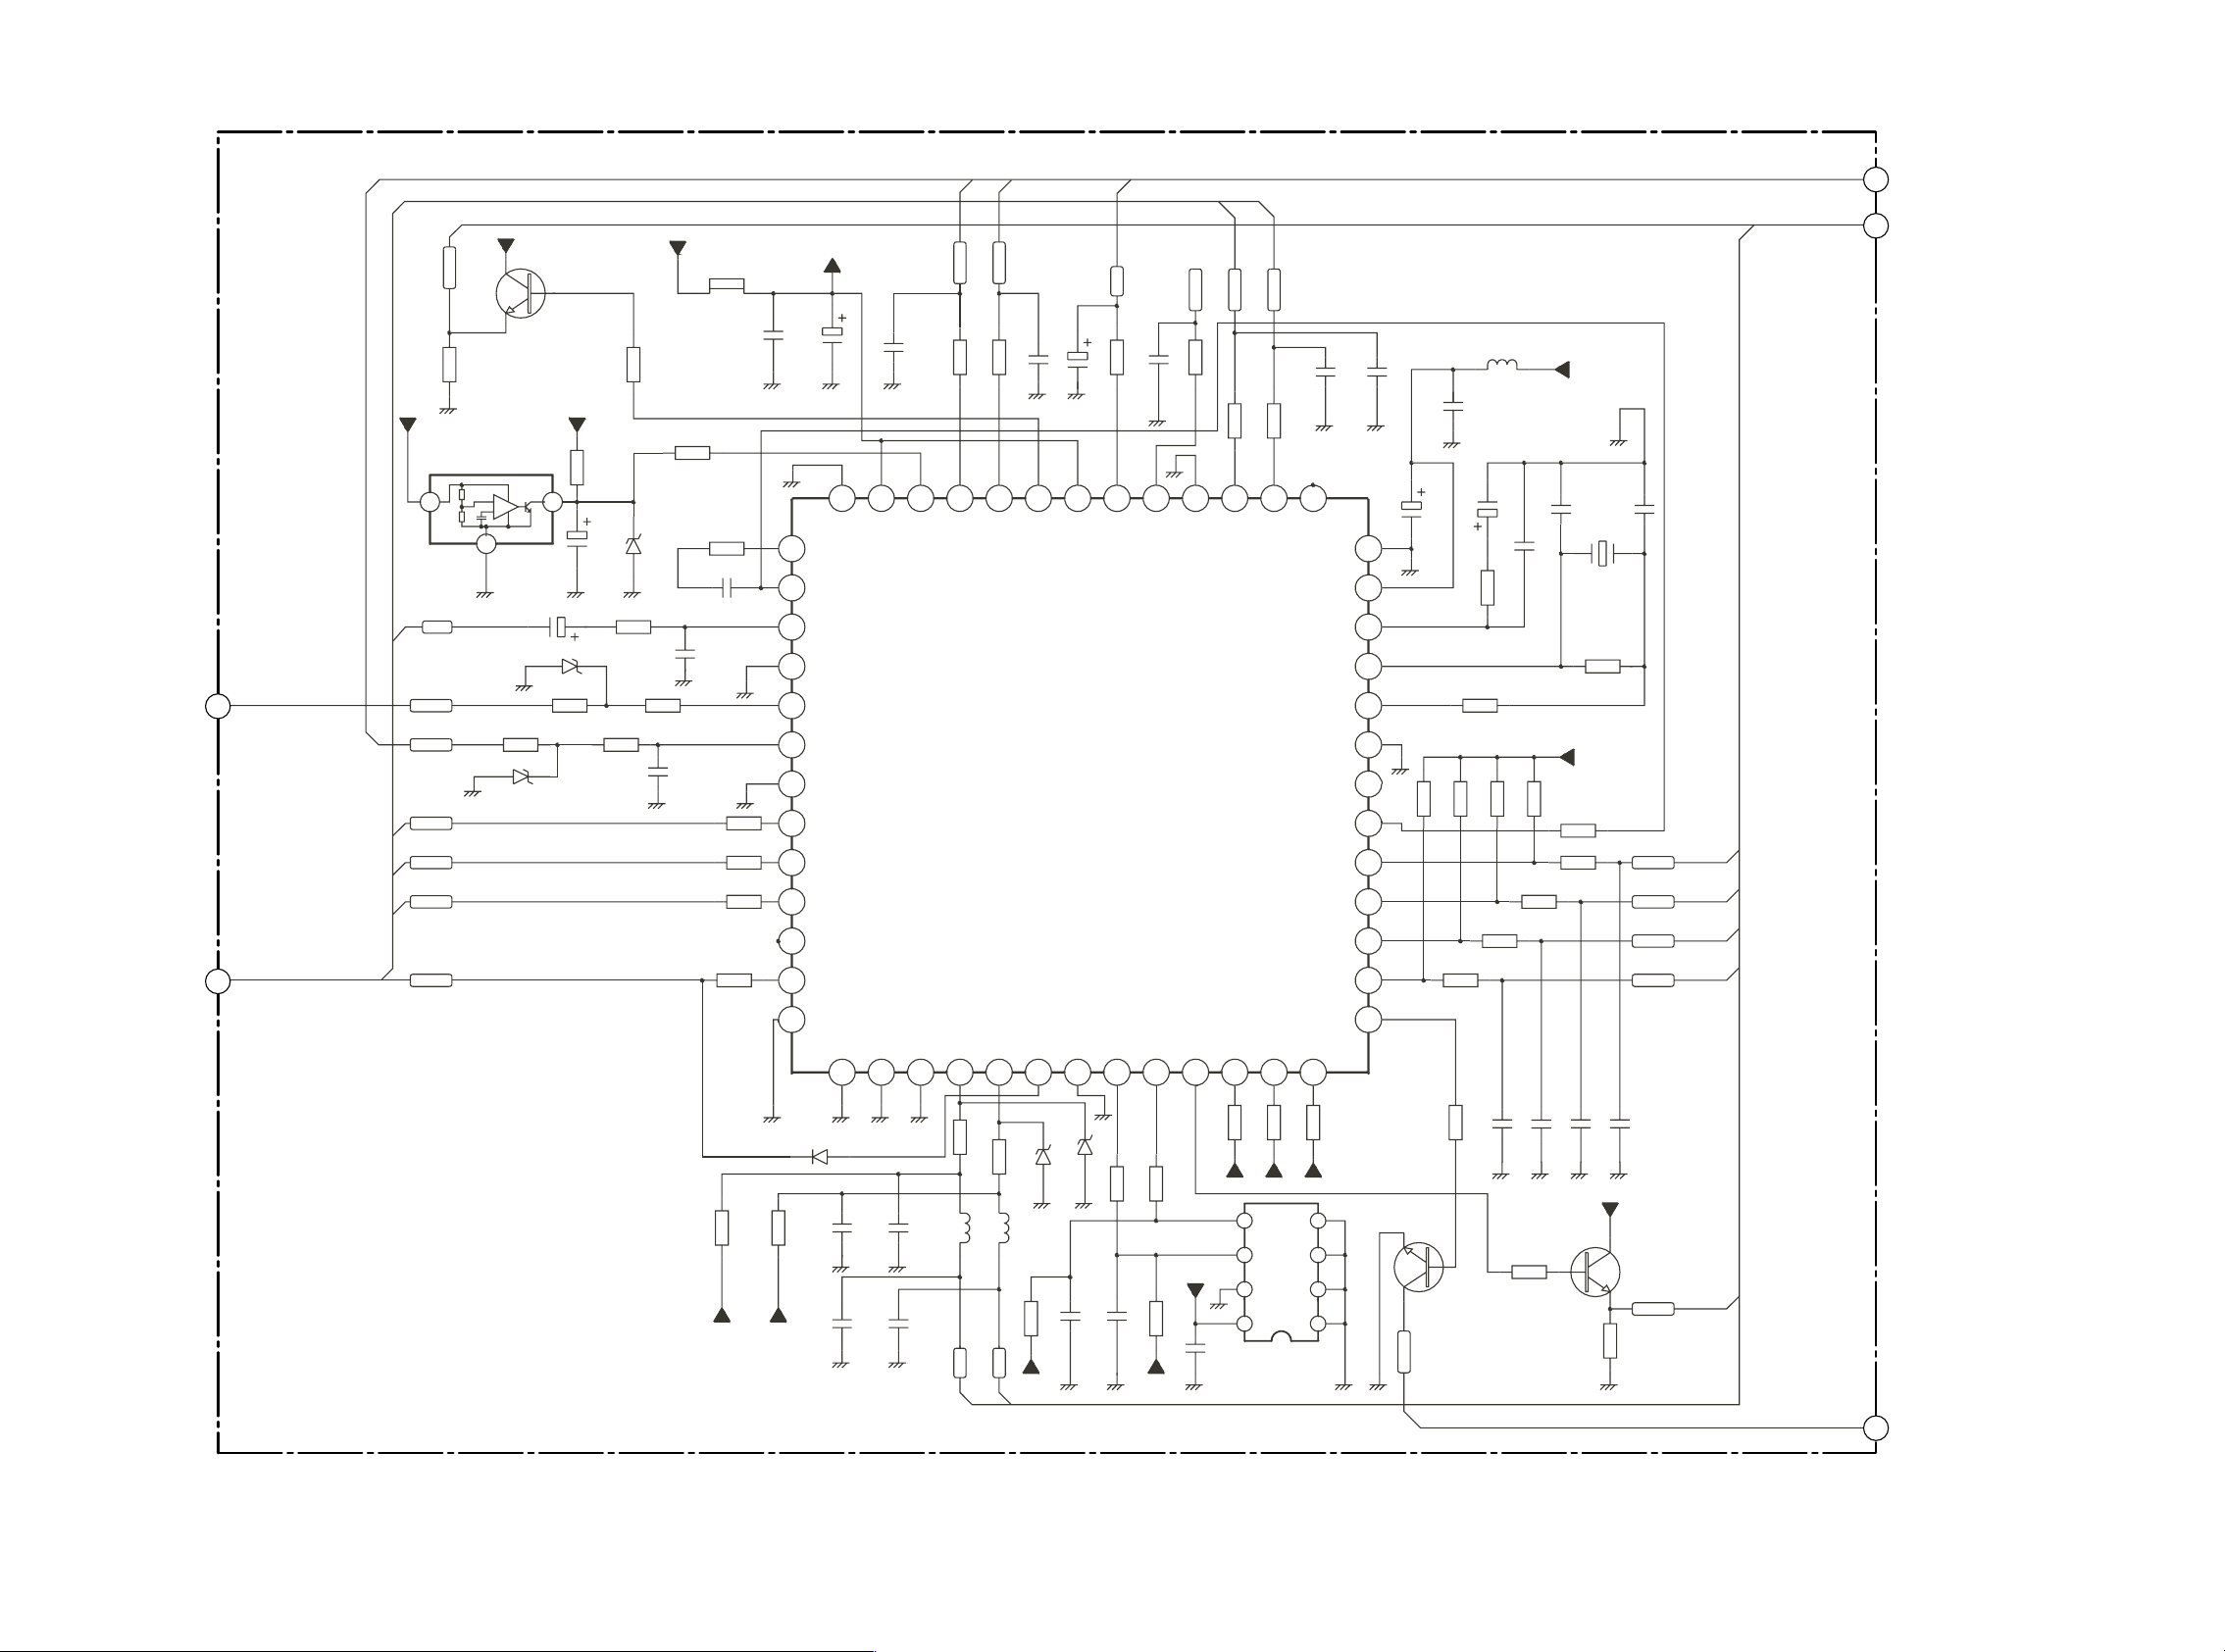
SCHEMATIC DIAGRAM-3 (MAIN C.B-3/6)
To
MAIN C.B
-6/6
To
MAIN C.B
-4/6
MAIN C. B -3/6 (CONTROL SECTION)
ST_BY
R751
IC703
M51943
13
C.C
7
8
HSYN
VSYN
R_OSD
G_OSD
B_OSD
FBLK
1k
DZ703
5V6
+
-
2
1uF/16 V
4V7(N)
4V7(N)
Q703
BC847B
R757
4K7
5V5V
R701
10k
C701
1uF/100V
C708
DZ701
R743
4K7(N) 220R(N)
100R(N)
R740R741
33K(N)2k2
R715
DZ702
5V1
C730
R739
5V6
22KpF/ 50V(N)
R737
1K( N)
C731
470kpF /16 V
C725
470pF/ 50V
R722
R721
R720
FB701
C717
R755
470pF/ 16V
22k
2k7(N)
2k7(N)
2k7(N)
R745
1k( N)
10
11
12
13
C716
1
2
3
4
5
6
7
8
9
5V
52 51
OSD
OSD
VI DEO
ADCIN
HSYNC
VSYNC
SCANEN
R
G
B
I
FBKG
SCL1
To
5
MAIN C.B
-2/6
To
3
MAIN C.B
-1/6
CTR L2
CTR L1
R747
10K
C718
1KpF/5 0V( N)220uF/ 16V
10K
R748
1KpF/ 50V( N)
C724
50 49 48 47 46 45 44 43 42 41 40
RST
PTC 4
PTC 3
VSSOSD
VDDOSD
(CTRL1)
PTC 2
(CTRL2)
IC701
MC68HC908
(SCL)
(SDA)
PTA 2
PTA 1
PTA 0
SDA2
SCL2
SDA1
VOL
C723
1k( N)
10uF/ 16V5V6(N)
R736
REM OT
C702
R702
150pF/ 50V
VDD
T1CH0
T1CH1
T1CLK
EMOTE)
(PWM)
R
(
(SDA)
(SCL)
PTA 5
PTA 4
PTA 3
VSS
PAL- N
PAL- M
L703
100R( N)
C734
NC
PTB 0
OSC1
OSC2
IRQ
PTB7
PTB6
PTB5
PTB4
PTB3
PTB2
PTB1
C735
150pF/ 50V( N)
150pF/ 50V( N)
C720
39
38
37
36
35
34
33
R710
4K7
32
31
30
29
28
27
4K7
4K7
R735
R734
PTC 1
PTC 0
VSSCGM
VDDCGM
( PALN)
( PALM )
(SERVICE)
SEL)
(PR
PLLXFC
(MN/ST)
PTA 7
PTA 6
100uF/ 16V
4K7
R709
R714
100R(N)
33uH
C719
33pF/5 0V
0, 47uF/ 16V
R754
R753
4K7
R708
R713
100R(N)
C733
C732
10K
330K
100R(N)
5V
C721 C722
X701
33pF/ 50V
32. 768kHz
10kpF/ 50V
R730
4M7
5V
R707
4K7
R766
2M2(N)
R711
100R(N)
R712
33pF/ 50V
KEY01
KEY02
KEY03
KEY04
26252423222120191817161514
R718 R719
2K2 2K2
150pF/ 50V
150pF/ 50V
150pF/ 50V
R744
4K7
4K7
4K7
R732
D701
1N4148(N)
C709 C710
33pF
5V5V
100R(N)
33pF
C711C712
33pF33p F
R716
L701
5V6(N)
100R( N)
R717
DZ704
L702
2u2H
2u2H
R727
4K7
C728
SDA
SCL
5V
100R( N)
DZ705
R728
R726
C727
150pF/ 50V
150pF/ 50V
5V
100R( N)
R729
4K7
R731
54
6
5V
7
8
C729
100kpF /25 V
SDA VSS
SCL
WP
VDD
5V5V5V
MN24C08MN6
A2
3
A1
2
A0
1
IC7 02
R704
33K(N)
POWER
Q701
BC847
C707
470R(N)
R759
C706
C705
R756
150pF/ 50V
C704
5V6
Q702
BC847B
TIM_ON
1k
To
9
MAIN C.B
-5/6
1413
Page 11
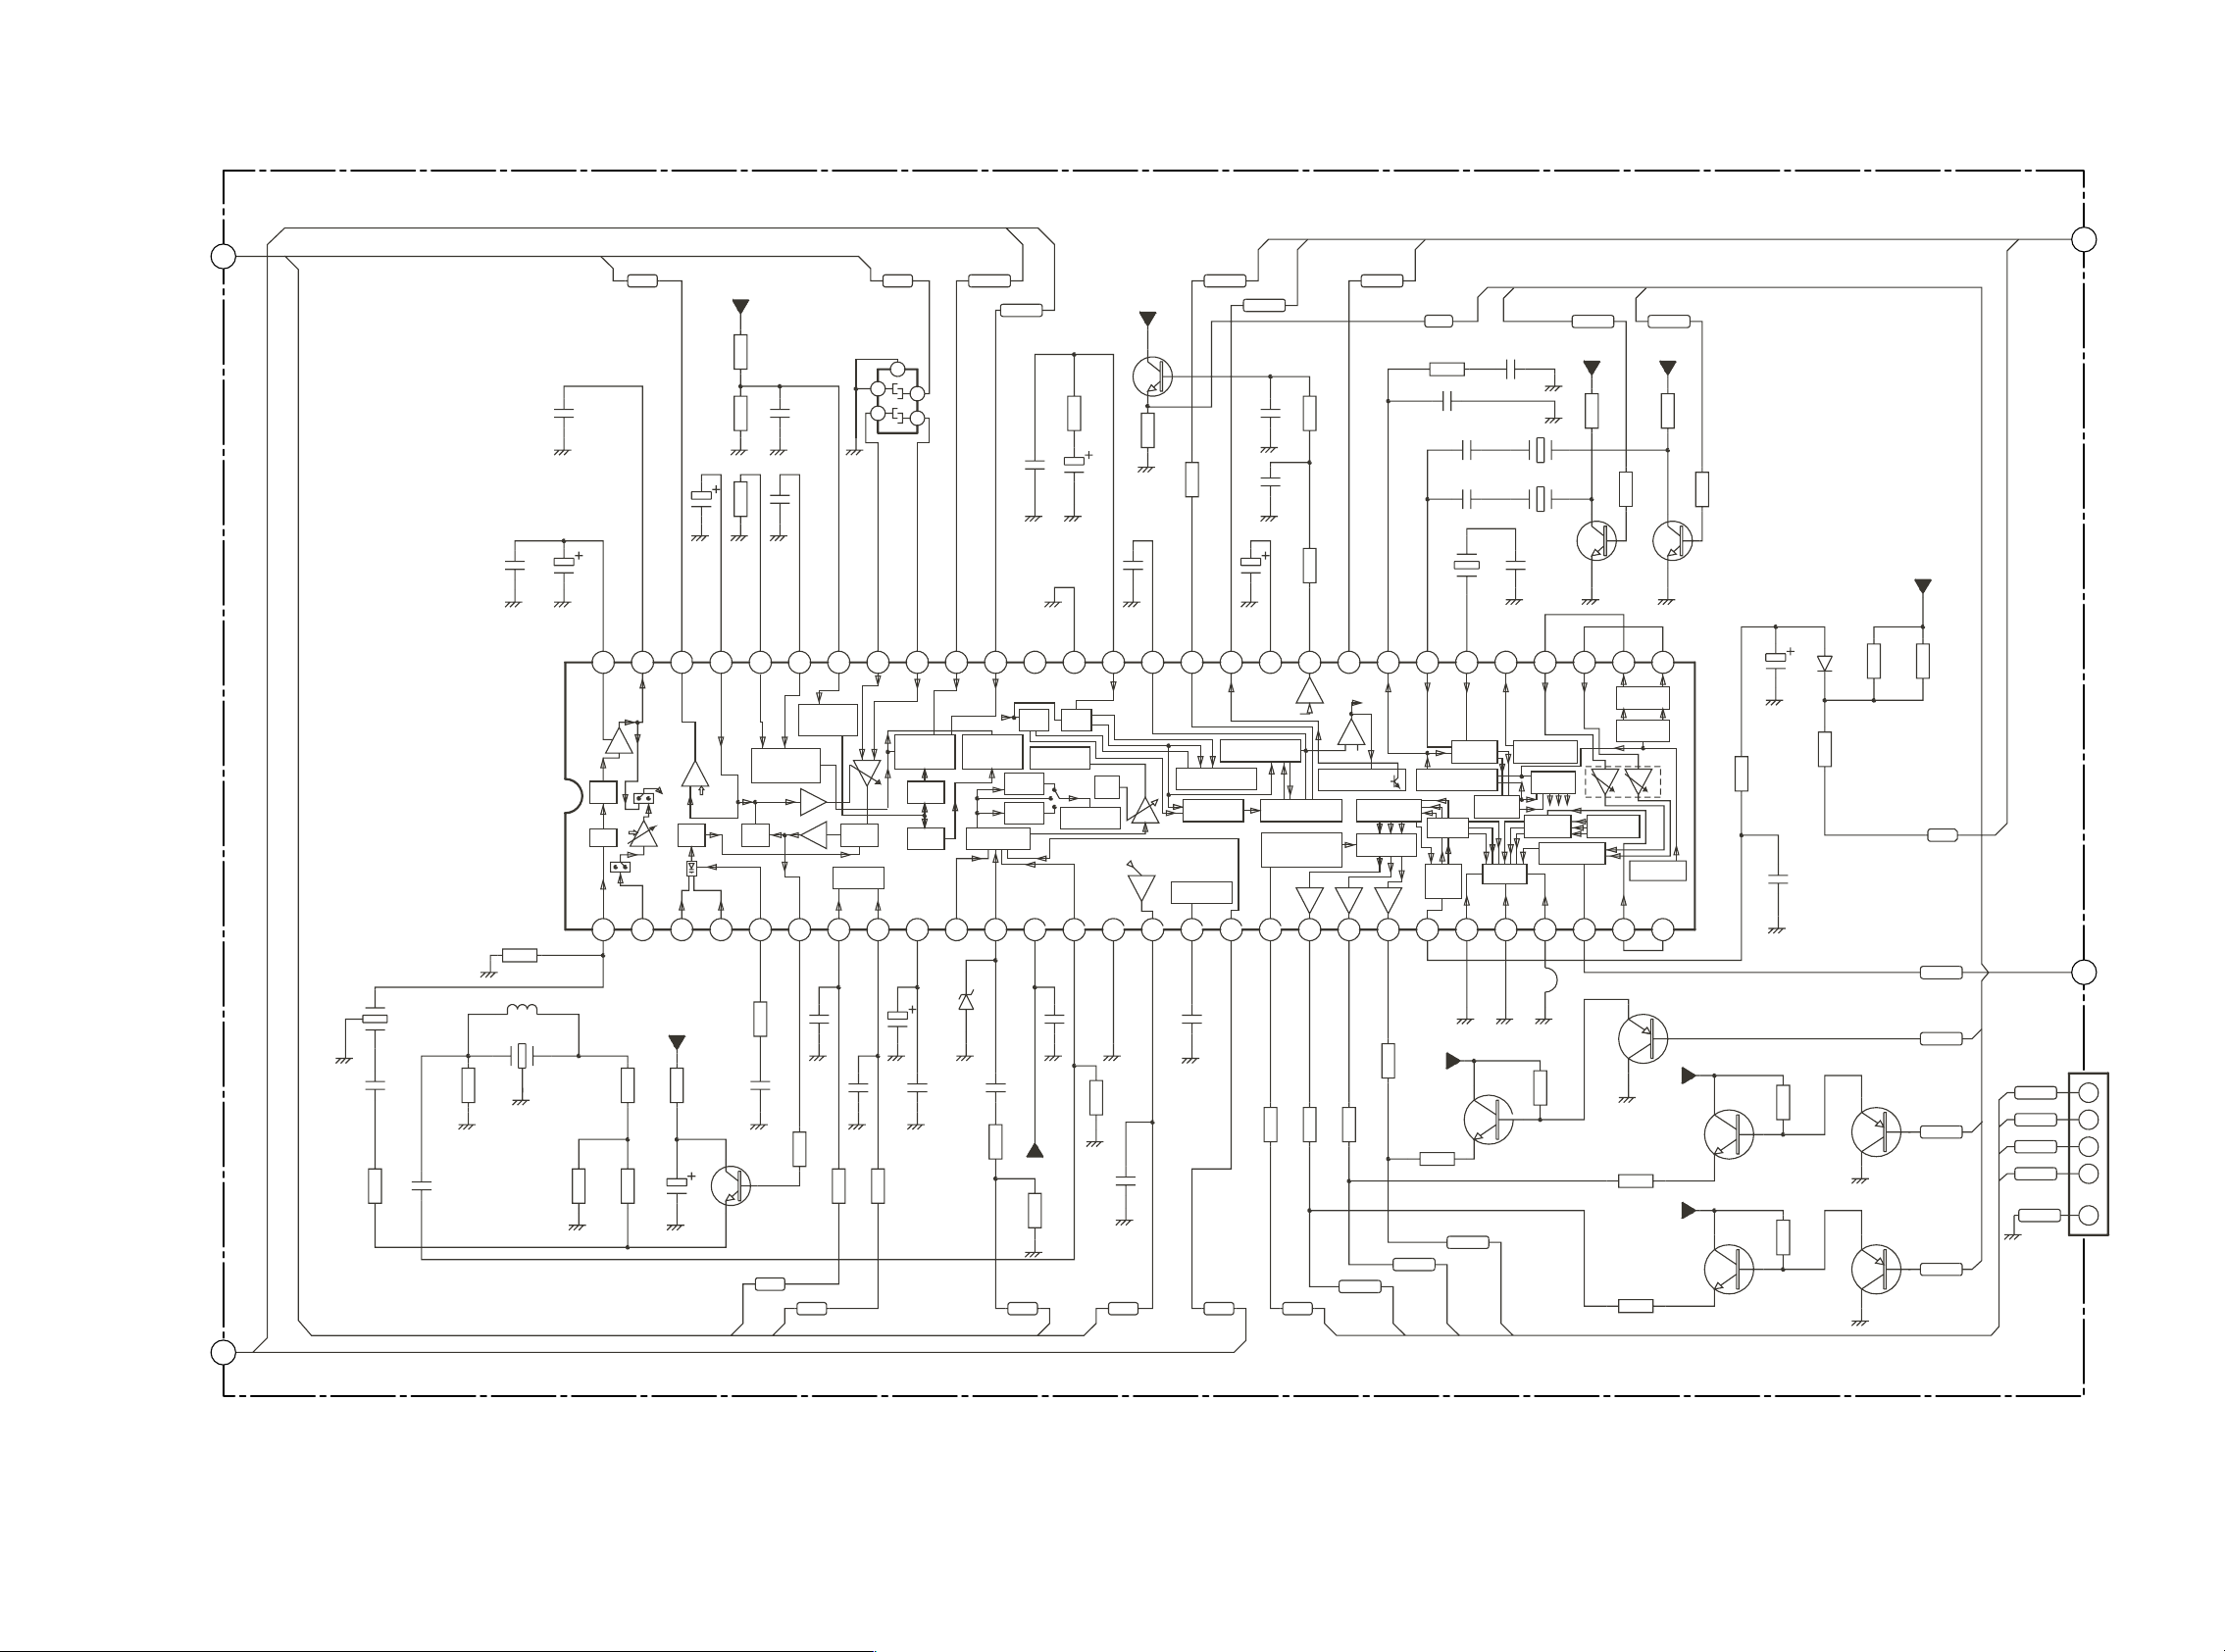
SCHEMATIC DIAGRAM-4 (MAIN C.B-4/6)
MAIN C. B -4/6 (AUDIO/VIDEO PROCESS SECTION)
To
MAIN C.B
-1/6
4
C604
33pF/5 0V
C603
10uF/1 6V
C602
1kpF/5 0V
AGC
8V
R406
4k7
R405
1k5
C103 R301
. 47uF/ 100V
C406
1kpF/5 0V
C301
39k/ 1%(N)
To
10
MAIN C.B
-6/6
Q202
BC847
R216
330R
R404
27K
HSYN
HOUT
C217
47pF/5 0V
C216
47pF/ 50V
C212
2u2F/ 100V
+V. DR
-V. DR
8V
R403
18k
SF101
M1971M/
F6221
2
5
FI
3
1
4
C403
C404
4k7pF/ 50V
1uF/10 0V
C405
2k2pF/ 50V
100kpF/ 160V_PP(N)
R218
470R
R215
H_VCC
R502
C502
3k3pF/ 25V
C.C
100k
C503
10kpF/ 50V
C504
10kpF/ 50V
100kpF /25 V
C501
PAL-N
PAL-M
PAL-M
8V 8V
X503
X502
PAL-N
R505R503
47k47k
R506R504
22k( N)
22k(N)
X501
C505
10kpF/ 50V
NTSC
470R( N)
Q502Q501
BC847BC847
R208
18k(N)
+12V
CF601
SFE4.5
C601
R601
100R
100pF/ 50V
R206
1K2
C203
100kpF /50 V
IC501
TDA8841
R602
1K2
L201
15uH
CF201
TPS4.5 MB
56 55 54 53 52 51 50 49 48 47 46 45 44 43 42 41 40 39 38 37 36 35 34 33 32 31 30 29
R204
180R
DET
BPF
R203
180R
DELAY
160ns
DELAY
160ns
47kpF/ 25V
VD2
SINC
BANDPASS
VCC
8V
CHROMA
C211
75R
R219
GNDEW/DRV
HOR
OSC
PEAKING
& CORING
VIDEO_I N
INT/
10kpF/ 50V
C652
ACC
DET
GND
R228
2M2
AUD
PHI 1
AUDIO
OUT
100pF/ 25V
PHI 2
AUDI O_OUT
C210
SCP_FBP
COINCIDENCE
DETECTOR
VERTICAL
DIVIDE R
AUTO ADJ
CIRCUIT
100kpF/ 25V
VD1
EHT
DEEM PH
RF_AGC
8V
VCO
PLL
VCC
R202
4R7(N)
TUNER
TIMER
OVER
AGC_DEC
R105
560R
COIL
C102
SAWTOOTH
GENERATOR
AGC
DET
Q201
BC847
SOUND_DE C
AUDIO
OUT
FM
VOL
AUDI O_I N
SI F
EXT/
R205
10R
C201
REF _CUR
VERTICAL
PLL
R201
1k
VERT_RAMP
100kpF/ 25V
OVER
VOLTAGE
DETECTOR
COMP
VI DEO
C401
R401
100R
VIF
DEMOD
I2C
CONTROL
SCL
33pF/ 50V
C402
IF_ AMP
SDA
+VDRIVE-
VERTICAL
GEOMETRY GEOMETRY
VERT
TRACK
E-W
TRACK
BG_DEC
DZ202
8V2(N)
C204
2u2F/ 100V
33pF/ 50V
R402
100R
PROCESSPROCESS
CVBS&SVHS
CHROMA_I N
C209
R213C205
100R22kpF/ 50V
CVBS SEP
E-W
SELECT
VIDEO_I N
Y/
10uF/1 6V
SCL
SDA
HOR_OUT
HORIZONTA L
FASE
VI DEO _OU T
R507
1K(N)
BPH
CVBS
SANDCASTLE
GENERATOR
BLACK LEVEL
ADJUST
CIRCUIT
B_OUT
BC
220R( N)
VCC
BLANK
VI D EO_ OUT
-+
8V
SLOW/START
/ST OP
CONTROLE
DE BRILHO
G_O UT
R509
R508
B_OUT
RGB
CUT OFF
CIRCUIT
RGB
R_OUT
R510
220R( N)
220R( N)
APC_FI LTER
560R(N)
G_OUT
PAL_ XTAL
BURST PHASE
DETECTOR
R G B
GAIN
PEAK
WHITE
DET
BEAM_CUR
9V
R760
R_OUT
90 0
VCX0
NT_ XT AL
PHASE
ROTATE
R G B
SWITCH
R_I N
BC847B
SECAM _REF
CHROMA
REFERENCE
MATRIX MATRIX
G_ I N
JS1
R761
4k7(N)
Q704
(R-Y)_IN
SYSTEM
IDENT
RGB
PIP/OSD
INSERT ION
B_I N
(B-Y)_IN
R-Y/B- Y
F_BLANK
R-Y/B-Y
SWITCH
(R-Y)_OUT
R-Y/B-Y
DEM
CHROMA
BANDPASS
Y_I N
R762
560R(N)
R764
560R(N)
28272625242322212019181716151413121110987654321
BC857B
9V
9V
(B- Y ) _OUT
Y_OUT
Q705
10uF/1 6V
R210
2k2(N)
R763
4k7(N)
BC847B
R765
4k7(N)
BC847B
C207
Q706
Q708
D201
1N4148(N)
R207
470R/1 W
C206
100kpF /50 V
R_OSD
G_OSD
Q707
BC857B
B_OSD
Q709
BC857B
ABL
FBLK
R209
18k(N)
BC
B_OUT
G_OUT
R_OUT
GND_1
CN501
To
8
MAIN C.B
-3/6
5
4
3
2
1
To
NK C.B
CN501
To
MAIN C.B
-2/6
6
1615
Page 12
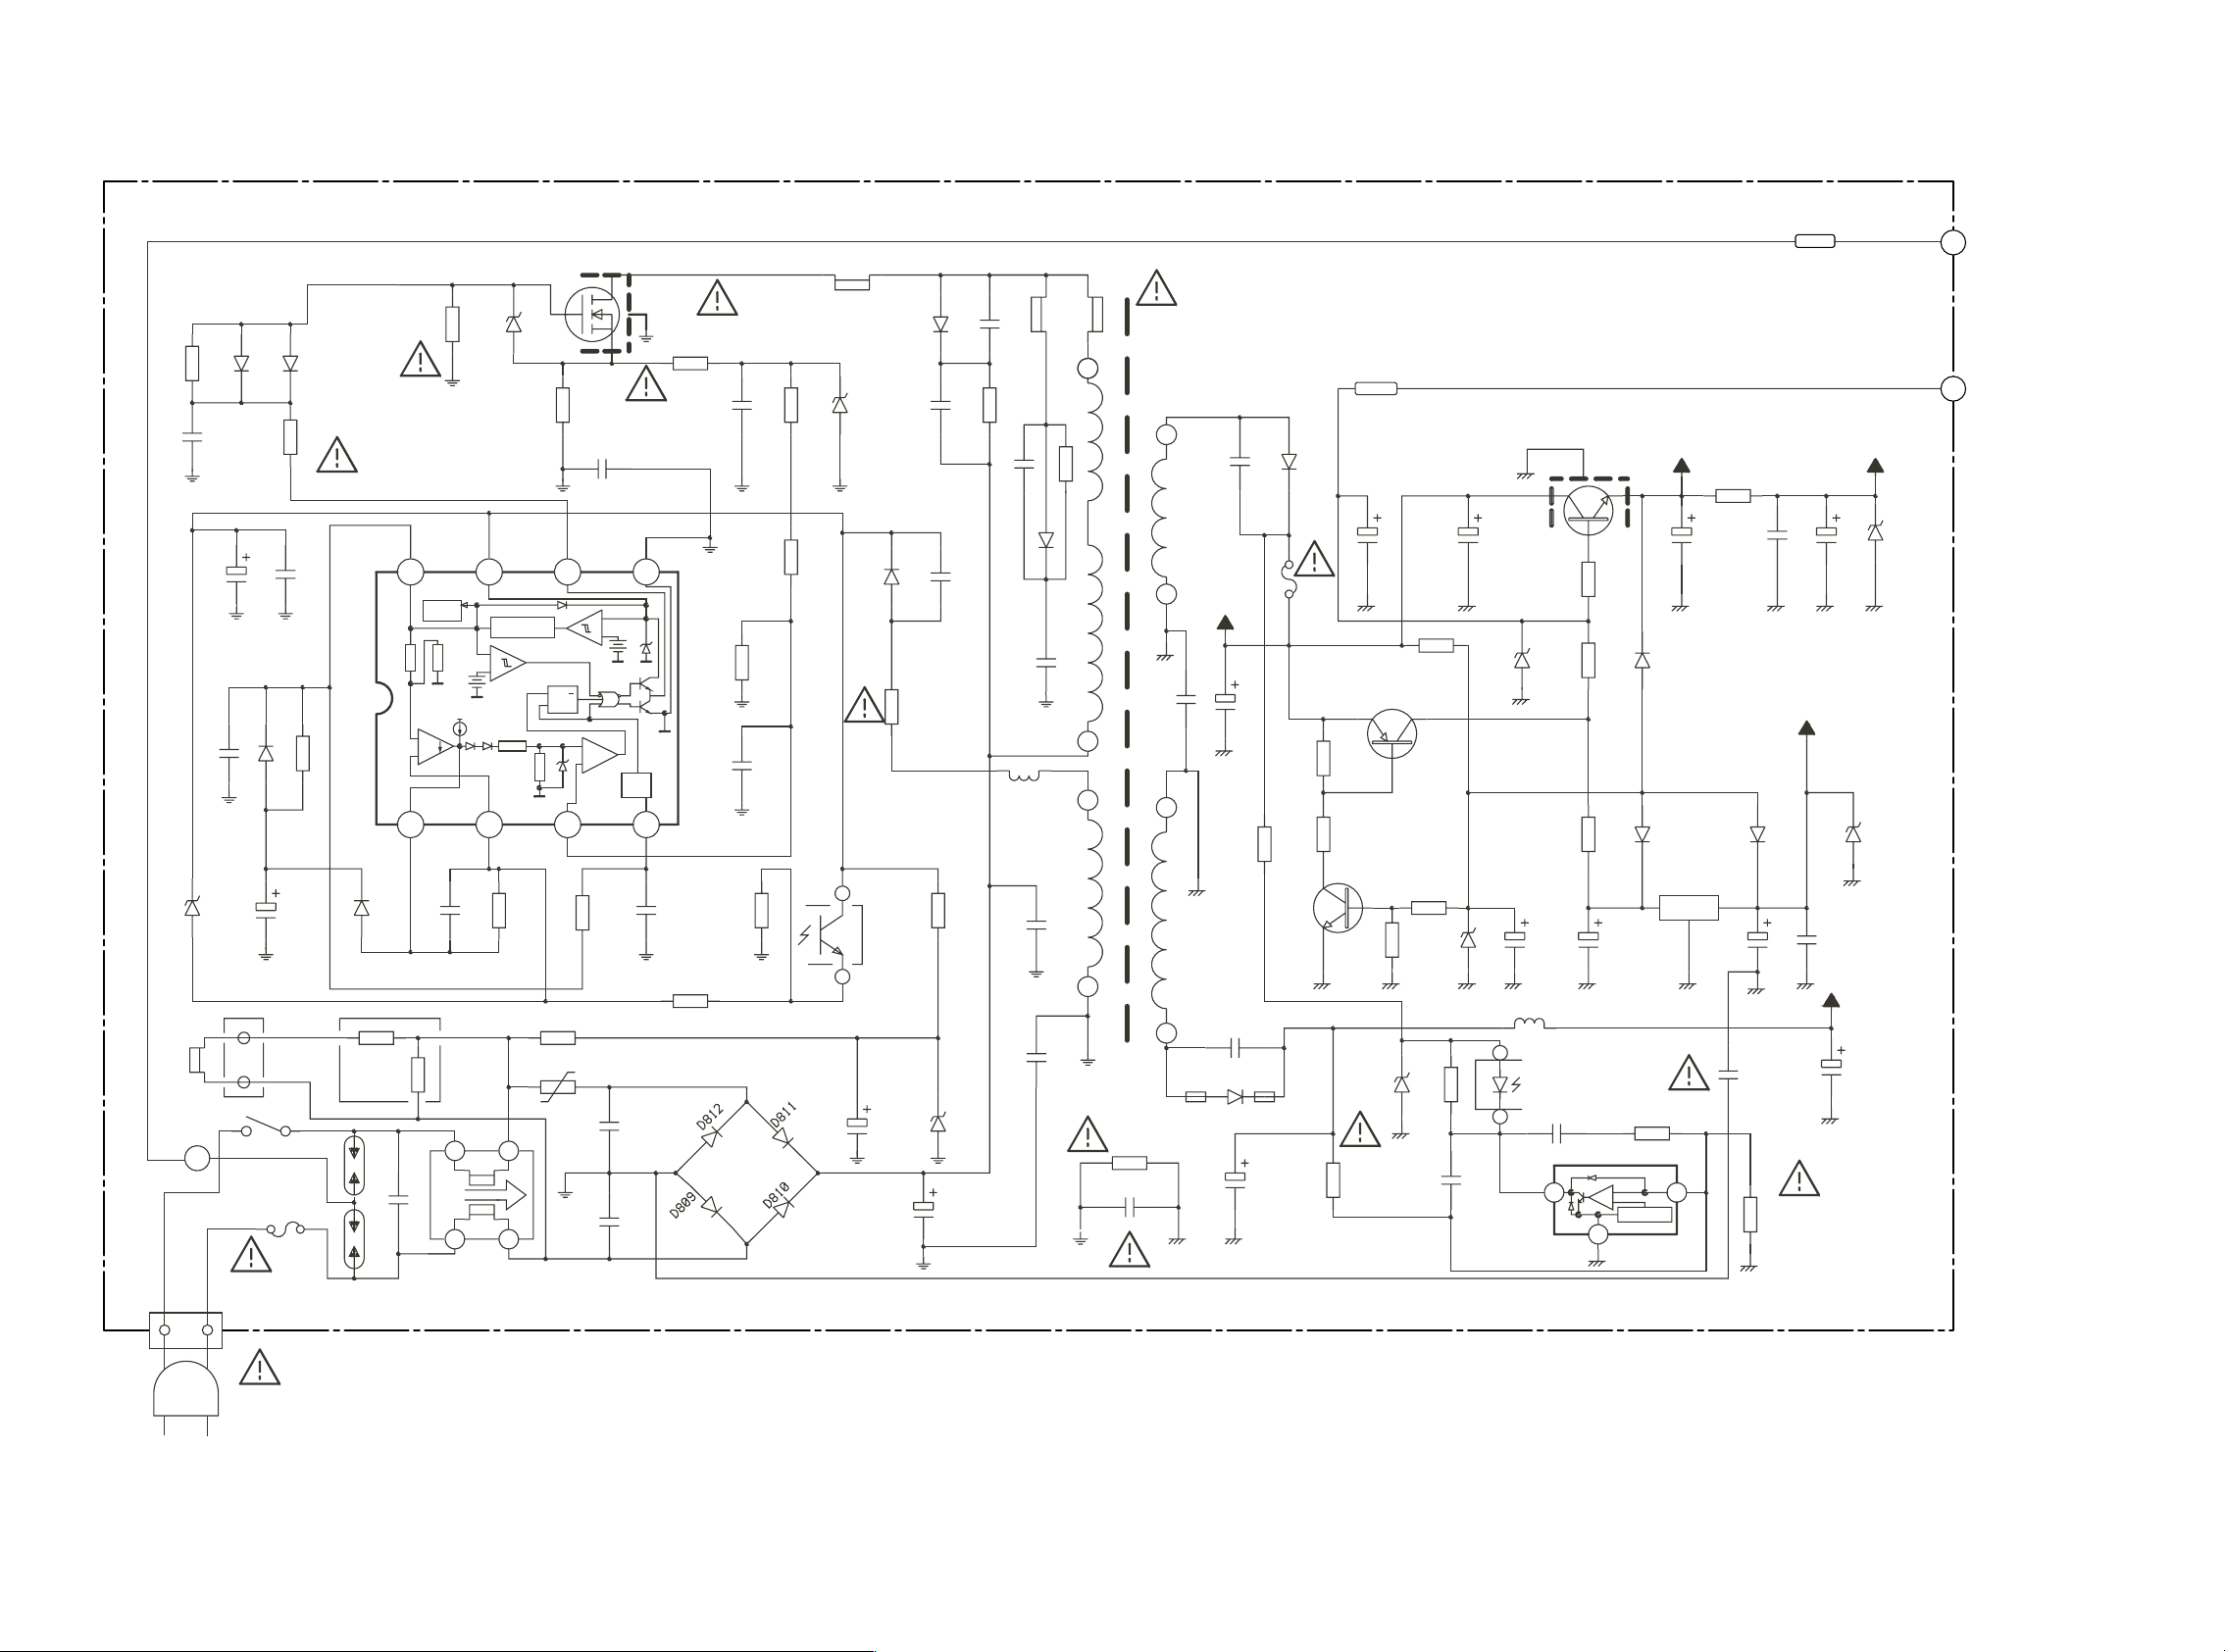
SCHEMATIC DIAGRAM-5 (MAIN C.B-5/6)
MAIN C. B -5/6 (POWER SECTION)
150R(N)
R814
D803
1N4148(N)
C816
470pF/ 500 V(N)
C812
47uF/2 5V
C810
C807
DZ802
18V(N)
4.7 uF/ 50V
W1
100kpF /25 V
D802
47 k pF/ 50V_ X7R
CN801
SW801
4A_T/2 50V
F801
D804
1N4148(N)
FR804
39R
C813
1N4148( N)
1M
R806
1N4148(N)
C
FR803
1K- NFR25
8765
Bia s
RR
D801
3K3pF/ 50V
PTC-S
PTC-H
A
+
-
GND
GND
+
+
-
EA
C808
B
PTC801
9R
LF801
C801
100kpF /25 0VAC-X1
5.0 V Ref
+
-
GND
R805
33k
NTC801
DZ804
18V(N)
27k/2W
R801
R
S
R810
0R27-2 W
C822
1kpF/5 0V_Y5V(N)
+
-
Q
+
R804
1k8(N)
4k7pF/ 2kV(N)
10R
C803
4k7pF/ 2kV(N)
Q801
2SK2545
39- NFR25
+
-
GND
GND
Osc
4321
C809
POLY
27kpF/ 63V_J( N)
C802
FR802
IC801
UC3842B
R813
68k(N)
C818
2k2pF/ 50V
SK-1/0 8
R803
2K2
R807
1k8
C811
22kpF/ 50V_Y5V
SK-1/0 8SK-1/0 8
R809
180R
R808
220R
SK-1/0 8
FB802
SK-4F1/06
DZ803
4V7(N)
4K7pF/ 1KV(N)
BAV21( N)
FR801
4
PS-250 1-H
3
4.7 uF/ 50V
D805
C806
IC8 03
1/2
D806
C819
1- FUSI STOR- 1 / 2W
220uF/ 385 V
C815
18V(N)
C805
C820
220pF/ 500V( N)
R802
1K5
DZ801
FB803
330pF/ 2KV( N)
R812
47K/2W
C843
220pF/ 1kV( N)
D813
C844
1kpF/2 kV( N)
L801
5u6H
C804
4K7pF/ 2KV
C824
FB801
R827
1KpF- Y5P(N)
3
1k/ 5W
SK- 4F1 / 06
1
6
5
2K2pF- GKO
T801
R815
6M8(N)
C823
1KpF/5 00V(N)
10
11
C847
470KpF/ Y5P
9
8
FB803
C833
F802
1A_T/2 50V
16V
C831
R820
470R/1 W
C842
330pF/ 2KV(N)
D819
SK-3GH/06
100uF/ 160 V-HR
D808
SK-4GH/06
470uF/25V-HR
Q803
BC547B
FB804
C825
POWER
C835
47uF/1 6V
Q804
BC327/ 16
R826
10k(N)
R828
1k8(N)
R829
1k8(N)
DZ805
4V7(N)
R816
120k/0.5%(N)
100pF/ 50V_Y5V
10k(N)
R830
1k8(N)
DZ808
3V6(N)
R819
C826
R831
1k
C834
100uF/ 25V
DZ806
9V1(N)
C846
47uF/1 6V
1
2
470kpF /63 V-M(N)
IC802
TL431
10R(N)
33R/3W
L803
33uH
IC8 03
PS-250 1-H
R825
R823
1k/ 1W
R821
1/2
C827
Q802
2SD2061
C839
100uF/ 16V
+
-
2.5 Vre f
2
9V 8V
R824
3R3(N)
C836
100uF/ 16V
C837
10kpF/ 50V
D814
1N4148(N)
1N4148(N)
D816
D815
1N4148(N)
IC804
7805
C840
1000uF/10 V
C800
R818
47k
13
1KpF- GKO
R817
2k37/0.5%(N)
C829
SPARK
C838
220uF/ 16V
5V6
C841
10kpF/ 50V
129.5V
33uF/ 160V- HR
DZ809
5V6(N)
DZ807
8V2(N)
To
1
MAIN C.B
-1/6
To
9
MAIN C.B
-3/6
CN802
AC90~240V
1817
Page 13
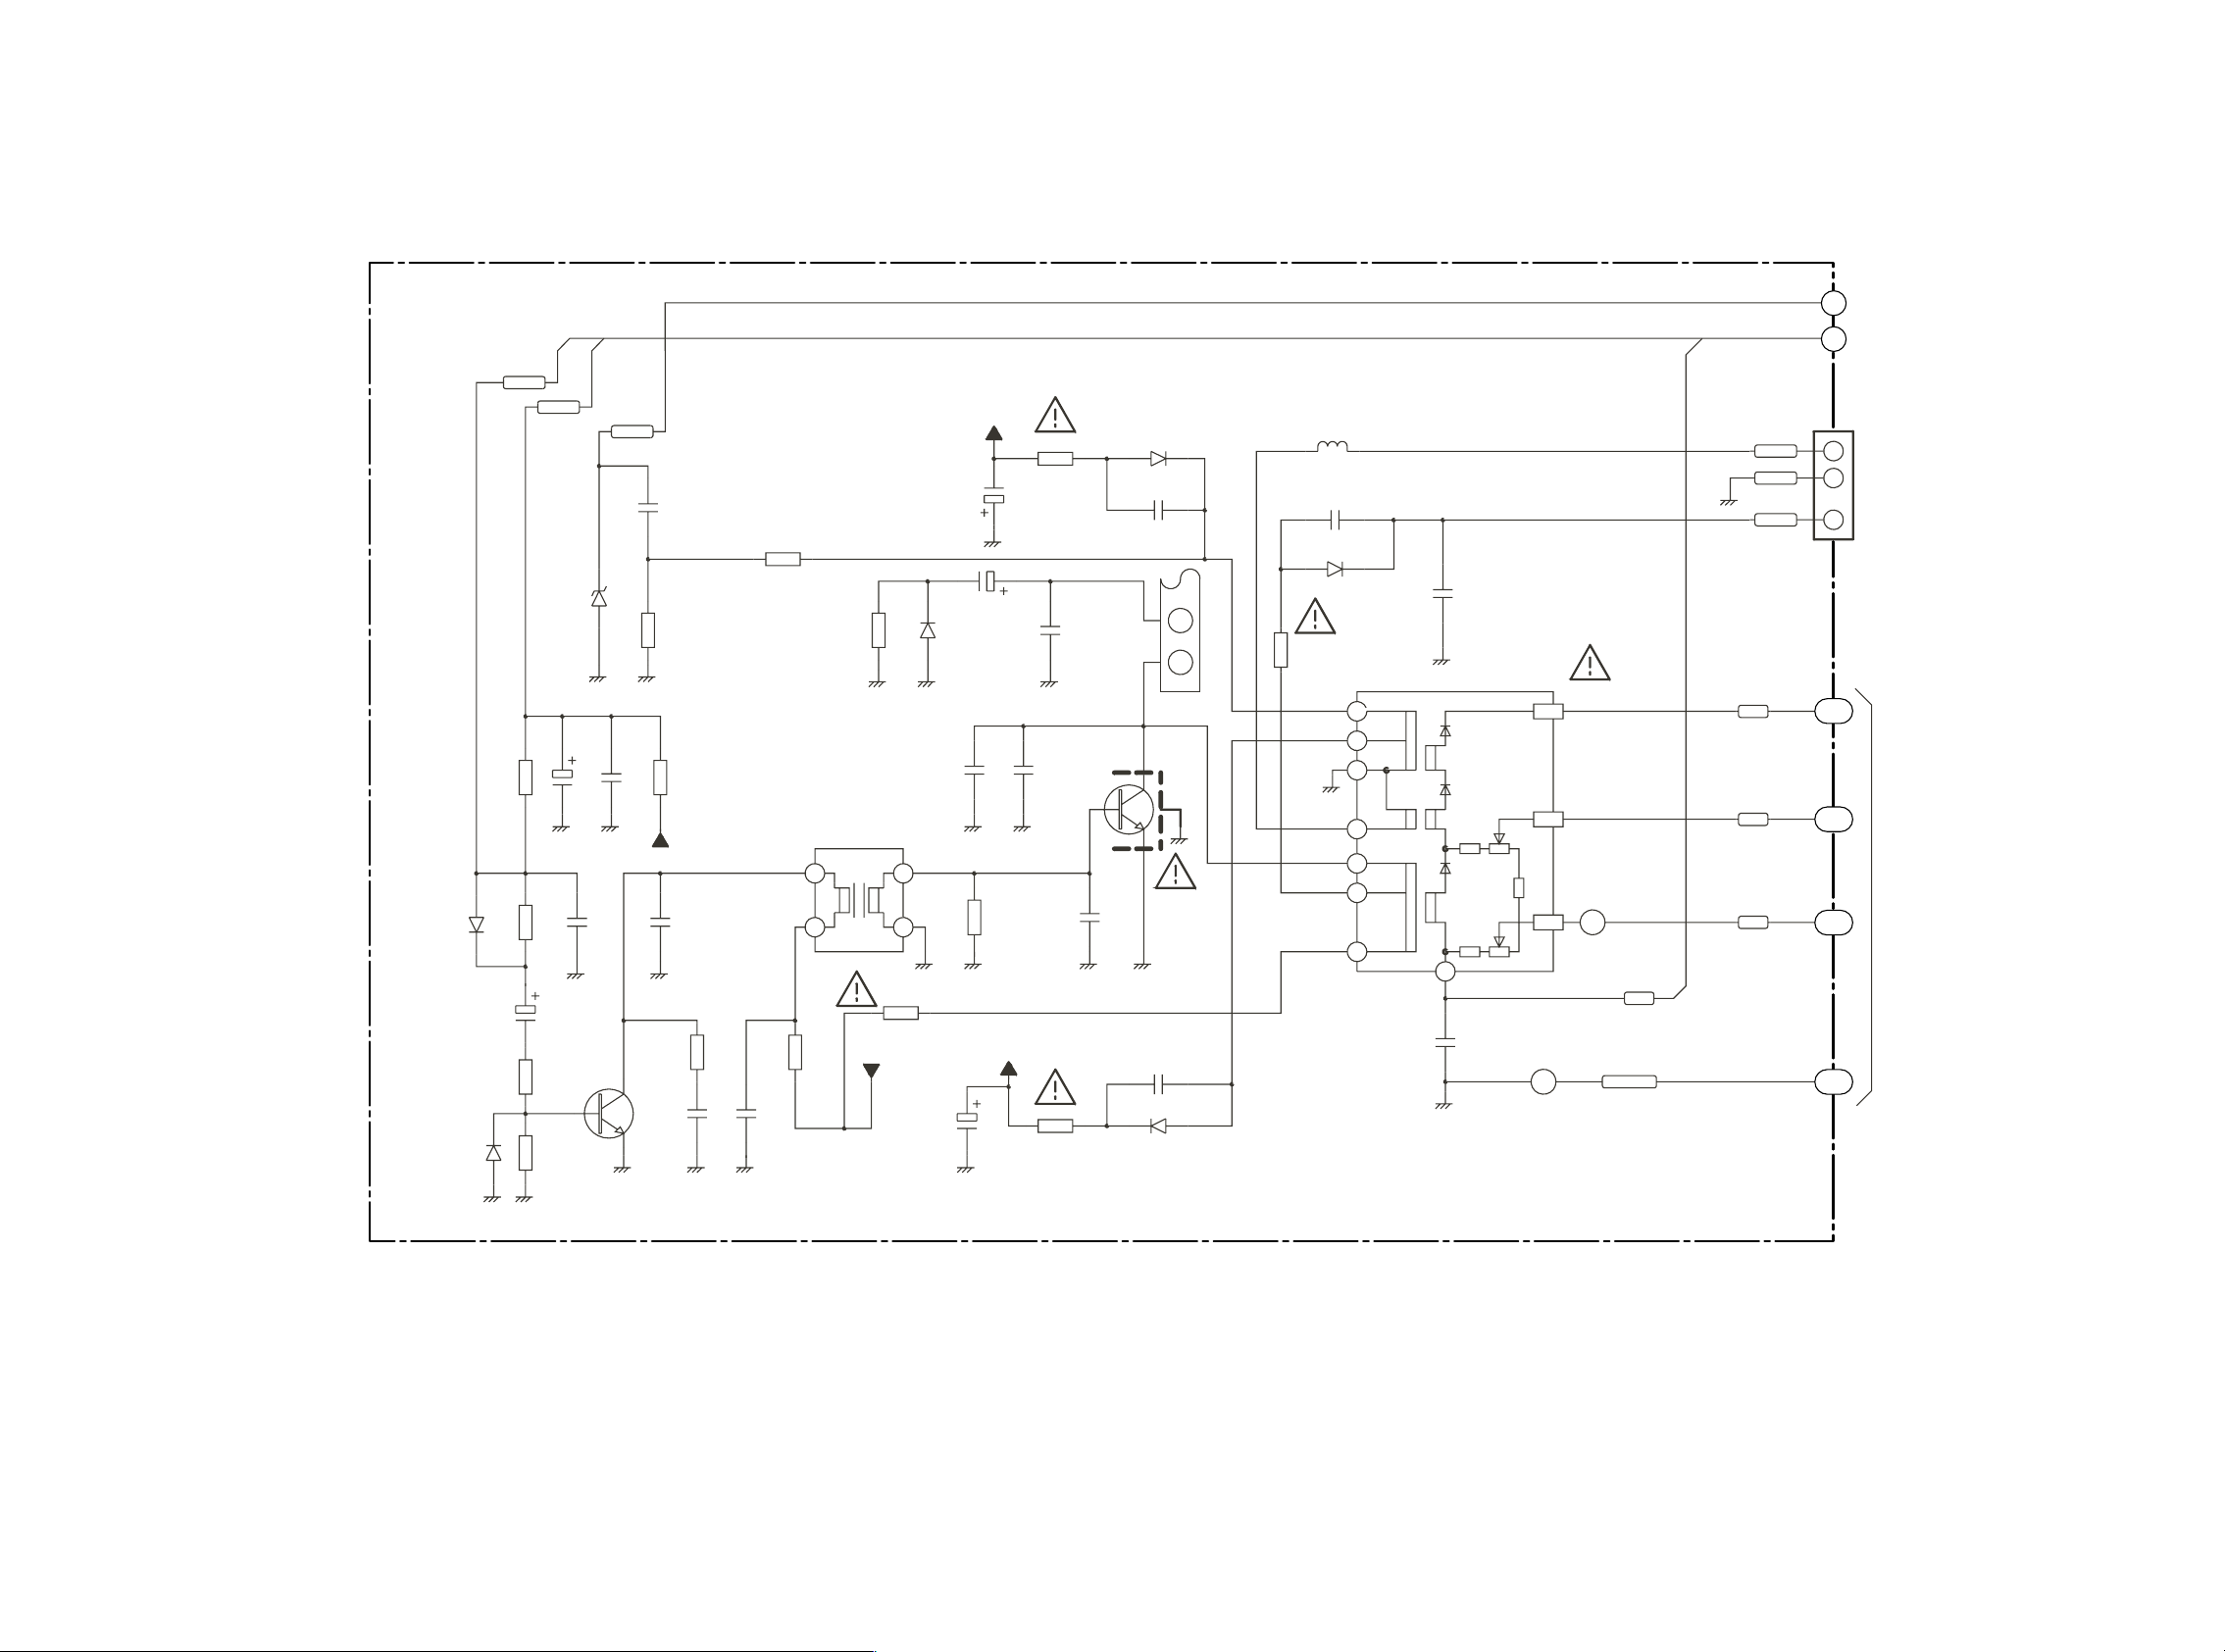
SCHEMATIC DIAGRAM-6 (MAIN C.B-6/6)
MAIN C. B -6/6 (FLYBACK TRANS SECTION)
HOUT
H_VCC
HSYN
C414
1K2pF_M(N)
DZ401
D405
1N4148(N)
1uF/100V
D406
1N4148(N)
C419
R407
R408
R409
330R
4K7
8V2(N)
100uF/ 16V
390R( N)
470pF/ 50V
MPSA42A
R418
27k
22KpF/ 50V
C412
C407
Q401
C413
R413
56K(N)
R412
2R2(N)
8V
C410
470pF/ 500 V(N)
R410
5K6(N)
C409
1K2pF_M(N)
C411
R414
15K(N)
10KpF/ 500V-M( N)
R415 D401
15K/1W(N)
T401
129.5V
R411
4k7/3W
470uF/ 16V
560pF/2kV(N)
FR401
1R-1W
470uF/ 16V
C425
C415
4,7 uF/ 160V
SK-4F1/06
C417
7k7pF/ 1k6V_PP(N)
C426
-12 V
C416
390kpF/250V_M(N)
R416
47R(N)
+12V
FR403
1R-1/2 W
C418
C427
2K2pF( N)
FR402
1R-1/2 W
1KpF/5 00V(N)
1/2 CN402
YOKE
HORIZONTAL
Q402
*
BU2508 DX
1KpF/5 00V(N)
D403
SK-4F1/06
C421
C420
D402
SK-4F1/06
To
7
MAIN C.B
-3/6
-4/6
10
MAT
FV
SCSC
HT
HTGND
180V
CN401
3
2
1
7-1
7-2
7-3
To
NK C.B
CN401
To
NK C.B
L402
20uH
C422
1KpF/5 00V(N)
D404
SK-4F1/06
AZ
2
FR404
VM
1
22R-FUSIS TOR
E-1 2
2
E+12
4
GND
6
FIL
3
COL
10
E+180
5
+B
9
C423
100KpF-M/ 250 V(N)
T402
FOCO
SCREEN
MAT
FV
SC
1
ABL
C424
47KpF/ 400V-M(N)
W2
ABL
GND_CRT
7-4
2019
Page 14
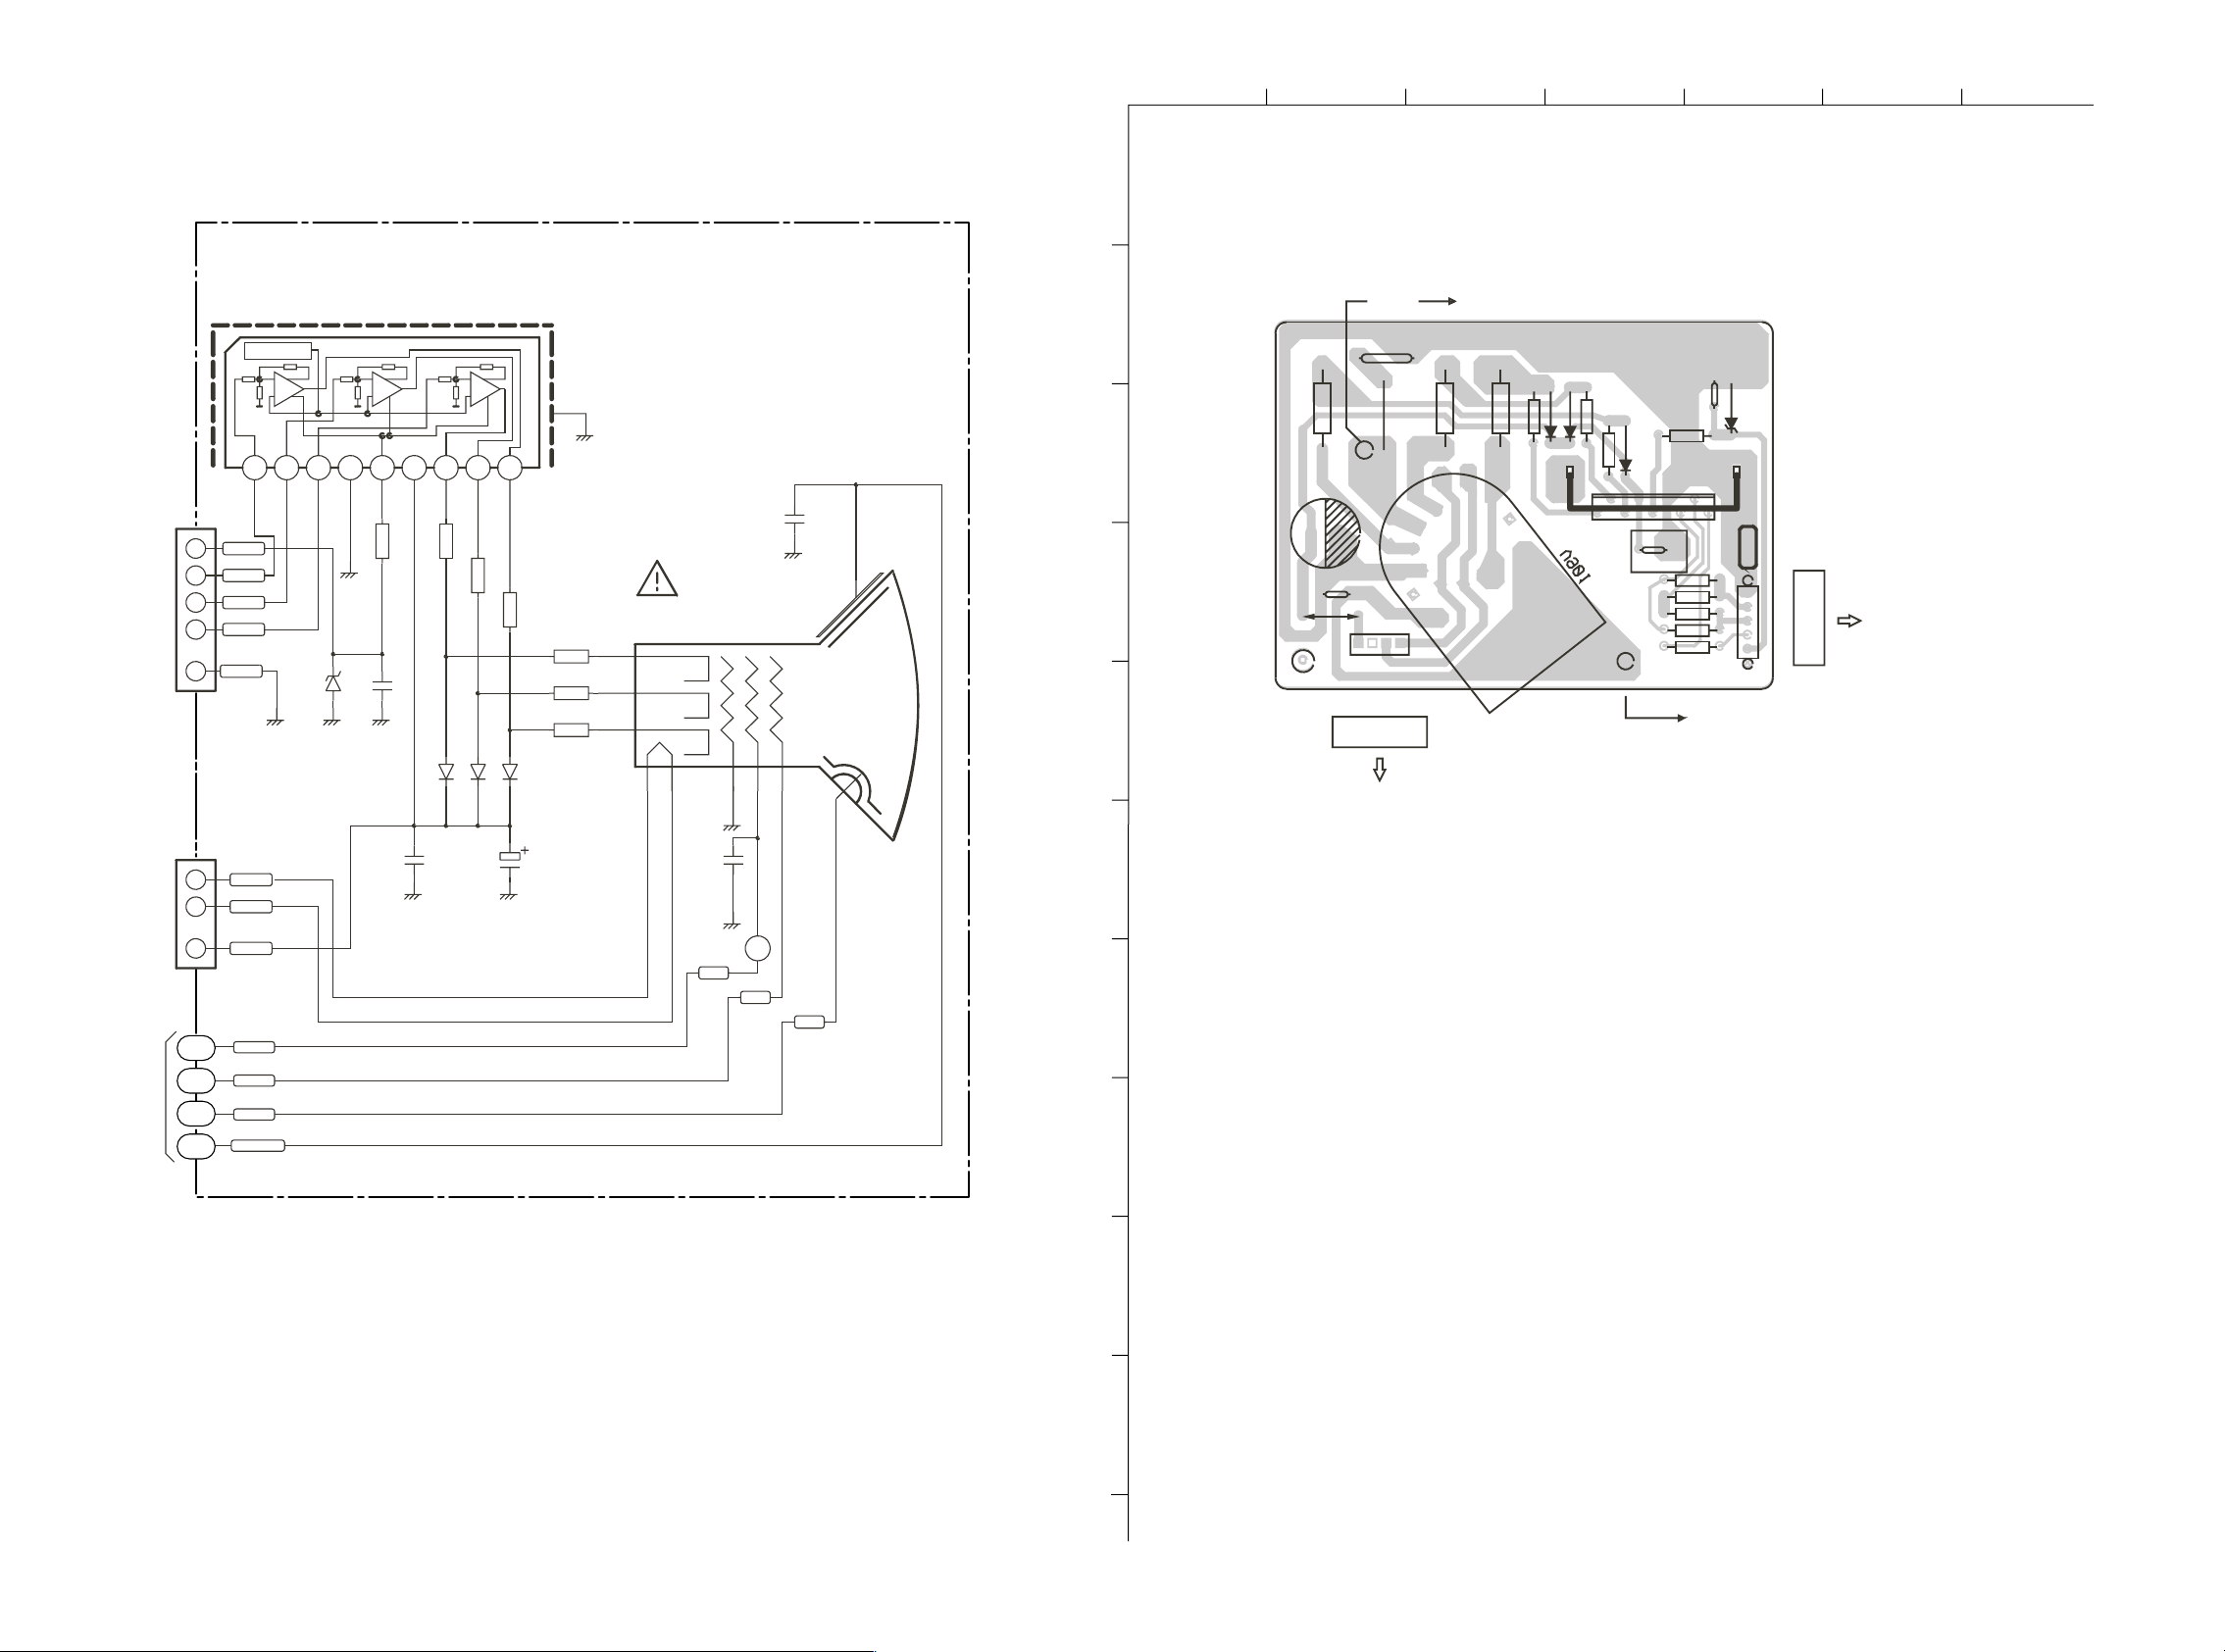
SCHEMATIC DIAGRAM-7 (NK C.B)
1
23456
7
A
B
C
D
E
F
G
H
I
J
R908
JD1
C901
R907
C905
41
C902
I C901
8
53
91
D901
R904
R903
D903
D902
R902
CN501
51
R910 - 14 R
R909 - 14 G
R901
R909 - 20 R
R906
R905
C904
JC5
R910 - 20 G
C903
180V
CN 501
TO CRT GND
TO MAI N PCB
51RBGBCGND
CN402
TO MAI N PCB
TO MAIN PCB
GF901
HTGND
SCREEN
10. 04. 00
72218- 02
CN401
DZ901
BCBGRGND
180VHT
HT- GND
SCREEN
W2
NK C. B
WIRING-1 (NK C.B)
NK C. B
REFVI P
--+++
IC901
TDA6107Q /N1
VDDGND
987654321
C905
BC
To
MAIN C.B
CN501
To
MAIN C.B
CN401
5
4
3
2
1
3
2
1
CN501
CN401
B_OUT
G_OUT
R_OUT
GND_1
HT
HTGND
180V
DZ901
8V2(N)
C901
470pF/ 50V(N)
100kpF -M/ 250V(N)
R907
1k( N)
100R( N)
R901
R902
BAV21 ( N)
D901
C903C902
22uF/2 50V
100R( N)
100R(N)
R903
R906
1k5-COMP
R905
1k5-COMP
R904
D903
1k5-COMP
BAV21 ( N)
BAV21 ( N)
D902
7
9
3
SC
FV
MAT
GND_CRT
7-3
7-2
7-1
7-4
To
MAIN C.B
1KpF/500V(N)
V901
A48KRD89X22
KR
KG
KB
H
C904
G3G2G1
18654
A
1kpF/ 2k V( N)
SC
SC
FV
MAT
2221
Page 15
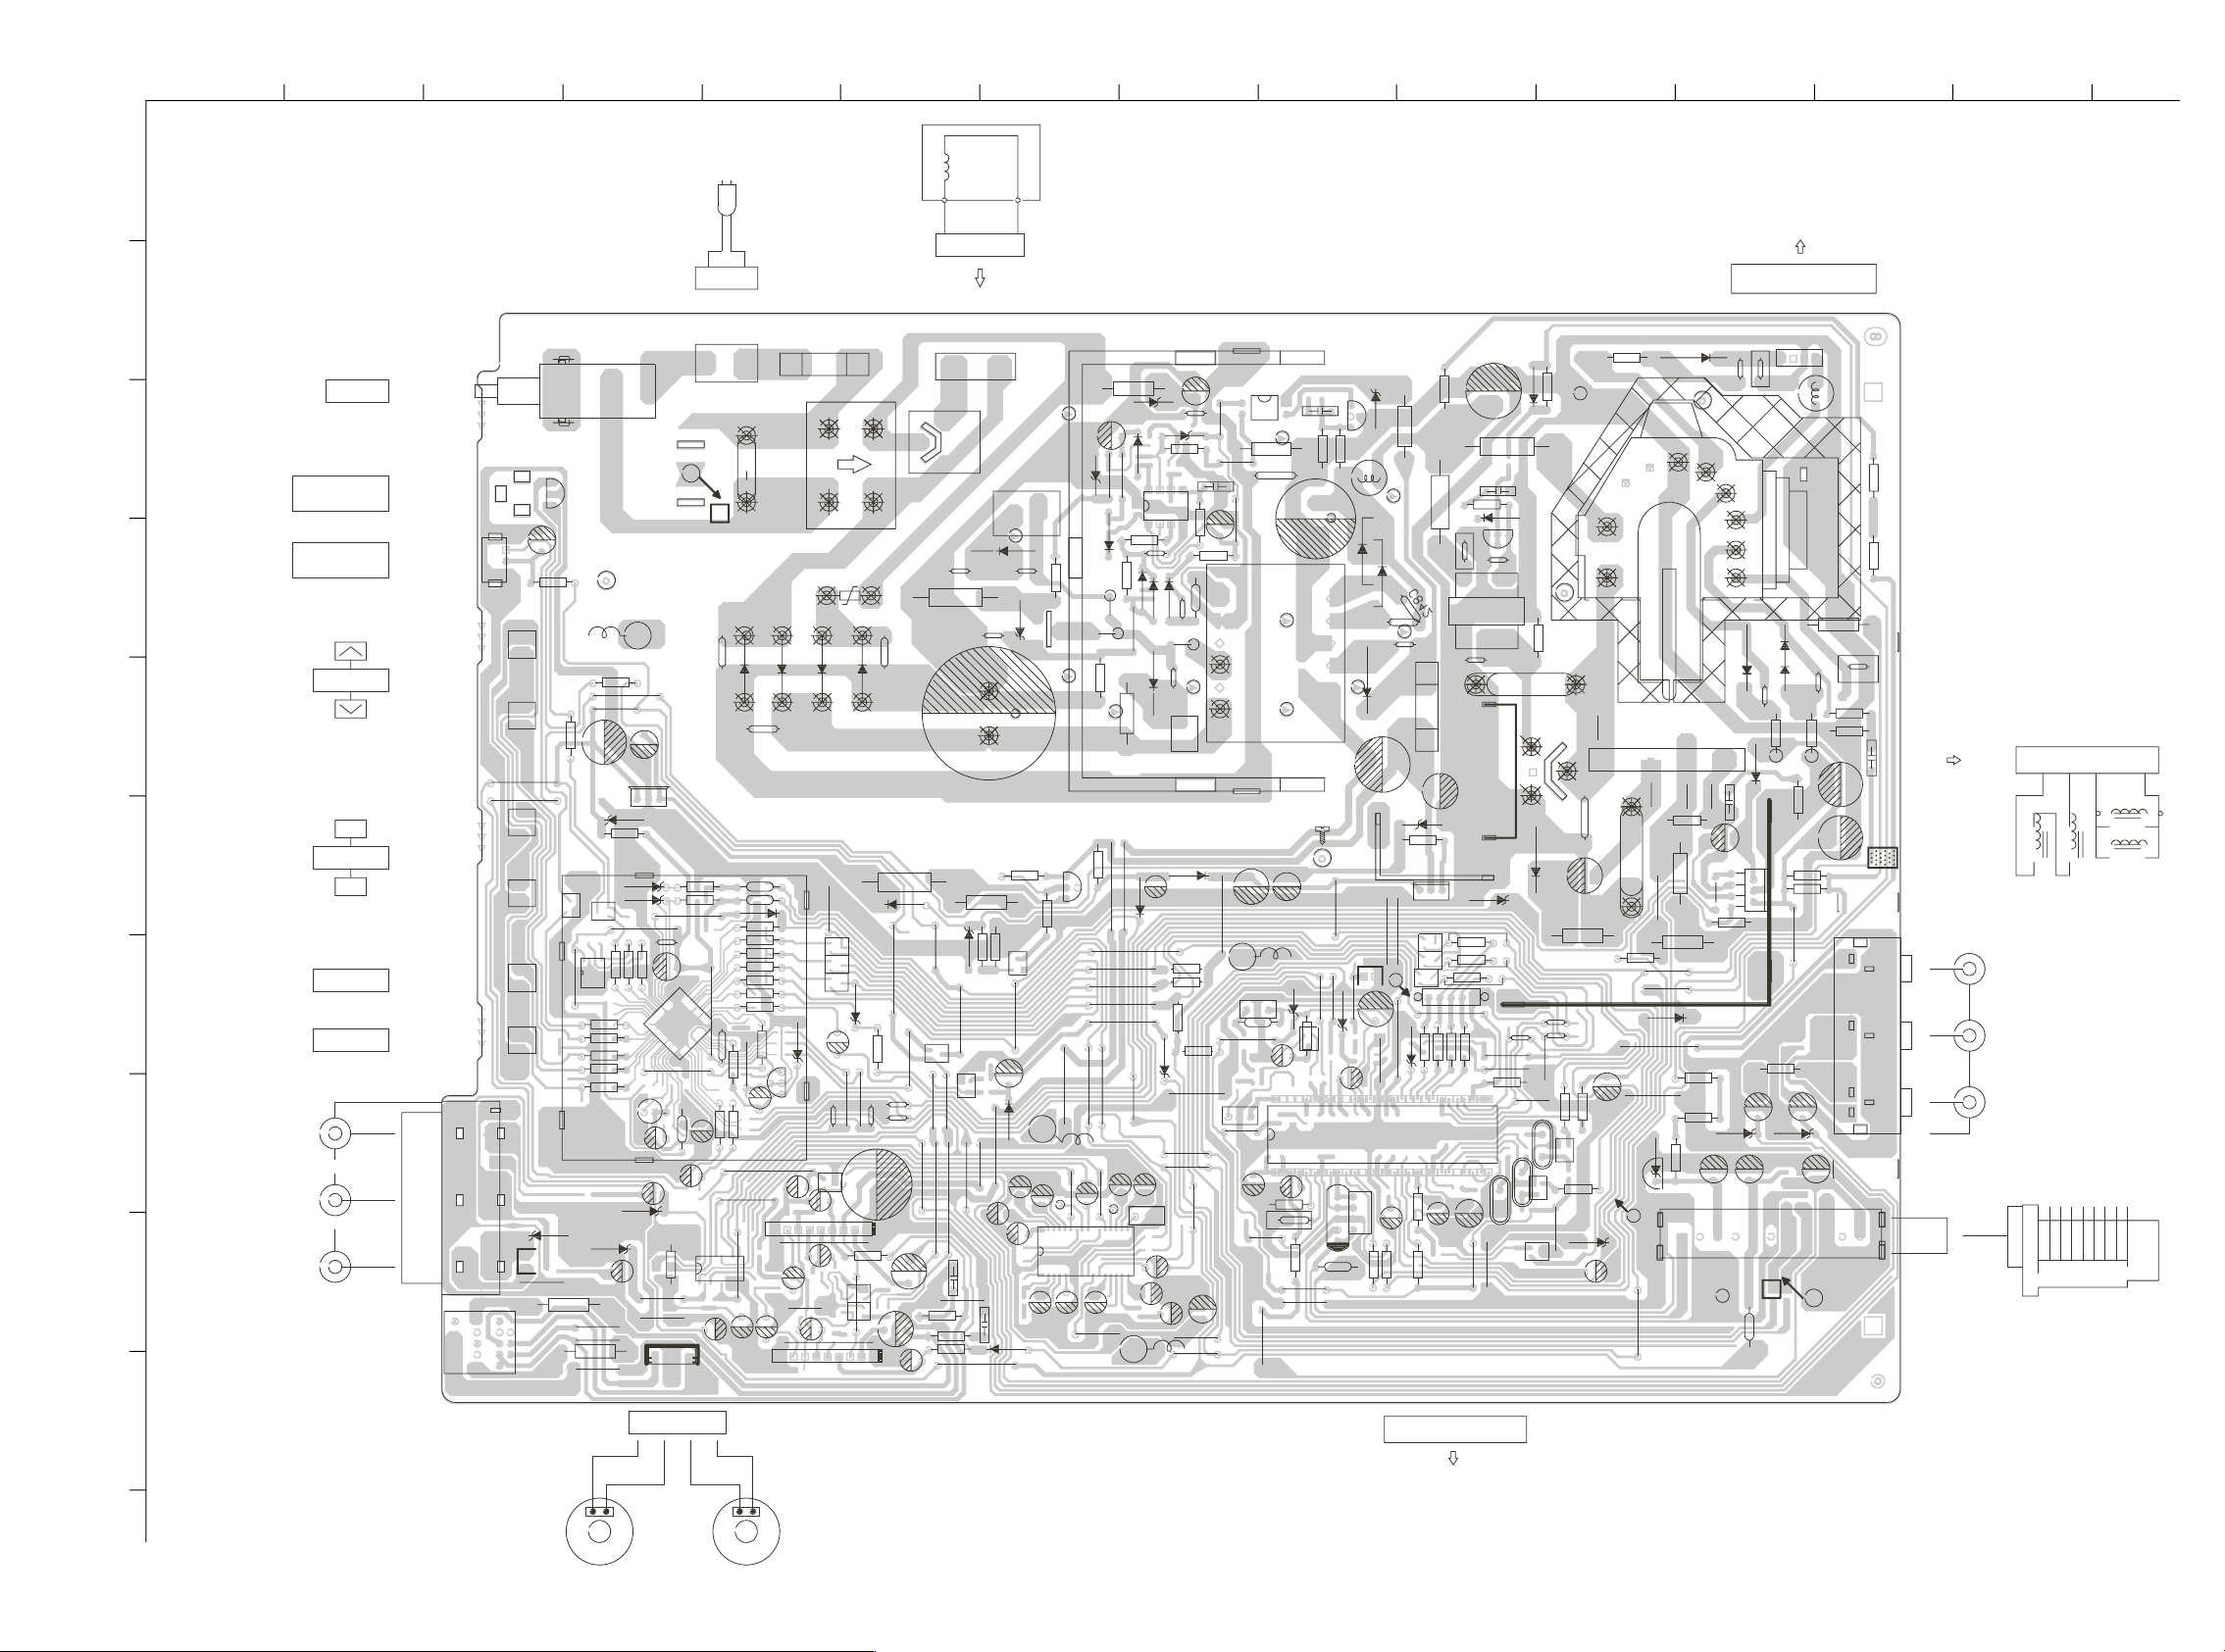
WIRING-2 (MAIN C.B)
1
A
234567
DEGUSSI NG COI L
AC 100-240V
50/ 60Hz
8
9
10
11 12 13
14
TO CN401
21
C844
R830
BE
JE19
TO CN801
DESMAG
CN801
PTC801
R827
D813
FR802
C843
DZ8 0 4
18V
Q801
D
SG
C817
R826
E
B
C
R823
R828
R829
C
BE
JE8
C654
D603
JF7
JC30
C619
IC604
C617
1510
C606
D601
C620
TP
C608
C618
JC31
C643
JF9
18V
C807
JC15
JC16
DZ803
4V7
D802
R814
D804
FB803
JC17
FB802
FR803
R812
R831
Q804
JG1
D816
JG2
JE4
JE5
JE6
JE7
JF6
JF4
JF5
JC23
JC25
JC24
C626
TP
C623
17 24 29 32
C612
JC26
B
SW801
PO WER
BE
IC702
58
JC36
JC37
R617
SW801
W1
R705
JE13
JC32
C839
C840
IC804
DZ809
FB701
5V6
DZ704
5V6
DZ705
JE17
R728
R759
R729
14
26
R704
27
R714
39
R713
R712
X701
R711
C733
C650
DZ601
8V2
8V2
DZ602
R608
C649
JC34
JC35
JC38
C
LD701
STANDBY
INDICATOR
RM 70 1
REMO TE
SENSOR
D
CHANNEL
E
+
F
VO LUM E
-
MENU
G
TV\ AV
H
I
AUDIO IN-2-R
AUDIO IN-2-L/MONO
VI DEO I N- 2
2
1
5
LD701
1- VM
2
3- VD
C703
RM701
S
5V
G
R706
SW704
SW705
R749
JE14
JE15
5V6
SW703
C
BE
C
SW706SW702
JD18
14
SW707
TV/ AVME N UVOL-VOL+CH-CH+
AUD2 R
AUD2 L
CN201
8V2
DZ203
VI DEO -2
EP601
VI DEO
GND
JC39
R619
AC
CN802
C801
A
C803
D809
R717
R716
JE16
C717
C716
13
JG5
1
52
40
C740
JE18
R702
L703
C720
C723
IC603
16
9
18
C628
CN601
41
R745
R720
R721
R722
R740
R739
R737
R736
LF801
D810
C804
L702
L701
D701
DZ7 0 2
R715
R766
JC33
5V
GND
I C703
C701
IN
JG6
C655
JD17
JE12
9
IC601
C651
C632
JB5
C630
C639
F801
T4AL 2 50V
NTC801
C802
D812
D811
JC29
BE
C
BE
BE
C708
C718
BE
C634
JG4
C
C
DZ7 0 1
4V7
R743
JD15
JD16
C724
C646
C
1
JG7
C635
R616
JD13
C
BE
C
BE
C653
JG8
19
C641
IC602
C
B
A
R810
C805
R821
D815
DZ8 0 8
JC28
3V6
JE10
JD14
BE
C
JD12
JD11
C
C735
C734
JE11
JI 1
JI 2
C636
C642
FR602
FR603
R620
MAIN C. B
R801
D801
14
FR804
D806
JG3
10V
16
C806
DZ801
C822
DZ802
18V
R813
IC801
R804
58
L801
C815
C816
D803
D805
654321
FB801
C820
C819
C846
D814
R765
R763
R761
DZ6 0 3
R824
JD9
JC18
JC19
C627
JC20
RS6 0 1
C611
C616
C615
JC21
JC27
IC803
43
JB1
C809
C812
JF3
CF601
C609
21
R815
JB2
C823
C825
JC14
FR801
T801
C835
C836
DZ8 0 7
8V2
CF201
L201
JD8
C201
1
JB7
C603
56 29
51 47 41 31
54 44 38 34
R301
C301
R102
JB4
JD10
IC802
C827
3
2
1
R817
R816
D819
12 11 10 9 8 7
C83 1
JD7
CN201
VI DEO
JC9
JC11
JC10
DZ2 0 2
8V2
BE
C
R202
C204
10 191613626
C103
SF101
R303
1
L101
JC12
JC13
D808
DZ805
GND
4V7
R820
L803
D807
C845
JE1
JE2
B
JF2
C838
JC8
C404
R302
R106
R411
D406
C411
T401
T1AL 250V
C833
C427
F802
C834
9V1
DZ806
R825
BE
Q802
BE
C
BE
C
BE
C
51
DZ201
R507
R510
8V2
R509
R508
R215
C212
R412
HT GND 180 V
C423
C422
180V
GND
D405
R408
C829
W2
FR401
C409
R410
D401
JD4
JD5
JD6
X50 3
BE
9
Q401
C410
10
R416
C418
Q402
C415
C737
C738
JC40
C736
R506
JB6
BE
C
BE
C
JC5
C
CBE
4V7
DZ703
R764
R762
R760
CN501
JE3
JC3
JC4
28
R746
IC501
X50 2
X50 1
C412
JC7
JC6
FR404
D404
T402
VI DEO
6
7
8
+B
COL
JA4
JA3
C417
C416
R415
R305
C207
R210
IC101
33V
R504
B
8V2
DZ401
5
4
12V
3
- 12VHC
2
ABL
1
D402 C302
CN402
JA1
JA2
C303
R307
R308
JC22
JB3
IC301
R309
R304
JC1
JC2
D201
JF1
R111
JD3
R112
8V28V2
R113
DZ604
C104
TU101
C419
JE9
L102
HT
HT
231
L402
CN401
R107
R110
R207
C424
R414
C414
R413
TO YOKE
AMVDAZVM
C426C425
HORI Z.
VERT.
COI L S
VI DEO -1
YWR
AUD1 L AUD1 R
COI L S
VI DEO I N- 1
FR402
D301
C420
12V
C421
D403
FR403
-12V
FR301
R208
R209
JD1
AUDIO IN-1-L/MONO
R624
C647 C648
AUDIO IN-1-R
DZ605
C107
C101
A
W1
AERI AL
72218- 03
25. 05. 00
J
21
34
TO SPEAKER L TO SPEAKER R
RGBFBGND 51
TO CN501
+-
-+
MAI N SPEAKER
2423
Page 16
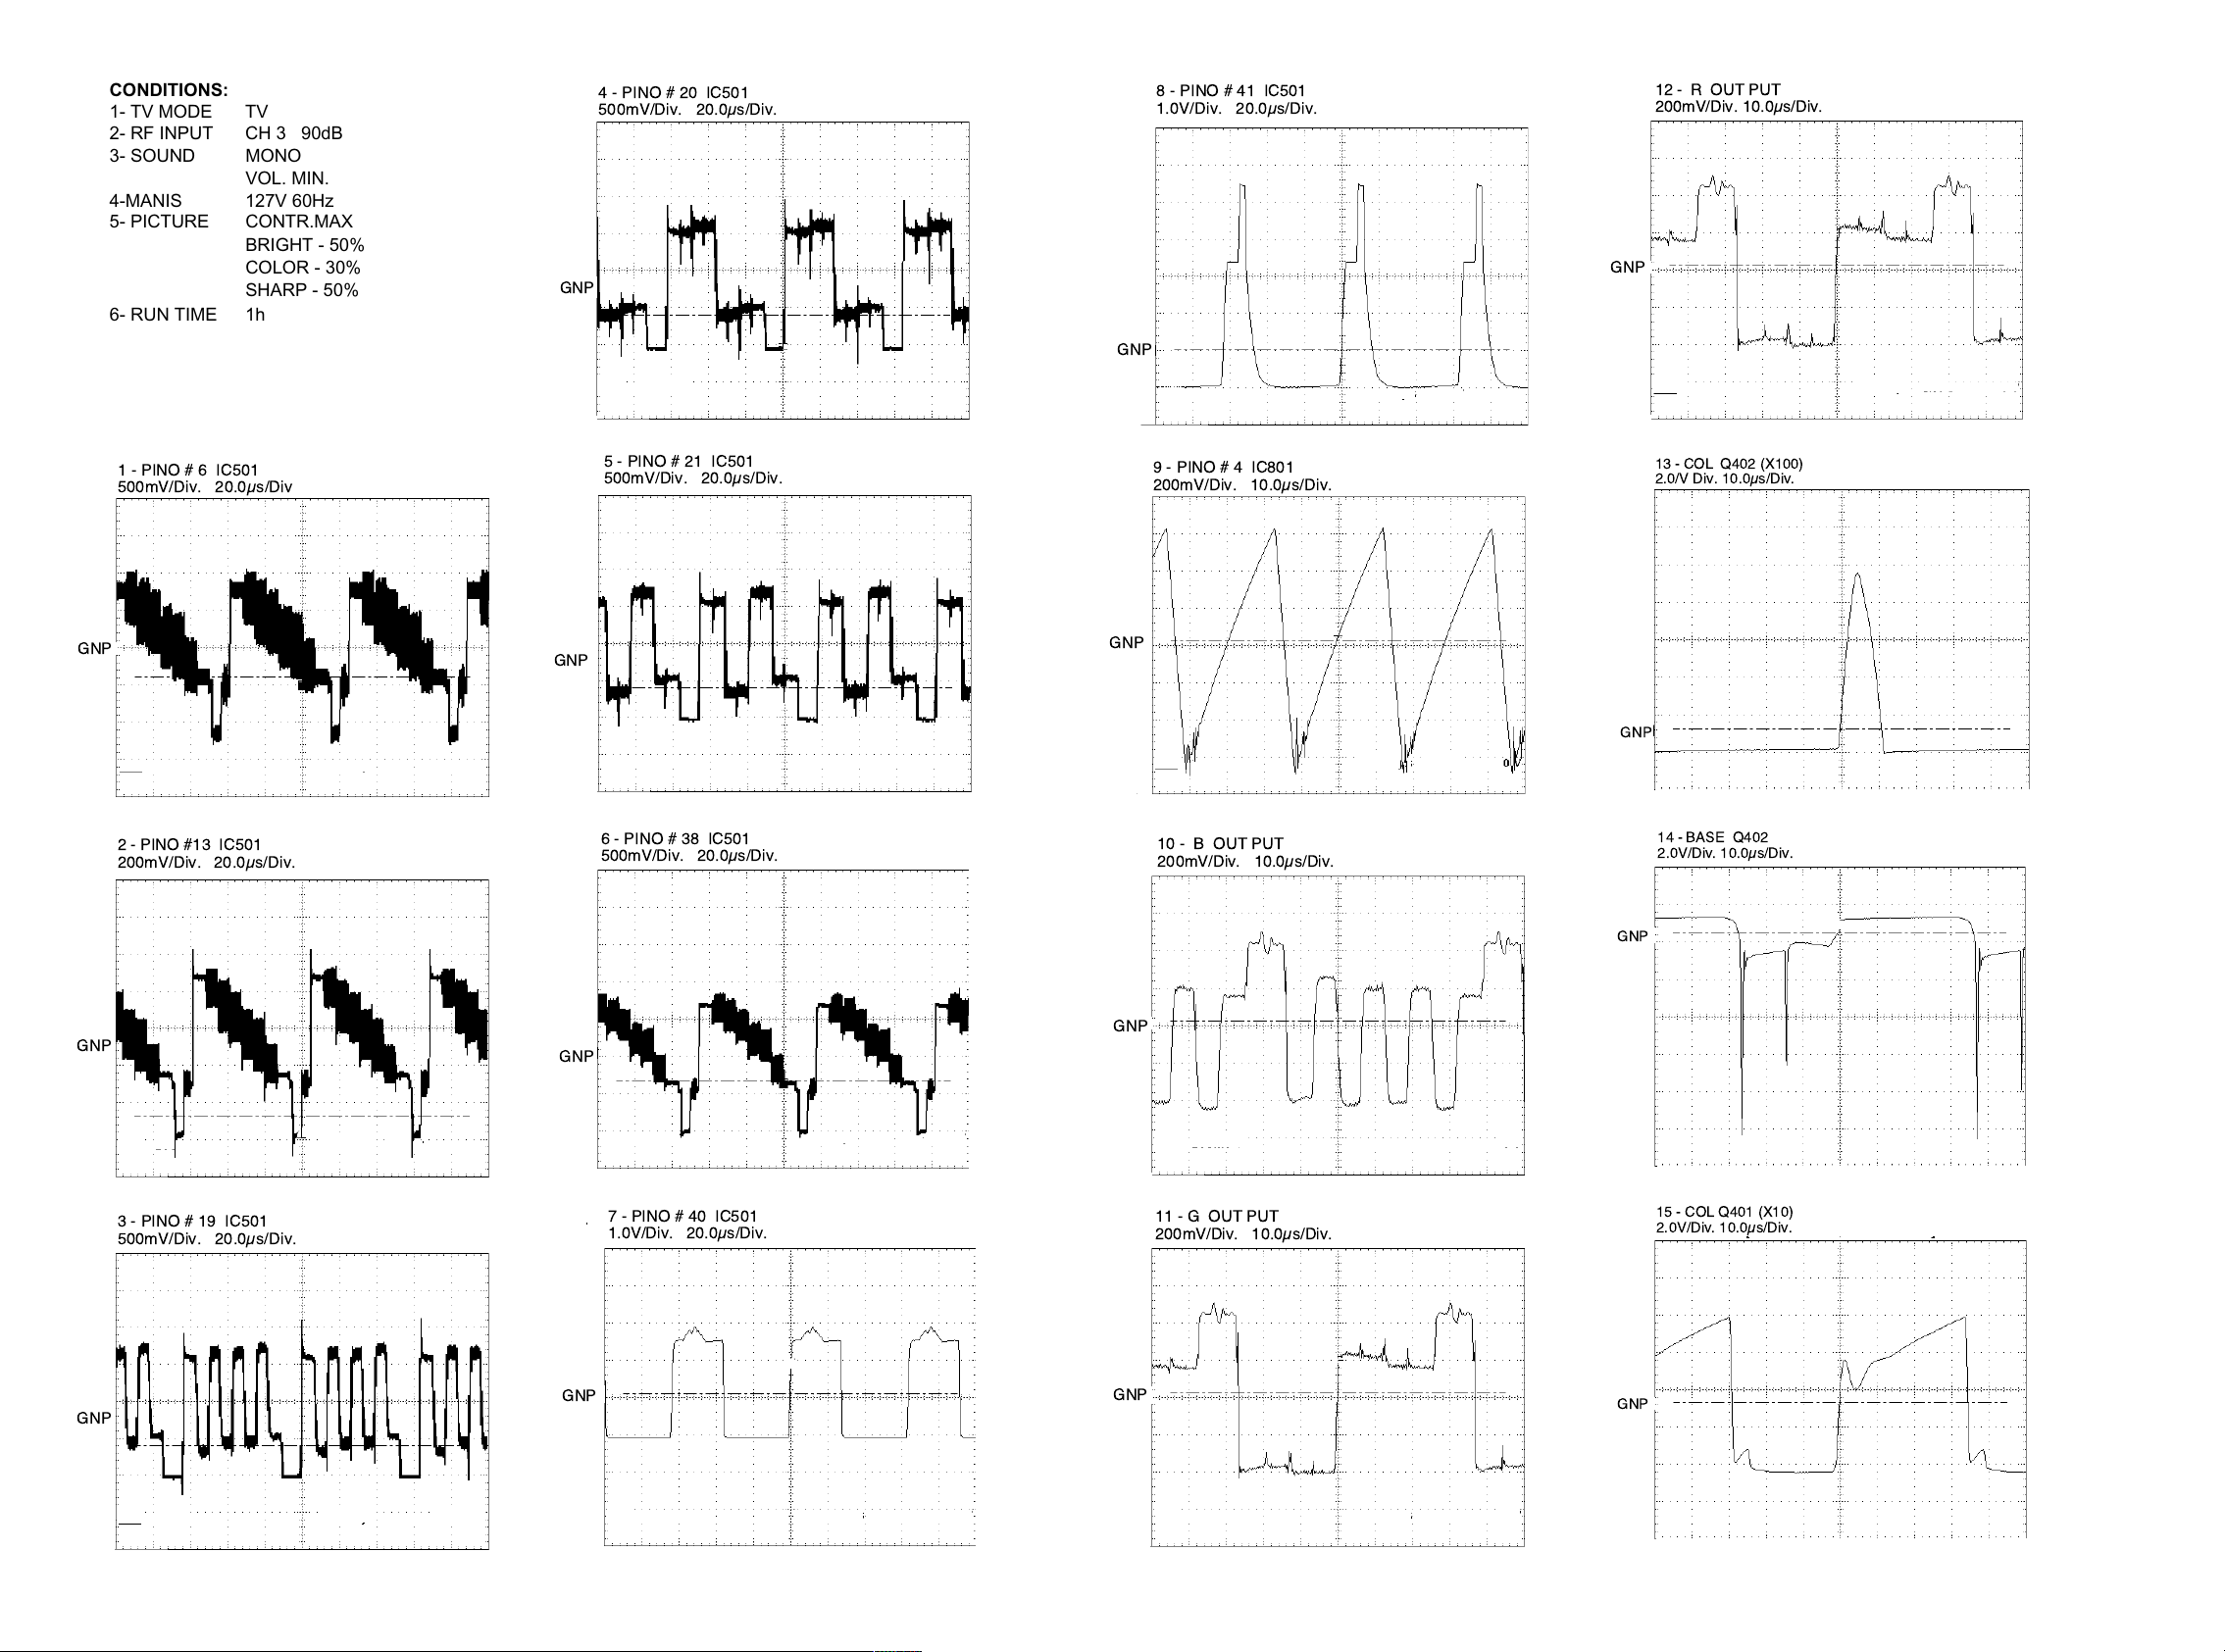
WAVEFORM
GNP
9 - PINO # 4 IC801
200mV/Div. 10.0µs/Div.
GNP
10 - B OUT PUT
200mV/Div. 10.0µs/Div.
GNP
11 - G OUT PUT
200mV/Div. 10.0µs/Div.
GNP
13 - COL Q402 (X100)
2.0/V Div. 10.0µs/Div.
GNP
14 - BASE Q402
2.0V/Div. 10.0µs/Div.
GNP
15 - COL Q401 (X10)
2.0V/Div. 10.0µs/Div.
GNP
8 - PINO # 41 IC501
1.0V/Div. 20.0µs/Div.
CONDITIONS:
1- TV MODE TV
2- RF INPUT CH 3 90dB
3- SOUND MONO
VOL. MIN.
4-MANIS 127V 60Hz
5- PICTURE CONTR.MAX
6- RUN TIME 1h
BRIGHT - 50%
COLOR - 30%
SHARP - 50%
4 - PINO # 20 IC501
500mV/Div. 20.0µs/Div.
GNP
12 - R OUT PUT
200mV/Div. 10.0µs/Div.
GNP
1 - PINO # 6 IC501
500mV/Div. 20.0µs/Div
GNP
2 - PINO #13 IC501
200mV/Div. 20.0µs/Div.
5 - PINO # 21 IC501
500mV/Div. 20.0µs/Div.
GNP
6 - PINO # 38 IC501
500mV/Div. 20.0µs/Div.
GNP
3 - PINO # 19 IC501
500mV/Div. 20.0µs/Div.
GNP
GNP
7 - PINO # 40 IC501
1.0V/Div. 20.0µs/Div.
GNP
2625
Page 17
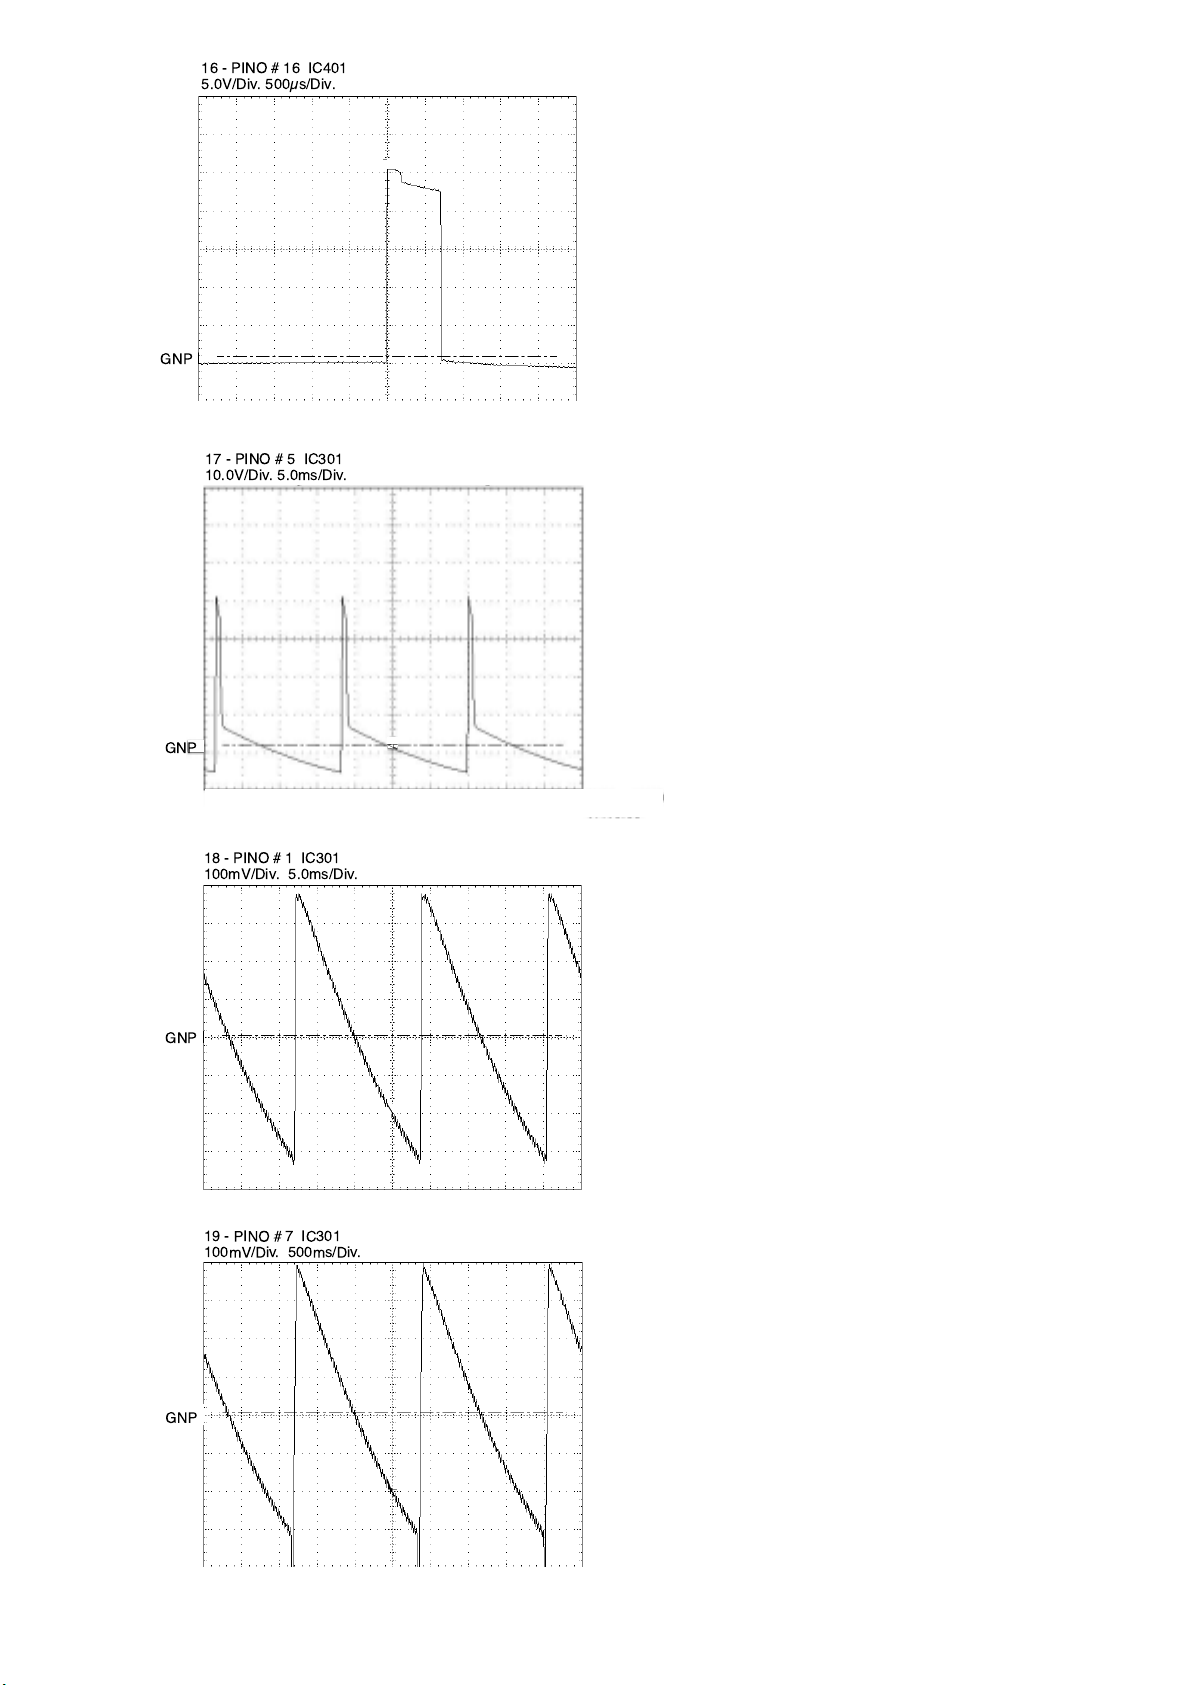
16 - PINO # 16 IC401
5.0V/Div. 500µs/Div.
GNP
17 - PINO # 5 IC301
10.0V/Div. 5.0ms/Div.
GNP
18 - PINO # 1 IC301
100mV/Div. 5.0ms/Div.
GNP
19 - PINO # 7 IC301
100mV/Div. 500ms/Div.
GNP
27
Page 18
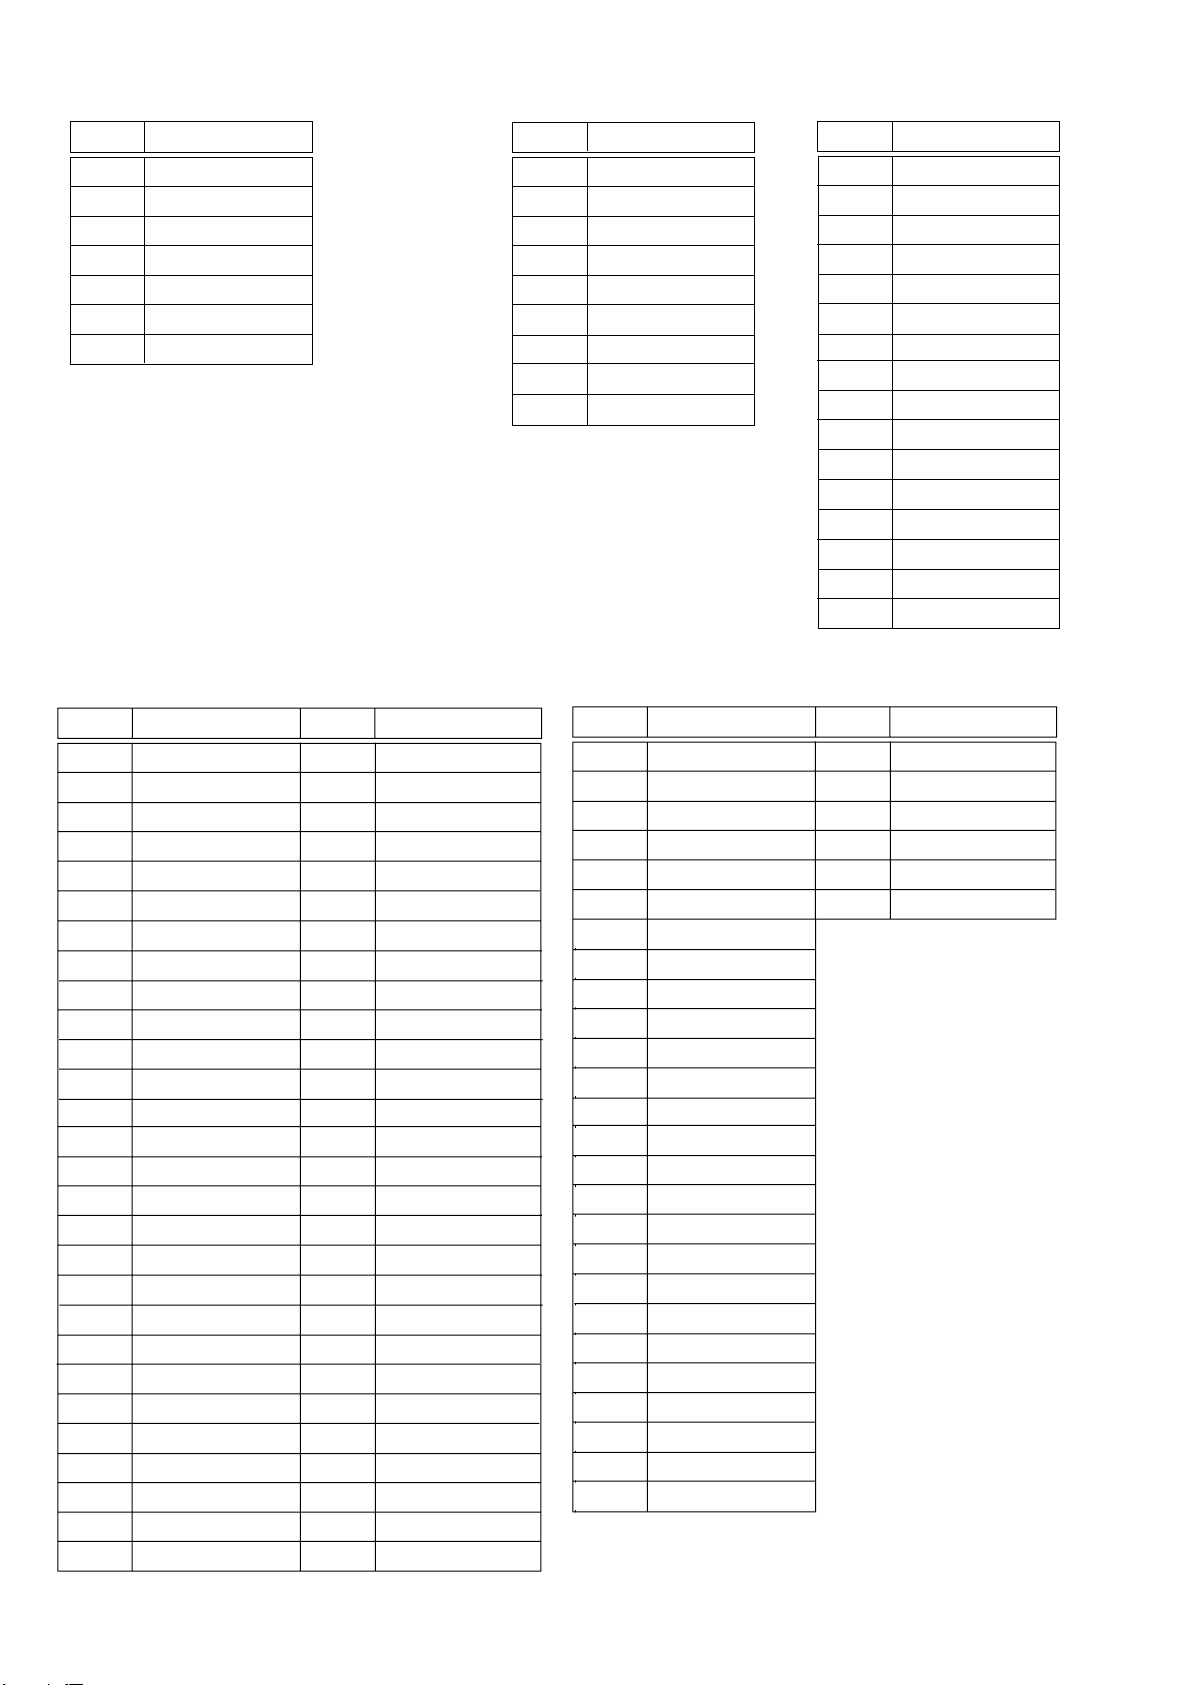
VOLTAGE CHARTS
IC301 IC601, IC602 IC603
PIN# VOLTAGE (V)
1 0.5
2 12.8
3 -10.4
4 -11.8
5 0.082
613
7 0.5
PIN# VOLTAGE (V)
10
2 5.7
3 14.9
4 11.9
5 1.1
6 6.6
7 3.4
8 2.8
90
PIN# VOLTAGE (V)
1 3.6
2 2.4
3 3.6
4 1.3
5 2.5
60
70
80
90
10 5
11 0
12 3.6
13 3.6
14 2.4
15 2.4
16 4.9
IC501 IC604
PIN# VOLTAGE (V) PIN# VOLTAGE (V)
PIN# VOLTAGE (V) PIN# VOLTAGE (V)
1 0 29 0
2 3.6 30 2.2
3 0 31 2.2
4 0 32 2.2
5 2.5 33 0
6 3 34 2.4
7 4.4 35 2.4
8 4.4 36 4.6
9 6.6 37 8
10 1.4 38 2.4
11 3.3 39 4.9
12 8.1 40 1.2
13 3.7 41 0.6
14 0 42 3.1
15 3 43 3.9
16 1.5 44 -2.2
17 3.3 45 0
18 5.9 46 05
19 3.0 47 06
20 3.0 48 4.6
21 3.0 49 4.6
22 3.0 50 1.9
23 1.9 51 3.8
24 0 52 3.8
25 0 53 4.4
26 0 54 0.9
10 8.5
11 3.5
12 8.5
13 3.5
14 3.6
15 3.5
16 2.9
17 5.4
18 3.6
19 3.5
20 3.5
21 3.6
22 3.6
23 3.6
24 3.6
25 3.5
26 3
27 2.7 55 2.8
28 2.7 56 0
1 2.9 27 3.5
2 2 28 0
3 3.6 29 3.4
4 0 30 3.5
5 3.5 31 3.6
6 0 32 3.5
70
8 4.4
9 4.4
28
Page 19
IC701 IC801
PIN# VOLTAGE (V) PIN# VOLTAGE (V)
1 0 27 6
2 0 28 4.9
3 3 29 4.9
4 0 30 4.9
5 0 31 4.9
6 0 32 4.9
7 0 33 0
8 0 34 0
9 0 35 2.4
10 0 36 2.2
11 0 37 1
12 0 38 4.9
13 0 39 0
14 0 40 15 0 41 0
16 0 42 4.9
17 4.9 43 0
18 4.9 44 4.9
19 0 45 2.7
20 0 46 4.9
21 4.9 47 0
22 4.9 48 0
23 0 49 0
24 4.9 50 4.9
25 4.9 51 4.9
26 4.9 52 0
IC702
PIN# VOLTAGE (V)
10
20
30
40
55
65
70
85
PIN# VOLTAGE (V)
1 2.5
20
30
4 2.39
5 1.95
6 3.6
718
85
IC901
PIN# VOLTAGE (V)
1 2.9
2 2.8
33
40
56
6 175
7 101
8 115
9 115
IC703
PIN# VOLTAGE (V)
15
20
35
29
Page 20
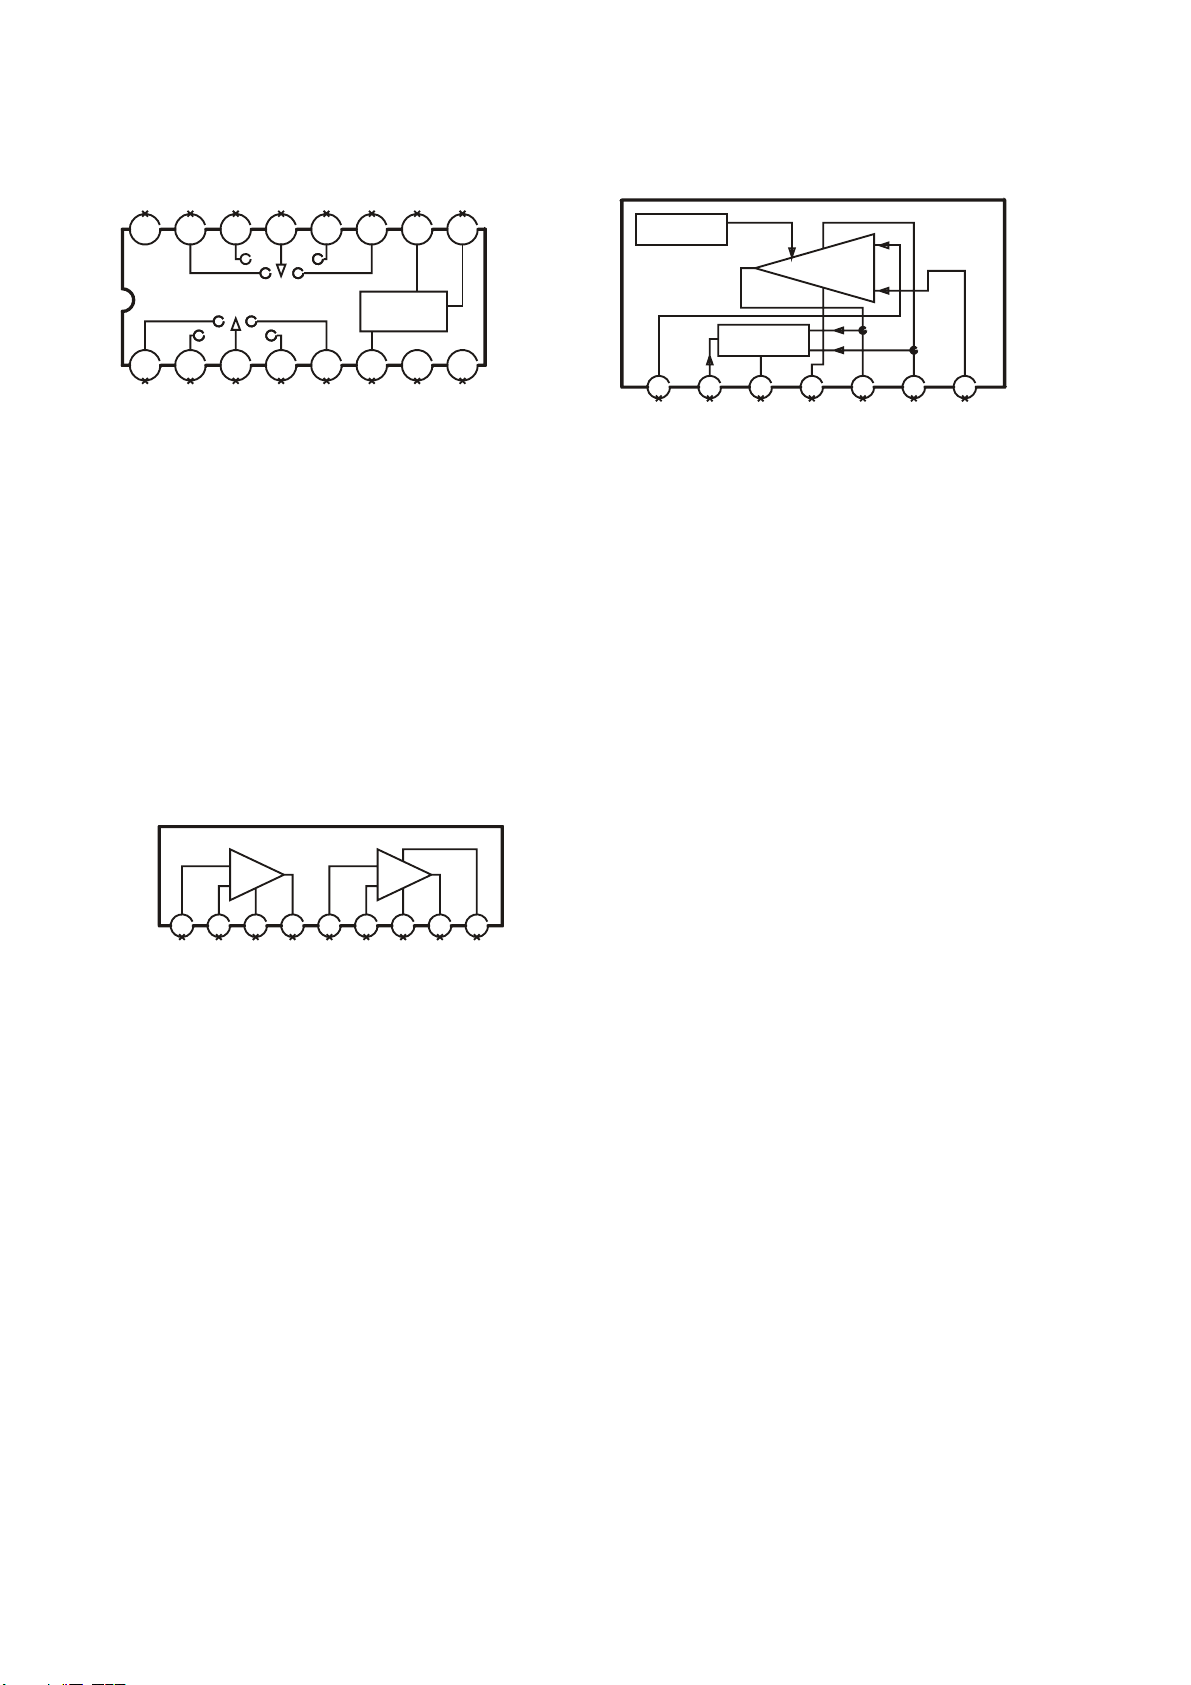
IC BLOCK DIAGRAMS
IC, HEF4052 IC, TDA9309
16 15 14 13 12 10 9
VDD
Y0
Y2
1
IC, TDA1013B
X2
11
X
X0X1
X3
CONTROL
Y1
Y
Y3
UNIT
VSSVEE
8765432
THERMAL
PROTECTION
INPUT
SUPPLY
NON-INVERTING
FLYBACK
GENERATOR
VOLTAGE
POWER
AMPLIFIER
GND
+
-
OUTPUT
OUTPUT
INVERTING
STAGE SUPPLY
7654321
INPUT
98765432987654321
GNDGND
30
Page 21
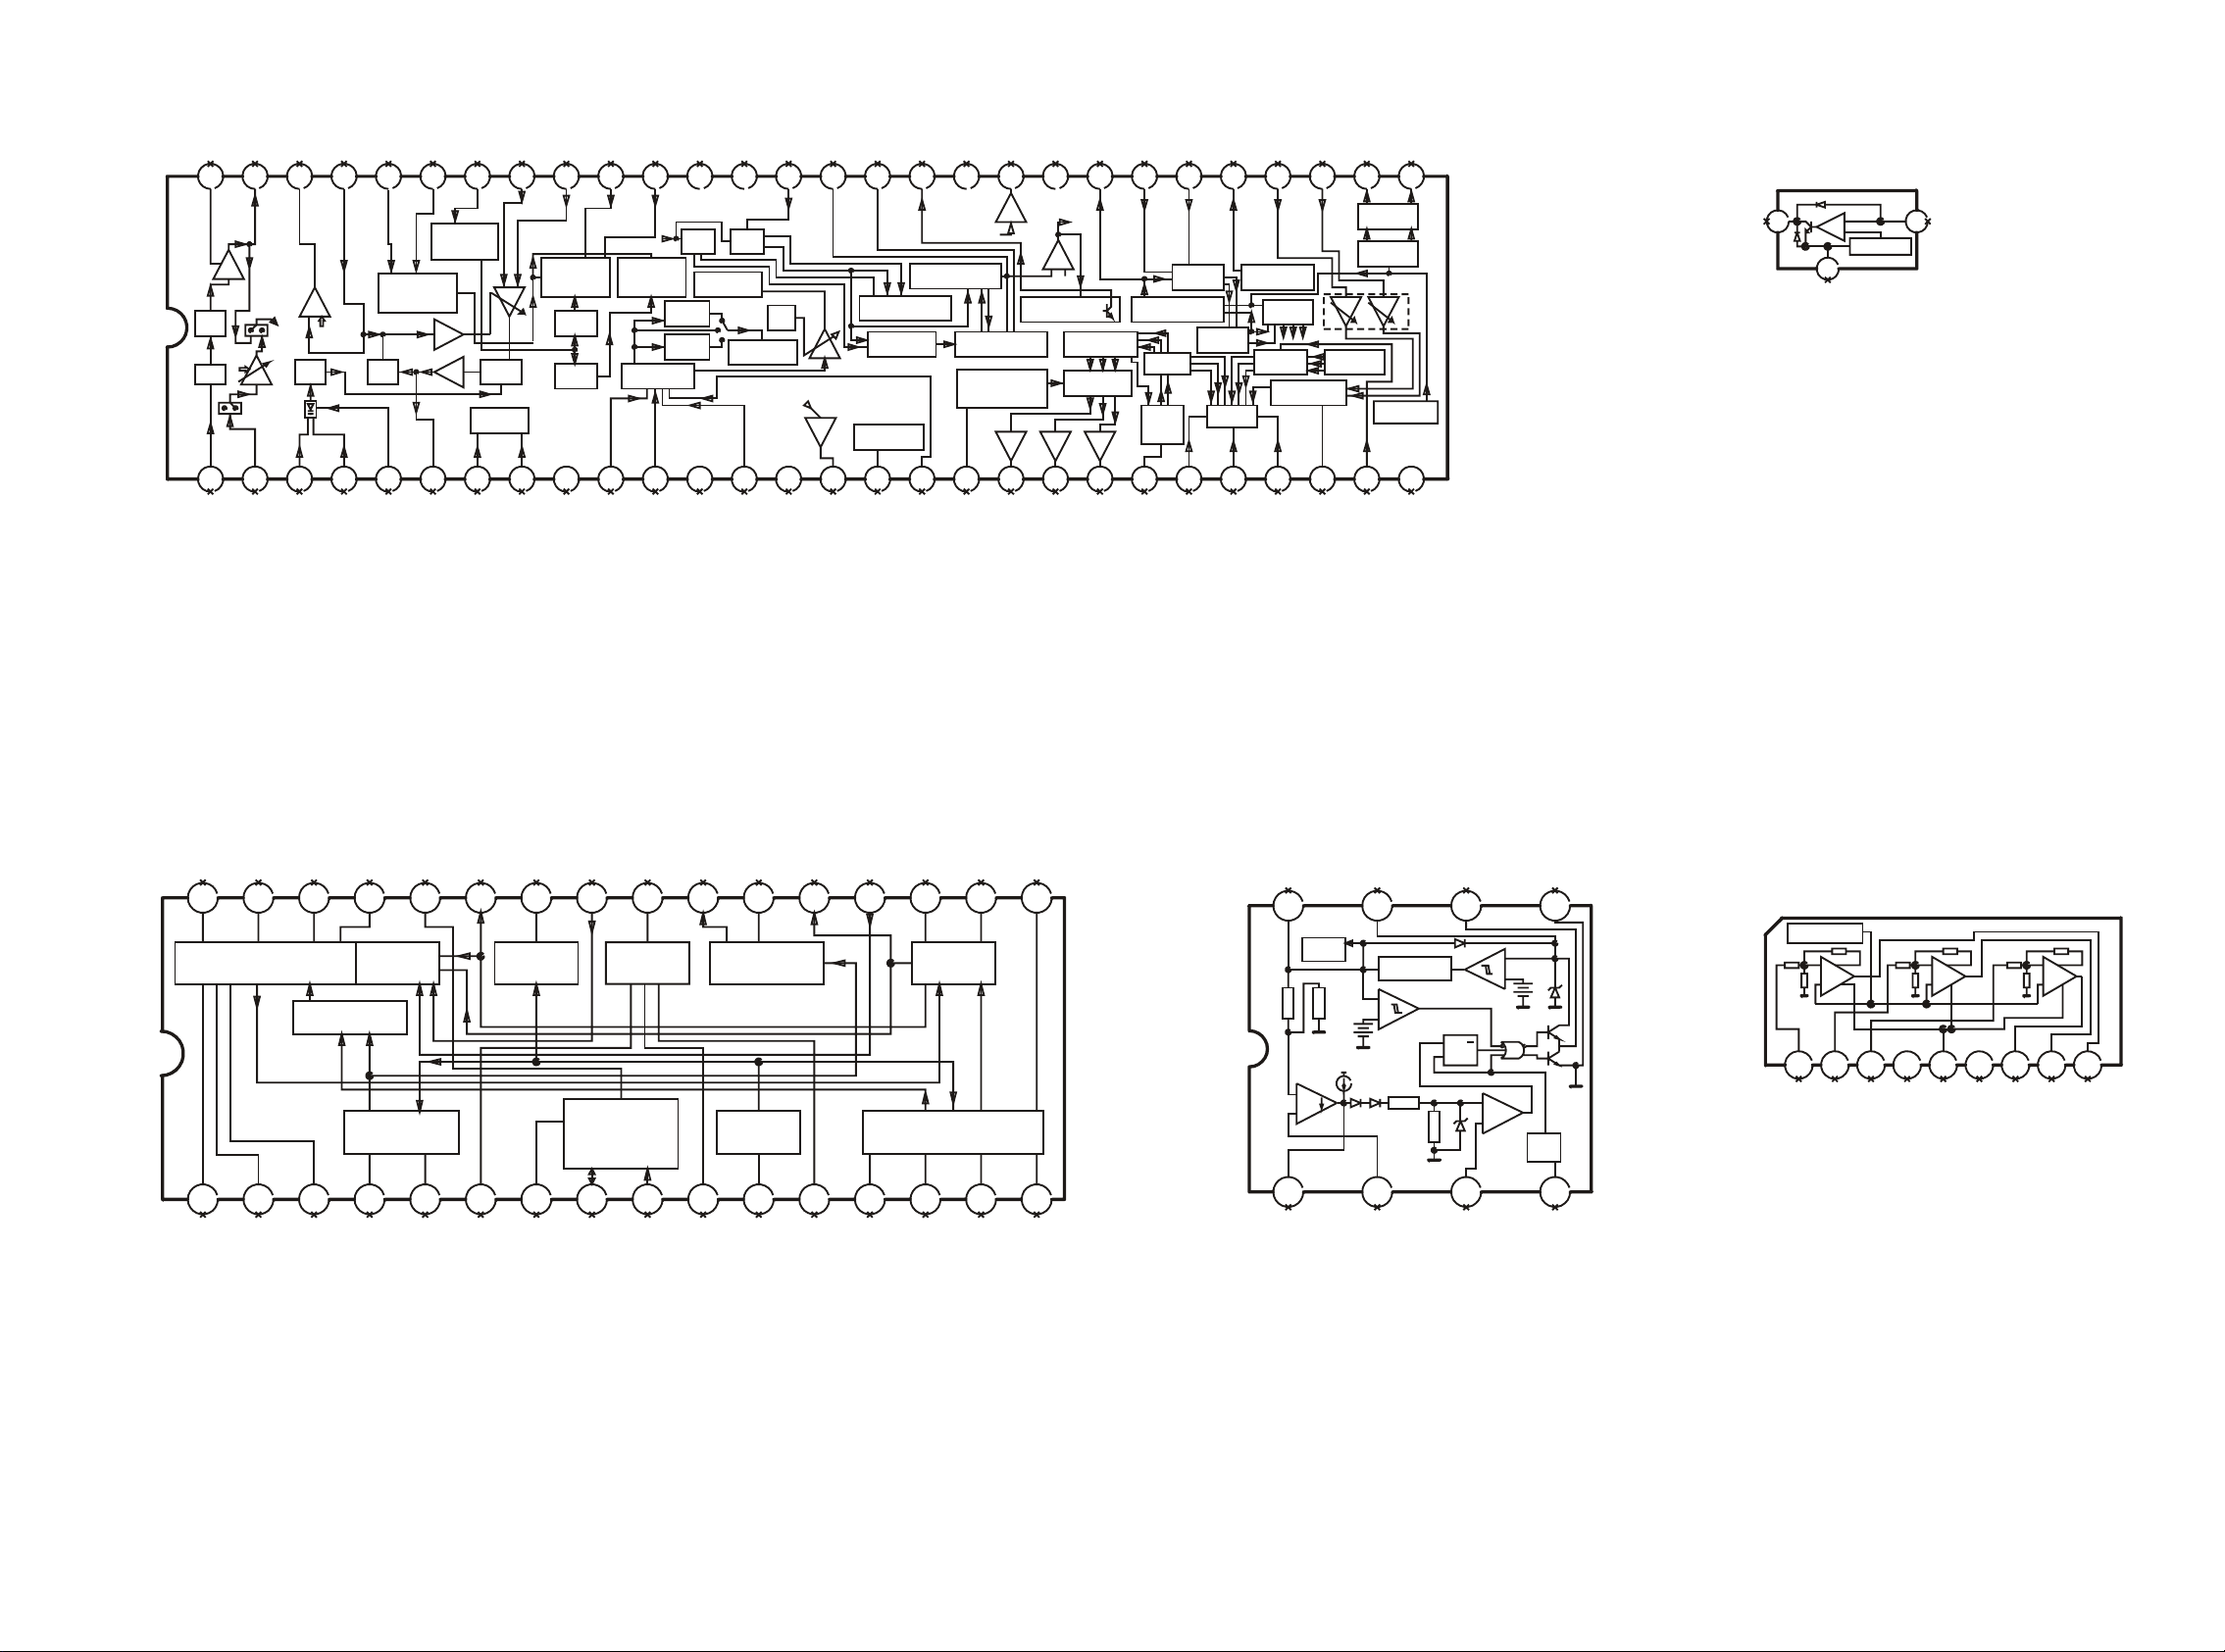
IC, TDA8841 IC, TL431
REFVIP
VDDGND
--+++
987654321
56 55 54 53 52 51 50 49 48 47 46 45 44 43 42 41 40 39 38 37 36 35 34 33 32 31 30 29
SOUND_DEC
FM
DET
VOL
BPF
SIF
DEEMPH
AUDIO
OUT
AUDIO_IN
EXT/
RF_AGC
VCO
PLL
VCC
AGC_DEC
TUNER
TIMER
OVER
GENERATOR
AGC
DET
COIL
REF_CUR
VERTICAL
SAWTOOTH
PLL
EHT
VERT_RAMP
OVER
VOLTAGE
DETECTOR
VIDEO
COMP
VIF
DEMOD
I2C
CONTROL
SCL
IF_AMP
+VDRIVE-
VERTICAL
GEOMETRY GEOMETRY
PROCESS PROCESS
VERT
TRACK
E-W
TRACK
BG_DEC
SDA
CVBS SEP
E-W
CHROMA_IN
CVBS&SVHS
VIDEO_IN
SELECT
Y/
SINC
DELAY
160ns
DELAY
160ns
GNDEW/DRV
CHROMA
BANDPASS
& CORING
HOR
OSC
PEAKING
INT/
VCC
ACC
DET
VIDEO_IN
GND
PHI1
AUDIO
OUT
PHI2
COINCIDENCE
DETECTOR
VERTICAL
DIVIDER
AUDIO_OUT
AUTO ADJ
CIRCUIT
SCP_FBP
HORIZONTAL
HOR_OUT
BPH
CVBS
FASE
SANDCASTLE
GENERATOR
VIDEO_OUT
BLACK LEVEL
ADJUST
CIRCUIT
B_OUT
VCC
VIDEO_OUT
BLANK
-+
8V
SLOW/START
/STOP
CONTROLE
DE BRILHO
CUT OFF
CIRCUIT
G_OUT
RGB
R_OUT
APC_FILTER
BURST PHASE
DETECTOR
R G B
BEAM_CUR
PEAK
WHITE
RGB
PAL_XTAL
90 0
VCX0
GAIN
DET
NT_XTAL
PHASE
ROTATE
R G B
R_IN
SWITCH
SECAM_REF
REFERENCE
G_IN
(B-Y)_IN
(R-Y)_IN
CHROMA
SYSTEM
IDENT
RGB
MATRIX MATRIX
PIP/OSD
INSERTION
B_IN
(R-Y)_OUT
R-Y/B-Y
F_BLANK
R-Y/B-Y
SWITCH
R-Y/B-Y
DEM
CHROMA
Y_IN
BANDPASS
(B-Y)_OUT
Y_OUT
28272625242322212019181716151413121110987654321
+
-
2
13
2.5Vref
IC, TDA9850 IC, UC3842B IC, TDA6107Q/N1
L+R
1718192021222324
8765
Bias
RR
GND
GND
+
+
-
EA
5.0V Ref
+
+
-
-
GND
+
+
-
-
GND
R
Q
S
+
Osc
GND
4321
32 31 30 29 28 27 26 25
MAD
OUT-L
DBX
L-R/SAP
STEREO/SAP
SWITCH
DEMODULATOR
STEREO
ADJUST
SAP
NOISE
DETECTOR
GND
GND
LOGIC, I2C
TRANSCEIVER
SUPPLY
GND
MAD
sem DBX
SCLSDA
SAP
VCC
OUT-R
DE-EMPHASIS
INPUT
LEVEL
ADJUST
DEMATRIX
L-R/SAP
STEREO DECODER
13 14 15 16
121110987654321
+ MODE
SELECT
3231
Page 22
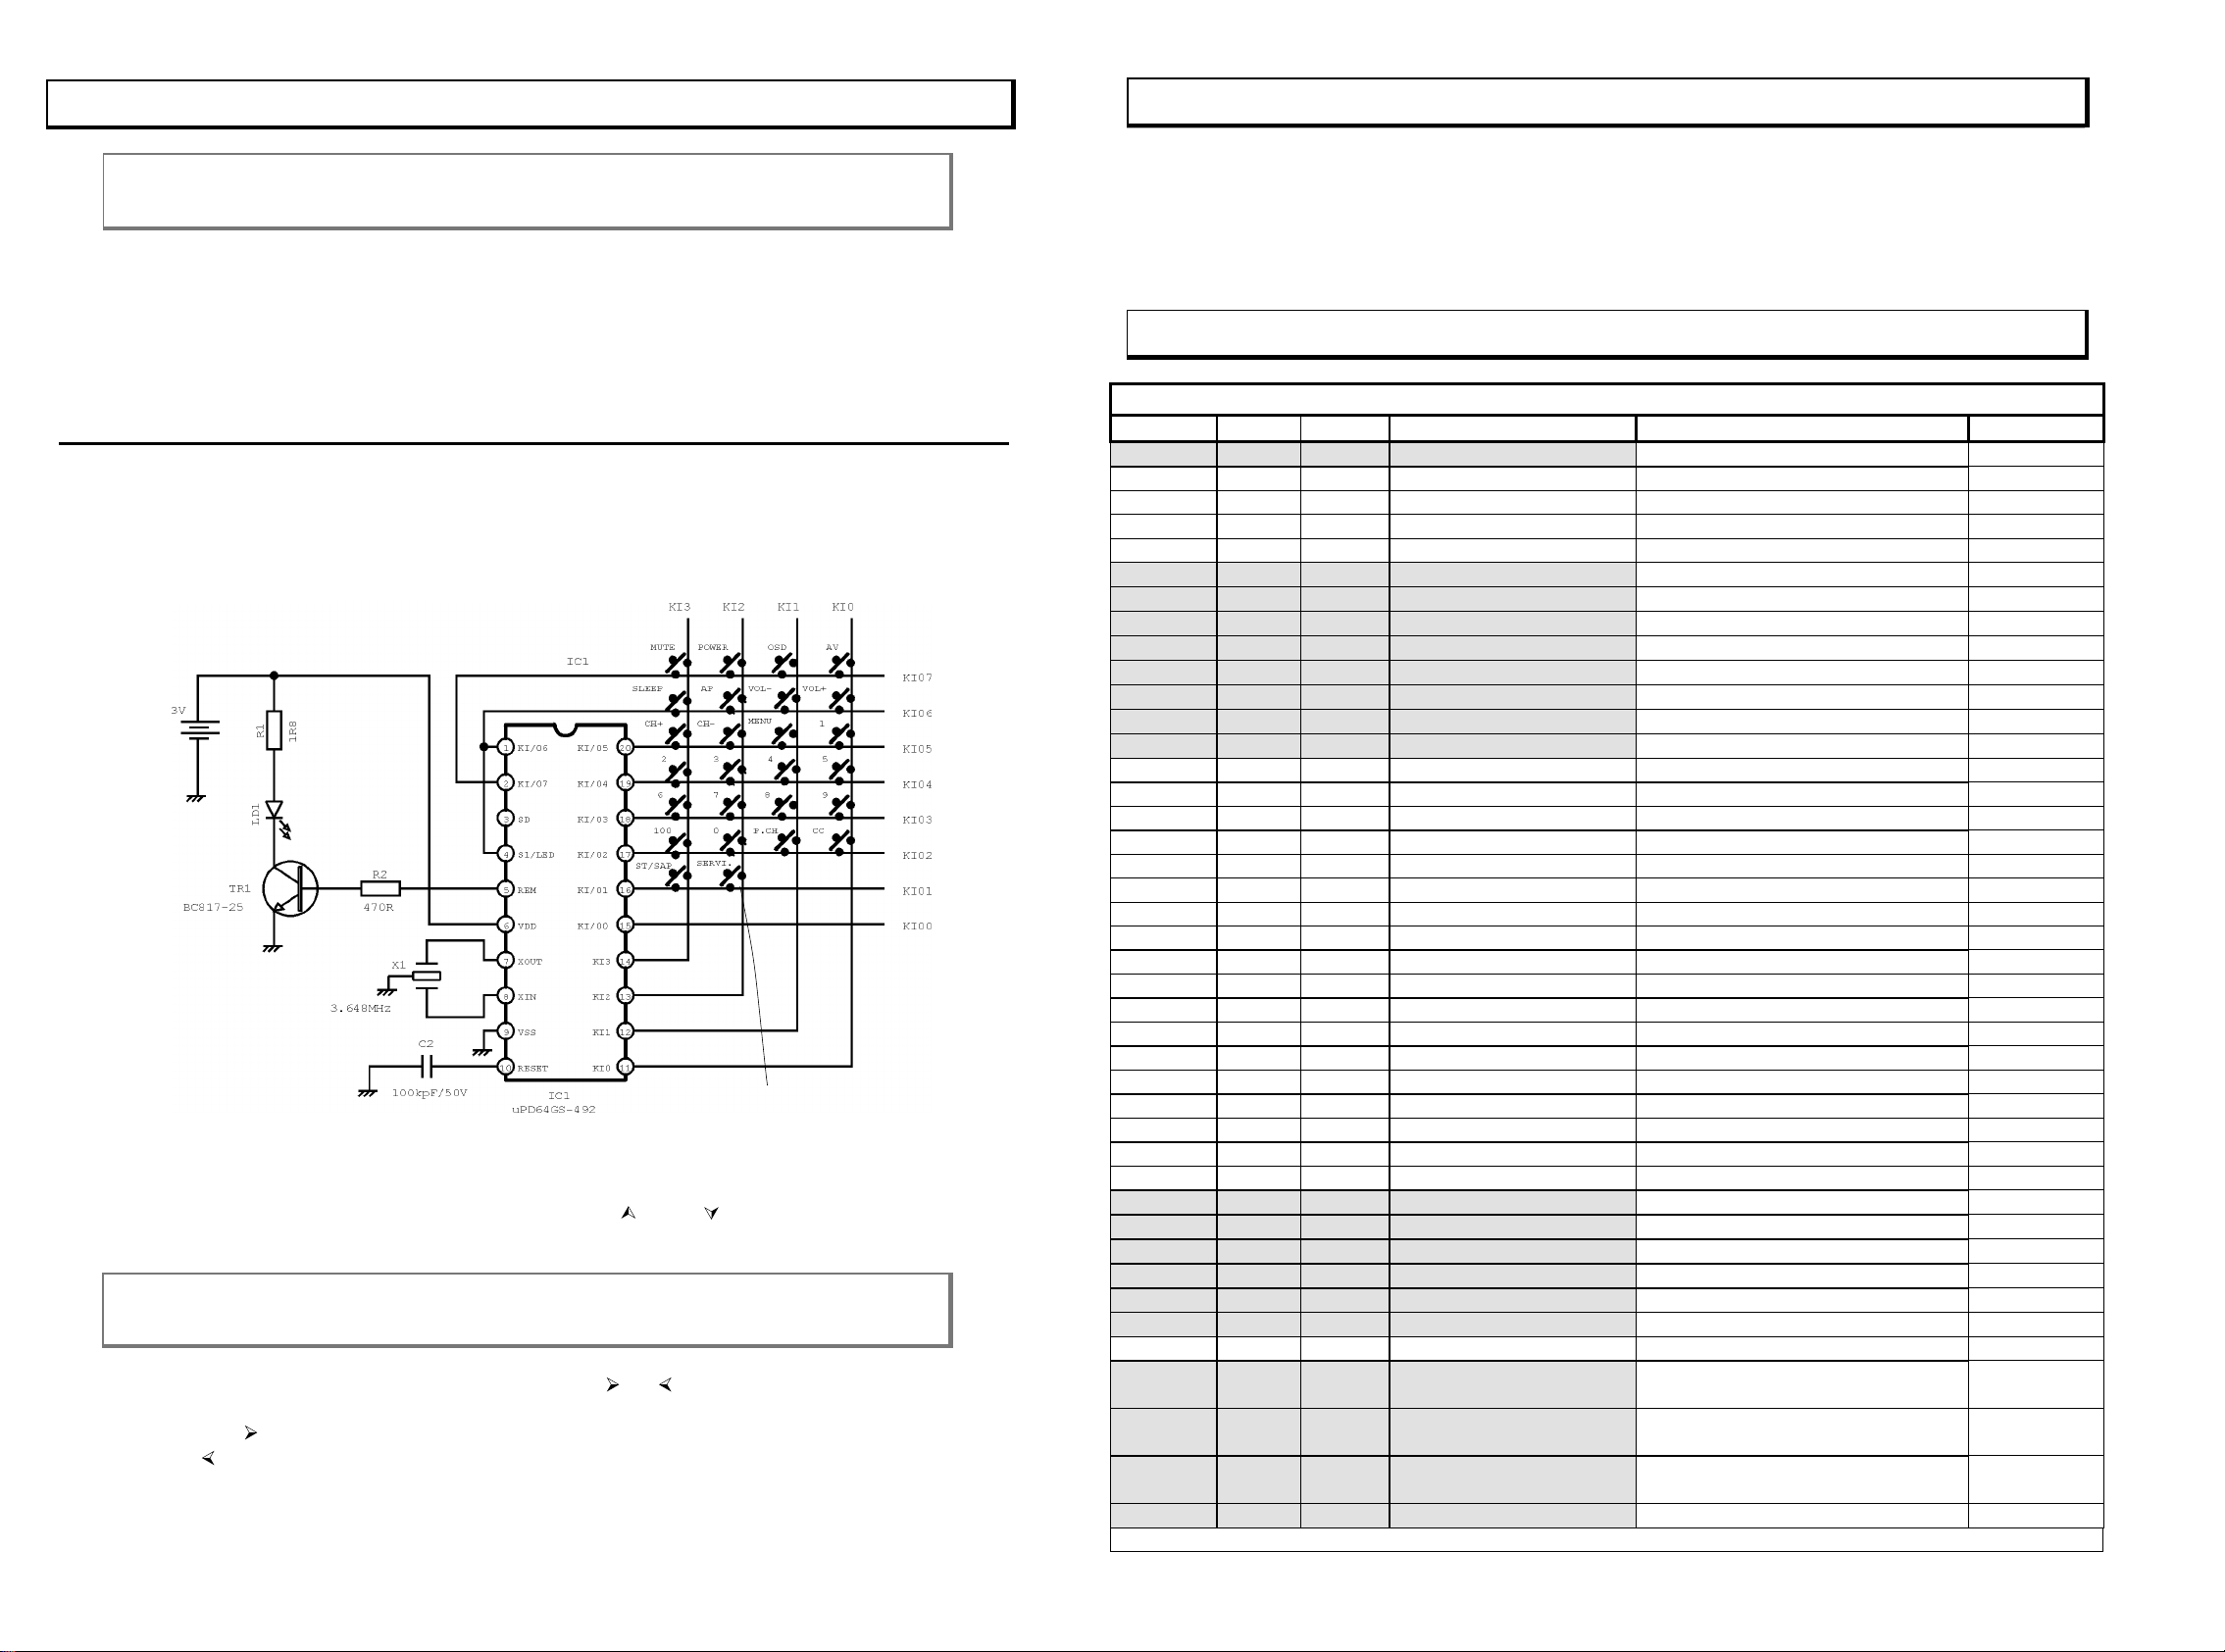
ELECTRICAL ADJUSTMENT
2.
Definitions of the terms
Description of service and factory registers
Register Name Range Description Descrição
Reference adjustment value
00 HSh 0...63 Horizontal Shift Posição Horizontal 42
01 HWi 0...63 Not used N o Usado 02 HPW 0...63 Not used N o Usado 03 HCP 0...63 Not used N o Usado 04 HTC 0...63 Not used N o Usado -
05 VSl 0...63 Ver tical Slope Aj. Linearidade vertical no “topo” 34
06 VAm 0...63 Vertical Amplitude Aj. de altura 27
07 VSc 0...63 S-Correction Aj. Linearidade vertical no “centro” 10
08 VSh 0...63 Vertical Shift Posição Vertical 38
09 WPR 0...63 White point R. Ganho R 31
10 WPG 0...63 White point G. Ganho G 31
11 WPB 0...63 White point B. Ganho B 31
12 AGC 0...63 AGC Take Over Aj. De atraso do AGC 15
13 PLL 0...127 IF-PLL adjustment Ajuste de IF-PLL 32
14 VZo 0...63 Not used N o Usado 15 VSR 0...63 Not used N o Usado 16 CT2 0...255 See description below Veja a descri o a seguir 136
17 CT3 0...255 See description below Veja a descri o a seguir 07
18 CT4 0...255 See description below Veja a descri o a seguir 168
19 CT5 0...255 See description below Veja a descri o a seguir 04
20 Bit 0...255 See description below Veja a descri o a seguir 00
21 OP1 0...255 See description below Veja a descri o a seguir 01
22 OP2 0...255 See description below Veja a descri o a seguir 145
23 OP3 0...255 See description below Veja a descri o a seguir 255
24 OP4 0...255 See description below Veja a descri o a seguir 33
25 OP5 0...255 See description below Veja a descri o a seguir 14
26 LA 0...15 Input level adjustment N vel de ajuste de udio 07
27 ALS 0...31 Alignment for spectral Aj. de separa o de est reo 15
28 ALW 0...31 Alignment for wideband Aj. de separa o de est reo 15
29 STT 0...03 Stereo noise threshold Aj. de sensibilidade de est reo 08
30 SPR 0...00 SAP noise threshold Aj. de sensibilidade SAP 08
31 BRI 0...99 Default Brightness Brilho 58
32 CON 0...99 Default Contrast Contraste 99
33 COR 0...99 Default Color Cor 55
34 NIT 0...99 Default Sharpness Nitidez 45
35 MAT 0...99 Default Hue Matiz 50
36 VOL 0...99 Default Volume Volume 00
37 AAL 0..00 Not used N o Usado -
38 CHN 0...00 Change channel in
factory mode
Seleção
Deflexão V ertical L: gado/Desi: gado
de canais no modo fábrica 03
39 InF 0...00 Initialize factory
parameters
Inicialização da EEPROM 00
40 Inc 0...00 Initialize channels
parameters
Inicialização dos canais 00
00
41 Scr Vertical out on/off
0...00
After replacing EEPROM (IC702), set to the refeence adjustment value, and them perform.
1.
Important recommendations
1.1 Before beginning the adjustments, the TV set should be a pre-heated during at least 15
minutes.
1.2 The positioning of the TV set should obey the magnetic parameters of South Amer ica that
it is -120 vertical mG. In the practice, this is gotten with a relative precision, positioning the
TV set with the face (screen) of the CRT pointing to the geographical East.
INTRODUCTION
Note:
It is necessary to pre-heat the TV during 15 minutes, before its calibration.
How to select the F ACT ORY MODE
1) Important recommendations
2) Definitions of the terms
3) Geometry of the Image
4) White Balance
5) Screen adjustment
6) AGC adjustment
a) Short to ground pin 24 of IC701 (momentarily) on the MAIN PWB or use a remote control with
protocol RC5 and system 7.
a1) Remote control reconstruction method.
Connection SW between pin13 and 16 of the IC: Pressing the SW will display the test mode screen
on TV.
b) Select the adjustment options pressing the key CH
television front panel.
Note: All the adjustment options can be selected directly by the remote control numeric
c) Adjust the selected option pressing the key VOL or VOL of the remote control or of the
television front panel.
c1) VOL
c2)
d) To exit the FACTORY MODE, use the key OSD/OUT of the remote control.
keys.
- increases registers (MAX.).
VOL - decreases registers (MIN.).
Service key
or CH of the remote control or of the
3433
Page 23
Nota:
* Estes ajuste não devem ser alterados em hipótese nenhuma, caso isto ocorra a EEPROM deverá ser inicializado novamente (Selecione e execute o registrador 39).
Initial conditions about some features after reset are: DSC off, Portuguese to
language, blue background off and Closed Caption off.
Binary description about some registers:
Register 20 (BIT)
BIT Description BIT Description
Bit0 Not-used Not used Bit0 - Force vertical in 60Hz
Bit1 HBL Normal Blanking Bit1 - Stereo menu (AV mode)
Bit2 IFS IF Sensitive Bit2 FOA Phase timing const. #1
Bit3 COR Noise cor ing Bit3 FOB Phase timing const. #2
Bit4 EVG Vertical guard Bit4 BCO ON/OFF behavior
Bit5 STM Search tuning mode Bit5 - Aiwa indication
Bit6 LBM Blanking mode Bit6 POC
Bit7 VID Video ident mode Bit7 Not used Not used
Register
BIT Description BIT Description
Bit0 - Field indicator is inverted or
Bit1 - Field selection to 50 Hz Bit1 - C.C initial pos. set 1 – 60Hz
Bit2 - Field selection to 60 Hz Bit2 - C.C initial pos. set 2 – 60Hz
Bit3 VPD VPD Vertical Pulse Delay Bit3 - C.C initial pos. set 3 – 60Hz
Bit4 PW0 PW0 vertical sync Pulse
Bit5 PW1 PW1 vertical sync Pulse
Bit6 VR0 VR0 Voltage Reference 0 Bit6 - C.C initial pos. set 2 – 50Hz
Bit7 VR1 VR1 Voltage Reference 1 Bit7 - C.C initial pos. set 3 – 50Hz
22 (OP2) Register 23 (OP3)
no
Width 0
Width 1
Register 21 (OP1)
(Automatic Programming)
POC control POC off=1
control.
Bit0 - C.C initial pos. set 0 – 60Hz
Bit4 - C.C initial pos. set 0 – 50Hz
Bit5 - C.C initial pos. set 1 – 50Hz
VPD
VSYNC input is delayed by 8 to 24 µs before field detection
0
VSYNC input is not delayed
1
VR1 VR0 Nominal Bias PW1 PW0 Pulse Width
0 0 3.12 V 0 0 8 µs
0 1 2.98 V 0 1 10 µs
1 0 2.84 V 1 0 12 µs
1 1 2.70 V 1 1 14 µs
Note:
The register 22 (OP2) is used to make adjustment about some Closed
Caption parameters in the microcontroller.
The register 23 (OP3) is used to make vertical positioning of Closed Caption
in the microcontroller.
35
Page 24
Register 24 (OP4):
This register has CC line number - (Low nibble to 60Hz and high nibble to 50Hz)
The Bits 0,1,2,3 are used to select the line where Closed Caption information will be extracted when in
60Hz, and the bits 4, 5, 6, 7 are used to select the line where Closed Caption information will be extracted
when in 50Hz
Note:
This information is used by microcontroller.
Register 2 5 (OP5) Register 16 (CTRL2)
BIT Description BIT Description
Bit0 - Horizontal Delay 0 Bit0 BB Blue back off
Bit1 - Horizontal Delay 1 Bit1 CS0 2
Bit2 - Horizontal Delay 2 Bit2 CS1 2
Bit3 - Horizontal Delay 3 Bit3 BKS Black Stretch mode
Bit4 - Not used Bit4 BLS Blue Stretch mode
Bit5 - Not used Bit5 CB Chroma band pass freq.
Bit6 - Not used Bit6 VSD Vertical scan active
Bit7 - Not used Bit7 OSC Switch off in vertical overscan
Note:
The register 25 (OP5) is used to make horizontal positioning of Closed Caption
in the microcontroller..
Forced color on.
and
CVBS output
and
CVBS output
Register 17 (CTRL3) Register 18 (CTRL4)
BIT Description BIT Description
Bit0 CL0 Cathode driver level Bit0 EBS Extend Blue Stretch
Bit1 CL1 Cathode driver level Bit1 FFI Fast filter IF PLL
Bit2 CL2 Cathode driver level Bit2 DSA Dynamic skin control angle
Bit3 AST Automatic mode Bit3 DS Dynamic skin control
Bit4 CMB Ext. comb filter on/off Bit4 ID0 Y delay adjustment
Bit5 ACL Automatic color limit Bit5 ID1 Y delay adjustment
Bit6 BPS By pass delay line Bit6 ID2 Y delay adjustment
Bit7 HOB Output blanking Bit7 ID3 Y delay adjustment
Register 19 (CTRL5)
BIT Description
Bit0 FCO
3. Geometry of the Image
a) Using the PM - 5515 generator, apply the crosshatch pattern with circle.
b) Adjust the following items:
Vertical slope (VSl);
Height (VAm);
Vertical position (VSh);
Center Linearity (VSc);
Horizontal position (HSh)
Adjust the above items, until obtaining the best circle symmetry and positioning, as well as the
minor image geometric distortion.
36
Page 25
4. White balance
Note:
The cut point doesn’t need adjustment, because it’s automatically made by the
IC501.
The white adjustment is already pre-adjusted and incised in the IC501 and,
thus, its adjustment is not necessary.
Otherwise, if it is necessary to change the temperature of the white pattern, proceed in the following way:
a) Enter in the service mode.
b) Select via CH
c) Increase or decrease the function via VOL
or CH the WPR (09), WPG (10) and WPB (11) functions.
or via VOL respectively.
5. Screen adjustment
a) Select the register 41 (Scr).
b) Press to access and adjust the screen control localized on the FBT, until the horizontal line
VOL
be slightly visible on the screen center.
6. AGC adjustment
a) Select the regiter12 (AGC)
Apply
a PHILIPS pattern with 60dB
AGC pin of tuner.
µV of intensity and adjust the delay until obtain 3.5V in
37
Page 26
2–11, IKENOHATA 1–CHOME, TAITO-KU, TOKYO 110-8710, JAPAN TEL:03 (3827) 3111
727105
Printed in Singapore
 Loading...