

Page 1

OPERATING INSTRUCTIONS
INSTRUCCIONES OE MANEJO
NSX-330
NSX-332
NSX-A92
COMPACT DISC STEREO SYSTEM
SISTEMA ESTEREOFÓNICO DE DISCO
COMPACTO
COMPACT DISC STEREO CASSETTE RECEIVER RADIOCASSETTE ESTEREO CON DISCO COMPACTO
IMPORTANT
(FOR USE IN THE UNITED KINGDOM)
Thu wires in tnia mams lead are colourud ;n accordance with
the following code:
Blue- Neutral
Brown: Live
As the coiours o1 the wires in the mams ioad of this apparatus
may not correspond with the coloured markings identifying the
terminals in your plug proceed as fn'iows
The wire which is coioured biuo must be connected to the
torminai which is marked with the ietter N or coloured blat:k
The v;ire which is coioured brown rriiisl be connected to the
terminal which is rnar<od with the letter I. or coloured rod
Do not connect either wire to the earth terminal ot a 3-pin plug.
CX~N330 LH,HE,U,C,E.K
CX-N332 u
CX-A92 HE
SPEAKER SYSTEM SISTEMA DE ALTAVOCES
SX-N330
SX-N332
SX-A92
Page 2
CAUTION
A
RISK OP ELECTRIC SHOCK
DO NOT OPEN
“CAUTION: TO REDUCE THE RISK OF
ELECTRIC SHOCK,
DO NOT REMOVE COVER (OR BACK).
NO USER-SERVICEABLE PARTS INSIDE.
REFER SERVICING TO QUALIFIED
SERVICE PERSONNEL.”
Explanation of Graphical Symbols;
The lightning flash with arrowhead symbol,
within an equilateral triangle, is intended to
alert the user to the presence of uninsulated
“dangerous voltage” within the product’s
enclosure that may be of sufficient magni
A
tude to constitute a risk of electric shock to
persons.
The exclamation point within an equilateral
triangle is intended to alert the user to the
presence of important operating and main
tenance (servicing) instructions in the lit
erature accompanying the appliance.
WARNING
t
WARNING
This equipment has been certified to comply with the limits for
a Class B computing device, pursuant to Subpart J of Part 15
of FCC Rules. Only peripherals certified to comply with the
Class B limits may be attached to this equipment. Operation
with noncertified peripherals is likely to result in interference to
radio and TV reception.
This equipment generates and uses radio frequency energy
and if not installed and used properly, that is, in strict accor
dance with the manufacturer’s Instructions, may cause inter
ference to radio and television reception. It has been type
tested and found to comply with the limits for a Class B
computing device in accordance with the specifications in
Subpart J of Part 15 of FCC Rules, which are designed to
provide reasonable protection against such interference in a
residential installation. However,there is no guarantee that
interference will not occur in a particular installation. If this
equipment does cause interference to radio or television
reception, which can be determined by turning the equipment
off and on, the user is encouraged to try to correct the
interference by one or more of the following measures:
-reorient the receiving antenna
-relocate the equipment with respect to the receiver
-move the equipment away from the receiver
-plug the equipment into a different outlet so that equipment
and receiver are on different branch circuits.
If necessary, the user should consult the dealer or an experi
enced radio/television technician for additional suggestions.
The user may find the following booklet prepared by the Federal
Communications Commission helpful:
‘‘How to Identify and Resolve Radio-TV Interference Problems”
This booklet is available from the US Government Printing
Office, Washington, D.C., 20402, Stock No. 004-000-00345-4.
TO REDUCE THE RISK OF FIRE OR ELECTRIC
SHOCK, DO NOT EXPOSE THIS APPLIANCE
TO RAIN OR MOISTURE.
CAUTION
Use of controls or adjustments or performance of procedures
other than those specified herein may result in hazardous
radiation exposure.
CAUTION!
Invisible laser radiation when open and inter
locks defeated. Avoid exposure to beam.
THIS DIGITAL APPARATUS DOES NOT EXCEED THE
CLASS B LIMITS FOR RADIO NOISE EMISSIONS FROM
DIGITAL APPARATUS AS SET OUT IN THE RADIO IN
TERFERENCE REGULATIONS OF THE CANADIAN DE
PARTMENT OF COMMUNICATIONS.
OWNER’S RECORD
For your convenience, record the model number and serial
number (you will find them on the rear of your set) in the space
provided below. Please refer to them when you contact your
AIWA dealer in case of difficulty.
Model No.
CX-N330
CX-N332
CX-A92
Model No. Serial No.
SX-N330
SX-N332
SX-A92
Serial No.
Page 3

FEATURES.....................................................4
PRECAUTIONS..............................................5
CONNECTIONS
CLOCK SETTING
SOUND ADJUSTMENT
LISTENING TO A COMPACT DISC
PROGRAMMED PLAY
RANDOM PLAY...........................................20
REPEAT PLAY.............................................20
PLAYING BACK A TAPE
CONTINUOUS PLAY FROM DECK TO
DECK............................................................24
TUNING IN TO A STATION
MANUALLY.............................................
PRESETTING STATIONS
TUNING IN TO A PRESET STATION ...27
RECORDING................................................28
TAPE DUBBING
RECORDING FROM COMPACT
DISCS
EDITING COMPACT DISCS........................36
Auto-edit recording
Programmed-edit recording..................38
TiMER SETTING
SLEEP TIMER SETTING
LISTENING TO OTHER SOURCES
MICROPHONE MIXING
MAINTENANCE
SPECIFICATIONS........................................49
TROUBLESHOOTING GUIDE
IDENTIFICATION OF PARTS......................55
.............................................
........................................
...............................
.............
................................
..........................
...........................
..........................................
......................................................
................................
..........................................
.............................
.............
...............................
...........................................
.....................
12
14
19
21
25
26
32
34
36
40
44
46
48
50
CARACTERISTICAS.................................4
PRECAUCIONES
6
CONEXIONES
..................................
...........................................
PUESTA EN HORA DEL RELOJ
AJUSTE DEL SONIDO
ESCUCHA DE DISCOS COMPACTOS 16
16
...........................
REPRODUCCIÓN PROGRAMADA........19
REPRODUCCIÓN ALEATORIA
REPRODUCCIÓN REPETIDA
REPRODUCCIÓN DE CINTAS
REPRODUCCIÓN CONTINUA
DE DECKADECK................................24
SINTONÍA MANUAL DE
EMISORAS........................................ 25
MEMORIZACIÓN DE EMISORAS
SINTONÍA DE EMISORAS
MEMORIZADAS................................ 27
GRABACIÓN...........................................28
DUPLICACIÓN DE CINTAS
GRABACIÓN DE DISCOS
COMPACTOS
.....................................
EDICIÓN DE DISCOS COMPACTOS ...36
Grabación con edición
automática......................................36
Grabación con edición
programada....................................38
45
PROGRAMACIÓN DEL
TEMPORIZADOR................................40
PROGRAMACIÓN DEL
CRONODESCONECTADOR
ESCUCHA DE OTRAS FUENTES..........45
MEZCLA CON MICRÓFONO..................46
MANTENIMIENTO
ESPECIFICACIONES
..................................
.............................
GUÍA PARA LA SOLUCIÓN DE
PROBLEMAS......................................52
IDENTIFICACIÓN DE PARTES
.............
.............
................
..............
..........
...................
..............
..............
5
14
20
20
21
26
32
34
44
48
51
55
................................................................. 4
6
mm.......................................................................B
12
.......................................................
........................................................
......................................................
...........................................IB
..........................................................
............................................................
............................................................
...........................................
..................................................
............................................................
..............................................
.....................................................................28
......................................................
..............................................
..............................................
..............................................
......................................
Sat 40
BBKSat 44
..........................................
..................................................
italics...................................................................48
«fê.......................................................................53
..................................................
...........................................................55
...........
5
12
14
19
20
20
21
24
25
2 B
27
32
34
36
36
38
45
46
54
The illustrations in this manual show the HE
model.
Las ilustraciones de este manual corresponden
al modelo HE.
Page 4

BBE system
Sistema BBE
BBESiK
BBE is a technology developed for professional
studio and live use. It gives astonishing definition
and clarity to music reproduction. It makes highfrequency sound especially clear and brings out
the special character of vocals' and solo instru
ments.
AIWA is the world’s first manufacturer to employ
the BBE sound in consumer audio equipment.
CD edit functions
Two different CD edit functions are available, and
you can easily make original tapes according to
your preference.
Other features
Amplifier section
• T-BASS for realistic reproduction at low sound
levels.
• The desired tone quality can be selected from
among three different preset tones.
Tuner section
• Synthesizer tuner.
• Internal daily event/sleep timer.
Cassette deck section
• High speed tape duplication.
CD player section
• Repeated playback of tracks.
• Playback of tracks in random order.
BBE es una tecnología desarrollada para
emplearse en estudios profesionales y en directo.
BBE ofrece una definición y una claridad
asombrosas a la reproducción musical. BBE hace
especialmente claro el sonido de alta frecuencia y
enfatiza el carácter especial de las voces y los
instrumentos solistas.
AIWA es el primerfabricante del mundo en emplear
el sonido de BBE en un equipe de audio para el
consumidor.
Funciones de edición de discos compactos
Existen cuatro funciones de edición de discos
compactos para mayor comodidad de duplicación
que le permitirán crear fácilmente cintas originales
a su gusto.
* •
Otras
Sección del amplificador
• T-BASS para ofrecer una reproducción realista
a bajos niveles de sonido
• La calidad de tono puede seleccionarse de
entre los tres diferentes tonos memorizados.
Sección del sintonizador
• Sintonizador sintetizador
• Temporizador interno para programa diario/ y
cronodesconectador
Sección del deck de casetes
• Duplicación de discos compactos a gran
velocidad
mam.
sfíSo m'èmmmscM
BASSiljtgo
• mimkmmM.
Sección del reproductor de discos compactos
• Reproducción repetida de canciones
• Reproducción de canciones en orden aleatorio
Page 5

Follow the advice below for safe and correct opera
tion.
On AC voltage (LH, HE, U, C models)
Before use, check that the rated voltage of your
system matches your local voltage.
Model name
NSX-330 LH, HE
NSX-A92 HE
NSX-330 U, C
NSX-332 U
Rated voltage
120/220/240 VAC
selectable, 50/60 Hz
120/220-240 VAC
selectable, 50/60 Hz
To adjust the operating voltage
The system should have been set for use on your
local voltage. If not, change the AC VOLTAGE
selector on the rear panel with a screwdriver or
similar object.
On placement
• Do not use the system in places which are
extremely hot, cold, dusty or humid.
• Place the system on a flat, even surface.
• Be careful not to obstruct the ventilation holes on
the rear panel, as increased internal tempera
ture may affect the electric parts. In particular,
do not place the system in an airtight rack.
On safety
• When connecting and disconnecting the AC
cord, grip the plug and not the cord itself. Pulling
the cord may damage it and thus be hazardous.
• When you are not going to use the system for a
long period of time, disconnect the AC cord. If
the cord is plugged in, a small amount of current
keeps on flowing to the system even if the power
switch is not ON.
• If the AC cord is broken or damaged, or if the
wires are exposed, contact your dealer or an
AIWA service station and have it replaced or
repaired immediately.
On condensation
When the room is heated, you sometimes see
water drops on your windows; this is called con
densation.
This can occur inside the CD player unit when;
• it is moved from a cold spot to a warm spot.
• it is used in a room where the heating system
has just been turned on.
• it is used in a place with a lot of moisture.
• it is used where it has direct contact with cool air,
such as near an air-conditioner.
When it has condensation inside, the unit may not
function normally. Let it stand for 1 to 2 hours
before turning the power on; or, gradually heat the
room and dry the unit before use.
Should any trouble occur, disconnect the AC cord
and refer sen/icing to qualified personnel only.
For customers purchasing the U or C mod
els
When using the unit in the AC 220-240V posi
tion, be sure to attach a suitable adaptor plug to
the plug end of the AC cord.
Adaptor plugs may be obtained at nominal cost
from an authorized AIWA dealer.
Para obtener una operación segura y apropiada,
siga los consejos ofrecidos a continuación.
Tensión de CA (modelos LH, HE, U, C)
Antes de emplear el sistema, compruebe si su
tensión nominal coincide con la de la red local.
Nombre del
modelo
NSX-330 LH, HE
NSX-A92 HE
NSX-330 U, C
NSX-332 U
Tensión nominal
120/220/240 VCA
seleccionable, 50/60 Hz
120/220-240 V CA
seleccionable, 50/60 Hz
Para ajustar la tensión de alimentación
El sistema ha sido ajustado para emplearse con la
tensión de la red local. Si la tensión de la red local
is diferente, cambie el selector AC VOLTAGE del
panel posterior del receptor estéreo con un
destornillador u otro objeto puntiagudo.
Ubicación
• No emplee el sistema en lugares
extremadamente cálidos, fríos, polvorientos, ni
húmedos.
• Coloque el sistema sobre una superficie
nivelada.
• Tenga cuidado de no obstruir los orificios de
ventilación del panel posterior del receptor
estéreo, ya que el aumento de la temperatura
interna podría afectar los componentes
electrónicos. En particular, no coloque el sistema
en un armario cerrado.
Seguridad
• Para conectar y desconectar el cable de CA,
sujete el enchufe, no el propio cable, si tirase del
cable podría dañarlo, lo que resultaría peligroso.
• Cuando no vaya a emplear el sistema durante
mucho tiempo, desconecte ei cable de
alimentación. Cuando el cable de alimentación
esté conectado, circulará una pequeñacantidad
de corriente incluso aunque el interruptor de
alimentación no esté en ON.
• Si el cable de alimentación se rompe o daña, o
si los hilos están al descubierto, póngase
inmediatamente en contacto con un centro de
reparaciones AIWA para que se lo reparen o
cambien.
Condensación
Ai calentar una sala, a veces pueden verse gotas
de agua en las ventanas; esto se denomina
condensación.
Este fenómeno puede ocurrir en el interior del
reproductor de discos compactos cuando:
• se traslade de un lugar frío a otro cálido.
• se emplee en una sala en la que se acabe de
poner en funcionamiento el sistema de
calefacción.
• se emplee en un lugar con mucha humedad.
• se emplee en un lugar directamente en contacto
con aire frío, como cerca de un acondicionador
de aire.
Cuando se haya producido condensación en el
interior, es posible que el sistema no funcione
normalmente. Déjelo 1 a 2 horas antes de conectar
la alimentación, o caliente gradualmente la sala y
el sistema antes de emplear éste.
Si se produce algún problema, desconecte el
cable de alimentación de CA y solicitar los servicios
de personal cualificado solamente.
HE, u, c mm)
Ü £ n IË
NSX-330LH,HE,
NSX-A92HE
NSX-330U.C
NSX-332U
120/220/240V ícíiS
iiJflS 50/60HZ
120/220-240V *ifíE«
M m M 50/60HZ
îif-affisiffæi^siïipœnrÆKifiizjciîitsB
mmmMum-
voltages#
• aií^rfnT^
• isus
ftTíiLIfííiT. :
jtÍT^Íio
lîiüËs5cÊmifflF«iisl
a«XíI«ES220~240V
Para los clientes que hayan adquirido los
modelos U o C
Antes de emplear el sistema en la posición AC
220-240V, cerciórese de colocar en el cable de
alimentación el adaptador de enchufe adecuado.
Los adaptadores de enchufe podrán obtenerse
al costo nominal del proveedor AIWA autorizado.
ÍSfif«®íírffiAIWA®Íl)gLJ[ÍIfí«f&i»
i'Jo
Page 6
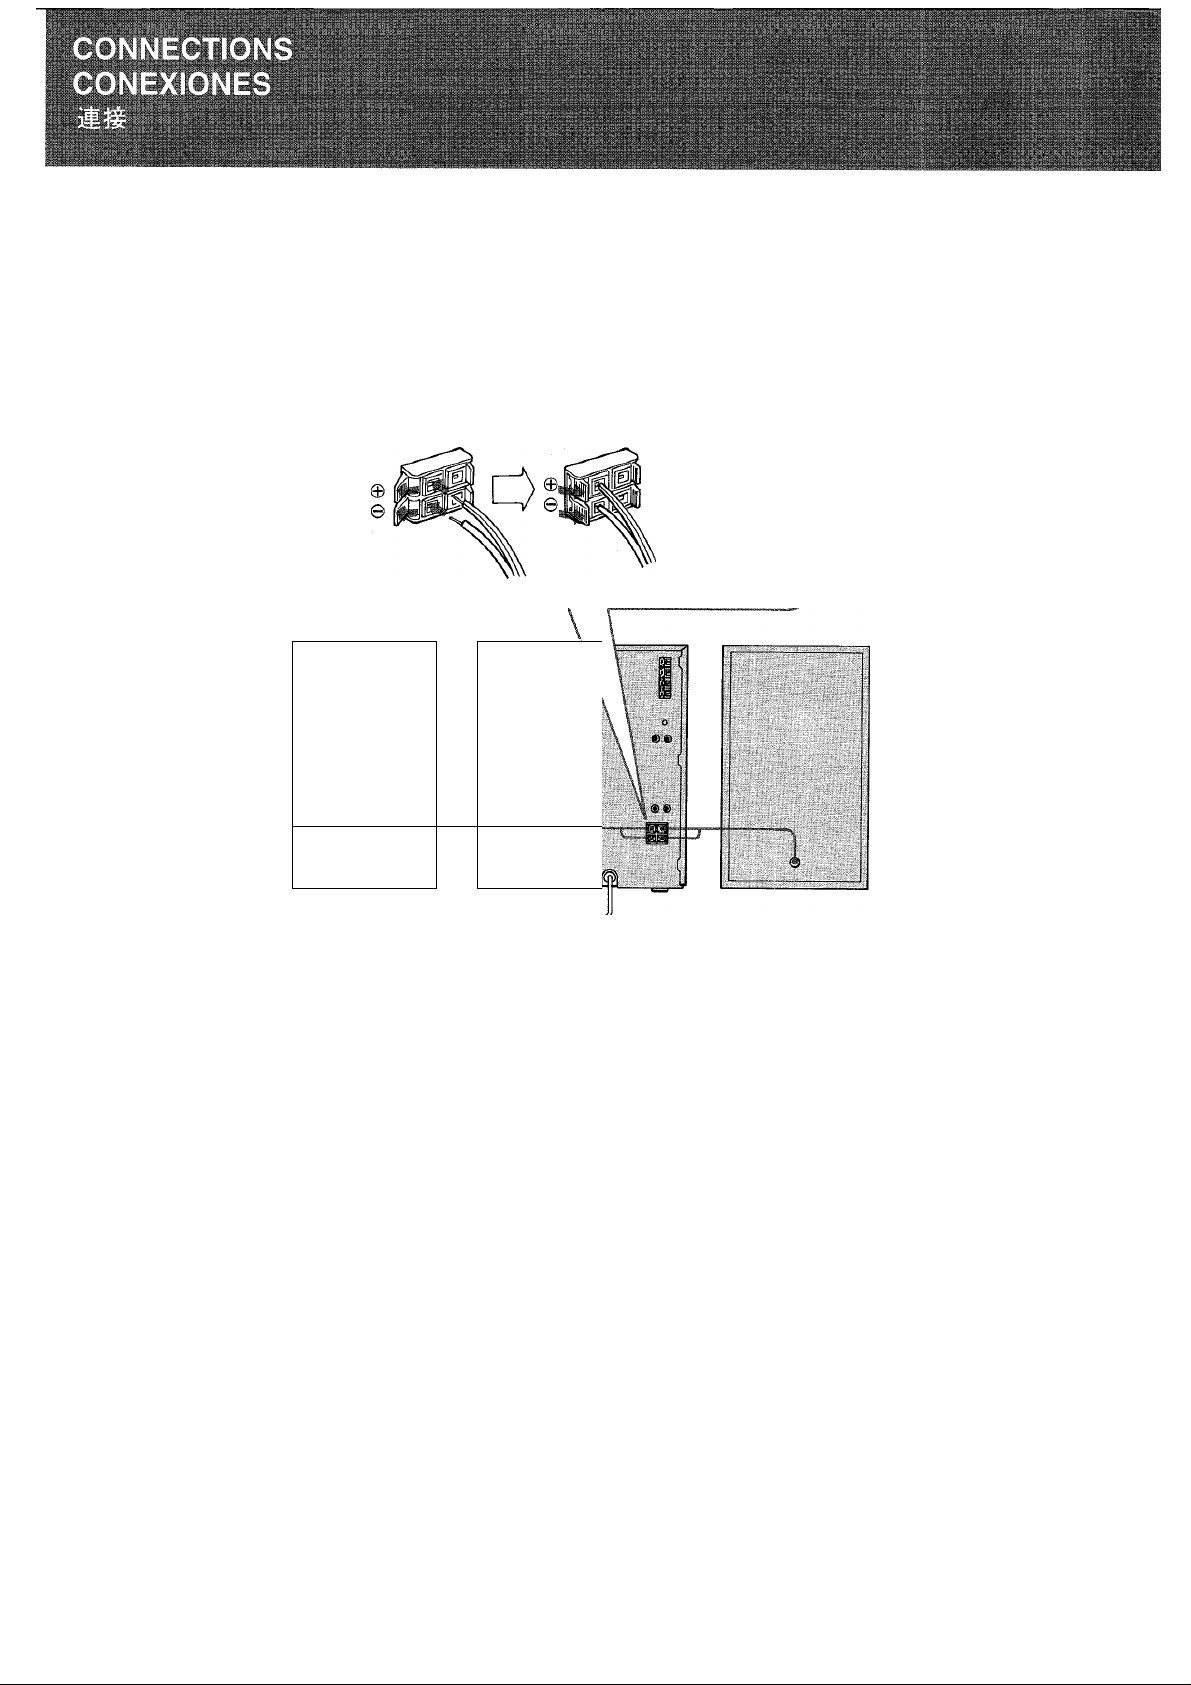
BASIC CONNECTION
CONEXIÓN BÁSICA
r
Speaker (right)
Altavoz (derecho)
(ir)
To an AC outlet ^
A un tomacorriente de CA
«A«aícítfL«!i!Sis„
v_
R L
R L
Connect the striped
leads to ©
Conecte los
conductores con
raya a ®.
«A©„
Speaker (left)
Altavoz (izquierdo)
“A
)
m
{&)
i
'
_________
Tips on connection
• Be sure to connect correctly, according to the
figure.
• Turn on the power after verifying that the con
nection is correct.
Notes on speaker connections
• Use speakers with an impedance of 6 ohms.
• This speaker system is magnetically shielded.
However, if the speaker should affect the color
on the TV screen, turn off the TV, and turn it on
again 15-30 minutes later. If the TV screen still
has poor color, place the speaker system away
from the TV.
• Do not leave magnets or objects generating
magnetism near the speaker system.
6
Consejos sobre las conexiones
• Cerciórese de realizar las conexiones como se
muestra en la ilustración.
• Conecte la alimentación después de haber
verificado que las conexiones sean correctas.
Notas sobre la conexión de los altavoces
• Emplee altavoces con una impedancia de 6
ohmios.
• Este sistema de altavoces está magnéticamente
apantallado. Sin embargo, si los altavoces
afectan el color o de la pantalla del televisor,
desconecte la alimentación de éste y vuelva a
conectarla después de 15 a 30 minutos. Si el
color de la pantalla sigue siendo de mala calidad,
aleje el sistema de altavoces del televisor.
• No deje imanes ni objetos que generen
magnetismo cerca del sistema de altavoces.
• mmanc, ^
fio
Page 7
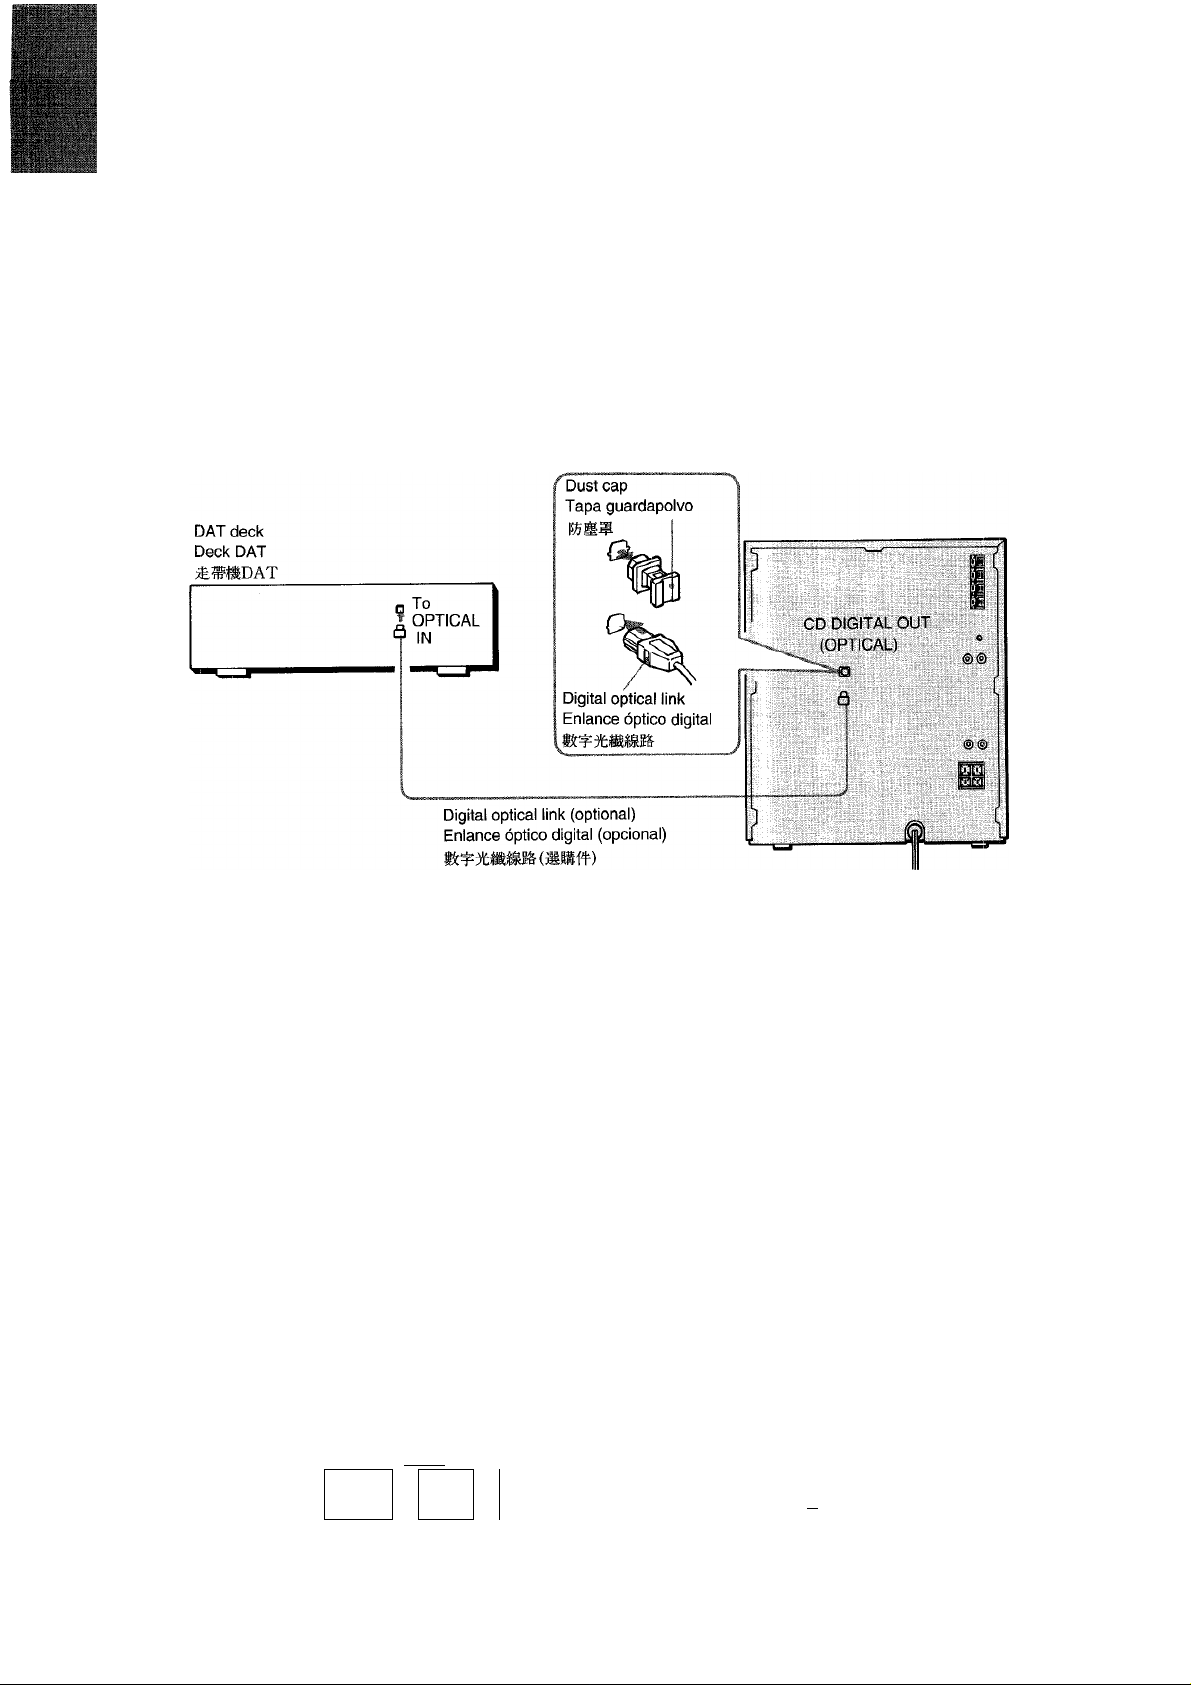
SETTINCS UP WITH DAT
INSTALACIÓN CON UN MAGNETÓFONO DE CINTA AUDIO DIGITAL
V.
f"
To turn on the system
Power is supplied to the system when the POWER
button is pressed.
The system can be turned off by pressing the
same button again.
When the power is turned on
The indicator of the function button previously
used flashes for 4 seconds, and the operation
buttons usable in the function light up.
E. g.) When the CD function is selected
Ejemplo) Cuando se seleccione la función CD
^J) tCDííltg«S#B#o
PAUSE
[DECK 2/CD] STOP
SET
Para activar el sistema
El sistema se activa al presionar el botón POWER.
Este sistema puede desactivarse presionando otra
vez el mismo botón.
Cuando el sistema está activado
El indicador del botón de función previamente
usado parpadea por 4 segundos, y se enciende los
botones de operación que pueden utilizarse en la
función.
PLAY/direction
<
CLEAR
DOWN
3J7~
TUMING/PRESET/
TIMER/SKIP/SEARCH/WIS
'tf£ffiPOWERfS®0#,
UP
I
7
Page 8
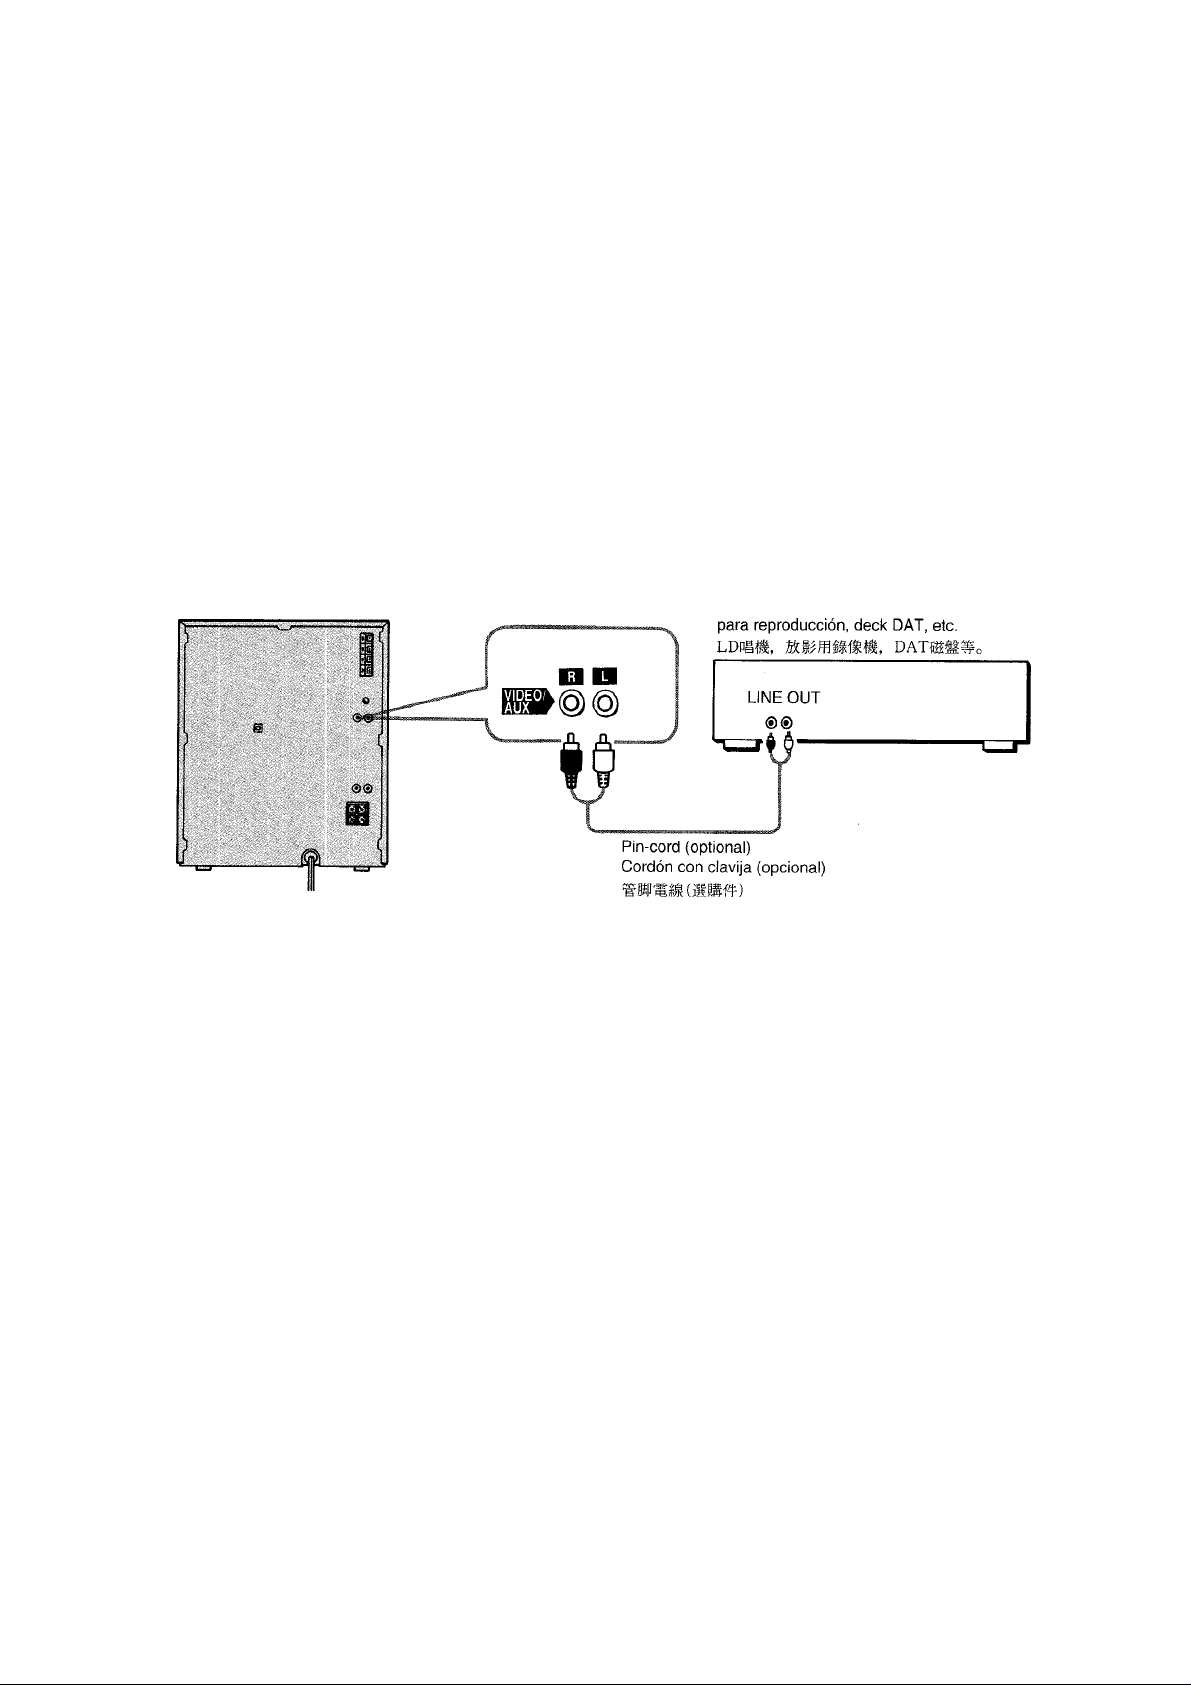
ADDING OTHER EQUIPMENT TO YOUR SYSTEM ADICIÓN DE OTROS EQUIPOS A SU SISTEMA
Connect the red plug to the R jack, and the
white plug to the L jack.
Conecte la clavija roja a la toma R, y la clavija
blanca a la toma L.
LD player, VCR for playback, DAT deck, etc.
Reproductor de discos láser, videograbadora
To connect an analog record player
Connect a player with an equalizer amplifier to
the VIDEO/AUX jacks.
8
Para conectar un tocadiscos análogo
Conecte un tocadiscos con un amplificador
ecualizador a las tomas VIDEO/AUX.
W A í j« H VIDEO/
AUX®TL*«o
Page 9

w----
CONNECTING THE SURROUND SPEAKERS CONEXIÓN DE LOS ALTAVOCES PERIFERICOS
Rear
T rasera
Surround speaker (right)
Altavoz periférico (derecho)
Setup example
Ejemplo de instalación
sesfij
Surround speaker (left)
Altavoz periférico (izquierdo)
Surround speaker: AIWA SX-R100, SX-R150, SX-R200, etc. (optional)
Altavoz periférico : AIWA SX-R100, SX-Rf 50, SX-R200, efe. (opcional)
BWSBiS : AIWA SX-RIOO, SX-R150, SX-R200í^(ilil#í4‘-)
SURROUND
SPEAKERS R
SURROUND
SPEAKERS L
Notes
• The surround effect will not work with monaural
sources.
• Connect only surround speakers to the SUR
ROUND SPEAKERS jacks.
• Use surround speakers with an impedance of 16
ohms.
• Be sure to connect surround speakers to both
right and left jacks.
Notas
• El efecto de sonido perimètrico no trabajará con
fuentes monoaurales.
• A las tomas SURROUND SPEAKERS conecte
solamente altavoces perimétricos.
• Empiee altavoces perimétricos con una
impedancia de 16 ohmios.
• Cerciórese de conectar altavoces perimétricos
a ambas tomas, izquierda y derecha.
ií
• aíi»g«Hg*íSftSURROUND
SPEAKERSSÍL±=
■ ÍÍEÍE:£.
9
Page 10
ANTENNA CONNECTION CONEXIÓN DE ANTENAS
Rear (LH, HE, U, C models)
I rosera (modelos LH. HE. U. C)
fr^'(LH.HE.U,OÍ5'!)
(E, K models)
(modelos E, K)
(E,K «S)
'Antenna terminals
Terminales de antena
.Antenna terminals
Terminales de antena
For LH. HE. U. C models
Para los modelos LH. HE. U. C
1 H, HE, u, cmmm
For FM reception
Para la recepción de FM
For AM reception
Para la recepción de AM
Position the supplied antennas after finding the
best direction for radio reception.
Coloque las antenas suministradas después de
haber encontrado la mejor orientación para la
radiorrecepción.
íío
To position the AM(MW/LW) loop antenna
Ubicación de la antena de cuadro de AM(MW/LW)
ínf^i^AM ( MW/LW) i®
To stand on a surface
Para colarla sobre una superficie
Outdoor antenna
Antena exterior
ir FM/75ñ
To hang on a wall
Para colgarla de una pared
10
Page 11
■ ■
■ ■■ I
For E and K models
Para los modelos E y K
For MW/LW reception
Para la recepción de MW/LW
MW/LWí|ÍCWffl
For better FM reception
Para mejorar la recepción de FM
For FM reception
Para la recepción de FM
Note on the FM feeder antenna
Do not bring the ends near metal objects or curtain
rails.
Extend horizontally.
Extiéndala horizontalmente.
Nota sobre la antena interior de FM
No acerque los extremos a objetos metálicos ni a
rieles de cortinas.
.
J
Notes on the AM (MW/LW) loop antenna
» Do not unwind the looped antenna wire.
» Do not bring the loop antenna near the turntable
system or CD player, or close to the AC cord or
speaker cords, since noise will be picked up.
Notas sobre la conexión de la antena de cuadro
de AM (MW/LW)
• No desbobine el conductor en forma de cuadro
de la antena.
• No acerque la antena de cuadro al giradiscos, al
reproductor de discos compactos, al cable de
alimentación de CA, ni a los cables de los
altavoces, porque podría captar ruido.
ISÍSAM(MW/LW)SS®^^
11
Page 12
Æ
1
2,4,6
CLOCK
:
ií , il
f'\ ,ri¡
V J V J'
C=3C=3
Î
V.
---------
J'
3 i
________
1
3,5
w
\\
\v
Set the hour.
Ajuste la hora.
iSÆ'J'Bfo
DOWN UP
fe
Within 4 seconds, go to step 2.
Dentro de 4 segundos, siga ai paso 2.
ft 4 2
/ ”/* /”/ /”/
/ /_ • /_/ /_/
SET
fe
II hnn
I
u-u u
SET
Set the minutes.
Ajuste los minutos.
DOWN UP
<Kl
»
fe
<K]
fe
>. ‘ 4M
I
I n- n n
lU-UU
Set the seconds. Ajuste los segundos.
SET
Clock starts from 00 second.
El reloj inicia su funcionamiento de 00.
ftOOtTfííjífli'lís«..
fe
12
Page 13

To set the time exactly
Press the SET button in step 6 to start the clock at
the desired point, as indicated by another ciock or
time signai from an externai time source.
To display the clock while the power is on
Press the CLOCK button. The clock is displayed
for 4 seconds.
During recording or dubbing, the clock is not dis
played even if the button is pressed.
To switch the time display
The time display is factory-set to the 12-hour stan
dard. When switching to the 24-hour standard,
press the POWER button while pressing the CLOCK
button. Repeat the same procedure to restore the
12-hour standard.
In case of power failure
• for less than about 24 hours, the clock stops
during the failure.
Only the current time setting is needed.
• for more than about 24 hours, setting of the
current time, station presetting and timer setting
are needed.
Note
• The current time cannot be set with the remote
control.
• While setting the current time, the on-timer is not
activated when the specified time is displayed.
Para ajustar exactamente la hora
Presione el botón SET en el paso 6 para poner en
funcionamiento el reloj en el punto deseado,
indicado por otro reloj o la señal horaria de de una
fuente externa.
Para visualizar el reloj cuando el sistema está activado
Presione el botón CLOCK. El reloj se visualiza
por 4 segundos.
Durante la grabación o duplicación, el reloj no
se visualizará aunque se presione el botón.
Para cambiar la visualización de la hora
La visualización de la hora ha sido ajustada en la
fábrica al sistema de 12 horas. Para cambiarla al
sistema de 24 horas, presione el botón POWER
manteninedo pulsado el botón CLOCK. Para volver
al sistema de 12 horas, repita el mismo
procedimiento.
En caso de corte del suministro eléctrico
• si el corte ha durado menos de unas 24 horas,
el reloj se habrá parado.
Solamente necesitará poner en hora el reloj.
• si el corte ha durado más de unas 24 horas,
necesitará poner en hora el reloj, memorizar las
emisoras, y programar el temporizador.
Nota
• La hora no puede ajustarse con el control remoto.
• Durante la puesta en hora, el temporizador no
se activará cuando se visualice la hora
especificada.
№6,
mmcLocmm,
[Bis#. líBPowERfíílo i*
• s#á*íE#«wrsO#iio iit
i±
' fEfff^©S^2|^tglS:£íl«li#fS
> 5eB#
13
Page 14

m
B
c
To adjust the volume
T0 increase the volume, turn the VOLUME control
clockwise.
To decrease the volume, turn the VOLUME control
counterclockwise.
Para ajustar el volumen
Para aumentar el volumen, gire el control VOL
UME hacia la derecha.
Para disminuirlo, gírelo hacia la izquierda.
D
A
ié];&l(gf|VOLUME®ilire$í,
a, ifa*ffiiivoLUMEeiijKii<
B
For louder deep bass
Press the T-BASS button repeatedly and select
one of the four levels for louder deep bass, or off
position to your preference.
Normally sef to the second level.
For clear and vivid high-definition sound - BBE system
The two main causes of sound distortion are the
deterioration of the higher harmonics and improper
phase characteristics. The BBE system compen
sates for these causes of distortion to produce
clear, high-definition sound reproduction closer to
that of the original source.
Press the BBE button repeatedly and select one of
fhe four levels, or off position to your preference.
14
B
Para graves profundos
Presione el botón T-BASS repetidamente y
seleccione uno de los cuatro niveles
de graves. Normalmente, ajuste al segundo nivel.
Para un sonido de alta definición, nítido y vivido - Sistema BBE
Las dos causas principales de la distorsión del
sonido son el deterioro de las armónicas altas y las
inadecuadas características de fase. El sistema
BBE compensa estas causas de distorsión para
producir una reproducción sonora de alta definición
casi igual a la fuente original. Presione el botón
BBE repetidamente y seleccione uno de los cuatro
niveles.
B
««aíSíEÍ#8t/r, S5?#ilfff)SSV®SMíBlitffilÍ3Ell
SíSto
SBoffílSo
Page 15
Selecting a factory-preset equalize-
D
1^
tion curve
You can enjoy music with 3 different equaliza
tion curves preset at the factory.
Selección de una curva de ecualización
D
preajustada en fábrica
Usted podrádisf rutar de música con 3 diferentes
curvas de ecualización preajustadas en fábrica.
n
LJ
Select an equalization mode.
ROCK POP
c
To cancel the selected mode
Press the selected button twice.
To select v;ith the remote control
Press it repeatedly.
GEO
CLASSIC
Seleccione el modo de ecualización deseado. iHff
(e.g.) / (Ejemplo)./ M'yij ' ROCK
= ==;;,ii „lililí
70 .'Í50 Ik 3.Sk 10HH7
Preset equalization curve is displayed.
Se visualiza la curva de ecualización prefijada.
Para cancelar el modo seleccionado
Presione dos veces el botón seleccionado.
Para seleccionar con el control remoto
Presiónelo repetidamente.
-> ROCK —> POP
RDLt;
CLASSIC
Cancel
Cancelar
> KXìfif -
About preset! sound quality
ROCK: Powerful sound emphasizing treble and
bass
POP: More presence of vocals and midrange
CLASSIC: Sound enriched with heavy bass and
fine treble
When recording
The VOLUME control, BBE button, GRAPHIC
EQUALIZER buttons, and T-BASS button have no
effect.
Headphone use
Connect headphones to the PHONES jack.
To mute the sound temporarily
Press the MUTE button of the remote control. The
indicator of the function button blinks. To restore
the sound, press the button again.
Cualidad acústica preajustada
ROCK: Sonido potente con losgravesy agudos
enfatizados
POP: Más presencia de los sonidos vocales
y de la gama media
CLASSIC; Sonido enriquecido con graves
potentes y agudos finos
Cuando grabe
El control VOLUME, el botón BBE, los botones
GRAPHIC EQUALIZER, y el botón T-BASS no
tendrán efecto sobre la grabación.
Utilización de auriculares
Conecte los auriculares a la toma PHONES.
Para silenciar temporalmente el sonido
Presione el botón MUTE del control remoto.
Parpadea el indicador del botón de función. Para
restablecer el sonido, presione nuevamente el
mismo botón.
ROCK;
POP:
CLASSIC:
VOLUME. BBESfit. GRAPHIC EQUAL-
IZERí£ffiT-BASSK»ÍB(1íffl „
HfsMmííItlfAPHONESjgíLo
mm. njiiLLígi
15
Page 16
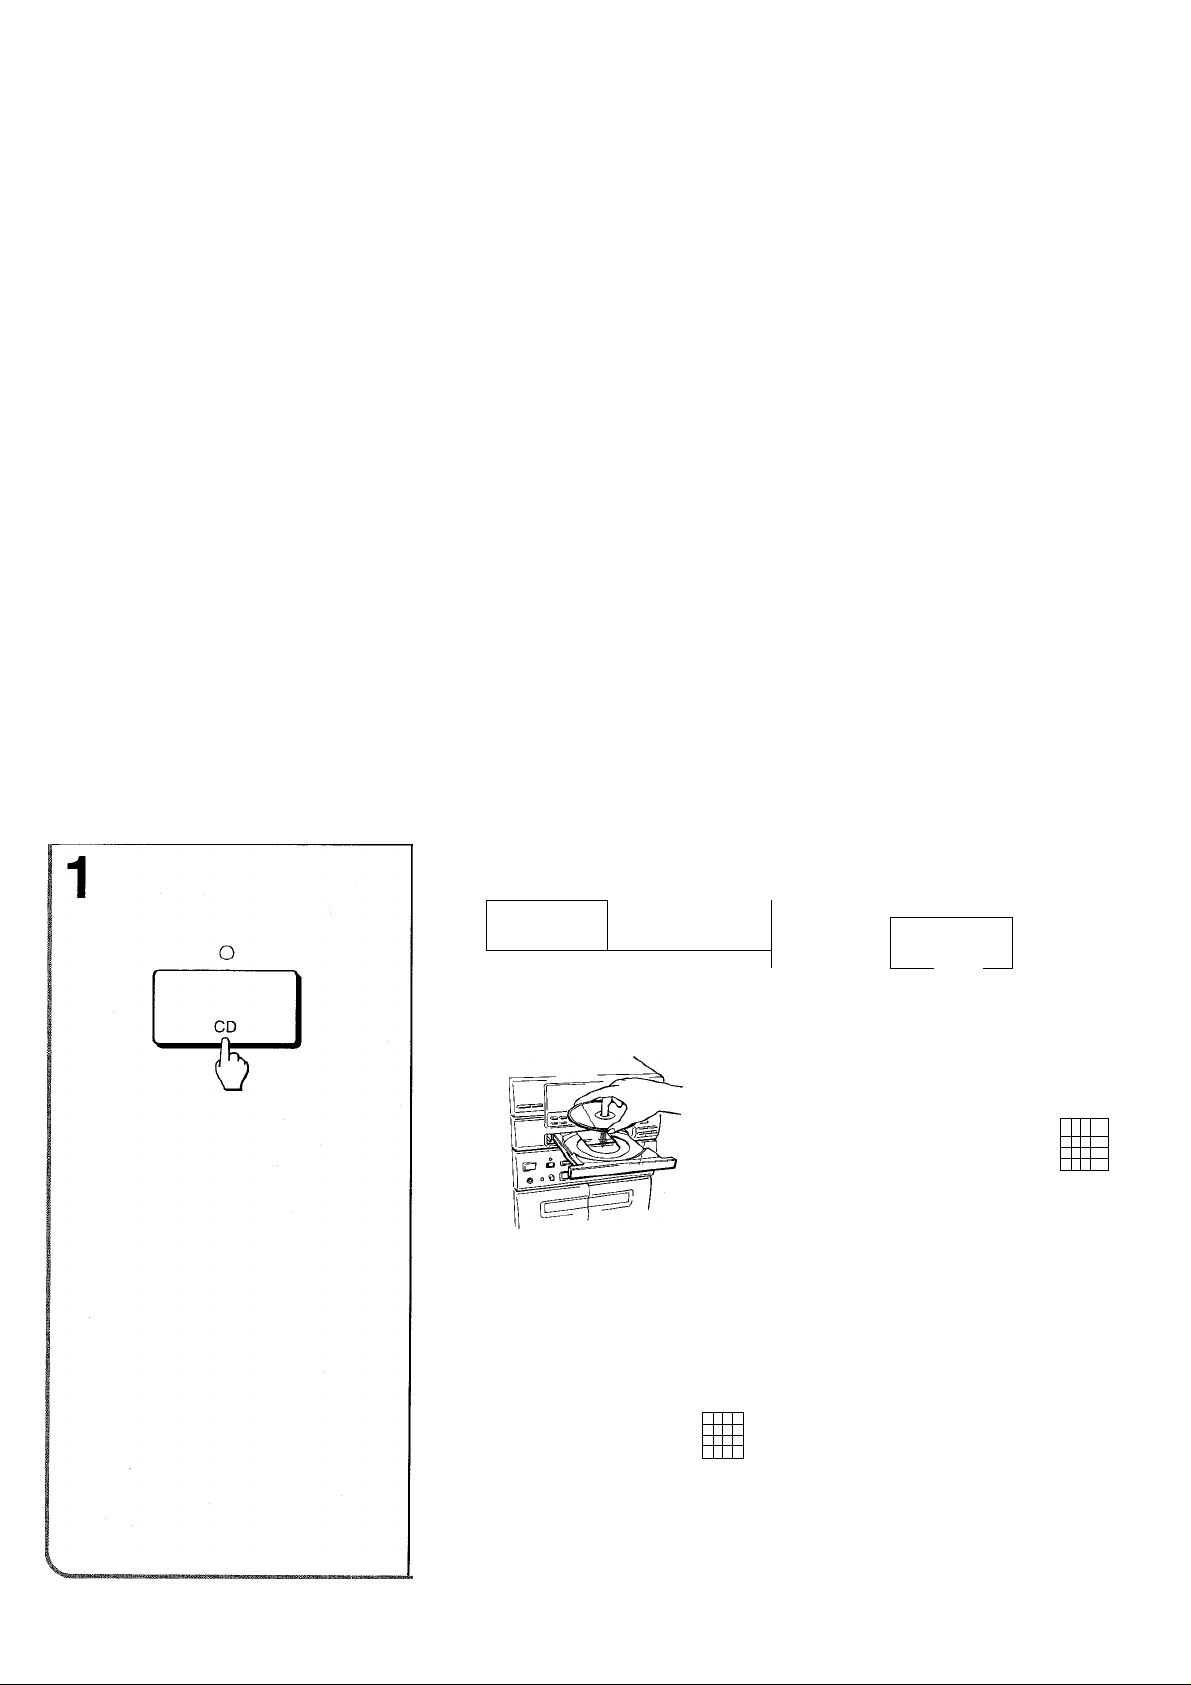
OPEN/CLOSE
3
2
1
PLAY/direction
<i >
OPEN/CLOSE
WS.-Í J
lilM
Total number of tracks and playing time
Número total de las canciones y tiempo de
reproducción
№g¿ÍÍ»}iíícB#PBT
«0
4
8
Play begins.
Inicia la reproducción
Secutó
.....
Él
/■•Í'S
cu I
Track number being played and elapsed play
ing time
El número de la canción en reproducción y el
tiempo transcurrido
1- •1
í:
10
8
16
Page 17

ñí-r ■ ■
To stop play
Press the H button.
To pause
Press the III button.
To resume play, press the II button again.
To play an 8cm CD
Load a disc onto the inner circle of the tray.
Note on the display window
If the disc includes more than 17 tracks, the track
numbers after 17 are not displayed.
To check the remaining time
Press the DISPLAY button during playback. The
amount of time remaining until all tracks finish
playing is displayed.
To resume the play time display, press the DIS
PLAY button again.
If a dirty disc is used
The disc may not play normally. (It may stop, the
search for a track may take longer, etc.)
In this case, press the ■ STOP button to stop play,
and take out the disc. Then wipe it with a cleaning
cloth.
A disc with a major flaw will not play normally either.
Notes
• Do not place more than one compact disc on the
disc tray at the same time.
• If, during CD play, the video image of a nearby
television is distorted, or if static is heard from a
hearby radio, please move this unit further away
from the affected television or radio.
Para cesar la reproducción
Presione el botón ■. if®® ■
Para realizar una pausa
Presione el botón II.
Para reanudar la reproducción, vuelva a presionar
el botón.
Para reproducir un disco compacto de 8 cm
Colóquelo en el círculo interior de la bandeja.
Nota sobre la ventanilla visualizadora
Si el disco contiene más de 17 canciones, no se
visualizarán los números posteriores a 17.
Para comprobar el tiempo restante
Presione el botón DISPLAY durante la
reproducción. Se visualizará el tiempo de
reproducción restante hasta el final del disco.
Para reanudar la visualización del tiempo de
reproducción, vuelva a presionar el botón DIS
PLAY.
En caso de un disco sucio
Un disco sucio puede que no se reproduzca
normalmente. (Puede detenerse la reproducción,
demorará mucho para buscar una canción, etc.)
En este caso, interrumpa la reproducción
presionando el botón de parada ■ STOP, saque
el disco y limpíelo con el paño de limpieza. El disco
con una rayadura grande puede también K
reproducirse anormalmente.
Notas
• No coloque más de un disco en la bandeja del
mismo.
• Si, durante la reproducción de un disco
compacto, las imágenes de un televisor cercano
sufren distorsión, o si se oyen estáticos en una
radio cercana, aleje el eistema del televisor o del
aparato de radio efectado.
ín«ÜC8cmH*l-ll>t-
íftt^S±№iiJi¥ii#Pí8«:(IliíKíli5Ko
PLAYKffio
■ i»^lB]Bf*PgSWiSc®-;iSLi,±№Pi>t„
itiSBiisia„
wicíssiiisiíto
nmmm
fSBDISPLAYSffi, KfiJ.Rlfí'aií
ftaaifsaii#, tTtSTBSTOPKffinffi#
17
Page 18

LOCATING A PARTICULAR POINT IN A TRACK LOCALIZACIÓN DE UN PUNTO PARTICULAR DE UNA CANCIÓN
...
..............
..................... -TM-rr-ii-mrl'
.............
^
DOWN
<Kl
UP
----------------
i'
J
Keep it pressed.
Mantenerlo presionado.
!)
k.
To go back: Keep the ◄◄ button pressed.
To go ahead: Keep the ►► button pressed.
Release the button when you reach the point in the
track you are looking for.
SEARCHING FOR THE BEGINNING OF A TRACK
BÚSQUEDA DEL COMIENZO DE UNA CANCIÓN
DOWN
<M
UP
oo
Para retroceder: Mantenga presionado el botón
Para avanzar: Mantenga presionado el botón
Suelte el botón cuando alcance el punto deseado.
Press it once.
Presiónelo una vez
íéT-:^o
SSílBÍi : üffil •►ÍSffio
i pariti
Ò
To find a previous track
By pressing the button once during play, the
CD will return to the beginning of the current track.
If the button is pressed repeatedly before play
starts, the CD will return to the previous track(s).
To skip tracks
By pressing the ►► button once, the CD will move
to the beginning of the next track.
If the button is pressed repeatedly, the CD will
move in succession to the following tracks.
Note
During random play, the beginning of the previous
track cannot be searched for by pressing the
button.
Para buscar una canción anterior
Si presiona una vez el botón ◄◄ durante la
reproducción, el disco compacto volverá al
comienzo de la canción actual.
Si lo presiona repetidamente antes de que se inicie
la reproducción, el disco compacto volverá al
comienzo de canciones anteriores.
Para buscar una canción posterior
Si presiona una vez el botón ►► durante la
reproducción, el disco compacto avanzará hasta
el comienzo de la canción siguiente.
Si lo presiona repetidamente antes, el disco
compacto avanzará sucesivamente hasta el
comienzo de canciones posteriores.
Nota
Durante la reproducción aleatoria no será posible
buscar el comienzo de la canción anterior
presionando el botón
B zmmño
18
Page 19

To check the programmed tracks
Press the DOWN (-4^) or UP (►►) button re
peatedly during the stop mode. The track number
and the program number are displayed in pro
grammed order.
To cancel programmed play
Press the ■ STOP button during the stop mode, or
press the OI^EN/CLOSE button.
Para comprobar las canciones programadas
Presione el botón DOWN (■^^) o UP {►►)
repetidamente durante el modo de parada. El
número de canciones y el número de programa se
visualizarán en el orden programado.
Para cancelar la reproducción programada
Presione el botón ■ STOP durante el modo de
parada o el botón OPEN/CLOSE.
##±:í5S;ii#S;iS«®DOWN(^<) ^
■ STOPííffl;,
SOPEN/CLOSESffio
To change ithe program
After cancelling the programmed play, program
the tracks again.
If the disc includes more than 17 tracks
Tracks after the 17th can be programmed, but their
track numbers are not displayed in the music
calendar.
Note
While the sleep function is activated, program
operation is impossible.
Para cambiar ei programa
Después de cancelar la reproducción programada,
programe nuevamente las canciones.
Si ei disco contiene más de 17 canciones
Pueden programarse las canciones posteriores a
la 17a., pero sus números no se visualizarán en el
calendario musical.
Nota
Durante la activación de la función de
cronodesconectador, será imposible la operación
del programa.
lí
19
Page 20

All the tracks on the disc can be played in random Todas las canciones del disco podrán »itV -SiiilíStWo
order. reproducirse en orden aleatorio.
í
ac=3 Q □ I
rUCZDCn ^^
To cancel random play
Press the RANDOM button so that “RANDOM” in Presione el botón RANDOM de forma que “RANthe display goes out.
The tracks on the disc can be played repeatedly. Las canciones pueden reproducirse repetidamente.
Para cancelar la reproducción aleatoria
DOM” desaparezca del visualizador.
Before or during playback Antes o durante la reproducción
■¿tífela BÍ íSÜ
nan-JiS^JIfllH B|'.*lgrAIo
REPEAT
U Ü. Zi z<
( J. L Z(
r ~l in
il_ _Ll //_/
123 4
6 7
5
9 10
’‘I
6
To cancel repeat play
Press the REPEAT button so that “REPEAT” in the
display goes out.
Repeat play during programmed play
Press the REPEAT button during programmed
play so that “REPEAT” is displayed. Repeat play
will be performed.
20
Para cancelar la reproducción repetida
Presione el botón REPEAT de manera que se
apague la visualización “REPEAT”.
Reproducción repetida durante la función de reproducción programada.
Presione el botón REPEAT durante la reproducción
programada de manera que se visualice “RE
PEAT”. Se realizará la reproducción repetida.
REPEAT
ÍSMREPEATJÍffi, Hltfcil^Ji6t]“REPEAT”
ffilD“REPEAT”ilS^tíl5fS„ IPiTii#!
Page 21

To stop play
Press the ■ button.
Para cesar la reproducción
Presione el botón ■.
To pause (deck 2 only)
Press the II button.
To resume play, press the II button again.
To change play direction
During play or pause, press the ◄ ► button.
Usable tapes
Normal (type I), Cr02 (Type II) or metal (type IV)
tapes can be played.
The type of the tape is detected automatically
when you insert the tape.
Para realizar una pausa (deck 2 solamente)
Presione el botón II. Para reanudar la
reproducción, vuelva a presionar el botón II.
Para cambiar el sentido de reproducción
Durante la reproducción o el modo de pausa,
presione el botón ◄ ►.
Cintas utilizables
Podrán reproducirse cintas de tipo normal (tipo I),
CrOa (tipo II), o de metal (tipo IV).
El tipo de cinta se detectará automáticamente
cuando inserte un casete.
mmmmo
í£®o
CrO2(iiS!0^A®^
íf(IVS)Eim^o
21
Page 22

When listening to a tape recorded with DOLBY
NR
Press the DOLBY N R button to tu rn on the “DO N R”
indicator on the display window.
For Dolby NR processed tape:
Turn on the indicator.
For a tape recorded without Dolby NR system:
Turn off the indicator.
To select the reverse mode (deck 2 only)
Press the REV MODE button until the desired
mode indicators are turned on.
For playing one side only:
For playing both sides one time only:
For playing both sides repeatedly:
ZD
CZ)
On deck 1, it plays both sides once.
To fast wind
During stop mode, press the ◄◄ or ►► button, and
then press the ■ button to stop winding.
When playback starts from the reverse side
On deck 1, the tape always stops when the reverse
side is played back once.
On deck 2, the tape stops when the reverse side is
played back once if is selected.
Note
Noise may be heard if a television set is on. In this
case, turn off the television or separate the televi
sion from this system.
To check the deck and playback side of the
tape during stop mode
The display window shows the deck and the side
which are selected to be played back.
Playback side / Cara de reproducción / KWfflJ
>: Forward side / Cara de avance /
Para escuchar una cinta grabada con el sistema
de reducción de ruido Dolby
Presione el botón DOLBY NR a fin de que se
encienda el indicador NR” en la ventanilla
visualizadora.
Para una cinta grabada con el sistema de
reducción de ruido Dolby:
Haga que se encienda el indicador.
Para una cinta grabada sin el sistema de
reducción de ruido Dolby:
Haga que se apague el indicador.
Para seleccionar el modo de inversión (deck 2
solamente)
Presione el botón REV MODE hasta que se
encienda el indicador de modo deseado.
Para reproducir una cara solamente:
——
Para reproducir ambas caras una
sola vez:
Para reproducir repetidamente ambas
caras:
CZ)
En el deck 1 las dos caras del casete se
reproducirán una vez.
Para bobinar rápidamente la cinta
Durante el modo de parada, presione el botón ◄◄
o ►► y después el botón ■ a fin de parar el
bobinado.
Si inicia la reproducción desde la cara poste
rior
En el deck 1. la cinta se parará siempre cuando se
haya reproducido una vez la cara posterior.
En el deck 2, si ha seleccionado , la cinta se
parará cuando se haya reproducido una vez la
cara posterior.
Nota
Es posible que se oiga ruido si hay un televisor
encendido. En tal caso apague el televisor o
sepárelo de este sistema.
Si&WUDOLBY
SKDOLBY NRKiimSa“ □□ NR”üá^
(íSREv
Z)
CZ)
1 -h,
íSSi^PJíéScgB#
ih^Bo ,
limiPilíc
E
*ibt
IfíRT,
E.g.) The forward side of deck 2 will be played back when
the PLAY button is pressed.
Ejemplo) La cara de avance del deck 2 se reproducirá
To select the deck to be played back when
al presionar el botón PLAY.
ofic
B o
tapes are inserted in both decks
During the stop mode
Durante el modo de pamaa
TAPE/deck vz
Each time it is pressed, the deck number changes.
Otherwise, the deck which was closed last is
selected.
22
Para comprobar el deck y la cara de
reproducción de la cinta durante el modo de
parada
La ventanilla visualizadora muestra el deck y la
cara seleccionados para la reproducción.
Consulte la figura en la columna de inglés.
Para seleccionar el deck a reproducirse cuando
las cintas están insertadas en ambos decks.
■ :„||
..............................
■'i i ' U UL. 1 >
1 70 350 1k 3.5k 10kHz * ^ W f
Cada vez que presione, cambia el número del
deck. De lo contrario, se selecciona el deck que se
seleccionó último.
Ill
Page 23

m'á! -.;,- .
т~т*"*гт ., ..:,т."':.|;-:';.":г.':,
..........
SEARCHING FOR THE BEGINNING OF A TRACK BUSQUEDA DEL COMIENZO DE UNA CANCIÓN
If there is a 4-second or longer blank between
tracks, you can search for the beginning of a track
I easily during playback. (Music Sensor; MS)
Si entre las canciones existe un espacio en írffiSltllH¿líj‘14íkÍlU.h3füláít^, IE"Í-Ói
blanco de 4 o más segundos, podrá buscar ®c*ir$tTffi№ílciT.tÍÍI H (fí^ífí^ ;
facilmente el comienzo de una canción durante
la reproducción. (Sensor de música; MS)
шшх
Press ►► or ◄◄ during playback, referring to the
following table.
Side of the
Indicator
PLAY/DIRECTION
1
PLAY/oifiECTiON
1
Note
Searching for the beginning of a track cannot be
correctly carried out on with the following tapes:
• A tape witti a blank of less than 4 seconds
• A tape witti a noisy blank
• A tape witti long low-level sections
• A tape of low recording level
caissette being
Front side
Reverse side
Desired track
Next track ’Track being '
played
«
« ►►
Presione ►► o ◄◄ durante la reproducción,
consultando la tabla siguiente.
Cara del
segundos
? casete en t
ireprOduGcióríj
Cara frontal
Cara posterior
Indicador
PLAY/OIRECTlON
PLAY/DIRECmON
|í53> 1
Nota
La busca del comienzo de una canción no puede
efectuarse correctamente con las siguientes cintas:
• Una cinta con un espacio en blanco inferior a 4
• Una cinta con un espacio en blanco ruidoso
• Una cinta con secciones largas con bajo nivel
• Una cinta con bajo nivel de grabación
Canción deseada
Canción
siguiente :
►►
Canción en
reprotìuóòión
►►
wm.
PLAVrblFECTION
1 -^1
PLAY/DIRECTION
jE ffi
К Ш
E
SrS- ;
• 4 #МДТ
SÍJcfr»n
T'-ff
tfta
#ÉjEí*#íJé--t 1!й 0 m
►►
•♦4
.íEfcB^Hí
ÍÑIffiR
►►
23
Page 24

The tapes on deck 1 and deck 2 can be played Las cintas de los decks 1 y 2 podrán reproducirse
back continuously. continuamente.
.. r—
1
Vv-
.....
........................
1
To select the deck to be played back first
During the stop mode
Durante el modo de parada
TAPE/deck 1/2
^ Select Z)-
Seleccione Z)-
mm z? o
REV MODE
Press repeatedly.
Presione repetidamente.
STSíSKfflo
Para seleccionar el deck que debe reproducir primero
o
70 350 Ik 3.5k 10kHz
TRPE ! ^
4
PLAY/direction
<l [>
Each time it is pressed, the deck number changes. Cada vez que presione, cambia el número del SIÜ,
Otherwise, the deck which was closed last is se- deck. De lo contrario, se selecciona el deck que se
lected. seleccionó último.
24
Page 25

I
FM MODE
1
Select a band.
1
Seleccione la banda.
îÆfêo >'^^3Slll®í5Ío
O
TUNER/band
S'?, so»»
f;i r
To search for a station quickly (Auto search)
Press the DOWN (◄◄) or UP (►►) button for 1 to
2 seconds, and a station is searched for automati
cally. When a station is found, searching stops
automaticaliy. To stop it manually, press eitherthe
DOWN (•^i) or UP (►►) button once.
The searching may not stop at a station with a very
weak signal.
If the FM sitsreo broadcast signal is weak.
Press the FM MODE button to extinguish “AUTO”
in the display. Background noise wiil be reduced
although the broadcast becomes monaural.
To change the AM (MW) tuning interval
The AM (MW) tuning interval of the LH, U and C
models is factory-set to 10kHz, and that of the HE,
E and K moitels to 9kHz.
If you use this unit where the frequency allocation
system is dilferent from the preset one, press the
POWER button to turn off the power. Then, while
pressing the TUNER/BAND button press the
POWER button. To reset the interval, repeat this
procedure.
o o o
Extinguish the preset number.
TUNING
_____
ui
= _si;ill! mi
I a il pi l-f'l [
; /g _ MU"; 1» ,ig|i ni ■ .. v«.v
Preset number
Número prefijado
Para buscar rápidamente una emisora (Búsqueda automática)
Presione el botón DOWN (◄◄) o U P (►►) du rante
1 o 2 segundos para buscar automáticamente una
emisora. Si se encuentra la emisora, la búsqueda
cesará automáticamente. Para cesarla
manualmente, presione una vez e botón DOWN
(◄◄) o UP (►►). Es posible que no pueda buscarse
una emisora con una señal muy débil.
Si la señal de radiodifusión de FM stereo es débil
Presione el botón FM MODE para que desaparezca
“AUTO” del visualizador. El ruido de fondo se
reducirá, pero la recepción será monoaural.
Para cambiar el intervalo de sintonía de AM (MW)
El intervalo de sintonía de AM (MW) de los modelos
LH, U y C está ajustado en fábrica a 10kHz y el de
los modelos HE, E y K está ajustado a 9kHz. Si
utiliza esta unidad donde el sistema de asignación
de frecuencia es diferente del preestablecido,
presione el botón POWER para desconectar la
alimentación. Luego de esto, mientras mantiene
presionado el botón TUNER/BAND, oprima el
botón POWER. Para reponer el intervalo, repita
este procedimiento.
Select a station. Seleccione una emisora.
mmm-to
DOWN
/
<Kl
UP
t>o I
ò
mi mlllll
ili
ííIDOWN ( ◄◄ ) flXUP ( ►►) fêffi 1 S 2 í>
fjcl№#g»)#±0 «SLjtT^KlffihlIfJc, WK-
TDOWN (◄◄ ) ® UP ( ►►) mm.
*FM/STERE0)S»11ÜÍI^
SgS|AM(IVIW)llltr¿lPi
SmOkHz, IfnHE. EffiKfÍi!|iiia:£®9kHz„
fliJK* POWER mA,
TUNER/BANDSffiütfSSPOWERfSfi
SS.OO»»
l'/y
r ; (
±№“AUTO”iiiíí;'iiií^, isílílfim
V
25
Page 26

Up to 32 stations on any band can be prosot.
Podrán momor zarso hasta 32 emisoras por
banda.
iü
1
2,
Select a band and station.
1
Seleccione la banda y la
emisora.
o
TUNER/band
TUNING
Select a preset number
(1 to 32).
Seleccione un número de
memorización (1 a 32).
ilíiÍlÜKíBo (1S32)
SET
1,2
Memorize the station.
Memorice la emisora.
SET
Extinguish preset number.
Haga que desaparezca el número de
memorización.
DOWN
<M Cí>
UP
Ò
7,iii sn.sü..
■ . . -w
Note
The remote control cannot be used for preset
ting.
26
r-n
Preset number.
Número de memorización.
Ò
DOWN
<KI
UP
^ 1
6
Nota
El control remoto no puede utilizarse para la
memorización.
ililili
70 350 » 3.5k Ihliz
Repeat steps 1 to 3.
Rapita los pasos 1 a 3.
a« 1 s 3
-
o F/'f .
Page 27

1
oc
a
O OO
•"o..o'"
Select a band.
1
Seleccione la banda.
ilíijáSo
O
TUNER/band
V.
To select a prciset number
When the DOWN (-44) or UP (►►) button is
pressed repeatedly, you can search for the
manually preset and factory-set* stations, only in
the band which is selected in step 1.
Example) When you preset three AM (MW)
stations to numbers 1 to 3, the preset numbers
are searched as following In the AM (MW) band.
1 2 -> 3 ^ 25 ^ 26 ^ 27 ^ 28 29—I
To receive a station of the other bands, first
change the band by pressing the TUNER/BAND
button.
'Factory-set stations
FM: Number 1 to 24
AM/MW: Number 25 to 29
LW (E, K models only): Number 30 to 32
PRESET
Para seleccionar un número momorizado
Presionando el botón DOWN (-44) o UP (►►),
usted podrá buscar manualmente las emisoras
memorizadas y preajustadas en fábrica*, sólo
en la banda seleccionada en el paso 1.
Ejemplo) Cuando usted memorice tres emisoras
a los números 1 al 3, los números memorizados
son buscados como sigue en la banda AM (MW)
1 ^ 2 -4 3 25 -H. 26 27 ^ 28 29-
[1
Para sintonizar una emisora de otras bandas,
cambie primero la banda presionando el botón
TUNER/BAND.
'Emisoras preajustadas en fábrica
FM: Número 1 a 24
AM/MW: Número 25 a 29
LW (modelos E, K solamente): Número 30 a 32
Select a preset number. Seleccione el número de memorización deseado.
DOWN
<M
6
-t fitSfSSDOWN ( 44 ) ^UP ( ►► ) fSan#,
pm. 1
m : tígllillíftl 1 ~ 3 № 3 (iAM(MW) «lÉJB#,
íSfíPTFfrS^#ttAM (MW) íSSÍitimíc
p 1 -> 2 3 ^ 25 ^ 26 ^ 27 ^ 28 29—j
□
FM : Ȓi 1 ~24
AM/MW : »«125-29
LWfíiIJSBE, Kjta) : »«130-32
UP
w>
tífeKTTUNER/
27
Page 28

3
2
6
5
When recording from a CD or a tape, see also the
pages after 32.
To stop recording
Press the ■ button.
To pause recording
Press the II button.
To resume recording, press the II button again.
To start recording with the remote control
First press the REC button, and then press the
•4 (play) button within 2 seconds.
Monitoring
During recording, the output volume and tone of
the speakers or headphones may be freely varied
without affecting the level of the recording.
Usable tapes
Normal (type I) and Cr02(type II) tapes can be
recorded on.
The type of the tape is detected automatically
when you insert it.
To erase a recording
It is possible to create a blank tape by erasing a
recording.
1 Press the TAPE button.
2 Insert the tape you want to erase into deck 2.
3 Set the reverse mode and the recording direc
tion.
4 Press the VIDEO/AUX button. (Turn off the
power of the external equipment connected to
the VIDEO/AUX jack.)
5 Press the RECORD button.
Note
When a tape without an erasure prevention tab is
inserted, the dubbing operation will not begin.
4
1
Para grabar de un disco compacto o una cinta,
consulte las páginas posteriores a 32.
Para cesar la grabación
Presione el botón ■ .
Para realizar una pausa en la grabación
Presione el botón II.
Para reanudar la grabación, vuelva a presionar el
botón II.
Para iniciar la grabación con el control remoto
Presione primero el botón REC, y luego oprima el
botón ◄ ► (reproducción) por aproximadamente 2
segundos.
Monitoreo
Durante la grabación, el volumen y el tono de
salida de ios altavoces o auriculares pueden
cambiarse sin afectar el nivel de grabación.
Cintas utilizables
Para grabar podrá emplear cintas de tipo normal
(tipo I) y Cr02 (tipo II).
El tipo de cinta se detectará automáticamente
cuando inserte un casete.
28
Page 29

Para borra r una grabación
Es posible crear una cinta en blanco borrando una íimmo
grabación.
1 Presione el botón TAPE.
2 Inserte la cinta que desea borrar en el deck 2.
3 Fije ei modo de inversión y la dirección de
grabación. 4
4 Presione el botón VIDEO/AUX. (Desconecte la
alimentación del equipo externo conectado a ia
toma VIDEO/AUX.)
5 Presione el botón RECORD.
Nota
Si se insería una cinta sin lengüeta de seguridad,
no iniciará la operación de duplicación.
j >s J ■»1^0
íSSIlíSito
15tsBREcm mm 2 ◄ ►
(mmmi-o
mm
SfflüS
*a (I sü) «®íSCr02 (n )i&wBifflR«-ií„
immunvm
ílíggAilltkílíífB$, SilSíi#É fí«H;íIJ
aiJlío
íii;» til S
ftSí TAPE lí uto
1
Éa
íiCro
2
Sx £ Ife H A f D Í3 A rn¡ 0
3
íSTVIDEO/AUXíSfilo
(l)-iíí|iiVIDE0/AUXjfíLÍÍÍStt£l-/iÍtíj|6^
Ííl!)
ÍÍKRECORDffiito
5
i±
bX
ÍTo
2
„
29
Page 30

—
...i- ■. J . i
® To record with Dolby noise reduction
system
The Dolby Noise Reduction system reduces tape
hiss and noise.
Press the DOLBY NR button to turn on the “□□ NR”
indicator on the display.
For recording with DOLBY NR;
Turn on the indicator.
For recording without DOLBY NR system:
Turn off the indicator.
(§) To select the reverse mode
Press the REV MODE button until the desired
mode indicators are turned on.
For recording on one side only:
Z)
Fni rer;ording on both sides:
Note
When you record on both sides, be sure to record
on the front side first. Recording automatically
stops after the reverse side recording is com
pleted, even if the REV MODE button issetto .
To insert a 4-second blank space during re
cording
Press the RECORD/REC MUTE button during the
recording or recording pause mode.
The red indicator biinks and incoming signais will
not be recorded on the tape, then a 4-second blank
space will be inserted.
4 seconds after the RECORD/REC MUTE button
is pressed, the cassette deck wiil automaticaiiy
enter the recording pause mode.
To resume recording, press the II button.
For a blank space of less than 4 seconds
After pressing the RECORD/REC MUTE button,
quickly press it again whiie the red indicator is
blinking and the recording will restart.
For a blank space of more than 4 seconds
After deck 2 enters the recording pause mode,
press the RECORD/REC MUTE button again.
Each time this button is pressed, a 4-second blank
space is added.
or
CZ)
® Para grabar con el sistema de reducción de
ruido Dolby
El sistema de reducción de ruido Dolby reduce el
siseo y el ruido de la cinta.
Presione el botón DOLBY NR de forma que se
encienda indicador NR” en el visualizador.
Para grabar con el sistema de reducción de
ruido Dolby:
Haga que se encienda el indicador.
Para grabar sin el sistema de reducción de ruido
Dolby:
Haga que se apague el indicador.
(D Para seleccionar el modo de ionversión
Presione el botón REV MODE hasta que se
enciendan los indicadores de modo deseados.
Para grabar una cara solamente:
Para grabar en ambas caras:
Nota
Para grabar en ambas caras, cerciórese de
comenzar por la frontal. La grabación se parará
automáticamente después de haber finalizado la
cara posterior, incluso aunque el betón REV MODE
esté en CZ).
Para insertar un espacio en blanco de 4
segundos durante la grabación
Presione el botón RECORD/REC MUTE durante
la grabación o en el modo de grabación en pausa.
El indicador rojo parpadeará, y las señales de
entrada no se grabarán en la cinta, y se insertará
un espacio en blanco de 4 segundos.
4 segundos después de haber presionado el botón
RECORD/REC MUTE, el deck entrará
automáticamente en el modo de grabación en
pausa.
Para reanudar la grabación, presione el botón II.
Para dejar espacios en blanco de menos de 4
segundos
Después de haber presionado el botón RECORD/
REC MUTE, vuelva a presionarlo rápidamente
mientras el indicador rojo esté parpadeando, y se
reanudará la grabación.
féüDOLBY NRi^ajytTI0iS7S±flfj“aaNR’’
».DOLBY NR»^Í# :
^FfüDOLBY NRÜcWBf : ilfflfi^^o
SBREV MODE,
Kfiifiaatp#: .
Z)
m
CD
K
as^sm»wüffSii)#±,T^f&REv modes
ffi:tSS:5E*CZ)fi;So
rÍí*^gcS#ijic,ffiTSeRECORD/REC
MUTESfflo
«SA«±, ÉiifciÌÌÈ4#ilÈ^^ÉtÈo
RECORD/REC MUTESBSffiS® 4 ©a
ft,
issB II fitto -
fiSRECORD/REC MUTEfíffift,
awffltóo
TEStf?jÍ2)ÍAiS#®#K.llít, t?:^se
RECORD/REC MUTEStto l^ttfeSS®-^,
íft-fisn-fa 4 mt^ùiÈo
-taMAM(MW), LWItfiíi#,
(^ffi), süffFM MODEsaa^sT^iírifig, m
Note
If squealing sounds (beating) occur when record
ing an AM(MW), LW broadcast, change the FM
MODE button to a different position, so as to
eliminate the beat noise.
By pressing the button repeatedly, the dot light is
on and off in turn in the display window.
30
Para dejar un espacio en blanco de más de 4
segundos
Después de que el deck 2 haya entrado en el modo
de grabación en pausa, presione repetidamente el
botón RECORD/REC MUTE. Cada vez que lo
presione, se añadirá un espacio en blanco de 4
segundos.
Nota
Si se escuchan silbidos (batido) cuando se graban
programas de AM (MW), LW, cambie el botón FM
MODE a una posición diferente para eiiminartales
ruidos.
Presionando este botón repetidamente, la luz de
punto se enciende y se apaga en la ventanilla
visualizadora.
Page 31

....
.
'\^-fy \- f. - •■•■ ~f'-r^ry."~ '"• -■ ■"•>■.. • •■■. H
S.sV-í:.. ?"i-sr.-r s-.‘—.• “':f. t:‘.-.-.'*.•: —. 'B
A
Cassette tape notes
Tape slack
Check and tighten slack tape before use with a
pencil or similar tool. Slack tape may possibly
break or g(3t jammed in the mechanism.
C-120tape
C-120 tape is extremely thin and easily deformed
or damaged. It is not recommended for use in this
unit.
To preveriit accidental erasure [b]
Use a screwdriver or other pointed tool to break off
the plastic tabs.
B
Side A
Cara A
Affi
Lengüeta para la cara A
Affiffl román-
Notas sobre las cintas de casete
Cinta floja
Compruebe y tense la cinta usando un lápiz o
herramienta similar. La cinta cuando está floja
puede romperse o atascarse en el mecanismo.
Cinta C-120
La cinta C-120 es muy fina y se deforma o daña
con facilidad. No se recomienda para su empleo
en este aparato.
Para evitar borrados accidentales [g
Emplee un desternilladoro herramienta puntiaguda
para romper las lengüetas de plástico.
Ranura de detección
féS'Jíf
■«I#
c-nmm^
11
RC'Use [c[|
Cover the tab openings with cellophane tape.
• Take care not to cover the CrOs tape detection
slot when covering the tab openings.
Para volver a grabar [c¡
Cubra los orificios de las lengüetas con cinta
adhesiva.
• Tenga cuidado de no cubrir la ranura de detección
de cintas CrOa cuando tape las aberturas de las
pestañas.
• IBd>'L>ÍÍlR, «iíMSWIBPgBíl#. liát/ffít
31
Page 32

i¡
■.ir' .lt.- j =
Use this function to get a tape of the same
contents as the original tape.
By pressing the SYNCHRO DUBBING button,
both tapes are rewound automatically to the
beginning of the forward side, and then the
recording starts. »'
1
Utilice esta función para obtener una cinta del
mismo contenido que la original.
Al presionar el botón SYNCHRO DUBBING,
ambas cintas se rebobinan automáticamente al
comienzo de la cara de avance, y luego inicia la
grabación.
ft
m
n =
aoi
1
íviüSYNCIlRO nUUBINGftta,
ñ tmmíé»
1
o
TAPE/deck 1/2
For playback
Para reproducción
Start dubbing.
Inicie ia duplicación.
For recording
Para grabación
SYNCHRO DUBBING
NORMAL HIGH
Ò
First the tapes are rewound to the beginning of
their forward sides, and then recording starts,
se rebobinan las cintas al comienzo de sus
caras de avance y luego inicia la grabación.
32
Page 33

IM
I
To stop dubbing
Press the III button.
About same tape side dubbing (STSD)
This feature allows both sides of the dubbed tape
to match those of the original tape.
The reverse side of both tapes will start at the
same time as soon as the longer tape has been
reversed.
® To select dubbing speed
NORMAL: For dubbing at normal speed.
HIGH: For dubbing at high speed.
Notes on dubbing
• During dubbing, only the ■ button operates.
• The same Dolby NR system as used on the
recorded tape is automatically used for the tape
to be recorded on.
• During dubbing, noise may be recorded on the
tape if a TV is on. If that happens, turn off the TV
or move it away from the unit.
• If the leader segment of the tape to be recorded
on is longer than that of the tape to be played
back, recording on the reverse side may stop
midway through the program. In that case, dub
each side manually by following the next pro
cedure.
To dub some part of the original tape manually
Press the RECORD button instead of one of the
SYNCHRO DUBBING buttons. The tapes are not
rewound, and dubbing starts immediately.
• Make sure that “TAPE 1” is displayed. If not,
dubbing will not start.
• Before dubbing, set the tape direction, and set
the reverse mode to the “ ” position.
Tone adjustment during dubbing
• The VOLUME, T-BASS, BBE and GRAPHIC
EQUALIZER buttons do not affect the level of
the recording.
• The output sound tone cannot be changed by
the GRAPHIC EQUALIZER buttons in the middle
of recording.
Para cesar la duplicación
Presione el botón ■ .
Duplicación de la misma cara del casete (STSD)
Esta función le permitirá hacer que ambas caras
del casete duplicado sean idénticas a las del
casete original.
Las cintas de las caras posteriores de ambos
casetes se pondrán en movimiento al mismo
tiempo tan pronto como se haya invertido el
casete de mayor duración.
® Para seleccionar la velocidad de duplicación
NORMAL; Para duplicar a velocidad normal
HIGH: Para duplicar a gran velocidad
Notas sobre la duplicación
• Durante la duplicación solamente funcionará el
botón ■.
• En la cinta duplicada se empleará
automáticamente el mismo sistema de reducción
de ruido Dolby que el utilizado para grabar la
cinta original.
• Durante la duplicación, es posible que se grabe
ruido en la cinta si hay un televisor encendido.
Cuando suceda esto, apague el televisor o
aléjelo de este sistema.
• Si el segmento guía de la cinta que desee
duplicar es más largo que el de la cinta original,
la grabación de la cara posterior puede cesar
antes de que finalice la cinta original. En tal
caso, duplique cada cara manualmente
siguiendo el procedimiento que se da a
continuación.
Para duplicar manualmente alguna parte de la
cinta original
Presione el botón RECORD en vez de unos de los
botones SYNCHRO DUBBING. No se
rebobinan las cintas y la operación de duplicación
empieza inmediatamente.
• Cerciórese de que está visualizado “TAPE 1”.
De no estarlo, no comenzará la duplicación.
• Antes de la duplicación, fije la dirección de la
cinta y el modo de inversión a la posición“ ^ ”,
(STSD)
NORMAL:
HIGH:
• iij
№ B RECORDS » TJ, it S T SYNCHRO
DUBBINGKMo flifTpfiJif, itiftTLlPIIBit&o
• 1”»^, Sli],
• ibiS»2ra,
• VOLUME, T-BASS, BBE W GRAPHIC
EQUALIZER
•iUrt^ipIt^IBGRAPHIC EQUALIZERS®
Ajuste del tono durante la duplicación
• Los botones VOLUME, T-BASS, BBE y
GRAPHIC EQUALIZER no afectan el nivel de la
grabación.
• El tono de sonido de salida no puede cambiarse
mediante los botones GRAPHIC EQUALIZER
durante la grabación.
33
Page 34

^^ДИмЁиН1ш^ШДЦ
шшш
: -..'■л.- •.
MIHÍHíF
34
Page 35

Select the DOLBY NR type.
Seleccione el sistema de reducción
de ruido Dolby.
ìlÌfDOLBY
DOLBY NR
Select the recording direction.
Seleccione la dirección de
grabación.
PLAY/direction
I .
STOP
■ I
(!)
Press once or twice.
Presione una o dos veces.
After play is completed
The compact disc stops, but Deck 2 is stili in the
recording mode. Press the STOP button to stop it.
To stop recording
Press the ■ button. The playback of the compact
disc stops simultaneously.
Después de terminar la reproducción
El disco compacto cesa, pero el Deck 2 permanece
en el modo de grabación. Presione el botón STOP
para detenerlo.
Para cesar la grabación
Presione el botón ■ . La reproducción del disco
compacto cesa simultáneamente.
8
RECORD
*IÍP§fr#±, №« 2
KSSTOPÍÍLT1g3f#jt„
35
Page 36

AUTO-EDIT RECORDING GRABACIÓN CON EDICIÓN AUTOMÁTICA
By inputting the iength of the tape, the tracks Registrando la duración de la cinta, las canciones SÁíáifrít'jjRljE,
which can be recorded are selected in the same que pueden grabarse se seleccionan en el mismo
order as they are in the CD. orden que están en el disco compacto.
2
1
üíí:Jt®»Ji'ñfí-
36
Page 37

1
Put the side to be recorded on first facing you.
Ponga la cara a grabarse primero enfrentada
hacia usted.
W-SDf lè]/a!o
Designate the tape length. Designe la duración de la cinta.
(Remote control only)
(Sólo el control remoto)
The tracks are selected automatically.
Las canciones se seleccionarán y
programarán automáticamente.
lülSgiljiKTÍlIfo
2 I: 3 H
Lll 5
t 5
s
AUTO-
■ EDIT
tr
Press once.
Presione una vez.
-ik
1 i r.iii
TU 3sii ” J.Wi l«hl Z) jJ EDIT
[■ss B :
r n *
start recording.
Inicie la grabación.
® Set the Dolby NR type and the reverse mode.
Seleccione el sistema de reducción de ruido
Dolby y el modo de inversión.
^^Doiby
RECORD
First the tape is rewound to the beginning of the
4
forward side, and then recording starts.
Se rebobina la cinta hasta el comienzo de la cara
de avance y luego inicia la grabación.
4
8
To check the editing contents on side B
Press the DISPLAY button.
To cancel the editing contents
Press the ■ button or the OPEN/CLOSE button.
Note on CD edit function
Use a compact disc which includes up to 20 tracks.
Up to 12 tracks can be programmed for recording
each side.
Para comprobar las canciones a ser editadas en la cara B
Presione el botón DISPLAY.
Para cancelar las canciones a ser editadas
Presione el botón ■ o el botón OPEN/CLOSE
botón.
Nota sobre la función de edición del disco
compacto
Utilice un disco compacto que contiene 20
canciones. Podrán programarse hasta 12
canciones para la grabación de cada cara.
«SDISPLAYISfiio
S®HSffi®OPEN/CLOSE®í
i8:fóCDil№:«№
ffi 0 WSItPifro
37
Page 38

DICIÓN DE DISCOS COMPACTO!
PROGRAMMED EDIT RECORDING GRABACIÓN CON EDICIÓN PROGRAMADA
' When inputting the iength of the tape, any extra tracks you desire can be dubbed after
^ checking the remaining amount of time on the tape side, r : ' <,
I
j Cuando introduzca ia duración de la cinta, used podrá duplicar las canciones extra que
i desee después de haber comprobado el tiempo restante de una cara del casete.
8
3
6
2
1
4,5
If the total time of the selected tracks exceeds the tape length
The mark is displayed instead of the track
number and the track is cancelled.
To check the program
In the stop mode, press the DISPLAY button.
Each time it is pressed, the contents of each side
are displayed in turn.
Remaining time on the tape
-[Üjt'lJ ®
T,
Jjcii gy
Total number of tracks
2
5 6
38
To Change a program
First press the ■ STOP button to cancel the pro
gram, then reprogram the tracks.
Time on cassette tapes
Cassette tapes generally have a bit more tape than
the time indicated on their labels. When you des
ignate the nominal tape length in step 4, you should
have a little unrecorded tape at the end.
- Track numbers
Si el tiempo total de las canciones seleccionadas excede la duración de la cinta
Se visualiza la marca en vez del número de la
canción y se cancela la canción.
Para comprobar el programa
En el modo de parada, presione el botón DISPLAY.
Cada vez que presione este botón, se visualiza
alternadamente las canciones de cada cara.
ilfi ’
QjS
. Cara A
2 .
• ; .
: I ml iiiillll
Tiempo remanente en la cinta
-iL
- T,
!_ J .'
Número total de canciones
H'l U
Page 39

Designate the tape length.
Designe la duración de la cinta.
(Remote control only)
(Sólo el control remoto)
(ÍI[!JIÍ«)ÉÍÍ;I5)
o
EDIT-
-PRGM
Press once.
Presione una vez.
e.g.) C-46 tape
ejemplo) Cinta C-46
m)
c-4
Tape length of side A
Duración de la cinta de la cara A.
mi mini
DISPLAY
-¿3:SÜ
JL'
mi iiilllll
Í-QÜ O
T;
**EDIT
Select the tracks for
side B.
Seleccione las
canciones deseadas
para la cara B.
■Tk-SS
start recording
8
Inicie la grabación.
© Set the Dolby NR type and the reverse
mode.
Seleccione el sistema de reducción de ruido
Dolby y el modo de inversión.
SSDolby
RECORD
First the tape is rewound to the beginning of
the forward side, and then recording starts.
Se rebobina la cinta hasta el comienzo del
lado de avance y luego inicia la grabación.
íi‘5E,
'S't
Para cambiar un programa
En primer lugar, presione el botón ■ STOP para
cancelar el programa, luego vuelva a programar
las canciones.
Duracirín de la cinta de los cassettes
La cinta de los cassettes normalmente dura algo
más que el tiempo inideado en sus etiquetas.
Cuando designe la duración nominal de la cinta en
el paso 4, le quedará cierta cinta sin grabar al final.
-Números de canciones
SíSiSffl a B#
líWÍL-n^m. fSEDISPLAYSffl,
BltkfíSM#, fiiJíRil;il©Sffi6l)|Ai^o
I r^-
: ir,Si
4 = , = ¿ o
rJiíM.
isTopféiñWMJRfáWo rm
féTl
1« a Silfio
AB
¿i
V
---
-EffiBftSS
39
Page 40

Preparation Preparativos
Make sure the clock is set correctly. (See pages 12 Cerciórese de que el reloj esté en hora. (Consulte • WltíStfi']íH!FSiMSfijK'iEí'^(#M12ílll3H)
and 13.) las páginas 12 y 13.)
2,4
1
3,5
8
6
—6
^7
40
Page 41

Page 42

Get ready for the source. Prepare la fuente.
Listening to a disc
Escucha de un disco
® Load a disc onto the disc tray.
Coioque un disco en ei receptor de disco.
@ Press the CD function button.
Presione ei botón de función CD.
«BCDíÜSgííffio
o
Listening to the radio
©
Escucha de la radio
Recording from the radio
©
Grabación de la radio
REC
Listening to a tape
Escucha de una cinta
® Insert a cassette tape into deck 1 or deck 2.
Inserte un casete en el deck 1 o el 2.
1 2 o
@ Set the Dolby NR and the reverse mode.
Seleccione el sistema de reducción de ruido
Doiby y el modo de inversión.
^SDolby
) Press the TAPE function button.
Presione el botón de función TAPE.
SSTAPEííltgfíMo
® To record from the radio, insert a cassette into
deck 2. Set the Doiby NR and the reverse
mode.
Para grabar de ia radio, inserte un cassette en
el deck 2. Fije el Dolby NR y el modo de
inversión.
o
O ^
) Tune in to a station.
Sintonice una emisora.
íAth'S'Éfo
PRESET
DOWN UP
TUNING
or
0
<M
i>i>
6
42
Page 43

After setting the timer
Turn the system power off. If the power is on, the
timer will not work at the preset time.
When the on-time is reached
“SLEEP” appears in the display and the sleep timer
starts to work.
The power is turned off automatically in 120 min
utes.
To change the time
After setting has been completed, reset the time.
To check the timer-on time
Press the STANDBY button once.
To cancei the timer standby mode
Once the timer is set, it activates every day.
To cancel it temporarily, press the STANDBY
button so that the © (REC) indicator disappears.
To restore the cancelled timer function, press the
STANDBY button so that the © (REC) indicator is
displayed.
Notes
• When the timer is worked, the FM mode, stereo
or monaural, is selected according to the preset
condition.
• The timer does not work if the © (REC) indicator
is not displayed. If the on-time is reached while
the power is turned on, the timer cannot work.
• The timer-on time cannot be set while the ©
(REC) indicator is displayed, or during record
ing.
Después del ajuste del temporizador
Desconecte la alimentación del sistema. Si la
alimentación está conectada, el temporizador no
trabajará a la hora ajustada.
Cuando llega la hora ajustada
Aparece “SLEEP” en el visualizadory accionará el
cronodesconectador a la hora establecida. Se
desconecta automáticamente la alimentación en
120 minutos.
Para cambiar la hora
Después de terminar el ajuste, reponga la hora.
Para comprobar la hora ajustada
Presione una vez el botón STANDBY.
ftéx#o mm^íímímzñmmmo
Para cancelar el modo de espera del temporizador
Una vez ajustado el temporizador, éste acciona
cada dfa a la hora señalada. Para cancelarlo
temporalmente, presione el botón STANDBY de
manera que desaparezca el indicador © (REC).
Para restablecer la función del temporizador
cancelado, presione el botón STANDBY de manera
que se visualice el indicador © (REC).
Notas
• Al trabajar el temporizador, el modo FM, estéreo
o monoaural, se selecciona según la condición
preestablecida.
• El temporizador no trabajará si no está visualizado
el indicador © (REC). Si llega la hora ajustada
cuando está conectada la alimentación, no podrá
trabajar el temporizador.
• El temporizador no podrá ajustarse cuando el
indicador © (REC) está visualizado o durante la
grabación.
fgSTANDBYSffi, Hitt
©(REC)MltíÍ^o
ststandby
Bife©(REO
IÎ
• (aanüJifcSiiijFM/AMi^a;,
«SSTANDBYfíffi-fiCo
• ^ © (REOMîîXil^ffiJK, Æ№fl|iJXX№o
süfsiiijx#
X№o
•lf©(REC)SiílSXli#^#4»^B#, Xigmí
43
Page 44

When the sleep function is used, the power
automatically turns off at the specified time be
tween 120 and 10 minutes.
• Empleando la función de cronodesconexión, la fÉHJBillKífjHÉSHíiSflfÍP, '§'jVfoxSEli#lul^íS>
alimentación del sistema se desconectará ;gio~]20í>S¿PHT^íSfÍÉI
automáticamente después del tiempo
especificado entre 120 y 10 minutos.
To change the time
Press the SLEEP button repeatedly until the de
sired time is displayed.
To cancel the sleep-timer function
Press the SLEEP button repeatedly until the
“SLEEP” indicator goes out.
When the SLEEP button is pressed while the
power is off
The power is turned on and the sleep timer starts
to work.
If the program source is changed while the sleep timer is working
The sleep timer is still in effect as long as the
“SLEEP” indicator is displayed.
44
-------
►
120
i k
Para cambiar el tiempo
Presione el botón SLEEP hasta que se visualice ei
tiempo deseado.
Para cancelar la función de cronodesconexión
Presione el botón SLEEP hasta que desaparezca
el indicador “SLEEP”.
Cuando el botón SLEEP está presionado con la alimentación desconectada
Se conecta la alimentación y acciona el
cronodesconectador.
Si se cambia la fuente del programa durante el trabajo del cronodesconectador
El cronodesconectador permanece activo mientras
el indicador “SLEEP” se encuentre visualizado.
110
20
-------
►! 10
±o
a»SSLEEPÍ$ffl, ¡iJiJ “SLEEP ” 1fig
egíMWÍÍB#SIESLEEP®Íl
HM“SLEEP”fgzRSftÍÍS^,
Released
Page 45

Refer to page 8 for connection.
Consulte la página 8 para la conexión.
L
s ño
1
1
1
o
VIDEO/AUX
To adjust the input level of the equipment
connected to the VIDEO/AUX jacks
1 Press the VIDEO/AUX function button and play
the equipment.
2 Turn: the VIDEO/AUX INPUT LEVEL knob on
the rear panel until the level of the sound being
heard becomes the same as that of the other
sound sources.
To record from the other sources
1 Insert a cassette into deck 2.
Set the reverse mode, tape direction and Dolby
NR.
2 Press the VIDEO/AUX function button and play
the erquipment.
3 Press the RECORD button.
2 PIsy the external source.
Funciona la fuente externa.
Para ajustar el nivel de entrada del equipo
conectado a las tomas VIDEO/AUX.
1 Presione el botón de función VIDEO/AUX y
opere el equipo.
2 Gire laperilla VIDEO/AUX INPUT LEVELsituada
en el tablero trasero hasta que el nivel del
sonido llegue al mismo nivel del sonido de las
otras fuentes sonoras.
Para grabar de las otras fuentes
1 Inserte un cassette en el deck 2.
Fije el modo de inversión, el sentido de la cinta
y Dolby NR.
2 Presione el botón de función VIDEO/AUX y
opere el equipo.
3 Presione el botón RECORD.
PSHVIDEO/AUXÍÍíL5ÍléÉlt**«Élf)ÍIÁl¥
1 ÍÍSVIDEO/AUX ÍÜSgSiS,
2 ígflí*ffiífiJi6^VIDE0/AUX INPUT LEV-
ELjgffi,
1 2 „
2 KsviDEo/Auxi/jt^m mmmo
3 ÍÍBRECORDÍÍffio
45
Page 46

MICROPHONE MIXING (KARAOKE)
MEZCLA CON MICRÓFONO (KARAOKE)
1
Miniplug (3.5 0)
Miniclavija (3.5 mm de diá.)
asssi(3.5s5)
Adjust the volume and tone.
Ajuste el volumen y el tono.
See pages 14 and 15.
Consulte las páginas 14 y 15.
Select the source to be mixed and play it.
Seleccione la fuente con la que desee realizar la mezcla, y
póngala en reproducción.
0
TAPE/deok mí.
0
TUNER/band
0
VIDEO/AUX
0
CD
6
Adjust the microphone volume.
Ajuste el volumen del micrófono.
MIXING PLAY
MIN‘
• MAX
46
Page 47

To enjoy karaoke with an ordinary compact Para disfrutar dei Karaoke con un disco disc compacto ordinario
Before playing
Antes de la reproducción
Notes on the VOCAL FADER
This function does not work correctly with the
following CDs:
• Those with a monaural recording
" Those recorded with strong echoes
" Those with the vocal part recorded on the right
or left side of the sound width
Toechothesound (NSX-330HEand NSX-A92HE only)
Slide the ECHO LEVEL lever toward MAX to
increase the echo.
Notes
" If a microphone is set too near the speaker, a
howling may be produced. In this case, keep the
microphone away from the speaker, or decrease
the sound level.
'» When not using the microphone, set the MIX
ING PLAY control to MIN and remove the micro
phone from the MIC jack.
KARAOKE
VOCAL 1 ADI..n
«• Do not set the microphone volume too high, by
observing the spectrum analyzer indication.
« For microphone mixing, it is recommended to
use a unidirectional type microphone to prevent
howling.
" The mixed sound cannot be recorded.
Press the VOCAL FADER button to make the singer’s voice softer than the accompaniment.
Presione el botón VOCAL FADER para hacer que la voz del cantante sea más suave que el
acompañamiento musical.
VOCAL FADE.R ííSt,
Notas sobre la función de VOCAL FADER
Esta función no opera correctamente con los
siguientes discos compactos:
• Los discos grabados en monoaural
• Los discos grabados con fuertes ecos
• Los discos con la parte vocal grabada en el lado
derecho e izquierdo de la anchura sonora.
Para añadir efecto de eco al sonido (Sólo NSX330HE y NSX-A92HE)
Deslice la palanca ECHO LEVEL hacia la posición
MAX para aumentar el eco.
Notas
• Si el micrófono está demasiado cerca de un
altavoz, es posible que se produzca aullido. En
este caso, aleje el micrófono del altavoz o
disminuya el nivel del sonido.
• Cuando no vaya a emplear el micrófono, ponga
el control MIXING PLAY en MIN y extráigalo de
la toma MIC.
• No ajuste el nivel del micrófono demasiado alto
obsen/ando la indicación del analizador de
espectro.
• Para la mezcla con micrófono, se recomienda
emplear un micrófono unidireccional a fin de
evitar el aullido.
• No puede grabarse el sonido mezclado.
fS^^;I#(1IPSfôNSX-330HEjSNSX-A92HE)
»ECHO LEVELífSfrfnMAXitiJ;, Ljlffiit
Q
• ibh»
»MIXING PLAYWfJMIN,
3ÉíE»s;afÉ3Mic»Lñiixaio
El,i!í«n4aiíS„
47
Page 48

To clean the cabinet
Use a soft cloth lightly moistened with mild deter
gent solution. Do not use strong solvents, such as
alcohol, benzine or thinner.
Regular deck cleaning ®
Clean the (recording/) playback head ®, erasure
head ® (deck-2 only), pinch rollers ©, and cap
stans @ regularly (every 10 hours of use) for
optimum sound quality. Use a cotton swab ®
lightly moistened with cleaning fluid or denatured
alcohol.
To clean discs ®
Before playing, wipe the disc from the center out
with the cleaning cloth. After playing, store the disc
in its case.
Para limpiar el exterior
Emplee un paño suave un poco humedecido en
solución de detergente poco concentrado. No
emplee solventes fuertes, como por ejemplo el
alcohol, bencina ni disolvente.
Limpieza regular del deck ®
Para obtener sonido de óptima calidad, limpie la
cabeza de (grabación/) reproducción ®, cabezas
de borrado ® (deck 2 solamente), los rodillos de
presión ©, y los ejes de arrastre @con regularidad
(cada 10 horas de utilización). Emplee un palillo
de algodón ® ligeramente humedecido en liquido
limpiador o en alcohol desnaturalizado.
ífftm
Para limpiar discos ®
Antes de la reproducción, frote el disco desde el
centro hacia afuera con el paño de limpieza.
Después de la reproducción guarde el disco en su
caja.
48
Page 49

<FM section>
Frequency range
Usable sensitivity (iHF)
Alternate channel selectivity
Signal-to-noise ratio
Harmonic distortion
Frequency response
Stereo separation
Antenna
<AIVI (MW) section>
Frequency range
Usable sensitivity
Selectivity
Signai-to-noise ratio 53dB(100 dB input)
Antenna
<LW section>(E and К modeis oniy)
Frequency range
Sensitivity
Antenna
87.5 MHz to 108 MHz
1.3|iV(75 ohms) 13.2 dBf
50 dB (±400 kHz)
70 dB (STEREO), 76 dB (MONO)
0.3 % (MONO), 1 kHz
0.5 % (STEREO, L-R), 1 kHz
30 Hz to 15 kHz (±0.5 dB, - 3 dB)
33 dB at 1 kHz
75 ohms (unbalanced)
NSX-330HE, E, K, NSX-A92HE:
AM 531 (530) kHz to 1,602 (1,710)
kHz
NSX-330LH, U, C, NSX-332U:
AM 530 (531) kHzto 1,710 (1,602)
kHz
350 |j,V/m
22 dB (9 kHz) 20 mm ('Yi6 in.) ceramic type super
Loop antenna
144 kHz to 290 kHz
1,400 pV/m
Loop antenna
<CD player sectlon>
Disc
Scanning method
Laser
Rotation speed
Error correction
No. of channeis
D-A conversion
Wow/flutter
Signal-to-noise ratio
Harmonic distortion
<Speaker SX-N330>
Cabinet type
Speaker
Impedance
Music power
Output sound pressure level
Dimensions (W x H x D)
Weight
Compact disc
Non contact optical scanner (semi
conductor laser application)
Semiconductor laser (A, = 780 nm)
Approx. 500 rpm - 200 rpm (CLV)
Cross Interleave, Reed Solomon
code
2 channels
16-bit linear
Unmeasurable
90 dB (1 kHz, 0 dB)
0.05% (1 kHz, 0 dB)
3 way, bass reflex (Magnetism sealed
type)
130 mm (5Vs in.) cone type woofer
50 mm (2 in.) cone type tweeter
tweeter
6 ohms
40 W
87 dB/W/m
180x302.5x200 mm
(7Va X 12 X 7Vs in.)
2.6 kg (5.7 lbs.)
<Timer section>
Program timer
Sieep timer
<Ampiifier section>
Power output
Harmonic distortion
Input sensitivity
<Cassette deck section>
Track format
Frequency response
Signal-to-noise ratio
Tape speed
Recording system
Erasure system
Motor
Heads
On-timer, capable of free setting
Capable of setting in 10-minute
increments, 120 minutes maximum
NSX-330LH, HE, NSX-A92HE:40W
± 40W (6 ohms, T.H.D. 10% 1 kHz)
NSX-330E: 30W ± 30W (6 ohms.
T.H.D. 1% 1kHz)
NSX-330K: 40W ± 40W (6 ohms,
T.H.D. 10% 1kHz)
30W ± 30W (6 ohms, T.H.D. 1% 1
kHz)
FTC RULE (NSX-330U, C,
NSX-332U)
30 watts per channel, Min.
RMS at 6 ohms, from 65 Hz to 15
kHz, with no more than 1%
Total Harmonic Distortion
0.05% (15 W, 1 kHz, 6 ohms)
VIDEO/AUX: 150 mV (adjustable)
4 tracks, 2 channels
CrOztape: 50-16,000 Hz
Normal tape: 50 - 15,000 Hz
60 dB (DOLBY NR ON, CrOz tape
peak level)
4,8 cm/sec. (1 Ve ips)
AC bias
AC erase
DC servomotor x 1
Playback head x 1 (deck 1)
Recording/playback/erasure head x
1 (deck 2)
<General>
Power requirements
Power consumption
Dimensions (W x H x D)
Weight
Accessories
• Specifications and external appearance are subject to change without
notice due to product improvement.
• Dolby noise reduction manufactured under license from Dolby Laborato-
ries Licensing Corporation.
“DOLBY” and the double-D symbol OD are trademarks of Dolby Labora-
tories Licensing Corporation.
• The word “BBE” and the “BBE symbol” are trademarks of BBE Sound, Inc.
Under license from BBE sound, Inc.
Note
Please check the laws on copyright relating to recordings from discs, radio
or external tape for the country in which the machine is being used.
NSX-330LH, HE, NSX-A92HE:
AC 120 V/220 V/240 V, switchable
50/60 Hz
NSX-330U, C, NSX-332U:
AC 120 V/220 V - 240 V, switchable
50/60 Hz
NSX-330E: AC 230 V, 50 Hz
NSX-330K: AC 240 V, 50 Hz
NSX-330LH, HE, NSX-A92: 85 W
NSX-330/332U: SOW
NSX-330E, K: 21OW
NSX-330C: 100W
Center unit:
260 X 302.5 X 329.5 mm
(1074x 12x 13 in.)
System-
620 X 302.5 x 329.5 mm
(2472x12x13 in)
Center unit: 7.2 kg (15.8 lbs.)
System: 12.4 kg (27.3 lbs.)
FM feeder antenna (1)
AM loop antenna (1)
Remote control (1)
49
Page 50

-ESHOOTING GUIO
If the unit fails to perform as it is supposed to, by following this operation manual, please check it carefully in accordance with the chart below:
Symptom
There is no sound.
There is no sound and no
indicators are lit in the display
window.
Sound comes from only one
speaker.
There is constant, wavelike static.
There is noise.
¡
The sound is distorted.
The tape does not run.
The sound is off-balance.
High sounds are too loud.
There are no high sounds.
o
Recording is impossible.
Erasure is impossible.
m
It does not play.
iiiiii
1
■5.
□
Ü
The output sound is not stereo.
Causes Solutions
• The power cord is not connected properly. • Correct the connection.
• An incorrect function selector button Is pressed.
• There is a bad connection between systems. • Correct the connection.
• Excessive voltage was applied to a speaker jack,
which tripped the amplifier’s voltage-protection
breaker.
• There is a short circuit in the speaker jack.
• The breaker tripped because of connection to a low-
impedance speaker.
• One speaker is disconnected. • Correct the speaker connection.
• The antenna is not connected properly.
• The receiver is not correctly tuned.
• The signal is too weak.
• The system picks up outside noise.
• There is multipath distortion.
• Deck 2 is on pause.
• The playback head is dirty.
• The DOLBY NR mode is set differently from when
the recording was done.
• A non-Dolby NR tape is being played back in that
mode.
• The playback head is dirty.
• The erasure-prevention tab on the tape has been
broken.
• There is an incorrect connection.
• The recording head is dirty.
• The erasure head is dirty.
• The disc is incorrectly inserted.
♦ The disc is dirty.
• There is condensation on the disc.
• The player is on pause.
• The VOCAL FADER is turned on.
• Press the function selector button to select the
correct input.
• Disconnect the power cord, correct the condition,
including speaker connections, and connect the
power cord again.
• Disconnect the power cord, correct the condition,
including speaker connections, and connect the
power cord again.
• Check the antenna connection.
• Correct the tuning.
• Install an outside antenna.
• Change the location or direction of the antenna.
• Turn the system to a different orientation.
• Move the system away from other electrical
appliances, like a TV or fluorescent lights, or move
the appliances.
• Change the orientation of the antenna.
• Replace the antenna with one that has the correct
orientation.
• Press II and release pause.
• Clean the head.
• Reset DOLBY NR to the same setting as when the
recording was made.
• Turn off DOLBY NR.
• Clean the head.
• Cover the erasure-prevention hole well with tape.
• Correct the connection.
• Clean the head.
• Clean the erasure head.
• insert the disc with the label facing up.
• Clean the disc.
• Wait about an hour and try again.
• Press II PAUSE to release pause.
• Turn off the VOCAL FADER.
50
Page 51

<Sección de FM>
Gama de frecuencia 87,5 MHz a 108 MHz
Sensibilidad útil (IHF) 1,3 |iV (75 ohmios) 13,2 dBf
Sensibilidad de canal alternativo
50 dB (±400 kHz)
Relación señal-ruido
Distorsión armónica
Respuesta de frecuencia
Separación entre canales
Antena
<Sección de AM (MW)>
Sensibilidad útil
Selectividad
Relación señal-ruido
Antena
<Sección de LW> (Sólo los modelos E y K)
Gama de frecuencia 144 kHz a 290 kHz
Sensibilidad 1.400 qV/m
Antena De cuadro
<Sección del temporizador>
Temporizador programableTemporizador activado, capaz ajustarse
Cronodesconectador Capaz de programarse en incrementos de
■ 10 minutos hasta un máximo de 120 minutos.
<Sección del amplificador>
Salida de potencia NSX-330LH, HE, NSX-A92HE:
Distorsión armónica
Sensibilidad de entrada
<Sección del deck de casetes estéreo
Formato de pistas
Respuesta de frecuencia
Relación señal-ruido
Velocidad de la cinta
Sistema de grabación
Sistema de borrado
IVIotor
Cabezas
70 dB (STEREO), 76 dB (MONO)
0,3% (MONO) 1 kHz
0,5% (STEREO, L-R), 1 kHz
30 Hz a 15 kHz (+0,5 dB, - 3 dB)
33 dB a 1 kHz
75 ohmios (desequilibrada)
NSX-330HE, E, K, NSX-A92HE:
AM 531 (530) kHz a 1.602
(1.710) kHz
NSX-330LH, U, C, NSX-332U:
AM 530 (531) kHz a 1.710 (1.602) kHz
350 q,V/m
22 dB (9 kHz)
53 dB (entrada de 100 dB)
De cuadro
libremente
40W + 40W (6 ohmios, 10% de
distorsión armónica total, 1 kHz)
NSX-330E: 30W + 30W (6 ohmios, 1% de
distorsión armónica, 1 kHz)
NSX-330K: 40W + 40W (6 ohmios, 10% de
distorsión armónica, 1 kHz)
30W + 30W (6 ohmios, 1 % de distorsión
armónica, 1 kHz)
Norma de ia FTC (NSX-330U, C, NSX-332U)
30 vatios por canal, min., eficaces con no
más del 1 % de distorsión armónica total
0,05% (15 W, 1 kHz, 6 ohmios)
VIDEO/AUX: 150 mV (ajustable)
4 pilas, 2 canales
Cinta de CrOa: 50 a 16.000 Hz
Cinta de normal: 50 a 15.000 Hz
60 dB (DOLBY NR ON, cinta de CrOa, nivel
de pico)
4,8 cm/seg.
Polarización de CA
Con CA
Servomotor de CC x 1
De reproducción x 1 (deck 1)
De grabación/reproducción/borrado x 1
(deck 2)
<Sección del reproductor
Disco
Método de muestreo
Láser
Velocidad de rotación
Corrección de errores
No. de canales
Conversión D-A
Fluctuación y trémolo
Relación señal-ruido
Distorsión armónica
<Altavoces SX-N330>
Tipo de la caja acústica
Altavoces
Impedancia
Potencia musical
Nivel de presión acústica de salida
Dimensiones (an/al/prf)
Peso
<Sección común>
Alimentación
Consumo de potencia
Dimensiones (an/al/prf)
Peso
Accesorios
• Las especificaciones y el aspecto externo están sujetos a cambio sin
previo aviso, debido a mejoras del producto.
• Reducción de ruido Dolby fabricado bajo licencia de Dolby Laboratories
Licensing Corporation. Dolby y el símbolo de la D doble DO son marcas
de Dolby Laboratories Licensing Corporation.
• La palabra “BBE” y el “símbolo BBE” son marcas comerciales de BBE
Sound, Inc.
Nota
Compruebe, por favor, las leyes relativas a la grabación de discos, la radio,
o casetes del país en el que vaya a emplear el sistema.
de discos compactos>
Compacto
Explorador óptico sin contacto
(aplicación de láser de semiconductor)
Láser de semiconductor {X = 780 nm)
Aprox. 500 rpm - 200 rpm (CLV)
Intercalación cruzada, código Reed Solomon
2
Lineal de 16 bitios
Inmensurable
90 dB (1 kHz, 0 dB)
0,05% (1 kHz, 0 dB)
De 3 vías, reflectora de graves
(tipo hermético al magnetismo)
De graves tipo cono de 130 mm
De agudos tipo cono de 50 mm
De super agudos tipo cerámico de 20 mm
6 ohmios
40 W
87 dB/W/m
180 X 302,5 X 200 mm
2,6 kg
NSX-330LH, HE, NSX-A92HE: 120/220/
240V CA, conmutable, 50/60 Hz
NSX-330U, C, NSX-332U:
120/220 - 240V CA, conmutable, 50/60 Hz
NSX-330E: 230V CA, 50 Hz
NSX-330K: 240V CA, 50 Hz
NSX-330LH, HE, NSX-A92: 85 W
NSX-330/332U: 80W
NSX-330E, K: 21OW
NSX-330C: 100W
Unidad central:
260 X 302,5 X 329,5 mm
Sistema:
620 X 302,5 X 329,5 mm
Unidad central: 7,2 kg
Sistema: 12,4 kg
Antena interior de FM (1)
Antena de cuadro de AM (1 )
Control remoto (1 )
51
Page 52

Si el sistema no funciona como se supone que tendría que hacerlo siguiendo las instrucciones de manejo, compruébelo cuidadosamente de acuerdo con la
tabla siguiente:
Síntoma
j No hay sonido.
No hay sonido y no se encienden
indicadores en el receptor estéreo.
Solamente se oye sonido a través
de un altavoz.
Solamente se oyen estáticos.
Se produce ruido.
El sonido está distorsionado. • Se está produciendo distorsión por trayectoria
La cinta no se mueve. • El deck 2 se encuentra en pausa.
El sonido está desequilibrado. • La cabeza está sucia.
Los sonidos de alta frecuencia son
demasiado fuertes.
No hay sonidos de alta frecuencia.
No es posible grabar.
No es posible borrar. • La cabeza de borrado está sucia.
No es posible reproducir.
l]
El sonido de salida no es estéreo
• El cable de alimentación no está adecuadamente
conectado.
• Ha presionado un botón selector de función
incorrecto.
• Las conexiones entre los componentes del sistema
no son correctas.
• Se ha aplicado una tensión excesiva a los terminales
del altavoz, y se ha disparado el disyuntor de
protección contra sobretensión del amplificador.
• En los terminales del altavoz se ha producido un
cortocircuito.
• El disyuntor se disparó debido a la conexión de un
altavoz de baja impedancia.
• El otro altavoz está desconectado.
• La antena no está correctamente conectada.
• El receptor no está correctamente sintonizado.
• La señal es demasiado débil.
• El sistema está captando ruido exterior.
múltiple.
• El modo DOLBY NR no es el mismo que el empleado
cuando se grabó la cinta.
• Está tratando de repropducir una cinta grabada sin
el sistema de reducción de ruido Dolby con tal
sistema.
• La cabeza está sucia.
• El casete carece de lengüeta de seguridad.
• Las conexiones no son correctas.
• La cabeza está sucia. • Limpíela adecuadamente.
• El disco no está correctamente insertado.
• El disco está sucio.
• Se ha condensado humedad en el disco.
• El reproductor se encuentra en el modo de pausa.
• EL VOCAL FADER está conectado.
Causas
Soluciones
• Corrija la conexión.
• Presione el botón selector de función correspondiente
a la entrada.
• Corrija las conexiones.
• Desconecte la alimentación y solucione el problema,
incluyendo las conexiones de los altavoces, y vuelva
a conectar el cable de alimentación.
• Desconecte la alimentación y solucione el problema,
incluyendo las conexiones de los altavoces, y vuelva
a conectar el cable de alimentación.
• Conecte correctamente los altavoces.
• Compruebe la conexión de la antena.
• Sintonice correctamente.
• Instale una antena exterior.
• Cambie la ubicación de la antena.
• Oriente el receptor en un sentido diferente.
• Aleje el sistema de aparatos eléctricos, tales como un
televisor, lámparas fluorescentes, o electrodomésticos.
• Cambie la orientación de la antena.
• Reemplace la antena por otra que posea la orientación
correcta.
• Presione II para desactivar el modo de pausa.
• Limpíela.
• Ponga DOLBY NR en la misma posición que la
empleada cuando grabó la cinta.
• Ponga DOLBY NR en OFF.
• Limpíela.
• Cubra el orificio con cinta plástica.
• Corríjalas.
• Limpíela.
• Insértelo con la cara de la etiqueta hacia arriba.
• Limpíelo.
• Espere aproximadamente una hora y vuelva a
intentarlo.
• Presione!! PAUSEparadesactivarelmododepausa.
♦ Desconecte el VOCAL FADER.
52
Page 53

<FMM*gß-i9->
m m ш m
87.5MHz~108MHz «i il
WfflBÄJS(IHF) 1.3даУ(750) 13.2dBf
50dB ( +400kHz)
If / « it
Ü Ä ífe Ä
70dB (З .Ш Ш ) . 76dB (¥.#)
0.3%(Ж»), ШкНгР#
0.5% (ittiS, L~ R), ЙЯкНгВ#
m m m m
30Hz~15kHz
( + 0.5dB, -3dB) ;1 Ш *■
33dB, IfilkHzB#
^ m
75Q (т ш ш )
<АМ(МУУ)ИЯ®'й->
Ш Щ m m
NSX-330HE,E,K,NSX-A92HE ' я
AM531 (530) kHz ~ 1,602 ( 1.710) kHz
NSX-330LH,U,C, NSX-332U:
AM5301531) kHz'-1.710 a, 602) kHz
350д V/m
Ш m &
m / « it
эе ш
22dB (9kHz)
53dB (lOOdB liA)
Ш В Ж Ш
<LW*;Æ®«-> («®ЙгЕ»К«а)
« » il6 H
m Ш &
^ Ш
и a s
144kHz~290kHz
l,400/iV/m
Ш Ш Х Ш
ttltjjtlf SSSæ
eaftëwg ®100ШМР1, йА12о^а
sa ♦ fi Ш
NSX-330LH, НЕ, NSX-A92HE.
40W+40W
(6ü ,T.H.D10%,lkHz)
NSX-330E:30W +30W
(6Q,T.H.Dl%,lkHz)
NSX-330K:40W +40W
(6Q ,T.H.D10%,lkHz)
30W+30W (6 Q , T. H. Dl%. IkHz)
FTC RULE(fSPBféNSX-330U,C.
NSX-332U)
4 Ш «1, 2*а V ] m Щ ж
m m m
« АШЬШ# : 50-16.000HZ
: 50-15.000Hz кШЙ. 50/60HZ
60dB(ÍTMDOLBY NR.
m / m
it
i&ff, *Я«¥И±)
Ш $
JS
45îj-'4.8cm
» ® * ACiiÄ
АСШ^
s
m
я Ш ît Ш :ш т ш ш (® ji^jftsit«)
9 ш
Ël îl S
fa®.iJix 1
ш
Й#в®х 1 (й#«1)
m
»/Ш / Ш ^ Ш я М . X1 (д1Ш2) NSX-330E, K:210W
ш 'J'S«SÍ (gXÄXgg) 260X302.5X329.5mm
4^)##iÄW(4=780nm)
Й500грт~ 200rpm (CLV)
ш
(CLV*®Ä)S)
PÍÍT»ffi, Р Ш П Ш
» Ä ш
2 Ш Ш
lefiÆig#
B т TfltBlite
ft / 1* it
S ® Ä к
® ffi a
« 5А
90dB(lkHz,0dB)
0.05%(lkHz,0dB)
SX-N330>
3sa, fSiíRiís
st
Ш Ш : 130ттШШа
йЖ : SOmmlilfSSä
Ш Ш Ш : 20mmPtlSS
5 Q
Pi
Ш m ^
ш
40W
т
87dB/W/m
я
ш ш
180 X 302.5 X 200mm
2.6kg
<*isia!-&>
NSX-330LH. НЕ. NSX-A92HE:
120V/220V/240V АС.
NSX-330U, С. NSX-332U:
АС lOOV/OOGV-OdOV АС,
кТЯЙ, 50/6ÛHZ
NSX-330E:AC230V,50Hz
NSX-330K;AC240V,50Hz
& m in n
NSX'330LH, НЕ, NSX-A92:85W
NSX-330/332 U:80W
NSX-3.30C:inOW
tJfeKS :
Ш :
620X302 5X329.5mm
ж ft
dHfcSS : 7.2kg
Ж Ш : 12.4kg
le #
FM«€A*8 (1)
А Ъ т Ш Х Ш (1)
Ш Ш Ш - (1)
• +*»tsi»Ä5i-asöcÄeÄ, iSWTFeaifffiö:-#,
m t m tt.
ttJt. DOLBY, Ä«DfS* ШЙЙЛ«®ЯЯ*0]
гшяо
• BBEf*fÍ¿feiHE»í#BBE#*&B]¿ffiír.
e
íSffigsaeiií Ш Ш Ш Ш Ш Х о
Ш !Й
mxi
Ä и
¡»JS
RMS 6Q ,65Hz~15kHz
штшшшв 1 %
0.05%(15W,lkHz,6Q)
VIDEO/AUX:150mV (пГИЙ)
53
Page 54

!t
lE-4?t„
—
m
te
m
Ìfr>j;iÌ®Ìo
ia-fflW"A>tSWo
te
■ •fÌftWo
s
m
SìVXXSo • *^mswxiSo
iS^XISMo
tffXXÌSo • mmmM. • ’mmm.
t^jn'?il5^0
ila#.
t
....
• «ìtlSÌHtXXito • aiTiiiaSo
• iijtgiiif ««»itmiiSo • iSBidigaifisa, il#xititA«iL.
• ^mzfMm^T-'So
»»tPo
• ftif »®if ÌLrt®XSi&„
• Ham7ffiPlìÌ»»®M1EÌfS&S®»ÌQo
• -if
• 'fistili.
• DOLBY NR:^5Sil;S*»^ffliii)Xl5l«
• -*#DOLBY NR^ifX*ilfc:^5i:iÌteo • »^DOLBY NRiS-S.
• msmmo
Ji a fi m
• ifBS«®, № № «j, 'SigjtBszaa, ««friiamìi.
• ìxmmm^zm^o
• ift$A^a««ci£o
• mmmmpimo
• épisis. ®!i«s
ga^Bio
• 3c«5titmiiao
• MSrKiDOLBY NRiiS;,
• Wàc^sMo
1
• aiSXIWo • «¿Aitili«.
• «llfjfio • a*№ -if ìife^si.
1 4'*'ìtì^o • 'ì#iifeìSM^sM.
jttp#xaw.
M
m
timswxiiifieo
• PgH-5feIit»CA„
• ni)Vìf ».
• VOCAL FADERRSa.
• WBifr^iSS-BfflXteSo
• »ÌftPgfro
«iSBIIPAUSEm
l^VOCAL FADERo
SiS-?A.
54
Page 55

Main L.nit
Unidad principal
(1>
(2>-
(9)
10)
№in unit
CD
PAUSE (IlySET button — ® © ®
@ Display window
@ REV MODE button —► @ @
CD
DOLBY NR button @ ®
CD Remote sensor —• @
CD TIMER buttons (STANDBY, SLEEP) — ® ®
CD SYNCHRO DUBBING buttons
(NORMAL, HIGH) — @
CD
RECORD/REC MUTE button — © ® ®
CD
Disc tray
CD STOP ( ■ )/CLEAR button — ® ©
CD PLAY/DIRECTION button (◄►)— © @
@TUNING/PRESET/TIMER/SKIP/SEARCH/MS
buttons (◄◄DOWN/►►UP) — ® © @ ©
©TUNER buttons (TUNING, PRESET) — © @
® FM MODE button — ©
CD CLOCK button — ®
© OPEN/CLOSE button — ©
@ EDIT buttons (AUTO, PRGM) — ® ©
CD REPEAT button — ©
© DISPLAY button — ®
© RANDOM button — ©
Unidad principai
® Botón PAUSE (ll)/SET — ® © ®
@ Ventanilla visualizadora
@ Botón REV MODE — © © ®
©Botón DOLBY NR — © ®
(D Sensor remoto — ®
(D Botones TIMER (STANDBY, SLEEP) — ® ®
(©Botones SYNCHRO DUBBING
(NORMAL, HIGH) — ©
® Botón RECORD/REC MUTE — © ® ®
(9) Receptor de discos
® Botón STOP ( ■ )/CLEAR — © ©
® Botón PLAY/DIRECTION (◄►)—©©
®Botones TUNING/PRESET/TIMER/SKIP/
SEARCH/MS (◄◄ DOWN/ ►► UP) — ® ©
© © ®
©Botones TUNER (TUNING, PRESET) — © @
(g) Botón FM/MODE — ©
® Botón CLOCK — ®
® Botón OPEN/CLOSE — ©
(@ Botones EDIT (AUTO, PRGM) — ® ®
© Botón REPEAT — ©
® Botón DISPLAY — ®
©Botón RANDOM — ©
® PAUSE(||)/SET(®#(II)/K$)}iffl;
©
(D REV MODEOtffiCiSOiSffi© DOLBY NRittib»*)»-
d)
(D TIMER (^l^ri^)Sffl;
(STANDBY,SLEEP)
® SYNCHRO DUBBING
(iB]#ig»)iSia(#a, iiM)
® RECORD/REC MUTE
® STOP(B)/CLEAR(#±(B))/i#itttll;
® PLAY/DIRECTION (iicW/*lii])iga
(◄►)
© TUNING/PRESET/TIMER/SKIP/
SEARCH/MS
a (◄◄DOWN/►►UP) -^®®®®®
(0 Sfgisa(TUNING, PRESET)-^®®
® FM/MODE(p«///S)iSffi-®
(® CLOCK (Bta) igffl;-♦ ©
® OPEN/CLOSE(fl-ffl/ilRfl)«tt ^ ®
® EDIT!«)«a(AUTO, PRGM) ® REPEAT (*a)isa^®
® DISPLAY (ilT:) KM ^®
i§) RANDOM (IS*) Sa^®
ir) in
55
Page 56

Main unit Unidad principai
Main unit
O VOCAL FADER button — ®
® POWER button — O
(g)T-BASS button — ©
@ PHONES jack — ©
(§) MIC jack — ©
@ ECHO LEVEL lever
(NSX-330HE, NSX-A92 only)
@ Cassette compartment (deck 1)
@ MIXING PLAY knob — ©
® BBE button — ©
©GRAPHIC EQUALIZER buttons
(ROCK, POP, CLASSIC) — ©
@ VOLUME control — ©
® Function buttons
(TAPE/DECK1/2, TUNER/BAND, VIDEO/AUX,
CD)
@) Cassette compartment (deck 2)
56
Unidad principal
@ Botón VOCAL FADER — ®
@ Botón POWER — O
@ Botón T-BASS — ©
©Toma PHONES — ©
©Torna MIC — ©
@ Palanca ECHO LEVEL
(Sólo NSX-330HE, NSX-A92)
@ Compartimiento de casete (deck 1)
© Perilla MIXING PLAY — ©
© Botón BBE — ©
@) Botones GRAPHIC EQUALIZER
(RQCK, POP, CLASSIC) — ©
@) Control VOLUME — ©
® Botones de función
(TAPE/DECK 1 /2, TUNER/BAND, VIDEO/AUX,
CD)
® Compartimiento de casete (deck 2)
VOCAL FADER (»f^*W)»i
POWER(l:il)№ffi^©
T-BASS (iilSW) Sffi ^ ®
PHONES (Pg®) STL ^ ©
MIC(»igm)STL~»®
ECHO LEVEL ()IS«^)(f((iPJ
NSX-330HE,NSX-A92 (tS)
MIXING PLAY(iI«®Ct^)J£®-^®
BBEISffl; ^ ©
GRAPHIC EQUALIZER(BSiilWSffiffi
(ROCK, POP, CLASSIC) ^®
VOLUME (W*)}®SiJ ^ ®
(TAPE/DECK 1/2, TUNER/
BAND, VIDEO/AUX, CD)
Page 57

Display window Ventanilla visualizadora
i; ';2} c;
350 1k 3.5k 10kHz
lililí Lili
IMKD
V
(4 D ® d
Hmm
PITO'l
•ikC
1^^——
.................. ..... .
5} :'V. C8
Ü Ü. J
---------------
m i
1
■ti4; CÍ5) m
Display window
$ Spectrum analyzer
T-BASS indicator
(D BBE indicator
® Stereo indicator
©Timer standby indicator
® Timer/frequency/CD time counter
©Tape side indicator
® Music calendar
® RECOFiD indicator
® Dolby NR indicator
@ Deck 2 reverse mode indicator
® RANDOM/REPEAT indicator
@ Clock/function indicator
@ CD edit recording indicator
® Program indicator
®Tape direction indicator
Ventanilla visualizadora
® Analizador de espectro
(©Indicador T-BASS
(3) Indicador BBE
® Indicador de estéreo
® Indicador de espera del temporizador
® Contador de temporizador/f recuencia/tiempo de
CD
(7) Indicador de la cara de cinta
® Calendario musical
@ Indicador RECORD
® Indicador Dolby NR
@ Indicador del modo de inversión del deck 2
@ Indicador RANDOM/REPEAT
@ Indicador de reloj/función
@ Indicador de grabación con edición de discos
compactos
® Indicador de programa
(g Indicación del sentido de la cinta
SS/.|vS[
(©
® T-BASS(,«1B;W)ígS3S
® BBEfg/SS
®
® ÍBfSfíiífgTES
@ RECORD
® Dolby NR(ttit®ft)tÍS3lt
@ ífe» 2
@ RANDOM/REPEAT
® CD mmm a > «wísw«/®«
® ISiítSk®
57
Page 58

Remote control
Control remoto
? Buttons with no explanations have the same
I
function as the ones on the main unit with iden-
j tical indications.
Remote control
© SLEEP button
(D TIMER button
(D RANDOM button
© DISPLAY button
® Function buttons
(TAPE, TUNER, VIDEO/AUX, CD)
©TUNING/PRESET/TIMER buttons
@ PAUSE (ID/SET button
The ll/SET button does not function to set the
clock and to preset radio stations.
® GEQ button
® REC/REC MUTE (•/©) button
To start recording, first press this button and
then press the ◄ ► button within 2 seconds.
® POWER button
® CLOCK button
® FM MODE button
® OPEN/CLOSE button
® REPEAT button
® Numeric buttons (1 - 0)
®+10 button
® Stop ( ■ )/CLEAR button
® Piay/DiRECTION (◄ ►) button
® T-BASS button
@ BBE button
©VOLUME buttons (^,v)
® MUTE button
Los botones sin explicación tienen las misma»
funciones que los de la unidad principal con las
mismas indicaciones.
Control remoto
© Botón SLEEP
(D Botón TIMER
® Botón RANDOM
@ Botón DISPLAY
© Botones de función
(TAPE, TUNER, VIDEO/AUX, CD)
© Botones TUNING/PRESET/TIMER
(◄◄ / ►►/ ►«)
@ Botón PAUSE (ll)/SET
El botón ll/SET no funciona para regular el reloj
y para presintonizar las emisoras.
® Botón GEQ
©Botón REC/REC MUTE (#/0)
Para iniciar la grabación, presione primero este
botón y luego el botón M ► dentro de 2 segundos.
® Botón POWER
® Botón CLOCK
® Botón FM MODE
® Botón OPEN/CLOSE
® Botón REPEAT
® Botones numéricos (1-10)
® Botón +10
® Botón de parada ( ■ )/CLEAR
® Botón de reproducción/DIRECTION (◄ ►)
® Botón T-BASS
@ Botón BBE
® Botones VOLUME (^,v)
® Botón MUTE
© SLEEP (BfIS) itffi
© TIMER(5Ei#g)ISfii
® RANDOM
@ DISPLAY (IS^) SO;
® i/jtgliiK TAPE, TUNER, VIDEO/
AUX, CD)
© TUNING/PRESET/TIMER (M§/Btil/
◄◄/!◄◄, ►►/►«)
® PAUSE(ll)/SET(Wff(ll)/IS:$)}iia
ii/sETii:afiBsSS0$iiiiiiii4&^jtmij©
efTiio
® GEQ(|iaii^«fg)iSffl;
© REC/REC MUTE(»^/aW*if§)
(•/0)»
aTtK'ESmStt, 2
ZfHmsM ►isfflo
® POWER (««)««;
@ cLocK(i#®)fia
® FM/MODE(iii»7®a:)» •
® OPEN/CLOSE(iTBB/lW)i£il
@ REPEAT (»IDItffl:
® tScT:№ffi(l~0)
® +io№m
® Stop(B)/CLEAR(#±(B)/-;#r©iSia
® T-BASS (lifi^) »a
@ BBEigffi
@ VOLUME (t^l:)fi®(/x,v)
@ MUTE(ff®Hi:fa
58
Page 59

Battery replacement
When the maximum operation distance of the
remote control decreases, replace the batteries
with new ones.
Hints for correct operation
• For the remote control to operate, it should have
an unobstructed line of sight with the REMOTE
SENSOR. This is because the remote control
uses infrared light rays.
« When there is a strong ambient light source, the
performance of the Infrared REMOTE SENSOR
is degraded, which can cause unreliable opera
tion.
» The recommended effective distance for wire
less operation Is 7 meters (23 feet). Operation
can be performed at an angle of up to 30° from
either side, but the effective distance becomes
somewhat shorter.
« Using televisions with the same type of infrared
remote control, in the same direction, will cause
the system to operate Incorrectly. Do not use
other kinds of wireless remote controls at the
same time.
Reemplazo de las pilas
Cuando el alcance máximo del controlador remoto
disminuya, reemplace las pilas por otras nuevas.
Consejos para la operación correcta
• Para emplear el telemando, no deberá existir
ningún obstáculo en la línea visual entre él y el
sensor de control remoto. Esto se debe a que el
telemando utiliza rayos infrarrojos.
• Cuando la luz ambiental sea intensa, el
rendimiento del sensor de control remoto de
rayos infrarrojos se degradará, lo que puede
causar una operación poco fiable.
• La distancia recomendada para la operación
por control remoto Inalámbrico es de 7 metros.
La operación podrá realizarse con un ángulo de
hasta 30° a cada lado, pero la distancia efectiva
se volverá más corta.
• El empleo de televisores con el mismo tipo de
control remoto por rayos infrarrojos, en el mismo
sentido, hará que el sistema funciones
incorrectamente. No emplee otros tipos de
controladores remotos de rayos infrarrojos al
mismo tiempo.
[REMOTE SENSOR) TFSLEfBfPUSWiigjt
ÍtSÍTo
• (REMOTE SENSOR)
lí,
Síl3|gS»So
i±
• a№±
Notes on batteries
• Do not mix different types of batteries, or old
batteries with new ones.
• When you are not going to use the unit for a long
period of time, remove them to prevent possible
electrolyte leakage.
Notas sobre las pilas
• No mezcle pilas de tipos diferentes, ni una vieja
y otra nueva.
• Cuando no vaya a emplear el controlador remoto
durante mucho tiempo, extraiga las pilas para
evitar la posible fuga de su electrólito.
59
Page 60

CAUTION
Use of controls or adjustments or performance of procedures other
than those specified herein may result in hazardous radiation expo
sure.
ATTENTION
L’utilisation de commandes, réglages ou procédures autres que ceux
spécifiés peut emrainer une dangereuse exposition aux radiations.
This compact dise player is classified as a CLASS 1 LASER product.
The CLASS 1 LA55ER PRODUCT label is located on the rear exterior.
Note
This product is manufactured to comply with the radio inter
ference requirements of EEC directive 82/499/ECC.
Nota
Este producto cumple los requisitos de radiointerferencia de
la normativa de la CEE 82/499/CEE.
OBSERVERA
Sâ länge som apparaten är ansluten tili nätet flyter en svag
ström genom densamma, även da den är avstängd. Om man
under en längre tid ej harföravsikt att använda den, drag dâ
ur nätkabeln.
BEMÆRK
Apparate! er stadig forbundet med lysnettet, sä længe stikket
er tilsluttet til stikkontakten, selv om afbryteren er släet fra.
Hvis apparate! ikke bruges i længere tid, skal netledningen
trækkes ud.
C MODEL
CAUTION: TO PREVENT ELECTRIC SHOCK DO
NOT USE THIS (POLARIZED) PLUG WITH AN EX
TENSION CORD, RECEPTACLE OR OTHER OUT
LET UNLESS THE BLADES CAN BE FULLY IN
SERTED TO PREVENT BLADE EXPOSURE
CAUTION!
Invisible laser radiation when open and inter locks
defeated. Avoid exposure to beam.
ADVARSEL!
Usynlig laserstâling ved âbning, nâr sikkerhedsafbrydereer ude af
funktion. Undgä cdsættelse for strâling.
VAROITUS!
Laitteen käyttäminen muulla kuin tässä käyttöohjeessa mainitulla
tavalla saattaa altistaa käyttäjän turvallisuusiuokan 1 ylittävälle
näkymättömälle lasersäteiylle.
VARNING!
Om apparaten används pä annat satt än i denna bruksanvisning
specificerats, kan användaren utsätta för osyniig laser-strälning,
som överskrider gränsen för laserklass 1.
AIWA CO., LTD.
8I-MX4-913-119
921029BNI-U
Printed in Malaysia
 Loading...