

Page 1
amsa
11
.,
m
B
SC4JC78
ACTIVESPEAKERSYSTEM
SISTEMA DEALTAVOCESACTIVOS
SYSTEME D’ENCEINTES ACTIVES
OPERATING INSTRUCTIONS
MANUAL DE INSTRUCCIONES
MODE D’EMPLOI -
OWNER’S RECORD
For your convenience, record the model number and serial number (you
will find them on the rear of your set) in the space provided below.
Please refer to them when you contact your AIWA dealer in case of
difficulty.
Model No.
Serial No.
SC-UC78
-
( For assistance and information,
call toll free I-800-BUY-AIWA.
L
(United States and Puerto Rico)
mm
)
J
Page 2
PRECAUTIONS
● The unit should be situated so that its location or position does not interfere
with the heat ventilation openings around the right speaker and sound pressure
ventilation on the rear of the left speaker.
Allow 15cm (6 in.) clearance from the rear and the top of the unit, and 5 cm (2
in,) from each side.
● Do not use the unit in places which are extremely hot, cold, dusty or humid.
In particular, do not keep the unit:
● in a high humidity area such as a bathroom
● near a heater
● in an area exposed to direct sunlight (e.g., inside a parked car, where there
could be a considerable rise in temperature)
● Keep cassettetapes, magnetic cards and other magnetically recorded materials
away from the speakers as the recorded information may be erased or noise
may occur on the cassette tapes.
Using the system near a TV set
● Ifthe TV picture is distorted, turn off the power of the TV set, and after 15 to 30
minutes turn it on again. If there seems to be no improvement, move the
system further away from the TV set.
● Be sure not to place magnets or objects using magnets, such as audio racks,
toys etc. near the TV set. These may cause magnetic distortion to the picture.
Safety
. When disconnecting the AC cord, pull it out by the AC power plug, Do not pull
the cord itself.
● If you are not going to use the system for a long period of time, disconnect the
AC cord,
Should any problem occur, disconnect the AC cord and refer servicing to qualified
personnel only,
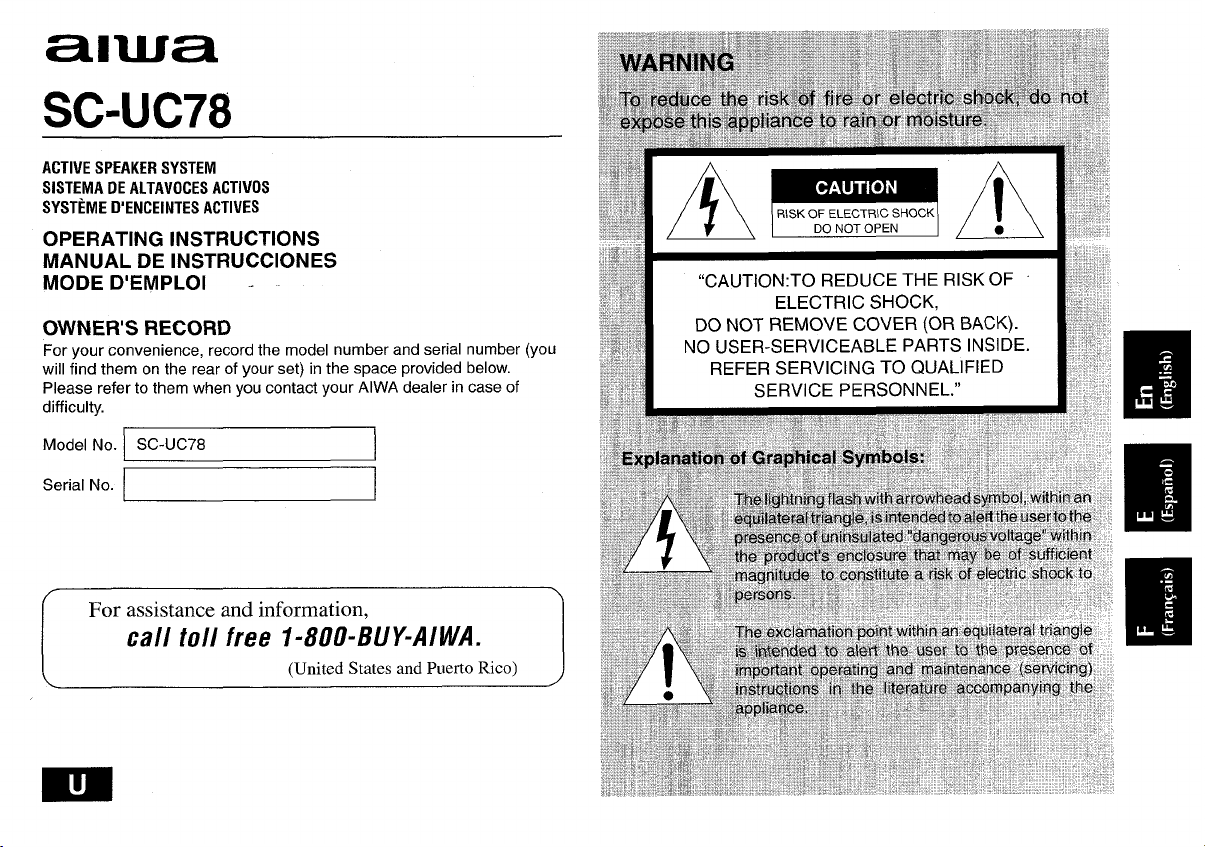
H FCC Part 156, Class B
FCC NOTICE
This equipment has been tested and found to comply with the limits
for a Class B digital device, pursuant to Part 15 of the FCC Rules.
These limits are designed to provide reasonable protection against
harmful interference in a residential installation.
This equipment generates, uses, and can radiate radio frequency
energy and, if not installed and used in accordance with the instructions,
may cause harmful interference to radio communications.
However, there is no guarantee that interference will not occur in a
particular installation. If this equipment does cause harmful interference
to radio or television reception, which can be determined by turning
the equipment off and on, the user is encouraged to try to correct the
interference by one or more of the following measures:
– Reorient or relocate the receiving antenna.
– Increase the separation between the equipment and receiver.
– Connect the equipment into an outlet on circuit different from
that to which the receiver is connected.
– Consult the dealer or an experienced radio/TV technician for
help,
CAUTION
Modifications or adjustments to this product, which are not expressly
approved by the manufacturer, may void the user’s right or authority
to operate this product.
● Windows@95 and Windows@98 are the trademarks of Microsoft Corporation
registered in the US and other countries,
● Company and product names mentioned herein are the trademarks or
registered trademarks of their respective owners.
2 ENGLISH
Page 3

TABLE OF CONTENTS
ABOUT USB
PRECAUTIONS ...................................................................................... 2
ABOUT USB ........................................................................................... 3
FEATURES ............................................................................................. 4
NAMES OF PARTS ................................................................................ 5
CONNECTION AND SETTINGS ............................................................ 6
Before connecting the speakers to your PC .. . ... .. ... .. .. ... .. .. . . 6
Connecting the speakers .................................................................... 8
INSTALLING THE USB DEVICE DRIVERS ........................................... 9
Verifying installation . ... . .... . .. . . . .. .. . . . ... . .... 11
If the USB port does not work .... .... ..... .. ... .... ... .... ..... .... .. .. ..... 12
When the Universal Serial bus controller is not displayed or
when thedevice driver installation will not begin 13
USING THE SPEAKERS ...................................................................... 14
OPERATION ......................................................................................... 15
(1) Using the USB port for audio .... .. ... .... .. .. ... . . .. .... .. .. .... 15
(2) Playing music CDs using the USB port ....... ... . . .... ....... .. ..... 17
TROUBLESHOOTING .......................................................................... 18
CARE .................................................................................................... 18
SPECIFICATIONS ................................................................................ 19
USB is an abbreviation of Universal Serial Bus. A USB is a high speed
interface for easily connecting a PC and peripheral devices.
The USB has the following features.
● With one USB cable, various peripherals can be connected.
● Data transfer speeds as high as 12 Mbps are possible.
* Peripherals can be plugged in even while the PC is on (hot plug in).
● Using a USB hub, as many as 127 peripherals can be plugged into a
singl; PC.
Requirements for connecting these speakers to a PC via a USB
To connect these speakers to a PC via a USB, a PC with a USB port
and Windows ‘ 98 is required. The USB port must be properly configured.
For more information, ask your computer dealer or manufacturer whether
or not USB audio is supported by your computer.
Notes reaardirw the use of these speakars with a USB
● When t;ese sp-eakers are connected to a PC by a USB, use the included
USB cord or a shielded-type (high speed tYPe) USB cord.
● After the speakers are co-nnected to the PC, it will take the PC about ten
seconds to recognize the speakers. Until the speakers are recognized,
avoid unplugging the USB cord or turning off the speakers.
. .
111111
ENGLISH 3
Page 4
FEATURES
● Equipped with both USB and analog audio inputs
● Dynamic Bass system
● QSOUND system
● Front 180’ speaker system
built-in
w
● High power sound of 5.5 W + 5.5 W speakers and
11
powered subwoofer
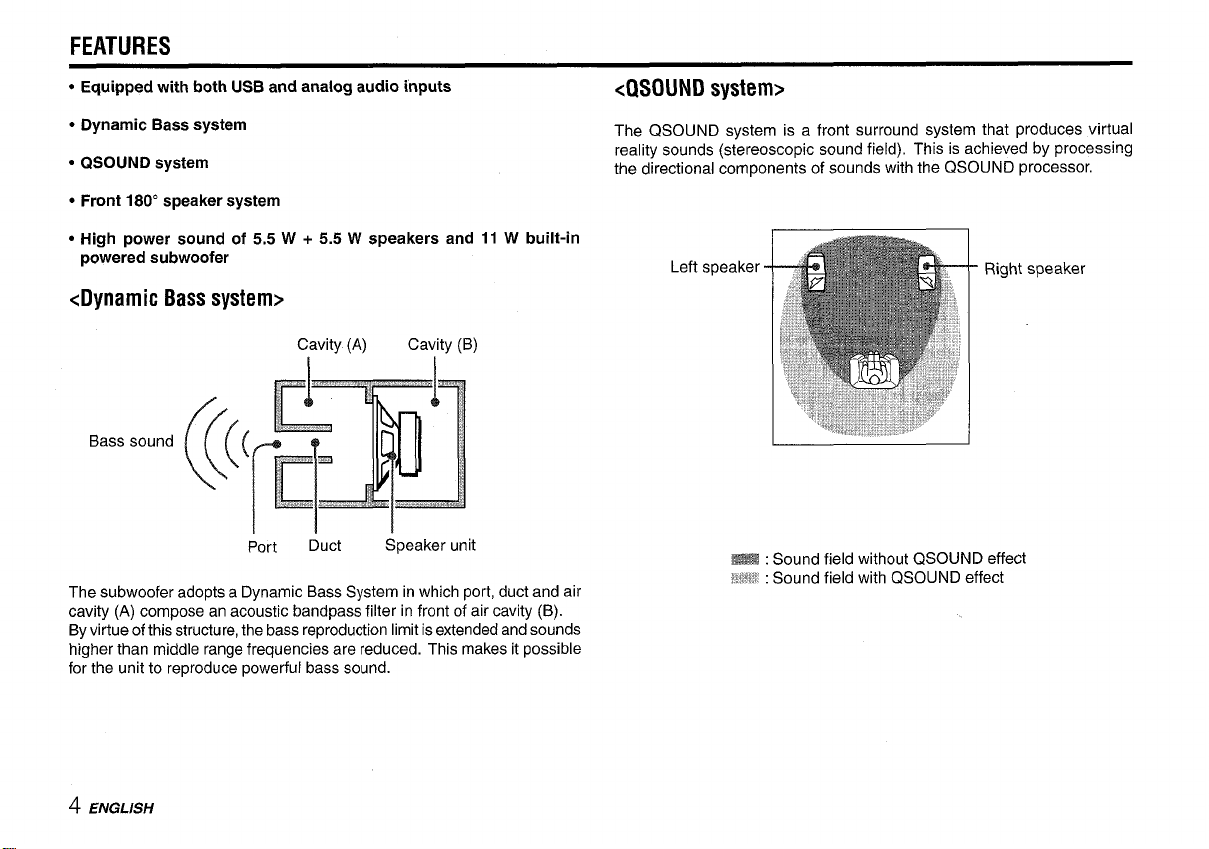
<Dynamic Bass system>
Cavity (A)
I
Port
Duct
The subwoofer adopts a Dynamic Bass System in which port, duct and air
cavity (A) compose an acoustic bandpass filter in front of air cavity (B).
By virtue of this structure, the bass reproduction limit is extended and sounds
higher than middle range frequencies are reduced. This makes it possible
for the unit to reproduce powerful bass sound.
Cavity (B)
I
Speaker unit
<QSOUND system>
The QSOUND system is a front surround system that produces virtual
reality sounds (stereoscopic sound field). This is achieved by processing
the directional components of sounds with the QSOUND processor.
Left speaker -
= : Sound field without QSOUND effect
\WMI’: Sound field with QSOUND effect
- Right speaker
4 ENGLISH
Page 5
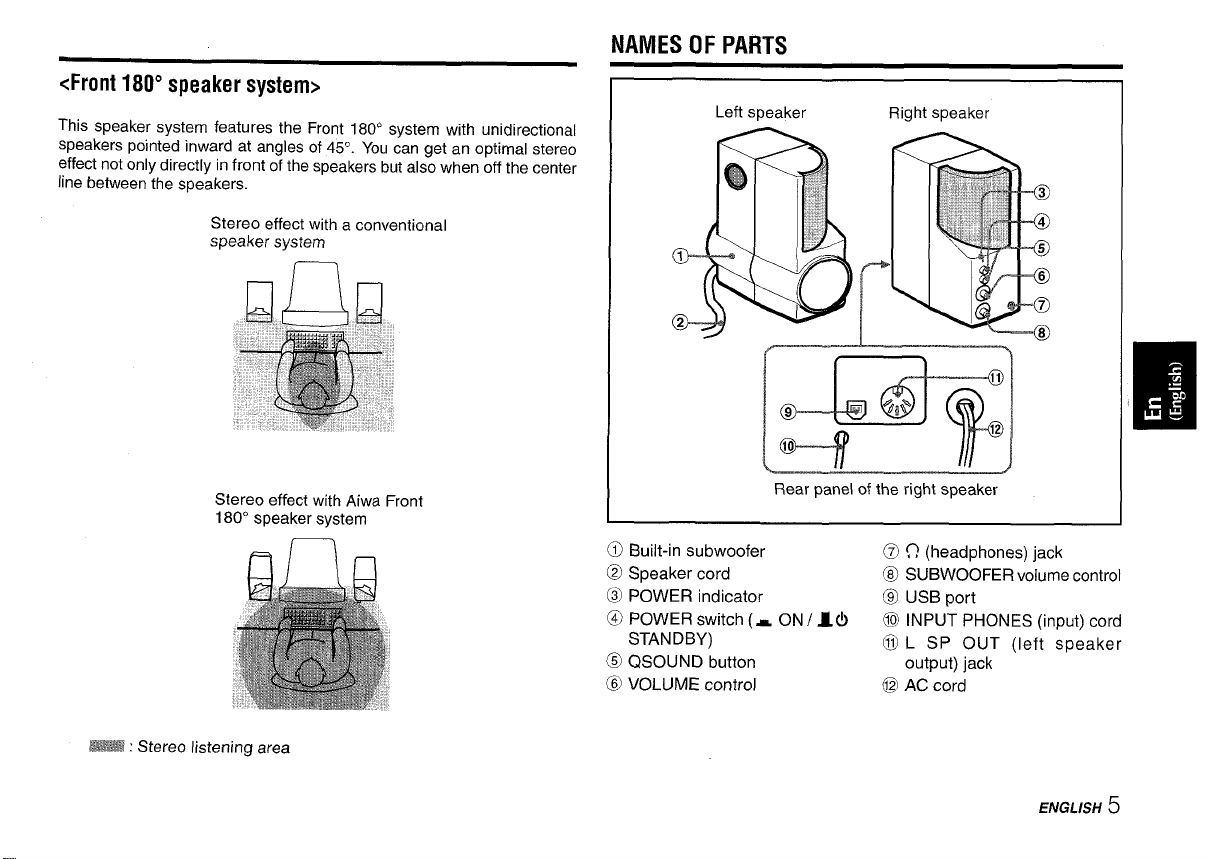
<Front 180° speaker system>
This speaker system features the Front 180” system with unidirectional
speakers pointed inward at angles of 45°. You can get an optimal stereo
effect not only directly in front of the speakers but also when off the center
line between the speakers.
NAMES OF PARTS
Left speaker
Right speaker
Stereo effect with a conventional
speaker
n /7
Stereo effect with Aiwa Front
180° speaker system
_: Stereo listening area
system
—
r-1
Rear panel of the right speaker
@ Built-in subwoofer @ fl (headphones) jack
@ Speaker cord
@ POWER indicator
@ POWER switch (~ ON/ l(!)
STANDBY)
@ QSOUND button
@ VOLUME control @AC cord
-—
‘@ SUBWOOFER volume control
@ USB port
@ INPUT PHONES (input) cord
@ L SP
OUT (left speaker
output) jack
ENGLISH 5
Page 6
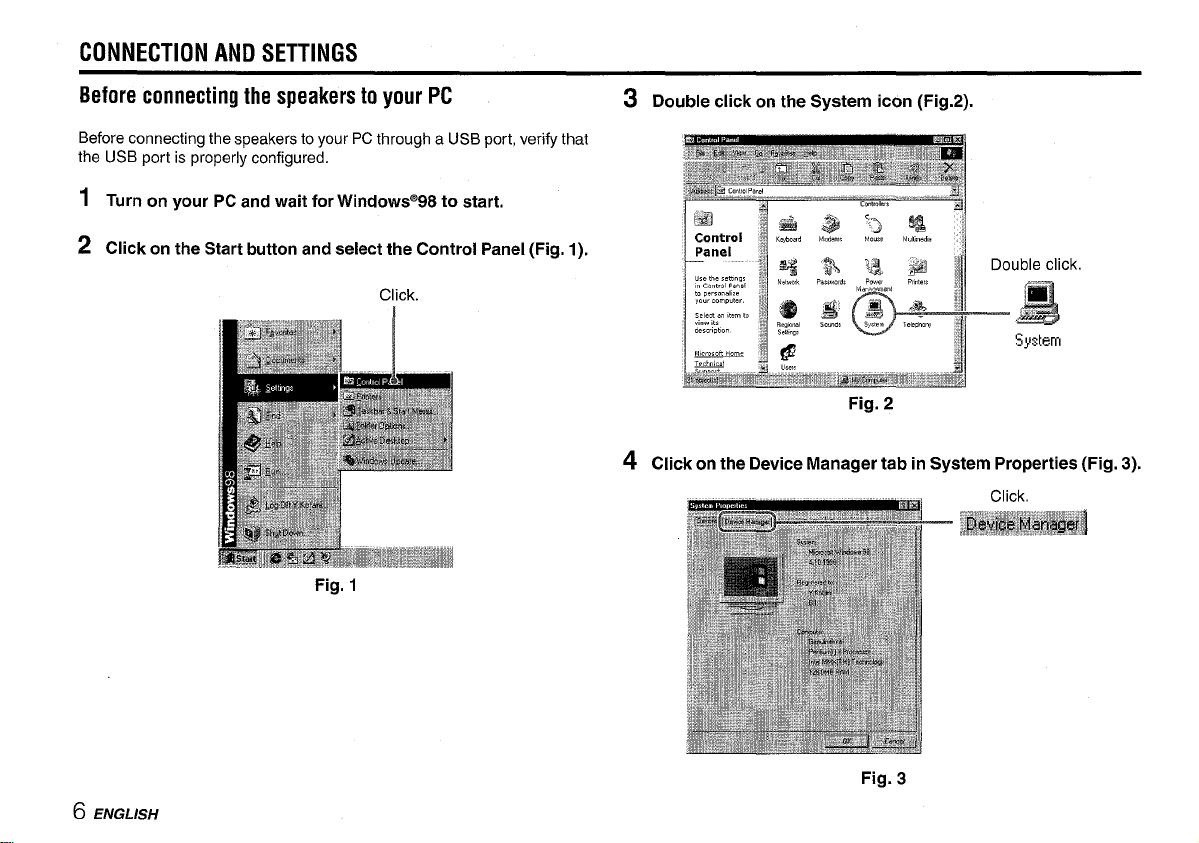
CONNECTION AND SETTINGS
Before connecting the speakers to your PC
Before connecting the speakers to your PC through a USB port, verify that
the USB port is properly configured.
1 Turn on your PC and wait for Windows@98 to start.
z Click on the Start button and select the Control Panel (Fig. 1).
Click.
Fig. 1
s Double click on the System icon (Fig.2).
Fig. 2
Q Click on the Device Manager tab in System Properties (Fig. 3).
6 ENGLISH
Fig. 3
Page 7
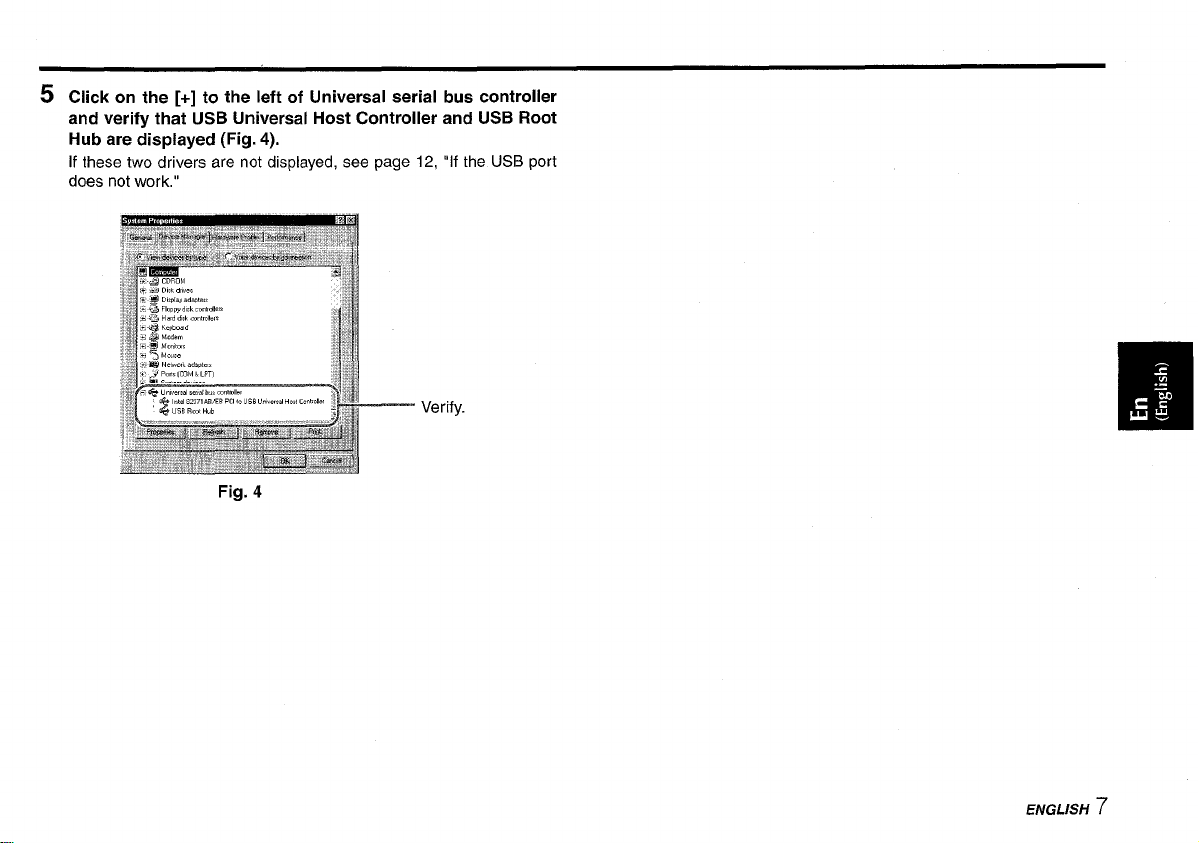
s Click onthe[+] totheleft of Universal serial bus controller
and verify that USB Universal Host Controller and USB Root
Hub are displayed (Fig. 4).
if these two drivers are not displayed, see page 12, “If the USB port
does not work.”
Verify.
Fig. 4
ENGLISH 7
Page 8
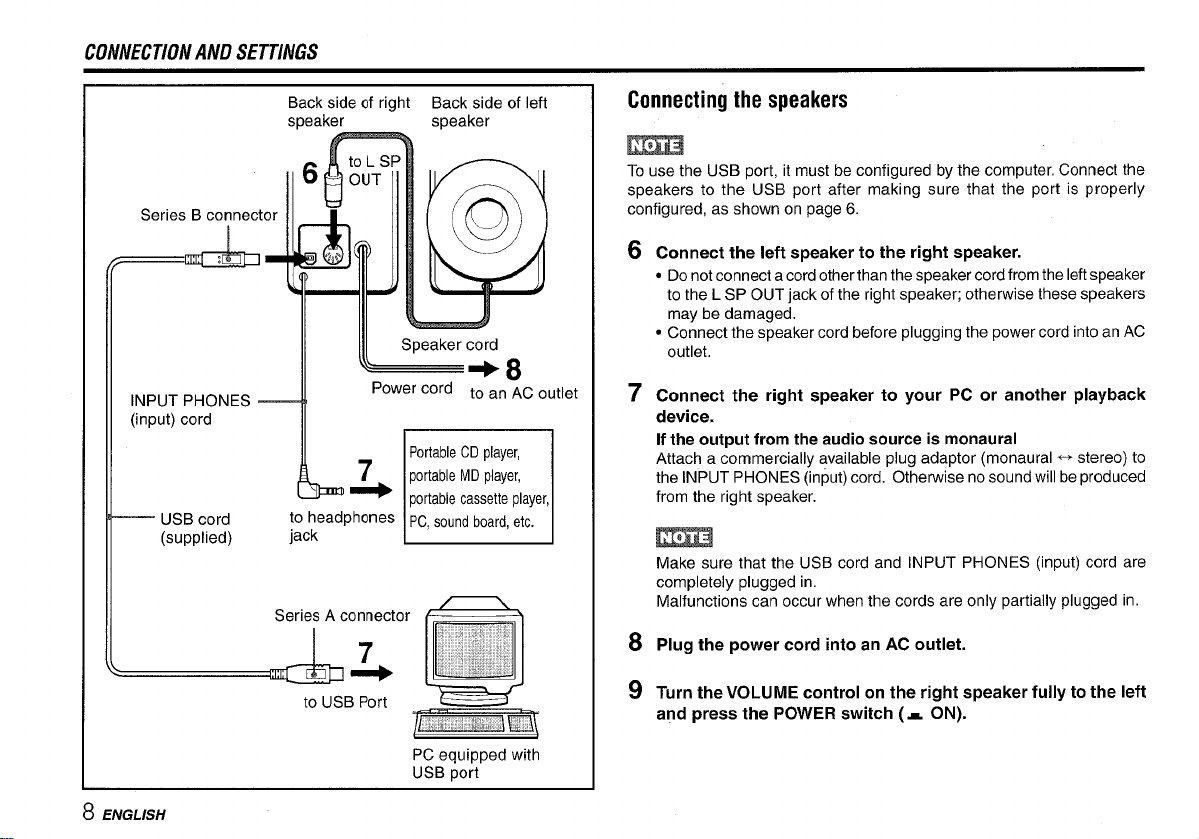
CO/V/VECTIONA/VD SETTINGS
(input) cord
— USB cord
(supplied)
Backside of right Back side of left Connecting the speakers
speaker -
@
to headphones
jack
speaker
cord
+8
to an AC
PortableCDplayer,
portableMDplayer,
portablecassetteplayer,
PC,soundboard,etc.
1
outlet
To use the USB port, it must be configured by the computer. Connect the
speakers to the USB port after making sure that the port is properly
configured, as shown on page 6.
6
Connect the left speaker to the right speaker.
● Donotconnect acordother than thespeaker cord from the leftspeaker
to the L SP OUT jack of the right speaker; otherwise these speakers
may be damaged.
● Connect thespeaker cord before plugging thepower cord into anAC
outlet.
7
Connect the right speaker to your PC or another playback
device.
If the output from the audio source is monaural
Attach a commercially available plug adaptor (monaural + stereo) to
the INPUT PHONES (input) cord. Otherwise no sound will be produced
from the right speaker.
Make sure that the USB cord and INPUT PHONES (input) cord are
completely plugged in.
Malfunctions can occur when the cords are only partially plugged in.
8 ENGLISH
PC equipped with
USB port
Plug the power cord into an AC outlet.
8
Turn the VOLUME control on the right speaker fully to the left
9
and press the POWER switch ( = ON).
Page 9
INSTALLING THE USB DEVICE DRIVERS
11 Select “Search for the best driver for your device
(Recommended)” and click on the Next button.
12 Select “CD-ROM drive”, insert the Windows” 98 CD-ROM into
the drive, and click on the Next button.
If Windowsm 98 was pre-installed on your PC, simply click on the Next
button.
1s Click on the Next button.
1 q Click on the Finish button.
After the USB Composite Device has been installed, the installation for
the USB Human Interface Device begins.
15 On the screen that appears after new hardware has been ‘o
detected appears, click on the Next button.
Ill!l
16 Select “Search for the best driver for your device
(Recommended)” and click on the Next button.
17 Select “CD-ROM drive” and click on the Next button.
If Windows@ 98 was pre-installed on your PC, simply click on the Next
button.
18 Click on the Next button.
I g Click on the Finish button.
After installation for the USB Human Interface Device is completed,
the installation for the USB Audio Device begins.
ENGLISH 9
Page 10
INSTALLING THE USB DEVICE DRIVERS
20 On the screen that appears after new hardware has been
detected appears, click on the NeKt button.
21 Select “Search for the best driverfor your device
(Recommended)” and click on the Next button.
22 Select “CD-ROM drive” and click on the Next button.
If Windows@98 was pre-installed on your PC, simply click on the Next
button.
23 Click on the Next button.
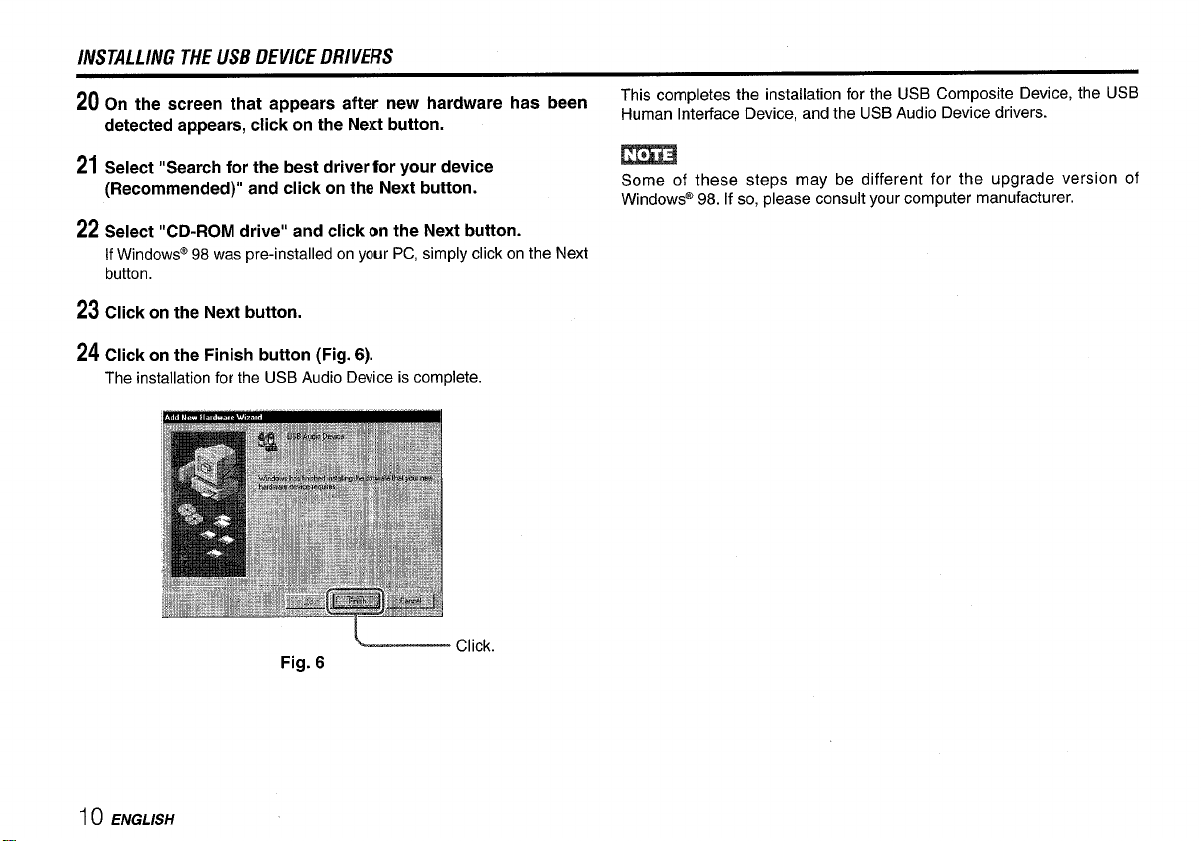
24 Click on the Finish button (Fig. 6).
The installation for the USB Audio Device is complete.
~ click,
Fig. 6
This completes the installation for the USB Composite Device, the USB
Human Interface Device, and the USB Audio Device drivers.
m
Some of these steps may be different for the upgrade version of
Windows@ 98. If so, please consult your computer manufacturer.
10 ENGLISH
Page 11
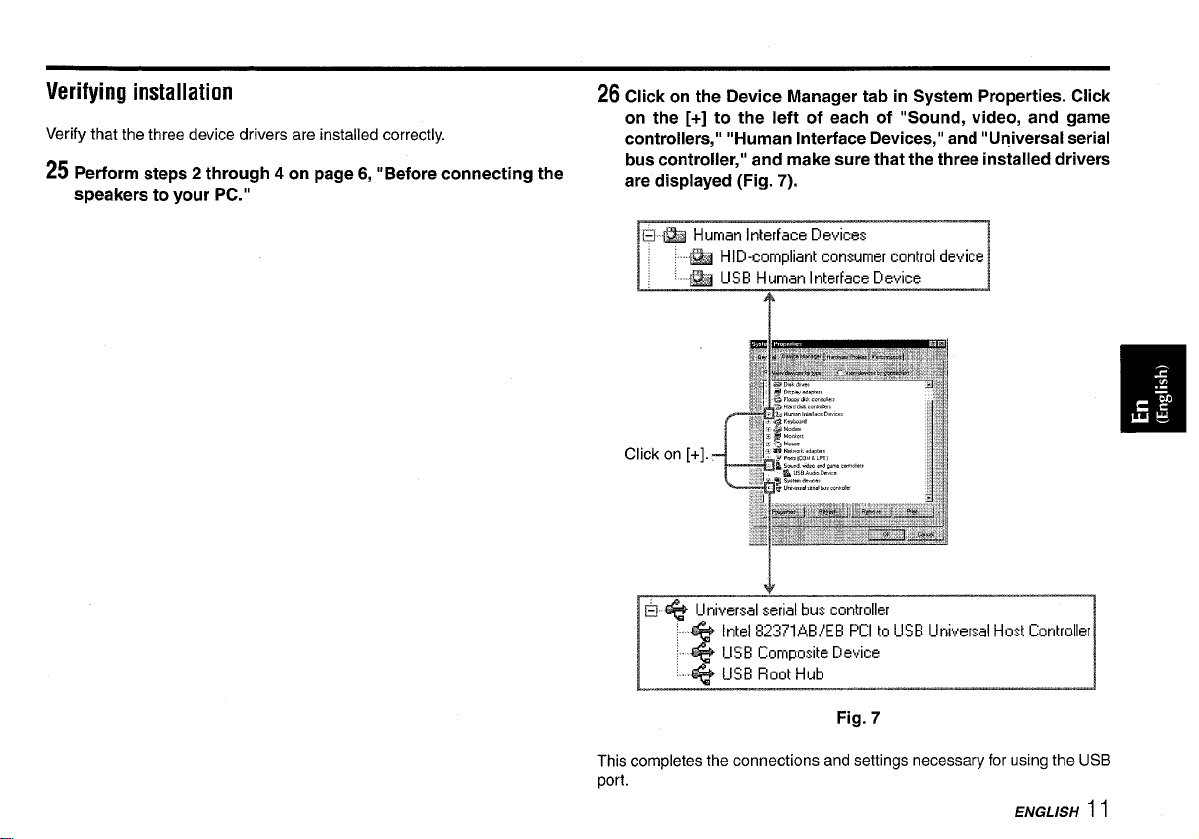
Verifying installation
Verify that the three device drivers are installed correctly.
25 Perform steps 2 through 4 on page 6, “Before connecting the
speakers to your PC. ”
26Click on the Device Manager tab in System Properties. Click
on the [+] to the left of each of “Sound, video, and game
controllers,”” Human Interface Devices, ” and “Universal serial
bus controller,” and make sure that the three installed drivers
are displayed (Fig. 7).
&--w Human Interface Devices
W HID-complmnt consumer control dwce
~& USE Human Interface Device
~
T
Click on [+].
&l * Universal serial bu$ controller
Intel 32371 AE/EE PCI to USE Universal Hoxt Controller
,,
USE Composite Device
USB Root Hub
Fig. 7
This completes the connections and settings necessary for using the USB
port.
ENGIVSH 1I
Page 12
INSTALLING THE USB DEVICE DRIVERS
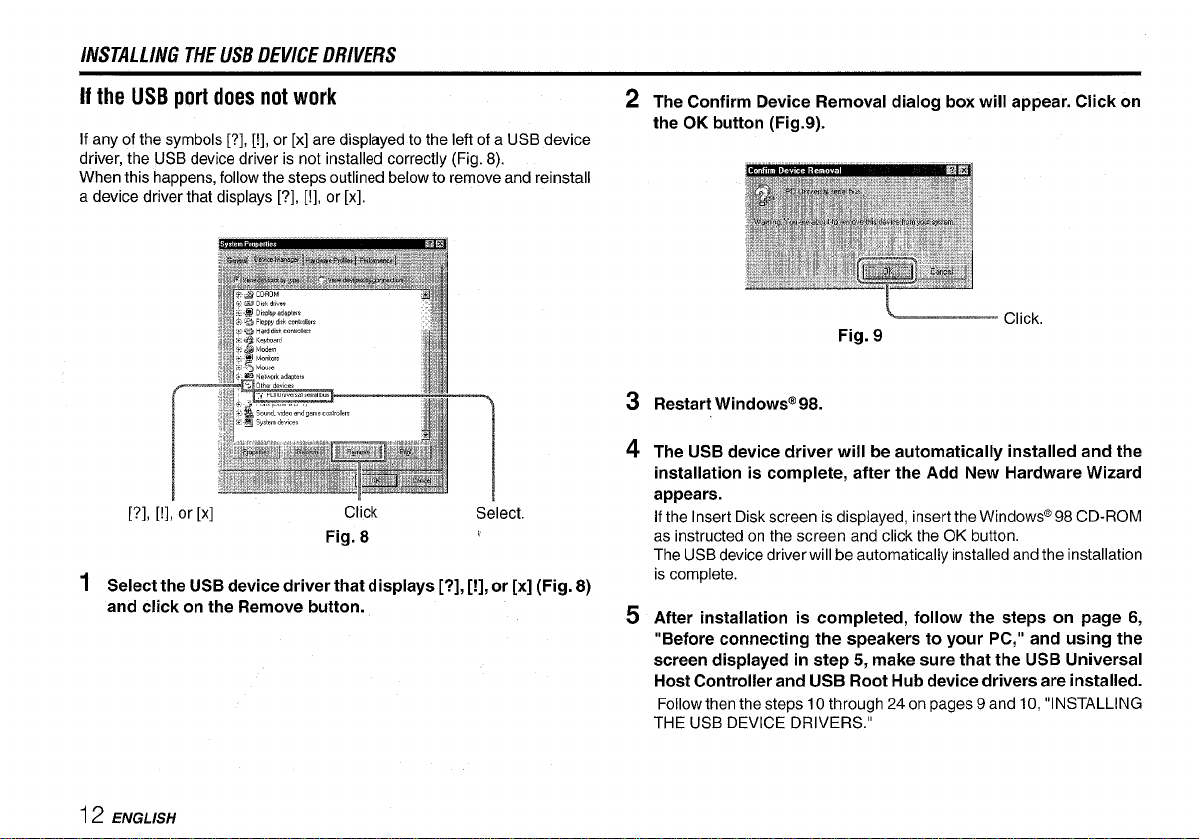
If the USB port does not work
If any of the symbols [?], [!], or [x] are displayed to the left of a USB device
driver, the USB device driver is not installed correctly (Fig. 8).
When this happens, follow the steps outlined below to remove and reinstall
a device driver that displays [?], [!], or [x],
[?],
[!]~or [x]
1
Select the USB device driver that displays [?], [!], or [x] (Fig. 8)
and click on the Remove button.
Ciick
Fig. 8
Select
?
2
The Confirm Device Removal dialog box will appear. Click on
the OK button (Fig.9).
Restart Windowsm 98.
3
4
The USB device driver will be automatically installed and the
installation is complete, after the Add New Hardware Wizard
appears.
If the Insert Disk screen is displayed, insert the Windows” 98 CD-ROM
as instructed on the screen and click the OK button.
The USB device driver will be automatically installed and the installation
is complete.
After installation is completed, follow the steps on page 6,
5
“Before connecting the speakers to your PC, ” and using the
screen displayed in step 5, make sure that the USB Universal
Host Controller and USB Root Hub device drivers are installed.
Follow then the steps 10 through 24 on pages 9 and 10, “INSTALLING
THE USB DEVICE DRIVERS.”
i 2 ENGLISH
Page 13
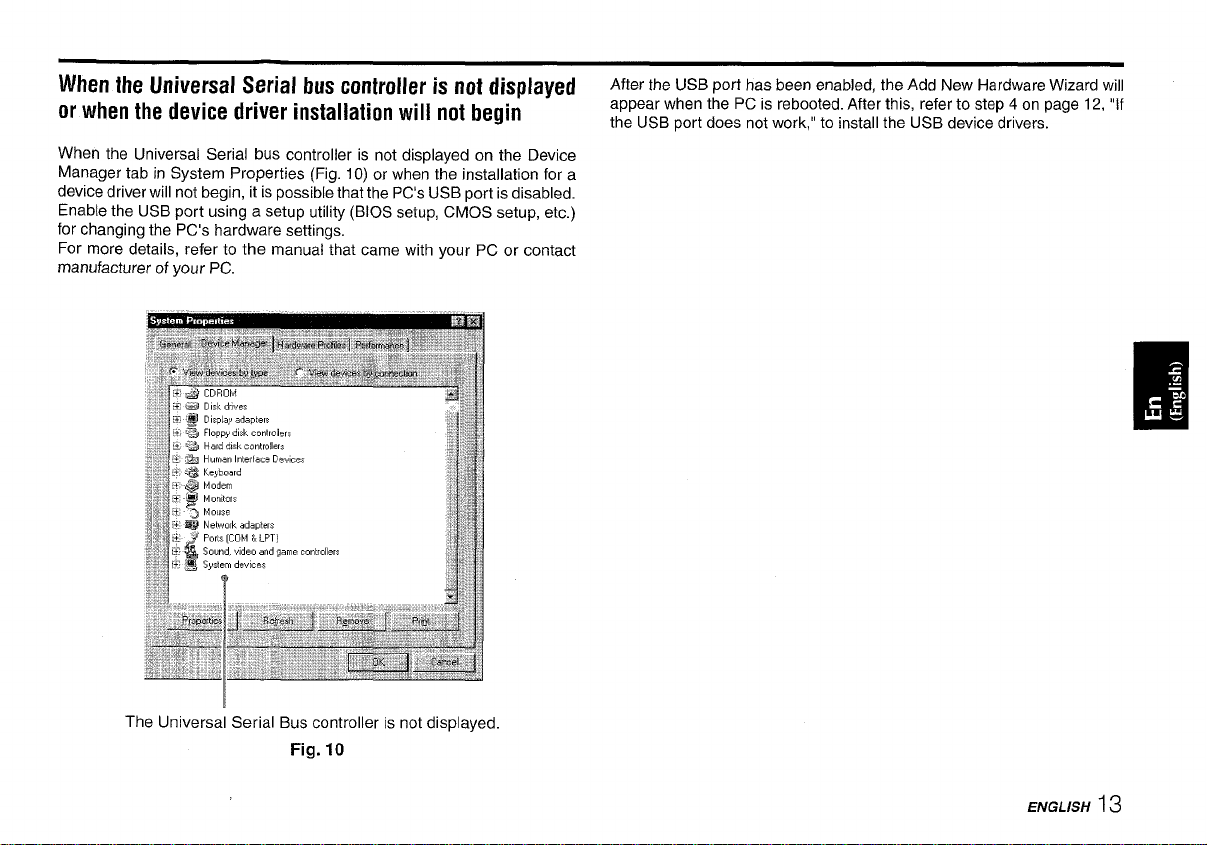
When the Universal Serial bus controller is not displayed
or when the device driver installation will not begin
When the Universal Serial bus controller is not displayed on the Device
Manager tab in System Properties (Fig. 10) or when the installation for a
device driver will not begin, it is possible that the PC’s USB port is disabled.
Enable the USB port using a setup utility (BIOS setup, CMOS setup, etc.)
for changing the PC’s hardware settings.
For more details, refer to the manual that came with your PC or contact
manufacturer of your PC.
After the USB port has been enabled, the Add New Hardware Wizard will
appear when the PC is rebooted. After this, refer to step 4 on page 12, “if
the USB port does not work,” to install the USB device drivers.
The Universal Serial Bus controller is not displayed.
Fig. 10
ENGLISH i 3
Page 14
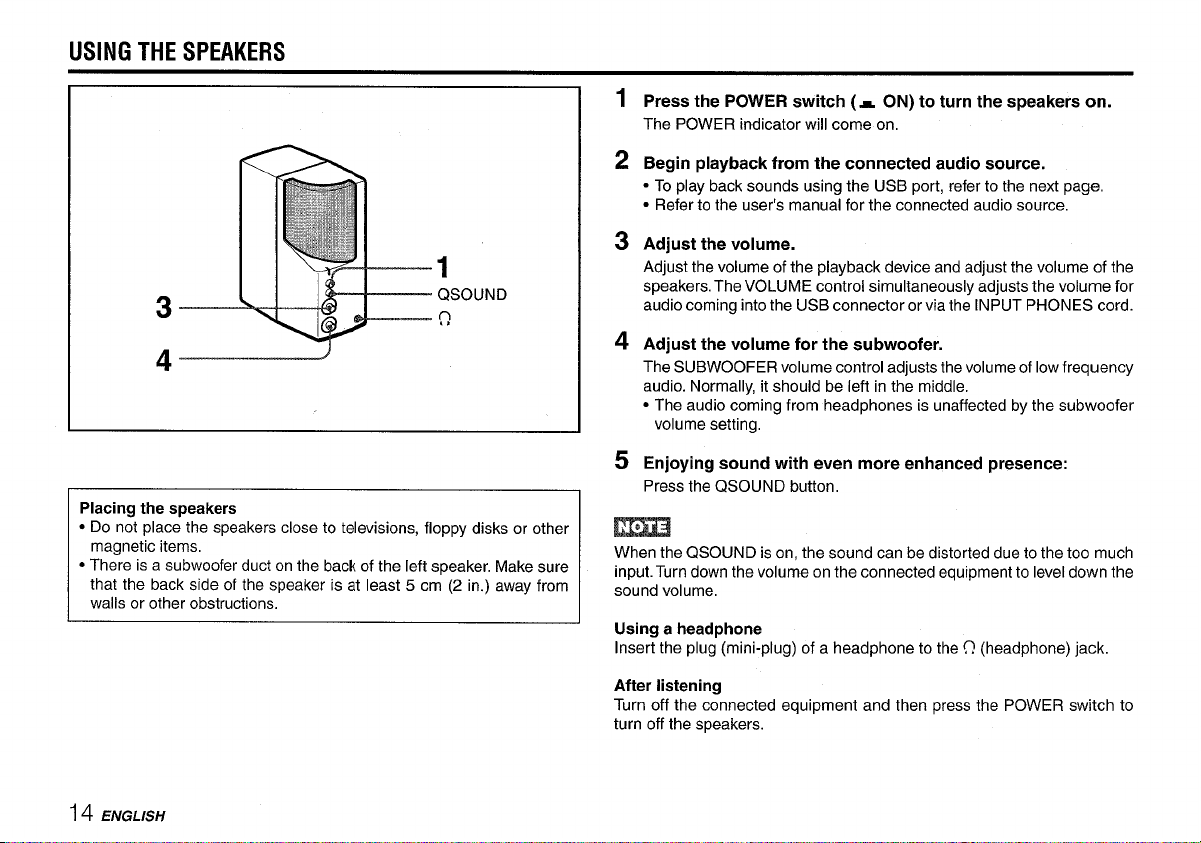
USING THE SPEAKERS
1
3
QSOUND
R
4
Placing the speakers
● Do not place the speakers close to televisions, floppy disks or other
magnetic items,
● There is a subwoofer duct on the back of the left speaker. Make sure
that the back side of the speaker is at least 5 cm (2 in.) away from
walls or other obstructions.
1
Press the POWER switch (~ ON) to turn the speakers on.
The POWER indicator will come on,
2
Begin playback from the connected audio source.
● To play back sounds using the USB port, refer to the next page,
● Refer to the user’s manual for the connected audio source,
Adjust the volume.
3
Adjust the volume of the playback device and adjust the volume of the
speakers. The VOLUME control simultaneously adjusts the volume for
audio coming into the USB connector orviathe INPUT PHONES cord.
Adjust the volume for the subwoofer.
4
The SUBWOOFER volume control adjusts the volume of low frequency
audio. Normally, it should be left in the middle.
● The audio coming from headphones is unaffected by the subwoofer
volume setting,
Enjoying sound with even more enhanced presence:
5
Press the QSOUND button,
When the QSOUND is on, the sound can be distorted due to the too much
input. Turn down the volume on the connected equipment to level down the
sound volume,
Using a headphone
Insert the plug (mini-plug) of a headphone to the (1 (headphone) jack.
I 4 ENGLLSH
After listening
Turn off the connected equipment and then press the POWER switch to
turn off the speakers.
Page 15
(1) Using the USB port for audio
if your PC is already set up to use a multimedia device connected to the
USB port, the steps for device driver installation can be skipped and you
can begin here.
1 Click on the Start button, select Settings, and click on Control
Panel. Double click on the Multimedia icon (Fig. 11 ).
2
Click on the Audio tab in Multimedia Properties. Select USB
Audio Device (1) in the Preferred device menu under Playback
(Fig. 12).
Depending on the PC, USB Audio Device(2) may be displayed.
— Select USB
Audio Device (l).
Fig. 12
s Click on the OK button to complete
the settings.
ENGLISH 15
Page 16
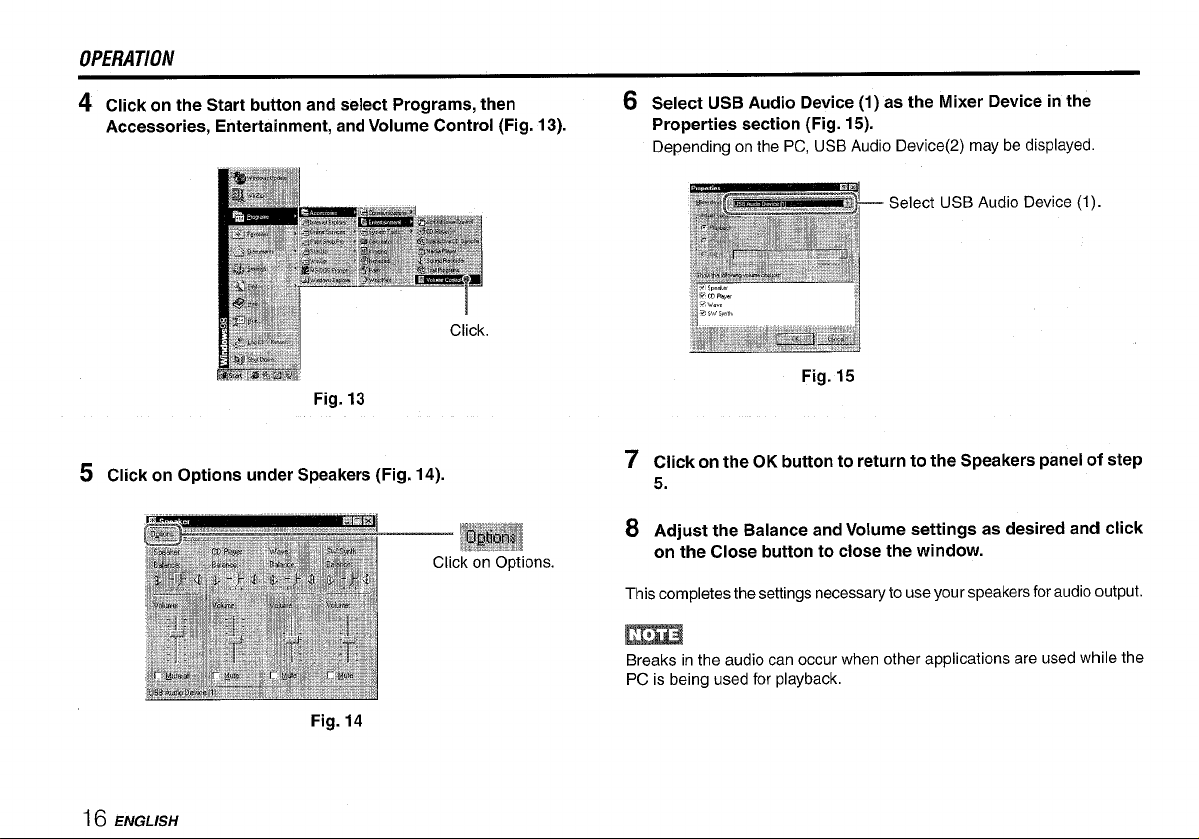
OPERATION
q Click on the Start button and select Programs, then
Accessories, Entertainment, and Volume Control (Fig. 13).
Fig. 13
s Click on Options under Speakers (Fig. 14).
6 Select USB Audio Device (1) as the Mixer Device in the
Properties section (Fig. 15).
Depending on the PC, USB Audio Device(2) may be displayed.
Fig. 15
‘7 Click on the OK button to return to the Speakers panel of step
5.
8 Adjust the Balance and Volume settings as desired and click
on the Close button to close the window.
This completes the settings necessary to use your speakers for audio output.
m
Breaks in the audio can occur when other applications are used while the
PC is being used for playback.
16 ENGLISH
Fig. 14
Page 17
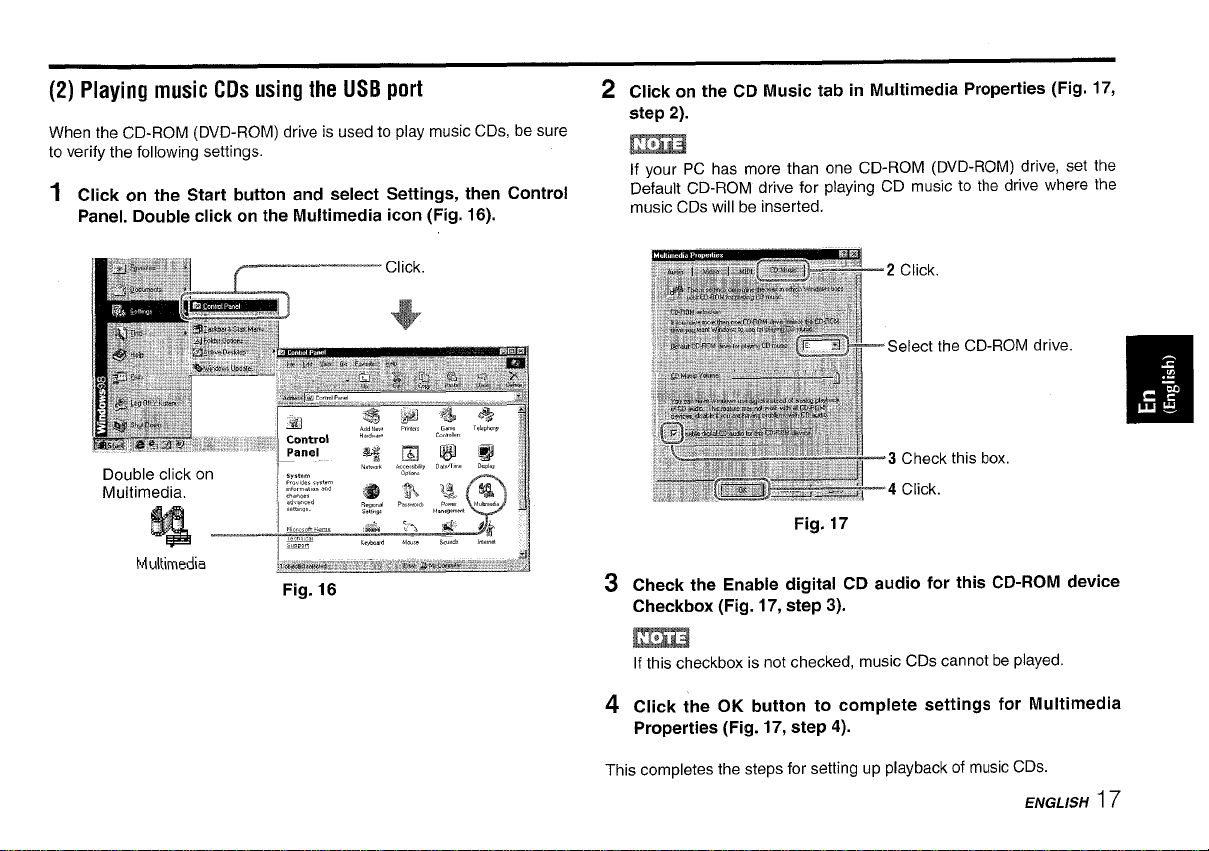
(2) Playing music CDs using the USB port
When the CD-ROM (DVD-ROM) drive is used to play music CDs, be sure
to verify the folIowing settings.
1 Click on the Start button and select Settings, then Control
Panel. Double click on the Multimedia icon (Fig. 16).
Click on the CD Music tab in Multimedia Properties (Fig. 17,
2
step 2).
m
If your PC has more than one CD-ROM (DVD-ROM) drive, set the
Default CD-ROM drive for playing CD music to the drive where the
music CDs will be inserted.
drive.
Fig. 17
Check the Enable digital CD audio for this CD-ROM device
3
Checkbox (Fig. 17, step 3).
If this checkbox is not checked, music CDs cannot be played.
Click the OK button to complete settings for Multimedia
4
Properties (Fig. 17, step 4).
This completes the steps for setting up playback of music CDs.
ENGLISH I
7
Page 18
TROUBLESHOOTING
CARE
Problem
Nosoundor sound is .Thespeakers arenotturned on.
Cause and solution
To clean the cabinet
Use a soft cloth lightly moistened with mild detergent solution.
very faint. + Tumthe poweron Do not use strong solvents such as alcohol, benzene or thinner.
. The VOLUME controlE set to the mmimum level
+ Adjust the volume,
The Mute checkbox IS checked m the Volume Control
.
panel or the volume lever ISset low.
+ If there IS no sound, uncheck the Mute checkbox. If
thesound letoofaint, movethevolume leverup (Refer
to page 16)
● Under Playback in the Audio section of Multimedia
Properties, the USB Audio Device (1) IS not selected as
the Preferred Device,
+ Select the USB Audio Device (1) as the Preferred
Device. (Refer to page 15.)
The speakera are not
detected by the PC.
●The USBcord lsnotplugged incompletely.
+ Makesurethat the USBcord is fkmlyplugged in. Note
that It WIIItake the PC approximately 10 seconds to
recognize the speakers after they are plugged in.
● The USB port Isnotfunctiomng,
+ Refer to’’lfthe USBport does notworkonpage12
to get the USB port functioning correctly.
● Anon-shielded (lowspeed type) USBcord lsbelng used.
+ Usethecord that comes with thespeakersor usea
shielded USB cord
Music CDs cannot be ●The[Enable digital CDaudio forthis CD-ROM device]
played.
checkbox isnot checked
+ Cllckon thecheckbox, (Refer topage17,)
● If your PC has more than one CD-ROM (DVD-ROM)
drive, the correct drive is not selected for playing music
CDs.
+ Select the CD Music tabin Multimedia Properties and
select the proper playback drwe under the CD-ROM
drive setting. (Refer to page 17,)
18 ENGLISH
Page 19

Power supply
Power consumption
120V AC, 60Hz
30VV
Speakers 77mm full range antimagnetic type
speakers (2)
10Omm antimagnetic type subwoofer (built
in the left speaker)
Power output
<Speakers>
FTC RULE
5.5 watts per channel, Mln RMS at 4
ohms, from 150 Hz to 20,000 Hz, with no
more than 1
YO total harmonic distortion
7 W + 7 W (4 ohms, THD 10% at 1 kHz)
5,5 W + 5.5 W (4 ohms, THD 17. at 1 kHz)
<Subwoofer>
FTC RULE
11 watts, Mm. RMS at 6 ohms, form 40 Hz
to 200 Hz, with no more than 17. total
harmonic distortion
14 W (6 ohms, THD 10% at 100 Hz)
11 W (6 ohms, THD 1% at 100 Hz)
Frequency response
<Speakers>
150 Hz to 20,000
Hz
&u bwoofer>
40 Hz to 200
HZ
Input terminals/sensitwty PHONES” 0.8 V/1500hms, stereo mini-
plug (1)
USB USB Rev.1.0 standard
Output terminals Headphones output: 10 mW+lOmV/16
ohms
Dimensions (w/h/d) 124x279 x219mm
(5xllx8%m)
Weight
Right speaker. 2.4 kg (5 lb 5 OZ)
Left speaker: 2.2 kg (4 lb 14 OZ)
Speaker cord length
1,5 m (59
‘/8 h.)
Supphed accessory USB cord (1.5m) (1)
● Specifications and external appearance are subject to change without
notice.
● Specifications, trade mark and model name are marked on the rear of
the umt.
ENGLISH 19
Page 20

Page 21

REGISTRO DEL PROPIETARIO
Para su conveniencia, registre el ntimero de modelo y numero de serie (en
la parte trasera de su aparato) en el espacio a continuation.
Constiltelos cuando Ilame a su tienda de Aiwa en caso de tener problemas,
Ntim. de modelo
Ntim. de serie
~ SC-UC78
ESPANOL 1
Page 22

. Esta unidad debera colocarse de forma que w ubicacion o position no obstruya
Ias aberturas de disipacion de calor situadas alrededor del altavoz derecho y
de disipacion de presion acustlca de la parte posterior del altavoz izquierdo.
Deje una holgura de 15 cm desde la parte posterior y superior de la unldad, y
5 cm desde cada Iado.
● No utilice la unidad en lugares extremadamente calidos, fries, polvonentos, ni
htimedos.
En particular, no guarde la unidad
● en un Iugar con gran humedad, como un cuarto de baiio
● cerca de un aparato de calefaccion
● en un Iugar expuesto a la Iuzsolar directs (p.ej., en el interior de un automovil
estacionado al sol, donde la temperature podria aumentar
considerablemente)
● Mantenga Ios casetes, tarjetas magnet leas, y demas materials
magneticamente grabados alejados de Ios altavoces, ya que la information
reglstrada podria borrarse o podria introducirse ruido en Ios casetes.
Utilization del sistema cerca de un televisor
● St Ias imageries de un televisor aparecen distorsionadas, desconecte la
ahmentacion de dicho televleor y, despues de 15 a 30 minutes, vuelva a
conectarla. Si no nota ninguna mejora, aleje el sistema del televisor.
● No coloque Imanes ni objetos que Ios utdicen, como bastidores para audio,
juguetes, etc. cerca del televisor Estos objetos podr~an causar la distortion
magnetica de Ias imageries.
Seguridad
● Paradesconectar el cable deahrnentaclon de CA, tlredesu enchufe, No tire
nunca del propio cable,
● Cuando novaya a utilizarel sistemadurante mucho tiempo, desconectele el
cable de alimentacion de CA.
Si ocurre cuaiqu!er problems, desconecte el cable de alimentaclon de CA y
sohcite Ios servlclos de personal cuahficado solamente.
■ Parte 15B, Clase B de la FCC
AVISO DE LA FCC
Este equipo ha sido probado y se ha probado que cumple con Ios
Iimites de clase B de aparatos digitales de acuerdo con la Parte 15 de
Ias reglas de la FCC. Estos Iimites se disefiaron para dar una
protection razonable contra interferencias peligrosas en una
instalacion residential,
Este equipo genera, utiliza y puede generar energ(a de frecuenclas
de radio y, si nose instala y utiliza de acuerdo con Ias instrucciones,
puede provocar interferencias peligrosas en Ias radlocomunicaciones.
.% embargo no existe ninguna garantfa de que no se produzcan
interferencias en la recepcion de radio o television, 10 que puede
determlnarse conectando y desconectando el equipo. Se recomienda
al usuario probar a corregir la interferencia tomando una de Ias
siguientes medidas:
– Camble la orientation o vuelva a mstalar la antena receptors.
– Aumente la separation entre el equipo y el receptor.
– Conecte el equipo en un tomacorriente con un circuito diferente
del receptor.
– Consulte con su tlenda o un tecnlco con experiencia en radio/TV
para solicitar su ayuda.
PRECAUTION
Las modiflcaciones y aJustes de este producto que no han sido
autorizadas a titulo expreso por el fabricate pueden anular el derecho
o autoridad del usuario para hater funclonar este producto.
Eiia
● Wmdows@95y Windows@98son marcas comerciales de Microsofl Corporation
registradas en EE.UU. y otros pak+es.
● Los nombres de compafiias y productos menclonados aqui son marcas
comerciales o registradas de sus respectivos propietarios.
2 ESPANOL
Page 23

iNDICE
ACERCADE USB
PRECAUCIONES ................................................................................... 2
ACERCA DE USB .................................................................................. 3
CARACTERiSTICAS .............................................................................. 4
NOMENCLATURE DE LAS PARTES .................................................... 5
CONEXIONY AJUSTES ........................................................................ 6
Antes de conectar Ios altavoces a su PC . 6
Conexlon delosaltavoces . 8
INSTALACION DE LOS CONTROLADORES
DE DISPOSITIVOS USB ........................................................................ 9
Verification delalnstalacion ......................... . .. .. ... ... ..............11
Sielpuerto USBnotrabaja ..,..,.,., . .. ..............................................l2
Cuando nose visualice el controlador de bus ser!e universal
ocuando nose inlciela lnstalacion delcontrolador dedlsposltivo ... 13
UTILIZATION DE LOS ALTAVOCES ................................................... 14
OPERACION ........................................................................................ 15
(l) Utilizaclon delpuerto USBpara audio,.,..., ...... .. . .. ... ... .. 15
(2) Reproduction de discos compactos de muslca utilizando
elpuerto USB . ...... ...................................... . 17
SOLUCION DE PROBLEMAS ............................................................. 18
CUIDADOS ........................................................................................... 18
ESPECIFICACIONES ........................................................................... 19
USBesla abreviaturade Unwersal Serial Busbuss erieuniversal. Un
USB es una mterfaz de alta velocidad para conectar facllmente un PC y
dlspositivos perifericos.
El USB posee Ias caracter~stlcas slgwentes.
● Con un cable USB pueden conectarse varies perifericos.
● Las velocldades detransferencla dedatos pueden Ilegara 12 Mbps,
● Los penferlcos podran conectarse mcluso con la allmentacion del PC
conectada (conexlon en caliente).
● Utllizando unconcentrador USB, en un solo PCpodran conectarsehasta
127 penfericos.
Requisites para conectar estos altavoces am PC a traw%
de un USB
para conectar estos altavoces a un PC a traves de unn USB, se requlere
unPCcon puerto USBy Windows@98. Elpuerto USBtendraqueestar
adecuadamente configurado.
Para mas Informaclon, consulte al dlstribuidor o al fabricate si tat PC
es compatible o no con audio USB.
Notas acerca de la utilization de estos altavoces con un USB
● Paraconectar estosaltavoces aun PC mediante unUSB, utlhceel cable
USB summistrado o un cable USB de tlpo bhrrdado (tl po de alta velocldad).
● Despues de haber conectado Ios altavoces a su PC, este tardara unos
diezsegundos enreconocerlos, Hastaque sereconozcan losaltavoces,
evlte desenchufar el cable USB o desconectar la ahrnentaclon de Ios
altavoces,
ESPANOL
3
Page 24

CARACTERkTICAS
● Provisto de entradas de audio USB y analogical
● Sistema de graves dinamicos
● Sistema QSOUND
● Sistema de altavoz delsntero de 180°
● Sonido de alta potencia con altavoces de 5,5 W + 5,5 W y
de
subgraves activo incorporado con 11 W
cSistema de graves dinamicos>
Cavidad (A)
Puerto Conducto Unidad altavoz
El altavoz de subgraves adopta un sistema de graves dinamicos en el que
el puerto, el conducto, y la cavidad de aire (A) forman un filtro de paso de
banda acktico frente a la cavidad de aire (B).
Gracias a esta estructura, el Iimite de reproduction de graves se amplia, y
se reducen Ios sonidos de frecuencia superior a la de la gama media.
Esto permite el que la unidad reproduzca sonido de graves profundos,
Cavidad (B)
<Sistema (MOUND>
El sistema QSOUND es un sistema de sonido perimetrico delantero que
produce sonidos de realismo virtual (campo acktico estereosc6pico), Esto
se Iogra procesando Ias components direccionales de Ios sonidos con el
proc&ador QSOUND,
Altavoz izquierdo.
m : Campo acustico sin efecto QSOUND
Iwnf : Campo acustico con efecto QSOUND
- Altavoz derecho
4 ESPANOL
Page 25

<Sistema de altavoz delantero de 180°>
Este sistema de altavoces se caracteriza por el sistema delantero de 180°
con altavoces unidireccionales orientados hacia adentro con un angulo de
45°. Usted podra obtener el efecto estereo optimo no solamente situado
directamente delante de Ios altavoces, sino tambien aunque se encuentre
fuera de la Iinea central entre Ios altavoces.
Efecto estereo con un sistema
de altavoces conventional
mm.
Efecto estereo con el sistema de
altavoz delantero de 180° Alwa
—
== : Zona de escucha del estereo
NOMENCLATURE DE LAS PARTES
Altavoz izquierdo
Panel posterior del altavoz derecho
~1 Altavoz de subgraves
incorporado -
@ Cable de altavoz
@ Indicador de alimentacion
(POWER)
@ Interrupter de alimentacion
(POWER)
( -ON/~~ STANDBY)
@ Boton de refuerzo del sonido
(QSOUND)
@ Control de volumen (VOLUME)
Altavoz derecho
@ Toma para auriculares (O)
@ Control de volumen del altavoz
de subgraves (SUBWOOFER)
@ Puerto del bus serie universal
(USB)
@ Cable de entrada (INPUT
PHONES)
@ Toma de salida para el
izquierdo (L SP OUT)
@ Cable de alimentacion de CA
dkWOZ
ESPANOL
5
Page 26

CONEXION Y AJUSTES
Antes de conectar Ios altavoces aw PC
Antes de conectar Ios altavoces a su PC a traves de un puerto USB,
compruebe si el puerto USB esta adecuadamente cordigurado.
1
Conecte la alimentacion de su PC y espere a que se inicie
Windows@98.
2
Haga clic en el boton Inicio y seleccione el Panel de control
(Fig. 1).
Haga clic.
Fig. 1
s Haga doble clic en el icono de Sistema (Fig. 2).
clic.
Q Haga clic en la ficha Administrador de dispositivos de
Propiedades de Sistema (Fig. 3).
6 ESPAfiOL
Fig. 3
Page 27

s Haga clic en [+] a la izquierda de Controlador de bus serie
universal y verifique si se visualizan Controlador universal
de host a USB y Concentrator de raiz USB (Fig. 4).
Si estos dos controiadores no se visualizan, consulte la pagina 12, “Si
el puerto USB no trabaja”.
Verifique.
Fig. 4
ESPANOL
7
Page 28

COiVEX/O/V YAJUSTES
Conector B en serie
‘A4
Cable lNPUT—
PHONES
(entrada)
— Cable USB
(suministrado)
Parteposteriordel Parteposteriordel
altavoz derecho
b?
w
>.
a
+
~+~
altavoz izquierdo
ble de altavoz
Cable de
aiimentacion tomacorriente
a un
F
a la toma para
auriculares
Conexion de Ios altavoces
Para utilizar el puerto USB habra que configurarlo con el PC. Conecte Ios
altavoces al puerto USB despues de haber comprobado si el puerto esta
adecuadamente configurado, como se indica en la pagina 6.
6
Conecte el altavoz izquierdo al altavoz derecho.
● No conecte mas que el cable procedente del altavoz izquierdo a la
toma L SP OUT del altavoz derecho, ya que de 10contrario podria
dahar estos altavoces,
● Conecte el cable del altavoz antes de enchufar el cable de
alimentacion en un tomacorriente,
7
Conecte el altavoz derecho a su PC o a otro dispositivo de
reproduction.
Si la salida de la fuente de audio es monoaural
Fije un adaptador de clavija (monoaural ++ estereo) adquirido en un
establecimiento del ramo al cable de entrada para auriculares (INPUT
PHONES). De lo contrario, el altavoz derecho no emitiria sonido,
Cerciorese de que el cable USB y el cable de entrada (INPUT PHONES)
hayan quedado completamente insertados,
Si solamente quedasen parcialmente insertados se podr[a producir
un mal funcionamiento.
Enchufe el cable de alimentacion en un tomacorriente.
8
8 ESPANOL
PC equipado con
Duerto USB
9
Gire el control VOLUME del altavoz derecho completamente
hacia la izquierda y presione el interruptor POWER ( ~ ON).
Page 29

INSTALACION DE LOS CONTROLADORES DE DISPOSITIVOS USB
Si el puerto USB no se habia utilizado antes
Si esta es la primers vez que va a conectar un periferico al puerto USB,
realice Ios pasos 10 a 24 para instalar Ios controladores de dispositivos
siguientes: el Dispositivo USB Composite, el Dispositivo de interfaz humana
USB, y el Dispositivo de audio USB, Si ha actualizado a Windows@98
desde Windows@95, necesitara su CD-ROM de Windows”98.
Si Windows@98 vino instalado en su PC, el contenido de Windows@98 estara
copiado en su disco duro, y no necesitara el CD-ROM de Windows@98
para instalar Ios controladores.
10Despues de que se haya detectado el nuevo hardware,
1 I Seleccione “Buscar el mejor controlador para su dispositivo
(Se recomienda)” y haga clic en el boton Siguiente.
1 z Seleccione “Unidad de CD-ROM”, inserte el CD-ROM de
Windows@98 en la unidad, y haga clic en el boton Siguiente.
Si Windows@98 esta preinstalado en su PC, haga simplemente clic en
el boton Siguiente.
13 Haga ciic en el boton Siguiente.
I o Haga clic en e! boton Finalizar.
Despues de la instalacion de Dispositivo USB Composite, se iniciara
la instalacion para Dispositivo de interfaz humana USB.
Is En la pantalla que aparecera despues de haberse detectado
el nuevo hardware, haga clic en el boton Siguiente.
16 Seieccione “Buscar el mejor controlador para su dispositivo
(Se recomienda)” y haga clic en el boton Siguiente.
1 T Seleccione “Unidad de CD-ROM” y haga clic en el boton
Siguiente.
Si Windows@98 esta preinstalado en su PC, haga simplemente clic en
el boton Siguiente.
18 Haga clic en el boton Siguiente.
.
-
I!!l
Fig. 5
~~agac,ic,
1 g Haga clic en el boton Finalizar.
Despues de la instalacion de Dispositivo de interfaz humana USB, se
iniciara la instalacion para Dispositivo de audio USB.
.ESF’A$iOL
9
Page 30

lNSTALACIONDELOS CONTROLADORES DE DISPOSITIVOS USB
En la pantaila que aparecera despues de haberse detectado
20
e! nuevo hardware, haga clic en el boton Siguiente.
21 Seleccione “Buscar el mejor controlador para su dispositivo -
(Se recomienda)” y haga clic en el boton Siguiente.
22 Seleccione “Unidad de CD-ROM” y haga clic en el boton
Siguiente.
Si Windows@98 esta preinstalado en su PC, haga simplemente clic en
ei boton Siguiente.
23 Haga clic en el boton Siguiente.
24 Haga clic en el boton Finalizar (Fig. 6).
Habra finalizado la instalacion para el Dispositivo de audio USB
Esto completa la instalacion de Ios controladores para el Dispositivo USB
Composite, el Dispositivo de interfaz humana USB, y el Dispositivo de
audio USB.
Alaunos de estos ~asos tweden ser diferentes Para la version actuaiizada
de-Windows@98. En tal case, consulte al fabricate de su PC.
i ().ESI?A/iOL
Fig. 6
~Haga clic,
Page 31

Verification de la instalacion
Verifique si Ios tres controladores de dispositivos estan correctamente
instalados.
25 Realice Ios pasos 2 a 4 de la pagina 6, “Antas de conectar Ios
altavoces a su PC”.
26 Haga clic en la ficha’ Administrator de dispositivos de
Propiedades de sistema. Haga clic en [+] de la izquierda de
“Dispositivos de sonido, video y juegos”, “Dispositivo de
interfaz humana”, y “Controlador de bus serie universal”, y
compruebe si se visualizan Ios tres controladores instalados
(Fig. 7).
!3 * Cnrtmladm de bus serieuniversal
~
Contmladm unwersal de host Irkl 82371AB/E E PCI a LK B
Disposltivo USE Composite
Haga clic
en [+].
‘&
El @ Dispositivos de inkrfaz humana
~* Dispoxitivo d~ control del consumidor compatible ,ccmHID
~+fi Dispositivo de interlaz humana USE
Fig, 7
De esta forma habran finalizado Ias conexiones y Ios ajustes necesarios
para utilizar el puerto USB.
ESPAriOL 11
Page 32

INSTALACION DE LOS CONTROLADORES DE DISPOSITIVOS USB
Si el puerto USB no trabaja
Si a la izquierda de un controlador de dispositivo USB se visualiza cualquiera
de Ios s(mbolos [?], [!], o [x], dicho controlador no estara correctamente
instalado (Fig. 8).
Cuando suceda esto, realice Ios pasos indicados a continuation para quitar
o reinstalar un controlador de dispositivo para el que se visualice [?], [!], o
[x].
[’2], [!], 0 [x]
1 Seleccione elcontrolador dedispositivo USBquevisuaIice
Haga clic.
Fig. 8
Seleccione
[?1,[!1,o [xI (Fig. 8) Y haga clic en el boton Quitar.
2
Aparecera el cuadro de dialogo de Confirmar la eliminaci6n
del dispositivo. Haga clic en el boton Aceptar.
~ HagaClic,
Fig. 9
3
Reinicie Windows@98.
4
El controlador de dispositivo se instalara automaticamente y
la instalacion finalizara despues de que haya aparecido el
Asistente para agregar nuevo hardware.
Si se visualiza la pantalla Inserte el disco, inserte el CD-ROM
Wndows@98 como indicara dicha pantalla y haga clic en el boton
Aceptar.
El controlador de dispositivo USB se instalara automaticamente y la
instalacion se habra completado.
5
Una vez completada la instalacion, realice Ios pasos de la
pagina 6, “Antes de conectar Ios altavoces a su PC”, y
utilizando la pantalla visualizada en el paso 5, compruebe si
se han instalado Ios controladores de dispositivos Controlador
universal de host a USB y Concentrator de raiz USB.
Realice Ios pasos 10a 24 de Ias paginas 9 y 10, “INSTALACION DE
CONTROLADORES DE DISPOSITIVOS USB,
12 ESPAfiOL
Page 33

Cuando no se visualice el controlador de bus serie universal
o cuando no se inicie la instalacion del controlador de
dispositivo
Cuando no este visualizandose el Controlador de bus serie universal detras
de la ficha Administrador de dispositivos de Propiedades de sistema (Fig.
10), o cuando no se inicie la instalacion para un controlador de dispositivo,
es posible que el puerto USB de su PC este inhabilitado. Habilite el puerto
utilizando la utilidad de configuration (configuration del BIOS, configuration
de CMOS, etc.) para cambiar Ios ajustes del hardware de su PC.
Para mas detalles, consulte el manual de su PC o pongase en contacto
con el fabricate de su PC.
Despues de haber habilitado el puerto USB, cuando reinicie su PC,
aparecera el Asistente para agregar nuevo hardware. Despues de esto,
consulte el paso 4 de la pagina 12, “Si el puerto USB no trabaja” , para
instalar Ios controladores de dispositivos USB.
El controlador de bus serie universal no esta visualizado.
Fig. 10
EsPAfloLi 3
Page 34

UTILIZATION DE LOS ALTAVOCES
3
4
Ubicacion de Ios altavoces
● No coloque Ios altavoces cerca de imanes, televisors, altavoces, ni
demas dispositivos magneticos.
● En la parte posterior del altavoz izquierdo hay un conducto de a[tavoz
de subgraves. Cerciorese de que la parte posterior del altavoz este a
5 cm por 10menos de paredes u otras obstrucciones.
1
Presione el interruptor POWER (~ ON) para conectar la
alimentacion de Ios altavoces.
El indicador POWER se encendera.
2
Inicie la reproduction en la fuente de audio conectada.
● Para reproducer sonido utilizando el puerto USB, vaya a la pagina
siguiente.
● Consulte el manual de instrucciones de la fuente de audio conectada.
Ajuste el volumen.
3
Ajuste el volumen del dispositivo de reproduction y el de Ios altavoces.
El control VOLUME ajustara simultaneamente el vdumen del sonido
que entra en el conector USB o la entrada de cable de entrada (INPUT
PHONES),
4
I
Ajuste el volumen para el aitavoz de subgraves.
El control de volumen SUBWOOFER ajusta el volumen del sonido de
baja frecuencia. Normalmente debera dejarse en el centro.
● El sonido procedente de Ios auriculares no se vera afectado por el
ajuste del volumen del altavoz de subgraves.
Para disfrutar de sonido con presencia todavia mas acentuada:
5
Presione el boton CK.OUND.
Cuando active QSOUND, el sonido podra distorsionarse debido al exceso
de entrada. Reduzca el volumen del equipo conectado para disminuir el
nivel del volumen del sonido,
14 ESPAfiOL
Utilization de auriculares
Inserte la clavija (miniclavija) de Ios auriculares en la toma (_?(auriculares).
Despues de la escucha
Desconecte la alimentacion del equipo conectado y despues presione el
interruptor POWER para desconectar la alimentacion de Ios altavoces.
Page 35

OPERACION
(1) Utilization del puerto USB para audio
Si su PC ya esta configurado para utilizar un dispositivo multimedia
conectado al puerto USB, podra saltar Ios pasos para instalacion de
controladores de dispositivos y comenzar aqui.
1 Haga clic en el boton Inicio, seleccione Configuration, y haga
clic en Panel decontrol. Haga doble clic en el icono Multimedia
(Fig. 11).
Fig. 11
z Haga clic en la ficha Audio de Propiedades de Multimedia.
Seleccione Dispositivo de audio USB (1 ) del menu Dispositivo
preferido debajo de Fteproduccion (Fig. 12).
Dependiendo de su PC, es posible que se visualice Dispositivo de
audio USB (2).
a Haga clic en el boton Aceptar para completar la configuration.
ESPAfiOL 15
Page 36

OPERAC16V
d Hagaclicen elboton lnicioyseleccione Programas, despues 6
Accesorios, Entretenimiento, y Control de volumen (Fig. 13).
Fig. 13
s Hagaclic en Opciones debajode Altavoz(Fig.14).
“m
Haga clic en
Opciones.
Seleccione Dispositivo de audio USB (1) como Dispositivo
mezclador de la seccion Propiedades (Fig. 15).
De~endiendo de su PC, es ~osible aue se visualice Dispositivo de
audio USB (2).
Seleccione Dispositivo de
audio USB (1).
Fig. 15
7
Haga clic en el boton Aceptar para volver al panel de Altavoces
del paso 5.
8 Realice Ios ajustes de Balance y Volumen a su gusto, y haga
clic en el boton Cerrar p’ara cerrar la ventana.
Esto completara Ios ajustes necesarios para utilizar sus altavoces para
salida de audio.
16 ESPA/iOL
Fig. 14
Si utiliza otras aplicaciones mientras este usando su PC para reproduction,
es posible que se interrumpa el sonido.
Page 37

(2) Reproduction de discos compactos de mkica utilizando
el puerto USB
2
Haga doble clic en la ficha Mfisica de CD de Propiedades de
Multimedia (Fig. 17, paso 2).
Cuando utilice la unidad de CD-ROM (DVD-ROM) para reproducer discos
compactos de musics, cerciorese de verificar Ios ajustes siguientes,
1 Haga clic en ei boton lnicio, seleccione Configuration, y
despues Panel de control. Haga doble clic en et icono
Multimedia (Fig. 16).
Fig. 16
m
Si su PC posee mas de una unidad de CD-ROM (DVD-ROM), ajuste
la unidad de CD-ROM predeterminada para reproducer musics de CD
a la unidad en la que haya insertado Ios discos compactos de musics.
Fig. 17
3
Marque el cuadro de verification Habilitar el CD de sonido
digital para este dispositivo de CD-ROM (Fig. 17, paso 3).
Si este cuadro de verification no esta marcado, no podra reproducer
discos compactos de misica,
4
Haga clic en el boton Aceptar para competer Ios ajustes para
Propiedades de multimedia (Fig. 17, paso 4),
.
.
El
Esto completara Ios ajustes necesarios para reproducer discos compactos
de mtisica,
EsPA/VoL17
Page 38

SOLUCION DE PROBLEMAS
CUIDADOS
Problems
Causa y solution
No hay sonido o este ● La alimentacion de Iosaltavoces no esta conectada.
debil. + Conecte la alimentacion,
es muy
El PC no detects Ios ● El cable USB no esta completamente insertado,
altavoces.
● El control VOLUME esta ajustado al nivel m(nimo.
Aitistelo el volumen.
+
● El cuadro de verification Silencio esta marcado en el
panel de Control de volumen, o el nivel de volumen
ajustado es muy bajo,
+ Si no hay sonido, quite la marca del cuadro de
verification SiIencio. Si el sonido es demasiado debil,
aumente el nivsl del volumen. (Consulte la pagina
16.)
. Debajo de Reproduction de la seccion Sonido de
Propiedades de multimedia, el Dispositivo de audio USB
(1) nose ha seleccionado como Dispositivo preferido.
+ Seleccione el Dlepositivo de audio USB (1) no se ha
seleccionado como Dispoaitivo preferido, (Consulte
la pagina 15.)
+
Cerciorese de que el cable USB este firmemente
insertado. Tenga en cuenta que su PC tardara unos
10 segundos en reconocer Ios altavoces despues de
haberlos conectado.
. El puerto USB no esta funcionando.
+ Consulte “Si el puerto USB no trabaja” de la pagina
12 para hater que el puerto USB funcione
correctamente.
● Esta utilizando un cable USB no blindado (tipo de baja
velocidad).
+ Utilice el cable suministrado con Ios altavoces o un
cable USB blindado,
Noes posible . El cuadro de verification [Habilitar el CD de sonido digital
reproducer discos para este dispositivo de CD-ROM] no esta marcado.
compactos
de musics.
+ Marque este cuadro de verification. (Consulte la
pagina 17.)
● Si su PC posee mas de una unidad de CD-ROM (DVD-
ROM), la unidad corrects no esta seleccionada para
reproducer discos compactos de musics.
+ Seleccione la ficha Mtisica de CD de Propiedades
de Multimedia y elija la unidad para reproduction
aproplada debajo de Unidad de CD-ROM, (Consulte
la pagina 17.)
18 ESPAfiOL
Para Iimpiar el exterior
Utilice un pafio suave Iigeramente humedecido en una solution poco
concentrada de detergence. No utilice disolventes fuertes como alcohol,
bencina, o diluidor de pintura.
Page 39

ESPECIFICACIONES
Alimentacion
Consumo
Altavoces
120 V CA, 60
Hz
30 w
Altavoces tipo antimagnetic de gama
completa de 77 mm (2)
Altavoz de subgraves tipo antimagnetic
de 100 mm (incorporado en et altavoz
izquierdo)
Salida de potencia
<Altavoces>
REGLAMENTO DE LA FTC
5,5 vatios por canal, min., valor eficaz a 4
ohmios, de 150 a 20.000 Hz, con no mas
del 1% de distortion armonica total
7 W + 7 W (4 ohmios, distortion armonica
total 10% a 1 kHz)
5,5 W + 5,5 W (4 ohmios, distortion
armonica total 1% a 1 kHz)
<Altavoz de subgraves>
REGLAMENTO DE LA FTC
11 vatios, mfn., valor eficaz a 6 ohmios,
de 40 a 200 Hz, con no mas del 1% de
distortion armonica total
. 14 W (6 ohmios, distortion armonica total
10% a 100 Hz)
11 W (6 ohmios, distortion armonica total
l%alOO Hz)
Respuesta en frecuencia
<Altavoces>
150 a 20.000 Hz
<Altavoz de su bgraves>
40a 200 Hz
Terminals de entrada/sensibilidad
PHONES: 0,8 V/150 ohmios, miniclavija
estereo (1)
USB: USB Rev. 1.0 estandar
Terminals de salida Salida de auriculares: 10 mW + 10 mW/
16 ohmios
Dimensioned (an/al/prf) 124x 279x 219mm
Peso Altavoz derecho: 2,4 kg
Altavoz izquierdo: 2,2 kg
Longitud del cable de altavoz 1,5 m
Accesorio suministrado Cable USB (1,5 m)
● Las especificaciones y el aspecto externo estan sujetos a cambios sin
previo aviso.
● Las especificaciones, la marca comercial, y el nombre del modelo estan
marcados en la parte posterior de la unidad,
ESPAfiOL 19
Page 40

Page 41

ENREGISTREMENT DU PROPRIETAIRE
Pour la commodite, inscrivez Ie numero du modele et Ie numero de serie
(marques a I’arriere de I’appareil) clans I’espace ci-dessous. Veuil[ez Ies
indiquer quandvous contactezun revendeur Aiwaencas deprobleme.
Node modele
N“ de s&ie
~ SC-UC78
r
I
FRAN~A/S
1
Page 42

PRECAUTIONS
● Lappareil doit &re place de fagon que sa situation ne gene pas Ies orifices de
ventilation de chaleur autour de I’enceinte droite et de ventilation de pression
acoustique a I’arriere de I’encemte gauche
Laissez 15 cm (6 PO.)d’espace hbre a I’arriere et a I’avant de I’appareil et 5 cm
(2 PO.)de chaque c6te.
● N’utilisez pas I’appareil clans des endroits extr6mement chauds, froids,
poussiereux ou humides, En particuher, ne placez pas I’apparell”
● clans une piece humlde telle qu’une sane de bain
. pres d’un chauffage
● clans un endroit directement expose aux rayons du soleil (par ex. clans une
voiture en statlonnement, ou latemperature peut s’clever considerablement).
● Ne laissez pas Ies cassettes, Iescartes magnetlques ou tout autre materiau a
enregistrement magnetlque pres des enceintes, car Ies informatlons
enregistrees peuvent ?+treeffacees ou la bande magnetique parasitee.
Utilisation du systeme pres d’un televiseur
● SI I’Image du televiseur est deformee, mettez-le hors tension et de nouveau
sous tension apres 15a 30 minutes. S’il n’y a pas d’ameliorations, eloignez Ie
systbme d’enceintes du televiseur.
. Ne placez pas d’almants ou d’objets utilrsant des aimants, tels que des
elements audio, des jouets, etc. pres du televiseur. Ils pourralent causer une
distortion magnetlque de I’Image.
Securite
● Pour deconnecter Ie cordon d’alimentation, tlrez-le en Ie tenant par la fiche
d’alimentatlon Ne hrez pas directement
● Si vous n’avez pas hntentlon d’utiliser Ie systeme pendant une Iongue penode
de temps, deconnectez Ie cordon d’alimentabon secteur.
Si un probleme se produit, deconnectez Ie cordon d’ahmentation secteur et
consultez un personnel quahfle pour une reparation.
sur Iecordon.
9 FCC, partie 15B, Classe B
REGLES FCC
Cet apparell a ete teste et Juge conforme aux Iimites des apparek
numerlques de classe B, conformement a la Partie 15 des Regles
FCC. Ces Iimites sent tongues pour fournir une protection ralsonnable
contre Ies interferences nefastes clans une installation residentielle.
Cet appared produit, utilise et peut rayonner une energie de frequence
radio et, s’il n’est pas installe et utilise conformement aux instructions,
peut provoquer des interferences g6nantes pour Ies communications
radio. Mais rlen ne garantit qu’une telle interference ne se produwa
pas clans une installation particuliere. Si cet appareil produit des
interferences gi%antes pour la reception radio ou de television, ce
qui peut se determiner en allumant et eteignant I’appareil, il est
recommande a I’utilisateur d’essayer de corriger cette interference en
appliquant une ou plusleurs des methodes ci-dessous.
Reorientation ou replacement de Iiantenne receptrice.
- Eloignement de l’apparetl du recepteur.
Raccordement de I’appare!l a une prise d’un circuit different de
celui du recepteur.
Consultez Ie revendeur ou un technician radio/television
experiment.
ATTENTION
Les modifications ou ajustements a ce prodult, non expressement
approuvees par Ie fabricant, peuvent annuler Ie droit ou I’autotite de
I’utkateur a faire fonctionner ce produit.
● Windows@95 et Wlndows@98,sont des marques de commerce de Microsoft
Corporation, enregistrees aux Etats-Unlset clansIes autres pays.
● Les noms de compagnle et de produts mentlonnes clans ce document sent des
marquesde commerce ou des marquesdeposeesde Ieur propnetalre respectif.
2 FRAN~AIS
anua SC-UC78U
~oyQs%&
c1
Page 43

TABLE DES MATIERES
APROPOS DE L’INTERFACE USB
PRECAUTIONS ...................................................................................... 2
APROPOS DE L’INTERFACE USB ....................................................... 3
CARACTERISTIQUES ........................................................................... 4
NOMENCLATURE .................................................................................. 5
CONNEXION ET REGLAGES ................................................................ 6
Avant de connecter Ies enceintes a votre ordmateur ,.,,, 6
Connexiondes enceintes .................................................................... 8
INSTALLATION DES PILOTES DE PERIPHERIQUE USB ...................9
Venflcatlon de I’installation 11
Si Ie port USBnefonctionne pas . 12
Quand Ie Contr61eur de bus USB n’est pas affiche ou quand
I’installation du pilote de peripherlque ne demarre pas 13
UTILISATION DES ENCEINTES .......................................................... 14
FONCTIONNEMENT ............................................................................ 15
(1) Utilisatlon du port USB pour I’audio . .. .....15
(2) Reproduction de CD audio en utlhsant Ie port US,.,...,,.,,.,.., ..... 17
GUIDE DE DEPANNAGE ..................................................................... 18
ENTRETIEN .......................................................................................... 18
SPECIFICATIONS ................................................................................ 19
USB est I’abreviation de Universal Serial Bus (Bus en serie universal).
C’est une interface rapide permettant de connecter facilement un ordmateur
et des appareils peripheriques.
12interface USB possede Ies caracterlstiques suivantes:
● Avec un ctible USB, II est possible de connecter divers per[pheriques.
● La vitesse de transfert des donnees peut atteindre jusqu’a 12 Mbps.
● Les peripheriques peuvent &re branches et debranches m~me quand
I’ordinateur est sous tension (hot pluging: branchement “a chaud”).
● En uhlisant un nceud de raccordement (Hub) USB, II est possible de
brancher jusqu’a 127 peripheriques sur un simple ordinateur personnel
(Pc).
Conditions pour la connexion des enceintes a un
ordinateur a I’aide de I’interface USB
Pour connecter ces enceintes a un ordlnateur personnel a I’aide de
I’interface USB, vous devez posseder un ordinateur munl d’un port USB
et de Wmdows@98. Le port USB doit c%reconfigure correctement. Pour
plus d’informations, consultez Ie revendeur ou Ie fabncant de votre
ordmateur pour savoir s’il est compatible avec I’audio USB.
Remarques concernant I’utilisation de ces enceintes avec une
interface USB
● Pour connecter ces enceintes a un ordinateur par Ie port USB, utlllsez Ie
cordon USB mclus ou un cordon USB blinde (a debit eleve).
● Apres avoir connecte Ies encelntes a I’ordinateur: il faudra enwron 10
secondes pour que I’ordmateur Ies reconnaisse. Evitez de debrancher .
[es enceintes ou de Ies mettre hors tension avant qu’elles solent
reconnues
I
FRAN~AIS
3
Page 44

CARACTERISTIQUES
● Equipe avec des entrees USB et analogiques
● Syateme a basses dynamiques
c Systeme QSOU ND
s Systeme d’enceintes avant a 180°
● Enceintes a son haute puissance 5,5 W + 5,5 W et haut-parleur
d’extrt2me grave actif integre de 11 W
cSystbme a basses dynamiques>
Cavite (A)
Ouverture C“onduit
Le haut-parleur d’extreme grave adopte un systeme a basses dynamiques
clans Iequel I’ouverture, Ie conduit et la cavite d’air (A) composent un filtre
passe-bande devant la cavite d’air (B).
Grace a cette structure, la Iimite de reproduction des graves est etendue et
Ies sons superieurs aux frequencies mediums sent reduits, Cela permet au
systeme de reproduire un son grave puissant.
Cavite (B)
Haut-parleur
cSysteme QSOUND>
Le systeme QSOUND est un systeme surround avant qui produit des sons
en realite virtuelle (champ sonore stereoscopique). Cela est realise par Ie
traitement des com~osants directionnels du son avec Ie processeur
QSOUND.
Enceinte gauche -
- Enceinte droite
1-
= : Champ sonore saris effet QSOUND
“- : Champ sonore avec effet QSOUND
4 FRAN~AIS
Page 45

cSysteme d’enceintes avant a 180°>
Ce systeme d’enceintes est muni d’un systeme avant a 18P avec des
haut-parleurs unidirectionnels pointes vers l’interieur avec un angle de 45°.
Vous pouvez obtenir un effet stereo optimal non seulement directement
devant Ies enceintes, mais aussi quand vous &es decentre par rapport
aux enceintes.
Effet stereo avec un systeme
d’enceintes avant a 180° Aiwa
~
=~= : zoneCf’(+coutestereo
Enceinte gauche Enceinte droite
Panneau arriere de l’enceinte droite
@ Haut-parleur d’extr6me grave
integre
@ Cordon de I’enceinte
@ Indicateur d,alimentation
(POWER)
@ Interrupter d’alimentation
(POWER)
(sON/~(!) STANDBY)
@ Touche QSOUND
@ Reglage du volume (VOLUME)
~ Prise de casque d’ecoute (~)
@ Reglage du volume de Ie haut-
parleur d’extr~me grave
(SUBWOOFER)
~ port USB
@ Cordon d’entree (INPUT
PHONES)
@j prise de sortie de l’enceinte
gauche (L SP OUT)
@ Cordon d’alimentation secteur
II
FRAN~AIS 5
Page 46

CONNEXION ET REGLAGE
Avant de connecter Ies enceintes a votre ordinateur
Avant de connecter Ies enceintes a votre ordinateur par le port USB, verifiez
que Ie port USB est correctement configure.
1
Mettez votre ordinateur sous tension et attendez que
Windows@98 demarre.
2
Cliquez sur Ie bouton Demarrer et choisissez Ie Panneau de
configuration (Fig. 1).
Cliquez.
1
Fig.
s Double-cliquez sur l’ic6ne du Systeme (Fig. 2).
Fig. 2
d Cliquez sur I’onglet du Gestionnaire de peripheriques clans
Proprieties Systeme (Fig. 3).
6 FRAN~AIS
Fig. 3
Page 47

s Cliquez sur Ie [+] situe a la gauche de Contr61eur de Bus USB
et verifiez que Contr61eur d’hdte PCI vers USB universel et
Concentrateur USB racine sent affiches (Fig, 4).
Si ces deux contrdeurs ne sent pas affiches, reportez-vous a la page
12, “Si Ie port USB ne fonctionne pas”.
Werif iez
Fig. 4
FRAN~AiS
7
Page 48

CONNEXIONETREGLA GE
Connecter de type B
!
Cordon lNPUT —
PHONES (entree)
— Cordon USB
(fourni)
Connecter de type A
Arriere del’enceinte Arrierede
droite
J@
:4;P
~
I’enceinte gauche
(!!I
] +,~
1$1
4
a la prise de
casque
d’ecbute
~ Cordond’e$e8
Cordon
“alimentation secteur murak
Lecteurde CD portable,
Iecteurde MD portable,
Iecteurde cassette
portable,
ordinateur,carte son,
etc.
E
~
a une prise
Connexion des enceintes
Pour utiliser Ie port USB, il doit 6tre configure par I’ordinateur, Connectez
Ies enceintes au port USB apres vous ~tre assure que Ie port est
correctement configure, comme explique a la page 6.
Connectez I’enceinte gauche a I’enceinte droite.
6
● Ne connectez aucun autre cordon que Ie cordon d’enceinte provenant
de I’enceinte gauche, ala prise L SP OUT de I’enceinte droite; sinon,
Ies enceintes risquent d’~tre endommagees.
● Connectez Ie cordon d’enceinte avant de brancher Ie cordon
d’alimentation secteur sur une prise murale.
7
Connectez I’enceinte droite a votre ordinateur ou a un autre
appareil de lecture.
Si la sortie de la source audio est monaurale
Connectez un adaptateur de ficher en vente clans Ie commerce
(monaural ++stereo) au cordon INPUT PHONES (entree). Sinon, aucun
son ne sortira de I’enceinte droite.
Verifiez que Ie cordon USB et Ie cordon INPUT PHONES (entree) sent
branches completement.
Un mauvais fonctionnement risque de se produire si Ies cordons ne
sent branches que partiellement.
Branchez Ie cordon d’alimentation sur une prise murale.
8
8 FRAN~AIS
au port USB
Ordinateur equipe
d’un port USB
Tournez Ie reglage VOLUME, situe sur I’enceinte droite,
9
completement sur la gauche et appuyez sur I’interrupteur
POWER (~ ON).
Page 49

INSTALLATION DES PILOTES DE PERIPHERIQUE USB
11 Choisissez “Rechercher Ie meilleur pilote pour votre
peripherique. (Recommande)” et cliquez sur Ie bouton
Suivant.
12 Choisissez “Lecteur de CD-ROM”, inserez Ie CD-ROM
Windows”98 clans [e Iecteur et cliquez sur Ie bouton Suivant.
Si Windows”98 a ete preinstall
simplement sur Ie bouton Suivant.
1s Cliquez sur Ie bouton Suivant.
14 Cliquez sur Ie bouton Terminer.
Apres que Peripherique USB composite a ete installe, I’installation de
Peripherique d’interface utilisateur USB commence.
sur votre ordinateur, appuyez
15 Sur I’ecran qui apparait apres que Ie nouveau materiel a ete
detecte, cliquez sur Ie bouton Suivant.
16 Choisissez “Rechercher le meilleur piiote pour votre
peripherique. (Recommande)” et cliquez sur Ie bouton
Suivant.
17 Choisissez “Lecteur de CD-ROM” et cliquez sur [e bouton
Suivant.
Si Windows”98 a ete preinstall sur votre ordinateur, appuyez .
simplement sur Ie bouton Suivant.
18 Cliquez sur ie bouton Suivant.
u
19 Cliquez sur le bouton Terminer.
Apres que I’installation de Peripherique d’interface utilisateur USB est
terminee, I’installation de Peripherique audio USB commence.
FRAN~AIS
9
Page 50

INSTALLATIOIV DES PILOTES DE PERIPHERIWE USB
20 Sur I’ecran qui apparait apres que Ie nouveau materiel a ete
detecte, cliquez sur Ie bouton Suivant.
21 Choisissez “Rechercher Ie meilleur pilote pour votre ~
peripherique. (Recommande)” et cliquez sur Ie bouton
Suivant.
22 Choisissez ‘iLecteur de CD-ROM” et cliquez sur Ie bouton
Suivant.
Si Windows@98 a ete preinstall sur votre ordinateur, appuyez
Ceci conclut I’installation des pilotes Peripherique USB composite,
Peripherique d’interface utilisateur USB et de Peripherique audio USB.
Certaines de ces etapes peuvent 6tre differences pour un version mise a
jour de Windows@98, veuillez consulter Ie fabricant de votre ordinateur.
10 FRANQAIS
Fig. 6
Cliquez.
Page 51

Verification de I’installation
Ill
Verifiez que Ies trois piiotes de peripherique ont ete installes correctement.
Realisez Ies etapes 2 a 4 de la page 6, “Avant de connecter Ies
25
enceintes a votre ordinateur”.
26
Cliquez sur I’onglet Gestionnaire de peripherique clans
Proprieties Systeme. Cliquez sur Ie [+] a la gauche des
“Contr61eurs son, video et ieu”, “Peripherique d’interface
utilisateur” et “Contr61eur de bus USB” et verifiez que Ies trois
pilotes installes sent affiches (Fig. 7).
Cancenkateur U5B racine
~~
Cliquez
sur [+].
Controleur dhok PCI versUSE unwmel Ink H2371HE}EB
R B Per,pher,ques dWerfa.e .Iil,sateur
& Peiipherque de contrtile consommde.t co.forme aw Pe!,ph&iq(~es d,nlerla.e
i&a P@h&ique dhierface utlllsateu[
Ceci conclut la connexion et Ies reglages necessaires pour utiliser Ie port
USB.
+
USE
Fig. 7
utIIIsate.! [HID]
FRAN~A/S i _i
Page 52

INSTALLATION DES PILOTES DE PERIPHtRIWE USB
Si Ie port USB ne fonctionne pas
Si I’un des symboles [?], [!] ou [x] est affiche a la gauche du pilote de
peripherique USB, c’est que Ie pilote n’est pas installe correctement (Fig.
8),
Si cela se woduit, suivez Ies etaues ci-dessous pour effacer et reinstaller
un pilote de periphetique qui affiche [?], [!] ou [xi.
[q, p], C)u [x]
1 Choisissez Ie pilote de peripherique qui affiche [?], [!] ou [x]
(Fig. 8) et cliquez sur Ie bouton Supprimer.
Cliquez,
Fig. 8
Choisissez,
2
La boite de dialogue de Confirmation de la suppression du
peripherique appara~t. Cliquez sur Ie bouton OK (Fig. 9).
~ Cliquez.
Fig. 9
Redemarrez Windows”98.
3
4
Le pilote de peripherique USB est installe automatiquement
et I’installation est terminee apres que I’Assistant Ajout de
nouveau materiel appara~t.
Si I’ecran Inserez une disquette apparait, inserez Ie CD-ROM de
Windows@98 comme indique sur I’ecran et cliquez sur Ie bouton OK.
Le pilote de peripherique est installe automatiquement et I’installation
est terminee.
Une fois que I’installation est terminee, suivez Ies etapes de
5
la page 6, “Avant de connecter Ies enceintes a votre ordinateur”
et en utilisant I’ecran affiche a I’etape 5, verifiez que Ies pilotes
de peripherique Contr61eur d’hbte PCI vers USB universel et
Concentrateur USB racine sent installes.
Suivez ensuite Ies etapes 10a 24 des pages 9 et 10, “INSTALLATION
DES PILOTES DE PERIPHERIQUE USB.
12 FRAN~A/S
Page 53

Quand Ie Contrbleur de bus USB n’est pas affiche ou quand
I’installation du pilote de peripherique ne demarre pas
Quand Ie Contr61eur de bus USB n’est pas affiche sur I’onglet Gestionnaire
de peripherique clans Proprieties Systeme (Fig. 10) ou quand I’installation
du pilote de peripherique ne demarre pas, il est possible que Ie port USB
de I’ordinateur soit desactive. Activez Ie port USB en utilisant un utilitaire
de configuration (configuration BIOS, configuration CMOS, etc.) pour
changer la configuration materielle de I’ordinateur.
Pour plus d’informations, referez-vous au manuel fourni avec votre
ordinateur ou contactez Ie fabricant de votre ordinateur.
Une fois que Ie port USB a ete active, I’Assistant Ajout de nouveau materiel
apparait quand I’ordinateur est redemarre. Referez-vous alors a I’etape 4
de la page 12, “Si Ie port USB ne fonctionne pas”, pour installer Ies pilotes
de peripherique USB.
Le Contr61eur de bus USB n’est pas affiche
Fig. 10
FRANQAIS
13
Page 54

UTILISATION DES ENCEINTES
Installation dea enceintes
● Ne placez pas Ies enceintes pres d’un aimant, d’un televiseur,
d’enceintes ou d’autres objets magnetiques.
● II y a un conduit pour Ie haut-parleur d’extr~me grave a I’arriere de
I’enceinte gauche. Verifiez que I’arriere de cette enceinte se situe a
plus de 5 cm (2 po.) des murs ou d’autres objets.
1
Appuyez sur I’interrupteur POWER (~ ON) pour mettre Ies
enceintes sous tension.
L’indicateur POWER s’allume.
2
Commencez la lecture sur la source audio connectee.
● Pour reproduire des sons a I’aide du port USB, referez-vous a la
page suivante.
● Referez-vous au mode d’emploi de la source audio connectee.
Ajustez Ie volume.
3
Ajustez Ie volume de I’appareil source et ajustez Ie volume des
enceintes. Le reglage VOLUME ajuste simultanement Ie volume du
signal audio provenant du connecter USB et de I’entree du cordon
INPUT PHONES (entree),
4
Ajustez Ie volume du haut-parleur d’extr6me grave.
Le reglage SUBWOOFER (volume du haut-parleur d’extriSme grave)
ajuste Ie volume des signaux basses frequencies. Normalement, il
devrait &re Iaisse au milieu.
● Le signal audio provenant de I’entree du casque d’ecoute n’est pas
affecte par Ie reglage du volume du haut-parleur d’extr~me grave.
Profitez du son avec une presence encore amelioree:
5
Appuyez sur la touche QSOUND.
m
Quand la fonction QSOUND est en service, Ie son peut i?ire deforme si Ie
volume d’entree est trop fort. Diminuez Ie volume sur I’appareil connecte
pour diminuer Ie volume sonore.
14 FRAN~A/S
Utilisation d’un casque d’ecoute
Inserez la fiche (mini-fiche) clans la prise (? (casque d’ecoute),
Apres I’utiiisation des enceintes
Mettez I’appareil connecte hors tension, puis appuyez sur I’interrupteur
POWER Dour mettre hors tension Ies enceintes.
Page 55

FONCTIONNEMENT
(1) Utilisation du port USB pour I’audio
Si votre ordinateur est deja configure pour utiliser un appareil multimedia
connecte au port USB, Ies etapes de I’installation du pilote de peripherique
peuvent &re sautees et vous
1
Cliquez sur Ie bouton Demarrer, choisissez Parametres et
Panneau de configuration. Double-cl iquez sur l’ic6ne
Multimedia (Fig. 11).
pouvez commencer ici.
Fig. 11
z Cliquez surl'onglet Audio clans Proprietes de Multimedia.
Choisissez Peripherique audio USB (1) clans Ie menu
Peripherique par defaut sous Lecture (Fig. 12).
SeIon l’ordinateur, Peripherique audio USB (2) peut &re affiche.
Choisissez
Peripherique audio
USB (l).
Fig. 12
s Cliquez sur Ie bouton OK pour terminer la configuration.
FRAN~AIS
15
Page 56

FONCT/ONNE/WENT
o Cliquez surlebouton Demarrer etchoisissez Programmed, 6
Accessoires, Divertissement et Contr61e du volume (Fig. 13).
Fig. 13
s Cliquez sur Options sous Haut-parleur (Fig. 14).
Fig. 14
Choisissez Peripherique audio USB (1) comme Peripherique
de mixage clans la section des Proprieties (Fig. 15).
SeIon I’ordinateur, Peripherique audio USB (2) peut &re affiche.
7 Cliquez sur Ie bouton OK pour retourner panneau Haut-parleur
de I’etape 5.
8 Ajustez la Balance et Ie Volume comme vous Ie souhaitez et
cliquez sur case de fermeture pour fermer la fen&re.’
Ceci conclut Ies reglages necessaires pour utiliser vos enceintes pour la
sortie audio.
Des coupures clans la sortie audio peuvent se produire si d’autres
applications sent utilisees quand I’ordinateur est utilise pour la lecture.
16 FRANQAIS
Page 57

Quand Ie Iecteur de CD-ROM (DVD-ROM) est utilise pour reproduire des
CD audio, verifiez Ies reglages suivants.
1
Cliquez sur Ie bouton Demarrer, choisissez Parametres et
Panneau de configuration. Double-cliquez sur l’ic6ne
Multimedia (Fig. 16).
2
Double cliquez I’onglet CD -audio clans Proprieties de
Multimedia (Fig. 17, etape 2).
Si votre PC possede plus d’un Iecteur de CD-ROM (DVD-ROM), reglez
Ie Iecteur de CD-ROM par defaut pour la reproduction des CD audio
sur Ie Iecteur ou Ies CD audio seront inseres.
Fig. 17
Cochez la case Lecture numerique pour Ies CD audio sur ce
3
Iecteur CD-ROM (Fig. 17, etape 3).
m
Si cette case n’est pas cochee, Ies CD audio ne peuvent pas &re ‘
reproduits.
111
4
Cliquez sur Ie bouton OK pour terminer Ies reglages pour
Proprieties de Multimedia (Fig. 17, etape 4).
Ceci conclut Ies etapes pour Ie reglage de la lecture de CD audio.
FRAN~A/S 17
Page 58

GUIDE DE DEPANNAGE
ENTRETIEN
Probleme
Cause et solution
Aucun son ou Ie son . Lesencemtes neeontpas soustension
est tres faible. + Mettez-leesous tension.
Le reglageVOLUME est regle sur Ie niveaummimum.
.
+ A}ustezle reglage.
● La caseMuet estcochee sur Iepanneau decontr61e du
volume ou Ie
+ S’II n’y a pasde son, enlevez la coche de la case
Muet, SI Ie son est trop falble, deplacez Ie Iewer du
volume vers Ie haut, (Referez-vous a la page 16).
● Sous Lecture clans la section Audio de Proprieties de
Multimedia, Perlpherique audio USB (1) n’est pas cholei
comme Peripherique par defaut
+ Chowssez Peripher!que aud]o USB (1) comme
Peripherique par defaut (Referez-vous a la page 15.)
Ievlerde volume est regle trop bas
Lesenceintes nesont ● Lecordon USBn’est pascompletement branche
pas detectees psr + Assurez-vous que Ie cordon USB est solldement
I’ordinateur.
branche Notez qu’11faut enwron
10 secondes a
I’ordlnateur pour reconna~tre Ies enceintes apres
qu’elles ont ete branchees
● Le port USB ne fonctionne pas
+ Referez-vous a “Si Ie port USB ne foncbonne pas” a
la page 12 pour le faire fonctionner correctement
● Un cordon USB non-blmde (a falble debit) est utilise
+ Utilisez Ie cordon qul est fourni avec Ies encelntes ou
utilisez un cordon USB blmde,
Les CD
audio ne ● La case [Lecture numenque pour Ies CD audio sur ce
peuvent pas etre IecteurCD-ROM]n’est pas cochee.
reproduits.
+ Cochezla case (Referez-vous a la page 17.)
● Si votreordmateuraplus d’un Iecteurde CD-ROM(DVD-
ROM), Ie Iecteur correct n’est pas cholel pour la lecture
des CD audio
+ Choiwsez I’onglet CD audio clans Proprletes de
Multimedia et choiswsez Ie Iecteur correct avec Ie
reglage du Lscteur de CD-ROM (Referez-vous a la
page 17)
Pour nettoyer Ie coffret
Utilisez un chffon Iegerement impregne dune solution detergence deuce.
N’utilisez pasdesolvant puissant commedel’alcool, du benzeneou un
diluant,
I 8 FRAN~AIS
Page 59

SPECIFICATIONS
E
Allmentatlon 120 V c.a., 60 Hz
Consommatlon
Haut-parleurs
Puissance de sortie
Reponse en frequence
Prises d’entree/sensibility
Prises de sortie Sortie du casque decoute: 10 mW + 10
Dimensions (l/h/p) 124x 279x 219mm
Poids Encemte droite: 2,4 kg
Longueur du cordon d’encemte 1,5 m
Accessoires fournls
30 w saris notification.
2 haut-parleurs haute-fidelite de type
antlmagnetique 77 mm marques a I’arriere de I’apparell.
Haut-parleur d’extr6me grave de type
antimagnetique 100mm (integre a
I’enceinte de gauche)
<Encemtes>
REGLE FTC
5,5 watts par canal, Mm. efficace a 4 ohms,
de 150 Hz a 20000 Hz, avec pas plus de
1% de distortion harmonique totale
7 W + 7 W (4 ohms, D.H,T. 10% a 1 kHz)
5,5 W + 5,5 W (4 ohms, D.H.T. 1% a
1 kHz)
<Haut-parleur d’extr~me grave>
REGLE FTC
11 watts, Min. efficace a 6 ohms, de 40
Hz a 200 Hz, avec pas plus de 1% de
distortion harmonique totale
14 W(60hms, DH,T, 10% a 100 Hz)
11 W (6 ohms, D.H.T. 1% a 100 Hz)
<Encemtes>
150 Hz a 20000
<Haut-parleur d’extr&me grave>
40 Hz a 200
PHONES: 0,8 V/150 ohms, mini-fiche
stereo (1)
USB: Standard USB Rev. 1.0
mW/16 ohms
Enceinte gauche: 2,2 kg
Cordon USB (1,5 m) (1)
+lz
tfz
● Les specifications et I’apparence exteneure sent sulettes a changement
● Les specifications, la marque de commerce et Ie nom du modele sent
FRAN~AIS 19
Page 60

AIWA
CO.,LTD.
8Z-YP5-901 -01
9901 O7AMK-H-D
Printed in China
 Loading...