

Page 1
COMPAQ DISC STiREO SYSTE
ESnREO CON REPRODUaOR DE DISCOS COMPAGOS
STEREO AVEC LEŒUR DE DISQUES COMPACIS
X-MT725
OPERATING INSTRUGIONS
MANUAL DE INSTRUCCIONES
Eh (English)
MODE D'EMPLOI
For assistance and information
call toll free 1-800-BUY-AIWA
(United States and Puerto Rico)
E (Español)
F (Français)
8Z-NFU-903-01
990120AMI-U-9
nc:i
:oMPAcr
alD
DIGITAL AUDICI
Page 2
ENGLISH
WARNING
TO REDUCE THE RISK OF FIRE OR ELECTRIC
SHOCK. DO NOT EXPOSE THIS APPLIANCE TO
RAIN OR MOISTURE.
CAUTION
RISK OF ELECTRIC SHOCK
DO NOT OPEN
“CAUTIONiTO REDUCE THE RISK OF
ELECTRIC SHOCK,
DO NOT REMOVE COVER (OR BACK).
NO USER-SERVICEABLE PARTS INSIDE.
REFER SERVICING TO QUALIFIED
SERVICE PERSONNEL.”
ExplHimtioii ot GiciphiCcil Symbols:
Tl'0 lightning fiRsh with Rirowhescl symbol,
within an fcquilatf;ral triangle, la iniKndf.d tu
«■ 'lifjr; the user lo the presence of unnsulnted
"dar-goroLis vo'tage" witli.n the product's
enclosure that mav oa o: s,,fficient magnitude
to constitute a risk of electric shock fo persons.
Tno exclamation point within an oouilaicial
triangle i.s ntonoed to aiert tno user to the
orescnco ot important opcating and
ma.ntenancR i.servicmgi inst'uctions in the
liteiatuie accom.pr.nying the appliance.
PRECAUTION
Read the Operating Instructions carefully and completely before
operating the unit. Be sure to keep the Operating Instructions
for future reference. All warnings and cautions in the Operating
Instructions and on the unit should be strictly followed, as well
as the safety suggestions below.
Installation
1 Water and moisture — Do not use this unit near water, such
as near a bathtub, washbowl, swimming pool, or the like.
2 Heat — Do not use this unit near sources of heat, including
heating vents, stoves, or other appliances that generate heat.
It also should not be placed in temperatures less than 5°C
(41 °F) or greater than 35°C (95°F).
3 Mounting surface — Place the unit on a flat, even surface.
4 Ventilation — The unit should be situated with adequate
space around it so that proper heat ventilation is assured.
Allow 10 cm (4 In.) clearance from the rear and the top of the
unit, and 5 cm (2 in.) from each side.
- Do not place the unit on a bed, rug, or similar surface that
may block the ventilation openings.
- Do not install the unit in a bookcase, cabinet, or airtight rack
where ventilation may be impeded.
5 Objects and liquid entry — Take care that objects or liquids
do not get inside the unit through the ventilation openings.
6 Carts and stands—When placed
or mounted on a stand or cart, the
unit should be moved with care.
Quick stops, excessive force, and
uneven surfaces may cause the
unit or cart to overturn or fall.
7 Condensation — Moisture may form on the CD pickup lens
when:
- The unit is moved from a cold spot to a warm spot
- The heating system has just been turned on
- The unit is used in a very humid room
- The unit is cooled by an air conditioner
When this unit has condensation inside, it may not function
normally. Should this occur, leave the unit for a few hours,
then try to operate again.
8 Wall or ceiling mounting —The unit should not be mounted
on a wall or celling, unless specified in the Operating
Instructions.
Owner’s record
For your convenience, record the model number and serial
number (you will find them on the rear of your set) in the space
provided below. Please refer to them when you contact your Aiwa
dealer in case of difficulty.
Model No.
Serial No. (Lot No.)
CX-NMT725
SX-NA772
SX-R275
SX-C605
ENGLISH
Electric Power
1 Power sources — Connect this unit only to power sources
specified in the Operating Instructions, and as marked on the
unit.
2 Polarization — As a safety feature, some units are equipped
with polarized AC power plugs which can only be inserted
one way into a power outlet. If it is difficult or impossible to
insert the AC power plug into an outlet, turn the plug over and
try again. If it still does not easily insert into the outlet, please
call a qualified service technician to service or replace the
outlet. To avoid defeating the safety feature of the polarized
plug, do not force it into a power outlet,
3 AC power cord
- When disconnecting the AC power cord, pull it out by the
AC power plug. Do not pull the cord itself.
- Never handle the AC power plug with wet hands, as this
could result in fire or shock.
- Power cords should be firmly secured to avoid being severely
bent, pinched, or walked upon. Pay particular attention to
the cord from the unit to the power outlet.
- Avoid overloading AC power plugs and extension cords
beyond their capacity, as this could result in fire or shock.
Page 3
4 Extension cord —To help prevent electric shock, do not use
a polarized AC power plug with an extension cord, receptacle,
or other outlet unless the polarized plug can be completely
inserted to prevent exposure of the blades of the plug.
5 When not in use — Unplug the AC power cord from the power
outlet if the unit will not be used for several months or more.
When the cord is plugged in, a small amount of current
continues to flow to the unit, even when the power is turned
off.
Outdoor Antenna
1
Power lines — When connecting an outdoor antenna, make
sure it is located away from power lines.
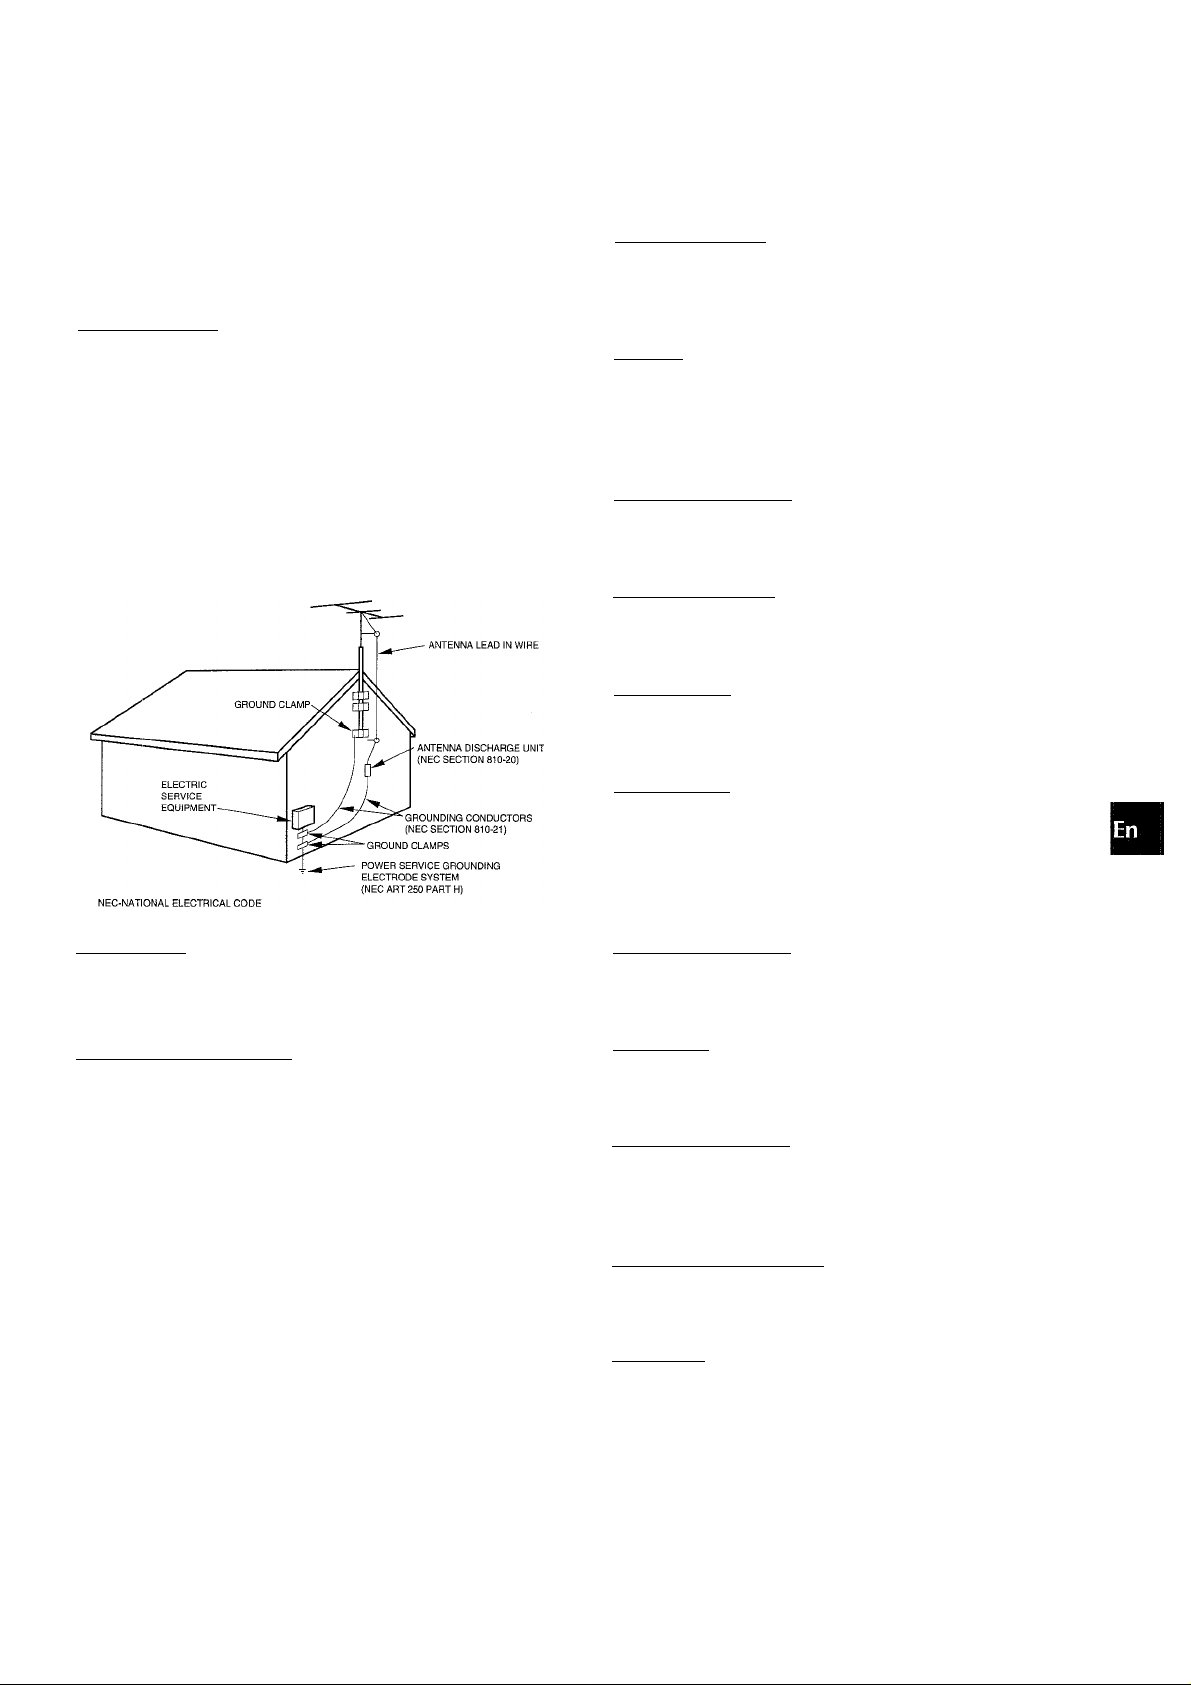
Outdoor antenna grounding — Be sure the antenna system
is properly grounded to provide protection against unexpected
voltage surges or static electricity build-up. Article 810 of the
National Electrical Code, ANSI/NFPA 70, provides information
on proper grounding of the mast, supporting structure, and
the lead-in wire to the antenna discharge unit, as well as the
size of the grounding unit, connection to grounding terminals,
and requirements for grounding terminals themselves.
Antenna Grounding According to the National Electrical Code
PRECAUTIONS
.................................................................2
PREPARATIONS_______________________________
SETTING UP.................................................................... 4
REMOTE CONTROL
BEFORE OPERATION
SOUND
_____________________________________
AUDIO ADJUSTMENTS
RHYTHM PLAY FUNCTION (BEAT MASTER DX)
GRAPHIC EQUALIZER
DSP SURROUND
RADIO RECEPTION
MANUAL TUNING
PRESETTING STATIONS
.......................................................
......................................................
.................................................
.........
..................................................
...........................................................
___________
..........................................................
..............................................
7
7
10
11
15
16
17
17
TAPE PLAYBACK______________________________
BASIC OPERATIONS..................................................... 18
CONTINUOUS PLAY.......................................................19
CD PLAYING__________________________________
BASIC OPERATIONS
PROGRAMMED PLAY................................................... 21
....................................................
20
IVIaintenance
Clean the unit only as recommended in the Operating
Instructions.
Damage Requiring Service
Have the units serviced by a qualified service technician if:
- The AC power cord or plug has been damaged
- Foreign objects or liquid have gotten inside the unit
- The unit has been exposed to rain or water
- The unit does not seem to operate normally
- The unit exhibits a marked change in performance
- The unit has been dropped, or the cabinet has been damaged
DO NOT ATTEMPT TO SERVICE THE UNIT YOURSELF.
RECORDING
BASIC RECORDING
DUBBING A TAPE MANUALLY
DUBBING THE WHOLE TAPE
Al EDIT RECORDING......................................................24
PROGRAMMED EDIT RECORDING
DOLBY PRO LOGIC
ADJUSTING SPEAKER LEVEL BALANCE
PLAY WITH DOLBY PRO LOGIC...................................27
__________________________________
.......................................................
.....................................
.......................................
..............................
22
23
23
25
____________________^______
...................
26
KARAOKE____________________________________
MICROPHONE MIXING.................................................. 23
KARAOKE PROGRAM
CLOCK AND TIMER
SETTING THE CLOCK................................................ 3(3
SETTING THE SLEEP TIMER
SETTING THE TIMER
OTHER CONNECTIONS
CONNECTING OPTIONAL EQUIPMENT
LISTENING TO EXTERNAL SOURCES
GENERAL
_______________________
.................................................
29
____________________________
...................................
...................................................
3(3
31
_________________________
.......
.......
................
.................
32
32
^____________
CARE AND MAINTENANCE......................................... 33
TROUBLESHOOTING GUIDE.........................................33
SPECIFICATIONS
PARTS INDEX
.........................................................
................
................................ Back cover
34
ENGLISH 3
Page 4
PREPARATIONS
i. I
The DOLBY PRO LOGIC system which is the biggest feature of
this stereo system provides you with muiti channei sound in your
home.
Complete setting and connection of the main unit, suppiied
speakers, yourTV and video equipment according to the foiiowing
procedure.
Check your system and accessories
NSX-MT725
CX-NÌVIT725 Compact disc stereo cassette receiver
SX-NA772 Front speakers
SX-R275 Surround speakers
SX-C605 Center speaker
Remote controi AM antenna FM antenna
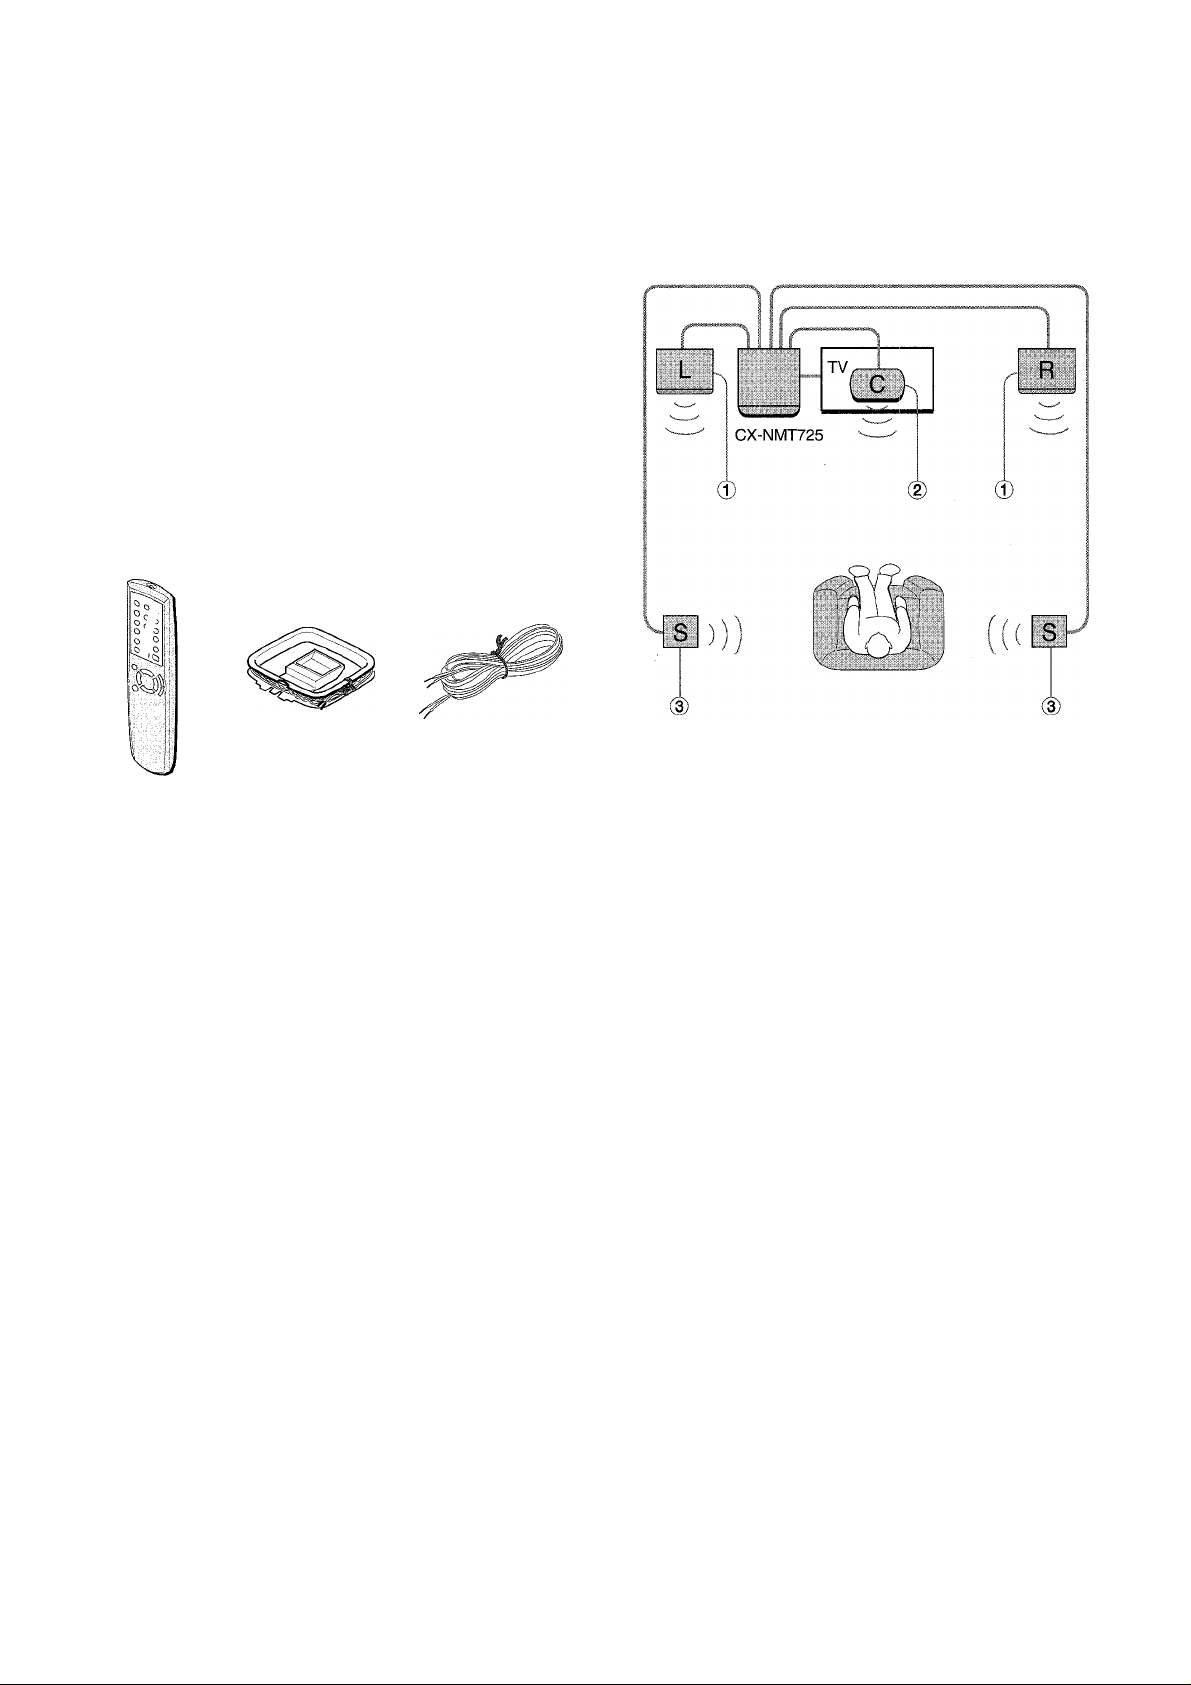
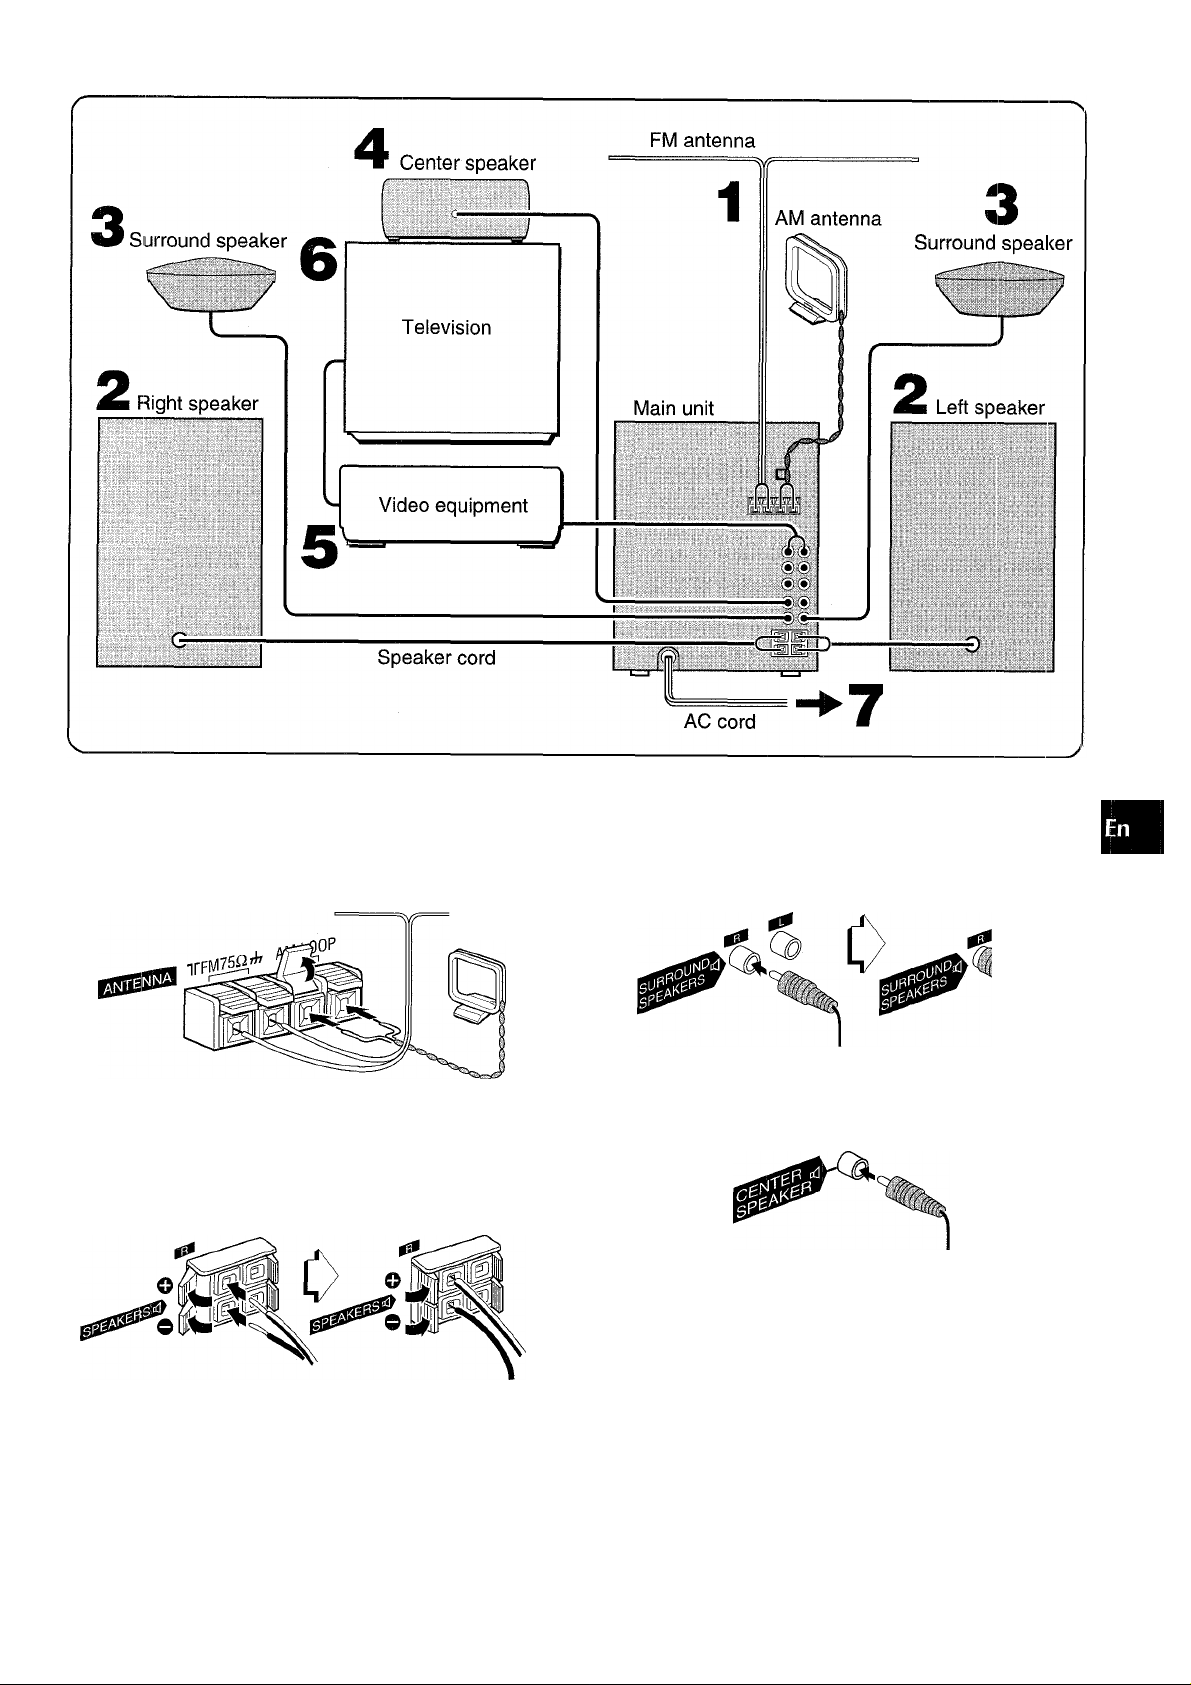
POSITIONING THE SPEAKERS
To achieve the optimum effects obtainabie with the DOLBY PRO
LOGiC system, it is important to position the speakers properly.
Refer to the fqllowing illustration to find out the best iocation in
your room.
Operating instructions, etc
® Front speakers
(D Center speaker
Position in the center of the two front speakers. In addition,
position on or beiow the TV set, if connecting a TV set to the
unit.
(D Surround speakers
Piace the surround speakers directly to the side of or slightly
behind the listening area. Aiign them horizontaily, about 1
meter (3.2 feet) above ear height.
' No sound is heard from the center and surround speakers when
the DOLBY PRO LOGiC and the SURROUND system are set
to off.
' The center speaker sounds when the DOLBY PRO LOGiC is
set to on.
CONNECTIONS
Before connecting the AC cord
The rated voitage of your unit shown on the rear panei is
120 V AC. Check that the rated voltage matches your local
voltage.
IMPORTANT
Connect the speakers, antennas, and all optional equipment first.
Then connect the AC cord.
4 ENGLISH
There are no differences between the front speakers. Both
speakers can be connected as L (ieft) or R (right).
Page 5
(A
Z
o
H
4
SC
4
a.
1 Connect the supplied antennas.
Connect the FM antenna to FM 75 Cl terminals and the AM
antenna to AM LOOP terminal.
FM antenna
AM antenna
2 Connect the right and left speakers to the main
unit.
Connect the right speaker cord to SPEAKERS R terminals,
and left to SPEAKERS L terminals.
The speaker cord with the white stripe should be connected
to O terminal and the black cord to O terminal.
3 Connect the surround speakers to the main unit.
There are no differences between the surround speakers,
Connect each surround speaker cord to SURROUNDi
SPEAKERS R or L terminal.
Connect the center speaker.
Connect the center speaker cord to CENTER SPEAKER
terminal.
5 Connect the video equipment.
Connect VIDEO/AUX jack of this unit to the audio output jack
of the video equipment with an optional audio connecting cord.
6 Connect the Television to the video equipmcmt.
Refer to the Operating Instructions of the connected equipment
for details.
7 Connect the AC cord to an AC outlet.
• The game Demo will begin when the AC cord is plugged
into an AC outlet. See page 9 “Game Demo” for details.
ENGLISH 5
Page 6
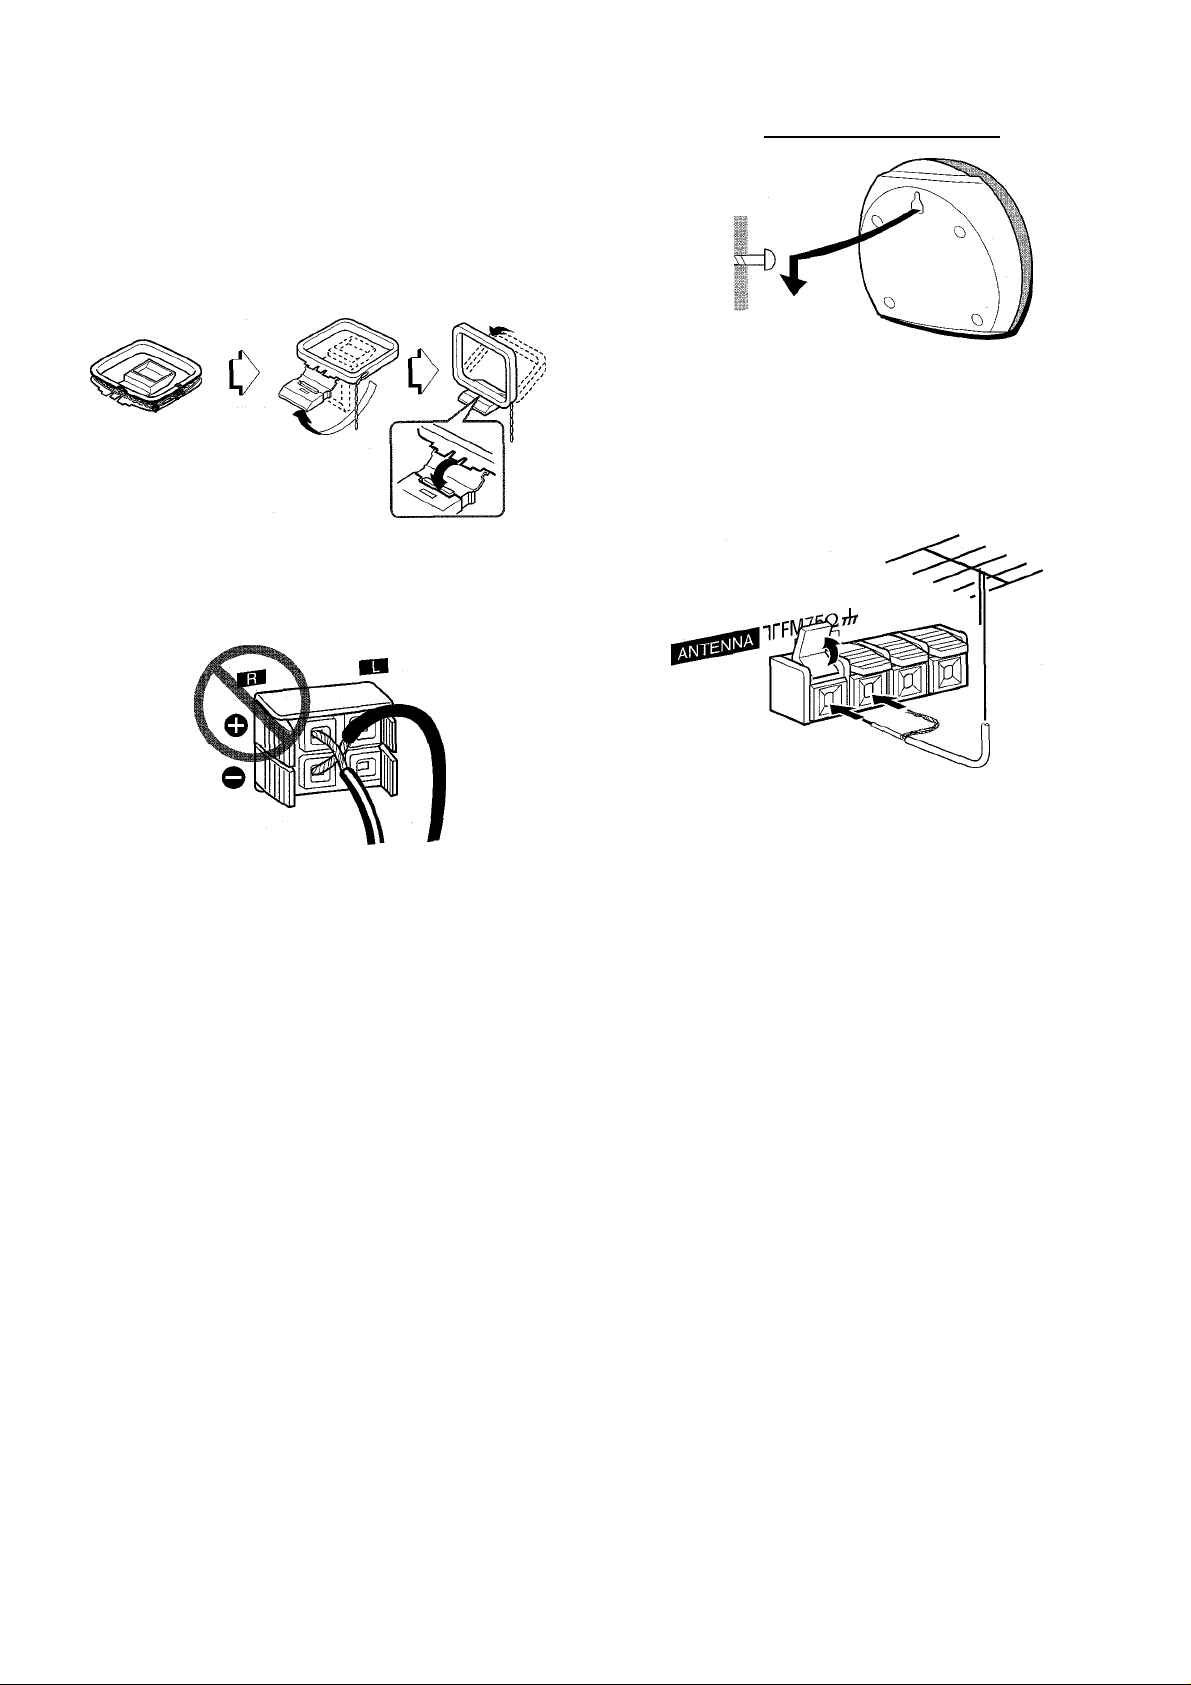
To position the antennas FM feeder antenna:
Extend this antenna horizontally in a T-shape and fix its ends to
the wall.
AM antenna:
Position to find the best possible reception.
To stand the AM antenna on a surface
Fix the claw to the slot.
• Be sure to connect the speaker cords correctly. Improper
connections can cause short circuits in SPEAKERS terminals.
To mount the surround speakers on the waii
Mount each speaker on a soot that can hold its weight.
CONNECTING AN OUTDOOR ANTENNA
For better FM reception, use of an outdoor antenna is
recommended.
Connect the outdoor antenna to FM 75 £î terminals.
• Do not leave objects generating magnetism, such as credit
cards, near the speakers, as these objects may be damaged.
• Do not bring the FM antenna near metal objects or curtain rails.
• Do not bring the AM antenna near other optional equipment,
the stereo system itself, the AC cord or speaker cords, since
noise will be picked up.
• Do not unwind the AM antenna wire. .
To connect other optional equipment page 32.
6 ENGLISH
Page 7
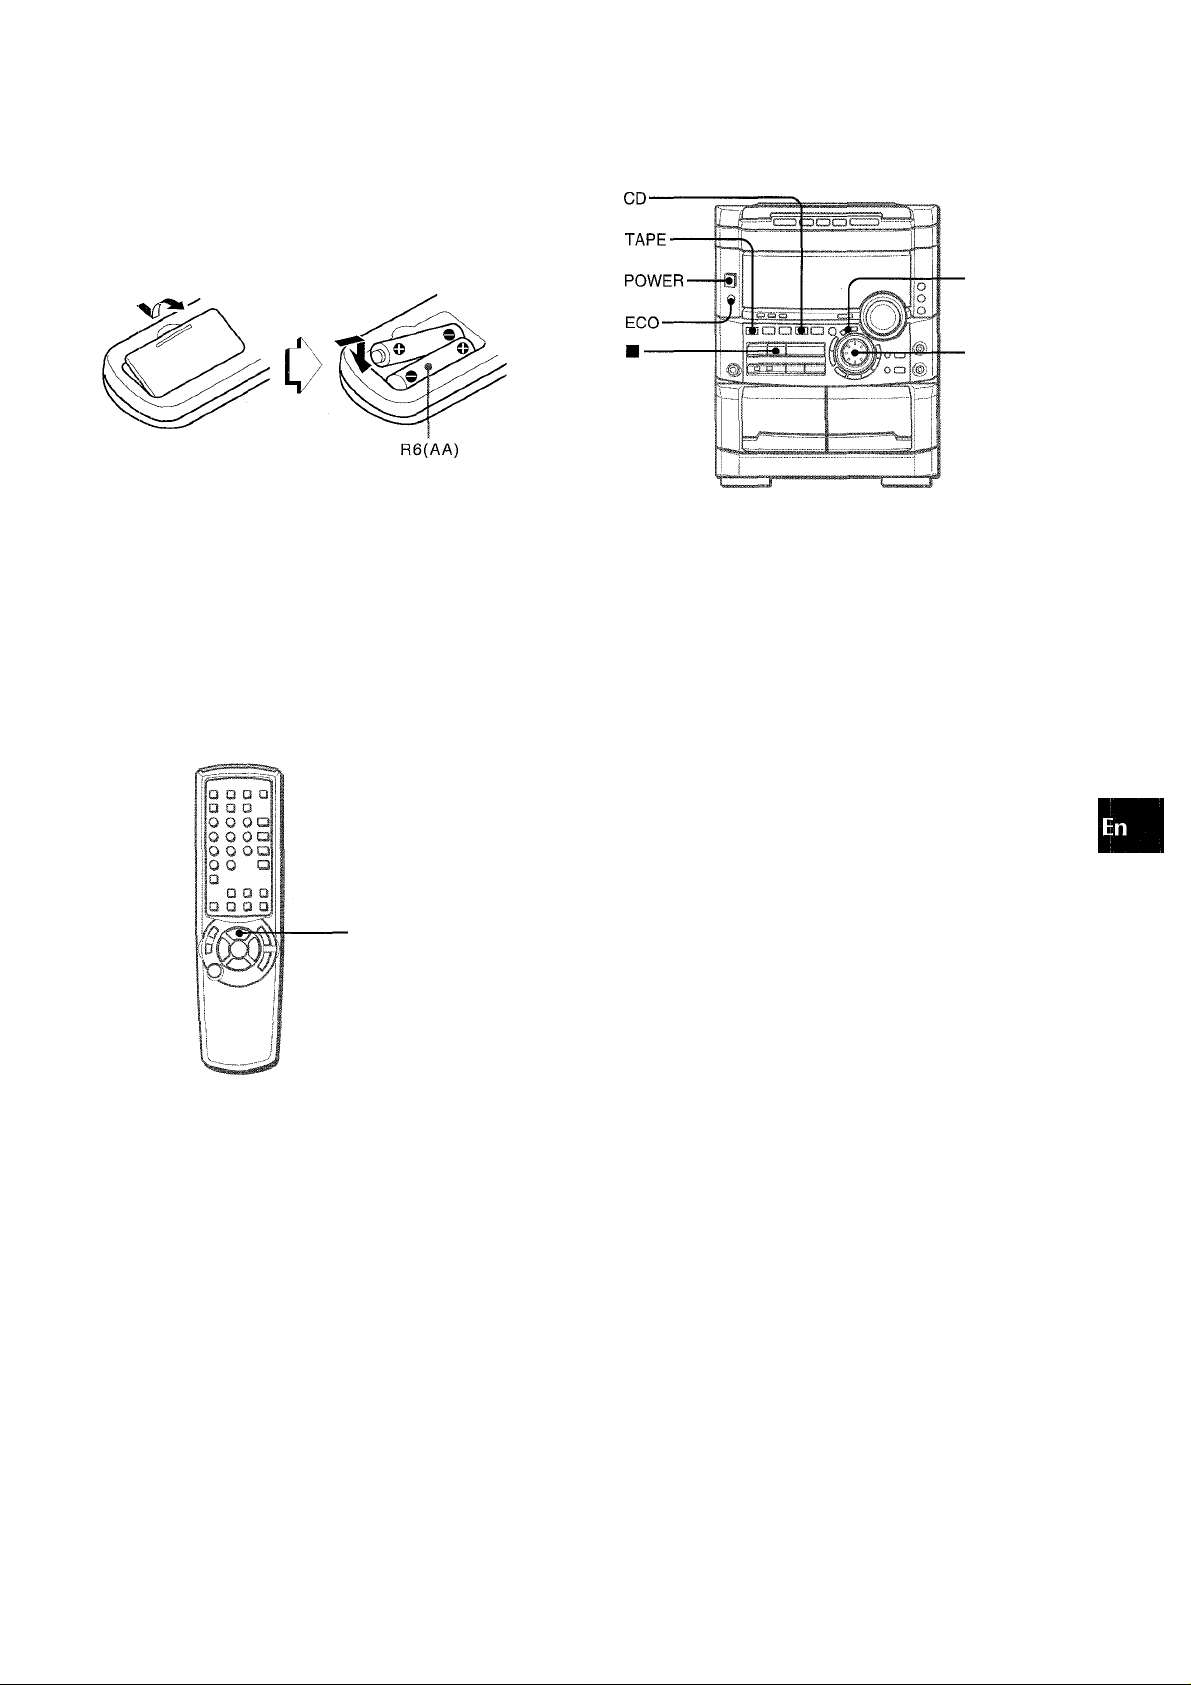
Inserting batteries
Detach the battery cover on the rear of the remote control and
insert two R6 (size AA) batteries.
When to replace the batteries
The maximum operational distance between the remote control
and the sensor on the main unit should be approximately 5 meters
(16 feet). When this distance decreases, replace the batteries
with new ones.
Using the remote control
The instructions in this manual refer mainly to the buttons on the
main unit. Buttons on the remote control with the same names
as those on the main unit can be used as well.
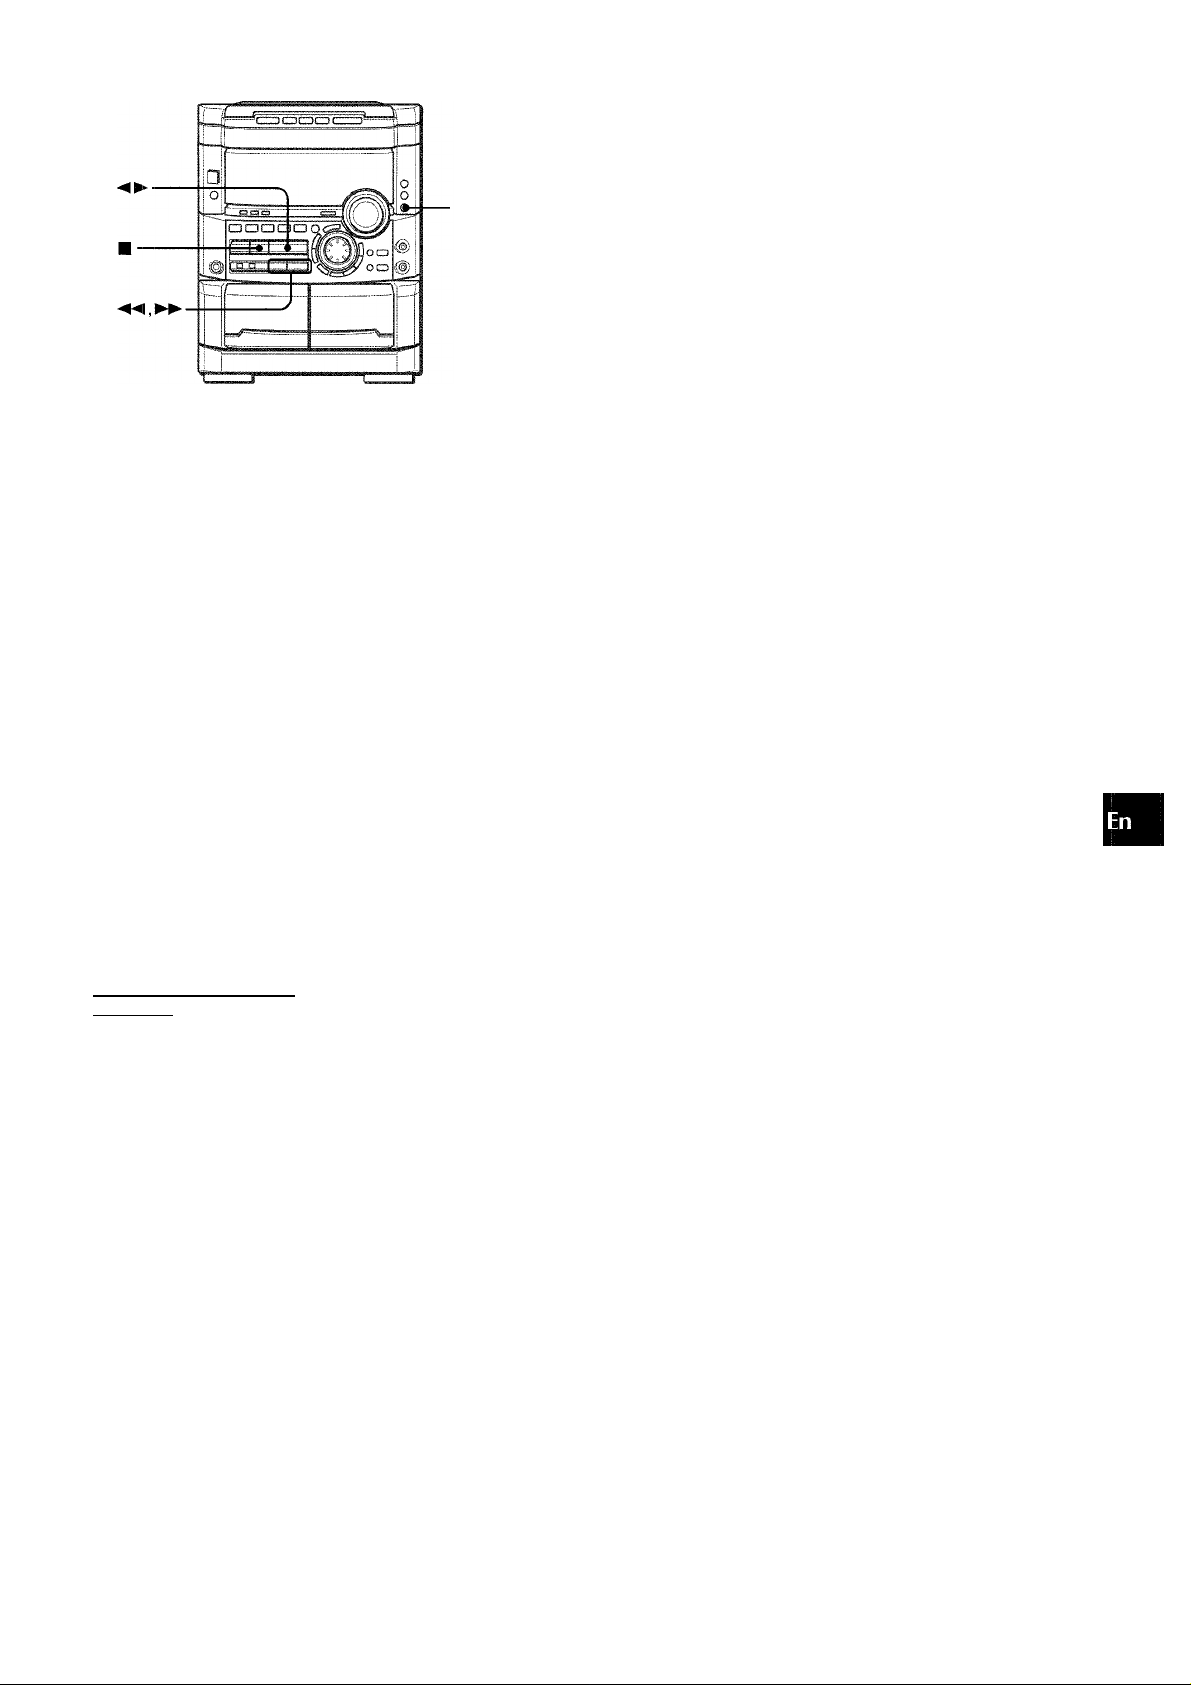
■ ENTER
■ MULTI JOG
To turn the power on
Press one of the function buttons (TAPE/DECK1/2, TUNER/
BAND, VIDEO/AUX, CD, MD). Playback of the inserted disc or
tape begins, or the previously tuned station is received (Direct
Play Function).
POWER is also available.
(A
Z
o
p
<
a
<
Q.
Ill
oe
0.
►/◄► PRESET on the remote control
The function is the same as that of on the main unit.
PRESET
' If the remote control is not going to be used for an extended
period of time, remove the batteries to prevent possible
electrolyte leakage.
' The remote control may not operate correctly when:
- The line of sight between the remote control and the remote
sensor inside the display window is exposed to intense light,
such as direct sunlight
- Other remote controls are used nearby (those of a television,
etc.)
When the power is turned on, the disc compartment may open
and close to reset the unit.
To turn the power off
Press POWER.
Flash window
The window on the top of the unit lights up or flashes while the
unit is being powered on.
To turn off the light of the top window, press ■ while pressing
CD. To turn back on, repeat the above.
To turn off the light of the cassette decks, press ■ while pressing
TAPE. To turn back on, repeat the above.
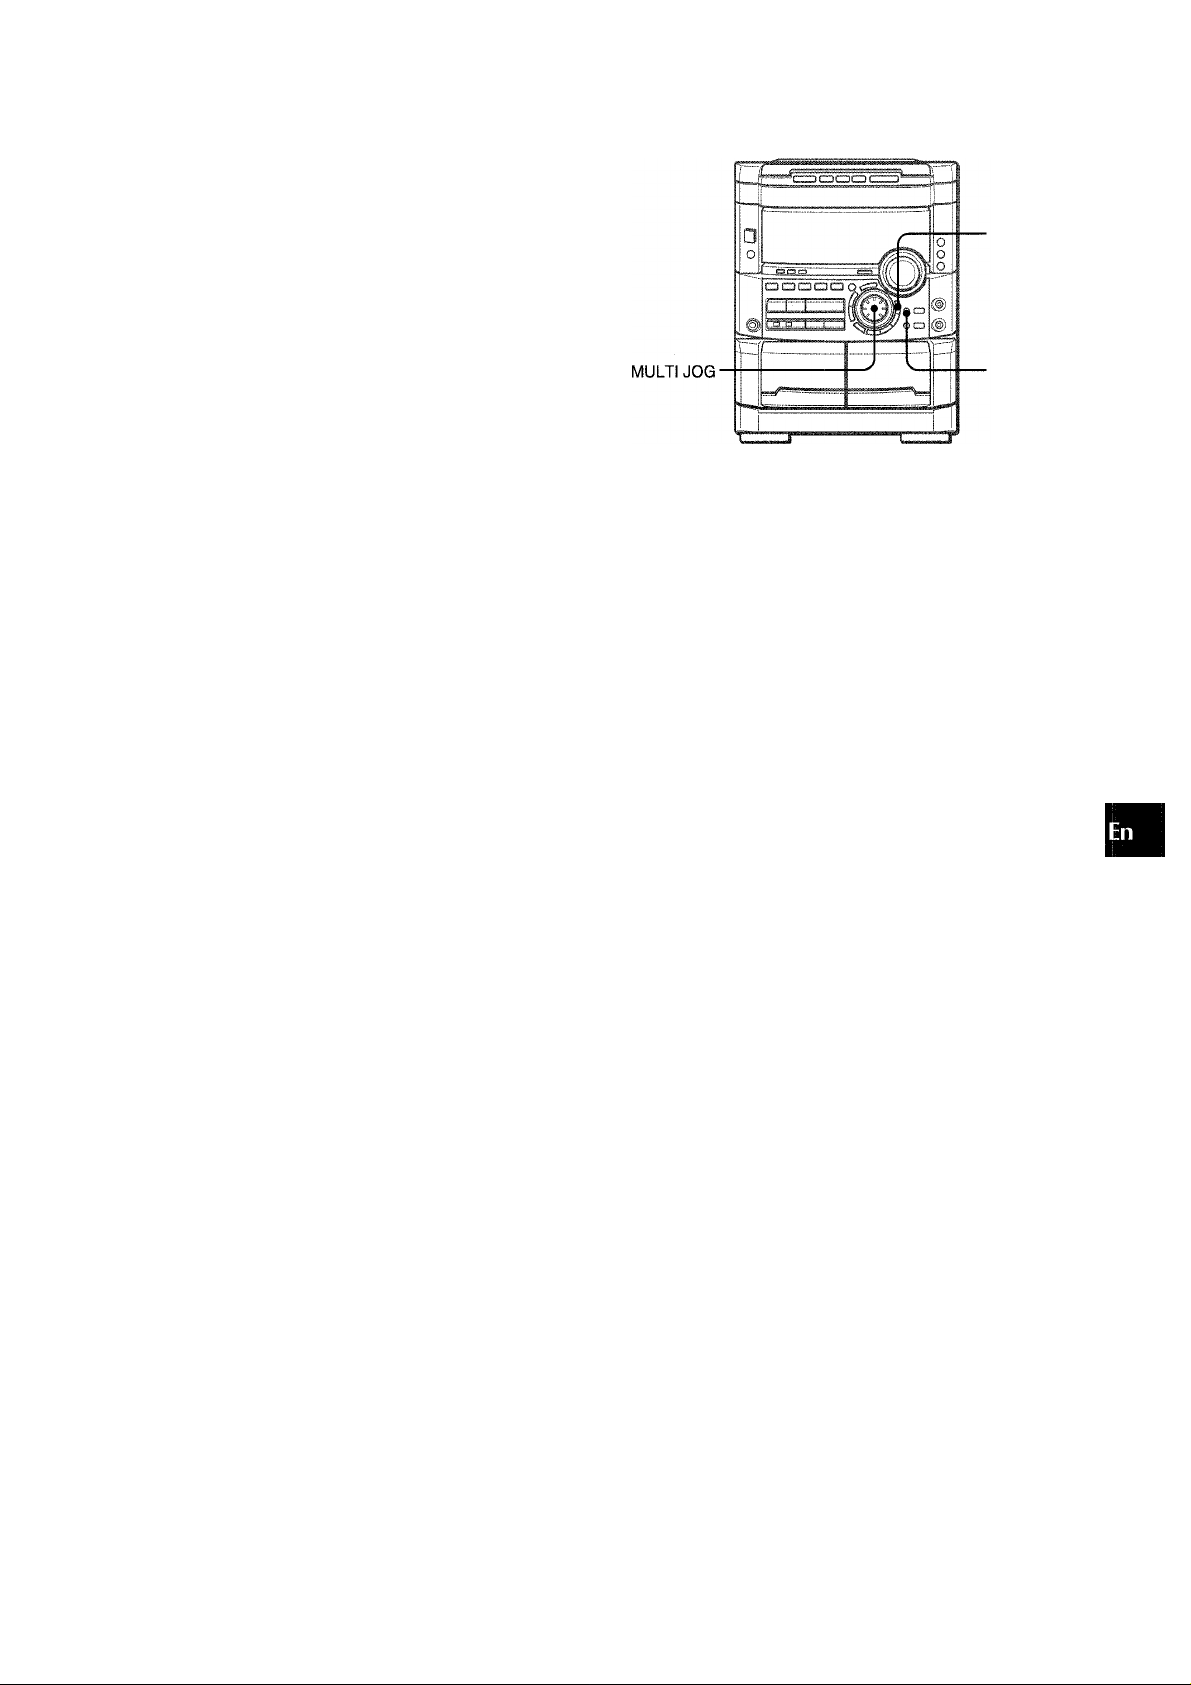
To change the brightness level of the display
1 Press ECO so that “ECO MODE” is displayed.
2 Within 4 seconds, turn MULTI JOG to display “DIM MODE”,
and then press ENTER within 4 seconds.
3 Within 4 seconds, turn MULTI JOG to select the dimmer mode
as below.
The mode will be automatically set after 4 seconds. It will also
be set if ENTER is pressed within 4 seconds after step 3.
DIM-OFF «^DIMMER 1 DIMMER 2^ DIMMER 3
c I]
DIM-OFF: The normal display.
DIMMER 1: The illumination of the display is dimmer than
usual.
DIMMER 2: The illumination of the display is dimmer than
DIMMER 1.
DIMMER 3: The illumination of the display is dimmer than
DIMMER 2. The spectrum analyzer, the window on the top of
the unit, and the button lamps light off.
If the timer recording (page 31) is done with the economizing
mode (page 8) set to “ON” and the power turns off, the dimmer
mode will be set to “DIMMER 3” the next time the power is
turned on.
ENGLISH
1
Page 8
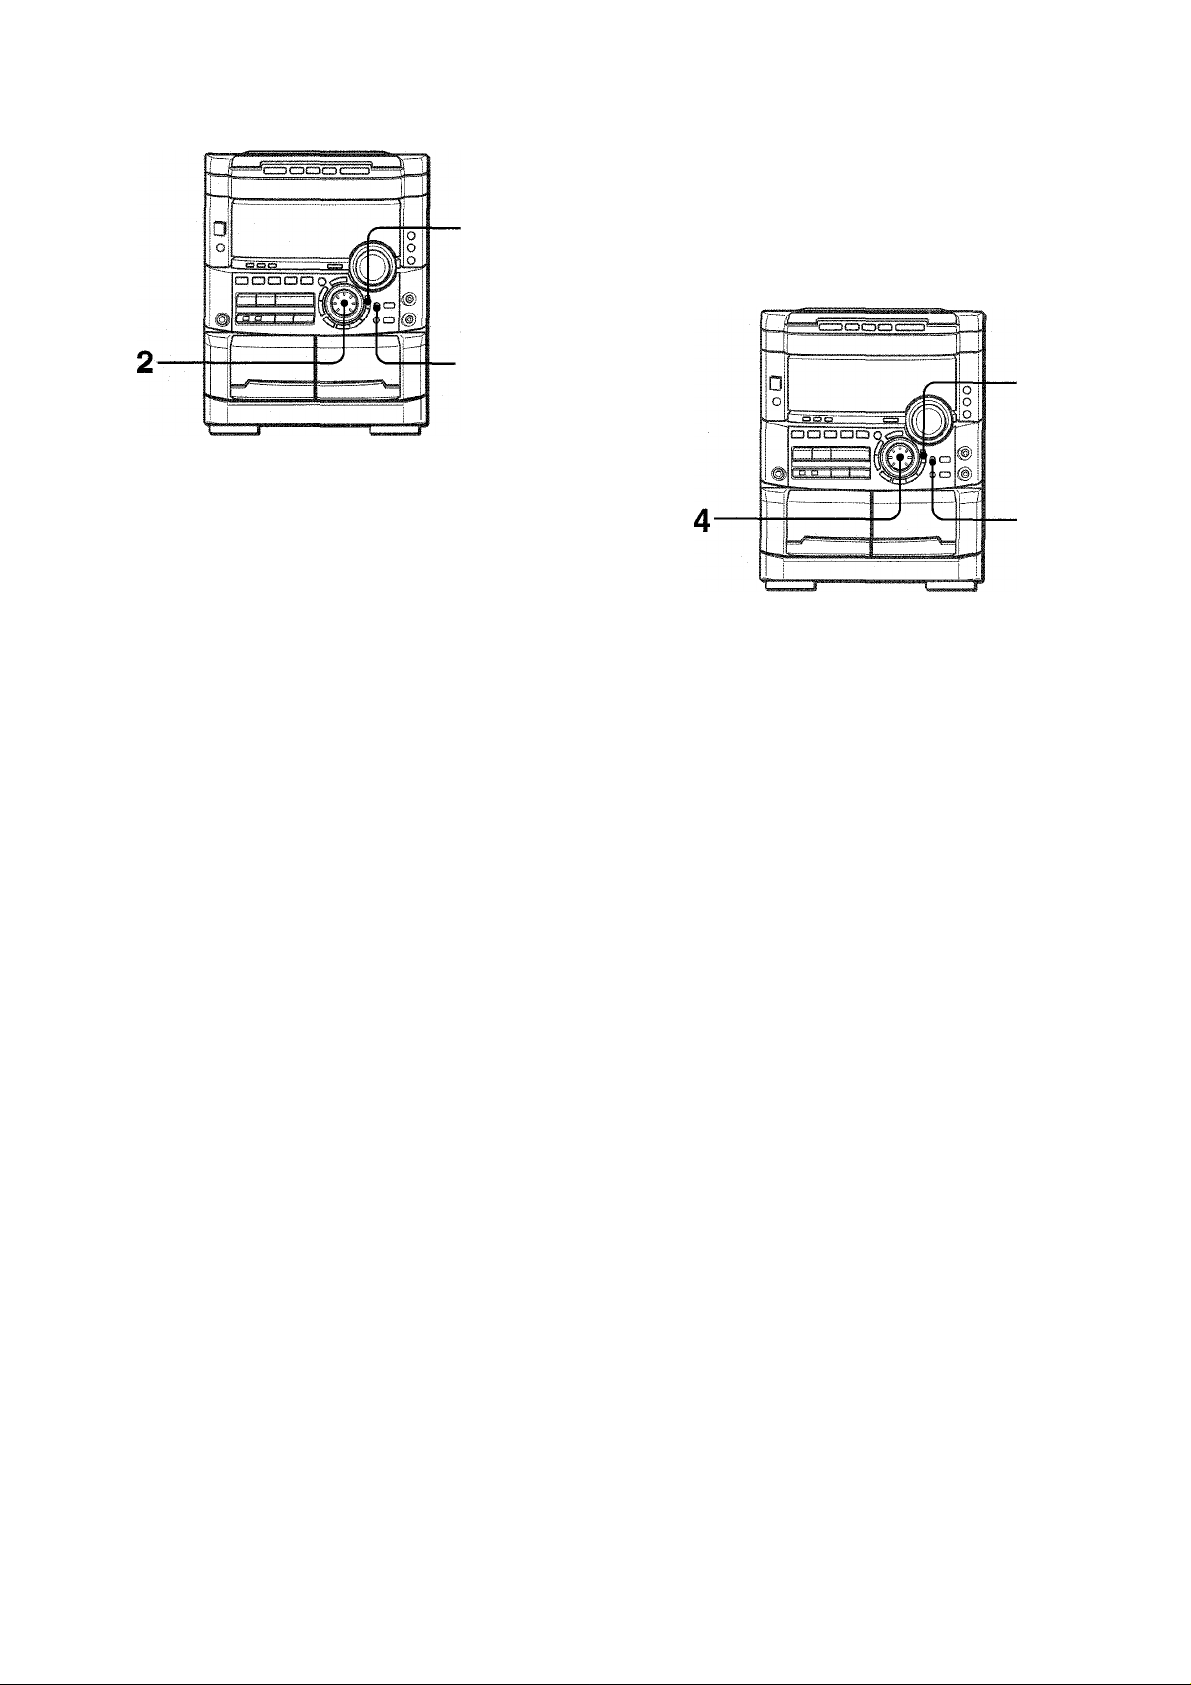
1 Press ECO.
“ECO MODE” will be displayed. .
2
3
SETTING POWER ECONOMIZING MODE
Setting this unit to power economizing mode reduces power
consumption as follows.
• When the power is turned off, all the display lights turn off.
However, if the clock is not set, the game Demo (page 9) will
begin when the power is turned off.
• If CD, Tape or Rhythm play function (page 11) does not play for
10 minutes or if there is no audio input from any connected
external equipment for 10 minutes when VIDEO/AUX or MD is
selected as the source, the power shuts off.
• When the power turns on due to timer recording (page 31), the
display brightness level is set to “DIMMER 3” (page 7), all button
lamps are off, and the volume Is set to the minimum level (0).
• The display brightens only when operating the unit. When the
unit has not been used for 10 seconds, the brightness level
switches to the mode previously selected in “DIM MODE”. (Page
7)
(If the display brightness level is set to “DIM-OFF”, the
brightness does not change. When the level is “DIMMER 3”,
the button lamps are also turned off.)
^'¿cn MODB
/C
________________
2 Press ENTER within 4 seconds.
The current power-economizing mode status will be displayed.
If the power-economizing mode is OFF: ECO OFF
If the power-economizing mode is ON: ECO ON
3 Turn MULTI JOG within 4 seconds to switch the
power-economizing mode on or off.
Example: When “ON” is selected
^'tTCn Tin 'fc
____ __ ___
The mode will be automatically set after 4 seconds. It will also
be set if ENTER is pressed within 4 seconds after step 3.
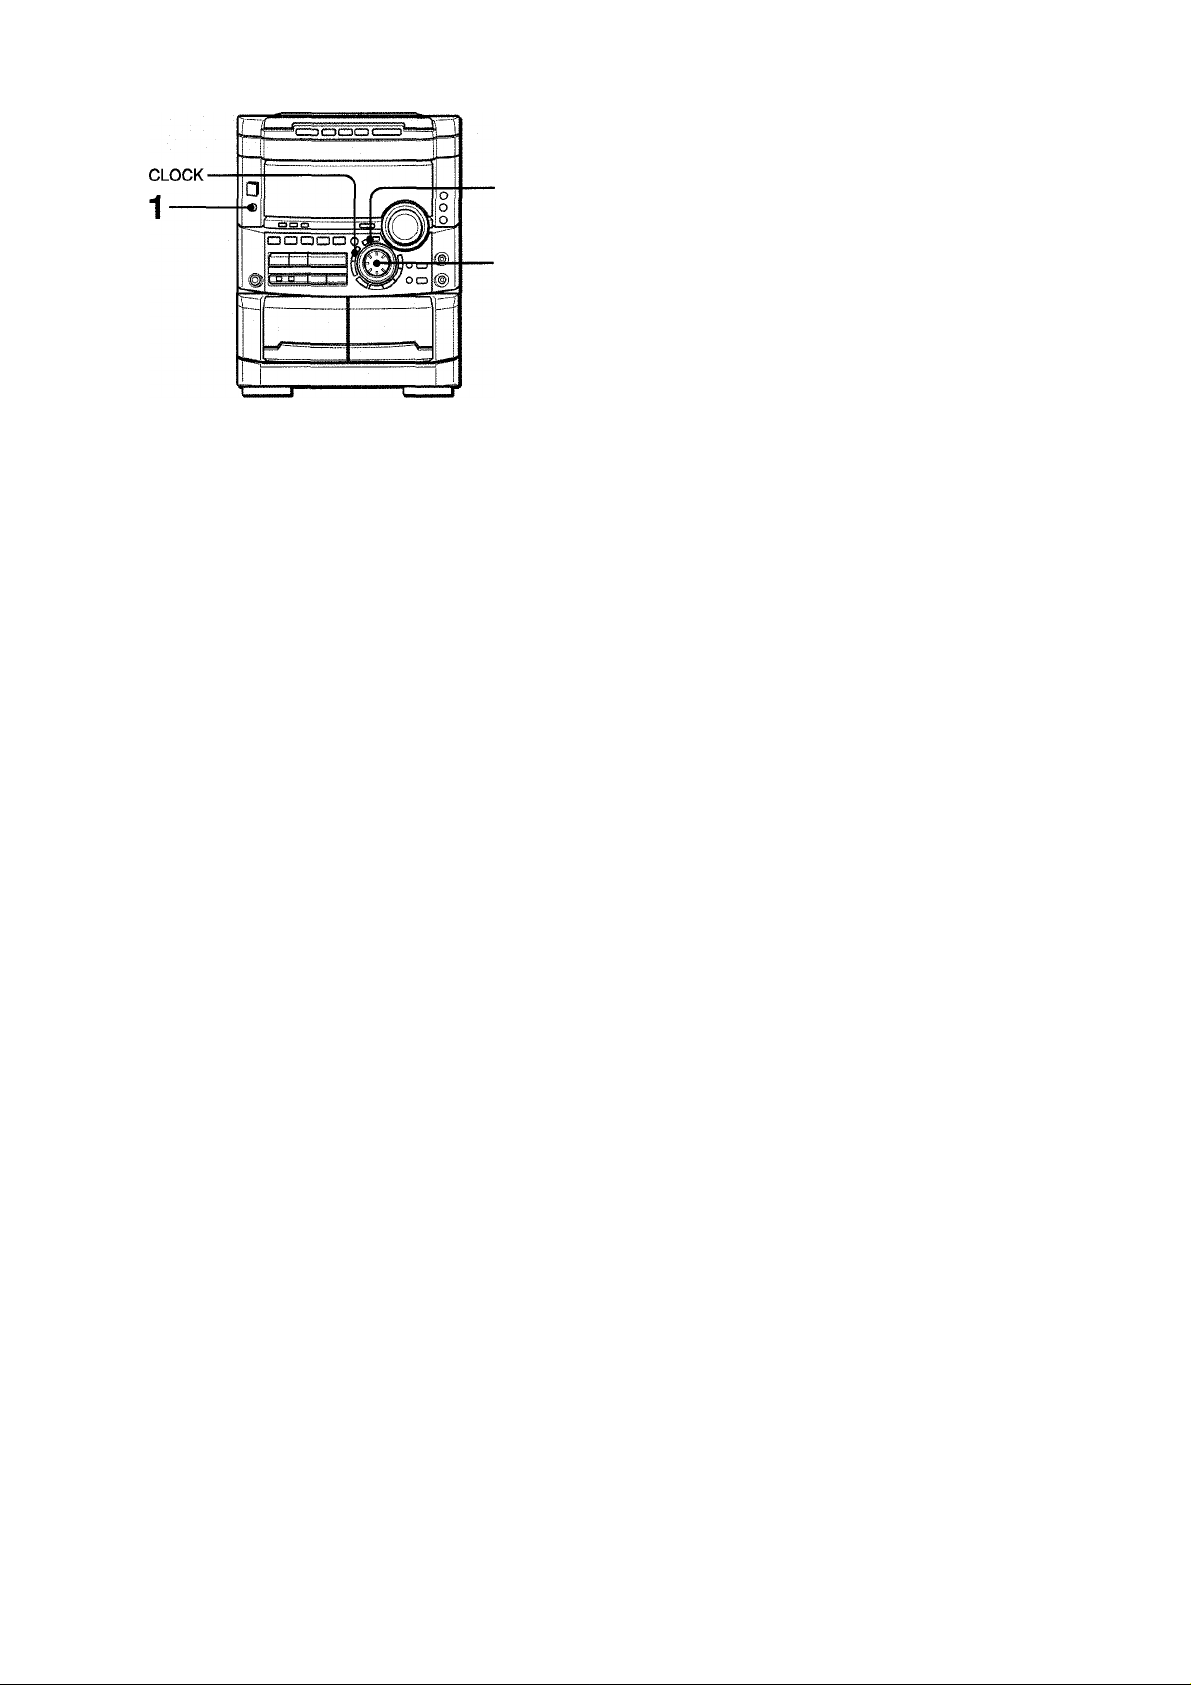
To view the clock when all the display lights turn off, press CLOCK
so that the time is displayed for 4 seconds.
8 ENGLISH
Page 9
-DEMO
To change the probability of equalizing the three numbers
Press ■« or ► ► repeatedly to select one of the three probability
levels when playing the game Demo. The tray number indicator
in the display changes between 1 and 3. As the tray number
increases from 1 to 3, the higher the probability of equalizing.
.I..-,.-5,
tf)
Z
o
<
a
<
&
Game Demo
When you only plug the AC power cord for the first time after
purchase, the game automatically comes on. This initial state is
disabled once you set the built-in clock. As long as you leave the
clock intact, the game automatically comes on when switching
off power.
To play the game Demo
Press DEMO whether the unit is turned on or off, and
whether the clock has been set or not.
With power switched off the game is silent. With power
switched on it is livened up with audio (referred to as game
sound in the following).
1 Press
Three numbers on the display start to run.
2 Press ■ once.
The number on the left side stops.
^ .
To mute the game sound
Firstly, cancel the game Demo by pressing DEMO. Then,
...
keep
pressing DEMO until OFF” is displayed.
To restore the game sound, keep pressing DEMO again until
ON” is displayed.
' During playing the game Demo, ■ , ► ► and are
available only for the game Demo. Cancel the game Demo to
use these buttons for the functions such as CD playing, etc.
‘ To change the game sound, see “RHYTHM PLAY FUNCTION”
on page 11.
' During the game Demo, some indicators unrelated with the
actual operation light up on the display.
' DEMO is locked out during recording and is not operative.
' The game Demo and the game sound are automatically
cancelled if the volume is adjusted while the unit is turned on.
3 Press ■ twice to stop the remaining two
numbers.
Scoring:
20 points are given to start the game.
If all the numbers are equal. 50 points are added to the score.
If not equal, one point is subtracted.
If the gained points reach 9999, you win.
If the gained points fall to 0, you lose.
To cancel the game Demo
Press DEMO.
To reset the game Demo
Press DEMO twice.
ENGLISH
Page 10
SOUND
AUDIO ADJUSTMENTS
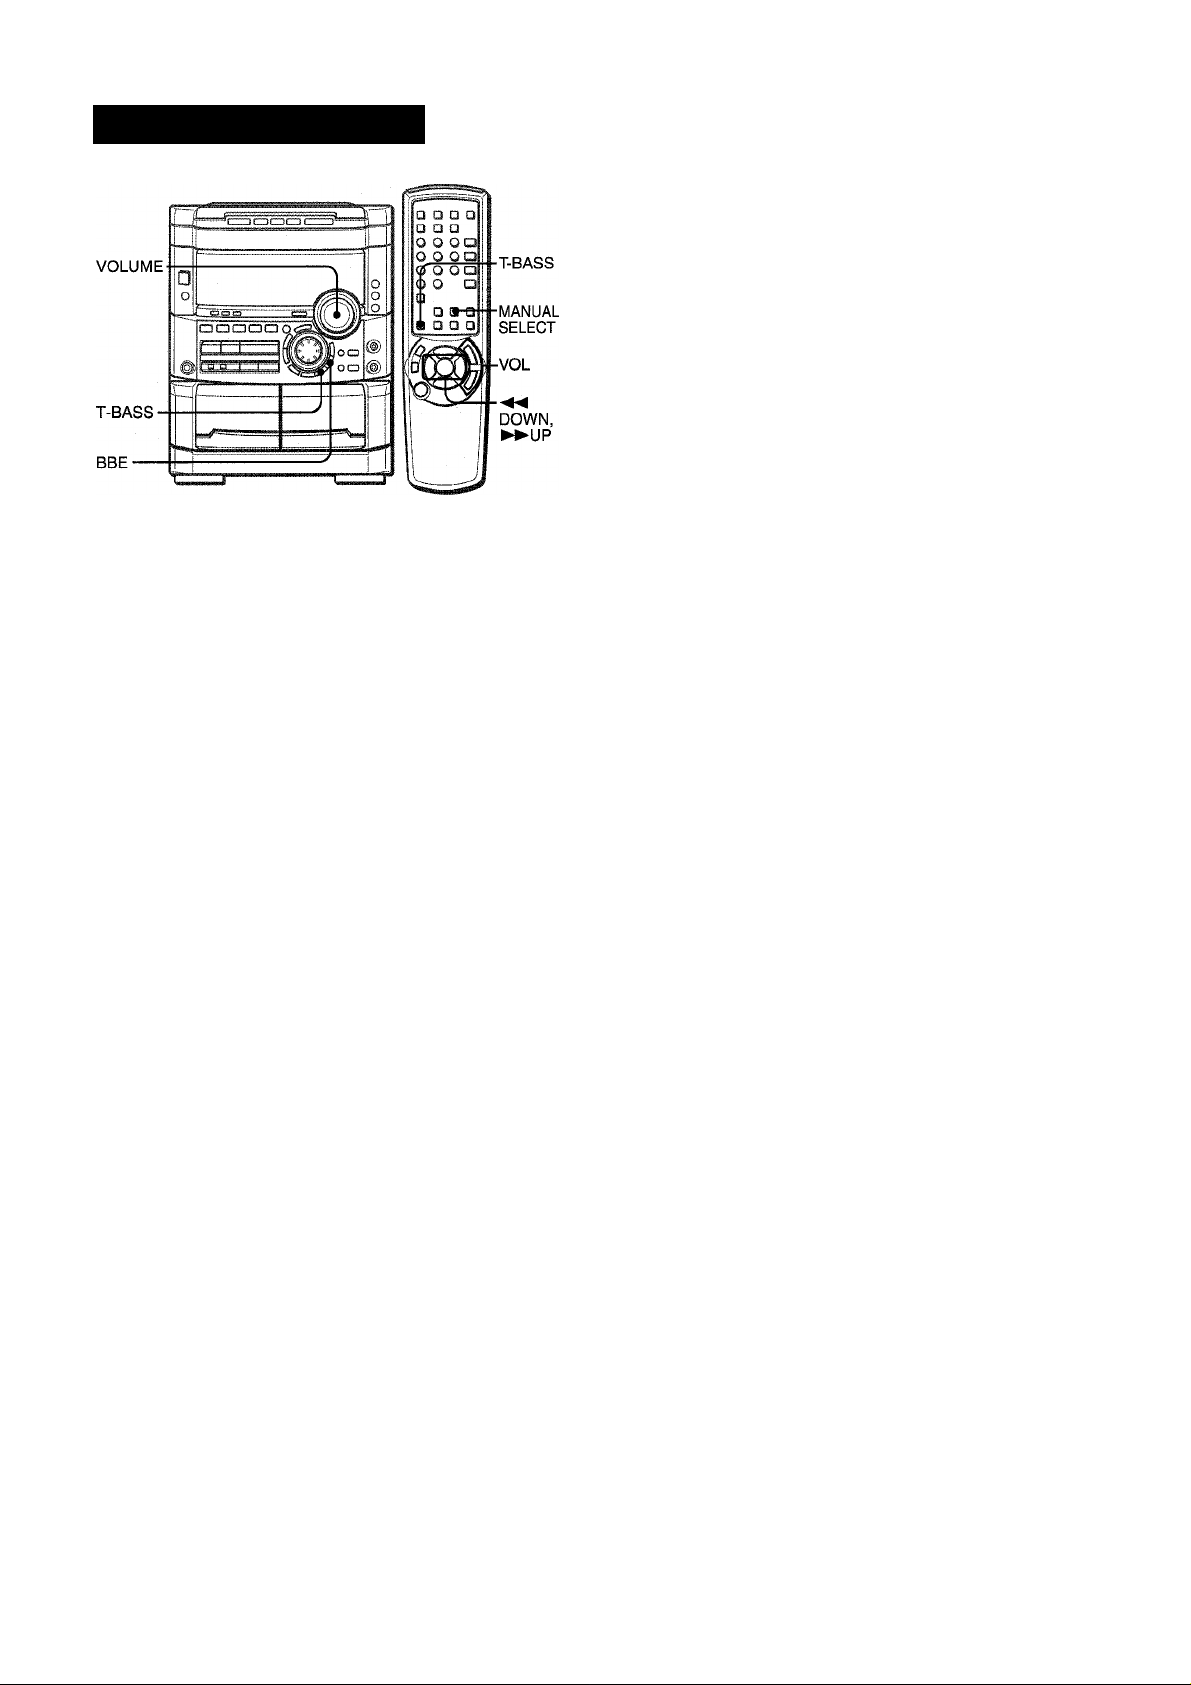
VOLUME
Turn VOLUME on the main unit, or press VOL on the remote control.
J
The volume level Is displayed as a number from 0 to MAX (50).
The volume level is automatically set to 20 when the power is
turned off with the volume level set to 21 or more.
SUPER T-BASS SYSTEM
The T-BASS system enhances the realism of low-frequency
sound.
Press T-BASS.
Each time it is pressed, the level changes. Select one of the
three levels, or the off position to suit your preference.
1..
1
______________
• Low frequency sound may be distorted when the T-BASS
system Is used for a disc or tape in which low frequency sound
is originally emphasized. In this case, cancel the T-BASS
system.
•When playing back a tape recorded with BBE, it is
recommended that BBE be set to off to avoid distorted high
frequency sound.
To change the left/right balance
Press MANUAL SELECT on the remote control. L/R is displayed
for 4 seconds. Press « DOWN or ► ► UP on the remote control
within these 4 seconds.
• The DOLBY PRO LOGIC (page 26) front speakers level is also
changed.
BBE SYSTEM
The BBE system enhances the clarity of high-frequency sound.
It also enriches the Karaoke function to make your voice sound
clear and pleasant.
Press BBE.
Each time it is pressed, the level changes. Select one of the
three levels, or the off position to suit your preference.
' mmm mmm «. ■ likA ««n
1 0 ENGLISH
Page 11
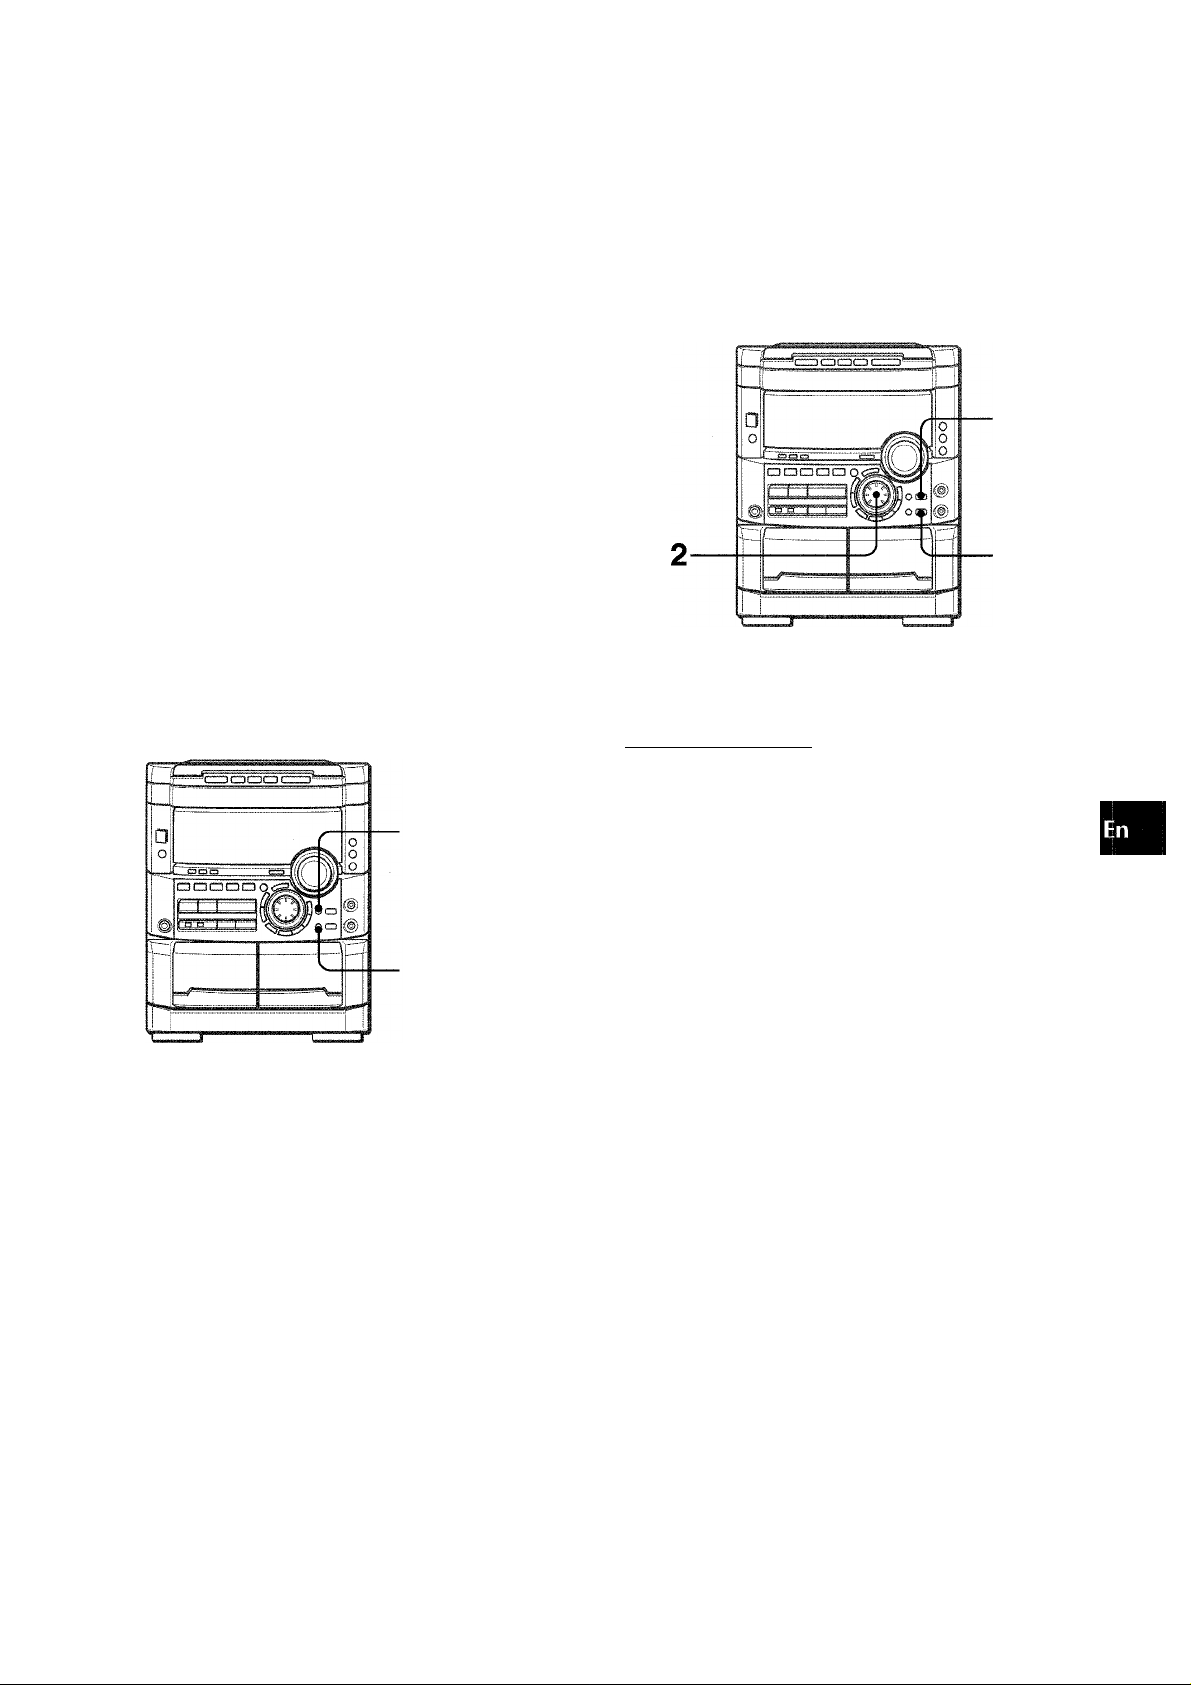
USING THE BEAT FUNCTION
This unit has a iibrary of rhythm patterns from which you can
seiect the desired one to add to the piayback of any music
sources, thus aiiowing you to create your originai sounds.
The mix created with the BEAT and BBE functions can be
recorded on tape if you want to. Aiso, the mix is avaiiabie at LINE
OUT.
The BEAT function is not avaiiabie when making a tape copy
between two tape decks using SYNC DUB.
To adjust the tempo of the rhythm pattern
■ RHYTHM
-BEAT
ON/OFI=
3
O
tf)
To select a rhythm pattern
1 Press BEAT ON/OFF to switch the function on.
You’ii hear the current rhythm pattern, the dispiay showing
the name of the rhythm.
2 Turn MULTi JOG to cycie through the options
provided untii you find one that meets the music.
The dispiay wiil change as foiiows:
GAME
i
TANGO
WALTZ 1-2
4 BEAT 1-2
i
8 BEAT 1-2
t
16 BEAT 1-3
t
MERENG1-3
(MERENGUE)
i
REGGAE *-
♦ H. ROCK 1-2
(HARD ROCK)
i
BOSSANOV
(BOSSA NOVA)
SAMBA 1-4
t
CUB RMBA
(CUBAN^RUMBA)
SALSA 1-3
t
SL RMBA 1-2
(SLOW RUMBA)
t
-----
► AFRO
1 Press RHYTHM repeatediy untii the display rciads
“Tempo XXX.”
if “AUTO” shows whiie you are pressing RHYTHM, change it to
“MANUAL” by tuning MULTI JOG to the ieft. In AUTO mode the
tempo is automatically set and you cannot access the display of
“Tempo.” (More about AUTO mode later.)
2 Turn MULTI JOG.
Turning to the right speeds up the tempo. Turning to the left
slows down the tempo.
(If a time-out occurs before you turn the dial, go back to the
display of “Tempo” by pressing RHYTHM.)
The tempo can be changed within the limits of 81 to 160.
The tempo of GAME is not adjustable.
These voice wave data incorporated in this product are Yamaha
Corporation’s copyrightable property and we are licensed by
Yamaha Corporation.
ENGLISH 1 1
Page 12
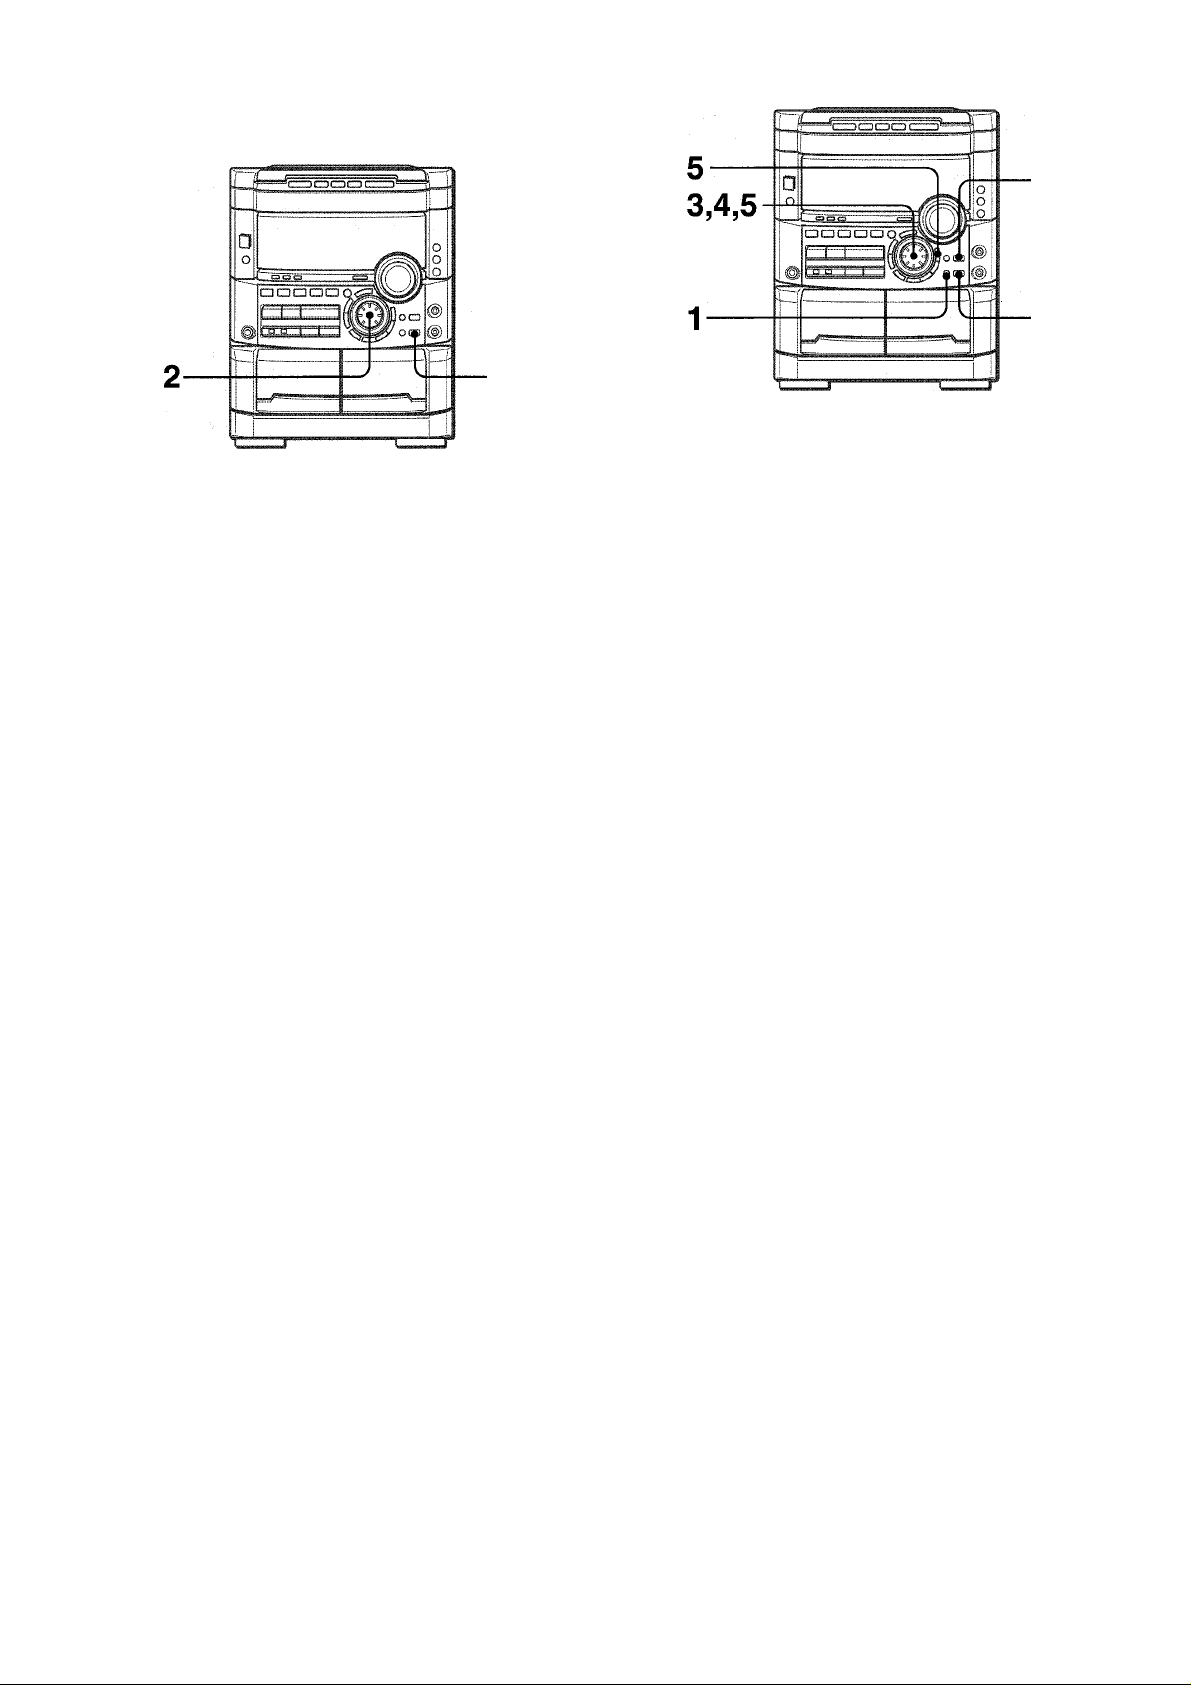
To change the volume level of the rhythm pattern
-BEAT
ON/OFF
1 Press RHYTHM repeatedly until the display reads
“LEVEL X.”
■::'rr LEUEL 3 • -=-
Using the AUTO mode
The AUTO mode automatically adjusts the tempo of the current
rhythm pattern so it coincides with the tempo of the music.
Depending on the music the AUTO mode may not work correctly
(with songs whose tempo is fuzzy, or is varying, for example).
2,3
2,
.....
2 Turn MULTI JOG.
Three levels, 1 -3, are available.
To stop the BEAT function
Press BEAT ON/OFF.
BEAT toggles between On and Off.
When you interrupt or stop the playback of the sound source,
the BEAT function is automaticaiiy switched off.
You can let the music start playing before performing step 1 or
later at the desired moment.
1 Press BEAT ON/OFF to switch the function on.
You will hear the current rhythm pattern.
2 Change the rhythm pattern and the level setting
as required by pressing RHYTHM and turning
MULTI JOG.
3 Press RHYTHM to switch the display to read
“MANUAL” or “AUTO.”
MflNUP.L
Turn MULTI JOG to the right to change the display
to “AUTO.”
If “AUTO” is displayed in step 3, turn MULTI JOG to the left to
change the display to “MANUAL” befor performing step 4.
hUTu
12 ENGLISH
On switching from MANUAL over to AUTO the level of the
rhythm pattern is automatically reduced to “1 .’’The preset level
will be resumed when the unit takes on the tempo of the music.
While the unit is trying to get synced up to the tempo of the
music, a cascade-like blue indicator will flash on the sides of
the graphic equalizer display section.
MUTO
When the unit gets synced up to the tempo of the music, the
display will momentarily read the synced-up tempo.
Depending on sound sources (such as, songs whose tempo
is varying), however, you may see different tempos appearing
one after the other in the display.
Page 13
After once synced up if the sync lock unlocks the display will
read “BEAT OUT,” and again the unit will try to get synced up.
At the occurrence of BEAT OUT the level of the rhythm is
automatically reduced to “1 and it increases back to the preset
level when sync is achieved again.
USING THE SPICE FUNCTION
SPICE A/B function
The SPICE A/B function allows you to add percussion to the q
playback of the music and create your original sounds. n
Your sounds created with SPICE A/B can be recorded on tape if
you want to. "
a
z
3
The BEAT function can be used together with the SPICE A/B
function, as well as with the FILL IN function. (For these functions
see below.) But you cannot use the AUTO SPICE function at the
same time as the BEAT function.
Using the FILL IN function
The FILL IN function is used together with the BEAT function to
insert a variation of the current rhythm pattern.
The AUTO SPICE/FILL IN double function switch takes on the
FILL IN function when the BEAT function is switched On.
• The AUTO SPICE function is not available at the same time as
the FILL IN function.
• The FILL IN function is not available when making a tape copy
between two tape decks using SYNC DUB.
TO USE THE FILL IN FUNCTION
-BEAT
ON/OFF
To select sounds
1 Press A.
You’ll hear the current sound stored in A.
2 Within 4 seconds, turn MULTI JOG to the left or
right until you find the desired sound.
As the display changes, you’ll hear the respective sound.
3 In a similar way, select a sound for B.
To actually use the function
Once you are satisfied with the sound selection, let the music
start playing, and hit SPICE A or B in time with the music as if to
play percussion instruments.
■ FILL IN
During piayback with the BEAT function switched on, press FILL
IN at the desired moment.
The display will read “FILL IN” and, when the current cycle of the
rhythm pattern is over, you’il hear a short sound different from
the rhythm pattern. This sound depends on rhythm patterns, if
you want, try to change the rhythm pattern. (Selecting a rhythm
pattern is discussed eariier, under the corresponding heading.)
' You cannot use the SPICE A/B function when making a tape
copy between two tape decks using SYNC DUB.
ENGLISH 1 3
Page 14
Using a scratch mode
1 Hofd down SPICE A. (Don’t release the button
until you complete step 2.)
The display will read “SCT MODE.”
■SC I" NODE
2 Still holding down the button, turn MULTi JOG.
Depending on the direction in which you turn MULTI JOG,
different scratches are produced.
The Scratch mode is disabled when you release the A button.
Using the AUTO SPICE function
The AUTO SPICE function produces the sounds of SPICE A
and B in sync with the music, the sound of A in response to low
frequency signals, and the sound of B in response to high
frequency signals.
' The AUTO SPICE function cannot be used together with the
BEAT function.
’ Depending on the music the AUTO SPICE function may not
work the way you’d expect. In such a case, use the SPICE A/B
function instead.
■ The AUTO SPICE function is not available when making a tape
copy between two tape decks using SYNC DUB.
1 Press AUTO SPiCE.
“A-SPICE” will show in the display.
H.SPiCh
2 Press SPICE A.
You’ll hear the sound currently stored in A, its name appearing
in the display.
Each time you press A the sound is produced.
3 If you want to change the sound of A, turn MULTI
JOG until you find the desired sound.
(If a time-out occurs after completing step 2 and before
performing step 3, press SPICE A again.)
4 In a similar way, check the sound of B and change
it if you want to.
5 To adjust the level of the A and B sounds, access
the display of “LEVEL X” by pressing RHYTHM
as many times as necessary, then within 4
seconds turn MULTI JOG.
Three levels, 1, 2 and 3, are available.
LEUEL 3
14
The A and B levels are adjusted at one time.
Let the source start playing to audition the effect.
The blue cascade-like indicator to the left of “BBE” in the
display will flash and the sound of SPICE A will play in sync
with the bass, and the sound of SPiCE B in sync with the
treble.
When a rhythm pattern is playing or while a FILL IN sound is
being produced if you flip SPICE A or B or produce scratches, a
momentary break would occasionally occur in the rhythm pattern
or the FILL IN sound. The same goes for the AUTO SPICE sounds
when you flip SPICE A or B or produce scratches.
ENGLISH
Page 15
I
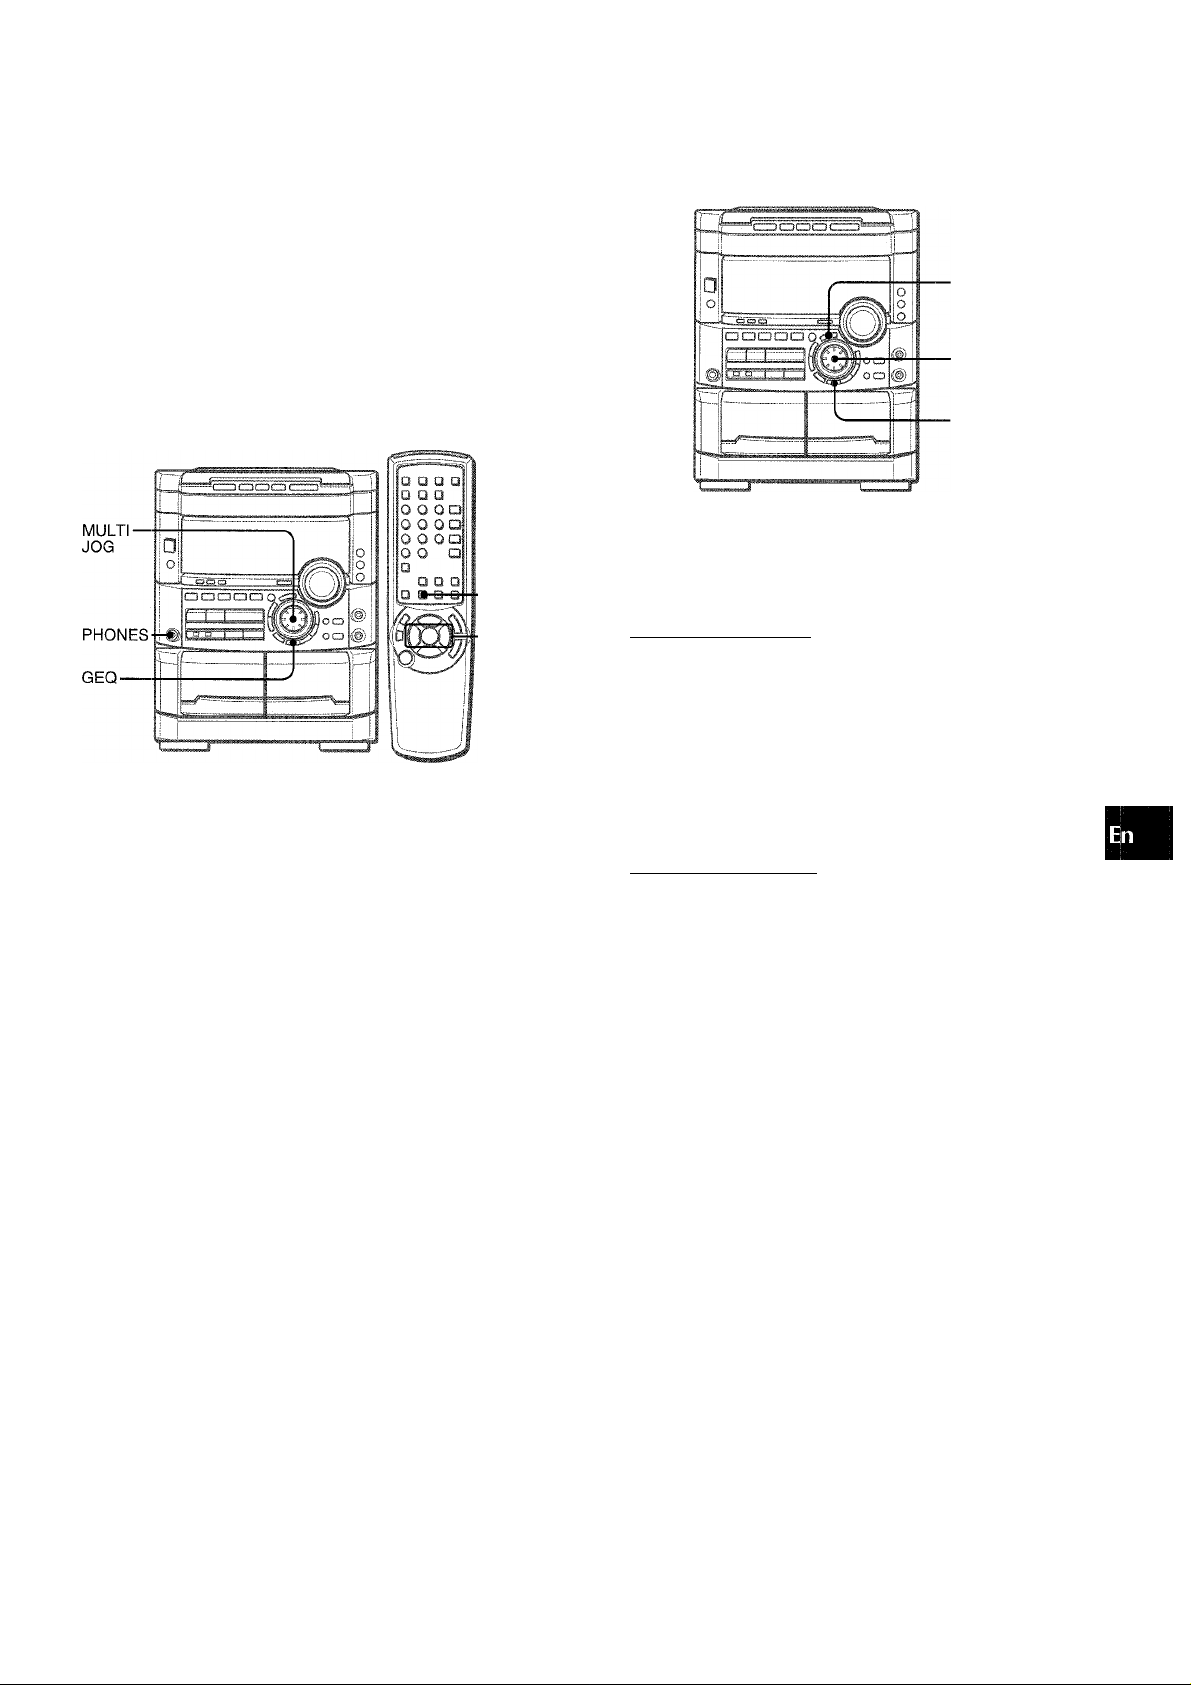
SELECTING THE PROGRAMMED EQUALIZATION CURVE
This unit provides the following 5 different programmed
equalization curves.
ROCK: Powerful sound emphasizing treble and bass
POP: More presence in the vocals and midrange
LATIN: Accented higher frequencies for latin music.
CLASSIC: Enriched sound with heavy bass and fine treble.
JAZZ: Accented lower frequencies for jazz-type music
GEQ
SETTING A NEW EQUALIZATION CURVE MANUALLY
Q
Z
3
o
1.3
2.4
1
The equalization curve can be customized to suit your preference.
1 Press GEQ, followed by ENTER within 4 seconds.
The display will be switched to read “GEQ LOW.”
2 Within 8 seconds, turn MULTI JOG to adjust the
level of the lowest frequency.
Press GEQ, and turn MULTI JOG to select one of the
programmed equalization curves within 4 seconds.
Pi'iri;' .
“GRAPHIC EQUALIZER” appears and the GEQ mode is
displayed cyclically as follows.
- ROCK ^ POP LATIN ^ CLASSIC ^ JAZZ ‘---------------Programmed mode
M5 >1
---
► M4
-----
► M3 -i
----
..................
► M2
------
► M1 —
Manual mode
To display the current GEQ mode
Press GEQ. The current mode is displayed for 4 seconds.
To cancel the selected mode
Press GEQ twice.
“GEQ OFF” appears and “GRAPHIC EQUALIZER” disappears.
To select with the remote control
Press GEQ, and within 4 seconds press ◄ ◄ or
repeatedly.
The GEQ mode is displayed cyclically as above.
3 Press ENTER to let “GEQ HIGH” show.
The highest level frequency indicator flashes for 8 seconds.
4 Within 8 seconds, turn MULTI JOG to adjust the
level of the highest frequency.
The frequency level indicators of between the lowest and the
highest are adjusted accordingly.
Using the headphones
Connect headphones to the PHONES jack with a standard stereo
plug (06.3 mm, ’/4 inch).
No sound is output from the speakers while the headphones are
plugged in.
• When the headphones are plugged in. the SURROUND system
and the DOLBY PRO LOGIC do not function.
Sound adjustment during recording
The VOLUME control has no effect on recording. It only sets the
level feeding the speakers and headphones. Remember, however,
recording takes on the BEAT, AUTO SPICE/FILL IN, SPICE A/B
functions, as well as on the BBE function.
ENGLISH
15
Page 16
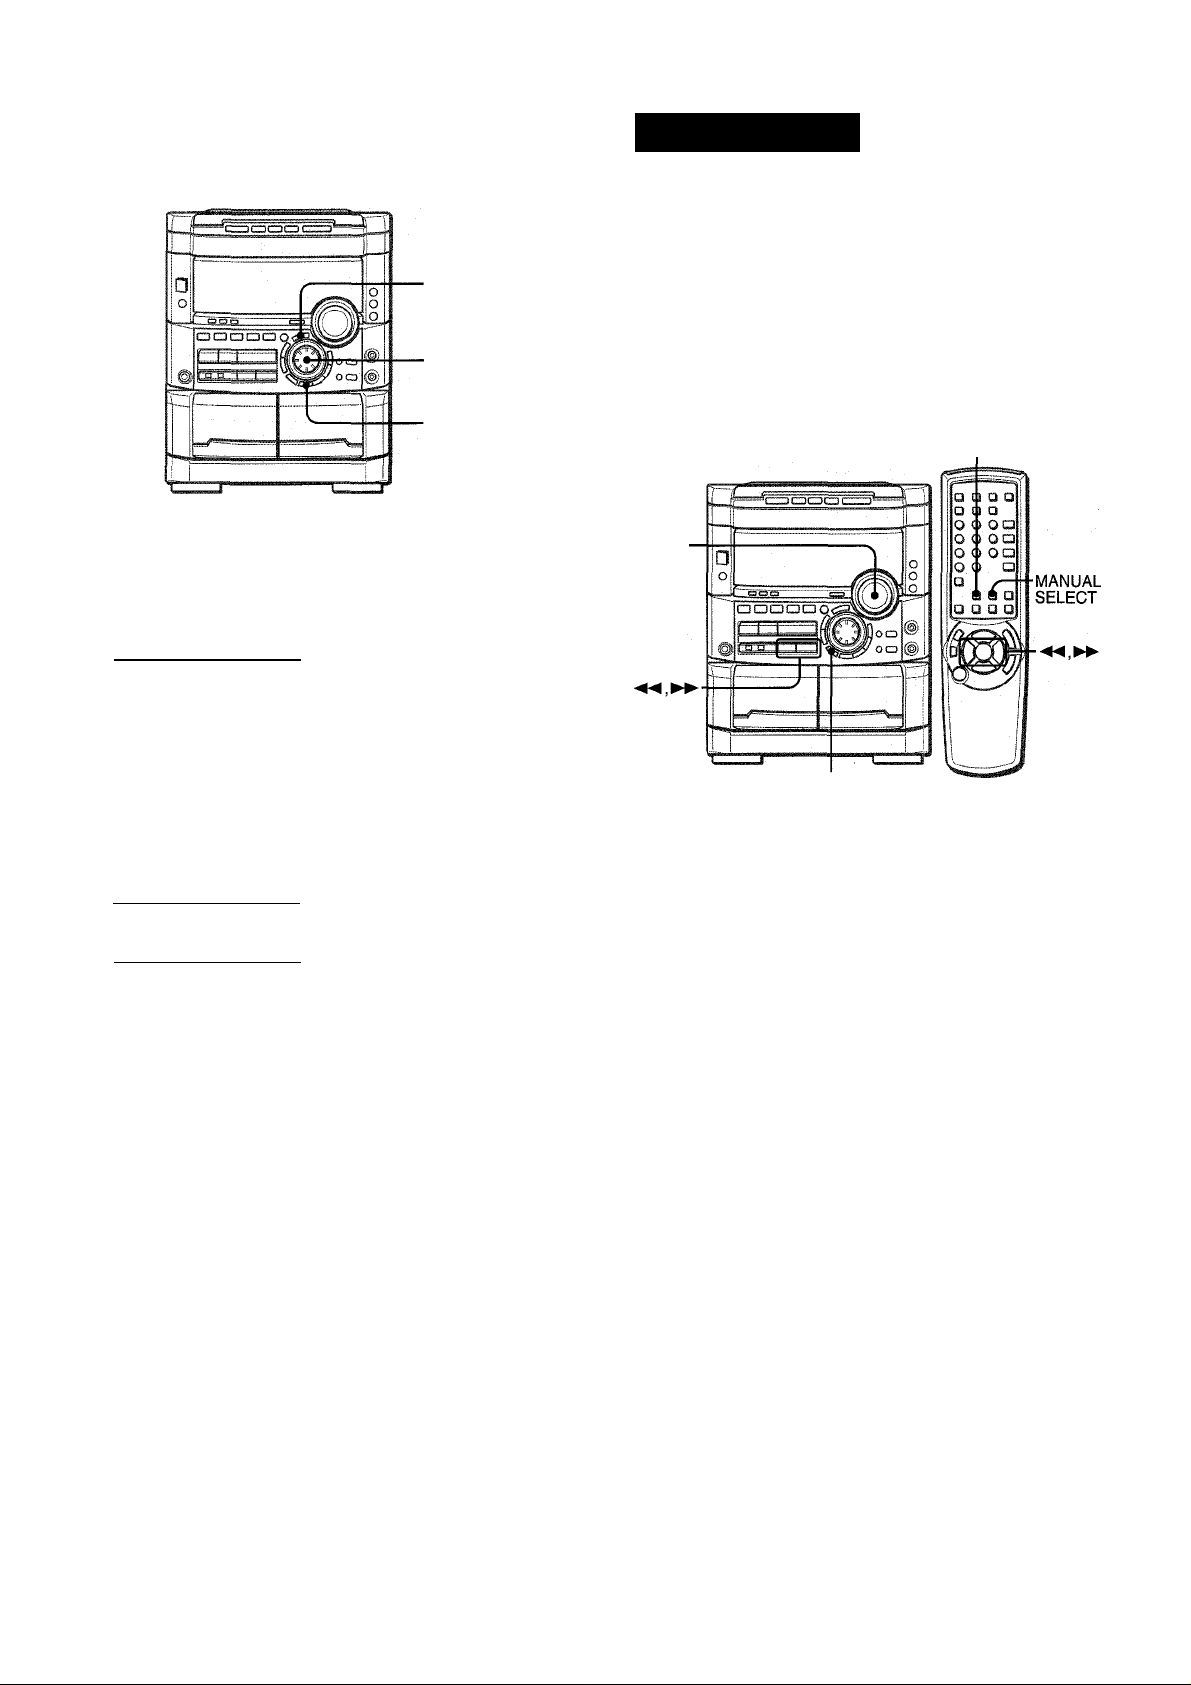
MEMORIZING THE NEW EQUALIZATION
CURVES
1,2,4
1,3
1
DSPSURROUN
The DSP (Digital Signal Processor) SURROUND adjusts the
delay time, the input mode and the feedback level to give a
resonant surround sound, allowing you to enjoy the real sound
presence of different environments.
This unit has been programmed with 5 different SURROUND
modes.
SELECTING A PROGRAMMED DSP SURROUND MODE
SURROUND
I
Up to 5 customized equalization curves can be stored as the
manual modes Ml - M5.
1 Go through steps 1-4 on previous page.
The created curve is displayed for 8 seconds.
2 Within 8 seconds, press ENTER.
“M 1” flashes on the display for 8 seconds.
i‘:T
............
• If this step is not completed within 8 seconds, press GEQ
first to display “GEQ ON”. Then within 4 seconds press
ENTER repeatedly until “Ml” flashes.
3 Within 8 seconds, turn MULTI JOG to select one
of the manual modes Ml - M5 to store the curve.
4 Within 8 seconds, press ENTER.
The new equalization curve is stored.
To select the stored equalization curve
Press GEQ, and turn MULTI JOG to select one of the manual
modes Ml - M5 within 4 seconds.
MULTI
JOG
SURROUND
Five modes of DSP SURROUND offer the sound presence you’d
experience in disco (DISCO), at a live concert (LIVE), stadium
(STADIUM), in a concert hall (HALL) or movie theater (MOVIE).
(Shown in parentheses are indications appearing in the display.)
Press SURROUND, and turn MULTI JOG or press ◄◄ or ►► repeatedly to select the desired programmed mode within 4 seconds.
i t
/
DISCO I -
To adjust the volume of the surround speakers
Press MANUAL SELECT twice on the remote control while DSP
SURROUND mode is on.
“SUR” is displayed for 4 seconds. Press ◄ ◄ DOWN or ► ► UP
on the remote control within these 4 seconds.
• The DOLBY PRO LOGIC (page 26) surround speakers level is
also changed.
The SURROUND mode is canceled when:
- the ECHO level is changed.
- the DOLBY PRO LOGIC is turned on.
- the headphones are plugged in.
ENGLISH
16
“DSP SURROUND” appears and the DSP SURROUND mode is
displayed cyclically as follows.
DISCO-^ LIVE-H—STADIUM^^HALL-^ MOVIE-
Equalization curves are selected automatically to match the DSP
SURROUND modes and can also be manually selected or turned
off to suit your preference.
To display the current DSP SURROUND mode
Press SURROUND. The current mode is displayed for 4 seconds.
To cancel the selected mode
Press SURROUND twice. “DSP OFF” appears and “DSP
SURROUND” disappears.
When the music source Is monaural
Select “LIVE”, “STADIUM” or “MOVIE” to obtain a simulated stereo
effect.
When “DISCO” or “HALL’ is selected, no sound will be heard
from the surround speakers.
Page 17
RADIO RECEPTION
■
MONO
TUNER
■ TUNER
BAND
1 Press TUNER/BAND repeatedly to select the
desired band.
FM-
When TUNER/BAND is pressed while the power is off, the
power is turned on directly.
2 Press ◄◄ DOWN or ►► UP to select a station.
Each time the button is pressed, the frequency changes.
When a station is received, “TUNE” is displayed for 2 seconds.
During FM stereo reception, lliaDil) is displayed.
(((QBII)
AM
TUNE
PRES
o
z
□
o
-TUNER
BAND
■ 0-9,+10
z
o
Î
lU
o
lU
IK
o
m
Í
The unit can store a total of 32 preset stations. When a station is
stored, a preset number is assigned to the station. Use the preset
number to tune in to a preset station directly.
1 Press TUNER/BAND to select a band, and press
◄◄ DOWN or ►► UP to select a station.
2 Press II SET to store the station.
A preset number beginning from 1 in consecutive order for
each band is assigned to the station.
Preset number
FM ;i.
Fh riJVfc.
To search for a station quickly (Auto Search)
Keep « DOWN or ► ► UP pressed until the frequency starts
to change rapidly. After tuning in to a station, the search stops.
To stop the Auto Search manually, press ◄ ◄ DOWN or ► ► UP.
• The Auto Search may not stop at stations with very weak signals.
When an FM stereo broadcast contains noise
Press MONO TUNER on the remote control so that “MONO”
appears on the display.
Noise is reduced, although reception is monaural.
To restore stereo reception, repeat the above so that “MONO”
disappears.
To change the AM tuning intervai
The default setting of the AM tuning interval is 10 kHz/step. If
you use this unit in an area where the frequency allocation system
is 9 kHz/step, change the tuning interval.
Press POWER while pressing -<► .
To reset the interval, repeat this procedure.
When the AM tuning interval is changed, all preset stations are
cleared. The preset stations have to be set again.
3 Repeat steps 1 and 2.
The next station will not be stored if a total of 32 preset stations
for all the bands have already been stored.
“FULL’ is displayed if you attempt to store more than 32 preset
stations.
PRESET NUMBER TUNING
Use the remote control to select the preset number directly.
1 Press TUNER/BAND to seiect a band.
2 Press numbered buttons 0-9 and -f10 to seiect a
preset number.
Example:
To select preset number 20, press +10, +10 and 0.
To select preset number 15, press +10 and 5.
Selecting a preset number on the main unit
Press TUNER/BAND to select a band. Then, press
repeatedly or turn MULTI JOG.
Each time -<► is pressed, the next ascending number is
selected.
To clear a preset station
Select the preset number of the station to be cleared.Then, press
■ CLEAR, and press II SET within 4 seconds.
The preset numbers of all other stations in the band with higher
numbers are also decreased by one.
ENGLISH 1 7
Page 18
TAPE PLAYBACK
BASIC OPERATIONS
■ APUSH
EJECT
■ Deck 2
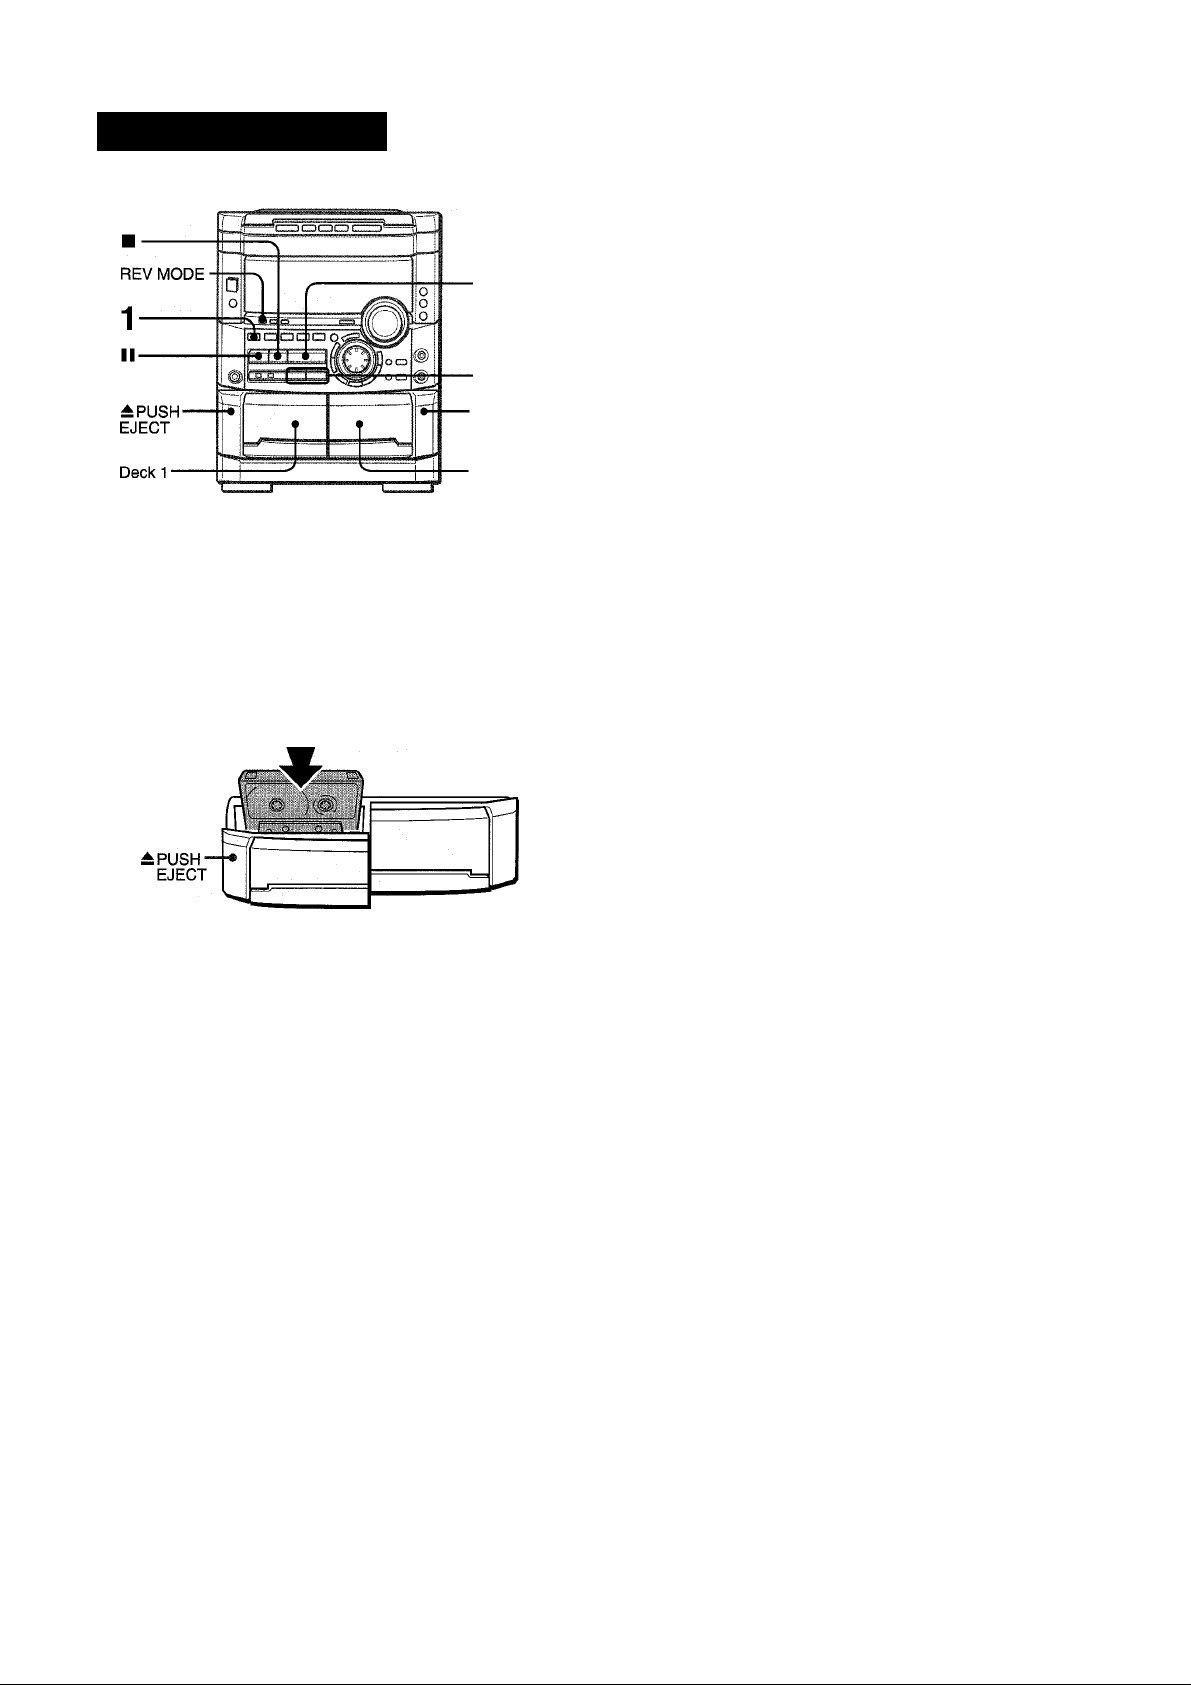
To select a reverse mode (deck 2 only)
Each time REV MODE is pressed, the reverse mode changes.
CF2 000y'
0
To play one side only, select Z.
To play from front side to reverse side once only, select Z).
To play both sides repeatedly, select CD.
• When tapes are loaded in both decks, D on the display
indicates Continuous Play.
To select a playing deck
When tapes are loaded in both decks, press TAPE/DECK 1/2
first to select a deck.
The selected deck number is displayed.
• On deck 1, tapes are always played back on both sides.
On deck 2, you can select a reverse mode to play back one or
both sides.
• Use Type I (normal), Type II (high/Cr02) or Type IV (metal)
tapes for playback.
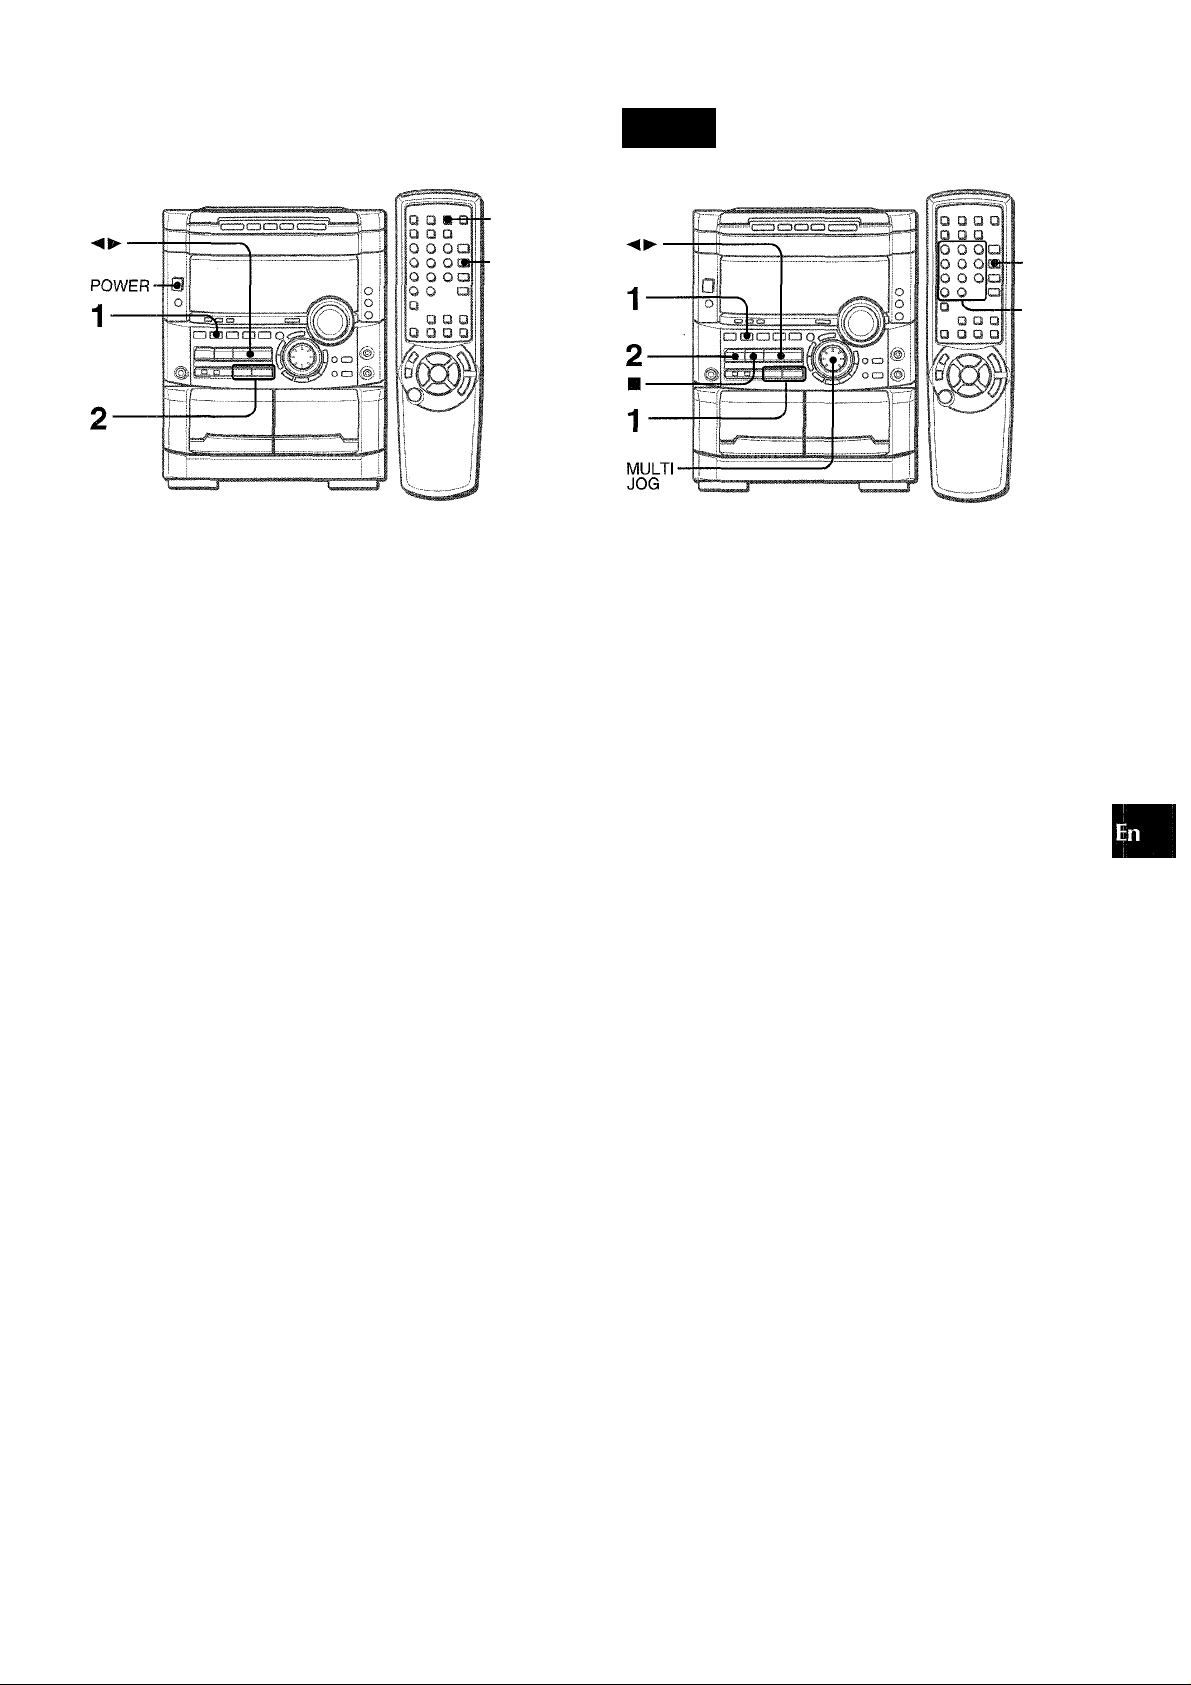
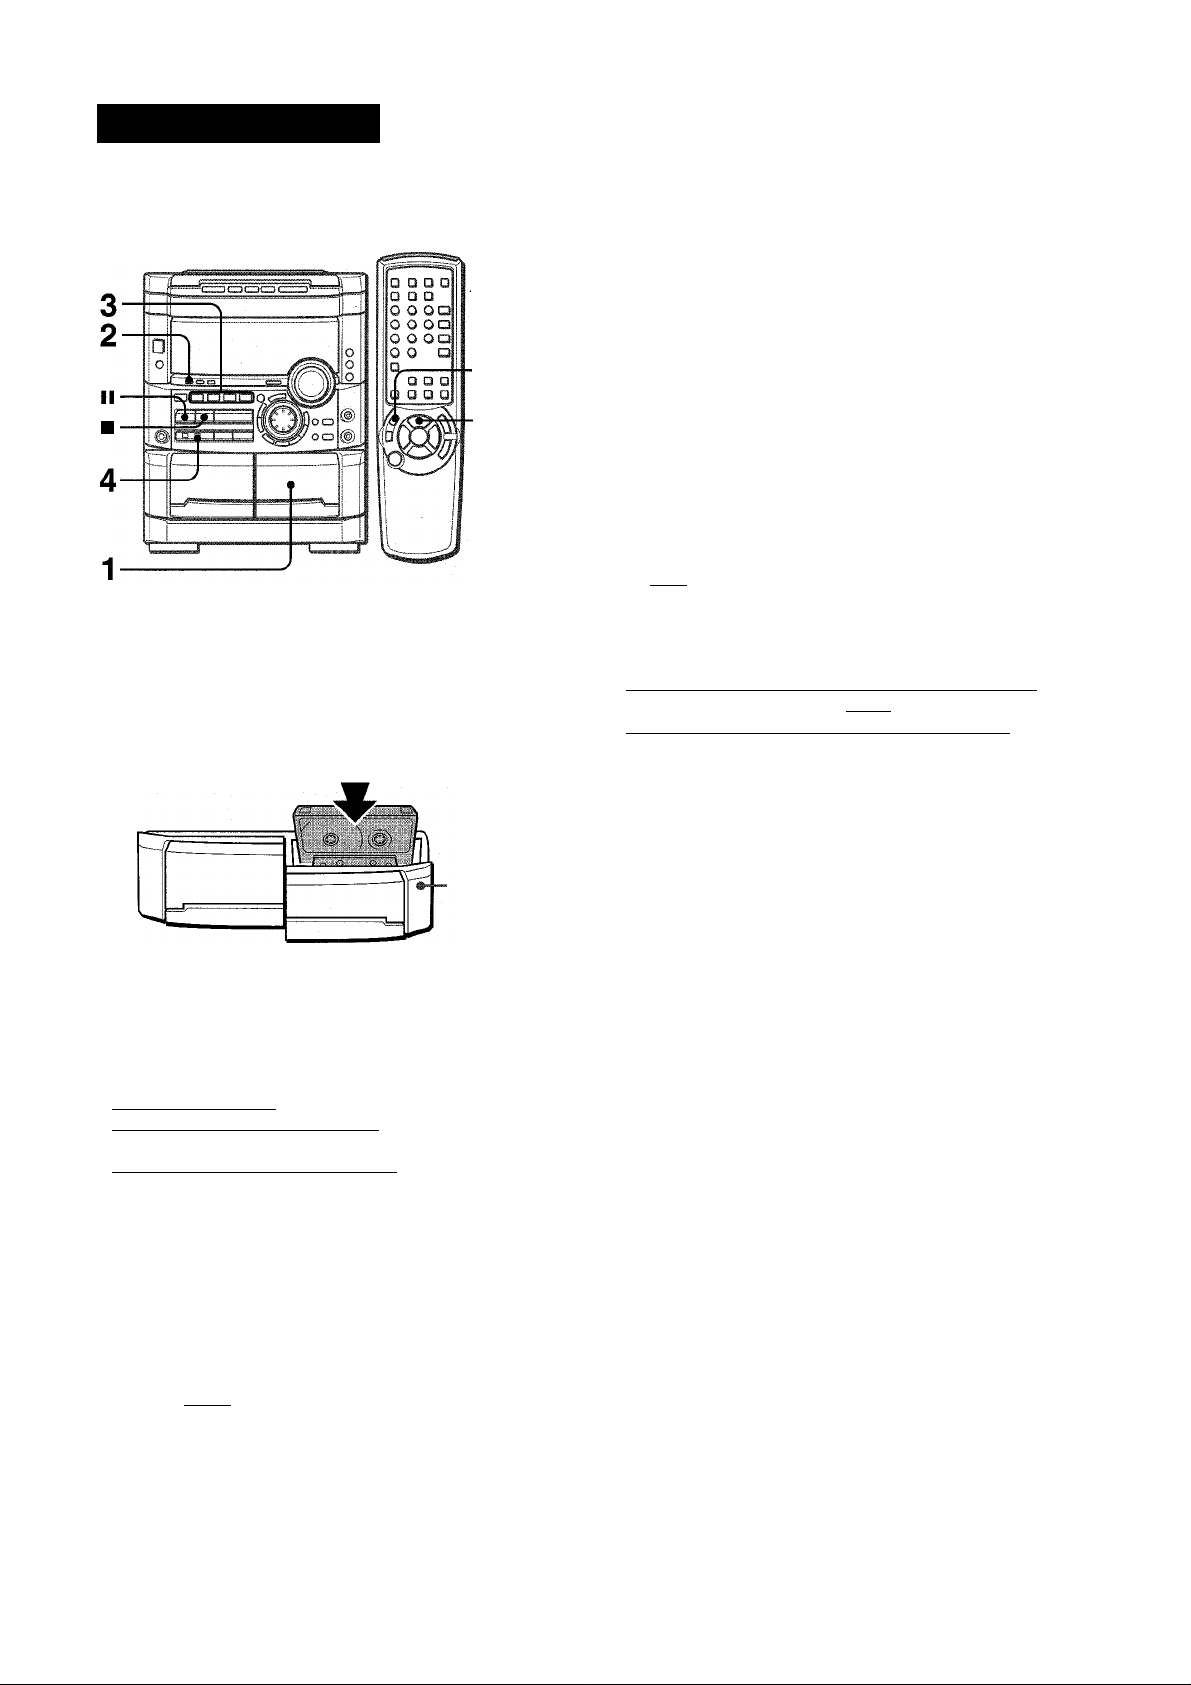
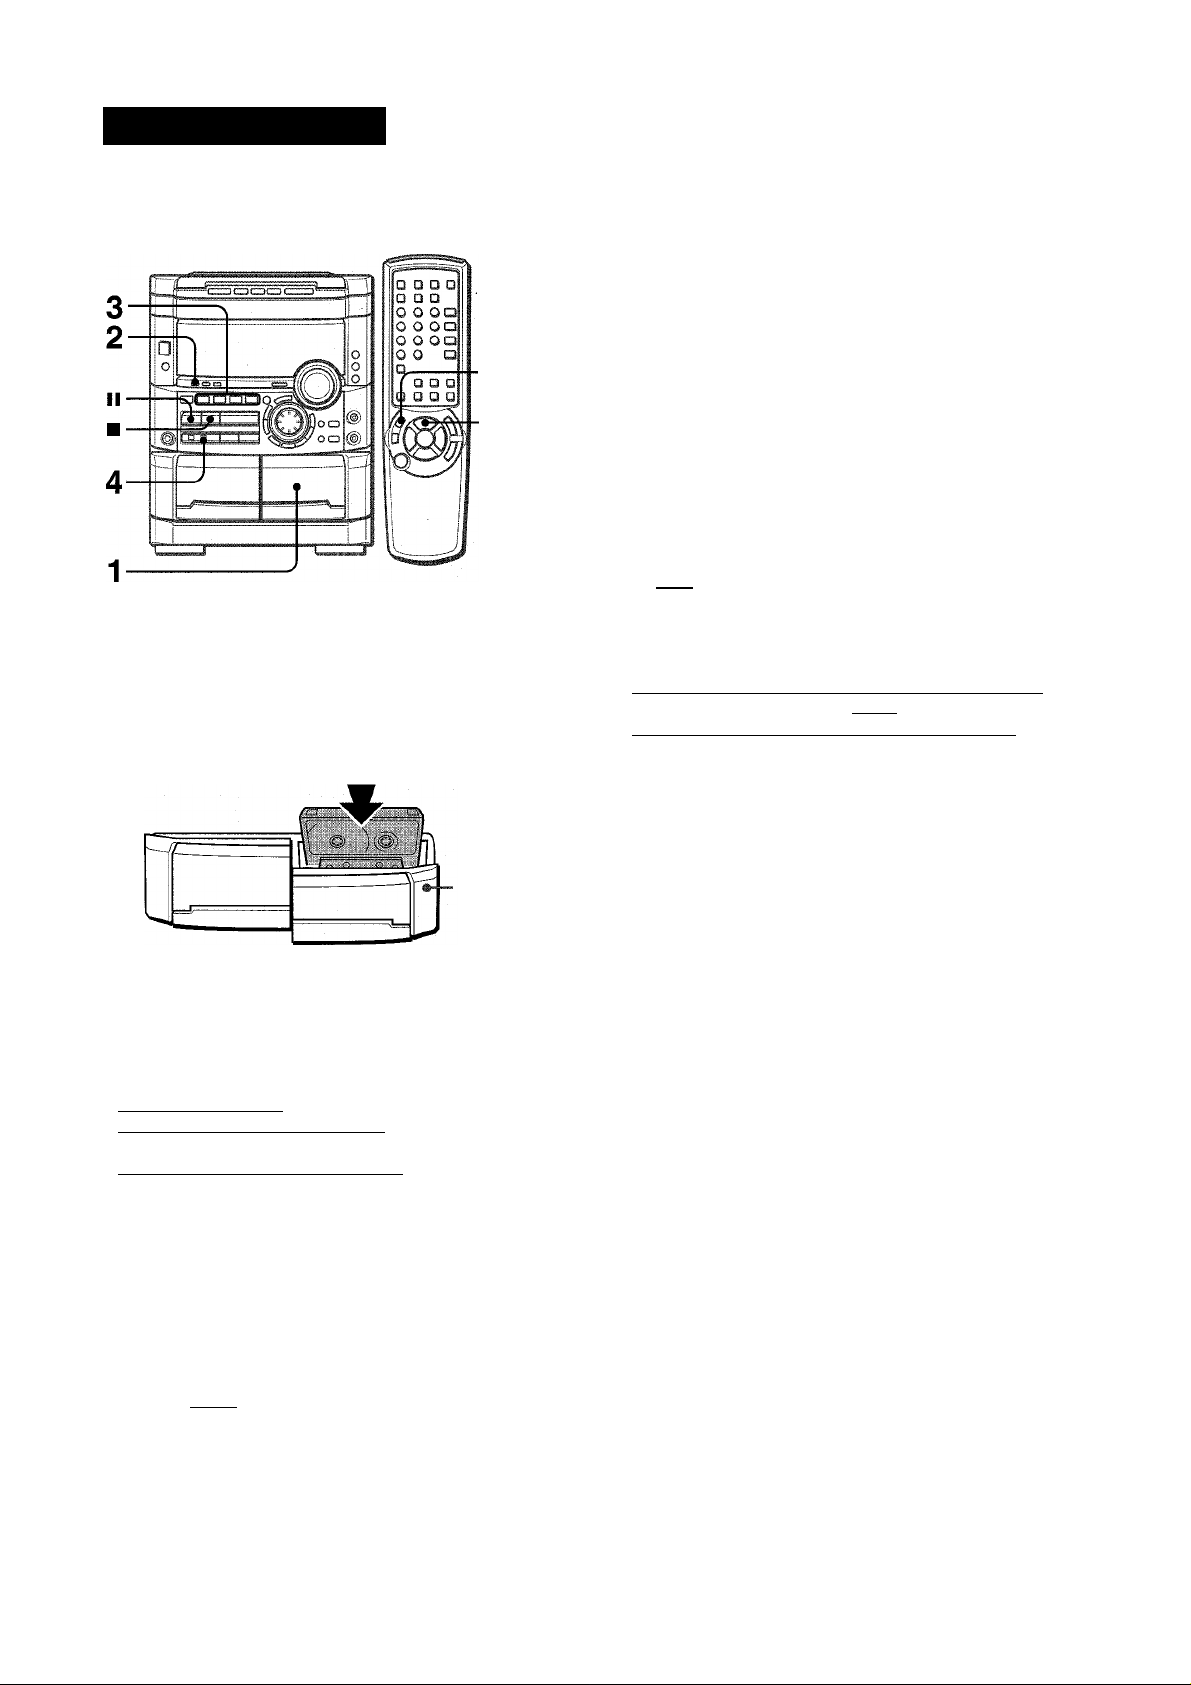
1 Press TAPE/DECK1/2 and press ± PUSH EJECT
to open the cassette holder.
Insert a tape with the exposed side down. Push the cassette
holder to close.
2 Press ◄►to start play.
Selected deck number The tape counter
.........................................I
; /TFl 000\;i
...........
^ I ,
To stop play, press ■.
To pause play (deck 2 only), press II. To resume play, press
again.
To change the playback side, press in play or pause mode.
To fast forward or rewind, press ◄ ◄ or ► ► .Then press ■ to
stop the tape.
To start piay when the power is off (Direct Play Function)
Press TAPE/DECK 1/2. The power is turned on and play of the
inserted tape begins.
To set the tape counter to 0000
Press ■ CLEAR in stop mode.
The counter is also set to 0000 when the cassette holder is
opened and closed.
Playback side indicator
I
The front side is being played (forward).
I: The back side is being played (reverse).
1 8 ENGLISH
Page 19
MUSIC SENSOR
If there is a 4-second or longer blank between each track, a search
for the beginning of the current or next track during playback can
be done easily.
Press ◄ ◄ or ► ► during playback referring to the playback side
indicator (◄ or ► ) on the display.
For example, when ► ► is pressed while ► is displayed, playback
of the next track starts.
Music sensor function may not be able to detect tracks under the
following conditions:
• Blanks of less than 4 seconds between tracks
• Noisy blanks
• Long passages of low-end sound
• Low overall recording levels
CONTINUO
I.
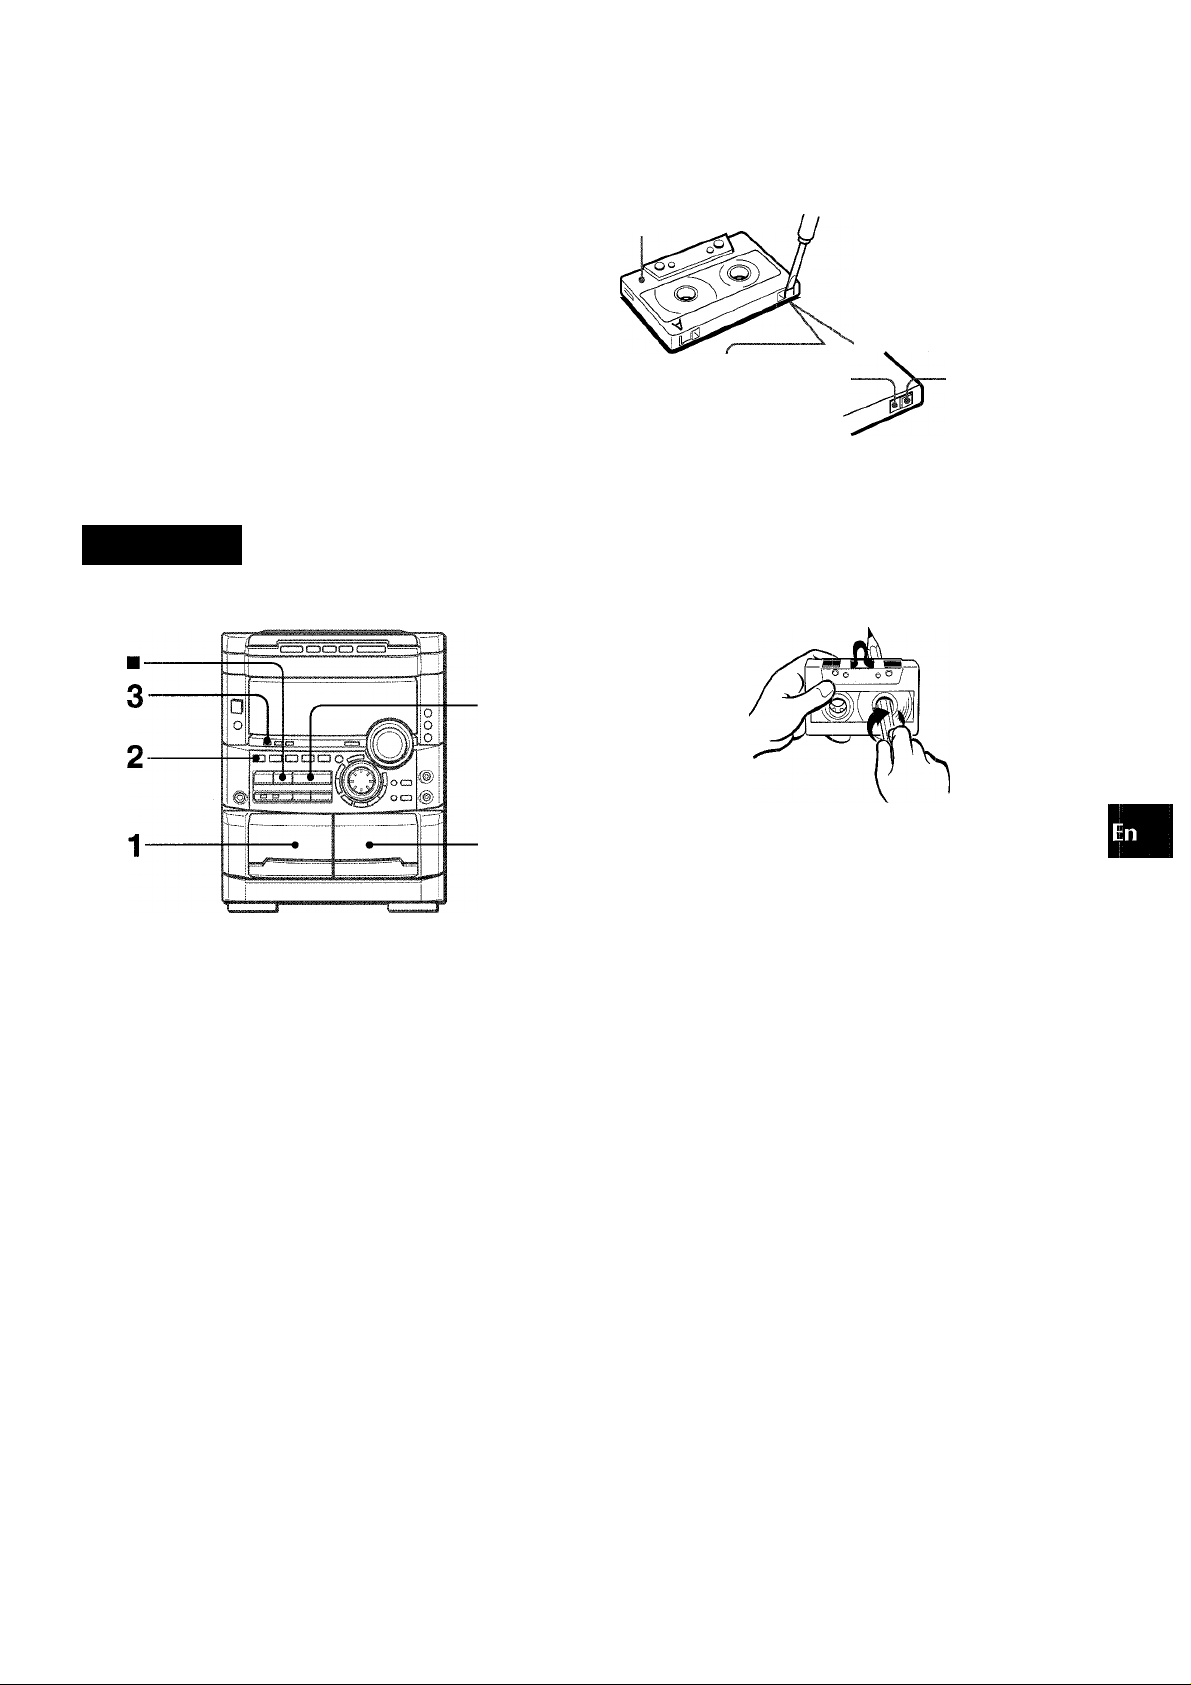
About cassette tapes
• To prevent accidental erasure, break off the plastic tabs
on the cassette tape after recording with a screwdriver or
other pointed tool.
Side A
Type II tape
Tab for side A
detection
slot
To record on the tape again, cover the tab openings with
adhesive tape, etc. (On Type II tapes, take care not to cover
the Type II tape detection slot.)
■ 120-minute or longer tapes are extremely thin and easily
deformed or damaged. They are not recommended.
' Take up any slack in the tape with a pencil or similar tool
before use. Slack tape may break or jam in the mechanism.
O
GQ
<
IX
u
DL
<
Ih
After playback on one deck finishes, the tape in the other deck
will start to play without interruption.
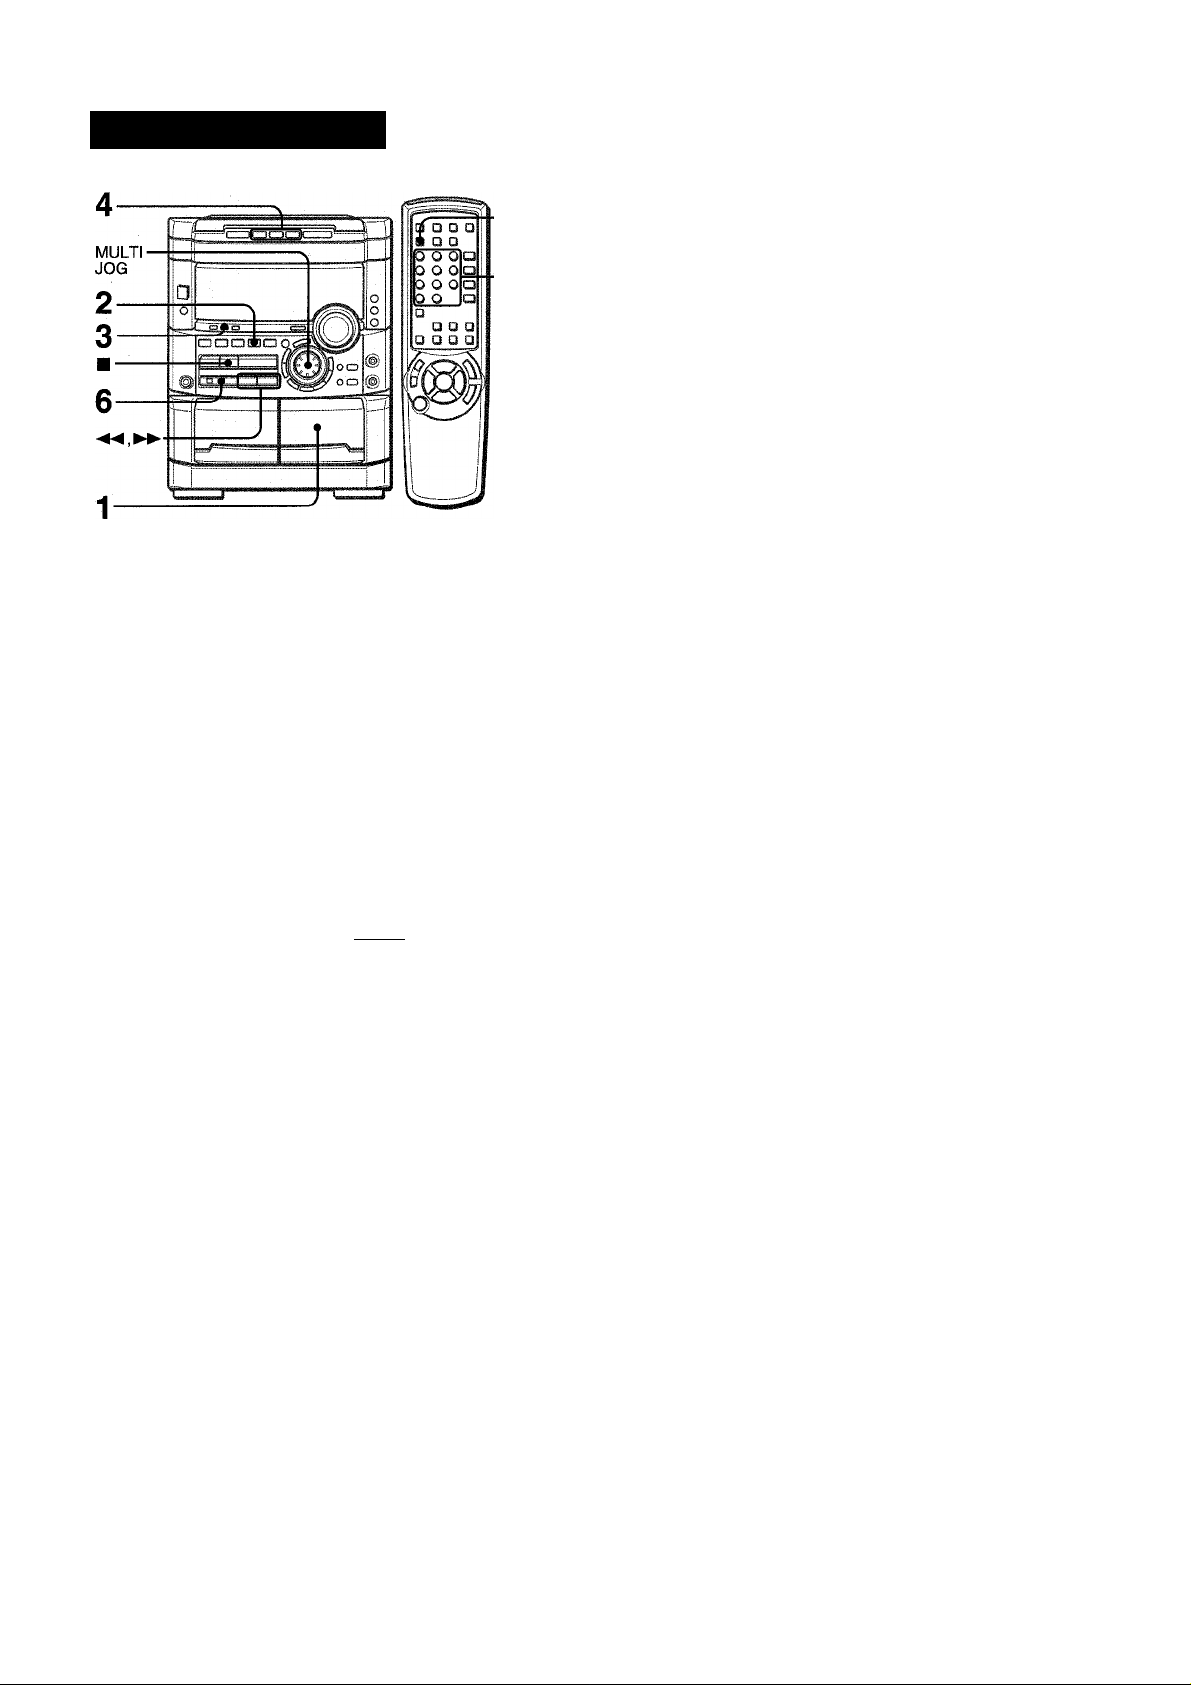
1 Insert tapes into deck 1 and deck 2.
2 Press TAPE/DECK 1/2 to select the deck to be
played back first.
3 Press REV MODE to select 4 Press to start playback.
Playback continues until ■ is pressed.
ENGLISH
19
Page 20
CD PLAYING
BASIC OPERATIONS
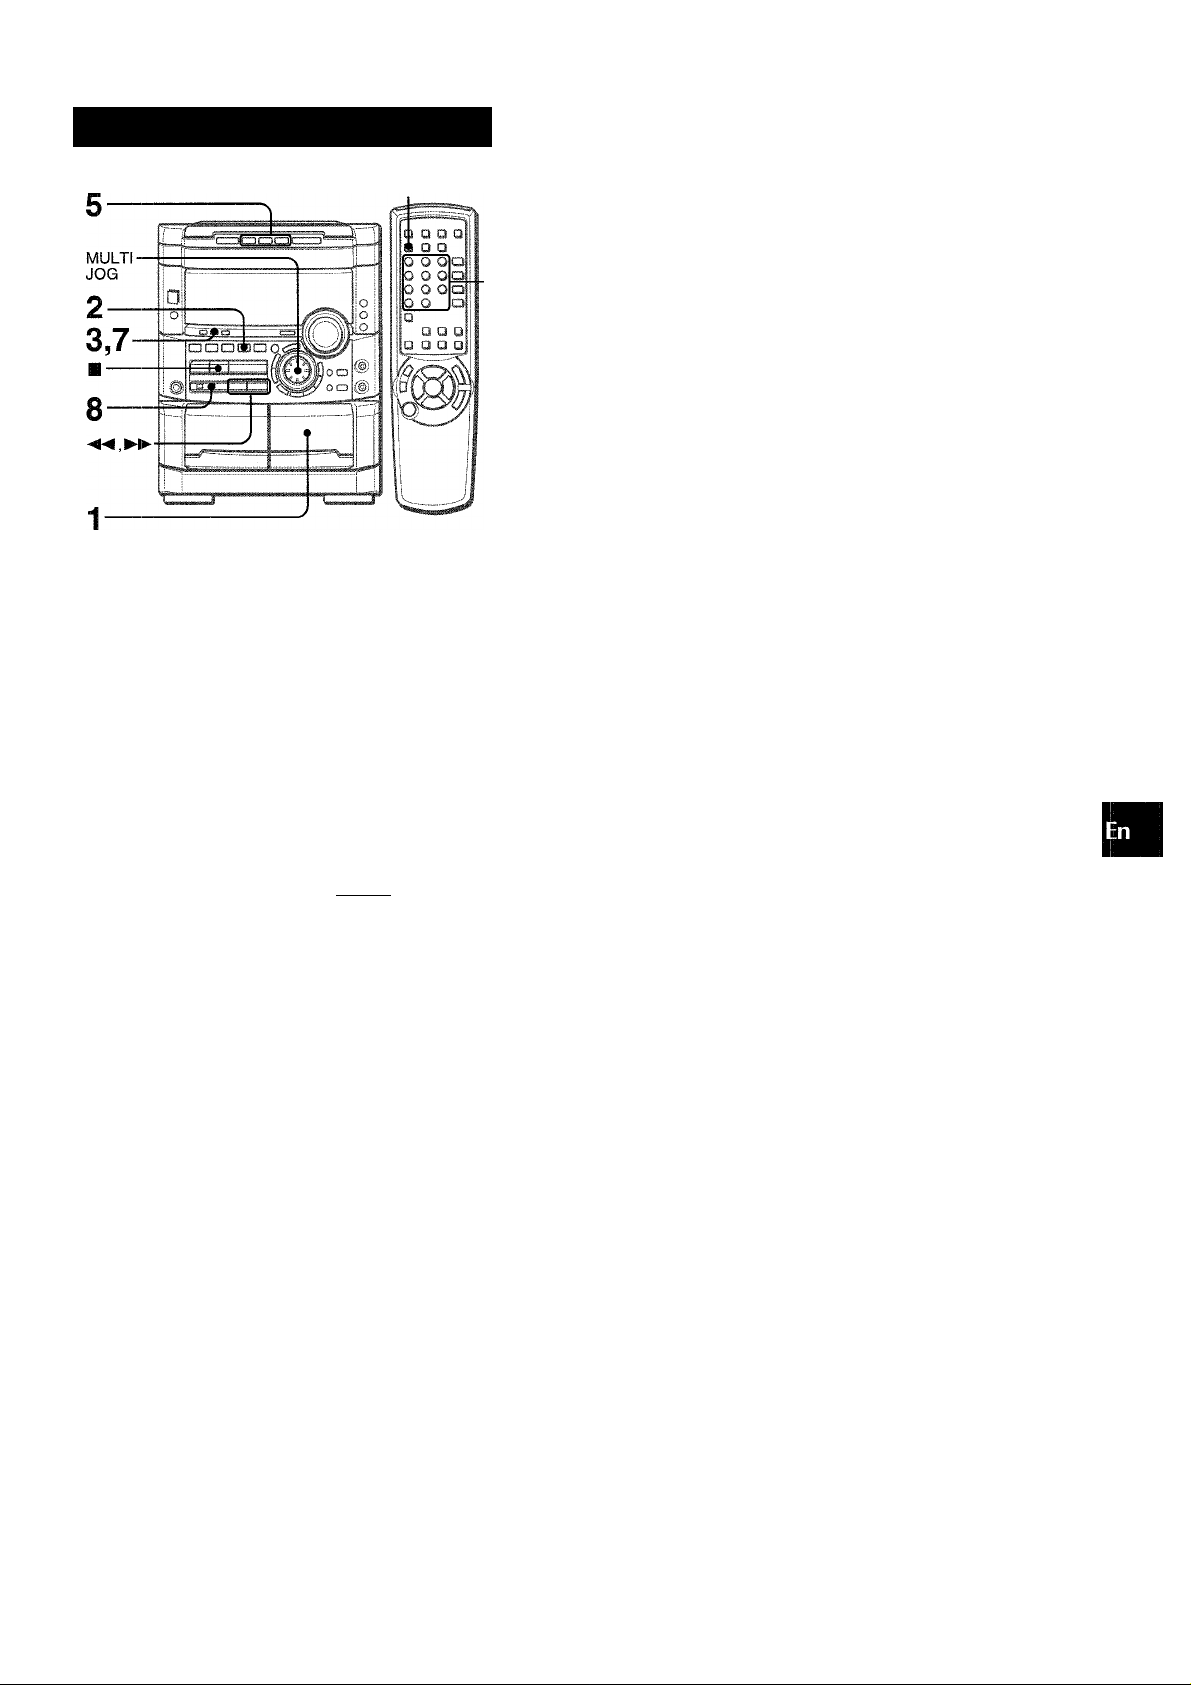
To play one disc only, press DISC DIRECT PLAY 1-3.
The selected disc is played once.
To stop play, press ■ .
To pause play, press II.To resume play, press again.
To search for a particular point during piayback, keep
or ► ► pressed and release it at the desired point.
To skip to the beginning of a track during playback, press
◄ ◄ or ► ► repeatedly or turn MULTI JOG.
To remove discs, press ± OPEN/CLOSE.
To start play when the power is off (Direct Piay Function)
Press CD. The power is turned on and play of the loaded disc(s)
begins.
When A OPEN/CLOSE is pressed, the power is also turned on
and the disc compartment is opened.
To check the remaining time
During play, press CD EDiT/CHECK. The amount of time
remaining until all tracks finish playing is displayed. To restore
the playing time display, repeat the above.
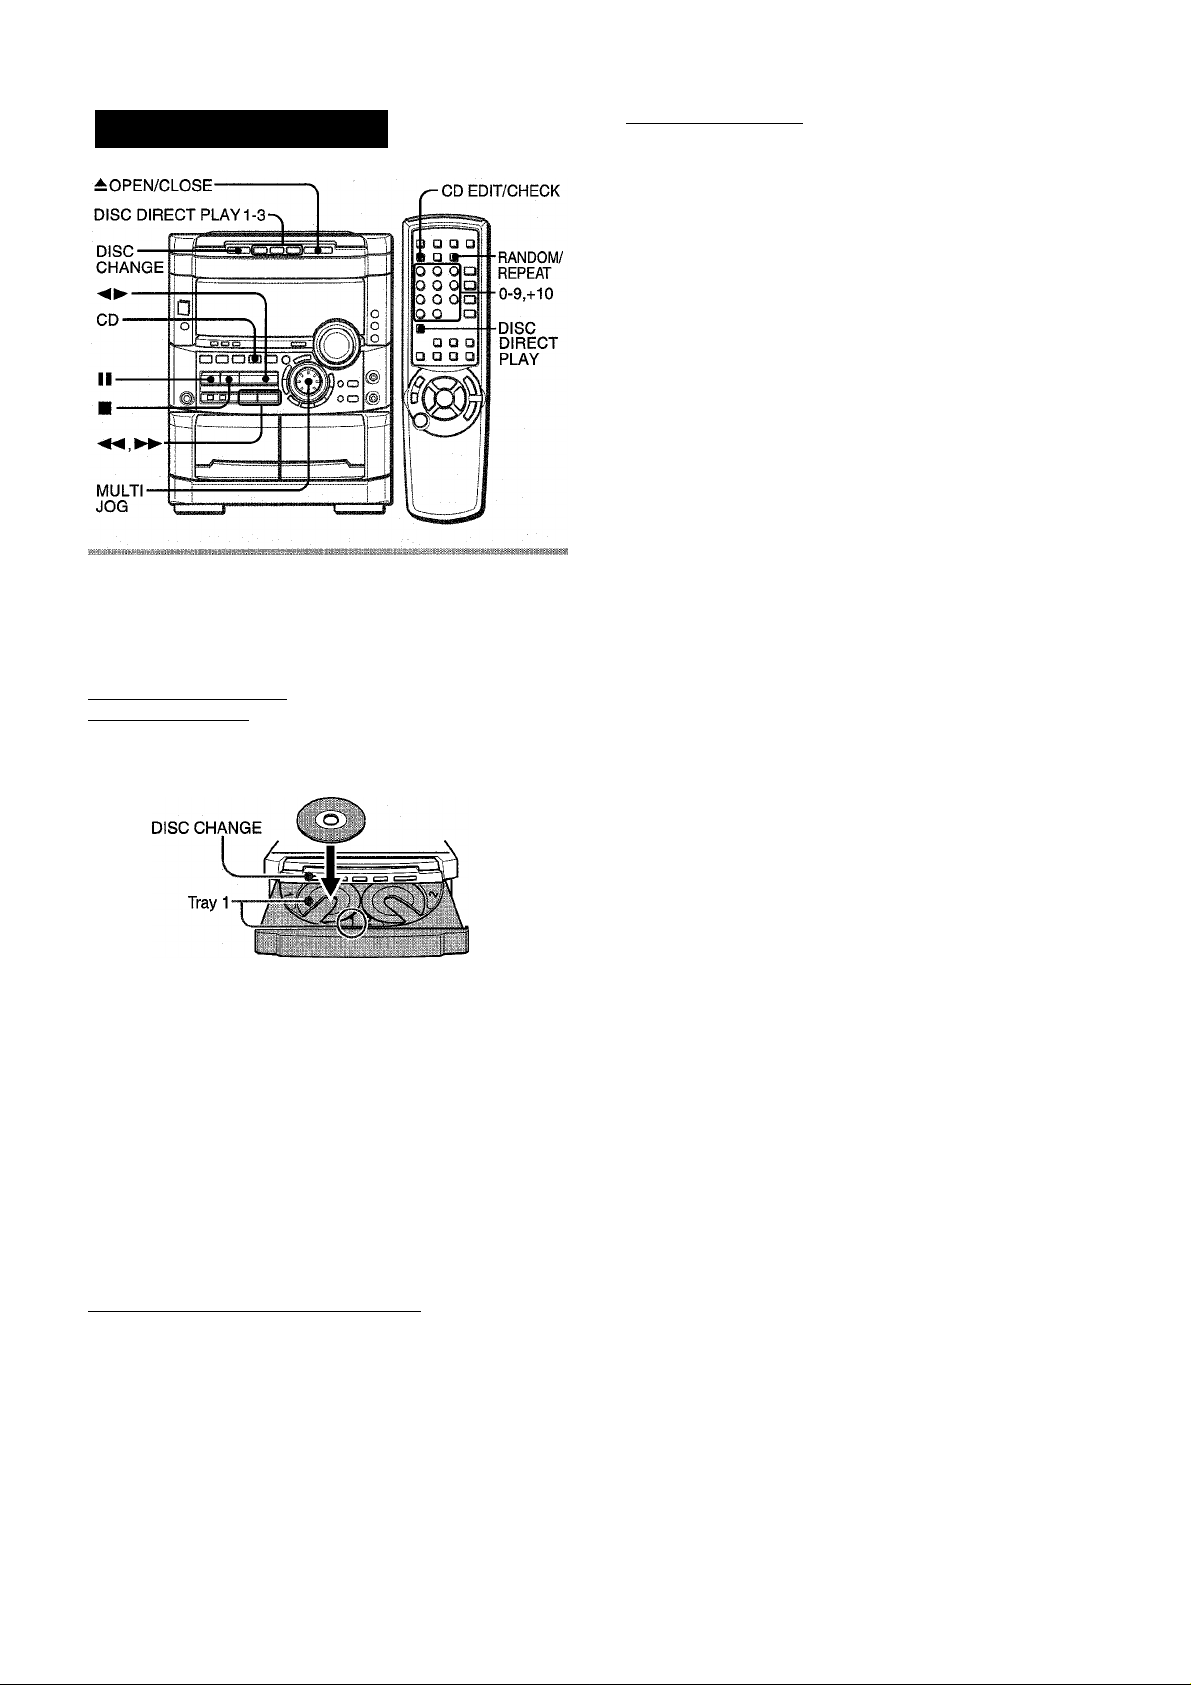
LOADING DISCS
Press CD, then press £ OPEN/CLOSE to open the disc compartment. Load disc(s) with the iabel side up.
To play one or two discs, place the discs on tray 1 and 2.
To play three discs, press DISC CHANGE to rotate the trays
after placing two discs. Place the third disc on tray 3.
Close the disc compartment by pressing £ OPEN/CLOSE.
Tray number of the
disc to be played Total playing time
lU-
.'16 4S;'23'.
/.
.................
Total number of tracks
.................... ,:s
.......................
I
Selecting a track with the remote controi
1 Press Disc DIRECT PLAY, then press numbered buttons
1-3 within 3 seconds to select a disc.
2 Press numbered buttons 0-9 and +10 to select a track.
Example:
To select the 25th track, press +10, +10 and 5.
To select the 10th track, press +10 and 0.
The selected track starts to play and continues to the end of
that disc.
Replacing discs during play
While one disc is playing, the other discs can be replaced without
interrupting play.
1 Press DISC CHANGE.
2 Remove the discs and replace with other discs.
3 Press ± OPEN/CLOSE to close the disc compartment.
' When loading an 8-cm (3-inch) disc, put it onto the inner circle
of the tray.
' Do not place more than one compact disc on one disc tray.
’ Do not tilt the unit with discs loaded. Doing so may cause
malfunctions.
' Do not use irregular shape CDs (example: heart-shaped,
octagonal ones). It may result in malfunctions.
PLAYING DISCS
Load discs.
To play all discs in the disc compartment, press
Play begins with the disc on tray 1.
Number of track being played Elapsed playing time
' , ■ ■ ■ ■ HI I
i ■ / r.-V;; ¡H '
..........
20 ENGLISH
Page 21

RANDOM /REPEAT PLAY
Use the remote control.
RANDOM play
All the tracks on the selected disc or all the discs can be played
randomly.
REPEAT play
A single disc or all the discs can be played repeatedly.
Press RANDOM/REPEAT.
Each time it is pressed, the function can be selected cyclically.
RANDOM play — RANDOM lights up on the display.
REPEAT play — lights up on the display.
RANDOM/REPEAT play — RANDOM and light up on the
display.
Cancel — RANDOM and c^. disappear from the display.
PROGRAM
I
Up to 30 tracks can be programmed from any of the inserted
discs. ^
(9
Z
►
◄
■ iJ
&
o
To play all discs, press to start play.
To play a single disc, press one of DISC DIRECT PLAY 1-3 to
start play.
During random play it is not possible to skip to the previously
played track with
BLANK SKIP PLAY
The silent portions between tracks recorded on a CD can be
skipped during playback.
1 Press CD BLANK SKIP.
“CD BLANK SKIP ON” is displayed and a small dot appears
in the display.
Small dot
' .r;n
'/r:
.................
2 Press ◄►to start playback.
■ tvo
..3
The silent portions between tracks will be skipped, and the
sound will be played back without interruption. If a track fades
out (ends with the sound gradually decreasing), the fadeout
portion also will be skipped.
To return to normal playback
Press CD BLANK SKIP again, and “CD BLANK SKIP OFF” is
displayed and the dot in the display disappears.
> There may be a case where BLANK SKIP PLAY does not
function correctly.
' BLANK SKIP PLAY is automatically canceled when performing
Al EDIT RECORDING (page 24), PROGRAMMED EDIT
RECORDING (page 25), or recording during PROGRAMMED
PLAY (page 21) or RANDOM PLAY (page 21).
Use the remote control.
1 Press PRGM twice in stop mode.
“PRGM” is displayed .
PRGM
.........
0;:00
• When PRGM is pressed once in step 1, the unit enters the
KARAOKE PROGRAM (page 29).
Press DISC DIRECT PLAY, then press numbered buttons 1-3 within 3 seconds to select a disc.
Go to the next step when the tray stops rotating.
Press numbered buttons 0-9 and +10 to program a track.
Example:
To select the 25th track, press +10, +10 and 5.
To select the 10th track, press +10 and 0.
Selected track number Total number of selected tracks
F'
.....
01'
Program number
- O
iP 4;: 20.
Total playing time of
the selected tracks
4 Repeat steps 2 and 3 to program other tracks.
5 Press ◄►to start play.
To check the program
Each time ◄ ◄ or ► ► is pressed in stop mode, a disc number,
track number, and program number will be displayed.
To clear the program
Press ■ CLEAR in stop mode.
To add tracks to the program
Repeat steps 2 and 3 in stop mode. The track will be programmed
after the last track.
To change the programmed tracks
Clear the program and repeat all the steps again.
To play the programmed tracks repeatedly
After programming the tracks, press RANDOM/REPEAT
repeatedly until Ci. appears on the display.
' During programmed play, you cannot perform random play,
check the remaining time, and select a disc or track. “CAN’T
USE” is displayed If you attempt to select a track.
' “FULL’ is displayed if you attempt to program more than 30
ENGLISH 21
Page 22
RECORDING
BASIC RECORDING
To stop recording, press ■ .
To pause recording, press II. (Applicabie when the source is
TUNER, VIDEO/AUX or MD) To resume recording, press it again.
This section expiains how to record from the tuner, CD piayer, or
externai equipment.
'•/OREC/
REC MUTE
Preparation
• Use Type I (normal) and Type II (high/CrOa) tapes for recording.
• Set the tape to the point where recording wiii start.
1 Insert the tape to be recorded on into deck 2.
Insert the tape with the side to be recorded on first facing out
from the unit.
To start recording with the remote control
First press #/0 REC/REC MUTE, and then press I
► /◄ ► within
2 seconds.
Sound adjustment during recording
The VOLUME controi has no effect on recording, it oniy sets the
level feeding the speakers and headphones. Remember, however,
recording takes on the BEAT, AUTO SPICE/FILL iN, SPiCE A/B
functions, as weil as on the BBE functien.
INSERTING BLANK SPACES
insertion of 4-second biank spaces enabies you to activate the
Music Sensor function. (Applicable when the source is TUNER/
BAND, ViDEO/AUX or MD.)
1 Press • REC/REC MUTE during recording or while in
recording pause mode.
ln=tH on the display flashes for 4 seconds and 4-second blank
space is made. Then, the deck enters the recording pause
mode.
2 Press II to resume recording. To insert a blank space of less than 4 seconds, press •
REC/REC MUTE again while l;l=t«i is flashing.
To insert blank spaces of more than 4 seconds, after the deck
enters recording pause mode, press # REC/REC MUTE again.
Each time the button is pressed, a 4-second blank space is added.
-±PUSH
EJECT
2 Press REV MODE to select the reverse mode.
To record on one side oniy, seiect 1.
To record on both sides, select TD or CZ).
3 Press function (TUNER/BAND, VIDEO/AUX, CD or
MD) and prepare the source to be recorded.
To record from a CD. press CD and load the disc(s).
To record from a radio broadcast, press TUNER/BAND and
tune in to a station.
To record from a connected source, press VIDEO/AUX or
MD.
4 Press # REC/REC MUTE to start recording.
When recording from a connected source, start playback of
the source.
• ! ! !.„! ! ii ...,S •
IsTsTil
When the selected function is CD, playback and recording
start simultaneously.
“Can’t REC” is displayed if you attempt to record on a tape with
the plastic tabs broken off.
To erase a recording
Make sure the microphone is not connected to this unit. Set the
microphone volume and the echo level to OFF (see page 28).
Also, check to make sure that BEAT and AUTO SPICE are
switched off (page 11).
1 Insert the tape to be erased into deck 2 and press TAPE/
DECK 1/2 to display “TP 2”.
2 Set the tape to the point where the erasure is to be started.
3 Set the reverse mode by pressing REV MODE.
4 Press 9 REC/REC MUTE to start the erasure.
22
ENGLISH
Page 23
RECORDING
BASIC RECORDING
To stop recording, press ■ .
To pause recording, press II. (Applicabie when the source is
TUNER, VIDEO/AUX or MD) To resume recording, press it again.
This section expiains how to record from the tuner, CD piayer, or
externai equipment.
'•/OREC/
REC MUTE
Preparation
• Use Type I (normal) and Type II (high/CrOa) tapes for recording.
• Set the tape to the point where recording wiii start.
1 Insert the tape to be recorded on into deck 2.
Insert the tape with the side to be recorded on first facing out
from the unit.
To start recording with the remote control
First press #/0 REC/REC MUTE, and then press I
► /◄ ► within
2 seconds.
Sound adjustment during recording
The VOLUME controi has no effect on recording, it oniy sets the
level feeding the speakers and headphones. Remember, however,
recording takes on the BEAT, AUTO SPICE/FILL iN, SPiCE A/B
functions, as weil as on the BBE functien.
INSERTING BLANK SPACES
insertion of 4-second biank spaces enabies you to activate the
Music Sensor function. (Applicable when the source is TUNER/
BAND, ViDEO/AUX or MD.)
1 Press • REC/REC MUTE during recording or while in
recording pause mode.
ln=tH on the display flashes for 4 seconds and 4-second blank
space is made. Then, the deck enters the recording pause
mode.
2 Press II to resume recording. To insert a blank space of less than 4 seconds, press •
REC/REC MUTE again while l;l=t«i is flashing.
To insert blank spaces of more than 4 seconds, after the deck
enters recording pause mode, press # REC/REC MUTE again.
Each time the button is pressed, a 4-second blank space is added.
-±PUSH
EJECT
2 Press REV MODE to select the reverse mode.
To record on one side oniy, seiect 1.
To record on both sides, select TD or CZ).
3 Press function (TUNER/BAND, VIDEO/AUX, CD or
MD) and prepare the source to be recorded.
To record from a CD. press CD and load the disc(s).
To record from a radio broadcast, press TUNER/BAND and
tune in to a station.
To record from a connected source, press VIDEO/AUX or
MD.
4 Press # REC/REC MUTE to start recording.
When recording from a connected source, start playback of
the source.
• ! ! !.„! ! ii ...,S •
IsTsTil
When the selected function is CD, playback and recording
start simultaneously.
“Can’t REC” is displayed if you attempt to record on a tape with
the plastic tabs broken off.
To erase a recording
Make sure the microphone is not connected to this unit. Set the
microphone volume and the echo level to OFF (see page 28).
Also, check to make sure that BEAT and AUTO SPICE are
switched off (page 11).
1 Insert the tape to be erased into deck 2 and press TAPE/
DECK 1/2 to display “TP 2”.
2 Set the tape to the point where the erasure is to be started.
3 Set the reverse mode by pressing REV MODE.
4 Press 9 REC/REC MUTE to start the erasure.
22
ENGLISH
Page 24
Al EDIT RECORDING
CD EDIT/
CHECK
6 Press # REC/REC MUTE to start recording on
the first side.
The tape is rewound to the beginning of the front side, the
iead segment is played through for 10 seconds, and recording
starts. When recording on the front (side A) ends, recording
on the back (side B) starts.
To Stop recording
Press ■ . Recording and CD play stop simultaneously.
To clear the edit program
Press ■ CLEAR twice so that “EDIT” disappears on the dispiay.
To check the order of the programmed track numbers
Before recording, press CD EDIT/CHECK to seiect side A or B,
and press ◄ ◄ or ► ► repeatedly.
Programmed
Track number
track numbers
The Al edit recording function enabies CD recording without
worrying about tape length and track length. When a CD is
inserted, the unit automaticaiiy caiculates the total track length.
If necessary, the order of tracks is rearranged so that no track is
cut short.
(Al: Artificial Intelligence)
Al edit recording will not start from a point halfway into the tape.
The tape must be recorded from the beginning of either side.
1 Insert the tape into deck 2.
Insert the tape with the side to be recorded on first facing out
from the unit.
2 Press CD and load the disc(s).
3 Press CD EDIT/CHECK once.
“EDIT” is displayed.
EDIT
. -V, ; ... ■ -
■rZv I fli C'-esift--
^
• When “PRGM” is displayed, press CD EDIT/CHECK.
4 Press DISC DIRECT PLAY 1-3 to select a disc. 5 Press numbered buttons 0-9 on the remote
control to designate the tape iength.
10 to 99 minutes can be specified.
Example: When using a 60-minute tape, press 6 and 0.
In a few seconds, the tracks to be recorded on each side of
the tape are determined.
• , ►► or MULTI JOG are also available to designate
the tape length.
Tape length of recording tracks for side A
...... I. VI..: =.v . vv*.
Remaining time Programmed
3 P.03' .--
^ ■“* . w-.. . .-I. ... * ^
. IWliijli.« 13!!- i ..
Tape side Program number
To add tracks from other discs to the edit program
If there is any time remaining on the tape after step 5, you can
add tracks from other discs in the CD compartment.
1 Press CD EDIT/CHECK to select side A or B.
2 Press DISC DIRECT PLAY 1-3 to seiect a disc.
3 Press numbered buttons on the remote controi to seiect tracks.
A track whose playing time is longer than the remaining time
cannot be programmed.
4 Repeat steps 2 and 3 to add more tracks.
Time on cassette tapes and editing time
The actuai cassette recording time is usually a little longer than
the specified recording time printed on the label. This unit can
program tracks to use the extra time. When the total recording
time is a little longer than the tape’s specified recording time
after editing, the display shows the extra time (without a minus
mark), instead of the time remaining on the tape (with the minus
mark).
' The Al edit recording function cannot be used with discs
containing 31 tracks or more. “TR OVER” is displayed if this is
attempted.
’ Recording is inhibited if the erasure prevention tab on either
side of the tape is broken off.
I C
...
24 ENGLISH
60:'
■ 'H
o;.-
......
Tape side
A: First recording side
B: Second recording side
Page 25
PROGRAMMED EDIT RECORDI
CD EDIT/CHECK
4,5
In the programmed edit recording function the tracks can be
programmed while checking the remaining time on each side of
the tape.
The programmed edit recording will not start from a point halfway
in the tape. The tape must be recorded on from the beginning of
either side.
6 Repeat step 5 for the rest of the tracks for side
A.
A track whose playing time is longer than the remaining time
cannot be programmed.
7 Press CD EDiT/CHECK to select side B and
program the tracks for side B.
After confirming “B” on the display, repeat step 5.
Tape side B (reverse side)
8 Press #REC/REC WIUTE to start recording.
The tape is rewound to the beginning of the front side, the
lead segment is played through for 10 seconds, and recording
starts. When recording on the front side (A) ends, recording
on the back side (B) starts.
To stop recording
Press ■ . Recording and CD play stop simultaneously.
To check the order of the programmed track numbers
Before recording, press CD EDIT/CHECK to select side A or B,
and press ◄ ◄ or ► ► repeatedly.
Programmed track
Disc number Track number numbers
0
2
5
sc
o
o
ilJ
m-
1 Insert the tape into deck 2.
Insert the tape with the side to be recorded on first facing out
from the unit.
2 Press CD and load the disc(s).
3 Press CD EDIT/CHECK twice.
“EDIT” and “PRGM” are displayed.
• When “Al” is displayed, press CD EDIT/CHECK again.
4 Press numbered buttons on the remote control
to designate the tape length.
10 to 99 minutes can be specified.
• The ◄ ◄ , ► ► or MULTI JOG are also available to designate
the tape length.
Tape length
i
PRGriC.by
Tape side A (front side)
R..........30;= yy
Maximum recording
time for side A
5 Press DISC DIRECT PLAY 1-3 to select a disc.
Then, press numbered buttons 0-9 and +10 on
the remote control to program a track.
Example: To select the 10th track of disc 2, press DISC
DIRECT PLAY 2, then press +10 and 0.
Tape side Program number
To change the program of each side
Press CD EDIT/CHECK to select side A or B, and press ■
CLEAR to clear the program on the selected side. Then program
tracks again.
To clear the edit program
Press ■ CLEAR twice so that “EDIT” disappears on the display.
• Up to 30 tracks can be programmed from any of the inserted
discs.
• “FULL” is displayed if you attempt to program more than 30
tracks.
• Recording is inhibited if the erasure prevention tab on either
side of the tape is broken off.
Selected track number
Hie p
................
yi
Program number
Remaining time Programmed
on side A tracks
1
.......
o
22;; ly
ENGLISH 25
Page 26
DOLBY PRO LOGIC
The DOLBY PRO LOGIC feature and the center and rear
speakers (standard) assure full-scale home theater sound. When
playing back laser discs or video software that have been
2 Press MANUAL SELECT and hold it down for
about 4 seconds until “L” flashes.
recorded in Dolby Surround, astonishingly realistic sound
surrounds the listener to create a new level of audio/visual
entertainment.
Independent control of the four sound channels allows the listener
to enjoy the same type of sound reproduction experienced in
movie theaters. Voices are reproduced in the front and center
sound field, while ambient sounds like cars and crowds are
reproduced on all sides of the listener for an incredibly lifelike
audio/video experience. Please read the following carefully to
“tune” the system’s output to match the characteristics of your
listening space.
Check the following:
• Before using the DOLBY PRO LOGIC, adjust the proper
balance of speaker sound levels.
• Make sure the supplied speakers are properly connected and
positioned. (See page 4 and 5)
• Make sure the TV set and video unit are properly connected.
A noise signal is sent to each channel in turn in the following
sequence.
L: Left speaker-» CEN: Center speaker-» R: Right speaker
r
---------------------
3 Adjust the sound level of the center and the
surround speakers.
While “CEN” or “SUR” is displayed, press ◄ ◄ DOWN or ► ►
UP on the remote control to adjust the volume of the center
or each surround speaker to match the level of the front
speakers.
(See page 5)
•Make sure the laser disc, video tape, etc., support
nn jPOUY SUHROUWDi .
To adjust the balance between the left and right front speakers,
see page 10. At this time, the DOLBY PRO LOGIC mode
ADJUSTING SPEAKER LEVEL BALANCE
should be canceled by pressing DOLBY PRO LOGIC until
the “PRO-OFF” is displayed.
^LyR
SUR: Surround speakers -<
v\-
■ CEN -i“ 3=
------------
]
2,4
1
The unit is equipped with a built-in test signal generator called a
noise sequencer for easy balance adjustment of all 4 channels.
The sequencer outputs a noise signal that “travels” from channel
to channel, enabling the simple adjustment of sound level to
achieve, at the listening position, the same apparent loudness
from each channel.
Use the remote control.
1 Press DOLBY PRO LOGIC to select “NORMAL”.
“NORMAL” is displayed.
If “PHANTOM” or “3 STEREO” is displayed, press DOLBY
PRO LOGIC repeatedly until “NORMAL’ is selected.
Press MANUAL SELECT again to stop the noise signal.
• When the sequencer outputs a noise signal, a clicking sound
might be heard from the speakers due to the characteristics of
the circuit. This is not malfunction.
• If the surround speakers or the center speaker level of the
DOLBY PRO LOGIC is changed, that of the SURROUND
system (page 16) is also changed.
About the channels
The left and right front speakers create the stereo effect.
The center speaker helps achieve precise sound positioning
over a broad sound field.
The rear-mounted surround speakers enhance the “depth” of
the sound field.
To change the delay time
The surround speakers reproduce sounds a split second after
the front speakers. The delay is initially set to 20 ms (milliseconds).
To change this standard delay time, press MANUAL SELECT
on the remote control repeatedly until “TIME” is displayed. Then,
press DOWN or ► ► UP. Each time one of the buttons is
pressed, the delay time changes as shown below.
15 mS <-> 20 mS 30 mS
33;''hnE20iMS_
26 ENGLISH
Page 27
OGIC
■ MANUAL
SELECT
1
2
DOWN,
► UP
1 Press VIDEO/AUX and start playback of the video
source.
“VIDEO” is displayed.
2 Press DOLBY PRO LOGIC.
“NORMAL” is selected, and the playback sound has the
DOLBY PRO LOGIC effect.
To cancel DOLBY PRO LOGIC mode
Press DOLBY PRO LOGIC repeatedly until “PRO-OFF” is
displayed.
To change the sound levels during playback
After adjusting the balance with the noise sequencer, the sound
levels of the center or each surround speaker can be adjusted
during playback of laser discs or video software.
1 Press MANUAL SELECT on the remote control repeatedly
to select “CEN” (center speaker) or “SUR” (surround speakers).
2 While the “CEN” or “SUR” is displayed, press ◄ ◄ DOWN or
UP on the remote control to adjust the volume.
ADDITIONAL DOLBY PRO LOGIC MODES
In addition to the NORMAL mode, this unit is also equipped with
the PHANTOM and the 3 STEREO modes.
PHANTOM mode: Use this mode when no center speaker is
connected. The center channel signals are output through the
left and right speakers.
3 STEREO mode; Use this mode when no surround speakers
are connected. This mode reproduces rear sounds through the
front speakers.
To select PHANTOM or 3 STEREO
Press DOLBY PRO LOGIC repeatedly until the desired DOLBY
PRO LOGIC mode is displayed. The DOLBY PRO LOGIC mode
is displayed cyclically as follows.
NORMAL — PHANTOM — 3 STEREO
------^-----
To adjust the balance of connected speaker sound levels
PRO-OFF (cancel)
-------------------------
-------------
1
'
Carry out steps 2 to 4 of “ADJUSTING SPEAKER LEIVEL
BALANCE”.
• Depending on the sound source and/or listening conditions, a
surround effect may not be obtained even when the DOLBY
PRO LOGIC is on.
• The full DOLBY PRO LOGIC effect cannot be obtained when
using software without nnipoLBYsumouwoi mark. In this case, use
the SURROUND system instead. (See page 16.)
• The DOLBY PRO LOGIC is automatically canceled when:
- the ECHO level is changed.
- the SURROUND system or the BBE is turned on.
- the headphones are plugged in.
- the Karaoke function is turned on.
• Set the microphone volume to OFF while the DOLBY PRO
LOGIC is on. Otherwise, the DOLBY PRO LOGIC sound can
not be reproduced correctly.
U
O
o
«J
o
IX
a.
>
IDQ
ihJ'
o
o
ENGLISH 27
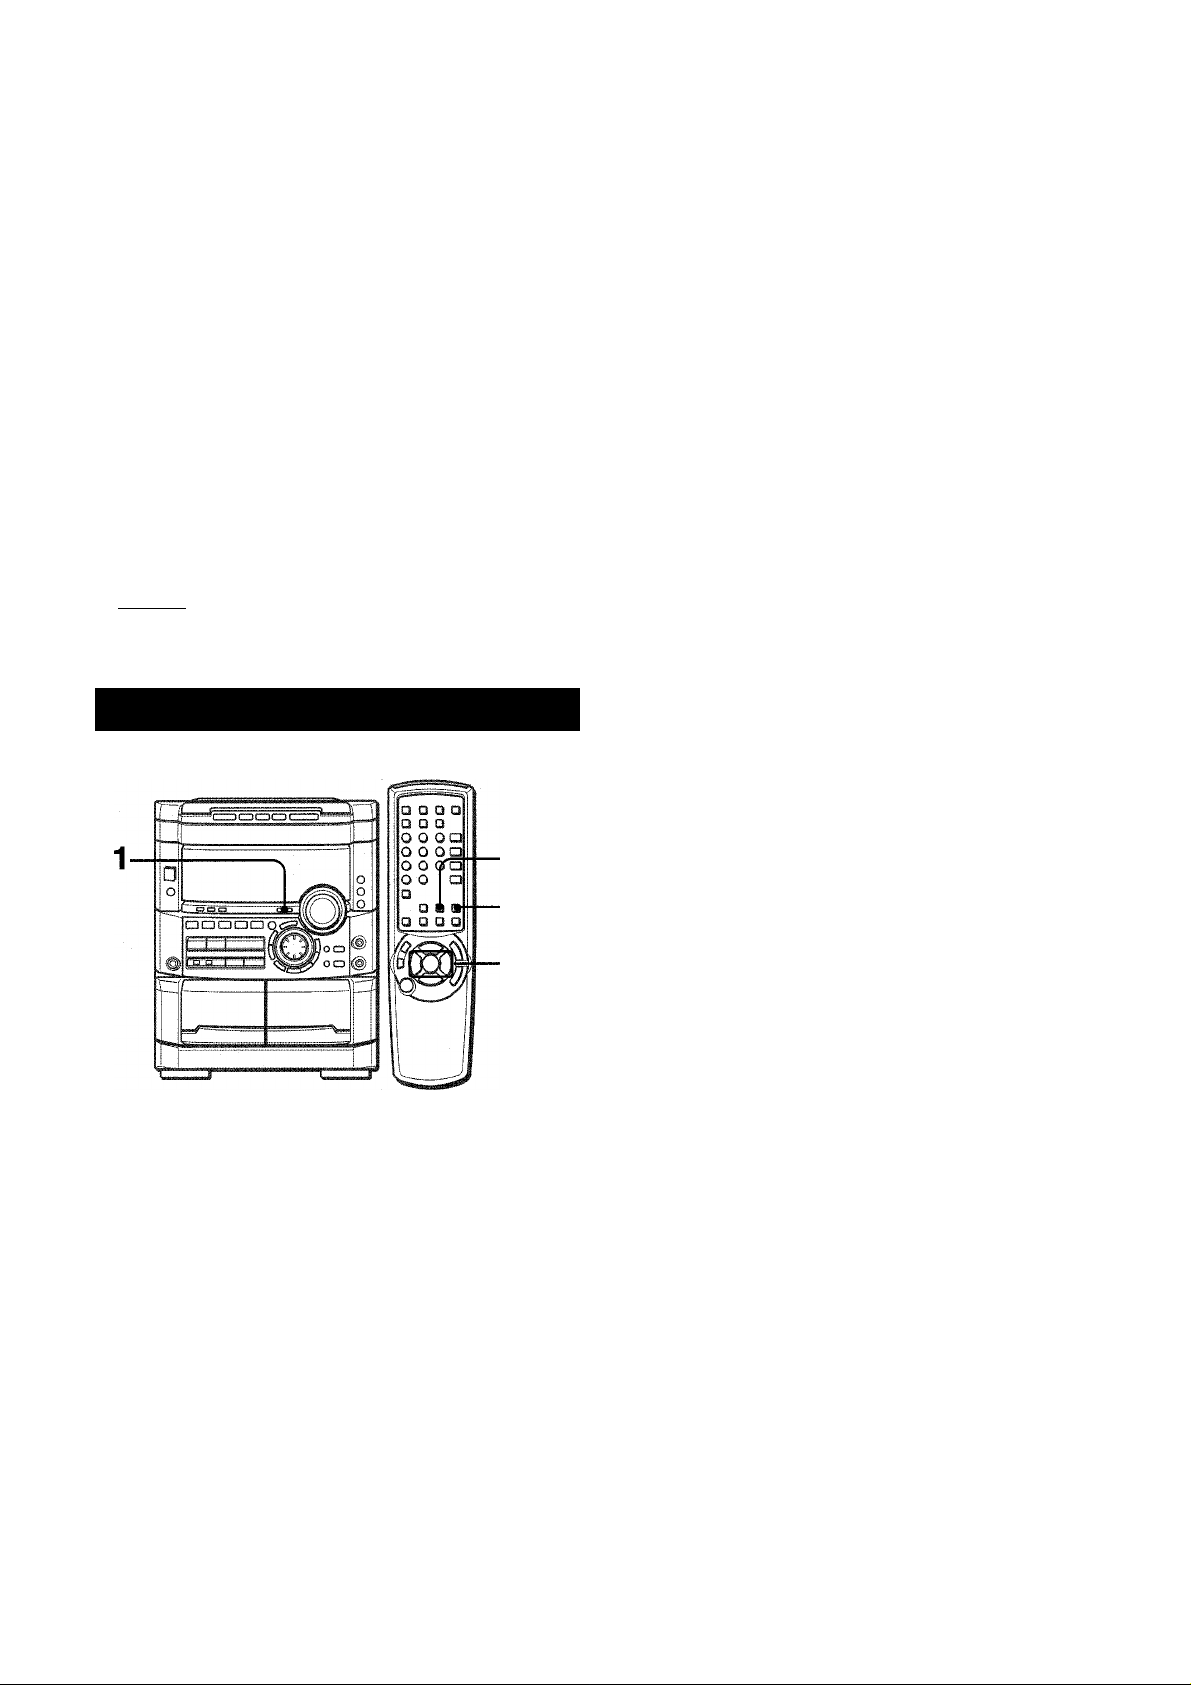
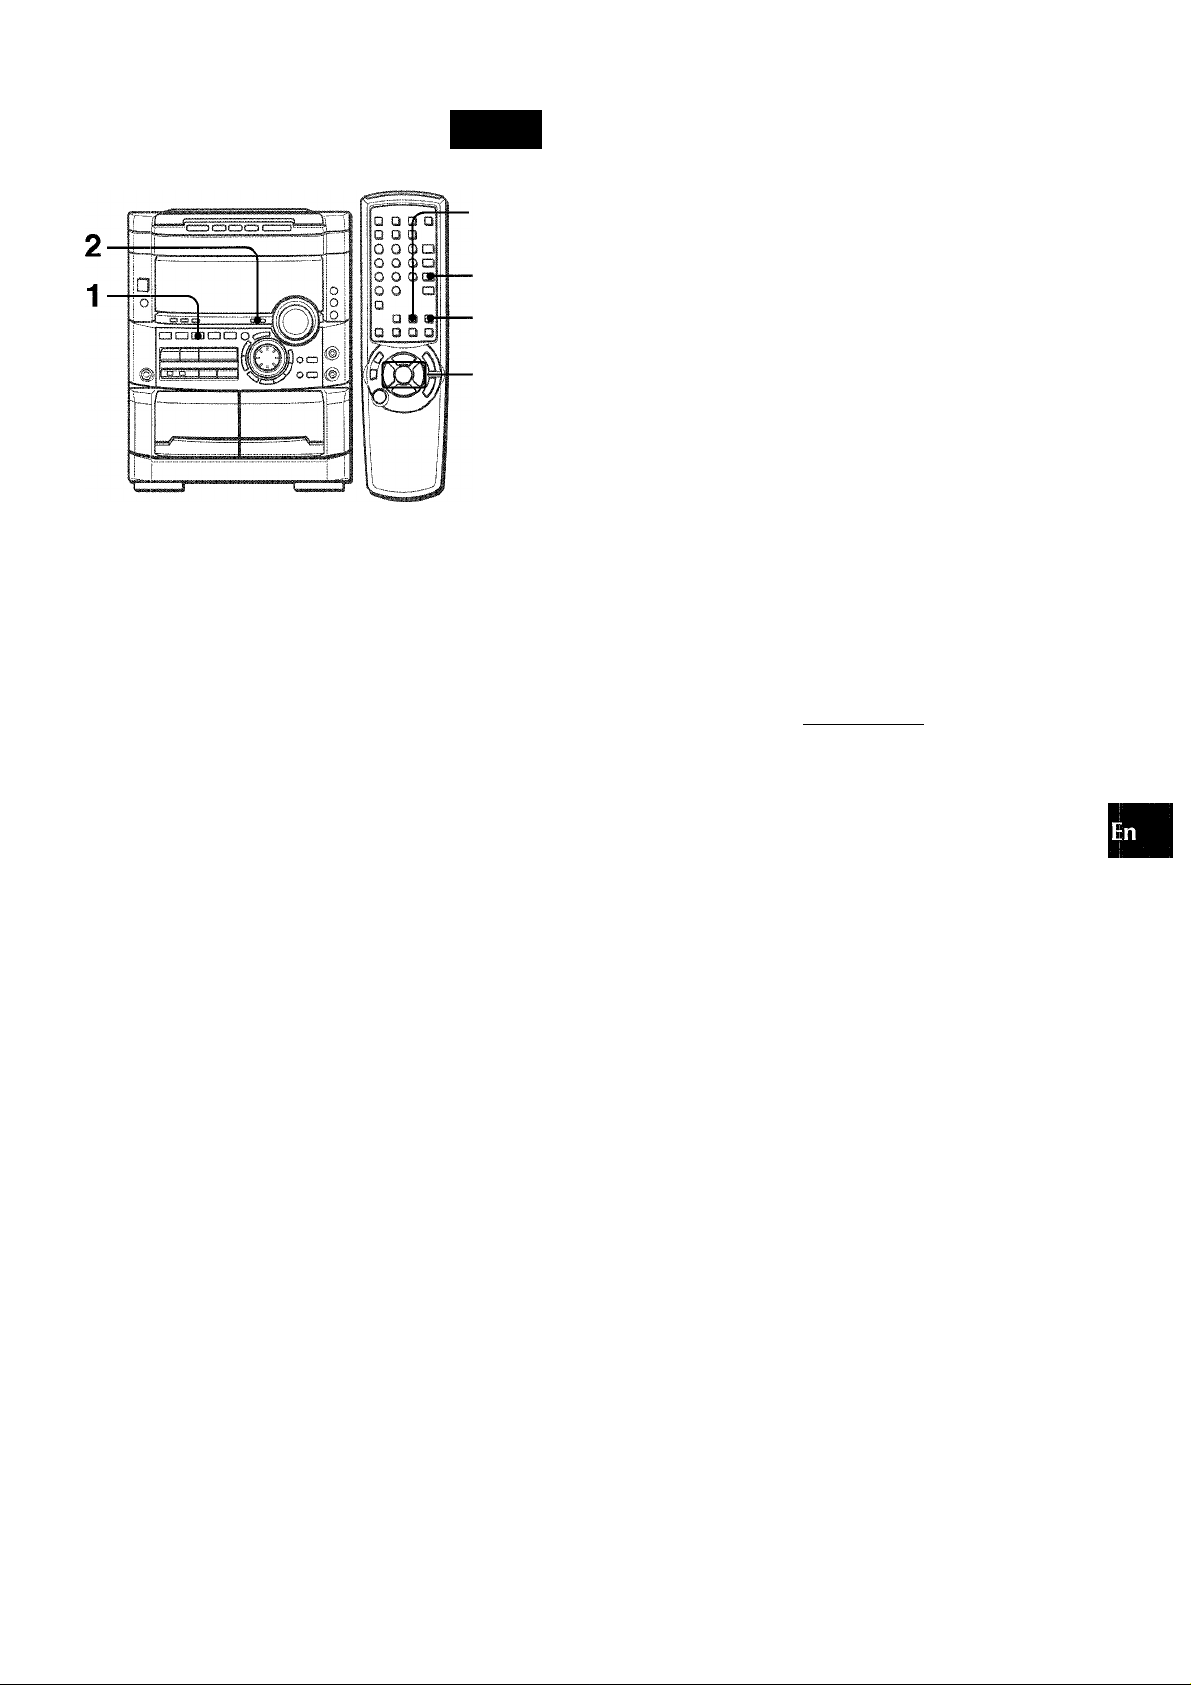
Page 28
KARAOKE
MICROPHONE MIXING
Recommended microphones
The use of unidirectional type microphones is recommended to
prevent howling. Contact your local Aiwa dealer for details.
3,4,5
5
4
Two microphones (not supplied) can be connected to this unit,
allowing you to sing along to music sources.
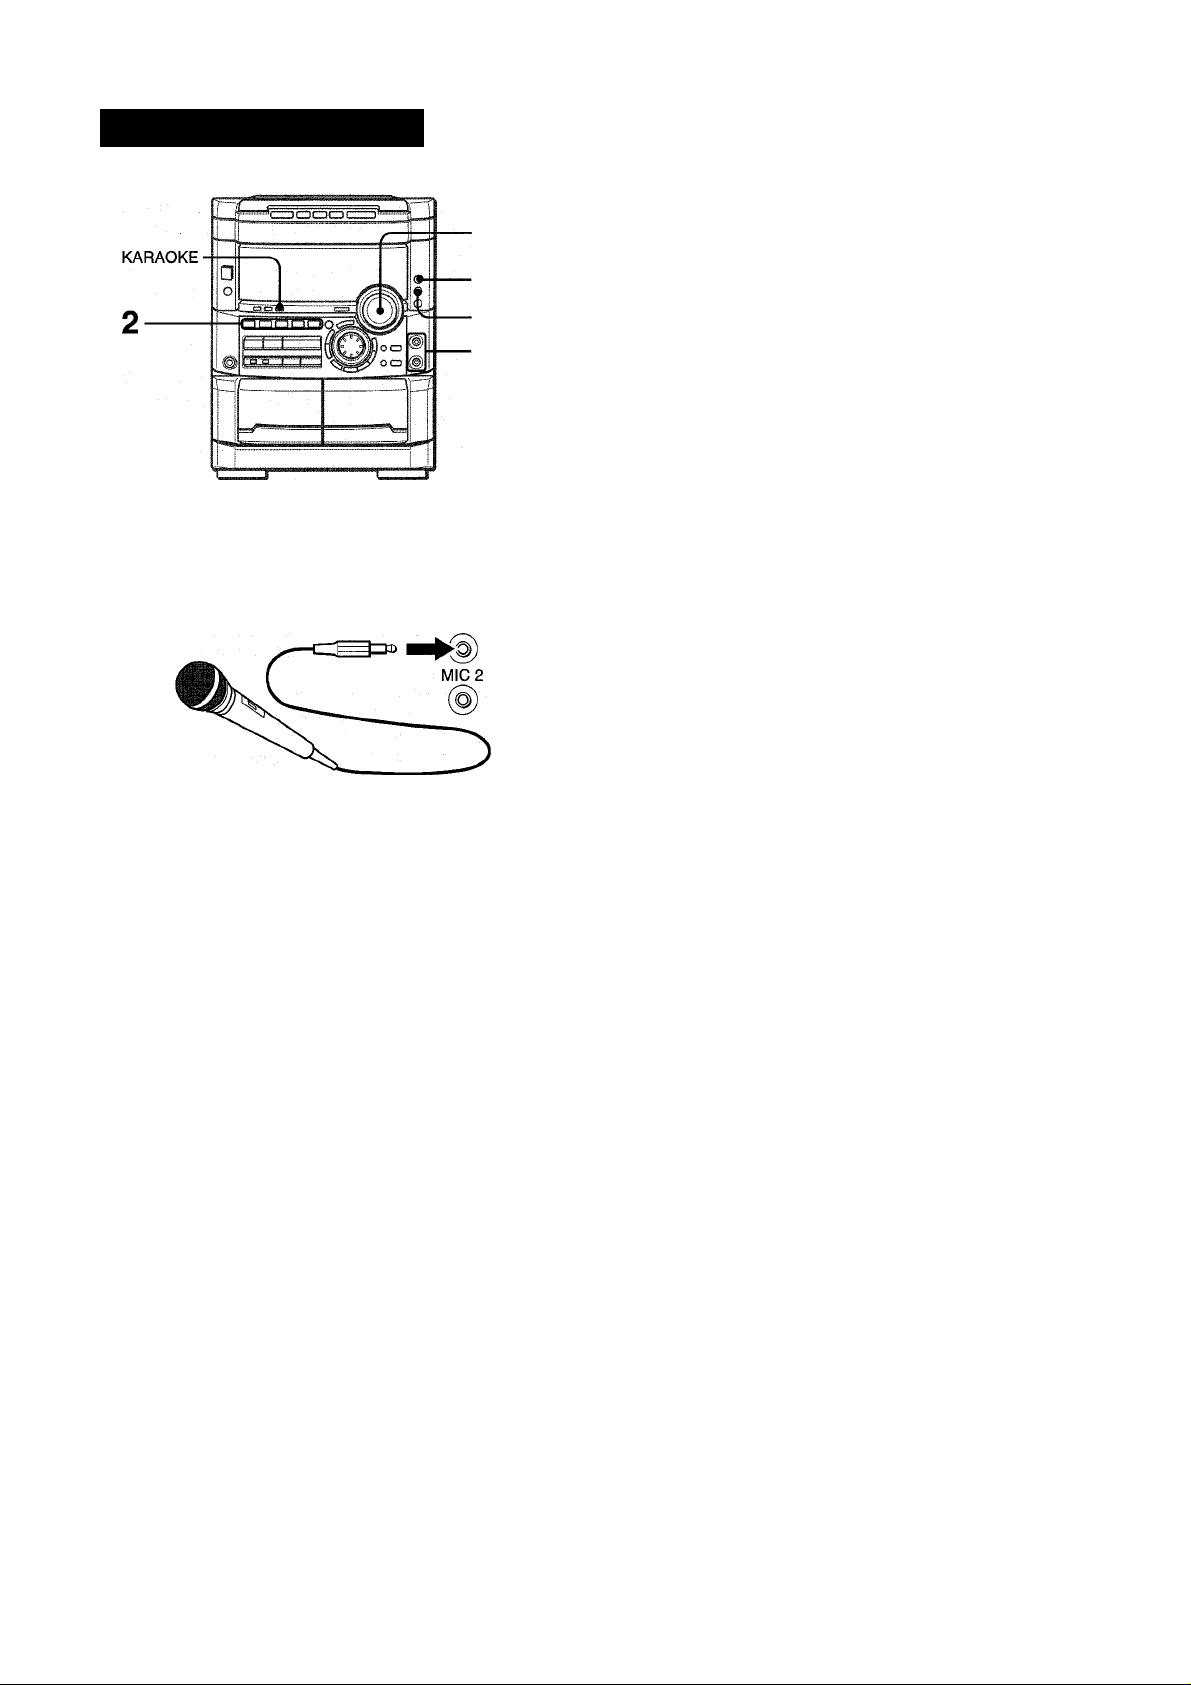
Use microphones with mini plugs (03.5 mm, 1/8 inch).
1 Connect your microphones to MIC 1 and MIC 2
jacks. i^iQ.,
2 Press one of the function buttons to select the
source to be mixed, and play the source.
3 Adjust the volume and tone of the source. 4 Press MIC and turn VOLUME within 4 seconds to
adjust the microphone volume.
The microphone volume can be selected from 1 to MAX (7)
or OFF (cancel).
The volume of both microphones is adjusted simultaneously.
5 Press ECHO and turn VOLUME within 4 seconds
to adjust the echo level.
The echo level can be selected from 1 to MAX (7) or OFF
(cancel).
To change the delay time of echo
Field down ECFIO while the echo is on.
“L” (Long) and “M” (Middle) are displayed alternately. At the
desired position, release the button.
To record microphone sound mixed with source sound
Follow the procedure for recording from the sound source (see
page 22).
SYNC DUB cannot be used for mixing recording.
When not using the microphones
Set the microphone volume and echo level to OFF and remove
the microphones from MIC jacks.
VOCAL FADER/MULTIPLEX FUNCTIONS
This unit can use discs or tapes as Karaoke sources.
Use the Vocal fader function for ordinary discs or tapes.
Use the Multiplex function for multi audio discs or tapes.
Press KARAOKE repeatedly to select the vocal fader or multiplex function.
Each time KARAOKE is pressed, one of these functions is
selected cyclically.
©
(IF
---------
® Vocal Fader
UF OFF H--MPX ^
..ih
---------------------
The singer’s voice becomes softer than the accompaniment.
® Auto Vocal Fader
The singer’s voice becomes softer only while there is audio
input through a microphone.
(D Multiplex
Only the Sound on the left channel is heard from both speakers,
and the sound on the right channel is muted.
® Auto Multiplex
The sound on the left channel is heard from both speakers,
and the sound on the right channel is muted only while there
is audio input through a microphone.
(D Cancel
To change the time lag setting in Auto Vocal Fader or Auto Multiplex function
The muted singer’s voice can be restored faster.
When Auto Vocal Fader or Auto Multiplex is selected, “A-VF” or
“A-MPX” is displayed for 3 seconds and changes to the selsected
function name. After the selected function name is displayed,
hold down KARAOKE until “FAST” is displayed.
To return to the initial setting, select SLOW.
When the power is turned off, SLOW is restored.
To Change the audible channel In Multiplex function
Only the sound on the right channel can be heard from both
speakers.
When Multiplex is selected, “MPX-L” is displayed for 3 seconds
and changes to the selected function name. After the selected
function name is displayed, hold down KARAOKE until “MPX-R”
is displayed.
To return to the initial setting, select MPX-L.
When the power is turned off, MPX-L is restored.
' When the ECFIO level is changed, the SURROUND system
and the DOLBY PRO LOGIC are automatically canceled.
’ If a microphone is held too near the speakers, a howling sound
may be produced. In this case, hold the microphone away from
the speakers, or decrease the microphone volume.
' If sound through the microphone is extremely loud, it may be
distorted. In this case, decrease the microphone volume. ,
' When the function is changed, the microphone volume and the
echo volume are set to off.
ENGLISH
28
• The Karaoke functions may not operate correctly with the
following kinds of CDs or tapes.
- Those with monaural sound
- Those recorded with strong echoes
- Those with the vocal part recorded on the right or left side of
the sound width
• While the Karaoke function is on, the sound is output as
monaural.
• When the function is changed, the Karaoke function is canceled.
Page 29
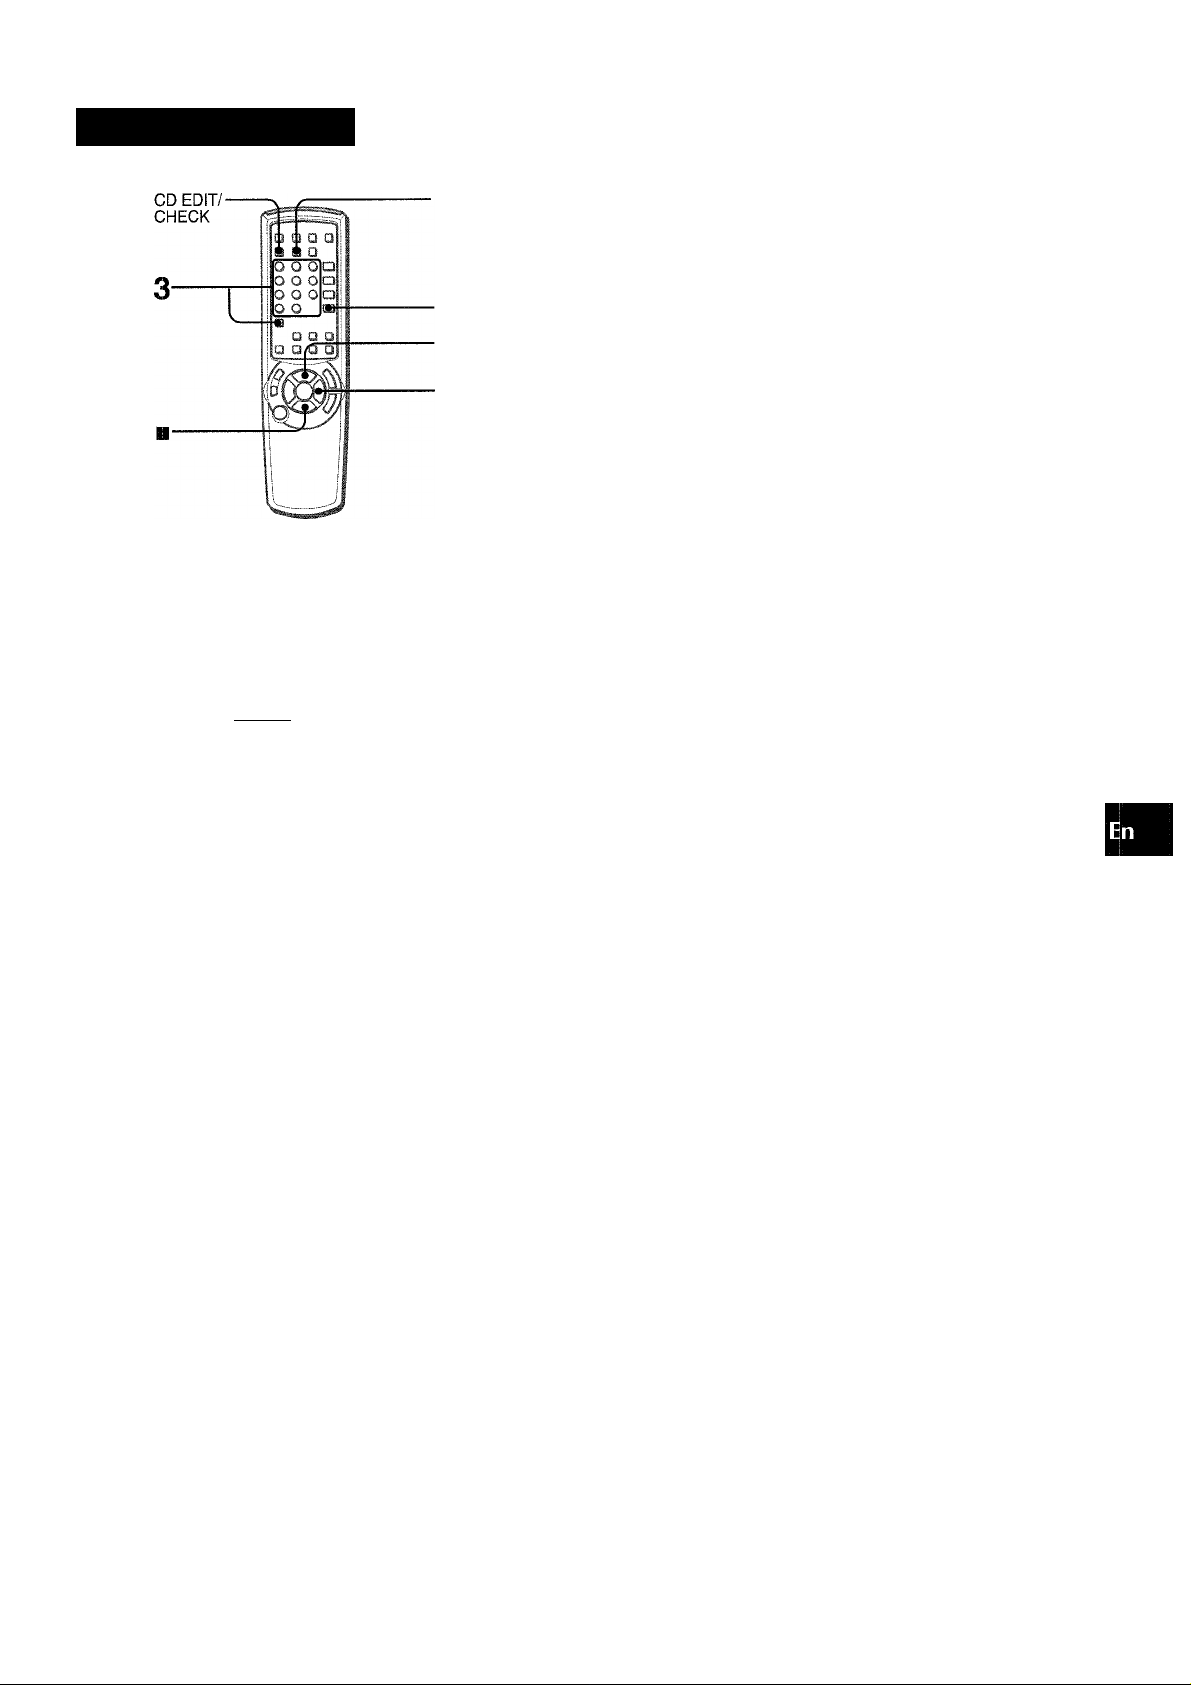
KARAOKE PROGRA
1
To add a reservation during piay
Repeat step 3.
To check the reserved tracks
Press CD EDiT/CHECK repeatedly. Each time it is pressed, the
disc number and track number are displayed in the reserved order.
To stop play
Press ■ .
When is pressed, the play starts from the last track again.
lU
O
•if
IX
<
ilf
5
Before or during CD piay, you can reserve up to 15 tracks to be
played after the current track. Each reservation is cleared when
it finishes playing.
Use the remote control.
1 Press CD and load the discs.
2 Press PRGM once.
K
...
P00
3 Press DISC DIRECT PLAY, then press numbered
buttons 1-3 within 3 seconds to seiect a disc.
Then, press numbered buttons 0-9 and + 10 to
program a track.
To skip a current track
Press ► ► . The skipped track is cleared from the program.
To clear all the reservations
Press ► ► repeatedly until “K - POO” is displayed.
K
......
P0W
Press it once more to cancel the Karaoke programs. The display
returns to that of CD play.
’ If the reserved track number does not exist on the selected
disc, the unit stops playing and the display flashes.
In this case, press ► ► to skip the error track. Then press
to start play with the next reserved track.
'When PRGM is pressed repeatedly in step 1, “PRGM” is
displayed and the unit enters CD program play mode (page
21).
To cancel program play, press ■ CLEAR.
Reserved disc number Reserved track number
K1
..
2P00
4 Repeat step 3 to reserve other tracks.
5 Press ◄►to start piay.
After a track is played, it is cleared from the program.
Currently Disc number of the Number of remaining
playing disc last reservation reserved tracks
2P03:
Track number of
the last reservation
Currently playing
track number
flashes
ENGLISH 29
Page 30
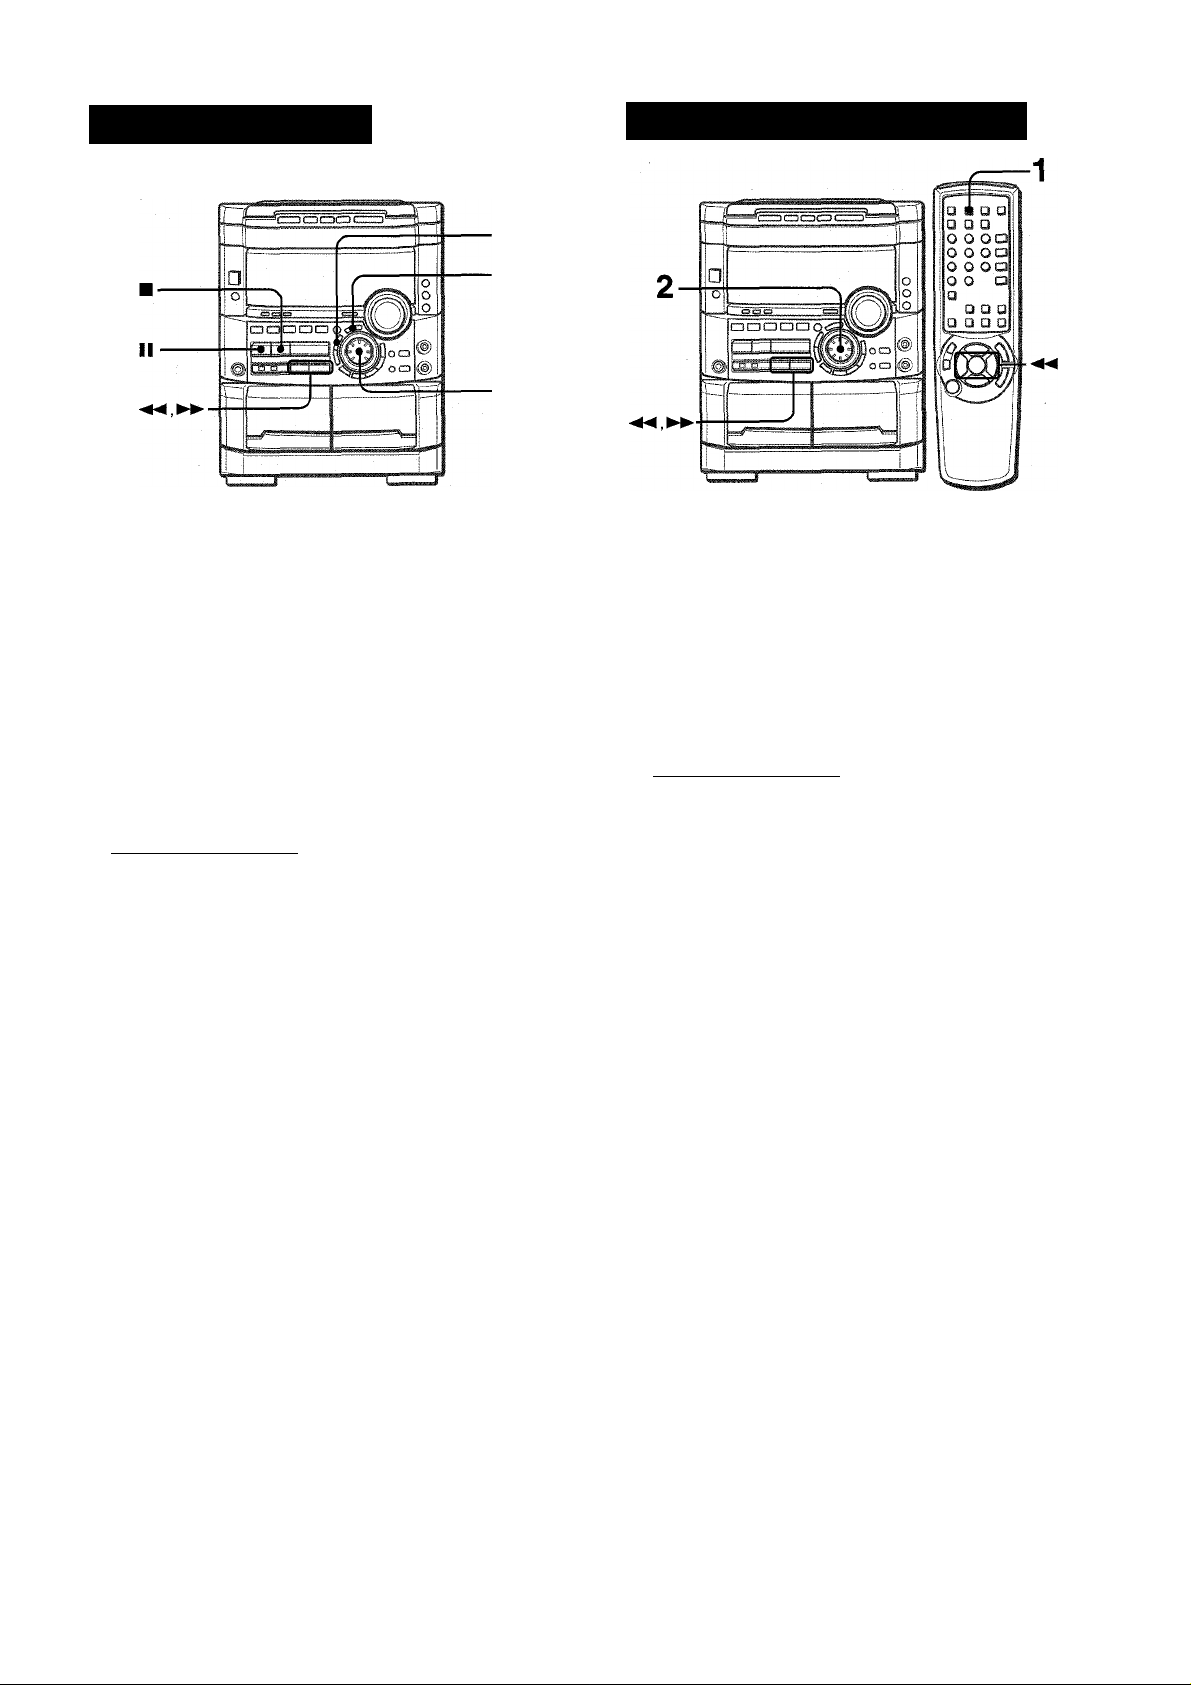
CLOCK AND TIMER
SEHING THE CLOC
1
3
The clock is displayed. (The between the hours and minutes
flashes.) When the power cord is piugged into an AC outlet
for the first time after purchase or when the clock setting is
canceled due to a power failure, the entire ciock display
flashes.
1 Press CLOCK.
SETTING THE SLEEP TIMER
The unit can be turned off automatically at a specified time.
Use the remote control.
1 Press SLEEP.
.... ,SLEEF=
flni 2;;0©
2 Within 4 seconds, turn MULTI JOG to designate
the hour and the minute.
Turning MULTI JOG changes both the hour and the minute.
◄ ◄ or ► ► is aiso avaiiable instead of MULTI JOG. Holding
these buttons down will vary the time rapidly.
3 Press ENTER or II.
The clock starts from 00 seconds.
To restore an original clock setting
Press CLOCK before completing step 3 to restore the previous
time setting. This cancels any new setting.
To view the clock when another display is in the display
Press CLOCK. The time is displayed for 4 seconds and then the
original display reappears. However, the clock cannot be
displayed during recording.
To switch to the 24-hour standard
Press the CLOCK and then press ■ within 4 seconds.
Repeat the same procedure to restore the 12-hour standard.
If the clock display flashes
This is caused by a power interruption. The current time needs
to be reset.
If power is interrupted for more than approximately 24 hours,
all settings stored in memory after purchase need to be reset.
2 Within 4 seconds, turn MULTI JOG to specify the
time until the power is turned off.
The time changes between 5 and 240 minutes in 5-minute
steps.
and ► ► are also available instead of MULTI JOG.
Specified time
To check the time remaining until the power is turned off
Press SLEEP once. The remaining time is displayed for 4
seconds.
To cancel the sleep timer
Press SLEEP twice so that “SLEEP oFF” appears on the display.
If the power-economizing mode (page 8) is on, all the display
lights turn off when the power is turned off. To view the clock,
press CLOCK so that the time is displayed for 4 seconds.
30 ENGLISH
Page 31

5
3,4
2
5 Adjust the volume.
The source sound will play at the volume level set In this step
when the power is turned on by the timer.
If the volume level is set to 21 or higher, howejver, it will
automatically be set to 20 when the power is turned on.
6 Prepare the source.
To listen to a CD, load the disc to be played first on tray 1.
To listen to a tape, insert the tape into deck 1 or 2.
To listen to the radio, tune in to a station.
7 Press POWER to turn off the power.
When the timer-on time is reached, the unit turns on and
begins play with the selected source.
You can change the source that was selected in step 1 by pressing
one of the function buttons before pressing ENTER or II in step
3.
Gi:
ud
1“
a
SE
m
.j
o
The unit can be turned on at a specified time every day with the
built-in timer.
Preparation
Make sure the clock is set correctly.
1 Press one of the function buttons to select a
source.
• If TUNER/BAND is pressed, the band cannot be selected in
this step.
2 Press TIMER repeatedly until © appears on the
display.
Time and audio source name flash alternately.
©
0 PL..HS'
3 Within 6 seconds, turn MULTI JOG to designate
the timer-on time, then press ENTER or II.
Turning MULTI JOG changes both the hour and the minute.
◄ ◄ or ► ► is also available instead of MULTI JOG. Holding
these buttons down will vary the time rapidly.
To check the timer setting
Press TiMER.
The selected source, the timer-on time, and the duration for the
timer-activated period will be displayed for 4 seconds.
To change any of the previous setting
Carry out from step 1.
However, if you do not change the timer-on time, in step 3 just
press ENTER twice and continue from step 4.
To cancel the timer standby mode temporarily
Press TiMER repeatedly so that 0 disappears.
To restore the timer standby mode, press again to display 0.
Using the unit while the timer is set
You can use the unit normally after setting the timer.
Before turning off the power, carry out step 5 and 6.
' Timer playback and timer recording will not begin unless the
power is turned off.
' Connected equipment cannot be turned on and off by the built-
in timer of this unit. Use an external timer.
TIMER RECORDING
Timer recording is applicable for TUNER and VIDEO/AUX (with
an external timer) sources only.
eWM 1;= 00
4 Within 4 seconds, turn MULTI JOG to select the
duration for the timer-activated period.
The duration can be set between 5 and 240 minutes in 5-
minute steps.
or ► ► is also available instead of MULTI JOG.
The duration will be automatically set after 4 seconds. It will
also be set if ENTER or II is pressed within 4 seconds after
step 4.
Press either TUNER/BAND or VIDEO/AUX to select a source,
then press TIMER repeatedly until ©REC lights up on the
display. Within 6 seconds, carry out the steps of “SETTING
THE TIMER” from step 3 and insert the tape to be recorded on
into deck 2 after step 6.
• When the power-economizing mode (page 8) has been turned
on, the timer recording volume level will be 0 (minimum level).
• You cannot use the timer function to record from a CD or tape.
ENGLISH
31
Page 32

OTHER CONNECTIONS
CONNECTING OPTIONAL EOUIPMENT
SUBWOOFER JACK
Connect an optional powered sub woofer with built-in-amplifier
to the jack.
-CD DIGITAL OUT
(OPTICAL)
• VIDEO/AUX
LISTENING TO EXTERNAL SOURCES
■ MD
■ LINE OUT
■ SUB
WOOFER
Refer to the operating instructions of the connected equipment
for detaiis.
• The connecting cords are not supplied. Obtain the necessary
connecting cords.
• Consult your local Aiwa dealer for optional equipment.
This unit can input analog sound signals through these jacks.
Use a cable with RCA phono plugs to connect audio equipment
(turntables, LD players, MD players, VCRs, TV, etc.).
Connect the red plug to the VIDEO/AUX R jack, and the white
plug to the VIDEO/AUX L jack.
When connecting a turntable
Use an Aiwa turntable equipped with a built-in equalizer amplifier.
To play a equipment connected to VIDEO/AUX jacks or MD jacks
proceed as follows.
1 Press VIDEO/AUX or MD.
To play the equipment connected to VIDEO/AUX. press
VIDEO/AUX. “VIDEO” appears on the display.
To play the equipment connected to MD. press MD. “MD”
MD JACKS
This jack is recommended to connect with an MD player.
Use a cable with RCA phono plugs.
Connect the red plug to the MD R jack, and the white plug to the
MD L jack.
appears on the display.
2 Play the connected equipment.
To change a source name in the display
When VIDEO/AUX is pressed, “VIDEO” is displayed initially. It
can be changed to “AUX” or “TV”.
With the power on, press POWER while pressing VIDEO/AUX.
LINE OUT JACKS
This unit can output analog sound signal through these jacks.
Use a cable with RCA phono plugs to connect audio equipment
with LINE IN (analog input) jacks.
Connect the red plug of a cable to LINE OUT R jack, and the
white plug to LINE OUT L jack.
Repeat the procedure to select one of the names.
To adjust the sound level of the external source
When the sound level of the external source is much higher or
much lower than that of other function sources, adjust it as follows.
1 Press VIDEO/AUX or MD and play the equipment.
2 Presss ◄ ◄ or ► ► so that the sound level becomes the same
as that of other function sources.
■ MD
Do not connect an equipment to LINE OUT jacks and VIDEO/
AUX jacks simultaneously. Otherwise, noise is generated and
malfunction occurs.
CD DIGITAL OUT (OPTICAL) JACK
This unit can output CD digital sound signals through this jack.
Use an optical cable to connect digital audio equipment (DAT
deck, MD recorder, etc.).
Remove the dust cap ® from the CD DIGITAL OUT (OPTICAL)
jack. Then, connect an optical cable plug to the CD DIGITAL
OUT (OPTICAL) jack.
When the CD DIGITAL OUT (OPTICAL) jack is not being
used
Attach the supplied dust cap.
32 ENGLISH
During recording, the sound level can not be adjusted.
Page 33

GENERAL
Occasional care and maintenance of the unit and the software
are needed to optimize the performance of your unit.
To clean the cabinet
Use a soft and dry cloth.
If the surfaces are extremely dirty, use a soft cloth lightly
moistened with mild detergent solution. Do not use strong
solvents, such as alcohol, benzine or thinner as these could
damage the finish of the unit.
To clean the tape heads
When the tape heads are dirty;
- high frequency sound is not emitted
- the sound is not adequately high
- the sound is off-balance
- the tape cannot be erased
- the tape cannot be recorded on
After every 10 hours of use, clean the tape heads with a head
cleaning cassette.
Refer to the instructions of the cleaning cassette for details.
If the unit fails to perform as described in these Operating
Instructions, check the following guide.
GENERAL
There is no sound.
• Is the AC cord connected properly?
• Is there a bad connection? (■ -» page 5)
• There may be a short circuit in the speaker terminals.
-► Disconnect the AC cord, then correct the speaker
connections.
• Was an incorrect function button pressed?
Sound Is emitted from one speaker only.
• Is the other speaker disconnected?
The output sound is not stereo.
• Is the Karaoke function turned on? (-> page 28)
An erroneous display or a malfunction occurs.
-♦ Reset the unit as stated below.
The power is not turned on.
-* Disconnect the AC cord, and connect it again in a few
seconds.
m
SE
O
Δ
O
UJ
SE
SE
O
u
ce
liH
X
o
..I
cc
in
X
u
O
To demagnetize the tape heads
The tape heads may become magnetized after long-term use.
This may narrow the output range of recorded tapes and increase
noise.
After every 20 to 30 hours of use, demagnetize the tape heads
with a separately sold demagnetizing cassette.
Refer to the instructions of the demagnetizing cassette for details.
Care of discs
• When a disc becomes dirty, wipe the disc from the center out
with a cleaning cloth.
• After playing a disc, store the disc in its case. Do not leave the
disc in places that are hot or humid.
Care of tapes
• Store tapes in their cases after use.
• Do not leave tapes near magnets, motors, television sets, or
any source of magnetism. This will downgrade the sound quality
and cause noise.
• Do not expose tapes to direct sunlight, or leave them in a car
parked in direct sunlight.
TUNER SECTION
There is constant, wave-like static.
• Is the antenna connected properly? (-> page 5)
• Is the signal weak?
-► Connect an outdoor antenna.
The reception contains noise interferences or the sound
is distorted.
• is the system picking up external noise or multipath distortion?
-» Change the orientation ot the antenna.
-> Move the unit away from other electrical appliances.
CASSETTE DECK SECTION
The tape does not run.
• Is deck 2 in pause mode? (-♦ page 18)
The sound is off-balance or not adequately high.
• Is the playback head dirty? (-* page 33)
Recording is not possible.
• Is the erasure prevention tab on the tape broken off? (-► page
22)
• Is the recording head dirty? (-» page 33)
Erasure is not possible.
• Is the erasure head dirty? {-■ > page 33)
• Is a metal tape being used?
High frequency sound is not emitted.
• Is the recording/playback head dirty? (-* page 33)
CD PLAYER SECTION The CD player does not play.
• Is the disc correctly placed? (-» page 20)
• Is the disc dirty? (-» page 33)
• Is the lens affected by condensation?
-» Wait approximately one hour and try again.
To reset
If an unusual condition occurs in the display window or the
cassette decks, reset the unit as follows.
1 Press POWER to turn off the power,
2 Press POWER to turn the power back on while pressing ■
CLEAR. Everything stored in memory after purchase is
canceled.
If the power cannot be turned off in step 1 because of a
malfunction, reset by disconnecting the AC cord, and connect it
again. Then carry out step 2.
ENGLISH 33
Page 34

SPECIFICATIONS
Main unit CX-NMT725
FM tuner section
Tuning range
Usable sensivity (IHF)
Antenna terminals
AM tuner section
Tuning range
Usable sensitivity
Antenna
Amplifier section
Power output
Total harmonic distortion
Inputs
Outputs
Cassette deck section
Track format
Frequency response
Recording system
Heads
Compact disc player section
Laser
D-A converter
Signal-to-noise ratio
Harmonic distortion
Wow and flutter
87.5 MHz to 108 MHz
13.2 dBf
75 ohms (unbalanced)
530 kHz to 1710 kHz (10 kHz step)
531 kHz to 1602 kHz (9 kHz step)
350 pV/m
Loop antenna
Front
80 W + 80 W (50 Hz - 20 kHz, THD
less than 1%, 6 ohms)
Rear (Surround)
10 W +10 W (1 kHz, THD less than
1 %. 8 ohms)
Center
20 W (1 kHz, THD less than 1 %, 8
ohms)
0.1 % (50 W, 1 kHz, 6 ohms, DIN
AUDIO/Front)
VIDEO/AUX: 445 mV (adjustable)
MD: 445 mV (adjustable)
MIC 1, MIC 2:1.4 mV (10 kohms)
LINE OUT: 210 mV
SUBWOOFER: 2.2 V
SPEAKERS: accept speakers of 6
ohms or more
SURROUND SPEAKERS:
accept speakers of 8 ohms to 16
ohms
CENTER SPEAKER: accept
speakers of 8 ohms or more
PHONES (stereo jack): accepts
headphones of 32 ohms or more
4 tracks, 2 channels stereo
Cr02 tape: 50 Hz -16000 Hz
Normal tape: 50 Hz - 15000 Hz
AC bias
Deck 1: Playback head x 1
Deck 2: Recording/playback head
X 1, erase head x 1
Semiconductor laser (X = 780 nm)
1 bit dual
85 dB (1 kHz, OdB)
0.05 % (1 kHz, 0 dB)
Unmeasurable
Speaker system SX-NA772
Cabinet type
3 way, Bass reflex
(magnetic shielded type)
Speakers
Woofer:
140 mm (5 % in.) cone type
Tweeter:
50 mm (2 in.) cone type
Super tweeter:
20 mm (^7i6Ìn.) ceramic type
Impedance
Output sound pressure level
Dimensions (W x H x D)
6 ohms
87 dB/W/m
234 X 324x 270 mm
(9 74X 12 78X 10% in.)
Weight
4.2 kg (9 lbs 4 oz)
Specifications and external appearance are subject to change without
notice.
UUE SYSTEM
The word “BBE” and the “BBE symbol” are trademarks of BBE
Sound, Inc.
Under license from BBE Sound, Inc.
DOLBY PRO LOGIC
Manufactured under license from Dolby Laborafories Licensing
Corporation.
“DOLBY”, the double-D symbol □ □ and “PRO LOGIC” are
trademarks of Dolby Laboratories Licensing Corporation.
COPYRIGHT
Please check the laws on copyright relating to recordings from
discs, radio or external tape for the c ountry in which the machine
is being used.
NOTE
This equipment has been tested and found to comply with the
limits for a Class B digital device, pursuant to Part 15 of the FCC
Rules.These limits are designed to provide reasonable protection
against harmful interference in a residential installation.
This equipment generates, uses, and can radiate radio frequency
energy and, if not installed and used in accordance with the
instructions, may cause harmful interference to radio
communications. However, there is no guarantee that interference
will not occur in a particular installation. If this equipment does
cause harmful interference to radio or television reception, which
can be determined by turning the equipment off and on, the user
is encouraged to try to correct the interference by one or more of
the following measures:
- Reorient or relocate the receiving antenna.
- Increase the separation between the equipment and receiver.
- Connect the equipment into an outlet on circuit different from
that to which the receiver is connected.
- Consult the dealer or an experienced radio/TV technician
for help.
General
Power requirements
Power consumption
Dimensions of main unit
(W X H X D)
Weight of main unit
Standby power consumption
34 ENGLISH
120 V AC, 60 Hz
155W
260 X 330 X 360 mm
(10 74x 13x 14 74 in.)
8.8 kg (19 lbs 6 oz)
If the power - economizing mode
is OFF: 20 W
If the power - economizing mode
is ON: 1.5 W
CAUTION
Modifications or adjustments to this product, which are not
expressly approved by the manufacturer, may void the user’s
right or authority to operate this product.
Page 35

Page 36

ESPAÑOL
ADVERTENCIA
PARA REDUCIR EL RIESGO DE INCENDIOS O
SACUDIDAS ELECTRICAS. NO EXPONGA ESTE
APARATO A LA LLUVIA NI A LA HUMEDAD.
CAUTIOrj
RISK OF ELECTRIC SHOCK
DO NOT OPEN
“CAUTIONTO REDUCE THE RISK OF
ELECTRIC SHOCK,
DO NOT REMOVE COVER (OR BACK).
NO USER-SERVICEABLE PARTS INSIDE.
REFER SERVICING TO QUALIFIED
SERVICE PERSONNEL.”
Expliciiciun cic los símbolos giiificos:
El .símbolo ;Jel invo con punta de 'lecha, en el
intenoi' de L.n lríáng.¡lo equilátero, tione la
finalidad de avisar al ..isuano de la presencia
de "tensiones pel'Qrosd.s" sin aislar en el
interior del producto que podrían ser de
sii'identG magnitud como para con.stituir un
riesgo de sacudida eléctrica para las
j3|S|w||igg
E' signo oe i?xc arnacion en ei interior de un
triangulo equilatoro tiene .a finalidad de avisar
F.i usuario de la presencia do in.striiccicnns de
operación y mantenimiento (roparacion.i en el
ma‘enal impmso que acompaña al aparato.
PRECAUCIONES
j
Lea cuidadosa y completamente el manual de instrucciones
antes de utilizar la unidad. Asegúrese de guardar el manual de
instrucciones para utilizarlo como referencia en el futuro. Todas
las advertencias y precauciones del manual de instrucciones y
de la unidad deberán cumplirse estrictamente, así como también
las sugerencias de seguridad mencionadas más abajo.
Instalación
1 Agua y humedad — No utilice esta unidad cerca del agua
como, por ejemplo, cerca de una bañera, una palangana, una
piscina o algo similar.
2 Calor — No utilice esta unidad cerca de fuentes de calor,
incluyendo salidas de aire caliente, estufas u otros aparatos
que generen calor.
No deberá colocarse tampoco en lugares donde la
temperatura sea inferior a 5°C o superior a 35°C.
3 Superficie de montaje — Ponga la unidad sobre una
superficie plana y nivelada.
4 Ventiiación — La unidad deberá situarse donde tenga
suficiente espacio libre a su alrededor, para que la ventilación
apropiada quede asegurada. Deje un espacio libre de 10 cm
por la parte posterior y superior de la unidad, y 5 cm por cada
lado.
- No ponga la unidad sobre una cama, una alfombra o
superficies similares que podrían tapar las aberturas de
ventilación.
- No instale la unidad en una librería, mueble o estantería
cerrada herméticamente donde la ventilación no sea
adecuada.
5 Entrada de objetos y líquidos — Tenga cuidado de que
objetos y líquidos no entren en la unidad por las aberturas de
ventilación.
6 Carros de mano y soportes — Cuando
ponga o monte la unidad en un soporte o
carro de mano, ésta deberá moverse con
mucho cuidado.
Las paradas repentinas, la fuerza excesiva
y las superficies irregulares pueden hacer
que la unidad o el carro de mano se dé vuelta o se caiga.
7 Condensación — En la lente del fonocaptor del reproductor
de discos compactos tal vez se forme condensación cuando:
- La unidad se pase de un lugar frío a uno caliente.
- El sistema de calefacción se acabe de encender.
- La unidad se utilice en una habitación muy húmeda.
- La unidad se enfríe mediante un acondicionador de aire.
Esta unidad tal vez funcione mal cuando tenga condensación
en su interior. En este caso, deje en reposo la unidad durante
unas pocas horas y repita de nuevo la operación.
8 Montaje en pared o techo — La unidad no se deberá montar
en una pared ni en el techo, a menos que se especifique lo
contrario en el manual de instrucciones.
Anotación del propietario
Para su conveniencia, anote el número de modelo y el número
de serie (los encontrará en el panel trasero de su aparato) en el
espacio suministrado más abajo. Menciónelos cuando se ponga
en contacto con su concesionario Aiwa en caso de tener
dificultades.
N.° de modelo N.° de serie (N.° de lote)
CX-NMT725
SX-NA772
SX-R275
SX-C605
2 ESPAÑOL
Energía eléctrica
1 Fuentes de alimentación — Conecte solamente esta unidad
a las fuentes de alimentación especificadas en el manual de
instrucciones, y como está marcado en la unidad.
2 Polarización — Como característica de seguridad, algunas
unidades están equipadas con ciavijas de alimentación de
CA polarizadas, las cuales sólo se pueden insertar de una
forma en las tomas de corriente. Si resulta difícil o imposible
insertar la clavija de alimentación de CA en una toma de
corriente, dé vuelta a la clavija e inténtelo de nuevo. Si sigue
sin poder insertar fácilmente la clavija en la toma de corriente,
llame a un electricista cualificado para que modifique o
reemplace la toma de corriente. Para evitar anuiar la
característica de seguridad de la clavija polarizada, no la
inserte a la fuerza en una toma de corriente.
Page 37

3 Cable de alimentación de CA
- Cuando desconecte el cable de alimentación de CA, sujete
la clavija de alimentación de CA y tire de ella. No tire del
propio cable.
- Nunca maneje la clavija de alimentación de CA con las
manos mojadas porque podría producirse un incendio o una
sacudida eléctrica.
- Los cables de alimentación deberán colocarse de forma que
no sean doblados excesivamente, pellizcados o pisados.
Tenga mucho cuidado con el cable que va de la unidad a la
toma de corriente.
- Evite sobrecargar las tomas de CA y los cables de extensión
más allá de su capacidad porque esto podría causar un
incendio o una sacudida eléctrica.
4 Cable de extensión — Para evitar sacudidas eléctricas, no
utilice la clavija de alimentación de CA polarizada con un cable
de extensión, ni tampoco en un receptáculo u otra toma de
corriente a menos que la clavija polarizada pueda insertarse
completamente evitando que sus patillas queden expuestas.
5 Periodos de no utilización — Desenchufe el cable de
alimentación de CA de la toma de corriente si la unidad no va
a ser utilizada durante varios meses o más. Cuando el cable
de alimentación esté conectado, por la unidad continuará
circulando una pequeña cantidad de corriente, aunque la
alimentación esté desconectada.
Antena exterior
1 Líneas de alta tensión — Cuando conecte una antena
exterior, asegúrese de colocarla lejos de las líneas de alta
tensión.
2 Conexión a tierra de la antena exterior — Asegúrese de
que el sistema de la antena esté conectado correctamente a
tierra para proporcionar así una protección contra el exceso
inesperado de tensión o contra la acumulación de electricidad
estática. El artículo 810 del Código Eléctrico Nacional, ANSI/
NFPA70, proporciona información acerca de la puesta a tierra
apropiada del mástil de la antena, la estructura de apoyo y el
cable de bajada a la unidad de descarga de la antena, así
como también del tamaño de la unidad de puesta a tierra, la
conexión de los terminales de puesta a tierra y ios requisitos
para conectar a tierra los mismos terminales.
Puesta a tierra de la antena según el Codigo Eléctrico Nacional
PRECAUCIONES...............................................................2
PREPARATIVOS
INSTALACION............................................................. 4
CONTROL REMOTO..................................................... 7
ANTES DE LA OPERACION........................................ ...7
________________________
SONIDO
AJUSTES DE AUDIO
FUNCION DE REPRODUCCION CON PATRON DE
RITMO (BEAT MASTER DX)
ECUALIZADOR GRAFICO
DSP SURROUND
.......
..........................................
........................
................................
........................................................
........
........
RECEPCION DE LA RADIO
SINTONIZACION MANUAL ....
PREAJUSTE DE EMISORAS.
REPRODUCCION DE CINTAS
OPERACIONES BASICAS
REPRODUCCION CONTINUA
.......
REPRODUCCION DE DISCOS COMPACTOS
OPERACIONES BASICAS
REPRODUCCION PROGRAMADA.
..............
GRABACION
GRABACION BASICA
COPIADO MANUAL DE UNA CINTA................
COPIADO DE TODA LA CINTA
GRABACION CON EDICION Al
GRABACION CON EDICION PROGRAMADA .
DOLBY PRO LOGIC
AJUSTE DEL EQUILIBRIO DE SONIDO DE LOS
ALTAVOCES.......................................................
REPRODUCCION CON DOLBY PRO LOGIC
.......................................
........................
........................
________________
........
10
11
15
16
17
17
18
19
20
21
22
23
23
24
25
26
27
Limpie la unidad sólo como se recomienda en el manual de
instrucciones.
Daños que necesitan ser reparados
Haga que un técnico en reparaciones cualificado le repare las
unidades si;
- El cable de alimentación de CA o su clavija está estropeado.
- Objetos extraños o líquidos han entrado en la unidad.
- La unidad ha estado expuesta a la lluvia o al agua.
- La unidad no parece funcionar normalmente.
- La unidad muestra un cambio considerable en sus prestaciones.
- La unidad se ha caído o la caja se ha estropeado.
NO TRATE DE REPARAR LA UNIDAD USTED MISMO.
KARAOKE
MEZCLA MICROFONICA...
PROGRAM DE KARAOKE.
RELOJ Y TEMPORIZADOR
PUESTA EN HORA DEL RELOJ .........................
AJUSTE DEL TEMPORIZADOR PARA DORMIR.
AJUSTE DEL TEMPORIZADOR
...........................
OTRAS CONEXIONES
CONEXION DE UN EQUIPO OPCIONAL
ESCUCHA DE FUENTES DE SONIDO EXTERNAS
GENERALIDADES
CUIDADOS Y MANTENIMIENTO
GUIA PARA LA SOLUCION DE PROBLEMAS.
ESPECIFICACIONES..........................................
INDICE DE LAS PARTES
________________
........................
.......................
......................
Cubierta trasera
31
32
......
32
ESPAÑOL 3
28
29
30
30
33
33
34
Page 38

PREPARATIVOS
INSTALACIO
El sistema Dolby Pro Logic, la característica más destacada de
este sistema, le proporciona en su propio hogar un sonido de
múltiples canales.
Complete los ajustes y las conexiones de la unidad principal,
los altavoces suministrados, su televisor y su equipo de vídeo
de acuerdo con el procedimiento siguiente.
Compruebe su sistema y accesorios
NSX-MT725
CX-NMT725 Sintonizador, amplificador, platina de casete y
reproductor de discos compactos estéreo
SX-NA772 Altavoces delanteros
SX-R275 Altavoces de sonido ambiental
SX-C605 Altavoz central
Control remoto Antena de AM
Antena de FM
UBICACION DE LOS ALTAVOCES
Para poder lograr los mejores efectos que puedan obtenerse
con el sistema Dolby Pro Logic, resulta importante colocar
apropiadamente los altavoces. Consulte la ilustración siguiente
para encontrar la mejor ubicación en su habitación.
Manual de instrucciones, etc.
® Altavoces delanteros
(D Altavoz central
Póngalo en medio de los dos altavoces delanteros. Además,
si conecta un televisor a la unidad, ponga este altavoz encima
o debajo del televisor.
(3) Altavoces de sonido ambiental
Ponga los altavoces de sonido ambiental directamente a los
lados o un poco por detrás de la zona de escucha. Alinéelos
horizontalmente, a 1 metro aproximadamente por encima de
la altura de los oídos.
' Cuando DOLBY PRO LOGIC y el sistema SURROUND estén
desactivados no se oirá sonido del altavoz central ni de los
altavoces de sonido ambiental.
« El altavoz central sólo sonará cuando DOLBY PRO LOGIC esté
activado.
CONEXIONES
Antes de conectar el cable de alimentación de CA
La tensión nominal de su unidad, mostrada en el panel trasero,
es de 120 V CA. Asegúrese de que la tensión nominal coincida
con la tensión empleada en su localidad.
IMPORTANTE
Conecte primero los altavoces, las antenas y todos los demás
equipos opcionales. Luego conecte el cable de CA.
4 ESPAÑOL
No hay diferencias entre los altavoces delanteros. Ambos pueden
conectarse como altavoz izquierdo (L) o derecho (R).
Page 39

№
O
>
F"
<K
dì:
<
Ck
LJ
GC
Ck
1 Conecte las antenas suministradas.
Conecte la antena de FM a los terminales FM 75 y la antena
de AM a los terminales AM LOOP.
Antena de FM
2 Conecte los altavoces derecho e izquierdo a la
unidad principal.
Conecte el cable del altavoz derecho a los terminales
SPEAKERS R, y el cable del altavoz izquierdo a los terminales
SPEAKERS L.
El cable de altavoz con la franja blanca deberá conectarse al
terminal O, y el cable negro al terminal ©.
3 Conecte los altavoces de sonido ambiental a la
unidad principal.
No existen diferencias entre los altavoces de sonido ambiental.
Conecte cada cable de altavoz de sonido ambiental al terminal
SURROUND SPEAKERS R o L.
4 Conecte el altavoz central.
Conecte el cable del altavoz central al terminal CENTER
SPEAKER.
5 Conecte el equipo de vídeo.
Conecte la toma VIDEO/AUX de esta unidad a la toma de
salida de audio del equipo de vídeo empleando un cable de
conexión de audio opcional.
6 Conecte el televisor al equipo de vídeo.
Consulte el manual de instrucciones del equipo conectado
para tener más detalles.
7 Conecte el cable de CA a una toma de CA.
• La demostración del juego empezará cuando el cable de
CA se enchufe en una toma de CA. Consulte la página 9
“Demostración del juego” para obtener más detalles.
ESPAÑOL 5
Page 40

Para posicionar las antenas
Antena de FM:
Extienda horizontalmente esta antena formando una T y fije sus
extremos en la pared.
Antena de AM:
Póngala para obtener la mejor recepción posible.
Para poner la antena de AM en posición vertical sobre una superficie
Fije el gancho en la ranura.
■ Asegúrese de conectar correctamente los cables de los
altavoces. Las conexiones mal hechas podrían causar
cortocircuitos en los terminales SPEAKERS.
•
Para montar los altavoces de sonido ambiental en la
CONEXION DE UNA ANTENA EXTERIOR
Para obtener la mejor recepción de FM se recomienda utilizar
una antena exterior.
Conecte la antena exterior a los terminales FM 75 £2.
• No deje objetos que generen magnetismo, tales como tarjetas
de crédito, cerca de los altavoces porque podrían estropearse.
• No ponga la antena de FM cerca de objetos metálicos o rieles
de cortinas.
• No ponga la antena de AM cerca de equipos opcionales, el
propio sistema estéreo, el cable de alimentación de CA o los
cables de los altavoces, porque se captarán ruidos.
• No desbobine el cable de la antena de AM.
Para conectar otro equipo opcional página 32.
6 ESPAÑOL
Page 41

Inserción de las pilas
Quite la tapa de las pilas, ubicada en la parte trasera del control
remoto, e inserte dos pilas R6 (tamaño AA).
Cuándo reemplazar las pilas
La distancia máxima de operación entre el control remoto y el
sensor de la unidad principal deberá ser de 5 metros
aproximadamente. Cuando disminuya esta distancia, reemplace
las pilas por otras nuevas.
Utilización del control remoto
Las instrucciones descritas en este manual se refieren
principalmente a los botones de la unidad principal. Los botones
del control remoto con los mismos nombres pueden usarse de
la misma manera que los de la unidad principal.
►/◄► PRESET en el control remoto
La función es la misma que la de de la unidad principal.
-ENTER
■ MULTI JOG
Para conectar la alimentación
Pulse uno de los botones de función (TAPE/DECK1/2, TUNIER/
BAND, VIDEO/AUX, CD, MD). La reproducción de la cinta o del
disco insertado empezará o se recibirá la emisora previamente
sintonizada (función de reproducción directa).
También podrá utilizarse POWER.
Cuando se conecte la alimentación, el compartimiento de los
discos tal vez se abra y se cierre para reponer la unidad.
Para desconectar la alimentación
Pulse POWER.
09
O
>
■M
h
CC
CL
LU
CC
ei.
' Si el control remoto no va a ser utilizado durante mucho tiempo,
quite las pilas para evitar posibles fugas de electrólito.
' El control remoto quizá no funcione correctamente cuando:
- La línea de visión entre el control remoto y el sensor de
señales del Interior del visuallzador esté expuesta a una luz
intensa como, por ejemplo, la luz del sol.
- Otros controles remotos (los de un televisor, etc.) estén siendo
utilizados cerca de esta unidad.
Ventanilla parpadeante
La ventanilla de la parte superior de la unidad se encenderá o
parpadeará mientras la unidad está siendo encendida.
Para apagar la luz de la ventanilla superior, pulse II mientras
pulsa CD. Para volver a encenderla, repita el procedimiento de
arriba.
Para apagar la luz de las platinas de casete, pulse II mientras
pulsa TAPE. Para volver a encenderla, repita lo de arriba.
Para cambiar el nivel de brillo del visualizador
1 Pulse ECO para que se visualice “ECO MODE”.
2 Antes de que pasen 4 segundos, gire MULTI JOG para
visualizar “DIM MODE”, y luego pulse ENTER antes de que
pasen otros 4 segundos.
3 Antes de que pasen 4 segundos, gire MULTI JOG para
seleccionar el modo del regulador de intensidad de
iluminación como se indica abajo.
El modo se establecerá automáticamente después de 4
segundos. También se establecerá si se pulsa ENTER antes
de que pasen 4 segundos después de realizar el paso 3.
DIM-OFF-^DIMMER 1 DIMMER 2-^ DIMMER 3
DIM-OFF: La visuallzaclón normal.
DIMMER 1: La Iluminación del visuallzador es menos Intensa
que la normal
DIMMER 2: La iluminación del visualizador es menos intensa
que la de DIMMER 1.
DIMMER 3: La Iluminación del visuallzador es menos Intensa
que la de DIMMER 2. El analizador de espectro, la ventanilla
de la parte superior de la unidad y las lámparas de los botones
se apagarán.
Si la grabación con temporizador (página 31) se realiza con
el modo de ahorro (página 8) en “ON” y se desconecta la
alimentación, el modo del regulador de Intensidad de luz se
pondrá en “DIMMER 3” la próxima vez que se conecte la
alimentación.
ESPAÑOL 7
Page 42

1 Pulse ECO.
“ECO MODE” se visualizará.
2
3
PUESTA DEL MODO DE AHORRO DE ENERGIA
Al poner esta unidad en el modo de ahorro de energía se reduce
el consumo de energía de la forma siguiente.
• Cuando se desconecta la alimentación, todas las luces del
visualizador se apagan.
Sin embargo, si el reloj no está puesto en hora, la demostración
del juego (página 9) empezará cuando se desconecte la
alimentación.
• Si la función de reproducción de disco compacto, cinta o ritmo
(página 11) no reproduce durante 10 minutos, o si no ha entrado
audio durante 10 minutos desde cualquier equipo externo
conectado estando seleccionado como fuente VIDEO/AUX o
MD, la alimentación se desconectará.
• Cuando se conecta la alimentación debido a una grabación con
temporizador (página 31), el nivel del brillo del visualizador se
ajusta a “DIMMER 3” (página 7), todos los indicadores de los
botones se apagan, y el volumen se pone al nivel mínimo (0).
• El visualizador se ilumina sólo cuando se utiliza la unidad.
Cuando la unidad no haya sido utilizada durante 10 segundos,
el nivel del brillo cambiará al modo seleccionado previamente
en “DIM MODE”. (Página 7)
(Si el nivel del brillo del visualizador está ajustado en “DIMOFF”, el brillo no cambiará. Cuando el nivel sea “DIMMER 3”,
los indicadores de los botones también se apagarán.)
cS'eCu nüDBÍ-
Pulse ENTER antes de que pasen 4 segundos.
El estado actual del modo de ahorro de energía se visualizará.
Si el modo de ahorro de energía está desactivado: ECO OFF
Si el modo de ahorro de energía está activado: ECO ON
Gire MULTI JOG antes de que pasen 4 segundos para activar o desactivar el modo de ahorro de energía.
Ejemplo: Cuando se seleccione “ON”.
ECO ON 1^-"
vC
________________
El modo se establecerá automáticamente después de 4
segundos. También se establecerá si se pulsa ENTER antes
de que pasen 4 segundos después del paso 3.
Para ver el reloj cuando todas las luces del visualizador se
apaguen, pulse CLOCK para que se visualice la hora durante 4
segundos.
8 ESPAÑOL
Page 43

■ DEMO
Demostración del juego
Cuando usted sólo enchufe el cable de alimentación de CA por
primera vez después de adquirir ei sistema, el juego se
encenderá automáticamente. Este estado inicial se desactiva
una vez que se pone en hora el reloj incorporado. Siempre que
no haga ningún ajuste en el reloj, el juego se encenderá
automáticamente cuando desconecte la alimentación.
Para disfrutar del juego
Pulse DEMO estando la unidad encendida o apagada, y
tanto si el reloj está puesto en hora como si no.
Con la alimentación desconectada, el juego se silencia.
Cuando se conecta la alimentación, el juego se activa con
sonido (a partir de ahora sonido del juego).
1 Pulse
En el visualizador empiezan a moverse tres números.
Para cambiar la probabilidad de igualación de los tres
números
Pulse repetidamente o para seleccionar uno de los
tres niveles de probabilidades cuando juegue con el juego. El
indicador del número de bandeja cambia en ei visualizador entre
1 y 3. Al aumentar el número de la bandeja de 1 a 3, más alta
será la probabilidad de la igualación.
Para silenciar el sonido del juego
Primero, cancele el juego pulsando DEMO. Luego, mantenga
pulsado DEMO hasta que se visualice OFF”.
Para reponer el sonido del juego, mantenga pulsado de nuevo
DEMO hasta que se visualice ON”.
• Mientras juega con el juego, ■ , •<◄ , y sólo se
encuentran disponibles para el juego. Cancele el juego para
utilizar estos botones en funciones tales como la reproducción
de un disco compacto, etc. ,
• Para cambiar el sonido del juego, consulte “FUNCION DE
REPRODUCCION CON RITMO” en la página 11.
• Durante el juego, algunos indicadores no relacionados con la
operación actual se encienden en el visualizador.
• DEMO queda bloqueado durante la grabación y nc funcicna.
• El juego y el sonido del juego se cancelan automáticamente si
el volumen se ajusta mientras la unidad está encendida.
m
O
>
■ ■ ■
K-
<
a
<
CL
u
cc
fil.
2 Pulse una vez ■.
El número del lado izquierdo se para.
3 Pulse dos veces ■ para detener los dos números
restantes.
Pun tu a ció n :
Para empezar el juego dispondrá de 20 puntos.
Si todos los números son iguales, se añadirán 50 puntos a la
puntuación.
Si no son iguales, se restará un punto.
Si los puntos ganados llegan a 9999, usted gana.
Si los puntos se reducen a 0, usted pierde.
Para cancelar el juego
Pulse DEMO.
Para reiniciar el juego
Pulse dos veces DEMO.
ESPAÑOL
9
Page 44

SONIDO
I
USTES DE AUDIO
CONTROL DE VOLUMEN
Gire VOLUME de la unidad principai o pulse VOL del control remoto.
El nivel de sonido se visualiza como un número del 0 a MAX
(50).
El nivel de sonido se ajusta automáticamente a 20 cuando se
desconecta la alimentación estando el nivel de sonido ajustado
en 21 o más.
SISTEMA SUPER T-BASS
El sistema T-BASS realza el realismo del sonido de baja
frecuencia.
Pulse T-BASS.
Cada vez que lo pulse, el nivel cambiará. Seleccione uno de ios
tres niveles e la posición de apagado, lo que usted prefiera.
NOTA
' El sonido de baja frecuencia tal vez se distorsione cuando se
utilice el sistema T-BASS con un disco o una cinta cuyo sonido
de baja frecuencia haya sido realzado originalmente. En este
caso, cancele el sistema T-BASS.
' Cuando reproduzca una cinta grabada con BBE se recomienda
desactivar BBE para evitar el sonido de alta frecuencia
distorsionado.
Para cambiar el equilibrio de los canales derecho/ izquierdo
Pulse MANUAL SELECT del control remoto. L7R se visualizará
durante 4 segundos. Pulse ◄ ◄ DOWN o UP del control
remoto antes de que pasen estos 4 segundos.
• El nivel DOLBY PRO LOGIC (página 26) de los altavoces
delanteros cambiará también.
SISTEMA BBE
El sistema BBE realza la claridad del sonido de alta frecuencia.
También mejora la función Karaoke para que su voz suene más
clara y agradable.
Pulse BBE.
Cada vez que lo pulse, el nivel cambiará. Seleccione uno de los
tres niveles o la posición de apagado, lo que usted prefiera.
1 0 ESPAÑOL
Page 45

UTILIZACION DE LA FUNCION BEAT
Esta unidad tiene una librería de patrones de ritmo de la que
usted podrá elegir el ritmo deseado para añadirlo a la
reproducción de cualquier fuente musical, permitiéndole así crear
sus propios sonidos originales.
La mezcla creada con las funciones BEAT y BBE puede grabarse
en cinta si así se desea. Además, la mezcla se encuentra
disponible en LINE OUT.
La función BEAT no se encuentra disponible cuando se hace
una copia entre dos platinas de casete usando SYNC DUB.
Para seleccionar un patrón de ritmo
1 Pulse BEAT ON/OFF para activar la función.
Oirá el patrón de ritmo actual y el visualizador mostrará el
nombre del ritmo.
2 Gire MULTi JOG para avanzar por las opciones
suministradas y encontrar ia que vaya mejor con
la música.
La visualización cambiará de la forma siguiente:
GAME -
t
TANGO
t
WALTZ 1-2
t
4 BEAT 1-2
i
8 BEAT 1-2
i
16 BEAT 1-3
t
MERENG 1-3
(MERENGUE)
i
REGGAE
H. ROCK 1-2
(ROCK DURO)
t
BOSSANOV
(BOSSA NOVA)
SAMBA 1-4
ì
CUB RMBA
(RUMBA CUBANA)
SALSA 1-3
t
SL RMBA 1-2
(RUMBA LENTA)
t
------
► AFRO
Para ajustar el tempo del patrón de ritmo
■ RHYTHM
MULTI JOG
1 Pulse repetidamente RHYTHM hasta que el
visualizador muestre “Tempo XXX”.
■ BEAT
ON/OFF
Si aparece “AUTO” mientras usted está pulsando RHYTHM,
cámbielo a “MANUAL’ girando MULTI JOG hacia la izquierda.
En el modo AUTO, el tempo es ajustado automáticamente y usted
no puede tener acceso a la visualización de “Tempo”. (Más
adelante se ofrece más información acerca del modo AUTO.)
2 Gire MULTI JOG.
Girándolo hacia la derecha el tempo se hace más rápido. Y
girándolo hacia la izquierda el tempo se hace más lento.
(Si pasa un intervalo de tiempo antes de girar el mando, vuelva
a ia visualización de “Tempo” pulsando RHYTHM.)
El tempo puede cambiarse dentro de los límites 81 a 160.
El tempo de GAME no puede ajustarse.
O
a
■IB
ss
O
en
Los derechos de autor de estos datos de onda de voz
incorporados en este producto son propiedad de Yamaha
Corporation, y nosotros tenemos licencia de Yamaha Corporation
para poder utilizar tales datos.
ESPAÑOL
11
Page 46

Para cambiar el nivel del sonido del patron de ritmo Utilización del modo AUTO
El modo AUTO ajusta automáticamente el tempo del patrón de
ritmo actual para que coincida con el tempo de la música.
Dependiendo de la música, el modo AUTO tal vez no funcione
correctamente (con canciones cuyo tempo es impreciso o cambia
a menudo, por ejemplo).
■ BEAT
ON/OFF
1 Pulse repetidamente RHYTHM hasta que la
visualización indique “LEVEL X”.
2,4
. L.EUEL 3'.^'
2,3
2 Gire MULTI JOG.
Se encuentran disponibles tres niveles: 1-3.
Para desactivar la función BEAT
Pulse BEAT ON/OFF.
BEAT cambia entre activado y desactivado.
Cuando interrumpa o detenga la reproducción de la fuente de
sonido, la función BEAT se desactivará automáticamente.
Puede dejar que la música empiece a reproducirse antes de
realizar el paso 1 u otro posterior en el momento deseado.
1 Pulse BEAT ON/OFF para activar la función.
Oirá el patrón de ritmo actual.
2 Cambie el patrón de ritmo y el ajuste del nivel
según sea necesario pulsando RHYTHM y
girando MULTI JOG.
3 Pulse RHYTHM para que el visualizador muestre
“MANUAL” o “AUTO”.
Mr¡ i
; ■ ■ ■ ■ ■ ■ ■UHL
4 Gire MULTI JOG hacia la derecha para cambiar
la visualización a “AUTO”.
Si se visualiza “AUTO” en el paso 3, gire MULTI JOG hacia la
izquierda para cambiar la visualización a "MANUAL’ antes de
realizar el paso 4.
12 ESPAÑOL
Al cambiar de MANUAL a AUTO, el nivel del patrón de ritmo
se reduce automáticamente a “1”. El nivel preajustado se
reanudará cuando la unidad asuma el tempo de la música.
Mientras la unidad intenta sincronizarse con el tempo de la
música, en los lados de la sección de visualización del
ecualizador gráfico aparecerá parpadeando un indicador azul
en forma de cascada.
PUTO
Cuando la unidad se sincronice con el tempo de la música, el
visualizador indicará momentáneamente el tempo
sincronizado.
Page 47

Sin embargo, dependiendo de ia fuente de sonido (como,
canciones cuyo tempo cambia), usted podrá ver aparecer en
la visualización tempos diferentes uno tras otro.
Tras una sincronización, si ei bloqueo de sincronización se
desbloquea, la visualización indicará “BEAT OUT”, y la unidad
volverá a intentar sincronizarse.
Al aparecer BEAT OUT, el nivel del ritmo se reducirá
automáticamente a “1”; y volverá al nivel preajustado después
de lograrse de nuevo la sincronización.
La función BEAT puede utilizarse junto con la función SPICE A/
B, así como también con la función FILL IN. (En cuanto a estas
funciones, siga leyendo por favor.) Pero la función AUTO SPICE
no puede utilizarse al mismo tiempo que la función BEAT.
Utili:zación de la función FILL IN
La función FILL IN se utiliza junto con la función BEAT para
introducir una variación en el patrón de ritmo actual.
El interruptor de función doble AUTO SPICE/FILL IN asume la
función FILL IN cuando la función BEAT está activada.
' La función AUTO SPICE no se encuentra disponible al mismo
tiemipo que la función FILL IN.
' La función FILL IN no se encuentra disponible cuando se hace
una copia entre dos platinas de casete utilizando SYNC DUB.
UTILIZACION DE LA FUNCION SPICE
Función SPICE A/B
§
La función SPICE A/B le permite añadir percusión a la
reproducción de la música y crear sus propios sonidos originales.
Los sonidos que usted cree con SPICE A/B podrán ser grabados
en cinta si así lo desea.
Para seleccionar sonidos
1 Pulse A.
Oirá el sonido almacenado actualmente en A.
2 Antes de que pasen 4 segundos, gire MULTIJOG
hacia la izquierda o hacia ia derecha hasta
encontrar ei sonido deseado.
Al cambiar la visualización oirá el sonido respectivo.
PARA UTILIZAR LA FUNCIÓN FILL IN
■ BEAT
ON/OFF
■ FILL IN
Durante la reproducción con ia función BEAT activada, pulse
FILL IN en el momento deseado.
FILL IH
Ei visualizador indicará “FILL IN” y, cuando termine el ciclo actual
del patrón de ritmo, usted oirá un breve sonido diferente del
patrón de ritmo. Este sonido depende de los patrones de ritmo.
Si lo desea, pruebe a cambiar el patrón del ritmo. (La selección de un
patrón de ritmo se ha explicado anteriormente, bajo el
encabezamiento correspondiente.)
3 De forma simiiar, seleccione un sonido para B.
Para utilizar la función
Una vez satisfecho con la selección del sonido, deje que la
música empiece a reproducirse y utilice SPICE A o B con la
música como si estuviera tocando instrumentos de percusión.
La función SPICE A/B no se puede utilizar al copiar entre dos
platinas de casete utilizando SYNC DUB.
ESPAÑOL
13
Page 48

utilización de un modo de rayado
1 Mantenga pulsado SPICE A. (No suelte el botón
hasta completar el paso 2.)
El visualizador indicará “SCT MODE”.
' ser P10DE
2 Sin soltar aún el botón, gire MULTI JOG.
Dependiendo del sentido de giro de MULTI JOG se producirán
rayados diferentes.
El modo de rayado se desactiva cuando se suelta el botón A.
Utilización de la función AUTO SPICE
La función AUTO SPICE produce los sonidos de SPICE A y B
en sincronización con la música, el sonido A en respuesta a las
señales de frecuencia baja, y el sonido B en respuesta a las
señales de frecuencia alta.
• La función AUTO SPICE no puede utilizarse junto con la función
BEAT.
• Dependiendo de la música, la función AUTO SPICE tal vez no
funcione como usted espera. En tal caso, utilice en su lugar la
función SPICE A/B.
- La función AUTO SPICE no se encuentra disponible cuando
se hace una copia entre dos platinas de casete utilizando SYNC
DUB.
1 Pulse AUTO SPICE.
“A-SPICE” se muestra en el visualizador.
..... .......... ... ..........
H .i. Ll:;;.
2 Pulse SPICE A.
Oirá el sonido almacenado en A, y su nombre aparecerá en
el visualizador.
Cada vez que pulse A se producirá sonido.
3 Si desea cambiar el sonido de A, gire MULTI JOG
hasta encontrar el sonido deseado.
(Si pasa un intervalo de tiempo después de completarse el
paso 2 y antes de realizar el paso 3, pulse de nuevo SPICE
A.) -
4 De forma similar, compruebe el sonido de B y
cámbielo si lo desea.
5 Para ajustar el nivel de los sonidos A y B, acceda
a la visualización de “LEVEL X” pulsando
RHYTHM tantas veces como sea necesario, y
luego gire MULTI JOG antes de que pasen 4
segundos.
Se encuentran disponibles tres niveles: 1, 2 y 3.
1 4 ESPAÑOL
Los niveles A y B se ajustan de una vez.
Deje que empiece la reproducción de la fuente
para escuchar el efecto.
El indicador azul en forma de cascada a la izquierda de “BBE”
en el visualizador parpadeará y el sonido de SPICE A se
reproducirá en sincronización con los graves, y el sonido de
SPICE B se reproducirá en sincronización con los agudos.
NOTA
Cuando esté reproduciéndose un patrón de ritmo o mientras
esté produciéndose sonido FILL IN, si usted da un toque ligero
a SPICE A o B o produce rayado, en el patrón de ritmo o en el
sonido FiLL ÍN podrán producirse ocasionalmente interrupciones
momentáneas. Lo mismo sucede con ei sonido AUTO SPICE
cuando se da un toque ligero a SPICE A o B o se produce rayado.
Page 49

SELECCION DE LA CURVA DE
ECUALIZACION PROGRAMADA
Esta unidad ofrece las 5 curvas de ecualización diferentes
siguientes:
ROCK: Sonido potente que realza los agudos y los graves.
POP: Más presencia en las voces y en la gama de registro medio.
LATIN: Frecuencias más altas acentuadas para música latina.
CLASSIC: Sonido enriquecido con graves profundos y agudos
finos.
JAZZ: Frecuencias bajas acentuadas para música tipo jazz.
GEQ
AJUSTE MANUAL DE UNA CURVA DE
ECUALIZACION NUEVA
O
q
iz
o
IA
1.3
2.4
1
La curva de ecualización puede personalizarse según sus
preferencias.
1 Pulse GEQ, seguido de ENTER antes de que
pasen 4 segundos.
La visualización cambiará a “GEQ LOW”.
2 Antes de que pasen 8 segundos, gire MULTI JOG
para ajustar el nivel de la frecuencia más baja.
Pulse GEQ, y antes de que pasen 4 segundos gire MULTI
JOG para seleccionar una de ias curvas de ecuaiización
programadas.
' ROCK
“GRAPHIC EQUALIZER” aparece y el modo GEQ se visualiza
cíclicamente de ia forma siguiente:
■ ROCK ^ POP LATIN CLASSIC ^ JAZZ ‘
.......
............
Modo programado
M5 ■ «--► M4 -<--► M3 ■ «-► M2 ------
Modo manual
Para visualizar el modo GEQ actual
Pulse GEQ. El modo actual se visualiza durante 4 segundos.
Para cancelar el modo seleccionado
Pulse dos veces GEQ.
“GEQ OFF” aparece y “GRAPHIC EQUALIZER” desaparece.
Para seleccionar con el control remoto
Pulse GEQ y antes de que pasen 4 segundos, pulse
repetidamente ◄ ◄ o ► ► . El modo GEQ se visualiza
cíclicamente de la forma indicada arriba.
-----------------► MI >•-
'
1
■
3 Pulse ENTER para que se muestre “GEQ HIGH”.
El indicador del nivel de ia frecuencia más alta parpadea
durante 8 segundos.
4 Antes de que pasen 8 segundos, gire MULTI JOG
para ajustar el nivel de la frecuencia más alta.
ilBi
Los indicadores de nivel de frecuencia entre la más baja y la
más alta se ajustan en conformidad.
Utilización de auricuiares
Conecte auriculares con clavija estéreo estándar de 6,3 mrn o a
la toma PHONES.
Mientras los auriculares estén conectados no saldrá sonido de
los altavoces.
•Cuando los auriculares estén conectados, el sistema
SURROUND y DOLBY PRO LOGIC no funcionarán.
■
'r-
■
Î1
Ajuste de sonido durante ia grabación
El control VOLUMEN no causa ningún efecto en la grabación
Sólo ajusta el sonido de los altavoces y auriculares. Sin embargo,
recuerde que la grabación eisume las funciones BEAT, AUTO
SPICE/FILL IN, SPICE A/B, así como también la función BBE.
ESPAÑOL 1 5
Page 50

MEMORIZACION DE CURVAS DE ECUALIZACION NUEVAS
1,2,4
1,3
1
Se puede almacenar un máximo de 5 curvas de ecualización
personalizadas como modos manuales MI - M5.
1 Realice los pasos 1-4 de la página anterior.
La curva creada se visualizará durante 8 segundos.
2 Pulse ENTER antes de que pasen 8 segundos.
“M 1” parpadeará en el visualizador durante 8 segundos.
DSPSURROUN
I
El DSP (Procesador de Señal Digital) SURROUND ajusta el
tiempo de retardo, el modo de entrada y el nivel de realimentación
para ofrecer un sonido ambiental resonante que le permite
disfrutar de la presencia real del sonido de diferentes ambientes.
Esta unidad ha sido programada con 5 modos SURROUND
diferentes.
SELECCION DE UN MODO DSP SURROUND PROGRAMADO
SURROUND
I heq .ht'' ^
iM—a
^ ~ .i--. .-.1.
• Si este paso no se completa antes de que pasen 8 segundos,
pulse primero GEQ para visualizar “GEQ ON”. Luego, antes
de que pasen 4 segundos, pulse repetidamente ENTER
hasta que parpadee “M1”.
3 Gire MULTI JOG antes de que pasen 8 segundos
para seleccionar uno de los modos manuales MI
- M5 donde almacenar la curva.
4 Pulse ENTER antes de que pasen 8 segundos.
La nueva curva de ecualización se almacena.
Para seleccionar la curva de ecualización almacenada
Pulse GEQ, y antes de que pasen 4 segundos gire MULTI JOG
para seleccionar uno de los modos manuales MI - M5.
Para ajustar el volumen de los altavoces de sonido
ambiental
Pulse dos veces MANUAL SELECT del control remoto mientras
está activado el modo DSP SURROUND.
“SUR” se visualizará durante 4 segundos. Pulse ◄ ◄ DOWN o
►>- UP del control remoto antes de que pasen estos 4
segundos.
• El nivel DOLBY PRO LOGIC (página 26) de los altavoces de
sonido ambiental cambiará también.
El modo SURROUND se cancelará cuando:
- se cambie el nivel de ECHO.
- se active DOLBY PRO LOGIC.
- los auriculares estén enchufados.
1 6 ESPAÑOL
Cinco modos de DSP SURROUND ofrecen la presencia de
sonido que usted notaría en una discoteca (DISCO), en un
concierto en directo (LIVE), en un estadio (STADIUM), en una
sala de conciertos (HALL) o en un cine (MOVIE). (En paréntesis
se muestran las indicaciones que aparecen en el visualizador.)
Pulse SURROUND, y antes de que pasen 4
segundos gire MULTI JOG o pulse repetidamente
■« o »■ para seleccionar el modo programado
deseado.
DISCO
“DSP SURROUND” aparece y el modo DSP SURROUND se
visualiza cíclicamente de la forma siguiente:
DISCO'
•UVE- -STADIUM-
► HALL*
Las curvas de ecualización se seleccionan automáticamente para
que concuerden con los modos DSP SURROUND, y también
pueden seleccionarse o desactivarse manualmente según sus
preferencias.
Para visualizar el modo DSP SURROUND actual
Pulse SURROUND. El modo actual se visualizará durante unos
4 segundos.
Para cancelar el modo seleccionado
Pulse dos veces SURROUND. Aparece “DSP OFF” y desaparece
“DSP SURROUND”.
Cuando la fuente musical sea mono
Seleccione “LIVE”, “STADIUM” o “MOVIE” para obtener un efecto
estéreo simulado.
Cuando se seleccione “DISCO” o “HALL” no se oirá sonido
procedente de los altavoces de sonido ambiental.
MOVIE
Page 51

RECEPCION DE LA RADIO
MONO
TUNER
TUNER
BAND
1 Pulse repetidamente TUNER/BAND para
seleccionar ia banda deseada.
FM-
AM
Cuando se pulse TUNER/BAND mientras la alimentación esté
desconectada, la alimentación se conectará directamente.
2 Pulse ◄◄ DOWN o ►► UP para seleccionar una
emisora.
Cada vez que pulse el botón, la frecuencia cambiará.
Cuando se reciba una emisora, “TUNE” se visualizará durante
2 segundos.
Durante la recepción estéreo por FM se visualizará
l(l®lll
TUNE
La unidad puede almacenar un total de 32 emisoras. Cuando
almacene una emisora, a esa emisora se le asignará un número
de preajuste. Utilice ei número de preajuste para sintonizar
directamente una emisora preajustada.
1 PulseTUNER/BAND para seleccionar una banda,
y pulse ◄◄ DOWN o ►► UP para seleccionar
una emisora. -
2 Pulse II SET para almacenar la emisora.
A las emisoras de cada banda se les asigna un número de
preajuste en orden consecutivo empezando por el 1.
Número de preajuste
FM 1
0
Q
1
S
O
<
a
<
..j
u
o
z
o
o
a
lUI
o
u
IK
: PM ■ njy.^£
Para buscar rápidamente una emisora (Búsqueda automática)
Mantenga pulsado ◄ ◄ DOWN o ► ► UP hasta que la frecuencia
empiece a cambiar rápidamente. Después de sintonizar una
emisora, la búsqueda parará. ’
Para detener manualmente la búsqueda automática, pulse ◄ ◄
DOWN o UP.
• La búsqueda automática quizá no pare en emisoras cuyas
señales sean muy débiles.
Cuando una radiodifusión estéreo por FM tenga ruido
Pulse MONO TUNER del control remoto para que “MONO”
aparezca en el visualizador.
El ruido se reducirá, pero la recepción será mono.
Para reponer la recepción estéreo, repita io de arriba para que
desaparezca “MONO”.
Para cambiar el intervalo de sintonización de AM
El ajuste predeterminado del intervalo de sintonización de AM
es de 10 kHz/paso. Si utiliza esta unidad en un área donde el
sistema de asignación de frecuencia es de 9 kHz/paso, cambie
el intervalo de sintonización.
Pulse POWER mientras pulsa
Para reponer el intervalo, repita este procedimiento.
Cuando se cambie el intervalo de sintonización de AM. todas
las emisoras preajustadas se borrarán. Las emisoras
preajustadas tendrán que ajustarse de nuevo.
3 Repita los pasos 1 y 2.
La siguiente emisora no se almacenará si ya se ha
almacenado un total de 32 emisoras de preajuste de todas
las bandas.
NOTA
“FULL” se visualiza si intenta almacenar más de 32 emisoras
preajustadas.
SINTONIZACION MEDIANTE NUMERO DE
PREAJUSTE
utilice el control remoto para seleccionar directamente el número
de preajuste.
1 PulseTUNER/BAND para seleccionar una banda.
2 Pulse los botones numerados 0-9 y +10 para
seleccionar un número de preajuste.
Ejemplo:
Para seleccionar el número de preajuste 20, pulse +10, +10
y 0.
Para seleccionar el número de preajuste 15, pulse +10 y 5.
Selección de un número de preajuste en la unidad
principai
Pulse TUNER/BAND para seleccionar una banda. Luego, pulse
repetidamente o gire MULTI JOG.
Cada vez que se pulse ◄ ► se seleccionará el siguiente número
más alto.
Para borrar una emisora preajustada
Seleccione el número de preajuste de la emisora que vaya a
borrar. Luego, pulse ■ CLEAR, y pulse II SET antes de que
pasen 4 segundos.
Los números de preajuste superiores de todas las demás
emisoras de ia banda disminuirán también en uno.
ESPAÑOL 1 7
Page 52

REPRODUCCION DE CINTAS
OPERACIONES BASICAS
• En la platina 1, las cintas se reproducen siempre por ambas
caras.
En la platina 2, podrá seleccionar un modo de inversión para
reproducir una o dos caras.
• Utilice cintas tipo I (normales), tipo II (alta polarización/Cr02)
o tipo IV (metal) para la reproducción.
1 Pulse TAPE/DECK1/2 PUSH EJECT para abrir
el portacasete.
Para seleccionar un modo de inversión (platina 2
solamente)
Cada vez que pulse REV MODE, el modo de inversión cambiará.
IK2 000W
Z** Z} **C Z i
Para reproducir una cara solamente, seleccione ü.
Para reproducir de la cara delantera a la trasera una vez
solamente, seleccione ü).
Para reproducir repetidamente ambas caras, seleccione CU).
• Cuando haya cintas introducidas en ambas platinas, el
indicador Z) del visualizador indicará la reproducción continua.
Para seleccionar una platina de reproducción
Cuando haya cintas cargadas en ambas platinas, pulse primero
TAPE/DECK 1/2 para seleccionar una de las platinas.
El número de la platina seleccionada se visualiza.
Para detener la reproducción, pulse ■ .
Para hacer una pausa en la reproducción (platina 2
soiamente), pulse II. Para reanudar la reproducción, púlselo
de nuevo.
Para cambiar la cara de reproducción, pulse en el modo
de reproducción o en el de pausa.
Para avanzar rápidamente o rebobinar, pulse ◄ ◄ o
Luego pulse ■ para detener la cinta.
Para iniciar la reproducción cuando la alimentación esté desconectada (función de reproducción directa)
Pulse TAPE/DECK 1/2. La alimentación se conectará y empezará
la reproducción de la cinta insertada.
Inserte una cinta con el lado expuesto hacia abajo. Empuje
el portacasete para cerrarlo.
2 Pulse para iniciar la reproducción.
Número de la
platina seleccionada
TRI 0000.
, ........................................... .
Contador de cinta
Indicador de la cara de reproducción
La cara que queda hacia adelante (cara delantera) está
siendo reproducida.
La cara que queda hacia atrás (cara trasera) está siendo
reproducida.
Para poner el contador de cinta a 0000
Pulse ■ CLEAR en el modo de parada.
El contador también se pone en 0000 cuando se abre el
portacasete.
18 ESPAÑOL
Page 53

SENSOR MUSICAL
Si hay un espacio sin grabar de 4 segundos o más entre cada
canción, la búsqueda del principio de la canción que esté siendo
reproducida o de la siguiente canción podrá realizarse fácilmente.
Pulse ◄ ◄ o ► ► durante la reproducción observando el
indicador de la cara de reproducción (◄ o ► ) del visualizador.
Por ejemplo, cuando pulse ► ► mientras se visualiza ► ,
empezará a reproducirse la siguiente canción.
La función del sensor musical tal vez no pueda detectar las
canciones bajo las condiciones siguientes:
• Espacios sin grabar de menos de 4 segundos entre las
canciones.
• Espacios sin grabar que tengan ruido.
• Pasajes largos con un sonido muy bajo.
• Niveles de grabación bajos en general.
Acerca de las cintas de casete
• Para evitar el borrado accidental., rompa con un
destornillador u otra herramienta puntiaguda las lengüetas
de plástico del casete después de grabar.
Cara A
Ranura de
detección de
Lengüeta
para la cara A
cinta tipo II
Para volver a grabar en una cinta, tape las aberturas con
cinta adhesiva, etc. (En cintas tipo II, tenga cuidado para
no tapar la ranura de detección de cinta tipo II.)
' Las cintas de 120 minutos o más son extremadamente
finas y se deforman o estropean fácilmente. No son
recomendadas.
' Tense la cinta con un lapicero o herramienta similar antes
de utilizarla. La cinta floja podrá romperse o atascarse en el
mecanismo.
0
<í
1“
Z
O
Ul
O
z
Ci
o
o
cí
o
b:
o.
un
Después de terminar la reproducción en una platina, la cinta de
la otra platina empezará a reproducirse sin interrupción.
1 Inserte cintas en las platinas 1 y 2.
2 Pulse TAPE/DECK1/2 para seleccionar la platina
que vaya a realizar la reproducción en primer
lugar.
3 Pulse REV MODE para seleccionar Z). 4 Pulse para iniciar la reproducción.
La reproducción continuará hasta que se pulse ■ .
ESPAÑOL 1 9
Page 54

REPRODUCCION DE DISCOS COMPACTOS
OPERACIONES BASICAS
mtmummmMmmmmim
INTRODUCCION DE DISCOS
Pulse CD, y luego pulse £ OPEN/CLOSE para abrir
el compartimiento de ios discos. Introduzca el(los)
dlsco(s) con el lado de la etiqueta hacia arriba.
Para reproducir uno o dos discos, ponga los discos en las
bandejas 1 y 2.
Para reproducir tres discos, pulse DISC CHANGE para girar
las bandejas después de poner dos discos. Ponga el tercer disco
en la bandeja 3.
Cierre el compartimiento del disco pulsando é. OPEN/CLOSE.
Para reproducir un disco solamente, pulse DISC DIRECT PLAY 1-3.
El disco seleccionado se reproducirá una vez.
Para detener la reproducción, pulse ■ .
Para hacer una pausa en la reproducción, pulse II. Para
reanudar la reproducción, púiselo de nuevo.
Para buscar un punto particular durante la reproducción,
mantenga pulsado ◄ ◄ o ► ► y suéltelo en el punto deseado.
Para saltar hasta el comienzo de una pista durante la
reproducción, pulse repetidamente ◄ ◄ o ► ► o gire MULTI
JOG.
Para quitar discos, pulse ± OPEN/CLOSE.
Para iniciar la reproducción cuando la alimentación esté desconectada (función de reproducción directa)
Pulse CD. La alimentación se conectará y la reproducción del(de
los) dlsco(s) introducldo(s) empezará.
Cuando se pulse A OPEN/CLOSE, la alimentación también se
conectará y el compartimiento de los discos se abrirá.
Para comprobar el tiempo restante
Durante la reproducción, pulse CD EDIT/CHECK. El tiempo
restante hasta que todas las canciones terminen de reproducirse
se visualizará. Para reponer la visuallzación del tiempo de
reproducción, repita este procedimiento.
Selección de una canción con el control remoto
1 Pulse DISC DIRECT PLAY, y luego pulse uno de los botones
numerados 1-3 antes de que pasen 3 segundos para
seleccionar un disco.
2 Pulse los botones numerados 0-9 y +10 para seleccionar una
canción.
Ejemplo:
Para seleccionar la canción número 25, pulse +10, +10 y 5.
Para seleccionar la canción número 10, pulse +10 y 0.
La canción seleccionada empieza a reproducirse y la
reproducción continúa hasta el final del disco.
Número de la bandeja del disco Tiempo de
que va a ser reproducido reproducción total
16 49;:2':v
Número total de canciones
REPRODUCCION DE DISCOS
Introduzca los discos.
Para reproducir todos los discos del compartimiento de los discos, pulse
La reproducción empezará por el disco de la bandeja 1.
Número de la canción que Tiempo de reproducción
está siendo reproducida transcurrido
i 0 " 05
Reemplazo de discos durante la reproducción
Mientras se reproduzca un disco, los otros discos podrán
reempiazarse sin interrumpir la reproducción.
1 Pulse DISC CHANGE.
2 Quite los discos y ponga otros.
3 Pulse A OPEN/CLOSE para cerrar el compartimiento de los
discos.
' Cuando introduzca un disco de 8 cm, póngalo en el círculo
interior de la bandeja.
■ No ponga más de un disco compacto en una bandeja de disco.
■ No incline la unidad habiendo discos introducidos. Hacer esto
podría causar averías.
' No utilice discos compactos con formas irregulares (por
ejemplo, con forma de corazón, octagonales, etc.). Éstos
podrían ocasionar un fallo en el funcionamiento.
20 ESPAÑOL
Page 55

REPRODUCCION ALEATORIA/ REPETICION DE REPRODUCCION
utilice el control remoto.
Reproducción aleatoria
Todas las canciones del disco seleccionado o de todos los discos
podrán reproducirse aleatoriamente.
Repetición de reproducción
Un solo disco o todos ellos podrán reproducirse repetidamente.
Pulse RANDOM/REPEAT mientras pulsa SHIFT.
Cada vez que se pulse, la función podrá seleccionarse cíclicamente.
Reproducción aleatoria — RANDOM se enciende en el
visualizador.
Repetición de reproducción — cí. se enciende en el
visualizador.
Reproducción aleatoria/Repetición de reproducción —
RANDOM y Cf. se encienden en el visualizador.
Cancelación — RANDOM y cj. desaparecen del visualizador.
Para reproducir todos los discos, pulse para iniciar la
reproducción. .
Para reproducir un solo disco, pulse uno de los botones DISC
DIRECT PLAY 1-3 para iniciar la reproducción.
Durante la reproducción aleatoria no será posible saltar a la canción
previamente reproducida con
REPRODUCCION CON SALTO DE SECCIONES EN BLANCO
Las secciones en blanco entre las canciones grabadas de un disco
compacto pueden saltarse durante la reproducción.
1 Pulse CD BLANK SKIP.
Se visualiza “CD BLANK SKIP ON’’ y aparece un punto pequeño
en el visualizador.
Punto pequeño
REPRODUCCION PROGRAMADA
Se podrá programar un máximo de 30 canciones de cualquiera de
los discos introducidos.
Utilice el control remoto.
1 Pulse PRGM dos veces en el modo de parada.
“PRGM” se visualiza.
• Cuando PRGM se pulse una vez en el paso 1, la. unidad se
pondrá en el modo PROGFIAMA DE KAFtAOKE (página 29).
Pulse DISC DIRECT PLAY, y luego pulse uno de los botones numerados 1-3 antes de que pasen 3 segundos para seleccionar un disco.
Vaya al paso siguiente cuando la bandeja deje de girar.
Pulse los botones numerados 0-9 y +10 para programar una canción.
Ejemplo:
Para seleccionar la canción número 25, pulse +10, +10 y 5.
Para seleccionar la canción número 10, pulse +10 y 0.
Número de la canción
seleccionada
PFtGM
I
Número total de canciones
seleccionadas
O
H
O
<
0.
Si
o
o
</l
o
u
tfl
el
Ul
o
z
o
o
o
D
o
o
di;
fli,
m
QE¡
CD
2 Pulse para iniciar la reproducción.
Las secciones en blanco entre canciones se saltarán, y el sonido
se reproducirá sin Interrupción. Si una canción termina con
desvanecimiento (el sonido va disminuyendo gradualmente), la
parte con desvanecimiento también se saltará.
Para volver a la reproducción normal
Pulse de nuevo CD BLANK SKIP, y “CD BLANK SKIP OFF” se
visualiza y el punto desaparece del visualizador.
Puede haber casos en ios que la REPRODUCCION CON SALTO
DE SECCIONES EN BLANCO no funcionará correctamente.
' La REPRODUCCION CON SALTO DE SECCIONES EN BLANCO
se cancela automáticamente cuando se realiza la GRABACION
CON EDICION Al (página 24), la GRABACION CON EDICION
PROGRAMADA (página 25) la grabación durante la
REPRODUCCION PROGRAMADA (página 21) o la
REPRODUCCION ALEATORIA (página 21).
í0iV P
..............
01
Número de programa
o
Tiempo de reproducción total de
IP 4:.20
las canciones seleccionadas
4 Repita los pasos 2 y 3 para programar otras
canciones.
5 Pulse para iniciar ia reproducción.
Para comprobar el programa
Cada vez que se pulse ◄ ◄ o ► ► en el modo de parada, se
visualizará un número de disco, un número de canción y un número
de programa.
Para borrar el programa
Pulse ■ CLEAR en el modo de parada.
Para añadir canciones ai programa
Repita los pasos 2 y 3 en el modo de parada. La canción se
programará después de la últimia canción.
Para cambiar ias canciones programadas
Borre el programa y repita de nuevo todos los pasos.
Para reproducir repetidamente ias canciones programadas
Después de programar las canciones, pulse repetidamente
RANDOM/REPEAT hasta que aparezca en el visualizador.
Durante la reproducción programada no se puede realizar la
reproducción aleatoria, comprobar el tiempo restante y seleccionar
un disco o una canción. “CANT USE” se visualizará si intenta
seleccionar una canción.
' “FULL” se visualizará si usted intenta programar más de 30
canciones. o +
ESPAÑOL¿ 1
Page 56

GRABACION
GRABACION BASIC
Esta sección explica cómo grabar del sintonizador, del
reproductor de discos compactos o de un equipo exterior.
► /OREC/
REC MUTE
Preparación
• Para la grabación, utilice cintas tipo I (normal) y tipo II (alta
polarización/Cr02).
• Ponga la cinta en el punto donde vaya a iniciar la grabación.
1 Inserte la cinta que vaya a grabar en la platina 2.
Inserte la cinta con la cara que vaya a grabar en primer lugar
hacia afuera de la unidad.
lPUSH
EJECT
Para detener la grabación, pulse ■ .
Para hacer una pausa en la grabación, pulse II. (Aplicable
cuando la fuente es TUNER, VIDEO/AUX o MD.) Para reanudar
la grabación, vuelva a pulsar el botón.
Para iniciar la grabación con ei control remoto
Pulse primero 0/0 REC/REC MUTE y luego pulse ► /◄ ► antes
de que passen 2 segundos.
Ajuste de sonido durante la grabación
El control VOLUMEN no causa ningún efecto en la grabación.
Sólo ajusta el sonido de los altavoces y de los auriculares. Sin
embargo, recuerde que la grabación asume las funciones SEAT,
AUTO SPICE/FILL IN, SPICE A/B , así como también la función
BBE.
INSERCION DE ESPACIOS SIN GRABAR
La inserción de espacios sin grabar de 4 segundos le permite
activar la función del sensor musical. (Puede aplicarse cuando
la fuente de sonido es TUNER/BAND, VIDEO/AUX o MD).
1 Pulse • REC/REC MUTE durante la grabación o en el
modo de pausa de grabación.
parpadeará en el visualizador durante 4 segundos y se
creará un espacio sin grabar de 4 segundos. Luego, la platina
entrará en el modo de pausa de grabación.
2 Pulse II para reanudar la grabación.
Para insertar un espacio en blanco de menos de 4 segundos.
pulse de nuevo # REC/REC MUTE mientras parpadea l:)=t«i
Para insertar espacios en blanco de más de 4 segundos.
después de que la platina entre en el modo de pausa de
grabación, pulse de nuevo • REC/REC MUTE.
Cada vez que se pulse el botón se añadirá un espacio en blanco
de 4 segundos.
2 Puise REV MODE para seieccionar ei modo de
inversión.
Para grabar en una cara solamente, seleccione T.
Para grabar en ambas caras, seleccione TI) o CU).
3 Pulse el botón de función (TUNNER/BAND,
VIDEO/AUX, CD o MD) y prepare la fuente de
sonido de la que vaya a grabar.
Para grabar de un disco compacto, pulse CD e introduzca
el(los) disco(s).
Para grabar de una radiodifusión, pulse TUNER/BAND y
sintonice una emisora.
Para grabar de una fuente conectada, pulse VIDEO/AUX o
MD.
4 Pulse # REC/REC MUTE para iniciar la
grabación.
Cuando grabe de una fuente conectada, inicie la reproducción
en esa fuente.
Fri =9T'" ■ ==
l;U«i
Cuando la función seleccionada sea CD, la reproducción y la
grabación empezarán simultáneamente.
Si se intenta grabar en una cinta cuyo casete tiene las lengüetas
de plástico rotas se visualizará “Can’t REO”.
Para borrar una grabación
Asegúrese de que el micrófono no esté conectado a esta unidad.
Ponga el volumen del microfono y el nivel del eco en OFF.
(Consulte la página 28.) Además, asegúrese de que BEAT y
AUTO SPICE estén apagados (página 11).
1 Introduzca la cinta que vaya a borrar en la platina 2 y pulse
TAPE/DECK 1/2 para visualizar “TP 2”.
2 Ponga la cinta en el punto donde vaya a empezar a borrar.
3 Ponga el modo de inversión pulsando REV MODE.
4 Pulse • REC/REC MUTE para iniciar el borrado.
22 ESPAÑOL
Page 57

!
AGI
• Ponga la cinta en el punto donde vaya a empezar la grabación.
• El modo de inversión se ajusta automáticamente a
Tenga en cuenta que la grabación se hará en una cara de la
cinta solamente.
1 Pulse TAPE/DECK 1/2.
2 Inserte la cinta original en la platina 1 y la cinta
que vaya a grabar en la platina 2.
Inserte las cintas con las caras que vaya a reproducir o grabar
hacia afuera de la unidad.
3 Pulse TAPE/DECK 1/2 para seleccionar la platina
1.
“TP 1” se visualizará.
4 Pulse 9 REC/REC MUTE para iniciar la
grabación.
La reproducción y la grabación empezarán simultáneamente.
TP 1 ili-2REC
:¡s
o
ii5
<
la
<
IX
o
Esta función le permitirá hacer copias exactas de ambas caras
de la cinta original. La cara de inversión de ambas cintas
empezará simultáneamente tan pronto como termine de
invertirse la cinta más larga.
• La copia no empieza desde un punto ubicado en medio de la
cinta.
• El modo de inversión se pone automáticamente en 1).
1 Pulse TAPE/DECK 1/2.
2 Inserte la cinta original en la platina 1 y ia cinta
que vaya a grabar en ia piatina 2.
Inserte cada cinta con la cara que vaya a ser reproducida o
grabada hacia afuera de la unidad.
3 Pulse una o dos veces SYNC DUB para iniciar la
grabación.
® Para grabar a velocidad normal, púlselo una vez para
visualizar NORM-DUB.
® Para grabar a alta velocidad, púlselo dos veces para
visualizar HIGH-DUB.
® @
Para detener el copiado
Pulse ■ .
VORn.Düb
Hi HI i■■■■UÜH
Las cintas se rebobinan hasta el principio de las caras
delanteras y comienza la grabación.
Para detener el copiado
Pulse ■ .
La grabación no empezará si las lengüetas de prevención de
borrado de ambos lados de la cinta están rotas.
ESPAÑOL 23
Page 58

GRABACION CON EDICION Al
CD EDIT/
CHECK
La función de grabación con edición Ai permite grabar discos
compactos sin preocuparse de la duración de la cinta y de las
canciones. Cuando se inserte un disco compacto, la unidad
calculará automáticamente la duración total de las canciones.
En caso de ser necesario, el orden de las canciones cambiará
para que ninguna de eilas quede cortada.
(Al: Inteligencia Artificial)
La grabación con edición Ai no empezará desde un punto que
se encuentre en medio de ia cinta. La cinta deberá grabarse
desde ei principio de cada cara.
1 Inserte la cinta en la platina 2.
Inserte la cinta con la cara que vaya a grabar en primer lugar
hacia afuera de la unidad.
2 Pulse CD e introduzca el (los) disco (s). 3 Pulse una vez CD EDIT/CHECK,
“EDIT” se visualizará
EDIT
I
6 Pulse # REC/REC MUTE para iniciar la grabación
de la primera cara.
La cinta se rebobinará hasta el principio de la primera cara,
el segmento guía avanzará durante 10 segundos y ia
grabación empezará. Cuando termine de grabarse la cara
delantera (cara A) empezará la grabación de la cara trasera
(cara B).
Para detener la grabación
Pulse ■ . La grabación y la reproducción del disco compacto se
pararán simultáneamente.
Para borrar el programa de edición
Pulse dos veces ■ CLEAR para que “EDIT” desaparezca del
visualizador.
Para comprobar el orden de los números de las canciones programadas
Antes de grabar, pulse CD EDIT/CHECK para seleccionar la
cara A o B, y pulse repetidamente ◄ ◄ o
Números de las
Número de canción canciones programadas
i-/ 3 P
Cara de la cinta Número del programa
Para añadir canciones de otros discos a un programa de edición
Si queda tiempo en la cinta después del paso 5, usted podrá
añadir canciones de otros discos que se encuentren en el
compartimiento de los discos compactos.
1 Pulse CD EDIT/CHECK para seleccionar la cara A o la B.
2 Pulse DISC DIRECT PLAY 1-3 para seleccionar un disco.
3 Pulse los botones numerados del control remoto para
seleccionar canciones.
Una canción cuyo tiempo de reproducción sea superior al
tiempo restante no podrá ser programada.
4 Repita los pasos 2 y 3 para añadir más canciones.
....
06
Hi l;--00
• Cuando se visualice “PRGM”, pulse CD EDIT/CHECK.
4 Pulse DISC DIRECT PLAY 1-3 para seleccionar
un disco.
5 Pulse los botones numerados 0-9 del control
remoto para designar la duración de la cinta.
Se puede especificar una duración de 10 a 99 minutos.
Ejemplo: Cuando utilice una cinta de 60 minutos, pulse 6 y 0.
En unos pocos sogundos, las candónos que van a ser
grabadas en cada cara de la cinta serán determinadas.
• ◄ ◄ , ► ► o MULTI JOG también se pueden utilizar para
designar la duración de la cinta.
Canciones
Tiempo de programadas
Duración de la cinta grabación restante para la cara A
I C
...
o
N •■ ■ ■ ■ 0::51
Cara de la cinta
A: Primera cara de grabación
B: Segunda cara de grabación
Tiempo de las cintas de casete y tiempo de edición
El tiempo real de grabación de los casetes es por lo general un
poco más largo que el tiempo de grabación especificado en sus
etiquetas. Esta unidad puede programar canciones para utilizar
ese tiempo extra. Cuando el tiempo total de grabación sea un
poco más largo que el tiempo de grabación especificado en el
casete, después de la edición, el visualizador mostrará el tiempo
extra (sin un signo menos) en lugar del tiempo restante de la
cinta (con el signo menos).
' La función de grabación con edición Al no se podrá utilizar con
discos que tengan 31 canciones o más. Si se intenta hacer
esto se visualizará “TR QVER”.
' La grabación no podrá realizarse si están rotas ias lengüetas
de prevención de borrado de ambos lados de la cinta.
24 ESPAÑOL
Page 59

4,5
En la función de grabación con edición programada, ias
canciones pueden programarse mientras se comprueba el tiempo
restante de cada cara de la cinta.
La grabación con edición programada no empezará desde un
punto ubicado en medio de la cinta. La cinta deberá grabarse
desde el principio de una de las caras.
1 Inserte la cinta en la platina 2.
Inserte la cinta con la cara que vaya a grabar en primer lugar
hacia afuera de la unidad.
2 Pulse CD e introduzca el(los) disco(s).
3 Pulse dos veces CD EDIT/CHECK.
“EDIT” y “PRGM” se visualizarán.
• Cuando se visualice “Al”, pulse de nuevo CD EDIT/CHECK.
6 Repita el paso 5 para el resto de las canciones
para la cara A.
Una canción cuyo tiempo de grabación sea superior al tiempo
restante no podrá ser programada. '
7 Pulse CD EDIT/CHECK para seleccionar la cara
B y programe las canciones para la cara B.
Después de confirmar que “B” aparezca en el visualizados
repita el paso 5.
Cara B de la cinta (cara trasera)
.30:
___________
8 Pulse • REC/REC MUTE para iniciar la
grabación.
La cinta se rebobina hasta el principio de la cara delantera,
el segmento guía avanza durante 10 segundos y empieza la
grabación. Cuando termine de grabarse la cara delantera (A)
empezará la grabación de la cara trasera (B).
Para detener la grabación
Pulse ■ . La grabación y la reproducción del disco compacto
pararán simultáneamente.
Para comprobar el orden de los números de las canciones programadas
Antes de grabar, pulse CD EDIT/CHECK para seleccionar la
cara A o B, y pulse repetidamente ◄ ◄ o
Número de disco
Número de
canelón
Números canciones
programadas
4 Pulse los botones numerados del control remoto
para designar la duración de la cinta.
Se puede especificar una duración de 10 a 99 minutos
• ◄ ◄ , ► ► o MULTIJOG también se encuentran disponibles
para designar la duración de la cinta.
Cara A de la cinta
Duración de la cinta (cara delantera)
.J
FRSíll
3i;:;i
Tiempo de grabación
máximo para la cara A
5 Pulse DISC DIRECT PLAY 1-3 para seleccionar
un disco.
Luego, pulse los botones numerados 0-9 y +10
del control remoto para programar una canción.
Ejemplo: Para seleccionar la canción número 10 del disco 2,
pulse DISC DIRECT PLAY 2, y luego pulse +10 y 0.
Número de canción
seleccionada
Tiempo restante Canciones
de la cara A programadas
S'
Número de programa
Para cambiar el programa de cada cara
Pulse CD EDIT/CHECK para seleccionar la cara A o B, y pulse
■ CLEAR para borrar el programa de la cara seleccionada.
Luego vuelva a programar canciones.
Para borrar el programa de edición
Pulse dos veces ■ CLEAR para que “EDIT” desaparezca del
visualizador.
■ Se puede programar un máximo de 30 canciones de cualquiera
de los discos insertados.
' “FULL” se visualizará si usted intenta programar más de 30
canciones.
■ La grabación no podrá realizarse si están rotas las lengüetas
de prevención de borrado de ambos lados de la cinta.
ESPAÑOL 25
Page 60

DOLBY PRO LOGIC
EI sistema Dolby Pro Logic, el altavoz central y los altavoces
traseros (suministrados) garantizan el sonido completo de un
cine en su hogar. Cuando reproduzca discos láser o programas
de vídeo que hayan sido grabados con Dolby Surround, el oyente
2 Pulse MANUAL SELECT y manténgalo pulsado
durante unos cuatro segundos hasta que
parpadee “L”.
se verá rodeado de un sonido extraordinariamente real que
creará un nuevo nivel de entretenimiento audiovisual.
El control independiente de los cuatro canales de sonido permitirá
L^-R
Pi
al oyente disfrutar del mismo tipo de reproducción de sonido
que el de los cines. Las voces se reproducirán en el campo de
sonido delantero y central, mientras que los sonidos ambientales,
como los de los automóviles y los de la gente, se reproducirán a
todo alrededor del oyente, para vivir una experiencia de audio/
vídeo increíble. Lea atentamente lo siguiente para “sintonizar” la
salida del sistema de forma que se adapte a las características
Se envía una señal de ruido a cada canal en el orden
siguiente.
L: Altavoz izquierdo CEN: Altavoz central -• R: Altavoz derecho -i
---------------------
SUR: Altavoces de sonido ambiental •
--------------------------
'
del lugar de escucha.
3 Ajuste el nivel del sonido del altavoz central y de
Compruebe lo siguiente;
• Antes de utilizar DOLBY PRO LOGIC, ajuste el equilibrio
apropiado de los niveles de sonido de ios aitavoces.
•Asegúrese de que los altavoces suministrados estén
conectados e instalados correctamente. (Consulte las páginas
los altavoces de sonido ambiental.
Mientras se visualiza “CEN” o “SUR”, pulse ◄ ◄ DOWN o
UP del control remoto para ajustar el volumen del altavoz
central y de cada uno de los altavoces de sonido ambiental
de forma que coincida con el nivel de los altavoces delanteros.
4 y 5.)
• Asegúrese de que el televisor y la unidad de vídeo estén
conectados correctamente. (Consulte la página 5.)
CEN 4-
• Asegúrese de que el disco láser, la cinta de vídeo, etc.
soporten nniPoigfsuRROUMDl .
Para ajustar el equilibrio entre los altavoces delanteros
derecho e izquierdo, consulte la página 10. Ahora, el modo
DOLBY PRO LOGIC deberá cancelarse pulsando DOLBY
AJUSTE DEL EQUILIBRIO DE SONIDO DE LOS ALTAVOCES
PRO LOGIC hasta que se visualice “PRO-OFF”.
4 Puise de nuevo MANUAL SELECT para detener
la señai de ruido.
2,4
1
La unidad está equipada con un generador de señal de prueba
incorporado, llamado secuenciador de ruido, para ajustar
fácilmente el equilibrio de los cuatro canales. El secuenciador
da salida a una señal de ruido que “viaja” de canal a canal,
permitiendo que el sencillo ajuste del nivel de sonido logre, en
la posición de escucha, la misma sonoridad aparente de cada
canal.
Utilice el control remoto.
1 Pulse DOLBY PRO LOGIC para seleccionar
“NORMAL”.
“NORMAL” se visualiza.
Si “PHANTOM” o “3 STEREO” se visualiza, pulse
repetidamente DOLBY PRO LOGIC hasta seleccionar
"NORMAL”.
• Cuando el secuenciador dé salida a una señal de ruido, tal vez
se oiga una sonido “clic” procedente de los altavoces debido a
las características del circuito. Esto no significa ningún fallo en
el funcionamiento.
• Si se cambia el nivel de los altavoces de sonido ambiental o
del altavoz central de DOLBY PRO LOGIG, el del sistema
SURROUND (página 16) cambiará también.
Acerca de los canales
Los altavoces delanteros derecho e izquierdo crean el efecto
estéreo.
El altavoz central ayuda a lograr un posicionamiento de sonido
exacto sobre un amplio campo de sonido.
Los altavoces de sonido ambiental montados en la parte
trasera realzan la “profundidad” del campo de sonido.
Para cambiar el tiempo de retardo
Los altavoces de sonido ambiental reproducen los sonidos
fracciones de segundo después que los altavoces delanteros.
El retardo está ajustado inicialmente a 20 ms (milisegundos).
Para cambiar este tiempo de retardo estándar, pulse
repetidamente MANUAL SELECT del control remoto hasta que
se visualice “TIME”. Luego, pulse ◄ ◄ DOWN o ► ► UP. Cada
vez que se pulse el botón, el tiempo de retardo cambiará como
se muestra más abajo.
15 mS o 20 mS o 30 mS
nnE20VMS.
26 ESPAÑOL
Page 61

■ MANUAL
SELECT
1
2
DOWN,
► UP
1 Pulse VIDEO/AUX y empiece a reproducir la
fuente de vídeo.
Se visualiza “VIDEO”.
OTROS MODOS DOLBY PRO LOGIC
Además del modo NORMAL, esta unidad tiene también los
modos PHANTOM y 3 STEREO.
Modo PHANTOM: Utilice este modo cuando no esté conectado
el altavoz central. Las señales del altavoz central saldrán por los
altavoces derecho e izquierdo.
Modo 3 STEREO: Utilice este modo cuando no estén conectados
los altavoces de sonido ambiental. Este modo reproduce el sonido
de los altavoces traseros por los altavoces delanteros.
Para seleccionar PHANTOM o 3 STEREO
Pulse repetidamente DOLBY PRO LOGIC hasta que se visualice
el modo DOLBY PRO LOGIC deseado. El modo DOLBY PRO
LOGIC se visualizará cíclicamente de la forma siguiente.
NORMAL — PHANTOM — 3 STEREO -
[:
-------------PRO-OFF (cancelación)
Para ajustar el equilibrio de los niveles de sonido de ios altavoces conectados
------------------
Realice los pasos 2 a 4 de “AJUSTE DEL EQUILIBRIO DE
SONIDO DE LOS ALTAVOCES”.
0
1
o
o
X
a.
>
sa
nJ
O
o
2 Pulse DOLBY PRO LOGIC.
Se seleccionará “NORMAL’ y el sonido de reproducción tendrá
el efecto DOLBY PRO LOGIC.
Para cancelar el modo DOLBY PRO LOGIC
Pulse repetidamente DOLBY PRO LOGIC hasta que se visualice
“PRO-OFF”.
Para cambiar los niveles de sonido durante la reproducción
Después de ajustar el equilibrio con el secuenclador de ruido,
los niveles de sonido del altavoz central y de cada uno de los
altavoces de sonido ambiental pueden ajustarse durante la
reproducción de discos láser o programas de vídeo.
1 Pulse repetidamente MANUAL SELECT del control remoto
para seleccionar “CEN” (altavoz central) o “SUR” (altavoces
de sonido ambiental).
2 Mientras se visualiza “CEN” o “SUR”, pulse DOWN o
UP del control remoto para ajustar el volumen.
' Dependiendo de la fuente de sonido y/o de las condiciones de
escucha, tal vez no se obtenga un efecto de sonido ambiental
aunque DOLBY PRO LOGIC esté activado.
' El efecto completo de DOLBY PRO LOGIC no se podrá obtener
cuando se utilicen programas que no tengan la miarca
□ □ inoLBYsuhboumdI este caso, utilice el sistema SURROUND,
(Consulte la página 16.)
' DOLBY PRO LOGIC se cancela automáticamente cuando:
- Se cambia el nivel de ECHO.
- Se activa el sistema SURROUND o BBE.
- Se conectan auriculares.
- Se activa la función de Karaoke.
’ Ponga el volumen de microfono en OFF cuando DOLBY PRO
LOGIC este activado. De lo contrario, el sonido DOLBY PRO
LOGIC no podrá ser reproducido correctamente.
ESPAÑOL 27
Page 62

KARAOKE
MEZCLA MICROFONIC
Micrófonos recomendados
Se recomienda utilizar micrófonos tipo unidireccional para evitar
el aullido. Póngase en contacto con su concesionario Aiwa para
que le dé los detalles.
3,4,5
5
4
1
función de desvanecimiento de voz o de múltiplex.
Cada vez que se pulse KARAOKE, una de las funciones
A esta unidad podrán conectarse dos micrófonos (no
suministrados), permitiéndoie así cantar con ei acompañamiento
de ias fuentes musicaies.
Utiiice micrófonos con miniciavijas (3,5 mm 0).
1 Conecte sus micrófonos a las tomas MIC 1 y MIC
2. MIC 1
2 Pulse uno de los botones de función para
seleccionar la fuente de sonido que vaya a ser
mezclada y luego reprodúzcala.
3 Ajuste el volumen y el tono de la fuente de sonido. 4 Pulse MIC y gire VOLUME antes de que pasen 4
segundos para ajustar el volumen del micrófono.
Ei voiumen dei micrófono se puede seieccionar entre 1 y MAX
(7) u OFF (cancelación).
El volumen de ambos micrófonos se ajustará
simultáneamente.
5 Pulse ECHO y gire VOLUME antes de que pasen
4 segundos para ajustar el nivel de eco.
El nivel de eco se puede seleccionar entre 1 y MAX (7) u
OFF (cancelación).
Para cambiar el tiempo de retardo del eco
Mantenga pulsado ECHO estando activada la función de eco.
T’ (largo) y “M” (medio) se visualizarán alternativamente. Suelte
el botón en la posición deseada.
Para grabar el sonido de micrófono mezclado con el sonido de la fuente
Siga ei procedimiento de grabación de la fuente de sonido
(consulte la página 22).
SYNC DUB no se podrá utilizar para grabar la mezcla.
Cuando no utilice los micrófonos
Ponga el volumen de los micrófonos y el nivel de eco en OFF y
desconecte los micrófonos de las tomas MIC.
•
• Cuando se cambie ei nivel de ECHO, el sistema SURROUND
y DOLBY PRO LOGIC se cancelarán automáticamente.
• Si el micrófono se pone demasiado cerca de los altavoces quizá
se produzca un ruido de aullido. En este caso, separe el
micrófono de los altavoces o disminuya el volumen del
micrófono.
• Si el sonido del micrófono se pone a un nivel demasiado alto
quizá se distorsione. En este caso, disminuya el volumen del
micrófono.
•Cuando se cambie la función, el ajuste de volumen del
micrófono y el ajuste de volumen del eco se cancelarán.
siguientes se seleccionará en orden.
funciones de desvanecimiento de voz automático y de
Cuando se seleccione el desvanecimiento de voz automático o
segundos y cambiará al nombre de la función seleccionada.
mantenga pulsado KARAOKE hasta que se visualice “FAST”.
Cuando se desconecte la alimentación se repondrá SLOW.
Sólo el sonido del canal derecho podrá oírse por ambos
altavoces.
Cuando se seleccione múltiplex, “MPX-L” se visualizará durante
3 segundos y cambiará al nombre de la función seleccionada.
mantenga pulsado KARAOKE hasta que se visualice “MPX-R”.
Cuando se desconecte la alimentación se repondrá MPX-L.
28 ESPAÑOL
FUNCIONES DE DESVANECIMIENTO DE
VOZ/MULTIPLEX
Esta unidad puede utilizar discos o cintas como fuentes de
Karaoke.
Utilice la función de desvanecimiento de voz para discos o cintas
normales.
Utilice la función de múltiplex para discos o cintas de audio
múltiplex.
Pulse repetidamente KARAOKE para seleccionar la
UF'
H
..
UF^
NP H- l.
(D
i ii;.."
® Desvanecimiento de voz
La voz del cantante se hace más suave que la del
acompañamiento.
H
...
MPx
(D Desvanecimiento de voz automático
La voz dei cantante se hace más suave sólo mientras hay
una entrada de audio por un micrófono.
(D Múltiplex
Sólo se oye el sonido del canal izquierdo por ambos altavoces,
y el sonido del canal derecho se silencia.
® Múltiplex automático
El sonido del canal izquierdo se oye por ambos altavoces, y
el sonido del canal derecho se silencia sólo mientras hay una
entrada de audio por un micrófono.
® Cancelación
Para cambiar el ajuste del retardo de tiempo en las
múltiplex automático
La voz del cantante silenciada originalmente recuperará más
rápidamente su nivel normal.
múltiplex automático, “A-VF” o “A-MPX” se visualizará durante 3
Después de visualizarse el nombre de la función seleccionada,
Para volver al ajuste inicial, seleccione SLOW.
Para cambiar el canal audible en la función de múltiplex
Después de visualizarse el nombre de la función seleccionada,
Para volver al ajuste inicial, seleccione MPX-L.
' Las funciones de Karaoke tal vez no funcionen correctamente
con las clases de discos compactos o cintas siguientes:
- Discos o cintas con sonido mono
- Discos o cintas grabados con ecos fuertes
- Discos o cintas con la parte vocal grabada en el lado derecho
o izquierdo del sonido
' Mientras la función de Karaoke esté activada, la salida de
sonido será mono.
' Cuando se cambie la función, la función de KARAOKE se
cancelará.
Page 63

PROGRA
1
5
Antes o durante la reproducción de discos compactos, usted
podrá reservar un máximo de 15 canciones para reproducirlas
después de la canción que esté siendo reproducida. Cada
reserva se borrará cuando termine de reproducirse la canción.
Utilice ei control remoto.
1 Pulse CD e introduzca los discos.
Para añadir una reserva durante la reproducción
Repita el paso 3.
Para comprobar las canciones reservadas
Pulse CD EDIT/CHECK repetidamente. Cada vez que lo pulse,
el número del disco y el número de la canción se visualizarán
en el orden en el que fueron reservados.
Para detener la reproducción
Pulse ■ .
Cuando pulse ◄ ► ,1a reproducción empieza de nuevo desde la
última canción.
Para saltar una canción
Pulse ► ► . La canción saltada se borrará del programa.
Para borrar todas las reservas
Pulse repetidamente ► ► hasta que se visualice “K - POO”.
— , ^
----------------------
S: ■■■■
•
#
P0&
Púlselo una vez más para cancelar programas de Karaoke. La
visualización volverá a ser la de la reproducción de discos
compactos.
Ul
ií
o
<
OC
<
Hi
2 Pulse PRGM una vez.
tS?.
ISIS
3 Pulse DISC DIRECT PLAY, y luego pulse uno de
los botones numerados 1-3 antes de que pasen
3 segundos para seleccionar un disco.
Luego, pulse los botones numerados 0-9 y el botón +10 para programar una canción.
Número de
disco reservado
Kl
4 Repita el paso 3 para reservar otras canciones.
5 Pulse para iniciar la reproducción.
Número de
canción reservada
.....
2P00
Después de reproducirse una canción, ésta se borrará dei
programa.
Número del
Disco que está
siendo reproducido
disco de la Numero de canciones
última reserva reservadas restantes
I I
' Si el número de la canción reservada no existe en el disco
seleccionado, la unidad parará la reproducción y la visualización
parpadeará.
En este caso, pulse ► ► para omitir esa canción. Y luego pulse
◄ ► para iniciar la reproducción con la siguiente canción
reservada.
• Cuando se pulse repetidamiente PRGM en el paso 1, “PF1GM”
se visualizará y la unidad se pondrá en el modo de reproducción
programada de disco compacto (página 21).
Para cancelar la reproducción programada, pulse ■ CLIEAR.
K2
..
2P03
Número de canción
de la última reserva
El número de la canción
que está reproduciéndose
parpadea.
ESPAÑOL
29
Page 64

RELOJ Y TEMPORIZADOR
iSTA EN HORA DEL RELOJ
1
3
El reloj se visualiza. entre las horas y los minutos parpadeará.)
Cuando el cable de alimentación se enchufe en una toma de CA
por primera vez después de haber adquirido ei aparato o cuando
el ajuste del reloj se cancele debido a un failo en ia alimentación,
toda ia visuaiización dei reloj parpadeará.
1 Pulse CLOCK.
Hril2“00
AJUSTE DEL TEMPORIZADOR PARA DORMIR
La unidad se podrá apagar automáticamente después de
transcurrido un tiempo especificado.
Utilice el control remoto.
1 Pulse SLEEP.
SL.EEP EÖ
2 Antes de que pasen 4 segundos, gire MULTI JOG
para designar la hora y los minutos.
Al girar MULTI JOG cambian las horas y los minutos. También
se puede utiiizar ◄ ◄ o ► ► en iugar de MULTI JOG.
Manteniendo guisados estos botones, ia hora cambiará
rápidamente.
3 Pulse ENTER o II.
El reloj empieza a funcionar desde 00 segundos.
Para reponer el ajuste original del reloj
Pulse CLOCK antes de completar el paso 3 para reponer el
ajuste anterior de ia hora. Esto cancelará cualquier nuevo ajuste.
Para ver el reloj habiendo otra visuaiización en ei
visuaiizador
Pulse CLOCK. La hora se visualizará durante 4 segundos y iuego
voiverá a aparecer la visuaiización original. Sin embargo, el reloj
no podrá visualizarse durante ia grabación.
Para cambiar ai modo de 24 horas
Pulse CLOCK y luego pulse ■ antes de que pasen 4 segundos.
Repita el mismo procedimiento para reponer ei modo de 12 horas.
Si parpadea la visuaiización dei reioj
Esto se deberá a una interrupción en ei suministro de
alimentación. La hora tendrá que ponerse de nuevo.
Si la alimentación se interrumpe durante más de 24 horas
aproximadamente, todos ios ajustes aimacenados en ia
memoria después de adquirir la unidad tendrán que ajustarse
otra vez.
2 Antes de que pasen 4 segundos, aire MULTI JOG
para especificar el tiempo tras el cual se
desconectará la alimentación.
El tiempo cambia entre 5 y 240 minutos en pasos de 5 minutos.
◄ ◄ y ► ► también se encuentran disponibles en lugar de
MULTI JOG.
Tiempo especificado
!... !...
. i.... ..... i
Para comprobar el tiempo restante hasta que se
desconecte la alimentación
Pulse una vez SLEEP. El tiempo restante se visualizará durante
4 segundos.
Para cancelar el temporizador para dormir
Pulse dos veces SLEEP para que “SLEEP oFF” aparezca en el
visuaiizador.
Si está activado el modo de ahorro de energía (página 8), todas
las luces del visuaiizador se apagarán cuando se desconecte la
alimentación. Para ver ei reloj, pulse CLOCK de forma que la
hora se visualice durante 4 segundos.
30 ESPAÑOL
Page 65

5
3,4
La unidad podrá encenderse a la hora especificada todos los
días gracias al temporizador incorporado.
Preparación
Asegúrese de que la hora del reloj sea correcta.
1 Pulse uno de los botones de función para
seleccionar una fuente.
• Si se pulsa TUNER/BAND, la banda no podrá seleccionarse
en este paso.
2 Pulse repetidamenteTIMER hasta que © aparezca
en el visualizador.
La hora y el nombre de la fuente de sonido parpadean
alternativamente. „
DI i"V=..'
ÍH
i i': !
3 Antes de que pasen 6 segundos, gire MULTI JOG
para designar la hora de encendido del
temporizador, y luego pulse ENTER oil.
Al girar MULTI JOG cambian las horas y los minutos.
◄ ◄ o ► ► también se encuentra disponible en lugar de
MULTI JOG. Al mantener pulsados estos botones, la hora
cambiará rápidamente.
&Ñ N 1 == 0^-^
©
5 Ajuste el volumen.
El sonido de la fuente se reproducirá al nivel de sonido
ajustado en este paso cuando la alimentación sea conectada
por el temporizador.
Sin embargo, si el nivel del sonido se ajusta a 21 o más, éste
se ajustará automáticamente a 20 cuando se conecte la
alimentación.
6 Prepare la fuente.
Para escuchar un disco compacto, cargue el disco que vaya
a reproducir en primer lugar en la bandeja 1.
Para escuchar una cinta, inserte la cinta en la platina 1 ó 2.
Para escuchar la radio, sintonice una emisora.
7 Pulse POWER para desconectar la alimentación.
Cuando llegue la hora de encendido del temporizador, la
unidad se encenderá y la reproducción empezará con la
fuente seleccionada.
Usted puede cambiar la fuente que fue seleccionada en el paso
1 pulsando uno de los botones de función antes de pulsar ENTEFl
o II en el paso 3.
Para comprobar el ajuste del temporizador
Pulse TIMER.
La fuente seleccionada, la hora de encendido del temporizador
y la duración del periodo activado por temporizador se
visualizarán durante 4 segundos.
Para cambiar cuaiquiera de ios ajustes anteriores
Empiece desde el paso 1.
Sin embargo, si no cambia la hora de encendido del temporizador
en el paso 3, pulse dos veces ENTER y continúe desde el paso
4.
Para cancelar temporalmente el modo de espera del
temporizador
Pulse repetidamente TIMER para que desaparezca ©.
Para reponer el modo de espera del temporizador, púlselo de
nuevo para visualizar 0.
Utilización de la unidad mientras esté ajustado el
temporizador
Podrá utilizar normalmente la unidad después de ajustar el
temporizador.
Antes de desconectar la alimentación, realice los pasos 5 y 6.
' La reproducción y la grabación con temporizador no empezarán
si no se desconecta la alimentación.
' El equipo conectado no se podrá encender ni apagar con el
temporizador incorporado de esta unidad. Utilice en este caso
un temporizador externo.
K
O
o
<
N
s
o
a
s
ui
H
>
áÉ¡
O
mi
ui
a
4 Antes de que pasen 4 segundos, gire MULTI JOG
para seleccionar la duración del periodo activado
por temporizador.
La duración puede ajustarse entre 5 y 240 minutos en pasos
de 5 minutos.
o también se encuentra disponible en lugar de
MULTI JOG.
La duración se ajustará automáticamente después de 4
segundos.También se ajustará si ENTER o II se pulsa antes
de que pasen 4 segundos después del paso 4.
GRABACION CONTEMPORIZADOR
La grabación con temporizcidor sólo podrá utilizarse con las
fuentes de sonido TUNER y VIDEO/AUX (con un temporizador
externo).
Pulse TUNER/BAND o VIDEO/AUX para seleccionar una fuente,
y luego pulse repetidamente TIMER hasta que ©REC se
visualice en el visualizador. Antes de que pasen 6 segundos,
realice los pasos de “AJUSTE DEL TEMPORIZADOR’’, desde
el 3, e inserte la cinta que vaya a grabar en la platina 2 después
del paso 6.
■ Cuando se haya activado el modo de ahorro de energía (página
8), el nivel del sonido para la grabación con temporizador será
0 (nivel mínimo).
' La función del temporizador no se puede utilizar para grabar
un disco compacto o una cinta.
ESPAÑOL..31
Page 66

OTRAS CONEXIONES
CONEXION OE UN EQUIPO OPCIONAL
TOMA SUBWOOFER
Conecte un altavoz de subgraves activo opcional con amplificador
incorporado a la toma.
-CD DIGITAL OUT
(OPTICAL)
■ VIDEO/AUX
■ MD
ESCUCHA DE FUENTES DE SONIDD EXTERNAS
LINE OUT
■ SUB
WOOFER
Consulte el manual de instrucciones del equipo conectado para
tener más detalles.
• Los cables de conexión no han sido suministrados. Obtenga
los cables de conexión necesarios.
• Consulte a su concesionario Aiwa local en cuanto al equipo
opcional.
TOMAS VIDEO/AUX
Esta unidad puede introducir señales de sonido analógico a
través de estas tomas.
Utilice un cable con clavijas fono RCA para conectar equipos de
audio (giradiscos, reproductores de discos láser, reproductores
de minidiscos, videograbadoras, televisores, etc.).
Conecte la clavija roja a la toma VIDEO/AUX R y la blanca a la
toma VIDEO AUX L.
Cuando conecte un giradiscos
Utilice un giradiscos Aiwa equipado con amplificador ecualizador
incorporado.
Para hacer la reproducción en un equipo conectado a las tomas
VIDEO/AUX o MD haga lo siguiente.
1 Pulse VIDEO/AUX O MD.
Para reproducir en un equipo conectado a VIDEO/AUX. pulse
VIDEO/AUX. “VIDEO” aparecerá en el visualizados
Para hacer la reproducción en un equipo conectado a MD.
pulse MD. “MD” aparecerá en el visualizador.
2 Haga la reproducción en el equipo conectado.
■ MD
TOMAS MD
Estas tomas se recomiendan para conectar un reproductor de
minidiscos.
Utilice un cable con clavijas fonográficas RCA. Conecte la clavija
roja a la toma MD R y la clavija blanca a la toma MD L.
TOMAS LINE OUT
Esta unidad puede dar salida a señales de sonido analógico a
través de estas tomas. Utilice un cable con clavijas fonográficas
RCA para conectar el equipo de audio a las tomas LINE IN
(entrada analógica).
Conecte la clavija roja de un cable a LINE OUT R y la clavija
blanca a LINE OUT L.
No conecte simultáneamente un equipo a las tomas LINE OUT
y a las tomas VIDEO/AUX. De lo contrario, se producirán ruidos
y fallos en el funcionamiento.
TOMA CD DIGITAL OUT (OPTICAL)
Esta unidad puede dar salida a señales de sonido digital de
discos compactos a través de esta toma. Utilice un cable óptico
para conectar equipos de audio digital (platina de cinta
audiodigital, grabadora de minidiscos, etc.).
Quite la tapa contra el polvo ® de la toma CD DIGITAL OUT
(OPTICAL). Luego, conecte la clavija del cable óptico a la toma
CD DIGITAL OUT (OPTICAL).
Para cambiar el nombre de una fuente de sonido en el
visualizador
Cuando se pulse VIDEO/AUX, “VIDEO” se visualizará
inicialmente. Esto podrá ser cambiado por “AUX” o “TV”.
Con la alimentación conectada, pulse POWER mientras pulsa
VIDEO/AUX.
Repita el procedimiento para seleccionar uno de los nombres.
Para ajustar el nivel del sonido de la fuente de sonido externa
Cuando el nivel del sonido de la fuente externa sea muy superior
0 muy inferior al nivel del sonido de otras fuentes de sonido,
ajústelo de la forma siguiente:
1 Pulse VIDEO/AUX o MD y haga la reproducción en el equipo.
2 Pulse o ► ► para que el nivel del sonido sea el mismo
que el de otras fuentes de sonido.
Durante la grabación, el nivel del sonido no se podrá ajustar.
Cuando no se utilice ia toma CD DiGITAL OUT (OPTICAL)
Ponga la tapa contra el polvo suministrada.
32 ESPAÑOL
Page 67

GENERALIDADES
El mantenimiento y ei cuidado ocasionai de la unidad y del
software resultan necesarios para optimizar las prestaciones de
su unidad.
Para limpiar la caja
Utilice un paño blando y seco.
Si las superficies están muy sucias, utilice un paño blando
humedecido un poco en una solución de detergente suave. No
utilice disolventes fuertes tales como alcohol, bencina o diluyente
porque éstos podrán estropear el acabado de la unidad.
Para limpiar las cabezas magnetofónicas
Cuando las cabezas magnetofónicas estén sucias:
- el sonido de alta frecuencia no se emitirá
- el sonido no alcanzará la altura adecuada
- el sonido estará desequilibrado
- la cinta no podrá borrarse
- no podrá grabarse en la cinta
Después de cada 10 horas de utiHzación, limpie las cabezas
magnetofónicas con un casete de limpieza de cabezas.
Consulte las instrucciones del casete de limpieza para conocer
detalles.
Para desmagnetizar las cabezas magnetofónicas
Las cabezas magnetofónicas puede magnetizarse después de
utilizarlas durante mucho tiempo. Esto puede reducir la gama
de salida de las cintas grabadas y aumentar el ruido.
Después de 20 a 30 horas de utilización, desmagnetice las
cabezas magnetofónicas con un casete desmagnetizador
vendido por separado.
Consulte las instrucciones del casete desmagnetizador para
conocer más detalles.
Cuidados de ios discos
• Cuando se ensucie un disco, limpíelo pasando un paño de
limpieza desde el centro hacia afuera.
• Después de reproducir un disco, guárdelo en su caja. No deje
los discos en lugares calientes o húmedos.
Cuidados de ias cintas
• Guarde las cintas en sus cajas después de utilizarlas.
• No deje las cintas cerca de imanes, motores, televisores o
cualquier otra fuente de magnetismo. Esto reducirá la calidad
del sonido y causará ruido.
• No exponga las cintas a la luz directa del sol, ni las deje en el
interior de un automóvil estacionado bajo la luz directa dei sol.
GUIA PARA LA SOLUCION DE PROBLEMAS
Si la unidad no funciona como se describe en este manual de
instrucciones, compruebe la guía siguiente:
GENERALIDADES
No hay sonido
• ¿Está correctamente conectado el cable de alimentación de
CA?
• ¿Hay alguna conexión mal hecha? (-> página 5)
• Puede haber un cortocircuito en los terminales de los altavoces.
-+ Desconecte el cable de alimentación de CA y luego corrija:
las conexiones de los altavoces.
• ¿Se ha pulsado un botón de función equivocado?
Sólo sale sonido de un altavoz.
• ¿Está el otro altavoz desconectado?
La salida de sonido no es estéreo.
• ¿Está activada la función de Karaoke? (-» página 28)
Se produce una visualización errónea o un mal
funcionamiento.
-> Vuelva a ajustar la unidad como se indica más abajo.
La alimentación no se conecta.
-» Desconecte el cable de alimentación y vuelva a conectarlo
después de pasar unos pocos segundos.
SECCION DEL SINTONIZADOR
Hay un ruido de estática constante en forma de onda.
• ¿Está conectada correctamiente la antena? {-♦ página 5)
• ¿Es débil la señal?
-* Conecte una antena exterior.
La recepción tiene interferencia o el sonido está
distorsionado.
• ¿Capta el sistema ruidos externos o distorsión de múltiples,
trayectorias?
-+ Cambie ia orientación de la antena.
-► Separe la unidad de otros aparatos eléctricos.
SECCION DE LA PLATINA
La cinta no se mueve.
• ¿Está la platina 2 en el modo de pausa? (-► página 18)
El sonido está desequilibrado o no alcanza la altura
suficiente.
• ¿Está sucia la cabeza de reproducción? (-» página 33)
No es posible grabar.
• ¿Está rota la lengüeta de prevención contra borrado? (-r página
22)
• ¿Está sucia la cabeza de grabación? (--> página 33)
No es posible borrar.
• ¿Está sucia la cabeza de borrado? (-* página 33)
• ¿Está utilizándose una cinta de metal?
No se emite sonido de alta frecuencia.
• ¿Está sucia la cabeza de grabación/reproducción? (-► página
33)
SECCION DEL REPRODUCTOR DE DISCOS COMPACTOS
El reproductor de discos compactos no puede reproducir.
• ¿Está bien puesto el disco? (-► página 20)
• ¿Está sucio el disco? (-► página 33)
• ¿Afecta la condensación a la lente?
Espere una hora aproximadamente y pruebe otra vez.
ui
z
o
X
Ul
z
o
u
(/)
<
QC
H
o
I/)
MJ
Q
<
a
<
X
UI
z
Ul
o
Para reajustar la unidad
Si se produce alguna condición extraña en el visualizador o en
las platinas de casete, reajuste la unidad de la forma siguiente.
1 Pulse POWER para desconectar la alimentación.
2 Pulse POWER para volver a conectar la alimentación mientras
pulsa ■ CLEAR. Todo lo que haya sido almacenado en la
memoria después de haber adquirido la unidad se borrará.
Si no puede desconectarse la alimentación en el paso 1 debido
a algún mal funcionamiento, reajuste la unidad desconectando
el cable de alimentación de CA y conectándolo de nuevo. Luego
ejecute el paso 2.
ESPAÑOL 33
Page 68

ESPECIFICACIONES
Unidad principal CX-NMT725
Sección del sintonizador de FM
Gama de sintonización 87,5 MHz a 108 MHz
Sensibilidad útil (IHF) 13,2 dBf
Terminales de antena 75 ohmios (desequilibrada)
Sección del sintonizador de AM
Gama de sintonización 530 kHz a 1710 kHz (pasos de 10
kHz)
531 kHz a 1602 kHz (pasos de 9
kHz)
Sensibilidad útil 350 pV/m
Antena Antena de cuadro
Sección del amplificador Potencia de salida
Distorsión armónica total
Entradas
Salidas
Sección de la platina de casetes
Formato de pistas
Respuesta de frecuencia
Sistema de grabación
Cabezas
Altavoces delanteros
80 W + 80 W (50 Hz - 20 kHz,
distorsión armónica total inferior al
1 %, 6 ohmios)
Altavoces traseros (sonido
ambiental)
10 W + 10 W (1 kHz, distorsión
armónica total inferior al 1%,
8 ohmios)
Altavoz central
20 W (1 kHz, distorsión armónica
total inferior ai 1 %, 8 ohmios)
0.1 % (50 W, 1 kHz, 6 ohmios, DIN
AUDIO/Delantero)
VIDEO/AUX: 445 mV (ajustable)
MD: 445 mV (ajustable)
MICI, MIC2:1,4 mV (10 kohmios)
UNE OUT: 210 mV
SUBWOOFER: 2,2 V
SPEAKERS: Acepta altavoces de
6 ohmios o más
SURROUND SPEAKERS:
Acepta altavoces de 8 ohmios a 16
ohmios
CENTER SPEAKER: Acepta
altavoces de 8 ohmios o más
PHONES (toma estéreo): Acepta
auriculares de 32 ohmios o más
4 pistas, 2 canales estéreo
Cinta de Cr02: 50 Hz-16000 Hz
Cinta normal: 50 Hz-15000 Hz
Polarización de CA
Platina 1: 1 cabeza de
reproducción
Platina 2:1 cabeza de grabación/
reproducción, 1 cabeza de
borrado
Sección del reproductor de discos compactos
Láser
Convertidor D-A
Relación señal a ruido
Distorsión armónica
Fluctuación y trémolo
Láser de semiconductor {X = 780
nm)
1 bit doble
85 dB (1 kHz, 0 dB)
0,05% (1 kHz, 0 dB)
No se puede medir
Generalidades
Alimentación
Consumo
Dimensiones de la unidad
120VCA, 60 Hz
155 W
260 X 330 X 360 mm
principal (An X Al X Prof)
Peso de la unidad principal
Consumo estando la
alimentación en espera
8,8 kg
Si el modo de ahorro de energía
está desactivado: 20 W
Si el modo de ahorro de energía
está activado: 1,5 W
Sistema de altavoces SX-NA772
Tipo de caja
Altavoces
Impedancia
Nivel de presión acústica
3 vías, reflejo de graves
(tipo de blindaje antimagnético)
Altavoz para graves:
Tipo cónico de 140 mm
Altavoz para agudos:
Tipo cónico de 50 mm
Altavoz para superagudos:
Tipo cerámico de 20 mm
6 ohmios
87 dB/W/m
de salida
Dimensiones (An x Al x Prof)
Peso
Las especificaciones y apariencia exterior están sujetas a cambios
sin previo aviso.
UUIs SYSTEM
La sigla “BBE” y el símbolo “BBE” son marcas registradas de
BBE Sound, Inc.
Bajo licencia de BBE Sound, Inc.
234 X 324 X 270 mm
4,2 kg
DOLBY PRO LOGIC
Fabricado bajo licencia de Dolby Laboratories Licensing
Corporation.
“DOLBY”, el símbolo de la doble D □□ y “PRO LOGIC” son
marcas de Dolby Laboratories Licensing Corporation.
COPYRIGHT (DERECHOS DE AUTOR)
Consulte las leyes del copyright, relacionadas con las
grabaciones de discos, de la radio o de cintas, que se encuentran
vigentes en el país en el que se utiliza la unidad.
34 ESPAÑOL
Page 69

Page 70

FRANÇAIS
AVERTISSEMENT
POUR REDUIRE LE RISQUE DE COURT-CIRCUIT
OU DE CHOC ELECTRIQUE. NE PAS EXPOSER
CET APPAREIL A LA PLUIE OU A LHUMIDITE.
CAUTION
RISK OF ELECTRIC SHOCK
DO NOT OPEN
“CAUTION:TO REDUCE THE RISK OF
ELECTRIC SHOCK,
DO NOT REMOVE COVER (OR BACK).
NO USER-SERVICEABLE PARTS INSIDE.
REFER SERVICING TO QUALIFIED
SERVICE PERSONNEL.”
Si^nificntioii dPS symbulc^ giajihiquos:
i.'ecliiit porHt't L.ne fleche, situé drfiis u-n triangle
■tq,i.latéral, sort a prévenir rotilisateur de la
presence d une "tension dangereuse" non isoloe
a ' intc-.'leur do rappare;!. assez élevee pour
constit..er un risque d é ec:roc",.ition.
Le point d'exclamation situó dans un triangle
equilateral so't à pro'vonir l’utilisatei.r de la
presence d instructions mportantes concernant
l ut lisation et '"ent'-etien lou la reparation) de
l appaieil dans le manue' qui accompagne ce
dernier.
PREGA
Lire le mode d’emploi attentivement et complètement avant
d’utiliser l’appareil. Garder le mode d’emploi pour toute référence
future. Tous les avertissements et toutes les précautions donnés
dans le mode d’emploi et sur l’appareil doivent être suivis à la
lettre, aussi bien que les suggestions de sécurité suivantes.
Installation
1 Eau et humidité — Ne pas utiliser cet appareil près d’eau,
comme près d’une baignoire, d’une cuvette, d’une piscine ou
autre.
2 Chaleur — Ne pas utiliser cet appareil près de sources de
chaleur, comme sorties de chauffage, poêles ou autres
appareils qui dégagent de la chaleur.
L’appareil ne doit pas être soumis à des températures
inférieures à 5°C ou supérieures à 35°C.
3 Surface d’utilisation — Poser l’appareil sur une surface plate
et lisse.
4 Ventilation — L’appareil doit être positionné avec un espace
suffisant autour afin d’assurer une dissipation adéquate de la
chaleur. Laisser un espace de 10 cm derrière et dessus
l’appareil, et un espace de 5 cm de chaque côté.
- Ne pas mettre l’appareil sur un lit, un tapis ou sur une surface
similaire qui pourrait obstruer les orifices de ventilation.
- Ne pas mettre l’appareil dans une bibliothèque, un coffret
ou un meuble complètement fermé où l’aération serait
insuffisante.
5 Entrée d’objets et de liquide — Faire attention à ce que
aucun corps étranger ou liquide ne pénètre dans l’appareil
pas les orifices de ventilation.
6 Chariot et support — Si l’appareil
est posé ou monté sur un support
ou un chariot, déplacer ce dernier
avec précaution.
Les arrêts brusques, une force
excessive et les surfaces inégales
peuvent provoquer le renversement ^ ^
ou la chute de l’appareil et du chariot.
7 Condensation — De la condensation peut se former sur la
lentille du capteur du lecteur de disques compacts quand:
- l’appareil est déplacé d’un endroit froid à un endroit chaud.
- le chauffage vient juste d’être mis en marche.
- l’appareil est utilisé dans une pièce très humide.
- l’appareil est refroidi par un climatiseur.
S’il y a de la condensation à l’intérieur de cet appareil, il risque
de ne pas fonctionner correctement. Le cas échéant, laisser
l’appareil pendant quelques heures, puis essayer de nouveau
de l’utiliser.
8 Fixation à un mur ou un piafond — L’appareil ne doit pas
être fixé à un mur ou un plafond, à moins que ce ne soit
spécifié dans le mode d’emploi.
Relevé du propriétaire
Pour plus de commodité, noter le numéro de modèle et le numéro
de série (ces numéros se trouvent au dos de l’appareil) dans les
cases ci-dessous. Prière de mentionner ces numéros quand on
contacte un distributeur Aiwa en cas de difficulté.
№ de modèle № de série (№ de lot)
CX-NMT725
SX-NA772
SX-R275
SX-C605
2 FRANÇAIS
Energie électrique
1 Alimentations électriques — Brancher cet appareil
uniquement aux alimentations électriques spécifiées dans le
mode d’emploi, et comme indiqué sur l’appareil.
2 Polarisation — Comme mesure de sécurité, certains
appareils sont munis de fiches polarisées d’alimentation
secteur qui ne peuvent être introduites que dans un sens dans
une prise de courant. S’il est difficile ou impossible d’insérer
la fiche d’alimentation secteur dans une prise, retourner la
fiche et essayer de nouveau. SI l’on ne peut toujours pas
insérer la fiche dans la prise, s’adresser à un électricien
qualifié pour faire réparer ou changer la prise. Afin de ne pas
annuler la sécurité de la fiche polarisée, ne pas insérer cette
fiche en force dans une prise.
Page 71

3 Cordon d’alimentation secteur
- Pour débrancher le cordon d’alimentation secteur, le tirer
par sa fiche. Ne pas tirer sur le cordon proprement dit.
- Ne jamais tenir la fiche d’alimentation secteur avec les mains
mouillées, cela pourrait se traduire par un court-circuit ou
un choc électrique.
- Les cordons d’alimentation doivent être installés de manière
à ne pas être pliés, pincés ou piétinés. Faire particulièrement
attention au cordon allant de l’appareil à la prise de courant.
- Eviter de surcharger les prises d’alimentation et les rallonges
au-delà de leur capacité, cela pourrait se traduire par un
court-circuit ou un choc électrique.
4 Rallonge — Afin d’éviter tout choc électrique, ne pas utiliser
une fiche polarisée d’alimentation secteur avec une rallonge
ou une prise si cette fiche ne peut pas être insérée
complètement de manière que ses lames ne soient pas
exposées.
5 Périodes de non-utilisation — Débrancher le cordon
d’alimentation secteur de la prise de courant si l’appareil ne
doit pas être utilisé pendant plusieurs mois ou plus. Quand le
cordon est branché, un courant de faible intensité continue
de circuler dans l’appareil même si l’alimentation est coupée.
Antenne extérieure
1 Lignes d’amenée de courant — Quand on branche une
antenne extérieure, s’assurer qu’elle est située à l’écart de
toute ligne d’amenée de courant.
2 Mise de l’antenne extérieure à la terre — Afin d’assurer
une protection contre toute impulsion de tension et contre
toute accumulation d’électricité statique, s’assurer que
l'antenne est correctement mise à la terre. L’article 810 du
code national d’électricité (NEC), ANSI/NFPA 70, fournit des
informations au sujet de la mise à la terre du mât, de la
structure de support et du conducteur arrivant à l’unité de
décharge d’antenne et au sujet des dimensions des
conducteurs de mise à la terre, de la connexion aux électrodes
de mise à la terre et des exigences concernant ces électrodes.
Mise à la terre d’une antenne selon le code national d’électricité (NEC)
PRECAUTIONS..................................................................
PREPARATIONS
INSTALLATION.............
TELECOMMANDE
........
AVANT L’UTILISATION .
SON
REGLAGES AUDIO........................................................ 10
FONCTION GENERATION DE RYTHME
(BEAT MASTER DX)................................................. 11
EGALISEUR GRAPHIQUE.............................................1£l
SURROUND DSP
............................................................
RECEPTION RADIO
ACCORD MANUEL.......................................................... 17
MEMORISATION DE STATIONS
....................................
LECTURE DE CASSETTES
OPERATIONS DE BASE................................................ 1«
LECTURE CONTINUE
LECTURE DE DISQUES COMPACTS
...................................................
_______
OPERATIONS DE BASE.................................................20
LECTURE PROGRAMMEE
............................................
ENREGISTREMENT
ENREGISTREMENT DE BASE.......................................22
DUPLICATION MANUELLE D’UNE CASSETTE
DUPLICATION DE LA TOTALITE D’UNE CASSETTE ... 23
ENREGISTREMENT AVEC MONTAGE ET
CALCUL DU TEMPS
..................................................
ENREGISTREMENT AVEC MONTAGE
PROGRAMME
..........................................................
...........
2
10
17
1i)
21
23
24
20
Entretien
Nettoyer l’appareil uniquement comme recommandé dans le
mode d’emploi.
Dommage nécessitant une réparation
S’adresser à un technicien qualifié pour faire réparer l’appareil
si:
- Le cordon ou la fiche d’alimentation secteur de l’appareil est
endommagé
- Tout corps étranger ou liquide est entré dans l’appareil
- Lappareil a été exposé à la pluie ou à de l’eau
- Lappareil ne semble pas fonctionner normalement
- Lappareil présente un changement notable de performances
- Lappareil a subi un choc, ou son coffret a été endommagé
N’ESSAYEZ PAS DE REPARER L’APPAREIL VQUS-MEME.
DOLBY PRO LOGIC
REGLAGE DE LA BALANCES DES NIVEAUX DES
ENCEINTES
................................................................
LECTURE AVEC LE SYS5TEME DOLBY PRO LOGIC... 27
KARAOKE
MIXAGE AVEC MICROPHONE .
PROGRAMME DE KARAOKE ..
HORLOGE ET MINUTERIE
REGLAGE DE L’HORLOGE
REGLAGE DE LA MINUTERIE D’ARRET .
REGLAGE DE LA MINUTERIE
......................
..................
AUTRES CONNEXIONS
CONNEXION D’UN APPAREIL OPTIONNEL.
ECOUTE DE SOURCES EXTERNES..............
GENERALITES
SOINS ET ENTRETIEN....
EN CAS DE PROBLEME .
SPECIFICATIONS
NOMENCLATURE
............
............................ Couverture du dos
20
20
20
30
30
31
32
32
33
33
34
FRANÇAIS 3
Page 72

PREPARATIONS
INSTALLATIO
Le système DOLBY PRO LOGIC, caractéristique la plus
marquante de cette chaîne stéréo, permet d’obtenir un son multi
canaux à domicile.
Effectuer l’installation et la connexion de l’appareil principal, des
enceintes fournies, de votre téléviseur et de votre appareil vidéo
en procédant comme décrit ci-après.
.-■ k.r:
Contrôler la chaîne et les accessoires
NSX-MT725
CX-NMT725 Récepteur magnétocassette lecteur de disques
compacts stéréo
SX-NA772 Enceintes avant
SX-R275 Enceintes surround
SX-C605 Enceinte centrale
Télécommande
tel;
Antenne AM
Antenne FM
POSITIONNEMENT DES ENCEINTES
Pour obtenir les meilleurs effets possibles du système DOLBY
PRO LOGIC, il est important de positionner les enceintes
correctement. Se reporter à l’illustration suivante pour trouver le
meilleur emplacement dans votre salle.
Mode d’emploi, etc.
® Enceintes avant
d) Enceinte centrale
Positionner cette enceinte au milieu des deux enceintes avant.
En plus, si on branche un téléviseur à la chaîne, positionner
l’enceinte centrale sur ou sous ce téléviseur.
(D Enceintes surround
Mettre les enceintes surround directement sur les côtés de la
zone d’écoute ou légèrement derrière cette zone. Les aligner
horizontalement, à environ un mètre au-dessus de la hauteur
des oreilles.
REMARQUE
' Aucun son ne sort par les enceintes centrale et surround quand
le système DOLBY PRO LOGIC et le système SURROUND
sont hors service.
' L’enceinte centrale fonctionne quand le système DOLBY PRO
LOGIC est en service.
CONNEXIONS
Avant de brancher ie cordon secteur
La tension nominale d’alimentation secteur de l’appareil, indiquée
au dos de ce dernier, est de 120V. S’assurer que cette tension
nominale correspond à celle du secteur local.
iMPORTANT
Commencer par connecter les enceintes, les antennes et tout
appareil optionnel. Brancher le cordon secteur en dernier.
4 FRANÇAIS
Il n’y a pas de différence entre les enceintes avant. Chacune
d’elles peut être connectée comme enceinte gauche (L) ou droite
(R).
Page 73

M
Z
O
h
<
ff
<
Q.
U
OC
0.
1 Connecter les antennes fournies.
Connecter l’antenne FM aux bornes FM 75 ü et l’antenne
AM aux bornes AM LOOP.
Antenne FM
Antenne AM
2 Connecter les enceintes droite et gauche à
l’appareil principal.
Connecter le cordon de l’enceinte droite aux bornes
SPEAKERS R et ceiui de i’enceinte gauche aux bornes
SPEAKERS L.
g0 0^
Le cordon d’enceinte rayé de blanc doit être connecté à la
borne O et le cordon noir à la borne ©.
3 Connecter les enceintes surround à l’appareil
principal.
Il n’y a pas de différence entre les enceintes surround.
Connecter le cordon de chaque enceinte surround à la borne
SURROUND SPEAKERS R ou L.
4 Connecter l’enceinte centrale.
Connecter le cordon de l’enceinte centraie à ia borne CENTER
SPEAKER.
5 Connecter l’appareil vidéo.
A l’aide d’un cordon de raccordement audio optionnel,
connecter la prise VIDEO/AUX de cet appareil à la prise de
sortie audio de l’appareii vidéo.
6 Connecter le téléviseur à l’appareil vidéo.
Pour pius de détails, voir le mode d’emploi de l’appareil
connecté.
7 Brancher le cordon secteur à une prise de
courant.
• Le jeu Demo démarre quand on branche le cordon secteur
à une prise de courant. Pour plus de détails, voir la partie
“Jeu Demo”, page 9.
FRANÇAIS ¡3
Page 74

Pour positionner ies antennes
Antenne FM intérieure:
Déployer cette antenne horizontalement selon la forme d’un T et
fixer ses extrémités à un mur.
Antenne AM:
Positionner cette antenne de manière à obtenir la meilleure
réception possible.
Pour poser l’antenne AM sur une surface
Fixer la griffe dans la rainure.
REMARQUE
’ Veiller à connecter les cordons d’enceinte correctement. Des
connexions incorrectes peuvent provoquer des courts-circuits
dans les bornes SPEAKERS.
Pour fixer les enceintes surround à un mur
CONNEXION D’UNE ANTENNE EXTERIEURE
Pour obtenir une meilleure réception FM, il est recommandé
d’utiliser une antenne FM extérieure.
Connecter l’antenne extérieure aux bornes FM 75 £î.
’ Ne pas laisser d’objets produisant un champ magnétique, tels
que des cartes de crédit, près des enceintes; ils pourraient être
endommagés.
' Ne pas mettre l’antenne FM près d’objets métalliques ou de
tringles à rideaux.
' Ne pas mettre l’antenne AM près d’un appareil optionnel, de la
chaîne stéréo proprement dite, du cordon secteur ou des
cordons d’enceinte; elle capterait des parasites.
' Ne pas dérouler le fil de l’antenne AM.
Pour connecter un autre appareil optionnel -* page
32.
6 FRANÇAIS
Page 75

Mise en place des piles
Enlever le couvercle des plies du dos de la télécommande et
mettre deux plies R6 (taille AA) en place.
Quand remplacer les piles
La distance maximale de fonctionnement entre la télécommande
et le capteur situé sur l’appareil principal doit être d’environ cinq
mètres. Lorsque cette distance diminue, remplacer les piles par
des neuves.
Utilisation de ia téiécommande
Les instructions données dans ce manuel concernent
principalement les touches de l’appareil principal. Les touches
de la télécommande portant les mêmes noms que celles de
l’appareil principal peuvent également être utilisées.
►/◄► PRESET de la télécommande
La fonction est la même que celle de de l’appareil principal.
PRESET
' Si la télécommande ne doit pas être utilisée pendant longtemps,
enlever les piles pour éviter tout risque de fuite d’électrolyte.
' La télécommande risque de ne pas fonctionner correctement
quand;
- l’espace entre la télécommande et le capteur situé sur la
fenêtre d’affichage est exposé à une lumière intense, comme
le soleil.
- d’autres télécommandes (téléviseur, etc.) sont utilisées à
proximité.
-ENTER
MULTI JOG
Pour mettre sous tension
Appuyer sur une des touches de fonction (TAPE/DECK 1/2,
TUNER/BAND, VIDEO/AUX, CD, MD). La lecture du disque
compact ou de la cassette en place commence, ou la station
écoutée en dernier est reçue (fonction de lecture directe).
On peut aussi appuyer sur PO'WER.
ËEæU
Lors de la mise sous tension, le compartiment à disques peut
s’ouvrir et se fermer pour réinitialiser l’appareil.
Pour mettre hors tension
Appuyer sur POWER.
Fenêtre ciignotante
La fenêtre située au sommet de l’appareil s’allume ou clignote
quand l’appareil est sous tension.
Pour éteindre l’éclairage de ia fenêtre supérieure, appuyer sur
■ tout en appuyant sur CD. Pour rallumer l’éclairage, répéter
cette opération.
Pour éteindre l’éclairage des platines du magnétocassette,
appuyer sur ■ tout en appuyant sur TAPE. Pour rallumer
l’éclairage, procéder de la même manière.
Pour changer le niveau de luminosité de l’affichage
1 Appuyer sur ECO de manière que “ECO MODE” soit affiché.
2 Dans les quatre secondes, tourner MULTI JOG pour afficher
“DIM MODE”, puis appuyer sur ENTER dans les quatre
secondes.
3 Dans les quatre secondes, tourner MULTI JOG pour
sélectionner le mode de luminosité comme ci-dessous.
Le mode est automatiquement réglé au bout de quatre
secondes. Il est aussi réglé si on appuie sur ENTER dans les
quatre secondes après l’étape 3.
DIM-OFF-^DIMMER 1 DIMMER DIMMER 3-^i
DIM-OFF: Affichage normal.
DIMMER 1: L’éclairage de l’affichage est plus sombre que
d’habitude.
DIMMER 2: L’éclairage de l’affichage est plus sombre que
dans le mode DIMMER 1.
DIMMER 3: L’éclairage de l’affichage est plus sombre que
dans le mode DIMMER 2. L’analyseur de spectre, la fenêtre
située au sommet de l’appareil et les témoins de touche
s’éteignent.
(/>
Z
O
H
<
K
<
a
ui
SC
O.
Si I enregistrement commandé par minuterie (voir page 31)
est fait avec le mode économie d’énergie (voir page 8) réglé
sur “ON” et si l’alimentation est coupée, le mode de luminosité
sera réglé sur “DIMMER 3” lors de la mise sous tension
suivante. 7
FRANÇÀilS /
Page 76

1 Appuyer sur ECO.
“ECQ MQDE” est affiché.
2
3
MISE EN SERVICE DU MODE ECONOMIE D’ENERGIE
La mise de cet appareil en mode économie d’énergie diminue la
consommation électrique comme suit.
• Quand l’appareil est hors tension, tous les indicateurs de
l’affichage s’éteignent.
Toutefois, si l’horloge n’est pas réglée, le jeu Demo (page 9)
démarre quand on met l’appareil hors tension.
• Si la fonction disque compact, cassette ou génération de rythme
(page 11) n’est pas utilisée pendant dix minutes ou s’il n’y a
pas d’entrée audio pendant dix minutes par tout appareil externe
connecté quand VIDEO/AUX ou MD est sélectionné comme
source, l’alimentation est coupée.
• Quand l’appareil se met sous tension du fait de l’enregistrement
commandé par minuterie (voir page 31), le niveau de luminosité
de l’affichage est réglé sur “DIMMER 3’’ (voir page 7), tous les
témoins de touche sont éteints et le volume est réglé sur le
niveau minimal (0).
• La luminosité de l’affichage augmente seulement quand on
utilise l’appareil. Si l’appareil n’est pas utilisé pendant dix
secondes, le niveau de luminosité passe au mode
précédemment sélectionné dans “DIM MQDE”. (Voir page 7.)
(Si le niveau de luminosité est réglé sur“DIM-OFF’, la luminosité
ne change pas. Quand le niveau est “DIMMER 3’’, les témoins
de touche s’éteignent.)
f0..i
S—'i
2 Appuyer sur ENTER dans les quatre secondes.
Le statut courant du mode économie d’énergie est affiché.
Si le mode économie d’énergie est hors service: ECO OFF
Si le mode économie d’énergie est en service: ECO ON
3 Tourner MULTI JOG dans les quatre secondes
pour mettre le mode économie d’énergie en ou
hors service.
Exemple: Quand “ON” est sélectionné
(ECO ü'i -i ' • ' ■
MIÆ.S. r.1rem., .rem ’reH.
Le mode est automatiquement réglé au bout de quatre
secondes. Il est aussi réglé si on appuie sur ENTER dans les
quatre secondes après l’étape 3.
REMARQUE
Pour visualiser l’horloge quand tous les indicateurs de l’affichage
sont éteints, appuyer sur CLOCK; l’heure est alors affichée
pendant quatre secondes.
'■v.
---
8 FRANÇAIS
Page 77

■DEMO
Jeu Demo
La première fois que l’on branche le cordon secteur à une prise
de courant après l’achat, le jeu apparaît automatiquement. Cet
état initial est invalidé une fois que l’on a réglé l'horloge interne.
Tant que l’on laisse l’horloge intacte, le jeu apparaît
automatiquement quand l’appareil est mis hors tension.
Utilisation du jeu Demo
Appuyer sur DEMO, que l’appareil soit sous ou hors tension, et que l’horloge soit réglée ou pas.
Quand l’appareil est hors tension, le jeu est silencieux. Quand
l’appareil est sous tension, le jeu comprend une animation
sonore (appelée “son du jeu” dans les explications suivantes).
1 Appuyer sur
Trois chiffres se déplacent sur l’affichage.
2 Appuyer une fois sur ■.
Le chiffre de gauche s’arrête.
Pour changer la probabilité d’égalisation des trois
chiffres
Appuyer sur « ou ►► à plusieurs reprises pour sélectionner
un des trois niveaux de probabilité lors de l’utilisation du jeu
Demo. L’indicateur de numéro de plateau change entre 1 et 3
sur l’affichage. La probabilité d’égalisation augmente comme le
numéro de plateau augmente de 1 à 3.
■: ■■■ :■ ■: :■ ■: ■■■ ■■
: : :
Pour supprimer le son du jeu
D’abord, annuler le jeu Demo en appuyant sur DEMO. Ensuite,
tenir DEMO enfoncée jusqu’à ce que OFF” soit affiché.
Pour rétablir le son du jeu, tenir de nouveau DEMO enfoncée
jusqu’à ce que ON” soit affiché.
REMARQUE
• Pendant l’utilisation du jeu Demo, ■, ◄-<, et ne
sont disponibles que pour ce jeu. Pour utiliser ces touches pour
les fonctions telles que lecture de disque compact ou autre,
annuler le jeu Demo.
• Pour changer le son du jeu, voir la partie “FONCTION
GENERATION DE RYTHME”, page 11.
• Pendant le jeu Demo, certains indicateurs sans rapport avec
l’utilisation en cours s’allument sur l’affichage.
• Pendant l’enregistrement, DEMO est bloqué et ne fonctionne
pas.
• Le jeu Demo et le son du jeu sont automatiquement annulés si
on règle le volume quand l’appareil est sous tension.
(Л
Z
O
H
<
oc
<
a
3 Appuyer deux fois sur ■ pour arrêter les deux
autres chiffres.
Marque:
On dispose de 20 points au démarrage du jeu.
Si les trois chiffres sont égaux. 50 points sont ajoutés au score.
Si les chiffres ne sont pas égaux, un point est soustrait.
Si le score atteint 9999, on a gagné.
Si le score tombe à 0, on a perdu.
Pour annuler le jeu Demo
Appuyer sur DEMO.
Pour réinitialiser le jeu Demo
Appuyer deux fois sur DEMO.
FRANÇAIS !Э
Page 78

SON
REGLAGES AUDI
VOLUME
T-BASS
BBE
VOLUME
Tourner VOLUME de l’appareil principal, ou appuyer sur VOL de la télécommande.
Le niveau du volume est affiché sous la forme d’un numéro de 0
à MAX (50).
Quand on met l’appareil hors tension alors que le niveau du
volume est réglé sur 21 ou plus, ce niveau est automatiquement
réglé sur 20.
T-BASS
MANUAL
SELECT
DOWN,
UP
SYSTEME SUPER T-BASS
Le système T-BASS augmente le réalisme du son aux basses
fréquences.
Appuyer sur T-BASS.
A chaque pression sur la touche, le niveau change. Sélectionner
un des trois niveaux ou la position de repos, comme on préfère.
H’
REMARQUE
' Le son aux basses fréquences risque d’être déformé quand le
système T-BASS est utilisé pour un disque ou une cassette
dont le son aux basses fréquences est accentué d’origine. Dans
ce cas, annuler le système T-BASS.
’ Lors de la lecture d’une cassette enregistrée avec BBE, il est
conseillé de mettre le système BBE hors service pour éviter
une distorsion du son aux fréquences élevées.
Pour changer la balance gauche/droite
Appuyer sur MANUAL SELECT de la télécommande; L/R est
alors affiché pendant quatre secondes. Appuyer sur ◄◄ DOWN
ou ►► UP de la télécommande dans ces quatre secondes.
• Le niveau des enceintes avant DOLBY PRO LOGIC (voir page
26) est aussi changé.
SYSTEME BBE
Le système BBE augmente la clarté du son aux fréquences
élevées. Il enrichit aussi la fonction Karaoke pour donner un son
clair et agréable de la voix.
Appuyer sur BBE.
A chaque pression sur cette touche, le niveau change.
Sélectionner un des trois niveaux ou la position de repos, comme
on préfère.
Lv I
/C.
...
..........................................
J__-
1 0 FRANÇAIS
Page 79

UTILISATION DE LA FONCTION BEAT
Cet appareil est muni d’un groupe de types de rythme parmi
lesquels on peut sélectionner celui que l’on souhaite pour l’ajouter
au son de toute source de musique et créer ainsi ses propres
sons originaux.
Le mélange créé avec les fonctions BEAT et BBE peut être
enregistré sur cassette si on le souhaite. Ce mélange est aussi
disponible aux prises LINE OUT.
La fonction BEAT n’est pas disponible quand on fait une copie
de cassette avec les deux platines à l’aide de SYNC DUB.
Pour sélectionner un type de rythme
Pour régler le tempo du type de rythme
■RHYTHM
-BEAT
ON/OFF
1 Appuyer sur RHYTHM à plusieurs reprises
jusqu’à ce que l’affichage indique “Tempo XXX”.
Z
о
ta
1 Appuyer sur BEAT ON/OFF pour mettre la
fonction en service.
Le type de rythme courant est audible et son nom apparaît
sur l’affichage.
2 Tourner MULTI JOG pour naviguer parmi les choix
possibles jusqu’à ce que l’on en trouve un qui
REMARQUE
Si “AUTO” apparaît quand on appuie sur RHYTHM, faire
apparaître “MANUAL’ en tournant MULTI JOG vers la gauche.
En mode AUTO, le tempo est automatiquement réglé et on ne
peut pas accéder à l’affichage de “Tempo”. (Voir ci-après la
description du mode AUTO.)
convient à la musique.
L’affichage change comme suit:
GAME (Jeu) -<—
î
TANGO (Tango)
î
WALTZ 1-2 (Valse)
î
4 BEAT 1-2 (4 temps)
Î
8 BEAT 1-2 (8 temps)
16 BEAT 1-3 (16 temps)
MERENG1 -3 (Merengue) SLRMBA1 -2 (Rumba lente)
t
t
t
REGGAE (Reggae)
-►H.R0CK1-2 (Hard rock)
BOSSANOV (Bossa-nova)
CUB RMBA (Rumba cubaine)
I
I
SAMBA 1-4 (Samba)
I
t
SALSA 1-3 (Salsa)
I
t
- AFRO (Afro)
2 Tourner MULTI JOG.
Le tempo de GAME n’est pas réglable.
La rotation vers la droite accélère le tempo. La rotation vers
la gauche ralentit le tempo.
(Si une coupure se produit avant la rotation de la commande,
repasser à l’affichage de “Tempo” en appuyant sur RHYTHM.)
Le tempo peut être changé dans les limites de 81 à 160.
Les données d’onde acoustique intégrées à cet appareil sont la
propriété, dont le droit de reproduction est réservé, de Yamaha
Corporation; et Aiwa possède la licence de Yamaha Corporation.
FRANÇAIS 1 1
Page 80

Pour changer le niveau du volume du type de rythme Utilisation du mode AUTO
Le mode AUTO règle automatiquement le tempo du type de
rythme courant de manière qu’ii coïncide avec ie tempo de la
musique.
REMARQUE
Selon la musique, le mode AUTO risque de ne pas fonctionner
correctement (avec de ia musique dont ie tempo est flou ou
variable, par exemple).
1 Appuyer sur RHYTHM à plusieurs reprises
jusqu’à ce que l’affichage indique “LEVEL X”.
^'iLEUEL 3 \
S
2,3
2 Tourner MULTI JOG.
Trois niveaux, 1 - 3, sont disponibles.
Pour arrêter la fonction BEAT
Appuyer sur BEAT ON/OFF.
Le réglage de BEAT bascule entre “en service” et “hors service”
REMARQUE
Quand on interrompt ou arrête la lecture sur la source sonore, la
fonction BEAT est automatiquement mise hors service.
On peut laisser la musique démarrer avant d’effectuer l’étape 1
ou inversement.
1 Appuyer sur BEAT ON/OFF pour mettre la
fonction en service.
Le type de rythme courant est audible.
2 En appuyant sur RHYTHM et en tournant MULTI
JOG, changer le type de rythme et le réglage de
niveau comme souhaité.
3 Appuyer sur RHYTHM de manière que i’affichage
indique “MANUAL” ou “AUTO”.
i MflHUfiL ;
....................................
4 Tourner MULTI JOG vers la droite de manière que
l’affichage indique “AUTO”.
Si “AUTO” est affiché à i’étape 3, tourner MULTI JOG vers la
gauche de manière que l’affichage indique “MANUAL” avant
d’effectuer l’étape 4.
PUTü
...............
.3
p^pjlj
s V
1 2 FRANÇAIS
Lors du passage de MANUAL à AUTO, le niveau du type de
rythme est autematiquement réduit à “1”. Le niveau préréglé
est rétabli quand l’appareil se synchronise sur le tempo de la
musique.
Pendant que i’appareil essaie de se synchroniser sur le tempo
de la musique, un indicateur bleu ressemblant à une cascade
clignote sur les côtés de la partie affichage d’égaliseur de
spectre.
hUTü
-/r:
Quand l’appareil se synchronise sur le tempo de la musique,
l’affichage indique momentanément le tempo de la
synchronisation.
Selon les sources sonores (comme, musiques dont le tempo
est variable), toutefois, on peut voir différents tempos
apparaissant l’un après l’autre sur l’affichage.
„3
Page 81

Après synchronisation, i’affichage indique “BEAT OUT” si ia
synchronisation se déverrouiiie, puis i’appareii essaie de
nouveau de se synchroniser.
Quand BEAT OUT est affiché, ie niveau du rythme est
automatiquement réduit à “1 et ie niveau prérégié est rétabli
quand il y a de nouveau synchronisation.
UTILISATION DE LA FONCTION SPICE
Fonction SPICE A/B
La fonction SPICE A/B permet d’ajouter des percussions à la
source de musique et de créer ainsi ses propres sons originaux,
Les sons créés avec la fonction SPICE A/B peuvent être
enregistrés sur cassette si on le souhaite.
REMARQU
La fonction BEAT peut être utilisée avec la fonction SPICE A/B,
aussi bien qu’avec la fonction FILL IN. (Voir ci-après la description
de ces fonctions.) Par contre, on ne peut pas utiliser la fonction
AUTO SPICE en même temps que la fonction BEAT.
Utilisation de la fonction FILL IN
La fonction FILL IN s’utilise avec la fonction BEAT pour introduire
une variation du type de rythme courant.
La commutation de double fonction AUTO SPICE/FILL IN
remplace la fonction FILL IN quand la fonction BEAT est mise en
service.
REMARQUE
• La fonction AUTO SPICE n’est pas disponible en même temps
que la fonction FILL IN.
• La fonction FILL IN n’est pas disponible quand on fait une copie
de cassette avec les deux platines à l’aide de SYNC DUB.
POUR UTILISER LA FONCTION FILL IN
Pour sélectionner des sons
1 Appuyer sur A.
Le son courant mémorisé en A est audible.
2 Dans les quatre secondes, tourner MULTI JOG
vers la gauche ou la droite jusqu’à ce que l’on
trouve le son souhaité.
Comme l’affichage change, le son correspondant est audible.
3 D’une façon similaire, sélectionner un son pour
B.
■BEAT
ON/OFF
■FILL IN
Pendant la lecture avec la fonction BEAT en service, appuyer
sur FILL IN au moment souhaité.
‘èr-'i FILL l'rtî---
.......................................
L’affichage indique “FILL IN” puis, quand le cycle courant de type
de rythme est terminé, un son de courte durée différent de ce
type de rythme est audible. Ce son dépend des types de rythme.
Si on veut, on peut essayer de changer le type de rythme. (La
sélection d’un type de rythme est expliquée plus haut, sous le
titre correspondant.)
.:.s
Utilisation de la fonction
Une fois que l’on est satisfait de la sélection sonore, laisser
démarrer la musique, et appuyer fugitivement sur SI’ICE A ou El
en synchronisation avec la musique comme si l’on jouait
d’instruments à percussion.
REMARQUE
On ne peut pas utiliser la fonction SPICE MB quand on fait une
copie de cassette avec les deux platines à l’aide de SYNC DUB.
FRANÇAIS 13
Page 82

utilisation d’un mode “crissement”
1 Tenir SPICE A enfoncée. (Ne pas relâcher la
touche tant que l’étape 2 n’est pas terminée.)
L’affichage indique “SCT MODE”.
SCT MODE:
2 Tout en tenant encore la touche enfoncée, tourner
MULTI JOG.
Selon le sens dans lequel on tourne MULTI JOG, différents
crissements sont produits.
Le mode “crissement” est invalidé quand on relâche la touche
A.
Utilisation de la fonction AUTO SPICE
La fonction AUTO SPICE produit les sons de SPICE A et B en
synchronisation avec la musique, le son de A en réponse aux
signaux de basse fréquence, et le son de B en réponse à ceux
de fréquence élevée.
REMARQU
• La fonction AUTO SPICE ne peut pas être utilisée avec la
fonction BEAT.
• Selon la musique, la fonction AUTO SPICE risque de ne pas
fonctionner comme on le voudrait. Le cas échéant, utiliser la
fonction SPICE A/B à la place.
• La fonction AUTO SPICE n’est pas disponible quand on fait
une copie de cassette avec les deux platines à l’aide de SYNC
DUB.
1 Appuyer sur AUTO SPICE.
“A-SPICE” apparaît sur l’affichage.
■
ft
.
SF=ICE
2 Appuyer sur SPICE A.
Le son actuellement mémorisé en A est audible et son nom
apparaît sur l’affichage.
Chaque fols qu’on appuie sur A, le son est produit.
3 Si on veut changer le son de A, tourner MULTI
JOG jusqu’à ce que l’on trouve le son souhaité.
(Si une coupure se produit après avoir terminé l’étape 2 et
avant d’effectuer l’étape 3, appuyer de nouveau sur SPICE
A.)
4 D’une façon similaire, contrôler le son de B et le
changer si on veut.
5 Pour régler le niveau des sons de A et B, accéder
à l’affichage de “LEVEL X” en appuyant sur
RYTHM autant de fois que nécessaire, puis
tourner MULTI JOG dans les quatre secondes.
Trois niveaux. 1,2 et 3, sont disponibles.
LELiEl.
Les niveaux de A et B sont réglés en même temps.
Démarrer la lecture sur la source pour écouter
l’effet.
L’indicateur bleu ressemblant à une cascade, situé à gauche
de “BBE” sur l’affichage, clignote et le son de SPICE A est
reproduit en synchronisation avec les graves, et celui de
SPICE B l’est en synchronisation avec les aigus.
1 4 FRANÇAIS
REMARQUE
Si on appuie fugitivement sur SPICE: A ou B ou si on produit des
crissements quand un type de rythme est généré ou tandis qu’un
son FILL IN est produit, une coupure momentanée peut se
produire parfois dans le type de rythme ou dans le son FILL IN.
Il en est de même pour les sons AUTO SPICE quand on appuie
fugitivement sur SPICE A ou B ou quand on produit des
crissements.
Page 83

EGALISEUR GRAPHIQU
SELECTION D’UNE COURBE
D’EGALISATION PROGRAMMEE
Cet appareil possède les cinq courbes d’égalisation
programmées différentes suivantes.
ROCK: Son puissant accentuant les aigus et les graves.
POP: Présence accrue des parties vocales et de la gamme
moyenne.
LATIN: Fréquences élevées accentuées pour la musique latine.
CLASSIC: Son enrichi par des graves puissants et des aigus
fins.
JAZZ: F-réquences basses accentuées pour la musique de type
jazz.
GEQ
REGLAGE MANUEL D’UNE NOUVELLE COURBE D’EGALISATION
O
(A
1.3
2.4
1
On peut personnaliser une courbe d'égalisation comme on
préfère.
1 Appuyer sur GEQ, puis appuyer sur ENTER dans
les quatre secondes.
L’affichage change et indique “GEQ LOW”.
2 Dans les huit secondes, tourner MULTI JOG pour
régler le niveau de la fréquence la plus basse.
Appuyer sur GEQ, puis tourner MULTI JOG dans les quatre secondes pour sélectionner une des courbes d’égalisation programmées.
“GRAPHIC EQUALIZER” apparaît et le mode d’égalisation
graphique est affiché de manière cyclique comme suit.
- ROCK^ POP LATIN CLASSIC JAZZ«
— Modes programmés
M5
M4 --------
► M3
Modes manuels -
■ CLASSIC -
---------------
--------
► M2 — Ml
Pour afficher le mode d’égalisation graphique courant
Appuyer sur GEQ. Le mode courant est affiché pendant quatre
secondes.
Pour annuler le mode sélectionné
Appuyer deux fois sur GEQ.
“GEQ OFF” apparaît et “GRAPHIC EQUALIZER” disparaît.
Pour sélectionner avec la télécommande
Appuyer sur GEQ et dans les quatre secondes, appuyer sur ou ►► à plusieurs reprises. Le mode d’égalisation graphique
est affiché de manière cyclique comme ci-dessus.
Jlïli
I
3 Appuyer sur ENTER pour faire apparsiître “GEQ
HIGH”.
L’indicateur de niveau de la fréquence la plus élevée clignote
pendant huit secondes.
4 Dans les huit secondes, tourner MULTI JOG pour
régler le niveau de la fréquence la plus élevée.
Les niveaux des fréquences comprises entre la plus basse et
la plus élevée sont réglés en conséquence.
Utilisation d’un casque
Brancher un casque muni d’une fiche stéréo standard (6,3 mm
0) à la prise PHONES.
Aucun son ne sort par les enceintes quand un casque est
branché.
• Quand un casque est branché, le système SURFtOUND et le
système DOLBY PRO LOGIC ne fonctionnent pas.
Réglage du son pendant l’enregistrement
La commande VOLUME n’a pas d’effet sur l’enregistrement. Elle
règle seulement le niveau des signaux allant aux enceintes et
au casque. Toutefois, ne pas oublier que l’enregistrement es;t
affecté par les fonctions BEAT, AUTO SPICE/FILL IN et SPICE
A/B, ainsi que par la fonction BBE.
FRANÇAIS 15
Page 84

MEMORISATION DES NOUVELLES COURBES D’EGALISATION
1,2,4
1,3
SURROUND DSP
Le système SURROUND DSP (processeur numérique de
signaux) règle le temps de retard, le mode d’entrée et le niveau
de rétroaction pour donner un son surround résonnant
reproduisant avec réalisme la présence sonore de différents
environnements.
Cet appareil a été programmé avec cinq modes SURROUND
différents.
1
Les modes manuels Ml - M5 permettent de mémoriser jusqu’à
cinq courbes d’égalisation personnalisées.
1 Effectuer les étapes 1 à 4 de la page précédente.
La courbe créée est affichée pendant huit secondes.
2 Dans les huit secondes, appuyer sur ENTER.
“M 1” clignote sur l’affichage pendant huit secondes.
GEQ-MX-'
«U mmm mmm mmm ■ ■ <« • *
• Si cette étape n’est pas terminée dans les huit secondes,
appuyer d’abord sur GEQ pour afficher “GEQ ON”. Ensuite,
dans les quatre secondes, appuyer sur ENTER à plusieurs
reprises jusqu’à ce que “Ml” clignote.
3 Dans les huit secondes, tourner MULTIJOG pour
sélectionner un des modes manuels M1 - M5 pour
mémoriser la courbe.
4 Dans les huit secondes, apouver sur ENTER.
La nouvelle courbe d’égalisation est mémorisée.
L
SELECTION D’UN MODE SURROUND DSP
PROGRAMME
SURROUND
Cinq modes SURROUND DSP offrent ia présence sonore d’une
discothèque (DISCO), d’une représentation musicale en public
(LIVE), d’un stadium (STADIUM), d’une salle de concert (HALL)
et d’un cinéma (MOVIE). (Les indications entre parenthèses sont
celles qui apparaissent sur i’affichage.)
Appuyer sur SURROUND, puis tourner MULTI JOG
ou appuyer sur « ou »■ à plusieurs reprises
pour sélectionner le mode programmé souhaité
dans les quatre secondes.
Pour sélectionner la courbe d’égalisation mémorisée
Appuyer sur GEQ, puis tourner MULTI JOG pour sélectionner
un des modes manuels Ml - M5 dans les quatre secondes.
Pour régler le volume des enceintes surround
Appuyer deux fois sur MANUAL SELECT de ia télécommande
tandis que le mode DSP SURROUND est en service.
“SUR” est affiché pendant quatre secondes. Appuyer sur ◄◄
DOWN ou ►► UP de ia télécommande dans ces quatre
secondes.
• Le niveau des enceintes surround DOLBY PRO LOGIC (voir
page 26) est aussi changé.
REMARQUE
Le mode SURROUND est annulé quand;
- le niveau d’écho est changé.
- le système DOLBY PRO LOGIC est mis en service.
- un casque est branché.
1 6 FRANÇAIS
DiSr.O U-
“DSP SURROUND” apparaît et le mode SURROUND DSP est
affiché de manière cyclique comme suit.
P DISCO-^LIVE*—STADIUM——HALL^—MOVIE
r]
Les courbes d’égalisation sont sélectionnées automatiquement
en fonction des modes SURROUND DSP et peuvent aussi être
sélectionnées manuellement ou annulées comme on préfère.
Pour afficher le mode SURROUND DSP courant
Appuyer sur SURROUND. Le mode courant est affiché pendant
quatre secondes.
Pour annuler le mode sélectionné
Appuyer deux fois sur SURROUND. “DSP OFF” apparaît et “DSP
SURROUND” disparaît.
Quand la source musicale est monophonique
Sélectionner “LIVE”, “STADIUM” ou “MOVIE” pour obtenir un effet
stéréo simuié. Quand “DISCO” ou “HALL” est sélectionné, le son
n’est pas audible par les enceintes surround.
Page 85

RECEPTION RADIO
MONO
TUNER
TUNER
BAND
I
Ilu M.
1 Appuyer sur TUNER/BAND à plusieurs reprises
pour sélectionner la gamme souhaitée.
• FM —► AM
Quand on appuie sur TUNER/BAND alors que l’alimentation
est coupée, l’appareil est mis sous tension directement.
2 Appuyer sur ◄◄ DOWN
ou
UP pour
sélectionner une station.
A chaque pression sur la touche, la fréquence change.
Quand une station est reçue, “TUNE” est affiché pendant deux
secondes.
Pendant la réception FM stéréo, (usdi)) est affiché.
MEMORISATION DE STATIONS
o
M
■TUNER
BAND
■0-9,-h10
L’appareil peut mémoriser un total de 32 stations. Quand une
station est mémorisée, un numéro de préréglage lui est affecté.
Pour accorder directement l’appareil sur une station mémorisée,
utiliser le numéro de préréglage correspondant.
1 Appuyer surTUNER/BAND pour sélectionner une
gamme, puis appuyer sur DOWN ou UIP
pour sélectionner une station.
2 Appuyer sur II SET pour mémoriser la station.
Un numéro de préréglage est affecté à la station, à partir de 1
dans l’ordre consécutif pour chaque gamme.
Numéro de préréglage
h
O
Q
<
a
Z
O
P
IL
Ul
O
U
GC
(IISSII)
=-.Fn
r
' s spf
Pour rechercher une station rapidement (Recherche
automatique)
Tenir <<◄ DOWN ou ►► UP enfoncée Jusqu’à ce que la
fréquence commence à changer rapidement. Après l’accord sur
une station, la recherche s’arrête. Pour arrêter la recherche
automatique manuellement, appuyer sur ◄◄ DOWN ou ►►
UP.
• La recherche automatique risque de ne pas s’arrêter aux
stations dont les signaux sont très faibles.
Quand une émission FM stéréo contient des parasites
Appuyer sur MONO TUNER de la télécommande de manière
que “MONO” apparaisse sur l’affichage.
Les parasites sont réduits, mais la réception est monophonique.
Pour rétablir la réception stéréophonique, répéter l’opération ci-
dessus de manière que “MONO” disparaisse.
Pour changer i’intervaiie d’accord AM
Le réglage par défaut de l’intervalle d’accord AM est de 10 kHz
par pas. Si on utilise cet appareil dans une région où le système
d’allocation de fréquences est de 9 kHz par pas, changer
l’intervalle d’accord.
Appuyer sur POWER tout en appuyant sur
Pour rétablir l’intervalle initial, procéder de la même façon.
REMARQUE
Quand on change l'intervalle d’accord AM, toutes les stations
mémorisées sont supprimées. Une nouvelle mémorisation est
alors nécessaire.
TUNE
TUV;;.-
n
3 Répéter les étapes 1 et 2.
Le station suivante ne sera pas mémorisée si un total de 32
stations ont déjà été mémorisées pour toutes les gammes.
REMARQU
“FULL’ est affiché si on tente de mémoriser plus de 32 stations.
ACCORD PAR NUMERO DE PREREGLAGE
Utiliser la télécommande pour sélectionner le numéro de
préréglage directement.
/ Appuyer surTUNER/BAND pour sélectionner une
gamme.
2 Utiliser les touches numériques 0-9 et -t-10 pour
sélectionner un numéro de préréglage.
Exemple:
Pour sélectionner le numéro de préréglage 20, appuyer sur
■ hlO, -hIO et 0.
Pour sélectionner le numéro de préréglage 15, appuyer sur
■ hIO et 5.
Sélection d’un numéro de préréglage sur l’appareil
principal
Appuyer sur TUNER/BAND pour sélectionner une gamme.
Ensuite, appuyer sur ◄►à plusieurs reprises ou tourner MULTI
JOG.
A chaque pression sur le numéro supérieur suivant est
sélectionné.
Pour supprimer une station mémorisée
Sélectionner le numéro de préréglage de la station à supprimer.
Ensuite, appuyer sur ■ CLEAR, puis appuyer sur II SET dans
les quatre secondes.
Les numéros de préréglage supérieurs de toutes les autres
stations de la gamme sont diminués d’une unité.
FRANÇAIS 1 7
Page 86

LECTURE DE CASSETTES
OPERATIONS OE BA
■APUSH
EJECT
J
Pour sélectionner un mode d’inversion (piatine 2 seuiement)
A Chaque pression sur REV MODE, le mode d’inversion change.
rS =7'F2 00'0v:i ;■
ìHbì^PBÉ^mIÌÌÌéIIII
Pour lire une seule face, sélectionner Z.
Pour lire de la face avant à la face arrière une seule fois,
sélectionner Z).
Pour lire les deux faces à plusieurs reprises, sélectionner C—5.
• Quand il y a des cassettes dans les deux platines, Ü5 sur
l’affichage signifie “Lecture continue”.
-Platine 2
• Avec la platine 1, les cassettes sont toujours lues sur les deux
faces.
Avec la platine 2, on peut choisir un mode d’inversion pour lire
une face ou les deux.
• Pour la lecture, utiliser des cassettes de type I (normales), de
type II (haute polarisation/CrOz) ou de type IV (métal).
1 Appuyer surTAPE/DECK 1/2 puis appuyer sur ±
PUSH EJECT pour ouvrir le porte-cassette.
Insérer une cassette avec le côté exposé du ruban magnétique
en bas. Pousser le porte-cassette pour le fermer.
2 Appuyer sur pour démarrer la lecture.
Numéro de la
platine sélectionnée Compteur
I
Pour sélectionner une platine de lecture
Quand il y des cassettes en place dans les deux platines, appuyer
d’abord sur TAPE/DECK1/2 pour sélectionner une platine.
Le numéro de la platine sélectionnée est affiché.
Pour arrêter la lecture, appuyer sur ■.
Pour mettre la lecture en pause (platine 2 seuiement), appuyer
sur II. Pour reprendre la lecture, appuyer de nouveau sur cette
touche.
Pour changer de face lue, appuyer sur -<► pendant la lecture
ou le mode pause.
Pour obtenir une avance rapide ou un rembobinage, appuyer
sur ◄◄ ou ►►. Ensuite, appuyer sur ■ pour arrêter le
défilement.
Pour démarrer la lecture quand l’alimentation est coupée
(fonction de lecture directe)
Appuyer sur TAPE/DECK 1/2. L’appareil est mis sous tension et
la lecture de la cassette en place commence.
Pour mettre le compteur à 0000
Appuyer sur ■ CLEAR dans le mode arrêt.
Le compteur est aussi mis à 0000 quand on ouvre et ferme le
porte-cassette.
'ITP 1 r--iP\Ri0 ^
I
Indicateur de face lue
La face avant (orientée vers l’avant) est lue.
La face arrière (orientée vers l’arrière) est lue.
1 8 FRANÇAIS
Page 87

SENSEUR DE MUSIQUE
S’il y a un blanc de quatre secondes ou plus entre les plages, on
peut retrouver facilement le début de la plage courante ou
suivante pendant la lecture.
Appuyer sur ◄◄ ou ►► pendant la lecture en vérifiant
l’indicateur de face lue (◄ ou ►) affiché.
Par exemple, si on appuie sur ►► tandis que l’indicateur ► est
affiché, la lecture de la plage suivante démarre.
La fonction senseur de musique risque de ne pas pouvoir détecter
les plages dans les cas suivants:
• blancs de moins de quatre secondes entre les plages.
• blancs présentant des parasites.
• longs passages à bas niveau.
• enregistrements à bas niveau.
LECTURE CONTINUE
I
4
Au sujet des cassettes
• Pour éviter un effacement accidentel, utiliser un
tournevis ou tout autre objet effilé pour casser les ergots
en plastique de la cassette après l’enregistrement.
Face A
Rainure de
détection de
cassette de
type II
Pour enregistrer de nouveau sur une cassette, recouvrir
les cavités des ergots avec du ruban adhésif ou autre. (Sur
les cassettes de type II, faire attention à ne pas recouvrir
la rainure de détection de cassette de type IL)
Ergot pour la
face A
' Le ruban magnétique des cassettes de 120 minutes
ou pius est extrêmement fin et se déforme et
s’endommage facilement. Ces cassettes ne sont pas
recommandées.
' Tendre le ruban magnétique avec un crayon ou un objet
similaire avant d’utiliser une cassette. Un ruban magnétique
détendu peut se rompre ou s’emmêler dans le mécanisme.
V)
U
I
H
Ul
w
(/)
<
U
LJ
Q
UJ
DC
O
H
O
LU
Une fols que la lecture sur une platine est terminée, la lecture de
la cassette de l’autre platine démarre sans interruption.
1 Insérer des cassettes dans les platines 1 et 2.
2 Appuyer sur TAPE/DECK 1/2 pour sélectionner
la platine à utiliser en premier.
3 Appuyer sur REV MODE pour sélectionner ZX 4 Appuyer sur pour démarrer la lecture.
La lecture continue jusqu’à ce qu’on appuie sur ■.
FRANÇAIS 1 9
Page 88

LECTURE DE
OPERATIONS DE BA
DISQUES COMPACTS
J
MISE EN PLACE DE DISQUES
Appuyer sur CD, puis appuyer sur ± OPEN/CLOSE
pour ouvrir ie compartiment à disques. Mettre ie(s)
disque(s) en piace avec ie côté portant l’étiquette
en haut.
Pour lire un ou deux disques, mettre les disques sur les
plateaux 1 et 2.
Pour lire trois disques, appuyer sur DISC CHANGE pour faire
tourner les plateaux après avoir mis deux disques en piace. Mettre
le troisième disque sur le plateau 3.
Fermer le compartiment à disques en appuyant sur ± OPEN/
CLOSE.
Pour lire un disque seulement, appuyer sur une des
touches DISC DIRECT PLAY 1-3.
Le disque sélectionné est lu une fois.
Pour arrêter la lecture, appuyer sur ■.
Pour mettre la lecture en pause, appuyer sur II. Pour reprendre
la lecture, appuyer de nouveau sur cette touche.
Pour rechercher un point particulier pendant la lecture, tenir
◄◄ ou ►► enfoncée Jusqu'à ce que le point souhaité soit atteint.
Pour sauter au début d’une plage pendant la lecture, appuyer
sur ◄◄ ou ►► à plusieurs reprises ou tourner MULTI JOG.
Pour enlever des disques, appuyer sur ± OPEN/CLOSE.
Pour démarrer la lecture quand l’alimentation est coupée
(fonction de iecture directe)
Appuyer sur CD. L’appareil est mis sous tension et la lecture du
(des) disque(s) en place commence.
Quand on appuie sur ± OPEN/CLOSE, l’appareil est aussi mis
sous tension et le compartiment à disques s’ouvre.
Pour vérifier le temps restant
Pendant la lecture, appuyer sur CD EDIT/CHECK. Le temps
restant jusqu’à ce que toutes les plages soient lues est affiché.
Pour rétablir l’affichage du temps de lecture, répéter cette
opération.
Sélection d’une plage avec la télécommande
1 Appuyer sur DISC DIRECT PLAY, puis appuyer sur une des
touches numériques 1-3 dans les trois secondes pour
sélectionner un disque.
2 Utiliser les touches numériques 0-9 et +10 pour sélectionner
une plage.
Exemple:
Pour sélectionner la vingt-cinquième plage, appuyer sur +10,
+10 et 5.
Pour sélectionner la dixième plage, appuyer sur +10 et 0.
La lecture démarre à la plage sélectionnée et continue jusqu’à
la fin du disque.
Numéro de piateau
du disque à lire Temps de iecture total
: J- •MwJmimm ■
'—■.L yt i :-,
Nombre total de plages
U. O "■i-:;:'« .=;..-...-î ;r-
........
■
I
LECTURE DE DISQUES
Mettre des disques en place.
Pour lire tous les disques situés dans le compartiment.
appuyer sur '4^.
La lecture commence par le disque du piateau 1.
Numéro de la plage
en cours de lecture Temps de lecture écoulé
Changement de disques pendant la lecture
Pendant qu’un disque est en lecture, on peut remplacer les autres
disques sans interrompre la lecture.
1 Appuyer sur DISC CHANGE.
2 Enlever les disques et les remplacer par d’autres disques.
3 Appuyer sur ^ OPEN/CLOSE pour fermer le compartiment
à disques.
REMARQUE
' Pour mettre un disque de 8 cm en place, le poser dans le
renfoncement circulaire du plateau.
■ Ne pas mettre plus d’un disque compact sur un plateau.
' Ne pas incliner l’appareil avec des disques en place. Cela
pourrait provoquer des pannes.
' Ne pas utiliser des disques compacts de forme irrégulière (par.
ex. disques en forme de cœur ou octogonaux). Cela pourrait
provoquer des pannes.
20 FRANÇAIS
/r:...:.
.............
5
Page 89

LECTURE ALEATOIRE/REPETEE
utiliser la télécommande.
Lecture aléatoire
Toutes les plages du disque sélectionné ou tous les disques peuvent
être lus dans un ordre aléatoire.
Lecture répétée
Un seul disque ou tous les disques peuvent être lus à plusieurs
reprises.
Appuyer sur RANDOM/REPEAT tout en appuyant sur SHIFT.
A chaque pression sur les touches, la fonction peut être sélectionnée
de façon cyclique.
Lecture aléatoire — RANDOM s’allume sur l’affichage.
Lecture répétée — Cf. s’allume sur l’affichage.
Lecture aléatoire/répétée — RANDOM et Ci. s’allument sur
l’affichage.
Annulation — RANDOM et Ci disparaissent de l’affichage.
Pour lire tous les disques, appuyer sur pour démarrer la
lecture.
Pour lire un seul disque, appuyer sur une des touches DISC
DIRECT PLAY 1-3 pour démarrer la lecture.
REMARQUE
Pendant la lecture aléatoire, Il est impossible de sauter à la plage
précédemment lue en appuyant sur
LECTURE AVEC SAUT DES BLANCS
Les parties vierges se trouvant entre les plages enregistrées sur un
disque compact peuvent être sautées pendant la lecture.
1 Appuyer sur CD BLANK SKIP.
“CD BLANK SKIP ON’’ est affiché et un petit point apparaît sur
l’affichage.
Petit point
J
.
....................._..
BLPit-'VKÎ
■ /;:..........................................................
2 Appuyer sur O- pour démarrer la lecture.
Les parties vierges se trouvant entre les plages sont sautées, et
le son est lu sans interruption. Si le son d’une plage s’affaiblit (si
la plage se termine avec une diminution progressive du niveau
sonore), la partie de raffaiblissement est aussi sautée.
Pour revenir à la lecture normale
Appuyer de nouveau sur CD BLANK SKIP; “CD BLANK SKIP OFF”
est affiché et le petit point disparaît de l’affichage.
• H peut y avoir des cas où la lecture avec saut des blancs ne
fonctionne pas correctement.
• La lecture avec saut des blancs est automatiquement annulée lors
de l’ENREGISTREMENT AVEC MONTAGE ET CALCUL DU
TEMPS (voir page 24), lors de l’ENREGISTREMENT AVEC
MONTAGE PROGRAMME (voir page 25) ou lors de
l’enregistrement pendant la LECTURE PROGRAMMEE (voir page
21) ou la LECTURE ALEATOIRE (voir page 21).
M
LECTURE PROGRAMME
On peut programmer un maximum de 30 plages de n'importe lequel
H
ü
<
O.
s
O
ü
w
Ul
D
a
M
5
ill
oc
3
H
ü
Ul
1 Appuyer sur deux fois PRGM en mode arrêt.
“PRGM” est affiché.
-■ 0 ;;0H
g
’ Mm
• Quand on appuie une fois sur PRGM à l’étape 1, l’appareil
passe au PROGRAMME DE KARAOKE (voir page 29)
Appuyer sur DISC DIRECT PLAY, puis appuyer sur
une des touches numériques 1-3 dans les trois
secondes pour sélectionner un disque.
Passer à l’étape suivante quand le plateau arrête de tourner.
Utiliser les touches numériques 0-9 et -i-IO pour
programmer une plage.
Exemple:
Pour sélectionner la vingt-cinquième plage, appuyer sur+10, +10
et 5.
Pour sélectionner la dixième plage, appuyer sur +10 et 0.
Numéro de la plage
sélectionnée
1: • J0iV
............
Numéro de programme Temps de lecture total des
P..0:-
O
4 Répéter les étapes 2 et 3 pour programmer d’autres
plages.
5 Appuyer sur -4^ pour démarrer la lecture.
Pour vérifier ie programme
A chaque pression sur ◄◄ ou ►► dans le mode arrêt, un numéro
de disque, un numéro de plage et un numéro de programme sont
affichés.
Pour effacer ie programme
Appuyer sur ■ CLEAR en mode arrêt.
Pour ajouter des piages au programme
Répéter les étapes 2 et 3 dans le mode arrêt. La plage sera
programmée à la suite de la dernière.
Pour changer ies piages programmées
Effacer le programme puis répéter toutes les étapes.
Pour iire ies piages programmées à piusieurs reprises
Après la programmation des plages, appuyer sur RANDOM/REPEAT
à plusieurs reprises jusqu’à ce que Ci. apparaisse sur l’affichage.
PRGM
I
Nombre total de plages
sélectionnées
:IP 4;;2\:ï
"■1
plages sélectionnées
REMARQUE
- Pendant la lecture programnnée, on ne peut pas effectuer la lecture
aléatoire, contrôler le temps restant et sélectionner un disque ou
une plage. “CAN’T USE” est affiché si on tente de sélectionner une
plage.
' “FULL” est affiché si on tente de programmer plus de 30 plages,
FRANÇAIS 21
Page 90

ENREGISTREMENT
ENREGISTREMENT DE BASE
Cette partie explique comment enregistrer à partir du tuner, du
lecteur de disques compacts ou d’un appareii externe.
►/O REC/
REC MUTE
Préparation
• Pour l’enregistrement, utiiiser des cassettes de type I (normales)
ou de type II (haute polarisation/Cr02).
• Bobiner la cassette jusqu’à l’endroit où on veut démarrer
i’enregistrement.
1 Insérer la cassette à enregistrer dans la platine
2.
insérer ia cassette avec la face à enregistrer en premier
orientée vers l’extérieur de i’appareil.
Pour arrêter l’enregistrement, appuyer sur ■.
Pour mettre l’enregistrement en pause, appuyer sur II.
(Applicable quand la source est TUNER, VIDEO/AUX ou MD.)
Pour reprendre l’enregistrement, appuyer de nouveau sur cette
touche.
Pour démarrer l’enregistrement avec la télécomande
Appuyer d’abord sur 9/0 REC/REC MUTE, puis appuyer sur
►/◄► dans ies deux secondes qui suivent.
Réglage du son pendant l’enregistrement
La commande VOLUME n’a pas d’effet sur l’enregistrement. Eiie
régie seulement le niveau des signaux allant aux enceintes et
au casque. Toutefois, ne pas oublier que l’enregistrement est
affecté par les fonctions BEAT, AUTO SPICE/FILL IN et SPICE
A/B, ainsi que par la fonction BBE.
INSERTION D’ESPACES BLANCS
L’insertion d’espaces blancs de quatre secondes permet
l’utilisation de la fonction senseur de musique. (Applicable quand
la source est TUNER/BAND, VIDEO/AUX ou MD.)
1 Appuyer sur • REC/REC MUTE pendant l’enregistrement
ou pendant le mode pause d’enregistrement.
lîUH clignote sur l’affichage pendant quatre secondes et un
espace blanc de quatre secondes est fait. Ensuite, la platine
■ passe au mode pause d’enregistrement.
2 Appuyer sur II pour reprendre l’enregistrement.
Pour insérer un espace blanc de moins de quatre secondes.
appuyer de nouveau sur # REC/REC MUTE tandis que l;l=t*i
clignote.
Pour insérer un espace blanc de plus de quatre secondes.
appuyer de nouveau sur • REC/REC MUTE une fois que la
platine passe au mode pause d’enregistrement. A chaque
pression sur la touche, un espace blanc de quatre secondes est
ajouté.
-A PUSH
EJECT
2 Appuyer sur REV MODE pour sélectionner le
mode d’inversion.
Pour enregistrer sur une face seulement, sélectionner Z..
Pour enregistrer sur les deux faces, sélectionner ID ou CID.
3 Sélectionner la fonction (TUNNER/BAND, VIDEO/
AUX, CD ou MD) et préparer la source à partir de
laquelle on veut enregistrer.
Pour enregistrer à partir d’un disque compact, appuyer
sur CD et mettre le(s) disque(s) compact(s) en place.
Pour enregistrer une émission de radio, appuyer sur
TUNER/BAND et accorder sur une station.
Pour enregistrer à partir d’une source connectée, appuyer
sur VIDEO/AUX ou MD.
4 Appuyer sur • REC/REC MUTE pour démarrer
l’enregistrement.
Lors de l’enregistrement à partir d’une source connectée,
mettre cette source en lecture.
Fn 87i;5y
Quand la fonction sélectionnée est CD, la lecture et
l’enregistrement démarrent simultanément.
22 FRANÇAIS
REMARQUE
“Can’t REC” est affiché si on tente d’enregistrer sur une cassette
dont les ergots en plastique sont cassés.
Pour effacer un enregistrement
S’assurer qu’aucun microphone n’est branché à cet appareil.
Régler le volume de microphone et le niveau d’écho sur OFF
(voir page 28). De plus, s’assurer que les fonctions BEAT et AUTO
SPICE sont hors service (page 11).
1 Insérer la cassette à effacer dans la platine 2 et appuyer sur
TAPE/DECK 1/2 pour afficher “TP 2”.
2 Bobiner la cassette jusqu’à l’endroit où on veut démarrer
l’effacement.
3 Régler le mode d’inversion en appuyant sur REV MODE.
4 Appuyer sur 9 REC/REC MUTE pour démarrer l’effacement.
Page 91

I-
DUPLICATION MANUELLE D UNE CASSEHE ■ DUPLICATION DE LA TOTALITE D UNE CASSEHE
Z
Ui
S
u
K
H
tf)
Ô
u
BC
z
111
REMARQ
• Bobiner la cassette jusqu'à l’endroit où on veut démarrer
l’enregistrement.
• Le mode d’inversion est automatiquement réglé sur ü.
Remarquer que l’enregistrement ne sera fait que sur une face
de la cassette.
1 Appuyer surTAPE/DECK 1/2.
2 Insérer la cassette originale dans la platine 1 et
la cassette à enregistrer dans la platine 2.
Insérer chaque cassette avec la face à lire ou à enregistrer
orientée vers l’extérieur de l’appareil.
3 Appuyer sur TAPE/DECK 1/2 pour sélectionner
la platine 1.
“TP 1” est affiché.
4 Appuyer sur • REC/REC MUTE pour démarrer
l’enregistrement.
La lecture et l’enregistrement démarrent simultanément.
Pour arrêter la duplication
Appuyer sur ■.
Cette fonction permet de faire des copies exactes des deux faces
de la cassette originale. Les faces arrière des deux cassettes
démarrent en même temps dès que la cassette la plus longue a
été inversée.
REMARQUE
• La duplication ne démarre pas à un point situé au milieu d’une
face.
• Le mode d’inversion est automatiquement réglé sur ü).
1 Appuyer sur TAPE/DECK 1/2.
2 Insérer la cassette originale dans la platine 1 et
la cassette à enregistrer dans la platine 2.
Insérer chaque cassette avec la face à lire ou à enregistrer
orientée vers l’extérieur de l’appareil.
3 Appuyer une ou deux fois sur SYNC DUB pour
démarrer l’enregistrement.
© Pour enregistrer à vitesse normale, appuyer une fois
sur la touche de manière que NORM-DUB soit affiché.
® Pour enregistrer à grande vitesse, appuyer deux fois sur
la touche de manière que HIGH-DUB soit affiché.
® (D
norm
Les cassettes sent rembebinées jusqu’au début des faces
avant, puis l’enregistrement démarre.
..
Düb.
H ./GH
......
DUE
Pour arrêter la duplication
Appuyer sur ■.
REMARQUE
Si l’ergot de sécurité d’une face ou l’autre de la cassette est
absent, l’enregistrement ne démarre pas.
FRANÇAIS 23
Page 92

6 Appuyer sur # REC/REC MUTE pour démarrer
EiEGISTRElNT AVEC lONTAGE ET CALCUL DU TEIPS
CD EDIT/
CHECK
l’enregistrement sur ia première face.
La cassette est rembobinée jusqu’au début de la face avant,
l’amorce est lue pendant dix secondes, puis l’enregistrement
démarre. Une fois que l’enregistrement sur la face avant (face
A) est terminé, l’enregistrement sur la face arrière (face B)
démarre.
5
La fonction enregistrement avec montage et calcul du temps
permet d’enregistrer à partir de disques compacts sans se
préoccuper de la durée de la cassette et de la durée des plages.
Quand un disque compact est en place, l’appareil calcule
automatiquement la durée totale des plages. Si nécessaire,
l’ordre des plages est changé de manière qu’aucune plage ne
soit tronquée.
(Al: Intelligence Artificielle)
REMARQUE
L’enregistrement avec montage et calcul du temps ne démarrera
pas à un point situé au milieu d’une face. La cassette doit être
enregistrée à partir du début d’une de ses faces.
1 Insérer la cassette dans la platine 2.
Insérer la cassette avec la face à enregistrer en premier
orientée vers l’extérieur de l’appareil.
2 Appuyer sur CD et mettre le(s) disque(s) en place.
3 Appuyer une fois sur CD EDIT/CHECK.
“EDIT” est affiché.
- - — «SB«*«™«»
^
------------------
_________
• Si “PRGM” est affiché, appuyer sur CD EDIT/CHECK.
4 Appuyer sur une des touches DISC DIRECT PLAY
1-3 pour sélectionner un disque.
5 Utiliser les touches numériques 0-9 de la
télécommande pour spécifier la durée de la
cassette.
On peut spécifier une durée de 10 à 99 minutes.
Exemple: Quand on utilise une cassette de 60 minutes,
appuyer sur 6 et 0.
En quelques secondes, les plages à enregistrer sur chaque
face de la cassette sont déterminées.
• La durée de la cassette peut aussi être spécifiée avec ◄◄,
►► ou MULTI JOG.
Durée de la cassette d’enregistrement restant pour la face A
I
Temps programmées
EDIT
:.::jïv
Plages
Pour arrêter l’enregistrement
Appuyer sur ■. L’enregistrement de la cassette et la lecture du
disque compact s’arrêtent simultanément.
Pour effacer le programme du montage
Appuyer deux fois sur ■ CLEAR de manière que “EDIT”
disparaisse de l’affichage.
Pour contrôler l’ordre des numéros des plages programmées
Avant l’enregistrement, appuyer sur CD EDIT/CHECK pour
sélectionner la face A ou B, puis appuyer sur ◄◄ ou à
plusieurs reprises.
Numéro de plage programmées
^/5 3 p--03it
>r_..
.............................
Face de la cassette Numéro de programme
I I
Numéros des plages
Pour ajouter des plages d’autres disques au programme du montage
S’il reste du temps sur la cassette après l’étape 5, on peut ajouter
des plages des autres disques situés dans le compartiment.
1 Appuyer sur CD EDIT/CHECK pour sélectionner la face A ou
B.
2 Appuyer sur une des touches DISC DIRECT PLAY 1-3 pour
sélectionner un disque.
3 Sélectionner les plages à l’aide des touches numériques de
la télécommande. Une plage dont la durée de lecture est
supérieure au temps restant ne peut pas être programmée.
4 Répéter les étapes 2 et 3 pour ajouter d’autres plages.
Durée des cassettes et temps du montage
La durée réelle d’une cassette est en général légèrement
supérieure à celle indiquée sur l’étiquette. Cet appareil peut
programmer des plages pour utiliser le temps en excès. Quand,
après le montage, la durée totale d’enregistrement est légèrement
supérieure à la durée spécifiée pour la cassette, l’affichage
indique le temps en excès (sans signe moins) au lieu du temps
restant de la face de la cassette (avec le signe moins).
REMARQUE
’ La fonction enregistrement avec montage et calcul du temps
ne peut pas être utilisée avec les disques contenant 31 plages
ou plus. “TR OVER” est affiché si un tel disque est utilisé.
' Si l’ergot de sécurité d’une face ou l’autre de la cassette est
absent, l’enregistrement ne se fait pas.
24 FRANÇAIS
Face de la cassette
A: Face du premier enregistrement
B: Face du deuxième enregistrement
Page 93

Répéter l’étape 5 pour le reste des plages de la
ENREGISTREMENT AVEC MONTAGE PROGRAMME
CD EDIT/CHECK
face A.
Une plage dont la durée de lecture est supérieure au temps
restant ne peut pas être programmée.
Appuyer sur CD EDIT/CHECK pour sélectionner
la face B, puis programmer les plages pour cette
face.
4,5
Après s’être assuré que “B” est affiché, répéter l’étape 5.
Face B de la cassette (face arrière)
8 Appuyer sur • REC/REC MUTE pour démarrer
l’enregistrement.
La cassette est rembobinée jusqu’au début de la face avant,
l’amorce est lue pendant dix secondes, puis l’enregistrement
démarre. Une fois que l’enregistrement sur la face avant (A)
La fonction enregistrement avec montage programmé permet
de programmer ies plages tout en contrôlant le temps restant
sur chaque face de la cassette.
est terminé, l’enregistrement sur la face arrière (B) démarre.
Pour arrêter l’enregistrement
Appuyer sur ■. Lenregistrement de la cassette et la lecture du
disque compact s’arrêtent simultanément.
I-
z
Itf
s
lU
oc
H
w
Ö
Ul
oc
Z
lU
Lenregistrement avec montage programmé ne démarrera pas à
un point situé au milieu d’une face. La cassette doit être
enregistrée à partir du début d’une de ses faces.
1 Insérer la cassette dans la platine 2.
Insérer la cassette avec la face à enregistrer en premier
orientée vers l’extérieur de l’appareil.
2 Appuyer sur CD et mettre le(s) disque(s) en place.
3 Appuyer deux fois sur CD EDIT/CHECK.
“EDIT” et “PRQM” sont affichés.
• Si “Al” est affiché, appuyer de nouveau sur CD EDIT/CHECK.
4 Utiliser les touches numériques de la
télécommande pour spécifier la durée de la
cassette.
On peut spécifier une durée de 10 à 99 minutes.
• La durée de la cassette peut aussi être spécifiée avec
ou MULTI JOG.
Durée de la cassette (face avant)
PRGMC.60
Face A de la cassette
.M
O
Durée maximale
d’enregistrement de la face A
...
30 » 00
Appuyer sur une des touches DISC DIRECT PLAY
1-3 pour sélectionner un disque.
Ensuite, utiliser les touches numériques 0-9 et
+10 de la télécommande pour programmer une
plage.
Exemple: Pour sélectionner la dixième plage du disque 2,
appuyer sur DISC DIRECT PLAY 2, puis appuyer sur +10 et
0.
Pour contrôler l’ordre des numéros des plages
programmées
Avant l’enregistrement, appuyer sur CD EDIT/CHECK pour
sélectionner la face A ou E5, puis appuyer sur ou à
plusieurs reprises.
Numéro de disque plage
Face de la cassette
Pour changer le programme de chaque face
Appuyer sur CD EDIT/CHECK pour sélectionner la face A ou B,
puis appuyer sur ■ CLEAR pour effacer le programme de la
face sélectionnée. Ensuite, reprogrammer des plages.
Pour effacer le programme du montage
Appuyer deux fois sur ■ CLEAR de manière que “EDIT”
disparaisse de l’affichage.
' On peut programmer un maximum de 30 plages de n’importe
lequel des disques en place.
' “FULL’ est affiché si on tente de programmer pius de 30 plages.
' Si l’ergot de sécurité d’une face ou l’autre de la cassette est
absent, l’enregistrement ne se fait pas.
Numéro de
B 0 F-'
I
.....
Numéro de programme
Numéros des plages
programmées
03
I
Numéro de la plage
sélectionnée
R10 P
Numéro de programme
....
01
Temps restant
de la face A
i
.........
O
Plages
programmées
221; 0 -
FRANÇAIS 25
Page 94

DOLBY PRO LOGIC
Le système Dolby Pro Logic et les enceintes centrale et arrière
(fournies d’origine) assurent un son "HomeTheater” intégral. Lors
de la lecture de disques laser ou de supports vidéo qui ont été
enregistrés avec Dolby Surround, un son étonnamment plein de
réalisme entoure l’auditeur pour créer un nouveau niveau de
divertissement audio/visuel.
La commande indépendante des quatre voies sonores permet à
l’auditeur d’obtenir le même type de reproduction sonore que
dans une salle de cinéma. Les parties vocales sont reproduites
à l’avant et au centre du champ sonore, tandis que les sons
ambiants tels que ceux d’automobiles et de foules sont reproduits
sur tous les côtés de l’auditeur pour une expérience audio/vidéo
pleine de réalisme. Prière de lire la partie suivante attentivement
pour “accorder” la sortie de la chaîne en fonction des
caractéristiques de l’espace d’écoute.
Contrôler les points suivants:
• Avant d’utiliser le système DOLBY PRO LOGIC, régler
correctement la balance des niveaux sonores des
enceintes.
• S’assurer que les enceintes fournies sont connectées et
positionnées correctement. (Voir pages 4 et 5.)
• S’assurer que le téléviseur et l’appareil vidéo sont connectés
correctement. (Voir page 5.)
• S’assurer que le disque laser, la cassette vidéo, etc. sont
compatibles .
2 Appuyer sur MANUAL SELECT pendant environ
quatre secondes, jusqu’à ce que “L” clignote.
L.:;-R
Un signal sonore est envoyé successivement à chaque canal
dans l’ordre suivant.
L: Enceinte gauche -*• CEN: Enceinte centrale -*■ R: Enceinte droite ■
-----------------------------
SUR: Enceintes surround •<
------------------------------
Régier ie niveau sonore des enceintes centrais
et surround.
Tandis que “CEN” ou “SUR” est affiché, appuyer sur ◄◄
DOWN ou UP de la télécommande pour régler le volume
de l’enceinte centrale ou de chaque enceinte surround et
l’adapter au niveau des enceintes avant.
rv-
CEN -i- 6N
r:.
Pour régler la balance entre les enceintes avant gauche et
droite, voir page 10. A ce moment, le mode DOLBY PRO
LOGIC doit être annulé en appuyant sur DOLBY PRO LOGIC
jusqu’à ce que "PRO-OFF” soit affiché.
REGLAGE DE LA BALANCE DES NIVEAUX DES ENCEINTES
4 Appuyer de nouveau sur MANUAL SELECT pour
arrêter le signal sonore.
REMARQUE
• Quand le séquenceur sonore, un cliquetis peut être émis par
les enceintes du fait des caractéristiques du circuit.Ceci n'est
■2,4
1
pas une panne.
• Si le niveau des enceintes surround ou de l’enceinte centrale
du système DOLBY PRO LOGIC est changé, celui du système
SURROUND (voir page 16) le sont également.
Au sujet des canaux
Les enceintes avant gauche et droite créent l’effet stéréo.
L’enceinte centrale aide à obtenir un positionnement sonore
précis sur un large champ sonore.
Les enceintes surround montées à l’arrière améliorent la
“profondeur” du champ sonore.
Pour changer le temps de retard
Cet appareil possède un générateur de signal d’essai intégré,
appelé séquenceur acoustique, pour un réglage aisé de la
balance des quatre voies. Le séquenceur sort un signal sonore
qui se “déplace” de voie à voie, permettant un réglage simple du
niveau sonore pour obtenir, à la position d’écoute, le même niveau
sonore apparent pour chaque voie.
Les enceintes surround reproduisent les sons une fraction de
seconde après les enceintes avant. Le retard est initialement
réglé à 20 millisecondes (ms).
Pour changer ce temps de retard standard, appuyer à plusieurs
reprises sur MANUAL SELECT de la télécommande jusqu’à ce
que “TIME” soit affiché. Ensuite, appuyer sur ◄◄ DOWN ou
►► UP. A chaque pression sur une des touches, le temps de
Utiliser la télécommande.
1 PRO LOGIC pourAppuyer sur DOLBY
retard change comme montré ci-dessous.
15 mS 20 mS <-> 30 mS
sélectionner NORMAL.
"NORMAL” est affiché.
Si “PHANTOM” ou “3 STEREO” est affiché, appuyer sur
DOLBY PRO LOGIC à plusieurs reprises jusqu’à ce que
“NORMAL” soit sélectionné.
r..
________
________
:!s
26 FRANÇAIS
Page 95

-MANUAL
SELECT
1
2
DOWN,
-UP
1 Appuyer sur VIDEO/AUX et mettre la source vidéo
en lecture.
“VIDEO” est affiché.
2 Appuyer sur DOLBY PRO LOGIC.
“NORMAL’ est sélectionné, et le son de la lecture est audible
avec l’effet DOLBY PRO LOGIC.
Pour annuler le mode Dolby Pro Logic
Appuyer sur DOLBY PRO LOGIC à plusieurs reprises jusqu’à
ce que “PRO-OFF” soit affiché.
Pour changer les niveaux sonores pendant la lecture
Après avoir réglé la balance avec le séquenceur acoustique, le
niveau sonore de l’enceinte centrale ou de chaque enceinte
surround peut être réglé pendant la lecture d’un disque laser ou
d’un support vidéo.
1 Appuyer à plusieurs reprises sur MANUAL SELECT de la
télécommande pour sélectionner “CEN” (enceinte centrale)
ou “SUR” (enceintes surround).
2 Tandis que “CEN”, ou “SUR” est affiché, appuyer sur
DOWN ou ►► UP de la télécommande pour régler le volume.
AUTRES MODES DOLBY PFîO LOGIC
En plus du mode NORMAL, cet appareil possède les modes
PHANTOM et 3 STEREO.
Mode PHANTOM: Utiliser ce mode quand aucune enceinte
centrale n’est connectée. Les signaux de la voie centrale sont
sortis par les enceintes gauche et droite.
Mode 3 STEREO: Utiliser ce mode quand aucune enceinte
surround n’est connectée. Ce mode reproduit les sons arrière
par les enceintes avant.
Pour sélectionner PHANTOM ou 3 STEREO
Appuyer sur DOLBY PRO LOGIC à plusieurs reprises jusqu'à
ce que le mode DOLBY PRO LOGIC souhaité soit affiché. Le
mode DOLBY PRO LOGIC est affiché de manière cyclique
comme suit.
|—>- NORMAL — PHANTOM — 3 STEREO
'---------------------PRO-OFF (annulation)
Pour régler la balance des niveaux sonores des enceintes connectées
Effectuer les étapes 2 à 4 de la partie “REGLAGE DE LA
BALANCE DES NIVEAUX DES ENCEINTES”.
• Selon la source sonore et/ou les conditions d'écoute, un effet
surround risque de ne pas être obtenu même quand le système
DOLBY PRO LOGIC est en service.
• Un effet DOLBY PRO LOGIC total ne peut pas être obtenu
quand on utilise un support ne portant pas la marque
□□jD^sûnnôû^ , Dans ce cas, utiliser le système SURROUND
à la place. (Voir page 16.)
• Le système DOLBY PRO LOGIC est annulé quand:
- le niveau d’écho est changé.
- le système SURROUND ou BBE est mis en service.
- un casque est branché.
- la fonction Karaoke est mise en service.
•Quand le système DOLBY PRO LOGIC est en service, le
volume de microphone doit être réglé sur OFF. Autrement, le
son DOLBY PRO LOGIC ne peut pas être reproduit
correctement.
------------------
----------------------------
1
'
O
(3
O
mi
O
ce
a
>■
n
mi
O
Q
FRANÇAIS 2 1
Page 96

KARAOKE
MIXAGE AVEC MICROPHON
3,4,5
5
4
1
Pour chanter avec accompagnement par une source musicale,
on peut brancher deux microphones (pas fournis) à cet appareil.
Utiliser des microphones à mini-fiches (3,5 mm 0).
Brancher les microphones aux prises MIC
MIC 2.
MIC 1
1 et
Microphones recommandés
L’utilisation de microphones de type unidirectionnel est
recommandée pour éviter le hurlement. Pour plus de détails,
contacter le distributeur Aiwa local.
FONCTIONS VOCAL FADER/MULTIPLEX
Cet appareil permet l’emploi de disques ou de cassettes comme
sources Karaoke.
Utiliser la fonction Vocal Fader pour des disques ou cassettes
ordinaires.
Utiliser la fonction Multiplex pour des disques ou cassettes multi
audio.
Appuyer sur KARAOKE à plusieurs reprises pour
sélectionner ia fonction Vocai Fader ou Muitiplex.
A chaque pression sur KARAOKE, une de ces fonctions est
sélectionnée de manière cyclique.
(D
UF
H
....
Lir
' Pïpx
.
1....
2 Appuyer sur une des touches de fonction pour
sélectionner la source à mixer, et mettre cette
source en lecture.
3 Régler le volume et la tonalité de la source.
4 Appuyer sur MIC puis tourner VOLUME dans les
quatre secondes pour régler le volume de
microphone.
Le volume de microphone peut être sélectionné de 1 à MAX
(7) ou OFF (annulation).
Le volume des deux microphones est réglé simultanément.
5 Appuyer sur ECHO puis tourner la commande
VOLUME dans les quatre secondes pour régler
le niveau d’écho.
Le niveau d’écho peut être sélectionné de 1 à MAX (7) ou
OFF (annulation).
Pour changer le temps de retard de l’écho
Tenir ECHO enfoncée tandis que l’écho est en service.
Les réglages “L” (Long) et “M” (Moyen) sont affichés
alternativement. Relâcher la touche quand le réglage souhaité
est affiché.
Pour enregistrer le son de microphone mixé avec la
source sonore
Suivre la procédure d’enregistrement à partir de la source (voir
page 22).
SYNC DUB ne peut pas être utilisée pour l’enregistrement de
mixage.
Quand on n’utiliae pas les microphones
Régler le volume de microphone et le niveau d’écho sur OFF et
débrancher les microphones des prises MIC.
REMARQUE
• Quand le niveau d’écho est changé, le système SURROUND
et le système DOLBY PRO LOGIC sont automatiquement
annulés.
• Si un microphone est placé trop près d’une enceinte, un bruit
de hurlement risque de se produire. Le cas échéant, éloigner
le microphone de l’enceinte ou baisser le volume de
microphone.
• Si le son d’un microphone est extrêmement fort, il peut être
déformé. Le cas échéant, baisser le volume de microphone.
• Quand la fonction est changée, les réglages de volume de
microphone et de niveau d’écho sont annulés.
28 FRANÇAIS
--------
® Vocal Fader
La partie vocale devient plus douce que l'accompagnement.
(2) Auto Vocal Fader
La partie vocale devient plus douce uniquement pendant qu'il
y a une entrée audio par un microphone.
UF- OFF ^
--------
(D Multiplex
Seul le son du canal gauche est audible par les deux enceintes
et le son du canal droit est atténué
® Auto Multiplex
Le son du canal gauche est audible par les deux enceintes et
le son du canal droit est atténué uniquement pendant qu’il y a
une entrée audio par un microphone.
® Annulation
Pour changer le réglage du retard de la fonction Auto
Vocal Fader ou Auto Multiplex
La partie vocale initiale atténuée peut être rétablie plus
rapidement au niveau normal.
Quand la fonction Auto Vocal Fader ou Auto Multiplex est
sélectionnée, “A-VF” ou “A-MPX” est affiché pendant trois
secondes puis l'affichage passe au nom de la fonction
sélectionnée. Une fois que le nom de la fonction sélectionnée
est affiché, tenir
soit affiché.
Pour revenir au réglage initial, sélectionner SLOW.
Quand l’alimentation est coupée, SLOW est sélectionné.
Pour changer le canal audible de la fonction Multiplex
Seul le son du canal droit peut être rendu audible par les deux
enceintes.
Quand la fonction Multiplex est sélectionnée, “MPX-L’ est affiché
pendant trois secondes puis l’affichage passe au nom de la
fonction sélectionnée. Une fois que le nom de la fonction
sélectionnée est affiché, tenir KARAOKE enfoncée jusqu’à ce
que “MPX-R” soit affiché.
Pour revenir au réglage initial, sélectionner MPX-L.
Quand l’alimentation est coupée, MPX-L est sélectionné.
REMARQUE
• Les fonctions Karaoke risquent de ne pas fonctionner
correctement avec les disques compacts ou cassettes suivants.
- Disques ou cassettes à enregistrement mono
- Disques ou cassettes enregistrés avec de forts échos
- Disques ou cassettes avec la partie vocale enregistrée sur la
droite ou la gauche du spectre sonore
• Quand la fonction Karaoke est en service, le son est sorti en
monophonie.
• Quand la fonction est changée, la fonction Karaoke est annulée.
KARAOKE enfoncée jusqu’à ce que “FAST”
Page 97

PROGRAMME DE KARAOKE
1
5
Pour ajouter une réservation pendant la lecture
Répéter l’étape 3.
Pour contrôler les plages réservées
Appuyer, à pusieurs reprises, sur CD EDIT/CHECK. A chaque
pression, un numéro de disque et un numéro de plage sont
affichés dans l'ordre réservé.
Pour arrêter la lecture
Appuyer sur ■.
Quand on appuie sur ◄►.la lecture redémarre à la dernière
plage.
Pour sauter la plage en cours de lecture
Appuyer sur ►►. La plage sautée est esffacée du programme.
Pour effacer toutes les réservations
Appuyer sur ►► à plusieurs reprises jusqu’à ce que “K - POO”
soit affiché.
U
ü
O
4
K
4
Avant ou pendant la lecture de disque compact, on peut réserver
jusqu’à quinze plages à lire après la plage courante. Chaque
réservation est effacée quand sa lecture est terminée.
Utiliser la télécommande.
1 Appuyer sur CD et mettre les disques en place.
2 Appuyer une fois sur PRGM.
. f;.--
r-.
/,
...............
...........
P0@ -
3 Appuyer sur DISC DIRECT PLAY, puis appuyer
sur une des touches numériques 1-3 dans les
trois secondes pour sélectionner un disque.
Ensuite, programmer une plage à l’aide des
touches numériques 0-9 et +10.
Numéro du Numéro de la
disque réservé plage réservée
.;>- iKi
............
K P 00
Pour annuler le programme de Karaoke, appuyer une fois de
plus sur cette touche. L’affichage repasse à celui de la lecture de
disque compact.
REMARQUE
’ Si le numéro de plage réservé n’existe pas sur le disque
sélectionné, l’appareil arrête la lecture et l’affichcige clignote.
Dans ce cas, appuyer sur ►► pour sauter l’erreur. Ensuite,
appuyer sur pour démarrer la lecture à la pfage réservée
suivante.
' Si on appuie plusieurs fois sur PRGM à l’étape 1, “PRGM” est
affiché et l’appareil passe au mode lecture programmée de
disque compact (voir page 21).
Pour annuler la lecture programmée, appuyer sur ■ C1.EAF1.
4 Répéter l’étape 3 pour réserver d’autres plages.
5 Appuyer sur pour démarrer la lecture.
Une fois qu’une plage est lue, elle est effacée du programme.
Numéro de disque
Disque en de la dernière Nombre de plages
cours de lecture réservation réservées restantes
f/-.
.....
..............—f- ■ .-.p-.-
Numéro de plage de la Le numéro de la plage en
dernière réservation cours de lecture clignote.
.........................
FRANÇAIS 29
Page 98

HORLOGE ET MINUTERIE
REGLAGE DE L’HORLOGE
1
3
L’horloge est affichée. (Le signe entre les heures et les minutes
clignote.) Lors du premier branchement du cordon secteur à une
prise de courant après l’achat ou quand le réglage de l’horloge
est annulé du fait d’une interruption d’alimentation, la totalité de
l’affichage de l’horloge clignote.
/ Appuyer sur CLOCK.
REGLAGE DE LA MINUTERIE D’ARRET
L’appareil peut être mis hors tension automatiquement au bout
d’un temps spécifié.
Utiliser la télécommande.
1 Appuyer sur SLEEP.
2 Dans les quatre secondes, tourner MULTI JOG
pour spécifier les heures et les minutes.
La rotation de MULTI JOG change à la fois les heures et les
minutes.
On peut aussi utiliser ◄◄ ou ►► au lieu de MULTI JOG. Le
fait de tenir l’une ou l’autre de ces touches enfoncée fait varier
l’heure rapidement.
3 Appuyer sur ENTER ou II.
L’horloge démarre à 00 seconde.
Pour rétablir un réglage initial de l’horloge
Pour rétablir le réglage initial de l’horloge, appuyer sur CLOCK
avant de terminer l’étape 3. Ceci annule tout nouveau réglage.
Pour faire apparaître l’horloge quand un autre affichage
est en service
Appuyer sur CLOCK. L’heure est affichée pendant quatre
secondes puis l’affichage initial réapparaît. Toutefois, l’heure ne
peut pas être affichée pendant l’enregistrement.
Pour passer au format de 24 heures
Appuyer sur CLOCK puis appuyer sur ■ dans les quatre
secondes.
Pour rétablir le format de 12 heures, procéder de la même
manière.
Si l’affichage de l’horloge clignote
Ceci est dû à une interruption d’alimentation. L’heure courante
doit être réglée de nouveau.
Si l’alimentation est interrompue pendant plus d’environ 24
heures, tous les réglages mémorisés après l’achat doivent
être faits de nouveau.
2 Dans les quatre secondes, tourner MULTI JOG
pour spécifier le temps jusqu’à la mise hors
tension.
Le temps change entre 5 et 240 minutes par pas de 5 minutes.
On peut aussi utiliser ◄◄ et ►► au lieu de MULTI JOG.
Temps spécifié
Pour contrôler le temps restant jusqu’à la mise hors tension
Appuyer une fois sur SLEEP. Le temps restant est affiché pendant
quatre secondes.
Pour annuier ia minuterie d’arrêt
Appuyer deux fois sur SLEEP de manière que “SLEEP oFF”
apparaisse sur l’affichage.
REMARQUE
Si le mode économie d’énergie (voir page 8) est en service, tous
les indicateurs de l’affichage s’éteignent quand l’alimentation est
coupée. Pour faire apparaître l’horloge, appuyer sur CLOCK;
l’heure est alors affichée pendant quatre secondes.
30 FRANÇAIS
Page 99

- ,5j1
----- ----- ----
‘
s'Ss r-, •
•G
Avec la minuterie intégrée, l’appareil peut être mis sous tension
chaque jour à l’heure spécifiée.
-
a Q
Préparation
S’assurer que l’horloge est réglée correctement.
1 Appuyer sur une des touches de fonction pour
sékictionner une source.
• Si on appuie sur TUNER/BAND, la gamme ne peut pas être
sélectionnée à cette étape.
2 Appuyer sur TIMER à plusieurs reprises jusqu’à
ce que 0 apparaisse sur l’affichage.
Lheure et le nom de la source audio clignotent alternativement.
©
I
¡H
: ■■■■■ :
3 Dans les six secondes, tourner MULTI JOG pour
spécifier l’heure de la mise sous tension par la
minuterie, puis appuyer sur ENTER ou II.
La rotation de MULTI JOG change à la fois les heures et les
minutes.
On peut aussi utiliser ◄◄ ou ►► au lieu de MULTI JOG. Le
fait de tenir l’une ou l’autre de ces touches enfoncée fait varier
l’heure rapidement.
5 Régler le volume.
Lors de la mise sous tension par la minuterie, le son de la
source sera reproduit au niveau du volume réglé à cette étape.
Toutefois, si le niveau du volume est réglé à 21 ou plus, il
sera automatiquement réglé à 20 lors de la mise sous tension.
6 Préparer la source.
Pour écouter un disque compact, mettre le disque à lire en
premier en place sur le plateau 1.
Pour écouter une cassette, l’insérer dans la platine 1 ou 2.
Pour écouter la radio, accorder sur une station.
7 Appuyer sur POWEFi pour meîttre l’appareil hors
tension.
Quand l’heure de la mise sous tension par la minuterie est
atteinte, l’appareil est mis sous tension et la lecture commence
sur la source sélectionnée.
En appuyant sur une des touches de fonction avant d’appuyer
sur ENTER ou II à l’étape 3, on peut changer la source
sélectionnée à l’étape 1.
U
E
U
I-
3
1“
111
111
o
G
J
DC
O
X
Pour contrôler le réglage de la minuterie
Appuyer sur TIMER.
La source sélectionnée, l’heure de la mise sous tension par la
minuterie et la durée de la mise sous tension par la minuterie
sont affichées pendant quatre secondes.
Pour changer un réglage
Recommencer à partir de l’étape 1.
Toutefois, si on ne change pas l’heure de la mise sous tension
par la minuterie, appuyer deux fois sur ENTER à l’étape 3 et
continuer à partir de l’étape 4.
Pour annuler provisoirement le mode attente de minuterie
Appuyer sur TIMER à plusieurs reprises de manière que 0
disparaisse.
Pour rétablir le mode attente de minuterie, appuyer de nouveau
sur la touche de manière que 0 soit affiché.
Utilisation de l’appareil lorsque la minuterie est réglée
On peut utiliser l’appareil normalement après avoir réglé la
minuterie.
Avant de mettre l’appareil hors tension, effectuer les étapes 5 est
6.
• La lecture et l’enregistrement commandés par la minuterie ne
se feront pas si l’appareil n’est pas mis hors tension.
• Un appareil connecté ne peut pas être mis sous et hors tension
par la minuterie intégrée de l’appareil principal. Utiliser une
minuterie externe.
0Mnl 2;; 00
4 Dans les quatre secondes, tourner MULTI JOG
pour sélectionner la durée de la mise sous
tension par la minuterie.
La durée peut être spécifiée entre 5 et 240 minutes par pas
de 5 minutes.
On peut aussi utiliser ◄◄ ou ►► au lieu de MULTI JOG.
La durée est automatiquement réglée au bout de quatre
secondes. Elle est aussi réglée si on appuie sur ENTER ou
Il dans les quatre secondes après l’étape 4.
ENREGISTREMENT COMMANDE PAR MINUTERIE
L’enregistrement commandé par minuterie est applicable
seulement aux sources TUNER et VIDEO/AUX (avec une
minuterie externe).
Appuyer sur TUNER/BAND ou VIDEO/AUX pour sélectionner
une source, puis appuyer sur TIMER à plusieurs reprises
jusqu’à ce que ©REC s’allume sur l’affichage. Dans les six
secondes, effectuer les étapes de la partie “REGLAGE DE LA
MINUTERIE” à partir de l’étape 3 et, après l’étape 6, insérer la
cassette à enregistrer dans la platine 2.
• Quand le mode économie d’énergie (voir page 8) est en service,
le niveau du volume de l’enregistrement commandé par
minuterie sera 0 (niveau minimal).
• On ne peut pas utiliser la fonction minuterie pour enregister à
partir d’un disque compact ou d’une cassette.
FRANÇAISS 31
Page 100

AUTRES CONNEXIONS
CONNEXION D’UN APPAREIL OPTIONNEL
-CD DIGITAL OUT
i
s
r^C»)r
(BIHI
IHUt
(OPTICAL)
■ VIDEO/AUX
■ MD
■ LINE OUT
•SUB
WOOFER
PRISE SUBWOOFER
Connecter un caisson de graves alimenté optionnel muni d’un
amplificateur intégré à cette prise.
ECOUTE DE SOURCES EXTERNES
f
Pour plus de détails, se reporter au mode d’emploi de l’appareil
connecté.
• Les cordons de raccordement ne sont pas fournis. Se procurer les
cordons nécessaires.
• Pour les appareils optionnels disponibles, consulter le distributeur
Aiwa local.
PRISES VIDEO/AUX
Cet appareil peut recevoir des signaux sonores analogiques par ces
prises.
Utiliser un câble à fiches phono RCA pour connecter un appareil
audio (tourne-disque, lecteur de disque laser, lecteur de minidisque,
magnétoscope, téléviseur, etc.).
Connecter la fiche rouge à la prise VIDEO/AUX R et la fiche blanche
à la prise VIDEO/AUX L.
Pour connecter un tourne-disque
Utiliser un tourne-disque Aiwa muni d’un amplificateur à égaliseur
intégré.
PRISES MD
Ces prises sont recommandées pour ia connexion d’un lecteur de
minidisque.
Utiliser un câble à fiches phono RCA.
Connecter la fiche rouge à la prise MD R et la fiche blanche à la
prise MD L.
Pour utiliser l’appareil connecté aux prises VIDEO/AUX ou aux prises
MD, procéder de la manière suivante.
1 Appuyer sur VIDEO/AUX ou MD.
Pour utiliser l’appareil connecté aux prises VIDEO/AUX. appuyer
sur VIDEO/AUX. “VIDEO” apparaît sur l’affichage.
Pour utiliser l’appareil connecté aux prises MD. appuyer sur MD.
“MD” apparaît sur l’affichage.
2 Mettre l’appareil connecté en lecture.
Pour changer un nom de source sur l’affichage
Quand on appuie sur VIDEO/AUX, “VIDEO” est affiché initialement.
On peut remplacer ce nom par “AUX” ou “TV”.
L’appareil étant sous tension, appuyer sur POWER tout en appuyant
sur VIDEO/AUX.
Répéter cette procédure pour sélectionner un des noms.
■MD
PRISES LINE OUT
Cet appareil peut sortir les signaux sonores analogiques par ces
prises.
Utiliser un câble à fiches phono RCA pour connecter un appareil
audio muni de prises LINE IN (entrée analogique).
Connecter la fiche rouge à la prise LINE OUT R et la fiche blanche
à la prise LINE OUT L.
REMARQUE
Ne pas connecter un appareil aux prises LINE OUT et aux prises
VIDEO/AUX simultanément. Cela générerait des parasites et
provoquerait une panne.
PRISE CD DIGITAL OUT (OPTICAL)
Cet appareil peut sortir les signaux sonores numériques de disque
compact par cette prise.
Utiliser un câble optique pour connecter un appareil audio numérique
(platine DAT, enregistreur de minidisque, etc.).
Enlever le capuchon antipoussière @ de la prise CD DIGITAL OUT
(OPTICAL). Ensuite, connecter la fiche d’un câble optique à cette
prise.
Quand la prise CD DIGITAL OUT (OPTICAL) n’est pas utilisée
Mettre en place le capuchon antipoussière fourni.
Pour régler le niveau sonore de la source externe
Si le niveau sonore de la source externe est beaucoup plus élevé ou
beaucoup plus faible que celui des autres sources, le régler de la
manière suivante.
1 Appuyer sur VIDEO/AUX ou MD et mettre l’appareil en lecture.
2 Appuyer sur ou ►► de manière que le niveau sonore soit le
même que celui des autres sources.
REMARQUE
Pendant l’enregistrement, le niveau sonore ne peut pas être réglé.
32 FRANÇAIS
 Loading...