

Page 1

d
OPERATING INSTRUCTIONS
MANUAL DE INSTRUCCIONES
MODE D’EMPLOI
CT-X410 YU
STEREO CAR CASSETTE RECEIVER
RADIO-CASSETTE ESTEREOFONICO PARA AUTOMOVIL
ENGLISH
ESPAÑOL
FRANÇAIS
OWNER’S RECORD
For your convenience, record the model number and
serial number (you will find them on the right side of
your set) in the space provided below. Please refer to
them when you contact your AIWA dealer in case of
difficulty.
Model No. CT-X410
Serial No.
Page 2
Welcome
Thank you for your purchasing this AIWA product.
To optimize the performance of this unit, please
read through this manual carefully.
In addition to this operating instructions manual,
be sure to refer to the separate installation and
connections manuals as well.
PRECAUTIONS
• This unit is designed to be operated on a 12-volt
DC negative-ground electrical system only.
•To prevent short-circuiting, disconnect the
negative car battery terminal until the unit has
been mounted and connected completely.
• When replacing the fuse, be sure to use one
whose amperage rating is identical. Use of a
fuse of higher amperage may cause serious
damage to the unit.
• Keep screwdrivers, etc. and other metallic or
magnetic objects away from the playback head.
• When your car was parked in direct sunlight
resulting in a considerable rise in temperature
inside the car, allow the unit to cool off before
operating it.
• Keep the volume at such a level that you can
hear outside warning sounds (horns, sirens,
etc.).
Notes on cassettes
Do NOT expose cassettes to direct sunlight,
extremely high or cold temperature or moisture.
Keep cassettes away from equipment with builtin magnets to avoid unwanted noise or loss of
sound quality.
Do NOT touch the tape of a cassette, as any dirt
or dust will contaminate the heads.
Be sure to remove any cassette from the unit if
you are not using it.
NOTE
This equipment has been tested and found to
comply with the limits for a Class B digital device,
pursuant to Part 15 of the FCC Rules. These
limits are designed to provide reasonable
protection against harmful interference in a
residential installation.
This equipment generates, uses, and can radiate
radio frequency energy and, if not installed and
used in accordance with the instructions, may
cause harmful interference to radio
communications. However, there is no guarantee
that interference will not occur in a particular
installation. If this equipment does cause harmful
interference to radio or television reception, which
can be determined by turning the equipment off
and on, the user is encouraged to try to correct
the interference by one or more of the following
measures:
— Reorient or relocate the receiving antenna.
— Increase the separation between the
equipment and receiver.
— Connect the equipment into an outlet on
circuit different from that to which the
receiver is connected.
— Consult the dealer or an experienced radio/
TV technician for help.
CAUTION
Modifications or adjustments to this product, which
are not expressly approved by the manufacturer,
may void the user’s right or authority to operate
this product.
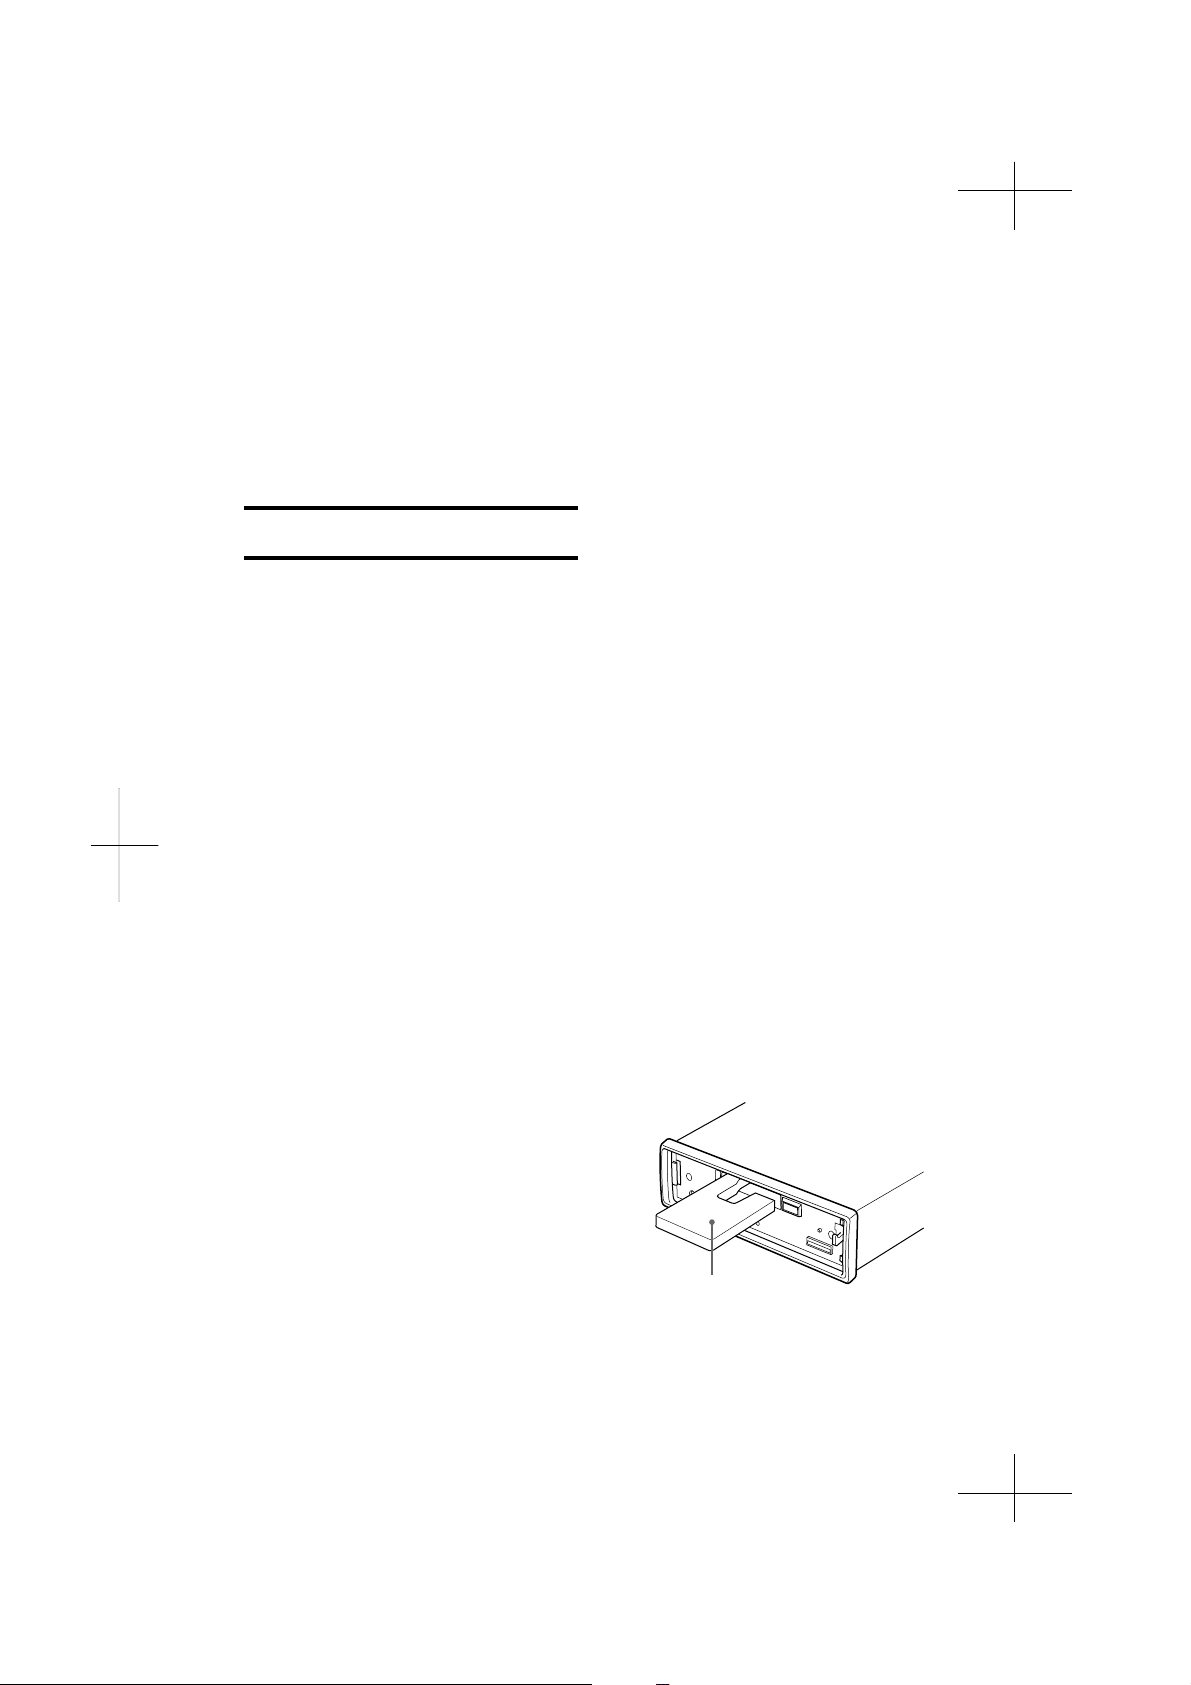
Caution on the transit protection pad
The unit is shipped with a transit protection pad
in the cassette compartment.
Be sure to press EJECT z to remove the pad
before operating the unit.
1
ENGLISH
Transit protection pad
CTX410(YU)-total-En-2
Page 3

TABLE OF CONTENTS
PARTS AND CONTROLS .................................................................................................................. 3
DETACHING AND ATTACHING THE FRONT PANEL ...................................................................... 4
SETTING THE CLOCK ....................................................................................................................... 5
RADIO OPERATION .......................................................................................................................... 5
PRESETTING STATIONS .................................................................................................................. 6
MY INFORMATION SWITCH ............................................................................................................. 8
TAPE PLAYBACK ............................................................................................................................... 9
SOUND ADJUSTMENTS ................................................................................................................. 10
CONNECTING A PORTABLE CD/MD/MP3 PLAYER OR OTHER EQUIPMENT ........................... 12
SETTING THE BEEP TONE ............................................................................................................. 13
MAINTENANCE ................................................................................................................................ 13
SPECIFICATIONS ............................................................................................................................ 14
ENGLISH
ENGLISH
CTX410(YU)-total-En-3
2
Page 4
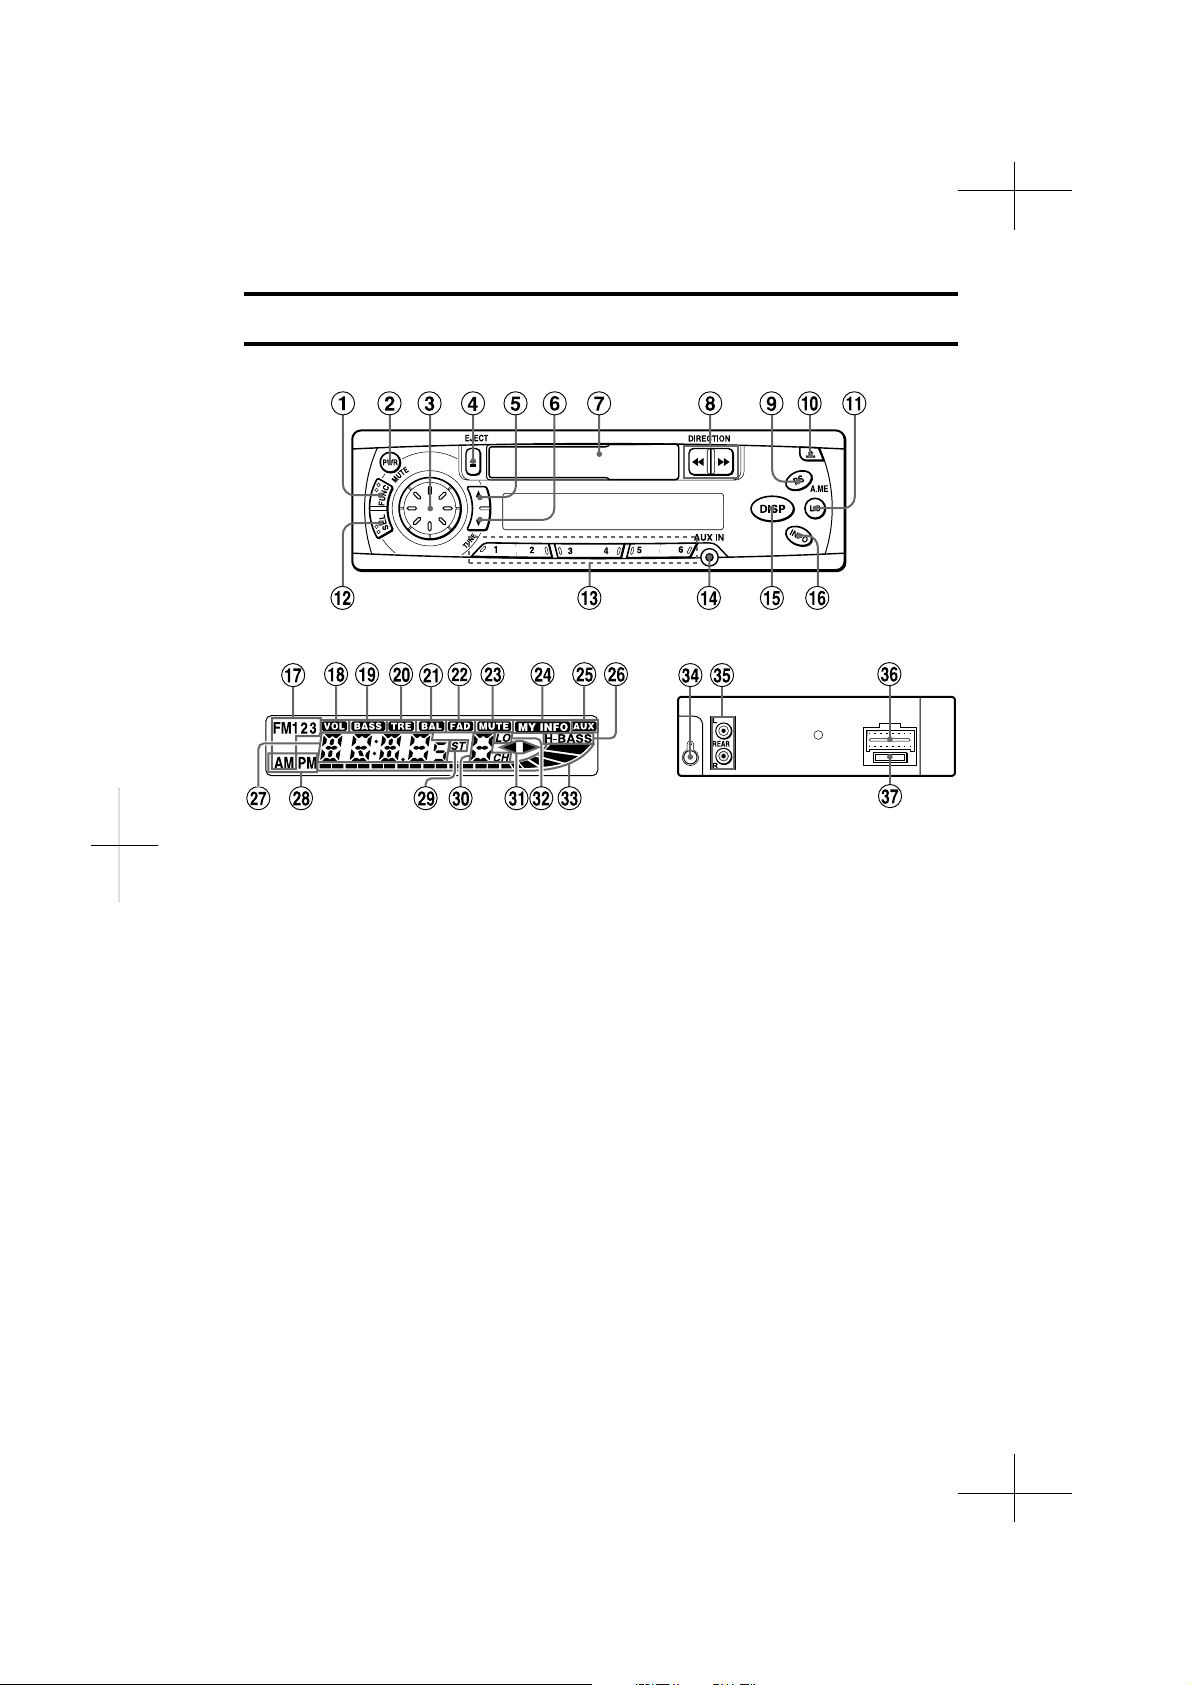
PARTS AND CONTROLS
Front panel
Display window
Front panel
1 FUNC (function) button
2 PWR (power on/off)/MUTE button
3 Jog Dial
4 z (eject) button
5 TUNE i button
6 TUNE k button
7 Cassette compartment
8 DIRECTION f/g button
9
A.ME (Auto Memory)/PS (Preset Scan)
button
0 % (release) button
! LO (local) button
@ SEL (select) button
# Preset station buttons (1 – 6)
$ AUX IN jack (3.5-mm dia.)
% DISP (display) button
^ INFO (My Information) button
Rear panel
Display window
& Band indicator
* VOL (volume) indicator
( BASS (bass) indicator
) TRE (treble) indicator
- BAL (balance) indicator
= FAD (fader) indicator
q MUTE indicator
w MY INFO (My Information) indicator
eAUX indicator
r H-BASS (High BASS) indicator
t Main display section
y AM/PM (clock) indicator
u ST (stereo) indicator
i Subdisplay section
o d (tape direction) indicators
p LO (local) indicator
[ Audio level indicator
Rear panel
] Antenna jack
\ REAR preout jacks
a Power supply/speaker connector
s Fuse
3
ENGLISH
CTX410(YU)-total-En-4
Page 5

DETACHING AND
ATTACHING THE FRONT
PANEL
You can detach the front panel from the unit and
carry it with you when you leave your car
unattended.
When you carry the front panel out of your car,
use the supplied carrying case.
Before detaching the front panel, remove the
cassette to prevent possible damage to the unit.
1 Press and hold PWR for more than 2
seconds to turn the unit off.
2 While supporting the front panel with
one hand, press % to release one side
of the panel. Care must be taken not to
drop the panel. It may suddenly become
detached at this point.
3 When the front panel is lifted from the
unit, remove it by pulling it away from
the unit.
Attaching the front panel
Security Lamp
When the front panel is detached, you can find an
LED lamp on the front side of the unit. This lamp
is designed to deter theft, and continues to flash
when the front panel is detached. This unit is not
equipped with any other security system, such as
a security alarm, so there are limitations to its
effectiveness.
LED lamp
Do NOT touch the connector on the reverse
side of the front panel, as doing so may
contaminate the connector and cause poor
connection, resulting in a malfunction.
ENGLISH
CTX410(YU)-total-En-5
4
Page 6

SETTING THE CLOCK
RADIO OPERATION
1 Press PWR to turn the unit on.
2 Press DISP to have the clock displayed.
If the clock indication is already displayed,
skip this step.
3 Press and hold DISP for more than 2
seconds.
4 Press TUNE
to set the hour.
Press TUNE
to set the minute.
Rotate the Jog Dial clockwise to go forward.
Rotate the Jog Dial counterclockwise to go
backward.
i
, then rotate the Jog Dial
k
, then rotate the Jog Dial
5 Press DISP.
The clock starts working from 0 second.
To have the clock displayed when the unit is on
Press DISP. To return the unit to its former
display, press DISP again.
1 Press PWR to turn the unit on.
2 Press FUNC repeatedly to select the
band from among FM1, FM2, FM3, AM1,
and AM2.
The band indicators appear cyclically in order.
• FM1, FM2 and FM3 share the same
frequency range.
• AM1 and AM2 share the same frequency
range.
Band indicator Frequency indication
3 Press (and hold for more than 2
seconds) either TUNE
tune in the desired station.
The unit starts scanning and tunes in a station
automatically (seek tuning).
Press TUNE i to increase and TUNE k to
decrease the frequency.
Press the button again to cancel seek tuning.
Repeat the procedure until the desired station
is tuned in.
Note
If you press (for less than 0.5 second at a
time) either TUNE i or TUNE k, the frequency
increase or decrease step by step.
i
or TUNE k to
4 Adjust the volume with the Jog Dial.
5
ENGLISH
CTX410(YU)-total-En-6
Page 7

To turn the unit off
Press and hold PWR for more than 2 seconds.
If you press this button for less than 2 seconds,
it functions as MUTE.
Note
The unit turns on in the last mode selected when
you turned off the unit.
LO (local/DX) button
You can use Local mode when you wish to tune
in only strong stations during seek tuning. In
Radio mode, press LO to select Local mode. The
“LO” indicator lights up.
• Press LO to cancel Local mode and switch to
DX (distance) mode.
• The “ST” (stereo) indicator lights up when the
tuned-in station is broadcasting in stereo and
the reception is good.
FUNC (function) button
Each time you press FUNC, the unit switches
to one of the following modes, in cyclic order.
FM1 FM2 FM3 AM1
AM2
* Tape Play mode (available while a cassette is in
the unit)
PRESETTING STATIONS
To preset stations automatically
(Auto Memory)
1 Press PWR to turn the unit on.
2 Press FUNC repeatedly to select a
desired band from among FM1, FM2,
FM3, AM1, and AM2.
3 Press and hold A.ME/PS for more than
2 seconds to activate the automatic
presetting function.
This unit can store up to 6 stations in memory
for the preset station buttons 1 to 6 (with the
“LO” (local) indicator lit).
If the unit could not find strong stations, the
“LO” (local) indicator goes off, and a search
begins for weaker stations.
Use this function to automatically preset up to 6
stations each for FM1, FM2, FM3, AM1, and AM2
(up to a total of 30 stations).
• When the auto memory operation is completed,
the station assigned to preset station button 1 is
tuned in.
• To stop the auto memory operation, press A.ME/
PS again.
To check the preset stations (Preset Scan)
• If you wish to check the preset stations, press
A.ME/PS for less than 2 seconds. The preset
stations stored in memory will be tuned in for 5
seconds each in order.
• To stop this function, press A.ME/PS again or
press any of the preset station buttons 1 to 6.
continued
ENGLISH
CTX410(YU)-total-En-7
6
Page 8
PRESETTING STATIONS
To preset stations manually
You can manually preset stations that have not
been selected by an auto memory operation.
1 Press PWR to turn the unit on.
2 Press FUNC repeatedly to select the
band from among FM1, FM2, FM3, AM1,
and AM2.
3 Tune in the station that you wish to
i
preset with TUNE
or TUNE k.
4 Press and hold one of the preset station
buttons 1 to 6 for approximately 2
seconds.
While the station you are presetting is being
registered in memory, the unit beeps.
The preset station number appears to the
right of the frequency indication.
Frequency
indication
Preset station
number
To tune in a preset station
1 Press PWR to turn the unit on.
2 Press FUNC repeatedly to select a
desired band from among FM1, FM2,
FM3, AM1, and AM2.
3 Press the desired preset station button.
The preset station number appears to the
right of the frequency indication.
Active tuning reception control (ATRC)
This unit automatically suppresses FM noise
caused by varying signal strength resulting from
movement of the car.
• The built-in automatic blending circuit mixes the
left and right channel signals according to the
strength of the reception. At the same time, the
high-cut circuit activates to maintain sound
quality.
• If the reception becomes even weaker, the unit
automatically switches to Monaural mode to
reduce noise.
Repeat these procedures to preset up to 6 stations
each for FM1, FM2, FM3, AM1, and AM2.
• If you preset a station on a preset station button
on which another station of the same band has
already been preset, the previously preset station
will be erased.
7
ENGLISH
CTX410(YU)-total-En-8
Page 9
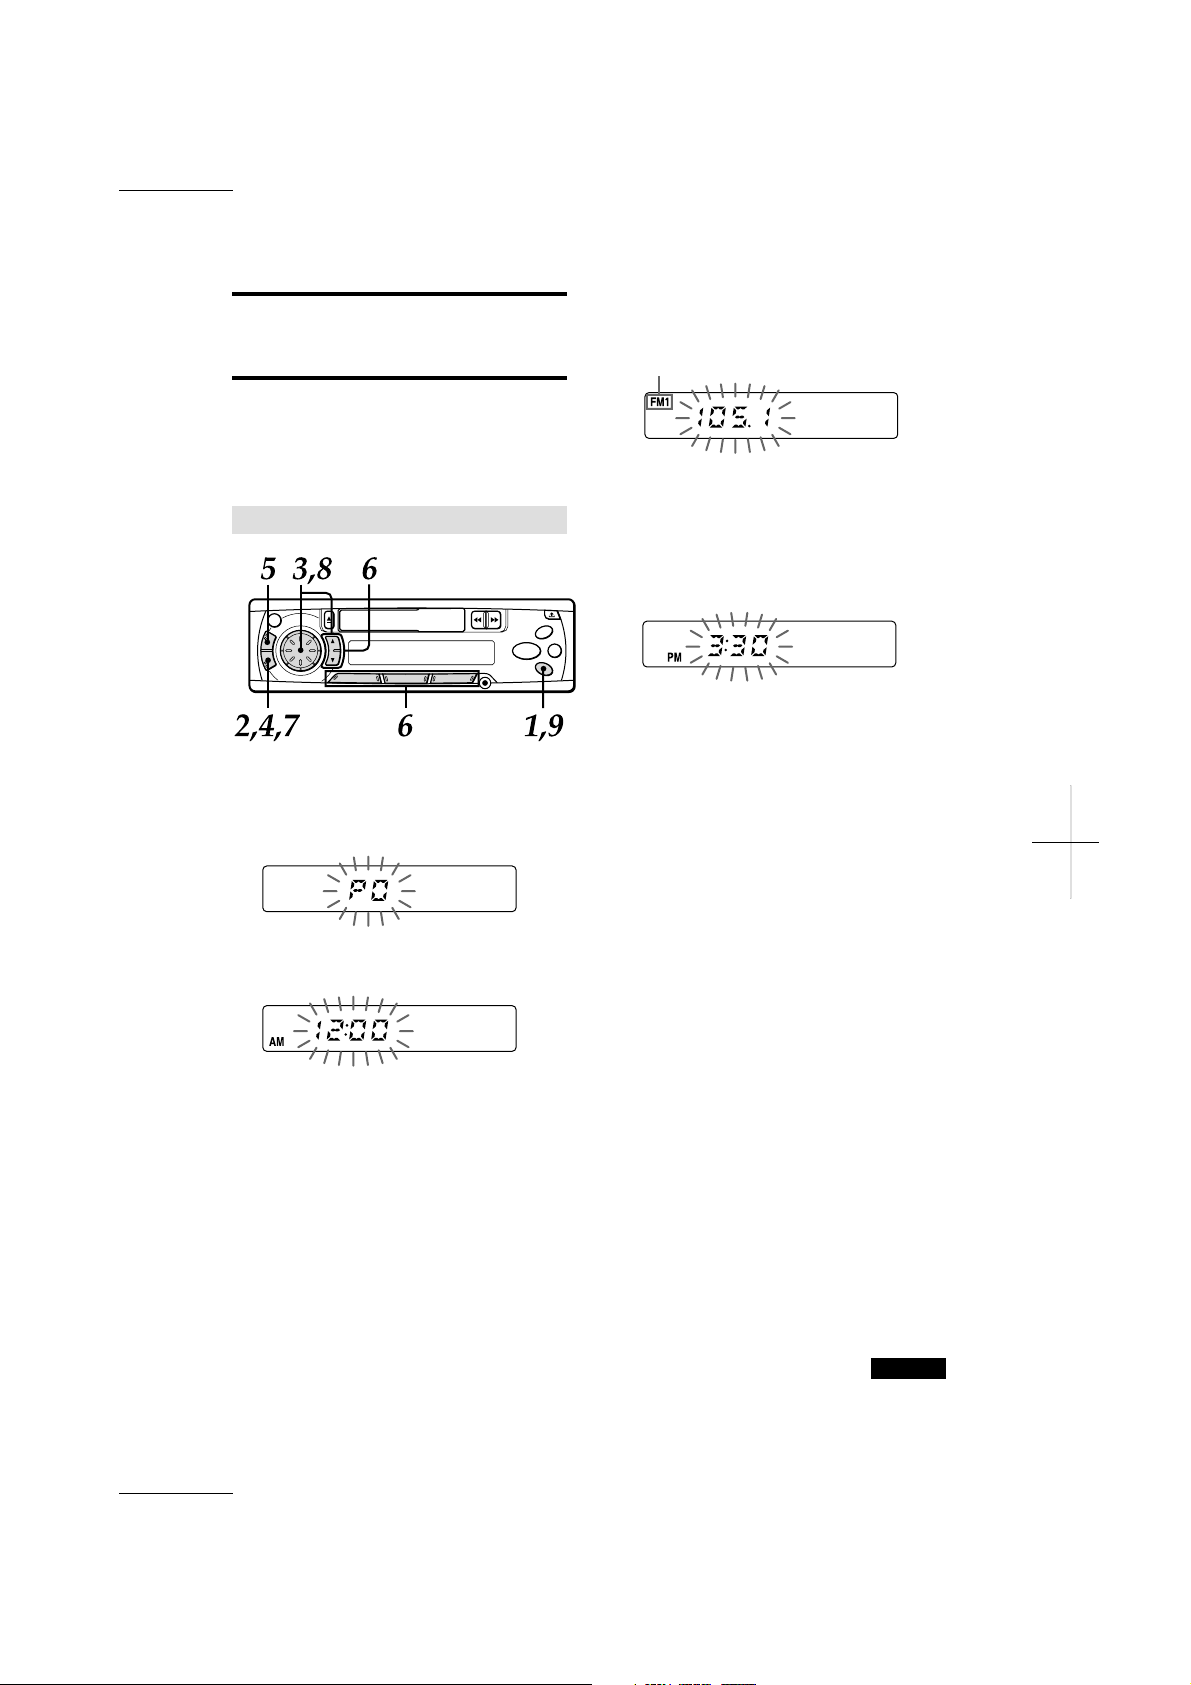
MY INFORMATION
4 Press SEL.
The radio indication flashes.
SWITCH
You can timer-activate the radio for a daily radio
program. The unit turns on and off in Radio mode
at the preset turn-on and turn-off times
automatically.
Setting the timer
1 With the unit off, press and hold INFO
for more than 2 seconds.
The “PO” indication flashes in the display
window.
2 Press SEL.
The timer indication flashes.
Band indicator
5 Press FUNC to select the band.
6 Tune in the desired station by pressing
i
TUNE
station buttons 1 to 6.
or TUNE k or one of the preset
7 Press SEL.
The timer indication flashes.
8 Set the time you wish the unit to turn
off.
Press TUNE i, then rotate the Jog Dial to set
the hour.
Press TUNE k, then rotate the Jog Dial to set
the minute.
9 Press and hold INFO for more than 2
seconds.
Your setting is stored in memory, and the unit
turns off.
• To cancel a timer setting in progress, press
and hold PWR for more than 2 seconds.
3 Set the time you wish the unit to turn on
in Radio mode.
Press TUNE i, then rotate the Jog Dial to set
the hour.
Press TUNE k, then rotate the Jog Dial to set
the minute.
continued
ENGLISH
CTX410(YU)-total-En-9
8
Page 10
MY INFORMATION SWITCH
Activating the timer
1 With the unit on, press INFO.
The “MY INFO” indicator lights up and the
timer is activated.
The “MY INFO” indicator flashes between
turn-on time and turn-off time.
To cancel the timer
Press INFO again so that the “MY INFO” indicator
disappears.
To check the setting
With the unit off, press INFO.
The turn-on time, followed by the radio frequency
and the turn-off time, appears in the display
window, each for 1 second, then the unit turns off.
Notes
• Even if the unit is in a mode other than Radio
mode, the unit switches to Radio mode and
tunes in the preset radio program at the preset
time automatically. When the program is over,
the unit returns to the former mode automatically.
• When this function is activated, TUNE i/k,
A.ME/PS, LO, and the preset number buttons
do not work for tuning in stations.
• Even if the unit is turned off and on, or the front
panel is detached and attached, this function is
active until turn-off time.
• Even if you are listening to a radio program with
this function, pressing FUNC switches the unit
to another mode. If you switch modes with
FUNC, the unit does not turn off at the turn-off
time of the timer.
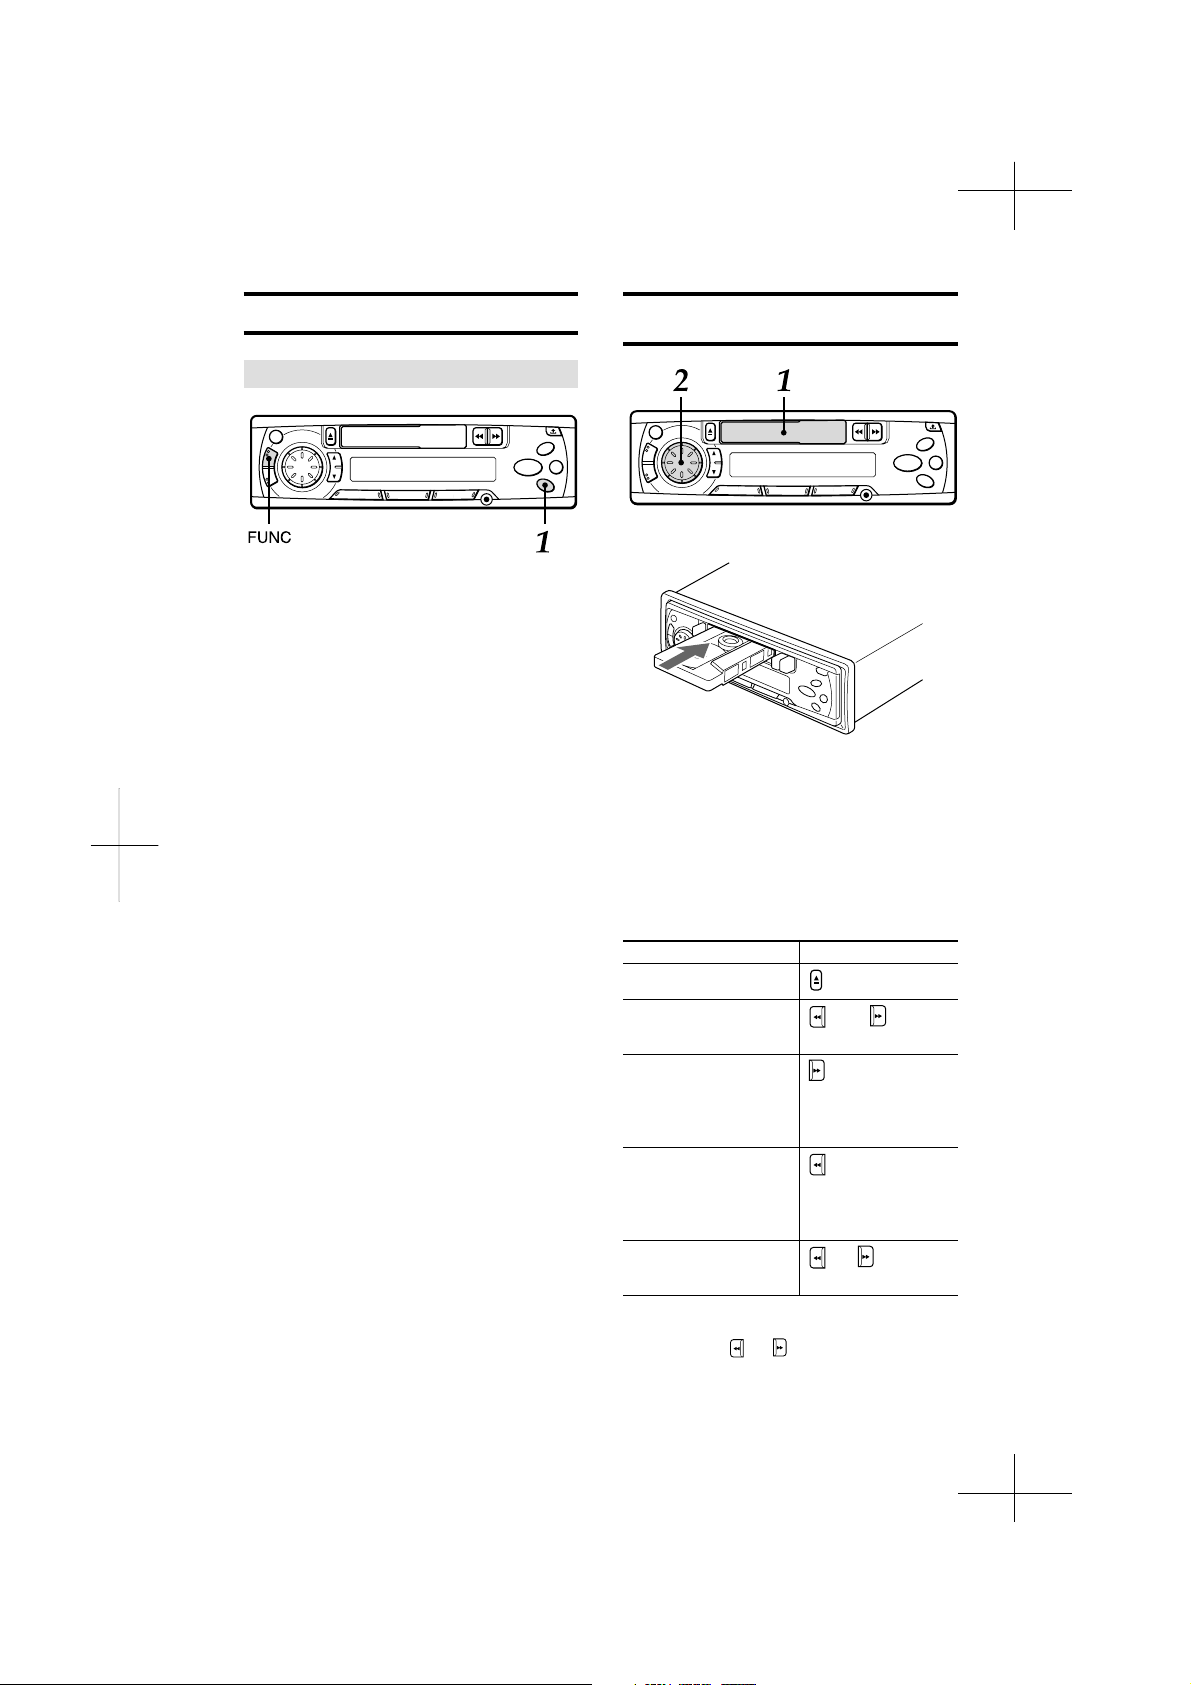
TAPE PLAYBACK
1 Insert a cassette to start playback.
If a cassette is already inserted, press FUNC
repeatedly to select Tape Play mode to start
playback.
Playback starts in the direction that the unit
played back previously.
2 Adjust the volume with the Jog Dial.
Press the following buttons to operate tape
transport.
To do this
Eject the cassette*
Change the playback
side
Fast-forward the upper
side (l) of the tape
Rewind the lower side
(j) of the tape
Rewind the upper side
(l) of the tape
Fast-forward the lower
side (j) of the tape
Press this button
and
simultaneously
9
ENGLISH
Stop fast transport and
resume playback
* When you eject the cassette, the unit switches to the
previous mode.
** Do not press
change the direction of tape transport.
or all the way. Doing so may
or lightly**
CTX410(YU)-total-En-10
Page 11

Auto Reverse function
When the end of the tape is reached during
playback or fast tape transport, the direction of
the tape is automatically reversed, and playback
starts on the other side.
Tape direction indications
Playback Fast- forward
or rewind
Upper side
Lower side
Switching modes
When the unit is in a mode other than Tape Play
mode, inserting a cassette switches the unit to
Tape Play mode automatically.
Before turning the ignition off
Be sure to eject any cassette.
To prevent tape problems
Before inserting a cassette into the unit, make
sure that there is no slack in the tape. If necessary,
take up the slack by inserting a pencil through the
spindle hole and winding.
Tapes of 90 minutes or longer are extremely thin
and easily deformed or damaged. They are not
recommended.
SOUND ADJUSTMENTS
1 Press PWR to turn the unit on.
2 Press SEL repeatedly to select the mode
that you wish to adjust from: BASS,
TRE (treble), BAL (balance), FAD (fader)
and VOL (volume).
Each time you press SEL, one of the following
indicators appears, in cyclic order.
If you do not proceed with the following step
3 within 5 seconds, the selected mode is
canceled, and the indication returns to the
current source mode.
3 Rotate the Jog Dial to adjust the level.
Adjust each mode referring to the audio
control indications in the display window.
Counterclockwise
Decreases the
bass level
Decreases the
treble level
Decreases the
level of the right
speaker(s)
Decreases the
level of the front
speakers
Decreases the
volume level
Without selecting any mode with SEL, only
the volume level can be adjusted by rotating
the Jog Dial.
Clockwise
Increases the
bass level
Increases the
treble level
Decreases the
level of the left
speaker(s)
Decreases the
level of the rear
speakers
Increases the
volume level
continued
ENGLISH
CTX410(YU)-total-En-11
10
Page 12

SOUND ADJUSTMENTS
MUTE button
Press this button to temporarily lower the volume.
Press it again to restore the previous volume.
The “MUTE” indicator in the display window
flashes while the mute function is active.
H-BASS (High BASS)
You can enjoy music with strong bass sound.
1 Press PWR to turn the unit on.
2 Press SEL repeatedly to select H-BASS
(High BASS) mode.
3 Rotate Jog Dial to select on or off.
Select “On” to obtain powerful bass.
The “H-BASS” indicator lights up.
Select “OFF” to cancel H-BASS.
Source Level Adjuster
You can adjust the output level in each mode to
equalize the volume level.
1 Press PWR to turn the unit on.
2 Press FUNC repeatedly to select the
desired mode.
3 Press DISP while pressing SEL.
The “LA 0” indication appears.
4 Rotate the Jog Dial to adjust the level.
Rotate clockwise to increase the output level.
Rotate counterclockwise to decrease the
output level.
If you do not operate the Jog Dial within 5
seconds, this function is canceled, and the
indication returns to the current source mode.
11
ENGLISH
CTX410(YU)-total-En-12
Page 13

Returning to the factory settings
Adjusted settings of VOL, BASS, TRE, BAL,
FAD, H-BASS, and source level can be returned
to the factory settings with a simple operation.
1 With the unit off, press and hold DISP
for more than 2 seconds.
The “LA--” indication appears, and all sound
settings are returned to the factory settings.
CONNECTING A
PORTABLE CD/MD/MP3
PLAYER OR OTHER
EQUIPMENT
1 Press PWR to turn the unit on.
2 If a cassette is inserted, remove it to
prevent possible damage to the unit.
3 Connect a portable CD/MD/MP3 player,
etc. via the AUX IN jack (3.5-mm dia.) of
the unit.
4 Press FUNC repeatedly to select AUX
IN mode to output sound received from
the connected equipment.
The “AUX” indicator lights up.
The clock display appears.
• For further information on the portable CD/MD/
MP3 player, etc., refer to the operating
instructions for that equipment.
ENGLISH
CTX410(YU)-total-En-13
12
Page 14

SETTING THE BEEP TONE
MAINTENANCE
The unit is preset at the factory to beep each time
you press any button on the front panel except %,
z, f, or g (no beep with the Jog Dial). You
can mute this beeping by following the procedure
below.
1 With the unit off, press and hold SEL for
more than 2 seconds.
The “BEEP” indication appears.
2 Rotate the Jog Dial to select on or off.
The beep function is activated when the
“BEEP” indication appears with the audio
level indicator lit, and canceled when not
displayed.
Audio level indicator
3 Press and hold SEL for more than 2
seconds.
The unit turns off.
Cleaning the front panel
When the front panel is soiled, wipe the surface
with a soft, dry cloth.
Cleaning the tape head
Use a cleaning cassette to clean the playback
head and capstans approximately once a month.
If the head is dirty, the high tones may not be
reproduced properly.
Cleaning the connector
The connector on the reverse side of the front
panel needs to be cleaned occasionally. Wipe
the surface of the connector with a cotton swab
slightly moistened with alcohol.
13
ENGLISH
CTX410(YU)-total-En-14
Page 15

SPECIFICATIONS
RADIO SECTION
(FM)
Frequency Range: 87.5 MHz – 108 MHz
Usable Sensitivity: 12.7 dBf
50 dB Quieting Sensitivity:
IF Rejection: 80 dB
Frequency Response: 30 Hz – 15,000 Hz
S/N Ratio: 63 dB
Stereo Separation: 35 dB at 1 kHz
Alternate Channel Selectivity:
Capture Ratio: 3 dB
(AM)
Frequency Range: 530 kHz – 1,710 kHz
Usable Sensitivity: 30 µV (30 dB)
* Set the frequency increment for your area using
the switch on the bottom of the unit.
(The switch is set at the factory to the 10k position [for the
U.S.A.])
TAPE SECTION
Tape Speed: 4.8 cm/sec. (1 7/8 ips)
S/N Ratio: 50 dB
Frequency Response: 40 Hz – 14,000 Hz
Stereo Separation: 40 dB
FF/REW Time: 190 sec. (C-60)
AUDIO SECTION
Max. Power Output: 40 W × 4 channels
AUX IN input
Input sensitivity (load impedance)
AUX IN: 300 mV (10 kΩ)
(100-kHz steps)*
87.5 MHz – 108 MHz
(50-kHz steps)*
17.2 dBf
70 dB
(10-kHz steps)*
531 kHz – 1,602 kHz
(9-kHz steps)*
GENERAL
Power-Supply Voltage:
Load Impedance: 4 Ω
Tone Control: Bass ± 10 dB at 100 Hz
Preamp Output Voltage (load impedance):
Installation size: 182 (W) × 53 (H) × 155 (D) mm
Accessory supplied: Carrying case (1)
14.4 V (11 to 16 V allowable),
DC, negative ground
Treble ± 10 dB at 10 kHz
2.2 V (10 kΩ)
1
(7
/4 (W) × 2 1/8 (H) ×
1
6
/8 (D) inches)
Specifications and external appearance are
subject to change without notice due to product
improvement.
ENGLISH
14
CTX410(YU)-total-En-15
Page 16

Bienvenidos
Muchas gracias por su compra de este producto
AIWA. Para utilizar este aparato en las mejores
condiciones posibles, lea cuidadosamente las
instrucciones de este manual.
PRECAUCION
Las modificaciones y ajustes de este producto
que no han sido autorizadas a título expreso por
el fabricante pueden anular el derecho o autoridad
del usuario para hacer funcionar este producto.
Además de este manual de instrucciones, lea
también los manuales de instalación y de
conexiones que vienen por separado.
PRECAUCIONES
• Este aparato fue diseñado para funcionar sólo
con un sistema eléctrico de CC de 12 voltios con
conexión a tierra negativa.
• Para evitar un cortocircuito, desconecte el
terminal negativo de la batería del coche hasta
haber terminado de instalar y de hacer todas las
conexiones.
• Cuando tenga que cambiar un fusible, utilice
otro que tenga las mismas especificaciones. El
uso de un fusible con un amperaje mayor puede
provocar daños graves en el aparato.
• No acerque destornilladores, etc. u otros objetos
metálicos o magnéticos a la cabeza de
reproducción.
• Si deja estacionado el coche en un lugar
expuesto a los rayos del sol, en verano, el
interior del vehículo puede calentarse
excesivamente. Espere hasta que baje la
temperatura lo suficiente antes de empezar a
reproducir.
• Mantenga el volumen a un nivel tal que pueda
escuchar los sonidos de advertencia del exterior
(bocinas, sirenas, etc.).
Notas sobre las cassettes
NO exponga las cassettes a los rayos del sol,
gran calor o frío o humedad. No acerque las
cassettes a un equipo con un imán incorporado
para evitar ruidos o pérdidas en la calidad del
sonido.
NO toque la cinta de la cassette ya que la
suciedad o polvo pueden hacer que se ensucien
las cabezas.
No se olvide de sacar la cassette del aparato si
no piensa seguir escuchando.
Precaución sobre el protector para transporte
El aparato se entrega con un protector para
transporte en el compartimiento de cassettes.
Presione EJECT z para sacar el protector antes
de hacer funcionar el aparato.
Protector para transpote
1
ESPAÑOL
CTX420(YU)-total-Sp-16
Page 17

INDICE
PARTES Y CONTROLES ................................................................................................................... 3
DESMONTAJE E INSTALACION DEL PANEL DELANTERO ........................................................... 4
AJUSTE DE RELOJ ............................................................................................................................ 5
FUNCIONAMIENTO DE LA RADIO ................................................................................................... 5
PROGRAMACION DE LAS ESTACIONES ........................................................................................ 6
INTERRUPTOR DE INFORMACION PROPIA ................................................................................... 8
REPRODUCCION DE LA CINTA ....................................................................................................... 9
AJUSTES DEL SONIDO ................................................................................................................... 10
CONEXION DE UN TOCADISCOS PORTATIL DE DISCOS COMPACTOS/MINIDISCOS
MP3 U OTRO EQUIPO ................................................................................................................... 12
AJUSTE DE LA ALARMA ................................................................................................................. 13
MANTENIMIENTO ............................................................................................................................ 13
ESPECIFICACIONES ....................................................................................................................... 14
ESPAÑOL
ESPAÑOL
CTX420(YU)-total-Sp-17
2
Page 18

PARTES Y CONTROLES
Panel delantero
Pantalla
Panel delantero
1 Botón FUNC (función)
2 Botón PWR (conexión/desconexión)/MUTE
3 Aro de avance lento
4 Botón z (expulsión)
5 Botón TUNE
6 Botón TUNE
7 Compartimiento de cassettes
8 Botón DIRECTION f/g
9 Botón A.ME (memoria automática)/PS
(exploración de programas)
0 Botón % (liberación)
! Botón LO (local)
@ Botón SEL (selección)
#
Botones de estaciones programadas (1 – 6)
$ Toma AUX IN (diám. de 3,5 mm)
% Botón DISP (pantalla)
^ Botón INFO (información propia)
i
k
Panel trasero
Pantalla
& Indicador de banda
* Indicador VOL (volumen)
( Indicador BASS (graves)
) Indicador TRE (agudos)
- Indicador BAL (balance)
= Indicador FAD (equilibrio)
q Indicador MUTE
w Indicador MY INFO (información propia)
e Indicador AUX
r Indicador H-BASS (graves altos)
t Sección de la pantalla principal
y Indicador AM/PM (reloj)
u Indicador ST (estéreo)
i Sección de visualizador secundario
o Indicadores d (sentido de la cinta)
p Indicador LO (local)
[ Indicador de nivel de audio
Panel trasero
] Toma de antena
\ Tomas de pre-salida REAR
a Fuente de alimentación/conector de
altavoces
s Fusible
3
ESPAÑOL
CTX420(YU)-total-Sp-18
Page 19

DESMONTAJE E
INSTALACION DEL PANEL
DELANTERO
Se puede desmontar el panel delantero del
aparato y llevarlo consigo cuando se deja el
coche estacionado sin vigilancia.
Para llevarse el panel delantero utilice la caja de
transporte provista.
Antes de desmontar el panel delantero, saque la
cassette para evitar que puede dañarse el
aparato.
1 Mantenga presionado PWR durante
más de 2 segundos para desconectar
el aparato.
2 Mientras sujeta el panel delantero con
una mano, presiona % para soltar un
lado del panel. Debe tenerse cuidado
de no dejar caer el panel. Puede salir
como un resorte en este momento.
3 Cuando desmonte el panel delantero
del aparato, hágalo tirando del mismo
para sacarlo del aparato.
Instalación del panel delantero
Luz de seguridad
Cuando se desmonte el panel delantero aparece
la luz LED en el lado delantero del aparato. Esta
luz fue diseñada para evitar el robo y permanece
destellando con el panel delantero desmontado.
Este aparato no tiene otro sistema de seguridad,
por ejemplo una alarma por lo que existen
limitaciones con respecto a su efectividad.
Luz LED
NO toque el conector en el lado de atrás del
panel delantero, ya que puede ensuciar el
conector y provocar un mal contacto que
puede ser la causa de un malfuncionamiento.
ESPAÑOL
CTX420(YU)-total-Sp-19
4
Page 20

AJUSTE DE RELOJ
1 Presione PWR para conectar el aparato.
2 Presione DISP para que aparezca el
reloj.
Si ya aparece la indicación del reloj, salte
este paso.
3 Mantenga presionado DISP durante
más de 2 segundos.
4 Presione TUNE
lento para ajustar la hora.
Presione TUNE
lento para ajustar los minutos.
Gire el aro de avance lento en sentido horario
para avanzar hacia adelante.
Gire el aro de avance lento en sentido
antihorario para retroceder.
5 Presione DISP.
El reloj empieza a funcionar desde 0 segundo.
Para que aparezca el reloj con el aparato
conectado
Presione DISP. Para volver a la pantalla anterior,
presione nuevamente DISP.
i
, y gire el aro de avance
k
, y gire el aro de avance
FUNCIONAMIENTO DE LA
RADIO
1 Presione PWR para conectar el aparato.
2 Presione FUNC repetidamente para
seleccionar la banda entre FM1, FM2,
FM3, AM1 y AM2.
Aparecen los indicadores de banda en ese
orden y en ciclo.
• FM1, FM2 y FM3 comparten la misma gama
de frecuencias.
• AM1 y AM2 comparten la misma gama de
frecuencias.
Indicador de banda Indicación de frecuencia
3 Presione (y mantenga presionado
durante más de 2 segundos) TUNE
k
TUNE
deseada.
El aparato empieza la exploración y sintoniza
automáticamente una estación (sintonización
con búsqueda).
Presione TUNE i para aumentar y TUNE
para disminuir la frecuencia.
Presione nuevamente el botón para cancelar
la función. Repita el procedimiento hasta
sintonizar la estación deseada.
Nota
Si se presiona (menos de 0,5 segundo cada
vez) TUNE i o TUNE k, la frecuencia sube
o baja un intervalo cada vez.
para sintonizar la estación
4 Ajuste el volumen con el aro de avance
lento.
i
o
k
5
ESPAÑOL
CTX420(YU)-total-Sp-20
Page 21

Para desconectar el aparato
Presione y mantenga PWR durante más de 2
segundos. Si presiona este botón durante
menos de 2 segundos, funciona como MUTE.
Nota
El aparato se conecta en el último modo
seleccionado cuando desconectó el aparato.
Botón LO (local/DX)
Puede utilizar el modo local cuando desea
sintonizar sólo estaciones fuertes durante la
sintonización con búsqueda. En el modo de
radio, presione LO para seleccionar el modo
local. Se enciende el indicador “LO”.
• Presione LO para cancelar el modo local y
conmute al modo DX (distancia).
• Se enciende el indicador “ST” (estéreo) cuando
se emite la estación sintonizada en estéreo y la
recepción es buena.
Botón FUNC (función)
Cada vez que presione FUNC, la unidad
cambia a uno de los siguientes modos en
orden en un ciclo continuo.
FM1 FM2 FM3 AM1
AM2
* Modo de reproducción de cinta (disponible cuando
hay una cassette en la unidad)
PROGRAMACION DE LAS
ESTACIONES
Programación automática de las
estaciones (memoria automática)
1 Presione PWR para conectar el aparato.
2 Presione FUNC repetidamente para
seleccionar la banda deseada entre
FM1, FM2, FM3, AM1 y AM2.
3 Mantenga presionado A.ME/PS durante
más de 2 segundos para activar la
función de programación automática.
Este aparato puede memorizar hasta 6
estaciones en los botones de estaciones
programadas 1 a 6 (cuando el indicador “LO”
(local) esté encendido).
Si el aparato no puede encontrar las
estaciones fuertes, se apaga el indicador
“LO” (local) y empieza a buscar estaciones
de señal más débiles.
Utilice esta función para programar
automáticamente hasta 6 estaciones cada una
para FM1, FM2, FM3, AM1 y AM2 (hasta un total
de 30 estaciones).
•Cuando se ha completado la memoria
automática se sintonizará la estación
memorizada en el botón de estación programada
1.
• Para parar la programación automática, presione
nuevamente A.ME/PS.
continuación
ESPAÑOL
CTX420(YU)-total-Sp-21
6
Page 22

PROGRAMACION DE LAS ESTACIONES
Verificación de estaciones programadas
(exploración programada)
•Si se desean verificar las estaciones
programadas, presione A.ME/PS durante
menos de 2 segundos. Las estaciones
programadas memorizadas se irán sintonizando
cada una durante 5 segundos.
• Para parar esta función, presione nuevamente
A.ME/PS o presione cualquiera de los botones
de estaciones programadas 1 a 6.
Programación manual de las
estaciones
Se pueden programar manualmente las
estaciones que no han podido ser seleccionadas
por una operación de memoria automática.
Repita estos procedimientos para programar
hasta 6 estaciones cada una en FM1, FM2, FM3,
AM1 y AM2.
• Si se trata de programar una estación en un
botón de estación programada donde ya existe
otra estación en la misma banda, se borrará la
estación programada previamente.
Sintonización de estaciones
programadas
1 Presione PWR para conectar el aparato.
2 Presione FUNC repetidamente para
seleccionar la banda deseada entre
FM1, FM2, FM3, AM1 y AM2.
3 Presione el botón de la estación
programada deseada.
El número de la emisora prefijada aparece a
la derecha de la indicación de frecuencia.
1 Presione PWR para conectar el aparato.
2 Presione FUNC repetidamente para
seleccionar la banda entre FM1, FM2,
FM3, AM1 y AM2.
3 Sintonice en la estación que desea
i
programar con TUNE
o TUNE k.
4 Mantenga presionado uno de los
botones de estaciones programadas 1
a 6 durante aproximadamente 2
segundos.
Mientras la estación programada se está
registrando en la memoria, se deja de
escuchar momentáneamente el sonido.
El número de la emisora prefijada aparece a
la derecha de la indicación de frecuencia.
Número de estación
programada
7
ESPAÑOL
Indicación de
frecuencia
Control de recepción con sintonización activa
(ATRC)
El aparato eliminará automáticamente el ruido
de FM provocando por las variaciones en la
fuerza de la señal a consecuencia del movimiento
de un coche.
• El circuito de mezcla automática incorporado
mezcla las señales de los canales de la derecha
y de la izquierda de acuerdo a la fuerza de la
recepción. Al mismo tiempo, se activa el circuito
de corte de altos para mantener la calidad del
sonido.
• Si la recepción se vuelve débil, el sintonizador
se conmutará automáticamente al modo
monoaural para reducir el ruido.
CTX420(YU)-total-Sp-22
Page 23

INTERRUPTOR DE
INFORMACION PROPIA
Se puede activar la radio con el temporizador de
un programa diario de la radio. El aparato conecta
y desconecta automáticamente en el modo de
radio a la hora programada.
Ajuste del temporizador
1 Con el aparato desconectado,
mantenga presionado INFO durante
más de 2 segundos.
Destella la indicación “PO” en la pantalla.
2 Presione SEL.
Destella la indicación del temporizador.
4 Presione SEL.
Destella la indicación de la radio.
Indicador de banda
5 Presione FUNC para seleccionar la
banda.
6 Sintonice en la estación deseada
i
presionando TUNE
de los botones de estaciones
programadas 1 a 6.
o TUNE k o uno
7 Presione SEL.
Destella la indicación del temporizador.
8 Seleccione la hora a la que desea que
se desconecte el aparato.
Presione TUNE i, y gire el aro de avance
lento para ajustar la hora.
Presione TUNE k, y gire el aro de avance
lento para ajustar los minutos.
9 Mantenga presionado INFO durante
más de 2 segundos.
Sus ajustes se memorizan y el aparato se
desconecta.
• Para cancelar el ajuste temporizador en
progreso, mantenga presionado PWR
durante más de 2 segundos.
3 Seleccione la hora a la que desea que
se conecte el aparato en el modo de
radio.
Presione TUNE i, y gire el aro de avance
lento para ajustar la hora.
Presione TUNE k, y gire el aro de avance
lento para ajustar los minutos.
continuación
ESPAÑOL
CTX420(YU)-total-Sp-23
8
Page 24

INTERRUPTOR DE INFORMACION
PROPIA
Activación del temporizador
1 Con el aparato conectado, presione
INFO.
Se enciende el indicador “MY INFO” y se
activa el temporizador.
El indicador “MY INFO” destella desde el
tiempo de conexión al tiempo de desconexión.
Para cancelar el temporizador
Presione nuevamente INFO para que se apague
el indicador “MY INFO”.
Para verificar el ajuste
Con el aparato desconectado, presione INFO.
Aparece la hora de conexión seguido de la
frecuencia de radio y la hora de desconexión en
la pantalla, una vez por segundo y se desconecta
el aparato.
Notas
•
Aunque el aparato esté en otro modo que no sea
el modo de radio, el aparato se conmuta al modo
de radio y se sintoniza automáticamente el
programa de radio programado a la hora
programada. Cuando finaliza el programa, el
aparato vuelve al modo anterior automáticamente.
• Cuando se activa esta función, TUNE i/k,
A.ME/PS, LO y los botones de números
programados no funcionan para sintonizar las
emisoras.
• Aunque el aparato se desconecte y vuelva a
conectar, o se suelta y vuelve a colocar el panel
delantero, esta función permanece activada
hasta la hora de desconexión.
•
Aunque se está escuchando un programa de
radio con esta función, si se presiona FUNC se
conmuta el aparato al otro modo. Si conmuta los
modos con FUNC, el aparato no se desconecta
en la hora de desconexión del temporizador.
9
ESPAÑOL
REPRODUCCION DE LA
CINTA
1 Coloque una cassette para empezar a
reproducir.
Si ya había una cassette colocada, presione
FUNC repetidamente para seleccionar el modo
de reproducción de cinta y empezar a reproducir.
La reproducción empieza en el sentido en el
que el aparato reprodujo la última vez.
2 Ajuste el volumen con el aro de avance
lento.
Presione los siguientes botones para hacer
funcionar el transporte de cinta.
Para
Expulsar la cassette*
Cambiar el lado
reproducido
Avanzar rápidamente el lado
superior (l) de la cinta
Rebobinar el lado inferior
(j) de la cinta
Rebobinar el lado
superior (l) de la cinta
Avanzar rápidamente el
lado inferior (j) de la cinta
Parar el transporte rápido
de la cinta y seguir
reproduciendo
* Cuando expulsa la cassette, el aparato se conmuta
al modo anterior.
** No presione
cambiar el sentido del movimiento de la cinta.
o hasta el fondo. Esto puede
Presione este
botón
y
simultáneamente
o
ligeramente**
CTX420(YU)-total-Sp-24
Page 25

Función de inversión automática
Cuando se llega al final de la cinta durante la
reproducción o el transporte rápido de la cinta, el
sentido de la cinta se invierte automáticamente y
empieza a reproducir el otro lado.
Indicaciones de sentido de la cinta
Reproducción Avance rápido
o rebobinado
Lado
superior
Lado
inferior
Conmutación de modos
Si el aparato está en otro modo que no sea el
modo de reproducción de cinta, al colocar una
cassette cambia automáticamente al modo de
reproducción de cinta.
Antes de girar la llave de encendido a OFF
No se olvide de expulsar la cassette del aparato.
Para evitar problemas con la cinta
Antes de colocar una cassette en el aparato,
verifique que no haya flojedad en la cinta. En el
caso de que fuera necesario, tense la cinta
introduciendo un lápiz por el orificio de bobinado
y elimine la flojedad.
Las cintas de 90 minutos o cintas más largas son
muy finas y pueden deformarse o dañarse muy
fácilmente. No se recomienda su uso.
AJUSTES DEL SONIDO
1 Presione PWR para conectar el aparato.
2 Presione SEL repetidamente para
seleccionar el modo que desea ajustar
de entre: BASS (graves), TRE (agudos),
BAL (balance), FAD (equilibrio) y VOL
(volumen).
Cada vez que presione SEL, aparece uno de
los siguientes indicadores en un ciclo.
Si no sigue con el paso 3 antes de 5 segundos,
se cancela el modo seleccionado, y la
indicación vuelve al modo de fuente actual.
3 Gire el aro de avance lento para ajustar
el nivel.
Ajuste cada modo consultando las
indicaciones de control de audio en la pantalla.
Sentido antihorario
Disminuye el nivel
de los graves
Disminuye el nivel
de los agudos
Disminuye el nivel
del(os)
altavoz(es) de la
derecha
Disminuye el nivel
de los altavoces
delanteros
Disminuye el nivel
del volumen
Si no se ha seleccionado ningún modo con el
SEL, sólo podrá ajustarse el nivel del volumen
girando el aro de avance lento.
Sentido horario
Aumenta el nivel
de los graves
Aumenta el nivel
de los agudos
Disminuye el
nivel del(os)
altavoz(es) de la
izquierda
Disminuye el
nivel de los
altavoces
traseros
Aumenta el nivel
del volumen
continuación
ESPAÑOL
CTX420(YU)-total-Sp-25
10
Page 26

AJUSTES DEL SONIDO
Botón MUTE
Presione este botón para bajar temporalmente el
volumen. Presione nuevamente para volver al
volumen original.
El indicador “MUTE” en la pantalla destella cuando
se ha activado la función de silenciamiento.
H-BASS (graves altos)
Se puede disfrutar de una música con un sonido
de graves fuertes.
Ajustador de nivel de fuente
Puede ajustar el nivel de salida en cada modo
para ecualizar el nivel de volumen.
1 Presione PWR para conectar el aparato.
2 Presione FUNC repetidamente para
seleccionar el modo deseado.
3 Presione DISP mientras presiona SEL.
Aparece la indicación “LA 0”.
1 Presione PWR para conectar el aparato.
2 Presione SEL repetidamente para
seleccionar el modo H-BASS (graves
altos).
3 Gire el aro de avance lento para
seleccionar la conexión o desconexión.
Seleccione “On” para obtener graves
potentes.
Se enciende el indicador “H-BASS”.
Seleccione “OFF” para cancelar H-BASS.
4 Gire el aro de avance lento para ajustar
el nivel.
Gire en sentido horario para aumentar el
nivel de salida.
Gire en sentido antihorario para disminuir el
nivel de salida.
Si no utiliza el aro de avance lento antes de
5 segundos, se cancela esta función y la
indicación vuelve al modo de fuente actual.
11
ESPAÑOL
CTX420(YU)-total-Sp-26
Page 27

Volviendo a los ajustes de fábrica
Los ajustes realizados de VOL, BASS, TRE,
BAL, FAD, H-BASS y el nivel de la fuente pueden
volver a los ajustes de fábrica con una simple
operación.
1 Con el aparato desconectado,
mantenga presionado DISP durante
más de 2 segundos.
Aparece la indicación “LA--”, y todos los
ajustes de sonido vuelven a los ajustes de
fábrica.
CONEXION DE UN
TOCADISCOS PORTATIL DE
DISCOS COMPACTOS/
MINIDISCOS/ MP3 U OTRO
EQUIPO
1 Presione PWR para conectar el aparato.
2 Si había una cassette colocada,
expúlsela para evitar que pueda dañar
el aparato.
3 Conecte un tocadiscos portátil de
discos compactos/minidiscos/MP3,
etc. utilizando la toma AUX IN (diám. de
3,5 mm) de este aparato.
4 Presione FUNC repetidamente para
seleccionar el modo AUX IN para que
salga el sonido recibido del equipo
conectado.
Se enciende el indicador “AUX”.
Aparece la pantalla del reloj.
• Para más detalles sobre el tocadiscos portátil
de discos compactos/minidiscos/MP3, etc., lea
el manual de instrucciones del equipo.
ESPAÑOL
CTX420(YU)-total-Sp-27
12
Page 28

AJUSTE DE LA ALARMA
MANTENIMIENTO
El aparato está programada de fábrica para sonar
cada vez que presione cualquier botón en el panel
delantero excepto
con el aro de avance lento).
alarma siguiendo el procedimiento siguiente.
%, z, f, o g
Puede silenciar esta
(no suena
1 Con el aparato desconectado,
mantenga presionado SEL durante más
de 2 segundos.
Aparece la indicación “BEEP”.
2 Gire el aro de avance lento para
seleccionar la conexión o desconexión.
La función de alarma se activa cuando
aparece la indicación “BEEP” cuando se
ilumina el indicador de nivel de audio, y se
cancela cuando no aparece.
Indicador de nivel de audio
Limpieza del panel delantero
Cuando el panel delantero está sucio, limpie la
superficie del panel con un paño suave y seco.
Limpieza de las cabezas de cintas
Utilice una cassette de limpieza para limpiar la
cabeza de reproducción y los cabrestantes
aproximadamente una vez al mes. Si la cabeza
estuviera sucia, los tonos altos pueden no
reproducirse correctamente.
Limpieza del conector
El conector en el lado trasero del panel delantero
debe limpiarse ocasionalmente. Limpie la
superficie del conector con un algodón
ligeramente empapado en alcohol.
3 Mantenga presionado SEL durante más
de 2 segundos.
Se desconecta el aparato.
13
ESPAÑOL
CTX420(YU)-total-Sp-28
Page 29

ESPECIFICACIONES
SECCION DE LA RADIO
(FM)
Gama de frecuencias: 87,5 MHz – 108 MHz
Sensibilidad aceptable:
Sensibilidad de silenciamiento de 50 dB:
Rechazo de IF: 80 dB
Respuesta de frecuencia:
Relación de señal/ruido:
Separación estéreo: 35 dB a 1 kHz
Selección de canal alternativo:
Relación de captura: 3 dB
(AM)
Gama de frecuencias: 530 kHz – 1.710 kHz
Sensibilidad aceptable:
* Ajuste el aumento de frecuencia para su área
utilizando el botón en la parte inferior del aparato.
(El botón se ajusta en fábrica a la posición 10k [para los
EE.UU])
SECCION DE CINTA
Velocidad de la cinta: 4,8 cm/seg.
Relación de señal/ruido:
Respuesta de frecuencia:
Separación estéreo: 40 dB
Tiempo de FF/REW: 190 seg. (C-60)
SECCION DE AUDIO
Máxima potencia de salida:
Entrada de AUX IN
Sensibilidad de entrada (impedancia de carga)
AUX IN: 300 mV (10 kΩ)
(intervalos de 100 kHz)*
87,5 MHz – 108 MHz
(intervalos de 50 kHz)*
12,7 dBf
17,2 dBf
30 Hz – 15.000 Hz
63 dB
70 dB
(intervalos de 10 kHz)*
531 kHz – 1.602 kHz
(intervalos de 9 kHz)*
30 µV (30 dB)
50 dB
40 Hz – 14.000 Hz
40 W × 4 canales
GENERALIDADES
Tensión de suministro de corriente:
Impedancia de carga: 4 Ω
Control de tono: Graves ± 10 dB a 100 Hz
Tensión de salida de pre-amplificación (impedancia
Tamaño de instalación:
Accesorio suministrado:
14,4 V (11 a 16 V admisible),
CC, tierra negativa
Agudos ± 10 dB a 10 kHz
de carga):
2,2 V (10 kΩ)
182 (An.) × 53 (Al.) ×
155 (Prof.) mm
Caja de transporte (1)
Las especificaciones y aspecto exterior están
sujetos a cambios sin previo aviso.
ESPAÑOL
14
CTX420(YU)-total-Sp-29
Page 30

Bienvenue
Nous vous remercions d’avoir choisi ce produit
AIWA. Pour optimiser ses performances, veuillez
lire attentivement ce mode d’emploi.
Outre ce mode d’emploi, veuillez également vous
référer aux manuels d’installation et de connexion
séparés.
PRECAUTIONS
•Cet appareil est conçu pour fonctionner
uniquement dans un système électrique à masse
négative CC de 12 volts.
• Pour éviter tout court-circuit, déconnecter le
terminal de batterie automobile négative jusqu’à
ce que l’appareil soit monté et entièrement
connecté.
• Au remplacement du fusible, bien utiliser un
fusible de même ampérage. L’emploi d’un fusible
à ampérage supérieur peut sérieusement
endommager l’appareil.
• Maintenir les tournevis, etc. ou autres objets
métalliques ou magnétiques éloignés de la tête
de lecture.
• Quand la voiture est garée en plein soleil en été,
la température peut considérablement
augmenter à l’intérieur. Laisser la température
ambiante baisser avant de faire fonctionner
l’appareil.
• Maintenir le volume à un niveau permettant
d’entendre les avertissements sonores (klaxons,
sirènes, etc.).
Remarques sur les cassettes
NE PAS soumettre les cassettes aux rayons
directs du soleil, à des températures très chaudes
ou très froides ou à l’humidité. Maintenir les
cassettes à l’écart d’appareils avec aimants
intégrés pour éviter tout bruit non souhaité ou
toute perte de qualité du son.
NE PAS toucher la surface de la bande, parce
que la saleté ou la poussière pourraient adhérer
aux têtes.
Ne pas oublier de retirer la cassette de l’appareil
quand il n’est pas utilisé.
ATTENTION
Les modifications ou ajustements à ce produit,
non expressément approuvées par le fabricant,
peuvent annuler le droit ou l’autorité de l’utilisateur
à faire fonctionner ce produit.
Précaution pour le bourrelet de protection
Cet appareil est expédié avec un bourrelet de
protection dans le logement de cassette.
Ne pas oublier d’appuyer sur EJECT z pour
retirer ce bourrelet avant de faire fonctionner
l’appareil.
Bourrelet de protection
1
FRANÇAIS
CTX420(YU)-total-Fr-30
Page 31

TABLE DES MATIERES
ORGANES ET COMMANDES ............................................................................................................3
RETRAIT ET FIXATION DU PANNEAU AVANT ................................................................................ 4
REGLAGE DE L’HEURE .................................................................................................................... 5
FONCTIONNEMENT DE LA RADIO .................................................................................................. 5
PREREGLAGE DE STATIONS ..........................................................................................................6
FONCTION MES INFORMATIONS .................................................................................................... 8
LECTURE DE CASSETTE ................................................................................................................. 9
AJUSTEMENTS DU SON ................................................................................................................. 10
RACCORDEMENT D’UN LECTEUR DE CD/MD/MP3 PORTABLE OU D’UN AUTRE
EQUIPEMENT ................................................................................................................................ 12
REGLAGE DE LA TONALITE BIP .................................................................................................... 13
ENTRETIEN ...................................................................................................................................... 13
SPECIFICATIONS ............................................................................................................................ 14
FRANÇAIS
FRANÇAIS
CTX420(YU)-total-Fr-31
2
Page 32

ORGANES ET COMMANDES
Panneau avant
Fenêtre d’affichage
Panneau avant
1 Touche FUNC (fonction)
2 Touche PWR (mise sous/hors tension)/
MUTE
3 Bague Jog
4 Touche z (éjection)
5 Touche TUNE
6 Touche TUNE
7 Logement de cassette
8 Touche DIRECTION f/g
9 Touche A.ME (mémoire automatique)/PS
(balayage de préréglage)
0 Touche % (libération)
! Touche LO (local)
@ Touche SEL (sélection)
# Touches de stations préréglées (1 – 6)
$ Prise AUX IN (dia. 3,5 mm)
% Touche DISP (affichage)
^ Touche INFO (mes informations)
i
k
Panneau arrière
Fenêtre d’affichage
& Indicateur de bande
* Indicateur VOL (volume)
( Indicateur BASS (graves)
) Indicateur TRE (aiguës)
- Indicateur BAL (balance)
= Indicateur FAD (fader)
q Indicateur MUTE
w Indicateur MY INFO (mes informations)
e Indicateur AUX
r Indicateur H-BASS (High BASS)
t Section d’affichage principale
y Indicateur AM/PM (horloge)
u Indicateur ST (stéréo)
i Section sous-affichage
o Indicateur d (sens de la bande)
p Indicateur LO (local)
[ Indicateur de niveau audio
Panneau arrière
] Prise d’antenne
\ Prises de sortie de préampli REAR
a Connecteur d’alimentation/enceintes
s Fusible
3
FRANÇAIS
CTX420(YU)-total-Fr-32
Page 33

RETRAIT ET FIXATION DU
PANNEAU AVANT
Fixation du panneau avant
Vous pouvez détacher le panneau avant de
l’appareil et l’emporter quand vous laissez la
voiture sans surveillance.
Utilisez le sac de transport fourni pour transporter
le panneau avant hors de la voiture.
Avant de détacher le panneau avant, retirez la
cassette pour éviter tout dommage éventuel à
l’appareil.
1 Appuyez sur PWR plus de 2 secondes
pour mettre l’appareil hors tension.
2 En soutenant le panneau avant d’une
main, appuyez sur % pour libérer l’autre
côté du panneau. Prenez garde de ne
pas faire tomber le panneau. Il pourrait
brutalement se détacher à ce momentlà.
3 Tirez sur le panneau avant de l’appareil
pour le détacher.
NE touchez PAS le connecteur au dos du
panneau avant, car cela pourrait contaminer
le connecteur et causer une mauvaise
connexion, qui se traduira par un mauvais
fonctionnement.
Témoin de sécurité
Quand le panneau avant est retiré, une DELtémoin est visible sur l’avant de l’appareil. Prévue
pour décourager les voleurs, elle clignote tant
que le panneau avant est détaché. Cet appareil
n’étant équipé d’aucun autre système de sécurité,
tel qu’alarme de sécurité, il y a donc des limites
à son efficacité.
DEL-témoin
FRANÇAIS
CTX420(YU)-total-Fr-33
4
Page 34

REGLAGE DE L’HEURE
1 Appuyez sur PWR pour mettre l’appareil
sous tension.
2 Appuyez sur DISP pour afficher
l’horloge.
Si l’indication de l’horloge est déjà affichée,
sautez cette étape.
3 Maintenez DISP pressé plus de 2
secondes.
4 Appuyez sur TUNE
bague Jog pour régler les heures.
Appuyez sur TUNE
bague Jog pour régler les minutes.
Tournez la bague Jog dans le sens horaire
pour avancer.
Tournez-la dans le sens anti-horaire pour
reculer.
5 Appuyez sur DISP.
L’horloge commence à avancer à partir de 0.
Affichage de l’horloge quand l’appareil est sous
tension
Appuyez sur DISP. Appuyez à nouveau pour
revenir à l’affichage précédent.
i
, puis tournez la
k
, puis tournez la
FONCTIONNEMENT DE LA
RADIO
1 Appuyez sur PWR pour mettre l’appareil
sous tension.
2 Appuyez plusieurs fois sur FUNC pour
sélectionner une bande parmi FM1,
FM2, FM3, AM1 et AM2.
Les indicateurs de bande apparaissent
cycliquement dans cet ordre.
• FM1, FM2 et FM3 ont la même gamme de
fréquences.
• AM1 et AM2 ont la même gamme de
fréquences.
Indicateur de bande Indication de fréquence
3 Appuyez (plus de 2 secondes) sur TUNE
i
ou TUNE k pour accorder la station
souhaitée.
L’appareil commence le balayage et accorde
automatiquement une station (recherche
d’accord).
Appuyez sur TUNE i pour augmenter ou
TUNE k pour diminuer la fréquence.
Appuyez à nouveau sur le bouton pour
annuler la recherche d’accord.
Répétez la procédure jusqu’à l’accord de la
station souhaitée.
Remarque
Si vous appuyez (moins de 0,5 seconde) sur
TUNE i ou TUNE k, la fréquence augmente
ou diminue pas à pas.
4 Ajustez le volume avec la bague Jog.
5
FRANÇAIS
CTX420(YU)-total-Fr-34
Page 35

Mise hors tension de l’appareil
Appuyez sur PWR plus de 2 secondes. Si la
touche est pressée moins de 2 secondes, elle
opérera comme MUTE.
Remarque
Cet appareil se met sous tension dans le dernier
mode sélectionné avant la mise hors tension.
Touche LO (local/DX)
Vous pouvez utiliser le mode Local pour accorder
seulement des stations puissantes pendant la
recherche d’accord. En mode Radio, appuyez
sur LO pour sélectionner le mode Local.
L’indicateur “LO” s’allume.
• Appuyez sur LO pour annuler le mode Local et
commuter au mode DX (distance).
• L’indicateur “ST” (stéréo) s’allume quand la
station accordée diffuse en stéréo et que la
réception est bonne.
Touche FUNC (fonction)
A chaque pression de FUNC, l'appareil
commute à l'un des modes suivants, en ordre
cyclique.
FM1 FM2 FM3 AM1
AM2
* Mode lecture de cassette (disponible quand une
cassette est insérée dans l’appareil)
PREREGLAGE DE
STATIONS
Préréglage automatique de stations
(mémoire automatique)
1 Appuyez sur PWR pour mettre l’appareil
sous tension.
2 Appuyez plusieurs fois sur FUNC pour
sélectionner la bande souhaitée parmi
FM1, FM2, FM3, AM1 et AM2.
3 Appuyez sur A.ME/PS plus de 2
secondes pour activer la fonction de
préréglage automatique.
Cet appareil peut mémoriser jusqu’à 6
stations sur les touches 1 à 6 de stations
préréglées (avec l’indicateur “LO” (local)
allumé).
Si l’appareil n’a pas pu trouver de stations
puissantes, l’indicateur “LO” (local) s’éteint,
et la recherche de stations moins puissantes
démarre.
Utilisez cette fonction pour prérégler
automatiquement jusqu’à 6 stations pour chacune
des bandes FM1, FM2, FM3, AM1 et AM2 (jusqu’à
un total de 30 stations).
•Quand la mémorisation automatique est
terminée, la station assignée à la touche 1 de
stations préréglées est accordée.
• Appuyez à nouveau sur A.ME/PS pour arrêter
l’opération de mémorisation automatique.
continue
FRANÇAIS
CTX420(YU)-total-Fr-35
6
Page 36

PREREGLAGE DE STATIONS
Contrôle des stations préréglées (balayage de
préréglage)
•Si vous souhaitez contrôler les stations
préréglées, appuyez sur A.ME/PS moins de 2
secondes. Les stations préréglées mémorisées
seront accordées dans l’ordre pendant 5
secondes chacune.
• Pour arrêter cette fonction, appuyez à nouveau
sur A.ME/PS ou sur une des touches 1 à 6 de
stations préréglées.
Préréglage manuel de stations
Vous pouvez prérégler manuellement des stations
qui n’ont pas été sélectionnées par mémorisation
automatique.
1 Appuyez sur PWR pour mettre l’appareil
sous tension.
2 Appuyez plusieurs fois sur FUNC pour
sélectionner la bande souhaitée parmi
FM1, FM2, FM3, AM1 et AM2.
3 Accordez la station que vous souhaitez
i
prérégler avec TUNE
ou TUNE k.
4 Appuyez sur une des touches 1 à 6 de
stations préréglées environ 2 secondes.
L’appareil émet une tonalité bip pendant la
mémorisation de la station sélectionnée.
Le numéro de la station préréglée apparaît à
droite de l’indication de fréquence.
Indication de
fréquence
Numéro de station
préréglée
Répétez ces procédures pour prérégler jusqu’à 6
stations pour chacune des bandes FM1, FM2,
FM3, AM1 et AM2.
• Si vous préréglez une station sur une touche de
station préréglée sur laquelle une autre station
de la même bande est déjà préréglée, la station
antérieurement préréglée sera effacée.
Accord d’une station préréglée
1 Appuyez sur PWR pour mettre l’appareil
sous tension.
2 Appuyez plusieurs fois sur FUNC pour
sélectionner la bande souhaitée parmi
FM1, FM2, FM3, AM1 et AM2.
3 Appuyez sur la touche de station
préréglée souhaitée.
Le numéro de la station préréglée apparaît à
droite de l’indication de fréquence.
Contrôle actif de la réception d’accord (ATRC)
Cet appareil supprime automatiquement le bruit
FM dû à la variation de la puissance du signal
résultant du déplacement de la voiture.
• Le circuit de mélange automatique intégré
mélange les signaux des canaux droit et gauche
selon la puissance de réception. Le circuit passebas s’active simultanément pour maintenir la
qualité du son.
• Si la réception faiblit encore, l’appareil commute
automatiquement au mode Monaural pour
réduire le bruit.
7
FRANÇAIS
CTX420(YU)-total-Fr-36
Page 37

FONCTION MES
INFORMATIONS
La radio peut être activée par minuterie pour un
programme par jour. L’appareil se met
automatiquement sous et hors tension en mode
Radio aux heures préréglées.
Réglage de la minuterie
1 L’appareil hors tension, appuyez sur
INFO plus de 2 secondes.
L’indication “PO” clignote dans la fenêtre
d’affichage.
2 Appuyez sur SEL.
L’indication de la minuterie clignote.
4 Appuyez sur SEL.
L’indication de la radio clignote.
Indicateur de bande
5 Appuyez sur FUNC pour sélectionner
la bande.
6 Accordez la station souhaitée en
i
appuyant sur TUNE
sur une des touches 1 à 6 de stations
préréglées.
ou TUNE k, ou
7 Appuyez sur SEL.
L’indication de la minuterie clignote.
8 Réglez l’heure à laquelle l’appareil doit
se mettre hors tension.
Appuyez sur TUNE i, puis tournez la bague
Jog pour régler les heures.
Appuyez sur TUNE k, puis tournez la bague
Jog pour régler les minutes.
9 Appuyez sur INFO plus de 2 secondes.
Le réglage est mémorisé, et l’appareil se met
hors tension.
• Pour annuler le réglage de la minuterie en
cours, appuyez sur PWR plus de 2
secondes.
3 Réglez l’heure souhaitée pour la mise
sous tension en mode Radio.
Appuyez sur TUNE i, puis tournez la bague
Jog pour régler les heures.
Appuyez sur TUNE k, puis tournez la bague
Jog pour régler les minutes.
continue
FRANÇAIS
CTX420(YU)-total-Fr-37
8
Page 38

FONCTION MES INFORMATIONS
Activation de la minuterie
1 L’appareil sous tension, appuyez sur
INFO.
L’indicateur “MY INFO” s’allume et la
minuterie est activée.
L’indicateur “MY INFO” clignote entre les
heures d’allumage et d’extinction.
Annulation de la minuterie
Appuyez à nouveau sur INFO de sorte que
l’indicateur “MY INFO” disparaisse.
Contrôle du réglage
L’appareil hors tension, appuyez sur INFO.
L’heure de mise sous tension, puis la fréquence
radio et l’heure de mise hors tension, apparaissent
dans la fenêtre d’affichage, chacune 1 seconde,
puis l’appareil se met hors tension.
Remarques
•
Même si l’appareil est en un mode autre que
Radio, à l’heure préréglée, il commute
automatiquement au mode Radio et accorde le
programme radio préréglé. Le programme terminé,
il revient automatiquement au mode antérieur.
• Quand cette fonction est activée, TUNE i/k,
A.ME/PS, LO et les touches numérotées de
préréglage sont inutilisables pour l’accord des
stations.
•
Cette fonction reste active jusqu'à l'heure de
coupure même à la mise hors puis sous tension
de l’appareil, ou au retrait puis réinstallation du
panneau avant.
•
Même si vous écoutez un programme de radio
avec cette fonction, la pression de FUNC
commutera l’appareil à un autre mode. Si vous
changez de mode avec FUNC, l’appareil ne se
mettra pas hors tension à l’heure préréglée avec
la minuterie.
LECTURE DE CASSETTE
1 Insérez une cassette pour démarrer la
lecture.
Si une cassette est déjà insérée, appuyez
plusieurs fois sur FUNC pour sélectionner le
mode de lecture de cassette et démarrer la lecture.
La lecture démarre dans le sens dans lequel
l’appareil a lu précédemment.
2 Ajustez le volume avec la bague Jog.
Appuyez sur les touches suivantes pour assurer
le transport de la bande.
Pour
Ejecter la cassette*
Changer de face lue
Avancer rapidement la face
supérieure (l) de la bande
Rebobiner la face
inférieure (j) de la bande
Rebobiner la face
supérieure (l) de la bande
Avancer rapidement la face
inférieure (j) de la bande
Arrêter le transport rapide
et reprendre la lecture
* A l’éjection de la cassette, l’appareil commute au
mode précédent.
** N’appuyez pas à fond sur
modifier le sens de défilement de la bande.
Pressez la touche
et
simultanément
ou
légèrement**
ou . Cela pourrait
9
FRANÇAIS
CTX420(YU)-total-Fr-38
Page 39

Fonction d’inversion automatique
En arrivant en fin de bande pendant la lecture ou
le transport rapide, le sens de défilement est
automatiquement inversé, et la lecture de l’autre
face démarre.
Indications de sens de défilement de la bande
Lecture Avance rapide
ou rebobinage
Face
supérieure
Face
inférieure
Commutation de mode
Quand l’appareil est dans un mode autre que
lecture de cassette, l’insertion d’une cassette
commute automatiquement au mode lecture de
cassette.
Avant de couper le commutateur d’allumage
N’oubliez pas d’éjecter toute cassette dans
l’appareil.
Pour éviter les problèmes de bande
Avant d’insérer une cassette dans l’appareil,
vérifiez que la bande est bien tendue. Si
nécessaire, retendez-la en insérant un crayon
dans le trou de la broche et en le tournant.
Les cassettes à bande de 90 minutes ou plus
sont très fines et se déforment et s’endommagent
facilement. Leur emploi n’est pas recommandé.
AJUSTEMENTS DU SON
1 Appuyez sur PWR pour mettre l’appareil
sous tension.
2 Appuyez plusieurs fois sur SEL pour
sélectionner le mode à ajuster parmi:
BASS (graves), TRE (aiguës), BAL
(balance), FAD (fader) et VOL (volume).
A chaque pression de SEL, l'un des
indicateurs suivants apparaît, dans un ordre
cyclique.
Si
vous ne passez pas à l’étape 3 dans les 5
secondes, le mode sélectionné est annulé, et
l’indication revient au mode de source actuel.
3
Tournez la bague Jog pour ajuster le niveau.
Ajustez chaque mode en consultant les
indications des commandes audio dans la
fenêtre d’affichage.
Sens anti-horaire
Réduit le niveau
des graves.
Réduit le niveau
des aiguës.
Réduit le niveau
de la ou des
enceintes droites.
Réduit le niveau
des enceintes
avant.
Réduit le volume.
Le volume peut s’ajuster en tournant la bague
Jog, sans sélectionner aucun mode avec SEL.
Sens horaire
Augmente le
niveau des graves.
Augmente le
niveau des aiguës.
Réduit le niveau de
la ou des enceintes
gauches.
Réduit le niveau
des enceintes
arrière.
Augmente le
volume.
continue
FRANÇAIS
CTX420(YU)-total-Fr-39
10
Page 40

AJUSTEMENTS DU SON
Touche MUTE
Appuyez pour réduire temporairement le volume.
Appuyez à nouveau pour rétablir le volume
précédent.
L’indicateur “MUTE” clignote dans la fenêtre
d’affichage pendant l’activation de la fonction
d’assourdissement.
H-BASS (High BASS)
Vous pouvez apprécier la musique avec des
graves renforcés.
Réglage de niveau sonore
Vous pouvez ajuster le niveau de sortie en chaque
mode pour égaliser le volume.
1 Appuyez sur PWR pour mettre l’appareil
sous tension.
2 Appuyez plusieurs fois sur FUNC pour
sélectionner le mode souhaité.
3 Appuyez sur DISP tout en appuyant sur
SEL.
L’indication “LA 0” apparaît.
1 Appuyez sur PWR pour mettre l’appareil
sous tension.
2 Appuyez plusieurs fois sur SEL pour
sélectionner le mode H-BASS (High
BASS).
3 Tournez la bague Jog pour sélectionner
l’activation ou la désactivation.
Sélectionnez “On” pour obtenir des graves
puissants.
L’indicateur “H-BASS” s’allume.
Sélectionnez “OFF” pour annuler H-BASS.
11
FRANÇAIS
4 Tournez la bague Jog pour ajuster le
niveau.
Tournez-la dans le sens horaire pour
augmenter le niveau de sortie.
Tournez-la dans le sens anti-horaire pour
réduire le niveau de sortie.
Si la bague Jog reste inopérée pensant 5
secondes, cette fonction est annulée et
l’indication revient au mode de source actuel.
CTX420(YU)-total-Fr-40
Page 41

Retour aux valeurs usine par défaut
Les réglages VOL, BASS, TRE, BAL, FAD, HBASS et le niveau sonore effectués peuvent être
remis aux valeurs usine par défaut par une
opération simple.
1 L’appareil hors tension, appuyez sur
DISP plus de 2 secondes.
L’indication “LA--” apparaît, et tous les
réglages de son sont remis aux valeurs usine
par défaut.
RACCORDEMENT D’UN
LECTEUR DE CD/MD/MP3
PORTABLE OU D’UN
AUTRE EQUIPEMENT
1 Appuyez sur PWR pour mettre l’appareil
sous tension.
2 Si une cassette est insérée, retirez-la
pour éviter tout dommage à l’appareil.
3 Raccordez un lecteur CD/MD/MP3
portable etc. via la prise AUX IN (dia. 3,5
mm) de l’appareil.
4 Appuyez plusieurs fois sur FUNC pour
sélectionner le mode AUX IN pour
fournir le son reçu du composant
raccordé.
L’indicateur “AUX” s’allume.
L’affichage de l’horloge apparaît.
• Pour plus d’informations sur le lecteur CD/MD/
MP3 etc. portable, consultez son mode d’emploi.
FRANÇAIS
CTX420(YU)-total-Fr-41
12
Page 42

REGLAGE DE LA
TONALITE BIP
L'appareil est préréglé à l'usine pour émettre une
tonalité bip à toute pression d'une touche sur le
panneau avant, sauf %, z, f, ou g (pas de
tonalité bip avec la bague Jog). Cette tonalité
peut être assourdie en procédant comme suit.
1 L’appareil hors tension, appuyez sur
SEL plus de 2 secondes.
L’indication “BEEP” apparaît.
2 Tournez la bague Jog pour sélectionner
l’activation ou la désactivation.
La fonction tonalité bip est activée quand
l’indication “BEEP” apparaît avec l’indicateur
de niveau audio allumé, et annulée quand
elle n’est pas affichée.
ENTRETIEN
Nettoyage du panneau avant
Quand le panneau avant est sale, essuyez la
surface avec un chiffon doux et sec.
Nettoyage de la tête de lecture
Utilisez une cassette de nettoyage pour nettoyer
la tête de lecture et les cabestans environ une
fois par mois. Si la tête est sale, les tonalités
aiguës ne seront pas reproduites correctement.
Nettoyage du connecteur
Le connecteur au dos du panneau avant doit être
nettoyé de temps à autre. Essuyez sa surface
avec une ouate de coton légèrement humidifiée
d’alcool.
Indicateur de niveau audio
3 Appuyez sur SEL plus de 2 secondes.
L’appareil se met hors tension.
13
FRANÇAIS
CTX420(YU)-total-Fr-42
Page 43

SPECIFICATIONS
SECTION RADIO
(FM)
Gamme de fréquences:
Sensibilité utilisable: 12,7 dBf
Seuil de sensibilité 50 dB:
Rejet IF: 80 dB
Réponse en fréquence:
Rapport signal/bruit: 63 dB
Séparation stéréo: 35 dB à 1 kHz
Sélectivité d’un canal de substitution:
Taux de capture: 3 dB
(AM)
Gamme de fréquences:
Sensibilité utilisable: 30 µV (30 dB)
*Réglez les incréments de fréquence pour votre
région avec le commutateur sous l’appareil.
(Ce commutateur est réglé à l’usine à la position 10 k
[pour les Etats-Unis].)
SECTION CASSETTE
Vitesse de défilement de la bande:
Rapport signal/bruit: 50 dB
Réponse de fréquence:
Séparation stéréo: 40 dB
Temps FF/REW: 190 sec. (C-60)
SECTION AUDIO
Puissance de sortie max.:
Entrée AUX IN
Sensibilité d’entrée (impédance de charge)
AUX IN: 300 mV (10 kΩ)
87,5 MHz à 108 MHz
(par étapes de 100 kHz)*
87,5 MHz à 108 MHz
(par étapes de 50 kHz)*
17,2 dBf
30 Hz à 15.000 Hz
70 dB
530 kHz à 1.710 kHz
(par étapes de 10 kHz)*
531 kHz à 1.602 kHz
(par étapes de 9 kHz)*
4,8 cm/sec.
40 Hz à 14.000 Hz
40 W × 4 canaux
GENERALITES
Tension d’alimentation:
Impédance de charge: 4 Ω
Contrôle de la tonalité:Graves ±10 dB à 100 Hz
Tension de sortie préampli (impédance de charge):
Encombrement (l × h × p):
Accessoires fournis: Sac de transport (1)
14,4 V (11 à 16 V tolérés), CC,
masse négative
Aiguës ±10 dB à 10 kHz
2,2 V (10 kΩ)
182 × 53 × 155 mm
Les spécifications et l’aspect extérieur sont sujets
à modification sans préavis pour amélioration du
produit.
FRANÇAIS
14
CTX420(YU)-total-Fr-43
Page 44

8A-KTG-902-11
000201BTM-OX Printed in China
A
 Loading...