

Page 1

CO MP A a D IS C C A RR Y C O MP O NE N T S YS T EM
SI ST E MA DE CO M PO N EN T ES [l E D I SC O S C OM P Aa O S P OR T AT I L
MIN I CH A I NE PO R TA BL E A LE C fE U R D E C D
CA-DWI635
OPERATING INSTRUaiONS
See page 2.
MANUAL DE INSTRUCCIONES
Ver la página 18.
MODE D'EMPLOI
Voir page 34.
En
(English)
E
(Español)
F
(Français)
8Z-CT4-905-01
981205AAO-I-S
iSOil
DIGITAL AUDIO
Page 2
WARNING
TO REDUCE THE RISK OF FIRE OR
ELECTRIC SHOCK, DO NOT EXPOSE THIS
APPLIANCE TO RAIN OR MOISTURE.
PRECAUTIONS
Read the Operating Instructions carefully and completely
before operating the unit. Be sure to keep the Operating
Instructions for future reference. All warnings and cautions in
the Operating Instructions and on the unit should be strictly
followed, as well as the safety suggestions below.
CAUTION
RISK OF ELECTRIC SHOCK
DO NOT OPEN
“CAUTION: TO REDUCE THE RISK OF
DO NOT REMOVE COVER (OR BACK).
NO USER-SERVICEABLE PARTS INSIDE.
ELECTRIC SHOCK,
REFER SERVICING TO QUALIFIED
SERVICE PERSONNEL.”
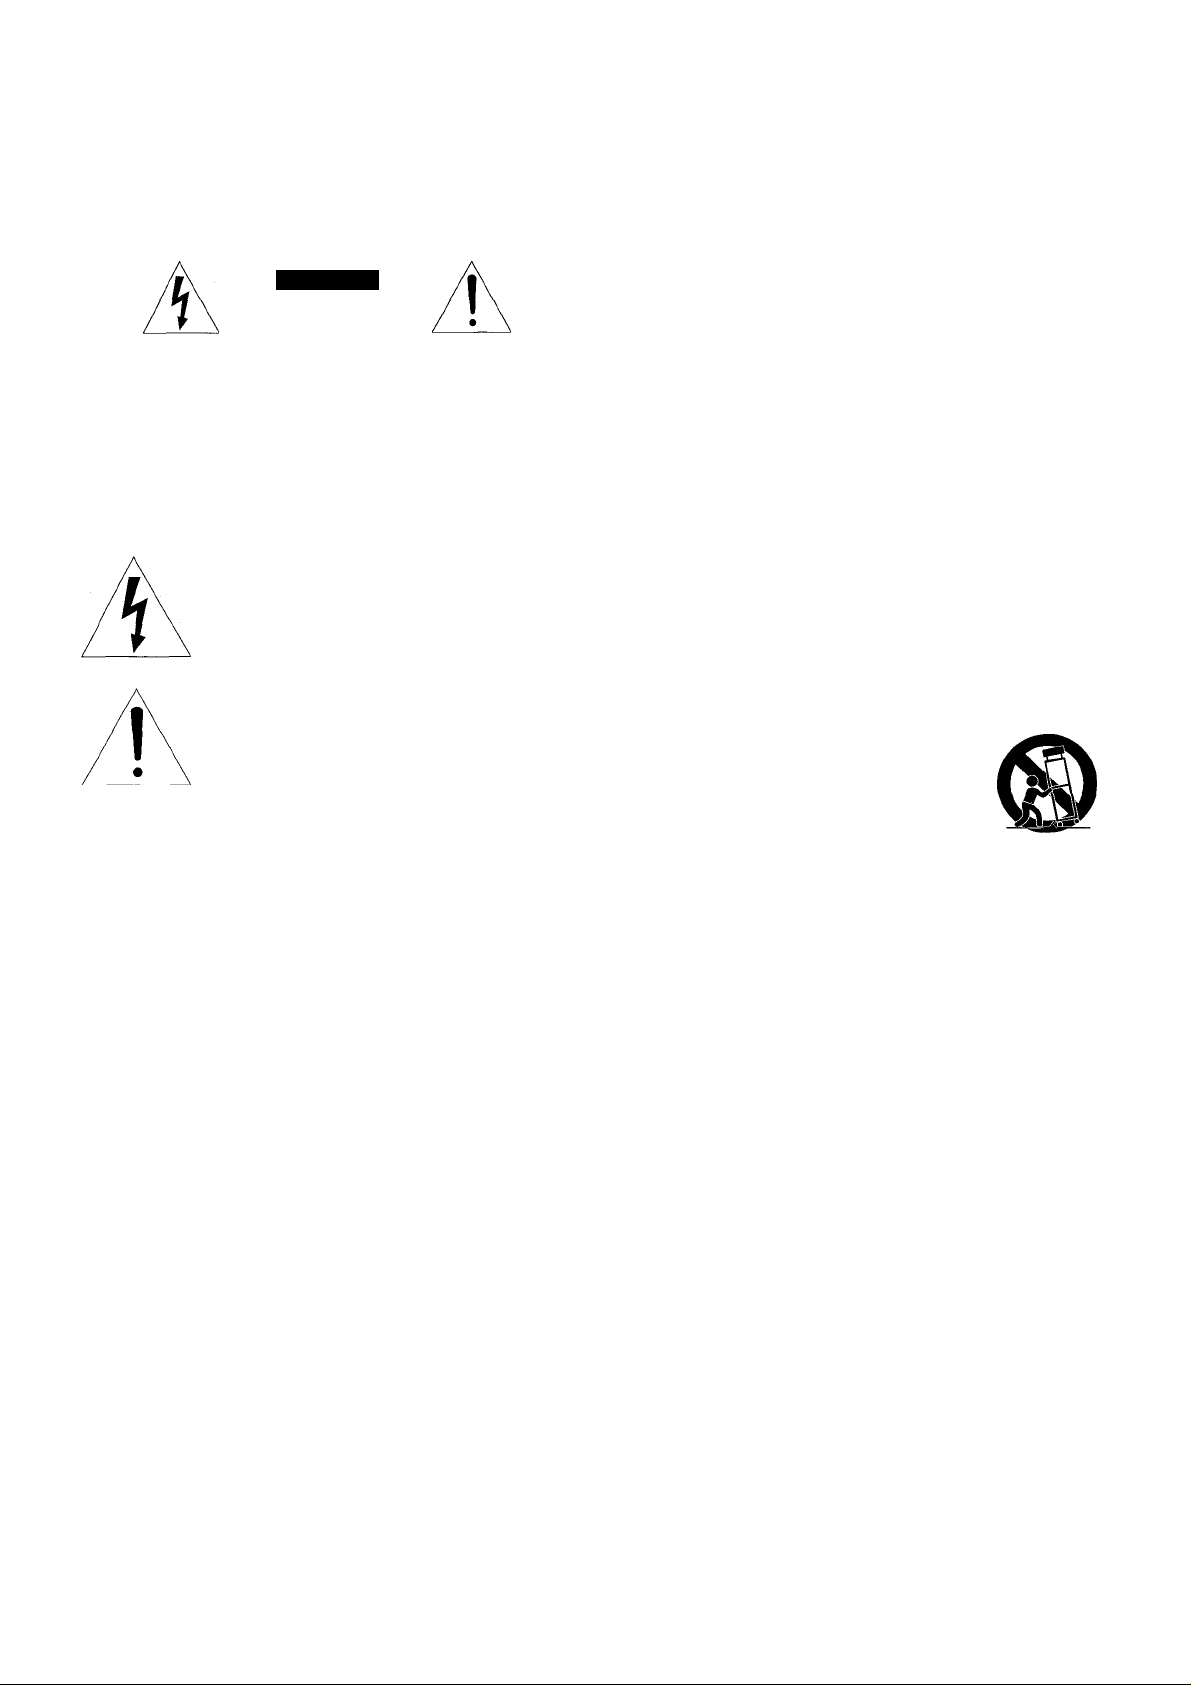
Explanation of Graphical Symbols:
The lightning flash with arrowhead symbol, within
an equilateral triangle, is intended to alert the user
to the presence of uninsulated “dangerous volt
age” within the product’s enclosure that may be of
sufficient magnitude to constitute a risk of electric
shock to persons.
The exclamation point within an equilateral trian
gle is intended to alert the user to the presence of
important operating and maintenance (servicing)
instructions in the literature accompanying the
appliance.
OWNER’S RECORD
For your convenience, record the model number (you will find it at the
rear of the unit) and serial number (you will find it in the battery
compartment) in the space provided below. Please refer to them when
you contact your AIWA dealer in case of difficulty.
Model No. Serial No.
Installation
1 Water and moisture - Do not use this unit near water,
such as near a bathtub, washbowl, kitchen sink, laundry
tub, in a wet basement, swimming pool, or the like.
2 Heat - Do not use this unit near sources of heat, including
heating vents, stoves, or other appliances that generate
heat.
It also should not be placed in temperatures less than 5°C
(41 °F) or greater than 35°C (95°F).
3 Mounting surface - Place the unit on a flat, even surface.
4 Ventilation - The unit should be situated with adequate
space around it so that proper heat ventilation is assured.
Allow 10 cm (4 in.) clearance from the rear and the top of
the unit and 5 cm (2 in.) from each side.
- Do not place the unit on a bed, rug, or similar surface
that may block the ventilation openings.
- Do not install the unit in a bookcase, cabinet, or airtight
rack where ventilation may be impeded.
5 Objects and liquid entry - Take care that objects or
liquids do not get inside the unit through the ventilation
openings.
6 Carts and stands - When placed or
mounted on a stand or cart, the unit should
be moved with care.
Quick stops, excessive force, and uneven
surfaces may cause the unit or cart to
overturn or fall.
7 Condensation - Moisture may form on the CD pickup
lens when:
- The unit is moved from a cold spot to a warm spot
- The heating system has just been turned on
- The unit is used in a very humid room
- The unit is cooled by an air conditioner
When this unit has condensation inside, it may not
function normally. Should this occur, leave the unit for a
few hours, then try to operate again.
8 Wall or ceiling mounting - The unit should not be
mounted on a wall or ceiling, unless specified in the
Operating Instructions.
NOTE
This equipment has been tested and found to comply with the limits for
a Class B digital device, pursuant to Part 15 of the FCC Rules. These
limits are designed to provide reasonable protection against harmful
interference in a residential installation.
This equipment generates, uses, and can radiate radio frequency
energy and, if not installed and used in accordance with the instruc
tions, may cause harmful interference to radio communications. How
ever, there is no guarantee that interference will not occur in a particular
installation. If this equipment does cause harmful interference to radio
or television reception, which can be determined by turning the equip
ment oft and on, the user is encouraged to try to correct the interference
by one or more of the following measures:
.... Reorient or relocate the receiving antenna.
.... Increase the separation between the equipment and receiver.
.... Connect the equipment into an outlet on a circuit different from that
to which the receiver is connected.
.... Consuitthedealer or an experienced radio/TV technician for help.
CAUTION
Modifications or adjustments to this product, which are not expressly
approved by the manufacturer, may void the user's right or authority to
operate this product.
2 ENGLISH
Electric Power
1 Power sources - Use on batteries or AC house current,
as specified in the Operating Instructions and marked on
the unit.
2 Polarization - As a safety feature, some units are
equipped with polarized AC power plugs which can only
be inserted one way into a power outlet. If it is difficult or
impossible to insert the AC power plug into an outlet, turn
the plug over and try again. If it still does not easily insert
into the outlet, please call a qualified service technician to
service or replace the outlet. To avoid defeating the
safety feature of the polarized plug, do not force it into a
power outlet.
3 AC power cord
- When disconnecting the AC power cord, pull it out by
the AC power plug. Do not pull the cord itself.
- Never handle the AC power plug with wet hands, as this
could result in fire or shock.
- Power cords shouid be firmly secured to avoid being
bent, pinched, or walked upon. Pay particular attention
to the cord from the unit to the power socket.
- Avoid overloading AC power plugs and extension cords
beyond their capacity, as this could result in fire or
shock.
Page 3

4 Extension cord - To help prevent electric shock, do not
use a polarized AC power plug with an extension cord,
receptacle, or other outlet unless the polarized plug can
be completely inserted to prevent exposure of the blades
of the plug.
5 When not in use - Unplug the AC power cord from the
AC outlet or remove all the batteries if the unit will not be
used for several months or more. When the cord is
plugged in, a small amount of current continues to flow to
the unit, even when the power is turned off.
Maintenance
Clean the unit only as recommended in the Operating
Instructions.
Damage Requiring Service
Have the units serviced by a qualified service technician if:
- The AC power cord or plug has been damaged
- Foreign objects or liquid have got inside the unit
- The unit has been exposed to rain or water
- The unit does not seem to operate normally
- The unit exhibits a marked change in performance
- The unit has been dropped, or the cabinet has been
damaged
DO NOT ATTEMPT TO SERVICE THE UNIT YOURSELF.
TABLE OF CONTENTS
PFTEPARATIONS
POWER SUPPLY..........................................................4
CONNECTIONS
REMOTE CONTROL.....................................................5
BEFORE OPERATION
RADIO RECEPTION___________________________
MANUAL TUNING.........................................................6
PRESETTING STATIONS.............................................7
CD PLAYING
CD OPERATIONS.........................................................8
T/(PE PLAYBACK_____________________________
TAPE OPERATIONS...................................................10
SOUND
_____________________________________
ADJUSTING THE SOUND..........................................11
RECORDING_________________________________
RECORDING FROM A CD OR THE TUNER
DUBBING A TAPE......................................................13
____________________________
............................................................
................................................
4
5
________________________________
............
12
CLOCK AND TIMER
SETTING THE CLOCK
SETTING THE TIMER
SETTING THE SLEEP TIMER
OTHERS
GENERAL
CARE AND MAINTENANCE
SPECIFICATIONS.......................................................16
TROUBLESHOOTING GUIDE
PARTS INDEX.............................................................17
____________________________________
MICROPHONE MIXING
___________________________________
___________________________
...............................................
.................................................
....................................
..............................................
......................................
....................................
13
14
15
15
16
17
ENGLISH 3
Page 4
PREPARATIONS
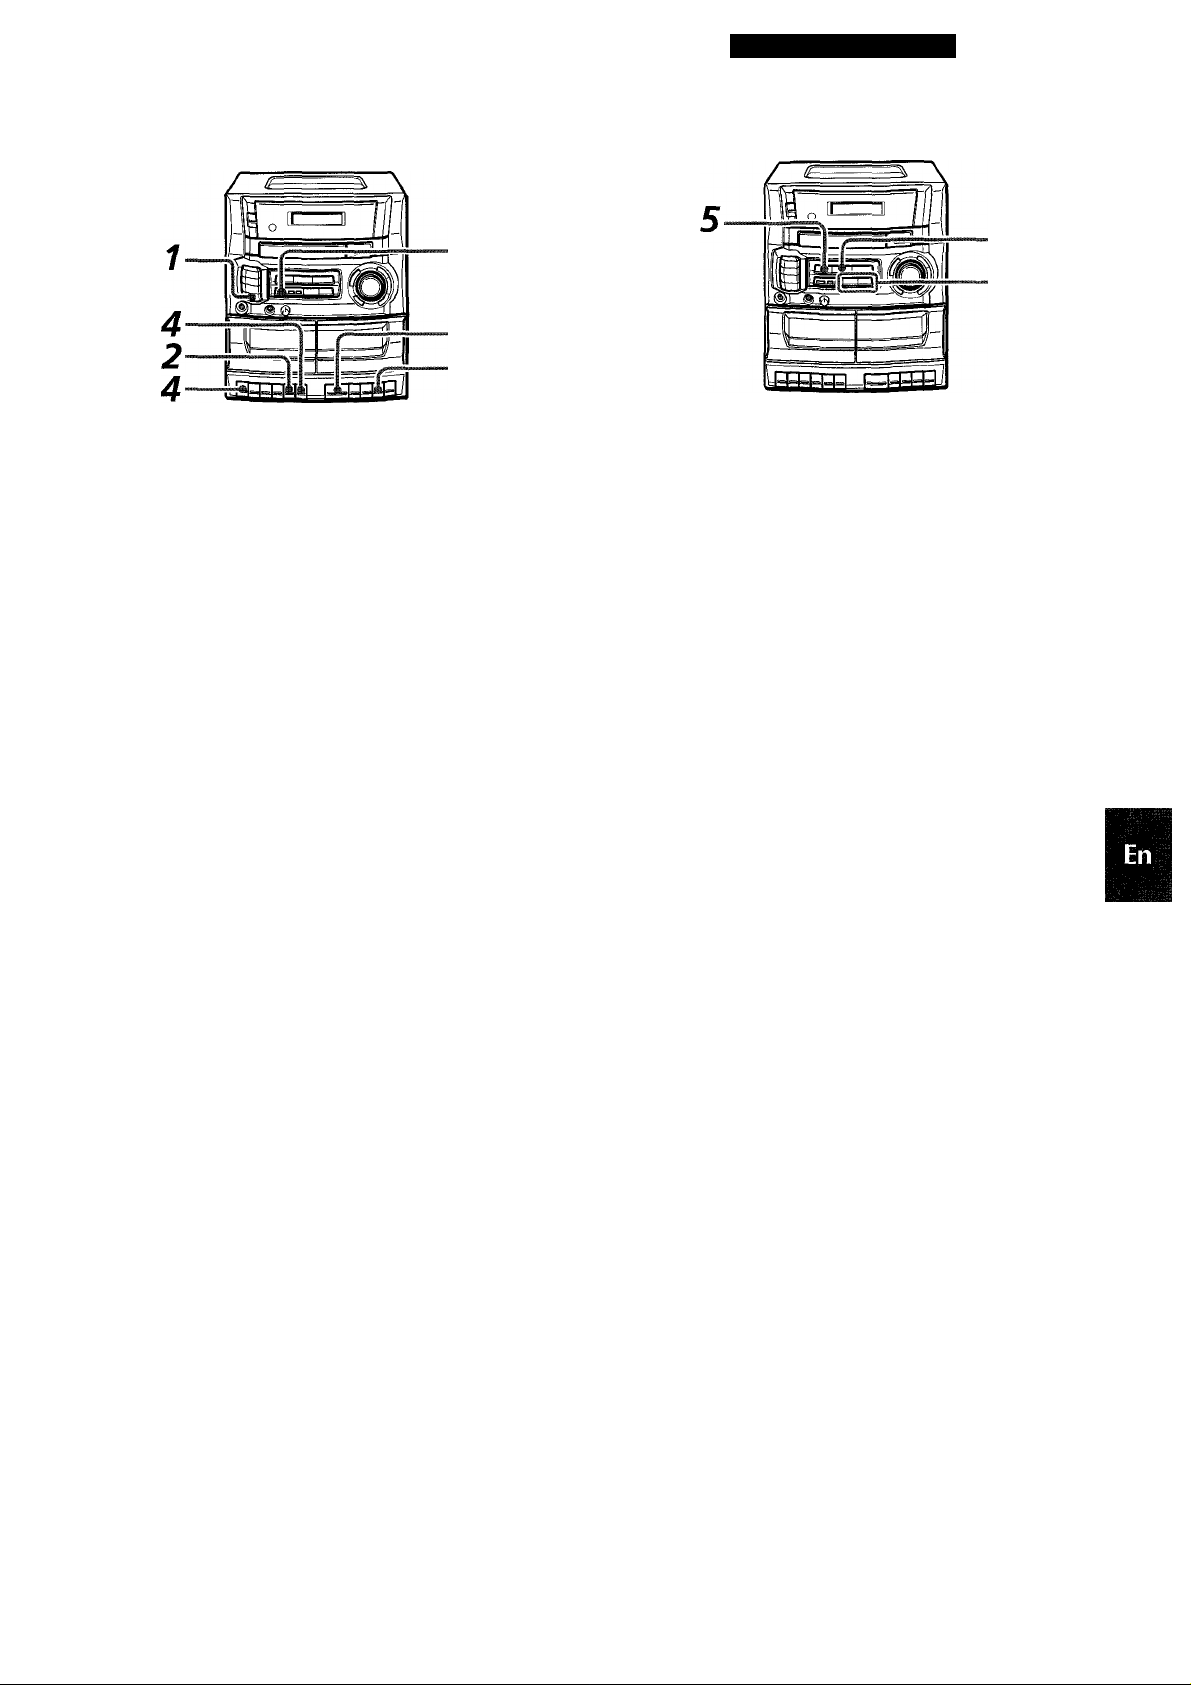
POWER SUPPLY
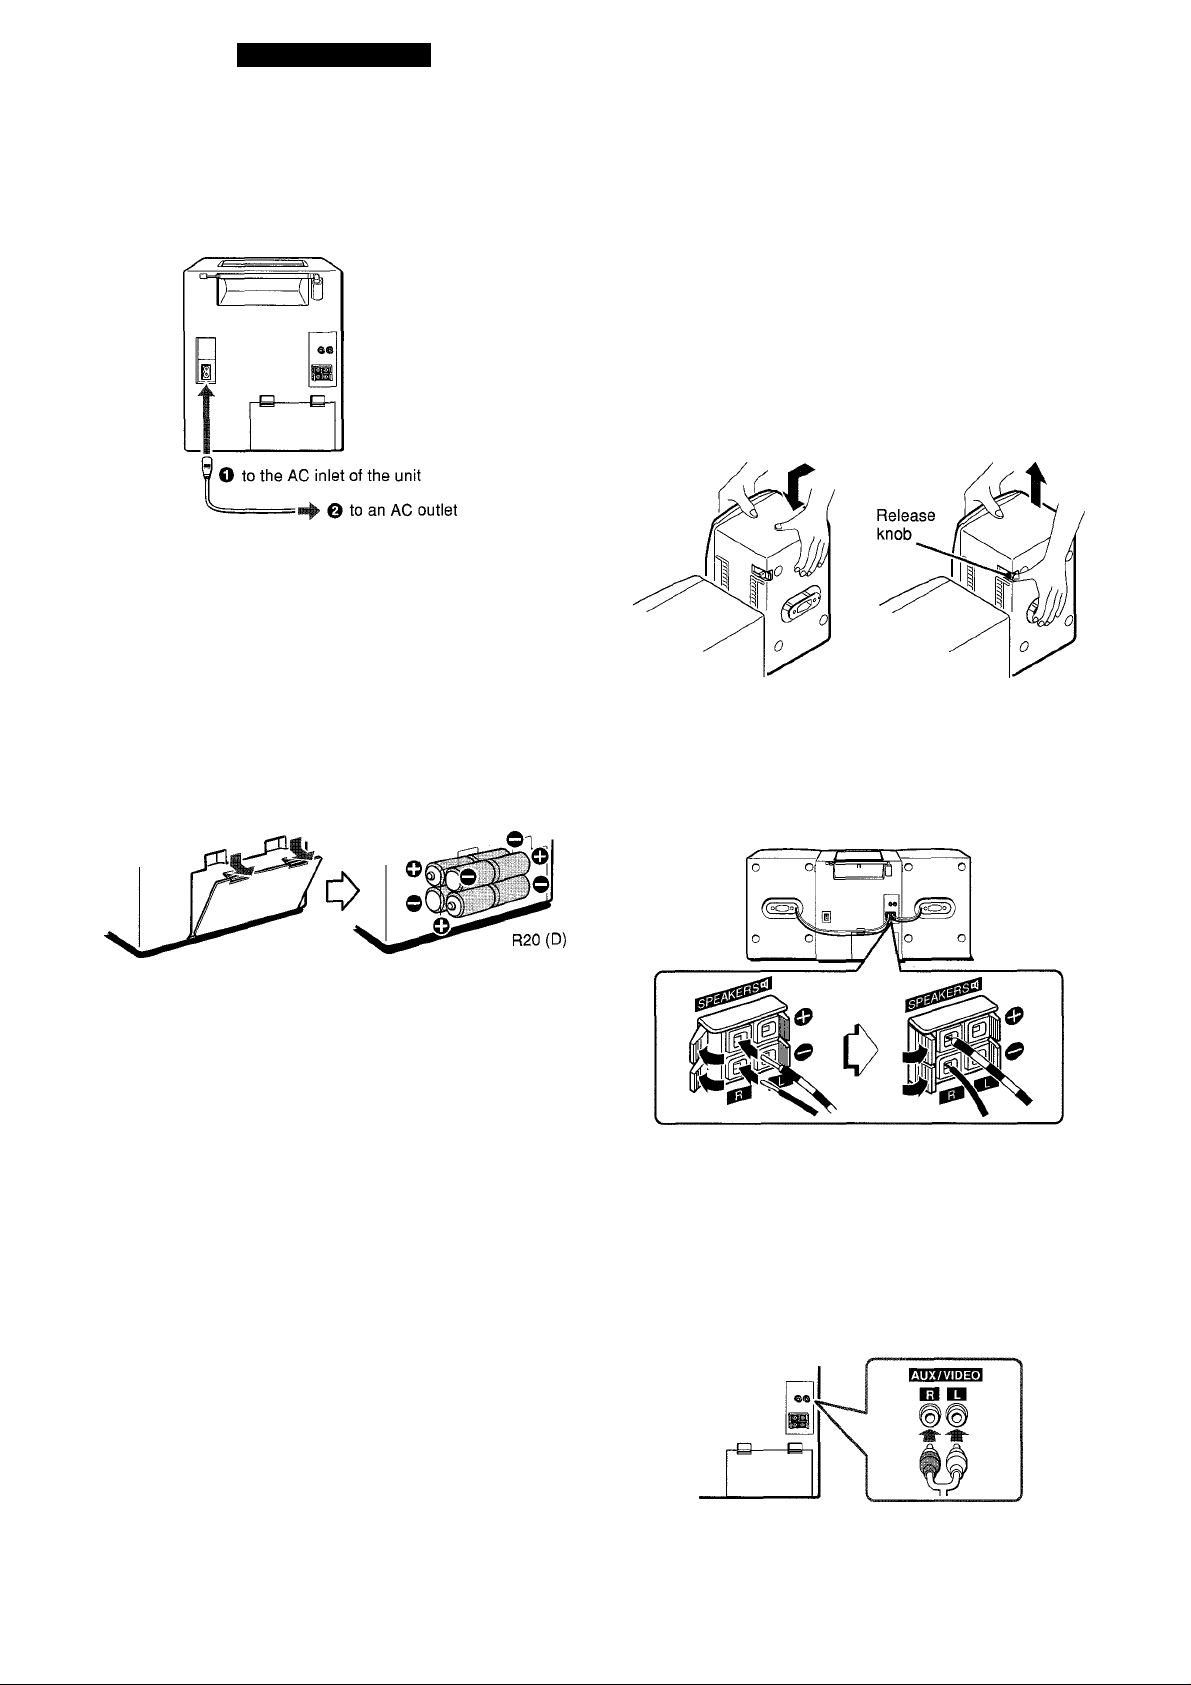
Usiiigi<.aR.^JyC..MQuse<.Giii'Ke^.
Connect the AC cord as illustrated below.
CAUTION
Use only the supplied AC cord. Use with other cords may
result in the risk of fire.
ysiRg.Ai]eJia.tteiLes ^
Open the iid of the battery compartment on the rear and
insert eight R20 (size D) batteries, not supplied, as illustrated
below. Then close the lid.
To switch from AC power supply to battery power
supply, disconnect the AC cord from the AC iniet.
Batteries wear excessively when the cord is connected.
CONNECTIONS
IMPORTANT
• Make sure that the AC cord is disconnected and batteries
are removed before connecting speakers.
• Do not connect other than the supplied speakers.
1 Position the speakers.
To couple with the speakers, slide each speaker down
into the guide brackets on the center unit until the height
is level with the unit.
To separate the unit from the speakers, slide the
speakers up and off, while pressing the speaker release
knob.
2 Connect the speakers.
Connect the right speaker cord to the R terminals, and
the left speaker cord to the L terminals.
Connect the speaker cord with the white broken line to
O and the other cord to ©.
The batteries need to be replaced when:
The OPE/BATT indicator becomes dim, the tape speed
slows down, volume decreases, or sound is distorted during
operation.
Notes on batteries
To avoid damage from ieakage or explosion, observe the
foliowing:
• Insert the batteries with the O and O marks correctiy
aligned.
• Do not mix different types of batteries or oid batteries with
new ones.
• Never recharge the batteries, appiy heat to them or take
them apart.
• Remove dead batteries.
if iiquid ieaks from the batteries, wipe thoroughly to remove.
Other Connections
Sound signals can be input to this unit through the AUX/
VIDEO jacks.
Use a cable with RCA phono plugs (not supplied) to connect
the external equipment.
Connect the red plug to the R jack, and the white plug to the
L jack.
To listen to the externai source
Press AUX and play the equipment.
Refer also to the operating instructions of the connected
equipment for details.
...
4 ENGLISH
Page 5
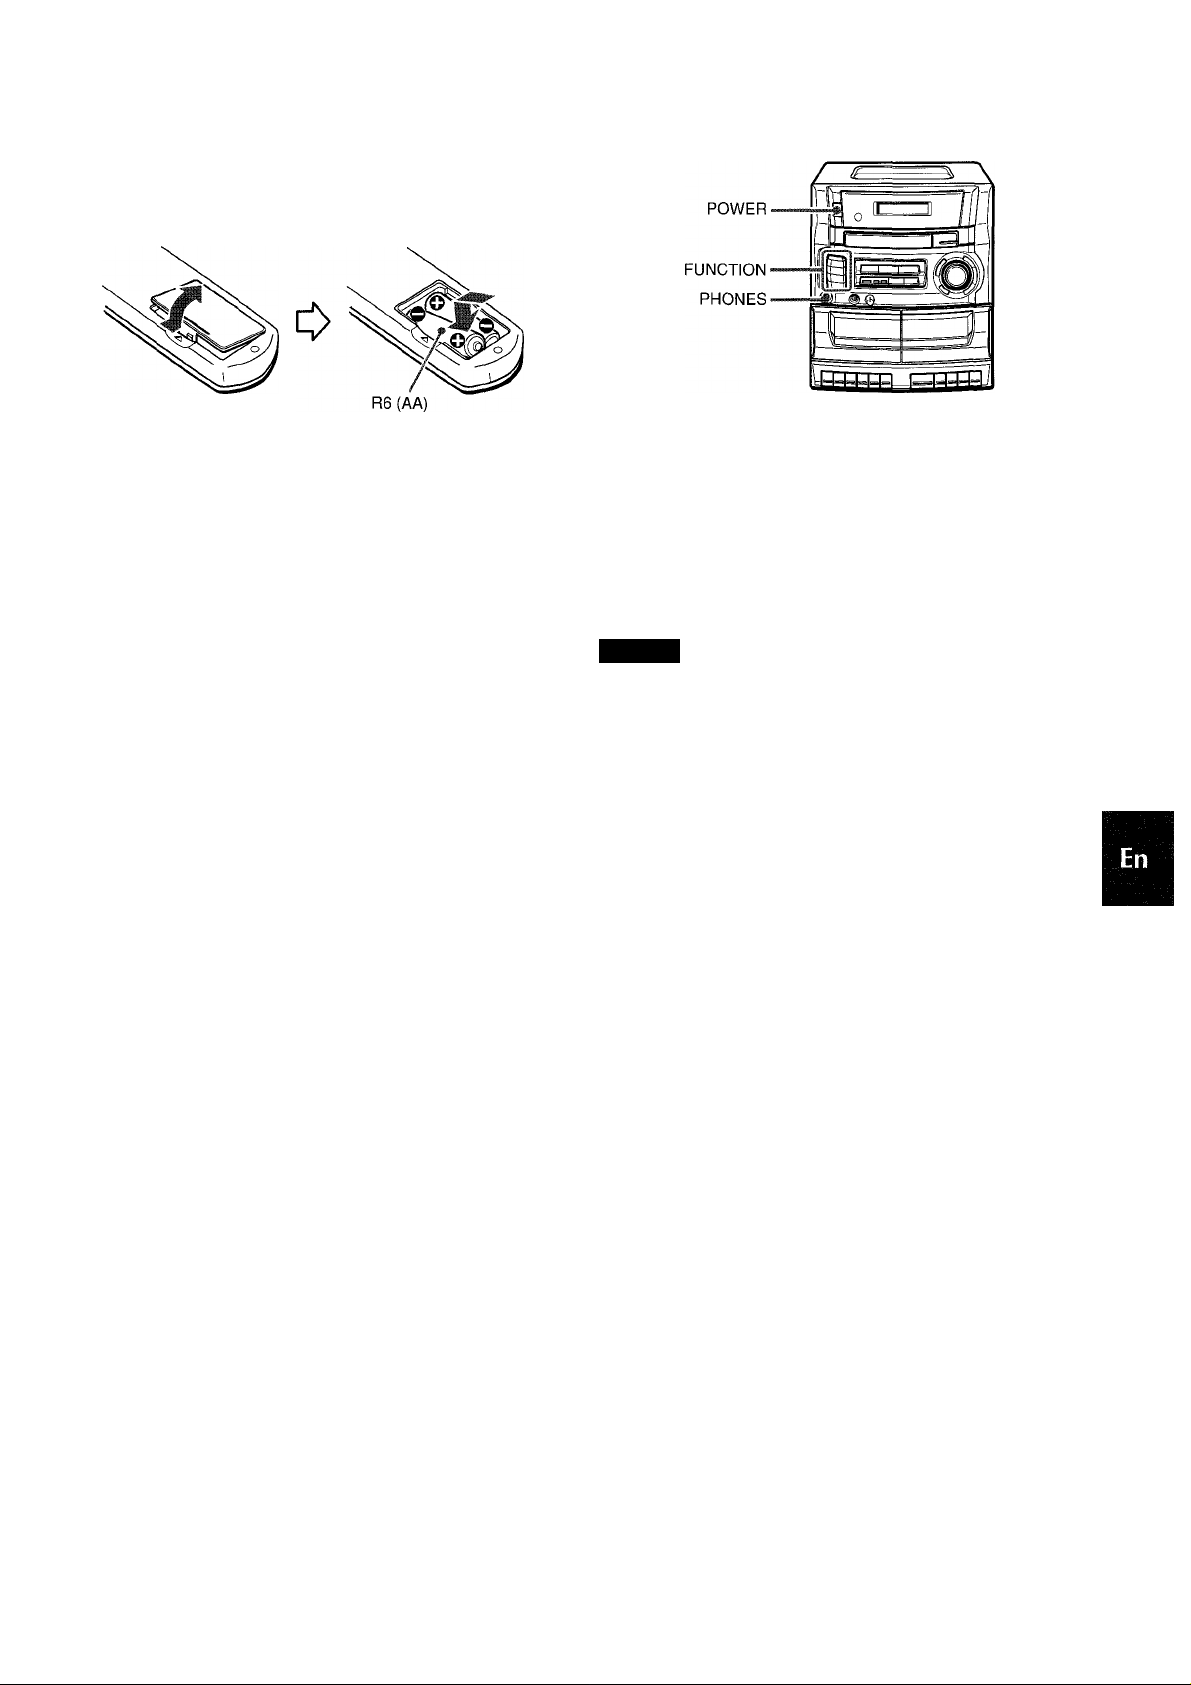
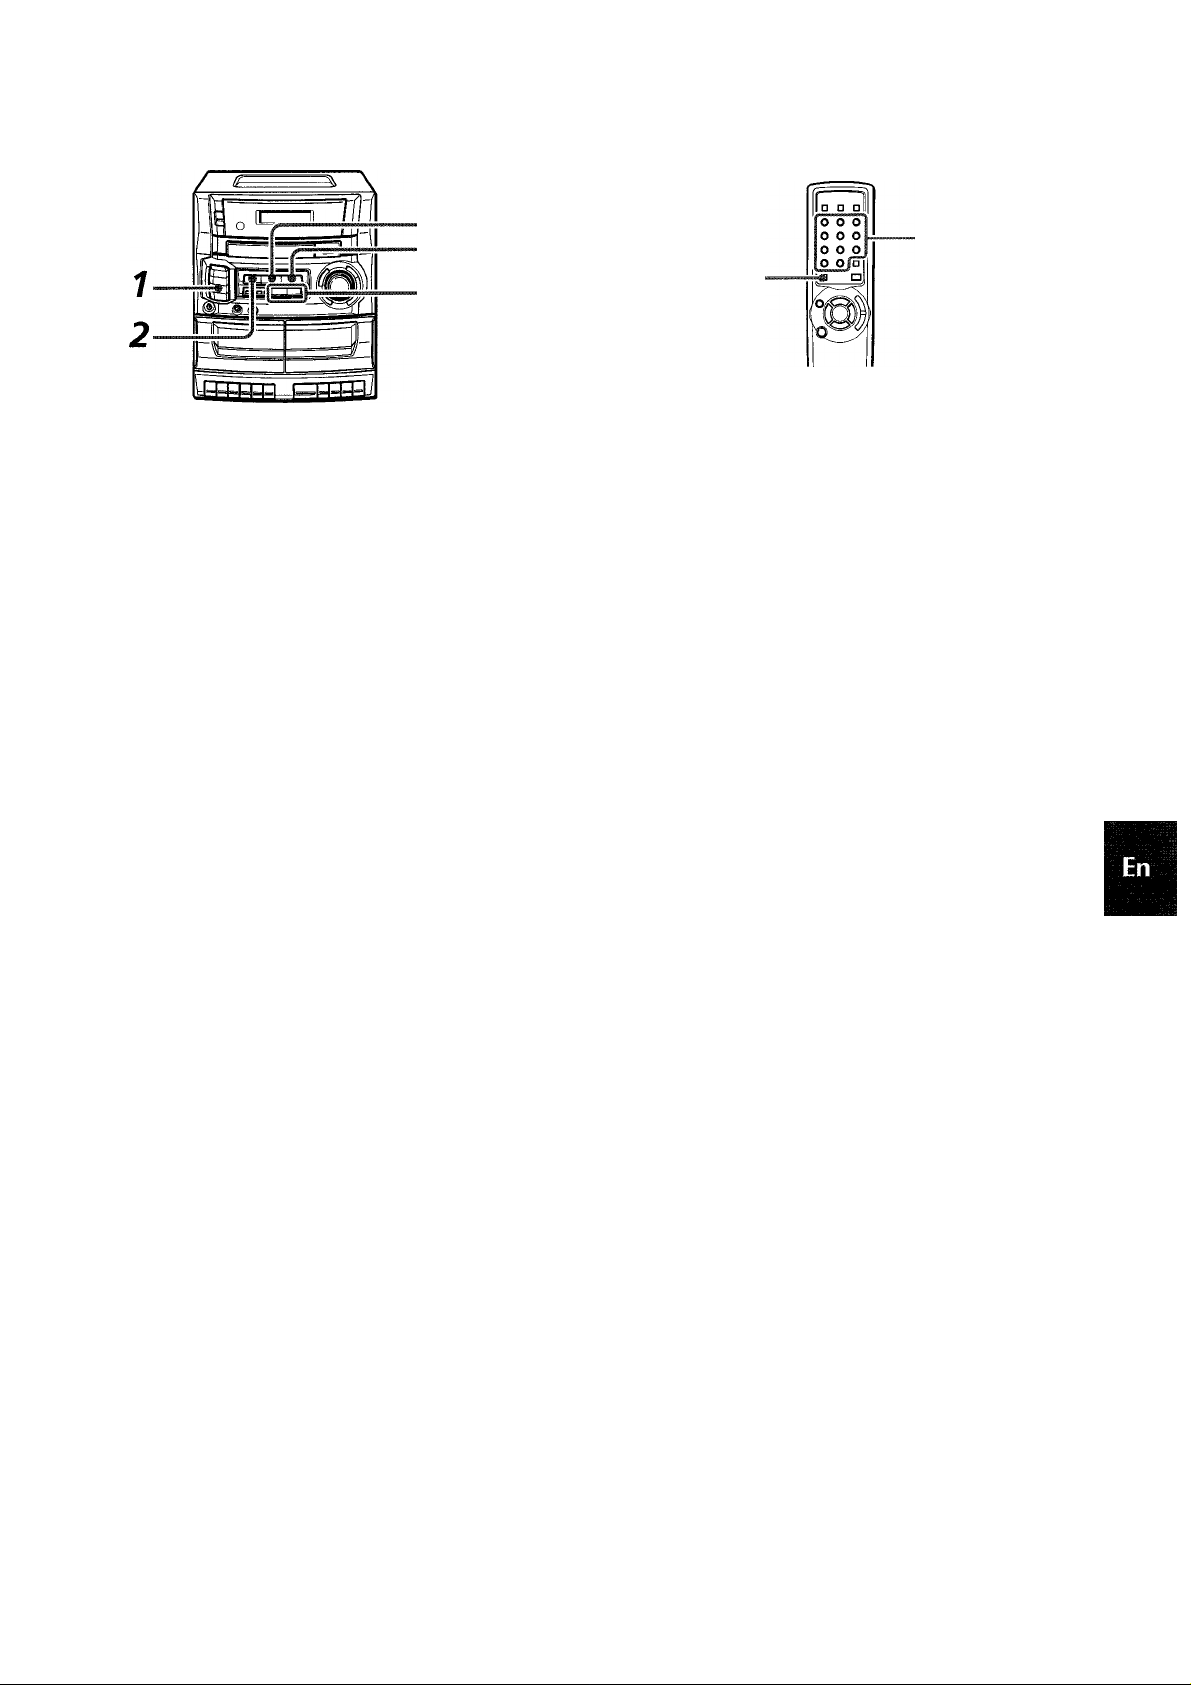
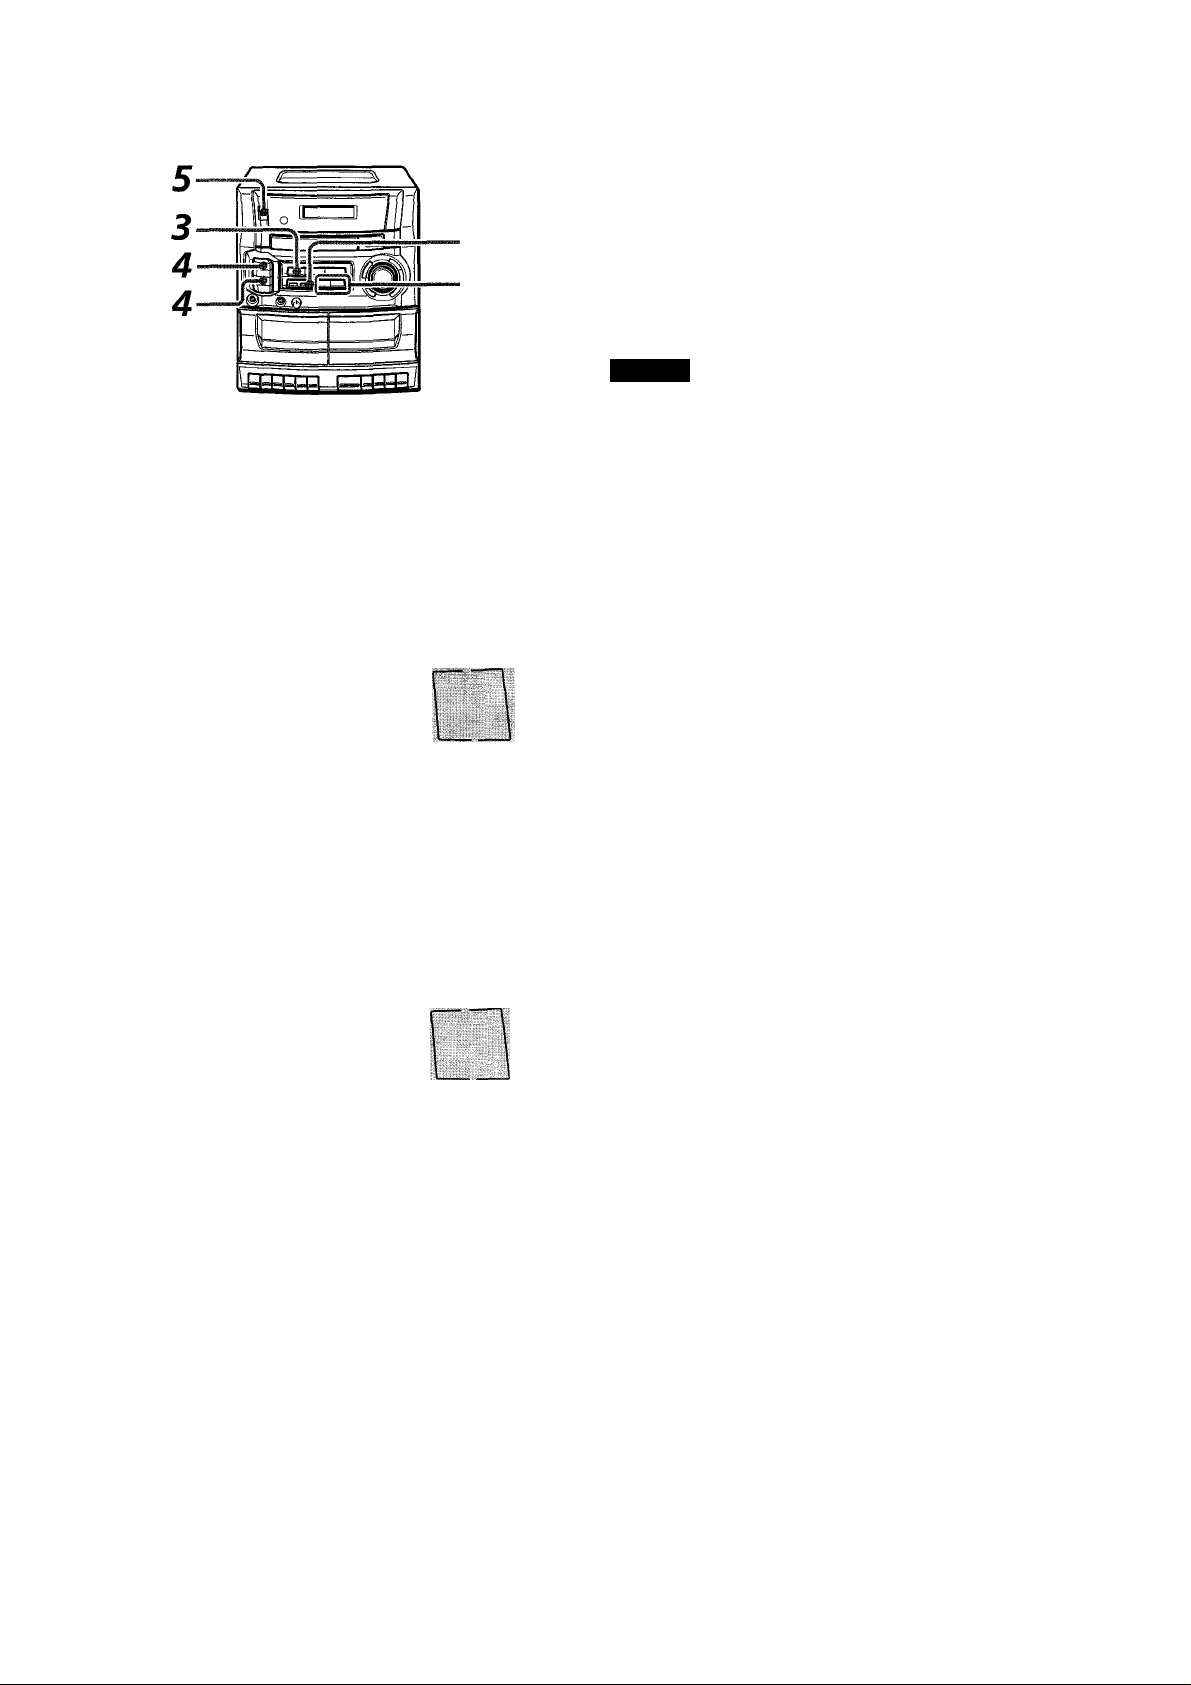
REMOTE CONTROL
Inserting batteries
Detach the battery cover on the rear of the remote control
and insert two R6 (size AA) batteries.
When to replace the batteries
The maximum operational distance of the remote control
should be approximately 5 meters (16 feet). When this
distance decreases, replace the batteries with new ones.
BEFORE OPERATION
To turn the power on
Press one of the FUNCTION buttons (CD, AUX, TUNER/
BAND, TAPE). Play of the inserted disc or the previously
tuned station is received (Direct Play Function).
POWER is also available.
Using the remote control
The instructions in this manual refer mainly to the buttons on
the main unit. Buttons on the remote control with the same
names as those on the main unit can be used as well.
To use the FUNCTION button
The FUNCTION button substitutes for the FUNCTION
buttons (CD, AUX, TUNER/BAND, TAPE) on the main unit.
Each time FUNCTION is pressed while power is on, the next
function is selected cyclically.
If the unit is not going to be used for an extended period of
time, remove the batteries to prevent possible electrolyte
leakage.
The remote control may not operate correctly when:
- The line of sight between the remote control and the unit
is exposed to intense light, such as direct sunlight
- Other remote controls are used nearby (television, etc.)
After use
Press POWER to turn off the power. The display changes to
the clock.
NOTE
When using on the batteries, you cannot turn the power on
with the remote control.
U sing the headphones
Connect headphones to the PHONES jack with a stereo mini
plug (03.5 mm. Vs inch).
No sound is output from the speakers while the headphones
are plugged in.
ENGLISH 5
Page 6
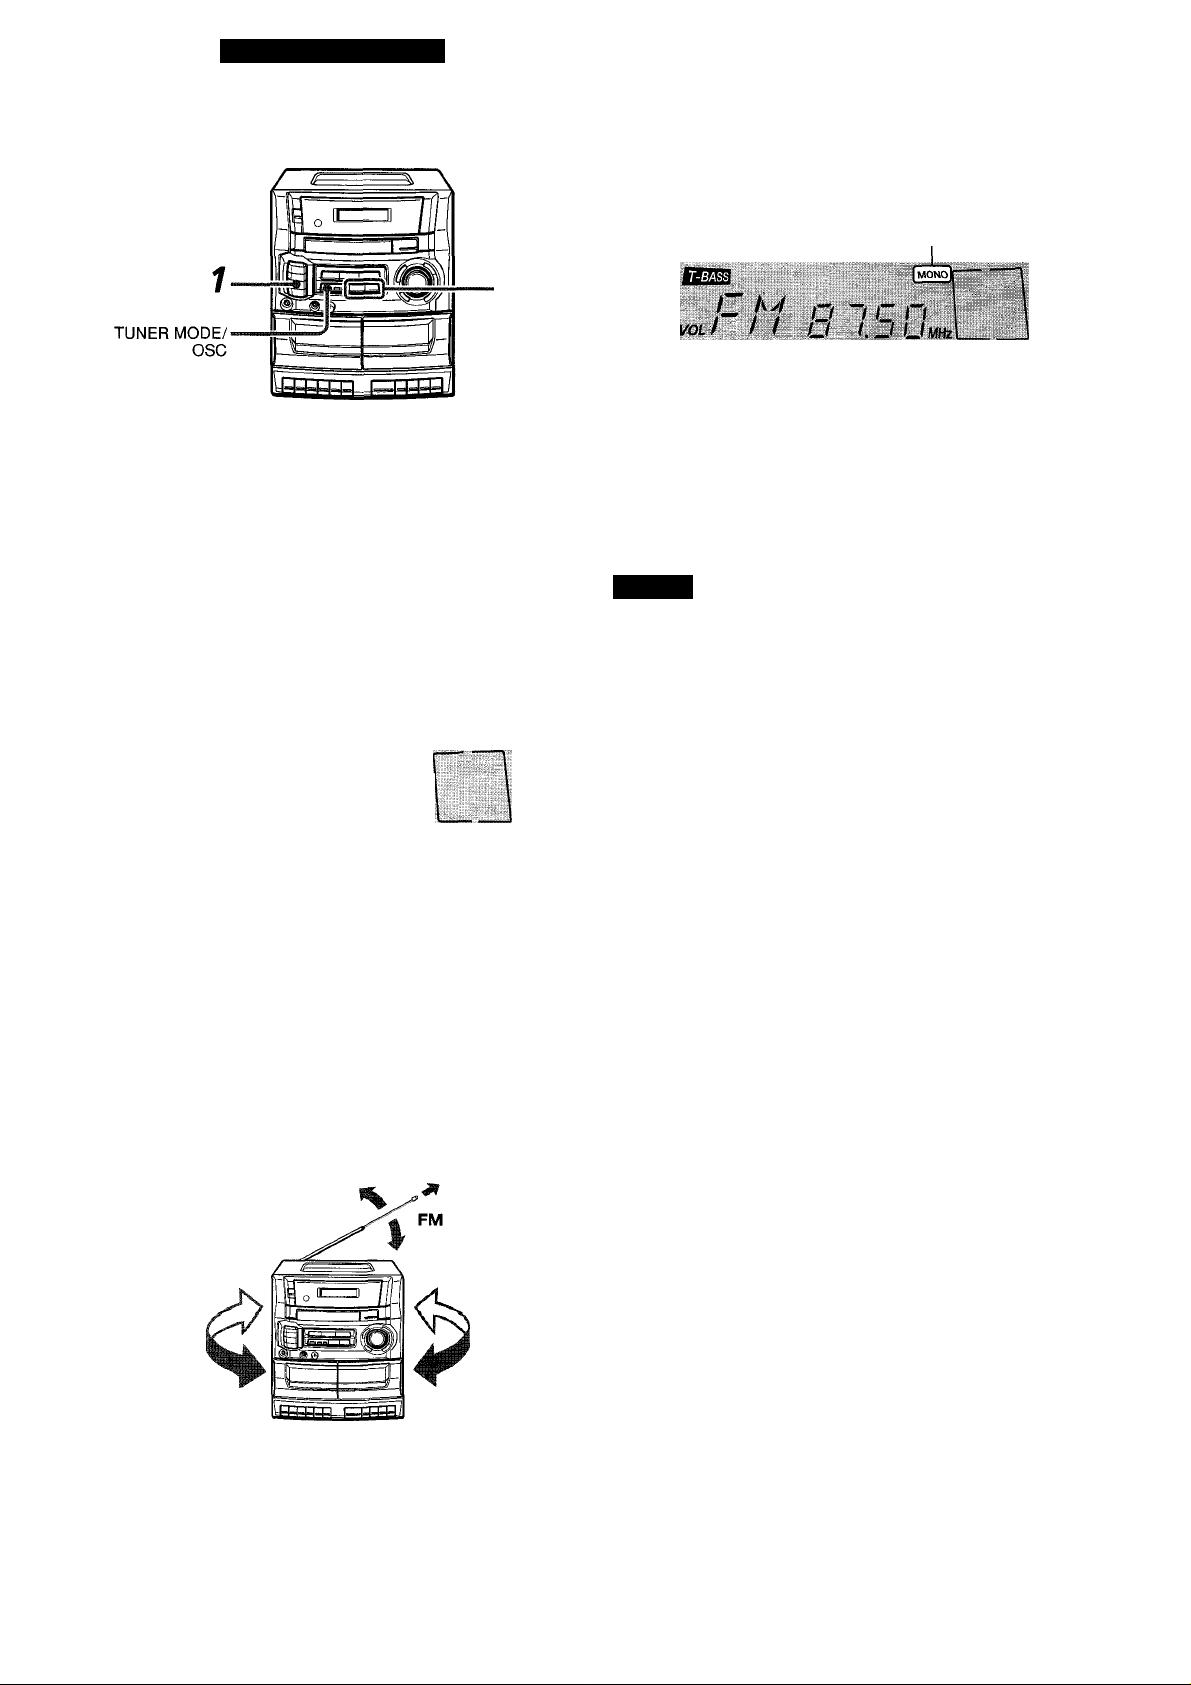
RADIO RECEPTION
MANUAL TUNING
7 Press TUNER/BAND repeatedly to select the
desired band.
FM AM
When TUNER/BAND is pressed while the power is off,
the power is turned on directly and the previously tuned
station is received (Direct Play Function).
When using the remote control, press BAND repeatedly
while the power is on.
Press ◄◄ DOWN or ►► UP to select a station.
Each time the button is pressed, the frequency changes.
During FM stereo reception, STEREO is displayed.
Z]
When an FM stereo broadcast contains noise
Press TUNER MODE/OSC.
MONO appears on the display.
Noise is reduced, although reception is monaural.
MODE on the remote control is also available.
MONO
To restore stereo reception, press the button again.
To change the AM tuning intervai
The default setting of the AM tuning interval is 10 kFIz/step.
If you use this unit in an area where the frequency allocation
system is 9 kHz/step, change the tuning interval.
Press POWER while pressing TUNER/BAND.
To reset the interval, repeat this procedure.
NOTE
When the AM tuning interval is changed, all preset stations
(see PRESETTING STATIONS) are cleared. The preset
stations have to be set again.
STEREO
VOL
/ // O I.DUmz
To search for a station quickly (Auto Search)
Keep ◄◄ DOWN or ►► UP pressed until the tuner starts
searching for a station. After tuning in to a station, the
search stops.
To stop the Auto Search manually, press ◄◄ DOWN or
UP.
• The Auto Search may not stop at stations with very weak
signals.
For better reception FM
Extend the FM antenna and orient it for the best reception.
AM
The AM antenna is inside the unit. Position the unit for the
best reception.
AM
I I ~l t I
6 ENGLISH
Page 7
PRESEniNG STATIONS
RBESET NUMBER TUNING
Use the remote control to select the preset number directly.
PRESET
• CLEAR
The unit can store a total of 24 preset stations for FM and
AM. However, up to 16 stations can be preset for each band.
When a station is stored, a preset number is assigned to the
station. Use the preset number to tune in to a preset station
directly.
1
Press TUNER/BAND to select a band. Then,
press ◄◄ DOWN or ►► UP to select a station.
Press 11 SET to store the station.
2
A station is assigned a preset number, beginning from 1
in consecutive order for each band.
Preset number
_ . . I I I , i
prg L \o ~I C n ^
VOL I II LU_/. _nUMHzJ_ .
^ I |l 7 ^
Frequency
•0-9,+10
BAND
1
Press BAND to select a band.
Press the numbered buttons 0-9, +10 to select a
2
preset number.
Example:
To select preset number 15, press +10 and 5.
To select preset number 10, press +10 and 0.
Selecting a preset station on the main unit
Press TUNER/BAND to select a band. Then, press ■
PRESET repeatedly.
Each time the button is pressed, the next highest number is
selected.
To clear a preset station
Select the preset station to be cleared. Then, press II SET,
and press ► CLEAR within 4 seconds.
The preset numbers of all other stations in the band with
higher numbers are also decreased by one.
3 Repeat steps 1 and 2.
During operation II, ■ and ► on the remote control are
also available instead of II SET, ■ PRESET and ►
CLEAR on the main unit respectively.
ENGLISH 7
Page 8
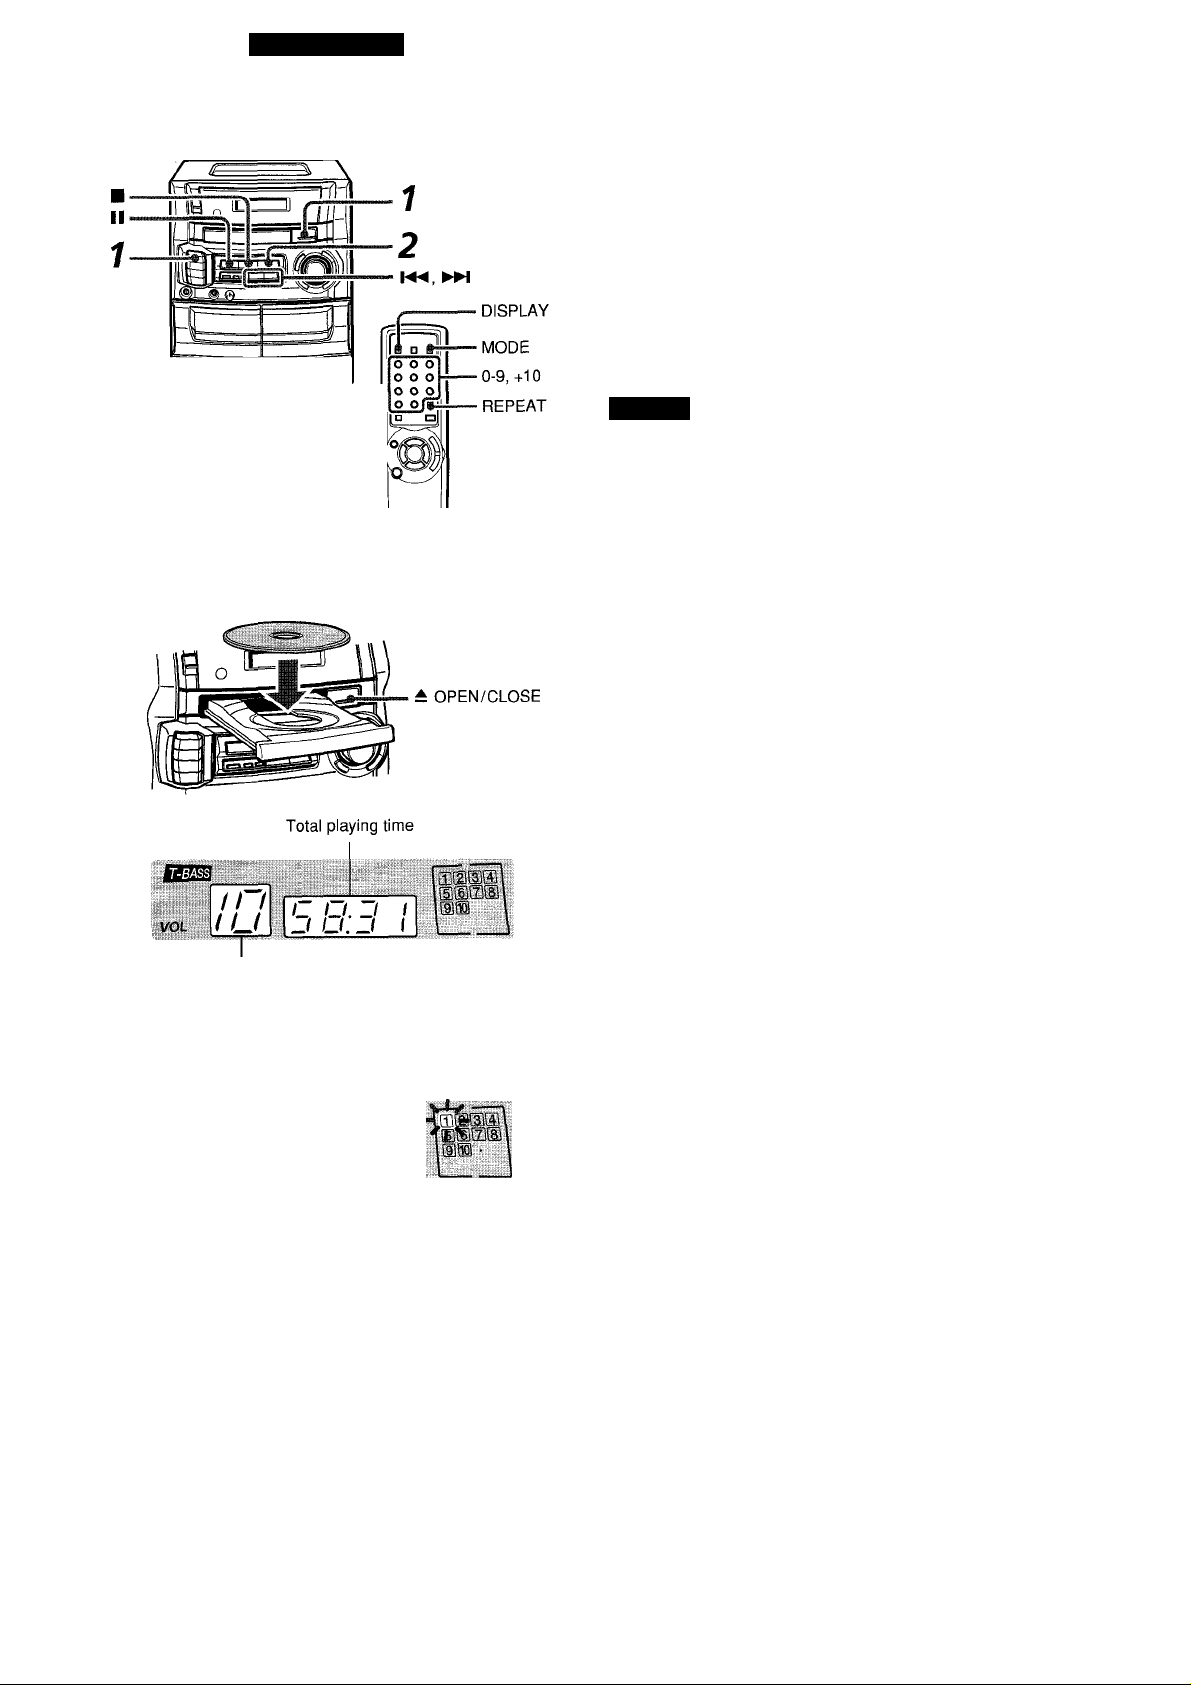
CD PLAYING
CD OPERATIONS
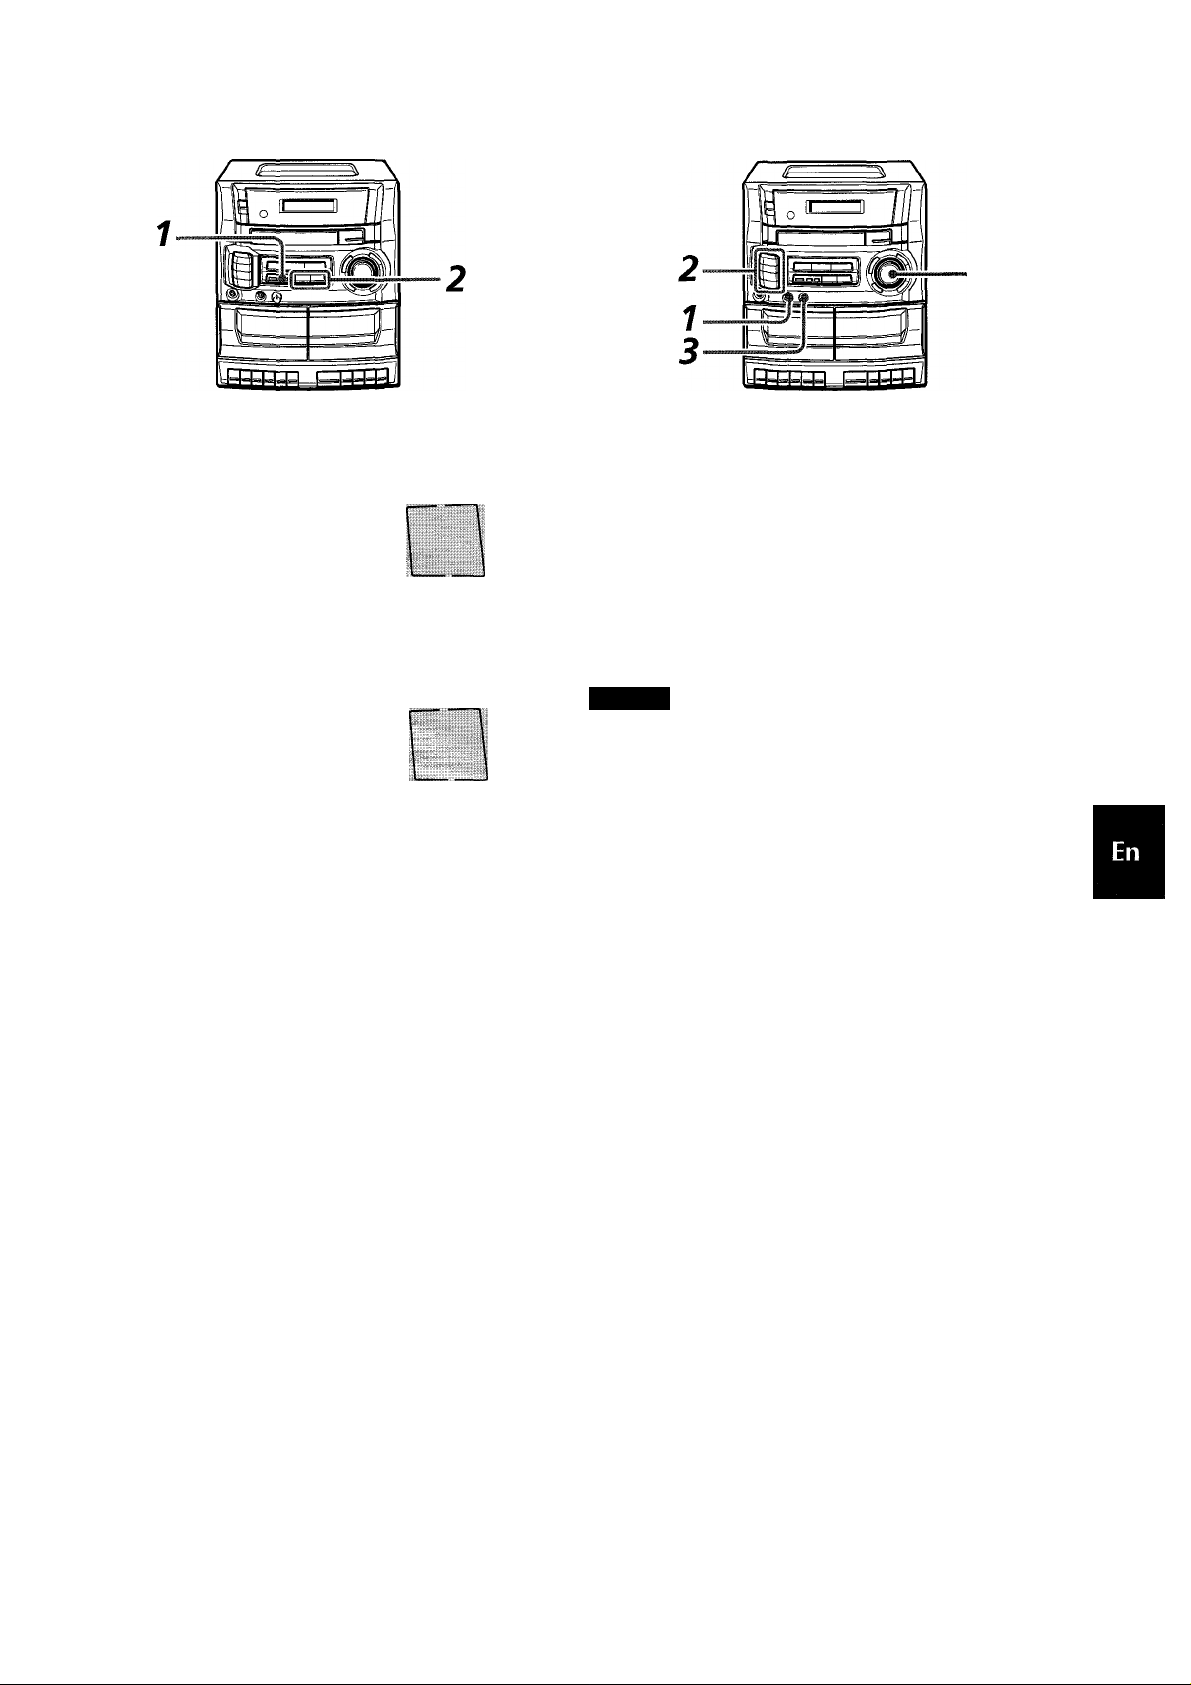
7 Press CD, then press ± OPEN/CLOSE to open
the disc compartment. Load a disc with the
label side up and close the disc compartment.
To check the remaining time
Press DISPLAY on the remote control during play. The
amount of time remaining until all tracks finish playing is
displayed. To restore the play time display, press the button
again.
Selecting a track with the remote control
Press the numberd buttons 0-9, -hIO to select a track.
Example:
To select the 25th track, press +10,-1-10 and 5.
To select the 10th track, press +10 and 0.
The selected track starts to play and play continues to the
end of that disc.
NOTE
Do not use irregular shaped CDs (example: heart-shaped,
octagonal ones).
It may result in malfunctions.
When loading an 8-cm (3-inch) disc, put it onto the inner
circle of the tray.
Do not place more than one compact disc on the disc tray.
Total number of tracks
2 Press ►.
Play begins with the first track.
Elapsed playing time
VOL
Track number being played
To stop play, press ■.
To pause play, press II. To resume play, press again.
II I l_
U.L _(
To search for a particular point during playback, keep
-4-4 or ►►- pressed and release the button at the desired
point.
To skip to the beginning of a track during playback,
press or ►► repeatedly.
To remove discs, press A OPEN/CLOSE. To start play when the power is off (Direct Play Function)
Press the ► button. The power is turned on and play of the
loaded disc begins.
If a function other than CD play is selected with the power
on, one press of ► selects the CD function and starts play.
8 ENGLISH
Page 9

EEEEAT PyyC,
BIBI3M3BAMMED PLAY
One track, all the tracks or programmed tracks can be played
repeatedly.
Press REPEAT on the remote control to display REPEAT
ALL or REPEAT 1.
To repeat all the tracks, display REPEAT ALL.
To repeat the current track only, display REPEAT 1.
To cancel repeat play, press REPEAT to turn off REPEAT.
To repeat the desired tracks only, program the tracks and
press REPEAT to display REPEAT ALL.
All the tracks on the disc can be played randomly.
Press MODE once on the remote control in stop mode to
display “rRn”.
Press ► to start play.
I c
VOL
I _l
To cancel random play, press MODE repeatedly in stop
mode until the total play time display is restored.
_ l-l _
/ I 11 I
NOTE
Even if the ◄◄ button is pressed, a previously played
track cannot be skipped. The unit returns to the beginning
of the current track only.
During random play, one-track repeat (REPEAT 1) cannot
be performed.
If you select tracks with the numbered buttons, random
play is canceied.
Up to 30 tracks can be programmed from the inserted disc.
1
2
Use the remote control.
7 Press MODE twice in stop mode.
PRG flashes on the display.
SBsVil
J.I
V
I i.l II I
U.U LI
Total playing time of
the selected tracks
[3]
■'«" 131
Total number of
selected tracks
I C. I 3
I U. I J
PRG
VOL
Press the numbered buttons 0-9, +10 to program a track.
Example:
To select the 12th track, press +10 and 2.
To select the 20th track, press +10, +10 and 0.
Program number
Selected track number
3 Repeat step 2 to program other tracks. 4 Press ► to start play.
To check the program
Each time ◄◄ or ►► is pressed in stop mode, a track
number and program number wili be displayed.
To clear the program
Press MODE in stop mode.
To add tracks to the program
In stop mode, repeat step 2. The track will be programmed
after the last track.
To change the programmed tracks
Clear the program and repeat all the steps again.
NOTE
If the programmed time is more than 99:59 minutes, or the
disc track number being programmed is 31 or above, the
dispiay shows - - as the total playing time.
ENGLISH 9
Page 10
TAPE PLAYBACK
TAPE OPERATIONS
► -4^ m/± II
• Use Type I (normal) tapes only.
• Tapes are played back on one side only.
1 Press TAPE and press m/± STOP/EJECT to
open the cassette holder.
The side to be played
Deck 1 n—iR~~' 3:^ I Deck 2
;------------------
Insert a tape with the exposed side down and the side to
be piayed facing out.
Push the cassette holder to close.
2 Press ► PLAY to start play.
To stop play, press ■/£ STOP/EJECT.
To pause play, press II PAUSE. To resume play, press
again.
To fast forward or rewind, press ►► FF or ◄◄ REW in
stop mode. Then press M/± to stop the tape.
To start play when the power is off (Direct Play Function)
Press ► PLAY. The power is turned on and play of the
inserted tape begins.
--------
\ m
®m/±
About cassette tapes
• To prevent accidental erasure, break off the plastic
tabs on the cassette tape with a screwdriver or other
pointed tool after recording.
Tab for side A
After play on deck 2 finishes, piay on deck 1 will start without
interruption.
During play on deck 2, press II PAUSE then press ► PLAY
on deck 1.
II PAUSE on deck 1 will be released at the end of play on
deck 2.
1 0 ENGLISH
To record on the tape again, cover the tab openings
with adhesive tape, etc.
• 120-minute or longer tapes are extremeiy thin and
easily deformed or damaged. They are not
recommended.
• Take up any slack in the tape with a pencii or similar
tool before use. Slack tape may break or jam in the
mechanism.
Page 11
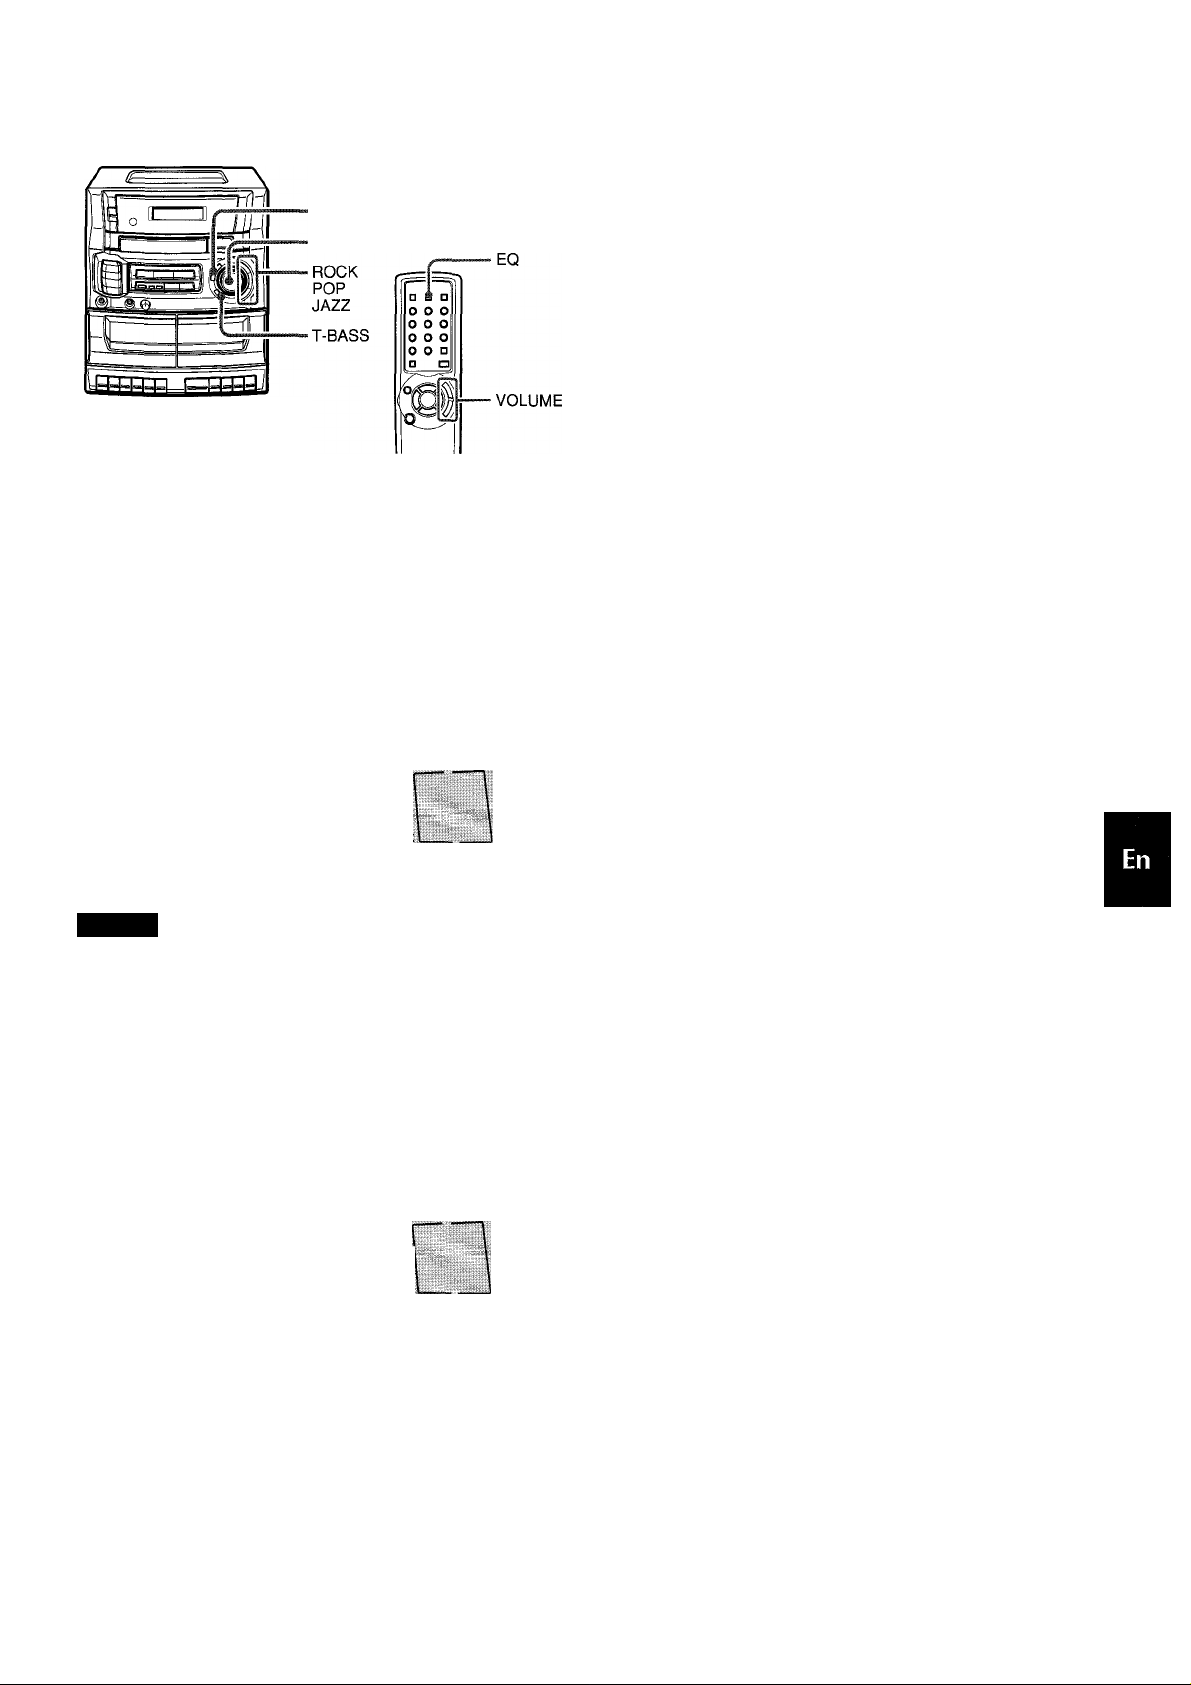
ADJUSTING THE SOUND
QSURROUND
VOLUME
MOLyME
Press VOLUME .A. UP or ▼ DOWN.
The volume level is displayed as a number from 0 to 29.
The volume level is automatically set to 21 when the power
is turned off with the volume level set to 22 or more.
suiiEaj:..BASs system
Press ROCK, POP or JAZZ.
The indicator of the seiected mode lights up.
ROCK: Powerful sound emphasizing treble and bass
POP: More presence in the vocals and midrange
JAZZ: Accented lower frequencies for jazz-type music
To cancel the selected mode
Press the selected button again.
When using the remote control
Press EQ until the desired equalizer mode is displayed.
The equalizer mode changes to ROCK, POP, JAZZ or no
equalization, cyclically.
The T-BASS system enhances the realism of low-frequency
sound.
Press T-BASS.
hiifxaliniiii
!— h'l o ~i c i~i
VOL
I II U I.JU
To cancel, press the button again.
NOTE
Low frequency sound may be distorted when the T-BASS
system is used for a disc or tape in which low frequency
sound is originally emphasized. In this case, cancel the T-
BASS system.
QSUReOUMD.SYSTEM
The QSURROUND system built into this unit uses only two
speakers at the left and right to create an atmosphere that
sounds as if you are surrounded by two front speakers and
two rear speakers.
Press QSURROUND.
VOL
l-l'l 8 7SCU
To cancel, press the button again.
ENGLISH 1 1
Page 12

RECORDING
RECORDING FROM A CD OR THE TUNER
■ TUNER MODE/
OSC
1
II PAUSE
• Note that recording is done on only one side of the tape.
• Use Type I (normal) tapes only.
7 Insert the tape to be recorded on into deck 1.
Insert the tape with the side to be recorded on facing
out.
To erase a recording
1 Insert the tape to be erased into deck 1.
2 Press TAPE.
3 Press • REC to start the erasure.
To record from an external source
You can record the sound from an external source
connected to the AUX/VIDEO jack.
1 Insert the tape to be recorded on into deck 1.
2 Press AUX.
3 Press • REC to start recording.
4 Start to play the connected external unit.
Sound adjustment during recording
The output volume and tone of the speakers or headphones
may be freely varied without affecting the level of the
recording.
Press one of the function buttons and prepare
the source to be recorded.
To record from a CD, press CD and load the disc.
To record from a radio broadcast, press TUNER/
BAND and tune to a station.
3 Press # REC to start recording.
► PLAY is pressed simultaneously.
When the selected function is CD, playback and
recording start simultaneously.
To stop recording, press M/± STOP/EJECT on deck 1.
To pause recording, press II PAUSE on deck 1. To
resume recording, press again.
NOTE
If squealing or beating sounds occur when recording an AM
broadcast, press TUNER MODE/OSC, so as to eliminate the
noise.
Each time the button is pressed, the dot light on the display
Is turned on and off.
MODE on the remote control is also available.
O
vol/ II I
b ‘El 5'"^
12 ENGLISH
The dot light
Page 13
CLOCK AND TIMER
DUBBING A TAPE
6
3
• Note that recording is done on oniy one side of the tape.
• Use Type I (normal) tapes oniy.
1 Press TAPE.
2 Insert a tape to be recorded on into deck 1 with
the side to be recorded on facing out.
3 Insert a tape to be played into deck 2 with the
side to be played facing out.
4 Press II PAUSE then press • REC on deck 1
to enter recording pause mode.
► PLAY is pressed simuitaneously.
5 Press DUB SPEED to seiect a dubbing speed.
Hi-DUB is displayed: Dubs at high speed.
Hi-DUB is not displayed: Dubs at normal speed.
6 Press ► PLAY on deck 2.
II PAUSE on deck 1 is released and recording starts.
To stop recording, press U/± STOP/EJECT on deck 1.
SETTING THE CLOCK
1.3,
2.4
When the AC cord is connected for the first time, the time on
the display flashes.
Set the time as follows while the power is off.
1 Press II SET.
The hour flashes.
/_/ A V
/ II I
(12-hour standard)
2 Press
hour.
Press 11 SET to set the hour.
The hour stops flashing and the minute starts flashing.
4 Press ◄◄ DOWN or ►► UP to designate the
minute.
5 Press II SET to set the minute and complete
the setting.
The minute stops flashing on the display and the clock
starts from 00 seconds.
DOWN or ►► UP to designate the
I _i.i II I
I I- . u u
* s t V
I I
T o correct the current time
Press POWER to turn the unit off and press II SET twice.
Then, carry out steps 2 to 5 above.
To switch to the 12/24-hour standard
While the power is off, press the II SET button twice until
the hour flashes and then press ■.
When the display switches, carry out steps 2 to 5 above to
set the clock again.
Ilf the clock display flashes while the power is off
This is caused by a power interruption. The current time
needs to be reset.
If power is interrupted for more than approximately 12 hours,
all settings stored in memory after purchase need to be
reset.
[luring operation II and ■ on the remote control are also
civailable instead of II SET and ■ PRESET on the main
unit respectively.
ENGLISH 13
Page 14
SETTING THE TIMER
1
2,3
The unit can be turned on at a specified time every day with
the built-in timer.
Set the timer as follows while the power is on.
Preparation
Make sure the clock is set correctly.
To check the specified time
Press TIMER. The timer-on time and the duration for the
timer-activated period flash for 4 seconds.
To cancei timer standby mode temporariiy
Press TIMER twice to turn off ©.
Using the unit while the timer is set
You can use the unit normally after setting the timer.
Before turning off the power, repeat step 4 to prepare the
source, and adjust the volume.
NOTE
• Timer playback will not begin unless the power is turned
off.
• Connected equipment cannot be turned on and off by the
built-in timer of this unit. Use an external timer.
7 Press TIMER to display
0
, and press II SET
within 4 seconds.
© and the hour flash.
...
...........
If you do not press II SET within 4 seconds, another
operation may start.
....................
/_/ A'/’ / -ifn n
■ i i I —i.i 11 '
II " / . C/ /_!
.....................
Designate the hour of the timer-on time by
pressing ◄◄ or and II SET. Repeat to
designate the minute of the timer-on time.
Select the duration for the timer-activated
period with ◄◄ or and press II SET.
©
VOL
Of
The duration for the timer-activated period can be set
between 5 and 240 minutes in 5-minute steps.
...c n,..,
Afu
4 Prepare the source.
To listen to a CD, press CD and load the disc.
To listen to the radio, press TUNER/BAND and tune to
a station.
5 Press POWER to turn the unit off after adjusting
the volume.
© remains on the display after the power is turned off
(timer standby mode).
©
O i^'i
/ // /
When the timer-on time is reached, the unit turns on and
begins play with the selected source.
The volume level is automatically set to 21 when the
power is turned off with the volume level set to 22 or
more.
I
____
II I
U. _f u
1 4 ENGLISH
Page 15
SEniNG THE SLEEP TIMER
MICROPHONE MIXING
The unit can be turned off automatically at a specified time,
1 Press SLEEP.
VOL
f_ l~i
U LI
2 Within 4 seconds, press ◄◄ or ►► to specify
the time until the power is turned off.
Each time the button is pressed, the time changes
between 5 and 240 minutes in 5-minute steps.
VOL
To check the time remaining untii the power is turned
Press SLEEP once. The remaining time is displayed for 4
seconds.
To cancel the sleep timer
Press SLEEP twice to turn off SLEEP on the display.
time remaining until the power is turned off
nnr-o Tho mmaininn timo ic HiftnlflVPrl fnr 4
1 I I
I LI
Specified time
Connect a microphone with a mini plug to the
MIC jack.
Prepare a source to be mixed and play it.
2
Adjust the volume of the microphone with MIC
3
VOL and the source to be mixed with VOLUME.
To record the microphone mixing sound
Insert a cassette to be recorded on into deck 1 and press
REC.
NOTE
During dubbing at high speed, the microphone mixing
sound is not recorded.
If a microphone is placed too close to the speaker, a
howling sound (feedback) may be produced. If this
happens, move the microphone away from the speaker or
decrease the main volume.
The use of a unidirectional type microphone is
recommended to prevent howling.
If you press SLEEP while the power is off, the power is
turned on and the sleep timer works directly so that the
unit will be turned off after 60 minutes.
To specify the time until the power is turned off, press
SLEEP once again then press ◄◄ or ►► within 4
seconds.
If the unit is turned off during tape playback, ► PLAY on
the decks will not be released. Press STOP/EJECT
to release ► PLAY.
ENGLISH 15
Page 16
GENERAL
CARE AND MAINTENANCE
Occasional care and maintenance of the unit and the
software are needed to optimize the performance of your
unit.
To clean the cabinet
Use a soft and dry cloth.
If the surfaces are extremely dirty, use a soft cloth lightly
moistened with mild detergent solution. Do not use strong
solvents, such as alcohol, benzine or thinner as these could
damage the finish of the unit.
To clean the heads
When the tape heads are dirty;
- high frequency sound is not emitted
- the sound is not adequately high
- the sound is off-balance
- the tape cannot be erased
- the tape cannot be recorded on
After every 10 hours of use, clean the tape heads with a
head cleaning cassette.
Use separately sold dry-type or wet-type cleaning cassette.
Refer to the instructions of the cleaning cassette for details.
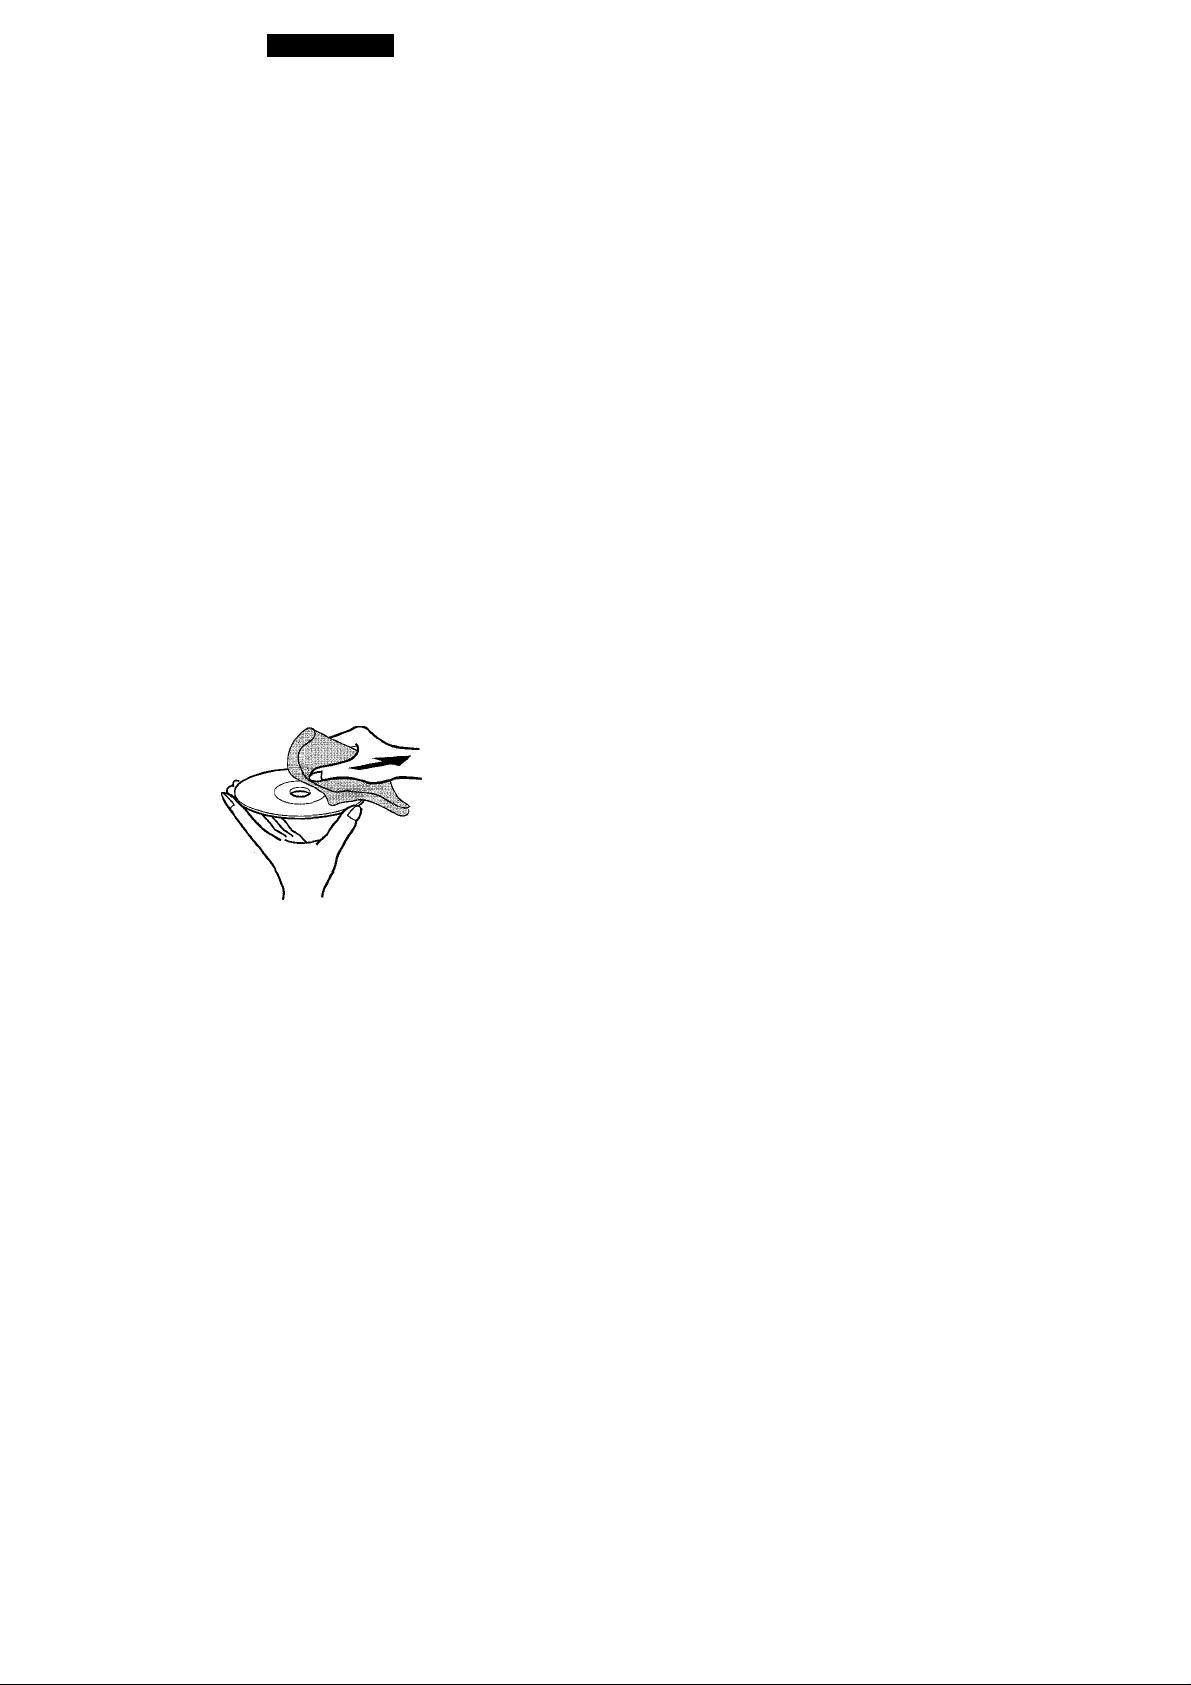
Care of discs
• When a disc becomes dirty, wipe the disc from the center
out with a cleaning cloth.
• After playing a disc, store the disc in its case. Do not leave
the disc in places that are hot or humid.
Care of tapes
• Store tapes in their cases after use.
• Do not leave tapes near magnets, motors, television sets,
or any source of magnetism. This will downgrade the
sound quality and cause noise.
• Do not expose tapes to direct sunlight, or leave them in a
car parked in direct sunlight.
SPECIFICATIONS
FM tuner section
Tuning range
Antenna
AM tuner section
Tuning range
Antenna
Cassette deck section
Track format
Frequency response
Recording system
Heads
Compact disc piayer section
Laser
D-A converter
General
Power output
Output
Power requirements
Power consumption
Dimensions of main unit (W x H x D)
Weight of main unit 4.1 kg (9 lbs. 1 oz.)
Speaker
Type
Dimensions (W x H x D)
Weight
impedance
Allowable max. input
87.5 MHz to 108 MHz
Rod antenna
530 kHz to 1710 kHz (10 kHz step)
531 kHz to 1602 kHz (9 kHz step)
Ferrite bar antenna
4 tracks, 2 channels stereo
Normal tape: 50 Hz - 12500 Hz
AC bias
Deck 1; Recording/playback head x 1
Erasure head x 1
Deck 2: Playback head x 1
Semiconductor laser {X = 780 nm)
1 bit dual
5 W -I- 5 W (4 ohms, EIAJ)
FTC rule
4 Watts per channel, Min.
RMS at 4 ohms from 65 Hz to
15,000 Hz, with no more than 1%
distortion
PHONES (stereo minijack)
DC 12 V using eight size 6 (R20)
batteries
AC 120 V, 60 Hz
30 W
266 X 303 X 278.5 mm
(IOV2X 12x11 in.)
120 mm cone type
27 mm ceramic type
I
198 x 303 X 232 mm
(7 Vs X 12x9 74 in.)
1.75 kg (3 lbs. 14 oz.)
4 ohms
low
x2
1 6 ENGLISH
Specifications and external appearance are subject to
change without notice.
COPYRIGHT
Please check the laws on copyright relating to recordings
from discs, radio or external tapes for the country in which
the machine is being used.
Page 17

TROUBLESHOOTING GUIDE
F*ARTS INDEX
If the unit fails to perform as described in these Operating
Instructions, check the foiiowing guide.
GENERAL
There is no sound.
• Is the AC cord connected properly?
• Was an incorrect function button pressed?
Power is not turned on.
• is the AC cord connected to the unit with old batteries
inserted?
-» Remove all the batteries and disconnect the AC cord.
Then, connect the AC cord again and reset the unit as
stated below.
An erroneous display or a malfunction occurs.
Reset the unit as stated below.
TUNER SECTION
The reception contains noise interferences or the sound
is distorted.
• Is the unit picking up external noise or multipath distortion?
Change the orientation of the antenna or the unit.
Move the unit away from other eiectrical appiiances.
CASSETTE DECK SECTION
The tape does not run.
• Is the deck in pause mode? (-» page 10)
The sound is off-balance or not adequately high.
• Is the playback head dirty? (-> page 16)
Recording is not possible.
• Is the erasure prevention tab on the tape broken off?
(-» page 10)
• Is the recording head dirty? (-» page 16)
Erasure is not possible.
• Is the erasure head dirty? (-» page 16)
• Is a metal tape or Cr02 tape being used?
High frequency sound is not emitted.
• Is the recording/playback head dirty? (-> page 16)
CD PLAYER SECTION
The CD player does not play.
• Is the disc correctly inserted? (-» page 8)
• Is the disc dirty? {-> page 16)
• Is the lens affected by condensation?
Wait approximately one hour and try again.
For instructions on use, refer to the page number indicated.
DISPLAY
EQ
MODE
0-9, +^0
BAND
E! POWER button ©
□ FUNCTION buttons (CD O, AUX O, TUNER/BAND 0,
TAPE ®)
■ PRESET button O O O 0
► CLEAR button O Q
REPEAT
FUNCTION
II SET button O O © ©
◄◄ DOWN, ►► UP buttons © O 0 ©
TUNER MODE/OSC, DUB SPEED button © ©
SLEEP button ©
TIMER button ©
± OPEN/CLOSE button O
VOLUME buttons ®
QSURROUND button ®
T-BASS button ©
GRAPHIC EQUALIZER (ROCK, POP, JAZZ) ©
PHONES jack ©
MIC jack 0
MIC VOL control ©
[¡1 Deck operation buttons (•, ►, ◄◄, M/±, II) ®
© ®
[| DISPLAY button ©
EQ button ©
MODE button © © 0
0-9, -hIO buttons O © 6
REPEAT button ©
BAND button ©
FUNCTION button ©
To reset
If an unusual condition occurs in the display window or the
cassette decks, reset the unit as follows.
1 Press POWER to turn off the power.
2 Press POWER while pressing ■. Everything stored in
memory after purchase is canceled.
Buttons on the remote control with the same names as those
on the main unit can be used as well.
ENGLISH 17
Page 18

ADVERTENCIA
PARA REDUCIR EL RIESGO DE
INCENDIOS O SACUDIDAS ELECTRICAS,
NO EXPONGA ESTE APARATO A LA
LLUVIA NI A LA HUMEDAD.
CAUTION
RISK OF ELECTRIC SHOCK
DO NOT OPEN
“CAUTION: TO REDUCE THE RISK OF
DO NOT REMOVE COVER (OR BACK).
NO USER-SERVICEABLE PARTS INSIDE.
Explicación de los símbolos gráficos:
REGISTRO DEL PROPIETARIO
Anote el número del modelo (que se encuentra en la parte inferior del
aparato) y el número de serie (dentro del compartimiento de las pilas)
en el espacio provisto a continuación. En caso de problemas o averías,
comunique estos números a su concesionario AIWA.
No del modelo
ELECTRIC SHOCK,
REFER SERVICING TO QUALIFIED
SERVICE PERSONNEL.”
El símbolo del relámpago con la punta en flecha
dentro de un triángulo equilát ero, sirve para alertar
al usuario de la presencia de “tensión peligrosa”
sin aislar en el interior de la caja del aparato, ia
cual podrá ser lo suficientem ente fuerte como para
suponer un riesgo de sacudida eléctrica a perso
nas.
El signo de exclamación dentro del un triángulo
equilátero sirve para alertar al usuario de la
presencia de instrucciones importantes de
operación y manten! miento (servicio) en la
información que acompaña al aparato.
No de serie
PRECAUCIONES
Leer detenida y completamente las instrucciones de
funcionamiento antes de manejar el aparato. Asegurarse de
conservar estas instrucciones de funcionamiento como
referencia en el futuro. Deben seguirse estrictamente todas
las advertencias y precauciones indicadas en este manual,
así como los consejos siguientes relacionados con la
seguridad.
Instalación
1 Agua y humedad - No utilizar este aparato cerca del
agua, como cerca de una bañera, lavabo, pila de la
cocina, lavadero, en sótanos húmedos, piscinas o lugares
similares.
2 Calor - No usar este aparato cerca de fuentes de calor,
como rejillas de calefacción, estufas u otros aparatos que
generan calor. No debe usarse en sitios en los que la
temperatura es inferior a 5°C (41 °F) o superior a 35°C
(95°F).
3 Superficie de montaje - Colocar el aparato sobre una
superficie plana y nivelada.
4 Ventilación - Este aparato debe colocarse de manera
que tenga un espacio adecuado a su alrededor para que
pueda disiparse el calor. Dejar un espacio de 10 cm (4
pulg.) desde la parte posterior y superior del aparato y 5
cm (2 pulg.) en cada lado.
- No colocar el aparato sobre una cama, alfombra o
superficie similar que pueda bloquear las rejillas de
ventilación.
- No instalar el aparato en una librería, estantería o
mueble donde la ventilación sea deficiente.
5 Entrada de objetos y agua - Tener cuidado de que no
entren objetos extraños ni líquidos por las rejillas de
ventilación.
6 Carros y mostradores - Cuando el
aparato se coloque sobre un carro o
mostrador, es necesario tener cuidado con
los movimientos.
Las paradas bruscas, fuerza excesiva y
superficies desiguales pueden hacer que
el aparato se caiga o que el carro vuelque.
7 Condensación - La lente del lector de CD puede
acumular humedad cuando:
- El aparato se mueve desde un sitio frío a uno caliente
- Se acaba de encender la calefacción
- El aparato se usa en una habitación muy húmeda
- El aparato se enfría con un acondicionador de aire
Ei aparato pudiera no funcionar correctamente cuando se
ha condensado humedad en su interior. Si ocurriera,
dejarlo apagado unas horas e intentar usarlo de nuevo.
8 Montaje en la pared o techo - El aparato no debe
montarse en una pared ni colgarse del techo a menos
que se especifique así en las instrucciones de
funcionamiento.
1 8 ESPAÑOL
Alimentación eléctrica
1 Fuentes de alimentación - Utilizarlo con pilas o
corriente alterna de la red, como se especifica en las
instrucciones de manejo y se indica en el aparato.
2 Polarización - Como medida de seguridad, algunos
aparatos están equipados con enchufes polarizados en el
cable de alimentación que pueden solamente insertarse
en un sentido único dentro del enchufe de la pared. Si
fuera difícil o imposible insertar el enchufe del cable de
alimentación dentro del tomacorrientes, invierta el sentido
de inserción del enchufe y vuelva a intentar conectarlo. Si
sigue siendo difícil insertarlo en el tomacorrientes, le
rogamos llame a un técnico de servicio calificado para
que repare o cambie el tomacorrientes. Para evitar que la
Page 19

medida de seguridad del enchufe de alimentación quede
anulada, no fuerce el enchufe dentro de un
tomacorrientes.
3 Cable de alimentación
- Cuando se desconecte el cable de alimentación,
sujetarlo por el enchufe. No tirar del cable.
- No tocar el enchufe del cable con las manos mojadas,
ya que puede producirse un incendio o una descarga
eléctrica.
- Los cables de alimentación deben colocarse de manera
que no queden doblados, pillados por objetos ni en un
sitio donde puedan pisarse. Prestar una atención
especial al cable que conecta el aparato y el
tomacorrientes.
- Evitar sobrecargar los cables de alimentación y los
cables de extensión por encima de su capacidad porque
puede producirse un incendio o una descarga eléctrica.
4 Cable de extensión - Para evitar descargas eléctricas,
no utilice un enchufe polarizado en el cable de
alimentación con un cable de extensión, receptáculo u
otro tomacorrientes a menos que el enchufe polarizado
pueda insertarse completamente con miras a evitar que
las hojas del enchufe queden expuestas.
5 Cuando no se utilice el aparato - Desenchufe el cable
de alimentación de la toma de corriente o saque todas las
pilas cuando el aparato no vaya a utilizarse durante
algunos meses. Cuando el cable está enchufado, sigue
entrando una pequeña cantidad de corriente en el
aparato aunque esté apagado.
Mantenimiento
Limpiar el aparato solamente como se recomienda en las
instrucciones de funcionamiento.
Servicio y reparación
Llevar el aparato a un técnico de servicio calificado cuando:
- Se haya dañado ei cable de alimentación o ei enchufe
- Hayan entrado objetos extraños o líquidos en su interior
- Haya estado expuesto a ia iluvia o agua
- No funcione correctamente
- Su rendimiento se aitere de forma notable
- Se haya caído al suelo o se haya dañado su cuerpo
NO INTENTE REPARAR EL APARATO USTED MISMO.
TABLA DE MATERIAS
PREPARATIVOS
ALIMENTACIÓN ELÉCTRICA
CONEXIONES
CONTROL REMOTO
ANTES DE MANEJARLO...........................................21
RECEPCIÓN DE LA RADIO
SINTONÍA MANUAL
MEMORIZACIÓN DE EMISORAS
REPRODUCCIÓN DE CDs___________________________
MANEJO DEL LECTOR DE CD..................................24
REPRODUCCIÓN DE CINTAS
MANEJO DE LA CINTA..............................................26
SONIDO
GRABACIÓN______________________________________
RELOJ Y TEMPORIZADOR
OTROS
GENERAL________________________________________
_________________________________________
AJUSTE DEL SONIDO................................................27
GRABACIÓN DESDE UN CD O EL SINTONIZADOR .... 28
COPIA DE CINTAS
AJUSTE DEL RELOJ..................................................29
AJUSTE DEL TEMPORIZADOR.................................30
AJUSTE DEL TEMPORIZADOR DE DESCONEXIÓN .... 31
__________________________________________
MEZCLA CON MICRÓFONO
CUIDADOS Y MANTENIMIENTO
ESPECIFICACIONES..................................................32
DIAGNÓSTICO DE PROBLEMAS..............................33
ÍNDICE DE PIEZAS.....................................................33
__________________________________
....................................
.............................................................
..................................................
_________________________
...................................................
..............................
_______________________
.....................................................
_________________________
.....................................
...............................
20
20
21
22
23
29
31
32
ESPAÑOL 19
Page 20

PREPARATIVOS
ALIMENTACION ELECTRICA CONEXIONES
IMPORTANTE
• Antes de conectar los altavoces, asegurarse de que el
Conectar el cable de alimentación como se indica en la figura.
O a la toma de alimentación del aparato
..
..© al tomacorrientes de la pared
PRECAUCIÓN
Usar solamente el cable de alimentación facilitado. El uso de
otros cables puede producir un incendio.
cable de alimentación está desconectado y las pilas
sacadas.
• No conectar unos altavoces diferentes a los que se
incluyen.
7 Instalación de los altavoces.
Para acoplar los altavoces, deslizar cada uno de ellos
dentro de las guías del aparato principal hasta que su
parte superior quede al ras con la parte superior del
aparato.
Para separar los altavoces del aparato, deslícelos
hacia arriba por las guías hasta sacarlos al tiempo que
oprime el botón de liberación.
JLIsjObiCoiisliJIdSw
Abrir la tapa del compartimiento de las pilas situada en la
parte trasera e insertar ocho pilas R20 (tamaño D), no
incluidas, como se ilustra abajo. Luego cerrar la tapa.
Para cambiar de alimentación a CA a alimentación por
pilas, desconectar el cable de alimentación de la toma de
corriente del aparato.
Cuando se desconecta el cable de alimentación, las pilas se
gastan excesivamente.
Es necesario cambiar las pilas cuando;
El indicador OPE/BATT pierde intensidad, disminuye la
velocidad de la cinta, se reduce el volumen o el sonido se
distorsiona durante el funcionamiento.
Notas sobre las pilas
Observar lo siguiente para evitar daños causados por fugas
o explosiones:
• Insertar las pilas alineando correctamente las marcas O y
e.
• No mezclar diferentes tipos de pilas ni pilas usadas con
pilas nuevas.
• No recargar, calentar ni desarmar nunca las pilas.
• Sacar las pilas gastadas.
Si se producen fugas de electrólito en las pilas, limpiar bien
los residuos.
Conexión de los altavoces.
Conectar el cable del altavoz derecho en los terminales
R, y el cable del altavoz izquierdo en los terminales L.
Conectar el cable del altavoz marcado con una línea
blanca punteada en el terminal O y el otro cable en el
terminal O.
jQtKa&Conexioiies
Se pueden ingresar señales de sonido de otros aparatos a
través de las tomas AUX/VIDEO de este aparato.
Utilizar un cable con clavijas de sonido RCA (no facilitado)
para conectar el equipo externo.
Conectar la clavija roja a la toma R y la clavija blanca a la
toma L.
............
20 ESPAÑOL
Escucha de una fuente de sonido externa
Pulsar AUX para reproducir en el equipo conectado.
Para más detalles, consultar también las instrucciones de
manejo del equipo que se ha conectado.
Page 21

CONTROL REMOTO
Inserción de las pilas
Abrir la tapa de las pilas, en la parte trasera del control
remoto, e insertar dos pilas R6 (tamaño AA).
Cuándo cambiar las pilas
La distancia máxima de funcionamiento del control remoto
es de aproximadamente 5 metros (16 pies). Cambiar las
pilas por nuevas cuando se reduzca esta distancia.
Uso del control remoto
Las instrucciones de este manual se refieren principalmente
a los botones del aparato principal. También pueden usarse
los botones del control remoto que tienen el mismo nombre
que los del aparato principal.
Uso del botón FUNCTION
El botón FUNCTION substituye a los botones FUNCTION
(CD, AUX, TUNER/BAND, TAPE) del aparato principal.
Cada vez que se oprime FUNCTION estando el aparato
encendido, se selecciona cíclicamente la función siguiente.
NOTA
Cuando no se vaya a utilizar el control remoto durante un
largo período de tiempo, sacar las pilas para evitar la
posible fuga de electrólito.
El control remoto puede no funcionar correctamente
cuando:
- La línea entre el control remoto y el aparato está
expuesta a una luz intensa, como la luz directa del sol.
- Se usan otros controles remotos cerca (televisor, etc.).
ANTES OE MANEJARLO
Eincendido del aparato
Pulsar uno de los botones FUNCTION (CD, AUX, TUNER/
EìAND, TAPE). Se reproduce el disco cargado o se sintoniza
la emisora seleccionada previamente (función de
reproducción directa).
También puede usarse el botón POWER.
Después del uso
Oprimir POWER para apagar el aparato. La pantalla indicará
entonces la hora.
NOTA
El aparato no puede encenderse con el control remoto
cuando se usa con pilas.
Uso con auriculares
Conectar los auriculares (con una miniclavija estéreo de
03,5 mm) a la toma PHONES.
Cuando están conectados los auriculares no hay sonido en
los altavoces.
ESPAÑOL 21
Page 22

RECEPCIOPN DE LA RADIO
SINTONIA MANUAL
Oprimir repetidamente TUNER/BAND para
seleccionar la banda deseada.
FM
CU
Cuando se oprime TUNER/BAND estando el aparato
apagado, el aparato se enciende directamente y se
recibe la emisora que estaba sintonizada previamente
(función de reproducción directa).
Cuando se utilice el control remoto, presionar
repetidamente BAND mientras el aparato está
encendido.
Pulsar DOWN o UP para seleccionar
una emisora.
La frecuencia cambia cada vez que se pulsa el botón.
Durante la recepción de FM en estéreo, se indica
STEREO en la pantalla.
AM
Cuando un programa de FM estéreo se recibe con interferencias
Pulsar TUNER MODE/OSC.
Aparecerá MONO en la pantalla.
Se reducirán las interferencias pero la recepción será
monoaural.
También se dispone del botón MODE en el control remoto.
VOL
hn 8 7.50
Volver a pulsar el botón para recibir de nuevo el programa
en estéreo.
Cambio del intervalo de sintonía de AM
El intervalo de sintonía de AM está ajustado en pasos de 10
kHz. Cambiar el intervalo de sintonía si este aparato se
utiliza en una región en la que el sistema de asignación de
frecuencias es de pasos de 9 kHz.
Pulsar POWER y TUNER/BAND simultáneamente.
Repetir el paso anterior para reponer el intervalo de sintonía.
NOTA
Cuando se cambia el intervalo de sintonía de AM, se borran
todas las emisoras memorizadas (ver MEMORIZACIÓN DE
EMISORAS). Al hacerlo será necesario memorizar todas
emisoras de nuevo.
VOL
Para buscar una emisora rápidamente (búsqueda automática)
Mantener pulsado ◄◄ DOWN o ►► UP hasta que el
sintonizador empiece a buscar una emisora. La búsqueda se
cancela después de sintonizar una emisora.
Para parar automáticamente la búsqueda automática,
presionar ◄◄ DOWN o ►► UP.
• La búsqueda automática pudiera no detenerse en
emisoras que tienen señales muy débiles.
Para mejorar la recepción FM
La antena de FM está dentro del aparato. Colocar el aparato
de modo que se consiga la mejor recepción.
AM
Extender la antena de AM y orientarla de modo que se
consiga la mejor recepción.
AM
U /._//_/MHz
/' 'j P 1 Q n
r
22 ESPAÑOL
Page 23

MEMORIZACION DE EMISORAS
PRESET
• CLEAR
i ìIMlDMÌA DE EMJSORASbM EMQWZADyàS
Usar el control remoto para seleccionar directamente el
número de memoria de la emisora.
■0-9, -rio
BAND
..
En la memoria del aparato se pueden almacenar un total de
24 emisoras de FM y AM. No obstante, el número máximo
de emisoras que pueden almacenarse para cada banda es
de 16.
Cuando se memoriza una emisora, se la asigna un número
de memoria. Usar el número de memoria para sintonizar
directamente una emisora memorizada.
1 Pulsar TUNER/BAND para seleccionar una
banda. Luego pulsar ◄◄ DOWN o ►► UP para
seleccionar una emisora.
2 Pulsar II SET para almacenar la emisora en la
memoria.
Se asigna un número de memoria a la emisora,
comenzando por el 1 y siguiendo el orden consecutivo
en cada banda.
Número de memoria
lili
pRG L ¡O ~Tc7T'V
volI II [U
_________
L_LUmhzJL
I I1 I '
Frecuencia
3 Repetir los pasos 1 y 2.
if Pulsar BAND para seleccionar una banda.
2 Pulsar los botones 0-9, +10 para seleccionar un
número de memoria.
Ejemplo:
Para seleccionar el número de memoria 15, pulsar +10 y
5.
Para seleccionar el número de memoria 10, pulsar +10 y
0.
Sielección de una emisora memorizada en el aparato principal
Pulsar TUNER/BAND para seleccionar una banda. Luego
pulsar ■ PRESET repetidamente.
Cada vez que se pulsa el botón se selecciona el siguiente
número superior.
Etorrado de una emisora memorizada
SIeleccionar la emisora que se desea borrar. Luego pulsar II
SET y pulsar ► CLEAR antes de 4 segundos.
Los números de memoria de las emisoras restantes en la
banda que tienen números de memoria más altos se
reducen en uno.
NOTA
Mientras se usa el aparato, los botones II, ■ y ► del
control remoto pueden usarse en lugar de II SET, ■
PRESET y ► CLEAR del aparato principal.
ESPAÑOL 23
Page 24

REPRODUCCION DE CDS
MANEJO DEL LECTOR DE CD
-i—
r
1 Pulsar CD y luego ± OPEN/CLOSE para abrir el
compartimiento dei disco. Cargar un disco con
el lado de la etiqueta hacia arriba y cerrar ei
compartimiento.
± OPEN/CLOSE
DISPLAY
MODE
0-9, -F10
REPEAT
Para empezar a reproducir cuando el aparato está
apagado (función de reproducción directa)
Pulsar el botón ►. Se enciende el aparato y comienza a
reproducirse el disco que se ha cargado.
Si se selecciona una función diferente a CD cuando el
aparato está encendido, pulsando una vez ► se selecciona
la función CD y se empieza a reproducir el disco.
Comprobación del tiempo restante
Pulsar DISPLAY del control remoto durante la reproducción.
En la pantalla se indica el tiempo restante hasta que se
reproduzcan todas las pistas. Para volver a presentar el
tiempo de reproducción, pulsar de nuevo el botón.
Selección de una pista con el control remoto
Pulsar los botones numéricos 0-9, +10 para seleccionar una
pista.
Ejemplo:
Para seleccionar la pista 25, pulsar +10, +10 y 5.
Para seleccionar la pista 10, pulsar +10 y 0.
La pista seleccionada empieza a reproducirse y la
reproducción continúa hasta el final del disco.
NOTA
No usar discos de formas irregulares (ejemplo:
octogonales, en forma de corazón, etc.).
Su uso puede producir errores de funcionamiento.
Cuando se cargue un disco de 8 cm (3 pulg.), colocarlo en
el círculo interno de la bandeja.
No colocar más de un disco compacto dentro de la
bandeja del disco.
Tiempo total de reproducción
Número total de pistas
2 Pulsar ►.
La reproducción empieza desde la primera pista.
Tiempo de reproducción
VOL
Número de la pistaque se está reproduciendo
Pulsar ■ para dejar de reproducir.
Pulsar II para hacer una pausa durante la reproducción.
Pulsarlo de nuevo para seguir reproduciendo.
Mantener oprimido ◄◄ o ►► y soltar el botón en el punto
deseado para buscar un punto particular durante la
reproducción.
Para saltar al principio de una pista durante la
reproducción, pulsar repetidamente ◄◄ o
Para cambiar de disco, pulsar ± OPEN/CLOSE.
24 ESPAÑOL
Page 25

BEPETlGIÓfeJ.DE LA REPRODUCCIÓN
ÍEBRODUCCK5N mOGRAMADA
......
Se puede repetir la reproducción de una pista, todas las
pistas o las pistas programadas.
Pulsar REPEAT del control remoto de modo que se
indique REPEAT ALL o REPEAT 1 en la pantalla.
Para repetir la reproducción de todas las pistas, la pantalla
debe indicar REPEAT ALL.
Para repetir solamente la pista que se está escuchando, la
pantalla debe indicar REPEAT 1.
Para cancelar la reproducción repetida, pulsar REPEAT
de modo que desaparezca REPEAT de la pantalla.
Para repetir solamente las pistas deseadas, programar
las pistar y pulsar REPEAT de modo que se indique
REPEAT ALL en la pantalla.
REPRODUCCIÓN AL AZAR
Las pistas del disco puede reproducirse al azar.
Pulsar una vez MODE en el control remoto en modalidad
de parada de modo que se presente '
pantalla.
Pulsar ► para empezar a reproducir.
! C
VOL
I _/
Para cancelar la reproducción al azar, pulsar
repetidamente MODE en la modalidad de parada hasta que
se vuelva a presentar el tiempo total de reproducción.
Aunque se pulse el botón no se puede saltar a una
pista que se ha reproducido previamente. El aparato sólo
vuelve al principio de la pista que se está reproduciendo.
Durante la reproducción al azar, no se puede efectuar la
repetición de una pista (REPEAT 1).
La modalidad de reproducción al azar se cancela si se
seleccionan las pistas con los botones numéricos.
_ U _
/ lili
■Rn" en la
Se pueden programar hasta 30 pistas del disco cargado.
1
2
utilizar el control remoto.
H Pulsar MODE dos veces en la modalidad de
parada.
Parpadea PRG en la pantalla.
PRG'i f!
VOI Ì_
2; Pulsar los botones numéricos 0-9, +10 para
programar una pista.
Ejemplo;
Para seleccionar la pista 12, pulsar +10 y 2.
Para seleccionar la pista 20, pulsar +10, +10 y 0.
Número de programa
■i. ? •? ^
Tñ\
■•tPRGp
Número de pista seleccionado
I u
0 - I ¡ ~l
1 u j
Repetir el paso 2 para programar otras pistas.
4 Pulsar ► para empezar a reproducir.
Comprobación del programa
Cada vez que se pulsa ◄◄ o ►► en la modalidad de
parada, se indica en la pantalla un número de pista y un
número de programa.
n. lili
U.U U
Tiempo total de reproducción
de las pistas seleccionadas
/ L. I J
f U. > J
Número total de
pistas seleccionadas
Eiorrado del programa
Pulsar MODE en la modalidad de parada.
Para añadir pistas al programa
En la modalidad de parada, repetir el paso 2. La pista se
programará después de la última pista.
P ara cambiar las pistas programadas
Eiorrar el programa y repetir los pasos desde el principio.
Guando el tiempo programado es superior a 99:59 minutos o
el número de pistas que se setán programando es de 31 o
mayor, la pantalla indicada como tiempo total de
reproducción.
ESPAÑOL 25
Page 26

REPRODUCCION DE CINTAS
MANEJO DE LA CINTA
• Utilizar soiamente cintas de tipo I (normales).
• Solamente se reproduce un lado de las cintas.
7 Pulsar TAPE y pulsar U/± STOP/EJECT para
abrir el portacasete.
Insertar una cinta con el lado abierto hacia abajo y el
lado que se va a reproducir encarado hacia afuera.
Empujar el portacassette para cerrarlo.
2 Pulsar ^ PLAY para empezar a reproducir.
Pulsar M/± STOP/EJECT para detener la reproducción.
Pulsar II PAUSE para hacer una pausa durante la
reproducción. Volver a oprimirlo para continuar la
reproducción.
Pulsar ►► FF o ◄◄ REW en la modalidad de parada para
avanzar rápidamente o rebobinar. Pulsar U/± para
detener la cinta.
Para reproducir cuando ei aparato está apagado
(función de reproducción directa)
Pulsar ► PLAY. El aparato se enciende y se empieza a
reproducir la cinta que está cargada.
BEBIüOJOyuy^QliÓUirlwOiMHii^llUy^^lA
Después de terminarse la reproducción en la platina 2,
comenzará a reproducirse la cinta de la platina 1 sin
interrupción.
Durante la reproducción en la platina 2, pulsar II PAUSE y
luego ► PLAY de la platina 1.
II PAUSE de la platina 1 se desactivará al finalizar la
reproducción en la platina 2.
Observaciones sobre las cintas cassette
• Para evitar el borrado accidental de la cinta,
romper las pestañas de plástico de la cinta con un
destornillador u otro artículo puntiagudo después de
grabar.
Pestaña del lado A
Para volver a grabar en una cinta, cubrir los orificios
de las pestañas con cinta adhesiva, etc.
Las cintas de 120 minutos o más son
extremadamente finas y se deforman y dañan muy
fácilmente. No se recomienda su uso.
Antes de usar una cinta, tensarla usando un lápiz o
artículo similar. Las cintas mal tensadas pueden
romperse y atorar el mecanismo del aparato.
26 ESPAÑOL
Page 27

AJUSTE DEL SONIDO
QSURROUND
VOLUME
MQiLUMENs.
Pulsar VOLUME ▲ UP o ▼ DOWN.
El nivel de volumen se indica como un número entre 0 y 29.
Al apagarse el aparato, el nivel de volumen se ajuste
automáticamente en 21 cuando estaba ajustado a un nivel
de 22 ó más alto.
ialQyi^iUi^^JClOBiiilQíRAPICO
Pulsar ROCK, POP o JAZZ.
£ie enciende el indicador de la modalidad seleccionada.
ROCK: Sonido potente que acentúa los tonos graves y
agudos.
F*OP: Más presencia en los vocales y tonos medios.
JAZZ: Se acentúan los tonos graves.
F'ara cancelar la modalidad seleccionada
Pulsar de nuevo el botón seleccionado.
Cuando se use el control remoto
Pulsar EQ hasta que se indique en la pantalla la modalidad
deseada del ecualizador.
L.a modalidad de ecualizador cambia cíclicamente a ROCK,
POP, JAZZ y sin ecualización.
SlSXEMA<SUAEB>.X-BáySS
El sistema T-BASS acentúa el realismo del sonido de bajas
frecuencias.
Pulsar T-BASS.
...........
Ulasaliiiiiii
¡— t '/ O ~i C i~i
l/OL
/ II O I.DUmhz
Para cancelar, pulsar de nuevo el botón.
El sonido de los graves puede distorsionarse cuando se
utiliza el sistema T-BASS al escuchar un disco o una cinta
donde se ha acentuado originalmente el sonido de los tonos
bajos. En este caso, cancelar el sistema T-BASS.
SISXEM JbiQSUBRO Uü D
El sistema QSURROUND incorporado en este aparato utiliza
solamente dos altavoces a la izquierda y derecha para crear
un entorno de sonido en el que parece que hay instalados
dos altavoces enfrente y dos detrás.
-Pulsar QSURROUND.
c
VOL /
Para cancelar, pulsar de nuevo el botón.
j'^^j P ~! U ! I
I. —I U ‘.;h:
ESPAÑOL 27
Page 28

GRABACION
GRABACION DESDE UN CD O EL SINTONIZADOR
■ TUNER MODE/
ose
1
Il PAUSE
• Recuérdese que la grabación se hace solamente en un
lado de la cinta.
• Usar soiamente cintas de tipo I (normales).
1 Insertar la cinta que se va a grabar en la platina
1.
Insertar la cinta con ei lado que se va a grabar encarado
hacia afuera.
Cómo borrar una grabación
1 Insertar la cinta que se desea borrar en la platina 1.
2 Pulsar TAPE.
3 Pulsar • REC para empezar a borrar.
Grabación desde una fuente externa
Se puede grabar el sonido de un aparato externo conectado
alatomaAUX/VIDEO.
1 Insertar la cinta que se va a grabar en la platina 1.
2 Pulsar AUX.
3 Pulsar O REC para empezar a grabar.
4 Dar comienzo a la reproducción en el aparato externo.
Ajuste del sonido durante la grabación
El volumen y el tono del sonido de los altavoces y
auriculares puede variarse libremente sin que el nivel de
grabación quede afectado.
iC Pulsar uno de los botones de función y
preparar la fuente que se va a grabar.
Para grabar de un CD, pulsar CD y cargar un disco.
Para grabar un programa de radio, pulsar TUNER/
BAND y sintonizar una emisora.
3 Puisar # REC para empezar a grabar.
► PLAY se activa simultáneamente.
Cuando se selecciona ia función CD, las modalidades
de reproducción y grabación se activan
simultáneamente.
Pulsar M/± STOP/EJECT en la platina 1 para dejar de
grabar.
Pulsar II PAUSE de la plantaina 1 para hacer una pause
durante la grabación. Pulsarlo de nuevo para seguir
grabando.
NOTA
Si se producen pitidos o ruidos de batido al grabar
programas de AM, pulsar TUNER MODE/OSC para
eliminarlos.
Cada vez que se pulsa el botón, se encenderá y apagará el
punto luminescente de la pantalla.
También se dispone del botón MODE en el control remoto.
VOL lili
28 ESPAÑOL
C/A'íd
U -I _r
Punto luminescente
Page 29

RELOJ Y TEMPORIZADOR
COPIA DE CINTAS
• Recordar que la grabación se hace solamente en un lado
de la cinta.
• Utilizar solamente cintas de tipo I (normales).
1 Pulsar TAPE.
2 Insertar la cinta en la que se va a grabar en la
platina 1 con en lado a grabar encarado hacia
afuera.
3 Insértar la cinta desde la que se va a grabar en
la platina 2 con el lado que se va a reproducir
encarado hacia afuera.
4 Pulsar II PAUSE y luego # REC de la platina 1
para entrar en la modalidad de pausa de
grabación.
► PLAY se activa simultáneamente.
5 Pulsar DUB SPEED para seleccionar una
velocidad de doblaje.
Se indica HI-DUB en la pantalla: la copia se hace a alta
velocidad.
Cuando se indica HI-DUB en la pantalla; el doblaje se
hace a velocidad normal.
6 Pulsar ► PLAY de la platina 2.
Se desactiva II PAUSE de la platina 1 y se empieza a
grabar.
Pulsar U/é. STOP/EJECT en la platina 1 para dejar de
grabar.
MUSTE DEL RELOJ
1,3,5
Cuando se conecta el cable de alimentación por vez
primera, parpadea la hora en la pantalla.
Ajustar la hora como sigue mientras el aparato está
apagado.
I Pulsar II SET.
Parpadea la indicación de la hora.
O
/—//’7 / ^ifLi > I
lili .... , »,
(norma de 12 horas)
2
Pulsar
hora.
3
Pulsar II SET para ajustar la hora.
Dejan de parpadear las horas y parpadean los minutos.
4
Pulsar DOWN o »- UP para designar los
minutos.
Pulsar II SET para ajustar los minutos y
5
completar el ajuste.
Los minutos dejan de parpadear en la pantalla y el reloj
se pone en funcionamiento desde los “00” segundos.
Cómo corregir la indicación de la hora
Pulsar POWER para apagar el aparato y pulsar II SET dos
veces. Efectuar luego los pasos 2 a 5 mencionados en la
sección de arriba.
Cómo cambiar entre la indicación de 12 y 24 horas
Mientras el aparato está apagado, pulsar II SET dos veces
hasta que la hora parpadee y luego pulsar ■.
Cuando cambie la indicación de la pantalla, efectuar los
pasos 2 a 5 para ajustar la hora.
DOWN o UP para designar la
i i
f í ^
Cuando la indicación de la hora parpadee mientras el
eiparato está apagado
Se debe a una interrupción en el suministro de energía. Es
necesario ajustar de nuevo la hora correcta.
Si la energía se interrumpe durante un período superior a
aproximadamente 12 horas, todos los ajustes almacenados
em la memoria desde la compra del aparato se borrarán y
deberán ser ajustados de nuevo.
NOTA
También pueden usarse II y ■ del control remoto en lugar
de II SET y ■ PRESET del aparato principal.
ESPAÑOL 29
Page 30

AJUSTE DEL TEMPORIZADOR
Comprobación de ia hora especificada
Pulsar TIMER. La hora de encendido y la duración del
período de activación con temporizador parpadean durante 4
segundos.
Cancelación temporal de la modalidad de espera de
temporizador
Pulsar TIMER dos veces para que se apague ©.
Uso del aparato mientras está activado el temporizador
El aparato puede utilizarse normalmente después de
establecer el temporizador.
Antes de apagar el aparato, repetir el paso 4 parar preparar
la fuente, y ajustar el nivel de volumen.
El aparato puede encenderse a cualquier hora especificada
del día mediante ei temporizador incorporado.
Ajustar el temporizador como sigue mientras el aparato está
encendido.
Preparativos
Asegurarse de que la hora es correcta.
Pulsar TIMER para que se indique
0
en la
pantalla, y pulsar II SET dentro de un período
de 4 segundos.
Parpadearán © y la indicación de las horas.
? f .
I tóp n
I I- ..O u
NOTA
Si no se pulsa II SET dentro de 4 segundos, pudiera
dar comienzo una nueva operación.
Designar la hora de encendido pulsando
y II SET. Repetir esta operación para
designar los minutos.
Seleccionar la duración del período de
activación con temporizador usando o
y pulsado II SET.
NOTA
La reproducción con temporizador no se iniciará a menos
que el aparato esté apagado.
El equipo externo no puede encenderse y apagarse con el
temporizador incorporado de este aparato. Utilice un
temporizador externo.
©
r
VOL
U f
La duración del período de activación con temporizador
puede ajustarse entre 5 y 240 minutos en pasos de 5
minutos.
4
Preparar la fuente.
Para escuchar un CD, pulsar CD y cargar el disco.
Pulsar TUNER/BAND y sintonizar una emisora para
escuchar la radio.
-Jj ц
Pulsar POWER para apagar el aparato después
de ajustar el nivel de volumen.
Después de apagarse el aparato, la pantalla indica ©
(modalidad de espera de temporizador).
©
O A>/
/ n /
Cuando se llegue a la hora de encendido con ei
temporizador, el aparato se enciende y se reproduce la
fuente seleccionada.
Al apagarse el aparato, el nivel de volumen se ajuste
automáticamente en 21 cuando estaba ajustado a un
nivel de 22 ó más alto. .
C. D I I
U. _/ U
30 ESPAÑOL
Page 31

AJUSTE DEL TEMPORIZADOR DE
DESCONEXIÓN
El aparato puede apagarse automáticamente a la hora
especificada.
7 Pulsar SLEEP.
SLEEP
VOL
c n
u u
MEZCLA CON MICROFONO
7 Conectar un micrófono equipado con una
miniclavija en la toma MIC.
4; Preparar la fuente con la que se va a mezclar el
sonido.
Ajustar el volumen del micrófono con MIC VOL,
y el de la fuente de mezcla con VOLUME.
Grabación del sonido de mezcia con micrófono
Insertar la casete a grabar en la platina 1 y pulsar • REC.
2 Dentro de un período de 4 segundos, pulsar
o para especificar la hora hasta la
desconexión del aparato.
Cada vez que se pulsa el botón, el tiempo cambiar entre
5 y 240 minutos en pasos de 5 minutos.
SLEEP
VOL
Tiempo especificado
Comprobación del tiempo restante hasta la desconexión
dei aparato
Pulsar SLEEP una vez. Se indica el tiempo restante hasta la
desconexión durante un espacio de 4 segundos.
Cancelación dei temporizador de desconexión
automática
Pulsar SLEEP dos veces para que desaparezca SLEEP de
la pantalla.
Si se pulsa SLEEP mientras el aparato está apagado, el
aparato se encenderá y funcionará directamente el
temporizador de desconexión de modo que el aparato se
apagará en un período de una hora.
Para especificar el tiempo hasta la desconexión del
aparato, pulsar SLEEP una vez y luego pulsar ◄◄ o
dentro de un período de 4 segundos.
Si el aparato se apaga durante la reproducción de una
cinta, no se desactivará ► PLAY de las platinas. Pulsar
M/± STOP/EJECT para que se desactive el botón ►
PLAY.
I I I
I U
NOTA
Cuando se copian cintas a alta velocidad no se graba el
sonido de mezcla del micrófono.
Cuando el micrófono está demasiado cerca de los
altavoces, puede acoplarse el sonido (silbido de
realimentación). Si ocurriera esto, alejar el micrófono de
los altavoces o reducir el volumen principal.
Se recomienda utilizar un micrófono unidireccional para
evitar que se acople el sonido.
ESPAÑOL 31
Page 32

GENERAL
CUIDADOS Y MANTENIMIENTO
Es necesario cuidar y mantener periódicamente el aparato
para optimizar su funcionamiento.
Limpieza dei aparato
Utilizar un paño suave y seco.
Si el aparato está muy sucio, usar un paño suave
humedecido con una solución de detergente suave. No usar
disolventes fuertes, como alcohol, bencina o disolvente de
pintura ya que estos productos pueden dañar el acabado del
aparato.
Limpieza de las cabezas
Cuando las cabezas están sucias:
- No se reproducen los sonidos de alta frecuencia
- El volumen del sonido no es suficientemente alto
- El equilibrio del sonido es malo
- No pueden borrarse cintas
- No se pueden grabar cintas
Limpiar las cabezas con una casete limpiadora cada 10
horas de uso.
Usar una casete limpiadora de tipo seco o húmedo de venta
en comercios.
Consultar las instrucciones de la casete limpiadora para más
detalles sobre su uso.
Cuidado de ios discos
• Cuando se ensucie un disco, limpiarlo pasando un paño
limpiador desde el centro hacia afuera.
• Después de reproducir un disco, guardarlo en su caja. No
dejar los discos en sitios calurosos o húmedos.
Cuidado de ias cintas
• Guardar las cintas en sus cajas después de usarlas.
• No dejar las cintas cerca de imanes, motores eléctricos,
televisores ni otras fuentes de magnetismo. De hacerlo
empeorará la calidad del sonido grabado en ellas.
• No dejar las cintas expuestas a la luz directa del sol ni
dentro de un automóvil estacionado a la luz directa del sol.
ESPECIFICACIONES
Sección del sintonizador de FM
Gama de sintonía 87,5 MHz a 108 MHz
Antena
Sección del sintonizador de AM
Gama de sintonía 530 kHz a 1710 kHz (pasos de 10
Antena Antena de barra de ferrite
Sección de la platina de cassette
Formato de pistas 4 pistas, 2 canales estéreo
Respuesta de frecuencias
Sistema de grabación Polarización de CA
Cabezas Platina 1: 1 cabeza de grabación/
Sección del lector de disco compacto
Láser
Convertidor D-A
General
Potencia de saiida
Saiida
Alimentación
Consumo de energía
Dimensiones del aparato principal (an x al x pr)
Peso del aparato principal
Altavoces
Tipo Tipo cónico de 120 mm
Dimensiones (an x al x pr)
Peso 1,75 kg X 2
Impedancia 4 ohmios
Capacidad máxima permitida
Antena de varilla
kHz)
531 kHz a 1602 kHz (pasos de 9
kHz)
Cinta normal: 50 Hz - 12500 Hz
reproducción
1 cabeza de borrado
Platina 2: 1 cabeza de reproducción
Láser de semiconductor (k = 780
nm)
Dual de 1 bitio
5 W + 5 W (4 ohmios, EIAJ),
Regulación de PTC
4 vatios por canal, mín. RMS a 4
ohmios desde 65 Hz a 15.000 Hz,
con menos del 1 % de distorsión
Auriculares (miniclavija estéreo)
12 V CC usando ocho pilas de
tamaño D (R20)
120 VGA, 60 Hz
30 W
266 X 303 X 278,5 mm
4,1 kg
Tipo cerámico de 27 mm
198 X 303 X 232 mm
10 W
32 ESPAÑOL
Las especificacionGs y el aspecto externo están sujetos a
cambios sin previo aviso.
COPYRIGHT
Rogamos compruebe las leyes sobre “copyright”
relacionadas con la grabación de discos, programas de radio
o cintas externas vigentes en el país en el que se va a utilizar
este aparato.
Page 33

DIAGNÓSTICO DE PROBLEMAS ÍNDICE DE PIEZAS
Si el aparato no funciona de la manera descrita en estas
instrucciones de funcionamiento, comprobar los puntos
siguientes.
GENERAL
No hay sonido
• ¿Está conectado correctamente el cable de alimentación?
• ¿Se ha pulsado un botón de función incorrecto?
No se enciende el aparato
• ¿Está el cable de alimentación conectado al aparato y las
pilas están gastadas?
Sacar las pilas y desconectar el cable de alimentación.
Luego conectar el cable de alimentación de nuevo y
reponer el aparato como se indica a continuación.
Se da una indicación errónea o se producen errores de
funcionamiento.
-> Reponer el aparato como se indica al pie de esta
página.
SECCIÓN DEL SINTONIZADOR
La recepción contiene interferencias o el sonido está
distorsionado.
• ¿Se están captando ruidos externos o distorsión de
trayectorias múltiples?
Cambiar la orientación de la antena o del aparato.
Alejar el aparato de otros electrodomésticos.
SECCIÓN DE LA PLATINA DE CASSETTE
La cinta no avanza.
• ¿Está el aparato en la modalidad de pausa? (-» página
26)
El sonido no tiene un equiiibrio correcto o no es lo
suficientemente aito.
• ¿Está sucia la cabeza de reproducción? (-> página 32)
No se puede grabar.
• ¿Está rota la pestaña de protección contra borrados de la
cinta? {-> página 26)
• ¿Está sucia la cabeza de grabación? (-> página 32)
No se puede borrar.
• ¿Está sucia la cabeza de borrado? página 32)
• ¿Se está usando una cinta de metal o de Cr02?
No se reproducen los tonos agudos.
• ¿Está sucia la cabeza de reproducción/grabación? (-»
página 32)
SECCIÓN DEL LECTOR DE CD
El lector de CD no reproduce.
• ¿Está el disco insertado correctamente? (-»■ página 24)
• ¿Está sucio el disco? (-»■ página 32)
• ¿Hay condensación en la lente?
Esperar aproximadamente una hora y volver a intentar
usarlo.
Relacionado con el manejo, consultar la página indicada.
DISPLAY
EQ
MODE
■0-9, +10
■ REPEAT
__
■ FUNCTION
&4-M-U.I—I—U4-I-B
BAND
-
íro
o o o 1“
o o OI
o_o|m
II
E3 Botón POWER ®
[] Botones FUNCTION (CD
TAPE @)
Botón ■ PRESET
Botón ► CLEAR ® ®
Botón II SET®®®®
Botones DOWN, ►► UP
Botón TUNER MODE/OSC, DUB SPEED ® '
Botón SLEEP ®
Botón TIMER ®
Botón ± OPEN/CLOSE ©
Botones VOLUME ®
Botón QSURROUND ®
Botón T-BASS ®
GRAPHIC EQUALIZER (ROCK, POP, JAZZ)
[3 Toma PHONES (para auriculares) ®
Toma MIC ®
Control MIC VOL ®
H Botones de manejo de la platina
■ /£, II)®®®
Botón DISPLAY ®
[i
Botón EQ ®
Botón MODE
Botones 0-9, +10
Botón REPEAT ®
Botón BAND ®
Botón FUNCTION
Los botones del control remoto que tienen los mismos
nombres que los del aparato principal pueden usarse para
las mismas funciones.
AUX TUNER/BAND (
Reposición
Si se produce una condición extraña en la pantalla o en la
platina de cassette, reponer el aparato como se explica a
continuación.
1 Pulsar POWER para apagar el aparato.
2 Pulsar POWER y ■ simultáneamente. Se borrará todo lo
almacenado en la memoria después de la compra.
ESPAÑOL 33
Page 34

AVERTISSEMENT
POUR REDUIRE LE RISQUE D’INCENDIE
OU DE CHOC ELECTRIQUE, NE PAS
EXPOSER CET APPAREIL A LA PLUIE OU A
L’HUMIDITE.
CAUTION
RISK OF ELECTRIC SHOCK
DO NOT OPEN
“CAUTION: TO REDUCE THE RISK OF
DO NOT REMOVE COVER (OR BACK).
NO USER-SERVICEABLE PARTS INSIDE.
Explication des symboies graphiques:
RESERVE AU PROPRIETAIRE
Pour votre commodité, noter dans l’espace réservé à cet effet ci-dessous
le numéro de modèle (indiqué au dos de l’appareil) et le numéro de
série (indiqué dans le compartiment à piles). Toujours mentionner ces
numéros dans toutes les relations avec les revendeurs AIWA en cas de
problème.
№ de modèle № de série
ELECTRIC SHOCK,
REFER SERVICING TO QUALIFIED
SERVICE PERSONNEL.”
Le symbole représentant un éclair au bout en
pointe de flèche placé à l’intérieur d’un triangle
équilatétal est destiné à mettre en garde l’usager
contre la présence d’une “tension dangereuse” non
isolée dans le boîtier de l’appareii, tension
suffisante pour constituer un risque d’électrocution
pour les humains.
Le point d’exclamation placé à l’intérieur d’un tri
angle équilatétal est destiné à signaler à l’usager
la présence d’instructions importantes d’opération
et d’entretien (service) dans les manuels fournis
avec l’appareil.
PRECAUTIONS
Lire attentivement tout ce mode d’emploi avant de faire
fonctionner l’appareil. Bien conserver ce mode d’emploi afin
de pouvoir s’y reporter ultérieurement. Observer
scrupuleusement tous les avertissements et les précautions
du mode d’emploi et de l’appareil, ainsi que les conseils de
sécurité ci-dessous.
Installation
1 Eau et humidité - Ne pas utiliser l’appareil à proximité
d’eau, par exemple près d’une baignoire, d’un lavabo,
d’un évier de cuisine, d’une cuve à lessive, dans une
cave humide, une piscine, etc.
2 Chaleur - Ne pas utiliser l’appareil à proximité de sources
de chaleur, par exemple une bouche de chauffage, un
appareil de chauffage ou tout autre appareil dégageant
de la chaleur. Par ailleurs, ne pas le soumettre à des
températures inférieures à 5°C ou supérieures à 35°C.
3 Surface de montage - Placer l’appareil sur une surface
plane et de niveau.
4 Ventilation - L’appareil devra être placé avec
suffisamment d’espace libre tout autour de façon à
assurer une bonne dissipation de la chaleur. Laisser
environ 10 cm derrière et au-dessus de l’appareil, et 5 cm
de chaque côté.
- Ne pas mettre l’appareil sur un lit, un tapis ou toute
surface similaire qui risquerait de boucher les évents de
ventilation.
- Ne pas mettre l’appareil dans une bibliothèque, une
armoire ou une étagère fermée où la ventilation risque
d’être inadéquate.
5 Pénétration d’objets et de liquides - Veiller à ce
qu’aucun objet ni aucun liquide ne pénètre à l’intérieur de
l’appareil par les évents de ventilation.
6 Chariots et socles - Si l’appareil est placé
sur un socle ou un chariot, le déplacer
avec précaution.
Des arrêts brusques, une force excessive
et des surfaces irréguiières pourraient
provoquer le renversement ou la chute de
l’appareil ou du chariot.
7 Condensation - De l’humidité risque de se former sur la
lentille du capteur CD si :
- l’appareii est amené d’un endroit froid à un endroit
chaud
- le chauffage vient juste d’être allumé
- l’appareil est utilisé dans une pièce très humide
- l’appareil est refroidi par un climatiseur.
S’il y a de la condensation à l’intérieur de l’appareil, il
risque de ne pas fonctionner normaiement. Dans ce cas,
attendre quelques heures avant de le réutiliser.
8 Montage au mur ou au plafond - L’appareil ne devra
pas être monté sur un mur ou un plafond, sauf
spécification contraire dans le mode d’emploi.
34 FRANÇAIS
Alimentation électrique
1 Sources d’alimentation - Alimenter l’appareil sur piles
ou sur courant secteur, comme spécifié dans le mode
d’emploi et indiqué sur l’appareil.
2 Polarisation - A des fins de sécurité, certains appareils
sont équipés d’une fiche secteur polarisée qui ne peut
rentrer dans la prise secteur que dans un seul sens. S’il
est difficile ou impossible d’insérer la fiche dans la prise,
tourner la fiche dans l’autre sens et recommencer. Si la
fiche ne rentre toujours pas facilement, contacter un
technicien qualifié pour faire réparer ou remplacer la
prise. Pour ne pas faire échec à la fonction de sécurité de
la fiche polarisée, ne pas l’insérer de force dans la prise.
Page 35

3 Cordon d’alimentation secteur
- Pour débrancher le cordon d’alimentation secteur, ie
tirer en le tenant par la fiche. Ne pas tirer sur le cordon
proprement dit.
- Ne jamais manipuler le cordon d’alimentation secteur
avec des mains mouillées, car cela pourrait provoquer
un feu ou une décharge électrique.
- Les cordons d’alimentation doivent être solidement fixés
pour éviter qu’ils ne soient pliés, pincés, ou qu’on ne
marche dessus. Faire particulièrement attention au
cordon qui relie l’appareil à la prise secteur.
- Eviter de surcharger les cordons d’alimentation secteur
et les cordons de rallonge au-delà de leur capacité
nominale, car cela pourrait provoquer un feu ou une
décharge électrique.
4 Cordon de rallonge - Pour éviter tout risque de choc
électrique, ne pas utiliser une fiche secteur polarisée
avec un cordon de rallonge ou toute autre prise si la fiche
polarisée ne rentre pas complètement dans la fiche, pour
éviter d’exposer les lames de la fiche.
5 En cas de non utilisation - SI l'appareil doit rester
inutilisé pendant plusieurs mois, débrancher le cordon
secteur de la prise secteur ou retirer toutes les piles.
Quand le cordon est branché, l’appareil continue de
consommer une petite quantité de courant, même s’il est
hors tension.
Entretien
Nettoyer l’appareil comme indiqué dans le mode d’emploi.
TABLE DES MATIERES
PREPARATIONS
ALIMENTATION..........................................................36
RACCORDEMENTS....................................................36
TÉLÉCOMMANDE
AVANT L’UTILISATION..............................................37
RÉCEPTION DE LA RADIO
ACCORD MANUEL.....................................................38
PRÉRÉGLAGE DES STATIONS
LECTURE DE DISQUES COMPACTS_____________
OPÉRATIONS DU DISQUE
LECTURE DE CASSETTES_____________________^
OPÉRATIONS DE LA CASSETTE
SON________________________________________
RÉGLAGE DU SON
ENREGISTREMENT___________________________
ENREGISTREMENT D’UN
DISQUE COMPACT OU DU TUNER
COPIE DE CASSETTE................................................45
_____________________________
......................................................
37
_____________________
................................
........................................
.............................
....................................................
..........................
39
40
42
43
44
Dommages nécessitant des réparations
Faire réparer l’appareil par un personnel qualifié si :
- Le cordon d’alimentation secteur ou la fiche sont
endommagés
- Des corps étrangers ou un liquide ont pénétré à l’intérieur
de l’appareil
- L’appareil a été exposé à la pluie ou à l’eau
- L’appareil semble ne pas fonctionner normalement
- L’appareil accuse un changement notable de ses
performances
- L’appareil est tombé, ou le coffret est endommagé.
NE PAS TENTER DE REPARER L’APPAREIL ÔOI-MEME.
HORLOGE ET MINUTERIE
RÉGLAGE DE L’HORLOGE.......................................45
RÉGLAGE DE LA MINUTERIE...................................46
RÉGLAGE DE LA MINUTERIE D’ARRÊT
AUTRES
____________________________________
MIXAGE DE MICROPHONE.......................................47
_____________________
.................
47
GÉNÉRALITÉS_______________________________
SOIN ET ENTRETIEN
SPÉCIFICATIONS.......................................................48
GUIDE DE DÉPANNAGE............................................49
NOMENCLATURE
.................................................
......................................................
48
49
FRANÇAIS 35
Page 36

PRÉPARATIONS
ALIMENTATION
Raccorder le cordon secteur comme indiqué ci-dessous.
O vers la prise AC de l’appareil
" '=■► © vers la prise secteur
ATTENTION
Utiliser exciusivement le cordon d’alimentation fourni.
L’utilisation d’autres cordons risque de provoquer un feu.
AliaiBntatiâEii5y£iBiiiaa.,
Ouvrir le couvercle du logement des piles au dos de
l’appareil et insérer huit piles R20 (taille D), non fournies,
comme indiqué ci-dessous. Puis, refermer le couvercle.
Pour passer de l’alimentation secteur à l’alimentation
sur piles, débrancher le cordon secteur de la prise AC.
Les piles s’useront excessivement si le cordon est raccordé.
RACCORDEMENTS
IMPORTANT
• Bien s’assurer que le cordon secteur est débranché et les
piles retirées avant de raccorder les enceintes.
• Ne pas raccorder d’autres enceintes que celles qui sont
fournies.
7 Installer les enceintes.
Pour coupler les enceintes à l’appareil, glisser chaque
enceinte vers le bas dans les étriers de guidage de
l’appareil central jusqu’à ce qu’elles arrivent au même
niveau que l’appareil.
Pour détacher les enceintes de l’appareil, glisser les
enceintes vers le haut jusqu’à les sortir, tout en
appuyant sur le bouton de dégagement des enceintes.
Raccorder les enceintes.
Raccorder le cordon de l’enceinte droite aux bornes R,
et celui de l’enceinte gauche aux bornes L.
Raccorder le cordon d’enceinte avec la ligne blanche
discontinue à O et l’autre cordon à ©.
Remplacer les piles lorsque :
L’indicateur OPE/BATT devient sombre, la vitesse du ruban
magnétique ralentit, le volume diminue ou le son est déformé
pendant le fonctionnement.
Remarques sur les piles
Pour éviter tout risque de fuite ou d’explosion, observer les
points suivants :
• Insérer les piles en respectant les polarités O et O.
• Ne pas mélanger des piles de type différent ni des piles
neuves avec des piles ayant déjà servi.
• Ne jamais recharger, chauffer ni démonter les piles.
• Retirer les piles mortes.
Si l’électrolyte des piles fuit, bien essuyer pour nettoyer.
Autres..Raccordemeiits.<i
Il est possible d’envoyer des signaux sonores à l’appareil par
les prises AUX/VIDEO.
Utiliser un câble à fiches phono RCA (non fourni) pour
raccorder l’appareil externe.
Raccorder la fiche rouge à la borne R, et la fiche blanche à
Pour écouter une source externe
Appuyer sur AUX et effectuer la lecture sur l’appareil.
Pour les détails, voir également le mode d’emploi de
l’appareil raccordé.
36 FRANÇAIS
Page 37

TELECOMMANDE
Insertion des piles
Enlever le couvercle des piles au dos de la télécommande et
insérer deux piles R6 (taille AA).
AVANT L’UTILISATION
Quand remplacer les piles
La distance de commande maximale de la télécommande
est d’environ 5 mètres. Si cette distance diminue, remplacer
les piles par des neuves.
Utilisation de la télécommande
Les instructions du manuel se réfèrent essentiellement aux
touches de l’appareil principal. Les touches de la
télécommande ayant le même nom que celles de l’appareil
principal pourront également être utilisées.
Pour utiliser la touche FUNCTION
La touche FUNCTION remplace les touches FUNCTION
(CD, AUX, TUNER/BAND, TAPE) de l’appareil principal. A
chaque pression sur la touche lorsque l’appareil est sous
tension, la fonction suivante est sélectionnée suivant un
cycle.
Si l’on ne prévoit pas d’utiliser l’appareil pendant un certain
temps, retirer les piles pour éviter tout risque de fuite de
l’électrolyte.
La télécommande peut ne pas fonctionner correctement si:
- La ligne de vue entre la télécommande et l’appareil est
exposée à une lumière vive, par exemple les rayons du
soleil.
- D’autres télécommandes sont utilisées à proximité
(téléviseur, etc.).
Pour mettre l’appareil sous tension
Appuyer sur l’une des touches FUNCTION (CD, AUX,
TUNER/BAND, TAPE) de l’appareil principal. La lecture du
disque inséré ou la réception de la station précédemment
accordée démarrent (Fonction de lecture directe).
On peut également utiliser POWER.
Après l’utilisation
Appuyer sur POWER pour mettre l’appareil hors tension.
L’affichage passe à l’horloge.
Lorsque l’appareil est alimenté sur piles, il n’est pas possible
de le mettre sous tension avec la télécommande.
Utilisation du casque
Brancher le casque sur la prise PHONES avec une minifiche
stéréo (dia. 3,5 mm).
Quand le casque est branché, aucun son n’est émis par les
enceintes.
FRANÇAIS 37
Page 38

RÉCEPTION DE LA RADIO
ACCORD MANUEL
Appuyer de façon répétée sur TUNER/BAND
pour sélectionner la gamme.
FM
Quand on appuie sur TUNER/BAND alors que l’appareil
est hors tension, il se met directement sous tension et la
station précédemment accordée est reçue (Fonction de
lecture directe).
Avec la télécommande, appuyer de façon répétée sur
BAND lorsque l’appareil est sous tension.
Appuyer sur ◄◄ DOWN ou ►► UP pour
sélectionner la station.
A chaque pression sur la touche, la fréquence change.
Pendant une réception FM stéréo, STEREO s’affiche.
AM
Quand une émission FM stéréo renferme des parasites
Appuyer sur TUNER MODE/OSC.
MONO apparaît sur l’affichage.
Les parasites sont réduits, mais la réception est
monophonique.
On pourra également utiliser MODE de la télécommande.
MONO
n^îlt—
/ A y Q -,
vol! Il /_/ /. _/ /_/ MHz
Pour rétablir la réception stéréophonique, appuyer de
nouveau sur la touche.
Pour changer l’intervalle d’accord AM
Le réglage par défaut de l’intervalle d’accord AM est de 10
kHz/pas. Si l’on utilise l’appareil dans une région où le
système d’allocation de fréquences est de 9 kHz/pas,
modifier l’intervalle d’accord de la façon suivante.
Appuyer sur POWER tout en tenant TUNER/BAND enfoncé.
Pour rétablir l’intervalle initial, procéder de la même façon.
REMARQUE
Quand on change l’intervalle d’accord AM, toutes les stations
mémorisées (voir PRÉRÉGLAGE DES STATIONS) sont
supprimées. Il faudra alors recommencer le préréglage des
stations.
I— ti O ~i c П
volI II U /._//_( MHz
Pour rechercher une station rapidement (Recherche
automatique)
Tenir ◄◄ DOWN ou ►► UP enfoncé jusqu’à ce que le
tuner commence à rechercher une station. Quand une
station est accordée, la recherche s’arrête.
Pour arrêter la recherche automatique manuellement,
appuyer sur ◄◄ DOWN ou ►► UP.
• La recherche automatique peut ne pas s’arrêter aux
stations dont les signaux sont très faibles.
Pour améliorer la réception
FM
Déployer l’antenne FM et l’orienter de façon à obtenir la
meilleure réception possible.
AM
L’antenne AM se trouve à l’intérieur de l’appareil. Diriger
l’appareil de façon à obtenir la meilleure réception possible.
38 FRANÇAIS
Page 39

PRÉRÉGLAGE DES STATIONS
■ PRESET
► CLEAR
âGJCÛBûaAe.....MUMÉRO
Utiliser la télécommande pour sélectionner directement un
numéro de préréglage.
..
de rréréglage
■0-9, -rio
1
L’appareil peut mémoriser un total de 24 stations préréglées
pour les gammes FM et AM. Toutefois, il pourra mémoriser
un maximum de 16 stations pour chaque gamme.
Quand une station est mémorisée, un numéro de préréglage
est affecté à cette station. Utiliser ces numéros de
prérégiage pour accorder directement les stations
préréglées.
1 Appuyer sur TUNER/BAND pour sélectionner la
gamme. Puis, appuyer sur ◄◄ DOWN ou ►►
UP pour sélectionner la station.
^ Appuyer sur II SET pour mémoriser la station.
La station reçoit un numéro de préréglage, à partir de 1
dans suivant l’ordre chronologique, pour chaque gamme.
Numéro de préréglage
BAND
7
Appuyer sur BAND pour sélectionner la gamme.
2
Appuyer sur les touches numériques 0-9, -f10
pour sélectionner un numéro de préréglage.
Exemple '.
Pour sélectionner le numéro de préréglage 15, appuyer
sur -1-10 et 5.
Pour sélectionner le numéro de préréglage 10, appuyer
sur -1-10 et 0.
Sélection d’une station préréglée sur l’appareil principal
Appuyer sur TUNER/BAND pour sélectionner la gamme.
Puis, appuyer de façon répétée sur ■ PRESET.
A chaque pression sur la touche, le numéro suivant est
sélectionné.
Pour effacer une station préréglée
Sélectionner la station préréglée à effacer. Puis, appuyer sur
III SET, et appuyer sur ► CLEAR dans les 4 secondes.
Les numéros de préréglage de toutes les autres stations de
la gamme ayant un numéro supérieur diminuent également
d’une unité.
3 Recommencer les opérations 1 et 2.
REMARQUE
Pendant le fonctionnement, on pourra également utiliser
respectivement II, ■ et ► de la télécommande à la place
de II SET, ■ PRESET et ► CLEAR de l’appareil principal.
FRANÇAIS 39
Page 40

LECTURE DE DISQUES COMPACTS
OPÉRATIONS DU DISQUE
■■■
Appuyer sur CD, puis appuyer sur ± OPEN/
CLOSE pour ouvrir le tiroir du disque. Mettre le
disque en place avec son étiquette vers le haut
et refermer le tiroir du disque.
A OPEN/CLOSE
DISPLAY
Pour démarrer la lecture quand l’alimentation est
coupée (Fonction de lecture directe)
Appuyer sur la touche ►. L’appareil se met sous tension et
la lecture du disque chargé commence.
Si i’on sélectionne une fonction autre que la lecture CD
lorsque l’appareil est sous tension, une pression sur ►
sélectionne ia fonction CD et la lecture commence.
Pour vérifier ie temps restant
Appuyer sur DISPLAY de la télécommande pendant la
lecture. Le temps restant jusqu’à ce que toutes les plages
aient été lues s’affiche. Pour rétablir l’affichage du temps de
lecture, appuyer de nouveau sur la touche.
Sélection d’une plage avec la télécommande
Appuyer sur les touches numériques 0-9, +10 pour
sélectionner une plage.
Exemple :
Pour sélectionner la plage 25, appuyer sur +10, +10 et 5.
Pour sélectionner la plage 10, appuyer sur +10 et 0.
La lecture de la plage sélectionnée commence, et elle se
poursuit jusqu’à la fin du disque.
REMARQUE
Ne pas utiliser de disques de forme irrégulière (par
exemple en forme de coeur, octogonale, etc.)
Cela risque de provoquer une anomalie.
Pour mettre un disque de 8 cm en place, le poser dansn
renfoncement circulaire du tiroir.
Ne pas mettre plus d’un disque compact dans le tiroir.
Temps de lecture total
Nombre total de plages
2 Appuyer sur ►.
La lecture commence à la première plage.
Temps de lecture écoulé
VOL
Numéro de la plage en cours de lecture
Pour arrêter la lecture, appuyer sur ■.
Pour interrompre momentanément la lecture, appuyer sur
II. Appuyer de nouveau pour reprendre la lecture.
Pour rechercher un point particulier pendant la lecture,
tenir ◄◄ ou ►► enfoncé et relâcher la touche lorsque le
point voulu est atteint.
Pour sauter au début d’une plage pendant la lecture,
appuyer de façon répétée sur ◄◄ ou
Pour retirer les disques, appuyer sur ^ OPEN/CLOSE.
40 FRANÇAIS
Page 41

LECIUBE
....
RÉBÉIÉE:
yiCXURE PROjQRdàMMÉE
Il est possible de répéter la lecture d’une plage, de toutes les
plages ou des plages programmées.
Appuyer sur REPEAT de la télécommande pour afficher
REPEAT ALL ou REPEAT 1.
Pour répéter tous les plages, afficher REPEAT ALL.
Pour répéter la plage en cours, afficher REPEAT 1.
Pour annuler la lecture répétée, appuyer sur REPEAT de
façon à éteindre REPEAT.
Pour répéter la lecture uniquement des plages voulues,
programmer les plages et appuyer sur REPEAT pour afficher
REPEAT ALL.
LEGIURE
II est possible de lire toutes les plages du disque dans un
ordre aléatoire.
Appuyer une fois sur MODE de la télécommande en
mode d’arrêt pour afficher Rn-
Appuyer sur ► pour démarrer la lecture.
Pour annuler la lecture aléatoire, appuyer de façon
répétée sur MODE en mode d’arrêt jusqu’à ce que
l’affichage de la durée de lecture totale soit rétabli.
Il n’est pas possible de sauter à une plage précédemment
lue, même en appuyant sur la touche ◄◄. L’appareil
revient seulement au début de la plage en cours.
Pendant la lecture aléatoire, il n’est pas possible
d’effectuer une lecture répétée d’une plage (REPEAT 1).
Si l’on sélectionne des plages avec les touches
numériques, la lecture aléatoire s’annule.
....
ALÉATOIRE
ИгЦ-Я
VOL
I -f
/С
I
H П
II est possible de programmer un maximum de 30 plages du
disque en place.
1
2
Utiliser la télécommande.
1 Appuyer deux fois sur MODE en mode d’arrêt.
PRG clignote sur l’affichage.
'Pf^G/■
VOL iL. J-f
Appuyer sur les touches numériques 0-9, +10
pour programmer une plage.
Exemple :
Pour sélectionner la plage 12, appuyer sur +10 et 2.
Pour sélectionner la plage 20, appuyer sur +10, +10 et
0.
Numéro de programme
Numéro de la plage sélectionnée
3 Recommencer l’opération 2 pour programmer
d’autres plages.
4 Appuyer sur pour démarrer la lecture.
I l.l I I I
U. U U
Nombre total de plages
programmées
Temps de lecture total des
plages programmées
f L. Í J
! U. / D
Pour vérifier le programme
A chaque pression sur ◄◄ ou ►► en mode d’arrêt, un
numéro de plage et un numéro de programme s’affichent.
Pour effacer le programme
Appuyer sur MODE en mode d’arrêt.
Pour ajouter des plages au programme
Recommencer l’opération 2. La plage sera programmée à la
suite de la dernière.
Pour modifier les plages programmées
Effacer le programme et recommencer depuis le début.
Si le temps de programmation dépasse 99:59 minutes, ou si
l’on programme un numéro de plage du disque égal ou
supérieur à 31, l’affichage indique - - comme temps de
lecture total.
B
FRANÇAIS 41
Page 42

LECTURE DE CASSETTES
OPERATIONS DE LA CASSEHE
• Utiliser uniquement des cassettes de type I (normaies).
• Les cassettes ne sont lues que sur une seule face.
7 Appuyer sur TAPE, puis sur M/± STOP/EJECT
pour ouvrir le porte-cassette.
Face de lecture ■
Platine 1 n—ik Platine 2
Insérer une cassette avec le côté exposé du ruban
magnétique orienté vers le bas et la face à lire vers
l’extérieur.
Appuyer sur le porte-cassette pour le refermer.
2 Appuyer sur ► PLAY pour démarrer la lecture.
Pour arrêter la lecture, appuyer sur U/± STOP/EJECT.
Pour interrompre momentanément la lecture, appuyer sur
Il PAUSE. Appuyer de nouveau pour reprendre la lecture.
Pour avancer rapidement ou rebobiner le ruban
magnétique, appuyer sur ►► FF ou ◄◄ REW en mode
d’arrêt. Puis, appuyer sur U/± pour arrêter le ruban
magnétique.
Pour démarrer la lecture quand l’alimentation est
coupée (Fonction de lecture directe)
Appuyer sur ► PLAY. L’appareil se met sous tension et la
lecture de la cassette insérée commence.
'LECtTyfiE,.EM
Quand la lecture est terminée sur la platine 2, elle redémarre
sans interruption sur la platine 1.
Pendant la lecture de la platine 2, appuyer sur II PAUSE
puis sur ► PLAY de la platine 1.
Il PAUSE de la platine 1 se libère à la fin de la lecture sur la
platine 2.
...
COMTliNU..... . . ............. ... .
A propos des cassettes
• Pour éviter tout effacement accidentel, utiliser un
tournevis ou tout autre outil effilé pour briser les ergots
en plastique de la cassette après l’enregistrement.
Ergot de la face A
Pour enregistrer de nouveau sur la cassette, recouvrir
les cavités des ergots avec du ruban adhésif ou autre.
Le ruban magnétique des cassettes de 120
minutes ou plus est extrêmement fin et il se déforme
et s’abîme facilement. Ces cassettes ne sont pas
recommandées.
Tendre le ruban magnétique avec un crayon ou tout
autre outil similaire avant d’utiliser une cassette. Un
ruban magnétique distendu peut se rompre ou
s’emmêler dans le mécanisme.
42 FRANÇAIS
Page 43

REGLAGE DU SON
QSURROUND
VOLUME
ROCK
POP
JAZZ
T-BASS
VOLUME
МОШМЕ
Appuyer sur VOLUME ▲ UP ou ▼ DOWN.
Le niveau du volume s’affiche sous forme d’un chiffre de 0 à
29.
Le niveau du volume se règle automatiquement sur 21
quand l’appareil est mis hors tension alors que le volume est
réglé sur 22 ou plus.
8¥ЕЖЕМЬ§УйЕВеЖя.ВА8&-
eiJbUSEUB
Appuyer sur ROCK, POP ou JAZZ.
L’indicateur du mode sélectionné s’allume.
ROCK : Son puissant accentuant les aigus et les graves.
POP : Présence accrue des parties vocales et de la gamme
moyenne.
JAZZ : Fréquences basses accentuées pour la musique de
type jazz.
Pour annuler le mode sélectionné
Appuyer de nouveau sur la même touche.
Si l’on utilise la télécommande
Appuyer sur EQ jusqu’à ce que le mode d’égalisation voulu
s’affiche.
Le mode d’égaliseur parcourt le cycle suivant : ROCK, POP,
JAZZ et pas d’égalisation.
....
ВШУШЮШ.
Le système T-BASS améliore le réalisme du son aux basses
fréquences.
Appuyer sur T-BASS.
filmili
/_ 'f O ~l C I”
volI II U I.-IIJmhz
Pour annuler, appuyer de nouveau sur la touche.
Le son aux basses fréquences risque d’être déformé lorsque
le système T-BASS est utilisé avec un disque ou une
cassette dont le son aux basses fréquences est accentué
d’origine. Dans ce cas, annuler le système T-BASS.
S^IÉME QSURROUND
Le système QSURROUND incorporé à l’appareil n’utilise que
deux enceintes, une à gauche et une à droite, pour recréer
une atmosphère donnant l’impression d’être entouré de deux
enceintes avant et deux enceintes arrière.
Appuyer sur QSURROUND.
te'ASi
c A//
VOL / Il
Pour annuler, appuyer de nouveau sur la touche.
FRANÇAIS 43
Page 44

ENREGISTREMENT
ENREGISTREMENT D’UN DISQUE COMPACT OU DU TUNER
■ TUNER MODE/
ose
1
Il PAUSE
• Noter que l’enregistrement ne s’effectue que sur une face
de la cassette.
• Utiliser uniquement des cassettes de type I (normales).
7 Insérer la cassette à enregistrer dans la platine
1.
Insérer la cassette avec la face à enregistrer en premier
orientée vers l’extérieur.
d) M /
Platine 1 I——I
--------------
Face d’enregistrement
----
--
Pour effacer un enregistrement
1 Insérer la cassette à effacer dans la platine 1.
2 Appuyer sur TAPE.
3 Appuyer sur 9 REC pour démarrer l’effacement.
Pour enregistrer à partir d’une source externe
Il est possible d’enregistrer le son d’une source externe
raccordée à la prise AUX/VIDEO.
1 Insérer la cassette à enregistrer dans la platine 1.
2 Appuyer sur AUX.
3 Appuyer sur
4 Démarrer la lecture sur l’appareil externe raccordé.
Régiage du son pendant l’enregistrement
Il est possible de modifier le volume de sortie et la tonalité
des enceintes ou du casque sans que cela affecte le niveau
d’enregistrement.
9
REC pour démarrer l’enregistrement.
©■/±
Appuyer sur l’une des touches de fonction et
préparer la source à enregistrer.
Pour enregistrer un disque, appuyer sur CD et charger
le disque.
Pour enregistrer une émission de radio, appuyer sur
TUNER/BAND et accorder la station.
3 Appuyer sur 9 REC pour démarrer
l’enregistrement.
► PLAY s’enfonce au même moment.
Quand on sélectionne la fonction CD, la lecture et
l’enregistrement démarrent simultanément.
Pour arrêter l’enregistrement, appuyer sur U/± STOP/
EJECT de la platine 1.
Pour faire une pause d’enregistrement, appuyer sur II
PAUSE de la platine 1. Pour reprendre l’enregistrement,
appuyer de nouveau.
REMARQUE
Si des interférences ou un bruit de battement se font
entendre pendant l’enregistrement d’une émission AM,
appuyer sur TUNER MODE/OSC de façon à éliminer le bruit.
A chaque pression sur la touche, le point lumineux de
l’affichage s’allume ou s’éteint.
On pourra également utiliser MODE de la télécommande.
44 FRANÇAIS
/_/A<]
vol/ // /
Point lumineux
b bl i!'^
Page 45

HORLOGE ET MINUTERIE
COPIE DE CASSEHE
6
3
• Noter que l’enregistrement ne s’effectue que sur une face
de la cassette.
• Utiliser uniquement des cassettes de Type I (normales).
7 Appuyer sur TAPE.
2 Insérer la cassette d’enregistrement dans la
platine 1 avec la face d’enregistrement orientée
vers l’extérieur.
3 Insérer la cassette de lecture dans la platine 2
avec la face de lecture orientée vers l’extérieur.
4 Appuyer sur II PAUSE puis sur # REC de la
platine 1 pour passer au mode de pause
d’enregistrement.
► PLAY s’enfonce au même moment.
5 Appuyer sur DUB SPEED pour sélectionner la
vitesse de doublage.
HI-DUB s’allume : la copie s'effectue à grande vitesse.
HI-DUB ne s’affiche pas : Le doublage s’effectue à
vitesse normale.
6 Appuyer sur ^ PLAY de la platine 2.
Il PAUSE de la platine 1 se libère et l’enregistrement
démarre.
Pour arrêter l’enregistrement, appuyer sur U/± STOP/
EJECT de la platine 1.
REGLAGE DE LHORLOGE
1,3,
2,4
Lorsque le cordon secteur est raccordé pour la première fois,
l’heure clignote sur l’affichage.
Régler l’heure en procédant comme suit lorsque
l’appareil est hors tension.
7 Appuyer sur II SET.
L’heure clignote.
"/A y/
/'
/
// /
(Format de 12 heures) '
2 Appuyer sur ◄ ◄ DOWN ou ► ► UP pour
spécifier les heures.
3 Appuyer sur II SET pour valider les heures.
Les heures cessent de clignoter, et les minutes se
mettent à clignoter.
4 Appuyer sur ◄ ◄ DOWN ou ►► UP pour
spécifier les minutes.
5 Appuyer sur II SET pour valider les minutes et
mettre fin au réglage.
Les minutes cessent de clignoter sur l’affichage et
l’horloge commence à fonctionner à partir de 00
seconde.
Pour corriger l’heure
Appuyer sur POWER pour mettre l’appareil hors tension,
puis appuyer deux fois sur II SET. Puis, effectuer les
opérations 2 à 5 ci-dessus.
I -U II I
■ I L.U U
^ I i '
Pour commuter alternativement entre les formats 12/24
heures
Lorsque l’appareil est hors tension, appuyer deux fois sur II
SE;T jusqu’à ce que l’heure clignote, et appuyer sur ■.
Quand l’affichage change, effectuer les opérations 2 à 5 cidessus pour rerégler l’heure.
Si l’affichage de l’horloge clignote quand l’appareil est
hors tension
Ceci est dû à une interruption du courant. Il faudra rerégler
l’horloge.
Si le courant est interrompu pendant plus de 12 heures
environ, il faudra recommencer tous les réglages mémorisés
après l’achat.
REMARQUE
Pendant le fonctionnement, on pourra également utiliser
respectivement II et ■ de la télécommande à la place de
Il SET et ■ PRESET de l’appareil principal.
FRANÇAIS 45
Page 46

RÉGLAGE DE LA MINUTERIE
Pour vérifier l’heure spécifiée
Appuyer sur TIMER. L’heure de mise sous tension et la
durée de fonctionnement par la minuterie clignotent pendant
4 secondes.
Pour annuler temporairement le mode d’attente de
minuterie
Appuyer deux fois sur TIMER pour éteindre ©.
Utilisation de l’appareil lorsque la minuterie est réglée
Il est possible d’utiliser normalement l’appareil quand la
minuterie est réglée.
Avant de mettre l’appareil hors tension, recommencer
l’opération 4 pour préparer la source, et régler le volume.
Avec la minuterie intégrée, il est possible de mettre l’appareil
sous tension chaque jour à l’heure spécifiée.
Régler la minuterie comme suit lossque l'appareil est sons
tension.
Préparation
S’assurer que l’horloge est réglée correctement.
Appuyer sur TIMER pour afficher
0
, puis
appuyer sur II SET dans les 4 secondes.
© et les heures clignotent.
-^0-
/■"//'y* ' -'’P
vol! / / / ./ /_ .D U
I I
REMARQUE
Si l’on n’appuie pas sur II SET dans les 4 secondes,
une autre opération risque de se déclencher.
Spécifier l’heure de mise sous tension par la
minuterie en appuyant sur ou et sur II
SET. Recommencer ces opérations pour
spécifier les minutes de mise sous tension par
la minuterie.
Sélectionner la durée de fonctionnement par la
minuterie avec ◄◄ ou et appuyer sur II
SET.
.
..................................................
. /_
VOL l_l /
.
REMARQUE
La lecture par minuterie ne démarrera pas si l’appareil est
sous tension.
Il n’est pas possible de mettre l’appareil raccordé sous et
hors tension avec la minuterie incorporée dans l’appareil.
Utiliser une minuterie externe.
La durée de la mise sous tension par la minuterie se
règle entre 5 et 240 minutes, par paliers de 5 minutes.
Préparer la source.
Pour écouter un disque, appuyer sur CD et charger le
disque.
Pour écouter la radio, appuyer sur TUNER/BAND et
accorder la station.
Appuyer sur POWER pour mettre l’appareil
sous tension après avoir réglé le volume.
“©” reste affiché quand l’appareil est hors tension (mode
d’attente de minuterie).
©
O A>/
/ // !
Quand l’heure de mise sous tension par la minuterie est
arrivée, l’appareil se met sous tension et la lecture
commence sur la source sélectionnée.
Le niveau du volume se règle automatiquement sur 21
quand l’appareil est mis hors tension alors que le volume
est réglé sur 22 ou plus.
C. _/ П
/_/. _f U
46 FRANÇAIS
Page 47

REGLAGE DE LA MINUTERIE D’ARRÊT
La minuterie d’arrêt permet de mettre l’appareil hors tension
automatiquement au bout d’une durée spécifiée.
7 Appuyer sur SLEEP.
VOL
c n
U U
IVIlIXAGE DE MICROPHONE
Raccorder un microphone avec minifiche à la
prise MIC.
Préparer ia source à mélanger et la lire.
2
Régier le volume du microphone avec MIC VOL
3
et la source de mixage avec VOLUME.
Pour enregistrer le son de mixage du microphone
Insérer la cassette à enregistrer dans la platine 1 et appuyer
sur # REC.
2 Dans les 4 secondes, appuyer sur ou
pour spécifier la durée jusqu’à la mise hors
tension.
Chaque fois qu’on appuie sur ia touche, ia durée change
de 5 à 240 minutes par paiiers de 5 minutes.
SLEEP
VOL
Pour vérifier ia durée jusqu’à ce que l’appareil se mette
hors tension
Appuyer une fois sur SLEEP. Le temps restant s’affiche
pendant 4 secondes.
Pour annuler la minuterie de sommeil
Appuyer deux fois sur SLEEP pour éteindre SLEEP sur
l’affichage.
REMARQUE
Si l’on appuie sur SLEEP alors que l’appareil est hors
tension, l’appareil se met sous tension et la minuterie de
sommeil fonctionne directement, de sorte que l’appareil se
met hors tension 60 minutes plus tard.
Pour spécifier la durée jusqu’à la mise hors tension,
appuyer une nouvelle fois sur SLEEP, puis appuyer sur
◄◄ ou ►► dans les 4 secondes.
Si l’appareil est mis hors tension pendant la lecture d’une
cassette, ► PLAY des deux platines ne se libèrent pas.
Appuyer sur Ш/± STOP/EJECT pour libérer ► PLAY.
~i n
I U
Durée spécifiée
F’endant la copie à grande vitesse, le son du mixage de
microphone ne s’enregistre pas.
Si le microphone est placé trop près des enceintes, un
hurlement (réaction acoustique) risque de se faire
entendre. Dans ce cas, éloigner le microphone des
enceintes ou réduire le volume.
Pour éviter ce hurlement, il est recommandé d’utiliser un
microphone de type unidirectionnel.
FRANÇAIS 47
Page 48

GENERALITES
SOIN ET ENTRETIEN
Pour pouvoir profiter au maximum des performances de
l’appareil, Il faudra de temps en temps nettoyer et entretenir
l’appareil et les supports audio.
Pour nettoyer le coffret
Utiliser un chiffon doux et sec.
Si les surfaces sont très sales, utiliser un chiffon doux
légèrement humecté de solution détergente douce. Ne pas
utiliser de solvants puissants, par exemple alcool, benzine
ou diluant, car ces produits pourraient endommager le fini de
l’appareil.
Pour nettoyer les têtes
Si les têtes du ruban magnétique sont très sales :
- les hautes fréquences ne sont pas reproduites
- le son n’est pas suffisamment haut
- le son est déséquilibré
- le ruban magnétique ne s’efface pas
- le ruban magnétique ne s’enregistre pas.
Toutes les 10 heures d’utilisation, nettoyer les têtes avec
une cassette de nettoyage de têtes.
Utiliser une cassette de type humide ou sec vendue
séparément.
Pour les détails, voir les instructions de la cassette de
nettoyage.
Soin des disques
• Quand un disque est sale, l’essuyer du centre vers la
périphérie avec un chiffon de nettoyage.
• Quand on a fini de lire un disque, le remettre dans son
étui. Ne pas laisser les disques dans des endroits chauds
ou humides.
Soin des cassettes
• Remettre les cassettes dans leur boîtier après l’utilisation.
• Ne pas laisser les cassettes à proximité d’un aimant, d’un
moteur, d’un téléviseur ni d’aucune autre source
magnétique. Cela détériorera la qualité du son et
engendrera des parasites.
• Ne pas exposer les cassettes en plein soleil, et ne pas les
laisser à l’intérieur d’un véhicule garé en plein soleil.
SPECIFICATIONS
Section tuner FM
Piage d’accord
Antenne
Section tuner AM
Piage d’accord
Antenne
Section magnétocassette
Format de piste 4 pistes, 2 canaux stéréo
Réponse en fréquence
Système d’enregistrement
Tête Platine 1: 1 tête d’enregistrement/
Section lecteur de disques compacts
Laser
Convertisseur N/A
Généralités
Puissance de sortie 5 W + 5 W (4 ohms, EIAJ)
Sortie PHQNES (minifiche stéréo)
Alimentation électrique
Consommation électrique
Dimensions de l’appareil principal (L x H x P)
Poids de l’appareil principal
Haut-parleurs
Type Type à cône de 120 mm
Dimensions (L x H x P)
Poids 1,75 kg X 2
Impédance 4 ohms
Entrée max. admissible
87,5 MHz à 108 MHz
Antenne à tige
530 kHz à 1710 kHz (pas de 10 kHz)
531 kHz à 1602 kHz (pas de 9 kHz)
Antenne à barre de ferrite
Cassette normale : 50 Hz - 12500 Hz
Polarisation CA
lecture
1 tête d’effacement
Platine 2: 1 tête de lecture
Laser à semi-conducteurs (X = 780
nm)
1 bit, double
Réglementation PTC
4 watts par canal, min. RMS à 4
ohms de 65 Hz à 15000 Hz, avec
une distorsion ne dépassant pas 1%
CC 12 V avec huit piles de taille D
(R20)
120 V CA, 60 Hz
30 W
266 X 303 X 278,5 mm
4,1 kg
Type céramique de 27 mm
198 X 303 X 232 mm
10 W
48 FRANÇAIS
Les spécifications et l’aspect extérieur sont sujets à
modification sans préavis pour des raisons d’amélioration du
produit.
DROITS D’AUTEUR
Vérifier les lois sur les droits d’auteur relatives à
l’enregistrement de disques, d’émissions de radio ou de
cassettes du pays dans lequel l’appareil est utilisé.
Page 49

GUIDE DE DEPANNAGE NOMENCLATURE
Si l’appareil ne fonctionne pas comme décrit dans ce mode
d’emploi, vérifier le guide suivant.
GÉNÉRALITÉS
Il n’y a pas de son.
• Le cordon secteur est-il branché correctement ?
• A-t-on appuyé sur une mauvaise touche ?
L’appareil n’est pas sous tension.
• Le cordon secteur est-il raccordé à l’appareil alors que les
vieilles piles sont insérées?
Retirer tous les piles et débrancher le cordon secteur.
Puis, rebrancher le cordon secteur et réinitialiser l'appareil
comme indiqué ci-dessous.
Un affichage ou un fonctionnement erroné se produit.
-> Réinitialiser l’appareil comme indiqué ci-dessous.
SECTION TUNER
La réception renferme des parasites ou le son présente
de la distorsion.
• L’appareil capte-t-il des bruits extérieurs ou des ondes
réfléchies ?
Changer l’orientation de l’antenne.
Eloigner l’appareil des autres appareils électriques.
SECTION MAGNÉTOCASSETTE
Le ruban magnétique ne défile pas.
• Le magnétocassette est-il en mode de pause ? (-> page
42)
Le son est déséquilibré ou trop faible.
• La tête de lecture est-elle sale ? (-» page 48)
L’enregistrement est impossible.
• Un ergot de sécurité de la cassette est-il absent ? (->
page 42)
• La tête d’enregistrement est-elle sale ? (->• page 48)
L’effacement est impossible.
• La tête d’effacement est-elle sale ? (->■ page 48)
• Utilise-t-on une cassette au métal ou Cr02 ?
Il n’y a pas de sons aigus.
• La tête d’enregistrement/lecture est-elle sale ? (-> page
48)
SECTION LECTEUR DE DISQUES COMPACTS
Le lecteur de disques compacts ne fonctionne pas.
• Le disque est-il correctement mis en place ? (-» page 40)
• Le disque est-il sale ? (->■ page 48)
• Y a-t-il de la condensation sur la lentille ?
Attendre environ une heure puis essayer de nouveau.
Pour les instructions d’utilisation, se reporter aux numéros
de page indiqués.
' DISPLAY
■EQ
•MODE
■0-9, +10
■ REPEAT
. FUNCTION
□ Touches FUNCTION (CD
TAPE ®)
Touche ■ PRESET ® ® ® ©
Touche ► CLEAR ® ©
Touche II SET © © © ©
Touches ◄◄ DOWN, ►► UP
Touche TUNER MODE/OSC, DUB SPEED
Touche SLEEP ®
Touche TIMER ©
Touche ± OPEN/CLOSE ©
Touche VOLUME ©
Touche QSURROUND ©
Touche T-BASS ©
GRAPHIC EQUALIZER (ROCK, POP, JAZZ)
Prise PHONES ®
B
Prise MIC ©
Commande MIC VOL ©
□ Touches de fonctionnement de cassette (•,
m/±.,
Il)©®®
B Touche DISPLAY ©
Touche EQ ©
Touche MODE © © ®
Touches 0-9, +10 © © ©
Touche REPEAT ©
Touche BAND ©
Touche FUNCTION ©
AUX ©, TUNER/BAND (
Pour réinitialiser
Si une anomalie apparaît sur la fenêtre d’affichage ou dans
le magnétocassette, réinitialiser l’appareil de la façon
suivante.
1 Appuyer sur POWER pour mettre l’appareil hors tension.
2 Appuyer sur POWER tout en tenant ■ enfoncé. Toutes
les données mémorisées après l’achat seront effacées.
On pourra également utiliser les touches de la
télécommande ayant le même nom que celles de l’appareil
principal.
FRANÇAIS 49
Page 50

Page 51

Page 52

Printed in China
AIWA CO.,LTD.
 Loading...