

DB-238 USB 2.0 DVB-T Receiver
Quick Start Guide
1. Installation
Place the CD-Rom into the CD drive. The CD should auto-run. If the CD-Rom does not auto-run
then go to START- RUN and type [CD-Rom Drive Path]\setup.exe. After installation follow the on
screen instructions and restart the computer. Then you are ready to use the DVB-T Digital TV
Receiver after following the below instructions.
2. System Settings
Channel List
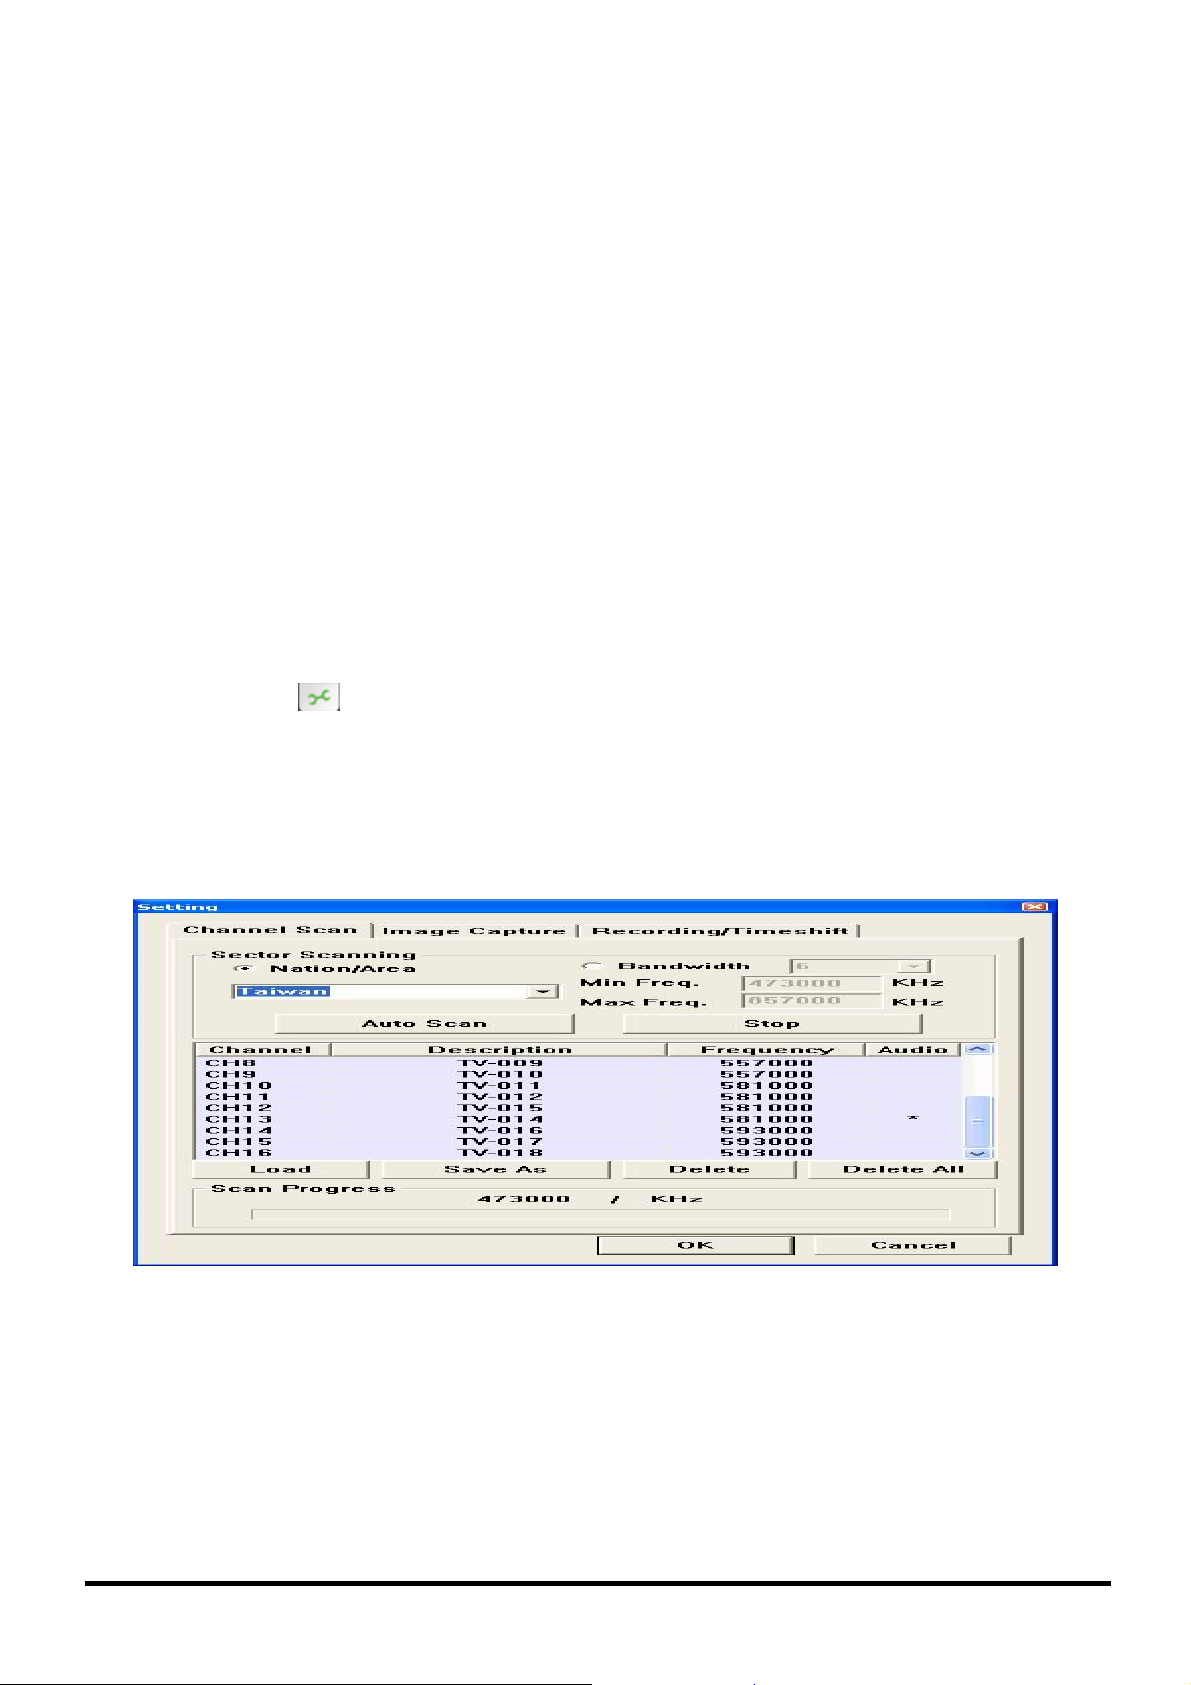
Press the button on the control panel to enter the setting menu.
y "Load" to use the channel table stored before, or select some specific channels;
y "Delete" to delete specific channels;
y "Delete All" to delete all channels stored;
y "OK" to store all changes;
y "Cancel" to give up all changes and leave.
Page 1
Channel Scan
y "Nation/Area": select the desired area;
y "Auto Scan": to start scanning;
y "OK": to exit;
y "Save As": to save a new channel list;
y "Bandwidth" - "6,7,8": select this if the desired area is not in the list.
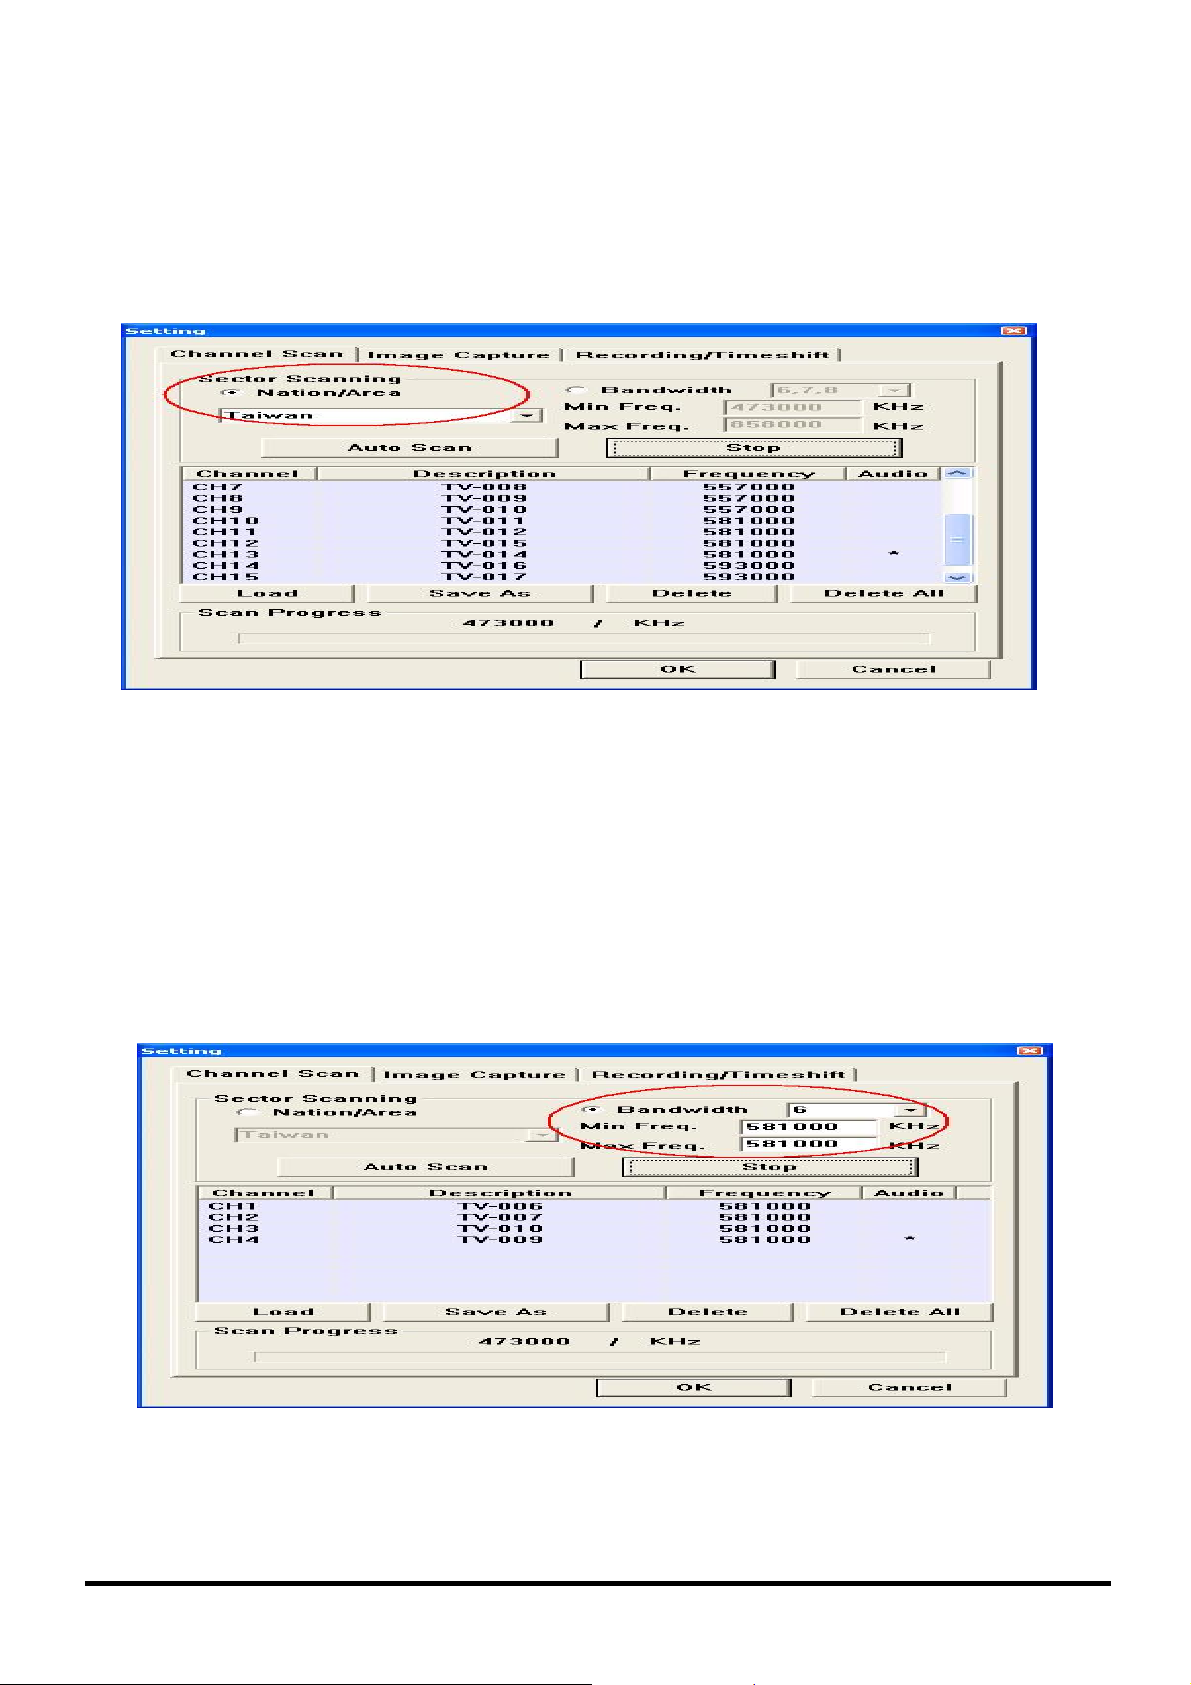
Single Channel Scan
y "Bandwidth" - select a bandwidth ("6", "7","8", "7,8" or "6,7,8");
y "Min Freq.": starting scan frequency;
y "Max Freq.": ending scan frequency;
y "Auto Scan": to start scanning;
y "OK": to save all the actions and exit;
y "Cancel": to abort and exit;
y "Save As": to save a new channel list.
Page 2

Frequency Range Scan
y "Bandwidth" - select a channel bandwidth ("6", "7","8", "7,8" or "6,7,8");
y "Min Freq.": starting scan frequency;
y "Max Freq.": ending scan frequency;
y "Auto Scan": start scanning.
y "OK": save all the actions and exit;
y "Cancel": abort and exit;
y "Save As": save a new channel list.
Page 3

3. Image Capture
y Total Frames: use left mouse button to set the number of frames to capture;
y Interval: use left mouse button to set the interval in seconds) of each capture;
y Default: restore the default value stored on the system;
y Frame Capture Path: location where to store the captured frames in this field.
y OK: save the settings and exit;
y Cancel: abort and exit.
4. Recording/Timeshift Settings
y Path: location where to store the recorded program(s).
Page 4

DVD Burning (optional feature): record program onto DVD disc directly.
Overwrite or Append: DVD disc burning option.
DVD Menu: configure the DVD menu style.
Timeshift Duration: maximum Timeshift period up to 60 minutes, depending on disc storage.
Page 5

5. Scheduled Recording Settings
Click the icon on the control panel to open the dialog box of "Scheduled Recording".
y Job Title: scheduled recording title.
y Action After Recording: action to take after scheduled recording is finished.
y Channel: channel to record, with Mute and Minimize options.
y Starting Date: starting date of the scheduled recording.
y Duration: duration of the scheduled recording.
y Once: record just this once;
y Weekly: record every week.
y Working Day: record every Monday through Friday.
y Daily: record every day.
Page 6

y New: add a new scheduled recording.
y Delete: delete a scheduled recording.
y Modify: modify a scheduled recording.
y Save: save a new or modified scheduled recording.
y Del Obsolete Data: delete the outdated scheduled recording data.
y OK: save all the actions and exit;
y Cancel: abort and exit.
Auto Power On for scheduled recording:
1. Uncheck "Prompt for password when computer resumes from standby" in Power Options Properties.
2. Check the box next to "Enable Hibernation" under the "Hibernate" tab in Power Options Properties.
3. Now TVGo Monitor is running.
Page 7

6. Control Panel Icon Functions
Icon Descriptions Icon Descriptions
TV Off
Full screen/Normal screen
Minimize TVGo Player
Display TVGo Player
information
Fast forward video
playback
Fast backward video
playback
Stop video playback
Pause/resume video
playback
Back to previous TV
channel
Live TV recording
~
Volume level status and
adjustment
Activate EPG (Electronic
Program Guide)
Sound On/Off
TVGo Player system setting
TV channel preview
Activate Timeshift
Frame capture
Set scheduled video recording
Bilingual Toggle
Select TV channels
Select video files for
playback
Toggle to previous TV
channel
Online Help
Toggle to next TV channel
Volume Up
Volume Down
Page 8
Open TeleText window of TV
program
Back to previous TV channel/
Deactivate Timeshift
TV channel signal strength
status
Mute Status
Stereo Status

7. Multi-function IR Remote Controller
ICON Descriptions
TV On/Off
Toggle through TV channels
Adjust volume levels
Sound Off
Back to previous TV channel
Rewind recorded program or TimeShift
Activate Timeshift
8. Mouse Menu
Functions Descriptions
Channel Up
Channel Down
Channel Return
Play
Stop
Pause
Forward
Backward
Recording
TimeShift
TeleText
Mute
Zoom
…
Channel Selections
Stop Record / Timeshift
Recording the currently program
Set TV channel up
Set TV channel down
Back to previous TV channel
Play a previously recorded program file
Stop playing a recorded program file or deactivate Timeshift function
Pause and stop playing a recorded program file
Fast forward a recorded program in playback
Fast backward a recorded program in playback
Recording the currently viewed TV program
Temporarily recording the currently viewed TV program
Open TeleText information window
Sound On/Off
Full screen / normal screen switch
About
Exit
Display TVGo player information
Close TVGo player
Page 9

9. Keyboard Shortcuts
Functions Shortcuts
TV Off
Open TeleText Window
Play
Stop
Forward
Backward
Pause
Recording
Stop Recording
Screen Capture
Timeshift
Full Screen
Normal Screen
Adjust Volume (Up)
Adjust Volume (Down)
Mute
ALT + P
ALT + E
ALT + S
ALT + S
ALT + F
ALT + B
ALT + S
ALT + R
ALT + S
ALT + C
ALT + T
ALT + X
ALT + X
ALT + V
ALT + L
ALT + M
Channel Up
Channel Down
Channel Selection
Back to Previous Channel
ALT + U
ALT + D
XX (X:1234567890)
ALT + J
Online Help F1
Page 10
 Loading...