

Page 1
SYSTEM SETUP
The MaxView will work at any of the following display settings:
• 640x480 at 60-85 Hz refresh rate
MaxView
Quick Install Guide
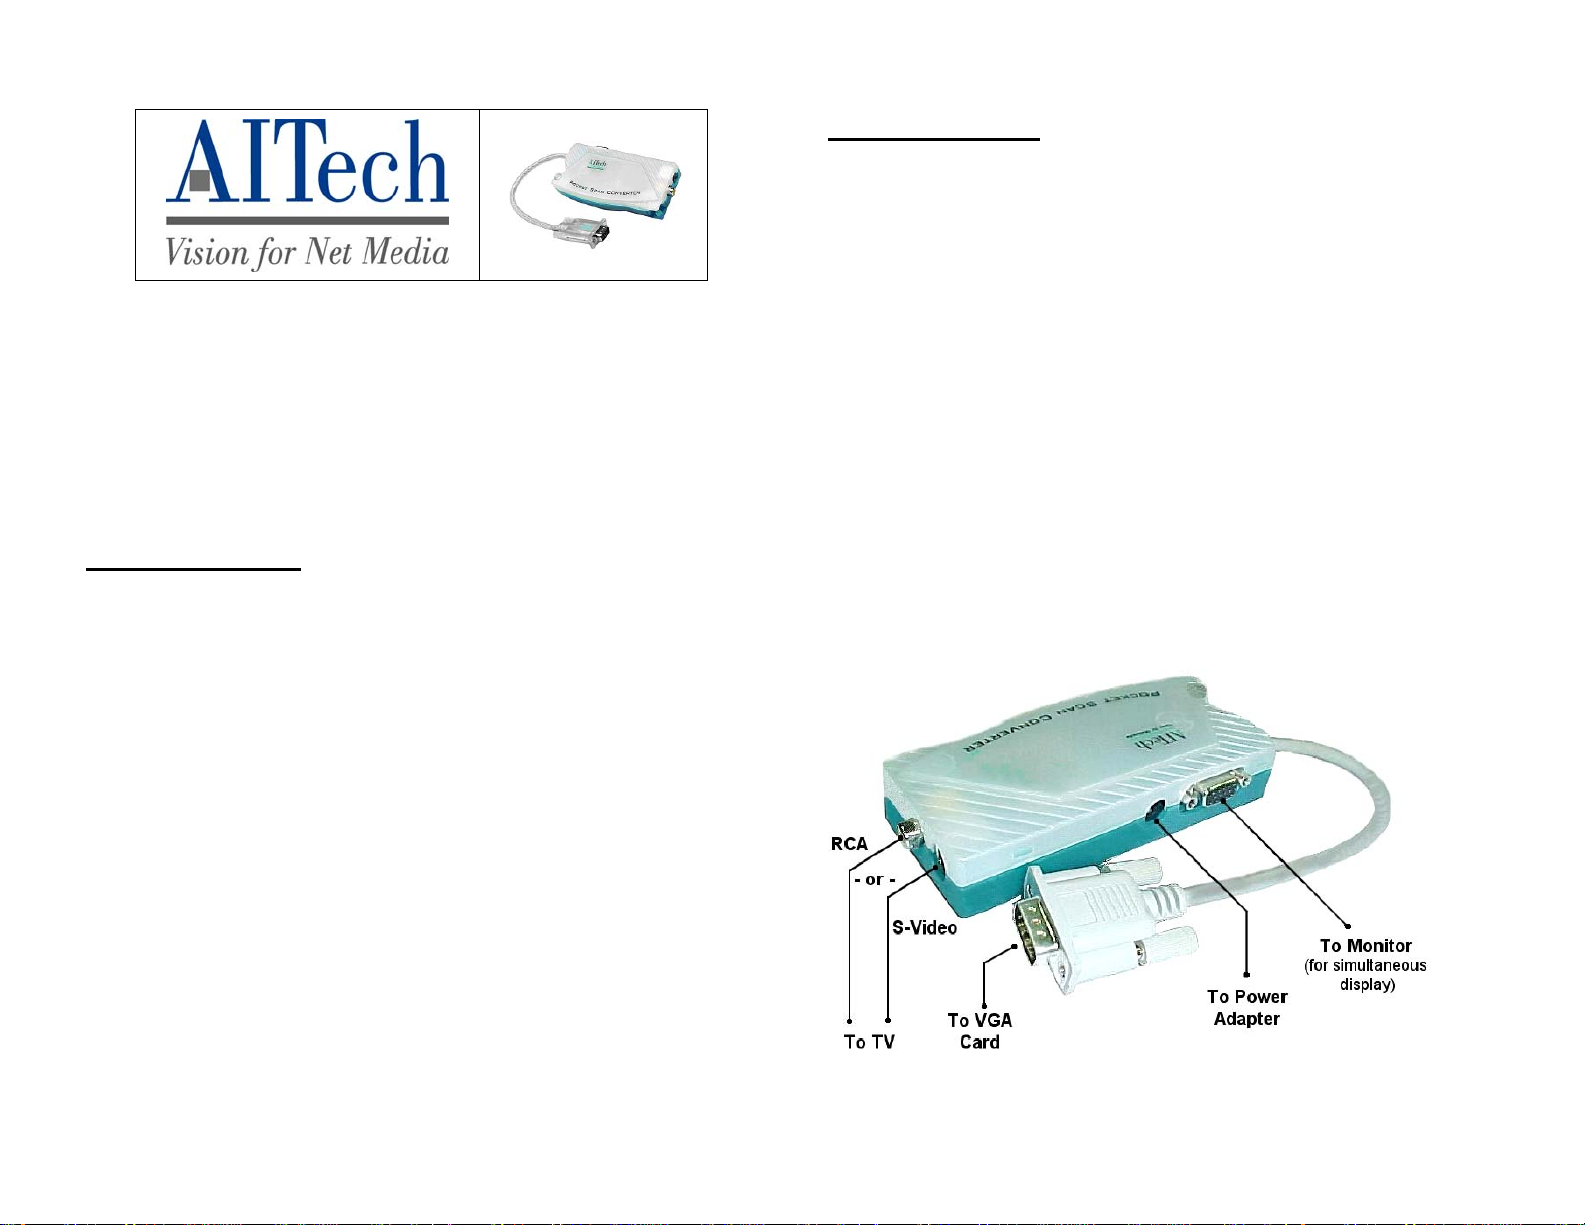
INSTALLATION
Step 1 - Turn off your computer. Disconnect your monitor’s VGA cable from the
VGA card on the back of your computer.
Step 2 – Connect the MaxView’s VGA cable to VGA card on the back of your
computer.
Step 3 – (Optional) Connect your computer monitor to the VGA-Out connector on
the MaxView. If you are connecting to a laptop, you may not have a monitor to
connect in this step. Note that a computer monitor is not required to use the
MaxView.
Step 4 - Connect the MaxView to your TV, VCR, or projector using either the
composite video (RCA) or the S-Video* cable.
Step 5 - Plug the 5V AC power adapter into an AC outlet and connect the power
cord to the MaxView.
Step 6 - Turn on your computer and your TV set. If you do not see an image on
the TV (or projector), continue with the System Setup section below.
• 800x600 at 60-75Hz refresh rate
• 1024x768 at 60-70 Hz refresh rate
In Windows, these settings are made in Display Properties. To get to Display
Properties, right-click a blank area of your desktop, click Properties at the bottom
of the menu, and then click the Settings tab.
*Note: The S-Video connection is a newer video standar d. Thi s type o f
connection improves color, clarity, and resolution. We recommend using the SVideo connection whenever available.
Not all TV's have S-Video or RCA connectors. If your TV does not, you will need
to connect to another device (usually a VCR or a RF modulator) that will provide
the proper signal output to your TV. The scan converter does not provide a proper
signal for the antenna input of a TV (F-connector). See connector information on
next page.
Page 2
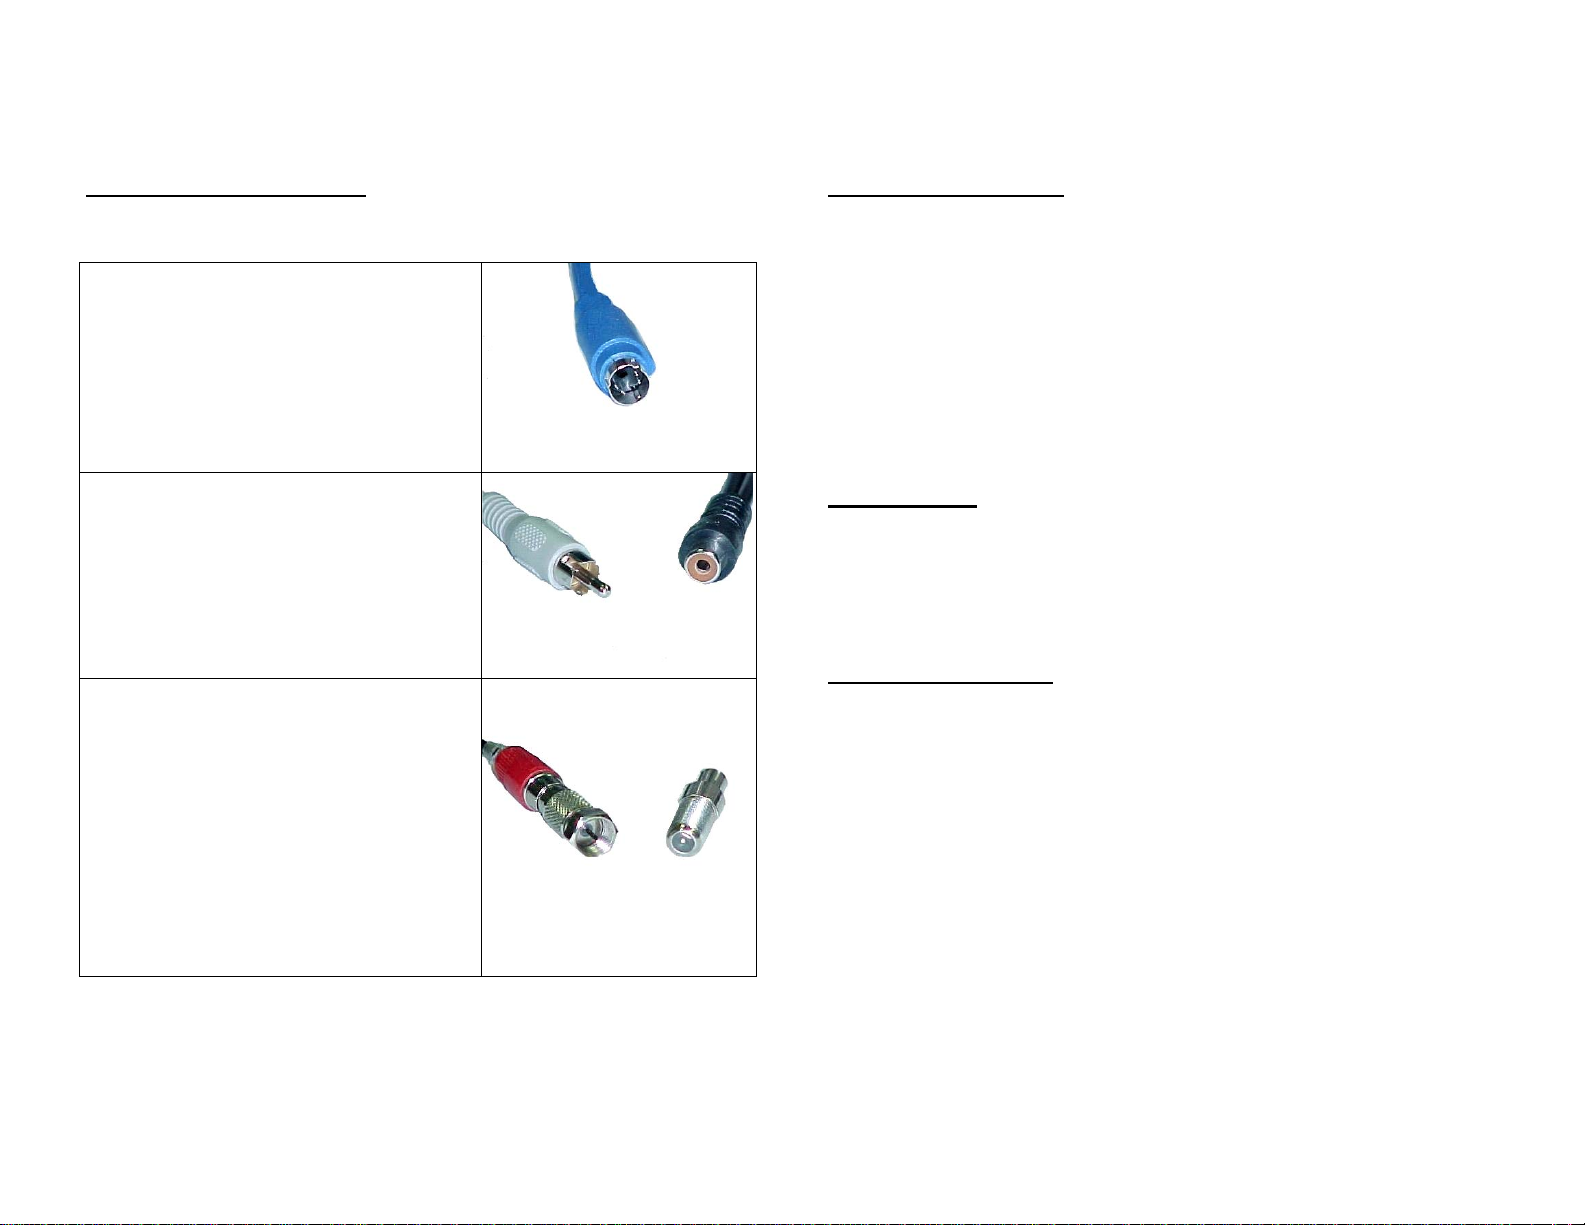
CONNECTOR TYPES
S-Video or S-VHS (Best)
This is a 4-pin DIN connector. The S-Video
signal will give you the best TV image. It is not
found on all TV's or VCR's. Use this cable if
you have the connection available on your video
device. The S-Video connection provides the
highest quality signal.
RCA / Composite (Good)
This connector carries the composite video
signal. If your TV does not have direct video
inputs, you will have to connect the scan
converter to your VCR or RF modulator. The
RCA/Composite connection provides a good
quality signal.
F Connector (Poor)
This is a threaded connector used to connect an
antenna or cable box to the TV or VCR. The F
connector is for RF (radio frequency) signals
only. If your TV only has this type of
connection, you will need to convert the
RCA/Composite signal to RF before you can
view it on your TV. A VCR or a RF-Modulator
(available at Radio Shack) can be used to
convert the signal. The RF connection provides
the lowest quality signal.
IMAGE QUALITY
Several factors affect the quality of the TV image.
The TV standard (NTSC, PAL, or SECAM) cannot match the higher image quality
achieved by PC monitors. Small text and numbers do not display very well on a
TV. Graphic images usually display much better. Therefore, the type of image
being displayed is a determining factor of how well it will be displayed.
Be sure to view the actual application you wish to display on the TV before making
any adjustments. Other screens may not appear the same on the TV.
TELEVISION
• Some TV’s will have better quality than others (not always determined by cost)
• Use the S-Video (S-VHS) connection, whenever possible.
• Adjust for color, sharpness, contrast, and brightness for best image.
ADJUSTING FONTS
If your display has smaller text and numbers, the following suggestions may help:
In Windows, you can specify the font you use for the different areas of the
Windows Desktop. To get to your Display Properties just right-click a blank area
of your desktop - click Properties at the bottom of the menu - and click the
Appearance tab at the top of the dialog box as shown on the next page.
Page 3
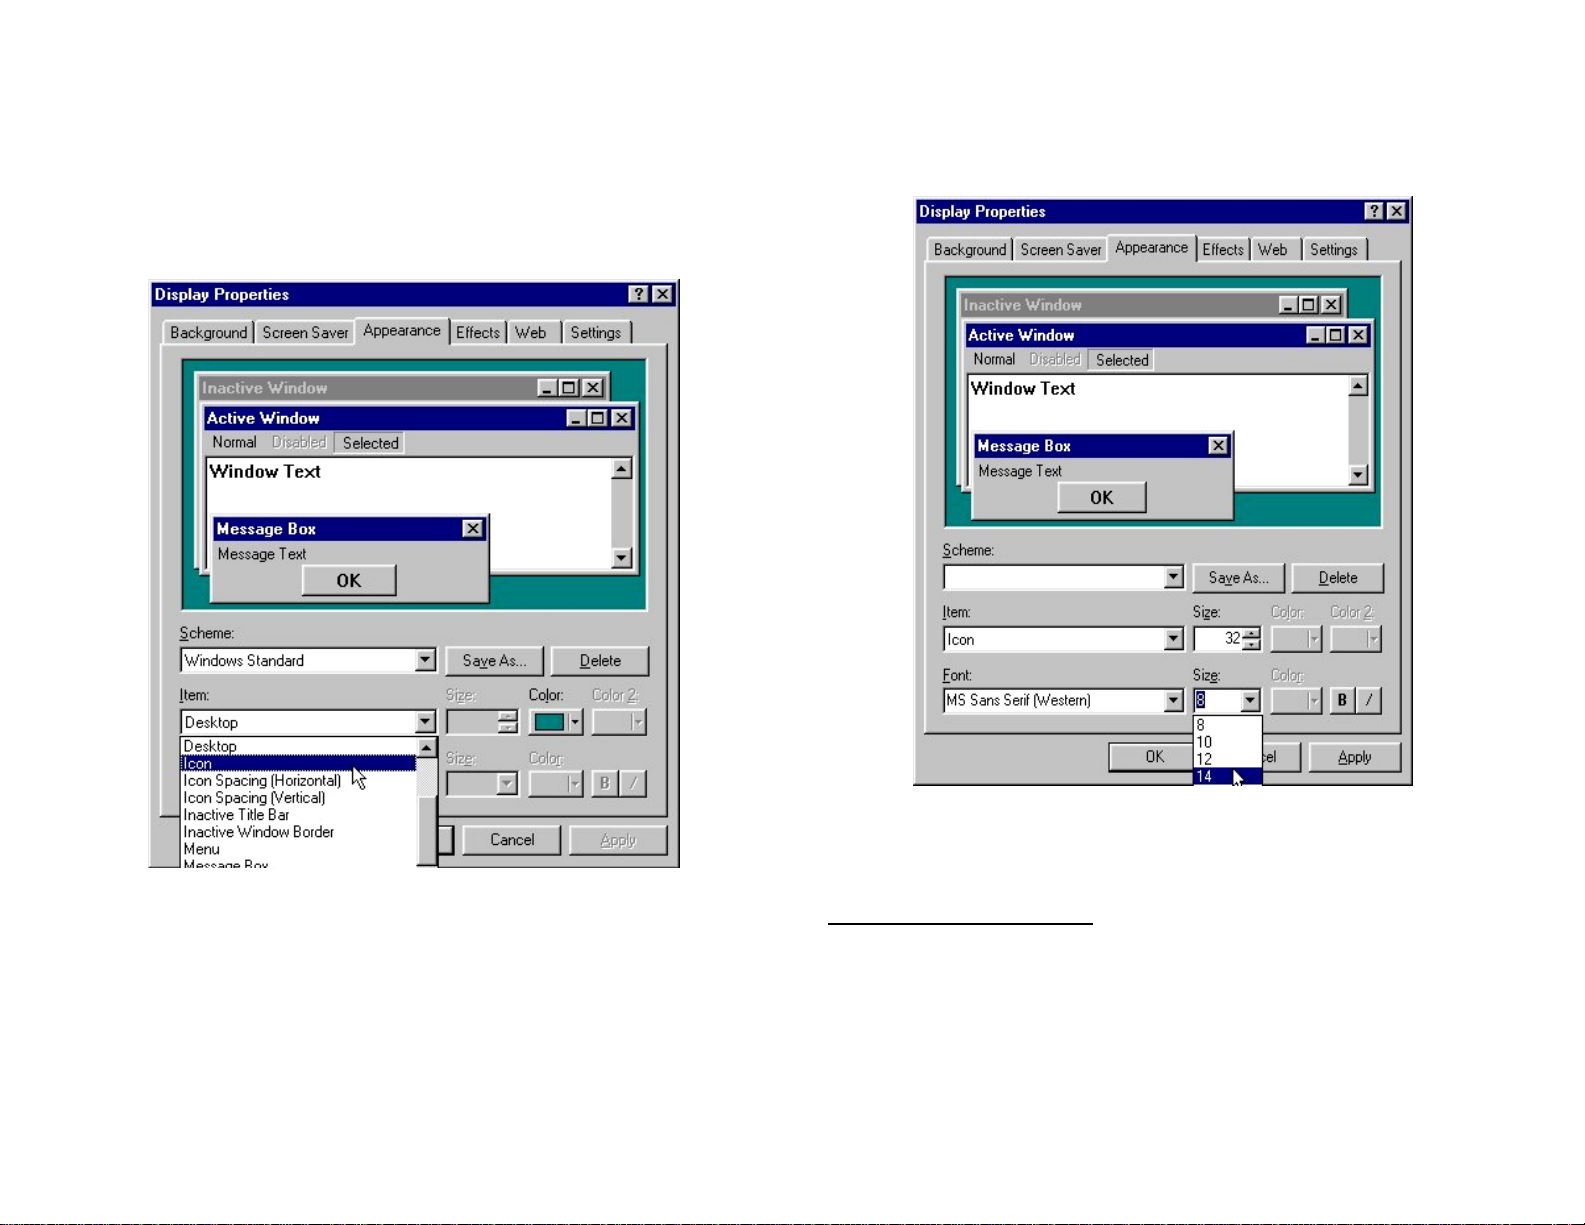
The graphic below shows how to set the font for the different areas of Windows.
The example shows how to change the size of the Desktop Icon font:
Select Icon from the Item pull-down list.
The graphic on the next page shows you how to change the size of the font. Select
the size you think will work and click the Apply button. If this setting is not
suitable for your needs, choose one higher or lower that you like better. No te that
the default font size is 8-point text. Standard printed text is 12-point. The list goes
up to 18-point text but this setting may be too large.
Note: The Scheme selection from the Appearance screen also allows you to adjust
font sizes in other areas of Windows.
INTERNET EXPLORER
You can select a larger font for displaying the Internet pages you are showing on
the TV. Click View - Fonts - and select a larger font for better viewing. Note that
Medium is the default font size for the normal screen view.
Page 4

HELP!! I CAN'T SEE
ANYTHING ON MY TV!
Connections:
• Check the power connection to the scan converter.
• Check the connections from the scan converter to the PC.
• Check the connections from the scan converter to the TV.
TV (or VCR):
• RCA connections to a TV or VCR must be to the Video Input (yellow)
connector.
• If you are connected directly to a TV with a S-Video or RCA cable, ensure
that the TV has been configured to accept auxiliary video input.
• If you are connected to the TV through a VCR, ensure that the TV and VCR
have been configured to accept auxiliary video input.
An input button on the TV or VCR’s original remote control often sets the video
input mode. This mode is needed for both S-Video and RCA video connections.
The button may be marked Video, Video-1, Aux, Input, Vid, Line, Line-In,
TV/VCR, etc. On some TV’s and VCR’s this setting is made by selecting Channel
2, then pressing the Down Channel button. If this does not work, refer to your TV
(or VCR) owner’s manual.
Settings: Check that the computer’s Display Settings are set correctly.
o 640x480 at 60-85Hz
o 800x600 at 60-75Hz
o 1024x768 at 60-70Hz
Laptops: Laptops must be set to External-only or Simultaneous VGA display
mode. This is usually done with a hot-key combination (Fn + function key). Refer
to your laptop manual for further details.
Still Having Problems:
• Check our Web site www.aitech.com for more information.
AITech International Corporation
Website: http://www.aitech.com
© 2007 AITech International Corporation
Page 5

User’s Guide
For IBM Compatibles - All Windows Versions
Page 6

© 2007 AITech International Corporation. All rights reserved.
Information in this document is subject to change without notice. No part of this document may be
reproduced or transmitted in any form or by any means, electronic or mechanical, including photocopying
and recording, for any purpose without the prior written permission of AITech International Corporation.
MaxView is a trademark of AITech International Corporation.
Pentium is a trademark of Intel Corporation.
IBM is a registered trademark of International Business Machines Corporation.
MS-DOS and Microsoft are registered trademarks and Windows is trademark of Microsoft Corporation.
AITech International Corporation World Headquarters
1288 Kifer Rd, Suite 203
Sunnyvale, CA 94086
USA
E-mail: technicalsupport@aitech.com
Website: www.aitech.com
2
Page 7

Introduction
Welcome to the world of the MaxView. This multimedia product is a convenient tool for business
conferences, classroom presentations, multimedia demonstrations and home entertainment. It is capable of
displaying your computer images onto the television, or any video product such as a VCR or camcorder .
Product Features
MaxView offers the following features:
• External VGA-to-TV digital scan converter
• Superior image quality with resolutions up to 1024x768. Wider horizontal and vertical (up to 85Hz) frequencies
• Simultaneous display on personal computer monitor (or laptop LCD) and TV screen
• Plug & Play. No settings to make in your system
• Patented Flic-Free
• 3 channel 10-bit output D/A converter
• Simultaneous RCA composite and S-Video outputs
• Default underscan
• FCC Class B certified and CE Conformance verified
Input
• 15-pin VGA analog RGB signal
• Multiple input frequencies
o 640x480 @ 60-85 Hz
o 800x600 @ 60-75 Hz
o 1024x768 @ 60-70 Hz
TM
filter technology for sharper flicker-free images on your TV screen
Output
• S-Video & RCA (cables included)
• VGA bypass
• SCART (optional cable for the PAL MaxView)
Power Requirement
• 5 volts DC, 800 mA, center negative polarity (AC adapter included)
Minimum System Requirements
• IBM AT or better PC, other PC compatible computer, or Mac computer (with compatible refresh rate)
• MS-DOS or any version of Windows
• VGA-Out port at 640x480 resolution and 16 colors
• Video input device such as video monitor, TV, or VCR
Package Contents
The following items are included in the MaxView package:
• MaxView Scan Converter
• MaxView Quick Start Guide
• Composite (RCA) Video cable
• S-Video cable
• 5V AC power adapter (center negative polarity)
• Audio Cable
3
Page 8

Installing the MaxView
The MaxView is totally plug-and play. Installation is simple and straightforward. There is no need to
install any device driver. Just follow these steps:
1. Turn off your computer.
2. Disconnect your monitor’s VGA cable from the VGA port on the rear of the computer.
3. Connect the MaxView’s 15-pin VGA connector to the VGA port where the monitor was connected.
(You may choose to connect the PC monitor to the VGA pass-thru
simultaneous display on your PC monitor.)
4. Choosing the S-VIDEO* or RCA video cable, connect one end to the appropriate port on the MaxView,
and the other end to the corresponding port on the TV.
5. Plug in the power adapter.
6. Power on your PC.
That’s all there is to it! You should now be able to see your computer image displayed on the TV screen,
LCD projector, VCR, or video camcorder. There is no need to change any settings unless your computer’s
VGA output is set at a refresh rate higher than 70Hz.
Adjust your Display Properties refresh rate. We suggest that you use one of the
following refresh rates:
70 Hz (Hertz) for 1024x768 resolutions
75 Hz (Hertz) for 800x600 resolutions
85 Hz (Hertz) for 640x480 resolutions
*Note: The S-Video connection is a newer video standard. This type of connection
improves color, clarity, and resolution. We recommend using the S-Video connection
whenever available.
port on the MaxView for
4
Page 9

Help! I Can’t See Anything On My TV!
If you are having difficulty seeing your computer displa y on the TV, check the following:
Connections:
• Check the power connection to the MaxView.
• Check the connections from the MaxView to the PC.
• Check the connections from the MaxView to the TV.
TV (or VCR):
• RCA connections to a TV or VCR must be to the Video Input (yellow) connector.
• If you are connected directly to a TV, ensure that the TV has been configured to accept auxiliary video
input.
• If you are connected to the TV through a VCR, ensure that the TV and VCR have b een configured to
accept auxiliary video input.
An input button on the TV or VCR’s original remote control often sets the video input mode. This mode is
needed for both S-Video and RCA video connections.
The button may be marked Video, Video-1, Aux, Input, Vid, Line, Line-In, TV/VCR, etc. On some TV’s
and VCR’s this setting is made by selecting Channel 2, then pressing the Down Channel button. If this does
not work, refer to your TV (or VCR) manual.
Settings: Check that the computer’s Display Settings are set correctly.
o 640x480 at 60-85Hz
o 800x600 at 60-75Hz
o 1024x768 at 60-70Hz
Laptops: Laptops must be set to External-only or Simultaneous VGA display mode. This is usually
done with a hot-key combination (Fn + function key). Refer to your laptop manual for further details.
Contacting AITech Technical Support
You may find it most convenient to visit our website anytime at www.aitech.com. The Technical Support
area of this site contains the very latest information on product usage and troubleshooting.
If you require our assistance to resolve problems with the product, please e-mail our Technical Support at
technicalsupport@aitech.com.
5
Page 10

Warranty Information
• If it becomes necessary to forward the MaxView for repair or modification, you must first obtain a
Return Authorization Number (RA) from AITech. Any product sent to AITech without an RA will be
returned to the sender. Call or e-mail Technical Support to obtain a RA number.
• Outside the United States: Please contact your local distributor.
Please ensure your product is adequately cushioned to prevent damage during shipping. Please include all
hardware and software that came with the MaxView in the original packaging, so the integrity of these items
can be verified by AITech technicians.
It is recommended that you ship your MaxView fully insured. AITech is not responsible for loss or
damage caused by shipping.
Software License Agreement
AITech International Corporation (AITech) grants the original purchaser a limited, non-exclusive license,
without the right to sublicense, to use this copy of AITech software on a single computer at a time. AITech
reserves all rights not expressly granted and retains title and ownership of the software including subsequent
copies in any media. Its is strictly prohibited to copy this software except to load the software from the
supplied diskette(s) or compact disc (CD) onto the computer’s hard disk solely for the purpose of executing
the program and for backup purposes in support of your use of the software on a single computer. You are
granted no other rights to copy, duplicate, sell or otherwise distribute this AITech software product.
Software Limited Warranty
As the only warranty under this agreement, and in the absence of accident, abuse or misapplication, AITech
warrants, to the original licensee only, that the diskettes on which the software is recorded are free from
defects in material and workmanship under normal use and service for a period of one year from the date of
original purchase as evidenced by a copy of the purchase receipt. AITech’s only obligation under this
warranty is, at AITech’s sole option, to replace the diskette that does not meet AITech’s warranty, and
which is returned to AITech, postage prepaid with a copy of the purchase receipt.
This warranty gives you limited specific legal rights. You may have other rights, which vary from
state to state, except as expressly provided above, the software and accompanying written materials
(including the User’s Guide) are provided “as is” without warranty of any kind including the implied
warranties of merchantability and fitness for a particular purpose. AITech specifically does not
warrant the operation of the hardware and will not be liable for any direct, indirect, consequent or
incidental damages arising out of the use or inability to use such product even if AITech has been
advised of the possibility of such damages. Some states do no t allow the exclusion or limitation of
liability for consequential or incidental damage, so the above limitation may not apply.
Hardware Limited Warranty
AITech imaging products are warranted to be free from failures due to defects in material and workmanship
for one year from the date of original purchase as evidenced by a copy of the purchase receipt. During the
warranty period, AITech, at AITech’s sole discretion, will repair or replace at no charge, the product which,
in its opinion, is defective.
6
Page 11

The original purchaser is responsible for packing the product for shipment and charges to ship the failed
product to AITech. AITech is responsible for charges to ship the repaired or replaced product. If any charge
to you is involved, the replacement product will be shipped C.O.D.
If the failed product has been modified in any way without the consent of AITech or if the failure is the
result of misuse, abuse, or misapplication, AITech has no obligation to repair or replace the failed product.
Except as expressly provided above, the hardware and accompanying written materials (including the
User’s Guide) are provided “as is” without warranty of any kind including the implied warranties of
merchantability and fitness for a particular purpose. AITech specifically does not warrant the
operation of the hardware and will not be liable for any direct, indirect, consequent or incidental
damages arising out of the use or inability to use such product even if AITech has been advised of the
possibility of such damages. Some states do not allow the exclusion or limitation of liability for
consequential or incidental damage, so the above limitation may not apply.
7
 Loading...