

Page 1
TRAMPOLINE ASSEMBLY:
STEP BY STEP INSTRUCTIONS:
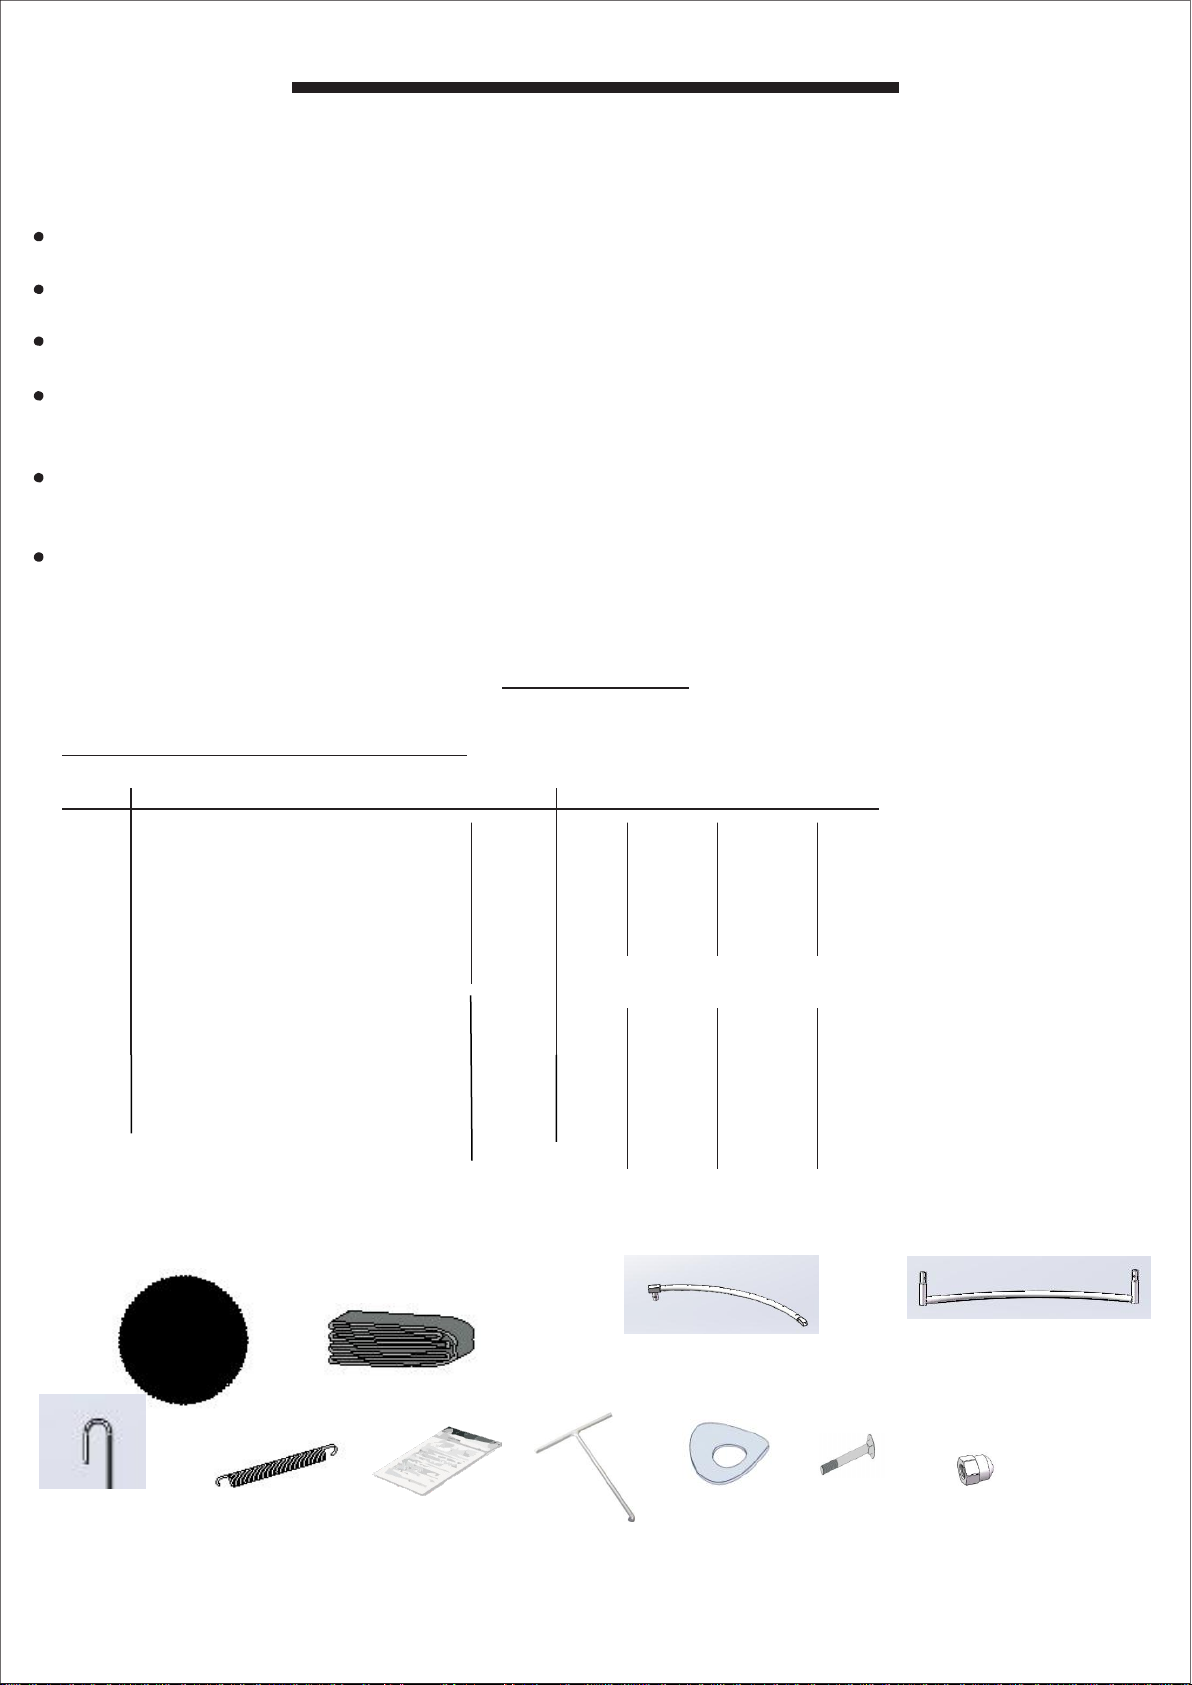
Please refer to the table for part descriptions and numbers. Use these descriptions and numbers
as reference .
Make sure that all parts listed are present. If you are missing any parts, please contact place of
purchase.
Please use gloves to protect your hands from pinch points during assembly. When you are ready
to start, make sure that you have plenty of space and a clean dry area for assembly.
6 Springs
Pcs
Please check the instruction cover
The above specifications, product features and equipment might be changed without further
notice due to availablity of parts or due to changes in the specifications.
ASSEMBLY BY ADULTS ONLY!
All you need to assemble this trampoline is our special spring loading tool provided with this product.
During periods of non-use this trampoline can be easily disassembled and stored.
Please read the assembly instructions before beginning to assemble the product.
PARTS LIST:
TRAMPOLINES WITH 3 OR 4 LEGS:
Ref.
1 Trampoline mat stitched Pcs 1 1 1 1
2 Frame pad
3
4 Leg base
5
7
8
9 Washer
10 Bolt
11 Nuts
Description Unit 8ft 10ft 12ft 14ft
with V rings
Top rail with leg sockets
The J hook
Safety instruction placard
Spring fix hook
Pcs
Pcs
Pcs
Pcs 12 16 16 16
Pcs 1 1 1 1
Pcs
Pcs
Pcs
Pcs
1 1 1 1
6 8 8 8
3 4 4 4
1 1 1 1
6 8 8 8
6 8 8 8
6 8 8 8
1 2 3 4
5 6 7 8 9 10 11
Page 2
FRAME LAYOUT:
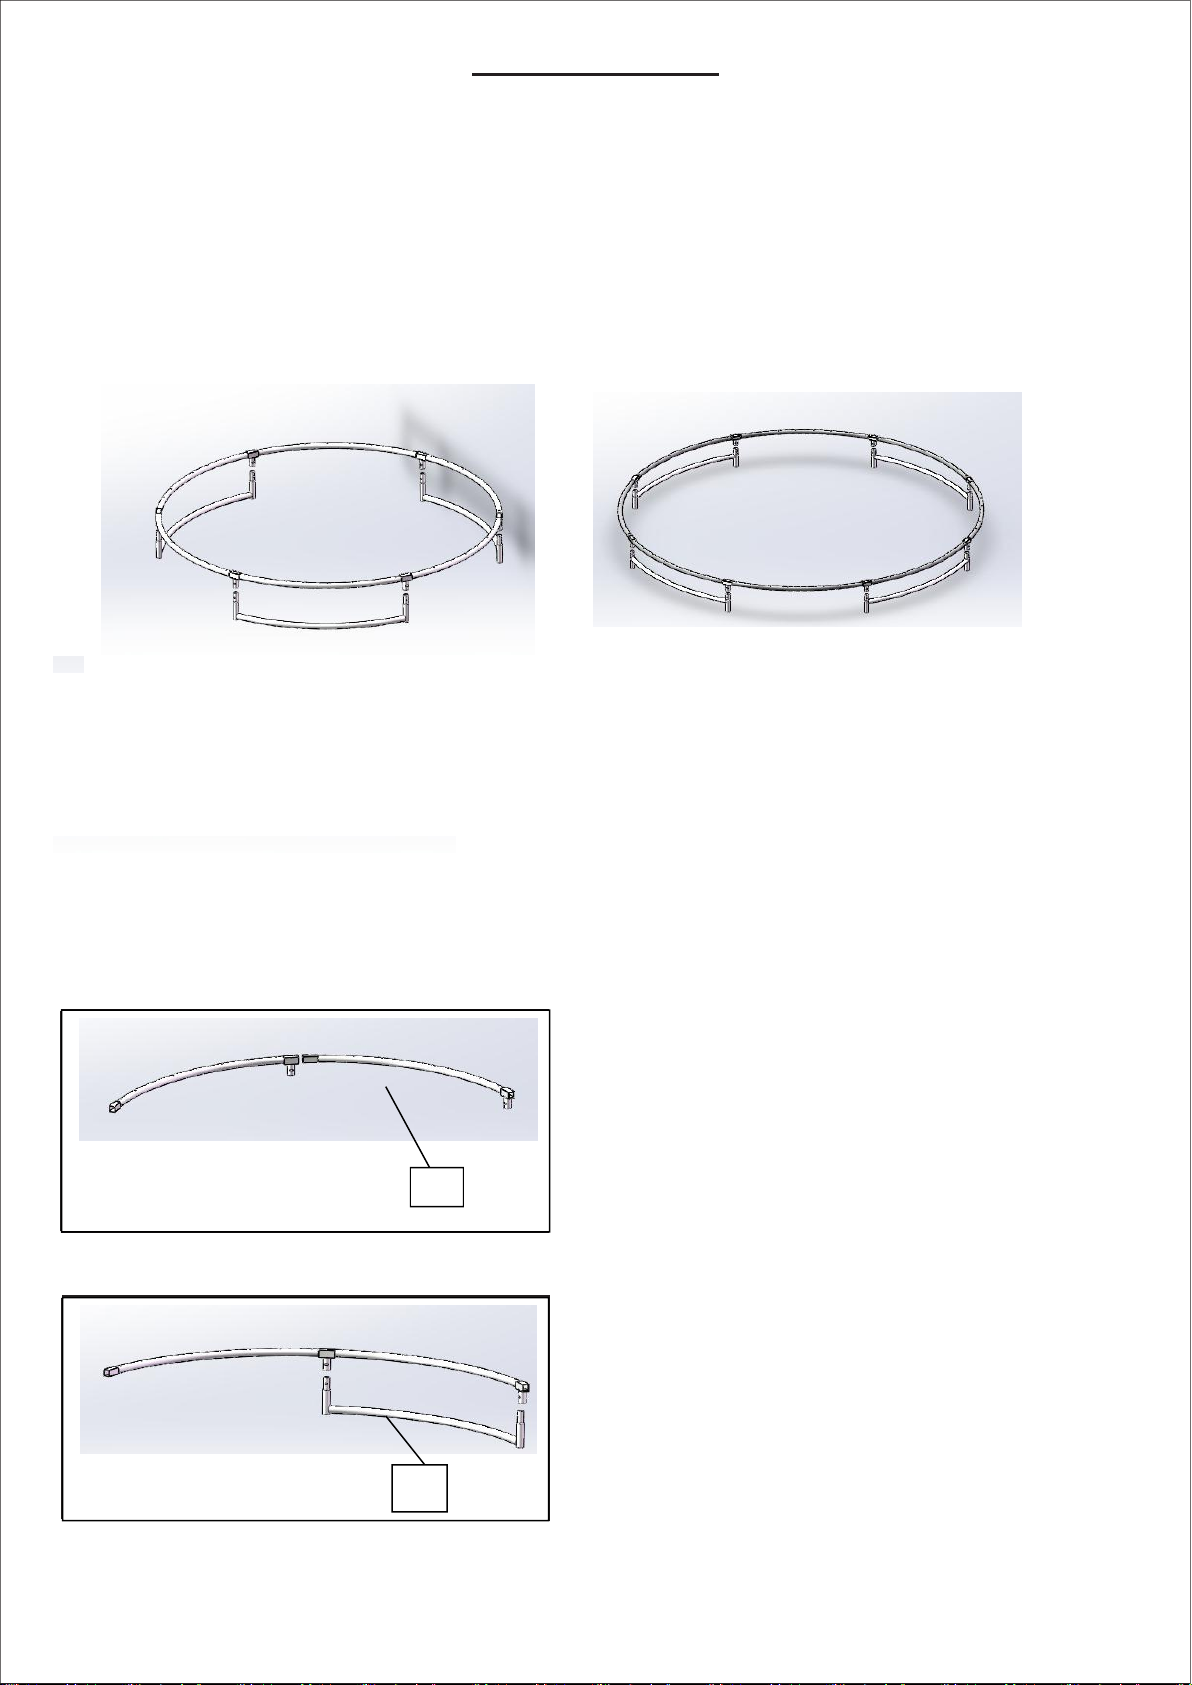
Use the parts lists to identify each part and to make sure that all parts are present. Check which
trampoline size you have purchased and lay all parts on the floor according to one of the below
pictures which matches your trampoline size.
All the “Top rails with leg sockets” are universal parts and can only be connected together in one
way. To connect the parts, simply slide the thinner end of the tubing into the adjacent section with the
larger opening. These joints are called “connector points”.
8ft Trampoline (3 legs)
Total: 15pcs
10ft, 12ft, 14ft Trampoline (4 legs)
STEP 1: Support assembly
5
4
STEP 2: Top Rail Assembly
3
Slide all Vertical Leg Extensions(5) into the
Leg Base(4) as shown.
Two people will be necessary at this point to
assemble the trampoline. One person lifts the
support assembly from step 1 to a standing
(vertical) position and inserts one of the sockets
of the top rail with sockets (3) into the vertical
leg extension portion of the support assembly.
The other person holds the other end and inserts
that portion into the other support assembly as
shown. You should now have 2 support
assemblies held together by 2 top rails with
sockets.
Total: 9pcs
Total:12pcs
3
4
Page 3
STEP 3: Frame assembly
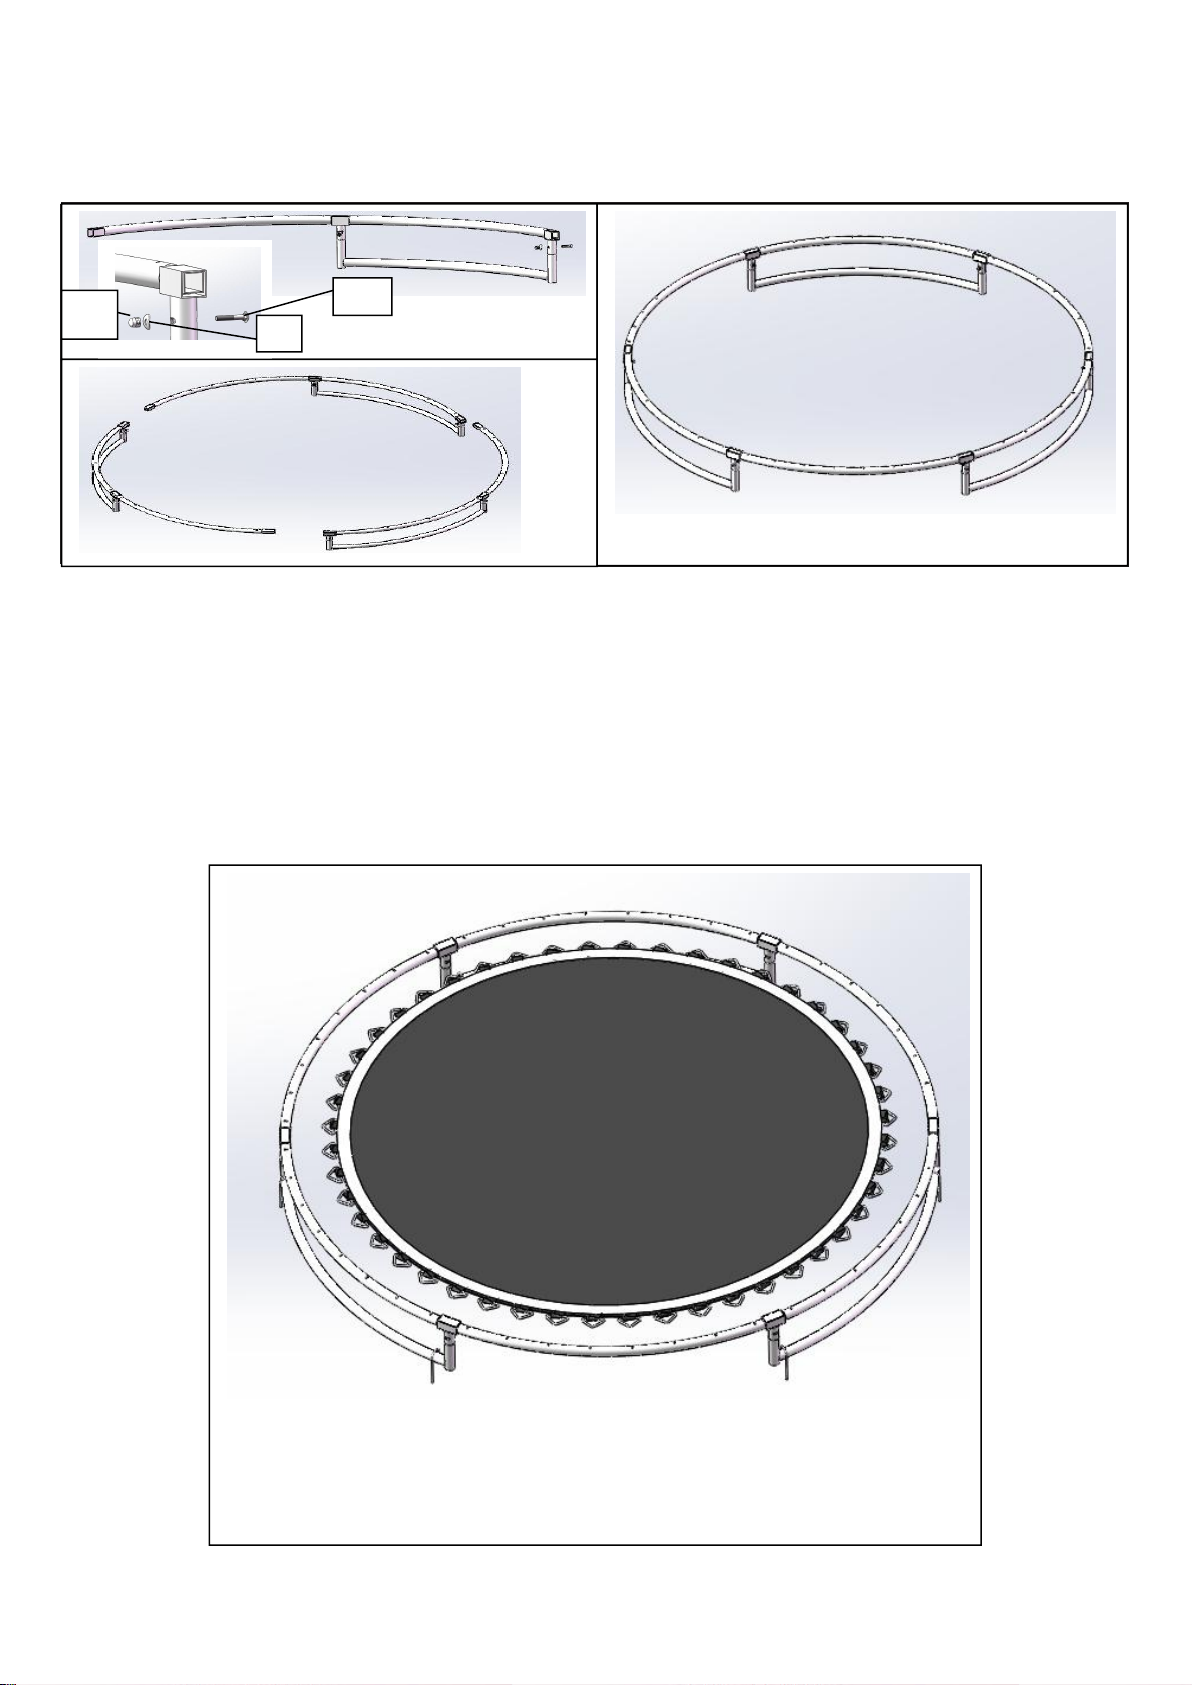
After STEP 2 has been finished all tubes will be like figure 5. Now the complete frame can be built
according to figure 6. (Two adults required for this step)
WARNING: Attach the springs by using the spring loading tool. The connecter points can become
pinch points since the trampoline is tightening up. With this in mind please be careful attaching
springs to the trampoline mat. Please be careful!
11
10
Figure 5 Figure 6
STEP 4: Trampoline mat assembly
Two adults are required for this part of the assembly
Spread the “Trampoline Mat” out on the floor inside the frame as picture above
Page 4
STEP 5: Attaching the springs to the trampoline mat
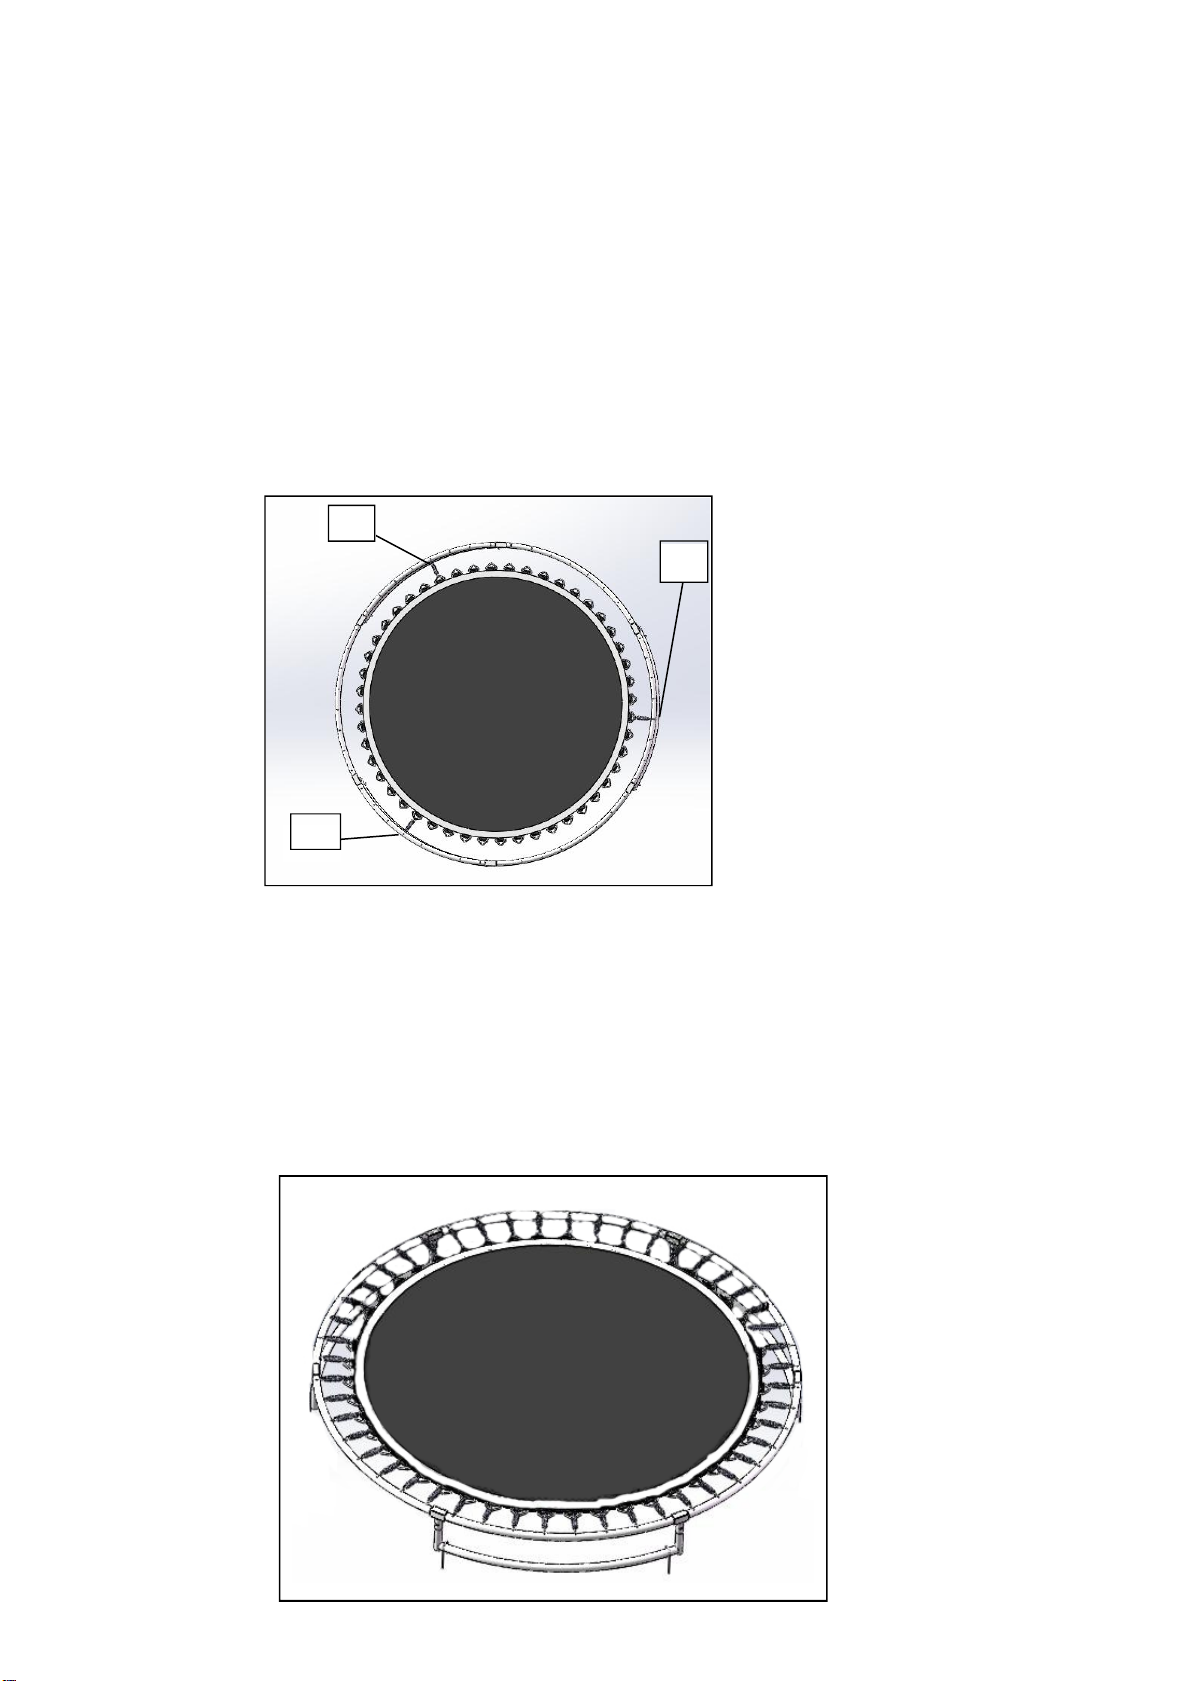
The springs need to be placed in position as shown in the
diagram to the right, in order to pull the “Trampoline Mat”
in all
directions.
The image to the right specifies and details the
spring positions to hold the “Trampoline Mat” in place.
#A , #B, #C, #D are the holes in the middle of the frame
section between the two frame connectors.
#C
#B
For easier fixing spings, we suggest always fix next spring which in the middle of two fixed springs.
Keep repeating this step till all the springs were fixed as below:
Finally all the springs were fixed as below:
Page 5
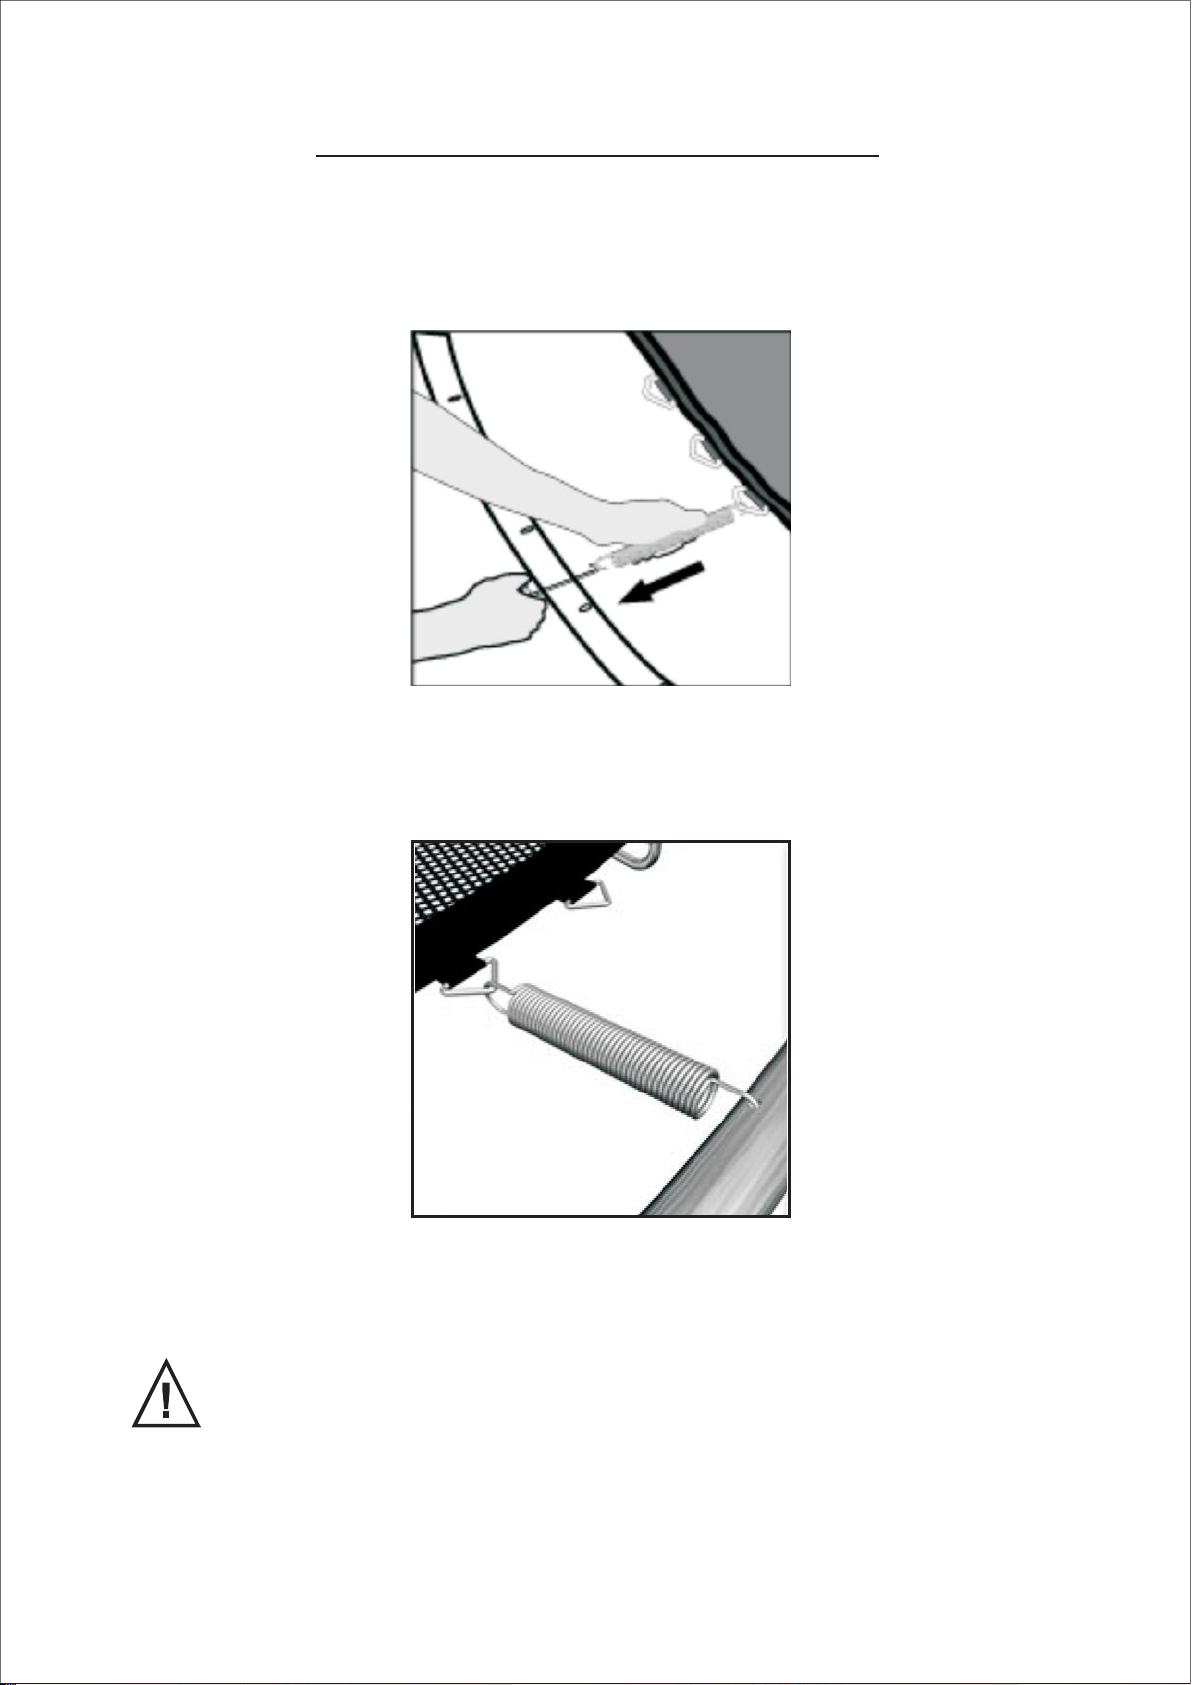
How to use the “Spring Loading Tool”:
Firstly hang one side of the spring on the triangle attached to the
“Trampoline Mat” and use the “spring loading tool” to hook the other
side of the spring to the frame (As shown in the image to the right) .
Pull the “Spring Loading Tool” until the spring hook inserts the hole
on the “trampoline frame” and disengage the “Spring Loading Tool”
leaving the “Spring” in place. Repeat this process for all springs .
of the body are placed as the connector points and spring attachments
can create hand or body traps.
WARNING!! : Please be careful where your hands and other parts
Page 6
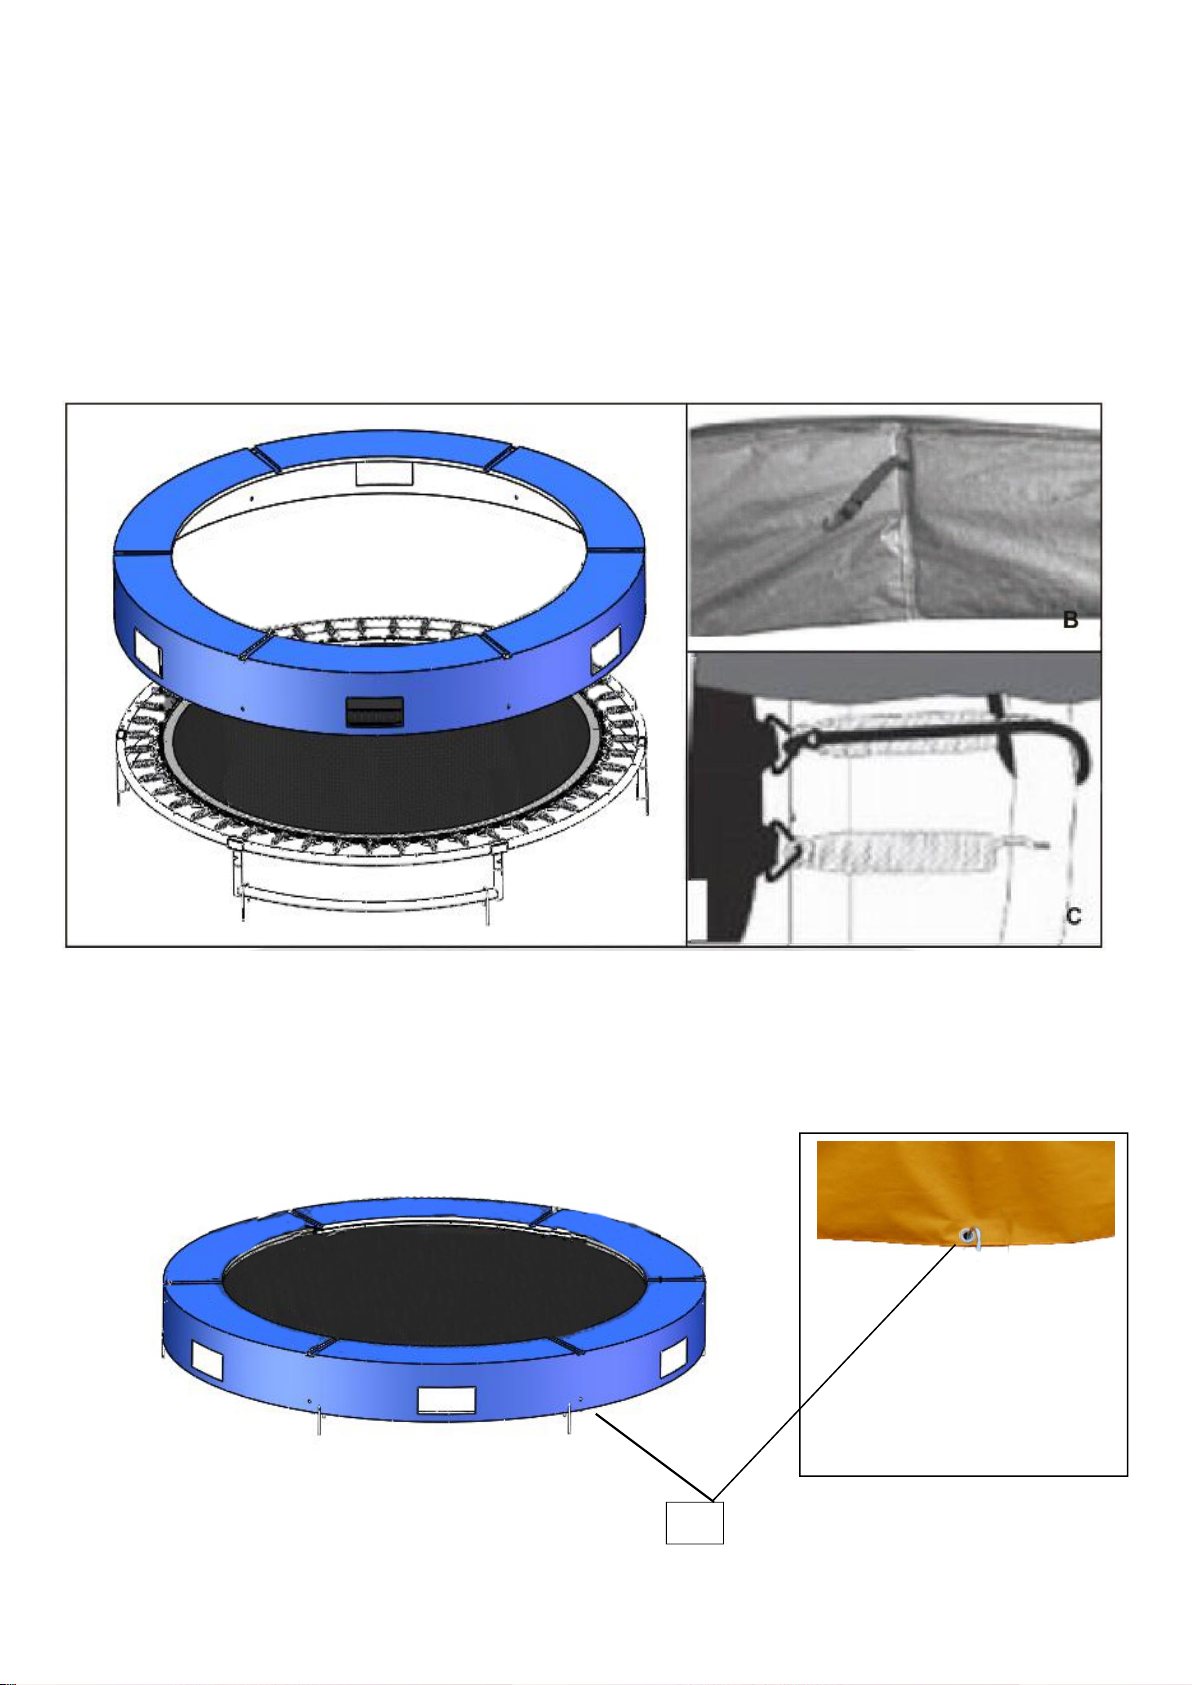
STEP 8: Frame pad assembly
Lay the frame pad over the trampoline so that the springs and the steel frame are covered.
Please ensure that the frame pad covers all metal parts.
Tie the straps located at the bottom side of the frame pad to the frame.
Showing the way how to fix the pad to the frame.
A.
B.
C.
If your trampoline with enclosure, please fix the pole base under the padding. See below picture.
The skit of padding need to fixed on the ground with J anchors as below:
#D
Page 7

CARE AND MAINTENANCE:
This trampoline was designed and manufactured with quality materials and craftsmanship. If proper
care and maintenance is provided, it will provide all jumpers with years of exercise, fun, and
enjoyment as well as reduce the risk of injury. Please follow the guidelines listed below:
This trampoline is designed to withhold a certain amount of weight and use. Please make sure that
only one person at any one time uses the trampoline. Also, the person should weigh less than
150kgs(8ft100kgs). Jumpers should either wear socks, gymnastics shoes, or be barefoot when using the
trampoline. Please be aware that street shoes or tennis shoes should NOT be worn while using the
trampoline. In order to prevent the trampoline mat from getting cut or damaged please do not
allow any pets onto the mat. Also, jumpers should remove all sharp objects from their person prior to
using the trampoline. Any type of sharp or pointed objects should be kept off the trampoline mat at
all times.
Always inspect the trampoline before each use for worn, abused or missing parts. A number of
conditions could arise that may increase your chances of getting injured. Please be aware of:
• Punctures, holes, or tears in the trampoline mat
• Sagging trampoline mat
• Loose stitching or any kind of deterioration of the mat
• Bent or broken frame parts, such as the legs
• Broken, missing, or damaged springs
• Damaged, missing, or insecurely attached frame pad
• Protrusions of any types (especially sharp types) on the frame, springs, or mat
IF YOU FIND ANY OF THE PREVIOUS CONDITIONS, OR ANYTHING ELSE THAT YOU FEEL
COULD CAUSE HARM TO ANY USER, THE TRAMPOLINE SHOULD BE DISASSEMBLED OR
SECURED FROM USE UNTIL THE CONDITION(S) HAS BEEN RESOLVED.
In severe wind situations, the trampoline can be blown about. If you expect windy weather conditions,
the trampoline should be moved to a sheltered area or disassembled. Another option is to tie the
round, outside portion (top frame) of the trampoline to the ground using ropes and stakes. To ensure
security, at least three(3) tie downs should be used. Do not just secure the legs of the trampoline to
the ground because they can pull out the frame sockets.
If you need to move the trampoline, two people should be used. All connector points should be
wrapped secured with weather resistant tape, such as duct tape. This will keep the frame intact
during the move and prevent the connector points from dislocating and separating. When moving,
lift the trampoline slightly of the ground and keep it horizontal to the ground. For any type of other
move, you should disassemble the trampoline.
WINDY CONDITIONS:
MOVING THE TRAMPOLINE:
 Loading...