

Airtraq A390CAM Users Manual
A-390 WI-FI CAMERA
Instructions For Use
ENGLISH
CHECK FOR LATEST SOFTWARE VERSION AVAILABLE BY CONNECTING
TO AIRTRAQ CAM APPLICATION (WINDOWS & MAC)

A-390 WI-FI CAMERA
INDEX
1. A-390 Basic information
2. A-390 Components
3. A-390 Switches, indicators and connectors
4. A-390 Battery charge & charge status checking
4.1. Camera Docking Station
4.2. Airtraq Docking Station
5. Mounting the A-390 onto the Airtraq
6. Turn On/Off
7. Touch Panel & Menus
8. Initial Set Up
9. Paediatric Mode
10. Record & Auto-Record
11. Play recorded videos on A-390
12. Download videos to a PC (Via USB cable)
13. Delete Videos
14. Connecting Wi-Fi Live video and recording onto Tablet/Phone
15. Connecting Wi-Fi Live video to a PC
16. View System Information
17. Troubleshooting
18. Updating A-390 Internal Software
19. Cleaning Instructions
20. Operating, Storage And Transport
21. Technical Data
22. Regulatory
23. Disposal Instructions
24. Manufacturer’s Warranty
25. Important Safety Instructions

1. A-390 BASIC INFORMATION
Code: A-390
Description: Airtraq Wi-Fi Camera
The A-390 has been specially designed to work only as an
accessory for the Airtraq Video Laryngoscope. It is
compatible with every Airtraq model.
The A-390 provides colour and real-time images on its 2.8
inch integrated touch screen.
Image can be rotated upside down when necessary.
The A-390 can record and playback videos which are stored
on its internal memory.
Videos can be downloaded to a PC (Windows or Mac)
through a USB – Micro USB cable, using the application
“Airtraq Cam”, available at www.airtraq.com (downloads
section).
The A-390 can be connected via Wi-Fi to PC, tablet or
smartphone according to IEEE 802.11 standard. A-390 does
not use any existing Wi-Fi network but creates a proprietary
one. An optional password guarantees that only authorized
devices are allowed to receive video signal (follow your
institution procedures and regulations if using these mobile
devices).
A-390 is powered by an internal rechargeable 3.7 V Li-Po
battery and does not work when connected to a battery
charger.
2. A-390 COMPONENTS
2.1. A-390 Camera
CMOS video camera with integrated touch screen and
rechargeable Li-Po Battery.
2.2. USB - micro USB cable
To be used to connect the A-390 to a PC for video
downloading or for camera’s settings administration.
2.3. Silicon protective case
Provides additional protection against shocks.
It can be easily placed onto or removed from the camera.
. Neoprene pouch
2.4
Accessory to store A390 camera and USB cable
. Battery charger
2.5
Must be connected to mains supply to charge the 3.7 volts,
Li-Po Battery.
Always use the provided mains power supply provided with
A-390.
2.6. Docking station
Accessory to facilitate charge of A-390.
Docking Station can also be used to charge the A-360
Airtraq Wi-Fi Camera.
The mains power supply is connected to the Docking Station
through its micro USB connector.
2.7. Storage case
Accessory to store all above items.
The A-390 can be charged when it is inside the storage case.
Pass the battery charger cable to the inside of the storage
case through the hole on its lateral side and connect the Micro
USB directly to the A-390.
It is recommended that the A-390 be stored and transported
inside the storage case to protect the camera while not in use.
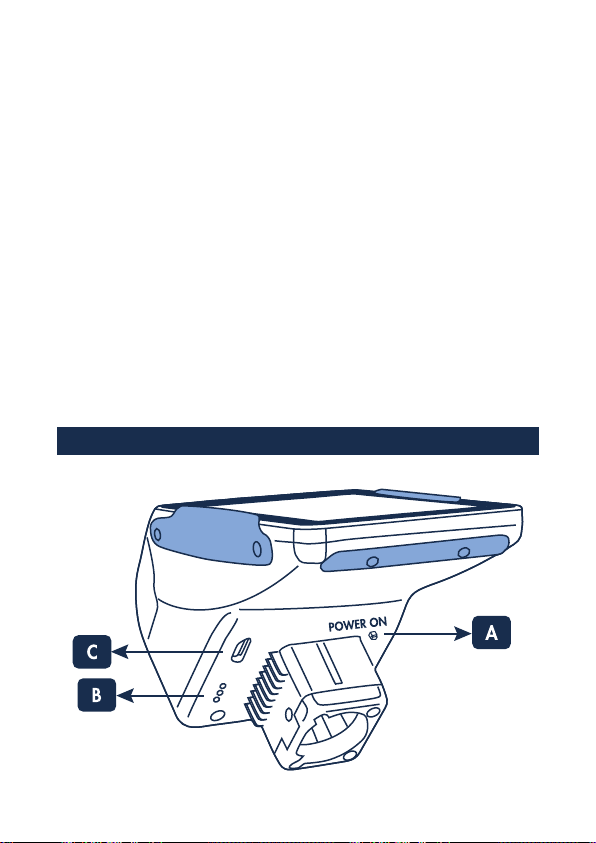
3. A-390 SWITCHES, INDICATORS AND CONNECTORS

A. Automatic power button: This button is automatically
pushed when the A-390 is inserted onto any Airtraq. It can
also be pushed manually to turn on the A-390. To turn off the
A-390 press the corresponding icon on the menu.
B. Battery charge connector: Brass surface connectors that
connect to docking station for battery charge.
C. Micro USB female connector: to connect to PC or to battery
charger.
4. A-390 BATTERY CHARGE & CHARGE STATUS CHECKING
The A-390 DOES NOT WORK WHEN IT IS BEING
CHARGED. IT SHOULD BE CHARGED AT LEAST 1.8 M
AWAY FROM THE PATIENT.
The A-390 is initially supplied with its battery discharged. It is
recommended to perform a full charge/discharge cycle of the
battery before starting to use the A-390 for clinical purposes.
After a full charge, the A-390 can operate for 240 minutes
when Wi-Fi is deactivated and for 180 minutes when Wi-Fi is
activated. Recharging takes approximately 110 minutes.
Without use, the battery will discharge at a rate of 1% per
day.
If the A-390 can be turned on, then a minimum of 10 minutes
of operating time is guaranteed.
When the A-390 is turned on, an icon and a figure will
appear on the header of the screen showing battery charge
status.
When in use, if the battery falls below 20 minutes of its
capacity the battery charge indicator on the header of the
screen and the left charge indicator will become blinking
orange. The A-390 will continue to operate for approximately
15 to 20 more minutes. The manufacturer recommends
recharging the battery of the A-390 frequently to ensure its
availability for use.
Service life for the rechargeable battery depends upon the
number of charge-discharge cycles performed. The A-390´s
battery is a service replaceable part, if its capacity falls below
the acceptable levels please contact your supplier. The A-390
should never be opened by unauthorized personnel. Internal
battery can only be replaced by the manufacturer.

To charge battery, Camera Docking Station (A-390-DOCK) or
Airtraq Docking Station (A-590) can be used:
4.1. CAMERA DOCKING STATION (A-390-DOCK)
To charge battery using Camera Docking Station (A-390DOCK):
1. Connect the stand-alone battery charger to mains
electrical supply.
2. Insert the micro USB connector to Docking Station and
place A-390 onto it.
3. Alternatively, insert charger’s micro USB connector
directly into the A-390.
Upon starting to charge battery the A-390 will automatically
turn Off.
When battery is being charged the user can check charge
status by touching the screen, which will show available
minutes of operating time and a battery icon.
4.2. AIRTRAQ DOCKING STATION (A-590)
The Airtraq Docking Station (A-590) recharges the battery
and displays the remaining service life of the Airtraq Avant
Optics and Airtraq Wi-Fi Cameras A-360 and A-390.
The A-590 Docking Station is supplied ready to use. Its
package includes a Battery Charger needed to connect it to
mains supply. USE DOCKING STATION ONLY WITH
BATTERY CHARGER PROVIDED.
In order to keep the Airtraq Avant Optics clean it shall be
inserted into the Docking Station covered by the Optics
Storage Case.
A full battery recharge cycle of the Airtraq Avant Optics takes
around 120 minutes. When the battery is fully charged it can
be used for around 120 minutes.
The manufacturer recommends placing the Optics and/or
Camera into the Docking Station after each intubation.
No maintenance of the Docking Station is required.

4.2.1. Indicators and connectors
1. Display: LCD that shows the remaining service life of the
Optics as well as its battery charge level.
2. Airtraq Avant Optics connector: Micro-USB male
connector.
3. Airtraq Camera A-390 connector: Brass pin connector
for the A-390 Camera.
4. Airtraq Wi-Fi Camera A-360 connector: Micro-USB
connector for A-360 Camera.
male
5. Mains Supply Connector: Micro-USB Female connector
to connect to battery charger.
 Loading...