

Page 1
Eclipse 5™ with autoSAT
®
Personal Ambulatory Oxygen System (PAOS)
Model 1000B
PROVIDER TECHNICAL MANUAL
™
Page 2

TABLE OF CONTENTS
General Information .................................................. 4
Warning and Caution Statements ........................................... 4
Introduction to the Eclipse 5 Oxygen System ................. 5
Eclipse 5 Oxygen System Specications ..................6
Pulse Dose Mode Specications .............................................. 7
Power Accessory Specications ............................................... 7
AC Power Supply ......................................................................... 7
DC Power Supply ......................................................................... 7
Power Cartridge (Battery) ....................................................... 7
Independent Safety Testing ........................................................ 8
Provider Support Policy ................................................................. 8
Electromagnetic Compatibility ................................................. 9
Guidance and Manufacturer’s Declarations ...................... 9
How The Eclipse 5 Works .........................................13
Introduction ........................................................................................13
Power Cartridge ................................................................................21
Typical New Power Cartridge Operation Time ........21
Charging Algorithm .................................................................24
Training The Patient ................................................25
Introduction ........................................................................................25
Pre-Delivery Check List ...........................................................25
Indications for Use...........................................................................26
Contraindications ............................................................................26
Basic Concept Training .................................................................26
Safety Guidelines and Operational Safety
Warnings/Cautions .............................................................26
Locating the Eclipse 5 for Proper Use and
Ventilation ................................................................................27
The Users Manual ......................................................................27
Showing Panel Buttons, Indicators, Alerts
and Alarms...............................................................................27
ATF® Concentrator Module .........................................................13
Compressor and Compressor Enclosure ...........................14
Power Distribution ..........................................................................14
Control Board .....................................................................................14
Control Panel ......................................................................................15
User Controls & System Status Indicators .........................15
Continuous Flow Mode ...............................................................17
Pulse Dose Mode .............................................................................17
Provider Mode Functions ............................................................18
Alarm Code ....................................................................................18
Pulse Mode Sensitivity Adjustment ...............................18
Hours of Operation ...................................................................18
9V Battery Status ........................................................................18
Rise Time (Bolus Delivery) .....................................................18
Software Version.........................................................................18
Service Mode Functions ..............................................................19
Eclipse 5 Data Acquisition Tool (EDAT) .........................19
Showing Power Cartridge Power Level .......................28
Selecting the Proper Flow Mode and Setting .........28
Selecting Continuous Flow Mode ..................................28
Selecting Pulse Dose Mode ................................................28
“Power Cartridge (Battery) Conservation”
Feature .........................................................................................29
Adjusting the Pulse Mode Sensitivity Setting ..........29
Adjusting Rise Time ..................................................................30
Connecting the AC Power Supply ..................................30
Connecting the DC Power Supply ..................................31
Active Lifestyle Training ...............................................................31
Attach the Universal Cart ......................................................32
Using Around the House ......................................................32
Traveling by Vehicle ..................................................................32
Traveling by Air............................................................................34
Traveling by Cruise Ship ........................................................34
Traveling by Train .......................................................................34
Power Supplies ..................................................................................20
AC Power Supply .......................................................................20
DC Power Supply .......................................................................20
Eclipse 5 Maintenance ..................................................................35
Weekly Maintenance—Patient .........................................35
Clean the Air Inlet Filter .........................................................35
Clean and Care for the Tubing and Cannula ............35
Page 3

TABLE OF CONTENTS CONTINUED
Clean the Cabinet and Control Panel
and Power Supplies ...........................................................35
Monthly Maintenance—Patient ......................................36
Care for the Power Cartridge ..............................................36
Calibrating the Power Cartridge ......................................36
Patient Training Checklist ............................................................ 37
Annual Maintenance—Provider ............................38
Introduction ........................................................................................38
Annual Maintenance Check List .......................................38
Checking and Replacing the Power Cartridge ........38
Eclipse 5 Monthly Run-Time Cycle ..................................38
Annual Maintenance Procedures ..........................................39
Removing the Unit Cover .....................................................39
Remove and Replace 9 Volt Battery ...............................43
Remove and Replace HEPA Filter .....................................44
Internal Filters ...............................................................................44
Troubleshooting, Service, and
Repair Procedures ..............................................55
System Troubleshooting and Alarms ..................................56
Alarm Conditions and Alarm Codes ....................................59
Malfunction Codes..........................................................................60
System Schematics and Diagrams ........................................61
Oxygen Circuit ...................................................................................63
Remove and Replace the ATF Module .........................63
Remove and Replace the Product Tank
Assembly (PN 4378-SEQ) Eclipse 5 ...........................67
Electronics ............................................................................................70
Remove and Replace the Control
Board Assembly ..................................................................70
Remove and Replace the Buzzer Wire Harness .......72
Control Board Connector Diagram ................................73
Remove and Replace the Power Manager
Printed Circuit Board .........................................................74
Remove and Replace the Compressor
Intake Filter ..............................................................................46
Reinstalling or Replacing the Unit Cover ....................48
Test Procedures .................................................................................49
Purity and Flow Rate Test
Procedure - Preferred Method ....................................49
Purity and Flow Rate Test Procedure-
Alternate Method ................................................................49
Assembly and Alarm Verication Tests .........................50
Record Hours of Operation & Software Version ......51
Electrical Safety Test .................................................................52
Cleaning the Eclipse 5 ............................................................52
Provider Service and Maintenance Record......................53
Shipping and Transporting the Eclipse 5 ....................54
Storing the Eclipse 5 ................................................................54
Discarding ......................................................................................54
Compressor .........................................................................................78
Remove and Replace the Compressor Box ...............78
Maintenance and Replacement Parts .................................82
Preventative Maintenance Parts .......................................82
Replacement Parts List ...........................................................82
Optional Accessories ...............................................................83
Chart-SeQual Customer Service Contact
Information .........................................................84
3
Page 4
Personal Ambulatory Oxygen System Provider Technical Manual
GENERAL INFORMATION
This technical manual will familiarize you with Provider-specic information regarding the Eclipse 5 Oxygen System.
Instructions in this manual are intended to help ensure that:
- Providers are familiar with Eclipse 5 system components and system principles of operation
- Providers are given proper guidance in the use of the Eclipse 5 and its accessories that can be conveyed
to patients
- Providers are made aware of the care, diagnostics, maintenance, and repair of the Eclipse 5
Warning and Caution Statements
Safety instructions are dened as follows:
WARNING:
CAUTION
NOTE:
Important safety information for hazards that might cause serious
injury.
Important information for preventing damage to the Eclipse 5.
Places emphasis on an operating characteristic or important
consideration.
PN 20631679 Rev C
4
Page 5
Personal Ambulatory Oxygen System Provider Technical Manual
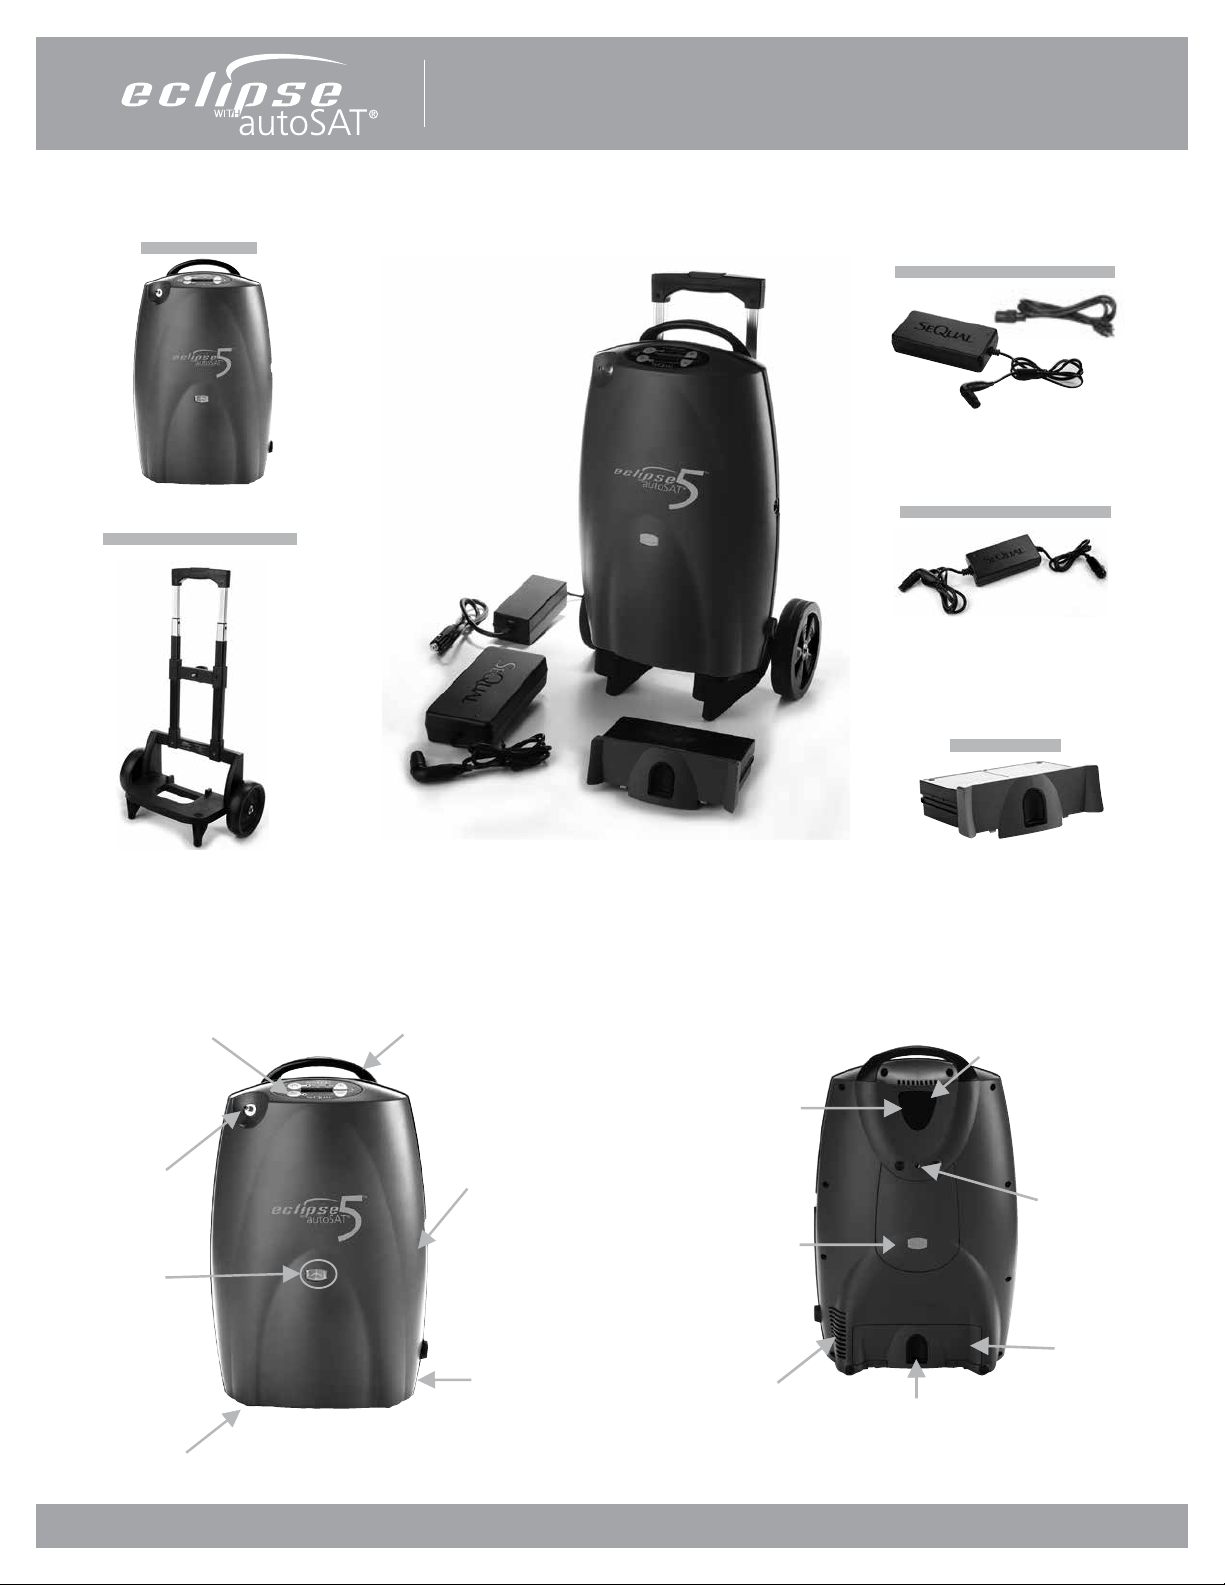
INTRODUCTION TO THE ECLIPSE 5 OXYGEN SYSTEM
ECLIPSE 5
UNIVERSAL CART
AC POWER SUPPLY
WITH NEMA POWER CORD
PN: 5941-SEQ
DC POWER SUPPLY
PN: 5942-SEQ
POWER CARTRIDGE
BATTERY
PN: 5991-SEQ
Control Panel
Oxygen
Outlet Port
FAA
Approval
Icon
Rating Label &
Serial Number
Location
FRONT
Handle
External Power
Receptacle
Power Cord
Retainer
Air Inlet
Filter
FAA Approval Icon
Exhaust Vent
PN: 7082-SEQ
Power Cartridge Latch
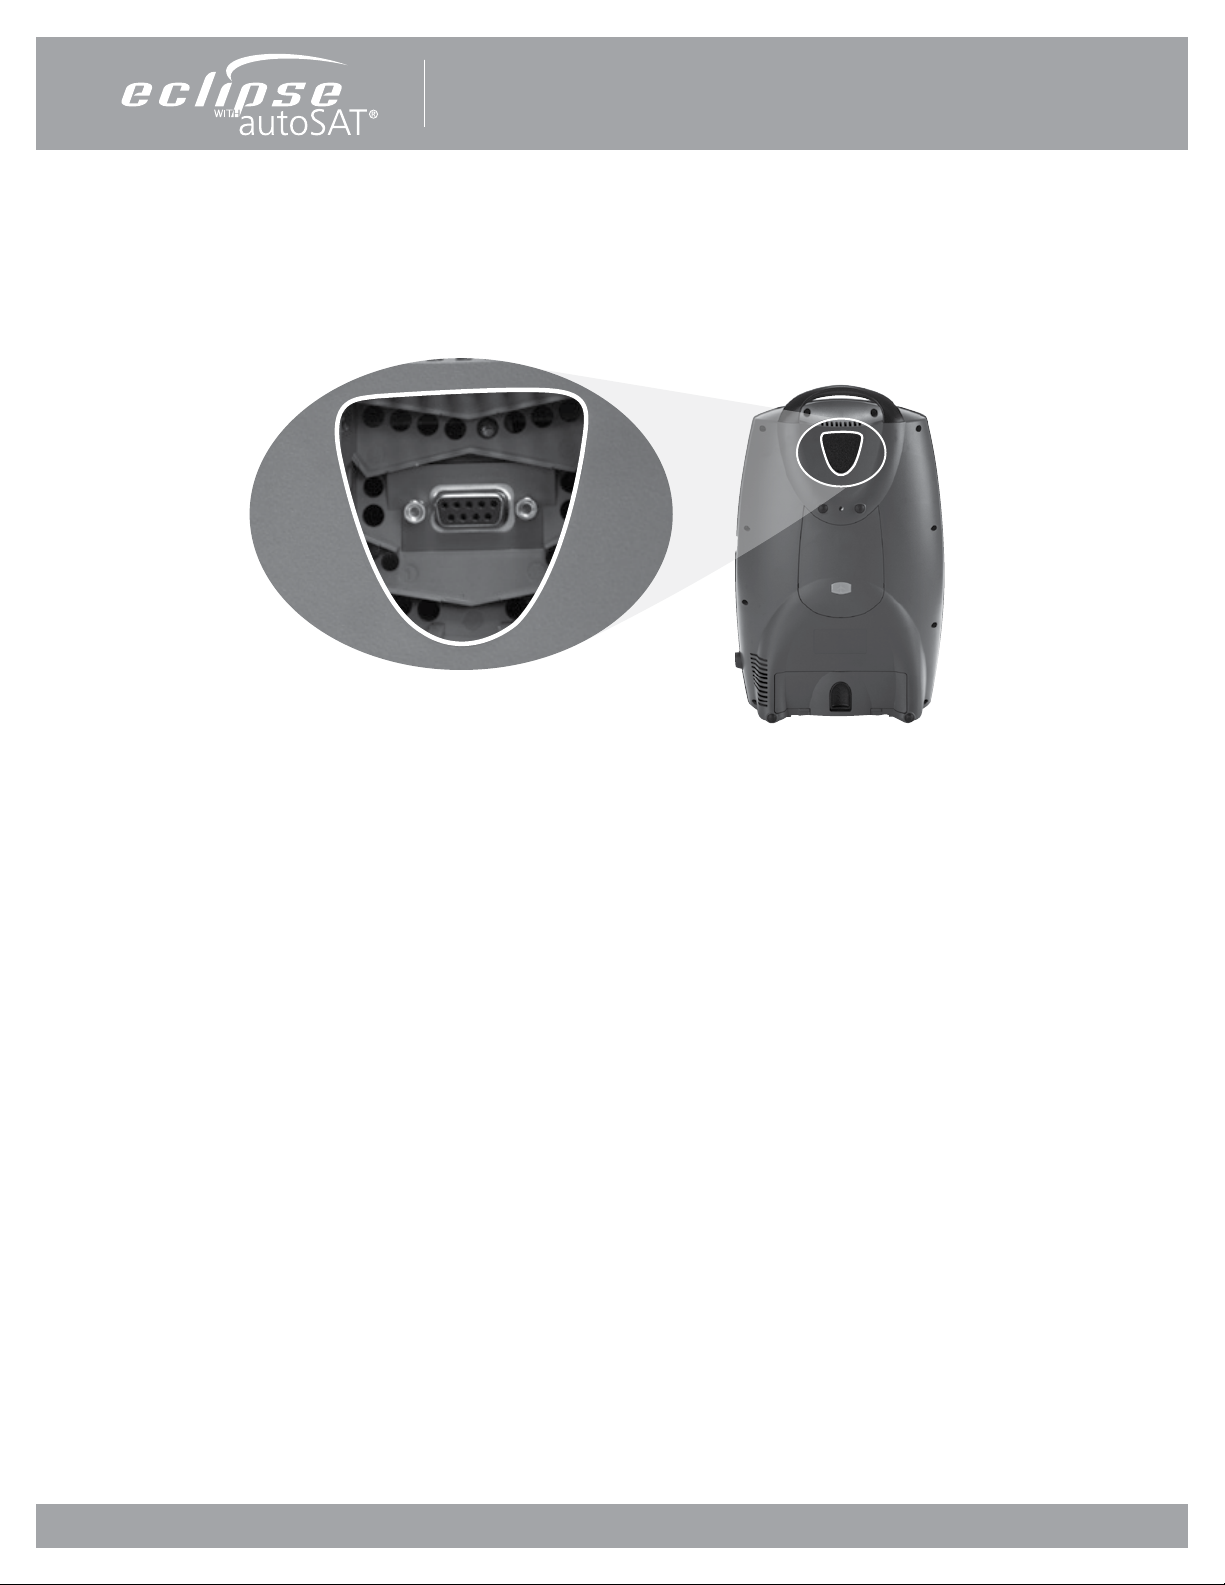
BACK
EDAT Service Port
(Not for Patient Use)
Cart
Attachment
Location
Power
Cartridge
(Battery)
PN 20631679 Rev C
5
Page 6

Personal Ambulatory Oxygen System Provider Technical Manual
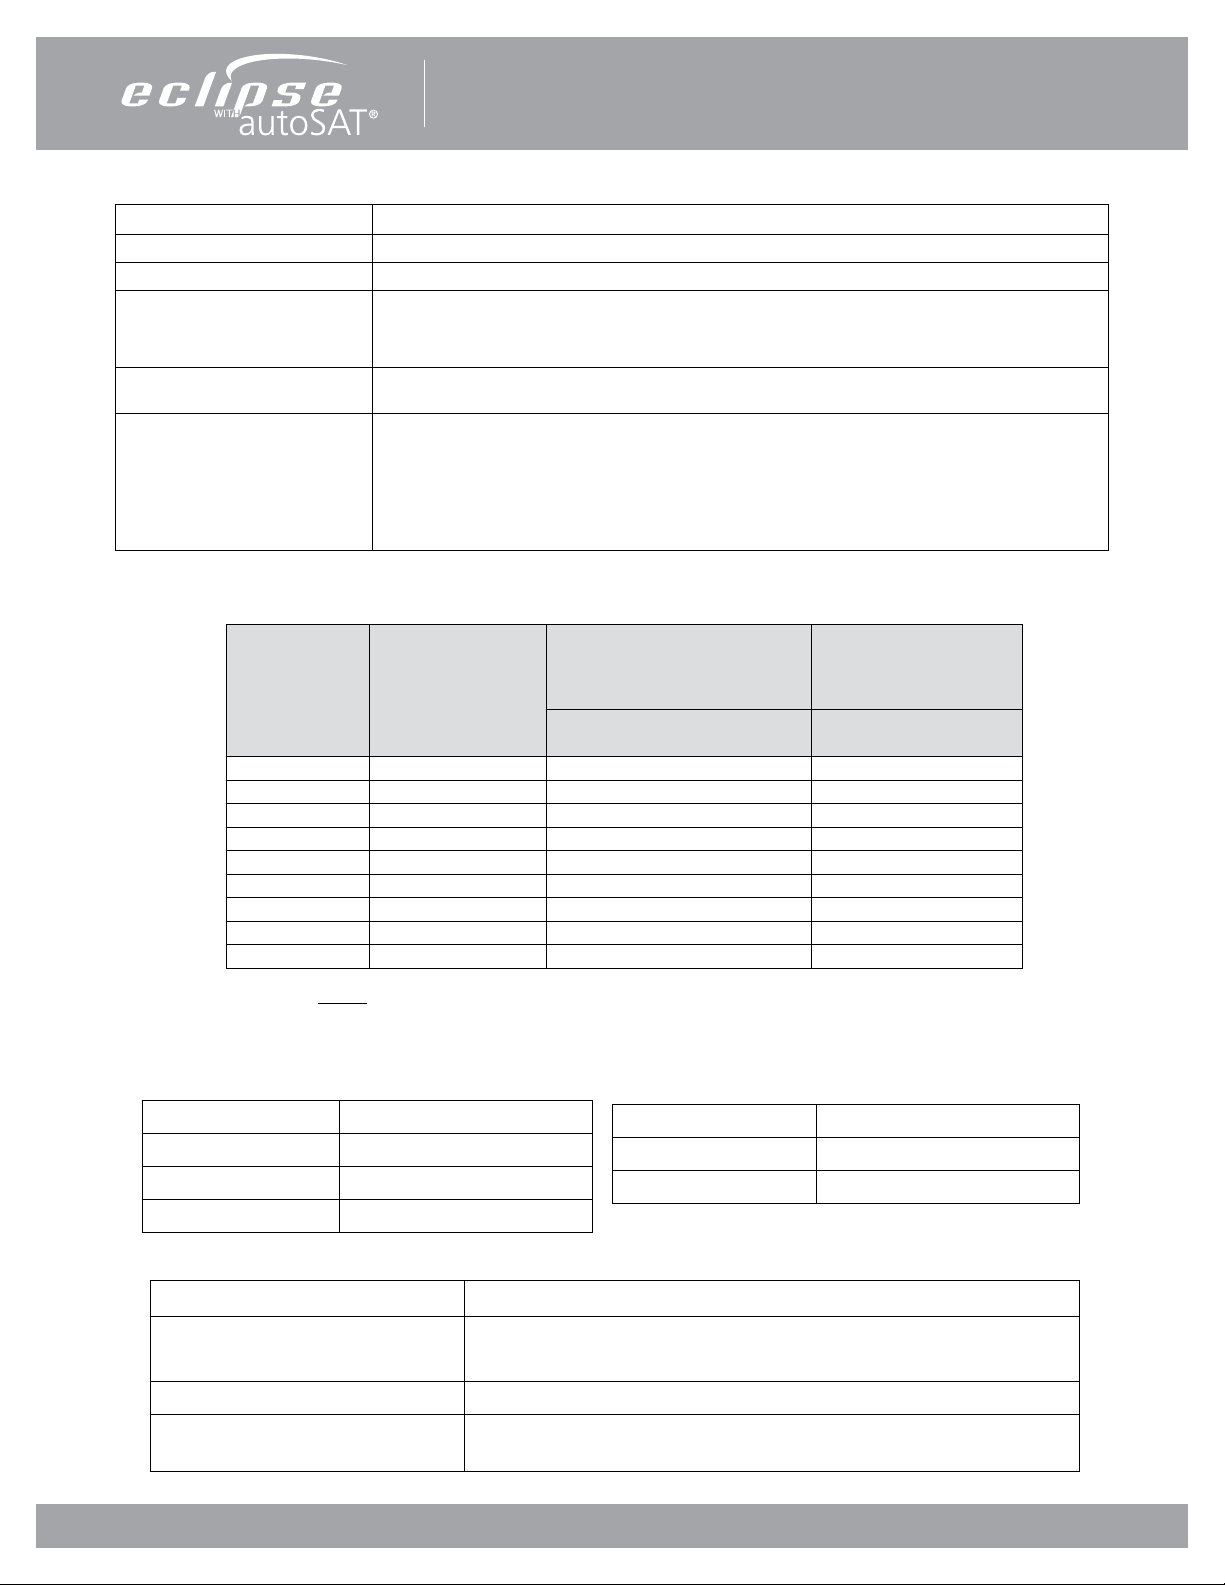
ECLIPSE 5 OXYGEN SYSTEM SPECIFICATIONS
Oxygen Concentrator
Dimensions (H x W X D)
Weight
Eclipse 5
Power Cartridge
Flow Settings
Continuous Flow
(measured in Liters Per Minute LPM)
Pulse Dose (measured in mL)
Continuous Flow Accuracy +/- 10% or 200ml/min, whichever is greater
Oxygen Concentration 87–95.6% for all ow settings
Maximum System Pressure 15 psig (103.5 kPa)
Oxygen Output Pressure 5.0 psig (34.5 kPa) nominal
Oxygen Concentration
Status Indicator
Nominal Sound Level
3.0 LPM Continuous Flow
3.0 Pulse Dose Mode
Operating Environment
Temperature
Humidity
Storage Environment
Temperature
Humidity
Altitude 0 – 13,123 feet (0 - 4,000 meters)
Nominal Power
0.5 LPM Continuous ow
3 LPM Continuous Flow
1.0 Pulse Dose Setting
6.0 Pulse Dose Setting
Battery Charging
Nominal Power Cartridge operating time
Continuous Flow
2.0 LPM
3.0 LPM
Pulse Dose (@ 12 BPM)
2.0
6.0
Continuous Flow Indication Expressed in liters per minute (LPM)
19.3 x 12.3 x 7.1 inches
(49.0cm x 31.2cm x 18.0cm)
15.0 pounds
3.4 pounds
0.5 to 3.0 LPM (0.5 liter increments)
16-96 (8mL increments), 128mL, 160mL, 192mL
Green Light = Normal Operation
Yellow Light = Warning or Caution, less than 85% ± 3%
Red Light Flashing = Abnormal Operation, less than 70% ± 5%
48 dB(A)
40 dB(A)
50º F to 104º F (+10° to 40°C)
10% to 95%, Non-condensing, 82.4°F (28°C) Maximum Dew point
-4º F to 140º F (-20° to 60°C)
Up to 95% Non-condensing
48 Watts
145 Watts
45 Watts
95 Watts
50 Watts
2.0 hours
1.3 hours
5.2 hours
3.5 hours
Note: Times will decrease with higher bolus size,
breath rate, ambient temperature, power cartridge
age and use over time.
• Loss of Power/Hot Power Cartridge
• Low Power Cartridge/Warm Power Cartridge
Audible Alarm Indicators
Back-Up Alarm Power 9V Internal Battery
Filters Air Inlet, HEPA, Compressor Intake
Device Classication IEC Class I, Type B Applied Part, IPX0
• Low Oxygen Output
• O
Flow Outside Normal Limits
2
• Unit Malfunction
• Low 9V battery
PN 20631679 Rev C
6
Page 7
Personal Ambulatory Oxygen System Provider Technical Manual
Pulse Dose Mode Specications
Pulse Settings 1.0 to 6.0, in 8mL increments and 128mL, 160mL, 192mL
Trigger Sensitivity Adjustable between settings of 1 (most sensitive) to 3 (least sensitive)
Adjustable Bolus Rise Time Adjustable settings of Fast(factory setting), Medium, or Slow
• Cannula pressure has dropped below the trigger point (typically between 0.135—0.37
Trigger Criteria
Minimum time between
breaths
Response to Missing Breaths
cm of H
• At least 1¼ seconds has passed since the last pulse began
1.25 seconds (max. 3 consecutive breaths)
While in Pulse Dose Mode, the Eclipse 5 is always monitoring for breath detection.
After 15 seconds of no breath detected, the Eclipse 5 “delivers” Continuous Flow at the
last Continuous Flow setting. After another 15 seconds, the Eclipse 5 stops delivering
Continuous Flow and waits 15 seconds for a breath. The Eclipse 5 will stay in this
modality until a breath is detected. (See Power Cartridge Conservation Feature, page 26.)
O of negative pressure)
2
Pulse Dose
BOLUS VOLUME +/ 15%
Setting
1.0 16 40 40
2.0 32 40 40
3.0 48 40 40
4.0 64 40 31
5.0 80 37 25
6.0 96 31 20
- 128 23 15
- 160 18 12
- 192 15 10
Bolus Size
(± 15%) mL
NOTE: Bolus volume decreases as breath rate exceeds published range.
Power Accessory Specications
AC Power Supply
Input Voltage 100-240VAC, 50-60 Hz
Input Power 245-260 VA
Output Voltage 28 VDC
Output Power 200W
AC Power Supply and
Power Cartridge (Battery)
Max Breath
Rate
DC Power Supply
Input Voltage 11.5-16VDC
Output Voltage 26 VDC
Output Power 150W Max
DC Power Supply
Max Breath
Rate
Power Cartridge (Battery)
Output voltage 14.8 VDC
Capacity
Nominal Power Cartridge Life 80% Capacity after 500 Charge/Discharge cycles
Power Cartridge Recharge Time
Quantity (2) 97.5 W-hrs batteries
(Each containing 7.92 grams equivalent Lithium content)
1.8 to 5.0 hours, dependent on ow setting, to achieve 80% capacity
from a fully discharged Power Cartridge
PN 20631679 Rev C
7
Page 8
Personal Ambulatory Oxygen System Provider Technical Manual
Independent Safety Testing
Eclipse System and Eclipse Concentrator, Model 1000B
Safety
Electromagnetic
Compatibility
AC Power Supply, Model 5941
Safety IEC 60601-1:1988 + A1:1991 + A2:1995
Electromagnetic
Compatibility
DC Power Supply, Model 5942
Safety
Electromagnetic
Compatibility
Power Cartridge 2400, PN 7082
Safety
Electromagnetic
Compatibility
IEC 60601-1 :1988 + A1 :1991 + A2 :1995 + Corrigendum (6/95)
EN 60601-1(1990) + A1(1993) + A2(1995) + A12(1993) + A13(1996) + Corrigenda (7/94)
FCC 15B (Sec. 107 & 109), EN55011, EN60601-1-2 :2001, EN6100-3-2, EN61000-3-3, IEC61000-4-2,
IEC61000-4-3, IEC61000-4-4, IEC61000-4-5, IEC61000-4-6, IEC61000-4-8, IEC61000-4-11, IEC 60601-12 :2001, RTCA DO 160 Rev E
FCC 15B (Sec. 107 & 109), EN55011, EN60601-1-2 :2001, EN6100-3-2, EN61000-3-3, IEC61000-4-2,
IEC61000-4-3, IEC61000-4-4, IEC61000-4-5, IEC61000-4-6, IEC61000-4-8, IEC61000-4-11, EN55014-1
Portions of IEC 60601-1:1988 + A1:1991 + A2:1995
FCC 15B (Sec. 109), EN55011, EN60601-1-2 :2001, IEC61000-4-2, IEC61000-4-3, IEC61000-4-4,
IEC61000-4-6, IEC 60601-1-2 :2001
IEC 62133, UL60950-1, First Edition (UL File MH29443), IEC 60601-1:1988 + A1:1991 + A2:1995, UN
Transportation Tests T1-T8
EN 61000-6-3 :2001 (EN55022 :1998+A1 :2001+A2 :2003), EN61000-6-1 :2001, EN61000-42 :1995+A1 :1998, EN61000-4-3 :2002
Any CSA-CUS mark for the Eclipse 5 system does not encompass operation with the DC Power Supply Model 5942.
PROVIDER SUPPORT POLICY
Objective: As a manufacturer our organizational goal is to provide customer support and assistance to
the highest level of excellence.
Customers are Providers (which include Dealers, Distributors and Agents).
Support includes, but is not limited to, troubleshooting and Return Material Authorizations (RMA).
Business Hours are Monday – Friday, 8:00am – 5:30pm EST.
Chart-SeQual can only support customers who are recognized as Providers, Dealers, Distributors and/or Agents.
These partnerships are qualied as having an existing account or are in the process of credit application
completion. All patient or end-user inquiries including but not limited to RMA, warranty or serial number
questions must be handled by their Provider.
Provider Support Policy: Chart-SeQual Technologies is unable to provide direct assistance, clinical advice or recommendations to a patient or end-user. Providers have sole responsibility in assisting their patients.
PN 20631679 Rev C
8
Page 9

Personal Ambulatory Oxygen System Provider Technical Manual
ELECTROMAGNETIC COMPATIBILITY
This equipment has been tested and found to comply with the limits for medical devices to the IEC60601-1-2 Electromagnetic
Compatibility standard. These limits are designed to provide reasonable protection against harmful interference in a typical
medical installation. This equipment generates, uses, and can radiate radio frequency energy and, if not installed according to the
instructions, may cause harmful interference to other devices in the vicinity. There is, however no guarantee that interference will
not occur in a particular installation. If this equipment does cause harmful interference to other devices, which can be determined
by turning the equipment o and on, the User is encouraged to try to correct the interference by one or more of the following
measures:
• Reorient or relocate the receiving device.
• Increase the separation distance between the equipment.
• Connect the equipment into an outlet on a circuit dierent from that which the other device(s) are connected.
• Consult with Chart SeQual’s Technical Support Department for help.
Medical Electrical Equipment needs special precautions regarding EMC and needs to be installed and put into service according
to the EMC information provided in this manual.
Portable and mobile RF communications equipment can aect Medical Electrical Equipment.
The use of Accessories, transducers, and cables other than those specied, with the exception of transducers and cables sold by
the Manufacturer of this device as replacement parts for internal components, may result in increased Emissions or decreased
Immunity of the Eclipse 5.
The Eclipse 5 should not be used adjacent to or stacked with other equipment and that if adjacent or stacked use is necessary, the
Eclipse 5 should be observed to verify normal operation in the conguration in which it will be used.
Guidance and Manufacturer’s Declaration electromagnetic emissions
The Eclipse 5 is intended for use in the electromagnetic environment specied below. The customer or the user of the
Eclipse 5 should assure that it is used in such an environment.
Emissions Test Compliance Electromagnetic environment - guidance
RF emissions
EN 55011
RF emissions
EN 55011
Harmonic emissions IEC
61000-3-2
Voltage uctuations/
icker emissions IEC
61000-3-3
Group 1
Class B
Class A
Complies
The Eclipse 5 uses RF energy only for its internal function.
Therefore, its RF emissions are very low and are not likely to
cause any interference in nearby electronic equipment.
The Eclipse 5 is suitable for use in all establishments, including
domestic establishments and those directly connected to
the public low - voltage power supply network that supplies
buildings used for domestic purposes.
PN 20631679 Rev C
9
Page 10

Personal Ambulatory Oxygen System Provider Technical Manual
Guidance and manufacturer’s declaration–electromagnetic immunity
The Eclipse 5 is intended for use in the electromagnetic environment specied below. The customer or the user of the Eclipse 5
should assure that it is used in such an environment.
Immunity test IEC 60601 test level Compliance level Electromagnetic environment – guidance
Electromagnetic
environment –
guidance
IEC 61000-4-2
Electrical fast transient/burst
±6 kV contact
±8 kV air
±2 kV for power supply
lines
±6 kV contact
±8 kV air
±2 kV for power supply
lines
Floors should be wood, concrete or ceramic
tile. If oors are covered with synthetic material, the relative humidity should be at least
30 %.
Mains power quality should be that of a typical commercial or hospital environment.
IEC 61000-4-4
Surge
IEC 61000-4-5
Voltage dips, short
interruptions and
voltage variations
on power supply
input lines IEC
61000-4-11
Power frequency
(50/60 Hz) magnetic eld IEC
61000-4-8
NOTE UT is the a.c. mains voltage prior to application of the test level.
±1 kV for input/output lines
±1 kV line(s) to line(s)
±2 kV line(s) to earth
<5 % UT
(>95 % dip in UT )
for 0,5 cycle
40 % UT
(60 % dip in UT )
for 5 cycles
70 % UT
(30 % dip in UT )
for 25 cycles
<5 % UT
(>95 % dip in UT )
for 5 sec
3 A / m 3 A / m Power frequency magnetic elds should be at
N/A
±1 kV line(s) to line(s)
±2 kV line(s) to earth
<5 % UT
(>95 % dip in UT )
for 0,5 cycle
40 % UT
(60 % dip in UT )
for 5 cycles
70 % UT
(30 % dip in UT )
for 25 cycles
<5 % UT
(>95 % dip in UT )
for 5 sec
Mains power quality should be that of a typical commercial or hospital environment.
Mains power quality should be that of a typical commercial or hospital environment. If
the user of the Eclipse 5 requires continued
operation during power mains interruptions,
it is recommended that the Eclipse 5 be powered from an uninterruptible power supply or
a battery.
levels characteristic of a typical location in a
typical commercial or hospital environment.
PN 20631679 Rev C
10
Page 11
Personal Ambulatory Oxygen System Provider Technical Manual
Guidance and manufacturer’s declaration–electromagnetic immunity
The Eclipse 5 is intended for use in the electromagnetic environment specied below. The customer or the user of the Eclipse 5
should assure that it is used in such an environment.
Immunity test IEC 60601 test level Compliance level Electromagnetic environment – guidance
Conducted RF
IEC 61000-4-6
3 Vrms
150 kHz to 80 MHz
3 Vrms
Portable and mobile RF communications
equipment should be used no closer to any
part of the Eclipse 5, including cables, than
the recommended separation distance calRadiated RF
IEC 61000-4-3
3 V/m
80 MHz to 2,5 GHz
3 V/m
culated from the equation applicable to the
frequency of the transmitter.
Recommended separation distance
d = 1.2 P
80 MHz to 800 MHz
d = 1.2 P
800 MHz to 2,5 GHz
d = 2.3 P
where P is the maximum output power rating
of the transmitter in watts (W) according to
the transmitter manufacturer and d is the
recommended separation distance in metres
(m).
Field strengths from xed RF transmitters, as
determined by an electromagnetic site sur-
vey, ashould be less than the compliance level
in each frequency range. b
Interference may occur in the vicinity of
equipment marked with the following sym-
bol:
NOTE 1 At 80 MHz and 800 MHz, the higher frequency range applies.
NOTE 2 These guidelines may not apply in all situations. Electromagnetic propagation is aected by absorption and reection
from structures, objects and people.
a
Field strengths from xed transmitters, such as base stations for radio (cellular/cordless) telephones and land mobile radios,
amateur radio, AM and FM radio broadcast and TV broadcast cannot be predicted theoretically with accuracy. To assess
the electromagnetic environment due to xed RF transmitters, an electromagnetic site survey should be considered. If the
measured eld strength in the location in which the Eclipse 5 is used exceeds the applicable RF compliance level above, the
Eclipse 5 should be observed to verify normal operation. If abnormal performance is observed, additional measures may be
necessary, such as re-orienting or relocating the Eclipse 5.
b
Over the frequency range 150 kHz to 80 MHz, eld strengths should be less than 3 V/m.
PN 20631679 Rev C
11
Page 12
Personal Ambulatory Oxygen System Provider Technical Manual
Pd 2.1
Pd 2.1
Pd 3.2
Recommended separation distances
between portable and mobile RF communications equipment and the Eclipse 5
The Eclipse 5 is intended for use in an electromagnetic environment in which radiated RF disturbances are controlled. The customer or the user of the Eclipse 5 can help prevent electromagnetic interference by maintaining a minimum distance between
portable and mobile RF communications equipment (transmitters) and the Eclipse 5 as recommended below, according to the
maximum output power of the communications equipment.
Rated maximum out-
put power of transmit-
ter
W
0,01 0.12 0.12 0.23
0,1 0.38 0.38 0.73
1 1.2 1.2 2.3
10 3.8 3.8 7.3
100 12 12 23
For transmitters rated at a maximum output power not listed above, the recommended separation distance d in metres (m) can
be estimated using the equation applicable to the frequency of the transmitter, where P is the maximum output power rating of
the transmitter in watts (W) according to the transmitter manufacturer.
150 kHz to 80 MHz 80 MHz to 800 MHz 800 MHz to 2,5 GHz
Separation distance according to frequency of transmitter
m
NOTE 1 At 80 MHz and 800 MHz, the separation distance for the higher frequency range applies.
NOTE 2 These guidelines may not apply in all situations. Electromagnetic propagation is aected by absorption and reection
from structures, objects and people.
PN 20631679 Rev C
12
Page 13
Personal Ambulatory Oxygen System Provider Technical Manual
How The Eclipse 5 Works
INTRODUCTION
The Eclipse 5, Personal Ambulatory Oxygen System with autoSAT Technology is a portable medical device used to extract
oxygen from the atmosphere, concentrate it to 87–95.6% and present the oxygen to the patient. The device will operate in
Continuous Flow Mode or Pulse Dose Mode. In Continuous Flow Mode the oxygen is provided at a constant ow rate between
0.5 and 3.0 LPM. In Pulse Dose Mode, oxygen is supplied in a bolus at the beginning of each inspiration, providing a selectable
range setting of 16mL to 192mL.
The Eclipse 5 operates from either external power or from an internal rechargeable Power Cartridge. The system includes a
“Smart” battery charger that recharges the internal Power Cartridge whenever the Eclipse 5 is connected to AC or DC power.
The system monitors and controls both the power source and the Power Cartridge charger.
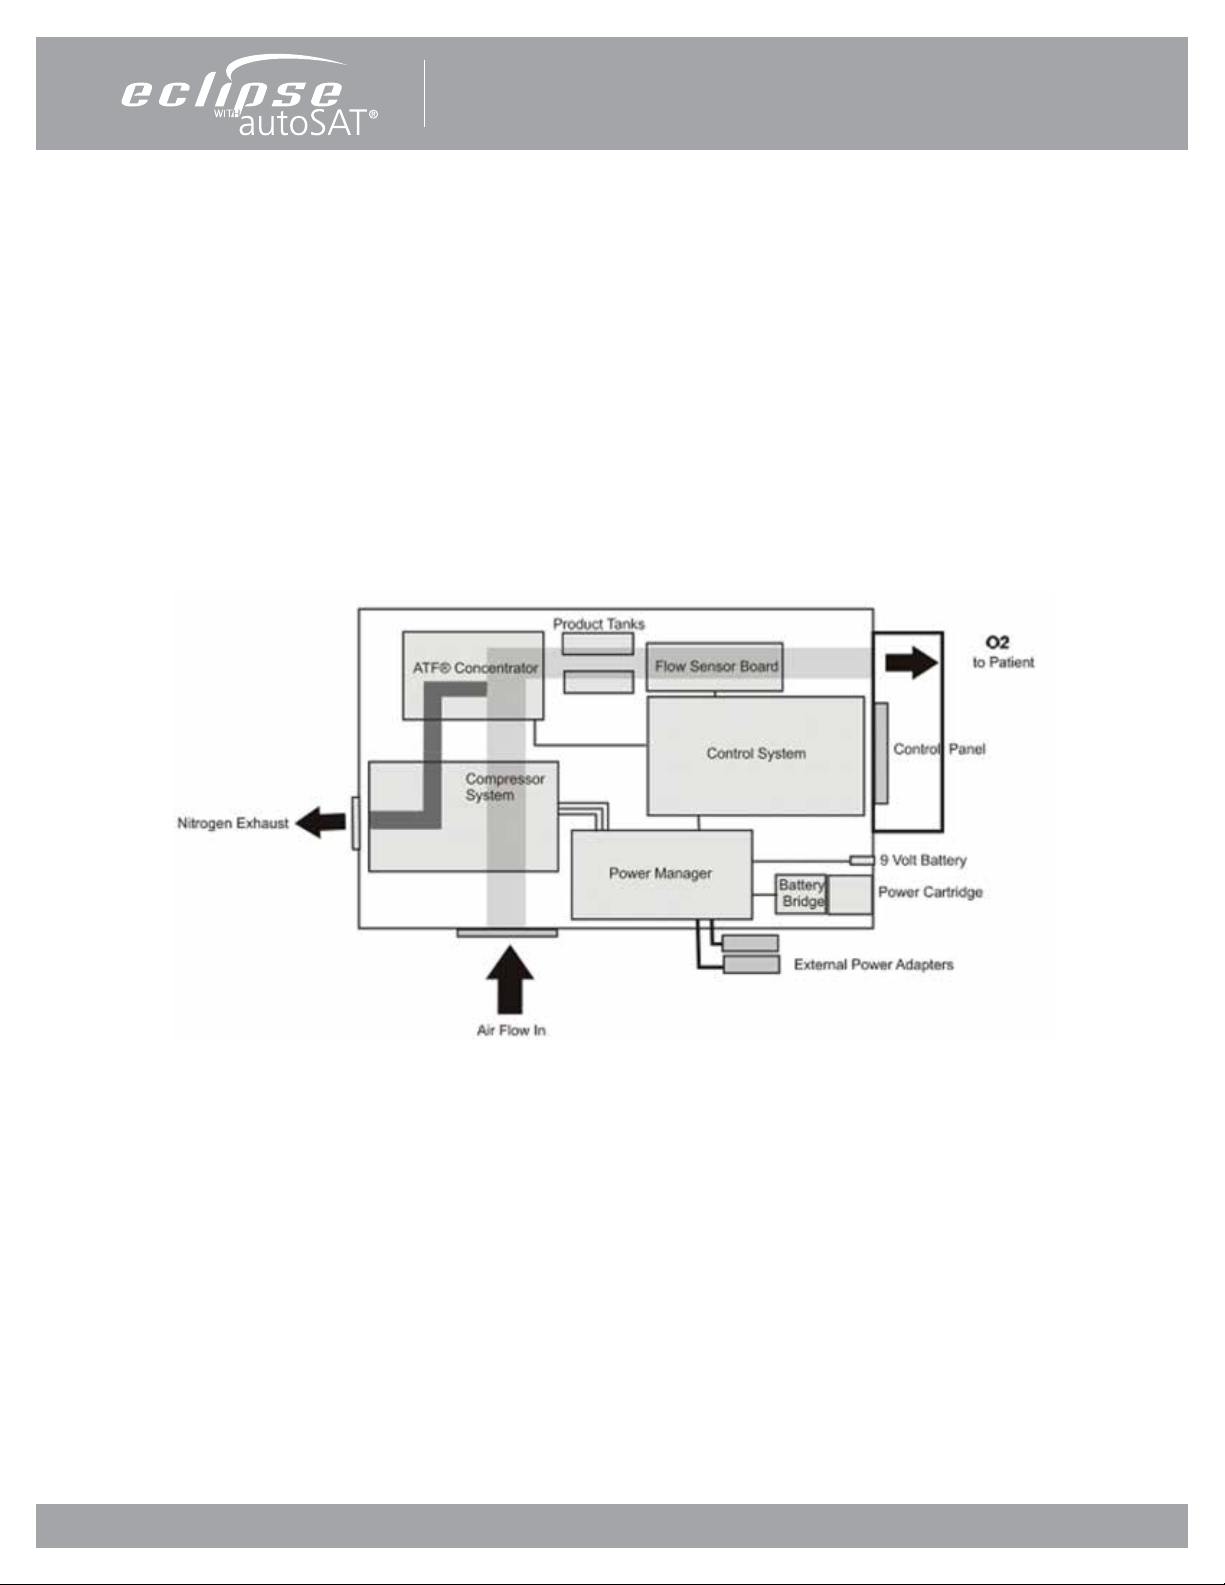
Figure 1: Eclipse 5 System Block Diagram
ATF® CONCENTRATOR MODULE
The Eclipse 5 uses a passive system to separate oxygen from air. Air ows into the Eclipse 5 where it is ltered and then
enters the compressor. Pressurized air ows from the compressor into the ATF® Concentrator Module where it is separated
into oxygen and nitrogen components. The air separation process uses a rotary valve system to force air through a series of
pressurized sieve beds. Through a process known as “vacuum pressure swing adsorption,” nitrogen molecules are collected on
an adsorbent material allowing the concentrated oxygen to be forced through a sieve bed into the product tank. The nitrogen
molecules are then purged from the adsorbent material using a vacuum pressure cycle.
Oxygen ows from the product tank through a HEPA lter and past a sensor that measures ow and concentration. A ow
control valve regulates the ow of concentrated oxygen presented to the patient. The process is continuously repeated during
operation.
PN 20631679 Rev C
13
Page 14
Personal Ambulatory Oxygen System Provider Technical Manual
COMPRESSOR AND COMPRESSOR ENCLOSURE
The Eclipse 5 Compressor is a two-cylinder, variable speed wobble piston compressor, driven by a highly ecient Brushless
DC (BLDC) motor. When air ows into the Compressor enclosure, it passes through an air intake lter/muer that mues
sound and lters out impurities. Using one cylinder, the compressor takes in ltered air and delivers it to the ATF Module under
pressure. The second cylinder draws a vacuum on the ATF module and exhausts nitrogen rich gas to the exhaust vent.
Using a multifaceted approach, sound, heat, and vibration generated by the compressor are mitigated by the compressor
enclosure. Vibration and structure-borne noise are addressed by the dual axis gimbal that supports the compressor and the
tubing that connects the compressor to the ATF module. The rigid walls of the compressor enclosure and the sound adsorbing
foam that lines it diminish the radiated noise. The centrifugal blower mounted within the compressor enclosure serves to
eciently draw cooling air in over the compressor cylinders while simultaneously pushing exhaust gas out of the concentrator.
POWER DISTRIBUTION
The Power Manager takes external power that comes into the Eclipse 5 from the power supplies or Power Cartridge and
monitors and controls power distribution to the rest of the Eclipse 5 system. The Power Manager drives the compressor, ATF
module motor, blower, and provides power to the Control Board. In addition, when the unit is connected to an external power
source, the power manager monitors and controls the recharging of the Power Cartridge.
CONTROL BOARD
The Control Board is at the center of nearly all Eclipse 5 functions. The board constantly monitors dynamics such as temperatures,
pressures, product ow and concentration, and user input. It determines proper compressor and ATF motor speeds needed
in order to provide optimum system performance. In addition, this system supports the operation of the Control Panel and its
indicators.
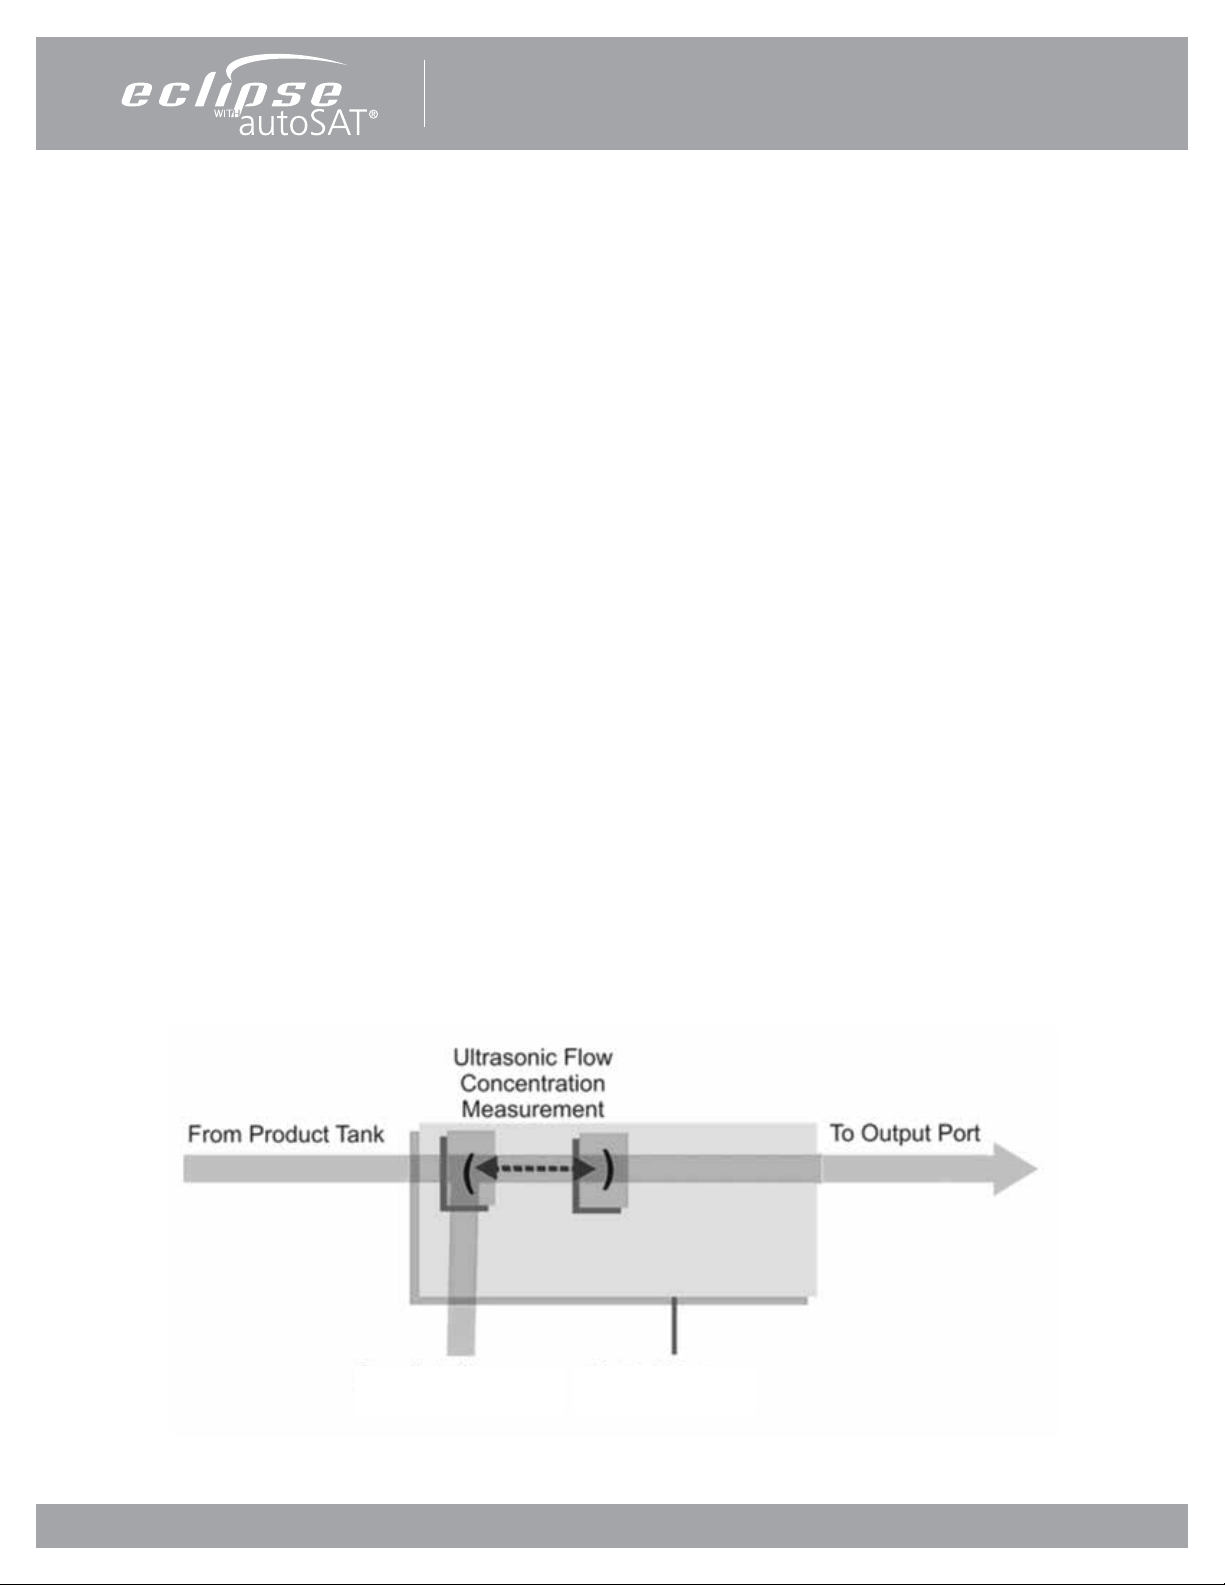
The Control Board utilizes a proprietary ultrasonic ow and concentration sensor and a ow control valve to accurately control
the ow of oxygen in Continuous Flow and Pulse Dose Modes.
Control BoardProduct Pressure
Figure 2: Flow Sensor Board Diagram
PN 20631679 Rev C
14
Page 15
Personal Ambulatory Oxygen System Provider Technical Manual
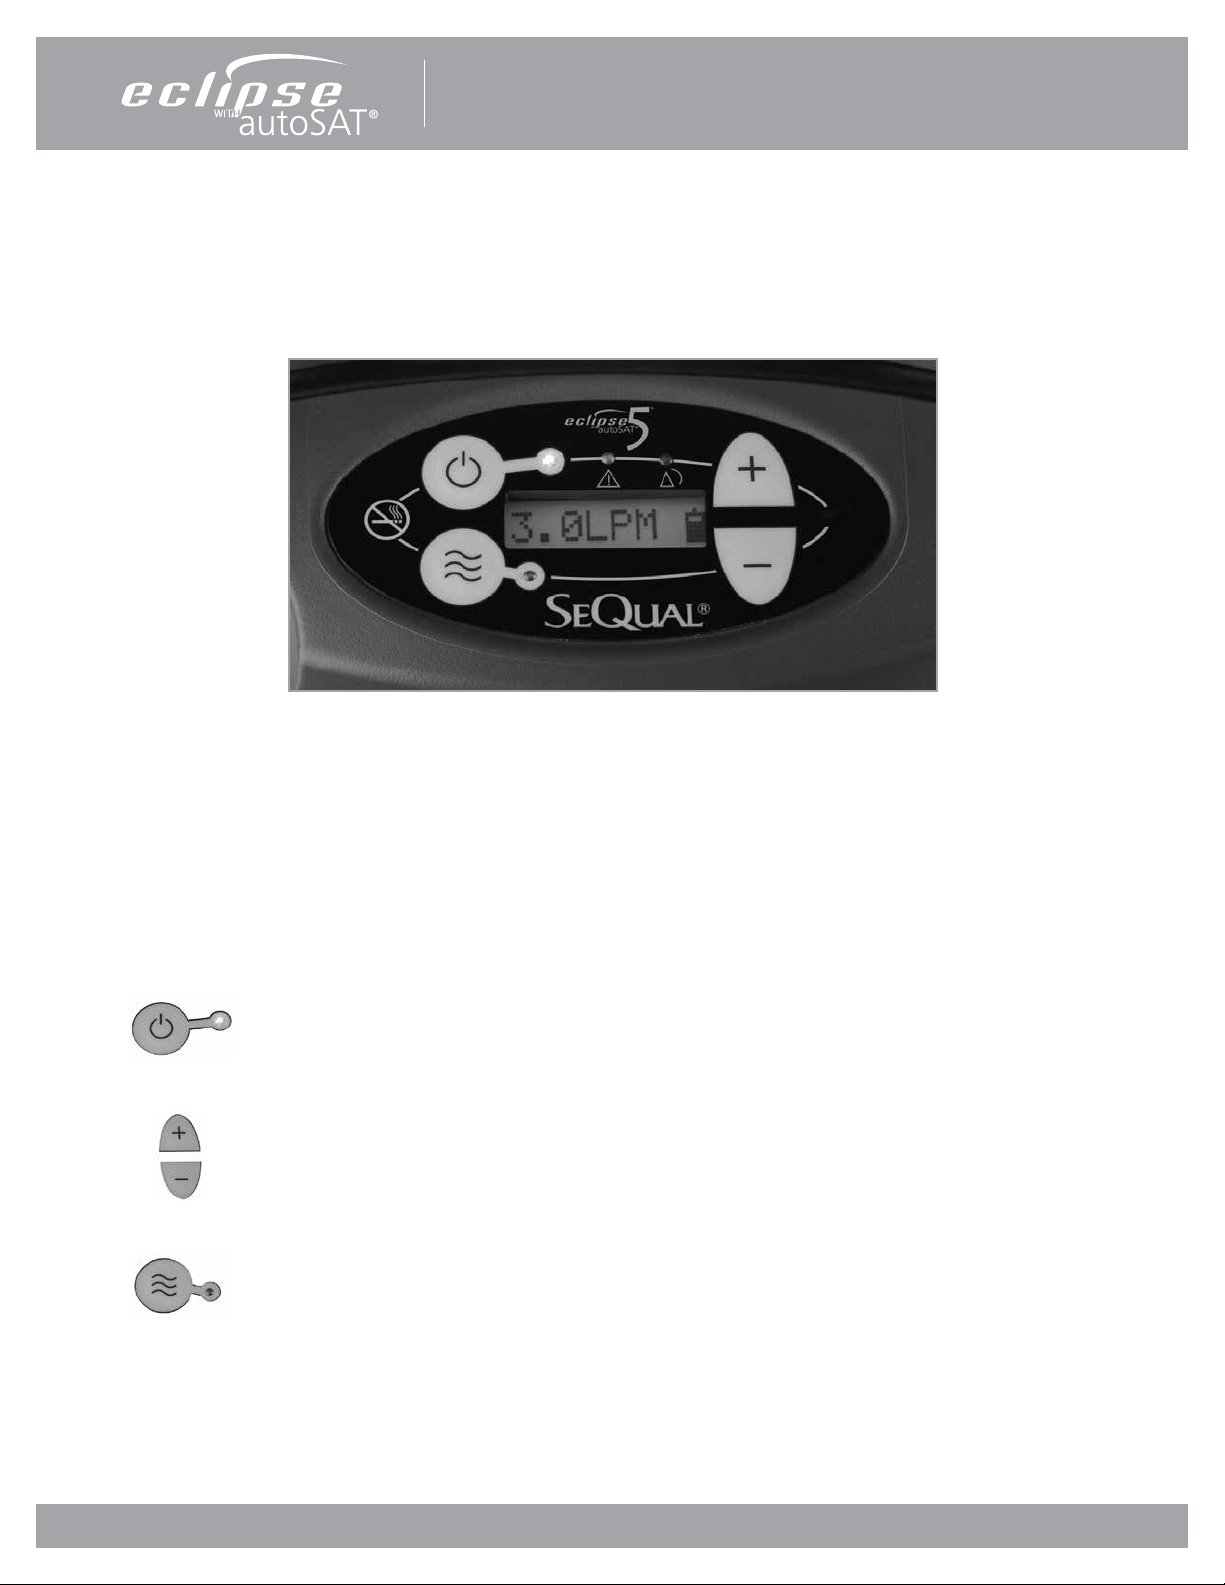
CONTROL PANEL
The control panel provides a user interface consisting of a membrane panel keyboard, Liquid Crystal Display (LCD), external
power present indicator, Power Cartridge capacity indicator, alarm status indicators, and an audio transducer. The user interface
informs the user of the system status and allows the user to set the desired ow rate and ow mode.
Figure 3: User Control Panel
USER CONTROLS AND SYSTEM STATUS INDICATORS
The Eclipse 5 control panel displays important operating information. This section will help you understand this operating information.
ON/OFF Button (Green) Indicator: This button powers the device ON or OFF. The Green Indicator is
illuminated when the device is ON.
Increase or Decrease Setting Buttons:
Use these buttons to change prescribed settings.
Delivery Mode Button and Indicator: The button toggles between Continuous Flow and Pulse Dose
Mode. The Pulse Dose Mode activates autoSAT Technology—as the patient’s breath rate changes,
the Eclipse 5 servo controls the unit to provide a consistent bolus size. The Pulse Dose Mode allows
a signicant increase in the operating time while powered by the battery. When Pulse Dose Mode is
activated, the green Delivery Mode Indicator illuminates and a pulse of oxygen is delivered with each
inspiratory eort. When in Continuous Mode, the LED is o.
PN 20631679 Rev C
15
Page 16
Personal Ambulatory Oxygen System Provider Technical Manual
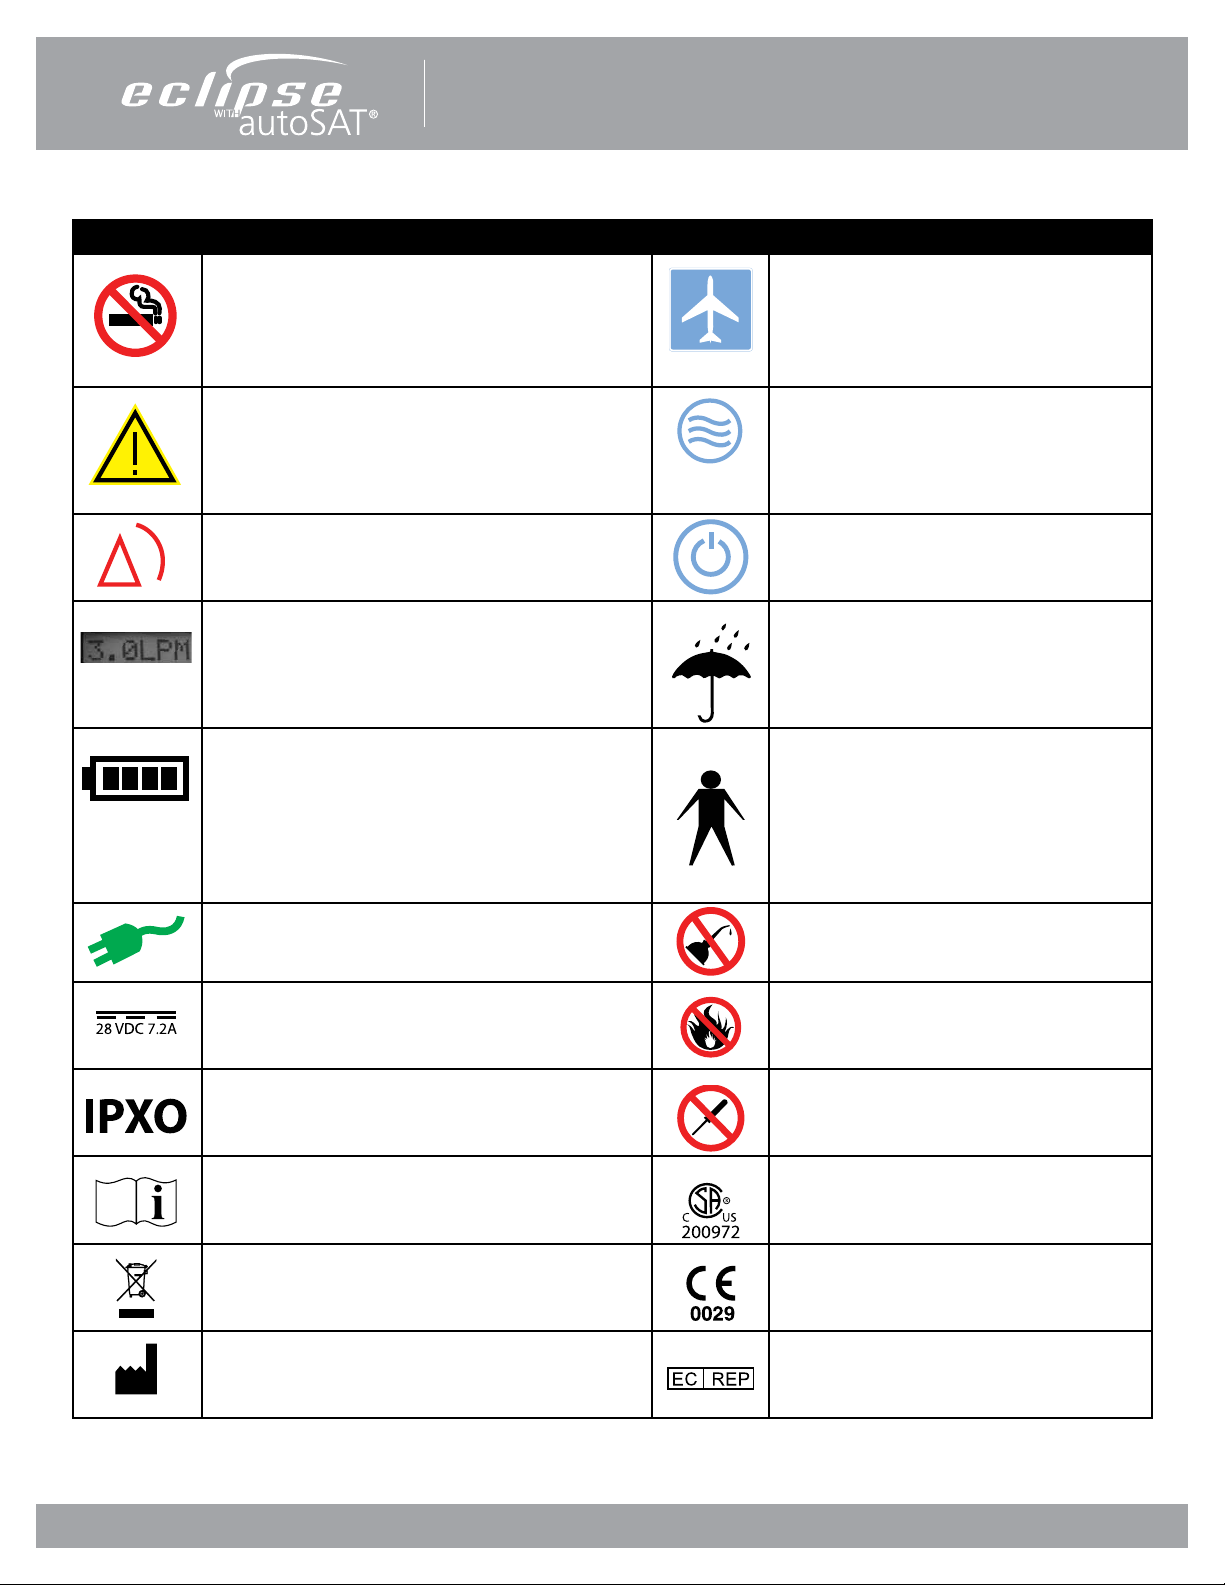
USER CONTROLS AND SYSTEM STATUS INDICATORS, CONT.
Symbol Denition Symbol Denition
No Smoking Icon (button): Do not smoke near unit. Providers can
access provider mode software functions using the Control Panel. All
provider mode information is displayed on the LCD. The software shall
advance the following Eclipse 5 display mode when the “No Smoking”
icon is pressed (see pg. 15).
ALERT (Yellow) Indicator—Low and Medium Priority Alerts:
When illuminated, this indicates a low priority awareness condition or
Caution. Use of the unit may continue and refer to the Troubleshooting
Table for the proper response. A ashing yellow indicates a medium
priority alert. A prompt response is necessary.
ALARM (Red) Indicator —High Priority Alarms: Indicates a high
priority alarm condition. An immediate response is necessary. Refer to
the Troubleshooting Table.
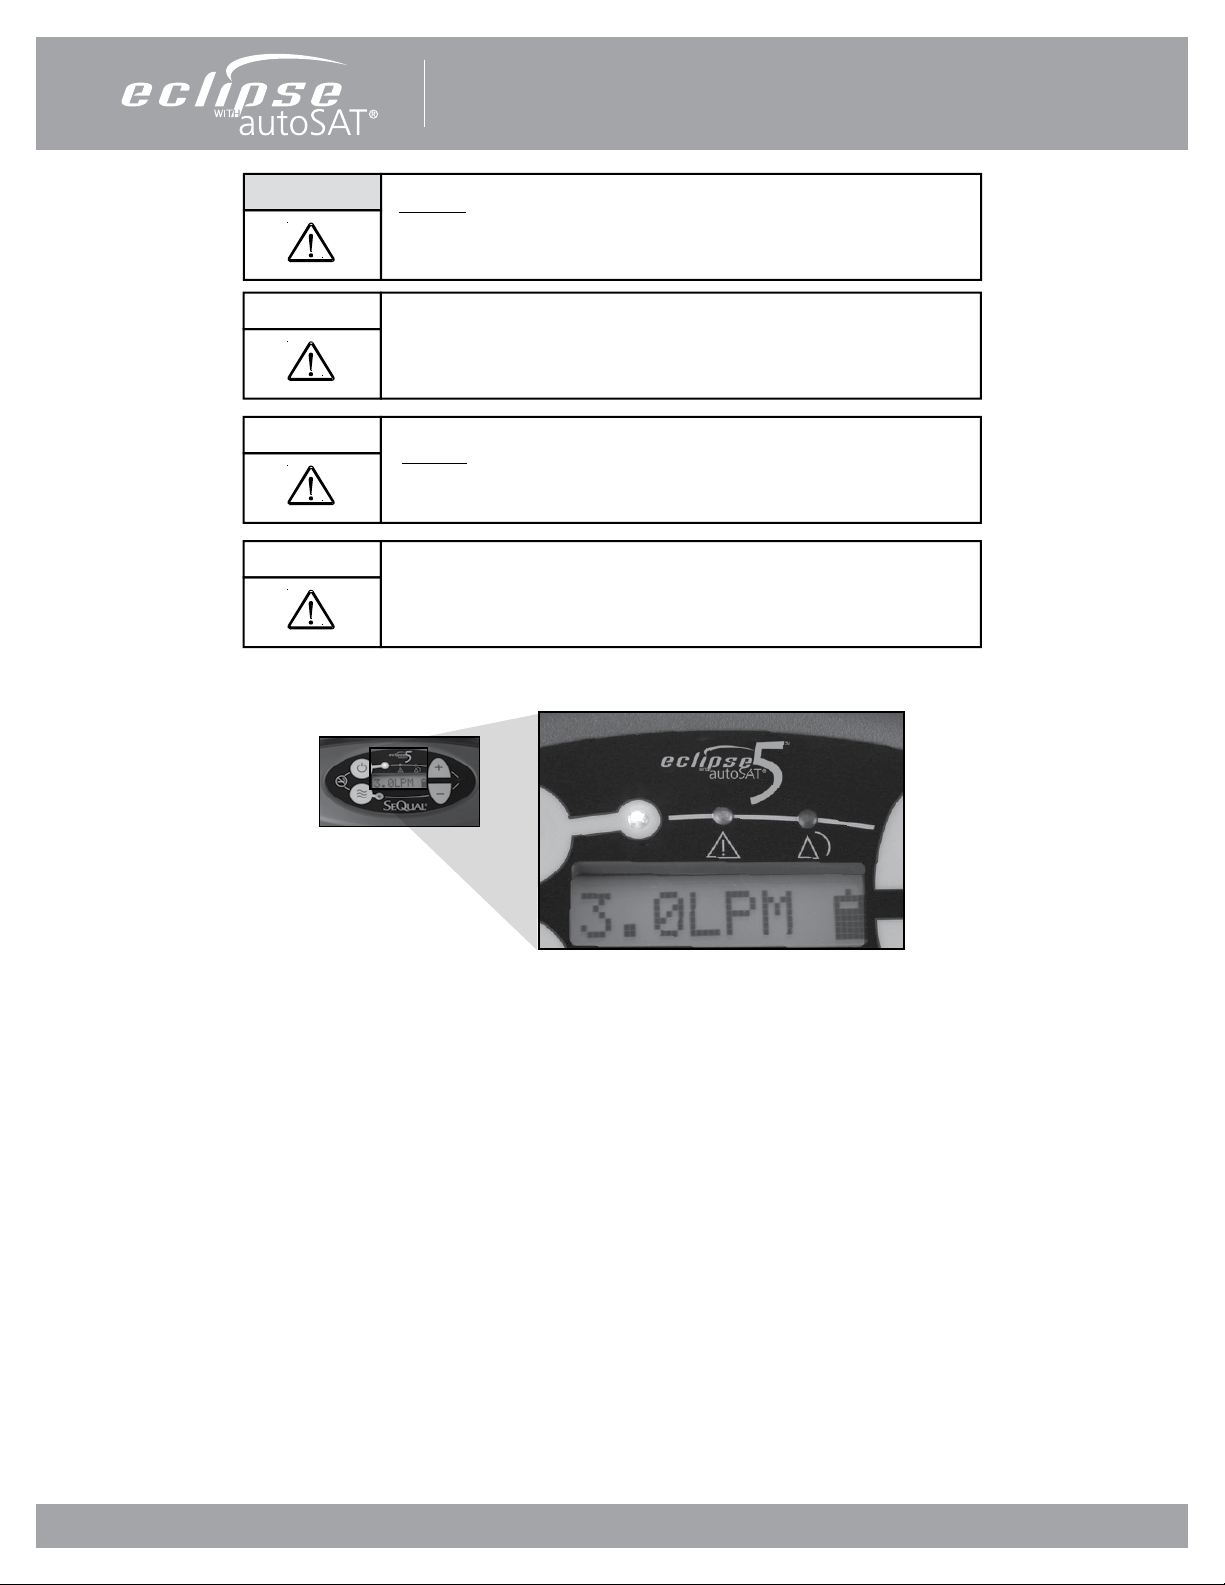
Flow Setting Indicator: This is the main focus on your control panel.
The home care provider will correctly set the prescribed ow for either
the Continuous Flow Mode (LPM) and/or the Pulse Dose settings (mL).
Each time you power the device ON, the previous mode and/or setting
has been saved and will be used at start-up.
Power Cartridge (battery) Status Gauge: This indicator displays
the charge remaining in the battery. Each of the ve horizontal gray
bars represents approximately 20% of the total battery charge. When
the battery is being charged, the charge indicator bars will blink in a
waterfall-type fashion.
If the battery is not installed, or if it is improperly installed, the Power
Cartridge (battery) Status Gauge will not be illuminated.
External Power Indicator: When the Eclipse 5 is properly plugged
in and is using the AC or DC Power Supply, this indicator will appear on
the User Control Panel.
FAA approved for use aboard passenger aircraft.
Pulse Mode Operation
Device operating normally; power button
Do not get wet.
Type B Applied Part (degree of protection against
electric shock)
Use no oil or grease.
DC Voltage No open or naked ames.
Drip Proof Equipment-IPX0: The Eclipse 5 enclosure does not provide
protection against the harmful eects of the ingress of liquids. (IPX0,
per IEC 60529)
Read user manual before operation. See user manual for instructions.
This symbol is to remind the equipment owners to return it to a
recycling facility at the end of its life, per Waste Electrical and Electronic
Equipment (WEEE) Directive.
Name and address of manufacturer Authorized representative in the European Community
Buzzer:
An audible alarm (or buzzer) is used to alert you to the operating condition of the device, either a warning or failure, and to
conrm a valid key press by the user.
No serviceable parts insde. Do not open cover.
Certied for both the U.S. and Canadian markets, to the
applicable U.S. and Canadian standards.
This device complies with the requirements of Directive
93/42/EEC concerning medical devices. It therefore bears
the CE marking as shown.
PN 20631679 Rev C
16
Page 17
Personal Ambulatory Oxygen System Provider Technical Manual
CONTINUOUS FLOW MODE
Continuous Flow Mode delivers a constant ow of oxygen to a patient by means of tubing and a nasal cannula at rates
between 0.5 LPM and 3.0 LPM. Within the Eclipse 5, concentrated oxygen is stored in a 500ml product tank at pressures in the
range of 5 to 9 psi. This pressure gives Continuous Flow Mode the capability to deliver the indicated ow rate to the patient
even if extension tubing is used, up to 50 feet long. In addition, the Eclipse 5 Continuous Flow Mode is fully compatible with
humidier use, with NC not exceeding 7 ft.
PULSE DOSE MODE
The Eclipse 5 Pulse Dose Mode delivers a measured bolus of oxygen at the very beginning of each inspiration. The approach
is based on the manner in which gas is absorbed into a patient’s airway. Eclipse 5 users may select pulse dose volume delivery
rates. Regardless of setting, the pulse prole is a simple square-wave pulse based on a 16 mL volume. (Refer to “Pulse Proles”
table below). Pulse durations are no less than 100 milli-seconds at the beginning of the inspiration. There are three Rise Time
settings (Slow, Medium, and Fast). The table below is for the FAST Rise Time setting (factory default is Fast).
Flow
Setting
1 8 120 16
2 9 213 32
3 10 288 48
4 11 349 64
5 12 400 80
6 13 443 96
128 15 512 128
160 17 565 160
192 19 606 192
The fundamental approach to triggering and controlling the oxygen bolus in Pulse Dose Mode is as follows:
The User may select a pulse trigger sensitivity in settings ranging from 1-3. Bolus volume should be prescribed by a physician
and may range from 16mL up to 192mL. The pulse will be triggered when the system meets all of the following criteria:
• The cannula pressure has dropped below the trigger point (typically between 0.135 and 0.37 cm H20)
Pulse Peak Flow,
LPM (volumetric)
Pulse Proles
Pulse Duration
(milli-second)
Bolus
Volume (ml)
• At least 1¼ seconds has passed since the last pulse began
PN 20631679 Rev C
17
Page 18

Personal Ambulatory Oxygen System Provider Technical Manual
PROVIDER MODE FUNCTIONS
Providers can access provider mode software functions using the Control Panel. All provider mode information is displayed
on the LCD. The software shall advance the following Eclipse 5 display mode when the “No Smoking”
icon is pressed:
• AlarmCode(ALRM)-Displaysmostrecentalarmcode.Additionalalarmcodes
will also be displayed, if present, by continuing to press the + key.
• PulseSensitivity(PS)
• HoursofOperation(HRS)
• 9-voltBatteryStatus(9V)
• RiseTime(BOL)
• ControlBoardSoftwareRevision(CS)
• PowerManagerSoftwareRevision(PM)
ALARM CODE
While in Continuous Flow Mode, pressing the “No Smoking” icon displays the current Eclipse 5 alarm code on the LCD. This
code may be used to help diagnose conditions indicated by the alert and alarm indicators. The LCD will show “ALRM=”. Refer
to the “Level 1 Maintenance” section for further information.
PULSE MODE SENSITIVITY ADJUSTMENT
During patient setup, a qualied clinician may adjust the Pulse Mode sensitivity to best suit patient inspiratory eort.
The LCD will show “PS=x”. PS=1 is the most sensitive setting, PS=3 is the least sensitive setting. Factory defaut is PS=2.
HOURS OF OPERATION
The Eclipse 5 hour meter provides valuable information on hours of operation. Providers may display the total number of
hours of operation using the Control Panel. The display counts up to “99,999” hours, then rolls over to “00000.” The LCD will
show “HRS xxxxx”. Refer to the “Level 1 Maintenance” section for further information.
9VOLT BATTERY STATUS
The status of the 9-Volt Battery is provided. This is the actual voltage of the 9-Volt battery. The LCD will show “9V=x.x”.
RISE TIME BOLUS DELIVERY
During patient set up, a qualied clinician may adjust the Rise Time (fast, medium or slow), i.e. how quickly the set bolus
volume is delivered. The LCD will display “BOL=”. Factory default is BOL=FAST.
SOFTWARE VERSION
Providers may occasionally need to obtain the software version on the Eclipse 5 to perform maintenance. The provider may
display software version numbers for both the Control Board and the Power Manager software using the Control Panel. Refer
to the “Level 1 Maintenance” section for further information.
Example: CB394111: Control Board PCB: PN 3941 with Rev 1.1 software
PM593211: Power Manager PCB: PN 5932 with Rev 1.1 software
PN 20631679 Rev C
18
Page 19
Personal Ambulatory Oxygen System Provider Technical Manual
SERVICE MODE FUNCTIONS
Factory maintenance or service updates may sometimes be required on the Eclipse 5. Factory and qualied factory-trained
technicians can access service mode software functions by using the Service Port located on the back of the unit. The
Service Port is not for patient use.
Figure 4: Eclipse 5 Service Port
ECLIPSE 5 DATA ACQUISITION TOOL EDAT
EDAT is the world’s rst computer-based data retrieval service tool for oxygen concentrators. EDAT is proprietary to SeQual
Technologies Inc., and is comprised of both hardware and software components. EDAT is SeQual’s global solution for your
service and support needs.
EDAT software is capable of sensing and displaying historical event logs and values of components and sensors within the
Eclipse 5 system. This can be used to determine system faults or user errors and communicate data for troubleshooting or
documentation related to service and updates. EDAT hardware attaches or Plugs into the Eclipse 5 Service Port, and into a
computer’s USB port.
The EDAT software set allows a provider to set-up a hub and spoke service center. Field service reps can travel to a patient’s
home, troubleshoot and transmit the data to either in-house tech support personnel or SeQual. Support personnel can
diagnose, provide solutions and print documentation for equipment records.
EDAT also makes Eclipse 5 software upgrades easy and accessible.
For more information on EDAT, contact Chart-SeQual Technologies Technical Service at 1-800-482-2473 and reference EDAT PN 5535-SEQ.
PN 20631679 Rev C
19
Page 20

Personal Ambulatory Oxygen System Provider Technical Manual
POWER SUPPLIES
The Eclipse 5 may operate from either the AC or DC Power Supply or the Power Cartridge. When power is available from an
external supply, the Eclipse 5 will draw from the external source rather than depleting the Power Cartridge. Connection to
external power is indicated when the External Power Present Indicator located on the Control Panel is illuminated.
AC POWER SUPPLY
The AC Power Supply is a universal input type, capable of accepting 100-240VAC, 50/60 Hz. It is capable of delivering up to
200W of 28VDC output. The input cord requires a grounded receptacle. Country specic cords or universal power adapter PN
5591-SEQ may be used with the AC Power Supply, as the power supply is equipped with a universal input receptacle. When
used in a medical care facility, international safety standards require the use of hospital grade AC power cord with the Eclipse 5.
Figure 5: Eclipse 5 AC Power Supply
The Eclipse 5 AC Power Supply does not contain a fan. When in use, the AC Power Supply should be located in a well-ventilated
area.
Located near the output cord, there is a green LED that is illuminated when the AC Power Supply is supplying 28VDC power.
If the LED is not illuminated, there is no input power available. In addition, the Power Supply contains protection circuits for
output over-current, input over-voltage, and internal over-temperature conditions. If any of these conditions exist, output
power will be interrupted and the LED turns o. However, these three conditions are self-resetting, such that output power will
resume when protection circuits fall back into acceptable operating ranges.
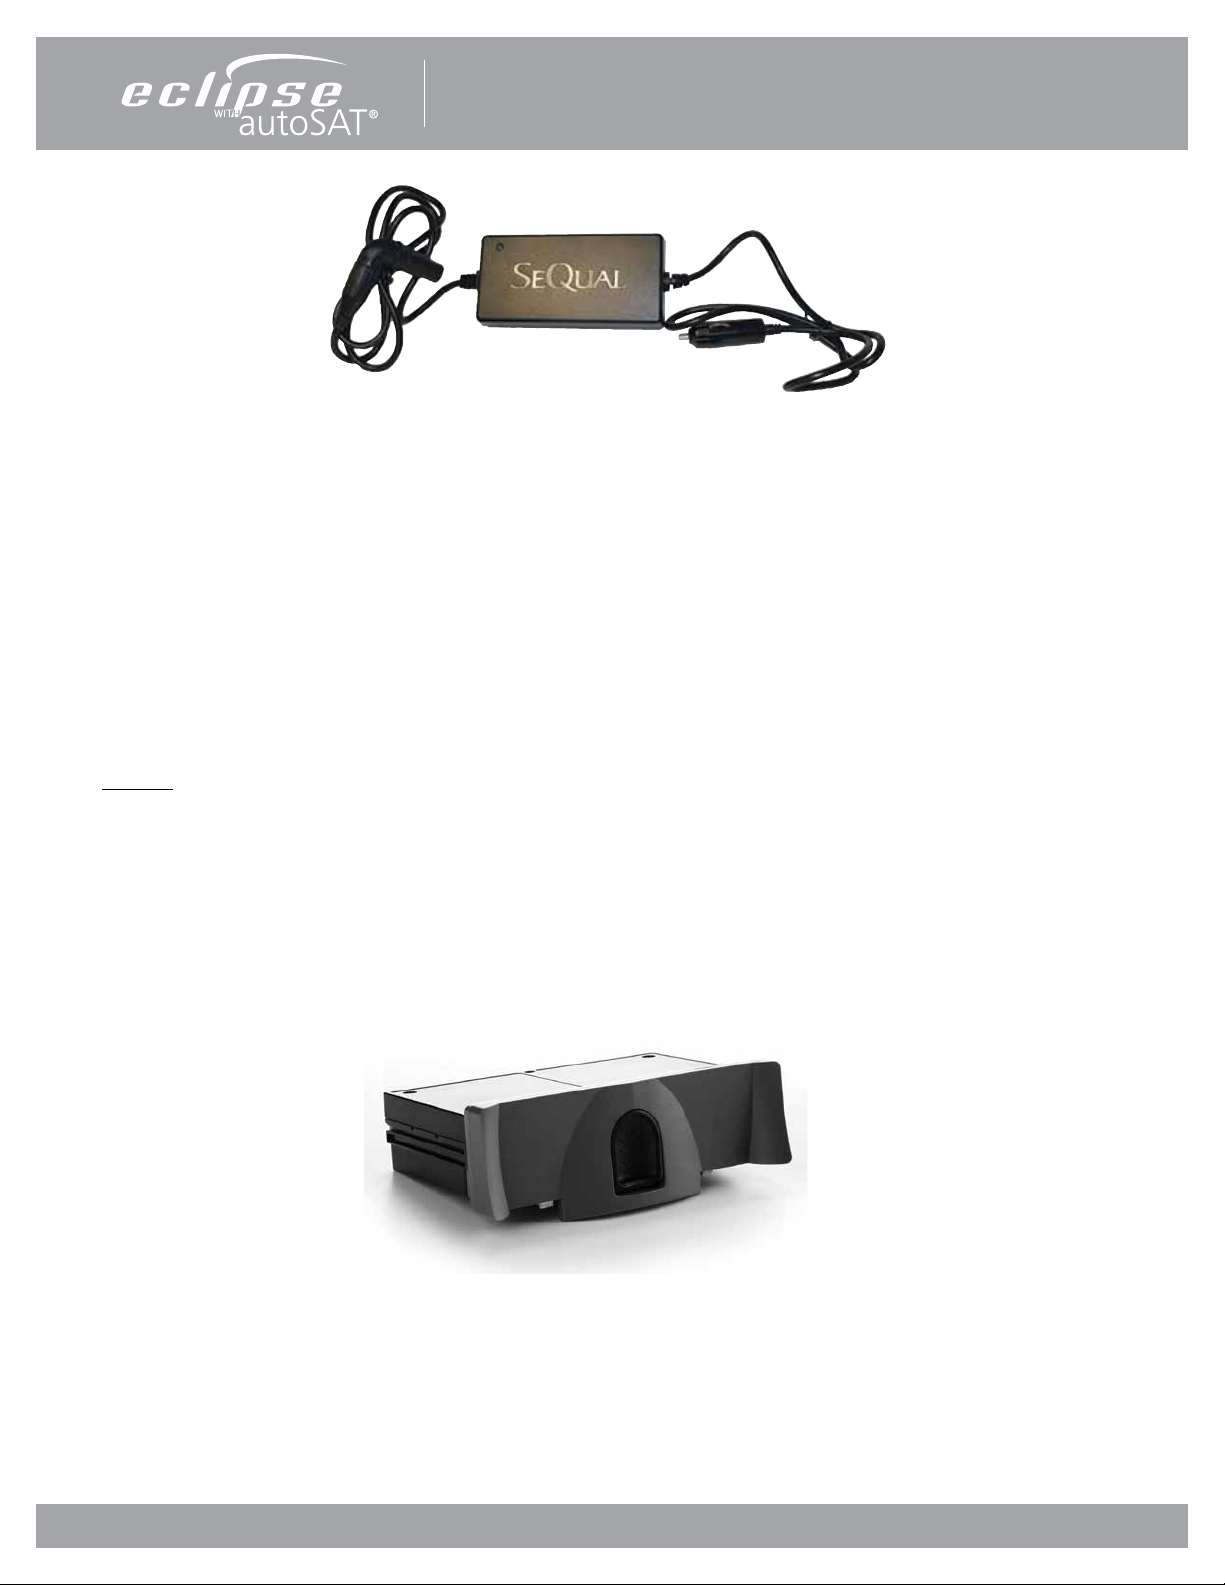
DC POWER SUPPLY
The DC Power Supply is intended for use with DC accessory outlets, such as those found in motor vehicles. Input voltage to
the DC Power Supply is 11.5-16 VDC. Sized to be compatible with most passenger vehicle electrical systems, it is capable of
delivering up to 150W of 26VDC output to the Eclipse 5.
PN 20631679 Rev C
20
Page 21
Personal Ambulatory Oxygen System Provider Technical Manual
Figure 6: Eclipse 5 DC Power Supply
Located near the output cord, there is a green LED that is illuminated when the DC Power Supply is supplying 26VDC power.
If the LED is not illuminated, there is no input power available. The Power Supply contains protection circuits for output overcurrent, input over-voltage, and internal over-temperature conditions. If any of these conditions exist, output power will be
interrupted and the LED will turn o. These three conditions are self-resetting, and output power will resume when protection
circuits fall back into acceptable operating ranges.
The Eclipse 5 will run at all ow settings when being operated with the DC power supply in a vehicle including 3.0LPM on
continuous ow and 192mL in pulse mode. The Eclipse 5 will charge the power cartridge while being operated with the DC
power supply while running at 2.0LPM or below with continuous ow. The power cartridge can charge at all pulse ow rates,
however charging functionality may stop depending on the breathing rate of the user. If the Eclipse 5 power cartridge is being
charged, the battery symbol will display with a waterfall animation. However, if the power cartridge is not charging then the
battery symbol will remain steady and display the current charge capacity.
DO NOT use the DC supply to power the Eclipse 5 once the vehicle’s engine is turned o as this may drain the car’s battery.
POWER CARTRIDGE BATTERY
The Power Cartridge allows operation away from AC or DC power. The Power Cartridge used with the Eclipse 5 contains
Lithium ion battery cells, similar to those used in laptop computers and cell phones. The Eclipse 5 Power Cartridge contains a
quantity of two 97.5 Watt hour battery packs. Each battery pack contains 7.92 grams of equivalent lithium content.
Figure 7: Eclipse 5 Power Cartridge
The Power Cartridge (Battery) may be charged in two ways: (a) place the Power Cartridge in the Eclipse 5 and connect the
Eclipse 5 to AC or DC power, or (b) place the Power Cartridge in the optional Desktop Charger (PN 7112-SEQ).
Operating and servicing the Power Cartridge will ensure longer life and higher performance. It is important to follow the tips
and recommendations when storing and operating the Eclipse 5 on the Power Cartridge.
PN 20631679 Rev C
21
Page 22

Personal Ambulatory Oxygen System Provider Technical Manual
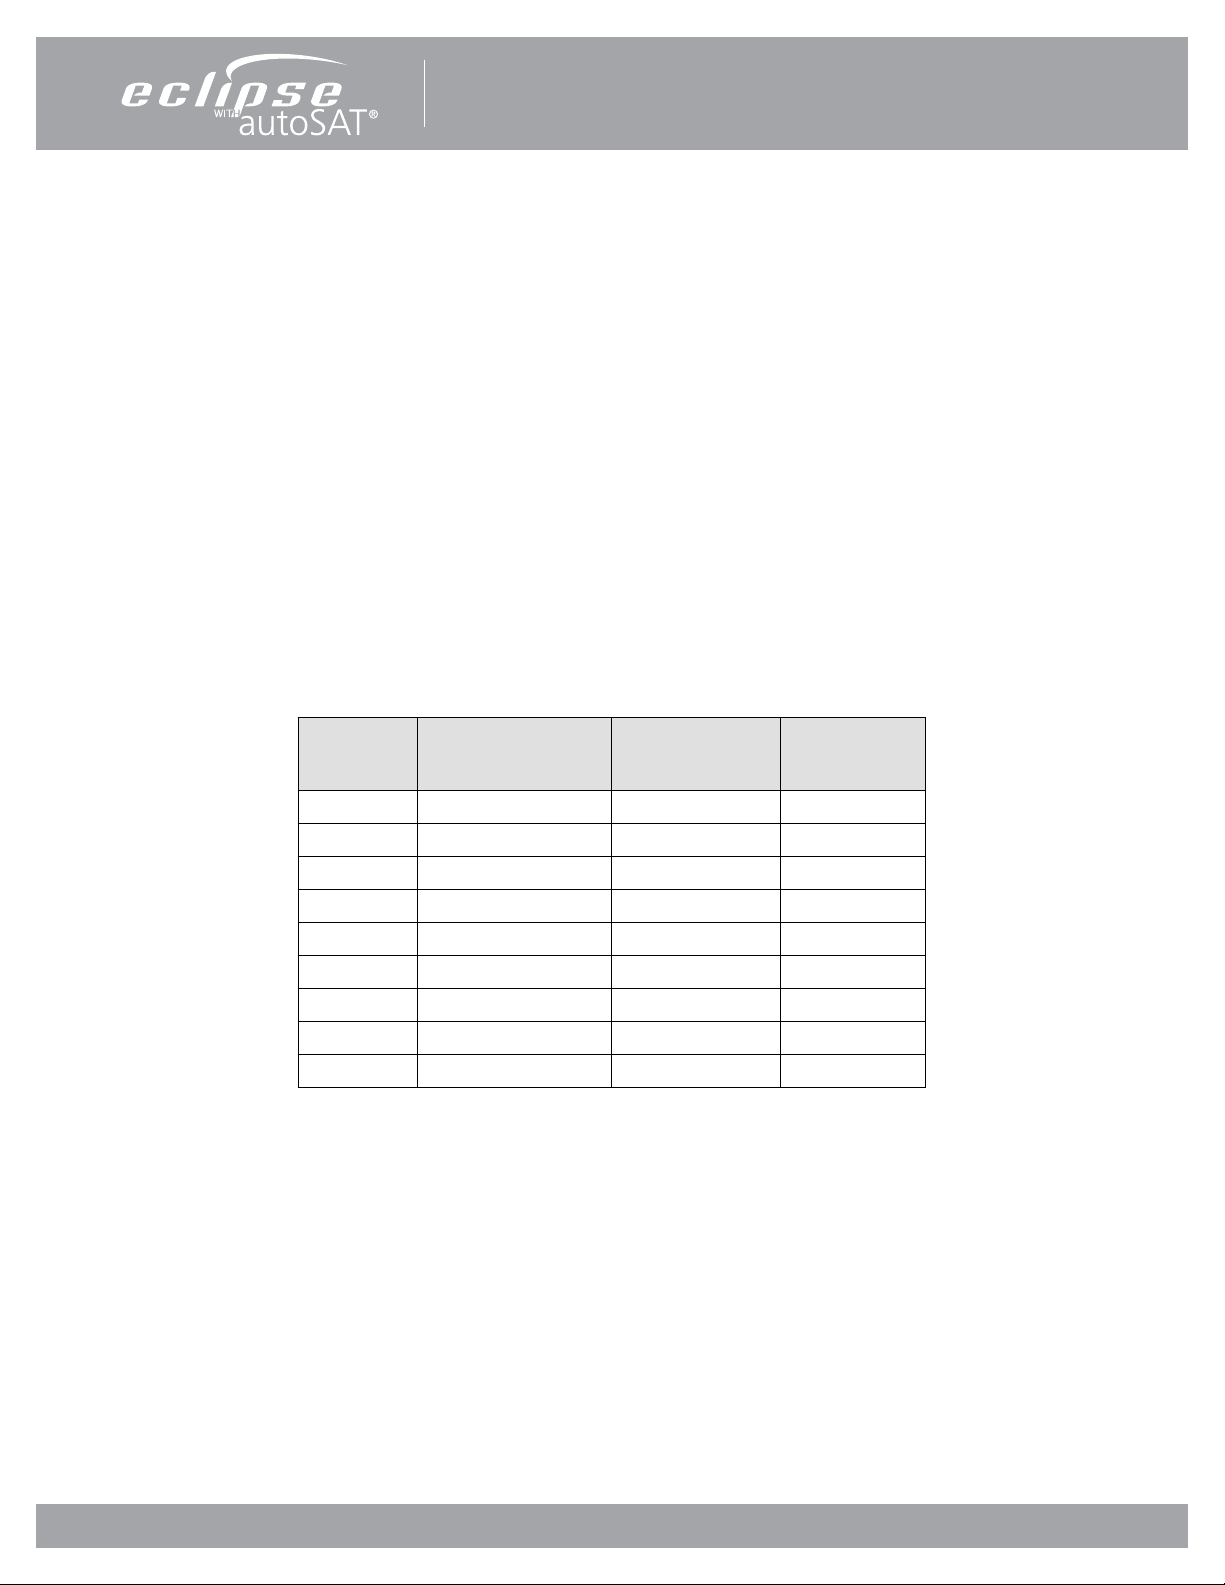
The Eclipse 5 Power Cartridge operation time may be aected by several factors such as bolus size, breathing rates, ambient
temperature, age of power cartridge and use over time. The table below describes the typical operating time for a new Power
Cartridge.
If the Eclipse 5 is used in Pulse Dose Mode, there will be longer operating time. The patient should consult their physician for
a prescription for Pulse Dose Mode.
TYPICAL NEW POWER CARTRIDGE OPERATING TIMES
(At nominal
temperature
FLOW RATE
SETTING
Continuous
Flow (LPM)
mL
SETTING
Pulse Dose
Mode (12 BPM)
of 25ºC/77°F)
0.5 4.4 hours - -
1.0 3.7 hours 16mL 1.0 5.4 hours
2.0 2.0 hours 32mL 2.0 5.1 hours
3.0 1.3 hours 48mL 3.0 4.9 hours
64mL 4.0 4.0 hours
80mL 5.0 3.7 hours
96mL 6.0 3.5 hours
128mL 2.5 hours
160mL 2.0 hours
192mL 1.7 hours
Battery Consumption Chart
NOTE: Battery times will decrease with higher bolus size, breath rate, ambient temperature, Battery age and use over time.
The Power Cartridge packaged with the Eclipse 5 is not fully charged. Before using the Eclipse 5 Oxygen System for the rst
time, the Power Cartridge must be fully charged.
Store the power cartridge in a cool, dry location. Do not leave the Eclipse 5 or Power Cartridge in a vehicle or trunk during a
hot or cold day.
When checking the Eclipse 5 as baggage on a commercial airline ight for international travel, remove the Power Cartridge
and properly package.
When shipping the Eclipse 5 for any reason, remove the Power Cartridge from the Eclipse 5.
If the Power Cartridge gets too warm, charging will not begin until the Power Cartridge suciently cools. Consider removing
the Power Cartridge to allow for faster cooling.
The Power Cartridge operating time is longer if the Eclipse 5 is operated in Pulse Dose Mode. (Refer to Battery Consumption
Chart above.)
The typical time to recharge the Power Cartridge to achieve 80% capacity from a fully discharged Power Cartridge is 1.8 hours
to 5.0 hours, dependent upon the ow setting.
The capacity of the Eclipse 5 Power Cartridge is determined by electronics and the Eclipse 5 software.
PN 20631679 Rev C
22
Page 23
Personal Ambulatory Oxygen System Provider Technical Manual
WARNING:
CAUTION
CAUTION
CAUTION
DO NOT tamper with, disassemble, crush or heat the Power Cartridge
above 140° F (60° C). The Power Cartridge may present a risk of re or
explosion and will void the warranty.
Store the Power Cartridge in a cool, dry place when not in use.
DO NOT leave the Eclipse 5 or the Power Cartridge in a vehicle or in the
trunk during a hot or cold day.
The Eclipse 5 system can only work with a SeQual Power Cartridge. Use
of another Power Cartridge or Battery may damage the unit, present a
risk of re or explosion and will void the warranty.
Figure 8: Power Cartridge Status Gauge
While the Eclipse 5 Power Cartridge allows the concentrator to operate at its full range of capabilities, the primary purpose of
the Power Cartridge is to allow a patient to ambulate while they are moving between stationary power sources. The Eclipse 5’s
Power Cartridge, like all lithium ion batteries, is susceptible to permanent damage from excessive heat. Exposure to excessive
heat may signicantly shorten the service life of the Power Cartridge.
Each Power Cartridge contains multiple temperature sensors to monitor battery cell temperature. The amount of heat the
Power Cartridge can safely endure varies depending on how the Power Cartridge is being used. During discharge, the Eclipse
5 software will alarm when internal battery cell temperature exceeds 60°C, and will shut the system down if internal battery
cell temperature exceeds 70°C. While the Power Cartridge is charging, software will interrupt charger operation when the
internal battery temperature exceeds 45°C or temperature is less than 0°C . In both of these cases, when internal battery cell
temperature falls within these limits, the Eclipse 5 will resume normal operation. Operation near these temperature limits will
not damage the Power Cartridge, but are in place to ensure that the service life of the Power Cartridge is preserved.
Heat in the Power Cartridge is generated during discharge, and can also be the result of operating the Eclipse 5 in high
ambient temperatures. The amount of internally generated heat varies with the ow setting – higher ows induce greater
Power Cartridge heating. While high ambient temperatures are typically the result of operation on a hot day, running the
Eclipse 5 with inadequate ventilation can also add additional heat. Always ensure that the Eclipse 5 is operated in a wellventilated space, the air intake lter is clean, and intake and exhaust vents are unobstructed.
PN 20631679 Rev C
23
Page 24

Personal Ambulatory Oxygen System Provider Technical Manual
CHARGING ALGORITHM
The charging algorithm is performed by the Power Manager software and involves three basic decisions:
1. When to start charging
2. How fast to charge
3. When to stop charging
Charging begins when Power Cartridge voltage falls below 16.0 volts.
The charging current is limited by the charger capability and the rated capacity of the Power Cartridge. Under certain
conditions, the Eclipse 5 may not have enough external power available to charge the batteries at the full rate. In this case, the
charging rate will be limited to the available power.
As the Power Cartridge accumulates charge, the charging current required will eventually fall. When the charging current for
each Power Cartridge has fallen below 5% of the rated capacity, charging is complete and the Power Cartridge charger is shut
o.
The software will only charge when the Power Cartridge temperature is at or below 45°C. The software will always run the
cooling fan whenever the charger is enabled. The Power Cartridge charger is disabled and the cooling fan is set to maximum
whenever the Power Cartridge temperature exceeds 45°C. The Power Cartridge charger is disabled when temperature is less
than 0°C.
All lithium ion batteries self-discharge at very low rates when not in use. Eclipse 5 Power Cartridges are shipped from SeQual
in a partially charged state (nominally 40%). When stored in a cool, dry location, the Power Cartridge can sit unused for up to
12 months without appreciable self-discharge occurring. Nevertheless, CAIRE recommends a rst in, rst out rotation of Power
Cartridge inventory for maximum Power Cartridge service life.
PN 20631679 Rev C
24
Page 25

Personal Ambulatory Oxygen System Provider Technical Manual
Training The Patient
INTRODUCTION
Welcome to the Eclipse 5, Personal Ambulatory Oxygen System with autoSAT Technology. Setting up and training your patient
to use the Eclipse 5 has never been easier! You can expect your patients and care providers to easily learn how to use the
device by following the directions in this section. While setting up and training a patient, be sure to point out the advantages
of the Eclipse 5. For example:
Slim and sleek appearance
Easy-to-use controls
Quiet operation
Lower electric bills
Self-monitoring alarm system
More consistent FiO2 at higher breath rates
After completing each training procedure, ask your patient if he or she has any questions. Proper training of your patients will
result in fewer service calls, improved compliance and increased patient satisfaction.
PREDELIVERY CHECK LIST
Before delivering the device, check and log the status of the following:
Parts Inventory – Verify that each Eclipse 5 is provided to the patient with the following items:
aUsers Manual
aQuick Start Guide
aEclipse 5 Passport
aUniversal Cart
aCannula
Power Sources – Insert and check the following for proper operation:
aAC Power Supply with Power Cord
aDC Power Supply
aPower Cartridge (Battery)
Electrical System – Use the Control Panel to check and/or adjust the following:
a Pulse Dose Setting
aContinuous Flow Setting
a Hour meter
aPulse Dose Sensitivity
The Eclipse 5 is shipped from SeQual at default ow settings of 2 LPM Continuous Flow, 2.0 Pulse Dose, and 2 for Pulse Mode
Sensitivity Adjustment and FAST Rise Time. You may adjust these settings to your patient’s prescription when you deliver and
set up the device.
a 9V Battery Status
a Rise Time
a Software Revision
a Power Cartridge Status Gauge
aAC Power Cord
aAC Power Supply
aDC Power Supply
aPower Cartridge (Battery)
aAir Inlet Filter and Spare
PN 20631679 Rev C
25
Page 26
Personal Ambulatory Oxygen System Provider Technical Manual
INDICATIONS FOR USE
The Eclipse 5 is indicated for the administration of supplemental oxygen. The device is not intended for life support nor does
it provide any patient monitoring capabilities.
A physician must prescribe a specic oxygen ow rate setting to meet patients’ individual needs.
Recommended oxygen ow rates should be adjusted only under the advice of a physician.
WARNING:
Federal law restricts this device to sell by or on the order
of a physician.
CONTRAINDICATIONS
WARNING:
The Eclipse 5 is not intended for life supporting or life sustaining
applications, nor does it provide any patient monitoring capabilities.
WARNING:
WARNING:
WARNING:
In certain circumstances, the use of non-prescribed oxygen can be
hazardous. This device should only be used when prescribed by a
physician.
Not for use in the presence of ammable anesthetics.
As with any electrically powered device, the user may experience
periods of non-operation as a result of electrical power interruption,
or the need to have the Eclipse 5 serviced by a qualied technician.
The Eclipse 5 is not appropriate for any patient who would experience
adverse health consequences as a result of such temporary
interruption.
BASIC CONCEPT TRAINING
The following section is intended to assist the provider to train the patient or caregiver to use the Eclipse 5. Topics in this
section should be discussed with each patient prior to release for use of the Eclipse 5.
SAFETY GUIDELINES AND OPERATIONAL SAFETY
WARNINGS & CAUTIONS
Provider should review all safety guidelines and operational safety Warnings/Cautions with each patient. In addition, provider
should carry out a risk assessment prior to installation of the Eclipse 5 to assure proper connection and compatibility with other
equipment the patient may be using.
PN 20631679 Rev C
26
Page 27

Personal Ambulatory Oxygen System Provider Technical Manual
WARNING:
No Smoking or Open Flames. For safety concerns, all possible sources of ignition must be kept
away from the oxygen system and preferably out of the room in which it is being used. Smoking
in the proximity of an operating oxygen concentrator is dangerous and can permanently
damage the device and void the warranty. Keep the Eclipse 5 at least ve (5) feet (1.5 m) from heat
sources, sparking objects or open ames.
LOCATING THE ECLIPSE 5 FOR PROPER USE AND VENTILATION
Ask your patient where they would like to set up the device. Whenever possible, the Eclipse 5 should be in the same room as
the patient for convenience and assurance that the patient can adequately hear and respond to Eclipse 5 alerts and alarms.
While unpacking and setting up the device, tell your patient about these important cautions and warnings:
WARNING:
CAUTION
• Locate the Eclipse 5 in a well-ventilated space that provides
adequate airow.
• Ensure that furniture, draperies or clothing will not impede air
circulation.
• Avoid placing the unit over a oor heat register or against a
baseboard heating system.
• Do not use in the presence of ammable anesthetics, solvents,
aerosols or ammable cleaning agents.
• Avoid high pollutant environments.
Some patients are highly mobile and may use the device under
varying circumstances. Make sure your patient or patient caregiver
completely understands the basic precautions to safely locate the
device.
NOTE:
After completing this training procedure, ask your patient if s/he has
any questions.
THE USERS MANUAL
Give your patient a copy of the Eclipse 5 Users Manual and advise them to read prior to operating. Open the manual and
briey review the Table of Contents, including subheadings. Show your patient the icons and symbols and explain what each
means.
CAUTION
Advise your patient to thoroughly read the Eclipse 5 Users Manual and
keep the manual in a safe place for future reference.
SHOWING PANEL BUTTONS, INDICATORS, ALERTS AND ALARMS
Open the Users Manual to the section on “UNDERSTANDING THE CONTROLS AND FRONT PANEL” and show your patient
where each button is located on the Eclipse 5 Control Panel and how each button and indicator operates. Go over the alerts
and alarms and how to handle alert and alarm conditions. Detailed instructions for each button and indicator can be found
in the Eclipse 5 Users Manual.
PN 20631679 Rev C
27
Page 28

Personal Ambulatory Oxygen System Provider Technical Manual
SHOWING POWER CARTRIDGE POWER LEVEL
The display on the Control Panel shows the amount of Power Cartridge capacity available and waterfalls when charging. Point
out the table showing typical new Power Cartridge duration-of-use time in the Users Manual.
WARNING:
The display gives an approximate level of remaining battery power.
If the patient is dependent on oxygen therapy, the users should
always have a backup oxygen supply or access to AC or DC Power
Supply in the event of loss of battery power.
SELECTING THE PROPER FLOW MODE AND SETTING
The recommendations of the qualied clinician responsible for the patient’s care should always be followed when instructing
patients on the use of Continuous or Pulse Dose Mode.
WARNING:
Do not attempt to prescribe oxygen level settings. Warn your patient
that only a qualied clinician or physician is qualied to perform the
necessary tests to prescribe treatment.
SELECTING CONTINUOUS FLOW MODE
When delivered from SeQual, the Eclipse 5 is set to Continuous Flow Mode. Refer your patient to the Users Manual for
instructions on how to select Continuous Flow Mode. Demonstrate the procedure on the device. Set the prescribed ow
using the increase or decrease ow rate buttons
CAUTION
• Continuous Flow Mode is required in order to use a humidier bottle.
• Continuous Flow Mode without a humidier bottle is required in order
use 50 foot tubing.
SELECTING PULSE DOSE MODE
Pulse Dose Mode, delivers a measured bolus of oxygen pulse at the beginning of each inspiration. Refer to the Users
Manual for instructions on how to select Pulse Dose Mode. Demonstrate the procedure for your patient. Set the prescribed
ow using the increase or decrease buttons. Verify that the patient is able to adequately trigger the oxygen delivery while
speaking, sitting quietly, and walking. If the patient is not able to satisfactorily trigger oxygen delivery, the Pulse Sensitivity
may need to be adjusted.
CAUTION
Review with the patient the breath rate capabilities of Pulse Dose Mode for their prescription.
• Do not use a humidier when in Pulse Dose Mode.
• Use only a 7-foot cannula when in Pulse Dose Mode. Do not use
a tubing extension.
See Table on page 7
PN 20631679 Rev C
28
Page 29

Personal Ambulatory Oxygen System Provider Technical Manual
‘POWER CARTRIDGE BATTERY CONSERVATION’ FEATURE
While in Pulse Dose Mode, the Eclipse 5 is always monitoring for breath detection. After 15 seconds of no breath detected, the
Eclipse 5 “delivers” Continuous Flow at the last Continuous Flow setting. The system and display are still in Pulse Dose Mode
and the green Delivery Mode Indicator is blinking fast, indicating you are receiving a Continuous Flow. After 15 seconds, the
Eclipse 5 stops delivering Continuous Flow and waits 15 seconds for a breath. If a breath is detected, then the Eclipse 5 will go
back to Pulse Dose Mode. If a breath is not detected, the Battery Conservation function will continue; 15 seconds Continuous
Flow, 15 seconds Pulse Dose Mode. The Eclipse 5 will stay in this modality until a breath is detected.
This power management feature of the Eclipse 5 greatly conserves the operating life of the battery, extending therapy time
and patient mobility.
ADJUSTING THE PULSE DOSE MODE SENSITIVITY SETTING
The oxygen delivery trigger sensitivity may be adjusted to satisfy patient requirements, by selecting setting 1, 2 or 3 (1=most
sensitive, 3=least sensitive). The default setting for units coming from SeQual is “2”. To adjust the Pulse Sensitivity, perform the
following steps:
1. Have the patient sit quietly, with the nasal cannula properly tted.
2. Put the Eclipse 5 into Pulse Dose Mode at the patient’s prescribed ow setting.
3. Press the “No Smoking” icon until the “PS=” value is displayed.
4. Press the “+” or “-” buttons to raise or lower the sensitivity (1=most sensitive, 3=least sensitive.)
Raising the sensitivity will require additional inspiratory eort to trigger the oxygen pulse.
Lowering the sensitivity will require less inspiratory eort to trigger the oxygen pulse.
Too low of a setting may result in false triggering.
5. Verify that the patient is able to adequately trigger the oxygen delivery while speaking,
sitting quietly, and walking. Steps 1-6 may be repeated until the patient is able to
adequately trigger oxygen delivery.
WARNING:
As with all conserving devices, the Eclipse 5 may not be able to detect
some respiratory eorts.
The Eclipse 5 requires a minimum of one minute to stabilize after
NOTE:
a change. After a setting change, always wait at least one minute
before determining if another adjustment is necessary.
PN 20631679 Rev C
29
Page 30

Personal Ambulatory Oxygen System Provider Technical Manual
ADJUSTING RISE TIME
The adjustable Rise Time feature on the Eclipse 5 was designed for patient comfort. The Rise Time feature adjusts ow and
speed of bolus delivery, and determines how quickly the patient receives their bolus volume while in Pulse Dose Mode. The
Eclipse 5 oers delivery settings of FAST, MEDIUM, and SLOW. The factory default setting is FAST. A MEDIUM or SLOW rise time
may be appropriate for certain patients, and should be determined and set by a trained clinician. Adjusting the Rise Time will
not aect the chosen volume of oxygen delivered to the patient (16-192 mL).
CONNECTING THE AC POWER SUPPLY
The Eclipse 5 operates from external power when connected to a power outlet.
To connect the Eclipse 5 to the AC Power Supply, follow these steps:
1. Insert the AC supply plug tip into the Eclipse 5.
2. Insert the power cord into the AC Power Supply.
3. Plug the power cord into a grounded outlet.
4. The power supply LED displays green to indicate that the AC Power Supply is drawing power. The External
Power Present Indicator on the Control Panel illuminates.
If the Power Supply Status LED is not illuminated after inserting the plug
NOTE:
WARNING:
CAUTION
NOTE:
International safety standards require the use of hospital grade AC power cords (3893-SEQ) when using the Eclipse 5 in a
medical care facility. Contact Chart SeQual to obtain a hospital grade AC power cord for the Eclipse 5 if necessary.
into a grounded outlet, check to make sure the Power Supply and power
cords are securely plugged into the Eclipse 5.
• Ensure adequate clearance around the AC Power Supply.
• The AC Power Supply is universal input, but the AC power cord
is appropriate to specic country’s electrical service. Ensure that
power cord is appropriate to country’s electrical service.
• DO NOT connect the Eclipse 5 to an extension cord or electrical
outlet controlled by a switch.
When removing the AC Power Supply from the Eclipse 5, remove the
plug from the AC outlet before removing the AC Power Supply plug
from the Eclipse 5.
PN 20631679 Rev C
30
Page 31

Personal Ambulatory Oxygen System Provider Technical Manual
CONNECTING THE DC POWER SUPPLY
To install the DC Power Supply, follow these steps:
A DC Power Supply allows the system to operate from DC outlets, such as those found in motor vehicles.
CAUTION
1. Consult your patient’s vehicle owner’s manual for DC Accessory outlet requirements.
2. Secure your Eclipse 5 and DC Power supply in your vehicle. Ensure that alerts and alarms are observable.
3. Start the vehicle’s engine.
4. Insert supply plug into DC accessory outlet.
5. Attach the Power Supply plug to the Eclipse 5.
6. Advise the patient to use Pulse Dose Mode if prescribed by their clinician.
7. When the device is properly connected and receiving power from the DC power source, a green indicator
light on the DC Power Supply will illuminate.
Ask your patient whether he or she will be using the device to travel by vehicle. If so, show your patient how to safely use the
Eclipse 5 while driving. Refer to the previous section on Connecting the DC Power Supply for proper setup of the Eclipse 5
system in a vehicle.
WARNING:
The DC Power Supply is designed for 12VDC minimum vehicle
electrical systems. Do not attempt to operate with 6V, 24V, or other
vehicle electrical system.
• Ensure adequate clearance around the DC Power Supply and the
Eclipse 5.
• Ensure the DC Power Supply and Eclipse 5 are secured in the vehicle
so that is does not become a projectile in the event of a sudden
stop.
• DO NOT operate the Eclipse 5 on DC power while the vehicle
engine is o. In such a scenario, the Eclipse 5 could quickly drain
the vehicle’s battery.
CAUTION
When the Eclipse 5 is running from an external (AC or DC) power supply, the External Power Present Indicator will illuminate.
The Eclipse 5 will always operate from external power when external power within the specied range is available.
When operating an Eclipse 5 5 with the DC power supply, the power
cartridge will only recharge if there is sucient excess voltage from
what the concentrator requires to operate.
ACTIVE LIFESTYLE TRAINING
Small, lightweight, and easily moved about, the Eclipse 5 is ideally suited to an active lifestyle. The AC and DC supplies enable
recharge of the Power Cartridge during longer excursions and even extended overnight travel. To train your patient on
mobility and ambulation, follow the procedures below.
PN 20631679 Rev C
31
Page 32

Personal Ambulatory Oxygen System Provider Technical Manual
CAUTION
NOTE:
Always check to see that the Air Inlet and the Exhaust Vent are not
blocked and the Air Inlet Filter is dry and clean before using your
Eclipse 5.
• Do not drop the Eclipse 5 or Eclipse 5 power supplies. If dropped or
damaged, verify unit performance.
• The Eclipse 5 will not detect a cannula that has been disconnected
from the Oxygen Outlet Port.
ATTACH THE UNIVERSAL CART
Your patient will enjoy the mobility oered by the Eclipse 5 Universal Cart in and outside the home. Show your patient how
to perform the following important activities:
• Mounting the Eclipse 5 to the Universal Cart
• Extending and collapsing the telescoping handle
CAUTION
Do not lift the Eclipse 5 by the cart handle.
USING AROUND THE HOUSE
Your patient may use 50’ tubing when operating the Eclipse 5 in the house. In order to use extended tubing, the device must
be in Continuous Flow Mode. When a humidier is used, the tubing between it and the patient must not exceed 7’.
CAUTION
When using a humidier adapter of any kind, the Eclipse 5 unit must
remain stationary, meaning that the unit must NOT by moved or
transported in any manner.
TRAVELING BY VEHICLE
Ask your patient whether he or she will be using the device to travel by vehicle. If so, show your patient how to safely use the
Eclipse 5 while driving. Refer to the previous section on Connecting the DC Power Supply for proper setup of the Eclipse 5
system in a vehicle.
NOTE:
Whenever possible, go to your patient’s vehicle to demonstrate this
procedure.
Figure 9: Eclipse 5 DC Power Supply
PN 20631679 Rev C
32
Page 33

CAUTION
Personal Ambulatory Oxygen System Provider Technical Manual
Be sure to accurately determine the amount of current the vehicle
accessory outlet is rated to supply.
WARNING:
• Avoid placing the Eclipse 5 in direct sunlight.
• Do not store the Eclipse 5 in a vehicle where the device may be subject to extreme
temperatures. Extreme heat or cold may impair operation and damage the device
and degrade the Power Cartridge.
•
When using the Eclipse 5 in a vehicle, check the cannula to make sure it
is not pinched or occluded.
PN 20631679 Rev C
33
Page 34

Personal Ambulatory Oxygen System Provider Technical Manual
TRAVELING BY AIR
TRAVEL APPROVED
The Eclipse 5 is an FAA approved portable concentrator.
A new US Department of Transportation regulation regarding portable oxygen concentrators took eect on May 13, 2009.
Under this regulation, every FAA approved portable concentrator is now authorized for use during any commercial ight that
departs or arrives in the USA, regardless of whether the airline itself has approved the device or not.
When traveling by air, instruct your patient to remove the Power Cartridge from the Eclipse 5 before checking the unit as
checked baggage or cargo. Transport of the Eclipse 5 as cargo or checked baggage with the Power Cartridge installed is
prohibited by international air cargo regulations.
The Power Cartridge may be installed if the patient is using the Eclipse 5 as a carry-on item.
If the airline allows use of the Eclipse 5 Oxygen System, only operate the Eclipse 5 from the Power Cartridge. DO NOT use DC
or AC Power Adapters on an aircraft. The patient must ensure that they have an adequate number of spare Power Cartridges
to last for the duration of their trip.
During taxi, take-o and landing the Eclipse 5 must be turned o and stowed under the seat or in another approved stowage location as to not block the aisle way or the entry way into the row if the Eclipse 5 will not be used.
During taxi, take-o and landing the user must be in a seat location that does not restrict any other passenger’s access to, or
use of any required emergency or regular exit, or the aisle(s) in the passenger compartment of the aircraft if the Eclipse 5 is
used.
User’s are not permitted to be seated in an exit row if using the Eclipse 5.
If the Eclipse 5 is used when decompression of the cabin occurs and the oxygen cabin oxygen system deploys, then the user
is to use discontinue use of the Eclipse 5 and use the aircraft supplemental oxygen. The Eclipse 5 unit is to be turned o after
securing the aircraft supplemental oxygen.
Prior to travel the user needs to inspect the Eclipse 5 to ensure in good operational condition.
Visit our website, www.sequal.com to the Travel Approved section, for helpful travel tips, forms used to assist with traveling
and estimated number of Power Cartridges (batteries) needed for ights.
Each airline has their own requirements and SeQual recommends checking those requirements prior to making a trip.
TRAVELING BY CRUISE SHIP
When traveling by watercraft, instruct your patient to inform the cruise line that the Eclipse 5 will be used onboard. Each
cruise line has a Special Needs coordinator that can answer any questions regarding travel and the cruise line’s individual
requirements. Have your patient contact the cruise ship Special Needs Coordinator directly.
TRAVELING BY TRAIN
When traveling by train, instruct your patient to inform the rail line in advance that the Eclipse 5 will be used onboard.
Operate the Eclipse 5 only from the Power Cartridge. The patient must ensure that they have an adequate number of spare
Power Cartridges to last for the duration of their trip.
PN 20631679 Rev C
34
Page 35

Personal Ambulatory Oxygen System Provider Technical Manual
ECLIPSE 5 MAINTENANCE
WEEKLY MAINTENANCEPATIENT
Training your patient to maintain the Eclipse 5 properly will lead to longer service intervals and lower maintenance costs.
Train your patient to perform the following procedures:
CLEAN THE AIR INLET FILTER
The Air Inlet Filter, located at the rear of the unit, must be cleaned at least once a week.
To clean the lter:
1. Remove the lter from the back of the cabinet.
2. Wash the lter in warm water using a mild detergent
solution.
3. Rinse the lter thoroughly and squeeze out the excess
water.
4. Allow the lter to air dry thoroughly.
5. Re-insert the lter in the cabinet.
6. Maintenance may be easier for the patient when a
second lter is provided.
Figure 10: Cleaning the Air Inlet Filter
CAUTION
• The lter should be completely dry before using it again. Excess
moisture may impair proper operation or damage the unit.
• Replace the Air Inlet Filter annually. If the Eclipse 5 is operated in a
dusty environment, the lter may need to be cleaned or replaced
more often. Do not operate the Eclipse 5 for more than 30 minutes
without a lter installed.
CLEAN AND CARE FOR THE TUBING AND CANNULA
Provide your patient instructions on cleaning, disinfection and/or replacement information for the tubing and cannula.
CLEAN THE CABINET AND CONTROL PANEL AND POWER SUPPLIES
To clean the cabinet, Control Panel or power supply, do the following:
1. Turn OFF the Eclipse 5 and discon nect from AC or DC power before any cleaning or disinfection activity.
2. Use mild detergent and water solution.
3. Use a damp (not soaking wet) cloth or sponge.
4. Spray or wet the cloth or sponge with the mild detergent solution. DO NOT spray the cabinet, Control Panel or
power supplies.
5. Wipe down the cabinet, Control Panel or power supplies.
6. To disinfect the Eclipse 5, use Lysol® Brand II disinfectant (or equivalent). Spray or wet a cloth or sponge with the
disinfectant. DO NOT spray the cabinet, Control Panel or power supplies. Proceed as directed by the manufacturer.
PN 20631679 Rev C
35
Page 36

Personal Ambulatory Oxygen System Provider Technical Manual
MONTHLY MAINTENANCEPATIENT
CARE FOR THE POWER CARTRIDGE
The Power Cartridge (battery) in the Eclipse 5 requires special care to assure a longer life and the highest level of
performance. The SeQual Power Cartridge is the only approved Power Cartridge recommended for use with the Eclipse 5.
The following are generic guidelines for the Power Cartridge:
• Avoid high temperatures
• Avoid cold temperatures
• Do not drop Power Cartridge
• No not poke objects into contacts
Power Cartridge Cleaning: Use a damp (not soaking wet) cloth or sponge. First spray the cloth or sponge with a mild
detergent and then clean the Power Cartridge case and the latch.
WARNING:
Exposing the Power Cartridge to water or other liquids may cause
personal injury or harm.
DO NOT tamper with or try to repair the Power Cartridge. There are no
serviceable parts inside.
Power Cartridge Storage: The Power Cartridge should be stored in a cool and dry location.
CALIBRATING THE POWER CARTRIDGE
In order to maintain the Power Cartidge, your patient should fully discharge the Power Cartridge once a month. In order to accurately maintain the Eclipse 5 Power Cartridge, periodic full discharge of Power Cartridge to zero is recommended. This serves
to calibrate the Power Cartridge Status Indicator. To do this, the patient will need an AC Power Supply to recharge the Power
Cartridge and should be able to run the Eclipse 5 from AC power for at least 5 hours.
NOTE:
The patient should follow these steps:
1. Install the Power Cartridge in the Eclipse 5
2. Remove external power and operate the Eclipse 5 from the Power Cartridge
3. Allow the Eclipse 5 to completely discharge the Power Cartridge. This is best performed at a setting of 2.0
LPM Continuous Flow. Ten to fteen minutes before the end of the discharge cycle, the “Low Power Cart ridge” alert will sound, followed by the “Power Cartridge Shutdown” alarm. If using the Eclipse 5 while
discharging the Power Cartridge, DO NOT deviate from the patient’s prescription.
4. Press the ON/OFF button to silence the alarm.
5. Allow the cartridge to cool for a minimum of 1 hour prior to recharging.
6. Reattach external power. Verify that the External Power Present Indicator illuminates. Leave the Power Cart ridge installed. Note that the Power Cartridge Status Gauge may not indicate charging immediately. When
the Power Cartridge reaches proper temperature, charging will begin automatically.
6. Allow Power Cartridge to fully charge, as indicated by the Power Cartridge Status Gauge.
The patient can still use the Eclipse 5 while zeroing the Power Cartridge.
NOTE:
• If the Power Cartridge temperature rises above 45°C (113°F), the Power Cartridge will not charge.
• If the Power Cartridge temperature rises above 70°C (158°F), the Power Cartridge will not discharge.
ECLIPSE 5 MONTHLY RUNTIME PROCEDURE
1. Power on Eclipse 5 using AC Power, DC Power, or Power Cartridge
2. Allow unit to run for a minimum of 2 hours
PN 20631679 Rev C
36
Page 37

PATIENT TRAINING CHECKLIST
Use the following checklist as a guide to assist in setup and training a patient on the use of the Eclipse 5™ with autoSAT® Technology and its accessories.
Patient Name:
Eclipse 5 Serial # DC Power Supply Serial #
AC Power Supply Serial # Power Cartridge Serial #
Training Topic Initials
Pre-Delivery Check List
Indications for Use
Contraindications
Basic Concept Training
Advise to read the Users Manual
Go over all accessories included with the Eclipse 5: AC, DC, Power Cord, Cart, Battery
Safety Guidelines and Operational Safety Warnings/Cautions
Locating the Eclipse 5
Panel Buttons and Indicators
Alerts and Alarms
Power Cartridge Power Level
Selecting Flow Mode and Setting
• Selecting Continuous Flow Mode
• Selecting Pulse Dose Mode with autoSAT Technology
• Adjusting the Pulse Dose Mode Sensitivity Setting
• Selecting Rise Time
• Battery Conservation feature
Connecting the AC Power Supply
Connecting the DC Power Supply
Active Lifestyle Training
Attach the Cart
Changing Power Cartridge (Battery)
Use Around the House
Traveling by Vehicle
Traveling by Air
Traveling by Boat
Traveling by Train
Eclipse 5 Maintenance
Weekly: Clean the Air Inlet Filter
Weekly: Clean and Care for the Cannula
Weekly: Clean the Cabinet and Control Panel
Monthly: Care for the Power Cartridge
Annually: Schedule PM at least once a year
Trained By: Date:
37
Page 38

Personal Ambulatory Oxygen System Provider Technical Manual
Annual Maintenance—Provider
INTRODUCTION
Properly maintaining the Eclipse 5 will ensure longer life and higher performance. Minimum annual maintenance is required.
CAUTION
The Eclipse 5 contains electrostatic sensitive components. Do not
open or handle except at a static free workstation. Do not remove
cover without ESD protection.
ANNUAL MAINTENANCE CHECK LIST
Perform the following maintenance procedures at least once a year or more often, as needed. The frequency of the periodic
maintenance should be based on the environment in which the Eclipse 5 is used.
• Replace air inlet lter
• Check Power Cartridge
• Inspect AC and DC Power Supply plugs and cords for damage. Replace as needed
• Verify that the AC and DC Power Supplies operate with the Eclipse 5
• Readjust the Pulse Dose Sensitivity setting between patients as needed
• Readjust the Rise Time setting between patients, as needed
• Replace 9V battery
• Check Universal Cart for functioning wheels and telescoping handle. Replace as needed
• Read and record hour meter
• Check ow rate, purity, Pulse Dose Mode and alarm functions
• Replace compressor intake lter
• Perform electrical safety test (Required only if used in a hospital or institutional setting; not required for home use)
• Replace HEPA lter
CHECKING AND REPLACING THE POWER CARTRIDGE
Typically, the Power Cartridge will require no routine maintenance beyond cleaning by the patient and calibration. SeQual
recommends that the Power Cartridge be replaced if there is physical damage to the cartridge enclosure or connector, or if the
battery’s recharge capacity, after calibration, is 20% less than published values at its given ow rate.
ECLIPSE 5 MONTHLY RUNTIME PROCEDURE
1. Power on Eclipse 5 using AC Power, DC Power, or Power Cartridge
2. Allow unit to run for a minimum of 2 hours
NOTE:
This procedure is performed to ensure and prolong the life of your Eclipse 5. This is also an ample
opportunity to calibrate the power cartridge of the Eclipse 5.
PN 20631679 Rev C
38
Page 39

Personal Ambulatory Oxygen System Provider Technical Manual
ANNUAL MAINTENANCE PROCEDURES
The following section lists procedures that are necessary to maintain the Eclipse 5. Service should only be performed by a
qualied technician. To perform periodic maintenance, the only tools that should be necessary are:
• #1 Phillips Screwdriver
• Wire-cutting pliers
• Small cable ties
• ESD Mat or approved ESD system
REMOVING THE UNIT COVER
1. Disconnect power supplies and remove Power Cartridge before removing the unit cover.
2. Place the unit horizontally on the front cover.
3. Using a Phillips #1 screwdriver, remove a total of 10 screws (M3x12 Pan Head SEM Screw,
P/N 6974-312-SEQ) from the back of the unit.
WARNING:
• Keep hands out of moving parts
• Disconnect power supplies and remove Power Cartridge before
removing the unit cover.
• ESDSafetyproceduremustbeinplace.
Figure 11: Maintenance Tools.
PN 20631679 Rev C
39
Page 40

Personal Ambulatory Oxygen System Provider Technical Manual
CAUTION
The Eclipse 5 contains electrostatic sensitive components. Do not
open or handle except at a static free workstation. Do not remove
cover without ESD protection.
Screws
Figure 12: Removing screws to open the Front Cover
4. Turn over and place the unit horizontally on the back cover.
5. Remove the front cover -- pop the bottom end o rst and rotate it towards the handle. Be careful not to tear
the Control Panel ribbon cable that is attached to the front cover.
Rotate front cover
up towards handle
Figure 13: Opening the Front Cover.
PN 20631679 Rev C
40
Page 41

Personal Ambulatory Oxygen System Provider Technical Manual
6. Disconnect the cable from the Control Panel as follows:
a. Grasp the circuit board rmly between your fore ngers and thumb.
b. Grasp the head of the Membrane Panel Overlay cable in your other hand.
c. Firmly pull the cable away from the board. Pull the cable straight out. Do not rock the
connector back and forth. This may damage the pins of the header.
CAUTION
Do not disconnect the Membrane Panel Overlay cable by pulling on
the ribbon cable.
Membrane Panel
Overlay Cable
Connection
Figure 14: Removing the Membrane Panel Overlay Ribbon Cable.
7. Disconnect the silicone tube from the oxygen outlet tube at the top of the cover. First cut the cable tie,
then pull the silicone tube o the oxygen outlet tube.
NOTE:
Always cut the heads of cable ties to avoid damaging the tubing.
CAUTION
Avoid possible eye injury by wearing protective eyewear or shielding
the eyes from possible ying debris.
PN 20631679 Rev C
41
Page 42

Personal Ambulatory Oxygen System Provider Technical Manual
Cut Cable Tie
Figure 15: Disconnecting the Oxygen Outlet Tube
8. Lay the front panel away from Eclipse 5. Inspect PEM Nut anchors in the front cover assembly. Perform necessary
maintenance.
Figure 16: Front Cover Removal
Once the cover has been removed, the procedures listed in this section may be performed.
PN 20631679 Rev C
42
Page 43

Personal Ambulatory Oxygen System Provider Technical Manual
REMOVE AND REPLACE 9 VOLT BATTERY
Replace the 9-volt battery when the unit beeps three times at the end of power-on self-test, when voltage is less than 7.0
Volts, or during annual PM. To replace the 9-volt battery, follow these steps:
WARNING:
Disconnect power supplies and remove Power Cartridge before
removing the unit cover. Do not touch exposed circuits during
maintenance without ESD protection.
1. Remove the Eclipse 5 front cover assembly.
2. Lift the battery out of the compartment located at the bottom right corner of the unit.
Battery
Compartment
Figure 17: Removing the 9-volt Battery
3. Disconnect the 9-volt battery harness.
4. Remove and replace the 9-volt battery.
Figure 18: Disconnecting the 9-volt Battery.
5. Reconnect the battery harness. Ensure that the terminals are aligned correctly.
6. Place the battery back into the compartment.
7. Install battery foam pad if necessary.
PN 20631679 Rev C
43
Page 44

Personal Ambulatory Oxygen System Provider Technical Manual
REMOVE AND REPLACE HEPA FILTER
Replace the HEPA lter annually, or more often as needed. To replace the HEPA lter, follow these steps.
WARNING:
NOTE:
DO NOT use any petroleum based or other lubricants. A spontaneous
and violent ignition may occur if oil, grease or other petroleum
substances come into contact with oxygen under pressure. Keep
these substances away from the oxygen system, tubing and
connections and any other oxygen source.
Always cut the heads of cable ties to avoid damaging the tubing.
Internal Filters
HEPA Filter replacement:
1. Cut cable tie and Disconnect the tubing at the top of the lter carriage.
Figure 19: Tubing on Filter Carriage.
PN 20631679 Rev C
44
Page 45

Personal Ambulatory Oxygen System Provider Technical Manual
2. Unscrew the wing nut that holds the HEPA lter.
Figure 20: Wing Nut.
3. Unscrew the Clear HEPA lter and discard lter & small o-ring.
Figure 21: Unscrewing the HEPA Filter.
4. Install the new small o-ring and HEPA lter.
Figure 22: Installing the new HEPA Filter.
PN 20631679 Rev C
45
Page 46

Personal Ambulatory Oxygen System Provider Technical Manual
5. Locate the large o-ring on the product tank, replace it with the new large o-Ring included in the PM kit (5022-SEQ). Screw the
new HEPA lter into the carriage holder (wing nut topped housing). Insert and screw the new HEPA lter (wing nut topped housing)
into the carriage holder (product tank) and nger snug in place (do not over-tighten). Re-attach tubing and secure with a cable tie.
Figure 23: O-Ring.
REMOVE AND REPLACE THE COMPRESSOR INTAKE FILTER
Replace the compressor intake lter annually, or more often as needed. The compressor intake lter may become clogged
depending upon the amount of contaminants in the air (smoke, dust, dirt, pollen, etc.) and may need to be changed more
frequently. The most common cause of low concentration and eventual system failure is a dirty or clogged compressor inlet lter.
Environmental conditions usually determine the eective life of a lter.
CAUTION
NOTE:
Operating the Eclipse 5 with a clogged compressor intake lter may
reduce performance and lead to system damage or premature failure.
Always cut the heads of cable ties to avoid damaging the tubing.
PN 20631679 Rev C
46
Page 47

Personal Ambulatory Oxygen System Provider Technical Manual
To replace the compressor intake lter, follow these steps:
1. Cut the cable tie on the silicone tubes attached to the compressor intake lter.
Figure 24: Removing the Compressor Intake Filter.
2. Remove the silicone tubes attached to each end of the lter body.
3. Install a new lter by pushing each tube completely over the barb on the lter body. Verify
ow direction is correct.
4. Reconnect silicone tubes to the lter. Ensure that the feed tubes are not blocked, crimped
or kinked upon completion of the installation or the unit will alarm for low oxygen purity
after the warm-up cycle is complete.
Figure 25: Installing the Compressor Intake Filter.
5. Re-install two cable ties on silicone tubes.
PN 20631679 Rev C
47
Page 48

Personal Ambulatory Oxygen System Provider Technical Manual
After replacing the Compressor Intake Filter, check the following:
• Verify proper seating of the lter in the Eclipse 5. The arrow on the lter body should point
toward the 9-volt battery.
• Ensure that the inlet tube is inserted securely into its hole in the compressor box and is not
pinched.
After lter is replaced and unit cover reinstalled, proper functionality should be checked by
following the Test Procedures described in this manual.
REINSTALLING OR REPLACING THE UNIT COVER
Chart-SeQual recommends providers have EDAT (PN 5535-SEQ), or a spare Control Panel (PN SP20618461) that can be attached
to the unit, and the unit run for a minimum of 20 minutes prior to re-installing the cover to check for a smooth and quiet
calibration to be replaced by operation.
To re-install the cover, follow the steps using the reverse order. Ensure that the Membrane Panel Overlay cable plug is correctly
lined up with circuit board connection and that there are no twists in the ribbon cable.
Figure 26: Membrane Panel Ribbon Cable Installation.
Align Front Cover over Control Board and then gently position front cover. Verify that the black rubber gasket (channel seal)
and strain relief are aligned and t properly. Do not over tighten cover screws (5 in. lbs. at maximum).
After the cover has been reinstalled, but before installing screws on
NOTE:
NOTE:
the cover, re-connect power and start unit. Let the unit run for 20-30
minutes.
Whenever the cover of the Eclipse 5 is removed, proper functionality
should be checked by following the Test Procedure described next.
PN 20631679 Rev C
48
Page 49

Personal Ambulatory Oxygen System Provider Technical Manual
ECLIPSE
Unit
Flow Meter
O2 Monitor with Pump
(preferred location)
O2 Monitor
(alternate location)
Vent to
Atmosphere
TEST PROCEDURES
PURITY AND FLOW RATE TEST PROCEDURE PREFERRED METHOD
It is recommended that the Eclipse 5 be tested for oxygen concentration and ow performance. The SeQual recommended
test setup is shown on the following diagram. Oxygen monitors may or may not have an internal pump to draw samples of
oxygen to be measured. Placement of the oxygen monitor in the test setup depends whether they have an internal pump.
Only one oxygen monitor is needed. An oxygen monitor such as Salter Labs’ PRO2 Check Elite® or equivalent may be used.
• Connect the circuit per the diagram shown below.
• Turn the concentrator on and set the target ow on the Eclipse 5 to 3 LPM continuous ow.
• Allow the Eclipse 5 to stabilize (can take up to 10 minutes).
• Verify the O2 concentration and O2 ow rate are within specication (shown in Table 1).
Figure 27: SeQual Recommended Test Setup to verify performance of Oxygen Concentrator
PURITY AND FLOW RATE TEST PROCEDUREALTERNATE METHOD
Attach a calibrated oxygen monitor to the oxygen outlet port in accordance with oxygen monitor manufacturer’s
recommendations.
Some sensing equipment may restrict the actual ow rate and provide inaccurate concentration read-
NOTE:
ings. If testing is performed with the oxygen monitor in the alternate location pictured above, ensure
that the oxygen monitor does not signicantly restrict oxygen ow.
PN 20631679 Rev C
49
Page 50

Personal Ambulatory Oxygen System Provider Technical Manual
ASSEMBLY AND ALARM VERIFICATION TESTS
To ensure proper assembly and functionality of the Eclipse 5 after it has been reassembled, the following steps should be
followed.
1. Install the Power Cartridge into the Power Cartridge compartment of the Eclipse 5. Plug the AC Power Supply into the
wall outlet and connect it to the External Power Connector of the Eclipse 5.
2. Press the ON button and set the Eclipse 5 to 2 LPM. At initial start-up Eclipse 5 units light the Green, Yellow and Red
LED’s accompanied by a beep. As concentration increases to ~70%, the Red LED turns o and the Yellow and Green
remain on. When the concentration reaches normal operating range (above 85%), the Yellow LED will turn o. The
Green LED will stay lit indicating normal operation. Table 3 shows the normal start-up operating conditions for Eclipse
5 Oxygen Systems. If LED is not green within 7 minutes there may be a problem with the Eclipse 5.
Green
Indicator
O O Blinking Beeps 004 Purity < 70%
O Blinking O O 008
On O O O 000 Normal Operating Condition
3. Verify that the Power Cartridge is charging as indicated by the Power Cartridge Status Gauge is moving in waterfall
fashion (scrolling from bottom to top). If the Power Cartridge Status Gauge is not moving, verify that the Power
Cartridge is properly engaged.
4. Check the Control Panel by pressing each of the Increase/Decrease, Pulse Dose Mode and No Smoking buttons and
observe that the Eclipse 5 buttons function normally.
5. Press the Delivery Mode button and set the Eclipse 5 to the patient’s normal Pulse Dose setting. Conrm that without
breathing from the unit, after 15 seconds of no breath detected, the system changes automatically to Continuous
Flow Mode. The green Delivery Mode light is blinking fast, indicating the system is delivering a Continuous Flow. After
another 15 seconds, the system stops delivering Continuous Flow and waits 15 seconds trying to detect a breath. The
cycle continues until a breath is detected.
6. After 5 minutes of operation, block the Cannula Fitting Outlet with your nger for 2 minutes and conrm that the
visual and audible alarm occurs. Unblock the Cannula Outlet Port and let it stabilize until the alarm stops.
Yellow
Indicator
Red Indicator
Audible
Alarm
Alarm code Operating Condition
Purity between 70% and
85%
7. Disconnect the AC Power Supply and allow the Eclipse 5 to run for about one minute. Set the Eclipse 5 to the
patient’s normal Continuous Mode setting. Conrm that the Power Cartridge Status Gauge is illuminated and External
Power Present Indicator is o.
8. Remove the Power Cartridge and verify that the Eclipse 5 alarms and red Alarm Indicator is ashing and the alarm
sounds. After about 5 seconds, re-install the Power Cartridge and connect the AC Adapter and observe that the
Eclipse 5 automatically restarts. Conrm that the External Power Present Indicator is illuminated.
9. Turn o Eclipse 5 and unplug the AC Power Supply.
10. Record results, initial and date the Service and Maintenance Record.
11. EDAT may be utilized to record Eclipse 5 device status and dates of service.
PN 20631679 Rev C
50
Page 51

Personal Ambulatory Oxygen System Provider Technical Manual
RECORD HOURS OF OPERATION & SOFTWARE VERSION
To help maintain the Eclipse 5, you may obtain the Total Hours of Operation and software version numbers for the Control
Board and the Power Manager Systems by following the steps below.
Data Output Form Example
Alarm Code
- If connected to the AC or DC Power Supplies, press
the “No Smoking” icon on the control panel and
advance to the following display mode for each time
the icon is depressed:
• AlarmCode(ALRM)-Displaysmostrecent
alarm code. Additional alarm codes
will also be displayed, if present, by
continuing to press the + key.
• PulseSensitivity(PS)
• HoursofOperation(HRS)
• 9-voltBatteryStatus(9V)
• RiseTime(BOL)
• ControlBoardSoftwareRevision
• PowerManagerSoftwareRevision
Pulse Sensitivity
Hours of
Operation
9-Volt Battery
Status (Volts)
Rise Time
Control Board
Software Revision
- If external power is not available and the power
cartridge is installed, start by pressing the ON/OFF key
for 1 second.
- If no key press is sensed within 5 seconds, the Eclipse
5 will drop out of Provider Mode.
Power Manager
Board Software
Revision
Log the Results
NOTE:
The display accrues to “99,999”
hours, then rolls over to “00,000”.
PN 20631679 Rev C
51
Page 52

Personal Ambulatory Oxygen System Provider Technical Manual
ELECTRICAL SAFETY TEST
This is required only for the Eclipse 5 Oxygen System, that is used in a hospital or institutional environment. This is not required
for home care use.
To test the basic electrical safety of the Eclipse 5 AC Power Supply, SeQual recommends using an LKG-601 Electrical Safety
Analyzer (Netech Corporation, Hicksville, NY) or equivalent to verify that the current leakage to ground is within appropriate
limits.
1. Plug the AC Power Supply into the electrical safety analyzer. Disconnect the AC Power Supply from the Eclipse
5 unit.
2. Plug the electrical safety analyzer into a wall outlet.
3. Follow the analyzer manufacturer’s instructions for measuring both the forward and reverse earth leakage
current only. Verify that forward and reverse-current leakage to ground is < 250 µA (100/115VAC applications)
and < 500 µA (220/240VAC applications).
4. Disconnect the AC Power Supply from the electrical safety analyzer.
5. If the AC Power Supply measures leakage current greater than the criteria in step 3, please return it to SeQual
for service.
6. EDAT may be utilized to record Eclipse 5 device status and dates of service.
CLEANING THE ECLIPSE 5
Clean inside the unit, as needed, using a small vacuum cleaner or brush to remove any accumulation of dust or debris prior to
attaching the covers. After reinstalling the cover, verify that the rubber gasket is installed correctly.
Use mild detergent solution to clean the cabinet, Control Panel and power supplies. Turn OFF the Eclipse 5 and discon nect
from AC or DC power before any cleaning or disinfection activity. DO NOT spray the cabinet Control Panel or power supplies.
Use a damp (not soaking wet) cloth or sponge. Spray the cloth or sponge with a mild detergent solution to clean the cabinet
and power supplies. To disinfect the Eclipse 5, use Lysol® Brand II disinfectant. Proceed as directed by the manufacturer.
WARNING:
Unplug Power Cords, AC or DC Power Supplies before cleaning the
exterior cabinet. DO NOT use denatured alcohol or apply liquid
spray or aerosol cleaners.
PN 20631679 Rev C
52
Page 53

Personal Ambulatory Oxygen System Provider Technical Manual
PROVIDER SERVICE AND MAINTENANCE RECORD
Whenever maintenance or service is performed on an Eclipse 5 unit, an entry should be made in the service log for that concentrator
or recorded in accordance with your company’s standard procedure. Whenever the case of the Eclipse 5 is opened, the ow rate, purity,
and alarm status should be veried per the Test Procedures in this manual.
EDAT may be utilized to record Eclipse 5 device status and dates of service.
Date
NOTE:
Hour meter
Reading
Use the “Save As” function under the “File” section and save the le as the SN and/or the date serviced
(example: 08D0110xxxx 08012000).
Eclipse 5 Serial Number ______________________
System Checkout
Initials Service Performed
Purity Flow Alarms
Comments
Table 13: Sample Eclipse 5 maintenance record
PN 20631679 Rev C
53
Page 54

Personal Ambulatory Oxygen System Provider Technical Manual
SHIPPING AND TRANSPORTING THE ECLIPSE 5
When shipping the Eclipse 5 use original packaging, if possible. Always remove the Power Cartridge and cart from the Eclipse
5 prior to shipping.
If original packaging material is available repack the Eclipse 5, Power Cartridge, cart and power supplies in the designated
packaging areas.
If original packaging material is not available, then place the Eclipse 5 in a plastic bag and surround the concentrator with a
minimum of two inches of soft foam packing material or bubble wrap. Wrap each accessory in a similar manner. Place the
Eclipse 5 and accessories in an appropriate cardboard box for shipping.
WARNING:
When the Eclipse 5 must be transported in a delivery vehicle, simply secure the Eclipse 5 and its accessories to prevent
damage. Do not expose the device to extreme heat, cold, or humidity.
DO NOT expose the Eclipse 5 to water. The Eclipse 5 enclosure does
not provide protection against the harmful eects of liquid ingress.
Electrical shock or damage to the unit may result.
STORING THE ECLIPSE 5
Heat and humidity may degrade performance or severely damage the Eclipse 5. Store the device in a cool, dry, protected area
away from high temperatures, moisture and humidity. Remove the Power Cartridge when storing the device.
The Eclipse 5 must be turned on and run for 2 hours each month to ensure proper operation performance.
Tip: Running the power cartridge down completely and recharging it will provide two dierent features for the Eclipse 5:
1. Ensures the battery cartridge is calibrated
2. Running the Eclipse 5 between uses while in storage allows the user to know if service may be needed prior to
needing the device.
DISCARDING
Power Cartridge Disposal: The Power Cartridge can be recycled and should not be thrown into the trash. Contact
the local city or town oces for instructions on proper disposal of the Power Cartridge. Alternately, CAIRE may be contacted
for the Power Cartridge disposal.
Eclipse 5 Oxygen System Disposal: Local environmental laws may prohibit disposal of electrical and/ or electronic
equipment such as the Eclipse 5, AC Power Supply or the DC Power Supply. Contact the local city or town oces for instructions
on proper disposal of electrical or electronic equipment. Alternately, Chart SeQual may be contacted for disposal information.
PN 20631679 Rev C
54
Page 55

Personal Ambulatory Oxygen System Provider Technical Manual
Troubleshooting, Service, and
Repair Procedures
CAUTION
The Eclipse 5 contains electrostatic sensitive components. Do not
open or handle except at a static free workstation. Do not remove
cover without ESD protection.
NOTE:
To adequately troubleshoot and repair the product in the eld, EDAT is recommended.
Eclipse 5 Data Acquisition Tool (EDAT) PN 5535-SEQ
PN 20631679 Rev C
55
Page 56

Personal Ambulatory Oxygen System Provider Technical Manual
SYSTEM TROUBLESHOOTING AND ALARMS
PROVIDER TROUBLESHOOTING TABLE DO NOT IGNORE ALARMS.
Yellow Light
Symptom Alarm Code Possible Cause Provider Action
The yellow light is on solid.
There is no audible alarm.
(This alarm may occur with
the Eclipse 5 o while the
battery is charging as well)
The yellow light is ashing.
The alarm is giving 1 beep
every 2 minutes.
The yellow light is ashing.
The alarm is giving 2 beeps
every 30 seconds.
The yellow light is ashing.
The alarm is giving 1 beep
every 2 minutes.
The yellow light is ashing.
There is no audible alarm.
001 or 100
002
010
020
008
The Eclipse 5 has detected a
problem with the connection
to the power cartridge.
The Eclipse 5 power cartridge
is warm.
The Eclipse 5 power cartridge
voltage is low.
The Eclipse 5 has detected a
ow restriction causing low
or blocked ow.
The Eclipse 5 has detected
low oxygen levels.
1) Remove power cartridge and re-install to ensure that it is secure in the concentrator.
2) If possible, install a separate power cartridge in the Eclipse 5 to verify if the condition occurs
with multiple batteries.
3) If this problem persists, contact Chart Technical Support for service.
1) Re-attach the Eclipse 5 to external power or install a fully-charged power cartridge in the
Eclipse 5. Allow warm power cartridge to cool outside the concentrator for 30 minutes.
2) Re-charge the power cartridge using AC or DC power.
3) Replace the power cartridge if another is available.
4) If the condition persists, contact Chart Technical Support for service.
1) Plug Eclipse 5 into AC or DC power supply and recharge or replace power cartridge with fully
charged power cartridge.
1) Clean and replace cabinet inlet lter
2) Ensure that the cannula is not kinked or blocked.
If used with a humidier bottle, ensure that it is lled properly and not creating a blockage.
3) Ensure that the Eclipse 5 has proper ventilation. It needs to be at least 3 inches from any
surface to ensure the vents aren’t blocked.
4) Remove any external tubing attachments to verify that any attached devices are not causing
a ow restriction.
5) If the Eclipse 5 has been recently opened for maintenance, verify that no tubing is kinked
between the circuit board and the oxygen outlet.
6) If the problem persists, advise patient to switch to alternate source of oxygen and contact
Chart Technical Support for service.
1) Ensure the air intake lter is not clogged or restricted. Clean and replace the lter if necessary.
2) Ensure the Eclipse 5 is in a well ventilated area. Make sure there are at least 3 inches
between the back of the Eclipse 5 and any obstructions (furniture, curtain, etc.).
3) If operating in the car, be sure the back of the Eclipse 5 is facing outward in the seat.
4) Perform the preventative maintenance and replace the HEPA, Air Inlet, and Compressor
Intake lters.
5) If the condition persists, contact Chart Technical Support for service.
PN 20631679 Rev C
56
Page 57

Personal Ambulatory Oxygen System Provider Technical Manual
Red Light
Symptom Alarm Code Possible Cause Your Action
1) Ensure the air intake lter is not clogged or restricted. Clean and replace the lter if necessary.
2) Ensure the Eclipse 5 is in a well ventilated area. Make sure there are at least 3 inches
The red light is ashing.
The alarm is giving 3 beeps
every 2 minutes.
The red light is solid. The
alarm is giving a constant
beep. The Eclipse 5 is not
delivering oxygen and it
will not power on.
The red light is solid. The
display screen says “FAIL”.
The Eclipse 5 is not producing delivering oxygen and
will not power on.
004
“********”
N/A
FAIL XX
The Eclipse 5 has detected
low oxygen levels
The Eclipse 5 has lost power
temporarily while running
on external power and needs
to be re-set.
The Eclipse 5 has lost power
due to a depleted power
cartridge charge or an overheated power cartridge.
The Eclipse 5 has experienced
a system malfunction.
between the back of the Eclipse 5 and any obstructions (furniture, curtain, etc.)
3) If operating in the car, be sure the back of the Eclipse 5 is facing outward in the seat.
4) Verify that the internal lters (HEPA, Compressor Intake) are clean and not restricted. If
necessary, replace lters.
5) If the condition persists, advise patient switch to an alternate source of oxygen and contact
Chart Technical Support for service.
1) Remove the power cartridge and disconnect the AC or DC power supply from the Eclipse 5.
The red light should disappear when the power sources are removed. Wait approximately 20
seconds, reconnect power sources, and attempt to power on the Eclipse 5 again. If the Eclipse
5 does not power on, proceed to step 2.
2) Inspect the external (AC or DC) power supply and ensure that its connections are secure at
the Eclipse 5, the transformer, and the external power outlet.
3) If possible, attempt to use another electrical (AC or DC) outlet to power the Eclipse 5.
4) Verify that the status LED on the external power supply (AC or DC) and external power LED
on the Eclipse 5 are lit. If they are not, attempt to use another external (AC or DC) power supply
to see if the problem persists.
5) If the condition persists, contact Chart Technical Support for service.
1) Reset the Eclipse 5 by removing the power cartridge and external (AC or DC) power supply.
2) Re-attach the Eclipse 5 to external power or install a fully-charged power cartridge in the
Eclipse 5. Allow warm power cartridge to cool outside the concentrator for 30 minutes.
3) Re-charge the power cartridge using AC or DC power.
4) Replace the power cartridge if another is available.
5) If the condition persists, contact Chart Technical Support for service.
1) Remove the power cartridge and disconnect the AC or DC power supply from the Eclipse 5.
The red light should disappear and the FAIL message will disappear from the screen when the
power sources are removed. Wait approximately 20 seconds, reconnect power sources, and
attempt to power on the Eclipse 5 again.
2) If the Eclipse 5 does power on, monitor it to determine if the FAIL message occurs again. If
the FAIL message occurs again, contact Chart technical support for service.
3) If the Eclipse 5 does not power back on, advise patient switch to an alternate source of
oxygen and contact Chart Technical Support for service.
Other Alarm Conditions
Symptom Alarm Code Possible Cause Your Action
1) Pulse mode may not work correctly if the user has any condition that causes blocked/re-
stricted nasal passages (Illness, deviated septum, etc.). Switch to continuous ow.
While in pulse mode, the
compressor speeds up and
the pulse mode LED ashes
quickly for 15 seconds.
N/A
The Eclipse 5 is unable to
detect the user’s breathing
eort. See page 17 for pulse
mode information.
2) Ensure cannula is no longer than 7 feet in length.
3) Ensure that there are no kinks or blockage in cannula tubing.
4) If a humidier bottle is connected, remove the humidier bottle and connect cannula
directly to outlet port.
Note: Pulse mode will not work with a humidier bottle installed.
5) If the condition persists, contact Chart Technical Support for service.
PN 20631679 Rev C
57
Page 58

Personal Ambulatory Oxygen System Provider Technical Manual
Other Alarm Conditions (Continued)
Symptom Alarm Code Possible Cause Your Action
1) Verify that the outlet is providing power. Do not connect the power supply to a dimmer circuit
or a power strip.
2) Check that cable connections on power supplies are secure to the wall/vehicle and concentrator. If using the ACor DC power supply, check the cable connection on the power supply
Power Cartridge is draining
while plugged in to AC/DC
power supply
The Power Cartridge (battery) charge is not lasting
as long as it should.
The Power Cartridge (battery) is not charging.
The Eclipse 5 beeps 3 times
when it is rst powered on.
N/A
N/A
N/A
N/A
N/A
The Eclipse 5 is not
receiving power from the
attached power supply.
The power cartridge was
not fully charged
The Eclipse 5 was not operating at the anticipated
ow rate.
The power cartridge is not
performing to specications.
The Eclipse 5 is not
receiving external AC or
DC power to charge the
battery.
The Eclipse 5 is not
properly communicating
with the power cartridge
to charge it.
The internal battery that
powers the alarms is low
transformer as well.
3) Ensure that the power verication lights are on.
- There will be a green light on the power supply transformer box.
- There will be a green light on the Eclipse 5 concentrator control panel in the shape of a power
cord.
4) If power verication LEDs are not lit, remove all connections of the power supply for 20
seconds and reconnect.
5) If the condition persists, contact Chart Technical Support for service.
1) Connect to AC or DC power to recharge the battery. Verify that the battery charges for 2-5
hours and the battery icon is full and not ashing before use.
2) Refer to the actions for “Power Cartridge is Not Charging” Symptom below.
1) Ensure that the prescribed ow rate is being used and that pulse or continuous ow is being
used as required.
1) Attempt to drain the battery cartridge completely. Do this by running the Eclipse 5 on battery power until the machine shuts o completely. Then remove the battery and allow it to cool
for approximately 30 minutes. After this time, re-insert the battery in the Eclipse 5 and recharge
it using ACor DC power. Perform the Battery Calibration procedure on page 36.
2) Time the battery duration and compare it to the chart on page 22.
3) If the battery duration is less than 80% of the run time listed in the chart on page 22 after the
battery calibration, it is recommended to replace power cartridge.
1) Verify that the outlet is providing power. Do not connect the power supply to a dimmer circuit
or a power strip if using AC power supply..
2) Check that cable connections on power supplies are secure to the wall/vehicle and concentrator. If using the AC power supply, check the cable connection on the power supply transformer as
well.
3) Ensure that the power verication lights are on.
- There will be a green light on the power supply transformer box.
- There will be a green light on the Eclipse 5 concentrator control panel in the shape of a power
cord.
4) If power verication LEDs are not lit, remove all connections of the power supply for 20
seconds and reconnect.
5) If the condition persists, contact Chart Technical Support for service.
1) Remove power cartridge and re-install to ensure that it is secure in the concentrator.
2) Inspect the Eclipse 5 for a solid yellow light when the battery is installed or a ashing battery
icon when attempting to charge. If either of these symptoms is present, continue to step 3.
3) If possible, install a separate power cartridge in the Eclipse 5. If the replacement cartridge
works properly, then the original cartridge needs to be replaced.
4) If this condition persists, contact Chart Technical Support for service.
1) Internal 9V battery needs replacement. Perform preventative maintenance or contact Chart
Technical Support for service.
WARNING:
WARNING: Do not modify this equipment without authorization of the
manufacturer.
PN 20631679 Rev C
58
Page 59

Personal Ambulatory Oxygen System Provider Technical Manual
ALARM CONDITIONS AND ALARM CODES
Use the table below to decode Eclipse 5 alarm conditions. If other alarm codes are displayed by the Eclipse 5, contact Chart
Technical Support for assistance.
Note: The following table is intended as a guide for the provider, not the user.
CONDITION
“Warming Up. Please
Wait.”
“Warming Up. Please Wait.” 008 O2 < 85% ON ON OFF OFF
“3.0” (or ow setting) 000 NO ALARM ON OFF OFF OFF
“Low Power Cartridge” 010 LOW BAT ON Flashing OFF 2 Beeps
“Warm Power Cartridge” 002 WARM BAT ON Flashing OFF 1 Beep
“Low 9V
Battery”
“O
Concentration < 85%” 008 O2 < 85% OFF Flashing OFF OFF
2
“O
Concentration < 70%” 004 O2 < 70% OFF OFF Flashing 3 Beeps
2
“Flow Rate Error / Blocked
Flow”
ALARM
CODE
004 O2 < 70% ON ON ON OFF
- - OFF OFF OFF
020 FLOWRATE OFF Flashing OFF 1 Beep
ALARM
DISPLAY
GREEN
INDICATOR
YELLOW
INDICATOR
RED
INDICATOR
AUDIBLE
ALARM
3 Beeps on
POST
WHAT TO DO
Wait. The system typically takes 3 – 5 minutes to reach
specied performance.
Wait. The system typically takes 3 – 5 minutes to reach
specied performance.
Nothing. The system is operating properly at the specied
ow rate.
Plug into external power or replace with a charged Power
Cartridge.
Plug into external power or replace with a charged Power
Cartridge.
Replace the internal 9-volt battery.
Perform Annual Filter PM Maintenance. If condition persists,
service is required.
Perform Annual Filter PM Maintenance. If condition persists,
service is required.
Check tubing and/or humidier for obstruction. Check/clean
air intake lter. If condition persists past 10 minutes, service
is required.
“Cannot Charge Power
Cartridge”
“One Wire Communica-
tion Loss”
“No Inspiration Detected”
(in Pulse Mode only)
“Loss of External Power”
(without charged Power
Cartridge installed)
“System Fault” 080 FAIL XX OFF OFF ON
001 CHARGER N/A ON OFF OFF
100 ONE WIRE N/A Flashing OFF 1 Beep Check batter y connections.
200 P <--> C ON OFF OFF OFF
040
********
(ashing)
OFF OFF Flashing ON for 5 min
ON 10 seconds
then silent
Instruct patient to seek an external power source. Remove
Power Cartridge and allow to cool to room temperature. If
Power Cartridge malfunction persists, service is required.
If no inspiratory eort is detected after 15 seconds, the
Eclipse 5 will switch to Continuous Flow for 15 seconds, and
continue this sequence until a breath is detected.
Instruct patient to seek an alternative oxygen supply
until external power is restored or install a charged Power
Cartridge.
Reset power, wait 20 seconds, reconnect power, restart
device.
Instruct patient to use back up oxygen supply. Service is
required.
PN 20631679 Rev C
59
Page 60

Personal Ambulatory Oxygen System Provider Technical Manual
MALFUNCTION CODES
If a malfunction occurs in the Eclipse 5, the device will stop, the Red LED on the front panel will light and the buzzer will sound for 10
seconds and then silence. The LCD will display one of the following Malfunction Codes:
Malfunction FAIL code Recommended Action
Invalid RESET FAIL 80 Check for secure communication cables, Verify functionality of PM and CS PCBs
I/O Port Failure FAIL 81 Check for secure communication cables, Verify functionality of PM and CS PCBs
RAM Failure FAIL 82 Check for secure communication cables, Verify functionality of PM and CS PCBs
FLASH Failure FAIL 83 Check for secure communication cables, Verify functionality of PM and CS PCBs
EEPROM Failure FAIL 84 Check for secure communication cables, Verify functionality of PM and CS PCBs
IPC Watchdog Timeout FAIL 90 Check for secure communication cables, Verify functionality of PM and CS PCBs
Compressor Motor Too Hot FAIL 91
PCB Too Hot FAIL 92
Compressor Motor Stalled FAIL 94
Battery Communication Failure FAIL 95
IPC Failure FAIL A0 Verify functionality of PM PCB
Allow Eclipse 5 to Cool for 30 Mintues. Check compressor fan functionality. Check to ensure vents
are not obstructed. Verify functionality of the Compressor Assy
Allow Eclipse 5 to cool for 30 Minutes. Verify functionality of PM fan. Check to ensure vents are
not obstructed
Check Compressor wires for damage. Verify functionality of PM PCB. Verify functionality of the
Compressor Assy
Verify functionality of the Battery Bridge PCB. Check Battery and Battery Bridge PCB for pin damage. Verify functionality of battery. Verify functionality of PM pcb
Product Pressure Sensor Failure FAIL A1 Verify functionality of CS PCB
Breath Pressure Sensor Failure FAIL A2 Verify functionality of CS PCB
Ultrasonic Failure FAIL A3 Verify functionality of CS PCB. Check for water intrusion from humidier
Product Temperature Sensor Failure FAIL A4 Verify functionality of DB9 cable harness. Verify functionality of CS PCB
Loss of Product Tank Pressure FAIL A5 Check for leaking, cracked HEPA lter or damaged tubing. Verify ATF motor is turning
Purity Calibration Data Failure FAIL A6 Check for leaking, cracked HEPA lter or damaged tubing. Verify functionality of CS PCB
Flow Calibration Data Failure FAIL A7 Verify functionality of Proportional Valve. Verify functionality of CS PCB
Breath Sensitivity Data Failure FAIL A8 Check for damaged tubing. Verify functionality of CS PCB
Hour of Operation Data Failure FAIL A9 Verify functionality of CS PCB
Invalid Assembly Option FAIL AA Remove Power to Reset
Ambient Pressure Sensor Failure FAIL AB Verify functionality of CS PCB
Unidentied Failure FAIL FF Remove Power to Reset
Step 1: Remove all power sources; battery and external power. Wait 20 seconds. Reconnect power to the Eclipse 5. Turn the
device to the ON position. If resolved, continue use.
Step 2: If unresolved, call Chart Technical Support for assistance.
PN 20631679 Rev C
60
Page 61

Personal Ambulatory Oxygen System Provider Technical Manual
System Schematics and Diagrams
SIMPLIFIED BLOCK DIAGRAM
Figure 28: Eclipse 5 Oxygen System Simplied Block Diagram.
Figure 29: Top Case Components.
PN 20631679 Rev C
61
Page 62

Personal Ambulatory Oxygen System Provider Technical Manual
Control
Board
ATF
Module
Compressor
Intake Filter
Compressor
Box
Product
Tank
Power Manager
PC Board
Exhaust
Duct
Battery Bridge PC
Board
Figure 30: Bottom Case Components
PN 20631679 Rev C
62
Page 63

Personal Ambulatory Oxygen System Provider Technical Manual
Oxygen Circuit
REMOVE AND REPLACE THE ATF MODULE
NOTE:
1. Remove the Unit Cover as described in the section Remove and Replace the Unit Cover.
2. Cut the cable tie as shown below, and disconnect the silicone tube that goes into the product port of
the ATF; this tube comes from the Product Tank.
3. Install port cap.
Cable
Tie
Silicone Tube to
Product Tank
There are no serviceable parts inside the ATF Module. Do not attempt
to disassemble or modify the ATF Module.
Figure 31: Removal of ATF Module Product Hose.
4. Cut the cable tie that secures the silicone tube to the braid tube at shown below.
To ATF Module
Vacuum Port
Cable
Tie
To ATF Module
Pressure Port
Figure 32: Removal of ATF Module Pressure and Vacuum Tubes.
PN 20631679 Rev C
63
Page 64

Personal Ambulatory Oxygen System Provider Technical Manual
5. Cut the cable ties to the braided tubes that connect into the ATF pressure and vacuum ports as shown
in Figure 32. Disconnect the braided tubes.
5a. Install port caps.
6. Unscrew the 3 screws (M4x16 Pan Head Machine Screw, P/N 6961-416-SEQ) and remove the screws and
washers (M4 Flat washer, P/N 6985-04-SEQ) as shown below.
Remove
Screws
Figure 33: Remove ATF Module from Eclipse 5 Case.
7. Lift the ATF. Take o the 3 grommets. Disconnect the wire harness from the gearbox of the ATF.
8. Remove the ATF.
9. Install 3 grommets into the mounting slots on the ATF as shown below. Position the ATF into the
bottom cover but DO NOT install the mounting screws yet. Route the 16” Silicone Tube under the ATF as
shown on Figure 35 on next page.
Caps
Grommet
Caps
Figure 34: ATF Module Grommet Installation
PN 20631679 Rev C
64
Page 65

Personal Ambulatory Oxygen System Provider Technical Manual
16” Silicone Tube
Routing
Figure 35: Tube Routing under ATF Module.
10. Place the ATF in the Unit Case and remove the caps from the ATF Ports. Install the Braided Tubes into
the ATF pressure and vacuum ports as shown on Figure 32. Do not use oil or grease if the tubing is
dicult to install. Secure joints with cable ties.
WARNING:
DO NOT use any petroleum based or other lubricants. A spontaneous
and violent ignition may occur if oil, grease or other petroleum
substances come into contact with oxygen under pressure. Keep these
substances away from the oxygen system, tubing and connections
and any other oxygen source.
NOTE:
Inspect all tubing before securing with a cable tie.
11. Mount the ATF with 3 M4x16 screws and 3 washers as shown on Figure 33 on previous page. Apply
Loctite® 425 Thread Locker on the threaded tips of the screws before installing. Tighten screws but DO
NOT squash the grommets (2 in.lbs. maximum).
If needed, install spacer (20623336) underneath the ATF mount closest to the product tank with a longer
screw (6961-418-SEQ) to ensure that the ATF is level.
NOTE:
CAUTION
Over tightening may cause excess vibration.
Remove caps on ATF ports ONLY before connecting the tubes. DO NOT
leave the ports open unless ready to install the tubes. Also place the
removed caps from the new ATF and place on the ports of the replaced
AT F.
PN 20631679 Rev C
65
Page 66

Personal Ambulatory Oxygen System Provider Technical Manual
12. Remove caps from ATF Module.
13. Connect the silicone tube from the Product Tank into the product port of the ATF and secure joints with
cable ties as shown on Figure 31.
14. Use cable tie to secure the silicone tube to the braid tube to ensure that there is NO kinking on the
bend as shown on Figure 32. Hand-tighten the cable tie. Inspect the tubing to ensure the tubing is not
kinked.
15. Perform product test prior to installing cover and again after cover replacement.
16. Installation of the Unit Cover on the unit is described in the Remove and Replace of the Unit Cover.
PN 20631679 Rev C
66
Page 67

Personal Ambulatory Oxygen System Provider Technical Manual
REMOVE AND REPLACE THE PRODUCT TANK ASSEMBLY PN 4378SEQ
Removal of Product Tank
1) Follow the steps to Removing the Unit Cover
2) Remove the Front Cover Assembly completely; disconnect outlet tubing and front membrane ribbon cable. Set aside.
3) Locate the Product Tank and cut the cable ties from the ATF to the product tank (Bottom), and O2 out from the outlet
connector (Top). Remove tubing from ATF to lower product tank barb. See Figure 36.
Important: Cap o the ATF hose barb with a black hose barb cap.
Figure 36: Cut Cable Ties
4) Locate the 2 screws that hold the securing straps and the product tank in place, remove the screws. Set aside for reinstallation. Figure 37.
Two screws
Figure 37: Remove Screws
5) Lift out the old product tank. Set aside for RMA return or scrap.
PN 20631679 Rev C
67
Page 68

Personal Ambulatory Oxygen System Provider Technical Manual
Install new Product Tank
1) Locate all parts needed: Product Tank, Product Tube from ATF (correct version), Securing arm and screws. See Figure 38.
Figure 38: New product tank
2) Position the product tank with the 2 hose barbs facing in the direction of the ATF. Refer to Figure 39.
Figure 39: Product tank and hose barbs
PN 20631679 Rev C
68
Page 69

Personal Ambulatory Oxygen System Provider Technical Manual
3) Install the securing arm over the product tank, and locate the screw hole on the back case cover to secure the product tank.
Install securing arm
and install two screws
Figure 40: Install securing arms
4) Locate the correct Product Tube - remove black ATF outlet barb cap, and attach the Product Tube Assy to the ATF output
barb, secure with a cable tie. Attach the other end of the Product Tube to the Bottom port on the Product Tank. See Figure
39.
5) Connect the Output tubing to the Top port on the Product Tank and secure with cable ties. See Figure 41.
Add cable tie to both
top and bottom parts
Figure 41: Connect output tubing
PN 20631679 Rev C
69
Page 70

Personal Ambulatory Oxygen System Provider Technical Manual
Electronics
REMOVE AND REPLACE THE CONTROL BOARD ASSEMBLY
CAUTION
The Eclipse 5 contains electrostatic sensitive components.
Do not open or handle except at a static free workstation.
NOTE:
1. Remove the Unit Cover as described in the section Remove and Replace the Unit Cover.
Air Inlet
Temperature
the Proportional
The Control Board Assembly is factory calibrated as a single unit. Do
not disassemble the Control Board Assembly.
Tube from
Valve
Data
Communications
Port
Cable Tie
Screw
Power
Manager PC Board
Communications
Proportional
Valve Connector
Tube from
Product Tank
Buzzer
Connector
Figure 42: Control Board Removal (ATF Module not shown for clarity).
2. Remove the 2 screws (M3x10 Plastite Screw, P/N 6950-310-SEQ) holding the Control Board Assembly to the
Unit Case as shown in Figure 42.
NOTE:
3. Lift the Control Board Assembly and disconnect the Inlet Air Temperature, Data Communications Port, Power
Manager PC Board Communications, Proportional Valve wire harness, and Buzzer wire harnesses as shown in
Figure 42.
Use a magnetized Phillips #1 screwdriver to remove the screws. This
greatly reduces the chances of dropping a screw in the Unit Case.
PN 20631679 Rev C
70
Page 71

Personal Ambulatory Oxygen System Provider Technical Manual
4. Lift the Control Board out of the Unit. Cut the green cable tie to the silicone tube that is connected to the sensor
as shown in Figure 42. Disconnect the silicone tube that is attached to the sensor. Cut the green cable ties to the
silicone tubes that are connected to the ow tube as shown in Figure 42. Disconnect the silicone tubes that are
attached to the ow tube.
5. Pinch or plug the silicone tube coming from the ATF product port and secure with a cable tie.
6. Remove the Control Board Assembly.
7. To install a new Control Board Assembly, cut the cable tie used to pinch the silicone tube coming from the
product tank. Attach this tube and the tubes from the Proportional Valve and from the Product Tank to the ow
tube as shown in Figure 42. Secure with a cable tie. Connect the silicone tube to the sensor as shown in Figure
42. Secure with a cable tie. Place the 2 screws in the sheet metal bracket as shown in Figure 43. Inspect the tubing
to ensure the tubing is not kinked.
8. Lower the Control Board Assembly into the Unit Case only to where the aligning pins go
through the sheet metal bracket; make sure the sheet metal bracket is 1/8” above the supporting ribs – this will
ensure the 2 screws stay in the bracket and do not fall in the unit case as shown in Figure 43. Start the 2 screws
by turning them 2 times into the unit case. After starting both screws, lower the Control Board Assembly onto
the supporting ribs; tighten the 2 screws to the unit case.
Lift Bracket
1/8” above
Ribs
Buzzer
Figure 43: Control Board Installation.
Screw
9. Connect the Inlet Air Temperature, Data Communications Port, Power Manager PC Board Communications,
Proportional Valve wire harness and Buzzer wire harnesses as shown on Figure 42.
10. Refer to “Flow Calibration” in EDAT User Manual (PN 5419-SEQ) to calibrate Eclipse 5 with new Control Board.
11. Installation of the unit cover on the unit is described in the Remove and Replace of the Unit Cover.
PN 20631679 Rev C
71
Page 72

Personal Ambulatory Oxygen System Provider Technical Manual
REMOVE AND REPLACE THE BUZZER WIRE HARNESS
1. Unplug the buzzer from the Control Board PC Board.
2. Remove the Control Board.
3. To remove the buzzer from the case, cut the cable tie, grasp the buzzer body with a pair of pliers and rotate the
buzzer to break the adhesive joint.
4. To install a new buzzer, apply a ring of cyanoacrylate adhesive (Super Glue) around the inlet hole as shown in
Figure 44.
Apply
Adhesive
Figure 44: Bonding the Buzzer to the case.
5. Place buzzer as shown in Figure 44. Ensure that the buzzer opening is centered over the grill hole. Hold in place
until adhesive cures.
Cable Tie
Allow Slack
Here
Figure 45: Buzzer Installation.
6. Install the Control Board Assembly. Secure the wire harness with Cable as shown on Figure 45. Insure that there
is a slack on the wire harness before tightening the Cable Tie. Plug in the buzzer.
PN 20631679 Rev C
72
Page 73

Personal Ambulatory Oxygen System Provider Technical Manual
CONTROL BOARD CONNECTOR DIAGRAM
Use the gure below as an aid to ensure proper connection of wire harnesses to the Control System printed circuit board.
Air Inlet
Temperature
Data
Communications
Port
Control
Panel
Power
Manager PC Board
Communications
Proportional
Valve Connector
Buzzer
Connector
Figure 46: Control Board Connector Diagram
PN 20631679 Rev C
73
Page 74

Personal Ambulatory Oxygen System Provider Technical Manual
Remove and Replace Power Manager Printed Circuit Board
1 Remove and Replace Combo Power Manager board set
WARNING:
Disconnect power supplies and remove Power Cartridge before
removing the unit cover. Do not touch exposed circuits during
maintenance without ESD protection.
CAUTION
The Eclipse 5 contains electrostatic sensitive components. Do not open
or handle except at a static free workstation.
1.1 Remove the Power Cartridge and unscrew the 4 screws (PN: 6974-312-SEQ) holding the BBB pcb to the case shown in Fig 47.
Fig 47: Screws
1.2 Remove the Unit cover as described in section, “Remove and Replace the Unit Cover”.
1.3 Disconnect the 5 wire harnesses as shown in Figure 48.
Cooling Fan Cable
Compressor Cable
Fig 48: Cable locations
External Power Cable
Compressor Cable
PN 20631679 Rev C
74
Page 75

Personal Ambulatory Oxygen System Provider Technical Manual
1.4 Unscrew the 2 Cooling Fan screws (PN: 6961-21-SEQ) holding the fan in place. Remove the Fan (PN: 1074-SEQ). Set aside for later
installation.
1.5 Remove the Exhaust tube in Figure 49. Set aside for later installation.
Exhaust Tube
Fig 49: Exhaust Tube
1.6 Pull the Power Manager pcb 1” out of the case. Gently push the compressor box away from the Power Manager pcb about 1/8”.
Slide the board and the cabling out from under the edge of the compressor for better access. Disconnect the two wire harnesses (9V
batt & ATF harness) and the Control board ribbon cable shown in Fig 50. Remove the Power Manager pcb.
9 V Battery Harness
Control Board Ribbon
Cable
ATF Gearmotor
Harness
Fig 50: Wire harnesses and control board ribbon
PN 20631679 Rev C
75
Page 76

Personal Ambulatory Oxygen System Provider Technical Manual
1.7 Unbox the SP5932-4-SEQ and account for all parts (Fig 51).
Fig 51: New Power Manager
1.8 Position the Power Manager PCB (PN: SP5932-4-SEQ) 1” out of the case as shown in Fig 52. Gently push the Compressor Box away
from the Power Manager pcb by 1/8”. Connect the 2 wire harnesses (Ext Power & ATF harness) and the Control Board Ribbon Cable.
Note: Route the wiring under the edge of the compressor. Position the Power Manager PCB into the alignment slots on the back case.
Finally connect the 9V battery wiring harness (between the exhaust & battery compartment) and 3 Compressor wiring harnesses to
their connectors.
Fig 52: Routing Wires
PN 20631679 Rev C
76
Page 77

Personal Ambulatory Oxygen System Provider Technical Manual
1.8 Install the Cooling Fan (PN: 1074-SEQ) with the 2 screws (PN: 6961-210-SEQ) and lightly tighten as shown in Fig 53. Apply Loctite
425 thread locker on the tips of the threads before installing.
Note: Ensure the cooling fan is blowing toward the circuit board as indicated by the arrow on the side of the fan.
Fig 53: Cooling Fan placement
1.9 Turn the device over and align the BBB with the holes in the case. Screw the 4 screws into the Battery Bridge Board from the Battery
compartment side, securing it to the case (snug screws).
1.10 Turn the device back over. Install the 2 clips that come with the power manager board set. Note: There is a right and left clip Large gap is on the right - ensure you get both the metal heat sink and pcb corner in the black clip.
1.11 Install the Unit’s front cover according to the “Remove and Replace front cover” section. This holds the Power Manager pcb corner
clips in place (no screw required).
Fig 54: Power Manager installed
PN 20631679 Rev C
77
Page 78

Personal Ambulatory Oxygen System Provider Technical Manual
Compressor
As with any concentrator, the compressor is a limited-wear component and may require servicing
during the lifetime of the device. The point of service will be dependent on factors such as operation
time, ow settings and environmental conditions. Service is required when oxygen purity and/or ow
rates cannot be maintained.
REMOVE AND REPLACE THE COMPRESSOR BOX
There are no eld serviceable parts inside the Compressor Box. Do not
NOTE:
1. Remove the Unit Cover as described in the section Remove and Replace the Unit Cover.
attempt to disassemble or modify the Compressor Box in the eld.
CAUTION
2. Flip unit over onto a padded ESD safe surface. Using a small at tip screwdriver to pry open the cover at each
pry point, remove the Case Bottom Cover as shown in Figure 55.
The Eclipse 5 contains electrostatic sensitive components. Do not open
or handle except at a static free workstation.
Pry
Point
Case Bottom
Cover
Pry
Point
Pry
Point
Figure 55: Case Bottom Cover Removal
PN 20631679 Rev C
78
Page 79

Personal Ambulatory Oxygen System Provider Technical Manual
3. Disconnect the 3 wire harnesses shown in Figure 56.
Compressor Signal
Wire Harness
Compressor Power
Wire Harness
Blower Wire
Harness
Figure 56: Compressor Box electrical connections.
4. Remove the Exhaust Tube as shown in Figure 57.
Verify Engagement
Exhaust
During Installation
Exhaust
Duct
Tube
Figure 57: Exhaust Tube Removal.
PN 20631679 Rev C
79
Page 80

Personal Ambulatory Oxygen System Provider Technical Manual
5. Cut the three cable ties shown in Figure 58. Disconnect the two braided hoses from the pressure and
vacuum ports of the ATF. Cap the three ATF module ports using tight tting vinyl caps or vinyl electrical
tape.
CAUTION
Once the braided hoses are disconnected from the ATF Module the
ATF Module is exposed to the atmosphere. Cap the ATF Module ports
immediately in order to minimize exposure to debris and humidity
which may result in ATF Module damage.
To ATF Module
Vacuum Port
Cable
Tie
To ATF Module
Pressure Port
Figure 58: Removal of Compressor Pressure and Vacuum Hoses from ATF Module.
PN 20631679 Rev C
80
Page 81

Personal Ambulatory Oxygen System Provider Technical Manual
6. Turn the unit over onto a padded ESD safe surface and remove the 4 screws (M4x16 Pan Head Machine Screw,
PN 6961-420-SEQ) and washers (M4 Flat Fender Washer, PN 3568-SEQ) shown in Figure 59.
Screws
Washers
(4 Places)
Figure 59: Remove Compressor Box screws.
7. Remove the Compressor Box.
There are no eld serviceable parts inside the Compressor Box. Do not
NOTE:
attempt to disassemble or modify the Compressor Box in the eld.
8. To install the Compressor Box, lay the new Compressor Box in the unit. Turn over the unit.
9. Position the Compressor Box into the Bottom Case with the compressor box screw holes aligned with the 4
brass eyelets. Screw in the 4 screws and 4 washers as shown in Figure 59. Apply small amount of Loctite 425 on
the threaded tips of the screw before installing.
10. Install the braided tubes into the ATF pressure and vacuum ports as shown on Figure 58 on previous page.
Secure joints with cable ties.
11. Use a cable tie to secure the silicone tube to the braid tube to ensure that there is NO kinking on the bend as
shown on Figure 58 on previous page. Hand tighten the cable tie. Inspect the tubing to ensure the tubing is
not kinked.
12. Hold onto the Compressor Box and lift the Bottom Case into a standing position. Insert the Exhaust Tube into
the slot of the Exhaust Duct as shown on Figure 57. Ensure that it is secure without any gaps.
13. Plug the 3 harnesses into the Power Manager PCB as shown on Figure 56.
14. Install the Case Bottom Cover as shown in Figure 55.
15. Install the Unit Cover as described in the section Remove and Replace the Unit Cover as outlined on page 39.
16. EDAT may be utilized to record Eclipse 5 device status and dates of service.
PN 20631679 Rev C
81
Page 82

Personal Ambulatory Oxygen System Provider Technical Manual
MAINTENANCE AND REPLACEMENT PARTS
Preventative Maintenance Parts
Description SeQual Part Number
Preventive Maintenance Kit (includes * items) 5022-SEQ
* Air Inlet Filter 7028-SEQ
* Compressor Intake Filter 8069-SEQ
* HEPA Filter (Old /New) 6986-SEQ / 9765-SEQ
* 9V Battery 8098-SEQ
* Wire Ties (Qty 10) 5268-SEQ
EDAT (Service Tool) 5535-SEQ
Replacement Parts List
Description SeQual Part Number
AC Power Supply 5941-SEQ
ATF Module Assembly, Eclipse 5 SP5494-SEQ
Cable harness, SPI/ I2C 8076-SEQ
Carton Assembly, Eclipse 5 Oxygen System SP3581-SEQ
Case Bottom Cover 20623857
Case Bottom Subassembly, Eclipse 5 SP20623837
Case Top Subassembly, Eclipse 5 SP20623840
Compressor Box Assembly, Universal SP5999-SEQ
Control System PCBA, Eclipse 5 SP4043-9-SEQ
DC Power Supply 5942-SEQ
Foot, bottom 6956-SEQ
Handle 6963-SEQ
Inlet Filter 7028-SEQ
Membrane Panel Overlay, Eclipse 5 SP20618461
Nut, Outlet 2777-SEQ
Outlet Assembly, Oxygen 3922-SEQ
Power Manager PCBA, Eclipse 5 (Not Field Replaceable) SP5932-4-SEQ
Power Cartridge 7082-SEQ
Product Tank Assembly SP4378-SEQ
Rubber Gasket (Channel Seal) 4106-2-SEQ
Screw, M2x10 Pan Head Machine (Cooling fan) 6961-210-SEQ
Screw, M3x10 Plastite (CS pcb, Product Tank, 9V Batt harness) 6950-310-SEQ
Screw, M3x12 Pan Head SEM (Top to Bottom case, BBB PCB) 6974-312-SEQ
Screw, M4x16 Pan Head Machine (ATF to Bottom case) 6961-416-SEQ
Screw, M4x16 Pan Head Machine (Compressor to Bottom Case) 6961-420-SEQ
Tubing, Silicone, 3/16” ID SP6981-SEQ
Tubing, Silicone, 2mm ID SP4101-SEQ
Tubing, Braided, 5/16” ID SP3534-SEQ
Washer, M3 Flat 6985-03-SEQ
Washer, M4 Flat 6985-04-SEQ
Washer, M4 Flat Fender 3568-SEQ
Wire harness, 9V 1076-SEQ
Wire Harness, Service Port 7012-SEQ
Wire Harness, External Power, Eclipse 5 4063-SEQ
Kit, Preventative Maintenance 5022-SEQ
PN 20631679 Rev C
82
Page 83

Personal Ambulatory Oxygen System Provider Technical Manual
OPTIONAL ACCESSORIES
Visit us at www.sequal.com for more information about optional accessories. There are many dierent types of oxygen tubing,
cannula, and humidiers. The following items are recommended by SeQual Technologies for use with the Eclipse 5.
Salter Labs® Humidier, Part Number 7600, or equivalent: If your physician has prescribed an optional humidier,
follow the manufacturer’s instructions for use. Attach the humidier to the oxygen outlet port of the Eclipse 5. Use of optional
humidiers not recommended for the Eclipse 5 may impair performance of the device and may void the warranty.
DO NOT use a humidier in the Pulse Flow Mode. The Eclipse 5 will not detect inspiratory eort. The device will alarm and
default to the Continuous Flow Mode for continuing operation after 15 seconds.
CAIRE Humidier Adapter – Part Number 7116-SEQ: If your physician has prescribed an optional humidier, you may
need to use the CAIRE Humidier Adapter. Follow the instructions for use. Attach the Humidier Adapter to the oxygen outlet
port of the Eclipse 5 and then to the humidier. Attach the cannula, or oxygen tubing to the humidier outlet.
Salter Labs Oxygen Supply Tubing, Part Number Series 2000, or equivalent: The internal diameter should be no less
than 3/16” (0.48 cm). Connect the oxygen tubing to the outlet port of the humidier, or directly to the oxygen outlet port of
the Eclipse 5 if you do not use a humidier. Connect the other end of the tube to the nasal cannula, if oxygen supply tubing is
not already attached to the cannula. Tubing not specied for use with this Eclipse 5 may impair the performance of the device.
Salter Labs Oxygen Cannula, Part Number 1600 Series, or equivalent: Your physician will have prescribed a cannula to
deliver oxygen. In most cases they are already attached to the oxygen tubing. If not, follow the instructions included with the
cannula to attach it to the oxygen tubing. Use of an oxygen cannula not specied for use with this Eclipse 5 may impair the
performance of the device.
PN 20631679 Rev C
83
Page 84

Personal Ambulatory Oxygen System Provider Technical Manual
CHART SEQUAL CUSTOMER SERVICE CONTACT INFORMATION
If you need any additional assistance, contact SeQual:
By mail:
CAIRE, Inc.
2200 Airport Industrial Drive, Suite 500
Ball Ground, GA 30107 USA
By telephone: 800.482.2473
By E-mail: techservice.usa@chart-ind.com
www.sequal.com
AUTHORIZED EUROPEAN UNION REPRESENTATIVE:
Medical Product Services GmbH
Borngasse 20
35619 Braunfels, Germany
E-mail: techservice.europe@chart-ind.com
www.sequal.com
SeQual®, ATF® and Eclipse 5® are registered trademarks of CAIRE Inc.
PRO2 Check Elite™ is a trademark of Salter Labs Inc.
Lysol® is a registered trademark of Reckitt Benckiser, UK.
Loctite® is a registered trademark of Loctite Corporation, USA.
Copyright © 2013 Chart Industries. CAIRE Inc. reserves the right to discontinue its products, or change the prices, materials, equipment, quality, descriptions, specifications and/or processes to its products at any time without prior notice
and with no further obligation or consequence. All rights not expressly stated herein are reserved by us, as applicable.
PN 20631679 Rev C
84
 Loading...