

Page 1
User Manual
Scan this QR code for
step-by-step videos
Page 2
Contents
EN
EnglishP01-P10
DE
DeutschP11-P20
JP
日本語P21-P30
RU
РусскийP31-P40
FR
FrançaisEdition électronique
ES
Español E-edición
IT
ItalianoEdizione elettronica
.................................................................................................................................................
...............................................................................................................................................
.................................................................................................................................................
...............................................................................................................................................
..........................................................................................................................
...............................................................................................................................................
.............................................................................................................................
Tips:
Scan the QR code on the left to get the latest manual.
English/Deutsch/日本語/Русский/Français/Español/Italiano included.
AIRROBO airrobo_official
Page 3
Thank you for purchasing AIRROBO ROBOT VACUUM CLEANER.
• It is strongly recommended to read and understand the user manual comprehensively, including proper use, safety information and
maintenance instructions for AIRROBO ROBOT VACUUM CLEANER, before using.
• The user manual offers instructions only. If there are any other situations that you encounter that may not be addressed through this
user manual, please contact our customer service [email protected] for product technical support.
• This user manual will be updated upon new software or hardware updates, and content and images will be updated without further
notice.
Part 1 Important information
1.1 Before first use
• Before using this robot vacuum cleaner, please read these instructions completely. And please save this manual and pass it on to next
user. Unbox it and remove all protective packaging and wrappings.
• Ensure to check all parts are included. If the unit is incomplete, kindly return it to the retailer immediately. And take the entire unit with
its original packaging and the proof of purchase to the store where your purchase was made.
• Before using the robot vacuum cleaner, please make sure that the power outlet is switched on and you remove all obstacles from the
immediate environment. It will pass over each section of the floor several times to build up the map through cleaning.
• The side brushes may occasionally resist smaller particles (dog food, cat litter), but the robot vacuum cleaner will remove them all
eventually. Please empty the dustbin after each use to guarantee the maximum performance afterwards.
• The robot vacuum cleaner may not be able to clean up dirt and dust if its dustbin is full. It is recommended that you clean the dustbin
regularly.
• Please make sure that you discard or safely store the packaging and wrappings after the checkups above. For the safety, please keep
your babies, infants, and children away from this stuff.
1.2 WARNING
• Only authorized technicians may be able to dismantle the robot vacuum cleaner. Users must not dismantle or repair it.
• Use the original adapter supplied by the manufacturer only. The incompatible adapters may cause electric shocks, fire, or the damage
of the robot vacuum cleaner.
• Do not touch the plug or the adapter when your hands are wet.
• Keep clothes and sticks away in case of getting the wheels stuck.
• Keep the robot vacuum cleaner away from cigarettes, lighters, matches or other flammable materials.
• Do not use force to bend the power cable and do not let it bear with pressure from heavy or sharp objects.
• The robot vacuum cleaner is only for using indoors. Do not use it outdoors.
• Do not sit on the robot vacuum cleaner or place any objects on top of it.
• Do not use the robot vacuum cleaner in a wet or damp environment.
• Clear the floor before using the robot vacuum cleaner and remove all fragile items, cables, clothes, papers, and curtains, etc., as they
might get tangled in it.
• Limited to use the robot vacuum cleaner on stable and level surfaces.
• Turn off the power if the robot vacuum cleaner remains unused for a longer period.
• Check before each use that the adapter and plug are correctly connected.
• Check if the adapter and the plug are correctly connected before each use.
• Tell everyone at home or in the office when the robot vacuum cleaner is in operation so that no one trips over it.
• The robot vacuum cleaner is unable to cross over the height difference of more than 12mm.
• Only use the robot vacuum cleaner in the temperature range between 0°C and +60°C (degrees Celsius) and do not expose it to higher
temperatures.
• Remove the battery before scrapping the robot vacuum cleaner.
• Disconnect the robot vacuum cleaner from the power supply before removing the battery.
• Dispose of the battery properly.
Notes: Ensure that children and people with mental or physical disabilities use the equipment under supervision.
Part 2 Product overview
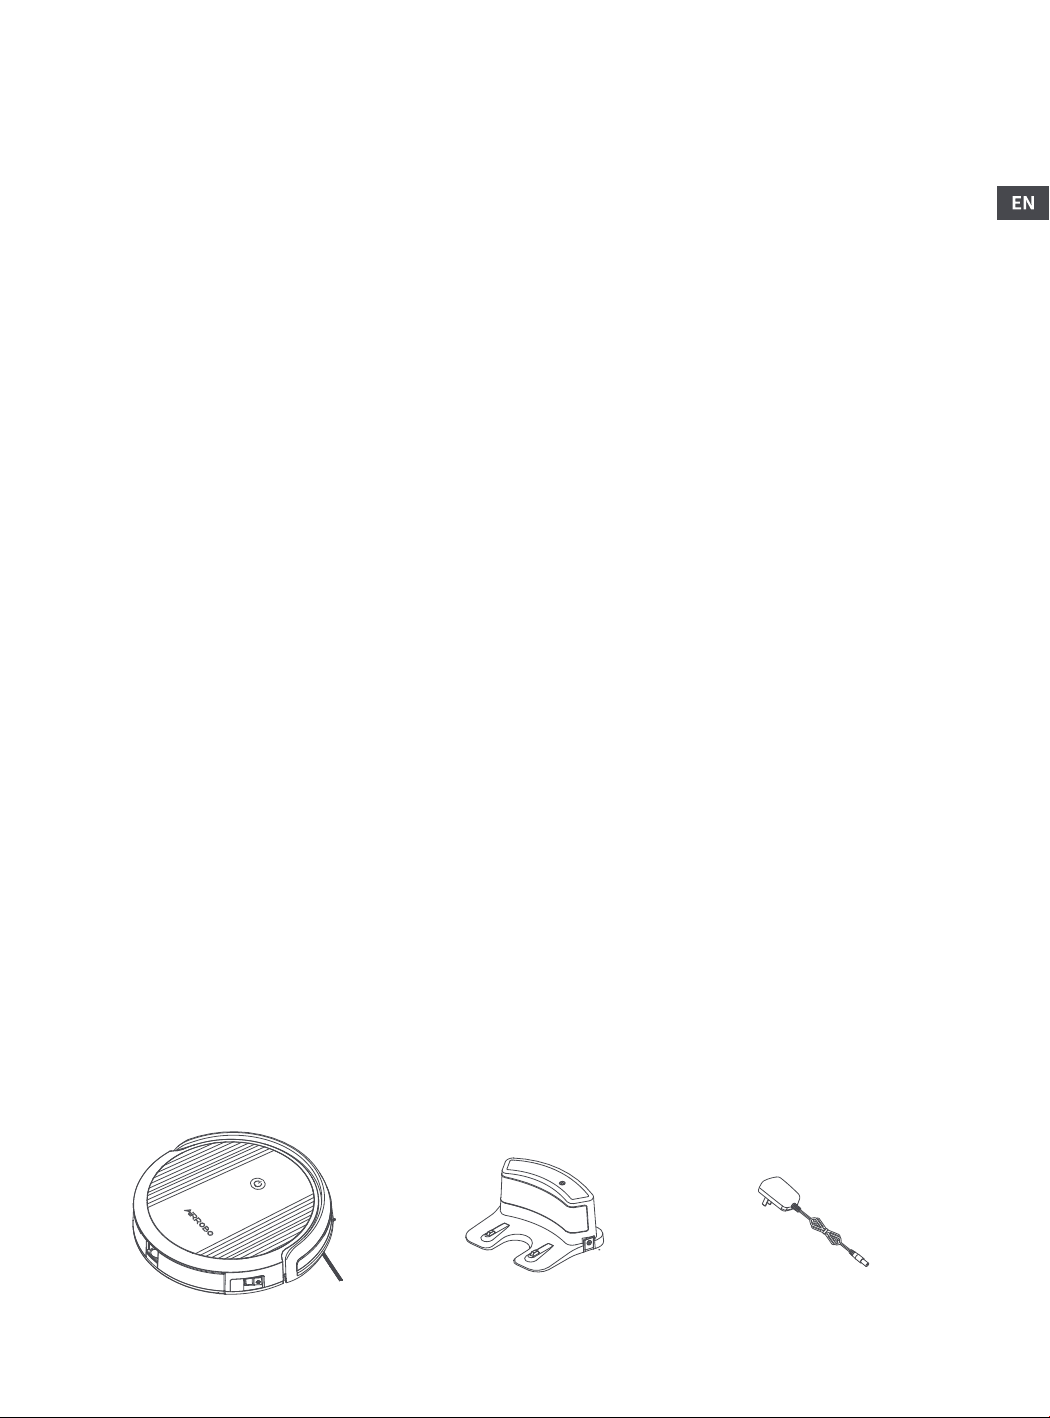
2.1 Packing list
Main unit(main brush x 1,
dustbin x 1,filter x 1,
and side brush x 2) x 1
Charging base x 1 Power adapter x 1
-1-
Page 4
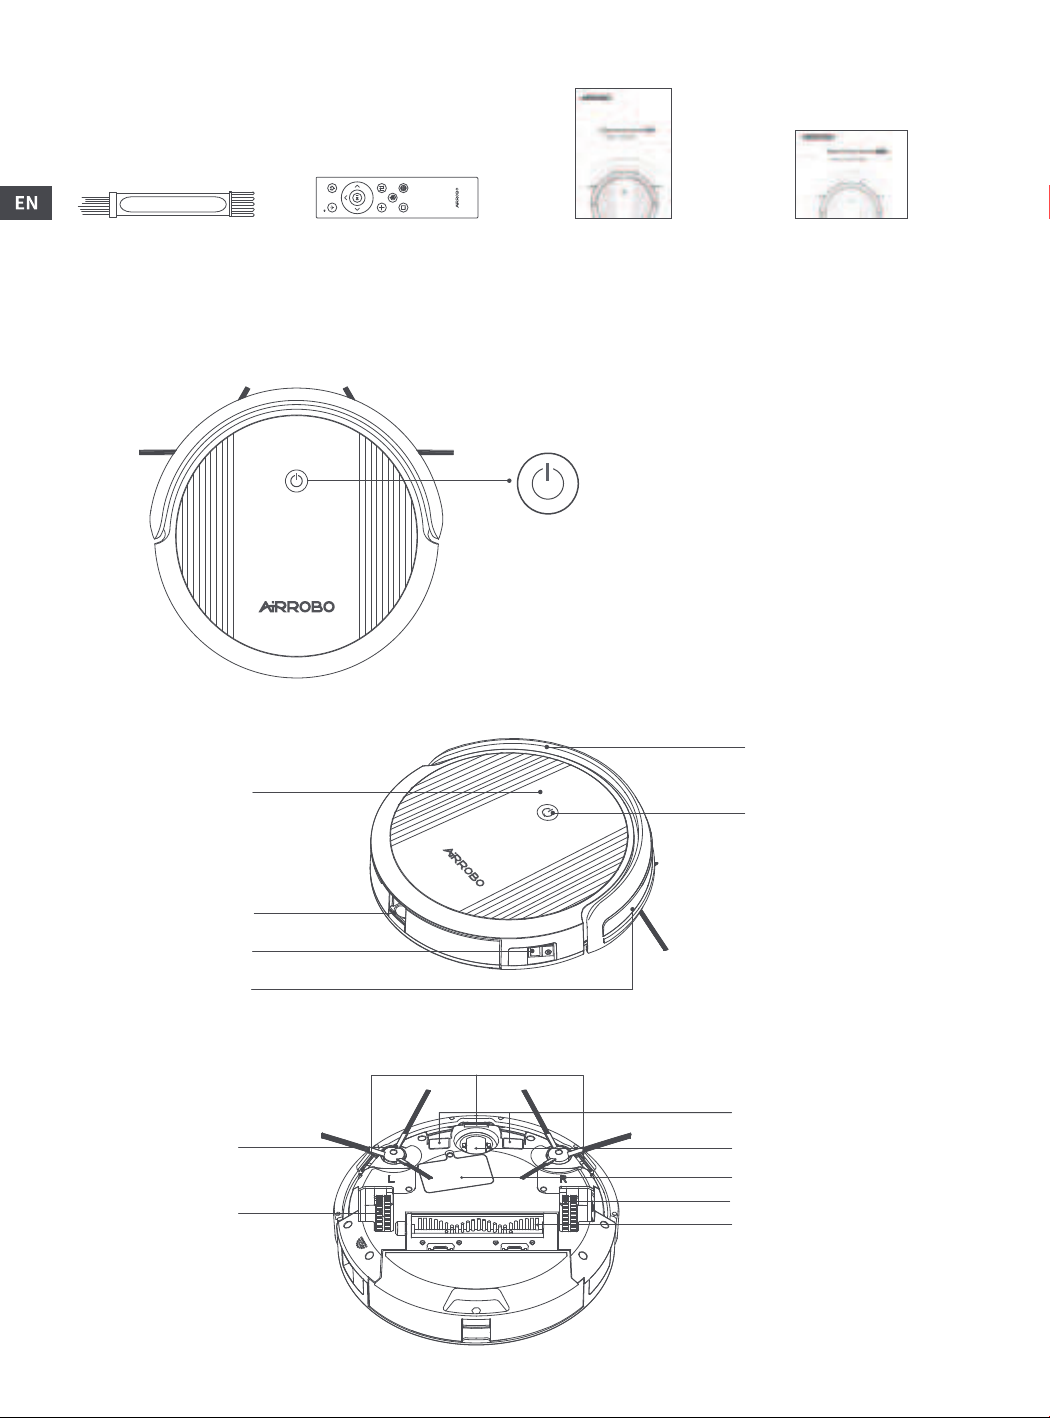
Cleaning brush x 1 Remote control x 1 User manual x 1 Quick start guides x 1
2.2 Product Appearance
• Main unit
CLEAN button
• Press this button to start/pause cleaning
• Press and hold this button for 3 seconds to make the robot
vacuum cleaner return to the charging base
• Press and hold this button for 8 seconds to reset the Wi-Fi
Bumper
Top cover
CLEAN button
Dustbin
Power switch
Signal window
(Built in recharging sensor/wall sensor/anti-collision sensors)
Cliff sensors
Side brush
Main wheel
-2-
Charging contact
point
Omnidirectional
wheel
Battery cover
Main wheel
Main brush
Page 5
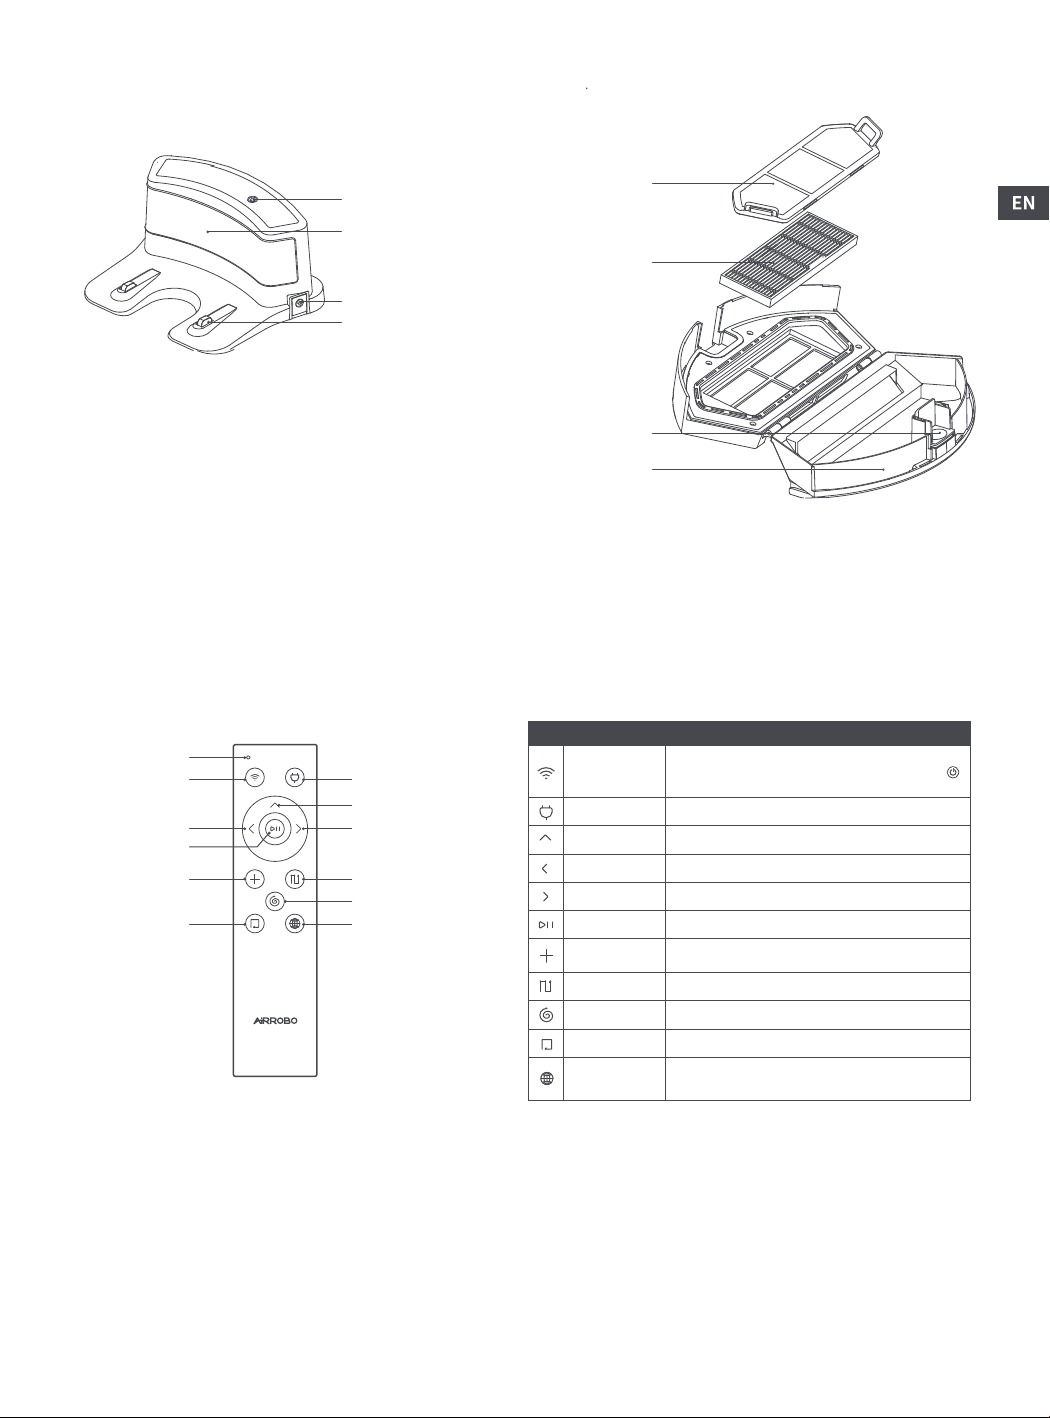
• Charging base
• Dustbin
• Remote control
Indicator
Reset Wi-Fi
button
Direction: Left
Start / Stop
Suction Level
Edge cleaning
Power indicator
Signal emission area
Adapter port
Charging contact
points
Charging button
Direction: Forward
Direction: Right
Spot cleaning
Spiral cleaning
Switch languages
Primary filter
Advanced filter
Dustbin release
buckle
Dustbin cover
Notes:
Use one hand to press the dustbin release buckle and use the
other one to open the dustbin while opening the cover.
ButtonFunction
The voice prompt volume turns up when the
Reset Wi-Fi
Charging
Forward
Left
Right
Start /Stop
Suction Level
Spot cleaning
Spiral cleaning
Edge cleaningFind and clean along the wall automatically
Switch
languages
robot vacuum cleaner is resetting, and the
button’s indicator it would blink blue.
Start returning to the base to charge
Move forward
Turn left
Turn right
Start or pause cleaning
Increase the suction power of your robot
vacuum cleaner
Start a zigzag cleaning of current small area
Start a spiral cleaning of current small area
Switch to language:
English/Deutsch/日本語/Русский
Notes:
• Install two AAA batteries in the remote control, making sure that the positive and negative ends follow the markings indicated in the
battery compartment. Turn on the switch on the side of the robot vacuum cleaner.
• Please aim at the robot vacuum cleaner when pressing the buttons of the remote control.
• When the robot vacuum cleaner is not connected to Wi-Fi network, you can operate it with the remote control.
• If you press any direction button to start the robot vacuum cleaner, it will back up a bit and turn 180° when it is on the charging base,
then you can command normally through the remote control.
• Remove the batteries if you will not use the remote control for a longer period.
* Two AAA batteries are not included in the package.
-3-
Page 6
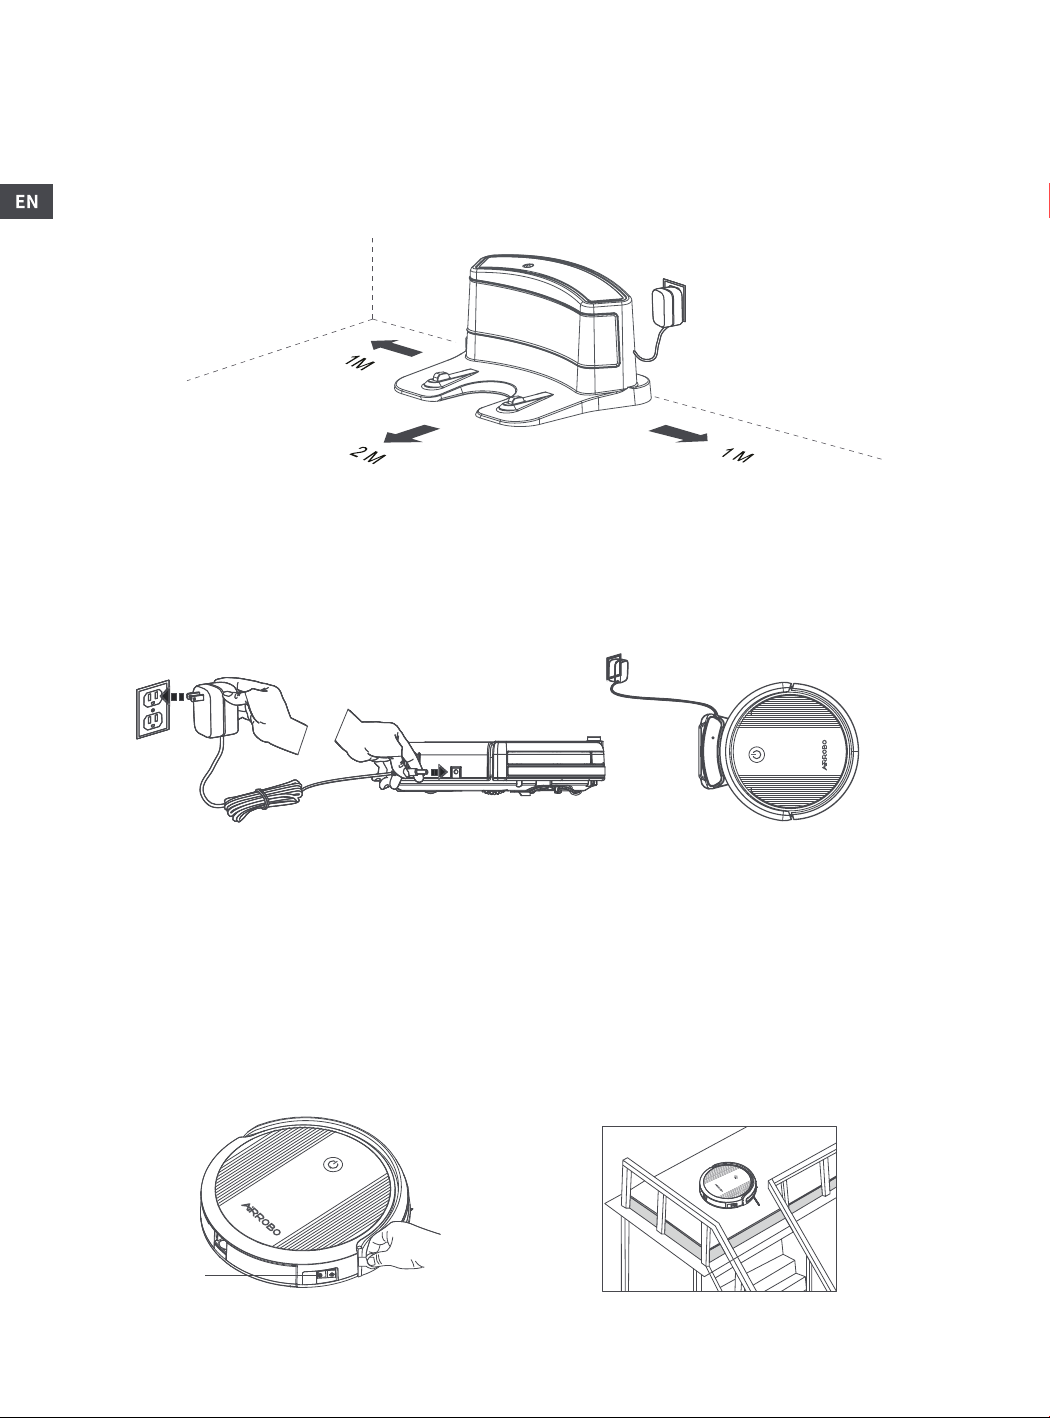
Part 3 Installation and operation
3.1 Connect the charging base
Assemble the charging base and switch on the adaptor.
Place the charging base close to a wall and remove obstacles approx. 1 M on both sides and approx. 2 M in front of the robot vacuum
cleaner. The signal light on the charging base should be on.
3.2 Charging the robot vacuum cleaner for the first time
A. Direct charging
Plug the adapter directly into the DC jack on the side of the robot vacuum cleaner, connect the other end of the adapter to the power supply.
B. Charged by charging base
Place the robot vacuum cleaner on the charging base to charge, making sure that the contact points are aligned with the charging base.
AB
To better maintain the battery life:
• Charge the robot vacuum cleaner for 4-6 hours before use. When fully charged, the indicator will stop blinking.
• During the normal use, the robot vacuum cleaner will automatically come back to its charging base, connected to the power supply, to
charge.
• If the robot vacuum cleaner will not be used for a long time, please turn off the power after it is fully charged and place it in a dry and
cool environment. Please charge it every three months to avoid irreversible damage to the battery.
Notes:
• Before use, remove the protective strip on the bumper to guarantee normal product use.
• The power switch is on the side of the robot vacuum cleaner, press “I” to turn it on, and press “O” to turn it off.
• Do not use the robot vacuum cleaner in a suspended environment. If you must use it in a suspended environment, please prevent it
from accidentally falling with firm protective fences, as it may cause personal injury or property loss.
• The robot vacuum cleaner will automatically return to the charging base when the battery runs low.
Power switch
-4-
Page 7
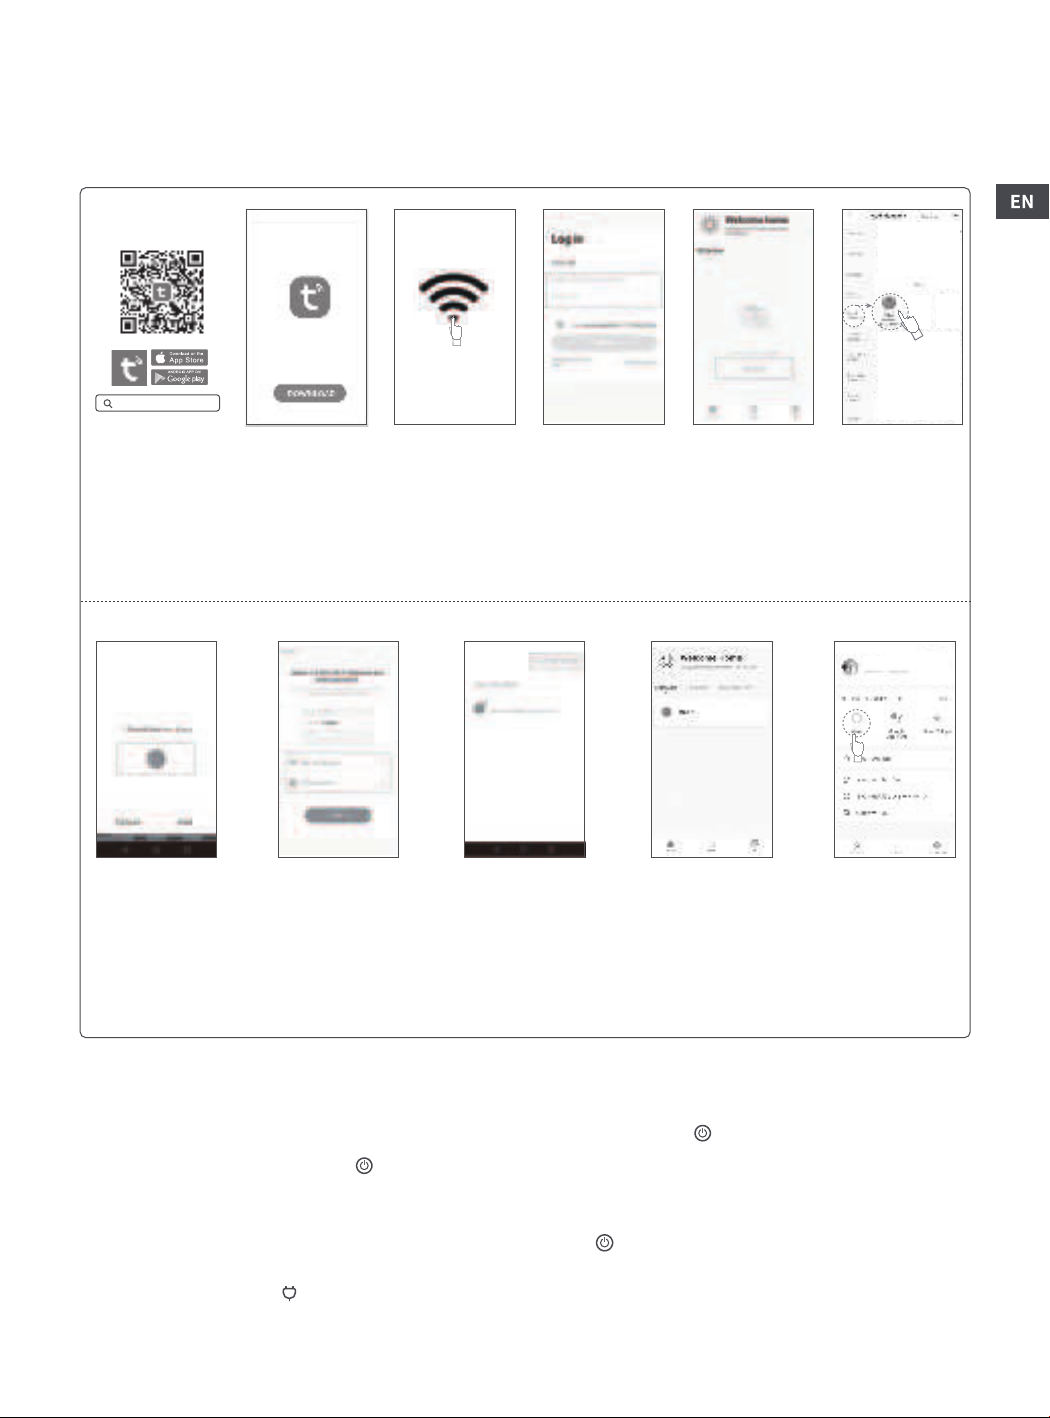
3.3 App Download and Wi-Fi Connection
Notes: The Tuya Smart App only works with robot vacuum cleaners under Wi-Fi. Please turn on the robot vacuum and connect the Wi-Fi
when running the App. If the connection fails, it’s probably because you are using 5GHz network. Please check out “Common router
setting method” and change it to 2.4GHz.
x
Tuya Smart
1. Scan the QR code
or search “Tuya
1
Smart” on App Store
or Google Play to
download the App.
4. Add the robot
vacuum cleaner it
found.
1.1 Please make
sure your phone is
connected to 2.4GHz
Wi-Fi network and
turn on the
Bluetooth before
downloading Tuya
Smart.
5. Select a 2.4GHz Wi-Fi
network and enter Wi-Fi
name and password.
Please note that a dual
band with mixed mode
(2.4GHz + 5GHz) or simply
5GHz Wi-Fi network will
not be able to connect the
robot vacuum cleaner.
1.2 Turn on the robot
vacuum cleaner,
press the [Wi-Fi]
button on remote
control for 5 seconds,
then the indicator
light will start
blinking quickly.
6. Added successful-
ly! Click [Done] to
enter next step.
2. Log in Tuya Smart
App. For new users,
please create your
account before
login.
3. Click [Add device]
or press [+] to add
the robot vacuum
cleaner.
7. Now you can
operate the robot
vacuum cleaner
through the Tuya
Smart App.
3.1 Select the type of
robot vacuum
cleaner. It is
recommended to
select the Robot
Vacuum (BLE +
Wi-Fi).
8. If you want to
connect to Alexa,
please click “Alexa”
and follow the
prompts!
3.4 Start working
1) Start/Pause
• After turning on the power switch on the side of the robot vacuum cleaner, press the Clean ( ) button on it or tap the Clean button on
the app to start cleaning.
• While cleaning, if you press the Clean ( ) button again or press the Pause button on the app, the robot vacuum cleaner will stop its
current task.
2) Charging
Method 1: When the robot vacuum cleaner is on hold, press and hold the Clean ( ) button for 3 seconds, then it will return to the charging
base to charge.
Method 2: Press the Recharge ( ) button on the remote control, then the robot vacuum cleaner will go back to the charging base to charge.
Method 3: Manually place it on the charging base to charge
3) Auto Cleaning
-5-
Page 8
After startup, the robot vacuum cleaner will plan the cleaning route in a zigzag pattern, then cleans along room’s edge. When the cleaning
is complete, it will automatically return to the charging base to charge.
4) Spot cleaning
Use the remote control to operate the robot vacuum cleaner or directly place it in the lower-left corner of the area to be cleaned, and tap
the Spot button in the App or press the Spot cleaning ( ) button on the remote control, then it will start a zigzag cleaning for the area from
the current position and return to the charging base after cleaning.
5)Spiral cleaning
Use the remote control to operate the robot vacuum cleaner or place it in cleaning-centered area, tap Spiral button in the app or press the
Spiral cleaning ( ) button on the remote control, then it will perform the cleaning from the current position and return to the charging
base after cleaning.
6) Edge cleaning
Tap the Edge button in the app or press the Edge cleaning ( ) button on the remote control, the robot vacuum cleaner will find the wall
and clean along the wall automatically. When the cleaning is complete, it will return to the charging base to charge.
7) Scheduled cleaning
Tap the Settings button in the app, set a cleaning time, then the robot vacuum cleaner will start to clean at the specified time. When the
cleaning is complete, it will go back to the charging base to charge.
8) Reset Wi-Fi
When you need to connect the robot vacuum cleaner with other mobile phone, or when the mobile phone fails to connect to it, please
press and hold the Clean ( ) button on it for 8 seconds or press and hold the Wi-Fi( )button on the remote control for 3 seconds until you
hear the voice prompt, then the Clean ( ) button indicator will quickly blink blue, indicating that the Wi-Fi has successfully been reset.
9)Suction mode
Tap the suction button in the app, you can select Quiet, Standard, Powerful, and Max suction modes in the app.
Part 4 Cleaning and Maintenance
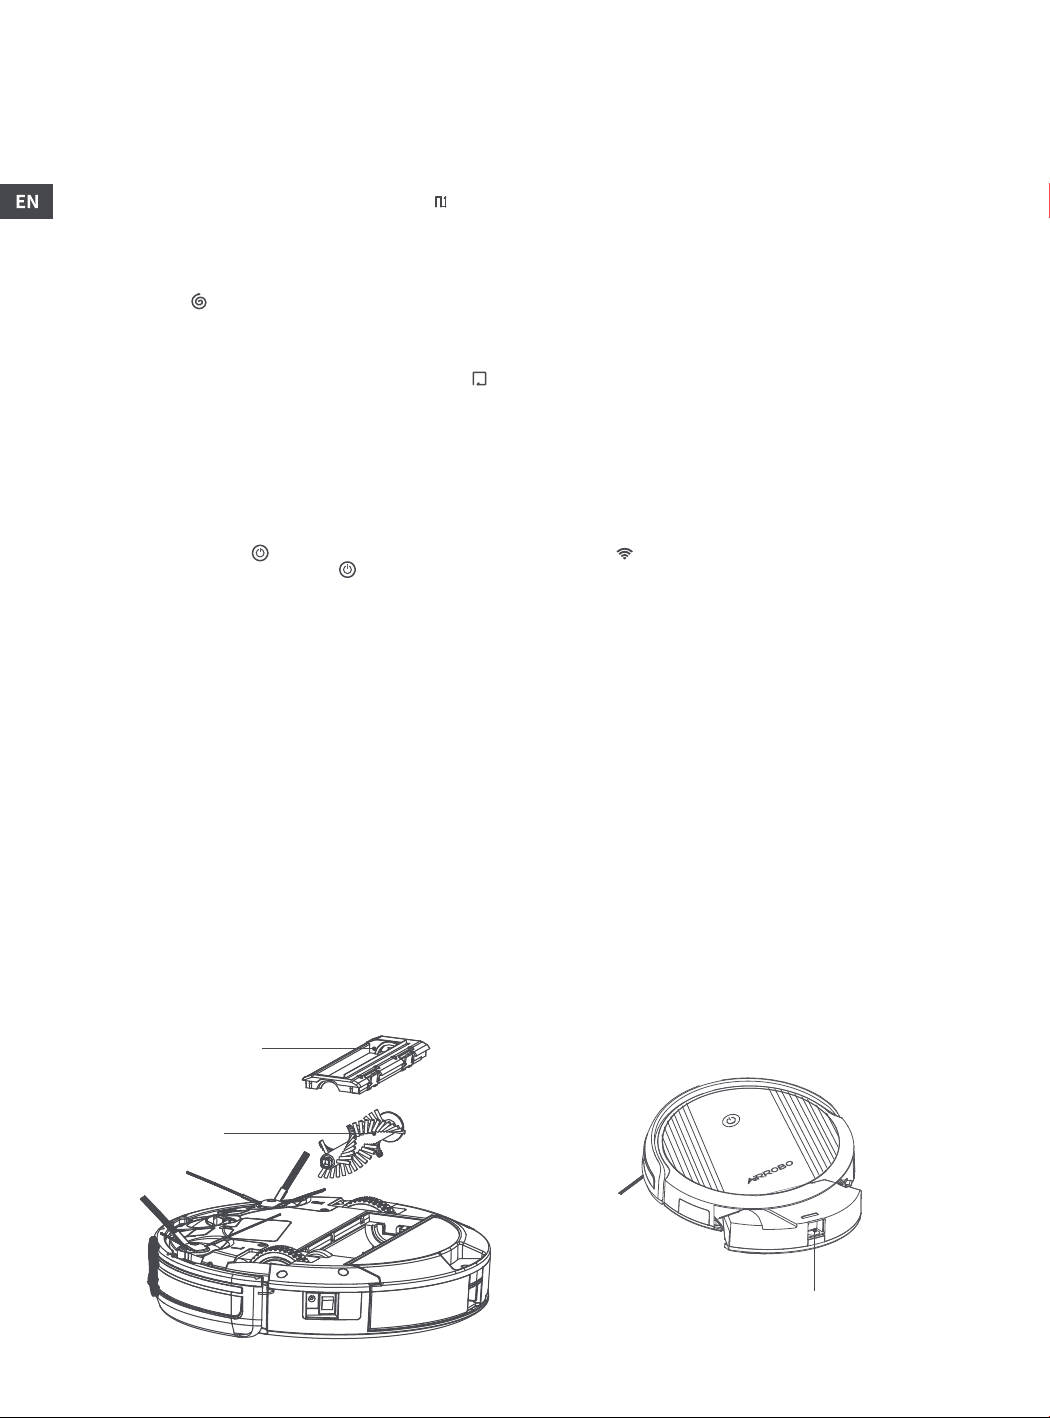
4.1 Cleaning the side brushes
Clean the side brushes and replace them if they are damaged.
Notes: Before replacing the side brushes, check the “L” & “R” marked on the two side brushes and make sure they match the correspond-
ing marking at the bottom of the robot vacuum cleaner.
4.2 Cleaning the main brush
• Turn off the robot vacuum cleaner. Press the two tabs on the main brush cover to remove the cover and then remove the main brush on
the right. Use the cleaning brush to remove hair and other dirt from the main brush.
• Rinse the main brush under running water and do not replace it until it is dried completely.
Main brush cover
Main brush
Unlocking button for the dustbin
-6-
Page 9
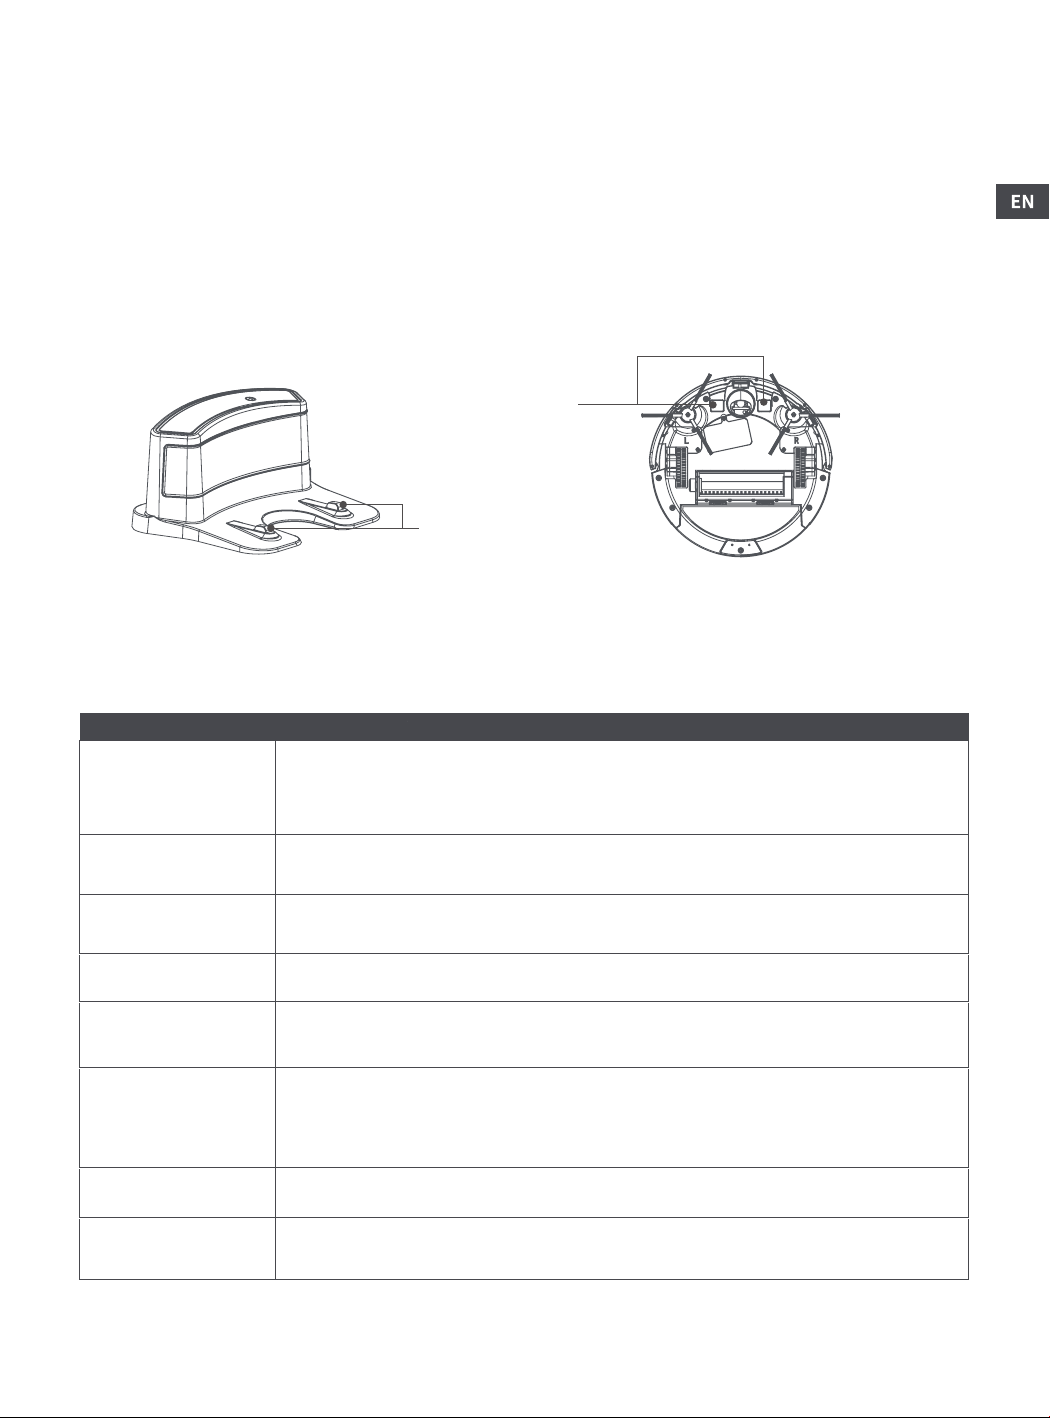
4.3 Cleaning the dustbin and filter
Hold the dustbin in a horizontal position and press the unlocking button to open the dustbin cover ‒ emptying the dustbin, removing the
filter, and rinsing the dustbin, filter, and sponge ‒ and then once again assemble the dustbin, filter, and sponge into the robot vacuum
cleaner before drying it out.
Notes:
• Switch off the robot vacuum cleaner and disconnect the charging base’s plug before cleaning and maintaining it.
• Check there are no foreign matters that were vacuumed before cleaning.
• The filter lasts for 6 months; Please clean the filter once or twice a month.
• Make sure the dustbin, the filter and the sponge are completely dry before replacing them.
• Do not expose the filter to direct sunlight for a long period.
Contact points for charging
Charging contact points
Part 5 FAQ & Troubleshooting
5.1 FAQ
Problem TypeCause and solution
1)When the battery runs low, place the robot vacuum cleaner on the charging base making sure that
Fails to power on
Fails to charge
Fails to go back to the
charging base
Abnormal noises while
cleaning
Cleaning ability reduced,
and dust left behind
Fails to connect to the
Wi-Fi network
Fails to perform scheduled
cleaning
Does the robot consume
power when it is on the
charging dock?
it’s aligned with the contact points. It will charge automatically (if the battery is completely out of
power, it needs to be charged for a while before it is on).
2)The ambient temperature is too low (below 0 °C) or too high (above 45 °C). Please use the robot
vacuum cleaner in an environment with a temperature ranging from 0-45 °C)
1)Remove the robot vacuum cleaner and check whether the charging base indicator is on. Make sure
both the charging base and the power adapter are properly plugged.
2)Clean the charging contact points of the robot vacuum cleaner and the base.
1)There are too many obstacles near the charging base. Place the charging base along the wall and make
sure the area around is open.
2)The robot vacuum cleaner is too far away from the charging base to receive the signal. Try placing it near
the charging base.
The side brushes or wheels may be tangled by foreign matters. Please turn off the robot vacuum cleaner
and clean it.
1) The dustbin is full. Please clean it.
2) The filter is clogged. Please clean it or replace it.
3) The side brush is entangled with foreign matters. Please clean the side brush.
1)The Wi-Fi signal is poor. Try to use the robot vacuum cleaner in other places where the Wi-Fi signal is good.
2)The Wi-Fi connection error. Reset the Wi-Fi and download the latest version of the mobile app and try
to connect again.
3) The password you entered might be incorrect.
4) The router used the 5 GHz band, while the robot vacuum cleaner supports the 2.4 GHz only.
The battery power is insufficient. The scheduled cleaning function works only when battery power is >
20%. Please make sure the battery power is sufficient when using the scheduled cleaning function.
The power doesn’t consumer a lot when the robot vacuum cleaner is on the charging base. Placing it on
the base helps the battery maintain its condition to the best.
-7-
Page 10
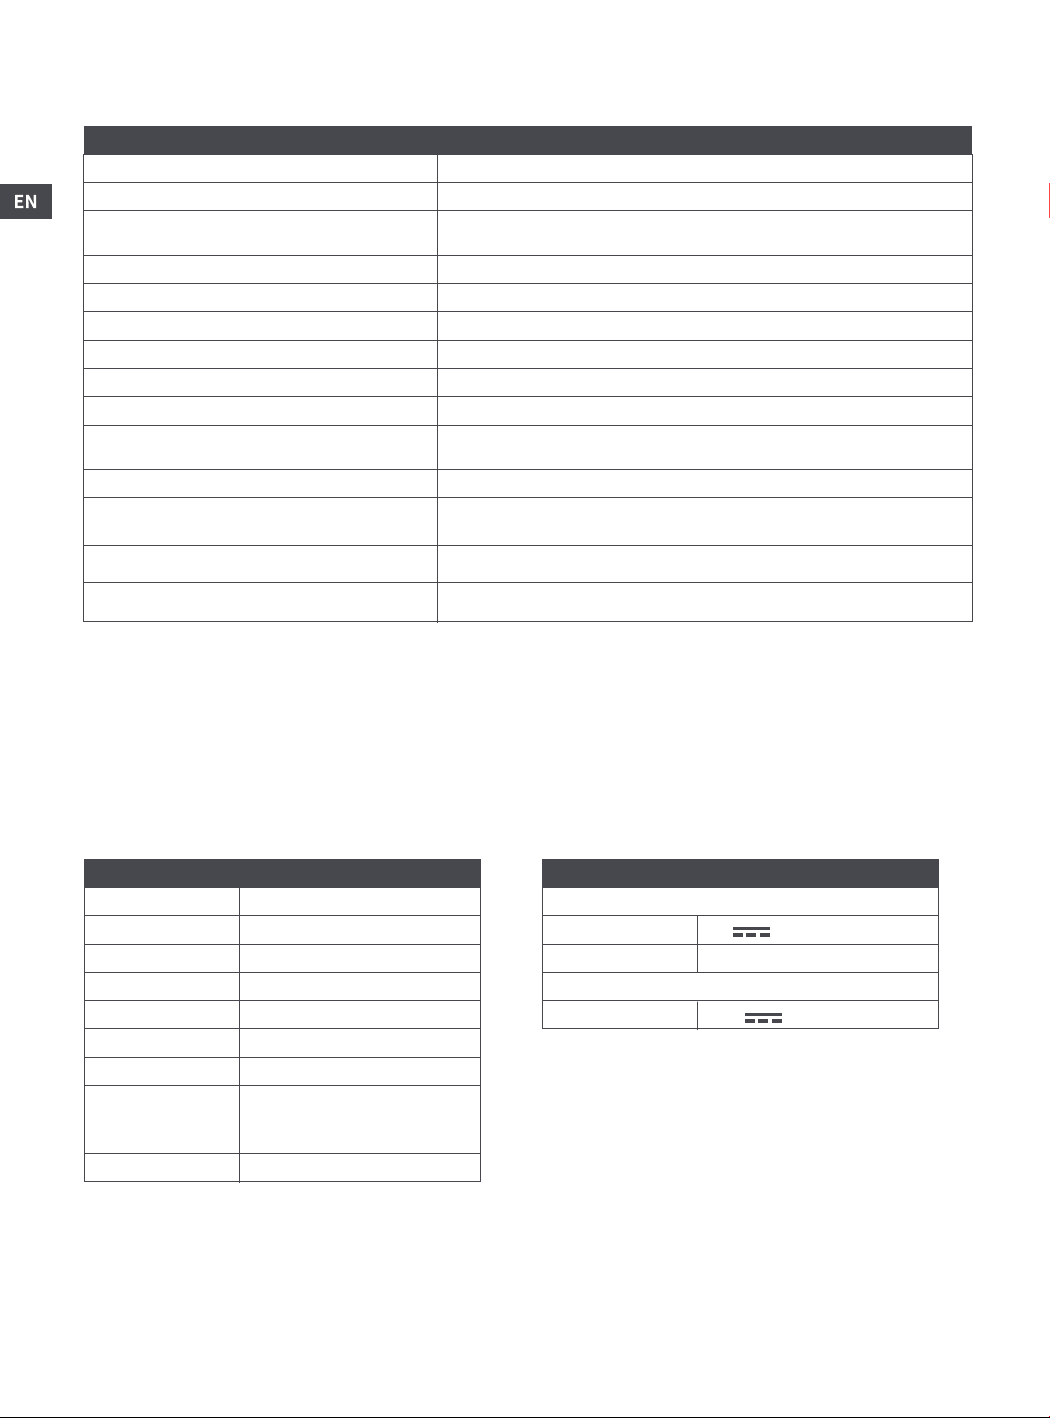
5.2 Troubleshooting
Fault voice prompt
Error 1: I need to change my starting location.The robot vacuum cleaner is lifted or suspended.
Error 2: Wipe off the bottom anti-drop sensors.The cliff sensor (s) is covered, dirty, or suspended.
Error 3: Please clean the IR self-charging sensor.The wall sensor responding to the signal window is dirty or blocked.
Error 4: Please wipe off the wall sensor.The edge of the bumper or internal light touch sensor is stuck.
Error 5: Oh, the edge seems to be stuck.
Error 6: I’m trapped, please help!
Error 7: I’m tilted, please set me upright.
Error 8: Hey, the main wheel is stuck, please help!
Error 9: Hey, the side brush is stuck, please help!
Error 10: Where is the charging dock?
Error 11: Malfunction! Please try restarting me!The robot vacuum cleaner may have encountered an unknown error. Restart it.
Error 12: Malfunction! Please power off.
Error 13: I need to charge!
Error 14: I cannot shut down the charging dock.
Notes:
• When the robot vacuum cleaner runs abnormally, the indicator flashes red, and its voice prompt turns up. Please refer to the above
tables to solve the problem.
• If the problem isn’t solved after troubleshooting, please contact the AIRROBO after-sales service (e-mail: support.airrobo@ubtro-
bot.com). Do not disassemble the robot vacuum cleaner yourself.
Problem and solution
The edge of the bumper or internal light touch sensor is stuck.
The robot vacuum cleaner is stuck.
The robot vacuum cleaner is tilted, please manually set it upright.
The main wheel is stuck or entangled.
The side brush is stuck or tangled.
The robot vacuum cleaner cannot find the charging base, or the charging base
does not have power.
This failure needs to power off the robot vacuum cleaner. After reminding the user,
it automatically shuts down or goes back to the charging base.
This happens when the battery is lower than 20%, please return the robot
vacuum cleaner to charge.
The robot vacuum cleaner cannot be powered off when it is charging on the
charging base.
Part 6 Specifications
Main units
Dimensions315*315*79mm
Battery capacity2600mAh
Battery Lithium battery
Charging duration≤300min
Dustbin capacity510ml
Charging methodsAuto-charging/manual charging
Cleaning modeAuto/Spot/Spiral/Edge
Operaing
humidity range
Operaing
temerature range
Noise
≤90%RH
0~45℃
≤ 65dB
Accessories
Power adapter
Output voltage
Output current0.6A
Charging base
Input voltage
-8-
19V
14.4V
Page 11
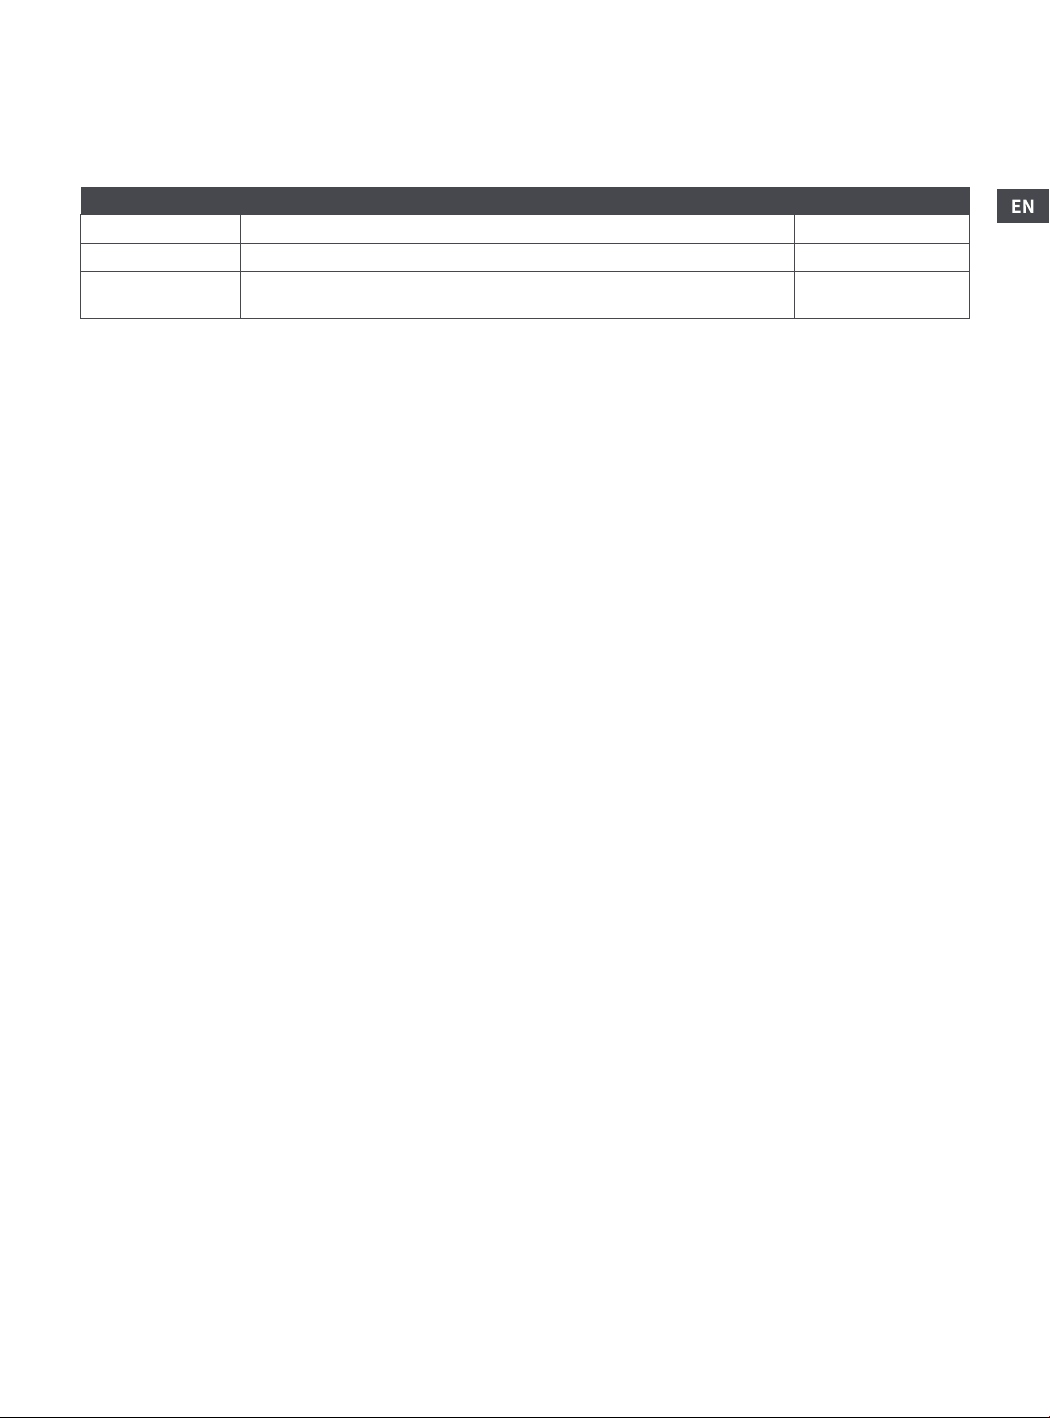
Part 7 After-sales Service
AIRROBO provides a warranty that is processed in the most hassle-free way. This policy should be regarded as a standard service policy
that covers products that are sold only by online stores or AIRROBO’s authorized distributors. Kindly contact us at support.airrobo@ub-
trobot.com with your order receipt or other proof of purchase for confirmation.
Item
Main unit
Accessories
Consumables
Notes:
• Consumables delivered with the product are not covered by warranty.
• Warranty protections are in addition to rights provided under local consumer laws and may vary among countries.
30-day Money-Back Guarantee for Any Reason:
Undamaged products may be returned for a full refund for any reason within 30 days of the date the item was delivered to the designated
shipping address.
• Returns must include all accessories.
• Items must include original packaging.
• For non-quality related warranty claims, the buyer is responsible for shipping costs.
• For non-quality related warranty claims, AIRROBO refunds the cost of the product itself.
• Returns may be rejected if the product does not meet the above requirements.
It is not possible to process a request for a refund for non-quality issues for items that have expired this 30-day window. For purchases
not made directly through online stores, please contact retailers for refunds. For quality-related issues, please see below.
Warranty Claims for Quality-Related Issues:
All quality-related defects on items sold directly by online stores or authorized distributors are covered by an extensive warranty, starting
from the date of purchase.
AIRROBO’s limited warranty is restricted to the country of purchase. The limited warranty is invalid on items taken outside the country
they were originally bought in or shipped directly from an authorized online purchase.
Warranties on all replacements follow the same warranty timeframe of the original defective item, or 3 months after being replaced,
whichever is longer.
Warranties on products are invalid after having been fully refunded.
Process:
• Buyer must provide sufficient proof of purchase.
• AIRROBO must document what happens when buyers troubleshoot the product.
• The defective item’s serial number and/or visible proof depicting the defect are required.
• It may be necessary to return the item for quality inspection.
Valid proof of purchase:
• Order numbers from online purchases made through online stores or AIRROBO’s authorized distributors.
• Sales invoice.
• Dated sales receipt from an authorized AIRROBO reseller that shows a description of the product along with its price.
Please note that more than one type of proof of purchase may be required to process a warranty claim (such as receipt of money transfer
and confirmation of address item was originally shipped to).
Shipping costs must be covered by the buyer in the following situations:
• Returning products for any reason other than a proven defect.
• Warranty claims on items taken outside the original country of purchase.
• Buyer’s accidental returns.
• Returning personal items.
• Returning items claimed to have defects but found by AIRROBO quality control to be in working condition.
• Returning defective items to international shipping.
• Costs associated with unauthorized returns (any returns made outside of the approved warranty process).
Not Covered Under Warranty:
• Products without sufficient proof of purchase
• Lost or stolen products
• Items that have expired their warranty period
• Non-quality-related issues (after 30 days of purchase)
• Free products
• Repairs through 3rd parties
When returning items with a prepaid shipping label provided by AIRROBO, AIRROBO takes responsibility for any damage or loss incurred
in transit. When returning items for non-quality issues, the buyer assumes responsibility for any damage or loss incurred in transit.
AIRROBO does not provide refunds for items damaged in transit for non-quality-related warranty claims.
Warranty ContentWarranty Period
Main unit (including the built-in lithium battery)1 year
Charging base and power adapter1 year
Side brush, filter, cleaning tools, dustbin, mopping cloth, water tank,
filter cartridge
• Damage from outside sources
• Damage from misuse of products (including, but not limited to
falls, extreme temperatures, water, and operating robot vacuum
cleaner improperly)
• Purchases from unauthorized resellers AIRROBO is not liable for
• Loss of data incurred from the use of AIRROBO products
• Returning personal items sent to AIRROBO
/
-9-
Page 12
Part 8 Declaration of Conformity
8.1 FCC Compliance Statement
Changes or modifications not expressly approved by the party responsible for compliance could void the user’s authority to operate the
equipment.
This device complies with Part 15 of the FCC Rules. Operation is subject to the following two conditions:
(1) this device may not cause harmful interference, and
(2) this device must accept any interference received, including interference that may cause undesired operation.
This equipment has been tested and found to comply with the limits for a Class B digital device, pursuant to Part 15 of the FCC Rules.
These limits are designed to provide reasonable protection against harmful interference in a residential installation. This equipment
generates, uses, and can radiate radio frequency energy and, if not installed and used in accordance with the instructions, may cause
harmful interference to radio communications. However, there is no guarantee that interference will not occur in a particular installation.
If this equipment does cause harmful interference to radio or television reception, which can be determined by turning the equipment off
and on, the user is encouraged to try to correct the interference by one or more of the following measures:
• Reorient or relocate the receiving antenna.
• Increase the separation between the equipment and receiver.
• Connect the equipment into an outlet on a circuit different from that to which the receiver is connected.
• Consult the dealer or an experienced radio/TV technician for help.
8.2 FCC Radiation Exposure Statement
This equipment complies with FCC radiation exposure limits set forth for an uncontrolled environment. This equipment should be
installed and operated with a minimum distance of 20 cm between the radiator and your body. This transmitter must not be co-located or
operating in conjunction with any other antenna or transmitter.
8.3 EU Declaration of Conformity
We, Best Epoch Technology Co., Ltd. declare under sole responsibility that the above products, to which this declaration relates, is in
conformity with the requirements of the following EU Directives:
Product description: Robot Vacuum Cleaner
Type designation(s): P10
Trademark: AIRROBO
Hereby we,
Name of manufacturer: Best Epoch Technology Co., Ltd
Address: 22 Floor, Block Cl, Nanshan I Park, No. 1001 Xueyuan Road, Nanshan District, Shenzhen City, China P.R
declare under our sole responsibility that the product described above is in conformity with the relevant Union harmonization
legislations:
European Directive (2014/53/EU)
The following harmonized standards and/or other relevant standards have been applied, which included for Article 3.1a Health, Article
3.1b EMC, Article 3.2 Radio Spectrum requirements and Article 3.1a Electrical Safety requirements:
EN 55014-1:2017
EN 55014-2:2015
EN IEC 61000-3-2:2019
EN 61000-3-3:2013+Al:2019
ETSI EN 301489-1 V2.2.3(2019-ll)
ETSI EN 301489-17 V3.2.4(2020-09)
EN300 328 V2.2.2(2019-07)
EN 62311:2008
EN 60335-2-2:2012+All:2012+Al:2013,EN 60335-l:2012+All:2014
EN 62233:2008
The performed the conformity assessment according to the European Directive, The laboratory issuing the report is Shenzhen Huaxia
Testing Technology Co., Ltd.
The Technical Documentation (TD) .relevant to the product described above and which support this DoC is available from the EU contact
address on this Doc.
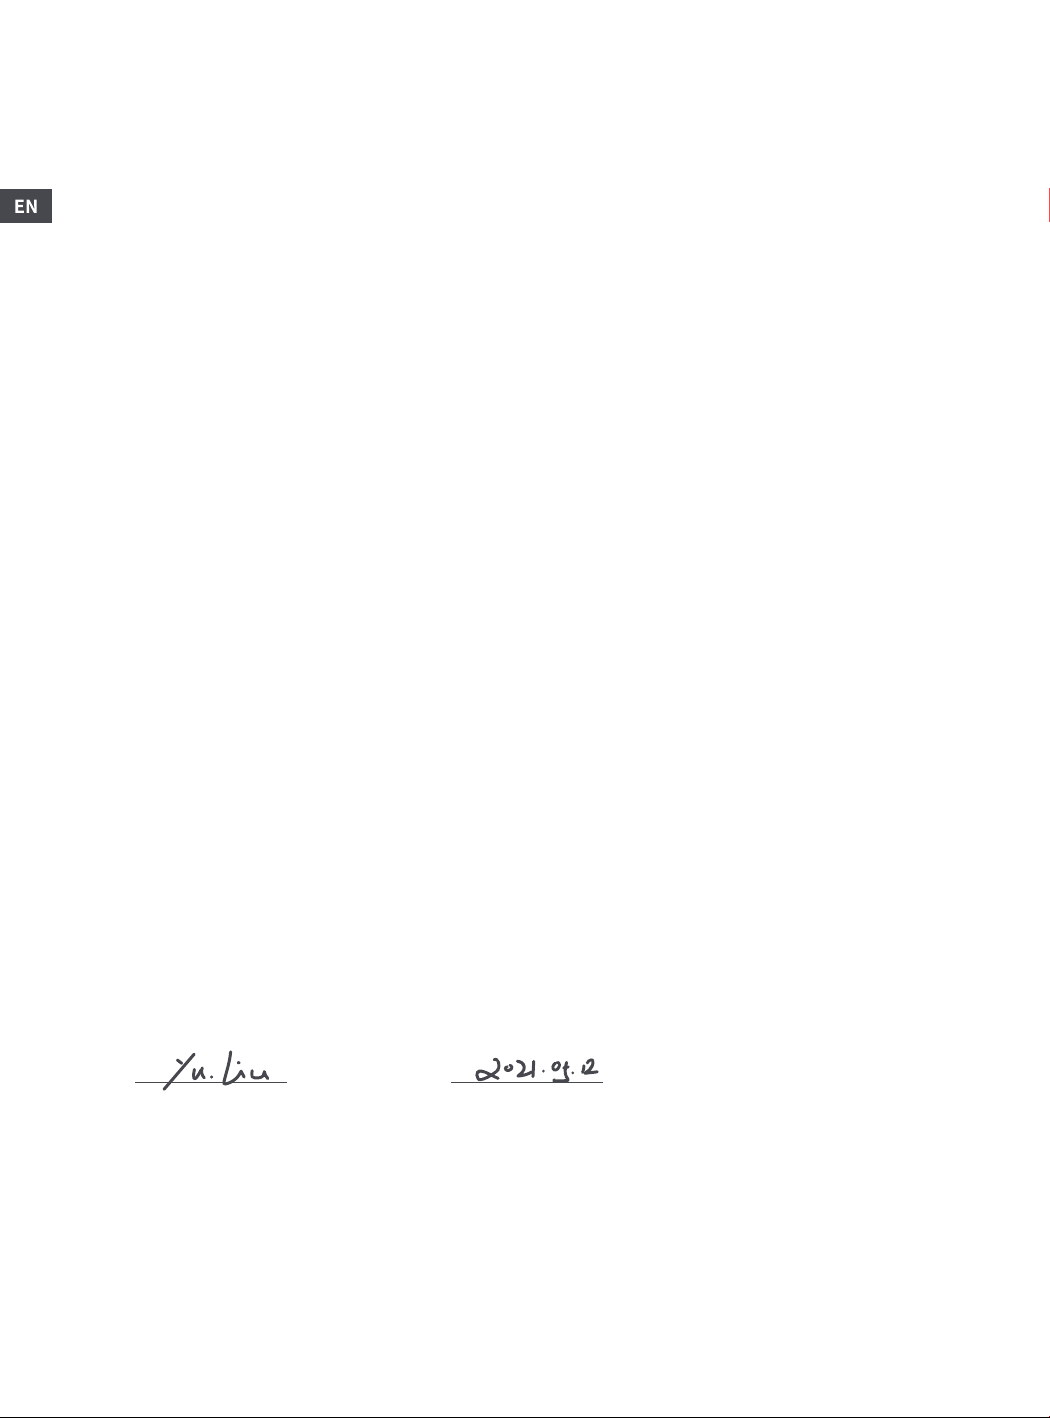
Signed: Date:
Best Epoch Technology Co., Ltd
-10-
Page 13
Tips:
Scan the QR code on the left to get the latest manual.
English/Deutsch/日本語/Русский/Français/Español/Italiano included.
Best Epoch Technology Co., LTD
22 Floor, Block C1, Nanshan I Park, No. 1001 Xueyuan Road,
Nanshan District, Shenzhen City, China P.R
©Best Epoch Technology Co., LTD. All Rights Reserved.
Google Play is a trademark of Google, Inc.
Apple, the Apple logo are trademarks of Apple, Inc.
Tuyasmart APP is a trademark of Tuya Inc.
The pictures of the product are for reference only and subject to change without notice.
V3.0
USA
Europe
Japan
Russia
MADE IN CHINA
 Loading...