

Page 1

Wireless N/A 5GHz 200mW Outdoor AP
Model: APO1200
Quick Installation Guide
V.1.0
Page 2
1. Before You Start
System Requirement
9 Web Browser : Internet Explorer (7.0 or above), Firefox, Safari
9 A Computer with a network adapter properly installed
Package Contents
• APO1200 x 1
• Quick Installation Guide x 1
• CD-ROM (with User Manual and QIG) x 1
• Power Adapter DC24 V 0.5A x 1
• PoE injector x 1
• Mounting Kit
x 2
9 2 x RJ-45 Ethern et cable
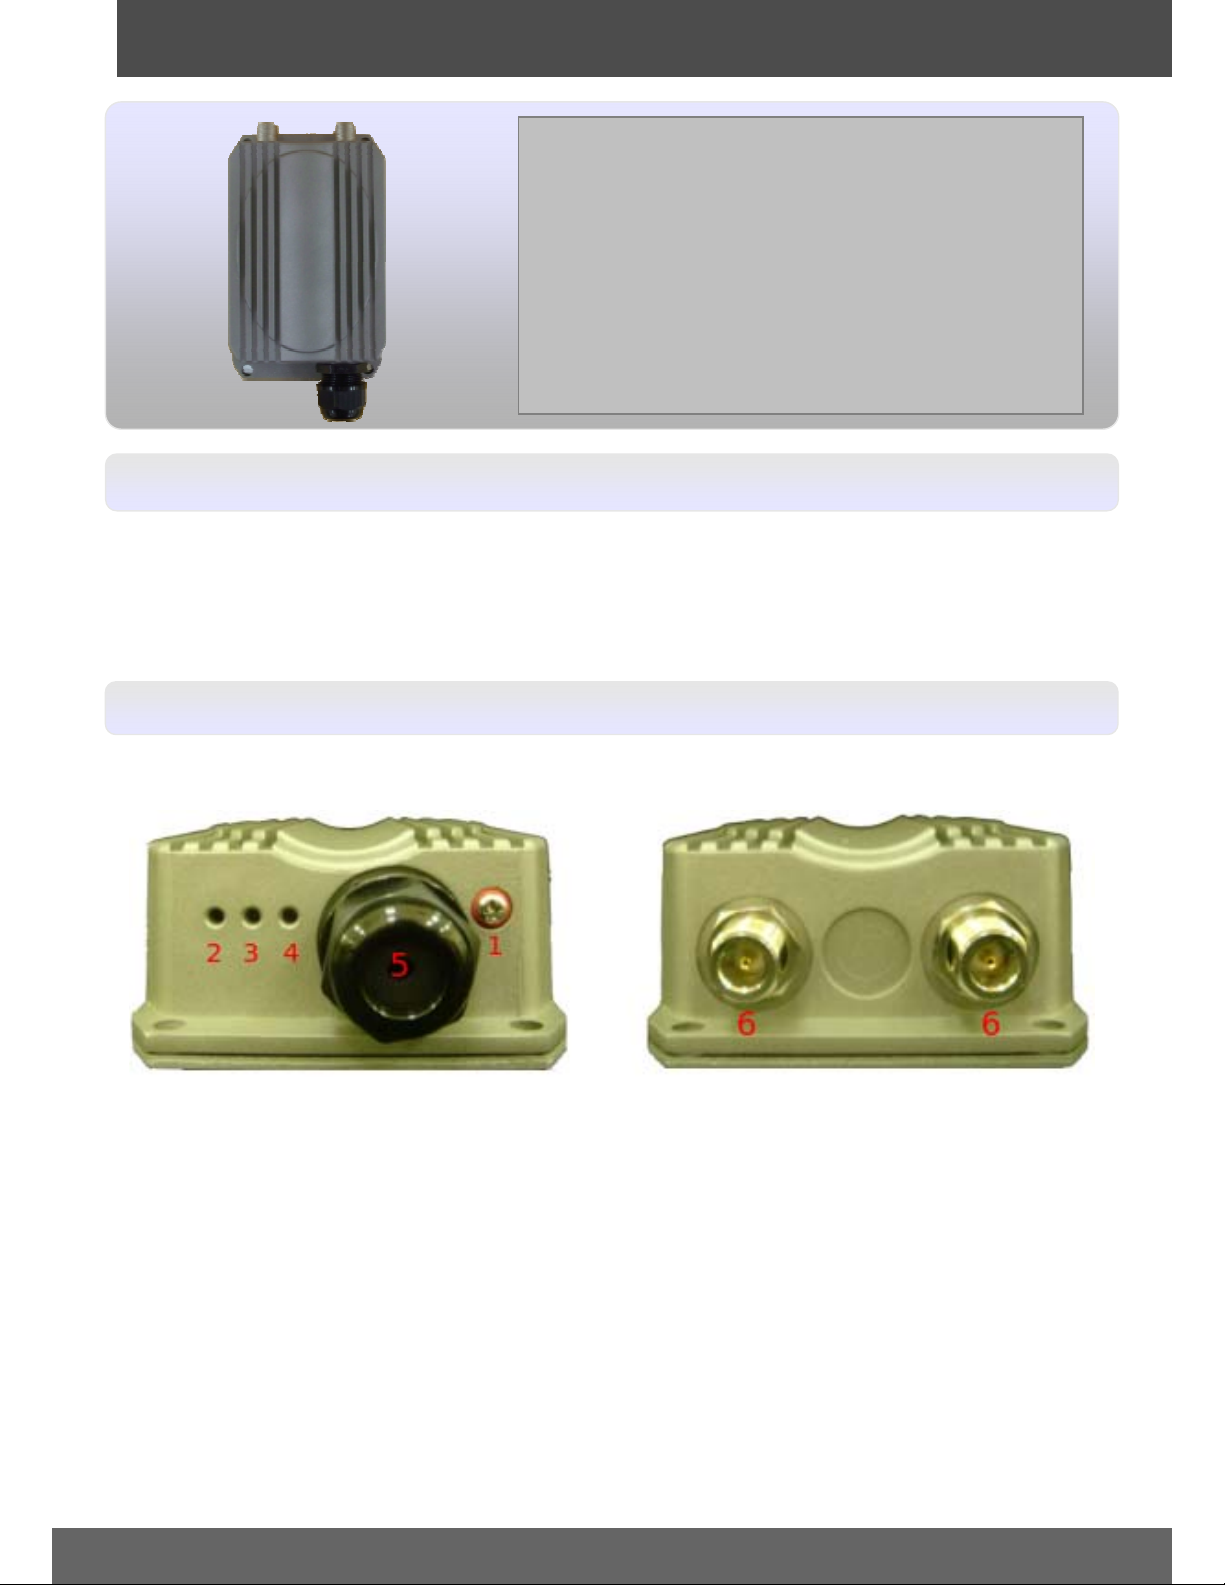
Panel Function Description
Front Panel Rear Panel
1. Reboot Button : Unscrew the screw and click Reset button to restart system or reset to default configurations.
Î Press and hold the Reset button for 2 seconds and release to restart system. The LED except Power indicator
will be off before restarting.
Î Press and hold the Reset button for more than 10 seconds to reset the system to default configurations.
2. Power : Green LED ON indicates power on, and OFF indicates power off.
3. WLAN : G reen LED FLASH in dicates Wireless Transmit.
4. LAN : Green LED ON indicates connection, OFF indicates no connection, FLASH indicates packets transmit.
5. PoE Connector : For connecting to PSE.
6. N-type Connector : For connecting to N-Type Antenna.
1
Page 3
A
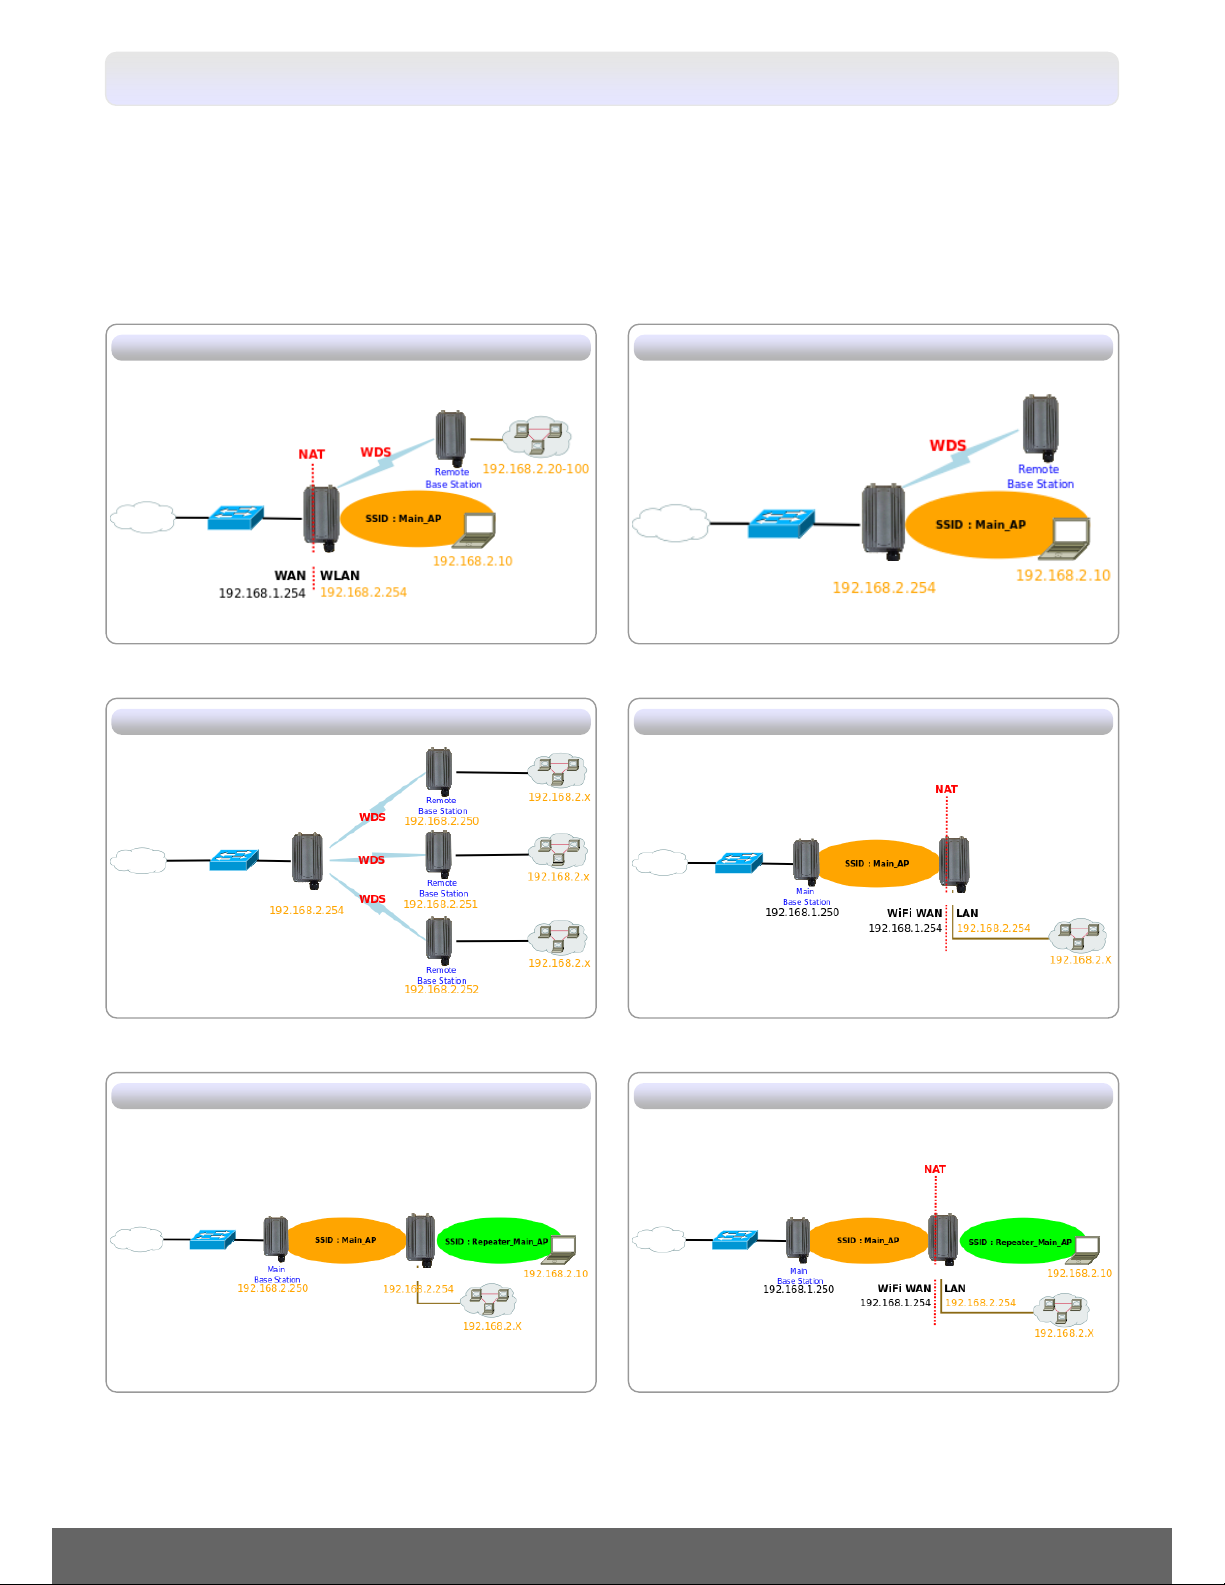
Application in Wireless Network
APO1200 is a multiple mode system which can be configured either as a wireless gateway or an access point
as desired. It also can be used as a WDS link for Ethernet network expansion. This section depicts different applications on
Router AP Mode, AP Mode, WDS Mode, CPE Mode, Client Bridge+Universal Repeater Mode and CPE+AP Mode.
Router AP/WDS Mode
WDS Mode CPE Mode
APO1200
P/WDS Mode
APO1200
APO1200
Client Bridge + Universal Repeater Mode CPE + AP Mode
2
Page 4
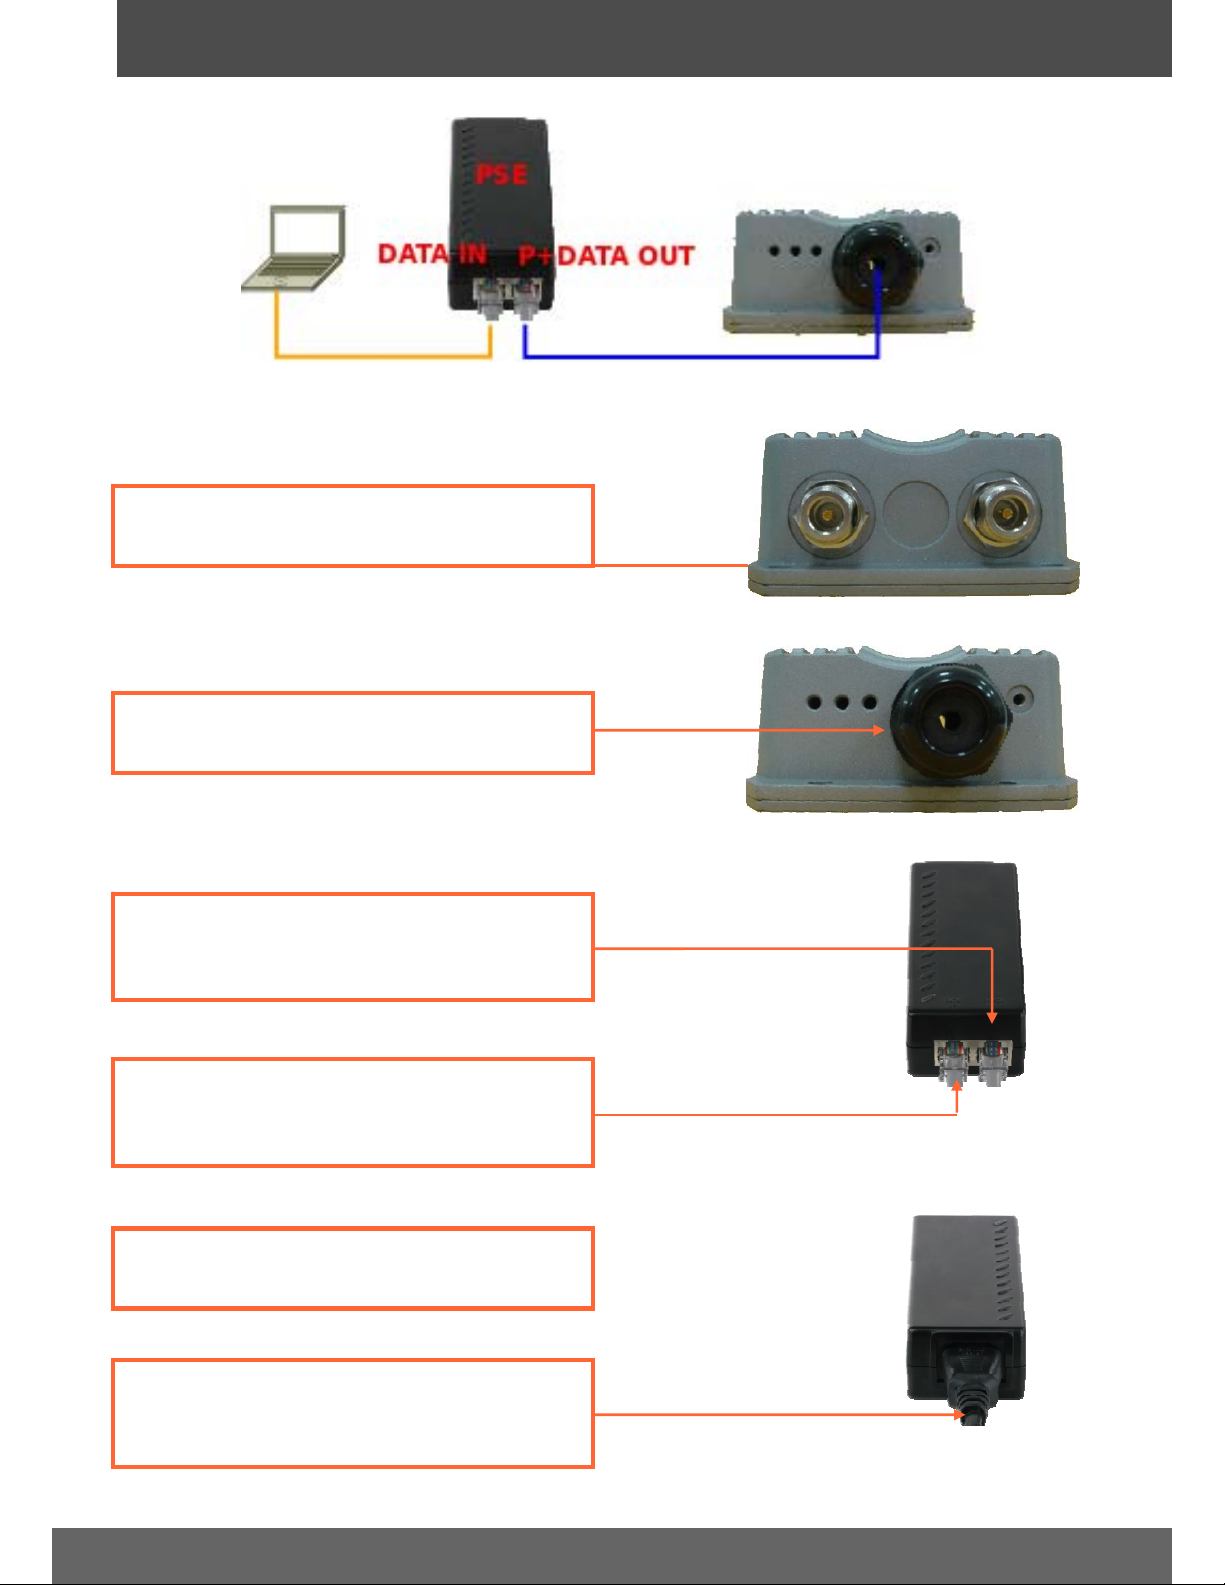
2. Hardware Installation
1. Connect N-type antenna to the N-type connector on
the rear panel
2. Connect one end of a RJ-45 cable into the
AP's PoE connector
3. Connect the opposite end of the RJ-45 cable to the
P+DATA OUT port on the Power over Ethernet
Injector
4. Connect one end of another RJ-45 cable to
the DATA IN port on the Power over
Ethernet Injector
5. Connect the opposite end of the RJ-45 cable to a
LAN port on your network or Computer
6. Connect the power cord into the Power over
Ethernet Injector. Then connect the power
cord to a power outlet.
3
Page 5
3. Configuring the Access Point
Note :
1. It is recommended that you configure the Access Point from a wired computer. Before the Access Point can be
configured, if you connect the AP to your computer directly, you must manually assign a static IP address to your
computer's network adapter in the subnet of 192.168.2.x (Refer to Section 7, How to configure TCP/IP settings on
your PC.); if you connect the AP to your Router or Switch, since the AP’s default IP address is 192.168.2.254, make
sure your Router’s IP address is 192.168.2.x and no other network devices are assigned an IP address of
192.168.2.254.
2. Disable any anti-virus and firewall programs before configuring the access point.
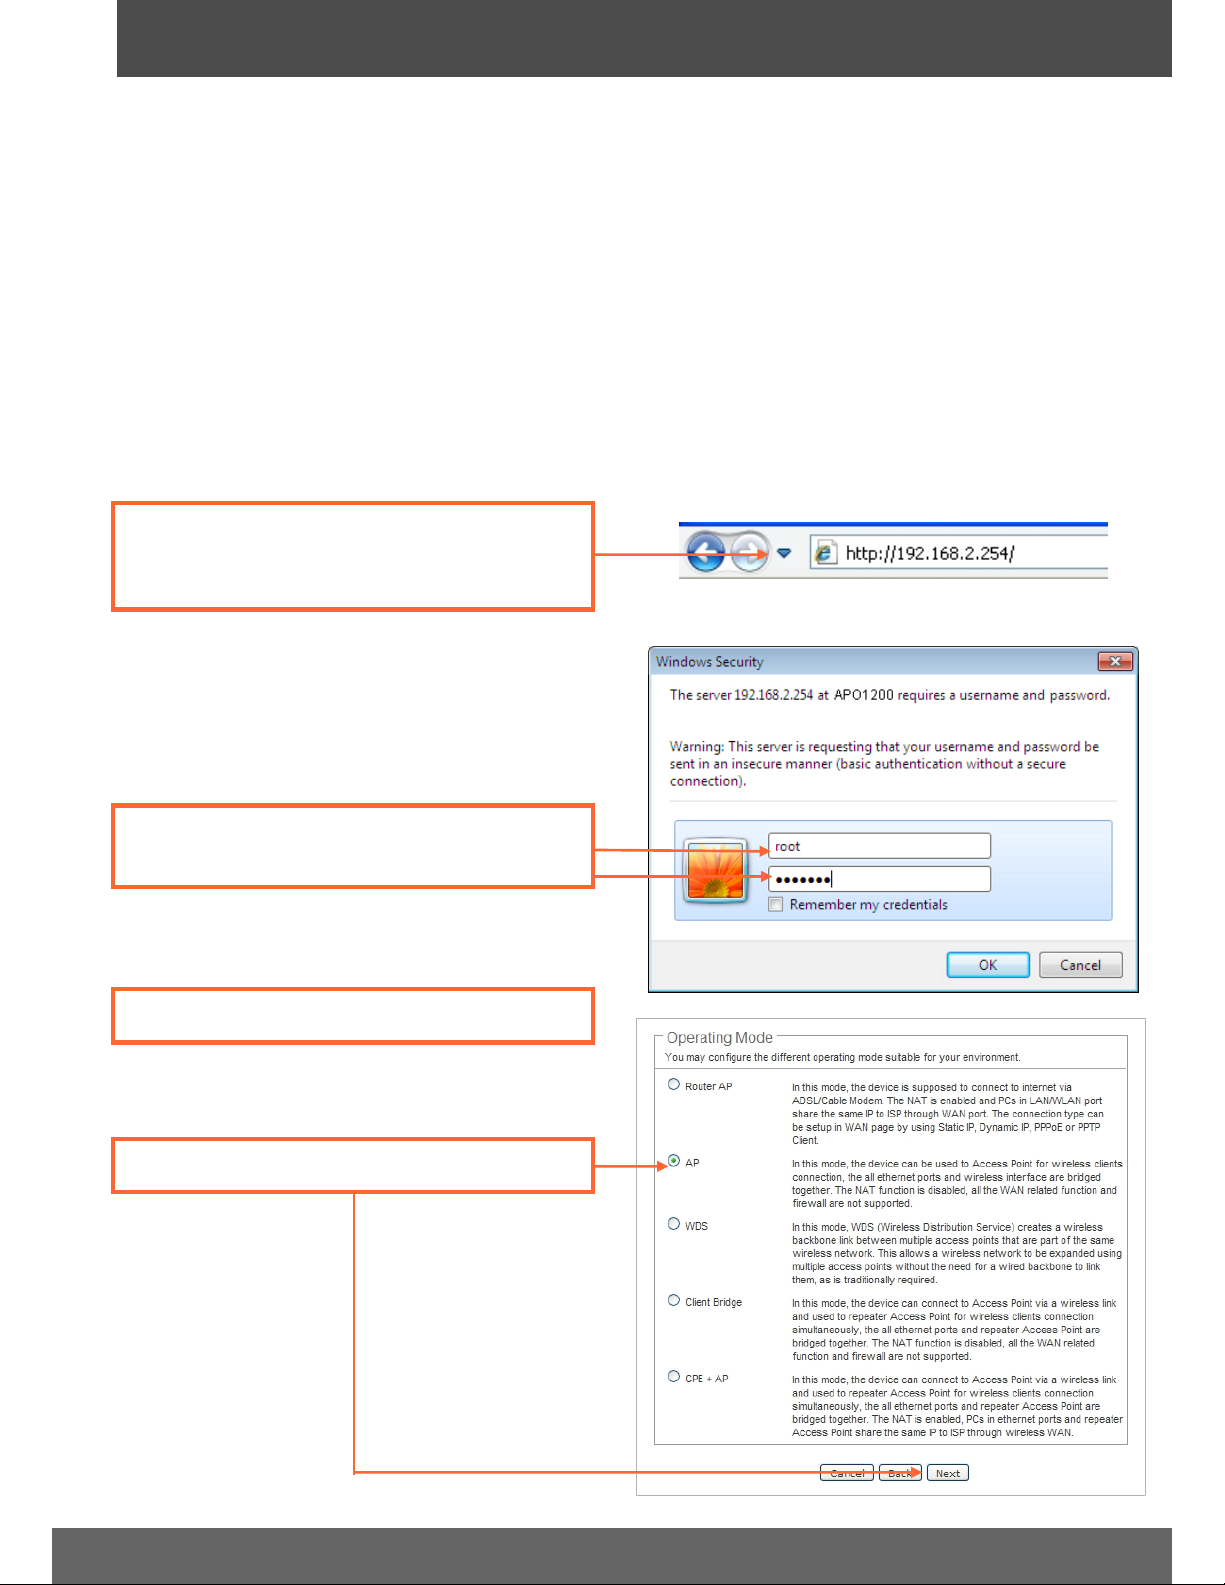
1. Open the web browser (Internet Explorer or Mozilla
Firefox). Enter the AP’s default IP address
“http://192.168.2.254/” and click “GO”.
2. Enter “root” for user name and “default” for
password.
3. Click Wizard.
4. Select “AP” mode and click Next button.
4
Page 6

5. Configure the LAN settings to match your
network settings and then click Next button.
6. Configure the DNS settings to match your
network settings and then click Next button.
7. Enter the desired Channel/Frequency and
ESSID, then click Next button.
Note :
1. To protect your network from any unauthorized access it is recommended to enable wireless encryption.
2. The examples below are for WPA2-PSK. If you select WPA-PSK or WPA2-PSK, make sure your wireless
adapters support WPA or WPA2. If your wireless adapters do not support WPA or WPA2, then select WEP.
8. Select the desired Security Type.
9. Select the Cipher Suite(Type). For WPA2-PSK
10. Enter a Pre-shared Key and then click Finish
button. The key must be between 8 and 63
ASCII or 64 HEX characters. Make sure to
11. Wait 35 seconds while the Access Point
reboots.
Your Installation is complete
For detailed information regarding the APO1200’s configuration and advanced settings, please
refer to User Manual.
5
Page 7

4. Configuring for WDS Link
Note :
1. The system prov i de WDS function on Router AP Mode, AP Mode and WDS Mode.
2. WDS Link requires at least 2 APO1200. The Two wire networks(LAN) need the same subnet.
3. The WDS Link needs to be set at same Channel and with same Security Type.
4. Please install and test in a lab environment before mounting the APO1200.
5. After you set the APO1200 to WDS Mode, wireless clients will not be able to connect to the APO1200.
6. The examples below are for WDS Mode.
Setting Up the Main APO1200 (Main Base Station)
1. Copy down the 12 digit MAC Address of the
Remote APO1200 (Remote Base Station).
The MAC Address is on the
Overview Page (Status->Overview) and
Wireless General Setup Pa ge (Wireless
->General Setup)
2. Follows steps 1-6 (Select “WDS” mode on
step 4) in Section 3 Configuring the Access
Point.
6
Page 8

3. Enter the desired Channel/Frequency , then
click Next button.
4. Click Enable and enter the Remote
APO1200's MAC Address .
5. Select the desired Security Type between
WDS link, then click Finish button.
6. Wait 35 seconds while the Access Point
reboots.
Setting Up the Remote APO1200 (Remote Base Station)
1. Copy down the 12 digit MAC Address of the
Main APO1200 (Main Base Station).
The MAC Address is on the device label or the
Overview Page (Status->Overview) and Wireless
General Setup Page(Wireless ->General Setup)
2. Repeat steps 2-6 in Setting Up the Main
APO1200
you change the IP Address of the Remote
APO1200 to be different from the Main APO1200.
for the Remote APO1200. Make sure
3. Click Status -> WDS Status.
4. Verify the R e mote APO1200's MAC
Address and Signal Strength (RSSI)
7
Page 9

5. Configuring for Client Bride
Note :
1. This section will walk you through the steps of sharing (bridging) an internet connection in one building, and extending that
same internet to another building.
2. The “Main Base Station” provi de Access Point with SSID “Main_AP”
3. The Two wire networks(LAN) need the same subnet.
4. The examples below are for Client Bridge.
Setting Up the Access Point (Main Base Station)
1. Follows steps in Section 3 Configuring the
Access Point.
2. Make sure changed options as below :
ESSID : Main_AP
Channel : 44
Security : WPA2-PSK
Cihper Type : AES
Pre-shared Key :
8
Page 10

Setting Up the Client Bridge (Client Station)
1. Follows steps 1-6 (Select “Client Bridge”
mode on step 4) in Section 3 Configuring
the Access Point. Make sure you change
the IP address of the Client Station to be
different.
2. Configure the DHCP Server settings to
match your demandand then click Next
button.
3. Click Site Survey button. The system
will automatically scan and display the scan
results of all AP existing near by the system
4. Use Main_AP as an example here where the
AP is encrypted via WPA2-PSK/ AES security
type. Click Select button of the Main_AP, and then
click Next button.
9
Page 11

5. Set Client Bridge associate to ESSID
“Main_AP” with corrent Pre-shared key. Then
click Next button.
6. Select Disable to deactivate Repeater AP.
Then click Finish button.
7. Wait 35 seconds while the Access Point
reboots.
8. Click Status->Remote AP, the Connection
Information should be display.
Note :
1. To verify wired network of Client Station can access Main Base Station, use ping command to “192.168.2.254”
2. If you can not access Main Base Station, verify the IP address of the wired client (PC or Laptop) is in the same subnet with
Main Base Station.
10
Page 12

6. Configuring for Universal Wireless Repeater
Note :
1. This section will walk you through the steps of sharing (bridging) an internet connection in one building, and extending that
same internet to another building with repeat Access Point.
2. A repeater is just a very normal client which, at the same time, can also be an access point, independent of the SSID and
type of encr yption used.
3. The “Main Base Station” provides Access Point with SSID “Main_AP”, and the “Client Station” provide repeat Access
Point with SSID “Repeater_Main_AP”.
4. The Wireless clients and “Main Base Station” need the same subnet.
5. The examples below are for Universal Wireless Repeater.
1. Follows steps in Section 5 Configuring for
Client Bridge.
2. Select Enable to active Repeater AP on
step 7. Enter the desired ESSID and click
Next button.
Note :
1. To protect your network from any unauthorized access it is recommended to enable wireless encryption.
2. The examples below are for WEP. If you select WPA-PSK or WPA2-PSK, make sure your wireless
adapters support WPA or WPA2. If your wireless adapters do not support WPA or WPA2, then select WEP.
11
Page 13

3. Select the desired Security Type.
4. Select the Authentication Type for WEP.
5. Select WEP Key Index and Key, then click
Finish. Make sure to copy down the
encryption key.
6. Wait 35 seconds while the Access Point
reboots.
7. Click Status->Remote AP, the Connection
Information should be display.
8. Set Wireless client associate to ESSID
“Repeater_Main_AP” with corrent WEP key.
9. Click Status->Client, the Repeater AP
Clients should be display.
Note :
1. The Channel of Repeat AP should be the same with Main Base Station.
2. To verify wireless clients can associate ESSID “Repeater_Main_AP” with WEP key.
3. To verify wireless clients can use ping command to “192.168.2.254”.
4. If you can not access Main Base Station, verify the IP address of the wireless client (PC or Laptop) is in the same subnet
with Main Base Station.
12
Page 14

7. How to configure TCP/IP settings on your PC
Windows XP/2000
1. Go into the Control Panel, double-click the
Network Connections icon and then
right-click the Local Area Connection icon
2. Click Internet Protocol (TCP/IP) and then
click Properties. Then click on Use the
follow IP address, and make sure you
assign your network adapter an IP address
in the subnet of 192.168.2.X.
13
Page 15

Technical Support
E-mail: support@airlink101.com
Toll Free: 1-888-746-3238
Web Site: www.airlink101.com
*Theoretical maximum wireless signal rate derived from IEEE standard 802.11 specifications. Actual data throughput will vary.
Network conditions and environmental factors, including volume of network traffic, building mate rials and construction, mix of wireless
products used, radio frequency interference (e.g., cordless telephones and microwaves) as well as network overhead lower actual
data throughput rate. Specifications are subject to change without notice. Photo of product may not reflect actual content. Al l products
and trademarks are the property of their respective owners. Copyright ©2010 Airlink101®
14
 Loading...