

Page 1
Ver. 1C
Quick Installation Guide
This Quick Installation Guide only provides you with some basic instructions. For more
detailed information, please refer to the User Manual on the supplied CD.
Model # RT210W
Package Content:
• 802.11g Wireless Router
• Power Adapter
• Category 5 UTP cable
• Utility CD
• Quick Installation Guide
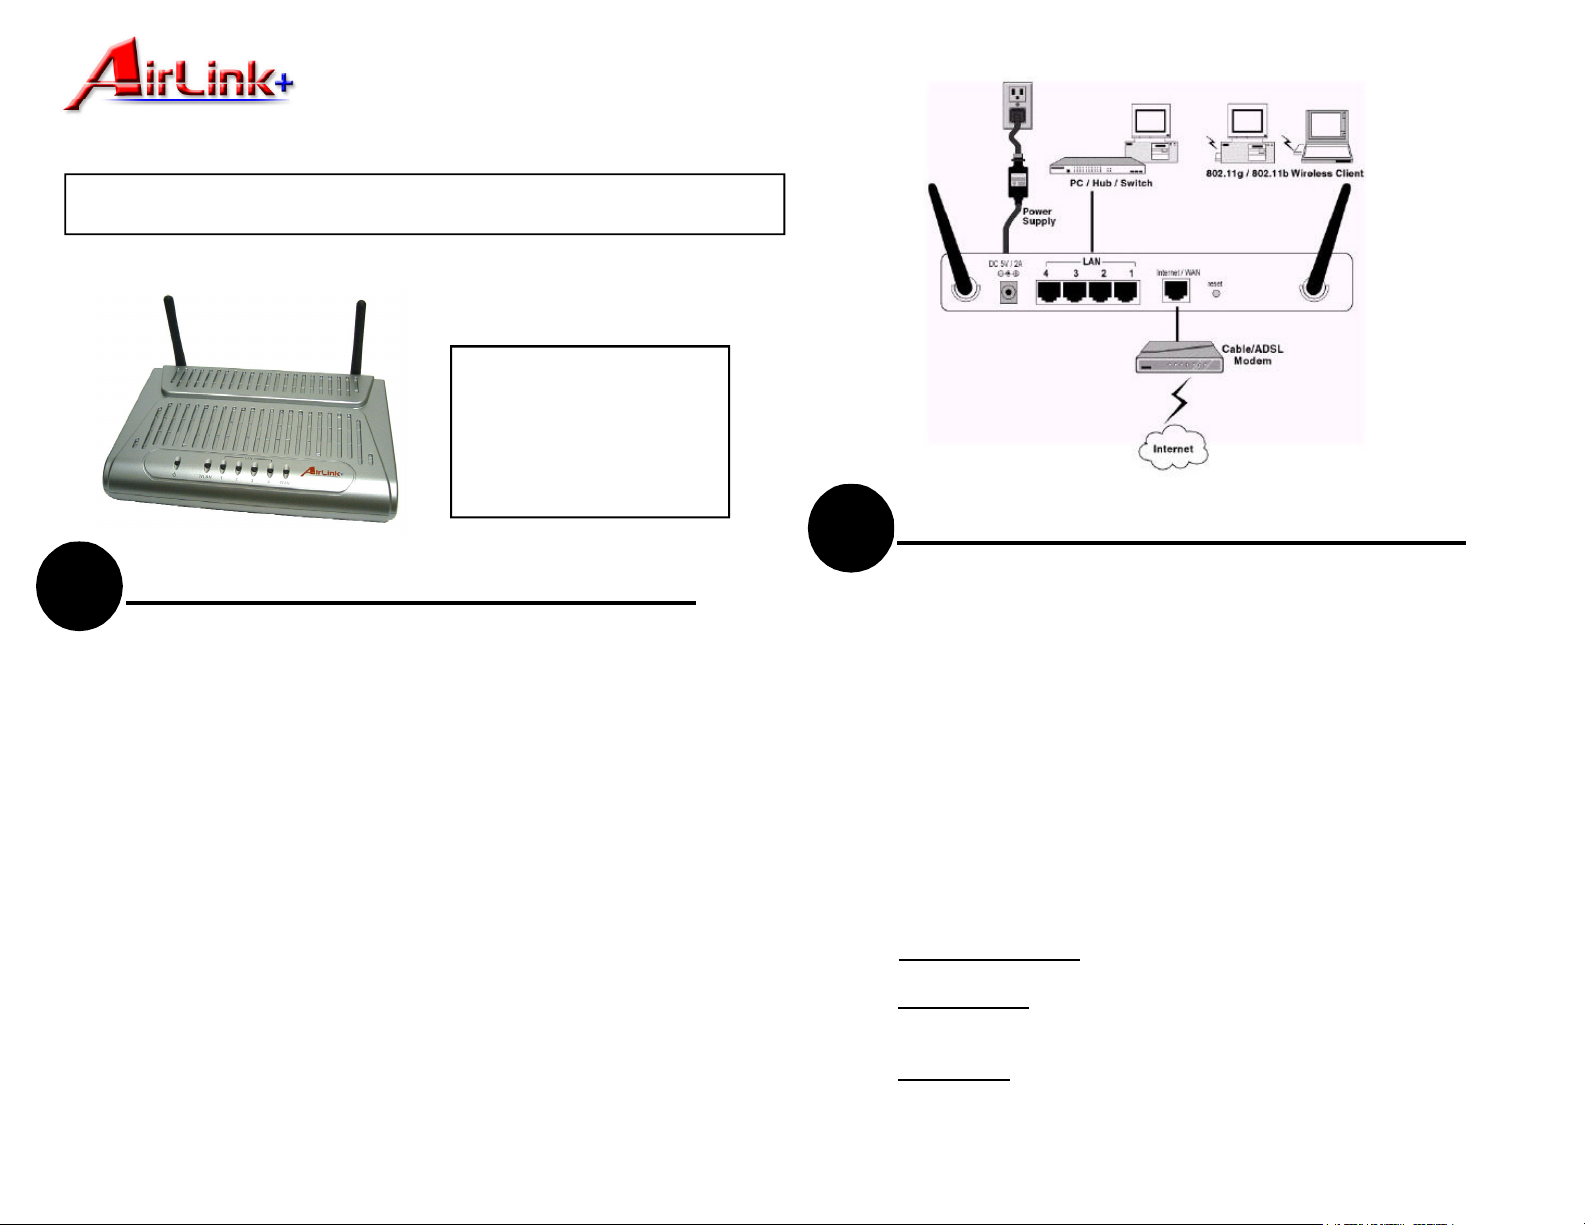
The figure below illustrates a connection example:
Setting Up Ethernet/WLAN Client
2
Connecting the Wireless Broadband Router
1
Prior to connecting the hardware, make sure to power off your
ethernet device, Cable/ADSL modem and Wireless Broadband
Router. Then follow the steps below to connect the related devices.
Step 1 Connecting Your computer to the LAN port.
Attach one end of the Ethernet cable with RJ-45 connector to your
hub, switch or a computer’s Ethernet port, and the other end to one
of the LAN ports of your Wireless Broadband Router.
Step 2 Connecting Cable/ADSL Modem to the WAN port.
Connect the Ethernet cable attaching to your Cable/ADSL modem to
the WAN port of your Wireless Broadband Router.
Step 3 Connecting the power adapter.
Connect the single DC output connector of the power adapter to the
power jack on the side of the Wireless Broadband Router. Then
connect the supplied power cord to the power adapter and the other
end to an AC outlet.
Step 4 Power on the following devices in this order:
Cable/ADSL modem, Router, and PCs
You can manage the Wireless Broadband Router through the
Web browser-based configuration utility. To configure the device
via Web browser, at least one properly configured computer must
be connected to the device via Ethernet or wireless network. The
Wireless Broadband Router is configured with the default IP
address of 192.168.1.1 and subnet mask of 255.255.255.0,
and its DHCP server is enabled by default. Before setting up the
Router, make sure your PCs are configured to obtain an IP (or
TCP/IP) address automatically from the Router by the steps
below.
Step 1
Click the Start button. Select Settings and/or click the Control Panel
icon.
For Windows 98 and ME, double-click the Network icon.
For Windows 2000, double-click the Network and Dial-up Connections
icon. Double-click the Local Area Connection x.
For Windows XP, click the Network and Internet Connections icon.
Click the Network Connections. Double click the Local Area
Connection x under LAN or High-Speed Internet.
Page 2
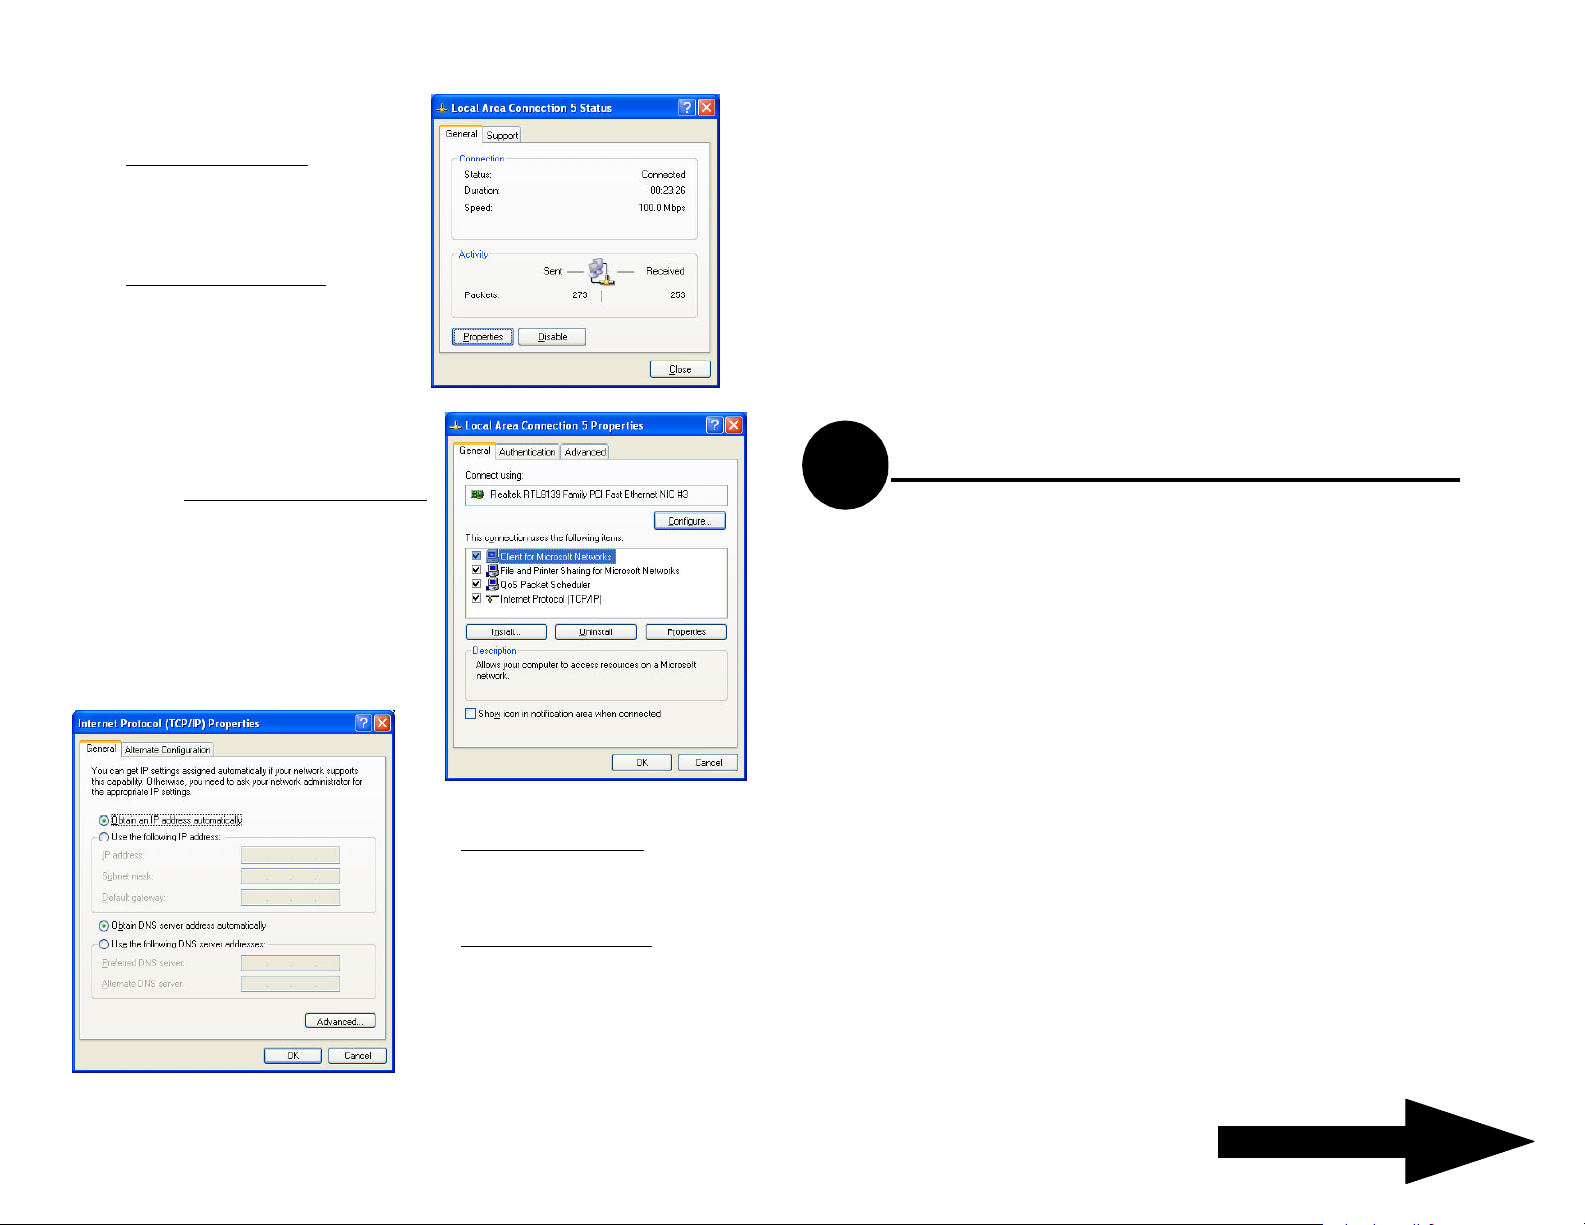
Note: snap shots are for Windows 2000 and XP
Step 2
For Windows 98 and ME, Select
“TCP/IP -> Your Ethernet
Adapter”, Click the Properties
button. Go to step 4
For Windows 2000 and XP, click
the Properties button in the Local
Area Connection Status window.
Step 3 For Windows 2000 and XP only,
Make sure the Internet Protocol (TCP/
IP) is checked and highlighted in the
Local Area Connection Properties
window. Click the Properties button.
If you choose to manage the router via a wireless client, please also check the
following:
1. Make sure your PC is equipped with 802.11g or 802.11b wireless adapter and
has appropriate WLAN card driver / utility and TCP/IP installed.
2. Set the wireless adapter to use appropriate TCP/IP settings as described in
previous section
3. Launch the wireless adapter’s provided utility and verify that your wireless
client is configured with these settings:
• Operation Mode: Infrastructure
• SSID: 11g AP
• Authentication: Open
• WEP Mode: Disabled
Checking the Connection to the Router
3
After configuring the TCP/IP protocol, you can use the ping command to verify
if your LAN/Wireless computer has successfully connected to the router.
To execute ping command, open the DOS window by clicking on
Start -> Run. In the Run window, type Command. At the DOS prompt, type
the following command:
Step 4
For Windows 98 and ME, select
Obtain an IP address automatically
in the TCP/IP properties window.
For Window 2000 and XP, select
Obtain an IP address automatically
and Obtain an DNS server address
automatically in the Internet protocol
(TCP/IP) properties window.
Step 5 Click the OK button and restart the computer.
ping 192.168.1.1
If the Command window returns something similar to the following:
Reply from 192.168.1.1 bytes=32 time=100ms TTL=253
Then the connection between the router and your computer has been
successfully established. If the computer fails to connect to the router, the
Command window will return the following:
Request time out
Veryfy your computer's network settings are correct and check the cable
connection between the router and the computer.
Continue on back...
Page 3

4
Description
from the protocol listed. Complete the User
If you want to use the Router to share your Internet (DSL/Cable Modem)
Accessing the Web-Based Configuration Utility
Step 1 Start your Web browser and type http://192.168.1.1 in the URL field.
This is your router's default private IP address.
Step 2 After connecting to the device,
you will be prompted to enter the
username and password. Leave the
username empty and enter the default
password as admin.
Step 3 The Web-Based utility will appear with the System Overview table
selected.
connection, keep the WAN/LAN Relation as NAT Routing selected.
There are four types of WAN connections (protocols) as listed in the following
table. Your ISP will provide you with information and a description of your WAN
connection. The ISP may require a specific setting. Select the correct protocol
for your ISP from the table below. See the User Manual for more information.
WAN Type
DHCP Client If you are connecting through DHCP or a dynamic
IP address from your ISP, keep this default setting.
PPPoE Client If you are connecting through PPPoE, check
PPPoE
name and Password fields.
Manual Config If your ISP assigns you a static IP address, check
Manual Config
IP address, Subnet mask, Default Gateway, and
DNS server fields. You need to enter at least one
DNS address.
PPTP Client This is a service used in Europe only. If you are
using a PPTP connection, check with your ISP for
the necessary setup information.
After selecting the proper WAN connection setting, click Apply to register
these settings with the Router. After the settings have been registered, the
screen will return to the WAN page and the settings are effective.
from protocol listed. Complete the
5
Quick Configuration for Wireless Router
Click the WAN page link to configure the WAN interface.
Note that if you use the table above for quick configuration and keep other
settings as the defaults, the following conditions apply:
• The IP address of LAN port is 192.168.1.1 and the subnet mask is
255.255.255.0.
• DHCP server is enabled; the DHCP address pool is
192.168.1.100~192.168.1.150.
• The built-in NAT function will provide local computers with Internet
access via the single public IP of the WAN port.
• The Filter Type is Listed Block and all the filters are disabled: No
filter rule is specified to block any packet. All packets can pass
through the WAN port.
• There is no forwarding entry and any external access to your LAN is
blocked.
• With the default values, the router (Access Point) can be easily
associated by a wireless client. For security concern, You should
modify the basic Wireless LAN security settings.
Page 4

6
Checking the Connection to the Internet
7
Quick Configuration for Bridge Mode
To check the connection to the Internet, you can open the Web browser and go
to a website. You can also go to the System Overview page of the router’s
Web -based configuration utility. The WAN Interface group will display the
current connection information.
Congratulations! You’ve successfully configured your Router.
You should customize the SSID and Channel settings as needed. For added
security, you should enable WEP encryption and firewall following instructions
from the manual included in the CD.
If you want to have the device to act as a bridge, follow the steps below.
*Ignore this section if your device is to be configured as a router
Part 1. Enable bridging function.
Go to the WAN configuration page and select the Bridging option as
the WAN/LAN relation and then click Apply to commit the changes.
Part 2. LAN configuration.
Go to the LAN configuration page and then:
1. In the Protocol item, select DHCP Client or Manual Config as
required. If you select DHCP Client, skip to step 4.
2. If you select Manual Config, manually enter the IP address and its
subnet mask in IP Address & Subnet Mask fields.
3. For Manual Config setting only, if you choose to enable DHCP
server service, enter related settings.
4. Click Apply to apply the changes.
Note: After applying these settings, your configuring computer may lose
connection to the device. To reconnect, you will need to make sure the
computer uses an IP address in the same subnet as the device.
8
Technical Support
Email: support@airlinkplus.com
Website: www.airlinkplus.com
 Loading...