

Page 1

MN-525
m
by
(14604)
ECR 5656
Single rear wheel applications with a 3.5” axle require an additional spacer kit
*See Page 3 for Details.
Please read these instructions completely
before proceeding with installation
Failure to read these instructions can result in mis-installation
Introduction to the RoadTamer System
What You Need to Know About RoadTamer ...................... 2
V ehicle Requirements ....................................................... 3
RoadT amer W arranty and Return Policy ........................... 3
Installing the RoadTamer System
Getting Started .................................................................. 4
Inspecting Axle Spring Perch Uniformity ........................... 5
Attaching the Axle Beams ................................................. 5
Attaching the Frame Brackets ........................................... 6
Attaching and Adjusting the Panhard Rod......................... 7
Hardware List .................................................................... 9
*Kit Installation Diagram ................................................... 10
Installing the Rolling Lobe Air Sleeves ............................. 11
Installing the Air Lines ...................................................... 12
Final Adjustments............................................................. 13
.
F250-F350 Kit No. 39010
www.airliftcompany.co
Checking Driveline Angles
Checking Driveline Angles ............................................... 14
Checking Angles in Various Conditions ............................ 14
Installation Checklist
Installation Checklist......................................................... 15
T r oubleshooting Guide
Troubleshooting Guide ..................................................... 16
Checking for Leaks........................................................... 17
Fixing Leaks ..................................................................... 17
Maintaining and Servicing the System
Maintenance Guidelines................................................... 17
Servicing the RoadT amer System.................................... 18
Technical Support
1-800-248-0892
Ext. 2
1
Page 2

What You Need to Know About RoadTamer
About RoadTamer
The RoadTamer suspension system and your
vehicle’ s original equipment steel spring suspension
operate differently . RoadTamer allows your vehicle to
ride “on air.” It lowers air pressure for lighter loads,
meaning you will have a softer ride when you don’t
need the heavy factory springs.
RoadTamer lowers your vehicle to be approximately
level with the front suspension. The result is a vehicle
altitude very similar to that of a fully loaded vehicle.
The air management system then maintains that rear
suspension height regardless of the load you carry .
Ride Height
This will give you optimum ride performance,
regardless of the load. RoadTamer’s air management
system will maintain the vehicle’s ride height within
½”. You will enjoy a much more comfortable,
controllable and safer ride. The design of RoadT amer
is carefully considered to give you “The Ultimate
Suspension Upgrade. ”
V ehicle Leveling, Side-to-Side
V ehicles are not alwa ys lev el when they are deliv ered
from the factory . Installing RoadTamer on your vehicle
does not correct this non-level condition. Before you
install RoadTamer, measure for vehicle levelness on
a flat surface. After the factory springs have been
removed, use a level to verify that the axle spring
perches are level from side-to-side. If the perches are
not level, y ou will need to apply a wedge shim to one
side or the other to correct this condition. The wedge
shim is provided with each RoadTamer kit. More
information is provided later in the instruction manual.
Install your RoadTamer kit and make sure the axle is
level and square with the v ehicle frame. Snug, but DO
NOT TORQUE, all fasteners per the directions provided
in this installation manual. Check again to see if the
vehicle is lev el. If it is not close to as level as its f actory
levelness, re-read the installation man ual concerning
the use of the wedge shim. Y ou may also hav e to loosen
all beam connecting bolts, u-bolts, etc. Re-level the
axle to the frame before re-torquing all fasteners.
Driveline Angles
Driveline angles are factory-set to cancel vibrations
caused by the u-joints. RoadTamer takes this into
consideration when lowering the vehicle to a level
height. How ever , the factory does not set up all vehicles
to be identical. Many different axle, suspension, and
wheelbase combinations are possible. You will need
to measure the driveline angles and make a calculation
to verify that the driveline cancels correctly. See the
section toward the back of the installation manual that
covers this operation in detail.
Introduction to the RoadTamer System
Technical Support
1-800-248-0892
Ext. 2
2
Page 3

V ehicle Requirements
Vehicle Type
Ford F-250 Ford F-350
NOTE: Single rear wheel applications with a 3.5”
axle require spacer kit #26024 to be purchased
separately . If you do not already have this kit, y ou
can purchase it by calling Air Lift’s Customer
Service Department at 800-248-0892 extension 1.
Vehicle Y ears
See the application guide for specific years.
5th Wheel Hitch
The installation of this RoadT amer kit will fit onto most
vehicles with a fifth wheel hitch. Some fifth wheel
hitches may require modifications to make the kit fit
properly.
See page 5 for further instructions.
Muffler Modifications
Modifications will need to be made to the muffler after
the completion of this kit.
Gross Vehicle Weight Rating
(GVWR)
IMPORTANT: The installation of this kit does not
alter the GVWR or payload of the vehicle. Check
your vehicle owner’ s manual and do not e xceed the
maximum load listed for y our vehicle.
Gross Vehicle Weight Rating - The maximum allowab le
weight of the fully loaded vehicle (including passengers
and cargo). This number - along with other weight limits ,
as well as tire, rim size and inflation pressure data - is
shown on the vehicle’ s Saf ety Compliance Certification
Label.
Payload - The combined, maximum allowable weight
of cargo and pasengers that the truck is designed to
carry . It is GVWR minus the Base Curb W eight.
Introduction to the RoadTamer System
Air Lift Company recommends taking your vehicle to
a muffler repair shop upon completion of the kit
installation.
RoadTamer Warranty and Return Polic y
Air Lift Company warranties its RoadT amer
product against quality and workmanship defects
to the original retail purchaser as follows; Main
Structural components defined as; beams,
brackets, and links for 24 months or 24,000 miles,
whichever occurs first. All other components for
12 months or 12,000 miles, whichever occurs
first. Air Lift Company provides no warranty on
the vehicle’s original equipment or other
aftermarket products. This warranty does not
apply to products that have been improperly
applied, installed, used in racing applications or
maintained in accordance with installation
instructions furnished with the product. A $10.00
minimum shipping and handling charge will apply
to all warranty claims. Before returning any
defective product, you must call Air Lift Company
(800) 248-0892 ext 2 for an RGA (Returned
Goods Authorization) number. Product failures
resulting from abnormal use or misuse are
excluded from this warranty. The loss of use of the
product, loss of time, inconvenience, commercial
loss, or consequential damages is not covered. The
Air Lift Company reserves the right to change the
design of any product without assuming any
obligation to modify any product previously
manufactured. Dated proof of purchase is
required.
Technical Support
1-800-248-0892
Ext. 2
3
Page 4
Getting Started
Driver-Side View
REMOVE Frame
Contact Overload
Upper Bracket
if Equipped.
REMOVE
Spare Tire.
Axle
REMOVE
Leaf Spring.
DANGER: Compressed air can cause injury and
damage to the vehicle and parts if it is not handled
properly. For your saf ety, do not try to inflate the air
springs until they have been properly secured to the
vehicle.
IMPORT ANT : Me asure and record the driveline angles
in the chassis as first received (Figure 19).
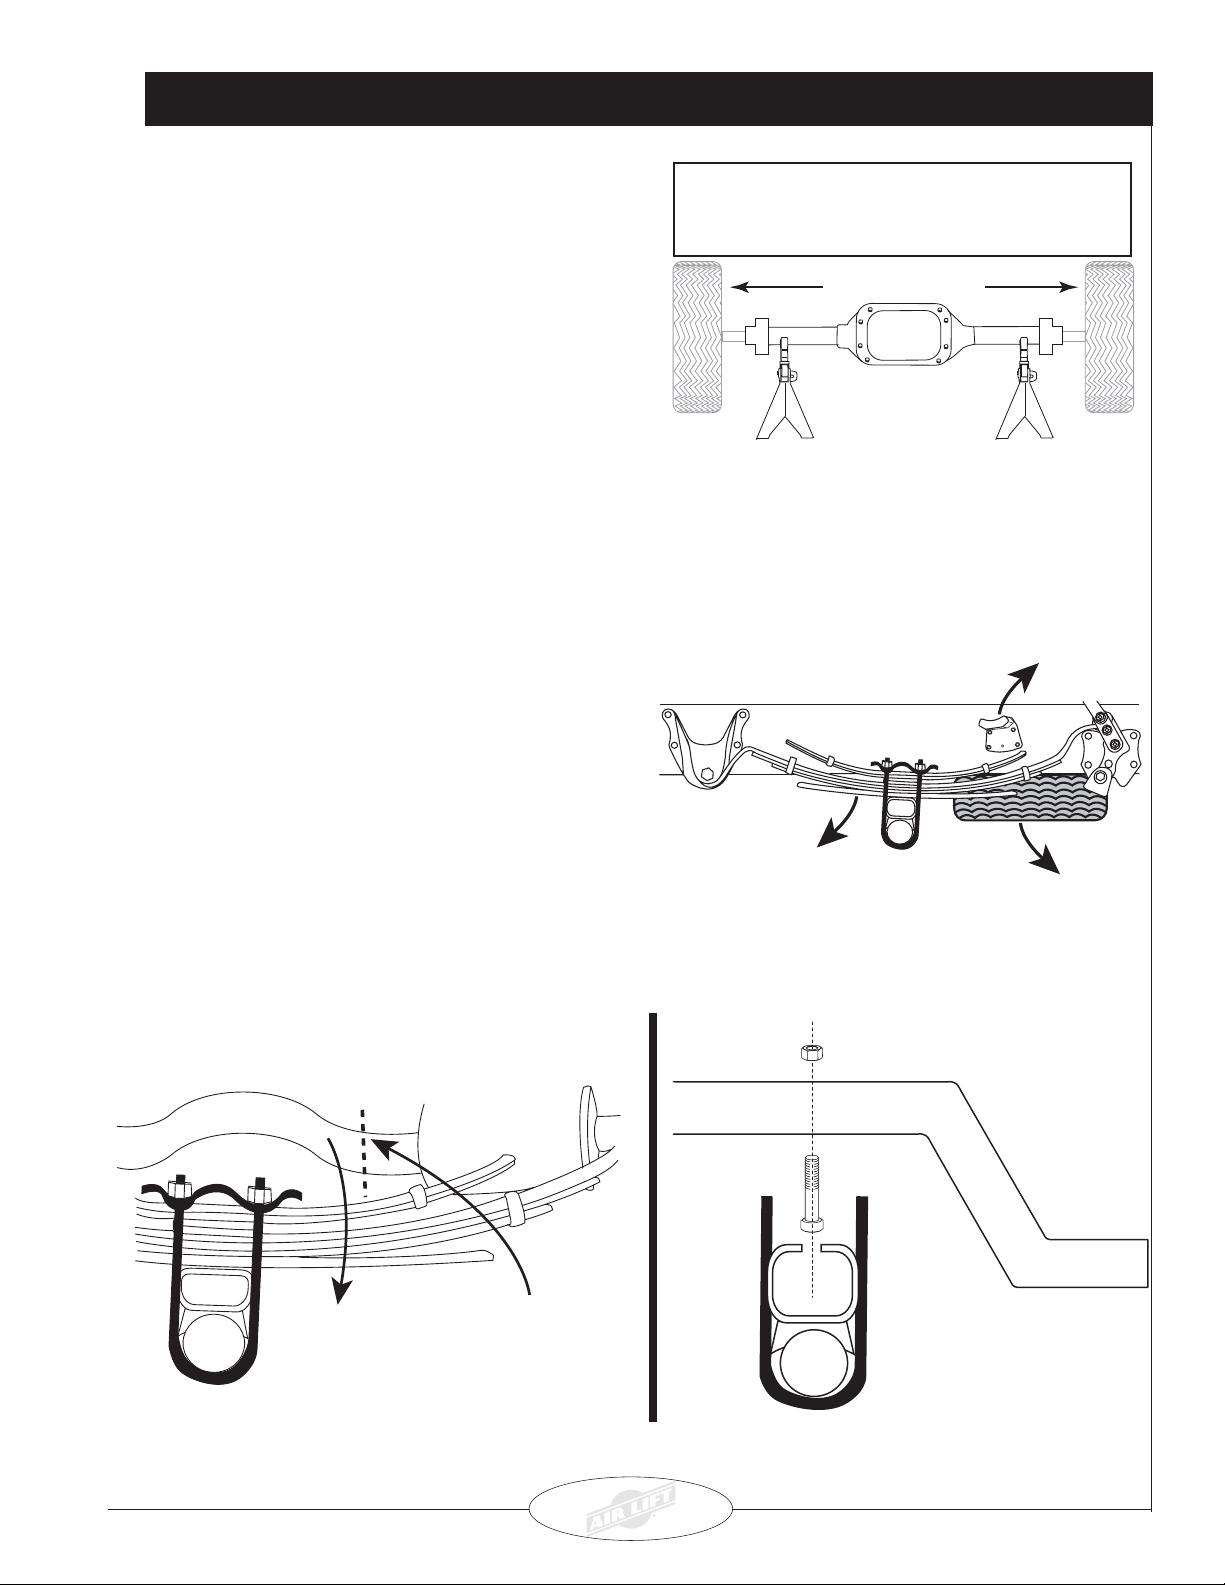
1. Elevate the rear of the vehicle and secure the frame
with jack stands or a frame-contact hoist. Support the
axle (Figure 1).
2. Remove the spare tire, both leaf springs, and the
rear frame contact ov erload brack ets, if equipped, from
the frame (Figure 2).
NOTE: It may be necessary to remove the trailer
hitch in order to remove the bolts fr om the spring
hanger.
NOTE: After removing the factory steel springs,
check the axle spring perches for side-to-side
angle uniformity. Refer to the Inspecting Axle
Spring Perc h Uniformity section for information
on installing the supplied 1° wedge shim.
No Load in Truck
Remove Wheel Remove Wheel
Support the axle with jack
stands and raise or lower
to Normal Ride Height
Figure 1
Installing the RoadTamer System
3. Cut off the tailpipe behind the muffler and remove.
4. Install the centering pin into the beam assembly.
Leave enough room on the muffler to install a
replacement pipe (Figure 3).
Install the pin so that the head is facing down and
the nut is at the top of the beam (Figure 4).
Passenger-Side Vie w
CUT OFF tailpipe behind
muffler. Leave enough
room to attach a
replacement pipe.
Axle
REMOVE
excess tailpipe.
Figure 2
Axle
Figure 3
Technical Support
1-800-248-0892
Ext. 2
Figure 4
4
Page 5
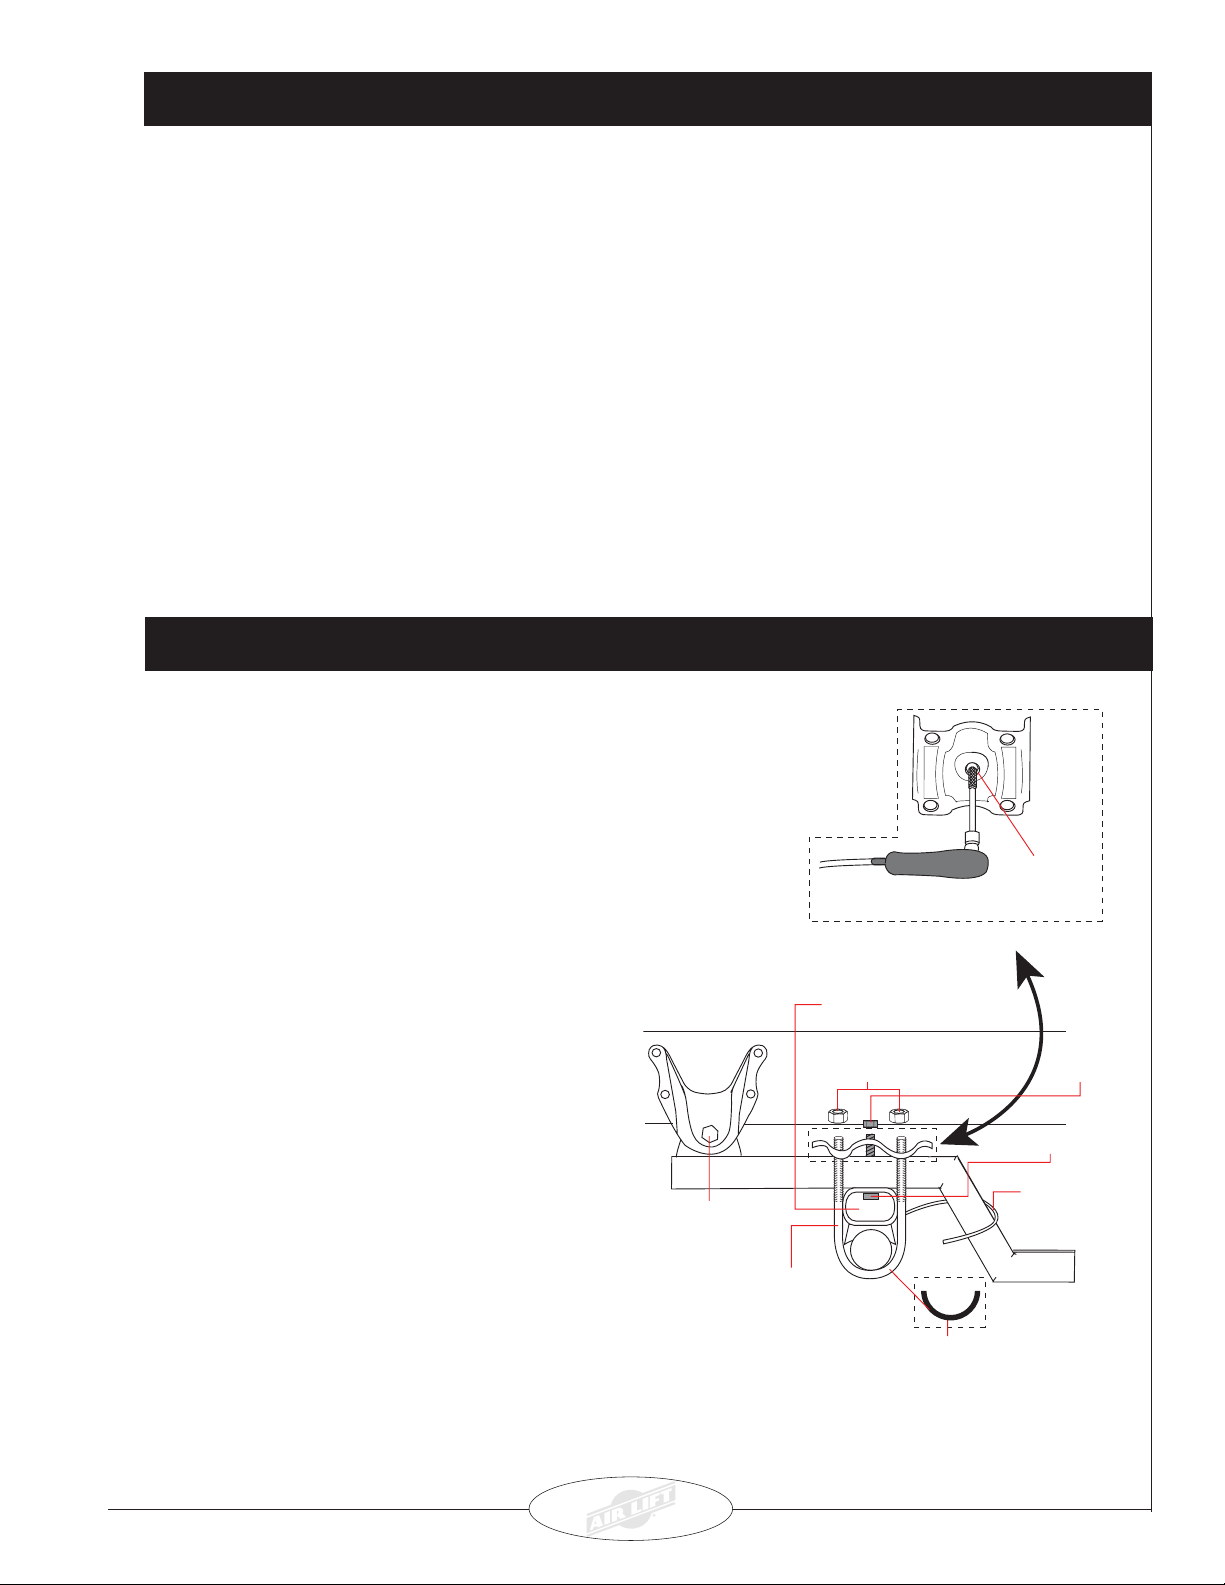
Inspecting Axle Spring Per ch Unif ormity
1. After removing the factory steel springs, check the
axle spring perches for side-to-side angle
uniformity. Without disturbing the axle position,
place a magnetic angle protractor on one perch
and note the angle. Next, place the angle protractor
on the other perch and note the angle there as
well. A difference of less than 1° is normal and
does not require a shim. If the diff erence between
the two angles exceeds 1°, use the supplied 1°
wedge shim to correct the difference.
2. Place the 1° wedge shim on one axle spring perch
and re-measure the angles to verify that they equal
less than 1°. Use the centering pin to attach the
wedge to the correct beam and install the beams
as directed in the section titled
Beams
. DO NO T TIGHTEN F ASTENERS until you
Attaching the Axle
Attaching the Axle Beams
1. Install the driver-side beam assembly to the front spring
eye hanger using the pre viously removed stock bolt and
nut. Be sure to index the centering pin into the stock
spacer block (4x4 only) or spring perch (2WD) in order
to properly locate the axle and the beam. Leav e loose
at this time (Figure 5).
NOTE: The emergency brake cable should go over
the beam assembly .
have chec ked the driveline angles as instructed in the
section dealing with that topic toward the back of this
manual.
NOTE: You must check the driveline angles for
cancellation before completing the installation (see the
Driveline Angles section toward the back of the
manual). It ma y be necessary to reverse the shim and
place it on the opposite side to maintain correct
driveline angles.
3. Measure from the top of each frame rail (at the rear of
the frame) to the ground. The measurement must be
made at vehicle ride height with the vehicle on level
ground and with equal tire pressures. The vehicle
levelness is acceptab le if the two measurements from
side-to-side are within 3/8”. If the vehicle is not level
within 3/8”, check that the 1° shim is placed properly.
Grind out to
provide clearance
for centering pin.
Stock Spring Retainer
Installing the RoadTamer System
NOTE: If a block or spacer was used between the
stock spring and axle, it is necessary to replace the
block or spacer between the axle and the beam.
2. Drill or grind the spring retainer center hole out to
provide clearance for the centering pin nut on the
beam assembly (Figure 5).
NOTE: Draw the nuts down evenly on the retainer
by using a criss-cross tightening pattern.
NOTE: On models with a 3.50” axle, use spacer
kit #26024.
Technical Support
1-800-248-0892
Stock Bolt
Figure 5
Ext. 2
U-Bolt
& Mounting
Hardware
Replace the
stock spacer
DO NOT
TIGHTEN
Centering Pin
Emergency
Brake Cable
Axle
Axle Spacer for
3.50" Diameter Axles
(Not Included In This Kit)
*See Page 1 for Details
Centering
Pin Nut
5
Page 6
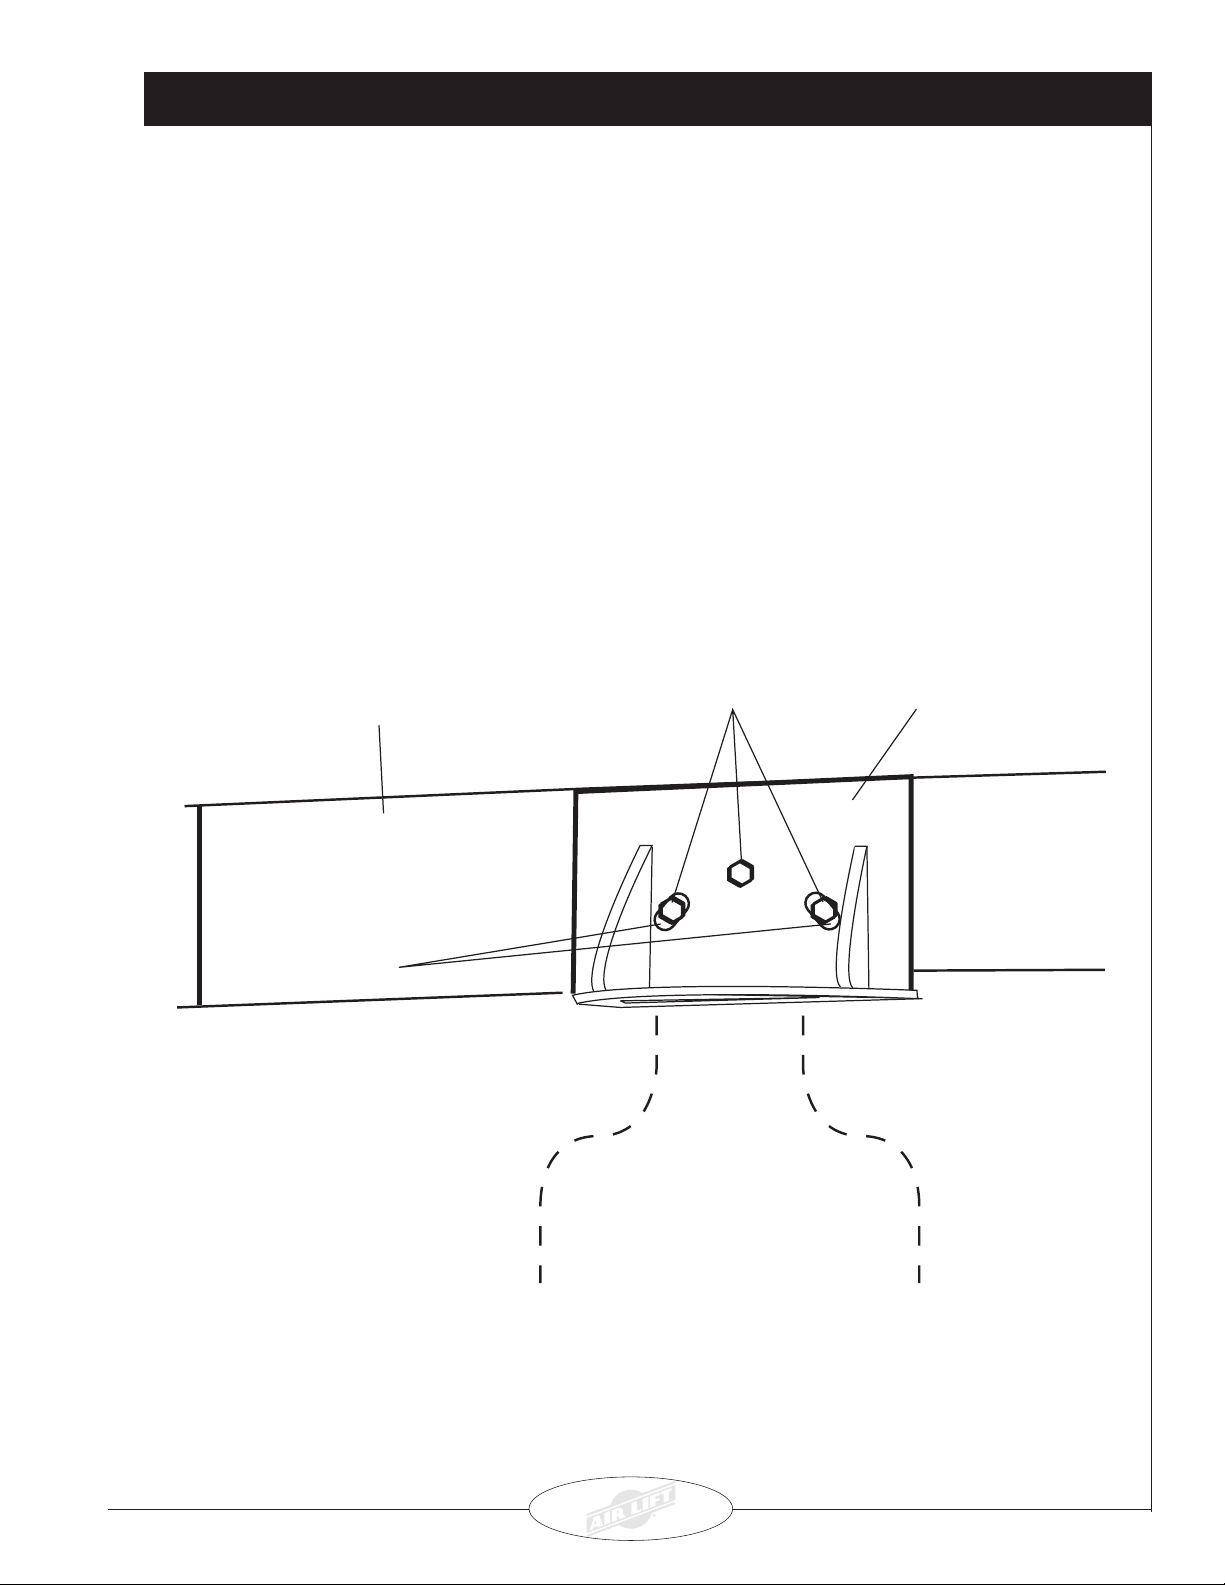
Attaching the Frame Brackets
1. Install the driver-side frame brac ket. Line up the lower
set of holes in the side of the frame brack et with the
slotted holes that are angled in the side of the frame.
Insert two 1/2” bolts, four flat washers and two 1/2”
nylock nuts. Secure the nylock nuts until snug, but
do not overtighten at this time (Figure 6).
2. Line the top hole up with the existing hole in the frame.
NOTE: Do not use the hole that does not line up with
the existing hole in the frame.
Driver-Side Shown
Frame
3. Drill a 1/2” hole through the frame using the top hole in the
bracket as a template .
4. Drill two 1/2” holes in the bottom on the frame flange.
5. Insert the remaining 1/2” hardw are and tighten all bolts to
107 ft.lbs. (Figure 6).
6. The spare tire can be reinstalled at this time.
Upper
1/2" Bolts
Bracket
Installing the RoadTamer System
Existing Slots
in Frame
Drill out 1/2" holes
in the underside of
the frame rail using
the bracket as a template
Figure 6
Technical Support
1-800-248-0892
Ext. 2
6
Page 7
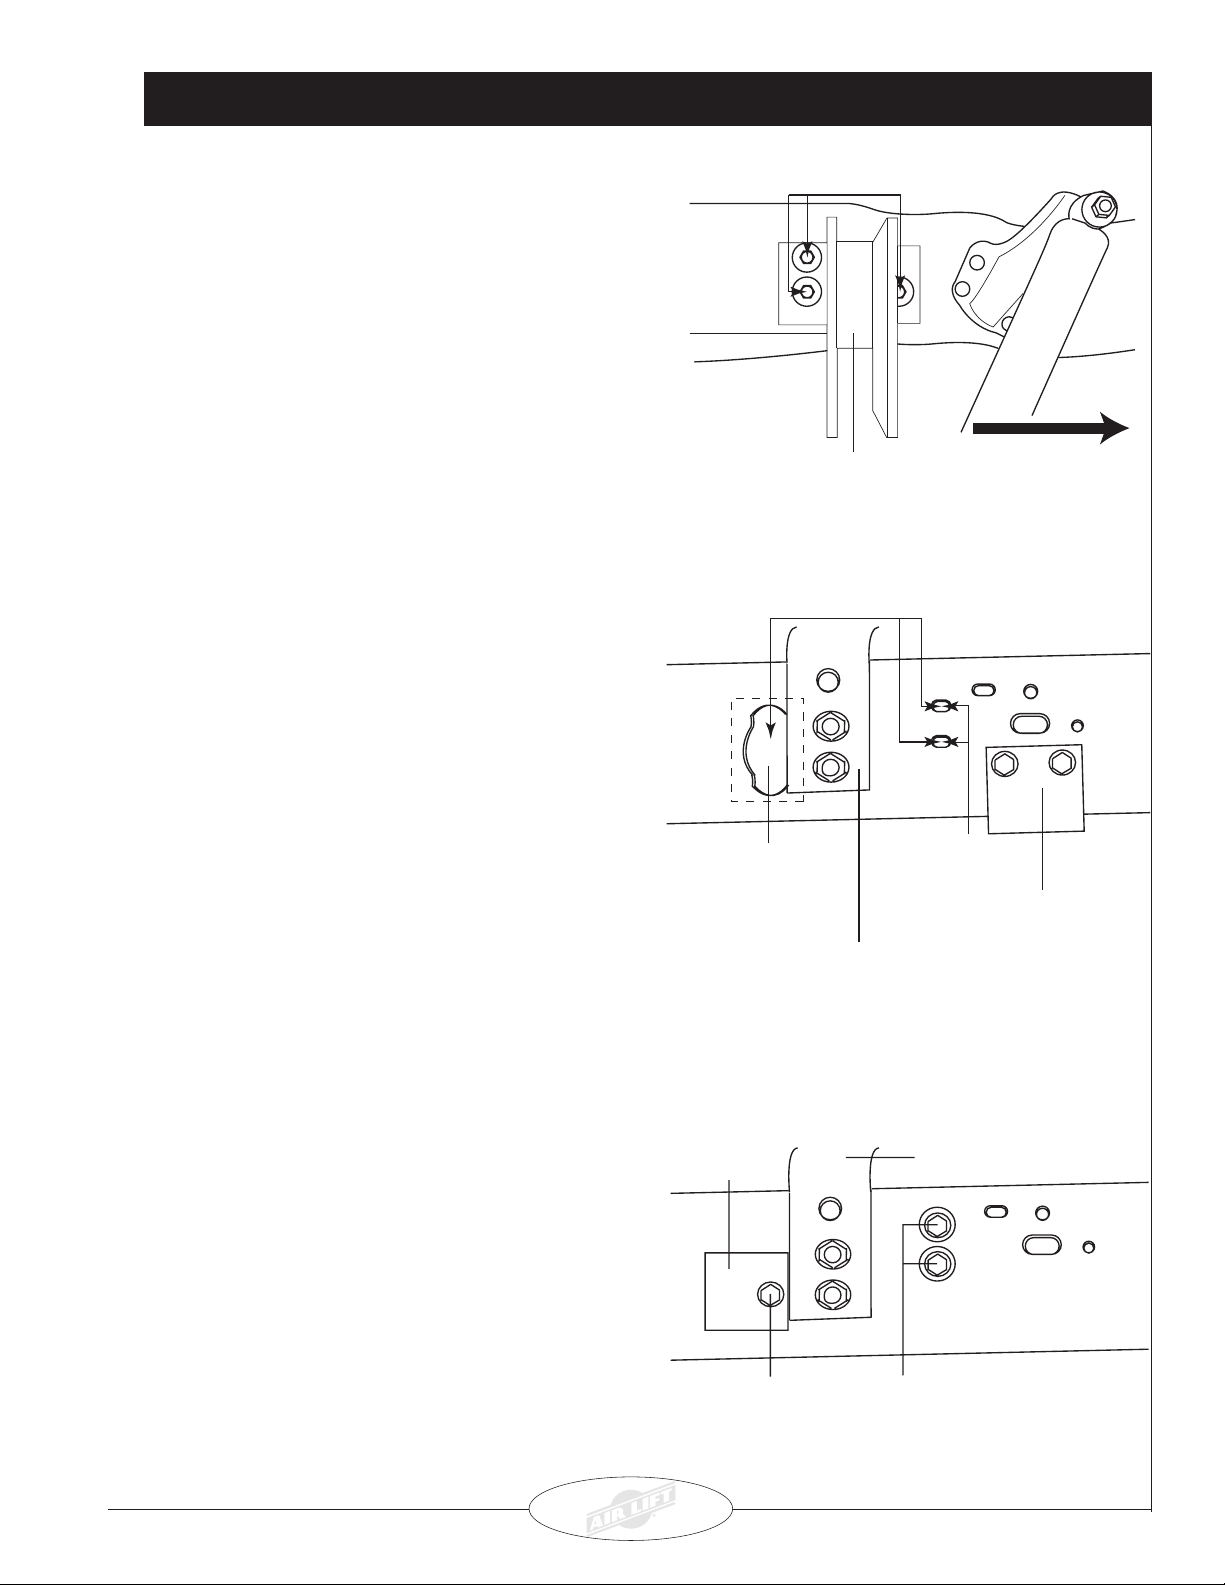
Attaching and Adjusting the Panhar d Rod
This hole may
be a square on
your vehicle.
Drill out
to 1/2"
5th Wheel
Hitch Bracket
Use these holes for mounting.
Jounce
Bumper
Bracket
NOTE: If you have a fifth-wheel hitch with a
bracket that hangs down to the side of the frame,
it may be necessary to modify the bracket and/
or the Air Lift bracket in order to mount the
panhard bracket to the inside of the frame.
NOTE: One large round washer and one large
square washer are supplied in this kit. Use the
square washer if you have a fifth wheel bracket.
It may be necessary to weld the square bracket
to the leg of the fifth-wheel hitch bracket to make
the bracket work properl y (Figure 8, Figure 9).
1. On the passenger’ s side frame r ail, drill out the two
oval holes that are behind the jounce bumper with a
1/2” drill bit (Figure 8).
2. Insert the panhard bracket into the inside of the
frame rail (Figure 7). Line up the front holes with
the previously drilled holes (Figure 8).
3. Place a flat washer onto each of the two 1/2” bolts.
Insert the bolts through the frame and the bracket and
then fasten each bolt with another flat washer and a
nyloc nut (Figure 9).
1/2" Flat Washers
1/2" Nylock Nuts
Inside View of
Frame-Rail on
Passenger-Side
Panhard Rod Bracket
REAR
Inside of Passenger-Side Framerail
Figure 7
Installing the RoadTamer System
4. Using the 1/2”-13 x 2.5” bolt, attach the rear of the
bracket through:
A) the large square washer, if using on v ehicles with
a fifth-wheel bracket.
B) the large round washer , if no fifth wheel bracket
is present.
Insert the bolt through the frame inside the panhard
rod bracket and use a 1/2” flat w asher and nylock nut
to attach. Tighten the front and rear bolts at this time,
making sure the two center holes on the panhard
bracket line up with the oval holes in the side of the
frame. Drill the two holes out to 1/2” and insert the
remaining 1/2” hardware (Figures 8 and 9). T orque all
bolts to 107 ft.lbs.
Large
Square
Washer
Figure 8
5th Wheel
Bracket
Technical Support
1-800-248-0892
Ext. 2
1/2" Bolt
1/2" Bolts
1/2" Washer s
Figure 9
7
Page 8

Attaching and Adjusting the Panhar d Rod
e
5. Attach the the rubber bushing end of the panhard
rod assembly to the driver-side beam assembly
using one 9/16” bolt, two flat washers and one nyloc k
nut (Figure 10). Leave loose at this time.
6. Raise or lower the axle to create a space of 12.5
inches between the rolling lobe upper and lower
mounting brackets (Figure 14). Measure the
distances between the passenger and driver sides
of the beam to the frame. Adjust the heim so both
beam-to-frame distances are equal. Y ou ma y have
to use a pry bar between the beam and frame to
adjust the heim.
CAUTION: There m ust be no more than 1-1/2” of
thread showing on the heim joint (Figure 11).
7. Attach the heim to the passenger side frame bracket.
Refer to Figure 12 for an installation diag ram. Tighten
both ends of the panhard rod securely.
Jam Nut
Heim Joint
8. Turn the heim joint so the cage is parallel with the
bracket to prevent suspension travel from
interfering. Tighten the lock nut on the heim.
9. Refer to figure 19 and the Checking Driveline
Angles section at this time. If angles are
acceptable, proceed with torquing the U-bolts and
pivot bolts.
10. Tighten the beam U-bolts to 170 ft/lbs. using a crisscross pattern to tighten evenly (Figure 13). Using
a hacksaw, grinder, or cut-off wheel, trim off the
excess U-bolt so it is 1” above the retaining nuts.
Torque the front stock beam pivot bolts to 185 ft/
lbs. (Figure 5).
No more than 1-1/2" of thread
showing on heim joint
Installing the RoadTamer System
Rubber Bushing
Driver-Side Passenger-Side
Figure 10
Flat Washer
Jam Nut
Flat Washer
Front of Vehicl
Bolt
Spacers
Nut
Frame
Bottom View P assenger-Side
0" to 1-1/2"
Figure 11
Torque to 170 ft/lbs.
Axle
Figure 12
Technical Support
1-800-248-0892
Ext. 2
Figure 13
8
Page 9

Kit Diagram
Hardware List
Item Part No. Description Quantity
A 26456 Passenger-Side Beam Assembly 1
B 26517 Driver-Side Beam Assembly 1
C 26404 Panhard Rod Assembly 1
D 10021 Panhard Rod Brac k et 1
E 58225 Rolling Lobe Slee ve 2
G 07001 Driver-Side F rame Brac k et 1
H 07002 Passenger-Side F rame Brac ket 1
J 18017 5/8”-18 x13” U-Bolt 4
K 18509 1.25” Flat Washer 8
L 18508 5/8”-18 Nylock Nut 8
M 18451 3/4”-16 Jam Nut 2
N 18484 1/2”-20 Hex Nut 4
O 18429 1/2” Lock Washer 4
P 21745 1/4” x 1/4” Air Fitting 2
Q 10466 8” Zip Tie 6
R 18405 5/16” x 5/8 x .032 Flat Washer 2
S 18411 5/16” Ext. Tooth Lock Washer 2
T 21230 Poly Cap 2
U 21233 He x Nut 4
V 21234 Rubber Washer 2
W 17219 9/16”-12 x 5 Bolt 1
X 18485 1/2” Flat Washer 28
Y 18480 9/16”-12 Nylock Nut 1
Z 13227 3/4” x 1/2” Spacer 2
AA 17269 3/4”-16 x 4 Bolt 1
BB 18518 3/4” Flat Washer 2
CC 18470 3/4”-16 Nylock Nut 1
DD 17247 1/2”-13 x 1.75 Bolt 12
EE 18460 1/2”-13 Nylock Nut 13
JJ 10035 3” Square W asher 1
KK 10008 2.5” Flat Washer 1
LL 17285 1/2”-13 x 2.5 Bolt 1
MM 17286 Centering Pin and Nut 2
NN 10049 Piston 2
Installing the RoadTamer System
I 20086 Air Line Assembly 16 ft.
25425 SmartAir Automatic Leveling System 1
10349 1° Wedge Shim 1
Technical Support
1-800-248-0892
Ext. 2
9
Page 10
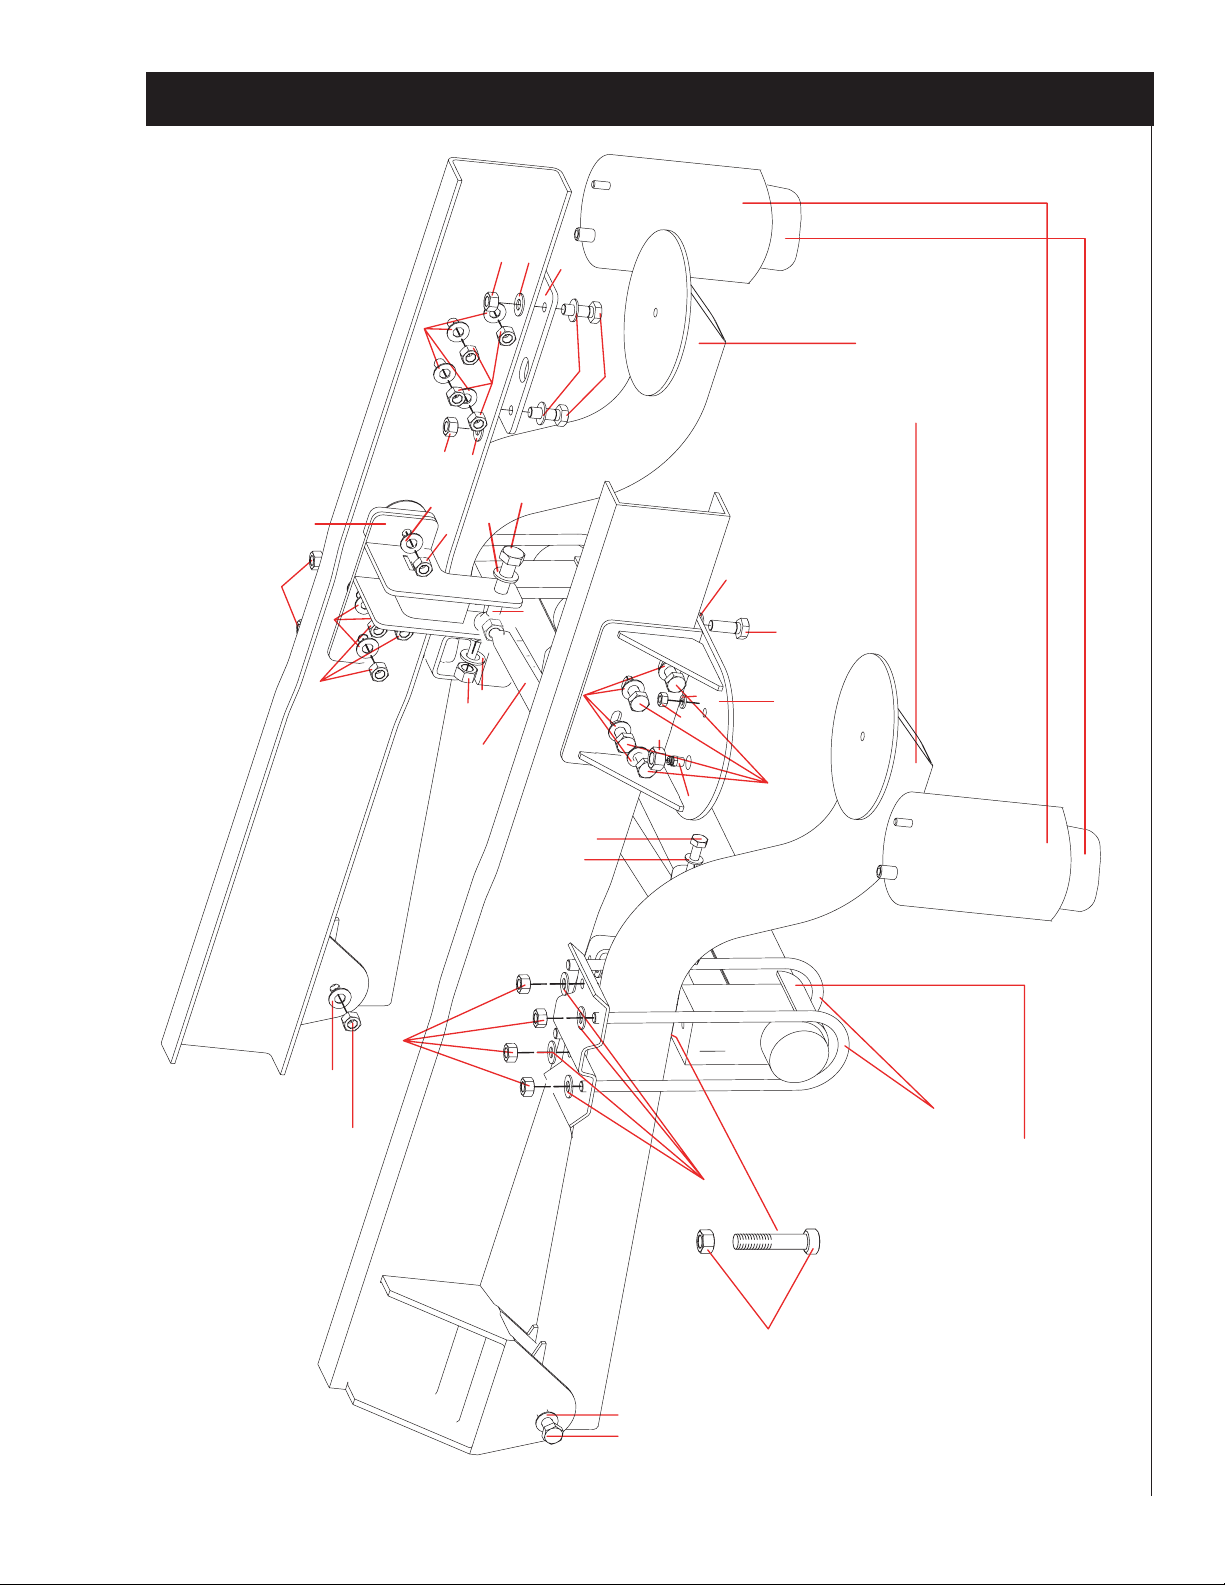
Kit Diagram
EE
E
NN
X
H
CC
D
EE
X
A
X
EE
DD
B
EE
X
BB
AA
Installing the RoadTamer System
BB
EE
X
X
Z
DD
CC
BB
X
M
O
G
N
C
P
DD
W
X
L
O.E.M.
J
K
*See Page 1 for Details
MM
Spacer for 3.5" Axles (Kit #26024)
O.E.M.
Technical Support
1-800-248-0892
Ext. 2
10
Page 11

Installing the Rolling Lobe Air Sleeves
Refer to Figure 14 f or the fo llowing instructions.
1. Install the fitting into the large top stud of the rolling
lobe air sleeve. Tighten the fitting finger-tight plus
11/2 turns, being careful to tighten on the metal hex
nut only.
NOTE: It may be necessary to raise the chassis
to provide adequate space to install the rolling
lobe air sleeves.
2. Insert the piston on the bottom the rolling lobe air sleev e.
3. Insert the studs of both rolling lobe air sleeves into the
bottom mounting hole of the beam assemblies on both
sides of the vehicle. Attach finger-tight using a 1/2”
lock washer and nut.
4. Lower the fr ame while guiding both studs on top of
the rolling lobe air sleeves through the holes in the
upper mounting bracket.
Installing the RoadTamer System
Lock
Washer
1/2" Nut
5. Attach the air sleeves using a 3/4” jam nut on the
large stud. Use a lock washer and 1/2” nut on the
smaller stud. Tighten the top mounts securely.
Leave the bottom loose at this time .
Driver-Side View
Inside of Beam
GUIDE rolling lobe bottom stud through
hole in center of beam. Attach with
hardware shown.
Air Fitting
3/4" Jam Nut
Large
Stud
1/2" Nut
Lock Washer
Small
Stud
Mounting
Height 12.5"
Figure 14
Technical Support
1-800-248-0892
Ext. 2
Beam
GUIDE rolling lobe top studs through
holes in upper mounting bracket
while lowering the frame.
Attach with hardware shown.
11
Page 12

Installing the Air Lines
Frame Rail
Air
Line
Tie Strap
Exhaust Pipe
Muffler
Keep air lines
secured at least 6"
away from all
heat sources
Good Cut
Air Line Cutting
Poor Cut
1. Choose a convenient location for mounting the inflation
valves. Popular locations for the inflation valve are:
the wheel well flanges, the license plate recess in the
bumper, under the gas cap access door, or through
the license plate itself.
NOTE: Whatever the chosen location is, make
sure there is enough clearance for an air chuc k
around the inflation valves.
2. Drill a 5/16 " hole to install the inflation valves.
3. Cut the air line assembly in two equal lengths .
CAUTION: When cutting or trimming the air line,
use a razor blade or a very sharp knife. A clean,
square cut will ensure against leaks. DO NOT
USE WIRE CUTTERS OR SCISSORS T O CUT THE
AIR LINE. These tools may flatten or crimp the
air line, causing it to leak around the O-ring seal
inside the elbow fitting (Figure 16).
4. Refer to Figure 15 to assist with air valve installation.
5. Route the air line along the frame to the air fitting on
the air spring. K eep at least 6" of clearance between
the air line and heat sources, such as the exhaust
pipes, muffler, or catalytic converter (Figure 17).
Avoid shar p bends and edges. Use the plastic tie
straps to secure the air line to fixed, non-moving
points along the chassis. Be sure that the tie straps
are tight, but do not pinch the air line. Leav e at least
2" of slack to allow for an y movement that might pull
on the air line.
6. Cut off air line leaving appro ximately 12" of extr a air
line. A clean square cut will ensure against leaks.
Insert the air line into the air fitting. This is a pushto-connect fitting. Simply push the air line into the
straight fitting until it bottoms out (9/16" of air line
should be in the fitting).
Valve
Cap
Flat
Washer
Hex Nut
Figure 15
Vehicle body
or bumper
Rubber
Washer
Figure 16
Installing the RoadTamer System
Air Line to
Bellows
Hex Nut
Star
Washer
Technical Support
1-800-248-0892
Ext. 2
Figure 17
12
Page 13
Final Adjustments
1. Inflate both rolling lobe air sleeves to 20 p.s.i and
check for leaks.
2. Tighten both bottom rolling lobe mounts
securely at this time. Torque to 50 ft/lbs.
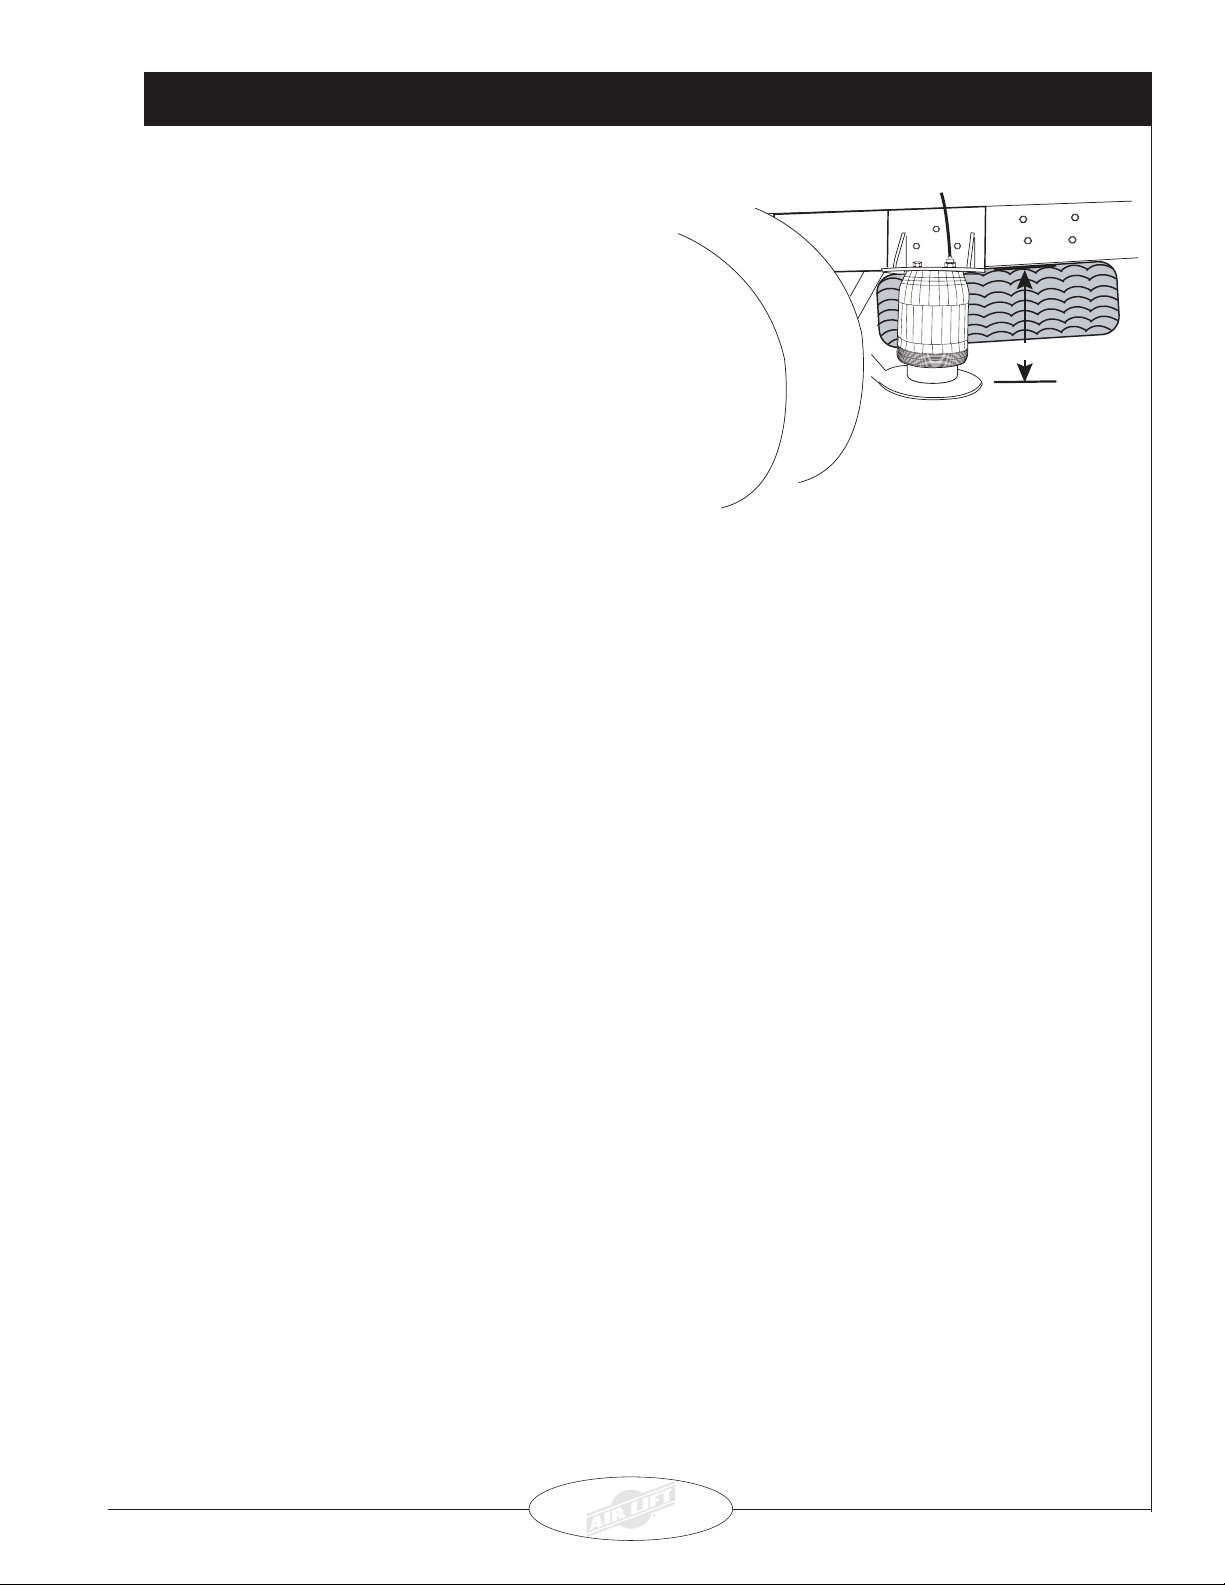
3. You are now ready to install the SmartAir Automatic
Leveling System. Refer to the SmartAir instruction
manual to proceed with the installation.
Once the SmartAir system is installed it will
automatically maintain the rolling lobe air springs’
installed height of 12 - 13 inches within their mounts
(Figure 18).
4. Routing the e xhaust out of the side of the vehicle in
front of the rear wheel on the passenger side is
recommended.
NOTE: It may be necessary to have a custom
bent pipe made if routing the exhaust out the
back behind the rear wheels is desired.
5.
IMPORTANT: Check and re-torque all mounting
hardware, especiall y the beam U-bolts, after 100
and 3,000 miles.
Driver-Side Shown
12 - 13 inches
Keep a distance of 12 - 13
inches for operation of vehicle.
Installing the RoadTamer System
Figure 18
Technical Support
1-800-248-0892
Ext. 2
13
Page 14
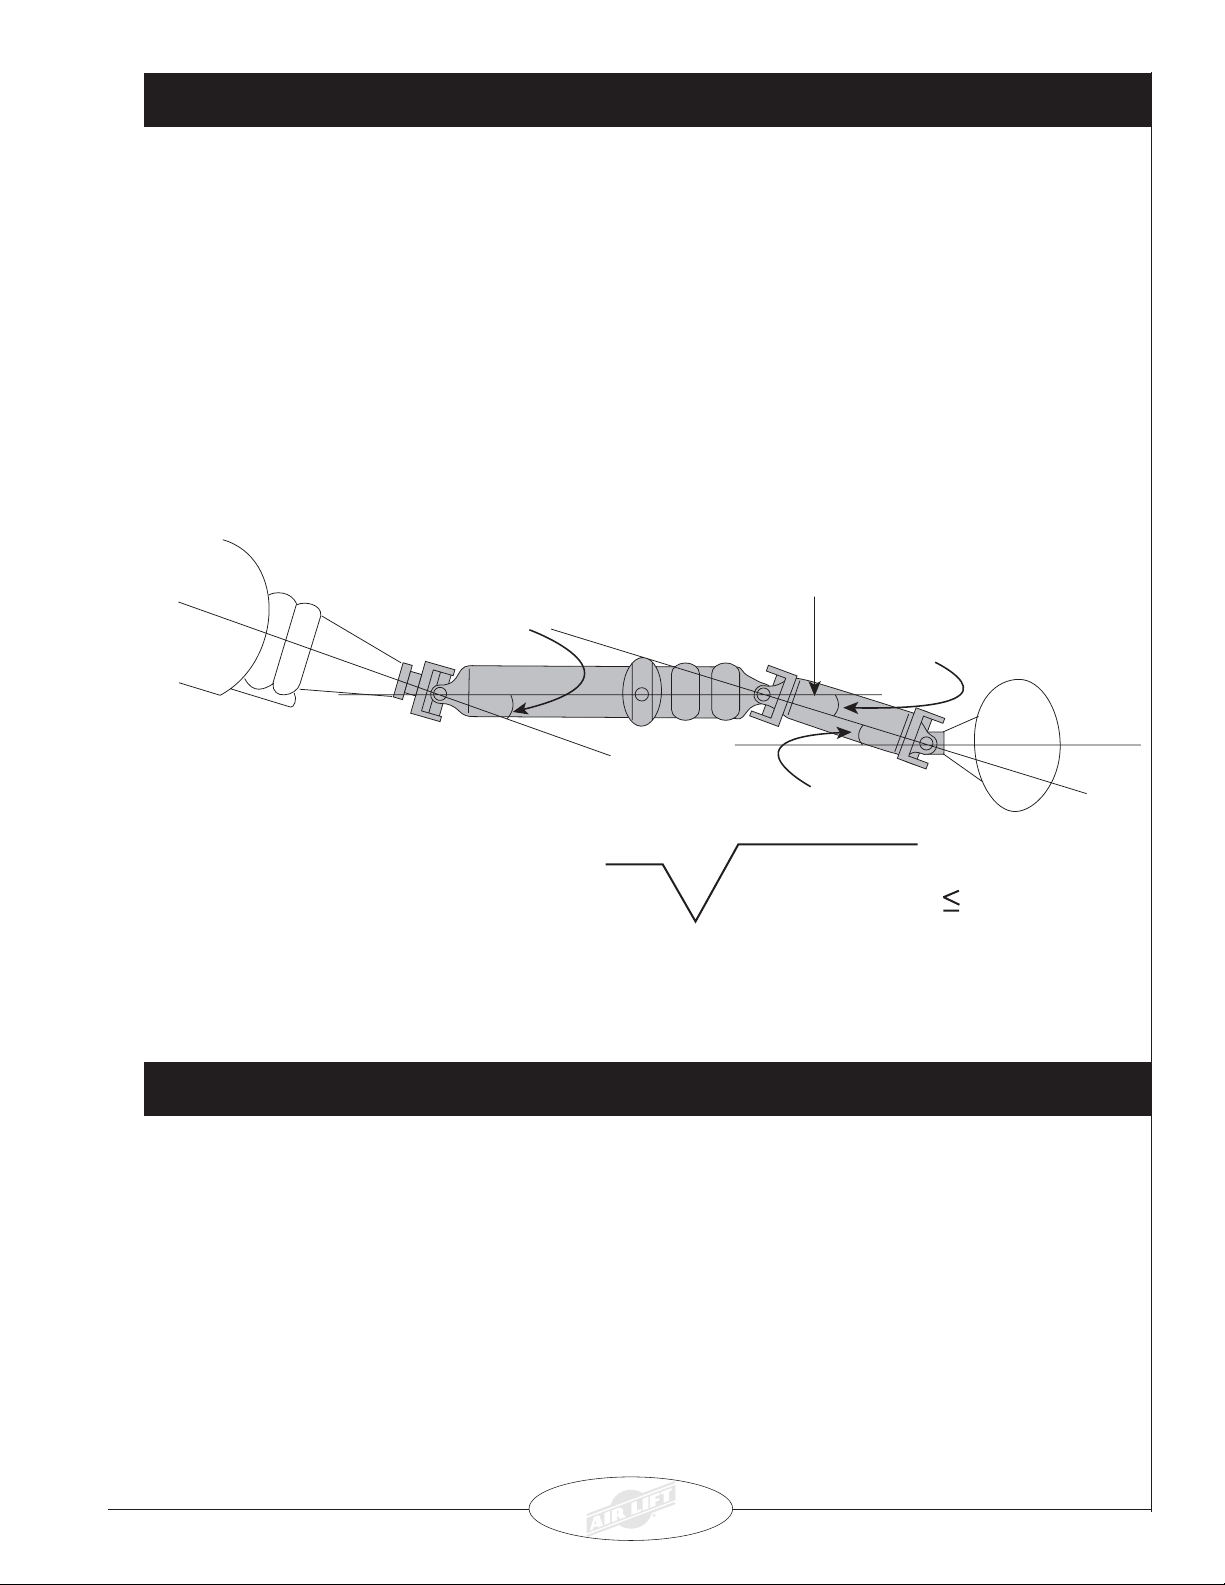
Checking Driveline Angles
1. After the RoadTamer kit is installed, the following
conditions must be true for the driveline angles, both at
unloaded and fully loaded ride heights:
a. Condition #1: The operating angle at an y individual
joint must be between 0.1° and 4°. The pref erred
maximum angle is 2°.
b. Condition #2: When added together, the operating
angles throughout the driveline MUST cancel. The
operating angles at either end of a shaft should
be within 1° of each other or at least satisfy the
following formula in order to provide adequate
cancellation (Figure 19).
angle-a
2. Wedge shims may be placed between the beams
and axle to correct driveline angles that fall outside
this requirement. Re-chec k all driveline angles after
installing the shims.
3. A minimum operating angle of 0.1° at each universal
joint is required to prevent dents from forming on
the bearing surfaces.
Checking Driveline Angles
DRIVESHAFT
angle-b
SIDE VIEW
For a 3-joint, 2-shaft driveline:
(as shown above)
angle-c
22 2
a - b + c 4.0˚
Figure 19
Checking Angles in Various Conditions
1. Measure and record the driveline angles in each of the
following conditions f or later comparison:
a. The chassis as first received (note that the driveline
angles may not conform e xactly to this bulletin in
this incomplete condition).
b. The completed v ehicle, unloaded.
c. The completed vehicle loaded to Gross
Vehicle Weight Rating (GVWR) with
maximum front Gross Axle Weight
Requirement (GAWR).
d. The completed vehicle loaded to GVWR with
maximum rear GAWR.
Technical Support
1-800-248-0892
Ext. 2
14
Page 15

Installation Checklist
This Installation Checklist must be completely filled out to ensure proper installation:
❏ Have you checked the mounted height of the air springs and is it correct?
❏ Have the axle U-bolts been torqued per the specification?
❏ Have the beam pivot bolts been torqued per the specification?
❏ Was the suspension at ride height and even from side-to-side
when the fasteners were torqued?
RoadTamer Installation Checklist
❏ Have the upper bracket bolts been torqued per the specification?
❏ Does the heim joint have the proper amount of thread showing?
❏ Have you tightened the heim joint jam nut?
❏ Was the axle centered in the chassis within
3
/8”?
❏ Have all remaining fasteners and fittings been torqued per the specification?
❏ Have the pinion angles been check and are they within specification?
❏ Has the panhard bar heim joint been properly greased?
❏ Is there a adequate clearance around all par ts of the panhard bar?
❏ Is there a minimum clearance of ½” around all par ts of the air spring?
❏ Has the system been leak checked and found free of leaks?
❏ Are all wires and hoses routed correctly and away from heat sources?
❏ Has the vehicle been road tested?
❏ Has the owner been infor med of the maintenance requirements?
❏ Has the owner been informed of the operation of the system?
❏ Does the owner have the correct instruction manual?
Technician’s Signature _____________________________
Technical Support
1-800-248-0892
Ext. 2
15
Page 16

Tro ubleshooting Guide
Problem Possible Problem Check Procedure Solution
Air System leaks.
Vehicle is not level sideto-side within 3/8".
Truck sits too low or too
high.
Suspension rides rough.
Rear end "jacks" when
vehicle is accelerated.
Pneumatic Control System
Problem
Compressor doesn't run.
Compressor runs all the
time.
System will not kneel.
Possible Problem Check Procedure Solution
SmartAir Control System
Problem
Compressor doesn't run.
Compressor runs all the
time.
System will not kneel.
Possible Problem Check Procedure Solution
• leaky airbag
• leaky pneumatic fittings
(i.e.: drain valve, Height
Control Valv e [HCV])
• cut or pinched air line
• OEM axle perch is not
level side-to-side.
• Air spring mounting height
is not correct.
• Air bag is mounted too
high or too low.
• OE shocks are too stiff or
worn out.
• Shocks are not compatible
with air suspension.
• blown fuse
• loose wire or ground
• bad pressure switch
• HCV or height sensor is
mounted incorrectly.
• Bad pressure switch
• Stuck or clogged solenoid
• Damaged or improperly
connected switch.
• blown fuse
• loose wire or ground
• Relay/ECU
• Magnet to ECU distance
• Magnet direction/180˚ off
• Possible major leak. • Check system for leaks.
• Stuck or clogged solenoid
• Damaged or improperly
connected switch.
• Spray air bag with a soapy
water solution.
• Spray fittings with a soapy
water solution.
• Conduct visual inspection.
• Refer to
Spring Perch Uniformity
the manual.
• Measure the distance
between the upper and
lower air bag mounting
surfaces.
• Measure the mounted height.
• Bounce the rear of the truck.
If there are more than two
oscillations, the shocks are
too worn. If less than two
oscillations, shocks are too stiff.
• Truck lurches when
accelerating.
• Check fuse.
• Inspect wiring connections.
• Jumper pressure switch.
• Check manual for mounting
location and adjustment
instructions.
• Disconnect switch.
• Inspect the exhaust port or
energize the solenoid.
• Ensure that switch wiring is
correct by referencing the
wiring diagram in the SmartAir manual.
• Check fuse.
• Inspect wiring connections.
• Ground terminals #85 if
compressor runs.
• Magnet may be too close or
too far from ECU
• Magnet not facing ECU
properly .
• Inspect the exhaust port or
energize the solenoid.
• Ensure that switch wiring is
correct by referencing the
wiring diagram in the SmartAir manual.
Inspecting Axle
in
• If leaking, replace air bag.
• Tighten fittings.
• Repair or replace as
necessary.
• Add a 1˚ shim per the
Inspecting Axle Spring Perch
Uniformity
• Change the ride height as
necessary to within
specifications given in the
manual for rolling lobe
mounting heights.
• Adjust mounted height as
necessary.
• Install Air Lift Select-A-Ride
shocks.
• Install Air Lift Select-A-Ride
shocks.
• Replace fuse.
• Tighten loose wires or grounds.
• If compressor runs, replace
switch.
• If compressor does not run,
replace compressor.
• Move HCV or height sensor
further towards the pivot
bushing.
• If compressor stops, replace
switch.
• Replace solenoid.
• Replace switch if found faulty.
• Replace fuse.
• Tighten loose wires or grounds.
• If compressor runs, replace ECU
• If compressor does not run,
replace compressor.
• Refer to SmartAir manual for
proper distance between magnet
and ECU
• Make sure dot on magnet
points towards the ECU
• Repair as necessary.
• Replace solenoid.
• Replace switch if found faulty.
section.
Trou bleshooting Guide
Technical Support
1-800-248-0892
Ext. 2
16
Page 17

Checking for Leaks
1. Spray all connections and the inflation v alves with
a solution of 1/5 liquid dish soap and 4/5 water to
check for leaks. You should be able to spot leaks
easily by looking for bub b les in the soap y w ater.
2 . After the test, deflate the springs to the minimum
pressure required to restore the Normal Ride
Height, but not less than 10 p.s .i.
Fixing Leaks
1. If there is a problem with the air fitting:
a. Check the air line connection by deflating the
spring and removing the line by pulling the
collar against the fitting and pulling firmly on
the air line. Trim 1" off the end of the air line.
Be sure the cut is clean and square. Reinsert
Minimum Air Pressure
the air line into the push-to-connect fitting.
b. Check the threaded connection by tightening
the swivel fitting another 1/2 turn. If it still leaks,
deflate the air spring, remove the fitting, and
re-coat the threads with thread sealant.
Reinstall by hand tightening as much as
possible, then use a wrench for an additional
two turns.
3.
IMPORT ANT : Check the air pressure a gain after
24 hours. A 2 to 4 p.s.i. loss after initial
installation is normal. Retest for leaks if the
loss is more than 5 lbs.
2. If there is a problem with the inflation v alv e:
a. Check the valve core b y tightening it with a valve
core tool.
b. Check the air line connection by removing the
air line from the barbed fitting.
not cut it off. This will usually nick the barb
and render the fitting useless.
a few inches in front of the fitting and use a pair
of pliers or vise-grips to pull/twist the air line off
the fitting.
3. If the preceding steps have not resolv ed the problem,
call Air Lift Technical Service at 1-800-248-0892 for
assistance.
CAUTION: Do
Cut air line off
Trou bleshooting Guide
Maintenance Guidelines
By following the steps below, vehicle owners will obtain the longest life and best results
from their air springs.
1. Fulfill all Installer Responsibilities:
The installer is solely responsible for checking the
installation for safe oper ation before the vehicle is
placed in service. This includes all fastener torques,
proper control system operation, and driveline
angles.
This instruction manual includes specifications for
fastener torques. Tighten fastening hardware as
instructed by the specifications.
Technical Support
1-800-248-0892
Ext. 2
Retorque the fasteners in intervals as
specified below under “Servicing the
RoadT amer System.”
Check driveline angles as shown in the
section titled “Checking Driveline Angles .”
2. If you dev elop an air leak in the system, use a
soapy water solution to check all air line
connections and the inflation valve core bef ore
deflating and removing the air spring.
17
Page 18

Servicing the RoadTamer System
1. At 150 miles and every 10,000 miles thereafter, check
and retorque (per the fastener torques specified in
this manual): the beam front hardw are and pivot bolts,
the axle U-bolts, and the panhard rod pivot bolts.
2. Every 3,000 miles:
Check the air spring install height and adjust the
height control valve as necessary.
Check all fittings for air leaks and reseal if
necessary.
Grease the panhard rod end fitting.
Check the compressor air filter and replace
as necessary.
3. Perf orm DAILY maintenance by releasing the
moisture from the air tank. To do this, pull
on the release cable attached to the drain
valve. Excess moisture in the system can
lead to component failure or freeze up in cold
weather.
Maintaining and Servicing the System
Thank you for purchasing Air Lift Products
Mailing Address: Street Address:
AIR LIFT COMPANY AIR LIFT COMPANY
P.O. Box 80167 2727 Snow Rd.
Lansing, MI 48908-0167 Lansing, MI 48917
Local Phone: (517) 322-2144
Fax: (517) 322-0240
www.airliftcompany.com
For Technical Assistance call 1-800-248-0892
Technical Support
“The Choice of the Professional Installer”
1-800-248-0892
Ext. 2
Printed in the USA
18
 Loading...