

Page 1

Page 2

Page 3
Page 4

Page 5
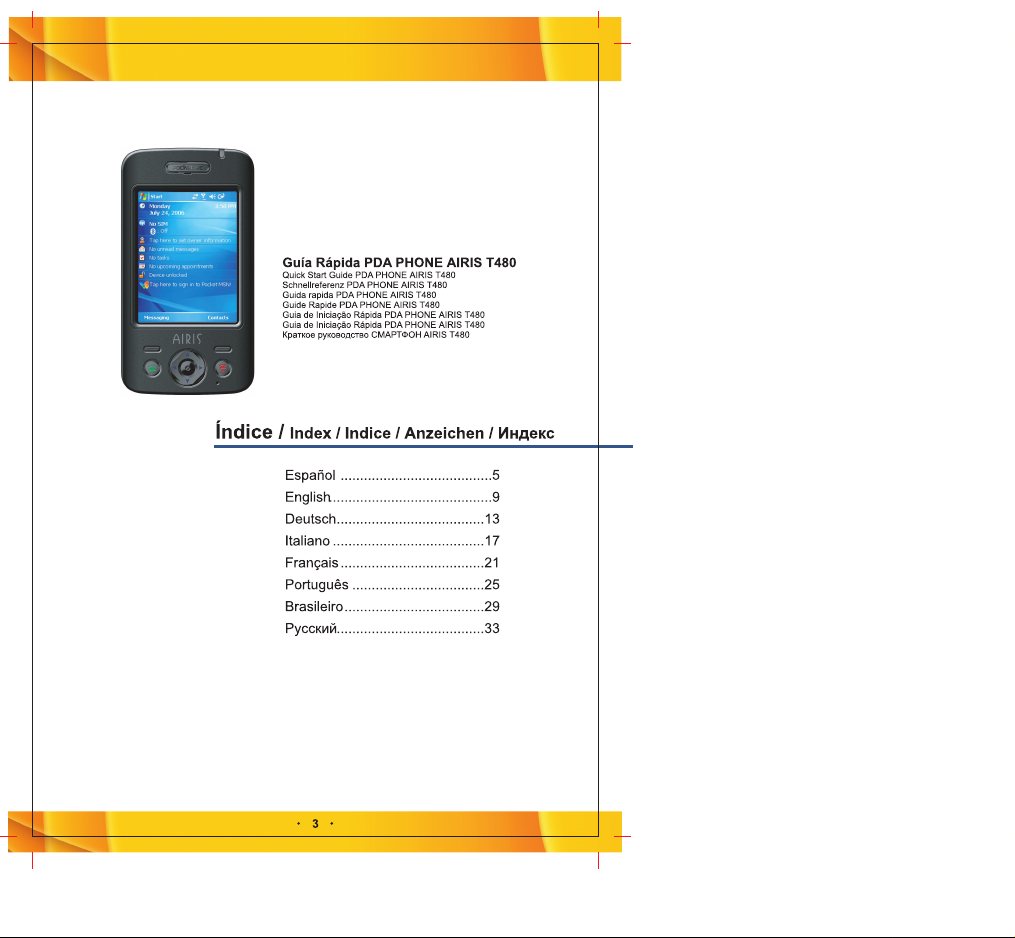
Guía Rápida PDA PHONE AIRIS T480
, FAMILIARIZÁNDOSE CON SU TELÉFONO
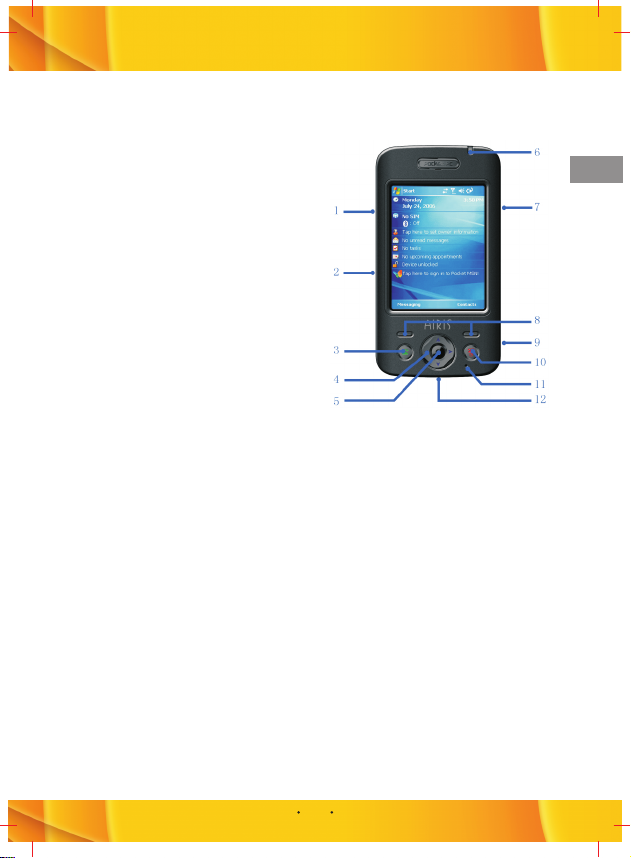
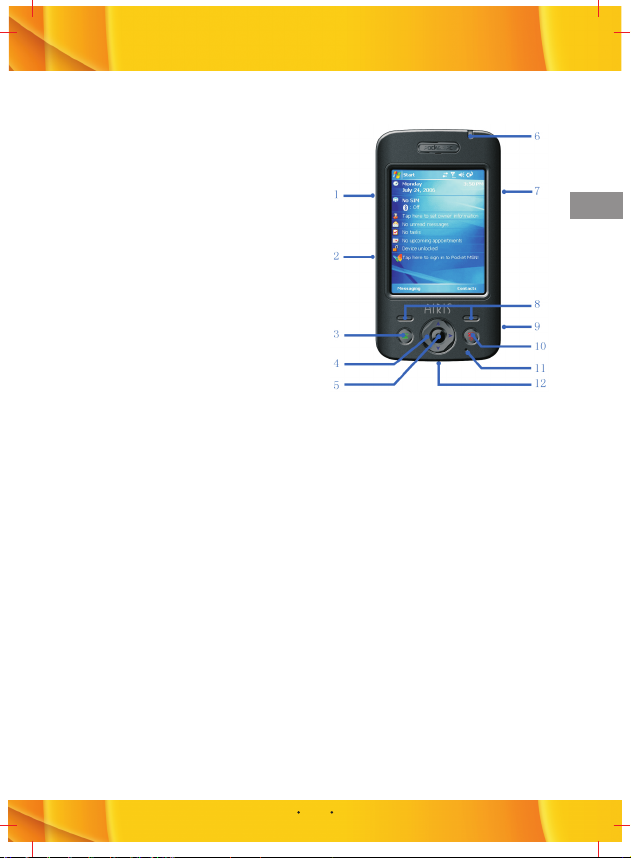
1. Botones laterales:
Sirven para subir/bajar el volumen. Sirven
para silenciar el tono de llamada de una
llamada entrante.
2. Ranura de la tarjeta T-FLASH:
Aquí se introduce la tarjeta T-FLASH.
3. Botón Talk:
Presiónelo para realizar o contestar una
llamada. Conteste una llamada entrante
mientras mantiene la anterior en espera.
Cambie entre dos llamadas en proceso.
Presiónelo para mantener en espera una
llamada en proceso. Le permite acceder al
Historial de Llamadas si en ese momento
no está hablando por teléfono.
4. Botones de navegación:
Sirven para desplazarse a izquierda,
derecha, hacia arriba o hacia abajo.
5. Botón OK
6. Indicador LED:
Luz verde parpadeando lentamente:
Señal de red de GSM
Luz roja parpadeando rápidamente: Aviso o batería baja.
Luz verde fija: Recarga finalizada
Luz roja fija: Recarga en curso
7. Botón Cámara:
Sirve para activar la Cámara.
8. Botón programable izquierdo (BPI) y botón programable derecho (BPD):
Realizan la función que haya indicada en la esquina derecha o izquierda de la parte inferior
de la pantalla.
9. Interfaz de infrarrojos:
Le permite intercambiar datos con otros aparatos que dispongan de infrarrojos.
10. Botón Power:
Manténgalo presionado para encender o apagar el aparato.
Presiónelo suavemente para colgar una llamada en proceso o desactivar una conexión de
datos.
11. Micrófono:
Micrófono mini incorporado. Debe aproximárselo a los labios para hablar o grabar un
mensaje de voz.
12. Conector para cable USB/cargador/auriculares:
Le permite transferir datos de su teléfono a otras memorias mediante el cable USB, así
como cargar su teléfono o enchufar los auriculares.
ES
5
Page 6

, CÓMO INSTALAR LA TARJETA SIM
La tarjeta SIM (Módulo de Identificación del Abonado) contiene su número de teléfono, las
características del servicio y memoria de mensajes y agenda telefónica.
Antes de empezar, asegúrese de que el teléfono está apagado.
- Abra la cubierta y extraiga la batería
1. Sostenga el teléfono en la palma de la mano con el teclado boca abajo. Presione
suavemente el pestillo para abrir la cubierta trasera;
2. Extraiga la batería cogiéndola desde la parte inferior.
- Instale la tarjeta SIM
1. Inserte la tarjeta SIM en la ranura de la tarjeta SIM con sus contactos dorados boca
abajo (la esquina cortada de la tarjeta SIM debería encajar en la esquina cortada de la
ranura).
2. Vuelva a colocar la batería empujándola suavemente para que quede bien ajustada en
su ubicación correspondiente.
Precauciones
1. Si la tarjeta SIM no funciona bien, póngase en contacto con el operador de servicios de
red.
2. Mantenga la tarjeta SIM fuera del alcance de los niños.
3. La tarjeta SIM y sus contactos dorados pueden rayarse fácilmente o incluso dañarse al
combarse, por lo que debe tener cuidado al utilizarla, insertarla o extraerla.
4. No coloque la tarjeta SIM en lugares húmedos, polvorientos o en los que haya
electricidad estática.
5. Asegúrese de que la batería está bien colocada.
, CÓMO CARGAR LA BATERÍA
Cuando la potencia de la batería esté por debajo del valor normal de presión electrónica
para funcionar, en la pantalla aparecerá un aviso para recordarle que debe cargarla y un
icono de batería vacía. Al mismo tiempo, la batería emitirá un sonido de aviso. Cargue la
batería de inmediato; de lo contrario, podría perder la información que tuviera guardada. Si
no carga o cambia la batería inmediatamente, el teléfono se apagará automáticamente
transcurrido un tiempo.
El teléfono contiene una batería de litio recargable. El teléfono está diseñado para utilizar
únicamente baterías y cargadores originales especificados por el fabricante para
garantizar la durabilidad del servicio.
Conecte con cuidado la clavija del cargador en el puerto del cargador USB. Asegúrese de
que la clavija está bien enchufada. Si la carga se realiza con el teléfono apagado, conecte
el cargador USB a una fuente de alimentación externa. El icono de la batería empezará a
parpadear en la pantalla y podrá seguir utilizando el teléfono. Si la carga se realiza con el
teléfono encendido, el indicador LED cambiará a rojo. Antes de utilizar la batería por
primera vez, cárguela utilizando el cargador que se incluye. El tiempo de carga es
aproximadamente de entre 8 y 10 horas. Obtendrá un mejor rendimiento de la nueva
batería después de dos o tres ciclos completos de carga y descarga.
Cuando finalice el proceso de carga de la batería, el indicador LED cambiará a verde.
Desconecte las conexiones entre el cargador y el teléfono.
ES
6
Page 7

, CÓMO ENCENDER EL TELÉFONO
Para encender el teléfono, mantenga presionado el botón POWER.
, CÓMO REALIZAR UNA LLAMADA
1. Asegúrese de que la tarjeta SIM está instalada y que la batería esta totalmente cargada.
2. Introduzca el número de teléfono marcando el número con el teclado y presione el botón
TALK.
- Cómo finalizar una llamada
Presione el botón END para finalizar la llamada
, CÁMARA
- Cómo realizar una foto
Introduzca el modo captura de imagen presionando el botón DISPARO o seleccionando la
función cámara en el menú principal. En la pantalla se mostrará el escenario capturado por
la lente de la cámara. A continuación, presione el botón OK o el botón DISPARO para hacer
fotos.
1. Una vez realizadas las fotos, el sistema las guardará automáticamente. Al mismo
tiempo, en la pantalla se mostrarán las fotos realizadas.
2. Si necesita realizar más fotos, presione OK para volver a la pantalla de disparo.
- Cómo realizar un vídeo
Este teléfono dispone de la función de realizar vídeos. Antes de empezar a grabar un
vídeo, deberá cambiar primero al modo vídeo.
1. En la pantalla de vista preliminar, seleccione Vídeo desde la función Modo del Menú. El
sistema cambiará al modo vídeo.
2. La longitud total de vídeo viene determinada por la capacidad de memoria.
- Cómo previsualizar fotos y vídeos
En Fotos y Vídeos, puede visualizar todas las fotos que tenga guardadas en el teléfono o
en la tarjeta de memoria.
Seleccione Inicio > Fotos y Vídeos.
Una vez en Fotos y Vídeos, en la pantalla aparecerán todas las fotos que tenga guardadas
tanto en el teléfono como en la tarjeta de memoria.
1. Haga clic sobre la foto que desee ampliar.
2. En la pantalla de vista preliminar, presione los botones de navegación para previsualizar
la foto anterior/siguiente.
ES
7
Page 8

, CÓMO INSTALAR ACTIVESYNC
ActiveSync sincroniza la información de su teléfono y de su ordenador, manteniendo
actualizada la información en ambos.
Antes de conectar el teléfono a su ordenador, debe instalar ActiveSync en el ordenador.
ActiveSync ya está instalado en su teléfono.
1. Introduzca el CD de instalación en el lector de CD de su ordenador.
2. Siga las instrucciones del asistente de instalación para instalar ActiveSync.
3. Conecte el cable de sincronización al teléfono y conéctelo al puerto USB de su
ordenador.
4. Encienda el teléfono. Cuando el ordenador detecta una conexión USB, se inicia el
asistente de instalación de ActiveSync Synchronization. Siga las instrucciones que
aparecerán en la pantalla y seleccione los elementos que desee sincronizar.
, CÓMO NAVEGAR POR INTERNET
Su teléfono tiene instalado Internet Explorer Mobile. Internet Explorer Mobile es un
navegador de Internet con todas las prestaciones necesarias para poder navegar por
Internet con su teléfono.
Para activar Internet Explorer
En la pantalla de Inicio, seleccione Inicio > Internet Explorer.
Puede utilizar ActiveSync para sincronizar los favoritos de Internet Explorer de su
ordenador con su teléfono para utilizarlos también con Internet Explorer Mobile. Para más
información, consulte la Ayuda de ActiveSync en su ordenador.
ES
8
Page 9
Quick Start Guide PDA PHONE AIRIS T480
, KNOWING YOUR PHONE
1. Side keys:
Use to turn up/down the volume.
Use to mute the ring tone of an incoming call.
2. T-FLASH slot:
T-FLASH card is inserted in the slot.
3. Talk button:
Press it to dial or receive a call.
Hold one call and receive another in the
mean time. Switch between two calls
engaged. Press it to enable Hold during a
call. Press it to enter Call History if no call
involved.
4. Navigation keys:
Use to scroll left, right, up, or down.
5. OK key:
Use to confirm your selection.
6. LED Indicator:
Slowly-twinkling green-GSM network signal
Rapidly-twinkling Red-Note or Low battery.
Long-lighted green-Charging complete
Long-lighted red-Charging in process
7. Camera key:
Lunch Camera application.
8. Left soft key & Right soft key:
Carry out the command displayed at the left/right corner at the bottom of the screen.
9. Infrared interface:
Transfer data with other infrared devices via this interface.
10. Power key:
Long press it to turn on/off your device.
Short press it to hang up a call in process or disconnect a data connection.
11. Microphone:
This is a mini-inbuilt microphone.
Speak to it to talk or record voice note.
12. USB cable/charger connector/earphone socket:
You can transfer data on your phone to other memories via USB cable as well as you can
charge your phone or plug in the earphone via this socket.
EN
9
Page 10

, INSERTING THE SIM CARD
SIM card (Subscriber Identity Module) contains your phone number, service details and
Phonebook/message memory.
Before you begin, ensure that the phone is turned off.
- Open the cover and remove the battery
1. Hold the phone in one hand with the keypad facing down in the palm of your hand. Press
gently on the stamped latch at the seam, then slide down to open the rear jacket;
2. Remove the battery by lifting it up from the bottom end.
- Install SIM card
1. Insert the SIM card into the SIM card slot with its gold contacts facing down (the cut-off
corner of the SIM card should match the cut-off corner in the slot).
2. Replace the battery and gently push down to snap it into place.
Precautions
1. If the SIM card is malfunctioned, please contact the network services operator.
2. Please put the SIM card where children cannot reach it.
3. SIM card and its golden contacts can be easily scuffed or even damaged by a warp.
Please be careful when you are using, inserting, or removing it.
4. Do not place the SIM card in electrostatic, dusty, or wet environment.
5. Ensure that the battery is installed properly
.
, CHARGING THE BATTERY
When the power of the battery is below the normal value of working electronic pressure, the
screen will display a charging Note and an empty battery icon. At the same time, the battery
will make a Note sound. Please charge the battery immediately; otherwise, the saved
information might be lost. If you do not charge the battery or replace the battery
immediately, the phone will be closed automatically after a while.
The phone contains a rechargeable lithium battery. The phone is designed to use only
manufacturer-specified original chargers and batteries, to secure the longevity of service of
the phone.
Plugging the charger connector in the USB charger port carefully. Make sure the connector
is plugging in properly. If charging in the switch-off status of the phone, connect the USB
charger to the external power source, and the battery icon in the phone screen will begin
flickering and the phone still can be used. If charging in the switch-on status of the phone,
the LED indicator will turn red. Before the first use, please charge the battery by using the
accessory charger. The charging time needs 8 to 10 hours. The new battery will reach its
best performance after two or three times full charge/discharge cycles.
When the battery finishes charging, the indicator LED will turn green. Disconnect the
connections between the charger and the phone.
EN
10
Page 11

, TURNING ON THE PHONE
Press and hold POWER to turn on the phone.
, MAKING A PHONE CALL
1. Ensuring SIM card is installed and the battery is fully charged.
2. Enter the phone number by dialing number on the keypad and press the TALK button.
- Ending a call
Press the END button to finish the call.
, CAMERA
- Capturing a photo
Enter the image capture mode by pressing “shooting” button or selecting camera function
from the main menu. The screen will show the scenery shot by the camera lens. Now, press
“OK” key or “Shooting” button to capture images.
·After shooting the images, the system will save the images automatically. At the same
time, the screen will display the images shot.
· If you need to shoot more images, please tap OK to back to the shooting screen.
- Capturing a video
The phone provides with video capture function. Before starting the video capture, you
need to change the shooting mode first.
1. On the screen of shooting preview, select Video from Mode function of Menu. The
system will be switched to video capture mode.
2. The length of video shooting time depends on the storage capability of the storage
devices.
- Previewing Pictures and videos
You can view pictures stored in your phone or storage card using the Pictures and Videos
application.
To start the program, go to Start > Pictures and Videos.
After you enter Pictures and videos, it will show on screen the preview of all pictures stored
on both your phone and memory card.
1. Click on any picture to zoom in on one picture.
2. On the preview screen, press navigation keys to preview previous/next picture in turn.
EN
11
Page 12

, INSTALLING ACTIVESYNC
ActiveSync synchronizes information between your phone and your PC, keeping
information up to date in both devices.
Before you connect your phone to your PC, you must install ActiveSync on the PC.
ActiveSync is already installed on your phone.
1. Insert the Getting Started CD into the CD drive of your PC.
2. Follow the instructions on the installation wizard screen to install ActiveSync.
3. Connect the sync cable to the phone and plug it into the USB port of your PC.
4. Turn on your phone .When the PC detects a USB connection, it starts the ActiveSync
Synchronization Setup Wizard. Follow the instructions on the screen and select the items
you want to synchronize.
, BROWSING THE WEB
Your phone comes with internet Explorer Mobile installed. Internet Explorer Mobile is a fullfeatured internet browser, optimized for use on your phone.
To open Internet Explorer:
On the home screen, select Start > Internet Explorer.
You can use ActiveSync to synchronize the Internet Explorer favorites on your PC with your
phone so you can use them with Internet Explorer Mobile as well. For more information, see
ActiveSync Help on your PC.
EN
12
Page 13

Schnellreferenz PDA PHONE AIRIS T480
, IHR TELEPHON KENNENLERNEN
1. Side keys
Use to turn up/down the volume.
Use to mute the ring tone of an incoming
call.
2. T-FLASH slot
T-FLASH card is inserted in the slot.
3. Talk button
Press it to dial or receive a call. Hold one
call and receive another in the mean time.
Switch between two calls engaged. Press
it to enable Hold during a call. Press it to
enter Call History if no call involved.
4. Navigation keys
Use to scroll left, right, up, or down.
5. OK key
Use to confirm your selection.
6. LED Indicator
Slowly-twinkling green-GSM network signal
Rapidly-twinkling Red-Note or Low battery.
Long-lighted green-Charging complete
Long-lighted red-Charging in process
7. Camera key
Lunch Camera application.
8. Left soft key & Right soft key
Carry out the command displayed at the left/right corner at the bottom of the screen.
9. Infrared interface
Transfer data with other infrared devices via this interface.
10. Power key
Long press it to turn on/off your device.
Short press it to hang up a call in process or disconnect a data connection.
11. Microphone
This is a mini-inbuilt microphone.
Speak to it to talk or record voice note.
12. USB cable/charger connector/earphone socket
You can transfer data on your phone to other memories via USB cable as well as you can
charge your phone or plug in the earphone via this socket.
DE
13
Page 14

, DIE SIM-KARTE EINFÜHREN
Die SIM-Kar te (Sub scriber Ide ntit y Module) e nthält Ihre Telephonnumme r,
Dienstleisterdetails und den Telephonbuch-/Nachrichtenspeicher.
Versichern Sie sich, bevor Sie beginnen, dass das Telephon ausgestellt ist.
- Öffnen Sie die Abdeckung und nehmen Sie die Batterie heraus
1. Halten Sie das Telephon in einer Hand, so dass die Tastatur nach unten in Ihre
Handfläche zeigt. Drücken Sie vorsichtig auf die Lasche an der Kante und schieben Sie
diese dann hinunter, um den hinteren Anschluss zu öffnen.
2. Nehmen Sie die Batterie heraus, indem Sie sie am hinteren Ende anheben.
- Die SIM-Karte installieren
1. Stecken Sie die SIM-Karte in den vorgesehenen Schlitz, so, dass die goldenen Kontakte
nach unten zeigen (die abgeschnittene Ecke der SIM-Karte sollte mit der abgeschnittenen
Ecke an dem Schlitz übereinstimmen).
2. Legen Sie die Batterie wieder ein und drücken Sie sie vorsichtig nach unten, damit Sie an
Ihrem Platz ist.
Vorsicht
1. Wenn die SIM-Karte nicht richtig funktioniert, setzen Sie sich bitte mit Ihrem
Netzwerkdienstleister in Verbindung.
2. Legen Sie die SIM-Karte bitte ausser Reichweite von Kindern.
3. Die SIM-Karte und die goldenen Kontakte können leicht zerkratzt oder sogar beschädigt
werden. Seien Sie bitte vorsichtig, wenn Sie die Karte benutzen, einführen oder
herausnehmen.
4. Legen Sie die SIM-Karte nicht in elektrostatische, staubige oder feuchte Umgebung.
5. Vergewissern Sie sich, dass die Batterie richtig eingelegt ist.
, DIE BATTERIE LADEN
Wenn die Batterieladung unter dem normalen Wert für elektronische Ladung liegt,
erscheint auf dem Display eine Ladebenachrichtigung und ein Icon mit einer leeren
Batterie. Gleichzeitig gibt die Batterie ein Warnsignal ab. Bitte laden Sie die Batterie
umgehend, da sonst die gespeicherte Information verloren gehen könnte. Wenn Sie die
Batterie nicht laden oder diese nicht umgehend ersetzen, geht das Telephon nach einiger
Zeit von alleine aus.
Das Telephon enthält eine wieder aufladbare Lithiumbatterie. Das Telephon ist dazu
ausgelegt, nur vom Händler genannte, Original-Ladegeräte und Batterien zu verwenden,
damit die Langlebigkeit des Telephons gewährleistet ist.
Stecken Sie vorsichtig den Ladestecker in den Anschluss des USB Ladegeräts.
Vergewissern Sie sich, dass das Ladegerät richtig eingesteckt ist. Wenn Sie das Telephon
im ausgestellten Zustand laden, schliessen Sie das USB-Ladegerät an die externe
Stromquelle und das Batterieicon auf dem Telephondisplay beginnt zu leuchten und das
Telephon kann weiterhin benutzt werden. Wenn Sie das Telephon im angestellten Zustand
laden, wird die LED-Anzeige rot. Laden Sie bitte vor dem ersten Benutzen die Batterie mit
dem zusätzlichen Ladegerät. Die Ladezeit beträgt 8 bis 10 Stunden. Die neuen Batterien
erreichen ihre beste Leistung nach zwei oder drei kompletten Lade/Entladezyklen.
Wenn die Batterie aufgeladen ist, wird die LED-Anzeige grün. Nehmen Sie das Telephon
vom Ladegerät.
DE
14
Page 15

, DAS TELEPHON ANSTELLEN
Drücken Sie POWER auf dem Telephon un halten Sie es gedrückt.
, EINEN ANRUF DURCHFÜHREN
1. Vergewissern Sie sich, dass die SIM-Karte installiert ist und die Batterie vollständig
geladen ist.
2. Geben Sie die Telephonnummer ein, indem Sie Nummer auf der Tastatur wählen und
drücken Sie die Taste TALK.
- Einen Anruf beenden.
Drücken Sie die Taste END, um den Anruf zu beenden.
, KAMERA
- Eine Aufnahme machen
Gegen Sie in den Photomodus, indem Sie die „Abdrück“-Taste drücken oder die
Kamerafunktion von dem Hauptmenü wählen. Auf dem Display erscheint das Bild, dass die
Kameralinse einfängt. Drücken Sie nun „OK“ oder erneut die „Abdrück“-Taste, um
Aufnahmen zu machen.
Das Bild wird anschliessend automatisch gespeichert. Gleichzeitig erscheinen auf dem
Display die photographierten Aufnahmen.
Wenn Sie weitere Aufnahmen machen möchte, drücken Sie bitte OK, um zurück zum
Display zu gehen.
- Ein Video aufnehmen
Das Telephon verfügt über Videofunktion. Sie müssen den Modus verändern, bevor Sie ein
Video aufnehmen können.
Auf dem Display mit der Aufnahmevorschau wählen Sie Video in der Modusfunktion des
Menüs. Das System geht in den Videoaufnahmemodus.
Die Länge der Videoaufnahme hängt von der Speicherkapazität der Speichervorrichtung
ab.
- Voransicht von Bildern und Videos
Sie können in Ihrem Telephon oder in der Speicherkarte gespeicherte Bilder ansehen,
indem Sie die Bilder- und Videoanwendung verwenden.
Um das Programm zu beginnen, wählen Sie bei Start > Bilder und Videos
Nachdem Sie in diesen Modus gegangen sind, erscheint auf dem Display die Voransicht
aller im Telephon oder in der Speicherkarte gespeicherten Bilder.
1. Klicken Sie auf irgendein Bild, um ein einziges Bild heranzuzoomen.
2. Auf dem Display der Voransicht drücken Sie die Navigationstasten, um abwechselnd
das vorherige/nächste Bild anzugucken.
DE
15
Page 16

, ACTIVESYNC INSTALLIEREN
AcitveSync synchronisiert Information zwischen Ihrem Telephon und Ihrem PC und hält die
Information auf beiden Seiten aktualisiert.
Bevor Sie Ihr Telephon an Ihren PC anschliessen, müssen Sie auf Ihrem PC ActiveSync
installieren. ActiveSync ist bereits auf Ihrem Telephon installiert.
1. Legen Sie die Getting Started CD in das CD-Laufwerk Ihres PCs.
2. Folgen Sie den Anweisungen der Installationsanzeige, um ActiveSync zu installieren.
3. Schliessen Sie das Sync-Kabel an das Telephon an und stecken sie es in den USB-Port
Ihres PCs.
4. Stellen Sie Ihr Telephon an. Wenn der PC eine USB-Verbindung entdeckt, beginnt er mit
dem ActiveSynch Synchronisierungs Setup-Assistenten. Folgen Sie den Anweisungen auf
dem Bildschirm und wählen Sie die Items, die Sie synchronisieren möchten.
, DAS INTERNET DURCHSUCHEN
In Ihrem Telephon ist bereits Internet Explorer Mobile installiert. Internet Explorer Mobile
ist ein kompletter Internet-Browser, der für die Anwendung auf Ihrem Telephon optimiert ist.
Um den Internet Explorer zu öffnen
Auf dem Home-Bildschirm wählen Sie Start > Internet Explorer.
Sie können ActiveSync verwenden, um die Internet Explorer Favoriten auf Ihrem PC mit
Ihrem Telephon zu synchronisieren, so dass Sie diese auch mit dem Internet Explorer
Mobile verwenden können. Für mehr Information siehe ActiveSync Help auf Ihrem PC.
DE
16
Page 17

Guida rapida PDA PHONE AIRIS T480
, FUNZIONALITÀ DEL TELEFONO
1. Tasti laterali
Alzare/abbassare il volume.
Escludere l'audio del tono di una chiamata
in entrata.
2. Slot T-FLASH
La scheda T-FLASH è inserita nello slot.
3. Pulsante di chiamata
Premerlo per comporre un numero o per
accettare una chiamata. Mettere in attesa
una chiamata e riceverne un'altra nel
frattempo. Passare tra due chiamate in
linea. Premerlo per mettere in attesa una
chiamata durante una conversazione.
Premerlo p er acceder e al regis tro
chiamate quando non si sta effettuando
nessuna chiamata.
4. Tasti di navigazione
Per spostarsi a sinistra, destra, verso l'alto
o verso il basso.
5. Tasto OK
Premerlo per confermare la selezione effettuata.
6. Indicatore LED
Lampeggia lentamente in verde Segnale di rete GSM
Lampeggia velocemente in rosso - Messaggio o batteria scarica.
Luce verde fissa- Carica completata
Luce rossa fissa In carica
7. Tasto fotocamera
Lancia l'applicazione della fotocamera.
8. Tasti morbidi sinistro e destro
Esegue il commando indicato nell'angolo sinistro/destro sul fondo della schermata.
9. Interfaccia a infrarossi
Trasferimento dei dati verso altri dispositivi a infrarossi mediante questa interfaccia.
10. Tasto di accensione
Premerlo a lungo per accendere/spegnere il dispositivo.
Premerlo brevemente per chiudere una chiamata in corso o interrompere una connessione
di dati.
11. Microfono
È presente un piccolo microfono integrato. Parlare nel microfono per comunicare o
registrare un messaggio di voce.
12. Cavo USB /connettore del caricabatteria/presa per l'auricolare
You can transfer data on your phone to other memories via USB cable as well as you can
charge your phone or plug in the earphone via this socket.
IT
17
Page 18

, INSERIMENTO DELLA SCHEDA SIM
La scheda SIM (Subscriber Identity Module) contiene il numero di telefono in uso, i dati di
servizio e la memoria dei messaggi e della rubrica.
Prima di iniziare, verificare che il telefono sia spento.
- Aprire lo sportellino ed estrarre la batteria
1. Afferrare il telefono mantenendo la tastiera rivolta verso il basso. Premere delicatamente
la linguetta che si trova sulla fenditura, quindi spingere verso il basso per aprire lo
sportellino posteriore.
2. Estrarre la batteria sollevandola dall'estremità inferiore
- Installazione della scheda SIM
1. Inserire la scheda SIM nello slot per scheda SIM con i contatti dorati rivolti verso il basso
(l'angolo tagliato della scheda SIM deve corrispondere a quello dello slot).
2. Inserire nuovamente la batteria e premere con delicatezza per farla scattare in
posizione.
Precauzioni
1. Se la scheda SIM non funziona correttamente, rivolgersi all'operatore di servizi di rete.
2. Conservare la scheda SIM in un luogo fuori dalla portata dei bambini.
3. La scheda SIM e i contatti dorati possono essere graffiati facilmente o danneggiati se la
vengono deformati. Fare attenzione quando si utilizza, inserisce o rimuove la scheda.
4. Non introdurre la scheda SIM in un ambiente elettrostatico, polveroso o umido.
5. Verificare che la batteria sia inserita correttamente.
, CARICA DELLA BATTERIA
Quando la carica della batteria è inferiore al valore normale di pressione elettronica di
funzionamento, sulla schermata verrà visualizzato un messaggio di richiesta di carica con
un'icona di una batteria vuota. Allo stesso tempo, la batteria emetterà un segnale di avviso.
Ricaricare la batteria immediatamente, in caso contrario, le informazioni memorizzate
potrebbero venire perse. Se non si ricarica la batteria o non la si sostituisce
immediatamente, il telefono si spegnerà automaticamente dopo un po'.
Il telefono contiene una batteria ricaricabile al litio. Il telefono è stato progettato per essere
utilizzato solo con caricabatteria e batterie originali indicati dal produttore, per garantire
una maggiore durata del telefono.
Inserire con attenzione il connettore del caricabatteria nella porta USB. Verificare che il
connettore sia collegato correttamente. Se si carica la batteria con il telefono spento,
collegare il caricabatteria USB alla sorgente di alimentazione esterna, e l'icona della
batteria del telefono inizierà a lampeggiare e il telefono potrà essere utilizzato. Se si
ricarica la batteria con il telefono acceso, l'indicatore LED diventerà rosso. La carica della
batteria richiede 8 - 10 ore. Prima di utilizzare il telefono per la prima volta, caricare la
batteria usando il caricabatteria fornito come accessorio. La nuova batteria offrirà le
massime prestazioni dopo due o tre cicli di carica/scaricamento completi.
Quando la batteria termina di caricarsi, il LED si illuminerà in verde. Scollegare quindi il
caricabatteria dal telefono.
IT
18
Page 19

, ACCENSIONE DE TELEFONO
Tenere premuto il tasto POWER per accendere il telefono.
, EFFETTUARE UNA CHIAMATA
1. Verificare che la scheda SIM sia inserita e che la batteria sia completamente carica.
2. Inserire il numero di telefono digitandolo sulla tastiera e premere il tasto TALK.
- Terminare una chiamata
Premere il tasto END per terminare una chiamata
, FOTOCAMERA
- Acquisizione di immagini
Accedere alla modalità di acquisizione di immagini premendo il tasto Shooting oppure
selezionando la funzione fotocamera dal menu principale. Lo schermo riporterà
l'immagine ripresa dall'obiettivo della fotocamera. Premere quindi il tasto OK o Shooting
per acquisire le immagini.
1. Dopo aver scattato delle foto, il sistema le salva automaticamente. Lo schermo
visualizza contemporaneamente le immagini acquisite.
2. Se si desidera scattare ulteriori foto, selezionare OK per tornare alla schermata di
acquisizione immagini.
- Acquisizione di video
Il telefono dispone della funzione di acquisizione di video. Prima di avviare l'acquisizione di
video, è necessario cambiare la modalità di acquisizione.
1. Sullo schermo dell'anteprima dell'acquisizione, selezionare Video dalla funzione Mode
del Menu. Il sistema passerà alla modalità di acquisizione video.
2. La durata di acquisizione del video dipende dalla capacità di memorizzazione dei
dispositivi di memorizzazione.
- Visualizzazione in anteprima di foto e video
È possibile visualizzare le immagini memorizzate nel telefono o nella scheda usando
l'applicazione Pictures and Video.
Per avviare il programma, selezionare Start > Pictures and Videos
Dopo aver selezionato Pictures and videos, verrà visualizzata sullo schermo l'anteprima di
tutte le immagini memorizzate sia nel telefono sia nella scheda di memoria.
1. Fare clic su un'immagine qualsiasi per ingrandire un'immagine.
2. Nella schermata di anteprima, premere i tasti di navigazione per ottenere l'anteprima
dell'immagine precedente/successiva.
IT
19
Page 20

, INSTALLAZIONE DI ACTIVESYNC
ActiveSync è in grado di sincronizzare le informazioni tra il telefono e il PC, mantenendo le
informazioni aggiornate sui due dispositivi.
Prima di collegare il telefono al PC, è necessario installare ActiveSync sul PC. ActiveSync è
già installato sul telefono.
1. Inserire il CD Getting Started nell'unità CD del PC in uso.
2. Seguire le istruzioni che compaiono sulle schermate dell'installazione guidata per
installare ActiveSync.
3. Collegare il cavo sync al telefono e inserirlo nella porta USB del PC in uso.
4. Accendere il telefono. Quando il PC rileva una connessione USB, avvia l'ActiveSync
Synchronization Setup Wizard. Seguire le istruzioni che vengono visualizzate sullo
schermo e selezionare gli elementi da sincronizzare.
, NAVIGAZIONE IN RETE
Il telefono viene fornito con Internet Explorer Mobile installato. Internet Explorer Mobile è
un browser Internet dalle funzionalità complete, ottimizzato per l'uso con il telefono.
Per aprire Internet Explorer:
Nella schermata di inizio, selezionare Start > Internet Explorer.
È possibile utilizzare ActiveSync per sincronizzare i preferiti di Internet Explorer sul PC in
uso con il telefono, in modo da poterli utilizzare anche con Internet Explorer Mobile. Per
ulteriori informazioni, consultare la guida in linea di ActiveSync sul PC in uso.
IT
20
Page 21

Guide Rapide PDA PHONE AIRIS T480
, POUR VOUS FAMILIARISEZ AVEC VOTRE TÉLÉPHONE
1. Touches sur les côtés
Elles servent à monter/descendre le
volume.
Elles servent à passer un appel en mode
silencieux.
2. Fente de la carte T-FLASH
C'est ici que l'on introduit la carte TFLASH.
3. Touche Talk
Appuyez dessus pour réaliser ou répondre
à un appel.
Répondez à un appel, tout en mettant en
attente l'appel précédent.
Passez d'un appel en cours à l'autre.
Appuyez dessus pour garder en attente un
appel en cours.
Vous permet d'accéder à l'historique des
appels si vous ne parlez pas déjà au
téléphone.
4. Joystick de navigation
Il sert à se déplacer à gauche, à droite, en
haut ou en bas.
5. Touche OK
Elle sert à confirmer votre sélection.
6. Voyant LED
Voyant vert clignote lentement : Signal du réseau de GSM
Voyant rouge clignote rapidement : Avertissement ou niveau de batterie faible.
Voyant vert continu : Chargement terminé.
Voyant rouge continu : En cours de chargement.
7. Touche Caméra
Elle sert à activer la caméra.
8. Touche programmable gauche (BPI) et touche programmable droite (BPD)
Elles réalisent la fonction qui est indiqué dans le coin gauche ou droit, au bas de l'écran.
9. Interface d'infrarouges
Vous permet d'échanger des données avec d'autres appareils à conditions qu'ils disposent
d'infrarouges.
10. Touche Power
Maintenez-la appuyez pour allumer ou éteindre l'appareil.
Appuyez doucement pour raccrochez un appel en cours ou pour désactiver une connexion
de données.
11. Micro
Mini microphone incorporé.
Vous devez l'approcher de vos lèvres pour parler ou enregistrer un message.
12. Prise pour câble USB/chargeur/écouteurs
Elle vous permet de téléchargez des données qui se trouvent dans votre téléphone à
d'autres mémoires au moyen du câble USB, mais aussi de charger votre téléphone ou de
brancher des écouteurs.
FR
21
Page 22

, COMMENT INSTALLER LA CARTE SIM
La carte SIM (Module d'identification de l'Abonné) contient votre numéro de téléphone, les
caractéristiques du service, la mémoire des messages et le répertoire de numéros.
Avant de commencer, assurez-vous que le téléphone est éteint.
- Retirez le couvercle et retirez la batterie
1. Placez le téléphone dans la paume de votre main, le clavier doit se trouver en dessous.
Appuyez doucement sur le clapet pour ouvrir le couvercle arrière ;
2. Retirez la batterie en l'attrapant par la partie inférieure.
- Installez la carte SIM
1. Introduisez la carte SIM dans la fente prévue à cet effet, ses connecteurs dorés en
dessous (le coin coupé de la carte SIM doit s'emboîter avec le coin manquant de la fente).
2. Remettez en place la batterie en la poussant doucement pour qu'elle s'emboîte
parfaitement dans son logement.
Précautions
1. Si la carte SIM ne fonctionne pas correctement, contactez l'opérateur de services de
votre réseau.
2. Ne laissez pas la carte SIM à la portée des enfants.
3. Le circuit imprimé et ses contacteurs dorés peuvent se rayer facilement, voir même vous
blesser s'ils se recourbent, c'est pourquoi vous devez le manipuler, l'introduire ou le retirez
avec précaution.
4. Ne laissez pas la carte SIM dans des endroits humides, qui contiennent de la poussière
ou au contact de l'électricité statique.
5. Assurez-vous que la batterie est bien en place.
, COMMENT CHARGER LA BATTERIE
Lorsque la puissance de la batterie est en dessous de la valeur normale de pression
électronique nécessaire pour fonctionner, un témoin s'affiche à l'écran pour vous indiquer
que vous devez la recharger, il s'agit de l'icône d'une batterie vide. La batterie émettra
également un signal d'avertissement sonore. Rechargez immédiatement la batterie ; le
cas échéant, vous risquez de perdre l'information sauvegardée. Si vous ne rechargez pas
ou ne changez pas la batterie immédiatement, le téléphone s'éteindra automatiquement
après un certain laps de temps.
Le téléphone contient une batterie de lithium rechargeable. Le téléphone a été conçut pour
utiliser uniquement des batteries et des chargeurs d'origine, indiqués par le fabriquant pour
garantir la durée du service.
Branchez avec précaution la fiche du chargeur sur le port du chargeur USB. Assurez-vous
de que la fiche est branchée correctement. Si vous rechargez la batterie avec le téléphone
éteint, branchez le chargeur USB à une source d'alimentation externe. L'icône de la
batterie commencera à clignoter sur l'écran et vous pourrez continuer à l'utiliser. Si vous
rechargez la batterie lorsque le téléphone est allumé, le voyant LED devient rouge. Avant
d'utiliser la batterie pour la première fois, rechargez-la au moyen du chargeur qui vous est
fourni. La durée de chargement oscille entre 8 et 10 heures. Vous renforcerez l'autonomie
de votre batterie après un ou deux cycles complets de recharge et décharge.
Lorsque le processus de chargement de la batterie est terminé, le voyant LED devient vert.
Débranchez alors les connexions entre le chargeur et le téléphone.
FR
22
Page 23

, COMMENT ALLUMER LE TÉLÉPHONE
Pour allumer le téléphone, maintenez appuyée la touche POWER.
, COMMENT RÉALISER UN APPEL
1. Assurez-vous de que la carte SIM est installée que la batterie est totalement chargée.
2. Introduisez le numéro de téléphone en le marquant sur le clavier, puis appuyez sur la
touche TALK.
- Comment mettre fin à un appel
Appuyez sur la touche END pour mettre fin à un appel
, CAMÉRA
- Comment prendre une photo
Introduisez le mode capture d'image en appuyant sur la touche CAPTURER ou en
sélectionnant la fonction caméra dans le menu principal. La prise de vue réalisée par la
lentille s'affichera à l'écran la lente de la caméra. Appuyez ensuite sur la touche OK ou sur
la touche CAPTURER pour prendre des photos.
1. Une fois que vous avez pris les photos, le système les sauvegarde automatiquement. En
même temps, les photos réalisées s'affichent à l'écran.
2. Si vous souhaitez prendre d'autres photos, appuyez sur OK pour retourner à l'écran de
capture.
- Comment réaliser un clip vidéo
Ce téléphone dispose d'une fonction qui permet de réaliser des clips vidéo. Avant de
commencer à enregistrer un clip vidéo, vous devrez passer en mode vidéo.
1. Sur l'écran d'aperçu, sélectionnez Vidéo dans la fonction Mode du Menu. Le système
passera alors en mode vidéo.
2. La longueur totale du clip vidéo dépend de la capacité de la mémoire.
- Comment afficher un aperçu des photos et clip vidéo
Dans Photos et Vidéos, vous pouvez visualiser toutes les photos que vous aurez
sauvegardées dans le téléphone ou sur la carte mémoire.
Sélectionnez Démarrage > Photos et Vidéos.
Une fois que vous vous trouvez dans Photos et Vidéos, toutes les photos que vous aurez
sauvegardées dans le téléphone et sur la carte mémoire apparaîtront à l'écran.
1. Cliquez sur la photo que vous souhaitez agrandir.
2. Sur l'écran d'aperçu, appuyez sur les touches de navigation pour afficher la photo
précédente/suivante.
23
FR
Page 24

, COMMENT INSTALLER ACTIVESYNC
ActiveSync synchronise l'information de votre téléphone et de votre ordinateur, en mettant
à jour l'information contenue dans les deux appareils.
Avant de raccorder le téléphone à votre ordinateur, vous devez installer ActiveSync dans
l'ordinateur. ActiveSync est déjà installé dans votre téléphone.
1. Introduisez le CD d'installation dans le lecteur de CD de votre ordinateur.
2. Suivez les instructions de l'assistant d'installation pour installer ActiveSync.
3. Branchez le câble de synchronisation au téléphone et raccordez-le au port USB de votre
ordinateur.
4. Allumez le téléphone. Lorsque l'ordinateur détecte une connexion USB, il lance
l'assistant d'installation d'ActiveSync Synchronization. Suivez les instructions qui
s'affichent à l'écran et sélectionnez les éléments que vous souhaitez synchroniser.
, COMMENT NAVIGUER SUR INTERNET
Internet Explorer Mobile est installé sur votre téléphone. Internet Explorer Mobile est un
navigateur d'Internet qui offre toutes les prestations nécessaires pour pouvoir naviguer sur
Internet avec votre téléphone.
Pour activer Internet Explorer
Sur l'écran de Démarrage, sélectionnez Démarrage > Internet Explorer.
Vous pouvez utilisez ActiveSync pour synchroniser les favoris d'Internet Explorer de votre
ordinateur avec votre téléphone pour les utiliser également avec Internet Explorer Mobile.
Pour plus d'informations, consultez l'Aide d'ActiveSync dans votre ordinateur..
24
FR
Page 25

Guia de Iniciação Rápida PDA PHONE AIRIS T480
, CONHECER O SEU TELEFONE
1. Teclas laterais
Use-as para aumentar/diminuir o volume.
Use-as para silenciar o toque de chamada
de uma chamada entrada.
2. Ranhura T-FLASH
O cartão T-FLASH é inserido na ranhura.
3. Botão Talk
Pressione-o para fazer ou receber uma
chamada.
Retenha uma chamada enquanto recebe
outra.
Alterne entre duas chamadas.
Pressione-o para permitir a Retenção
durante uma chamada.
Pressione-o para entrar no Histórico de
Chamadas, se não houver nenhuma
chamada envolvida.
4. Teclas de navegação
Use-as para se movimentar para a
esquerda, direita, cima ou baixo.
5. Tecla OK
Use-a para confirmar a sua selecção.
6. Indicador LED
Verde a piscar lentamente-Sinal de rede GSM
Vermelho a piscar rapidamente-Nota ou bateria fraca.
Verde fixo-Carga concluída
Vermelho fixo-Carga em andamento
7. Tecla Camera
Iniciar a aplicação da câmara.
8. Tecla programável esquerda e Tecla programável direita
Executar o comando que aparece no canto inferior esquerdo/direito do ecrã.
9. Interface de infra-vermelhos
Transferir dados com outros aparelhos de infra-vermelhos através desta interface.
10. Tecla Power
Pressione-a longamente para ligar/desligar o aparelho.
Pressione-a para desligar uma chamada em andamento ou desligar uma conexão de
dados.
11. Microfone
É um mini-microfone incorporado.
Fale para ele para conversar ou gravar uma nota de voz.
12. Tomada USB para cabo/ conector do carregador/auscultadores
You can transfer data on your phone to other memories via USB cable as well as you can
charge your phone or plug in the earphone via this socket.
PT
25
Page 26

, INSERÇÃO DO CARTÃO SIM
O cartão SIM (Subscriber Identity Module = Módulo de Identidade do Subscritor) contém o
seu número de telefone, detalhes de serviço e memória de Agenda/mensagens.
Antes de começar, certifique-se de que o telefone está desligado.
- Abra a tampa e remova a bateria
1. Segure no telefone com uma das mãos, com o teclado para baixo na palma da outra
mão. Pressione suavemente na lingueta impressa na ranhura, e depois faça-a deslizar
para baixo para abrir o compartimento traseiro.
2. Remova a bateria levantando-a da extremidade inferior.
- Instalar o cartão SIM
1. Insira o cartão SIM na ranhura do cartão SIM, com os contactos dourados virados para
baixo (o canto cortado do cartão SIM deve coincidir com o canto cortado da ranhura).
2. Recoloque a bateria e pressione-a levemente para baixo para que se encaixe no devido
lugar.
Precauções
1. Se o cartão SIM não funcionar bem, por favor contacte o operador de serviços de rede.
2. Por favor coloque o cartão SIM num local fora do alcance das crianças.
3. O cartão SIM e os seus contactos dourados podem-se desgastar facilmente ou até
mesmo ficar danificados por deformação. Por favor tenha cuidado quando o estiver a usar,
inserindo-o ou removendo-o.
4. Não coloque o cartão SIM em ambientes electrostáticos, poeirentos ou húmidos.
5. Certifique-se de que a bateria está correctamente instalada.
, CARREGAMENTO DA BATERIA
Quando a corrente da bateria estiver abaixo do valor normal da carga electrónica de
funcionamento, o ecrã mostrará uma Nota de carga e um ícone de bateria descarregada.
Simultaneamente, a bateria emitirá um som de aviso. Por favor carregue imediatamente a
bateria; caso contrário, as informações gravadas serão perdidas. Se não carregar ou
substituir imediatamente a bateria, o telefone será desligado decorrido algum tempo.
O telefone contém uma bateria de lítio recarregável. O telefone foi concebido para usar
apenas carregadores e baterias originais especificados pelo fabricante, para garantir a
longevidade da utilização do telefone.
Ligue cuidadosamente a ficha do conector de carga à porta USB do carregador. Certifiquese de que o conector está correctamente conectado. Se carregar com o telefone
desligado, conecte o carregador USB à fonte de alimentação externa, e o ícone da bateria
no ecrã do telefone começará a piscar, podendo o telefone ser usado. Se carregar com o
telefone ligado, o indicador LED ficará vermelho. Antes de usar pela primeira vez, por favor
carregue a bateria usando o carregador acessório. O tempo de carga é de 8 a 10 horas. A
nova bateria atingirá o seu melhor desempenho após dois ou três ciclos de
carga/descarga totais.
Quando o carregamento da bateria terminar, o indicador LED ficará verde. Desconecte as
ligações entre o carregador e o telefone.
PT
26
Page 27

, LIGAR O TELEFONE
Pressione a tecla POWER e mantenha-a pressionada para ligar o telefone.
, FAZER UMA CHAMADA
1. Certifique-se de que o cartão SIM está instalado e a bateria totalmente carregada.
2. Introduza o número de telefone pelo teclado e pressione o botão TALK.
- Terminar uma chamada
Pressione o botão END para terminar uma chamada
, CÂMARA
- Tirar uma foto
Entre no modo de captação pressionando o botão "shooting" ou seleccionando a função
"camera" do menu principal. O ecrã mostrará a cena captada pela lente da câmara.
Pressione agora a tecla "OK" ou o botão "Shooting" para captar imagens.
1. Depois de captar as imagens, o sistema guarda-as automaticame nte.
Simultaneamente, o ecrã mostra as imagens captadas.
2. Se precisar de captar mais imagens, por favor pressione OK para voltar ao ecrã de
captação de imagens.
- Fazer um vídeo
O telefone oferece uma função de captação de vídeo. Antes de iniciar a captação de vídeo,
é necessário que altere primeiramente o modo de captação.
1. No ecrã de pré-visualização da captação, seleccione Video da função ou Menu Mode. O
sistema será comutado para o modo de captação de vídeo.
2. A duração da captação de vídeo depende da capacidade de armazenamento dos
dispositivos de armazenamento.
- Pré-visualização de Fotos e Vídeos
Você pode ver imagens armazenadas no seu telefone ou cartão de armazenamento
usando a aplicação Pictures and Video.
Para iniciar o programa, vá para Start > Pictures and Videos.
Depois de entrar em Pictures and videos, aparecerá no ecrã a pré-visualização de todas
as imagens armazenadas no seu telefone e no cartão de memória.
1. Faça clique em qualquer imagem para a aproximar.
2. No ecrã de pré-visualização, pressione as teclas de navegação para pré-visualizar a
imagem anterior/seguinte.
PT
27
Page 28

, INSTALAÇÃO DO ACTIVESYNC
O ActiveSync sincroniza as informações entre o seu telefone e o seu PC, mantendo as
informações actualizadas nos dois aparelhos.
Antes de conectar o telefone ao PC, deve instalar o ActiveSync no PC. O ActiveSync já
está instalado no seu telefone.
1. Insira o CD Getting Started na unidade de CD's do seu PC.
2. Siga as instruções do ecrã do assistente de instalação para instalar o ActiveSync.
3. Conecte o cabo Sync ao telefone e ligue-o à porta USB do seu PC.
4. Ligue o seu telefone. Quando o PC detecta uma conexão USB, inicia o Assistente de
configuração do ActiveSync. Siga as instruções no ecrã e seleccione os itens que quer
sincronizar.
, NAVEGAR NA WEB
O seu telefone é fornecido com o Internet Explorer Mobile instalado. O Internet Explorer
Mobile é um navegador da Internet com todas as funções, optimizado para uso no seu
telefone
Para abrir o Internet Explorer:
No ecrã principal, seleccione Start > Internet Explorer.
Você pode usar o ActiveSync para sincronizar os favoritos do Internet Explorer do seu PC
com o telefone de maneira que também os possa usar com o Internet Explorer Mobile.
Para mais informações, veja a Ajuda do ActiveSync no seu PC.
PT
28
Page 29

Guia de Iniciação Rápida PDA PHONE AIRIS T480
, CONHECER O SEU TELEFONE
1. Teclas laterais
Use para aumentar/diminuir o volume.
Use para silenciar o toque de chamada de
uma chamada em entrada.
2. Ranhura T-FLASH
O cartão T-FLASH se insere na ranhura.
3. Botão Talk
Pressione para fazer ou receber uma
chamada.
Retenha uma chamada enquanto recebe
outra.
Alterne entre duas chamadas.
Pressione para permitir a Retenção
durante uma chamada.
Pressione para entrar no Histórico de
Chamada s, se não tiv er nenhuma
chamada em curso.
4. Teclas de navegação
Use para se movimentar para a esquerda,
direita, acima ou abaixo.
5. Tecla OK
Use para confirmar a sua seleção.
6. Indicador LED
Verde piscando lentamente-Sinal de rede GSM
Vermelho piscando rapidamente-Nota ou bateria fraca.
Verde fixo-Carga concluída
Vermelho fixo-Carga em andamento
7. Tecla Câmara
Iniciar a aplicação da câmara.
8. Tecla programável esquerda e Tecla programável direita
Executar o comando que aparece no canto inferior esquerdo/direito da tela.
9. Interface de infra-vermelhos
Transferir dados com outros aparelhos de infra-vermelhos através desta interface.
10. Tecla Power
Mantenha pressionada para ligar/desligar o aparelho.
Pressione para fechar uma chamada em andamento ou desligar uma conexão de dados.
11. Microfone
É um mini-microfone incorporado.
Fale para ele para conversar ou salvar uma mensagem de voz.
12. Conector USB para cabo / conector do carregador/fones
You can transfer data on your phone to other memories via USB cable as well as you can
charge your phone or plug in the earphone via this socket.
BR
29
Page 30

, INSERÇÃO DO CARTÃO SIM
O cartão SIM (Subscriber Identity Module = Módulo de Identidade do Subscritor) contém o
seu número de telefone, detalhes de serviço e memória de Agenda/mensagens.
Antes de começar, verifique que o telefone está desligado.
- Abra a tampa e remova a bateria
1. Segure o telefone com uma das mãos, com o teclado para baixo na palma da outra mão.
Pressione suavemente na lingüeta impressa na ranhura, e depois faça-a deslizar para
baixo para abrir o compartimento traseiro.
2. Remova a bateria levantando-a da extremidade inferior.
- Instalar o cartão SIM
1. Insira o cartão SIM na ranhura do cartão SIM, com os contatos dourados voltados para
baixo (o canto cortado do cartão SIM deve coincidir com o canto cortado da ranhura).
2. Recoloque a bateria e pressione-a levemente para baixo para que ela encaixe no local
correspondente.
Precauções
1. Se o cartão SIM não funcionar bem, por favor contate o operador de serviços de rede.
2. Por favor coloque o cartão SIM num local fora do alcance das crianças.
3. O cartão SIM e os seus contatos dourados podem desgastar-se facilmente ou até
mesmo ficar danificados por deformação. Por favor tenha cuidado quando o estiver
manobrando, inserindo ou removendo.
4. Não coloque o cartão SIM em ambientes eletrostáticos, poeirentos ou úmidos.
5. Verifique que a bateria está corretamente instalada.
, CARREGAMENTO DA BATERIA
Quando a corrente da bateria estiver abaixo do valor normal da carga eletrônica de
funcionamento, a tela visualizará uma Mensagem de carga e um ícone de bateria
descarregada. Simultaneamente, a bateria emitirá um som de aviso. Por favor carregue
imediatamente a bateria; caso contrário, as informações salvadas se perderão. Se não
carregar ou substituir imediatamente a bateria, o telefone se desligará decorrido algum
tempo.
O telefone contém uma bateria de lítio recarregável. O telefone foi concebido para usar só
carregadores e baterias originais especificados pelo fabricante, para garantir a
longevidade da utilização do telefone.
Ligue cuidadosamente a ficha do conector de carga à porta USB do carregador. Verifique
que o conector está corretamente conectado. Se faz a carga com o telefone desligado,
conecte o carregador USB à fonte de alimentação externa, e o ícone da bateria na tela do
telefone começará a piscar, podendo o telefone ser usado. Se faz a carga com o telefone
ligado, o indicador LED ficará vermelho. Antes de usar pela primeira vez, por favor
carregue a bateria usando o carregador acessório. O tempo de carga é de 8 a 10 horas. A
nova bateria atingirá o seu melhor desempenho após dois ou três ciclos de
carga/descarga totais.
Quando o carregamento da bateria terminar, o indicador LED ficará verde. Desconecte as
conexões entre o carregador e o telefone.
BR
30
Page 31

, COMO LIGAR O TELEFONE
Pressione a tecla POWER e mantenha pressionada para ligar o telefone.
, COMO FAZER UMA CHAMADA
1. Verifique que o cartão SIM está instalado e a bateria totalmente carregada.
2. Digite o número de telefone no teclado e pressione o botão TALK.
- Como terminar uma chamada
Pressione o botão END para terminar uma chamada
, CÂMARA
- Como tirar uma foto
Entre no modo de captação pressionando o botão "shooting" ou selecionando a função
"camera" do menu principal. A tela visualizará a cena captada pela lente da câmara.
Pressione agora a tecla "OK" ou o botão "Shooting" para captar imagens.
1. Depois de captar as imagens, o sistema as salva automaticamente. Simultaneamente, a
tela visualiza as imagens captadas.
2. Se precisar captar mais imagens, por favor pressione OK para voltar à tela de captação
de imagens.
- Fazer um vídeo
O telefone oferece uma função de captação de vídeo. Antes de iniciar a captação de vídeo,
é necessário que altere primeiramente o modo de captação.
1. Na tela de pré-visualização da captação, selecione Vídeo a partir função Modo do Menu.
O sistema mudará para o modo de captação de vídeo.
2. A duração da captação de vídeo depende da capacidade de armazenamento dos
dispositivos de armazenamento.
- Como pré-visualizar Fotos e Vídeos
Você pode ver imagens armazenadas no seu telefone ou cartão de armazenamento
usando a aplicação Pictures and Video.
Para iniciar o programa, vá para Start > Pictures and Videos
Depois de entrar em Pictures and videos, aparecerá na tela a pré-visualização de todas as
imagens armazenadas no seu telefone e no cartão de memória.
1. Faça clique em qualquer imagem para a aproximar.
2. Na tela de pré-visualização, pressione as teclas de navegação para pré-visualizar a
imagem anterior/seguinte.
BR
31
Page 32

, INSTALAÇÃO DO ACTIVESYNC
O ActiveSync sincroniza as informações entre o seu telefone e o seu PC, mantendo as
informações atualizadas nos dois aparelhos.
Antes de conectar o telefone ao PC, deve instalar o ActiveSync no PC. O ActiveSync já
está instalado no seu telefone.
1 Insira o CD Getting Started na unidade de CD's do seu PC.
2 Siga as instruções da tela do assistente de instalação para instalar o ActiveSync.
3 Conecte o cabo Sync ao telefone e ligue-o à porta USB do seu PC.
4 Ligue o seu telefone. Quando o PC detecta uma conexão USB, inicia o Assistente de
configuração do ActiveSync. Siga as instruções na tela e selecione os itens que quer
sincronizar.
, NAVEGAR NA WEB
O seu telefone é fornecido com o Internet Explorer Mobile instalado. O Internet Explorer
Mobile é um navegador da Internet com todas as funções, optimizado para uso no seu
telefone
Para abrir o Internet Explorer:
Na tela principal, selecione Start > Internet Explorer.
Você pode usar o ActiveSync para sincronizar os favoritos do Internet Explorer do seu PC
com o telefone de maneira que também possa usá-los com o Internet Explorer Mobile.
Para mais informações, veja a Ajuda do ActiveSync no seu PC.
BR
32
Page 33

Краткое руководство СМАРТФОН AIRIS T480
, ВОЗМОЖНОСТИ СМАРТФОНА
1. Боковые клавиши
Изменяет громкость.
Приглушает звук входящего звонка.
2. Разъем для T-FLASH
Сюда вставляется карта памяти TFLASH.
3. Кнопка вызова
Нажмите, чтобы позвонить или принять
звонок.
Уде ржи вая од ин зв он ок, м ож но
одновременно принять другой.
П ер е кл ю че н ие м еж ду д ву м я
подключенными линиями.
Во время звонка н ажатие кнопки
включает удержание.
При отсутствии подключенных линий
нажатие кнопки позволяет войти в
архив звонков.
4. Клавиши перемещения
Перемещения вправо, влево, вверх или
вниз.
5. Клавиша ОК
Нажмите для подтверждения выбора.
6. Светодиодный индикатор
Медленно мерцающий зеленый: сигнал сети GSM
Быстро мерцающий красный: «обратите внимание» или подзарядите батарею.
Продолжительный зеленый: зарядка завершена
Продолжительный красный: зарядка продолжается
7. Клавиша камеры
Запуск приложения для камеры.
8. Левая и правая многофункциональные клавиши
Выполняют команды, указанные соответственно в левом или правом нижнем углу
экрана.
9. Инфракрасный порт
Порт дает возможность обмена данными с различными инфракрасными
устройствами.
10. Клавиша питания
Нажмите и удерживайте ее некоторое время, чтобы включить или выключить
смартфон.
Нажмите и сразу же отпустите, чтобы прервать звонок или прекратить передачу
данных.
11. Микрофон
Встроенный миниатюрный микрофон для разговора по телефону и записи
голосовых сообщений.
12. Порт USB для подключений, зарядки и наушников
Через порт для кабеля USB можно передавать данные на другие носители памяти,
заряжать смартфон и подключать наушники.
RU
33
Page 34

, КАК ВСТАВИТЬ SIM-КАРТУ
В SIM-карте содержатся номер вашего телефона, условия обслуживания, а также
телефонная книга и архив сообщений.
Прежде всего, убедитесь в том, что телефон отключен.
- Снимите заднюю панель и извлеките батарею
1. Возьмите смартфон в руку, держась за клавиатуру, так, чтобы экран был обращен
вниз. Мягко нажмите на защелку, расположенную на стыке корпуса и задней панели,
сдвиньте последнюю вниз и откройте задний футляр.
2. Приподнимите снизу батарею и извлеките ее.
- Вставьте SIM-карту
1. Вставьте SIM-карту в гнездо. Позолоченные контакты SIM-карты должны быть
снизу, а срезанный угол совпадать с таким же углом в гнезде.
2. Поставьте батарею на место и мягко нажмите до щелчка.
Предостережение
1. Если SIM-карта не работает должным образом, обратитесь к оператору сети
мобильной связи.
2. Храните SIM-карту в недоступном для детей месте.
3. SIM-карта и ее позолоченные контакты легко могут истереться или погнуться.
Будьте осторожны, когда берете в руки, вставляете или вынимаете SIM-карту.
4. Не держите SIM-карту в пыльных, влажных или наполненных статическим
электричеством помещениях.
5. Убедитесь в том, что батарея правильно вставлена в смартфон.
, ЗАРЯДКА БАТАРЕИ
Если батарея разрядится и рабочее напряжение упадет ниже нормы, на экране
появятся сообщение о необходимости зарядить смартфон и символ разряженной
батареи. Одновременно устройство издаст звук уведомления. Зарядите батарею без
промедления, иначе можете потерять сохраненные в памяти сведения. Если вы не
начнете зарядку батареи или не замените ее на другую, через какое-то время
смартфон автомат ически отключится. В смартфоне находится литиевая
аккумуляторная батарея. С целью продления срока эксплуатации устройства
разработчики предусмотрели, что работать оно может исключительно на батареях
одной, указанной изготовителем марки. То же касается зарядных устройств.
Осторожно вставьте разъем зарядного устройства в порт USB. Убедитесь, что
разъем вошел в него полностью. При зарядке отключенного смартфона подключите
зарядное устройство к внешнему источнику питания — символ батареи на экране
начнет мерцать. Смартфоном при этом можно пользоваться. При зарядке
включенного смартфона светодиодный индикатор загорится красным светом. Перед
тем, как включить смартфон в первый раз, зарядите батарею с помощью внешнего
зарядного устройства. Время зарядки — от 8 до 10 часов. Новая батарея достигнет
наилучших характеристик после того, как два или три раза полностью разрядится и
будет заряжена снова.
Перед тем, как включить смартфон впервые, зарядите батарею с помощью внешнего
зарядного устройства. Время зарядки — от 8 до 10 часов. Новая батарея достигнет
наибольшей емкости после того, как два или три раза полностью разрядится и будет
заряжена снова.
Когда зарядка батареи окончится, светодиодный индикатор загорится зеленым.
Отключите зарядное устройство от смартфона.
RU
34
Page 35

, ВКЛЮЧЕНИЕ СМАРТФОНА
Чтобы включить устройство, нажмите и удерживайте кнопку питания (POWER).
, ТЕЛЕФОННЫЙ ЗВОНОК
1. Убедитесь в том, что SIM-карта установлена, а батарея заряжена полностью.
2. Наберите номер на клавиатуре и нажмите кнопку вызова (TALK)
- Завершение звонка
Чтобы завершить звонок, нажмите кнопку END.
, КАМЕРА
- Фотосъемка
Чтобы войти в режим съемки, нажмите кнопку «Shooting» (съемка) или выберите
функцию «камера» в главном меню. На экране отобразится вид через объектив
камеры смартфона. Чтобы произвести съемку, нажмите клавишу «OK» или кнопку
«Shooting».
1. Система автоматически сохраняет все фотографии. Одновременно сделанные
снимки отображаются на экране.
2. Если необходимо сделать еще несколько фотографий, нажмите OK, чтобы
вернуться в режим съемки.
- Видеосъемка
Смартфон предусматривает возможность видеосъемки. Чтобы ее начать, требуется
изменить режим.
1. На экране предварительного просмотра снимков выберите в меню в разделе
«Mode» (режим) функцию «Video» (видео). Система переключится в режим видео.
2. Продолжительность видеосъемки зависит от емкости устройств хранения данных.
- Предварительный просмотр снимков и видео
Вы можете просмотреть фотографии, сохраненные на смартфоне или на карте
памяти, используя программу Pictures and Videos (снимки и видео).
Для запуска программы выберите меню Start (пуск) и перейдите к Pictures and Videos
После запуска Pictures and Videos все снимки, хранящиеся на смартфоне и карте
памяти, отобразятся на экране уменьшенными.
1. Нажмите на снимок, чтобы его увеличить.
2. На экране предварительного просмотра используйте клавиши перемещения для
перехода к следующему или предыдущему снимку.
RU
35
Page 36

, УСТАНОВКА ПРОГРАММЫ ACTIVESYNC
Программа ActiveSync обеспечивает синхронизацию сведений на персональном
компьютере и смартфоне, что позволяет сэкономить время.
Перед тем как подключить смартфон к ПК, установите на последний программу
ActiveSync. На смартфоне она уже установлена.
1. Вставьте диск Getting Started (начало работы) в привод для компакт-дисков на
компьютере.
2. Следуйте инструкциям в окне мастера установки ActiveSync.
3. Вставьте в смартфон соединительный кабель и подключите его к компьютеру
через USB-порт.
4. Включите смартфон. Когда компьютер распознает подключение через USB,
запустится мастер установки ActiveSync Synchronization. Следуя инструкциям на
экране, определите, что именно требуется синхронизировать.
, ВЫХОД В ИНТЕРНЕТ
На смартфоне установлен браузер Internet Explorer Mobile. Это полноценный
Интернет-браузер, приспособленный для пользователей карманных ПК.
Для запуска Internet Explorer:
Выберите меню Start на экране смартфона и перейдите к Internet Explorer.
Для использования избранного из браузера Internet Explorer компьютера на
браузере Internet Explorer Mobile смартфона нужно синхронизировать их при помощи
ActiveSync. Более подробные сведения содержатся в разделе Help (помощь)
программы ActiveSync, установленной на компьютере.
RU
36
Page 37

WEEE: Nota explicativa
“No tire nunca este equipo electrónico con los desechos
domésticos. Pida información a su ayuntamiento sobre las
posibilidades de una correcta eliminación que no arruine el
medio ambiente. Respete siempre las normas vigentes en
la materia. Los transgresores están sujetos a las sanciones
y a las medidas que establece la ley.”
WEEE statement
“ This electronic device must not be dropped with litter. Ask
to your council how about to eliminate correctly in order to
save th e environment. Follow related legislat ion.
Lawbreakers depend on law penalties”
WEEE-Hinweis
“Entsorgen Sie die ses elektronische Gerät niemals
zusammen mit dem Hausmüll. Fordern Sie Informationen
bei Ihrer Stadtverwaltung bezüglich der Möglichkeiten für
eine korrekte Entsorgung an, die die Umwelt nicht belastet.
Bitte beachten Sie immer die gültigen Normen bezüglich
dieser Materie. Zuwiderhandlungen sind den Sanktionen
und Maßnahmen unterlegen, die das Gesetz vorsieht.”
WEEE: Nota spiegativa
“Non disperda questa apparecchiatura elettronica insieme
ai rifiuti domestici. Richieda informazione nel suo municipio
sulle possibilità di una corretta eliminazione affinché il
medio ambiente non venga rovinato. Rispetti sempre le
apposite norme in vigore. I trasgressori saranno passibili
delle sanzioni e misure che stabilisce la legge”.
WEEE
37
Page 38

WEEE: Note explicative
“ Ne jamais jeter cet appareil électronique avec les déchets
ménagers. Renseignez-vous auprès de votre mairie sur
les possibilités d'une élimination conforme qui n'affecte pas
l'environnement. Veuillez toujours respecter les règles en
vigueur en la matière. La transgression de ces règle peut
faire l'objet de sanctions et mesures établies par la loi.”
WEEE: Nota explicativa
“Não jogue nunca este equipamento electrónico com os
detritos domésticos. Peça informação a seu município
sobre as possibilidades de uma correcta eliminação que
não polua o meio ambiente. Respeite sempre as normas
vigentes na matéria. Os transgressores estão sujeitos às
sanções e às medidas que estabelece a lei.”
Специальное замечание, согласно Директиве ЕС по
утилизации электрических и электронных приборов
(WEEE):
“Никогда не выбрасывайте да нный электр онный
прибор вместе с домашними отходами. Запросите в
вашем муниципальном совете информацию о методах
правильной утилизации, позволяющих не загрязнять
окружающую среду. Всегда соблюдайте действующие
нормы в области охраны окружающей среды. В
отношении лиц, нарушающих данные правила, будут
прим енены сан кции и меры, пр едусмотр енные
законодательством”.
38
Page 39

Page 40

 Loading...