

Air Innovations MH-509 User Manual
CLEAN MIST™ SMART HUMIDIFIER
Instruction Manual and Warranty Information
™
IM0030C
READ AND SAVE THESE INSTRUCTIONS

Contents
Safety Instructions ............................................................................................................. 1
Unpacking / Specications ............................................................................................... 2
Parts & Contents ............................................................................................................... 3
Filling The Water Tank ....................................................................................................... 4
Operating Instructions ....................................................................................................... 5
Weekly Cleaning & Care / Storage .................................................................................... 6
Troubleshooting ................................................................................................................. 7
Other Great Products ........................................................................................................ 8
Warranty .............................................................................................................. Last Page
If you have a respiratory condition, please contact your physician prior to use.
FCC STATEMENT
Potential for Radio/Television interference
This device complies with Part 18 of the FCC Rules. Operation is subject to the following two conditions:
(1) This device may not cause harmful interference, and (2) this device must accept any interference received,
including interference that may cause undesired operation.This product has been tested and found to comply
with the limits for a Class B digital device, pursuant to Part 18 of the FCC rules.
These limits are designed to provide reasonable protection against harmful interference in a residential installation.
The product generates, uses, and can radiate radio frequency energy and, if not installed and used in accordance
with the instructions, may cause harmful interference to radio communications. However, there is no guarantee
that the interference will not occur in a particular installation. If the product does cause harmful interference to
radio or television reception, which can be determined by turning the product on or o, the user is encouraged to
try to correct the interference by one or more of the following measures:
• Reorient or relocate the receiving antenna.
• Increase the separation between the product and the receiver.
• Connect the product into an outlet on a circuit dierent from that to which the receiver is connected.
• Consult the dealer or an experienced radio/TV technician for help
• Changes or modications not expressly approved by the party responsible for compliance could void the
user’s authority to operate the equipment.

SAFETY INSTRUCTIONS
Prior to using the appliance, read through the instructions for complete use and
keep in a safe place for later reference.
•
WARNING: DO NOT use outdoors. Only use as intended and described
in this manual.
•
WARNING: DO NOT expose or immerse the Base in water or other liquids.
• Before using the appliance, extend the cord and inspect for any signs of
damage. WARNING: DO NOT use if cord has been damaged.
•
WARNING: Keep cord away from heated surfaces and out of the way,
where it cannot be stepped on or tripped over.
•
WARNING: This appliance has a polarized plug (one blade is wider than the other)
as a safety feature. If the plug does not t fully into the outlet, reverse the plug.
If it still doesn’t t, contact a qualied electrician. WARNING: DO NOT attempt
to defeat this safety feature.
•
WARNING: ALWAYS place humidier on an elevated rm, at, level surface
where it’s not easily knocked over. (e.g. on a table, chest, cabinet, etc.).
•
WARNING: DO NOT place the appliance directly on the oor, next to a heating
vent, under direct sunlight, high temperature areas, near computers or sensitive
electronic equipment.
•
WARNING: DO NOT place the appliance directly on wood furniture or other
surfaces which could get damaged by water.
•
WARNING: NEVER use in an environment where explosive gases are present.
•
WARNING: DO NOT use any attachments not provided with the unit.
•
WARNING: NEVER use the appliance after a malfunction, after it has been
dropped or damaged in any other way.
• Only operate when fully assembled.
• Keep out of reach of children. Close supervision is necessary when this
appliance is used by or near children, elderly or disabled persons.
•
WARNING: NEVER drop or insert any object into any opening.
•
WARNING: DO NOT block any air outlets or intakes.
•
WARNING: NEVER cover the appliance when it’s in operation.
•
WARNING: To unplug turn controls to the “OFF” position, then remove the plug
from the outlet. Ensure your hands are dry.
•
WARNING: ALWAYS unplug and EMPTY the Water Tank when not in use for a
long period of time.
•
WARNING: ALWAYS turn o or unplug before removing, lling or emptying
the Water Tank.
•
WARNING: DO NOT wash, adjust or move without rst unplugging the unit.
•
WARNING: DO NOT touch the water or any other part in the Base
during operation.
•
WARNING: NEVER operate WITHOUT water in the tank.
•
WARNING: DO NOT use hot water in the tank.
•
WARNING: ONLY use water in the tank, never use any additive such as
essential oils, eucalyptus, water conditioners, etc… in the water.
•
WARNING: DO NOT move appliance with water inside the tank. In this case
remove the Water Tank and empty the Water Reservoir prior to moving.
•
WARNING: DO NOT attempt to repair or adjust the unit. Servicing must be
performed by professional or qualied personnel.
•
WARNING: Discontinue use if unit makes loud noises or has a strange smell.
• Perform regular maintenance of the Ultrasonic Nebulizer.
•
WARNING: DO NOT direct the mist against a wall or other home appliance.
•
WARNING: DO NOT pour water into the Base through Air Outlet during
cleaning and lling.
•
WARNING: DO NOT rinse Base under faucet.
•
WARNING: DO NOT immerse the Base in water.
•
WARNING: NEVER scrape the Ultrasonic Nebulizer with a hard or sharp object.
1
No More Dry Air
Thank you for choosing the Air Innovations® – Clean Mist™ Smart Humidier™ and
congratulations on taking this important step in improving the quality of air in your home
or oce.
The Air Innovations® – Clean Mist™ Smart Humidier™ uses Ultrasonic Technology to
create humidity instantaneously, while working silently to erase the discomforts of dry air.
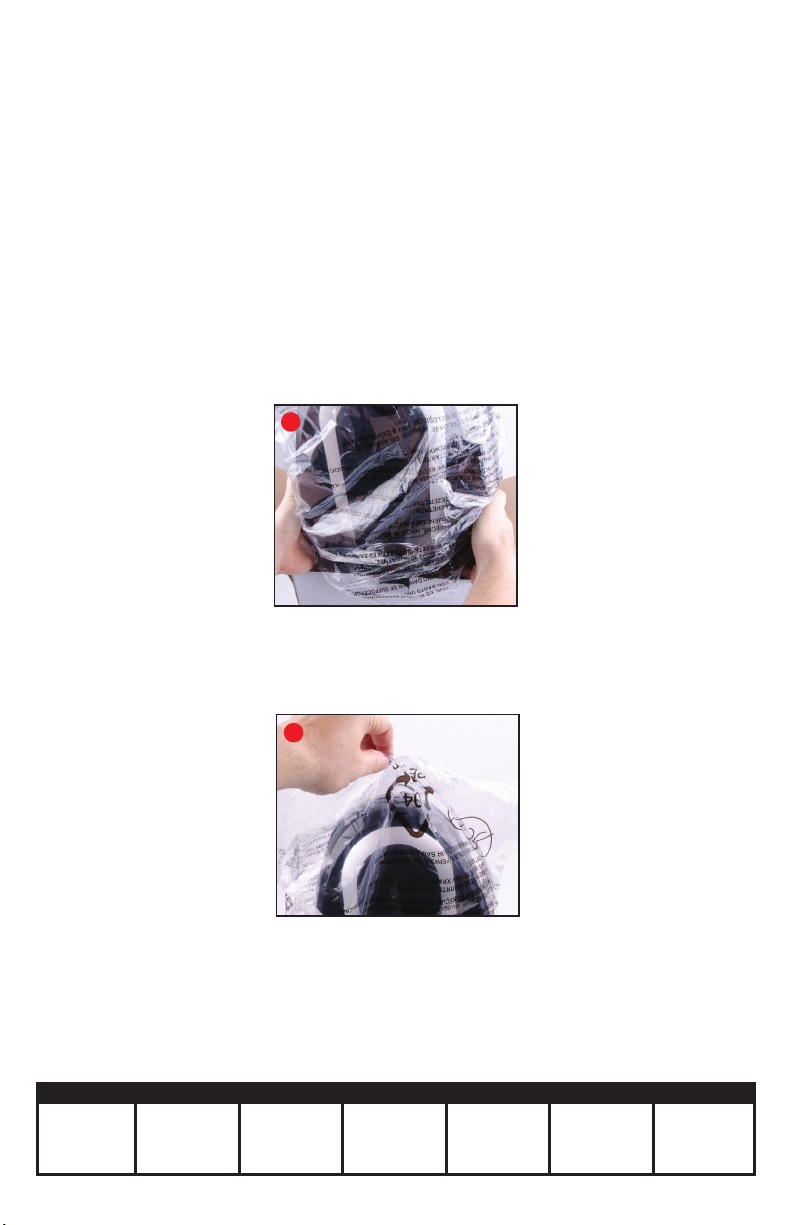
Unpacking
1
Carefully remove the humidier from
the box by pulling the Base of the unit
(Do not take the unit out of the box
by pulling the Water Tank).
2
Remove the plastic bag
from the humidier.
*Follow directions to ll and operate the humidier.
Specications
Proudct Model Power Consumption Current Rating Voltage Tank Capacity Dimensions Weight
MH-509 30W 0.4A 110-120V~60Hz 5.2L / 1.36
2
Gallon
9.75”W x 6.5”D
x 13.5” H
3.39 Lbs.
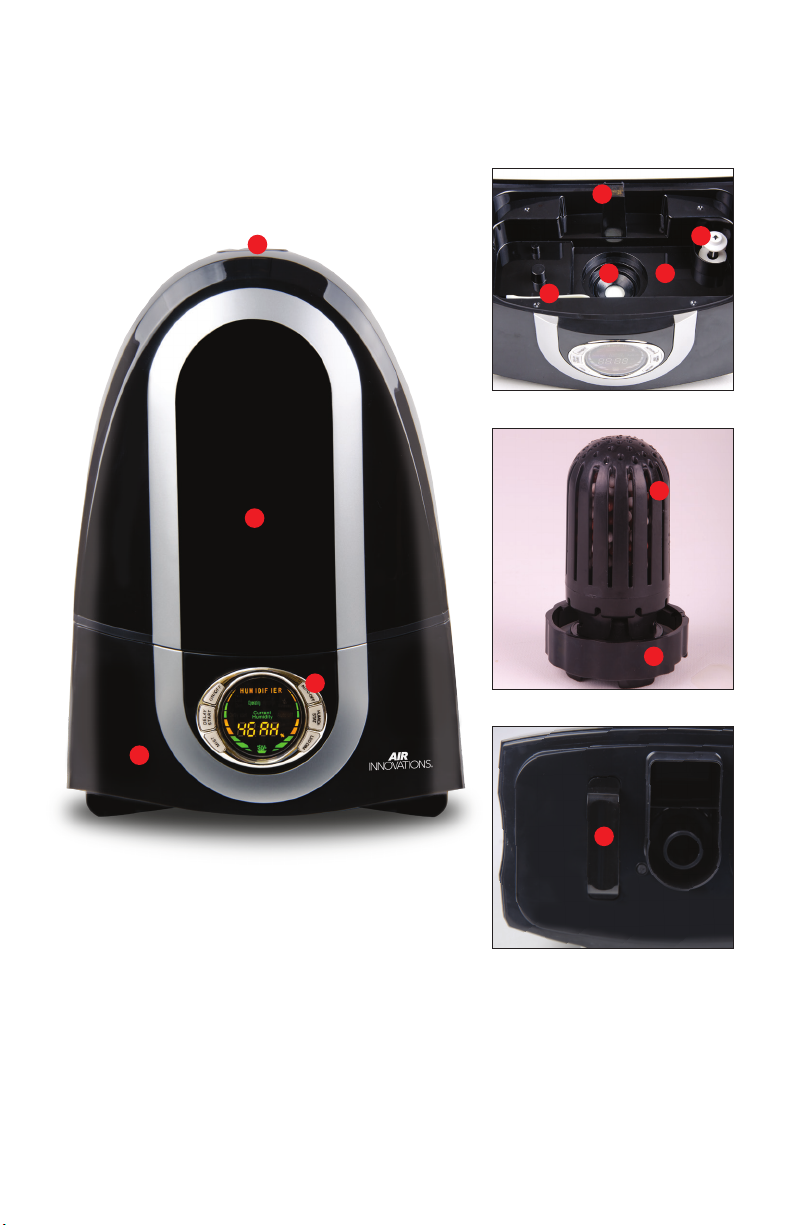
Parts & Contents
6
1
5
9
2
4
3
7
8
10
11
1. Rotating Mist Nozzle
2. Water Tank
3. Base
4. Control Panel
5. Ultrasonic Nebulizer
6. Air Outlet
12
7. Water Sensor
8. Water Reservoir
9. Cleaning Brush
10. Ceramic Filter
11. Tank Cap
12. Bottom Tank Handle
3
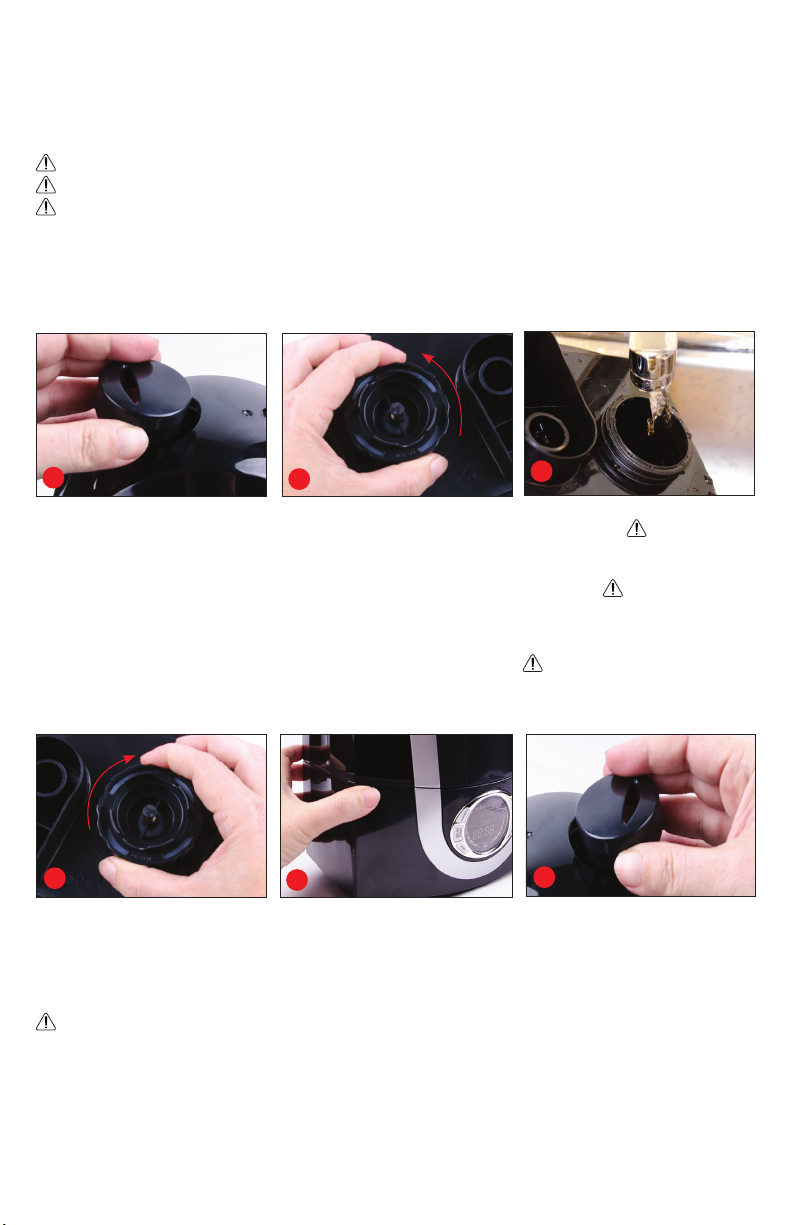
Filling The Water Tank
WARNING: Always unplug the unit before removing the Water Tank.
WARNING: DO NOT touch the water in the Base.
WARNING: NEVER ll the Water Tank from the top of the unit. Follow Water Tank
lling instructions in #3.
1
Remove Rotating Mist Nozzle
prior to lling the Water Tank.
4
Replace the Tank Cap by rmly
turning clockwise until tight.
Turn the Water Tank upright and
check the Tank Cap for leaks.
If any water drips, remove the
Tank Cap and retighten.
WARNING: DO NOT place
Water Tank on the humidier
Base if the cap is leaking.
2
Turn the Water Tank upside
down and remove the Tank Cap
by turning it counter clockwise.
5
Place the humidier Water Tank
on the Base, make sure to follow the shape of the Water Tank
and the humidier Base
(as shown above) so that the
tank sits level and ush to the
Base. Ensure the tank is rmly
seated.
3
Filling the Water Tank: Use clean,
cool, tap water. WARNING:
DO NOT
use extremely cold water,
since it may temporarily reduce the
mist output. WARNING:
ll with hot/warm water or use
additives as this could damage
the unit and void the warranty.
WARNING:
water STOP using tap water and use
ONLY ltered, distilled, cold boiled or
bottled water.
If you have hard tap
NEVER
6
Attach the Rotating Mist Nozzle
to the top of the Water Tank for
desired use as pictured.
4

Operating Instructions
WARNING: DO NOT operate the humidier without water in the tank.
WARNING: NEVER lift the tank o the Base while the unit is operating.
ON/OFF – Plug into a standard (120V AC) electrical outlet. The LED Display will turn
on for 2 seconds then turn OFF. Press the ON/OFF button once and the “Operating”
indicator will turn ON. Mist may not appear immediately; allow up to 15 minutes for the
water in the tank to transfer to the Base.
1
The Delay Start and Auto-O buttons allow you to set the humidier to turn ON and OFF automatically as desired.
Delay Start – The Delay Start feature allows you to program the unit to turn ON
Automatically. To use, press the “Delay Start” button once; you will see “Delay
Start” 01:00H illuminated on the display. This feature works in one hour increments and is programmable up to 24 hours. Simply keep pressing the Delay Start
button until you get to your desired delay start time, once you have reached the
time the display will ash three times and then will start to countdown until the
2
3
unit turns ON.
Auto-O – The Auto-O feature allows you to run the humidier now and set it
to turn O at a specic time automatically (in 1 hour increments from 1-24 hours).
To use - press the “Auto-O’ button once; you will see “Auto-O” 01:00H illuminated
on the display. This feature works in one hour increments and is programmable up
to 24 hours. Simply keep pressing the Auto-O button until you get to your desired
Auto-O time, once you have reached the time the display will ash three times and
then start to count down until the unit turns OFF. The display will start alternating between the current ambient humidity and the Auto-o Timer. NOTE: You can use the
Delay Start and Auto-O functions together on this fully programmable LED Display
to program the humidier to turn ON and turn OFF at your desired times.
Mist Output
the “Mist” button each time will increase the output. Press once for Medium, twice for High, three
times for Supreme. Pressing the Mist button a fourth time will bring the unit back to Low.
4
5
Humidistat – By using this feature the humidier will automatically monitor and con-
trol the humidity level according to your desired setting. Once the desired humidity level
is reached the mist will shut OFF until the humidity drops below the setting and then
the mist will turn back ON automatically to maintain the humidity level desired. To set
this feature press the “Humidistat” button to your desired setting. Settings range from
40%-95% RH (Relative Humidity) in 5% RH increments. A 40%-60% Relative Humidity
is recommended. Once you set your desired humidity, the number will blink 3 times and
then the display will revert back to the relative humidity. To view the set humidity level,
press the Humidistat button once.
LED Dim – To turn OFF the LED Display, press the “LED DIM” button once. Press
the “LED DIM”, or any other button on the control panel to turn the display back ON.
–
When you turn the unit ON, it will default to the lowest mist setting. Pressing
6
LOW Water – When the tank is out of water the “waterless” indicator will appear
in the display, you will hear 3 beeps and the automatic safety shut-o will turn the
Ultrasonic Nebulizer & unit OFF.
7
5
Weekly Cleaning & Care
WARNING: Before cleaning always turn power O and unplug the unit from outlet.
WARNING: DO NOT rinse Base under faucet. To clean, wipe the Base with a paper towel.
WARNING: DO NOT use any solvents or aggressive cleaning agents. Keep water away
from the Air Outlet. WARNING: DO NOT tamper with the Water Sensor.
About White Dust -Use of high-mineral content water may cause a white mineral residue to
accumulate on room surfaces near the humidier. The mineral residue is commonly referred to as
“White Dust”. The higher the mineral content (the harder your water is), the greater the potential for
White Dust. The White Dust is not caused by a defect in the humidier, but is due only to minerals
suspended in the water from your tap. WARNING: If you have hard tap water STOP using tap
water and use ONLY ltered, distilled, cold boiled or bottled water to minimize the White Dust
residue.
Tank Cleaning - Remove the Rotating Mist Nozzle from the top of the Water Tank then remove the
Water Tank from the unit. Turn the tank upside down, unscrew the Tank Cap and drain any water
from the tank. Wipe the tank with a soft damp cloth then rinse it with warm water inside and out.
Base Cleaning - Gently wipe the Base with a soft damp
cloth.
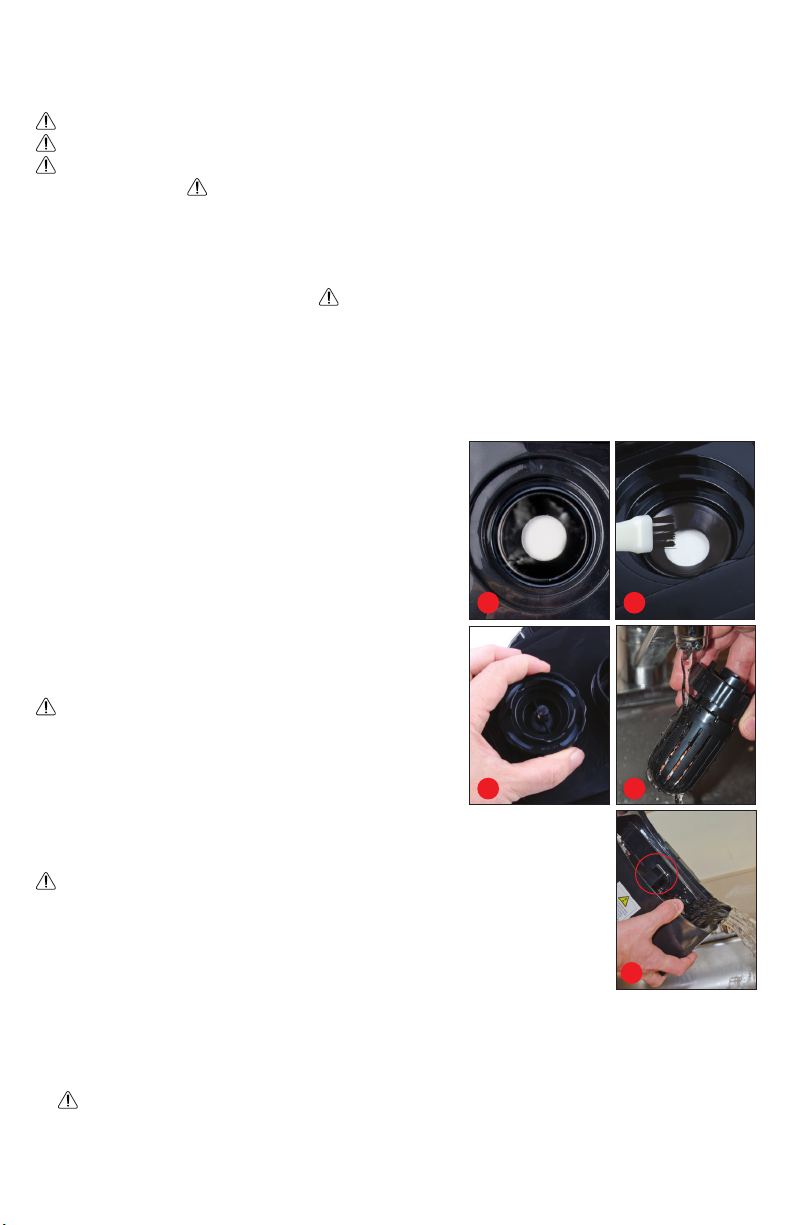
White Dust Cleaning - If mineral deposits
“White Dust” are evident around the Ultrasonic
Nebulizer and Water Sensor, clean these surfaces
with a soft, cloth and a small amount of undiluted
white vinegar. If necessary, mix a solution of 50%
white vinegar and 50% water and ll the Base with
enough solution to cover the Ultrasonic Nebulizer (a).
Allow it to soak for an hour and then use the provided
brush to gently loosen buildup on the
Ultrasonic Nebulizer (b). Put 1 cup of water in the
Base and wipe clean with a soft cloth.
WARNING: DO NOT rinse base under faucet.
Ceramic Water Filter Cleaning - Remove the
Water Tank from the humidier Base. Remove the
Tank Cap (c) and rinse Ceramic Filter thoroughly with
tap water, then replace on Water Tank (d).
Surface Cleaning - Clean all surfaces of the unit with a clean
damp soft cloth.
WARNING: When emptying the Water Reservoir on the Base, make
sure that the water is poured away from the Air Outlet (e). If water is
poured into the outlet it may damage the humidier.
a
c
b
d
Storage
1. Follow all cleaning instructions prior to storage.
2. Dry all parts, including the inside of the Water Tank.
WARNING: NEVER
3. Leave the Water Tank Cap partially loosened to prolong the life of the cap.
4. Preferably store in its original box, in a dry place away from high temperatures.
5. Follow all cleaning instructions after long periods of storage.
6
leave water inside the tank for several days.
e
 Loading...