

Page 1
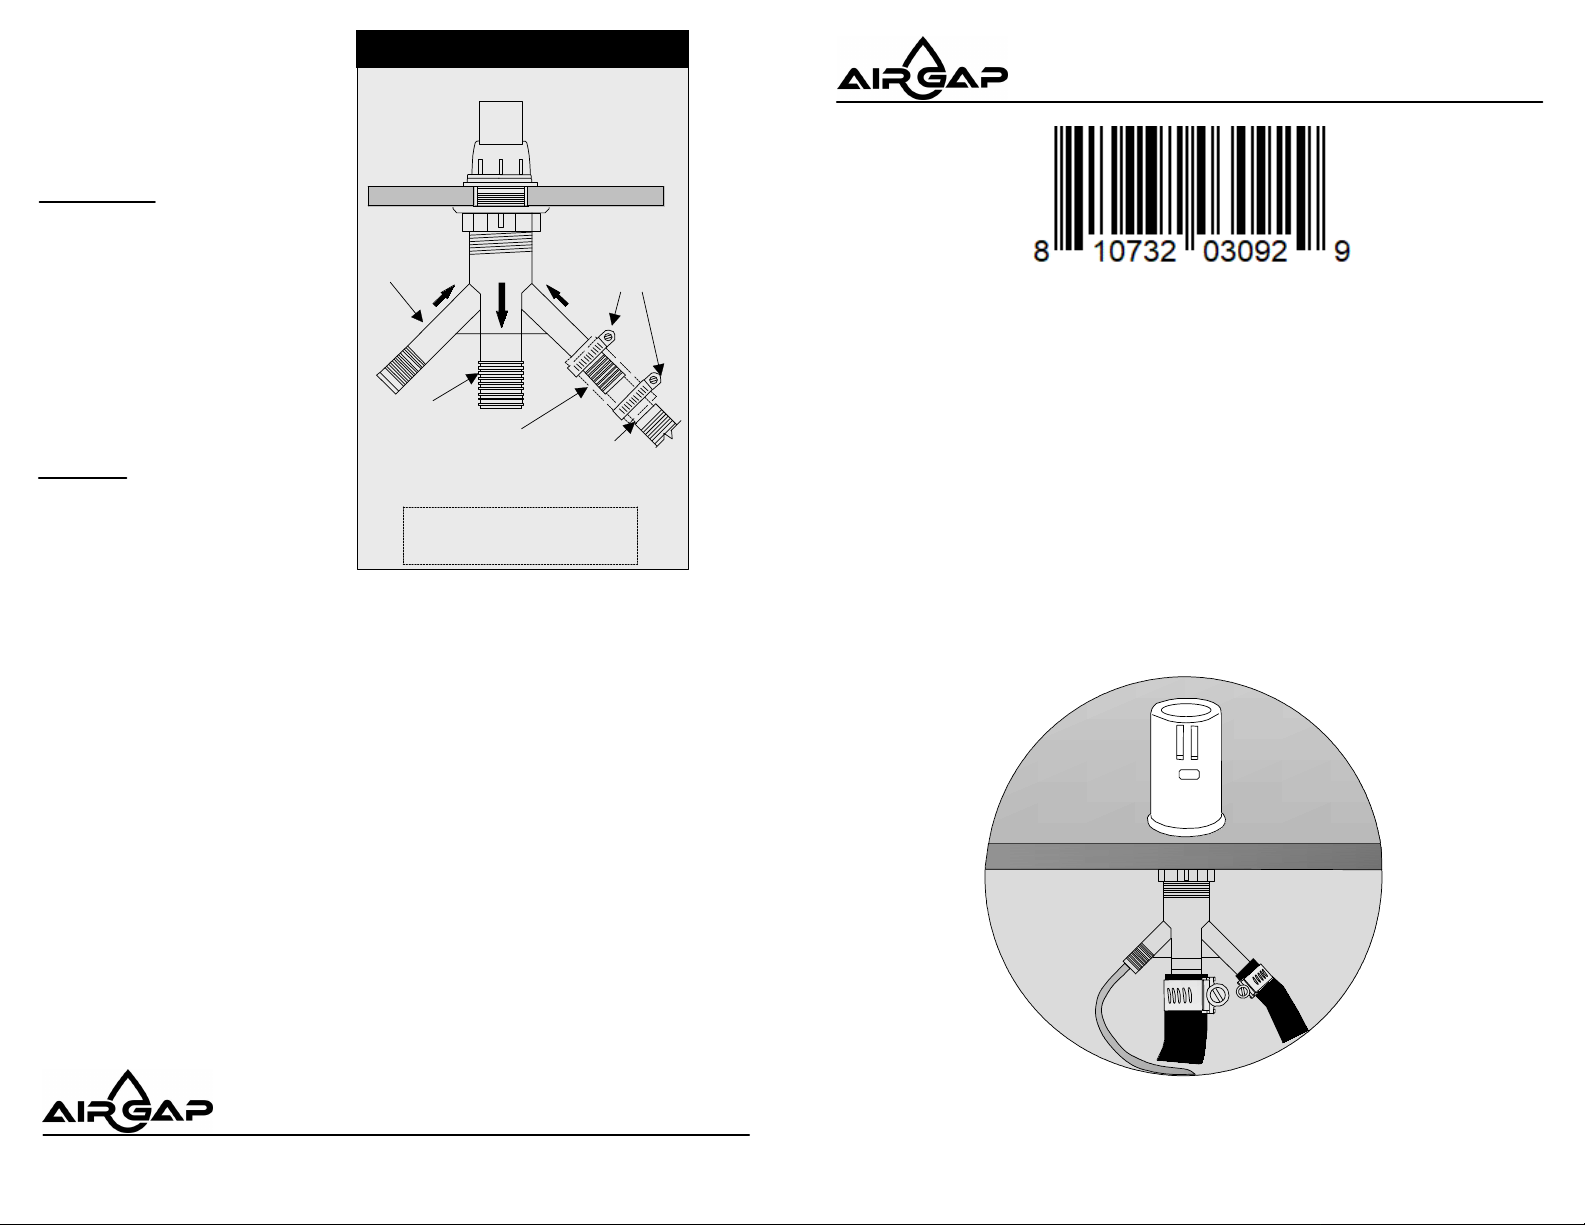
11. Connect the AG200-005
outlet to the garbage disposal
drain inlet by using a length of
7/8-inch dishwasher drain line
hose and two hose clamps.
IMPORTANT:
Remove the garbage disposal
knock-out plug if still present. Tap
away all edges until a round hole
remains. Disconnect power to the
garbage disposal unit and then
remove all loose pieces from the
nside the disposal. Run fingers
carefully around the bottom of the
disposal chamber to locate any
fragments. (See Caution below)
CAUTION: Exercise extreme caution
whenever reaching hand inside the
garbage disposal. After confirming
that power has been turned off (and
will stay off until the job is complete),
use extra care not to cut fingers on
sharp surfaces.
Making Tubing Connections
Both inlet ports
are identical.
Tubing not
furnished. Use
existing tubing and
clamps or
purchase at local
supply store (7/8”
I.D. waste disposal
tubing.)
Both inlet ports can handle twin high
flow inputs. Up to 5.0GMP (19.0LPM)
is recommended for each port.
5/8” I.D.
rubber
tubing
tubing leaving about
push over inlet port
FIG 5.
Stainless
screw
drive clamps
Fully insert the
dishwasher drain
1 1/8" of cuff to
Placentia, California
Model:
AG200-005
AMERIGAP
DISHWASHER AND RO
AIR GAP
REPLACEMENT INSTALLATION
(To replace an existing dishwasher air gap with the AG200-005)
1. Disconnect inlet and outlet drain hoses from the existing air gap. Save hose
clamps for reassembly.
2. Remove the existing air gap from a sink or countertop. Clean the surface before
installing the AG200-005.
3. Follow instructions under the new installation section.
MAINTENANCE:
Dishwasher air gaps may become clogged with leftover food debris escaping the
dishwasher filtering mechanism. The AG200-005 is easy to clean in the event of a clog.
To clear a blockage, remove the decorative cover cap and unscrew the top nut. Remove
the top housing, sliding it straight up and then remove any trapped food particles.
After cleaning, carefully replace the top housing. Take care to align the key on the top
housing with A slot in the air gap's body (see Fig.2).
Install the top nut before replacing the Cover cap.
Copyright AIR GAP INTERNATIONAL
500 Jefferson St. Placentia, CA 92870 USA • 949-955-3928 • Email: [email protected]
Doc. # 400-0717-003
Page 2
AG200-005
Installation Procedures
Caution - Do Not Overtighten Nuts or Clamps
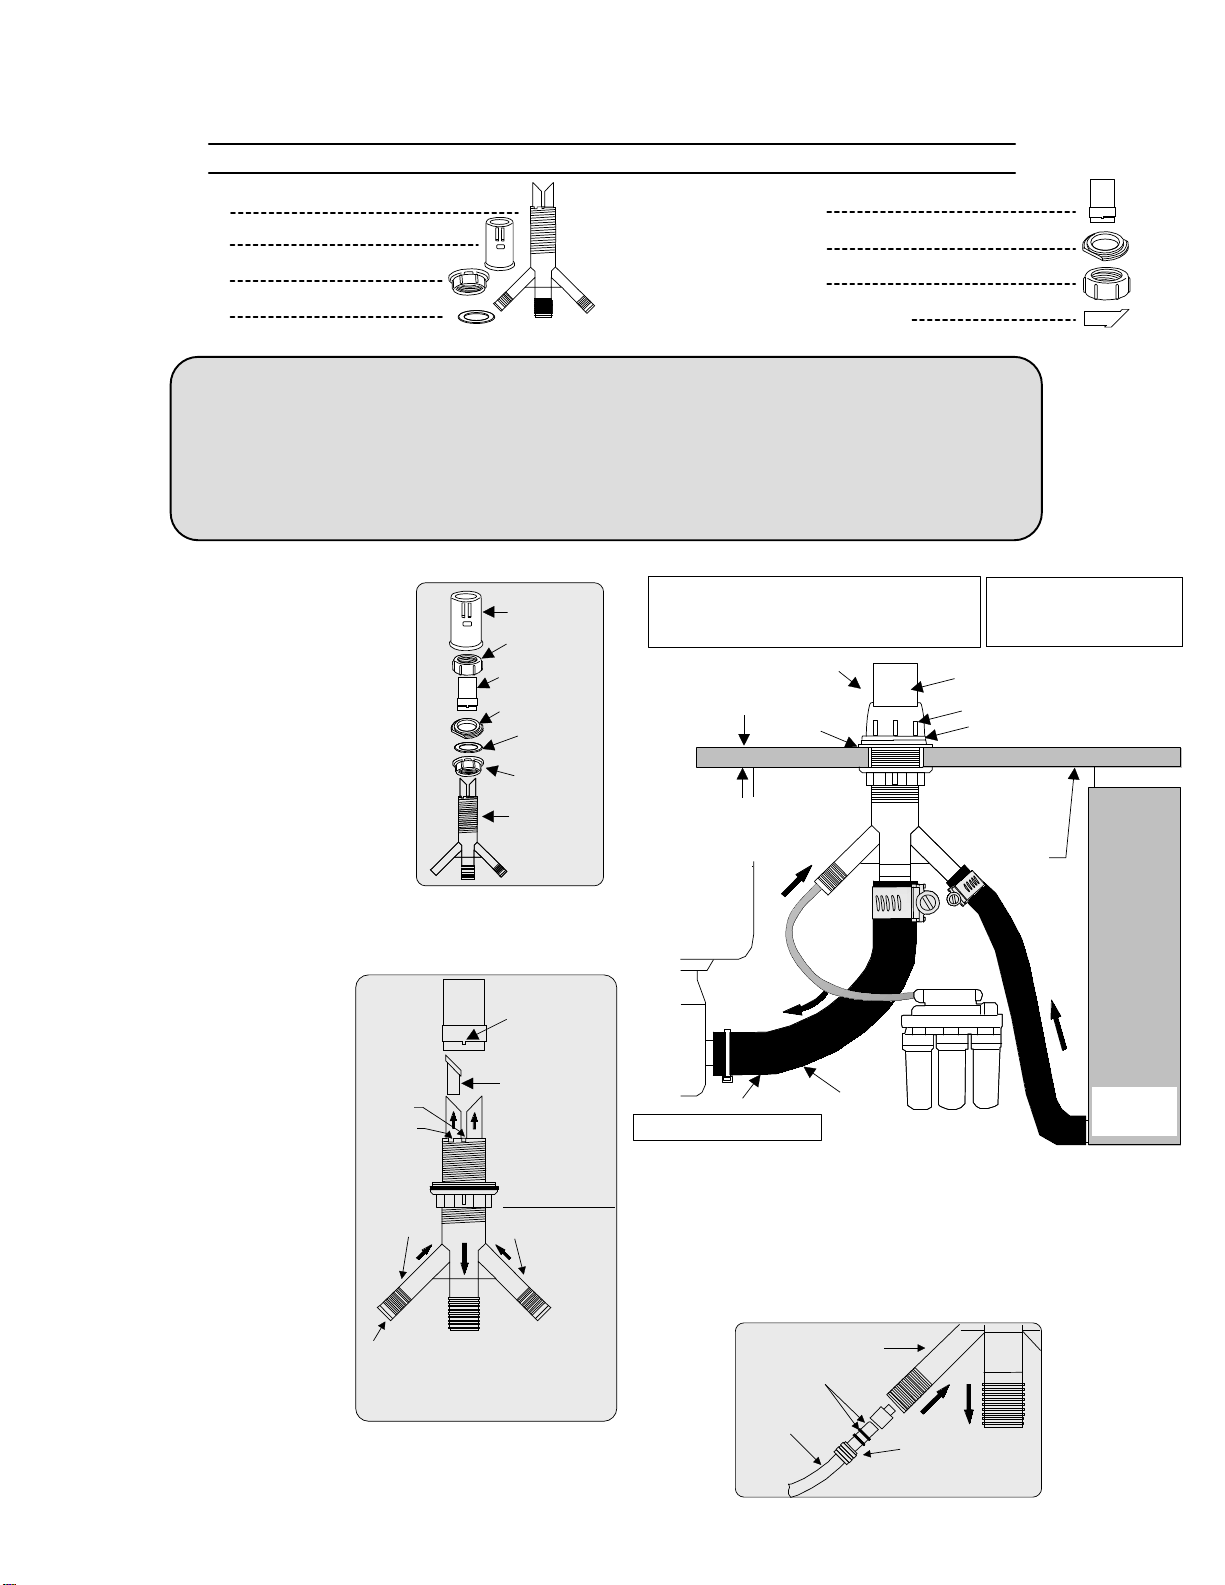
LIST OF PARTS ENCLOSED
1 – Main Body
1 – Cover Cap
1 – Bottom Nut
1 – Washer
A dishwasher air gap is a critical component in maintaining a safe water
supply. It prevents contaminants in the sink from flowing into the
dishwasher and is required by code in most states.
The Amerigap brand dual dishwasher air gap provides many advantages
over other air gaps available on the market.
It ensures safety and peace of mind that your water supply is clean.
Please read the instructions once through before starting.
NEW INSTALLATION
1. Unit installation requires a 1-3/8-inch
hole in the sink or countertop.
2. Unscrew the top nut from the
AG200-005 body. Next, unscrew and
remove the mounting nut and the washer.
Turn the bottom nut further down the air
gap's body. Leave sufficient length for the
thread to protrude up through the
mounting hole. (See Fig.1)
3. Insert the air gap from the bottom through
the hole in the sink. Reinstall the washer and
mounting nut over the threaded main body
of the unit.
4. If only one inlet is needed, use the
plug provided to cover the unused
port.
Cover Cap
Top Nut
Top Housing
Mounting Nut
Mounting
Washer
Bottom Nut
Main Body
FIG. 1
1 – Top Housing
1 – Mounting Nut
1 – Top Nut
1 – Inlet Plug
To clean the decorative cap, use mild soap
and water. Do not clean with abrasive
cleaners.
Decorative cap
Table thickness
up to 2 3/8"
Washer
Use suitable
tool.
Basin wrench is
recommended.
Sink
1
2
CAUTION: (NO TOOLS)
Use hands
only above the sink
Top housing
Top Nut
Mounting Nut
Use suitable
cuff
adapter over
inlet
port(s) when
needed.
Sink
Mounting
Deck
FIG. 3
5. If a port plug is required, then
remove the top housing sliding it
straight up. After the plug is inserted,
place the top housing back by
pushing down and carefully rotating it
until the housing key engages with
the A slot keyway in the threaded air
gap body. (See Fig. 2).
6. Install top nut over the housing and
screw it down until it touches the
mounting nut.
7. Orient the bottom inlets and
outlet under the sink as desired.
Pull down on the air gap while
tightening the bottom nut
clockwise.
DO NOT OVER-TIGHTEN.
8. Install the decorative cap by
pushing it down over the housing.
Rotate the decorative cap so that
the two air gap openings face the
sink.
"A" slot
"B" slot
Inlet Port 1
1
Low flow
1/4 inlet tubing
from "RO" unit
reject water port
"Key"
With only
inlet port 2
connected
included plug
must be
installed here
(Push fully down)
Inlet Port 2
2
FIG.2
-OVER-
Water
Disposal
7/8" hose ONLY
Do NOT use smaller hose
Avoid any
low spot
RO System
Dishwasher
9. Connect the dishwasher drain hose to the 5/8-inch inlet port of
the AG200-005 with hose clamp. (See Fig.3)
10. Connect hose from dishwasher to the air gap's port and
secure with worm clamps. ( See Fig.5)
11. See Fig. 4 for other ways to connect hoses to the air gap.
2 O-ring
Low Flow
Inlet port
Quick connect adapter
"John Guest" type
FIG.4
1/4" Tubing
 Loading...