

Page 1
Airflow Vector Pty Ltd
4 Collins Rd, DROMANA VIC. 3936
AUSTRALIA
Ph: +61 3 5987 3733
www.airflowvector.com
SD097E (S097 Instructions booklet).doc 23 March 2011 Page 1 of 16
\\Server\d\AirflowSnorkels\Products\Snorkels\S97\SD097E (S097 Instructions booklet).doc
Instructions to fit the Snorkel Kit S097
for the GWC V240 4WD
1.0 Introduction
Airflow Vector Pty Ltd thanks you for your purchase and the trust you put in our
products.
We strive to supply our customers with the highest quality equipment based on
the most efficient design and best styling. We are confident that you will enjoy
using our Snorkel system.
It should improve the power of your vehicle as well as reduce its fuel
consumption.
1.1 General instructions
Follow carefully the instructions listed on these pages and use the template
provided, do not over tighten bolts. Do not use silicone on any connections,
use mastic.
Ensure that safe work practices are followed when installing your Airflow
Snorkel. Protective ear and eye wear should be worn at all times when using
power tools.
1.2 Disclaimer
It is highly recommended that installation is undertaken by a qualified
mechanic or panel beater. Airflow Vector will not be held responsible for any
damage incurred through incorrect fitment of the templates and workmanship.
It is the responsibility of the fitter to ensure that particular care is taken when
assembling the Snorkel kit to the vehicle as it may cause damage to the
windscreen and or electrical components. Safe work practices must be used at
all times when undergoing installation.
We guarantee Airflow Vector’s kits against manufacturing defects as long as
proof of purchase can be established.
All models produced by Airflow Vector are verified to suit right hand drive
vehicles according to Australian specifications. Variations in vehicle
specifications may occur in other markets.
If you're in doubt about the product suitability, please forward a photograph of
the engine bay, air filter housing and of the vehicle at frontal/side position to
Page 2
Airflow Vector Pty Ltd
4 Collins Rd, DROMANA VIC. 3936
AUSTRALIA
Ph: +61 3 5987 3733
www.airflowvector.com
Page 2 of 16 23 March 2011 SD097E (S097 Instructions booklet).doc
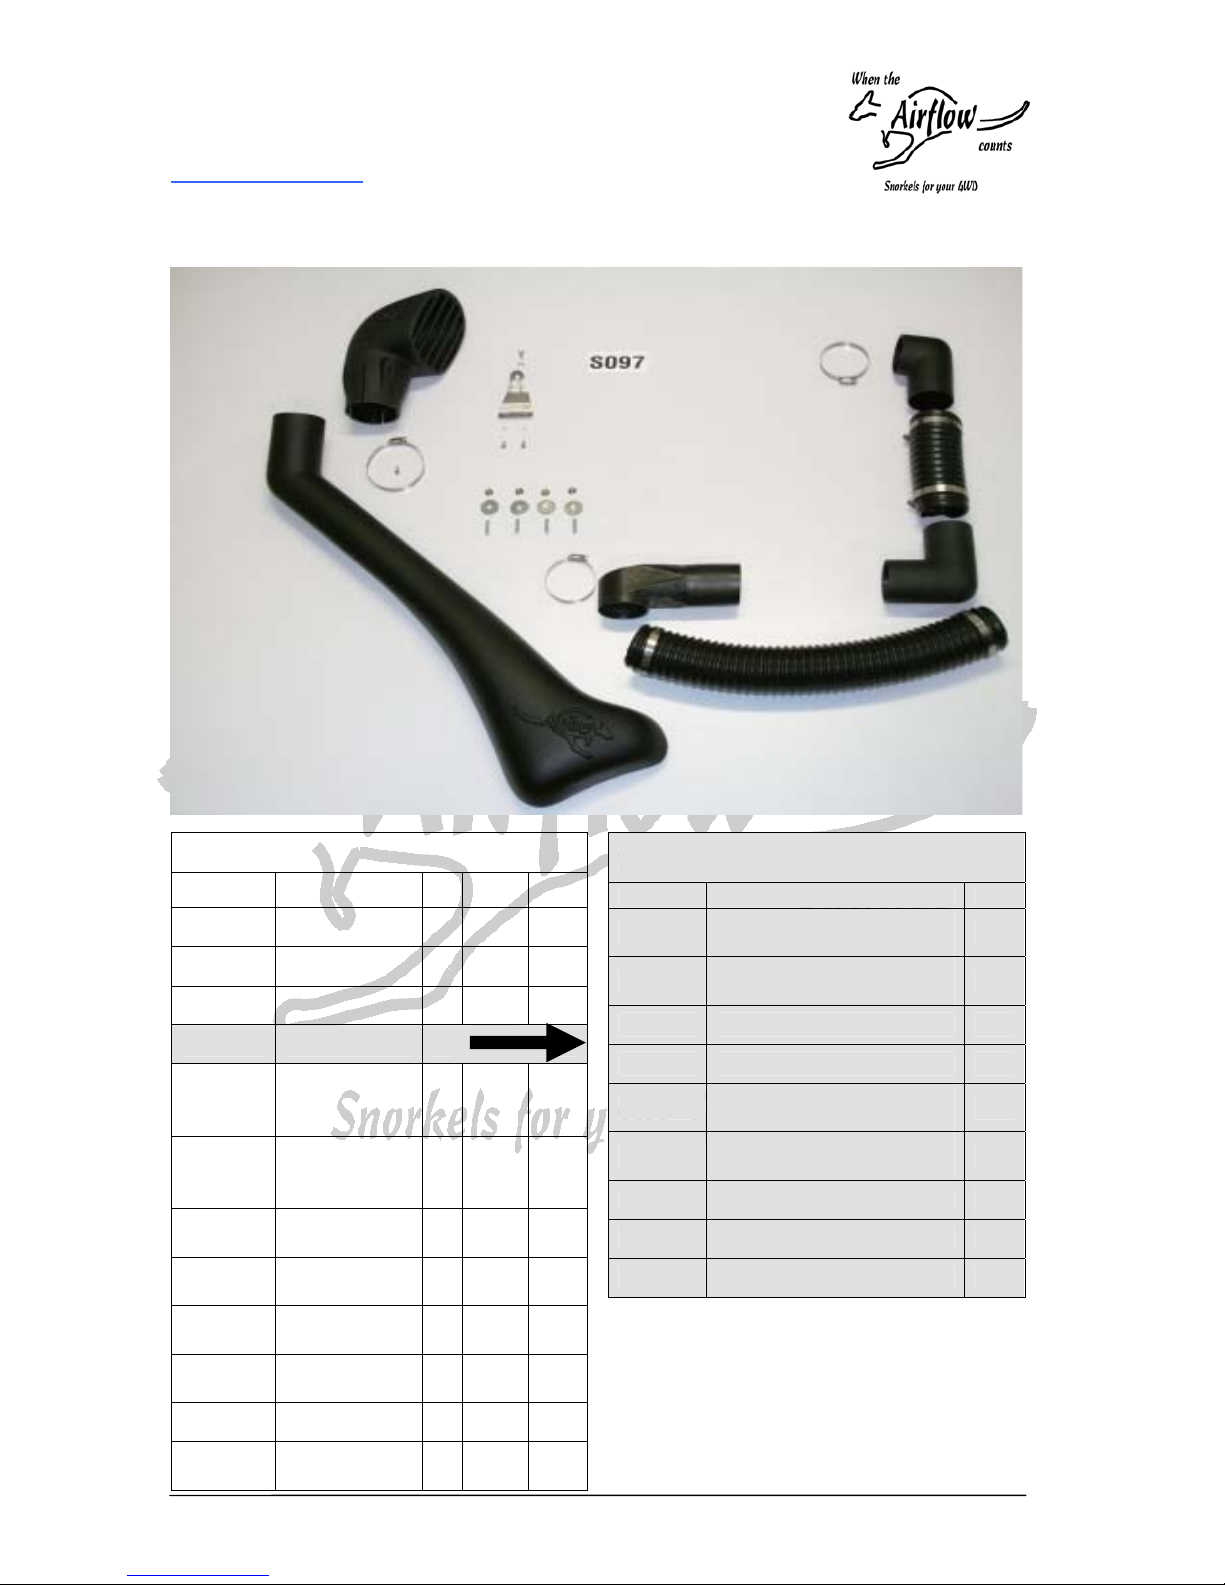
2.0 List of Components
S097 Kit content
Ref Designation
Qty
Length Unit
SP181 Snorkel V240 1
SP063 Air Ram 3.5” 1
SP090D Under bonnet 1
SK039 Bolt kit 1
SP137
Elbow
76OD/6576OD/60
1
SP137B
Elbow
76OD/6576OD/15
1
SP015
TPR Hose
76mm
1 550 mm
SP015
TPR Hose
76mm
1 200 mm
SP019
Hose clamp
60/80mm
6
SP018
Hose Clamp
80/100mm
1
SD097 Template 1
SD097E
Booklet in
English
1
Fasteners included
Ref Designation Qty
SP182
A Pillar Extended V240
4WD
1
SP023
Washer Spring 1/4 x 1/4
Z/P
1
SP026 Screw Plug Nylon 2
SP024 G/Bolt M6 x 12mm Z/P 1
SP025
Washer Panel 1/4 x 1.1/4
x 16g Z/P
4
SP029
Screw Self Tap 10gx5/8
Z/P
3
SP022 Stud M6 x 25mm Z/P 4
SP027 Flange Nut M6 Z/P 4
SP170 Plastic bag 75x125mm 1
Ensure that all parts listed are
included in the parcel before
starting any work.
The total expected time of
installation is around 3 hours.
Page 3
Airflow Vector Pty Ltd
4 Collins Rd, DROMANA VIC. 3936
AUSTRALIA
Ph: +61 3 5987 3733
www.airflowvector.com
SD097E (S097 Instructions booklet).doc 23 March 2011 Page 3 of 16
2.1 List of tools and additional parts required
Masking tape, clear tape, black mastic, hammer, centre punch
Assorted screw drivers, sockets and spanners
A 76mm and a 79mm hole saws
Assorted drill set, wet / dry sand paper, ½ round file, small square file,
Zinc rich primer
3.0 Detailed Instructions
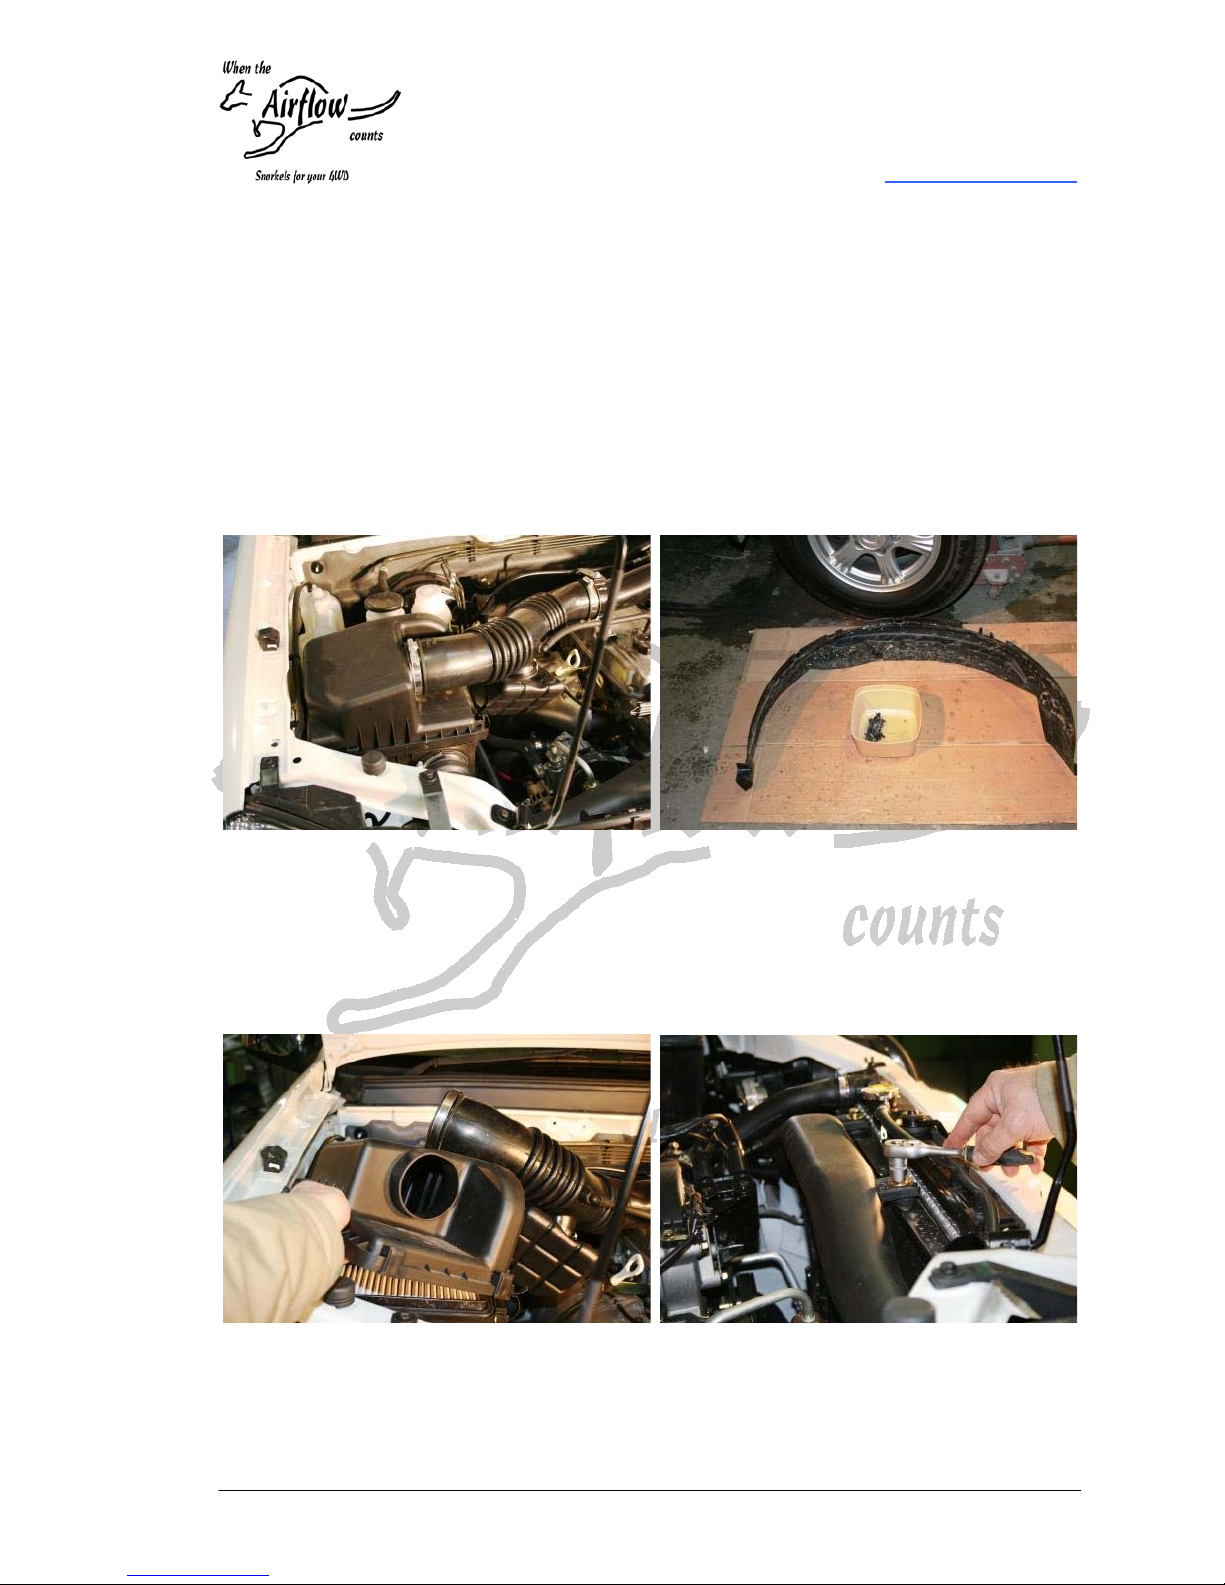
3.1 Prior starting any work,
ensure that the configuration
of the air box is as shown. If it
is not, the fitting of this kit will
not be possible. Contact your
dealer for further assistance
3.2 Remove the splash panel
3.3 Disconnect and remove the
top of the air box
3.4 Remove the air intake…
Page 4
Airflow Vector Pty Ltd
4 Collins Rd, DROMANA VIC. 3936
AUSTRALIA
Ph: +61 3 5987 3733
www.airflowvector.com
Page 4 of 16 23 March 2011 SD097E (S097 Instructions booklet).doc
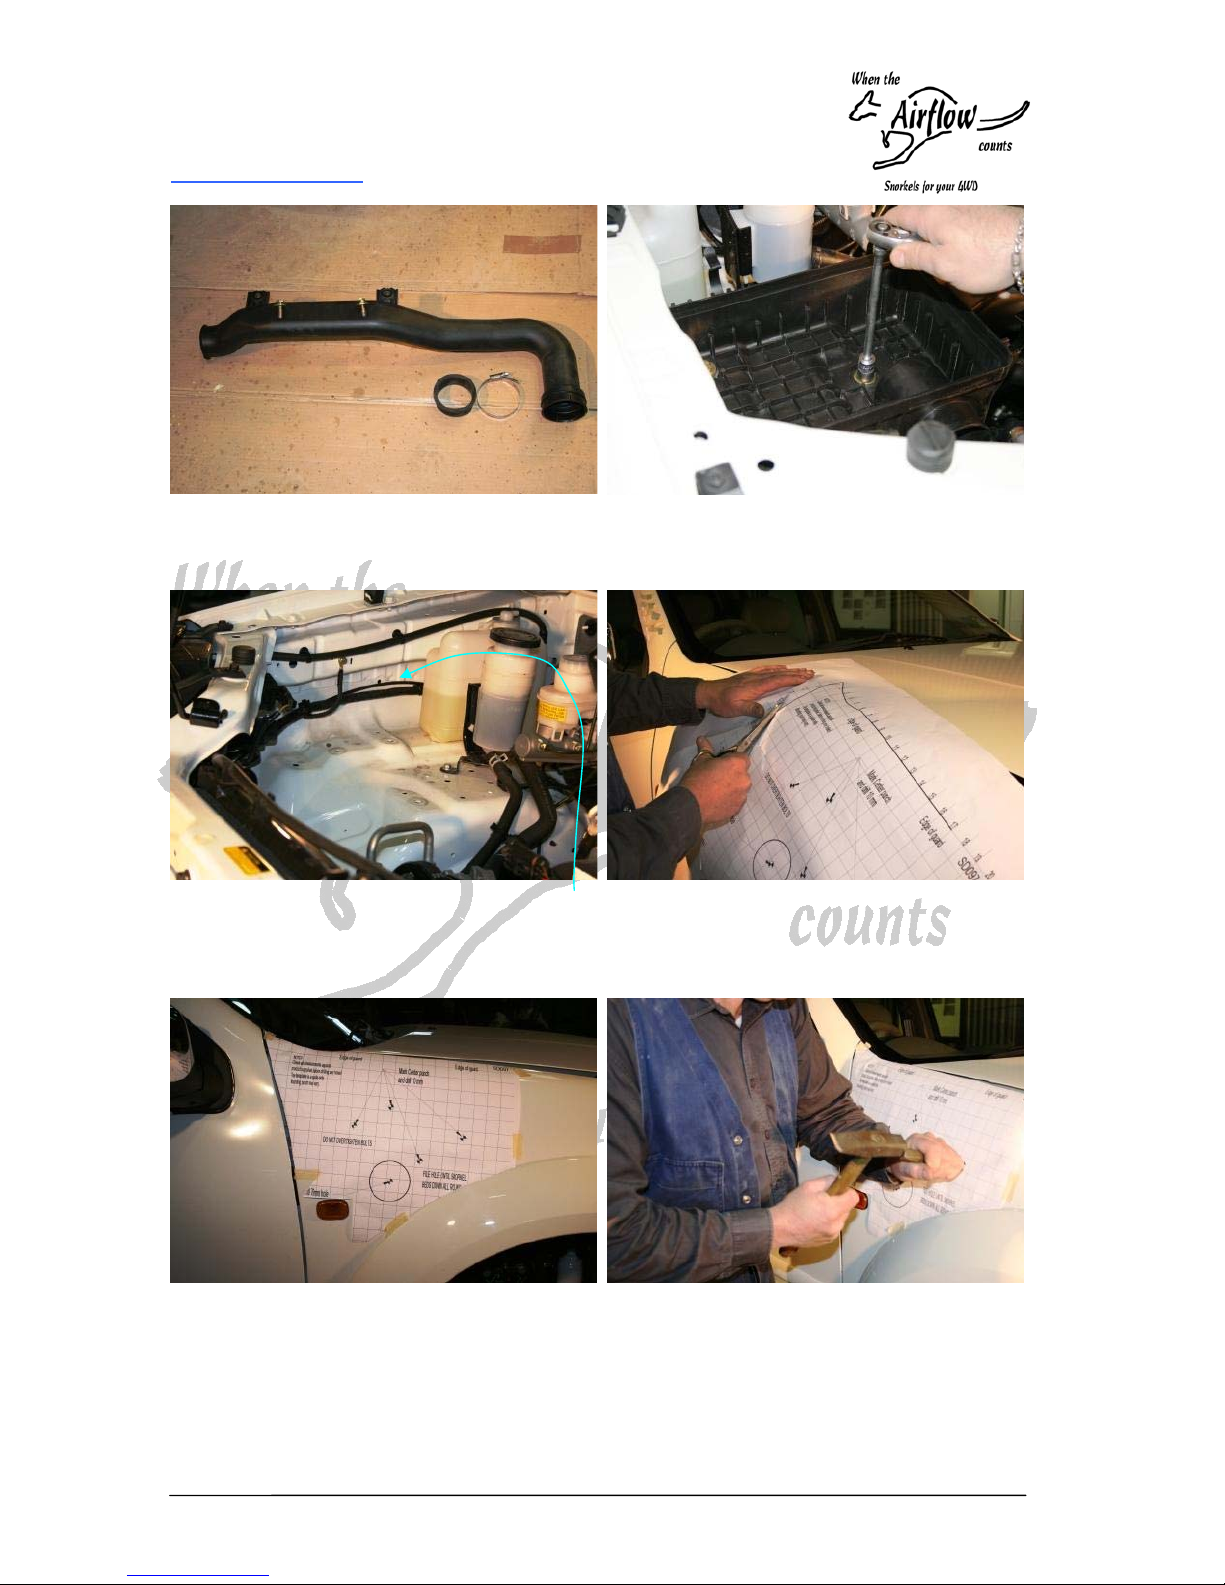
3.5 … and discard it. 3.6 Remove the air box from the
engine bay
3.7 Unclip the electrical harness 3.8 Read the template carefully
3.9 Cut the template out along
the guard line
3.10 Line up the template to the
guard edges
3.11 Tape it to the guard ensuring
to fit the contours of the
guard
3.12 Centre punch all marked
holes
3.13 Ensure the electric cable
harness located under the
guard is out of the way
Page 5
Airflow Vector Pty Ltd
4 Collins Rd, DROMANA VIC. 3936
AUSTRALIA
Ph: +61 3 5987 3733
www.airflowvector.com
SD097E (S097 Instructions booklet).doc 23 March 2011 Page 5 of 16
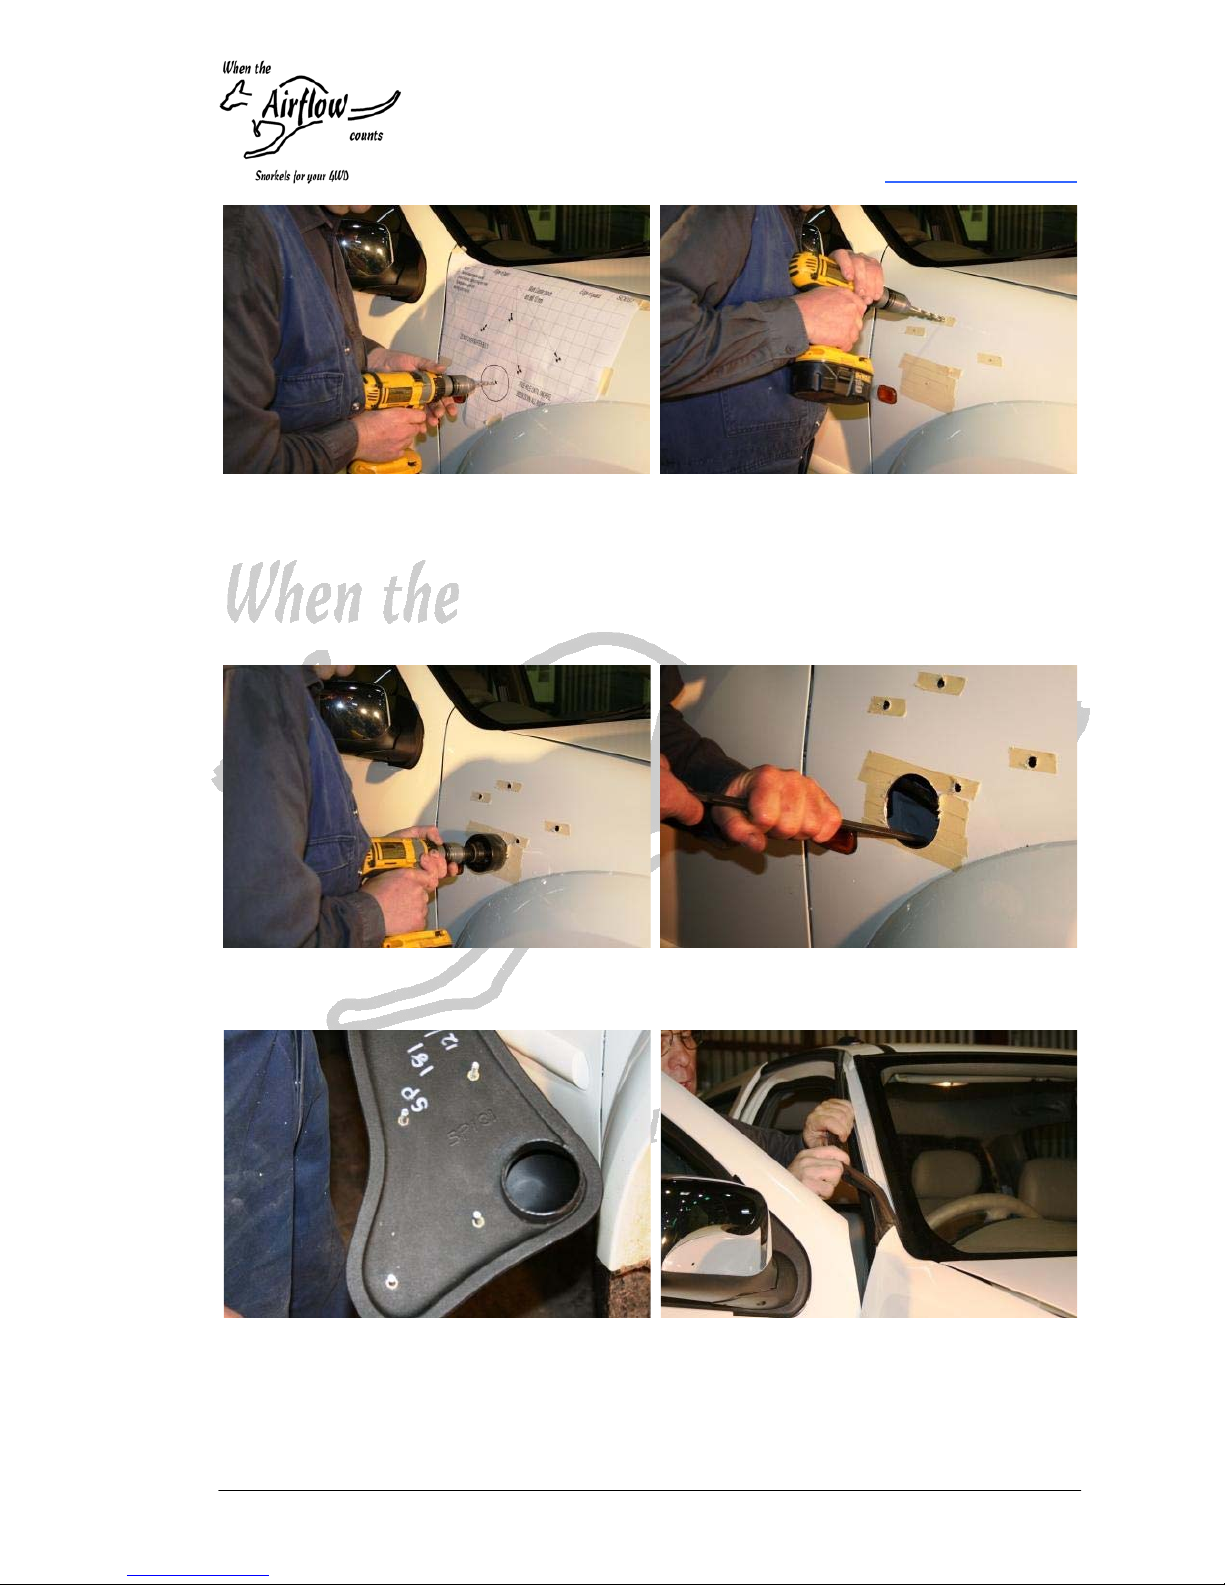
3.14 Pre-drill all holes at 5mm (4
snorkel mounting holes, 1 air
intake hole)
3.15 Remove the template
3.16 Cover the areas to be drilled
with masking tape
3.17 Drill the 4 snorkel mounting
holes at 10mm
3.18 Using the hole saw, drill at
LOW SPEED a 76mm hole
3.19 File to suit snorkel tube and
to remove any burr
3.20 Screw the 4 studs SP022 with
chemical locking compound;
at least 20mm must protrude
3.21 Peel off the rubber seal from
the A Pillar
Page 6
Airflow Vector Pty Ltd
4 Collins Rd, DROMANA VIC. 3936
AUSTRALIA
Ph: +61 3 5987 3733
www.airflowvector.com
Page 6 of 16 23 March 2011 SD097E (S097 Instructions booklet).doc
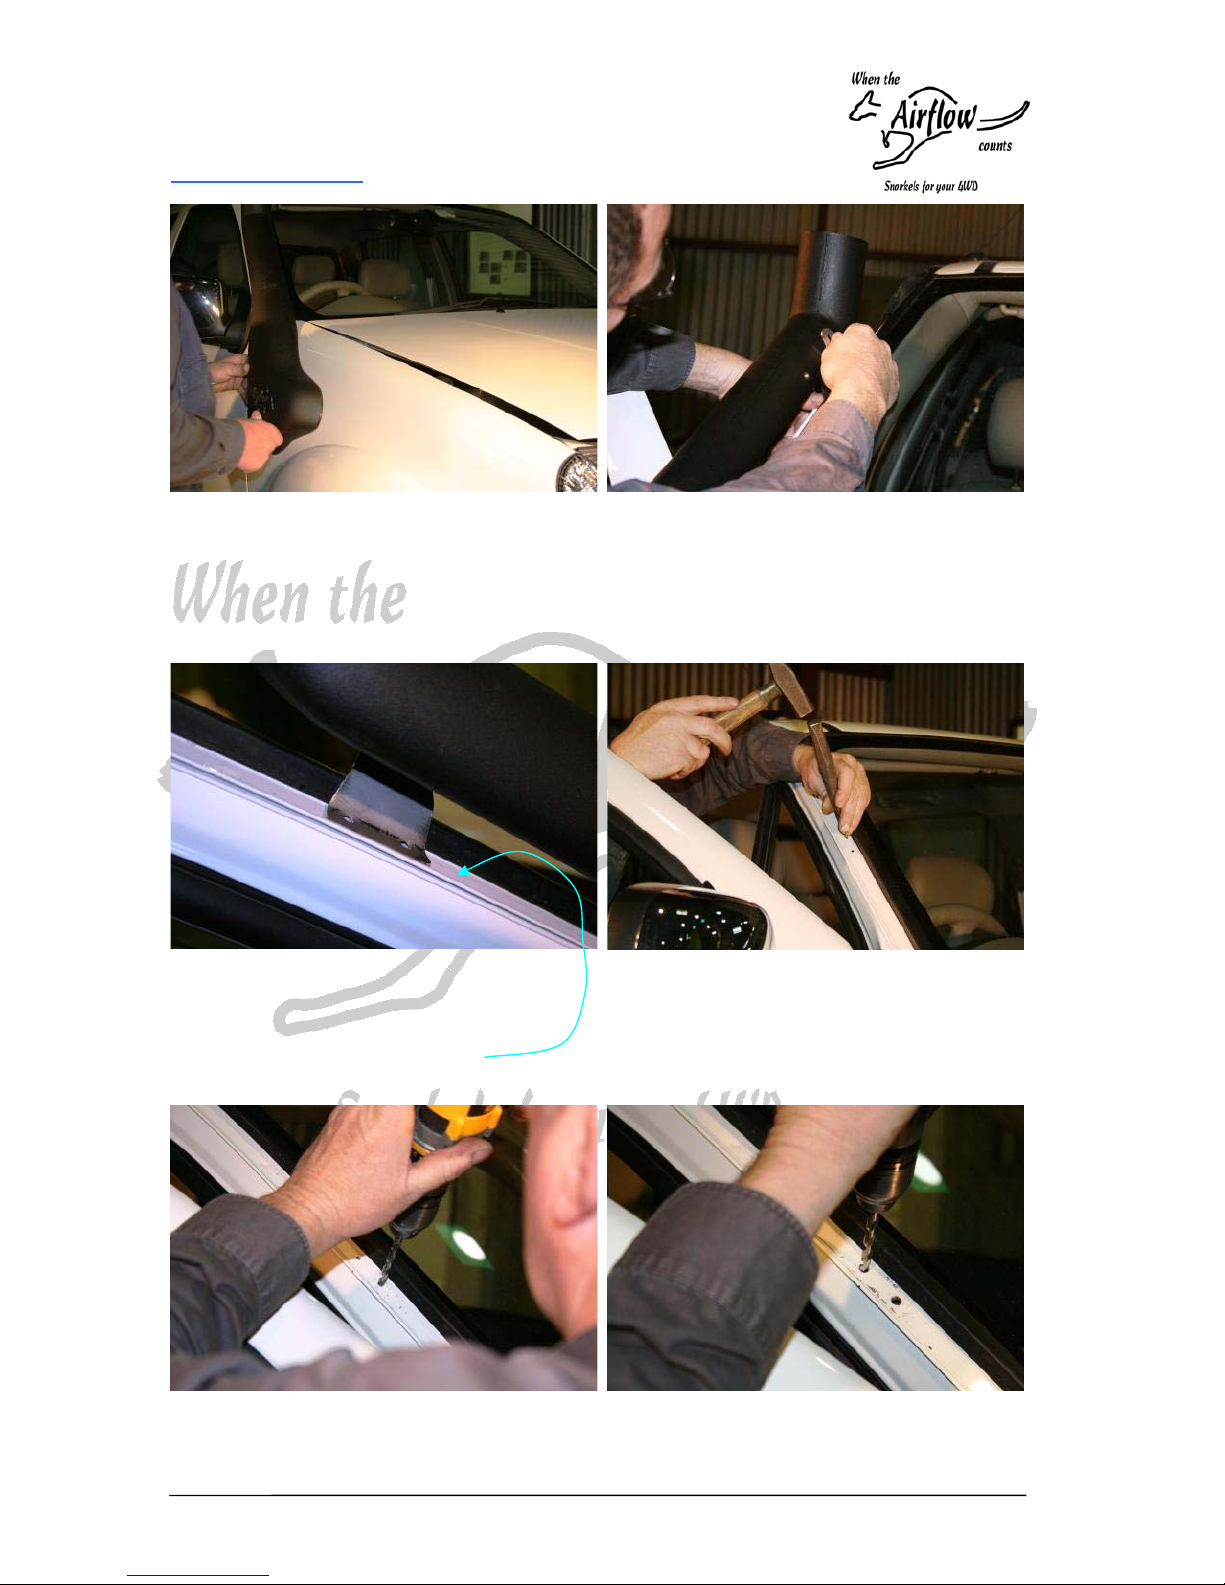
3.22 Fit temporarily the snorkel
SP181 to allow the marking of
the “A” pillar bracket
3.23 Fit the “A” pillar bracket
SP182 with the washer
SP023 and bolt SP024
Do not over tighten fixings to
avoid damage to the snorkel
3.24 Mark the “A” pillar bracket
position
3.25 Ensure the bracket slips
UNDER the lip
3.26 Remove the snorkel
3.27 Centre punch the 2 holes
3.28 Pre-drill two 4mm holes in the
“A” Pillar
3.29 Then drill the two holes at
7mm
Page 7
Airflow Vector Pty Ltd
4 Collins Rd, DROMANA VIC. 3936
AUSTRALIA
Ph: +61 3 5987 3733
www.airflowvector.com
SD097E (S097 Instructions booklet).doc 23 March 2011 Page 7 of 16
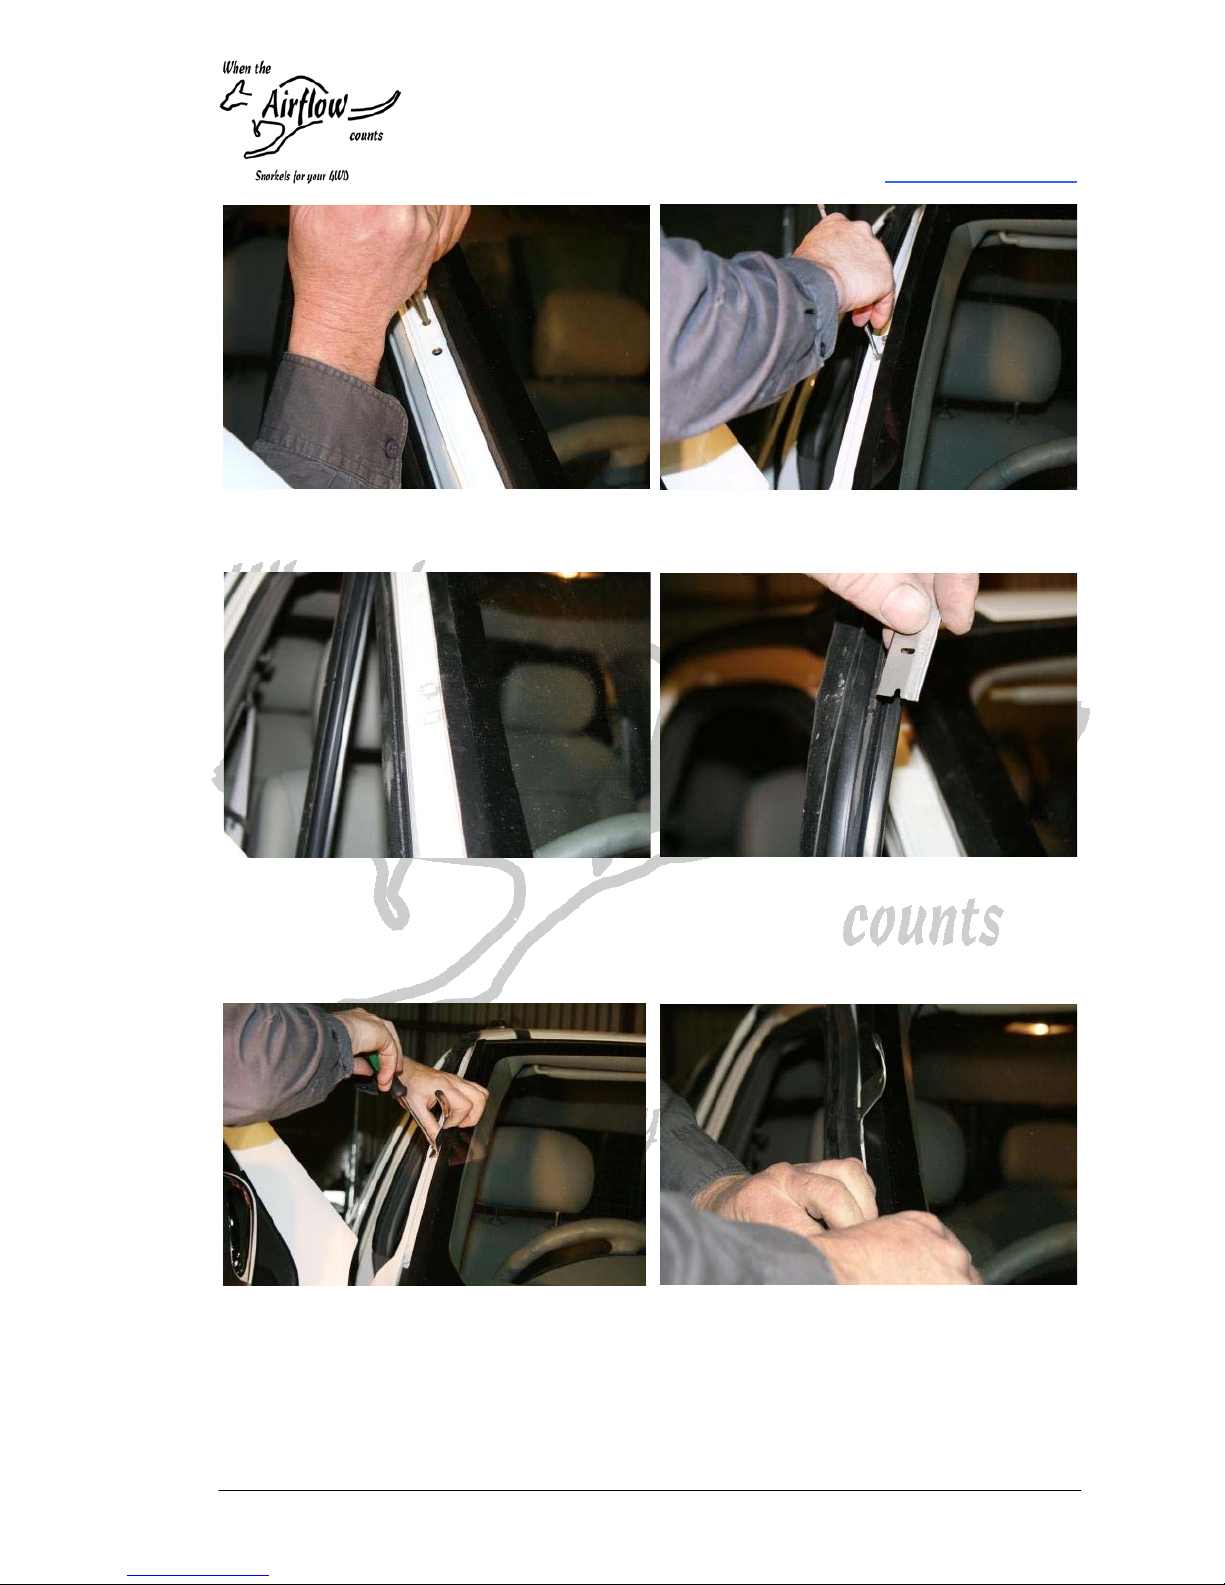
3.30 File the holes with a square
file to suit nylon plugs SP026
3.31 Paint the 2 holes with Zinc
rich primer
3.32 Once the paint is dry, fit the 2
square plugs SP026
3.33 Cut the inside of the rubber
seal to avoid increased
thickness on the “A” pillar
bracket
3.34 Ensure the bracket slips
UNDER the lip
3.35 Secure the bracket to the “A”
pillar with the two self tap
screws SP029
3.36 Re-fit the rubber seal onto
the A Pillar
Page 8
Airflow Vector Pty Ltd
4 Collins Rd, DROMANA VIC. 3936
AUSTRALIA
Ph: +61 3 5987 3733
www.airflowvector.com
Page 8 of 16 23 March 2011 SD097E (S097 Instructions booklet).doc
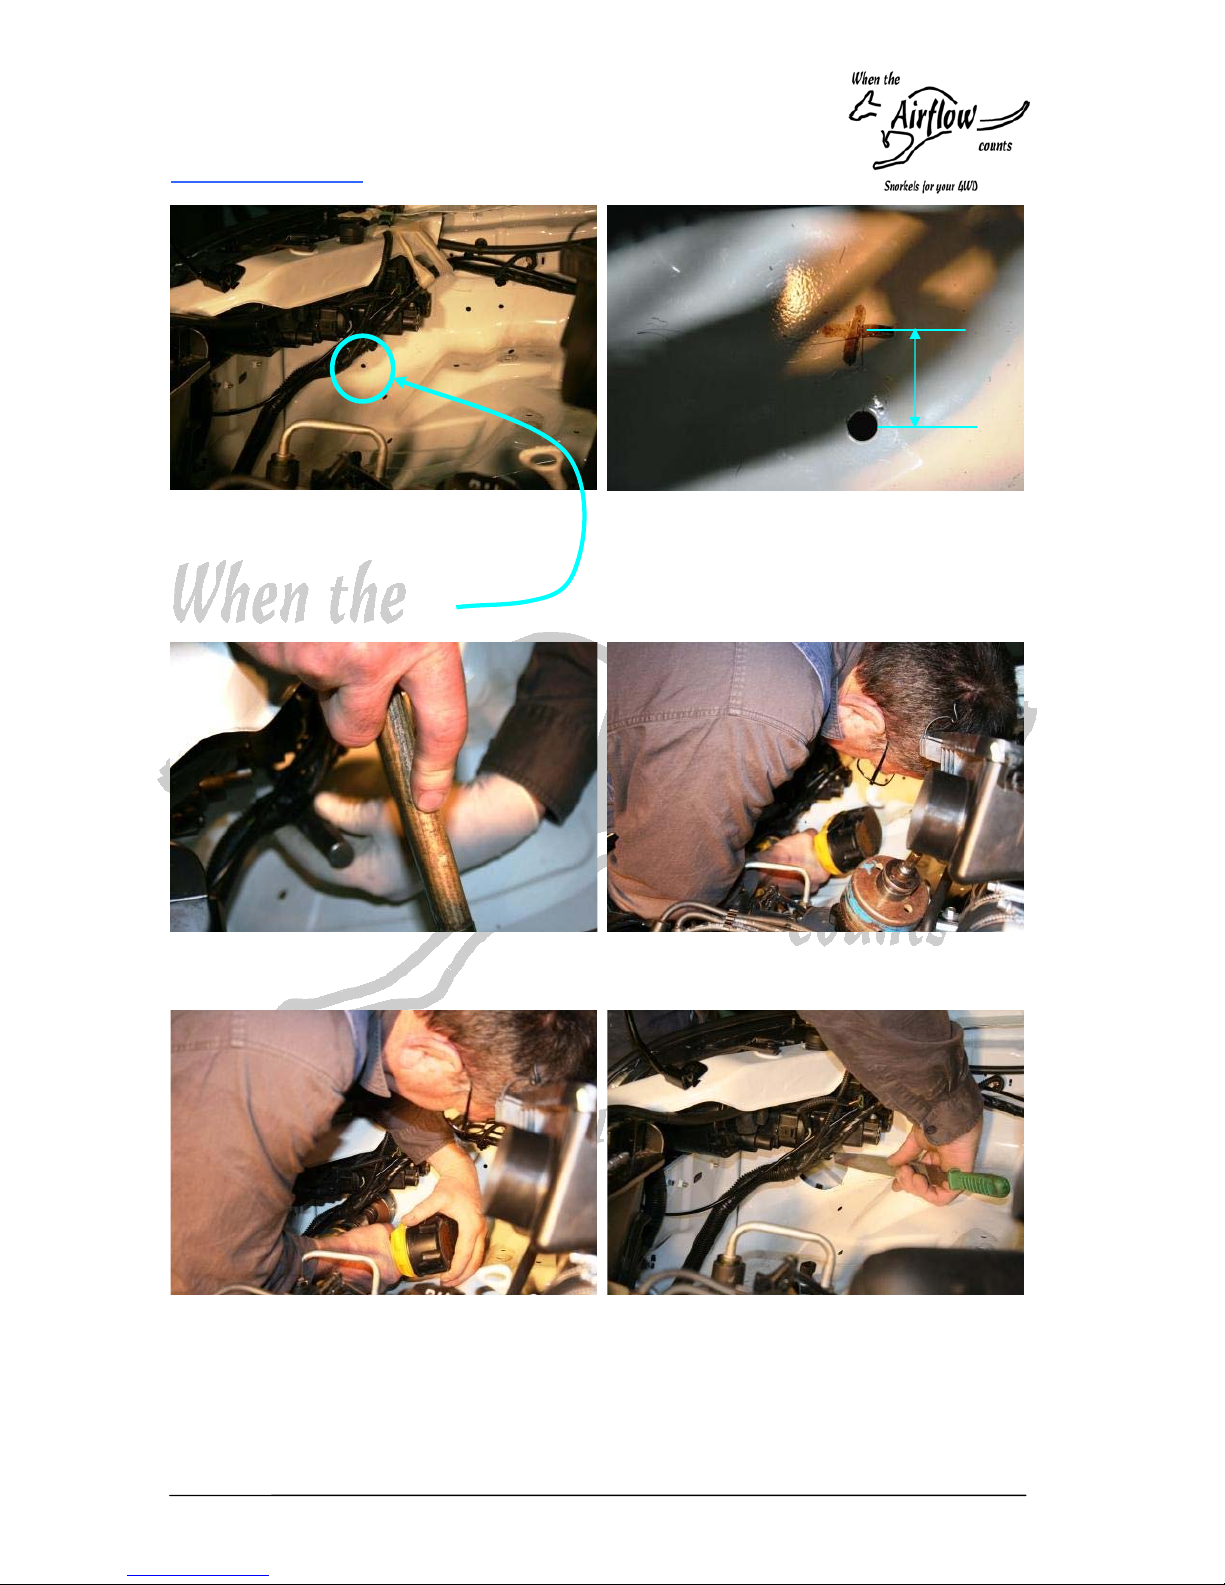
3.37 In the engine bay, tape the
electric harness away above
the right hand light
3.38 Locate this hole
3.39 Mark a spot 20 mm above
this hole
3.40 Centre punch the location 3.41 Pre-drill at 5mm
3.42 Using the hole saw, drill at
LOW SPEED a 79mm hole
3.43 File to remove any burr
20 mm
Page 9
Airflow Vector Pty Ltd
4 Collins Rd, DROMANA VIC. 3936
AUSTRALIA
Ph: +61 3 5987 3733
www.airflowvector.com
SD097E (S097 Instructions booklet).doc 23 March 2011 Page 9 of 16
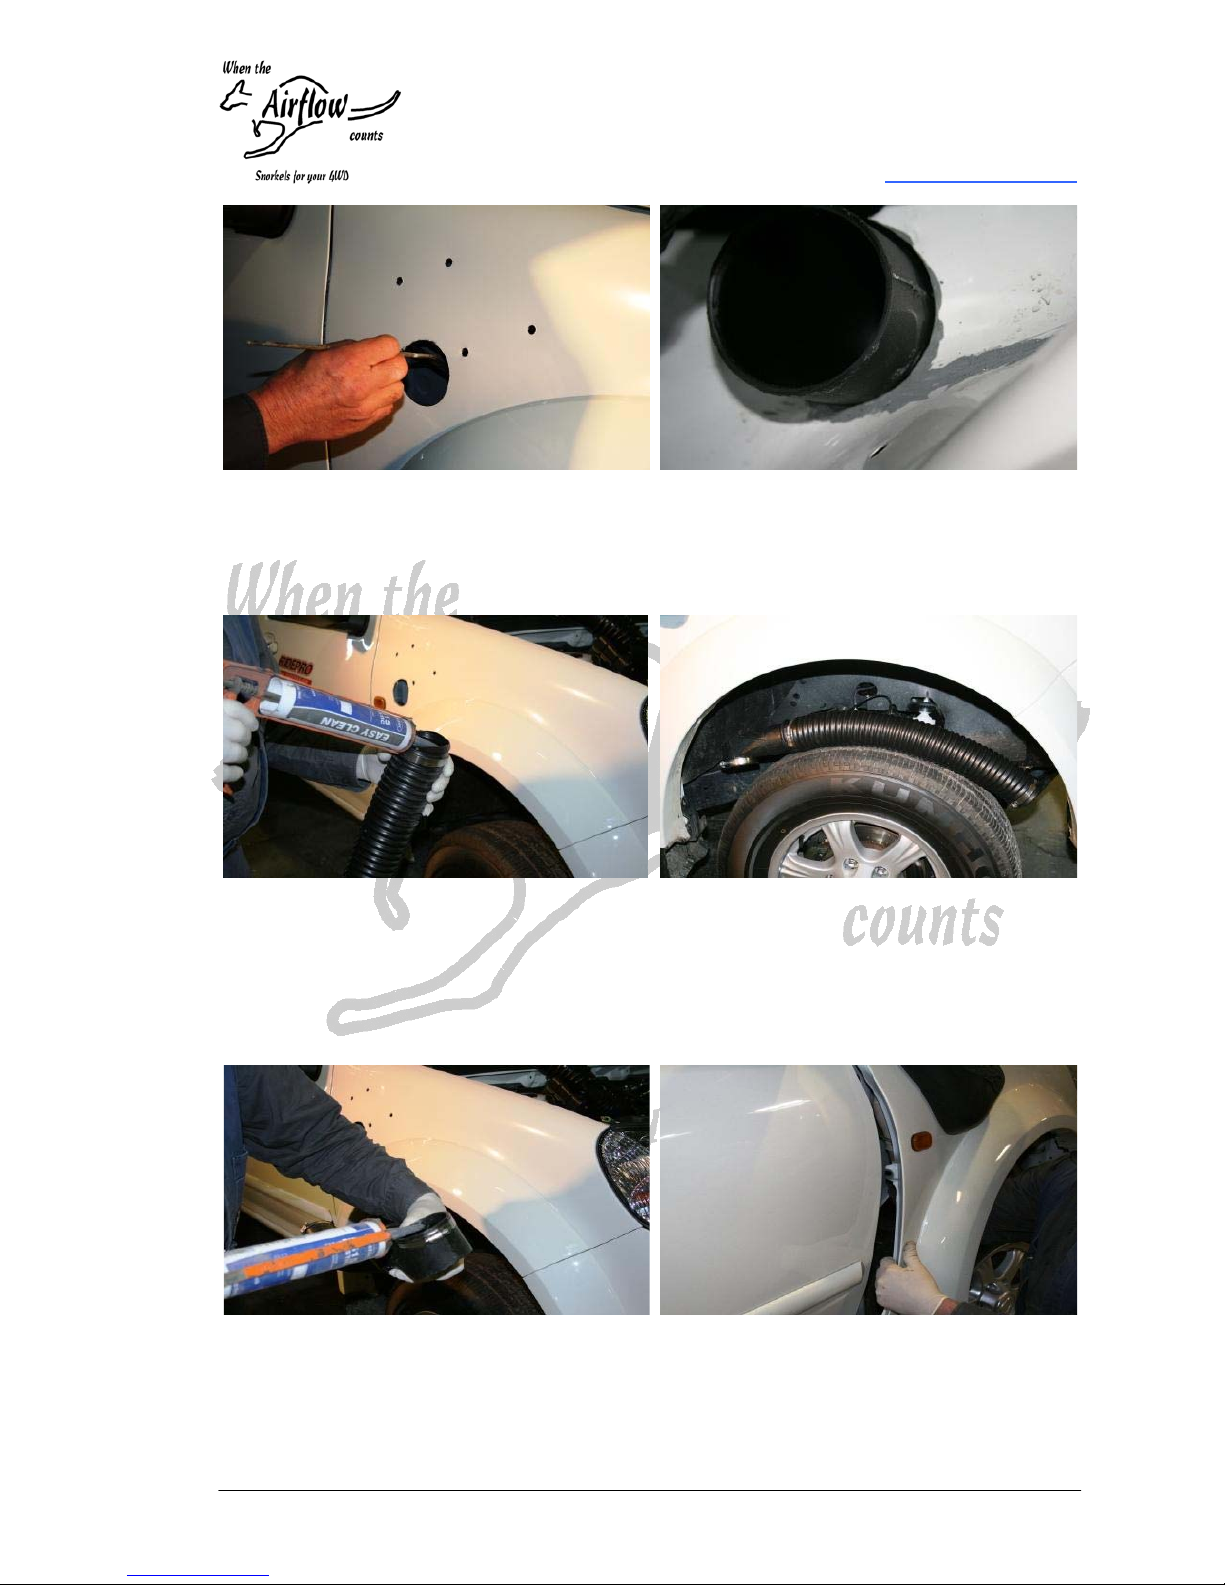
3.44 Paint all the holes with Zinc
rich prime (4 snorkel fixing
holes, 1 air intake, 1 through
the inner guard)
3.45 From under the wheel arch,
slide the elbow SP137
through the inner guard
3.46 Please wear gloves
3.47 Use only NON SILICONE
BASE black mastic
3.48 Smear some mastic inside
the TPR hose SP015 550mm
3.49 Slide a hose clamp SP019 at
each end of the TPR hose
3.50 Connect the SP090D to the
snorkel end
3.51 Smear some mastic inside
the short end of the SP090D
3.52 Slide a hose clamp SP019 on
the short end of the SP090D
3.53 Depending the size of your
hands, you may want to
loosen the guard to access
the back of the snorkel to
secure it
Page 10
Airflow Vector Pty Ltd
4 Collins Rd, DROMANA VIC. 3936
AUSTRALIA
Ph: +61 3 5987 3733
www.airflowvector.com
Page 10 of 16 23 March 2011 SD097E (S097 Instructions booklet).doc
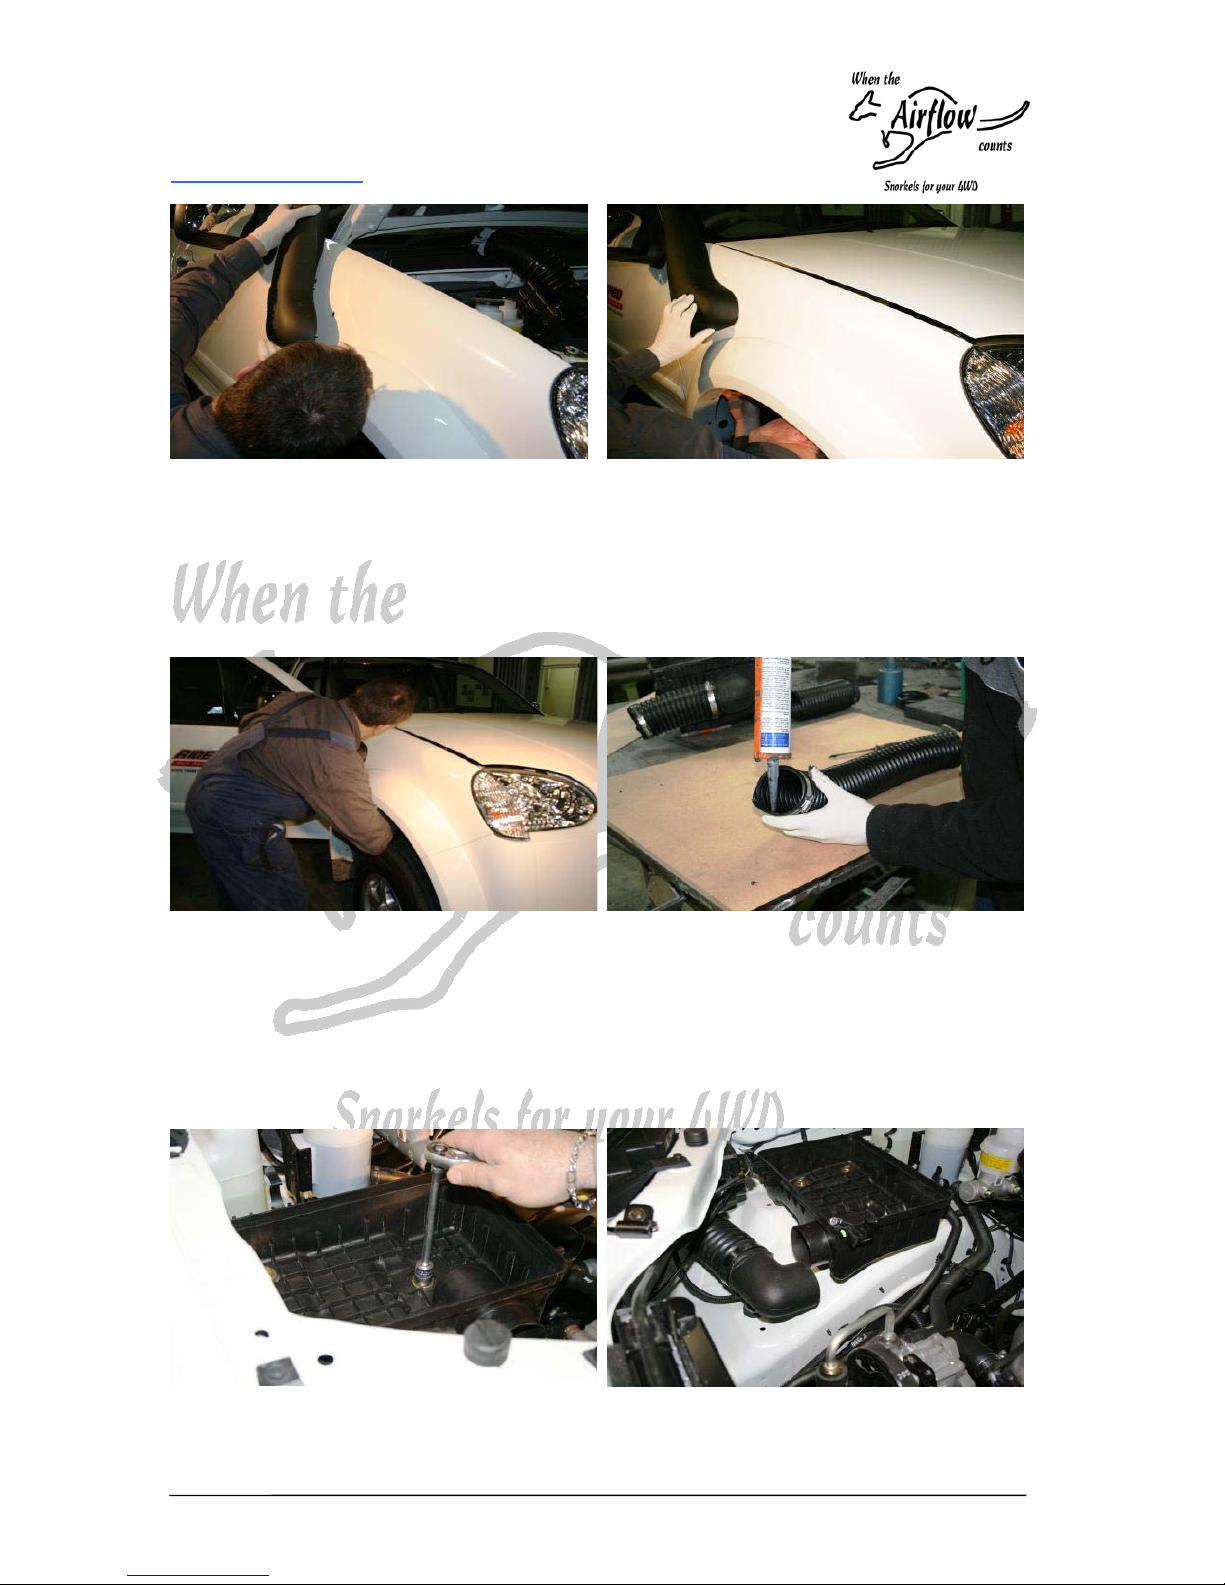
3.54 While holding the assembly
under the guard, connect the
snorkel SP181 to the
SP090D through the guard
3.55 Fit washers SP025 (x4) and
the nuts SP027 (x4) to
secure the snorkel to the
guard
Do not over tighten fixings to
avoid damage to the snorkel
3.56 Connect the TPR hose to the
elbow SP137
3.57 Secure all the hose clamps
under the guard
3.58 Smear the inside of both
sides of the TPR hose
SP015 200 with sealant
3.59 Connect it to the SP137
inside the engine bay
3.60 Tighten the hose clamp
3.61 Re-clip the electrical harness
3.62 Re-secure the air box in the
engine bay
3.63 Connect the long side of the
elbow SP137B to the TPR
hose
Page 11
Airflow Vector Pty Ltd
4 Collins Rd, DROMANA VIC. 3936
AUSTRALIA
Ph: +61 3 5987 3733
www.airflowvector.com
SD097E (S097 Instructions booklet).doc 23 March 2011 Page 11 of 16
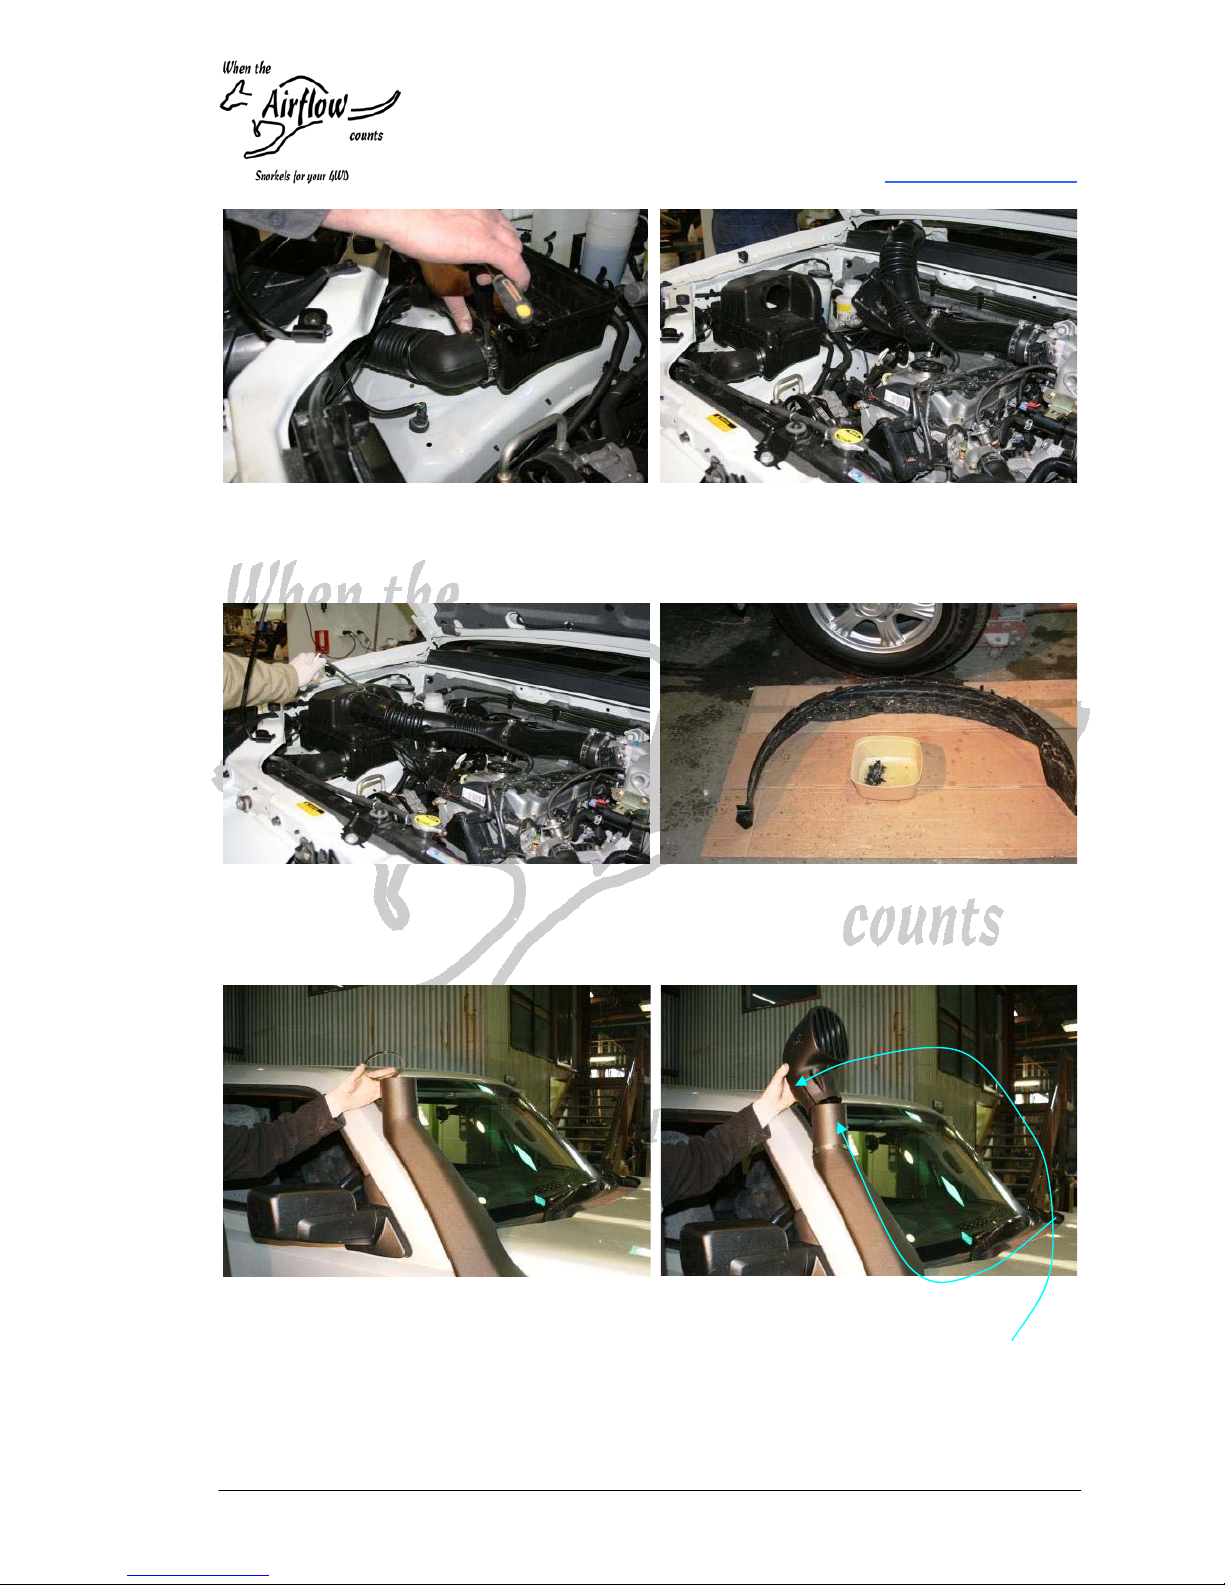
3.64 Connect the short side of the
elbow SP137B to the air box
3.65 Tighten the hose clamp
3.66 Refit the air filter inside the
air box
3.67 Close the air box
3.68 Re-connect the hose to the
air box
3.69 Secure the hose clamp
3.70 Re-install the splash panel
3.71 Slide the hose clamp SP018
on the snorkel SP181
3.72 Slide the air ram SP063 onto
the snorkel
3.73 Ensure that the top of the
snorkel matches the top of
the slot cut in the Air Ram
Page 12
Airflow Vector Pty Ltd
4 Collins Rd, DROMANA VIC. 3936
AUSTRALIA
Ph: +61 3 5987 3733
www.airflowvector.com
Page 12 of 16 23 March 2011 SD097E (S097 Instructions booklet).doc
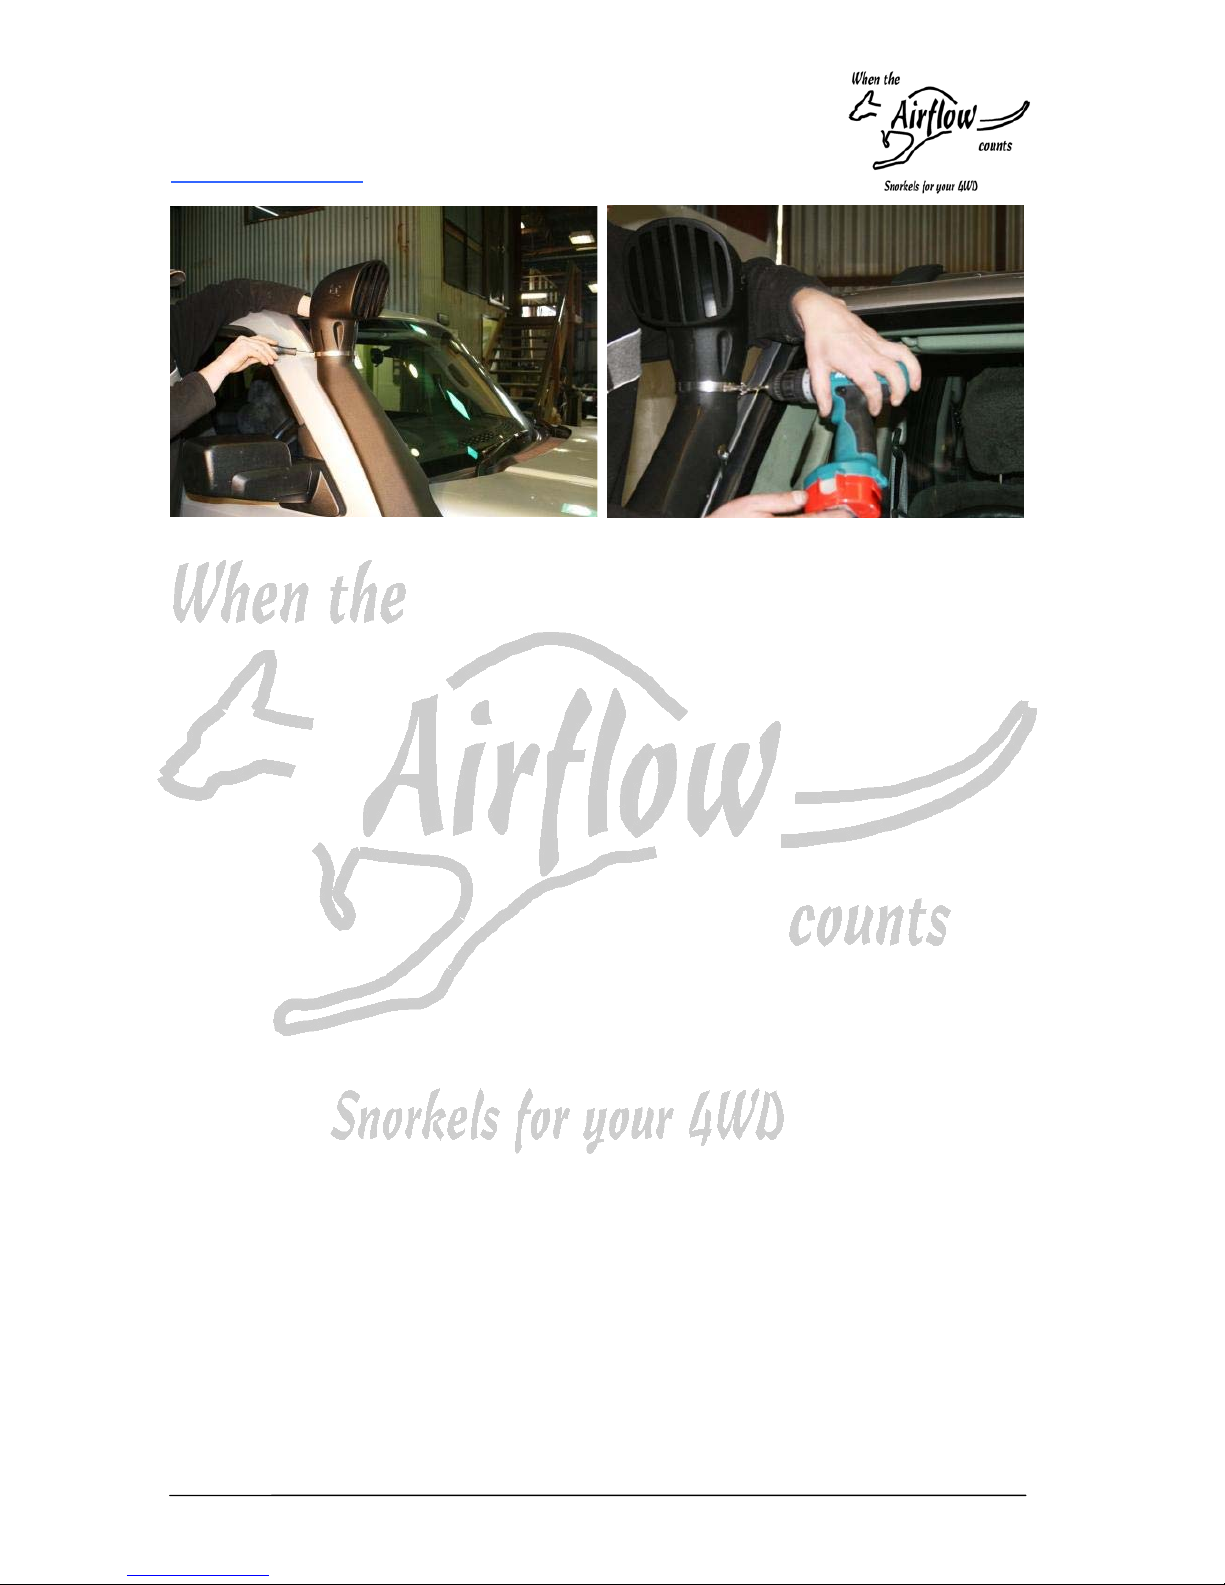
3.74 Tighten the hose clamp 3.75 Drill the hose clamp next to
the worm drive
3.76 Secure the Air Ram with the
self tapping screw SP029
Note: The Air Ram is also
available in Fluro, green or
blue
Note: This Snorkel is fitted with a second “A” pillar location to be installed
if one intends to use the Collector Pre-Cleaner instead of the Air Ram. If
required, please contact us to obtain the Bolt Kit SK239
Important note: Do not turn the Air Ram away from the direction of
travel because it will lessen the positive pressure necessary for proper
operation. In extreme situation, at speed above 25km/h (15m/h) a
vacuum may be generated causing irreversible engine damage
Page 13
Airflow Vector Pty Ltd
4 Collins Rd, DROMANA VIC. 3936
AUSTRALIA
Ph: +61 3 5987 3733
www.airflowvector.com
SD097E (S097 Instructions booklet).doc 23 March 2011 Page 13 of 16
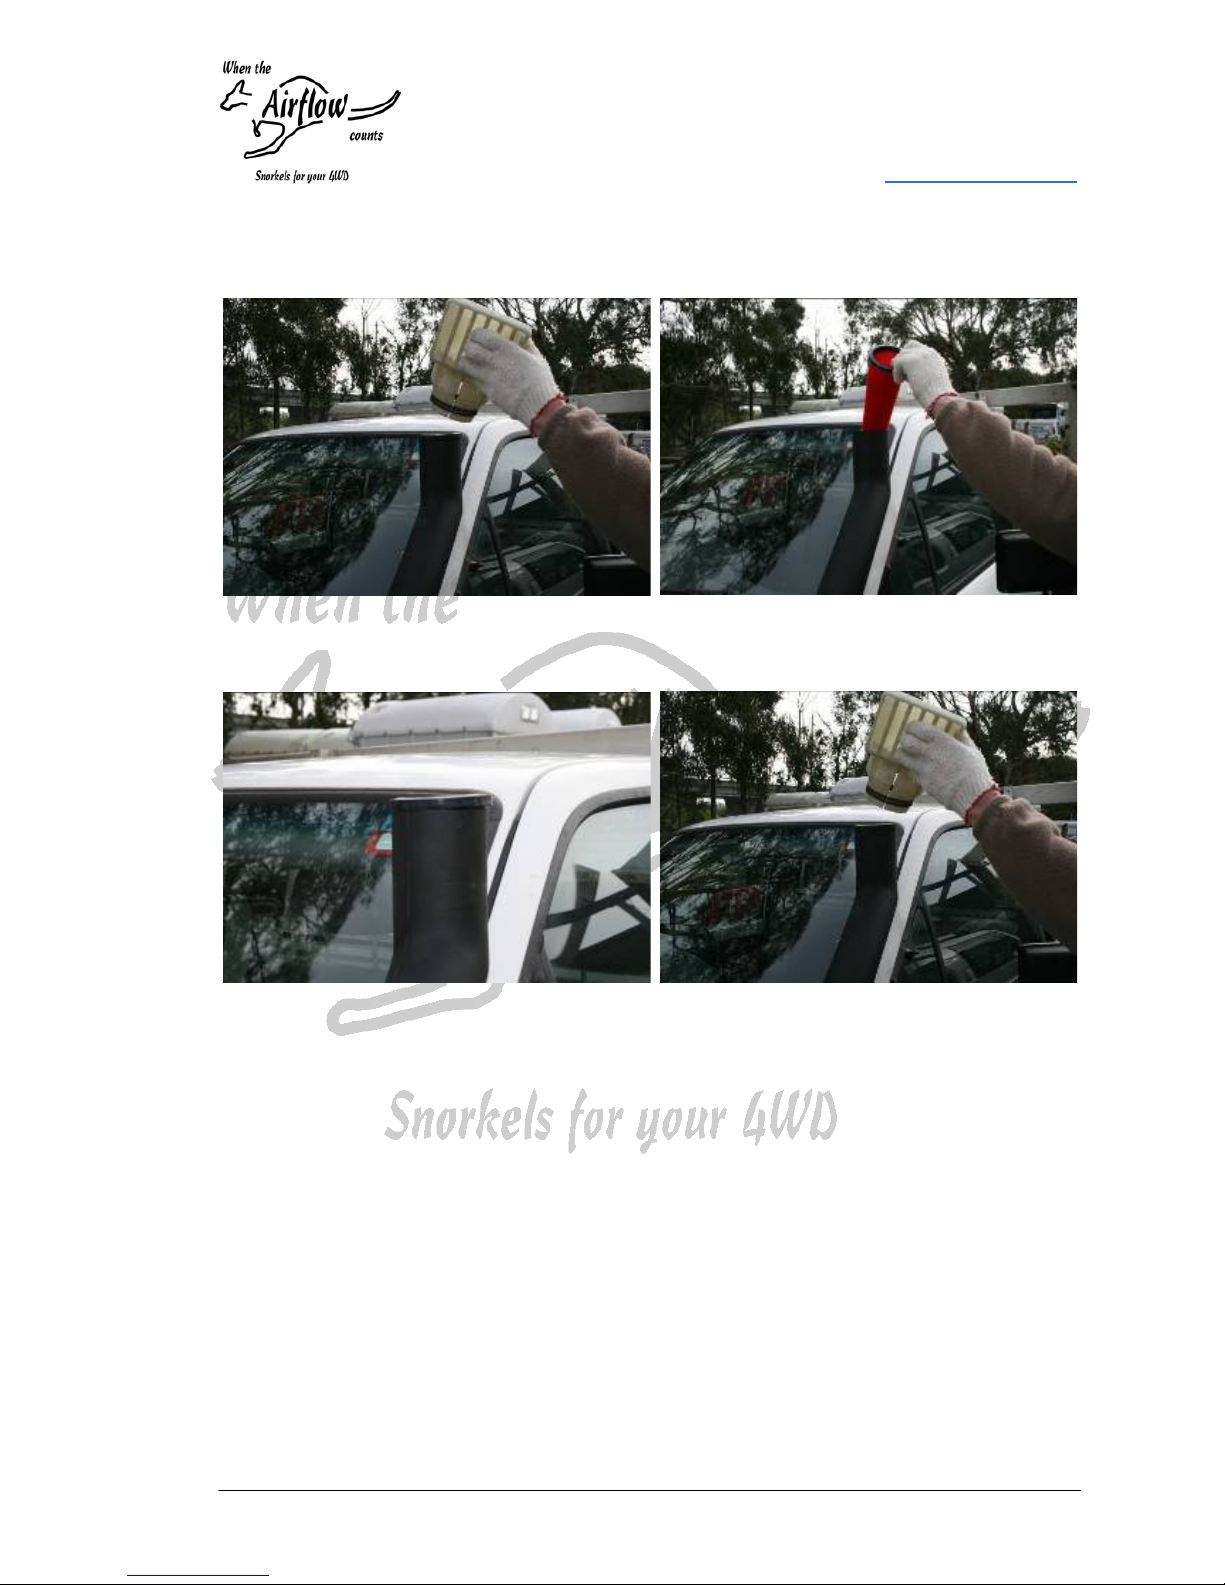
4.0 Optional pre-cleaner (not included in this kit)
4.1 Remove the Air Ram SP063 4.2 Install Pre-cleaner filter sock
SP065B
4.3 Air sock should neatly fit into
the top of the snorkel body
4.4 Re-install the Air ram SP063
4.5 Tighten the hose clamp
SP018
4.6 Screw the self tapper SP029
through the hose clamp
Page 14
Airflow Vector Pty Ltd
4 Collins Rd, DROMANA VIC. 3936
AUSTRALIA
Ph: +61 3 5987 3733
www.airflowvector.com
Page 14 of 16 23 March 2011 SD097E (S097 Instructions booklet).doc
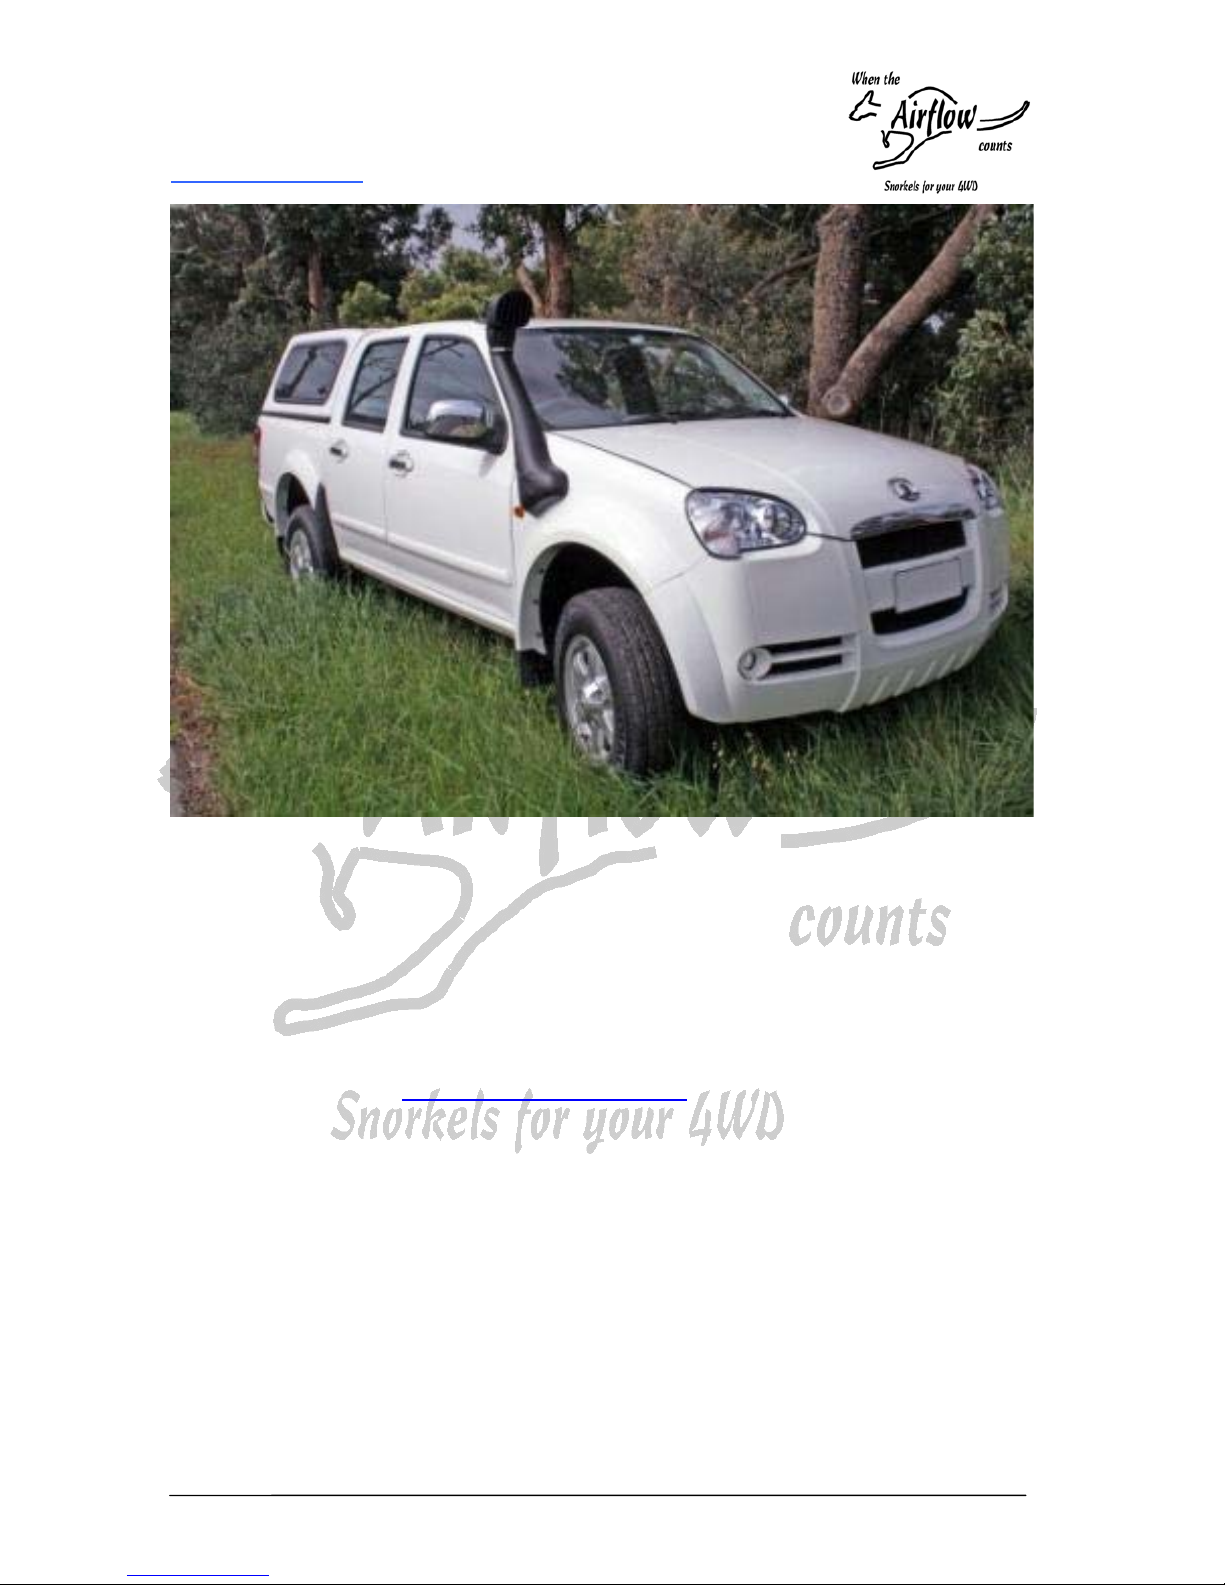
4.7 Polish with silicone cleaner
5.0 Improvement program
We strive to produce documentation and kits free of mistakes, however,
should you discover any error or omission, please let us know by quoting
the initials shown in the box overleaf.
Furthermore, if you think that a step of this procedure could be improved,
please send us at [email protected]
your suggestions indicating
the procedure name, its release date, the step details and the photo if
necessary.
We appreciate your support.
Page 15
Airflow Vector Pty Ltd
4 Collins Rd, DROMANA VIC. 3936
AUSTRALIA
Ph: +61 3 5987 3733
www.airflowvector.com
SD097E (S097 Instructions booklet).doc 23 March 2011 Page 15 of 16
This page is left intentionally blank
Page 16
Airflow Vector Pty Ltd
4 Collins Rd, DROMANA VIC. 3936
AUSTRALIA
Ph: +61 3 5987 3733
www.airflowvector.com
Page 16 of 16 23 March 2011 SD097E (S097 Instructions booklet).doc
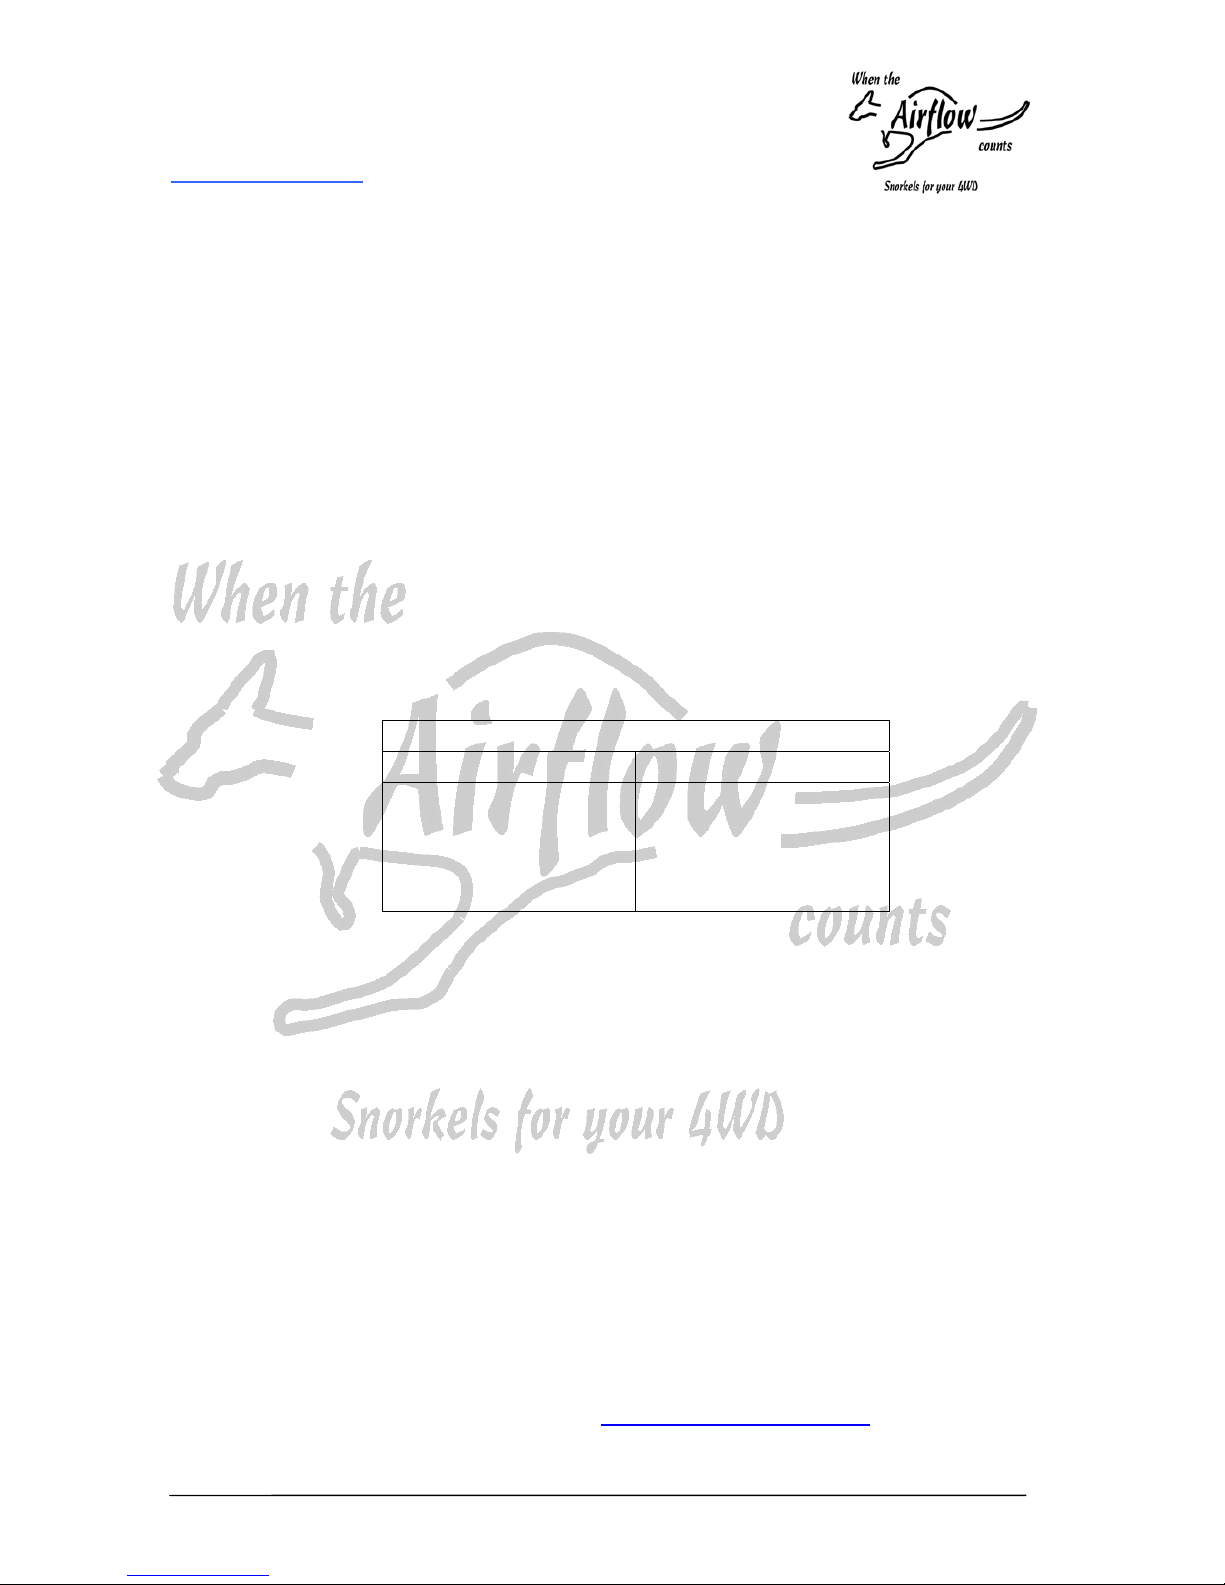
This kit has been carefully packed by
Date Initials
Note: The content of this manual may be modified from time to time to
ensure that improvements brought to our kits are described accurately.
Before starting the installation, try to obtain the latest version of the
instruction manual from our web site www.airflowvector.com
 Loading...