

Airborne athletics DR Dish User Manual
TM
Train like you’re in the game!
Owner’s Manual
1

Table of Contents
Getting Started
Setting up BallBoy Net System...................... page 3
Starting Dr. Dish ............................................ page 4
Parts of the Dr. Dish ....................................... page 5
Consistent Air Technology ............................ page 6
Court Smart Technology ................................ page 6
Touch Pad Control Panel................................ page 6
Master Power Switch...................................... page 6
Caution ........................................................... page 6
Machine Overview
Pre-Toss Indicator Light ................................. page 7
Beeper ............................................................. page 7
Timer Mode .................................................... page 7
Remote Mode ................................................. page 7
Multi-Ball Mode ............................................. page 8
Teach Mode .................................................... page 8
Custom Drills ................................................. page 9
Predefined Drills ............................................. page 9
Adjustable Ball Speed .................................... page 9
Adjustable Rotation ........................................ page 9
Adjustable Trajectory ..................................... page 9
Test Buttons .................................................... page 9
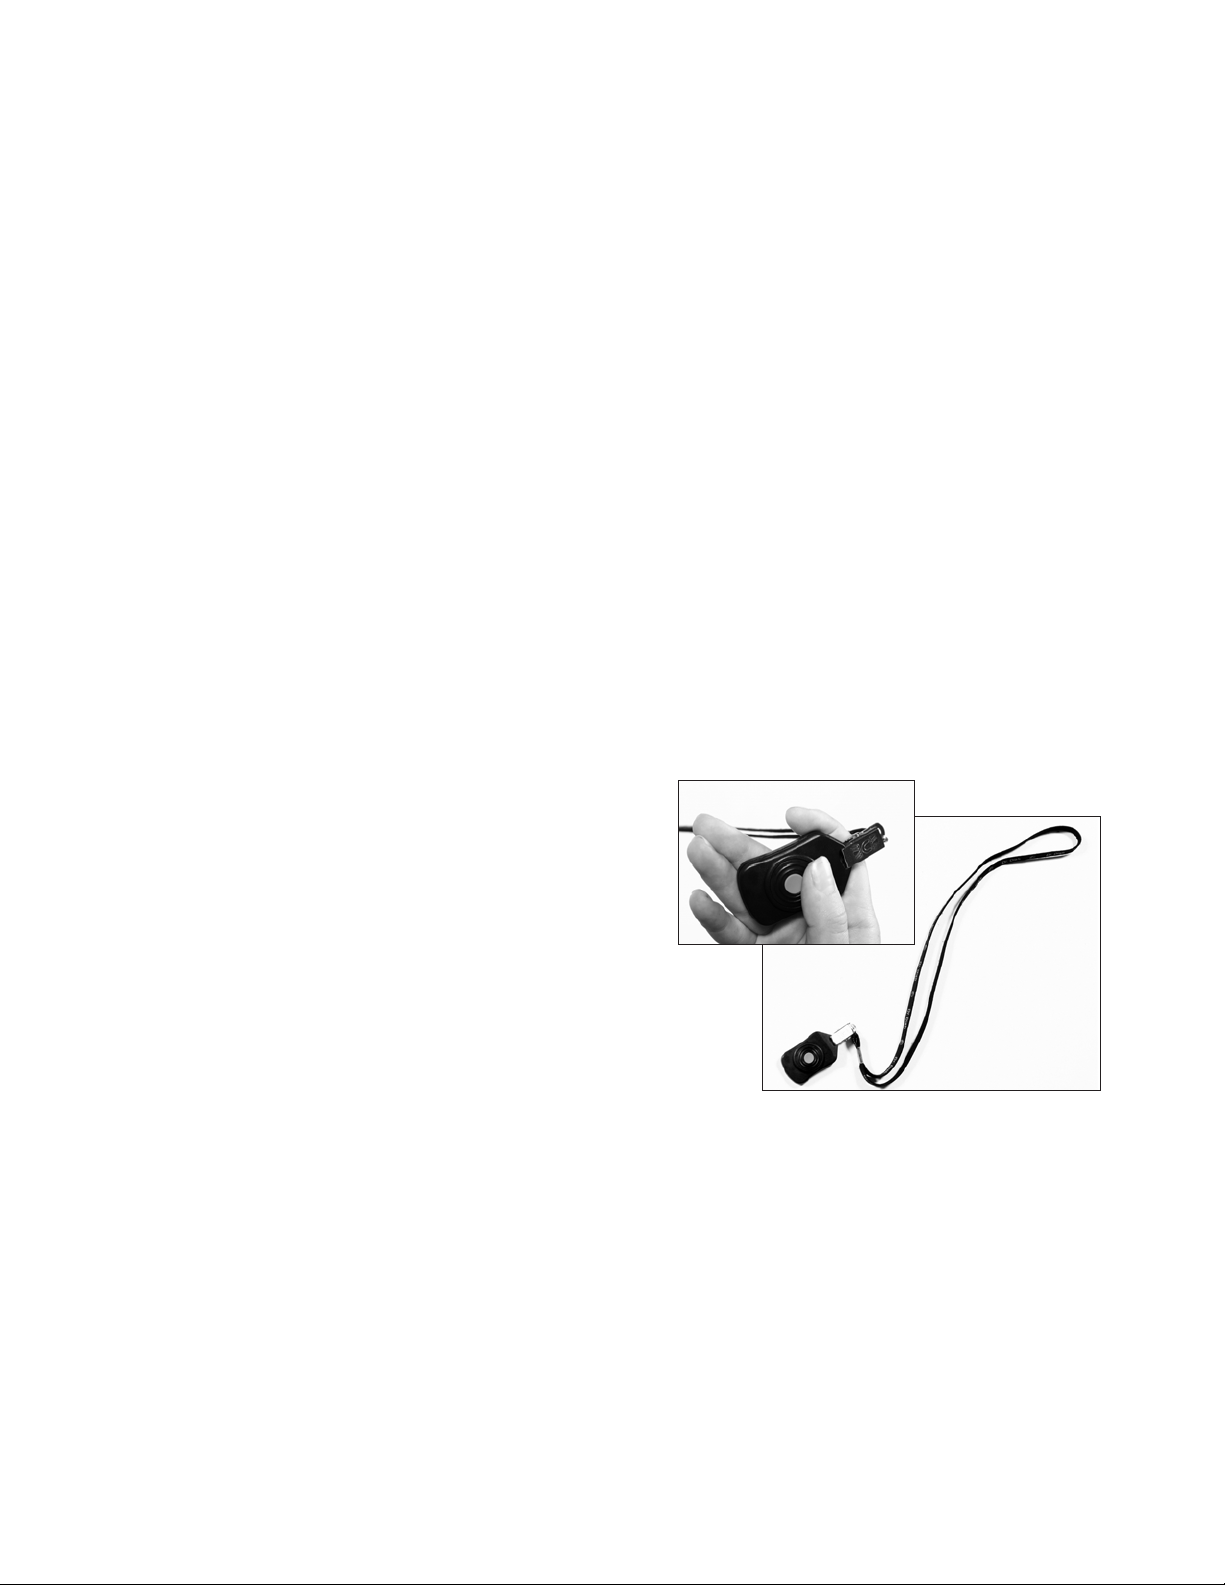
Remote .......................................................... page 10
Wireless Shots Made Counter ...................... page 10
BallBoy Net System ..................................... page 10
Pass & Feed .................................................. page 10
Ball Rack ...................................................... page 11
Battery .......................................................... page 11
Storage .......................................................... page 11
Password ....................................................... page 12
Changing Password ...................................... page 12
BallBoy Net System
Parts of BallBoy ........................................... page 19
Raising net on BallBoy Net System ............. page 20
Height Adjustment on BallBoy Net System page 20
Prior to using BallBoy for first time ............ page 20
Placement of the BallBoy Net System ......... page 21
Collapsing the BallBoy Net System ............. page 21
Attachment Clamps ...................................... page 21
BallBoy Pass & Feed.................................... page 22
Shots Made Counter and Pole
Storage .......................................................... page 23
Use ................................................................ page 23
Charging ....................................................... page 23
Reset ............................................................ page 23
Diangnostic Menu
Diagnostic Menu .......................................... page 24
Diagnostic Menu Descriptions ..................... page 25
Dr. Dish Accessories/Options
Shots Made Counter ..................................... page 26
Video Camera Mount ................................... page 26
Ball Cart ....................................................... page 26
Additional Remotes ...................................... page 26
Troubleshooting ........................................... page 27
Dr. Dish Warranty ......................................... page 28
Modes of Operation
Timer Mode .................................................. page 13
Remote Mode ............................................... page 14
Multi-Ball Mode ........................................... page 15
Teach Mode .................................................. page 16
Saving a Custom Drill .................................. page 17
Changing Drills Settings .............................. page 18
2
Getting Started
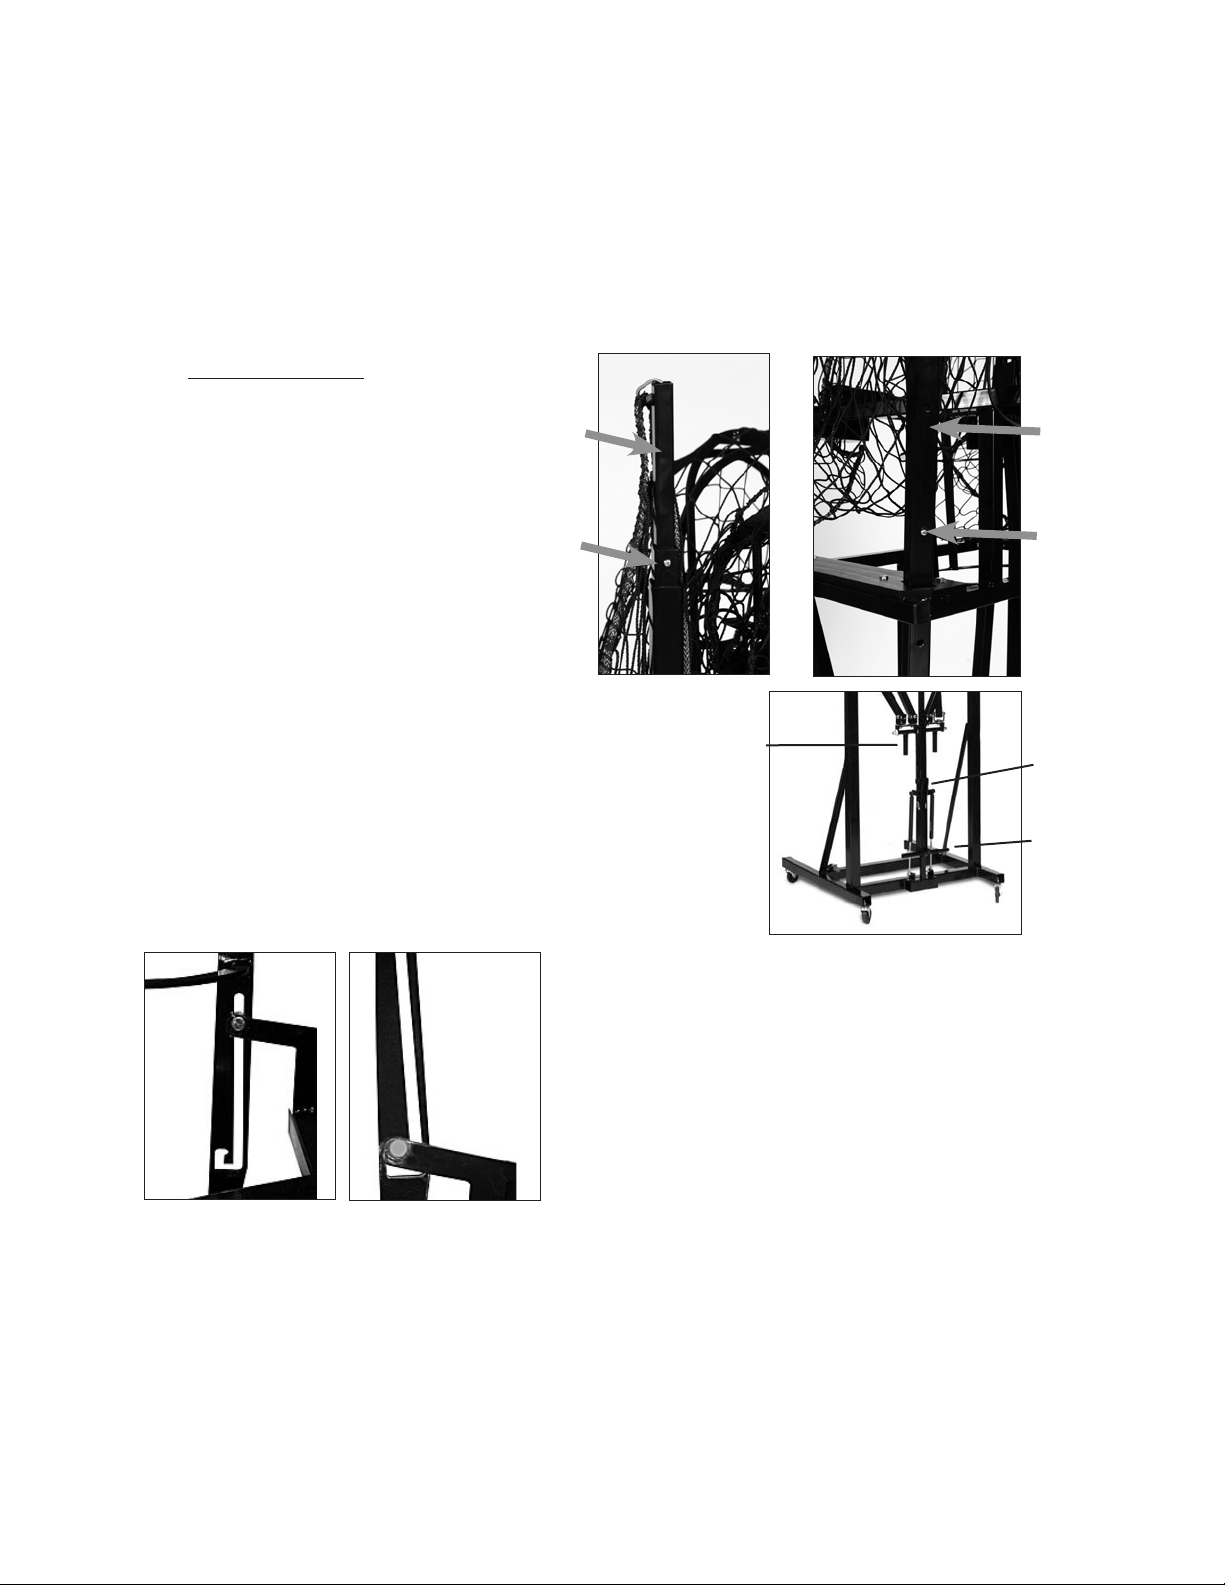
Setting up BallBoy Net System
Raising net on BallBoy Net System:
1. Slide back poles up before front poles.
2. Slide the front poles upward until all the poles snap in place.
Height Adjustment on BallBoy Net System:
Height Pole Setting
11’ Bottom extension pole
latched in hole 1.
Extension Pole
Top
11’ 6” Bottom extension pole
latched in hole 2.
Bottom
12’ Top extension pole
Extension Pole
extended until clip latches
in pole.
Bottom extension
pole latched in hole 2.
3. Place your hand on the horizontal handle and start to push in
a downward motion. As this handle is being pushed do wn, reach
with your left hand and grab the vertical handle and pull it towards
you until it reaches the top position. The motion is a push on the
horizontal handle and a pull on the vertical handle. Once it snaps
in place, flip the locking latch to secure the system.
Prior to using BallBoy the first time:
The BallBoy is shipped with the Pass & Feed
in shipping position. Lift Pass & Feed into the use position.
Vertical
Handle
Hole 2
Hole 1
Locking
Latch
Horizontal
Handles
Shipping position
Use position
(See pages 19 and 22 for picture of Pass & Feed.)
3
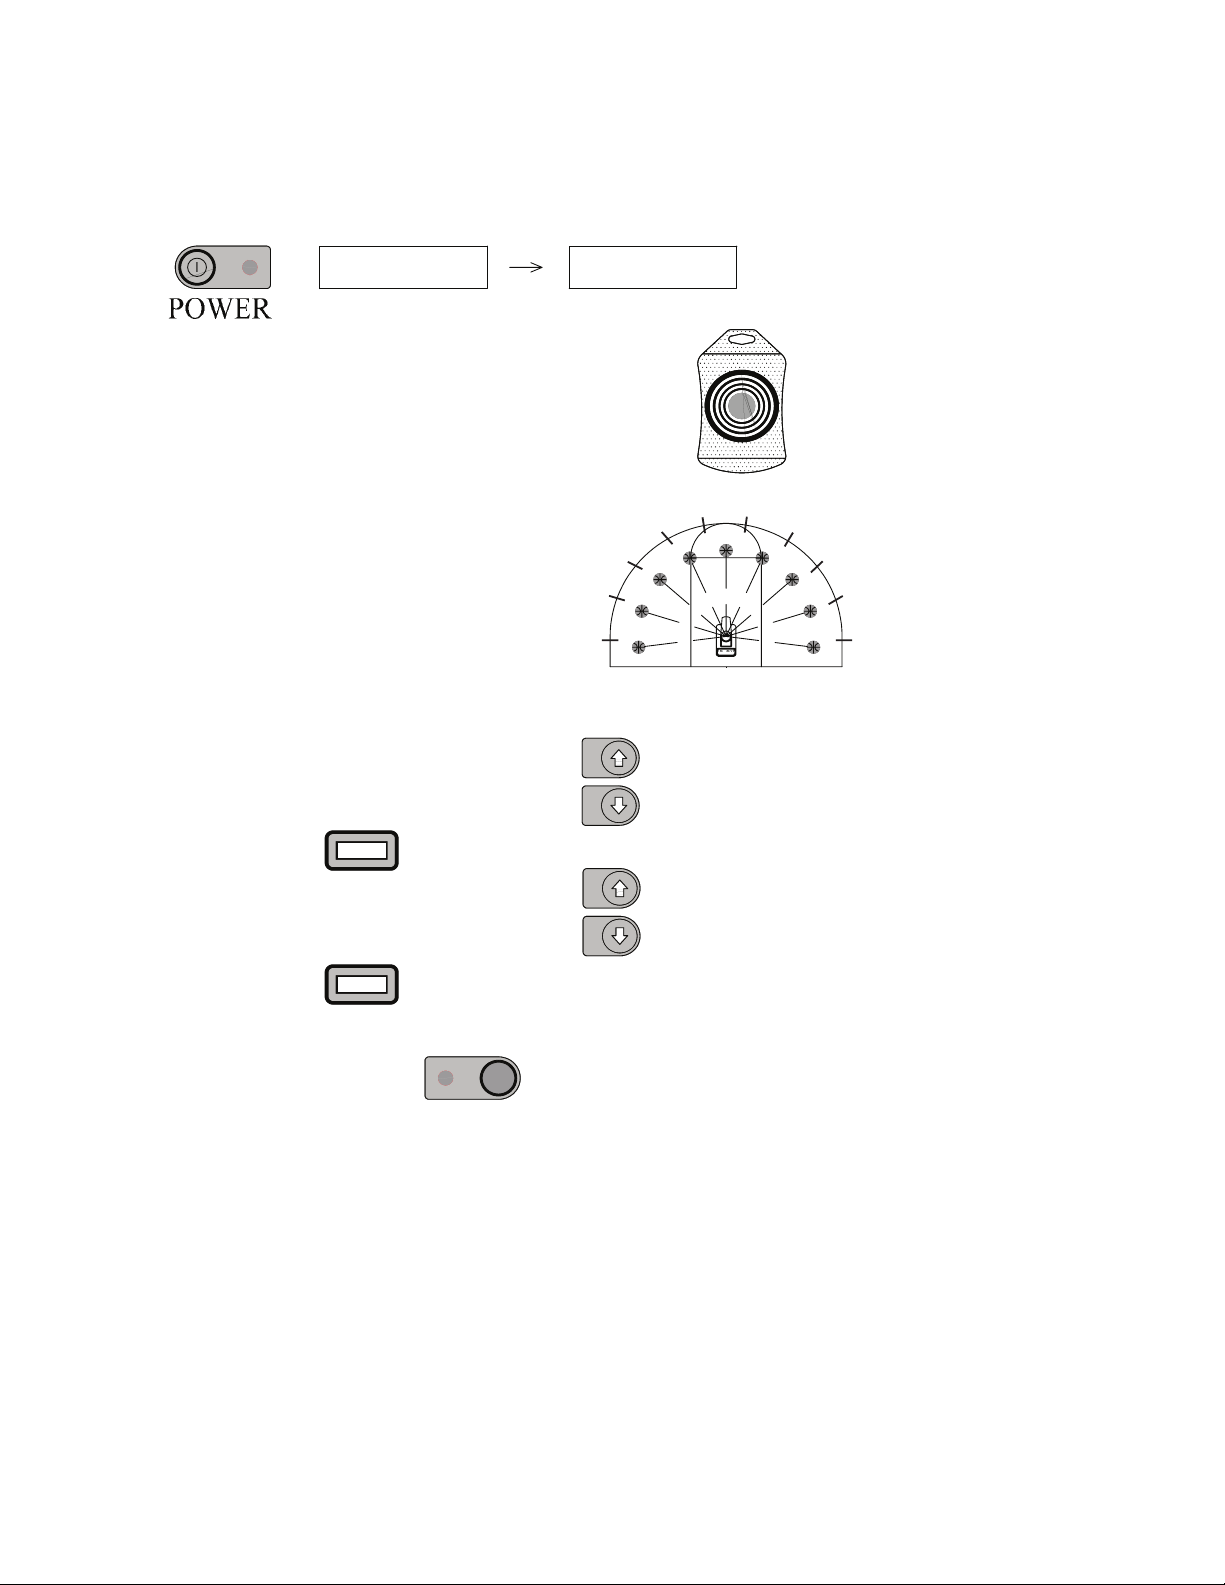
Starting Dr. Dish
3. Enter the default password of "999", pressing Enter
after each character, or use your remote to unlock
the Dr. Dish by pressing the button once. See page
12 to change and create your own password.
DR.DISH REV XX
ENTER PASSWORD
1. Turn Master Power Switch to “On” position.
See page 9 for more details on
predened drills.
1. Use arrow buttons to scroll to Custom Drills.
2. Press Enter.
3. Using arrow buttons, scroll up to Drill 20.
4. Press Enter.
Please see following pages to learn more about your Dr. Dish and to create your own drills.
6. Press Start to begin drill.
To get started with perimeter shooting drill,
(Around the World) select Custom Drill "Drill 20".
• Position 50 (on diagram above) is based on the Dr. Dish frame. The ball launch of the Dr. Dish will
be facing the same direction as the "Throwing Direction Indicators" by the Dr. Dish wheels. (See page 5)
• The rst pass thrown on each drill is always thrown to the farthest position away from "center" of drill.
• Dr. Dish will pass to same locations in reverse order when returning to starting position.
Selecting Drill
Helpful Hints
2. Press Power button.
5. Adjust trajectory with T-handle.
START/STOP
ENTER
ENTER
10
20
30
40
50
60
70
80
90
0010
4

Parts of the Dr. Dish
Trajectory Adjustment Handle
Trajectory Adjustment Knob
Video Camera Mount
(optional)
Trajectory Rod
Control Panel
Rear Access Panel
Shots Made Counter
Storage Bracket
(optional)
Ball Feeder
Ball Launch
Pre-Toss
Indicator
Light
Top Access Panel
Shots Taken, Made
and Percentage Panel
BallBoy Connection Latch
Master Power Switch
Throwing
Direction Indicator
Rear Access Panel
Plug for Recharging the Dr. Dish
5
Consistent Air Technology
Balls are launched using the precise power of air. Dr. Dish can throw powerful passes well beyond the three-point
line. Dr. Dish is capable of throwing lob, chest, bounce and cross-court passes, depending on the trajectory of the
machine.
Court Smart™ Technology
Court Smart makes the Dr. Dish flexible and easy to use. Dr. Dish can throw a ball to any location at any speed at
any tempo and within any rotation range. With Court Smart you can create and save your own drills.
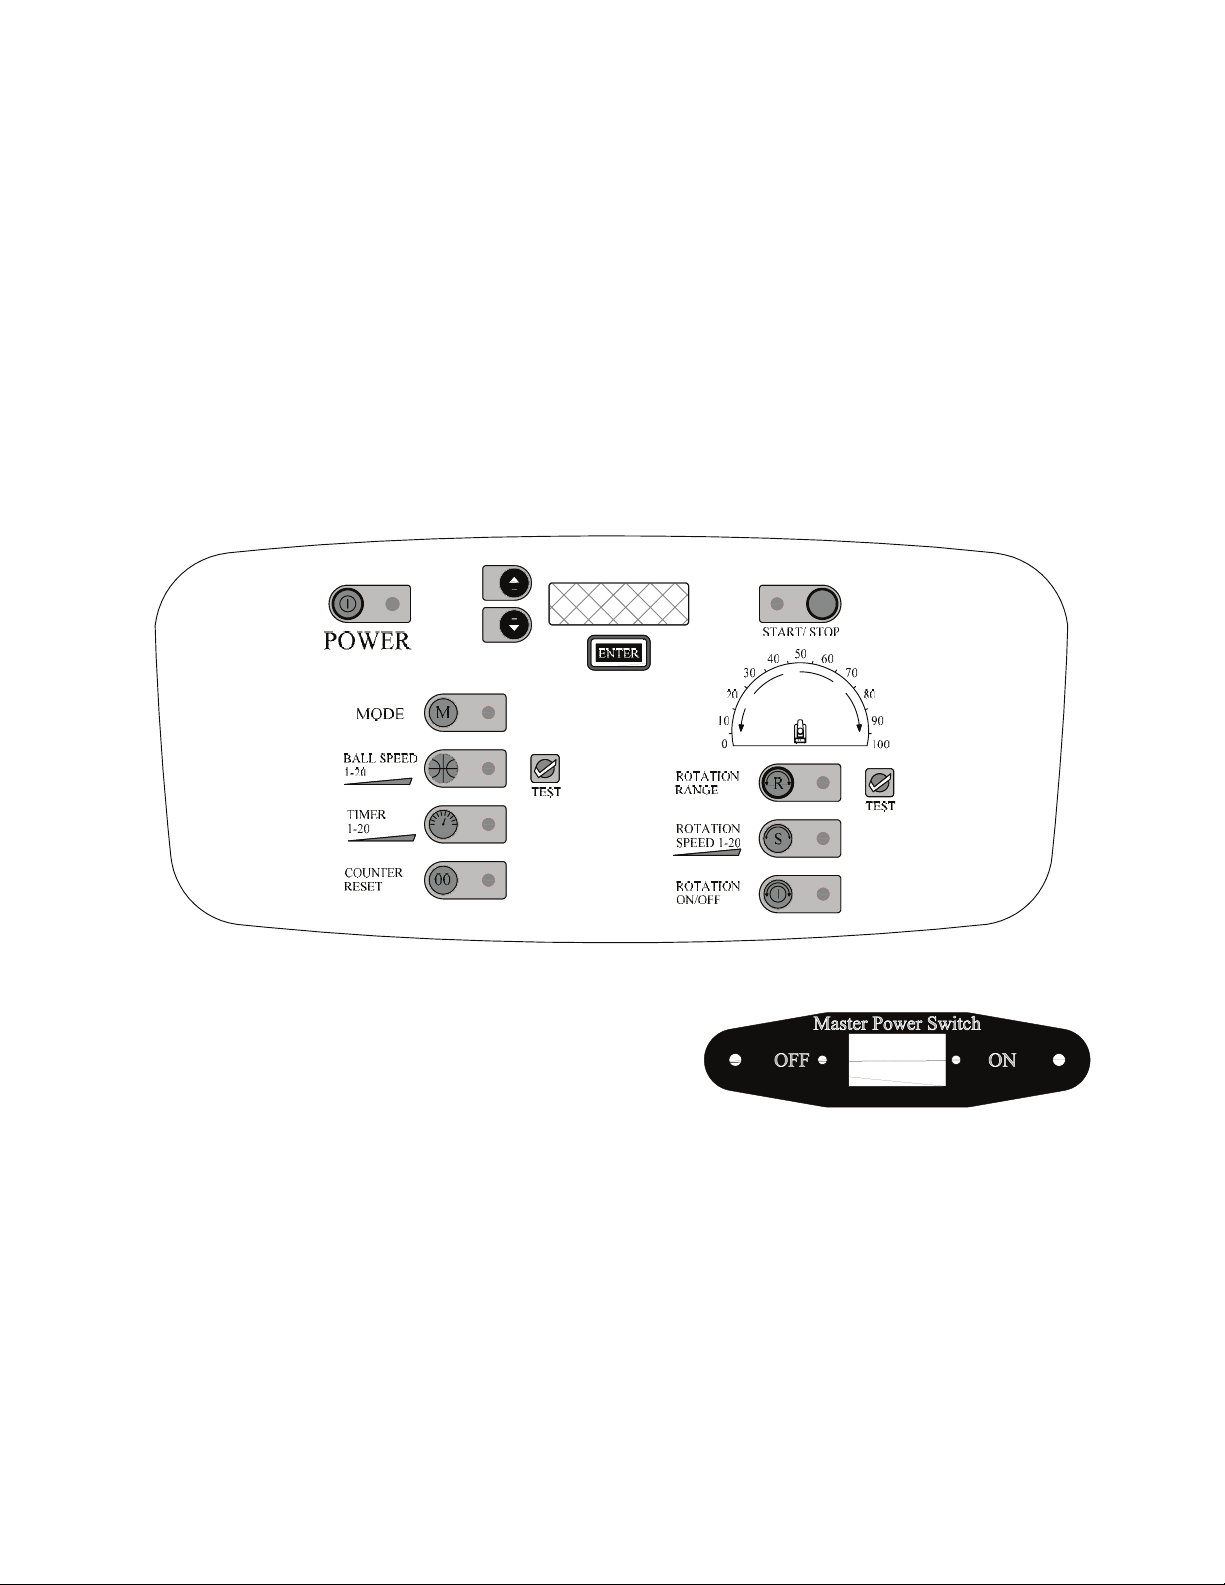
Touch Pad Control Panel
The touch pad control panel will take you through step-by-step procedures when setting up drills.
The following pages will walk you through creating a password, using timer, remote, teach or multi-ball modes,
setting up and saving custom drills, and using the predefined drills of the Dr. Dish with Court Smart Technology.
Master Power Switch
The Dr. Dish is equipped with a master power switch, which
will cut all power to the machine when turned off. The switch
is located right above the control panel. Turn the master power
switch off when Dr. Dish is not in use.
Caution
Do not put your hand in the launcher or ball feed mechanism.
Personal injury could result from placing hands in ball feed port or the launch port.
Do not stand too close to the ball feed launch area.
A ball may be thrown. A pre-toss indicator light and beeper will warn the player when the ball is being thrown.
If charging machine off an electrical cord, remember to place the electrical cord where it is not a tripping hazard.
6
Machine Overview
Pre-Toss Indicator Light
The pre-toss indicator light is a safety device to let players know there is a ball being tossed. The pre-toss indicator
light will flash twice to alert a player that a ball is coming.
Beeper
The Dr. Dish has a beeper to alert players when a ball is coming. Two quick beeps in conjunction with the pre-toss
indicator light alerts the player before a ball is tossed.
Modes of operation
Timer Mode
See page 13 for operation instructions.
The timer setting will determine how often a ball is launched from Dr. Dish. The timer can be set from 1 to 20
seconds in increments of 1 second.
If you run out of balls, Dr. Dish will attempt 20 ball feeds before it goes into reset mode. You can reset the timer
again by pressing the remote control button or pressing the start/stop button on the control panel. After the ball is
tossed, a ball is automatically fed into the machine and the timer resets and begins countdown again.
You can use the remote control button to pause any timer operation. To pause, press the button on the remote
once, press the remote button again to resume timer operation.
Remote Mode
See page 14 for operation instructions.
Remote control mode allows the coach (or player if training by
themselves) the ultimate control over when the ball is delivered.
Pressing the button on the remote delivers the ball. If there are
no balls in the machine, but a ball is in the feeder, pressing the
remote button once will load a ball. Pressing the remote button
again (after the ball feeds) will launch the ball. It is not necessary to point
the remote at the Dr. Dish, it will work within 100 feet of the machine.
7
Multi-Ball Mode
Multi-ball
T
each
See page 15 for operation instructions.
Multi-Ball allows the user to select how many balls they want to throw within a selected rotation range. The balls
are thrown in equal increments within the range. The minimum number of locations that can be selected is two,
with balls being thrown at the end of each rotation. The maximum number of locations is twenty-one. A minimum
of five increments (i.e. 10, 15, 20, etc.) is required between each location. For example: If you want to throw five
balls to each elbow from under the basket, you would select Multi-Ball, set the left range at 40 and the right range
at 60, select two locations, five balls/location, and select the amount of time between throws. Each time Dr. Dish
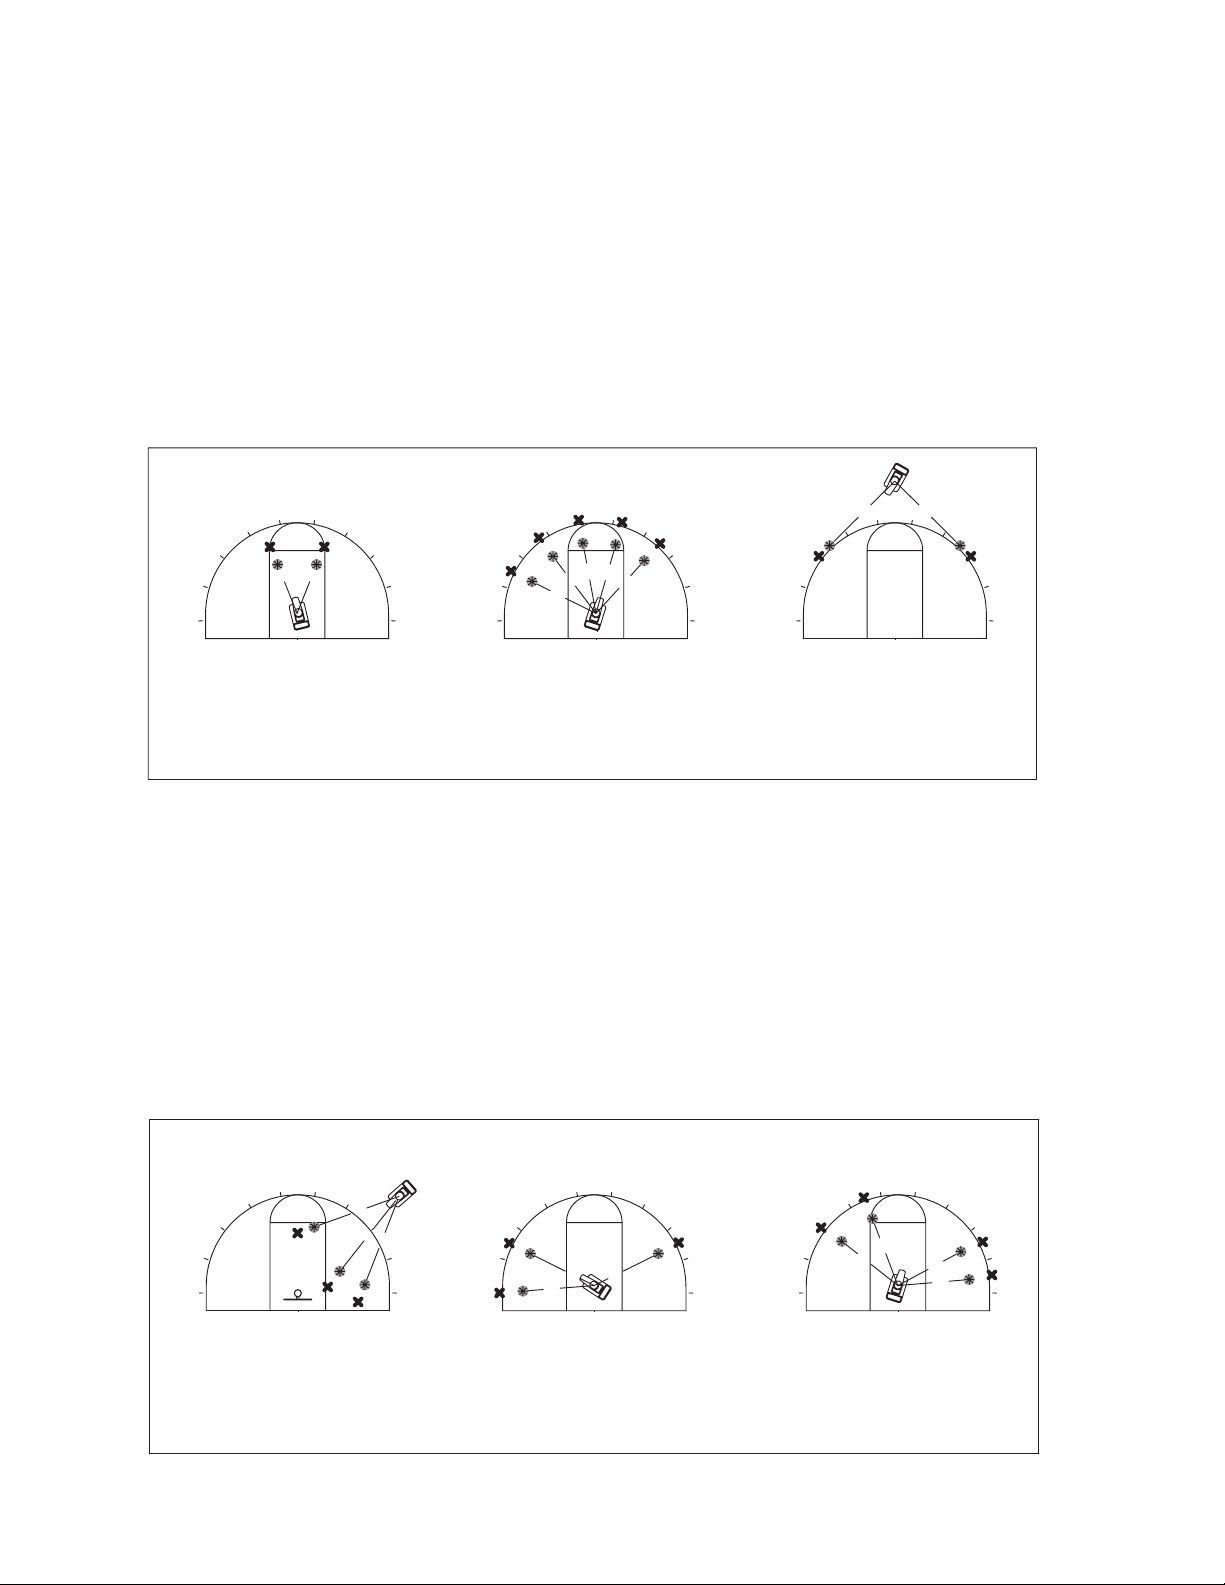
reaches 40 and 60 it will deliver five balls to each location. See Illustration I, Example 1 below.
See examples 2 and 3 for additional uses of the Multi-Ball Mode.
Illustration I
Example 1
50
40
30
20
10
0
Left Range 40
Right Range 60
Number of Locations 2
# Balls/Location 5
Example 2
60
70
80
90
100
30
20
10
0
50
40
60
70
Left Range 20
Right Range 70
Number of Locations 5
# Balls/Location 12
Example 3
80
90
100
40
30
20
10
0
Left Range 30
Right Range 70
Number of Locations 2
# Balls/Location 50
50
60
70
80
90
100
Timer 3 seconds Timer 3 seconds Timer 3 seconds
Teach Mode
See page 16 for operation instructions.
Teach mode gives the coach the ability to “teach” Dr. Dish where to throw a ball. In this mode, the coach has
the flexibility of throwing balls to locations that are not of equal distance apart. For example, with the Dr. Dish
positioned on the wing and throwing into the post, you could throw a ball at the baseline, one at the block and one
in the lane. See Illustration II, Example 1 below. In addition, as in multi-ball mode, you can throw more than one
ball to each location before rotating to the next location, and can also select the time between each throw.
See examples 2 and 3 for additional uses of the Teach Mode.
Illustration II
Example 1
40
30
20
10
Pos. 3
Position 1 - 35
Position 2 - 45
Position 3 - 60
# Balls per location (1-50) # Balls per location (1-50)
Timer (1-20 seconds) Timer (1-20 seconds)
50
60
70
80
Pos. 2
Pos. 1
90
0010
Example 2
40
30
20
10
Position 1 - 5
Position 2 - 20
Position 3 - 80
Example 3
50
60
70
80
90
0010
30
20
10
50
40
60
70
80
90
0010
Position 1 - 25
Position 2 - 40
Position 3 - 80
Position 4 - 90
# Balls per location (1-50)
Timer (1-20 seconds)
8
Custom Drills/Saving Your Drill
See page 17 for operation instructions.
Custom drills are drills that you have created and want to save into the Dr. Dish. Saving a drill saves the mode,
ball speed, timer increment, rotation speed and range and where to throw the balls. Fifty custom drills can be
saved. You can keep the name “Drill 1” or change the name to something more descriptive like “Post D1” or
“Wing D1”. You have 16 characters (letters or numbers) to use when naming a drill. When you select a drill from
this mode, all the settings are set and you simply press start to begin. While running your selected drill, you can
still change the settings to personalize it for each player.
Note: 45 of these drills are already predefined. Each of these can be modified or a new drill saved in its place.
Predefined Drills & Drill Chart
Dr. Dish comes with 45 predefined drills, you can locate these drills by selecting Custom Drills as your mode,
and using the arrow buttons to scroll through the drills. The settings, such as ball speed, timer, rotation speed, etc.,
can each be changed to meet your personal needs and then saved to the machine. These predefined drills can also
be overwritten by the drills that you have created. You will find these predefined drills under the mode “Custom
Drills.”
A drill chart referencing all 45 drills comes with Dr. Dish. The drills and settings can also be downloaded from
www.airborneathletics.com
Adjustable Ball Speed
The ball speed on Dr. Dish can be adjusted within a range of 1 to 20, with 1 being the softest and 20 being the
hardest. Ball speed can be increased /decreased during use by pressing the Ball Speed button and using the arrow
buttons accordingly.
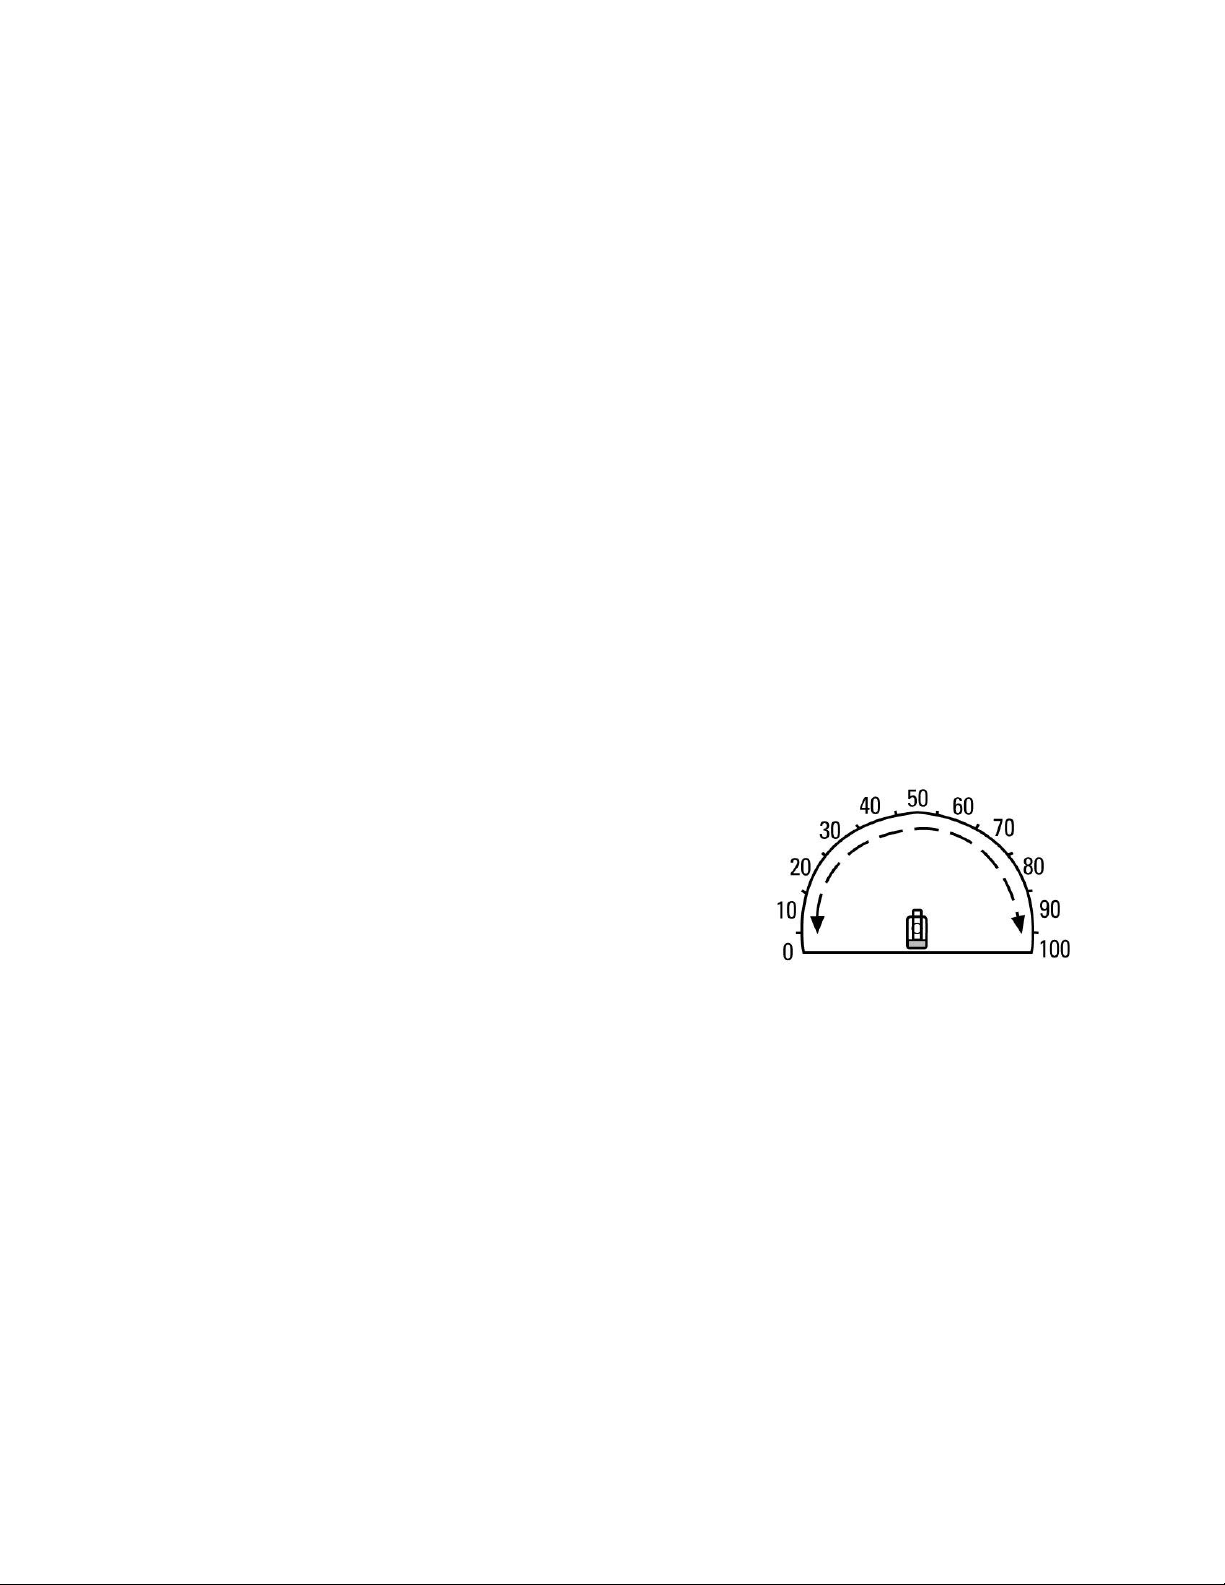
Adjustable Rotation
Dr. Dish has an adjustable rotation range that can be set to rotate in
increments of 5 between 0 and 100, or the rotation can be turned off. Dr.
Dish will easily rotate from baseline to baseline, or can be adjusted to any
range of rotation within the baselines. For example, if you want a player to
work just the baseline to the wing, you could set the range from 5 to 40 or
60 to 95. Dr. Dish will rotate within this rotation range until you change the
range.
Note: 0 and 100 will throw the ball beyond the baseline.
Adjustable Trajectory
The ball delivery of the Dr. Dish can be adjusted from a bounce pass to a simulated shot at the basket. To adjust
the trajectory, loosen the trajectory adjustment knob by turning it counter clockwise and then raise or lower the
machine with the trajectory adjustment handle. Pushing the trajectory handle all the way up will result in a bounce
pass; pushing it all the way down will create a high lob or simulated shot to the rim. Lock the Dr. Dish in position
by turning the trajectory adjustment knob clockwise until tight (do not over tighten).
Test Buttons
On your control board, you will find a test button for Ball Speed and Rotation Range. After choosing a mode and
selecting the settings, but before pushing Start, you can test both the ball speed and rotation range (if applicable)
by pressing the appropriate test button.
Note: Use caution when testing ball speed, a ball will be thrown immediately after pressing button.
9
 Loading...