

Page 1
Installation Instructions
Part Number 883-300
2011-14 Polaris Ranger RZR XP
2012-14 Polaris Ranger RZR XP 4
900 E.F.I.
Thank you for purchasing the Airaid Intake System. Contact Airaid @ (800) 498-6951 8:00
AM - 5:00 PM MST weekdays for questions regarding fit or instructions that are not clear to you.
Your Airaid Intake System was carefully inspected and packaged. Check that no parts are missing,
or were damaged during shipping. If any parts are missing, contact Airaid. The air filter element is
protected from direct exposure to water and debris; care should be taken not to drive through deep
water. WATER INGESTION IS THE DRIVERS RESPONSIBILITY
Tools Required For Installation:
7/16” and 1/2” Wrenches. 10mm, 7/16”, and 1/2”
Sockets.
T-27 Torx driver and 5/32” Allen Wrench. Ratchet
& Extension. 1/8”& 5/16” Drill bits.
Center punch and Mallet
Phillips and Standard Tip Screwdrivers.
Locktite ® 242 or equivalent, and a Prep– Solvent.
Advisory Note:
Please read these installation instructions in their entirety before beginning the install process. Airaid strongly recommends the use of Locktite®
242 Medium strength threadlocker on
all threaded fasteners.
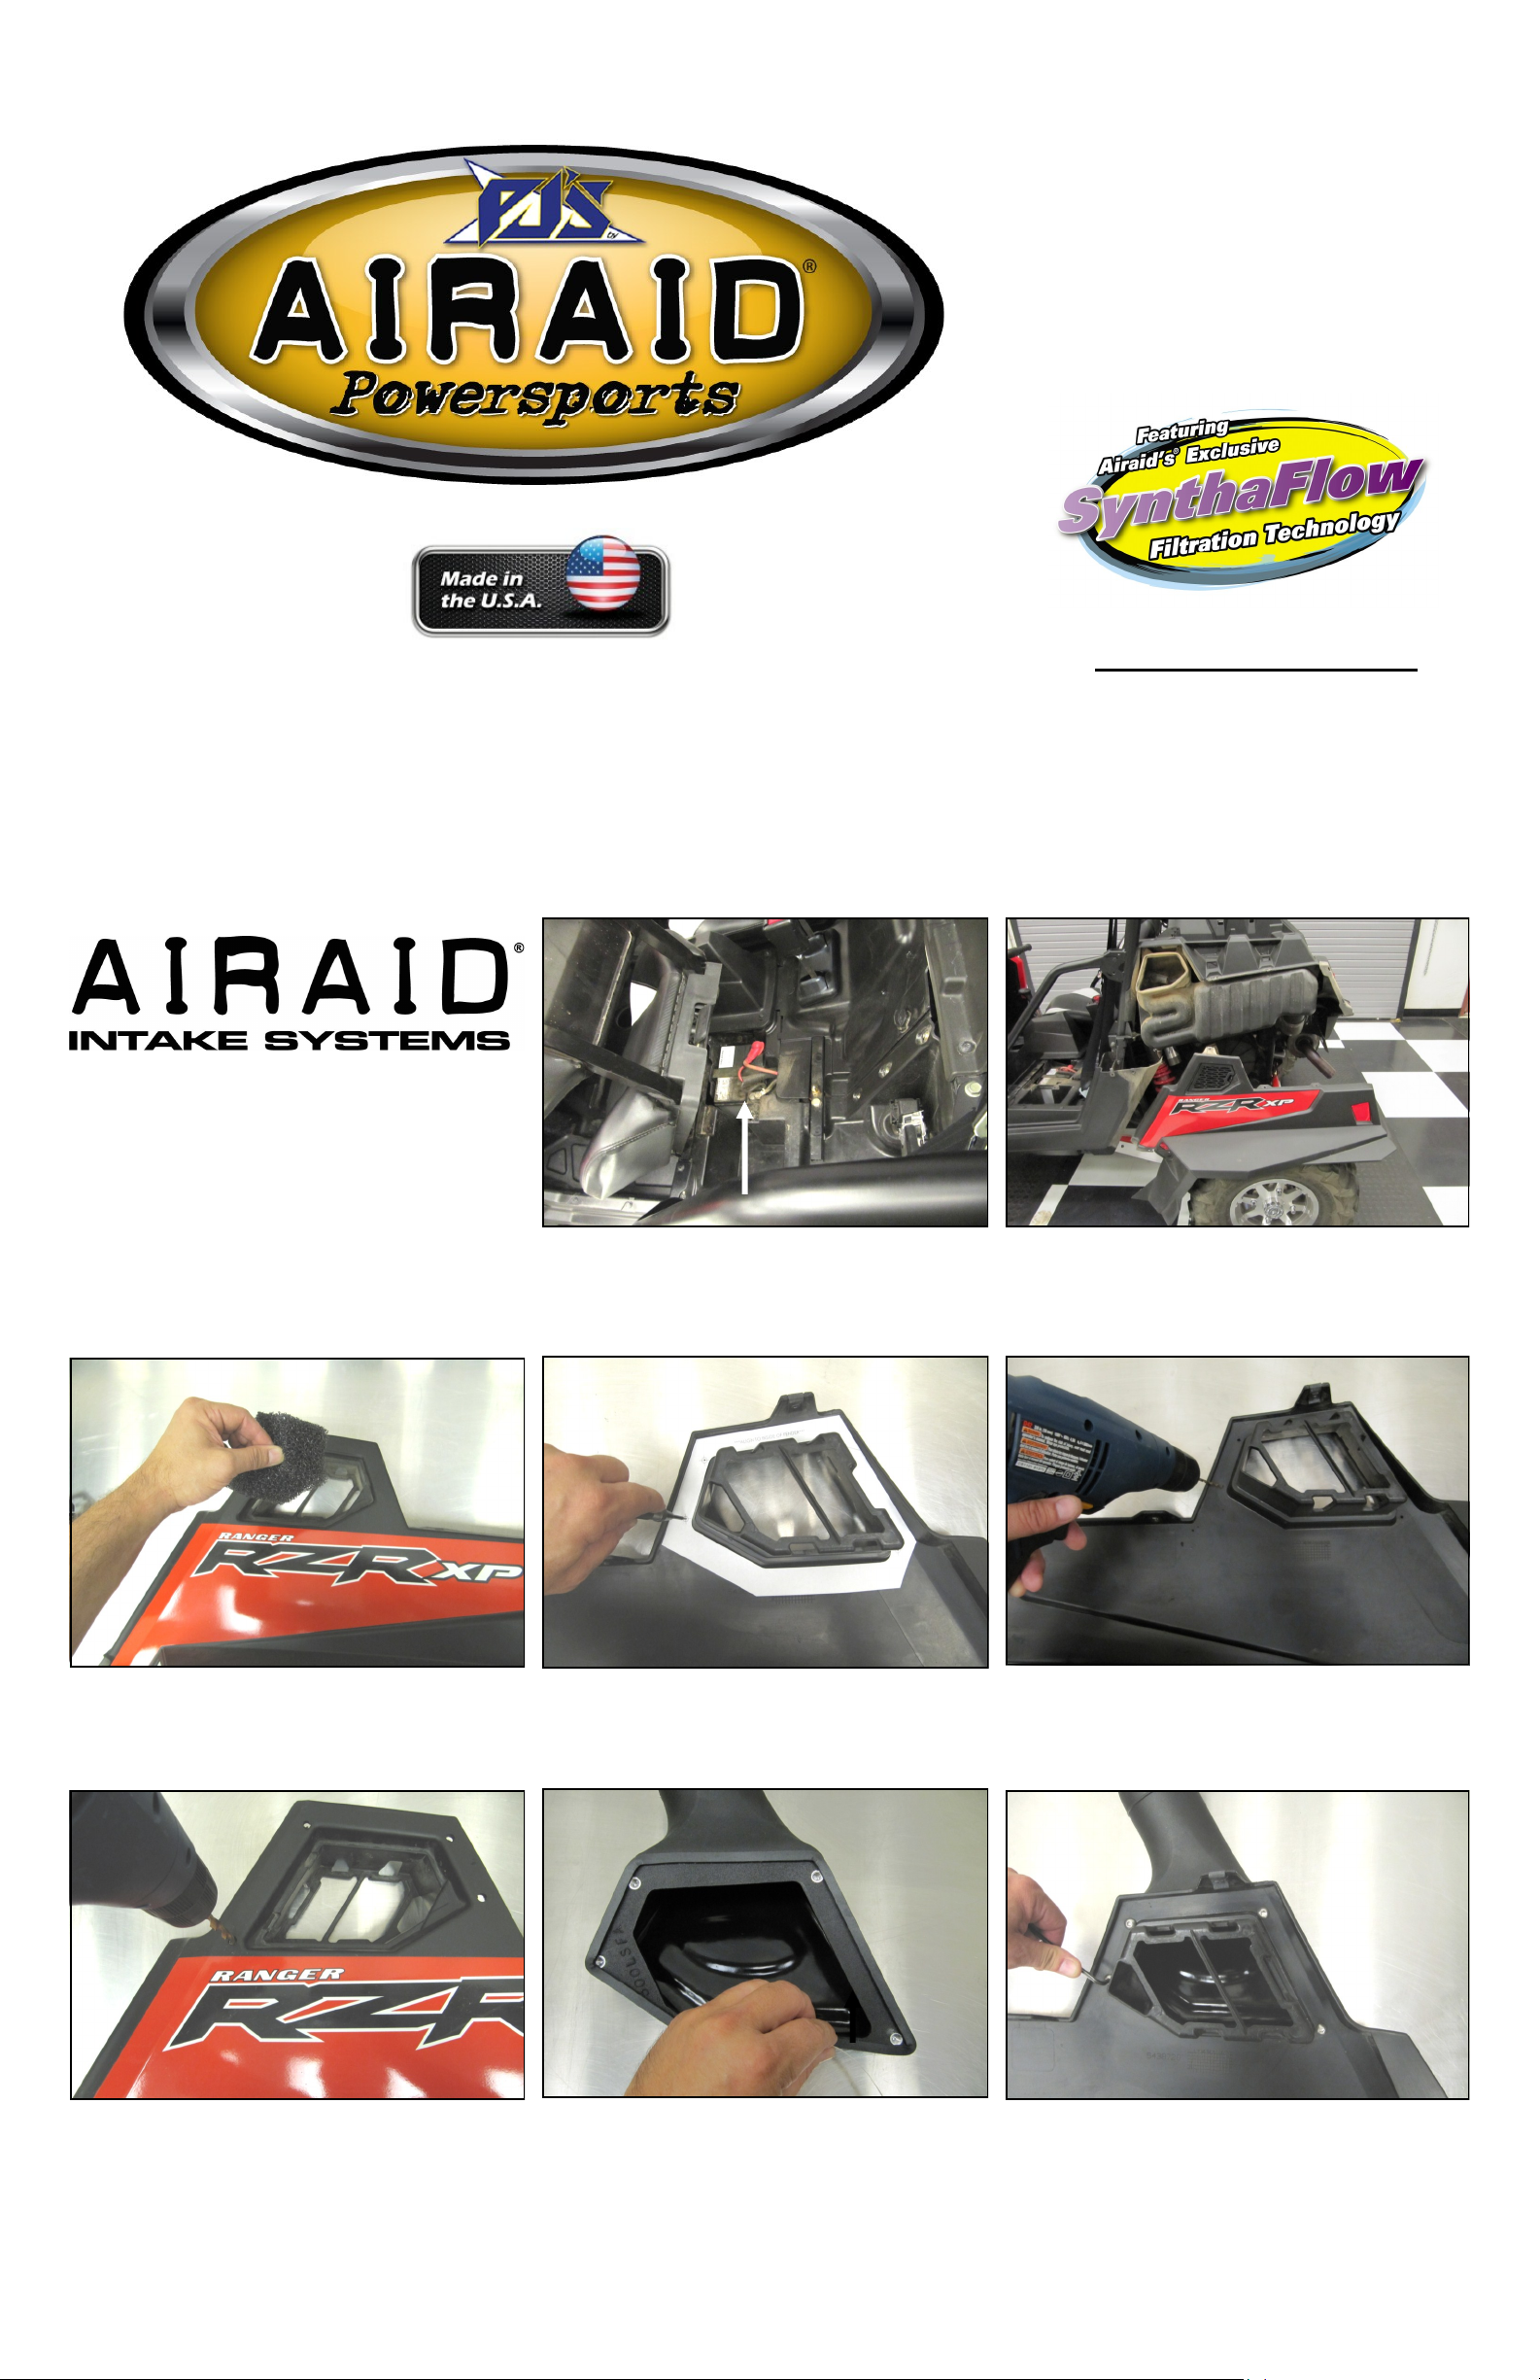
1. Place the range selector in Park and remove the driv-
ers seat from the vehicle. Disconnect the negative terminal on the battery.
2. Starting on the Drivers side first, remove the nine T-27
head screws holding the fender in place. Remove the
fender and place it on a work bench.
3. Remove the OEM filter cover and pre filter from the
fender and set aside. They will not be reused.
6. Using a 9/32” bit, drill out the pilot holes.
4. Cut out the paper Template. Align it with the edges
of inner fender, and punch the four pilot holes. Be careful with the Template as it will be re used on the passenger side fender too.
7. Prepare the mating surface of the Fender Adapter
(#2) for the Foam Gasket Tape (#10) by cleaning with
a prep solvent. Apply the gasket tape along the outside
edge of the Fender Adapter as shown, avoiding the bolt
holes.
5. Using a drill and a 1/8” bit, drill out the four pilot holes
in the inner fender.
8. Attach the Fender Adapter to the outside of the factory
Fender using four 1/4-20 button head screws (#14).
Page 2

9. Re install the fender onto the vehicle, reusing the
nine fasteners from step 2.
10. Insert the Foam Pre Filter (#6) into the Snorkel Inlet
(#4) .
11. Install the Snorkel Screen (#5) onto the Inlet using
four 8-32 Button Head Screws (# 13) and a 5/32” Allen
wrench.
12. Install the Hump Hose (#8) and Aluminum Intake
Tube (#3) onto the Fender adapter. Loosely install two
#48 Clamps (#8) onto the Hump Hose.
15. Secure the snorkel assemblies to the roll cage using the Tube Mounts (#9) and #68 Clamps (#12).
Align the Snorkels to each other for symmetry.
18. Double check your work!
Make sure there is no foreign material in the intake path. Make sure all clamps, hoses, bolts, and
screws are tight.
Make sure all clamps, hoses, bolts, and screws
are tight. Periodically check the tightness of all
hose clamps.
Re-connect the negative battery cable and
re install the driver seat.
13. Install the Silicone Elbow (#7) and two #48 clamps
onto the Inlet a shown. Leave the Hose Clamps loose
for now.
16. Remove the access hatch in the bed and remove
the factory air filter from the airbox.
Filter Service
Airaid recommends following the manufacturers maintenance schedule for filter cleanings.
“Air filters should be inspected before each
ride. Filter and pre-filter need to be replaced at
least annually and more often if subjected to
severe use.”
The Airaid Filter is reusable and
should be cleaned using the Airaid Filter Tune
-Up Kit .
14. Install the Snorkel Inlet and elbow onto the Intake
tube. Align the assembly into the desired position and
tighten all of the Clamps. Repeat steps 2-14 on the Passenger side and re use the template, face down.
17. Apply the supplied silicone grease (#15) to both
sides of the sealing flange on the Airaid Premium Filter.
Install the filter as shown , flange first, with the domed
portion facing away from the engine.
Don’t Forget Your AIRAID Filter Tune-Up Kit!
P/N 790-551 Aerosol Spray
P/N 790-550 Squeeze Spray
Airaid Filter Co. 2688 E Rose Garden Ln. Phoenix AZ 85050 (800) 498-6951 AiraidInfo@airaid.com www.airaid.com
Page Two
REVDATE:01.07.14
Page 3
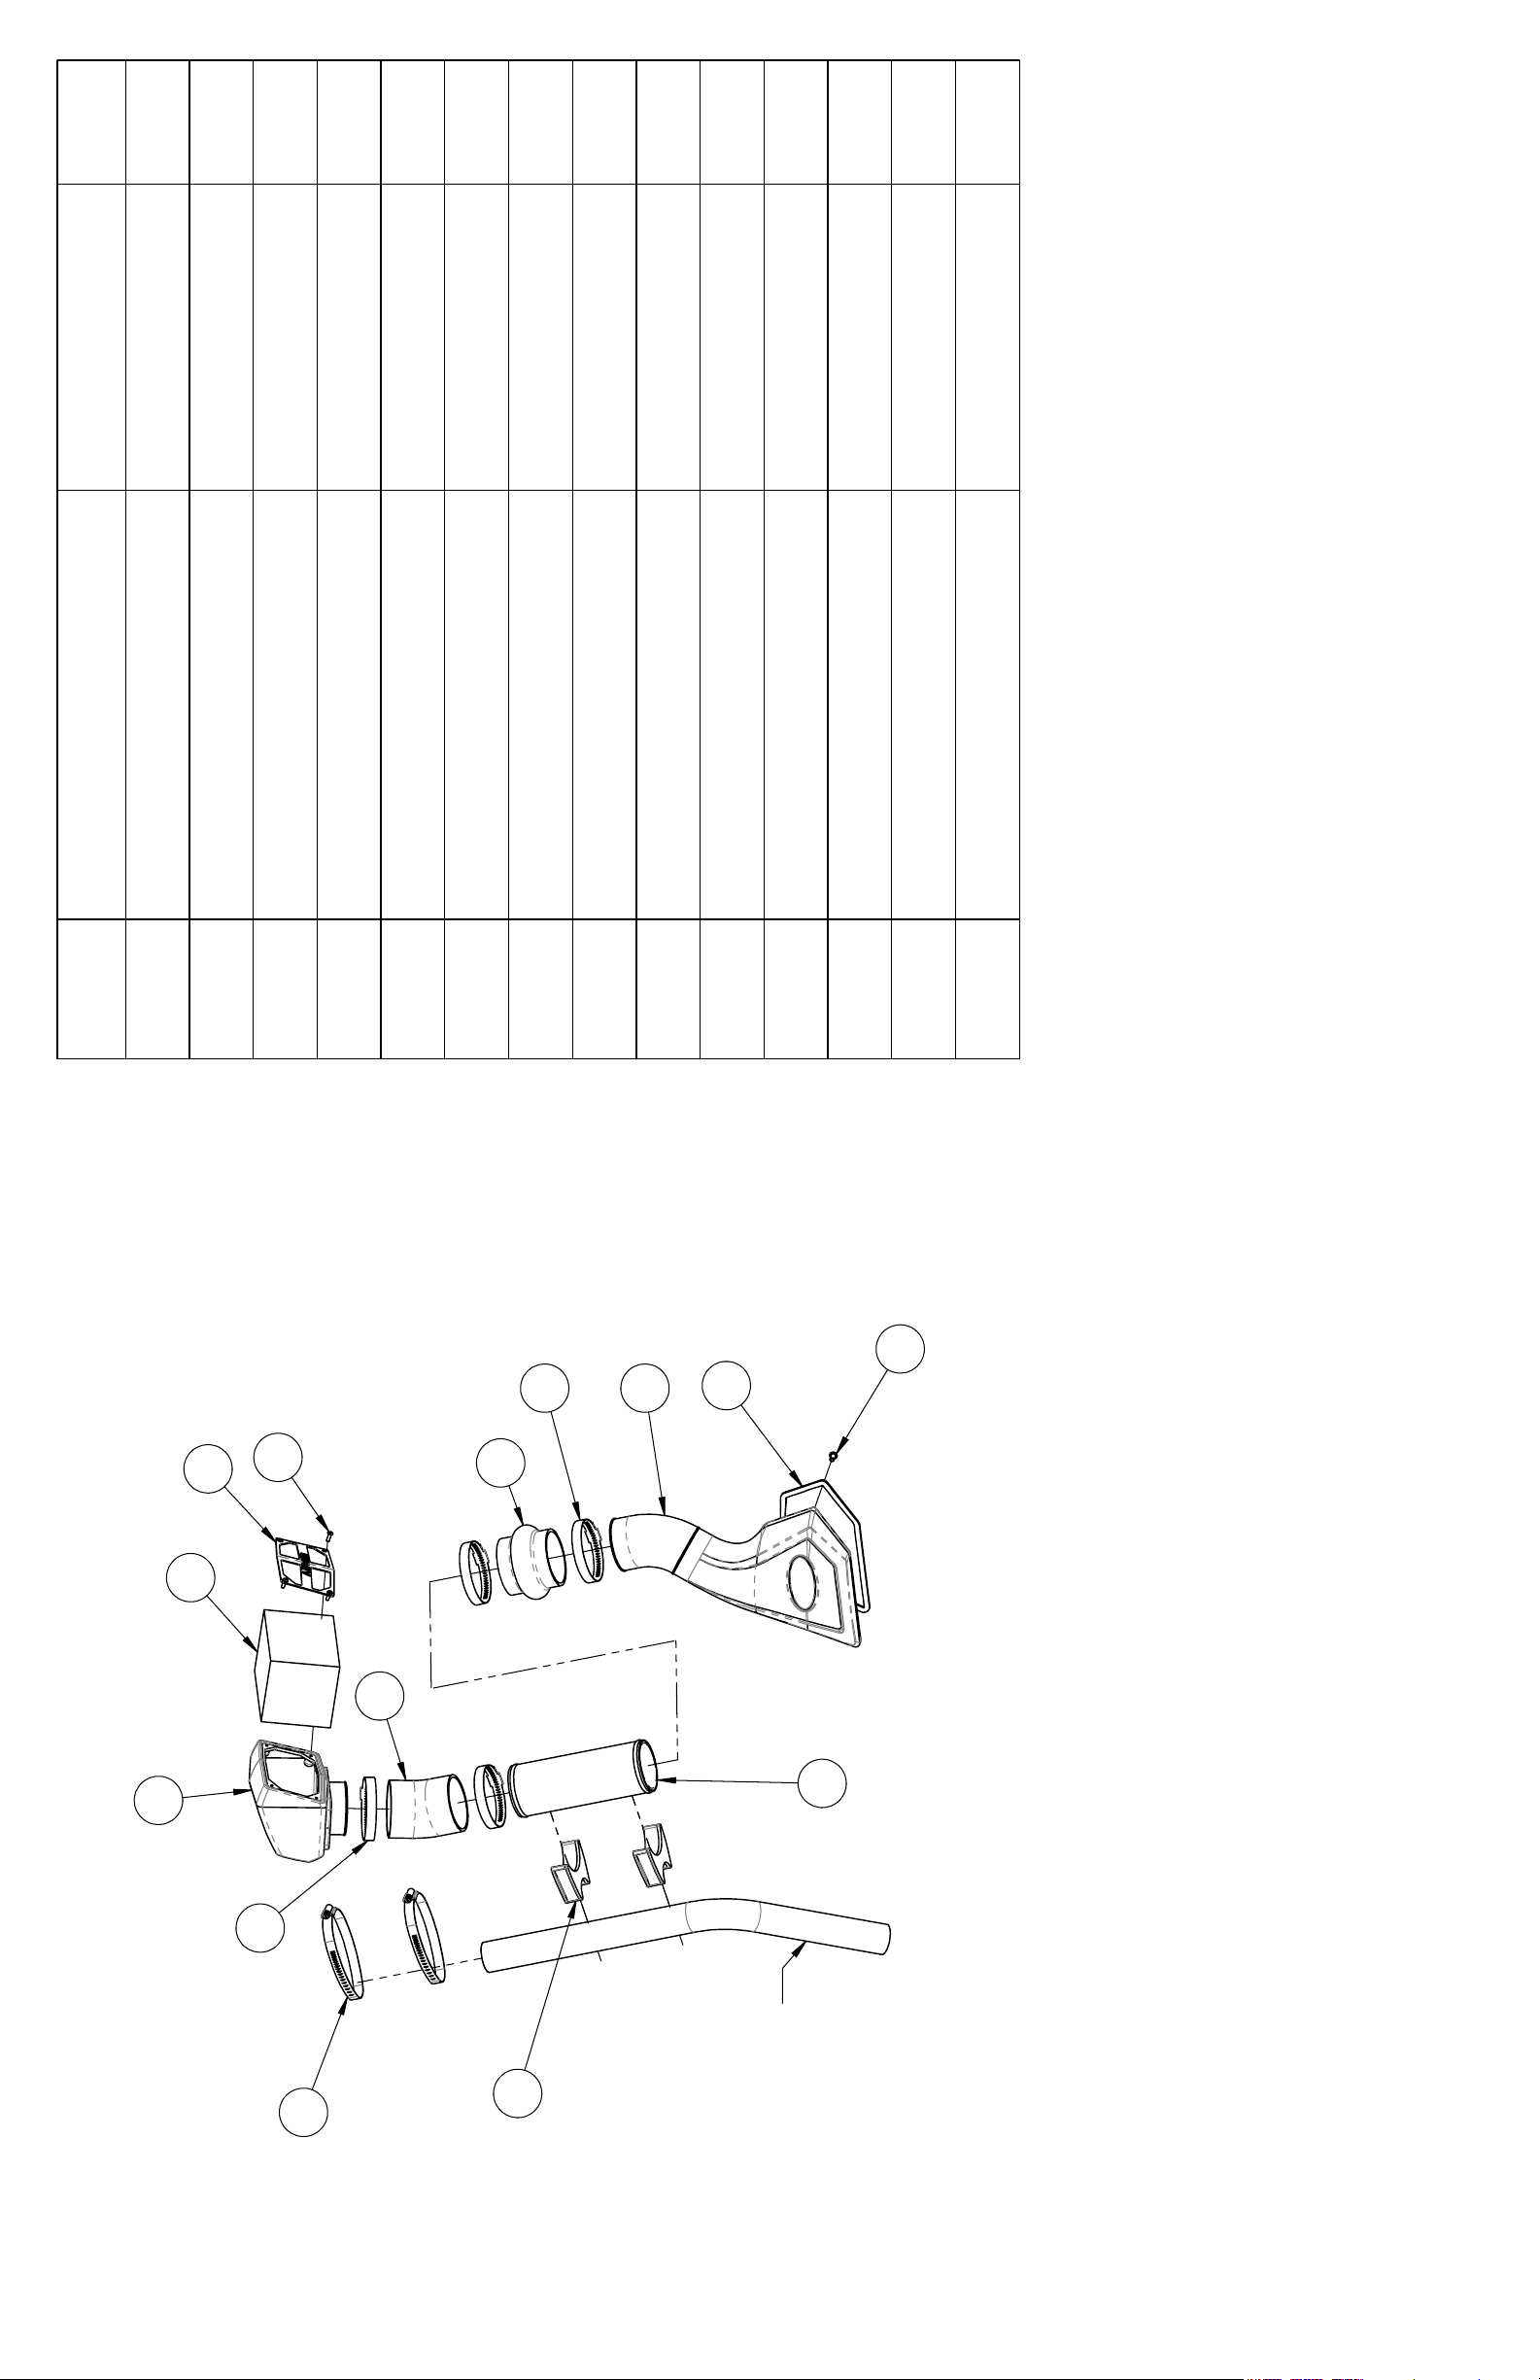
QTY.
1
2
2
2
2
2
2
2
4
2
8
4
8
8
850-352
AiraidPackinglistP/N
AiraidPackinglistDESCR
AIRAID Premium Filter (NOT SHOWN)
KIT300LSFA/KIT300RSFA
Fender Adapter, Left & Right
KIT300ALT
3.00" X 8.00" Aluminum Tube
KIT300SIT
Snorkel Inlet
KIT262SS
Snorkel Screen
KIT262PF
KITELBOW10
Foam Prefilter
3.00" 25° Silicone Elbow
KITHUMPHS06S
Silicone Hump Hose
KIT300UTM
Urethane Tube Mount
KITWSTRIP05
Foam Gasket Tape, 24"
KITHS48
#48 Hose Clamp
KITHS68
#68 Hose Clamp
KIT15BHC3050
#8-32 x ½” Button Head Screw
KIT15DHC3050
¼-20 x 1/2” Button Head Screw
1
ITEM NO.
2
5
3
13
4
5
6
7
8
11
8
9
2
10
10
11
12
14
13
14
6
7
4
11
9
12
3
DRIVER SIDE ASSEMBLY SHOWN
STOCK ROLL CAGE
Page 4
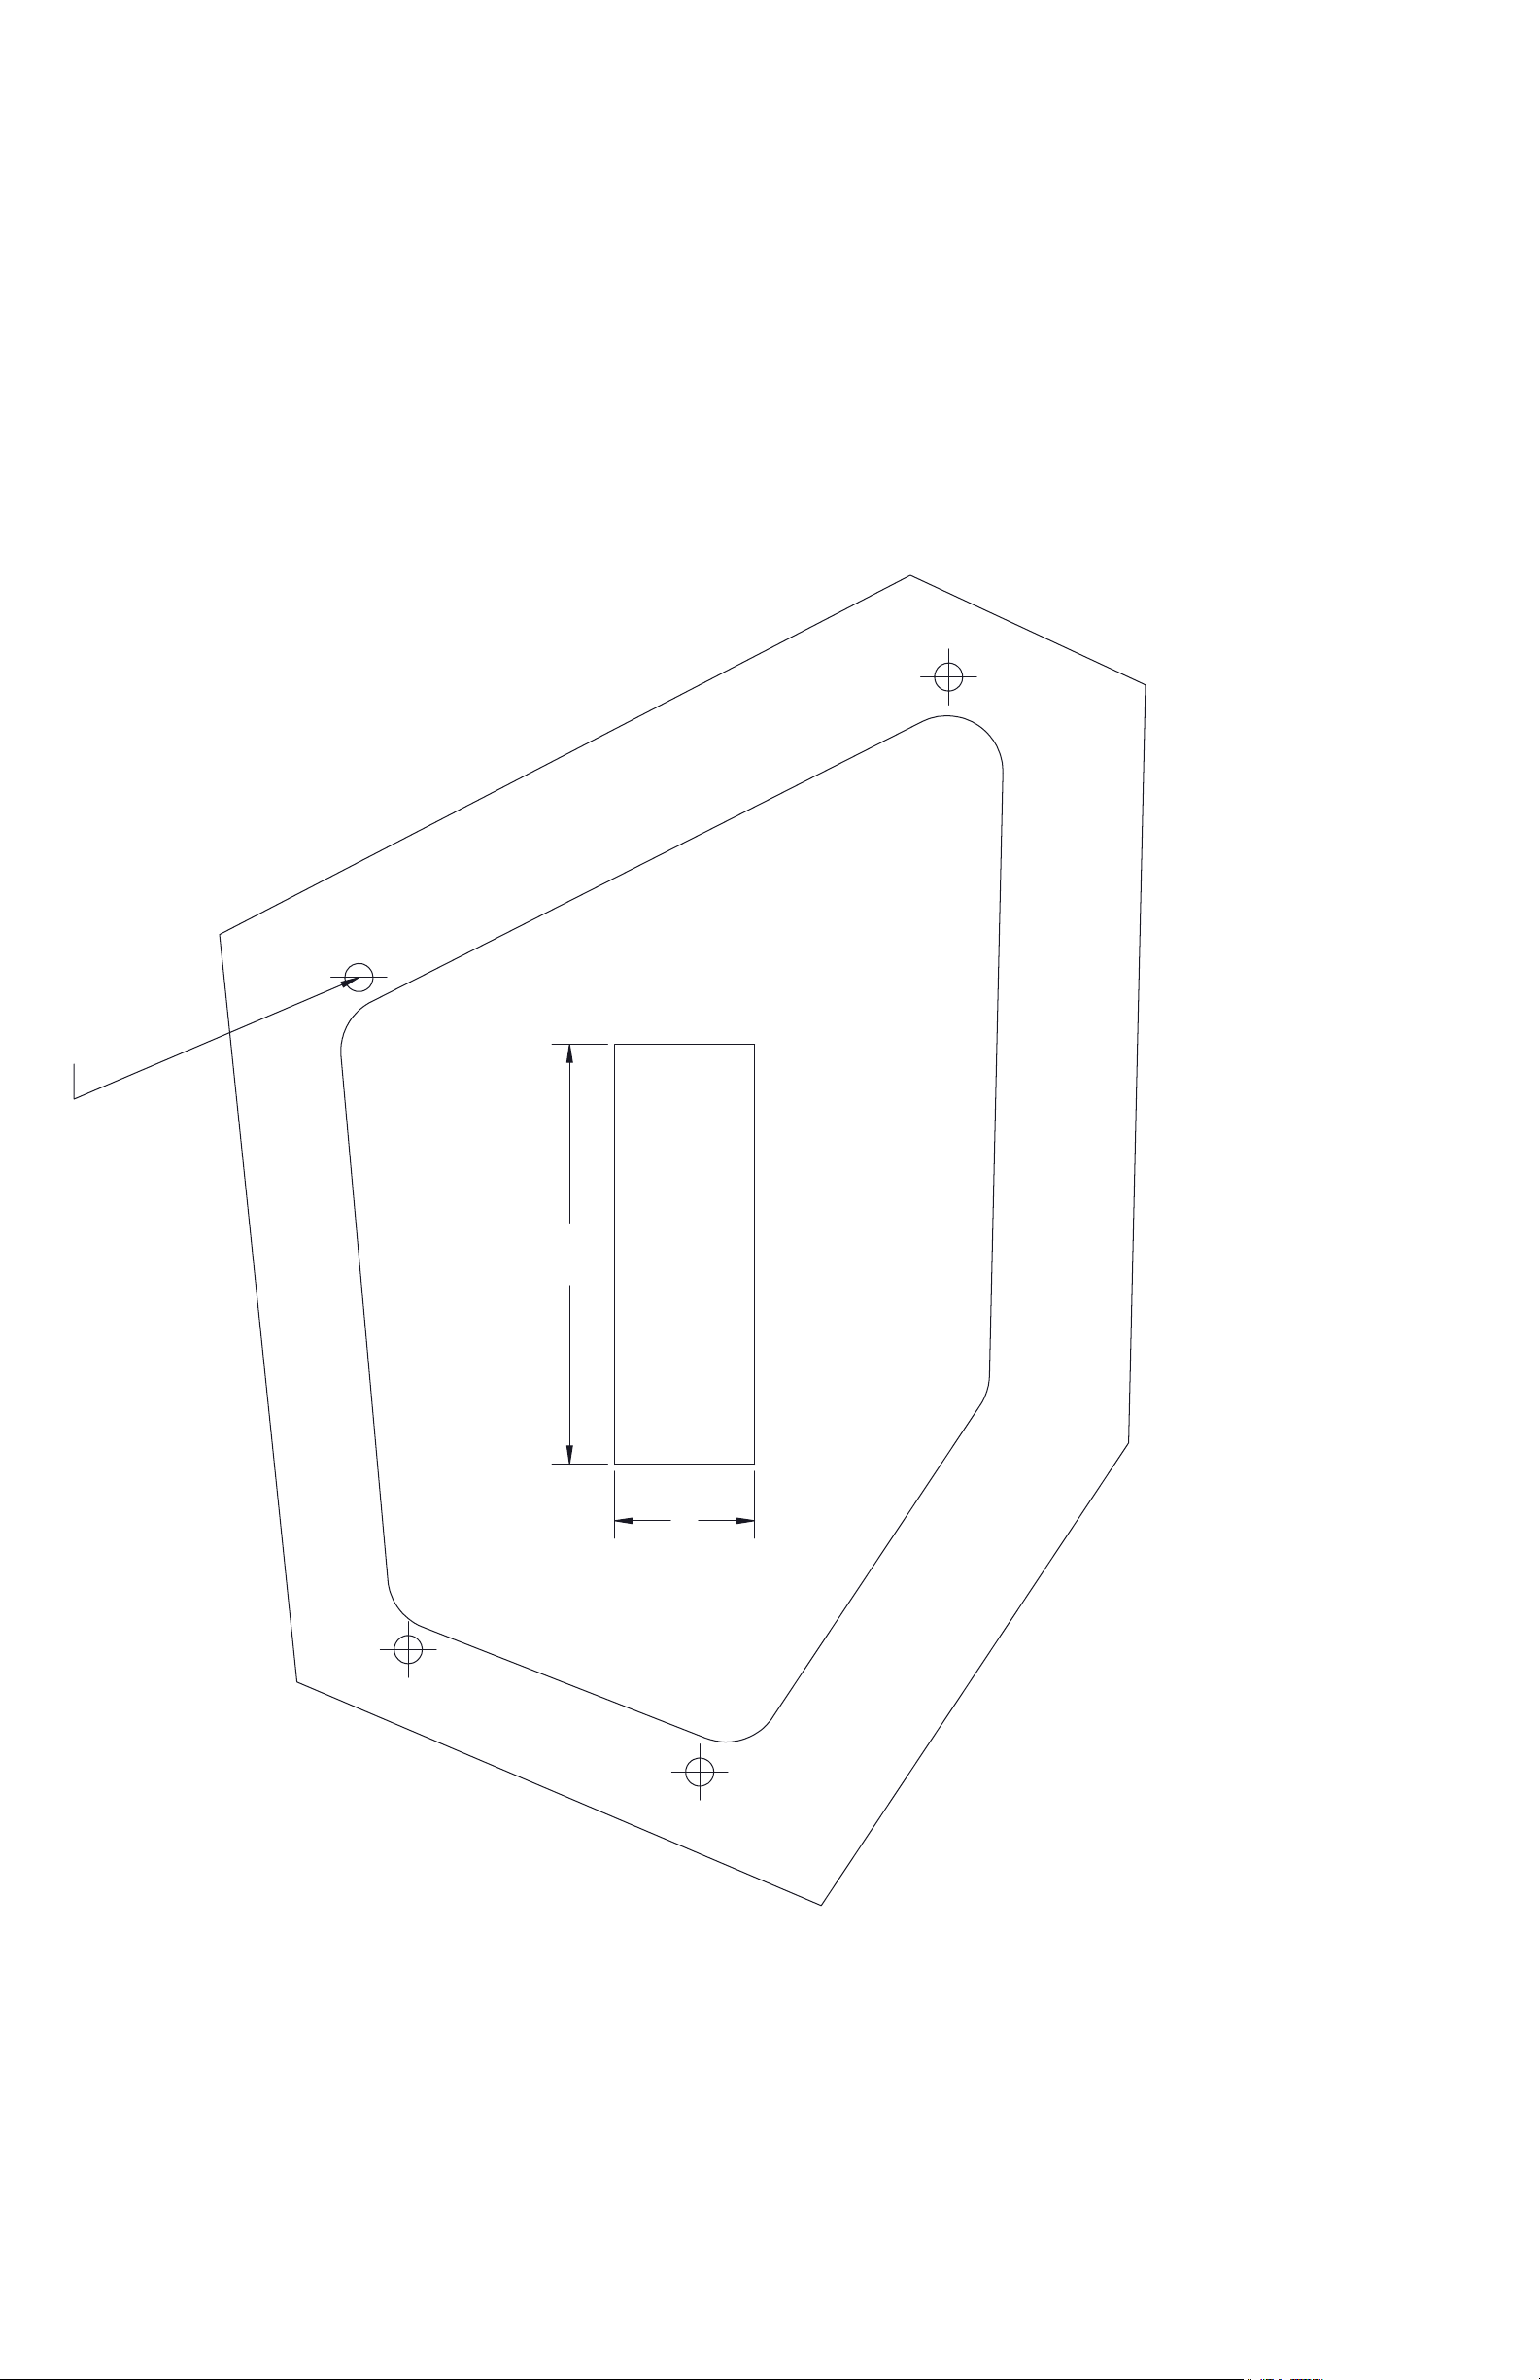
MARK WITH CENTERPUNCH, DRILL 1/8" PILOT HOLE
THEN DRILL USING 9/32" BIT, ADJUST AS NECESSARY
3.00
***ALIGN TO INSIDE OF FENDER***
1.00
***CHECK SCALE BEFORE USING TEMPLATE***
 Loading...