

Page 1
XP-KIT
Programming Starter Kit for Aiphone -XP Series
Proximity Reader Stations
Programming & Operations
Manual
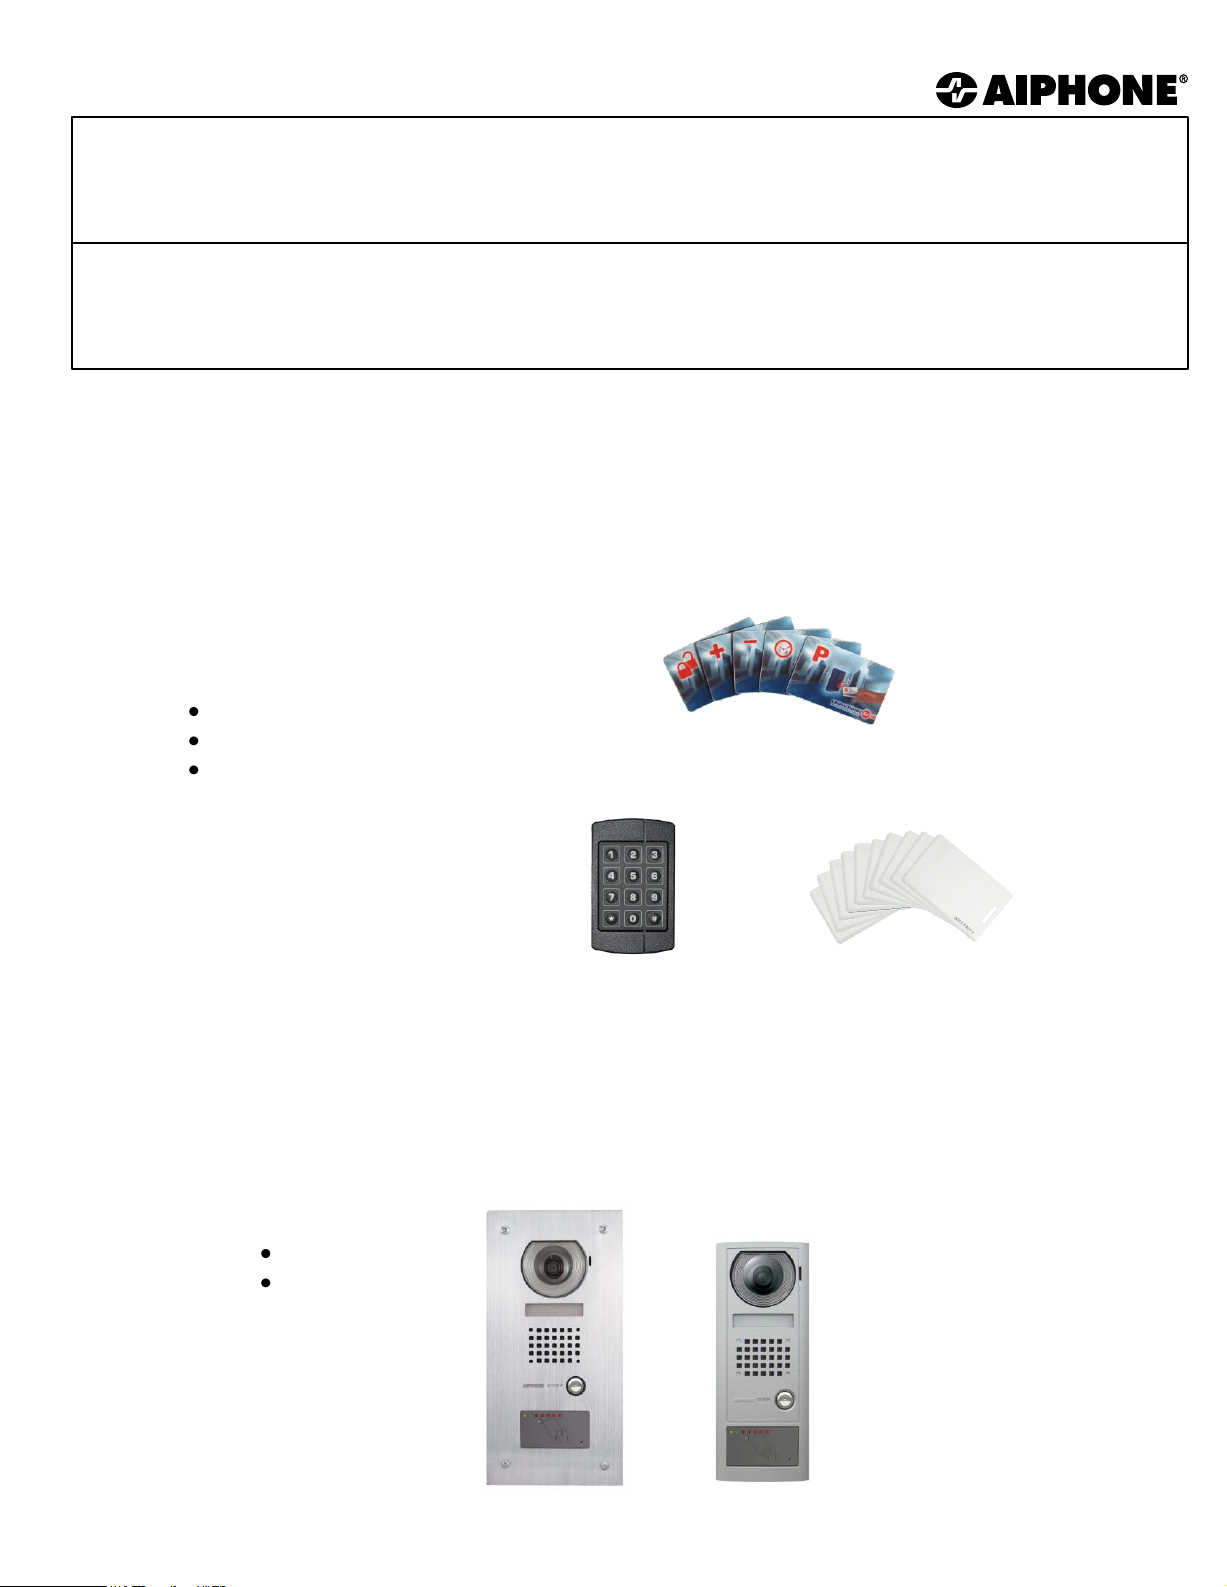
KIT CONTENTS:
Programming Keypad
Programming Master Card Pack
10 Blank Proximity Cards
(supplied only with XP-KIT Programming Starter Kit)
XMMC3/9
Master Card Pack
Aiphone Corporation
1700 130th Ave. NE
Bellevue, WA 98005
(800) 692-0200
FAX (425) 455-0071
tech@aiphone.com
For use with:
AX-DV-XP
AX-DVF-XP
XRP3 Remote
Programmer
XC5T/9 Blank
Proximity Card
(Qty. 10 Included)
XP-Kit Item # 38800
063008
Page 2

TABLE OF CONTENTS
Section 1 – Introduction……………………………………………………………… Pg. 3
1.1 – Reader LED and Tone Definitions
1.2 – Package Contents
Section 2 – Initialization……………………………………………………………… Pg. 4
2.1 – Assigning the XRP3 Remote Programmer
2.2 – Assigning the Program Master Card
2.3 – Assigning the Additional Master Function Cards
Section 3 – Basic Operations………………………………………………………..Pg. 6
3.1 – General Operations & Programming Tips
3.2 – Operating the Door Release
3.2.1 – With programmed user credentials
3.2.2 – With the XRP3 Remote Programmer
3.3 – Toggling Unlock Mode
3.4 – Toggling Night Lock Mode
3.4.1 – With the Night Lock master card
3.4.2 – Exiting Night Lock mode with the XRP3 Remote Programmer
Section 4 – Basic Programming……………………………………………………. Pg. 9
4.1 – Adding User Credentials (Level I) by Presentation
4.1.1 – With the Add master card
4.1.2 – With the XRP3 Remote Programmer
4.2 – Voiding User Credentials by Presentation
4.2.1 – With the Void master card
4.2.2 – With the XRP3 Remote Programmer
4.3 – Setting the Door Release Timer
4.3.1 – With master cards
4.3.2 – With the XRP3 Remote Programmer
Section 5 – Advanced Programming……………………………………………….Pg. 12
5.1 – Adding Special User Credentials (Level II) by Presentation
5.1.1 – With the Add master card
5.1.2 – With the XRP3 Remote Programmer
5.2 – Adding Night User Credentials (Level III) by Presentation
5.3 – Voiding Credentials by ID number
5.4 – Door Ajar / Forced Entry Function
5.4.1 – Setting the Door Closed timer duration
5.4.2 – Door Ajar alarm operation
5.4.3 – Forced Entry alarm operation
5.5 – Creating Additional / Replacement master cards
5.5.1 – „Night Lock‟ master card creation
5.5.2 – „Add‟ master card creation
5.5.3 – „Void‟ master card creation
5.5.4 – „Lock / Unlock‟ master card creation
5.6 – Adding an XRP3 Remote Programmer
5.7 – Adding Credentials by ID number
5.8 – Batch Credential Removal
5.8.1 – Batch Credential Removal with master cards
5.8.2 – Batch Credential Removal with XRP3 Remote Programmer
Section 6 – Troubleshooting………………………………………………………... Pg. 20
Log Sheet Template……………………………………………………. Pg. 22
Pg. 2
Page 3
1 INTRODUCTION
The XP-KIT is a programming starter kit capable of programming any of Aiphone‟s -XP series readerequipped door stations (Such as AX-DV-XP, AX-DVF-XP, etc.). These door stations are capable of
acting as stand-alone access control card readers, operating completely independent of 3rd party host
controllers, PC interfaces, etc. In this guide you will find all the information necessary to perform basic
system operations, as well as learning basic and advanced programming functionality.
Note: This manual covers programming and operations for the -XP series reader only. For stationspecific mounting and installation information, please consult the documentation included with your
chosen -XP series door station.
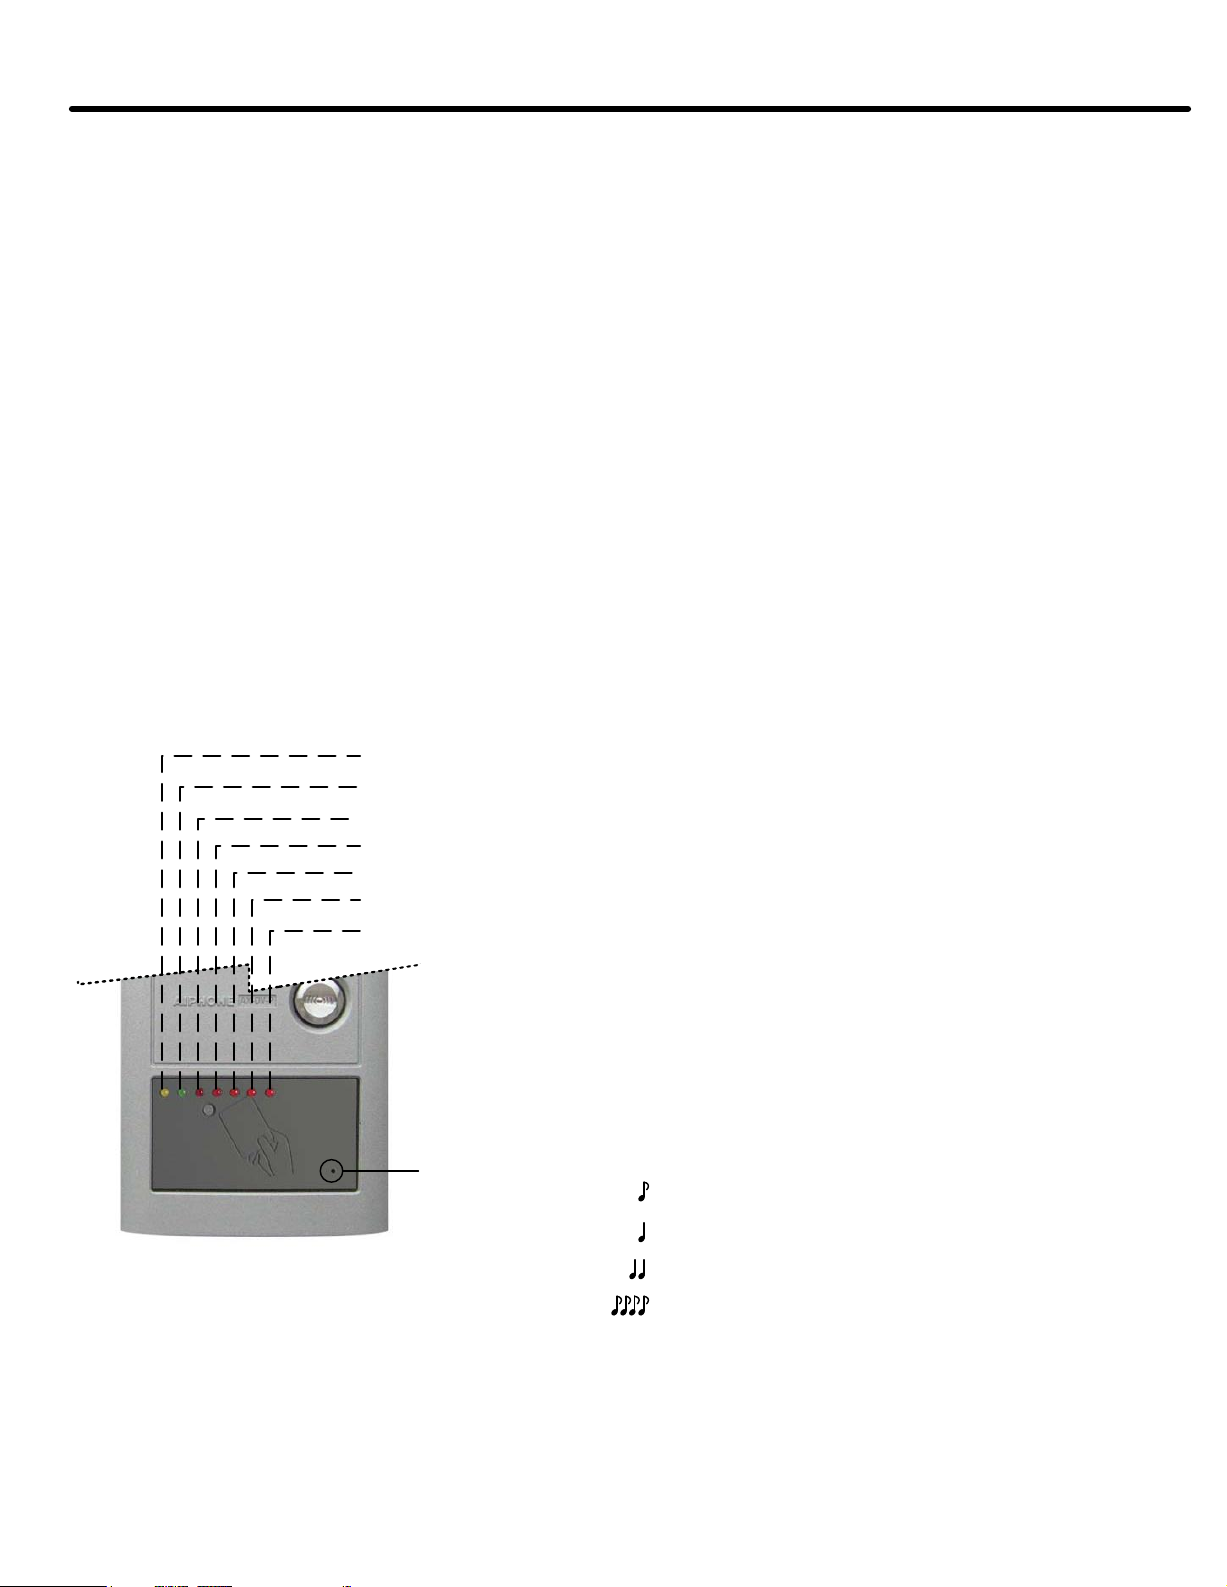
1.1 READER LED AND TONE DEFINITIONS –
All programming and operations of the -XP series reader provide audible and visual feedback to
indicate to the user the functional status and current operations of the reader. Use the following key to
determine the meaning of each LED / Tone type:
LED 1 (Yellow)
LED 2 (Green)
LED 3 (Red)
LED 4 (Red)
LED 5 (Red)
LED 6 (Red)
LED 7 (Red)
Buzzer
LED Definitions:
LED 1 – Indicates the presence of a proximity card,
tag or Remote Programmer
LED 2 – Indicates that the door contact output is
active (access granted)
LED 3 – Indicates that the door contact output is
inactive (secure)
LED 4 – Indicates that the “Night Lock” mode is
active
LED 5 – Indicates “Add Credentials” mode
LED 6 – Indicates “Void Credentials” mode
LED 7 – Indicates that the reader is in
“Programming” mode
Tone Definitions:
– Card read (short beep)
– „Master‟ card read (long beep)
(AX-DV-XP shown for reference)
– XRP3 read (2 long beeps)
– Invalid card read / error (4 short beeps)
Pg. 3
Page 4
1 INTRODUCTION (continued)
1.2 PACKAGE CONTENTS –
XMMC3/9
Master Card Pack
(supplied only with XP-KIT Programming Starter Kit)
XRP3 Remote
Programmer
XC5T/9 Blank
Proximity Card
(Qty. 10 Included)
XP-KIT – Programming Starter Kit (containing):
XC5T/9 Blank User Cards (Qty. 10)
XRP3 Handheld Remote Programmer (Qty. 1)
XMMC3/9 Master card pack – (Qty. 1)
Note: XRP3 Remote Programmers and XC5T/9
Blank Proximity Cards may be ordered individually, as
necessary, to suit customer requirements. The
XMMC3/9 Master Card Pack, however, is included
only in the XP-KIT Programming Starter Kit; regular
XC5T/9 proximity cards can be programmed to
supplement or replace these cards, as necessary.
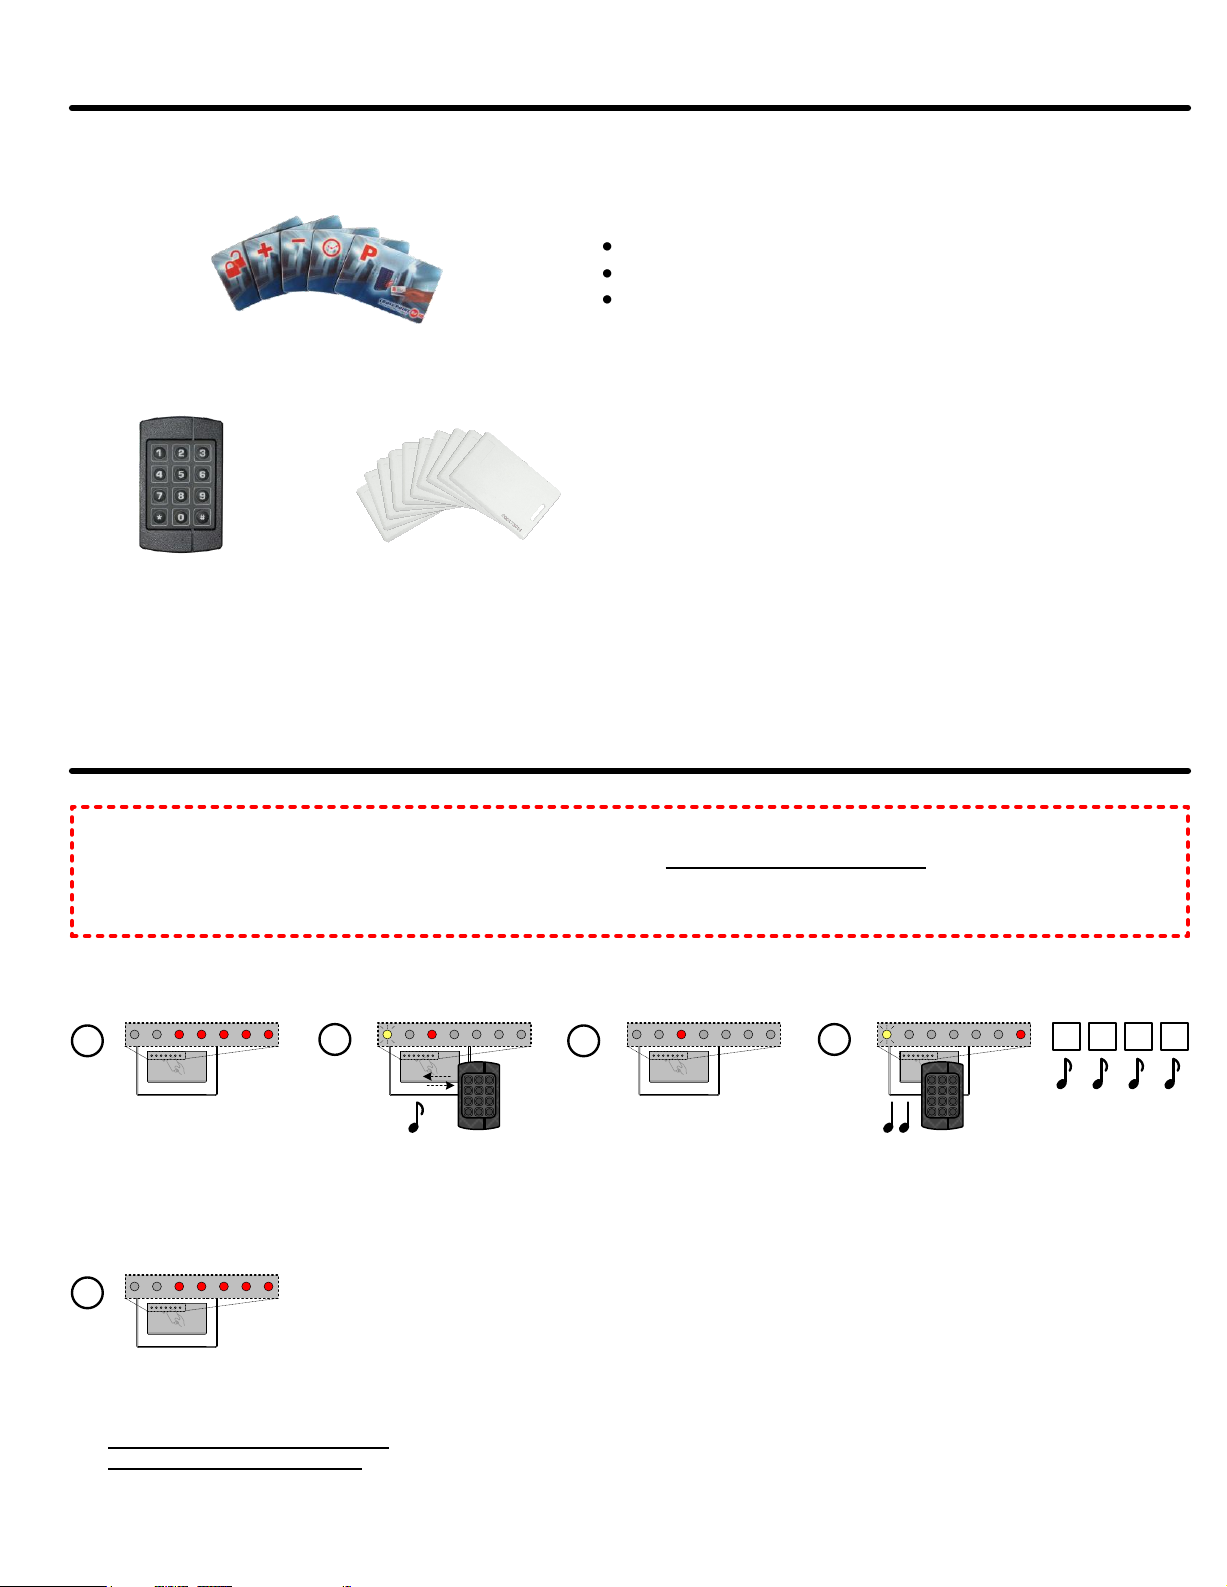
2 INITIALIZATION
Your Aiphone -XP series proximity-equipped station has been shipped from the factory in „Sleep mode‟.
Before it can be operated or programmed in any way it must first be initialized to recognize the XRP3
remote programmer and master card set provided in your XP-KIT starter kit. The following steps
should be carefully followed to ensure proper setup of the reader.
2.1 ASSIGNING THE XRP3 REMOTE PROGRAMMER –
1
When powered on
for the first time, the
reader is in „Sleep
mode‟.
5
The reader has now been returned
to „Sleep mode‟, awaiting
configuration of the master cards.
Cycle power (turn off / on) at this
time to complete the process.
2
Present and remove
the XRP3 Remote
Programmer.
Note: Be sure that the LEDs lit on the -XP series card reader
match those shown in step (4) before proceeding. If they do not
match, simply repeat the presenting of the XRP3 and key entry of the
sleep mode command as shown in step (4). Be sure that you see not
only LED1 (yellow) flashing while the XRP3 is held against the reader
but also that you hear audible confirmation of both the presenting of
the keypad in addition to each key press.
1 2 3
4 5 6
7 8 9
*
3
0 #
The XRP3 is now assigned
as a „User Programmer‟
(Note: Write the 9-digit ID
from the back of the XRP3
onto your Log Sheet, Pg
22).
4
1 2 3
4 5 6
7 8 9
0 #
*
Holding the XRP3 against the
reader, key the sequence as shown.
0 * 0 *
Pg. 4
Page 5
2 INITIALIZATION (continued)
2.1 ASSIGNING THE PROGRAM MASTER CARD –
After cycling power in step 1, the reader should be in sleep mode, ready to have the Program master
card assigned.
1
(Reader is in „User
Sleep‟ mode)
2
P
Present the „P‟ (Program
Master) card.
3
The Program master card is now assigned,
and the system is in „Standby‟. (Note: Write
the 9-digit ID from the back of the Program
master onto your Log Sheet, Pg 22)
Both the XRP3 and the Program master card should now be properly assigned to the -XP series
reader. Please continue to section 2.2 and follow the instructions to associate the remaining master
cards.
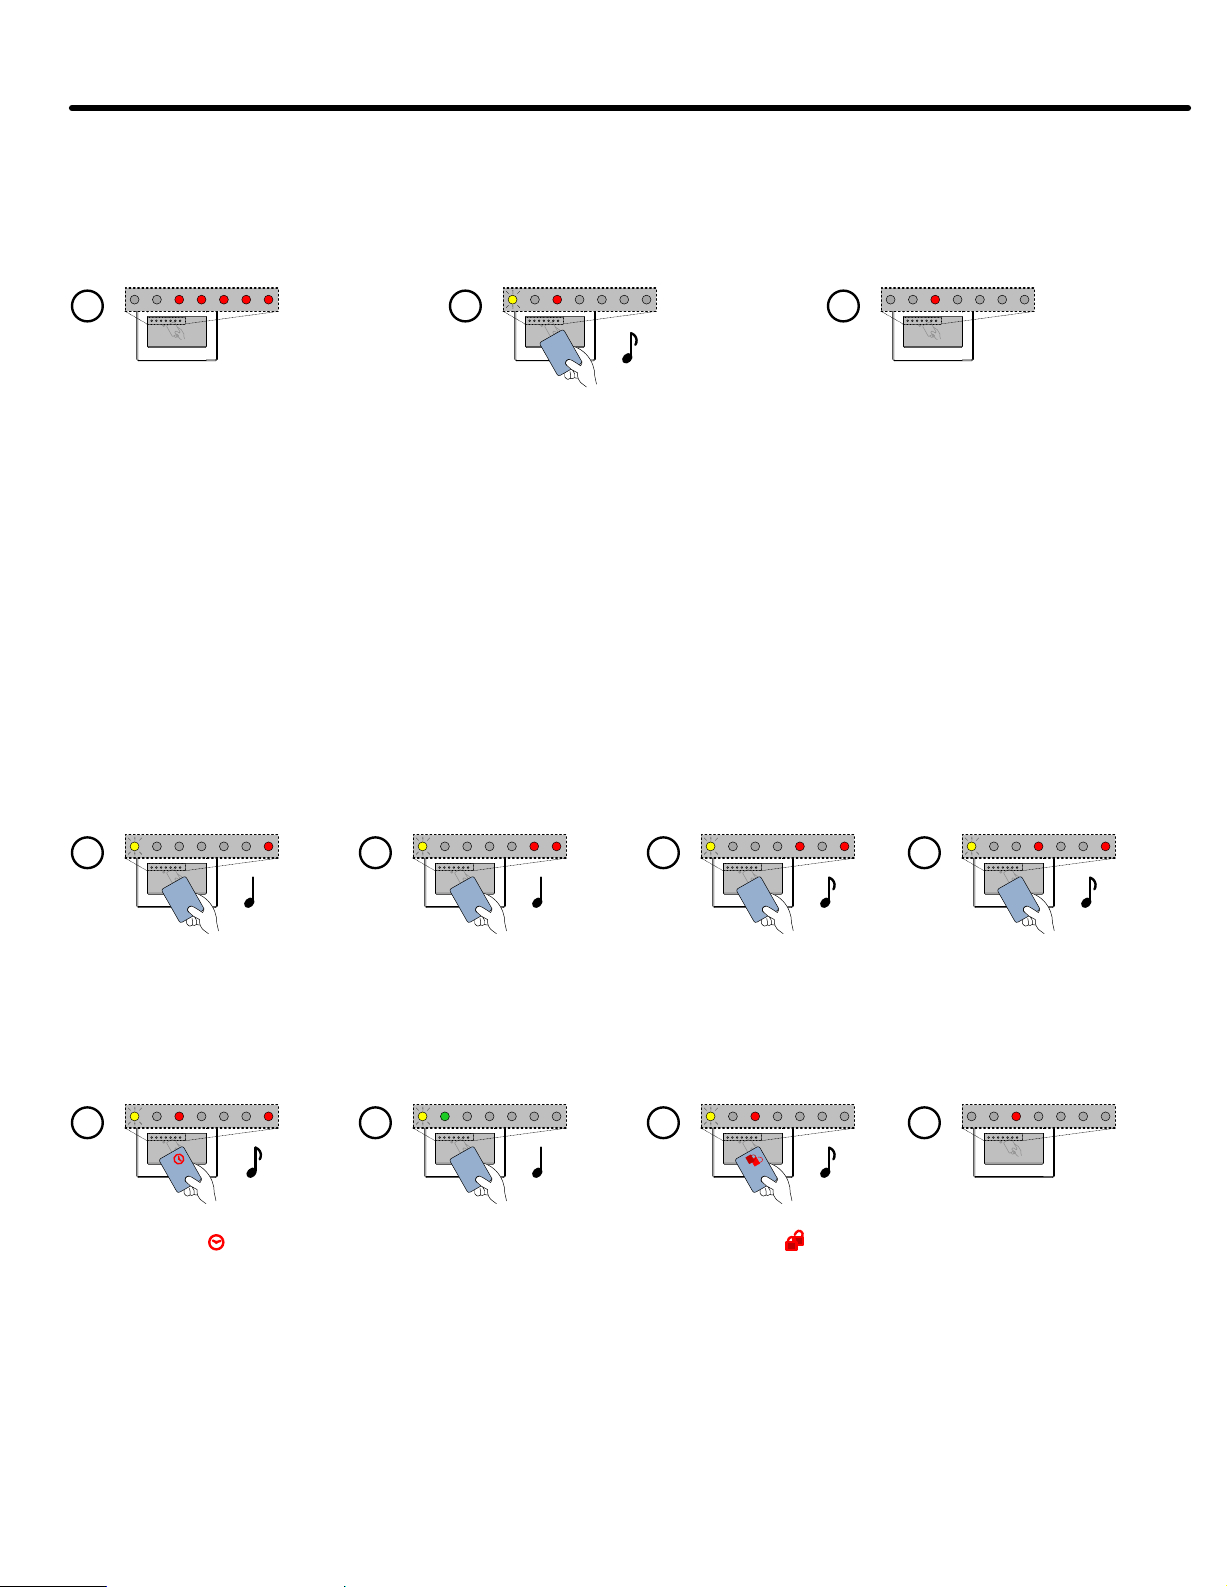
2.3 ASSIGNING THE ADDITIONAL MASTER FUNCTION CARDS –
Once the Program master has been assigned, additional master function cards can be
designated (for a basic description of master card functions, see Pg. 4). These cards will be
usable for basic programming and operation of the -XP reader.
1
P
2
P
3
–
4
+
Present the Program master
card; the reader is now in
„Programming‟ mode.
5 6
Present the „ ‟ (Night Lock
master) card. The Night Lock
master is now assigned.
Present the Program master
card again to begin new
master card assignment.
P
Present the „P‟ (Program
master) card again.
Present the „–‟ (Void
master) card. The Void
master is now assigned.
7 8
Present the „ ‟ (Lock /
Unlock master) card. The
Lock / Unlock master is
now assigned.
Present the „+‟ (Add
master) card. The Add
master is now assigned.
The system is now in User
Standby mode, ready for
active use!
Congratulations! Your Aiphone -XP series reader is now ready for active use! Be sure to log the 9-digit
ID numbers of the XRP3 remote programmer and each master card on the provided Log Sheet, page 22.
NOTE: If you have multiple Aiphone -XP series reader-equipped door stations, please repeat this
Initialization section for each of them. Master cards and XRP3 programmers can be shared
between as many door stations as desired.
Pg. 5
Page 6
3 BASIC OPERATIONS
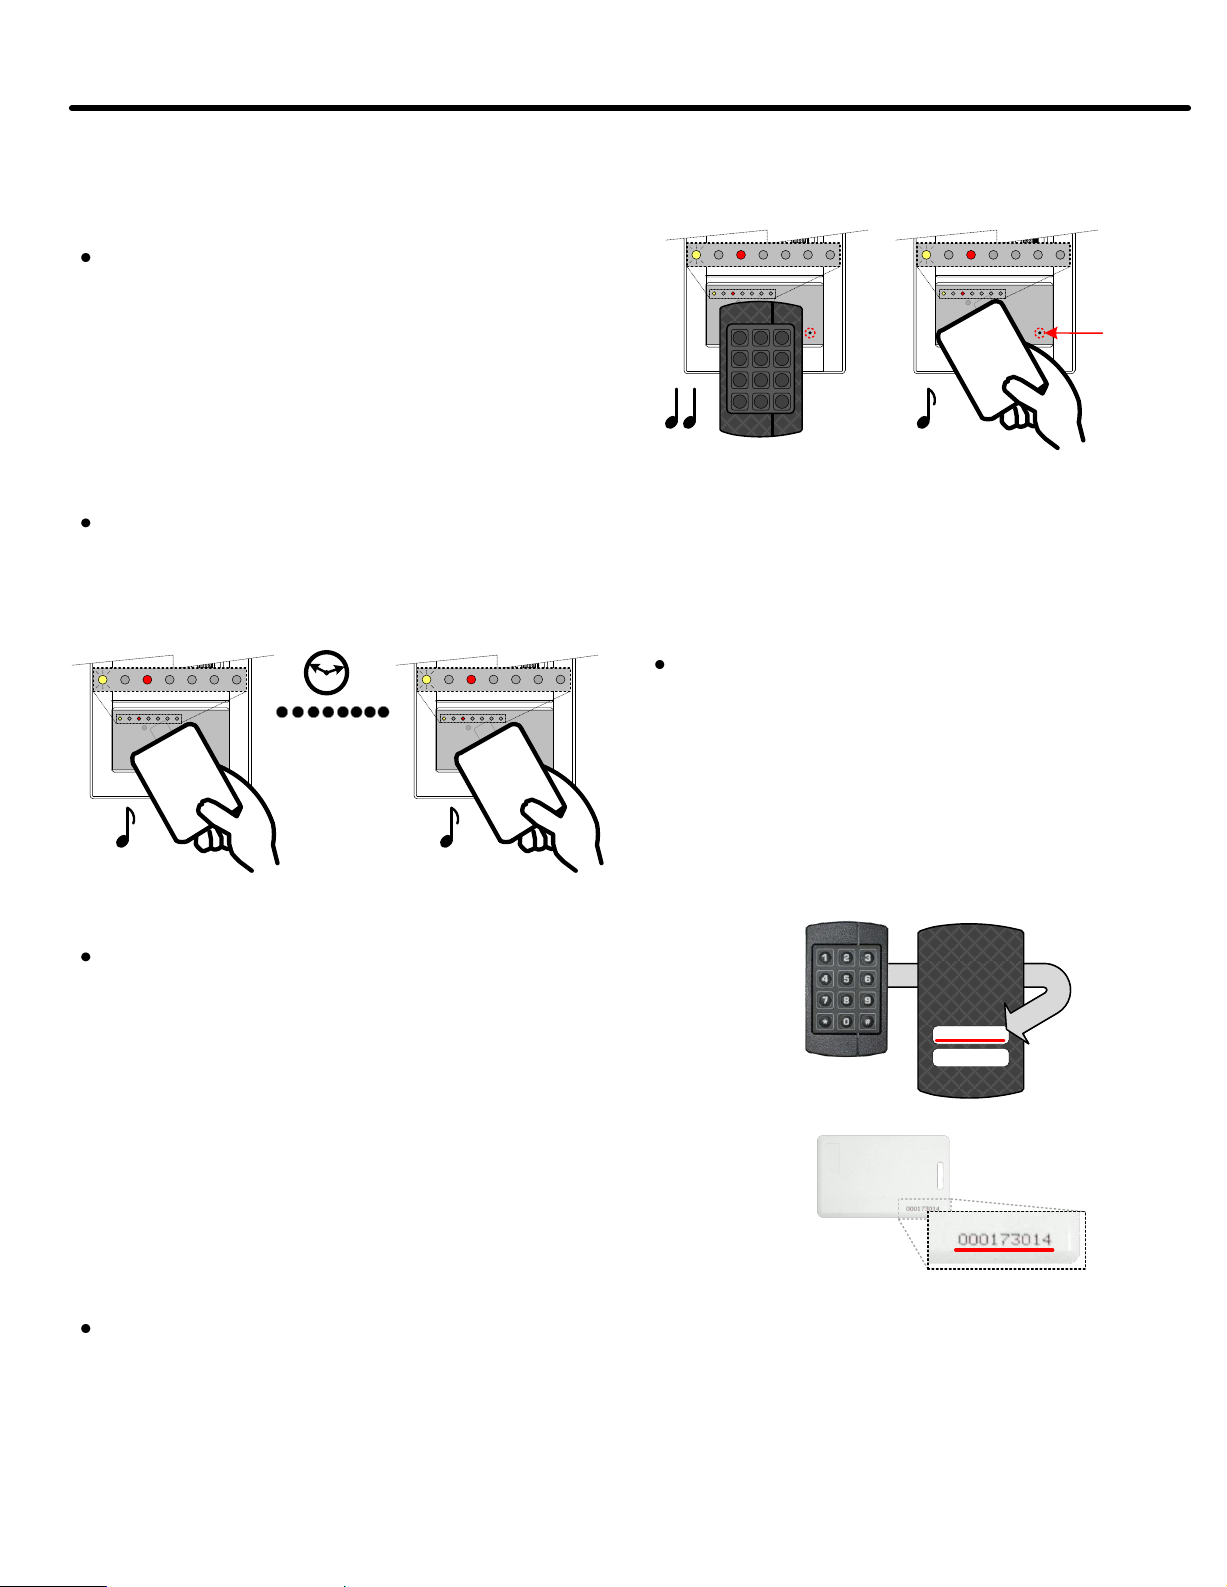
3.1 GENERAL OPERATION & PROGRAMMING TIPS:
When „presenting‟ credentials to the reader, a
successful „read‟ should be indicated by visual
lighting of LED1 (Yellow) and an audible beep
(dependant upon function). Try not to block the
buzzer opening, otherwise it may be difficult to
hear audible notifications.
When performing operations with the XRP3 Remote Programmer, be sure to hold the XRP3 against
the reader, and that LED 1 (Yellow) is flashing. Each keypress will be confirmed by an audible
„beep‟.
(wait 1 second)
1 2 3
4 5 6
7 8 9
0 #
*
For all operations and programming steps, a
one (1) second delay should be given
between the presentation of cards or
credentials. A lesser delay will not give an
audible confirmation. If an audible
confirmation is not heard, simply pause and
present the card or credentials again.
Buzzer
All credentials (including Master cards and the XRP3
Remote Programmer) have a unique 9-digit ID number
printed on them. These should be carefully logged and
stored in a safe location should the need ever arise to
801924115
XRP3
remove a user or function card. A blank Log Sheet
template is included (see Pg. 22) to facilitate this. Be
sure to document the credential‟s access level, as well
as additional notes (Master status, access level, etc.).
In some instances (especially multi-door applications), it may be practical to pre-program the
Master cards and Remote Programmer prior to physical installation of the AX-DVF-XP / AX-DVXP. Programming and configuration are done independently for each reader in the system.
Always be sure to follow the „Getting Started‟ guide (section 6 of this manual) when initially
setting up a new door station with reader.
Pg. 6
Page 7
3 BASIC OPERATIONS (continued)
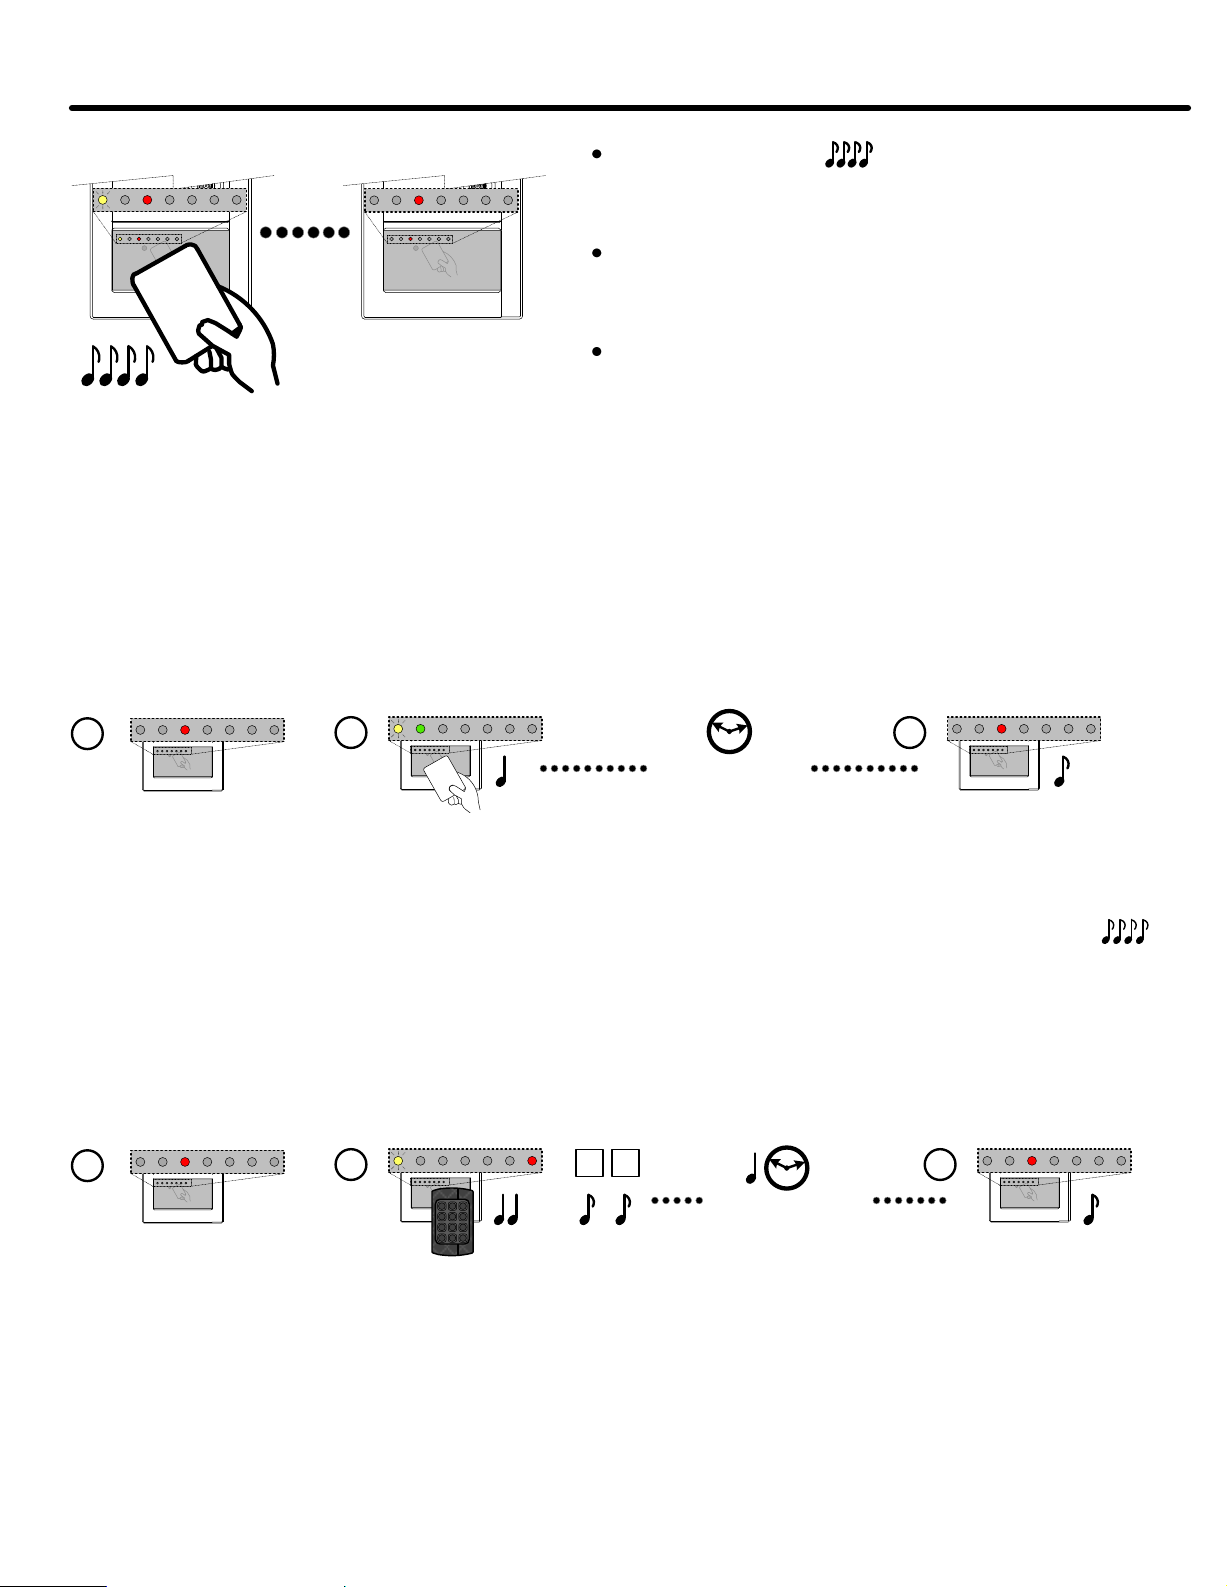
If an error occurs ( ) during any operation or
step of a programming function, the reader will
revert to „Standby‟ mode.
If an error occurs while programming, begin that
programming function from the first step
(standby).
If an error occurs during normal operation, verify
that the reader is in the expected mode
(standby, night lock, etc.), and that the
(an error occurred!)
System returns to
„Standby‟ mode; begin
programming function or
operation again
credentials are assigned the appropriate access
level. (See Section 5.3 under Advanced
Programming)
3.2 OPERATING THE DOOR RELEASE
3.2.1 With already programmed user credentials –
When in normal standby mode, any normal user credential (Level 1) or special user credential (Level 2)
can operate the -XP reader‟s door release (as shown). For information on adding credentials to the
reader‟s memory, see Section 4.1 under Basic Programming.
1
(Reader is in „Standby‟)
2
Present a Level 1 or
Level 2 user credential.
(Door release timer
duration, default 3 sec.)
LED2 (green) will remain lit
for the duration of the door
release closure.
3
After the door release timer
completes, the reader will
return to „Standby‟.
Note: If the credential(s) being presented are not present in the reader‟s memory, an error tone ( )
will sound, and the system will be returned to standby mode.
3.2.2 With the XRP3 Remote Programmer –
Once associated with the -XP reader, XRP3 Remote Programmer is capable of operating the reader‟s
door release contact using the following method.
1
(Reader is in „Standby‟)
2
1 2 3
4 5 6
7 8 9
0 #
*
Holding the XRP3
against the reader, enter
the shown sequence.
1 *
(Door release timer
duration, default 3 sec.)
LED2 (green) will remain
lit for the duration of the
door release closure.
3
After the door release timer
completes, the reader will
return to „Standby.‟
Note: When this action is executed, the XRP3 is treated as a Level 2 (Special user) credential; access
will be granted whether the system is in normal standby or Night Lock standby.
Pg. 7
Page 8

3 BASIC OPERATIONS (continued)
3.3 TOGGLING UNLOCK MODE –
Utilizing the Lock / Unlock master, the -XP reader can be toggled between controlled access and
unlocked state. This is particularly useful for sites that wish to manually control public access to an area.
1
(Reader is in „Standby‟)
2
Present the Lock /
Unlock ( ) master card.
3
Note: LED2 (green) will
remain lit, indicating that the
door release contact is
continuously active.
4
To return the -XP reader to
controlled access mode,
simply present the Lock /
Unlock master card again.
3.4 TOGGLING NIGHT LOCK MODE
3.4.1 With the Night Lock master card –
The -XP reader is equipped with a special „Night Lock‟ mode which can be used to restrict access to
those users only who have Level 2 (Special user) or Level 3 (Night user) credentials. Presenting a Level
1 user credential will result in an error tone ( ). Typical use of this function would be for sites desiring
one level of user access during business hours, while allowing only certain users access outside of these
hours.
1
2
3
(Reader is in „Standby‟)
4
To return the -XP reader to
normal access mode: Present
the Night Lock master card again.
The door release trigger will then
be activated for the default
duration.
Pg. 8
Present the Night Lock
( ) master card.
(Door release timer
duration, default 3 sec.)
LED2 (green) will remain lit
for the duration of the door
release closure.
The reader is now in Night Lock standby
mode. Only Level 2 & 3 credentials will be
valid in this mode. If present, the reader‟s
Night Lock Trigger Output will be active.
5
After the door release activation, the -XP
reader will return to normal Standby mode.
If present, the reader‟s Night Lock Trigger
Output will be inactive.
Page 9

3 BASIC OPERATIONS (continued)
3.4.2 Exiting Night Lock mode with the XRP3 Remote Programmer –
While engaging Night Lock mode with an XRP3 Remote Programmer, it is possible to disengage it.
1
The reader is currently in Night
Lock standby mode. Only Level
2 & 3 credentials are valid in this
mode.
2
1 2 3
4 5 6
7 8 9
0 #
*
To return the -XP reader to
normal access mode: Holding the
XRP3 against the reader, enter the
shown sequence.
3 *
(Door release timer
duration, default 3 sec.)
LED2 (green) will remain
lit for the duration of the
door release closure.
3
After the door release
timer completes, the
reader will return to
normal „Standby‟.
Note: This will also cause the Night Lock Trigger Output, if present, to become inactive.
4 BASIC PROGRAMMING
The basic programming functions of the Aiphone -XP series proximity card reader can be accomplished
using solely the Master function cards. Each of the following functions can be easily performed by the
end user with minimal training.
4.1 ADDING USER CREDENTIALS (LEVEL 1) BY PRESENTATION –
4.1.1 With the Add master card –
This process will add blank user credentials to the reader‟s memory, allowing them entry control under
normal „Standby‟ access conditions. For information on adding credentials for Level 2 (Day & Night) or
Level 3 (Night only) access, see Sections 5.1 and 5.2 under Advanced Programming.
1 2
(Reader is in „Standby‟)
+
Present the Add (+)
master to place the
reader in „Add‟ mode.
3
Present as many blank credentials as
desired (up to the reader‟s memory limit);
a short beep will confirm each addition.
4
+
Present the Add (+)
master again to return
the reader to „Standby.‟
The blank credentials have now been granted Level 1 access (normal hours). Be sure to record the 9digit ID number of each credential added on the Log Data sheet (pg. 22) for future reference.
Note: If the credential(s) being presented while in „Add‟ mode are already present in the reader‟s
memory (or invalid type), an error ( ) will sound, and the system will be returned to standby mode.
Begin again at step 1 to resume adding credentials.
Pg. 9
Page 10

4 BASIC PROGRAMMING (continued)
4.1.2 With the XRP3 Remote Programmer –
The adding of Level 1 user credentials may also be done with the XRP3, as shown.
1
(Reader is in „Standby‟)
4
Present as many blank credentials as
desired (up to the reader‟s memory limit);
a short beep will confirm each addition.
2
1 2 3
4 5 6
7 8 9
0 #
*
Holding the XRP3
against the reader, enter
the shown sequence.
5
Holding the XRP3
against the reader, enter
the shown sequence.
1 2 3
4 5 6
7 8 9
*
4 *
*
0 #
3
The reader is now in
„Add‟ mode.
6
The reader has now
been returned to
„standby‟ mode.
The blank credentials have now been granted Level 1 access (normal hours). Be sure to record the 9digit ID number of each credential added on the Log Data sheet (pg. 22) for future reference.
Note: If the credential(s) being presented while in „Add‟ mode are already present in the reader‟s
memory (or invalid type), an error ( ) will sound, and the system will be returned to standby mode.
Begin again at step 1 to resume adding credentials.
4.2 VOIDING USER CREDENTIALS BY PRESENTATION (ANY ACCESS LEVEL) –
4.2.1 With the Void master card –
This process will void (remove) user credentials from the reader‟s memory, regardless of access level,
preventing them from accessing the controlled entry. Note: If the credential to remove is not available,
follow the process shown in Section 5.3 – Voiding Credentials by ID number.
1 2
(Reader is in „Standby‟)
–
Present the Void (-)
master to place the
reader in „Void‟ mode.
3
Present as many credentials to be
voided as desired; a short beep will
confirm each removal.
4
–
Present the Void (-)
master again to return
the reader to „Standby‟.
Be sure to erase or cross out the 9-digit ID number of each credential removed from the Log Data sheet
(pg. 22) to avoid future confusion.
Note: If the credential(s) presented while in „Void‟ mode are not already present in the reader‟s memory
(or of higher level, such as a Program master), an error ( ) will sound, and the system will be
returned to standby mode. Begin again at step 1 to resume voiding credentials.
Pg. 10
Page 11

4 BASIC PROGRAMMING (continued)
4.2.2 With the XRP3 Remote Programmer –
The voiding of user credentials may also be done with the XRP3, as shown.
1
(Reader is in „Standby‟)
2
1 2 3
4 5 6
7 8 9
0 #
*
Holding the XRP3
against the reader, enter
5 *
3
The reader is now in
„Void‟ mode.
the shown sequence.
4
Present as many credentials to be voided
as desired; a short beep will confirm each
removal.
5
1 2 3
4 5 6
7 8 9
0 #
*
Holding the XRP3
against the reader, enter
the shown sequence.
*
6
The reader has now been
returned to „standby‟ mode.
Be sure to erase or cross out the 9-digit ID number of each credential removed from the Log Data sheet
(pg. 22) to avoid future confusion.
Note: If the credential(s) presented while in „Void‟ mode are not already present in the reader‟s memory
(or of higher level, such as a Program master), an error ( ) will sound, and the system will be
returned to standby mode. Begin again at step 1 to resume voiding credentials.
4.3 SETTING THE DOOR RELEASE TIMER –
4.3.1 With master cards –
When shipped from the factory, the reader is pre-programmed with a 3-second door release timer. This
process will allow the user to change the duration of door release (between 1 – 255 seconds). Note:
This duration applies to all credentials, regardless of access level (1, 2 or 3). This process can also be
accomplished using XRP3 Remote programmer (See Section 5.3 under Advanced Programming).
1 2
(Reader is in „Standby‟)
5
P
P
Present the Program (P)
master to place the
reader in „Programming‟
mode.
6
3
P
Present the Program (P) master 5
more times consecutively (with 1
second pause between) until LED2
(green) is lit, as shown.
P
x5
4
+
Present the Add (+) master
the number of times
corresponding to the desired
door release duration (max
255). Example: Present the
Add master 5 times = 5
seconds.
+
Present the Program (P) master to
exit Programming mode.
(Reader is returned to
„Standby‟ mode)
Pg. 11
Page 12

4 BASIC PROGRAMMING (continued)
4.3.2 With the XPR3 Remote Programmer –
The door release timer can also be set using the XRP3, as shown.
1 *
1
2
1 2 3
4 5 6
7 8 9
0 #
*
1
+
(Desired release
duration, 1 to 255)
? *??
3
(Reader is in „Standby‟)
Holding the XRP3 against the reader, enter the key
sequence as shown, including the desired time duration
(1 to 255), where indicated.
The reader will return to
Standby mode.
Note: It is not necessary to enter leading zeros (e.g., „005‟ instead of „5‟). Entering a number outside of
the valid range (1 to 255) will result in an error ( ). This release duration applies to any function
which would trigger the -XP reader‟s contact output (egress input, credential access, etc.).
5 ADVANCED PROGRAMMING
Though the most functionality can be accomplished via the -XP reader‟s Basic Programming methods
(shown in Section 4) there are many other features and capabilities which are available to be utilized.
These functions and settings should only be performed by users already familiar with the Aiphone -XP
reader‟s basic operations and programming.
Please thoroughly read each step before performing it on the -XP reader; certain operations
cannot be undone, or may cause accidental loss of user data if performed in error or by accident!
5.1 ADDING SPECIAL USER CREDENTIALS (LEVEL 2) BY PRESENTATION –
5.1.1 With the Add master card –
This process will add blank user credentials to the reader‟s memory with Special User (Level 2) access,
allowing them entry control under both normal ‘Standby’ and ‘Night Lock’ access conditions. For
information on adding credentials for Level 3 (Night only) access, see Section 5.2 under Advanced
Programming.
1
(Begin with the reader in
„Night Lock Standby‟
mode)
Pg. 12
2
+
Present the Add (+)
master to place the
reader in „Add‟ mode.
3 4
Present as many credentials to be
added with Level 2 access as desired;
a short beep will confirm each
addition.
+
Present the Add (+) master
again to return the reader
to Night Lock standby
mode.
Page 13

5 ADVANCED PROGRAMMING (continued)
5.1.2 With the XRP3 Remote Programmer –
Adding blank credentials with Special User (Level 2) access may also be done with the XRP3, as shown.
1
(Begin with the reader in
Standby or Night Lock
Standby mode)
4
Present as many blank credentials as
desired (up to the reader‟s memory limit);
a short beep will confirm each addition.
2
1 2 3
4 5 6
7 8 9
0 #
*
Holding the XRP3
against the reader, enter
the shown sequence.
5
Holding the XRP3
against the reader, enter
the shown sequence.
1 2 3
4 5 6
7 8 9
*
7 *
3
The reader is now in
„Add‟ mode.
*
0 #
6
The reader has now been
returned to Standby mode.
5.2 ADDING NIGHT USER CREDENTIALS (LEVEL 3) BY PRESENTATION –
This process will add blank user credentials to the reader‟s memory with Night User (Level 3) access,
allowing them entry control only under ‘Night Lock’ access conditions.
1
(Reader is in „Standby‟)
4
Present as many blank credentials as
desired (up to the reader‟s memory limit);
a short beep will confirm each addition.
2
1 2 3
4 5 6
7 8 9
0 #
*
Holding the XRP3 against the
reader, enter the shown sequence.
5
1 2 3
4 5 6
7 8 9
*
Holding the XRP3
against the reader, enter
the shown sequence.
8 *
3
The reader is now in „Add‟
mode.
*
0 #
6
The reader has now been
returned to „standby‟ mode.
Be sure to record the 9-digit ID number and access level of each credential added on the Log Data sheet
(pg. 22) for future reference.
Pg. 13
Page 14

5 ADVANCED PROGRAMMING (continued)
5.3 VOIDING CREDENTIALS BY ID NUMBER –
This process will allow the XRP3 Remote Programmer to remove any credential ID from the -XP series
reader‟s memory (including master cards, other XRP3 Remote Programmers, and user credentials of all
levels).
1
(Reader is in „Standby‟)
3
2
1 2 3
4 5 6
7 8 9
0 #
*
Holding the XRP3 against the reader, enter the key sequence as shown, including the 9-digit
ID of the credentials or Programmer to be removed, where indicated.
Note: Leading zeros, if existent, need not be entered (e.g., 000412445 instead of 412445).
9 *
+
Note: Short of removing all credentials at or below a given level from the
+
? ?
? ? ? ? ? ? ? *0 *
(9-digit ID number of Credentials or
Programmer to be removed)
+
reader‟s memory, this is the only method to erase a lost or stolen credential
or programmer from the -XP reader. If the ID number of the card or
The reader will return to
Standby mode.
programmer is not known, follow the directions under Section 5.8 regarding
batch voiding of the reader‟s memory. If the ID number entered does not
match a programmer or credential currently in the reader‟s memory, an error
( ) will occur and the system will revert to Standby mode.
5.4 DOOR AJAR / FORCED ENTRY –
Your -XP series reader is equipped with both a Forced Entry Sensor Input and Forced Entry Alarm
Output, for useful integration with 3rd party alarm control panels or external sounders. The following
section covers the programming and functionality of the -XP reader‟s forced entry and door ajar features.
0
5.4.1 SETTING THE DOOR CLOSED TIMER DURATION –
This setting adjusts the duration of the „Door Closed‟ timer (0 to 255 seconds, default = 0 / disabled).
This is used when a normally-closed door position sensor (mechanical or magnetic) is connected across
the -XP series reader‟s Forced Entry Sensor Input (Grey wire) and Ground (Brown or Black wire).
Note: The Forced Entry Sensor Input should be connected prior to executing these commands,
otherwise the tamper alarm will be engaged!
1
(Reader is in „Standby‟)
2
1 2 3
4 5 6
7 8 9
0 #
*
Holding the XRP3 against the reader, enter the key sequence
as shown, including the desired time duration for the Door
Closed timer, in seconds (0 to 255), where indicated.
1
+
(Desired Door Closed
timer duration, 0 to 255)
? *??
{
3
The reader will return to
Standby mode.
2 *
Note: It is not necessary to enter leading zeros (e.g., „005‟ instead of „5‟). Entering a number outside of
the valid range (1 to 255) will result in an error ( ). This release duration applies to any function
which would trigger the -XP reader‟s contact output (egress input, credential access, etc.).
Pg. 14
Page 15

5 ADVANCED PROGRAMMING (continued)
5.4.2 DOOR AJAR ALARM OPERATION –
If a normally-closed door position sensor (mechanical or magnetic) is connected across the -XP series
reader‟s Forced Entry Sensor Input (Grey wire) and Ground (Brown or Black wire), and the Door Closed
timer duration is not set to „0‟ (disabled), the Door Ajar alarm event will be enabled.
1
2
3
!
(Any action causes the
door release output to
be activated)
Note: When activated, the Forced Entry Alarm Output can only be reset by removing the open condition
across the Forced Entry Sensor Input (Grey wire) and Ground (Brown or Black wire), or by entering
programming mode with the XRP3 and disabling the Door Closed timer (See Section 5.4.1).
5.4.3 FORCED ENTRY ALARM OPERATION –
If a normally-closed door position sensor (mechanical or magnetic) is connected across the -XP series
reader‟s Forced Entry Sensor Input (Grey wire) and Ground (Brown or Black wire), and the Door Closed
timer duration is not set to „0‟ (disabled), the Forced Entry alarm event will be enabled.
1
(Door release
timer counts down,
default 2 seconds)
Upon returning to the prior
Standby state, the Door
Closed timer will begin.
2
If the Door Closed timer reaches time-out,
the Forced Entry alarm output (Grey/Pink
wire) will be activated, and LED2 (green) will
blink and be accompanied by an alternating
alarm tone.
!
The -XP series reader is in
ANY state besides „Door
release active.‟
Note: When activated, the Forced Entry Alarm Output can only be reset by removing the open condition
across the Forced Entry Sensor Input (Grey wire) and Ground (Brown or Black wire), or by entering
programming mode with the XRP3 and disabling the Door Closed timer (See Section 5.4.1).
5.5 CREATING ADDITIONAL / REPLACEMENT MASTER CARDS –
Your XP-KIT programming starter kit was shipped with a set of XMMC3/9 master cards for use as master
cards. There may, however, be instances where multiple master cards of any given type may be
desired; blank credentials may be „promoted‟ to master functionality utilizing the procedures in this
section.
Note: Credentials promoted to master functionality are dedicated to that function, and cannot share
other abilities (such as normal access control ability, or other master functionality). Only blank /
unassigned credentials can be promoted to master functionality. If multiple functionality is desired,
additional XRP3 remote programmers may be added as well (see Section 5.6).
Forced Entry
Sensor Input is
triggered!
The Forced Entry alarm output (Grey/Pink wire) will be
activated, and LED2 (green) will blink and be accompanied by
an alternating alarm tone.
!
Pg. 15
Page 16

5 ADVANCED PROGRAMMING (continued)
5.5.1 ‘NIGHT LOCK’ MASTER CARD CREATION –
This procedure will promote any blank credential to be recognized as a „Night Lock‟ master card.
3 *
1
(Reader is in „Standby‟)
2
1 2 3
4 5 6
7 8 9
0 #
*
Holding the XRP3 against
the reader, enter the key
sequence as shown.
The blank credential has now been added as a „Night Lock‟ master card. Be sure to label the card
accordingly, and record the 9-digit ID number of the credential added (noting „Night Lock‟ master status
in the comments field), on the Log Data sheet (pg. 22) and for future reference.
5.5.2 ‘ADD’ MASTER CARD CREATION –
This procedure will promote any blank credential to be recognized as an „Add‟ master card.
1
3 4
The reader is now in
„Night Lock Master
Creation‟ mode.
x2
Present the blank
credential to be promoted.
Present the credential
again to return to „Standby‟
mode.
4 *
1
(Reader is in „Standby‟)
2
1 2 3
4 5 6
7 8 9
0 #
*
Holding the XRP3 against
the reader, enter the key
sequence as shown.
1
3
The reader is now in „Add
Master Creation‟ mode.
4
x2
Present the blank
credential to be promoted.
Present the credential
again to return to „Standby‟
mode.
The blank credential has now been added as an „Add‟ master card. Be sure to label the card accordingly,
and record the 9-digit ID number of the credential added (noting „Add‟ master status in the comments
field), on the Log Data sheet (pg. 22) and for future reference.
5.5.3 ‘VOID’ MASTER CARD CREATION –
This procedure will promote any blank credential to be recognized as an „Void‟ master card.
5 *
1
(Reader is in „Standby‟)
2
1 2 3
4 5 6
7 8 9
0 #
*
Holding the XRP3 against
the reader, enter the key
sequence as shown.
1
3
The reader is now in
„Void Master Creation‟
mode.
4
x2
Present the blank
credential to be promoted.
Present the credential
again to return to „Standby‟
mode.
The blank credential has now been added as a „Void‟ master card. Be sure to label the card accordingly,
and record the 9-digit ID number of the credential added (noting „Void‟ master status in the comments
field), on the Log Data sheet (pg. 22) and for future reference.
Pg. 16
Page 17

5 ADVANCED PROGRAMMING (continued)
5.5.4 ‘LOCK / UNLOCK’ MASTER CARD CREATION –
This procedure will promote any blank credential to be recognized as a „Lock / Unlock‟ master card.
7 *
1
(Reader is in „Standby‟)
2
1 2 3
4 5 6
7 8 9
0 #
*
Holding the XRP3 against
the reader, enter the key
sequence as shown.
The blank credential has now been added as a „Lock / Unlock‟ master card. Be sure to label the card
accordingly, and record the 9-digit ID number of the credential added (noting „Lock / Unlock‟ master
status in the comments field), on the Log Data sheet (pg. 22) and for future reference.
5.6 ADDING AN XRP3 REMOTE PROGRAMMER –
5
3
The reader is now in
„Lock / Unlock Master
Creation‟ mode.
4
Present the blank
credential to be promoted.
Present the credential
again to return to „Standby‟
mode.
x2
Your XP-KIT programming starter kit shipped with a single XRP3 remote programmer. More may be
easily added to the system, as necessary, to suit customer requirements. This is done by „copying‟ an
existing XRP3, as shown.
6 *
1
(Reader is in „Standby‟)
5
The reader has now returned to
„Standby‟ mode.
2
1 2 3
4 5 6
7 8 9
0 #
*
Holding an existing (already
assigned) XPR3 against the
reader and enter the key
sequence as shown.
1
3 4
The reader is now in
„Copy Programmer‟
mode.
1 2 3
4 5 6
7 8 9
0 #
*
Present the unassigned
XRP3 remote programmer
to be recognized.
The new XPR3 remote programmer should now be recognized by the system as a standard user
programmer. Be sure to record the 9-digit ID number of the new XRP3 remote programmer added
(noting that it is an XPR3 in the comments field), on the Log Data sheet (pg. 22) and for future reference.
Note: If an XPR3 must be added to the -XP series reader‟s memory when an existing XPR3 is not
available to initiate „Copy Programmer‟ mode, see Section 6 under Cannot program the -XP reader
using the XRP3 Remote Programmer.
Pg. 17
Page 18

5 ADVANCED PROGRAMMING (continued)
5.7 ADDING CREDENTIALS BY ID NUMBER –
In some cases, it may be necessary to add or re-enter users and master cards using only the ID-number
of the credentials (particularly after accidental removal or batch removal of credentials). Using the XRP3
remote programmer, any type of credential can be added. Consult the following table to determine the
„level‟ desired for the credential to be added, then follow the instructions below.
Level
Number
10
9 „Void‟ Master
8 „Add‟ Master
7 „Night Lock‟ Master
6 (unused)
5 Lock / Unlock Master
4 (unused)
3 (unused)
2
1
0
Tag Level Description
User Programmer (XRP3) /
Program master (Card)
Level III Access
(Night Lock Only)
Level II Access (Special /
24hr Access)
Level I Access
(Normal User)
1
(Reader is in „Standby‟)
3
1 2 3
4 5 6
7 8 9
0 #
*
The reader is now in „Add‟
mode; enter the sequence as
shown (inserting both the
desired level and 9-digit IDnumber where shown).
2
1 2 3
4 5 6
7 8 9
0 #
*
Holding an existing (already assigned)
XPR3 against the reader and enter the
key sequence (as shown) to enter „Add‟
mode.
? ?
(desired level, see table)
*
? ?
(9-digit ID number of Credentials or
0 *
+
? ? ? ? ? ? ? *
Programmer to be added)
2 *
+
*
+
The credential (or XRP3) has now been entered into the -XP series reader‟s memory, at the indicated
level, and the reader will return to „standby‟ mode. If an error ( ) occurs at any point during this
process, ensure that the credential (or XRP3) is not already in the reader‟s memory, and begin again at
step 1.
Note: It is not necessary to enter leading zeros (e.g., „05‟ instead of „5‟).
5.8 BATCH CREDENTIAL REMOVAL –
In certain instances it may be necessary to delete large batches from the -XP series reader to maintain a
secure access environment. This is particularly true when a credential or programmer is lost, but the 9digit ID-number was not written down for reference. The two methods of batch credential removal
described in this section will remove all credentials (including programmers) at or below a specified level.
Please Note: These two functions are 100% irrevocable once performed. Please read the
directions for each method carefully and be sure that the result will be as desired. If all
programmers and program master cards are removed, system usability can only be restored by
following the recovery procedure shown in Section 6 under Troubleshooting.
Pg. 18
Page 19

5 ADVANCED PROGRAMMING (continued)
5.8.1 BATCH CREDENTIAL REMOVAL WITH MASTER CARDS–
This procedure will remove a batch of credentials from the -XP series reader‟s memory at or below the
level of a presented credential. Carefully consult the Void Level chart below to determine which
credential should be presented, and what range of levels that credential will void.
Void Level
(at and below)
10 and below
9 and below „Void‟ Master
8 and below „Add‟ Master
7 and below „Night Lock‟ Master
6 (unused)
5 and below Lock / Unlock Master
4 (unused)
3 (unused)
2 and below
1 and below
0
Tag Level Description
User Programmer (XRP3) /
Program master (Card)
Level III Access
(Night Lock Only)
Level II Access (Special /
24hr Access)
Level I Access
(Normal User)
Note: The credential used to set the voiding level
in step 4 must be present in the reader‟s memory,
otherwise an error ( ) will occur.
1
(Reader is in „Standby‟)
3
P
Present the „P‟ (Program
master) card to enter
„Batch Erase‟ mode.
2
4
5 6
The reader will emit a short
beep for each erasure, and
the LEDs will blink once
upon completion
–
Present the „–‟ (Void
master) card to enter
„Void‟ mode.
Present any credential at
the desired voiding level.
Warning: this operation
CANNOT be undone!
The reader will then be
returned to standby, the
credentials having been
voided.
If a Program master card is presented in step 4, all credentials will be removed from the reader‟s
memory, and the reader will be returned to the „User Sleep‟ mode. The user must then follow the
Initialization instructions (found in Section 2) to re-assign an XRP3 remote programmer and Master Card
set and resume normal system usability.
5.8.2 BATCH CREDENTIAL REMOVAL WITH XRP3 REMOTE PROGRAMMER–
This procedure will remove a batch of credentials from the -XP series reader‟s memory at or below the
entered level. Carefully consult the Void Level chart above to determine which number level should be
entered.
1
(Reader is in „Standby‟)
9 *
2
1 2 3
4 5 6
7 8 9
0 #
*
Holding the XRP3 against the reader, enter the key
sequence as shown, including the desired voiding level
(as indicated). Warning: this operation CANNOT be
undone!
9
(desired ‘Voiding level,
? ?
+
see table above)
*
3
After emitting a short beep
for each erasure, the LEDs
will blink and the reader
will return to standby.
Pg. 19
Page 20

6 TROUBLESHOOTING
Please consult the following section for solutions to common problems which may be encountered during
the programming and use of the -XP series reader before calling Aiphone Technical Support.
Problem: The -XP reader was not initialized or was initialized incorrectly.
Solution: The system should be cleared, and the initialization process begun again. Follow these steps
to clear the reader‟s memory and put the -XP series reader back into „User Sleep‟ mode.
1
1 2 3
4 5 6
7 8 9
0 #
*
With power disconnected
from the reader, hold or
secure the XRP3 Remote
Programmer to the reader.
3
1 2 3
4 5 6
7 8 9
0 #
*
While in programming mode, enter the shown
key sequence to clear all credential data from
the reader‟s memory.
5
1 2 3
4 5 6
7 8 9
0 #
*
While in programming mode, enter the
shown key sequence to reset the -XP
reader to „User Sleep‟ mode.
*9 9 *1 0
*0 0 *
2
1 2 3
4 5 6
7 8 9
0 #
*
Keeping the XRP3 Remote Programmer in position, apply
power to the reader. After a brief initialization sequence,
the reader should beep and enter „Programming‟ mode.
1 2 3
4 5 6
7 8 9
*
0 #
4
1 2 3
4 5 6
7 8 9
0 #
*
Keeping the XRP3 Remote Programmer in position, cycle
(disconnect and reconnect) power to the reader. After a brief
initialization sequence, the reader should beep and enter
„Programming‟ mode again.
1 2 3
4 5 6
7 8 9
*
0 #
Note: The reader has now been completely cleared, and
put back into ‘User Sleep’ mode. Please carefully follow
initialization sequence found in Section 2!
Problem: Cannot program the -XP reader using the XRP3 Remote Programmer
Cause: The XRP3 is either not associated with the -XP series reader in question, or is being used
incorrectly.
Solution: Verify whether the XRP3 is associated with the -XP reader by presenting it. If LED7 (red)
lights, and is accompanied by a single or double beep, the XRP3 is already recognized by the -XP
reader, indicating correct association. Consult the Section 3.1 for general programming tips.
If presenting the XRP3 to the -XP reader causes an error tone ( ), the XRP3 is not correctly
associated with the -XP reader. Use the following procedure to associate the XRP3 with the -XP
reader.
Pg. 20
1
1 2 3
4 5 6
7 8 9
0 #
*
With power disconnected from the
reader, hold or secure the XRP3
Remote Programmer to the reader.
2
1 2 3
4 5 6
7 8 9
0 #
*
Keeping the XRP3 Remote Programmer in position, apply
power to the reader. After a brief initialization sequence,
the reader should beep and enter „Programming‟ mode.
1 2 3
4 5 6
7 8 9
*
0 #
Page 21

6 TROUBLESHOOTING (continued)
3
1 2 3
4 5 6
7 8 9
0 #
*
*0 0 *
4
5
1 2 3
4 5 6
7 8 9
0 #
*
The -XP reader has now been
While in programming mode, enter the
shown key sequence.
placed in „User Sleep‟ mode;
cycle (disconnect and
reconnect) power to the reader.
Present and remove
the XRP3 Remote
Programmer.
The XRP3 is now associated with the -XP reader, and is ready for active use. Be sure to record the 9digit ID number of each credential added on the Log Data sheet (pg. 22) for future reference.
Problem: Cannot add the desired credentials to the -XP reader
Cause: The credentials are already present in the -XP reader‟s memory.
Solution: Using the procedure in Section 5.3, remove the credential from the -XP reader‟s memory,
and try the programming operation again.
Aiphone Corporation
1700 130th Ave. NE
Bellevue, WA 98005
(800) 692-0200
FAX (425) 455-0071
tech@aiphone.com
Pg. 21
Page 22

7 CREDENTIALS LOG SHEET
Use this page as a template for recording the ID of credentials entered into -XP Series Reader
As a safety precaution, all credentials (including Master cards and XRP3 Remote Programmers) 9-bit ID numbers should be logged. This
will facilitate easy maintenance of the system, should the need arise.
Program Master Void Master Add Master
Night Lock Master Lock / Unlock Master XRP3 Remote Programmer
Access
Card ID Assigned User
Level
I II III
I II III
I II III
I II III
I II III
Notes
I II III
I II III
I II III
I II III
I II III
I II III
I II III
I II III
I II III
I II III
I II III
Pg. 22
I II III
I II III
I II III
I II III
 Loading...